
Chapter 16. Managing instance security
One of the benefits of running instances in a virtualized environment is the new opportunities for security controls that are not typically available when deploying onto bare metal. Certain technologies can be applied to the virtualization stack that bring improved information assurance for OpenStack deployments. Operators with strong security requirements might want to consider deploying these technologies, however, not all are applicable in every situation. In some cases, technologies might be ruled out for use in a cloud because of prescriptive business requirements. Similarly some technologies inspect instance data such as run state which might be undesirable to the users of the system.
This chapter describes these technologies and the situations where they can be used to help improve security for instances or the underlying nodes. Possible privacy concerns are also highlighted, which can include data passthrough, introspection, or entropy sources.
16.1. Supplying entropy to instances
Entropy refers to the quality and source of random data that is available to an instance. Cryptographic technologies typically rely on randomness, which requires drawing from a pool of entropy. Entropy starvation occurs when an instance cannot get enough entropy to support the randomness required by cryptographic technologies. Entropy starvation can manifest in instances as something seemingly unrelated. For example, slow boot time might be caused by the instance waiting for SSH key generation. The potential for entropy starvation can also motivate cloud users to use poor quality entropy sources from within the instance, which makes applications running in the cloud less secure.
To provide a high quality source of entropy to the instances you need enough hardware random number generators (HRNG) in the cloud to support the instances. For everyday operations, a modern HRNG can produce enough entropy to support 50-100 Compute nodes. High bandwidth HRNGs can handle more nodes. You must identify the application requirements for a cloud to ensure that sufficient entropy is available.
The VirtIO RNG is a random number generator that uses /dev/urandom as the source of entropy by default, to ensure instances are not starved of entropy at boot time. It can also can be configured to use a HRNG, or a tool such as the entropy gathering daemon (EGD) to provide a way to distribute entropy through a deployment. Virtio RNG devices are enabled by default for instances. To disable Virtio RNG devices for instances you must set hw_rng:allowed to False on the instance flavor.
16.2. Scheduling instances to nodes
Before an instance is created, a host for the image instantiation must be selected. This selection is performed by the nova-scheduler which determines how to dispatch compute and volume requests.
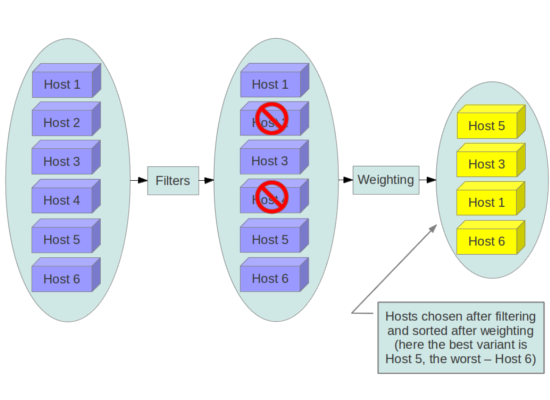
The FilterScheduler is the default scheduler for Compute, although other schedulers exist. This capability works in collaboration with filter hints to determine where an instance should be started. This process of host selection allows administrators to fulfill many different security and compliance requirements. If data isolation is a primary concern, you could choose to have project instances reside on the same hosts whenever possible. Conversely, you could attempt to have instances reside on as many different hosts as possible for availability or fault tolerance reasons.
Filter schedulers fall under the following main categories:
- Resource based filters - Determines the placement of an instance, based on the system resource usage of the hypervisor host sets, and can trigger on free or used properties such as RAM, IO, or CPU utilization.
- Image based filters - Delegates instance creation based on the image metadata used, such as the operating system of the VM or type of image used.
- Environment based filters - Determines the placement of an instance based on external details, such as within a specific IP range, across availability zones, or on the same host as another instance.
- Custom criteria - Delegates instance creation based on user or administrator-provided criteria such as trusts or metadata parsing.
Multiple filters can be applied at once. For example, the ServerGroupAffinity filter checks that an instance is created on a member of a specific set of hosts, and the ServerGroupAntiAffinity filter checks that same instance is not created on another specific set of hosts. Note that these two filters would usually be both enabled at the same time, and can never conflict with each other as they each check for the value of a given property, and cannot both be true at the same time.
Consider disabling filters that parse objects that are provided by users, or could be manipulated (such as metadata).
16.3. Using trusted images
In a cloud environment, users work with either pre-installed images or images they upload themselves. In both cases, users should be able to ensure the image they are using has not been tampered with. The ability to verify images is a fundamental imperative for security. A chain of trust is needed from the source of the image to the destination where it is used. This can be accomplished by signing images obtained from trusted sources and by verifying the signature prior to use. Various ways to obtain and create verified images will be discussed below, followed by a description of the image signature verification feature.
16.4. Creating images
The OpenStack documentation provides guidance on how to create and upload an image to the Image service. In addition, it is assumed that you have a process for installing and hardening the guest operating systems. The following items will provide additional guidance on how transferring your images into OpenStack. There are a variety of options for obtaining images. Each has specific steps that help validate the image’s provenance.
- Option 1: Obtain boot media from a trusted source. For example, you can download images from official Red Hat sources and then perform additional checksum validation.
- Option 2: Use the OpenStack Virtual Machine Image Guide. In this case, you will want to follow your organizations OS hardening guidelines.
-
Option 3: Use an automated image builder. The following example uses the Oz image builder. The OpenStack community has recently created a newer tool called
disk-image-builder, which has not yet undergone a security evaluation.
In this example, RHEL 6 CCE-26976-1 helps implement NIST 800-53 Section AC-19(d) within Oz.
<template>
<name>centos64</name>
<os>
  <name>RHEL-6</name>
  <version>4</version>
  <arch>x86_64</arch>
  <install type='iso'>
  <iso>http://trusted_local_iso_mirror/isos/x86_64/RHEL-6.4-x86_64-bin-DVD1.iso</iso>
  </install>
  <rootpw>CHANGE THIS TO YOUR ROOT PASSWORD</rootpw>
</os>
<description>RHEL 6.4 x86_64</description>
<repositories>
  <repository name='epel-6'>
  <url>http://download.fedoraproject.org/pub/epel/6/$basearch</url>
  <signed>no</signed>
  </repository>
</repositories>
<packages>
  <package name='epel-release'/>
  <package name='cloud-utils'/>
  <package name='cloud-init'/>
</packages>
<commands>
  <command name='update'>
  yum update
  yum clean all
  sed -i '/^HWADDR/d' /etc/sysconfig/network-scripts/ifcfg-eth0
  echo -n > /etc/udev/rules.d/70-persistent-net.rules
  echo -n > /lib/udev/rules.d/75-persistent-net-generator.rules
  chkconfig --level 0123456 autofs off
  service autofs stop
  </command>
</commands>
</template>
Consider avoiding the manual image building process as it is complex and prone to error. In addition, using an automated system like Oz for image building, or a configuration management utility (like Chef or Puppet) for post-boot image hardening, gives you the ability to produce a consistent image as well as track compliance of your base image to its respective hardening guidelines over time.
If subscribing to a public cloud service, you should check with the cloud provider for an outline of the process used to produce their default images. If the provider allows you to upload your own images, you will want to ensure that you are able to verify that your image was not modified before using it to create an instance. To do this, refer to the following section on _ Verifying image signatures_, or the following paragraph if signatures cannot be used.
The Image Service (glance) is used to upload the image to the Compute service on a node. This transfer should be further hardened over TLS. Once the image is on the node, it is checked with a basic checksum and then its disk is expanded based on the size of the instance being launched. If, at a later time, the same image is launched with the same instance size on this node, it is launched from the same expanded image. Since this expanded image is not re-verified by default before launching, there is a risk that it has undergone tampering. The user would not be aware of tampering, unless a manual inspection of the files is performed in the resulting image. To help mitigate this, see the following section on the topic of verifying image signatures.
16.5. Verifying image signatures
You can enable image signature verification to ensure that your Image service (glance) images do not contain unauthorized changes before the Compute service (nova) starts the instance. With this feature enabled, you prevent a new instance from starting that may include malware or security vulnerabilities.
Procedure
In your heat templates, enable instance signature verfication by setting the value of
Trueto theVerifyGlanceSignaturesparameter:parameter_defaults: VerifyGlanceSignatures: True-
Ensure that the template that you use to modify the
VerifyGlanceSignaturesparameter is included in youropenstack overcloud deployscript, and rerun the deploy script.
If you create an instance with an image that you have not signed, the image fails verification and the instance does not start. For more information on signing your images, see Signing Image service images.
16.6. Migrating instances
OpenStack and the underlying virtualization layers provide for the live migration of images between OpenStack nodes, allowing you to seamlessly perform rolling upgrades of your Compute nodes without instance downtime. However, live migrations also carry significant risk. To understand the risks involved, the following are the high-level steps performed during a live migration:
- Start instance on destination host
- Transfer memory
- Stop the guest and sync disks
- Transfer the state
- Start the guest
Certain operations, such as cold migration, resize, and shelve can all result in some amount of transferring the instance’s data to other services, across the network, among others.
16.6.1. Live migration risks
At various stages of the live migration process, the contents of an instance’s run time memory and disk are transmitted over the network in plain text. Consequently there are multiple risks that need to be addressed when using live migration. The following non-exhaustive list details some of these risks:
- Denial of Service (DoS): If something fails during the migration process, the instance could be lost.
- Data exposure: Memory or disk transfers must be handled securely.
- Data manipulation: If memory or disk transfers are not handled securely, then an attacker could manipulate user data during the migration.
- Code injection: If memory or disk transfers are not handled securely, then an attacker could manipulate executables, either on disk or in memory, during the migration.
16.6.2. Disable live migration
Currently, live migration is enabled in OpenStack by default. Live migrations are admin-only tasks by default, so a user cannot initiate this operation, only administrators (which are presumably trusted). Live migrations can be disabled by adding the following lines to the nova policy.json file:
"compute_extension:admin_actions:migrate": "!",
"compute_extension:admin_actions:migrateLive": "!",
Alternatively, live migration can be expected to fail when blocking TCP ports 49152 through 49261, or ensuring that the nova user does not have passwordless SSH access between compute hosts.
Note that SSH configuration for live migration is significantly locked down: A new user is created (nova_migration) and the SSH keys are restricted to that user, and only for use on the allowed networks. A wrapper script then restricts the commands that can be run (for example, netcat on the libvirt socket).
16.6.3. Encrypted live migration
Live migration traffic transfers the contents of disk and memory of a running instance in plain text, and is currently hosted on the Internal API network by default.
If there is a sufficient requirement (such as upgrades) for keeping live migration enabled, then libvirtd can provide encrypted tunnels for the live migrations. However, this feature is not exposed in either the OpenStack Dashboard or nova-client commands, and can only be accessed through manual configuration of libvirtd. The live migration process then changes to the following high-level steps:
- Instance data is copied from the hypervisor to libvirtd.
- An encrypted tunnel is created between libvirtd processes on both source and destination hosts.
- The destination libvirtd host copies the instances back to an underlying hypervisor.
For Red Hat OpenStack Platform 13, the recommended approach is to use tunnelled migration, which is enabled by default when using Ceph as the back end. For more information, see https://docs.openstack.org/nova/queens/configuration/config.html#libvirt.live_migration_tunnelled.
16.7. Monitoring, alerting, and reporting
Instances are a server image capable of being replicated across hosts. Consequently, it would be a good practice to apply logging similarly between physical and virtual hosts. Operating system and application events should be logged, including access events to hosts and data, user additions and removals, privilege changes, and others as dictated by your requirements. Consider exporting the results to a log aggregator that collects log events, correlates them for analysis, and stores them for reference or further action. One common tool to do this is an ELK stack, or Elasticsearch, Logstash, and Kibana.
These logs should be reviewed regularly, or even monitored within a live view performed by a network operations center (NOC).
You will need to further determine which events will trigger an alert that is subsequently sent to a responder for action.
For more information, see the Monitoring Tools Configuration Guide
16.8. Updates and patches
A hypervisor runs independent virtual machines. This hypervisor can run in an operating system or directly on the hardware (called bare metal). Updates to the hypervisor are not propagated down to the virtual machines. For example, if a deployment is using KVM and has a set of CentOS virtual machines, an update to KVM will not update anything running on the CentOS virtual machines.
Consider assigning clear ownership of virtual machines to owners, who are then responsible for the hardening, deployment, and continued functionality of the virtual machines. You should also have a plan to regularly deploy updates, while first testing them in an environment that resembles production.
16.9. Firewalls and instance profiles
Most common operating systems include host-based firewalls for an additional layer of security. While instances should run as few applications as possible (to the point of being single-purpose instances, if possible), all applications running on an instance should be profiled to determine which system resources the application needs access to, the lowest level of privilege required for it to run, and what the expected network traffic is that will be going into and coming from the virtual machine. This expected traffic should be added to the host-based firewall as allowed traffic, along with any necessary logging and management communication such as SSH or RDP. All other traffic should be explicitly denied in the firewall configuration.
On Linux instances, the application profile above can be used in conjunction with a tool like audit2allow to build an SELinux policy that will further protect sensitive system information on most Linux distributions. SELinux uses a combination of users, policies and security contexts to compartmentalize the resources needed for an application to run, and segmenting it from other system resources that are not needed.
Red Hat OpenStack Platform has SELinux enabled by default, with policies that are customized for OpenStack services. Consider reviewing these polices regularly, as required.
16.10. Security Groups
OpenStack provides security groups for both hosts and the network to add defense-in-depth to the instances in a given project. These are similar to host-based firewalls as they allow or deny incoming traffic based on port, protocol, and address. However, security group rules are applied to incoming traffic only, while host-based firewall rules can be applied to both incoming and outgoing traffic. It is also possible for host and network security group rules to conflict and deny legitimate traffic. Consider checking that security groups are configured correctly for the networking being used. See Security groups in this guide for more detail.
You should keep security groups and port security enabled unless you specifically need them to be disabled. To build on the defense-in-depth approach, it is recommended that you apply granular rules to instances.
16.11. Accessing the instance console
By default, an instance’s console is remotely accessible through a virtual console. This can be useful for troubleshooting purposes. Red Hat OpenStack Platform uses VNC for remote console access.
-
Consider locking down the VNC port using firewall rules. By default,
nova_vnc_proxyuses6080and13080. -
Confirm that the VNC traffic is encrypted by TLS. For director-based deployments, start with
UseTLSTransportForVnc.
16.12. Certificate injection
If you need to SSH into your instances, you can configure Compute to automatically inject the required SSH key into the instance upon creation.
For more information, see Creating an image.