
Manage Secrets with OpenStack Key Manager
How to integrate OpenStack Key Manager (barbican) with your OpenStack deployment.
Abstract
Making open source more inclusive
Red Hat is committed to replacing problematic language in our code, documentation, and web properties. We are beginning with these four terms: master, slave, blacklist, and whitelist. Because of the enormity of this endeavor, these changes will be implemented gradually over several upcoming releases. For more details, see our CTO Chris Wright’s message.
Providing feedback on Red Hat documentation
We appreciate your input on our documentation. Tell us how we can make it better.
Providing documentation feedback in Jira
Use the Create Issue form to provide feedback on the documentation. The Jira issue will be created in the Red Hat OpenStack Platform Jira project, where you can track the progress of your feedback.
- Ensure that you are logged in to Jira. If you do not have a Jira account, create an account to submit feedback.
- Click the following link to open a the Create Issue page: Create Issue
- Complete the Summary and Description fields. In the Description field, include the documentation URL, chapter or section number, and a detailed description of the issue. Do not modify any other fields in the form.
- Click Create.
Chapter 1. Deploying and configuring OpenStack Key Manager (barbican)
OpenStack Key Manager (barbican) is the secrets manager for Red Hat OpenStack Platform. You can use the barbican API and command line to centrally manage the certificates, keys, and passwords used by OpenStack services. Barbican is not enabled by default in Red Hat OpenStack Platform. You can deploy barbican in an existing OpenStack deployment.
Barbican currently supports the following use cases described in this guide:
- Symmetric encryption keys - used for Block Storage (cinder) volume encryption, ephemeral disk encryption, and Object Storage (swift) encryption, among others.
- Asymmetric keys and certificates - used for glance image signing and verification, among others.
OpenStack Key Manager integrates with the Block Storage (cinder), Networking (neutron), and Compute (nova) components.
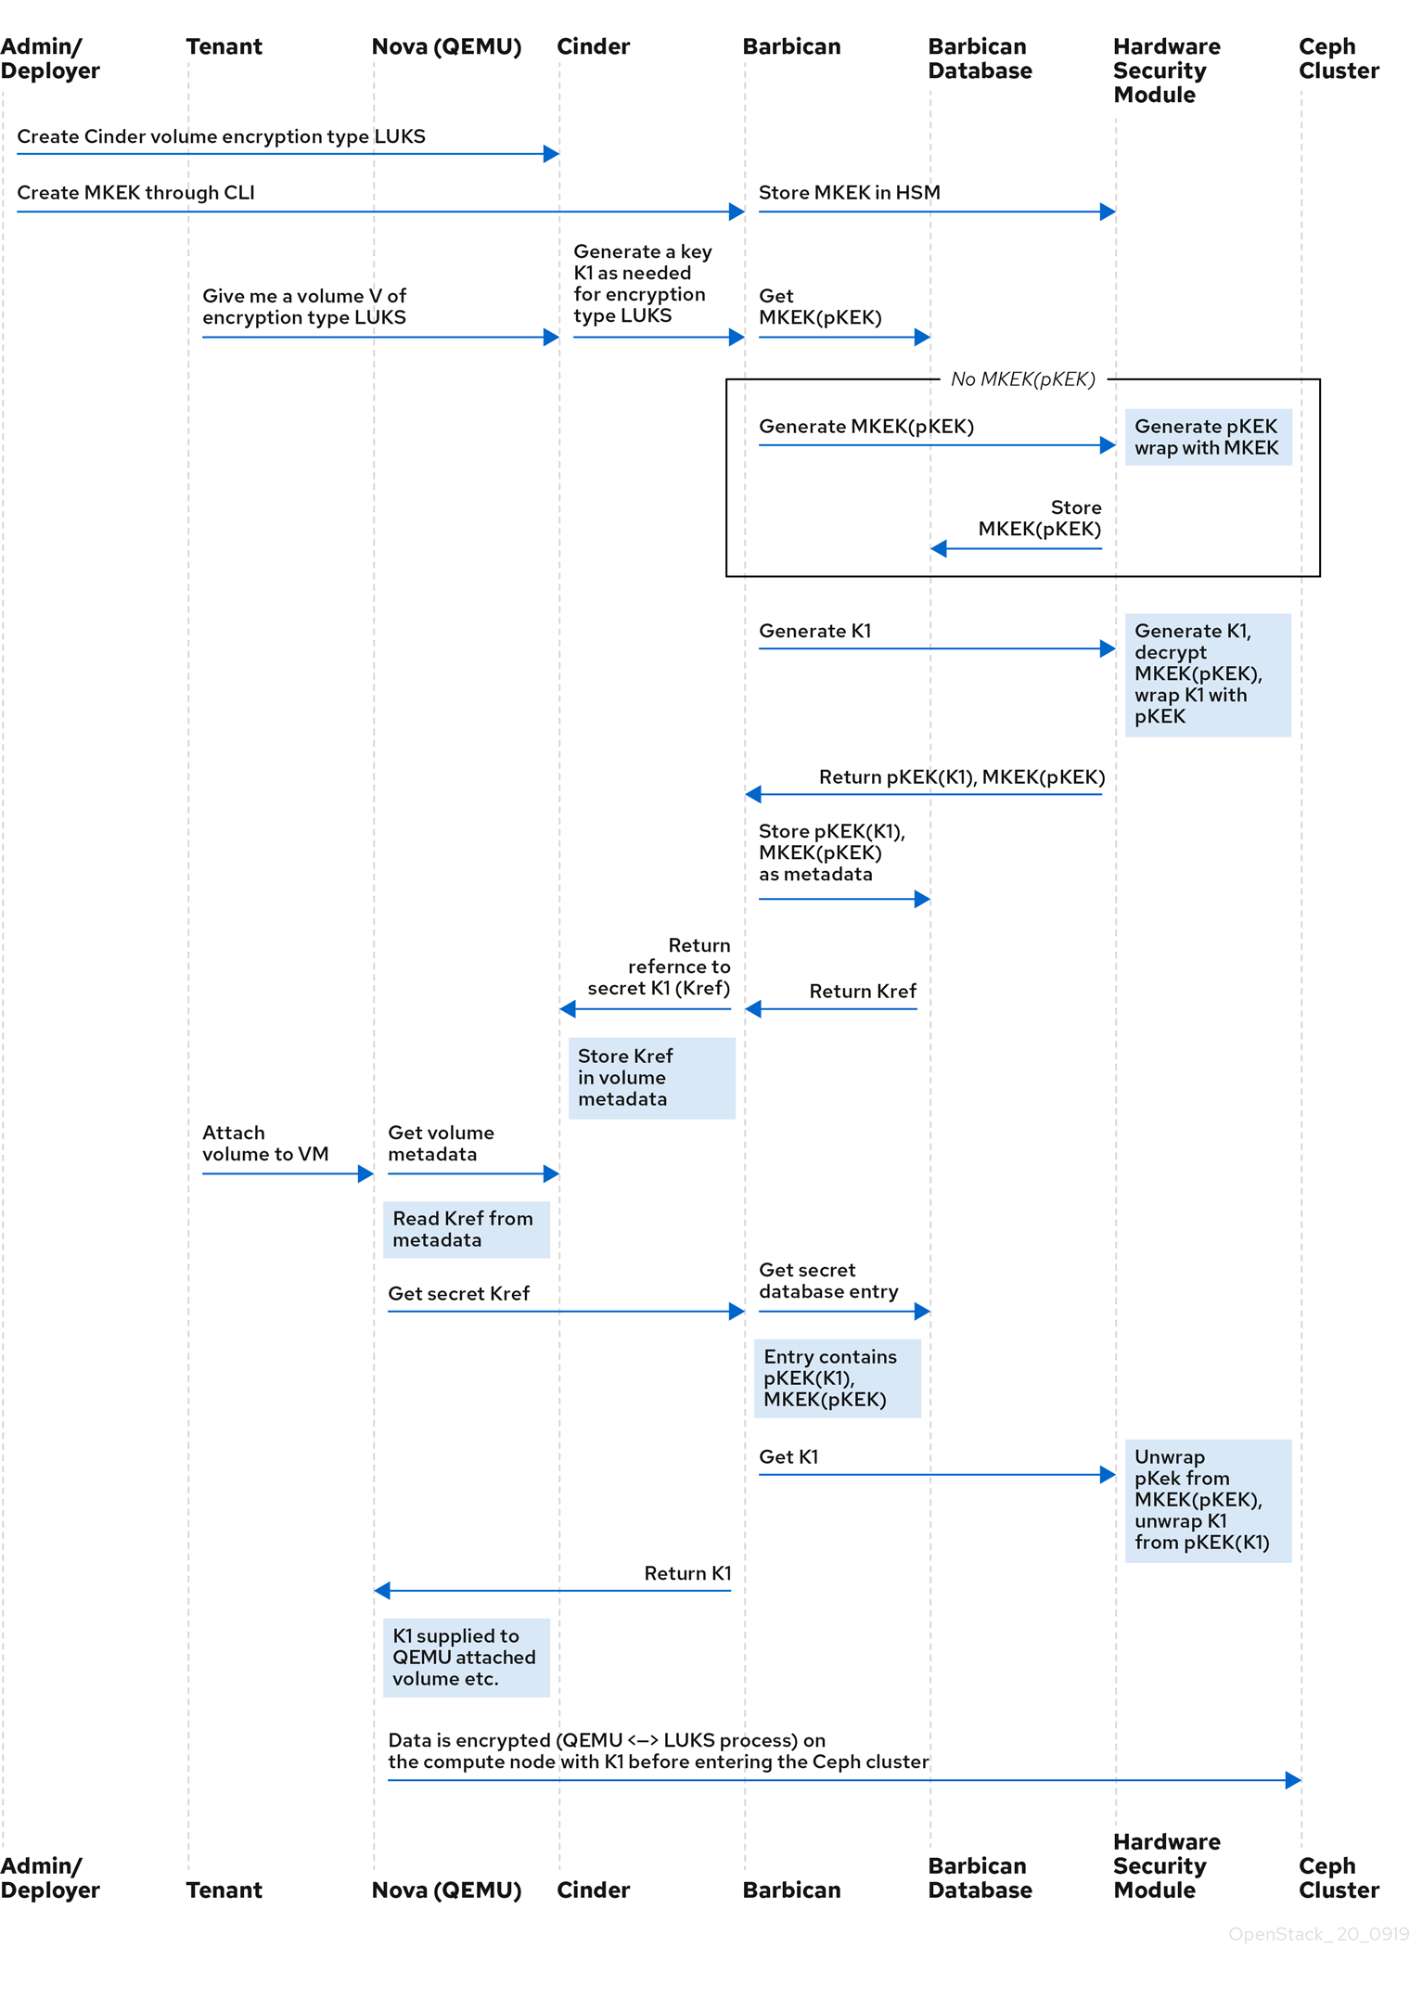
1.1. OpenStack Key Manager workflow
The following diagram shows the workflow that OpenStack Key Manager uses to manage secrets for your environment.
1.2. OpenStack Key Manager encryption types
Secrets such as certificates, API keys, and passwords, can be stored in an encrypted blob in the barbican database or directly in a secure storage system. You can use a simple crypto plugin or PKCS#11 crypto plugin to encrypt secrets.
To store the secrets as an encrypted blob in the barbican database, the following options are available:
-
Simple crypto plugin - The simple crypto plugin is enabled by default and uses a single symmetric key to encrypt all secret payloads. This key is stored in plain text in the
barbican.conffile, so it is important to prevent unauthorized access to this file. PKCS#11 crypto plugin - The PKCS#11 crypto plugin encrypts secrets with project-specific key encryption keys (pKEK), which are stored in the barbican database. These project-specific pKEKs are encrypted by a main key-encryption-key (MKEK), which is stored in a hardware security module (HSM). All encryption and decryption operations take place in the HSM, rather than in-process memory. The PKCS#11 plugin communicates with the HSM through the PKCS#11 API. Because the encryption is done in secure hardware, and a different pKEK is used per project, this option is more secure than the simple crypto plugin.
Red Hat supports the PKCS#11 back end with any of the following HSMs.
Device Supported in release High Availability (HA) support ATOS Trustway Proteccio NetHSM
16.0+
16.1+
Entrust nShield Connect HSM
16.0+
Not supported
Thales Luna Network HSM
16.1+ (Technology Preview)
16.1+ (Technology Preview)
NoteRegarding high availability (HA) options: The barbican service runs within Apache and is configured by director to use HAProxy for high availability. HA options for the back end layer will depend on the back end being used. For example, for simple crypto, all the barbican instances have the same encryption key in the config file, resulting in a simple HA configuration.
1.2.1. Configuring multiple encryption mechanisms
You can configure a single instance of Barbican to use more than one back end. When this is done, you must specify a back end as the global default back end. You can also specify a default back end per project. If no mapping exists for a project, the secrets for that project are stored using the global default back end.
For example, you can configure Barbican to use both the Simple crypto and PKCS#11 plugins. If you set Simple crypto as the global default, then all projects use that back end. You can then specify which projects use the PKCS#11 back end by setting PKCS#11 as the preferred back end for that project.
If you decide to migrate to a new back end, you can keep the original available while enabling the new back end as the global default or as a project-specific back end. As a result, the old secrets remain available through the old back end, and new secrets are stored in the new global default back end.
1.3. Deploying Key Manager
To deploy OpenStack Key Manager, first create an environment file for the barbican service and redeploy the overcloud with additional environment files. You then add users to the creator role to create and edit barbican secrets or to create encrypted volumes that store their secret in barbican.
This procedure configures barbican to use the simple_crypto back end. Additional back ends are available, such as PKCS#11 which requires a different configuration, and different heat template files depending on which HSM is used. Other back ends such as KMIP, Hashicorp Vault and DogTag are not supported.
Prerequisites
- Overcloud is deployed and running
Procedure
On the undercloud node, create an environment file for barbican.
$ cat /home/stack/templates/configure-barbican.yaml
	parameter_defaults:
	  BarbicanSimpleCryptoGlobalDefault: true
The
BarbicanSimpleCryptoGlobalDefaultsets this plugin as the global default plugin.You can also add the following options to the environment file:
-
BarbicanPassword- Sets a password for the barbican service account. -
BarbicanWorkers- Sets the number of workers forbarbican::wsgi::apache. Uses'%{::processorcount}'by default. -
BarbicanDebug- Enables debugging. -
BarbicanPolicies- Defines policies to configure for barbican. Uses a hash value, for example:{ barbican-context_is_admin: { key: context_is_admin, value: 'role:admin' } }. This entry is then added to/etc/barbican/policy.json. Policies are described in detail in a later section. -
BarbicanSimpleCryptoKek- The Key Encryption Key (KEK) is generated by director, if none is specified.
-
Add the following files to the
openstack overcloud deploycommand, without removing previously added role, template or environment files from the script:- /usr/share/openstack-tripleo-heat-templates/environments/services/barbican.yaml
- /usr/share/openstack-tripleo-heat-templates/environments/barbican-backend-simple-crypto.yaml
- /home/stack/templates/configure-barbican.yaml
Re-run the deployment script to apply changes to your deployment:
$ openstack overcloud deploy \
    --timeout 100 \
    --templates /usr/share/openstack-tripleo-heat-templates \
    --stack overcloud \
    --libvirt-type kvm \
    --ntp-server clock.redhat.com \
    -e /home/stack/containers-prepare-parameter.yaml \
    -e /home/stack/templates/config_lvm.yaml \
    -e /usr/share/openstack-tripleo-heat-templates/environments/network-isolation.yaml \
    -e /home/stack/templates/network/network-environment.yaml \
    -e /home/stack/templates/hostnames.yml \
    -e /home/stack/templates/nodes_data.yaml \
    -e /home/stack/templates/extra_templates.yaml \
    -e /home/stack/container-parameters-with-barbican.yaml \
    -e /usr/share/openstack-tripleo-heat-templates/environments/services/barbican.yaml \
    -e /usr/share/openstack-tripleo-heat-templates/environments/barbican-backend-simple-crypto.yaml \
    -e /home/stack/templates/configure-barbican.yaml \
    --log-file overcloud_deployment_38.log
Retrieve the
idof thecreatorrole:openstack role show creator +-----------+----------------------------------+ | Field | Value | +-----------+----------------------------------+ | domain_id | None | | id | 4e9c560c6f104608948450fbf316f9d7 | | name | creator | +-----------+----------------------------------+
NoteYou will not see the
creatorrole unless OpenStack Key Manager (barbican) is installed.Assign a user to the
creatorrole and specify the relevant project. In this example, a user nameduser1in theproject_aproject is added to thecreatorrole:openstack role add --user user1 --project project_a 4e9c560c6f104608948450fbf316f9d7
Verification
Create a test secret. For example:
$ openstack secret store --name testSecret --payload 'TestPayload'
+---------------+------------------------------------------------------------------------------------+
| Field         | Value                                                                              |
+---------------+------------------------------------------------------------------------------------+
| Secret href   | https://192.168.123.163/key-manager/v1/secrets/4cc5ffe0-eea2-449d-9e64-b664d574be53 |
| Name          | testSecret                                                                         |
| Created       | None                                                                               |
| Status        | None                                                                               |
| Content types | None                                                                               |
| Algorithm     | aes                                                                                |
| Bit length    | 256                                                                                |
| Secret type   | opaque                                                                             |
| Mode          | cbc                                                                                |
| Expiration    | None                                                                               |
+---------------+------------------------------------------------------------------------------------+
Retrieve the payload for the secret you just created:
openstack secret get https://192.168.123.163/key-manager/v1/secrets/4cc5ffe0-eea2-449d-9e64-b664d574be53 --payload
+---------+-------------+
| Field   | Value       |
+---------+-------------+
| Payload | TestPayload |
+---------+-------------+
1.4. Viewing Key Manager policies
Barbican uses policies to determine which users are allowed to perform actions against the secrets, such as adding or deleting keys. To implement these controls, keystone project roles such as creator you created earlier, are mapped to barbican internal permissions. As a result, users assigned to those project roles receive the corresponding barbican permissions.
The default policy is defined in code and typically does not require any amendments. If policy changes have not been made, you can view the default policy using the existing container in your environment. If changes have been made to the default policy, and you would like to see the defaults, use a separate system to pull the openstack-barbican-api container first.
Prerequisites
- OpenStack Key Manager is deployed and running
Procedure
Use your Red Hat credentials to log in to podman:
podman login
username: ********
password: ********
Pull the
openstack-barbican-apicontainer:podman pull \ registry.redhat.io/rhosp-rhel8/openstack-barbican-api:16.2
Generate the policy file in the current working directory:
podman run -it \
registry.redhat.io/rhosp-rhel8/openstack-barbican-api:16.2 \
oslopolicy-policy-generator \
--namespace barbican > barbican-policy.yaml
Verification
Review the barbican-policy.yaml file to check the policies used by barbican. The policy is implemented by four different roles that define how a user interacts with secrets and secret metadata. A user receives these permissions by being assigned to a particular role:
admin- The admin role can read, create, edit and delete secrets across all projects.
creator- The creator role can read, create, edit, and delete secrets that are in the project for which the creator is scoped.
observer- The observer role can only read secrets.
audit- The audit role can only read metadata. The audit role can not read secrets.
For example, the following entries list the admin, observer, and creator keystone roles for each project. On the right, notice that they are assigned the role:admin, role:observer, and role:creator permissions:
#
#"admin": "role:admin"

#
#"observer": "role:observer"

#
#"creator": "role:creator"
These roles can also be grouped together by barbican. For example, rules that specify admin_or_creator can apply to members of either rule:admin or rule:creator.
Further down in the file, there are secret:put and secret:delete actions. To their right, notice which roles have permissions to execute these actions. In the following example, secret:delete means that only admin and creator role members can delete secret entries. In addition, the rule states that users in the admin or creator role for that project can delete a secret in that project. The project match is defined by the secret_project_match rule, which is also defined in the policy.
secret:delete": "rule:admin_or_creator and rule:secret_project_match"
Chapter 2. Managing secrets and keys with OpenStack Key Manager (barbican)
You use OpenStack Key Manager to create, update, and delete secrets and encryption keys. You can also back up and restore the encryption keys and the barbican database. It is recommended that you regularly back up your encryption keys and barbican database.
2.1. Viewing secrets
To view the list of secrets, run the openstack secret list command. The list includes the URI, name, type, and other information about the secrets.
Procedure
View the list of secrets:
$ openstack secret list
+------------------------------------------------------------------------------------+------+---------------------------+--------+-------------------------------------------+-----------+------------+-------------+------+------------+
| Secret href                                                                        | Name | Created                   | Status | Content types                             | Algorithm | Bit length | Secret type | Mode | Expiration |
+------------------------------------------------------------------------------------+------+---------------------------+--------+-------------------------------------------+-----------+------------+-------------+------+------------+
| https://192.168.123.169:9311/v1/secrets/24845e6d-64a5-4071-ba99-0fdd1046172e | None | 2018-01-22T02:23:15+00:00 | ACTIVE | {u'default': u'application/octet-stream'} | aes       |        256 | symmetric   | None | None       |
+------------------------------------------------------------------------------------+------+---------------------------+--------+-------------------------------------------+-----------+------------+-------------+------+------------+
2.2. Creating a secret
To create a secret, run the openstack secret store command and specify the name of the secret and optionally the payload for the secret.
Procedure
Create a secret. For example:
$ openstack secret store --name testSecret --payload 'TestPayload'
+---------------+------------------------------------------------------------------------------------+
| Field         | Value                                                                              |
+---------------+------------------------------------------------------------------------------------+
| Secret href   | https://192.168.123.163:9311/v1/secrets/ecc7b2a4-f0b0-47ba-b451-0f7d42bc1746 |
| Name          | testSecret                                                                         |
| Created       | None                                                                               |
| Status        | None                                                                               |
| Content types | None                                                                               |
| Algorithm     | aes                                                                                |
| Bit length    | 256                                                                                |
| Secret type   | opaque                                                                             |
| Mode          | cbc                                                                                |
| Expiration    | None                                                                               |
+---------------+------------------------------------------------------------------------------------+
2.3. Adding a payload to a secret
You cannot change the payload of a secret (other than deleting the secret), but if you created a secret without specifying a payload, you can later add a payload to it by using the openstack secret update command.
Procedure
Add a payload to a secret:
$ openstack secret update https://192.168.123.163:9311/v1/secrets/ca34a264-fd09-44a1-8856-c6e7116c3b16 'TestPayload-updated'
$
2.4. Deleting a secret
To delete a secret, run the openstack secret delete command and specify the secret URI.
Procedure
Delete a secret with the specified URI:
$ openstack secret delete https://192.168.123.163:9311/v1/secrets/ecc7b2a4-f0b0-47ba-b451-0f7d42bc1746
$
2.5. Generating a symmetric key
To generate a symmetric key, use the order create command and then store the key in barbican. You can then use symmetric keys for certain tasks, such as nova disk encryption and swift object encryption.
Prerequisites
- OpenStack Key Manager is installed and running
Procedure
Generate a new 256-bit key using
order createand store it in barbican. For example:$ openstack secret order create --name swift_key --algorithm aes --mode ctr --bit-length 256 --payload-content-type=application/octet-stream key +----------------+-----------------------------------------------------------------------------------+ | Field | Value | +----------------+-----------------------------------------------------------------------------------+ | Order href | https://192.168.123.173:9311/v1/orders/043383fe-d504-42cf-a9b1-bc328d0b4832 | | Type | Key | | Container href | N/A | | Secret href | None | | Created | None | | Status | None | | Error code | None | | Error message | None | +----------------+-----------------------------------------------------------------------------------+
You can also use the
--modeoption to configure generated keys to use a particular mode, such asctrorcbc. For more information, see NIST SP 800-38A.View the details of the order to identify the location of the generated key, shown here as the
Secret hrefvalue:$ openstack secret order get https://192.168.123.173:9311/v1/orders/043383fe-d504-42cf-a9b1-bc328d0b4832 +----------------+------------------------------------------------------------------------------------+ | Field | Value | +----------------+------------------------------------------------------------------------------------+ | Order href | https://192.168.123.173:9311/v1/orders/043383fe-d504-42cf-a9b1-bc328d0b4832 | | Type | Key | | Container href | N/A | | Secret href | https://192.168.123.173:9311/v1/secrets/efcfec49-b9a3-4425-a9b6-5ba69cb18719 | | Created | 2018-01-24T04:24:33+00:00 | | Status | ACTIVE | | Error code | None | | Error message | None | +----------------+------------------------------------------------------------------------------------+
Retrieve the details of the secret:
$ openstack secret get https://192.168.123.173:9311/v1/secrets/efcfec49-b9a3-4425-a9b6-5ba69cb18719
+---------------+------------------------------------------------------------------------------------+
| Field         | Value                                                                              |
+---------------+------------------------------------------------------------------------------------+
| Secret href   | https://192.168.123.173:9311/v1/secrets/efcfec49-b9a3-4425-a9b6-5ba69cb18719 |
| Name          | swift_key                                                                     |
| Created       | 2018-01-24T04:24:33+00:00                                                          |
| Status        | ACTIVE                                                                             |
| Content types | {u'default': u'application/octet-stream'}                                          |
| Algorithm     | aes                                                                                |
| Bit length    | 256                                                                                |
| Secret type   | symmetric                                                                          |
| Mode          | ctr                                                                                |
| Expiration    | None                                                                               |
+---------------+------------------------------------------------------------------------------------+
2.6. Backing up simple crypto encryption keys
To backup simple crypto encryption keys, back up the barbican.conf file that contains the main KEK to a security hardened location, and then back up the barbican database.
The procedure includes steps to generate a test secret and key. If you already generated a key for your secrets, skip the test key steps and use the key that you generated.
Prerequisites
- OpenStack Key Manager is installed and running
- You have a security hardened location for the KEK backup
Procedure
On the overcloud, generate a new 256-bit key and store it in barbican:
(overcloud) [stack@undercloud-0 ~]$ openstack secret order create --name swift_key --algorithm aes --mode ctr --bit-length 256 --payload-content-type=application/octet-stream key
+----------------+-----------------------------------------------------------------------+
| Field          | Value                                                                 |
+----------------+-----------------------------------------------------------------------+
| Order href     | http://10.0.0.104:9311/v1/orders/2a11584d-851c-4bc2-83b7-35d04d3bae86 |
| Type           | Key                                                                   |
| Container href | N/A                                                                   |
| Secret href    | None                                                                  |
| Created        | None                                                                  |
| Status         | None                                                                  |
| Error code     | None                                                                  |
| Error message  | None                                                                  |
+----------------+-----------------------------------------------------------------------+
Create a test secret:
(overcloud) [stack@undercloud-0 ~]$ openstack secret store --name testSecret --payload 'TestPayload'
+---------------+------------------------------------------------------------------------+
| Field         | Value                                                                  |
+---------------+------------------------------------------------------------------------+
| Secret href   | http://10.0.0.104:9311/v1/secrets/93f62cfd-e008-401f-be74-bf057c88b04a |
| Name          | testSecret                                                             |
| Created       | None                                                                   |
| Status        | None                                                                   |
| Content types | None                                                                   |
| Algorithm     | aes                                                                    |
| Bit length    | 256                                                                    |
| Secret type   | opaque                                                                 |
| Mode          | cbc                                                                    |
| Expiration    | None                                                                   |
+---------------+------------------------------------------------------------------------+
Confirm that the test secret is created:
(overcloud) [stack@undercloud-0 ~]$ openstack secret list +------------------------------------------------------------------------+------------+---------------------------+--------+-------------------------------------------+-----------+------------+-------------+------+------------+ | Secret href | Name | Created | Status | Content types | Algorithm | Bit length | Secret type | Mode | Expiration | +------------------------------------------------------------------------+------------+---------------------------+--------+-------------------------------------------+-----------+------------+-------------+------+------------+ | http://10.0.0.104:9311/v1/secrets/93f62cfd-e008-401f-be74-bf057c88b04a | testSecret | 2018-06-19T18:25:25+00:00 | ACTIVE | {u'default': u'text/plain'} | aes | 256 | opaque | cbc | None | | http://10.0.0.104:9311/v1/secrets/f664b5cf-5221-47e5-9887-608972a5fefb | swift_key | 2018-06-19T18:24:40+00:00 | ACTIVE | {u'default': u'application/octet-stream'} | aes | 256 | symmetric | ctr | None | +------------------------------------------------------------------------+------------+---------------------------+--------+-------------------------------------------+-----------+------------+-------------+------+------------+-
Copy the
barbican.conffile that contains the main KEK to a security hardened location. Log in to the
controller-0node and retrieve barbican user password:[heat-admin@controller-0 ~]$ sudo grep -r "barbican::db::mysql::password" /etc/puppet/hieradata /etc/puppet/hieradata/service_configs.json: "barbican::db::mysql::password": "seDJRsMNRrBdFryCmNUEFPPev",
NoteOnly the user barbican has access to the barbican database. So the barbican user password is required to backup or restore the database.
Back up the barbican database:
[heat-admin@controller-0 ~]$ mysqldump -u barbican -p"seDJRsMNRrBdFryCmNUEFPPev" barbican > barbican_db_backup.sql
Check that the database backup is stored in
/home/heat-admin:[heat-admin@controller-0 ~]$ ll total 36 -rw-rw-r--. 1 heat-admin heat-admin 36715 Jun 19 18:31 barbican_db_backup.sql
On the overcloud, delete the secrets you created previously and verify that they no longer exist:
(overcloud) [stack@undercloud-0 ~]$ openstack secret delete http://10.0.0.104:9311/v1/secrets/93f62cfd-e008-401f-be74-bf057c88b04a
(overcloud) [stack@undercloud-0 ~]$ openstack secret delete http://10.0.0.104:9311/v1/secrets/f664b5cf-5221-47e5-9887-608972a5fefb
(overcloud) [stack@undercloud-0 ~]$ openstack secret list

(overcloud) [stack@undercloud-0 ~]$
2.7. Restoring simple crypto encryption keys from a backup
To restore the barbican database from a backup, log in to the Controller node with barbican permissions and restore the barbican database. To restore the KEK from a backup, override the barbican.conf file with the backup file.
Prerequisites
- OpenStack Key Manager is installed and running
-
You have an existing backup of the
barbican.conffile and the barbican database
Procedure
Log in to the
controller-0node and check that you have thebarbicandatabase on the controller that grants access to thebarbicanuser to restore the database:[heat-admin@controller-0 ~]$ mysql -u barbican -p"seDJRsMNRrBdFryCmNUEFPPev" Welcome to the MariaDB monitor. Commands end with ; or \g. Your MariaDB connection id is 3799 Server version: 10.1.20-MariaDB MariaDB Server Copyright (c) 2000, 2016, Oracle, MariaDB Corporation Ab and others. Type 'help;' or '\h' for help. Type '\c' to clear the current input statement. MariaDB [(none)]> SHOW DATABASES; +--------------------+ | Database | +--------------------+ | barbican | | information_schema | +--------------------+ 2 rows in set (0.00 sec) MariaDB [(none)]> exit Bye [heat-admin@controller-0 ~]$
Restore the backup file to the
barbicandatabase:[heat-admin@controller-0 ~]$ sudo mysql -u barbican -p"seDJRsMNRrBdFryCmNUEFPPev" barbican < barbican_db_backup.sql [heat-admin@controller-0 ~]$
-
Override the
barbican.conffile with the file that you previously backed up.
Verification
On the overcloud, verify that the test secrets were restored successfully:
(overcloud) [stack@undercloud-0 ~]$ openstack secret list
+------------------------------------------------------------------------+------------+---------------------------+--------+-------------------------------------------+-----------+------------+-------------+------+------------+
| Secret href                                                            | Name       | Created                   | Status | Content types                             | Algorithm | Bit length | Secret type | Mode | Expiration |
+------------------------------------------------------------------------+------------+---------------------------+--------+-------------------------------------------+-----------+------------+-------------+------+------------+
| http://10.0.0.104:9311/v1/secrets/93f62cfd-e008-401f-be74-bf057c88b04a | testSecret | 2018-06-19T18:25:25+00:00 | ACTIVE | {u'default': u'text/plain'}               | aes       |        256 | opaque      | cbc  | None       |
| http://10.0.0.104:9311/v1/secrets/f664b5cf-5221-47e5-9887-608972a5fefb | swift_key  | 2018-06-19T18:24:40+00:00 | ACTIVE | {u'default': u'application/octet-stream'} | aes       |        256 | symmetric   | ctr  | None       |
+------------------------------------------------------------------------+------------+---------------------------+--------+-------------------------------------------+-----------+------------+-------------+------+------------+
(overcloud) [stack@undercloud-0 ~]$
Chapter 3. Integrating OpenStack Key Manager (barbican) with Hardware Security Module (HSM) appliances
Integrate your Red Hat OpenStack Platform deployment with hardware security module (HSM) appliances to increase your security posture by using hardware based cryptographic processing. When you plan your OpenStack Key Manager integration with an HSM appliance, you must choose a supported encryption type and HSM appliance, set up regular backups, and review any other information or limitations that might affect your deployment.
3.1. Integrating OpenStack Key Manager (barbican) with an Atos HSM
To integrate the PKCS#11 back end with your Trustway Proteccio Net HSM appliance, create a configuration file with the parameters to connect barbican with the HSM. You can enable HA by listing two or more HSMs below the atos_hsms parameter.
Planning
By default, the HSM can have a maximum of 32 concurrent connections. If you exceed this number, you might experience a memory error from the PKCS#11 client. You can calculate the number of connections as follows:
-
Each Controller has one
barbican-apiand onebarbican-workerprocess. -
Each Barbican API process is executed with
NApache workers - (whereNdefaults to the number of CPUs). - Each worker has one connection to the HSM.
Each barbican-worker process has one connection to the database. You can use the BarbicanWorkers heat parameter to define the number of Apache workers for each API process. By default, the number of Apache workers matches the CPU count.
For example, if you have three Controllers, each with 32 cores, then the Barbican API on each Controller uses 32 Apache workers. Consequently, one Controller consumes all 32 HSM connections available. To avoid this contention, limit the number of Barbican Apache workers configured for each node. In this example, set BarbicanWorkers to 10 so that all three Controllers can make ten concurrent connections each to the HSM.
Prerequisites
- A password-protected HTTPS server that provides vendor software for the Atos HSM
Table 3.1. Files provided by the HTTPS server
| File | Example | Provided by |
|---|---|---|
| Proteccio Client Software ISO image file | Proteccio1.09.05.iso | HSM Vendor |
| SSL server certificate | proteccio.CRT | HSM administrator |
| SSL client certificate | client.CRT | HSM administrator |
| SSL Client key | client.KEY | HSM administrator |
Procedure
Create a
configure-barbican.yamlenvironment file for Barbican and add the following parameters:parameter_defaults BarbicanSimpleCryptoGlobalDefault: false BarbicanPkcs11CryptoGlobalDefault: true BarbicanPkcs11CryptoLogin: ******** BarbicanPkcs11CryptoSlotId: 1 ATOSVars: atos_client_iso_name: Proteccio1.09.05.iso atos_client_iso_location: https://user@PASSWORD:example.com/Proteccio1.09.05.iso atos_client_cert_location: https://user@PASSWORD:example.com/client.CRT atos_client_key_location: https://user@PASSWORD:example.com/client.KEY atos_hsms: - name: myHsm1 server_cert_location: https://user@PASSWORD:example.com/myHsm1.CRT ip: 192.168.1.101 - name: myHsm2 server_cert_location: https://user@PASSWORD:example.com/myHsm2.CRT ip: ip: 192.168.1.102NoteThe
atos_hsmsparameter supersedes the parametersatos_hsm_ip_addressandatos_server_cert_locationwhich have been deprecated and will be removed in a future release.Table 3.2. Heat parameters
Parameter Value BarbicanSimpleCryptoGlobalDefault
This is a Boolean that determines if
simplecryptois the global default.BarbicanPkcs11GlobalDefault
This is a Boolean that determines if
PKCS#11is the global default.BarbicanPkcs11CryptoSlotId
Slot ID for the Virtual HSM to be used by Barbican.
ATOSVars
atos_client_iso_name
The filename for the Atos client software ISO. This value must match the filename in the URL for the
atos_client_iso_locationparameter.atos_client_iso_location
The URL, including the username and password, that specifies the HTTPS server location of the Proteccio Client Software ISO image.
atos_client_cert_location
The URL, including the username and password, that specifies the HTTPS server location of the SSL client certificate.
atos_client_key_location
The URL, including the username and password, that specifies the HTTPS server location of the SSL client key. This must be the matching key for the client certificate above.
atos_hsms
A list of one or more HSMs that specifies the name, certificate location and IP address of the HSM. When you include more than one HSM in this list, Barbican configures the HSMs for load balancing and high availability.
Include the custom
configure-barbican.yaml,barbican.yamland ATOS specificbarbican-backend-pkcs11-atos.yamlenvironment files in the deployment command, as well as any other environment files relevant to your deployment:$ openstack overcloud deploy \ --timeout 100 \ --templates /usr/share/openstack-tripleo-heat-templates \ --stack overcloud \ --libvirt-type kvm \ --ntp-server clock.redhat.com \ -e /home/stack/containers-prepare-parameter.yaml \ -e /home/stack/templates/config_lvm.yaml \ -e /usr/share/openstack-tripleo-heat-templates/environments/network-isolation.yaml \ -e /home/stack/templates/network/network-environment.yaml \ -e /home/stack/templates/hostnames.yml \ -e /home/stack/templates/nodes_data.yaml \ -e /home/stack/templates/extra_templates.yaml \ -e /usr/share/openstack-tripleo-heat-templates/environments/services/barbican.yaml \ -e /usr/share/openstack-tripleo-heat-templates/environments/barbican-backend-pkcs11-atos.yaml \ -e /home/stack/templates/configure-barbican.yaml \ --log-file overcloud_deployment_with_atos.log
Verification
Create a test secret:
$ openstack secret store --name testSecret --payload 'TestPayload'
+---------------+------------------------------------------------------------------------------------+
| Field         | Value                                                                              |
+---------------+------------------------------------------------------------------------------------+
| Secret href   | https://192.168.123.163/key-manager/v1/secrets/4cc5ffe0-eea2-449d-9e64-b664d574be53 |
| Name          | testSecret                                                                         |
| Created       | None                                                                               |
| Status        | None                                                                               |
| Content types | None                                                                               |
| Algorithm     | aes                                                                                |
| Bit length    | 256                                                                                |
| Secret type   | opaque                                                                             |
| Mode          | cbc                                                                                |
| Expiration    | None                                                                               |
+---------------+------------------------------------------------------------------------------------+
Retrieve the payload for the secret that you just created:
openstack secret get https://192.168.123.163/key-manager/v1/secrets/4cc5ffe0-eea2-449d-9e64-b664d574be53 --payload
+---------+-------------+
| Field   | Value       |
+---------+-------------+
| Payload | TestPayload |
+---------+-------------+
3.2. Integrating OpenStack Key Manager (barbican) with a Thales Luna Network HSM
To integrate the PKCS#11 back end with your Thales Luna Network HSM appliance for hardware based cryptographic processing, use an Ansible role to download and install the Thales Luna client software on the Controller, and create a Key Manager configuration file to include the predefined HSM IP and credentials.
Prerequisites
- A password-protected HTTPS server that provides vendor software for the Thales Luna Network HSM.
- The vendor provided Luna Network HSM client software in a compressed zip archive.
Procedure
Install the
ansible-role-lunasa-hsmrole on the director:sudo dnf install ansible-role-lunasa-hsm
Create a
configure-barbican.yamlenvironment file for Key Manager (barbican) and add parameters specific to your environment.parameter_defaults: BarbicanPkcs11CryptoMKEKLabel: "barbican_mkek_0" BarbicanPkcs11CryptoHMACLabel: "barbican_hmac_0" BarbicanPkcs11CryptoLogin: "$PKCS_11_USER_PIN" BarbicanPkcs11CryptoGlobalDefault: true LunasaVars: lunasa_client_tarball_name: 610-012382-014_SW_Client_HSM_6.2_RevA.tar.zip lunasa_client_tarball_location: https://user:$PASSWORD@http-server.example.com/luna_software/610-012382-014_SW_Client_HSM_6.2_RevA.tar.zip lunasa_client_installer_path: 610-012382-014_SW_Client_HSM_6.2_RevA/linux/64/install.sh lunasa_hsms: - hostname: luna-hsm.example.com admin_password: "$HSM_ADMIN_PASSWORD" partition: myPartition1 partition_serial: 123456789Table 3.3. Heat parameters
Parameter Value BarbicanSimpleCryptoGlobalDefault
This is a Boolean that determines if simplecrypto is the global default.
BarbicanPkcs11GlobalDefault
This is a Boolean that determines if PKCS#11 is the global default.
BarbicanPkcs11CryptoTokenLabel
If you have one HSM, then the value of the parameter is the partition Label. If you are using HA between two or more partitions, then this is the label that you want to give to the HA group.
BarbicanPkcs11CryptoLogin
The PKCS#11 password used to log into the HSM, provided by the HSM administrator.
LunasaVar
lunasa_client_tarball_name
The name of the Luna software tarball.
lunasa_client_tarball_location
The URL that specifies the HTTPS server location of the Luna Software tarball.
lunasa_client_installer_path
Path to the install.sh script in the zipped tarball.
lunasa_client_rotate_cert
(Optional) When set to true, new client certificates will be generated to replace any existing certificates. Default: false
lunasa_client_working_dir
(Optional) Working directory in the Controller nodes. Default: /tmp/lunasa_client_install
lunasa_hsms
A list of one or more HSMs that specifies the name, hostname, admin_password, partition, and partition serial number. When you include more than one HSM in this list, Barbican configures the HSMs for high availability.
Include the custom
configure-barbican.yamland Thales specificbarbican-backend-pkcs11-llunasa.yamlenvironment files in the deployment command, as well as any other templates relevant for your deployment:$ openstack overcloud deploy --templates \ .... -e /usr/share/openstack-tripleo-heat-templates/environments/services/barbican.yaml \ -e /usr/share/openstack-tripleo-heat-templates/environments/barbican-backend-pkcs11-lunasa.yaml \ -e /home/stack/templates/configure-barbican.yaml \ --log-file overcloud_deployment_with_luna.log
3.3. Integrating OpenStack Key Manager (barbican) with an Entrust nShield Connect XC HSM
To integrate the PKCS#11 back end with your Entrust nShield Connect XC HSM, use an Ansible role to download and install the Entrust client software on the Controller, and create a Barbican configuration file to include the predefined HSM IP and credentials.
Prerequisites
- A password-protected HTTPS server that provides vendor software for the Entrust nShield Connect XC.
Procedure
Create a
configure-barbican.yamlenvironment file for Barbican and add parameters specific to your environment. Use the following snippet as an example:parameter_defaults: VerifyGlanceSignatures: true SwiftEncryptionEnabled: true BarbicanPkcs11CryptoLogin: 'sample string' BarbicanPkcs11CryptoSlotId: '492971158' BarbicanPkcs11CryptoGlobalDefault: true BarbicanPkcs11CryptoLibraryPath: '/opt/nfast/toolkits/pkcs11/libcknfast.so' BarbicanPkcs11CryptoEncryptionMechanism: 'CKM_AES_CBC' BarbicanPkcs11CryptoHMACKeyType: 'CKK_SHA256_HMAC' BarbicanPkcs11CryptoHMACKeygenMechanism: 'CKM_NC_SHA256_HMAC_KEY_GEN' BarbicanPkcs11CryptoMKEKLabel: 'barbican_mkek_10' BarbicanPkcs11CryptoMKEKLength: '32' BarbicanPkcs11CryptoHMACLabel: 'barbican_hmac_10' BarbicanPkcs11CryptoThalesEnabled: true BarbicanPkcs11CryptoEnabled: true ThalesVars: thales_client_working_dir: /tmp/thales_client_install thales_client_tarball_location: https://your server/CipherTools-linux64-dev-12.40.2.tgz thales_client_tarball_name: CipherTools-linux64-dev-12.40.2.tgz thales_client_path: linux/libc6_11/amd64/nfast thales_client_uid: 42481 thales_client_gid: 42481 thales_km_data_location: https://your server/kmdata_post_card_creation.tar.gz thales_km_data_tarball_name: kmdata_post_card_creation.tar.gz thales_rfs_server_ip_address: 192.168.10.12 thales_hsm_config_location: hsm-C90E-02E0-D947 nShield_hsms: - name: hsm-name.example.com ip: 192.168.10.10 thales_rfs_user: root thales_rfs_key: | -----BEGIN RSA PRIVATE KEY----- Sample private key -----END RSA PRIVATE KEY----- resource_registry: OS::TripleO::Services::BarbicanBackendPkcs11Crypto: /home/stack/tripleo-heat-templates/puppet/services/barbican-backend-pkcs11-crypto.yamlTable 3.4. Heat parameters
Parameter Value BarbicanSimpleCryptoGlobalDefault
This is a Boolean that determines if
simplecryptois the global default.BarbicanPkcs11GlobalDefault
This is a Boolean that determines if
PKCS#11is the global default.BarbicanPkcs11CryptoSlotId
Slot ID for the Virtual HSM to be used by Barbican.
BarbicanPkcs11CryptoMKEKLabel
This parameter defines the name of the mKEK generated in the HSM. Director creates this key in the HSM using this name.
BarbicanPkcs11CryptoHMACLabel
This parameter defines the name of the HMAC key generated in the HSM. Director creates this key in the HSM using this name.
ThalesVars
thales_client_working_dir
A user-defined temporary working directory.
thales_client_tarball_location
The URL that specifies the HTTPS server location of the Entrust software.
thales_km_data_tarball_name
The name of the Entrust software tarball.
thales_rfs_key
A private key used to obtain an SSH connection to the RFS server. You must add this as an authorized key to the RFS server.
Include the custom
configure-barbican.yamlenvironment file, along with thebarbican.yamland Thales specificbarbican-backend-pkcs11-thales.yamlenvironment files, and any other templates needed for you deployment when running theopenstack overcloud deploycommand:$ openstack overcloud deploy \ --timeout 100 \ --templates /usr/share/openstack-tripleo-heat-templates \ --stack overcloud \ --libvirt-type kvm \ --ntp-server clock.redhat.com \ -e /home/stack/containers-prepare-parameter.yaml \ -e /home/stack/templates/config_lvm.yaml \ -e /usr/share/openstack-tripleo-heat-templates/environments/network-isolation.yaml \ -e /home/stack/templates/network/network-environment.yaml \ -e /home/stack/templates/hostnames.yml \ -e /home/stack/templates/nodes_data.yaml \ -e /home/stack/templates/extra_templates.yaml \ -e /usr/share/openstack-tripleo-heat-templates/environments/services/barbican.yaml \ -e /usr/share/openstack-tripleo-heat-templates/environments/barbican-backend-pkcs11-thales.yaml \ -e /home/stack/templates/configure-barbican.yaml \ --log-file overcloud_deployment_with_atos.log
Verification
Create a test secret:
$ openstack secret store --name testSecret --payload 'TestPayload'
+---------------+------------------------------------------------------------------------------------+
| Field         | Value                                                                              |
+---------------+------------------------------------------------------------------------------------+
| Secret href   | https://192.168.123.163/key-manager/v1/secrets/4cc5ffe0-eea2-449d-9e64-b664d574be53 |
| Name          | testSecret                                                                         |
| Created       | None                                                                               |
| Status        | None                                                                               |
| Content types | None                                                                               |
| Algorithm     | aes                                                                                |
| Bit length    | 256                                                                                |
| Secret type   | opaque                                                                             |
| Mode          | cbc                                                                                |
| Expiration    | None                                                                               |
+---------------+------------------------------------------------------------------------------------+
Retrieve the payload for the secret that you just created:
openstack secret get https://192.168.123.163/key-manager/v1/secrets/4cc5ffe0-eea2-449d-9e64-b664d574be53 --payload
+---------+-------------+
| Field   | Value       |
+---------+-------------+
| Payload | TestPayload |
+---------+-------------+
3.3.1. Load Balancing with Entrust nShield Connect
You can now enable load sharing on Entrust nShield Connect HSMs by specifying an array of valid HSMs. When more than one HSMs are listed, load sharing is enabled.
This feature is available in this release as a Technology Preview, and therefore is not fully supported by Red Hat. It should only be used for testing, and should not be deployed in a production environment.
For more information about Technology Preview features, see Scope of Coverage Details.
Procedure
When configuring the
nameandipparameters for your Entrust nShield Connect HSMs, specifying more than one will enable load sharing:parameter_defaults: .... ThalesVars: .... nshield_hsms: - name: hsm-name1.example.com ip: 192.168.10.10 - name: hsm-nam2.example.com ip: 192.168.10.11 ....
3.4. Rotating MKEK and HMAC keys
You can rotate the MKEK and HMAC keys using a director update.
Due to a limitation in Barbican, the MKEK and HMAC have the same key type.
Procedure
Add the following parameter to your deployment environment files:
BarbicanPkcs11CryptoRewrapKeys: true
Change the labels on the MKEK and HMAC keys For example, if your labels are similar to these:
        BarbicanPkcs11CryptoMKEKLabel: 'barbican_mkek_10'
        BarbicanPkcs11CryptoHMACLabel: 'barbican_hmac_10'
You can change the labels by incrementing the values:
BarbicanPkcs11CryptoMKEKLabel: 'barbican_mkek_11' BarbicanPkcs11CryptoHMACLabel: 'barbican_hmac_11'NoteDo not change the HMAC key type.
-
Re-deploy using director to apply the update. Director checks whether the keys that are labelled for the MKEK and HMAC exist, and then creates them. In addition, with the
BarbicanPkcs11CryptoRewrapKeysparameter set toTrue, director callsbarbican-manage hsm pkek_rewrapto rewrap all existing pKEKs.
Chapter 4. Encrypting and validating OpenStack services
You can use barbican to encrypt and validate several Red Hat OpenStack Platform services, such as Block Storage (cinder) encryption keys, Block Storage volume images, Object Storage (swift) objects, and Image Service (glance) images.
Nova formats encrypted volumes during their first use if they are unencrypted. The resulting block device is then presented to the Compute node.
Guidelines for containerized services
-
Do not update any configuration file you might find on the physical node’s host operating system, for example,
/etc/cinder/cinder.conf. The containerized service does not reference this file. Do not update the configuration file running within the container. Changes are lost once you restart the container.
Instead, if you must change containerized services, update the configuration file in
/var/lib/config-data/puppet-generated/, which is used to generate the container.For example:
-
keystone:
/var/lib/config-data/puppet-generated/keystone/etc/keystone/keystone.conf -
cinder:
/var/lib/config-data/puppet-generated/cinder/etc/cinder/cinder.conf -
nova:
/var/lib/config-data/puppet-generated/nova_libvirt/etc/nova/nova.conf
Changes are applied after you restart the container.
-
keystone:
4.1. Encrypting Object Storage (swift) at-rest objects
By default, objects uploaded to Object Storage (swift) are stored unencrypted. Because of this, it is possible to access objects directly from the file system. This can present a security risk if disks are not properly erased before they are discarded. When you have barbican enabled, the Object Storage service (swift) can transparently encrypt and decrypt your stored (at-rest) objects. At-rest encryption is distinct from in-transit encryption in that it refers to the objects being encrypted while being stored on disk.
Swift performs these encryption tasks transparently, with the objects being automatically encrypted when uploaded to swift, then automatically decrypted when served to a user. This encryption and decryption is done using the same (symmetric) key, which is stored in barbican.
You cannot disable encryption after you have enabled encryption and added data to the swift cluster, because the data is now stored in an encrypted state. Consequently, the data will not be readable if encryption is disabled, until you re-enable encryption with the same key.
Prerequisites
- OpenStack Key Manager is installed and enabled
Procedure
-
Include the
SwiftEncryptionEnabled: Trueparameter in your environment file, then re-runningopenstack overcloud deployusing/home/stack/overcloud_deploy.sh. Confirm that swift is configured to use at-rest encryption:
$ crudini --get /var/lib/config-data/puppet-generated/swift/etc/swift/proxy-server.conf pipeline-main pipeline

pipeline = catch_errors healthcheck proxy-logging cache ratelimit bulk tempurl formpost authtoken keystone staticweb copy container_quotas account_quotas slo dlo versioned_writes kms_keymaster encryption proxy-logging proxy-server
The result should include an entry for
encryption.
4.2. Encrypting Block Storage (cinder) volumes
You can use barbican to manage your Block Storage (cinder) encryption keys. This configuration uses LUKS to encrypt the disks attached to your instances, including boot disks. Key management is transparent to the user; when you create a new volume using luks as the encryption type, cinder generates a symmetric key secret for the volume and stores it in barbican. When booting the instance (or attaching an encrypted volume), nova retrieves the key from barbican and stores the secret locally as a Libvirt secret on the Compute node.
Procedure
On nodes running the
cinder-volumeandnova-computeservices, confirm that nova and cinder are both configured to use barbican for key management:$ crudini --get /var/lib/config-data/puppet-generated/cinder/etc/cinder/cinder.conf key_manager backend castellan.key_manager.barbican_key_manager.BarbicanKeyManager $ crudini --get /var/lib/config-data/puppet-generated/nova_libvirt/etc/nova/nova.conf key_manager backend castellan.key_manager.barbican_key_manager.BarbicanKeyManager
Create a volume template that uses encryption. When you create new volumes they can be modeled off the settings you define here:
$ openstack volume type create --encryption-provider nova.volume.encryptors.luks.LuksEncryptor --encryption-cipher aes-xts-plain64 --encryption-key-size 256 --encryption-control-location front-end LuksEncryptor-Template-256
+-------------+------------------------------------------------------------------------------------------------------------------------------------------------------------------------------------+
| Field       | Value                                                                                                                                                                              |
+-------------+------------------------------------------------------------------------------------------------------------------------------------------------------------------------------------+
| description | None                                                                                                                                                                               |
| encryption  | cipher='aes-xts-plain64', control_location='front-end', encryption_id='9df604d0-8584-4ce8-b450-e13e6316c4d3', key_size='256', provider='nova.volume.encryptors.luks.LuksEncryptor' |
| id          | 78898a82-8f4c-44b2-a460-40a5da9e4d59                                                                                                                                               |
| is_public   | True                                                                                                                                                                               |
| name        | LuksEncryptor-Template-256                                                                                                                                                         |
+-------------+------------------------------------------------------------------------------------------------------------------------------------------------------------------------------------+
Create a new volume and specify that it uses the
LuksEncryptor-Template-256settings:$ openstack volume create --size 1 --type LuksEncryptor-Template-256 'Encrypted-Test-Volume' +---------------------+--------------------------------------+ | Field | Value | +---------------------+--------------------------------------+ | attachments | [] | | availability_zone | nova | | bootable | false | | consistencygroup_id | None | | created_at | 2018-01-22T00:19:06.000000 | | description | None | | encrypted | True | | id | a361fd0b-882a-46cc-a669-c633630b5c93 | | migration_status | None | | multiattach | False | | name | Encrypted-Test-Volume | | properties | | | replication_status | None | | size | 1 | | snapshot_id | None | | source_volid | None | | status | creating | | type | LuksEncryptor-Template-256 | | updated_at | None | | user_id | 0e73cb3111614365a144e7f8f1a972af | +---------------------+--------------------------------------+
The resulting secret is automatically uploaded to the barbican back end.
NoteEnsure that the user creating the encrypted volume has the
creatorbarbican role on the project. For more information, see theGrant user access to the creator rolesection.Use barbican to confirm that the disk encryption key is present. In this example, the timestamp matches the LUKS volume creation time:
$ openstack secret list
+------------------------------------------------------------------------------------+------+---------------------------+--------+-------------------------------------------+-----------+------------+-------------+------+------------+
| Secret href                                                                        | Name | Created                   | Status | Content types                             | Algorithm | Bit length | Secret type | Mode | Expiration |
+------------------------------------------------------------------------------------+------+---------------------------+--------+-------------------------------------------+-----------+------------+-------------+------+------------+
| https://192.168.123.169:9311/v1/secrets/24845e6d-64a5-4071-ba99-0fdd1046172e | None | 2018-01-22T02:23:15+00:00 | ACTIVE | {u'default': u'application/octet-stream'} | aes       |        256 | symmetric   | None | None       |
+------------------------------------------------------------------------------------+------+---------------------------+--------+-------------------------------------------+-----------+------------+-------------+------+------------+
Attach the new volume to an existing instance. For example:
$ openstack server add volume testInstance Encrypted-Test-Volume
The volume is then presented to the guest operating system and can be mounted using the built-in tools.
4.2.1. Migrating Block Storage volumes to OpenStack Key Manager
If you previously used ConfKeyManager to manage disk encryption keys, you can migrate the volumes to OpenStack Key Manager by scanning the databases for encryption_key_id entries within scope for migration to barbican. Each entry gets a new barbican key ID and the existing ConfKeyManager secret is retained.
-
Previously, you could reassign ownership for volumes encrypted using
ConfKeyManager. This is not possible for volumes that have their keys managed by barbican. -
Activating barbican will not break your existing
keymgrvolumes.
Prerequisites
Before you migrate, review the following differences between Barbican-managed encrypted volumes and volumes that use ConfKeyManager:
- You cannot transfer ownership of encrypted volumes, because it is not currently possible to transfer ownership of the barbican secret.
- Barbican is more restrictive about who is allowed to read and delete secrets, which can affect some cinder volume operations. For example, a user cannot attach, detach, or delete a different user’s volumes.
Procedure
- Deploy the barbican service.
Add the
creatorrole to the cinder service. For example:#openstack role create creator #openstack role add --user cinder creator --project service
Restart the
cinder-volumeandcinder-backupservices. Thecinder-volumeandcinder-backupservices automatically begin the migration process. You can check the log files to view status information about the migration:-
cinder-volume- migrates keys stored in cinder’s Volumes and Snapshots tables. -
cinder-backup- migrates keys in the Backups table.
-
-
Monitor the logs for the message indicating migration has finished and check that no more volumes are using the
ConfKeyManagerall-zeros encryption key ID. -
Remove the
fixed_keyoption fromcinder.confandnova.conf. You must determine which nodes have this setting configured. -
Remove the
creatorrole from the cinder service.
Verification
After you start the process, one of these entries appears in the log files. This indicates whether the migration started correctly, or it identifies the issue it encountered:
-
Not migrating encryption keys because the ConfKeyManager is still in use. -
Not migrating encryption keys because the ConfKeyManager's fixed_key is not in use. -
Not migrating encryption keys because migration to the 'XXX' key_manager backend is not supported.- This message is unlikely to appear; it is a safety check to handle the code ever encountering another Key Manager back end other than barbican. This is because the code only supports one migration scenario: From ConfKeyManager to barbican. -
Not migrating encryption keys because there are no volumes associated with this host.- This can occur whencinder-volumeis running on multiple hosts, and a particular host has no volumes associated with it. This arises because every host is responsible for handling its own volumes. -
Starting migration of ConfKeyManager keys. Migrating volume <UUID> encryption key to Barbican- During migration, all of the host’s volumes are examined, and if a volume is still using the ConfKeyManager’s key ID (identified by the fact that it’s all zeros (00000000-0000-0000-0000-000000000000)), then this message appears.-
For
cinder-backup, this message uses slightly different capitalization:Migrating Volume [...]orMigrating Backup [...]
-
For
-
After each host examines all of its volumes, the host displays a summary status message:
`No volumes are using the ConfKeyManager's encryption_key_id.`
`No backups are known to be using the ConfKeyManager's encryption_key_id.`
You may also see the following entries:
-
There are still %d volume(s) using the ConfKeyManager's all-zeros encryption key ID. There are still %d backup(s) using the ConfKeyManager’s all-zeros encryption key ID.Both of these messages can appear in the
cinder-volumeandcinder-backuplogs. Whereas each service only handles the migration of its own entries, the service is aware of the the other’s status. As a result,cinder-volumeknows ifcinder-backupstill has backups to migrate, andcinder-backupknows if thecinder-volumeservice has volumes to migrate.
-
Although each host migrates only its own volumes, the summary message is based on a global assessment of whether any volume still requires migration This allows you to confirm that migration for all volumes is complete.
Cleanup
After migrating your key IDs into barbican, the fixed key remains in the configuration files. This can present a security concern to some users, because the fixed_key value is not encrypted in the .conf files.
To address this, you can manually remove the fixed_key values from your nova and cinder configurations. However, first complete testing and review the output of the log file before you proceed, because disks that are still dependent on this value are not accessible.
The encryption_key_id was only recently added to the Backup table, as part of the Queens release. As a result, pre-existing backups of encrypted volumes are likely to exist. The all-zeros encryption_key_id is stored on the backup itself, but it does not appear in the Backup database. As such, it is impossible for the migration process to know for certain whether a backup of an encrypted volume exists that still relies on the all-zeros ConfKeyMgr key ID.
Review the existing
fixed_keyvalues. The values must match for both services.crudini --get /var/lib/config-data/puppet-generated/cinder/etc/cinder/cinder.conf keymgr fixed_key crudini --get /var/lib/config-data/puppet-generated/nova_libvirt/etc/nova/nova.conf keymgr fixed_key
ImportantMake a backup of the existing
fixed_keyvalues. This allows you to restore the value if something goes wrong, or if you need to restore a backup that uses the old encryption key.Delete the
fixed_keyvalues:crudini --del /var/lib/config-data/puppet-generated/cinder/etc/cinder/cinder.conf keymgr fixed_key crudini --del /var/lib/config-data/puppet-generated/nova_libvirt/etc/nova/nova.conf keymgr fixed_key
Troubleshooting
The barbican secret can only be created when the requestor has the creator role. This means that the cinder service itself requires the creator role, otherwise a log sequence similar to this will occur:
-
Starting migration of ConfKeyManager keys. -
Migrating volume <UUID> encryption key to Barbican -
Error migrating encryption key: Forbidden: Secret creation attempt not allowed - please review your user/project privileges -
There are still %d volume(s) using the ConfKeyManager's all-zeros encryption key ID.
The key message is the third one: Secret creation attempt not allowed. To fix the problem, update the cinder account’s privileges:
-
Run
openstack role add --project service --user cinder creator -
Restart the
cinder-volumeandcinder-backupservices.
As a result, the next attempt at migration should succeed.
4.3. Validating Block Storage (cinder) volume images
The Block Storage Service (cinder) automatically validates the signature of any downloaded, signed image during volume from image creation. The signature is validated before the image is written to the volume. To improve performance, you can use the Block Storage Image-Volume cache to store validated images for creating new volumes.
Cinder image signature validation is not supported with Red Hat Ceph Storage or RBD volumes.
Procedure
- Log in to a Controller node.
Choose one of the following options:
View cinder’s image validation activities in the
Volumelog,/var/log/containers/cinder/cinder-volume.log.For example, you can expect the following entry when the instance is booted:
2018-05-24 12:48:35.256 1 INFO cinder.image.image_utils [req-7c271904-4975-4771-9d26-cbea6c0ade31 b464b2fd2a2140e9a88bbdacf67bdd8c a3db2f2beaee454182c95b646fa7331f - default default] Image signature verification succeeded for image d3396fa0-2ea2-4832-8a77-d36fa3f2ab27
Use the
openstack volume listandcinder volume showcommands:-
Use the
openstack volume listcommand to locate the volume ID. Run the
cinder volume showcommand on a compute node:cinder volume show <VOLUME_ID>
-
Use the
Locate the
volume_image_metadatasection with the linesignature verified : True.$ cinder show d0db26bb-449d-4111-a59a-6fbb080bb483 +--------------------------------+-------------------------------------------------+ | Property | Value | +--------------------------------+-------------------------------------------------+ | attached_servers | [] | | attachment_ids | [] | | availability_zone | nova | | bootable | true | | consistencygroup_id | None | | created_at | 2018-10-12T19:04:41.000000 | | description | None | | encrypted | True | | id | d0db26bb-449d-4111-a59a-6fbb080bb483 | | metadata | | | migration_status | None | | multiattach | False | | name | None | | os-vol-host-attr:host | centstack.localdomain@nfs#nfs | | os-vol-mig-status-attr:migstat | None | | os-vol-mig-status-attr:name_id | None | | os-vol-tenant-attr:tenant_id | 1a081dd2505547f5a8bb1a230f2295f4 | | replication_status | None | | size | 1 | | snapshot_id | None | | source_volid | None | | status | available | | updated_at | 2018-10-12T19:05:13.000000 | | user_id | ad9fe430b3a6416f908c79e4de3bfa98 | | volume_image_metadata | checksum : f8ab98ff5e73ebab884d80c9dc9c7290 | | | container_format : bare | | | disk_format : qcow2 | | | image_id : 154d4d4b-12bf-41dc-b7c4-35e5a6a3482a | | | image_name : cirros-0.3.5-x86_64-disk | | | min_disk : 0 | | | min_ram : 0 | | | signature_verified : False | | | size : 13267968 | | volume_type | nfs | +--------------------------------+-------------------------------------------------+
Snapshots are saved as Image service (glance) images. If you configure the Compute service (nova) to check for signed images, then you must manually download the image from glance, sign the image, and then re-upload the image. This is true whether the snapshot is from an instance created with signed images, or an instance booted from a volume created from a signed image.
A volume can be uploaded as an Image service (glance) image. If the original volume was bootable, the image can be used to create a bootable volume in the Block Storage service (cinder). If you have configured the Block Storage service to check for signed images then you must manually download the image from glance, compute the image signature and update all appropriate image signature properties before using the image. For more information, see Section 4.5, “Validating snapshots”.
Additional resources
4.3.1. Automatic deletion of volume image encryption key
The Block Storage service (cinder) creates an encryption key in the Key Management service (barbican) when it uploads an encrypted volume to the Image service (glance). This creates a 1:1 relationship between an encryption key and a stored image.
Encryption key deletion prevents unlimited resource consumption of the Key Management service. The Block Storage, Key Management, and Image services automatically manage the key for an encrypted volume, including the deletion of the key.
The Block Storage service automatically adds two properties to a volume image:
-
cinder_encryption_key_id- The identifier of the encryption key that the Key Management service stores for a specific image. -
cinder_encryption_key_deletion_policy- The policy that tells the Image service to tell the Key Management service whether to delete the key associated with this image.
The values of these properties are automatically assigned. To avoid unintentional data loss, do not adjust these values.
When you create a volume image, the Block Storage service sets the cinder_encryption_key_deletion_policy property to on_image_deletion. When you delete a volume image, the Image service deletes the corresponding encryption key if the cinder_encryption_key_deletion_policy equals on_image_deletion.
Red Hat does not recommend manual manipulation of the cinder_encryption_key_id or cinder_encryption_key_deletion_policy properties. If you use the encryption key that is identified by the value of cinder_encryption_key_id for any other purpose, you risk data loss.
4.4. Signing Image Service (glance) images
When you configure the Image Service (glance) to verify that an uploaded image has not been tampered with, you must sign images before you can start an instance using those images. Use the openssl command to sign an image with a key that is stored in barbican, then upload the image to glance with the accompanying signing information. As a result, the image’s signature is verified before each use, with the instance build process failing if the signature does not match.
Prerequisites
- OpenStack Key Manager is installed and enabled
Procedure
-
In your environment file, enable image verification with the
VerifyGlanceSignatures: Truesetting. You must re-run theopenstack overcloud deploycommand for this setting to take effect. To verify that glance image validation is enabled, run the following command on an overcloud Compute node:
$ sudo crudini --get /var/lib/config-data/puppet-generated/nova_libvirt/etc/nova/nova.conf glance verify_glance_signatures
NoteIf you use Ceph as the back end for the Image and Compute services, a CoW clone is created. Therefore, Image signing verification cannot be performed.
Confirm that glance is configured to use barbican:
$ sudo crudini --get /var/lib/config-data/puppet-generated/glance_api/etc/glance/glance-api.conf key_manager backend
castellan.key_manager.barbican_key_manager.BarbicanKeyManager
Generate a certificate:
openssl genrsa -out private_key.pem 1024
openssl rsa -pubout -in private_key.pem -out public_key.pem
openssl req -new -key private_key.pem -out cert_request.csr
openssl x509 -req -days 14 -in cert_request.csr -signkey private_key.pem -out x509_signing_cert.crt
Add the certificate to the barbican secret store:
$ source ~/overcloudrc
$ openstack secret store --name signing-cert --algorithm RSA --secret-type certificate --payload-content-type "application/octet-stream" --payload-content-encoding base64  --payload "$(base64 x509_signing_cert.crt)" -c 'Secret href' -f value
https://192.168.123.170:9311/v1/secrets/5df14c2b-f221-4a02-948e-48a61edd3f5b
NoteRecord the resulting UUID for use in a later step. In this example, the certificate’s UUID is
5df14c2b-f221-4a02-948e-48a61edd3f5b.Use
private_key.pemto sign the image and generate the.signaturefile. For example:$ openssl dgst -sha256 -sign private_key.pem -sigopt rsa_padding_mode:pss -out cirros-0.4.0.signature cirros-0.4.0-x86_64-disk.img
Convert the resulting
.signaturefile into base64 format:$ base64 -w 0 cirros-0.4.0.signature > cirros-0.4.0.signature.b64
Load the base64 value into a variable to use it in the subsequent command:
$ cirros_signature_b64=$(cat cirros-0.4.0.signature.b64)
Upload the signed image to glance. For
img_signature_certificate_uuid, you must specify the UUID of the signing key you previously uploaded to barbican:openstack image create \ --container-format bare --disk-format qcow2 \ --property img_signature="$cirros_signature_b64" \ --property img_signature_certificate_uuid="5df14c2b-f221-4a02-948e-48a61edd3f5b"\ --property img_signature_hash_method="SHA-256" \ --property img_signature_key_type="RSA-PSS" cirros_0_4_0_signed \ --file cirros-0.4.0-x86_64-disk.img +--------------------------------+----------------------------------------------------------------------------------+ | Property | Value | +--------------------------------+----------------------------------------------------------------------------------+ | checksum | None | | container_format | bare | | created_at | 2018-01-23T05:37:31Z | | disk_format | qcow2 | | id | d3396fa0-2ea2-4832-8a77-d36fa3f2ab27 | | img_signature | lcI7nGgoKxnCyOcsJ4abbEZEpzXByFPIgiPeiT+Otjz0yvW00KNN3fI0AA6tn9EXrp7fb2xBDE4UaO3v | | | IFquV/s3mU4LcCiGdBAl3pGsMlmZZIQFVNcUPOaayS1kQYKY7kxYmU9iq/AZYyPw37KQI52smC/zoO54 | | | zZ+JpnfwIsM= | | img_signature_certificate_uuid | ba3641c2-6a3d-445a-8543-851a68110eab | | img_signature_hash_method | SHA-256 | | img_signature_key_type | RSA-PSS | | min_disk | 0 | | min_ram | 0 | | name | cirros_0_4_0_signed | | owner | 9f812310df904e6ea01e1bacb84c9f1a | | protected | False | | size | None | | status | queued | | tags | [] | | updated_at | 2018-01-23T05:37:31Z | | virtual_size | None | | visibility | shared | +--------------------------------+----------------------------------------------------------------------------------+
You can view glance’s image validation activities in the Compute log:
/var/log/containers/nova/nova-compute.log. For example, you can expect the following entry when the instance is booted:2018-05-24 12:48:35.256 1 INFO nova.image.glance [req-7c271904-4975-4771-9d26-cbea6c0ade31 b464b2fd2a2140e9a88bbdacf67bdd8c a3db2f2beaee454182c95b646fa7331f - default default] Image signature verification succeeded for image d3396fa0-2ea2-4832-8a77-d36fa3f2ab27
4.5. Validating snapshots
Snapshots are saved as Image service (glance) images. If you configure the Compute service (nova) to check for signed images, then snapshots must by signed, even if they were created from an instance with a signed image.
Procedure
Download the snapshot from glance
openstack image save --file <local-file-name> <image-name>
- Generate to signature to validate the snapshot. This is the same process you use when you generate a signature to validate any image. For more information, see Validating Image Service (glance) images.
Update the image properties:
  openstack image set \
    --property img_signature="$cirros_signature_b64" \
    --property img_signature_certificate_uuid="5df14c2b-f221-4a02-948e-48a61edd3f5b" \
    --property img_signature_hash_method="SHA-256" \
    --property img_signature_key_type="RSA-PSS" \
    <image_id_of_the_snapshot>
Optional: Remove the downloaded glance image from the filesystem:
rm <local-file-name>