
Chapter 5. Accessing the desktop remotely
You can connect to the desktop on a RHEL server from a remote client.
5.1. Remote desktop access options
RHEL provides several options for remotely connecting to the desktop. Each option fits a different use case:
- Single-user access using GNOME tools
This method enables remote access on the client and the server using graphical GNOME applications. It configures a Virtual Network Computing (VNC) session so that only a single user can connect to the desktop on the server at a given time.
Depending on the session type, this method uses different components to implement screen sharing:
-
In an X11 session, it uses the
vinocomponent. In a Wayland session, it uses the
gnome-remote-desktopcomponent.This method always uses display number 0. As a consequence, the VNC session always connects to the user who is logged into the server system.
The VNC client application must support
tls_anonconnections. For example, you can use the Remote Desktop Viewer (vinagre) application on Linux systems. Before you can connect from Microsoft Windows clients, such as RealVNC, you must disable the VNC encryption on the server.
-
In an X11 session, it uses the
- Multi-user access using command-line tools
This method configures a VNC session so that multiple remote clients can connect to the server in parallel. You must first enable the VNC access on the client and the server using command-line tools.
Any VNC client application can connect to a server configured using this method.
- Accessing a single application using X11 forwarding over SSH
This method executes an SSH command on the client that launches an individual graphical on the server. The application window opens on the client.
This method is useful when you do not require a full remote desktop session.
5.2. Remotely accessing the desktop as a single user
You can remotely connect to the desktop on a RHEL server using graphical GNOME applications. Only a single user can connect to the desktop on the server at a given time.
5.2.1. Enabling desktop sharing on the server using GNOME
This procedure configures a RHEL server to enable a remote desktop connection from a single client.
Prerequisites
The GNOME Remote Desktop service is installed:
# yum install gnome-remote-desktop
Procedure
Configure a firewall rule to enable VNC access to the server:
# firewall-cmd --permanent --add-service=vnc-server
success
Reload firewall rules:
# firewall-cmd --reload success- Open Settings in GNOME.
Navigate to the Sharing menu:

Click Screen Sharing.
The screen sharing configuration opens:
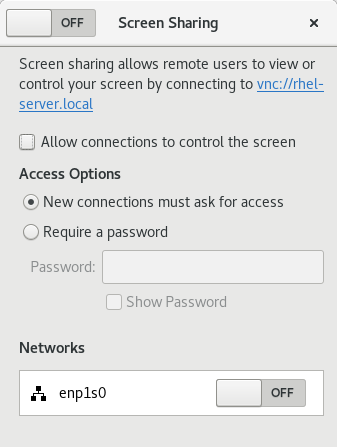
Click the switch button in the window header to enable screen sharing:
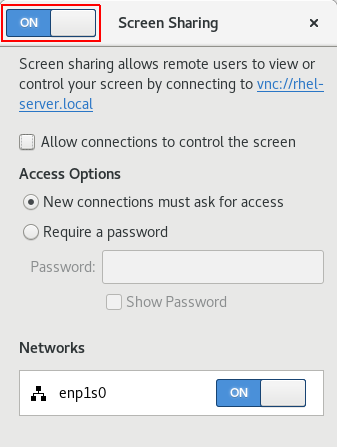
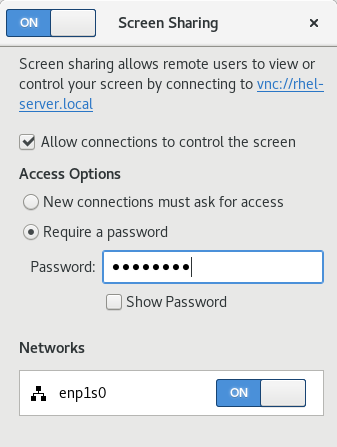
- Select the Allow connections to control the screen check box.
- Under Access Options, select the Require a password option.
Set a password in the Password field.
Remote clients must enter this password when connecting to the desktop on the server.
5.2.2. Connecting to a shared desktop using GNOME
This procedure connects to a remote desktop session using the Remote Desktop Viewer application (vinagre). It connects to the graphical session of the user that is currently logged in on the server.
Prerequisites
- A user is logged into the GNOME graphical session on the server.
- The desktop sharing is enabled on the server. For details, see Section 5.2.1, “Enabling desktop sharing on the server using GNOME”.
Procedure
Install the Remote Desktop Viewer application on the client:
# yum install vinagre
-
Launch the Remote Desktop Viewer application (
vinagre). Click .

- In the Protocol menu, select VNC.
In the Host field, enter the IP address of the server.
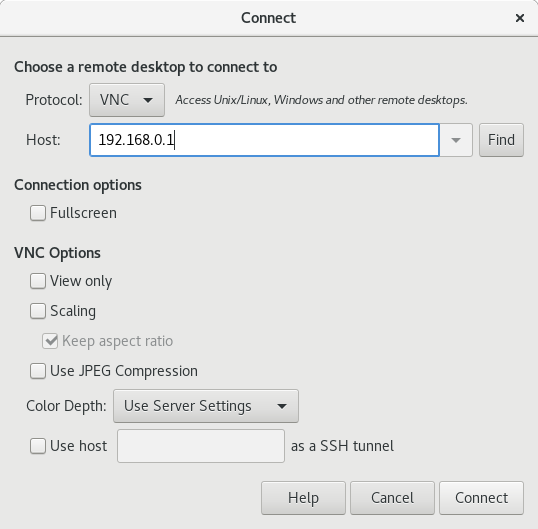
- Click .
Verification steps
- On the client, check that you can see the shared server desktop.
On the server, a screen sharing indicator appears on the right side of the top panel:

You can control the screen sharing in the system menu.
5.2.3. Disabling encryption in GNOME VNC
You can disable encryption in the GNOME remote desktop solution. This enables VNC clients that do not support the encryption to connect to the server.
Procedure
As the server user, set the
encryptionkey oforg.gnome.desktop.remote-desktop.vncGSettings schema to['none'].$ gsettings set org.gnome.desktop.remote-desktop.vnc encryption "['none']"Optional: Red Hat recommends that you tunnel the VNC connection over SSH to your VNC port. As a result, the SSH tunnel keeps the connection encrypted.
For example:
On the client, configure the port forwarding.
# ssh -N -T -L 5901:server-ip-address:5901 user@server-ip-address-
Connect to the VNC session on the
localhost:5901address.
5.3. Remotely accessing the desktop as multiple users
You can remotely connect to the desktop on a RHEL server and open multiple sessions as different users at the same time.
The following instructions apply to RHEL 8.3 and later. If you are using RHEL 8.0 to 8.2, see How to configure user specific VNC Server in Red Hat Enterprise Linux 8.0 - 8.2? instead.
Prerequisites
Install the VNC server:
# yum install tigervnc-serverInstall the VNC client:
# yum install tigervnc
5.3.1. The mapping of port and display numbers to users in VNC
With VNC, the client can connect to the desktop sessions of different users on the server. A display number and a TCP port number are attached to each server user that exports a VNC session. The client uses the port number to specify which server user it connects to.
If several clients connect using the same port number, they all open a VNC session to the same server user.
You must configure a mapping for each server user that exports a VNC session. For every such user, you must pick a unique port and display number.
The recommended mapping
Red Hat recommends that you start with port number 5902 and display number 2 for the first user, and increment the numbers by one for each additional server user.
Port number 5900 and display number 0 represent the server user that is currently logged into the graphical session. You cannot start a VNC server for the user who is already logged into the graphical session.
Table 5.1. Port and display number pairs
| Port number | Display number | Note |
|---|---|---|
| 5900 | 0 | The logged-in user |
| 5901 | 1 | |
| 5902 | 2 | The first recommended VNC user |
| 5903 | 3 | |
| … | … |
Red Hat recommends that you do not configure the root user to export a VNC session. A root VNC session is unsafe and certain elements of the session might not work as expected.
Firewall rules
You must open the selected ports in your firewall configuration. Allowing the vnc-server service in your firewall opens ports from 5900 to 5903. If you need to enable access to additional server users, you must open ports above 5903 by manually specifying the port numbers.
5.3.2. VNC server configuration files
Several configuration files affect the behavior of the VNC server. You can configure the user mapping and various global options.
General options
You can configure general options of the VNC server in the /etc/tigervnc/vncserver-config-defaults configuration file. The file uses the following format:
option1=value
option2
For example:
session=gnome
alwaysshared
securitytypes=vncauth,tlsvnc
desktop=sandbox
geometry=2000x1200
The priority of configuration files
The VNC server reads the following files for general options, in order from most important to least important:
/etc/tigervnc/vncserver-config-mandatoryThis file replaces the default configuration and has a higher priority than the per-user configuration. It is intended for system administrators who want to enforce particular VNC options.
$HOME/.vnc/configIndividual users can override the default VNC configuration in this file.
/etc/tigervnc/vncserver-config-defaultsThis file stores the default VNC configuration.
User mapping
You can configure the mapping between users and their associated port and display numbers in the /etc/tigervnc/vncserver.users configuration file. The file uses the following format:
:number=user
For example:
:2=test
:3=vncuser
Additional resources
-
For a list of available configuration options, see the
Xvnc(1)man page.
5.3.3. Enabling multi-user VNC access on the server
This procedure configures a RHEL server so that multiple users can open VNC sessions on it at the same time.
Prerequisites
If you previously configured VNC using
systemdunit files, remove any outdated VNC configuration:[root]# rm /etc/systemd/system/vncserver@.service
Procedure
Map users to display and port numbers.
In the
/etc/tigervnc/vncserver.usersconfiguration file, add a line for each server user that will export a VNC session::user-number=user-name
- Replace user-number with the port and display number mapped to the selected existing user.
- Replace user-name with the user name of the selected existing user.
For example:
:2=vncuser
Open TCP ports 5900 to 5903 in the firewall:
[root]# firewall-cmd --permanent --add-service=vnc-serverReload the firewall rules:
[root]# firewall-cmd --reloadAdd the following lines to the
/etc/tigervnc/vncserver-config-defaultsconfiguration file:session=gnome alwaysshared
This configuration has the following effects:
- The VNC server starts the GNOME session when a remote user logs in.
- Multiple users can connect to the VNC server at the same time.
As each server user that exports a VNC session, set the VNC password for the user:
[regular-user]$ vncpasswdRemote clients must enter this password when connecting to the desktop on the server.
If you previously configured VNC for the user, ensure that the configuration files have the correct SELinux context:
[regular-user]$ restorecon -RFv ~/.vncEnable and start the VNC server unit for the regular user:
[root]# systemctl enable --now vncserver@:user-numberIf the server uses the proprietary Nvidia driver, disable Wayland:
-
Uncomment the
WaylandEnable=Falseline in the/etc/gdm/custom.confconfiguration file. -
Add the
DefaultSession=gnome-xorg.desktopoption to the[daemon]section of the configuration file. - Reboot the server.
-
Uncomment the
Additional resources
- To enable VNC access to more than two server users, open TCP ports above 5903. For details, see Opening a port using CLI or Opening ports using GUI.
5.3.4. Connecting to the VNC server as multiple users
This procedure connects to a remote desktop session using the vncviewer application. You can open multiple connections to the remote desktop at the same time.
Prerequisites
- Remote desktop access for multiple users is enabled on the server. For details, see Section 5.3.3, “Enabling multi-user VNC access on the server”.
Procedure
Connect to the VNC server:
$ vncviewer --shared server-ip:display- Replace server-ip with the IP address of the server that you are connecting to.
- Replace display with the display number where the server user exports the VNC session.
5.4. Remotely accessing an individual application
You can remotely launch a graphical application on a RHEL server and use it from the remote client using X11 forwarding.
5.4.1. Enabling X11 forwarding on the server
Configure a RHEL server so that remote clients can use graphical applications on the server over SSH.
Procedure
Install basic X11 packages:
# yum install xorg-x11-xauth xorg-x11-fonts-\* xorg-x11-utils dbus-x11
NoteYour applications might rely on additional graphical libraries.
Enable the
X11Forwardingoption in the/etc/ssh/sshd_configconfiguration file:X11Forwarding yes
The option is disabled by default in RHEL.
Restart the
sshdservice:# systemctl restart sshd.service
5.4.2. Launching an application remotely using X11 forwarding
Access a graphical application on a RHEL server from a remote client using SSH.
Prerequisites
- X11 forwarding over SSH is enabled on the server. For details, see Section 5.4.1, “Enabling X11 forwarding on the server”.
Ensure that an X11 display server is running on your system:
- On RHEL, X11 is available by default in the graphical interface.
- On Microsoft Windows, install an X11 server such as Xming.
- On macOS, install the XQuartz X11 server.
- You have configured and restarted an OpenSSH server. For details, see Configuring and starting an OpenSSH server.
Procedure
Log in to the server using SSH:
[local-user]$ ssh -X -Y remote-server
The authenticity of host 'remote-server (192.168.122.120)' can't be established.
ECDSA key fingerprint is SHA256:uYwFlgtP/2YABMHKv5BtN7nHK9SHRL4hdYxAPJVK/kY.
Are you sure you want to continue connecting (yes/no/[fingerprint])?
Confirm that a server key is valid by checking its fingerprint.
NoteIf you plan to log in to the server on a regular basis, add the user’s public key to the server using the
ssh-copy-idcommand.Continue connecting by typing yes.
Warning: Permanently added 'remote-server' (ECDSA) to the list of known hosts.When prompted, type the server password.
local-user's password:
[local-user ~]$
Launch the application from the command line:
[remote-user]$ application-binary
To skip the intermediate terminal session, use the following command:
$ ssh user@server -X -Y -C binary_application