
Red Hat Training
A Red Hat training course is available for RHEL 8
Chapter 11. Configuring automated unlocking of encrypted volumes by using policy-based decryption
Policy-Based Decryption (PBD) is a collection of technologies that enable unlocking encrypted root and secondary volumes of hard drives on physical and virtual machines. PBD uses a variety of unlocking methods, such as user passwords, a Trusted Platform Module (TPM) device, a PKCS #11 device connected to a system, for example, a smart card, or a special network server.
PBD allows combining different unlocking methods into a policy, which makes it possible to unlock the same volume in different ways. The current implementation of the PBD in RHEL consists of the Clevis framework and plug-ins called pins. Each pin provides a separate unlocking capability. Currently, the following pins are available:
tang- Allows unlocking volumes using a network server.
tpm2- allows unlocking volumes using a TPM2 policy.
sss- allows deploying high-availability systems using the Shamir’s Secret Sharing (SSS) cryptographic scheme.
11.1. Network-bound disk encryption
The Network Bound Disc Encryption (NBDE) is a subcategory of Policy-Based Decryption (PBD) that allows binding encrypted volumes to a special network server. The current implementation of the NBDE includes a Clevis pin for the Tang server and the Tang server itself.
In RHEL, NBDE is implemented through the following components and technologies:
Figure 11.1. NBDE scheme when using a LUKS1-encrypted volume. The luksmeta package is not used for LUKS2 volumes.
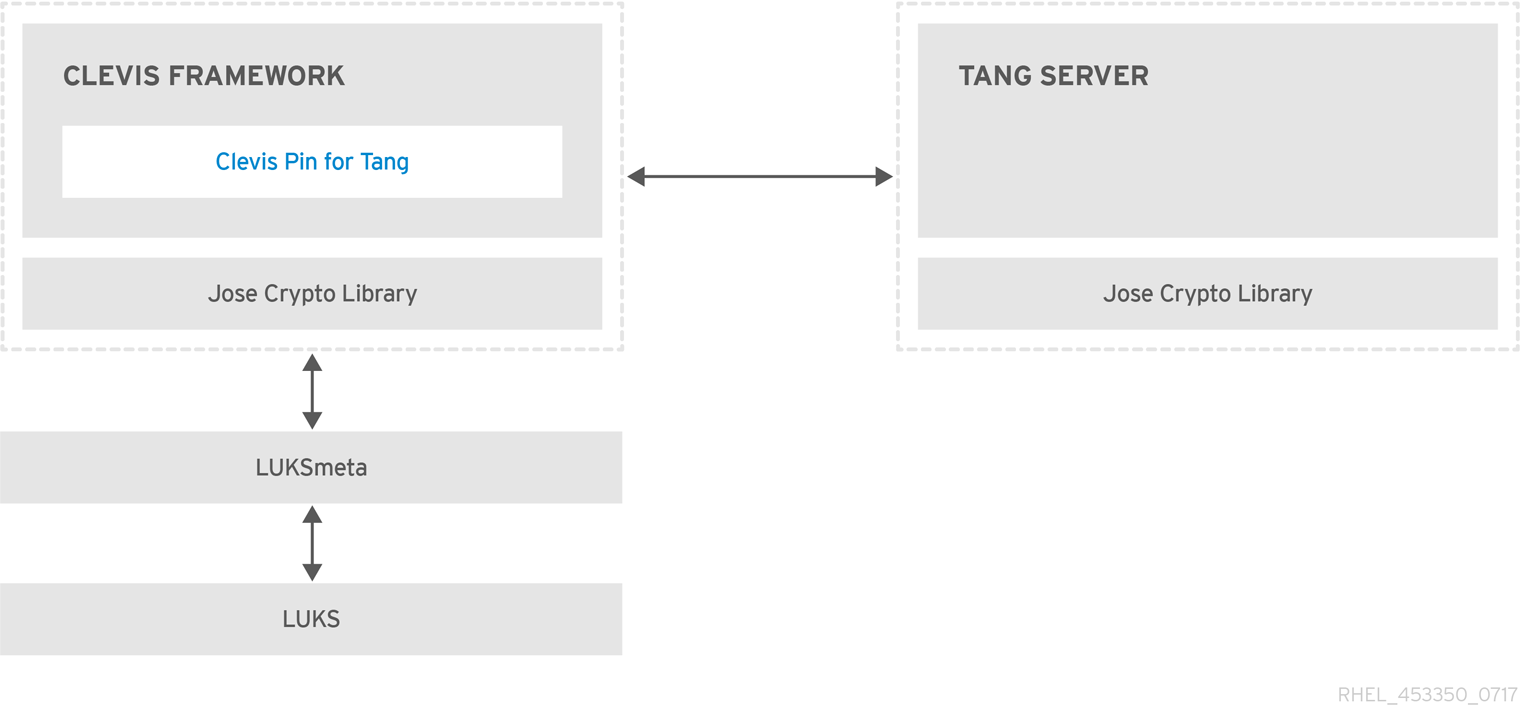
Tang is a server for binding data to network presence. It makes a system containing your data available when the system is bound to a certain secure network. Tang is stateless and does not require TLS or authentication. Unlike escrow-based solutions, where the server stores all encryption keys and has knowledge of every key ever used, Tang never interacts with any client keys, so it never gains any identifying information from the client.
Clevis is a pluggable framework for automated decryption. In NBDE, Clevis provides automated unlocking of LUKS volumes. The clevis package provides the client side of the feature.
A Clevis pin is a plug-in into the Clevis framework. One of such pins is a plug-in that implements interactions with the NBDE server — Tang.
Clevis and Tang are generic client and server components that provide network-bound encryption. In RHEL, they are used in conjunction with LUKS to encrypt and decrypt root and non-root storage volumes to accomplish Network-Bound Disk Encryption.
Both client- and server-side components use the José library to perform encryption and decryption operations.
When you begin provisioning NBDE, the Clevis pin for Tang server gets a list of the Tang server’s advertised asymmetric keys. Alternatively, since the keys are asymmetric, a list of Tang’s public keys can be distributed out of band so that clients can operate without access to the Tang server. This mode is called offline provisioning.
The Clevis pin for Tang uses one of the public keys to generate a unique, cryptographically-strong encryption key. Once the data is encrypted using this key, the key is discarded. The Clevis client should store the state produced by this provisioning operation in a convenient location. This process of encrypting data is the provisioning step.
The LUKS version 2 (LUKS2) is the default disk-encryption format in RHEL, hence, the provisioning state for NBDE is stored as a token in a LUKS2 header. The leveraging of provisioning state for NBDE by the luksmeta package is used only for volumes encrypted with LUKS1.
The Clevis pin for Tang supports both LUKS1 and LUKS2 without specification need. Clevis can encrypt plain-text files but you have to use the cryptsetup tool for encrypting block devices. See the Encrypting block devices using LUKS for more information.
When the client is ready to access its data, it loads the metadata produced in the provisioning step and it responds to recover the encryption key. This process is the recovery step.
In NBDE, Clevis binds a LUKS volume using a pin so that it can be automatically unlocked. After successful completion of the binding process, the disk can be unlocked using the provided Dracut unlocker.
If the kdump kernel crash dumping mechanism is set to save the content of the system memory to a LUKS-encrypted device, you are prompted for entering a password during the second kernel boot.
Additional resources
- NBDE (Network-Bound Disk Encryption) Technology Knowledgebase article
-
tang(8),clevis(1),jose(1), andclevis-luks-unlockers(7)man pages - How to set up Network-Bound Disk Encryption with multiple LUKS devices (Clevis + Tang unlocking) Knowledgebase article
11.2. Installing an encryption client - Clevis
Use this procedure to deploy and start using the Clevis pluggable framework on your system.
Procedure
To install Clevis and its pins on a system with an encrypted volume:
# yum install clevisTo decrypt data, use a
clevis decryptcommand and provide a cipher text in the JSON Web Encryption (JWE) format, for example:$ clevis decrypt < secret.jwe
Additional resources
-
clevis(1)man page Built-in CLI help after entering the
cleviscommand without any argument:$ clevis Usage: clevis COMMAND [OPTIONS] clevis decrypt Decrypts using the policy defined at encryption time clevis encrypt sss Encrypts using a Shamir's Secret Sharing policy clevis encrypt tang Encrypts using a Tang binding server policy clevis encrypt tpm2 Encrypts using a TPM2.0 chip binding policy clevis luks bind Binds a LUKS device using the specified policy clevis luks edit Edit a binding from a clevis-bound slot in a LUKS device clevis luks list Lists pins bound to a LUKSv1 or LUKSv2 device clevis luks pass Returns the LUKS passphrase used for binding a particular slot. clevis luks regen Regenerate clevis binding clevis luks report Report tang keys' rotations clevis luks unbind Unbinds a pin bound to a LUKS volume clevis luks unlock Unlocks a LUKS volume
11.3. Deploying a Tang server with SELinux in enforcing mode
You can use a Tang server to automatically unlock LUKS-encrypted volumes on Clevis-enabled clients. In the minimalistic scenario, you deploy a Tang server on port 80 by installing the tang package and entering the systemctl enable tangd.socket --now command. The following example procedure demonstrates the deployment of a Tang server running on a custom port as a confined service in SELinux enforcing mode.
Prerequisites
-
The
policycoreutils-python-utilspackage and its dependencies are installed. -
The
firewalldservice is running.
Procedure
To install the
tangpackage and its dependencies, enter the following command asroot:# yum install tangPick an unoccupied port, for example, 7500/tcp, and allow the
tangdservice to bind to that port:# semanage port -a -t tangd_port_t -p tcp 7500Note that a port can be used only by one service at a time, and thus an attempt to use an already occupied port implies the
ValueError: Port already definederror message.Open the port in the firewall:
# firewall-cmd --add-port=7500/tcp
# firewall-cmd --runtime-to-permanent
Enable the
tangdservice:# systemctl enable tangd.socketCreate an override file:
# systemctl edit tangd.socketIn the following editor screen, which opens an empty
override.conffile located in the/etc/systemd/system/tangd.socket.d/directory, change the default port for the Tang server from 80 to the previously picked number by adding the following lines:[Socket] ListenStream= ListenStream=7500ImportantInsert the previous code snippet between the lines starting with
# Anything between hereand# Lines below this, otherwise the system discards your changes.- Save the changes by pressing Ctrl+O and Enter. Exit the editor by pressing Ctrl+X.
Reload the changed configuration:
# systemctl daemon-reloadCheck that your configuration is working:
# systemctl show tangd.socket -p Listen
Listen=[::]:7500 (Stream)
Start the
tangdservice:# systemctl restart tangd.socketBecause
tangduses thesystemdsocket activation mechanism, the server starts as soon as the first connection comes in. A new set of cryptographic keys is automatically generated at the first start. To perform cryptographic operations such as manual key generation, use thejoseutility.
Additional resources
-
tang(8),semanage(8),firewall-cmd(1),jose(1),systemd.unit(5), andsystemd.socket(5)man pages.
11.4. Rotating Tang server keys and updating bindings on clients
Use the following steps to rotate your Tang server keys and update existing bindings on clients. The precise interval at which you should rotate them depends on your application, key sizes, and institutional policy.
Alternatively, you can rotate Tang keys by using the nbde_server RHEL system role. See Using the nbde_server system role for setting up multiple Tang servers for more information.
Prerequisites
- A Tang server is running.
-
The
clevisandclevis-lukspackages are installed on your clients. -
Note that
clevis luks list,clevis luks report, andclevis luks regenhave been introduced in RHEL 8.2.
Procedure
Rename all keys in the
/var/db/tangkey database directory to have a leading.to hide them from advertisement. Note that the file names in the following example differs from unique file names in the key database directory of your Tang server:# cd /var/db/tang # ls -l -rw-r--r--. 1 root root 349 Feb 7 14:55 UV6dqXSwe1bRKG3KbJmdiR020hY.jwk -rw-r--r--. 1 root root 354 Feb 7 14:55 y9hxLTQSiSB5jSEGWnjhY8fDTJU.jwk # mv UV6dqXSwe1bRKG3KbJmdiR020hY.jwk .UV6dqXSwe1bRKG3KbJmdiR020hY.jwk # mv y9hxLTQSiSB5jSEGWnjhY8fDTJU.jwk .y9hxLTQSiSB5jSEGWnjhY8fDTJU.jwk
Check that you renamed and therefore hid all keys from the Tang server advertisement:
# ls -l
total 0
Generate new keys using the
/usr/libexec/tangd-keygencommand in/var/db/tangon the Tang server:# /usr/libexec/tangd-keygen /var/db/tang # ls /var/db/tang 3ZWS6-cDrCG61UPJS2BMmPU4I54.jwk zyLuX6hijUy_PSeUEFDi7hi38.jwk
Check that your Tang server advertises the signing key from the new key pair, for example:
# tang-show-keys 7500
3ZWS6-cDrCG61UPJS2BMmPU4I54
On your NBDE clients, use the
clevis luks reportcommand to check if the keys advertised by the Tang server remains the same. You can identify slots with the relevant binding using theclevis luks listcommand, for example:# clevis luks list -d /dev/sda2 1: tang '{"url":"http://tang.srv"}' # clevis luks report -d /dev/sda2 -s 1 ... Report detected that some keys were rotated. Do you want to regenerate luks metadata with "clevis luks regen -d /dev/sda2 -s 1"? [ynYN]
To regenerate LUKS metadata for the new keys either press
yto the prompt of the previous command, or use theclevis luks regencommand:# clevis luks regen -d /dev/sda2 -s 1When you are sure that all old clients use the new keys, you can remove the old keys from the Tang server, for example:
# cd /var/db/tang
# rm .*.jwk
Removing the old keys while clients are still using them can result in data loss. If you accidentally remove such keys, use the clevis luks regen command on the clients, and provide your LUKS password manually.
Additional resources
-
tang-show-keys(1),clevis-luks-list(1),clevis-luks-report(1), andclevis-luks-regen(1)man pages
11.5. Configuring automated unlocking by using a Tang key in the web console
You can configure automated unlocking of a LUKS-encrypted storage device using a key provided by a Tang server.
Prerequisites
- The RHEL 8 web console has been installed. See Installing the web console for details.
-
The
cockpit-storagedandclevis-lukspackages are installed on your system. -
The
cockpit.socketservice is running at port 9090. - A Tang server is available. See Deploying a Tang server with SELinux in enforcing mode for details.
Procedure
Open the RHEL web console by entering the following address in a web browser:
https://<localhost>:9090Replace the <localhost> part by the remote server’s host name or IP address when you connect to a remote system.
-
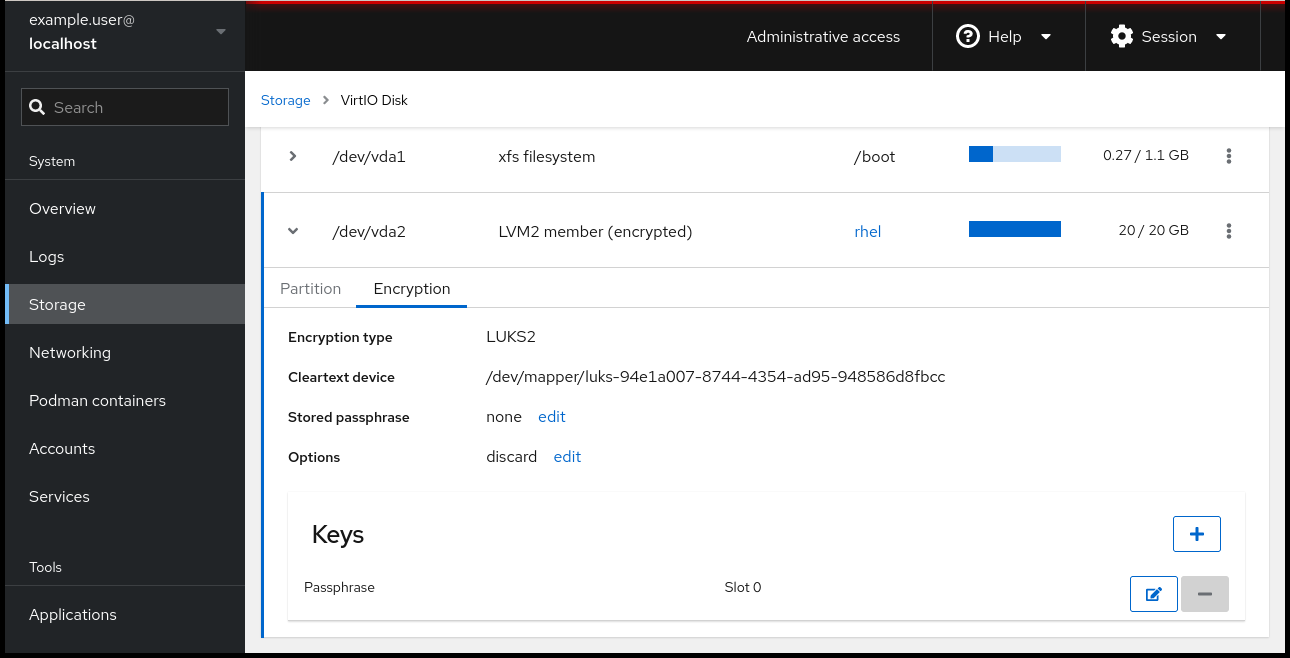
Provide your credentials and click . In the
Filesystemssection, click the disk that contains an encrypted volume you plan to add to unlock automatically. - In the following window listing partitions and drive details of the selected disk, click next to the encrypted file system to expand details of the encrypted volume you want to unlock using the Tang server, and click .
Click in the Keys section to add a Tang key:
Select
Tang keyserverasKey source, provide the address of your Tang server, and a password that unlocks the LUKS-encrypted device. Click to confirm: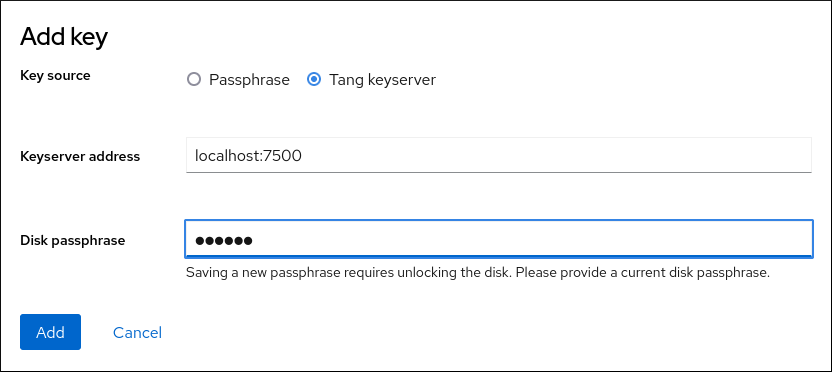
The following dialog window provides a command to verify that the key hash matches.
In a terminal on the Tang server, use the
tang-show-keyscommand to display the key hash for comparison. In this example, the Tang server is running on the port 7500:# tang-show-keys 7500 fM-EwYeiTxS66X3s1UAywsGKGnxnpll8ig0KOQmr9CMClick when the key hashes in the web console and in the output of previously listed commands are the same:

-
In RHEL 8.8 and later, after you select an encrypted root file system and a Tang server, you can skip adding the
rd.neednet=1parameter to the kernel command line, installing theclevis-dracutpackage, and regenerating an initial RAM disk (initrd). For non-root file systems, the web console now enables theremote-cryptsetup.targetandclevis-luks-akspass.pathsystemdunits, installs theclevis-systemdpackage, and adds the_netdevparameter to thefstabandcrypttabconfiguration files.
Verification
Check that the newly added Tang key is now listed in the Keys section with the
Keyservertype: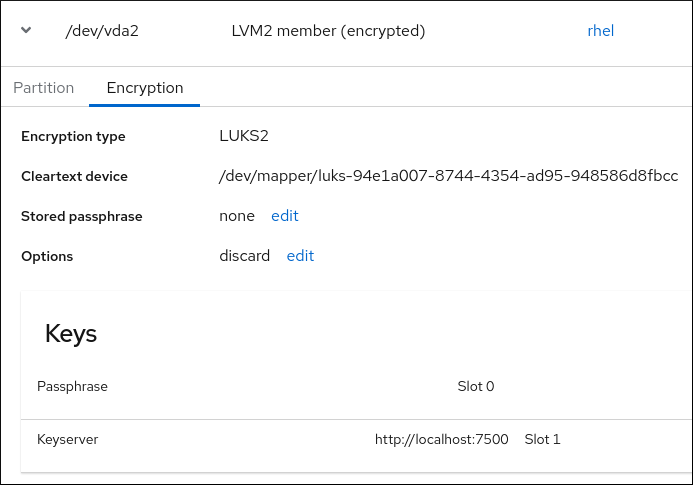
Verify that the bindings are available for the early boot, for example:
# lsinitrd | grep clevis
clevis
clevis-pin-null
clevis-pin-sss
clevis-pin-tang
clevis-pin-tpm2
lrwxrwxrwx   1 root     root           48 Feb 14 17:45 etc/systemd/system/cryptsetup.target.wants/clevis-luks-askpass.path…
…
Additional resources
11.6. Basic NBDE and TPM2 encryption-client operations
The Clevis framework can encrypt plain-text files and decrypt both ciphertexts in the JSON Web Encryption (JWE) format and LUKS-encrypted block devices. Clevis clients can use either Tang network servers or Trusted Platform Module 2.0 (TPM 2.0) chips for cryptographic operations.
The following commands demonstrate the basic functionality provided by Clevis on examples containing plain-text files. You can also use them for troubleshooting your NBDE or Clevis+TPM deployments.
Encryption client bound to a Tang server
To check that a Clevis encryption client binds to a Tang server, use the
clevis encrypt tangsub-command:$ clevis encrypt tang '{"url":"http://tang.srv:port"}' < input-plain.txt > secret.jwe The advertisement contains the following signing keys: _OsIk0T-E2l6qjfdDiwVmidoZjA Do you wish to trust these keys? [ynYN] yChange the
http://tang.srv:portURL in the previous example to match the URL of the server wheretangis installed. Thesecret.jweoutput file contains your encrypted cipher text in the JWE format. This cipher text is read from theinput-plain.txtinput file.Alternatively, if your configuration requires a non-interactive communication with a Tang server without SSH access, you can download an advertisement and save it to a file:
$ curl -sfg http://tang.srv:port/adv -o adv.jwsUse the advertisement in the
adv.jwsfile for any following tasks, such as encryption of files or messages:$ echo 'hello' | clevis encrypt tang '{"url":"http://tang.srv:port","adv":"adv.jws"}'To decrypt data, use the
clevis decryptcommand and provide the cipher text (JWE):$ clevis decrypt < secret.jwe > output-plain.txt
Encryption client using TPM 2.0
To encrypt using a TPM 2.0 chip, use the
clevis encrypt tpm2sub-command with the only argument in form of the JSON configuration object:$ clevis encrypt tpm2 '{}' < input-plain.txt > secret.jweTo choose a different hierarchy, hash, and key algorithms, specify configuration properties, for example:
$ clevis encrypt tpm2 '{"hash":"sha256","key":"rsa"}' < input-plain.txt > secret.jweTo decrypt the data, provide the ciphertext in the JSON Web Encryption (JWE) format:
$ clevis decrypt < secret.jwe > output-plain.txt
The pin also supports sealing data to a Platform Configuration Registers (PCR) state. That way, the data can only be unsealed if the PCR hashes values match the policy used when sealing.
For example, to seal the data to the PCR with index 0 and 7 for the SHA-256 bank:
$ clevis encrypt tpm2 '{"pcr_bank":"sha256","pcr_ids":"0,7"}' < input-plain.txt > secret.jweHashes in PCRs can be rewritten, and you no longer can unlock your encrypted volume. For this reason, add a strong passphrase that enable you to unlock the encrypted volume manually even when a value in a PCR changes.
If the system cannot automatically unlock your encrypted volume after an upgrade of the shim-x64 package, follow the steps in the Clevis TPM2 no longer decrypts LUKS devices after a restart KCS article.
Additional resources
-
clevis-encrypt-tang(1),clevis-luks-unlockers(7),clevis(1), andclevis-encrypt-tpm2(1)man pages clevis,clevis decrypt, andclevis encrypt tangcommands without any arguments show the built-in CLI help, for example:$ clevis encrypt tang Usage: clevis encrypt tang CONFIG < PLAINTEXT > JWE ...
11.7. Configuring manual enrollment of LUKS-encrypted volumes
With the Clevis framework, you can configure clients for automated unlocking of LUKS-encrypted volumes when a selected Tang server is available. This creates an NBDE (Network-Bound Disk Encryption) deployment.
Prerequisites
- A Tang server is running and available.
Procedure
To automatically unlock an existing LUKS-encrypted volume, install the
clevis-lukssubpackage:# yum install clevis-luksIdentify the LUKS-encrypted volume for PBD. In the following example, the block device is referred as /dev/sda2:
# lsblk
NAME                                          MAJ:MIN RM   SIZE RO TYPE  MOUNTPOINT
sda                                             8:0    0    12G  0 disk
├─sda1                                          8:1    0     1G  0 part  /boot
└─sda2                                          8:2    0    11G  0 part
  └─luks-40e20552-2ade-4954-9d56-565aa7994fb6 253:0    0    11G  0 crypt
    ├─rhel-root                               253:0    0   9.8G  0 lvm   /
    └─rhel-swap                               253:1    0   1.2G  0 lvm   [SWAP]
Bind the volume to a Tang server using the
clevis luks bindcommand:# clevis luks bind -d /dev/sda2 tang '{"url":"http://tang.srv"}' The advertisement contains the following signing keys: _OsIk0T-E2l6qjfdDiwVmidoZjA Do you wish to trust these keys? [ynYN] y You are about to initialize a LUKS device for metadata storage. Attempting to initialize it may result in data loss if data was already written into the LUKS header gap in a different format. A backup is advised before initialization is performed. Do you wish to initialize /dev/sda2? [yn] y Enter existing LUKS password:This command performs four steps:
- Creates a new key with the same entropy as the LUKS master key.
- Encrypts the new key with Clevis.
- Stores the Clevis JWE object in the LUKS2 header token or uses LUKSMeta if the non-default LUKS1 header is used.
- Enables the new key for use with LUKS.
NoteThe binding procedure assumes that there is at least one free LUKS password slot. The
clevis luks bindcommand takes one of the slots.The volume can now be unlocked with your existing password as well as with the Clevis policy.
To enable the early boot system to process the disk binding, use the
dracuttool on an already installed system:# yum install clevis-dracutIn RHEL, Clevis produces a generic
initrd(initial RAM disk) without host-specific configuration options and does not automatically add parameters such asrd.neednet=1to the kernel command line. If your configuration relies on a Tang pin that requires network during early boot, use the--hostonly-cmdlineargument anddracutaddsrd.neednet=1when it detects a Tang binding:# dracut -fv --regenerate-all --hostonly-cmdlineAlternatively, create a .conf file in the
/etc/dracut.conf.d/, and add thehostonly_cmdline=yesoption to the file, for example:# echo "hostonly_cmdline=yes" > /etc/dracut.conf.d/clevis.confNoteYou can also ensure that networking for a Tang pin is available during early boot by using the
grubbytool on the system where Clevis is installed:# grubby --update-kernel=ALL --args="rd.neednet=1"Then you can use
dracutwithout--hostonly-cmdline:# dracut -fv --regenerate-all
Verification
To verify that the Clevis JWE object is successfully placed in a LUKS header, use the
clevis luks listcommand:# clevis luks list -d /dev/sda2 1: tang '{"url":"http://tang.srv:port"}'
To use NBDE for clients with static IP configuration (without DHCP), pass your network configuration to the dracut tool manually, for example:
# dracut -fv --regenerate-all --kernel-cmdline "ip=192.0.2.10::192.0.2.1:255.255.255.0::ens3:none"
Alternatively, create a .conf file in the /etc/dracut.conf.d/ directory with the static network information. For example:
# cat /etc/dracut.conf.d/static_ip.conf
kernel_cmdline="ip=192.0.2.10::192.0.2.1:255.255.255.0::ens3:none"
Regenerate the initial RAM disk image:
# dracut -fv --regenerate-allAdditional resources
-
clevis-luks-bind(1)anddracut.cmdline(7)man pages. - Kickstart commands for network configuration
11.8. Configuring manual enrollment of LUKS-encrypted volumes by using a TPM 2.0 policy
Use the following steps to configure unlocking of LUKS-encrypted volumes by using a Trusted Platform Module 2.0 (TPM 2.0) policy.
Prerequisites
- An accessible TPM 2.0-compatible device.
- A system with the 64-bit Intel or 64-bit AMD architecture.
Procedure
To automatically unlock an existing LUKS-encrypted volume, install the
clevis-lukssubpackage:# yum install clevis-luksIdentify the LUKS-encrypted volume for PBD. In the following example, the block device is referred as /dev/sda2:
# lsblk
NAME                                          MAJ:MIN RM   SIZE RO TYPE  MOUNTPOINT
sda                                             8:0    0    12G  0 disk
├─sda1                                          8:1    0     1G  0 part  /boot
└─sda2                                          8:2    0    11G  0 part
  └─luks-40e20552-2ade-4954-9d56-565aa7994fb6 253:0    0    11G  0 crypt
    ├─rhel-root                               253:0    0   9.8G  0 lvm   /
    └─rhel-swap                               253:1    0   1.2G  0 lvm   [SWAP]
Bind the volume to a TPM 2.0 device using the
clevis luks bindcommand, for example:# clevis luks bind -d /dev/sda2 tpm2 '{"hash":"sha256","key":"rsa"}' ... Do you wish to initialize /dev/sda2? [yn] y Enter existing LUKS password:This command performs four steps:
- Creates a new key with the same entropy as the LUKS master key.
- Encrypts the new key with Clevis.
- Stores the Clevis JWE object in the LUKS2 header token or uses LUKSMeta if the non-default LUKS1 header is used.
Enables the new key for use with LUKS.
NoteThe binding procedure assumes that there is at least one free LUKS password slot. The
clevis luks bindcommand takes one of the slots.Alternatively, if you want to seal data to specific Platform Configuration Registers (PCR) states, add the
pcr_bankandpcr_idsvalues to theclevis luks bindcommand, for example:# clevis luks bind -d /dev/sda2 tpm2 '{"hash":"sha256","key":"rsa","pcr_bank":"sha256","pcr_ids":"0,1"}'WarningBecause the data can only be unsealed if PCR hashes values match the policy used when sealing and the hashes can be rewritten, add a strong passphrase that enable you to unlock the encrypted volume manually when a value in a PCR changes.
If the system cannot automatically unlock your encrypted volume after an upgrade of the
shim-x64package, follow the steps in the Clevis TPM2 no longer decrypts LUKS devices after a restart KCS article.
- The volume can now be unlocked with your existing password as well as with the Clevis policy.
To enable the early boot system to process the disk binding, use the
dracuttool on an already installed system:# yum install clevis-dracut # dracut -fv --regenerate-all
Verification
To verify that the Clevis JWE object is successfully placed in a LUKS header, use the
clevis luks listcommand:# clevis luks list -d /dev/sda2 1: tpm2 '{"hash":"sha256","key":"rsa"}'
Additional resources
-
clevis-luks-bind(1),clevis-encrypt-tpm2(1), anddracut.cmdline(7)man pages
11.9. Removing a Clevis pin from a LUKS-encrypted volume manually
Use the following procedure for manual removing the metadata created by the clevis luks bind command and also for wiping a key slot that contains passphrase added by Clevis.
The recommended way to remove a Clevis pin from a LUKS-encrypted volume is through the clevis luks unbind command. The removal procedure using clevis luks unbind consists of only one step and works for both LUKS1 and LUKS2 volumes. The following example command removes the metadata created by the binding step and wipe the key slot 1 on the /dev/sda2 device:
# clevis luks unbind -d /dev/sda2 -s 1Prerequisites
- A LUKS-encrypted volume with a Clevis binding.
Procedure
Check which LUKS version the volume, for example
/dev/sda2, is encrypted by and identify a slot and a token that is bound to Clevis:# cryptsetup luksDump /dev/sda2 LUKS header information Version: 2 ... Keyslots: 0: luks2 ... 1: luks2 Key: 512 bits Priority: normal Cipher: aes-xts-plain64 ... Tokens: 0: clevis Keyslot: 1 ...In the previous example, the Clevis token is identified by
0and the associated key slot is1.In case of LUKS2 encryption, remove the token:
# cryptsetup token remove --token-id 0 /dev/sda2If your device is encrypted by LUKS1, which is indicated by the
Version: 1string in the output of thecryptsetup luksDumpcommand, perform this additional step with theluksmeta wipecommand:# luksmeta wipe -d /dev/sda2 -s 1Wipe the key slot containing the Clevis passphrase:
# cryptsetup luksKillSlot /dev/sda2 1
Additional resources
-
clevis-luks-unbind(1),cryptsetup(8), andluksmeta(8)man pages
11.10. Configuring automated enrollment of LUKS-encrypted volumes by using Kickstart
Follow the steps in this procedure to configure an automated installation process that uses Clevis for the enrollment of LUKS-encrypted volumes.
Procedure
Instruct Kickstart to partition the disk such that LUKS encryption has enabled for all mount points, other than
/boot, with a temporary password. The password is temporary for this step of the enrollment process.part /boot --fstype="xfs" --ondisk=vda --size=256 part / --fstype="xfs" --ondisk=vda --grow --encrypted --passphrase=temppass
Note that OSPP-compliant systems require a more complex configuration, for example:
part /boot --fstype="xfs" --ondisk=vda --size=256
part / --fstype="xfs" --ondisk=vda --size=2048 --encrypted --passphrase=temppass
part /var --fstype="xfs" --ondisk=vda --size=1024 --encrypted --passphrase=temppass
part /tmp --fstype="xfs" --ondisk=vda --size=1024 --encrypted --passphrase=temppass
part /home --fstype="xfs" --ondisk=vda --size=2048 --grow --encrypted --passphrase=temppass
part /var/log --fstype="xfs" --ondisk=vda --size=1024 --encrypted --passphrase=temppass
part /var/log/audit --fstype="xfs" --ondisk=vda --size=1024 --encrypted --passphrase=temppass
Install the related Clevis packages by listing them in the
%packagessection:%packages clevis-dracut clevis-luks clevis-systemd %end
- Optionally, to ensure that you can unlock the encrypted volume manually when required, add a strong passphrase before you remove the temporary passphrase. See the How to add a passphrase, key, or keyfile to an existing LUKS device article for more information.
Call
clevis luks bindto perform binding in the%postsection. Afterward, remove the temporary password:%post clevis luks bind -y -k - -d /dev/vda2 \ tang '{"url":"http://tang.srv"}' <<< "temppass" cryptsetup luksRemoveKey /dev/vda2 <<< "temppass" dracut -fv --regenerate-all %endIf your configuration relies on a Tang pin that requires network during early boot or you use NBDE clients with static IP configurations, you have to modify the
dracutcommand as described in Configuring manual enrollment of LUKS-encrypted volumes.Note that the
-yoption for theclevis luks bindcommand is available from RHEL 8.3. In RHEL 8.2 and older, replace-yby-fin theclevis luks bindcommand and download the advertisement from the Tang server:%post curl -sfg http://tang.srv/adv -o adv.jws clevis luks bind -f -k - -d /dev/vda2 \ tang '{"url":"http://tang.srv","adv":"adv.jws"}' <<< "temppass" cryptsetup luksRemoveKey /dev/vda2 <<< "temppass" dracut -fv --regenerate-all %endWarningThe
cryptsetup luksRemoveKeycommand prevents any further administration of a LUKS2 device on which you apply it. You can recover a removed master key using thedmsetupcommand only for LUKS1 devices.
You can use an analogous procedure when using a TPM 2.0 policy instead of a Tang server.
Additional resources
-
clevis(1),clevis-luks-bind(1),cryptsetup(8), anddmsetup(8)man pages - Installing Red Hat Enterprise Linux 8 using Kickstart
11.11. Configuring automated unlocking of a LUKS-encrypted removable storage device
Use this procedure to set up an automated unlocking process of a LUKS-encrypted USB storage device.
Procedure
To automatically unlock a LUKS-encrypted removable storage device, such as a USB drive, install the
clevis-udisks2package:# yum install clevis-udisks2Reboot the system, and then perform the binding step using the
clevis luks bindcommand as described in Configuring manual enrollment of LUKS-encrypted volumes, for example:# clevis luks bind -d /dev/sdb1 tang '{"url":"http://tang.srv"}'The LUKS-encrypted removable device can be now unlocked automatically in your GNOME desktop session. The device bound to a Clevis policy can be also unlocked by the
clevis luks unlockcommand:# clevis luks unlock -d /dev/sdb1
You can use an analogous procedure when using a TPM 2.0 policy instead of a Tang server.
Additional resources
-
clevis-luks-unlockers(7)man page
11.12. Deploying high-availability NBDE systems
Tang provides two methods for building a high-availability deployment:
- Client redundancy (recommended)
-
Clients should be configured with the ability to bind to multiple Tang servers. In this setup, each Tang server has its own keys and clients can decrypt by contacting a subset of these servers. Clevis already supports this workflow through its
sssplug-in. Red Hat recommends this method for a high-availability deployment. - Key sharing
-
For redundancy purposes, more than one instance of Tang can be deployed. To set up a second or any subsequent instance, install the
tangpackages and copy the key directory to the new host usingrsyncoverSSH. Note that Red Hat does not recommend this method because sharing keys increases the risk of key compromise and requires additional automation infrastructure.
High-available NBDE using Shamir’s Secret Sharing
Shamir’s Secret Sharing (SSS) is a cryptographic scheme that divides a secret into several unique parts. To reconstruct the secret, a number of parts is required. The number is called threshold and SSS is also referred to as a thresholding scheme.
Clevis provides an implementation of SSS. It creates a key and divides it into a number of pieces. Each piece is encrypted using another pin including even SSS recursively. Additionally, you define the threshold t. If an NBDE deployment decrypts at least t pieces, then it recovers the encryption key and the decryption process succeeds. When Clevis detects a smaller number of parts than specified in the threshold, it prints an error message.
Example 1: Redundancy with two Tang servers
The following command decrypts a LUKS-encrypted device when at least one of two Tang servers is available:
# clevis luks bind -d /dev/sda1 sss '{"t":1,"pins":{"tang":[{"url":"http://tang1.srv"},{"url":"http://tang2.srv"}]}}'The previous command used the following configuration scheme:
{
    "t":1,
    "pins":{
        "tang":[
            {
                "url":"http://tang1.srv"
            },
            {
                "url":"http://tang2.srv"
            }
        ]
    }
}
In this configuration, the SSS threshold t is set to 1 and the clevis luks bind command successfully reconstructs the secret if at least one from two listed tang servers is available.
Example 2: Shared secret on a Tang server and a TPM device
The following command successfully decrypts a LUKS-encrypted device when both the tang server and the tpm2 device are available:
# clevis luks bind -d /dev/sda1 sss '{"t":2,"pins":{"tang":[{"url":"http://tang1.srv"}], "tpm2": {"pcr_ids":"0,7"}}}'The configuration scheme with the SSS threshold 't' set to '2' is now:
{
    "t":2,
    "pins":{
        "tang":[
            {
                "url":"http://tang1.srv"
            }
        ],
        "tpm2":{
            "pcr_ids":"0,7"
        }
    }
}
Additional resources
-
tang(8)(sectionHigh Availability),clevis(1)(sectionShamir’s Secret Sharing), andclevis-encrypt-sss(1)man pages
11.13. Deployment of virtual machines in a NBDE network
The clevis luks bind command does not change the LUKS master key. This implies that if you create a LUKS-encrypted image for use in a virtual machine or cloud environment, all the instances that run this image share a master key. This is extremely insecure and should be avoided at all times.
This is not a limitation of Clevis but a design principle of LUKS. If your scenario requires having encrypted root volumes in a cloud, perform the installation process (usually using Kickstart) for each instance of Red Hat Enterprise Linux in the cloud as well. The images cannot be shared without also sharing a LUKS master key.
To deploy automated unlocking in a virtualized environment, use systems such as lorax or virt-install together with a Kickstart file (see Configuring automated enrollment of LUKS-encrypted volumes using Kickstart) or another automated provisioning tool to ensure that each encrypted VM has a unique master key.
Additional resources
-
clevis-luks-bind(1)man page
11.14. Building automatically-enrollable VM images for cloud environments by using NBDE
Deploying automatically-enrollable encrypted images in a cloud environment can provide a unique set of challenges. Like other virtualization environments, it is recommended to reduce the number of instances started from a single image to avoid sharing the LUKS master key.
Therefore, the best practice is to create customized images that are not shared in any public repository and that provide a base for the deployment of a limited amount of instances. The exact number of instances to create should be defined by deployment’s security policies and based on the risk tolerance associated with the LUKS master key attack vector.
To build LUKS-enabled automated deployments, systems such as Lorax or virt-install together with a Kickstart file should be used to ensure master key uniqueness during the image building process.
Cloud environments enable two Tang server deployment options which we consider here. First, the Tang server can be deployed within the cloud environment itself. Second, the Tang server can be deployed outside of the cloud on independent infrastructure with a VPN link between the two infrastructures.
Deploying Tang natively in the cloud does allow for easy deployment. However, given that it shares infrastructure with the data persistence layer of ciphertext of other systems, it may be possible for both the Tang server’s private key and the Clevis metadata to be stored on the same physical disk. Access to this physical disk permits a full compromise of the ciphertext data.
For this reason, Red Hat strongly recommends maintaining a physical separation between the location where the data is stored and the system where Tang is running. This separation between the cloud and the Tang server ensures that the Tang server’s private key cannot be accidentally combined with the Clevis metadata. It also provides local control of the Tang server if the cloud infrastructure is at risk.
11.15. Deploying Tang as a container
The tang container image provides Tang-server decryption capabilities for Clevis clients that run either in OpenShift Container Platform (OCP) clusters or in separate virtual machines.
Prerequisites
-
The
podmanpackage and its dependencies are installed on the system. -
You have logged in on the
registry.redhat.iocontainer catalog using thepodman login registry.redhat.iocommand. See Red Hat Container Registry Authentication for more information. - The Clevis client is installed on systems containing LUKS-encrypted volumes that you want to automatically unlock by using a Tang server.
Procedure
Pull the
tangcontainer image from theregistry.redhat.ioregistry:# podman pull registry.redhat.io/rhel8/tangRun the container, specify its port, and specify the path to the Tang keys. The previous example runs the
tangcontainer, specifies the port 7500, and indicates a path to the Tang keys of the/var/db/tangdirectory:# podman run -d -p 7500:7500 -v tang-keys:/var/db/tang --name tang registry.redhat.io/rhel8/tangNote that Tang uses port 80 by default but this may collide with other services such as the Apache HTTP server.
[Optional] For increased security, rotate the Tang keys periodically. You can use the
tangd-rotate-keysscript, for example:# podman run --rm -v tang-keys:/var/db/tang registry.redhat.io/rhel8/tang tangd-rotate-keys -v -d /var/db/tang Rotated key 'rZAMKAseaXBe0rcKXL1hCCIq-DY.jwk' -> .'rZAMKAseaXBe0rcKXL1hCCIq-DY.jwk' Rotated key 'x1AIpc6WmnCU-CabD8_4q18vDuw.jwk' -> .'x1AIpc6WmnCU-CabD8_4q18vDuw.jwk' Created new key GrMMX_WfdqomIU_4RyjpcdlXb0E.jwk Created new key _dTTfn17sZZqVAp80u3ygFDHtjk.jwk Keys rotated successfully.
Verification
On a system that contains LUKS-encrypted volumes for automated unlocking by the presence of the Tang server, check that the Clevis client can encrypt and decrypt a plain-text message using Tang:
# echo test | clevis encrypt tang '{"url":"http://localhost:7500"}' | clevis decrypt
The advertisement contains the following signing keys:

x1AIpc6WmnCU-CabD8_4q18vDuw

Do you wish to trust these keys? [ynYN] y
test
The previous example command shows the
teststring at the end of its output when a Tang server is available on the localhost URL and communicates through port 7500.
Additional resources
-
podman(1),clevis(1), andtang(8)man pages
11.16. Introduction to the nbde_client and nbde_server System Roles (Clevis and Tang)
RHEL System Roles is a collection of Ansible roles and modules that provide a consistent configuration interface to remotely manage multiple RHEL systems.
RHEL 8.3 introduced Ansible roles for automated deployments of Policy-Based Decryption (PBD) solutions using Clevis and Tang. The rhel-system-roles package contains these system roles, related examples, and also the reference documentation.
The nbde_client System Role enables you to deploy multiple Clevis clients in an automated way. Note that the nbde_client role supports only Tang bindings, and you cannot use it for TPM2 bindings at the moment.
The nbde_client role requires volumes that are already encrypted using LUKS. This role supports to bind a LUKS-encrypted volume to one or more Network-Bound (NBDE) servers - Tang servers. You can either preserve the existing volume encryption with a passphrase or remove it. After removing the passphrase, you can unlock the volume only using NBDE. This is useful when a volume is initially encrypted using a temporary key or password that you should remove after you provision the system.
If you provide both a passphrase and a key file, the role uses what you have provided first. If it does not find any of these valid, it attempts to retrieve a passphrase from an existing binding.
PBD defines a binding as a mapping of a device to a slot. This means that you can have multiple bindings for the same device. The default slot is slot 1.
The nbde_client role provides also the state variable. Use the present value for either creating a new binding or updating an existing one. Contrary to a clevis luks bind command, you can use state: present also for overwriting an existing binding in its device slot. The absent value removes a specified binding.
Using the nbde_client System Role, you can deploy and manage a Tang server as part of an automated disk encryption solution. This role supports the following features:
- Rotating Tang keys
- Deploying and backing up Tang keys
Additional resources
-
/usr/share/ansible/roles/rhel-system-roles.nbde_server/README.mdfile -
/usr/share/ansible/roles/rhel-system-roles.nbde_client/README.mdfile -
/usr/share/doc/rhel-system-roles/nbde_server/directory -
/usr/share/doc/rhel-system-roles/nbde_client/directory
11.17. Using the nbde_server System Role for setting up multiple Tang servers
Follow the steps to prepare and apply an Ansible playbook containing your Tang server settings.
Prerequisites
- You have prepared the control node and the managed nodes
- You are logged in to the control node as a user who can run playbooks on the managed nodes.
-
The account you use to connect to the managed nodes has
sudopermissions on them.
Procedure
Create a playbook file, for example
~/playbook.yml, with the following content:--- - hosts: managed-node-01.example.com roles: - rhel-system-roles.nbde_server vars: nbde_server_rotate_keys: yes nbde_server_manage_firewall: true nbde_server_manage_selinux: trueThis example playbook ensures deploying of your Tang server and a key rotation.
When
nbde_server_manage_firewallandnbde_server_manage_selinuxare both set totrue, thenbde_serverrole uses thefirewallandselinuxroles to manage the ports used by thenbde_serverrole.Validate the playbook syntax:
$ ansible-playbook --syntax-check ~/playbook.ymlNote that this command only validates the syntax and does not protect against a wrong but valid configuration.
Run the playbook:
$ ansible-playbook ~/playbook.yml
Verification
To ensure that networking for a Tang pin is available during early boot by using the
grubbytool on the systems where Clevis is installed, enter:# grubby --update-kernel=ALL --args="rd.neednet=1"
Additional resources
-
/usr/share/ansible/roles/rhel-system-roles.nbde_server/README.mdfile -
/usr/share/doc/rhel-system-roles/nbde_server/directory
11.18. Setting up multiple Clevis clients by using the nbde_client RHEL System Role
With the nbde_client RHEL System Role, you can prepare and apply an Ansible playbook that contains your Clevis client settings on multiple systems.
The nbde_client System Role supports only Tang bindings. Therefore, you cannot use it for TPM2 bindings.
Prerequisites
- You have prepared the control node and the managed nodes
- You are logged in to the control node as a user who can run playbooks on the managed nodes.
-
The account you use to connect to the managed nodes has
sudopermissions on them.
Procedure
Create a playbook file, for example
~/playbook.yml, with the following content:- hosts: managed-node-01.example.com roles: - rhel-system-roles.nbde_client vars: nbde_client_bindings: - device: /dev/rhel/root encryption_key_src: /etc/luks/keyfile servers: - http://server1.example.com - http://server2.example.com - device: /dev/rhel/swap encryption_key_src: /etc/luks/keyfile servers: - http://server1.example.com - http://server2.example.comThis example playbook configures Clevis clients for automated unlocking of two LUKS-encrypted volumes when at least one of two Tang servers is available
The
nbde_clientSystem Role supports only scenarios with Dynamic Host Configuration Protocol (DHCP). To use NBDE for clients with static IP configuration use the following playbook:- hosts: managed-node-01.example.com roles: - rhel-system-roles.nbde_client vars: nbde_client_bindings: - device: /dev/rhel/root encryption_key_src: /etc/luks/keyfile servers: - http://server1.example.com - http://server2.example.com - device: /dev/rhel/swap encryption_key_src: /etc/luks/keyfile servers: - http://server1.example.com - http://server2.example.com tasks: - name: Configure a client with a static IP address during early boot ansible.builtin.command: cmd: grubby --update-kernel=ALL --args='GRUB_CMDLINE_LINUX_DEFAULT="ip={{ <ansible_default_ipv4.address> }}::{{ <ansible_default_ipv4.gateway> }}:{{ <ansible_default_ipv4.netmask> }}::{{ <ansible_default_ipv4.alias> }}:none"'In this playbook, replace the
<ansible_default_ipv4.*>strings with IP addresses of your network, for example:ip={{ 192.0.2.10 }}::{{ 192.0.2.1 }}:{{ 255.255.255.0 }}::{{ ens3 }}:none.Validate the playbook syntax:
$ ansible-playbook --syntax-check ~/playbook.ymlNote that this command only validates the syntax and does not protect against a wrong but valid configuration.
Run the playbook:
$ ansible-playbook ~/playbook.yml
Additional resources
-
/usr/share/ansible/roles/rhel-system-roles.nbde_client/README.mdfile -
/usr/share/doc/rhel-system-roles/nbde_client/directory - Looking forward to Linux network configuration in the initial ramdisk (initrd) article