
Chapter 9. Configuring network teams using the web console
Learn how network bonding works, what are the differences between network teams and network bonds, and what are the possibilities of configuration in the web console.
Additionally you can find guidelines for:
- Adding a new network team
- Adding new interfaces to an existing network team
- Removing interfaces from an existing network team
- Removing a network team
Network teaming is deprecated in Red Hat Enterprise Linux 9. If you plan to upgrade your server to a future version of RHEL, consider using the kernel bonding driver as an alternative. For details, see Configuring network bonding.
Prerequisites
The RHEL web console installed and enabled.
For details, see Installing the web console.
9.1. Configuring a network team by using the RHEL web console
Use the RHEL web console to configure a network team if you prefer to manage network settings using a web browser-based interface.
Network teaming is deprecated in Red Hat Enterprise Linux 9. If you plan to upgrade your server to a future version of RHEL, consider using the kernel bonding driver as an alternative. For details, see Configuring network bonding.
Prerequisites
-
The
teamdandNetworkManager-teampackages are installed. - Two or more physical or virtual network devices are installed on the server.
- To use Ethernet devices as ports of the team, the physical or virtual Ethernet devices must be installed on the server and connected to a switch.
To use bond, bridge, or VLAN devices as ports of the team, create them in advance as described in:
Procedure
-
Select the
Networkingtab in the navigation on the left side of the screen. -
Click in the
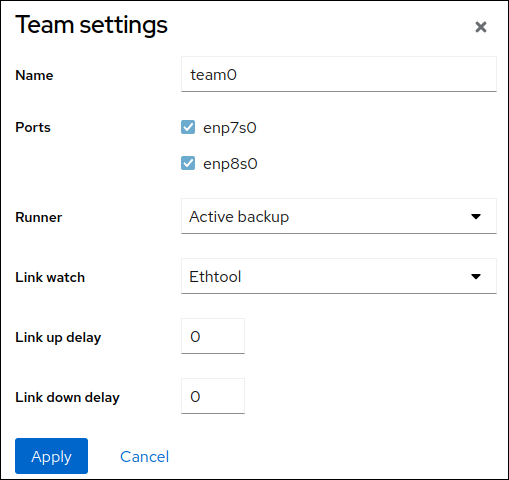
Interfacessection. - Enter the name of the team device you want to create.
- Select the interfaces that should be ports of the team.
Select the runner of the team.
If you select
Load balancingor802.3ad LACP, the web console shows the additional fieldBalancer.Set the link watcher:
-
If you select
Ethtool, additionally, set a link up and link down delay. -
If you set
ARP pingorNSNA ping, additionally, set a ping interval and ping target.
-
If you select
- Click .
By default, the team uses a dynamic IP address. If you want to set a static IP address:
-
Click the name of the team in the
Interfacessection. -
Click
Editnext to the protocol you want to configure. -
Select
Manualnext toAddresses, and enter the IP address, prefix, and default gateway. -
In the
DNSsection, click the button, and enter the IP address of the DNS server. Repeat this step to set multiple DNS servers. -
In the
DNS search domainssection, click the button, and enter the search domain. If the interface requires static routes, configure them in the
Routessection.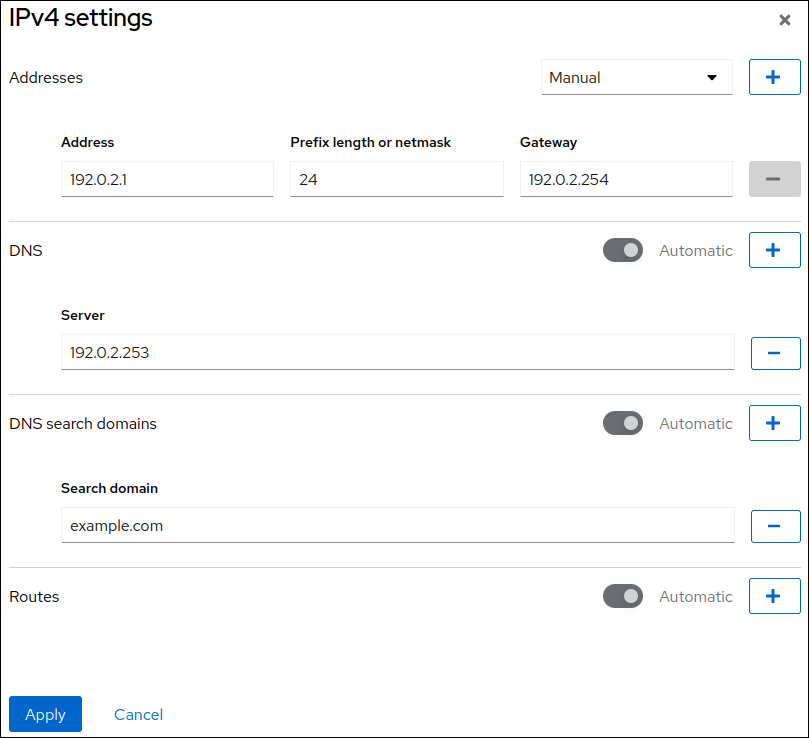
- Click
-
Click the name of the team in the
Verification
Select the
Networkingtab in the navigation on the left side of the screen, and check if there is incoming and outgoing traffic on the interface.
Display the status of the team:
# teamdctl team0 state
setup:
  runner: activebackup
ports:
  enp7s0
    link watches:
      link summary: up
      instance[link_watch_0]:
        name: ethtool
        link: up
        down count: 0
  enp8s0
    link watches:
      link summary: up
      instance[link_watch_0]:
        name: ethtool
        link: up
        down count: 0
runner:
  active port: enp7s0
In this example, both ports are up.
Additional resources
9.2. Adding new interfaces to the team using the web console
Network teams can include multiple interfaces and it is possible to add or remove any of them at any time. The following section describes how to add a new network interface to an existing team.
Prerequisites
- A network team with is configured.
Procedure
Log in to the web console.
For details, see Logging in to the web console.
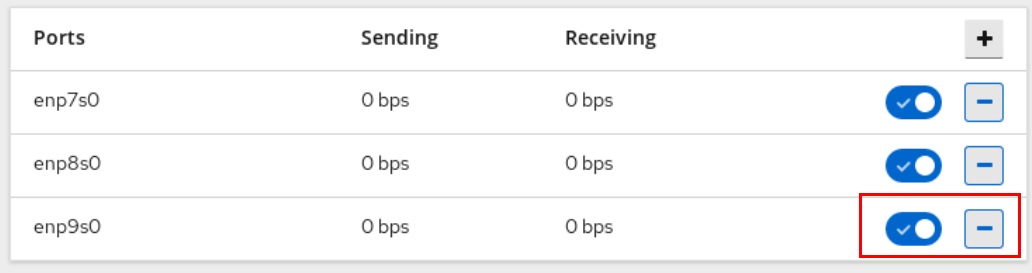
- Switch to the Networking tab.
- In the Interfaces table, click on the team you want to configure.
- In the team settings window, scroll down to the Ports table.
- Click on the button.
Select the interface you want to add from the drop down list.

The RHEL web console adds the interface to the team.
9.3. Removing or disabling an interface from the team using the web console
Network teams can include multiple interfaces. If you need to change a device, you can remove or disable particular interfaces from the network team, which will work together with the rest of active interfaces.
There are two options how to stop using an interface included in a team:
- Removing the interface from the team
- Temporarily disabling the interface. The interface then stays as part of the team, but the team will not use it until you enable it again.
Prerequisites
- A network team with multiple interfaces exists on the host.
Procedure
Log in to the RHEL web console.
For details, see Logging in to the web console.
- Switch to the Networking tab.
- Click the team you want to configure.
- In the team settings window, scroll down to the table of ports (interfaces).
Select an interface and remove or disable it.
- Switch the button to Off to disable the interface.
Click the button to remove the interface.
Based on your choice, the web console either removes or disables the interface. If you remove the interface, it will be available in Networking as a standalone interface.
9.4. Removing or disabling a team using the web console
Remove or disable a network team using the web console. If you only disable the team, interfaces in the team will stay in it but the team will not be used for network traffic.
Prerequisites
- A network team is configured on the host.
Procedure
Log in to the web console.
For details, see Logging in to the web console.
- Switch to the Networking tab.
- Click the team you want to remove or disable.
Remove or disable the selected team.
- You can remove the team by clicking the button.
You can disable the team by moving the switch to a disabled position.

Verification steps
- If you removed the team, go to Networking, and verify that all the interfaces from your team are now listed as standalone interfaces.