
Chapter 20. Restricting an application to trust only a subset of certificates
If your Identity Management (IdM) installation is configured with the integrated Certificate System (CS) certificate authority (CA), you are able to create lightweight sub-CAs. All sub-CAs you create are subordinated to the primary CA of the certificate system, the ipa CA.
A lightweight sub-CA in this context means a sub-CA issuing certificates for a specific purpose. For example, a lightweight sub-CA enables you to configure a service, such as a virtual private network (VPN) gateway and a web browser, to accept only certificates issued by sub-CA A. By configuring other services to accept certificates only issued by sub-CA B, you prevent them from accepting certificates issued by sub-CA A, the primary CA, that is the ipa CA, and any intermediate sub-CA between the two.
If you revoke the intermediate certificate of a sub-CA, all certificates issued by this sub-CA are automatically considered invalid by correctly configured clients. All the other certificates issued directly by the root CA, ipa, or another sub-CA, remain valid.
This section uses the example of the Apache web server to illustrate how to restrict an application to trust only a subset of certificates. Complete this section to restrict the web server running on your IdM client to use a certificate issued by the webserver-ca IdM sub-CA, and to require the users to authenticate to the web server using user certificates issued by the webclient-ca IdM sub-CA.
The steps you need to take are:
- Create an IdM sub-CA
- Download the sub-CA certificate from IdM WebUI
- Create a CA ACL specifying the correct combination of users, services and CAs, and the certificate profile used
- Request a certificate for the web service running on an IdM client from the IdM sub-CA
- Set up a single-instance Apache HTTP Server
- Add TLS encryption to the Apache HTTP Server
- Set the supported TLS protocol versions on an Apache HTTP Server
- Set the supported ciphers on the Apache HTTP Server
- Configure TLS client certificate authentication on the web server
- Request a certificate for the user from the IdM sub-CA and export it to the client
- Import the user certificate into the browser and configure the browser to trust the sub-CA certificate
20.1. Managing lightweight sub-CAs
This section describes how to manage lightweight subordinate certificate authorities (sub-CAs). All sub-CAs you create are subordinated to the primary CA of the certificate system, the ipa CA. You can also disable and delete sub-CAs.
-
If you delete a sub-CA, revocation checking for that sub-CA will no longer work. Only delete a sub-CA when there are no more certificates that were issued by that sub-CA whose
notAfterexpiration time is in the future. - You should only disable sub-CAs while there are still non-expired certificates that were issued by that sub-CA. If all certificates that were issued by a sub-CA have expired, you can delete that sub-CA.
- You cannot disable or delete the IdM CA.
For details on managing sub-CAs, see:
20.1.1. Creating a sub-CA from the IdM WebUI
Follow this procedure to use the IdM WebUI to create new sub-CAs named webserver-ca and webclient-ca.
Prerequisites
- Make sure you have obtained the administrator’s credentials.
Procedure
- In the Authentication menu, click Certificates.
- Select Certificate Authorities and click Add.
- Enter the name of the webserver-ca sub-CA. Enter the Subject DN, for example CN=WEBSERVER,O=IDM.EXAMPLE.COM, in the Subject DN field. Note that the Subject DN must be unique in the IdM CA infrastructure.
- Enter the name of the webclient-ca sub-CA. Enter the Subject DN CN=WEBCLIENT,O=IDM.EXAMPLE.COM in the Subject DN field.
In the command-line interface, run the
ipa-certupdatecommand to create a certmonger tracking request for the webserver-ca and webclient-ca sub-CA certificates:[root@ipaserver ~]#
ipa-certupdateImportantForgetting to run the
ipa-certupdatecommand after creating a sub-CA means that if the sub-CA certificate expires, end-entity certificates issued by the sub-CA are considered invalid even if the end-entity certificate has not expired.
Verification
Verify that the signing certificate of the new sub-CA has been added to the IdM database:
[root@ipaserver ~]#
certutil -d /etc/pki/pki-tomcat/alias/ -LCertificate Nickname Trust Attributes SSL,S/MIME,JAR/XPI caSigningCert cert-pki-ca CTu,Cu,Cu Server-Cert cert-pki-ca u,u,u auditSigningCert cert-pki-ca u,u,Pu caSigningCert cert-pki-ca ba83f324-5e50-4114-b109-acca05d6f1dc u,u,u ocspSigningCert cert-pki-ca u,u,u subsystemCert cert-pki-ca u,u,uNoteThe new sub-CA certificate is automatically transferred to all the replicas that have a certificate system instance installed.
20.1.2. Deleting a sub-CA from the IdM WebUI
Follow this procedure to delete lightweight sub-CAs in the IdM WebUI.
-
If you delete a sub-CA, revocation checking for that sub-CA will no longer work. Only delete a sub-CA when there are no more certificates that were issued by that sub-CA whose
notAfterexpiration time is in the future. - You should only disable sub-CAs while there are still non-expired certificates that were issued by that sub-CA. If all certificates that were issued by a sub-CA have expired, you can delete that sub-CA.
- You cannot disable or delete the IdM CA.
Prerequisites
- Make sure you have obtained the administrator’s credentials.
- You have disabled the sub-CA in the IdM CLI. See Disabling a sub-CA from the IdM CLI
Procedure
-
In the IdM WebUI, open the
Authenticationtab, and select theCertificatessubtab. -
Select
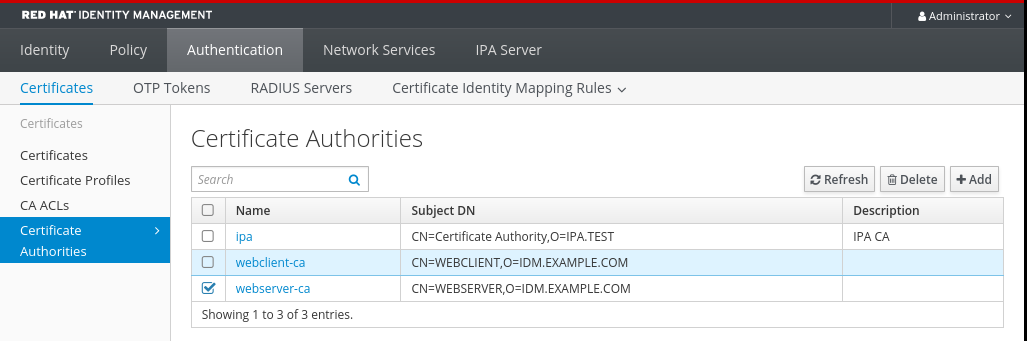
Certificate Authorities. Select the sub-CA to remove and click
Delete.Figure 20.1. Deleting a sub-CA in the IdM Web UI
-
Click
Deleteto confirm.
The sub-CA is removed from the list of Certificate Authorities.
20.1.3. Creating a sub-CA from the IdM CLI
Follow this procedure to use the IdM CLI to create new sub-CAs named webserver-ca and webclient-ca.
Prerequisites
- Make sure that you have obtained the administrator’s credentials.
- Make sure you are logged in to an IdM server that is a CA server.
Procedure
Enter the
ipa ca-addcommand, and specify the name of the webserver-ca sub-CA and its Subject Distinguished Name (DN):[root@ipaserver ~]#
ipa ca-add webserver-ca --subject="CN=WEBSERVER,O=IDM.EXAMPLE.COM"------------------- Created CA "webserver-ca" ------------------- Name: webserver-ca Authority ID: ba83f324-5e50-4114-b109-acca05d6f1dc Subject DN: CN=WEBSERVER,O=IDM.EXAMPLE.COM Issuer DN: CN=Certificate Authority,O=IDM.EXAMPLE.COM- Name
- Name of the CA.
- Authority ID
- Automatically created, individual ID for the CA.
- Subject DN
- Subject Distinguished Name (DN). The Subject DN must be unique in the IdM CA infrastructure.
- Issuer DN
- Parent CA that issued the sub-CA certificate. All sub-CAs are created as a child of the IdM root CA.
Create the webclient-ca sub-CA for issuing certificates to web clients:
[root@ipaserver ~]#
ipa ca-add webclient-ca --subject="CN=WEBCLIENT,O=IDM.EXAMPLE.COM"------------------- Created CA "webclient-ca" ------------------- Name: webclient-ca Authority ID: 8a479f3a-0454-4a4d-8ade-fd3b5a54ab2e Subject DN: CN=WEBCLIENT,O=IDM.EXAMPLE.COM Issuer DN: CN=Certificate Authority,O=IDM.EXAMPLE.COMRun the ipa-certupdate command to create a certmonger tracking request for the webserver-ca and webclient-ca sub-CAs certificates:
[root@ipaserver ~]#
ipa-certupdateImportantIf you forget to run the ipa-certupdate command after creating a sub-CA and the sub-CA certificate expires, end-entity certificates issued by that sub-CA are considered invalid even though the end-entity certificate has not expired.
Verification steps
Verify that the signing certificate of the new sub-CA has been added to the IdM database:
[root@ipaserver ~]# certutil -d /etc/pki/pki-tomcat/alias/ -L

Certificate Nickname                      Trust Attributes
                                          SSL,S/MIME,JAR/XPI

caSigningCert cert-pki-ca                 CTu,Cu,Cu
Server-Cert cert-pki-ca                   u,u,u
auditSigningCert cert-pki-ca              u,u,Pu
caSigningCert cert-pki-ca ba83f324-5e50-4114-b109-acca05d6f1dc u,u,u
ocspSigningCert cert-pki-ca               u,u,u
subsystemCert cert-pki-ca                 u,u,u
NoteThe new sub-CA certificate is automatically transferred to all the replicas that have a certificate system instance installed.
20.1.4. Disabling a sub-CA from the IdM CLI
Follow this procedure to disable a sub-CA from the IdM CLI. If there are still non-expired certificates that were issued by a sub-CA, you should not delete it but you can disable it. If you delete the sub-CA, revocation checking for that sub-CA will no longer work.
Prerequisites
- Make sure you have obtained the administrator’s credentials.
Procedure
Run the
ipa ca-findcommand to determine the name of the sub-CA you are deleting:[root@ipaserver ~]# ipa ca-find ------------- 3 CAs matched ------------- Name: ipa Description: IPA CA Authority ID: 5195deaf-3b61-4aab-b608-317aff38497c Subject DN: CN=Certificate Authority,O=IPA.TEST Issuer DN: CN=Certificate Authority,O=IPA.TEST Name: webclient-ca Authority ID: 605a472c-9c6e-425e-b959-f1955209b092 Subject DN: CN=WEBCLIENT,O=IDM.EXAMPLE.COM Issuer DN: CN=Certificate Authority,O=IPA.TEST Name: webserver-ca Authority ID: 02d537f9-c178-4433-98ea-53aa92126fc3 Subject DN: CN=WEBSERVER,O=IDM.EXAMPLE.COM Issuer DN: CN=Certificate Authority,O=IPA.TEST ---------------------------- Number of entries returned 3 ----------------------------Run the
ipa ca-disablecommand to disable your sub-CA, in this example, thewebserver-ca:ipa ca-disable webserver-ca -------------------------- Disabled CA "webserver-ca" --------------------------
20.1.5. Deleting a sub-CA from the IdM CLI
Follow this procedure to delete lightweight sub-CAs from the IdM CLI.
-
If you delete a sub-CA, revocation checking for that sub-CA will no longer work. Only delete a sub-CA when there are no more certificates that were issued by that sub-CA whose
notAfterexpiration time is in the future. - You should only disable sub-CAs while there are still non-expired certificates that were issued by that sub-CA. If all certificates that were issued by a sub-CA have expired, you can delete that sub-CA.
- You cannot disable or delete the IdM CA.
Prerequisites
- Make sure you have obtained the administrator’s credentials.
Procedure
To display a list of sub-CAs and CAs, run the
ipa ca-findcommand:# ipa ca-find ------------- 3 CAs matched ------------- Name: ipa Description: IPA CA Authority ID: 5195deaf-3b61-4aab-b608-317aff38497c Subject DN: CN=Certificate Authority,O=IPA.TEST Issuer DN: CN=Certificate Authority,O=IPA.TEST Name: webclient-ca Authority ID: 605a472c-9c6e-425e-b959-f1955209b092 Subject DN: CN=WEBCLIENT,O=IDM.EXAMPLE.COM Issuer DN: CN=Certificate Authority,O=IPA.TEST Name: webserver-ca Authority ID: 02d537f9-c178-4433-98ea-53aa92126fc3 Subject DN: CN=WEBSERVER,O=IDM.EXAMPLE.COM Issuer DN: CN=Certificate Authority,O=IPA.TEST ---------------------------- Number of entries returned 3 ----------------------------Run the
ipa ca-disablecommand to disable your sub-CA, in this example, thewebserver-ca:# ipa ca-disable webserver-ca -------------------------- Disabled CA "webserver-ca" --------------------------
Delete the sub-CA, in this example, the
webserver-ca:# ipa ca-del webserver-ca ------------------------- Deleted CA "webserver-ca" -------------------------
Verification
Run
ipa ca-findto display the list of CAs and sub-CAs. Thewebserver-cais no longer on the list.# ipa ca-find ------------- 2 CAs matched ------------- Name: ipa Description: IPA CA Authority ID: 5195deaf-3b61-4aab-b608-317aff38497c Subject DN: CN=Certificate Authority,O=IPA.TEST Issuer DN: CN=Certificate Authority,O=IPA.TEST Name: webclient-ca Authority ID: 605a472c-9c6e-425e-b959-f1955209b092 Subject DN: CN=WEBCLIENT,O=IDM.EXAMPLE.COM Issuer DN: CN=Certificate Authority,O=IPA.TEST ---------------------------- Number of entries returned 2 ----------------------------
20.2. Downloading the sub-CA certificate from IdM WebUI
Prerequisites
- Make sure that you have obtained the IdM administrator’s credentials.
Procedure
In the Authentication menu, click Certificates > Certificates.
Figure 20.2. sub-CA certificate in the list of certificates

- Click the serial number of the sub-CA certificate to open the certificate information page.
- In the certificate information page, click Actions > Download.
In the CLI, move the sub-CA certificate to the
/etc/pki/tls/private/directory:# mv path/to/the/downloaded/certificate /etc/pki/tls/private/sub-ca.crt
20.3. Creating CA ACLs for web server and client authentication
Certificate authority access control list (CA ACL) rules define which profiles can be used to issue certificates to which users, services, or hosts. By associating profiles, principals, and groups, CA ACLs permit principals or groups to request certificates using particular profiles.
For example, using CA ACLs, the administrator can restrict the use of a profile intended for employees working from an office located in London only to users that are members of the London office-related group.
20.3.1. Viewing CA ACLs in IdM CLI
Follow this procedure to view the list of certificate authority access control lists (CA ACLs) available in your IdM deployment and the details of a specific CA ACL.
Procedure
To view all the CA ACLs in your IdM environment, enter the
ipa caacl-findcommand:$ ipa caacl-find ----------------- 1 CA ACL matched ----------------- ACL name: hosts_services_caIPAserviceCert Enabled: TRUETo view the details of a CA ACL, enter the
ipa caacl-showcommand, and specify the CA ACL name. For example, to view the details of the hosts_services_caIPAserviceCert CA ACL, enter:$ ipa caacl-show hosts_services_caIPAserviceCert ACL name: hosts_services_caIPAserviceCert Enabled: TRUE Host category: all Service category: all CAs: ipa Profiles: caIPAserviceCert Users: admin
20.3.2. Creating a CA ACL for web servers authenticating to web clients using certificates issued by webserver-ca
Follow this procedure to create a CA ACL that requires the system administrator to use the webserver-ca sub-CA and the caIPAserviceCert profile when requesting a certificate for the HTTP/my_company.idm.example.com@IDM.EXAMPLE.COM service. If the user requests a certificate from a different sub-CA or of a different profile, the request fails. The only exception is when there is another matching CA ACL that is enabled. To view the available CA ACLs, see Viewing CA ACLs in IdM CLI.
Prerequisites
- Make sure that the HTTP/my_company.idm.example.com@IDM.EXAMPLE.COM service is part of IdM.
- Make sure you have obtained IdM administrator’s credentials.
Procedure
Create a CA ACL using the
ipa caaclcommand, and specify its name:$ ipa caacl-add TLS_web_server_authentication -------------------------------------------- Added CA ACL "TLS_web_server_authentication" -------------------------------------------- ACL name: TLS_web_server_authentication Enabled: TRUEModify the CA ACL using the
ipa caacl-modcommand to specify the description of the CA ACL:$ ipa caacl-mod TLS_web_server_authentication --desc="CAACL for web servers authenticating to web clients using certificates issued by webserver-ca" ----------------------------------------------- Modified CA ACL "TLS_web_server_authentication" ----------------------------------------------- ACL name: TLS_web_server_authentication Description: CAACL for web servers authenticating to web clients using certificates issued by webserver-ca Enabled: TRUEAdd the webserver-ca sub-CA to the CA ACL:
$ ipa caacl-add-ca TLS_web_server_authentication --ca=webserver-ca
  ACL name: TLS_web_server_authentication
  Description: CAACL for web servers authenticating to web clients using certificates issued by webserver-ca
  Enabled: TRUE
  CAs: webserver-ca
-------------------------
Number of members added 1
-------------------------
Use the
ipa caacl-add-serviceto specify the service whose principal will be able to request a certificate:$ ipa caacl-add-service TLS_web_server_authentication --service=HTTP/my_company.idm.example.com@IDM.EXAMPLE.COM ACL name: TLS_web_server_authentication Description: CAACL for web servers authenticating to web clients using certificates issued by webserver-ca Enabled: TRUE CAs: webserver-ca Services: HTTP/my_company.idm.example.com@IDM.EXAMPLE.COM ------------------------- Number of members added 1 -------------------------Use the
ipa caacl-add-profilecommand to specify the certificate profile for the requested certificate:$ ipa caacl-add-profile TLS_web_server_authentication --certprofiles=caIPAserviceCert ACL name: TLS_web_server_authentication Description: CAACL for web servers authenticating to web clients using certificates issued by webserver-ca Enabled: TRUE CAs: webserver-ca Profiles: caIPAserviceCert Services: HTTP/my_company.idm.example.com@IDM.EXAMPLE.COM ------------------------- Number of members added 1 -------------------------You can use the newly-created CA ACL straight away. It is enabled after its creation by default.
The point of CA ACLs is to specify which CA and profile combinations are allowed for requests coming from particular principals or groups. CA ACLs do not affect certificate validation or trust. They do not affect how the issued certificates will be used.
20.3.3. Creating a CA ACL for user web browsers authenticating to web servers using certificates issued by webclient-ca
Follow this procedure to create a CA ACL that requires the system administrator to use the webclient-ca sub-CA and the IECUserRoles profile when requesting a certificate. If the user requests a certificate from a different sub-CA or of a different profile, the request fails. The only exception is when there is another matching CA ACL that is enabled. To view the available CA ACLs, see Viewing CA ACLs in IdM CLI.
Prerequisites
- Make sure that you have obtained IdM administrator’s credentials.
Procedure
Create a CA ACL using the
ipa caaclcommand and specify its name:$ ipa caacl-add TLS_web_client_authentication -------------------------------------------- Added CA ACL "TLS_web_client_authentication" -------------------------------------------- ACL name: TLS_web_client_authentication Enabled: TRUEModify the CA ACL using the
ipa caacl-modcommand to specify the description of the CA ACL:$ ipa caacl-mod TLS_web_client_authentication --desc="CAACL for user web browsers authenticating to web servers using certificates issued by webclient-ca" ----------------------------------------------- Modified CA ACL "TLS_web_client_authentication" ----------------------------------------------- ACL name: TLS_web_client_authentication Description: CAACL for user web browsers authenticating to web servers using certificates issued by webclient-ca Enabled: TRUEAdd the webclient-ca sub-CA to the CA ACL:
$ ipa caacl-add-ca TLS_web_client_authentication --ca=webclient-ca
  ACL name: TLS_web_client_authentication
  Description: CAACL for user web browsers authenticating to web servers using certificates issued by webclient-ca
  Enabled: TRUE
  CAs: webclient-ca
-------------------------
Number of members added 1
-------------------------
Use the
ipa caacl-add-profilecommand to specify the certificate profile for the requested certificate:$ ipa caacl-add-profile TLS_web_client_authentication --certprofiles=IECUserRoles ACL name: TLS_web_client_authentication Description: CAACL for user web browsers authenticating to web servers using certificates issued by webclient-ca Enabled: TRUE CAs: webclient-ca Profiles: IECUserRoles ------------------------- Number of members added 1 -------------------------Modify the CA ACL using the
ipa caacl-modcommand to specify that the CA ACL applies to all IdM users:$ ipa caacl-mod TLS_web_client_authentication --usercat=all ----------------------------------------------- Modified CA ACL "TLS_web_client_authentication" ----------------------------------------------- ACL name: TLS_web_client_authentication Description: CAACL for user web browsers authenticating to web servers using certificates issued by webclient-ca Enabled: TRUE User category: all CAs: webclient-ca Profiles: IECUserRolesYou can use the newly-created CA ACL straight away. It is enabled after its creation by default.
The point of CA ACLs is to specify which CA and profile combinations are allowed for requests coming from particular principals or groups. CA ACLs do not affect certificate validation or trust. They do not affect how the issued certificates will be used.
20.4. Obtaining an IdM certificate for a service using certmonger
To ensure that communication between browsers and the web service running on your IdM client is secure and encrypted, use a TLS certificate. If you want to restrict web browsers to trust certificates issued by the webserver-ca sub-CA but no other IdM sub-CA, obtain the TLS certificate for your web service from the webserver-ca sub-CA.
Follow this procedure to use certmonger to obtain an IdM certificate for a service (HTTP/my_company.idm.example.com@IDM.EXAMPLE.COM) running on an IdM client.
Using certmonger to request the certificate automatically means that certmonger manages and renews the certificate when it is due for a renewal.
For a visual representation of what happens when certmonger requests a service certificate, see Communication flow for certmonger requesting a service certificate.
Prerequisites
- The web server is enrolled as an IdM client.
- You have root access to the IdM client on which you are running the procedure.
- The service for which you are requesting a certificate does not have to pre-exist in IdM.
Procedure
On the
my_company.idm.example.comIdM client on which theHTTPservice is running, request a certificate for the service corresponding to theHTTP/my_company.idm.example.com@IDM.EXAMPLE.COMprincipal, and specify that-
The certificate is to be stored in the local
/etc/pki/tls/certs/httpd.pemfile -
The private key is to be stored in the local
/etc/pki/tls/private/httpd.keyfile -
The
webserver-casub-CA is to be the issuing certificate authority That an extensionRequest for a
SubjectAltNamebe added to the signing request with the DNS name ofmy_company.idm.example.com:# ipa-getcert request -K HTTP/my_company.idm.example.com -k /etc/pki/tls/private/httpd.key -f /etc/pki/tls/certs/httpd.pem -g 2048 -D my_company.idm.example.com -X webserver-ca -C "systemctl restart httpd" New signing request "20190604065735" added.In the command above:
-
The
ipa-getcert requestcommand specifies that the certificate is to be obtained from the IdM CA. Theipa-getcert requestcommand is a shortcut forgetcert request -c IPA. -
The
-goption specifies the size of key to be generated if one is not already in place. -
The
-Doption specifies theSubjectAltNameDNS value to be added to the request. -
The
-Xoption specifies that the issuer of the certificate must bewebserver-ca, notipa. -
The
-Coption instructscertmongerto restart thehttpdservice after obtaining the certificate.
-
To specify that the certificate be issued with a particular profile, use the
-Toption.
NoteRHEL 8 uses a different SSL module in Apache than the one used in RHEL 7. The SSL module relies on OpenSSL rather than NSS. For this reason, in RHEL 8 you cannot use an NSS database to store the
HTTPScertificate and the private key.-
The
-
The certificate is to be stored in the local
Optionally, to check the status of your request:
# ipa-getcert list -f /etc/pki/tls/certs/httpd.pem
Number of certificates and requests being tracked: 3.
Request ID '20190604065735':
    status: MONITORING
    stuck: no
    key pair storage: type=FILE,location='/etc/pki/tls/private/httpd.key'
    certificate: type=FILE,location='/etc/pki/tls/certs/httpd.crt'
    CA: IPA
    issuer: CN=WEBSERVER,O=IDM.EXAMPLE.COM

[...]
The output shows that the request is in the
MONITORINGstatus, which means that a certificate has been obtained. The locations of the key pair and the certificate are those requested.
20.5. Communication flow for certmonger requesting a service certificate
These diagrams show the stages of what happens when certmonger requests a service certificate from Identity Management (IdM) certificate authority (CA) server. The sequence consists of these diagrams:
In the diagrams, the webserver-ca sub-CA is represented by the generic IdM CA server.
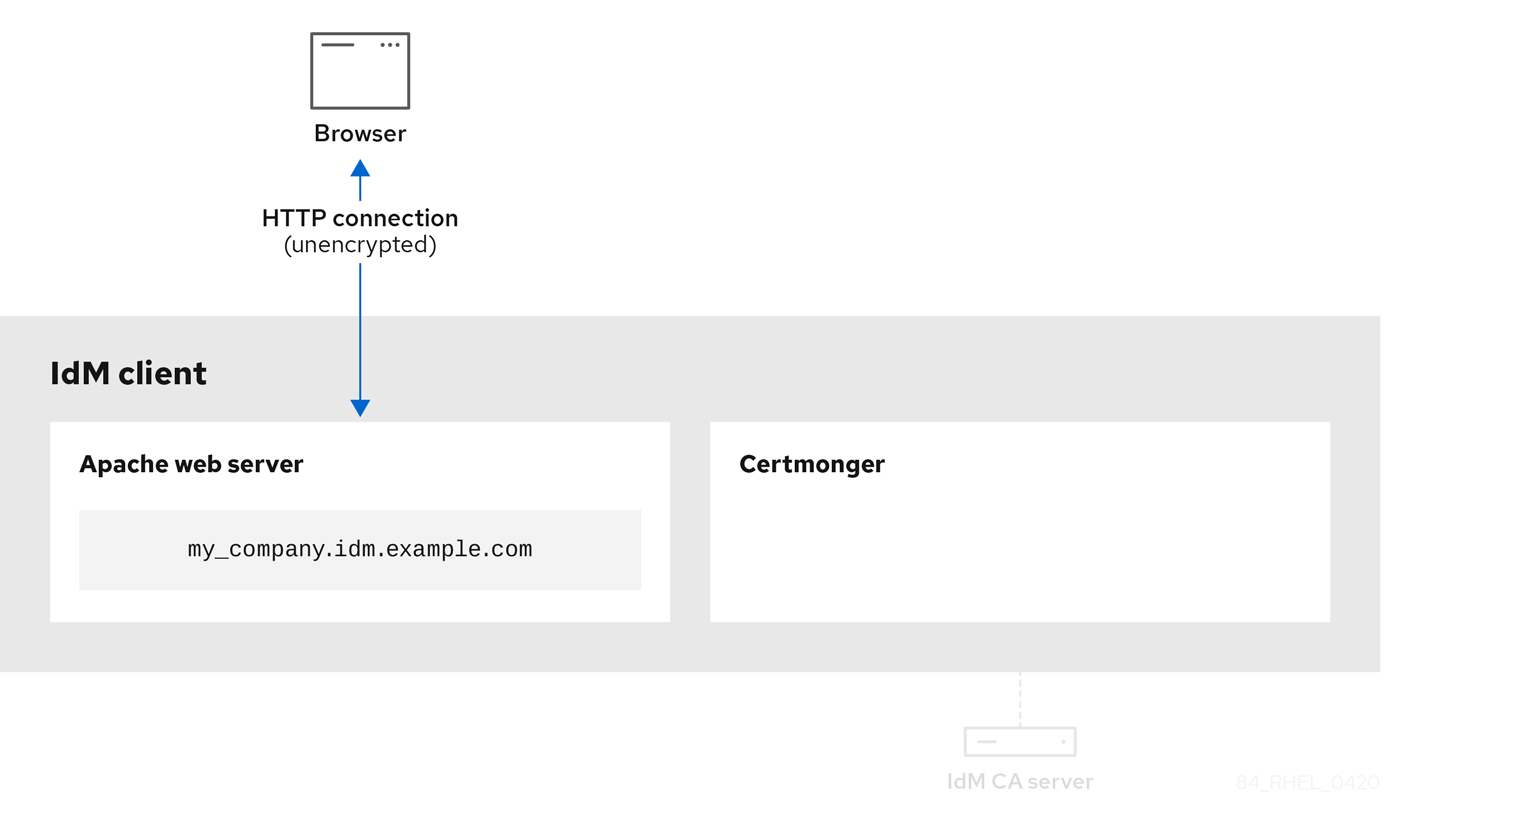
Unencrypted communication shows the initial situation: without an HTTPS certificate, the communication between the web server and the browser is unencrypted.
Figure 20.3. Unencrypted communication
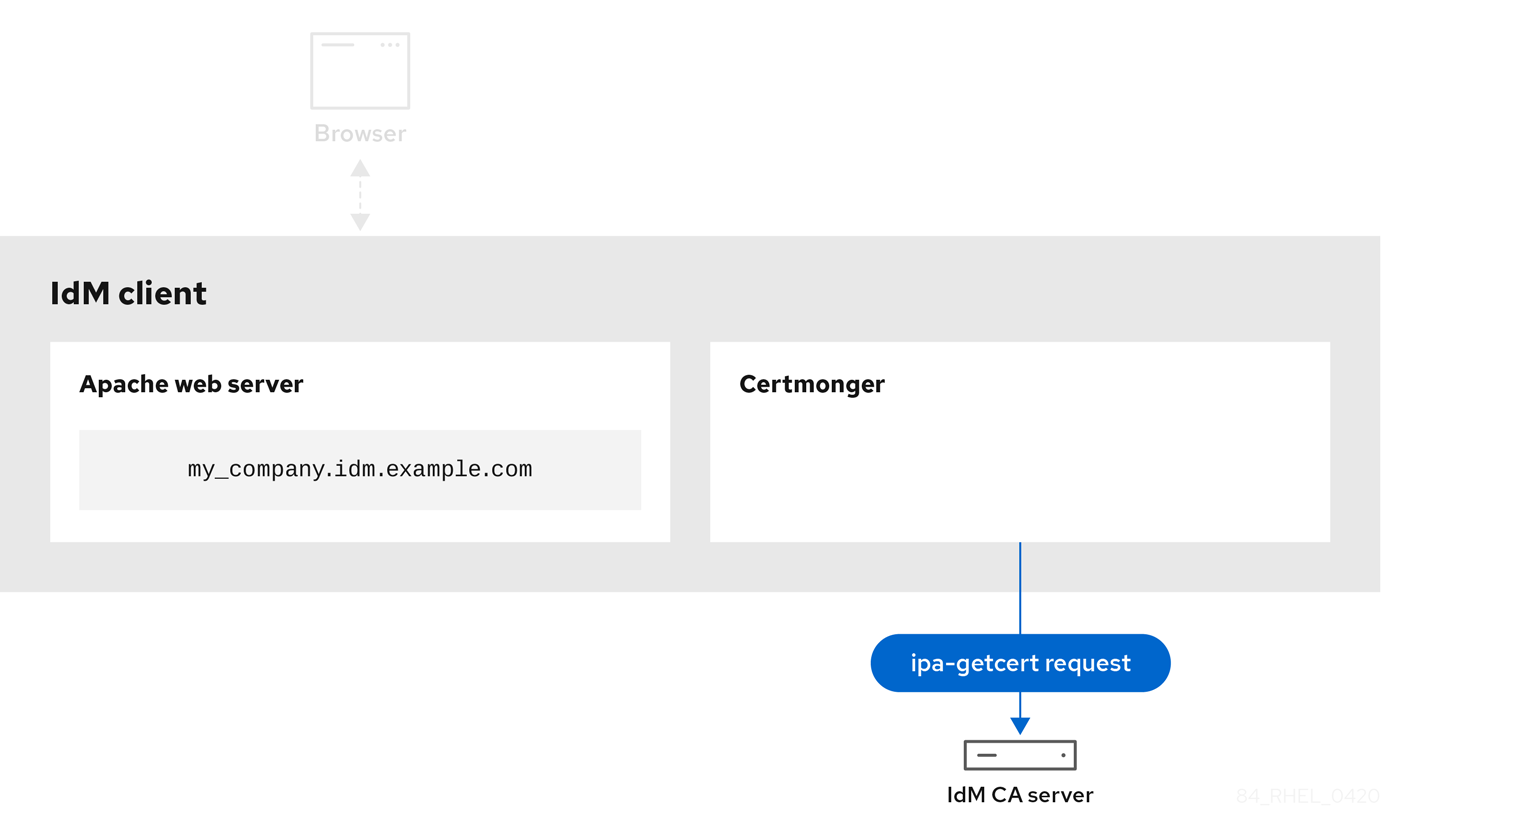
Certmonger requesting a service certificate shows the system administrator using certmonger to manually request an HTTPS certificate for the Apache web server. Note that when requesting a web server certificate, certmonger does not communicate directly with the CA. It proxies through IdM.
Figure 20.4. Certmonger requesting a service certificate
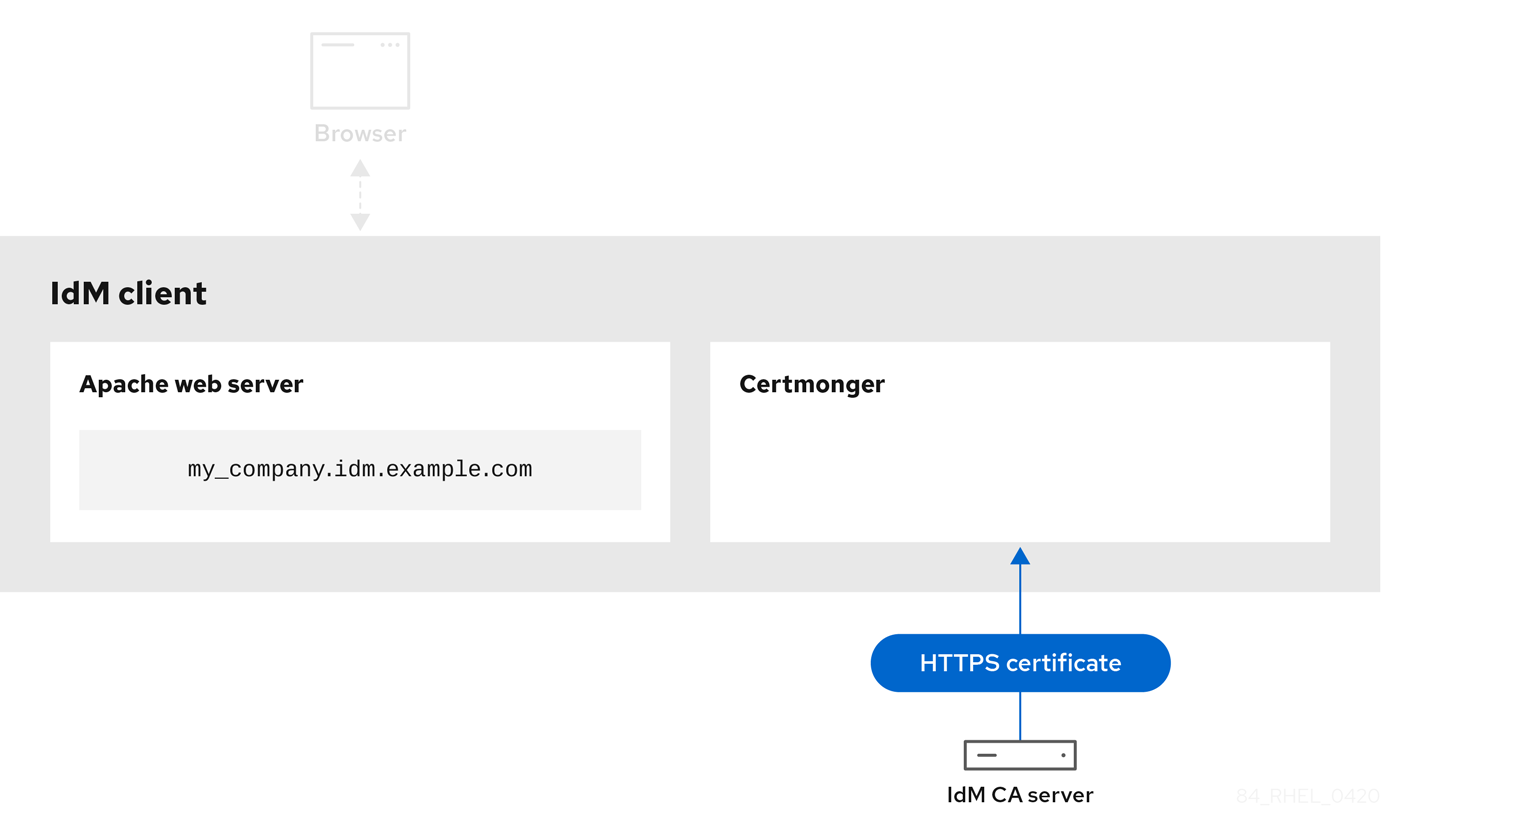
IdM CA issuing the service certificate shows an IdM CA issuing an HTTPS certificate for the web server.
Figure 20.5. IdM CA issuing the service certificate
Certmonger applying the service certificate shows certmonger placing the HTTPS certificate in appropriate locations on the IdM client and, if instructed to do so, restarting the httpd service. The Apache server subsequently uses the HTTPS certificate to encrypt the traffic between itself and the browser.
Figure 20.6. Certmonger applying the service certificate

Certmonger requesting a new certificate when the old one is nearing expiration shows certmonger automatically requesting a renewal of the service certificate from the IdM CA before the expiration of the certificate. The IdM CA issues a new certificate.
Figure 20.7. Certmonger requesting a new certificate when the old one is nearing expiration

20.6. Setting up a single-instance Apache HTTP Server
You can set up a single-instance Apache HTTP Server to serve static HTML content.
Follow the procedure if the web server should provide the same content for all domains associated with the server. If you want to provide different content for different domains, set up name-based virtual hosts. For details, see Configuring Apache name-based virtual hosts.
Procedure
Install the
httpdpackage:# yum install httpdIf you use
firewalld, open the TCP port80in the local firewall:# firewall-cmd --permanent --add-port=80/tcp # firewall-cmd --reload
Enable and start the
httpdservice:# systemctl enable --now httpdOptional: Add HTML files to the
/var/www/html/directory.NoteWhen adding content to
/var/www/html/, files and directories must be readable by the user under whichhttpdruns by default. The content owner can be the either therootuser androotuser group, or another user or group of the administrator’s choice. If the content owner is therootuser androotuser group, the files must be readable by other users. The SELinux context for all the files and directories must behttpd_sys_content_t, which is applied by default to all content within the/var/wwwdirectory.
Verification steps
Connect with a web browser to
http://my_company.idm.example.com/orhttp://server_IP/.If the
/var/www/html/directory is empty or does not contain anindex.htmlorindex.htmfile, Apache displays theRed Hat Enterprise Linux Test Page. If/var/www/html/contains HTML files with a different name, you can load them by entering the URL to that file, such ashttp://server_IP/example.htmlorhttp://my_company.idm.example.com/example.html.
Additional resources
- Apache manual: Installing the Apache HTTP Server manual.
-
See the
httpd.service(8)man page.
20.7. Adding TLS encryption to an Apache HTTP Server
You can enable TLS encryption on the my_company.idm.example.com Apache HTTP Server for the idm.example.com domain.
Prerequisites
-
The
my_company.idm.example.comApache HTTP Server is installed and running. -
You have obtained the TLS certificate from the webserver-ca sub-CA, and stored it in the
/etc/pki/tls/certs/httpd.pemfile as described in Obtaining an IdM certificate for a service using certmonger. If you use a different path, adapt the corresponding steps of the procedure. -
The corresponding private key is stored in the
/etc/pki/tls/private/httpd.keyfile. If you use a different path, adapt the corresponding steps of the procedure. -
The webserver-ca CA certificate is stored in the
/etc/pki/tls/private/sub-ca.crtfile. If you use a different path, adapt the corresponding steps of the procedure. - Clients and the my_company.idm.example.com web server resolve the host name of the server to the IP address of the web server.
Procedure
Install the
mod_sslpackage:# yum install mod_sslEdit the
/etc/httpd/conf.d/ssl.conffile and add the following settings to the<VirtualHost _default_:443>directive:Set the server name:
ServerName my_company.idm.example.com
ImportantThe server name must match the entry set in the
Common Namefield of the certificate.Optional: If the certificate contains additional host names in the
Subject Alt Names(SAN) field, you can configuremod_sslto provide TLS encryption also for these host names. To configure this, add theServerAliasesparameter with corresponding names:ServerAlias www.my_company.idm.example.com server.my_company.idm.example.comSet the paths to the private key, the server certificate, and the CA certificate:
SSLCertificateKeyFile "/etc/pki/tls/private/httpd.key"
SSLCertificateFile "/etc/pki/tls/certs/httpd.pem"
SSLCACertificateFile "/etc/pki/tls/certs/ca.crt"
For security reasons, configure that only the
rootuser can access the private key file:# chown root:root /etc/pki/tls/private/httpd.key # chmod 600 //etc/pki/tls/private/httpd.key
WarningIf the private key was accessed by unauthorized users, revoke the certificate, create a new private key, and request a new certificate. Otherwise, the TLS connection is no longer secure.
If you use
firewalld, open port443in the local firewall:# firewall-cmd --permanent --add-port=443/tcp # firewall-cmd --reload
Restart the
httpdservice:# systemctl restart httpdNoteIf you protected the private key file with a password, you must enter this password each time when the
httpdservice starts.-
Use a browser and connect to
https://my_company.idm.example.com.
-
Use a browser and connect to
Additional resources
20.8. Setting the supported TLS protocol versions on an Apache HTTP Server
By default, the Apache HTTP Server on RHEL uses the system-wide crypto policy that defines safe default values, which are also compatible with recent browsers. For example, the DEFAULT policy defines that only the TLSv1.2 and TLSv1.3 protocol versions are enabled in apache.
You can manually configure which TLS protocol versions your my_company.idm.example.com Apache HTTP Server supports. Follow the procedure if your environment requires to enable only specific TLS protocol versions, for example:
-
If your environment requires that clients can also use the weak
TLS1(TLSv1.0) orTLS1.1protocol. -
If you want to configure that Apache only supports the
TLSv1.2orTLSv1.3protocol.
Prerequisites
- TLS encryption is enabled on the my_company.idm.example.com server as described in Adding TLS encryption to an Apache HTTP server.
Procedure
Edit the
/etc/httpd/conf/httpd.conffile, and add the following setting to the<VirtualHost>directive for which you want to set the TLS protocol version. For example, to enable only theTLSv1.3protocol:SSLProtocol -All TLSv1.3Restart the
httpdservice:# systemctl restart httpd
Verification steps
Use the following command to verify that the server supports
TLSv1.3:# openssl s_client -connect example.com:443 -tls1_3Use the following command to verify that the server does not support
TLSv1.2:# openssl s_client -connect example.com:443 -tls1_2If the server does not support the protocol, the command returns an error:
140111600609088:error:1409442E:SSL routines:ssl3_read_bytes:tlsv1 alert protocol version:ssl/record/rec_layer_s3.c:1543:SSL alert number 70
- Optional: Repeat the command for other TLS protocol versions.
Additional resources
-
update-crypto-policies(8)man page - Using system-wide cryptographic policies.
-
For further details about the
SSLProtocolparameter, refer to themod_ssldocumentation in the Apache manual: Installing the Apache HTTP Server manual.
20.9. Setting the supported ciphers on an Apache HTTP Server
By default, the Apache HTTP Server uses the system-wide crypto policy that defines safe default values, which are also compatible with recent browsers. For the list of ciphers the system-wide crypto allows, see the /etc/crypto-policies/back-ends/openssl.config file.
You can manually configure which ciphers the my_company.idm.example.com Apache HTTP server supports. Follow the procedure if your environment requires specific ciphers.
Prerequisites
- TLS encryption is enabled on the my_company.idm.example.com server as described in Adding TLS encryption to an Apache HTTP server.
Procedure
Edit the
/etc/httpd/conf/httpd.conffile, and add theSSLCipherSuiteparameter to the<VirtualHost>directive for which you want to set the TLS ciphers:SSLCipherSuite "EECDH+AESGCM:EDH+AESGCM:AES256+EECDH:AES256+EDH:!SHA1:!SHA256"This example enables only the
EECDH+AESGCM,EDH+AESGCM,AES256+EECDH, andAES256+EDHciphers and disables all ciphers which use theSHA1andSHA256message authentication code (MAC).Restart the
httpdservice:# systemctl restart httpd
Verification steps
To display the list of ciphers the Apache HTTP Server supports:
Install the
nmappackage:# yum install nmapUse the
nmaputility to display the supported ciphers:# nmap --script ssl-enum-ciphers -p 443 example.com ... PORT STATE SERVICE 443/tcp open https | ssl-enum-ciphers: | TLSv1.2: | ciphers: | TLS_ECDHE_RSA_WITH_AES_256_GCM_SHA384 (ecdh_x25519) - A | TLS_DHE_RSA_WITH_AES_256_GCM_SHA384 (dh 2048) - A | TLS_ECDHE_RSA_WITH_CHACHA20_POLY1305_SHA256 (ecdh_x25519) - A ...
Additional resources
-
update-crypto-policies(8)man page - Using system-wide cryptographic policies.
- Installing the Apache HTTP Server manual - SSLCipherSuite
20.10. Configuring TLS client certificate authentication
Client certificate authentication enables administrators to allow only users who authenticate using a certificate to access resources on the my_company.idm.example.com web server. You can configure client certificate authentication for the /var/www/html/Example/ directory.
If the my_company.idm.example.com Apache server uses the TLS 1.3 protocol, certain clients require additional configuration. For example, in Firefox, set the security.tls.enable_post_handshake_auth parameter in the about:config menu to true. For further details, see Transport Layer Security version 1.3 in Red Hat Enterprise Linux 8.
Prerequisites
- TLS encryption is enabled on the my_company.idm.example.com server as described in Adding TLS encryption to an Apache HTTP server.
Procedure
Edit the
/etc/httpd/conf/httpd.conffile and add the following settings to the<VirtualHost>directive for which you want to configure client authentication:<Directory "/var/www/html/Example/"> SSLVerifyClient require </Directory>
The
SSLVerifyClient requiresetting defines that the server must successfully validate the client certificate before the client can access the content in the/var/www/html/Example/directory.Restart the
httpdservice:# systemctl restart httpd
Verification steps
Use the
curlutility to access thehttps://my_company.idm.example.com/Example/URL without client authentication:$ curl https://my_company.idm.example.com/Example/ curl: (56) OpenSSL SSL_read: error:1409445C:SSL routines:ssl3_read_bytes:tlsv13 alert certificate required, errno 0The error indicates that the my_company.idm.example.com web server requires a client certificate authentication.
Pass the client private key and certificate, as well as the CA certificate to
curlto access the same URL with client authentication:$ curl --cacert ca.crt --key client.key --cert client.crt https://my_company.idm.example.com/Example/If the request succeeds,
curldisplays theindex.htmlfile stored in the/var/www/html/Example/directory.
Additional resources
20.11. Requesting a new user certificate and exporting it to the client
As an Identity Management (IdM) administrator, you can configure a web server running on an IdM client to request users that use web browsers to access the server to authenticate with certificates issued by a specific IdM sub-CA. Follow this procedure to request a user certificate from a specific IdM sub-CA and to export the certificate and the corresponding private key on to the host from which the user wants to access the web server using a web browser. Afterwards, import the certificate and the private key into the browser.
Procedure
Optionally, create a new directory, for example
~/certdb/, and make it a temporary certificate database. When asked, create an NSS Certificate DB password to encrypt the keys to the certificate to be generated in a subsequent step:# mkdir
~/certdb/# certutil -N -d~/certdb/Enter a password which will be used to encrypt your keys. The password should be at least 8 characters long, and should contain at least one non-alphabetic character. Enter new password: Re-enter password:Create the certificate signing request (CSR) and redirect the output to a file. For example, to create a CSR with the name
certificate_request.csrfor a4096bit certificate for theidm_useruser in theIDM.EXAMPLE.COMrealm, setting the nickname of the certificate private keys toidm_userfor easy findability, and setting the subject toCN=idm_user,O=IDM.EXAMPLE.COM:# certutil -R -d
~/certdb/-a -g4096-nidm_user-s "CN=idm_user,O=IDM.EXAMPLE.COM" >certificate_request.csrWhen prompted, enter the same password that you entered when using
certutilto create the temporary database. Then continue typing randlomly until told to stop:Enter Password or Pin for "NSS Certificate DB": A random seed must be generated that will be used in the creation of your key. One of the easiest ways to create a random seed is to use the timing of keystrokes on a keyboard. To begin, type keys on the keyboard until this progress meter is full. DO NOT USE THE AUTOREPEAT FUNCTION ON YOUR KEYBOARD! Continue typing until the progress meter is full:
Submit the certificate request file to the server. Specify the Kerberos principal to associate with the newly-issued certificate, the output file to store the certificate, and optionally the certificate profile. Specify the IdM sub-CA that you want to issue the certificate. For example, to obtain a certificate of the
IECUserRolesprofile, a profile with added user roles extension, for theidm_user@IDM.EXAMPLE.COMprincipal fromwebclient-ca, and save the certificate in the~/idm_user.pemfile:# ipa cert-request
certificate_request.csr--principal=idm_user@IDM.EXAMPLE.COM--profile-id=IECUserRoles--ca=webclient-ca--certificate-out=~/idm_user.pemAdd the certificate to the NSS database. Use the
-noption to set the same nickname that you used when creating the CSR previously so that the certificate matches the private key in the NSS database. The-toption sets the trust level. For details, see the certutil(1) man page. The-ioption specifies the input certificate file. For example, to add to the NSS database a certificate with theidm_usernickname that is stored in the~/idm_user.pemfile in the~/certdb/database:# certutil -A -d
~/certdb/-nidm_user-t "P,," -i~/idm_user.pemVerify that the key in the NSS database does not show
(orphan)as its nickname. For example, to verify that the certificate stored in the~/certdb/database is not orphaned:# certutil -K -d
~/certdb/< 0> rsa 5ad14d41463b87a095b1896cf0068ccc467df395 NSS Certificate DB:idm_userUse the
pk12utilcommand to export the certificate from the NSS database to the PKCS12 format. For example, to export the certificate with theidm_usernickname from the/root/certdbNSS database into the~/idm_user.p12file:# pk12util -d
~/certdb-o~/idm_user.p12-nidm_userEnter Password or Pin for "NSS Certificate DB": Enter password for PKCS12 file: Re-enter password: pk12util: PKCS12 EXPORT SUCCESSFULTransfer the certificate to the host on which you want the certificate authentication for
idm_userto be enabled:# scp
~/idm_user.p12idm_user@client.idm.example.com:/home/idm_user/On the host to which the certificate has been transferred, make the directory in which the .pkcs12 file is stored inaccessible to the 'other' group for security reasons:
# chmod o-rwx
/home/idm_user/For security reasons, remove the temporary NSS database and the .pkcs12 file from the server:
# rm
~/certdb/# rm~/idm_user.p12
20.12. Configuring a browser to enable certificate authentication
To be able to authenticate with a certificate when using the WebUI to log into Identity Management (IdM), you need to import the user and the relevant certificate authority (CA) certificates into the Mozilla Firefox or Google Chrome browser. The host itself on which the browser is running does not have to be part of the IdM domain.
IdM supports the following browsers for connecting to the WebUI:
- Mozilla Firefox 38 and later
- Google Chrome 46 and later
The following procedure shows how to configure the Mozilla Firefox 57.0.1 browser.
Prerequisites
- You have the user certificate that you want to import to the browser at your disposal in the PKCS#12 format.
- You have downloaded the sub-CA certificate and have it at your disposal in the PEM format.
Procedure
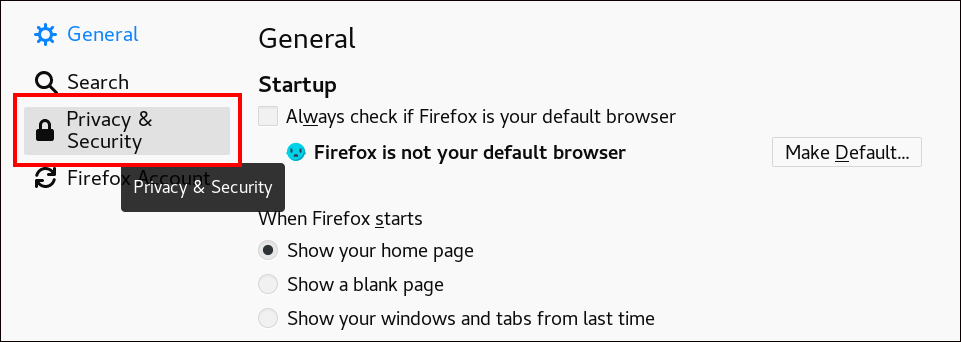
Open Firefox, then navigate to
Preferences→Privacy & Security.Figure 20.8. Privacy and Security section in Preferences
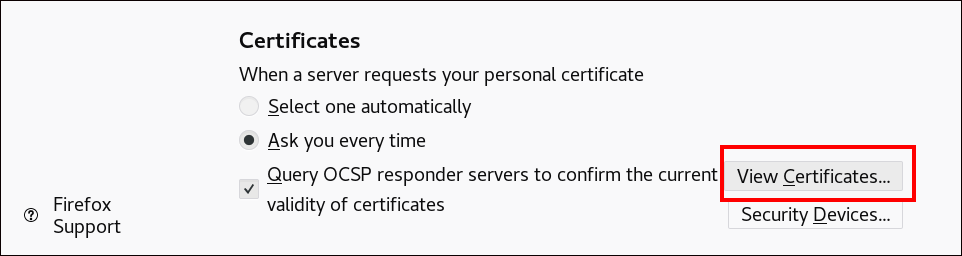
Click .
Figure 20.9. View Certificates in Privacy and Security
-
In the
Your Certificatestab, click . Locate and open the certificate of the user in the PKCS12 format, then click and . To make sure that your IdM sub-CA is recognized by Firefox as a trusted authority, import the IdM sub-CA certificate that you saved in Downloading the sub-CA certificate from IdM WebUI as a trusted certificate authority certificate:
Open Firefox, navigate to Preferences and click .
Figure 20.10. Privacy and Security section in Preferences
Click .
Figure 20.11. View Certificates in Privacy and Security
-
In the
Authoritiestab, click . Locate and open the sub-CA certificate. Trust the certificate to identify websites, then click and .