
Red Hat Training
A Red Hat training course is available for RHEL 8
Chapter 6. Viewing information about virtual machines
When you need to adjust or troubleshoot any aspect of your virtualization deployment on RHEL 8, the first step you need to perform usually is to view information about the current state and configuration of your virtual machines. To do so, you can use the command-line interface or the web console. You can also view the information in the VM’s XML configuration.
6.1. Viewing virtual machine information by using the command-line interface
To retrieve information about virtual machines (VMs) on your host and their configurations, use one or more of the following commands.
Procedure
To obtain a list of VMs on your host:
# virsh list --all
Id   Name              State
----------------------------------
1    testguest1             running
-    testguest2             shut off
-    testguest3             shut off
-    testguest4             shut off
To obtain basic information about a specific VM:
# virsh dominfo testguest1
Id:             1
Name:           testguest1
UUID:           a973666f-2f6e-415a-8949-75a7a98569e1
OS Type:        hvm
State:          running
CPU(s):         2
CPU time:       188.3s
Max memory:     4194304 KiB
Used memory:    4194304 KiB
Persistent:     yes
Autostart:      disable
Managed save:   no
Security model: selinux
Security DOI:   0
Security label: system_u:system_r:svirt_t:s0:c486,c538 (enforcing)
To obtain the complete XML configuration of a specific VM:
# virsh dumpxml testguest2

<domain type='kvm' id='1'>
  <name>testguest2</name>
  <uuid>a973434f-2f6e-4ěša-8949-76a7a98569e1</uuid>
  <metadata>
[...]
For information about a VM’s disks and other block devices:
# virsh domblklist testguest3
 Target   Source
---------------------------------------------------------------
 vda      /var/lib/libvirt/images/testguest3.qcow2
 sda      -
 sdb      /home/username/Downloads/virt-p2v-1.36.10-1.el7.iso
For instructions on managing a VM’s storage, see Managing storage for virtual machines.
To obtain information about a VM’s file systems and their mountpoints:
# virsh domfsinfo testguest3
Mountpoint   Name   Type   Target
------------------------------------
 /            dm-0   xfs
 /boot        vda1   xfs
To obtain more details about the vCPUs of a specific VM:
# virsh vcpuinfo testguest4
VCPU:           0
CPU:            3
State:          running
CPU time:       103.1s
CPU Affinity:   yyyy

VCPU:           1
CPU:            0
State:          running
CPU time:       88.6s
CPU Affinity:   yyyy
To configure and optimize the vCPUs in your VM, see Optimizing virtual machine CPU performance.
To list all virtual network interfaces on your host:
# virsh net-list --all
 Name       State    Autostart   Persistent
---------------------------------------------
 default    active   yes         yes
 labnet     active   yes         yes
For information about a specific interface:
# virsh net-info default
Name:           default
UUID:           c699f9f6-9202-4ca8-91d0-6b8cb9024116
Active:         yes
Persistent:     yes
Autostart:      yes
Bridge:         virbr0
For details about network interfaces, VM networks, and instructions for configuring them, see Configuring virtual machine network connections.
- For instructions on viewing information about storage pools and storage volumes on your host, see Viewing virtual machine storage information by using the CLI.
6.2. Viewing virtual machine information by using the web console
By using the RHEL 8 web console, you can view information about all VMs and storage pools the web console session can access.
You can view information about a selected VM to which the web console session is connected. This includes information about its disks, virtual network interface and resource usage.
6.2.1. Viewing a virtualization overview in the web console
By using the web console, you can access a virtualization overview that contains summarized information about available virtual machines (VMs), storage pools, and networks.
Prerequisites
- The web console VM plug-in is installed on your system.
Procedure
Click in the web console’s side menu.
A dialog box appears with information about the available storage pools, available networks, and the VMs to which the web console is connected.
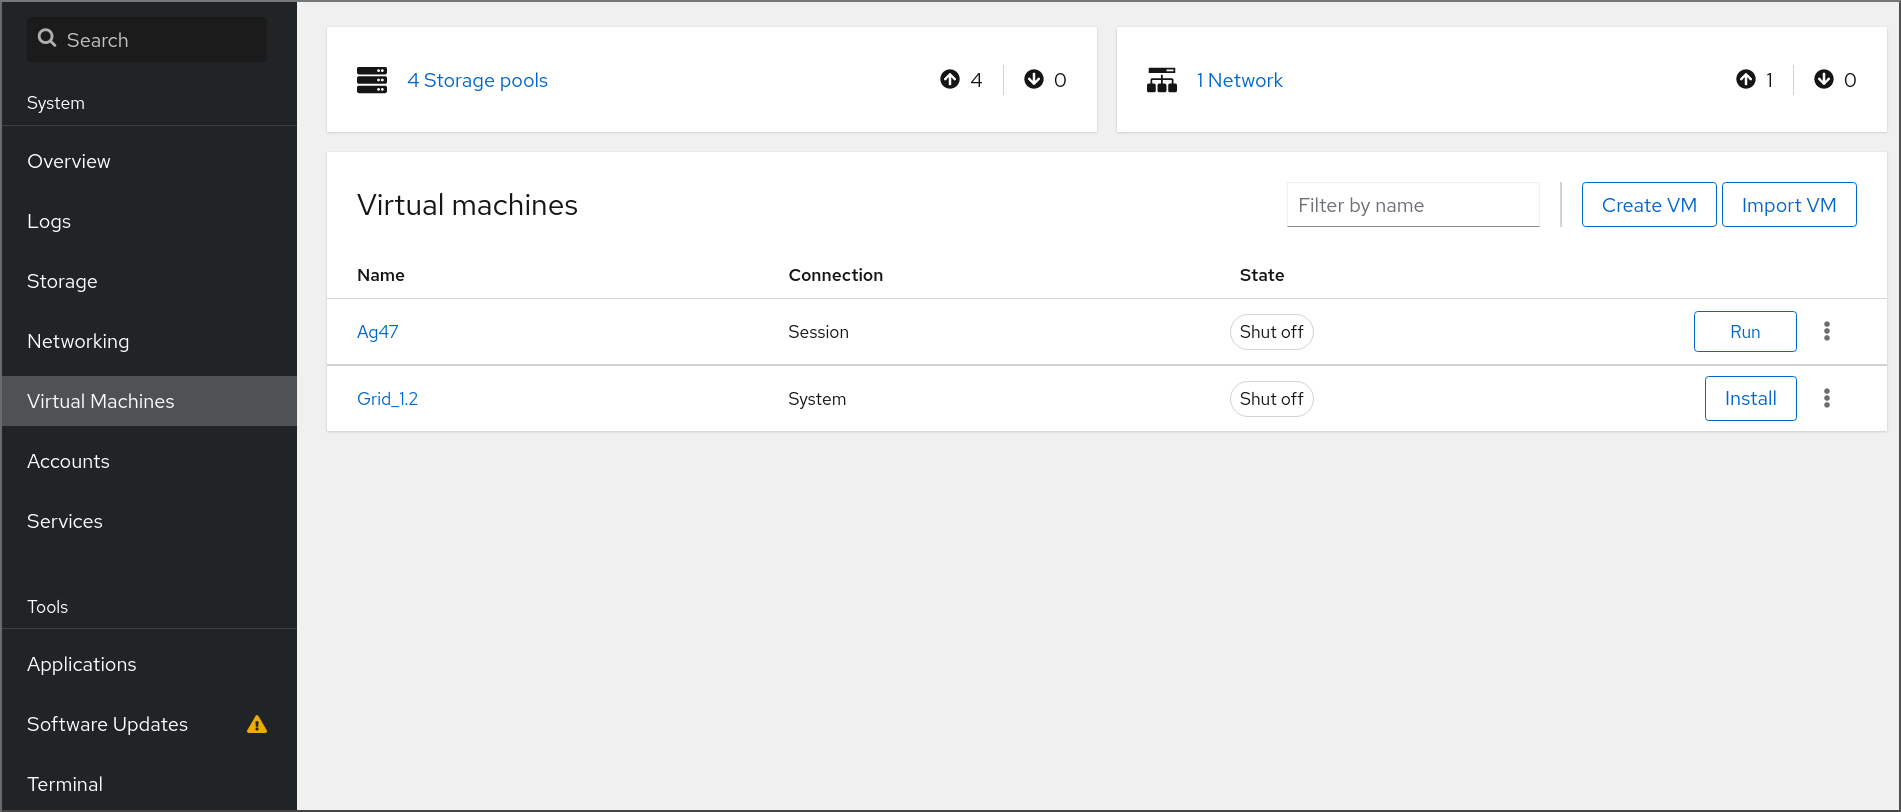
The information includes the following:
- Storage Pools - The number of storage pools, active or inactive, that can be accessed by the web console and their state.
- Networks - The number of networks, active or inactive, that can be accessed by the web console and their state.
- Name - The name of the VM.
- Connection - The type of libvirt connection, system or session.
- State - The state of the VM.
Additional resources
6.2.2. Viewing storage pool information by using the web console
By using the web console, you can view detailed information about storage pools available on your system. Storage pools can be used to create disk images for your virtual machines.
Prerequisites
- The web console VM plug-in is installed on your system.
Procedure
Click at the top of the interface.
The Storage pools window appears, showing a list of configured storage pools.

The information includes the following:
- Name - The name of the storage pool.
- Size - The current allocation and the total capacity of the storage pool.
- Connection - The connection used to access the storage pool.
- State - The state of the storage pool.
Click the arrow next to the storage pool whose information you want to see.
The row expands to reveal the Overview pane with detailed information about the selected storage pool.

The information includes:
-
Target path - The source for the types of storage pools backed by directories, such as
dirornetfs. - Persistent - Indicates whether or not the storage pool has a persistent configuration.
- Autostart - Indicates whether or not the storage pool starts automatically when the system boots up.
- Type - The type of the storage pool.
-
Target path - The source for the types of storage pools backed by directories, such as
To view a list of storage volumes associated with the storage pool, click .
The Storage Volumes pane appears, showing a list of configured storage volumes.

The information includes:
- Name - The name of the storage volume.
- Used by - The VM that is currently using the storage volume.
- Size - The size of the volume.
Additional resources
6.2.3. Viewing basic virtual machine information in the web console
By using the web console, you can view basic information, such as assigned resources or hypervisor details, about a selected virtual machine (VM).
Prerequisites
- The web console VM plug-in is installed on your system.
Procedure
- Click in the web console side menu.
Click the VM whose information you want to see.
A new page opens with an Overview section with basic information about the selected VM and a Console section to access the VM’s graphical interface.

The Overview section includes the following general VM details:
- State - The VM state, Running or Shut off.
- Memory - The amount of memory assigned to the VM.
- vCPUs - The number of virtual CPUs configured for the VM.
- CPU Type - The architecture of the virtual CPUs configured for the VM.
- Boot Order - The boot order configured for the VM.
- Autostart - Whether or not autostart is enabled for the VM.
The information also includes the following hypervisor details:
- Emulated Machine - The machine type emulated by the VM.
- Firmware - The firmware of the VM.
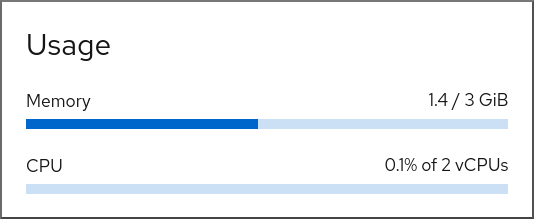
6.2.4. Viewing virtual machine resource usage in the web console
By using the web console, you can view memory and virtual CPU usage of a selected virtual machine (VM).
Prerequisites
- The web console VM plug-in is installed on your system.
Procedure
In the interface, click the VM whose information you want to see.
A new page opens with an Overview section with basic information about the selected VM and a Console section to access the VM’s graphical interface.
Scroll to .
The Usage section displays information about the memory and virtual CPU usage of the VM.
Additional resources
6.2.5. Viewing virtual machine disk information in the web console
By using the web console, you can view detailed information about disks assigned to a selected virtual machine (VM).
Prerequisites
- The web console VM plug-in is installed on your system.
Procedure
Click the VM whose information you want to see.
A new page opens with an Overview section with basic information about the selected VM and a Console section to access the VM’s graphical interface.
Scroll to .
The Disks section displays information about the disks assigned to the VM as well as options to Add, Remove, or Edit disks.

The information includes the following:
- Device - The device type of the disk.
- Used - The amount of disk currently allocated.
- Capacity - The maximum size of the storage volume.
- Bus - The type of disk device that is emulated.
-
Access - Whether the disk is Writeable or Read-only. For
rawdisks, you can also set the access to Writeable and shared. - Source - The disk device or file.
Additional resources
6.2.6. Viewing and editing virtual network interface information in the web console
By using the RHEL 8 web console, you can view and modify the virtual network interfaces on a selected virtual machine (VM):
Prerequisites
- The web console VM plug-in is installed on your system.
Procedure
In the interface, click the VM whose information you want to see.
A new page opens with an Overview section with basic information about the selected VM and a Console section to access the VM’s graphical interface.
Scroll to .
The Networks Interfaces section displays information about the virtual network interface configured for the VM as well as options to Add, Delete, Edit, or Unplug network interfaces.

The information includes the following:
Type - The type of network interface for the VM. The types include virtual network, bridge to LAN, and direct attachment.
NoteGeneric Ethernet connection is not supported in RHEL 8 and later.
- Model type - The model of the virtual network interface.
- MAC Address - The MAC address of the virtual network interface.
- IP Address - The IP address of the virtual network interface.
- Source - The source of the network interface. This is dependent on the network type.
- State - The state of the virtual network interface.
To edit the virtual network interface settings, Click . The Virtual Network Interface Settings dialog opens.
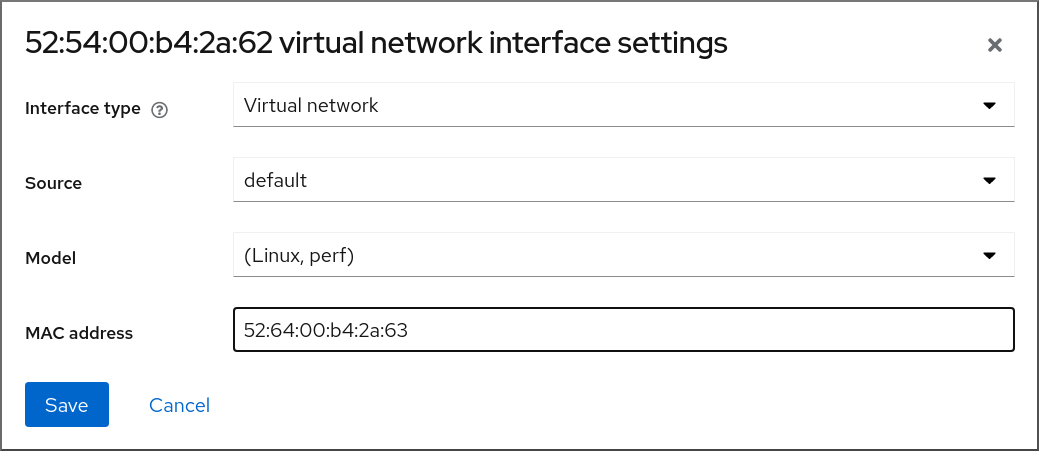
- Change the interface type, source, model, or MAC address.
Click . The network interface is modified.
NoteChanges to the virtual network interface settings take effect only after restarting the VM.
Additionally, MAC address can only be modified when the VM is shut off.
Additional resources
6.3. Sample virtual machine XML configuration
The XML configuration of a VM, also referred to as a domain XML, determines the VM’s settings and components. The following table shows sections of a sample XML configuration of a virtual machine (VM) and explains the contents.
To obtain the XML configuration of a VM, you can use the virsh dumpxml command followed by the VM’s name.
# virsh dumpxml testguest1Table 6.1. Sample XML configuration
| Domain XML Section | Description |
|---|---|
<domain type='kvm'> <name>Testguest1</name> <uuid>ec6fbaa1-3eb4-49da-bf61-bb02fbec4967</uuid> <memory unit='KiB'>1048576</memory> <currentMemory unit='KiB'>1048576</currentMemory> | This is a KVM virtual machine called Testguest1, with 1024 MiB allocated RAM. |
<vcpu placement='static'>1</vcpu> | The VM is allocated with a single virtual CPU (vCPU). For information about configuring vCPUs, see Optimizing virtual machine CPU performance. |
<os> <type arch='x86_64' machine='pc-q35-4.1'>hvm</type> <boot dev='hd'/> </os> | The machine architecture is set to the AMD64 and Intel 64 architecture, and uses the Intel Q35 machine type to determine feature compatibility. The OS is set to be booted from the hard disk drive. For information about creating a VM with an installed OS, see Creating virtual machines and installing guest operating systems by using the web console. |
<features> <acpi/> <apic/> </features> | The acpi and apic hypervisor features are disabled. |
<cpu mode='host-model' check='partial'/> |
The host CPU definitions from capabilities XML (obtainable with |
<clock offset='utc'> <timer name='rtc' tickpolicy='catchup'/> <timer name='pit' tickpolicy='delay'/> <timer name='hpet' present='no'/> </clock> | The VM’s virtual hardware clock uses the UTC time zone. In addition, three different timers are set up for synchronization with the QEMU hypervisor. |
<on_poweroff>destroy</on_poweroff> <on_reboot>restart</on_reboot> <on_crash>destroy</on_crash> |
When the VM powers off, or its OS terminates unexpectedly, |
<pm> <suspend-to-mem enabled='no'/> <suspend-to-disk enabled='no'/> </pm> | The S3 and S4 ACPI sleep states are disabled for this VM. |
<devices> <emulator>/usr/bin/qemu-kvm</emulator> <disk type='file' device='disk'> <driver name='qemu' type='qcow2'/> <source file='/var/lib/libvirt/images/Testguest.qcow2'/> <target dev='hda' bus='ide'/> </disk> <disk type='file' device='cdrom'> <driver name='qemu' type='raw'/> <target dev='hdb' bus='ide'/> <readonly/> </disk> |
The VM uses the
The first disk is a virtualized hard-drive based on the
The second disk is a virtualized CD-ROM and its logical device name is set to |
<controller type='usb' index='0' model='qemu-xhci' ports='15'/> <controller type='sata' index='0'/> <controller type='pci' index='0' model='pcie-root'/> <controller type='pci' index='1' model='pcie-root-port'> <model name='pcie-root-port'/> <target chassis='1' port='0x10'/> </controller> <controller type='pci' index='2' model='pcie-root-port'> <model name='pcie-root-port'/> <target chassis='2' port='0x11'/> </controller> <controller type='pci' index='3' model='pcie-root-port'> <model name='pcie-root-port'/> <target chassis='3' port='0x12'/> </controller> <controller type='pci' index='4' model='pcie-root-port'> <model name='pcie-root-port'/> <target chassis='4' port='0x13'/> </controller> <controller type='pci' index='5' model='pcie-root-port'> <model name='pcie-root-port'/> <target chassis='5' port='0x14'/> </controller> <controller type='pci' index='6' model='pcie-root-port'> <model name='pcie-root-port'/> <target chassis='6' port='0x15'/> </controller> <controller type='pci' index='7' model='pcie-root-port'> <model name='pcie-root-port'/> <target chassis='7' port='0x16'/> </controller> <controller type='virtio-serial' index='0'/> |
The VM uses a single controller for attaching USB devices, and a root controller for PCI-Express (PCIe) devices. In addition, a For more information about virtual devices, see Types of virtual devices. |
<interface type='network'> <mac address='52:54:00:65:29:21'/> <source network='default'/> <model type='rtl8139'/> </interface> |
A network interface is set up in the VM that uses the For information about configuring the network interface, see Optimizing virtual machine network performance. |
  <serial type='pty'>
   <target type='isa-serial' port='0'>
    <model name='isa-serial'/>
   </target>
  </serial>
  <console type='pty'>
   <target type='serial' port='0'/>
  </console>
  <channel type='unix'>
   <target type='virtio' name='org.qemu.guest_agent.0'/>
   <address type='virtio-serial' controller='0' bus='0' port='1'/>
  </channel>
  <channel type='spicevmc'>
   <target type='virtio' name='com.redhat.spice.0'/>
    <address type='virtio-serial' controller='0' bus='0' port='2'/>
  </channel>
|
A For more information about interacting with VMs, see Interacting with virtual machines by using the web console. |
<input type='tablet' bus='usb'> <address type='usb' bus='0' port='1'/> </input> <input type='mouse' bus='ps2'/> <input type='keyboard' bus='ps2'/> | The VM uses a virtual usb port, which is set up to receive tablet input, and a virtual ps2 port set up to receive mouse and keyboard input. This is set up automatically and changing these settings is not recommended. |
<graphics type='spice' autoport='yes' listen='127.0.0.1'> <listen type='address' address='127.0.0.1'/> <image compression='off'/> </graphics> <graphics type='vnc' port='-1' autoport='yes' listen='127.0.0.1'> <listen type='address' address='127.0.0.1'/> </graphics> |
The VM uses the |
<sound model='ich6'> <address type='pci' domain='0x0000' bus='0x00' slot='0x04' function='0x0'/> </sound> <video> <model type='qxl' ram='65536' vram='65536' vgamem='16384' heads='1' primary='yes'/> <address type='pci' domain='0x0000' bus='0x00' slot='0x02' function='0x0'/> </video> |
An |
<redirdev bus='usb' type='spicevmc'> <address type='usb' bus='0' port='1'/> </redirdev> <redirdev bus='usb' type='spicevmc'> <address type='usb' bus='0' port='2'/> </redirdev> <memballoon model='virtio'> <address type='pci' domain='0x0000' bus='0x00' slot='0x07' function='0x0'/> </memballoon> </devices> </domain> | The VM has two re-directors for attaching USB devices remotely, and memory ballooning is turned on. This is set up automatically and changing these settings is not recommended. |