
Red Hat Training
A Red Hat training course is available for RHEL 8
Chapter 8. Cloning virtual machines
To quickly create a new virtual machine (VM) with a specific set of properties, you can clone an existing VM.
Cloning creates a new VM that uses its own disk image for storage, but most of the clone’s configuration and stored data is identical to the source VM. This makes it possible to prepare multiple VMs optimized for a certain task without the need to optimize each VM individually.
8.1. How cloning virtual machines works
Cloning a virtual machine (VM) copies the XML configuration of the source VM and its disk images, and makes adjustments to the configurations to ensure the uniqueness of the new VM. This includes changing the name of the VM and ensuring it uses the disk image clones. Nevertheless, the data stored on the clone’s virtual disks is identical to the source VM.
This process is faster than creating a new VM and installing it with a guest operating system, and can be used to rapidly generate VMs with a specific configuration and content.
If you are planning to create multiple clones of a VM, first create a VM template that does not contain:
- Unique settings, such as persistent network MAC configuration, which can prevent the clones from working correctly.
- Sensitive data, such as SSH keys and password files.
For instructions, see Creating virtual machines templates.
8.2. Creating virtual machine templates
To create multiple virtual machine (VM) clones that work correctly, you can remove information and configurations that are unique to a source VM, such as SSH keys or persistent network MAC configuration. This creates a VM template, which you can use to easily and safely create VM clones.
You can create VM templates using the virt-sysprep utility or you can create them manually based on your requirements.
8.2.1. Creating a virtual machine template by using virt-sysprep
To create a cloning template from an existing virtual machine (VM), you can use the virt-sysprep utility. This removes certain configurations that might cause the clone to work incorrectly, such as specific network settings or system registration metadata. As a result, virt-sysprep makes creating clones of the VM more efficient, and ensures that the clones work more reliably.
Prerequisites
The
libguestfs-tools-cpackage, which contains thevirt-syspreputility, is installed on your host:# yum install libguestfs-tools-c- The source VM intended as a template is shut down.
You know where the disk image for the source VM is located, and you are the owner of the VM’s disk image file.
Note that disk images for VMs created in the system connection of libvirt are located in the
/var/lib/libvirt/imagesdirectory and owned by the root user by default:# ls -la /var/lib/libvirt/images -rw-------. 1 root root 9665380352 Jul 23 14:50 a-really-important-vm.qcow2 -rw-------. 1 root root 8591507456 Jul 26 2017 an-actual-vm-that-i-use.qcow2 -rw-------. 1 root root 8591507456 Jul 26 2017 totally-not-a-fake-vm.qcow2 -rw-------. 1 root root 10739318784 Sep 20 17:57 another-vm-example.qcow2- Optional: Any important data on the source VM’s disk has been backed up. If you want to preserve the source VM intact, clone it first and turn the clone into a template.
Procedure
Ensure you are logged in as the owner of the VM’s disk image:
# whoami
root
Optional: Copy the disk image of the VM.
# cp /var/lib/libvirt/images/a-really-important-vm.qcow2 /var/lib/libvirt/images/a-really-important-vm-original.qcow2This is used later to verify that the VM was successfully turned into a template.
Use the following command, and replace /var/lib/libvirt/images/a-really-important-vm.qcow2 with the path to the disk image of the source VM.
# virt-sysprep -a /var/lib/libvirt/images/a-really-important-vm.qcow2
[   0.0] Examining the guest ...
[   7.3] Performing "abrt-data" ...
[   7.3] Performing "backup-files" ...
[   9.6] Performing "bash-history" ...
[   9.6] Performing "blkid-tab" ...
[...]
Verification
To confirm that the process was successful, compare the modified disk image to the original one. The following example shows a successful creation of a template:
# virt-diff -a /var/lib/libvirt/images/a-really-important-vm-orig.qcow2 -A /var/lib/libvirt/images/a-really-important-vm.qcow2
- - 0644       1001 /etc/group-
- - 0000        797 /etc/gshadow-
= - 0444         33 /etc/machine-id
[...]
- - 0600        409 /home/username/.bash_history
- d 0700          6 /home/username/.ssh
- - 0600        868 /root/.bash_history
[...]
Additional resources
-
The OPERATIONS section in the
virt-sysprepman page - Cloning a virtual machine by using the command-line interface
8.2.2. Creating a virtual machine template manually
To create a template from an existing virtual machine (VM), you can manually reset or unconfigure a guest VM to prepare it for cloning.
Prerequisites
Ensure that you know the location of the disk image for the source VM and are the owner of the VM’s disk image file.
Note that disk images for VMs created in the system connection of libvirt are by default located in the
/var/lib/libvirt/imagesdirectory and owned by the root user:# ls -la /var/lib/libvirt/images -rw-------. 1 root root 9665380352 Jul 23 14:50 a-really-important-vm.qcow2 -rw-------. 1 root root 8591507456 Jul 26 2017 an-actual-vm-that-i-use.qcow2 -rw-------. 1 root root 8591507456 Jul 26 2017 totally-not-a-fake-vm.qcow2 -rw-------. 1 root root 10739318784 Sep 20 17:57 another-vm-example.qcow2- Ensure that the VM is shut down.
- Optional: Any important data on the VM’s disk has been backed up. If you want to preserve the source VM intact, clone it first and edit the clone to create a template.
Procedure
Configure the VM for cloning:
- Install any software needed on the clone.
- Configure any non-unique settings for the operating system.
- Configure any non-unique application settings.
Remove the network configuration:
Remove any persistent udev rules by using the following command:
# rm -f /etc/udev/rules.d/70-persistent-net.rulesNoteIf udev rules are not removed, the name of the first NIC might be
eth1instead ofeth0.Remove unique network details from ifcfg scripts by editing
/etc/sysconfig/network-scripts/ifcfg-eth[x]as follows:Remove the HWADDR and Static lines:
NoteIf the HWADDR does not match the new guest’s MAC address, the
ifcfgwill be ignored.DEVICE=eth[x] BOOTPROTO=none ONBOOT=yes #NETWORK=192.0.2.0 <- REMOVE #NETMASK=255.255.255.0 <- REMOVE #IPADDR=192.0.2.1 <- REMOVE #HWADDR=xx:xx:xx:xx:xx <- REMOVE #USERCTL=no <- REMOVE # Remove any other *unique or non-desired settings, such as UUID.*Configure DHCP but do not include HWADDR or any other unique information:
DEVICE=eth[x] BOOTPROTO=dhcp ONBOOT=yes
Ensure the following files also contain the same content, if they exist on your system:
-
/etc/sysconfig/networking/devices/ifcfg-eth[x] /etc/sysconfig/networking/profiles/default/ifcfg-eth[x]NoteIf you had used
NetworkManageror any special settings with the VM, ensure that any additional unique information is removed from theifcfgscripts.
-
Remove registration details:
For VMs registered on the Red Hat Network (RHN):
# rm /etc/sysconfig/rhn/systemidFor VMs registered with Red Hat Subscription Manager (RHSM):
If you do not plan to use the original VM:
# subscription-manager unsubscribe --all # subscription-manager unregister # subscription-manager cleanIf you plan to use the original VM:
# subscription-manager cleanNoteThe original RHSM profile remains in the Portal along with your ID code. Use the following command to reactivate your RHSM registration on the VM after it is cloned:
# subscription-manager register --consumerid=71rd64fx-6216-4409-bf3a-e4b7c7bd8ac9
Remove other unique details:
Remove SSH public and private key pairs:
# rm -rf /etc/ssh/ssh_host_exampleRemove the configuration of LVM devices:
# rm /etc/lvm/devices/system.devices- Remove any other application-specific identifiers or configurations that might cause conflicts if running on multiple machines.
Remove the
gnome-initial-setup-donefile to configure the VM to run the configuration wizard on the next boot:# rm ~/.config/gnome-initial-setup-doneNoteThe wizard that runs on the next boot depends on the configurations that have been removed from the VM. In addition, on the first boot of the clone, it is recommended that you change the hostname.
8.3. Cloning a virtual machine by using the command-line interface
For testing, to create a new virtual machine (VM) with a specific set of properties, you can clone an existing VM by using CLI.
Prerequisites
- The source VM is shut down.
- Ensure that there is sufficient disk space to store the cloned disk images.
- Optional: When creating multiple VM clones, remove unique data and settings from the source VM to ensure the cloned VMs work properly. For instructions, see Creating virtual machine templates.
Procedure
Use the
virt-cloneutility with options that are appropriate for your environment and use case.Sample use cases
The following command clones a local VM named
example-VM-1and creates theexample-VM-1-cloneVM. It also creates and allocates theexample-VM-1-clone.qcow2disk image in the same location as the disk image of the original VM, and with the same data:# virt-clone --original example-VM-1 --auto-clone Allocating 'example-VM-1-clone.qcow2' | 50.0 GB 00:05:37 Clone 'example-VM-1-clone' created successfully.The following command clones a VM named
example-VM-2, and creates a local VM namedexample-VM-3, which uses only two out of multiple disks ofexample-VM-2:# virt-clone --original example-VM-2 --name example-VM-3 --file /var/lib/libvirt/images/disk-1-example-VM-2.qcow2 --file /var/lib/libvirt/images/disk-2-example-VM-2.qcow2 Allocating 'disk-1-example-VM-2-clone.qcow2' | 78.0 GB 00:05:37 Allocating 'disk-2-example-VM-2-clone.qcow2' | 80.0 GB 00:05:37 Clone 'example-VM-3' created successfully.To clone your VM to a different host, migrate the VM without undefining it on the local host. For example, the following commands clone the previously created
example-VM-3VM to the192.0.2.1remote system, including its local disks. Note that you require root privileges to run these commands for192.0.2.1:# virsh migrate --offline --persistent example-VM-3 qemu+ssh://root@192.0.2.1/system root@192.0.2.1's password: # scp /var/lib/libvirt/images/<disk-1-example-VM-2-clone>.qcow2 root@192.0.2.1/<user@remote_host.com>://var/lib/libvirt/images/ # scp /var/lib/libvirt/images/<disk-1-example-VM-2-clone>.qcow2 root@192.0.2.1/<user@remote_host.com>://var/lib/libvirt/images/
Verification
To verify the VM has been successfully cloned and is working correctly:
Confirm the clone has been added to the list of VMs on your host:
# virsh list --all
Id   Name                  State
---------------------------------------
-    example-VM-1          shut off
-    example-VM-1-clone    shut off
Start the clone and observe if it boots up:
# virsh start example-VM-1-clone
Domain 'example-VM-1-clone' started
Additional resources
-
virt-clone (1)man page - Migrating virtual machines
8.4. Cloning a virtual machine by using the web console
To create new virtual machines (VMs) with a specific set of properties, you can clone a VM that you had previously configured by using the web console.
Cloning a VM also clones the disks associated with that VM.
Prerequisites
- The web console VM plug-in is installed on your system.
- Ensure that the VM you want to clone is shut down.
Procedure
In the Virtual Machines interface of the web console, click the Menu button of the VM that you want to clone.
A drop down menu appears with controls for various VM operations.
Click .
The Create a clone VM dialog appears.
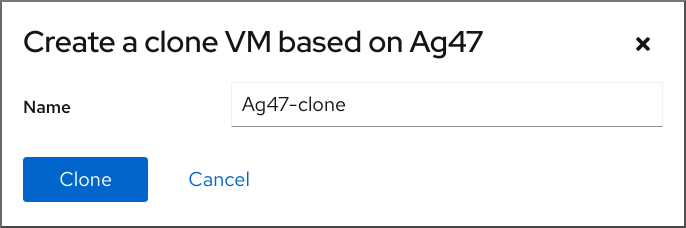
- Optional: Enter a new name for the VM clone.
Click .
A new VM is created based on the source VM.
Verification
- Confirm whether the cloned VM appears in the list of VMs available on your host.