
Red Hat Training
A Red Hat training course is available for RHEL 8
Chapter 11. Preparing and uploading cloud images by using RHEL image builder
RHEL image builder can create custom system images ready for use on various cloud platforms. To use your customized RHEL system image in a cloud, create the system image with RHEL image builder using the chosen output type, configure your system for uploading the image, and upload the image to your cloud account. You can push customized image clouds through the Image Builder application in the RHEL web console, available for a subset of the service providers that we support, such as AWS and Microsoft Azure clouds. See Pushing images to AWS Cloud AMI and Pushing VHD images to Microsoft Azure cloud.
11.1. Preparing to upload AWS AMI images
Before uploading an AWS AMI image, you must configure a system for uploading the images.
Prerequisites
- You must have an Access Key ID configured in the AWS IAM account manager.
- You must have a writable S3 bucket prepared.
Procedure
Install Python 3 and the
piptool:# yum install python3 python3-pip
Install the AWS command-line tools with
pip:# pip3 install awscli
Set your profile. The terminal prompts you to provide your credentials, region and output format:
$ aws configure
AWS Access Key ID [None]:
AWS Secret Access Key [None]:
Default region name [None]:
Default output format [None]:
Define a name for your bucket and create a bucket:
$ BUCKET=bucketname
$ aws s3 mb s3://$BUCKET
Replace bucketname with the actual bucket name. It must be a globally unique name. As a result, your bucket is created.
To grant permission to access the S3 bucket, create a
vmimportS3 Role in the AWS Identity and Access Management (IAM), if you have not already done so in the past:Create a
trust-policy.jsonfile with the trust policy configuration, in the JSON format. For example:{ "Version": "2022-10-17", "Statement": [{ "Effect": "Allow", "Principal": { "Service": "vmie.amazonaws.com" }, "Action": "sts:AssumeRole", "Condition": { "StringEquals": { "sts:Externalid": "vmimport" } } }] }Create a
role-policy.jsonfile with the role policy configuration, in the JSON format. For example:{ "Version": "2012-10-17", "Statement": [{ "Effect": "Allow", "Action": ["s3:GetBucketLocation", "s3:GetObject", "s3:ListBucket"], "Resource": ["arn:aws:s3:::%s", "arn:aws:s3:::%s/"] }, { "Effect": "Allow", "Action": ["ec2:ModifySnapshotAttribute", "ec2:CopySnapshot", "ec2:RegisterImage", "ec2:Describe"], "Resource": "*" }] } $BUCKET $BUCKETCreate a role for your Amazon Web Services account, by using the
trust-policy.jsonfile:$ aws iam create-role --role-name vmimport --assume-role-policy-document file://trust-policy.json
Embed an inline policy document, by using the
role-policy.jsonfile:$ aws iam put-role-policy --role-name vmimport --policy-name vmimport --policy-document file://role-policy.json
Additional resources
11.2. Uploading an AMI image to AWS by using the CLI
You can use RHEL image builder to build ami images and push them directly to Amazon AWS Cloud service provider, by using the CLI.
Prerequisites
Procedure
Using the text editor, create a configuration file with the following content:
provider = "aws"

[settings]
accessKeyID = "AWS_ACCESS_KEY_ID"
secretAccessKey = "AWS_SECRET_ACCESS_KEY"
bucket = "AWS_BUCKET"
region = "AWS_REGION"
key = "IMAGE_KEY"
Replace values in the fields with your credentials for
accessKeyID,secretAccessKey,bucket, andregion. TheIMAGE_KEYvalue is the name of your VM Image to be uploaded to EC2.- Save the file as CONFIGURATION-FILE.toml and close the text editor.
Start the compose to upload it to AWS:
# composer-cli compose start blueprint-name image-type image-key configuration-file.toml
Replace:
- blueprint-name with the name of the blueprint you created
-
image-type with the
amiimage type. - image-key with the name of your VM Image to be uploaded to EC2.
configuration-file.toml with the name of the configuration file of the cloud provider.
NoteYou must have the correct AWS Identity and Access Management (IAM) settings for the bucket you are going to send your customized image to. You have to set up a policy to your bucket before you are able to upload images to it.
Check the status of the image build:
# composer-cli compose status
After the image upload process is complete, you can see the "FINISHED" status.
Verification
To confirm that the image upload was successful:
-
Access EC2 on the menu and select the correct region in the AWS console. The image must have the
availablestatus, to indicate that it was successfully uploaded. - On the dashboard, select your image and click .
Additional Resources
11.3. Pushing images to AWS Cloud AMI
You can create a (.raw) image by using RHEL image builder, and choose to check the Upload to AWS checkbox to push the output image that you create directly to the Amazon AWS Cloud AMI service provider.
Prerequisites
-
You must have
rootorwheelgroup user access to the system. - You have opened the RHEL image builder interface of the RHEL web console in a browser.
- You have created a blueprint. See Creating a blueprint in the web console interface.
- You must have an Access Key ID configured in the AWS IAM account manager.
- You must have a writable S3 bucket prepared.
Procedure
- In the RHEL image builder dashboard, click the blueprint name that you previously created.
- Select the tab .
Click to create your customized image.
The Create Image window opens.
-
From the Type drop-down menu list, select
Amazon Machine Image Disk (.raw). - Check the Upload to AWS checkbox to upload your image to the AWS Cloud and click .
To authenticate your access to AWS, type your
AWS access key IDandAWS secret access keyin the corresponding fields. Click .NoteYou can view your AWS secret access key only when you create a new Access Key ID. If you do not know your Secret Key, generate a new Access Key ID.
-
Type the name of the image in the
Image namefield, type the Amazon bucket name in theAmazon S3 bucket namefield and type theAWS regionfield for the bucket you are going to add your customized image to. Click . Review the information and click .
Optionally, click to modify any incorrect detail.
NoteYou must have the correct IAM settings for the bucket you are going to send your customized image. This procedure uses the IAM Import and Export, so you have to set up a policy to your bucket before you are able to upload images to it. For more information, see Required Permissions for IAM Users.
-
From the Type drop-down menu list, select
A pop-up on the upper right informs you of the saving progress. It also informs that the image creation has been initiated, the progress of this image creation and the subsequent upload to the AWS Cloud.
After the process is complete, you can see the Image build complete status.
In a browser, access Service→EC2.
-
On the AWS console dashboard menu, choose the correct region. The image must have the
Availablestatus, to indicate that it is uploaded. - On the AWS dashboard, select your image and click .
-
On the AWS console dashboard menu, choose the correct region. The image must have the
- A new window opens. Choose an instance type according to the resources you need to start your image. Click .
- Review your instance start details. You can edit each section if you need to make any changes. Click
Before you start the instance, select a public key to access it.
You can either use the key pair you already have or you can create a new key pair.
Follow the next steps to create a new key pair in EC2 and attach it to the new instance.
- From the drop-down menu list, select Create a new key pair.
- Enter the name to the new key pair. It generates a new key pair.
- Click Download Key Pair to save the new key pair on your local system.
Then, you can click to start your instance.
You can check the status of the instance, which displays as Initializing.
- After the instance status is running, the button becomes available.
Click . A window appears with instructions on how to connect by using SSH.
- Select A standalone SSH client as the preferred connection method to and open a terminal.
In the location you store your private key, ensure that your key is publicly viewable for SSH to work. To do so, run the command:
$ chmod 400 _your-instance-name.pem_>
Connect to your instance by using its Public DNS:
$ ssh -i <_your-instance-name.pem_> ec2-user@<_your-instance-IP-address_>
Type
yesto confirm that you want to continue connecting.As a result, you are connected to your instance over SSH.
Verification
- Check if you are able to perform any action while connected to your instance by using SSH.
11.4. Preparing to upload Microsoft Azure VHD images
You can use RHEL image builder to create a VHD image that can be uploaded to Microsoft Azure cloud.
Prerequisites
- You must have a Microsoft Azure resource group and storage account.
-
You have Python installed. The
AZ CLItool depends on python.
Procedure
Import the Microsoft repository key:
# rpm --import https://packages.microsoft.com/keys/microsoft.asc
Create a local
azure-cli.reporepository with the following information. Save theazure-cli.reporepository under/etc/yum.repos.d/:[azure-cli] name=Azure CLI baseurl=https://packages.microsoft.com/yumrepos/vscode enabled=1 gpgcheck=1 gpgkey=https://packages.microsoft.com/keys/microsoft.asc
Install the Microsoft Azure CLI:
# yumdownloader azure-cli
# rpm -ivh --nodeps azure-cli-2.0.64-1.el7.x86_64.rpm
NoteThe downloaded version of the Microsoft Azure CLI package can vary depending on the current available version.
Run the Microsoft Azure CLI:
$ az login
The terminal shows the following message
Note, we have launched a browser for you to login. For old experience with device code, use "az login --use-device-code. Then, the terminal opens a browser with a link to https://microsoft.com/devicelogin from where you can login.NoteIf you are running a remote (SSH) session, the login page link will not open in the browser. In this case, you can copy the link to a browser and login to authenticate your remote session. To sign in, use a web browser to open the page https://microsoft.com/devicelogin and enter the device code to authenticate.
List the keys for the storage account in Microsoft Azure:
$ az storage account keys list --resource-group <resource_group_name> --account-name <storage_account_name>
Replace resource-group-name with name of your Microsoft Azure resource group and storage-account-name with name of your Microsoft Azure storage account.
NoteYou can list the available resources using the following command:
$ az resource list
Make note of value key1 in the output of the previous command.
Create a storage container:
$ az storage container create --account-name <storage_account_name>\
--account-key <key1_value> --name <storage_account_name>
Replace storage-account-name with name of the storage account.
Additional resources
11.5. Uploading VHD images to Microsoft Azure cloud
After you have created your customized VHD image, you can upload it to the Microsoft Azure cloud.
Prerequisites
- Your system must be set up for uploading Microsoft Azure VHD images. See Preparing to upload Microsoft Azure VHD images.
You must have a Microsoft Azure VHD image created by RHEL image builder.
-
In the CLI, use the
vhdoutput type. -
In the GUI, use the
Azure Disk Image (.vhd)image type.
-
In the CLI, use the
Procedure
Push the image to Microsoft Azure and create an instance from it:
$ az storage blob upload --account-name <account_name> --container-name <container_name> --file <_image_-disk.vhd> --name <_image_-disk.vhd> --type page
...
After the upload to the Microsoft Azure Blob storage completes, create a Microsoft Azure image from it:
$ az image create --resource-group < _resource_group_name_> --name <_image_-disk.vhd>  --os-type linux --location eastus --source https://$ACCOUNT.blob.core.windows.net/<_container_name_> <_image_-disk.vhd>
 - Running ...
Verification
Create an instance either with the Microsoft Azure portal, or a command similar to the following:
$ az vm create --resource-group <_resource_group_name_> --location eastus --name <_image_-disk.vhd> --image <_image_-disk.vhd> --admin-username azure-user --generate-ssh-keys
 - Running ...
-
Use your private key via SSH to access the resulting instance. Log in as
azure-user. This username was set on the previous step.
Additional Resources
11.6. Pushing VHD images to Microsoft Azure cloud
You can create .vhd images by using RHEL image builder. Then, you can push the output .vhd images to a Blob Storage of the Microsoft Azure Cloud service provider.
Prerequisites
- You have root access to the system.
- You have access to the RHEL image builder interface of the RHEL web console.
- You created a blueprint. See Creating a RHEL image builder blueprint in the web console interface.
- You have a Microsoft Storage Account created.
- You have a writable Blob Storage prepared.
Procedure
- In the RHEL image builder dashboard, select the blueprint you want to use.
- Click the tab.
Click to create your customized
.vhdimage.The Create image wizard opens.
-
Select
Microsoft Azure (.vhd)from the Type drop-down menu list. - Check the Upload to Azure checkbox to upload your image to the Microsoft Azure Cloud.
- Enter the Image Size and click .
-
Select
On the Upload to Azure page, enter the following information:
On the Authentication page, enter:
- Your Storage account name. You can find it on the Storage account page, in the Microsoft Azure portal.
- Your Storage access key: You can find it on the Access Key Storage page.
- Click .
On the Authentication page, enter:
- The image name.
- The Storage container. It is the blob container to which you will upload the image. Find it under the Blob service section, in the Microsoft Azure portal.
- Click .
On the Review page, click . The RHEL image builder and upload processes start.
Access the image you pushed into Microsoft Azure Cloud.
- Access the Microsoft Azure portal.
- In the search bar, type "storage account" and click Storage accounts from the list.
- On the search bar, type "Images" and select the first entry under Services. You are redirected to the Image dashboard.
- On the navigation panel, click Containers.
-
Find the container you created. Inside the container is the
.vhdfile you created and pushed by using RHEL image builder.
Verification
Verify that you can create a VM image and launch it.
- In the search bar, type images account and click Images from the list.
- Click .
- From the dropdown list, choose the resource group you used earlier.
- Enter a name for the image.
- For the OS type, select Linux.
- For the VM generation, select Gen 2.
- Under Storage Blob, click and click through the storage accounts and container until you reach your VHD file.
- Click Select at the end of the page.
- Choose an Account Type, for example, Standard SSD.
- Click and then . Wait a few moments for the image creation.
To launch the VM, follow the steps:
- Click .
- Click from the menu bar on the header.
- Enter a name for your virtual machine.
- Complete the Size and Administrator account sections.
Click and then . You can see the deployment progress.
After the deployment finishes, click the virtual machine name to retrieve the public IP address of the instance to connect by using SSH.
- Open a terminal to create an SSH connection to connect to the VM.
11.7. Uploading VMDK images and creating a RHEL virtual machine in vSphere
With RHEL image builder, you can create customized VMware vSphere system images, either in the Open virtualization format (.ova) or in the Virtual disk (.vmdk) format. You can upload these images to the VMware vSphere client. You can upload the .vmdk or .ova image to VMware vSphere using the govc import.vmdk CLI tool. The vmdk you create contains the cloud-init package installed and you can use it to provision users by using user data, for example.
Uploading vmdk images by using the VMware vSphere GUI is not supported.
Prerequisites
- You created a blueprint with username and password customizations.
-
You created a VMware vSphere image either in the
.ovaor.vmdkformat by using RHEL image builder and downloaded it to your host system. -
You installed and configured the
govcCLI tool, to be able use theimport.vmdkcommand.
Procedure
Configure the following values in the user environment with the GOVC environment variables:
GOVC_URL
GOVC_DATACENTER
GOVC_FOLDER
GOVC_DATASTORE
GOVC_RESOURCE_POOL
GOVC_NETWORK
- Navigate to the directory where you downloaded your VMware vSphere image.
Launch the VMware vSphere image on vSphere by following the steps:
Import the VMware vSphere image in to vSphere:
$ govc import.vmdk ./composer-api.vmdk foldernameFor the
.ovaformat:$ govc import.ova ./composer-api.ova foldernameCreate the VM in vSphere without powering it on:
govc vm.create \
-net.adapter=vmxnet3 \
-m=4096 -c=2 -g=rhel8_64Guest \
-firmware=efi -disk=”foldername/composer-api.vmdk” \
-disk.controller=scsi -on=false \
 vmname
For the
.ovaformat, replace the line-firmware=efi -disk=”foldername/composer-api.vmdk” \with `-firmware=efi -disk=”foldername/composer-api.ova” \Power-on the VM:
govc vm.power -on vmnameRetrieve the VM IP address:
govc vm.ip vmnameUse SSH to log in to the VM, using the username and password you specified in your blueprint:
$ ssh admin@<_ip_address_of_the_vm_>
NoteIf you copied the
.vmdkimage from your local host to the destination using thegovc datastore.uploadcommand, using the resulting image is not supported. There is no option to use theimport.vmdkcommand in the vSphere GUI and as a result, the vSphere GUI does not support the direct upload. As a consequence, the.vmdkimage is not usable from the vSphere GUI.
11.8. Uploading images to GCP with RHEL image builder
With RHEL image builder, you can build a gce image, provide credentials for your user or GCP service account, and then upload the gce image directly to the GCP environment.
11.8.1. Uploading a gce image to GCP by using the CLI
Follow the procedure to set up a configuration file with credentials to upload your gce image to GCP.
You cannot manually import gce image to GCP, because the image will not boot. You must use either gcloud or RHEL image builder to upload it.
Prerequisites
You have a valid Google account and credentials to upload your image to GCP. The credentials can be from a user account or a service account. The account associated with the credentials must have at least the following IAM roles assigned:
-
roles/storage.admin- to create and delete storage objects -
roles/compute.storageAdmin- to import a VM image to Compute Engine.
-
- You have an existing GCP bucket.
Procedure
By using a text editor, create a
gcp-config.tomlconfiguration file with the following content:provider = "gcp" [settings] bucket = "GCP_BUCKET" region = "GCP_STORAGE_REGION" object = "OBJECT_KEY" credentials = "GCP_CREDENTIALS"
-
GCP_BUCKETpoints to an existing bucket. It is used to store the intermediate storage object of the image which is being uploaded. -
GCP_STORAGE_REGIONis both a regular Google storage region and, a dual or multi region. -
OBJECT_KEYis the name of an intermediate storage object. It must not exist before the upload, and it is deleted when the upload process is done. If the object name does not end with.tar.gz, the extension is automatically added to the object name. GCP_CREDENTIALSis a Base64-encoded scheme of the credentials JSON file downloaded from GCP. The credentials determine which project the GCP uploads the image to.NoteSpecifying
GCP_CREDENTIALSin thegcp-config.tomlfile is optional if you use a different mechanism to authenticate with GCP. For other authentication methods, see Authenticating with GCP.
-
Retrieve the
GCP_CREDENTIALSfrom the JSON file downloaded from GCP.$ sudo base64 -w 0 cee-gcp-nasa-476a1fa485b7.json
Create a compose with an additional image name and cloud provider profile:
$ sudo composer-cli compose start BLUEPRINT-NAME gce IMAGE_KEY gcp-config.toml
The image build, upload, and cloud registration processes can take up to ten minutes to complete.
Verification
Verify that the image status is FINISHED:
$ sudo composer-cli compose status
Additional resources
11.8.2. How RHEL image builder sorts the authentication order of different GCP credentials
You can use several different types of credentials with RHEL image builder to authenticate with GCP. If RHEL image builder configuration is set to authenticate with GCP using multiple sets of credentials, it uses the credentials in the following order of preference:
-
Credentials specified with the
composer-clicommand in the configuration file. -
Credentials configured in the
osbuild-composerworker configuration. Application Default Credentialsfrom theGoogle GCP SDKlibrary, which tries to automatically find a way to authenticate by using the following options:- If the GOOGLE_APPLICATION_CREDENTIALS environment variable is set, Application Default Credentials tries to load and use credentials from the file pointed to by the variable.
Application Default Credentials tries to authenticate by using the service account attached to the resource that is running the code. For example, Google Compute Engine VM.
NoteYou must use the GCP credentials to determine which GCP project to upload the image to. Therefore, unless you want to upload all of your images to the same GCP project, you always must specify the credentials in the
gcp-config.tomlconfiguration file with thecomposer-clicommand.
11.8.2.1. Specifying GCP credentials with the composer-cli command
You can specify GCP authentication credentials in the upload target configuration gcp-config.toml file. Use a Base64-encoded scheme of the Google account credentials JSON file to save time.
Procedure
Get the encoded content of the Google account credentials file with the path stored in
GOOGLE_APPLICATION_CREDENTIALSenvironment variable, by running the following command:$ base64 -w 0 "${GOOGLE_APPLICATION_CREDENTIALS}"In the upload target configuration
gcp-config.tomlfile, set the credentials:provider = "gcp" [settings] provider = "gcp" [settings] ... credentials = "GCP_CREDENTIALS"
11.8.2.2. Specifying credentials in the osbuild-composer worker configuration
You can configure GCP authentication credentials to be used for GCP globally for all image builds. This way, if you want to import images to the same GCP project, you can use the same credentials for all image uploads to GCP.
Procedure
In the
/etc/osbuild-worker/osbuild-worker.tomlworker configuration, set the following credential value:[gcp] credentials = "PATH_TO_GCP_ACCOUNT_CREDENTIALS"
11.9. Pushing VMDK images to vSphere using the RHEL image builder GUI tool
You can build VMware images by using the RHEL image builder GUI tool and push the images directly to your vSphere instance, to avoid having to download the image file and push it manually. The vmdk you create contains the cloud-init package installed and you can use it to provision users by using user data, for example. To build .vmdk images by using RHEL image builder and push them directly to vSphere instances service provider, follow the steps:
Prerequisites
-
You are a member of the
rootor theweldrgroup. - You have opened link:https://localhost:9090/RHEL image builder in a browser.
- You have created a blueprint. See Creating a RHEL image builder blueprint in the web console interface.
- You have a vSphere Account.
Procedure
- For the blueprint you created, click the tab .
Click to create your customized image.
The Image type window opens.
In the Image type window:
- From the dropdown menu, select the Type: VMware vSphere (.vmdk).
- Check the Upload to VMware checkbox to upload your image to the vSphere.
- Optional: Set the size of the image you want to instantiate. The minimal default size is 2 GB.
- Click .
In the Upload to VMware window, under Authentication, enter the following details:
- Username: username of the vSphere account.
- Password: password of the vSphere account.
In the Upload to VMware window, under Destination, enter the following details about the image upload destination:
- Image name: a name for the image.
- Host: The URL of your VMware vSphere.
- Cluster: The name of the cluster.
- Data center: The name of the data center.
- Data store:The name of the Data store.
- Click Next.
In the Review window, review the details of the image creation and click .
You can click to modify any incorrect detail.
RHEL image builder adds the compose of a RHEL vSphere image to the queue, and creates and uploads the image to the Cluster on the vSphere instance you specified.
NoteThe image build and upload processes take a few minutes to complete.
After the process is complete, you can see the Image build complete status.
Verification
After the image status upload is completed successfully, you can create a Virtual Machine (VM) from the image you uploaded and login into it. To do so:
- Access VMware vSphere Client.
- Search for the image in the Cluster on the vSphere instance you specified.
- Select the image you uploaded.
- Right-click the selected image.
Click
New Virtual Machine.A New Virtual Machine window opens.
In the New Virtual Machine window, provide the following details:
-
Select
New Virtual Machine. - Select a name and a folder for your VM.
- Select a computer resource: choose a destination computer resource for this operation.
- Select storage: For example, select NFS-Node1
- Select compatibility: The image should be BIOS only.
- Select a guest operating system: For example, select Linux and Red Hat Fedora (64-bit).
- Customize hardware: When creating a VM, on the Device Configuration button on the upper right, delete the default New Hard Disk and use the drop-down to select an Existing Hard Disk disk image:
- Ready to complete: Review the details and click Finish to create the image.
-
Select
Navigate to the VMs tab.
- From the list, select the VM you created.
- Click the Start button from the panel. A new window appears, showing the VM image loading.
- Log in with the credentials you created for the blueprint.
You can verify if the packages you added to the blueprint are installed. For example:
$ rpm -qa | grep firefox
Additional resources
11.10. Pushing customized images to OCI
With RHEL image builder, you can build customized images and push them directly to your Oracle Cloud Infrastructure (OCI) instance. Then, you can start an image instance from the OCI dashboard.
Prerequisites
-
You have
rootorweldrgroup user access to the system. - You have an Oracle Cloud account.
- You must be granted security access in an OCI policy by your administrator.
-
You have created an OCI Bucket in the
OCI_REGIONof your choice.
Procedure
- Open the RHEL image builder interface of the web console in a browser.
- Click . The Create blueprint wizard opens.
- On the Details page, enter a name for the blueprint, and optionally, a description. Click .
- On the Packages page, select the components and packages that you want to include in the image. Click .
- On the Customizations page, configure the customizations that you want for your blueprint. Click .
- On the Review page, click .
- To create an image, click . The Create image wizard opens.
On the Image output page, complete the following steps:
- From the "Select a blueprint" drop-down menu, select the blueprint you want.
-
From the "Image output type" drop-down menu, select
Oracle Cloud Infrastructure (.qcow2). - Check the "Upload OCI checkbox to upload your image to the OCI.
- Enter the "image size". Click .
On the Upload to OCI - Authentication page, enter the following mandatory details:
- User OCID: you can find it in the Console on the page showing the user’s details.
- Private key
On the Upload to OCI - Destination page, enter the following mandatory details and click .
- Image name: a name for the image to be uploaded.
- OCI bucket
- Bucket namespace
- Bucket region
- Bucket compartment
- Bucket tenancy
- Review the details in the wizard and click .
RHEL image builder adds the compose of a RHEL .qcow2 image to the queue.
Verification
- Access the OCI dashboard → Custom Images.
- Select the Compartment you specified for the image and locate the image in the Import image table.
- Click the image name and verify the image information.
Additional resources
11.11. Uploading QCOW2 images to OpenStack
With the RHEL image builder tool, you can create customized .qcow2 images that are suitable for uploading to OpenStack cloud deployments, and starting instances there. RHEL image builder creates images in the QCOW2 format, but with further changes specific to OpenStack.
Do not mistake the generic QCOW2 image type output format you create by using RHEL image builder with the OpenStack image type, which is also in the QCOW2 format, but contains further changes specific to OpenStack.
Prerequisites
- You have created a blueprint.
Procedure
Start the compose of a
QCOW2image.# composer-cli compose start blueprint_name openstackCheck the status of the building.
# composer-cli compose status
After the image build finishes, you can download the image.
Download the
QCOW2image:# composer-cli compose image UUID- Access the OpenStack dashboard and click .
-
On the left menu, select the
Admintab. From the
System Panel, clickImage.The
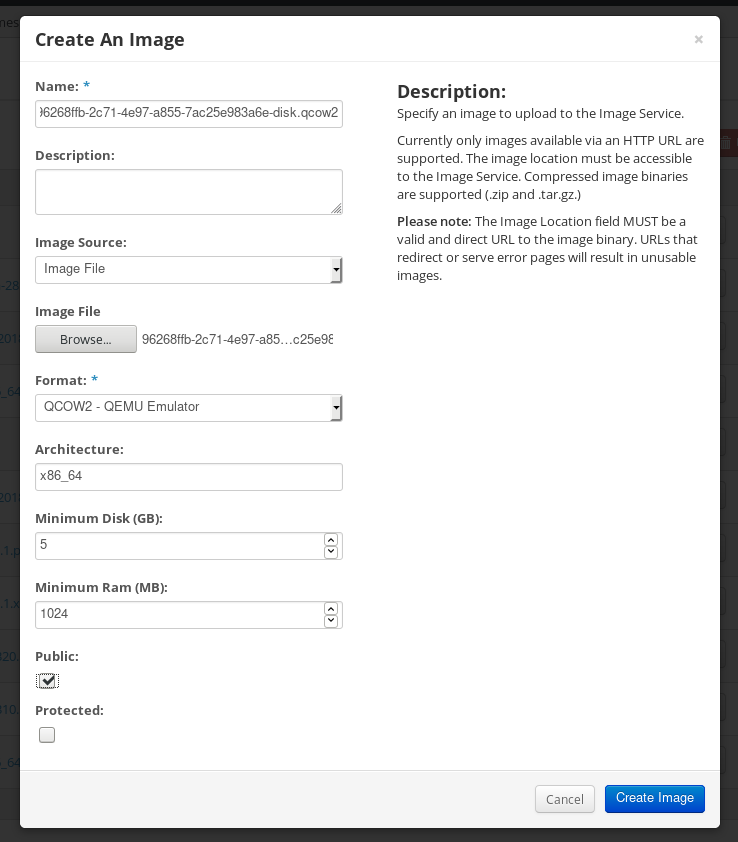
Create An Imagewizard opens.In the
Create An Imagewizard:- Enter a name for the image
-
Click
Browseto upload theQCOW2image. -
From the
Formatdropdown list, select theQCOW2 - QEMU Emulator. Click .
On the left menu, select the
Projecttab.-
From the
Computemenu, selectInstances. Click the button.
The
Launch Instancewizard opens.-
On the
Detailspage, enter a name for the instance. Click . -
On the
Sourcepage, select the name of the image you uploaded. Click . On the
Flavorpage, select the machine resources that best fit your needs. Click .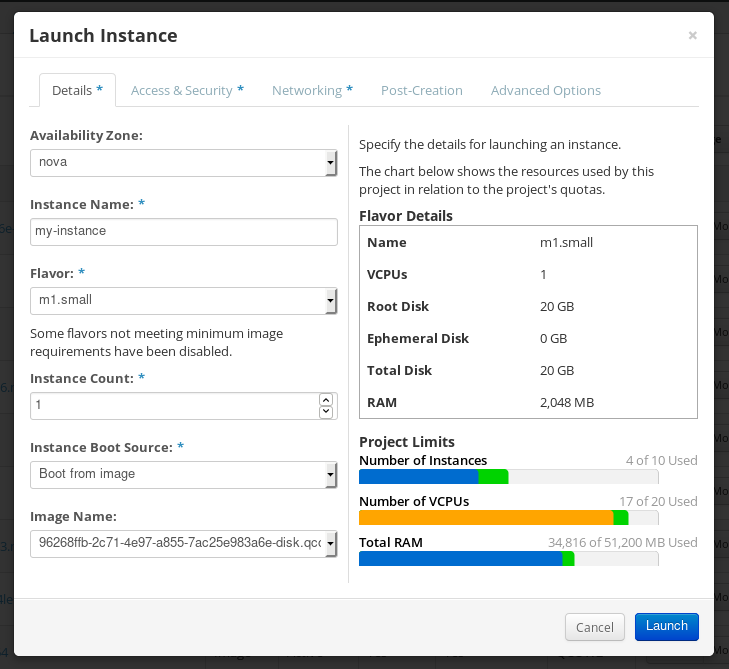
-
From the
-
You can run the image instance using any mechanism (CLI or OpenStack web UI) from the image. Use your private key via SSH to access the resulting instance. Log in as
cloud-user.
11.12. Preparing to upload customized RHEL images to Alibaba Cloud
To deploy a customized RHEL image to the Alibaba Cloud, first you need to verify the customized image. The image needs a specific configuration to boot successfully, because Alibaba Cloud requests the custom images to meet certain requirements before you use it.
RHEL image builder generates images that conform to Alibaba’s requirements. However, Red Hat recommends also using the Alibaba image_check tool to verify the format compliance of your image.
Prerequisites
- You must have created an Alibaba image by using RHEL image builder.
Procedure
- Connect to the system containing the image that you want to check by using the Alibaba image_check tool.
Download the image_check tool:
$ curl -O https://docs-aliyun.cn-hangzhou.oss.aliyun-inc.com/assets/attach/73848/cn_zh/1557459863884/image_check
Change the file permission of the image compliance tool:
# chmod +x image_check
Run the command to start the image compliance tool checkup:
# ./image_check
The tool verifies the system configuration and generates a report that is displayed on your screen. The image_check tool saves this report in the same folder where the image compliance tool is running.
Troubleshooting
If any of the Detection Items fail, follow the instructions in the terminal to correct it.
Additional resources
11.13. Uploading customized RHEL images to Alibaba
You can upload a customized AMI image you created by using RHEL image builder to the Object Storage Service (OSS).
Prerequisites
- Your system is set up for uploading Alibaba images. See Preparing for uploading images to Alibaba.
-
You have created an
amiimage by using RHEL image builder. - You have a bucket. See Creating a bucket.
- You have an active Alibaba Account.
- You activated OSS.
Procedure
- Log in to the OSS console.
- In the Bucket menu on the left, select the bucket to which you want to upload an image.
- In the upper right menu, click the Files tab.
Click . A dialog window opens on the right side. Configure the following:
- Upload To: Choose to upload the file to the Current directory or to a Specified directory.
- File ACL: Choose the type of permission of the uploaded file.
- Click .
- Select the image you want to upload to the OSS Console..
- Click .
Additional resources
11.14. Importing images to Alibaba Cloud
To import a customized Alibaba RHEL image that you created by using RHEL image builder to the Elastic Compute Service (ECS), follow the steps:
Prerequisites
- Your system is set up for uploading Alibaba images. See Preparing for uploading images to Alibaba.
-
You have created an
amiimage by using RHEL image builder. - You have a bucket. See Creating a bucket.
- You have an active Alibaba Account.
- You activated OSS.
- You have uploaded the image to Object Storage Service (OSS). See Uploading images to Alibaba.
Procedure
Log in to the ECS console.
- On the left-side menu, click .
- On the upper right side, click . A dialog window opens.
Confirm that you have set up the correct region where the image is located. Enter the following information:
-
OSS Object Address: See how to obtain OSS Object Address. -
Image Name -
Operating System -
System Disk Size -
System Architecture -
Platform: Red Hat
-
Optionally, provide the following details:
-
Image Format:qcow2orami, depending on the uploaded image format. -
Image Description Add Images of Data DisksThe address can be determined in the OSS management console. After selecting the required bucket in the left menu:
-
-
Select
Filessection. Click the Details link on the right for the appropriate image.
A window appears on the right side of the screen, showing image details. The
OSSobject address is in theURLbox.Click .
NoteThe importing process time can vary depending on the image size.
The customized image is imported to the ECS Console.
Additional resources
11.15. Creating an instance of a customized RHEL image using Alibaba Cloud
You can create instances of a customized RHEL image by using the Alibaba ECS Console.
Prerequisites
- You have activated OSS and uploaded your custom image.
- You have successfully imported your image to ECS Console. See Importing images to Alibaba.
Procedure
- Log in to the ECS console.
- On the left-side menu, select Instances.
- In the upper-right corner, click Create Instance. You are redirected to a new window.
- Complete all the required information. See Creating an instance by using the wizard for more details.
Click Create Instance and confirm the order.
NoteYou can see the option Create Order instead of Create Instance, depending on your subscription.
As a result, you have an active instance ready for deployment from the Alibaba ECS Console.
Additional resources