
Composing, installing, and managing RHEL for Edge images
Creating, deploying, and managing Edge systems with Red Hat Enterprise Linux 8
Abstract
Making open source more inclusive
Red Hat is committed to replacing problematic language in our code, documentation, and web properties. We are beginning with these four terms: master, slave, blacklist, and whitelist. Because of the enormity of this endeavor, these changes will be implemented gradually over several upcoming releases. For more details, see our CTO Chris Wright’s message.
Providing feedback on Red Hat documentation
We appreciate your feedback on our documentation. Let us know how we can improve it.
Submitting feedback through Jira (account required)
- Log in to the Jira website.
- Click Create in the top navigation bar.
- Enter a descriptive title in the Summary field.
- Enter your suggestion for improvement in the Description field. Include links to the relevant parts of the documentation.
- Click Create at the bottom of the dialogue.
Chapter 1. Introducing RHEL for Edge images
A RHEL for Edge image is an rpm-ostree image that includes system packages to remotely install RHEL on Edge servers.
The system packages include:
-
Base OSpackage - Podman as the container engine
- Additional RPM content
Differently from RHEL images, RHEL for Edge is an immutable operating system, that is, it contains a read-only root directory with the following characteristics:
- The packages are isolated from root directory
- Package installs create layers that make it easy to rollback to previous versions
- Efficient updates to disconnected environments
- Supports multiple operating system branches and repositories
-
Has a hybrid
rpm-ostreepackage system
You can deploy a RHEL for Edge image on Bare Metal, Appliance, and Edge servers.
You can compose customized RHEL for Edge images using the RHEL image builder tool. You can also create RHEL for Edge images by accessing the edge management application in the Red Hat Hybrid Cloud Console platform and configure automated management.
The edge management application simplifies the way you can provision and register your images. To learn more about the edge management, see the Create RHEL for Edge images and configure automated management documentation.
Using RHEL for Edge customized images that were created using the RHEL image builder on-premise version artifacts is not supported in the edge management application. See Edge management supportability.
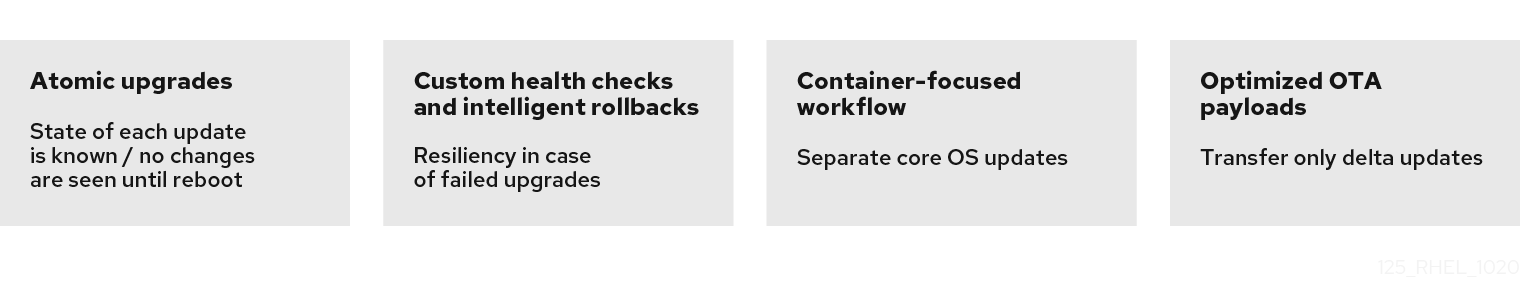
With a RHEL for Edge image, you can achieve the following:
1.1. RHEL for Edge—supported architecture
Currently, you can deploy RHEL for Edge images on AMD and Intel 64-bit systems.
RHEL for Edge does not support ARM systems in RHEL 8.
1.2. How to compose and deploy a RHEL for Edge image
Composing and deploying a RHEL for Edge image involves two phases:
-
Composing a RHEL
rpm-ostreeimage using the RHEL image builder tool. You can access RHEL image builder through a command-line interface in thecomposer-clitool, or use a graphical user interface in the RHEL web console. - Deploying the image using RHEL installer.
While composing a RHEL for Edge image, you can select any of the following image types. Composing the different RHEL for Edge images might or might not require network access. See the table:
Table 1.1. RHEL for Edge images type
| Image type | Description | Suitable for network-based deployments | Suitable for non-network-based deployments |
|---|---|---|---|
|
RHEL for Edge Commit ( |
The | Yes | No |
|
RHEL for Edge Container ( |
The | No | Yes |
|
RHEL for Edge Installer ( |
The | No | Yes |
| RHEL for Edge Raw Image (.raw.xz) |
The | Yes | Yes |
|
RHEL for Edge Simplified Installer ( |
The | Yes | Yes |
|
RHEL for Edge AMI ( |
The | Yes | Yes |
|
RHEL for Edge VMDK ( |
The | Yes | Yes |
The image types vary in terms of their contents, and are therefore suitable for different types of deployment environments.
Additional resources
1.3. Non-network-based deployments
Use RHEL image builder to create flexible RHEL rpm-ostree images to suit your requirements, and then use Anaconda to deploy them in your environment.
You can access RHEL image builder through a command-line interface in the composer-cli tool, or use a graphical user interface in the RHEL web console.
Composing and deploying a RHEL for Edge image in non-network-based deployments involves the following high-level steps:
- Install and register a RHEL system
- Install RHEL image builder
- Using RHEL image builder, create a blueprint with customizations for RHEL for Edge Container image
- Import the RHEL for Edge blueprint in RHEL image builder
- Create a RHEL for Edge image embed in an OCI container with a webserver ready to deploy the commit as an OSTree repository
- Download the RHEL for Edge Container image file
- Deploy the container serving a repository with the RHEL for Edge Container commit
- Using RHEL image builder, create another blueprint for RHEL for Edge Installer image
- Create a RHEL for Edge Installer image configured to pull the commit from the running container embedded with RHEL for Edge Container image
- Download the RHEL for Edge Installer image
- Run the installation
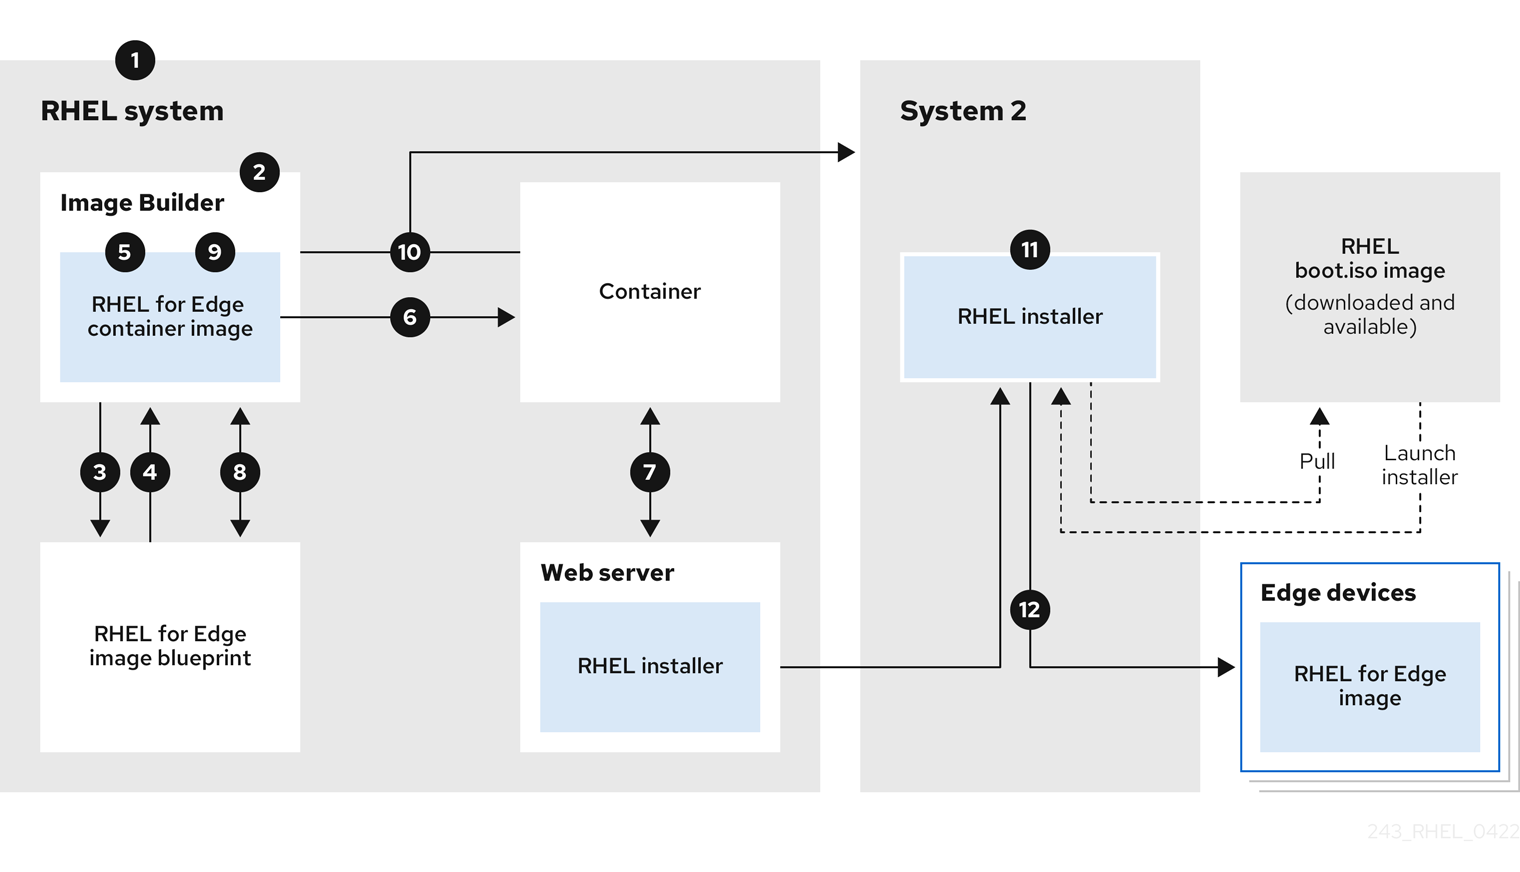
The following diagram represents the RHEL for Edge image non-network deployment workflow:
Figure 1.1. Deploying RHEL for Edge in non-network environment
1.4. Network-based deployments
Use RHEL image builder to create flexible RHEL rpm-ostree images to suit your requirements, and then use Anaconda to deploy them in your environment. RHEL image builder automatically identifies the details of your deployment setup and generates the image output as an edge-commit as a .tar file.
You can access RHEL image builder through a command-line interface in the composer-cli tool, or use a graphical user interface in the RHEL web console.
You can compose and deploy the RHEL for Edge image by performing the following high-level steps:
For an attended installation
- Install and register a RHEL system
- Install RHEL image builder
- Using RHEL image builder, create a blueprint for RHEL for Edge image
- Import the RHEL for Edge blueprint in RHEL image builder
-
Create a RHEL for Edge Commit (
.tar) image - Download the RHEL for Edge image file
- On the same system where you have installed RHEL image builder, install a web server that you want to serve the the RHEL for Edge Commit content. For instructions, see Setting up and configuring NGINX
-
Extract the RHEL for Edge Commit (
.tar) content to the running web server - Create a Kickstart file that pulls the OSTree content from the running web server. For details on how to modify the Kickstart to pull the OSTree content, see Extracting the RHEL for Edge image commit
- Boot the RHEL installer ISO on the edge device and provide the Kickstart to it.
For an unattended installation, you can customize the RHEL installation ISO and embed the Kickstart file to it.
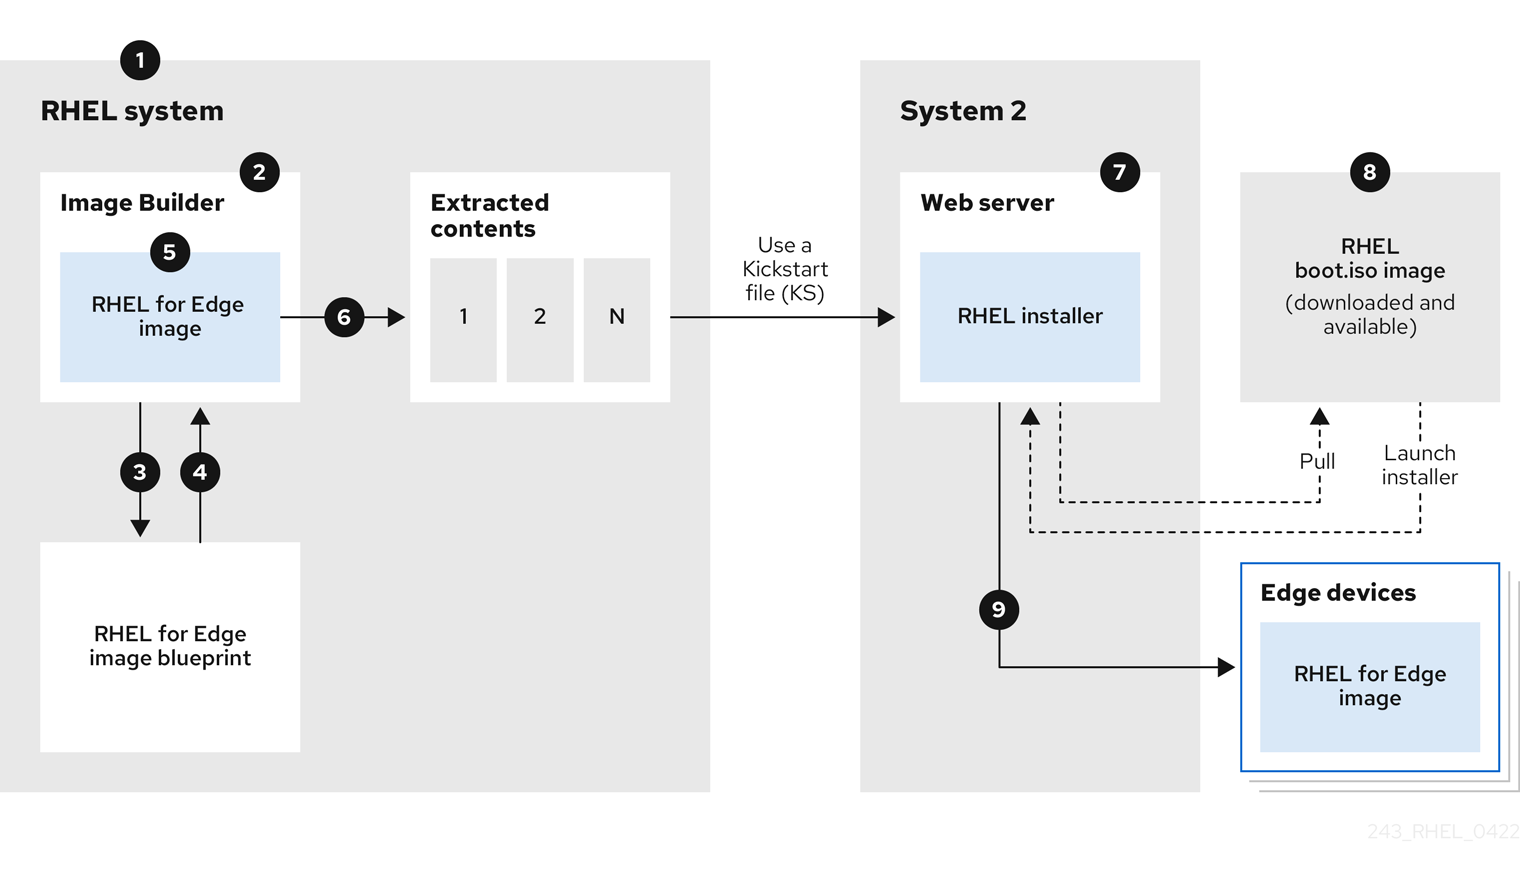
The following diagram represents the RHEL for Edge network image deployment workflow:
Figure 1.2. Deploying RHEL for Edge in network-base environment
1.5. Difference between RHEL RPM images and RHEL for Edge images
You can create RHEL system images in traditional package-based RPM format and also as RHEL for Edge (rpm-ostree) images.
You can use the traditional package-based RPMs to deploy RHEL on traditional data centers. However, with RHEL for Edge images you can deploy RHEL on servers other than traditional data centers. These servers include systems where processing of large amounts of data is done closest to the source where data is generated—Edge servers.
The RHEL for Edge (rpm-ostree) images are not a package manager. They only support complete bootable file system trees, not individual files. These images do not have information regarding the individual files such as how these files were generated or anything related to their origin.
The rpm-ostree images need a separate mechanism, the package manager, to install additional applications in the /var directory. With that, the rpm-ostree image keeps the operating system unchanged, while maintaining the state of the /var and /etc directories. The atomic updates enable rollbacks and background staging of updates.
Refer to the following table to know how RHEL for Edge images differ from the package-based RHEL RPM images.
Table 1.2. Difference between RHEL RPM images and RHEL for Edge images
| Key attributes | RHEL RPM image | RHEL for Edge image |
|
| You can assemble the packages locally to form an image. | The packages are assembled in an ostree which you can install on a system. |
|
|
You can use |
You can use |
|
| The package contains YUM repositories | The package contains Ostree remote repository |
|
| Read write |
Read-only ( |
|
| You can mount the image to any non tmpfs mount point |
|
Chapter 2. Setting up RHEL image builder
Use RHEL image builder to create your customized RHEL for Edge images. After you install RHEL image builder on a RHEL system, RHEL image builder is available as an application in RHEL web console. You can also access RHEL image builder through a command line interface in the composer-cli tool.
It is recommended to install RHEL image builder on a virtual machine.
2.1. Image builder system requirements
The environment where RHEL image builder runs, for example a virtual machine, must meet the requirements that are listed in the following table.
Running RHEL image builder inside a container is not supported.
Table 2.1. Image builder system requirements
| Parameter | Minimal Required Value |
| System type | A dedicated virtual machine |
| Processor | 2 cores |
| Memory | 4 GiB |
| Disk space | 20 GiB |
| Access privileges | Administrator level (root) |
| Network | Connectivity to Internet |
The 20 GiB disk space requirement is enough to install and run RHEL image builder in the host. To build and deploy image builds, you must allocate additional dedicated disk space.
2.2. Installing RHEL image builder
To install RHEL image builder on a dedicated virtual machine, follow these steps:
Prerequisites
- The virtual machine is created and is powered on.
- You have installed RHEL and you have subscribed to RHSM or Red Hat Satellite.
-
You have enabled the
BaseOSandAppStreamrepositories to be able to install the RHEL image builder packages.
Procedure
Install the following packages on the virtual machine.
- osbuild-composer
- composer-cli
- cockpit-composer
- bash-completion
- firewalld
# yum install osbuild-composer composer-cli cockpit-composer bash-completion firewalld
RHEL image builder is installed as an application in RHEL web console.
- Reboot the virtual machine
Configure the system firewall to allow access to the web console:
# firewall-cmd --add-service=cockpit && firewall-cmd --add-service=cockpit --permanent
Enable RHEL image builder.
# systemctl enable osbuild-composer.socket cockpit.socket --now
The osbuild-composer and cockpit services start automatically on first access.
Load the shell configuration script so that the autocomplete feature for the
composer-clicommand starts working immediately without reboot:$ source /etc/bash_completion.d/composer-cli
Additional resources
Chapter 3. Configuring RHEL image builder repositories
To use RHEL image builder, you must ensure that the repositories are configured. You can use the following types of repositories in RHEL image builder:
- Official repository overrides
- Use these if you want to download base system RPMs from elsewhere than the Red Hat Content Delivery Network (CDN) official repositories, for example, a custom mirror in your network. Using official repository overrides disables the default repositories, and your custom mirror must contain all the necessary packages.
- Custom third-party repositories
- Use these to include packages that are not available in the official RHEL repositories.
3.1. Adding custom third-party repositories to RHEL image builder
You can add custom third-party sources to your repositories and manage these repositories by using the composer-cli.
Prerequisites
- You have the URL of the custom third-party repository.
Procedure
Create a repository source file, such as
/root/repo.toml. For example:id = "k8s" name = "Kubernetes" type = "yum-baseurl" url = "https://server.example.com/repos/company_internal_packages/" check_gpg = false check_ssl = false system = false
The
typefield accepts the following valid values:yum-baseurl,yum-mirrorlist, andyum-metalink.- Save the file in the TOML format.
Add the new third-party source to RHEL image builder:
$ composer-cli sources add <file-name>.toml
Verification
Check if the new source was successfully added:
$ composer-cli sources listCheck the new source content:
$ composer-cli sources info <source_id>
3.2. Adding third-party repositories with specific distributions to RHEL image builder
You can specify a list of distributions in the custom third-party source file by using the optional field distro. The repository file uses the distribution string list while resolving dependencies during the image building.
Any request that specifies rhel-8 uses this source. For example, if you list packages and specify rhel-8, it includes this source. However, listing packages for the host distribution do not include this source.
Prerequisites
- You have the URL of the custom third-party repository.
- You have the list of distributions that you want to specify.
Procedure
Create a repository source file, such as
/root/repo.toml. For example, to specify the distribution:check_gpg = true check_ssl = true distros = ["rhel-8"] id = "rh9-local" name = "packages for RHEL" system = false type = "yum-baseurl" url = "https://local/repos/rhel8/projectrepo/"- Save the file in the TOML format.
Add the new third-party source to RHEL image builder:
$ composer-cli sources add <file-name>.toml
Verification
Check if the new source was successfully added:
$ composer-cli sources listCheck the new source content:
$ composer-cli sources info <source_id>
3.3. Checking repositories metadata with GPG
To detect and avoid corrupted packages, you can use the DNF package manager to check the GNU Privacy Guard (GPG) signature on RPM packages, and also to check if the repository metadata has been signed with a GPG key.
You can either enter the gpgkey that you want to do the check over https by setting the gpgkeys field with the key URL. Alternatively, to improve security, you can also embed the whole key into the gpgkeys field, to import it directly instead of fetching the key from the URL.
Prerequisites
- The directory that you want to use as a repository exists and contains packages.
Procedure
Access the folder where you want to create a repository:
$ cd repo/Run the
createrepo_cto create a repository from RPM packages:$ createrepo_c .Access the directory where the repodata is:
$ cd repodata/Sign your
repomd.xmlfile:$ gpg -u <_gpg-key-email_> --yes --detach-sign --armor /srv/repo/example/repomd.xmlTo enable GPG signature checks in the repository:
-
Set
check_repogpg = truein the repository source. Enter the
gpgkeythat you want to do the check. If your key is available overhttps, set thegpgkeysfield with the key URL for the key. You can add as many URL keys as you need.The following is an example:
check_gpg = true
check_ssl = true
id = "signed local packages"
name = "repository_name"
type = "yum-baseurl"
url = "https://local/repos/projectrepo/"
check_repogpg = true
gpgkeys=["https://local/keys/repokey.pub"]
As an alternative, add the GPG key directly in the
gpgkeysfield, for example:check_gpg = true check_ssl = true check_repogpg id = "custom-local" name = "signed local packages" type = "yum-baseurl" url = "https://local/repos/projectrepo/" gpgkeys=["https://remote/keys/other-repokey.pub", '''-----BEGIN PGP PUBLIC KEY BLOCK----- … -----END PGP PUBLIC KEY BLOCK-----''']
If the test does not find the signature, the GPG tool shows an error similar to the following one:
$ GPG verification is enabled, but GPG signature is not available.
This may be an error or the repository does not support GPG verification:
Status code: 404 for http://repo-server/rhel/repodata/repomd.xml.asc (IP: 192.168.1.3)
If the signature is invalid, the GPG tool shows an error similar to the following one:
repomd.xml GPG signature verification error: Bad GPG signature
-
Set
Verification
Test the signature of the repository manually:
$ gpg --verify /srv/repo/example/repomd.xml.asc
3.4. RHEL image builder official repository overrides
RHEL image builder osbuild-composer back end does not inherit the system repositories located in the /etc/yum.repos.d/ directory. Instead, it has its own set of official repositories defined in the /usr/share/osbuild-composer/repositories directory. This includes the Red Hat official repository, which contains the base system RPMs to install additional software or update already installed programs to newer versions. If you want to override the official repositories, you must define overrides in /etc/osbuild-composer/repositories/. This directory is for user defined overrides and the files located there take precedence over those in the /usr/share/osbuild-composer/repositories/ directory.
The configuration files are not in the usual YUM repository format known from the files in /etc/yum.repos.d/. Instead, they are JSON files.
3.5. Overriding a system repository
You can configure your own repository override for RHEL image builder in the /etc/osbuild-composer/repositories directory.
Prior to RHEL 8.5 release, the name of the repository overrides is rhel-8.json. Starting from RHEL 8.5, the names also respect the minor version: rhel-84.json, rhel-85.json, and so on.
Prerequisites
- You have a custom repository that is accessible from your host system.
Procedure
Create the
/etc/osbuild-composer/repositories/directory to store your repository overrides:$ sudo mkdir -p /etc/osbuild-composer/repositories
Create a JSON file, using a name corresponding to your RHEL version. Alternatively, you can copy the file for your distribution from
/usr/share/osbuild-composer/and modify its content.For RHEL 8.9, use
/etc/osbuild-composer/repositories/rhel-89.json.Add the following structure to your JSON file. Specify only one of the following attributes, in the string format:
-
baseurl- The base URL of the repository. -
metalink- The URL of a metalink file that contains a list of valid mirror repositories. mirrorlist- The URL of a mirrorlist file that contains a list of valid mirror repositories. The remaining fields, such asgpgkey, andmetadata_expire, are optional.For example:
{ "x86_64": [ { "name": "baseos", "baseurl": "http://mirror.example.com/composes/released/RHEL-8/8.0/BaseOS/x86_64/os/", "gpgkey": "-----BEGIN PGP PUBLIC KEY BLOCK-----\n\n (…)", "check_gpg": true } ] }Alternatively, you can copy the JSON file for your distribution, by replacing
rhel-version.jsonwith your RHEL version, for example: rhel-8.json.$ cp /usr/share/osbuild-composer/repositories/rhel-version.json /etc/osbuild-composer/repositories/
-
Optional: Verify the JSON file:
$ json_verify /etc/osbuild-composer/repositories/<file>.json
Edit the
baseurlpaths in therhel-8.jsonfile and save it. For example:$ /etc/osbuild-composer/repositories/rhel-version.jsonRestart the
osbuild-composer.service:$ sudo systemctl restart osbuild-composer.service
Verification
Check if the repository points to the correct URLs:
$ cat /etc/yum.repos.d/redhat.repo
You can see that the repository points to the correct URLs which are copied from the
/etc/yum.repos.d/redhat.repofile.
Additional resources
3.6. Overriding a system repository that requires subscriptions
You can set up the osbuild-composer service to use system subscriptions that are defined in the /etc/yum.repos.d/redhat.repo file. To use a system subscription in osbuild-composer, define a repository override that has the following details:
-
The same
baseurlas the repository defined in/etc/yum.repos.d/redhat.repo. The value of
”rhsm”: truedefined in the JSON object.Noteosbuild-composerdoes not automatically use repositories defined in/etc/yum.repos.d/. You need to manually specify them either as a system repository override or as an additionalsourceby usingcomposer-cli. The “BaseOS” and “AppStream” repositories usually use system repository overrides, whereas all the other repositories usecomposer-clisources.
Prerequisites
-
Your system has a subscription defined in
/etc/yum.repos.d/redhat.repo - You have created a repository override. See Overriding a system repository.
Procedure
Get the
baseurlfrom the/etc/yum.repos.d/redhat.repofile:# cat /etc/yum.repos.d/redhat.repo [AppStream] name = AppStream mirror example baseurl = https://mirror.example.com/RHEL-8/8.0/AppStream/x86_64/os/ enabled = 1 gpgcheck = 0 sslverify = 1 sslcacert = /etc/pki/ca1/ca.crt sslclientkey = /etc/pki/ca1/client.key sslclientcert = /etc/pki/ca1/client.crt metadata_expire = 86400 enabled_metadata = 0Configure the repository override to use the same
baseurland setrhsmto true:{ "x86_64": [ { "name": "AppStream mirror example", "baseurl": "https://mirror.example.com/RHEL-8/8.0/AppStream/x86_64/os/", "gpgkey": "-----BEGIN PGP PUBLIC KEY BLOCK-----\n\n (…)", "check_gpg": true, "rhsm": true } ] }Restart the
osbuild-composer.service:$ sudo systemctl restart osbuild-composer.service
Additional resources
Chapter 4. Composing a RHEL for Edge image using image builder in RHEL web console
Use RHEL image builder to create a custom RHEL for Edge image (OSTree commit).
To access RHEL image builder and to create your custom RHEL for Edge image, you can either use the RHEL web console interface or the command-line interface.
You can compose RHEL for Edge images using RHEL image builder in RHEL web console by performing the following high-level steps:
- Access RHEL image builder in RHEL web console
- Create a blueprint for RHEL for Edge image.
Create a RHEL for Edge image. You can create the following images:
- RHEL for Edge Commit image.
- RHEL for Edge Container image.
- RHEL for Edge Installer image.
- Download the RHEL for Edge image
4.1. Accessing RHEL image builder in the RHEL web console
To access RHEL image builder in RHEL web console, ensure that you have met the following prerequisites and then follow the procedure.
Prerequisites
- You have installed a RHEL system.
- You have administrative rights on the system.
- You have subscribed the RHEL system to Red Hat Subscription Manager (RHSM) or to Red Hat Satellite Server.
- The system is powered on and accessible over network.
- You have installed RHEL image builder on the system.
Procedure
- On your RHEL system, access https://localhost:9090/ in a web browser.
- For more information about how to remotely access RHEL image builder, see Managing systems using the RHEL 8 web console document.
- Log in to the web console using an administrative user account.
- On the web console, in the left hand menu, click .
Click .
The RHEL image builder dashboard opens in the right pane. You can now proceed to create a blueprint for the RHEL for Edge images.
4.2. Creating a blueprint for a RHEL for Edge image using image builder in the web console
To create a blueprint for a RHEL for Edge image by using RHEL image builder in RHEL web console, ensure that you have met the following prerequisites and then follow the procedure.
Prerequisites
- On a RHEL system, you have opened the RHEL image builder dashboard.
Procedure
On the RHEL image builder dashboard, click .
The Create Blueprint dialogue box opens.
On the
Detailspage:- Enter the name of the blueprint and, optionally, its description. Click .
Optional: In the
Packagespage:On the
Available packagessearch, enter the package name and click the button to move it to the Chosen packages field. Search and include as many packages as you want. Click .NoteThese customizations are all optional unless otherwise specified.
-
On the
Kernelpage, enter a kernel name and the command-line arguments. -
On the
File systempage, selectUse automatic partitioning. OSTree systems do not support filesystem customization, because OSTree images have their own mount rule, such as read-only. Click . On the
Servicespage, you can enable or disable services:- Enter the service names you want to enable or disable, separating them by a comma, by space, or by pressing the key. Click .
On the
Firewallpage, set up your firewall setting:-
Enter the
Ports, and the firewall services you want to enable or disable. - Click the button to manage your firewall rules for each zone independently. Click .
-
Enter the
On the
Userspage, add a users by following the steps:- Click .
-
Enter a
Username, apassword, and aSSH key. You can also mark the user as a privileged user, by clicking theServer administratorcheckbox. Click .
On the
Groupspage, add groups by completing the following steps:Click the button:
-
Enter a
Group nameand aGroup ID. You can add more groups. Click .
-
Enter a
On the
SSH keyspage, add a key:Click the button.
- Enter the SSH key.
-
Enter a
User. Click .
On the
Timezonepage, set your timezone settings:On the
Timezonefield, enter the timezone you want to add to your system image. For example, add the following timezone format: "US/Eastern".If you do not set a timezone, the system uses Universal Time, Coordinated (UTC) as default.
-
Enter the
NTPservers. Click .
On the
Localepage, complete the following steps:-
On the
Keyboardsearch field, enter the package name you want to add to your system image. For example: ["en_US.UTF-8"]. -
On the
Languagessearch field, enter the package name you want to add to your system image. For example: "us". Click .
-
On the
On the
Otherspage, complete the following steps:-
On the
Hostnamefield, enter the hostname you want to add to your system image. If you do not add a hostname, the operating system determines the hostname. -
Mandatory only for the Simplifier Installer image: On the
Installation Devicesfield, enter a valid node for your system image. For example:dev/sda. Click .
-
On the
Mandatory only when building FIDO images: On the
FIDO device onboardingpage, complete the following steps:On the
Manufacturing server URLfield, enter the following information:-
On the
DIUN public key insecurefield, enter the insecure public key. -
On the
DIUN public key hashfield, enter the public key hash. -
On the
DIUN public key root certsfield, enter the public key root certs. Click .
-
On the
On the
OpenSCAPpage, complete the following steps:-
On the
Datastreamfield, enter thedatastreamremediation instructions you want to add to your system image. -
On the
Profile IDfield, enter theprofile_idsecurity profile you want to add to your system image. Click .
-
On the
Mandatory only when building Ignition images: On the
Ignitionpage, complete the following steps:-
On the
Firstboot URLfield, enter the package name you want to add to your system image. -
On the
Embedded Datafield, drag or upload your file. Click .
-
On the
-
. On the
Reviewpage, review the details about the blueprint. Click .
The RHEL image builder view opens, listing existing blueprints.
4.3. Creating a RHEL for Edge Commit image by using image builder in web console
You can create a “RHEL for Edge Commit” image by using RHEL image builder in RHEL web console. The “RHEL for Edge Commit (.tar)” image type contains a full operating system, but it is not directly bootable. To boot the Commit image type, you must deploy it in a running container.
Prerequisites
- On a RHEL system, you have accessed the RHEL image builder dashboard.
Procedure
- On the RHEL image builder dashboard click .
On the Image output page, perform the following steps:
- From the Select a blueprint dropdown menu, select the blueprint you want to use.
- From the Image output type dropdown list, select “RHEL for Edge Commit (.tar)” for network-based deployment.
- Click .
On the OSTree settings page, enter:
- Repository URL: specify the URL to the OSTree repository of the commit to embed in the image. For example, http://10.0.2.2:8080/repo/.
- Parent commit: specify a previous commit, or leave it empty if you do not have a commit at this time.
-
In the Ref textbox, specify a reference path for where your commit is going to be created. By default, the web console specifies
rhel/8/$ARCH/edge. The "$ARCH" value is determined by the host machine. Click .
On the Review page, check the customizations and click .
RHEL image builder starts to create a RHEL for Edge Commit image for the blueprint that you created.
NoteThe image creation process takes up to 20 minutes to complete.
Verification
To check the RHEL for Edge Commit image creation progress:
- Click the tab.
After the image creation process is complete, you can download the resulting “RHEL for Edge Commit (.tar)” image.
Additional resources
4.4. Creating a RHEL for Edge Container image by using RHEL image builder in RHEL web console
You can create RHEL for Edge images by selecting “RHEL for Edge Container (.tar)”. The RHEL for Edge Container (.tar) image type creates an OSTree commit and embeds it into an OCI container with a web server. When the container is started, the web server serves the commit as an OSTree repository.
Follow the steps in this procedure to create a RHEL for Edge Container image using image builder in RHEL web console.
Prerequisites
- On a RHEL system, you have accessed the RHEL image builder dashboard.
- You have created a blueprint.
Procedure
- On the RHEL image builder dashboard click .
- On the Image output page, perform the following steps:
From the Select a blueprint dropdown menu, select the blueprint you want to use.
- From the Image output type dropdown list, select “RHEL for Edge Container (.tar)” for network-based deployment.
- Click .
On the OSTree page, enter:
Repository URL: specify the URL to the OSTree repository of the commit to embed in the image. For example, http://10.0.2.2:8080/repo/. By default, the repository folder for a RHEL for Edge Container image is "/repo".
To find the correct URL to use, access the running container and check the
nginx.conffile. To find which URL to use, access the running container and check thenginx.conffile. Inside thenginx.conffile, find therootdirectory entry to search for the/repo/folder information. Note that, if you do not specify a repository URL when creating a RHEL for Edge Container image(.tar)by using RHEL image builder, the default/repo/entry is created in thenginx.conffile.- Parent commit: specify a previous commit, or leave it empty if you do not have a commit at this time.
-
In the Ref textbox, specify a reference path for where your commit is going to be created. By default, the web console specifies
rhel/8/$ARCH/edge. The "$ARCH" value is determined by the host machine. Click .
- On the Review page, check the customizations. Click .
Click .
RHEL image builder starts to create a RHEL for Edge Container image for the blueprint that you created.
NoteThe image creation process takes up to 20 minutes to complete.
Verification
To check the RHEL for Edge Container image creation progress:
- Click the tab.
After the image creation process is complete, you can download the resulting “RHEL for Edge Container (.tar)” image.
Additional resources
4.5. Creating a RHEL for Edge Installer image by using image builder in RHEL web console
You can create RHEL for Edge Installer images for non-network-based deployment by selecting RHEL for Edge Installer (.iso). The RHEL for Edge Installer (.iso) image type pulls the OSTree commit repository from the running container served by the RHEL for Edge Container (.tar) and creates an installable boot ISO image with a Kickstart file that is configured to use the embedded OSTree commit.
Follow the steps in this procedure to create a RHEL for Edge image using image builder in RHEL web console.
Prerequisites
- On a RHEL system, you have accessed the image builder dashboard.
- You created a blueprint.
- You created a RHEL for Edge Container image and loaded it into a running container. See Creating a RHEL for Edge Container image for non-network-based deployments.
Procedure
- On the RHEL image builder dashboard click .
On the Image output page, perform the following steps:
- From the Select a blueprint dropdown menu, select the blueprint you want to use.
-
From the Image output type dropdown list, select RHEL for Edge Installer (
.iso) image. - Click .
On the OSTree settings page, enter:
- Repository URL: specify the URL to the OSTree repository of the commit to embed in the image. For example, http://10.0.2.2:8080/repo/.
-
In the Ref textbox, specify a reference path for where your commit is going to be created. By default, the web console specifies
rhel/8/$ARCH/edge. The "$ARCH" value is determined by the host machine. Click .
- On the Review page, check the customizations. Click .
Click .
RHEL image builder starts to create a RHEL for Edge Installer image for the blueprint that you created.
NoteThe image creation process takes up to 20 minutes to complete.
Verification
After the image creation process is complete, you can download the resulting RHEL for Edge Installer (.iso) image.
To check the RHEL for Edge Installer image creation progress:
- Click the tab.
After the image creation process is complete, you can download the resulting RHEL for Edge Installer (.iso) image and boot the ISO image into a device.
Additional resources
4.6. Downloading a RHEL for Edge image
After you successfully create the RHEL for Edge image by using RHEL image builder, download the image on the local host.
Procedure
To download an image:
From the More Options menu, click .
The RHEL image builder tool downloads the file at your default download location.
The downloaded file consists of a .tar file with an OSTree repository for RHEL for Edge Commit and RHEL for Edge Container images, or a .iso file for RHEL for Edge Installer images, with an OSTree repository. This repository contains the commit and a json file which contains information metadata about the repository content.
4.7. Additional resources
Chapter 5. Composing a RHEL for Edge image using image builder command-line
You can use image builder to create a customized RHEL for Edge image (OSTree commit).
To access image builder and to create your custom RHEL for Edge image, you can either use the RHEL web console interface or the command-line interface.
For Network-based deployments, the workflow to compose RHEL for Edge images using the CLI, involves the following high-level steps:
- Create a blueprint for RHEL for Edge image
- Create a RHEL for Edge Commit image
- Download the RHEL for Edge Commit image
For Non-Network-based deployments, the workflow to compose RHEL for Edge images using the CLI, involves the following high-level steps:
- Create a blueprint for RHEL for Edge image
- Create a blueprint for the RHEL for Edge Installer image
- Create a RHEL for Edge Container image
- Create a RHEL for Edge Installer image
- Download the RHEL for Edge image
To perform the steps, use the composer-cli package.
To run the composer-cli commands as non-root, you must be part of the weldr group or you must have administrator access to the system.
5.1. Network-based deployments workflow
This provides steps on how to build OSTree commits. These OSTree commits contain a full operating system, but are not directly bootable. To boot them, you need to deploy them using a Kickstart file.
5.1.1. Creating a RHEL for Edge Commit image blueprint using image builder command-line interface
Create a blueprint for RHEL for Edge Commit image using the CLI.
Prerequisite
You do not have an existing blueprint. To verify that, list the existing blueprints:
$ sudo composer-cli blueprints list
Procedure
Create a plain text file in the TOML format, with the following content:
name = "blueprint-name"
description = "blueprint-text-description"
version = "0.0.1"
modules = [ ]
groups = [ ]
Where,
- blueprint-name is the name and blueprint-text-description is the description for your blueprint.
- 0.0.1 is the version number according to the Semantic Versioning scheme.
Modules describe the package name and matching version glob to be installed into the image, for example, the package name = "tmux" and the matching version glob is version = "2.9a".
Notice that currently there are no differences between packages and modules.
Groups are packages groups to be installed into the image, for example the group package anaconda-tools.
At this time, if you do not know the modules and groups, leave them empty.
Include the required packages and customize the other details in the blueprint to suit your requirements.
For every package that you want to include in the blueprint, add the following lines to the file:
[[packages]]
name = "package-name"
version = "package-version"
Where,
- package-name is the name of the package, such as httpd, gdb-doc, or coreutils.
package-version is the version number of the package that you want to use.
The package-version supports the following dnf version specifications:
- For a specific version, use the exact version number such as 8.0.
- For the latest available version, use the asterisk *.
- For the latest minor version, use formats such as 8.*.
Push (import) the blueprint to the RHEL image builder server:
# composer-cli blueprints push blueprint-name.tomlList the existing blueprints to check whether the created blueprint is successfully pushed and exists.
# composer-cli blueprints show BLUEPRINT-NAME
Check whether the components and versions listed in the blueprint and their dependencies are valid:
# composer-cli blueprints depsolve blueprint-name
Additional resources
5.1.2. Creating a RHEL for Edge Commit image using image builder command-line interface
To create a RHEL for Edge Commit image by using RHEL image builder command-line interface, ensure that you have met the following prerequisites and follow the procedure.
Prerequisites
- You have created a blueprint for RHEL for Edge Commit image.
Procedure
Create the RHEL for Edge Commit image.
# composer-cli compose start blueprint-name image-type
Where,
- blueprint-name is the RHEL for Edge blueprint name.
image-type is
edge-commitfor network-based deployment.A confirmation that the composer process has been added to the queue appears. It also shows a Universally Unique Identifier (UUID) number for the image created. Use the UUID number to track your build. Also keep the UUID number handy for further tasks.
Check the image compose status.
# composer-cli compose status
The output displays the status in the following format:
<UUID> RUNNING date blueprint-name blueprint-version image-type
NoteThe image creation process takes up to 20 minutes to complete.
To interrupt the image creation process, run:
# composer-cli compose cancel <UUID>To delete an existing image, run:
# composer-cli compose delete <UUID>After the image is ready, you can download it and use the image on your network deployments.
Additional resources
5.1.3. Creating a RHEL for Edge image update with a ref commit by using RHEL image builder CLI
If you performed a change in an existing blueprint, for example, you added a new package, and you want to update an existing RHEL for Edge image with this new package, you can use the --parent argument to generate an updated RHEL for Edge Commit (.tar) image. The --parent argument can be either a ref that exists in the repository specified by the URL argument, or you can use the Commit ID, which you can find in the extracted .tar image file. Both ref and Commit ID arguments retrieve a parent for the new commit that you are building. RHEL image builder can read information from the parent commit that will affect parts of the new commit that you are building. As a result, RHEL image builder reads the parent commit’s user database and preserves UIDs and GIDs for the package-created system users and groups.
Prerequisites
- You have updated an existing blueprint for RHEL for Edge image.
- You have an existing RHEL for Edge image (OSTree commit). See Extracting RHEL for Edge image commit.
-
The
refbeing built is available at theOSTreerepository specified by the URL.
Procedure
Create the RHEL for Edge commit image:
# composer-cli compose start-ostree --ref rhel/8/x86_64/edge --parent parent-OSTree-REF --url URL blueprint-name image-type
For example:
To create a new RHEL for Edge commit based on a
parentand with a newref, run the following command:# composer-cli compose start-ostree --ref rhel/8/x86_64/edge --parent rhel/8/x86_64/edge --url http://10.0.2.2:8080/repo rhel_update edge-commit
To create a new RHEL for Edge commit based on the same
ref, run the following command:# composer-cli compose start-ostree --ref rhel/8/x86_64/edge --url http://10.0.2.2:8080/repo rhel_update edge-commit
Where:
- The --ref argument specifies the same path value that you used to build an OSTree repository.
-
The --parent argument specifies the parent commit. It can be ref to be resolved and pulled, for example
rhel/8/x86_64/edge, or theCommit IDthat you can find in the extracted.tarfile. - blueprint-name is the RHEL for Edge blueprint name.
-
The
--urlargument specifies the URL to the OSTree repository of the commit to embed in the image, for example, http://10.0.2.2:8080/repo. image-type is
edge-commitfor network-based deployment.Note-
The
--parentargument can only be used for theRHEL for Edge Commit (.tar)image type. Using the--urland--parentarguments together results in errors with theRHEL for Edge Container (.tar)image type. -
If you omit the
parent refargument, the system falls back to therefspecified by the--refargument.
A confirmation that the composer process has been added to the queue appears. It also shows a Universally Unique Identifier (UUID) number for the image created. Use the UUID number to track your build. Also keep the UUID number handy for further tasks.
-
The
Check the image compose status.
# composer-cli compose status
The output displays the status in the following format:
<UUID> RUNNING date blueprint-name blueprint-version image-type
NoteThe image creation process takes a few minutes to complete.
(Optional) To interrupt the image creation process, run:
# composer-cli compose cancel <UUID>(Optional) To delete an existing image, run:
# composer-cli compose delete <UUID>
After the image creation is complete, to upgrade an existing OSTree deployment, you need:
- Set up a repository. See Deploying a RHEL for Edge image .
- Add this repository as a remote, that is, the http or https endpoint that hosts the OSTree content.
- Pull the new OSTree commit onto their existing running instance. See Deploying RHEL for Edge image updates manually .
5.1.4. Downloading a RHEL for Edge image using the image builder command-line interface
To download a RHEL for Edge image by using RHEL image builder command line interface, ensure that you have met the following prerequisites and then follow the procedure.
Prerequisites
- You have created a RHEL for Edge image.
Procedure
Review the RHEL for Edge image status.
# composer-cli compose status
The output must display the following:
$ <UUID> FINISHED date blueprint-name blueprint-version image-type
Download the image.
# composer-cli compose image <UUID>
RHEL image builder downloads the image as a
tarfile to the current directory.The UUID number and the image size is displayed alongside.
$ <UUID>-commit.tar: size MB
The image contains a commit and a json file with information metadata about the repository content.
Additional resources
5.2. Non-network-based deployments workflow
To build a boot ISO image that installs an OSTree-based system using the "RHEL for Edge Container" and the "RHEL for Edge Installer" images and that can be later deployed to a device in disconnected environments, follow the steps.
5.2.1. Creating a RHEL for Edge Container blueprint by using image builder CLI
To create a blueprint for RHEL for Edge Container image, perform the following steps:
Procedure
Create a plain text file in the TOML format, with the following content:
name = "blueprint-name"
description = "blueprint-text-description"
version = "0.0.1"
modules = [ ]
groups = [ ]
Where,
- blueprint-name is the name and blueprint-text-description is the description for your blueprint.
- 0.0.1 is the version number according to the Semantic Versioning scheme.
Modules describe the package name and matching version glob to be installed into the image, for example, the package name = "tmux" and the matching version glob is version = "2.9a".
Notice that currently there are no differences between packages and modules.
Groups are packages groups to be installed into the image, for example the group package anaconda-tools.
At this time, if you do not know the modules and groups, leave them empty.
Include the required packages and customize the other details in the blueprint to suit your requirements.
For every package that you want to include in the blueprint, add the following lines to the file:
[[packages]]
name = "package-name"
version = "package-version"
Where,
- package-name is the name of the package, such as httpd, gdb-doc, or coreutils.
package-version is the version number of the package that you want to use.
The package-version supports the following dnf version specifications:
- For a specific version, use the exact version number such as 8.0.
- For the latest available version, use the asterisk *.
- For the latest minor version, use formats such as 8.*.
Push (import) the blueprint to the RHEL image builder server:
# composer-cli blueprints push blueprint-name.tomlList the existing blueprints to check whether the created blueprint is successfully pushed and exists.
# composer-cli blueprints show BLUEPRINT-NAME
Check whether the components and versions listed in the blueprint and their dependencies are valid:
# composer-cli blueprints depsolve blueprint-name
Additional resources
5.2.2. Creating a RHEL for Edge Installer blueprint using image builder CLI
You can create a blueprint to build a RHEL for Edge Installer (.iso) image, and specify user accounts to automatically create one or more users on the system at installation time.
When you create a user in the blueprint with the customizations.user customization, the blueprint creates the user under the /usr/lib/passwd directory and the password, under the /usr/etc/shadow directory. Note that you cannot change the password in further versions of the image in a running system using OSTree updates. The users you create with blueprints must be used only to gain access to the created system. After you access the system, you need to create users, for example, using the useradd command.
To create a blueprint for RHEL for Edge Installer image, perform the following steps:
Procedure
Create a plain text file in the TOML format, with the following content:
name = "blueprint-installer"
description = "blueprint-for-installer-image"
version = "0.0.1"

[[customizations.user]]
name = "user"
description = "account"
password = "user-password"
key = "user-ssh-key "
home = "path"
groups = ["user-groups"]
Where,
- blueprint-name is the name and blueprint-text-description is the description for your blueprint.
- 0.0.1 is the version number according to the Semantic Versioning scheme.
Push (import) the blueprint to the RHEL image builder server:
# composer-cli blueprints push blueprint-name.tomlList the existing blueprints to check whether the created blueprint is successfully pushed and exists.
# composer-cli blueprints show blueprint-nameCheck whether the components and versions listed in the blueprint and their dependencies are valid:
# composer-cli blueprints depsolve blueprint-name
Additional resources
5.2.3. Creating a RHEL for Edge Container image by using image builder CLI
To create a RHEL for Edge Container image by using RHEL image builder command-line interface, ensure that you have met the following prerequisites and follow the procedure.
Prerequisites
- You have created a blueprint for RHEL for Edge Container image.
Procedure
Create the RHEL for Edge Container image.
# composer-cli compose start-ostree --ref rhel/8/x86_64/edge --url URL-OSTree-repository blueprint-name image-type
Where,
-
--refis the same value that customer used to build ostree repository --urlis the URL to the OSTree repository of the commit to embed in the image. For example, http://10.0.2.2:8080/repo/. By default, the repository folder for a RHEL for Edge Container image is "/repo". See Setting up a web server to install RHEL for Edge image.To find the correct URL to use, access the running container and check the
nginx.conffile. To find which URL to use, access the running container and check thenginx.conffile. Inside thenginx.conffile, find therootdirectory entry to search for the/repo/folder information. Note that, if you do not specify a repository URL when creating a RHEL for Edge Container image(.tar)by using RHEL image builder, the default/repo/entry is created in thenginx.conffile.- blueprint-name is the RHEL for Edge blueprint name.
image-type is
edge-containerfor non-network-based deployment.A confirmation that the composer process has been added to the queue appears. It also shows a Universally Unique Identifier (UUID) number for the image created. Use the UUID number to track your build. Also keep the UUID number handy for further tasks.
-
Check the image compose status.
# composer-cli compose status
The output displays the status in the following format:
<UUID> RUNNING date blueprint-name blueprint-version image-type
NoteThe image creation process takes up to 20 minutes to complete.
To interrupt the image creation process, run:
# composer-cli compose cancel <UUID>To delete an existing image, run:
# composer-cli compose delete <UUID>After the image is ready, it can be used for non-network deployments. See Creating a RHEL for Edge Container image for non-network-based deployments.
Additional resources
5.2.4. Creating a RHEL for Edge Installer image using command-line interface for non-network-based deployments
To create a RHEL for Edge Installer image that embeds the OSTree commit, use the RHELimage builder command-line interface, and ensure that you have met the following prerequisites and then follow the procedure.
Prerequisites
- You have created a blueprint for RHEL for Edge Installer image.
- You have created a RHEL for Edge Edge Container image and deployed it using a web server.
Procedure
Begin to create the RHEL for Edge Installer image.
# composer-cli compose start-ostree --ref rhel/8/x86_64/edge --url URL-OSTree-repository blueprint-name image-type
Where,
- ref is the same value that customer used to build ostree repository
- URL-OSTree-repository is the URL to the OSTree repository of the commit to embed in the image. For example, http://10.0.2.2:8080/repo. See Creating a RHEL for Edge Container image for non-network-based deployments.
- blueprint-name is the RHEL for Edge Installer blueprint name.
image-type is
edge-installer.A confirmation that the composer process has been added to the queue appears. It also shows a Universally Unique Identifier (UUID) number for the image created. Use the UUID number to track your build. Also keep the UUID number handy for further tasks.
Check the image compose status.
# composer-cli compose status
The command output displays the status in the following format:
<UUID> RUNNING date blueprint-name blueprint-version image-type
NoteThe image creation process takes a few minutes to complete.
To interrupt the image creation process, run:
# composer-cli compose cancel <UUID>To delete an existing image, run:
# composer-cli compose delete <UUID>After the image is ready, you can use it for non-network deployments. See Installing the RHEL for Edge image for non-network-based deployments.
5.2.5. Downloading a RHEL for Edge Installer image using the image builder CLI
To download a RHEL for Edge Installer image by using RHEL image builder command line interface, ensure that you have met the following prerequisites and then follow the procedure.
Prerequisites
- You have created a RHEL for Edge Installer image.
Procedure
Review the RHEL for Edge image status.
# composer-cli compose status
The output must display the following:
$ <UUID> FINISHED date blueprint-name blueprint-version image-type
Download the image.
# composer-cli compose image <UUID>
RHEL image builder downloads the image as an
.isofile to the current directory.The UUID number and the image size is displayed alongside.
$ <UUID>-boot.iso: size MB
The resulting image is a bootable ISO image.
Additional resources
5.3. Supported image customizations
You can customize your image by adding customizations to your blueprint, such as:
- Adding an additional RPM package
- Enabling a service
- Customizing a kernel command line parameter.
Between others. You can use several image customizations within blueprints. By using the customizations, you can add packages and groups to the image that are not available in the default packages. To use these options, configure the customizations in the blueprint and import (push) it to RHEL image builder.
Additional resources
5.3.1. Selecting a distribution
You can use the distro field to select the distribution to use when composing your images, or depsolving the blueprint. If distro is left blank it will use the host distribution. If you do not specify a distribution, the blueprint uses the host distribution. In case you upgrade the host operating system, the blueprints with no distribution set build images using the new operating system version. You cannot build an operating system image that differs from the RHEL image builder host.
Procedure
Customize the blueprint with the distro to always build the specified RHEL image:
name = "blueprint_name"
description = "blueprint_version"
version = "0.1"
distro = "different_minor_version"
Replace "different_minor_version" to build a different minor version, for example, if you want to build a RHEL 8.8 image, use distro = "rhel-88". On RHEL 8.9 image, you can build minor versions such as RHEL 8.8 and earlier releases.
5.3.2. Selecting a package group
Customize the blueprint with packages and modules. The name attribute is a required string. The version attribute is an optional string that, if not provided, uses the latest version in the repositories.
Currently, there are no differences between packages and modules in osbuild-composer. Both are treated as an RPM package dependency.
Procedure
Customize your blueprint with a package:
[[packages]]
name = "package_group_name"
Replace "package_group_name" with the name of the group. For example, "tmux".
[[packages]]
name = "tmux"
version = "2.9a"
5.3.3. Setting the image hostname
The customizations.hostname is an optional string that you can use to configure the final image hostname. This customization is optional, and if you do not set it, the blueprint uses the default hostname.
Procedure
Customize the blueprint to configure the hostname:
[customizations]
hostname = "baseimage"
5.3.4. Specifying additional users
Add a user to the image, and optionally, set their SSH key. All fields for this section are optional except for the name.
Procedure
Customize the blueprint to add a user to the image:
[[customizations.user]]
name = "USER-NAME"
description = "USER-DESCRIPTION"
password = "PASSWORD-HASH"
key = "PUBLIC-SSH-KEY"
home = "/home/USER-NAME/"
shell = "/usr/bin/bash"
groups = ["users", "wheel"]
uid = NUMBER
gid = NUMBER
The GID is optional and must already exist in the image. Optionally, a package creates it, or the blueprint creates the GID by using the
[[customizations.group]]entry.Replace PASSWORD-HASH with the actual
password hash. To generate thepassword hash, use a command such as:$ python3 -c 'import crypt,getpass;pw=getpass.getpass();print(crypt.crypt(pw) if (pw==getpass.getpass("Confirm: ")) else exit())'Replace the other placeholders with suitable values.
Enter the
namevalue and omit any lines you do not need.Repeat this block for every user to include.
5.3.5. Specifying additional groups
Specify a group for the resulting system image. Both the name and the gid attributes are mandatory.
Procedure
Customize the blueprint with a group:
[[customizations.group]]
name = "GROUP-NAME"
gid = NUMBER
Repeat this block for every group to include.
5.3.6. Setting SSH key for existing users
You can use customizations.sshkey to set an SSH key for the existing users in the final image. Both user and key attributes are mandatory.
Procedure
- Customize the blueprint by setting an SSH key for existing users:
[[customizations.sshkey]]
user = "root"
key = "PUBLIC-SSH-KEY"
You can only configure the customizations.sshkey customization for existing users. To create a user and set an SSH key, see the User specifications for the resulting system image customization.
5.3.7. Appending a kernel argument
You can append arguments to the boot loader kernel command line. By default, RHEL image builder builds a default kernel into the image. However, you can customize the kernel by configuring it in the blueprint.
Procedure
Append a kernel boot parameter option to the defaults:
[customizations.kernel]
append = "KERNEL-OPTION"
Define a kernel name to use in an image
[customizations.kernel]
name = "KERNEL-rt"
5.3.8. Setting time zone and NTP
You can customize your blueprint to configure the time zone and the Network Time Protocol (NTP). Both timezone and ntpservers attributes are optional strings. If you do not customize the time zone, the system uses Universal Time, Coordinated (UTC). If you do not set NTP servers, the system uses the default distribution.
Procedure
Customize the blueprint with the
timezoneand thentpserversyou want:[customizations.timezone] timezone = "TIMEZONE" ntpservers = "NTP_SERVER"
For example:
[customizations.timezone]
timezone = "US/Eastern"
ntpservers = ["0.north-america.pool.ntp.org", "1.north-america.pool.ntp.org"]
NoteSome image types, such as Google Cloud, already have NTP servers set up. You cannot override it because the image requires the NTP servers to boot in the selected environment. However, you can customize the time zone in the blueprint.
5.3.9. Customizing the locale settings
You can customize the locale settings for your resulting system image. Both language and the keyboard attributes are mandatory. You can add many other languages. The first language you add is the primary language and the other languages are secondary.
Procedure
- Set the locale settings:
[customizations.locale]
languages = ["LANGUAGE"]
keyboard = "KEYBOARD"
For example:
[customizations.locale]
languages = ["en_US.UTF-8"]
keyboard = "us"
To list the values supported by the languages, run the following command:
$ localectl list-locales
To list the values supported by the keyboard, run the following command:
$ localectl list-keymaps
5.3.10. Customizing firewall
Set the firewall for the resulting system image. By default, the firewall blocks incoming connections, except for services that enable their ports explicitly, such as sshd.
If you do not want to use the [customizations.firewall] or the [customizations.firewall.services], either remove the attributes, or set them to an empty list []. If you only want to use the default firewall setup, you can omit the customization from the blueprint.
The Google and OpenStack templates explicitly disable the firewall for their environment. You cannot override this behavior by setting the blueprint.
Procedure
Customize the blueprint with the following settings to open other ports and services:
[customizations.firewall]
ports = ["PORTS"]
Where
portsis an optional list of strings that contain ports or a range of ports and protocols to open. You can configure the ports by using the following format:port:protocolformat. You can configure the port ranges by using theportA-portB:protocolformat. For example:[customizations.firewall] ports = ["22:tcp", "80:tcp", "imap:tcp", "53:tcp", "53:udp", "30000-32767:tcp", "30000-32767:udp"]
You can use numeric ports, or their names from the
/etc/servicesto enable or disable port lists.Specify which firewall services to enable or disable in the
customizations.firewall.servicesection:[customizations.firewall.services] enabled = ["SERVICES"] disabled = ["SERVICES"]
You can check the available firewall services:
$ firewall-cmd --get-services
For example:
[customizations.firewall.services]
enabled = ["ftp", "ntp", "dhcp"]
disabled = ["telnet"]
NoteThe services listed in
firewall.servicesare different from theservice-namesavailable in the/etc/servicesfile.
5.3.11. Enabling or disabling services
You can control which services to enable during the boot time. Some image types already have services enabled or disabled to ensure that the image works correctly and you cannot override this setup. The [customizations.services] settings in the blueprint do not replace these services, but add the services to the list of services already present in the image templates.
Procedure
Customize which services to enable during the boot time:
[customizations.services]
enabled = ["SERVICES"]
disabled = ["SERVICES"]
For example:
[customizations.services]
enabled = ["sshd", "cockpit.socket", "httpd"]
disabled = ["postfix", "telnetd"]
5.3.12. Specifying a custom filesystem configuration
You can specify a custom filesystem configuration in your blueprints and therefore create images with a specific disk layout, instead of the default layout configuration. By using the non-default layout configuration in your blueprints, you can benefit from:
- Security benchmark compliance
- Protection against out-of-disk errors
- Improved performance
- Consistency with existing setups
The filesystem customization is not supported for OSTree systems, because OSTree images have their own mount rule, such as read-only.
The blueprint supports the following mountpoints and their sub-directories:
-
/- the root mount point -
/var -
/home -
/opt -
/srv -
/usr -
/app -
/data -
/boot- The blueprint supports the/bootcustomization from RHEL 8.7 and RHEL 9.1 onward.
Customizing mount points is only supported from RHEL 8.5 distributions onward, by using the CLI. In earlier distributions, you can only specify the root partition as a mount point and specify the size argument as an alias for the image size. Beginning with RHEL 8.6, for the osbuild-composer-46.1-1.el8 RPM and later version, the physical partitions are no longer available and filesystem customizations create logical volumes.
If you have more than one partition in the customized image, you can create images with a customized file system partition on LVM and resize those partitions at runtime. To do this, you can specify a customized filesystem configuration in your blueprint and therefore create images with the required disk layout. The default filesystem layout remains unchanged - if you use plain images without file system customization, and cloud-init resizes the root partition.
The blueprint automatically converts the file system customization to an LVM partition.
You can use the custom file blueprint customization to create new files or to replace existing files. The parent directory of the file you specify must exist, otherwise, the image build fails. Ensure that the parent directory exists by specifying it in the [[customizations.directories]] customization.
If you combine the files customizations with other blueprint customizations, it might affect the functioning of the other customizations, or it might override the current files customizations.
With the [[customizations.files]] blueprint customization you can:
- Create new text files.
- Modifying existing files. WARNING: this can override the existing content.
- Set user and group ownership for the file you are creating.
- Set the mode permission in the octal format.
You cannot create or replace the following files:
-
/etc/fstab -
/etc/shadow -
/etc/passwd -
/etc/group
You can create customized files and directories in your image, by using the [[customizations.files]] and the [[customizations.directories]] blueprint customizations. You can use these customizations only in the /etc directory.
These blueprint customizations are supported by all image types, except the image types that deploy OSTree commits, such as edge-raw-image, edge-installer, and edge-simplified-installer.
If you use the customizations.directories with a directory path which already exists in the image with mode, user or group already set, the image build fails to prevent changing the ownership or permissions of the existing directory.
With the [[customizations.directories]] blueprint customization you can:
- Create new directories.
- Set user and group ownership for the directory you are creating.
- Set the directory mode permission in the octal format.
- Ensure that parent directories are created as needed.
With the [[customizations.files]] blueprint customization you can:
- Create new text files.
- Modifying existing files. WARNING: this can override the existing content.
- Set user and group ownership for the file you are creating.
- Set the mode permission in the octal format.
You cannot create or replace the following files:
-
/etc/fstab -
/etc/shadow -
/etc/passwd -
/etc/group
Procedure
Customize the filesystem configuration in your blueprint:
[[customizations.filesystem]]
mountpoint = "MOUNTPOINT"
size = MINIMUM-PARTITION-SIZE
The
MINIMUM-PARTITION-SIZEvalue has no default size format. The blueprint customization supports the following values and units: kB to TB and KiB to TiB. For example, you can define the mount point size in bytes:[[customizations.filesystem]] mountpoint = "/var" size = 1073741824
Define the mount point size by using units. For example:
[[customizations.filesystem]]
mountpoint = "/opt"
size = "20 GiB"
[[customizations.filesystem]]
mountpoint = "/boot"
size = "1 GiB"
Create customized directories under the
/etcdirectory for your image by using[[customizations.directories]]:[[customizations.directories]] path = "/etc/directory_name" mode = "octal_access_permission" user = "user_string_or_integer" group = "group_string_or_integer" ensure_parents = boolean
The blueprint entries are described as following:
-
path- Mandatory - enter the path to the directory that you want to create. It must be an absolute path under the/etcdirectory. -
mode- Optional - set the access permission on the directory, in the octal format. If you do not specify a permission, it defaults to 0755. The leading zero is optional. -
user- Optional - set a user as the owner of the directory. If you do not specify a user, it defaults toroot. You can specify the user as a string or as an integer. -
group- Optional - set a group as the owner of the directory. If you do not specify a group, it defaults toroot. You can specify the group as a string or as an integer. -
ensure_parents- Optional - Specify whether you want to create parent directories as needed. If you do not specify a value, it defaults tofalse. Create customized file under the
/etcdirectory for your image by using[[customizations.directories]]:[[customizations.files]] path = "/etc/directory_name" mode = "octal_access_permission" user = "user_string_or_integer" group = "group_string_or_integer" data = "Hello world!"
The blueprint entries are described as following:
-
path- Mandatory - enter the path to the file that you want to create. It must be an absolute path under the/etcdirectory. -
modeOptional - set the access permission on the file, in the octal format. If you do not specify a permission, it defaults to 0644. The leading zero is optional. -
user- Optional - set a user as the owner of the file. If you do not specify a user, it defaults toroot. You can specify the user as a string or as an integer. -
group- Optional - set a group as the owner of the file. If you do not specify a group, it defaults toroot. You can specify the group as a string or as an integer. -
data- Optional - Specify the content of a plain text file. If you do not specify a content, it creates an empty file.
5.4. Packages installed by RHEL image builder
When you create a system image using RHEL image builder, the system installs a set of base package groups.
When you add additional components to your blueprint, ensure that the packages in the components you added do not conflict with any other package components. Otherwise, the system fails to solve dependencies and creating your customized image fails. You can check if there is no conflict between the packages by running the command:
# composer-cli blueprints depsolve BLUEPRINT-NAME
By default, RHEL image builder uses the Core group as the base list of packages.
Table 5.1. Default packages to support image type creation
| Image type | Default Packages |
|---|---|
|
|
|
|
|
|
|
|
|
|
|
|
|
|
|
|
|
|
|
|
|
|
|
|
|
|
|
|
|
|
|
|
|
|
|
|
|
|
|
Additional resources
Chapter 6. Building simplified installer images to provision a RHEL for Edge image
You can build a RHEL for Edge Simplified Installer image, which is optimized for unattended installation to a device, and provision the image to a RHEL for Edge image.
6.1. Simplified installer image build and deployment
Build a RHEL for Edge Simplified Installer image by using the edge-simplified-installer image type,.
To build a RHEL for Edge Simplified Installer image, provide an existing OSTree commit. The resulting simplified image contains a raw image that has the OSTree commit deployed. After you boot the Simplified installer ISO image, it provisions a RHEL for Edge system that you can use on a hard disk or as a boot image in a virtual machine. You can log in to the deployed system with the user name and password that you specified in the blueprint that you used to create the Simplified Installer image.
The RHEL for Edge Simplified Installer image is optimized for unattended installation to a device and supports both network-based deployment and non-network-based deployments. However, for network-based deployment, it supports only UEFI HTTP boot.
Composing and deploying a simplified RHEL for Edge image involves the following high-level steps:
- Install and register a RHEL system
- Install RHEL image builder
- Using RHEL image builder, create a blueprint with customizations for RHEL for Edge Container image
- Import the RHEL for Edge blueprint in RHEL image builder
- Create a RHEL for Edge image embed in an OCI container with a web server ready to deploy the commit as an OSTree repository
-
Create a blueprint for the
edge-simplified-installerimage - Build a simplified RHEL for Edge image
- Download the RHEL for Edge simplified image
-
Install the raw image with the
edge-simplified-installervirt-install
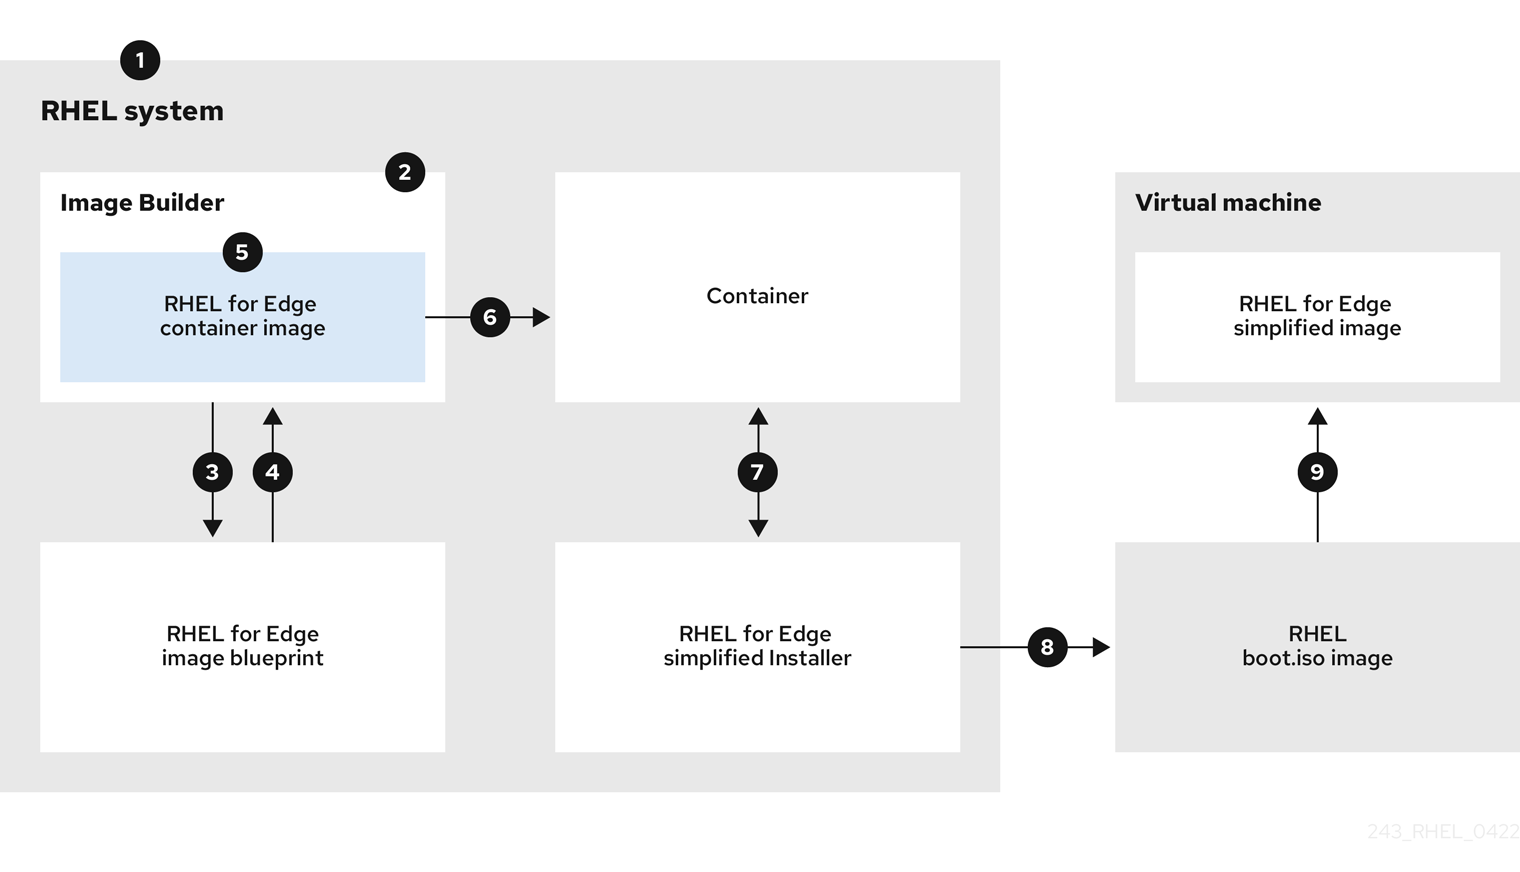
The following diagram represents the RHEL for Edge Simplified building and provisioning workflow:
Figure 6.1. Building and provisioning RHEL for Edge in network-based environment
6.2. Creating a blueprint for a Simplified image using RHEL image builder CLI
To create a blueprint for a simplified RHEL for Edge image, you must customize it with a device file location to enable an unattended installation to a device and a URL to perform the initial device credential exchange. You also must specify users and user groups in the blueprint. For that,follow the steps:
Procedure
Create a plain text file in the Tom’s Obvious, Minimal Language (TOML) format, with the following content:
name = "simplified-installer-blueprint"
description = "blueprint for the simplified installer image"
version = "0.0.1"
packages = []
modules = []
groups = []
distro = ""

[customizations]
installation_device = "/dev/vda"

[[customizations.user]]
name = "admin"
password = "admin"
groups = ["users", "wheel"]

[customizations.fdo]
manufacturing_server_url = "http://10.0.0.2:8080"
diun_pub_key_insecure = "true"
NoteThe FDO customization in the blueprints is optional, and you can build your RHEL for Edge Simplified Installer image with no errors.
- name is the name and description is the description for your blueprint.
- 0.0.1 is the version number according to the Semantic Versioning scheme.
- Modules describe the package name and matching version glob to be installed into the image, for example, the package name = "tmux" and the matching version glob is version = "2.9a". Notice that currently there are no differences between packages and modules.
-
Groups are packages groups to be installed into the image, for example the
anaconda-toolsgroup package. If you do not know the modules and groups, leave them empty. - installation-device is the customization to enable an unattended installation to your device.
- manufacturing_server_url is the URL to perform the initial device credential exchange.
- name is the user name to login to the image.
- password is a password of your choice.
- groups are any user groups, such as "widget".
Push (import) the blueprint to the RHEL image builder server:
# composer-cli blueprints push blueprint-name.tomlList the existing blueprints to check whether the created blueprint is successfully pushed and exists.
# composer-cli blueprints show blueprint-nameCheck whether the components and versions listed in the blueprint and their dependencies are valid:
# composer-cli blueprints depsolve blueprint-name
Additional resources
6.3. Creating a RHEL for Edge Simplified Installer image using image builder CLI
To create a RHEL for Edge Simplified image by using RHEL image builder command-line interface, ensure that you have met the following prerequisites and then follow the procedure.
Prerequisites
- You created a blueprint for the RHEL for Edge Simplified image.
- You served an OSTree repository of the commit to embed in the image. For example, http://10.0.2.2:8080/repo. See Setting up a web server to install RHEL for Edge image.
Procedure
Create the bootable ISO image.
# composer-cli compose start-ostree \
blueprint-name \
edge-simplified-installer \
--ref rhel/8/x86_64/edge \
--url URL-OSTree-repository \
Where,
-
blueprint-nameis the RHEL for Edge blueprint name. -
edge-simplified-installeris the image type . -
--refis the reference for where your commit is going to be created. --urlis the URL to the OSTree repository of the commit to embed in the image. For example, http://10.0.2.2:8080/repo/. You can either start a RHEL for Edge Container or set up a web server. See Creating a RHEL for Edge Container image for non-network-based deployments and Setting up a web server to install RHEL for Edge image.A confirmation that the composer process has been added to the queue appears. It also shows a Universally Unique Identifier (UUID) number for the image created. Use the UUID number to track your build. Also keep the UUID number handy for further tasks.
-
Check the image compose status.
# composer-cli compose status
The output displays the status in the following format:
<UUID> RUNNING date blueprint-name blueprint-version image-type
NoteThe image creation processes can take up to ten minutes to complete.
To interrupt the image creation process, run:
# composer-cli compose cancel <UUID>To delete an existing image, run:
# composer-cli compose delete <UUID>
Additional resources
6.4. Downloading a simplified RHEL for Edge image using the image builder command-line interface
To download a RHEL for Edge image by using RHEL image builder command line interface, ensure that you have met the following prerequisites and then follow the procedure.
Prerequisites
- You have created a RHEL for Edge image.
Procedure
Review the RHEL for Edge image status.
# composer-cli compose status
The output must display the following:
$ <UUID> FINISHED date blueprint-name blueprint-version image-type
Download the image.
# composer-cli compose image <UUID>
RHEL image builder downloads the image as an
.isofile at the current directory path where you run the command.The UUID number and the image size is displayed alongside.
$ <UUID>-simplified-installer.iso: size MB
As a result, you downloaded a RHEL for Edge Simplified Installer ISO image. You can use it directly as a boot ISO to install a RHEL for Edge system.
6.5. Creating a blueprint for a Simplified image RHEL using image builder GUI
To create a RHEL for Edge Simplified Installer image, you must create a blueprint and ensure that you customize it with:
- A device node location to enable an unattended installation to your device.
- A URL to perform the initial device credential exchange.
- A user or user group.
You can also add any other customizations that your image requires.
To create a blueprint for a simplified RHEL for Edge image in the RHEL image builder GUI, complete the following steps:
Prerequisites
- You have opened the image builder app from the web console in a browser. See Accessing the RHEL image builder GUI in the RHEL web console.
Procedure
Click Create Blueprint in the upper-right corner of the RHEL image builder app.
A dialog wizard with fields for the blueprint name and description opens.
On the
Detailspage:- Enter the name of the blueprint and, optionally, its description. Click .
Optional: On the Packages page, complete the following steps:
In the
Available packagessearch, enter the package name and click the button to move it to the Chosen packages field. Search and include as many packages as you want. Click .NoteThe customizations are all optional unless otherwise specified.
-
Optional: On the
Kernelpage, enter a kernel name and the command-line arguments. -
Optional: On the
File systempage, selectUse automatic partitioning.The filesystem customization is not supported for OSTree systems, because OSTree images have their own mount rule, such as read-only. Click . Optional: On the
Servicespage, you can enable or disable services:- Enter the service names you want to enable or disable, separating them by a comma, by space, or by pressing the key. Click .
Optional: On the
Firewallpage, set up your firewall setting:-
Enter the
Ports, and the firewall services you want to enable or disable. - Click the button to manage your firewall rules for each zone independently. Click .
-
Enter the
On the
Userspage, add a users by following the steps:- Click .
Enter a
Username, apassword, and aSSH key. You can also mark the user as a privileged user, by clicking theServer administratorcheckbox.NoteWhen you specify the user in the blueprint customization and then create an image from that blueprint, the blueprint creates the user under the
/usr/lib/passwddirectory and the password under the/usr/etc/shadowduring installation time. You can log in to the device with the username and password you created for the blueprint. After you access the system, you must create users, for example, using theuseraddcommand.Click .
Optional: On the
Groupspage, add groups by completing the following steps:Click the button:
-
Enter a
Group nameand aGroup ID. You can add more groups. Click .
-
Enter a
Optional: On the
SSH keyspage, add a key:Click the button.
- Enter the SSH key.
-
Enter a
User. Click .
Optional: On the
Timezonepage, set your timezone settings:On the
Timezonefield, enter the timezone you want to add to your system image. For example, add the following timezone format: "US/Eastern".If you do not set a timezone, the system uses Universal Time, Coordinated (UTC) as default.
-
Enter the
NTPservers. Click .
Optional: On the
Localepage, complete the following steps:-
On the
Keyboardsearch field, enter the package name you want to add to your system image. For example: ["en_US.UTF-8"]. -
On the
Languagessearch field, enter the package name you want to add to your system image. For example: "us". Click .
-
On the
Mandatory: On the
Otherspage, complete the following steps:-
In the
Hostnamefield, enter the hostname you want to add to your system image. If you do not add a hostname, the operating system determines the hostname. -
Mandatory: In the
Installation Devicesfield, enter a valid node for your system image to enable an unattended installation to your device. For example:dev/sda1. Click .
-
In the
Optional: On the
FIDO device onboardingpage, complete the following steps:-
On the
Manufacturing server URLfield, enter themanufacturing server URLto perform the initial device credential exchange, for example: "http://10.0.0.2:8080". The FDO customization in the blueprints is optional, and you can build your RHEL for Edge Simplified Installer image with no errors. -
On the
DIUN public key insecurefield, enter the certification public key hash to perform the initial device credential exchange. This field accepts "true" as value, which means this is an insecure connection to the manufacturing server. For example:manufacturing_server_url="http://${FDO_SERVER}:8080" diun_pub_key_insecure="true". You must use only one of these three options: "key insecure", "key hash" and "key root certs". On the
DIUN public key hashfield, enter the hashed version of your public key. For example:17BD05952222C421D6F1BB1256E0C925310CED4CE1C4FFD6E5CB968F4B73BF73. You can get the key hash by generating it based on the certificate of the manufacturing server. To generate the key hash, run the command:# openssl x509 -fingerprint -sha256 -noout -in /etc/fdo/aio/keys/diun_cert.pem | cut -d"=" -f2 | sed 's/://g'
The
/etc/fdo/aio/keys/diun_cert.pemis the certificate that is stored in the manufacturing server.On the
DIUN public key root certsfield, enter the public key root certs. This field accepts the content of the certification file that is stored in the manufacturing server. To get the content of certificate file, run the command:$ cat /etc/fdo/aio/keys/diun_cert.pem.
-
On the
- Click .
-
On the
Reviewpage, review the details about the blueprint. Click .
The RHEL image builder view opens, listing existing blueprints.
6.6. Creating a RHEL for Edge Simplified Installer image using image builder GUI
To create a RHEL for Edge Simplified image by using RHEL image builder GUI, ensure that you have met the following prerequisites and then follow the procedure.
Prerequisites
- You opened the RHEL image builder app from the web console in a browser.
- You created a blueprint for the RHEL for Edge Simplified image.
-
You served an OSTree repository of the commit to embed in the image, for example,
http://10.0.2.2:8080/repo. See Setting up a web server to install RHEL for Edge image. - The FDO manufacturing server is up and running.
Procedure
- Access mage builder dashboard.
- On the blueprint table, find the blueprint you want to build an image for.
-
Navigate to the
Imagestab and clickCreate Image. TheCreate imagewizard opens. On the
Image outputpage, complete the following steps:-
From the
Select a blueprintlist, select the blueprint you created for the RHEL for Edge Simplified image. -
From the
Image output typelist, selectRHEL for Edge Simplified Installer (.iso). -
In the
Image Sizefield, enter the image size. Minimum image size required for Simplified Installer image is:
-
From the
- Click .
In the
OSTree settingspage, complete the following steps:-
In the
Repository URLfield, enter the repository URL to where the parent OSTree commit will be pulled from. -
In the
Reffield, enter therefbranch name path. If you do not enter aref, the defaultreffor the distro is used.
-
In the
-
On the
Reviewpage, review the image customization and click .
The image build starts and takes up to 20 minutes to complete. To stop the building, click .
6.7. Downloading a simplified RHEL for Edge image using the image builder GUI
To download a RHEL for Edge image by using RHEL image builder GUI, ensure that you have met the following prerequisites and then follow the procedure.
Prerequisites
- You have successfully created a RHEL for Edge image. See link.
Procedure
- Access the RHEL image builder dashboard. The blueprint list dashboard opens.
- In the blueprint table, find the blueprint you built your RHEL for Edge Simplified Installer image for.
-
Navigate to the
Imagestab. Choose one of the options:
- Download the image.
- Download the logs of the image to inspect the elements and verify if any issue is found.
You can use the RHEL for Edge Simplified Installer ISO image that you downloaded directly as a boot ISO to install a RHEL for Edge system.
6.8. Setting up an UEFI HTTP Boot server
To set up an UEFI HTTP Boot server, so that you can start to provision a RHEL for Edge Virtual Machine over network by connecting to this UEFI HTTP Boot server, follow the steps:
Prerequisites
- You have created the ISO simplified installer image.
- An http server that serves the ISO content.
Procedure
Mount the ISO image to the directory of your choice:
# mkdir /mnt/rhel8-install/
# mount -o loop,ro -t iso9660 /path_directory/installer.iso /mnt/rhel8-install/
Replace
/path_directory/installer.isowith the path to the RHEL for Edge bootable ISO image.Copy the files from the mounted image to the HTTP server root. This command creates the
/var/www/html/rhel8-install/directory with the contents of the image.# mkdir /var/www/html/httpboot/ # cp -R /mnt/rhel8-install/* /var/www/html/httpboot/ # chmod -R +r /var/www/html/httpboot/*
NoteSome copying methods can skip the
.treeinfofile which is required for a valid installation source. Running thecpcommand for whole directories as shown in this procedure will copy.treeinfocorrectly.Update the
/var/www/html/EFI/BOOT/grub.cfgfile, by replacing:-
coreos.inst.install_dev=/dev/sdawithcoreos.inst.install_dev=/dev/vda -
linux /images/pxeboot/vmlinuzwithlinuxefi /images/pxeboot/vmlinuz -
initrd /images/pxeboot/initrd.imgwithinitrdefi /images/pxeboot/initrd.img coreos.inst.image_file=/run/media/iso/disk.img.xzwithcoreos.inst.image_url=http://{IP-ADDRESS}/disk.img.xzThe IP-ADDRESS is the ip address of this machine, which will serve as a http boot server.
-
Start the httpd service:
# systemctl start httpd.service
As a result, after you set up an UEFI HTTP Boot server, you can install your RHEL for Edge devices by using UEFI HTTP boot.
6.9. Deploying the Simplified ISO image in a Virtual Machine
Deploy the RHEL for Edge ISO image you generated by creating a RHEL for Edge Simplified image by using any the following installation sources:
- UEFI HTTP Boot
- virt-install
This example shows how to create a virt-install installation source from your ISO image for a network-based installation .
Prerequisites
- You have created an ISO image.
- You set up a network configuration to support UEFI HTTP boot.
Procedure
- Set up a network configuration to support UEFI HTTP boot. See Setting up UEFI HTTP boot with libvirt.
Use the
virt-installcommand to create a RHEL for Edge Virtual Machine from the UEFI HTTP Boot.# virt-install \ --name edge-install-image \ --disk path=” “, ,format=qcow2 --ram 3072 \ --memory 4096 \ --vcpus 2 \ --network network=integration,mac=mac_address \ --os-type linux --os-variant rhel8 \ --cdrom "/var/lib/libvirt/images/”ISO_FILENAME" --boot uefi,loader_ro=yes,loader_type=pflash,nvram_template=/usr/share/edk2/ovmf/OVMF_VARS.fd,loader_secure=no --virt-type kvm \ --graphics none \ --wait=-1 --noreboot
After you run the command, the Virtual Machine installation starts.
Verification
- Log in to the created Virtual Machine.
6.10. Deploying the Simplified ISO image from a USB flash drive
Deploy the RHEL for Edge ISO image you generated by creating a RHEL for Edge Simplified image by using an USB installation.
This example shows how to create a USB installation source from your ISO image.
Prerequisites
- You have created a simplified installer image, which is an ISO image.
- You have a 8 GB USB flash drive.
Procedure
- Copy the ISO image file to a USB flash drive.
- Connect the USB flash drive to the port of the computer you want to boot.
Boot the ISO image from the USB flash drive.The boot menu shows you the following options:
Install Red Hat Enterprise Linux 8
Test this media & install Red Hat Enterprise Linux 8
- Choose Install Red Hat Enterprise Linux 8. This starts the system installation.
Additional resources
Chapter 7. Automatically provisioning and onboarding RHEL for Edge devices with FDO
You can build a RHEL for Edge Simplified Installer image, and provision it to a RHEL for Edge image. The FIDO Device Onboarding (FDO) process automatically provisions and onboards your Edge devices, and exchanges data with other devices and systems connected on the networks.
Red Hat provides the FDO process as a Technology Preview feature and should run on secure networks. Technology Preview features are not supported with Red Hat production service level agreements (SLAs) and might not be functionally complete. These features provide early access to upcoming product features, enabling customers to test functionality and provide feedback during the development process. See Technology Preview Features Support Scope on the Red Hat Customer Portal for information about the support scope for Technology Preview features.
7.1. The FIDO Device Onboarding (FDO) process
The FIDO Device Onboarding (FDO) is the process that:
- Provisions and onboards a device.
- Automatically configures credentials for this device. The FDO process is an automatic onboarding mechanism that is triggered by the installation of a new device.
- Enables this device to securely connect and interact on the network.
With FIDO Device Onboarding (FDO), you can perform a secure device onboarding by adding new devices into your IoT architecture. This includes the specified device configuration that needs to be trusted and integrated with the rest of the running systems. The FDO process is an automatic onboarding mechanism that is triggered by the installation of a new device.
The FDO protocol performs the following tasks:
- Solves the trust and chain of ownership along with the automation needed to securely onboard a device at scale.
- Performs device initialization at the manufacturing stage and late device binding for its actual use. This means that actual binding of the device to a management system happens on the first boot of the device without requiring manual configuration on the device.
- Supports automated secure devices onboarding, that is, zero touch installation and onboarding that does not need any specialized person at the edge location. After the device is onboarded, the management platform can connect to it and apply patches, updates, and rollbacks.
With FDO, you can benefit from the following:
- FDO is a secure and simple way to enroll a device to a management platform. Instead of embedding a Kickstart configuration to the image, FDO applies the device credentials during the device first boot directly to the ISO image.
- FDO solves the issue of late binding to a device, enabling any sensitive data to be shared over a secure FDO channel.
- FDO cryptographically identifies the system identity and ownership before enrolling and passing the configuration and other secrets to the system. That enables non-technical users to power-on the system.
To build a RHEL for Edge Simplified Installer image and automatically onboard it, provide an existing OSTree commit. The resulting simplified image contains a raw image that has the OSTree commit deployed. After you boot the Simplified installer ISO image, it provisions a RHEL for Edge system that you can use on a hard disk or as a boot image in a virtual machine.
The RHEL for Edge Simplified Installer image is optimized for unattended installation to a device and supports both network-based deployment and non-network-based deployments. However, for network-based deployment, it supports only UEFI HTTP boot.
The FDO protocol is based on the following servers:
- Manufacturing server
- Generates the device credentials.
- Creates an Ownership voucher that is used to set the ownership of the device, later in the process.
- Binds the device to a specific management platform.
- Owner management system
- Receives the Ownership voucher from the Manufacturing server and becomes the owner of the associated device.
- Later in the process, it creates a secure channel between the device and the Owner onboarding server after the device authentication.
- Uses the secure channel to send the required information, such as files and scripts for the onboarding automation to the device.
- Service-info API server
- Based on Service-info API server’s configuration and modules available on the client, it performs the final steps of onboarding on target client devices, such as copying SSH keys and files, executing commands, creating users, encrypting disks and so on
- Rendezvous server
- Gets the Ownership voucher from the Owner management system and makes a mapping of the device UUID to the Owner server IP. Then, the Rendezvous server matches the device UUID with a target platform and informs the device about which Owner onboarding server endpoint this device must use.
- During the first boot, the Rendezvous server will be the contact point for the device and it will direct the device to the owner, so that the device and the owner can establish a secure channel.
- Device client
This is installed on the device. The Device client performs the following actions:
- Starts the queries to the multiple servers where the onboarding automation will be executed.
- Uses TCP/IP protocols to communicate with the servers.
The following diagram represents the FIDO device onboarding workflow:
Figure 7.1. Deploying RHEL for Edge in non-network environment
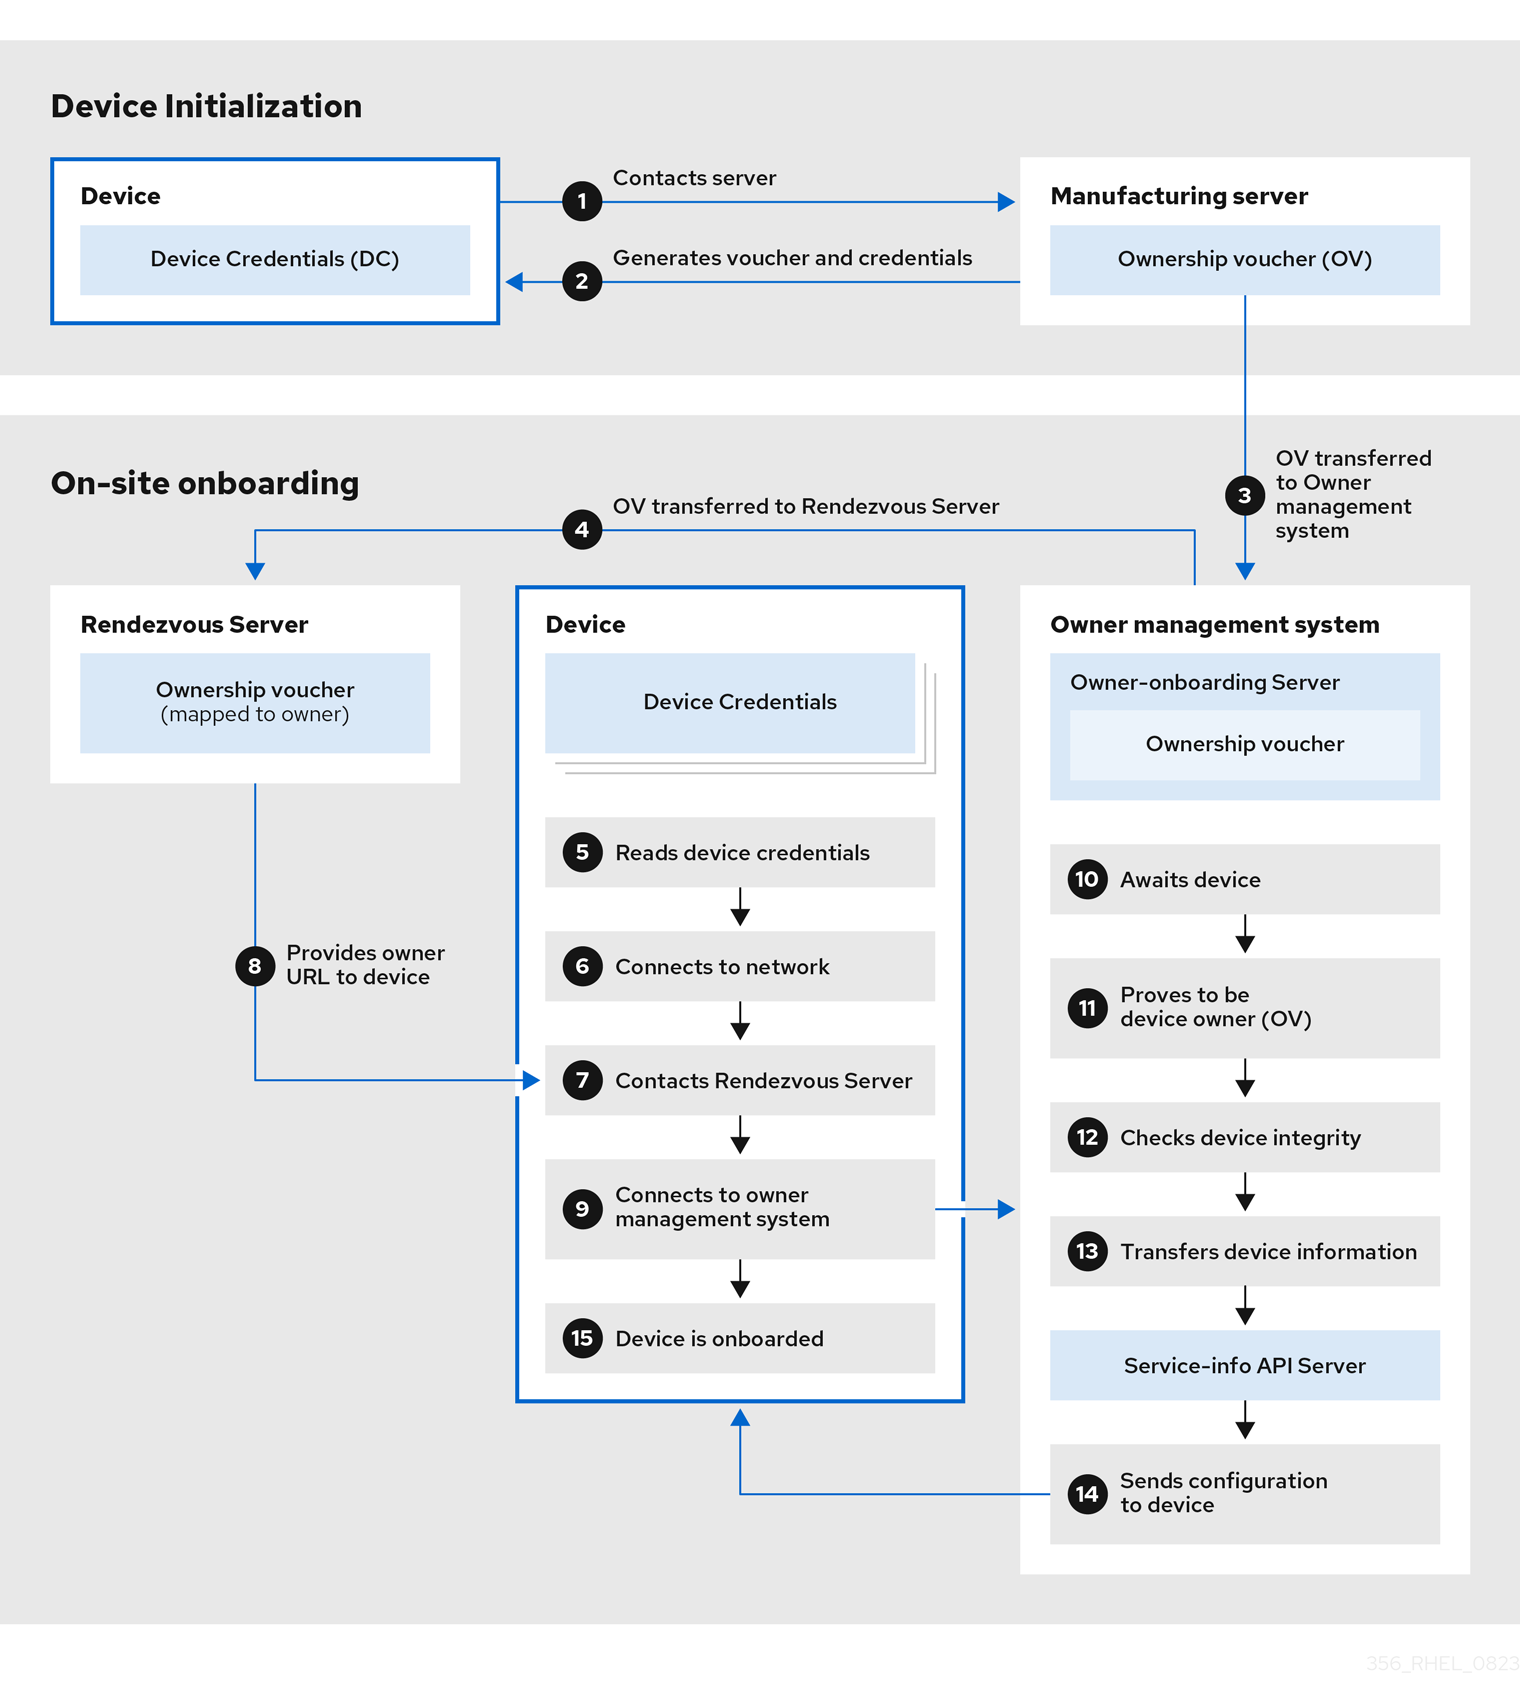
At the Device Initialization, the device contacts the Manufacturing server to get the FDO credentials, a set of certificates and keys to be installed on the operating system with the Rendezvous server endpoint (URL). It also gets the Ownership Voucher, that is maintained separately in case you need to change the owner assignment.
- The Device contacts the Manufacturing server
- The Manufacturing server generates an Ownership Voucher and the Device Credentials for the Device.
- The Ownership Voucher is transferred to the Owner onboarding server.
At the On-site onboarding, the Device gets the Rendezvous server endpoint (URL) from its device credentials and contacts Rendezvous server endpoint to start the onboarding process, which will redirect it to the Owner management system, that is formed by the Owner onboarding server and the Service Info API server.
- The Owner onboarding server transfers the Ownership Voucher to the Rendezvous server, which makes a mapping of the Ownership Voucher to the Owner.
- The device client reads device credentials.
- The device client connects to the network.
- After connecting to the network, the Device client contacts the Rendezvous server.
- The Rendezvous server sends the owner endpoint URL to the Device Client, and registers the device.
- The Device client connects to the Owner onboarding server shared by the Rendezvous server.
- The Device proves that it is the correct device by signing a statement with a device key.
- The Owner onboarding server proves itself correct by signing a statement with the last key of the Owner Voucher.
- The Owner onboarding server transfers the information of the Device to the Service Info API server.
- The Service info API server sends the configuration for the Device.
- The Device is onboarded.
7.2. Automatically provisioning and onboarding RHEL for Edge devices
To build a RHEL for Edge Simplified Installer image and automatically onboard it, provide an existing OSTree commit. The resulting simplified image contains a raw image that has the OSTree commit deployed. After you boot the Simplified installer ISO image, it provisions a RHEL for Edge system that you can use on a hard disk or as a boot image in a virtual machine.
The RHEL for Edge Simplified Installer image is optimized for unattended installation to a device and supports both network-based deployment and non-network-based deployments. However, for network-based deployment, it supports only UEFI HTTP boot.
Automatically provisioning and onboarding a RHEL for Edge device involves the following high-level steps:
- Install and register a RHEL system
- Install RHEL image builder
By using RHEL image builder, create a blueprint with customizations for RHEL for a
rhel-edge-containerimage type.name = "rhel-edge-container" description = "Minimal RHEL for Edge Container blueprint" version = "0.0.1"
- Import the RHEL for Edge Container blueprint in RHEL image builder
- Create a RHEL for Edge Container image
- Use the RHEL for Edge Container image to serve the OSTree commit, which will be later used when building the RHEL for Edge Simplified Installer image type
Create a blueprint for and
edge-simplified-installerimage type with customizations for storage device path and FDO customizationsname = "rhel-edge-simplified-installer-with-fdo" description = "Minimal RHEL for Edge Simplified Installer with FDO blueprint" version = "0.0.1" packages = [] modules = [] groups = [] distro = "" [customizations] installation_device = "/dev/vda" [customizations.fdo] manufacturing_server_url = "http://10.0.0.2:8080" diun_pub_key_insecure = "true"
- Build a simplified installer RHEL for Edge image
- Download the RHEL for Edge simplified installer image
-
At this point, the FDO server infrastructure should be up and running, and the specific onboarding details handled by the
service-info APIserver, that is part of the owner’s infrastructure, are configured - Install the simplified installer ISO image to a device. The FDO client runs on the Simplified Installer ISO and the UEFI directory structure makes the image bootable.
- The network configuration enables the device to reach out to the manufacturing server to perform the initial device credential exchange.
- After the system reaches the endpoint, the device credentials are created for the device.
- The device uses the device credentials to reach the Rendezvous server, where it checks the cryptographic credentials based on the vouchers that the Rendezvous server has, and then the Rendezvous server redirects the device to the Owner server.
- The device contacts the Owner server. They establish a mutual trust and the final steps of onboarding happen based on the configuration of the Service-info API server. For example, it installs the SSH keys in the device, transfer the files, create the users, run the commands, encrypt the filesystem, and so on.
Additional resources
7.3. Generating key and certificates
To run the FIDO Device Onboarding (FDO) infrastructure, you need to generate keys and certificates. FDO generates these keys and certificates to configure the manufacturing server. FDO automatically generates the certificates and .yaml configuration files when you install the services, and re-creating them is optional. After you install and start the services, it runs with the default settings.
Red Hat provides the fdo-admin-tool tool as a Technology Preview feature and should run on secure networks. Technology Preview features are not supported with Red Hat production service level agreements (SLAs) and might not be functionally complete. These features provide early access to upcoming product features, enabling customers to test functionality and provide feedback during the development process. See Technology Preview Features Support Scope on the Red Hat Customer Portal for information about the support scope for Technology Preview features.
Prerequisites
-
You installed the
fdo-admin-cliRPM package
Procedure
Generate the keys and certificates in the
/etc/fdodirectory:$ for i in "diun" "manufacturer" "device-ca" "owner"; do fdo-admin-tool generate-key-and-cert $i; done $ ls keys device_ca_cert.pem device_ca_key.der diun_cert.pem diun_key.der manufacturer_cert.pem manufacturer_key.der owner_cert.pem owner_key.der
Check the key and certificates that were created in the
/etc/fdo/keysdirectory:$ tree keys
You can see the following output:
– device_ca_cert.pem
– device_ca_key.der
– diun_cert.pem
– diun_key.dre
– manufacturer_cert.pem
– manufacturer_key.der
– owner_cert.pem
– owner_key.pem
Additional resources
-
See the
fdo-admin-tool generate-key-and-cert –-helpmanual page
7.4. Installing and running the manufacturing server
The fdo-manufacturing-server RPM package enables you to run the Manufacturing Server component of the FDO protocol. It also stores other components, such as the owner vouchers, the manufacturer keys, and information about the manufacturing sessions. During the device installation, the Manufacturing server generates the device credentials for the specific device, including its GUID, rendezvous information and other metadata. Later on in the process, the device uses this rendezvous information to contact the Rendezvous server.
Red Hat provides the fdo-manufacturing-server tool as a Technology Preview feature and should run on secure networks because Technology Preview features are not supported with Red Hat production service level agreements (SLAs) and might not be functionally complete. These features provide early access to upcoming product features, enabling customers to test functionality and provide feedback during the development process. See Technology Preview Features Support Scope on the Red Hat Customer Portal for information about the support scope for Technology Preview features.
To install the manufacturing server RPM package, complete the following steps:
Procedure
Install the
fdo-admin-clipackage:# yum install -y fdo-admin-cli
Check if the
fdo-manufacturing-serverRPM package is installed:$ rpm -qa | grep fdo-manufacturing-server --refresh
Check if the files were correctly installed:
$ ls /usr/share/doc/fdo
You can see the following output:
Output:
manufacturing-server.yml
owner-onboarding-server.yml
rendezvous-info.yml
rendezvous-server.yml
serviceinfo-api-server.yml
Optional: Check the content of each file, for example:
$ cat /usr/share/doc/fdo/manufacturing-server.yml
Configure the Manufacturing server. You must provide the following information:
- The Manufacturing server URL
- The IP address or DNS name for the Rendezvous server
The path to the keys and certificates you generated. See Generating key and certificates.
You can find an example of a Manufacturing server configuration file in the
/usr/share/doc/fdo/manufacturing-server.ymldirectory. The following is amanufacturing server.ymlexample that is created and saved in the/etc/fdodirectory. It contains paths to the directories, certificates, keys that you created, the Rendezvous server IP address and the default port.session_store_driver: Directory: path: /etc/fdo/stores/manufacturing_sessions/ ownership_voucher_store_driver: Directory: path: /etc/fdo/stores/owner_vouchers public_key_store_driver: Directory: path: /etc/fdo/stores/manufacturer_keys bind: "0.0.0.0:8080" protocols: plain_di: false diun: mfg_string_type: SerialNumber key_type: SECP384R1 allowed_key_storage_types: - Tpm - FileSystem key_path: /etc/fdo/keys/diun_key.der cert_path: /etc/fdo/keys/diun_cert.pem rendezvous_info: - deviceport: 8082 ip_address: 192.168.122.99 ownerport: 8082 protocol: http manufacturing: manufacturer_cert_path: /etc/fdo/keys/manufacturer_cert.pem device_cert_ca_private_key: /etc/fdo/keys/device_ca_key.der device_cert_ca_chain: /etc/fdo/keys/device_ca_cert.pem owner_cert_path: /etc/fdo/keys/owner_cert.pem manufacturer_private_key: /etc/fdo/keys/manufacturer_key.der
Start the Manufacturing server.
Check if the systemd unit file are in the server:
# systemctl list-unit-files | grep fdo | grep manufacturing
fdo-manufacturing-server.service disabled disabled
Enable and start the manufacturing server.
# systemctl enable --now fdo-manufacturing-server.service
Open the default ports in your firewall:
# firewall-cmd --add-port=8080/tcp --permanent
# systemctl restart firewalld
Ensure that the service is listening on the port 8080:
# ss -ltn
- Install RHEL for Edge onto your system using the simplified installer. See Building simplified installer images to provision a RHEL for Edge image.
Additional resources
7.5. Installing, configuring, and running the Rendezvous server
Install the fdo-rendezvous-server RPM package to enable the systems to receive the voucher generated by the Manufacturing server during the first device boot. The Rendezvous server then matches the device UUID with the target platform or cloud and informs the device about which Owner server endpoint the device must use.
Prerequisites
-
You created a
manufacturer_cert.pemcertificate. See Generating key and certificates. -
You copied the
manufacturer_cert.pemcertificate to the/etc/fdo/keysdirectory in the Rendezvous server.
Procedure
Install the
fdo-rendezvous-serverRPM packages:# yum install -y fdo-rendezvous-server
Create the
rendezvous-server.ymlconfiguration file, including the path to the manufacturer certificate. You can find an example in/usr/share/doc/fdo/rendezvous-server.yml. The following example shows a configuration file that is saved in/etc/fdo/rendezvous-server.yml.storage_driver: Directory: path: /etc/fdo/stores/rendezvous_registered session_store_driver: Directory: path: /etc/fdo/stores/rendezvous_sessions trusted_manufacturer_keys_path: /etc/fdo/keys/manufacturer_cert.pem max_wait_seconds: ~ bind: "0.0.0.0:8082"Check the Rendezvous server service status:
# systemctl list-unit-files | grep fdo | grep rende
fdo-rendezvous-server.service disabled disabled
If the service is stopped and disabled, enable and start it:
# systemctl enable --now fdo-rendezvous-server.service
Check that the server is listening on the default configured port 8082:
# ss -ltn
Open the port if you have a firewall configured on this server:
# firewall-cmd --add-port=8082/tcp --permanent
# systemctl restart firewalld
7.6. Installing, configuring, and running the Owner server
Install the fdo-owner-cli and fdo-owner-onboarding-server RPM package to enable the systems to receive the voucher generated by the Manufacturing server during the first device boot. The Rendezvous server then matches the device UUID with the target platform or cloud and informs the device about which Owner server endpoint the device must use.
Prerequisites
- The device where the server will be deployed has a Trusted Platform Module (TPM) device to encrypt the disk. If not, you will get an error when booting the RHEL for Edge device.
-
You created the
device_ca_cert.pem,owner_key.der, andowner_cert.pemwith keys and certificates and copied them into the/etc/fdo/keysdirectory.
Procedure
Install the required RPMs in this server:
# dnf install -y fdo-owner-cli fdo-owner-onboarding-server
Prepare the
owner-onboarding-server.ymlconfiguration file and save it to the/etc/fdo/directory. Include the path to the certificates you already copied and information about where to publish the Owner server service in this file.The following is an example available in
/usr/share/doc/fdo/owner-onboarding-server.yml. You can find references to the Service Info API, such as the URL or the authentication token.--- ownership_voucher_store_driver: Directory: path: /etc/fdo/stores/owner_vouchers session_store_driver: Directory: path: /etc/fdo/stores/owner_onboarding_sessions trusted_device_keys_path: /etc/fdo/keys/device_ca_cert.pem owner_private_key_path: /etc/fdo/keys/owner_key.der owner_public_key_path: /etc/fdo/keys/owner_cert.pem bind: "0.0.0.0:8081" service_info_api_url: "http://localhost:8083/device_info" service_info_api_authentication: BearerToken: token: Kpt5P/5flBkaiNSvDYS3cEdBQXJn2Zv9n1D50431/lo= owner_addresses: - transport: http addresses: - ip_address: 192.168.122.149Create and configure the Service Info API.
Add the automated information for onboarding, such as user creation, files to be copied or created, commands to be executed, disk to be encrypted, and so on. Use the Service Info API configuration file example in
/usr/share/doc/fdo/serviceinfo-api-server.ymlas a template to create the configuration file under/etc/fdo/.--- service_info: initial_user: username: admin sshkeys: - "ssh-rsa AAAA...." files: - path: /root/resolv.conf source_path: /etc/resolv.conf commands: - command: touch args: - /root/test return_stdout: true return_stderr: true diskencryption_clevis: - disk_label: /dev/vda4 binding: pin: tpm2 config: "{}" reencrypt: true additional_serviceinfo: ~ bind: "0.0.0.0:8083" device_specific_store_driver: Directory: path: /etc/fdo/stores/serviceinfo_api_devices service_info_auth_token: Kpt5P/5flBkaiNSvDYS3cEdBQXJn2Zv9n1D50431/lo= admin_auth_token: zJNoErq7aa0RusJ1w0tkTjdITdMCWYkndzVv7F0V42Q=
Check the status of the systemd units:
# systemctl list-unit-files | grep fdo
fdo-owner-onboarding-server.service        disabled        disabled
fdo-serviceinfo-api-server.service         disabled        disabled
If the service is stopped and disabled, enable and start it:
# systemctl enable --now fdo-owner-onboarding-server.service
# systemctl enable --now fdo-serviceinfo-api-server.service
NoteYou must restart the
systemdservices every time you change the configuration files.
Check that the server is listening on the default configured port 8083:
# ss -ltn
Open the port if you have a firewall configured on this server:
# firewall-cmd --add-port=8081/tcp --permanent
# firewall-cmd --add-port=8083/tcp --permanent
# systemctl restart firewalld
7.7. Automatically onboarding a RHEL for Edge device by using FDO authentication
To prepare your device to automatically onboard a RHEL for Edge device and provision it as part of the installation process, complete the following steps:
Prerequisites
-
You built an OSTree commit for RHEL for Edge and used that to generate an
edge-simplified-installerartifact. - Your device is assembled.
-
You installed the
fdo-manufacturing-serverRPM package. See Installing the manufacturing server package.
Procedure
- Start the installation process by booting the RHEL for Edge simplified installer image on your device. You can install it from a CD-ROM or from a USB flash drive, for example.
Verify through the terminal that the device has reached the manufacturing service to perform the initial device credential exchange and has produced an ownership voucher.
You can find the ownership voucher at the storage location configured by the
ownership_voucher_store_driver:parameter at themanufacturing-sever.ymlfile.The directory should have an
ownership_voucherfile with a name in the GUID format which indicates that the correct device credentials were added to the device.The onboarding server uses the device credential to authenticate against the onboarding server. It then passes the configuration to the device. After the device receives the configuration from the onboarding server, it receives an SSH key and installs the operating system on the device. Finally, the system automatically reboots, encrypts it with a strong key stored at TPM.
Verification
After the device automatically reboots, you can log in to the device with the credentials that you created as part of the FDO process.
- Log in to the device by providing the username and password you created in the Service Info API.
Additional resources
Chapter 8. Deploying a RHEL for Edge image in a network-based environment
You can deploy a RHEL for Edge image using the RHEL installer graphical user interface or a Kickstart file. The overall process for deploying a RHEL for Edge image depends on whether your deployment environment is network-based or non-network-based.
To deploy the images on bare metal, use a Kickstart file.
Network-based deployments
Deploying a RHEL for Edge image in a network-based environment involves the following high-level steps:
- Extract the image file contents.
- Set up a web server
- Install the image
8.1. Extracting the RHEL for Edge image commit
After you download the commit, extract the .tar file and note the ref name and the commit ID.
The downloaded commit file consists of a .tar file with an OSTree repository. The OSTree repository has a commit and a compose.json file.
The compose.json file has information metadata about the commit with information such as the "Ref", the reference ID and the commit ID. The commit ID has the RPM packages.
To extract the package contents, perform the following the steps:
Prerequisites
- Create a Kickstart file or use an existing one.
Procedure
Extract the downloaded image
.tarfile:# tar xvf <UUID>-commit.tarGo to the directory where you have extracted the
.tarfile.It has a
compose.jsonfile and an OSTree directory. Thecompose.jsonfile has the commit number and theOSTreedirectory has the RPM packages.Open the
compose.jsonfile and note the commit ID number. You need this number handy when you proceed to set up a web server.If you have the
jqJSON processor installed, you can also retrieve the commit ID by using thejqtool:# jq '.["ostree-commit"]' < compose.json
List the RPM packages in the commit.
# rpm-ostree db list rhel/8/x86_64/edge --repo=repo
Use a Kickstart file to run the RHEL installer. Optionally, you can use any existing file or can create one by using the Kickstart Generator tool.
In the Kickstart file, ensure that you include the details about how to provision the file system, create a user, and how to fetch and deploy the RHEL for Edge image. The RHEL installer uses this information during the installation process.
The following is a Kickstart file example:
lang en_US.UTF-8 keyboard us timezone Etc/UTC --isUtc text zerombr clearpart --all --initlabel autopart reboot user --name=core --group=wheel sshkey --username=core "ssh-rsa AAAA3Nza…." rootpw --lock network --bootproto=dhcp ostreesetup --nogpg --osname=rhel --remote=edge --url=https://mirror.example.com/repo/ --ref=rhel/8/x86_64/edge
The OStree-based installation uses the
ostreesetupcommand to set up the configuration. It fetches the OSTree commit, by using the following flags:-
--nogpg- Disable GNU Privacy Guard (GPG) key verification. -
--osname- Management root for the operating system installation. -
--remote- Management root for the operating system installation -
--url- URL of the repository to install from. -
--ref- Name of the branch from the repository that the installation uses. --url=http://mirror.example.com/repo/- is the address of the host system where you extracted the edge commit and served it overnginx. You can use the address to reach the host system from the guest computer.For example, if you extract the commit image in the
/var/www/htmldirectory and serve the commit overnginxon a computer whose hostname iswww.example.com, the value of the--urlparameter ishttp://www.example.com/repo.NoteUse the http protocol to start a service to serve the commit, because https is not enabled on the Apache HTTP Server.
-
Additional resources
8.2. Setting up a web server to install RHEL for Edge images
After you have extracted the RHEL for Edge image contents, set up a web server to provide the image commit details to the RHEL installer by using HTTP.
The following example provides the steps to set up a web server by using a container.
Prerequisites
- You have installed Podman on your system. See How do I install Podman in RHEL
Procedure
Create the
nginxconfiguration file with the following instructions:events { } http { server{ listen 8080; root /usr/share/nginx/html; } } pid /run/nginx.pid; daemon off;Create a Dockerfile with the following instructions:
FROM registry.access.redhat.com/ubi8/ubi
RUN yum -y install nginx && yum clean all
COPY kickstart.ks /usr/share/nginx/html/
COPY repo /usr/share/nginx/html/
COPY nginx /etc/nginx.conf
EXPOSE 8080
CMD ["/usr/sbin/nginx", "-c", "/etc/nginx.conf"]
ARG commit
ADD ${commit} /usr/share/nginx/html/
Where,
kickstart.ksis the name of the Kickstart file from the RHEL for Edge image. The Kickstart file includes directive information. To help you manage the images later, it is advisable to include the checks and settings for greenboot checks. For that, you can update the Kickstart file to include the following settings:lang en_US.UTF-8 keyboard us timezone Etc/UTC --isUtc text zerombr clearpart --all --initlabel autopart reboot user --name=core --group=wheel sshkey --username=core "ssh-rsa AAAA3Nza…." ostreesetup --nogpg --osname=rhel --remote=edge --url=https://mirror.example.com/repo/ --ref=rhel/8/x86_64/edge %post cat << EOF > /etc/greenboot/check/required.d/check-dns.sh #!/bin/bash DNS_SERVER=$(grep nameserver /etc/resolv.conf | cut -f2 -d" ") COUNT=0 # check DNS server is available ping -c1 $DNS_SERVER while [ $? != '0' ] && [ $COUNT -lt 10 ]; do COUNT++ echo "Checking for DNS: Attempt $COUNT ." sleep 10 ping -c 1 $DNS_SERVER done EOF %end
Any HTTP service can host the OSTree repository, and the example, which uses a container, is just an option for how to do this. The Dockerfile performs the following tasks:
- Uses the latest Universal Base Image (UBI)
- Installs the web server (nginx)
- Adds the Kickstart file to the server
- Adds the RHEL for Edge image commit to the server
Build a Docker container
# podman build -t name-of-container-image --build-arg commit=uuid-commit.tar .
Run the container
# podman run --rm -d -p port:8080 localhost/name-of-container-image
As a result, the server is set up and ready to start the RHEL Installer by using the
commit.tarrepository and the Kickstart file.
8.3. Performing an attended installation to an edge device by using Kickstart
For an attended installation in a network-based environment, you can install the RHEL for Edge image to a device by using the RHEL Installer ISO, a Kickstart file, and a web server. The web server serves the RHEL for Edge Commit and the Kickstart file to boot the RHEL Installer ISO image.
Prerequisites
- You have made the RHEL for Edge Commit available by running a web server. See Setting up a web server to install RHEL for Edge images.
-
You have created a
.qcow2disk image to be used as the target of the attended installation. See Creating a virtual disk image by using qemu-img.
Procedure
Run the RHEL Anaconda Installer by using the
libvirt virt-installutility to create a virtual machine (VM) with a RHEL operating system. Use the.qcow2disk image as the target disk in the attended installation:virt-install \ --name rhel-edge-test-1 \ --memory 2048 \ --vcpus 2 \ --disk path=prepared_disk_image.qcow2,format=qcow2,size=8 \ --os-variant rhel8 \ --cdrom /home/username/Downloads/rhel-8-x86_64-boot.iso
On the installation screen:
Figure 8.1. Red Hat Enterprise Linux boot menu
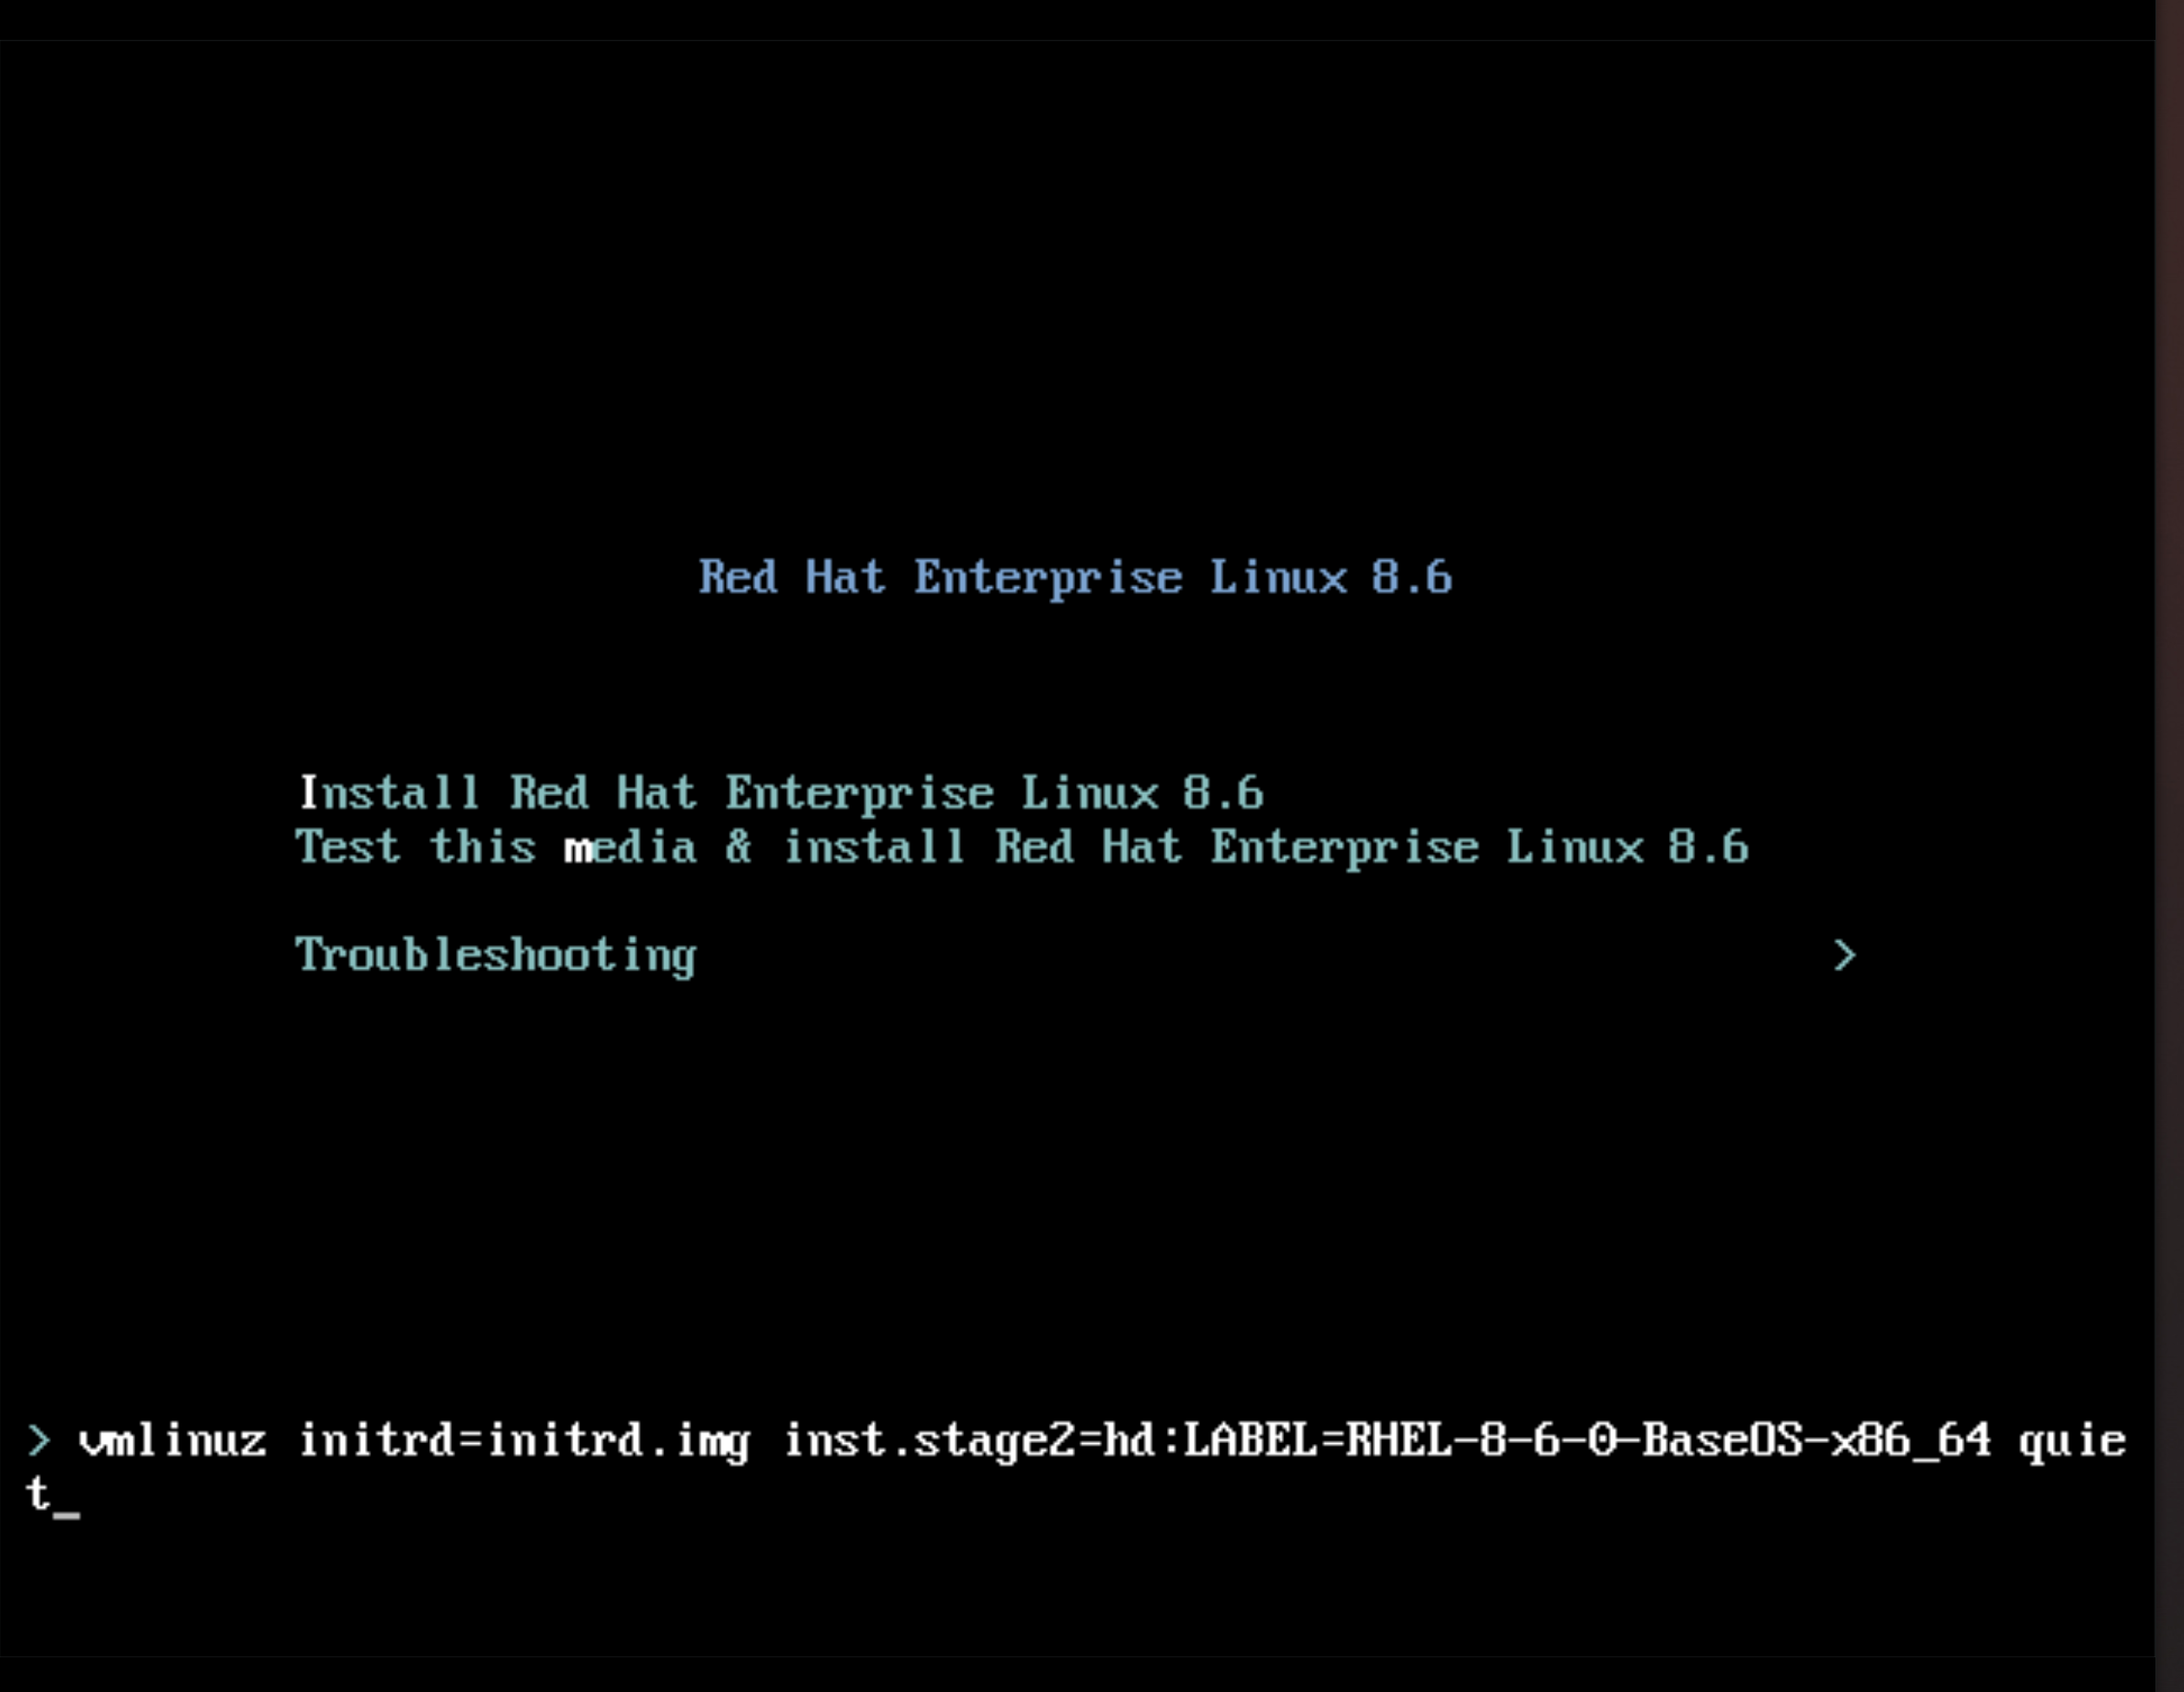
Press the key to add an additional kernel parameter:
inst.ks=http://edge_device_ip:port/kickstart.ks
The kernel parameter specifies that you want to install RHEL by using the Kickstart file and not the RHEL image contained in the RHEL Installer.
After adding the kernel parameters, press Ctrl+X to boot the RHEL installation by using the Kickstart file.
The RHEL Installer starts, fetches the Kickstart file from the server (HTTP) endpoint and executes the commands, including the command to install the RHEL for Edge image commit from the HTTP endpoint. After the installation completes, the RHEL Installer prompts you for login details.
Verification
- On the Login screen, enter your user account credentials and click .
Verify whether the RHEL for Edge image is successfully installed.
$ rpm-ostree status
The command output provides the image commit ID and shows that the installation is successful.
Following is a sample output:
State: idle
Deployments:
* ostree://edge:rhel/8/x86_64/edge
		  Timestamp: 2020-09-18T20:06:54Z
			Commit: 836e637095554e0b634a0a48ea05c75280519dd6576a392635e6fa7d4d5e96
Additional resources
8.4. Performing an unattended installation to an edge device by using Kickstart
For an unattended installation in a network-based environment, you can install the RHEL for Edge image to an Edge device by using a Kickstart file and a web server. The web server serves the RHEL for Edge Commit and the Kickstart file, and both artifacts are used to start the RHEL Installer ISO image.
Prerequisites
-
You have the
qemu-imgutility installed on your host system. -
You have created a
.qcow2disk image to install the commit you created. See Creating a system image with RHEL image builder in the CLI. - You have a running web server. See Creating a RHEL for Edge Container image for non-network-based deployments.
Procedure
- Run a RHEL for Edge Container image to start a web server. The server fetches the commit in the RHEL for Edge Container image and becomes available and running.
Run the RHEL Anaconda Installer, passing the customized
.qcow2disk image, by usinglibvirt virt-install:virt-install \ --name rhel-edge-test-1 \ --memory 2048 \ --vcpus 2 \ --disk path=prepared_disk_image.qcow2,format=qcow2,size=8 \ --os-variant rhel8 \ --cdrom /home/username/Downloads/rhel-8-x86_64-boot.iso
On the installation screen:
Figure 8.2. Red Hat Enterprise Linux boot menu
Press the key and add the Kickstart kernel argument:
inst.ks=http://web-server_device_ip:port/kickstart.ks
The kernel parameter specifies that you want to install RHEL by using the Kickstart file and not the RHEL image contained in the RHEL Installer.
After adding the kernel parameters, press Ctrl+X to boot the RHEL installation by using the Kickstart file.
The RHEL Installer starts, fetches the Kickstart file from the server (HTTP) endpoint, and executes the commands, including the command to install the RHEL for Edge image commit from the HTTP endpoint. After the installation completes, the RHEL Installer prompts you for login details.
Verification
- On the Login screen, enter your user account credentials and click .
Verify whether the RHEL for Edge image is successfully installed.
$ rpm-ostree status
The command output provides the image commit ID and shows that the installation is successful.
The following is a sample output:
State: idle
Deployments:
* ostree://edge:rhel/8/x86_64/edge
		  Timestamp: 2020-09-18T20:06:54Z
			Commit: 836e637095554e0b634a0a48ea05c75280519dd6576a392635e6fa7d4d5e96
Additional resources
Chapter 9. Deploying a RHEL for Edge image in a non-network-based environment
The RHEL for Edge Container (.tar) in combination with the RHEL for Edge Installer (.iso) image type result in a ISO image. The ISO image can be used in disconnected environments during the image deployment to a device. However, network access might require network access to build the different artifacts.
Deploying a RHEL for Edge image in a non-network-based environment involves the following high-level steps:
- Download the RHEL for Edge Container. See Downloading a RHEL for Edge image for information about how to download the RHEL for Edge image.
- Load the RHEL for Edge Container image into Podman
- Run the RHEL for Edge Container image into Podman
- Load the RHEL for Edge Installer blueprint
- Build the RHEL for Edge Installer image
-
Prepare a
.qcow2disk - Boot the Virtual Machine (VM)
- Install the image
9.1. Creating a RHEL for Edge Container image for non-network-based deployments
You can build a running container by loading the downloaded RHEL for Edge Container OSTree commit into Podman. For that, follow the steps:
Prerequisites
- You created and downloaded a RHEL for Edge Container OSTree commit.
-
You have installed
Podmanon your system. See How do I install Podman in RHEL.
Procedure
- Navigate to the directory where you have downloaded the RHEL for Edge Container OSTree commit.
Load the RHEL for Edge Container OSTree commit into
Podman.$ sudo podman load -i UUID-container.tarThe command output provides the image ID, for example:
@8e0d51f061ff1a51d157804362bc875b649b27f2ae1e66566a15e7e6530cec63Tag the new RHEL for Edge Container image, using the image ID generated by the previous step.
$ sudo podman tag image-ID localhost/edge-container
The
podman tagcommand assigns an additional name to the local image.Run the container named
edge-container.$ sudo podman run -d --name=edge-container -p 8080:8080 localhost/edge-container
The
podman run -d --name=edge-containercommand assigns a name to your container-based on thelocalhost/edge-containerimage.List containers:
$ sudo podman ps -a
CONTAINER ID  IMAGE                               	COMMAND	CREATED    	STATUS                	PORTS   NAMES
2988198c4c4b  …./localhost/edge-container   /bin/bash  3 seconds ago  Up 2 seconds ago      	edge-container
As a result, Podman runs a container that serves an OSTree repository with the RHEL for Edge Container commit.
9.2. Creating a RHEL for Edge Installer image for non-network-based deployments
After you have built a running container to serve a repository with the RHEL for Edge Container commit, create an RHEL for Edge Installer (.iso) image. The RHEL for Edge Installer (.iso) pulls the commit served by RHEL for Edge Container (.tar). After the RHEL for Edge Container commit is loaded in Podman, it exposes the OSTree in the URL format.
To create the RHEL for Edge Installer image in the CLI, follow the steps:
Prerequisites
- You created a blueprint for RHEL for Edge image.
- You created a RHEL for Edge Edge Container image and deployed it using a web server.
Procedure
Begin to create the RHEL for Edge Installer image.
# composer-cli compose start-ostree --ref rhel/8/x86_64/edge --url URL-OSTree-repository blueprint-name image-type
Where,
- ref is the same value that customer used to build ostree repository
- URL-OSTree-repository is the URL to the OSTree repository of the commit to embed in the image. For example, http://10.0.2.2:8080/repo/. See Creating a RHEL for Edge Container image for non-network-based deployments.
- blueprint-name is the RHEL for Edge Installer blueprint name.
image-type is
edge-installer.A confirmation that the composer process has been added to the queue appears. It also shows a Universally Unique Identifier (UUID) number for the image created. Use the UUID number to track your build. Also keep the UUID number handy for further tasks.
Check the image compose status.
# composer-cli compose status
The command output displays the status in the following format:
<UUID> RUNNING date blueprint-name blueprint-version image-type
NoteThe image creation process takes a few minutes to complete.
To interrupt the image creation process, run:
# composer-cli compose cancel <UUID>To delete an existing image, run:
# composer-cli compose delete <UUID>RHEL image builder pulls the commit that is being served by the running container during the image build.
After the image build is complete, you can download the resulting ISO image.
Download the image. See Downloading a RHEL for Edge image.
After the image is ready, you can use it for non-network deployments. See Installing the RHEL for Edge image for non-network-based deployments.
9.3. Installing the RHEL for Edge image for non-network-based deployments
To install the RHEL for Edge image, follow the steps:
Prerequisites
- You created a RHEL for Edge Installer ISO image.
- You stopped the running container.
- A disk image to install the commit you created.
-
You installed the
edk2-ovmfpackage. -
You installed the
virt-viewerpackage. You customized your blueprint with a user account. See Creating a blueprint for a RHEL for Edge image using RHEL image builder in RHEL web console.
WarningIf you do not define a user account customization in your blueprint, you will not be able to login to the ISO image.
Procedure
Create a
qcowVM disk file to install the (.iso) image. That is an image of a hard disk drive for the virtual machine (VM). For example:$ qemu-img create -f qcow2 diskfile.qcow2 20GUse the
virt-installcommand to boot the VM using the disk as a drive and the installer ISO image as a CD-ROM. For example:$ virt-install \ --boot uefi \ --name VM_NAME --memory 2048 \ --vcpus 2 \ --disk path=diskfile.qcow2 --cdrom /var/lib/libvirt/images/UUID-installer.iso \ --os-variant rhel9.0
This command instructs
virt-installto:- Instructs the VM to use UEFI to boot, instead of the BIOS.
- Mount the installation ISO.
Use the hard disk drive image created in the first step.
It gives you an Anaconda Installer. The RHEL Installer starts, loads the Kickstart file from the ISO and executes the commands, including the command to install the RHEL for Edge image commit. Once the installation is complete, the RHEL installer prompts for login details.
NoteAnaconda is preconfigured to use the Container commit during the installation. However, you need to set up system configurations, such as disk partition, timezone, between others.
Connect to Anaconda GUI with
virt-viewerto setup the system configuration:$ virt-viewer --connect qemu:///system --wait VM_NAME
- Reboot the system to finish the installation.
- On the login screen, specify your user account credentials and click .
Verification steps
Verify whether the RHEL for Edge image is successfully installed.
$ rpm-ostree status
The command output provides the image commit ID and shows that the installation is successful.
Chapter 10. Managing RHEL for Edge images
To manage the RHEL for Edge images, you can perform any of the following administrative tasks:
- Edit the RHEL for Edge image blueprint by using image builder in RHEL web console or in the command-line
- Build a commit update by using image builder command-line
- Update the RHEL for Edge images
-
Configure
rpm-ostreeremotes on nodes, to update node policy - Restore RHEL for Edge images manually or automatically by using greenboot
10.1. Editing a RHEL for Edge image blueprint by using image builder
You can edit the RHEL for Edge image blueprint to:
- Add additional components that you might require
- Modify the version of any existing component
- Remove any existing component
10.1.1. Adding a component to RHEL for Edge blueprint using image builder in RHEL web console
To add a component to a RHEL for Edge image blueprint, ensure that you have met the following prerequisites and then follow the procedure to edit the corresponding blueprint.
Prerequisites
- On a RHEL system, you have accessed the RHEL image builder dashboard.
- You have created a blueprint for RHEL for Edge image.
Procedure
On the RHEL image builder dashboard, click the blueprint that you want to edit.
To search for a specific blueprint, enter the blueprint name in the filter text box, and click .
On the upper right side of the blueprint, click .
The Edit blueprints wizard opens.
- On the Details page, update the blueprint name and click .
On the Packages page, follow the steps:
In the Available Packages, enter the package name that you want to add in the filter text box, and click .
A list with the component name appears.
- Click to add the component to the blueprint.
On the Review page, click .
The blueprint is now updated with the new package.
10.1.2. Removing a component from a blueprint using RHEL image builder in the web console
To remove one or more unwanted components from a blueprint that you created by using RHEL image builder, ensure that you have met the following prerequisites and then follow the procedure.
Prerequisites
- On a RHEL system, you have accessed the RHEL image builder dashboard.
- You have created a blueprint for RHEL for Edge image.
- You have added at least one component to the RHEL for Edge blueprint.
Procedure
On the RHEL image builder dashboard, click the blueprint that you want to edit.
To search for a specific blueprint, enter the blueprint name in the filter text box, and click .
On the upper right side of the blueprint, click .
The Edit blueprints wizard opens.
- On the Details page, update the blueprint name and click .
On the Packages page, follow the steps:
- From the Chosen packages, click to remove the chosen component. You can also click to remove all the packages at once.
On the Review page, click .
The blueprint is now updated.
10.1.3. Editing a RHEL for Edge image blueprint using command-line interface
You can change the specifications for your RHEL for Edge image blueprint by using RHEL image builder command-line. To do so, ensure that you have met the following prerequisites and then follow the procedure to edit the corresponding blueprint.
Prerequisites
- You have access to the RHEL image builder command-line.
- You have created a RHEL for Edge image blueprint.
Procedure
Save (export) the blueprint to a local text file:
# composer-cli blueprints save BLUEPRINT-NAME
Edit the
BLUEPRINT-NAME.tomlfile with a text editor of your choice and make your changes.Before finishing with the edits, verify that the file is a valid blueprint:
Increase the version number.
Ensure that you use a Semantic Versioning scheme.
Noteif you do not change the version, the patch component of the version is increased automatically.
Check if the contents are valid TOML specifications. See the TOML documentation for more information.
NoteTOML documentation is a community product and is not supported by Red Hat. You can report any issues with the tool at https://github.com/toml-lang/toml/issues.
- Save the file and close the editor.
Push (import) the blueprint back into RHEL image builder server:
# composer-cli blueprints push BLUEPRINT-NAME.toml
NoteWhen pushing the blueprint back into the RHEL image builder server, provide the file name including the
.tomlextension.Verify that the contents uploaded to RHEL image builder match your edits:
# composer-cli blueprints show BLUEPRINT-NAME
Check whether the components and versions listed in the blueprint and their dependencies are valid:
# composer-cli blueprints depsolve BLUEPRINT-NAME
10.2. Updating RHEL for Edge images
10.2.1. How RHEL for Edge image updates are deployed
With RHEL for Edge images, you can either deploy the updates manually or can automate the deployment process. The updates are applied in an atomic manner, where the state of each update is known, and the updates are staged and applied only upon reboot. Because no changes are seen until you reboot the device, you can schedule a reboot to ensure the highest possible uptime.
During the image update, only the updated operating system content is transferred over the network. This makes the deployment process more efficient compared to transferring the entire image. The operating system binaries and libraries in /usr are read-only, and the read and write state is maintained in /var and /etc directories.
When moving to a new deployment, the /etc and the /var directories are copied to the new deployment with read and write permissions. The /usr directory is copied as a soft link to the new deployment directory, with read-only permissions.
The following diagram illustrates the RHEL for Edge image update deployment process:
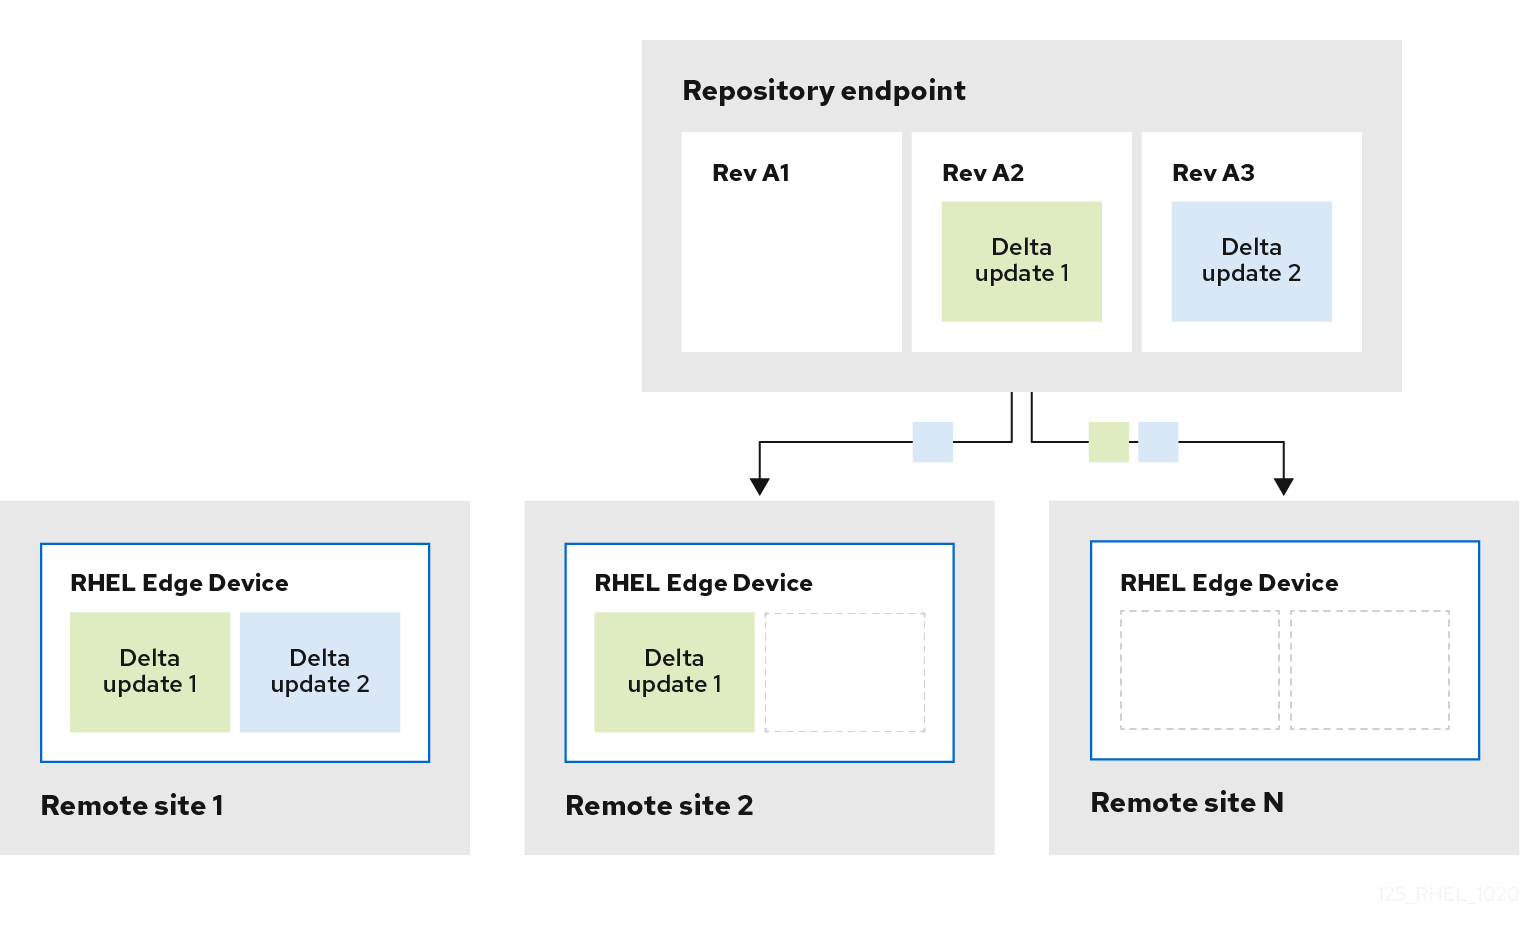
By default, the new system is booted using a procedure similar to a chroot operation, that is, the system enables control access to a filesystem while controlling the exposure to the underlying server environment. The new /sysroot directory mainly has the following parts:
-
Repository database at the
/sysroot/ostree/repodirectory. -
File system revisions at the
/sysroot/ostree/deploy/rhel/deploydirectory, which are created by each operation in the system update. -
The
/sysroot/ostree/bootdirectory, which links to deployments on the previous point. Note that/ostreeis a soft link to/sysroot/ostree. The files from the/sysroot/ostree/bootdirectory are not duplicated. The same file is used if it is not changed during the deployment. The files are hard-links to another file stored in the/sysroot/ostree/repo/objectsdirectory.
The operating system selects the deployment in the following way:
-
The
dracuttool parses theostreekernel argument in theinitramfs rootfile system and sets up the/usrdirectory as aread-onlybind mount. -
Bind the deployment directory in
/sysrootto/directory. -
Re-mount the operating system already mounted
dirsusing theMS_MOVEmount flag
If anything goes wrong, you can perform a deployment rollback by removing the old deployments with the rpm-ostree cleanup command. Each client machine contains an OSTree repository stored in /ostree/repo, and a set of deployments stored in /ostree/deploy/$STATEROOT/$CHECKSUM.
With the deployment updates in RHEL for Edge image, you can benefit from a better system consistency across multiple devices, easier reproducibility, and better isolation between the pre and post system states change.
10.2.2. Building a commit update
You can build a commit update after making a change in the blueprint, such as:
- Adding an additional package that your system requires
- Modifying the package version of any existing component
- Removing any existing package.
Prerequisites
- You have updated a system which is running RHEL image builder.
- You created a blueprint update.
- You have previously created an OSTree repository and served it through HTTP. See Setting up a web server to install RHEL for Edge images.
Procedure
Start the compose of the new commit image, with the following arguments:
--url,--ref,blueprint-name,edge-commit.# composer-cli compose start-ostree --ref rhel/8/x86_64/edge --url http://localhost:8080/repo <blueprint-name> edge-commitThe command instructs the compose process to fetch the metadata from the OStree repo before starting the compose. The resulting new OSTree commit contains a reference of the original OSTree commit as a parent image.
After the compose process finishes, fetch the
.tarfile.# composer-cli compose image <UUID>Extract the commit to a temporary directory, so that you can store the commit history in the OSTree repo.
$ tar -xf UUID.tar -C /var/tmpInspect the resulting OSTree repo commit, by using the
tar -xfcommand. It extracts the tar file to disk so you can inspect the resulting OSTree repo:$ ostree --repo=/var/tmp/repo log rhel/8/x86_64/edge commit d523ef801e8b1df69ddbf73ce810521b5c44e9127a379a4e3bba5889829546fa Parent: f47842de7e6859cee07d743d3c67949420874727883fa9dbbaeb5824ad949d91 ContentChecksum: f0f6703696331b661fa22d97358db48ba5f8b62711d9db83a00a79b3ae0dfe16 Date: 2023-06-04 20:22:28 /+0000 Version: 8
In the output example, there is a single OSTree commit in the repo that references a parent commit. The parent commit is the same checksum from the original OSTree commit that you previously made.
Merge the two commits by using the
ostree pull-localcommand:$ sudo ostree --repo=/var/srv/httpd/repo pull-local /var/tmp/repo 20 metadata, 22 content objects imported; 0 bytes content written
This command copies any new metadata and content from the location on the disk, for example,
/var/tmp, to a destination OSTree repo in/var/srv/httpd.
Verification
Inspect the target OSTree repo:
$ ostree --repo=/var/srv/httpd/repo log rhel/8/x86_64/edge
commit d523ef801e8b1df69ddbf73ce810521b5c44e9127a379a4e3bba5889829546fa
Parent:  f47842de7e6859cee07d743d3c67949420874727883fa9dbbaeb5824ad949d91
ContentChecksum:  f0f6703696331b661fa22d97358db48ba5f8b62711d9db83a00a79b3ae0dfe16
Date:  2023-06-04 20:22:28 /+0000
Version: 8
(no subject)

commit f47842de7e6859cee07d743d3c67949420874727883fa9dbbaeb5824ad949d91
ContentChecksum:  9054de3fe5f1210e3e52b38955bea0510915f89971e3b1ba121e15559d5f3a63
Date:  2023-06-04 20:01:08 /+0000
Version: 8
(no subject)
You can see that the target OSTree repo now contains two commits in the repository, in a logical order. After successful verification, you can update your RHEL for Edge system.
10.2.3. Deploying RHEL for Edge image updates manually
After you have edited a RHEL for Edge blueprint, you can update the image commit. RHEL image builder generates a new commit for the updated RHEL for Edge image. Use this new commit to deploy the image with latest package versions or with additional packages.
To deploy RHEL for Edge images updates, ensure that you meet the prerequisites and then follow the procedure.
Prerequisites
- On a RHEL system, you have accessed the RHEL image builder dashboard.
- You have created a RHEL for Edge image blueprint.
- You have edited the RHEL for Edge image blueprint.
Procedure
- On the RHEL image builder dashboard click .
On the Create Image window, perform the following steps:
In the Image output page:
- From the Select a blueprint dropdown list, select the blueprint that you edited.
-
From the Image output type dropdown list, select
RHEL for Edge Commit (.tar). Click .
In the OSTree settings page, enter:
- In the Repository URL field, enter the URL to the OSTree repository of the commit to embed in the image. For example, http://10.0.2.2:8080/repo/. See Setting up a web server to install RHEL for Edge image.
- In the Parent commit field, specify the parent commit ID that was previously generated. See Extracting RHEL for Edge image commit.
-
In the Ref field, you can either specify a name for your commit or leave it empty. By default, the web console specifies the
Refasrhel/8/arch_name/edge. Click .
In the Review page, check the customizations and click . RHEL image builder starts to create a RHEL for Edge image for the updated blueprint. The image creation process takes a few minutes to complete.
To view the RHEL for Edge image creation progress, click the blueprint name from the breadcrumbs, and then click the Images tab.
The resulting image includes the latest packages that you have added, if any, and have the original
commit IDas a parent.
Download the resulting RHEL for Edge Commit (
.tar) image.-
From the Images tab, click to save the RHEL for Edge Commit (
.tar) image to your system.
-
From the Images tab, click to save the RHEL for Edge Commit (
Extract the OSTree commit (
.tar) file.# tar -xf UUID-commit.tar -C UPGRADE_FOLDER
Upgrade the OSTree repo:
# ostree pull-local --repo http://10.0.2.2:8080/repo UPGRADE_FOLDER/repo OSTREE_REF
# ostree summary --update --repo http://10.0.2.2:8080/repo
Build a docker container, serving the child commit ID this time.
# podman build -t name-of-server --build-arg commit=UUID-child_commit.tar .
Run the container.
# podman run --rm -p 8000:80 name-of-serverOn the RHEL system provisioned, from the original edge image, verify the current status.
$ rpm-ostree status
If there is no new commit ID, run the following command to verify if there is any upgrade available:
$ rpm-ostree upgrade --check
The command output provides the current active OSTree commit ID.
Update OSTree to make the new OSTree commit ID available.
$ rpm-ostree upgrade
OSTree verifies if there is an update on the repository. If yes, it fetches the update and requests you to reboot your system so that you can activate the deployment of this new commit update.
Check the current status again:
$ rpm-ostree status
You can now see that there are 2 commits available:
- The active parent commit.
- A new commit that is not active and contains 1 added difference.
To activate the new deployment and to make the new commit active, reboot your system.
# systemctl reboot
The Anaconda Installer reboots into the new deployment. On the login screen, you can see a new deployment available for you to boot.
-
If you want to boot into the newest deployment (commit), the
rpm-ostreeupgrade command automatically orders the boot entries so that the new deployment is first in the list. Optionally, you can use the arrow key on your keyboard to select the GRUB menu entry and press . - Provide your login user account credentials.
Verify the OSTree status:
$ rpm-ostree status
The command output provides the active commit ID.
To view the changed packages, if any, run a diff between the parent commit and the new commit:
$ rpm-ostree db diff parent_commit new_commit
The update shows that the package you have installed is available and ready for use.
10.2.4. Deploying RHEL for Edge image updates manually using the command-line
After you have edited a RHEL for Edge blueprint, you can update the image commit. RHEL image builder generates a new commit for the updated RHEL for Edge image. Use the new commit to deploy the image with latest package versions or with additional packages using the CLI.
To deploy RHEL for Edge image updates using the CLI, ensure that you meet the prerequisites, and then follow the procedure.
Prerequisites
- You created the RHEL for Edge image blueprint.
- You edited the RHEL for Edge image blueprint. See Editing a RHEL for Edge image blueprint using command-line interface.
Procedure
Create the RHEL for Edge Commit (
.tar) image with the following arguments:# composer-cli compose start-ostree --ref ostree_ref --url URL-OSTree-repository -blueprint_name_ image-type
where
-
refis the reference you provided during the creation of the RHEL for Edge Container commit. For example,rhel/8/x86_64/edge. -
URL-OSTree-repositoryis the URL to the OSTree repository of the commit to embed in the image. For example, http://10.0.2.2:8080/repo/. See Setting up a web server to install RHEL for Edge image. image-typeisedge-commit.RHEL image builder creates a RHEL for Edge image for the updated blueprint.
-
Check the RHEL for Edge image creation progress:
# composer-cli compose status
NoteThe image creation processes can take up to ten to thirty minutes to complete.
The resulting image includes the latest packages that you have added, if any, and has the original
commit IDas a parent.- Download the resulting RHEL for Edge image. For more information, see Downloading a RHEL for Edge image using the RHEL image builder command-line interface.
Extract the OSTree commit.
# tar -xf UUID-commit.tar -C UPGRADE_FOLDER
- Serve the OSTree commit by using httpd. See Setting up a web server to install RHEL for Edge image.
Upgrade the OSTree repo:
# ostree pull-local --repo http://10.0.2.2:8080/repo UPGRADE_FOLDER/repo OSTREE_REF
# ostree summary --update --repo http://10.0.2.2:8080/repo
On the RHEL system provisioned from the original edge image, verify the current status:
$ rpm-ostree status
If there is no new commit ID, run the following command to verify if there is any upgrade available:
$ rpm-ostree upgrade --check
The command output provides the current active OSTree commit ID.
Update OSTree to make the new OSTree commit ID available:
$ rpm-ostree upgrade
OSTree verifies if there is an update on the repository. If yes, it fetches the update and requests you to reboot your system so that you can activate the deployment of the new commit update.
Check the current status again:
$ rpm-ostree status
You should now see that there are 2 commits available:
- The active parent commit
- A new commit that is not active and contains 1 added difference
To activate the new deployment and make the new commit active, reboot your system:
# systemctl reboot
The Anaconda Installer reboots into the new deployment. On the login screen, you can see a new deployment available for you to boot.
-
If you want to boot into the newest deployment, the
rpm-ostree upgradecommand automatically orders the boot entries so that the new deployment is first in the list. Optionally, you can use the arrow key on your keyboard to select the GRUB menu entry and press . - Log in using your account credentials.
Verify the OSTree status:
$ rpm-ostree status
The command output provides the active commit ID.
To view the changed packages, if any, run a diff between the parent commit and the new commit:
$ rpm-ostree db diff parent_commit new_commit
The update shows that the package you have installed is available and ready for use.
10.2.5. Deploying RHEL for Edge image updates manually for non-network-base deployments
After editing a RHEL for Edge blueprint, you can update your RHEL for Edge Commit image with those updates. Use RHEL image builder to generate a new commit to update your RHEL for Edge image that is already deployed in a VM, for example. Use this new commit to deploy the image with latest package versions or with additional packages.
To deploy RHEL for Edge images updates, ensure that you meet the prerequisites and then follow the procedure.
Prerequisites
- On your host, you have opened the RHEL image builder app from the web console in a browser.
- You have a RHEL for Edge system provisioned that is up and running.
- You have an OSTree repository that is being served over HTTP.
- You have edited a previously created RHEL for Edge image blueprint.
Procedure
- On your system host, on the RHEL image builder dashboard, click .
On the Create Image window, perform the following steps:
In the Image output page:
- From the Select a blueprint dropdown list, select the blueprint that you edited.
-
From the Image output type dropdown list, select
RHEL for Edge Container (.tar). - Click .
In the OSTree settings page, enter:
- In the Repository URL field, enter the URL to the OSTree repository of the commit to embed in the image. For example, http://10.0.2.2:8080/repo/. See Setting up a web server to install RHEL for Edge image.
- In the Parent commit field, specify the parent commit ID that was previously generated. See Extracting RHEL for Edge image commit.
-
In the Ref field, you can either specify a name for your commit or leave it empty. By default, the web console specifies the
Refasrhel/8/arch_name/edge. - Click .
In the Review page, check the customizations and click .
RHEL image builder creates a RHEL for Edge image for the updated blueprint.
Click the Images tab to view the progress of RHEL for Edge image creation.
NoteThe image creation process takes a few minutes to complete.
The resulting image includes the latest packages that you have added, if any, and has the original
commit IDas a parent.
Download the resulting RHEL for Edge image on your host:
-
From the Images tab, click to save the RHEL for Edge Container (
.tar) image to your host system.
-
From the Images tab, click to save the RHEL for Edge Container (
On the RHEL system provisioned from the original edge image, perform the following steps:
Load the RHEL for Edge Container image into Podman, serving the child commit ID this time.
$ cat ./child-commit_ID-container.tar | sudo podman load
Run
Podman.# sudo podman run -p 8080:8080 localhost/edge-test
Upgrade the OSTree repo:
# ostree pull-local --repo http://10.0.2.2:8080/repo UPGRADE_FOLDER/repo OSTREE_REF
# ostree summary --update --repo http://10.0.2.2:8080/repo
On the RHEL system provisioned, from the original edge image, verify the current status.
$ rpm-ostree status
If there is no new commit ID, run the following command to verify if there is any upgrade available:
$ rpm-ostree upgrade --check
If there are updates available, the command output provides information about the available updates in the OSTree repository, such as the current active OSTree commit ID. Else, it prompts a message informing that there are no updates available.
Update OSTree to make the new OSTree commit ID available.
$ rpm-ostree upgrade
OSTree verifies if there is an update on the repository. If yes, it fetches the update and requests you to reboot your system so that you can activate the deployment of this new commit update.
Check the current system status:
$ rpm-ostree status
You can now see that there are 2 commits available:
- The active parent commit.
- A new commit that is not active and contains 1 added difference.
To activate the new deployment and to make the new commit active, reboot your system.
# systemctl reboot
The Anaconda Installer reboots into the new deployment. On the login screen, you can see a new deployment available for you to boot.
To boot into the newest commit, run the following command to automatically order the boot entries so that the new deployment is first in the list:
$ rpm-ostree upgrade
Optionally, you can use the arrow key on your keyboard to select the GRUB menu entry and press .
- Provide your login user account credentials.
Verify the OSTree status:
$ rpm-ostree status
The command output provides the active commit ID.
To view the changed packages, if any, run a diff between the parent commit and the new commit:
$ rpm-ostree db diff parent_commit new_commit
The update shows that the package you have installed is available and ready for use.
10.3. Deploying RHEL for Edge automatic image updates
After you install a RHEL for Edge image on an Edge device, you can check for image updates available, if any, and can auto-apply them.
The rpm-ostreed-automatic.service (systemd service) and rpm-ostreed-automatic.timer (systemd timer) control the frequency of checks and upgrades. The available updates, if any, appear as staged deployments.
Deploying automatic image updates involves the following high-level steps:
- Update the image update policy
- Enable automatic download and staging of updates
10.3.1. Updating the RHEL for Edge image update policy
To update the image update policy, use the AutomaticUpdatePolicy and an IdleExitTimeout setting from the rpm-ostreed.conf file at /etc/rpm-ostreed.conf location on an Edge device.
The AutomaticUpdatePolicy settings controls the automatic update policy and has the following update checks options:
-
none: Disables automatic updates. By default, theAutomaticUpdatePolicysetting is set tonone. -
check: Downloads enough metadata to display available updates withrpm-ostreestatus. -
stage: Downloads and unpacks the updates that are applied on a reboot.
The IdleExitTimeout setting controls the time in seconds of inactivity before the daemon exit and has the following options:
- 0: Disables auto-exit.
-
60: By default, the
IdleExitTimeoutsetting is set to60.
To enable automatic updates, perform the following steps:
Procedure
In the
/etc/rpm-ostreed.conffile, update the following:-
Change the value of
AutomaticUpdatePolicytocheck. -
To run the update checks, specify a value in seconds for
IdleExitTimeout.
-
Change the value of
Reload the
rpm-ostreedservice and enable thesystemdtimer.# systemctl reload rpm-ostreed # systemctl enable rpm-ostreed-automatic.timer --now
Verify the
rpm-ostreestatus to ensure the automatic update policy is configured and time is active.# rpm-ostree status
The command output shows the following:
State: idle; auto updates enabled (check; last run <minutes> ago)
Additionally, the output also displays information about the available updates.
10.3.2. Enabling RHEL for Edge automatic download and staging of updates
After you update the image update policy to check for image updates, the updates if any are displayed along with the update details. If you decide to apply the updates, enable the policy to automatically download and stage the updates. The available image updates are then downloaded and staged for deployment. The updates are applied and take effect when you reboot the Edge device.
To enable the policy for automatic download and staging of updates, perform the following updates:
Procedure
-
In the
/etc/rpm-ostreed.conffile, update ‘AutomaticUpdatePolicy’ tostage. Reload the rpm-ostreed service.
# systemctl enable rpm-ostreed-automatic.timer --now
Verify the rpm-ostree status
# rpm-ostree status
The command output shows the following:
State: idle
AutomaticUpdates: stage; rpm-ostreed-automatic.timer: last run <time> ago
To initiate the updates, you can either wait for the timer to initiate the updates, or can manually start the service.
# systemctl start rpm-ostreed-automatic.service
After the updates are initiated, the rpm-ostree status shows the following:
# rpm-ostree status
State: busy
AutomaticUpdates: stage; rpm-ostreed-automatic.service: running
Transaction: automatic (stage)
When the update is complete, a new deployment is staged in the list of deployments, and the original booted deployment is left untouched. You can decide if you want to boot the system using the new deployment or can wait for the next update.
To view the list of deployments, run the
rpm-ostree statuscommand.Following is a sample output.
# rpm-ostree status
State: idle
AutomaticUpdates: stage; rpm-ostreed-automatic.timer: last run <time> ago
Deployments:
To view the list of deployments with the updated package details, run the
rpm-ostree status -vcommand.
10.4. Rolling back RHEL for Edge images
Because RHEL for Edge applies transactional updates to the operating system, you can either manually or automatically roll back the unsuccessful updates to the last known good state, which prevents system failure during updates. You can automate the verification and rollback process by using the greenboot framework.
The greenboot health check framework leverages rpm-ostree to run custom health checks on system startup. In case of an issue, the system rolls back to the last working state. When you deploy a rpm-ostree update, it runs scripts to check that critical services can still work after the update. If the system does not work, for example, due to some failed package, you can roll back the system to a previous stable version of the system. This process ensures that your RHEL for Edge device is in an operational state.
After you update an image, it creates a new image deployment while preserving the previous image deployment. You can verify whether the update was successful. If the update is unsuccessful, for example, due to a failed package, you can roll back the system to a previous stable version.
10.4.1. Introducing the greenboot checks
Greenboot is a Generic Health Check Framework for systemd available on rpm-ostree based systems. It contains the following RPM packages that you can install on your system:
greenboot- a package that contains the following functionalities:- Checking provided scripts
- Reboot the system if the check fails
- Rollback to a previous deployment the reboot did not solve the issue.
-
greenboot-default-health-checks- a set of optional and selected health checks provided by yourgreenbootsystem maintainers.
Greenboot works in a RHEL for Edge system by using health check scripts that run on the system to assess the system health and automate a rollback to the last healthy state in case of some software fails. These health checks scripts are available in the /etc/greenboot/check/required.d directory. Greenboot supports shell scripts for the health checks. Having a health check framework is especially useful when you need to check for software problems and perform system rollbacks on edge devices where direct serviceability is either limited or non-existent. When you install and configure health check scripts, it triggers the health checks to run every time the system starts.
You can create your own health check scripts to assess the health of your workloads and applications. These additional health check scripts are useful components of software problem checks and automatic system rollbacks.
You cannot use rollback in case of any health check failure on a system that is not using OSTree.
10.4.2. RHEL for Edge images roll back with greenboot
With RHEL for Edge images, only transactional updates are applied to the operating system. The transactional updates are atomic, which means that the updates are applied only if all the updates are successful, and there is support for rollbacks. With the transactional updates, you can easily rollback the unsuccessful updates to the last known good state, preventing system failure during updates.
Performing health checks is especially useful when you need to check for software problems and perform system rollbacks on edge devices where direct serviceability is limited or non-existent.
You cannot use rollback in case of an update failure on a system that is not using OSTree, even if health checks might run.
You can use intelligent rollbacks with the greenboot health check framework to automatically assess system health every time the system starts. You can obtain pre-configured health from the greenboot-default-health-checks subpackage. These checks are located in the /usr/lib/greenboot/check read-only directory in rpm-ostree systems.
Greenboot leverages rpm-ostree and runs custom health checks that run on system startup. In case of an issue, the system rolls back the changes and preserves the last working state. When you deploy an rpm-ostree update, it runs scripts to check that critical services can still work after the update. If the system does not work, the update rolls back to the last known working version of the system. This process ensures that your RHEL for Edge device is in an operational state.
You can obtain pre-configured health from the greenboot-default-health-checks`subpackage. These checks are located in the `/usr/lib/greenboot/check read-only directory in rpm-ostree systems. You can also configure shell scripts as the following types of checks:
Example 10.1. The greenboot directory structure
etc
└─ greenboot
   ├─ check
   |   └─ required.d
   |   └─ init.py
   └─ green.d
└─ red.d- Required
-
Contains the health checks that must not fail. Place required shell scripts in the
/etc/greenboot/check/required.ddirectory. If the scripts fail, greenboot retries them three times by default. You can configure the number of retries in the/etc/greenboot/greenboot.conffile by setting theGREENBOOT_MAX_BOOTSparameter to the number of retries you want.
After all retries fail, greenboot automatically initiates a rollback if one is available. If a rollback is not available, the system log output shows that you need to perform a manual intervention.
- Wanted
-
Contains the health checks that might fail without causing the system to roll back. Place wanted shell scripts in the
/etc/greenboot/check/wanted.ddirectory.Greenbootinforms that the script fails, the system health status remains unaffected and it does not perform a rollback neither a reboot.
You can also specify shell scripts that will run after a check:
- Green
-
Contains the scripts to run after a successful boot. Place these scripts into the
/etc/greenboot/green.d`directory.Greenbootinforms that the boot was successful. - Red
-
Contains the scripts to run after a failed boot. Place these scripts into the
/etc/greenboot/red.ddirectory. The system attempts to boot three times and in case of failure, it executes the scripts.Greenbootinforms that the boot failed.
The following diagram illustrates the RHEL for Edge image roll back process.

After booting the updated operating system, greenboot runs the scripts in the required.d and wanted.d directories. If any of the scripts fail in the required.d directory, greenboot runs any scripts in the red.d directory, and then reboots the system.
Greenboot makes 2 more attempts to boot on the upgraded system. If during the third boot attempt the scripts in required.d are still failing, greenboot runs the red.d scripts one last time, to ensure that the script in the red.d directory tried to make a corrective action to fix the issue and this was not successful. Then, greenboot rollbacks the system from the current rpm-ostree deployment to the previous stable deployment.
10.4.3. Greenboot health check status
When deploying your updated system, wait until the greenboot health checks have finished before making the changes to ensure that those changes are not lost if greenboot rolls the system back to an earlier state. If you want to make configuration changes or deploy applications you must wait until the greenboot health checks have finished. This ensures that your changes are not lost if greenboot rolls your rpm-ostree system back to an earlier state.
The greenboot-healthcheck service runs once and then exits. You can check the status of the service to know if it is done, and to know the outcome, by using the following commands:
systemctl is-active greenboot-healthcheck.service-
This command reports
activewhen the service has exited. If it the service did not even run it showsinactive. systemctl show --property=SubState --value greenboot-healthcheck.service-
Reports
exitedwhen done,runningwhile still running. systemctl show --property=Result --value greenboot-healthcheck.service-
Reports
successwhen the checks passed. systemctl show --property=ExecMainStatus --value greenboot-healthcheck.service- Reports the numerical exit code of the service, 0 means success and nonzero values mean a failure occurred.
cat /run/motd.d/boot-status- Shows a message, such as "Boot Status is GREEN - Health Check SUCCESS".
10.4.4. Checking greenboot health checks statuses
Check the status of greenboot health checks before making changes to the system or during troubleshooting. You can use any of the following commands to help you ensure that greenboot scripts have finished running.
Use one of the following options to check the statuses:
To see a report of health check status, enter:
$ systemctl show --property=SubState --value greenboot-healthcheck.service
The following outputs are possible:
-
startmeans that greenboot checks are still running. -
exitedmeans that checks have passed and greenboot has exited. Greenboot runs the scripts in thegreen.ddirectory when the system is in a healthy state. -
failedmeans that checks have not passed. Greenboot runs the scripts inred.ddirectory when the system is in this state and might restart the system.
-
To see a report showing the numerical exit code of the service, where
0means success and nonzero values mean a failure occurred, use the following command:$ systemctl show --property=ExecMainStatus --value greenboot-healthcheck.service
To see a report showing a message about boot status, such as
Boot Status is GREEN - Health Check SUCCESS, enter:$ cat /run/motd.d/boot-status
10.4.5. Manually rolling back RHEL for Edge images
When you upgrade your operating system, a new deployment is created, and the rpm-ostree package also keeps the previous deployment. If there are issues on the updated version of the operating system, you can manually roll back to the previous deployment with a single rpm-ostree command, or by selecting the previous deployment in the GRUB boot loader.
To manually roll back to a previous version, perform the following steps.
Prerequisite
- You updated your system and it failed.
Procedure
Optional: Check for the fail error message:
$ journalctl -u greenboot-healthcheck.service.
Run the
rollbackcommand:# rpm-ostree rollback
The command output provides details about the commit ID that is being moved and indicates a completed transaction with the details of the package being removed.
Reboot the system.
# systemctl reboot
The command activates the previous commit with the stable content. The changes are applied and the previous version is restored.
10.4.6. Rolling back RHEL for Edge images using an automated process
Greenboot checks provides a framework that is integrated into the boot process and can trigger rpm-ostree rollbacks when a health check fails. For the health checks, you can create a custom script that indicates whether a health check passed or failed. Based on the result, you can decide when a rollback should be triggered. The following procedure shows how to create an health check script example:
Procedure
Create a script that returns a standard exit code
0.For example, the following script ensures that the configured DNS server is available:
#!/bin/bash

DNS_SERVER=$(grep ^nameserver /etc/resolv.conf | head -n 1 | cut -f2 -d" ")
COUNT=0
# check DNS server is available
ping -c1 $DNS_SERVER
while [ $? != '0' ] && [ $COUNT -lt 10 ]; do
((COUNT++))
echo "Checking for DNS: Attempt $COUNT ."
sleep 10
ping -c 1 $DNS_SERVER
done
Include an executable file for the health checks at
/etc/greenboot/check/required.d/.chmod +x check-dns.sh
During the next reboot, the script is executed as part of the boot process, before the system enters the
boot-complete.targetunit. If the health checks are successful, no action is taken. If the health checks fail, the system will reboot several times, before marking the update as failed and rolling back to the previous update.
Verification steps
To check if the default gateway is reachable, run the following health check script:
Create a script that returns a standard exit code
0.#!/bin/bash DEF_GW=$(ip r | awk '/^default/ {print $3}') SCRIPT=$(basename $0) count=10 connected=0 ping_timeout=5 interval=5 while [ $count -gt 0 -a $connected -eq 0 ]; do echo "$SCRIPT: Pinging default gateway $DEF_GW" ping -c 1 -q -W $ping_timeout $DEF_GW > /dev/null 2>&1 && connected=1 || sleep $interval ((--count)) done if [ $connected -eq 1 ]; then echo "$SCRIPT: Default gateway $DEF_GW is reachable." exit 0 else echo "$SCRIPT: Failed to ping default gateway $DEF_GW!" 1>&2 exit 1 fiInclude an executable file for the health checks at
/etc/greenboot/check/required.d/directory.chmod +x check-gw.sh
Chapter 11. Creating and managing OSTree image updates
You can easily create and manage OStree image updates for your RHEL for Edge systems and make them immediately available to RHEL for Edge devices. With OSTree, you can use image builder to create RHEL for Edge Commit or RHEL for Edge Container images as .tar files that contain OSTree commits. The OSTree update versioning system works as a “Git repository” that stores and versions the OSTree commits. The rpm-ostree image and package system then assembles the commits on the client device. When you create a new image with RHEL image builder to perform an update, RHEL image builder pulls updates from these repositories.
11.1. Basic concepts for OSTree
Basic terms that OSTree and rpm-ostree use during image updates.
rpm-ostree-
The technology on the edge device that handles how the OSTree commits are assembled on the device. It works as a hybrid between an image and a package system. With the
rpm-ostreetechnology, you can make atomic upgrades and rollbacks to your system. - OSTree
- OSTree is a technology that enables you to create commits and download bootable file system trees. You can also use it to deploy the trees and manage the boot loader configuration.
- Commit
- An OSTree commit contains a full operating system that is not directly bootable. To boot the system, you must deploy it, for example, with a RHEL Installable image.
- Reference
It is also known as
ref. An OSTree ref is similar to a Git branch and it is a name. The following reference names examples are valid:-
rhel/9/x86_64/edge -
ref-name -
app/org.gnome.Calculator/x86_64/stable -
ref-name-2
-
By default, RHEL image builder specifies rhel/8/$ARCH/edge as a path. The "$ARCH" value is determined by the host machine.
- Parent
-
The
parentargument is an OSTree commit to build a new commit with RHEL image builder. It retrieves a parent commit for the new commit that you are building. You can specify the parent commit as arefvalue to be resolved and pulled, for examplerhel/8/x86_64/edge. You can also use theCommit IDthat you can find in the extracted.tarimage file. - Remote
- The http or https endpoint that hosts the OSTree content. This is analogous to the baseurl for a yum repository.
- Static delta
- Static deltas are a collection of updates generated between two OSTree commits. This enables the system client to fetch a smaller amount of files, which are larger in size. The static deltas updates are more network efficient because, when updating an ostree-based host, the system client will only fetch the objects from the new OSTree commit which do not exist on the system. Typically, the new OSTree commit contains many small files, which requires multiple TCP connections.
- Summary
- The summary file is a concise way of enumerating refs, checksums, and available static deltas in an OSTree repo. You can check the state of all the refs and static deltas available in an Ostree repo. However, you must generate the summary file every time a new ref, commit, or static-delta is added to the OSTree repo.
11.2. Creating OSTree repositories
You can create OSTree repos with RHEL image builder by using either RHEL for Edge Commit (.tar) or RHEL for Edge Container (.tar) image types. These image types contain an OSTree repo that contains a single OSTree commit.
-
You can extract the
RHEL for Edge Commit (.tar)on a web server and it is ready to be served. -
You must import the
RHEL for Edge Container (.tar)to a local container image storage or push the image to a container registry. After you start the container, it serves the commit over an integratednginxweb server.
Use the RHEL for Edge Container (.tar) on a RHEL server with Podman to create an OSTree repo:
Prerequisite
-
You created a
RHEL for Edge Container (.tar)image.
Procedure
Download the container image from RHEL image builder:
$ composer-cli compose image <UUI>Import the container into Podman:
$ skopeo copy oci-archive:<UUI>-container.tar containers-storage:localhost/ostreeStart the container and make it available by using the port
8080:$ podman run -rm -p 8080:8080 ostree
Verification
Check that the container is running:
$ podman ps -a
11.3. Managing a centralized OSTree mirror
For production environments, having a central OSTree mirror that serves all the commits has several advantages, including:
- Deduplicating and minimizing disk storage
- Optimizing the updates to clients by using static delta updates
- Pointing to a single OSTree mirror for their deployment life.
To manage a centralized OSTree mirror, you must pull each commit from RHEL image builder into the centralized repository where it will be available to your users.
You can also automate managing an OSTree mirror by using the osbuild.infra Ansible collection. See osbuild.infra Ansible.
To create a centralized repository you can run the following commands directly on a web server:
Procedure
Create an empty blueprint, customizing it to use "rhel-93" as the distro:
name = "minimal-rhel93"
description = "minimal blueprint for ostree commit"
version = "1.0.0"
modules = []
groups = []
distro = "rhel-93"
Push the blueprint to the server:
# composer-cli blueprints push minimal-rhel93.tomlBuild a RHEL for Edge Commit (
.tar) image from the blueprint you created:# composer-cli compose start-ostree minimal-rhel93 edge-commitRetrieve the
.tar fileand decompress it to the disk:# composer-cli compose image _<rhel-93-uuid> $ tar -xf <rhel-93-uuid>.tar -C /usr/share/nginx/html/
The
/usr/share/nginx/html/repolocation on disk will become the single OSTree repo for all refs and commits.Create another empty blueprint, customizing it to use "rhel-89" as the distro:
name = "minimal-rhel89"
description = "minimal blueprint for ostree commit"
version = "1.0.0"
modules = []
groups = []
distro = "rhel-89"
-
Push the blueprint and create another RHEL for Edge Commit (
.tar) image:
# *composer-cli blueprints push minimal-rhel89.toml*
# *composer-cli compose start-ostree minimal-rhel89 edge-commit*
Retrieve the
.tar fileand decompress it to the disk:# composer-cli compose image <rhel-89-uuid> $ tar -xf <rhel-89-uuid>.tar
Pull the commit to the local repo. By using
ostree pull-local, you can copy the commit data from one local repo to another local repo.# ostree --repo=/usr/share/nginx/html/repo pull-local repoOptional: Inspect the status of the OSTree repo. The following is an output example:
$ ostree --repo=/usr/share/nginx/html/repo refs

rhel/8/x86_64/edge
rhel/9/x86_64/edge

$ ostree --repo=/usr/share/nginx/html/repo show rhel/8/x86_64/edge
commit f7d4d95465fbd875f6358141f39d0c573df6a321627bafde68c73850667e5443
ContentChecksum:  41bf2f8b442a770e9bf03e096a46a286f5836e0a0702b7c3516ef4e0acec2dea
Date:  2023-09-15 16:17:04 +0000
Version: 8.9
(no subject)

$ ostree --repo=/usr/share/nginx/html/repo show rhel/9/x86_64/edge
commit 89290dbfd6f749700c77cbc434c121432defb0c1c367532368eee170d9e53ea9
ContentChecksum:  70235bfb9cae82c53f856183750e809becf0b9b076122b19c40fec92fc6d74c1
Date:  2023-09-15 15:30:24 +0000
Version: 9.3
(no subject)
Update the RHEL 9.3 blueprint to include a new package and build a new commit, for example:
name = "minimal-rhel93"
description = "minimal blueprint for ostree commit"
version = "1.1.0"
modules = []
groups = []
distro = "rhel-93"

[[packages]]
name = "strace"
version = "*"
Push the updated blueprint and create a new RHEL for Edge Commit (
.tar) image, pointing the compose to the existing OSTree repo:# composer-cli blueprints push minimal-rhel93.toml # composer-cli compose start-ostree minimal-rhel93 edge-commit --url http://localhost/repo --ref rhel/9/x86_64/edge
Retrieve the
.tarfile and decompress it to the disk:# rm -rf repo # composer-cli compose image <rhel-93-uuid> # tar -xf <rhel-93-uuid>.tar
Pull the commit to repo:
# ostree --repo=/usr/share/nginx/html/repo pull-local repoOptional: Inspect the OSTree repo status again:
$ ostree --repo=/usr/share/nginx/html/repo refs
rhel/8/x86_64/edge
rhel/9/x86_64/edge

$ ostree --repo=/usr/share/nginx/html/repo show rhel/8/x86_64/edge
commit f7d4d95465fbd875f6358141f39d0c573df6a321627bafde68c73850667e5443
ContentChecksum:  41bf2f8b442a770e9bf03e096a46a286f5836e0a0702b7c3516ef4e0acec2dea
Date:  2023-09-15 16:17:04 +0000
Version: 8.9
(no subject)

$ ostree --repo=/usr/share/nginx/html/repo show rhel/9/x86_64/edge
commit a35c3b1a9e731622f32396bb1aa84c73b16bd9b9b423e09d72efaca11b0411c9
Parent:  89290dbfd6f749700c77cbc434c121432defb0c1c367532368eee170d9e53ea9
ContentChecksum:  2335930df6551bf7808e49f8b35c45e3aa2a11a6c84d988623fd3f36df42a1f1
Date:  2023-09-15 18:21:31 +0000
Version: 9.3
(no subject)

$ ostree --repo=/usr/share/nginx/html/repo log rhel/9/x86_64/edge
commit a35c3b1a9e731622f32396bb1aa84c73b16bd9b9b423e09d72efaca11b0411c9
Parent:  89290dbfd6f749700c77cbc434c121432defb0c1c367532368eee170d9e53ea9
ContentChecksum:  2335930df6551bf7808e49f8b35c45e3aa2a11a6c84d988623fd3f36df42a1f1
Date:  2023-09-15 18:21:31 +0000
Version: 9.3
(no subject)

commit 89290dbfd6f749700c77cbc434c121432defb0c1c367532368eee170d9e53ea9
ContentChecksum:  70235bfb9cae82c53f856183750e809becf0b9b076122b19c40fec92fc6d74c1
Date:  2023-09-15 15:30:24 +0000
Version: 9.3
(no subject)

$ rpm-ostree db diff --repo=/usr/share/nginx/html/repo 89290dbfd6f749700c77cbc434c121432defb0c1c367532368eee170d9e53ea9 a35c3b1a9e731622f32396bb1aa84c73b16bd9b9b423e09d72efaca11b0411c9
ostree diff commit from: 89290dbfd6f749700c77cbc434c121432defb0c1c367532368eee170d9e53ea9
ostree diff commit to:   a35c3b1a9e731622f32396bb1aa84c73b16bd9b9b423e09d72efaca11b0411c9
Added:
  elfutils-default-yama-scope-0.188-3.el9.noarch
  elfutils-libs-0.188-3.el9.x86_64
  strace-5.18-2.el9.x86_64
Appendix A. Terminology and commands
Learn more about the rpm ostree terminology and commands.
A.1. OSTree and rpm-ostree terminology
Following are some helpful terms that are used in context to OSTree and rpm-ostree images.
Table A.1. OSTree and rpm-ostree terminology
| Term | Definition |
|---|---|
|
| A tool used for managing Linux-based operating system versions. The OSTree tree view is similar to Git and is based on similar concepts. |
|
| A hybrid image or system package that hosts operating system updates. |
|
| A release or image version of the operating system. RHEL image builder generates an ostree commit for RHEL for Edge images. You can use these images to install or update RHEL on Edge servers. |
|
|
Represents a branch in ostree. Refs always resolve to the latest commit. For example, |
|
| SHA-256 for a specific commit. |
|
| The http or https endpoint that hosts the ostree content. This is analogous to the baseurl for a yum repository. |
|
| Updates to ostree images are always delta updates. In case of RHEL for Edge images, the TCP overhead can be higher than expected due to the updates to number of files. To avoid TCP overhead, you can generate static-delta between specific commits, and send the update in a single connection. This optimization helps large deployments with constrained connectivity. |
A.2. OSTree commands
The following table provides a few OSTree commands that you can use when installing or managing OSTree images.
Table A.2. ostree commands
| ostree pull |
|
| ostree summary |
|
| View refs |
|
| View commits in repo |
|
| Inspect a commit |
|
| List remotes of a repo |
|
| Resolve a REV |
|
| Create static-delta |
|
|
Sign an |
|
A.3. rpm-ostree commands
The following table provides a few rpm-ostree commands that you can use when installing or managing OSTree images.
Table A.3. rpm-ostree commands
| Commands | Description |
|---|---|
|
| This command lists the packages existing in the <REV> commit into the repository. |
|
|
OSTree manages an ordered list of boot loader entries, called |
|
|
This command gives information about the current deployment in use. Lists the names and |
|
| Use this command to see which packages are within the commit or commits. You must specify at least one commit, but more than one or a range of commits also work. |
|
| Use this command to show how the packages are different between the trees in two revs (revisions). If no revs are provided, the booted commit is compared to the pending commit. If only a single rev is provided, the booted commit is compared to that rev. |
|
| This command downloads the latest version of the current tree, and deploys it, setting up the current tree as the default for the next boot. This has no effect on your running filesystem tree. You must reboot for any changes to take effect. |
Additional resources
-
The
rpm-ostreeman page.
A.4. FDO automatic onboarding terminology
Learn more about the FDO terminology.
Table A.4. FDO terminology
| Commands | Description |
|---|---|
| FDO | FIDO Device Onboarding. |
| Device | Any hardware, device, or computer. |
| Owner | The final owner of the device - a company or an IT department. |
| Manufacturer | The device manufacturer. |
| Manufacturer server | Creates the device credentials for the device. |
| Manufacturer client | Informs the location of the manufacturing server. |
| Ownership Voucher (OV) | Record of ownership of an individual device. Contains the following information:
* Owner (
* Rendezvous Server - FIDO server (
* Device (at least one combination) ( |
| Device Credential (DC) | Key credential and rendezvous stored in the device at manufacture. |
| Keys | Keys to configure the manufacturing server * key_path * cert_path * key_type * mfg_string_type: device serial number * allowed_key_storage_types: Filesystem and Trusted Platform Module (TPM) that protects the data used to authenticate the device you are using. |
| Rendezvous server | Link to a server used by the device and later on, used on the process to find out who is the owner of the device |
Additional resources
A.5. FDO automatic onboarding technologies
Following are the technologies used in context to FDO automatic onboarding.
Table A.5. OSTree and rpm-ostree terminology
| Technology | Definition |
|---|---|
| UEFI | Unified Extensible Firmware Interface. |
| RHEL | Red Hat® Enterprise Linux® operating system |
|
| Background image-based upgrades. |
| Greenboot |
|
| Osbuild | Pipeline-based build system for operating system artifacts. |
| Container | A Linux® container is a set of 1 or more processes that are isolated from the rest of the system. |
| Coreos-installer | Assists installation of RHEL images, boots systems with UEFI. |
| FIDO FDO | Specification protocol to provision configuration and onboarding devices. |