
16.4. Setting up Synchronization Between Active Directory and Directory Server
Configuring synchronization is very similar to configuring replication. It requires configuring the database as a supplier with a changelog and creating an agreement to define synchronization. A common user identity, a synchronization user, connects to the Active Directory (AD) domain controller (DC) to send updates from Directory Server to AD and to check AD for updates to synchronize them to Directory Server.
Note
To enable users to use their accounts on Directory Server and AD, synchronize passwords. Password synchronization requires to use an encrypted connection.
Synchronization for user and group entries is passive from the AD side. Directory Server send updates to AD and polls for updates on the AD domain. For passwords, the AD server requires a separate password service. This service actively sends password changes from the AD domain to Directory Server.
16.4.1. Step 1: Enabling TLS on the Directory Server Host
The Password Sync service requires to synchronize passwords over an encrypted connection. If TLS is not yet enabled in your Directory Server instance, enable it. For details, see Section 9.4.1, “Enabling TLS in Directory Server”.
16.4.2. Step 2: Enabling Password Complexity in the AD Domain
Enable password complexity in the AD domain using a group policy. For example:
- Open the Group Policy Management console and create a new Group Policy Object (GPO) in the domain.For details about using the Group Policy Management console, see the Windows documentation.
- Right-click the GPO, and select Edit to open the Group Policy Management Editor.
- Navigate to → → → → , and double-click the policy named Password must meet complexity requirements.
- Enable the policy and click .
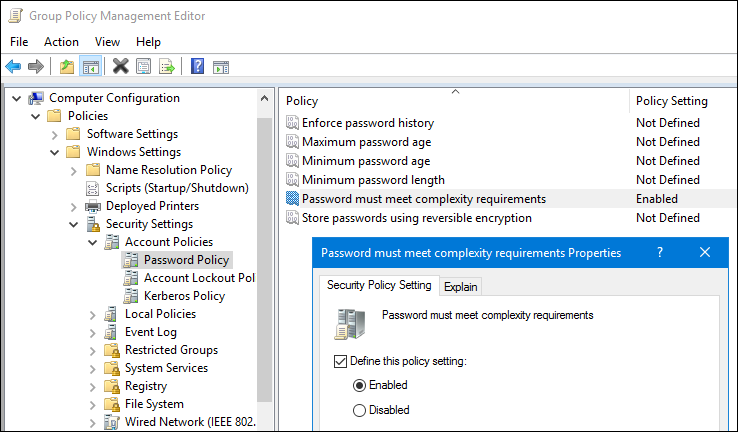
- Close the Group Policy Management Editor and the Group Policy Management console.
16.4.3. Step 3: Extracting the CA Certificate from AD
Extract the root certificate authority (CA) certificate and copy it to the Directory Server host:
- If your AD CA certificate is self-signed:
- On an AD DC with the Certification Authority application installed, press the Super key+R combination to open the Run dialog.
- Enter the
certsrv.msccommand and click to open the Certification Authority application. - Right-click on the name of the local Certificate Authority and choose Properties.
- On the General tab, select the certificate to export in the CA certificates field and click .
- On the Details tab, click to start the Certificate Export Wizard.
- Click , and then select Base-64 encoded X.509 (.CER).

- Specify a suitable directory and file name for the exported file. Click to export the certificate, and then click .
- Copy the root CA certificate to the Directory Server host.
- If your AD CA certificate is signed by an external CA:
- Determine the root CA. For example:
# openssl s_client -connect adserver.example.com:636
CONNECTED(00000003)
depth=1 C = US, O = Demo Company, OU = IT, CN = Demo CA-28
verify error:num=20:unable to get local issuer certificate
verify return:0
---
Certificate chain
 0 s:/C=US/O=Demo Company/OU=IT/CN=adserver.example.com
   i:/C=US/O=Demo Company/OU=IT/CN=Demo CA-1
 1 s:/C=US/O=Demo Company/OU=IT/CN=Demo CA-1
   i:/C=US/O=Demo Company/OU=IT/CN=Demo Root CA 2
The previous example shows that the AD server's CA certificate is signed byCN=Demo CA-1, which is signed byCN=Demo Root CA 2. This means thatCN=Demo Root CA 2is the root CA. - Contact the operator of the root CA about how to retrieve the CA certificate.
- Copy the root CA certificate to the Directory Server host.
16.4.4. Step 4: Extracting the CA Certificate from the Directory Server's NSS Database
To extract the CA certificate from the Directory Server's NSS database:
- List the certificates in the database:
# certutil -d /etc/dirsrv/slapd-instance_name/ -L Certificate Nickname Trust Attributes SSL,S/MIME,JAR/XPI Server-Cert u,u,u Example CA C,, - Extract the CA certificate from the database. For example, to extract the CA certificate with the
Example CAnickname and store it in the/root/ds-ca.crtfile:# certutil -d /etc/dirsrv/slapd-instance_name/ -L -n "Example CA" -a > /root/ds-ca.crt
- Copy the CA certificate to the AD DC.
16.4.5. Step 5: Creating the Synchronization Accounts
For synchronization between AD and Directory Server, you require one account in AD and one in Directory Server. This section explains further details about creating these accounts.
Creating an Account in Directory Server
The AD DCs use a Directory Server account in the
Password Sync service to synchronize passwords to Directory Server. For example, to create the cn=pw_sync_user,dc=config user in Directory Server:
- Create the user account:
# ldapadd -D "cn=Directory Manager" -W -p 389 -h server.example.com -x

dn: cn=pw_sync_user,cn=config
objectClass: inetorgperson
objectClass: person
objectClass: top
cn: pw_sync_user
sn: pw_sync_user
userPassword: password
passwordExpirationTime: 20380101000000Z
This creates thecn=pw_sync_user,dc=configaccount and sets its expiration time to January 01 2038.Important
For security reasons, do not create the account in the synchronized subtree. - Set an ACI at the top of the subtree that will be synchronized and grants
writeandcomparepermissions to thecn=pw_sync_user,dc=configuser. For example, to add such an ACI to theou=People,dc=example,dc=comentry:# ldapmodify -D "cn=Directory Manager" -W -p 389 -h server.example.com -x dn: ou=People,dc=example,dc=com changetype: modify add: aci aci: (targetattr="userPassword")(version 3.0;acl "Password synchronization"; allow (write,compare) userdn="ldap:///cn=pw_sync_user,dc=config";)
- Configure that Directory Server can store passwords in clear text in the changelog:
# dsconf -D "cn=Directory Manager" ldap://server.example.com config replace nsslapd-unhashed-pw-switch=on
Because Directory Server uses a different password encryption than Active Directory, Directory Server must send the password in clear text to the Windows server. However, the clear text password is sent over a TLS encrypted connection that is required for password synchronization and is, therefore, not exposed to the network.
Creating an Account in AD
To send and receive updates, Directory Server uses an AD account when connecting to AD. This account must be a member of the
Domain Admins group or have equivalent permissions in AD. For details about creating AD accounts, see your AD documentation.
16.4.6. Step 6: Installing the Password Sync Service
Install the Password Sync on every writable DC in your AD. For details about installing the Password Sync service, see the Installing the password synchronization service section in the Red Hat Directory Server Installation Guide.
For a list of operating systems running the Password Sync service that Red Hat supports, see the Red Hat Directory Server Release Notes.
16.4.7. Step 7: Adding the CA Certificate Directory Server uses to the Password Sync Service's Certificate Database
On every DC that has the Password Sync service installed, add the CA certificate Directory Server uses to the Password Sync service's certificate database:
- Change into the
C:\Program Files\Red Hat Directory Password Synchronization\directory:> cd "C:\Program Files\Red Hat Directory Password Synchronization\"
- Create the certificate databases in the current directory:
> certutil.exe -d . -N
Thecertutil.exeutility prompts to set a password to the new database it creates. - Import the CA certificate used by the Directory Server instance. You copied this certificate in Section 16.4.4, “Step 4: Extracting the CA Certificate from the Directory Server's NSS Database” to the Windows DC. For example, to import the certificate from the
C:\ds-ca.crtfile and store it in the database with theExample CAnickname:> certutil.exe -d . -A -n "Example CA" -t CT,, -a -i "C:\ds-ca.crt"
- Optionally, verify that the CA certificate was stored correctly in the database:
> certutil.exe -d . -L Certificate Nickname Trust Attributes SSL,S/MIME,JAR/XPI Example CA CT,, - Reboot the Windows DC. The Password Sync service is not available until you reboot the system.
Note
If any AD user accounts exist when you install Password Sync, the service cannot synchronize the passwords for those accounts until the passwords are changed. This happens because Password Sync cannot decrypt a password once it has been stored in Active Directory. For details about enforcing a password reset for AD users, see the Active Directory documentation.
16.4.8. Step 8: Adding the CA Certificate AD uses to Directory Server's Certificate Database
On the Directory Server host, add the CA certificate AD uses to the certificate database:
- Import the CA certificate AD uses. You copied this certificate in Section 16.4.3, “Step 3: Extracting the CA Certificate from AD” to the Directory Server host. For example, to import the certificate from the
/root/ad-ca.crtfile and store it in the database with theExample CAnickname:> certutil -d /etc/dirsrv/slapd-instance_name/ -A -n "Example CA" -t CT,, -a -i /root/ad-ca.crt
- Optionally, verify that the CA certificate was stored correctly in the database:
> certutil -d /etc/dirsrv/slapd-instance_name/ -L

Certificate Nickname                Trust Attributes
                                    SSL,S/MIME,JAR/XPI
...
Example CA                          CT,,
16.4.9. Step 9: Configuring the Database for Synchronization and Creating the Synchronization Agreement
This section describes how to configure the database for synchronization and create the synchronization agreement.
16.4.9.1. Configuring the Database for Synchronization and Creating the Synchronization Agreement Using the Command Line
The following example assumes that you have Directory Server running on a host named
ds.example.com and an AD DC running on a host named win-server.ad.example.com. The following procedure describes how to configure synchronization between these hosts:
- Enable replication for the suffix:
# dsconf -D "cn=Directory Manager" ldap://ds.example.com replication \
    enable --suffix="dc=example,dc=com" --role="supplier" --replica-id=1
This command configures theds.example.comhost as a supplier for thedc=example,dc=comsuffix and sets the replica ID for this entry to1.Important
The replica ID must be a unique integer between1and65534for a suffix across all suppliers in the topology. - Add the synchronization agreement and initialize the agreement. For example:
# dsconf -D "cn=Directory Manager" ldap://ds.example.com repl-winsync-agmt \
     create --suffix="dc=example,dc=com" --host="win-server.ad.example.com" --port=636 \
     --conn-protocol="LDAPS" --bind-dn="cn=user_name,cn=Users,dc=ad,dc=example,dc=com" \
     --bind-passwd="password" --win-subtree="cn=Users,dc=example,dc=com" \
     --ds-subtree="ou=People,dc=example,dc=com" --win-domain="AD" \
     --init example-agreement
This command creates a replication agreement named example-agreement. The replication agreement defines settings, such as AD DC's host name, protocol, and authentication information, Directory Server uses when connecting and synchronizing data to the DC.After the agreement is created, Directory Server initializes the agreement. To initialize the agreement later, omit the--initoption. Note that synchronization does not start before you initialized the agreement. For details about initializing a synchronization agreement, see Section 16.11.2.1, “Performing a Full Synchronization Using the Command Line”.Optionally, pass the--sync-users="on"and--sync-groups="on"option to the command to automatically synchronize new Windows users and groups to Directory Server.For further details about the options used in the command, enter:# dsconf -D "cn=Directory Manager" ldap://ds.example.com repl-agmt --help
- Verify that the initialization was successful:
# dsconf -D "cn=Directory Manager" ldap://ds.example.com repl-winsync-agmt \
     init-status --suffix="dc=example,dc=com" example-agreement
Agreement successfully initialized.
16.4.9.2. Configuring the Database for Synchronization and Creating the Synchronization Agreement Using the Web Console
The following example assumes that you have Directory Server running on a host named
ds.example.com and an AD DC running on a host named win-server.ad.example.com. The following procedure describes how to configure synchronization between these hosts:
- Open the Directory Server user interface in the web console. See Section 1.4, “Logging Into Directory Server Using the Web Console”.
- Select the instance.
- Enable replication for the suffix:
- Open the menu.
- Select the
dc=example,dc=comsuffix, and click . - Select
Supplierin the Replication Role field and enter a replica ID. For example: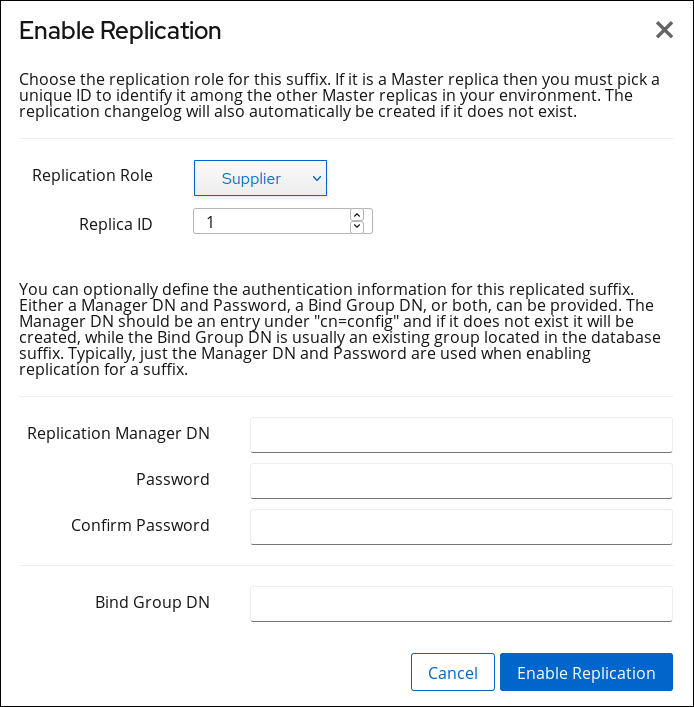 These settings configure the
ds.example.comhost as a supplier for thedc=example,dc=comsuffix and sets the replica ID for this entry to1.Important
The replica ID must be a unique integer between1and65534for a suffix across all suppliers in the topology. - Click .
- Add the synchronization agreement and initialize agreement:
- Open the menu and select the entry.
- Click and fill the fields. For example:
 These settings will create a synchronization agreement named
example-agreement. The synchronization agreement defines settings, such as the DC's host name, protocol, and authentication information, Directory Server uses when connecting and synchronizing data.Optionally, select Sync New Windows Users and Sync New Windows Groups to automatically synchronize new Windows users and groups to Directory Server.After the agreement is created, Directory Server initializes the agreement. To initialize the agreement later, do not select Do Online Initialization. Note that synchronization does not start before you initialized the agreement. For details about initializing a synchronization agreement, see Section 16.11.2.2, “Performing a Full Synchronization Using the Web Console”. - Click .
- Verify that the initialization was successful:
- Open the menu.
- Select the entry.If the initialization completed successfully, the web console displays the
Error (0) Replica acquired successfully: Incremental update succeededmessage in the Last Update Status column. Depending of the amount of data to synchronize, the initialization can take up to several hours.