
Administration Guide
Basic and advanced administration of Directory Server
Abstract
Making Open Source More Inclusive
Chapter 1. General Directory Server Management Tasks
1.1. System Requirements
1.2. File Locations
1.3. Supported Methods to Configure Directory Server
- the command-line utilities provided by Directory Server
- the web console
Important
1.4. Logging Into Directory Server Using the Web Console
- Use a browser and connect to the web console running on port 9090 on the Directory Server host. For example:
https://server.example.com:9090
- Log in as the
rootuser or as a user withsudoprivileges. - Select the
Red Hat Directory Serverentry.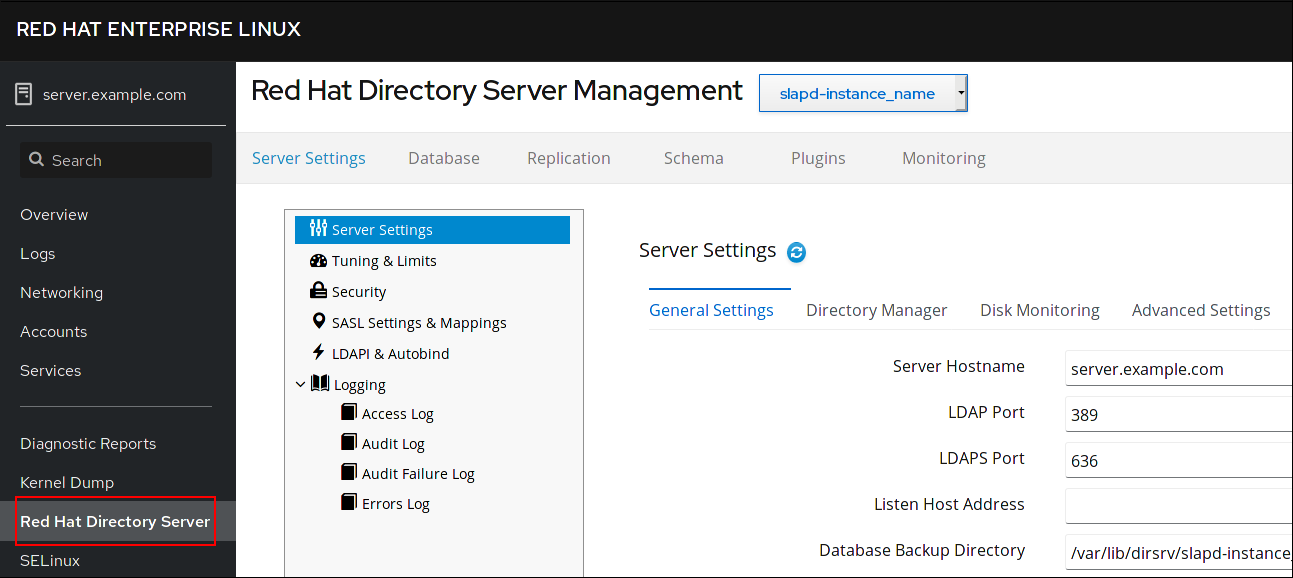
1.5. Starting and Stopping a Directory Server Instance
1.5.1. Starting and Stopping a Directory Server Instance Using the Command Line
dsctl utility to start, stop, or restart an instance:
- To start the instance:
# dsctl instance_name start
- To stop the instance:
# dsctl instance_name stop
- To restart the instance:
# dsctl instance_name restart
- For a single instance:
# systemctl enable dirsrv@instance_name
- For all instances on a server:
# systemctl enable dirsrv.target
1.5.2. Starting and Stopping a Directory Server Instance Using the Web Console
- Open the Directory Server user interface in the web console. See Section 1.4, “Logging Into Directory Server Using the Web Console”.
- Select the instance.
- Click the button and select the action to execute:
- Start Instance
- Stop Instance
- Restart Instance

1.6. Creating a New Directory Server Instance
1.7. Removing a Directory Server Instance
/var/lib/dirsrv/slapd-instance_name/ and /etc/dirsrv/slapd-instance_name/ directories are removed.
Important
/var/lib/dirsrv/slapd-instance_name/ directory contains the database, as well as the backup and export directory. The /etc/dirsrv/slapd-instance_name/ directory contains the instance configuration and the network security services (NSS) database. Before you remove an instance, backup this data.
1.7.1. Removing an Instance Using the Command Line
# dsctl instance_name remove --do-it
Removing instance ...
Completed instance removal
1.7.2. Removing an Instance Using the Web Console
- Open the Directory Server user interface in the web console. See Section 1.4, “Logging Into Directory Server Using the Web Console”.
- Select the instance.
- Click the button, and select Remove instance.
1.8. Setting Directory Server Configuration Parameters
cn=config directory entry. Each configuration parameter is an LDAP attribute and the parameter's value is the value set in this attribute.
1.8.1. Managing Configuration Parameters
- Using the
dsconfutility:Note
Red Hat recommends using thedsconfutility to manage the Directory Server configuration.Example 1.1. Setting a Configuration Parameter Using
dsconfFor example, to set the error log level to16384, update thensslapd-errorlog-levelparameter using thedsconfutility:# dsconf -D "cn=Directory Manager" ldap://server.example.com config replace nsslapd-errorlog-level=16384
For further details about usingdsconf, see the dsconf(8) man page. - Using the LDAP interface:
Example 1.2. Setting a Configuration Parameter using the LDAP Interface
For example, to set the error log level to16384, update thensslapd-errorlog-levelparameter using the LDAP interface:# ldapmodify -D "cn=Directory Manager" -W -x -H ldap://server.example.com:389 dn: cn=config replace: nsslapd-errorlog-level nsslapd-errorlog-level: 16384
- Editing the
/etc/dirsrv/slapd-instance_name/dse.ldiffile.Warning
As long as an instance starts successfully, do not manually edit this file because this can cause Directory Server to not work as expected, or the instance can fail to start.
1.8.2. Where Directory Server Stores its Configuration
cn=config entry in the /etc/dirsrv/slapd-instance_name/dse.ldif file. The server stores only parameters you modified in this file. Attributes that are not listed, use their default value. This enables you to identify all configuration parameters you set in this instance by displaying the /etc/dirsrv/slapd-instance_name/dse.ldif file.
Important
/etc/dirsrv/slapd-instance_name/dse.ldif file as long as the instance starts successfully.
1.8.3. Benefits of Using Default Values
passwordStorageScheme attribute, Directory Server automatically uses the strongest supported password storage scheme available. If a future update changes the default value to increase security, passwords will be automatically encrypted using the new storage scheme when a user sets a password.
1.8.3.1. Removing a Parameter to Use the Default Value
# dsconf -D "cn=Directory Manager" ldap://server.example.com config delete parameter_name
Important
nsslapd-secureport to reset them to default. If you try to delete them, the server rejects the request with a Server is unwilling to perform (53) error.
1.8.4. The dsconf config backend command limitations
dsconf config backend command retrieves and sets backends configuration. The command has the following arguments:
- get
- set
dsconf config backend get command retrieves all server backend configuration attributes with set values, for example:
# dsconf -D "cn=Directory Manager" ldap://server.example.com:389 backend config get

nsslapd-lookthroughlimit: 5000
nsslapd-mode: 600
nsslapd-idlistscanlimit: 2147483646
…
Note
dsconf config backend get command, not a value for a specified attribute.
dsconf config backend set command sets backends configuration attributes individually. To set a value, specify an option that matches the LDAP attribute name, for example:
# dsconf -D "cn=Directory Manager" ldap://server.example.com:389 backend config set --lookthroughlimit 4000 --cache-autosize-split 24
dsconf backend config set command options and LDAP attribute names mapping:
Table 1.1. Mapping of the dsconf backend config set command options and LDAP attribute names
The dsconf backend config set command options | LDAP attribute names |
|---|---|
| --lookthroughlimit | nsslapd-lookthroughlimit |
| --mode | nsslapd-mode |
| --idlistscanlimit | nsslapd-idlistscanlimit |
| --directory | nsslapd-directory |
| --dbcachesize | nsslapd-dbcachesize |
| --logdirectory | nsslapd-db-logdirectory |
| --txn-wait | nsslapd-db-transaction-wait |
| --checkpoint-interval | nsslapd-db-checkpoint-interval |
| --compactdb-interval | nsslapd-db-compactdb-interval |
| --compactdb-time | nsslapd-db-compactdb-time |
| --txn-batch-val | nsslapd-db-transaction-batch-val |
| --txn-batch-min | nsslapd-db-transaction-batch-min-wait |
| --txn-batch-max | nsslapd-db-transaction-batch-max-wait |
| --logbufsize | nsslapd-db-logbuf-size |
| --locks | nsslapd-db-locks |
| --locks-monitoring-enabled | nsslapd-db-locks-monitoring-enabled |
| --locks-monitoring-threshold | nsslapd-db-locks-monitoring-threshold |
| --locks-monitoring-pause | nsslapd-db-locks-monitoring-pause |
| --import-cache-autosize | nsslapd-import-cache-autosize |
| --import-cachesize | nsslapd-import-cachesize |
| --cache-autosize | nsslapd-cache-autosize |
| --cache-autosize-split | nsslapd-cache-autosize-split |
| --exclude-from-export | nsslapd-exclude-from-export |
| --pagedlookthroughlimit | nsslapd-pagedlookthroughlimit |
| --pagedidlistscanlimit | nsslapd-pagedidlistscanlimit |
| --rangelookthroughlimit | nsslapd-rangelookthroughlimit |
| --backend-opt-level | nsslapd-backend-opt-level |
| --deadlock-policy | nsslapd-db-deadlock-policy |
| --db-home-directory | nsslapd-db-home-directory |
| --db-lib | nsslapd-backend-implement |
1.9. Changing the LDAP and LDAPS Port Numbers
Important
1.9.1. Changing the Port Numbers Using the Command Line
nsslapd-port: Stores the port number the instance uses for the LDAP protocol.nsslapd-secureport: Stores the port number the instance uses for the LDAPS protocol.
- Optionally, display the currently configured port numbers for the instance:
# dsconf -D "cn=Directory Manager" ldap://server.example.com config get nsslapd-port nsslapd-secureport
nsslapd-port: 389
nsslapd-secureport: 636
- To change the LDAP port:
- Set the port for the LDAP protocol. For example, to set it to
1389:# dsconf -D "cn=Directory Manager" ldap://server.example.com config replace nsslapd-port=1389 Successfully replaced "nsslapd-port"
- Set the
ldap_port_ttype for the LDAP port you assigned in the previous step:# semanage port -a -t ldap_port_t -p tcp 1389
- To change the LDAPS port:
- Set the port for the LDAPS protocol. For example, to set it to
1636:# dsconf -D "cn=Directory Manager" ldap://server.example.com config replace nsslapd-secureport=1636 Successfully replaced "nsslapd-secureport"
- Set the
ldap_port_ttype for the LDAPS port you assigned in the previous step:# semanage port -a -t ldap_port_t -p tcp 1636
- Restart the instance:
# dsctl instance_name restart
1.9.2. Changing the Port Numbers Using the Web Console
- Open the Directory Server user interface in the web console. See Section 1.4, “Logging Into Directory Server Using the Web Console”.
- Select the instance.
- To change the LDAP port:
- Open the menu.
- On the Server Settings tab, fill the new port number into the LDAP Port field.
- Click .
- To change the LDAPS port:
- Open the menu.
- On the General Settings tab, fill the new port number into the LDAPS Port field.
- Click .
- Restart the instance. See Section 1.5.2, “Starting and Stopping a Directory Server Instance Using the Web Console”.
1.10. Using Directory Server Plug-ins
1.10.1. Listing Available Plug-ins
1.10.1.1. Listing Available Plug-ins Using the Command Line
# dsconf -D "cn=Directory Manager" ldap://server.example.com plugin list
7-bit check
Account Policy Plugin
...
1.10.1.2. Listing Available Plug-ins Using the Web Console
- Open the Directory Server user interface in the web console. See Section 1.4, “Logging Into Directory Server Using the Web Console”.
- Select the instance.
- Select the menu.
1.10.2. Enabling and Disabling Plug-ins
1.10.2.1. Enabling and Disabling Plug-ins Using the Command Line
dsconf utility.
Note
dsconf command requires that you provide the name of the plug-in. For details about displaying the names of all plug-ins, see Section 1.10.1.1, “Listing Available Plug-ins Using the Command Line”.
- Enable the plug-in:
# dsconf -D "cn=Directory Manager" ldap://server.example.com plugin automember enable
- Restart the instance:
# dsctl instance_name restart
1.10.2.2. Enabling and Disabling Plug-ins Using the Web Console
- Open the Directory Server user interface in the web console. See Section 1.4, “Logging Into Directory Server Using the Web Console”.
- Select the instance.
- Select the menu.
- Select the All Plugins tab.
- Click the button to the right of the plug-in you want to enable or disable.
- Change the status to
ONto enable or toOFFto disable the plug-in.
- Restart the instance. See Section 1.5.2, “Starting and Stopping a Directory Server Instance Using the Web Console”.
1.10.3. Configuring Plug-ins
1.10.3.1. Configuring Plug-ins Using the Command Line
dsconf plugin command:
# dsconf -D "cn=Directory Manager" ldap://server.example.com plugin \
plug-in-specific_subcommand ...# dsconf -D "cn=Directory Manager" ldap://server.example.com plugin --help
1.10.3.2. Configuring Plug-ins Using the Web Console
- Open the Directory Server user interface in the web console. See Section 1.4, “Logging Into Directory Server Using the Web Console”.
- Select the instance.
- Select the menu.
- Select the All Plugins tab.
- Select the plug-in and click Show Advanced Settings.
- Open the plug-in-specific tab.
- Set the appropriate settings.
- Restart the instance. See Section 1.5.2, “Starting and Stopping a Directory Server Instance Using the Web Console”.
1.10.4. Setting the Plug-in Precedence
1 (highest priority) to 99 (lowest priority). If no precedence is set, the default is 50.
Warning
1.10.4.1. Setting the Plug-in Precedence Using the Command Line
- Set precedence of the plug-in. For example, to set the precedence for the
exampleplug-in to1:# dsconf -D "cn=Directory Manager" ldap://server.example.com plugin edit example --precedence 1
- Restart the instance:
# dsctl instance_name restart
1.10.4.2. Setting the Plug-in Precedence Using the Web Console
- Open the Directory Server user interface in the web console. See Section 1.4, “Logging Into Directory Server Using the Web Console”.
- Select the instance.
- Open the menu.
- Select All Plugins.
- Press the button next to the plug-in for which you want to configure the precedence value.
- Update the value in the Plugin Precedence field.
- Click .
- Restart the instance. See Section 1.5.2, “Starting and Stopping a Directory Server Instance Using the Web Console”.
1.11. Creating and Using a .dsrc File to Set Default Options for Directory Server Command-line Utilities
~/.dsrc file simplifies commands that use the Directory Server command-line utilities. By default, these utilities require that you pass, for example, an LDAP URL or bind distinguished name (DN) to the command. If you store these settings in a ~/dsrc file, you can use the command-line utilities without specifying these settings each time.
1.11.1. How a .dsrc File Simplifies Commands
~/.dsrc file that specifies the LDAP URL of an instance and a bind DN:
[server1]
uri = ldap://server1.example.com
binddn = cn=Directory Manager
basedn = dc=example,dc=com
# dsidm server1 user create
~/.dsrc file, you must specify the bind DN, LDAP URL, and base DN in the command:
# dsidm -D cn=Directory Manager ldap://server1.example.com -b "dc=example,dc=com" user create
1.11.2. Using the dsctl Utility to Create a .dsrc File
~/.dsrc file, you can use the dsctl utility to create it:
# dsctl instance_name dsrc create ...
--uri: Sets the URL to the instance in the formatprotocol://host_name_or_IP_address_or_socket.Examples:--uri ldap://server.example.com--uri = ldaps://server.example.com--uri = ldapi://%%2fvar%%2frun%%2fslapd-instance_name.socketIf you set the path to an Directory Server socket, use%%02instead of slashes (/) in the path.Important
If you use anldapiURL, the server identifies the user ID (UID) and group ID (GID) of the user who runs the Directory Server command-line utility. If you run the command as therootuser, both UID and GID are0and Directory Server automatically authenticates you ascn=Directory Managerwithout entering the corresponding password.
--starttls: Sets configures the utilities to connect to an LDAP port and then send theSTARTTLScommand to switch to an encrypted connection.--basedn: Sets the base distinguished name (DN). For example:--basedn dc=example,dc=com--binddn: Sets the bind DN. For example:--binddn cn=Directory Manager--pwdfile: Sets the path to a file that contains the password of bind DN. For example:--pwdfile /root/rhds.pwd--tls-cacertdir: When you use an LDAPS connection, the path set in this parameter defines the directory with the certificate authority (CA) certificate that is required to verify the server's certificate. For example:--tls-cacertdir /etc/pki/CA/certs/Note that you must use thec_rehash /etc/pki/CA/certs/command after you copied the CA certificate to the specified directory.--tls-cert: Sets the absolute path to the server's certificate. For example:--tls-cert /etc/dirsrv/slapd-instance_name/Server-Cert.crt--tls-key: Sets the absolute path to the server's private key. For example:--tls-key /etc/dirsrv/slapd-instance_name/Server-Cert.key--tls-reqcert: Sets what checks the client utilities perform on server certificates in a TLS session. For example:--tls-reqcert hardThe following parameters are available:never: The utilities do not request or check the server certificate.allow: The utilities ignore certificate errors and the connection is established anyway.hard: The utilities terminate the connection on certificate errors.
--saslmech: Sets the SASL mechanism to use toPLAINorEXTERNAL. For example:--saslmech PLAIN
1.11.3. Remote and Local Connection Resolution When Using Directory Server Utilities
/etc/openldap/ldap.conf configuration file along with system-wide settings to proceed with the command.
~/.dsrc file is present and applies the following logic to proceed:
- If the
~/.dsrcfile exists and contains both the instance name and the LDAP URL, Directory Server considers it as a remote connection and checks/etc/openldap/ldap.confconfiguration file and system-wide settings. - If the
~/.dsrcfile exists and contains only the specified instance name, or if the~/.dsrcfile does not exist, Directory Server considers it as a local connection and uses thensslapd-certdirsetting from the localdse.ldiffile to secure the connection. Ifnsslapd-certdiris not present, the server uses the default path/etc/dirsrv/slapd-instance_name/to store the Network Security Services (NSS) database of the instance.
nsslapd-certdir parameter refer to nsslapd-certdir (Certificate and Key Database Directory) section.
Chapter 2. Configuring Directory Databases
2.1. Creating and Maintaining Suffixes
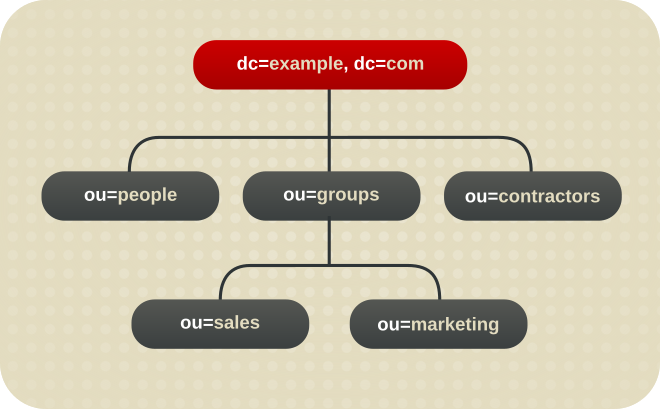
Figure 2.1. A Directory Tree with One Root Suffix
ou=people suffix and all the entries and nodes below it might be stored in one database, the ou=groups suffix in another database, and the ou=contractors suffix in yet another database.
2.1.1. Creating Suffixes
2.1.1.1. Creating a Root Suffix
example.com and one for redhat.com. In this scenario, two root suffixes are required. One corresponding to the dc=example,dc=com naming context and one corresponding to the dc=redhat,dc=com naming context, as displayed in the following diagram:
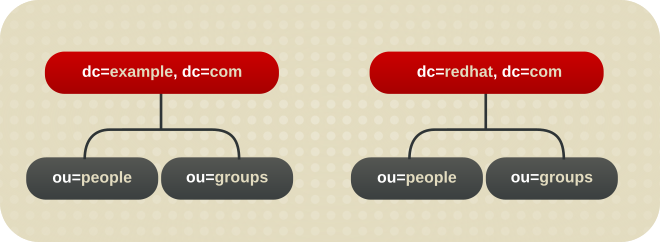
Figure 2.2. A Directory with Two Root Suffixes
dc=example,dc=com, and one root suffix corresponds to the European branch of their directory tree, ou=europe,dc=example,dc=com. From a client application's perspective, the directory tree looks as illustrated the following diagram:
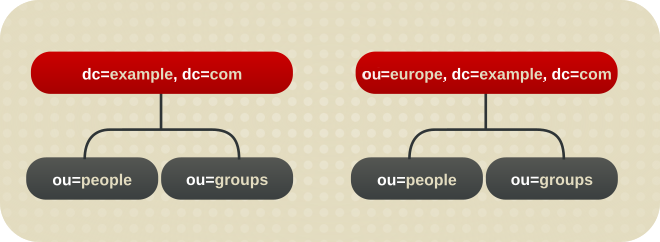
Figure 2.3. A Directory with a Root Suffix Off Limits to Search Operations
dc=example,dc=com branch of the directory will not return entries from the ou=europe,dc=example,dc=com branch of the directory, as it is a separate root suffix.
2.1.1.1.1. Creating a Root Suffix Using the Command Line
dsconf backend create command to create a new root suffix:
- Optional: Identify the suffixes and back end databases that are already in use:
# dsconf -D "cn=Directory Manager" ldap://server.example.com backend suffix list
dc=example,dc=com (userroot)
The name in parentheses is the back end database that stores the data of the corresponding suffix. You cannot use existing database names when you create the root suffix in the next step. - Create the
dc=example,dc=netroot suffix in theexampleback end database:# dsconf -D "cn=Directory Manager" ldap://server.example.com backend create \ --suffix="dc=example,dc=net" --be-name="example"
2.1.1.1.2. Creating a Root Suffix Using the Web Console
- Open the Directory Server user interface in the web console. See Section 1.4, “Logging Into Directory Server Using the Web Console”.
- Select the instance.
- Open the menu.
- Click .
- Enter the suffix DN and back end name. For example:

- Select
Create The Top Suffix Entry. - Click .
2.1.1.2. Creating a Sub-suffix
ou=europe,dc=example,dc=com entry as a sub-suffix, this suffix is stored in a separate database. At the same time, the dc=example,com root suffix and all its sub-entries - except ou=europe,dc=example,dc=com and subentries - are stored also in a separate database.
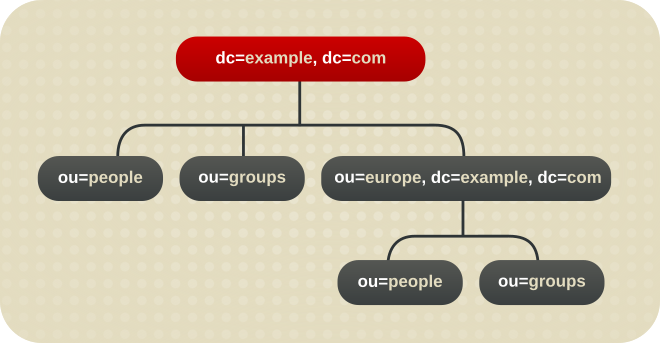
Figure 2.4. A Directory Tree with a Sub Suffix
2.1.1.2.1. Creating a Sub-suffix Using the Command Line
dsconf backend create command to create a new sub-suffix. For example, to create the ou=People,dc=example,dc=com sub-suffix in a new database called people under the dc=example,dc=com root suffix:
- Optional: Identify the suffixes and back end databases that are already in use:
# dsconf -D "cn=Directory Manager" ldap://server.example.com backend suffix list
dc=example,dc=com (userroot)
The name in parentheses is the back end database that stores the data of the corresponding suffix. You cannot use existing database names when you create the sub-suffix in the next step. - Create the sub-suffix. For example, to create the
ou=People,dc=example,dc=comsub-suffix along with theexampleback end database, enter:# dsconf -D "cn=Directory Manager" ldap://server.example.com backend create \ --suffix="ou=People,dc=example,dc=com" --be-name="example" \ --parent-suffix="dc=example,dc=com"
2.1.1.2.2. Creating a Sub-suffix Using the Web Console
- Open the Directory Server user interface in the web console. See Section 1.4, “Logging Into Directory Server Using the Web Console”.
- Select the instance.
- Open the menu.
- Select the suffix, under which you want to create the sub-suffix, click , and select .
- Enter the sub-suffix DN and back end name. For example:

- Select
Create The Top Sub-Suffix Entry. - Click .
2.1.2. Maintaining Suffixes
2.1.2.1. Viewing the Default Naming Context
dc=example,dc=com and a configuration suffix in cn=config.
nsslapd-defaultnamingcontext attribute in cn=config. This value is propagated over to the root DSE (Directory Server Agent Service Entry) and can be queried by clients anonymously by checking the defaultnamingcontext attribute in the root DSE:
# ldapsearch -p 389 -h server.example.com -x -b "" -s base | egrep namingcontext
namingContexts: dc=example,dc=com
namingContexts: dc=example,dc=net
namingContexts: dc=redhat,dc=com
defaultnamingcontext: dc=example,dc=com
Important
nsslapd-defaultnamingcontext attribute from the nsslapd-allowed-to-delete-attrs list.
nsslapd-defaultnamingcontext attribute is included in the list of attributes which can be deleted, in the nsslapd-allowed-to-delete-attrs attribute. This allows the current default suffix to be deleted and then update the server configuration accordingly.
nsslapd-defaultnamingcontext attribute is removed from the list of configuration attributes which can be deleted, then no changes to that attribute are preserved. If the default suffix is deleted, that change cannot be propagated to the server configuration. This means that the nsslapd-defaultnamingcontext attribute retains the old information instead of being blank (removed), which is the correct and current configuration.
2.1.2.2. Disabling a Suffix
2.1.2.2.1. Disabling a Suffix Using the Command Line
dsconf backend suffix set --disable command. For example, to disable the o=test suffix:
- Display the suffixes and their corresponding back end:
# dsconf -D "cn=Directory Manager" ldap://server.example.com backend suffix list
dc=example,dc=com (userroot)
o=test (test_database)
This command displays the name of the back end database next to each suffix. You require the suffix's database name in the next step. - Disable the suffix:
# dsconf -D "cn=Directory Manager" ldap://server.example.com backend \
     suffix set --disable "test_database"
2.1.2.3. Deleting a Suffix
Warning
2.1.2.3.1. Deleting a Suffix Using the Command Line
dsconf backend delete command. For example, to delete the o=test suffix:
- Display the suffixes and their corresponding back end:
# dsconf -D "cn=Directory Manager" ldap://server.example.com backend suffix list
dc=example,dc=com (userroot)
o=test (test_database)
This command displays the name of the back end database next to each suffix. You require the suffix's database name in the next step. - Delete the back end database and the corresponding suffix:
# dsconf -D "cn=Directory Manager" ldap://server.example.com backend delete test_database
Deleting Backend cn=test_database,cn=ldbm database,cn=plugins,cn=config :
Type 'Yes I am sure' to continue: Yes I am sure
The database, and any sub-suffixes, were successfully deleted
2.1.2.3.2. Deleting a Suffix Using the Web Console
- Open the Directory Server user interface in the web console. See Section 1.4, “Logging Into Directory Server Using the Web Console”.
- Select the instance.
- Open the menu.
- Select the suffix, click , and select Delete Suffix.
- Click to confirm.
2.2. Creating and Maintaining Databases
Note
dsconf utility or the web console to create the suffix, Directory Server created the database automatically.
2.2.1. Creating Databases
- One database per suffix. The data for each suffix is contained in a separate database.
- Three databases are added to store the data contained in separate suffixes:
 This division of the tree units corresponds to three databases, for example:
 In this example, DB1 contains the data for
ou=peopleand the data fordc=example,dc=com, so that clients can conduct searches based atdc=example,dc=com. However, DB2 only contains the data forou=groups, and DB3 only contains the data forou=contractors: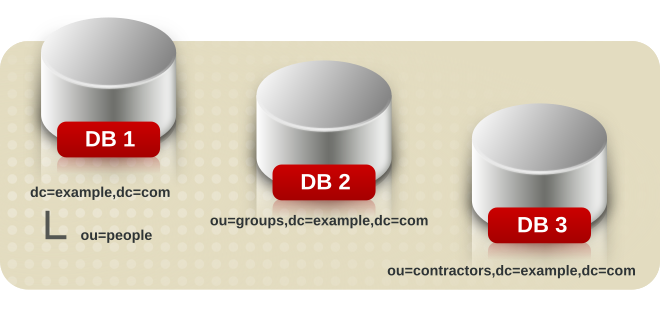
- Multiple databases for one suffix.
- Suppose the number of entries in the
ou=peoplebranch of the directory tree is so large that two databases are needed to store them. In this case, the data contained byou=peoplecould be distributed across two databases: DB1 contains people with names from
A-K, and DB2 contains people with names fromL-Z. DB3 contains theou=groupsdata, and DB4 contains theou=contractorsdata.A custom plug-in distributes data from a single suffix across multiple databases. Contact Red Hat Consulting for information on how to create distribution logic for Directory Server.
2.2.1.1. Creating a New Database for a Single Suffix Using the Command Line
ldapmodify command-line utility to add a new database to the directory configuration file. The database configuration information is stored in the cn=ldbm database,cn=plugins,cn=config entry. To add a new database:
- Run
ldapmodifyand create the entry for the new database.# ldapmodify
-a-D "cn=Directory Manager" -W -p 389 -h server.example.com -x dn: cn=UserData,cn=ldbm database,cn=plugins,cn=config changetype: add objectclass: extensibleObject objectclass: nsBackendInstance nsslapd-suffix: ou=people,dc=example,dc=comThe added entry corresponds to a database namedUserDatathat contains the data for the root or sub-suffixou=people,dc=example,dc=com. - Create a root or a sub-suffix, as described in Section 2.1.1.1.1, “Creating a Root Suffix Using the Command Line” and Section 2.1.1.2.1, “Creating a Sub-suffix Using the Command Line”. The database name, given in the DN attribute, must correspond with the value in the
nsslapd-backendattribute of the suffix entry.
2.2.1.2. Adding Multiple Databases for a Single Suffix
Note
- The distribution function cannot be changed once entry distribution has been deployed.
- The LDAP
modrdnoperation cannot be used to rename entries if that would cause them to be distributed into a different database. - Distributed local databases cannot be replicated.
- The
ldapmodifyoperation cannot be used to change entries if that would cause them to be distributed into a different database.
- Run
ldapmodify.# ldapmodify -D "cn=Directory Manager" -W -p 389 -h server.example.com -x
- Add the following attributes to the suffix entry itself, supplying the information about the custom distribution logic:
dn: suffix
changetype: modify
add: nsslapd-backend
nsslapd-backend: Database1
-
add: nsslapd-backend
nsslapd-backend: Database2
-
add: nsslapd-backend
nsslapd-backend: Database3
-
add: nsslapd-distribution-plugin
nsslapd-distribution-plugin: /full/name/of/a/shared/library
-
add: nsslapd-distribution-funct
nsslapd-distribution-funct: distribution-function-name
Thensslapd-backendattribute specifies all databases associated with this suffix. Thensslapd-distribution-pluginattribute specifies the name of the library that the plug-in uses. Thensslapd-distribution-functattribute provides the name of the distribution function itself.
2.2.2. Maintaining Directory Databases
2.2.2.1. Setting a Database in Read-Only Mode
2.2.2.1.1. Setting a Database in Read-only Mode Using the Command Line
dsconf backend suffix set command. For example, to set the database of the o=test suffix in read-only mode:
- Display the suffixes and their corresponding back end:
# dsconf -D "cn=Directory Manager" ldap://server.example.com backend suffix list
dc=example,dc=com (userroot)
o=test (test_database)
This command displays the name of the back end database next to each suffix. You require the suffix's database name in the next step. - Set the database in read-only mode:
# dsconf -D "cn=Directory Manager" ldap://server.example.com backend suffix set --enable-readonly "test_database"
2.2.2.1.2. Setting a Database in Read-only Mode Using the Web Console
- Open the Directory Server user interface in the web console. See Section 1.4, “Logging Into Directory Server Using the Web Console”.
- Select the instance.
- Open the menu.
- Select the suffix entry.
- Select Database Read-Only Mode.
- Click .
2.2.2.2. Placing the Entire Directory Server in Read-Only Mode
Warning
Note
2.2.2.2.1. Placing the Entire Directory Server in Read-Only Mode Using the Command Line
- Set the
nsslapd-readonlyparameter toon:# dsconf -D "cn=Directory Manager" ldap://server.example.com config replace nsslapd-readonly=on
- Restart the instance:
# dsctl instance_name restart
2.2.2.2.2. Placing the Entire Directory Server in Read-Only Mode Using the Web Console
- Open the Directory Server user interface in the web console. See Section 1.4, “Logging Into Directory Server Using the Web Console”.
- Select the instance.
- Open the menu, and select the Server Settings entry.
- On the Advanced Settings tab, select Server Read-Only.
- Click Save.
2.2.2.3. Deleting a Database
2.2.2.3.1. Deleting a Database Using the Command Line
dsconf backend delete command. For example, to delete the database of the o=test suffix:
- Display the suffixes and their corresponding back end:
# dsconf -D "cn=Directory Manager" ldap://server.example.com backend suffix list
dc=example,dc=com (userroot)
o=test (test_database)
You require the name of the back end database, which is displayed next to the suffix, in the next step. - Delete the database:
# dsconf -D "cn=Directory Manager" ldap://server.example.com backend delete "test_database"
2.2.2.3.2. Deleting a Database Using the Web Console
- Open the Directory Server user interface in the web console. See Section 1.4, “Logging Into Directory Server Using the Web Console”.
- Select the instance.
- Open the menu.
- Select the suffix to delete, click , and select Delete Suffix.
- Click to confirm.
2.2.2.4. Changing the Transaction Log Directory
Note
- Stop Directory Server instance:
# dsctl instance_name stop
- Create a new location for the transaction logs. For example:
# mkdir -p /srv/dirsrv/instance_name/db/
- Set permissions to enable only Directory Server to access the directory:
# chown dirsrv:dirsrv /srv/dirsrv/instance_name/db/
# chmod 770 /srv/dirsrv/instance_name/db/
- Remove all
__db.*files from the previous transaction log directory. For example:# rm /var/lib/dirsrv/slapd-instance_name/db/__db.*
- Move all
log.*files from the previous to the new transaction log directory. For example:# mv /var/lib/dirsrv/slapd-instance_name/db/log.* \ /srv/dirsrv/instance_name/db/ - If SELinux is running in
enforcingmode, set thedirsrv_var_lib_tcontext on the directory:# semanage fcontext -a -t dirsrv_var_lib_t /srv/dirsrv/instance_name/db/ # restorecon -Rv /srv/dirsrv/instance_name/db/
- Edit the
/etc/dirsrv/slapd-instance_name/dse.ldiffile, and update thensslapd-db-logdirectoryparameter under thecn=config,cn=ldbm database,cn=plugins,cn=configentry. For example:dn: cn=config,cn=ldbm database,cn=plugins,cn=config ... nsslapd-db-logdirectory: /srv/dirsrv/instance_name/db/
- Start the instance:
# dsctl instance_name start
2.3. Creating and Maintaining Database Links
2.3.1. Creating a New Database Link
- Suffix information. A suffix is created in the directory tree that is managed by the database link, not a regular database. This suffix corresponds to the suffix on the remote server that contains the data.
- Bind credentials. When the database link binds to a remote server, it impersonates a user, and this specifies the DN and the credentials for each database link to use to bind with remote servers.
- LDAP URL. This supplies the LDAP URL of the remote server to which the database link connects. The URL consists of the protocol (ldap or ldaps), the host name or IP address (IPv4 or IPv6) for the server, and the port.
- List of failover servers. This supplies a list of alternative servers for the database link to contact in the event of a failure. This configuration item is optional.
Note
2.3.1.1. Creating a New Database Link Using the Command Line
dsconf chaining link-create command. For example:
# dsconf -D "cn=Directory Manager" ldap://server.example.com chaining link-create --suffix="ou=Customers,dc=example,dc=com" --server-url="ldap://remote_server.example.com:389" --bind-mech="" --bind-dn="cn=proxy_user,cn=config" --bind-pw="password" "example_chain_name"
example_chain_name for the ou=Customers,dc=example,dc=com. The link refers to the server ldap://remote_server.example.com:389 and uses the specified bind DN and password to authenticate. Because the --bind-mech is set empty, the link uses simple authentication.
Note
dc=example,dc=com suffix on remote server. How to do so, refer to the section Section 2.3.1.4, “Additional Information on Required Settings When Creating a Database Link”
# dsconf -D "cn=Directory Manager" ldap://server.example.com chaining link-create --help
2.3.1.2. Creating a New Database Link Using the Web Console
- Open the Directory Server user interface in the web console. See Section 1.4, “Logging Into Directory Server Using the Web Console”.
- Select the instance.
- Open the menu.
- Create a new suffix as described in Section 2.1.1, “Creating Suffixes”.
- Select the suffix, click , and select Create Database Link.
- Fill the fields with the details about the connection to the remote server. For example:
 For further details, see Section 2.3.1.4, “Additional Information on Required Settings When Creating a Database Link”.
 - Click .
2.3.1.3. Managing the Default Configuration for New Database Links
dsconf chaining command you can manage the default configuration of database links.
# dsconf -D "cn=Directory Manager" ldap://server.example.com chaining config-get-def
dsconf chaining config-set-def command. For example, to set response-delay parameter to 30, run:
# dsconf -D "cn=Directory Manager" ldap://server.example.com chaining config-set-def --response-delay 30
dsconf instance chaining link-set command.
# dsconf -D "cn=Directory Manager" ldap://server.example.com chaining config-set-def --help
2.3.1.4. Additional Information on Required Settings When Creating a Database Link
Suffix Information
Bind Credentials
anonymous.
Warning
Note
creatorsName and modifiersName do not reflect the real creator or modifier of the entries. These attributes contain the name of the administrative user granted proxied authorization rights on the remote data server.
- Create an administrative user, such as
cn=proxy_user,cn=config, for the database link. For information on adding entries, see Chapter 3, Managing Directory Entries. - Provide proxy access rights for the administrative user created in the previous step on the subtree chained to by the database link. For more information on configuring ACIs, see Chapter 18, Managing Access ControlFor example, the following ACI grants read-only access to the
cn=proxy_admin,cn=configuser to access data contained on the remote server only within the subtree where the ACI is set.aci: (targetattr = "*")(version 3.0; acl "Proxied authorization for database links"; allow (proxy) userdn = "ldap:///cn=proxy_admin ,cn=config";)
Note
LDAP URL
ldap://host_name:port.
ldaps://africa.example.com:636/
Note
Bind Mechanisms
- Over the standard LDAP port
- Over a dedicated LDAPS port
- Using STARTTLS, which is a secure connection over a standard port
Note
- empty: If there is no bind mechanism set, then the server performs simple authentication and requires a bind DN and password.
- EXTERNAL: This uses an TLS certificate to authenticate the farm server to the remote server. Either the farm server URL must be set to the secure URL (
ldaps) or thensUseStartTLSattribute must be set toon.Additionally, the remote server must be configured to map the farm server's certificate to its bind identity, as described in the certmap.conf section in the Red Hat Directory Server Configuration, Command, and File Reference. - DIGEST-MD5: This uses SASL authentication with DIGEST-MD5 encryption. As with simple authentication, this requires the
nsMultiplexorBindDNandnsMultiplexorCredentialsattributes to give the bind information. - GSSAPI: This uses Kerberos-based authentication over SASL.The farm server must be configured with a Kerberos keytab, and the remote server must have a defined SASL mapping for the farm server's bind identity. Setting up Kerberos keytabs and SASL mappings is described in Section 9.10, “Setting up SASL Identity Mapping”.
Note
Note
2.3.2. Configuring the Chaining Policy
2.3.2.1. Chaining Component Operations
- ACI plug-in
- This plug-in implements access control. Operations used to retrieve and update ACI attributes are not chained because it is not safe to mix local and remote ACI attributes. However, requests used to retrieve user entries may be chained by setting the chaining components attribute:
nsActiveChainingComponents: cn=ACI Plugin,cn=plugins,cn=config
Permissions: Read, search, and compare - Resource limit component
- This component sets server limits depending on the user bind DN. Resource limits can be applied on remote users if the resource limitation component is allowed to chain. To chain resource limit component operations, add the chaining component attribute:
nsActiveChainingComponents: cn=resource limits,cn=components,cn=config
Permissions: Read, search, and compare - Certificate-based authentication checking component
- This component is used when the external bind method is used. It retrieves the user certificate from the database on the remote server. Allowing this component to chain means certificate-based authentication can work with a database link. To chain this component's operations, add the chaining component attribute:
nsActiveChainingComponents: cn=certificate-based authentication,cn=components,cn=config
Permissions: Read, search, and compare - Password policy component
- This component is used to allow SASL binds to the remote server. Some forms of SASL authentication require authenticating with a user name and password. Enabling the password policy allows the server to verify and implement the specific authentication method requested and to apply the appropriate password policies. To chain this component's operations, add the chaining component attribute:
nsActiveChainingComponents: cn=password policy,cn=components,cn=config
Permissions: Read, search, and compare - SASL component
- This component is used to allow SASL binds to the remote server. To chain this component's operations, add the chaining component attribute:
nsActiveChainingComponents: cn=password policy,cn=components,cn=config
Permissions: Read, search, and compare - Referential Integrity plug-in
- This plug-in ensures that updates made to attributes containing DNs are propagated to all entries that contain pointers to the attribute. For example, when an entry that is a member of a group is deleted, the entry is automatically removed from the group. Using this plug-in with chaining helps simplify the management of static groups when the group members are remote to the static group definition. To chain this component's operations, add the chaining component attribute:
nsActiveChainingComponents: cn=referential integrity postoperation,cn=plugins,cn=config
Permissions: Read, search, and compare - Attribute Uniqueness plug-in
- This plug-in checks that all the values for a specified attribute are unique (no duplicates). If this plug-in is chained, it confirms that attribute values are unique even on attributes changed through a database link. To chain this component's operations, add the chaining component attribute:
nsActiveChainingComponents: cn=attribute uniqueness,cn=plugins,cn=config
Permissions: Read, search, and compare - Roles component
- This component chains the roles and roles assignments for the entries in a database. Chaining this component maintains the roles even on chained databases. To chain this component's operations, add the chaining component attribute:
nsActiveChainingComponents: cn=roles,cn=components,cn=config
Permissions: Read, search, and compare
Note
- Roles plug-in
- Password policy component
- Replication plug-ins
- Referential Integrity plug-in
2.3.2.1.1. Chaining Component Operations Using the Command Line
- Specify the components to include in chaining. For example, to configure that the referential integrity component can chain operations:
# dsconf -D "cn=Directory Manager" ldap://server.example.com chaining config-set \
     --add-comp="cn=referential integrity postoperation,cn=components,cn=config"
See Section 2.3.2.1, “Chaining Component Operations” for a list of the components which can be chained. - Restart the instance:
# dsctl instance_name restart
- Create an ACI in the suffix on the remote server to which the operation will be chained. For example, to create an ACI for the Referential Integrity plug-in:
# ldapmodify -D "cn=Directory Manager" -W -p 389 -h remoteserver.example.com -x
dn: ou=People,dc=example,dc=com
changetype: modify
add: aci
aci: (targetattr = "*")(target="ldap:///ou=customers,l=us,dc=example,dc=com")
 (version 3.0; acl "RefInt Access for chaining"; allow
 (read,write,search,compare) userdn = "ldap:///cn=referential
 integrity postoperation,cn=plugins,cn=config";)
2.3.2.1.2. Chaining Component Operations Using the Web Console
- Open the Directory Server user interface in the web console. See Section 1.4, “Logging Into Directory Server Using the Web Console”.
- Select the instance.
- Open the tab.
- In the navigation on the left, select the entry.
- Click the button below the Components to Chain field.
- Select the component, and click .

- Create an ACI in the suffix on the remote server to which the operation will be chained. For example, to create an ACI for the Referential Integrity plug-in:
# ldapmodify -D "cn=Directory Manager" -W -p 389 -h remoteserver.example.com -x
dn: ou=People,dc=example,dc=com
changetype: modify
add: aci
aci: (targetattr = "*")(target="ldap:///ou=customers,l=us,dc=example,dc=com")
 (version 3.0; acl "RefInt Access for chaining"; allow
 (read,write,search,compare) userdn = "ldap:///cn=referential
 integrity postoperation,cn=plugins,cn=config";)
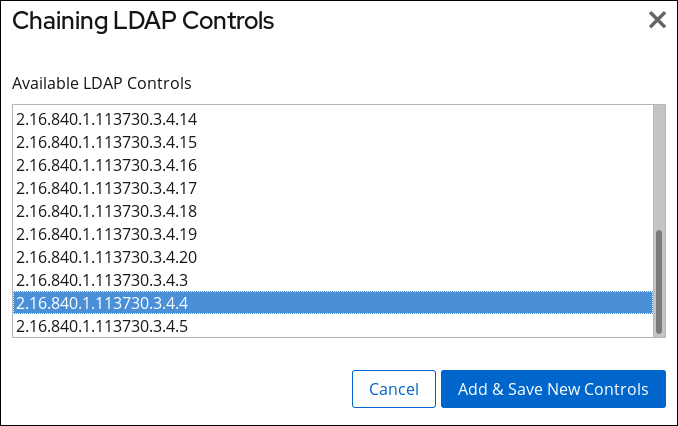
2.3.2.2. Chaining LDAP Controls
- Virtual List View (VLV). This control provides lists of parts of entries rather than returning all entry information.
- Server-side sorting. This control sorts entries according to their attribute values, usually using a specific matching rule.
- Dereferencing. This control pulls specified attribute information from the referenced entry and returns this information with the rest of the search results.
- Managed DSA. This controls returns smart referrals as entries, rather than following the referral, so the smart referral itself can be changed or deleted.
- Loop detection. This control keeps track of the number of times the server chains with another server. When the count reaches the configured number, a loop is detected, and the client application is notified. For more information about using this control, see Section 2.4.3, “Detecting Loops”.
Note
Table 2.1. LDAP Controls and Their OIDs
| Control Name | OID |
|---|---|
| Virtual list view (VLV) | 2.16.840.1.113730.3.4.9 |
| Server-side sorting | 1.2.840.113556.1.4.473 |
| Managed DSA | 2.16.840.1.113730.3.4.2 |
| Loop detection | 1.3.6.1.4.1.1466.29539.12 |
| Dereferencing searches | 1.3.6.1.4.1.4203.666.5.16 |
2.3.2.2.1. Chaining LDAP Controls Using the Command Line
dsconf chaining config-set --add-control command. For example, to forward the virtual list view control:
# dsconf -D "cn=Directory Manager" ldap://server.example.com chaining \
config-set --add-control="2.16.840.1.113730.3.4.9"2.3.2.2.2. Chaining LDAP Controls Using the Web Console
- Open the Directory Server user interface in the web console. See Section 1.4, “Logging Into Directory Server Using the Web Console”.
- Select the instance.
- Open the menu.
- Select the entry.
- Click the button below the Forwarded LDAP Controls field.
- Select the LDAP control and click .
 If clients of Directory Server create their own controls and their operations should be chained to remote servers, add the object identifier (OID) of the custom control.For a list of LDAP controls that can be chained and their OIDs, see Table 2.1, “LDAP Controls and Their OIDs”.
 - Click .
2.3.3. Database Links and Access Control Evaluation
- Not all types of access control can be used.For example, role-based or filter-based ACIs need access to the user entry. Because the data are accessed through database links, only the data in the proxy control can be verified. Consider designing the directory in a way that ensures the user entry is located in the same database as the user's data.
- All access controls based on the IP address or DNS domain of the client may not work since the original domain of the client is lost during chaining. The remote server views the client application as being at the same IP address and in the same DNS domain as the database link.
Note
Directory Server supports both IPv4 and IPv6 IP addresses.
- ACIs must be located with any groups they use. If the groups are dynamic, all users in the group must be located with the ACI and the group. If the group is static, it links to remote users.
- ACIs must be located with any role definitions they use and with any users intended to have those roles.
- ACIs that link to values of a user's entry (for example,
userattrsubject rules) will work if the user is remote.
- During access control evaluation, contents of user entries are not necessarily available (for example, if the access control is evaluated on the server containing the database link and the entry is located on a remote server).For performance reasons, clients cannot do remote inquiries and evaluate access controls.
- The database link does not necessarily have access to the entries being modified by the client application.When performing a modify operation, the database link does not have access to the full entry stored on the remote server. If performing a delete operation, the database link is only aware of the entry's DN. If an access control specifies a particular attribute, then a delete operation will fail when being conducted through a database link.
Note
nsCheckLocalACI attribute in the cn=database_link, cn=chaining database,cn=plugins,cn=config entry. However, evaluating access controls on the server containing the database link is not recommended except with cascading chaining.
2.4. Configuring Cascading Chaining
2.4.1. Overview of Cascading Chaining
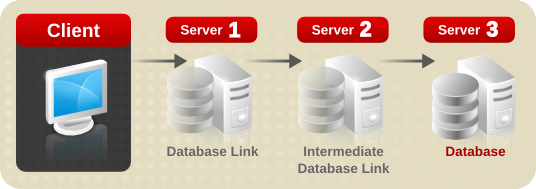
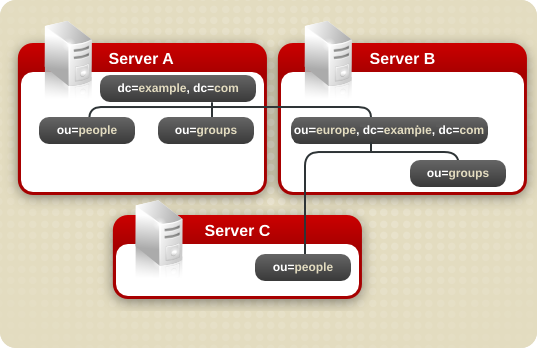
dc=example,dc=com and ou=people and ou=groups sub-suffixes are stored on Server A. The ou=europe,dc=example,dc=com and ou=groups suffixes are stored in on Server B, and the ou=people branch of the ou=europe,dc=example,dc=com suffix is stored on Server C.
ou=people,ou=europe,dc=example,dc=com entry would be routed by the directory as follows:
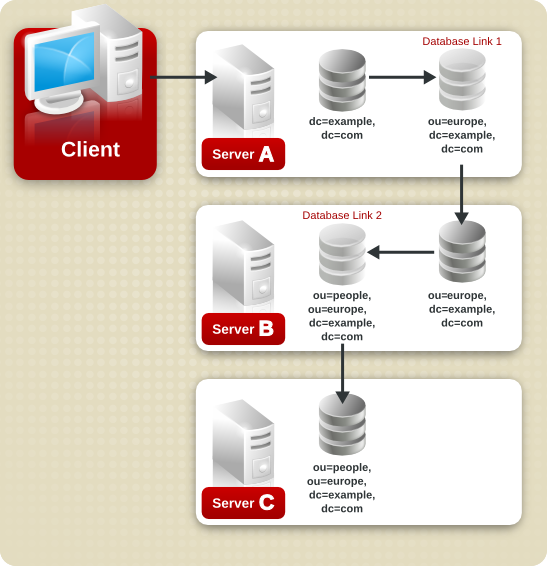
ou=people,ou=europe,dc=example,dc=com branch. Because at least two hops are required for the directory to service the client request, this is considered a cascading chain.
2.4.2. Configuring Cascading Chaining Using the Command Line

Configuration Steps on Server 1
- Create the suffix
c=africa,ou=people,dc=example,dc=com:# dsconf -D "cn=Directory Manager" ldap://server1.example.com backend create --parent-suffix="ou=people,dc=example,dc=com" --suffix="c=africa,ou=people,dc=example,dc=com"
- Create the
DBLink1database link:# dsconf -D "cn=Directory Manager" ldap://server1.example.com chaining link-create --suffix="c=africa,ou=people,dc=example,dc=com" --server-url="ldap://africa.example.com:389/" --bind-mech="" --bind-dn="cn=server1 proxy admin,cn=config" --bind-pw="password" --check-aci="off" "DBLink1"
- Enable loop detection:
# dsconf -D "cn=Directory Manager" ldap://server1.example.com chaining config-set --add-control="1.3.6.1.4.1.1466.29539.12"
Configuration Steps on Server 2
- Create a proxy administrative user on server 2 for server 1 to use for proxy authorization:
# ldapadd -D "cn=Directory Manager" -W -p 389 -h server2.example.com -x
dn: cn=server1 proxy admin,cn=config
objectclass: person
objectclass: organizationalPerson
objectclass: inetOrgPerson
cn: server1 proxy admin
sn: server1 proxy admin
userPassword: password
description: Entry for use by database links
Important
For security reasons, do not use thecn=Directory Manageraccount. - Create the suffix
ou=Zanzibar,c=africa,ou=people,dc=example,dc=com:# dsconf -D "cn=Directory Manager" ldap://server2.example.com backend create --parent-suffix="c=africaou=people,dc=example,dc=com" --suffix="ou=Zanzibar,c=africa,ou=people,dc=example,dc=com"
- Create the
DBLink2database link:# dsconf -D "cn=Directory Manager" ldap://server2.example.com chaining link-create --suffix="ou=Zanzibar,c=africa,ou=people,dc=example,dc=com" --server-url="ldap://zanz.africa.example.com:389/" --bind-mech="" --bind-dn="server2 proxy admin,cn=config" --bind-pw="password" --check-aci="on "DBLink2"
Because theDBLink2link is the intermediate database link in the cascading chaining configuration, enable the ACL check to allow the server to check whether it should allow the client and proxy administrative user access to the database link. - Enable loop detection:
# dsconf -D "cn=Directory Manager" ldap://server2.example.com chaining config-set --add-control="1.3.6.1.4.1.1466.29539.12"
- Enable the proxy authorization control:
# dsconf -D "cn=Directory Manager" ldap://server2.example.com chaining config-set --add-control="2.16.840.1.113730.3.4.12"
- Add the local proxy authorization ACI:
# ldapmodify -D "cn=Directory Manager" -W -p 389 -h server2.example.com -x dn: c=africa,ou=people,dc=example,dc=com changetype: modify add: aci aci:(targetattr="*")(target="lou=Zanzibar,c=africa,ou=people,dc=example,dc=com") (version 3.0; acl "Proxied authorization for database links"; allow (proxy) userdn = "ldap:///cn=server1 proxy admin,cn=config";) - Add an ACI that enables users in
c=us,ou=people,dc=example,dc=comon server 1 who have auidattribute set, to perform any type of operation on theou=Zanzibar,c=africa,ou=people,dc=example,dc=comsuffix tree on server 3:# ldapmodify -D "cn=Directory Manager" -W -p 389 -h server2.example.com -x dn: c=africa,ou=people,dc=example,dc=com changetype: modify add: aci aci:(targetattr="*")(target="ou=Zanzibar,c=africa,ou=people,dc=example,dc=com") (version 3.0; acl "Client authorization for database links"; allow (all) userdn = "ldap:///uid=*,c=us,ou=people,dc=example,dc=com";)If there are users on server 3 under a different suffix that will require additional rights on server 3, it is necessary to add additional client ACIs on server 2.
Configuration Steps on Server 3
- Create a proxy administrative user on server 3 for server 2 to use for proxy authorization:
# ldapadd -D "cn=Directory Manager" -W -p 389 -h server3.example.com -x
dn: cn=server2 proxy admin,cn=config
objectclass: person
objectclass: organizationalPerson
objectclass: inetOrgPerson
cn: server2 proxy admin
sn: server2 proxy admin
userPassword: password
description: Entry for use by database links
Important
For security reasons, do not use thecn=Directory Manageraccount. - Add the local proxy authorization ACI:
# ldapmodify -D "cn=Directory Manager" -W -p 389 -h server3.example.com -x dn: ou=Zanzibar,ou=people,dc=example,dc=com changetype: modify add: aci aci: (targetattr = "*")(version 3.0; acl "Proxied authorization for database links"; allow (proxy) userdn = "ldap:///cn=server2 proxy admin,cn=config";) - Add an ACI that enables users in
c=us,ou=people,dc=example,dc=comon server 1 who have auidattribute set, to perform any type of operation on theou=Zanzibar,c=africa,ou=people,dc=example,dc=comsuffix tree on server 3:# ldapmodify -D "cn=Directory Manager" -W -p 389 -h server3.example.com -x dn: ou=Zanzibar,ou=people,dc=example,dc=com changetype: modify add: aci aci: (targetattr ="*")(target="ou=Zanzibar,c=africa,ou=people,dc=example,dc=com") (version 3.0; acl "Client authentication for database link users"; allow (all) userdn = "ldap:///uid=*,c=us,ou=people,dc=example,dc=com";)If there are users on server 3 under a different suffix that will require additional rights on server 3, it is necessary to add additional client ACIs on server 2.
ou=Zanzibar,c=africa,ou=people,dc=example,dc=com branch on server 3. Depending on your security needs, it can be necessary to provide more detailed access control.
2.4.3. Detecting Loops
0, it determines that a loop has been detected and notifies the client application.
1.3.6.1.4.1.1466.29539.12 OID. For details about adding an LDAP control, see Section 2.3.2.2, “Chaining LDAP Controls”. If the control is not present in the configuration file of each database link, loop detection will not be implemented.
nsHopLimit parameter. By default, the parameter is set to 10. For example, to set the hop limit of the example chain to 5:
# dsconf -D "cn=Directory Manager" ldap://server.example.com chaining link-set --hop-limit 5 example
2.5. Using Referrals
2.5.1. Starting the Server in Referral Mode
refer command.
nsslapd with the refer option.
# ns-slapd refer -D /etc/dirsrv/slapd-instance_name [-p port] -r referral_url
/etc/dirsrv/slapd-instance_name/ is the directory where the Directory Server configuration files are. This is the default location on Red Hat Enterprise Linux.- port is the optional port number of Directory Server to start in referral mode.
- referral_url is the referral returned to clients. The format of an LDAP URL is covered in Appendix C, LDAP URLs.
2.5.2. Setting Default Referrals
2.5.2.1. Setting a Default Referral Using the Command Line
dsconf config replace command, to set the default referral in the nsslapd-referral parameter. For example, to set ldap://directory.example.com/ as the default referral:
# dsconf -D "cn=Directory Manager" ldap://server.example.com config replace nsslapd-referral="ldap://directory.example.com/"
2.5.3. Creating Smart Referrals
uid=jdoe,ou=people,dc=example,dc=com. A smart referral is returned to the client that points to the entry cn=john doe,o=people,ou=europe,dc=example,dc=com on the server directory.europe.example.com.
2.5.3.1. Creating Smart Referrals Using the Command Line
referral object class and set the ref attribute to the referral LDAP URL.
uid=user,ou=people,dc=example,dc=com that refers to ldap://directory.europe.example.com/cn=user,ou=people,ou=europe,dc=example,dc=com:
# ldapadd -D "cn=Directory Manager" -W -p 389 -h server2.example.com -x
dn: uid=user,ou=people,dc=example,dc=com
objectclass: top
objectclass: person
objectclass: organizationalPerson
objectclass: inetOrgPerson
objectclass: referral
sn: user
uid: user
cn: user
ref: ldap://directory.europe.example.com/cn=user,ou=people,ou=europe,dc=example,dc=com
Note
%20 instead of spaces in LDAP URLs used as a referral.
-M option with ldapadd if there is already a referral in the DN path. For more information on smart referrals, see the Directory Server Deployment Guide.
2.5.4. Creating Suffix Referrals
Warning
2.5.4.1. Creating Suffix Referrals Using the Command Line
- Optionally, create a root or sub-suffix, if it does not already exist. For details, see Section 2.1.1, “Creating Suffixes”.
- Add the referral to the suffix. For example:
# dsconf -D "cn=Directory Manager" ldap://server.example.com backend suffix set --add-referral="ldap://directory.example.com/" database_name
2.5.4.2. Creating Suffix Referrals Using the Web Console
- Open the Directory Server user interface in the web console. See Section 1.4, “Logging Into Directory Server Using the Web Console”.
- Select the instance.
- Open the menu.
- Optionally, create a root or sub-suffix, if it does not already exist. For details, see Section 2.1.1, “Creating Suffixes”.
- Select the suffix in the list, and open the Referrals tab.
- Click .
- Fill the fields to create the referral URL.

- Click .
2.6. Verifying the Integrity of Back-end Databases
dsctl dbverify command enables administrators to verify the integrity of back-end databases. For example, to verify the userroot database:
- Optionally, list the back-end databases of the instance:
# dsconf -D "cn=Directory Manager" ldap://server.example.com backend suffix list
dc=example,dc=com (userroot)
You need the name of the database in a later step. - Stop the Directory Server instance:
# dsctl instance_name stop
- Verify the database:
# dsctl instance_name dbverify userroot
[04/Feb/2020:13:11:02.453624171 +0100] - INFO - ldbm_instance_config_cachememsize_set - force a minimal value 512000
[04/Feb/2020:13:11:02.465339507 +0100] - WARN - ldbm_instance_add_instance_entry_callback - ldbm instance userroot already exists
[04/Feb/2020:13:11:02.468060144 +0100] - ERR - ldbm_config_read_instance_entries - Failed to add instance entry cn=userroot,cn=ldbm database,cn=plugins,cn=config
[04/Feb/2020:13:11:02.471079045 +0100] - ERR - bdb_config_load_dse_info - failed to read instance entries
[04/Feb/2020:13:11:02.476173304 +0100] - ERR - libdb - BDB0522 Page 0: metadata page corrupted
[04/Feb/2020:13:11:02.481684604 +0100] - ERR - libdb - BDB0523 Page 0: could not check metadata page
[04/Feb/2020:13:11:02.484113053 +0100] - ERR - libdb - /var/lib/dirsrv/slapd-instance_name/db/userroot/entryrdn.db: BDB0090 DB_VERIFY_BAD: Database verification failed
[04/Feb/2020:13:11:02.486449603 +0100] - ERR - dbverify_ext - verify failed(-30970): /var/lib/dirsrv/slapd-instance_name/db/userroot/entryrdn.db
dbverify failed
- If the verification process reported any problems, fix them manually or restore a backup.
- Start the Directory Server instance:
# dsctl instance_name start
Chapter 3. Managing Directory Entries
3.1. Managing Directory Entries Using the Command Line
- Add new entries
- Add new attributes to existing entries
- Update existing entries and attributes
- Delete entries and attributes from entries
- Perform bulk operations
# yum install openldap-clients
Note
3.1.1. Providing Input to the ldapadd, ldapmodify, and ldapdelete Utilities
3.1.1.1. Providing Input Using the Interactive Mode
ldapadd, ldapmodify, and ldapdelete utilities read the input from the command line. To exit the interactive mode, press the Ctrl+D (^D) key combination to send the End Of File (EOF) escape sequence.
- To enter LDIF statements without creating a file:
Example 3.1. Using the
ldapmodifyInteractive Mode to Enter LDIF StatementsThe following example startsldapmodifyin interactive mode, deletes thetelephoneNumberattribute, and adds the manager attribute with thecn=manager_name,ou=people,dc=example,dc=comvalue to theuid=user,ou=people,dc=example,dc=comentry. Press Ctrl+D after the last statement to exit the interactive mode.# ldapmodify -D "cn=Directory Manager" -W -p 389 -h server.example.com -x dn: uid=user,ou=people,dc=example,dc=com changetype: modify delete: telephoneNumber - add: manager manager: cn=manager_name,ou=people,dc=example,dc=com
^D - To redirect LDIF statements, outputted by another command, to Directory Server:
Example 3.2. Using the
ldapmodifyInteractive Mode with Redirected ContentThe following example redirects the output of thecommand_that_outputs_LDIFcommand toldapmodify. The interactive mode exits automatically after the redirected command exits.# command_that_outputs_LDIF | ldapmodify -D "cn=Directory Manager" \ -W -p 389 -h server.example.com -x
3.1.1.2. Providing Input Using an LDIF File
ldapadd, ldapmodify, and ldapdelete utilities read the LDIF statements from a file. Use this mode to send a larger number of LDIF statements to Directory Server.
Example 3.3. Passing a File with LDIF Statements to ldapmodify
- Create a file with the LDIF statements. For example, create the
~/example.ldiffile with the following statements:dn: uid=user,ou=people,dc=example,dc=com changetype: modify delete: telephoneNumber - add: manager manager: cn=manager_name,ou=people,dc=example,dc=com
This example deletes thetelephoneNumberattribute and to adds the manager attribute with thecn=manager_name,ou=people,dc=example,dc=comvalue to theuid=user,ou=people,dc=example,dc=comentry. - Pass the file to the
ldapmodifycommand using the-f file_nameoption:# ldapmodify -D "cn=Directory Manager" -W -p 389 -h server.example.com -x \ -f ~/example.ldif
3.1.2. The Continuous Operation Mode
-c option to ldapadd and ldapmodify. For example:
# ldpamodify -c -D "cn=Directory Manager" -W -p 389 -h server.example.com -x3.1.3. Adding an Entry
ldapadd or ldapmodify utility. Note that ldapadd is a symbolic link to /bin/ldapmodify. Therefore, ldapadd performs the same operation as ldapmodify -a.
Note
cn=user,ou=people,dc=example,dc=com entry, if the ou=people,dc=example,dc=com parent entry does not exist.
3.1.3.1. Adding an Entry Using ldapadd
ldapadd utility to add, for example, the cn=user,ou=people,dc=example,dc=com user entry:
# ldapadd -D "cn=Directory Manager" -W -p 389 -h server.example.com -x

dn: uid=user,ou=People,dc=example,dc=com
uid: user
givenName: given_name
objectClass: top
objectClass: person
objectClass: organizationalPerson
objectClass: inetorgperson
sn: surname
cn: user
Note
ldapadd automatically performs a changetype: add operation. Therefore, you do not need to specify changetype: add in the LDIF statement.
3.1.3.2. Adding an Entry Using ldapmodify
ldapmodify utility to add, for example, the cn=user,ou=people,dc=example,dc=com user entry:
# ldapmodify -a -D "cn=Directory Manager" -W -p 389 -h server.example.com -x

dn: uid=user,ou=People,dc=example,dc=com
uid: user
givenName: given_name
objectClass: top
objectClass: person
objectClass: organizationalPerson
objectClass: inetorgperson
sn: surname
cn: user
Note
-a option to the ldapmodify command, the utility automatically performs a changetype: add operation. Therefore, you do not need to specify changetype: add in the LDIF statement.
3.1.3.3. Creating a Root Entry
dc=example,dc=com, bind as the cn=Directory Manager user and add the entry.
dc=example,dc=com suffix:
# ldapmodify -D "cn=Directory Manager" -W -p 389 -h server.example.com -x

dn: dc=example,dc=com
changetype: add
objectClass: top
objectClass: domain
dc: example
Note
ldif2db utility with the -n back_end option to set the database that will hold the new entries. For details, see Section 6.1.2, “Importing Using the Command Line”.
3.1.4. Updating a Directory Entry
changetype: modify statement. Depending on the change operation, you can add, change, or delete attributes from the entry.
ldapmodify utility to send the LDIF statements to Directory Server. For example, in interactive mode:
# ldapmodify -D "cn=Directory Manager" -W -p 389 -h server.example.com -x
ldapmodify commands, see the ldapmodify(1) man page.
3.1.4.1. Adding Attributes to an Entry
add operation.
telephoneNumber attribute with the 555-1234567 value to the uid=user,ou=People,dc=example,dc=com entry:
# ldapmodify -D "cn=Directory Manager" -W -p 389 -h server.example.com -x

dn: uid=user,ou=People,dc=example,dc=com
changetype: modify
add: telephoneNumber
telephoneNumber: 555-1234567
telephoneNumber attributes at once to the uid=user,ou=People,dc=example,dc=com:
# ldapmodify -D "cn=Directory Manager" -W -p 389 -h server.example.com -x

dn: uid=user,ou=People,dc=example,dc=com
changetype: modify
add: telephoneNumber
telephoneNumber: 555-1234567
telephoneNumber: 555-7654321
3.1.4.2. Updating an Attribute's Value
Updating a Single-value Attribute
replace operation to override the existing value. The following command updates the manager attribute of the uid=user,ou=People,dc=example,dc=com entry:
# ldapmodify -D "cn=Directory Manager" -W -p 389 -h server.example.com -x

dn: uid=user,ou=People,dc=example,dc=com
changetype: modify
replace: manager
manager: uid=manager_name,ou=People,dc=example,dc=com
Updating a Specific Value of a Multi-value Attribute
telephoneNumber attribute that is currently set to 555-1234567 in the uid=user,ou=People,dc=example,dc=com entry:
# ldapmodify -D "cn=Directory Manager" -W -p 389 -h server.example.com -x

dn: uid=user,ou=People,dc=example,dc=com
changetype: modify
delete: telephoneNumber
telephoneNumber: 555-1234567
-
add: telephoneNumber
telephoneNumber: 555-9876543
3.1.4.3. Deleting Attributes from an Entry
delete operation.
Deleting an Attribute
manager attribute from the uid=user,ou=People,dc=example,dc=com entry:
# ldapmodify -D "cn=Directory Manager" -W -p 389 -h server.example.com -x

dn: uid=user,ou=People,dc=example,dc=com
changetype: modify
delete: manager
Note
Deleting a Specific Value of a Multi-value Attribute
telephoneNumber attribute that is set to 555-1234567 from the uid=user,ou=People,dc=example,dc=com entry:
# ldapmodify -D "cn=Directory Manager" -W -p 389 -h server.example.com -x

dn: uid=user,ou=People,dc=example,dc=com
changetype: modify
delete: telephoneNumber
telephoneNumber: 555-1234567
3.1.5. Deleting an Entry
Note
ou=People,dc=example,dc=com entry, if the uid=user,ou=People,dc=example,dc=com entry still exists.
3.1.5.1. Deleting an Entry Using ldapdelete
ldapdelete utility enables you to delete one or multiple entries. For example, to delete the uid=user,ou=People,dc=example,dc=com entry:
# ldapdelete -D "cn=Directory Manager" -W -p 389 -h server.example.com -x "uid=user,ou=People,dc=example,dc=com"
# ldapdelete -D "cn=Directory Manager" -W -p 389 -h server.example.com -x \
     "uid=user1,ou=People,dc=example,dc=com" \
"uid=user2,ou=People,dc=example,dc=com"3.1.5.2. Deleting an Entry Using ldapmodify
ldapmodify utility, use the changetype: delete operation. For example, to delete the uid=user,ou=People,dc=example,dc=com entry:
# ldapmodify -D "cn=Directory Manager" -W -p 389 -h server.example.com -x

dn: uid=user,ou=People,dc=example,dc=com
changetype: delete
3.1.6. Renaming and Moving an Entry
Note
moddn Access Control List (ACL) to grant permissions to move entries. For details, see Section 18.9.2.1, “Targeting Source and Destination DNs”.
- Renaming an Entry
- If you rename an entry, the
modrdnoperation changes the Relative Distinguished Name (RDN) of the entry:
- Renaming a Subentry
- For subtree entries, the
modrdnoperation renames the subtree and also the DN components of child entries: Note that for large subtrees, this process can take a lot of time and resources.
 - Moving an Entry to a New Parent
- A similar action to renaming a subtree is moving an entry from one subtree to another. This is an expanded type of the
modrdnoperation, which simultaneously renames the entry and sets anewSuperiorattribute which moves the entry from one parent to another:
3.1.6.1. Considerations for Renaming Entries
- You cannot rename the root suffix.
- Subtree rename operations have minimal effect on replication. Replication agreements are applied to an entire database, not a subtree within the database. Therefore, a subtree rename operation does not require reconfiguring a replication agreement. All name changes after a subtree rename operation are replicated as normal.
- Renaming a subtree might require any synchronization agreements to be reconfigured. Synchronization agreements are set at the suffix or subtree level. Therefore, renaming a subtree might break synchronization.
- Renaming a subtree requires that any subtree-level Access Control Instructions (ACI) set for the subtree be reconfigured manually, as well as any entry-level ACIs set for child entries of the subtree.
- Trying to change the component of a subtree, such as moving from
outodc, might fail with a schema violation. For example, theorganizationalUnitobject class requires theouattribute. If that attribute is removed as part of renaming the subtree, the operation fails. - If you move a group, the MemberOf plug-in automatically updates the
memberOfattributes. However, if you move a subtree that contain groups, you must manually create a task in thecn=memberof taskentry or use thefixup-memberof.plto update the relatedmemberOfattributes.For details about cleaning upmemberOfattribute references, see Section 8.1.4.8, “RegeneratingmemberOfValues”.
3.1.6.2. Renaming Users, Groups, POSIX Groups, and OUs
dsidm utility can rename several types of objects:
- Users:
# dsidm -D "cn=Directory Manager" ldap://server.example.com -b "dc=example,dc=com" user rename current_user_name new_user_name
Note that thedsidm user renamecommand automatically placesou=Peoplein front of the base DN you have specified. - Groups:
# dsidm -D "cn=Directory Manager" ldap://server.example.com -b "dc=example,dc=com" group rename current_group_name new_group_name
Note that thedsidm group renamecommand automatically placesou=Groupsin front of the base DN you have specified. - POSIX Groups:
# dsidm -D "cn=Directory Manager" ldap://server.example.com -b "dc=example,dc=com" posixgroup rename current_posix_group_name new_posix_group_name
Note that thedsidm posixgroup renamecommand automatically placesou=Groupsin front of the base DN you have specified. - Organizational Units (OU)
# dsidm -D "cn=Directory Manager" ldap://server.example.com -b "dc=example,dc=com" organizationalunit rename current_ou_name new_ou_name
Thedsidm organizationalunit renamecommand performs the rename operation directly in the base DN you have specified.
3.1.6.3. The deleteOldRDN Parameter When Renaming Entries Using LDIF Statements
deleteOldRDN parameter controls whether the old RDN will be deleted or retained.
deleteOldRDN:0- The existing RDN is retained as a value in the new entry. The resulting entry contains two
cnattributes: one with the old and one with the new common name (CN).For example, the following attributes belong to a group that was renamed fromcn=old_group,dc=example,dc=comtocn=new_group,dc=example,dc=comwith thedeleteOldRDN: 0parameter set.dn: cn=new_group,ou=Groups,dc=example,dc=com objectClass: top objectClass: groupOfUniqueNames cn: old_group cn: new_group
deleteOldRDN:1- Directory Server deletes the old entry and creates a new entry using the new RDN. The new entry only contains the
cnattribute of the new entry.For example, the following group was renamed tocn=new_group,dc=example,dc=comwith thedeleteOldRDN: 1parameter set:dn: cn=new_group,ou=Groups,dc=example,dc=com objectClass: top objectClass: groupofuniquenames cn: new_group
3.1.6.4. Renaming an Entry or Subtree Using LDIF Statements
changetype: modrdn operation and, set the new RDN in the newrdn attribute.
cn=demo1,dc=example,dc=com entry to cn=example_user,dc=example,dc=com:
# ldapmodify -D "cn=Directory Manager" -W -p 389 -h server.example.com -x

dn: cn=example_user,cn=ldap_connect,dc=example,dc=com
changetype: modrdn
newrdn: cn=example_user
deleteOldRDN: 1
newSuperior: dc=example,dc=com
deleteOldRDN, see Section 3.1.6.3, “The deleteOldRDN Parameter When Renaming Entries Using LDIF Statements”.
3.1.6.5. Moving an Entry to a New Parent Using LDIF Statements
changetype: modrdn operation and set the following to attributes:
newrdn- Sets the RDN of the moved entry. You must set this entry, even if the RDN remains the same.
newSuperior- Sets the DN of the new parent entry.
cn=demo entry from ou=Germany,dc=example,dc=com to ou=France,dc=example,dc=com:
# ldapmodify -D "cn=Directory Manager" -W -p 389 -h server.example.com -x

dn: cn=demo,ou=Germany,dc=example,dc=com
changetype: modrdn
newrdn: cn=demo
deleteOldRDN: 1
newSuperior: ou=France,dc=example,dc=com
deleteOldRDN, see Section 3.1.6.3, “The deleteOldRDN Parameter When Renaming Entries Using LDIF Statements”.
3.1.7. Using Special Characters
cn=Directory Manager user, enclose the user's DN in quotation marks:
# ldapmodify -a -D "cn=Directory Manager" -W -p 389 -h server.example.com -x
uid=user,ou=People,dc=example.com Chicago, IL user:
# ldapmodify -a -D "cn=uid=user,ou=People,dc=example.com Chicago\, IL" \
     -W -p 389 -h server.example.com -x
3.1.8. Using Binary Attributes
jpegPhoto attribute. When you add or update such an attribute, the utility reads the value for the attribute from a file. To add or update such an attribute, you can use the ldapmodify utility.
jpegPhoto attribute to the uid=user,ou=People,dc=example,dc=com entry, and read the value for the attribute from the /home/user_name/photo.jpg file, enter:
# ldapmodify -D "cn=Directory Manager" -W -p 389 -h server.example.com -x

dn: uid=user,ou=People,dc=example,dc=com
changetype: modify
add: jpegPhoto
jpegPhoto:< file:///home/user_name/photo.jpg
Important
: and <.
3.1.9. Updating an Entry in an Internationalized Directory
ldapmodify to update an attribute that has a language tag set, you must match the value and language tag exactly or the operation will fail.
lang-fr language tag set, include the tag in the modify operation:
# ldapmodify -D "cn=Directory Manager" -W -p 389 -h server.example.com -x

dn: uid=user,ou=People,dc=example,dc=com
changetype: modify
replace: homePostalAddress;lang-fr
homePostalAddress;lang-fr: 34 rue de Seine
3.2. Managing Directory Entries Using the Web Console
3.2.1. Adding an LDAP Entry Using the Web Console
- users
- groups
- roles
- organizational units (OUs)
- custom entries
cn=John Smith,ou=people,dc=example,dc=com with a password.
Prerequisites
- You are logged in to the Directory Server web console.
- The parent entry exists. For example,
ou=people,dc=example,dc=com.
Procedure
- In the web console, open the menu to reveal the list of existing suffixes.
- Using the or view, expand the parent entry
ou=people,dc=example,dc=comunder which you want to create a user. - Click the and select to open the wizard window.

- Select the option and click .
- For the user entry, select type and click .
- Optional: Select additional attributes, such as
userPassword, and click . You can view all selected attributes by expanding the drop-down list near the step name.
- Set a value for each attribute:
- Click on the pencil button of the attribute and add a value.
 Note that a separate menu opens when you set the
userPasswordvalue. The value is filled with asterisks (*) to hide the plain text. - Click on the check button to save changes.
- Optional: Set an additional attribute value by clicking the → .
- After you have set all values, click .
- Verify that all entry details are correct and click . Directory Server creates the entry with mandatory attributes for a POSIX user and sets the password to it. You can click to modify entry settings, or click to cancel the entry creation.
- View the and click .
Verification
- Navigate to → .
- Select the database suffix that contains the entry, such as
dc=example,cd=com. - Enter your search criteria in the field, such as
John, and press . - Find the entry you recently created in the list of entries.
3.2.2. Editing an LDAP Entry Using the Web Console
cn=John Smith,ou=people,dc=example,dc=com by:
- adding telephone numbers
556778987and556897445. - adding email
jsmith@example.com. - changing the password.
Prerequisites
Procedure
- In the web console, open the menu to reveal the list of existing suffixes.
- Using the or view, expand the entry you want to edit, such as
cn=John Smith,ou=people,dc=example,dc=com. - Click the and select to open the wizard window.
- Optional: In the step, add or delete object classes for the entry. Click .
- In the step, add
telephoneNumberandmailattributes to the entry and click . If you do not see an attribute you want to add to the entry it means that you did not add corresponding object class in the previous step.Note
In this step, you can not delete mandatory attributes of the selected object classes. - In the step, set
telephoneNumberto556778987and556897445,mailtojsmith@example.comand changeuserPasswordvalue:- Click on the pencil button of the attribute and add or change a new value.
- Click on the check button to save changes.
- Optional: Set an additional value to an attribute by clicking the → . The
telephoneNumberattribute has two values in this example. When you set all values, click .
- Review your changes and click .
- To edit the entry, click . You can click to modify entry settings, or click to cancel the entry editing.
- View the and click .
Verification
- Expand the entry details and view the new changes appear among the entry attributes.
3.2.3. Renaming and Relocating an LDAP Entry or Subtree Using the Web Console
cn=John Smith,ou=people,dc=example,dc=com to cn=Tom Smith,ou=clients,dc=example,dc=com.
Prerequisites
Procedure
- In the web console, open the menu to reveal the list of existing suffixes.
- Using the or view, expand the entry you want to modify, such as
cn=John Smith,ou=people,dc=example,dc=com. - Click the and select to open the wizard window.
- In the step:
- Set a new value
Tom Smithfor the naming attributecnand click . - Optional: Select another naming attribute from the drop-down menu.
- Optional: In case you want to delete the old entry and create a new one using the new RDN, check .
- In step, select the parent entry for the new location, and click .
- Review changes you made to the entry and click .
- If the entry details are correct, click . You can click to make other changes to the entry or click to cancel the entry modification.
- View and click .
Verification
- Expand the entry details and review the updated entry.
3.2.4. Deleting an LDAP Entry Using the Web Console
cn=Tom Smith,ou=clients,dc=example,dc=com.
Prerequisites
Procedure
- In the web console, open the menu to reveal the list of existing suffixes.
- Using the or view, expand the entry you want to delete, such as
cn=Tom Smith,ou=clients,dc=example,dc=com. - Click the and select to open the wizard window.
- Click after you review the data about the entry you want to delete.
- In the step, toggle the switch to the position and click . You can click to cancel the entry deletion.
- View the and click .
Verification
- Navigate to → .
- Select the suffix where the entry previously existed, such as
dc=example,cd=com. - Enter your search criteria in the field, such as
Tom, and press . - Verify that the deleted entry is no longer present.
Chapter 4. Tracking Modifications to Directory Entries
- Using change sequence numbers to track changes to the database. This is similar to change sequence numbers used in replication and synchronization. Every normal directory operation triggers a sequence number.
- Assigning creation and modification information. These attributes record the names of the user who created and most recently modified an entry, as well as the timestamps of when it was created and modified.
Note
ldapsearch. For details on running a search for operational attributes, see Section 14.4.7, “Searching for Operational Attributes”.
4.1. Tracking Modifications to the Database through Update Sequence Numbers
4.1.1. An Overview of the Entry Sequence Numbers
4.1.1.1. Local and Global USNs
entryUSN operational attribute. For further details about operational attributes, see Section 14.4.7, “Searching for Operational Attributes”.
Example 4.1. Example Entry USN
entryusn attribute of the uid=example,ou=People,dc=example,dc=com user entry:
# ldapsearch -D "cn=Directory Manager" -W -H ldap://server.example.com:389 -x -b "uid=example,ou=People,dc=example,dc=com" -s base -x entryusn

dn: uid=example,ou=People,dc=example,dc=com
entryusn: 17653- In local mode, each back end database has an instance of the USN Plug-in with a USN counter specific to that back end database. This is the default setting.
- In global mode, there is a global instance of the USN Plug-in with a global USN counter that applies to changes made to the entire directory.
lastusn attribute. When the USN Plug-in is set to local mode, so each database has its own local USN counter, the lastUSN shows both the database which assigned the USN and the USN:
lastusn;database_name:USN
lastusn;example1: 2130
lastusn;example2: 2070
lastUSN attribute shows the latest USN only:
lastusn: 4200
4.1.1.2. Importing USN Entries
nsslapd-entryusn-import-initval attribute to check if the entry has an assigned USN. If the value of nsslapd-entryusn-import-initval is numerical, the imported entry will use this numerical value as the entry's USN. If the value of nsslapd-entryusn-import-initval is not numerical, the USN Plug-in will use the value of the lastUSN attribute and increment it by one as the USN for the imported entry.
4.1.2. Enabling the USN Plug-in
4.1.2.1. Enabling the USN Plug-in Using the Command Line
- Use the
dsconfutility to enable the plug-in:# dsconf -D "cn=Directory Manager" ldap://server.example.com plugin usn enable
- Restart the instance:
# dsctl instance_name restart
4.1.2.2. Enabling the USN Plug-in Using the Web Console
- Open the Directory Server user interface in the web console. See Section 1.4, “Logging Into Directory Server Using the Web Console”.
- Select the instance.
- Select the menu.
- Select the USN plug-in.
- Change the status to
ONto enable the plug-in. - Restart the instance. See Section 1.5.2, “Starting and Stopping a Directory Server Instance Using the Web Console”.
4.1.3. Global USNs
Note
4.1.3.1. Identifying Whether Global USNs are Enabled
4.1.3.1.1. Identifying Whether Global USNs are Enabled Using the Command Line
# dsconf -D "cn=Directory Manager" ldap://server.example.com plugin usn global
USN global mode is disabled
4.1.3.1.2. Identifying Whether Global USNs are Enabled Using the Web Console
- Open the Directory Server user interface in the web console. See Section 1.4, “Logging Into Directory Server Using the Web Console”.
- Select the instance.
- Select the menu.
- Select the USN plug-in.
- Verify that the switch is set to
On.
4.1.3.2. Enabling Global USNs
4.1.3.2.1. Enabling Global USNs Using the Command Line
- Enable global USNs:
# dsconf -D "cn=Directory Manager" ldap://server.example.com plugin usn global on
- Restart the instance:
# dsctl instance_name restart
4.1.3.2.2. Enabling Global USNs Using the Web Console
- Open the Directory Server user interface in the web console. See Section 1.4, “Logging Into Directory Server Using the Web Console”.
- Select the instance.
- Open the menu.
- Select the USN plug-in.
- Change the status of the plug-in to
On. - Change the USN Global status to
On. - Restart the instance. See Section 1.5.2, “Starting and Stopping a Directory Server Instance Using the Web Console”.
4.1.4. Cleaning up USN Tombstone Entries
- before converting a server to a replica
- to free memory for the server
4.1.4.1. Cleaning up USN Tombstone Entries Using the Command Line
dc=example,dc=com suffix using the command line:
# dsconf -D "cn=Directory Manager" ldap://server.example.com plugin usn cleanup -s "dc=example,dc=com"
-o max_USN option to the command to delete USN tombstone entries up to the specified value.
4.1.4.2. Cleaning up USN Tombstone Entries Using the Web Console
dc=example,dc=com suffix using the web console:
- Open the Directory Server user interface in the web console. See Section 1.4, “Logging Into Directory Server Using the Web Console”.
- Select the instance.
- Open the menu.
- Select the USN plug-in.
- Press the button.
- Fill the fields, and press .
4.2. Tracking Entry Modifications through Operational Attributes
creatorsName: The distinguished name (DN) of the user who initially created the entry.createTimestamp: The times stamp in Greenwich Mean Time (GMT) format when the entry was created.modifiersName: The distinguished name of the user who last modified the entry.modifyTimestamp: The time stamp in the GMT format for when the entry was last modified.
Important
nsUniqueID attribute and replication does not work.
4.2.1. Entries Modified or Created by a Database Link
creatorsName and modifiersName attributes contain the name of the user who is granted proxy authorization rights on the remote server. In this case, the attributes do not display the original creator or latest modifier of the entry. However, the access logs show both the proxy user (dn) and the original user (authzid). For example:
[23/May/2018:18:13:56.145747965 +051800] conn=1175 op=0 BIND dn="cn=proxy admin,ou=People,dc=example,dc=com" method=128 version=3
[23/May/2018:18:13:56.575439751 +051800] conn=1175 op=0 RESULT err=0 tag=97 nentries=0 etime=0 dn="cn=proxy admin,ou=people,dc=example,dc=com"
[23/May/2018:18:13:56.744359706 +051800] conn=1175 op=1 SRCH base="dc=example,dc=com" scope=2 filter="(objectClass=*)" attrs=ALL authzid="uid=user_name,ou=People,dc=example,dc=com"
4.2.2. Enabling Tracking of Modifications
Note
4.2.2.1. Enabling Tracking Of Modifications Using the Command Line
- Set the
nsslapd-lastmodparameter toon:# dsconf -D "cn=Directory Manager" ldap://server.example.com config replace nsslapd-lastmod=on
- Optionally, to regenerate the missing
nsUniqueIDattributes:- Export the database into an LDAP Data Interchange Format (LDIF) file. See Section 6.2.1, “Exporting Data into an LDIF File Using the Command Line”.
- Import the database from the LDIF file. See Section 6.1.2, “Importing Using the Command Line”.
4.3. Tracking the Bind DN for Plug-in Initiated Updates
dn: cn=example_group,ou=groups,dc=example,dc=com
modifiersname: uid=example,ou=people,dc=example,dc=com

dn: uid=example,ou=people,dc=example,dc=com
modifiersname: cn=memberOf plugin,cn=plugins,cn=config
nsslapd-plugin-binddn-tracking parameter enables the server to track which user originated an update operation, as well as the internal plug-in which actually performed it. The bound user is shown in the modifiersname and creatorsname operational attributes, while the plug-in which performed it is shown in the internalModifiersname and internalCreatorsname operational attributes. For example:
dn: uid=example,ou=people,dc=example,dc=com
modifiersname: uid=admin,ou=people,dc=example,dc=com
internalModifiersname: cn=memberOf plugin,cn=plugins,cn=config
nsslapd-plugin-binddn-tracking parameter tracks and maintains the relationship between the bound user and any updates performed for that connection.
Note
internalModifiersname and internalCreatorsname attributes always show a plug-in as the identity. This plug-in could be an additional plug-in, such as the MemberOf Plug-in. If the change is made by the core Directory Server, then the plug-in is the database plug-in, cn=ldbm database,cn=plugins,cn=config.
4.3.1. Enabling Tracking the Bind DN for Plug-in Initiated Updates Using the Command Line
- Set the
nsslapd-plugin-binddn-trackingparameter toon:# dsconf -D "cn=Directory Manager" ldap://server.example.com config replace nsslapd-plugin-binddn-tracking=on
- Restart the instance:
# dsctl instance_name restart
4.3.2. Enabling Tracking the Bind DN for Plug-in Initiated Updates Using the Web Console
- Open the Directory Server user interface in the web console. See Section 1.4, “Logging Into Directory Server Using the Web Console”.
- Select the instance.
- Open the menu, and select the Server Settings entry.
- On the Advanced Settings tab, select Enable Plugin Bind DN Tracking.
- Click .
- Restart the instance. See Section 1.5.2, “Starting and Stopping a Directory Server Instance Using the Web Console”.
4.4. Tracking Password Change Times
lastModified operational attribute. However, there can be times when the time of the last password change needs to be recorded separately, to make it easier to update passwords in Active Directory synchronization or to connect with other LDAP clients.
passwordTrackUpdateTime attribute within the password policy tells the server to record a timestamp for the last time that the password was updated for an entry. The password change time itself is stored as an operational attribute on the user entry, pwdUpdateTime (which is separate from the modifyTimestamp or lastModified operational attributes).
passwordTrackUpdateTime attribute can be set as part of the global password policy or on a subtree or user-level policy, depending on what clients need to access the password change time. Setting password policies is described in Section 20.4, “Managing the Password Policy”.
Chapter 5. Maintaining Referential Integrity
5.1. How Referential Integrity Works
Note
- For entries, marked in the log file as deleted, the corresponding attribute in the directory is deleted.
- For entries, marked in the log file as renamed or moved, the value of the corresponding attribute in the directory is renamed.
member, uniquemember, owner, and seeAlso attributes immediately after a delete or rename operation. However, you can configure the behavior of the Referential Integrity Postoperation plug-in to suit the needs of the directory in several different ways:
- Record Referential Integrity updates in the replication change log.
- Modify the update interval.
- Select the attributes to which to apply Referential Integrity.
- Disable Referential Integrity.
nsIndexType: pres
nsIndexType: eq
nsIndexType: sub
See Section 13.2, “Creating Standard Indexes” for more information about checking and creating indexes.
5.2. Using Referential Integrity with Replication
- Never enable it on a dedicated consumer server (a server that contains only read-only replicas).
- Never enable it on a server that contains a combination of read-write and read-only replicas.
- Enable it on a supplier server that contains only read-write replicas.
- Enable the plug-in for each supplier server in multi-supplier replication topology. The plug-in configuration must be the same on all supplier servers.
Note
5.3. Enabling Referential Integrity
5.3.1. Enabling Referential Integrity Using the Command Line
- Use the
dsconfutility to enable the plug-in:# dsconf -D "cn=Directory Manager" ldap://server.example.com plugin referential-integrity enable
- Restart the instance:
# dsctl instance_name restart
5.3.2. Enabling Referential Integrity Using the Web Console
- Open the Directory Server user interface in the web console. See Section 1.4, “Logging Into Directory Server Using the Web Console”.
- Select the instance.
- Select the Plugins menu.
- Select the Referential Integrity plug-in and click Show Advanced Settings.
- Change the status to
ONto enable the plug-in.
5.4. The Referential Integrity Update Interval
0: The check for referential integrity is performed immediately.-1: No check for referential integrity is performed.
Important
0 on all suppliers.
Note
5.4.1. Displaying the Update Interval Using the Command Line
# dsconf -D "cn=Directory Manager" ldap://server.example.com plugin referential-integrity show
referint-update-delay: 0
...
5.4.2. Displaying the Update Interval Using the Web Console
- Open the Directory Server user interface in the web console. See Section 1.4, “Logging Into Directory Server Using the Web Console”.
- Select the instance.
- Open the menu.
- Select the Referential Integrity plug-in.
- See the Update Delay field for the update interval.
5.4.3. Modifying the Update Interval Using the Command Line
- Set the update interval to
0:# dsconf -D "cn=Directory Manager" ldap://server.example.com plugin referential-integrity set --update-delay=0
- Restart the instance:
# dsctl instance_name restart
5.4.4. Modifying the Update Interval Using the Web Console
- Open the Directory Server user interface in the web console. See Section 1.4, “Logging Into Directory Server Using the Web Console”.
- Select the instance.
- Open the menu.
- Select the Referential Integrity plug-in.
- Set the interval in the Update Delay field.
- Press .
- Restart the instance. See Section 1.5.2, “Starting and Stopping a Directory Server Instance Using the Web Console”.
5.5. Displaying and Modifying the Attribute List
member, uniquemember, owner, and seeAlso attributes. You can add or delete attributes to be updated using the command line or the web console.
Note
5.5.1. Displaying the Attribute List Using the Command Line
# dsconf -D "cn=Directory Manager" ldap://server.example.com plugin referential-integrity show
5.5.2. Displaying the Attribute List Using the Web Console
- Open the Directory Server user interface in the web console. See Section 1.4, “Logging Into Directory Server Using the Web Console”.
- Select the instance.
- Open the menu.
- Select the Referential Integrity plug-in.
- See the Membership Attribute field for the list of attributes.
5.5.3. Configuring the Attribute List Using the Command Line
- Optionally, display the current list of attributes. See Section 5.5.1, “Displaying the Attribute List Using the Command Line”.
- Update the attribute list:
- To set an attribute list that should be checked and updated by the plug-in:
# dsconf -D "cn=Directory Manager" ldap://server.example.com plugin referential-integrity set --membership-attr attribute_name_1 attribute_name_2
- To delete all attributes that should no longer be checked and updated by the plug-in:
# dsconf -D "cn=Directory Manager" ldap://server.example.com plugin referential-integrity set --membership-attr delete
- Restart the instance:
# dsctl instance_name restart
5.5.4. Configuring the Attribute List Using the Web Console
- Open the Directory Server user interface in the web console. See Section 1.4, “Logging Into Directory Server Using the Web Console”.
- Select the instance.
- Open the menu.
- Select the Referential Integrity plug-in.
- Update the Membership Attribute field to set the attributes.
- To add an attribute, enter the name into the Membership Attribute field.
- To remove an attribute, press the button right next to the attribute's name in the Membership Attribute field.
- Press .
5.6. Configuring Scope for the Referential Integrity
dc=example,dc=com, containing two subtrees: ou=active users,dc=example,dc=com and ou=deleted users,dc=example,dc=com. Entries in deleted users should not be handled for purposes of referential integrity.
5.6.1. Parameters That Control the Referential Integrity Scope
nsslapd-pluginEntryScope- This multi-value parameter controls the scope of the entry that is deleted or renamed. It defines the subtree in which the Referential Integrity Postoperation plug-in looks for the delete or rename operations of a user entry. If a user is deleted or renamed that does not exist under the defined subtree, the plug-in ignores the operation. The parameter allows you to specify to which branches of the database the plug-in should apply the operation.
nsslapd-pluginExcludeEntryScope- This parameter also controls the scope of the entry that is deleted or renamed. It defines the subtree in which the Referential Integrity Postoperation plug-in ignores any operations for deleting or renaming a user.
nsslapd-pluginContainerScope- This parameter controls the scope of groups in which references are updated. After a user is deleted, the Referential Integrity Postoperation plug-in looks for the groups to which the user belongs and updates them accordingly. This parameter specifies which branch the plug-in searches for the groups to which the user belongs. The Referential Integrity Postoperation plug-in only updates groups that are under the specified container branch, and leaves all other groups not updated.
5.6.2. Displaying the Referential Integrity Scope Using the Command Line
# dsconf -D "cn=Directory Manager" ldap://server.example.com plugin referential-integrity show
...
nsslapd-pluginEntryScope: DN
nsslapd-pluginExcludeEntryScope: DN
nsslapd-pluginContainerScope: DN
5.6.3. Displaying the Referential Integrity Scope Using the Web Console
- Open the Directory Server user interface in the web console. See Section 1.4, “Logging Into Directory Server Using the Web Console”.
- Select the instance.
- Open the menu.
- Select the Referential Integrity plug-in.
- See the Entry Scope, Exclude Entry Scope, and Container Scope fields for the currently configured scope.
5.6.4. Configuring the Referential Integrity Scope Using the Command Line
- Optionally, display the scope settings. See Section 5.6.2, “Displaying the Referential Integrity Scope Using the Command Line”.
- The following commands show how to configure the individual referential integrity scope settings using the command line:
- To set a distinguished name (DN):
- To the
nsslapd-pluginEntryScopeparameter:# dsconf -D "cn=Directory Manager" ldap://server.example.com plugin referential-integrity set --entry-scope="DN"
- To the
nsslapd-pluginExcludeEntryScopeparameter:# dsconf -D "cn=Directory Manager" ldap://server.example.com plugin referential-integrity set --exclude-entry-scope="DN"
- To the
nsslapd-pluginContainerScopeparameter:# dsconf -D "cn=Directory Manager" ldap://server.example.com plugin referential-integrity set --container-scope="DN"
- To remove a DN:
- From the
nsslapd-pluginEntryScopeparameter:# dsconf -D "cn=Directory Manager" ldap://server.example.com plugin referential-integrity set --entry-scope=delete
- From the
nsslapd-pluginExcludeEntryScopeparameter:# dsconf -D "cn=Directory Manager" ldap://server.example.com plugin referential-integrity set --exclude-entry-scope=delete
- From the
nsslapd-pluginContainerScopeparameter:# dsconf -D "cn=Directory Manager" ldap://server.example.com plugin referential-integrity set --container-scope=delete
- Restart the instance:
# dsctl instance_name restart
5.6.5. Configuring the Referential Integrity Scope Using the Web Console
- Open the Directory Server user interface in the web console. See Section 1.4, “Logging Into Directory Server Using the Web Console”.
- Select the instance.
- Select the menu.
- Select the Referential Integrity plug-in.
- Set the scope in the Entry Scope, Exclude Entry Scope, and Container Scope fields.
- Click .
Chapter 6. Populating Directory Databases
6.1. Importing Data
- Importing data
Important
To import data, you must store the LDIF file that you want to import in the/var/lib/dirsrv/slapd-instance_name/ldif/directory. Directory Server usesPrivateTmpsystemd directive by default. As a result, if you export LDIF files into the/tmp/or/var/tmp/system directories, Directory Server does not see these LDIF files during import. For more information aboutPrivateTmp, seesystemd.exec(5)man page. - Initializing a database for replication
Table 6.1. Import Method Comparison
| Action | Import | Initialize Database |
|---|---|---|
| Overwrites database | No | Yes |
| LDAP operations | Add, modify, delete | Add only |
| Performance | More time-consuming | Fast |
| Partition specialty | Works on all partitions | Local partitions only |
| Response to server failure | Best effort (all changes made up to the point of the failure remain) | Atomic (all changes are lost after a failure) |
| LDIF file location | Local to the web console | Local to the web console or local to server |
Imports configuration information (cn=config) | Yes | No |
6.1.1. Setting EntryUSN Initial Values During Import
nsslapd-entryusn-import-initval parameter, which sets a starting USN for all imported entries.
nsslapd-entryusn-import-initval:
- An integer, which is the explicit start number used for every imported entry.
next, which means that every imported entry uses whatever the highest entry USN value was on the server before the import operation, incremented by one.
nsslapd-entryusn-import-initval is not set, then all entry USNs begin at zero.
Example 6.1. How the nsslapd-entryusn-import-initval Parameter works
1000 before the import or initialization operation, and the nsslapd-entryusn-import-initval value is next, then every imported entry is assigned a USN of 1001:
# ldapsearch -D "cn=Directory Manager" -W -p 389 -h server.example.com -x "(cn=*)" entryusn

dn: dc=example,dc=com
entryusn: 1001
dn: ou=Accounting,dc=example,dc=com
entryusn: 1001
dn: ou=Product Development,dc=example,dc=com
entryusn: 1001
...
dn: uid=user_name,ou=people,dc=example,dc=com
entryusn: 1001
...
nsslapd-entryusn-import-initval parameter to the server into which data are being imported or to the supplier server which will perform the initialization. For example:
# dsconf -D "cn=Directory Manager" ldap://server.example.com config replace nsslapd-entryusn-import-initval=next
Note
nsslapd-entryusn-import-initval parameter is not replicated between servers. This means that the value must be set specifically on whichever supplier server is being used to initialize a replica.
Supplier1 host has nsslapd-entryusn-import-initval set to next and is used to initialize a replica, then the entry USNs for imported entries have the highest value plus one. If the Supplier2 host does not have nsslapd-entryusn-import-initval set and is used to initialize a replica, then all entry USNs for imported entries begin at zero — even if Supplier1 and Supplier2 have a multi-supplier replication agreement between them.
6.1.2. Importing Using the Command Line
- Use one of the following methods if the instance is running:
- Use the
dsconf backend importcommand. See Section 6.1.2.1.1, “Importing Using thedsconf backend importCommand”. - Create a
cn=tasksentry. See Section 6.1.2.1.2, “Importing Data Using acn=tasksEntry”.
- If the instance is offline, use the
dsctl ldif2dbcommand. See Section 6.1.2.2, “Importing Data While the Server is Offline”.
Warning
UTF-8 character set encoding. Import operations do not convert data from the local character set encoding to UTF-8. Additionally, all imported LDIF files must contain the root suffix entry.
dirsrv user. Therefore, the permissions of the LDIF file must allow this user to read the file.
6.1.2.1. Importing Data While the Server is Running
6.1.2.1.1. Importing Using the dsconf backend import Command
dsconf backend import command to automatically create a task that imports data from an LDIF file. For example, to import the /var/lib/dirsrv/slapd-instance_name/ldif/instance_name-database_name-time_stamp.ldif file into the userRoot database:
- Create the suffix if it does not exist. For details, see Section 2.1.1, “Creating Suffixes”.
- If the LDIF you want to import does not contain statements that add the suffix entry, create this entry manually as described in Section 3.1.3.3, “Creating a Root Entry”.
- Import the LDIF file:
# dsconf -D "cn=Directory Manager" ldap://server.example.com backend import userRoot /var/lib/dirsrv/slapd-instance_name/ldif/instance_name-database_name-time_stamp.ldif
The import task has finished successfully
Thedsconf backend importcommand supports additional options, for example, to exclude a specific suffix. To display all available options, enter:# dsconf ldap://server.example.com backend import --help
6.1.2.1.2. Importing Data Using a cn=tasks Entry
cn=tasks,cn=config entry in the Directory Server configuration is a container entry for temporary entries the server uses to manage tasks. To initiate an import operation, create a task in the cn=import,cn=tasks,cn=config entry.
cn: Sets the unique name of the task.nsFilename: Sets the name of the LDIF file to import.nsInstance: Sets the name of the database into which the file should be imported.
/var/lib/dirsrv/slapd-instance_name/ldif/example.ldif file into the userRoot database:
- Create the suffix if it does not exist. For details, see Section 2.1.1, “Creating Suffixes”.
- If the LDIF you want to import does not contain statements that add the suffix entry, create this entry manually as described in Section 3.1.3.3, “Creating a Root Entry”.
- Add the import task:
# ldapadd -D "cn=Directory Manager" -W -H ldap://server.example.com -x

dn: cn=example_import,cn=import,cn=tasks,cn=config
changetype: add
objectclass: extensibleObject
cn: example_import
nsFilename: /var/lib/dirsrv/slapd-instance_name/ldif/example.ldif
nsInstance: userRoot
6.1.2.2. Importing Data While the Server is Offline
dsctl ldif2db command:
- Create the suffix if it does not exist. For details, see Section 2.1.1, “Creating Suffixes”.
- If the LDIF you want to import does not contain statements that add the suffix entry, create this entry manually as described in Section 3.1.3.3, “Creating a Root Entry”.
- Stop the instance:
# dsctl instance_name stop
- Import the data from the LDIF file. For example, to import the
/var/lib/dirsrv/slapd-instance_name/ldif/example.ldiffile into theuserRootdatabase:# dsctl instance_name ldif2db userroot /var/lib/dirsrv/slapd-instance_name/ldif/example.ldif OK group dirsrv exists OK user dirsrv exists [17/Jul/2018:13:42:42.015554231 +0200] - INFO - ldbm_instance_config_cachememsize_set - force a minimal value 512000 ... [17/Jul/2018:13:42:44.302630629 +0200] - INFO - import_main_offline - import userroot: Import complete. Processed 160 entries in 2 seconds. (80.00 entries/sec) ldif2db successfulWarning
If the database specified in the command does not correspond with the suffix contained in the LDIF file, all data contained in the database is deleted, and the import fails. - Start the instance:
# dsctl instance_name start
6.1.3. Importing Data Using the Web Console
- Create the suffix if it does not exist. For details, see Section 2.1.1, “Creating Suffixes”.
- If the LDIF you want to import does not contain statements that add the suffix entry, create this entry manually as described in Section 3.1.3.3, “Creating a Root Entry”.
- Store the LDIF file you want to import in the
/var/lib/dirsrv/slapd-instance_name/ldif/directory. - Open the Directory Server user interface in the web console. See Section 1.4, “Logging Into Directory Server Using the Web Console”.
- Select the instance.
- Open the menu.
- Select the suffix entry.
- Click , and select Initialize Suffix.
- Select the LDIF file to import or enter the full path to the file.

- Select Yes, I am sure., and click to confirm.
6.2. Exporting Data
Note
cn=config), schema information (cn=schema), or monitoring information (cn=monitor).
- Backing up the data in the database.
- Copying data to another Directory Server.
- Exporting data to another application.
- Repopulating databases after a change to the directory topology.For example, if a directory contains one database, and its contents should be split into two databases, then the two new databases receive their data by exporting the contents of the old databases and importing it into the two new databases, as illustrated in Figure 6.1, “Splitting a Database Contents into Two Databases”.

Figure 6.1. Splitting a Database Contents into Two Databases
Warning
dirsrv user. Therefore, the permissions of the destination directory must allow this user to write the file.
6.2.1. Exporting Data into an LDIF File Using the Command Line
- Use one of the following methods if the instance is running:
- Use the
dsconf backend exportcommand. See Section 6.2.1.1.1, “Exporting a Databases Using thedsconf backend exportCommand”. - Create a
cn=tasksentry. See Section 6.2.1.1.2, “Exporting a Database Using acn=tasksEntry”.
- If the instance is offline, use the
dsctl db2ldifcommand. See Section 6.2.1.2, “Exporting a Database While the Server is Offline”.
Important
/tmp or /var/tmp/ directories because of the following reasons:
- Directory Server uses
PrivateTmpfeature ofsystemdby default. If you place LDIF files into the/tmpor/var/tmp/system directory, Directory Server does not see these LDIF files during import. For more information aboutPrivateTmp, seesystemd.exec(5)man page. - LDIF files often contain sensitive data, such as user passwords. Therefore, you must not use temporary system directories to store these files.
6.2.1.1. Exporting a Database While the Server is Running
6.2.1.1.1. Exporting a Databases Using the dsconf backend export Command
dsconf backend export command to automatically create a task that exports data to an LDIF file.
userRoot database:
# dsconf -D "cn=Directory Manager" ldap://server.example.com backend export userRoot
The export task has finished successfully
dsconf stores the export in a file called instance_name_database_name-time_stamp.ldif in the /var/lib/dirsrv/slapd-instance_name/export/ directory. Alternatively, add the -l file_name option to the command to specify a different location.
dsconf backend export command supports additional options, for example, to exclude a specific suffix. To display all available options, enter:
# dsconf ldap://server.example.com backend export --help
6.2.1.1.2. Exporting a Database Using a cn=tasks Entry
cn=tasks,cn=config entry in the Directory Server configuration is a container entry for temporary entries the server uses to manage tasks. To initiate an export operation, create a task in the cn=export,cn=tasks,cn=config entry.
cn: Sets the unique name of the task.nsInstance: Sets the name of the database to export.nsFilename: Sets the name of the file into which the export should be stored.
userRoot database into the /var/lib/dirsrv/slapd-instance_name/ldif/example.ldif file:
# ldapadd -D "cn=Directory Manager" -W -H ldap://server.example.com -x

dn: cn=example_export,cn=export,cn=tasks,cn=config
changetype: add
objectclass: extensibleObject
cn: example_export
nsInstance: userRoot
nsFilename: /var/lib/dirsrv/slapd-instance_name/ldif/example.ldif
6.2.1.2. Exporting a Database While the Server is Offline
dsctl db2ldif command:
- Stop the instance:
# dsctl instance_name stop
- Export the database into an LDIF file. For example to export the
userRootdatabase into the/var/lib/dirsrv/slapd-instance_name/ldif/example.ldiffile:# dsctl instance_name db2ldif userroot /var/lib/dirsrv/slapd-instance_name/ldif/example.ldif OK group dirsrv exists OK user dirsrv exists ldiffile: /var/lib/dirsrv/slapd-instance_name/ldif/example.ldif [18/Jul/2018:10:46:03.353656777 +0200] - INFO - ldbm_instance_config_cachememsize_set - force a minimal value 512000 [18/Jul/2018:10:46:03.383101305 +0200] - INFO - ldbm_back_ldbm2ldif - export userroot: Processed 160 entries (100%). [18/Jul/2018:10:46:03.391553963 +0200] - INFO - dblayer_pre_close - All database threads now stopped db2ldif successful - Start the instance:
# dsctl instance_name start
6.2.2. Exporting a Suffix to an LDIF File Using the Web Console
- Open the Directory Server user interface in the web console. See Section 1.4, “Logging Into Directory Server Using the Web Console”.
- Select the instance.
- Open the menu.
- Select the suffix entry.
- Click , and select Export Suffix.
- Enter the name of the LDIF file in which you want to store the export. Directory Server will store the file in the
/var/lib/dirsrv/slapd-instance_name/ldif/directory using the specified file name.
- Click .
6.2.3. Enabling Members of a Group to Export Data and Performing the Export as One of the Group Members
cn=Directory Manager in your scripts. Additionally, you can easily grant and revoke the export permissions by modifying the group.
6.2.3.1. Enabling a Group to Export Data
cn=export_users,ou=groups,dc=example,dc=com group and enable members of this group to create export tasks.
Procedure
- Create the
cn=export_users,ou=groups,dc=example,dc=comgroup:# dsidm -D "cn=Directory Manager" ldap://server.example.com -b "dc=example,dc=com" group create --cn export_users
- Add access control instructions (ACI) that allows members of the
cn=export_users,ou=groups,dc=example,dc=comgroup to create export tasks:# ldapadd -D "cn=Directory Manager" -W -H ldap://server.example.com dn: cn=config changetype: modify add: aci aci: (target = "ldap:///cn=export,cn=tasks,cn=config")(targetattr="*") (version 3.0 ; acl "permission: Allow export_users group to export data" ; allow (add, read, search) groupdn = "ldap:///cn=export_users,ou=groups,dc=example,dc=com";) - add: aci aci: (target = "ldap:///cn=config")(targetattr = "objectclass || cn || nsslapd-suffix || nsslapd-ldifdir") (version 3.0 ; acl "permission: Allow export_users group to access ldifdir attribute" ; allow (read,search) groupdn = "ldap:///cn=export_users,ou=groups,dc=example,dc=com";)
- Create a user:
- Create a user account:
# dsidm -D "cn=Directory Manager" ldap://server.example.com -b "dc=example,dc=com" user create --uid="example" --cn="example" --uidNumber="1000" --gidNumber="1000" --homeDirectory="/home/example/" --displayName="Example User"
- Set a password on the user account:
# dsidm -D "cn=Directory Manager" ldap://server.example.com -b "dc=example,dc=com" account reset_password "uid=example,ou=People,dc=example,dc=com" "password"
- Add the
uid=example,ou=People,dc=example,dc=comuser to thecn=export_users,ou=groups,dc=example,dc=comgroup:# dsidm -D "cn=Directory Manager" ldap://server.example.com -b "dc=example,dc=com" group add_member export_users uid=example,ou=People,dc=example,dc=com
Verification
- Display the ACIs set on the
cn=config:# ldapsearch -o ldif-wrap=no -LLLx -D "cn=Directory Manager" -W -H ldap://server.example.com -b cn=config aci=* aci -s base dn: cn=config aci: (target = "ldap:///cn=export,cn=tasks,cn=config")(targetattr="*")(version 3.0 ; acl "permission: Allow export_users group to export data" ; allow (add, read, search) groupdn = "ldap:///cn=export_users,ou=groups,dc=example,dc=com";) aci: (target = "ldap:///cn=config")(targetattr = "objectclass || cn || nsslapd-suffix || nsslapd-ldifdir")(version 3.0 ; acl "permission: Allow export_users group to access ldifdir attribute" ; allow (read,search) groupdn = "ldap:///cn=export_users,ou=groups,dc=example,dc=com";) ...
6.2.3.2. Performing an Export as a Regular User
cn=Directory Manager.
Prerequisites
- You enabled members of the
cn=export_users,ou=groups,dc=example,dc=comgroup to export data. See Section 6.2.3.1, “Enabling a Group to Export Data”. - The user you use to perform the export is a member of the
cn=export_users,ou=groups,dc=example,dc=comgroup.
Procedure
- Create a export task using one of the following methods:
- Using the
dsconf backend exportcommand:# dsconf -D "uid=example,ou=People,dc=example,dc=com" ldap://server.example.com backend export userRoot
- By manually creating the task:
# ldapadd -D "uid=example,ou=People,dc=example,dc=com" -W -H ldap://server.example.com

dn: cn=userRoot-2021_07_23_12:55_00,cn=export,cn=tasks,cn=config
changetype: add
objectClass: extensibleObject
nsFilename: /var/lib/dirsrv/slapd-instance_name/ldif/None-userroot-2021_07_23_12:55_00.ldif
nsInstance: userRoot
cn: export-2021_07_23_12:55_00
Verification
- Verify that the backup was created:
# ls -l /var/lib/dirsrv/slapd-instance_name/ldif/*.ldif
total 0
-rw-------. 1 dirsrv dirsrv 10306 Jul 23 12:55 None-userroot-2021_07_23_12_55_00.ldif
...
6.3. Backing up Directory Server
- All database files including the data stored within these databases
Note
Directory Server does not support backing up individual databases. - The transaction logs
- The Indices
Warning
dirsrv user. Therefore, the permissions of the destination directory must allow this user to create files.
6.3.1. Backing up All Databases Using the Command Line
- Use one of the following methods if the instance is running:
- Use the
dsconf backup createcommand. See Section 6.3.1.1.1, “Backing up All Databases Using thedsconf backup createCommand”. - Create a
cn=tasksentry. See Section 6.3.1.1.2, “Backing up All Databases Using acn=tasksentry”.
- If the instance is offline, use the
dsctl db2bakcommand. See Section 6.3.1.2, “Backing up All Databases While the Server is Offline”.
Important
6.3.1.1. Backing up All Databases While the Server is Running
6.3.1.1.1. Backing up All Databases Using the dsconf backup create Command
dsconf backup create command to automatically create a task that backs up all databases.
Important
# dsconf -D "cn=Directory Manager" ldap://server.example.com backup create
The backup create task has finished successfully
dsconf stores the backup in a subdirectory called instance_name-time_stamp in the /var/lib/dirsrv/slapd-instance_name/bak/ directory. To specify a different location, append a directory name to the command.
6.3.1.1.2. Backing up All Databases Using a cn=tasks entry
cn=tasks,cn=config entry in the Directory Server configuration is a container entry for temporary entries the server uses to manage tasks. To initiate a backup operation, create a task in the cn=backup,cn=tasks,cn=config entry.
cn: Sets the unique name of the task.nsDatabaseType: Sets the type of the database to back up. Directory Server supports only theldbm databasevalue in this attribute.
/var/lib/dirsrv/slapd-instance_name/bak/. For a complete list, see the cn=backup section in the Red Hat Directory Server Configuration, Command, and File Reference.
# ldapadd -D "cn=Directory Manager" -W -H ldap://server.example.com -x

dn: cn=example_backup,cn=export,cn=tasks,cn=config
changetype: add
objectclass: extensibleObject
cn: example_backup
nsDatabaseType: ldbm database
nsArchiveDir attribute, the server stores the backup in a subdirectory called instance_name-time_stamp in the /var/lib/dirsrv/slapd-instance_name/bak/ directory.
6.3.1.2. Backing up All Databases While the Server is Offline
dsctl db2bak command:
- Stop the instance:
# dsctl instance_name stop
- Backup the database:
# dsctl instance_name db2bak
db2bak successful
Note
Thedsctl db2bakcommand runs as the backup as thedirsrvuser. Therefore, the permissions of the destination directory must allow this user to create files and directories.If you not append a destination directory to the command, the server stores the backup in a subdirectory calledinstance_name-time_stampin the/var/lib/dirsrv/slapd-instance_name/bak/directory. - Start the instance:
# dsctl instance_name start
6.3.2. Backup up all Databases Using the Web Console
Important
- Open the Directory Server user interface in the web console. See Section 1.4, “Logging Into Directory Server Using the Web Console”.
- Select the instance.
- Click the button, and select Manage Backup.
- Click .
- Enter a name for the backup, such as a time stamp to indicate the creation date and time of the backup.
- Click .
/var/lib/dirsrv/slapd-instance_name/bak/ directory.
6.3.3. Backing up Configuration Files, the Certificate Database, and Custom Schema Files
/etc/dirsrv/slapd-instance_name/ directory which are required to, for example, restore a instance on a different server after a hardware failure.
Note
Example 6.2. How to Back up the /etc/dirsrv/slapd-instance_name/ Directory
/etc/dirsrv/slapd-instance_name/, you can copy the directory or store it into an archive file. For example, to store the content of the /etc/dirsrv/slapd-instance_name/ directory in the /root/config_slapd-instance_name_time_stamp.tar.gz file:
# cd /etc/dirsrv/
# tar -zcvf /root/config_slapd-instance_name_$(date +%Y-%m-%d_%H-%M-%S).tar.gz slapd-instance_name/
Important
6.3.4. Enabling Members of a Group to Back up Directory Server and Performing the Backup as One of the Group Members
cn=Directory Manager in your backup script or cron jobs. Additionally, you can easily grant and revoke the backup permissions by modifying the group.
6.3.4.1. Enabling a Group to Back up Directory Server
cn=backup_users,ou=groups,dc=example,dc=com group and enable members of this group to create backup tasks.
Procedure
- Create the
cn=backup_users,ou=groups,dc=example,dc=comgroup:# dsidm -D "cn=Directory Manager" ldap://server.example.com -b "dc=example,dc=com" group create --cn backup_users
- Add access control instructions (ACI) that allows members of the
cn=backup_users,ou=groups,dc=example,dc=comgroup to create backup tasks:# ldapadd -D "cn=Directory Manager" -W -H ldap://server.example.com dn: cn=config changetype: modify add: aci aci: (target = "ldap:///cn=backup,cn=tasks,cn=config")(targetattr="*") (version 3.0 ; acl "permission: Allow backup_users group to create backup tasks" ; allow (add, read, search) groupdn = "ldap:///cn=backup_users,ou=groups,dc=example,dc=com";) - add: aci aci: (target = "ldap:///cn=config")(targetattr = "nsslapd-bakdir || objectClass") (version 3.0 ; acl "permission: Allow backup_users group to access bakdir attribute" ; allow (read,search) groupdn = "ldap:///cn=backup_users,ou=groups,dc=example,dc=com";)
- Create a user:
- Create a user account:
# dsidm -D "cn=Directory Manager" ldap://server.example.com -b "dc=example,dc=com" user create --uid="example" --cn="example" --uidNumber="1000" --gidNumber="1000" --homeDirectory="/home/example/" --displayName="Example User"
- Set a password on the user account:
# dsidm -D "cn=Directory Manager" ldap://server.example.com -b "dc=example,dc=com" account reset_password "uid=example,ou=People,dc=example,dc=com" "password"
- Add the
uid=example,ou=People,dc=example,dc=comuser to thecn=backup_users,ou=groups,dc=example,dc=comgroup:# dsidm -D "cn=Directory Manager" ldap://server.example.com -b "dc=example,dc=com" group add_member backup_users uid=example,ou=People,dc=example,dc=com
Verification
- Display the ACIs set on the
cn=configentry:# ldapsearch -o ldif-wrap=no -LLLx -D "cn=directory manager" -W -H ldap://server.example.com -b cn=config aci=* aci -s base dn: cn=config aci: (target = "ldap:///cn=backup,cn=tasks,cn=config")(targetattr="*")(version 3.0 ; acl "permission: Allow backup_users group to create backup tasks" ; allow (add, read, search) groupdn = "ldap:///cn=backup_users,ou=groups,dc=example,dc=com";) aci: (target = "ldap:///cn=config")(targetattr = "nsslapd-bakdir || objectClass")(version 3.0 ; acl "permission: Allow backup_users group to access bakdir attribute" ; allow (read,search) groupdn = "ldap:///cn=backup_users,ou=groups,dc=example,dc=com";) ...
6.3.4.2. Performing a Backup as a Regular User
cn=Directory Manager.
Prerequisites
- You enabled members of the
cn=backup_users,ou=groups,dc=example,dc=comgroup to perform backups. See Section 6.3.4.1, “Enabling a Group to Back up Directory Server”. - The user you use to perform the backup is a member of the
cn=backup_users,ou=groups,dc=example,dc=comgroup.
Procedure
- Create a backup task using one of the following methods:
- Using the
dsconf backup createcommand:# dsconf -D uid=example,ou=People,dc=example,dc=com ldap://server.example.com backup create
- By manually creating the task:
# ldapadd -D uid=example,ou=People,dc=example,dc=com -W -H ldap://server.example.com

dn: cn=backup-2021_07_23_12:55_00,cn=backup,cn=tasks,cn=config
changetype: add
objectClass: extensibleObject
nsarchivedir: /var/lib/dirsrv/slapd-instance_name/bak/backup-2021_07_23_12:55_00
nsdatabasetype: ldbm database
cn: backup-2021_07_23_12:55_00
Verification
- Verify that the backup was created:
# ls -l /var/lib/dirsrv/slapd-instance_name/bak/
total 0
drwx------. 3 dirsrv dirsrv 108 Jul 23 12:55 backup-2021_07_23_12_55_00
...
6.4. Restoring Directory Server
Note
dirsrv user. Therefore, the permissions of the directory containing the backup must allow this user to read the files.
6.4.1. Restoring All Databases Using the Command Line
- Use one of the following methods if the instance is running:
- Use the
dsconf backup restorecommand. See Section 6.4.1.1.1, “Restoring All Databases Using thedsconf backup restoreCommand”. - Create a
cn=tasksentry. See Section 6.4.1.1.2, “Restoring all Databases Using acn=tasksentry”.
- If the instance is offline, use the
dsctl bak2dbcommand. See Section 6.4.1.2, “Restoring all Databases While the Server is Offline”.
6.4.1.1. Restoring All Databases While the Server is Running
6.4.1.1.1. Restoring All Databases Using the dsconf backup restore Command
dsconf backup restore command to automatically create a task that restores up all databases from a backup directory.
/var/lib/dirsrv/slapd-instance_name/bak/instance_name-time_stamp/ directory:
# dsconf -D "cn=Directory Manager" ldap://server.example.com backup restore /var/lib/dirsrv/slapd-instance_name/bak/instance_name-time_stamp/
The backup restore task has finished successfully
6.4.1.1.2. Restoring all Databases Using a cn=tasks entry
cn=tasks,cn=config entry in the Directory Server configuration is a container entry for temporary entries the server uses to manage tasks. To initiate a restore operation, create a task in the cn=restore,cn=tasks,cn=config entry.
Warning
cn: Sets the unique name of the task.nsArchiveDir: Sets the path to the directory that contains the backup.nsDatabaseType: Sets the type of the database to restore. Directory Server supports only theldbm databasevalue in this attribute.
/var/lib/dirsrv/slapd-instance_name/bak/instance_name-time_stamp/ directory:
# ldapadd -D "cn=Directory Manager" -W -H ldap://server.example.com -x

dn: cn=example_restore,cn=import,cn=tasks,cn=config
changetype: add
objectclass: extensibleObject
cn: example_restore
nsArchiveDir: /var/lib/dirsrv/slapd-instance_name/bak/instance_name-time_stamp/
nsDatabaseType: ldbm database
6.4.1.2. Restoring all Databases While the Server is Offline
dsctl bak2db command:
- Stop the instance:
# dsctl instance_name stop
- Restore the databases. For example, to add a task that restores all databases from the backup stored in the
/var/lib/dirsrv/slapd-instance_name/bak/instance_name-time_stamp/directory:# dsctl instance_name bak2db /var/lib/dirsrv/slapd-instance_name/bak/instance_name-time_stamp/ bak2db successful
Note
Thedsctl bak2dbcommand runs as the restore as thedirsrvuser. Therefore, the permissions of the source directory must allow this user to read files and directories. - Start the instance:
# dsctl instance_name start
6.4.2. Restoring All Databases Using the Web Console
- Open the Directory Server user interface in the web console. See Section 1.4, “Logging Into Directory Server Using the Web Console”.
- Select the instance.
- Click the button, and select Manage Backups.The displayed window lists the available backups in the
/var/lib/dirsrv/slapd-instance_name/bak/directory.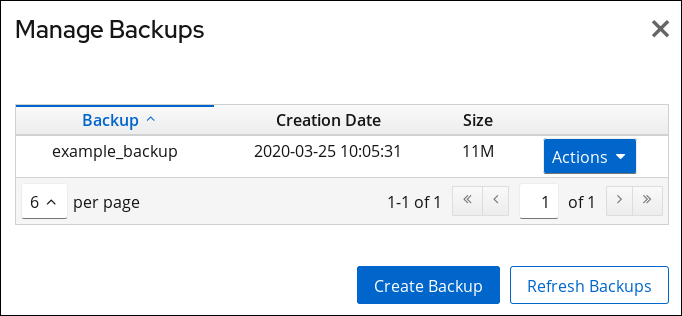
- Open the Actions menu next to the backup you want to restore, and select .
- Click to confirm.
6.4.3. Restoring Databases That Include Replicated Entries
- The consumer servers are also restored.For the very unlikely situation, that all databases are restored from backups taken at exactly the same time (so that the data are in sync), the consumers remain synchronized with the supplier, and it is not necessary to do anything else. Replication resumes without interruption.
- Only the supplier is restored.If only the supplier is restored or if the consumers are restored from backups taken at a different times, reinitialize the consumers for the supplier to update the data in the database. If only the supplier is restored or if the consumers are restored from backups taken at a different times, reinitialize the consumers for the supplier to update the data in the database.
- Changelog entries have not yet expired on the supplier server.If the supplier's changelog has not expired since the database backup was taken, then restore the local consumer and continue with normal operations. This situation occurs only if the backup was taken within a period of time that is shorter than the value set for the maximum changelog age attribute,
nsslapd-changelogmaxage, in thecn=changelog5,cn=configentry. For more information about this option, see the Red Hat Directory Server Configuration, Command, and File Reference.Directory Server automatically detects the compatibility between the replica and its changelog. If a mismatch is detected, the server removes the old changelog file and creates a new, empty one. - Changelog entries have expired on the supplier server since the time of the local backup.If changelog entries have expired, reinitialize the consumer. For more information on reinitializing consumers, see Section 15.8.3, “Initializing a Consumer”.
Example 6.3. Restoring a Directory Server Replication Topology
- Restore the first supplier. Use the
dsconf backend importcommand to import the data. See Section 6.1.2, “Importing Using the Command Line”. - Online-initialize the remaining servers by using replication:
- Initialize the second supplier from the first one.
- Initialize the consumers from the supplier.
For details, see Section 15.8.3, “Initializing a Consumer”. - On each server, display the replication status to verify that replication works correctly. For details, see Section 15.22, “Displaying the Status of a Specific Replication Agreement”.
Chapter 7. Managing Attributes and Values
7.1. Enforcing Attribute Uniqueness
7.1.1. Creating a New Configuration Record of the Attribute Uniqueness Plug-in
Note
Example Attribute Uniqueness:
dsconf -D "cn=Directory Manager" ldap://server.example.com plugin attr-uniq add "Example" --attr-name uid
7.1.2. Configuring Attribute Uniqueness over Suffixes or Subtrees
7.1.2.1. Configuring Attribute Uniqueness over Suffixes or Subtrees Using the Command Line
mail attributes are unique:
- Create a new configuration record of the Attribute Uniqueness plug-in named, for example,
mail Attribute Uniqueness. For details, see Section 7.1.1, “Creating a New Configuration Record of the Attribute Uniqueness Plug-in”. - Enable the plug-in configuration record:
# dsconf -D "cn=Directory Manager" ldap://server.example.com plugin attr-uniq enable "mail Attribute Uniqueness"
- Configure that values stored in
mailattributes must be unique inside, for example, theou=Engineering,dc=example,dc=comandou=Sales,dc=example,dc=comsubtrees:# dsconf -D "cn=Directory Manager" ldap://server.example.com plugin attr-uniq set "mail Attribute Uniqueness" --attr-name mail --subtree ou=Engineering,dc=example,dc=com ou=Sales,dc=example,dc=com
- Optionally, to configure uniqueness across all subtrees configured in this plug-in configuration record:
# dsconf -D "cn=Directory Manager" ldap://server.example.com plugin attr-uniq set "mail Attribute Uniqueness" --across--all-subtrees=on
- Restart the instance:
# dsctl instance_name restart
7.1.2.2. Configuring Attribute Uniqueness over Suffixes or Subtrees Using the Web Console
mail attributes are unique:
- Open the Directory Server user interface in the web console. See Section 1.4, “Logging Into Directory Server Using the Web Console”.
- Select the instance.
- Open the menu.
- Select the Attribute Uniqueness plug-in.
- Click .
- Fill the fields, and enable the config. For example:
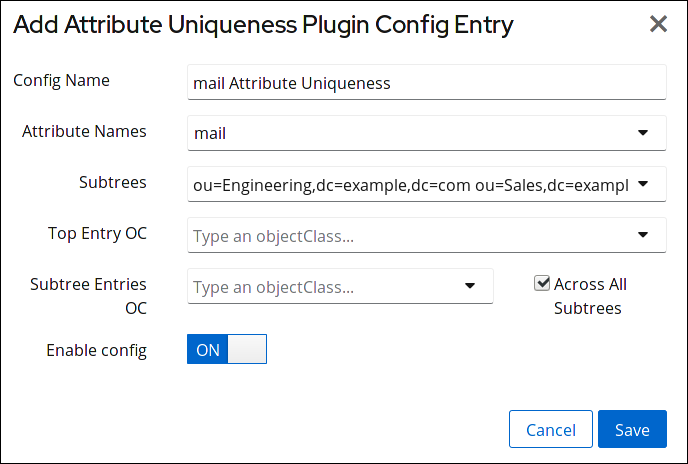
Figure 7.1. Adding an Attribute Uniqueness Configuration
- Restart the instance. See Section 1.5.2, “Starting and Stopping a Directory Server Instance Using the Web Console”.
7.1.3. Configuring Attribute Uniqueness over Object Classes
uniqueness-attribute-name is unique in this subtree.
mail attributes are unique under the entry that contains the nsContainer object class:
- Create a new configuration record of the Attribute Uniqueness plug-in named, for example,
mail Attribute Uniqueness. For details, see Section 7.1.1, “Creating a New Configuration Record of the Attribute Uniqueness Plug-in”. - Enable the plug-in configuration record:
# dsconf -D "cn=Directory Manager" ldap://server.example.com plugin attr-uniq enable "mail Attribute Uniqueness"
- Configure that values stored in
mailattributes must be unique under the entry that contains thensContainerobject class:# dsconf -D "cn=Directory Manager" ldap://server.example.com plugin attr-uniq set "mail Attribute Uniqueness" --top-entry-oc=nsContainer
- Optionally, you can limit the scope of objects being checked. If you want the server to check only a subset of entries under the entry that contains the
nsContainerobject class, set an additional object class in theuniqueness-subtree-entries-ocparameter. This additional class will also have to be present.For example, themailattribute must be unique in all entries under the entry that contains thensContainerobject class set. However, you want that the plug-in only searches themailin entries that contain a object class that provides this attribute, such asinetOrgPerson. In this situation enter:# dsconf -D "cn=Directory Manager" ldap://server.example.com plugin attr-uniq set "mail Attribute Uniqueness" --subtree-entries-oc=inetOrgPerson
- Restart the instance:
# dsctl instance_name restart
7.1.4. Attribute Uniqueness Plug-in Configuration Parameters
cn=attribute_uniqueness_configuration_record_name,cn=plugins,cn=config entry.
Example 7.1. Attribute Uniqueness Plug-in Configuration Using Plug-in-specific Attributes
dn: cn=Example Attribute Uniqueness,cn=plugins,cn=config
nsslapd-pluginEnabled: on
uniqueness-attribute-name: attribute_name
uniqueness-top-entry-oc: objectclass1
uniqueness-subtree-entries-oc: objectclass2
7.2. Assigning Class of Service
- CoS definition entry. The CoS definition entry identifies the type of CoS used. Like the role definition entry, it inherits from the
LDAPsubentryobject class. The CoS definition entry is below the branch at which it is effective. - Template entry. The CoS template entry contains a list of the shared attribute values. Changes to the template entry attribute values are automatically applied to all the entries within the scope of the CoS. A single CoS might have more than one template entry associated with it.
7.2.1. About the CoS Definition Entry
cosSuperDefinition object class. The CoS definition entry also contains one of three object class that specifies the type of template entry it uses to generate the entry. The target entries which interact with the CoS share the same parent as the CoS definition entry.
- Pointer CoS. A pointer CoS identifies the template entry using the template DN only.
- Indirect CoS. An indirect CoS identifies the template entry using the value of one of the target entry's attributes. For example, an indirect CoS might specify the
managerattribute of a target entry. The value of themanagerattribute is then used to identify the template entry.The target entry's attribute must be single-valued and contain a DN. - Classic CoS. A classic CoS identifies the template entry using a combination of the template entry's base DN and the value of one of the target entry's attributes.
7.2.2. About the CoS Template Entry
cosTemplate. The CoS template entries for a given CoS are stored in the directory tree along with the CoS definition.
- The DN of the template entry alone. This type of template is associated with a pointer CoS definition.
- The value of one of the target entry's attributes. The attribute used to provide the relative DN to the template entry is specified in the CoS definition entry using the
cosIndirectSpecifierattribute. This type of template is associated with an indirect CoS definition. - By a combination of the DN of the subtree where the CoS performs a one level search for templates and the value of one of the target entry's attributes. This type of template is associated with a classic CoS definition.
7.2.3. How a Pointer CoS Works
dc=example,dc=com. The three entries for this CoS appear as illustrated in Figure 7.2, “Sample Pointer CoS”.
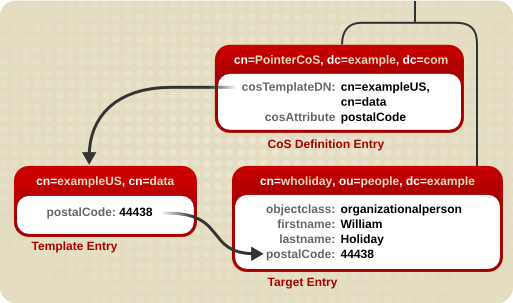
Figure 7.2. Sample Pointer CoS
cn=exampleUS,cn=data, in the CoS definition entry. Each time the postalCode attribute is queried on the entry cn=wholiday,ou=people,dc=example,dc=com, the Directory Server returns the value available in the template entry cn=exampleUS,cn=data.
7.2.4. How an Indirect CoS Works
manager attribute of the target entry to identify the template entry. The three CoS entries appear as illustrated in Figure 7.3, “Sample Indirect CoS”.
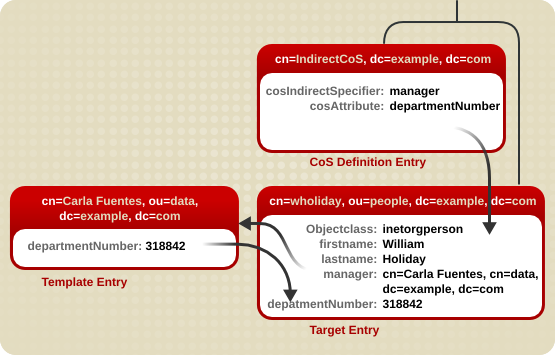
Figure 7.3. Sample Indirect CoS
manager attribute. William's manager is Carla Fuentes, so the manager attribute contains a pointer to the DN of the template entry, cn=Carla Fuentes,ou=people,dc=example,dc=com. The template entry in turn provides the departmentNumber attribute value of 318842.
7.2.5. How a Classic CoS Works

Figure 7.4. Sample Classic CoS
cosSpecifier attribute specifies the employeeType attribute. This attribute, in combination with the template DN, identify the template entry as cn=sales,cn=exampleUS,cn=data. The template entry then provides the value of the postalCode attribute to the target entry.
7.2.6. Handling Physical Attribute Values
cosAttribute attribute contains the name of another attribute which is governed by the class of service. This attribute allows an override qualifier after the attribute value which sets how the CoS handles existing attribute values on entries when it generates attribute values.
cosAttribute: attribute_name override
default: Only returns a generated value if there is no corresponding attribute value stored with the entry.override: Always returns the value generated by the CoS, even when there is a value stored with the entry.operational: Returns a generated attribute only if it is explicitly requested in the search. Operational attributes do not need to pass a schema check in order to be returned. Whenoperationalis used, it also overrides any existing attribute values.Note
An attribute can only be made operational if it is defined as operational in the schema. For example, if the CoS generates a value for thedescriptionattribute, it is not possible to use theoperationalqualifier because this attribute is not marked operational in the schema.operational-default: Only returns a generated value if there is no corresponding attribute value stored with the entry and if it is explicitly requested in the search.
default is assumed.
cn=exampleUS,ou=data,dc=example,dc=com, that generates the value of the postalCode attribute. The override qualifier indicates that this value will take precedence over the value stored by the entries for the postalCode attribute:
dn: cn=pointerCoS,dc=example,dc=com
objectclass: top
objectclass: cosSuperDefinition
objectclass: cosPointerDefinition
cosTemplateDn: cn=exampleUS,ou=data,dc=example,dc=com
cosAttribute: postalCode override
Note
7.2.7. Handling Multi-valued Attributes with CoS
- Creating a rule to merge multiple CoS-generated attributes into the target entry. This results in multiple values in the target entry.
- Setting a priority to select one CoS value out of competing CoS definitions. This generates one single value for the target entry.
Note
cosPriority attribute.
cosAttribute: attribute override merge-schemes
Note
cosAttribute for every competing CoS definition. Otherwise, one combination is chosen arbitrarily from all possible CoS definitions.
- One CoS template entry contains multiple instances of the managed CoS attribute, resulting in multiple values on the target entry. For example:
dn: cn=server access template,dc=example,dc=com
objectclass: top
objectclass: extensibleObject
objectclass: cosTemplate
accessTo: mail.example.com
accessTo: irc.example.com
Note
This method only works with classic CoS. - Multiple CoS definitions may define a class of service for the same target attribute, so there are multiple template entries. For example:
dn: cn=mail template,dc=example,dc=com
objectclass: top
objectclass: extensibleObject
objectclass: cosTemplate
accessTo: mail.example.com

dn: cn=chat template,dc=example,dc=com
objectclass: top
objectclass: extensibleObject
objectclass: cosTemplate
accessTo: irc.example.com
cosSpecifier attribute in the CoS definition entry. The template priority is set using the cosPriority attribute. This attribute represents the global priority of a particular template. A priority of zero is the highest priority.
dn: cn=data,dc=example,dc=com
objectclass: top
objectclass: extensibleObject
objectclass: cosTemplate
departmentNumber: 71776
cosPriority: 0
departmentNumber attribute. It has a priority of zero, meaning this template takes precedence over any other conflicting templates that define a different departmentNumber value.
cosPriority attribute are considered the lowest priority. Where two or more templates are considered to supply an attribute value and they have the same (or no) priority, a value is chosen arbitrarily.
Note
cosPriority values is not defined in Directory Server; do not enter negative values.
7.2.8. Searches for CoS-Specified Attributes
postalCode attribute for every entry in a subtree. Searches against those CoS-defined attributes, however, do not behave like searches against regular entries.
- The
postalCodeattribute for Ted Morris is defined by a CoS. - The
postalCodeattribute for Barbara Jensen is set in her entry. - The
postalCodeattribute is indexed.
ldapsearch command uses the filter (postalCode=*), then Barbara Jensen's entry is returned, while Ted Morris's is not.
- The
postalCodeattribute for Ted Morris is defined by a CoS. - The
postalCodeattribute for Barbara Jensen is set in her entry. - The
postalCodeattribute is not indexed.
ldapsearch command uses the filter (postalCode=*), then both Barbara Jensen's and Ted Morris's entries are returned.
cosAttribute attribute in the CoS entry, which means that local values for an attribute can override the CoS value. If an override is set on the CoS, then an ldapsearch operation will return a value for an entry even if the attribute is indexed, as long as there is a local value for the entry. Other entries which possess the CoS but do not have a local value will still not be returned in the ldapsearch operation.
7.2.9. Access Control and CoS
7.2.10. Managing CoS from the Command Line
7.2.10.1. Creating the CoS Definition Entry from the Command Line
LDAPsubentry object class and the cosSuperDefinition object class.
cosPointerDefinition object class. This object class identifies the template entry using an entry DN value specified in the cosTemplateDn attribute, as shown in Example 7.2, “An Example Pointer CoS Entry”.
Example 7.2. An Example Pointer CoS Entry
dn: cn=pointerCoS,dc=example,dc=com objectclass: top objectclass: cosSuperDefinition objectclass:cosPointerDefinitioncosTemplateDn:DN_string cosAttribute:list_of_attributes qualifier cn: pointerCoS
cosIndirectDefinition object class. This type of CoS identifies the template entry based on the value of one of the target entry's attributes, as specified in the cosIndirectSpecifier attribute. This is illustrated in Example 7.3, “An Example Indirect CoS Entry”.
Example 7.3. An Example Indirect CoS Entry
dn: cn=indirectCoS,dc=example,dc=com objectclass: top objectclass: cosSuperDefinition objectclass:cosIndirectDefinitioncosIndirectSpecifier:attribute_name cosAttribute:list_of_attributes qualifier cn: indirectCoS
cosClassicDefinition object class. This identifies the template entry using both the template entry's DN (set in the cosTemplateDn attribute) and the value of one of the target entry's attributes (set in the cosSpecifier attribute). This is illustrated in Example 7.4, “An Example Classic CoS Entry”.
Example 7.4. An Example Classic CoS Entry
dn: cn=classicCoS,dc=example,dc=com objectclass: top objectclass: cosSuperDefinition objectclass:cosClassicDefinitioncosTemplateDn:DN_stringcosSpecifier:attribute_name cosAttribute:list_of_attributes qualifier cn: classicCoS
cosAttribute. The purpose of a CoS is to supply attribute values across multiple entries; the cosAttribute attribute defines which attribute the CoS generates values for.
7.2.10.2. Creating the CoS Template Entry from the Command Line
cosTemplate object class.
Note
LDAPsubentry object class to a new template entry. Making the CoS template entry an instance of the LDAPsubentry object classes allows ordinary searches to be performed unhindered by the configuration entries. However, if the template entry already exists and is used for something else, such as a user entry, the LDAPsubentry object class does not need to be added to the template entry.
cosAttribute attribute of the CoS definition entry) and the value for that attribute.
postalCode attribute follows:
dn:cn=exampleUS,ou=data,dc=example,dc=com
objectclass: top
objectclass: extensibleObject
objectclass: cosTemplate
postalCode: 44438
7.2.10.3. Example of a Pointer CoS
dc=example,dc=com tree.
- Add a new pointer CoS definition entry to the
dc=example,dc=comsuffix usingldapmodify:# ldapmodify -D "cn=Directory Manager" -W -p 389 -h server.example.com -x dn: cn=pointerCoS,dc=example,dc=com changetype: add objectclass: top objectclass: cosSuperDefinition objectclass: cosPointerDefinition cosTemplateDn: cn=exampleUS,ou=data,dc=example,dc=com cosAttribute: postalCode
- Create the template entry:
# ldapmodify -D "cn=Directory Manager" -W -p 389 -h server.example.com -x
dn: cn=exampleUS,ou=data,dc=example,dc=com
changetype: add
objectclass: top
objectclass: extensibleObject
objectclass: cosTemplate
postalCode: 44438
cn=exampleUS,ou=data,dc=example,dc=com) supplies the value stored in its postalCode attribute to any entries located under the dc=example,dc=com suffix. These entries are the target entries.
7.2.10.4. Example of an Indirect CoS
manager attribute of the target entry to identify the CoS template entry, which varies depending on the different values of the attribute.
- Add a new indirect CoS definition entry to the
dc=example,dc=comsuffix usingldapmodify:# ldapmodify -D "cn=Directory Manager" -W -p 389 -h server.example.com -x dn: cn=indirectCoS,dc=example,dc=com changetype: add objectclass: top objectclass: cosSuperDefinition objectclass: cosIndirectDefinition cosIndirectSpecifier: manager cosAttribute: departmentNumber
departmentNumber attribute, then no other attribute needs to be added to the manager entries. The definition entry looks in the target suffix (the entries under dc=example,dc=com) for entries containing the manager attribute because this attribute is specified in the cosIndirectSpecifier attribute of the definition entry). It then checks the departmentNumber value in the manager entry that is listed. The value of the departmentNumber attribute will automatically be relayed to all of the manager's subordinates that have the manager attribute. The value of departmentNumber will vary depending on the department number listed in the different manager's entries.
7.2.10.5. Example of a Classic CoS
cosSpecifier attribute.
- Add a new classic CoS definition entry to the
dc=example,dc=comsuffix usingldapmodify:# ldapmodify -D "cn=Directory Manager" -W -p 389 -h server.example.com -x dn: cn=classicCoS,dc=example,dc=com changetype: add objectclass: top objectclass: cosSuperDefinition objectclass: cosClassicDefinition cosTemplateDn: cn=classicCoS,dc=example,dc=com cosSpecifier: businessCategory cosAttribute: postalCode override
- Create the template entries for the sales and marketing departments. Add the CoS attributes to the template entry. The
cnof the template sets the value of thebusinessCategoryattribute in the target entry, and then the attributes are added or overwritten according to the value in the template:# ldapmodify -D "cn=Directory Manager" -W -p 389 -h server.example.com -x dn: cn=sales,cn=classicCoS,dc=example,dc=com changetype: add objectclass: top objectclass: extensibleObject objectclass: cosTemplate postalCode: 44438 - dn: cn=marketing,cn=classicCoS,dc=example,dc=com changetype: add objectclass: top objectclass: extensibleObject objectclass: cosTemplate postalCode: 99111
dc=example,dc=com suffix. Depending upon the combination of the businessCategory attribute found in the entry and the cosTemplateDn, it can arrive at one of two templates. One, the sales template, provides a postal code specific to employees in the sales department. The marketing template provides a postal code specific to employees in the marketing department.
7.2.10.6. Searching for CoS Entries
ldapSubEntry object class to the CoS definition entries. For example:
# ldapmodify -D "cn=Directory Manager" -W -p 389 -h server.example.com -x
dn: cn=pointerCoS,ou=People,dc=example,dc=com
changetype: add
objectclass: ldapSubEntry
(objectclass=ldapSubEntry) filter with the ldapsearch utility to search for entries containing the ldapSubEntry object class. For example:
# ldapsearch -x -s sub -b ou=People,dc=example,dc=com "(|(objectclass=*)(objectclass=ldapSubEntry))"ou=People,dc=example,dc=com subtree.
7.2.10.7. The costargettree attribute
costargettree attribute defines the subtrees to which the CoS schema applies. The values for costargettree for the schema and for multiple CoS schema may overlap their target trees arbitrarily.
Table 7.1. The costargettree attribute
| OID | 2.16.840.1.113730.3.1.552 |
| Syntax | DirectoryString |
| Multi or Single-Valued | Single-valued |
| Defined in | Directory Server |
7.2.11. Creating Role-Based Attributes
nsRole attribute as the cosSpecifier in the CoS definition entry of a classic CoS. Because the nsRole attribute can be multi-valued, CoS schemes can be defined that have more than one possible template entry. To resolve the ambiguity of which template entry to use, include the cosPriority attribute in the CoS template entry.
dn: cn=ManagerRole,ou=people,dc=example,dc=com
objectclass: top
objectclass: nsRoleDefinition
objectclass: nsComplexRoleDefinition
objectclass: nsFilteredRoleDefinition
cn: ManagerRole
nsRoleFilter: ou=managers
Description: filtered role for managers
Warning
nsRoleFilter attribute cannot accept virtual attribute values.
dn: cn=managerCOS,dc=example,dc=com
objectclass: top
objectclass: cosSuperDefinition
objectclass: cosClassicDefinition
cosTemplateDn: cn=managerCOS,dc=example,dc=com
cosSpecifier: nsRole
cosAttribute: mailboxquota override
cosTemplateDn attribute provides a value that, in combination with the attribute specified in the cosSpecifier attribute (in the example, the nsRole attribute of the target entry), identifies the CoS template entry. The CoS template entry provides the value for the mailboxquota attribute. An additional qualifier of override tells the CoS to override any existing mailboxquota attributes values in the target entry.
dn:cn="cn=ManagerRole,ou=people,dc=example,dc=com",cn=managerCOS,dc=example,dc=com
objectclass: top
objectclass: extensibleObject
objectclass: cosTemplate
mailboxquota: 1000000
mailboxquota attribute, 1000000.
Note
7.3. Linking Attributes to Manage Attribute Values
7.3.1. About Linking Attributes
linkType) and one attribute which is automatically maintained by the plug-in (managedType).
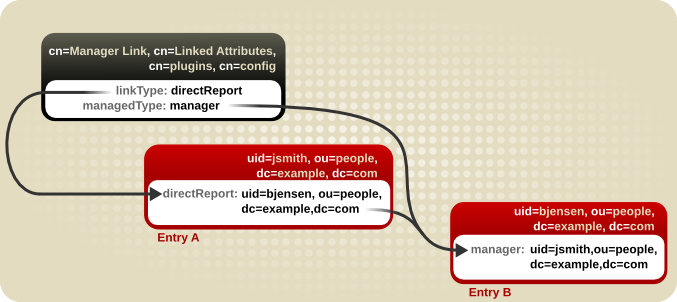
Figure 7.5. Basic Linked Attribute Configuration
Note
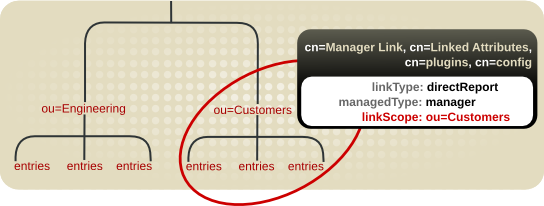
Figure 7.6. Restricting the Linked Attribute Plug-in to a Specific Subtree
- Both the managed attribute and linked attribute must require the Distinguished Name syntax in their attribute definitions. The linked attributes are essentially managed cross-references, and the way that the plug-in handles these cross-references is by pulling the DN of the entry from the attribute value.For information on planning custom schema elements, see Chapter 12, Managing the Directory Schema.
- Each Linked Attribute Plug-in instance must be local and any managed attributes must be blocked from replication using fractional replication.Any changes that are made on one supplier will automatically trigger the plug-in to manage the values on the corresponding directory entries, so the data stay consistent across servers. However, the managed attributes must be maintained by the plug-in instance for the data to be consistent between the linked entries. This means that managed attribute values should be maintained solely by the plug-in processes, not the replication process, even in a multi-supplier replication environment.For information on using fractional replication, see Section 15.1.7, “Replicating a Subset of Attributes with Fractional Replication”.
7.3.2. Looking at the Linking Attributes Plug-in Syntax
- The attribute that is managed manually by administrators, in the
linkTypeattribute - The attribute that is created dynamically by the plug-in, in the
managedTypeattribute - Optionally, a scope that restricts the plug-in to a specific part of the directory tree, in the
linkScopeattribute
Example 7.5. Example Linked Attributes Plug-in Instance Entry
dn: cn=Manager Link,cn=Linked Attributes,cn=plugins,cn=config
objectClass: top
objectClass: extensibleObject
cn: Manager Link
linkType: directReport
managedType: manager
linkScope: ou=people,dc=example,dc=com
7.3.3. Configuring Attribute Links
- If it is not already enabled, enable the Linked Attributes plug-in. For details, see Section 1.10.2, “Enabling and Disabling Plug-ins”.f
- Create the plug-in instance. Both the
--managed-typeand--link-typeparameters are required. The following example shows the plug-in instance created by usingdsconf:# dsconf -D "cn=Directory Manager" ldap://server.example.com plugin linked-attr config "Manager Link" add --link-type=directReport --managed-type=manager
- Restart the instance:
# dsctl instance_name restart
7.3.4. Cleaning up Attribute Links
dsconf plugin linked-attr fixup command or by launching a fix-up task.
7.3.4.1. Regenerating Linked Attributes
dsconf plugin linked-attr fixup command launches a special task to regenerate all of the managed-link attribute pairs on directory entries. One or the other may be lost in certain situations. If the link attribute exists in an entry, the task traces the cross-referenced DN in the available attribute and creates the corresponding configured managed attribute on the referenced entry. If a managed attribute exists with no corresponding link attribute, then the managed attribute value is removed.
# dsconf -D "cn=Directory Manager" ldap://server.example.com plugin linked-attr fixup
# dsconf -D "cn=Directory Manager" ldap://server.example.com plugin linked-attr fixup "cn=Manager Link,cn=Linked Attributes,cn=plugins,cn=config"
7.3.4.2. Regenerating Linked Attributes Using ldapmodify
cn=tasks configuration entry in the dse.ldif file, so it is also possible to initiate a task by adding the entry using ldapmodify. When the task is complete, the entry is removed from the directory.
dsconf plugin linked-attr fixup command when it is run.
cn=fixup linked attributes,cn=tasks,cn=config entry. The only required attribute is the cn for the specific task, though it also allows the ttl attribute to set a timeout period. Using ldapmodify:
# ldapmodify -D "cn=Directory Manager" -W -p 389 -h server.example.com -x
dn: cn=example,cn=fixup linked attributes,cn=tasks,cn=config
changetype: add
cn:example
ttl: 5
dse.ldif configuration, so it is possible to reuse the same task entry continually.
cn=fixup linked attributes task configuration is described in more detail in the Configuration, Command, and File Reference.
7.4. Assigning and Managing Unique Numeric Attribute Values
uidNumber and gidNumber. The Directory Server can automatically generate and supply unique numbers for specified attributes using the Distributed Numeric Assignment (DNA) Plug-in.
Note
7.4.1. About Dynamic Number Assignments
7.4.1.1. Filters, Searches, and Target Entries
Important
7.4.1.2. Ranges and Assigning Numbers
- In the simplest case, a user entry is added to the directory with an object class which requires the unique-number attribute, but without the attribute present. Adding an entry with no value for the managed attribute triggers the DNA Plug-in to assign a value. This option only works if the DNA Plug-in has been configured to assign unique values to a single attribute.
- A similar and more manageable option is to use a magic number. This magic number is a template value for the managed attribute, something outside the server's range, a number or even a word, that the plug-in recognizes it needs to replace with a new assigned value. When an entry is added with the magic value and the entry is within the scope and filter of the configured DNA Plug-in, then using the magic number automatically triggers the plug-in to generate a new value. The following example, based on using
ldapmodify, adds 0 as a magic number:dn: uid=jsmith,ou=people,dc=example,dc=com changetype: add objectClass: top objectClass: person objectClass: posixAccount uid: jsmith cn: John Smith
uidNumber: 0gidNumber: 0....The DNA Plug-in only generates new, unique values. If an entry is added or modified to use a specific value for an attribute controlled by the DNA Plug-in, the specified number is used; the DNA Plug-in will not overwrite it.
7.4.1.3. Multiple Attributes in the Same Range
- A single number assigned to a single attribute type from a single range of unique numbers.
- The same unique number assigned to two attributes for a single entry.
- Two different attributes assigned two different numbers from the same range of unique numbers.
employeeID to a new employee entry, it is important each employee entry is assigned a unique employeeID.
uidNumber and a gidNumber to a posixAccount entry, the DNA Plug-in will assign the same number to both attributes. To do this, then pass both managed attributes to the modify operation, specifying the magic value. Using ldapmodify:
#  ldapmodify -D "cn=Directory Manager" -W -x

dn: uid=jsmith,ou=people,dc=example,dc=com
changetype: modify
add: uidNumber
uidNumber: 0
-
add:gidNumber
gidNumber: 0
posixGroup object class does not allow a uidNumber attribute but it does allow gidNumber. If the DNA Plug-in manages both uidNumber and gidNumber, then when a posixGroup entry is created, a unique number for gidNumber is assigned from the same range as the uidNumber and gidNumber attributes. Using the same pool for all attributes manged by the plug-in keeps the assignment of unique numbers aligned and prevents situations where a uidNumber and a gidNumber on different entries are assigned from different ranges and result in the same unique number.
ldapmodify to do so:
# ldapmodify -D "cn=Directory Manager" -W -x
dn: uid=jsmith,ou=people,dc=example,dc=com
changetype: modify
add: uidNumber
uidNumber: 0
^D

# ldapmodify -D "cn=Directory Manager" -W -x
dn: uid=jsmith,ou=people,dc=example,dc=com
changetype: modify
add: employeeId
employeeId: magic
Important
Example 7.6. DNA and Unique Bank Account Numbers
primaryAccount and customerID attributes. The Example Bank administrator configured the DNA Plug-in to assign unique values for both attributes from the same range.
secondaryAccount attribute, but will only add the secondaryAccount attribute to an entry after the entry is created and the primaryAccount and customerID attributes are assigned. This ensures that primaryAccount and customerID share the same unique number, and any secondaryAccount numbers are entirely unique but still from the same range of numbers.
7.4.2. Looking at the DNA Plug-in Syntax
- The attribute that value is being managed, set in the
dnaTypeattribute - The entry DN to use as the base to search for entries, set in the
dnaScopeattribute - The search filter to use to identify entries to manage, set in the
dnaFilterattribute - The next available value to assign, set in the
dnaNextValueattribute (after the entry is created, this is handled by the plug-in)
cn=DNA_config_entry,cn=Distributed Numeric Assignment Plugin,cn=plugins,cn=config entry, see the Red Hat Directory Server Configuration, Command, and File Reference.
dn: cn=Account UIDs,cn=Distributed Numeric Assignment Plugin,cn=plugins,cn=config
objectClass: top
objectClass: dnaPluginConfig
cn: Account UIDs
dnatype: uidNumber
dnafilter: (objectclass=posixAccount)
dnascope: ou=people,dc=example,dc=com
dnaNextValue: 1
- The maximum number that the server can assign; this sets the upward bound for the range, which is logically required when multiple servers are assigning numbers. This is set in the
dnaMaxValueattribute. - The threshold where the range is low enough to trigger a range transfer, set in the
dnaThresholdattribute. If this is not set, the default value is1. - A timeout period so that the server does not hang waiting for a transfer, set in the
dnaRangeRequestTimeoutattribute. If this is not set, the default value is10, meaning 10 seconds. - A configuration entry DN which is shared among all supplier servers, which stores the range information for each supplier, set in the
dnaSharedCfgDNattribute.
dnaNextRange attribute. This shows the next available range for transfer and is managed automatically by the plug-in, as ranges are assigned or used by the server. This range is just "on deck." It has not yet been assigned to another server and is still available for its local Directory Server to use.
dn: cn=Account UIDs,cn=Distributed Numeric Assignment Plugin,cn=plugins,cn=config
objectClass: top
objectClass: dnaPluginConfig
cn: Account UIDs
dnatype: uidNumber
dnafilter: (objectclass=posixAccount)
dnascope: ou=People,dc=example,dc=com
dnanextvalue: 1
dnaMaxValue: 1300
dnasharedcfgdn: cn=Account UIDs,ou=Ranges,dc=example,dc=com
dnathreshold: 100
dnaRangeRequestTimeout: 60
dnaNextRange: 1301-2301
dnaNextRange attribute should be set explicitly only if a separate, specific range has to be assigned to other servers. Any range set in the dnaNextRange attribute must be unique from the available range for the other servers to avoid duplication. If there is no request from the other servers and the server where dnaNextRange is set explicitly has reached its set dnaMaxValue, the next set of values (part of the dnaNextRange) is allocated from this deck.
dnaNextRange allocation is also limited by the dnaThreshold attribute that is set in the DNA configuration. Any range allocated to another server for dnaNextRange cannot violate the threshold for the server, even if the range is available on the deck of dnaNextRange.
Note
dnaNextRange attribute is handled internally if it is not set explicitly. When it is handled automatically, the dnaMaxValue attribute serves as upper limit for the next range.
dnasharedcfgdn. The configuration entry is replicated to all of the other suppliers, so each supplier can check that configuration to find a server to contact for a new range. For example:
dn: dnaHostname=ldap1.example.com+dnaPortNum=389,cn=Account UIDs,ou=Ranges,dc=example,dc=com
objectClass: dnaSharedConfig
objectClass: top
dnahostname: ldap1.example.com
dnaPortNum: 389
dnaSecurePortNum: 636
dnaRemainingValues: 1000
7.4.3. Configuring Unique Number Assignments
7.4.3.1. Creating a New Instance of the DNA Plug-in
Note
- For example, to create a new instance of the plug-in:
# dsconf -D "cn=Directory Manager" ldap://server.example.com plugin dna config "Account UIDs" add --type uidNumber --filter "(objectclass=posixAccount)" --scope ou=People,dc=example,dc=com --next-value 1 --max-value 1300 --shared-config-entry "cn=Account UIDs,ou=Ranges,dc=example,dc=com" --threshold 100 --range-request-timeout 60 --magic-regen magic
For details about the value you can set in the--magic-regenparameter, see thednaMagicRegenattribute description in the Configuration, Command and File Reference. - Enable the DNA plug-in. For details, see Section 1.10.2, “Enabling and Disabling Plug-ins”.
7.4.3.2. Configuring Unique Number Assignments Using the Command Line
Note
dnaNextvalue is already taken, which requires an equality index on an integer attribute, with the proper ordering matching rule.
Note
- Create a new instance of the plug-in. See Section 7.4.3.1, “Creating a New Instance of the DNA Plug-in”.
- Create the shared container entry in the replicated subtree:
# ldapmodify -D "cn=Directory Manager" -W -p 389 -h server.example.com -x
dn: ou=Ranges,dc=example,dc=com
changetype: add
objectclass: top
objectclass: extensibleObject
objectclass: organizationalUnit
ou: Ranges
-
dn: cn=Account UIDs,ou=Ranges,dc=example,dc=com
changetype: add
objectclass: top
objectclass: extensibleObject
cn: Account UIDs
- Restart the instance:
# dsctl instance_name restart
7.4.3.3. Configuring Unique Number Assignments Using the Web Console
- Create a new instance of the plug-in. See Section 7.4.3.1, “Creating a New Instance of the DNA Plug-in”.
- Open the Directory Server user interface in the web console. See Section 1.4, “Logging Into Directory Server Using the Web Console”.
- Select the instance.
- Open the menu.
- Select the DNA plug-in.
- Change the status to
ONto enable the plug-in. - Click .
- Fill the fields, and enable the config.
- Restart the instance. See Section 1.5.2, “Starting and Stopping a Directory Server Instance Using the Web Console”.
7.4.4. Distributed Number Assignment Plug-in Performance Notes
Chapter 8. Organizing and Grouping Entries
8.1. Using Groups
nsRoleDN attribute in the user object. If you use groups, then the DN of the users who are members of this group are stored in member attributes in the group object. If you enabled the memberOf plug-in, then the groups the user is a member of, are additionally stored in memberOf attribute in the user object. With this plug-in enabled, groups additionally have the benefit of roles, that you can list the group memberships of a user, similar as when using roles. Additionally, groups are faster than roles.
8.1.1. The Different Types of Groups
groupOfNames(recommended) is a simple group, that allows any entry to be added. The attribute used to determine members for this ismember.groupOfUniqueNames, likegroupOfNames, simply lists user DNs as members, but the members must be unique. This prevents users being added more than once as a group member, which is one way of preventing self-referential group memberships. The attribute used to determine members for this isuniqueMember.groupOfURLsuses a list of LDAP URLs to filter and generate its membership list. This object class is required for any dynamic group and can be used in conjunction withgroupOfNamesandgroupOfUniqueNames.groupOfCertificatesis similar togroupOfURLsin that it uses an LDAP filter to search for and identify certificates (or, really, certificate names) to identify group members. This is useful for group-based access control, since the group can be given special access permissions. The attribute used to determine members for this ismemberCertificate.
Table 8.1. Dynamic and Static Group Schema
Example 8.1. A Static Group Entry
objectClass: top
objectClass: groupOfUniqueNames
cn: static group
description: Example static group.
uniqueMember: uid=mwhite,ou=People,dc=example,dc=com
uniqueMember: uid=awhite,ou=People,dc=example,dc=com
Example 8.2. A Dynamic Group Entry
groupOfUniqueNames, can explicitly list some group members along with the dynamic LDAP URL. For example:
objectClass: top
objectClass: groupOfUniqueNames
objectClass: groupOfURLs
cn: dynamic group
description: Example dynamic group.
memberURL: ldap:///dc=example,dc=com??sub?(&(objectclass=person)(cn=*sen*))
Note
memberURL attribute instead of listing the group members in an attribute, the memberOf plug-in does not add the memberOf attribute to the user objects that match the filter.
8.1.2. Creating a Static Group
8.1.2.1. Creating a Static Group Using the Command Line
Creating a Static Group with the groupOfNames Object Class
dsidm utility creates static groups in the cn=Groups entry in the specified base DN.
example_group group with the groupOfNames object class in the cn=Groups,dc=example,dc=com entry
# dsidm -D "cn=Directory Manager" ldap://server.example.com -b "dc=example,dc=com" group create --cn "example_group"
Creating a Static Group with the groupOfUniqueNames Object Class
groupOfUniqueNames object class, use the ldapmodify utility to add the entry.
example_group group with the groupOfUniqueNames object class in the cn=Groups,dc=example,dc=com entry:
# ldapmodify -D "cn=Directory Manager" -W -p 389 -h server.example.com -x
dn: cn=example_group,cn=Groups,dc=example,dc=com
changetype: add
objectClass: top
objectClass: groupOfUniqueNames
cn: example_group
description: Example static group with unique members
8.1.3. Creating a Dynamic Group
8.1.3.1. Creating a Dynamic Group Using the Command Line
Creating a Dynamic Group with the groupOfURLs Object Class
example_group group with the groupOfURLs object class in the cn=Groups,dc=example,dc=com entry:
# ldapmodify -D "cn=Directory Manager" -W -p 389 -h server.example.com -x
dn: cn=example_group,cn=Groups,dc=example,dc=com
changetype: add
objectClass: top
objectClass: groupOfURLs
cn: example_group
description: Example dynamic group for user entries
memberURL: ldap:///dc=example,dc=com??sub?(&(objectclass=person)(cn=*sen*))
Creating a Dynamic Group with the groupOfCertificates Object Class
example_group group with the groupOfCertificates object class in the cn=Groups,dc=example,dc=com entry:
# ldapmodify -D "cn=Directory Manager" -W -p 389 -h server.example.com -x
dn: cn=example_group,cn=Groups,dc=example,dc=com
changetype: add
objectClass: top
objectClass: groupOfURLs
cn: example_group
description: Example dynamic group for certificate entries
memberCertificate: ...
8.1.4. Listing Group Membership in User Entries
memberOf attribute in the member's entry. (By default, this checks the member attribute, but multiple attribute instances can be used to support multiple different group types.)
memberOf attributes on the user entries. The MemberOf Plug-in provides a way to view the groups to which a user belongs simply by looking at the entry, including nested group membership. It can be very difficult to backtrack memberships through nested groups, but the MemberOf Plug-in shows memberships for all groups, direct and indirect.
8.1.4.1. Considerations When Using the memberOf Plug-in
memberOf plug-in.
- Using the
memberOfPlug-in in a Replication Topology - There are two approaches to manage the
memberOfattribute in a replication topology:- Enable the
memberOfplug-in on all supplier and read-only replica servers in the topology. In this case, you must exclude thememberOfattribute from replication in all replication agreements. For details about about excluding attributes, see Section 15.1.7, “Replicating a Subset of Attributes with Fractional Replication”. - Enable the
memberOfplug-in only on all supplier servers in the topology. For this:- You must disable replication of the
memberOfattribute to all write-enabled suppliers in the replication agreement. For details about about excluding attributes, see Section 15.1.7, “Replicating a Subset of Attributes with Fractional Replication”. - You must Enable replication of the
memberOfattribute to all read-only replicas in their replication agreement. - You must not enable the
memberOfplug-in on read-only replicas.
- Using the
memberOfplug-in With Distributed Databases - As described in Section 2.2.1, “Creating Databases”, you can store sub-trees of your directory in individual databases. By default, the
memberOfplug-in only updates user entries which are stored within the same database as the group. To enable the plug-in to also update users in different databases as the group, you must set thememberOfAllBackendsparameter toon. See Section 8.1.4.5.2, “Configuring the MemberOf Plug-in on Each Server Using the Web Console”.
8.1.4.2. Required Object Classes by the memberOf Plug-In
memberOf plug-in By default, the memberOf plug-in will add the MemberOf object class to objects to provide the memberOf attribute. This object class is safe to add to any object for this purpose, and no further action is required to enable this plug-in to operate correctly. Alternatively, you can create user objects that contain the inetUser or inetAdmin, object class. Both object classes support the memberOf attribute as well.
extensibleObject object class.
Note
LDAP: error code 65 - Object Class Violation
8.1.4.3. The MemberOf Plug-in Syntax
memberOfGroupAttr) and the other for the attribute to create and manage in the member's user entry (memberOfAttr).
memberOfGroupAttr attribute is multi-valued. Because different types of groups use different member attributes, using multiple memberOfGroupAttr attributes allows the plug-in to manage multiple types of groups.
Example 8.3. Default MemberOf Plug-in Entry
dn: cn=MemberOf Plugin,cn=plugins,cn=config objectClass: top objectClass: nsSlapdPlugin objectClass: extensibleObjectcn: MemberOf Pluginnsslapd-pluginPath: libmemberof-pluginnsslapd-pluginInitfunc: memberof_postop_initnsslapd-pluginType: postoperationnsslapd-pluginEnabled: onnsslapd-plugin-depends-on-type: databasememberOfGroupAttr: membermemberOfGroupAttr: uniqueMembermemberOfAttr: memberOfmemberOfAllBackends: onnsslapd-pluginId: memberOf nsslapd-pluginVersion:X.Y.Znsslapd-pluginVendor: Red Hat, Inc. nsslapd-pluginDescription: memberOf plugin
Note
member), it may be necessary to include the member group attribute or whatever previous member attribute was used, in addition any new member attributes used in the plug-in configuration.
memberOfGroupAttr: membermemberOfGroupAttr: uniqueMember
8.1.4.4. Enabling the MemberOf Plug-in
8.1.4.4.1. Enabling the MemberOf Plug-in Using the Command Line
- Use the
dsconfutility to enable the plug-in:# dsconf -D "cn=Directory Manager" ldap://server.example.com plugin memberof enable
- Restart the instance:
# dsctl instance_name restart
8.1.4.4.2. Enabling the MemberOf Plug-in Using the Web Console
- Open the Directory Server user interface in the web console. See Section 1.4, “Logging Into Directory Server Using the Web Console”.
- Select the instance.
- Select the menu.
- Select the MemberOf plug-in.
- Change the status to
ONto enable the plug-in. - Restart the instance. See Section 1.5.2, “Starting and Stopping a Directory Server Instance Using the Web Console”.
8.1.4.5. Configuring the MemberOf Plug-in on Each Server
8.1.4.5.1. Configuring the MemberOf Plug-in on Each Server Using the Command Line
- Enable the plug-in. See Section 8.1.4.4.1, “Enabling the MemberOf Plug-in Using the Command Line”.
- To retrieve members of a group from a different attribute than
member, which is the default, set thememberOfGroupAttrparameter to the respective attribute name.For example, to read group members fromuniqueMemberattributes, replace the current value ofmemberOfGroupAttr:- Optionally, display the attribute that is currently configured:
# dsconf -D "cn=Directory Manager" ldap://server.example.com plugin memberof show
...
memberofgroupattr: member
...
The command displays that currently only thememberattribute is configured to retrieve members of a group. - Remove all attributes from the configuration that currently set:
# dsconf -D "cn=Directory Manager" ldap://server.example.com plugin memberof set --groupattr delete
Successfully changed the cn=MemberOf Plugin,cn=plugins,cn=config
Note
It is not possible to remove a specific group attribute. - Add the
uniqueMemberattribute to the configuration:# dsconf -D "cn=Directory Manager" ldap://server.example.com plugin memberof set --groupattr uniqueMember successfully added memberOfGroupAttr value "uniqueMember"
To set multiple attributes, pass them all to the--groupattrparameter. For example:# dsconf -D "cn=Directory Manager" ldap://server.example.com plugin memberof set --groupattr member uniqueMember ...
- By default, the MemberOf plug-in adds the
memberOfattribute to user entries. To use a different attribute, set the name of the attribute in thememberOfAttrparameter.For example, to add thecustomMemberOfattribute to user records, replace the current value ofmemberOfAttr:- Optionally, display the attribute that is currently configured:
# dsconf -D "cn=Directory Manager" ldap://server.example.com plugin memberof show ... memberofattr: memberOf ... - Configure the MemberOf plug-in to add the
customMemberOfattribute to user entries:# dsconf -D "cn=Directory Manager" ldap://server.example.com plugin memberof set --attr customMemberOf memberOfAttr set to "customMemberOf"
Note
You can only set this parameter to an attribute that supports DN syntax.
- In an environment that uses distributed databases, you can configure the plug-in to search user entries in all databases instead of only the local database:
dsconf -D "cn=Directory Manager" ldap://server.example.com plugin memberof set --allbackends on
memberOfAllBackends enabled successfully
- Restart the instance:
# dsctl instance_name restart
8.1.4.5.2. Configuring the MemberOf Plug-in on Each Server Using the Web Console
- Open the Directory Server user interface in the web console. See Section 1.4, “Logging Into Directory Server Using the Web Console”.
- Select the instance.
- Open the menu.
- Select the memberOf plug-in.
- Change the status to
ONto enable the plug-in. - Fill the fields to configure the plug-in. For example, to configure that the plug-in adds the
customMemberOfattribute to user entries if theuniqueMemberattribute is added to a group:
- Click .
- Restart the instance. See Section 1.5.2, “Starting and Stopping a Directory Server Instance Using the Web Console”.
8.1.4.7. Setting the Scope of the MemberOf Plug-in
memberOfEntryScope and memberOfEntryScopeExcludeSubtree parameters to set what suffixes the MemberOf plug-in works on.
MemberOf plug-in only adds the memberOf attribute to the group if both the user and the group are in the plug-in's scope. For example, to configure the MemberOf plug-in to work on all entries in dc=example,dc=com, but to exclude entries in ou=private,dc=example,dc=com:
# dsconf -D "cn=Directory Manager" ldap://server.example.com plugin memberof set --scope "dc=example,com"
# dsconf -D "cn=Directory Manager" ldap://server.example.com plugin memberof set --exclude "dc=group,dc=example,com"
--scope DN parameter:
- The membership attribute, such as
member, is updated in the group entry to remove the user DN value. - The
memberOfattribute is updated in the user entry to remove the group DN value.
Note
--exclude parameter has a higher priority than values set in --scope. If the scopes set in both parameters overlap, the MemberOf plug-in only works on the non-overlapping directory entries.
8.1.4.8. Regenerating memberOf Values
memberOf attributes on group member entries, based on the configuration in the group entry itself. However, the memberOf attribute can be manually edited in a user entry or new entries can be imported or replicated to the server that have a memberOf attribute already set. These situations create inconsistencies between the memberOf configuration managed by the server plug-in and the actual memberships defined in an entry.
memberOf values in dc=example,dc=com entry and subentries:
# dsconf -D "cn=Directory Manager" ldap://server.example.com plugin memberof fixup -f "(|(objectclass=inetuser)(objectclass=inetadmin)(objectclass=nsmemberof))" "dc=example,dc=com"
Attempting to add task entry...
Successfully added task entry
-f filter option is optional. Use the filter to regenerate the memberOf attributes in user entries matching the filter. If you do not specify a filter, the tasks regenerates the attributes in all entries containing the inetUser, inetAdmin, or nsMemberOf object class.
Note
memberOf attributes for entries on other servers are not updated until the updated entry is replicated.
8.1.5. Automatically Adding Entries to Specified Groups
Note
autoMemberProcessModifyOps parameter in the cn=Auto Membership Plugin,cn=plugins,cn=config entry is set to on. With this setting, the Automembership plug-in also updates group memberships when an administrator moves a user to a different group by editing a user entry.
autoMemberProcessModifyOps to off, Directory Server invokes the plug-in only when you add a group entry to the user, and you must manually run a fix-up task to update the group membership.
Note
8.1.5.1. Looking at the Structure of an Automembership Rule
cn=plugins,cn=config. Group assignments are defined through child entries.
8.1.5.1.1. The Automembership Configuration Entry
- An LDAP search to identify entries, including both a search scope and a search filter (
autoMemberScopeandautoMemberFilter) - A default group to which to add the member entries (
autoMemberDefaultGroup) - The member entry format, which is the attribute in the group entry, such as
member, and the attribute value, such asdn(autoMemberGroupingAttr)
ntUser to the cn=windows-users group:
dn: cn=Windows Users,cn=Auto Membership Plugin,cn=plugins,cn=config
objectclass: autoMemberDefinition
autoMemberScope: ou=People,dc=example,dc=com
autoMemberFilter: objectclass=ntUser
autoMemberDefaultGroup: cn=windows-group,cn=groups,dc=example,dc=com
autoMemberGroupingAttr: member:dn
cn=Auto Membership Plugin,cn=plugins,cn=config entry description in the Red Hat Directory Server Configuration, Command, and File Reference.
8.1.5.1.2. Additional Regular Expression Entries
Example 8.4. Automember Definition for a Host Group
dn: cn=Hostgroups,cn=Auto Membership Plugin,cn=plugins,cn=config
objectclass: autoMemberDefinition
cn: Hostgroups
autoMemberScope: dc=example,dc=com
autoMemberFilter: objectclass=ipHost
autoMemberDefaultGroup: cn=systems,cn=hostgroups,dc=example,dc=com
autoMemberGroupingAttr: member:dn
Example 8.5. Regular Expression Condition for a Web Server Group
dn: cn=webservers,cn=Hostgroups,cn=Auto Membership Plugin,cn=plugins,cn=config
objectclass: autoMemberRegexRule
description: Group for webservers
cn: webservers
autoMemberTargetGroup: cn=webservers,cn=hostgroups,dc=example,dc=com
autoMemberInclusiveRegex: fqdn=^www\.web[0-9]+\.example\.com
^www\.web[0-9]+\.example\.com, such as www.web1.example.com, is added to the cn=webservers group, defined for that exact regular expression. Any other machine entry, which matches the LDAP filter objectclass=ipHost but with a different type of fully-qualified domain name, is added to the general host group, cn=systems, defined in the main definition entry.
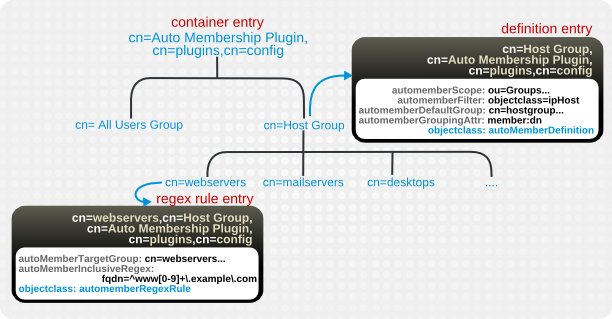
Figure 8.1. Regular Expression Conditions
Table 8.2. Regular Expression Condition Attributes
| Attribute | Description |
|---|---|
| autoMemberRegexRule (required object class) | Identifies the entry as a regular expression rule. This entry must be a child of an automember definition (objectclass: autoMemberDefinition). |
| autoMemberInclusiveRegex | Sets a regular expression to use to identify entries to include. Only matching entries are added to the group. Multiple regular expressions could be used, and if an entry matches any one of those expressions, it is included in the group.
The format of the expression is a Perl-compatible regular expression (PCRE). For more information on PCRE patterns, see the
pcresyntax(3) man page.
This is a multi-valued attribute.
|
| autoMemberExclusiveRegex | Sets a regular expression to use to identify entries to exclude. If an entry matches the exclusion condition, then it is not included in the group. Multiple regular expressions could be used, and if an entry matches any one of those expressions, it is excluded in the group.
The format of the expression is a Perl-compatible regular expression (PCRE). For more information on PCRE patterns, see the
pcresyntax(3) man page.
This is a multi-valued attribute.
Note
Exclude conditions are evaluated first and take precedence over include conditions.
|
| autoMemberTargetGroup | Sets which group to add the entry to as a member, if it meets the regular expression conditions. |
8.1.5.2. Configuring Auto Membership Definitions
8.1.5.2.1. Configuring Auto Membership Definitions Using the Command Line
- Enable the Auto Membership plug-in:
# dsconf -D "cn=Directory Manager" ldap://server.example.com plugin automember enable
Enabled Auto Membership Plugin
- Create a Auto Membership definition. For example:
#  dsconf -D "cn=Directory Manager" ldap://server.example.com plugin automember definition definition_name add --default-group "cn=windows-group,cn=groups,dc=example,dc=com" --scope "ou=People,dc=example,dc=com" --filter "objectclass=ntUser" --grouping-attr "member:dn"
Automember definition created successfully!
- Optionally, you can set further parameters in an Auto Membership definition, for example, to use regular expressions to identify entries to include.Use the
ldapmodifyutility to add or update these parameters in thecn=definition_name,cn=Auto Membership Plugin,cn=plugins,cn=configentry. For parameters you can set, seecn=Auto Membership Plugin,cn=plugins,cn=configentry description in the Red Hat Directory Server Configuration, Command, and File Reference. - Restart the instance:
# dsctl instance_name restart
8.1.5.2.2. Configuring Auto Membership Definitions Using the Web Console
- Open the Directory Server user interface in the web console. See Section 1.4, “Logging Into Directory Server Using the Web Console”.
- Select the instance.
- Open the menu.
- Select the Auto Membership plug-in.
- Change the status to
ONto enable the plug-in. - Click .
- Fill the fields. For example:

- Optionally, add a regular expression filter.
- Click .
- Restart the instance. See Section 1.5.2, “Starting and Stopping a Directory Server Instance Using the Web Console”.
8.1.5.3. Updating Existing Entries to apply Auto Membership Definitions
autoMemberProcessModifyOps parameter in the cn=Auto Membership Plugin,cn=plugins,cn=config entry is enabled. With this setting, the Automembership plug-in also updates group memberships when an administrator moves a user to a different group by editing a user entry. However, if you set autoMemberProcessModifyOps to off, you must manually run a fix-up task when you added new entries to the directory or changed existing entries.
# dsconf -D "cn=Directory Manager" ldap://server.example.com plugin automember fixup -f "filter" -s scope
8.1.5.4. Examples of Automembership Rules
- Different host groups based on IP address
- Windows user groups
- Different user groups based on employee ID
Example 8.6. Host Groups by IP Address
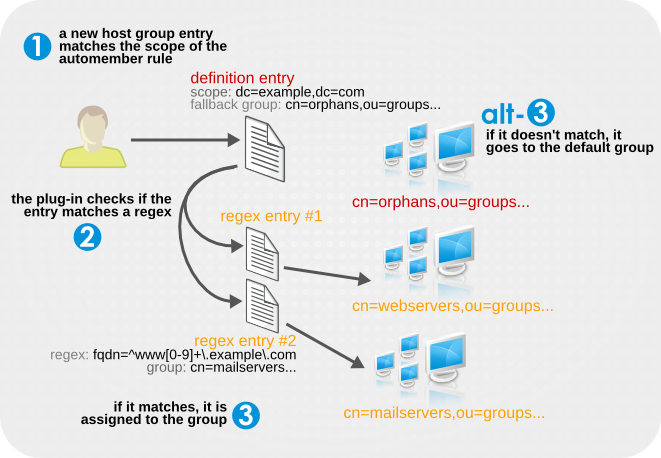
configuration entry
dn: cn=Hostgroups,cn=Auto Membership Plugin,cn=plugins,cn=config
objectclass: autoMemberDefinition
cn: Hostgroups
autoMemberScope: dc=example,dc=com
autoMemberFilter: objectclass=bootableDevice
autoMemberDefaultGroup: cn=orphans,cn=hostgroups,dc=example,dc=com
autoMemberGroupingAttr: member:dn

regex entry #1
dn: cn=webservers,cn=Hostgroups,cn=Auto Membership Plugin,cn=plugins,cn=config
objectclass: autoMemberRegexRule
description: Group placement for webservers
cn: webservers
autoMemberTargetGroup: cn=webservers,cn=hostgroups,dc=example,dc=com
autoMemberInclusiveRegex: fqdn=^www[0-9]+\.example\.com
autoMemberInclusiveRegex: fqdn=^web[0-9]+\.example\.com
autoMemberExclusiveRegex: fqdn=^www13\.example\.com
autoMemberExclusiveRegex: fqdn=^web13\.example\.com

regex entry #2
dn: cn=mailservers,cn=Hostgroups,cn=Auto Membership Plugin,cn=plugins,cn=config
objectclass: autoMemberRegexRule
description: Group placement for mailservers
cn: mailservers
autoMemberTargetGroup: cn=mailservers,cn=hostgroups,dc=example,dc=com
autoMemberInclusiveRegex: fqdn=^mail[0-9]+\.example\.com
autoMemberInclusiveRegex: fqdn=^smtp[0-9]+\.example\.com
autoMemberExclusiveRegex: fqdn=^mail13\.example\.com
autoMemberExclusiveRegex: fqdn=^smtp13\.example\.com
Example 8.7. Windows User Group
posixAccount attribute to identify all new users. All new users created within Directory Server are created with the posixAccount attribute, so that is a safe catch-all for new Directory Server users. However, when user accounts are synchronized over from the Windows domain to the Directory Server, the Windows user accounts are created without the posixAccount attribute.
ntUser attribute. The basic, all-users group rule can be modified to target Windows users specifically, which can then be added to the default all-users group or to a Windows-specific group.
dn: cn=Windows Users,cn=Auto Membership Plugin,cn=plugins,cn=config
objectclass: autoMemberDefinition
autoMemberScope: dc=example,dc=com
autoMemberFilter: objectclass=ntUser
autoMemberDefaultGroup: cn=Windows Users,cn=groups,dc=example,dc=com
autoMemberGroupingAttr: member:dn
Example 8.8. User Groups by Employee Type
employeeType attribute.
configuration entry
dn: cn=Employee groups,cn=Auto Membership Plugin,cn=plugins,cn=config
objectclass: autoMemberDefinition
cn: Hostgroups
autoMemberScope: ou=employees,ou=people,dc=example,dc=com
autoMemberFilter: objectclass=inetorgperson
autoMemberDefaultGroup: cn=general,cn=employee groups,ou=groups,dc=example,dc=com
autoMemberGroupingAttr: member:dn

regex entry #1
dn: cn=full time,cn=Employee groups,cn=Auto Membership Plugin,cn=plugins,cn=config
objectclass: autoMemberRegexRule
description: Group for full time employees
cn: full time
autoMemberTargetGroup: cn=full time,cn=employee groups,ou=groups,dc=example,dc=com
autoMemberInclusiveRegex: employeeType=full

regex entry #2
dn: cn=temporary,cn=Employee groups,cn=Auto Membership Plugin,cn=plugins,cn=config
objectclass: autoMemberRegexRule
description: Group placement for interns, contractors, and seasonal employees
cn: temporary
autoMemberTargetGroup: cn=temporary,cn=employee groups,ou=groups,dc=example,dc=com
autoMemberInclusiveRegex: employeeType=intern
autoMemberInclusiveRegex: employeeType=contractor
autoMemberInclusiveRegex: employeeType=seasonal
8.1.5.5. Testing Automembership Definitions
cn=automember export updates runs against existing entries in the directory and exports the results of what users would have been added to what groups, based on the rules. This is useful for testing existing rules against existing users to see how your real deployment are performing.
cn=automember rebuild membership task — the base DN to search, search filter, and search scope — and has an additional parameter to specify an export LDIF file to record the proposed entry updates.
# ldapadd -D "cn=Directory Manager" -W -p 389 -h server.example.com -x

dn: cn=test_export,cn=automember export updates,cn=tasks,cn=config
objectClass: top
objectClass: extensibleObject
cn: test_export
basedn: dc=example,dc=com
filter: (uid=*)
scope: sub
ldif: /tmp/automember-updates.ldif
cn=automember map updates takes an import LDIF of new users and then runs the new users against the current automembership rules. This can be very useful for testing a new rule, before applying it to (real) new or existing user entries.
ldapmodify:
# ldapadd -D "cn=Directory Manager" -W -p 389 -h server.example.com -x

dn: cn=test_mapping, cn=automember map updates,cn=tasks,cn=config
objectClass: top
objectClass: extensibleObject
cn: test_mapping
ldif_in: /tmp/entries.ldif
ldif_out: /tmp/automember-updates.ldif
8.1.5.6. Canceling the Auto Membership Plug-in Task
Procedure
- To cancel the Auto Membership plug-in task enter:
# dsconf server.example.com plugin automember abort-fixup
Verification
- To see the list of all Auto Membership plug-in tasks, including canceled tasks, enter:
# dsconf server.example.com plugin automember fixup-status
8.2. Using Roles
8.2.1. About Roles
- Managed roles have an explicit enumerated list of members.
- Filtered roles are assigned entries to the role depending upon the attribute contained by each entry, specified in an LDAP filter. Entries that match the filter possess the role.
- Nested roles are roles that contain other roles.
Note
nsRole attribute. The nsRole attribute is a computed attribute, which identifies to which roles an entry belongs; the nsRole attribute is not stored with the entry itself. From the client application point of view, the method for checking membership is uniform and is performed on the server side.
8.2.2. Managing Roles Using the Command Line
8.2.2.1. Creating a Managed Role
nsRoleDN attribute to the entry.
8.2.2.1.1. Creating Managed Roles through the Command Line
ldapsubentry object class, which is defined in the ITU X.509 standard. In addition, each managed role requires two object classes that inherit from the nsRoleDefinition object class:
- nsSimpleRoleDefinition
- nsManagedRoleDefinition
description attribute.
nsRoleDN attribute in their entry.
- Use
ldapmodifywith the-aoption to add the managed role entry. The new entry must contain thensManagedRoleDefinitionobject class, which in turn inherits from theLdapSubEntry,nsRoleDefinition, andnsSimpleRoleDefinitionobject classes.dn: cn=Marketing,ou=people,dc=example,dc=com objectclass: top objectclass: LdapSubEntry objectclass: nsRoleDefinition objectclass: nsSimpleRoleDefinition objectclass: nsManagedRoleDefinition cn: Marketing description: managed role for marketing staff
- Assign the role to the marketing staff members, one by one, using
ldapmodify:dn: cn=Bob,ou=people,dc=example,dc=com changetype: modify add: nsRoleDN nsRoleDN: cn=Marketing,ou=people,dc=example,dc=com
ThensRoleDNattribute in the entry indicates that the entry is a member of a managed role,cn=Marketing,ou=people,dc=example,dc=com.
8.2.2.2. Creating a Filtered Role
8.2.2.2.1. Creating a Filtered Role through the Command Line
ldapsubentry object class, which is defined in the ITU X.509 standard. In addition, each filtered role requires two object classes that inherit from the nsRoleDefinition object class:
- nsComplexRoleDefinition
- nsFilteredRoleDefinition
nsRoleFilter attribute to define the LDAP filter to determine role members. Optionally, the role can take a description attribute.
nsRoleFilter attribute.
- Run
ldapmodifywith the-aoption to add a new entry. - Create the filtered role entry.The role entry has the
nsFilteredRoleDefinitionobject class, which inherits from theLdapSubEntry,nsRoleDefinition, andnsComplexRoleDefinitionobject classes.ThensRoleFilterattribute sets a filter foro(organization) attributes that contain a value ofsales managers.dn: cn=SalesManagerFilter,ou=people,dc=example,dc=com changetype: add objectclass: top objectclass: LDAPsubentry objectclass: nsRoleDefinition objectclass: nsComplexRoleDefinition objectclass: nsFilteredRoleDefinition cn: SalesManagerFilter nsRoleFilter: o=sales managers Description: filtered role for sales managers
o attribute with the value sales managers), and, therefore, it is a member of this filtered role automatically:
dn: cn=Pat Smith,ou=people,dc=example,dc=com
objectclass: person
cn: Pat
sn: Smith
userPassword: secret
o: sales managers
8.2.2.3. Creating a Nested Role
nsRoleDN attribute.
8.2.2.3.1. Creating Nested Role through the Command Line
ldapsubentry object class, which is defined in the ITU X.509 standard. In addition, each nested role requires two object classes that inherit from the nsRoleDefinition object class:
- nsComplexRoleDefinition
- nsNestedRoleDefinition
nsRoleDN attribute to identify the roles to nest within the container role. Optionally, the role can take a description attribute.
nsRoleDN attributes of the nested role definition entry.
- Run
ldapmodifywith the-aoption to add a new entry. - Create the nested role entry. The nested role has four object classes:
nsNestedRoleDefinitionLDAPsubentry(inherited)nsRoleDefinition(inherited)nsComplexRoleDefinition(inherited)
ThensRoleDNattributes contain the DNs for both the marketing managed role and the sales managers filtered role.dn: cn=MarketingSales,ou=people,dc=example,dc=com objectclass: top objectclass: LDAPsubentry objectclass: nsRoleDefinition objectclass: nsComplexRoleDefinition objectclass: nsNestedRoleDefinition cn: MarketingSales nsRoleDN: cn=SalesManagerFilter,ou=people,dc=example,dc=com nsRoleDN: cn=Marketing,ou=people,dc=example,dc=com
8.2.2.4. Viewing Roles for an Entry through the Command Line
+ to output all operational attributes for result objects. For example, this ldapsearch command returns the list of roles of which uid=user_name is a member, in addition to the regular attributes for the entry:
# ldapsearch -D "cn=Directory Manager" -W -p 389 -h server.example.com -b "dc=example,dc=com" -s sub -x "(uid=user_name)"” \* nsRole

dn: uid=user_name,ou=people,dc=example,dc=com
...
nsRole: cn=Role for Managers,dc=example,dc=com
nsRole: cn=Role for Accounting,dc=example,dc=com
8.2.2.5. About Deleting Roles
nsRoleDN attribute for each role member. To delete the nsRoleDN attribute for each role member, enable the Referential Integrity plug-in, and configure it to manage the nsRoleDN attribute. For more information on the Referential Integrity plug-in, see Chapter 5, Maintaining Referential Integrity.
8.2.3. Managing Roles in Directory Server Using the LDAP Browser
8.2.3.1. Creating a role in the LDAP browser
Prerequisites
- Access to the web console.
- A parent entry exists in the Red Hat Directory Server.
Procedure
- Log in to the web console and click .
- After the web console loads the interface, click .
- Select an LDAP entry and click the Options menu.
- From the drop-down menu, select and click .
- Follow the steps in the wizard and click the button after you complete each step.
- To create the role, review the role settings in the step and click the . You can click the button to modify the role settings or click the button to cancel the role creation.
- To close the wizard window, click the button.
Verification
- Expand the LDAP entry and verify the new role appears among the entry parameters.
8.2.3.2. Modifying a Role in the LDAP browser
Prerequisites
- Access to the web console.
- A parent entry exists in the Red Hat Directory Server.
Procedure
- Log in to the web console and click .
- After the web console loads the interface, click .
- Expand the LDAP entry and select the role you are modifying.
- Click the Options menu and select to modify the parameters of the role or to rename the role.
- In the wizard window modify the necessary parameters and click after each step until you observe the step.
- Check the updated parameters and click or .
- To close the wizard window, click the button.
Verification
- Expand the LDAP entry and verify the updated parameters are listed for the role.
8.2.3.3. Deleting a Role in the LDAP browser
Prerequisites
- Access to the web console.
- A parent entry exists in the Red Hat Directory Server.
Procedure
- Log in to the web console and click .
- After the web console loads the interface, click .
- Expand the LDAP entry and select the role which you want to delete.
- Open the Options menu and select .
- Verify the data about the role you want to delete and click the button until you reach the step.
- Toggle the switch to the position and click the button.
- To close the wizard window, click the button.
Verification
- Expand the LDAP entry and verify the role is no longer a part of the entry details.
8.2.4. Using Roles Securely
Mountain Biking, interested users should be able to add themselves or remove themselves easily.
MR. The MR role has been locked using account inactivation. This means that user A cannot bind to the server because the nsAccountLock attribute is computed as true for that user. However, if user A was already bound to Directory Server and noticed that he is now locked through the MR role, the user can remove the nsRoleDN attribute from his entry and unlock himself if there are no ACIs preventing him.
nsRoleDN attribute, use the following ACIs depending upon the type of role being used.
- Managed roles. For entries that are members of a managed role, use the following ACI to prevent users from unlocking themselves by removing the appropriate
nsRoleDN:aci: (targetattr="nsRoleDN") (targattrfilters= add=nsRoleDN:(!(nsRoleDN=cn=AdministratorRole,dc=example,dc=com)), del=nsRoleDN:(!(nsRoleDN=cn=nsManagedDisabledRole,dc=example,dc=com))) (version3.0;acl "allow mod of nsRoleDN by self but not to critical values"; allow(write) userdn=ldap:///self;)
- Filtered roles. The attributes that are part of the filter should be protected so that the user cannot relinquish the filtered role by modifying an attribute. The user should not be allowed to add, delete, or modify the attribute used by the filtered role. If the value of the filter attribute is computed, then all attributes that can modify the value of the filter attribute should be protected in the same way.
- Nested roles. A nested role is comprised of filtered and managed roles, so both ACIs should be considered for modifying the attributes (
nsRoleDNor something else) of the roles that comprise the nested role.
8.3. Automatically Creating Dual Entries
8.3.1. About Managed Entries
posixAccount entry) is created, a corresponding group entry (posixGroup entry) should also be created. An instance of the Managed Entries Plug-in identifies what entry (the origin entry) triggers the plug-in to automatically generate a new entry (the managed entry).
- A definition entry, that identifies the scope of the plug-in instance and the template to use
- A template entry, that models what the final managed entry will look like
8.3.1.1. About the Instance Definition Entry
cn=plugins,cn=config, and each unique configuration instance of the plug-in has a definition entry beneath that container.
- The search criteria to identify the origin entries (using a search scope and a search filter)
- The subtree under which to create the managed entries (the new entry location)
- The template entry to use for the managed entries
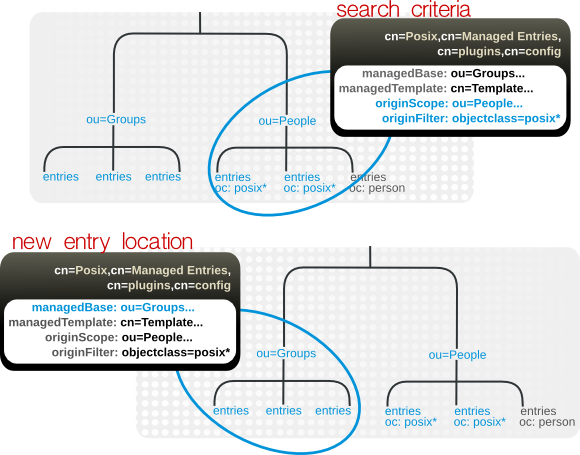
Figure 8.2. Defining Managed Entries
dn: cn=Posix User-Group,cn=Managed Entries,cn=plugins,cn=config
objectclass: extensibleObject
cn: Posix User-Group
originScope: ou=people,dc=example,dc=com
originFilter: objectclass=posixAccount
managedBase: ou=groups,dc=example,dc=com
managedTemplate: cn=Posix User-Group Template,ou=Templates,dc=example,dc=com
8.3.1.2. About the Template Entry
Note
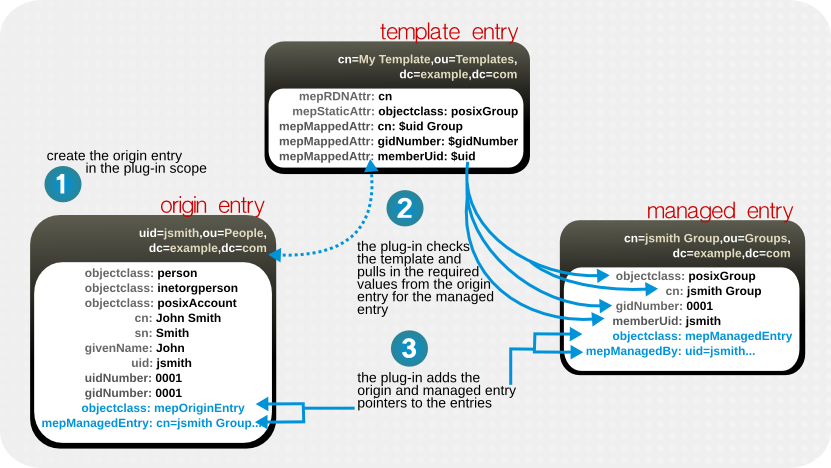
Figure 8.3. Templates, Managed Entries, and Origin Entries
dn: cn=Posix User-Group Template,ou=Templates,dc=example,dc=com
objectclass: mepTemplateEntry
cn: Posix User-Group Template
mepRDNAttr: cn
mepStaticAttr: objectclass: posixGroup
mepMappedAttr: cn: $cn Group Entry
mepMappedAttr: gidNumber: $gidNumber
mepMappedAttr: memberUid: $uid
Attr: ${cn}test. Quoting a token value is not required if the token name is not immediately followed by a character that is valid in an attribute name, such as a space or comma. For example, $cn test is acceptable in an attribute definition because a space character immediately follow the attribute name, but $cntest is not valid because the Managed Entries Plug-in attempts to look for an attribute named cntest in the origin entry. Using curly braces identifies the attribute token name.
Note
8.3.1.3. Entry Attributes Written by the Managed Entries Plug-in
dn: uid=jsmith,ou=people,dc=example,dc=com
objectclass: mepOriginEntry
objectclass: posixAccount
...
sn: Smith
mail: jsmith@example.com
mepManagedEntry: cn=jsmith Posix Group,ou=groups,dc=example,dc=com
dn: cn=jsmith Posix Group,ou=groups,dc=example,dc=com
objectclass: mepManagedEntry
objectclass: posixGroup
...
mepManagedBy: uid=jsmith,ou=people,dc=example,dc=com
8.3.1.4. Managed Entries Plug-in and Directory Server Operations
Table 8.3. Managed Entries Plug-in and Directory Server Operations
| Operation | Effect by the Managed Entries Plug-in |
|---|---|
| Add | With every add operation, the server checks to see if the new entry is within the scope of any Managed Entries Plug-in instance. If it meets the criteria for an origin entry, then a managed entry is created and managed entry-related attributes are added to both the origin and managed entry. |
| Modify |
If an origin entry is modified, it triggers the plug-in to update the managed entry. Changing a template entry, however, does not update the managed entry automatically. Any changes to the template entry are not reflected in the managed entry until after the next time the origin entry is modified.
The mapped managed attributes within a managed entry cannot be modified manually, only by the Managed Entry Plug-in. Other attributes in the managed entry (including static attributes added by the Managed Entry Plug-in) can be modified manually.
|
| Delete | If an origin entry is deleted, then the Managed Entries Plug-in will also delete any managed entry associated with that entry. There are some limits on what entries can be deleted.
|
| Rename | If an origin entry is renamed, then plug-in updates the corresponding managed entry. If the entry is moved out of the plug-in scope, then the managed entry is deleted, while if an entry is moved into the plug-in scope, it is treated like an add operation and a new managed entry is created. As with delete operations, there are limits on what entries can be renamed or moved.
|
| Replication | The Managed Entries Plug-in operations are not initiated by replication updates. If an add or modify operation for an entry in the plug-in scope is replicated to another replica, that operation does not trigger the Managed Entries Plug-in instance on the replica to create or update an entry. The only way for updates for managed entries to be replicated is to replicate the final managed entry over to the replica. |
8.3.2. Creating the Managed Entries Template Entry
mepStaticAttr: attribute: specific_value
mepMappedAttr: attribute: $token_value
mepMappedAttr: cn: Managed Group for $cn
- A mapped value use a combination of token (dynamic values) and static values, but it can only use one token per mapped attribute.
- The mapped attributes in the template use tokens, prepended by a dollar sign ($), to pull in values from the origin entry and use it in the managed entry. (If a dollar sign is actually in the managed attribute value, then the dollar sign can be escaped by using two dollar signs in a row.)
- A mapped attribute definition can be quoted with curly braces, such as
Attr: ${cn}test. Quoting a token value is not required if the token name is not immediately followed by a character that is valid in an attribute name, such as a space or comma. For example,$cn testis acceptable in an attribute definition because a space character immediately follow the attribute name, but$cntestis not valid because the Managed Entries Plug-in attempts to look for an attribute namedcntestin the origin entry. Using curly braces identifies the attribute token name. - Make sure that the values given for static and mapped attributes comply with the required attribute syntax.
Note
gidNumber, then the mapped value should be an integer.
Table 8.4. Attributes for the Managed Entry Template
| Attribute | Description |
|---|---|
| mepTemplateEntry (object class) | Identifies the entry as a template. |
| cn | Gives the common name of the entry. |
| mepMappedAttr | Contains an attribute-token pair that the plug-in uses to create an attribute in the managed entry with a value taken from the originating entry. |
| mepRDNAttr | Specifies which attribute to use as the naming attribute in the managed entry. The attribute used as the RDN must be a mapped attribute for the configuration to be valid. |
| mepStaticAttr | Contains an attribute-value pair that will be used, with that specified value, in the managed entry. |
dsconf plugin managed-entries template add command to add the template entry. For example:
# dsconf -D "cn=Directory Manager" ldap://server.example.com plugin managed-entries template "cn=Posix User Template,ou=templates,dc=example,dc=com" add --rdn-attr "cn" --static-attr "objectclass: posixGroup" --mapped-attr "cn: $cn Group Entry" "gidNumber: $gidNumber" "memberUid: $uid"
8.3.3. Creating the Managed Entries Instance Definition
Note
Table 8.5. Attributes for the Managed Entries Definition Entry
| Attribute Name | Description |
|---|---|
| originFilter | The search filter to use to search for and identify the entries within the subtree which require a managed entry. The syntax is the same as a regular search filter. |
| originScope | The base subtree which contains the potential origin entries for the plug-in to monitor. |
| managedTemplate | Identifies the template entry to use to create the managed entry. This entry can be located anywhere in the directory tree. |
| managedBase | The subtree under which to create the managed entries. |
Note
- Create the new plug-in instance below the
cn=Managed Entries,cn=plugins,cn=configcontainer entry. For example:# dsconf -D "cn=Directory Manager" ldap://server.example.com plugin managed-entries config "cn=instance,cn=Managed Entries,cn=plugins,cn=config" add --scope="ou=people,dc=example,dc=com" --filter="objectclass=posixAccount" --managed-base="ou=groups,dc=example,dc=com" --managed-template="cn=Posix User-Group Template,ou=Templates,dc=example,dc=com"
This command sets the scope and filter for the origin entry search, the location of the new managed entries, and the template entry to use. - If the Directory Server is not configured to enable dynamic plug-ins, restart the server to load the modified new plug-in instance:
# dsctl instance_name restart
8.3.4. Putting Managed Entries Plug-in Configuration in a Replicated Database
cn=plugins,cn=com. (This is common for plug-ins which allow multiple instances.) The drawback to this is that the configuration entries in cn=plugins,cn=com are not replicated, so the configuration has to be re-created on each Directory Server instance.
nsslapd-pluginConfigArea attribute. This attribute to another container entry, in the main database area, which contains the plug-in instance entries. This container entry can be in a replicated database, which allows the plug-in configuration to be replicated.
- Create a container entry. For example, to create an entry that points back to the container entry, enter:
# dsconf -D "cn=Directory Manager" ldap://server.example.com plugin managed-entries set --config-area="cn=managed entries container,ou=containers,dc=example,dc=com"
- Move or create the definition (Section 8.3.3, “Creating the Managed Entries Instance Definition”) and template (Section 8.3.2, “Creating the Managed Entries Template Entry”) entries under the new container entry.
8.4. Using Views
8.4.1. About Views
nsview) and a filter attribute (nsviewfilter) that set up a filter for the entries which belong in that view. Once the view container entry is added, all of the entries that match the view filter instantly populate the view. The target entries only appear to exist in the view; their true location never changes. For example, a view may be created as ou=Location Views, and a filter is set for l=Mountain View. Every entry, such as cn=Jane Smith,l=Mountain View,ou=People,dc=example,dc=com, is immediately listed under the ou=Location Views entry, but the real cn=Jane Smith entry remains in the ou=People,dc=example,dc=com subtree.
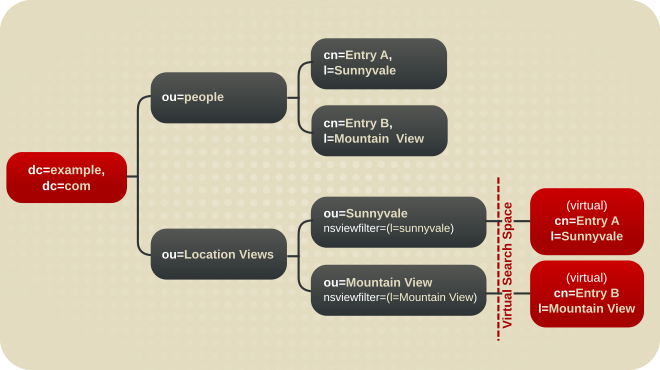
Figure 8.4. A Directory Tree with a Virtual DIT View hierarchy
Note
Example-views.ldif, installed with Directory Server. This file is in the /usr/share/dirsrv/data/ directory. The sections in this chapter assume Example-views.ldif is imported to the server.
8.4.2. Creating Views from the Command Line
- Use the
ldapmodifyutility to bind to the server and prepare it to add the new view entry to the configuration file. - Assuming the view container
ou=Location Views,dc=example,dc=comfrom theExample-views.ldiffile is in the Directory Server, add the new views container entry, in this example, under thedc=example,dc=comroot suffix. This entry must have thensviewobject class and thensViewFilterattribute. ThensViewFilterattribute sets the attribute-value which identifies entries that belong in the view.dn: ou=Mountain View,ou=Location Views,dc=example,dc=com changetype: add objectClass: top objectClass: organizationalUnit objectClass: nsview ou: Mountain View nsViewFilter: l=Mountain View description: views categorized by location
8.4.3. Improving Views Performance
nsViewFilter attribute; the rest of the filter is based on the entry hierarchy, looking for the entryid and parentid of the real entries included in the view.
(|(parentid=search_base_id)(entryid=search_base_id)
entryid, parentid, or the attribute set in nsViewFilter — are not indexed, then the views search becomes an unindexed search because the views operation searches the entire tree for matching entries.
entryid, parentid, and the attribute set in nsViewFilter.
8.5. Managing Organizational Units
dsidm organizationalunit command.
- To create an OU, enter:
# dsidm -D "cn=Directory Manager" ldap://server.example.com -b "dc=example,dc=com" organizationalunit create --ou OU_name
- To list the OUs in an entry, enter:
# dsidm -D "cn=Directory Manager" ldap://server.example.com -b "dc=example,dc=com" organizationalunit list
People
...
- To rename an OU, enter:
# dsidm -D "cn=Directory Manager" ldap://server.example.com -b "dc=example,dc=com" organizationalunit rename old_name new_name
- To delete an OU, enter:
# dsidm -D "cn=Directory Manager" ldap://server.example.com -b "dc=example,dc=com" organizationalunit delete OU_name
Chapter 9. Configuring Secure Connections
STARTTLS connection, and SASL authentication, which provide layers of encryption and security that protect directory data from being read even if it is intercepted.
9.1. Requiring Secure Connections
- LDAPS
- When you use the LDAPS protocol, the connection starts using encryption and either succeeds or fails. However, no unencrypted data is ever send over the network. For this reason, prefer LDAPS instead of using
STARTTLSover unencrypted LDAP. STARTTLSover LDAP- Clients establish an unencrypted connection over the LDAP protocol and then send the
STARTTLScommand. If the command succeeds, all further communication is encrypted.Warning
If theSTARTTLScommand fails and the client does not cancel the connection, all further data, including authentication information, is sent unencrypted over the network. - SASL
- Simple Authentication and Security Layer (SASL) enables you to authenticate a user using external authentication methods, such as Kerberos. For details, see Section 9.10, “Setting up SASL Identity Mapping”.
9.2. Setting a Minimum Strength Factor
nsslapd-minssf configuration attribute. When enforcing a minimum SSF, Directory Server looks at each available encryption type for an operation — TLS or SASL — and determines which has the higher SSF value and then compares the higher value to the minimum SSF. It is possible for both SASL authentication and TLS to be configured for some server-to-server connections, such as replication.
Note
nsslapd-minssf-exclude-rootdse configuration attribute. This sets a minimum SSF setting for all connections to the Directory Server except for queries against the root DSE. A client may need to obtain information about the server configuration, like its default naming context, before initiating an operation. The nsslapd-minssf-exclude-rootdse attribute allows the client to get that information without having to establish a secure connection first.
STARTTLS and SASL binds to succeed, even though those two connections initially open a regular connection. After the TLS or SASL session is opened, then the SSF is evaluated. Any connection which does not meet the SSF requirements is closed with an LDAP unwilling to perform error.
Warning
nsslapd-minssf attribute value is 0, which means there is no minimum SSF for server connections. The value can be set to any reasonable positive integer. The value represents the required key strength for any secure connection.
nsslapd-minssf parameter to 128:
# dsconf -D "cn=Directory Manager" ldap://server.example.com config replace nsslapd-minssf=128
Successfully replaced "nsslapd-minssf"
Note
nsslapd-require-secure-binds attribute, as in Section 20.12.1, “Requiring Secure Binds”.
9.3. Managing the NSS Database Used by Directory Server
dscreate utility automatically created this database in the /etc/dirsrv/slapd-instance_name/ directory and protected it with a strong password. The utility stored the password in the /etc/dirsrv/slapd-instance_name/pwdfile.txt file. Note that Directory Server does not use this file. The dscreate utility only created this file to provide the password to the administrator. For details about changing the password, see Section 9.3.10, “Changing the Password of the NSS Database”.
9.3.1. Creating a Certificate Signing Request
Note
certutil utility.
9.3.1.1. Creating a Certificate Signing Request Using the Command Line
dsctl tls generate-server-cert-csr command:
# dsctl instance_name tls generate-server-cert-csr -s "certificate_subject"
dsctl tls generate-server-cert-csr command stores the CSR in the /etc/dirsrv/slapd-instance_name/Server-Cert.csr file and the private key in the Directory Server's network security services (NSS) database.
Example 9.1. Creating a Private Key and CSR for a Single Host Name
server.example.com host:
# dsctl instance_name tls generate-server-cert-csr -s "CN=server.example.com,O=example_organization,OU=IT,ST=North Carolina,C=US"
-s parameter must be a valid subject name according to RFC 1485. The CN field is required, and you must set it to the Fully-qualified Domain Name (FQDN) of the server. The other fields are optional.
Example 9.2. Creating a Private Key and CSR for a Multi-homed Host
server.example.com and server.example.net host names:
# dsctl instance_name tls generate-server-cert-csr -s "CN=server.example.com,O=example_organization,OU=IT,ST=North Carolina,C=US" server.example.com server.example.net
DNS:server.example.com, DNS:server.example.net entries to the CSR. The string specified in the -s parameter must be a valid subject name according to RFC 1485. The CN field is required, and you must set it to one of the FQDNs of the server. The other fields are optional.
9.3.2. Installing a CA Certificate
Table 9.1. CA Trust Options
| Web Console Option | dsconf and certutil Option | Description |
|---|---|---|
| (C) Trusted CA | C,, | The server verifies that certificates, used to establish an encrypted connection to a replication partner, have been issued by a trusted CA. |
| (T) Trusted CA Client Auth | T,, | The server trusts this CA certificate for issuing client certificates suitable for TLS EXTERNAL binds. |
certutil, pass the -T "CT,," parameter to the utility.
9.3.2.1. Installing a CA Certificate Using the Command Line
- Import the CA certificate. For example, to import the CA certificate stored in the
/root/ca.crtfile and store it in the database with theExample CAnick name:# dsconf -D "cn=Directory Manager" ldap://server.example.com security ca-certificate add --file /root/ca.crt --name "Example CA"
- Set the trust options. For example, to set the
CT,,trust flags:# dsconf -D "cn=Directory Manager" ldap://server.example.com security ca-certificate set-trust-flags "Example CA" --flags "CT,,"
9.3.2.2. Installing a CA Certificate Using the Web Console
- Open the Directory Server user interface in the web console. See Section 1.4, “Logging Into Directory Server Using the Web Console”.
- Select the instance.
- Open the menu, and select the Security entry.
- Open the Certificate Management tab, and select the Trusted Certificate Authorities sub-tab.
- Click .
- Enter the path to the CA certificate file and a nickname for the certificate.

Figure 9.1. Adding a CA Certificate
Note
The CA certificate must be stored locally on the Directory Server host and must be readable by thedirsrvuser. - Click .
- Click next to the imported CA certificate, and select Edit Trust Flags.
- Select (C) - Trusted CA and (T) - Trusted CA Client Auth in the SSL column.

Figure 9.2. Adding Trust Flags of a CA Certificate
9.3.3. Importing a Private Key and Server Certificate
/root/server.crt and the private key from the /root/server.key file, enter:
# dsctl instance_name tls import-server-key-cert /root/server.crt /root/server.key
dsctl tls import-server-key-cert command requires the paths in the following order:
- Path to the server certificate.
- Path to the private key file.
9.3.4. Installing a Server Certificate
9.3.4.1. Installing a Server Certificate Using the Command Line
certutil utility. For example:
- Install the CA certificate. See Section 9.3.2, “Installing a CA Certificate”.
- Import the server certificate. For example to import the certificate stored in the
/root/instance_name.crtfile, and set it as the primary certificate the instance uses:# dsconf -D "cn=Directory Manager" ldap://server.example.com security certificate add --file /root/instance_name.crt --name "Server-Cert" --primary-cert
9.3.4.2. Installing a Server Certificate Using the Web Console
- Install the CA certificate. See Section 9.3.2, “Installing a CA Certificate”.
- Open the Directory Server user interface in the web console. See Section 1.4, “Logging Into Directory Server Using the Web Console”.
- Select the instance.
- Open the menu, and select the Security entry.
- Open the Certificate Management tab, and select the TLS Certificates sub-tab.
- Click .
- Enter the path to the server certificate file and a nickname for the certificate.

Figure 9.3. Adding a Server Certificate
Note
The server certificate must be stored locally on the Directory Server host and must be readable by thedirsrvuser. - Click .
9.3.5. Generating and Installing a Self-signed Certificate
dscreate utility, dscreate automatically created and installed a self-signed certificate. However, if you did not enable TLS during instance creation, you can manually create and install a self-signed certificate.
Note
- Generate a noise file with random data. For example, to generate a file with a size of 4096 bits:
# openssl rand -out /tmp/noise.bin 4096
- Create the self-signed certificate and add it to the NSS database:
# certutil -S -x -d /etc/dirsrv/slapd-instance_name/ -z /tmp/noise.bin \
     -n "Server-Cert" -s "CN=$HOSTNAME" -t "CT,C,C" -m $RANDOM \
     --keyUsage digitalSignature,nonRepudiation,keyEncipherment,dataEncipherment
Red Hat Enterprise Linux automatically replaces the$HOSTNAMEvariable with the Fully Qualified Domain Name (FQDN) and$RANDOMwith a randomly-generated number. For further details about the parameters used in the previous commands, see the certutil(1) man page. - Optionally, verify that the generated certificate is self-signed:
# certutil -L -d /etc/dirsrv/slapd-instance_name/ -n "Server-Cert" | egrep "Issuer|Subject"
        Issuer: "CN=server.example.com"
        Subject: "CN=server.example.com"
The output of this command must display the FQDN of the Directory Server host for both the issuer and subject of the certificate.
9.3.6. Renewing a Certificate
9.3.6.1. Renewing a Certificate Using the Command Line
- If you do not use attribute encryption:
- Create a new Certificate Signing Request (CSR) with the same options, such as key size, host name, and subject. For details about creating a CSR, see Section 9.3.1.1, “Creating a Certificate Signing Request Using the Command Line”
- After you received the issued certificate from your CA, install it in the database using the same nickname. See Section 9.3.2.1, “Installing a CA Certificate Using the Command Line”.
- Stop the instance:
# dsctl instance_name stop
- Edit the
/etc/dirsrv/slapd-instance_name/dse.ldiffile and remove the following entries including their attributes:cn=AES,cn=encrypted attribute keys,cn=database_name,cn=ldbm database,cn=plugins,cn=configcn=3DES,cn=encrypted attribute keys,cn=database_name,cn=ldbm database,cn=plugins,cn=config
Important
Remove the entries for all databases. If any entry that contains thensSymmetricKeyattribute is left in the/etc/dirsrv/slapd-instance_name/dse.ldiffile, Directory Server will fail to start. - Start the instance:
# dsctl instance_name start
Directory Server will automatically use the newer issued certificate. - If you use attribute encryption, see Section 10.5, “Updating the TLS Certificates Used for Attribute Encryption”.
9.3.7. Removing a Certificate
9.3.7.1. Removing a Certificate Using the Command Line
- Optionally, display the certificates in the database:
# dsconf -D "cn=Directory Manager" ldap://server.example.com security certificate list

Certificate Name: Server-Cert
Subject DN: CN=server.example.com
Issuer DN: CN=Example CA
Expires: 2022-07-29 11:10:14
Trust Flags: ,,
- Remove the certificate. For example, to remove the certificate with the Server-Cert nickname:
# dsconf -D "cn=Directory Manager" ldap://server.example.com security certificate del Server-Cert
9.3.7.2. Removing a Certificate Using the Web Console
- Open the Directory Server user interface in the web console. See Section 1.4, “Logging Into Directory Server Using the Web Console”.
- Select the instance.
- Open the menu, and select the Security entry.
- Open the Certificate Management tab, and select the TLS Certificates sub-tab.
- Click next to the certificate, and select Delete Certificate.
- Click .
9.3.8. Removing a Private Key
Warning
9.3.8.1. Removing a Private Key Using the Command Line
- Remove all certificates based on the key you want to delete. See Section 9.3.7, “Removing a Certificate”.
- Optionally, display the keys in the database:
# certutil -d /etc/dirsrv/slapd-instance_name/ -K
certutil: Checking token "NSS Certificate DB" in slot "NSS User Private Key and Certificate Services"
Enter Password or Pin for "NSS Certificate DB":
< 0> rsa      7a2fb6c269d83c4036eac7e4edb6aaf2ed08bc4a   Server-Cert
< 1> rsa      662b826aa3dd4ca7fd7e6883558cf3866c42f4e2   example-cert
- Remove the private key. For example, to remove the private key with the example-cert nickname:
# certutil -d /etc/dirsrv/slapd-instance_name/ -F -n "example-cert"
9.3.9. Changing the CA Trust Options
9.3.9.1. Changing the CA Trust Options Using the Command Line
--flags parameter to the dsconf security ca-certificate set-trust-flags command.
example-CA:
# dsconf -D "cn=Directory Manager" ldap://server.example.com security ca-certificate set-trust-flags "example-CA" --flags "T,,"
--flags trust_options parameter sets which certificates issued by the CA should be trusted. See Table 9.1, “CA Trust Options”.
9.3.9.2. Changing the CA Trust Options Using the Web Console
- Open the Directory Server user interface in the web console. See Section 1.4, “Logging Into Directory Server Using the Web Console”.
- Select the instance.
- Open the menu, and select the Security entry.
- Open the Certificate Management tab.
- On the Trusted Certificate Authorities sub-tab, click next to the imported CA certificate, and select Edit Trust Flags.
- Select the trust flags. For example:
Figure 9.4. Setting the Trust Flags of a CA Certificate
- Click .
9.3.10. Changing the Password of the NSS Database
Important
9.3.10.1. Changing the Password of the NSS Database Using the Command Line
# certutil -d /etc/dirsrv/slapd-instance_name -W
Enter Password or Pin for "NSS Certificate DB":
Enter a password which will be used to encrypt your keys.
The password should be at least 8 characters long,
and should contain at least one non-alphabetic character.

Enter new password:
Re-enter password:
Password changed successfully.
9.4. Enabling TLS
- The LDAPS protocol: TLS encryption is used directly after the connection has been established.
- The
STARTTLScommand over the LDAP protocol: The connection is unencrypted until the client sends theSTARTTLScommand.
Important
9.4.1. Enabling TLS in Directory Server
9.4.1.1. Enabling TLS in Directory Server Using the Command Line
- Request and install the certificate:
- For a certificate issued by a Certificate Authority (CA):
- Create a Certificate Signing Request (CSR). See Section 9.3.1.1, “Creating a Certificate Signing Request Using the Command Line”
- Import the CA certificate. See Section 9.3.2.1, “Installing a CA Certificate Using the Command Line”.
- Import the server certificate issued by the CA. See Section 9.3.4.1, “Installing a Server Certificate Using the Command Line”.
- For a self-signed certificate, see Section 9.3.5, “Generating and Installing a Self-signed Certificate”.
- Enable TLS and set the LDAPS port:
# dsconf -D "cn=Directory Manager" ldap://server.example.com config replace nsslapd-securePort=636 nsslapd-security=on
Successfully replaced "nsslapd-securePort"
Successfully replaced "nsslapd-security"
- Display the name of the server certificate in the NSS database:
# dsconf -D "cn=Directory Manager" ldap://server.example.com security certificate list

Certificate Name: Server-Cert
Subject DN: CN=server.example.com
Issuer DN: CN=Example CA
Expires: 2022-07-29 11:10:14
Trust Flags: ,,
You need the nickname in the next step. - To enable the RSA cipher family, setting the NSS database security device, and the server certificate name:
# dsconf -D "cn=Directory Manager" ldap://server.example.com security rsa set --tls-allow-rsa-certificates on --nss-token "internal (software)" --nss-cert-name Server-Cert
Note
By default, the name of the security device in the NSS database isinternal (software). - Optionally, update the list of ciphers Directory Server supports. For details, see Section 9.4.1.3.2, “Displaying and Setting the Ciphers Used by Directory Server Using the Command Line”.
- Optionally, enable certificate-based authentication. For details, see Section 9.9, “Using Certificate-based Client Authentication”.
- Optionally, create a password file to enable Directory Server to start without prompting for the password of the NSS database. For details, see Section 9.4.1.5, “Creating a Password File for Directory Server”.
- Restart the Directory Server instance:
# dsctl instance_name restart
If you set a password on the NSS database and did not create a password file, Directory Server prompts for the password of the NSS database. For details, see Section 9.4.1.4, “Starting Directory Server Without a Password File”.
9.4.1.2. Enabling TLS in Directory Server Using the Web Console
- Open the Directory Server user interface in the web console. See Section 1.4, “Logging Into Directory Server Using the Web Console”.
- Select the instance.
- Create a CSR. See Section 9.3.1, “Creating a Certificate Signing Request”.
- Import the Certificate Authority (CA) certificate. See Section 9.3.2.2, “Installing a CA Certificate Using the Web Console”.
- Import the server certificate issued by the CA. See Section 9.3.4.2, “Installing a Server Certificate Using the Web Console”.
- Open the menu, and select the Security entry.
- On the Security Configuration tab:
- Click Security Enabled.
- Select the certificate's nickname in the Server Certificate Name field.
- Optionally, change the settings for the minimum and maximum TLS version that the server should support.
- Optionally, configure client authentication to enable users to authenticate using certificates. For details, see Section 9.9, “Using Certificate-based Client Authentication”.
- Click .
- Optionally, create a password file to enable Directory Server to start without prompting for the password of the NSS database. For details, see Section 9.4.1.5, “Creating a Password File for Directory Server”.
- Restart the Directory Server instance. See Section 1.5.2, “Starting and Stopping a Directory Server Instance Using the Web Console”If you set a password on the NSS database and did not create a password file, Directory Server prompts for the password of the NSS database. For details, see Section 9.4.1.4, “Starting Directory Server Without a Password File”.
9.4.1.3. Setting Encryption Ciphers
9.4.1.3.1. Displaying the Default Ciphers
nsSSL3Ciphers parameter is not set in the cn=encryption,cn=config entry, Directory Server uses the default ciphers of the Network Security Service (NSS). To display the default ciphers:
# /usr/lib64/nss/unsupported-tools/listsuites | grep -B1 --no-group-separator "Enabled"
TLS_AES_128_GCM_SHA256:
  0x1301 TLS 1.3 TLS 1.3 AES-GCM  128 AEAD   Enabled  FIPS Domestic
TLS_CHACHA20_POLY1305_SHA256:
  0x1303 TLS 1.3 TLS 1.3 CHACHA20POLY1305 256 AEAD   Enabled       Domestic
...
9.4.1.3.2. Displaying and Setting the Ciphers Used by Directory Server Using the Command Line
Displaying all Available Ciphers
# dsconf -D "cn=Directory Manager" ldap://server.example.com security ciphers list --supported
TLS_ECDHE_ECDSA_WITH_AES_256_GCM_SHA384
TLS_ECDHE_RSA_WITH_AES_256_GCM_SHA384
...
Displaying the Ciphers Directory Server Uses
# dsconf -D "cn=Directory Manager" ldap://server.example.com security ciphers list --enabled
TLS_DHE_RSA_WITH_CHACHA20_POLY1305_SHA256
TLS_DHE_RSA_WITH_AES_256_GCM_SHA384
...
# dsconf -D "cn=Directory Manager" ldap://server.example.com security ciphers list
default
+tls_rsa_aes_128_sha
+tls_rsa_aes_256_sha
...
default keyword refers to the preferred default ciphers provided by the NSS. See Section 9.4.1.3.1, “Displaying the Default Ciphers”.
Important
nsSSL3Ciphers attribute to generate the list of ciphers which are actually used. However, if you enabled weak ciphers in nsSSL3Ciphers, but set the allowWeakCiphers parameter to off, which is the default, Directory Server only uses the strong ciphers and displays them in the nsSSLSupportedCiphers read-only attribute.
Updating the List of Enabled Ciphers
- Display the list of currently enabled ciphers. See the section called “Displaying the Ciphers Directory Server Uses”.
- To enable only specific ciphers, update the
nsSSL3Ciphersattribute. For example, to enable only theTLS_RSA_WITH_AES_128_GCM_SHA256cipher:# dsconf -D "cn=Directory Manager" ldap://server.example.com security ciphers set "-all,+TLS_RSA_WITH_AES_128_GCM_SHA256"
- Restart the Directory Server instance:
# dsctl instance_name restart
- Optionally, display the list of enabled ciphers to verify the result. See the section called “Displaying the Ciphers Directory Server Uses”.
9.4.1.3.3. Displaying and Setting the Ciphers Used by Directory Server Using the Web Console
- Open the Directory Server user interface in the web console. See Section 1.4, “Logging Into Directory Server Using the Web Console”.
- Select the instance.
- Open the menu, and select the Security entry.
- On the Cipher Preferences tab, Directory Server displays the currently enabled ciphers.
- If you use different ciphers than the default, select Default Ciphers in the Ciphers Suite field to automatically enable the default ciphers. For details, see Section 9.4.1.3.1, “Displaying the Default Ciphers”.Alternatively, you can set Ciphers Suite to:
All Ciphersto enable all ciphers. Optionally, disable specific ciphers in the Deny Specific Ciphers field.No Ciphersto disable all ciphers. Optionally, enable specific ciphers in the Allow Specific Ciphers field.

- Click .
- If you updated the list of ciphers, restart the Directory Server instance. See Section 1.5.2, “Starting and Stopping a Directory Server Instance Using the Web Console”
9.4.1.4. Starting Directory Server Without a Password File
- If the
ns-slapdDirectory Server process is started by thesystemctlcommand,systemdprompts for the password and automatically passes the input to thesystemd-tty-ask-password-agentutility. For example:# systemctl start dirsrv@instance_name Enter PIN for Internal (Software) Token:
- In rare cases, when the
ns-slapdDirectory Server process is not started by thesystemctlutility and is detached from the terminal, a message is send to all terminals using thewallcommand. For example:Broadcast message from root@server (Fri 2017-01-01 06:00:00 CET): Password entry required for 'Enter PIN for Internal (Software) Token:' (PID 1234). Please enter password with the systemd-tty-ask-password-agent tool!
To enter the password, run:# systemd-tty-ask-password-agent Enter PIN for Internal (Software) Token:
9.4.1.5. Creating a Password File for Directory Server
/etc/dirsrv/slapd-instance_name/pin.txt file. This enables Directory Server to start automatically without prompting for this password.
Warning
- Create the
/etc/dirsrv/slapd-instance_name/pin.txtfile with the following content:- If you use the NSS software cryptography module, which is the default:
Internal (Software) Token:password
- If you use a Hardware Security Module (HSM):
name_of_the_token:password
- Set the permissions:
# chown dirsrv:dirsrv /etc/dirsrv/slapd-instance_name/pin.txt
# chmod 400 /etc/dirsrv/slapd-instance_name/pin.txt
9.4.1.6. Managing How Directory Server Behaves If the Certificate Has Been Expired
nsslapd-validate-cert parameter. You can set it to the following values:
warn: The Directory Server instance starts and log a warning about the expired certificate into the/var/log/dirsrv/slapd-instance_name/errorlog file. This is the default setting.on: Directory Server validates the certificate and the instance fails to start if the certificate has expired.off: Directory Server does not validate the certificate expiration date. The instance starts and no warning will be logged.
Example 9.3. Preventing Directory Server to Start If the Certificate Has Been Expired
- Set the
nsslapd-validate-certparameter toon:# dsconf -D "cn=Directory Manager" ldap://server.example.com config replace nsslapd-validate-cert=on Successfully replaced "nsslapd-validate-cert"
- Restart the Directory Server instance:
# dsctl instance_name restart
9.4.2. Adding the CA Certificate Used By Directory Server to the Trust Store of Red Hat Enterprise Linux
STARTTLS command over LDAP, Directory Server uses this certificate to encrypt the connection. Client utilities use the CA certificate to verify if the server's certificate is valid. By default, these utilities cancel the connection if they do not trust the certificate of the server.
Example 9.4. Possible Connection Errors If Client Utilities Do Not Use the CA Certificate
dsconf# dsconf -D "cn=Directory Manager" ldaps://server.example.com:636 config get Error: {'desc': "Can't contact LDAP server", 'info': 'error:1416F086:SSL routines:tls_process_server_certificate:certificate verify failed (self signed certificate in certificate chain)'}ldapsearch# ldapsearch -H ldaps://server.example.com:636 -D "cn=Directory Manager" -W -b "dc=example,dc=com" -x Enter LDAP Password: ldap_sasl_bind(SIMPLE): Can't contact LDAP server (-1)
- If you do not have a local copy of the CA certificate used by Directory Server:
- List the certificates in the server's NSS database:
# certutil -d /etc/dirsrv/slapd-instance_name/ -L Certificate Nickname Trust Attributes SSL,S/MIME,JAR/XPI Example CA C,, Server-Cert u,u,u - Use the nickname of the CA certificate in the NSS database to export the CA certificate:
# certutil -d /etc/dirsrv/slapd-instance_name/ -L -n "Example CA" -a > /tmp/ds-ca.crt
- Copy the CA certificate to the
/etc/pki/ca-trust/source/anchors/directory. For example:# cp /tmp/ds-ca.crt /etc/pki/ca-trust/source/anchors/
- Rebuild the CA trust database:
# update-ca-trust
9.5. Displaying the Encryption Protocols Enabled in Directory Server
# dsconf -D "cn=Directory Manager" ldap://server.example.com security get
...
sslversionmin: TLS1.2
sslversionmax: TLS1.3
sslVersionMin and sslVersionMax parameter control which encryption protocol versions Directory Server uses. The default of sslVersionMin depends on the system-wide crypto policy you use.
9.6. Setting the Minimum TLS Encryption Protocol Version
sslVersionMin parameter automatically based on the system-wide crypto policy. The following table provides an overview of the TLS version in sslVersionMin Directory Server uses based on the system-wide crypto policy profile:
Table 9.2. Overview of System-wide Crypto Policy Profiles and the Minimum TLS Version They Define
| Profile | Minimum TLS Version |
|---|---|
DEFAULT | TLS 1.2 |
FUTURE | TLS 1.2 |
FIPS | TLS 1.2 |
LEGACY | TLS 1.0 |
sslVersionMin to higher value than the one defined in the crypto policy profile:
# dsconf -D "cn=Directory Manager" ldap://server.example.com security set --tls-protocol-min="TLS1.3"
9.7. Setting the Highest TLS Encryption Protocol Version
# dsconf -D "cn=Directory Manager" ldap://server.example.com security set --tls-protocol-max="protocol_version"
sslVersionMin, then Directory Server sets sslVersionMax to the same value as sslVersionMin.
Important
sslVersionMax parameter, do not set this parameter.
9.8. Using Hardware Security Modules
key4.db and cert9.db, to store the keys and certificates used by the servers.
9.9. Using Certificate-based Client Authentication
subject field of the certificate. If the search return exactly one user entry, Directory Server uses this user for all further operations. Optionally, you can configure that the certificate used for authentication must match the Distinguished Encoding Rules (DER)-formatted certificate stored in the userCertificate attribute of the user.
- Improved efficiency. When using applications that prompt once for the certificate database password and then use that certificate for all subsequent bind or authentication operations, it is more efficient than continuously providing a bind DN and password.
- Improved security. The use of certificate-based authentication is more secure than non-certificate bind operations because certificate-based authentication uses public-key cryptography. Bind credentials cannot be intercepted across the network. If the certificate or device is lost, it is useless without the PIN, so it is immune from third-party interference like phishing attacks.
9.9.1. Setting up Certificate-based Authentication
- Enable encrypted connections. For details, see Section 9.4, “Enabling TLS”.
- Install the CA certificate and set the trust options for client and server connections. See Section 9.3.2, “Installing a CA Certificate”.
- Optionally, verify that the
CT,,trust options for client and server are set for the CA certificate:# dsconf -D "cn=Directory Manager" ldap://server.example.com security ca-certificate get "Example-CA" Certificate Name: Example-CA Subject DN: CN=server.example.com,ST=Queensland,C=AU Issuer DN: CN=server.example.com,,ST=Queensland,C=AU Expires: 2021-05-09 10:57:54 Trust Flags: CT,, - Create the
/etc/dirsrv/slapd-instance_name/certmap.conffile to map information from the certificate to Directory Server users. For example:certmap default default default:DNComps dc default:FilterComps mail,cn default:VerifyCert on certmap example o=Example Inc.,c=US example:DNComps
This configures that for authenticating users who use a certificate that has theo=Example Inc.,c=USissuer Distinguished Name (DN) set, Directory Server does not generate a base DN from the subject of the certificate, because theDNCompsparameter is set empty for this issuer. Additionally, the settings for theFilterCompsandVerifyCertare inherited from the default entry.Certificates that have a different issuer DN than the specified one will use the settings from thedefaultentry and generate the base DN based on thecnattributes in the subject of the certificate. This enables Directory Server to start the search under a specific DN, without searching the whole directory.For all certificates, Directory Server generates the search filter using themailand thecnattribute from the certificate's subject. However, if themaildoes not exist in the subject, Directory Server will automatically use the value of the certificate'seattribute in the subject.For further details and descriptions of the available parameters, see the description of thecertmap.conffile in the Red Hat Directory Server Configuration, Command, and File Reference. - Enable client authentication. For example, to configure that client authentication is optional:
# dsconf -D "cn=Directory Manager" ldap://server.example.com security set --tls-client-auth="allowed"
Alternatively, set the--tls-client-authparameter torequiredto configure that clients must use a certificate to authenticate. - If you enabled that the authenticating certificate must match the one stored in the
userCertificateattribute of the user by settingalias_name:VerifyCert onin the/etc/dirsrv/slapd-instance_name/certmap.conffile, add the certificates to the user entries. See Section 9.9.2, “Adding a Certificate to a User”.
9.9.2. Adding a Certificate to a User
userCertificate binary attribute of the user. If you enabled this feature by setting alias_name:VerifyCert on in the /etc/dirsrv/slapd-instance_name/certmap.conf file, you must add the certificate of the affected users to their directory entry.
Important
userCertificate attribute.
userCertificate attribute of a user:
- If the certificate is not DER-formatted, convert it. For example:
# openssl x509 -in /root/certificate.pem -out /root/certificate.der -outform DER
- Add the certificate to the user's
userCertificateattribute. For example:# ldapmodify -D "cn=Directory Manager" -W -p 389 -h server.example.com -x dn: uid=user_name,ou=People,dc=example,dc=com changetype: modify add: userCertificate userCertificate:< file:///root/example.der
9.9.3. Forcing the EXTERNAL SASL Mechanism for Bind Requests
EXTERNAL SASL mechanism, which signals Directory Server that it needs to use the identity in the certificate for the bind, instead of the credentials in the bind request.
EXTERNAL SASL mechanism and to ignore any other bind method in the request:
# dsconf -D "cn=Directory Manager" ldap://server.example.com config replace nsslapd-force-sasl-external=on
Successfully replaced "nsslapd-force-sasl-external"
9.9.4. Authenticating Using a Certificate
- Set the following environment variables to the corresponding paths for the CA certificate, the user key, and the user certificate. For example:
LDAPTLS_CACERT=/home/user_name/CA.crt
LDAPTLS_KEY=/home/user_name/user.key
LDAPTLS_CERT=/home/user_name/user.crt
Alternatively, set theTLS_CACERT,TLS_KEY, andTLS_CERTparameters in the~/.ldaprcfile. For details, see the TLS OPTIONS section in the ldap.conf(5) man page. - Connect to the server. For example:
# ldapwhoami -H ldaps://server.example.com:636
9.10. Setting up SASL Identity Mapping
9.10.1. About SASL Identity Mapping
scarter@EXAMPLE.COM. This ID must be converted into the DN of the user's Directory Server entry, such as uid=scarter,ou=people,dc=example,dc=com.
dn: cn=sasl,cn=config
objectClass: top
objectClass: nsContainer
cn: sasl
dn: cn=mapping,cn=sasl,cn=config
objectClass: top
objectClass: nsContainer
cn: mapping
nsSaslMapRegexString: The regular expression which is used to map the elements of the suppliedauthid.nsSaslMapFilterTemplate: A template which applies the elements of thensSaslMapRegexStringto create the DN.nsSaslMapBaseDNTemplate: Provides the search base or a specific entry DN to match against the constructed DN.- Optional:
nsSaslMapPriority: Sets the priority of this SASL mapping. The priority value is used, ifnsslapd-sasl-mapping-fallbackis enabled incn=config. For details, see Section 9.10.4.1, “Setting SASL Mapping Priorities”.
dn: cn=mymap,cn=mapping,cn=sasl,cn=config
objectclass:top
objectclass:nsSaslMapping
cn: mymap
nsSaslMapRegexString: \(.*\)@\(.*\)\.\(.*\)
nsSaslMapFilterTemplate: (objectclass=inetOrgPerson)
nsSaslMapBaseDNTemplate: uid=\1,ou=people,dc=\2,dc=\3
nsSaslMapRegexString attribute sets variables of the form \1, \2, \3 for bind IDs which are filled into the template attributes during a search. This example sets up a SASL identity mapping for any user in the ou=People,dc=example,dc=com subtree who belongs to the inetOrgPerson object class.
mconnors@EXAMPLE.COM as the user ID (authid), the regular expression fills in the base DN template with uid=mconnors,ou=people,dc=EXAMPLE,dc=COM as the user ID, and authentication proceeds from there.
Note
dc values are not case sensitive, so dc=EXAMPLE and dc=example are equivalent.
dn: cn=example map,cn=mapping,cn=sasl,cn=config
objectclass: top
objectclass: nsSaslMapping
cn: example map
nsSaslMapRegexString: \(.*\)
nsSaslMapBaseDNTemplate: ou=People,dc=example,dc=com
nsSaslMapFilterTemplate: (cn=\1)
ou=People,dc=example,dc=com subtree which meets the filter cn=userId.
nsSaslMapRegexString attribute. For example:
dn: cn=example map,cn=mapping,cn=sasl,cn=config
objectclass: top
objectclass: nsSaslMapping
cn: example map
nsSaslMapRegexString: \(.*\)@US.EXAMPLE.COM
nsSaslMapBaseDNTemplate: ou=People,dc=example,dc=com
nsSaslMapFilterTemplate: (cn=\1)US.EXAMPLE.COM realm. (Realms are described in Section 9.11.2.1, “About Principals and Realms”.)
ldap1.example.com server to the cn=replication manager,cn=config entry. The mapping entry itself is created on the second server, such as ldap2.example.com.
dn: cn=z,cn=mapping,cn=sasl,cn=config
objectclass: top
objectclass: nsSaslMapping
cn: z
nsSaslMapRegexString: ldap/ldap1.example.com@EXAMPLE.COM
nsSaslMapBaseDNTemplate: cn=replication manager,cn=config
nsSaslMapFilterTemplate: (objectclass=*)
dn: cn=y,cn=mapping,cn=sasl,cn=config
objectclass: top
objectclass: nsSaslMapping
cn: y
nsSaslMapRegexString: ldap/ldap1.example.com
nsSaslMapBaseDNTemplate: cn=replication manager,cn=config
nsSaslMapFilterTemplate: (objectclass=*)
nsSaslMapPriority parameter, there is no way to specify the order that mappings are processed. However, there is a way to control how SASL mappings are processed: the name. The Directory Server processes SASL mappings in reverse ASCII order. In the past two example, then the cn=z mapping (the first example) is processed first. If there is no match, the server processes the cn=y mapping (the second example).
Note
ConfigFile directive. Using silent installation is described in the Installation Guide.
9.10.2. Default SASL Mappings for Directory Server
This matches a Kerberos principal using a two part realm, such as user@example.com. The realm is then used to define the search base, and the user ID (authid) defines the filter. The search base is dc=example,dc=com and the filter of (uid=user).
dn: cn=Kerberos uid mapping,cn=mapping,cn=sasl,cn=config
objectClass: top
objectClass: nsSaslMapping
cn: Kerberos uid mapping
nsSaslMapRegexString: \(.*\)@\(.*\)\.\(.*\)
nsSaslMapBaseDNTemplate: dc=\2,dc=\3
nsSaslMapFilterTemplate: (uid=\1)
This mapping matches an authid that is a valid DN (defined in RFC 2829) prefixed by dn:. The authid maps directly to the specified DN.
dn: cn=rfc 2829 dn syntax,cn=mapping,cn=sasl,cn=config
objectClass: top
objectClass: nsSaslMapping
cn: rfc 2829 dn syntax
nsSaslMapRegexString: ^dn:\(.*\)
nsSaslMapBaseDNTemplate: \1
nsSaslMapFilterTemplate: (objectclass=*)
This mapping matches an authid that is a UID prefixed by u:. The value specified after the prefix defines a filter of (uid=value). The search base is hard-coded to be the suffix of the default userRoot database.
dn: cn=rfc 2829 u syntax,cn=mapping,cn=sasl,cn=config
objectClass: top
objectClass: nsSaslMapping
cn: rfc 2829 u syntax
nsSaslMapRegexString: ^u:\(.*\)
nsSaslMapBaseDNTemplate: dc=example,dc=com
nsSaslMapFilterTemplate: (uid=\1)
This mapping matches an authid that is any plain string that does not match the other default mapping rules. It use this value to define a filter of (uid=value). The search base is hard-coded to be the suffix of the default userRoot database.
dn: cn=uid mapping,cn=mapping,cn=sasl,cn=config
objectClass: top
objectClass: nsSaslMapping
cn: uid mapping
nsSaslMapRegexString: ^[^:@]+$
nsSaslMapBaseDNTemplate: dc=example,dc=com
nsSaslMapFilterTemplate: (uid=&)
9.10.3. Configuring SASL Identity Mapping
9.10.3.1. Configuring SASL Identity Mapping Using the Command Line
dsconf utility to add the identity mapping scheme.
- Add the identity mapping scheme. For example:
# dsconf -D "cn=Directory Manager" ldap://server.example.com sasl create --cn "example_map" --nsSaslMapRegexString "\(.*\)" --nsSaslMapBaseDNTemplate "ou=People,dc=example,dc=com" --nsSaslMapFilterTemplate "(cn=\1)" --nsSaslMapPriority 50
Successfully created example_map
This matches any user's common name and maps it to the result of the subtree search with baseou=People,dc=example,dc=com, based on the filtercn=userId. - Restart the instance:
# dsctl instance_name restart
Note
dsconf adds the mapping to the end of the list, regardless of its ASCII order.
9.10.3.2. Configuring SASL Identity Mapping Using the Web Console
- Open the Directory Server user interface in the web console. See Section 1.4, “Logging Into Directory Server Using the Web Console”.
- Select the instance.
- Open the menu, and select SASL Settings & Mappings.
- Click .
- Fill the form. For example:

- Click .
9.10.4. Enabling SASL Mapping Fallback
nsslapd-sasl-mapping-fallback parameter:
# dsconf -D "cn=Directory Manager" ldap://server.example.com config replace nsslapd-sasl-mapping-fallback=on
Successfully replaced "nsslapd-sasl-mapping-fallback"
9.10.4.1. Setting SASL Mapping Priorities
nsslapd-sasl-mapping-fallback attribute, you can optionally set the nsSaslMapPriority attribute in mapping configurations to prioritize them. The nsSaslMapPriority attribute supports values from 1 (highest priority) to 100 (lowest priority). The default is 100.
cn=Kerberos uid mapping,cn=mapping,cn=sasl,cn=config mapping:
# ldapmodify -D "cn=Directory Manager" -W -p 389 -h server.example.com -x

dn: cn=Kerberos uid mapping,cn=mapping,cn=sasl,cn=config
changetype: modify
replace: nsSaslMapPriority
nsSaslMapPriority: 1
9.11. Using Kerberos GSS-API with SASL
9.11.1. Authentication Mechanisms for SASL in Directory Server
- PLAIN. PLAIN sends cleartext passwords for simple password-based authentication.
- EXTERNAL. EXTERNAL, as with TLS, performs certificate-based authentication. This method uses public keys for strong authentication.
- CRAM-MD5.
CRAM-MD5is a weak, simple challenge-response authentication method. It does not establish any security layer.Warning
Red Hat recommends not using the insecureCRAM-MD5mechanism. - DIGEST-MD5.
DIGEST-MD5is a weak authentication method for LDAPv3 servers.Warning
Red Hat recommends not using the insecureDIGGEST-MD5mechanism. - Generic Security Services (GSS-API). Generic Security Services (GSS) is a security API that is the native way for UNIX-based operating systems to access and authenticate Kerberos services. GSS-API also supports session encryption, similar to TLS. This allows LDAP clients to authenticate with the server using Kerberos version 5 credentials (tickets) and to use network session encryption.For Directory Server to use GSS-API, Kerberos must be configured on the host machine. See Section 9.11, “Using Kerberos GSS-API with SASL”.
Note
GSS-API and, thus, Kerberos are only supported on platforms that have GSS-API support. To use GSS-API, it may be necessary to install the Kerberos client libraries; any required Kerberos libraries will be available through the operating system vendor.
9.11.2. About Kerberos in Directory Server
9.11.2.1. About Principals and Realms
Note
uid=user_name/[server_instance],cn=realm,cn=mechanism,cn=auth
engineering realm of the European division of example.com uses the following association to access a server in the US realm:
uid=mconnors/cn=Europe.example.com,cn=engineering,cn=gssapi,cn=auth
accounting realm of US.example.com, does not have to specify a realm when to access a local server:
uid=bjensen,cn=accounting,cn=gssapi,cn=auth
Note
9.11.2.2. About the KDC Server and Keytabs
ldap service name in a Kerberos principal. For example:
ldap/server.example.com@EXAMPLE.COM
Note
9.11.3. Configuring SASL Authentication at Directory Server Startup
/etc/sysconfig/dirsrv file.
/etc/sysconfig/ directory named dirsrv-instance. For example, dirsrv-example. The default dirsrv file can be used if there is a single instance on a host.
KRB5_KTNAME line in the /etc/sysconfig/dirsrv (or instance-specific) file, and set the keytab location for the KRB5_KTNAME variable. For example:
# In order to use SASL/GSSAPI the directory
# server needs to know where to find its keytab
# file - uncomment the following line and set
# the path and filename appropriately
KRB5_KTNAME=/etc/dirsrv/krb5.keytab
9.12. Setting SASL Mechanisms
supportedSASLMechanisms parameter. To enable specific SASL mechanisms, set the nsslapd-allowed-sasl-mechanisms attribute in the cn=config entry. For example, to enable only the GSSAPI and DIGEST-MD5 mechanism, run:
# dsconf -D "cn=Directory Manager" ldap://server.example.com config replace nsslapd-allowed-sasl-mechanisms="GSSAPI, DIGEST-MD5"
Successfully replaced "nsslapd-allowed-sasl-mechanisms"
Note
EXTERNAL is not listed in the nsslapd-allowed-sasl-mechanisms parameter, this mechanism is always enabled.
9.13. Using SASL with LDAP Clients
ldapsearch, pass the -Y SASL_mechanism to the command. For example:
- To use the
GSSAPISASL mechanism over the LDAP protocol:# ldapsearch -Y GSSAPI -U "dn:uid=user_name,ou=people,dc=example,dc=com" -R EXAMPLE.COM -H ldap://server.example.com -b "dc=example,dc=com"
- To use the
PLAINSASL mechanism over the LDAPS protocol:# ldapsearch -Y PLAIN -D "uid=user_name,ou=people,dc=example,dc=com" -W -H ldaps://server.example.com -b "dc=example,dc=com"
Note
authzid value supplied by the client.
Chapter 10. Configuring Attribute Encryption
Note
uid attribute is encrypted, the value is encrypted in the entry but is displayed in the DN:
dn: uid=jsmith1234,ou=People,dc=example,dc=com ... uid:: Sf04P9nJWGU1qiW9JJCGRg==
eq and pres indexing. The contents of the index files that are normally derived from attribute values are also encrypted to prevent an attacker from recovering part or all of the encrypted data from an analysis of the indexes.
10.1. Encryption Keys
Warning
Warning
10.2. Encryption Ciphers
- Advanced Encryption Standard (AES)
- Triple Data Encryption Standard (3DES)
Note
10.3. Configuring Attribute Encryption
10.3.1. Enabling Encryption of an Attribute Using the Command Line
telephoneNumber attributes in the userRoot database AES-encrypted:
- Optionally, to encrypt existing
telephoneNumberattributes, export the database. See Section 10.4.1, “Exporting an Encrypted Database”. - Enable AES encryption for the
telephoneNumberattribute in theuserRootdatabase:# dsconf -D "cn=Directory Manager" ldap://server.example.com backend attr-encrypt --add-attr telephoneNumber userRoot
- If you exported the database to encrypt also existing attributes, reimport the database. See Section 10.4.2, “Importing an LDIF File into an Encrypted Database”.
10.3.2. Enabling Encryption of an Attribute Using the Web Console
telephoneNumber attributes in the database AES-encrypted:
- Optionally, to encrypt existing
telephoneNumberattributes, export the database. See Section 10.4.1, “Exporting an Encrypted Database”. - Open the Directory Server user interface in the web console. See Section 1.4, “Logging Into Directory Server Using the Web Console”.
- Select the instance.
- Open the menu.
- Select the suffix entry.
- Open the Encrypted Attributes tab.
- Enter the name of the attribute to be encrypted.

- Click .
- If you exported the database to encrypt also existing attributes, reimport the database. See Section 10.4.2, “Importing an LDIF File into an Encrypted Database”.
10.3.3. Disabling Encryption for an Attribute Using the Command Line
telephoneNumber attributes encrypted in the userRoot database:
- Optionally, to decrypt existing
telephoneNumberattributes, export the database. See Section 10.4.1, “Exporting an Encrypted Database”. - Disable encryption for the
telephoneNumberattribute in theuserRootdatabase:# dsconf -D "cn=Directory Manager" ldap://server.example.com backend attr-encrypt --del-attr telephoneNumber userRoot
- If you exported the database to decrypt existing attributes, reimport the database. See Section 10.4.2, “Importing an LDIF File into an Encrypted Database”.
10.3.4. Disabling Encryption of an Attribute Using the Web Console
telephoneNumber attributes in the database AES-encrypted:
- Optionally, to encrypt existing
telephoneNumberattributes, export the database. See Section 10.4.1, “Exporting an Encrypted Database”. - Open the Directory Server user interface in the web console. See Section 1.4, “Logging Into Directory Server Using the Web Console”.
- Select the instance.
- Open the menu.
- Select the suffix entry.
- Open the Encrypted Attributes tab.
- Click the button to the right of the
telephoneNumberattribute.
- Click to confirm.
- If you exported the database to decrypt existing attributes, reimport the database. See Section 10.4.2, “Importing an LDIF File into an Encrypted Database”.
10.3.5. General Considerations after Enabling Attribute Encryption
- Unencrypted data can persist in the server's database page pool backing file. To remove this data:
- Stop the instance:
# dsctl instance_name stop
- Delete the
/var/lib/dirsrv/slapd-instance_name/db/guardianfile:# rm /var/lib/dirsrv/slapd-instance_name/db/guardian
- Start the instance:
# dsctl instance_name start
- After you enabled encryption and successfully imported the data, delete the LDIF file with the unencrypted data.
- After enabling encryption, Directory Server deletes and creates a new database when reimporting the data.
- The replication log file is not encrypted. To protect this data, store it on an encrypted disk.
- Data in the server's memory (RAM) is unencrypted and can be temporarily stored in swap partitions. To protect this data, set up encrypted swap space.
Important
10.4. Exporting and Importing an Encrypted Database
10.4.1. Exporting an Encrypted Database
-E parameter to the dsconf command.
userRoot database with decrypted attributes:
# dsconf -D "cn=Directory Manager" ldap://server.example.com backend export -E userRootou=People,dc=example,dc=com entry:
# dsconf -D "cn=Directory Manager" ldap://server.example.com backend export -E -s "ou=People,dc=example,dc=com" userRoot
dsconf to export data, see Section 6.2.1.1.1, “Exporting a Databases Using the dsconf backend export Command”.
10.4.2. Importing an LDIF File into an Encrypted Database
- Stop the Directory Server instance:
# dsctl instance_name stop
- If you replaced the certificate database between the last export and this import, edit the
/etc/dirsrv/slapd-instance_name/dse.ldiffile, and remove the following entries including their attributes:cn=AES,cn=encrypted attribute keys,cn=database_name,cn=ldbm database,cn=plugins,cn=configcn=3DES,cn=encrypted attribute keys,cn=database_name,cn=ldbm database,cn=plugins,cn=config
Important
Remove the entries for all databases. If any entry that contains thensSymmetricKeyattribute is left in the/etc/dirsrv/slapd-instance_name/dse.ldiffile, Directory Server will fail to start. - Import the LDIF file. For example, to import the
/tmp/example.ldifinto theuserRootdatabase:# dsctl instance_name ldif2db --encrypted userRoot /tmp/example.ldifThe--encryptedparameter enables the script to encrypt attributes configured for encryption during the import. - Start the instance:
# dsctl instance_name start
10.5. Updating the TLS Certificates Used for Attribute Encryption
- Export the database with decrypted attributes. See Section 10.4.1, “Exporting an Encrypted Database”.
- Create a new Certificate Signing Request (CSR). See Section 9.3.1, “Creating a Certificate Signing Request”.
- Install the new certificate. See Section 9.3.4, “Installing a Server Certificate”.
- Stop the Directory Server instance:
# dsctl instance_name stop
- Edit the
/etc/dirsrv/slapd-instance_name/dse.ldiffile and remove the following entries including their attributes:cn=AES,cn=encrypted attribute keys,cn=database_name,cn=ldbm database,cn=plugins,cn=configcn=3DES,cn=encrypted attribute keys,cn=database_name,cn=ldbm database,cn=plugins,cn=config
Important
Remove the entries for all databases. If any entry that contains thensSymmetricKeyattribute is left in the/etc/dirsrv/slapd-instance_name/dse.ldiffile, Directory Server will fail to start. - Import the database. See Section 10.4.2, “Importing an LDIF File into an Encrypted Database”.
- Start the instance:
# dsctl instance_name start
Chapter 11. Managing FIPS Mode Support
Enabling FIPS Mode Support
- Optionally, enable FIPS mode in Red Hat Enterprise Linux. For details, see the corresponding section in the Red Hat Enterprise Linux 8 Security hardening documentation.
- Enable FIPS mode for the network security services (NSS) database:
# modutil -dbdir /etc/dirsrv/slapd-instance_name/ -fips true
- Restart the Directory Server instance:
# dsctl instance_name restart
Disabling FIPS Mode Support
- Disable FIPS mode for the network security services (NSS) database:
# modutil -dbdir /etc/dirsrv/slapd-instance_name/ -fips false
- Restart the Directory Server instance:
# dsctl instance_name restart
Chapter 12. Managing the Directory Schema
12.1. Overview of Schema
12.1.1. Default Schema Files
/usr/share/dirsrv/schema/ directory. The files in this directory are used as templates for new Directory Server instances. Adding a new schema into this directory will make it available to any new instances.
12.1.2. Object Classes
person and inetOrgPerson), groups (groupOfNames), locations (locality), organizations and divisions (organization and organizationalUnit), and equipment (device).
objectclasses line, then followed by its OID, name, a description, its direct superior object class (an object class which is required to be used in conjunction with the object class and which shares its attributes with this object class), and the list of required (MUST) and allowed (MAY) attributes.
Example 12.1. person Object Class Schema Entry
objectClasses: ( 2.5.6.6 NAME 'person' DESC 'Standard LDAP objectclass' SUP top MUST ( sn $ cn ) MAY ( description $ seeAlso $ telephoneNumber $ userPassword ) X-ORIGIN 'RFC 4519' )
MUST keyword in the schema) and of allowed attributes (MAY keyword in the schema). Required attributes must be present in entries using the specified object class, while allowed attributes are permissible and available for the entry to use, but are not required for the entry to be valid.
person object class requires the cn, sn, and objectClass attributes and allows the description, seeAlso, telephoneNumber, and userPassword attributes.
inetOrgPerson object class. In that case, the entry must also include the superior object class for inetOrgPerson, organizationalPerson, and the superior object class for organizationalPerson, which is person:
objectClass: top objectClass: person objectClass: organizationalPerson objectClass: inetOrgPerson
objectclasses attribute for the cn=schema entry. The objectclasses attribute has the format:
objectclasses: ( definition )
- An OID, usually a dot-separated number
- A unique name, in the form
NAMEname - A description, in the form
DESCdescription - The superior, or parent, object class for this object class, in the form
SUPobject_class; if there is no related parent, useSUP top - The word
AUXILIARY, which gives the type of entry to which the object class applies;AUXILIARYmeans it can apply to any entry - A list of required attributes, preceded by the word
MUST; to include multiple attributes, enclose the group in parentheses and separate with attributes with dollar signs ($) - A list of allowed attributes, preceded by the word
MAY; to include multiple attributes, enclose the group in parentheses and separate with attributes with dollar signs ($)
/etc/dirsrv/slapd-instance_name/schema/99user.ldif when using the command line or the web console to modify cn=schema entries.
12.1.3. Attributes
cn attribute is used to store a person's full name, such as cn: John Smith.
givenname: John surname: Smith mail: jsmith@example.com
- OID
- name
- syntax matching rule (optional)
- substring matching rules (optional)
- ordering rule (optional)
- description (optional)
- syntax
- single-valued or multi-valued attribute
- details about where the attribute is defined
uid Attribute Schema Entry”.
Example 12.2. uid Attribute Schema Entry
( 0.9.2342.19200300.100.1.1 NAME ( 'uid' 'userid' ) EQUALITY caseIgnoreMatch SUBSTR caseIgnoreSubstringsMatch SYNTAX 1.3.6.1.4.1.1466.115.121.1.15 X-ORIGIN 'RFC 4519' )
12.1.3.1. Directory Server Attribute Syntaxes
12.1.4. Extending the Schema
99user.ldif. It is also possible to create a new, separate schema file and include it with the default schema files.
- Planning and defining OIDs for the new schema. Schema elements are recognized by the server by their OID, so it is important for the OIDs to be unique and organized. Directory Server itself does not manage OIDs, but there are some best practices described in Section 12.2, “Managing Object Identifiers”.
- Create the new attributes. Attribute definitions require a name, a syntax (the allowed format of the values), an OID, and a description of whether the attribute can only be used once per entry or multiple times.
- Create an object class to contain the new attributes. An object class lists the required attributes for that entry type and the allowed (permissible) attributes. Because the default schema should never be altered, if any new attributes are created, then they should be added to a custom object class.
/usr/share/dirsrv/schema/. Become familiar with the available schema; then plan what information attributes are missing and how best to fill those gaps with custom attributes. Planning the schema is covered in the Deployment Guide.
Warning
- Keep the schema as simple as possible.
- Reuse existing schema elements whenever possible.
- Minimize the number of mandatory attributes defined for each object class.
- Do not define more than one object class or attribute for the same purpose.
- Do not modify any existing definitions of attributes or object classes.
Note
12.1.5. Schema Replication
cn=schema sub-tree, Directory Server stores the changes in the local /etc/dirsrv/slapd-instance_name/schema/99user.ldif file, including a change state number (CSN). The updated schema is not automatically replicated to other replicas. The schema replication starts when directory content is updated in the replicated tree. For example, if you update a user or group entry after modifying the schema, the supplier compares the CSN stored in the nsSchemaCSN attribute with the one on the consumer. If the remote CSN is lower than the one on the supplier, the schema is replicated to the consumer. For a successful replication, all object classes and attribute types on the supplier must be a superset of the consumer's definition.
Example 12.3. Schema subsets and supersets
- On
server1, thedemoobject class allows thea1,a2, anda3attributes. - On
server2, thedemoobject class allows thea1anda3attributes.
demo object class on server1 is a superset of the object class on server2. During the validation phase, when the schema is being replicated or accepted, Directory Server retrieves the superset definitions. For example, if a consumer detects that an object class in the local schema allows less attributes than the object class in the supplier schema, the local schema is updated.
nsSchemaCSN attributes are identical on both servers and no longer compared at the beginning of a replication session.
- The schema on one host is a subset of the schema of another host.For example, in Example 12.3, “Schema subsets and supersets”, the schema definition of the
demoobject class onserver2is a subset of the object class onserver1. Subsets can also occur for attributes (a single-value attribute is a subset of a multi-value attribute) and attribute syntaxes (IA5is a subset ofOctet_string). - When definitions in supplier schema and consumer schema need to be merged.Directory Server does not support merging schemas. For example, if an object class on one server allows the
a1,a2, anda3attributes anda1,a3, anda4on the other, the schemas are not subsets and cannot be merged. - Schema files other than
/etc/dirsrv/slapd-instance_name/schema/99user.ldifare used.Directory Server enables you to add additional schema files in the/etc/dirsrv/slapd-instance_name/schema/directory. However, only the CSN in the99user.ldiffile is updated. For this reasons, other schema file are only used locally and are not automatically transferred to replication partners. Copy the updated schema file manually to the consumers and reload the schema. For details, see Section 12.10, “Dynamically Reloading Schema”.To avoid duplicate schema definitions and to enable automatic replication, store all custom schema in the/etc/dirsrv/slapd-instance_name/schema/99user.ldiffile. For further information about creating custom schema files, see Section 12.9, “Creating Custom Schema Files”.
12.2. Managing Object Identifiers
1, and there can be a branch for attributes at 1.1 and for object classes at 1.2.
Note
12.3. Creating an Object Class
12.3.1. Creating an Object Class Using the Command Line
ldapmodify utility to create a new object class entry. For example:
# dsconf -D "cn=Directory Manager" ldap://server.example.com schema objectclasses add examplePerson --oid="2.16.840.1133730.2.123" --desc="Example Person Object Class" --sup="inetOrgPerson" --kind="AUXILIARY" --must="cn" --may exampleDateOfBirth examplePreferredOS
12.3.2. Creating an Object Class Using the Web Console
- Open the Directory Server user interface in the web console. See Section 1.4, “Logging Into Directory Server Using the Web Console”.
- Select the instance.
- Select → .
- Click .
- Select the parent object class.
- Enter an object class name and, optionally, set a object identifier (OID).
- Select the object class kind.
- Enter the required and allowed attributes in the corresponding fields:

- Click .
12.4. Updating an Object Class
12.4.1. Updating an Object Class Using the Command Line
dsconf utility to update an object class entry. For example:
# dsconf -D "cn=Directory Manager" ldap://server.example.com schema objectclasses replace examplePerson --oid="2.16.840.1133730.2.123" --desc="Example Person Object Class" --sup="inetOrgPerson" --kind="AUXILIARY" --must="cn" --may exampleDisplayName exampleAlias
12.4.2. Updating an Object Class Using the Web Console
- Open the Directory Server user interface in the web console. See Section 1.4, “Logging Into Directory Server Using the Web Console”.
- Select the instance.
- Select → .
- Click the button to the right of the object class entry you want to edit.
- Select .
- Update the parameters.

- Click .
12.5. Removing an Object Class
Warning
12.5.1. Removing an Object Class Using the Command Line
ldapmodify utility to delete an object class entry. For example, to delete the examplePerson object class:
- Remove the unwanted attributes from any entries that use them. For details, see Section 12.8, “Removing an Attribute”.
- Delete the object class entry:
# dsconf -D "cn=Directory Manager" ldap://server.example.com schema objectclasses delete examplePerson
12.5.2. Removing an Object Class Using the Web Console
- Open the Directory Server user interface in the web console. See Section 1.4, “Logging Into Directory Server Using the Web Console”.
- Select the instance.
- Select → .
- Click the button next to the object class entry you want to remove.
- Select .
- Click to confirm.
12.6. Creating an Attribute
12.6.1. Creating an Attribute Using the Command Line
ldapmodify utility to create a new attribute. For example:
# dsconf -D "cn=Directory Manager" ldap://server.example.com schema attributetypes add dateofbirth --desc="For employee birthdays" --syntax="1.3.6.1.4.1.1466.115.121.1.15" --single-value --x-origin="Example defined"
12.6.2. Creating an Attribute Using the Web Console
- Open the Directory Server user interface in the web console. See Section 1.4, “Logging Into Directory Server Using the Web Console”.
- Select the instance.
- Select → .
- Click .
- Fill the parameters.

- Click .
12.7. Updating an attribute
12.7.1. Updating an Attribute Using the Command Line
dsconf utility to update an attribute entry. For example:
# dsconf -D "cn=Directory Manager" ldap://server.example.com schema attributetypes replace dateofbirth --desc="Employee birthday" --syntax="1.3.6.1.4.1.1466.115.121.1.15" --single-value --x-origin="Example defined"
12.7.2. Updating an Attribute Using the Web Console
- Open the Directory Server user interface in the web console. See Section 1.4, “Logging Into Directory Server Using the Web Console”.
- Select the instance.
- Select → .
- Click the button next to the attribute you want to edit.
- Select .
- Update the parameters.
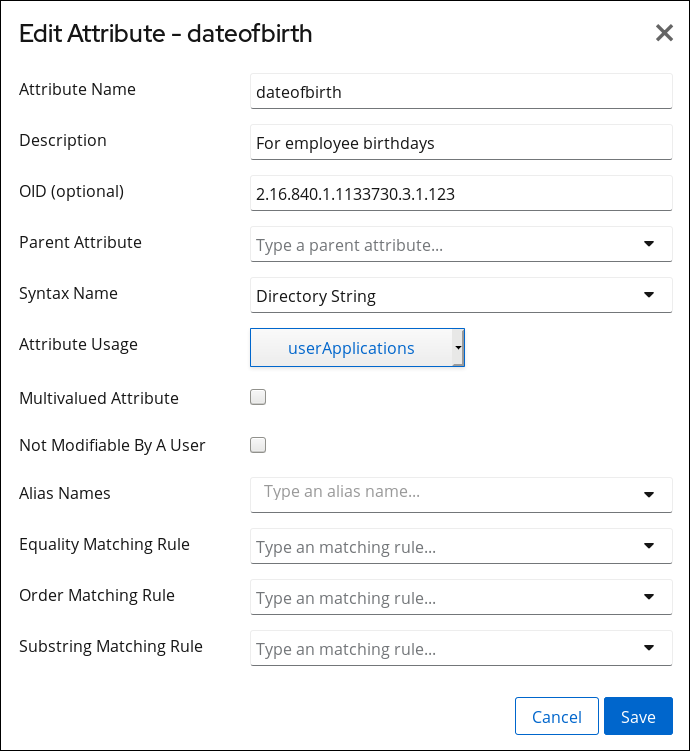
- Click .
12.8. Removing an Attribute
12.8.1. Removing an Attribute Using the Command Line
ldapmodify utility to delete an attribute. For example:
- Remove the unwanted attributes from any entries which use them.
- Delete the attribute:
# dsconf -D "cn=Directory Manager" ldap://server.example.com schema attributetypes remove dateofbirth
12.8.2. Removing an Attribute Using the Web Console
- Open the Directory Server user interface in the web console. See Section 1.4, “Logging Into Directory Server Using the Web Console”.
- Select the instance.
- Select → .
- Click the button next to the attribute you want to remove.
- Select .
- Click to confirm.
12.9. Creating Custom Schema Files
cn=schema entry. Each attribute and object class is added as an attribute to that entry. Here are the requirements for creating a schema file:
- The first line must be
dn: cn=schema. - The schema file can include both attributes and object classes, but it can also include only one or the other.
- If both attributes and object classes are defined in the style, all of the attributes must be listed in the file first, then the object classes.
- The object classes can use attributes defined in other schema files.
- The file must be named in the format
[1-9][0-9]text.ldif.The file must always begin with two numbers. Numerically, the schema file cannot be loaded before the core configuration schema (which begin with00and01).Also, the Directory Server always writes its custom schema to the numerically and alphabetically highest named schema file in the schema directory. It expects this file to be99user.ldif. If this file is not99user.ldif, the server can experience problems. So, always make sure custom schema files are at least alphabetically lower than99user.ldif. The name99alpha.ldifis okay; the name99zzz.ldifis not.
attributetypes attributes to the schema, with five components:
- An OID, usually a dot-separated number
- A unique name, in the form
NAMEname - A description, in the form
DESCdescription - The OID for the syntax of the attribute values, discussed in Section 12.1.3.1, “Directory Server Attribute Syntaxes”, in the form
SYNTAXOID - Optionally, the source where the attribute is defined
attributetypes: ( 1.2.3.4.5.6.1 NAME 'dateofbirth' DESC 'For employee birthdays' SYNTAX 1.3.6.1.4.1.1466.115.121.1.15 SINGLE-VALUED X-ORIGIN 'Example defined')
objectclasses attributes, although there is slightly more flexibility in how the object class is defined. The only required configurations are the name and OID for the object class; all other configuration depends on the needs for the object class:
- An OID, usually a dot-separated number
- A unique name, in the form
NAMEname - A description, in the form
DESCdescription - The superior, or parent, object class for this object class, in the form
SUPobject_class; if there is no related parent, useSUP top - The word
AUXILIARY, which gives the type of entry to which the object class applies;AUXILIARYmeans it can apply to any entry - A list of required attributes, preceded by the word
MUST; to include multiple attributes, enclose the group in parentheses and separate with attributes with dollar signs ($) - A list of allowed attributes, preceded by the word
MAY; to include multiple attributes, enclose the group in parentheses and separate with attributes with dollar signs ($)
objectclasses: ( 2.16.840.1133730.2.123 NAME 'examplePerson' DESC 'Example Person Object Class' SUP inetOrgPerson AUXILIARY MUST cn MAY (exampleDateOfBirth $ examplePreferredOS) )
Example 12.4. Example Schema File
dn: cn=schema attributetypes: ( 2.16.840.1133730.1.123 NAME 'dateofbirth' DESC 'For employee birthdays' SYNTAX 1.3.6.1.4.1.1466.115.121.1.15 X-ORIGIN 'Example defined') objectclasses: ( 2.16.840.1133730.2.123 NAME 'examplePerson' DESC 'Example Person Object Class' SUP inetOrgPerson AUXILIARY MAY (dateofbirth) )
/etc/dirsrv/slapd-instance/schema. The schema in these files are not loaded and available to the server unless the server is restarted or a dynamic reload task is run.
Important
/usr/share/data/ directory, copy the schema file to the /usr/share/dirsrv/schema/ directory. If you require that a standard schema is only available to a specific instance, copy the schema file to the /etc/dirsrv/slapd-instance_name/schema/ directory, but use a different file name in the destination directory. Otherwise, Directory Server renames the file during an upgrade and appends the .bak suffix.
12.10. Dynamically Reloading Schema
- The
dsconf schema reloadcommand. See Section 12.10.1, “Dynamically Reloading the Schema Using thedsconf schema reloadCommand” - A
cn=tasksentry. See Section 12.10.2, “Dynamically Reloading the Schema Using acn=tasksEntry”
Note
/usr/share/dirsrv/schema/ directory.
12.10.1. Dynamically Reloading the Schema Using the dsconf schema reload Command
dsconf schema reload command to reload the schema:
# dsconf -D "cn=Directory Manager" ldap://server.example.com schema reload Attempting to add task entry... This will fail if Schema Reload plug-in is not enabled. Successfully added task entry cn=schema_reload_2018-08-28T09:45:48.027962,cn=schema reload task,cn=tasks,cn=config To verify that the schema reload operation was successful, please check the error logs
nsslapd-schemadir parameter. Optionally, pass the -d directory option to the command to reload the schema stored in a different directory.
12.10.2. Dynamically Reloading the Schema Using a cn=tasks Entry
cn=tasks,cn=config entry in the Directory Server configuration is a container entry for temporary entries the server uses to manage tasks. To initiate a schema reload operation, create a task in the cn=schema reload task,cn=tasks,cn=config entry.
nsslapd-schemadir parameter. For example, to reload the schema files stored in the directory set in this parameter:
# ldapadd -D "cn=Directory Manager" -W -p 389 -h server.example.com -x dn: cn=example_schema_reload,cn=schema reload task,cn=tasks,cn=config objectclass: extensibleObject cn: cn=example_schema_reload
schemadir parameter, to reload the schema stored in a different directory. For example:
# ldapadd -D "cn=Directory Manager" -W -p 389 -h server.example.com -x dn: cn=example_schema_reload,cn=schema reload task,cn=tasks,cn=config objectclass: extensibleObject cn: cn=example_schema_reload schemadir: /example/schema/
cn=schema reload task,cn=tasks,cn=config entry, see the cn=schema reload task section in the Red Hat Directory Server Configuration, Command, and File Reference.
12.10.3. Reloading The Schema in a Replication Topology
- Stop replication. See Section 15.9, “Disabling and Re-enabling Replication”.
- Copy the new schema file over and run the schema reload task for every supplier and replica server. See:
- Restart replication. See Section 15.9, “Disabling and Re-enabling Replication”.
12.10.4. Schema Reload Errors
[06/Jan/2009:17:52:04.001214874 -0500] schemareload - Schema reload task starts (schema dir: default) ... [06/Jan/2009:17:52:04.754335904 -0500] schemareload - Schema validation passed. [06/Jan/2009:17:52:04.894255328 -0500] schemareload - Schema reload task finished.
[..] schemareload - Schema reload task starts (schema dir: /bogus) ... [..] schema - No schema files were found in the directory /bogus [..] schema_reload - schema file validation failed [..] schemareload - Schema validation failed.
12.11. Turning Schema Checking On and Off
- The object classes and attributes using are defined in the directory schema.
- The attributes required for an object class are contained in the entry.
- Only attributes allowed by the object class are contained in the entry.
Important
12.11.1. Turning Schema Checking On and Off Using the Command Line
nsslapd-schemacheck parameter. For example to disable schema checking:
# dsconf -D "cn=Directory Manager" ldap://server.example.com config replace nsslapd-schemacheck=off Successfully replaced "nsslapd-schemacheck"
nsslapd-schemacheck parameter, see the description of the parameter in the Red Hat Directory Server Configuration, Command, and File Reference.
12.11.2. Turning Schema Checking On and Off Using the Web Console
- Open the Directory Server user interface in the web console. See Section 1.4, “Logging Into Directory Server Using the Web Console”.
- Select the instance.
- Open the , and select the entry.
- Open the Advanced Settings tab.
- To enable schema checking, select the Enable Schema Checking check box. To disable the feature, clear the check box.
- Click .
12.12. Using Syntax Validation
telephoneNumber attribute actually has a valid telephone number for its value.
Important
12.12.1. About Syntax Validation
12.12.2. Syntax Validation and Other Directory Server Operations
For normal LDAP operations, an attribute is encrypted just before the value is written to the database. This means That encryption occurs after the attribute syntax is validated.
-E flag with db2ldif and ldif2db, which allows syntax validation to occur just fine for the import operation. However, if the encrypted database is exported without using the -E flag (which is not supported), then an LDIF with encrypted values is created. When this LDIF is then imported, the encrypted attributes cannot be validated, a warning is logged, and attribute validation is skipped in the imported entry.
There may be differences in the allowed or enforced syntaxes for attributes in Windows Active Directory entries and Red Hat Directory Server entries. In that case, the Active Directory values could not be properly synchronized over because syntax validation enforces the RFC standards in the Directory Server entries.
If the Directory Server 11 instance is a supplier which replicates its changes to a consumer, then there is no issue with using syntax validation. However, if the supplier in replication is an older version of Directory Server or has syntax validation disabled, then syntax validation should not be used on the consumer because the Directory Server 11 consumer may reject attribute values that the supplier allows.
12.12.2.1. Turning Syntax Validation On and Off Using the Command Line
nsslapd-syntaxcheck parameter. For example to disable syntax validation:
# dsconf -D "cn=Directory Manager" ldap://server.example.com config replace nsslapd-syntaxcheck=off Successfully replaced "nsslapd-syntaxcheck"
nsslapd-syntaxcheck parameter, see the description of the parameter in the Red Hat Directory Server Configuration, Command, and File Reference.
12.12.2.2. Turning Syntax Validation On and Off Using the Web Console
- Open the Directory Server user interface in the web console. See Section 1.4, “Logging Into Directory Server Using the Web Console”.
- Select the instance.
- Open the , and select the entry.
- Open the Advanced Settings tab.
- To enable attribute syntax checking, select the Enable Attribute Syntax Checking check box. To disable the feature, clear the check box.
- Click .
12.12.3. Enabling or Disabling Strict Syntax Validation for DNs
Note
34, INVALID_DN_SYNTAX.
12.12.3.1. Enabling or Disabling Strict Syntax Validation for DNs Using the Command Line
nsslapd-dn-validate-strict parameter. For example to disable strict syntax validation for DNs::
# dsconf -D "cn=Directory Manager" ldap://server.example.com config replace nsslapd-dn-validate-strict=off Successfully replaced "nsslapd-dn-validate-strict"
nsslapd-syntaxcheck parameter, see the description of the parameter in the Red Hat Directory Server Configuration, Command, and File Reference.
12.12.3.2. Enabling or Disabling Strict Syntax Validation for DNs Using the Web Console
- Open the Directory Server user interface in the web console. See Section 1.4, “Logging Into Directory Server Using the Web Console”.
- Select the instance.
- Open the , and select the entry.
- Open the Advanced Settings tab.
- Select or unselect the Strict DN Syntax Validation option depending on whether you want to enable or disable the feature.
- Click .
12.12.4. Enabling Syntax Validation Logging
nsslapd-syntaxlogging attribute enables error logging for any syntax violations.
Note
nsslapd-syntaxlogging and nsslapd-syntaxcheck parameter are enabled, any invalid attribute modification is rejected and the message written to the log. If nsslapd-syntaxlogging is enabled but nsslapd-syntaxcheck is disabled, then the operation is allowed to succeed, but the warning message is still written to the error log.
12.12.4.1. Enabling Syntax Validation Logging Using the Command Line
nsslapd-syntaxlogging parameter to on.
# dsconf -D "cn=Directory Manager" ldap://server.example.com config replace nsslapd-syntaxlogging=on Successfully replaced "nsslapd-syntaxlogging"
nsslapd-syntaxlogging parameter, see the description of the parameter in the Red Hat Directory Server Configuration, Command, and File Reference.
12.12.4.2. Enabling Syntax Validation Logging Using the Web Console
- Open the Directory Server user interface in the web console. See Section 1.4, “Logging Into Directory Server Using the Web Console”.
- Select the instance.
- Open the , and select the entry.
- Open the Advanced Settings tab.
- Select the Enable Attribute Syntax Logging option.
- Click .
12.12.5. Validating the Syntax of Existing Attribute Values
- If syntax validation is disabled in the
nsslapd-syntaxcheckparameter. For details, see Section 12.12.2, “Syntax Validation and Other Directory Server Operations”.Important
Red Hat recommends not disabling syntax validation. - If you migrate data from a server without or disabled syntax validation.
/var/log/dirsrv/slapd-instance_name/errors file. For example:
- If all verified values are valid:
[28/Jun/2017:12:52:43.669867966 +0200] - ERR - syntax-plugin - syntax_validate_task_thread - Starting (base: "dc=example,dc=com", filter: "(objectclass=*)") ... [28/Jun/2017:12:52:43.696850129 +0200] - ERR - syntax-plugin - syntax_validate_task_thread - Complete. Found 0 invalid entries.
- If invalid entries were found:
[28/Jun/2017:12:54:05.736087520 +0200] - ERR - syntax-plugin - syntax_validate_task_thread - Starting (base: "dc=example,dc=com", filter: "(objectclass=*)") ... [28/Jun/2017:12:54:05.754195607 +0200] - ERR - syntax-plugin - syntax_validate_task_callback - Entry "cn=user,ou=People,dc=example,dc=com" violates syntax. description: value #0 invalid per syntax [28/Jun/2017:12:54:05.759905671 +0200] - ERR - syntax-plugin - syntax_validate_task_thread - Complete. Found 1 invalid entries.
Note
The syntax validation task identifies only syntax violations. You must fix incorrect values manually.
12.12.5.1. Creating a Syntax Validation Task Using the dsconf schema validate-syntax Command
dsconf schema validate-syntax command to create a syntax validation task. For example, to create a task that validates the syntax of all values in the ou=People,dc=example,dc=com sub-tree which match the (objectclass=inetorgperson) filter, enter:
# dsconf -D "cn=Directory Manager" ldap://server.example.com schema validate-syntax -f '(objectclass=inetorgperson)' ou=People,dc=example,dc=com
12.12.5.2. Creating a Syntax Validation Task Using a cn=tasks Entry
cn=tasks,cn=config entry in the Directory Server configuration is a container entry for temporary entries the server uses to manage tasks. To initiate a syntax validation operation, create a task in the cn=syntax validate,cn=tasks,cn=config entry.
ou=People,dc=example,dc=com sub-tree which match the (objectclass=inetorgperson) filter:
# ldapadd -D "cn=Directory Manager" -W -p 389 -h server.example.com -x dn: cn=example_syntax_validate,cn=syntax validate,cn=tasks,cn=config objectclass: extensibleObject cn: cn=example_syntax_validate basedn: ou=People,dc=example,dc=com filter: (objectclass=inetorgperson)
cn=syntax validate,cn=tasks,cn=config entry, see the cn=schema reload task section in the Red Hat Directory Server Configuration, Command, and File Reference.
Chapter 13. Managing Indexes
13.1. About Indexes
13.1.1. About Index Types
cn.db file.
- Presence index (pres) contains a list of the entries that contain a particular attribute, which is very useful for searches. For example, it makes it easy to examine any entries that contain access control information. Generating an
aci.dbfile that includes a presence index efficiently performs the search forACI=*to generate the access control list for the server. - Equality index (eq) improves searches for entries containing a specific attribute value. For example, an equality index on the
cnattribute allows a user to perform the search forcn=Babs Jensenfar more efficiently. - Approximate index (approx) is used for efficient approximate or sounds-like searches. For example, an entry may include the attribute value
cn=Firstname M Lastname. An approximate search would return this value for searches againstcn~=Firstname Lastname,cn~=Firstname, orcn~=Lastname. Similarly, a search againstl~=San Fransisco(note the misspelling) would return entries includingl=San Francisco. - Substring index (sub) is a costly index to maintain, but it allows efficient searching against substrings within entries. Substring indexes are limited to a minimum of three characters for each entry.For example, searches of the form
cn=*derson, match the common names containing strings such asBill Anderson,Jill Henderson, orSteve Sanderson. Similarly, the search fortelephoneNumber= *555*returns all the entries in the directory with telephone numbers that contain555. - International index speeds up searches for information in international directories. The process for creating an international index is similar to the process for creating regular indexes, except that it applies a matching rule by associating an object identifier (OID) with the attributes to be indexed.The supported locales and their associated OIDs are listed in Appendix D, Internationalization. If there is a need to configure the Directory Server to accept additional matching rules, contact Red Hat Consulting.
13.1.2. About Default and Database Indexes
cn=default indexes,cn=config,cn=ldbm database,cn=plugins,cn=config to the new database. Then the database only uses the copy of these indexes, which are stored in cn=index,cn=database_name,cn=ldbm database,cn=plugins,cn=config.
Note
# ldapsearch -D "cn=Directory Manager" -W -p 389 -h server.example.com \
-b "cn=default indexes,cn=config,cn=ldbm database,cn=plugins,cn=config" \
'(objectClass=nsindex)'Note
cn=default indexes,cn=config,cn=ldbm database,cn=plugins,cn=config, the changes are not applied to the individual databases in cn=index,cn=database_name,cn=ldbm database,cn=plugins,cn=config.
# dsconf -D "cn=Directory Manager" ldap://server.example.com backend index list database_name
13.1.3. Overview of the Searching Algorithm
cn, common name, attribute) and a list of IDs of the entries which contain the indexed attribute value:
- An LDAP client application sends a search request to the directory.
- The directory examines the incoming request to make sure that the specified base DN matches a suffix contained by one or more of its databases or database links.
- If they do match, the directory processes the request.
- If they do not match, the directory returns an error to the client indicating that the suffix does not match. If a referral has been specified in the
nsslapd-referralattribute undercn=config, the directory also returns the LDAP URL where the client can attempt to pursue the request. - The Directory Server examines the search filter to see what indexes apply, and it attempts to load the list of entry IDs from each index that satisfies the filter. The ID lists are combined based on whether the filter used AND or OR joins.Each filter component is handled independently and returns an ID list.
- If the list of entry IDs is larger than the configured ID list scan limit or if there is no index defined for the attribute, then Directory Server sets the results for this
filtercomponenttoallids. If, after applying the logical operations to the results of the individual search components the list is stillALLIDsit searches every entry in the database. This is an unindexed search.
- The Directory Server reads every entry from the
id2entry.dbdatabase or the entry cache for every entry ID in the ID list (or from the entire database for an unindexed search). The server then checks the entries to see if they match the search filter. Each match is returned as it is found.The server continues through the list of IDs until it has searched all candidate entries or until it hits one of the configured resource limits. (Resource limits are listed in Section 14.5.3, “Setting User and Global Resource Limits Using the Command Line”.)Note
It's possible to set separate resource limits for searches using the simple paged results control. For example, administrators can set high or unlimited size and look-through limits with paged searches, but use the lower default limits for non-paged searches.
13.1.4. Approximate Searches
Note
- All of the query string codes match the codes generated in the entry string.
- All of the query string codes are in the same order as the entry string codes.
| Name in the Directory (Phonetic Code) | Query String (Phonetic code) | Match Comments |
|---|---|---|
| Alice B Sarette (ALS B SRT) | Alice Sarette (ALS SRT) | Matches. Codes are specified in the correct order. |
| Alice Sarrette (ALS SRT) | Matches. Codes are specified in the correct order, despite the misspelling of Sarette. | |
| Surette (SRT) | Matches. The generated code exists in the original name, despite the misspelling of Sarette. | |
| Bertha Sarette (BR0 SRT) | No match. The code BR0 does not exist in the original name. | |
| Sarette, Alice (SRT ALS) | No match. The codes are not specified in the correct order. |
13.1.5. Balancing the Benefits of Indexing
- Approximate indexes are not efficient for attributes commonly containing numbers, such as telephone numbers.
- Substring indexes do not work for binary attributes.
- Equality indexes should be avoided if the value is big (such as attributes intended to contain photographs or passwords containing encrypted data).
- Maintaining indexes for attributes not commonly used in a search increases overhead without improving global searching performance.
- Attributes that are not indexed can still be specified in search requests, although the search performance may be degraded significantly, depending on the type of search.
- The more indexes you maintain, the more disk space you require.
- The Directory Server receives an add or modify operation.
- The Directory Server examines the indexing attributes to determine whether an index is maintained for the attribute values.
- If the created attribute values are indexed, then Directory Server adds or deletes the new attribute values from the index.
- The actual attribute values are created in the entry.
dn: cn=John Doe,ou=People,dc=example,dc=com objectclass: top objectClass: person objectClass: orgperson objectClass: inetorgperson cn: John Doe cn: John sn: Doe ou: Manufacturing ou: people telephoneNumber: 408 555 8834 description: Manufacturing lead for the Z238 line of widgets.
- Equality, approximate, and substring indexes for
cn(common name) andsn(surname) attributes. - Equality and substring indexes for the telephone number attribute.
- Substring indexes for the description attribute.
- Create the
cnequality index entry forJohnandJohn Doe. - Create the appropriate
cnapproximate index entries forJohnandJohn Doe. - Create the appropriate
cnsubstring index entries forJohnandJohn Doe. - Create the
snequality index entry forDoe. - Create the appropriate
snapproximate index entry forDoe. - Create the appropriate
snsubstring index entries forDoe. - Create the telephone number equality index entry for
408 555 8834. - Create the appropriate telephone number substring index entries for
408 555 8834. - Create the appropriate description substring index entries for
Manufacturing lead for the Z238 line of widgets. A large number of substring entries are generated for this string.
13.1.6. Indexing Limitations
nsrole and cos_attribute. Virtual attributes contain computed values. If you index these attributes, Directory Server can return an invalid set of entries to direct and internal searches.
13.2. Creating Standard Indexes
Note
dsctl db2index command or a cn=index,cn=tasks task, as described in Section 13.3, “Creating New Indexes to Existing Databases”.
13.2.1. Creating Indexes Using the Command Line
Note
ldapmodify to add the new index attributes to your directory.
- To create a new index that will become one of the default indexes, add the new index attributes to the
cn=default indexes,cn=config,cn=ldbm database,cn=plugins,cn=configentry. - To create a new index for a particular database, add it to the
cn=index,cn=database_name,cn=ldbm database,cn=plugins,cn=configentry, wherecn=database_name corresponds to the name of the database.
Note
cn=config in the dse.ldif file. The cn=config entry in the dse.ldif configuration file is not stored in the same highly scalable database as regular entries. As a result, if many entries, particularly entries that are likely to be updated frequently, are stored under cn=config, performance will probably suffer. Although we recommend you do not store simple user entries under cn=config for performance reasons, it can be useful to store special user entries such as the Directory Manager entry or replication manager (supplier bind DN) entry under cn=config since this centralizes configuration information.
sn (surname) attribute in the Example1 database:
- Run
ldapmodifyand add the LDIF entry for the new indexes:# ldapmodify
-a-D "cn=Directory Manager" -W -p 389 -h server.example.com -x dn: cn=sn,cn=index,cn=Example1,cn=ldbm database,cn=plugins,cn=config changetype: add objectClass:top objectClass:nsIndex cn:sn nsSystemIndex:false nsIndexType:pres nsIndexType:eq nsIndexType:sub nsMatchingRule:2.16.840.1.113730.3.3.2.3.1Thecnattribute contains the name of the attribute to index, in this example thesnattribute. The entry is a member of thensIndexobject class. ThensSystemIndexattribute isfalse, indicating that the index is not essential to Directory Server operations. The multi-valuednsIndexTypeattribute specifies the presence (pres), equality (eq) and substring (sub) indexes. Each keyword has to be entered on a separate line. ThensMatchingRuleattribute in the example specifies the OID of the Bulgarian collation order; the matching rule can indicate any possible value match, such as languages or other formats like date or integer.You can use the keywordnonein thensIndexTypeattribute to specify that no indexes are to be maintained for the attribute. This example temporarily disables thesnindexes on theExample1database by changing thensIndexTypetonone:dn: cn=sn,cn=index,cn=Example1,cn=ldbm database,cn=plugins,cn=config objectClass:top objectClass:nsIndex cn:sn nsSystemIndex:false nsIndexType:none
Note
uid for the user ID attribute.
13.2.2. Creating Indexes Using the Web Console
- Open the Directory Server user interface in the web console. See Section 1.4, “Logging Into Directory Server Using the Web Console”.
- Select the instance.
- Open the menu.
- Select the suffix entry.
- Open the Indexes tab.
- Click the button.
- Select the attribute to index, the type of index, and optionally a matching rule.

- Click .
13.3. Creating New Indexes to Existing Databases
Important
13.3.1. Creating an Index While the Instance is Running
13.3.1.1. Creating an Index Using the dsconf backend index reindex Command
# dsconf -D "cn=Directory Manager" ldap://server.example.com backend index reindex database_name
13.3.1.2. Creating an Index Using a cn=tasks Entry
cn=tasks,cn=config entry in the Directory Server configuration is a container entry for temporary entries the server uses to manage tasks. To initiate an index operation, create a task in the cn=index,cn=tasks,cn=config entry.
ldapadd utility to add a new index task. For example, to add a task that creates the presence index for the cn attribute in the userRoot database:
# ldapadd -D "cn=Directory Manager" -W -p 389 -h server.example.com -x dn: cn=example_presence_index,cn=index,cn=tasks,cn=config objectclass: top objectclass: extensibleObject cn: example presence index nsInstance: userRoot nsIndexAttribute: "cn:pres"
cn=index,cn=tasks,cn=config entry, see the cn=index section in the Red Hat Directory Server Configuration, Command, and File Reference.
13.3.2. Creating an Index While the Instance Offline
dsconf db2index command:
- Shut down the instance:
# dsctl instance_name stop
- Recreate the index:
# dsctl instance_name db2index userRoot [13/Aug/2019:15:25:37.277426483 +0200] - INFO - ldbm_instance_config_cachememsize_set - force a minimal value 512000 [13/Aug/2019:15:25:37.289257996 +0200] - INFO - check_and_set_import_cache - pagesize: 4096, available bytes 1704378368, process usage 22212608 [13/Aug/2019:15:25:37.291738104 +0200] - INFO - check_and_set_import_cache - Import allocates 665772KB import cache. ... db2index successful
- Start the instance:
# dsctl instance_name start
13.4. Using virtual list view control to request a contiguous subset of a large search result
13.4.1. How the VLV control works in ldapsearch commands
ldapsearch utility to request only partial results.
ldapsearchcommands, specify the -E option for both the sss (server-side sorting) and vlv search extensions:
# ldapsearch ... -E 'sss=attribute_list' -E 'vlv=query_options'
sss search extension has the following syntax:
[!]sss=[-]<attr[:OID]>[/[-]<attr[:OID]>...]
vlv search extension has the following syntax:
[!]vlv=<before>/<after>(/<offset>/<count>|:<value>)
beforesets the number of entries returned before the targeted one.aftersets the number of entries returned after the targeted one.index,count, andvaluehelp to determine the target entry. If you setvalue, the target entry is the first one having its first sorting attribute starting with the value. Otherwise, you setcountto0, and the target entry is determined by theindexvalue (starting from 1). If thecountvalue is higher than0, the target entry is determined by theratio index * number of entries / count.
Example 13.1. Output of an ldapsearch command with VLV search extension
ou=People,dc=example,dc=com. The server then sorts the results by the cn attribute and returns the uid attributes of the 70th entry together with one entry before and two entries after the offset.
# ldapsearch -D "cn=Directory Manager" -W -H ldap://server.example.com -b "ou=People,dc=example,dc=com" -s one -x -E 'sss=cn' -E 'vlv=1/2/70/0' uid # user069, People, example.com dn: uid=user069,ou=People,dc=example,dc=com uid: user069 # user070, People, example.com dn: uid=user070,ou=People,dc=example,dc=com uid: user070 # user071, People, example.com dn: uid=user071,ou=People,dc=example,dc=com uid: user071 # user072, People, example.com dn: uid=user072,ou=People,dc=example,dc=com uid: user072 # search result search: 2 result: 0 Success control: 1.2.840.113556.1.4.474 false MIQAAAADCgEA sortResult: (0) Success control: 2.16.840.1.113730.3.4.10 false MIQAAAALAgFGAgMAnaQKAQA= vlvResult: pos=70 count=40356 context= (0) Success # numResponses: 5 # numEntries: 4 Press [before/after(/offset/count|:value)] Enter for the next window.
-E parameter description in the ldapsearch(1) man page.
13.4.2. Enabling unauthenticated users to use the VLV control
oid=2.16.840.1.113730.3.4.9,cn=features,cn=config entry enables only authenticated users to use the VLV control. To enable also non-authenticated users to use the VLV control, update the ACI by changing userdn = "ldap:///all" to userdn = "ldap:///anyone".
Procedure
- Update the ACI in
oid=2.16.840.1.113730.3.4.9,cn=features,cn=config:# ldapmodify -D "cn=Directory Manager" -W -H ldap://server.example.com -x dn: oid=2.16.840.1.113730.3.4.9,cn=features,cn=config changetype: modify replace: aci aci: (targetattr != "aci")(version 3.0; acl "VLV Request Control"; allow( read, search, compare, proxy ) userdn = "ldap:///anyone";)
Verification
- Perform a query with VLV control not specify a bind user:
# ldapsearch -H ldap://server.example.com -b "ou=People,dc=example,dc=com" -s one -x -E 'sss=cn' -E 'vlv=1/2/70/0' uid
This command requires that the server allows anonymous binds.If the command succeeds but returns no entries, run the query again with a bind user to ensure that the query works when using authentication.
13.4.3. Creating a VLV index using the command line to improve the speed of VLV queries
ou=People,dc=example,dc=com that contain a mail attribute and have the objectClass attribute set to person.
Prerequisites
- Your client applications use the VLV control.
- Client applications require to query a contiguous subset of a large search result.
- The directory contains a large number of entries.
Procedure
- Create the VLV search entry:
# dsconf -D "cn=Directory Manager" ldap://server.example.com backend vlv-index add-search --name "VLV People" --search-base "ou=People,dc=example,dc=com" --search-filter "(&(objectClass=person)(mail=*))" --search-scope 2 userRoot
This command uses the following options:--namesets the name of the search entry. This can be any name.--search-basesets the base DN for the VLV index. Directory Server creates the VLV index on this entry.--search-scopesets the scope of the search to run for entries in the VLV index. You can set this option to0(base search),1(one-level search), or2(subtree search).--search-filtersets the filter Directory Server applies when it creates the VLV index. Only entries that match this filter become part of the index.userRootis the name of the database in which to create the entry.
- Create the index entry:
# dsconf -D "cn=Directory Manager" ldap://server.example.com backend vlv-index add-index --index-name "VLV People - cn sn" --parent-name "VLV People" --sort "cn sn" --index-it dc=example,dc=com
This command uses the following options:--index-namesets the name of the index entry. This can be any name.--parent-namesets the name of the VLV search entry and must match the name you set in the previous step.--sortsets the attribute names and their sort order. Separate the attributes by space.--index-itcauses that Directory Server automatically starts an index task after the entry was created.dc=example,dc=comis the suffix of the database in which to create the entry.
Verification
- Verify the successful creation of the VLV index in the
/var/log/dirsrv/slapd-instance_name/errorsfile:[26/Nov/2021:11:32:59.001988040 +0100] - INFO - bdb_db2index - userroot: Indexing VLV: VLV People - cn sn [26/Nov/2021:11:32:59.507092414 +0100] - INFO - bdb_db2index - userroot: Indexed 1000 entries (2%). ... [26/Nov/2021:11:33:21.450916820 +0100] - INFO - bdb_db2index - userroot: Indexed 40000 entries (98%). [26/Nov/2021:11:33:21.671564324 +0100] - INFO - bdb_db2index - userroot: Finished indexing.
- Use the VLV control in an
ldapsearchcommand to query only specific records from the directory:# ldapsearch -D "cn=Directory Manager" -W -H ldap://server.example.com -b "ou=People,dc=example,dc=com" -s one -x -E 'sss=cn' -E 'vlv=1/2/70/0' uid # user069, People, example.com dn: uid=user069,ou=People,dc=example,dc=com cn: user069 # user070, People, example.com dn: uid=user070,ou=People,dc=example,dc=com cn: user070 # user071, People, example.com dn: uid=user071,ou=People,dc=example,dc=com cn: user071 # user072, People, example.com dn: uid=user072,ou=People,dc=example,dc=com cn: user072
This example assumes you have entries continuously nameduid=user001to at leastuid=user072inou=People,dc=example,dc=com.
-E parameter description in the ldapsearch(1) man page.
13.4.4. Creating a VLV index using the web console to improve the speed of VLV queries
ou=People,dc=example,dc=com that contain a mail attribute and have the objectClass attribute set to person.
Prerequisites
- Your client applications use the VLV control.
- Client applications require to query a contiguous subset of a large search result.
- The directory contains a large number of entries.
Procedure
- Open the Directory Server user interface in the web console. See Section 1.4, “Logging Into Directory Server Using the Web Console”.
- Navigate to → → →
- Click and fill the fields:
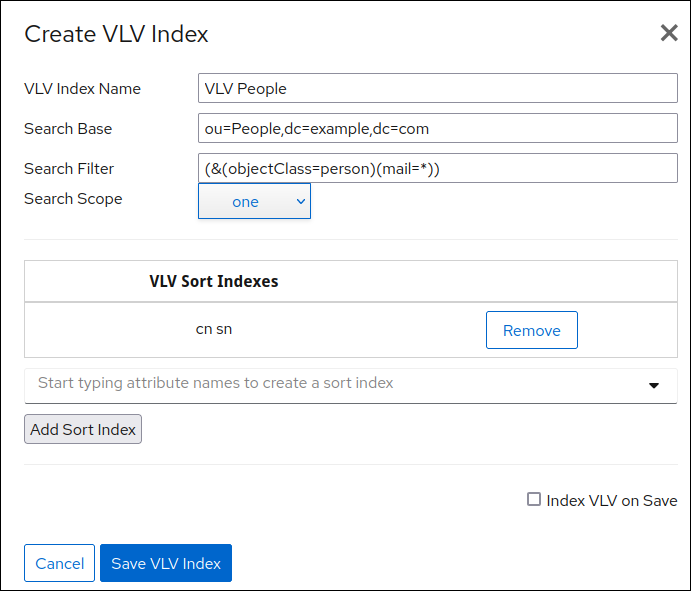
Figure 13.1. Creating a VLV Index Using the Web Console
- Enter the attribute names, and click .
- Select Index VLV on Save.
- Click .
Verification
- Navigate to → →
[26/Nov/2021:11:32:59.001988040 +0100] - INFO - bdb_db2index - userroot: Indexing VLV: VLV People - cn sn [26/Nov/2021:11:32:59.507092414 +0100] - INFO - bdb_db2index - userroot: Indexed 1000 entries (2%). ... [26/Nov/2021:11:33:21.450916820 +0100] - INFO - bdb_db2index - userroot: Indexed 40000 entries (98%). [26/Nov/2021:11:33:21.671564324 +0100] - INFO - bdb_db2index - userroot: Finished indexing.
- Use the VLV control in an
ldapsearchcommand to query only specific records from the directory:# ldapsearch -D "cn=Directory Manager" -W -H ldap://server.example.com -b "ou=People,dc=example,dc=com" -s one -x -E 'sss=cn' -E 'vlv=1/2/70/0' uid # user069, People, example.com dn: uid=user069,ou=People,dc=example,dc=com cn: user069 # user070, People, example.com dn: uid=user070,ou=People,dc=example,dc=com cn: user070 # user071, People, example.com dn: uid=user071,ou=People,dc=example,dc=com cn: user071 # user072, People, example.com dn: uid=user072,ou=People,dc=example,dc=com cn: user072
This example assumes you have entries continuously nameduid=user001to at leastuid=user072inou=People,dc=example,dc=com.
-E parameter description in the ldapsearch(1) man page.
13.5. Changing the Index Sort Order
13.5.1. Changing the Sort Order Using the Command Line
nsMatchingRule for the attribute index. For example:
# ldapmodify -D "cn=Directory Manager" -W -x dn: cn=sn,cn=index,cn=Example1,cn=ldbm database,cn=plugins,cn=config changetype:modify replace:nsMatchingRule nsMatchingRule: integerOrderingMatch
13.6. Changing the Width for Indexed Substring Searches
abc would be an indexed search while ab* would not be. Indexed searches are significantly faster than unindexed searches, so changing the minimum length of the search key is helpful to increase the number of indexed searches.
- The
nsSubStrBeginattribute sets the required number of characters for an indexed search for the beginning of a search string, before the wildcard.abc*
- The
nsSubStrMiddleattribute sets the required number of characters for an indexed search where a wildcard is used in the middle of a search string. For example:*abc*
- The
nsSubStrEndattribute sets the required number of characters for an indexed search for the end of a search string, after the wildcard. For example:*xyz
extensibleObject object class to the entry and then set the substring search lengths.
- Set the new key length for the specific attribute index. This requires adding the
extensibleObjectobject class and then adding thensSubStrBegin,nsSubStrEnd, ornsSubStrMiddleattributes as appropriate. For example:# ldapmodify -D "cn=Directory Manager" -W -p 389 -h server.example.com -x dn: attribute_name,cn=index,cn=database_name,cn=ldbm database,cn=plugins,cn=config changetype: modify add: objectclass objectclass: extensibleObject - add: nsSubStrBegin nsSubStrBegin: 2 - add: nsSubStrMiddle nsSubStrMiddle: 2 - add: nsSubStrEnd nsSubStrEnd: 2
13.7. Deleting Indexes
13.7.1. Deleting an Attribute from the Default Index Entry
sn, are indexed. The following attributes are part of the default index:
Table 13.1. Default Index Attributes
|
aci
|
cn
|
entryusn
|
|
givenName
|
mail
|
mailAlternateAddress
|
|
mailHost
|
member
|
memberOf
|
|
nsUniqueId
|
ntUniqueId
|
ntUserDomainId
|
|
numsubordinates
|
objectclass
|
owner
|
|
parentid
|
seeAlso
|
sn
|
|
telephoneNumber
|
uid
|
uniquemember
|
Warning
sn attribute from the default index:
- Remove the attribute from the
cn=default indexes,cn=config,cn=ldbm database,cn=plugins,cn=configentry:# ldapdelete -D "cn=Directory Manager" -W -p 389 -h server.example.com -x cn=sn,cn=default indexes,cn=config,cn=ldbm database,cn=plugins,cn=config
If you do not remove the attribute from this entry, the index for thesnattribute is automatically recreated and corrupted after the server is restarted. - Remove the
cn=attribute_name,cn=index,cn=userRoot,cn=ldbm database,cn=plugins,cn=configentry. For details, see Section 13.7.2, “Removing an Attribute from the Index”
13.7.2. Removing an Attribute from the Index
13.7.2.1. Removing an Attribute from the Index Using the Command Line
- If the attribute to remove is listed in the
cn=default indexes,cn=config,cn=ldbm database,cn=plugins,cn=configdefault index entry, remove it from this entry first. For details, see Section 13.7.1, “Deleting an Attribute from the Default Index Entry”. - Remove the attribute from the index. For example:
# ldapdelete -D "cn=Directory Manager" -W -p 389 -h server.example.com -x cn=sn,cn=index,cn=database_name,cn=ldbm database,cn=plugins,cn=config
After deleting the entry, Directory Server no longer maintains the index for the attribute. - Recreate the attribute index. See Section 13.3, “Creating New Indexes to Existing Databases”.
13.7.2.2. Removing an Attribute from the Index Using the Web Console
- Open the Directory Server user interface in the web console. See Section 1.4, “Logging Into Directory Server Using the Web Console”.
- Select the instance.
- Open the menu.
- Select the suffix entry.
- Open the Indexes tab.
- Click the button next to the attribute for which you want to remove the index, and select Delete Index.
- Click to confirm.
13.7.3. Deleting Index Types Using the Command Line
sub index type of the sn attribute from the index:
- Remove the index type:
# ldapmodify -D "cn=Directory Manager" -W -x dn: cn=sn,cn=index,cn=database_name,cn=ldbm database,cn=plugins,cn=config changetype: modify delete: nsIndexType nsIndexType: sub
After deleting the index entry, Directory Server no longer maintains the substring index for the attribute. - Recreate the attribute index. See Section 13.3, “Creating New Indexes to Existing Databases”.
13.7.4. Removing Browsing Indexes
13.7.4.1. Removing Browsing Indexes Using the Command Line
- Remove the browsing index entries from the
cn=index,cn=database_name,cn=ldbm database,cn=plugins,cn=configentry. For example:# ldapdelete -D "cn=Directory Manager" -W -p 389 -h server.example.com -x "cn=MCC ou=People dc=example dc=com,cn=userRoot,cn=ldbm database,cn=plugins,cn=config" "cn=by MCC ou=People dc=example dc=com,cn=MCC ou=People dc=example dc=com,cn=userRoot,cn=ldbm database,cn=plugins,cn=config"
After deleting the two browsing index entries, Directory Server no longer maintains these indexed. - Recreate the attribute index. See Section 13.3, “Creating New Indexes to Existing Databases”.
Chapter 14. Finding Directory Entries
14.1. Finding Directory Entries Using the Command Line
ldapsearch command-line utility to search for directory entries. This utility opens a connection to a specified server using the specified identity and credentials and locates entries based on a specified search filter. The search scope can include:
- a single entry (
-s base) - an entry immediate subentries (
-s one) - an entire tree or subtree (
-s sub)
Note
uid=bjensen,ou=People,dc=example,dc=com, then a search for dc=example does not match that entry unless dc:example has explicitly been added as an attribute in that entry.
14.1.1. ldapsearch Command-Line Format
ldapsearch command must use the following format:
# ldapsearch [-x | -Y mechanism] [options] [search_filter] [list_of_attributes]
- Either
-x(to use simple binds) or-Y(to set the SASL mechanism) must be used to configure the type of connection. - options is a series of command-line options. These must be specified before the search filter, if any are used.
- search_filter is an LDAP search filter as described in Section 14.3, “LDAP Search Filters”. Do not specify a separate search filter if search filters are specified in a file using the
-foption. - list_of_attributes is a list of attributes separated by a space. Specifying a list of attributes reduces the number of attributes returned in the search results. This list of attributes must appear after the search filter. For an example, see Section 14.4.6, “Displaying Subsets of Attributes”. If a list of attributes is not specified, the search returns values for all attributes permitted by the access control set in the directory, with the exception of operational attributes.For operational attributes to be returned as a result of a search operation, they must be explicitly specified in the search command. To return all operational attributes of an object specify
+. To retrieve regular attributes in addition to explicitly specified operational attributes, use an asterisk (*) in the list of attributes in theldapsearchcommand.To retrieve only a list of matching DNs, use the special attribute1.1. For example:# ldapsearch -D "cn=Directory Manager" -W -p 389 -h server.example.com \ -b "dc=example,dc=com" -x "(objectclass=inetorgperson)" 1.1
14.1.2. Commonly Used ldapsearch Options
ldapsearch command-line options. If a specified value contains a space ( ), the value should be surrounded by single or double quotation marks, such as -b "cn=My Special Group,ou=groups,dc=example,dc=com".
Important
ldapsearch utility from OpenLDAP uses SASL connections by default. To perform a simple bind or to use TLS, use the -x argument to disable SASL and allow other connection methods.
| Option | Description | |||
|---|---|---|---|---|
| -b | Specifies the starting point for the search. The value specified here must be a distinguished name that currently exists in the database. This is optional if the LDAP_BASEDN environment variable has been set to a base DN. The value specified in this option should be provided in single or double quotation marks. For example:
-b "cn=user,ou=Product Development,dc=example,dc=com"To search the root DSE entry, specify an empty string here, such as -b "" . | |||
| -D | Specifies the distinguished name with which to authenticate to the server. This is optional if anonymous access is supported by the server. If specified, this value must be a DN recognized by the Directory Server, and it must also have the authority to search for the entries. For example, -D "uid=user_name,dc=example,dc=com". | |||
| -H |
Specifies an LDAP URL to use to connect to the server. For a traditional LDAP URL, this has the following format:
ldap[s]://hostname[:port]The port is optional; it will use the default LDAP port of 389 or LDAPS port of 636 if the port is not given.
This can also use an LDAPI URL, with each element separated by the HTML hex code
%2F, rather than a forward slash (/):
ldapi://%2Ffull%2Fpath%2Fto%2Fslapd-example.socketFor LDAPI, specify the full path and filename of the LDAPI socket the server is listening to. Since this value is interpreted as an LDAP URL, the forward slash characters (/) in the path and filename must be escaped encoded as the URL escape value %2F.
The
-H option is used instead of -h and -p.
| |||
| -h | Specifies the host name or IP address of the machine on which the Directory Server is installed. For example, -h server.example.com. If a host is not specified, ldapsearch uses the localhost.
Note
Directory Server supports both IPv4 and IPv6 addresses.
| |||
| -l | Specifies the maximum number of seconds to wait for a search request to complete. For example, -l 300. The default value for the nsslapd-timelimit attribute is 3600 seconds. Regardless of the value specified, ldapsearch will never wait longer than is allowed by the server's nsslapd-timelimit attribute. | |||
| -p | Specifies the TCP port number that the Directory Server uses. For example, -p 1049. The default is 389.
If
-h is specified, -p must also be specified, even if it gives the default value.
| |||
| -s scope | Specifies the scope of the search. The scope can be one of the following:
| |||
| -W |
Prompt for the password. If this option is not set, anonymous access is used.
Alternatively, use the
-w option to pass the password to the utility. Note that the password can be visible in the process list for other users and is saved in the shell's history.
| |||
| -x | Disables the default SASL connection to allow simple binds. | |||
| -Y SASL_mechanism |
Sets the SASL mechanism to use for authentication. If no mechanism is set,
ldapsearch selects the best mechanism supported by the server.
If If
-x is not used, then the -Y option must be used.
| |||
| -z number | Sets the maximum number of entries to return in a response to a search request. This value overwrites the server-side nsslapd-sizelimit parameter when binding using the root DN. |
14.1.3. Using Special Characters
ldapsearch command-line utility, it may be necessary to specify values that contain characters that have special meaning to the command-line interpreter, such as space ( ), asterisk (*), or backslash (\). Enclose the value which has the special character in quotation marks (""). For example:
-D "cn=user_name,ou=Product Development,dc=example,dc=com"
14.2. Finding Entries Using the Web Console
uid=user_name,ou=People,dc=example,dc=com, then a search for dc=example matches the entry only when dc:example attribute exists in this entry.
Prerequisites
- You are logged in to the Directory Server web console.
- You have root permissions.
Procedure
- In the web console, navigate to → .
- Expand and select the search criteria to filter entries:
Table 14.1. Default Index Attributes
Search Parameter Description Search base Specifies the starting point of the search. It is a distinguished name (DN) that currently exists in the database.Note
The Search tabs opens with pre-defined search base, when you open an entry details in the or , click on the and select .Search Scope SelectSubtreeto search entries in the whole subtree starting from the search base and including all child entries.SelectOne Levelto search entries starting from the search base and including only the first level of child entries.SelectBaseto search for attribute values only in the entry specified as the search base.Size Limit Set the maximum number of entries to return from a search operation.Time Limit Set the time in seconds the search engine can look for entries.Show Locking Toggle the switch to on to see the lock status of the found entries.Search Attributes Select attributes that take part in the search. You can choose from the predefined attributes and add custom ones. - Type the attribute value in the search text field and press .
Note
Directory Server records all search requests to the access log file, which you can view at → → . - Optional: To further refine your search, use search filters in the tab to search for entries.
14.3. LDAP Search Filters
ldapsearch command-line utility. When using ldapsearch, there can be multiple search filters in a file, with each filter on a separate line in the file, or a search filter can be specified directly on the command line.
attribute operator value
buildingname>=alpha
buildingname is the attribute, >= is the operator, and alpha is the value. Filters can also be defined that use different attributes combined together with Boolean operators.
Note
l and ends with the letter n, enter a l*n in the value portion of the search filter. Similarly, to search for all attribute values beginning with the letter u, enter a value of u* in the value portion of the search filter.
\5c2a. For example, to search for all employees with businessCategory attribute values of Example*Net product line, enter the following value in the search filter:
Example\5c2a*Net product line
Note
uid=user_name,ou=People,dc=example,dc=com, then a search for dc=example does not match that entry unless the dc attribute exists in this entry and is set to example.
14.3.1. Using Attributes in Search Filters
manager attribute:
"(manager=*)"
"(cn=example)"
example. Most of the time, equality searches are not case sensitive.
"(cn=example)" filter:
cn: example cn;lang-fr: example
"(description=*X.500*)" "(sn=*nderson)" "(givenname=car*)"
14.3.2. Using Operators in Search Filters
"(employeeNumber>=500)" "(sn~=suret)" "(salary<=150000)"
Table 14.2. Search Filter Operators
| Search Type | Operator | Description |
|---|---|---|
| Equality | = | Returns entries containing attribute values that exactly match the specified value. For example, cn=example |
| Substring | =string* string | Returns entries containing attributes containing the specified substring. For example, cn=exa*l. The asterisk (*) indicates zero (0) or more characters. |
| Greater than or equal to | >= | Returns entries containing attributes that are greater than or equal to the specified value. For example, uidNumber >= 5000. |
| Less than or equal to | <= | Returns entries containing attributes that are less than or equal to the specified value. For example, uidNumber <= 5000. |
| Presence | =* | Returns entries containing one or more values for the specified attribute. For example, cn=*. |
| Approximate | ~= | Returns entries containing the specified attribute with a value that is approximately equal to the value specified in the search filter. For example, l~=san fransico can return l=san francisco. |
14.3.3. Using Compound Search Filters
(Boolean-operator(filter)(filter)(filter)...)
(!(objectClass=person))
(Boolean-operator(filter)((Boolean-operator(filter)(filter)))
Marketing and whose description attribute does not contain the substring X.500:
(&(ou=Marketing)(!(description=*X.500*)))
Marketing, that do not have the substring X.500, and that have example or demo set as a manager:
(&(ou=Marketing)(!(description=*X.500*))(|(manager=cn=example,ou=Marketing,dc=example,dc=com)(manager=cn=demo,ou=Marketing,dc=example,dc=com)))
printer3b:
(&(!(objectClass=person))(cn~=printer3b))
Table 14.3. Search Filter Boolean Operators
| Operator | Symbol | Description |
|---|---|---|
| AND | & | All specified filters must be true for the statement to be true. For example, (&(filter)(filter)(filter)...). |
| OR | | | At least one specified filter must be true for the statement to be true. For example, (|(filter)(filter)(filter)...). |
| NOT | ! | The specified statement must not be true for the statement to be true. Only one filter is affected by the NOT operator. For example, (!(filter)). |
- Innermost to outermost parenthetical expressions first.
- All expressions from left to right.
14.3.4. Using Matching Rules
- EQUALITY specifies how to compare two values for an equal match. For example, how to handle strings like "Fred" and "FRED". Search filters that test for equality (for example, attribute=value) use the EQUALITY rule. Equality (eq) indexes use the EQUALITY rule to generate the index keys. Update operations use the EQUALITY rule to compare values to be updated with values already in an entry.
- ORDERING specifies how to compare two values to see if one value is greater or less than another value. Search filters that set a range (for example, attribute<=value or attribute>=value) use the ORDERING rule. An index for an attribute with an ORDERING rule orders the equality values.
- SUBSTR specifies how to do substring matching. Substring search filters (for example, attribute=*partial_string* or attribute=*end_string) use the SUBSTR rule. Substring (sub) indexes use the SUBSTR rule to generate the index keys.
Important
Example 14.1. Matching Rules and Custom Attributes
MyFirstName with IA5 String (7-bit ASCII) syntax and an EQUALITY matching rule of caseExactIA5Match. An entry with a MyFirstName value of Fred is returned in a search with a filter of (MyFirstName=Fred), but it is not returned for filters like (MyFirstName=FRED) and (MyFirstName=fred) Fred, FRED, and fred are all valid IA5 String values, but they do not match using the caseExactIA5Match rule.
MyFirstName should be defined to use the caseIgnoreIA5Match matching rule.
(MyFirstName:caseIgnoreIA5Match:=fred)Note
Note
nsMatchingRule attribute, as in Section 13.2.1, “Creating Indexes Using the Command Line”.
attr:matchingRule:=value
- attr is an attribute belonging to entries being searched, such as
cnormail. - matchingRule is a string that contains the name or OID of the rule to use to match attribute values according to the required syntax.
- value is either the attribute value to search for or a relational operator plus the attribute value to search for. The syntax of the value of the filter depends on the matching rule format used.
2.16.840.1.113730.3.3.2.17.1 identifies the Finnish collation order.
Note
- Bitwise AND match
- Performs bitwise
ANDmatches.OID: 1.2.840.113556.1.4.803Compatible syntaxes: Typically used withIntegerand numeric strings. Directory Server converts numeric strings automatically to integer. - Bitwise OR match
- Performs bitwise
ORmatches.OID: 1.2.840.113556.1.4.804Compatible syntaxes: Typically used withIntegerand numeric strings. Directory Server converts numeric strings automatically to integer. - booleanMatch
- Evaluates whether the values to match are
TRUEorFALSEOID: 2.5.13.13Compatible syntaxes: Boolean - caseExactIA5Match
- Makes a case-sensitive comparison of values.OID: 1.3.6.1.4.1.1466.109.114.1Compatible syntaxes:
IA5Syntax, URI - caseExactMatch
- Makes a case-sensitive comparison of values.OID: 2.5.13.5Compatible syntaxes: Directory String, Printable String, OID
- caseExactOrderingMatch
- Allows case-sensitive ranged searches (less than and greater than).OID: 2.5.13.6Compatible syntaxes: Directory String, Printable String, OID
- caseExactSubstringsMatch
- Performs case-sensitive substring and index searches.OID: 2.5.13.7Compatible syntaxes: Directory String, Printable String, OID
- caseIgnoreIA5Match
- Performs case-insensitive comparisons of values.OID: 1.3.6.1.4.1.1466.109.114.2Compatible syntaxes:
IA5Syntax, URI - caseIgnoreIA5SubstringsMatch
- Performs case-insensitive searches on substrings and indexes.OID: 1.3.6.1.4.1.1466.109.114.3Compatible syntaxes:
IA5Syntax, URI - caseIgnoreListMatch
- Performs case-insensitive comparisons of values.OID: 2.5.13.11Compatible syntaxes: Postal address
- caseIgnoreListSubstringsMatch
- Performs case-insensitive searches on substrings and indexes.OID: 2.5.13.12Compatible syntaxes: Postal address
- caseIgnoreMatch
- Performs case-insensitive comparisons of values.OID: 2.5.13.2Compatible syntaxes: Directory String, Printable String, OID
- caseIgnoreOrderingMatch
- Allows case-insensitive ranged searches (less than and greater than).OID: 2.5.13.3Compatible syntaxes: Directory String, Printable String, OID
- caseIgnoreSubstringsMatch
- Performs case-insensitive searches on substrings and indexes.OID: 2.5.13.4Compatible syntaxes: Directory String, Printable String, OID
- distinguishedNameMatch
- Compares distinguished name values.OID: 2.5.13.1Compatible syntaxes: Distinguished name (DN)
- generalizedTimeMatch
- Compares values that are in a Generalized Time format.OID: 2.5.13.27Compatible syntaxes: Generalized Time
- generalizedTimeOrderingMatch
- Allows ranged searches (less than and greater than) on values that are in a Generalized Time format.OID: 2.5.13.28Compatible syntaxes: Generalized Time
- integerMatch
- Evaluates integer values.OID: 2.5.13.14Compatible syntaxes: Integer
- integerOrderingMatch
- Allows ranged searches (less than and greater than) on integer values.OID: 2.5.13.15Compatible syntaxes: Integer
- keywordMatch
- Compares the given search value to a string in an attribute value.OID: 2.5.13.33Compatible syntaxes: Directory String
- numericStringMatch
- Compares more general numeric values.OID: 2.5.13.8Compatible syntaxes: Numeric String
- numericStringOrderingMatch
- Allows ranged searches (less than and greater than) on more general numeric values.OID: 2.5.13.9Compatible syntaxes: Numeric String
- numericStringSubstringMatch
- Compares more general numeric values.OID: 2.5.13.10Compatible syntaxes: Numeric String
- objectIdentifierMatch
- Compares object identifier (OID) values.OID: 2.5.13.0Compatible syntaxes: OID
- octetStringMatch
- Evaluates octet string values.OID: 2.5.13.17Compatible syntaxes: Octet String
- octetStringOrderingMatch
- Supports ranged searches (less than and greater than) on a series of octet string values.OID: 2.5.13.18Compatible syntaxes: Octet String
- telephoneNumberMatch
- Evaluates telephone number values.OID: 2.5.13.20Compatible syntaxes: Telephone Number
- telephoneNumberSubstringsMatch
- Performs substring and index searches on telephone number values.OID: 2.5.13.21Compatible syntaxes: Telephone Number
- uniqueMemberMatch
- Compares both name and UID values.OID: 2.5.13.23Compatible syntaxes: Name and Optional UID
- wordMatch
- Compares the given search value to a string in an attribute value. This matching rule is case-insensitive.OID: 2.5.13.32Compatible syntaxes: Directory String
Table 14.4. Language Ordering Matching Rules
| Matching Rule | Object Identifiers (OIDs) |
|---|---|
| English (Case Exact Ordering Match) | 2.16.840.1.113730.3.3.2.11.3 |
| Albanian (Case Insensitive Ordering Match) | 2.16.840.1.113730.3.3.2.44.1 |
| Arabic (Case Insensitive Ordering Match) | 2.16.840.1.113730.3.3.2.1.1 |
| Belorussian (Case Insensitive Ordering Match) | 2.16.840.1.113730.3.3.2.2.1 |
| Bulgarian (Case Insensitive Ordering Match) | 2.16.840.1.113730.3.3.2.3.1 |
| Catalan (Case Insensitive Ordering Match) | 2.16.840.1.113730.3.3.2.4.1 |
| Chinese - Simplified (Case Insensitive Ordering Match) | 2.16.840.1.113730.3.3.2.49.1 |
| Chinese - Traditional (Case Insensitive Ordering Match) | 2.16.840.1.113730.3.3.2.50.1 |
| Croatian (Case Insensitive Ordering Match) | 2.16.840.1.113730.3.3.2.22.1 |
| Czech (Case Insensitive Ordering Match) | 2.16.840.1.113730.3.3.2.5.1 |
| Danish (Case Insensitive Ordering Match) | 2.16.840.1.113730.3.3.2.6.1 |
| Dutch (Case Insensitive Ordering Match) | 2.16.840.1.113730.3.3.2.33.1 |
| Dutch - Belgian (Case Insensitive Ordering Match) | 2.16.840.1.113730.3.3.2.34.1 |
| English - US (Case Insensitive Ordering Match) | 2.16.840.1.113730.3.3.2.11.1 |
| English - Canadian (Case Insensitive Ordering Match) | 2.16.840.1.113730.3.3.2.12.1 |
| English - Irish (Case Insensitive Ordering Match) | 2.16.840.1.113730.3.3.2.14.1 |
| Estonian (Case Insensitive Ordering Match) | 2.16.840.1.113730.3.3.2.16.1 |
| Finnish (Case Insensitive Ordering Match) | 2.16.840.1.113730.3.3.2.17.1 |
| French (Case Insensitive Ordering Match) | 2.16.840.1.113730.3.3.2.18.1 |
| French - Belgian (Case Insensitive Ordering Match) | 2.16.840.1.113730.3.3.2.19.1 |
| French - Canadian (Case Insensitive Ordering Match) | 2.16.840.1.113730.3.3.2.20.1 |
| French - Swiss (Case Insensitive Ordering Match) | 2.16.840.1.113730.3.3.2.21.1 |
| German (Case Insensitive Ordering Match) | 2.16.840.1.113730.3.3.2.7.1 |
| German - Austrian (Case Insensitive Ordering Match) | 2.16.840.1.113730.3.3.2.8.1 |
| German - Swiss (Case Insensitive Ordering Match) | 2.16.840.1.113730.3.3.2.9.1 |
| Greek (Case Insensitive Ordering Match) | 2.16.840.1.113730.3.3.2.10.1 |
| Hebrew (Case Insensitive Ordering Match) | 2.16.840.1.113730.3.3.2.27.1 |
| Hungarian (Case Insensitive Ordering Match) | 2.16.840.1.113730.3.3.2.23.1 |
| Icelandic (Case Insensitive Ordering Match) | 2.16.840.1.113730.3.3.2.24.1 |
| Italian (Case Insensitive Ordering Match) | 2.16.840.1.113730.3.3.2.25.1 |
| Italian - Swiss (Case Insensitive Ordering Match) | 2.16.840.1.113730.3.3.2.26.1 |
| Japanese (Case Insensitive Ordering Match) | 2.16.840.1.113730.3.3.2.28.1 |
| Korean (Case Insensitive Ordering Match) | 2.16.840.1.113730.3.3.2.29.1 |
| Latvian, Lettish (Case Insensitive Ordering Match) | 2.16.840.1.113730.3.3.2.31.1 |
| Lithuanian (Case Insensitive Ordering Match) | 2.16.840.1.113730.3.3.2.30.1 |
| Macedonian (Case Insensitive Ordering Match) | 2.16.840.1.113730.3.3.2.32.1 |
| Norwegian (Case Insensitive Ordering Match) | 2.16.840.1.113730.3.3.2.35.1 |
| Norwegian - Bokmul (Case Insensitive Ordering Match) | 2.16.840.1.113730.3.3.2.36.1 |
| Norwegian - Nynorsk (Case Insensitive Ordering Match) | 2.16.840.1.113730.3.3.2.37.1 |
| Polish (Case Insensitive Ordering Match) | 2.16.840.1.113730.3.3.2.38.1 |
| Romanian (Case Insensitive Ordering Match) | 2.16.840.1.113730.3.3.2.39.1 |
| Russian (Case Insensitive Ordering Match) | 2.16.840.1.113730.3.3.2.40.1 |
| Serbian - Cyrillic (Case Insensitive Ordering Match) | 2.16.840.1.113730.3.3.2.45.1 |
| Serbian - Latin (Case Insensitive Ordering Match) | 2.16.840.1.113730.3.3.2.41.1 |
| Slovak (Case Insensitive Ordering Match) | 2.16.840.1.113730.3.3.2.42.1 |
| Slovenian (Case Insensitive Ordering Match) | 2.16.840.1.113730.3.3.2.43.1 |
| Spanish (Case Insensitive Ordering Match) | 2.16.840.1.113730.3.3.2.15.1 |
| Swedish (Case Insensitive Ordering Match) | 2.16.840.1.113730.3.3.2.46.1 |
| Turkish (Case Insensitive Ordering Match) | 2.16.840.1.113730.3.3.2.47.1 |
| Ukrainian (Case Insensitive Ordering Match) | 2.16.840.1.113730.3.3.2.48.1 |
Table 14.5. Language Substring Matching Rules
| Matching Rule | Object Identifiers (OIDs) |
|---|---|
| English (Case Exact Substring Match) | 2.16.840.1.113730.3.3.2.11.3.6 |
| Albanian (Case Insensitive Substring Match) | 2.16.840.1.113730.3.3.2.44.1.6 |
| Arabic (Case Insensitive Substring Match) | 2.16.840.1.113730.3.3.2.1.1.6 |
| Belorussian (Case Insensitive Substring Match) | 2.16.840.1.113730.3.3.2.2.1.6 |
| Bulgarian (Case Insensitive Substring Match) | 2.16.840.1.113730.3.3.2.3.1.6 |
| Catalan (Case Insensitive Substring Match) | 2.16.840.1.113730.3.3.2.4.1.6 |
| Chinese - Simplified (Case Insensitive Substring Match) | 2.16.840.1.113730.3.3.2.49.1.6 |
| Chinese - Traditional (Case Insensitive Substring Match) | 2.16.840.1.113730.3.3.2.50.1.6 |
| Croatian (Case Insensitive Substring Match) | 2.16.840.1.113730.3.3.2.22.1.6 |
| Czech (Case Insensitive Substring Match) | 2.16.840.1.113730.3.3.2.5.1.6 |
| Danish (Case Insensitive Substring Match) | 2.16.840.1.113730.3.3.2.6.1.6 |
| Dutch (Case Insensitive Substring Match) | 2.16.840.1.113730.3.3.2.33.1.6 |
| Dutch - Belgian (Case Insensitive Substring Match) | 2.16.840.1.113730.3.3.2.34.1.6 |
| English - US (Case Insensitive Substring Match) | 2.16.840.1.113730.3.3.2.11.1.6 |
| English - Canadian (Case Insensitive Substring Match) | 2.16.840.1.113730.3.3.2.12.1.6 |
| English - Irish (Case Insensitive Substring Match) | 2.16.840.1.113730.3.3.2.14.1.6 |
| Estonian (Case Insensitive Substring Match) | 2.16.840.1.113730.3.3.2.16.1.6 |
| Finnish (Case Insensitive Substring Match) | 2.16.840.1.113730.3.3.2.17.1.6 |
| French (Case Insensitive Substring Match) | 2.16.840.1.113730.3.3.2.18.1.6 |
| French - Belgian (Case Insensitive Substring Match) | 2.16.840.1.113730.3.3.2.19.1.6 |
| French - Canadian (Case Insensitive Substring Match) | 2.16.840.1.113730.3.3.2.20.1.6 |
| French - Swiss (Case Insensitive Substring Match) | 2.16.840.1.113730.3.3.2.21.1.6 |
| German (Case Insensitive Substring Match) | 2.16.840.1.113730.3.3.2.7.1.6 |
| German - Austrian (Case Insensitive Substring Match) | 2.16.840.1.113730.3.3.2.8.1.6 |
| German - Swiss (Case Insensitive Substring Match) | 2.16.840.1.113730.3.3.2.9.1.6 |
| Greek (Case Insensitive Substring Match) | 2.16.840.1.113730.3.3.2.10.1.6 |
| Hebrew (Case Insensitive Substring Match) | 2.16.840.1.113730.3.3.2.27.1.6 |
| Hungarian (Case Insensitive Substring Match) | 2.16.840.1.113730.3.3.2.23.1.6 |
| Icelandic (Case Insensitive Substring Match) | 2.16.840.1.113730.3.3.2.24.1.6 |
| Italian (Case Insensitive Substring Match) | 2.16.840.1.113730.3.3.2.25.1.6 |
| Italian - Swiss (Case Insensitive Substring Match) | 2.16.840.1.113730.3.3.2.26.1.6 |
| Japanese (Case Insensitive Substring Match) | 2.16.840.1.113730.3.3.2.28.1.6 |
| Korean (Case Insensitive Substring Match) | 2.16.840.1.113730.3.3.2.29.1.6 |
| Latvian, Lettish (Case Insensitive Substring Match) | 2.16.840.1.113730.3.3.2.31.1.6 |
| Lithuanian (Case Insensitive Substring Match) | 2.16.840.1.113730.3.3.2.30.1.6 |
| Macedonian (Case Insensitive Substring Match) | 2.16.840.1.113730.3.3.2.32.1.6 |
| Norwegian (Case Insensitive Substring Match) | 2.16.840.1.113730.3.3.2.35.1.6 |
| Norwegian - Bokmul (Case Insensitive Substring Match) | 2.16.840.1.113730.3.3.2.36.1.6 |
| Norwegian - Nynorsk (Case Insensitive Substring Match) | 2.16.840.1.113730.3.3.2.37.1.6 |
| Polish (Case Insensitive Substring Match) | 2.16.840.1.113730.3.3.2.38.1.6 |
| Romanian (Case Insensitive Substring Match) | 2.16.840.1.113730.3.3.2.39.1.6 |
| Russian (Case Insensitive Substring Match) | 2.16.840.1.113730.3.3.2.40.1.6 |
| Serbian - Cyrillic (Case Insensitive Substring Match) | 2.16.840.1.113730.3.3.2.45.1.6 |
| Serbian - Latin (Case Insensitive Substring Match) | 2.16.840.1.113730.3.3.2.41.1.6 |
| Slovak (Case Insensitive Substring Match) | 2.16.840.1.113730.3.3.2.42.1.6 |
| Slovenian (Case Insensitive Substring Match) | 2.16.840.1.113730.3.3.2.43.1.6 |
| Spanish (Case Insensitive Substring Match) | 2.16.840.1.113730.3.3.2.15.1.6 |
| Swedish (Case Insensitive Substring Match) | 2.16.840.1.113730.3.3.2.46.1.6 |
| Turkish (Case Insensitive Substring Match) | 2.16.840.1.113730.3.3.2.47.1.6 |
| Ukrainian (Case Insensitive Substring Match) | 2.16.840.1.113730.3.3.2.48.1.6 |
14.4. Examples of Common ldapsearches
- The search is for all entries in the directory.
- The directory is configured to support anonymous access for search and read. This means that no bind information has to be supplied in order to perform the search. For more information on anonymous access, see Section 18.11.1.1.3, “Granting Anonymous Access”.
- The server is located on a host named
server.example.com. - The server uses port number
389. Since this is the default port, the port number does not have to be sent in the search request. - TLS is enabled for the server on port
636(the default LDAPS port number). - The suffix under which all data are stored is
dc=example,dc=com.
14.4.1. Returning All Entries
# ldapsearch -D "cn=Directory Manager" -W -p 389 -h server.example.com -b "dc=example,dc=com" -s sub -x "(objectclass=*)"
"objectclass=*" is a search filter that matches any entry in the directory. Since every entry must have an object class, and the objectclass attribute is always indexed, this is a useful search filter to return every entry.
14.4.2. Specifying Search Filters on the Command Line
-f option. For example:
# ldapsearch -D "cn=Directory Manager" -W -p 389 -h server.example.com -b "dc=example,dc=com" -s sub -x "cn=babs jensen"
14.4.3. Searching the Root DSE Entry
base, and a filter of "objectclass=*". For example:
# ldapsearch -D "cn=Directory Manager" -W -p 389 -h server.example.com -x -b "" -s base "objectclass=*"
14.4.4. Searching the Schema Entry
cn=schema entry is a special entry that contains information about the directory schema, such as object classes and attribute types.
cn=schema entry:
# ldapsearch -o ldif-wrap=no -D "cn=Directory Manager" -W -b "cn=schema" \
'(objectClass=subSchema)' -s sub objectClasses attributeTypes matchingRules \
matchingRuleUse dITStructureRules nameForms ITContentRules ldapSyntaxes14.4.5. Using LDAP_BASEDN
LDAP_BASEDN environment variable. Doing this means that the search base does not have to be set with the -b option. For information on how to set environment variables, see the documentation for the operating system.
LDAP_BASEDN to the directory's suffix value. Since the directory suffix is equal to the root, or topmost, entry in the directory, this causes all searches to begin from the directory's root entry.
LDAP_BASEDN to dc=example,dc=com and search for cn=babs jensen in the directory, use the following command-line call:
# export LDAP_BASEDN="dc=example,dc=com" # ldapsearch -D "cn=Directory Manager" -W -p 389 -h server.example.com -x "cn=babs jensen"
sub is used because the -s option was not used to specify the scope.
14.4.6. Displaying Subsets of Attributes
ldapsearch command returns all search results in LDIF format. By default, ldapsearch returns the entry's distinguished name and all of the attributes that a user is allowed to read. The directory access control can be set such that users are allowed to read only a subset of the attributes on any given directory entry. Only operational attributes are not returned. For operational attributes to be returned as a result of a search operation, explicitly specify them in the search command or use + to return all operational attributes.
cn and sn attributes for every entry in the directory, use the following command-line call:
# ldapsearch -D "cn=Directory Manager" -W -p 389 -h server.example.com -b "dc=example,dc=com" -s sub -x "(objectclass=*)" sn cn
14.4.7. Searching for Operational Attributes
ldapsearches. According to RFC3673, use + to return all operational attributes in a search request:
# ldapsearch -D "cn=Directory Manager" -W -p 389 -h server.example.com -b "dc=example,dc=com" -s sub -x "(objectclass=*)" '+'
ldapsearch request:
# ldapsearch -D "cn=Directory Manager" -W -p 389 -h server.example.com -b "dc=example,dc=com" -s sub -x "(objectclass=*)" creatorsName createTimestamp modifiersName modifyTimestamp
Note
"*", in addition to the operational attributes that are listed.
# ldapsearch -D "cn=Directory Manager" -W -p 389 -h server.example.com -b "dc=example,dc=com" -s sub -x "(objectclass=*)" "*" aci14.4.8. Specifying Search Filters Using a File
ldapsearch command runs each search in the order in which it appears in the file.
sn=example givenname=user
ldapsearch first finds all the entries with the surname set to example, then all the entries with the givenname set to user. If an entry is found that matches both search criteria, then the entry is returned twice.
searchdb:
# ldapsearch -D "cn=Directory Manager" -W -p 389 -h server.example.com -x -f searchdb
ldapsearch command performs both searches but returns only the DN and the givenname and sn attributes of each entry:
# ldapsearch -D "cn=Directory Manager" -W -p 389 -h server.example.com -x -f searchdb sn givenname
14.4.9. Specifying DNs That Contain Commas in Search Filters
example.com Bolivia, S.A. subtree, use the following command:
# ldapsearch -D "cn=Directory Manager" -W -p 389 -h server.example.com -x -s base -b "l=Bolivia\,S.A.,dc=example,dc=com" "objectclass=*"
14.4.10. Using a Client Certificate to Bind to Directory Server
14.4.11. Searching with Language Matching Rules
attr:matchingRule:=value
2.16.840.1.113730.3.3.2.46.1) matching rule.
departmentNumber:2.16.840.1.113730.3.3.2.46.1:=>= N4709
14.4.12. Searching for Attributes with Bit Field Values
Note
1.2.840.113556.1.4.803) checks that the bit given in the assertion value is set in the bit field attribute value. (This is somewhat analogous to an equality search.) In this example, the userAccountControl value must be set to the bit representing 2.
"(UserAccountControl:1.2.840.113556.1.4.803:=2)"
"(UserAccountControl:1.2.840.113556.1.4.803:=6)”
1.2.840.113556.1.4.804) checks to see if any of the bits in the assertion string are represented in the attribute value. (This is somewhat analogous to a substring search.) In this example, the userAccountControl value must have any of the bits which are set in the bit field of 6, meaning that the attribute value can be 2, 4, or 6.
"(UserAccountControl:1.2.840.113556.1.4.804:=6)"
14.5. Improving Search Performance through Resource Limits
- Look through limit. Specifies how many entries can be examined for a search operation.
- Size limit. Specifies the maximum number of entries the server returns to a client application in response to a search operation.
- Time limit. Specifies the maximum time the server spends processing a search operation.
- Idle timeout. Specifies the time a connection to the server can be idle before the connection is dropped.
- Range timeout. Specifies a separate look-through limit specifically for searches using a range.
Note
14.5.1. Search Performance and Resource Limits
14.5.2. Fine Grained ID List Size
14.5.3. Setting User and Global Resource Limits Using the Command Line
ldapmodify to add the attributes to the entry.
- Look-through limit
- Specifies how many entries are examined for a search operation. Giving this attribute a value of
-1indicates that there is no limit.- User-level attribute:
nsLookThroughLimit - Global configuration:
- Attribute:
nsslapd-lookthroughlimit - Entry:
cn=config,cn=ldbm database,cn=plugins,cn=config
- Page look-through limit
- As with the look-through limit, specifies how many entries are examined, but specifically for simple paged search operations. Giving this attribute a value of
-1indicates that there is no limit.- User-level attribute:
nsPagedLookThroughLimit - Global configuration:
- Attribute:
nsslapd-pagedlookthroughlimit - Entry:
cn=config,cn=ldbm database,cn=plugins,cn=config
- Size limit
- Specifies the maximum number of entries the server returns to a client application in response to a search operation. Giving this attribute a value of
-1indicates that there is no limit.- User-level attribute:
nsSizeLimit - Global configuration:
- Attribute:
nsslapd-sizelimit - Entry:
cn=config
- Paged size limit
- As with the size limit, specifies the maximum number of entries the server returns to a client application but only for simple paged search operations. Giving this attribute a value of
-1indicates that there is no limit.- User-level attribute:
nsPagedSizeLimit - Global configuration:
- Attribute:
nsslapd-pagedsizelimit - Entry:
cn=config
- Time Limit
- Specifies the maximum time the server spends processing a search operation. Giving this attribute a value of
-1indicates that there is no time limit.- User-level attribute:
nsTimeLimit - Global configuration:
- Attribute:
nsslapd-timelimit - Entry:
cn=config
- Idle timeout
- Specifies the time a connection to the server can be idle before the connection is dropped. The value is given in seconds. Giving this attribute a value of
-1indicates that there is no limit.- User-level attribute:
nsidletimeout - Global configuration:
- Attribute:
nsslapd-idletimeout - Entry:
cn=config
- ID list scan limit
- Specifies the maximum number of entry IDs loaded from an index file for search results. If the ID list size is greater than this value, the search will not use the index list but will treat the search as an unindexed search and look through the entire database.
- User-level attribute:
nsIDListScanLimit - Global configuration:
- Attribute:
nsslapd-idlistscanlimit - Entry:
cn=config,cn=ldbm database,cn=plugins,cn=config
- Paged ID list scan limit
- As with the ID list scan limit, specifies the maximum number of entry IDs loaded from an index file for search results, but specifically for paged search operations.
- User-level attribute:
nsPagedIDListScanLimit - Global configuration:
- Attribute:
nsslapd-pagedidlistscanlimit - Entry:
cn=config,cn=ldbm database,cn=plugins,cn=config
- Range look-through limit
- Specifies how many entries are examined for a range search operation (a search using greater-than, equal-to-or-greater-than, less-than, or equal-to-less-than operators). Giving this attribute a value of
-1indicates that there is no limit.- User-level attribute: not available
- Global configuration:
- Attribute:
nsslapd-rangelookthroughlimit - Entry:
cn=config,cn=ldbm database,cn=plugins,cn=config
# ldapmodify -D "cn=Directory Manager" -W -p 389 -h server.example.com -x dn: uid=user_name,ou=People,dc=example,dc=com changetype: modify add: nsSizeLimit nsSizeLimit: 500
ldapmodify statement adds the nsSizeLimit attribute to the user's entry and gives it a search return size limit of 500 entries.
Note
14.5.4. Setting Resource Limits on Anonymous Binds
- Create a template entry and set whatever resource limits you want to apply to anonymous binds.
Note
For performance reasons, the template should be in the normal back end, not in thecn=configsuffix, which does not use an entry cache.For example:# ldapadd -D "cn=Directory Manager" -W -p 389 -h server.example.com -x dn: cn=anonymous_template,ou=people,dc=example,dc=com objectclass: nsContainer objectclass: top cn: anonymous_template nsSizeLimit: 250 nsLookThroughLimit: 1000 nsTimeLimit: 60
- On all suppliers in a replication topology, add the
nsslapd-anonlimitsdnparameter to the server configuration, pointing to the DN of the template entry. Any of the resource limits in Section 14.5.3, “Setting User and Global Resource Limits Using the Command Line” can be set. For example:# dsconf -D "cn=Directory Manager" ldap://server.example.com config replace nsslapd-anonlimitsdn="cn=anonymous_template,ou=people,dc=example,dc=com"
14.5.5. Improving Performance for Range Searches
(modifyTimestamp>=20210101010101Z)
nsslapd-rangelookthroughlimit attribute. The default value is 5000, the same as the default nsslapd-lookthroughlimit attribute value.
# ldapmodify -a -D "cn=Directory Manager" -W -p 389 -h server.example.com -x
dn: cn=config,cn=ldbm database,cn=plugins,cn=config
changetype: add
add: nsslapd-rangelookthroughlimit
nsslapd-rangelookthroughlimit: 750014.6. Using Persistent Search
ldapsearch which remains open even after the initial search results are returned.
Important
- Keep a consistent and current local cache.Any client will query local cache before trying to connect to and query the directory. Persistent searches provide the local cache necessary to improve performance for these clients.
- Automatically initiate directory actions.The persistent cache can be automatically updated as entries are modified, and the persistent search results can display what kind of modification was performed on the entry. Another application can use that output to update entries automatically, such as automatically creating an email account on a mail server for new users or generating a unique user ID number.
- The
ldapsearchdoes not send a notification when the client disconnects, and the change notifications are not sent for any changes made while the search is disconnected. This means that the client's cache will not be updated if it is ever disconnected and there is no good way to update the cache with any new, modified, or deleted entries that were changed while it was disconnected. - An attacker could open a large number of persistent searches to launch a denial of service attack.
- A persistent search requires leaving open a TCP connection between the Directory Server and client. This should only be done if the server is configured to allow a lot of client connections and has a way to close idle connections.
options=persistent.
[12/Jan/2009:12:51:54.899423510 -0500] conn=19636710736396323 op=0 SRCH base="dc=example,dc=com" scope=2 filter="(objectClass=person)" attrs=ALL options=persistent14.7. Searching with Specified Controls
supportedControls attribute in its DSE. Some of these define server operations like replication; other are allowed extended operations like get effective rights or dereferencing controls which clients can pass through LDAP operations to the server.
-E option by giving the control OID, its criticality for the ldapsearch, and any information required for the control operation.
-E '[!]control_OID:control_information'
14.7.1. Retrieving Effective User Rights
# ldapsearch -D "cn=Directory Manager" -W -p 389 -h server.example.com -b "dc=example,dc=com" -s sub -x -E '!1.3.6.1.4.1.42.2.27.9.5.2=:dn:uid=jsmith,ou=people,dc=example,dc=com' "(objectclass=*)"
Important
14.7.2. Using Server-Side Sorting
-E flag and the sss control alias. The structure of the operation sets the attribute by which to sort the results and, optionally, the sort order and ordering rule.
-E sss=[-]attribute_name:[ordering_rule_OID]
-) is an optional flag that reverses the sort order, which naturally runs descending. The matching rule tables in Section 14.3.4, “Using Matching Rules” contain the ordering rules supported by the Directory Server.
# ldapsearch -D "cn=Directory Manager" -W -p 389 -h server.example.com -b "dc=example,dc=com" -s sub -x -E sss=-uidNumber:2.5.13.15 "(objectclass=*)"
14.7.3. Performing Dereferencing Searches
Important
-E 'deref=deref_attribute:list_of_attributes'
member or manager.
Note
1.3.6.1.4.1.1466.115.121.1.12).
l,mail,cn.
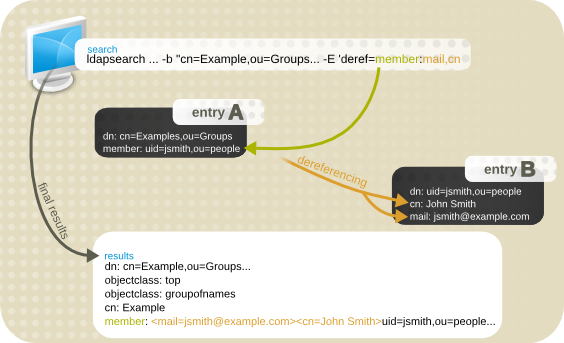
Figure 14.1. Simple Dereferencing Search Command
member attribute in the search target entry (the Engineers group) as the deref_attribute. It then returns the locality attribute for each member.
# ldapsearch -x -D "cn=Directory Manager" -W -b "cn=Example,ou=Groups,dc=example,dc=com" -E 'deref=member:mail,cn' "(objectclass=*)" # Engineers, Groups, example.com dn: cn=Engineers,ou=Groups,dc=example,dc=com control: 1.3.6.1.4.1.4203.666.5.16 false MIQAAADNMIQAAAA1BAZtZW1iZXIEK2NuPURld mVsb3BlcnMsIG91PUdyb3VwcywgZGM9ZXhhbXBsZSxkYz1jb20whAAAADIEBm1lbWJlcgQoY249VG VzdGVycywgb3U9R3JvdXBzLCBkYz1leGFtcGxlLGRjPWNvbTCEAAAAVAQGbWVtYmVyBCp1aWQ9ZW5 nLCBvdT1lbmdpbmVlcmluZywgZGM9ZXhhbXBsZSxkYz1jb22ghAAAABowhAAAABQEAWwxhAAAAAsE CUNhbWJyaWRnZQ== # member: <mail=jsmith@example.com><cn=John Smith>;uid=jsmith,ou=people,dc=example,dc=com objectClass: top objectClass: inetuser objectClass: groupofnames cn: Engineers member: uid=jsmith,ou=people,dc=example,dc=com
14.7.4. Using Simple Paged Results
1.2.840.113556.1.4.319.
When you start a simple paged results search:
- The client sends the search to the server, together with the paged results control and with how many records to return in the first page.
- Before Directory Server starts returning data, the server generates an estimate how many records can be returned in total.The estimate of records is not an exact number. The total number of records returned can be lower than the estimate. The reasons for such a scenario include
- attributes used in the search filter do not exist in the index. For an optimal result, all queried attributes must be indexed.
- before an entry is send to the client, access control lists (ACL) are validated. Insufficient permissions can prevent the entry from being returned.
After generating the estimate, the server sends the first set of results, a cookie, and the estimated number of records. - The returned records are displayed in the client. The user can now enter how many records should be returned in the next request. The requested number is now sent, together with the cookie, to the server.
- The server retrieves the requested number of records from the database and sends them together with a cookie to the client.
- The previous two steps are repeated until all records are sent or the search is cancelled.
The format of the simple paged result search option with ldapsearch is:
-E pg=size
ldapsearch -x -D "cn=Directory Manager" -W -b "ou=Engineers,ou=People,dc=example,dc=com" -E pg=3 "(objectclass=*)" cn dn: uid=jsmith,ou=Engineers,ou=People,dc=example,dc=com cn: John Smith dn: uid=bjensen,ou=Engineers,ou=People,dc=example,dc=com cn: Barbara Jensen dn: uid=hmartin,ou=Engineers,ou=People,dc=example,dc=com cn: Henry Martin Results are sorted. next page size (3): 5
5 as shown would open the next page of results with five entries.
Important
Simple paged results can be used together with server-side sorting. Server-side sorting is a control which performs the sort process on the server rather than in a client; this is usually done for a search which uses a particular matching rule. (This behavior is defined in RFC 2891.) The OpenLDAP client tools do not support server-side sort with the simple paged results control, but other LDAP utilities such as Perl Net::LDAP do support both.
Some clients may open a single connection to the Directory Server, but send multiple operation requests, including multiple search requests using the simple paged results extension.
VLV indexes are similar to simple paged results in that they also return a usable browsing list of results. The main difference is in how that list is generated. Simple paged results are calculated per search, while VLV indexes are a permanent list. Overall, VLV indexes are faster for searches, but do require some server-side configuration and overhead for the server to maintain.
Note
UNWILLING_TO_PERFORM error.
14.7.5. Pre- and Post-read Entry Response Controls
description attribute and display the value before and after the modification:
#ldapmodify -D "cn=Directory Manager" -W -x \-e \!preread=description -e \!postread=descriptiondn: uid=user,ou=People,dc=example,dc=com changetype: modify replace: description description: new description modifying entry "uid=user,ou=People,dc=example,dc=com" control: 1.3.6.1.1.13.1 false ZCkEJXVpZD1qdXNlcixvdT1QZW9wbGUsZGM9ZXhhbXBsZSxk Yz1jb20wAA== # ==> preread dn: uid=user,ou=People,dc=example,dc=com description: old description # <== preread control: 1.3.6.1.1.13.2 false ZEsEJXVpZD1qdXNlcixvdT1QZW9wbGUsZGM9ZXhhbXBsZSxk Yz1jb20wIjAgBAtkZXNjcmlwdGlvbjERBA9uZXcgZGVzY3JpcHRpb24= # ==> postread dn: uid=user,ou=People,dc=example,dc=com description: new description # <== postread
Chapter 15. Managing Replication
15.1. Replication Overview
15.1.1. What Directory Units Are Replicated
15.1.2. Read-Write and Read-Only Replicas
15.1.3. Suppliers and Consumers
- In the case of cascading replication, the hub server holds a read-only replica that it supplies to consumers. Section 15.4, “Cascading Replication” has more information.
- In the case of multi-supplier replication, the suppliers are both suppliers and consumers for the same information. For more information, see Section 15.3, “Multi-Supplier Replication”.
15.1.4. Changelog
Important
dsctl db2bak command or the web console. Both ways, the RUVs are written to the database before the backup starts.
15.1.5. Replication Identity
- It is created on the consumer server in the
cn=configentry. - Create this entry on every server that receives updates from another server, meaning on every hub or dedicated consumer.
- When a replica is configured as a consumer or hub, this entry must be specified as the one authorized to perform replication updates.
- The replication agreement is created on the supplier server, the DN of this entry must be specified in the replication agreement.
- In a replication context, this entry, with its special user profile, bypasses access control rules defined on the consumer server for the database involved in that replication agreement. Note that, outside of the replication context, the replication manager is subject to ACIs when performing regular operations.
15.1.6. Replication Agreement
- The database to be replicated.
- The consumer server to which the data is pushed.
- The days and times during which replication can occur.
- The DN and credentials that the supplier server must use to bind (the replication manager entry or supplier bind DN).
- How the connection is secured (TLS, client authentication).
- Any attributes that will not be replicated (fractional replication).
15.1.7. Replicating a Subset of Attributes with Fractional Replication
MAY keyword) in the schema, it is possible to set different attributes to be replicated for an incremental update and a total update. The incremental update list (nsDS5ReplicatedAttributeList) must always be set to enable fractional replication; if that is the only attribute set, then it applies to both incremental and total updates. The optional nsDS5ReplicatedAttributeListTotal attribute sets an additional fractional replication list for total updates. This is described in Section 15.11.1, “Setting Different Fractional Replication Attributes for Total and Incremental Updates”.
Note
nsds5ReplicaStripAttrs attribute adds a list of attributes which cannot be sent in an empty replication event and are stripped from the update sequence. This logically includes operational attribtes like modifiersName.
15.1.8. Replication over TLS
Prerequisites
- Configure both the supplier and consumer servers to use TLS. See Section 9.4.1, “Enabling TLS in Directory Server”.
- Configure the consumer server to recognize the supplier server's certificate as the supplier DN. Do this only to use TLS client authentication rather than simple authentication. See Section 9.9, “Using Certificate-based Client Authentication”.
Important
Replication configured over TLS with certificate-based authentication fails if the supplier's certificate is only capable of behaving as a server certificate and not also as a client during an TLS handshake. Replication with certificate-based authentication uses the Directory Server's server certificate for authentication to the remote server.If you usecertutilto generate the Certificate Signing Request (CSR), pass the--nsCertType=sslClient,sslServeroption to the command to set the certificate required type.
Configuring Replication over TLS
- When using user name and password authentication:
- When using certificate-based authentication, see Section 15.6, “Configuring Replication Partners to use Certificate-based Authentication”.
15.2. Single-supplier Replication
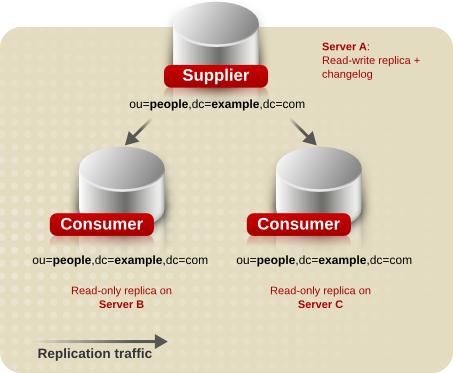
Figure 15.1. Single-supplier Replication
15.2.1. Setting up Single-supplier Replication Using the Command Line
supplier.example.com that will act as a supplier in the replication topology to be set up. The following procedures describe how to add a read-only consumer named consumer.example.com to the topology, and how to configure single-supplier replication for the dc=example,dc=com suffix.
Steps to be Performed on the Consumer
consumer.example.com host:
- Install Directory Server, and create an instance. For details, see the Red Hat Directory Server Installation Guide.
- In case you created the instance without a database, create the database for the suffix. For example, to create a database named
userRootfor thedc=example,dc=comsuffix:# dsconf -D "cn=Directory Manager" ldap://consumer.example.com backend \ create --suffix="dc=example,dc=com" --be-name="userRoot"For details on creating a database for a suffix, see Section 2.1.1, “Creating Suffixes”. - Enable replication for the suffix, and create the replication manager account:
# dsconf -D "cn=Directory Manager" ldap://consumer.example.com replication \ enable --suffix="dc=example,dc=com" --role="consumer" \ --bind-dn="cn=replication manager,cn=config" --bind-passwd="password"This command configures theconsumer.example.comhost as a consumer for thedc=example,dc=comsuffix. Additionally, the server creates thecn=replication manager,cn=configuser with the specified password, and allows this account to replicate changes for the suffix to this host.
Steps to be Performed on the Supplier
supplier.example.com host:
- Enable replication for the
dc=example,dc=comsuffix:# dsconf -D "cn=Directory Manager" ldap://supplier.example.com replication \ enable --suffix="dc=example,dc=com" --role="supplier" --replica-id=1This command configures thesupplier.example.comhost as a supplier for thedc=example,dc=comsuffix, and sets the replica ID for this entry to1.Important
The replica ID must be a unique integer between1and65534for a suffix across all suppliers in the topology. - Add the replication agreement, and initialize the consumer. For example:
# dsconf -D "cn=Directory Manager" ldap://supplier.example.com repl-agmt \ create --suffix="dc=example,dc=com" --host="consumer.example.com" --port=636 \ --conn-protocol=LDAPS --bind-dn="cn=replication manager,cn=config" \ --bind-passwd="password" --bind-method=SIMPLE --init \ example-agreementThis command creates a replication agreement namedexample-agreement. The replication agreement defines settings, such as the consumer's host name, protocol, and authentication information that the supplier uses when connecting and replicating data to the consumer.After the agreement was created, Directory Server initializes the consumer. To initialize the consumer later, omit the--initoption. Note that replication does not start before you initialize the consumer. For details about initializing a consumer, see Section 15.8.3, “Initializing a Consumer”.For further details about the options used in the command, enter:# dsconf -D "cn=Directory Manager" ldap://supplier.example.com repl-agmt --help
- Verify whether the initialization was successful:
# dsconf -D "cn=Directory Manager" ldap://supplier.example.com repl-agmt \ init-status --suffix="dc=example,dc=com" example-agreement Agreement successfully initialized.Depending on the amount of data to replicate, the initialization can be time-consuming.
15.2.2. Setting up Single-supplier Replication Using the Web Console
supplier.example.com that will act as a supplier in the replication topology to be set up. The following procedures describe how to add a read-only consumer named consumer.example.com to the topology, and how to configure single-supplier replication for the dc=example,dc=com suffix.
Steps to be Performed on the Consumer
consumer.example.com host:
- Install Directory Server, and create an instance. For details, see the Red Hat Directory Server Installation Guide.
- Open the Directory Server user interface in the web console. See Section 1.4, “Logging Into Directory Server Using the Web Console”.
- Select the instance.
- In case you created the instance without a database, create the database for the suffix. For details about creating a database for a suffix, see Section 2.1.1, “Creating Suffixes”.
- Enable replication for the suffix:
- Open the menu.
- Select the
dc=example,dc=comsuffix, and click . - Select
Consumerin the Replication Role field, and enter the DN and password of the replication manager account to create. For example: These settings configure the host as a consumer for the
dc=example,dc=comsuffix. Additionally, the server creates thecn=replication manager,cn=configuser with the specified password, and allows this account to replicate changes for the suffix to this host. - Click .
Steps to be Performed on the Supplier
supplier.example.com host:
- Open the Directory Server user interface in the web console. See Section 1.4, “Logging Into Directory Server Using the Web Console”.
- Select the instance.
- Enable replication for the
dc=example,dc=comsuffix:- Open the menu.
- Select the
dc=example,dc=comsuffix, and click . - Select
Supplierin the Replication Role field, enter a replica ID, and leave the fields in the Replication Authentication area empty. For example: This configures the host as a supplier for the
dc=example,dc=comsuffix, and sets the replica ID for this entry to1.Important
The replica ID must be a unique integer between1and65534for a suffix across all suppliers in the topology. - Click .
- Add the replication agreement, and initialize the consumer:
- Open the menu, and select the
dc=example,dc=comsuffix. - On tab, click , and fill the fields. For example:
 These settings create a replication agreement named
example-agreement. The replication agreement defines settings, such as the consumer's host name, protocol, and authentication information that the supplier uses when connecting and replicating data to the consumer. - Select Do Online Initialization in the Consumer Initialization field to automatically initialize the consumer after saving the agreement.To initialize the consumer later, select Do Not Initialize. Note that replication does not start before you initialize the consumer. For details about initializing a consumer, see Section 15.8.3, “Initializing a Consumer”.
- Click .
- Verify whether the initialization was successful:
- Open the menu.
- Select the entry.For a successfully-completed initialization, the web console displays the
Error (0) Replica acquired successfully: Incremental update succeededmessage in the Last Update Status column. Depending on the amount of data to replicate, the initialization can be time-consuming.
15.3. Multi-Supplier Replication
Note
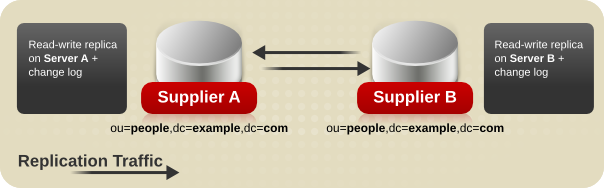
Figure 15.2. Multi-supplier Replication with Two Suppliers
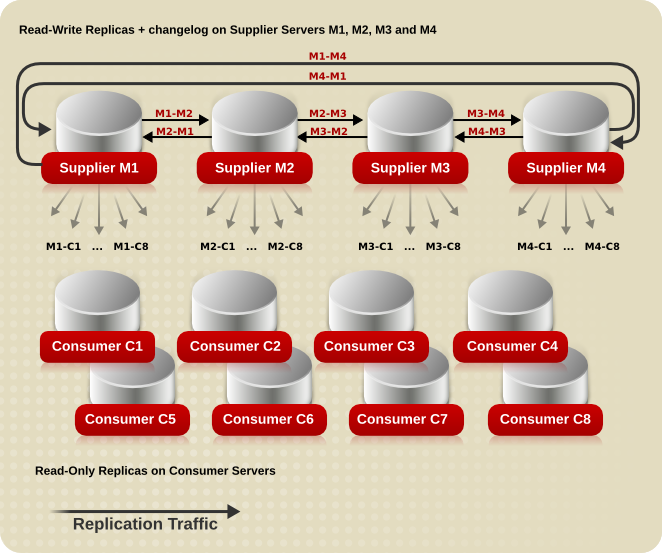
Figure 15.3. Complex Replication Scenario with Four Suppliers and Eight Consumers
Note
- The speed of the network.
- The number of outgoing and incoming replication agreements.
15.3.1. Setting up Multi-supplier Replication Using the Command Line
supplier1.example.com. The following procedures describe how to add another read-write replica named supplier2.example.com to the topology, and how to configure multi-supplier replication for the dc=example,dc=com suffix.
Preparing the New Server to Join
supplier2.example.com host:
- Install Directory Server, and create an instance. For details, see the Red Hat Directory Server Installation Guide.
- In case you created the instance without a database, create the database for the suffix. For example, to create a database named
userRootfor thedc=example,dc=comsuffix:# dsconf -D "cn=Directory Manager" ldap://supplier2.example.com backend \ create --suffix="dc=example,dc=com" --be-name="userRoot"For details on creating a database for a suffix, see Section 2.1.1, “Creating Suffixes”. - Enable replication for the suffix, and create the replication manager account:
# dsconf -D "cn=Directory Manager" ldap://supplier2.example.com replication \ enable --suffix="dc=example,dc=com" --role="supplier" --replica-id=1 \ --bind-dn="cn=replication manager,cn=config" --bind-passwd="password"This command configures thesupplier2.example.comhost as a supplier for thedc=example,dc=comsuffix, and sets the replica ID for this entry to1. Additionally, the server creates thecn=replication manager,cn=configuser with the specified password, and allows this account to replicate changes for the suffix to this host.Important
The replica ID must be a unique integer between1and65534for a suffix across all suppliers in the topology.
Configuring the Existing Server as a Supplier
supplier1.example.com host:
- Similarly to the command you ran on the new server to join, enable replication for the
dc=example,dc=comsuffix, and create the replication manager account:# dsconf -D "cn=Directory Manager" ldap://supplier1.example.com replication \ enable --suffix="dc=example,dc=com" --role="supplier" --replica-id=2 \ --bind-dn="cn=replication manager,cn=config" --bind-passwd="password"The replica ID must be different than the one created in the section called “Preparing the New Server to Join”, but the replication manager account can use the same DN. - Add the replication agreement, and initialize a new server. For example:
# dsconf -D "cn=Directory Manager" ldap://supplier1.example.com repl-agmt \ create --suffix="dc=example,dc=com" --host="supplier2.example.com" --port=636 \ --conn-protocol=LDAPS --bind-dn="cn=replication manager,cn=config" \ --bind-passwd="password" --bind-method=SIMPLE --init \ example-agreement-supplier1-to-supplier2This command creates a replication agreement namedexample-agreement-supplier1-to-supplier2. The replication agreement defines settings, such as the consumer's host name, protocol, and authentication information that the supplier uses when connecting and replicating data to the consumer.After the agreement was created, Directory Server initializes the consumer. To initialize the consumer later, omit the--initoption. Note that replication does not start before you initialize the consumer. For details on initializing a consumer, see Section 15.8.3, “Initializing a Consumer”.For further details about the options used in the command, enter:# dsconf -D "cn=Directory Manager" ldap://supplier1.example.com repl-agmt --help
- Verify whether the initialization was successful:
# dsconf -D "cn=Directory Manager" ldap://supplier1.example.com repl-agmt \ init-status --suffix="dc=example,dc=com" example-agreement-supplier1-to-supplier2 Agreement successfully initialized.Depending on the amount of data to replicate, the initialization can take be time-consuming.
Configuring the New Server as a Supplier
supplier2.example.com host:
Warning
- Add the replication agreement to replicate information from
supplier 2tosupplier 1. For example:# dsconf -D "cn=Directory Manager" ldap://supplier2.example.com repl-agmt \ create --suffix="dc=example,dc=com" --host="supplier1.example.com" --port=636 \ --conn-protocol=LDAPS --bind-dn="cn=replication manager,cn=config" \ --bind-passwd="password" --bind-method=SIMPLE \ example-agreement-supplier2-to-supplier1This command creates a replication agreement namedexample-agreement-supplier2-to-supplier1. The replication agreement defines settings, such as the consumer's host name, protocol, and authentication information that the supplier uses when connecting and replicating data to the consumer.
15.3.2. Setting up Multi-supplier Replication Using the Web Console
supplier1.example.com. The following procedures describe how to add another read-write replica named supplier2.example.com to the topology, and how to configure multi-supplier replication for the dc=example,dc=com suffix.
Preparing the New Server to Join
supplier2.example.com host:
- Install Directory Server, and create an instance. For details, see the Red Hat Directory Server Installation Guide.
- Open the Directory Server user interface in the web console. See Section 1.4, “Logging Into Directory Server Using the Web Console”.
- Select the instance.
- In case you created the instance without a database, create the database from the suffix. For details about creating a database for a suffix, see Section 2.1.1, “Creating Suffixes”.
- Enable replication for the suffix:
- Open the menu.
- Select the
dc=example,dc=comsuffix, and click . - Select
Supplierin the Replication Role field, enter a replica ID, as well as the DN and password of the replication manager account to create. For example: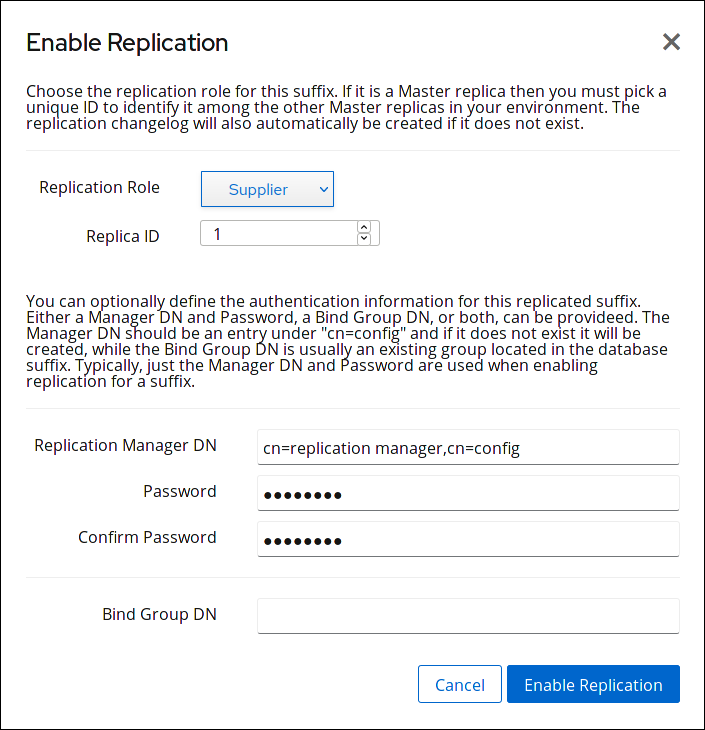 These settings configure the
supplier2.example.comhost as a supplier for thedc=example,dc=comsuffix, and set the replica ID for this entry to1. Additionally, the server creates thecn=replication manager,cn=configuser with the specified password, and allows this account to replicate changes for the suffix to this host.Important
The replica ID must be a unique integer between1and65534for a suffix across all suppliers in the topology. - Click .
Configuring the Existing Server as a Supplier
supplier1.example.com host:
- Open the Directory Server user interface in the web console. See Section 1.4, “Logging Into Directory Server Using the Web Console”.
- Select the instance.
- Similarly to the settings on the new server to join, enable replication for the
dc=example,dc=comsuffix, and create a replication manager account:- Open the menu.
- Select the
dc=example,dc=comsuffix, and click . - Select
Supplierin the Replication Role field, enter a replica ID, as well as the DN and password of the replication manager account to create. For example: The replica ID must be different than the one created in the section called “Preparing the New Server to Join”, but the replication manager account can use the same DN.
 - Click .
- Add the replication agreement and initialize the consumer:
- Open the menu, and select the entry.
- Click , and fill the fields. For example:
 These settings create a replication agreement named
example-agreement-supplier1-to-supplier2. The replication agreement defines settings, such as the consumer's host name, protocol, and authentication information that the supplier uses when connecting and replicating data to the consumer. - Select Do Online Initialization in the Consumer Initialization field to automatically initialize the consumer after saving the agreement.To initialize the consumer later, select Do Not Initialize. Note that replication does not start before you initialize the consumer. For details on initializing a consumer, see Section 15.8.3, “Initializing a Consumer”.
- Click .
- Verify whether the initialization was successful:
- Open the menu.
- Select the entry.For a successfully-completed initialization, the web console displays the
Error (0) Replica acquired successfully: Incremental update succeededmessage in the Last Update Status column.Depending on the amount of data to replicate, the initialization can be time-consuming.
Configuring the New Server as a Supplier
supplier2.example.com host:
Warning
- Add the replication agreement, and initialize the consumer:
- Open the menu, and select the entry.
- Click , and fill the fields. For example:
 These settings create a replication agreement named
example-agreement-supplier2-to-supplier1. - Select Do Online Initialization in the Consumer Initialization field to automatically initialize the consumer after saving the agreement.To initialize the consumer later, select Do Not Initialize. Note that replication does not start before you initialize the consumer. For details on initializing a consumer, see Section 15.8.3, “Initializing a Consumer”.
- Click .
- Verify whether the initialization was successful:
- Open the menu.
- Select the entry.If the initialization completed successfully, the web console displays the
Error (0) Replica acquired successfully: Incremental update succeededmessage in the Last Update Status column.Depending on the amount of data to replicate, the initialization be time-consuming.
15.3.3. Preventing Monopolization of a Consumer in Multi-Supplier Replication
nsds5ReplicaBusyWaitTime- Sets the time in seconds for a supplier to wait after a consumer sends back a busy response before making another attempt to acquire access.For example, to configure that a supplier waits
5seconds before making another acquire attempt:# dsconf -D "cn=Directory Manager" ldap://supplier.example.com repl-agmt \ set --suffix="suffix" --busy-wait-time=5 agreement_name nsds5ReplicaSessionPauseTime- Sets the time in seconds for a supplier to wait between two update sessions. If you set a value lower or equal than the value specified in
nsds5ReplicaBusyWaitTime, Directory Server automatically uses the value for thensds5ReplicaSessionPauseTimeparameter that is one second higher than the value set innsds5ReplicaBusyWaitTime.For example, to configure that the supplier waits10seconds between two update sessions:# dsconf -D "cn=Directory Manager" ldap://supplier.example.com repl-agmt \ set --suffix="suffix" --session-pause-time=10 agreement_name nsds5ReplicaReleaseTimeout- Sets the timeout after which a supplier releases the replica, whether or not it has finished sending its updates. This prevents a single supplier from monopolizing a replica.For example, to configure a supplier to release a replica after
90seconds in a heavy replication environment:# dsconf -D "cn=Directory Manager" ldap://supplier.example.com replication \ set --suffix="suffix" --repl-release-timeout=90
Replication error logging (log level 8192). See Section 21.3.7, “Configuring the Log Levels”.
15.4. Cascading Replication
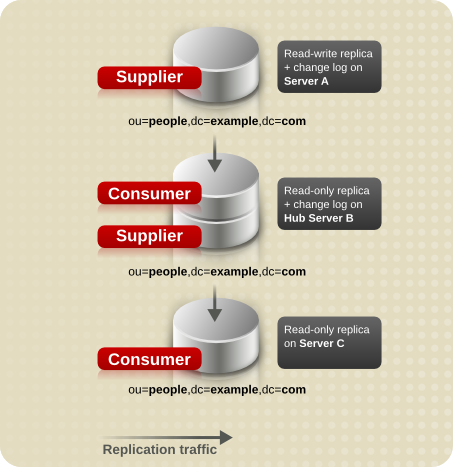
Figure 15.4. Cascading Replication
Note
15.4.1. Setting up Cascading Replication Using the Command Line
supplier.example.com. The following procedures describe how to add a hub named hub.example.com to the topology that receives updates from the supplier for the dc=example,dc=com suffix. Subsequently, the procedure describes adding a consumer named consumer.example.com that receives updates from the hub server for the suffix.
Preparing the New Hub Server to Join
hub.example.com host:
- Install Directory Server and create an instance. For details, see the Red Hat Directory Server Installation Guide.
- In case you created the instance without a database, create the database for the suffix. For example, to create a database named
userRootfor thedc=example,dc=comsuffix:# dsconf -D "cn=Directory Manager" ldap://hub.example.com backend \ create --suffix="dc=example,dc=com" --be-name="userRoot"For details about creating a database for a suffix, see Section 2.1.1, “Creating Suffixes”. - Enable replication for the suffix and create the replication manager account:
# dsconf -D "cn=Directory Manager" ldap://hub.example.com replication \ enable --suffix="dc=example,dc=com" --role="hub" \ --bind-dn="cn=replication manager,cn=config" --bind-passwd="password"This command configures thehub.example.comhost as a hub for thedc=example,dc=comsuffix. Additionally, the server creates thecn=replication manager,cn=configuser with the specified password and allows this account to replicate changes for the suffix to this host.
Configuring the Existing Server as a Supplier
supplier.example.com host:
- Similarly to the command you ran on the new hub server to join in the section called “Preparing the New Hub Server to Join”, enable replication for the
dc=example,dc=comsuffix and create a replication manager account:# dsconf -D "cn=Directory Manager" ldap://supplier1.example.com replication \ enable --suffix="dc=example,dc=com" --role="supplier" --replica-id=1 \ --bind-dn="cn=replication manager,cn=config" --bind-passwd="password"Important
The replica ID must be a unique integer between1and65534for a suffix across all suppliers in the topology.The replication manager account can use the same DN as the one created on the hub. - Add the replication agreement and initialize the hub. For example:
# dsconf -D "cn=Directory Manager" ldap://supplier.example.com repl-agmt \ create --suffix="dc=example,dc=com" --host="hub.example.com" --port=636 \ --conn-protocol=LDAPS --bind-dn="cn=replication manager,cn=config" \ --bind-passwd="password" --bind-method=SIMPLE --init \ example-agreement-supplier-to-hubThis command creates a replication agreement namedexample-agreement-supplier-to-hub. The replication agreement defines settings, such as the hubs' host name, protocol, and authentication information, which supplier uses when connecting and replicating data to the hub.After the agreement was created, Directory Server initializes the hub. To initialize the hub later, omit the--initoption. Note that replication does not start before you initialized the consumer. For details about initializing a consumer, see Section 15.8.3, “Initializing a Consumer”.For further details about the options used in the command, enter:# dsconf -D "cn=Directory Manager" ldap://supplier.example.com repl-agmt --help
- Verify whether the initialization was successful:
# dsconf -D "cn=Directory Manager" ldap://supplier.example.com repl-agmt \ init-status --suffix="dc=example,dc=com" example-agreement-supplier-to-hub Agreement successfully initialized.Depending on the amount of data to replicate, the initialization can be time-consuming.
Preparing the new Consumer to Join
consumer.example.com host:
- Install Directory Server and create an instance. For details, see the Red Hat Directory Server Installation Guide.
- In case you created the instance without a database, create the database for the suffix. For example, to create a database named
userRootfor thedc=example,dc=comsuffix:# dsconf -D "cn=Directory Manager" ldap://hub.example.com backend \ create --suffix="dc=example,dc=com" --be-name="userRoot"For details about creating a database for a suffix, see Section 2.1.1, “Creating Suffixes”. - Enable replication for the suffix and create the replication manager account:
# dsconf -D "cn=Directory Manager" ldap://consumer.example.com replication \ enable --suffix="dc=example,dc=com" --role="consumer" \ --bind-dn="cn=replication manager,cn=config" --bind-passwd="password"This command configures theconsumer.example.comhost as a consumer for thedc=example,dc=comsuffix. Additionally, the server creates thecn=replication manager,cn=configuser with the specified password and allows this account to replicate changes for the suffix to this host.
Configuring the Hub as a Supplier for the Consumer
hub.example.com host:
- Add the replication agreement and initialize the server. For example:
# dsconf -D "cn=Directory Manager" ldap://hub.example.com repl-agmt \ create --suffix="dc=example,dc=com" --host="consumer.example.com" --port=636 \ --conn-protocol=LDAPS --bind-dn="cn=replication manager,cn=config" \ --bind-passwd="password" --bind-method=SIMPLE --init \ example-agreement-hub-to-consumerAfter the agreement was created, Directory Server initializes the consumer. To initialize the consumer later, omit the--initoption. - Verify whether the initialization was successful:
# dsconf -D "cn=Directory Manager" ldap://hub.example.com repl-agmt \ init-status --suffix="dc=example,dc=com" example-agreement-hub-to-consumer Agreement successfully initialized.Depending on the amount of data to replicate, the initialization can be time-consuming.
15.4.2. Setting up Cascading Replication Using the Web Console
supplier.example.com. The following procedures describe how to add a hub named hub.example.com to the topology that receives updates from the supplier for the dc=example,dc=com suffix. Subsequently, the procedure describes adding a consumer named consumer.example.com that receives updates from the hub server for the suffix.
Preparing the New Hub Server to Join
hub.example.com host:
- Install Directory Server and create an instance. For details, see the Red Hat Directory Server Installation Guide.
- Open the Directory Server user interface in the web console. See Section 1.4, “Logging Into Directory Server Using the Web Console”.
- Select the instance.
- In case you created the instance without a database, create the database for the suffix. For details about creating a database for a suffix, see Section 2.1.1, “Creating Suffixes”.
- Enable replication for the suffix:
- Open the menu.
- Select the
dc=example,dc=comsuffix and click . - Select
Hubin the Replication Role field, and enter the DN and password of the replication manager account to create. For example: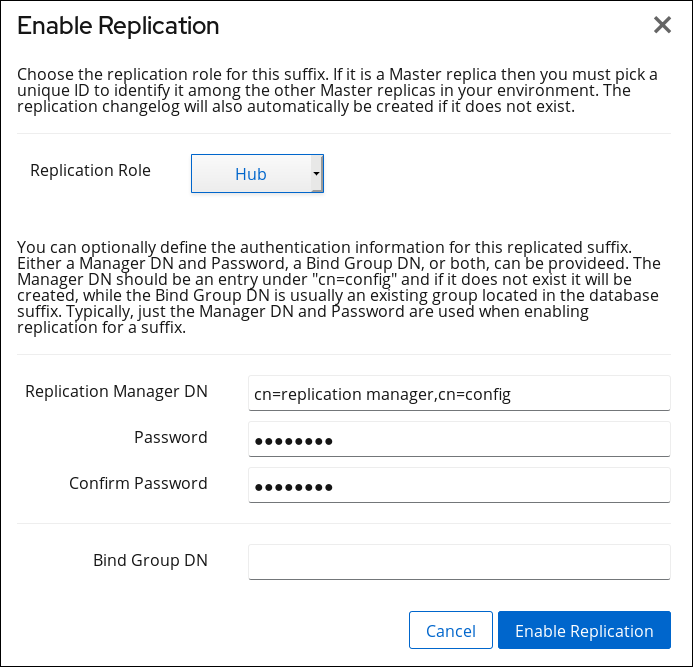 These settings configure the
hub.example.comhost as a hub for thedc=example,dc=comsuffix. Additionally, the server creates thecn=replication manager,cn=configuser with the specified password and allows this account to replicate changes for the suffix to this host. - Click .
Configuring the Existing Server as a Supplier
supplier.example.com host:
- Open the Directory Server user interface in the web console. See Section 1.4, “Logging Into Directory Server Using the Web Console”.
- Select the instance.
- Similarly to the settings on the new hub server to join in the section called “Preparing the New Hub Server to Join”, enable replication for the
dc=example,dc=comsuffix and create a replication manager account:- Open the menu.
- Select the
dc=example,dc=comsuffix and click . - Select
Supplierin the Replication Role field, enter a replica ID, as well as the DN and password of the replication manager account to create. For example:Important
The replica ID must be a unique integer between1and65534for a suffix across all suppliers in the topology.The replication manager account can use the same DN as the one created on the hub. - Click .
- Add the replication agreement and initialize the hub:
- Open the menu, and select the suffix.
- On the tab, click , and fill the fields. For example:
 These settings create a replication agreement named
example-agreement-supplier-to-hub. The replication agreement defines settings, such as the hubs' host name, protocol, and authentication information, the supplier uses when connecting and replicating data to the hub. - Select Do Online Initialization in the Consumer Initialization field to automatically initialize the consumer after saving the agreement.To initialize the hub later, select Do Not Initialize. Note that replication does not start before you initialized the consumer. For details about initializing a consumer, see Section 15.8.3, “Initializing a Consumer”.
- Click .
- Verify whether the initialization was successful:
- Open the menu.
- Select the entry.If the initialization completed successfully, the web console displays the
Error (0) Replica acquired successfully: Incremental update succeededmessage in the Last Update Status column.Depending on the amount of data to replicate, the initialization can be time-consuming.
Configuring the New Consumer to Join
consumer.example.com host:
- Install Directory Server and create an instance. For details, see the Red Hat Directory Server Installation Guide.
- Open the Directory Server user interface in the web console. See Section 1.4, “Logging Into Directory Server Using the Web Console”.
- Select the instance.
- In case you created the instance without a database, create the database for the suffix. For details about creating a database for a suffix, see Section 2.1.1, “Creating Suffixes”.
- Enable replication for the suffix:
- Open the menu.
- Select the
dc=example,dc=comsuffix and click . - Select
Consumerin the Replication Role field, and enter the DN and password of the replication manager account to create. For example:These settings configure theconsumer.example.comhost as a consumer for thedc=example,dc=comsuffix. Additionally, the server creates thecn=replication manager,cn=configuser with the specified password and allows this account to replicate changes for the suffix to this host. - Click .
Configuring the Hub as a Supplier for the Consumer
consumer.example.com host:
- Add the replication agreement and initialize the consumer:
- Open the menu, and select the suffix.
- On the tab, click , and fill the fields. For example:
 These settings create a replication agreement named
example-agreement-hub-to-consumer. - Select Do Online Initialization in the Consumer Initialization field to automatically initialize the consumer after saving the agreement.To initialize the consumer later, select Do Not Initialize. Note that replication does not start before you initialized the consumer. For details about initializing a consumer, see Section 15.8.3, “Initializing a Consumer”.
- Click .
- Verify whether the initialization was successful:
- Open the menu.
- Select the entry.If the initialization completed successfully, the web console displays the
Error (0) Replica acquired successfully: Incremental update succeededmessage in the Last Update Status column.Depending on the amount of data to replicate, the initialization can be time-consuming.
15.5. Configuring Bootstrap Credentials
- During online initialization where you must authenticate to the replica before the database is initialized
- When you use GSSAPI as authentication method and the Kerberos credentials are changed
LDAP_INVALID_CREDENTIALS (err=49)LDAP_INAPPROPRIATE_AUTH (err=48)LDAP_NO_SUCH_OBJECT (err=32)
Procedure
# dsconf -D "cn=Directory Manager" ldap://supplier.example.com repl-agmt create ... --bootstrap-bind-dn "bind_DN" --bootstrap-bind-passwd "password" --bootstrap-bind-method bind_method --bootstrap-conn-protocol connection protocol ...
# dsconf -D "cn=Directory Manager" ldap://supplier.example.com repl-agmt set --suffix="suffix" --bootstrap-bind-dn "bind_DN" --bootstrap-bind-passwd "password" --bootstrap-bind-method bind_method --bootstrap-conn-protocol connection protocol agreement_name
15.6. Configuring Replication Partners to use Certificate-based Authentication
server2.example.com to the replication topology, and how to set up replication agreements between the new host and the existing server1.example.com using certificate-based authentication:
- On both hosts, set up certificate-based authentication. For details, see Section 9.9.1, “Setting up Certificate-based Authentication”.
- On the
server1.example.comhost:- Create accounts for both servers, such as
cn=server1,example,dc=comandcn=server2,dc=example,dc=comand add the client certificates to the corresponding accounts. For details, see:Both servers will later use these accounts and certificates to authenticate when they establish a replication connection to each other. - Create a group, such as
cn=repl_server,ou=Groups,dc=example,dc=com, and add both server accounts. See Section 8.1, “Using Groups”. - Create the replica entry and set the
nsds5ReplicaBindDNGroupattribute to the DN of the group created in the previous step:# dsconf -D "cn=Directory Manager" ldap://server1.example.com replication \ enable --suffix="dc=example,dc=com" --role="supplier" --replica-id="7" \ --bind-group-dn="cn=repl_server,ou=Groups,dc=example,dc=com" - Set the replica entry's interval in which Directory Server checks if the group has been changed to
0:# dsconf -D "cn=Directory Manager" ldap://server1.example.com replication \ set --suffix="dc=example,dc=com" --repl-bind-group-interval=0
- Initialize the new server:
- Create a temporary replication manager account, such as
cn=Replication Manager,cn=config, onserver2.example.com. - On
server1.example.com, create a temporary replication agreement which uses the account from the previous step for authentication:# dsconf -D "cn=Directory Manager" ldap://server2.example.com repl-agmt \ create --suffix="dc=example,dc=com" --host="server1.example.com" --port=636 \ --conn-protocol=LDAPS --bind-dn="cn=Replication Manager,cn=config" \ --bind-passwd="password" --bind-method=SIMPLE --init \ temporary_agreementThis agreement uses the previously-created replication manager account to initialize the database. Before this initialization, the database onserver2.example.comis empty and the accounts with the associated certificates do not exist. Therefore, replication using certificates is not possible before the database is initialized.
- After the new server has been initialized:
- Remove the temporary replication agreement from
server1.example.com:# dsconf -D "cn=Directory Manager" ldap://server1.example.com repl-agmt \ delete --suffix="dc=example,dc=com" temporary_agreement - Remove the temporary replication manager account from
server2.example.com:# dsconf -D "cn=Directory Manager" ldap://server2.example.com replication \ delete-manager --suffix="dc=example,dc=com" --name="Replication Manager"
- Create a replication agreement on both servers that use certificate-based authentication:
- On
server1.example.com:# dsconf -D "cn=Directory Manager" ldap://server1.example.com repl-agmt \ create --suffix="dc=example,dc=com" --host="server2.example.com" --port=636 \ --conn-protocol=LDAPS --bind-method="SSLCLIENTAUTH" \ --init example_agreement - On
server2.example.com:# dsconf -D "cn=Directory Manager" ldap://server2.example.com repl-agmt \ create --suffix="dc=example,dc=com" --host="server1.example.com" --port=636 \ --conn-protocol=LDAPS --bind-method="SSLCLIENTAUTH" \ --init example_agreement
- To verify the replication works correctly, display the
nsds5replicaLastUpdateStatusattribute in the replication agreement:# dsconf -D "cn=Directory Manager" ldap://server1.example.com repl-agmt status --suffix="dc=example,dc=com" example_agreement
For details about possible statuses, see the Replication Agreement Status appendix in the Red Hat Directory Server Configuration, Command, and File Reference.
15.7. Promoting a Consumer or Hub to a Supplier
15.7.1. Promoting a Consumer or Hub to a Supplier Using the Command Line
server.example.com host to a supplier for the dc=example,dc=com suffix:
# dsconf -D "cn=Directory Manager" ldap://server.example.com replication \
promote --suffix="dc=example,dc=com" --newrole="supplier" --replica-id=2Important
1 and 65534 for a suffix across all suppliers in the topology.
15.7.2. Promoting a Consumer or Hub to a Supplier Using the Web Console
dc=example,dc=com suffix:
- Open the Directory Server user interface in the web console. See Section 1.4, “Logging Into Directory Server Using the Web Console”.
- Select the instance.
- Open the menu and select the entry.
- Select the
dc=example,dc=comsuffix. - Click .
- Select
Supplierin the Replication Role field and enter a replica ID.Important
The replica ID must be a unique integer between1and65534for a suffix across all suppliers in the topology. - Select .
- Click to confirm the new role.
15.8. About Initializing a Consumer
Important
15.8.1. When to Initialize a Consumer
15.8.2. Setting Initialization Timeouts
- The
nsslapd-idletimeoutconfiguration parameter in thecn=configentry sets the timeout for all replication agreements on the server. For example, to disable the timeout globally:# dsconf -D "cn=Directory Manager" ldap://server.example.com config replace nsslapd-idletimeout=0
- The
nsIdleTimeoutparameter in the replication manager's DN set's the timeout for all agreements that use this replication manager entry. For example, to disable the timeout for thecn=replication manager,cn=configentry:# ldapmodify -D "cn=Directory Manager" -w -h server.example.com -p 389 -x dn: cn=replication manager,cn=config changetype: modify add: nsIdleTimeout nsIdleTimeout: 0
15.8.3. Initializing a Consumer
15.8.3.1. Initializing a Consumer Using the Command Line
15.8.3.1.1. Initializing a Consumer Online
dsconf repl-agmt init command to initialize a consumer online:
# dsconf -D "cn=Directory Manager" ldap://supplier.example.com repl-agmt \
init --suffix="suffix" agreement_name15.8.3.1.2. Initializing a Consumer Offline
- On the supplier:
- Shutdown the instance on the supplier:
# dsctl instance_name stop
- Export the
userRootdatabase that contains the suffix to replicate into the/tmp/example.ldiffile with replication information:# dsctl instance_name db2ldif --replication userRoot /tmp/example.ldif
- Start the instance on the supplier:
# dsctl instance_name start
- Copy the exported file to the consumer.
- Import the data on the consumer. For details, see Section 6.1.2.2, “Importing Data While the Server is Offline”.
15.8.4. Initializing a Consumer Using the Web Console
- Open the Directory Server user interface in the web console. See Section 1.4, “Logging Into Directory Server Using the Web Console”.
- Select the instance.
- Open the menu, and select the suffix.
- On the tab, open the Choose Action menu next to the replication agreement for the suffix and select Initialize Agreement.If the initialization completed successfully, web console displays the
Error (0) Replica acquired successfully: Incremental update succeededmessage in the Last Update Status column.Depending on the amount of data to replicate, the initialization can be time-consuming.
15.9. Disabling and Re-enabling Replication
Important
dsconf replication disable command, Directory Server automatically deletes the replication agreement as well. In this case, to re-enable replication, you must recreate the replication agreement.
# dsconf -D "cn=Directory Manager" ldap://server.example.com repl-agmt disable --suffix="dc=example,dc=com" agreement_name
# dsconf -D "cn=Directory Manager" ldap://server.example.com repl-agmt enable --suffix="dc=example,dc=com" agreement_name
15.10. Removing a Directory Server Instance from the Replication Topology
15.10.1. Removing a Consumer or Hub from the Replication Topology
- If the host to remove is a hub and also a supplier for other servers in the topology, configure other suppliers or hubs to replicate data to these servers. If these servers have no other supplier configured and you remove the hub, these servers become isolated from the replication topology. For details about configuring replication, see:
- On the host to remove, set the database into read-only mode to prevent any updates:
# ldapmodify -D "cn=Directory Manager" -W -p 389 -h host-to-remove.example.com -x dn: cn=userRoot,cn=ldbm database,cn=plugins,cn=config changetype: modify replace: nsslapd-readonly nsslapd-readonly: on
- On all suppliers that have a replication agreement with the host to remove, delete the replication agreements. For example:
# dsconf -D "cn=Directory Manager" ldap://server.example.com repl-agmt \ delete --suffix="dc=example,dc=com" agreement_name - On the consumer or hub to remove disable replication for all suffixes. For example:
# dsconf -D "cn=Directory Manager" ldap://host-to-remove.example.com replication \ disable --suffix="dc=example,dc=com"Disabling replication automatically deletes all replication agreements for this suffix on this server.
15.10.2. Removing a Supplier from the Replication Topology
- If the replica to be removed is also a supplier for other servers in the topology, configure other suppliers or hubs to replicate data to these servers. If these servers have no other supplier configured and you remove the supplier, these servers become isolated from the replication topology. For details about configuring replication, see:
- On the supplier to remove:
- Set the database into read-only mode to prevent any updates. For details, see Section 2.2.2.1, “Setting a Database in Read-Only Mode”.
- Wait until all other servers in the topology received all data from this supplier. To verify, ensure that the CSN on other servers is equal or greater than the CSN on the supplier to remove. For example:
# ds-replcheck online -D "cn=Directory Manager" -w password -m ldap://replica-to-remove.example.com:389 -r ldap://server.example.com:389 -b dc=example,dc=com ================================================================================ Replication Synchronization Report (Tue Mar 5 09:46:20 2019) ================================================================================ Database RUV's ===================================================== Supplier RUV: {replica 1 ldap://replica-to-remove.example.com:389} 5c7e8927000100010000 5c7e89a0000100010000 {replicageneration} 5c7e8927000000010000 Replica RUV: {replica 1 ldap://replica-to-remove.example.com:389} 5c7e8927000100010000 5c7e8927000400010000 {replica 2 ldap://server.example.com:389} {replicageneration} 5c7e8927000000010000 - Display the replica ID:
# dsconf -D "cn=Directory Manager" ldap://replica-to-remove.example.com replication get --suffix="dc=example,dc=com" | grep -i "nsds5replicaid" nsDS5ReplicaId: 1
In this example, the replica ID is1. Remember your replica ID for the last step of this procedure.
- On all suppliers that have a replication agreement with the replica to remove, delete the replication agreements. For example:
# dsconf -D "cn=Directory Manager" ldap://server.example.com repl-agmt \ delete --suffix="dc=example,dc=com" agreement_name - On the replica to remove, disable replication for all suffixes. For example:
# dsconf -D "cn=Directory Manager" ldap://replica-to-remove.example.com replication \ disable --suffix="dc=example,dc=com"Disabling replication automatically deletes all replication agreements for this suffix on this server. - On one of the remaining suppliers in the topology, clean the RUVs for the replica ID. For example:
# dsconf -D "cn=Directory Manager" ldap://server.example.com repl-tasks \ cleanallruv --suffix="dc=example,dc=com" --replica-id=1The command requires to specify the replica ID displayed in an earlier step of this procedure.
15.11. Managing Attributes Within Fractional Replication
memberOf calculations) are run.
nsDS5ReplicatedAttributeList attribute. This attribute is part of the replication agreement and it can be configured in the replication agreement wizard in the web console or through the command line when the replication agreement is created.
nsDS5ReplicatedAttributeList: (objectclass=*) $ EXCLUDE memberof authorityRevocationList accountUnlockTime
Important
(objectclass=*) $ EXCLUDE part in the value of the nsDS5ReplicatedAttributeList attribute. If you edit the attribute directly, for example using the ldapmodify utility, you must specify this part together with the list of attributes as displayed in the example above. However, both the dsconf and web console automatically add the (objectclass=*) $ EXCLUDE part, and you must only specify the attributes.
15.11.1. Setting Different Fractional Replication Attributes for Total and Incremental Updates
nsDS5ReplicatedAttributeListTotal.
Note
nsDS5ReplicatedAttributeList is the primary fractional replication attribute. If only nsDS5ReplicatedAttributeList is set, then it applies to both incremental updates and total updates. If both nsDS5ReplicatedAttributeList and nsDS5ReplicatedAttributeListTotal are set, then nsDS5ReplicatedAttributeList only applies to incremental updates.
memberOf attribute is added to an entry, a memberOf fixup task is run to resolve the group membership. This can cause overhead on the server if that task is run every time replication occurs. Since a total update only occurs for a database which is newly-added to replication or that has been offline for a long time, running a memberOf fixup task after a total update is an acceptable option. In this case, the nsDS5ReplicatedAttributeList attribute lists memberOf so it is excluded from incremental updates, but nsDS5ReplicatedAttributeListTotal does not list memberOf so that it is included in total updates.
nsDS5ReplicatedAttributeList attribute for the replication agreement. For example:
nsds5replicatedattributelist: (objectclass=*) $ EXCLUDE authorityRevocationList accountUnlockTime memberof
nsDS5ReplicatedAttributeList attribute, use the dsconf repl-agmt set command. For example:
# dsconf -D "cn=Directory Manager" ldap://supplier.example.com repl-agmt set \
--suffix="suffix" --frac-list="authorityRevocationList accountUnlockTime memberof" \
agreement_namensDS5ReplicatedAttributeList is the only attribute set, then that list applies to both incremental and total updates. To set a separate list for total updates, add the nsDS5ReplicatedAttributeListTotal attribute to the replication agreement:
# dsconf -D "cn=Directory Manager" ldap://supplier.example.com repl-agmt set \
--suffix="suffix" --frac-list-total="accountUnlockTime" \
agreement_nameNote
nsDS5ReplicatedAttributeList attribute must be set for incremental updates before nsDS5ReplicatedAttributeListTotal can be set for total updates.
15.11.2. The Replication Keep-alive Entry
keepalivetimestamp attribute is updated on the supplier and replicated to the consumer. Because the keepalivetimestamp attribute is not excluded from replication, the update of the keep-alive entry is replicated, the CSN on the consumer is updated, and then equal to the one on the supplier. The next time the supplier connects to the consumer, only updates that are newer than the CSN on the consumer are searched. This reduces the amount of time spent by a supplier to search for new updates to send.
# ldapsearch -D "cn=Directory Manager" -b "dc=example,dc=com" -W -p 389 -h server.example.com -x 'objectClass=ldapsubentry' dn: cn=repl keep alive 1,dc=example,dc=com objectclass: top objectclass: ldapsubentry objectclass: extensibleObject cn: repl keep alive 1 keepalivetimestamp: 20181112150654Z
- When a fractional replication agreement skips more than 100 updates and does not send any updates before ending the replication session.
- When a supplier initializes a consumer, initially it creates its own keep-alive entry. A consumer that is also a supplier does not create its own keep-alive entry unless it also initializes another consumer.
15.11.3. Preventing "Empty" Updates from Fractional Replication
nsDS5ReplicatedAttributeList). However, a changed to an excluded attribute still triggers a modify event and generates an empty replication update.
nsds5ReplicaStripAttrs attribute adds a list of attributes which cannot be sent in an empty replication event and are stripped from the update sequence. This logically includes operational attribtes like modifiersName.
accountUnlockTime attribute is excluded. John Smith's user account is locked and then the time period expires and it is automatically unlocked. Only the accountUnlockTime attribute has changed, and that attribute is excluded from replication. However, the operational attribute internalmodifytimestamp also changed. A replication event is triggered because John Smith's user account was modified — but the only data to send is the new modify time stamp and the update is otherwise emtpy. If there are a large number of attributes related to login times or password expiration times (for example), this could create a flood of empty replication updates that negatively affect server performance or that interfere with associated applications.
nsds5ReplicaStripAttrs attribute to the replication agreement to help tune the fractional replication behavior:
# dsconf -D "cn=Directory Manager" ldap://supplier.example.com repl-agmt set \
--suffix="suffix" \
--strip-list="modifiersname modifytimestamp internalmodifiersname" \
agreement_name15.12. Managing Deleted Entries with Replication
nsTombstone object class, but the attributes are removed from the index.
nsDS5ReplicaTombstonePurgeInterval attribute); the purge removes old tombstone entries. Tombstone entries are saved for a given amount of time (set in the nsDS5ReplicaPurgeDelay attribute); once a tombstone entry is older than the delay period, it is reaped at the next purge job.
cn=replica,cn=replicated suffix,cn=mapping tree,cn=config configuration entry. There are two considerations when defining the purge settings for replication:
- The purge operation is time-consuming, especially if the server handles a lot of delete operations. Do not set the purge interval too low or it could consume too many server resources and affect performance.
- Suppliers use change information, including tombstone entries, to prime replication after initialization. There should be enough of a backlog of changes to effectively re-initialize consumers and to resolve replication conflicts. Do not set the purge delay (the age of tombstone entries) too low or you could lose information required to resolve replication conflicts.Set the purge delay so that it is slightly longer than the longest replication schedule in the replication topology. For example, if the longest replication interval is 24 hours, keep tombstone entries around for 25 hours. This ensures that there is enough change history to initialize consumers and prevent the data stored in different suppliers from diverging.
dsconf replication set command, the --repl-tombstone-purge-interval=seconds option sets the nsDS5ReplicaTombstonePurgeInterval attribute and the --repl-purge-delay=seconds option the nsDS5ReplicaPurgeDelay attribute.
43200 (12 hours) and the replica purge delay to 90000 (25 hours):
# dsconf -D "cn=Directory Manager" ldap://supplier.example.com replication set \
--repl-tombstone-purge-interval=43200 --repl-purge-delay=90000Note
nsDS5ReplicaTombstonePurgeInterval and nsDS5ReplicaPurgeDelay attributes. Both attributes have values set in seconds, so the purge operations can be initiated almost immediately.
Warning
15.13. Configuring Changelog Encryption
Prerequisites
Procedure
- Except for the server on which you want to enable changelog encryption, stop all instances in the replication topology by entering the following command:
# dsctl instance_name stop
- On the server where you want to enable changelog encryption:
- Export the changelog, for example, to the
/tmp/changelog.ldiffile:# dsconf -D "cn=Directory Manager" ldap://server.example.com replication dump-changelog -o /tmp/changelog.ldif
- Stop the instance:
# dsctl instance_name stop
- Add the following setting to the
dn: cn=changelog5,cn=configentry in the/etc/dirsrv/slapd-instance_name/dse.ldiffile:nsslapd-encryptionalgorithm: AES
- Start the instance:
# dsctl instance_name start
- Import the changelog from the
/tmp/changelog.ldiffile:# dsconf -D "cn=Directory Manager" ldap://server.example.com replication restore-changelog from-ldif /tmp/changelog.ldif
- Start all instances on the other servers in the replication topology using the following command:
# dsctl instance_name start
Verification
- Make a change in the LDAP directory, such as updating an entry.
- Stop the instance:
# dsctl stop instance_name
- Enter the following command to display parts of the changelog:
# dbscan -f /var/lib/dirsrv/slapd-instance_name/changelogdb/replica_name_replGen.db | tail -50
If the changelog is encrypted, you see only encrypted data. - Start the instance:
# dsctl start instance_name
Additional Resources
15.14. Removing the Changelog
15.14.1. Removing the Changelog using the Command Line
- Verify whether replication is disabled for all suffixes:
# dsconf -D "cn=Directory Manager" ldap://supplier.example.com replication list There are no replicated suffixes - Remove the changelog:
# dsconf -D "cn=Directory Manager" ldap://supplier.example.com replication delete-changelog
15.14.2. Removing the Changelog using the Web Console
- Open the Directory Server user interface in the web console. See Section 1.4, “Logging Into Directory Server Using the Web Console”.
- Select the instance.
- Open the menu, and select the entry.
- Click .
15.15. Exporting the Replication Changelog
Prerequisites
- Replication is enabled on the Directory Server instance.
Procedure
/tmp/changelog.ldif file, enter:
# dsconf -D "cn=Directory Manager" ldap://server.example.com replication dump-changelog -o /tmp/changelog.ldif
dirsrv user requires appropriate file system permissions to create the specified file.
15.16. Importing the Replication Changelog from an LDIF-formatted Changelog Dump
Prerequisites
- Replication is enabled on the Directory Server instance.
- The changelog dump has been created as described in Section 15.15, “Exporting the Replication Changelog”.
Procedure
/tmp/changelog.ldif file, enter:
# dsconf -D "cn=Directory Manager" ldap://server.example.com replication restore-changelog from-ldif /tmp/changelog.ldif
dirsrv user requires permissions to read the specified file.
15.17. Moving the Replication Changelog Directory
/var/lib/dirsrv/slapd-instance_name/new_changelogdb/:
- Display the current path to the changelog and set the new path:
- Using the command line:
- Display the current directory:
# ldapsearch -D "cn=Directory Manager" -W -p 389 -h server.example.com -x \ -b "cn=changelog5,cn=config" nsslapd-changelogdir ... nsslapd-changelogdir: /var/lib/dirsrv/slapd-instance_name/changelogdb/You need the displayed path in a later step to move the directory. - Set the new path:
# ldapmodify -D "cn=Directory Manager" -W -p 389 -h server.example.com -x dn: cn=changelog5,cn=config changetype: modify replace: nsslapd-changelogdir nsslapd-changelogdir: /var/lib/dirsrv/slapd-instance_name/new_changelogdb/
- Using the web console:
- Open the Directory Server user interface in the web console. See Section 1.4, “Logging Into Directory Server Using the Web Console”.
- Select the instance.
- Open the menu, and select the entry.
- Click Show Advanced Settings.
- Identify the current path in the Changelog Location field. You need the displayed path in a later step to move the directory.
- Set the new path in the Changelog Location field.
- Click .
- Stop the Directory Server instance:
# dsctl instance_name stop
- Move the content of the previous directory to
/var/lib/dirsrv/slapd-instance_name/new_changelogdb/:# mv /var/lib/dirsrv/slapd-instance_name/changelogdb/ \ /var/lib/dirsrv/slapd-instance_name/new_changelogdb/ - Delete the previous directory:
# rm /var/lib/dirsrv/slapd-instance_name/changelogdb/
- Start the Directory Server instance:
# dsctl instance_name start
15.18. Trimming the Replication Changelog
- A maximum age of entries in the changelog in the
nsslapd-changelogmaxageparameter. - The total number of records in the changelog in the
nsslapd-changelogmaxentriesparameter.
nsslapd-changelogtrim-interval).
15.18.1. Configuring Replication Changelog Trimming
Note
nsDS5ReplicaPurgeDelay parameter in the cn=replica,cn=suffixDN,cn=mapping tree,cn=config entry.
- Configure change log trimming:
- To set a maximum age of changelog entries, enter:
# dsconf -D "cn=Directory Manager" ldap://server.example.com replication set-changelog --max-age "4w"
This command sets the maximum age to four weeks. The parameter supports the following units:s (S)for secondsm (S)for minutesh (H)for hoursd (D)for daysw (W)for weeks
- To set a maximum number of entries, enter:
# dsconf -D "cn=Directory Manager" ldap://server.example.com replication set-changelog --max-entries "100000"
This command sets the maximum number of entries in the changelog to 100,000.
- By default, Directory Server trims the changelog every 5 minutes (300 seconds). To set a different interval, enter:
# dsconf -D "cn=Directory Manager" ldap://server.example.com replication set-changelog --trim-interval 600
This command sets the interval to 10 minutes (600seconds).
15.18.2. Manually Reducing the Size of a Large Changelog
Prerequisites
Procedure
- Optional: Display the size of the changelog:
# ls -lh /var/lib/dirsrv/slapd-instance_name/changelogdb/ total 159M rw------. 1 dirsrv dirsrv 159M Nov 21 04:01 a1cf5703-697a11ed-896ed7a0-04f329b5_637b3daf000000010000.db rw------. 1 dirsrv dirsrv 30 Nov 21 03:58 DBVERSIONThis example shows that the /var/lib/dirsrv/slapd-instance_name/changelogdb/ directory contains only one changelog file with the size of 159M. - To be able to reset the parameters after reducing the changelog size, display and note the current values of the corresponding parameters:
# dsconf instance_name replication get-changelog dn: cn=changelog5,cn=config cn: changelog5 nsslapd-changelogdir: /var/lib/dirsrv/slapd-instance_name/changelogdb/ nsslapd-changelogmaxage: 7d nsslapd-changelogtrim-interval: 300 objectClass: top objectClass: nsChangelogConfig
If you do not see any specific attributes in the output, Directory Server uses their default values. - Temporarily, reduce trimming-related parameters:
# dsconf -D "cn=Directory Manager" ldap://server.example.com replication set-changelog --max-age "300s" --max-entries 500 --trim-interval 60
Important
For performance reasons, do not permanently use too short interval settings. - Wait until the time set in the
--trim-intervalparameter expires. - Compact the changelog to regain the disk space:
# dsconf -D "cn=Directory Manager" ldap://server.example.com backend compact-db --only-changelog
- Reset the changelog parameters to the values they had before you temporarily reduced them:
# dsconf -D "cn=Directory Manager" ldap://server.example.com replication set-changelog --max-age "7d" --max-entries 0 --trim-interval 300
Verification
- Display the size of the changelog:
# ls -lh /var/lib/dirsrv/slapd-instance_name/changelogdb/ total 14M rw------. 1 dirsrv dirsrv 14M Nov 21 05:08 a1cf5703-697a11ed-896ed7a0-04f329b5_637b3daf000000010000.db rw------. 1 dirsrv dirsrv 30 Nov 21 05:01 DBVERSION
15.19. Forcing Replication Updates
Prerequisites
- The replication is set up.
- The consumer has been initialized.
Procedure
- Check if the replication agreement has an update schedule configured:
# dsconf -D "cn=Directory Manager" ldap://server.example.com repl-agmt get --suffix="dc=example,dc=com" agreement_name
If the output of the command containsnsDS5ReplicaUpdateSchedule: *or thensDS5ReplicaUpdateScheduleparameter is not present, no update schedule is configured.IfnsDS5ReplicaUpdateSchedulecontains a schedule, such as shown below, note the value:nsDS5ReplicaUpdateSchedule: 0800-2200 0246
- If an update schedule is configured, enter the following command to temporary disable it:
# dsconf -D "cn=Directory Manager" ldap://server.example.com repl-agmt set --schedule \* --suffix="dc=example,dc=com" agreement_name
- Temporarily disable the replication agreement:
# dsconf -D "cn=Directory Manager" ldap://server.example.com repl-agmt disable --suffix="dc=example,dc=com" agreement_name
- Re-enable the replication agreement to force the replication update:
# dsconf -D "cn=Directory Manager" ldap://server.example.com repl-agmt enable --suffix="dc=example,dc=com" agreement_name
- If a replication schedule was configured at the beginning of this procedure, set the schedule to the previous value:
# dsconf -D "cn=Directory Manager" ldap://server.example.com repl-agmt set --schedule "0800-2200 0246" --suffix="dc=example,dc=com" agreement_name
15.20. Setting Replication Timeout Periods
nsDS5ReplicaTimeoutsets the number of seconds that the replication operation waits for a response from the consumer before timing out and failing. To set the optimum number, check the access logs to see the average amount of time that the replication process takes, and set the timeout period accordingly.nsDS5DebugReplicaTimeoutsets the timeout period for the replication operation when debug logging is enabled. This setting may be appreciably higher than thensDS5ReplicaTimeoutsetting because debug logging can slow down directory operations. This attribute can optionally set an error log level where this parameter is applied; the default is replication debugging (8192).
# ldapmodify -D "cn=Directory Manager" -W -x dn: cn=example-agreement,cn=replica,cn=dc\3Dexample\2Cdc\3Dcom,cn=mapping tree,cn=config changetype: modify add: nsDS5ReplicaTimeout nsDS5ReplicaTimeout: 600 - add: nsDS5DebugReplicaTimeout nsDS5DebugReplicaTimeout: 6000
15.21. Using the Retro Changelog Plug-in
Note
cn=changelog.
changeLogEntry. For a list of possible attributes in a changelog entry, see the Changelog Attributes section in the Red Hat Directory Server Configuration, Command, and File Reference.
15.21.1. Enabling the Retro Changelog Plug-in
Warning
- Generating an excessive amount of replication traffic, half of which is duplicated updates.
- Creating errors with the delete operations related to retro changelog trimming.
- Very poor replication performance and no convergence of updates on suppliers.
15.21.1.1. Enabling the Retro Changelog Plug-in Using the Command Line
- Use the
dsconfutility to enable the plug-in:# dsconf -D "cn=Directory Manager" ldap://server.example.com plugin retro-changelog enable
- Restart the instance:
# dsctl instance_name restart
15.21.1.2. Enabling the Retro Changelog Plug-in Using the Web Console
- Open the Directory Server user interface in the web console. See Section 1.4, “Logging Into Directory Server Using the Web Console”.
- Select the instance.
- Select the menu.
- Select the Retro Changelog plug-in in the list on the left.
- Change the status to
On. - Click .
- Restart the instance. See Section 1.5.2, “Starting and Stopping a Directory Server Instance Using the Web Console”.
15.21.2. Trimming the Retro Changelog
nsslapd-changelogmaxage parameter and the next trim interval, set in nsslapd-changelog-trim-interval, is executed.
# dsconf -D "cn=Directory Manager" ldap://server.example.com plugin retro-changelog set --max-age="2d"
15.21.3. Searching and Modifying the Retro Changelog
(&(changeNumber>=X)(changeNumber<=Y)).
15.21.4. Retro Changelog and the Access Control Policy
aci attribute of the cn=changelog entry. For example, if you want to grant read, search, and compare permissions to all authorized users, add the following ACI to the cn=changelog:
dn: cn=changelog
aci: (targetattr="changeNumber || objectClass")(targetfilter="(objectClass=changelogentry)")
(version 3.0; acl "Enable authenticated users to read the retro changelog"; allow (read, search, compare)
(userdn="ldap:///all");)
Warning
aci attribute, do not grant read permissions to anonymous users (userdn=anyone) because the changelog entries can contain sensitive information, such as passwords. You must allow only authenticated applications and users (userdn=all) to access this information.
15.22. Displaying the Status of a Specific Replication Agreement
15.22.1. Displaying the Status of a Specific Replication Agreement Using the Command-Line
# dsconf -D "cn=Directory Manager" ldap://server.example.com repl-agmt status --suffix="dc=example,dc=com" agreement_name agreement_name Status for agreement_name agmt consumer.example.com:636 Replica Enabled: on Update In Progress: FALSE Last Update Start: 19700101000000Z Last Update End: 19700101000000Z Number Of Changes Sent: 0 Number Of Changes Skipped: None Last Update Status: Error (-1) Problem connecting to replica - LDAP error: Can't contact LDAP server (connection error) Init In Progress: Last Init Start: 19700101000000Z Last Init End: 19700101000000Z Last Init Status: unavailable Reap Active: 0 Replication Status: Not in Synchronization: supplier (5bed8467000100010000) consumer (Unavailable) Reason(Unknown) Replication Lag Time: Unavailable
consumer.example.com host is unavailable.
15.22.2. Displaying the Status of a Specific Replication Agreement Using the Web Console
- Open the Directory Server user interface in the web console. See Section 1.4, “Logging Into Directory Server Using the Web Console”.
- Select the instance.
- Open the menu, and select
- Select Replication entry from the list in the left pane.
- Depending on whether you want to display the status of a replication agreement between Directory Server instances or a Winsync Agreement, select the appropriate tab.
 The Update Status column displays the status of replication agreement.
15.23. Monitoring the Replication Topology
dsconf replication monitor command to display the replication status, as well as additional information, such as replica IDs and Change State Numbers (CSN) on suppliers, consumers, and hubs:
# dsconf -D "cn=Directory Manager" ldap://supplier.example.com replication monitor Enter password for cn=Directory Manager on ldap://supplier.example.com: password Enter a bind DN for consumer.example.com:389: cn=Directory Manager Enter a password for cn=Directory Manager on consumer.example.com:389: password Supplier: server.example.com:389 -------------------------------- Replica Root: dc=example,dc=com Replica ID: 1 Replica Status: Available Max CSN: 5e3acb77001d00010000 Status For Agreement: "example-agreement" (consumer.example.com:389) Replica Enabled: on Update In Progress: FALSE Last Update Start: 20200205140439Z Last Update End: 20200205140440Z Number Of Changes Sent: 1:166/0 Number Of Changes Skipped: None Last Update Status: Error (0) Replica acquired successfully: Incremental update succeeded Last Init Start: 20200205133709Z Last Init End: 20200205133711Z Last Init Status: Error (0) Total update succeeded Reap Active: 0 Replication Status: In Synchronization Replication Lag Time: 00:00:00 Supplier: consumer.example.com:389 ----------------------------------- Replica Root: dc=example,dc=com Replica ID: 65535 Replica Status: Available Max CSN: 00000000000000000000
15.23.1. Setting Credentials for Replication Monitoring in the .dsrc File
dsconf replication monitor command prompts for bind DNs and passwords when authenticating to remote instances. Alternatively, you can set the bind DNs, and optionally passwords, for each server in the topology in the user's ~/.dsrc file.
Example 15.1. An Example .dsrc File with Explanations of the Different Fields
~/.dsrc file:
[repl-monitor-connections] connection1 = server1.example.com:389:cn=Directory Manager:* connection2 = server2.example.com:389:cn=Directory Manager:[~/pwd.txt] connection3 = hub1.example.com:389:cn=Directory Manager:S3cret
connection1 to connection3 as keys for each entry. However, you can use any key as long as it is unique.
dsconf replication monitor command, the dsconf utility connects to all servers configured in replication agreements of the instance. If the utility finds the host name in ~/.dsrc, it uses the defined credentials to authenticate to the remote server. In the example above, dsconf uses the following credentials when connecting to a server:
| Host name | Bind DN | Password |
|---|---|---|
server1.example.com | cn=Directory Manager | Prompts for the password |
server2.example.com | cn=Directory Manager | Reads password from ~/pwd.txt |
hub1.example.com | cn=Directory Manager | S3cret |
15.23.2. Using Aliases in the Replication Topology Monitoring Output
dsconf replication monitor command displays the host names of servers in the monitoring report. Alternatively, you can display aliases using one of the following methods:
- Define the aliases in the
~/.dsrcfile:[repl-monitor-aliases] M1 = server1.example.com:389 M2 = server2.example.com:389
- Define the aliases by passing the
-a alias=host_name:portparameter to thedsconf replication monitorcommand:# dsconf -D "cn=Directory Manager" ldap://server.example.com replication monitor -a M1=server1.example.com:389 M2=server2.example.com:389
... Supplier: M1 (server1.example.com:389) ... Supplier: M2 (server2.example.com:389) ...
15.24. Comparing Two Directory Server Instances
ds-replcheck utility enables you to compare two online servers. Alternatively, ds-replcheck can compare two LDIF-formatted files in offline mode and two servers in online mode.
Note
db2ldif -r command to include replication state information.
-l time_in_seconds parameter to ds-replcheck. By default, this value is set to 300 seconds (5 minutes). If the utility detects an inconsistency that is within the lag time, it is not reported. This helps to reduce false positives.
ds-replcheck reports these attributes as different. To ignore these attributes, pass the -i attribute_list parameter to the utility.
dc=example,dc=com suffix of two Directory Servers:
# ds-replcheck -D "cn=Directory Manager" -W \
-m ldap://server1.example.com:389 \
-r ldap://server2.example.com:389 \
-b "dc=example,dc=com"- Database RUV's
- Lists the Replication Update Vectors (RUV) of the databases including the minimum and maximum Change Sequence Numbers (CSN). For example:
Supplier RUV: {replica 1 ldap://server1.example.com:389} 58e53b92000200010000 58e6ab46000000010000 {replica 2 ldap://server2.example.com:389} 58e53baa000000020000 58e69d7e000000020000 {replicageneration} 58e53b7a000000010000 Replica RUV: {replica 1 ldap://server1.example.com:389} 58e53ba1000000010000 58e6ab46000000010000 {replica 2 ldap://server2.example.com:389} 58e53baa000000020000 58e7e8a3000000020000 {replicageneration} 58e53b7a000000010000 - Entry Count
- Displays the total number of entries on the both servers, including tombstone entries. For example:
Supplier: 12 Replica: 10
- Tombstones
- Displays the number of tombstone entries on each replica. These entries are added to the total entry count. For example:
Supplier: 4 Replica: 2
- Conflict Entries
- Lists the Distinguished Names (DN) of each conflict entry, the conflict type, and the date it was created. For example:
Supplier Conflict Entries: 1 - nsuniqueid=48177227-2ab611e7-afcb801a-ecef6d49+uid=user1,dc=example,dc=com - Conflict: namingConflict (add) uid=user1,dc=example,dc=com - Glue entry: no - Created: Wed Apr 26 20:27:40 2017 Replica Conflict Entries: 1 - nsuniqueid=48177227-2ab611e7-afcb801a-ecef6d49+uid=user1,dc=example,dc=com - Conflict: namingConflict (add) uid=user1,dc=example,dc=com - Glue entry: no - Created: Wed Apr 26 20:27:40 2017 - Missing Entries
- Lists the DNs of each missing entry and the creation date from the other server where the entry resides. For example:
Entries missing on Supplier: - uid=user2,dc=example,dc=com (Created on Replica at: Wed Apr 12 14:43:24 2017) - uid=user3,dc=example,dc=com (Created on Replica at: Wed Apr 12 14:43:24 2017) Entries missing on Replica: - uid=user4,dc=example,dc=com (Created on Supplier at: Wed Apr 12 14:43:24 2017)
- Entry Inconsistencies
- Lists the DNs of the entry that contain attributes that are different to those on the other server. If a state information is available, it is also displayed. If no state information for an attribute is available, it is listed as an origin value. This means that the value was not updated since the replication was initialized for the first time. For example:
cn=group1,dc=example,dc=com --------------------------- Replica missing attribute "objectclass": - Supplier's State Info: objectClass;vucsn-58e53baa000000020000: top - Date: Wed Apr 5 14:47:06 2017 - Supplier's State Info: objectClass;vucsn-58e53baa000000020000: groupofuniquenames - Date: Wed Apr 5 14:47:06 2017
15.25. Solving Common Replication Conflicts
# dsconf -D "cn=Directory Manager" ldap://server.example.com repl-conflict list dc=example,dc=com
15.25.1. Solving Naming Conflicts
nsuniqueid operational attribute. When a naming conflict occurs, this unique ID is appended to the non-unique DN.
uid=user_name,ou=People,dc=example,dc=com entry was created on two different servers, replication adds the unique ID to the DN of the last entry created. This means, the following entries exist:
uid=user_name,ou=People,dc=example,dc=comnsuniqueid=66446001-1dd211b2+uid=user_name,ou=People,dc=example,dc=com
- To keep only the valid entry (
uid=user_name,ou=People,dc=example,dc=com) and delete the conflict entry, enter:# dsconf -D "cn=Directory Manager" ldap://server.example.com repl-conflict delete nsuniqueid=66446001-1dd211b2+uid=user_name,ou=People,dc=example,dc=com
- To keep only the conflict entry (
nsuniqueid=66446001-1dd211b2+uid=user_name,ou=People,dc=example,dc=com), enter:# dsconf -D "cn=Directory Manager" ldap://server.example.com repl-conflict swap nsuniqueid=66446001-1dd211b2+uid=user_name,ou=People,dc=example,dc=com
- To keep both entries, enter:
# dsconf -D "cn=Directory Manager" ldap://server.example.com repl-conflict convert --new-rdn=uid=user_name_NEW nsuniqueid=66446001-1dd211b2+uid=user_name,ou=People,dc=example,dc=com
To keep the conflict entry, you must specify a new Relative Distinguished Name (RDN) in the--new-rdnoption to rename the conflict entry. The previous command renames the conflict entry touid=user_name_NEW,ou=People,dc=example,dc=com.
15.25.2. Solving Orphan Entry Conflicts
glue entry to avoid having orphaned entries in the directory.
glue and extensibleObject. Glue entries can be created in several ways:
- If the conflict resolution procedure finds a deleted entry with a matching unique identifier, the glue entry is a resurrection of that entry, with the addition of the
glueobject class and thensds5ReplConflictattribute.In such cases, either modify the glue entry to remove theglueobject class and thensds5ReplConflictattribute to keep the entry as a normal entry or delete the glue entry and its child entries. - The server creates a minimalistic entry with the
glueandextensibleObjectobject classes.
# dsconf -D "cn=Directory Manager" ldap://server.example.com repl-conflict list-glue suffix
# dsconf -D "cn=Directory Manager" ldap://server.example.com repl-conflict delete-glue DN_of_glue_entry
# dsconf -D "cn=Directory Manager" ldap://server.example.com repl-conflict convert-glue DN_of_glue_entry
15.25.3. Resolving Errors for Obsolete or Missing Suppliers
[22/Jan/2021:17:16:01 -0500] NSMMReplicationPlugin - ruv_compare_ruv: RUV [changelog max RUV] does not contain element [{replica 8 ldap://m2.example.com:389} 4aac3e59000000080000 4c6f2a02000000080000] which is present in RUV [database RUV]
<...several more samples...>
[22/Jan/2021:17:16:01 -0500] NSMMReplicationPlugin - replica_check_for_data_reload: Warning: for replica dc=example,dc=com there were some differences between the changelog max RUV and the database RUV. If there are obsolete elements in the database RUV, you should remove them using the CLEANALLRUV task. If they are not obsolete, you should check their status to see why there are no changes from those servers in the changelog.
8.
cleanallruv directory task to remove a RUV entry from all suppliers in the topology.
Note
cleanallruv task is replicated. Therefore, you only need to run it on one supplier.
Procedure 15.1. Removing an Obsolete or Missing Supplier Using the cleanallruv Task Operation
- List all RUV records and replica IDs, both valid and invalid, as deleted suppliers may have left metadata on other suppliers:
# ldapsearch -o ldif-wrap=no -xLLL -H m1.example.com -D "cn=Directory Manager" -W -b dc=example,dc=com '(&(nsuniqueid=ffffffff-ffffffff-ffffffff-ffffffff)(objectclass=nstombstone))' nsDS5ReplicaId nsDS5ReplicaType nsds50ruvdn: cn=replica,cn=dc\3Dexample\2Cdc\3Dcom,cn=mapping tree,cn=config nsDS5ReplicaId: 1 nsDS5ReplicaType: 3 nsds50ruv: {replicageneration} 55d5093a000000010000 nsds50ruv: {replica 1 ldap://m1.example.com:389} 55d57026000000010000 55d57275000000010000 nsds50ruv: {replica 20 ldap://m2.example.com:389} 55e74b8c000000140000 55e74bf7000000140000 nsds50ruv: {replica 9 ldap://m2.example.com:389} nsds50ruv: {replica 8 ldap://m2.example.com:389} 506f921f000000080000 50774211000500080000Note the returned replica IDs:1,20,9, and8. - List the currently defined and valid replica IDs of all suppliers which are replicating databases by searching the replica configuration entries DN
cn=replicaunder thecn=configsuffix.Note
Consumers and read-only nodes always have the replica ID set to65535, andnsDS5ReplicaType: 3signifies a supplier.# ldapsearch -o ldif-wrap=no -xLLL -H m1.example.com m2.example.com -D "cn=Directory Manager" -W -b cn=config cn=replica nsDS5ReplicaId nsDS5ReplicaTypedn: cn=replica,cn=dc\3Dexample\2Cdc\3Dcom,cn=mapping tree,cn=config nsDS5ReplicaId: 1 nsDS5ReplicaType: 3 dn: cn=replica,cn=dc\3Dexample\2Cdc\3Dcom,cn=mapping tree,cn=config nsDS5ReplicaId: 20 nsDS5ReplicaType: 3After you search all URIs returned in the first step (in this procedure,m1.example.comandm2.example.com), compare the list of returned suppliers (entries which havensDS5ReplicaType: 3) to the list of RUVs from the previous step. In the above example, this search only returned IDs1and20, but the previous search also returned9and8on URIm2.example.com. This means that the latter two are removed, and their RUVs need to be cleaned. - After determining which RUVs require cleaning, create a new
cn=cleanallruv,cn=tasks,cn=configentry and provide the following information about your replication configuration:- The base DN of the replicated database (
replica-base-dn) - The replica ID (
replica-id) - Whether to catch up to the maximum change state number (CSN) from the missing supplier, or whether to just remove all RUV entries and miss any updates (
replica-force-cleaning); setting this attribute tonomeans that the task will wait for all the configured replicas to catch up with all the changes from the removed replica first, and then remove the RUV.
# dsconf -D "cn=Directory Manager" ldap://m2.example.com repl-tasks \ cleanallruv --suffix="dc=example,dc=com" --replica-id=8Note
Thecleanallruvtask is replicated. Therefore, you only need to run it on one supplier.Repeat the same for every RUV you want to clean (ID9in this procedure). - After cleaning the RUVs of all replicas discovered earlier, you can again use the search from the first step to verify that all extra RUVs are removed:
# ldapsearch -o ldif-wrap=no -xLLL -H m1.example.com -D "cn=Directory Manager" -W -b dc=example,dc=com '(&(nsuniqueid=ffffffff-ffffffff-ffffffff-ffffffff)(objectclass=nstombstone))' nsDS5ReplicaId nsDS5ReplicaType nsds50ruvdn: cn=replica,cn=dc\3Dexample\2Cdc\3Dcom,cn=mapping tree,cn=config nsDS5ReplicaId: 1 nsDS5ReplicaType: 3 nsds50ruv: {replicageneration} 55d5093a000000010000 nsds50ruv: {replica 1 ldap://m1.example.com:389} 55d57026000000010000 55d57275000000010000 nsds50ruv: {replica 20 ldap://m2.example.com:389} 55e74b8c000000140000 55e74bf7000000140000As you can see in the above output, replica IDs8and9are no longer present, which indicates that their RUVs have been cleaned successfully.
15.26. Troubleshooting Replication-Related Problems
8192, which is replication debugging. See Section 21.3.7, “Configuring the Log Levels”.
8192:
# dsconf -D "cn=Directory Manager" ldap://server.example.com config replace nsslapd-errorlog-level=8192
Chapter 16. Synchronizing Red Hat Directory Server with Microsoft Active Directory
16.1. About Windows Synchronization
- Directory Server Windows Synchronization. Synchronization for user and group entries is configured in a synchronization agreement, much like replication is configured in a replication agreement. A sync agreement defines what kinds of entries are synchronized (users, groups, or both) and which direction changes are synchronized (from the Directory Server to Active Directory, from Active Directory to Directory Server, or both).The Directory Server relies on the Multi-Supplier Replication Plug-in to synchronize user and group entries. The same changelog that is used for multi-supplier replication is also used to send updates from the Directory Server to Active Directory as LDAP operations. The server also performs LDAP search operations against its Windows server to synchronize changes made to Windows entries to the corresponding Directory Server entry.
- Password Synchronization Service. If you set the
nsslapd-unhashed-pw-switchparameter in thecn=configentry toon, password changes made on Directory Server are automatically synchronized over to Active Directory. However, there must be a special hook to recognize and transmit password changes on Active Directory over to Directory Server. This is done by the Password Synchronization Service. This application captures password changes on the Active Directory domain controller and sends them to the Directory Server over LDAPS.The Password Synchronization Service must be installed on every Active Directory domain controller.
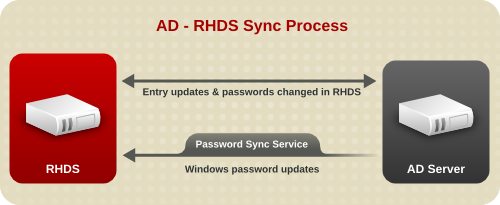
Figure 16.1. Active Directory — Directory Server Synchronization Process
Note
winSyncInterval parameter in the cn=syncAgreement_Name,cn=WindowsReplica,cn=suffix_Name,cn=mapping tree,cn=config entry. Using Dirsync ensures that only those entries that have changed since the previous search are retrieved.
- When creating the sync agreement, there is an option to synchronizing new Windows entries (
nsDS7NewWinUserSyncEnabledandnsDS7NewWinGroupSyncEnabled) as they are created. If these attributes are set toon, then existing Windows users/groups are synchronized to the Directory Server, and users/groups as they are created are synchronized to the Directory Server.Within the Windows subtree, only entries with user or group object classes can be synchronized to Directory Server. - On the Directory Server, only entries with the
ntUserorntGroupobject classes and attributes can be synchronized.
Important
Warning
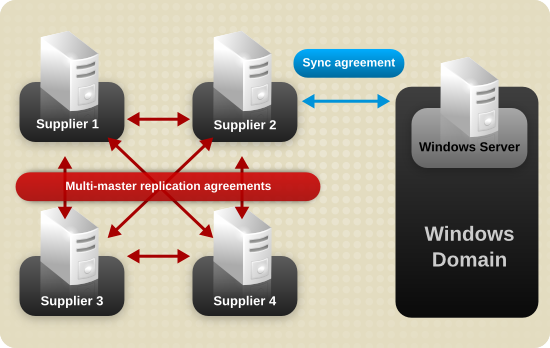
Figure 16.2. Multi-Supplier Directory Server — Windows Domain Synchronization
16.2. Supported Active Directory Versions
16.3. Synchronizing Passwords
Important
- The Password Sync utility must be installed locally on the Windows machine that will be synchronized with a Directory Server.
- Password Sync can only link the Windows machine to a single Directory Server; to sync changes with multiple Directory Server instances, configure the Directory Server for multi-supplier replication.
- Password expiration warnings and times, failed bind attempts, and other password-related information is enforced locally per server and is not synchronized between sync peer servers.
- On the Directory Server instance that has the replication agreement with the Windows server configured, set the
nsslapd-unhashed-pw-switchparameter in thecn=configentry toon. - The same bind behavior should occur on all servers. Make sure to create the same or similar password policies on both Directory Server and Active Directory servers.
- Entries that are created for synchronization (for example, the server identities) need to have passwords that never expire. To make sure that these special users have passwords that do not expire, add the
passwordExpirationTimeattribute to the Directory Server entry, and give it a value of20380119031407Z(the top of the valid range).
16.4. Setting up Synchronization Between Active Directory and Directory Server
Note
16.4.1. Step 1: Enabling TLS on the Directory Server Host
16.4.2. Step 2: Enabling Password Complexity in the AD Domain
- Open the Group Policy Management console and create a new Group Policy Object (GPO) in the domain.For details about using the Group Policy Management console, see the Windows documentation.
- Right-click the GPO, and select Edit to open the Group Policy Management Editor.
- Navigate to → → → → , and double-click the policy named Password must meet complexity requirements.
- Enable the policy and click .
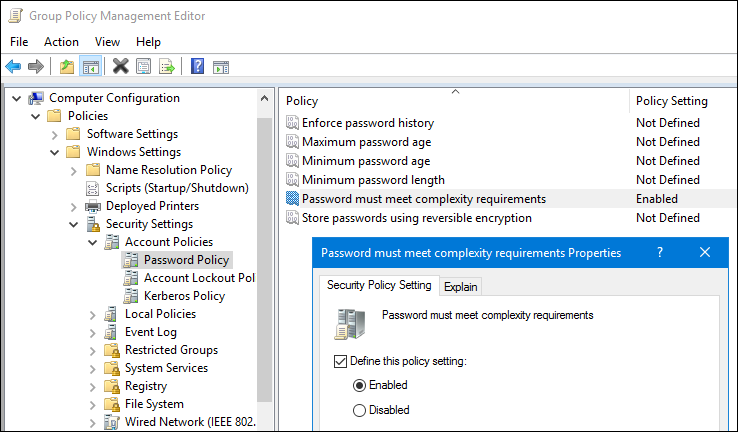
- Close the Group Policy Management Editor and the Group Policy Management console.
16.4.3. Step 3: Extracting the CA Certificate from AD
- If your AD CA certificate is self-signed:
- On an AD DC with the Certification Authority application installed, press the Super key+R combination to open the Run dialog.
- Enter the
certsrv.msccommand and click to open the Certification Authority application. - Right-click on the name of the local Certificate Authority and choose Properties.
- On the General tab, select the certificate to export in the CA certificates field and click .
- On the Details tab, click to start the Certificate Export Wizard.
- Click , and then select Base-64 encoded X.509 (.CER).

- Specify a suitable directory and file name for the exported file. Click to export the certificate, and then click .
- Copy the root CA certificate to the Directory Server host.
- If your AD CA certificate is signed by an external CA:
- Determine the root CA. For example:
# openssl s_client -connect adserver.example.com:636 CONNECTED(00000003) depth=1 C = US, O = Demo Company, OU = IT, CN = Demo CA-28 verify error:num=20:unable to get local issuer certificate verify return:0 --- Certificate chain 0 s:/C=US/O=Demo Company/OU=IT/CN=adserver.example.com i:/C=US/O=Demo Company/OU=IT/CN=Demo CA-1 1 s:/C=US/O=Demo Company/OU=IT/CN=Demo CA-1 i:/C=US/O=Demo Company/OU=IT/CN=Demo Root CA 2
The previous example shows that the AD server's CA certificate is signed byCN=Demo CA-1, which is signed byCN=Demo Root CA 2. This means thatCN=Demo Root CA 2is the root CA. - Contact the operator of the root CA about how to retrieve the CA certificate.
- Copy the root CA certificate to the Directory Server host.
16.4.4. Step 4: Extracting the CA Certificate from the Directory Server's NSS Database
- List the certificates in the database:
# certutil -d /etc/dirsrv/slapd-instance_name/ -L Certificate Nickname Trust Attributes SSL,S/MIME,JAR/XPI Server-Cert u,u,u Example CA C,, - Extract the CA certificate from the database. For example, to extract the CA certificate with the
Example CAnickname and store it in the/root/ds-ca.crtfile:# certutil -d /etc/dirsrv/slapd-instance_name/ -L -n "Example CA" -a > /root/ds-ca.crt
- Copy the CA certificate to the AD DC.
16.4.5. Step 5: Creating the Synchronization Accounts
Creating an Account in Directory Server
Password Sync service to synchronize passwords to Directory Server. For example, to create the cn=pw_sync_user,dc=config user in Directory Server:
- Create the user account:
# ldapadd -D "cn=Directory Manager" -W -p 389 -h server.example.com -x dn: cn=pw_sync_user,cn=config objectClass: inetorgperson objectClass: person objectClass: top cn: pw_sync_user sn: pw_sync_user userPassword: password passwordExpirationTime: 20380101000000Z
This creates thecn=pw_sync_user,dc=configaccount and sets its expiration time to January 01 2038.Important
For security reasons, do not create the account in the synchronized subtree. - Set an ACI at the top of the subtree that will be synchronized and grants
writeandcomparepermissions to thecn=pw_sync_user,dc=configuser. For example, to add such an ACI to theou=People,dc=example,dc=comentry:# ldapmodify -D "cn=Directory Manager" -W -p 389 -h server.example.com -x dn: ou=People,dc=example,dc=com changetype: modify add: aci aci: (targetattr="userPassword")(version 3.0;acl "Password synchronization"; allow (write,compare) userdn="ldap:///cn=pw_sync_user,dc=config";)
- Configure that Directory Server can store passwords in clear text in the changelog:
# dsconf -D "cn=Directory Manager" ldap://server.example.com config replace nsslapd-unhashed-pw-switch=on
Because Directory Server uses a different password encryption than Active Directory, Directory Server must send the password in clear text to the Windows server. However, the clear text password is sent over a TLS encrypted connection that is required for password synchronization and is, therefore, not exposed to the network.
Creating an Account in AD
Domain Admins group or have equivalent permissions in AD. For details about creating AD accounts, see your AD documentation.
16.4.6. Step 6: Installing the Password Sync Service
16.4.7. Step 7: Adding the CA Certificate Directory Server uses to the Password Sync Service's Certificate Database
- Change into the
C:\Program Files\Red Hat Directory Password Synchronization\directory:> cd "C:\Program Files\Red Hat Directory Password Synchronization\"
- Create the certificate databases in the current directory:
> certutil.exe -d . -N
Thecertutil.exeutility prompts to set a password to the new database it creates. - Import the CA certificate used by the Directory Server instance. You copied this certificate in Section 16.4.4, “Step 4: Extracting the CA Certificate from the Directory Server's NSS Database” to the Windows DC. For example, to import the certificate from the
C:\ds-ca.crtfile and store it in the database with theExample CAnickname:> certutil.exe -d . -A -n "Example CA" -t CT,, -a -i "C:\ds-ca.crt"
- Optionally, verify that the CA certificate was stored correctly in the database:
> certutil.exe -d . -L Certificate Nickname Trust Attributes SSL,S/MIME,JAR/XPI Example CA CT,, - Reboot the Windows DC. The Password Sync service is not available until you reboot the system.
Note
16.4.8. Step 8: Adding the CA Certificate AD uses to Directory Server's Certificate Database
- Import the CA certificate AD uses. You copied this certificate in Section 16.4.3, “Step 3: Extracting the CA Certificate from AD” to the Directory Server host. For example, to import the certificate from the
/root/ad-ca.crtfile and store it in the database with theExample CAnickname:> certutil -d /etc/dirsrv/slapd-instance_name/ -A -n "Example CA" -t CT,, -a -i /root/ad-ca.crt
- Optionally, verify that the CA certificate was stored correctly in the database:
> certutil -d /etc/dirsrv/slapd-instance_name/ -L Certificate Nickname Trust Attributes SSL,S/MIME,JAR/XPI ... Example CA CT,,
16.4.9. Step 9: Configuring the Database for Synchronization and Creating the Synchronization Agreement
16.4.9.1. Configuring the Database for Synchronization and Creating the Synchronization Agreement Using the Command Line
ds.example.com and an AD DC running on a host named win-server.ad.example.com. The following procedure describes how to configure synchronization between these hosts:
- Enable replication for the suffix:
# dsconf -D "cn=Directory Manager" ldap://ds.example.com replication \ enable --suffix="dc=example,dc=com" --role="supplier" --replica-id=1This command configures theds.example.comhost as a supplier for thedc=example,dc=comsuffix and sets the replica ID for this entry to1.Important
The replica ID must be a unique integer between1and65534for a suffix across all suppliers in the topology. - Add the synchronization agreement and initialize the agreement. For example:
# dsconf -D "cn=Directory Manager" ldap://ds.example.com repl-winsync-agmt \ create --suffix="dc=example,dc=com" --host="win-server.ad.example.com" --port=636 \ --conn-protocol="LDAPS" --bind-dn="cn=user_name,cn=Users,dc=ad,dc=example,dc=com" \ --bind-passwd="password" --win-subtree="cn=Users,dc=example,dc=com" \ --ds-subtree="ou=People,dc=example,dc=com" --win-domain="AD" \ --init example-agreementThis command creates a replication agreement named example-agreement. The replication agreement defines settings, such as AD DC's host name, protocol, and authentication information, Directory Server uses when connecting and synchronizing data to the DC.After the agreement is created, Directory Server initializes the agreement. To initialize the agreement later, omit the--initoption. Note that synchronization does not start before you initialized the agreement. For details about initializing a synchronization agreement, see Section 16.11.2.1, “Performing a Full Synchronization Using the Command Line”.Optionally, pass the--sync-users="on"and--sync-groups="on"option to the command to automatically synchronize new Windows users and groups to Directory Server.For further details about the options used in the command, enter:# dsconf -D "cn=Directory Manager" ldap://ds.example.com repl-agmt --help
- Verify that the initialization was successful:
# dsconf -D "cn=Directory Manager" ldap://ds.example.com repl-winsync-agmt \ init-status --suffix="dc=example,dc=com" example-agreement Agreement successfully initialized.
16.4.9.2. Configuring the Database for Synchronization and Creating the Synchronization Agreement Using the Web Console
ds.example.com and an AD DC running on a host named win-server.ad.example.com. The following procedure describes how to configure synchronization between these hosts:
- Open the Directory Server user interface in the web console. See Section 1.4, “Logging Into Directory Server Using the Web Console”.
- Select the instance.
- Enable replication for the suffix:
- Open the menu.
- Select the
dc=example,dc=comsuffix, and click . - Select
Supplierin the Replication Role field and enter a replica ID. For example: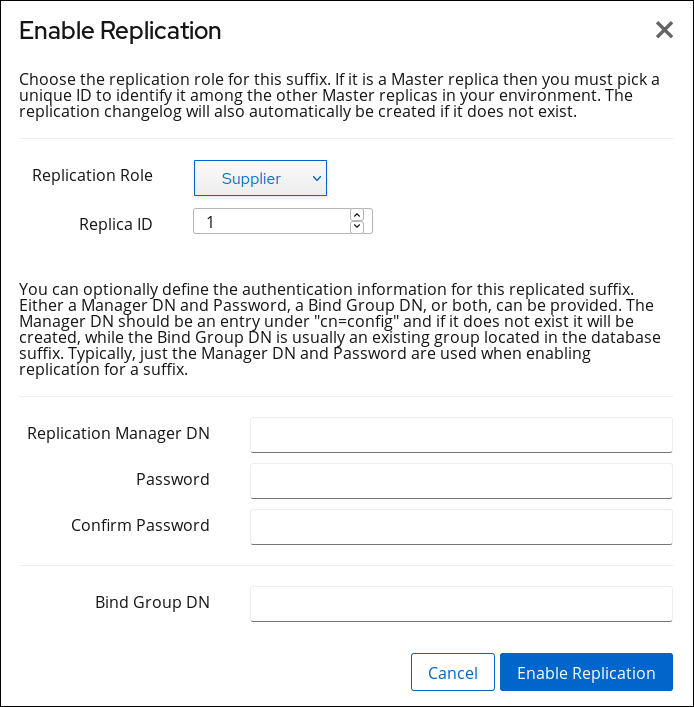 These settings configure the
ds.example.comhost as a supplier for thedc=example,dc=comsuffix and sets the replica ID for this entry to1.Important
The replica ID must be a unique integer between1and65534for a suffix across all suppliers in the topology. - Click .
- Add the synchronization agreement and initialize agreement:
- Open the menu and select the entry.
- Click and fill the fields. For example:
 These settings will create a synchronization agreement named
example-agreement. The synchronization agreement defines settings, such as the DC's host name, protocol, and authentication information, Directory Server uses when connecting and synchronizing data.Optionally, select Sync New Windows Users and Sync New Windows Groups to automatically synchronize new Windows users and groups to Directory Server.After the agreement is created, Directory Server initializes the agreement. To initialize the agreement later, do not select Do Online Initialization. Note that synchronization does not start before you initialized the agreement. For details about initializing a synchronization agreement, see Section 16.11.2.2, “Performing a Full Synchronization Using the Web Console”. - Click .
- Verify that the initialization was successful:
- Open the menu.
- Select the entry.If the initialization completed successfully, the web console displays the
Error (0) Replica acquired successfully: Incremental update succeededmessage in the Last Update Status column.Depending of the amount of data to synchronize, the initialization can take up to several hours.
16.5. Synchronizing Users
- Users in the Active Directory domain are synchronized if it is configured in the sync agreement by selecting the Sync New Windows Users option. All of the Windows users are copied to the Directory Server when synchronization is initiated and then new users are synchronized over when they are created.
- A Directory Server user account is synchronized to Active Directory through specific attributes that are present on the Directory Server entry. Any Directory Server entry must have the
ntUserobject class and thentUserCreateNewAccountattribute; thentUserCreateNewAccountattribute (even on an existing entry) signals the Directory Server Windows Synchronization plug-in to write the entry over to the Active Directory server.New or modified user entries with thentUserobject class added are created and synchronized over to the Windows machine at the next regular update, which is a standard poll of entry.
Note
- ntUserDomainId. This corresponds to the
sAMAccountNameattribute for Active Directory entries. - ntUniqueId. This contains the value of the
objectGUIDattribute for the corresponding Windows entry. This attribute is set by the synchronization process and should not be set or modified manually. - ntUserDeleteAccount. This attribute is set automatically when a Windows entry is synchronized over but must be set manually for Directory Server entries. If
ntUserDeleteAccounthas the valuetrue, the corresponding Windows entry be deleted when the Directory Server entry is deleted. Otherwise, the entry remains in Active Directory, but is removed from the Directory Server database if it is deleted in the Directory Server.
ntUserCreateNewAccount and ntUserDeleteAccount on Directory Server entries allows the Directory Manager precise control over which users within the synchronized subtree are synchronized on Active Directory.
16.5.1. User Attributes Synchronized between Directory Server and Active Directory
Table 16.1. User Schema Mapped between Directory Server and Active Directory
| Directory Server | Active Directory |
|---|---|
| cn[a] | name |
| ntUserDomainId | sAMAccountName |
| ntUserHomeDir | homeDirectory |
| ntUserScriptPath | scriptPath |
| ntUserLastLogon | lastLogon |
| ntUserLastLogoff | lastLogoff |
| ntUserAcctExpires | accountExpires |
| ntUserCodePage | codePage |
| ntUserLogonHours | logonHours |
| ntUserMaxStorage | maxStorage |
| ntUserProfile | profilePath |
| ntUserParms | userParameters |
| ntUserWorkstations | userWorkstations |
[a]
The cn is treated differently than other synchronized attributes. It is mapped directly (cn to cn) when syncing from Directory Server to Active Directory. When syncing from Active Directory to Directory Server, however, cn is mapped from the name attribute on Windows to the cn attribute in Directory Server.
| |
Table 16.2. User Schema That Are the Same in Directory Server and Windows Servers
| cn[a] | physicalDeliveryOfficeName |
| description | postOfficeBox |
| destinationIndicator | postalAddress |
| facsimileTelephoneNumber | postalCode |
| givenname | registeredAddress |
| homePhone | sn |
| homePostalAddress | st |
| initials | street |
| l | telephoneNumber |
| teletexTerminalIdentifier | |
| mobile | telexNumber |
| o | title |
| ou | usercertificate |
| pager | x121Address |
[a]
The cn is treated differently than other synchronized attributes. It is mapped directly (cn to cn) when syncing from Directory Server to Active Directory. When syncing from Active Directory to Directory Server, however, cn is mapped from the name attribute on Windows to the cn attribute in Directory Server.
| |
16.5.2. User Schema Differences between Red Hat Directory Server and Active Directory
16.5.2.1. Values for cn Attributes
cn attribute can be multi-valued, while in Active Directory this attribute must have only a single value. When the Directory Server cn attribute is synchronized, then, only one value is sent to the Active Directory peer.
cn value is added to an Active Directory entry and that value is not one of the values for cn in Directory Server, then all of the Directory Server cn values are overwritten with the single Active Directory value.
cn attribute attribute as its naming attribute, where Directory Server uses uid. This means that there is the potential to rename the entry entirely (and accidentally) if the cn attribute is edited in the Directory Server. If that cn change is written over to the Active Directory entry, then the entry is renamed, and the new named entry is written back over to Directory Server.
16.5.2.2. Password Policies
16.5.2.3. Values for street and streetAddress
streetAddress for a user or group's postal address; this is the way that Directory Server uses the street attribute. There are two important differences in the way that Active Directory and Directory Server use the streetAddress and street attributes, respectively:
- In Directory Server,
streetAddressis an alias forstreet. Active Directory also has thestreetattribute, but it is a separate attribute that can hold an independent value, not an alias forstreetAddress. - Active Directory defines both
streetAddressandstreetas single-valued attributes, while Directory Server definesstreetas a multi-valued attribute, as specified in RFC 4519.
streetAddress and street attributes, there are two rules to follow when setting address attributes in Active Directory and Directory Server:
- Windows Synchronization maps
streetAddressin the Windows entry tostreetin Directory Server. To avoid conflicts, thestreetattribute should not be used in Active Directory. - Only one Directory Server
streetattribute value is synchronized to Active Directory. If thestreetAddressattribute is changed in Active Directory and the new value does not already exist in Directory Server, then allstreetattribute values in Directory Server are replaced with the new, single Active Directory value.
16.5.2.4. Constraints on the initials Attribute
initials attribute, Active Directory imposes a maximum length constraint of six characters, but Directory Server does not have a length limit. If an initials attribute longer than six characters is added to Directory Server, the value is trimmed when it is synchronized with the Active Directory entry.
16.5.3. Configuring User Synchronization for Directory Server Users
- The
ntUserobject class - The
ntUserDomainIdattribute, to give the Windows ID - The
ntUserCreateNewAccountattribute, to signal to the synchronization plug-in to sync the Directory Server entry over to Active Directory
ldapmodify utility:
dn: uid=scarter,ou=People,dc=example,dc=com changetype: modify add: objectClass objectClass:ntUser - add: ntUserDomainId ntUserDomainId: Sam Carter - add: ntUserCreateNewAccount ntUserCreateNewAccount: true - add: ntUserDeleteAccount ntUserDeleteAccount: true
ntUser object class, are described in more detail in the Red Hat Directory Server 11 Configuration, Command, and File Reference.
Note
16.5.4. Configuring User Synchronization for Active Directory Users
# dsconf -D "cn=Directory Manager" ldap://server.example.com repl-winsync-agmt set --sync-users="on" --suffix="dc=example,dc=com" example-agreement
--sync-users option to off.
16.6. Synchronizing Groups
- Groups in the Active Directory domain are synchronized if it is configured in the sync agreement by selecting the Sync New Windows Groups option. All of the Windows groups are copied to the Directory Server when synchronization is initiated and then new groups are synchronized over as they are created.
- A Directory Server group account is synchronized to Active Directory through specific attributes that are present on the Directory Server entry. Any Directory Server entry must have the
ntGroupobject class and thentGroupCreateNewGroupattribute; thentGroupCreateNewGroupattribute (even on an existing entry) signals Directory Server Windows Synchronization to write the entry over to the Active Directory server.New or modified groups that have thentGroupobject class are created and synchronized over to the Windows machine at the next regular update.
Important
- Two attributes control whether Directory Server groups are created and deleted on Active Directory,
ntGroupCreateNewGroupandntGroupDeleteGroup.ntGroupCreateNewGroupis required to sync Directory Server groups over to Active Directory. - ntUserDomainId contains the unique ID for the entry on the Active Directory domain. This is the only required attribute for the
ntGroupobject class. - ntGroupType is the type of Windows group. Windows group types are global/security, domain local/security, builtin, universal/security, global/distribution, domain local/distribution, or universal/distribution. This is set automatically for Windows groups that are synchronized over, but this attribute must be set manually on Directory Server entries before they can be synchronized.
16.6.1. About Windows Group Types
-2147483646for global/security (the default)-2147483644for domain local/security-2147483643for builtin-2147483640for universal/security2for global/distribution4for domain local/distribution8for universal/distribution
16.6.2. Group Attributes Synchronized between Directory Server and Active Directory
Table 16.3. Group Entry Attribute Mapping between Directory Server and Active Directory
Table 16.4. Group Entry Attributes That Are the Same between Directory Server and Active Directory
| cn | o |
| description | ou |
| l | seeAlso |
16.6.3. Group Schema Differences between Red Hat Directory Server and Active Directory
16.6.4. Configuring Group Synchronization for Directory Server Groups
- The
ntGroupobject class. - The
ntUserDomainIdattribute, to give the Windows ID for the entry. - The
ntGroupCreateNewGroupattribute, to signal to the synchronization plug-in to sync the Directory Server entry over to Active Directory.ThentGroupDeleteGroupattribute is optional, but this sets whether to delete the entry automatically from the Active Directory domain if it is deleted in the Directory Server.
ntGroupType attribute. If this attribute is not specified, then the group is automatically added as a global security group (ntGroupType:-2147483646).
ldapmodify:
# ldapmodify -D "cn=Directory Manager" -W -p 389 -h server.example.com -x dn: cn=Example Group,ou=Groups,dc=example,dc=com changetype: modify add: objectClass objectClass:ntGroup - add: ntUserDomainId ntUserDomainId: example-group - add: ntGroupCreateNewGroup ntGroupCreateNewGroup: true - add: ntGroupDeleteGroup ntGroupDeleteGroup: true - add: ntGroupType ntGroupType: 2
ntGroup object class, are described in more detail in the Red Hat Directory Server 11 Configuration, Command, and File Reference.
16.6.5. Configuring Group Synchronization for Active Directory Groups
# dsconf -D "cn=Directory Manager" ldap://server.example.com repl-winsync-agmt set --sync-groups="on" --suffix="dc=example,dc=com" example-agreement
--sync-groups option to off.
16.7. Configuring Uni-Directional Synchronization
oneWaySync, enables uni-directional synchronization and specifies the direction to send changes. The possible values are fromWindows (for Active Directory to Directory Server sync) and toWindows (for Directory Server to Active Directory sync). If this attribute is absent, then synchronization is bi-directional.
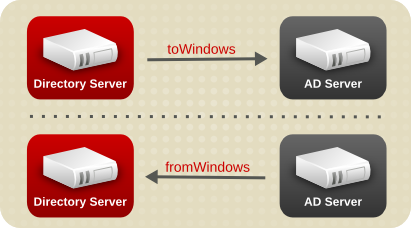
Figure 16.3. Uni-Directional Synchronization
--one-way-sync="direction" option to enable uni-directional synchronization in one of the following situations:
- If you create a new synchronization agreement in Section 16.4.9, “Step 9: Configuring the Database for Synchronization and Creating the Synchronization Agreement”, pass the option to the
dsconf repl-winsync-agmt createcommand. - If the synchronization agreement already exists, update the agreement. For example, to set synchronization from AD to Directory Server:
# dsconf -D "cn=Directory Manager" ldap://server.example.com repl-winsync-agmt set --one-way-sync="fromWindows" --suffix="dc=example,dc=com" example-agreement
Note
toWindows, after updating a password on the Active Directory server, the password is sent to the Directory Server.
16.8. Configuring Multiple Subtrees and Filters in Windows Synchronization
Multiple Subtrees in Windows Synchronization
winSyncSubtreePair parameter in the Windows sync agreement. For example to set multiple the ou=OU1,dc=DSexample,dc=com and ou=OU1,DC=ADexample,DC=com subtree:
# dsconf -D "cn=Directory Manager" ldap://server.example.com repl-winsync-agmt set --subtree-pair="ou=OU1,dc=DSexample,dc=com:ou=OU1,DC=ADexample,DC=com" --suffix="dc=example,dc=com" example-agreement
winSyncSubtreePair is not set, the nsds7WindowsReplicaSubtree AD subtree parameter and the nsds7DirectoryReplicaSubtree DS subtree parameter are used for the synchronization target checks instead. Otherwise, these two parameters are ignored.
Filters in Windows Synchronization
--win-filtersets an additional filter on the Active Directory server,--ds-filterparameter sets an additional filter on Directory Server.
example_agreement synchronizes entries that contain user and group attributes:
# dsconf -D "cn=Directory Manager" ldap://server.example.com repl-winsync-agmt \
set --win-filter="(|(cn=*user*)(cn=*group*))" --ds-filter="(|(uid=*user*)(cn=*group*))" \
example_agreement16.9. Synchronizing POSIX Attributes for Users and Groups
ntUser and ntGroup attributes automatically added which identify them as Windows accounts, but no POSIX attributes are synchronized over (even if they exist on the Active Directory entry) and no POSIX attributes are added on the Directory Server side.
Note
uidNumber, gidNumber, and homeDirectory) are synchronized between Active Directory and Directory Server entries. However, if a new POSIX entry or POSIX attributes are added to an existing entry in the Directory Server, only the POSIX attributes are synchronized over to the Active Directory corresponding entry. The POSIX object class (posixAccount for users and posixGroup for groups) is not added to the Active Directory entry.
16.9.1. Enabling POSIX Attribute Synchronization
- Enable the plug-in:
# dsconf -D "cn=Directory Manager" ldap://server.example.com plugin "cn=Posix Winsync API,cn=plugins,cn=config" enable
- Restart the instance:
# dsctl instance_name restart
16.9.2. Changing Posix Group Attribute Synchronization Settings
- Use the following command to enable the nested group mapping:
# dsconf -D "cn=Directory Manager" ldap://server.example.com plugin posix-winsync set --map-nested-grouping="true"
- Restart the Directory Server to load the new configuration.
# dsctl instance_name restart
16.9.3. Fixing Mismatched member and uniqueMember Attribute Values in posixGroup Entries
member and uniqueMember attribute values in posixGroup entries on Directory Server and Active Directory (AD) do not match, use the dsconf plugin posix-winsync fixup command to fix the problem:
# dsconf -D "cn=Directory Manager" ldap://server.example.com plugin posix-winsync fixup DN
memberUid values on Directory Server and automatically modifies the member and uniqueMember attribute values to match the values defined in AD.
-f filter parameter to the command to specify in which entries the command should fix memberUid attributes. Without a filter, the command operates on all entries that contain the inetuser, inetadmin, and nsmemberof object class.
16.10. Deleting and Resurrecting Entries
16.10.1. Deleting Entries
ntUserDeleteAccount or ntGroupDeleteGroup attribute set to true.
Note
ntUniqueId attribute. If the Directory Server entry is deleted on Active Directory before the unique ID is synchronized back to Directory Server, the entry will not be deleted on Directory Server. Directory Server uses the ntUniqueId attribute to identify and synchronize changes made on Active Directory to the corresponding Directory Server entry; without that attribute, Directory Server will not recognize the deletion.
winSyncInterval (by default, five minutes) after the entry is created before deleting it so that the ntUniqueId attribute is synchronized.
16.10.2. Resurrecting Entries
ntUniqueId attribute which was used to synchronize the entries, which signals to the Active Directory server that this new entry is a tombstone entry.
16.11. Sending Synchronization Updates
winSyncInterval setting (for retrieving changes from the Active Directory domain) or nsds5replicaupdateschedule setting (for pushing changes from the Directory Server). By default, changes are retrieved from Active Directory every five minutes, and changes from the Directory Server are sent immediately.
16.11.1. Performing a Manual Incremental Synchronization
# dsconf -D "cn=Directory Manager" ldap://server.example.com repl-winsync-agmt poke --suffix="dc=example,dc=com" example-agreement
16.11.2. Performing a Full Synchronization
16.11.2.1. Performing a Full Synchronization Using the Command Line
# dsconf -D "cn=Directory Manager" ldap://server.example.com repl-winsync-agmt init --suffix="suffix" agreement_name
# dsconf -D "cn=Directory Manager" ldap://server.example.com repl-winsync-agmt init-status --suffix="suffix" agreement_name
16.11.2.2. Performing a Full Synchronization Using the Web Console
- Open the Directory Server user interface in the web console. See Section 1.4, “Logging Into Directory Server Using the Web Console”.
- Select the instance.
- Open the menu and select the entry.
- Open the menu next to the synchronization agreement you want to synchronize and select Full Re-Synchronization.Resynchronizing does not delete data on the sync peer. The process sends and receives all updates and adds any new or modified Directory Server entries. For example, the process adds a pre-existing Directory Server user that had the
ntUserobject class added.
- Open the menu.
- Select the entry.If the synchronization completed successfully, the web console displays the
Error (0) Replica acquired successfully: Incremental update succeededmessage in the Last Update Status column.
16.11.3. Setting Synchronization Schedules
nsds5replicaupdateschedule attribute. The Directory Server polls the Active Directory to check for changes; the frequency that it checks the Active Directory server is set in the winSyncInterval attribute.
nsds5replicaupdateschedule attribute. The schedule is set with start (SSSS) and end (EEEE) times in the form HHMM, using a 24-hour clock. The days to schedule sync updates are use ranging from 0 (Sunday) to 6 (Saturday).
nsds5replicaupdateschedule: SSSS EEEE DDDDDDD
nsds5replicaupdateschedule: 1200 1400 0246
Note
2300 0100 is not valid.
winSyncInterval attribute. This attribute is set in seconds, so the default of 300 means that the Directory Server polls the Active Directory server every 300 seconds, or five minutes. Setting this to a higher value can be useful if the directory searches are taking too long and affecting performance.
winSyncInterval: 1000
16.11.4. Changing Synchronization Connections
- The bind user name and password (
nsDS5ReplicaBindDNandnsDS5ReplicaCredentials). - The connection method (
nsDS5ReplicaTransportInfo).It is only possible to change thensDS5ReplicaTransportInfofromLDAPtoStartTLSand vice versa. It is not possible to change to or fromLDAPSbecause it is not possible to change the port number, and switching between LDAP and LDAPS requires changing the port number.
nsDS5ReplicaBindDN: cn=sync user,cn=Users,dc=ad1
nsDS5ReplicaCredentials: {DES}ffGad646dT0nnsT8nJOaMA==
nsDS5ReplicaTransportInfo: StartTLS
Warning
16.11.5. Handling Entries That Move Out of the Synchronized Subtree
samAccount in the Active Directory and the uid attribute in Directory Server. The synchronization plug-in notes if an entry (based on the samAccount/uid relationship) is removed from the synchronized subtree either because it is deleted or moved. That is the signal to the synchronization plug-in that the entry is no longer to be synchronized.
Note
samAccount ID of jsmith was created in the ou=Employees subtree on Active Directory. The synchronized subtree is ou=Users, so the jsmith user was never synchronized over to Directory Server.
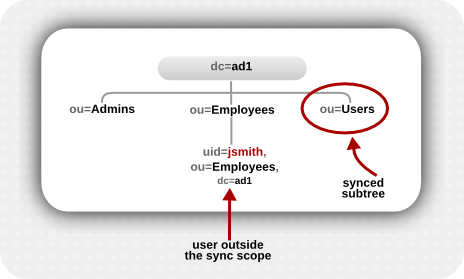
Figure 16.4. Active Directory Tree
samAccount/uid relationship) but are outside the synchronized subtree are intentionally moved outside the synchronized subtree — essentially, a rename operation. The assumption then was that the "corresponding" Directory Server entry should be deleted.
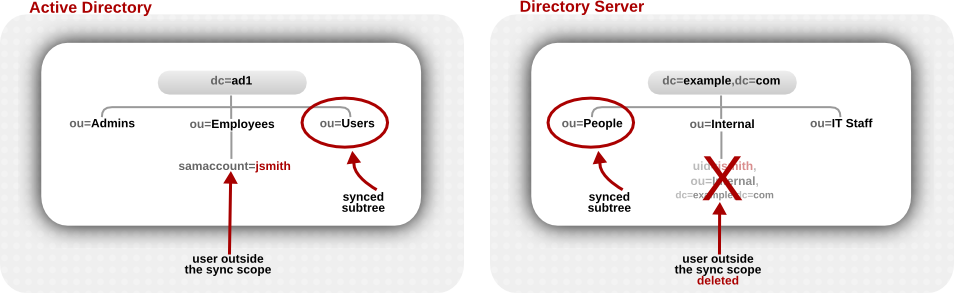
Figure 16.5. Active Directory and Directory Server Trees Compared
winSyncMoveAction attribute for the synchronization agreement sets instructions on how to handle these moved entries:
nonetakes no action, so if a synchronized Directory Server entry exists, it may be synchronized over to or create an Active Directory entry within scope. If no synchronized Directory Server entry exists, nothing happens at all (this is the default behavior in the Directory Server version 9.1 and later).unsyncremoves any sync-related attributes (ntUserorntGroup) from the Directory Server entry but otherwise leaves the Directory Server entry intact.Important
There is a risk when unsyncing entries that the Active Directory entry may be deleted at a later time, and the Directory Server entry will be left intact. This can create data inconsistency issues, especially if the Directory Server entry is ever used to recreate the entry on the Active Directory side later.deletedeletes the corresponding entry on the Directory Server side, regardless of whether it was ever synchronized with Active Directory (this was the default behavior in 9.0).Important
You almost never want to delete a Directory Server entry without deleting the corresponding Active Directory entry. This option is available only for compatibility with Directory Server 9.0 systems.
# dsconf -D "cn=Directory Manager" ldap://server.example.com repl-winsync-agmt --move-action="action" --suffix="suffix" agreement_name
16.12. Troubleshooting
Enable replication logging to record synchronization errors
Error #1: After synchronization, the status returns error 81.
Note
Error #2: An entry is moved from one subtree on Active Directory to another subtree, but the user is not moved to the corresponding subtree on Directory Server.
Chapter 17. Setting up Content Synchronization Using the SyncRepl Protocol
Content Synchronization plug-in, Directory Server supports the SyncRepl protocol according to RFC 4533. This protocol enables LDAP servers and clients to use Red Hat Directory Server as a source to synchronize their local database with the changing content of Directory Server.
SyncRepl protocol:
- Enable the
Content Synchronizationplug-in in Directory Server and optionally create a new user which the client will use to bind to Directory Server. The account must have permissions to read the content in the directory. - Configure the client. For example, set the search base for a subtree to synchronize. For further details, see your client's documentation.
17.1. Configuring the Content Synchronization Plug-in Using the Command Line
Content Synchronization plug-in using the command line:
- The
Content Synchronizationplug-in requires theRetro Changelogplug-in to log thensuniqueidattribute:- To verify if the retro changelog is already enabled, enter:
# dsconf -D "cn=Directory Manager" ldap://server.example.com plugin retro-changelog show ... nsslapd-pluginEnabled: offIf thensslapd-pluginEnabledparameter is set tooff, the retro changelog is disabled. To enable, see Section 15.21.1, “Enabling the Retro Changelog Plug-in”. - Add the
nsuniqueidattribute to retro changelog plug-in configuration:# dsconf -D "cn=Directory Manager" ldap://server.example.com plugin retro-changelog set --attribute nsuniqueid:targetUniqueId
- Optionally, apply the following recommendations for improved performance:
- Set maximum validity for entries in the retro change log. For example, to set 2 days (
2d):# ldapmodify -D "cn=Directory Manager" -W -p 389 -h server.example.com -x dn: cn=changelog5,cn=config changetype: modify replace: nsslapd-changelogmaxage nsslapd-changelogmaxage: 2d
- If you know which back end or subtree clients access to synchronize data, limit the scope of the
Retro Changelogplug-in. For example, to exclude thecn=demo,dc=example,dc=comsubtree, enter:# dsconf -D "cn=Directory Manager" ldap://server.example.com plugin retro-changelog set --exclude-suffix "cn=demo,dc=example,dc=com"
- Enable the
Content Synchronizationplug-in:# dsconf -D "cn=Directory Manager" ldap://server.example.com plugin set --enabled on "Content Synchronization"
- Using the defaults, Directory Server creates an access control instruction (ACI) in the
oid=1.3.6.1.4.1.4203.1.9.1.1,cn=features,cn=configentry that enables all users to use theSyncReplprotocol:aci: (targetattr != "aci")(version 3.0; acl "Sync Request Control"; allow( read, search ) userdn = "ldap:///all";)
Optionally, update the ACI to limit using theSyncReplcontrol. For further details about ACIs, see Section 18.11, “Defining Bind Rules”. - Restart Directory Server:
# dsctl instance_name restart
SyncRepl protocol.
Chapter 18. Managing Access Control
18.1. Access Control Principles
read, write, search, and compare. The permission level granted to a user depends on the authentication information provided.
- For the entire directory, a subtree, or specific entries
- For a specific user, all users belonging to a specific group or role, or all users in the directory
- For a specific location, such as an IP address, an IP range, or a DNS name.Note that load balancers can affect location-specific rules.
Important
18.2. ACI Placement
aci operational attribute in directory entries. To set an ACI, add the aci attribute to the corresponding directory entry. Directory Server applies the ACIs:
- Only to the entry that contains the ACI, if it does not have any child entries. For example, if a client requires access to the
uid=user_name,ou=People,dc=example,dc=comobject, and an ACI is only set ondc=example,dc=comand not on any child entries, only this ACI is applied.Note
ACIs withaddpermissions also apply to child entries created in future. - To the entry that contains the ACI and to all entries below it, if it has child entries. As a direct consequence, when the server evaluates access permissions to any given entry, it verifies the ACIs for every entry between the one requested and the directory suffix, as well as the ACIs on the entry itself.For example, ACIs are set on the
dc=example,dc=comand theou=People,dc=example,dc=comentry: If a client wants to access theuid=user_name,ou=People,dc=example,dc=comobject, which has no ACI set, Directory Server first creates a set with the ACIs fromdc=example,dc=comandou=People,dc=example,dc=com. Directory Server builds the list of applicable ACIs bottom-up from the target entry up to the top suffix. However, consider this list as a set, and the client application should not anticipate any order into ACI evaluation.The server selects the ACIs that match the resource entry that creates the final set of applicable ACIs from this initial set. Then it first evaluates the ACIs that deny permission. If aDENYACI has been successfully evaluated, the operation fails. If noDENYACI is found, Directory Server checks if an ACI exists that grantsALLOWpermissions. If at least one of the ACIs allows access, Directory Server grants access. If no ACI grantsALLOWpermissions, Directory Server refuses access, and the operation fails.
Note
rootDSE entry apply only to this entry.
inetOrgPerson object class can be created at the level of an organizationalUnit entry or a locality entry.
Note
18.3. ACI Structure
aci attribute uses the following syntax:
(target_rule) (version 3.0; acl "ACL_name"; permission_rule bind_rules;)
target_rulespecifies the entry, attributes, or set of entries and attributes for which to control access. For details, see Section 18.9, “Defining Targets”.version 3.0is a required string which identifies the ACI version.aci "ACL_name"sets a name or string that describes the ACI.permission_rulesets what rights, such asreadorwrite, are allowed or denied. For details, see Section 18.10, “Defining Permissions”.bind_rulesspecifies which rules must match during the bind to allow or deny access. For details, see Section 18.11, “Defining Bind Rules”.
Note
(target_rule)(version 3.0; acl "ACL_name"; permission_rule bind_rules; permission_rule bind_rules; ... ;)
18.4. ACI Evaluation
deny permission in ACIs take precedence over the allow permission. For example, if you deny write permission at the directory's root level, none of the users can write to the directory, regardless if an other ACI grants this permission. To grant a specific user write permissions to the directory, you have to add an exception to the original denying rule to allow the user to write in that directory.
Note
allow rules instead of deny rules.
18.5. Limitations of ACIs
- If your directory database is distributed over multiple servers, the following restrictions apply to the keywords you can use in ACIs:
- ACIs depending on group entries using the
groupdnkeyword must be located on the same server as the group entry.If the group is dynamic, all members of the group must have an entry on the server. Member entries of static groups can be located on the remote server. - ACIs depending on role definitions using the
rolednkeyword, must be located on the same server as the role definition entry. Every entry that is intended to have the role must also be located on the same server.
However, you can match values stored in the target entry with values stored in the entry of the bind user by, for example, using theuserattrkeyword. In this case, access is evaluated normally even if the bind user does not have an entry on the server that stores the ACI.For further details, see Section 2.3.3, “Database Links and Access Control Evaluation”. - You cannot use virtual attributes, such as Class of Service (CoS) attributes, in the following ACI keywords:
targetfiltertargattrfiltersuserattr
For details, see Chapter 8, Organizing and Grouping Entries. - Access control rules are evaluated only on the local server. For example, if you specify the host name of a server in LDAP URLs in ACI keywords, the URL will be ignored.
18.6. How Directory Server Handles ACIs in a Replication Topology
aci attributes of entries. Therefore, if an entry containing ACIs is part of a replicated database, the ACIs are replicated.
18.7. Managing ACIs using the command line
Note
18.7.1. Displaying ACIs
ldapsearch utility to display ACI using the command line. For example, to display the ACIs set on dc=example,dc=com and sub-entries:
# ldapsearch -D "cn=Directory Manager" -W -p 389 -h server.example.com -x \
-b "dc=example,dc=com" -s sub '(aci=*)' aci18.7.2. Adding an ACI
ldapmodify utility to add an ACI. For example:
# ldapmodify -D "cn=Directory Manager" -W -p 389 -h server.example.com -x dn: ou=People,dc=example,dc=com changetype: modify add: aci aci: (targetattr="userPassword") (version 3.0; acl "Allow users updating their password"; allow (write) userdn= "ldap:///self";)
18.7.3. Deleting an ACI
- Display the ACIs set on the entry. See Section 18.7.1, “Displaying ACIs”.
- Delete the ACI:
- If only one
aciattribute is set on the entry or you want to remove all ACIs from the entry:# ldapmodify -D "cn=Directory Manager" -W -p 389 -h server.example.com -x dn: ou=People,dc=example,dc=com changetype: delete delete: aci
- If multiple ACIs exist on the entry and you want to delete a specific ACI, specify the exact ACI:
# ldapmodify -D "cn=Directory Manager" -W -p 389 -h server.example.com -x dn: ou=People,dc=example,dc=com changetype: modify delete: aci aci: (targetattr="userPassword") (version 3.0; acl "Allow users updating their password"; allow (write) userdn= "ldap:///self";)
18.7.4. Updating an ACI
- Delete the existing ACI. See Section 18.7.3, “Deleting an ACI”.
- Add a new ACI with the updated settings. See Section 18.7.2, “Adding an ACI”.
18.8. Managing ACIs Using the Web Console
18.8.1. Creating an Access Control Instruction in the LDAP browser
Prerequisites
- Access to the web console.
- A parent entry exists in the Red Hat Directory Server.
Procedure
- Log in to the web console and click .
- After the web console loads the interface, click .
- Select an LDAP entry and click the Options menu.
- From the drop-down menu, select .
- To create an ACI by using the LDAP browser wizard, you have two options:
- Click to create the ACI using the wizard. Continue with the next step.
- Click , specify the instruction in the text field, and click .
- Follow the steps in the wizard and click the button after you complete each step.
- To create the ACI, review the data that the wizard generated, and click .
- To close the wizard window, click the button.
Verification
- Verify the new ACI appears in the window.
18.8.2. Editing Access Control Instructions in the LDAP browser
Prerequisites
- Access to the web console.
- A parent entry exists in the Red Hat Directory Server.
Procedure
- Log in to the web console and click .
- After the web console loads the interface, click .
- Select an LDAP entry and click the Options menu.
- From the drop-down menu, select .
- Click the Options menu and select .
- Modify the instruction in the text field and click .
Verification
- On the window, expand the ACI you modified and observe your changes.
18.8.3. Removing an Access Control Instruction in the LDAP browser
Prerequisites
- Access to the web console.
- A parent entry exists in the Red Hat Directory Server.
Procedure
- Log in to the web console and click .
- After the web console loads the interface, click .
- Select an LDAP entry and click the Options menu.
- From the drop-down menu, select to open the window.
- Click the Node options icon for the ACI you are removing and select .
- Select the checkbox and click the button.
Verification
- On the window, verify the ACI you removed no longer appears on the list of ACIs.
18.9. Defining Targets
aci attribute and to entries below.
(target_rule)(version 3.0; acl "ACL_name"; permission_rule bind_rules;)(target_rule_1)(target_rule_2)(...)(version 3.0; acl "ACL_name"; permission_rule bind_rules;)targettargetattrtargetattrfilterstargetfiltertarget_fromtarget_to
Syntax
(keyword comparison_operator "expression")
keyword: Sets the type of the target. See Section 18.9.1, “Frequently Used Target Keywords”.comparison_operator: Valid values are=and!=and indicate whether or not the target is the object specified in the expression.Warning
For security reasons, Red Hat recommends not using the!=operator, because it allows the specified operation on all other entries or attributes. For example:(targetattr != "userPassword");(version 3.0; acl "example"); allow (write) ... );
The previous example allows users to set, update, or delete any attribute except theuserPasswordattribute under the Distinguished Name (DN) you set the ACI. However, this also enables users, for example, to add an additionalaciattribute that allows write access to this attribute as well.expression: Sets the target and must be surrounded by quotation marks. The expression itself depends on the keyword you use.
18.9.1. Frequently Used Target Keywords
target: See Section 18.9.1.1, “Targeting a Directory Entry”.targetattr: See Section 18.9.1.2, “Targeting Attributes”.targetfilter: See Section 18.9.1.3, “Targeting Entries and Attributes Using LDAP Filters”.targattrfilters: See Section 18.9.1.4, “Targeting Attribute Values Using LDAP Filters”.
18.9.1.1. Targeting a Directory Entry
target keyword in the ACI. A target rule which uses the target keyword takes a DN as expression:
(target comparison_operator "ldap:///distinguished_name")
Note
target keyword on the DN you are targeting or a higher-level DN of it. For example, if you target ou=People,dc=example,dc=com, you must either set the ACI on ou=People,dc=example,dc=com or dc=example,dc=com.
Example 18.1. Using the target Keyword
ou=People,dc=example,dc=com entry to search and display all attributes in their own entry:
# ldapmodify -D "cn=Directory Manager" -W -p 389 -h server.example.com -x dn: ou=People,dc=example,dc=com changetype: modify add: aci aci: (target = "ldap:///ou=People,dc=example,dc=com") (version 3.0; acl "Allow users to read and search attributes of own entry"; allow (search, read) (userdn = "ldap:///self");)
Using Wildcards with the target Keyword
* wildcard character target multiple entries.
ou=People,dc=example,dc=com whose uid attribute is set to a value that starts with the letter a:
(target = "ldap:///uid=a*,ou=People,dc=example,dc=com")
Example 18.2. Targeting a Directory Entries Using Wildcards
dc=example,dc=com tree with a matching uid attribute and not only entries which are stored in the dc=example,dc=com entry itself:
(target = "ldap:///uid=user_name*,dc=example,dc=com")
uid=user_name,dc=example,dc=comuid=user_name,ou=People,dc=example,dc=comuid=user_name2,dc=example,dc=com
Important
dc=example,dc=com, you cannot use a target with a wildcard in this suffix, such as (target = "ldap:///dc=*.com").
18.9.1.2. Targeting Attributes
targetattr keyword. For example, this keyword defines:
- In a read operation, what attributes will be returned to a client
- In a search operation, what attributes will be searched
- In a write operation, what attributes can be written to an object
- In an add operation, what attributes can be added when creating a new object
Note
targetattr keyword to secure ACIs by combining other target keywords with targetattr. See Section 18.9.3, “Advanced Usage of Target Rules” for examples.
Important
read and search operations, the default targets no attribute. An ACI without a targetattr keyword is only useful for ACIs with rights affecting a complete entry, such as add or delete.
targetattr keyword, use ||:
(targetattr comparison_operator "attribute_1 || attribute_2 || ...")
Note
Example 18.3. Using the targetattr Keyword
dc=example,dc=com and all subentries to update the userPassword attribute in their own entry:
# ldapmodify -D "cn=Directory Manager" -W -p 389 -h server.example.com -x dn: dc=example,dc=com changetype: modify add: aci aci: (targetattr = "userPassword") (version 3.0; acl "Allow users updating own userPassword"; allow (write) (userdn = "ldap:///self");)
Using Wildcards with the targetattr Keyword
* wildcard character, you can, for example, target all attributes:
(targetattr = "*")
Warning
targetattr, because it allows access to all attributes, including operational attributes. For example, if users can add or modify all attributes, users might create additional ACI and increase their own permissions.
18.9.1.3. Targeting Entries and Attributes Using LDAP Filters
targetfilter keyword with an LDAP filter:
(targetfilter comparison_operator "LDAP_filter")
Example 18.4. Using the targetfilter Keyword
cn=Human Resources,dc=example,dc.com group to modify all entries having the department attribute set to Engineering or Sales:
# ldapmodify -D "cn=Directory Manager" -W -p 389 -h server.example.com -x dn: dc=example,dc=com changetype: modify add: aci aci: (targetfilter = "(|(department=Engineering)(department=Sales)") (version 3.0; acl "Allow HR updating engineering and sales entries"; allow (write) (groupdn = "ldap:///cn=Human Resources,dc=example,dc.com");)
targetfilter keyword targets whole entries. If you combine it with the targetattr keyword, the ACI applies only to a subset of attributes of the targeted entries. See Section 18.9.3.3, “Targeting Certain Attributes of Entries Matching a Filter”.
Note
ldapsearch operation.
Using Wildcards with the targetfilter Keyword
targetfilter keyword supports wildcards similarly to standard LDAP filters. For example, to target all uid attributes whose value starts with adm:
(targetfilter = "(uid=adm*) ...)
18.9.1.4. Targeting Attribute Values Using LDAP Filters
Note
ADD and DEL operations. You cannot limit search rights by specific values.
targattrfilters keyword with the following syntax:
- For one operation with one attribute and filter combination:
(targattrfilters="operation=attribute:filter")
- For one operation with multiple attribute and filter combinations:
(targattrfilters="operation=attribute_1:filter_1 && attribute_2:filter_2 ... && attribute_m:filter_m")
- For two operations, each with multiple attribute and filter combinations:
(targattrfilters="operation_1=attribute_1_1:filter_1_1 && attribute_1_2:filter_1_2 ... && attribute_1_m:filter_1_m , operation_2=attribute_2_1:filter_2_1 && attribute_2_2:filter_2_2 ... & attribute_2_n:filter_2_n ")
add or del. The attribute:filter combination sets the filter and the attribute the filter is applied to.
- When creating an entry and a filter applies to an attribute in the new entry, then each instance of that attribute must match the filter.
- When deleting an entry and a filter applies to an attribute in the entry, then each instance of that attribute must also match the filter.
- When modifying an entry and the operation adds an attribute, then the
addfilter that applies to that attribute must match. - If the operation deletes an attribute, then the
delfilter that applies to that attribute must match. If the individual values of an attribute already present in the entry are replaced, then both theaddanddelfilters must match.
Example 18.5. Using the targattrfilters Keyword
Admin role, and to add the telephone attribute, as long as the value begins with the 123 prefix:
# ldapmodify -D "cn=Directory Manager" -W -p 389 -h server.example.com -x dn: dc=example,dc=com changetype: modify add: aci aci: (targattrfilters="add=nsroledn:(!(nsroledn=cn=Admin)) && telephoneNumber:(telephoneNumber=123*)") (version 3.0; acl "Allow adding roles and telephone"; allow (add) (userdn = "ldap:///self");)
18.9.2. Further Target Keywords
18.9.2.1. Targeting Source and Destination DNs
target_from and target_to keywords in an ACI, you can specify the source and destination of the operation, however, without enabling the user:
- To move entries from a different source as set in the ACI.
- To move entries to a different destination as set in the ACI.
- To delete existing entries from the source DN.
- To add new entries to the destination DN.
Example 18.6. Using the target_from and target_to Keywords
uid=user,dc=example,dc=com account to move user accounts from the cn=staging,dc=example,dc=com entry to cn=people,dc=example,dc=com:
# ldapmodify -D "cn=Directory Manager" -W -p 389 -h server.example.com -x dn: dc=example,dc=com changetype: modify add: aci aci: (target_from="ldap:///uid=*,cn=staging,dc=example,dc=com") (target_to="ldap:///cn=People,dc=example,dc=com") (version 3.0; acl "MODDN from"; allow (moddn)) userdn="ldap:///uid=user,dc=example,dc=com";)
Note
dc=example,dc=com subtree.
target_from or target_to keyword is not set, the ACI matches any source or destination.
18.9.3. Advanced Usage of Target Rules
18.9.3.1. Delegating Permissions to Create and Maintain Groups
Example 18.7. Delegating Permissions to Create and Maintain Groups
uid=user,ou=People,dc=example,dc=com" account to create and update groups in the ou=groups,dc=example,dc=com entry:
# ldapmodify -D "cn=Directory Manager" -W -p 389 -h server.example.com -x dn: dc=example,dc=com changetype: modify add: aci aci: (target = "ldap:///cn=*,ou=Groups,dc=example,dc=com") (targattrfilters="add=objectclass:(|(objectclas=top)(objectclass=groupOfUniqueNames))) (targetattr="cn || uniqueMember || objectClass") (version 3.0; acl "example"; allow (read, search, write, add) (userdn = "ldap:///uid=test,ou=People,dc=example,dc=com");)
uid=test,ou=People,dc=example,dc=com user:
- Can create objects that must contain the
topandgroupOfUniqueNamesobject classes. - Cannot add additional object classes, such as
account. For example, this prevents if you use Directory Server accounts for local authentication, to create new users with an invalid user ID, such as0for therootuser.
targetfilter rule ensures that the ACI entry applies only to entries with the groupofuniquenames object class and the targetattrfilter rule ensures that no other object class can be added.
18.9.3.2. Targeting Both an Entry and Attributes
target controls access based on a DN. However, if you use it in combination with a wildcard and the targetattr keyword, you can target both entries and attributes.
Example 18.8. Targeting Both an Entry and Attributes
uid=user,ou=People,dc=example,dc.com user to read and search members of groups in all organizational units in the dc=example,dc=com subtree:
# ldapmodify -D "cn=Directory Manager" -W -p 389 -h server.example.com -x dn: dc=example,dc=com changetype: modify add: aci aci: (target="ldap:///cn=*,dc=example,dc=com")(targetattr="member" || "cn") (version 3.0; acl "Allow uid=user to search and read members of groups"; allow (read, search) (userdn = "ldap:///uid=user,ou=People,dc=example,dc.com");)
18.9.3.3. Targeting Certain Attributes of Entries Matching a Filter
targetattr and targetfilter keywords in two target rules, you can target certain attributes in entries that match a filter.
Example 18.9. Targeting Certain Attributes of Entries Matching a Filter
cn=Engineering Admins,dc=example,dc=com group to modify the jpegPhoto and manager attributes of all entries having the department attribute set to Engineering:
# ldapmodify -D "cn=Directory Manager" -W -p 389 -h server.example.com -x dn: dc=example,dc=com changetype: modify add: aci aci: (targetattr = "jpegPhoto || manager") (targetfilter = "(department=Engineering)") (version 3.0; acl "Allow engineering admins updating jpegPhoto and manager of department members"; allow (write) (groupdn = "ldap:///cn=Engineering Admins,dc=example,dc.com");)
18.9.3.4. Targeting a Single Directory Entry
targetattr and targetfilter keywords.
Example 18.10. Targeting a Single Directory Entry
uid=user,ou=People,dc=example,dc=com user to read and search the ou and cn attributes in the ou=Engineering,dc=example,dc=com entry:
# ldapmodify -D "cn=Directory Manager" -W -p 389 -h server.example.com -x dn: ou=Engineering,dc=example,dc=com changetype: modify add: aci aci: (targetattr = "ou || cn") (targetfilter = "(ou=Engineering)") (version 3.0; acl "Allow uid=user to search and read engineering attributes"; allow (read, search) (userdn = "ldap:///uid=user,ou=People,dc=example,dc.com");)
ou=Engineering,dc=example,dc=com entry, sub-entries in ou=Engineering,dc=example,dc=com must not have the ou attribute set to Engineering.
Important
18.10. Defining Permissions
(target_rule) (version 3.0; acl "ACL_name"; permission_rule bind_rules;)Syntax
permission (rights)
permission: Sets if the ACI allows or denies permission.rights: Sets the rights which the ACI allows or denies. See Section 18.10.1, “User rights”.
Example 18.11. Defining Permissions
ou=People,dc=example,dc=com entry to search and display all attributes in their own entry:
# ldapmodify -D "cn=Directory Manager" -W -p 389 -h server.example.com -x
dn: ou=People,dc=example,dc=com
changetype: modify
add: aci
aci: (target = "ldap:///ou=People,dc=example,dc=com") (version 3.0;
acl "Allow users to read and search attributes of own entry"; allow (search, read)
(userdn = "ldap:///self");)18.10.1. User rights
Table 18.1. User Rights
| Right | Description |
|---|---|
| read | Sets whether users can read directory data. This permission applies only to search operations in LDAP. |
| write | Sets whether users can modify an entry by adding, modifying, or deleting attributes. This permission applies to the modify and modrdn operations in LDAP. |
| add | Sets whether users can create an entry. This permission applies only to the add operation in LDAP. |
| delete | Sets whether users can delete an entry. This permission applies only to the delete operation in LDAP. |
| search | Sets whether users can search for directory data. To view data returned as part of a search result, assign search and read rights. This permission applies only to search operations in LDAP. |
| compare | Sets whether the users can compare data they supply with data stored in the directory. With compare rights, the directory returns a success or failure message in response to an inquiry, but the user cannot see the value of the entry or attribute. This permission applies only to the compare operation in LDAP. |
| selfwrite | Sets whether users can add or delete their own DN from a group. This right is used only for group management. |
| proxy |
Sets whether the specified DN can access the target with the rights of another entry. The
proxy right is granted within the scope of the ACL, and the user or group who as the right granted can run commands as any Directory Server user. You cannot restrict the proxy rights to certain users.
For security reasons, set ACIs that use the
proxy right at the most targeted level of the directory.
|
| all | Sets all of the rights, except proxy. |
18.10.2. Rights Required for LDAP Operations
- Adding an entry:
- Grant
addpermission on the entry that you want to add. - Grant
writepermission on the value of each attribute in the entry. This right is granted by default but can be restricted using thetargattrfilterskeyword.
- Deleting an entry:
- Grant
deletepermission on the entry that you want to delete. - Grant
writepermission on the value of each attribute in the entry. This right is granted by default but can be restricted using thetargattrfilterskeyword.
- Modifying an attribute in an entry:
- Grant
writepermission on the attribute type. - Grant
writepermission on the value of each attribute type. This right is granted by default but can be restricted using thetargattrfilterskeyword.
- Modifying the RDN of an entry:
- Grant
writepermission on the entry. - Grant
writepermission on the attribute type that is used in the new RDN. - Grant
writepermission on the attribute type that is used in the old RDN, if you want to grant the right to delete the old RDN. - Grant
writepermission on the value of attribute type that is used in the new RDN. This right is granted by default but can be restricted using thetargattrfilterskeyword.
- Comparing the value of an attribute:
- Grant
comparepermission on the attribute type.
- Searching for entries:
- Grant
searchpermission on each attribute type used in the search filter. - Grant
readpermission on attribute types used in the entry.
18.10.3. Access Control and the modrdn Operation
modrdn operations using ACIs, target the relevant entries but omit the targetattr keyword. For example, to add an ACI that defines the cn=example,ou=Groups,dc=example,dc=com group, cannot rename entries in ou=people,dc=example,dc=com which contain the cn attribute:
ldapmodify -D "cn=Directory Manager" -W -p 389 -h server.example.com -x dn: dc=example,dc=com changetype: modify add: aci aci: (target="ldap:///cn=*,ou=people,dc=example,dc=com") (version 3.0; acl "Deny modrdn rights to the example group"; deny(write) groupdn="ldap:///cn=example,ou=groups,dc=example,dc=com";)
18.11. Defining Bind Rules
- DNs
- Group memberships or assigned roles
- Locations from which an entry must bind
- Types of authentication that must be in use during the bind
- Times or days on which the bind occurs
(target_rule) (version 3.0; acl "ACL_name"; permission_rule bind_rules;)Syntax
keyword comparison_operator "expression"
keyword: Sets the type of the bind operation. See Section 18.11.1, “Frequently Used Bind Rules”.comparison_operator: Valid values are=and!=and indicate whether or not the target is the object specified in the expression. If a keyword supports additional comparison operators, it is mentioned in the corresponding section.expression: Sets the expression and must be surrounded by quotation marks. The expression itself depends on the keyword you use.
18.11.1. Frequently Used Bind Rules
userdn: See Section 18.11.1.1, “Defining User-based Access”.groupdn: See Section 18.11.1.2, “Defining Group-based Access”.
18.11.1.1. Defining User-based Access
userdn keyword enables you to grant or deny access based on one or multiple DNs and uses the following syntax:
userdn comparison_operator "ldap:///distinguished_name || ldap:///distinguished_name || ..."
- An LDAP filter: See Section 18.11.1.1.2, “Using the
userdnKeyword with an LDAP Filter”. - The
anyonealias: See Section 18.11.1.1.3, “Granting Anonymous Access”. - The
allalias: See Section 18.11.1.1.4, “Granting Access to Authenticated Users”. - The
selfalias: See Section 18.11.1.1.5, “Enabling Users to Access Their Own Entries”. - The
parentalias: See Section 18.11.1.1.6, “Setting Access for Child Entries of a User”.
Note
18.11.1.1.1. Using a DN with the userdn Keyword
userdn keyword to a DN to apply the ACI only to the matching entry. To match multiple entries, use the * wildcard in the DN.
userdn keyword with a DN must match the following syntax:
userdn comparison_operator ldap:///distinguished_name
Example 18.12. Using a DN with the userdn Keyword
uid=admin,ou=People,dc=example,dc=com user to read the manager attribute of all other users in the ou=People,dc=example,dc=com entry:
# ldapmodify -D "cn=Directory Manager" -W -p 389 -h server.example.com -x dn: ou=People,dc=example,dc=com changetype: modify add: aci aci: (targetattr="manager") (version 3.0; acl "Allow uid=admin reading manager attribute"; allow (search, read) userdn = "ldap:///uid=admin,ou=People,dc=example,dc=com";)
18.11.1.1.2. Using the userdn Keyword with an LDAP Filter
userdn keyword with an LDAP filter:
userdn comparison_operator "ldap:///distinguished_name??scope?(filter)"
Note
* wildcard.
Example 18.13. Using the userdn Keyword with an LDAP Filter
department attribute set to Human Resources to update the homePostalAddress attribute of users in the ou=People,dc=example,dc=com entry:
# ldapmodify -D "cn=Directory Manager" -W -p 389 -h server.example.com -x dn: ou=People,dc=example,dc=com changetype: modify add: aci aci: (targetattr="homePostalAddress") (version 3.0; acl "Allow HR setting homePostalAddress"; allow (write) userdn = "ldap:///ou=People,dc=example,dc=com??sub?(department=Human Resources)";)
18.11.1.1.3. Granting Anonymous Access
- No bind DN and password
- A valid bind DN and password
ldap:///anyone expression with the userdn keyword in a bind rule:
userdn comparison_operator "ldap:///anyone"
Example 18.14. Granting Anonymous Access
sn, givenName, and telephoneNumber attributes in the ou=People,dc=example,dc=com entry:
# ldapmodify -D "cn=Directory Manager" -W -p 389 -h server.example.com -x dn: ou=People,dc=example,dc=com changetype: modify add: aci aci: (targetattr="sn" || targetattr="givenName" || targetattr = "telephoneNumber") (version 3.0; acl "Anonymous read, search for names and phone numbers"; allow (read, search) userdn = "ldap:///anyone";)
18.11.1.1.4. Granting Access to Authenticated Users
ldap:///all expression with the userdn keyword in a bind rule:
userdn comparison_operator "ldap:///all"
Example 18.15. Granting Access to Authenticated Users
ou=example,ou=groups,dc=example,dc=com group:
# ldapmodify -D "cn=Directory Manager" -W -p 389 -h server.example.com -x dn: ou=example,ou=Groups,dc=example,dc=com changetype: modify add: aci aci: (targetattr="member") (version 3.0; acl "Allow users to add/remove themselves from example group"; allow (selfwrite) userdn = "ldap:///all";)
18.11.1.1.5. Enabling Users to Access Their Own Entries
ldap:///self expression with the userdn keyword in a bind rule:
userdn comparison_operator "ldap:///self"
Example 18.16. Enabling Users to Access Their Own Entries
ou=People,dc=example,dc=com entry to update their own userPassword attribute:
# ldapmodify -D "cn=Directory Manager" -W -p 389 -h server.example.com -x dn: ou=People,dc=example,dc=com changetype: modify add: aci aci: (targetattr="userPassword") (version 3.0; acl "Allow users updating their password"; allow (write) userdn = "ldap:///self";)
18.11.1.1.6. Setting Access for Child Entries of a User
self:///parent expression with the userdn keyword in a bind rule:
userdn comparison_operator "ldap:///parent"
Example 18.17. Setting Access for Child Entries of a User
cn=user,ou=People,dc=example,dc=com user to update the manager attribute of its own sub-entries, such as cn=example,cn=user,ou=People,dc=example,dc=com:
# ldapmodify -D "cn=Directory Manager" -W -p 389 -h server.example.com -x dn: cn=user,ou=People,dc=example,dc=com changetype: modify add: aci aci: (targetattr="manager") (version 3.0; acl "Allow cn=user to update manager attributes"; allow (write) userdn = "ldap:///parent";)
18.11.1.2. Defining Group-based Access
groupdn keyword. If the user is a member of one or multiple of the specified groups, the ACI matches.
groupdn keyword, Directory Server verifies the group membership based on the following attributes:
memberuniqueMembermemberURLmemberCertificateDescription
groupdn keyword use the following syntax:
groupdn comparison_operator "ldap:///distinguished_name || ldap:///distinguished_name || ..."
- An LDAP filter. See Section 18.11.1.2.2, “Using the
groupdnKeyword with an LDAP Filter”.
groupdn keywords and combine them using the Boolean and operator. For details, see Section 18.11.3, “Combining Bind Rules Using Boolean Operators”.
Note
18.11.1.2.1. Using a DN with the groupdn Keyword
groupdn keyword to the group's DN.
groupdn keyword set to a DN uses the following syntax:
groupdn comparison_operator ldap:///distinguished_name
Example 18.18. Using a DN with the groupdn Keyword
cn=example,ou=Groups,dc=example,dc=com group to search and read the manager attribute of entries in ou=People,dc=example,dc=com:
# ldapmodify -D "cn=Directory Manager" -W -p 389 -h server.example.com -x dn: ou=People,dc=example,dc=com changetype: modify add: aci aci: (targetattr="manager") (version 3.0; acl "Allow example group to read manager attribute"; allow (search, read) groupdn = "ldap:///cn=example,ou=Groups,dc=example,dc=com";)
18.11.1.2.2. Using the groupdn Keyword with an LDAP Filter
groupdn keyword, you can define that the authenticated user must be a member of at least one of the groups that the filter search returns, to match the ACI.
groupdn keyword with an LDAP filter uses the following syntax:
groupdn comparison_operator "ldap:///distinguished_name??scope?(filter)"
Note
* wildcard.
Example 18.19. Using the groupdn Keyword with an LDAP Filter
dc=example,dc=com and subtrees, which have the manager attribute set to example, update the homePostalAddress of entries in ou=People,dc=example,dc=com:
# ldapmodify -D "cn=Directory Manager" -W -p 389 -h server.example.com -x dn: ou=People,dc=example,dc=com changetype: modify add: aci aci: (targetattr="homePostalAddress") (version 3.0; acl "Allow manager=example setting homePostalAddress"; allow (write) userdn = "ldap:///dc=example,dc=com??sub?(manager=example)";)
18.11.2. Further Bind Rules
18.11.2.1. Defining Access Based on Value Matching
userattr keyword in a bind rule to specify which attribute must match between the entry used to bind to the directory and the targeted entry.
userattr keyword uses the following syntax:
userattr comparison_operator "attribute_name#bind_type_or_attribute_value
Important
add permissions to the entry where you set the ACI, when using the userattr keyword. To configure this behavior, use the userattr keyword in conjunction with the parent keyword and grant the permission additionally on level 0.
userattr Keyword with Inheritance”.
18.11.2.1.1. Using the USERDN Bind Type
USERDN bind type.
userattr keyword with the USERDN bind type requires the following syntax:
userattr comparison_operator "attribute_name#USERDN"
Example 18.20. Using the USERDN Bind Type
telephoneNumber attribute of its own associates:
# ldapmodify -D "cn=Directory Manager" -W -p 389 -h server.example.com -x dn: ou=People,dc=example,dc=com changetype: modify add: aci aci: (targetattr = "telephoneNumber") (version 3.0; acl "Manager: telephoneNumber"; allow (all) userattr = "manager#USERDN";)
ou=People,dc=example,dc=com, matches the DN stored in the manager attribute of this entry.
18.11.2.1.2. Using the GROUPDN Bind Type
GROUPDN bind type.
userattr keyword with the GROUPDN bind type requires the following syntax:
userattr comparison_operator "attribute_name#GROUPDN"
Example 18.21. Using the GROUPDN Bind Type
ou=Social Committee,ou=Groups,dc=example,dc=com entry:
# ldapmodify -D "cn=Directory Manager" -W -p 389 -h server.example.com -x dn: ou=Social Committee,ou=Groups,dc=example,dc=com changetype: modify add: aci aci: (target="ou=Social Committee,ou=Groups,dc=example,dc=com) (targattrfilters="del=objectClass:(objectClass=groupOfNames)") (version 3.0; acl "Delete Group"; allow (delete) userattr = "owner#GROUPDN";)
owner attribute.
userattr comparison_operator "ldap:///distinguished_name?attribute_name#GROUPDN"
18.11.2.1.3. Using the ROLEDN Bind Type
ROLEDN bind type.
userattr keyword with the ROLEDN bind type requires the following syntax:
userattr comparison_operator "attribute_name#ROLEDN"
Example 18.22. Using the ROLEDN Bind Type
cn=Administrators,dc=example,dc=com role to search and read the manager attribute of entries in ou=People,dc=example,dc=com:
# ldapmodify -D "cn=Directory Manager" -W -p 389 -h server.example.com -x dn: ou=People,dc=example,dc=com changetype: modify add: aci aci: (version 3.0; acl "Allow example role owners to read manager attribute"; allow (search, read) userattr = manager#ROLEDN;)
18.11.2.1.4. Using the SELFDN Bind Type
SELFDN bind type enables you to grant permissions, when the bound user's DN is set in a single-value attribute of the entry.
userattr keyword with the SELFDN bind type requires the following syntax:
userattr comparison_operator "attribute_name#SELFDN"
Example 18.23. Using the SELFDN Bind Type
ipatokenuniqueid=*,cn=otp,dc=example,dc=com entries that have the bind user's DN set in the ipatokenOwner attribute:
# ldapmodify -D "cn=Directory Manager" -W -p 389 -h server.example.com -x dn: ou=otp,dc=example,dc=com changetype: modify add: aci aci: (target = "ldap:///ipatokenuniqueid=*,cn=otp,dc=example,dc=com") (targetfilter = "(objectClass=ipaToken)")(version 3.0; acl "token-add-delete"; allow (add) userattr = "ipatokenOwner#SELFDN";)
18.11.2.1.5. Using the LDAPURL Bind Type
LDAPURL bind type.
userattr keyword with the LDAPURL bind type requires the following syntax:
userattr comparison_operator "attribute_name#LDAPURL"
Example 18.24. Using the LDAPURL Bind Type
aciurl attribute set to ldap:///ou=People,dc=example,dc=com??one?(uid=user*):
# ldapmodify -D "cn=Directory Manager" -W -p 389 -h server.example.com -x dn: ou=People,dc=example,dc=com changetype: modify add: aci aci: (targetattr = "*") (version 3.0; acl "Allow read,search "; allow (read,search) (userattr = "aciurl#LDAPURL);)
18.11.2.1.6. Using the userattr Keyword with Inheritance
userattr keyword to associate the entry used to bind with the target entry, the ACI applies only to the target specified and not to the entries below it. In certain situations, administrators want to extend the application of the ACI several levels below the targeted entry. This is possible by using the parent keyword and specifying the number of levels below the target that should inherit the ACI.
userattr keyword with the parent keyword, the syntax is as follows:
userattr comparison_operator "parent[inheritance_level].attribute_name#bind_type_or_attribute_value
- inheritance_level: Comma-separated list that indicates how many levels below the target inherit the ACI. You can include five levels (
0,1,2,3,4) below the targeted entry. Zero (0) indicates the targeted entry. - attribute_name: The attribute targeted by the
userattrorgroupattrkeyword. - bind_type_or_attribute_value: Sets the attribute value or a bind type, such as
USERDN.
userattr = "parent[0,1].manager#USERDN"
Example 18.25. Using the userattr Keyword with Inheritance
cn=Profiles,dc=example,dc=com entry where the user's DN is set in the owner attribute, as well as the first level of child entries which includes cn=mail,cn=Profiles,dc=example,dc=com and cn=news,cn=Profiles,dc=example,dc=com:
# ldapmodify -D "cn=Directory Manager" -W -p 389 -h server.example.com -x dn: cn=Profiles,dc=example,dc=com changetype: modify add: aci aci: (targetattr="*") (version 3.0; acl "Profile access", allow (read,search) userattr="parent[0,1].owner#USERDN" ;)
18.11.2.2. Defining Access from Specific IP Addresses or Ranges
ip keyword in a bind rule enables you to grant or deny access from a specific IP address or a range of IP addresses.
ip keyword use the following syntax:
ip comparison_operator "IP_address_or_range"
Example 18.26. Using IPv4 Address Ranges in Bind Rules
192.0.2.0/24 network to the dc=example,dc=com entry:
# ldapmodify -D "cn=Directory Manager" -W -p 389 -h server.example.com -x dn: dc=example,dc=com changetype: modify add: aci aci: (targetattr = "*") (version 3.0;acl "Deny 192.0.2.0/24"; deny (all) (userdn = "ldap:///anyone") and (ip != "192.0.2.");)
Example 18.27. Using IPv6 Address Ranges in Bind Rules
2001:db8::/64 network to the dc=example,dc=com entry:
# ldapmodify -D "cn=Directory Manager" -W -p 389 -h server.example.com -x dn: dc=example,dc=com changetype: modify add: aci aci: (targetattr = "*") (version 3.0;acl "Deny 2001:db8::/64"; deny (all) (userdn = "ldap:///anyone") and (ip != "2001:db8::");)
18.11.2.3. Defining Access from a Specific Host or Domain
dns keyword in a bind rule enables you to grant or deny access from a specific host or domain.
Warning
dns bind rule for this client.
ip keyword and IP addresses instead. See Section 18.11.2.2, “Defining Access from Specific IP Addresses or Ranges”.
dns keyword use the following syntax:
dns comparison_operator "host_name_or_domain_name"
Example 18.28. Defining Access from a Specific Host
client.example.com host to the dc=example,dc=com entry:
# ldapmodify -D "cn=Directory Manager" -W -p 389 -h server.example.com -x dn: dc=example,dc=com changetype: modify add: aci aci: (targetattr = "*") (version 3.0;acl "Deny client.example.com"; deny (all) (userdn = "ldap:///anyone") and (dns != "client.example.com");)
Example 18.29. Defining Access from a Specific Domain
example.com domain to the dc=example,dc=com entry:
# ldapmodify -D "cn=Directory Manager" -W -p 389 -h server.example.com -x dn: dc=example,dc=com changetype: modify add: aci aci: (targetattr = "*") (version 3.0;acl "Deny example.com"; deny (all) (userdn = "ldap:///anyone") and (dns != "*.example.com");)
18.11.2.4. Requiring a Certain Level of Security in Connections
ssf keyword in a bind rule, you can set that a connection must use a certain level of security. This enables you to force operations, for example password changes, to be performed over an encrypted connection.
ssf keyword use the following syntax:
ssf comparison_operator key_strength
=(equal to)!(not equal to)<(less than)>(greater than)<=(less than or equal to)>=(greater than or equal to)
key_strength parameter is set to 0, no secure operation is required for the LDAP operation.
Example 18.30. Requiring a Certain Level of Security in Connections
dc=example,dc=com entry can only update their userPassword attribute when the SSF is 128 or higher:
# ldapmodify -D "cn=Directory Manager" -W -p 389 -h server.example.com -x dn: dc=example,dc=com changetype: modify add: aci aci: (targetattr = "userPassword") (version 3.0; acl "Allow users updating own userPassword"; allow (write) (userdn = "ldap:///self") and (ssf >= "128");)
18.11.2.5. Defining Access at a Specific Day of the Week
dayofweek keyword in a bind rule enables you to grant or deny access based on the day of the week.
Note
dayofweek keyword use the following syntax:
dayofweek comparison_operator "comma-separated_list_of_days"
Example 18.31. Granting Access on Specific Days of the Week
uid=user,ou=People,dc=example,dc=com user entry to bind to the server on Saturdays and Sundays:
# ldapmodify -D "cn=Directory Manager" -W -p 389 -h server.example.com -x dn: ou=People,dc=example,dc=com changetype: modify add: aci aci: (version 3.0; acl "Deny access on Saturdays and Sundays"; deny (all) (userdn = "ldap:///uid=user,ou=People,dc=example,dc=com") and (dayofweek = "Sun,Sat");)
18.11.2.6. Defining Access at a Specific Time of Day
timeofday keyword in a bind rule enables you to grant or deny access based on the time of day.
Note
timeofday keyword use the following syntax:
timeofday comparison_operator "time"
=(equal to)!(not equal to)<(less than)>(greater than)<=(less than or equal to)>=(greater than or equal to)
Important
timeofday keyword requires that you specify the time in 24-hour format.
Example 18.32. Defining Access at a Specific Time of a Day
uid=user,ou=People,dc=example,dc=com user entry to bind to the server between 6pm and 0am:
# ldapmodify -D "cn=Directory Manager" -W -p 389 -h server.example.com -x dn: ou=People,dc=example,dc=com changetype: modify add: aci aci: (version 3.0; acl "Deny access between 6pm and 0am"; deny (all) (userdn = "ldap:///uid=user,ou=People,dc=example,dc=com") and (timeofday >= "1800" and timeofday < "2400");)
18.11.2.7. Defining Access Based on the Authentication Method
authmethod keyword in a bind rule sets what authentication method a client must use when connecting to the server, to apply the ACI.
authmethod keyword use the following syntax:
authmethod comparison_operator "authentication_method"
none: Authentication is not required and represents anonymous access. This is the default.simple: The client must provide a user name and password to bind to the directory.SSL: The client must bind to the directory using a TLS certificate either in a database, smart card, or other device. For details about certificate-based authentication, see Section 9.9, “Using Certificate-based Client Authentication”.SASL: The client must bind to the directory over a Simple Authentication and Security Layer (SASL) connection. When you use this authentication method in a bind rule, additionally specify the SASL mechanism, such asEXTERNAL.
Example 18.33. Enabling Access Only for Connections Using the EXTERNAL SASL Authentication Method
# ldapmodify -D "cn=Directory Manager" -W -p 389 -h server.example.com -x dn: ou=People,dc=example,dc=com changetype: modify add: aci aci: (version 3.0; acl "Deny all access without certificate"; deny (all) (authmethod = "none" or authmethod = "simple");)
18.11.2.8. Defining Access Based on Roles
roledn keyword in a bind rule enables you to grant or deny access to users having one or multiple role sets.
Note
roledn keyword use the following syntax:
roledn comparison_operator "ldap:///distinguished_name || ldap:///distinguished_name || ..."
Note
Example 18.34. Defining Access Based on Roles
cn=Human Resources,ou=People,dc=example,dc=com role set in the nsRole attribute to search and read the manager attribute of entries in ou=People,dc=example,dc=com:
# ldapmodify -D "cn=Directory Manager" -W -p 389 -h server.example.com -x dn: ou=People,dc=example,dc=com changetype: modify add: aci aci: (targetattr="manager") (version 3.0; acl "Allow manager role to update manager attribute"; allow (search, read) roledn = "ldap:///cn=Human Resources,ou=People,dc=example,dc=com";)
18.11.3. Combining Bind Rules Using Boolean Operators
AND, OR, and NOT Boolean operators enable you to combine multiple keywords.
bind_rule_1 boolean_operator bind_rule_2...
Example 18.35. Combining Bind Rules Using Boolean Operators
cn=Administrators,ou=Groups,dc=example,com and cn=Operators,ou=Groups,dc=example,com group can read, search, add, update, and delete entries in ou=People,dc=example,dc=com:
# ldapmodify -D "cn=Directory Manager" -W -p 389 -h server.example.com -x dn: ou=People,dc=example,dc=com changetype: modify add: aci aci: (target="ldap:///ou=People,dc=example,dc=com") (version 3.0; acl "Allow members of administrators and operators group to manage users"; allow (read, search, add, write, delete) groupdn = "ldap:///cn=Administrators,ou=Groups,dc=example,com" AND groupdn = "ldap:///cn=Operators,ou=Groups,dc=example,com";)
How Directory Server Evaluates Boolean Operators
- All expressions from left to right.In the following example,
bind_rule_1is evaluated first:(bind_rule_1) OR (bind_rule_2)
- From innermost to outermost parenthetical expressions first.In the following example,
bind_rule_2is evaluated first andbind_rule_3second:(bind_rule_1) OR ((bind_rule_2) AND (bind_rule_3))
NOTbeforeANDorORoperators.In the following example,bind_rule_2is evaluated first:(bind_rule_1) AND NOT (bind_rule_2)
TheANDandORoperators have no order of precedence.
18.12. Checking Access Rights on Entries (Get Effective Rights)
- An administrator can use the get effective rights command in order to better organize access control instructions for the directory. It is frequently necessary to restrict what one group of users can view or edit versus another group. For instance, members of the
QA Managersgroup may have the right to search and read attributes likemanagerandsalarybut onlyHR Groupmembers have the rights to modify or delete them. Checking the effective rights for a user or group is one way to verify that the appropriate access controls are in place. - A user can run the get effective rights command to see what attributes he can view or modify on his personal entry. For instance, a user should have access to attributes such as
homePostalAddressandcnbut may only have read access tomanagerandsalaryattributes.
getEffectiveRights search. The first is the requester, which is the authenticated entry when the getEffectiveRights search operation is issued. The second is the subject whose rights will be evaluated, it is defined as authorization DN in the GER control. The third is the target, which is defined by the search base, search filter, and attribute list of the request.
18.12.1. Rights Shown with a Get Effective Rights Search
entryLevelRights: vadn attributeLevelRights: givenName:rscWO, sn:rscW, objectClass:rsc, uid:rsc, cn:rscW
Table 18.2. Entry Rights
| Permission | Description |
|---|---|
| a | Add an entry. |
| d | Delete this entry. |
| n | Rename the DN. |
| v | View the entry. |
Table 18.3. Attribute Rights
| Permission | Description |
|---|---|
| r | Read. |
| s | Search. |
| w | Write (mod-add). |
| o | Obliterate(mod-del). Analogous to delete. |
| c | Compare. |
| W | Self-write. |
| O | Self-delete. |
18.12.2. The Format of a Get Effective Rights Search
-E option to pass an LDAP control with the ldapsearch command. (If an ldapsearch is run without the -E option, then, naturally, the entry is returned as normal, without any get effective rights information.)
# ldapsearch -x -D bind_dn -W -p server_port -h server_hostname -E [!]1.3.6.1.4.1.42.2.27.9.5.2=:GER_subject (searchFilter) attributeList
-bis the base DN of the subtree or entry used to search for the GER subject.If the search base is a specific entry DN or if only one entry is returned, then the results show the rights the requester has over that specific entry. If multiple entries beneath the search base match the filter, then the search returns every matching entry, with the rights for the requester over each entry.1.3.6.1.4.1.42.2.27.9.5.2is the OID for the get effective rights control.- The exclamation point (
!) specifies whether the search operation should return an error if the server does not support this control (!) or if it should be ignored and let the search return as normal (nothing). - The GER_subject is the person whose rights are being checked. If the GER_subject is left blank (
dn:), then the rights of an anonymous user are returned. - An optional attributeList limits the get effective rights results to the specified attribute or object class. As with a regular
ldapsearch, this can give specific attributes, likemail. If no attributes are listed, then every present attribute for the entry is returned. Using an asterisk (*) returns the rights for every possible attribute for the entry, both existing attribute and non-existent attributes. Using an plus sign (+) returns operational attributes for the entry. Examples for checking rights for specific attributes are given in Section 18.12.3.2, “Examples of Get Effective Rights Searches for Non-Existent Attributes” and Section 18.12.3.3, “Examples of Get Effective Rights Searches for Specific Attributes or Object Classes”.
-E) has to the targets of the search (-b). The get effective rights search is a regular ldapsearch, in that it simply looks for entries that match the search parameters and returns their information. The get effective rights option adds extra information to those search results, showing what rights a specific user has over those results. That GER subject user can be the requester himself (-D is the same as -E) or someone else.
- User A checks the rights that he has over other directory entries.
- User A checks the rights that he has to his personal entry.
- User A checks the rights that User B has to User A's entry.
18.12.3. Examples of GER Searches
18.12.3.1. General Examples on Checking Access Rights
-D and -E options give his entry as the requester. Since he is checking his personal entry, the -b option also contains his DN.
Example 18.36. Checking Personal Rights (User A to User A)
# ldapsearch -x -p 389 -h server.example.com -D "uid=tmorris,ou=people,dc=example,dc=com" -W -b "uid=tmorris,ou=people,dc=example,dc=com" -E '!1.3.6.1.4.1.42.2.27.9.5.2=:dn:uid=tmorris,ou=people,dc=example,dc=com' "(objectClass=*)"
dn: uid=tmorris,ou=People,dc=example,dc=com
givenName: Ted
sn: Morris
ou: IT
ou: People
l: Santa Clara
manager: uid=jsmith,ou=People,dc=example,dc=com
roomNumber: 4117
mail: tmorris@example.com
facsimileTelephoneNumber: +1 408 555 5409
objectClass: top
objectClass: person
objectClass: organizationalPerson
objectClass: inetOrgPerson
uid: tmorris
cn: Ted Morris
userPassword: {SSHA}bz0uCmHZM5b357zwrCUCJs1IOHtMD6yqPyhxBA==
entryLevelRights: v
attributeLevelRights: givenName:rsc, sn:rsc, ou:rsc, l:rsc, manager:rsc, roomNumber:rscwo, mail:rscwo, facsimileTelephoneNumber:rscwo, objectClass:rsc, uid:rsc, cn:rsc, userPassword:wo-D) checks his rights (-E) to Dave Miller's entry (-b):
Example 18.37. Personally Checking the Rights of One User over Another (User A to User B)
# ldapsearch -p 389 -h server.example.com -D "uid=tmorris,ou=people,dc=example,dc=com" -W -b "uid=dmiller,ou=people,dc=example,dc=com" -E '!1.3.6.1.4.1.42.2.27.9.5.2=:dn:uid=tmorris,ou=people,dc=example,dc=com' "(objectClass=*)" dn: uid=dmiller,ou=People,dc=example,dc=com ... entryLevelRights: vad attributeLevelRights: givenName:rscwo, sn:rscwo, ou:rscwo, l:rscwo, manager:rsc, roomNumber:rscwo, mail:rscwo, facsimileTelephoneNumber:rscwo, objectClass:rscwo, uid:rscwo, cn:rscwo, userPassword:rswo
-E), has over her subordinate, Ted Morris (-b):
Example 18.38. The Directory Manager's Checking the Rights of One User over Another (User A to User B)
# ldapsearch -p 389 -h server.example.com -D "cn=Directory Manager" -W -b "uid=tmorris,ou=people,dc=example,dc=com" -E '!1.3.6.1.4.1.42.2.27.9.5.2=:dn:uid=jsmith,ou=people,dc=example,dc=com' "(objectClass=*)" dn: uid=tmorris,ou=People,dc=example,dc=com ... entryLevelRights: vadn attributeLevelRights: givenName:rscwo, sn:rscwo, ou:rscwo, l:rscwo, manager:rscwo, roomNumber:rscwo, mail:rscwo, facsimileTelephoneNumber:rscwo, objectClass:rscwo, uid:rscwo, cn:rscwo, userPassword:rscwo
# ldapsearch -p 389 -h server.example.com -D "uid=dmiller,ou=people,dc=example,dc=com" -W -b "uid=tmorris,ou=people,dc=example,dc=com" -E '!1.3.6.1.4.1.42.2.27.9.5.2=:dn:uid=tmorris,ou=people,dc=example,dc=com' "(objectClass=*)" ldap_search: Insufficient access ldap_search: additional info: get-effective-rights: requester has no g permission on the entry
Example 18.39. Checking the Rights Someone Else Has to a Personal Entry
# ldapsearch -p 389 -h server.example.com -D "uid=tmorris,ou=people,dc=example,dc=com" -W -b "uid=tmorris,ou=people,dc=example,dc=com" -E '!1.3.6.1.4.1.42.2.27.9.5.2=:dn:uid=dmiller,ou=people,dc=example,dc=com' "(objectClass=*)" dn: uid=tmorris,ou=people,dc=example,dc=com ... entryLevelRights: v attributeLevelRights: givenName:rsc, sn:rsc, ou:rsc, l:rsc,manager:rsc, roomNumber:rsc, mail:rsc, facsimileTelephoneNumber:rsc, objectClass:rsc, uid:rsc, cn:rsc, userPassword:none
ou, givenName, l, and other attributes, and no rights to the userPassword attribute.
18.12.3.2. Examples of Get Effective Rights Searches for Non-Existent Attributes
userPassword value is removed, then a future effective rights search on the entry above would not return any effective rights for userPassword, even though self-write and self-delete rights could be allowed.
*) with the get effective rights search returns every attribute available for the entry, including attributes not set on the entry.
Example 18.40. Returning Effective Rights for Non-Existent Attributes
# ldapsearch -D "cn=Directory Manager" -W -b "uid=scarter,ou=people,dc=example,dc=com" -E '!1.3.6.1.4.1.42.2.27.9.5.2=:dn:uid=scarter,ou=people,dc=example,dc=com' "(objectclass=*)" "*"
dn: uid=scarter,ou=People,dc=example,dc=com
givenName: Sam
telephoneNumber: +1 408 555 4798
sn: Carter
ou: Accounting
ou: People
l: Sunnyvale
manager: uid=dmiller,ou=People,dc=example,dc=com
roomNumber: 4612
mail: scarter@example.com
facsimileTelephoneNumber: +1 408 555 9700
objectClass: top
objectClass: person
objectClass: organizationalPerson
objectClass: inetOrgPerson
uid: scarter
cn: Sam Carter
userPassword: {SSHA}Xd9Jt8g1UsHC8enNDrEmxj3iJPKQLItlDYdD9A==
entryLevelRights: vadn
attributeLevelRights: objectClass:rscwo, aci:rscwo, sn:rscwo, cn:rscwo, description:rscwo, seeAlso:rscwo, telephoneNumber:rscwo, userPassword:rscwo, destinationIndicator:rscwo, facsimileTelephoneNumber:rscwo, internationaliSDNNumber:rscwo, l:rscwo, ou:rscwo, physicalDeliveryOfficeName:rscwo, postOfficeBox:rscwo, postalAddress:rscwo, postalCode:rscwo, preferredDeliveryMethod:rscwo, registeredAddress:rscwo, st:rscwo, street:rscwo, teletexTerminalIdentifier:rscwo, telexNumber:rscwo, title:rscwo, x121Address:rscwo, audio:rscwo, businessCategory:rscwo, carLicense:rscwo, departmentNumber:rscwo, displayName:rscwo, employeeType:rscwo, employeeNumber:rscwo, givenName:rscwo, homePhone:rscwo, homePostalAddress:rscwo, initials:rscwo, jpegPhoto:rscwo, labeledUri:rscwo, manager:rscwo, mobile:rscwo, pager:rscwo, photo:rscwo, preferredLanguage:rscwo, mail:rscwo, o:rscwo, roomNumber:rscwo, secretary:rscwo, uid:rscwo,x500UniqueIdentifier:rscwo, userCertificate:rscwo, userSMIMECertificate:rscwo, userPKCS12:rscwosecretary, are listed, even though that attribute is non-existent.
18.12.3.3. Examples of Get Effective Rights Searches for Specific Attributes or Object Classes
Example 18.41. Get Effective Rights Results for Specific Attributes
# ldapsearch -D "cn=Directory Manager" -W -b "uid=scarter,ou=people,dc=example,dc=com" -E '!1.3.6.1.4.1.42.2.27.9.5.2=:dn:uid=scarter,ou=people,dc=example,dc=com' "(objectclass=*)"cn mail initialsdn: uid=scarter,ou=People,dc=example,dc=com cn: Sam Carter mail: scarter@example.com entryLevelRights: vadn attributeLevelRights:cn:rscwo, mail:rscwo, initials:rscwo
initials attribute in Example 18.41, “Get Effective Rights Results for Specific Attributes”, to see the rights which are available, similar to using an asterisk to list all attributes.
Example 18.42. Get Effective Rights Results for an Attribute within an Object Class
# ldapsearch -D "cn=Directory Manager" -W -b "uid=scarter,ou=people,dc=example,dc=com" -E '!1.3.6.1.4.1.42.2.27.9.5.2=:dn:uid=scarter,ou=people,dc=example,dc=com' "(objectclass=*)" uidNumber@posixAccount
...
dn: cn=template_posixaccount_objectclass,uid=scarter,ou=people,dc=example,dc=com
uidnumber: (template_attribute)
entryLevelRights: v
attributeLevelRights: uidNumber:rscNote
-D) is the Directory Manager.
*) instead of a specific attribute returns all of the attributes (present and non-existent) for the specified GER subject and the full list of attributes for the object class template.
Example 18.43. Get Effective Rights Results for All Attributes for an Object Class
# ldapsearch -D "cn=Directory Manager" -W -b "uid=scarter,ou=people,dc=example,dc=com" -E '!1.3.6.1.4.1.42.2.27.9.5.2=:dn:uid=scarter,ou=people,dc=example,dc=com' "(objectclass=*)" *@posixaccount
...
dn: cn=template_posixaccount_objectclass,uid=scarter,ou=people,dc=example,dc=com
objectClass: posixaccount
objectClass: top
homeDirectory: (template_attribute)
gidNumber: (template_attribute)
uidNumber: (template_attribute)
uid: (template_attribute)
cn: (template_attribute)
entryLevelRights: v
attributeLevelRights: cn:rsc, uid:rsc, uidNumber:rsc, gidNumber:rsc, homeDirectory:rsc, objectClass:rsc, userPassword:none, loginShell:rsc, gecos:rsc, description:rsc, aci:rsc18.12.3.4. Examples of Get Effective Rights Searches for Non-Existent Entries
jsmith) would have to a non-existent user, based on the existing access control rules. For checking non-existent entries, the server generates a template entry within that subtree. For example, to check for the template entry cn=joe new user,cn=accounts,ou=people,dc=example,dc=com, the server creates cn=template,cn=accounts,ou=people,dc=example,dc=com.
cn=joe new user,cn=accounts,ou=people,dc=example,dc=com with a person object class (@person), the server generates cn=template_person_objectclass,cn=accounts,ou=people,dc=example,dc=com.
scarter for a non-existent Posix entry with uidNumber as its RDN:
# ldapsearch -D "cn=Directory Manager" -W -b "ou=people,dc=example,dc=com" -E '!1.3.6.1.4.1.42.2.27.9.5.2=:dn:uid=scarter,ou=people,dc=example,dc=com' "(objectclass=*)" @posixaccount:uidnumber
dn: uidNumber=template_posixaccount_objectclass,ou=people,dc=example,dc=com
entryLevelRights: v
attributeLevelRights: description:rsc, gecos:rsc, loginShell:rsc, userPassword
:rsc, objectClass:rsc, homeDirectory:rsc, gidNumber:rsc, uidNumber:rsc, uid:
rsc, cn:rsc18.12.3.5. Examples of Get Effective Rights Searches for Operational Attributes
ldapsearches, including get effective rights searches. To return the information for the operational attributes, use the plus sign (+). This returns only the operational attributes that can be used in the entry.
Example 18.44. Get Effective Rights Results for Operational Attributes
# ldapsearch -D "cn=Directory Manager" -W -x -b "uid=scarter,ou=people,dc=example,dc=com" -E '!1.3.6.1.4.1.42.2.27.9.5.2=:dn:uid=scarter,ou=people,dc=example,dc=com' "(objectclass=*)" "+"
dn: uid=scarter,ou=People,dc=example,dc=com
entryLevelRights: vadn
attributeLevelRights: nsICQStatusText:rscwo, passwordGraceUserTime:rscwo, pwdGraceUserTime:rscwo, nsYIMStatusText:rscwo, modifyTimestamp:rscwo, passwordExpWarned:rscwo, pwdExpirationWarned:rscwo, entrydn:rscwo, aci:rscwo, nsSizeLimit:rscwo, nsAccountLock:rscwo, passwordExpirationTime:rscwo, entryid:rscwo, nsSchemaCSN:rscwo, nsRole:rscwo, retryCountResetTime:rscwo, ldapSchemas:rscwo, nsAIMStatusText:rscwo, copiedFrom:rscwo, nsICQStatusGraphic:rscwo, nsUniqueId:rscwo, creatorsName:rscwo, passwordRetryCount:rscwo, dncomp:rscwo, nsTimeLimit:rscwo, passwordHistory:rscwo, pwdHistory:rscwo, nscpEntryDN:rscwo, subschemaSubentry:rscwo, nsYIMStatusGraphic:rscwo, hasSubordinates:rscwo, pwdpolicysubentry:rscwo, nsAIMStatusGraphic:rscwo, nsRoleDN:rscwo, createTimestamp:rscwo, accountUnlockTime:rscwo, copyingFrom:rscwo, nsLookThroughLimit:rscwo, nsds5ReplConflict:rscwo, modifiersName:rscwo, parentid:rscwo, passwordAllowChangeTime:rscwo, nsBackendSuffix:rscwo, nsIdleTimeout:rscwo, ldapSyntaxes:rscwo, numSubordinates:rscwo18.12.3.6. Examples of Get Effective Rights Results and Access Control Rules
dn: dc=example,dc=com objectClass: top objectClass: domain dc: example aci: (target=ldap:///ou=Accounting,dc=example,dc=com)(targetattr="*")(version 3.0; acl "test acl"; allow (read,search,compare) (userdn = "ldap:///anyone") ;) dn: ou=Accounting,dc=example,dc=com objectClass: top objectClass: organizationalUnit ou: Accounting
dc=example,dc=com subtree, the get effective rights search shows that the user does not have any rights to the dc=example,dc=com entry:
Example 18.45. Get Effective Rights Results with No ACL Set (Directory Manager)
# ldapsearch -D "cn=Directory Manager" -W -b "dc=example,dc=com" -E '!1.3.6.1.4.1.42.2.27.9.5.2=:dn:uid=scarter,ou=people,dc=example,dc=com' "(objectclass=*)" "*@person" dn: cn=template_person_objectclass,uid=scarter,ou=people,dc=example,dc=com objectClass: person objectClass: top cn: (template_attribute) sn: (template_attribute) description: (template_attribute) seeAlso: (template_attribute) telephoneNumber: (template_attribute) userPassword: (template_attribute) entryLevelRights: none attributeLevelRights: sn:none, cn:none, objectClass:none, description:none, seeAlso:none, telephoneNumber:none, userPassword:none, aci:none
Example 18.46. Get Effective Rights Results with No ACL Set (Regular User)
# ldapsearch -D "uid=scarter,ou=people,dc=example,dc=com" -W -b "dc=example,dc=com" -E '!1.3.6.1.4.1.42.2.27.9.5.2=:dn:uid=scarter,ou=people,dc=example,dc=com' "(objectclass=*)" "*@person"
18.12.4. Get Effective Rights Return Codes
entryLevelRights and attributeLevelRights, an error code is returned. This code can give information on the configuration of the entry that was queried. Table 18.4, “Returned Result Codes” summarizes the error codes and the potential configuration information they can relay.
Table 18.4. Returned Result Codes
| Code | Description |
|---|---|
| 0 | Successfully completed. |
| 1 | Operation error. |
| 12 | The critical extension is unavailable. If the criticality expression is set to true and effective rights do not exist on the entry being queried, then this error is returned. |
| 16 | No such attribute. If an attribute is specifically queried for access rights but that attribute does not exist in the schema, this error is returned. |
| 17 | Undefined attribute type. |
| 21 | Invalid attribute syntax. |
| 50 | Insufficient rights. |
| 52 | Unavailable. |
| 53 | Unwilling to perform. |
| 80 | Other. |
18.13. Logging Access Control Information
nsslapd-errorlog-level parameter to a value that includes 128 (access control list processing). For further details about setting the error log level, see Section 21.3.7, “Configuring the Log Levels”.
18.14. Advanced Access Control: Using Macro ACIs
18.14.1. Macro ACI Example
ou=groups, ou=people). This pattern is also repeated across the tree because the Example Corp. directory tree stores the suffixes dc=hostedCompany2,dc=example,dc=com and dc=hostedCompany3,dc=example,dc=com.
dc=hostedCompany1,dc=example,dc=com node:
aci: (targetattr="*")(targetfilter=(objectClass=nsManagedDomain))
(version 3.0; acl "Domain access"; allow (read,search)
groupdn="ldap:///cn=DomainAdmins,ou=Groups,dc=hostedCompany1,dc=example,dc=com";)DomainAdmins group to any entry in the dc=hostedCompany1,dc=example,dc=com tree.
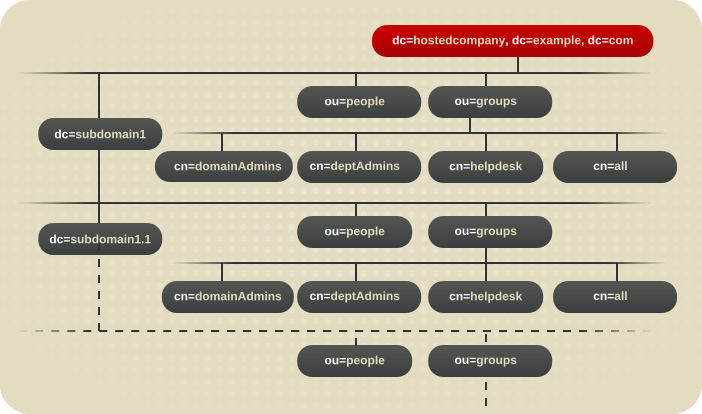
Figure 18.1. Example Directory Tree for Macro ACIs
dc=hostedCompany1,dc=example,dc=com node:
aci: (targetattr="*")(targetfilter=(objectClass=nsManagedDomain))
(version 3.0; acl "Domain access"; allow (read,search)
groupdn="ldap:///cn=DomainAdmins,ou=Groups,dc=hostedCompany1,dc=example,dc=com";)dc=subdomain1,dc=hostedCompany1,dc=example,dc=com node:
aci: (targetattr="*")(targetfilter=(objectClass=nsManagedDomain))
(version 3.0; acl "Domain access"; allow (read,search)
groupdn="ldap:///cn=DomainAdmins,ou=Groups,dc=subdomain1,dc=hostedCompany1,dc=example,dc=com";)dc=hostedCompany2,dc=example,dc=com node:
aci: (targetattr="*")(targetfilter=(objectClass=nsManagedDomain))
(version 3.0; acl "Domain access"; allow (read,search)
groupdn="ldap:///cn=DomainAdmins,ou=Groups,dc=hostedCompany2,dc=example,dc=com";)dc=subdomain1,dc=hostedCompany2,dc=example,dc=com node:
aci: (targetattr="*")(targetfilter=(objectClass=nsManagedDomain))
(version 3.0; acl "Domain access"; allow (read,search)
groupdn="ldap:///cn=DomainAdmins,ou=Groups,dc=subdomain1,dc=hostedCompany2,dc=example,dc=com";)groupdn keyword. By using a macro for the DN, it is possible to replace these ACIs by a single ACI at the root of the tree, on the dc=example,dc=com node. This ACI reads as follows:
aci: (target="ldap:///ou=Groups,($dn),dc=example,dc=com")
(targetattr="*")(targetfilter=(objectClass=nsManagedDomain))
(version 3.0; acl "Domain access"; allow (read,search)
groupdn="ldap:///cn=DomainAdmins,ou=Groups,[$dn],dc=example,dc=com";)target keyword, which was not previously used, is utilized in the new ACI.
18.14.2. Macro ACI Syntax
- ($dn)
- [$dn]
- ($attr.attrName), where attrName represents an attribute contained in the target entry
userdn, roledn, groupdn, and userattr, are collectively called the subject, as opposed to the target, of the ACI. Macro ACIs can be used in the target part or the subject part of an ACI.
Table 18.5. Macros in ACI Keywords
| Macro | ACI Keyword |
|---|---|
| ($dn) | target, targetfilter, userdn, roledn, groupdn, userattr |
| [$dn] | targetfilter, userdn, roledn, groupdn, userattr |
| ($attr.attrName) | userdn, roledn, groupdn, userattr |
- If you use
($dn)intargetfilter,userdn,roledn,groupdn,userattr, you must define a target that contains($dn). - If you use
[$dn]intargetfilter,userdn,roledn,groupdn,userattr, you must define a target that contains($dn).
Note
($dn) macro.
($dn) macro and the ($attr.attrName) macro.
18.14.2.1. Macro Matching for ($dn)
($dn) macro is replaced by the matching part of the resource targeted in an LDAP request. For example, you have an LDAP request targeted at the cn=all,ou=groups,dc=subdomain1,dc=hostedCompany1,dc=example,dc=com entry and an ACI that defines the target as follows:
(target="ldap:///ou=Groups,($dn),dc=example,dc=com")
($dn) macro matches with dc=subdomain1,dc=hostedCompany1.
($dn), the substring that matches the target is used to expand the subject. For example:
aci: (target="ldap:///ou=*,($dn),dc=example,dc=com")
(targetattr = "*") (version 3.0; acl "Domain access"; allow (read,search)
groupdn="ldap:///cn=DomainAdmins,ou=Groups,($dn),dc=example,dc=com";)($dn) in the target is dc=subdomain1,dc=hostedCompany1, then the same string is used in the subject. The ACI is then expanded as follows:
aci: (target="ldap:///ou=Groups,dc=subdomain1,dc=hostedCompany1,
dc=example,dc=com") (targetattr = "*") (version 3.0; acl "Domain
access"; allow (read,search) groupdn="ldap:///cn=DomainAdmins,ou=Groups,
dc=subdomain1,dc=hostedCompany1,dc=example,dc=com";)18.14.2.2. Macro Matching for [$dn]
[$dn] is slightly different than for ($dn). The DN of the targeted resource is examined several times, each time dropping the left-most RDN component, until a match is found.
cn=all,ou=groups,dc=subdomain1,dc=hostedCompany1,dc=example,dc=com subtree and the following ACI:
aci: (target="ldap:///ou=Groups,($dn),dc=example,dc=com")
(targetattr = "*") (version 3.0; acl "Domain access"; allow (read,search)
groupdn="ldap:///cn=DomainAdmins,ou=Groups,[$dn],dc=example,dc=com";)($dn)in the target matchesdc=subdomain1,dc=hostedCompany1.[$dn]in the subject is replaces withdc=subdomain1,dc=hostedCompany1.The result isgroupdn="ldap:///cn=DomainAdmins,ou=Groups,dc=subdomain1,dc=hostedCompany1,dc=example,dc=com". If the bind DN is a member of that group, the matching process stops, and the ACI is evaluated. If it does not match, the process continues.[$dn]in the subject is replaced withdc=hostedCompany1.The result isgroupdn="ldap:///cn=DomainAdmins,ou=Groups,dc=hostedCompany1,dc=example,dc=com". In this case, if the bind DN is not a member of that group, the ACI is not evaluated. If it is a member, the ACI is evaluated.
[$dn] macro is that it provides a flexible way of granting access to domain-level administrators to all the subdomains in the directory tree. Therefore, it is useful for expressing a hierarchical relationship between domains.
aci: (target="ldap:///ou=*, ($dn),dc=example,dc=com")
(targetattr="*")(targetfilter=(objectClass=nsManagedDomain))
(version 3.0; acl "Domain access"; allow (read,search)
groupdn="ldap:///cn=DomainAdmins,ou=Groups,[$dn],dc=example,dc=com";)cn=DomainAdmins,ou=Groups,dc=hostedCompany1,dc=example,dc=com to all of the subdomains under dc=hostedCompany1, so an administrator belonging to that group could access a subtree like ou=people,dc=subdomain1.1,dc=subdomain1.
cn=DomainAdmins,ou=Groups,dc=subdomain1.1 would be denied access to the ou=people,dc=hostedCompany1 and ou=people,dc=subdomain1,dc=hostedCompany1 nodes.
18.14.2.3. Macro Matching for ($attr.attrName)
($attr.attrName) macro is always used in the subject part of a DN. For example, define the following roledn:
roledn = "ldap:///cn=DomainAdmins,($attr.ou)"
dn: cn=Jane Doe,ou=People,dc=HostedCompany1,dc=example,dc=com cn: Jane Doe sn: Doe ou: Engineering,dc=HostedCompany1,dc=example,dc=com ...
roledn part of the ACI, the server looks at the ou attribute stored in the targeted entry and uses the value of this attribute to expand the macro. Therefore, in the example, the roledn is expanded as follows:
roledn = "ldap:///cn=DomainAdmins,ou=Engineering,dc=HostedCompany1,dc=example,dc=com"
dn: cn=Jane Doe,ou=People,dc=HostedCompany1,dc=example,dc=com cn: Jane Doe sn: Doe ou: Engineering,dc=HostedCompany1,dc=example,dc=com ou: People,dc=HostedCompany1,dc=example,dc=com...
roledn = "ldap:///cn=DomainAdmins,ou=Engineering,dc=HostedCompany1,dc=example,dc=com" roledn = "ldap:///cn=DomainAdmins,ou=People,dc=HostedCompany1,dc=example,dc=com"
18.15. Setting Access Controls on Directory Manager
18.15.1. About Access Controls on the Directory Manager Account
- Time-based access controls for time ranges, such as 8a.m. to 5p.m. (0800 to 1700), and day-of-week access controls, so access is only allowed on explicitly defined days. This is analogous to Section 18.11.2.5, “Defining Access at a Specific Day of the Week” and Section 18.11.2.6, “Defining Access at a Specific Time of Day”.
- IP address rules, where only specified IP addresses, domains, or subnets are explicitly allowed or denied. This is analogous to Section 18.11.2.2, “Defining Access from Specific IP Addresses or Ranges”.
- Host access rules, where only specified host names, domain names, or subdomains are explicitly allowed or denied. This is analogous to Section 18.11.2.3, “Defining Access from a Specific Host or Domain”.
Important
18.15.2. Configuring the RootDN Access Control Plug-in
RootDN Access Control plug-in, and then set the appropriate access control rules.
Note
- Enable the
RootDN Access Controlplug-in:# dsconf -D "cn=Directory Manager" ldap://server.example.com plugin root-dn enable Plugin 'RootDN Access Control' enabled ... - Set the bind rules for the access control instruction. For example:
# dsconf -D "cn=Directory Manager" ldap://server.example.com plugin root-dn set --open-time=0600 --close-time=2100 --allow-host="*.example.com" --deny-host="*.remote.example.com"
You can set the following parameters:--open-timeand--close-timefor time-based access controls.--days-allowedfor day-based access controls.--allow-host,--deny-host,--allow-ip, and--deny-ipfor host-based access controls. These are all multi-valued attributes and you can use wild cards to allow or deny IP ranges or domains.Important
Deny rules have a higher priority then allow rules. For example, if the--allow-hostparameter is set to*.example.com, and--deny-hostis set to*.front-office.example.com, access from all hosts in thefront-office.example.comsubdomain as Directory Manager is prevented.
- Restart Directory Server:
# dsctl instance_name restart
Chapter 19. Using the Health Check Feature to Identify Problems
dsctl healthcheck command analyzes the Directory Server instance for potential issues and recommends solutions to solve them.
Table 19.1. Overview of Checks
| Component | Severity | Result Code | Description |
|---|---|---|---|
| Backend | Low | DSBLE0003 | The database was not initialized. A database was created but the database is empty. |
| Backend | Medium | DSBLE0001 | The mapping tree entry for a back end is missing in the configuration. |
| Config | Low | DSCLE0001 | High-resolution time stamps are disabled. |
| Config | High | DSVIRTLE0001 | A virtual attribute is incorrectly indexed. Indexed attributes used by roles or Class of Service (CoS) definitions can corrupt search results. |
| Operating System | Medium | DSPERMLE0001 | The permissions set on the /etc/resolve.conf file are different to 0644. |
| Operating System | High | DSDSLE0001 | Low disk space |
| Operating System | High | DSPERMLE0002 | The permissions set on the /etc/dirsrv/slapd-instance_name/pin.txt and /etc/dirsrv/slapd-instance_name/pwdfile.txt files are different to 0400. |
| Plug-ins | Low | DSRILE0001 | An update delay is set for the Referential Integrity plug-in. This can cause replication issues. |
| Plug-ins | High | DSRILE0002 | The Referential Integrity plug-in misses indexes. The plug-in queries certain attributes for every delete operation if they are not indexed. This can cause hard-to-detect unindexed searches and high CPU usage. |
| Replication | Low | DSREPLLE0002 | Conflict entries exist in the database. |
| Replication | Low | DSSKEWLE0001 | The replication time skew is larger than 6 hours and lower than 12 hours. |
| Replication | Medium | DSCLLE0001 | Changelog trimming is disabled. In this case, the changelog grows without limits. |
| Replication | Medium | DSREPLLE0004 | The health check failed to retrieve the replication status. |
| Replication | Medium | DSREPLLE0003 | The topology is not in sync, but the replication is working. |
| Replication | Medium | DSREPLLE0005 | A remote replica is not reachable. |
| Replication | Medium | DSSKEWLE0002 | The replication time skew is larger than 12 hours and lower than 24 hours. |
| Replication | High | DSREPLLE0001 | The topology is not in sync, and the replication is not working. |
| Replication | High | DSSKEWLE0003 | The replication time skew is larger than 24 hours. Replication sessions could break. |
| Security | Medium | DSELE0001 | The minimum TLS version is set to a value lower than TLS 1.2. |
| Security | High | DSCLE0002 | A weak password storage scheme is configured. |
| Server | High | DSBLE0002 | The health check failed to query the back end. |
| TLS certificates | Medium | DSCERTLE0001 | The server certificate expires within the next 30 days. |
| TLS certificates | High | DSCERTLE0002 | The server certificate has expired. |
19.1. Running the Directory Server Health Check
# dsctl instance_name healthcheck Beginning lint report, this could take a while ... Checking Backends ... Checking Config ... Checking Encryption ... Checking FSChecks ... Checking ReferentialIntegrityPlugin ... Checking MonitorDiskSpace ... Checking Replica ... Checking Changelog5 ... Checking NssSsl ... Healthcheck complete. 1 Issue found! Generating report ...
Example 19.1. Possible Report of the Health Check
[1] DS Lint Error: DSELE0001
--------------------------------------------------------------------------------
Severity: MEDIUM
Affects:
-- cn=encryption,cn=config
Details:
-----------
This Directory Server may not be using strong TLS protocol versions. TLS1.0 is known to
have a number of issues with the protocol. Please see:
https://tools.ietf.org/html/rfc7457
It is advised you set this value to the maximum possible.
Resolution:
-----------
There are two options for setting the TLS minimum version allowed. You,
can set "sslVersionMin" in "cn=encryption,cn=config" to a version greater than "TLS1.0"
You can also use 'dsconf' to set this value. Here is an example:
# dsconf slapd-instance_name security set --tls-protocol-min=TLS1.2
You must restart the Directory Server for this change to take effect.
Or, you can set the system wide crypto policy to FUTURE which will use a higher TLS
minimum version, but doing this affects the entire system:
# update-crypto-policies --set FUTURE
===== End Of Report (1 Issue found) =====--json parameter to the command:
# dsctl --json instance_name healthcheck
Example 19.2. Possible Report of the Health Check in JSON Format
[
{
"dsle": "DSELE0001",
"severity": "MEDIUM",
"items": [
"cn=encryption,cn=config"
],
"detail": "This Directory Server may not be using strong TLS protocol versions. TLS1.0 is known to\nhave a number of issues with the protocol. Please see:\n\nhttps://tools.ietf.org/html/rfc7457\n\nIt is advised you set this value to the maximum possible.",
"fix": "There are two options for setting the TLS minimum version allowed. You,\ncan set \"sslVersionMin\" in \"cn=encryption,cn=config\" to a version greater than \"TLS1.0\"\nYou can also use 'dsconf' to set this value. Here is an example:\n\n # dsconf slapd-instance_name security set --tls-protocol-min=TLS1.2\n\nYou must restart the Directory Server for this change to take effect.\n\nOr, you can set the system wide crypto policy to FUTURE which will use a higher TLS\nminimum version, but doing this affects the entire system:\n\n # update-crypto-policies --set FUTURE"
}
]Chapter 20. Managing User Authentication
20.1. Setting User Passwords
userPassword attribute and if it has not been inactivated. Because user passwords are stored in the directory, the user passwords can be set or reset with any LDAP operation, such as using the ldapmodify utility.
pwdReset operational attribute in the user's entry to true. Applications can use this attribute to identify if a password of a user has been reset by an administrator.
Warning
Directory Manager (root DN) to set a password, password policies are bypassed and not verified. Do not use these accounts for regular user password management. Use them only to perform password administration tasks that require bypassing the password policies.
20.2. Setting Password Administrators
- forcing the user to change their password,
- changing a user's password to a different storage scheme defined in the password policy,
- bypassing the password syntax checks,
- and adding already hashed passwords.
userPassword attribute. Red Hat recommends not to use the password administrator account for these ordinary tasks.
- In a local policy. For example:
# dsconf -D "cn=Directory Manager" ldap://server.example.com localpwp set ou=people,dc=example,dc=com --pwdadmin "cn=password_admins,ou=groups,dc=example,dc=com"
- In a global policy. For example:
# dsconf -D "cn=Directory Manager" ldap://server.example.com pwpolicy set --pwdadmin "cn=password_admins,ou=groups,dc=example,dc=com"
Note
passwordAdminSkipInfoUpdate: on/off setting under the cn=config entry to provide a fine grained control over password updates performed by password administrators. When you enable this setting, passwords updates do not update certain attributes, for example, passwordHistory, passwordExpirationTime, passwordRetryCount, pwdReset, and passwordExpWarned.
20.3. Changing Passwords Stored Externally
ldapmodify operations, there are some passwords that cannot be changed through regular LDAP operations. These passwords may be stored outside the Directory Server, such as passwords stored in a SASL application. These passwords can be modified through the password change extended operation.
dsidm utility passes the changes for the password for the specified user:
# dsidm ldap://server.example.com -D bind_dn -W -b dc=example,dc=com account change_password user newPassword oldPassword
Important
dsidm instance_name account change_password --help command.
dsidm with the -Z option and the standard LDAP port number. The password extended change operation has the following format:
# dsidm ldap://server.example.com -Z bind_dn -W -b dc=example,dc=com account change_password user newPassword oldPassword
Note
-Z option to force the connection to be successful.
dsidm like any other operation. It is necessary to specify a bind DN, even if the account is the same as that given in the bind DN. For example:
# dsidm ldap://server.example.com -Z bind_dn -W -b dc=example,dc=com account change_password user newPassword oldPassword
Insufficient rights error.
20.4. Managing the Password Policy
- Users must change their passwords according to a schedule.
- Users must provide non-trivial passwords.
- The password syntax must meet certain complexity requirements.
Warning
Directory Manager (root DN) to set a password, password policies are bypassed and not verified. Do not use these accounts for regular user password management. Use them only to perform password administration tasks that require bypassing the password policies.
- The type or level of password policy checks. This information indicates whether the server should check for and enforce a global password policy or local (subtree/user-level) password policies.Password policies work in an inverted pyramid, from general to specific. A global password policy is superseded by a subtree-level password policy, which is superseded by a user-level password policy. Only one password policy is enforced for the entry; password policies are not additive. This means that if a particular attribute is configured in the global or subtree-level policy, but not in the user-level password policy, the attribute is not used for the user when a login is attempted because the active, applied policy is the user-level policy.
- Password add and modify information. The password information includes password syntax and password history details.
- Bind information. The bind information includes the number of grace logins permitted, password aging attributes, and tracking bind failures.
Note
20.4.1. Configuring the Global Password Policy
Note
20.4.1.1. Configuring a Global Password Policy Using the Command Line
dsconf utility to display and edit the global password policy settings:
- Display the current settings:
# dsconf -D "cn=Directory Manager" ldap://server.example.com pwpolicy get Global Password Policy: cn=config ------------------------------------ passwordstoragescheme: PBKDF2_SHA256 passwordChange: on passwordMustChange: off passwordHistory: off passwordInHistory: 6 ...
- Adjust the password policy settings. For example, to enable the password syntax check and set the minimum length of passwords to
12characters, enter:# dsconf -D "cn=Directory Manager" ldap://server.example.com pwpolicy set --pwdchecksyntax=on --pwdmintokenlen=12
For a full list of available settings, enter:# dsconf -D "cn=Directory Manager" ldap://server.example.com pwpolicy set --help
- Enable the password policy:
# dsconf -D "cn=Directory Manager" ldap://server.example.com pwpolicy set --pwdlockout on
20.4.1.2. Configuring a Global Password Policy Using the Web Console
- Open the Directory Server user interface in the web console. See Section 1.4, “Logging Into Directory Server Using the Web Console”.
- Select the instance.
- Open the menu.
- In the menu, select Global Policy.
- Set the global password policy settings. You can set parameters in the following categories:
- General settings, such as the password storage scheme
- Password expiration settings, such as the time when a password expires.
- Account lockout settings, such as after how many failed login attempts an account should be locked.
- Password syntax settings, such as the minimum password length.
To display a tool tip and the corresponding attribute name in thecn=configentry for a parameter, hover the mouse cursor over the setting. For further details, see the parameter's description in the Red Hat Directory Server Configuration, Command, and File Reference.
- Click .
20.4.2. Using Local Password Policies
nsslapd-pwpolicy-inherit-global parameter is on.
--pwpinheritglobal option is defined, the passwordchecksyntax option is set to OFF in the local policy and to ON in the global policy, you can inherit the following attributes from the global policy to the local policy:
passwordchecksyntax
passwordminlength
passwordmindigits
passwordminalphas
passwordminuppers
passwordminlowers
passwordminspecials
passwordmin8bit
passwordmaxrepeats
passwordmincategories
passwordmintokenlength
20.4.2.1. Where Directory Server Stores Local Password Policy Entries
dsconf localpwp adduser or dsconf localpwp addsubtree commands, Directory Server creates automatically an entry to store the policy attributes:
- For a subtree (for example,
ou=people,dc=example,dc=com), the following entries are added:- A container entry (
nsPwPolicyContainer) at the subtree level for holding various password policy-related entries for the subtree and all its children. For example:dn: cn=nsPwPolicyContainer,ou=people,dc=example,dc=com objectClass: top objectClass: nsContainer cn: nsPwPolicyContainer
- The actual password policy specification entry (
nsPwPolicyEntry) for holding all the password policy attributes that are specific to the subtree. For example:dn: cn="cn=nsPwPolicyEntry,ou=people,dc=example,dc=com", cn=nsPwPolicyContainer,ou=people,dc=example,dc=com objectclass: top objectclass: extensibleObject objectclass: ldapsubentry objectclass: passwordpolicy
- The CoS template entry (
nsPwTemplateEntry) that has thepwdpolicysubentryvalue pointing to the above (nsPwPolicyEntry) entry. For example:dn: cn="cn=nsPwTemplateEntry,ou=people,dc=example,dc=com", cn=nsPwPolicyContainer,ou=people,dc=example,dc=com objectclass: top objectclass: extensibleObject objectclass: costemplate objectclass: ldapsubentry cosPriority: 1 pwdpolicysubentry: cn="cn=nsPwPolicyEntry,ou=people,dc=example,dc=com", cn=nsPwPolicyContainer,ou=people,dc=example,dc=com - The CoS specification entry at the subtree level. For example:
dn: cn=newpwdpolicy_cos,ou=people,dc=example,dc=com objectclass: top objectclass: LDAPsubentry objectclass: cosSuperDefinition objectclass: cosPointerDefinition cosTemplateDn: cn=cn=nsPwTemplateEntry\,ou=people\,dc=example,dc=com, cn=nsPwPolicyContainer,ou=people,dc=example,dc=com cosAttribute: pwdpolicysubentry default operational
- For a user (for example,
uid=user_name,ou=people,dc=example,dc=com), the following entries are added:- A container entry (
nsPwPolicyContainer) at the parent level for holding various password policy related entries for the user and all its children. For example:dn: cn=nsPwPolicyContainer,ou=people,dc=example,dc=com objectClass: top objectClass: nsContainer cn: nsPwPolicyContainer
- The actual password policy specification entry (
nsPwPolicyEntry) for holding the password policy attributes that are specific to the user. For example:dn: cn="cn=nsPwPolicyEntry,uid=user_name,ou=people,dc=example,dc=com", cn=nsPwPolicyContainer,ou=people,dc=example,dc=com objectclass: top objectclass: extensibleObject objectclass: ldapsubentry objectclass: passwordpolicy
20.4.2.2. Configuring a Local Password Policy
Note
- Verify if a local password policy already exists for the subtree or user entry. For example:
# dsconf -D "cn=Directory Manager" ldap://server.example.com localpwp get "ou=People,dc=example,dc=com" Error: The policy wasn't set up for the target dn entry or it is invalid
If no local policy exists, create one:- To create a subtree password policy:
# dsconf -D "cn=Directory Manager" ldap://server.example.com localpwp addsubtree "ou=People,dc=example,dc=com" - To create a user password policy:
# dsconf -D "cn=Directory Manager" ldap://server.example.com localpwp adduser "uid=user_name,ou=People,dc=example,dc=com"
Important
When you create a new local policy, the previous commands automatically sets thensslapd-pwpolicy-localparameter in thecn=configentry toon.If the local password policy should not be enabled, manually set the parameter tooff:dsconf -D "cn=Directory Manager" ldap://server.example.com pwpolicy set --pwdlocal off
- Set local policy attributes. For example, to enable password expiration and set the maximum password age to 14 days (
1209600seconds):- On a subtree password policy:
# dsconf -D "cn=Directory Manager" ldap://server.example.com localpwp set --pwdexpire=on --pwdmaxage=1209600 "ou=People,dc=example,dc=com"
- On a user password policy:
# dsconf -D "cn=Directory Manager" ldap://server.example.com localpwp set --pwdexpire=on --pwdmaxage=1209600 "uid=user_name,ou=People,dc=example,dc=com"
For a full list of available settings, enter:# dsconf -D "cn=Directory Manager" ldap://server.example.com localpwp set --help
20.5. Configuring temporary password rules
- Only the
cn=Directory Manageraccount can assign temporary passwords. - Directory Server allows authentication attempts only for a fixed number of times to avoid that an attacker probes the password.
- Directory Server allows authentication attempts after a specified delay to configure that the temporary passwords are not usable directly after you set them.
- Directory Server allows authentication attempts only for a specified time so that the temporary password expires if a user does not use or reset it.
- If the authentication was successful, Directory Server requires that the user resets the password before the server performs any other operation.
20.5.1. Enabling temporary password rules in the global password policy
- Enable that users must change their password if an administrator resets it.
- Configure the feature in the global password policy.
userPassword attribute of a user and sets the passwordMustChange attribute to on, Directory Server applies the temporary password rules.
Procedure
- Configure that a user must change its password after an administrator resets it:
# dsconf -D "cn=Directory Manager" ldap://server.example.com pwpolicy set --pwdmustchange on
- Configure the temporary password rules settings in a global password policy:
# dsconf -D "cn=Directory Manager" ldap://server.example.com pwpolicy set --pwptprmaxuse 5 --pwptprdelayexpireat 3600 --pwptprdelayvalidfrom 60
In this example:- The
--pwptprmaxuseoption sets the maximum number of attempts a user can use the temporary password to5. - The
--pwptprdelayexpireatoption sets the time before the temporary password expires to3600seconds (1 hour) - The
--pwptprdelayvalidfromoption configures that the time set in--pwptprdelayexpireatstarts60seconds after an administrator reset the password of a user.
Verification
- Display the attributes that store the temporary password rules:
# dsconf -D "cn=Directory Manager" ldap://server.example.com pwpolicy get | grep -i TPR passwordTPRMaxUse: 5 passwordTPRDelayExpireAt: 3600 passwordTPRDelayValidFrom: 60
20.5.2. Enabling temporary password rules in a local password policy
userPassword attribute of a user and sets the passwordMustChange attribute to on, Directory Server applies the temporary password rules if the user:
- Has the local password policy enabled
- Is stored in a sub-tree that has the local password policy enabled
Procedure
- Configure that a user must change its password after an administrator resets it:
# dsconf -D "cn=Directory Manager" ldap://server.example.com pwpolicy set --pwdmustchange on
- Configure the temporary password rules settings:
- For a sub-tree:
# dsconf -D "cn=Directory Manager" ldap://server.example.com localpwp addsubtree --pwptprmaxuse 5 --pwptprdelayexpireat 3600 --pwptprdelayvalidfrom 60 ou=People,dc=example,dc=com
- For a user:
# dsconf -D "cn=Directory Manager" ldap://server.example.com localpwp adduser --pwptprmaxuse 5 --pwptprdelayexpireat 3600 --pwptprdelayvalidfrom 60 uid=example,ou=People,dc=example,dc=com
Note that you can only set a local password policy on entries that exist.In these examples:- The
--pwptprmaxuseoption sets the maximum number of attempts a user can use the temporary password to5. - The
--pwptprdelayexpireatoption sets the time before the temporary password expires to3600seconds (1 hour). - The
-pwptprdelayvalidfromoption configures that the time set in--pwptprdelayexpireatstarts60seconds after an administrator reset the password of a user.
Verification
- Display the local password policy of the distinguished name (DN):
# dsconf -D "cn=Directory Manager" ldap://server.example.com localpwp get distinguished_name | grep -i TPR passwordTPRMaxUse: 5 passwordTPRDelayExpireAt: 3600 passwordTPRDelayValidFrom: 60
20.6. Understanding Password Expiration Controls
- Expired control (
2.16.840.1.113730.3.4.4): Indicates that the password is expired. Directory Server sends this control in the following situations:- The password is expired, and grace logins have been exhausted. The server rejects the bind with an
Error 49message. - The password is expired, but grace logins are still available. The bind will be allowed.
- If
passwordMustChangeis enabled in thecn=configentry, and a user needs to reset the password after an administrator changed it. The bind is allowed, but any subsequent operation, other than changing the password, results in anError 53message.
- Expiring control (
2.16.840.1.113730.3.4.5): Indicates that the password will expire soon. Directory Server sends this control in the following situations:- The password will expire within the password warning period set in the
passwordWarningattribute in thecn=configentry. - If the password policy configuration option is enabled in the
passwordSendExpiringTimeattribute in thecn=configentry, the expiring control is always returned, regardless of whether the password is within the warning period.
- Bind response control (
1.3.6.1.4.1.42.2.27.8.5.1): The control contains detailed information about the state of the password that is about to expire or will expire soon.Note
Directory Server only sends the bind response control if the client requested it. For example, if you useldapsearch, you must pass the-e ppolicyparameter to the command to request the bind response control.Example 20.1. Requesting the Bind Response Control in a Query
If you request the bind response control, for example by passing the-e ppolicyparameter to theldapsearchcommand, the server returns detailed information about account expiration. For example:# ldapsearch -D "uid=user_name,dc=example,dc=com" -xLLL -W \ -b "dc=example,dc=com" -e ppolicy ldap_bind: Success (0); Password expired (Password expired, 1 grace logins remain)
20.7. Managing the Directory Manager Password
root user in Linux. The Directory Manager entry and the corresponding password are set during the instance installation.
cn=Directory Manager.
20.7.1. Resetting the Directory Manager Password
- Stop the Directory Server instance:
# dsctl instance_name stop
- Generate a new password hash. For example:
# pwdhash -D /etc/dirsrv/slapd-instance_name password {PBKDF2_SHA256}AAAgABU0bKhyjY53NcxY33ueoPjOUWtl4iyYN5uW...Specifying the path to the Directory Server configuration automatically uses the password storage scheme set in thensslapd-rootpwstorageschemeattribute to encrypt the new password. - Edit the
/etc/dirsrv/slapd-instance_name/dse.ldiffile and set thensslapd-rootpwattribute to the value displayed in the previous step:nsslapd-rootpw: {PBKDF2_SHA256}AAAgABU0bKhyjY53NcxY33ueoPjOUWtl4iyYN5uW... - Start the Directory Server instance:
# dsctl instance_name start
20.7.2. Changing the Directory Manager Password
20.7.2.1. Changing the Directory Manager Password Using the Command Line
Important
- To set the
nsslapd-rootpwparameter to a plain text value which Directory Server automatically encrypts:# dsconf -D "cn=Directory Manager" ldaps://server.example.com config replace nsslapd-rootpw=password
Warning
Do not use curly braces ({}) in the password. Directory Server stores the password in the{password-storage-scheme}hashed_passwordformat. The server interprets characters in curly braces as the password storage scheme. If the string is an invalid storage scheme or if the password is not correctly hashed, the Directory Manager cannot connect to the server. - To manually encrypt the password and setting it in the
nsslapd-rootpwparameter:- Generate a new password hash. For example:
# pwdhash -D /etc/dirsrv/slapd-instance_name password {PBKDF2_SHA256}AAAgAMwPYIhEkQozTagoX6RGG5E7d6/6oOJ8TVty...Specifying the path to the Directory Server configuration automatically uses the password storage scheme set in thensslapd-rootpwstorageschemeattribute to encrypt the new password. - Set the
nsslapd-rootpwattribute to the value displayed in the previous step using a secure connection (STARTTLS):# dsconf -D "cn=Directory Manager" ldaps://server.example.com config replace nsslapd-rootpw="{PBKDF2_SHA256}AAAgAMwPYIhEkQozTagoX6RGG5E7d6/6oOJ8TVty..."
20.7.2.2. Changing the Directory Manager Password Using the Web Console
- Open the Directory Server user interface in the web console. See Section 1.4, “Logging Into Directory Server Using the Web Console”.
- Select the instance.
- Open the menu, and select Server Settings.
- Open the Directory Manager tab.
- Enter the new password into the Directory Manager Password and Confirm Password fields
- Optionally, set a different password storage scheme.
- Click .
20.7.3. Changing the Directory Manager Password Storage Scheme
nsslapd-rootpwstoragescheme) can be different than the scheme used to encrypt user passwords (nsslapd-pwstoragescheme).
Note
20.7.3.1. Changing the Directory Manager Password Storage Scheme Using the Command Line
- Generate a new password hash that uses the new storage scheme. For example:
# pwdhash -s PBKDF2_SHA256 password {PBKDF2_SHA256}AAAgAMwPYIhEkQozTagoX6RGG5E7d6/6oOJ8TVty... - Set the
nsslapd-rootpwstorageschemeattribute to the storage scheme and thensslapd-rootpwattribute to the value displayed in the previous step using a secure connection (STARTTLS):# dsconf -D "cn=Directory Manager" ldap://server.example.com config replace nsslapd-rootpwstoragescheme=PBKDF2_SHA256 nsslapd-rootpw="{PBKDF2_SHA256}AAAgAMwPYIhEkQozTagoX6RGG5E7d6/6oOJ8TVty..."
20.7.3.2. Changing the Directory Manager Password Storage Scheme Using the Web Console
- Open the Directory Server user interface in the web console. See Section 1.4, “Logging Into Directory Server Using the Web Console”.
- Select the instance.
- Open the menu, and select Server Settings.
- Open the Directory Manager tab.
- Set the password storage scheme.
- Directory Server cannot re-encrypt the current password using the new storage scheme. Therefore, enter a new password into the Directory Manager Password and Confirm Password field.
- Click .
20.7.4. Changing the Directory Manager DN
cn=New Directory Manager:
# dsconf -D "cn=Directory Manager" ldap://server.example.com config replace nsslapd-rootdn="cn=New Directory Manager"
20.8. Checking Account Availability for Passwordless Access
ldapsearch by passing the Account Usability Extension Control. This control acts as if it performs an authenticated bind operation for a given user and returns the account status for that user — but without actually binding to the server. This allows a client to determine whether that account can be used to log in and then to pass that account information to another application, like PAM.
20.8.1. Searching for Entries Using the Account Usability Extension Control
ldapsearch. It returns an extra line for each returned entry that gives the account status and some information about the password policy for that account. A client or application can then use that status to evaluate authentication attempts made outside Directory Server for that user account. Basically, this control signals whether a user should be allowed to authenticate without having to perform an authentication operation.
Note
-J with the control OID (1.3.6.1.4.1.42.2.27.9.5.8) or with the accountusability:true flag:
# ldapsearch -D "cn=Directory Manager" -W -p 389 -h server.example.com -b "dc=example,dc=com" -s sub-J "accountusability:true""(objectclass=*)" # Account Usability Response Control# The account is usabledn: dc=example,dc=com objectClass: domain objectClass: top dc: example ...
# ldapsearch -D "cn=Directory Manager" -W -p 389 -h server.example.com -b "uid=bjensen,ou=people,dc=example,dc=com" -s base-J "accountusability:true""(objectclass=*)" # Account Usability Response Control# The account is usabledn: uid=bjensen,ou=people,dc=example,dc=com ...
Note
cn=features. See Section 20.8.2, “Changing What Users Can Perform an Account Usability Search”.
Table 20.1. Possible Account Usability Control Result Messages
| Account Status | Control Result Message |
|---|---|
| Active account with a valid password | The account is usable |
| Active account with no password set | The account is usable |
| Expired password | Password expired |
| The password policy for the account is modified | Password expired |
| The account is locked and there is no lockout duration | Password reset |
| The account is locked and there is a lockout duration | Time (in seconds) for automatic unlock of the account |
| The password for the account should be reset at the first login | Password reset |
| The password has expired and grace logins are allowed | Password expired and X grace login is allowed |
| The password has expired and the number of grace logins is exhausted | Password expired |
| The password will expire (expiration warning) | Password will expire in X number of seconds |
20.8.2. Changing What Users Can Perform an Account Usability Search
cn=Administrators,ou=groups,dc=example,dc=com group to read the Account Usability Extension Control of all users:
# ldapmodify -D "cn=Directory Manager" -W -x dn: oid=1.3.6.1.4.1.42.2.27.9.5.8,cn=features,cn=config changetype: modify add: aci aci: (targetattr = "*")(version 3.0; acl "Account Usable"; allow (read)(groupdn = "ldap:///cn=Administrators,ou=groups,dc=example,dc=com");)
20.9. Configuring a Password-Based Account Lockout Policy
20.9.1. Configuring the Account Lockout Policy Using the Command Line
dsconf pwpolicy set command to configure the account lockout policy settings. For example, to enable the lockout policy and configure that accounts are locked after four failed login attempts:
# dsconf -D "cn=Directory Manager" ldap://server.example.com pwpolicy set --pwdlockout on --pwdmaxfailures=4
--pwdlockout: Set this parameter toonoroffto enable or disable the account lockout feature.--pwdunlock: Set this parameter toonto unlock an account after the lockout duration.--pwdlockoutduration: Sets the number of seconds for which an account will be locked out.--pwdmaxfailures: Sets the maximum number of allowed failed password attempts before the account gets locked.--pwdresetfailcount: Sets the number of seconds before Directory Server resets the failed login count of an account.
20.9.2. Configuring the Account Lockout Policy Using the Web Console
- Open the Directory Server user interface in the web console. See Section 1.4, “Logging Into Directory Server Using the Web Console”.
- Select the instance.
- Open the Database tab, and select Global Password Policy.
- On the Account Lockout tab, enable Enable Account Lockout setting and set the parameters. For example:
 To display a tool tip and the corresponding attribute name in the
cn=configentry for a parameter, hover the mouse cursor over the setting. For further details, see the parameter's description in the Red Hat Directory Server Configuration, Command, and File Reference.
- Click .
20.9.3. Disabling Legacy Password Lockout Behavior
passwordMaxFailure) has been reached. It depends on how the server counts the last failed attempt in the overall failure count.
passwordLegacyPolicy parameter.
# dsconf -D "cn=Directory Manager" ldap://server.example.com config replace passwordLegacyPolicy=off
20.10. Configuring Time-Based Account Lockout Policies
Note
- A configuration entry for the plug-in itself. This sets global values that are used for all account policies configured on that server.
- An account policy configuration entry. This entry is within the user directory and is essentially a template which is referenced and applied to user account entries.
- An entry which applies the account policy entry. A user account can reference an account policy directly or a CoS or role can be used to apply account policies to sets of user accounts automatically.
Note
An account policy is applied through theacctPolicySubentryattribute. While this attribute can be added directly to user accounts, this attribute is single-valued — which means that only one account policy can be applied to that account.That may be fine in most cases. However, an organization could realistically create two account policies, one for account inactivity and then another for account expiration based on age.Using a CoS to apply account policies allows multiple account policies to be used for an account.
20.10.1. Account Policy Plug-in Syntax
- nsslapd-pluginEnabled, which sets whether the plug-in is enabled or disabled. This attribute is
offby default. - nsslapd-pluginarg0, which points to he DN of the plug-in configuration directory. The configuration entry is usually a child entry of the plug-in itself, such as
cn=config,cn=Account Policy Plugin,cn=plugins,cn=config.
- The plug-in configuration entry identified in the nsslapd-pluginarg0 attribute. This sets global configuration for the plug-in to use to identify account policy configuration entries and to manage user account entries. These settings apply across the server.The configuration entry attributes are described in the Account Policy Plug-in Attributes section in the Red Hat Directory Server Configuration, Command, and File Reference.
- The account policy configuration entry. This is much like a template entry, which sets specific values for the account policies. User accounts — either directly or through CoS entries — reference this account policy entry.The account policy and user entry attributes are described in the following table:
Table 20.2. Account Policy Entry and User Entry Attributes
Attribute Definition Configuration or User Entry accountpolicy (object class) Defines a template entry for account inactivation or expiration policies. Configuration accountInactivityLimit (attribute) Sets the time period, in seconds, from the last login time of an account before that account is locked for inactivity. Configuration acctPolicySubentry (attribute) Identifies any entry which belongs to an account policy (specifically, an account lockout policy). The value of this attribute points to the DN of the account policy which is applied to the entry. User createTimestamp (operational attribute) Contains the date and time that the entry was initially created. User lastLoginTime (operational attribute) Contains a timestamp of the last time that the given account authenticated to the directory. User For further details, see the attribute's description in the Red Hat Directory Server Configuration, Command, and File Reference
20.10.2. Account Inactivity and Account Expiration
Account Policy plug-in enables you to set up:
- account expiration: Accounts are disabled a certain amount of time after you created an account.
- account inactivity: Accounts are disabled a certain amount of time after the last successful login. This enables you to automatically disable unused accounts.
Account Policy plug-in:
- Enable the Account Policy Plug-in:
# dsconf -D "cn=Directory Manager" ldap://server.example.com plugin account-policy enable
- Set the plug-in configuration entry:
# dsconf -D "cn=Directory Manager" ldap://server.example.com plugin account-policy set --config-entry="cn=config,cn=Account Policy Plugin,cn=plugins,cn=config"
- Create the plug-in configuration entry:
- To use CoS or roles with account policies, set the
alwaysRecordLoginvalue toyes. This means every entry has a login time recorded, even if it does not have theacctPolicySubentryattribute. - Set the primary attribute to use for the account policy evaluation as value for
stateAttrName. For account inactivity, use thelastLoginTimeattribute. For a simple account expiration time, usecreateTimestampattribute. - You can set a secondary attribute in
altStateAttrName, that is checked if the primary one defined instateAttrNamedoes not exist. If no attribute is specified as alternative the default valuecreateTimestampis used.Warning
If the value for the primary attribute is set tolastLoginTimeandaltStateAttrNametocreateTimestamp, users in existing environments are automatically locked out when their accounts do not have thelastLoginTimeattribute and thecreateTimestampis older than the configured inactivity period.To avert this situation, set the alternative attribute to1.1. This explicitly states to use no attribute as alternative. ThelastLoginTimeattribute will be created automatically after the user logs in the next time. - Set the attribute to use to show which entries have an account policy applied to them (
acctPolicySubentry). - Set the attribute in the account policy which is used to set the actual timeout period, in seconds (
accountInactivityLimit).
# dsconf -D "cn=Directory Manager" ldap://server.example.com plugin account-policy config-entry set "cn=config,cn=Account Policy Plugin,cn=plugins,cn=config" --always-record-login yes --state-attr lastLoginTime --alt-state-attr 1.1 --spec-attr acctPolicySubentry --limit-attr accountInactivityLimit
- Restart the server to load the new plug-in configuration:
# dsctl instance_name restart
- Define an account policy:
# ldapadd
-a-D "cn=Directory Manager" -W -p 389 -h server.example.com -x dn: cn=Account Inactivation Policy,dc=example,dc=com objectClass: top objectClass: ldapsubentry objectClass: extensibleObjectobjectClass: accountpolicyaccountInactivityLimit: 2592000cn: Account Inactivation Policy - Create the class of service template entry:
# ldapadd
-a-D "cn=Directory Manager" -W -p 389 -h server.example.com -x dn: cn=TempltCoS,dc=example,dc=com objectClass: top objectClass: ldapsubentry objectClass: extensibleObject objectClass: cosTemplate acctPolicySubentry: cn=Account Inactivation Policy,dc=example,dc=comAccount policies can be defined directly on user entries, instead of using a CoS. However, using a CoS allows an account policy to be applied and updated reliably for multiple entries and it allows multiple policies to be applied to an entry. - Create the class of service definition entry. The managed entry for the CoS is the account policy attribute,
acctPolicySubentry. This example applies the CoS to the entire directory tree:# ldapadd
-a-D "cn=Directory Manager" -W -p 389 -h server.example.com -x dn: cn=DefnCoS,dc=example,dc=com objectClass: top objectClass: ldapsubentry objectclass: cosSuperDefinition objectclass: cosPointerDefinition cosTemplateDn: cn=TempltCoS,dc=example,dc=com cosAttribute: acctPolicySubentry default operational-default
20.10.3. Disabling Accounts a Certain Amount of Time After Password Expiry
dn: cn=config,cn=Account Policy Plugin,cn=plugins,cn=config objectClass: top objectClass: extensibleObject cn: config alwaysrecordlogin: yes stateAttrName: non_existent_attribute altStateAttrName: passwordExpirationTime specattrname: acctPolicySubentry limitattrname: accountInactivityLimit
stateAttrName parameter. Therefore, only the passwordExpirationTime attribute set in the altStateAttrName parameter is used to calculate when an account is expired.
lastLoginTime attribute of the user entry, set:
dn: cn=config,cn=Account Policy Plugin,cn=plugins,cn=config alwaysRecordLoginAttr: lastLoginTime
passwordExpirationTime attribute and in the accountInactivityLimit parameter's value is in the past. Using this configuration, an account is automatically disabled if the sum of the value in the user's passwordExpirationTime attribute and in the accountInactivityLimit parameter exceeds the time since the alwaysRecordLoginAttr attribute was last updated.
20.10.4. Tracking Login Times without Setting Lockout Policies
lastLoginTime attribute to user entries, but no other policy rules need to be set.
- Enable the Account Policy Plug-in:
# dsconf -D "cn=Directory Manager" ldap://server.example.com plugin account-policy enable
- Create the plug-in configuration entry to record login times:
- Set the
alwaysRecordLoginvalue to yes so that every entry has a login time recorded. - Set the
lastLoginTimeattribute as the attribute to use for the account policy (stateattrname). - Set the attribute to use to show which entries have an account policy applied to them (
acctPolicySubentry). - Set the attribute in the account policy which is used to set the actual timeout period, in seconds (
accountInactivityLimit).
# dsconf -D "cn=Directory Manager" ldap://server.example.com plugin account-policy config-entry set "cn=config,cn=Account Policy Plugin,cn=plugins,cn=config" --always-record-login yes --state-attr lastLoginTime --alt-state-attr createTimestamp --spec-attr acctPolicySubentry --limit-attr accountInactivityLimit
- Restart the server to load the new plug-in configuration:
# dsctl instance_name restart
20.10.5. Unlocking Inactive Accounts
- Using the
dsidmutility:# dsidm -D "cn=Directory Manager" ldap://server.example.com -b "dc=example,dc=com" account unlock "uid=example"
- Manually by resetting the
lastLoginTimeattribute to a current time stamp:# ldapmodify -D "cn=Directory Manager" -W -p 389 -h server.example.com -x dn: uid=example,ou=people,dc=example,dc=com changetype: modify replace: lastLoginTime lastLoginTime: 20210901000000Z
ThelastLoginTimeattribute stores its value in GMT/UTC time (Zulu time zone), indicated by the appendedZto the time stamp.
20.11. Replicating Account Lockout Attributes
passwordRetryCountretryCountResetTimeaccountUnlockTime
20.11.1. Managing the Account Lockouts and Replication
- Password policies are enforced on the data supplier.
- Account lockout is enforced on all servers participating in replication.
passwordMinAgeandpasswordMaxAgepasswordExppasswordWarning
- Warnings from the server of an impending password expiration are issued by all replicas. This information is kept locally on each server, so if a user binds to several replicas in turn, they will be issued the same warning several times. In addition, if the user changes the password, it may take time for this information to filter to the replicas. If a user changes a password and then immediately rebinds, he may find that the bind fails until the replica registers the changes.
- The same bind behavior should occur on all servers, including suppliers and replicas. Make sure to create the same password policy configuration information on each server.
- Account lockout counters may not work as expected in a multi-suppliered environment. Account lockout counters are not replicated by default (although this can be configured). If account lockout attributes are not replicated at all, then a user could be locked out from one server but could successfully bind to another server (or, conversely, a user may be unlocked on one server and still blocked on another). If account lockout attributes are replicated, then there could be lags between an account lockout change on one server and when that change is propagated to the other servers. It depends on the replication schedule.
- Entries that are created for replication (for example, the server identities) need to have passwords that never expire. To make sure that these special users have passwords that do not expire, add the
passwordExpirationTimeattribute to the entry, and give it a value of20380119031407Z(the top of the valid range).
Note
alwaysRecordLogin parameter set to yes, the value of the lastLoginTime attribute can be different on suppliers and read-only replicas. For example, if a user logs in to a read-only replica, the lastLoginTime attribute is updated locally but the value is not replicated to the supplier servers.
20.11.2. Configuring Directory Server to Replicate Password Policy Attributes
passwordIsGlobalPolicy attribute, which is enabled in the consumer Directory Server configuration to allow the consumer to accept password policy operational attributes.
off.
passwordIsGlobalPolicy configuration parameter on the consumer:
# dsconf -D "cn=Directory Manager" ldap://server.example.com pwpolicy set --pwdisglobal="on"
on allows the passwordRetryCount, retryCountResetTime, and accountUnlockTime to be replicated.
20.11.3. Configuring Fractional Replication for Password Policy Attributes
passwordIsGlobalPolicy attribute affects the consumer in replication, in that it allows the consumer to receive updates to those attributes. To control whether the password policy attributes are actually replicated by the supplier, use fractional replication, which controls what specific entry attributes are replicated.
passwordIsGlobalPolicy attribute is set to off on the consumer, so no password policy attributes should be replicated, use fractional replication (described in Section 15.1.7, “Replicating a Subset of Attributes with Fractional Replication”) to enforce that on the supplier and specifically exclude those attributes from the replication agreement.
- When configuring the replication agreement on the supplier, click Show Advanced Settings.
- Enter the
passwordRetryCount,retryCountResetTime, andaccountUnlockTimeattributes names in to the Exclude Attributes field.
- Finish configuring the replication agreement.
20.12. Enabling Different Types of Binds
20.12.1. Requiring Secure Binds
Important
nsslapd-require-secure-binds attribute is turned on. Otherwise, these operations will fail.
Note
- Set the
nsslapd-require-secure-bindsconfiguration parameter toon:# dsconf -D "cn=Directory Manager" ldap://server.example.com config replace nsslapd-require-secure-binds=on
- Restart the instance:
# dsctl instance_name restart
20.12.2. Disabling Anonymous Binds
Note
rootdse, allows anonymous search and read access to search the root DSE itself, but restricts access to all other directory entries.
- Set the
nsslapd-allow-anonymous-accessconfiguration parameter tooff:# dsconf -D "cn=Directory Manager" ldap://server.example.com config replace nsslapd-allow-anonymous-access=off
- Restart the instance:
# dsctl instance_name restart
Note
20.12.3. Allowing Unauthenticated Binds
# ldapsearch -w "" -p 389 -h server.example.com -b "dc=example,dc=com" \
-s sub -x "(objectclass=*)"
ldap_bind: Server is unwilling to perform (53)
additional info: Unauthenticated binds are not allowedWarning
nsslapd-allow-unauthenticated-binds configuration option to on:
# dsconf -D "cn=Directory Manager" ldap://server.example.com config replace nsslapd-allow-unauthenticated-binds=on
20.12.4. Configuring Autobind
Autobind Feature”).
20.12.4.1. Overview of Autobind and LDAPI
- User entries, if the Unix user matches one user entry
- Directory Manager if the Unix user is
rootor the super user defined innsslapd-ldapimaprootdn
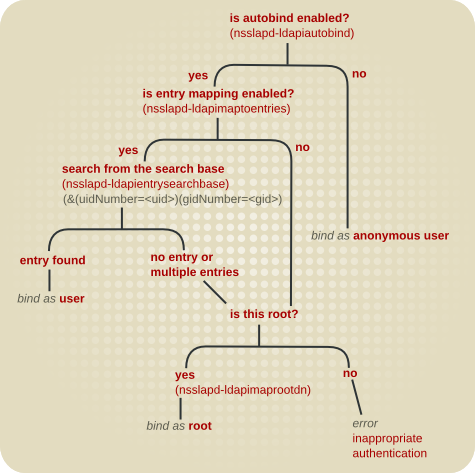
Figure 20.1. Autobind Connection Path
gidNumber=gid+uidNumberuid, autobindsuffix
Note
20.12.4.2. Configuring the Autobind Feature
Autobind feature allows only anonymous access to Directory Server. However, you can configure to map Linux users to Directory Server entries and also to map the root user to the Directory Manager:
- Verify that the
nsslapd-ldapiautobindparameter is enabled, which is the default:# dsconf -D "cn=Directory Manager" ldap://server.example.com config get nsslapd-ldapiautobind nsslapd-ldapiautobind: on - If
nsslapd-ldapiautobindparameter is set tooff, enable it:# dsconf -D "cn=Directory Manager" ldap://server.example.com config replace nsslapd-ldapiautobind=on
- To map user entries, set, for example:
# dsconf -D "cn=Directory Manager" ldap://server.example.com config replace nsslapd-ldapimaptoentries=on nsslapd-ldapiuidnumbertype=uidNumber nsslapd-ldapigidnumbertype=gidNumber nsslapd-ldapientrysearchbase=ou=People,dc=example,dc=com
nsslapd-ldapimaptoentries=onenables entry mapping.nsslapd-ldapiuidnumbertype=uidNumbersets the attribute in Directory Server that contains the Unix UID number.nsslapd-ldapigidnumbertype=gidNumbersets the attribute in Directory Server that contains the Unix GID number.nsslapd-ldapientrysearchbase=ou=People,dc=example,dc=comsets the DN where to search user entries.
- Optionally, to map the
rootuser in Red Hat Enterprise Linux to thecn=Directory Manageraccount in Directory Server:# dsconf -D "cn=Directory Manager" ldap://server.example.com config replace nsslapd-ldapimaprootdn="cn=Directory Manager"
- Restart the instance:
# dsctl instance_name restart
20.13. Using Pass-Through Authentication
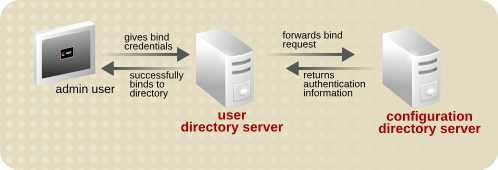
Figure 20.2. Simple Pass-Through Authentication Process
- The configuration Directory Server (authenticating directory) is installed on machine A. The configuration directory always contains the suffix with the authenticating user entry, for example,
o=RedHat. In this example, the server name isauthdir.example.com. - The user Directory Server (PTA directory) is then installed on machine B. The user directory stores the root suffix, such as
dc=example,dc=com. In this example, the server name isuserdir.example.com. - Set up the plug-in on
userdir.example.comby using the following commands:# dsconf -D "cn=Directory Manager" ldap://userdir.example.com plugin pass-through-auth enable # dsconf -D "cn=Directory Manager" ldap://userdir.example.com plugin pass-through-auth url add "ldap://authdir.example.com/o=RedHat"
- Restart Directory Server on
userdir.example.com. - The user directory is now configured to send all bind requests for entries with a DN containing
o=RedHatto the configuration directoryauthdir.example.com. - The user directory allows any user from
o=RedHatto bind.
20.13.1. PTA Plug-in Syntax
cn=Pass Through Authentication, cn=plugins,cn=config entry on the PTA directory (the user directory configured to pass through bind requests to the authenticating directory) using the required PTA syntax.
- To add a pass-through authentication URL:
# dsconf -D "cn=Directory Manager" ldap://server.example.com plugin pass-through-auth url add URL
- To modify a pass-through authentication URL:
# dsconf -D "cn=Directory Manager" ldap://server.example.com plugin pass-through-auth url modify old_URL new_URL
- To remove pass-through authentication URL:
# dsconf -D "cn=Directory Manager" ldap://server.example.com plugin pass-through-auth url delete URL
Note
ldap|ldaps://authDS/subtree) must be separated from the optional parameters (maxconns, maxops, timeout, ldver, connlifetime, startTLS) by a single space. If any of the optional parameters are defined, all of them must be defined, even if only the default values are used.
nsslapd-pluginarg attribute suffix by one each time, as in Section 20.13.3.2, “Specifying Multiple Authenticating Directory Servers”. For example:
nsslapd-pluginarg0: LDAP URL for the first server nsslapd-pluginarg1: LDAP URL for the second server nsslapd-pluginarg2: LDAP URL for the third server ...
Table 20.3. PTA Plug-in Parameters
| Variable | Definition | ||
|---|---|---|---|
| state | Defines whether the plug-in is enabled or disabled. Acceptable values are on or off. | ||
| ldap|ldaps | Defines whether TLS is used for communication between the two Directory Servers. See Section 20.13.2.1, “Configuring the Servers to Use a Secure Connection” for more information. | ||
| authDS | The authenticating directory host name. The port number of the Directory Server can be given by adding a colon and then the port number. For example, ldap://dirserver.example.com:389/. If the port number is not specified, the PTA server attempts to connect using either of the standard ports:
| ||
| subtree | The pass-through subtree. The PTA Directory Server passes through bind requests to the authenticating Directory Server from all clients whose DN is in this subtree. See Section 20.13.2.3, “Specifying the Pass-Through Subtree” for more information. This subtree must not exist on this server. | ||
| maxconns | Optional. The maximum number of connections the PTA directory can simultaneously open to the authenticating directory. The default is 3. See Section 20.13.2.4, “Configuring the Optional Parameters” for more information. | ||
| maxops | Optional. The maximum number of simultaneous operations (usually bind requests) the PTA directory can send to the authenticating directory within a single connection. The default is 5. See Section 20.13.2.4, “Configuring the Optional Parameters” for more information. | ||
| timeout | Optional. The time limit, in seconds, that the PTA directory waits for a response from the authenticating Directory Server. If this timeout is exceeded, the server returns an error to the client. The default is 300 seconds (five minutes). Specify zero (0) to indicate no time limit should be enforced. See Section 20.13.2.4, “Configuring the Optional Parameters” for more information. | ||
| ldver | Optional. The version of the LDAP protocol used to connect to the authenticating directory. Directory Server supports LDAP version 2 and 3. The default is version 3, and Red Hat strongly recommends against using LDAPv2, which is old and will be deprecated. See Section 20.13.2.4, “Configuring the Optional Parameters” for more information. | ||
| connlifetime | Optional. The time limit, in seconds, within which a connection may be used. If a bind request is initiated by a client after this time has expired, the server closes the connection and opens a new connection to the authenticating directory. The server will not close the connection unless a bind request is initiated and the directory determines the connection lifetime has been exceeded. If this option is not specified, or if only one host is listed, no connection lifetime will be enforced. If two or more hosts are listed, the default is 300 seconds (five minutes). See Section 20.13.2.4, “Configuring the Optional Parameters” for more information. | ||
| startTLS |
Optional. A flag of whether to use STARTTLS for the connection to the authenticating directory. STARTTLS establishes a secure connection over the standard port, so it is useful for connecting using LDAP instead of LDAPS. The TLS server and CA certificates need to be available on both of the servers.
The default is
0, which is off. To enable STARTTLS, set it to 1. To use STARTTLS, the LDAP URL must use ldap:, not ldaps:.
See Section 20.13.2.4, “Configuring the Optional Parameters” for more information.
|
20.13.2. Configuring the PTA Plug-in
- Use the
dsconf plugin pass-through-authcommand to modify thecn=Pass Through Authentication,cn=plugins,cn=configentry. - Restart Directory Server.
Note
20.13.2.1. Configuring the Servers to Use a Secure Connection
nsslapd-pluginarg0: ldaps://ldap.example.com:636/o=example
20.13.2.2. Specifying the Authenticating Directory Server
- Use the
dsconf plugin pass-through-authcommand to edit the PTA Plug-in entry:# dsconf -D "cn=Directory Manager" ldap://server.example.com plugin pass-through-auth add ldap://server.example.com/o=example
Optionally, include the port number. If the port number is not given, the PTA Directory Server attempts to connect using either the standard port (389) forldap://or the secure port (636) forldaps://.If the connection between the PTA Directory Server and the authenticating Directory Server is broken or the connection cannot be opened, the PTA Directory Server sends the request to the next server specified, if any. There can be multiple authenticating Directory Servers specified, as required, to provide failover if the first Directory Server is unavailable. All of the authentication Directory Server are set in thensslapd-pluginarg0attribute.Multiple authenticating Directory Servers are listed in a space-separate list of host:port pairs, with this format:ldap|ldaps://host1:port1 host2:port2/subtree
- Restart the server.
# dsctl instance_name restart
20.13.2.3. Specifying the Pass-Through Subtree
- Use the
dsconf plugin pass-through-authcommand to import the LDIF file into the directory:# dsconf -D "cn=Directory Manager" ldap://server.example.com plugin pass-through-auth add ldap://server.example.com/o=example
For information on the variable components in this syntax, see Table 20.3, “PTA Plug-in Parameters”. - Restart the server:
# dsctl instance_name restart
20.13.2.4. Configuring the Optional Parameters
ldap|ldaps://authDS/subtree maxconns, maxops, timeout, ldver, connlifetime, startTLS
- The maximum number of connections the PTA Directory Server can open simultaneously to the authenticating directory, represented by maxconns in the PTA syntax. The default value is
3. - The maximum number of bind requests the PTA Directory Server can send simultaneously to the authenticating Directory Server within a single connection. In the PTA syntax, this parameter is maxops. The default is value is
5. - The time limit for the PTA Directory Server to wait for a response from the authenticating Directory Server. In the PTA syntax, this parameter is timeout. The default value is
300seconds (five minutes). - The version of the LDAP protocol for the PTA Directory Server to use to connect to the authenticating Directory Server. In the PTA syntax, this parameter is ldver. The default is
LDAPv3. - The time limit in seconds within which a connection may be used. If a bind request is initiated by a client after this time has expired, the server closes the connection and opens a new connection to the authenticating Directory Server. The server will not close the connection unless a bind request is initiated and the server determines the timeout has been exceeded. If this option is not specified or if only one authenticating Directory Server is listed in the authDS parameter, no time limit will be enforced. If two or more hosts are listed, the default is
300seconds (five minutes). In the PTA syntax, this parameter is connlifetime. - Whether to use STARTTLS for the connection. STARTTLS creates a secure connection over a standard LDAP port. For STARTTLS, the servers must have their server and CA certificates installed, but they do not need to be running in TLS.The default is
0, which means STARTTLS is off. To enable STARTTLS, set it to1. To use STARTTLS, the LDAP URL must useldap:, notldaps:.
- Use the
dsconf plugin pass-through-authcommand to edit the plug-in entry:# dsconf -D "cn=Directory Manager" ldap://server.example.com plugin pass-through-auth add ldap://server.example.com/o=example 3,5,300,3,300,0
(In this example, each of the optional parameters is set to its default value.) Make sure there is a space between the subtree parameter, and the optional parameters.Note
Although these parameters are optional, if any one of them is defined, they all must be defined, even if they use the default values. - Restart the server:
# dsctl instance_name restart
20.13.3. PTA Plug-in Syntax Examples
dse.ldif file:
20.13.3.1. Specifying One Authenticating Directory Server and One Subtree
o=example subtree. The host name of the authenticating Directory Server is configdir.example.com.
dn: cn=Pass Through Authentication,cn=plugins,cn=config ... nsslapd-pluginEnabled: on nsslapd-pluginarg0: ldap://configdir.example.com/o=example ...
20.13.3.2. Specifying Multiple Authenticating Directory Servers
nsslapd-pluginarg0 attribute. Multiple authenticating Directory Servers are listed in a space-separate list of host:port pairs. For example:
dn: cn=Pass Through Authentication,cn=plugins,cn=config ... nsslapd-pluginEnabled: on nsslapd-pluginarg0: ldap://configdir.example.com:389 config2dir.example.com:1389/o=example ...
Note
nsslapd-pluginarg0 attribute sets the authentication Directory Server; additional nsslapd-pluginargN attributes can set additional suffixes for the PTA Plug-in to use, but not additional hosts.
20.13.3.3. Specifying One Authenticating Directory Server and Multiple Subtrees
dn: cn=Pass Through Authentication,cn=plugins,cn=config ... nsslapd-pluginEnabled: on nsslapd-pluginarg0: ldap://configdir.example.com/o=example nsslapd-pluginarg1: ldap://configdir.example.com/dc=example,dc=com ...
20.13.3.4. Using Non-Default Parameter Values
10) only for the maximum number of connections parameter maxconns. Each of the other parameters is set to its default value. However, because one parameter is specified, all parameters must be defined explicitly in the syntax.
dn: cn=Pass Through Authentication,cn=plugins,cn=config ... nsslapd-pluginEnabled: on nsslapd-pluginarg0: ldap://configdir.example.com/o=example 10,5,300,3,300,1 ...
20.13.3.5. Specifying Different Optional Parameters and Subtrees for Different Authenticating Directory Servers
dn: cn=Pass Through Authentication,cn=plugins,cn=config ... nsslapd-pluginEnabled: on nsslapd-pluginarg0:ldap://configdir.example.com/o=example 10,15,30,3,600,0 nsslapd-pluginarg1:ldap://config2dir.example.com/dc=example,dc=com 7,7,300,3,300,1 ...
20.14. Using Active Directory-formatted User Names for Authentication
uid=user_name,ou=People,dc=example,dc=com, to authenticate. However, the DN can be difficult to remember. If you enable and configure the AD DN plug-in, you can use Active Directory-formatted user names, such as user_name or user_name@domain instead of the DN.
Note
example.com as the default domain:
- Add the
cn=addn,cn=plugins,cn=configplug-in entry and set the default domain:# ldapmodify -D "cn=Directory Manager" -W -p 389 -h server.example.com -x dn: cn=addn,cn=plugins,cn=config changetype: add objectClass: top objectClass: nsSlapdPlugin objectClass: extensibleObject cn: addn nsslapd-pluginPath: libaddn-plugin nsslapd-pluginInitfunc: addn_init nsslapd-pluginType: preoperation nsslapd-pluginEnabled: on nsslapd-pluginId: addn nsslapd-pluginVendor: 389 Project nsslapd-pluginVersion: 1.3.6.0 nsslapd-pluginDescription: Allow AD DN style bind names to LDAP addn_default_domain: example.com
The requiredaddn_default_domainparameter in the plug-in entry sets the default domain. The plug-in appends this domain if the specified user name during an authentication does not contain a domain name. - Add a configuration entry for the default domain:
# ldapmodify -D "cn=Directory Manager" -W -p 389 -h server.example.com -x dn: cn=example.com,cn=addn,cn=plugins,cn=config changetype: add objectClass: top objectClass: extensibleObject cn: example.com addn_base: ou=People,dc=example,dc=com addn_filter: (&(objectClass=account)(uid=%s))
For details about the parameters used in the example, see their descriptions in the Red Hat Directory Server Configuration, Command, and File Reference.Warning
You must add at least a configuration entry for the default domain. If the entry is missing, Directory Server fails to start. - Optionally, you can create additional domain configurations as described in the previous step to support multiple domain names. Each domain configuration can use a different search base and filter.
- Restart the Directory Server instance:
# dsctl instance_name restart
20.15. Using PAM for Pass Through Authentication
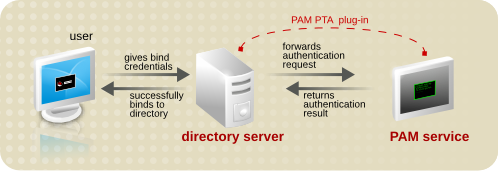
Figure 20.3. PAM Pass Through Authentication Process
Note
20.15.1. PAM Pass Through Authentication Configuration Options
- The suffixes that are controlled by the PAM Pass Through Auth plug-in. This covers suffixes to exclude, suffixes to include, and how to handle a missing suffix.
- Individual entries within the configured suffixes which are the target of the authentication configuration. By default, all entries within a suffix are included in the authentication scope, but it is possible to configure multiple, different PAM Pass Through Auth plug-in instances and then apply different plug-in configuration to different users.
- The PAM attribute mapping. The credentials that are offered to the Directory Server have to be mapped in some way to an LDAP entry and then, back to the credentials in the PAM service. This is done by defining a mapping method and then, optionally, which LDAP attribute to use to match the credentials.
- General configuration such as using TLS connections, the PAM service to use, and whether to fallback to LDAP authentication if PAM authentication fails.
Note
pamFilter attribute to set an LDAP filter to search for the specific entries to use with the plug-in.
20.15.1.1. Specifying the Suffixes to Target for PAM PTA
Note
cn=config which is associated with the root suffix dc=example,dc=com which is associated with userRoot.
pamExcludeSuffix attribute excludes a suffix. By default, only the configuration subtree (cn=config) is excluded. Alternatively, the PAM PTA plug-in can be applied to a suffix with the pamIncludeSuffix attribute. Both of these attributes are multi-valued.
pamExcludeSuffix: cn=config
pamIncludeSuffix, only the given suffix is included and all others are automatically excluded. Since this attribute is multi-valued, more than one suffix can be included in the PAM evaluation by explicitly listing the suffixes.
pamIncludeSuffix: ou=Engineering,dc=example,dc=com pamIncludeSuffix: ou=QE,dc=example,dc=com
pamMissingSuffix attribute tells the server how to handle a failure if the specified suffix (include or exclude) does not exist. If it is set to IGNORE, then if the suffix does not exist, the plug-in simply skips that suffix and tries the next.
pamMissingSuffix: IGNORE pamIncludeSuffix: ou=Engineering,dc=example,dc=com pamIncludeSuffix: ou=Not Real,dc=example,dc=com
20.15.1.2. Applying Different PAM Pass Through Authentication Configurations to Different Entries
pamFilter attribute which identifies specific entries within the suffix to which to apply the PAM pass through authentication policy.
20.15.1.3. Setting PAM PTA Mappings
pamIDMapMethod: RDN ENTRY DN
Note
Table 20.4. Mapping Methods for PAM Authentication
| Mapping | Description |
|---|---|
| RDN | This method uses the value from the leftmost RDN in the bind DN. The mapping for this method is defined by Directory Server. This is the default mapping method, if none is given. |
| ENTRY | This method pulls the value of the PAM identity from a user-defined attribute in the bind DN entry. The identity attribute is defined in the pamIDAttr attribute. For example: pamIDAttr: customPamUid |
| DN | This method uses the full distinguished name from the bind DN. The mapping for this method is defined by Directory Server. |
20.15.1.4. Configuring General PAM PTA Settings
- The service name to send to PAM (
pamService); this is the name of the configuration file to use in/etc/pam.d - Whether to require a secure connection (
pamSecure) - Whether to fall back to LDAP authentication if PAM authentication fails (
pamFallback)
pamFallback: false pamSecure: false pamService: ldapserver
20.15.2. Configuring PAM Pass Through Authentication
Note
pamFilter attribute to set an LDAP filter to search for the specific entries to use with the plug-in.
- Make sure the PAM service is fully configured.
- Remove the
pam_fprintd.somodule from the PAM configuration file.Important
Thepam_fprintd.somodule cannot be in the configuration file referenced by thepamServiceattribute of the PAM Pass Through Auth plug-in configuration. Using the PAMfprintdmodule causes the Directory Server to hit the max file descriptor limit and can cause the Directory Server process to abort. - Enable the PAM Pass Through Auth plug-in:
# dsconf -D "cn=Directory Manager" ldap://server.example.com plugin set "PAM Pass Through Auth" --enabled on
- Create the PAM Pass Through Auth configuration entry:
# dsconf -D "cn=Directory Manager" ldap://server.example.com plugin pass-through-auth pam-config "Admin PAM PTA Config" add --exclude-suffix="cn=config" --id_map_method="RDN ENTRY" --id-attr="customPamUid" --filter="(manager=uid=example_user,ou=people,dc=example,dc=com pamFallback: FALSE" --secure="TRUE" --service="ldapserver"
- Restart the instance:
# dsctl instance_name restart
20.15.3. Using PAM Pass Through Authentication with Active Directory as the Back End
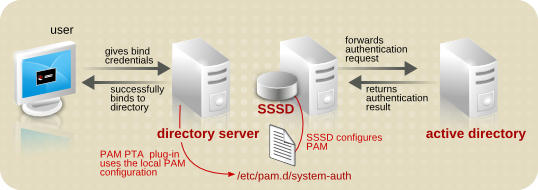
Figure 20.4. PAM Pass Through Authentication with SSSD
- Configure SSSD to use the Active Directory server as one of its identity providers.This configuration is covered in the Connecting RHEL systems directly to AD using SSSD section in Integrating RHEL systems directly with Windows Active Directory.
- Enable the PAM Pass Through Auth plug-in as follows:
# dsconf -D "cn=Directory Manager" ldap://server.example.com plugin set "PAM Pass Through Auth" --enabled on
- Create the PAM Pass Through Auth configuration entry as follows:
# dsconf -D "cn=Directory Manager" ldap://server.example.com plugin pass-through-auth pam-config "AD PAM PTA Config" add --id_map_method="ENTRY" --id-attr="uid" --service="login" --include-suffix="ou=people,dc=example,dc=com" --missing-suffix="ERROR"
The example uses theuid LDAPattribute as the username to pass to Active Directory and enables this configuration only for the people OU. - Restart the directory server instance to load the configuration.
# dsctl instance_name restart
20.16. Manually Inactivating Users and Roles
nsAccountLock. When an entry contains the nsAccountLock attribute with a value of true, the server rejects the bind.
Warning
20.16.1. Displaying the Status of an Account or Role
- An account, enter:
# dsidm -D "cn=Directory Manager" ldap://server.example.com -b "dc=example,dc=com" account entry-status "uid=user_name,ou=People,dc=example,dc=com" Entry DN: uid=user_name,ou=People,dc=example,dc=com Entry Creation Date: 20200813085535Z (2020-08-13 08:55:35) Entry Modification Date: 20200813085535Z (2020-08-13 08:55:35) Entry State: activated
Optional: Pass the-Voption to the command to display additional details:# dsidm -D "cn=Directory Manager" ldap://server.example.com -b "dc=example,dc=com" account entry-status "uid=user_name,ou=People,dc=example,dc=com" -V Entry DN: uid=user_name,ou=People,dc=example,dc=com Entry Creation Date: 20200824160645Z (2020-08-24 16:06:45) Entry Modification Date: 20200824160645Z (2020-08-24 16:06:45) Entry Last Login Date: 20200824160645Z (2020-08-24 16:06:45) Entry Time Until Inactive: 2 seconds (2020-08-24 16:07:45) Entry State: activated
The previous output is an example of an active account, as indicated by the last two lines of the output. An inactive account would instead provide output similar to the following:# dsidm -D "cn=Directory Manager" ldap://server.example.com -b "dc=example,dc=com" account entry-status "uid=user_name,ou=People,dc=example,dc=com" -V Entry DN: uid=user_name,ou=People,dc=example,dc=com Entry Creation Date: 20200824160645Z (2020-08-24 16:06:45) Entry Modification Date: 20200824160645Z (2020-08-24 16:06:45) Entry Last Login Date: 20200824160645Z (2020-08-24 16:06:45) Entry Time Since Inactive: 3 seconds (2020-08-24 16:07:45) Entry State: inactivity limit exceeded
- A role, enter:
# dsidm -D "cn=Directory Manager" ldap://server.example.com -b "dc=example,dc=com" role entry-status "cn=Marketing,ou=People,dc=example,dc=com" Entry DN: cn=Marketing,ou=people,dc=example,dc=com Entry State: activated
subtree-status instead of the entry-status option. When you use the subtree-status option, you can specify a filter (-f) and a search scope (-s) to narrow down the results. Additionally, you can refine the search using the -i option to return only inactive accounts or the -o date option to return only accounts which will be inactive before the specified date:
# dsidm -D "cn=Directory Manager" ldap://server.example.com -b "dc=example,dc=com" account account "ou=People,dc=example,dc=com" -f "(uid=*)" -V -o "2020-08-25T14:30:30"
20.16.2. Inactivating and Activating Users and Roles Using the Command Line
- A user account, enter:
# dsidm -D "cn=Directory Manager" ldap://server.example.com -b "dc=example,dc=com" account lock "uid=user_name,ou=People,dc=example,dc=com
- A role, enter:
# dsidm -D "cn=Directory Manager" ldap://server.example.com -b "dc=example,dc=com" role lock "cn=Marketing,ou=People,dc=example,dc=com
- A user account, enter:
# dsidm -D "cn=Directory Manager" ldap://server.example.com -b "dc=example,dc=com" account unlock "uid=user_name,ou=People,dc=example,dc=com
- A role, enter:
# dsidm -D "cn=Directory Manager" ldap://server.example.com -b "dc=example,dc=com" role unlock "cn=Marketing,ou=People,dc=example,dc=com
Chapter 21. Monitoring Server and Database Activity
21.1. Types of Directory Server Log Files
- Access log: Contains information on client connections and connection attempts to the Directory Server instance. This log type is enabled by default.
- Error log: Contains detailed messages of errors and events the directory experiences during normal operations. This log type is enabled by default.
Warning
If the Directory Server fails to write to the errors log, the server sends an error message to the Syslog service and exits. This log type is enabled by default. - Audit log: Records changes made to each database as well as to server configuration. This log is not enabled by default.
- Audit fail log: Records failed audit events. This log is not enabled by default.
21.2. Displaying Log Files
21.2.1. Displaying Log Files Using the Command Line
# less /var/log/dirsrv/slapd-instance_name/access
# dsconf -D "cn=Directory Manager" ldap://server.example.com config get nsslapd-accesslog nsslapd-errorlog nsslapd-auditlog nsslapd-auditfaillog nsslapd-accesslog: /var/log/dirsrv/slapd-instance_name/access nsslapd-errorlog: /var/log/dirsrv/slapd-instance_name/errors nsslapd-auditlog: /var/log/dirsrv/slapd-instance_name/audit nsslapd-auditfaillog: /var/log/dirsrv/slapd-instance_name/audit-failure
Note
21.2.2. Displaying Log Files Using the Web Console
- Open the Directory Server user interface in the web console. See Section 1.4, “Logging Into Directory Server Using the Web Console”.
- Select the instance.
- Open the menu.
- Open the menu, and select the log file you want to display.
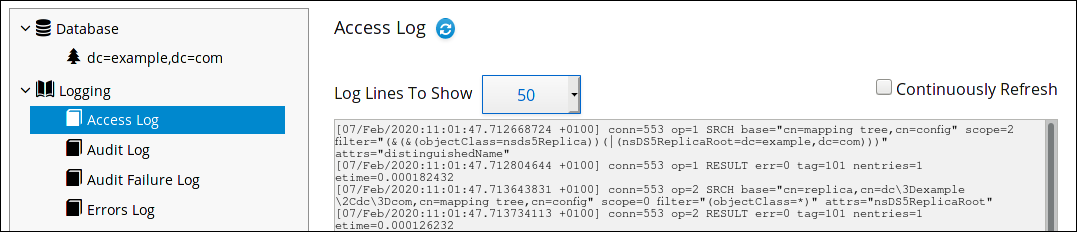
- Optionally, you can apply the following settings to the log file viewer:
- Set the number of lines to display in the Log Lines To Show field.
- Enable automatically displaying new log entries by selecting Continuously Refresh.
- Click the button to apply the changes.
21.3. Configuring Log Files
21.3.1. Enabling or Disabling Logs
Note
21.3.1.1. Enabling or Disabling Logging Using the Command Line
dsconf config replace command to modify the parameters in the cn=config subtree that control the Directory Server logging feature:
- Access log:
nsslapd-accesslog-logging-enabled - Error log:
nsslapd-errorlog-logging-enabled - Audit log:
nsslapd-auditlog-logging-enabled - Audit fail log:
nsslapd-auditfaillog-logging-enabled
# dsconf -D "cn=Directory Manager" ldap://server.example.com config replace nsslapd-auditlog-logging-enabled=on
21.3.1.2. Enabling or Disabling Logging Using the Web Console
- Open the Directory Server user interface in the web console. See Section 1.4, “Logging Into Directory Server Using the Web Console”.
- Select the instance.
- Open the menu, and select the log type you want to configure under the entry.

- Enable or disable the logging feature for the selected log type.
- Optionally, set additional parameters to define, for example, a log rotation or log deletion policy.
- Click .
21.3.2. Configuring Plug-in-specific Logging
nsslapd-logAccess and nsslapd-logAudit parameter in the corresponding section in the Red Hat Directory Server Configuration, Command, and File Reference.
21.3.3. Disabling High-resolution Log Time Stamps
[27/May/2016:17:52:04.754335904 -0500] schemareload - Schema validation passed. [27/May/2016:17:52:04.894255328 -0500] schemareload - Schema reload task finished.
# dsconf -D "cn=Directory Manager" ldap://server.example.com config replace nsslapd-logging-hr-timestamps-enabled=off
Note
[27/May/2016:17:52:04 -0500] schemareload - Schema validation passed. [27/May/2016:17:52:04 -0500] schemareload - Schema reload task finished.
21.3.4. Defining a Log File Rotation Policy
cn=config subtree using the command line or the web console.
- Access mode
- The access mode sets the file permissions on newly created log files.
- Access log:
nsslapd-accesslog-mode - Error log:
nsslapd-errorlog-mode - Audit log:
nsslapd-auditlog-mode - Audit fail log:
nsslapd-auditfaillog-mode
- Maximum number of logs
- Sets the maximum number of log files to keep. When the number of files is reached, Directory Server deletes the oldest log file before creating the new one.
- Access log:
nsslapd-accesslog-maxlogsperdir - Error log:
nsslapd-errorlog-maxlogsperdir - Audit log:
nsslapd-auditlog-maxlogsperdir - Audit fail log:
nsslapd-auditfaillog-maxlogsperdir
- File size for each log
- Sets the maximum size of a log file in megabytes before it is rotated.
- Access log:
nsslapd-accesslog-maxlogsize - Error log:
nsslapd-errorlog-maxlogsize - Audit log:
nsslapd-auditlog-maxlogsize - Audit fail log:
nsslapd-auditfaillog-maxlogsize
- Create a log every
- Sets the maximum age of a log file.
nsslapd-accesslog-logrotationtimeandnsslapd-accesslog-logrotationtimeunitnsslapd-errorlog-logrotationtimeandnsslapd-errorlog-logrotationtimeunitnsslapd-auditlog-logrotationtimeandnsslapd-auditlog-logrotationtimeunitnsslapd-auditfaillog-logrotationtimeandnsslapd-auditfaillog-logrotationtimeunit
Additionally, you can set the time when the log file is rotated using the following parameters:nsslapd-accesslog-logrotationsynchourandnsslapd-accesslog-logrotationsyncminnsslapd-errorlog-logrotationsynchourandnsslapd-errorlog-logrotationsyncminnsslapd-auditlog-logrotationsynchourandnsslapd-auditlog-logrotationsyncminnsslapd-auditfaillog-logrotationsynchourandnsslapd-auditfaillog-logrotationsyncmin
389-Directory/1.4.0.11 B2018.197.1151 server.example.com:389 (/etc/dirsrv/slapd-instance)
21.3.4.1. Defining a Log File Rotation Policy Using the Command Line
dsconf config replace command to modify parameters controlling the Directory Server logging features. For example for the error log, to set access mode 600, to keep maximum 2, and to rotate log files at a size of 100 MB or every 5 days, enter:
# dsconf -D "cn=Directory Manager" ldap://server.example.com config replace nsslapd-errorlog-mode=600 nsslapd-errorlog-maxlogsperdir=2 nsslapd-errorlog-maxlogsize=100 nsslapd-errorlog-logrotationtime=5 nsslapd-errorlog-logrotationtimeunit=day
21.3.4.2. Defining a Log File Rotation Policy Using the Web Console
21.3.5. Defining a Log File Deletion Policy
Deletion Policy.
Note
- Total log size
- If the size of all access, error, audit or audit fail log files increases the configured value, the oldest log file is automatically deleted.
- Access log:
nsslapd-accesslog-logmaxdiskspace - Error log:
nsslapd-errorlog-logmaxdiskspace - Audit log:
nsslapd-auditlog-logmaxdiskspace - Audit log:
nsslapd-auditfaillog-logmaxdiskspace
- Free disk space is less than
- When the free disk space reaches this value, the oldest archived log file is automatically deleted.
- Access log:
nsslapd-accesslog-logminfreediskspace - Error log:
nsslapd-errorlog-logminfreediskspace - Audit log:
nsslapd-auditlog-logminfreediskspace - Audit log:
nsslapd-auditfaillog-logminfreediskspace
- When a file is older than a specified time
- When a log file is older than the configured time, it is automatically deleted.
- Access log:
nsslapd-accesslog-logexpirationtimeandnsslapd-accesslog-logexpirationtimeunit - Error log:
nsslapd-errorlog-logminfreediskspaceandnsslapd-errorlog-logexpirationtimeunit - Audit log:
nsslapd-auditlog-logminfreediskspaceandnsslapd-auditlog-logexpirationtimeunit - Audit log:
nsslapd-auditfaillog-logminfreediskspaceandnsslapd-auditfaillog-logexpirationtimeunit
21.3.5.1. Configuring a Log Deletion Policy Using the Command Line
dsconf config replace command to modify parameters controlling the Directory Server logging features. For example, to auto-delete the oldest access log file if the total size of all access log files increases 500 MB, run:
dsconf -D "cn=Directory Manager" ldap://server.example.com config replace nsslapd-accesslog-logmaxdiskspace=500
21.3.5.2. Configuring a Log Deletion Policy Using the Web Console
21.3.6. Manual Log File Rotation
/var/log/dirsrv/slapd-instance
- Stop the instance.
# dsctl instance_name stop
- Move or rename the log file being rotated so that the old log file is available for future reference.
- Start the instance:
# dsctl instance_name restart
21.3.7. Configuring the Log Levels
- Access log:
nsslapd-accesslog-level - Error log:
nsslapd-errorlog-level
Note
21.3.7.1. Configuring the Log Levels Using the Command Line
dsconf config replace command to set the log level.
32) and config file processing (64), set the nsslapd-errorlog-level parameter to 96 (32 + 64):
# dsconf -D "cn=Directory Manager" ldap://server.example.com config replace nsslapd-errorlog-level=96
4) and logging of connections, operations, and results (256), set the nsslapd-accesslog-level parameter to 260 (4 + 256):
# dsconf -D "cn=Directory Manager" ldap://server.example.com config replace nsslapd-accesslog-level=260
21.3.7.2. Configuring the Log Levels Using the Web Console
- Open the Directory Server user interface in the web console. See Section 1.4, “Logging Into Directory Server Using the Web Console”.
- Select the instance.
- To configure:
- The access log level:
- Open the → → menu.
- Select the log levels in the Access Logging Levels section. For example:

- The error log level:
- Open the → → menu.
- Select the log levels in the Error Logging Levels section. For example:

- Click .
21.3.7.3. Logging Internal Operations
- Server-initiated Internal Operations
- Example of an internal operation log entry that was initiated by the server:
[14/Jan/2021:09:45:25.814158882 -0400] conn=Internal(0) op=0(0)(0) MOD dn="cn=uniqueid generator,cn=config" [14/Jan/2021:09:45:25.822103183 -0400] conn=Internal(0) op=0(0)(0) RESULT err=0 tag=48 nentries=0 etime=0.0007968796
For log entries of this type:- The
connfield is set toInternalfollowed by(0). - The
opfield is set to0(0)(nesting_level). For server-initiated internal operations, both the operation ID and internal operation ID are always0. For log entries that are not nested, the nesting level is0.
- Client-initiated Internal Operations
- Example of an internal operation log entry that was initiated by a client:
[14/Jan/2021:09:45:14.382918693 -0400] conn=5 (Internal) op=15(1)(0) SRCH base="cn=config,cn=userroot,cn=ldbm database,cn=plugins,cn=config" scope=1 filter="objectclass=vlvsearch" attrs=ALL [14/Jan/2021:09:45:14.383191380 -0400] conn=5 (Internal) op=15(1)(0) RESULT err=0 tag=48 nentries=0 etime=0.0000295419 [14/Jan/2021:09:45:14.383216269 -0400] conn=5 (Internal) op=15(2)(0) SRCH base="cn=config,cn=example,cn=ldbm database,cn=plugins,cn=config" scope=1 filter="objectclass=vlvsearch" attrs=ALL [14/Jan/2021:09:45:14.383449419 -0400] conn=5 (Internal) op=15(2)(0) RESULT err=0
For log entries of this type:- The
connfield is set to the client connection ID, followed by the string(Internal). - The
opfield contains the operation ID, followed by(internal_operation_ID)(nesting_level). The internal operation ID can vary, and log entries that are not nested, the nesting level is0.
nsslapd-plugin-logging parameter is set to on and internal operations logging is enabled, Directory Server additionally logs internal operations of plug-ins.
Example 21.1. Internal Operations Log Entries with Plug-in Logging Enabled
uid=user,dc=example,dc=com entry, and the Referential Integrity plug-in automatically deletes this entry from the example group, the server logs:
[time_stamp] conn=2 op=37 DEL dn="uid=user,dc=example,dc=com" [time_stamp] conn=2 (Internal) op=37(1) SRCH base="uid=user,dc=example,dc=com" scope=0 filter="(|(objectclass=*)(objectclass=ldapsubentry))" attrs=ALL [time_stamp] conn=2 (Internal) op=37(1) RESULT err=0 tag=48 nentries=1 etime=0.0000129148 [time_stamp] conn=2 (Internal) op=37(2) SRCH base="dc=example,dc=com" scope=2 filter="(member=uid=user,dc=example,dc=com)" attrs="member" [time_stamp] conn=2 (Internal) op=37(2) RESULT err=0 tag=48 nentries=0 etime=0.0000123162 [time_stamp] conn=2 (Internal) op=37(3) SRCH base="dc=example,dc=com" scope=2 filter="(uniquemember=uid=user,dc=example,dc=com)" attrs="uniquemember" [time_stamp] conn=2 (Internal) op=37(3) RESULT err=0 tag=48 nentries=1 etime=0.0000128104 [time_stamp] conn=2 (Internal) op=37(4) MOD dn="cn=example,dc=example,dc=com" [time_stamp] conn=2 (Internal) op=37(5) SRCH base="cn=example,dc=example,dc=com" scope=0 filter="(|(objectclass=*)(objectclass=ldapsubentry))" attrs=ALL [time_stamp] conn=2 (Internal) op=37(5) RESULT err=0 tag=48 nentries=1 etime=0.0000130685 [time_stamp] conn=2 (Internal) op=37(4) RESULT err=0 tag=48 nentries=0 etime=0.0005217545 [time_stamp] conn=2 (Internal) op=37(6) SRCH base="dc=example,dc=com" scope=2 filter="(owner=uid=user,dc=example,dc=com)" attrs="owner" [time_stamp] conn=2 (Internal) op=37(6) RESULT err=0 tag=48 nentries=0 etime=0.0000137656 [time_stamp] conn=2 (Internal) op=37(7) SRCH base="dc=example,dc=com" scope=2 filter="(seeAlso=uid=user,dc=example,dc=com)" attrs="seeAlso" [time_stamp] conn=2 (Internal) op=37(7) RESULT err=0 tag=48 nentries=0 etime=0.0000066978 [time_stamp] conn=2 (Internal) op=37(8) SRCH base="o=example" scope=2 filter="(member=uid=user,dc=example,dc=com)" attrs="member" [time_stamp] conn=2 (Internal) op=37(8) RESULT err=0 tag=48 nentries=0 etime=0.0000063316 [time_stamp] conn=2 (Internal) op=37(9) SRCH base="o=example" scope=2 filter="(uniquemember=uid=user,dc=example,dc=com)" attrs="uniquemember" [time_stamp] conn=2 (Internal) op=37(9) RESULT err=0 tag=48 nentries=0 etime=0.0000048634 [time_stamp] conn=2 (Internal) op=37(10) SRCH base="o=example" scope=2 filter="(owner=uid=user,dc=example,dc=com)" attrs="owner" [time_stamp] conn=2 (Internal) op=37(10) RESULT err=0 tag=48 nentries=0 etime=0.0000048854 [time_stamp] conn=2 (Internal) op=37(11) SRCH base="o=example" scope=2 filter="(seeAlso=uid=user,dc=example,dc=com)" attrs="seeAlso" [time_stamp] conn=2 (Internal) op=37(11) RESULT err=0 tag=48 nentries=0 etime=0.0000046522 [time_stamp] conn=2 op=37 RESULT err=0 tag=107 nentries=0 etime=0.0010297858
21.3.8. Disabling Access Log Buffering for Debugging
Important
21.3.8.1. Disabling Access Log Buffering Using the Command Line
- Set the
nsslapd-accesslog-logbufferingparameter tooff:# dsconf -D "cn=Directory Manager" ldap://server.example.com config replace nsslapd-accesslog-logbuffering=off
21.3.8.2. Disabling Access Log Buffering Using the Web Console
- Open the Directory Server user interface in the web console. See Section 1.4, “Logging Into Directory Server Using the Web Console”.
- Select the instance.
- Open → → .
- Select Disable Access Log Buffering.
- Click .
21.4. Getting Access Log Statistics
logconv.pl script parses the access log and returns summary information on different users and operations that have been run on the server.
# logconv.pl /relative/path/to/accessLog
# logconv.pl /var/log/dirsrv/slapd-instance/access*
logconv.pl are covered in the manpage and in the Configuration, Command, and File Reference.
logconv.pl can be used to pull general usage information from the access logs.
logconv.pl prints a list of total operations, total number of connections, counts per each operation type, counts for some extended operations like persistent searches, and bind information.
# logconv.pl /var/log/dirsrv/slapd-instance/access Access Log Analyzer 8.2 Command: logconv.pl /var/log/dirsrv/slapd-instance/access Processing 1 Access Log(s)... [001] /var/log/dirsrv/slapd-instance/access size (bytes): 77532 Total Log Lines Analysed: 527 Start of Logs: 14/Oct/2017:16:15:22.452909568 End of Logs: 14/Oct/2017:16:39:50.157790196 Processed Log Time: 0 Hours, 24 Minutes, 27.704877056 Seconds Restarts: 10 Secure Protocol Versions: - TLS1.2 client bound as uid=user_name,ou=people,o=example.com (11 connections) - TLS1.2 128-bit AES; client CN=CA Subsystem,O=example.com; issuer CN=Certificate Authority,O=example.com (11 connections) - TLS1.2 128-bit AES-GCM (2 connections) - TLS1.2 128-bit AES (3 connections) Peak Concurrent Connections: 38 Total Operations: 4771 Total Results: 4653 Overall Performance: 97.5% Total Connections: 249 (0.17/sec) (10.18/min) - LDAP Connections: 107 (0.07/sec) (4.37/min) - LDAPI Connections: 128 (0.09/sec) (5.23/min) - LDAPS Connections: 14 (0.01/sec) (0.57/min) - StartTLS Extended Ops: 2 (0.00/sec) (0.08/min) Searches: 2963 (2.02/sec) (121.13/min) Modifications: 649 (0.44/sec) (26.53/min) Adds: 785 (0.53/sec) (32.09/min) Deletes: 10 (0.01/sec) (0.41/min) Mod RDNs: 6 (0.00/sec) (0.25/min) Compares: 0 (0.00/sec) (0.00/min) Binds: 324 (0.22/sec) (13.25/min) Proxied Auth Operations: 0 Persistent Searches: 17 Internal Operations: 0 Entry Operations: 0 Extended Operations: 4 Abandoned Requests: 0 Smart Referrals Received: 0 VLV Operations: 30 VLV Unindexed Searches: 0 VLV Unindexed Components: 20 SORT Operations: 22 Entire Search Base Queries: 12 Paged Searches: 2 Unindexed Searches: 0 Unindexed Components: 149 FDs Taken: 249 FDs Returned: 212 Highest FD Taken: 107 Broken Pipes: 0 Connections Reset By Peer: 0 Resource Unavailable: 0 Max BER Size Exceeded: 0 Binds: 324 Unbinds: 155 --------------------------------- - LDAP v2 Binds: 41 - LDAP v3 Binds: 180 - AUTOBINDs(LDAPI): 103 - SSL Client Binds: 0 - Failed SSL Client Binds: 0 - SASL Binds: 134 - EXTERNAL: 114 - GSSAPI: 20 - Directory Manager Binds: 10 - Anonymous Binds: 1 Cleaning up temp files... Done.
b) and the total connection codes returned by the server (c) are passed as -bc.
# logconv.pl -bc /var/log/dirsrv/slapd-instance/access ... ----- Total Connection Codes ----- U1 3 Cleanly Closed Connections B1 1 Bad Ber Tag Encountered ----- Top 20 Bind DN's ----- Number of Unique Bind DN's: 212 1801 cn=Directory Manager 1297 Anonymous Binds 311 uid=jsmith,ou=people... 87 uid=bjensen,ou=peopl... 85 uid=mreynolds,ou=peo... 69 uid=jrockford,ou=peo... 55 uid=sspencer,ou=peop... ...
-S), before a certain end time (-E), or within a range. When start and end times are set, the logconv.pl first prints the time range given, then the summary for that period.
# logconv.pl -S "[01/Jul/2016:16:11:47.000000000 -0400]" -E "[01/Jul/2016:17:23:08.999999999 -0400]" /var/log/dirsrv/slapd-instance/access ... ----------- Access Log Output ------------ Start of Logs: 01/Jul/2016:16:11:47 End of Logs: 01/Jul/2016:17:23:08 ...
-M) or per second (-m). In this case, the data are printed, in time unit increments, to a specified CSV output file.
# logconv.pl -m|-M outputFile accessLogFile
# logconv.pl -M /home/output/statsPerMin.txt /var/log/dirsrv/slapd-instance/access*
-M|-m options can also be used with the -S and -E arguments, to get per-minute or per-second counts within a specific time period.
Time,time_t,Results,Search,Add,Mod,Modrdn,Delete,Abandon,Connections,SSL Conns,Bind,Anon Bind,Unbind,Unindexed
- Open the CSV file.
- Click the menu, and select .
- In the Chart Type area, set the chart type to XY (Scatter).
- Set the subtype to lines only.
- Select the option to sort by X values.

- Accept the defaults in the other screens (particularly, to use the data series in columns and to set the first row and first column as labels), and create the chart.
21.5. Monitoring the Local Disk for Graceful Shutdown
21.6. Monitoring Server Activity
21.7. Monitoring Database Activity
21.8. Monitoring Database Link Activity
21.9. Enabling and Disabling Counters
nsslapd-counters parameter enabled counters to run. However, running counters can affect performance, so it also possible to turn off counters. If counters are off, they all have a value of zero (0).
ldapmodify. For example, to disable:
# dsconf -D "cn=Directory Manager" ldap://server.example.com config replace nsslapd-counters=off
21.10. Monitoring Directory Server Using SNMP
21.10.1. About SNMP
21.10.2. Enabling and Disabling SNMP Support
nsSNMPEnabled parameter to on or off. For example, to disable SNMP in a Directory Server instance:
# ldapmodify -D "cn=Directory Manager" -W -p 389 -h server.example.com -x dn: cn=SNMP,cn=config changetype: modify replace: nsSNMPEnabled nsSNMPEnabled: on
21.10.3. Setting Parameters to Identify an Instance Using SNMP
nsSNMPOrganizationnsSNMPLocationnsSNMPContactnsSNMPDescription
nsSNMPLocation parameter to Munich, Germany:
# ldapmodify -D "cn=Directory Manager" -W -p 389 -h server.example.com -x dn: cn=SNMP,cn=config changetype: modify replace: nsSNMPLocation nsSNMPLocation: Munich, Germany
21.10.4. Setting up an SNMP Agent for Directory Server
- Install the 389-ds-base-snmp and net-snmp packages:
# yum install 389-ds-base-snmp net-snmp
- To configure the SNMP master agent, edit the
/etc/snmp/snmpd.conffile, adding the following entry to enable the agent extensibility (AgentX) protocol:master agentx
For further details about the AgentX protocol, see RFC 2741. - To configure the SNMP subagent, edit the
/etc/dirsrv/config/ldap-agent.conffile, adding a server parameter for each Directory Server instance you want to monitor. For example:server slapd-instance_name
- Optionally, create an SNMP user account:
- Stop the
snmpdservice:# systemctl stop snmpd
- Create the SNMP user account. For example:
# net-snmp-create-v3-user -A authentication_password -a SHA \ -X private_password -x AES user_nameFor details about the parameters used in the command, see the net-snmp-create-v3-user(1) man page. - Start the
snmpdservice:# systemctl start snmpd
- Optionally, set the Directory Server descriptive properties. For details, see Section 21.10.3, “Setting Parameters to Identify an Instance Using SNMP”.
- Start the
dirsrv-snmpservice:# systemctl start dirsrv-snmp
- Optionally, to verify the configuration:
- Install the net-snmp-utils package:
# yum install net-snmp-utils
- Query the Directory Server Object Identifiers (OID). For example:
# snmpwalk -v3 -u user_name -M /usr/share/snmp/mibs:/usr/share/dirsrv/mibs/ \ -l AuthPriv -m +RHDS-MIB -A authentication_password -a SHA -X private_password -x AES server.example.com .1.3.6.1.4.1.2312.6.1.1
21.10.5. Configuring SNMP Traps
Entity Table, which contains information specific to the Directory Server instance, such as its name and version number. The Entity Table is described in Section 21.10.6.3, “Entity Table”. This means that the action the master agent takes when it receives a trap is flexible, such as sending an email to an email address defined in the dsEntityContact variable for one instance while sending a notification to a pager number in the dsEntityContact variable for another instance.
- DirectoryServerDown. This trap is generated whenever the subagent detects the Directory Server is potentially not running. This trap will be sent with the Directory Server instance description, version, physical location, and contact information, which are detailed in the
dsEntityDescr,dsEntityVers,dsEntityLocation, anddsEntityContactvariables. - DirectoryServerStart. This trap is generated whenever the subagent detects that the Directory Server has started or restarted. This trap will be sent with the Directory Server instance description, version, physical location, and contact information, which are detailed in the
dsEntityDescr,dsEntityVers,dsEntityLocation, anddsEntityContactvariables.
21.10.6. Using the Management Information Base
redhat-directory.mib stored in the /usr/share/dirsrv/mibs directory. This MIB contains definitions for variables pertaining to network management for the directory. These variables are known as managed objects. Using the directory MIB and Net-SNMP, you can monitor your directory like all other managed devices on your network. For more information on using the MIB, see Section 21.10.4, “Setting up an SNMP Agent for Directory Server”.
Note
21.10.6.1. Operations Table
Operations Table provides statistical information about Directory Server access, operations, and errors. Table 21.1, “Operations Table: Managed Objects and Descriptions” describes the managed objects stored in the Operations Table of the redhat-directory.mib file.
Table 21.1. Operations Table: Managed Objects and Descriptions
| Managed Object | Description |
|---|---|
| dsAnonymousBinds | The number of anonymous binds to the directory since server startup. |
| dsUnauthBinds | The number of unauthenticated binds to the directory since server startup. |
| dsSimpleAuthBinds | The number of binds to the directory that were established using a simple authentication method (such as password protection) since server startup. |
| dsStrongAuthBinds | The number of binds to the directory that were established using a strong authentication method (such as TLS or a SASL mechanism like Kerberos) since server startup. |
| dsBindSecurityErrors | The number of bind requests that have been rejected by the directory due to authentication failures or invalid credentials since server startup. |
| dsInOps | The number of operations forwarded to this directory from another directory since server startup. |
| dsReadOps | The number of read operations serviced by this directory since application start. The value of this object will always be 0 because LDAP implements read operations indirectly using the search operation. |
| dsCompareOps | The number of compare operations serviced by this directory since server startup. |
| dsAddEntryOps | The number of add operations serviced by this directory since server startup. |
| dsRemoveEntryOps | The number of delete operations serviced by this directory since server startup. |
| dsModifyEntryOps | The number of modify operations serviced by this directory since server startup. |
| dsModifyRDNOps | The number of modify RDN operations serviced by this directory since server startup. |
| dsListOps | The number of list operations serviced by this directory since server startup. The value of this object will always be 0 because LDAP implements list operations indirectly using the search operation. |
| dsSearchOps | The total number of search operations serviced by this directory since server startup. |
| dsOneLevelSearchOps | The number of one-level search operations serviced by this directory since server startup. |
| dsWholeSubtreeSearchOps | The number of whole subtree search operations serviced by this directory since server startup. |
| dsReferrals | The number of referrals returned by this directory in response to client requests since server startup. |
| dsSecurityErrors | The number of operations forwarded to this directory that did not meet security requirements. |
| dsErrors | The number of requests that could not be serviced due to errors (other than security or referral errors). Errors include name errors, update errors, attribute errors, and service errors. Partially serviced requests will not be counted as an error. |
21.10.6.2. Entries Table
Entries Table provides information about the contents of the directory entries. Table 21.2, “Entries Table: Managed Objects and Descriptions” describes the managed objects stored in the Entries Table in the redhat-directory.mib file.
Table 21.2. Entries Table: Managed Objects and Descriptions
| Managed Object | Description |
|---|---|
| dsCopyEntries | The number of directory entries for which this directory contains a copy.The value of this object will always be 0 (as no updates are currently performed). |
| dsCacheEntries | The number of entries cached in the directory. |
| dsCacheHits | The number of operations serviced from the locally held cache since application startup. |
21.10.6.3. Entity Table
Entity Table contains identifying information about the Directory Server instance. The values for the Entity Table are set in cn=SNMP,cn=config entry as described in Section 21.10.3, “Setting Parameters to Identify an Instance Using SNMP”.
Entity Table of the redhat-directory.mib file.
Table 21.3. Entity Table: Managed Objects and Descriptions
| Managed Object | Description |
|---|---|
| dsEntityDescr | The description set for the Directory Server instance. |
| dsEntityVers | The Directory Server version number of the Directory Server instance. |
| dsEntityOrg | The organization responsible for the Directory Server instance. |
| dsEntityLocation | The physical location of the Directory Server instance. |
| dsEntityContact | The name and contact information for the person responsible for the Directory Server instance. |
| dsEntityName | The name of the Directory Server instance. |
21.10.6.4. Interaction Table
Note
Interaction Table is not supported by the subagent. The subagent can query the table, but it will not ever be updated with valid data.
Interaction Table of the redhat-directory.mib file.
Table 21.4. Interaction Table: Managed Objects and Descriptions
| Managed Object | Description |
|---|---|
| dsIntTable | Details, in each row of the table, related to the history of the interaction of the monitored Directory Servers with their respective peer Directory Servers. |
| dsIntEntry | The entry containing interaction details of a Directory Server with a peer Directory Server. |
| dsIntIndex | Part of the unique key, together with applIndex, to identify the conceptual row which contains useful information on the (attempted) interaction between the Directory Server (referred to by applIndex) and a peer Directory Server. |
| dsName | The distinguished name (DN) of the peer Directory Server to which this entry belongs. |
| dsTimeOfCreation | The value of sysUpTime when this row was created. If the entry was created before the network management subsystem was initialized, this object will contain a value of zero. |
| dsTimeOfLastAttempt | The value of sysUpTime when the last attempt was made to contact this Directory Server. If the last attempt was made before the network management subsystem was initialized, this object will contain a value of zero. |
| dsTimeOfLastSuccess | The value of sysUpTime when the last attempt made to contact this Directory Server was successful. This entry will have a value of zero if there have been no successful attempts or if the last successful attempt was made before the network management subsystem was initialized. |
| dsFailuresSinceLastSuccess | The number of failures since the last time an attempt to contact this Directory Server was successful. If there has been no successful attempts, this counter will contain the number of failures since this entry was created. |
| dsFailures | Cumulative failures since the creation of this entry. |
| dsSuccesses | Cumulative successes since the creation of this entry. |
| dsURL | The URL of the Directory Server application. |
Chapter 22. Making a High-availability and Disaster Recovery Plan
Note
22.1. Identifying Potential Scenarios
Table 22.1. Disaster Scenarios and Responses
| Scenario | Effects on Infrastructure | Ideal Response |
|---|---|---|
| Data corruption | Through software or hardware failure (or through a malicious attack), the data at one site or on one server could be corrupted. If that corrupted server is a supplier in multi-supplier replication, then the corruption can quickly be propagated throughout the deployment. | An isolated server should be available with access to the most recent backup of uncorrupted data. When a problem is detected, replication can be suspended on the regular infrastructure, and this server can be brought online to reinitialize the suppliers with good data. |
| Natural disasters and other mass events | Natural disasters can take an entire office or data center offline, even through something as simple as a long-term power outage. | Directory operations can be transferred to a mirrored site at another physical location, with the same data. |
| Server or machine loss | A single machine could fail. | Another machine, with the same data, can assume the lost machine's place. |
22.2. Defining the Type of Rollover
- A hot rollover means that the infrastructure is completely mirrored at another site and that the backup site is always up and current with the primary site. This requires only a few adjustments to switch operations from the primary to the backup.
- A warm rollover means that all of the elements for the backup site are in place (adequate network connections, all required applications and hardware) but the system is not actively running or necessarily configured. This can require some extra time to configure the machines and get the system running.
- A cold rollover means that a site is available but there are few resources immediately available to set it up.
22.3. Identifying Useful Directory Server Features for Disaster Recovery
- Backing up databases and verifying the backups regularly
- Multi-supplier replication, chaining, backing up databases, and monitoring the server with a named pipe script
- Chaining
22.3.1. Backing up Directory Data for Disaster Recovery
ldap://server.example.com instance daily at 22:00 (10pm):
0 22 * * 1 /usr/sbin/dsconf -D "cn=Directory Manager" ldap://server.example.com backup create
dsconf backup create command backs up the directory data without having to stop the server first.
Note
dse.ldif file) are covered in Section 6.3, “Backing up Directory Server”.
22.3.2. Multi-Supplier Replication for High-availability
Note
Example 22.1. Scenarios for Multi-Supplier Replication
- For a single server failure, all of the data stored on that instance is both accessible and retrievable from other servers.
- For the loss of an entire office or colocation facility, servers can be mirrored at an entirely different physical location (which is aided by Directory Server's wide area replication performance). With minimal effort, traffic can be redirected to the replicated site without having to bring new servers online.
22.3.3. Chaining Databases for High-availability
Example 22.2. Scenarios for Chaining
22.4. Defining the Recovery Process
- What signals a disaster? Some things are obvious (a massive power outage, network loss, or fire), but other situations need to be defined. For example, what signals that a backup server needs to be brought online?
- Who responds to a disaster and how? Once a disaster situation occurs, who has the responsibility to act? How are they notified of the event? What are they expected to do?
Important
- Store a printed copy off the disaster recovery plan off-site.
- Test the disaster recovery plan on a regular basis and after configuration and infrastructure changes.
22.5. Basic Example: Performing a Recovery
- Plan A covers losing a single instance of Directory Server
- Plan B covers some kind of data corruption or attack
- Plan C covers losing an entire office
Chapter 23. Creating Test Entries
dsctl ldifgen command creates LDIF files with different types of test entries. For example, you can use this LDIF file to populate a test instance or a sub-tree to test the performance of Directory Server with the example entries.
dsctl ldifgen:
users: Creates an LDIF file that contains user entries.groups: Creates an LDIF file that contains static group and member entries.cos-def: Creates an LDIF file that either contains a classic pointer or an indirect Class of Service (CoS) definition.cos-template: Creates an LDIF file that contains a CoS template.roles: Creates an LDIF file that contains managed, filtered, or indirect role entries.mod-load: Creates an LDIF file that contains modify operations. Import this file using theldapmodifyutility.nested: Creates an LDIF file that contains heavily nested entries in a cascading or fractal tree design.
Note
dsctl ldifgen command creates only the LDIF file. To load the file into your Directory Server instance, use the:
ldapmodifyutility after you created an LDIF file using themod-loadoptionldapaddutility for all other options
nested entry type, if you do not provide any command line options, the dsctl ldifgen command uses an interactive mode:
# dsctl instance_name ldifgen entry_type
23.1. Creating an LDIF File with Example User Entries
dsctl ldifgen users command to create an LDIF file with example user entries. For example, to create an LDIF file named /tmp/users.ldif that adds 100,000 generic users to the dc=example,dc=com suffix, enter:
# dsctl instance_name ldifgen users --suffix "dc=example,dc=com" --number 100000 --generic --ldif-file=/tmp/users.ldif
ou=accountingou=product developmentou=product testingou=human resourcesou=payrollou=peopleou=groups
# dsctl instance_name ldifgen users --help
23.2. Creating an LDIF File with Example Group Entries
dsctl ldifgen groups command to create an LDIF file with example group entries. For example, to create an LDIF file named /tmp/groups.ldif that adds 500 groups to the ou=groups,dc=example,dc=com entry, and each group has has 100 members, enter:
# dsctl instance_name ldifgen groups --number 500 --suffix "dc=example,dc=com" --parent "ou=groups,dc=example,dc=com" --num-members 100 --create-members --member-parent "ou=People,dc=example,dc=com" --ldif-file /tmp/group.ldif example
ou=People,dc=example,dc=com.
Important
ldapmodif utility, you can exceed the maximum Basic Encoding Rules (BER) size limit, and the import fails. In this case, increase the value of the nsslapd-maxbersize parameter in the cn=config entry.
# dsctl instance_name ldifgen groups --help
23.3. Creating an LDIF File with an Example CoS Definition
dsctl ldifgen cos-def command to create an LDIF file with a Class of Service (CoS) definition. For example, to create an LDIF file named /tmp/cos-definition.ldif that adds a classic CoS definition to the ou=cos definitions,dc=example,dc=com entry:
# dsctl instance_name ldifgen cos-def Postal_Def --type classic --parent "ou=cos definitions,dc=example,dc=com" --cos-specifier businessCatagory --cos-template "cn=sales,cn=classicCoS,dc=example,dc=com" --cos-attr postalcode telephonenumber --ldif-file /tmp/cos-definition.ldif
# dsctl instance_name ldifgen cos-def --help
23.4. Creating an LDIF File with Example Modification Statements
dsctl ldifgen mod-load command to create an LDIF file that contains update operations.
# dsctl instance_name ldifgen mod-load --parent dc=example,dc=com --num-users 1000 --create-users --mod-users 1000 --add-users 10 --del-users 100 --mod-users 1000 --modrdn-users 100 --mod-attrs cn uid sn --delete-users
/tmp/modifications.ldif file with the statements that do the following:
- Create an LDIF file with 1000
ADDoperations to create user entries. - Modify all entries by changing their
cn,uid,snattributes. - Add additional 10 user entries.
- Perform 100
MODRDNoperations. - Delete 100 entries
- Delete all remaining entries at the end.
# dsctl instance_name ldifgen mod-load --help
23.5. Creating an LDIF File with Nested Example Entries
dsctl ldifgen nested command to create an LDIF file that contains a heavily nested cascading fractal structure. For example, to create an LDIF file named /tmp/nested.nldif, that adds 600 users in total in different organization units (OU) under the dc=example,dc=com entry, with each OU containing a maximum number of 100 users:
# dsctl instance_name ldifgen nested --num-users 600 --node-limit 100 --suffix "dc=example,dc=com"
# dsctl instance_name ldifgen nested --help
Appendix A. Using LDAP Client Tools
ldapsearch and ldapmodify) supplied with OpenLDAP. The OpenLDAP tool options are described in the OpenLDAP man pages at http://www.openldap.org/software/man.cgi.
ldapsearch are given in Chapter 14, Finding Directory Entries. More examples for using ldapmodify and ldapdelete are given in Chapter 3, Managing Directory Entries.
A.1. Running Extended Operations
ldapmodify, ldapsearch, and the others) use either the -e or -E options to send an extended operation. The -e argument can be used with any OpenLDAP client tool and sends general instructions about the operation, like how to handle password policies. The -E is used only with ldapsearches and passes more useful controls like GER searches, sort and page information, and information for other, not-explicitly-support extended operations.
ldapexop, which is used exclusively to perform extended search operations, the same as running ldapsearch -E.
ldapsearch is generally:
-E extended_operation_type=operation_parameters
deref for a dereference search or sss for server-side sorting. A supported extended operation has formatted output. Other extended operations, like GER searches, are passed using their OID rather than an alias, and then the extended_operation_type is the OID. For those unsupported operations the tool does not recognize the response from the server, so the output is unformatted.
pg extended operation type formats the results in simple pages:
# ldapsearch -x -D "cn=Directory Manager" -W -b "ou=Engineers,ou=People,dc=example,dc=com" -E pg=3 "(objectclass=*)" cn dn: uid=jsmith,ou=Engineers,ou=People,dc=example,dc=com cn: John Smith dn: uid=bjensen,ou=Engineers,ou=People,dc=example,dc=com cn: Barbara Jensen dn: uid=hmartin,ou=Engineers,ou=People,dc=example,dc=com cn: Henry Martin Results are sorted. next page size (3): 5
ldapexop can be run using only the OID of the simple paged results operation and the operation's settings (3 results per page):
ldapexop 1.2.840.113556.1.4.319=3
ldapexop does not accept the same range of search parameters that ldapsearch does, making it less flexible.
A.2. Comparing Entries
ldapcompare checks entries to see if the specified entry or entries contain an attribute of a specific value. For example, this checks to see if an entry has an sn value of Smith:
# ldapcompare -D "cn=Directory Manager" -W -p 389 -h server.example.com -x sn:smith uid=bjensen,ou=people,dc=example,dc=com comparing type: "sn" value: "smith" in entry "uid=bjensen,ou=people,dc=example,dc=com" compare FALSE ldapcompare -D "cn=Directory Manager" -W -p 389 -h server.example.com -x sn:smith uid=jsmith,ou=people,dc=example,dc=com comparing type: "sn" value: "smith" in entry "uid=jsmith,ou=people,dc=example,dc=com" compare TRUE
- A single attribute:value statement passed in the command line directly
sn:Smith
- A single attribute::base64value statement passed in the command line directly, for attributes like
jpegPhotoor to verify certificates or CRLsjpegPhoto:dkdkPDKCDdko0eiofk==
- An attribute:file statement that points to a file containing a list of comparison values for the attribute, and the script iterates through the list
postalCode:/tmp/codes.txt
-f option.
Example A.1. Comparing One Attribute Value to One Entry
ldapcompare -D "cn=Directory Manager" -W -p 389 -h server.example.com -x sn:smith uid=jsmith,ou=people,dc=example,dc=com comparing type: "sn" value: "smith" in entry "uid=jsmith,ou=people,dc=example,dc=com" compare TRUE
Example A.2. Comparing a List Attribute Values from a File
sn values.
jensen johnson johannson jackson jorgenson
uid=jen200,ou=people,dc=example,dc=com uid=dsj,ou=people,dc=example,dc=com uid=matthewjms,ou=people,dc=example,dc=com uid=john1234,ou=people,dc=example,dc=com uid=jack.son.1990,ou=people,dc=example,dc=com
# ldapcompare -D "cn=Directory Manager" -W -p 389 -h server.example.com -x sn:/tmp/surnames.txt -f /tmp/names.txt comparing type: "sn" value: "jensen" in entry "uid=jen200,ou=people,dc=example,dc=com" compare TRUE
A.3. Changing Passwords
ldappasswd command can either set a new user-defined password or generate a new password for an account. Other settings (for bind information, connection information, or other command settings) may be required and are listed in the OpenLDAP manpages.
# ldappasswd -x -D bind_dn -W -p server_port -h server_hostname [-A | -a oldPassword] [-S | -s newPassword] [user]
Important
Example A.3. Directory Manager Changing a User's Password Over TLS
uid=tuser1,ou=People,dc=example,dc=com to new_password over TLS.
# ldappasswd -D "cn=Directory Manager" -W -ZZ -p 389 -h server.example.com -x -s new_password "uid=tuser1,ou=People,dc=example,dc=com"
Example A.4. Directory Manager Generating a User's Password
uid=tuser2,ou=People,dc=example,dc=com over TLS.
# ldappasswd -D "cn=Directory Manager" -W -ZZ -p 389 -h server.example.com -x "uid=tuser2,ou=People,dc=example,dc=com"
Example A.5. User Changing His Own Password
tuser3, changes the password from old_newpassword to new_password over TLS.
# ldappasswd -p 389 -h server.example.com -ZZ -x -D "uid=tuser3,ou=People,dc=example,dc=com" -W -a old_password -s new_password
Example A.6. User Authenticating with DIGEST_MD5 and Changing His Password
# ldappasswd -p 389 -h server.example.com -O noplain,minssf=1,maxbufsize=512 -Y GSSAPI -U "dn:uid=jsmith,ou=people,dc=example,dc=com" -R EXAMPLE.COM -W -s new_password
Example A.7. User Already Authenticated by Kerberos Prompts for a New Password
# ldappasswd -p 389 -h server.example.com -O noplain,minssf=1,maxbufsize=512 -I
A.4. Generating LDAP URLs
-H option to pass an LDAP URL instead of other connection information (like the host name, port, subtree, and search base).
Note
ldapurl command manages URL in two ways:
- Deconstruct a given LDAP URL into its constituent element
- Construct a new, valid LDAP URL from given elements
Table A.1. ldapurl Parameters
| Option | Description |
|---|---|
| For Deconstructing a URL | |
| -H "URL" | Passes the LDAP URL to break down into elements. |
| For Constructing a URL | |
| -a attributes | Gives a comma-separated attributes that are specifically returned in search results. |
| -b base | Sets the search base or subtree for the URL. |
| -f filter | Sets the search filter to use. |
| -h hostname | Gives the Directory Server's host name. |
| -p port | Gives the Directory Server's port. |
| -S ldap|ldaps|ldapi | Gives the protocol to use to connect, such as ldap, ldaps, or ldapi. |
| -s scope | Gives the search scope. |
Example A.8. Deconstructing an LDAP URL
ldapurl uses the -H option to feed in an existing LDAP URL, and the tool returns the elements of the URL in a neat list:
# ldapurl -H "ldap://:389/dc=example,dc=com?cn,sn?sub?(objectclass=inetorgperson)" scheme: ldap port: 389 dn: dc=example,dc=com selector: cn selector: sn scope: sub filter: (objectclass=inetorgperson)
Example A.9. Constructing an LDAP URL
ldapurl is to construct a valid LDAP URL manually. Using ldapurl ensures that the URL is valid.
ldapurl accepts the normal connection parameters of all LDAP client tools and additional ldapsearch arguments for search base, scope, and attributes, but this tool never connects to a Directory Server instance, so it does not require any bind information. It accepts the connection and search settings and feeds them in as elements to the URL.
ldapurl -a cn,sn -b dc=example,dc=com -s sub -f "(objectclass=inetorgperson)" ldap://:389/dc=example,dc=com?cn,sn?sub?(objectclass=inetorgperson)
Appendix B. LDAP Data Interchange Format
B.1. About the LDIF File Format
dn: distinguished_name objectClass: object_class objectClass: object_class ... attribute_type[;subtype]:attribute_value ...
- Every LDIF entry must have a DN and at least one object class definition.
- Include any attributes required by the object classes defined for the entry.
- All other attributes and object classes are optional.
- Object classes and attributes can be specified in any order.
- The space after the colon is optional.
Table B.1. LDIF Fields
| Field | Definition |
|---|---|
| [id] | Optional. A positive decimal number representing the entry ID. The database creation tools generate this ID automatically. Never add or edit this value yourself. |
| dn: distinguished_name | Specifies the distinguished name for the entry. |
| objectClass: object_class | Specifies an object class to use with this entry. The object class identifies the types of attributes, or schema, allowed and required for the entry. See the Red Hat Directory Server 11 Configuration, Command, and File Reference for a list of standard object classes and Chapter 12, Managing the Directory Schema for information on customizing the schema. |
| attribute_type | Specifies a descriptive attribute to use with the entry. The attribute should be defined either in the schema. See the Red Hat Directory Server 11 Configuration, Command, and File Reference for a list of standard attributes and Chapter 12, Managing the Directory Schema for information on customizing the schema. |
| [subtype] | Optional. Specifies subtype, language, binary, or pronunciation. Use this tag to identify the language in which the corresponding attribute value is expressed or whether the attribute value is binary or a pronunciation of an attribute value. For a complete list of the supported subtypes tags, see Table D.1, “Supported Language Subtypes”. |
| attribute_value | Specifies the attribute value to be used with the attribute type. |
Note
B.2. Continuing Lines in LDIF
dn: cn=some_example_user,dc=example,dc=com dn: cn=some_e xample_user, dc=example,d c=com
B.3. Representing Binary Data
B.3.1. Standard LDIF Notation
jpegphoto: < file:/path/to/photo
ldapmodify -b parameter. However, standard notation requires that the following line be added to the beginning of the LDIF file or the LDIF update statements:
version: 1
# ldapmodify -x -D userDN -W version: 1 dn: cn=Barney Fife,ou=People,dc=example,dc=com changetype: modify add: usercertificate usercertificate;binary: < file: BarneysCert
B.3.2. Base-64 Encoding
:: symbol. For example:
jpegPhoto::encoded_data
- Any value that begins with a colon (:) or a space.
- Any value that contains non-ASCII data, including new lines.
ldif command-line utility with the -b parameter to convert binary data to LDIF format:
# ldif -b attribute_name
ldif command-line utility will take any input and format it with the correct line continuation and appropriate attribute information. The ldif utility also assesses whether the input requires base-64 encoding. For example:
# ldif -b jpegPhoto < mark.jpg > out.ldif
jpegPhoto. The output is saved to out.ldif.
-b option specifies that the ldif utility should interpret the entire input as a single binary value. If -b is not present, each line is considered to be a separate input value.
B.4. Specifying Directory Entries Using LDIF
B.4.1. Specifying Domain Entries
ldap.example.com, then the domain entry for the directory is probably named dc=ldap,dc=example,dc=com or simply dc=example,dc=com.
dn: distinguished_name objectClass: top objectClass: domain dc: domain_component_name list_of_optional_attributes ...
dn: dc=example,dc=com objectclass: top objectclass: domain dc: example description: Fictional example company
Table B.2. LDIF Elements in Domain Entries
| LDIF Element | Description |
|---|---|
| dn: distinguished_name | Required. Specifies the distinguished name for the entry. |
| objectClass: top | Required. Specifies the top object class. |
| objectClass: domain | Specifies the domain object class. This line defines the entry as a domain or domain component. See the Red Hat Directory Server 11 Configuration, Command, and File Reference for a list of the attributes that can be used with this object class. --> |
| dc: domain_component | Attribute that specifies the domain's name. The server is typically configured during the initial setup to have a suffix or naming context in the form dc=hostname,dc=domain,dc=toplevel. For example, dc=ldap,dc=example,dc=com. The domain entry should use the leftmost dc value, such as dc: ldap. If the suffix were dc=example,dc=com, the dc value is dc: example. Do not create the entry for dn: dc=com unless the server has been configured to use that suffix. |
| list_of_attributes | Specifies the list of optional attributes to maintain for the entry. See the Red Hat Directory Server 11 Configuration, Command, and File Reference for a list of the attributes that can be used with this object class. |
B.4.2. Specifying Organizational Unit Entries
dn: distinguished_name objectClass: top objectClass: organizationalUnit ou: organizational_unit_name list_of_optional_attributes ...
dn: ou=people,dc=example,dc=com objectclass: top objectclass: organizationalUnit ou: people description: Fictional example organizational unit
Table B.3. LDIF Elements in Organizational Unit Entries
| LDIF Element | Description |
|---|---|
| dn: distinguished_name | Specifies the distinguished name for the entry. A DN is required. If there is a comma in the DN, the comma must be escaped with a backslash (\), such as dn: ou=people,dc=example,dc=com. |
| objectClass: top | Required. Specifies the top object class. |
| objectClass: organizationalUnit | Specifies the organizationalUnit object class. This line defines the entry as an organizational unit. See the Red Hat Directory Server 11 Configuration, Command, and File Reference for a list of the attributes available for this object class. |
| ou: organizational_unit_name | Attribute that specifies the organizational unit's name. |
| list_of_attributes | Specifies the list of optional attributes to maintain for the entry. See the Red Hat Directory Server 11 Configuration, Command, and File Reference for a list of the attributes available for this object class. |
B.4.3. Specifying Organizational Person Entries
dn: distinguished_name objectClass: top objectClass: person objectClass: organizationalPerson objectClass: inetOrgPerson cn: common_name sn: surname list_of_optional_attributes
dn: uid=bjensen,ou=people,dc=example,dc=com
objectclass: top
objectclass: person
objectclass: organizationalPerson
objectclass: inetOrgPerson
cn: Babs Jensen
sn: Jensen
givenname: Babs
uid: bjensen
ou: people
description: Fictional example person
telephoneNumber: 555-5557
userPassword: {SSHA}dkfljlk34r2kljdsfk9Table B.4. LDIF Elements in Person Entries
| LDIF Element | Description |
|---|---|
| dn: distinguished_name | Required. Specifies the distinguished name for the entry. For example, dn: uid=bjensen,ou=people,dc=example,dc=com. If there is a comma in the DN, the comma must be escaped with a backslash (\). |
| objectClass: top | Required. Specifies the top object class. |
| objectClass: person | Specifies the person object class. This object class specification should be included because many LDAP clients require it during search operations for a person or an organizational person. |
| objectClass: organizationalPerson | Specifies the organizationalPerson object class. This object class specification should be included because some LDAP clients require it during search operations for an organizational person. |
| objectClass: inetOrgPerson | Specifies the inetOrgPerson object class. The inetOrgPerson object class is recommended for the creation of an organizational person entry because this object class includes the widest range of attributes. The uid attribute is required by this object class, and entries that contain this object class are named based on the value of the uid attribute. See the Red Hat Directory Server 11 Configuration, Command, and File Reference for a list of the attributes available for this object class. |
| cn: common_name | Specifies the person's common name, which is the full name commonly used by the person. For example, cn: Bill Anderson. At least one common name is required. |
| sn: surname | Specifies the person's surname, or last name. For example, sn: Anderson. A surname is required. |
| list_of_attributes | Specifies the list of optional attributes to maintain for the entry. See the Red Hat Directory Server 11 Configuration, Command, and File Reference for a list of the attributes available for this object class. |
B.5. Defining Directories Using LDIF
- Create an ASCII file containing the entries to add in LDIF format.Make sure each entry is separated from the next by an empty line. Use just one line between entries, and make sure the first line of the file is not be blank, or else the
ldapmodifyutility will exit. For more information, see Section B.4, “Specifying Directory Entries Using LDIF”. - Begin each file with the topmost, or root, entry in the database.The root entry must represent the suffix or sub-suffix contained by the database. For example, if the database has the suffix
dc=example,dc=com, the first entry in the directory must bedn: dc=example,dc=com.For information on suffixes, see the "Suffix" parameter described in the Red Hat Directory Server Configuration, Command, and File Reference. - Make sure that an entry representing a branch point in the LDIF file is placed before the entries to create under that branch.For example, to place an entry in a people and a group subtree, create the branch point for those subtrees before creating entries within those subtrees.
Note
The LDIF file is read in order, so parent entries must be listed before the child entries. - Create the directory from the LDIF file using one of the following methods:
- Initializing the database through the web console. Use this method if there is a small database to import (less than 10,000 entries). See Section 6.1.3, “Importing Data Using the Web Console”.
Warning
This method is destructive and will erase any existing data in the suffix. - ldif2db or ldif2db.pl command-line utility. Use this method if there is a large database to import (more than 10,000 entries). See Section 6.1.2.2, “Importing Data While the Server is Offline”.
ldif2dbcannot be used if the server is running.ldif2db.plcan only be used if the server is running.
Warning
This method is destructive and will erase any existing data in the suffix. - ldapmodify command-line utility with the -a parameter. Use this method if a new subtree is being added to an existing database or there is existing data in the suffix which should not be deleted. Unlike the other methods for creating the directory from an LDIF file, Directory Server must be running before a subtree can be added using
ldapmodify. See Section 3.1.3, “Adding an Entry”.
Example B.1. LDIF File Example
dn: dc=example,dc=com
objectclass: top
objectclass: domain
dc: example
description: Fictional example domain
dn: ou=People,dc=example,dc=com
objectclass: top
objectclass: organizationalUnit
ou: People
description: Fictional example organizational unit
tel: 555-5559
dn: cn=June Rossi,ou=People,dc=example,dc=com
objectClass: top
objectClass: person
objectClass: organizationalPerson
objectClass: inetOrgPerson
cn: June Rossi
sn: Rossi
givenName: June
mail: rossi@example.com
userPassword: {sha}KDIE3AL9DK
ou: Accounting
ou: people
telephoneNumber: 2616
roomNumber: 220
dn: cn=Marc Chambers,ou=People,dc=example,dc=com
objectClass: top
objectClass: person
objectClass: organizationalPerson
objectClass: inetOrgPerson
cn: Marc Chambers
sn: Chambers
givenname: Marc
mail: chambers@example.com
userPassword: {sha}jdl2alem87dlacz1
telephoneNumber: 2652
ou: Manufacturing
ou: People
roomNumber: 167
dn: cn=Robert Wong,ou=People,example.com Corp,dc=example,dc=com
objectClass: top
objectClass: person
objectClass: organizationalPerson
objectClass: inetOrgPerson
cn: Robert Wong
cn: Bob Wong
sn: Wong
givenname: Robert
givenname: Bob
mail: bwong@example.com
userPassword: {sha}nn2msx761
telephoneNumber: 2881
roomNumber: 211
ou: Manufacturing
ou: people
dn: ou=Groups,dc=example,dc=com
objectclass: top
objectclass: organizationalUnit
ou: groups
description: Fictional example organizational unitB.6. Storing Information in Multiple Languages
Note
iconv or uconv command provided by most operating systems can be used to convert data from the native characterset into UTF-8.
- The administrator creates a file,
street.txt, with the French street address value:1 rue de l'Université
- The file contents are then converted to UTF-8:
# iconv -t UTF-8 -o output.txt street.txt
- The following LDIF entry is created using the UTF-8 value of the street address value for
streetAddress;lang-fr.dn: uid=bjensen,ou=people,dc=example,dc=com objectclass: top objectclass: person objectclass: organizationalPerson name: Babs Jensen cn: Babs Jensen sn: Jensen uid: bjensen streetAddress: 1 University Street streetAddress;lang-en: 1 University Street streetAddress;lang-fr
:: AasljdoaAJASI023909jaASJaonasd0ADSpreferredLanguage: frThe double colons after the attribute name and subtype indicate that the value is binary base-64 encoded.
1 University Street. Users accessing the directory with an LDAP client with the preferred language set to French will see the address 1 rue de l'Université.
Appendix C. LDAP URLs
- The LDAP URL is used to identify the specific Directory Server instance when the Directory Server is accessed using a web-based client.
- LDAP URLs are used to configure Directory Server referrals.
- LDAP URLs are used to configure access control instructions.
Note
C.1. Components of an LDAP URL
ldap[s]://hostname:port/base_dn?attributes?scope?filter
ldap:// protocol is used to connect to LDAP servers over unsecured connections, and the ldaps:// protocol is used to connect to LDAP servers over TLS connections. Table C.1, “LDAP URL Components” lists the components of an LDAP URL.
Note
Table C.1. LDAP URL Components
| Component | Description | |||
|---|---|---|---|---|
| host name | Name, IPv4, o r IPv6 address of the LDAP server. For example, ldap.example.com, 192.0.2.90, or [2001:db8::1]. | |||
| port | Port number of the LDAP server (for example, 696). If no port is specified, the standard LDAP port (389) or LDAPS port (636) is used. | |||
| base_dn | Distinguished name (DN) of an entry in the directory. This DN identifies the entry that is the starting point of the search. If no base DN is specified, the search starts at the root of the directory tree. | |||
| attributes | The attributes to be returned. To specify more than one attribute, use commas to separate the attributes; for example, cn,mail,telephoneNumber. If no attributes are specified in the URL, all attributes are returned. | |||
| scope | The scope of the search, which can be one of these values:
base search. | |||
| filter | Search filter to apply to entries within the specified scope of the search. If no filter is specified, the server uses the filter (objectClass=*). |
dc=example,dc=com that returns all attributes for entries matching (sn=Jensen), use the following LDAP URL:
ldap://ldap.example.com/dc=example,dc=com??sub?(sn=Jensen)
??, indicate that no attributes have been specified. Since no specific attributes are identified in the URL, all attributes are returned in the search.
C.2. Escaping Unsafe Characters
%20 within the URL. Thus, the distinguished name o=example.com corporation must be encoded as o=example.com%20corporation.
| Unsafe Character | Escape Characters |
|---|---|
| space | %20 |
| < | %3c |
| > | %3e |
| " | %22 |
| # | %23 |
| % | %25 |
| { | %7b |
| } | %7d |
| | | %7c |
| \ | %5c |
| ^ | %5e |
| ~ | %7e |
| [ | %5b |
| ] | %5d |
| ` | %60 |
C.3. Examples of LDAP URLs
Note
The following LDAP URL specifies a base search for the entry with the distinguished name dc=example,dc=com.
ldap://ldap.example.com/dc=example,dc=com
- Because no port number is specified, the standard LDAP port number (
389) is used. - Because no attributes are specified, the search returns all attributes.
- Because no search scope is specified, the search is restricted to the base entry
dc=example,dc=com. - Because no filter is specified, the directory uses the default filter (
objectclass=*).
The following LDAP URL retrieves the postalAddress attribute of the entry with the DN dc=example,dc=com:
ldap://ldap.example.com/dc=example,dc=com?postalAddress
- Because no search scope is specified, the search is restricted to the base entry
dc=example,dc=com. - Because no filter is specified, the directory uses the default filter (
objectclass=*).
The following LDAP URL retrieves the cn, mail, and telephoneNumber attributes of the entry for Barbara Jensen:
ldap://ldap.example.com/cn=Barbara%20Jensen,dc=example,dc=com?cn,mail,telephoneNumber
- Because no search scope is specified, the search is restricted to the base entry
cn=Barbara Jensen,dc=example,dc=com. - Because no filter is specified, the directory uses the default filter
(objectclass=*).
The following LDAP URL specifies a search for entries that have the surname Jensen and are at any level under dc=example,dc=com:
ldap://ldap.example.com/dc=example,dc=com??sub?(sn=Jensen)
- Because no attributes are specified, the search returns all attributes.
- Because the search scope is
sub, the search encompasses the base entrydc=example,dc=comand entries at all levels under the base entry.
The following LDAP URL specifies a search for the object class for all entries one level under dc=example,dc=com:
ldap://ldap.example.com/dc=example,dc=com?objectClass?one
- Because the search scope is
one, the search encompasses all entries one level under the base entrydc=example,dc=com. The search scope does not include the base entry. - Because no filter is specified, the directory uses the default filter (
objectclass=*).
Note
Appendix D. Internationalization
Note
D.1. About Locales
- Collation order. The collation order provides language and cultural-specific information about how the characters of a given language are to be sorted. It identifies things like the sequence of the letters in the alphabet, how to compare letters with accents to letters without accents, and if there are any characters that can be ignored when comparing strings. The collation order also takes into account culture-specific information about a language, such as the direction in which the language is read (left to right, right to left, or up and down).
- Character type. The character type distinguishes alphabetic characters from numeric or other characters. For example, in some languages, the pipe (|) character is considered punctuation while in others it is considered alphabetic. In addition, it defines the mapping of upper-case to lower-case letters.
- Monetary format. The monetary format specifies the monetary symbol used by a specific region, whether the symbol goes before or after its value, and how monetary units are represented.
- Time/date format. The time and date format indicates the customary formatting for times and dates in the region. The time and date format indicates whether dates are customarily represented in the mm/dd/yy (month, day, year) or dd/mm/yy (day, month, year) format and specifies what the days of the week and month are in a given language. For example, the date January 10, 1996, is represented as
10. leden 1996in Czech and10 janvier 1996in French.
D.2. Supported Locales
en-GB.
2.16.840.1.113730.3.3.2.17.1 identifies the Finnish collation order.
/etc/dirsrv/config/slapd-collations.conf file.
D.3. Supported Language Subtypes
Table D.1. Supported Language Subtypes
| Language Tag | Language |
|---|---|
| af | Afrikaans |
| be | Belarusian |
| bg | Bulgarian |
| ca | Catalan |
| cs | Czech |
| da | Danish |
| de | German |
| el | Greek |
| en | English |
| es | Spanish |
| eu | Basque |
| fi | Finnish |
| fo | Faroese |
| fr | French |
| ga | Irish |
| gl | Galician |
| hr | Croatian |
| hu | Hungarian |
| id | Indonesian |
| is | Icelandic |
| it | Italian |
| ja | Japanese |
| ko | Korean |
| nl | Dutch |
| no | Norwegian |
| pl | Polish |
| pt | Portuguese |
| ro | Romanian |
| ru | Russian |
| sk | Slovak |
| sl | Slovenian |
| sq | Albanian |
| sr | Serbian |
| sv | Swedish |
| tr | Turkish |
| uk | Ukrainian |
| zh | Chinese |
D.4. Searching an Internationalized Directory
Note
ldapsearch.
ldapsearch syntax, see Section 14.3, “LDAP Search Filters”.
D.4.1. Matching Rule Formats
- As the OID of the collation order for the locale on which to base the search.
- As the language tag associated with the collation order on which to base the search.
- As the OID of the collation order and a suffix that represents a relational operator.
- As the language tag associated with the collation order and a suffix that represents a relational operator.
D.4.1.1. Using an OID for the Matching Rule
/etc/dirsrv/config/slapd-collations.conf file.
attr:OID:=(relational_operator value)
departmentNumber attributes that are at or after N4709 in the Swedish collation order, use the following filter:
departmentNumber:2.16.840.1.113730.3.3.2.46.1:=>= N4709
D.4.1.2. Using a Language Tag for the Matching Rule
/etc/dirsrv/config/slapd-collations.conf file.
attr:language-tag:=(relational_operator value)
estudiante using the Spanish collation order, use the following filter:
cn:es:== estudiante
D.4.1.3. Using an OID and Suffix for the Matching Rule
attr: OID+suffix:=value
Note
mozldap utility and not by OpenLDAP utilities, such as ldapsearch.
businessCategory attributes with the value softwareprodukte in the German collation order, use the following filter:
businessCategory:2.16.840.1.113730.3.3.2.7.1.3:=softwareprodukte
.3 in the previous example is the equality suffix.
/etc/dirsrv/config/slapd-collations.conf file. For a list of relational operators and their equivalent suffixes, see Table D.2, “Search Types, Operators, and Suffixes”.
D.4.1.4. Using a Language Tag and Suffix for the Matching Rule
attr: language-tag+suffix:=value
Note
mozldap utility and not by OpenLDAP utilities, such as ldapsearch.
La Salle in the French collation order, use the following filter:
sn:fr.4:=La Salle
/etc/dirsrv/config/slapd-collations.conf file. For a list of relational operators and their equivalent suffixes, see Table D.2, “Search Types, Operators, and Suffixes”.
D.4.2. Supported Search Types
- equality (=)
- substring (*)
- greater-than (>)
- greater-than or equal-to (>=)
- less-than (<)
- less-than or equal-to (<=)
ldapsearch search operation, an international search uses operators to define the type of search. However, when invoking an international search, either use the standard operators (=, >=, >, <, <=) in the value portion of the search string, or use a special type of operator, called a suffix (not to be confused with the directory suffix), in the matching rule portion of the filter. Table D.2, “Search Types, Operators, and Suffixes” summarizes each type of search, the operator, and the equivalent suffix.
Table D.2. Search Types, Operators, and Suffixes
| Search Type | Operator | Suffix |
|---|---|---|
| Less-than | < | .1 |
| Less-than or equal-to | <= | .2 |
| Equality | = | .3 |
| Greater-than or equal-to | >= | .4 |
| Greater-than | > | .5 |
| Substring | * | .6 |
D.4.3. International Search Examples
D.4.3.1. Less-Than Example
.1) searches for all attribute values that come before the given attribute in a specific collation order.
Marquez in the Spanish collation order, any of the following matching rule filters would work:
sn:2.16.840.1.113730.3.3.2.15.1:=< Marquez ... sn:es:=< Marquez ... sn:2.16.840.1.113730.3.3.2.15.1.1:=Marquez ... sn:es.1:=Marquez
D.4.3.2. Less-Than or Equal-to Example
.2) searches for all attribute values that come at or before the given attribute in a specific collation order.
CZ422 in the Hungarian collation order, any of the following matching rule filters would work:
roomNumber:2.16.840.1.113730.3.3.2.23.1:=<= CZ422 ... roomNumber:hu:=<= CZ422 ... roomNumber:2.16.840.1.113730.3.3.2.23.1.2:=CZ422 ... roomNumber:hu.2:=CZ422
D.4.3.3. Equality Example
.3) searches for all attribute values that match the given attribute in a specific collation order.
businessCategory attributes with the value softwareprodukte in the German collation order, any of the following matching rule filters would work:
businessCategory:2.16.840.1.113730.3.3.2.7.1:==softwareprodukte ... businessCategory:de:== softwareprodukte ... businessCategory:2.16.840.1.113730.3.3.2.7.1.3:=softwareprodukte ... businessCategory:de.3:=softwareprodukte
D.4.3.4. Greater-Than or Equal-to Example
>=), or suffix (.4) searches for all attribute values that come at or after the given attribute in a specific collation order.
Québec in the French collation order, any of the following matching rule filters would work:
locality:2.16.840.1.113730.3.3.2.18.1:=>= Québec ... locality:fr:=>= Québec ... locality:2.16.840.1.113730.3.3.2.18.1.4:=Québec ... locality:fr.4:=Québec
D.4.3.5. Greater-Than Example
.5) searches for all attribute values that come at or before the given attribute in a specific collation order.
schranka4 in the Czech collation order, any of the following matching rule filters would work:
mailHost:2.16.840.1.113730.3.3.2.5.1:=> schranka4 ... mailHost:cs:=> schranka4 ... mailHost:2.16.840.1.113730.3.3.2.5.1.5:=schranka4 ... mailHost:cs.5:=schranka4
D.4.3.6. Substring Example
ming in the Chinese collation order, any of the following matching rule filters would work:
uid:2.16.840.1.113730.3.3.2.49.1:=* *ming ... uid:zh:=* *ming ... uid:2.16.840.1.113730.3.3.2.49.1.6:=* *ming .. uid:zh.6:=* *ming
modifiersName or memberOf, do not always match entries correctly if the filter contains one or more space characters.
= part of the DN. For example, this filter should not be used:
(memberOf=*Domain Administrators*)
(memberOf=cn=Domain Administrators*) ... (memberOf=cn=Domain Administrators,ou=Groups,dc=example,dc=com)
D.5. Troubleshooting Matching Rules
# ldapsearch -x -p 389 -D "uid=userID,ou=people,dc=example,dc=com" -W -b "dc=example,dc=com" "sn:2.16.840.1.113730.3.3.2.7.1:=passin" ldapsearch -x -p 389 -D "uid=userID,ou=people,dc=example,dc=com" -W -b "dc=example,dc=com" "sn:de:=passin"
.3 before the passin value):
# ldapsearch -x -p 389 -D "uid=userID,ou=people,dc=example,dc=com" -W -b "dc=example,dc=com" "sn:2.16.840.1.113730.3.3.2.7.1.3:=passin" ldapsearch -x -p 389 -D "uid=userID,ou=people,dc=example,dc=com" -W -b "dc=example,dc=com" "sn:de.3:=passin"
Appendix E. Revision History
| Revision History | |||
|---|---|---|---|
| Revision 11.5-1 | Tue May 10 2022 | ||
| |||
| Revision 11.4-1 | Tue Nov 09 2021 | ||
| |||
| Revision 11.3-1 | Tue May 11 2021 | ||
| |||
| Revision 11.2-1 | Tue Nov 03 2020 | ||
| |||
| Revision 11.1-1 | Tue Apr 28 2020 | ||
| |||
| Revision 11.0-1 | Tue Nov 05 2019 | ||
| |||