
Chapter 4. Basic configuration
As a storage administrator, learning the basics of configuring the Ceph Object Gateway is important. You can learn about the defaults and the embedded web server called Beast. For troubleshooting issues with the Ceph Object Gateway, you can adjust the logging and debugging output generated by the Ceph Object Gateway. Also, you can provide a High-Availability proxy for storage cluster access using the Ceph Object Gateway.
4.1. Prerequisites
- A running, and healthy Red Hat Ceph Storage cluster.
- Installation of the Ceph Object Gateway software package.
4.2. Add a wildcard to the DNS
You can add the wildcard such as hostname to the DNS record of the DNS server.
Prerequisite
- A running Red Hat Ceph Storage cluster.
- Ceph Object Gateway installed.
- Root-level access to the admin node.
Procedure
To use Ceph with S3-style subdomains, add a wildcard to the DNS record of the DNS server that the
ceph-radosgwdaemon uses to resolve domain names:Syntax
bucket-name.domain-name.com
For
dnsmasq, add the following address setting with a dot (.) prepended to the host name:Syntax
address=/.HOSTNAME_OR_FQDN/HOST_IP_ADDRESS
Example
address=/.gateway-host01/192.168.122.75
For
bind, add a wildcard to the DNS record:Example
$TTL    604800
@       IN      SOA     gateway-host01. root.gateway-host01. (
                              2         ; Serial
                         604800         ; Refresh
                          86400         ; Retry
                        2419200         ; Expire
                         604800 )       ; Negative Cache TTL
;
@       IN      NS      gateway-host01.
@       IN      A       192.168.122.113
*       IN      CNAME   @
Restart the DNS server and ping the server with a subdomain to ensure that the
ceph-radosgwdaemon can process the subdomain requests:Syntax
ping mybucket.HOSTNAMEExample
[root@host01 ~]# ping mybucket.gateway-host01
-
If the DNS server is on the local machine, you might need to modify
/etc/resolv.confby adding a nameserver entry for the local machine. Add the host name in the Ceph Object Gateway zone group:
Get the zone group:
Syntax
radosgw-admin zonegroup get --rgw-zonegroup=ZONEGROUP_NAME > zonegroup.jsonExample
[ceph: root@host01 /]# radosgw-admin zonegroup get --rgw-zonegroup=us > zonegroup.json
Take a back-up of the JSON file:
Example
[ceph: root@host01 /]# cp zonegroup.json zonegroup.backup.json
View the
zonegroup.jsonfile:Example
[ceph: root@host01 /]# cat zonegroup.json
{
    "id": "d523b624-2fa5-4412-92d5-a739245f0451",
    "name": "asia",
    "api_name": "asia",
    "is_master": "true",
    "endpoints": [],
    "hostnames": [],
    "hostnames_s3website": [],
    "master_zone": "d2a3b90f-f4f3-4d38-ac1f-6463a2b93c32",
    "zones": [
        {
            "id": "d2a3b90f-f4f3-4d38-ac1f-6463a2b93c32",
            "name": "india",
            "endpoints": [],
            "log_meta": "false",
            "log_data": "false",
            "bucket_index_max_shards": 11,
            "read_only": "false",
            "tier_type": "",
            "sync_from_all": "true",
            "sync_from": [],
            "redirect_zone": ""
        }
    ],
    "placement_targets": [
        {
            "name": "default-placement",
            "tags": [],
            "storage_classes": [
                "STANDARD"
            ]
        }
    ],
    "default_placement": "default-placement",
    "realm_id": "d7e2ad25-1630-4aee-9627-84f24e13017f",
    "sync_policy": {
        "groups": []
    }
}
Update the
zonegroup.jsonfile with new host name:Example
"hostnames": ["host01", "host02","host03"],
Set the zone group back in the Ceph Object Gateway:
Syntax
radosgw-admin zonegroup set --rgw-zonegroup=ZONEGROUP_NAME --infile=zonegroup.jsonExample
[ceph: root@host01 /]# radosgw-admin zonegroup set --rgw-zonegroup=us --infile=zonegroup.json
Update the period:
Example
[ceph: root@host01 /]# radosgw-admin period update --commit
- Restart the Ceph Object Gateway so that the DNS setting takes effect.
Additional Resources
- See the The Ceph configuration database section in the Red Hat Ceph Storage Configuration Guide for more details.
4.3. The Beast front-end web server
The Ceph Object Gateway provides Beast, a C/C embedded front-end web server. Beast uses the `Boost.Beast` C library to parse HTTP, and Boost.Asio for asynchronous network I/O.
Additional Resources
4.4. Configuring SSL for Beast
You can configure the Beast front-end web server to use the OpenSSL library to provide Transport Layer Security (TLS). To use Secure Socket Layer (SSL) with Beast, you need to obtain a certificate from a Certificate Authority (CA) that matches the hostname of the Ceph Object Gateway node. Beast also requires the secret key, server certificate, and any other CA in a single .pem file.
Prevent unauthorized access to the .pem file, because it contains the secret key hash.
Red Hat recommends obtaining a certificate from a CA with the Subject Alternative Name (SAN) field, and a wildcard for use with S3-style subdomains.
Red Hat recommends only using SSL with the Beast front-end web server for small to medium sized test environments. For production environments, you must use HAProxy and keepalived to terminate the SSL connection at the HAProxy.
If the Ceph Object Gateway acts as a client and a custom certificate is used on the server, you can inject a custom CA by importing it on the node and then mapping the etc/pki directory into the container with the extra_container_args parameter in the Ceph Object Gateway specification file.
Prerequisites
- A running, and healthy Red Hat Ceph Storage cluster.
- Installation of the Ceph Object Gateway software package.
- Installation of the OpenSSL software package.
- Root-level access to the Ceph Object Gateway node.
Procedure
Create a new file named
rgw.ymlin the current directory:Example
[ceph: root@host01 /]# touch rgw.yml
Open the
rgw.ymlfile for editing, and customize it for the environment:Syntax
service_type: rgw
service_id: SERVICE_ID
service_name: SERVICE_NAME
placement:
  hosts:
  - HOST_NAME
spec:
  ssl: true
  rgw_frontend_ssl_certificate: CERT_HASH
Example
service_type: rgw
service_id: foo
service_name: rgw.foo
placement:
  hosts:
  - host01
spec:
  ssl: true
  rgw_frontend_ssl_certificate: |
    -----BEGIN RSA PRIVATE KEY-----
    MIIEpAIBAAKCAQEA+Cf4l9OagD6x67HhdCy4Asqw89Zz9ZuGbH50/7ltIMQpJJU0
    gu9ObNtIoC0zabJ7n1jujueYgIpOqGnhRSvsGJiEkgN81NLQ9rqAVaGpadjrNLcM
    bpgqJCZj0vzzmtFBCtenpb5l/EccMFcAydGtGeLP33SaWiZ4Rne56GBInk6SATI/
    JSKweGD1y5GiAWipBR4C74HiAW9q6hCOuSdp/2WQxWT3T1j2sjlqxkHdtInUtwOm
    j5Ism276IndeQ9hR3reFR8PJnKIPx73oTBQ7p9CMR1J4ucq9Ny0J12wQYT00fmJp
    -----END RSA PRIVATE KEY-----
    -----BEGIN CERTIFICATE-----
    MIIEBTCCAu2gAwIBAgIUGfYFsj8HyA9Zv2l600hxzT8+gG4wDQYJKoZIhvcNAQEL
    BQAwgYkxCzAJBgNVBAYTAklOMQwwCgYDVQQIDANLQVIxDDAKBgNVBAcMA0JMUjEM
    MAoGA1UECgwDUkhUMQswCQYDVQQLDAJCVTEkMCIGA1UEAwwbY2VwaC1zc2wtcmhj
    czUtOGRjeHY2LW5vZGU1MR0wGwYJKoZIhvcNAQkBFg5hYmNAcmVkaGF0LmNvbTAe
    -----END CERTIFICATE-----
Deploy the Ceph Object Gateway using the service specification file:
Example
[ceph: root@host01 /]# ceph orch apply -i rgw.yml
4.5. Adjusting logging and debugging output
Once you finish the setup procedure, check your logging output to ensure it meets your needs. By default, the Ceph daemons log to journald, and you can view the logs using the journalctl command. Alternatively, you can also have the Ceph daemons log to files, which are located under the /var/log/ceph/CEPH_CLUSTER_ID/ directory.
Verbose logging can generate over 1 GB of data per hour. This type of logging can potentially fill up the operating system’s disk, causing the operating system to stop functioning.
Prerequisites
- A running Red Hat Ceph Storage cluster.
- Installation of the Ceph Object Gateway software.
Procedure
Set the following parameter to increase the Ceph Object Gateway logging output:
Syntax
ceph config set client.rgw debug_rgw VALUEExample
[ceph: root@host01 /]# ceph config set client.rgw debug_rgw 20
You can also modify these settings at runtime:
Syntax
ceph --admin-daemon /var/run/ceph/ceph-client.rgw.NAME.asok config set debug_rgw VALUE
Example
[ceph: root@host01 /]# ceph --admin-daemon /var/run/ceph/ceph-client.rgw.rgw.asok config set debug_rgw 20
Optionally, you can configure the Ceph daemons to log their output to files. Set the
log_to_file, andmon_cluster_log_to_fileoptions totrue:Example
[ceph: root@host01 /]# ceph config set global log_to_file true
[ceph: root@host01 /]# ceph config set global mon_cluster_log_to_file true
Additional Resources
- See the Ceph debugging and logging configuration section of the Red Hat Ceph Storage Configuration Guide for more details.
4.6. Static web hosting
As a storage administrator, you can configure the Ceph Object Gateway to host static websites in S3 buckets. Traditional website hosting involves configuring a web server for each website, which can use resources inefficiently when content does not change dynamically. For example, sites that do not use server-side services like PHP, servlets, databases, nodejs, and the like. This approach is substantially more economical than setting up virtual machines with web servers for each site.
4.6.1. Prerequisites
- A healthy, running Red Hat Ceph Storage cluster.
4.6.2. Static web hosting assumptions
Static web hosting requires at least one running Red Hat Ceph Storage cluster, and at least two Ceph Object Gateway instances for the static web sites. Red Hat assumes that each zone will have multiple gateway instances using a load balancer, such as high-availability (HA) Proxy and keepalived.
Red Hat DOES NOT support using a Ceph Object Gateway instance to deploy both standard S3/Swift APIs and static web hosting simultaneously.
Additional Resources
- See the High availability service section in the Red Hat Ceph Storage Object Gateway Guide for additional details on using high availability.
4.6.3. Static web hosting requirements
Static web hosting functionality uses its own API, so configuring a gateway to use static web sites in S3 buckets requires the following:
- S3 static web hosting uses Ceph Object Gateway instances that are separate and distinct from instances used for standard S3/Swift API use cases.
- Gateway instances hosting S3 static web sites should have separate, non-overlapping domain names from the standard S3/Swift API gateway instances.
- Gateway instances hosting S3 static web sites should use separate public-facing IP addresses from the standard S3/Swift API gateway instances.
- Gateway instances hosting S3 static web sites load balance, and if necessary terminate SSL, using HAProxy/keepalived.
4.6.4. Static web hosting gateway setup
To enable a Ceph Object Gateway for static web hosting, set the following options:
Syntax
ceph config set client.rgw OPTION VALUE
Example
[ceph: root@host01 /]# ceph config set client.rgw rgw_enable_static_website true
[ceph: root@host01 /]# ceph config set client.rgw rgw_enable_apis s3,s3website
[ceph: root@host01 /]# ceph config set client.rgw rgw_dns_name objects-zonegroup.example.com
[ceph: root@host01 /]# ceph config set client.rgw rgw_dns_s3website_name objects-website-zonegroup.example.com
[ceph: root@host01 /]# ceph config set client.rgw rgw_resolve_cname true
The rgw_enable_static_website setting MUST be true. The rgw_enable_apis setting MUST enable the s3website API. The rgw_dns_name and rgw_dns_s3website_name settings must provide their fully qualified domains. If the site uses canonical name extensions, then set the rgw_resolve_cname option to true.
The FQDNs of rgw_dns_name and rgw_dns_s3website_name MUST NOT overlap.
4.6.5. Static web hosting DNS configuration
The following is an example of assumed DNS settings, where the first two lines specify the domains of the gateway instance using a standard S3 interface and point to the IPv4 and IPv6 addresses. The third line provides a wildcard CNAME setting for S3 buckets using canonical name extensions. The fourth and fifth lines specify the domains for the gateway instance using the S3 website interface and point to their IPv4 and IPv6 addresses.
objects-zonegroup.domain.com. IN    A 192.0.2.10
objects-zonegroup.domain.com. IN AAAA 2001:DB8::192:0:2:10
*.objects-zonegroup.domain.com. IN CNAME objects-zonegroup.domain.com.
objects-website-zonegroup.domain.com. IN    A 192.0.2.20
objects-website-zonegroup.domain.com. IN AAAA 2001:DB8::192:0:2:20
The IP addresses in the first two lines differ from the IP addresses in the fourth and fifth lines.
If using Ceph Object Gateway in a multi-site configuration, consider using a routing solution to route traffic to the gateway closest to the client.
The Amazon Web Service (AWS) requires static web host buckets to match the host name. Ceph provides a few different ways to configure the DNS, and HTTPS will work if the proxy has a matching certificate.
Hostname to a Bucket on a Subdomain
To use AWS-style S3 subdomains, use a wildcard in the DNS entry which can redirect requests to any bucket. A DNS entry might look like the following:
*.objects-website-zonegroup.domain.com. IN CNAME objects-website-zonegroup.domain.com.
Access the bucket name, where the bucket name is bucket1, in the following manner:
http://bucket1.objects-website-zonegroup.domain.com
Hostname to Non-Matching Bucket
Ceph supports mapping domain names to buckets without including the bucket name in the request, which is unique to Ceph Object Gateway. To use a domain name to access a bucket, map the domain name to the bucket name. A DNS entry might look like the following:
www.example.com. IN CNAME bucket2.objects-website-zonegroup.domain.com.
Where the bucket name is bucket2.
Access the bucket in the following manner:
http://www.example.com
Hostname to Long Bucket with CNAME
AWS typically requires the bucket name to match the domain name. To configure the DNS for static web hosting using CNAME, the DNS entry might look like the following:
www.example.com. IN CNAME www.example.com.objects-website-zonegroup.domain.com.
Access the bucket in the following manner:
http://www.example.com
Hostname to Long Bucket without CNAME
If the DNS name contains other non-CNAME records, such as SOA, NS, MX or TXT, the DNS record must map the domain name directly to the IP address. For example:
www.example.com. IN A 192.0.2.20
www.example.com. IN AAAA 2001:DB8::192:0:2:20
Access the bucket in the following manner:
http://www.example.com
4.6.6. Creating a static web hosting site
To create a static website, perform the following steps:
Create an S3 bucket. The bucket name MIGHT be the same as the website’s domain name. For example,
mysite.commay have a bucket name ofmysite.com. This is required for AWS, but it is NOT required for Ceph.- See the Static web hosting DNS configuration section in the Red Hat Ceph Storage Object Gateway Guide for details.
-
Upload the static website content to the bucket. Contents may include HTML, CSS, client-side JavaScript, images, audio/video content, and other downloadable files. A website MUST have an
index.htmlfile and might have anerror.htmlfile. - Verify the website’s contents. At this point, only the creator of the bucket has access to the contents.
- Set permissions on the files so that they are publicly readable.
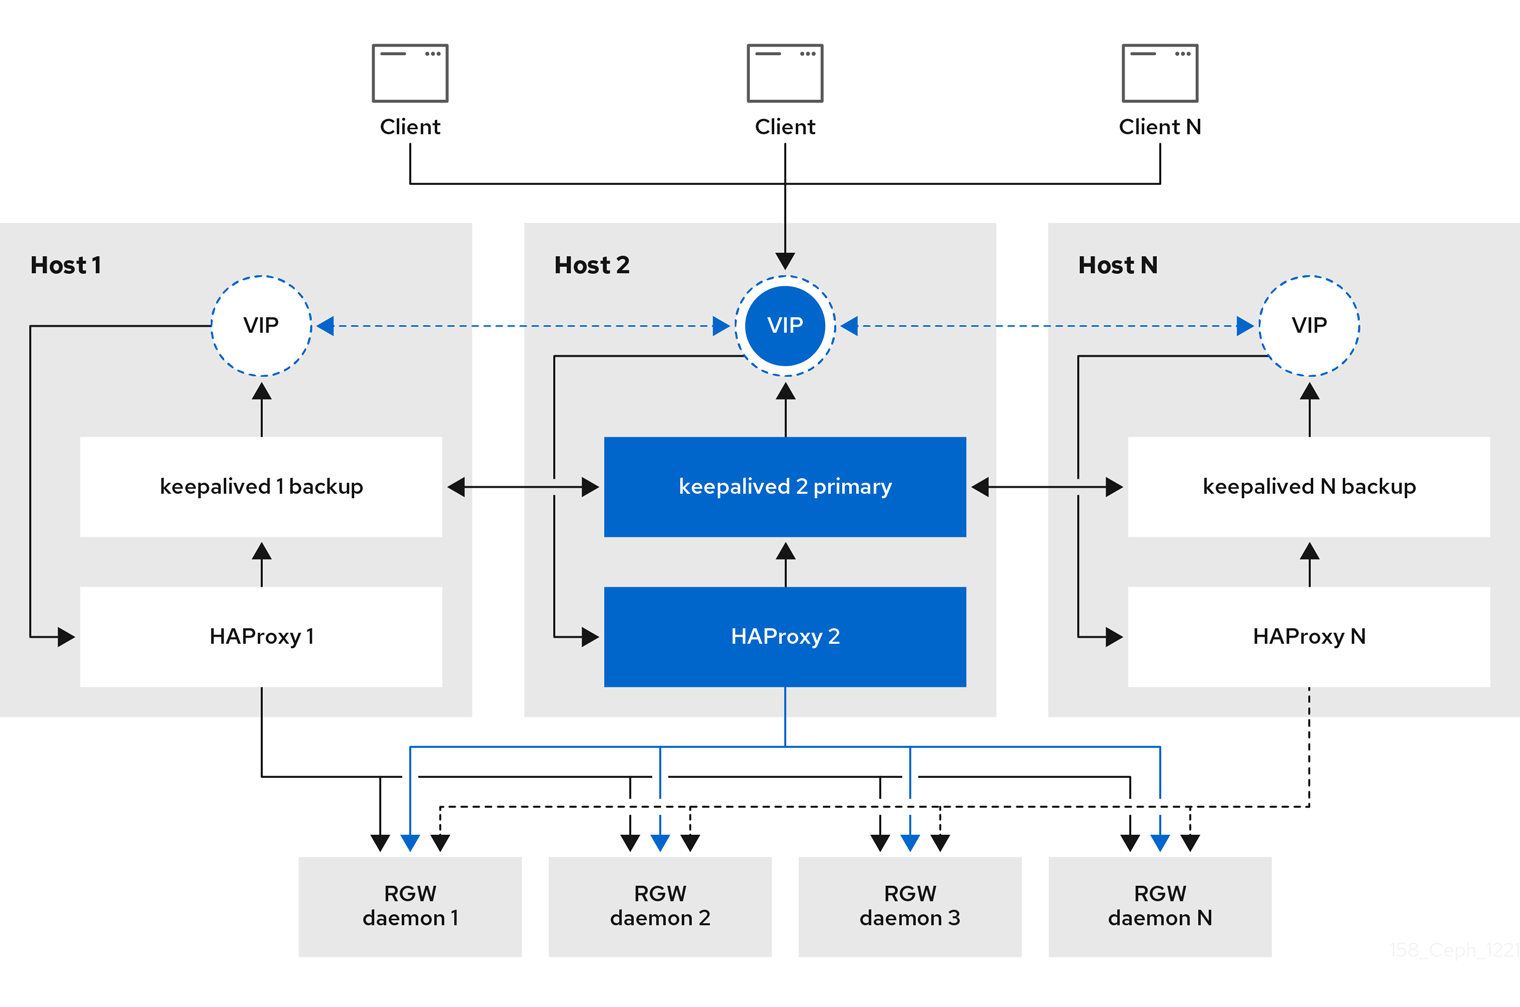
4.7. High availability for the Ceph Object Gateway
As a storage administrator, you can assign many instances of the Ceph Object Gateway to a single zone. This allows you to scale out as the load increases, that is, the same zone group and zone; however, you do not need a federated architecture to use a highly available proxy. Since each Ceph Object Gateway daemon has its own IP address, you can use the ingress service to balance the load across many Ceph Object Gateway daemons or nodes. The ingress service manages HAProxy and keepalived daemons for the Ceph Object Gateway environment. You can also terminate HTTPS traffic at the HAProxy server, and use HTTP between the HAProxy server and the Beast front-end web server instances for the Ceph Object Gateway.
4.7.1. Prerequisites
- At least two Ceph Object Gateway daemons running on different hosts.
-
Capacity for at least two instances of the
ingressservice running on different hosts.
4.7.2. High availability service
The ingress service provides a highly available endpoint for the Ceph Object Gateway. The ingress service can be deployed to any number of hosts as needed. Red Hat recommends having at least two Red Hat Enterprise Linux 8 servers, each server configured with the ingress service. You can run a high availability (HA) service with a minimum set of configuration options. The Ceph orchestrator deploys the ingress service, which manages the haproxy and keepalived daemons, by providing load balancing with a floating virtual IP address. The active haproxy distributes all Ceph Object Gateway requests to all the available Ceph Object Gateway daemons.
A virtual IP address is automatically configured on one of the ingress hosts at a time, known as the primary host. The Ceph orchestrator selects the first network interface based on existing IP addresses that are configured as part of the same subnet. In cases where the virtual IP address does not belong to the same subnet, you can define a list of subnets for the Ceph orchestrator to match with existing IP addresses. If the keepalived daemon and the active haproxy are not responding on the primary host, then the virtual IP address moves to a backup host. This backup host becomes the new primary host.
Currently, you can not configure a virtual IP address on a network interface that does not have a configured IP address.
To use the secure socket layer (SSL), SSL must be terminated by the ingress service and not at the Ceph Object Gateway.
4.7.3. Configuring high availability for the Ceph Object Gateway
To configure high availability (HA) for the Ceph Object Gateway you write a YAML configuation file, and the Ceph orchestrator does the installation, configuraton, and management of the ingress service. The ingress service uses the haproxy and keepalived daemons to provide high availability for the Ceph Object Gateway.
Prerequisites
-
A minimum of two hosts running Red Hat Enterprise Linux 8, or higher, for installing the
ingressservice on. - A healthy running Red Hat Ceph Storage cluster.
- A minimum of two Ceph Object Gateway daemons running on different hosts.
-
Root-level access to the host running the
ingressservice. - If using a firewall, then open port 80 for HTTP and port 443 for HTTPS traffic.
Procedure
Create a new
ingress.yamlfile:Example
[root@host01 ~] touch ingress.yaml
Open the
ingress.yamlfile for editing. Added the following options, and add values applicable to the environment:Syntax
service_type: ingress 1
service_id: SERVICE_ID 2
placement: 3
  hosts:
    - HOST1
    - HOST2
    - HOST3
spec:
  backend_service: SERVICE_ID
  virtual_ip: IP_ADDRESS/CIDR 4
  frontend_port: INTEGER 5
  monitor_port: INTEGER 6
  virtual_interface_networks: 7
    - IP_ADDRESS/CIDR
  ssl_cert: | 8
- 1
- Must be set to
ingress. - 2
- Must match the existing Ceph Object Gateway service name.
- 3
- Where to deploy the
haproxyandkeepalivedcontainers. - 4
- The virtual IP address where the
ingressservice is available. - 5
- The port to access the
ingressservice. - 6
- The port to access the
haproxyload balancer status. - 7
- Optional list of available subnets.
- 8
- Optional SSL certificate and private key.
Example
service_type: ingress
service_id: rgw.foo
placement:
  hosts:
    - host01.example.com
    - host02.example.com
    - host03.example.com
spec:
  backend_service: rgw.foo
  virtual_ip: 192.168.1.2/24
  frontend_port: 8080
  monitor_port: 1967
  virtual_interface_networks:
    - 10.10.0.0/16
  ssl_cert: |
    -----BEGIN CERTIFICATE-----
    MIIEpAIBAAKCAQEA+Cf4l9OagD6x67HhdCy4Asqw89Zz9ZuGbH50/7ltIMQpJJU0
    gu9ObNtIoC0zabJ7n1jujueYgIpOqGnhRSvsGJiEkgN81NLQ9rqAVaGpadjrNLcM
    bpgqJCZj0vzzmtFBCtenpb5l/EccMFcAydGtGeLP33SaWiZ4Rne56GBInk6SATI/
    JSKweGD1y5GiAWipBR4C74HiAW9q6hCOuSdp/2WQxWT3T1j2sjlqxkHdtInUtwOm
    j5Ism276IndeQ9hR3reFR8PJnKIPx73oTBQ7p9CMR1J4ucq9Ny0J12wQYT00fmJp
    -----END CERTIFICATE-----
    -----BEGIN PRIVATE KEY-----
    MIIEBTCCAu2gAwIBAgIUGfYFsj8HyA9Zv2l600hxzT8+gG4wDQYJKoZIhvcNAQEL
    BQAwgYkxCzAJBgNVBAYTAklOMQwwCgYDVQQIDANLQVIxDDAKBgNVBAcMA0JMUjEM
    MAoGA1UECgwDUkhUMQswCQYDVQQLDAJCVTEkMCIGA1UEAwwbY2VwaC1zc2wtcmhj
    czUtOGRjeHY2LW5vZGU1MR0wGwYJKoZIhvcNAQkBFg5hYmNAcmVkaGF0LmNvbTAe
    -----END PRIVATE KEY-----
Launch the Cephadm shell:
Example
[root@host01 ~]# cephadm shell --mount ingress.yaml:/var/lib/ceph/radosgw/igress.yaml
Configure the latest
haproxyandkeepalivedimages:Syntax
ceph config set mgr mgr/cephadm/container_image_haproxy HAPROXY_IMAGE_ID
ceph config set mgr mgr/cephadm/container_image_keepalived KEEPALIVED_IMAGE_ID
Example
[ceph: root@host01 /]# ceph config set mgr mgr/cephadm/container_image_haproxy registry.redhat.io/rhceph/rhceph-haproxy-rhel8:latest
[ceph: root@host01 /]# ceph config set mgr mgr/cephadm/container_image_keepalived registry.redhat.io/rhceph/keepalived-rhel8:latest
Install and configure the new
ingressservice using the Ceph orchestrator:[ceph: root@host01 /]# ceph orch apply -i ingress.yaml
After the Ceph orchestrator completes, verify the HA configuration.
On the host running the
ingressservice, check that the virtual IP address appears:Example
[root@host01 ~]# ip addr show
Try reaching the Ceph Object Gateway from a Ceph client:
Syntax
wget HOST_NAMEExample
[root@client ~]# wget host01.example.com
If this returns an
index.htmlwith similar content as in the example below, then the HA configuration for the Ceph Object Gateway is working properly.Example
<?xml version="1.0" encoding="UTF-8"?>
	<ListAllMyBucketsResult xmlns="http://s3.amazonaws.com/doc/2006-03-01/">
		<Owner>
			<ID>anonymous</ID>
			<DisplayName></DisplayName>
		</Owner>
		<Buckets>
		</Buckets>
	</ListAllMyBucketsResult>
Additional resources
- See the Performing a Standard RHEL Installation Guide for more details.
- See the High availability service section in the Red Hat Ceph Storage Object Gateway Guide for more details.
4.7.4. HAProxy and keepalived
As a storage administrator, you can assign many instances of the Ceph Object Gateway to a single zone. This allows you scale out as the load increases, that is, the same zone group and zone; however, you do not need a federated architecture to use HAProxy and keepalived. Since each object gateway instance has its own IP address, you can use HAProxy and keepalived to balance the load across Ceph Object Gateway servers.
Another use case for HAProxy and keepalived is to terminate HTTPS at the HAProxy server. You can use an HAProxy server to terminate HTTPS at the HAProxy server and use HTTP between the HAProxy server and the Beast web server instances.
4.7.4.1. HAProxy/keepalived Prerequisites
To set up an HAProxy with the Ceph Object Gateway, you must have:
- A running Red Hat Ceph Storage cluster
-
At least two Ceph Object Gateway servers within the same zone are configured to run on port
80. If you follow the simple installation procedure, the gateway instances are in the same zone group and zone by default. If you are using a federated architecture, ensure that the instances are in the same zone group and zone. -
At least two Red Hat Enterprise Linux 8 servers for HAProxy and
keepalived.
This section assumes that you have at least two Ceph Object Gateway servers running, and that you get a valid response from each of them when running test scripts over port 80.
4.7.4.2. Preparing HAProxy Nodes
The following setup assumes two HAProxy nodes named haproxy and haproxy2 and two Ceph Object Gateway servers named rgw1 and rgw2. You might use any naming convention you prefer. Perform the following procedure on at least two HAProxy nodes:
- Install Red Hat Enterprise Linux 8 or 9.
Register the nodes.
[root@haproxy]# subscription-manager register
Enable the RHEL server repository.
Red Hat Enterprise Linux 9
[root@haproxy]# subscription-manager repos --enable=rhel-9-server-rpms
Red Hat Enterprise Linux 8
[root@haproxy]# subscription-manager repos --enable=rhel-8-server-rpms
Update the server.
[root@haproxy]# dnf update -y
-
Install admin tools (e.g.,
wget,vim, etc.) as needed. Open port
80.[root@haproxy]# firewall-cmd --zone=public --add-port 80/tcp --permanent [root@haproxy]# firewall-cmd --reload
For HTTPS, open port
443.[root@haproxy]# firewall-cmd --zone=public --add-port 443/tcp --permanent [root@haproxy]# firewall-cmd --reload
4.7.4.3. Installing and Configuring keepalived
Perform the following procedure on your at least two HAProxy nodes:
Prerequisites
- A minimum of two HAProxy nodes.
- A minimum of two Object Gateway nodes.
Procedure
Install
keepalived:[root@haproxy]# yum install -y keepalived
Configure
keepalivedon both HAProxy nodes:[root@haproxy]# vim /etc/keepalived/keepalived.conf
In the configuration file, there is a script to check the
haproxyprocesses:vrrp_script chk_haproxy { script "killall -0 haproxy" # check the haproxy process interval 2 # every 2 seconds weight 2 # add 2 points if OK }Next, the instance on the primary and backup load balancers uses
eno1as the network interface. It also assigns a virtual IP address, that is,192.168.1.20.Primary load balancer node
vrrp_instance RGW {
    state MASTER # might not be necessary. This is on the primary LB node.
    @main interface eno1
    priority 100
    advert_int 1
    interface eno1
    virtual_router_id 50
    @main unicast_src_ip 10.8.128.43 80
    unicast_peer {
           10.8.128.53
           }
    authentication {
        auth_type PASS
        auth_pass 1111
    }
    virtual_ipaddress {
        192.168.1.20
    }
    track_script {
      chk_haproxy
    }
}
virtual_server 192.168.1.20 80 eno1 { #populate correct interface
    delay_loop 6
    lb_algo wlc
    lb_kind dr
    persistence_timeout 600
    protocol TCP
    real_server 10.8.128.43 80 { # ip address of rgw2 on physical interface, haproxy listens here, rgw listens to localhost:8080 or similar
        weight 100
        TCP_CHECK { # perhaps change these to a HTTP/SSL GET?
            connect_timeout 3
        }
    }
    real_server 10.8.128.53 80 { # ip address of rgw3 on physical interface, haproxy listens here, rgw listens to localhost:8080 or similar
        weight 100
        TCP_CHECK { # perhaps change these to a HTTP/SSL GET?
            connect_timeout 3
        }
    }
}
Backup load balancer node
vrrp_instance RGW {
    state BACKUP # might not be necessary?
    priority 99
    advert_int 1
    interface eno1
    virtual_router_id 50
    unicast_src_ip 10.8.128.53 80
    unicast_peer {
           10.8.128.43
           }
    authentication {
        auth_type PASS
        auth_pass 1111
    }
    virtual_ipaddress {
        192.168.1.20
    }
    track_script {
      chk_haproxy
    }
}
virtual_server 192.168.1.20 80 eno1 { #populate correct interface
    delay_loop 6
    lb_algo wlc
    lb_kind dr
    persistence_timeout 600
    protocol TCP
    real_server 10.8.128.43 80 { # ip address of rgw2 on physical interface, haproxy listens here, rgw listens to localhost:8080 or similar
        weight 100
        TCP_CHECK { # perhaps change these to a HTTP/SSL GET?
            connect_timeout 3
        }
    }
    real_server 10.8.128.53 80 { # ip address of rgw3 on physical interface, haproxy listens here, rgw listens to localhost:8080 or similar
        weight 100
        TCP_CHECK { # perhaps change these to a HTTP/SSL GET?
            connect_timeout 3
        }
    }
}
Enable and start the
keepalivedservice:[root@haproxy]# systemctl enable keepalived [root@haproxy]# systemctl start keepalived
Additional Resources
-
For more details on using
keepalived, refer to the Setting up a Linux cluster with Keepalived: Basic configuration article on the Red Hat’s Customer Portal.
4.7.4.4. Installing and Configuring HAProxy
Perform the following procedure on your at least two HAProxy nodes:
Install
haproxy.[root@haproxy]# dnf install haproxy
Configure
haproxyfor SELinux and HTTP.[root@haproxy]# vim /etc/firewalld/services/haproxy-http.xml
Add the following lines:
<?xml version="1.0" encoding="utf-8"?>
<service>
<short>HAProxy-HTTP</short>
<description>HAProxy load-balancer</description>
<port protocol="tcp" port="80"/>
</service>
As
root, assign the correct SELinux context and file permissions to thehaproxy-http.xmlfile.[root@haproxy]# cd /etc/firewalld/services [root@haproxy]# restorecon haproxy-http.xml [root@haproxy]# chmod 640 haproxy-http.xml
If you intend to use HTTPS, configure
haproxyfor SELinux and HTTPS.[root@haproxy]# vim /etc/firewalld/services/haproxy-https.xml
Add the following lines:
<?xml version="1.0" encoding="utf-8"?>
<service>
<short>HAProxy-HTTPS</short>
<description>HAProxy load-balancer</description>
<port protocol="tcp" port="443"/>
</service>
As
root, assign the correct SELinux context and file permissions to thehaproxy-https.xmlfile.# cd /etc/firewalld/services # restorecon haproxy-https.xml # chmod 640 haproxy-https.xml
If you intend to use HTTPS, generate keys for SSL. If you do not have a certificate, you can use a self-signed certificate.
Finally, put the certificate and key into a PEM file.
[root@haproxy]# cat example.com.crt example.com.key > example.com.pem
[root@haproxy]# cp example.com.pem /etc/ssl/private/
Configure
haproxy.[root@haproxy]# vim /etc/haproxy/haproxy.cfg
The
globalanddefaultsmay remain unchanged. After thedefaultssection, you will need to configurefrontendandbackendsections. For example:frontend http_web bind *:80 mode http default_backend rgw frontend rgw-https bind *:443 ssl crt /etc/ssl/private/example.com.pem default_backend rgw backend rgw balance roundrobin mode http server rgw1 10.0.0.71:80 check server rgw2 10.0.0.80:80 checkFor details on HAProxy configuration, refer to Add an HAProxy Load Balancer chapter in the Red Hat Update Infrastructure System Administrator’s Guide.
Enable/start
haproxy[root@haproxy]# systemctl enable haproxy [root@haproxy]# systemctl start haproxy
4.7.4.5. Testing the HAProxy Configuration
On the HAProxy nodes, check to ensure the virtual IP address from the
keepalivedconfiguration appears.[root@haproxy]# ip addr show
On the node hosting the Red Hat Ceph Dashboard container, see if you can reach the Ceph Object Gateway nodes using the load balancer configuration. For example:
[root@haproxy]# wget haproxy
This should return the same result as:
[root@haproxy]# wget rgw1
If it returns an
index.htmlfile with the following contents:<?xml version="1.0" encoding="UTF-8"?> <ListAllMyBucketsResult xmlns="http://s3.amazonaws.com/doc/2020-03-01/"> <Owner> <ID>anonymous</ID> <DisplayName></DisplayName> </Owner> <Buckets> </Buckets> </ListAllMyBucketsResult>
Then, your configuration is working properly.
4.8. Exporting the namespace to NFS-Ganesha
To configure new NFS Ganesha exports for use with the Ceph Object Gateway, you have to use the Red Hat Ceph Storage Dashboard. See the Management of NFS Ganesha exports on the Ceph Dashboard section in the Red Hat Ceph Storage Dashboard Guide for more details.
For existing NFS environments using the Ceph Object Gateway, upgrading from Red Hat Ceph Storage 4 to Red Hat Ceph Storage 5 is not supported at this time.
Red Hat does not support NFS version 3 exports using the Ceph Object Gateway.