
Chapter 8. Management of NFS Ganesha exports on the Ceph dashboard
As a storage administrator, you can manage the NFS Ganesha exports that use Ceph object gateway as the backstore on the Red Hat Ceph Storage dashboard. You can deploy and configure, edit and delete the NFS ganesha daemons on the dashboard.
The dashboard manages NFS-Ganesha configuration files stored in RADOS objects on the Ceph Cluster. NFS-Ganesha must store part of their configuration in the Ceph cluster.
8.1. Configuring NFS Ganesha daemons on the Ceph dashboard
You can configure NFS Ganesha on the dashboard after configuring the Ceph object gateway and enabling a dedicated pool for NFS-Ganesha using the command line interface.
Red Hat Ceph Storage 5 supports only NFSv4 protocol.
Prerequisites
- A running Red Hat Ceph Storage cluster.
- Dashboard is installed.
- The Ceph Object Gateway is installed.
- Ceph Object gateway login credentials are added to the dashboard.
-
A dedicated pool enabled and tagged with custom tag of
nfs. -
At least
ganesha-managerlevel of access on the Ceph dashboard.
Procedure
Log into the Cephadm shell:
Example
[root@host01 ~]# cephadm shell
Create the RADOS pool, namespace, and enable
rgw:Syntax
ceph osd pool create POOL_NAME _
ceph osd pool application enable POOL_NAME freeform/rgw/rbd/cephfs/nfs
Example
[ceph: root@host01 /]# ceph osd pool create nfs-ganesha
[ceph: root@host01 /]# ceph osd pool application enable nfs-ganesha rgw
Deploy NFS-Ganesha gateway using placement specification in the command line interface:
Syntax
ceph orch apply nfs SERVICE_ID --placement="NUMBER_OF_DAEMONS HOST_NAME_1 HOST_NAME_2 HOST_NAME_3"
Example
[ceph: root@host01 /]# ceph orch apply nfs foo --placement="2 host01 host02"
This deploys an NFS-Ganesha cluster
nfsganeshawith one daemon onhost01andhost02.Update
ganesha-clusters-rados-pool-namespaceparameter with the namespace and the service_ID:Syntax
ceph dashboard set-ganesha-clusters-rados-pool-namespace POOL_NAME/SERVICE_ID
Example
[ceph: root@host01 /]# ceph dashboard set-ganesha-clusters-rados-pool-namespace nfs-ganesha/foo
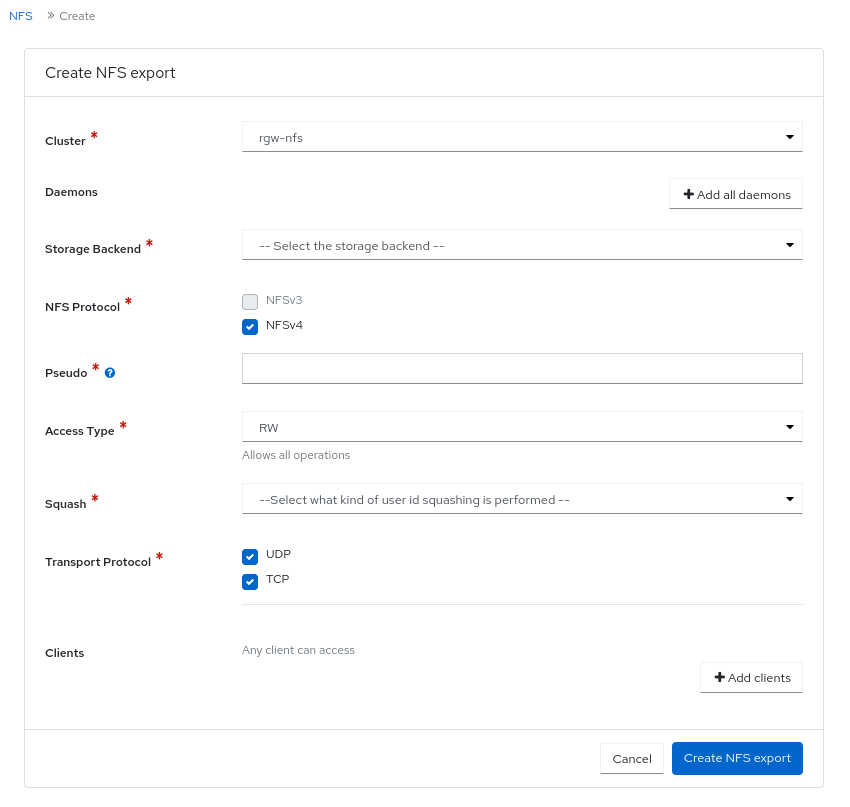
- On the dashboard landing page, click NFS.
- Select Create.
In the Create NFS export window, set the following parameters and click Create NFS export:
- Cluster - Name of the cluster.
- Daemons - You can select all daemons.
- Storage Backend - You can select Object Gateway.
- Object Gateway User - Select the user created. In this example, it is test_user.
- Path - Any directory.
- NFS Protocol - NFSv4 is selected by default.
- Pseudo - root path
- Access Type - The supported access types are RO, RW, and NONE.
- Squash
- Transport Protocol
Clients
Verify the NFS daemon is configured:
Example
[ceph: root@host01 /]# ceph -s
As a root user, check if the NFS-service is active and running:
Example
[root@host01 ~]# systemctl list-units | grep nfs
- Mount the NFS export and perform a few I/O operations.
-
Once the NFS service is up and running, in the NFS-RGW container, comment out the
dir_chunk=0parameter inetc/ganesha/ganesha.conffile. Restart the NFS-Ganesha service. This allows proper listing at the NFS mount.
Verification
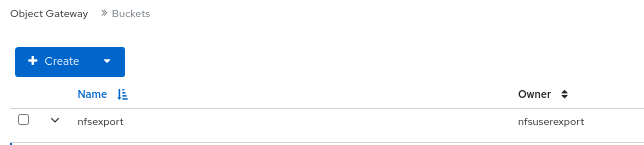
You can view the NFS daemon under buckets in the Ceph Object Gateway.
Additional Resources
- For more information on deploying Ceph object gateway, see the Deploying the Ceph object gateway using the command line interface section in the Red Hat Ceph Storage Operations guide.
- For more information on adding object gateway login credentials to the dashboard, see the Manually adding Ceph object gateway login credentials to the dashboard section in the Red Hat Ceph Storage Dashboard guide.
- For more information on creating object gateway users on the dashboard, see the Creating Ceph object gateway users on the dashboard section in the Red Hat Ceph Storage Dashboard guide.
- For more information on creating object gateway buckets on the dashboard, see the Creating Ceph object gateway buckets on the dashboard section in the Red Hat Ceph Storage Dashboard guide.
- For more information on system roles, see the User roles and permissions on the Ceph dashboard section in the Red Hat Ceph Storage Dashboard Guide.
8.2. Configuring NFS exports with CephFS on the Ceph dashboard
You can create, edit, and delete NFS exports on the Ceph dashboard after configuring the Ceph File System (CephFS) using the command-line interface. You can export the CephFS namespaces over the NFS Protocol.
You need to create an NFS cluster which creates a common recovery pool for all the NFS Ganesha daemons, new user based on the CLUSTER_ID, and a common NFS Ganesha config RADOS objects.
Red Hat Ceph Storage 5 supports only NFSv4 protocol.
Prerequisites
- A running Red Hat Ceph Storage cluster.
- Dashboard is installed.
- Root-level access to the bootstrapped host.
-
At least
ganesha-managerlevel of access on the Ceph dashboard.
Procedure
Log in to the
cephadmshell:Example
[root@host01 ~]# cephadm shell
Create the CephFS storage in the backend:
Syntax
ceph fs volume create CEPH_FILE_SYSTEMExample
[ceph: root@host01 /]# ceph fs volume create cephfs
Enable the Ceph Manager NFS module:
Example
[ceph: root@host01 /]# ceph mgr module enable nfs
Create an NFS Ganesha cluster:
Syntax
ceph nfs cluster create NFS_CLUSTER_NAME "HOST_NAME_PLACEMENT_LIST"
Example
[ceph: root@host01 /]# ceph nfs cluster create nfs-cephfs host02
NFS Cluster Created Successfully
Get the dashboard URL:
Example
[ceph: root@host01 /]# ceph mgr services { "dashboard": "https://10.00.00.11:8443/", "prometheus": "http://10.00.00.11:9283/" }- Log in to the Ceph dashboard with your credentials.
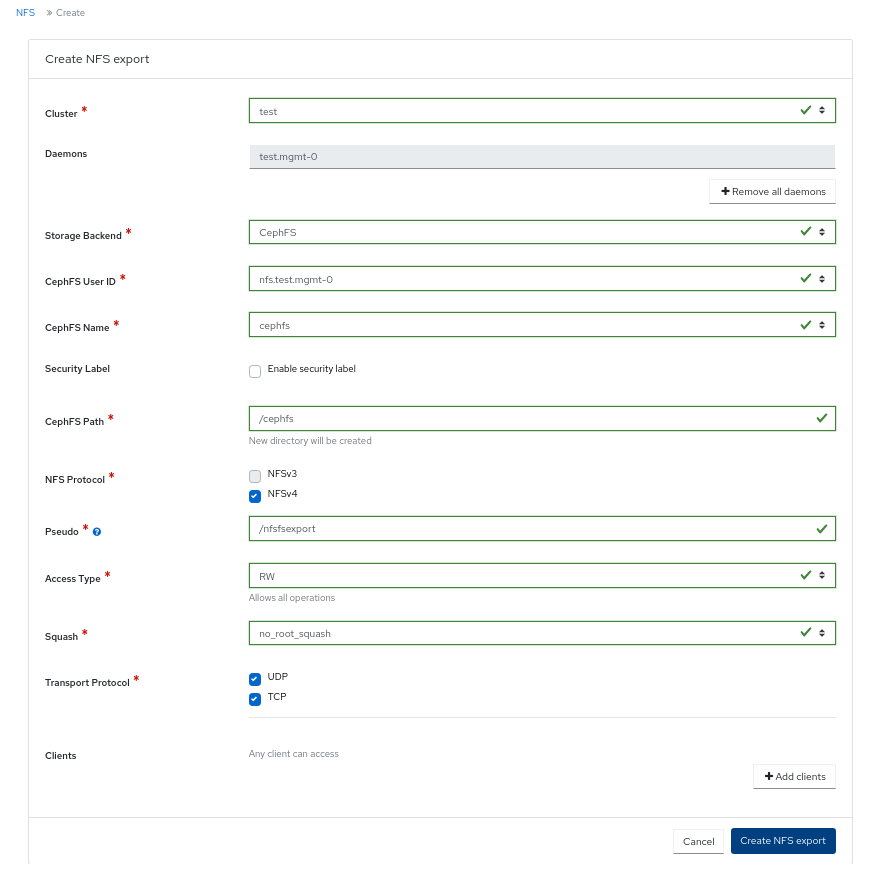
- On the dashboard landing page, click NFS.
- Click Create.
In the Create NFS export window, set the following parameters and click Create NFS export:
- Cluster - Name of the cluster.
- Daemons - You can select all daemons.
- Storage Backend - You can select CephFS.
- CephFS User ID - Select the service where the NFS cluster is created.
- CephFS Name - Provide a user name.
- CephFs Path - Any directory.
- NFS Protocol - NFSv4 is selected by default.
- Pseudo - root path
- Access Type - The supported access types are RO, RW, and NONE.
- Squash - Select the squash type.
- Transport Protocol - Select either the UDP or TCP protocol.
Clients
Figure 8.1. CephFS NFS export window
As a root user on the client host, create a directory and mount the NFS export:
Syntax
mkdir -p /mnt/nfs/
mount -t nfs -o port=2049 HOSTNAME:EXPORT_NAME _MOUNT_DIRECTORY_
Example
[root@ client ~]# mkdir -p /mnt/nfs/
[root@ client ~]# mount -t nfs -o port=2049 host02:/export1 /mnt/nfs/
Verification
Verify if the NFS daemon is configured:
Example
[ceph: root@host01 /]# ceph -s
Additional Resources
- See Creating the NFS-Ganesha cluster using the Ceph Orchestrator section in the Red Hat Ceph Storage Operations Guide for more details.
8.3. Editing NFS Ganesha daemons on the Ceph dashboard
You can edit the NFS Ganesha daemons on the Red Hat Ceph Storage dashboard.
Prerequisites
- A running Red Hat Ceph Storage cluster.
-
At least
ganesha-managerlevel of access on the Ceph dashboard. - NFS Ganesha daemon configured on the dashboard.
Procedure
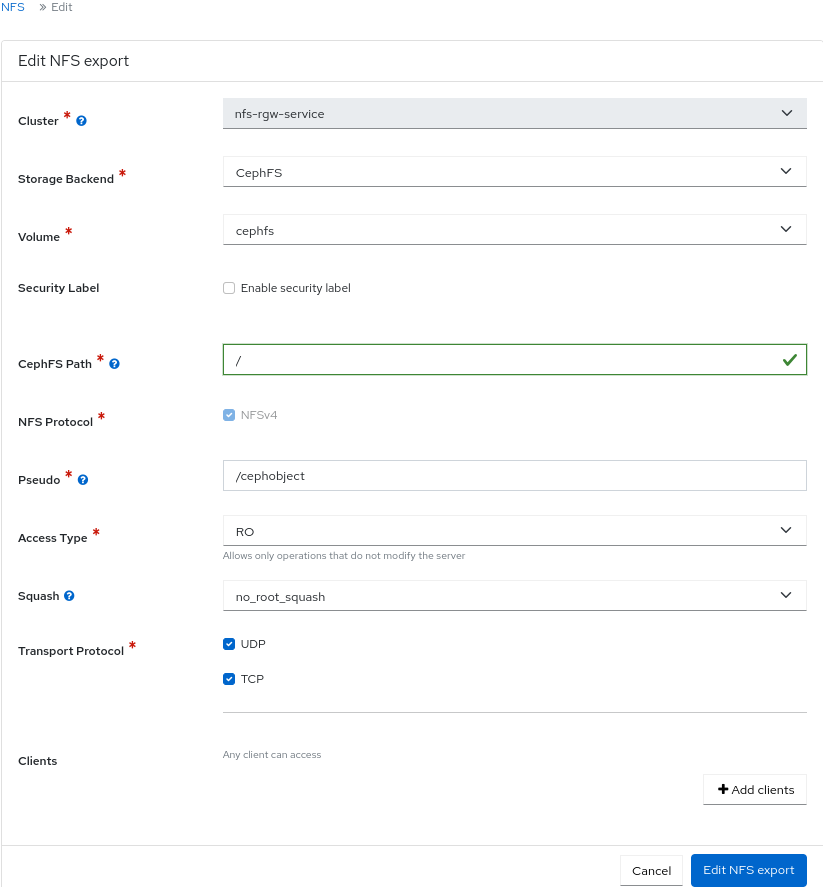
- On the dashboard, click NFS.
- Click the row that needs to be edited.
- From the Edit drop-down menu, click Edit.
In the Edit NFS export window, edit the required parameters and click Edit NFS export.
Verification
- You will get a notification that the NFS ganesha is updated successfully.
Additional Resources
- For more information on configuring NFS Ganesha, see Configuring NFS Ganesha daemons on the Ceph dashboard section in the Red Hat Ceph Storage Dashboard Guide.
- For more information on adding Ceph Object Gateway login credentials to the dashboard, see the Manually adding Ceph object gateway login credentials to the dashboard section in the Red Hat Ceph Storage Dashboard Guide.
- For more information on creating Ceph Object Gateway users on the dashboard, see the Creating Ceph object gateway users on the dashboard section in the Red Hat Ceph Storage Dashboard Guide.
- For more information on creating Ceph Object Gateway buckets on the dashboard, see the Creating Ceph object gateway buckets on the dashboard section in the Red Hat Ceph Storage Dashboard Guide.
- For more information on system roles, see the User roles and permissions on the Ceph dashboard section in the Red Hat Ceph Storage Dashboard Guide.
8.4. Deleting NFS Ganesha daemons on the Ceph dashboard
The Ceph dashboard allows you to delete the NFS Ganesha daemons.
Prerequisites
- A running Red Hat Ceph Storage cluster.
-
At least
ganesha-managerlevel of access on the Ceph dashboard. - NFS Ganesha daemon configured on the dashboard.
Procedure
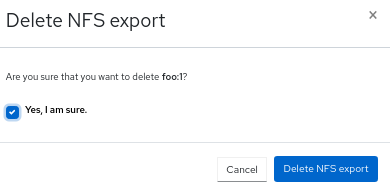
- On the dashboard, click NFS.
- Click the row that needs to be delete.
- From the Edit drop-down menu, click Delete.
In the Delete NFS export dialog box, check Yes, I am sure and click Delete NFS export.
Verification
- The selected row is deleted successfully.
Additional Resources
- For more information on configuring NFS Ganesha, see Configuring NFS Ganesha daemons on the Ceph dashboard section in the Red Hat Ceph Storage Dashboard Guide.
- For more information on adding Ceph Object Gateway login credentials to the dashboard, see the Manually adding Ceph object gateway login credentials to the dashboard section in the Red Hat Ceph Storage Dashboard guide.
- For more information on creating Ceph Object Gateway users on the dashboard, see the Creating Ceph object gateway users on the dashboard section in the Red Hat Ceph Storage Dashboard guide.
- For more information on creating Ceph Object Gateway buckets on the dashboard, see the Creating Ceph object gateway buckets on the dashboard section in the Red Hat Ceph Storage Dashboard guide.
- For more information on system roles, see the User roles and permissions on the Ceph dashboard section in the Red Hat Ceph Storage Dashboard Guide.
8.5. Upgrading NFS cluster to NFS-HA on the Ceph dashboard
The Ceph dashboard allows you to upgrade a standalone NFS cluster to NFS-HA.
Prerequisites
- A running Red Hat Ceph Storage cluster.
- A running NFS service.
-
At least
ganesha-managerlevel of access on the Ceph dashboard. - NFS Ganesha daemon configured on the dashboard.
Procedure
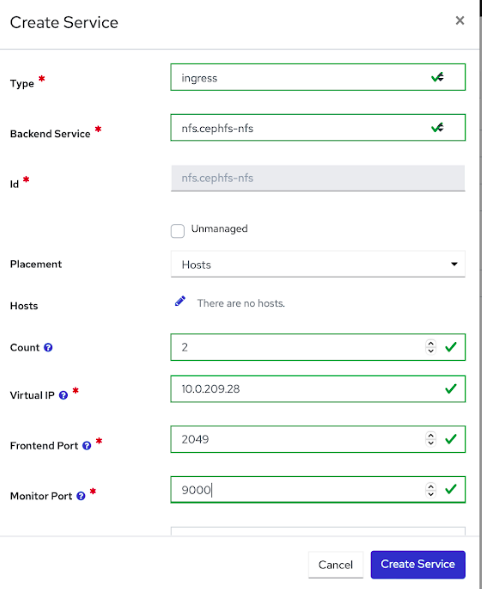
- On the dashboard, click Cluster.
- From the Cluster drop-down menu, click Services.
- Click + Create.
-
In the Create Service window, select
ingressservice. Select the required backend service, edit the required parameters, and click Create Service to upgrade.
Figure 8.2. Create Service window
Additional Resources
- For more information on configuring NFS Ganesha, see Configuring NFS Ganesha daemons on the Ceph dashboard section in the Red Hat Ceph Storage Dashboard guide.