
Operations Guide
Operational tasks for Red Hat Ceph Storage
Abstract
Chapter 1. Introduction to the Ceph Orchestrator
As a storage administrator, you can use the Ceph Orchestrator with Cephadm utility that provides the ability to discover devices and create services in a Red Hat Ceph Storage cluster.
1.1. Use of the Ceph Orchestrator
Red Hat Ceph Storage Orchestrators are manager modules that primarily act as a bridge between a Red Hat Ceph Storage cluster and deployment tools like Rook and Cephadm for a unified experience. They also integrate with the Ceph command line interface and Ceph Dashboard.
The following is a workflow diagram of Ceph Orchestrator:
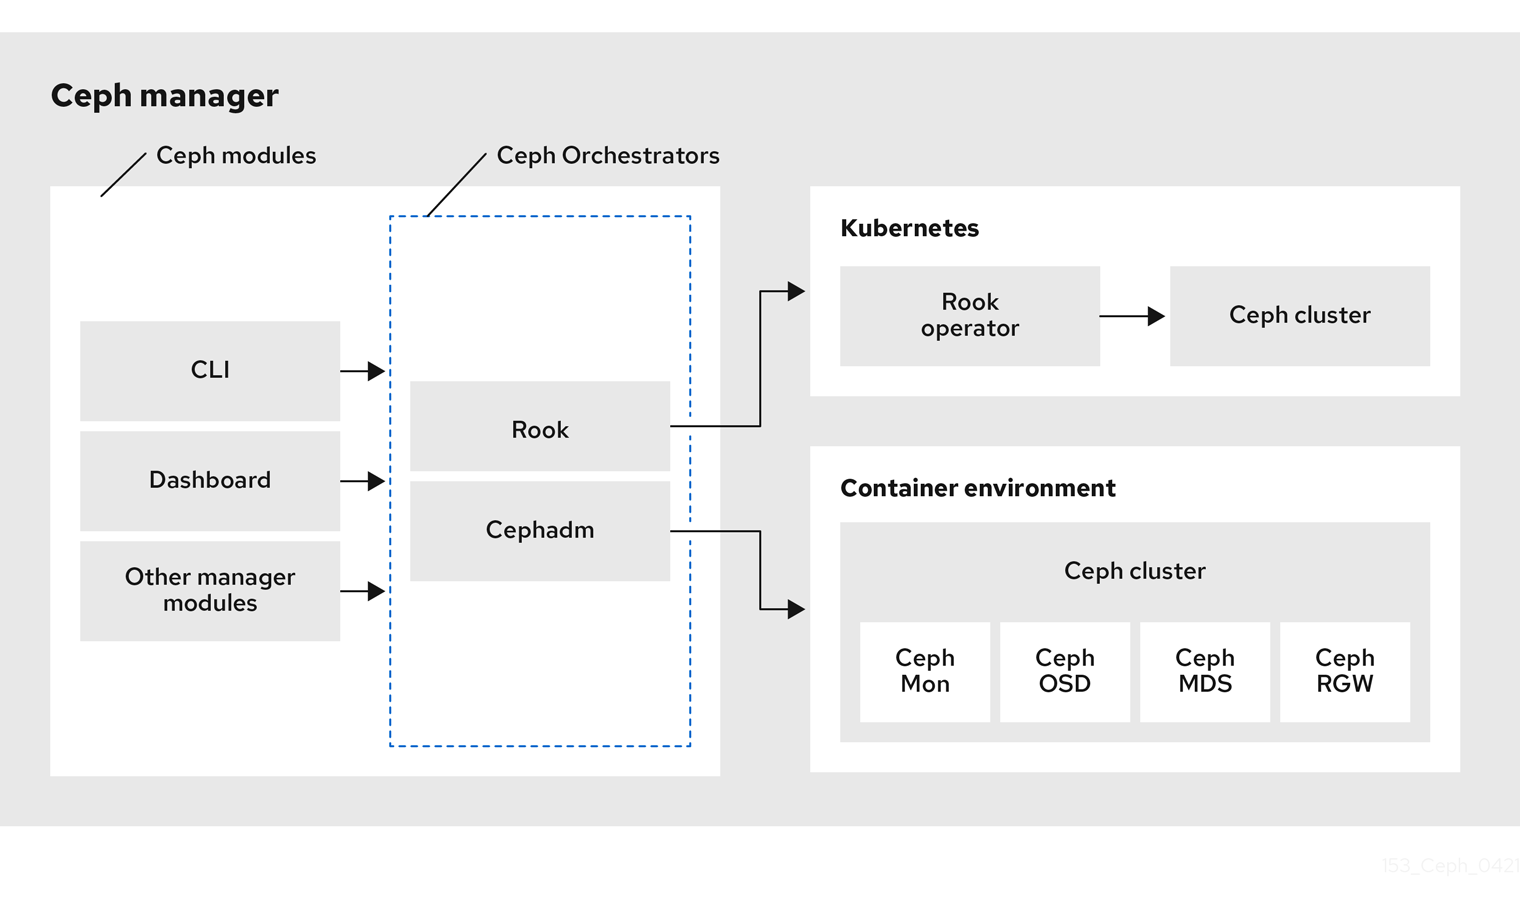
Types of Red Hat Ceph Storage Orchestrators
There are three main types of Red Hat Ceph Storage Orchestrators:
Orchestrator CLI : These are common APIs used in Orchestrators and include a set of commands that can be implemented. These APIs also provide a common command line interface (CLI) to orchestrate
ceph-mgrmodules with external orchestration services. The following are the nomenclature used with the Ceph Orchestrator:- Host : This is the host name of the physical host and not the pod name, DNS name, container name, or host name inside the container.
- Service type : This is the type of the service, such as nfs, mds, osd, mon, rgw, mgr, and iscsi.
- Service : A functional service provided by a Ceph storage cluster such as monitors service, managers service, OSD services, Ceph Object Gateway service, and NFS service.
- Daemon : A specific instance of a service deployed by one or more hosts such as Ceph Object Gateway services can have different Ceph Object Gateway daemons running in three different hosts.
Cephadm Orchestrator - This is a Ceph Orchestrator module that does not rely on an external tool such as Rook or Ansible, but rather manages nodes in a cluster by establishing an SSH connection and issuing explicit management commands. This module is intended for day-one and day-two operations.
Using the Cephadm Orchestrator is the recommended way of installing a Ceph storage cluster without leveraging any deployment frameworks like Ansible. The idea is to provide the manager daemon with access to an SSH configuration and key that is able to connect to all nodes in a cluster to perform any management operations, like creating an inventory of storage devices, deploying and replacing OSDs, or starting and stopping Ceph daemons. In addition, the Cephadm Orchestrator will deploy container images managed by
systemdin order to allow independent upgrades of co-located services.This orchestrator will also likely highlight a tool that encapsulates all necessary operations to manage the deployment of container image based services on the current host, including a command that bootstraps a minimal cluster running a Ceph Monitor and a Ceph Manager.
Rook Orchestrator - Rook is an orchestration tool that uses the Kubernetes Rook operator to manage a Ceph storage cluster running inside a Kubernetes cluster. The rook module provides integration between Ceph’s Orchestrator framework and Rook. Rook is an open source cloud-native storage operator for Kubernetes.
Rook follows the “operator” model, in which a custom resource definition (CRD) object is defined in Kubernetes to describe a Ceph storage cluster and its desired state, and a rook operator daemon is running in a control loop that compares the current cluster state to desired state and takes steps to make them converge. The main object describing Ceph’s desired state is the Ceph storage cluster CRD, which includes information about which devices should be consumed by OSDs, how many monitors should be running, and what version of Ceph should be used. Rook defines several other CRDs to describe RBD pools, CephFS file systems, and so on.
The Rook Orchestrator module is the glue that runs in the
ceph-mgrdaemon and implements the Ceph orchestration API by making changes to the Ceph storage cluster in Kubernetes that describe desired cluster state. A Rook cluster’sceph-mgrdaemon is running as a Kubernetes pod, and hence, the rook module can connect to the Kubernetes API without any explicit configuration.
Chapter 2. Management of services using the Ceph Orchestrator
As a storage administrator, after installing the Red Hat Ceph Storage cluster, you can monitor and manage the services in a storage cluster using the Ceph Orchestrator. A service is a group of daemons that are configured together.
This section covers the following administrative information:
- Checking service status.
- Checking daemon status.
- Placement specification of the Ceph Orchestrator.
- Deploying the Ceph daemons using the command line interface.
- Deploying the Ceph daemons on a subset of hosts using the command line interface.
- Service specification of the Ceph Orchestrator.
- Deploying the Ceph daemons using the service specification.
2.1. Checking service status
You can check the following status of the services of the Red Hat Ceph Storage cluster using the ceph orch ls command:
- Print a list of services.
- Locate the service whose status you want to check.
- Print the status of the service.
If the services are applied with the ceph orch apply command while bootstrapping, changing the service specification file is complicated. Instead, you can use the --export option with the ceph orch ls command to export the running specification, update the yaml file, and re-apply the service.
Prerequisites
- A running Red Hat Ceph Storage cluster.
-
Log into the
cephadmshell.
Procedure
Print a list of services:
Syntax
ceph orch ls [--service_type SERVICE_TYPE] [--service_name SERVICE_NAME] [--export] [--format FORMAT] [--refresh]
The format can be plain,
json,json-pretty,yaml,xml-pretty, orxml.Example
[ceph: root@host01 /]# ceph orch ls
Check the status of a particular service or a daemon:
Syntax
ceph orch ls [--service_type SERVICE_TYPE] [--service_name SERVICE_NAME] [--refresh]
Example
[ceph: root@host01 /]# ceph orch ls --service-type mds
[ceph: root@host01 /]# ceph orch ls --service-name rgw.realm.myzone
Export the service specification:
Example
[ceph: root@host01 /]# ceph orch ls --service-type mgr --export > mgr.yaml
[ceph: root@host01 /]# ceph orch ls --export > cluster.yaml
This exports the file in the
.yamlfile format. This file can be used with theceph orch apply -icommand for retrieving the service specification of a single service.
2.2. Checking daemon status
A daemon is a systemd unit that is running and is part of the service.
You can check the following status of the daemons of the Red Hat Ceph Storage cluster using the ceph orch ps command:
- Print a list of all the daemons.
- Query the status of the target daemon.
Prerequisites
- A running Red Hat Ceph Storage cluster.
-
Log into the
cephadmshell.
Procedure
Print a list of daemons:
Syntax
ceph orch ps [--daemon-type DAEMON_TYPE] [--service_name SERVICE_NAME] [--daemon_id DAEMON_ID] [--format FORMAT] [--refresh]
Example
[ceph: root@host01 /]# ceph orch ps
Check the status of a particular service instance:
Syntax
ceph orch ls [--daemon-type DAEMON_TYPE] [--daemon_id DAEMON_ID] [--refresh]
Example
[ceph: root@host01 /]# ceph orch ps --daemon_type osd --daemon_id 0
2.3. Placement specification of the Ceph Orchestrator
You can use the Ceph Orchestrator to deploy osds, mons, mgrs, mds and rgw, and iSCSI services. Red Hat recommends deploying services using placement specifications. You need to know where and how many daemons have to be deployed to deploy a service using the Ceph Orchestrator. Placement specifications can either be passed as command line arguments or as a service specification in a yaml file.
There are two ways of deploying the services using the placement specification:
Using the placement specification directly in the command line interface. For example, if you want to deploy three monitors on the hosts, running the following command deploys three monitors on
host01,host02, andhost03.Example
[ceph: root@host01 /]# ceph orch apply mon --placement="3 host01 host02 host03"
Using the placement specification in the YAML file. For example, if you want to deploy
node-exporteron all the hosts, then you can specify the following in theyamlfile.Example
service_type: node-exporter
placement:
host_pattern: '*'
2.4. Deploying the Ceph daemons using the command line interface
Using the Ceph Orchestrator, you can deploy the daemons such as Ceph Manager, Ceph Monitors, Ceph OSDs, monitoring stack, and others using the ceph orch command. Placement specification is passed as --placement argument with the Orchestrator commands.
Prerequisites
- A running Red Hat Ceph Storage cluster.
- Hosts are added to the storage cluster.
Procedure
Log into the Cephadm shell:
Example
[root@host01 ~]# cephadm shell
Use one of the following methods to deploy the daemons on the hosts:
Method 1: Specify the number of daemons and the host names:
Syntax
ceph orch apply SERVICE_NAME --placement="NUMBER_OF_DAEMONS HOST_NAME_1 HOST_NAME_2 HOST_NAME_3"
Example
[ceph: root@host01 /]# ceph orch apply mon --placement="3 host01 host02 host03"
Method 2: Add the labels to the hosts and then deploy the daemons using the labels:
Add the labels to the hosts:
Syntax
ceph orch host label add HOSTNAME_1 LABEL
Example
[ceph: root@host01 /]# ceph orch host label add host01 mon
Deploy the daemons with labels:
Syntax
ceph orch apply DAEMON_NAME label:LABEL
Example
ceph orch apply mon label:mon
Method 3: Add the labels to the hosts and deploy using the
--placementargument:Add the labels to the hosts:
Syntax
ceph orch host label add HOSTNAME_1 LABEL
Example
[ceph: root@host01 /]# ceph orch host label add host01 mon
Deploy the daemons using the label placement specification:
Syntax
ceph orch apply DAEMON_NAME --placement="label:LABEL"
Example
ceph orch apply mon --placement="label:mon"
Verification
List the service:
Example
[ceph: root@host01 /]# ceph orch ls
List the hosts, daemons, and processes:
Syntax
ceph orch ps --daemon_type=DAEMON_NAME
ceph orch ps --service_name=SERVICE_NAME
Example
[ceph: root@host01 /]# ceph orch ps --daemon_type=mon
[ceph: root@host01 /]# ceph orch ps --service_name=mon
Additional Resources
- See the Adding hosts using the Ceph Orchestrator section in the Red Hat Ceph Storage Operations Guide.
2.5. Deploying the Ceph daemons on a subset of hosts using the command line interface
You can use the --placement option to deploy daemons on a subset of hosts. You can specify the number of daemons in the placement specification with the name of the hosts to deploy the daemons.
Prerequisites
- A running Red Hat Ceph Storage cluster.
- Hosts are added to the cluster.
Procedure
Log into the Cephadm shell:
Example
[root@host01 ~]# cephadm shell
List the hosts on which you want to deploy the Ceph daemons:
Example
[ceph: root@host01 /]# ceph orch host ls
Deploy the daemons:
Syntax
ceph orch apply SERVICE_NAME --placement="NUMBER_OF_DAEMONS HOST_NAME_1 _HOST_NAME_2 HOST_NAME_3"
Example
ceph orch apply mgr --placement="2 host01 host02 host03"
In this example, the
mgrdaemons are deployed only on two hosts.
Verification
List the hosts:
Example
[ceph: root@host01 /]# ceph orch host ls
Additional Resources
- See the Listing hosts using the Ceph Orchestrator section in the Red Hat Ceph Storage Operations Guide.
2.6. Service specification of the Ceph Orchestrator
A service specification is a data structure to specify the service attributes and configuration settings that is used to deploy the Ceph service. The following is an example of the multi-document YAML file, cluster.yaml, for specifying service specifications:
Example
service_type: mon
placement:
  host_pattern: "mon*"
---
service_type: mgr
placement:
  host_pattern: "mgr*"
---
service_type: osd
service_id: default_drive_group
placement:
  host_pattern: "osd*"
data_devices:
  all: true
The following list are the parameters where the properties of a service specification are defined as follows:
service_type: The type of service:- Ceph services like mon, crash, mds, mgr, osd, rbd, or rbd-mirror.
- Ceph gateway like nfs or rgw.
- Monitoring stack like Alertmanager, Prometheus, Grafana or Node-exporter.
- Container for custom containers.
-
service_id: A unique name of the service. -
placement: This is used to define where and how to deploy the daemons. -
unmanaged: If set totrue, the Orchestrator will neither deploy nor remove any daemon associated with this service.
Stateless service of Orchestrators
A stateless service is a service that does not need information of the state to be available. For example, to start an rgw service, additional information is not needed to start or run the service. The rgw service does not create information about this state in order to provide the functionality. Regardless of when the rgw service starts, the state is the same.
2.7. Deploying the Ceph daemons using the service specification
Using the Ceph Orchestrator, you can deploy daemons such as ceph Manager, Ceph Monitors, Ceph OSDs, monitoring stack, and others using the service specification in a YAML file.
Prerequisites
- A running Red Hat Ceph Storage cluster.
- Root-level access to all the nodes.
Procedure
Create the
yamlfile:Example
[root@host01 ~]# touch mon.yaml
This file can be configured in two different ways:
Edit the file to include the host details in placement specification:
Syntax
service_type: SERVICE_NAME
placement:
  hosts:
    - HOST_NAME_1
    - HOST_NAME_2
Example
service_type: mon
placement:
  hosts:
    - host01
    - host02
    - host03
Edit the file to include the label details in placement specification:
Syntax
service_type: SERVICE_NAME
placement:
  label: "LABEL_1"
Example
service_type: mon
placement:
  label: "mon"
Optional: You can also use extra container arguments in the service specification files such as CPUs, CA certificates, and other files while deploying services:
Example
extra_container_args:
  - "-v"
  - "/etc/pki/ca-trust/extracted:/etc/pki/ca-trust/extracted:ro"
  - "--security-opt"
  - "label=disable"
  - "cpus=2"
Mount the YAML file under a directory in the container:
Example
[root@host01 ~]# cephadm shell --mount mon.yaml:/var/lib/ceph/mon/mon.yaml
Navigate to the directory:
Example
[ceph: root@host01 /]# cd /var/lib/ceph/mon/
Deploy the Ceph daemons using service specification:
Syntax
ceph orch apply -i FILE_NAME.yamlExample
[ceph: root@host01 mon]# ceph orch apply -i mon.yaml
Verification
List the service:
Example
[ceph: root@host01 /]# ceph orch ls
List the hosts, daemons, and processes:
Syntax
ceph orch ps --daemon_type=DAEMON_NAMEExample
[ceph: root@host01 /]# ceph orch ps --daemon_type=mon
Additional Resources
- See the Listing hosts using the Ceph Orchestrator section in the Red Hat Ceph Storage Operations Guide.
Chapter 3. Management of hosts using the Ceph Orchestrator
As a storage administrator, you can use the Ceph Orchestrator with Cephadm in the backend to add, list, and remove hosts in an existing Red Hat Ceph Storage cluster.
You can also add labels to hosts. Labels are free-form and have no specific meanings. Each host can have multiple labels. For example, apply the mon label to all hosts that have monitor daemons deployed, mgr for all hosts with manager daemons deployed, rgw for Ceph object gateways, and so on.
Labeling all the hosts in the storage cluster helps to simplify system management tasks by allowing you to quickly identify the daemons running on each host. In addition, you can use the Ceph Orchestrator or a YAML file to deploy or remove daemons on hosts that have specific host labels.
This section covers the following administrative tasks:
- Adding hosts using the Ceph Orchestrator.
- Adding multiple hosts using the Ceph Orchestrator.
- Listing hosts using the Ceph Orchestrator.
- Adding labels to hosts using the Ceph Orchestrator.
- Removing a label from a host.
- Removing hosts using the Ceph Orchestrator.
- Placing hosts in the maintenance mode using the Ceph Orchestrator.
3.1. Prerequisites
- A running Red Hat Ceph Storage cluster.
- Root-level access to all the nodes.
-
The IP addresses of the new hosts should be updated in
/etc/hostsfile.
3.2. Adding hosts using the Ceph Orchestrator
You can use the Ceph Orchestrator with Cephadm in the backend to add hosts to an existing Red Hat Ceph Storage cluster.
Prerequisites
- A running Red Hat Ceph Storage cluster.
- Root-level access to all nodes in the storage cluster.
- Register the nodes to the CDN and attach subscriptions.
-
Ansible user with sudo and passwordless
sshaccess to all nodes in the storage cluster.
Procedure
From the Ceph administration node, log into the Cephadm shell:
Example
[root@host01 ~]# cephadm shell
Extract the cluster’s public SSH keys to a folder:
Syntax
ceph cephadm get-pub-key > ~/PATHExample
[ceph: root@host01 /]# ceph cephadm get-pub-key > ~/ceph.pub
Copy Ceph cluster’s public SSH keys to the root user’s
authorized_keysfile on the new host:Syntax
ssh-copy-id -f -i ~/PATH root@HOST_NAME_2
Example
[ceph: root@host01 /]# ssh-copy-id -f -i ~/ceph.pub root@host02
From the Ansible administration node, add the new host to the Ansible inventory file. The default location for the file is
/usr/share/cephadm-ansible/hosts. The following example shows the structure of a typical inventory file:Example
host01
host02
host03

[admin]
host00
NoteIf you have previously added the new host to the Ansible inventory file and run the preflight playbook on the host, skip to step 6.
Run the preflight playbook with the
--limitoption:Syntax
ansible-playbook -i INVENTORY_FILE cephadm-preflight.yml --extra-vars "ceph_origin=rhcs" --limit NEWHOST
Example
[ceph-admin@admin cephadm-ansible]$ ansible-playbook -i hosts cephadm-preflight.yml --extra-vars "ceph_origin=rhcs" --limit host02
The preflight playbook installs
podman,lvm2,chronyd, andcephadmon the new host. After installation is complete,cephadmresides in the/usr/sbin/directory.From the Ceph administration node, log into the Cephadm shell:
Example
[root@host01 ~]# cephadm shell
Use the
cephadmorchestrator to add hosts to the storage cluster:Syntax
ceph orch host add HOST_NAME IP_ADDRESS_OF_HOST [--label=LABEL_NAME_1,LABEL_NAME_2]
The
--labeloption is optional and this adds the labels when adding the hosts. You can add multiple labels to the host.Example
[ceph: root@host01 /]# ceph orch host add host02 10.10.128.70 --labels=mon,mgr
Verification
List the hosts:
Example
[ceph: root@host01 /]# ceph orch host ls
Additional Resources
- See the Listing hosts using the Ceph Orchestrator section in the Red Hat Ceph Storage Operations Guide.
-
For more information about the
cephadm-preflightplaybook, see Running the preflight playbook section in the Red Hat Ceph Storage Installation Guide. - See the Registering Red Hat Ceph Storage nodes to the CDN and attaching subscriptions section in the Red Hat Ceph Storage Installation Guide.
- See the Creating an Ansible user with sudo access section in the Red Hat Ceph Storage Installation Guide.
3.3. Setting the initial CRUSH location of host
You can add the location identifier to the host which instructs cephadm to create a new CRUSH host located in the specified hierarchy.
The location attribute only affects the initial CRUSH location. Subsequent changes of the location property is ignored. Also, removing a host does not remove any CRUSH buckets.
Prerequisites
- A running Red Hat Ceph Storage cluster.
Procedure
Edit the
hosts.yamlfile to include the following details:Example
service_type: host
hostname: host01
addr: 192.168.0.11
location:
  rack: rack1
Mount the YAML file under a directory in the container:
Example
[root@host01 ~]# cephadm shell --mount hosts.yaml:/var/lib/ceph/hosts.yaml
Navigate to the directory:
Example
[ceph: root@host01 /]# cd /var/lib/ceph/
Deploy the hosts using service specification:
Syntax
ceph orch apply -i FILE_NAME.yamlExample
[ceph: root@host01 ceph]# ceph orch apply -i hosts.yaml
Additional Resources
- See the Listing hosts using the Ceph Orchestrator section in the Red Hat Ceph Storage Operations Guide.
3.4. Adding multiple hosts using the Ceph Orchestrator
You can use the Ceph Orchestrator to add multiple hosts to a Red Hat Ceph Storage cluster at the same time using the service specification in YAML file format.
Prerequisites
- A running Red Hat Ceph Storage cluster.
Procedure
Create the
hosts.yamlfile:Example
[root@host01 ~]# touch hosts.yaml
Edit the
hosts.yamlfile to include the following details:Example
service_type: host
addr: host01
hostname: host01
labels:
- mon
- osd
- mgr
---
service_type: host
addr: host02
hostname: host02
labels:
- mon
- osd
- mgr
---
service_type: host
addr: host03
hostname: host03
labels:
- mon
- osd
Mount the YAML file under a directory in the container:
Example
[root@host01 ~]# cephadm shell --mount hosts.yaml:/var/lib/ceph/hosts.yaml
Navigate to the directory:
Example
[ceph: root@host01 /]# cd /var/lib/ceph/
Deploy the hosts using service specification:
Syntax
ceph orch apply -i FILE_NAME.yamlExample
[ceph: root@host01 hosts]# ceph orch apply -i hosts.yaml
Verification
List the hosts:
Example
[ceph: root@host01 /]# ceph orch host ls
Additional Resources
- See the Listing hosts using the Ceph Orchestrator section in the Red Hat Ceph Storage Operations Guide.
3.5. Listing hosts using the Ceph Orchestrator
You can list hosts of a Ceph cluster with Ceph Orchestrators.
The STATUS of the hosts is blank, in the output of the ceph orch host ls command.
Prerequisites
- A running Red Hat Ceph Storage cluster.
- Hosts are added to the storage cluster.
Procedure
Log into the Cephadm shell:
Example
[root@host01 ~]# cephadm shell
List the hosts of the cluster:
Example
[ceph: root@host01 /]# ceph orch host ls
You will see that the STATUS of the hosts is blank which is expected.
3.6. Adding labels to hosts using the Ceph Orchestrator
You can use the Ceph Orchestrator to add labels to hosts in an existing Red Hat Ceph Storage cluster. A few examples of labels are mgr, mon, and osd based on the service deployed on the hosts.
You can also add the following host labels that have special meaning to cephadm and they begin with _:
-
_no_schedule: This label preventscephadmfrom scheduling or deploying daemons on the host. If it is added to an existing host that already contains Ceph daemons, it causescephadmto move those daemons elsewhere, except OSDs which are not removed automatically. When a host is added with the_no_schedulelabel, no daemons are deployed on it. When the daemons are drained before the host is removed, the_no_schedulelabel is set on that host. -
_no_autotune_memory: This label does not autotune memory on the host. It prevents the daemon memory from being tuned even when theosd_memory_target_autotuneoption or other similar options are enabled for one or more daemons on that host. -
_admin: By default, the_adminlabel is applied to the bootstrapped host in the storage cluster and theclient.adminkey is set to be distributed to that host with theceph orch client-keyring {ls|set|rm}function. Adding this label to additional hosts normally causescephadmto deploy configuration and keyring files in/etc/cephdirectory.
Prerequisites
- A running Red Hat Ceph Storage cluster.
- Hosts are added to the storage cluster
Procedure
Log into the Cephadm shell:
Example
[root@host01 ~]# cephadm shell
Add labels to the hosts:
Syntax
ceph orch host label add HOST_NAME LABEL_NAME
Example
[ceph: root@host01 /]# ceph orch host label add host02 mon
Verification
List the hosts:
Example
[ceph: root@host01 /]# ceph orch host ls
3.7. Removing a label from a host
You can use the Ceph orchestrator to remove a label from a host.
Prerequisites
- A storage cluster that has been installed and bootstrapped.
- Root-level access to all nodes in the storage cluster.
Procedure
Launch the
cephadmshell:[root@host01 ~]# cephadm shell [ceph: root@host01 /]#
Remove the label.
Syntax
ceph orch host label rm HOSTNAME LABEL
Example
[ceph: root@host01 /]# ceph orch host label rm host02 mon
Verification
List the hosts:
Example
[ceph: root@host01 /]# ceph orch host ls
3.8. Removing hosts using the Ceph Orchestrator
You can remove hosts of a Ceph cluster with the Ceph Orchestrators. All the daemons are removed with the drain option which adds the _no_schedule label to ensure that you cannot deploy any daemons or a cluster till the operation is complete.
If you are removing the bootstrap host, be sure to copy the admin keyring and the configuration file to another host in the storage cluster before you remove the host.
Prerequisites
- A running Red Hat Ceph Storage cluster.
- Root-level access to all the nodes.
- Hosts are added to the storage cluster.
- All the services are deployed.
- Cephadm is deployed on the nodes where the services have to be removed.
Procedure
Log into the Cephadm shell:
Example
[root@host01 ~]# cephadm shell
Fetch the host details:
Example
[ceph: root@host01 /]# ceph orch host ls
Drain all the daemons from the host:
Syntax
ceph orch host drain HOSTNAMEExample
[ceph: root@host01 /]# ceph orch host drain host02
The
_no_schedulelabel is automatically applied to the host which blocks deployment.Check the status of OSD removal:
Example
[ceph: root@host01 /]# ceph orch osd rm status
When no placement groups (PG) are left on the OSD, the OSD is decommissioned and removed from the storage cluster.
Check if all the daemons are removed from the storage cluster:
Syntax
ceph orch ps HOSTNAMEExample
[ceph: root@host01 /]# ceph orch ps host02
Remove the host:
Syntax
ceph orch host rm HOSTNAMEExample
[ceph: root@host01 /]# ceph orch host rm host02
Additional Resources
- See the Adding hosts using the Ceph Orchestrator section in the Red Hat Ceph Storage Operations Guide for more information.
- See the Listing hosts using the Ceph Orchestrator section in the Red Hat Ceph Storage Operations Guide for more information.
3.9. Placing hosts in the maintenance mode using the Ceph Orchestrator
You can use the Ceph Orchestrator to place the hosts in and out of the maintenance mode. The ceph orch host maintenance enter command stops the systemd target which causes all the Ceph daemons to stop on the host. Similarly, the ceph orch host maintenance exit command restarts the systemd target and the Ceph daemons restart on their own.
The orchestrator adopts the following workflow when the host is placed in maintenance:
-
Confirms the removal of hosts does not impact data availability by running the
orch host ok-to-stopcommand. -
If the host has Ceph OSD daemons, it applies
nooutto the host subtree to prevent data migration from triggering during the planned maintenance slot. - Stops the Ceph target, thereby, stopping all the daemons.
-
Disables the
ceph targeton the host, to prevent a reboot from automatically starting Ceph services.
Exiting maintenance reverses the above sequence.
Prerequisites
- A running Red Hat Ceph Storage cluster.
- Root-level access to all the nodes.
- Hosts added to the cluster.
Procedure
Log into the Cephadm shell:
Example
[root@host01 ~]# cephadm shell
You can either place the host in maintenance mode or place it out of the maintenance mode:
Place the host in maintenance mode:
Syntax
ceph orch host maintenance enter HOST_NAME [--force]Example
[ceph: root@host01 /]# ceph orch host maintenance enter host02 --force
The
--forceflag allows the user to bypass warnings, but not alerts.Place the host out of the maintenance mode:
Syntax
ceph orch host maintenance exit HOST_NAMEExample
[ceph: root@host01 /]# ceph orch host maintenance exit host02
Verification
List the hosts:
Example
[ceph: root@host01 /]# ceph orch host ls
Chapter 4. Management of monitors using the Ceph Orchestrator
As a storage administrator, you can deploy additional monitors using placement specification, add monitors using service specification, add monitors to a subnet configuration, and add monitors to specific hosts. Apart from this, you can remove the monitors using the Ceph Orchestrator.
By default, a typical Red Hat Ceph Storage cluster has three or five monitor daemons deployed on different hosts.
Red Hat recommends deploying five monitors if there are five or more nodes in a cluster.
Red Hat recommends deploying three monitors when Ceph is deployed with the OSP director.
Ceph deploys monitor daemons automatically as the cluster grows, and scales back monitor daemons automatically as the cluster shrinks. The smooth execution of this automatic growing and shrinking depends upon proper subnet configuration.
If your monitor nodes or your entire cluster are located on a single subnet, then Cephadm automatically adds up to five monitor daemons as you add new hosts to the cluster. Cephadm automatically configures the monitor daemons on the new hosts. The new hosts reside on the same subnet as the bootstrapped host in the storage cluster.
Cephadm can also deploy and scale monitors to correspond to changes in the size of the storage cluster.
4.1. Ceph Monitors
Ceph Monitors are lightweight processes that maintain a master copy of the storage cluster map. All Ceph clients contact a Ceph monitor and retrieve the current copy of the storage cluster map, enabling clients to bind to a pool and read and write data.
Ceph Monitors use a variation of the Paxos protocol to establish consensus about maps and other critical information across the storage cluster. Due to the nature of Paxos, Ceph requires a majority of monitors running to establish a quorum, thus establishing consensus.
Red Hat requires at least three monitors on separate hosts to receive support for a production cluster.
Red Hat recommends deploying an odd number of monitors. An odd number of Ceph Monitors has a higher resiliency to failures than an even number of monitors. For example, to maintain a quorum on a two-monitor deployment, Ceph cannot tolerate any failures; with three monitors, one failure; with four monitors, one failure; with five monitors, two failures. This is why an odd number is advisable. Summarizing, Ceph needs a majority of monitors to be running and to be able to communicate with each other, two out of three, three out of four, and so on.
For an initial deployment of a multi-node Ceph storage cluster, Red Hat requires three monitors, increasing the number two at a time if a valid need for more than three monitors exists.
Since Ceph Monitors are lightweight, it is possible to run them on the same host as OpenStack nodes. However, Red Hat recommends running monitors on separate hosts.
Red Hat ONLY supports collocating Ceph services in containerized environments.
When you remove monitors from a storage cluster, consider that Ceph Monitors use the Paxos protocol to establish a consensus about the master storage cluster map. You must have a sufficient number of Ceph Monitors to establish a quorum.
Additional Resources
- See the Red Hat Ceph Storage Supported configurations Knowledgebase article for all the supported Ceph configurations.
4.2. Configuring monitor election strategy
The monitor election strategy identifies the net splits and handles failures. You can configure the election monitor strategy in three different modes:
-
classic- This is the default mode in which the lowest ranked monitor is voted based on the elector module between the two sites. -
disallow- This mode lets you mark monitors as disallowed, in which case they will participate in the quorum and serve clients, but cannot be an elected leader. This lets you add monitors to a list of disallowed leaders. If a monitor is in the disallowed list, it will always defer to another monitor. -
connectivity- This mode is mainly used to resolve network discrepancies. It evaluates connection scores, based on pings that check liveness, provided by each monitor for its peers and elects the most connected and reliable monitor to be the leader. This mode is designed to handle net splits, which may happen if your cluster is stretched across multiple data centers or otherwise susceptible. This mode incorporates connection score ratings and elects the monitor with the best score. If a specific monitor is desired to be the leader, configure the election strategy so that the specific monitor is the first monitor in the list with a rank is0.
Red Hat recommends you to stay in the classic mode unless you require features in the other modes.
Before constructing the cluster, change the election_strategy to classic, disallow, or connectivity in the following command:
Syntax
ceph mon set election_strategy {classic|disallow|connectivity}
4.3. Deploying the Ceph monitor daemons using the command line interface
The Ceph Orchestrator deploys one monitor daemon by default. You can deploy additional monitor daemons by using the placement specification in the command line interface. To deploy a different number of monitor daemons, specify a different number. If you do not specify the hosts where the monitor daemons should be deployed, the Ceph Orchestrator randomly selects the hosts and deploys the monitor daemons to them.
If you are using a cluster in stretched mode, before adding the Ceph Monitor, add the crush_location to the monitor manually:
Syntax
ceph mon add HOST IP_ADDRESS datacenter=DATACENTER
Example
[ceph: root@host01 /]# ceph mon add host01 213.222.226.50 datacenter=DC1 adding mon.host01 at [v2:213.222.226.50:3300/0,v1:213.222.226.50:6789/0]
In this example datacenter=DC1 is the crush_location.
Prerequisites
- A running Red Hat Ceph Storage cluster.
- Hosts are added to the cluster.
Procedure
Log into the Cephadm shell:
Example
[root@host01 ~]# cephadm shell
- There are four different ways of deploying Ceph monitor daemons:
Method 1
Use placement specification to deploy monitors on hosts:
NoteRed Hat recommends that you use the
--placementoption to deploy on specific hosts.Syntax
ceph orch apply mon --placement="HOST_NAME_1 HOST_NAME_2 HOST_NAME_3"
Example
[ceph: root@host01 /]# ceph orch apply mon --placement="host01 host02 host03"
NoteBe sure to include the bootstrap node as the first node in the command.
ImportantDo not add the monitors individually as
ceph orch apply monsupersedes and will not add the monitors to all the hosts. For example, if you run the following commands, then the first command creates a monitor onhost01. Then the second command supersedes the monitor on host1 and creates a monitor onhost02. Then the third command supersedes the monitor onhost02and creates a monitor onhost03. Eventually. there is a monitor only on the third host.# ceph orch apply mon host01 # ceph orch apply mon host02 # ceph orch apply mon host03
Method 2
Use placement specification to deploy specific number of monitors on specific hosts with labels:
Add the labels to the hosts:
Syntax
ceph orch host label add HOSTNAME_1 LABEL
Example
[ceph: root@host01 /]# ceph orch host label add host01 mon
Deploy the daemons:
Syntax
ceph orch apply mon --placement="HOST_NAME_1:mon HOST_NAME_2:mon HOST_NAME_3:mon"
Example
[ceph: root@host01 /]# ceph orch apply mon --placement="host01:mon host02:mon host03:mon"
Method 3
Use placement specification to deploy specific number of monitors on specific hosts:
Syntax
ceph orch apply mon --placement="NUMBER_OF_DAEMONS HOST_NAME_1 HOST_NAME_2 HOST_NAME_3"
Example
[ceph: root@host01 /]# ceph orch apply mon --placement="3 host01 host02 host03"
Method 4
Deploy monitor daemons randomly on the hosts in the storage cluster:
Syntax
ceph orch apply mon NUMBER_OF_DAEMONSExample
[ceph: root@host01 /]# ceph orch apply mon 3
Verification
List the service:
Example
[ceph: root@host01 /]# ceph orch ls
List the hosts, daemons, and processes:
Syntax
ceph orch ps --daemon_type=DAEMON_NAMEExample
[ceph: root@host01 /]# ceph orch ps --daemon_type=mon
4.4. Deploying the Ceph monitor daemons using the service specification
The Ceph Orchestrator deploys one monitor daemon by default. You can deploy additional monitor daemons by using the service specification, like a YAML format file.
Prerequisites
- A running Red Hat Ceph Storage cluster.
- Hosts are added to the cluster.
Procedure
Create the
mon.yamlfile:Example
[root@host01 ~]# touch mon.yaml
Edit the
mon.yamlfile to include the following details:Syntax
service_type: mon placement: hosts: - HOST_NAME_1 - HOST_NAME_2Example
service_type: mon placement: hosts: - host01 - host02Mount the YAML file under a directory in the container:
Example
[root@host01 ~]# cephadm shell --mount mon.yaml:/var/lib/ceph/mon/mon.yaml
Navigate to the directory:
Example
[ceph: root@host01 /]# cd /var/lib/ceph/mon/
Deploy the monitor daemons:
Syntax
ceph orch apply -i FILE_NAME.yamlExample
[ceph: root@host01 mon]# ceph orch apply -i mon.yaml
Verification
List the service:
Example
[ceph: root@host01 /]# ceph orch ls
List the hosts, daemons, and processes:
Syntax
ceph orch ps --daemon_type=DAEMON_NAMEExample
[ceph: root@host01 /]# ceph orch ps --daemon_type=mon
4.5. Deploying the monitor daemons on specific network using the Ceph Orchestrator
The Ceph Orchestrator deploys one monitor daemon by default. You can explicitly specify the IP address or CIDR network for each monitor and control where each monitor is placed.
Prerequisites
- A running Red Hat Ceph Storage cluster.
- Hosts are added to the cluster.
Procedure
Log into the Cephadm shell:
Example
[root@host01 ~]# cephadm shell
Disable automated monitor deployment:
Example
[ceph: root@host01 /]# ceph orch apply mon --unmanaged
Deploy monitors on hosts on specific network:
Syntax
ceph orch daemon add mon HOST_NAME_1:IP_OR_NETWORK
Example
[ceph: root@host01 /]# ceph orch daemon add mon host03:10.1.2.123
Verification
List the service:
Example
[ceph: root@host01 /]# ceph orch ls
List the hosts, daemons, and processes:
Syntax
ceph orch ps --daemon_type=DAEMON_NAMEExample
[ceph: root@host01 /]# ceph orch ps --daemon_type=mon
4.6. Removing the monitor daemons using the Ceph Orchestrator
To remove the monitor daemons from the host, you can just redeploy the monitor daemons on other hosts.
Prerequisites
- A running Red Hat Ceph Storage cluster.
- Hosts are added to the cluster.
- At least one monitor daemon deployed on the hosts.
Procedure
Log into the Cephadm shell:
Example
[root@host01 ~]# cephadm shell
Run the
ceph orch applycommand to deploy the required monitor daemons:Syntax
ceph orch apply mon “NUMBER_OF_DAEMONS HOST_NAME_1 HOST_NAME_3”
If you want to remove monitor daemons from
host02, then you can redeploy the monitors on other hosts.Example
[ceph: root@host01 /]# ceph orch apply mon “2 host01 host03”
Verification
List the hosts,daemons, and processes:
Syntax
ceph orch ps --daemon_type=DAEMON_NAMEExample
[ceph: root@host01 /]# ceph orch ps --daemon_type=mon
Additional Resources
- See Deploying the Ceph monitor daemons using the command line interface section in the Red Hat Ceph Storage Operations Guide for more information.
- See Deploying the Ceph monitor daemons using the service specification section in the Red Hat Ceph Storage Operations Guide for more information.
4.7. Removing a Ceph Monitor from an unhealthy storage cluster
You can remove a ceph-mon daemon from an unhealthy storage cluster. An unhealthy storage cluster is one that has placement groups persistently in not active + clean state.
Prerequisites
- A running Red Hat Ceph Storage cluster.
- Root-level access to the Ceph Monitor node.
- At least one running Ceph Monitor node.
Procedure
Identify a surviving monitor and log into the host:
Syntax
ssh root@MONITOR_IDExample
[root@admin ~]# ssh root@host00
Log in to each Ceph Monitor host and stop all the Ceph Monitors:
Syntax
cephadm unit --name DAEMON_NAME.HOSTNAME stop
Example
[root@host00 ~]# cephadm unit --name mon.host00 stop
Set up the environment suitable for extended daemon maintenance and to run the daemon interactively:
Syntax
cephadm shell --name DAEMON_NAME.HOSTNAME
Example
[root@host00 ~]# cephadm shell --name mon.host00
Extract a copy of the
monmapfile:Syntax
ceph-mon -i HOSTNAME --extract-monmap TEMP_PATH
Example
[ceph: root@host00 /]# ceph-mon -i host01 --extract-monmap /tmp/monmap 2022-01-05T11:13:24.440+0000 7f7603bd1700 -1 wrote monmap to /tmp/monmap
Remove the non-surviving Ceph Monitor(s):
Syntax
monmaptool TEMPORARY_PATH --rm HOSTNAME
Example
[ceph: root@host00 /]# monmaptool /tmp/monmap --rm host01
Inject the surviving monitor map with the removed monitor(s) into the surviving Ceph Monitor:
Syntax
ceph-mon -i HOSTNAME --inject-monmap TEMP_PATH
Example
[ceph: root@host00 /]# ceph-mon -i host00 --inject-monmap /tmp/monmap
Start only the surviving monitors:
Syntax
cephadm unit --name DAEMON_NAME.HOSTNAME start
Example
[root@host00 ~]# cephadm unit --name mon.host00 start
Verify the monitors form a quorum:
Example
[ceph: root@host00 /]# ceph -s
-
Optional: Archive the removed Ceph Monitor’s data directory in
/var/lib/ceph/CLUSTER_FSID/mon.HOSTNAMEdirectory.
Chapter 5. Management of managers using the Ceph Orchestrator
As a storage administrator, you can use the Ceph Orchestrator to deploy additional manager daemons. Cephadm automatically installs a manager daemon on the bootstrap node during the bootstrapping process.
In general, you should set up a Ceph Manager on each of the hosts running the Ceph Monitor daemon to achieve same level of availability.
By default, whichever ceph-mgr instance comes up first is made active by the Ceph Monitors, and others are standby managers. There is no requirement that there should be a quorum among the ceph-mgr daemons.
If the active daemon fails to send a beacon to the monitors for more than the mon mgr beacon grace, then it is replaced by a standby.
If you want to pre-empt failover, you can explicitly mark a ceph-mgr daemon as failed with ceph mgr fail MANAGER_NAME command.
5.1. Prerequisites
- A running Red Hat Ceph Storage cluster.
- Root-level access to all the nodes.
- Hosts are added to the cluster.
5.2. Deploying the manager daemons using the Ceph Orchestrator
The Ceph Orchestrator deploys two Manager daemons by default. You can deploy additional manager daemons using the placement specification in the command line interface. To deploy a different number of Manager daemons, specify a different number. If you do not specify the hosts where the Manager daemons should be deployed, the Ceph Orchestrator randomly selects the hosts and deploys the Manager daemons to them.
Ensure your deployment has at least three Ceph Managers in each deployment.
Prerequisites
- A running Red Hat Ceph Storage cluster.
- Hosts are added to the cluster.
Procedure
Log into the Cephadm shell:
Example
[root@host01 ~]# cephadm shell
- You can deploy manager daemons in two different ways:
Method 1
Deploy manager daemons using placement specification on specific set of hosts:
NoteRed Hat recommends that you use the
--placementoption to deploy on specific hosts.Syntax
ceph orch apply mgr --placement=" HOST_NAME_1 HOST_NAME_2 HOST_NAME_3"
Example
[ceph: root@host01 /]# ceph orch apply mgr --placement="host01 host02 host03"
Method 2
Deploy manager daemons randomly on the hosts in the storage cluster:
Syntax
ceph orch apply mgr NUMBER_OF_DAEMONSExample
[ceph: root@host01 /]# ceph orch apply mgr 3
Verification
List the service:
Example
[ceph: root@host01 /]# ceph orch ls
List the hosts, daemons, and processes:
Syntax
ceph orch ps --daemon_type=DAEMON_NAMEExample
[ceph: root@host01 /]# ceph orch ps --daemon_type=mgr
5.3. Removing the manager daemons using the Ceph Orchestrator
To remove the manager daemons from the host, you can just redeploy the daemons on other hosts.
Prerequisites
- A running Red Hat Ceph Storage cluster.
- Root-level access to all the nodes.
- Hosts are added to the cluster.
- At least one manager daemon deployed on the hosts.
Procedure
Log into the Cephadm shell:
Example
[root@host01 ~]# cephadm shell
Run the
ceph orch applycommand to redeploy the required manager daemons:Syntax
ceph orch apply mgr "NUMBER_OF_DAEMONS HOST_NAME_1 HOST_NAME_3"
If you want to remove manager daemons from
host02, then you can redeploy the manager daemons on other hosts.Example
[ceph: root@host01 /]# ceph orch apply mgr "2 host01 host03"
Verification
List the hosts,daemons, and processes:
Syntax
ceph orch ps --daemon_type=DAEMON_NAMEExample
[ceph: root@host01 /]# ceph orch ps --daemon_type=mgr
Additional Resources
- See Deploying the manager daemons using the Ceph Orchestrator section in the Red Hat Ceph Storage Operations Guide for more information.
5.4. Using the Ceph Manager modules
Use the ceph mgr module ls command to see the available modules and the modules that are presently enabled.
Enable or disable modules with ceph mgr module enable MODULE command or ceph mgr module disable MODULE command respectively.
If a module is enabled, then the active ceph-mgr daemon loads and executes it. In the case of modules that provide a service, such as an HTTP server, the module might publish its address when it is loaded. To see the addresses of such modules, run the ceph mgr services command.
Some modules might also implement a special standby mode which runs on standby ceph-mgr daemon as well as the active daemon. This enables modules that provide services to redirect their clients to the active daemon, if the client tries to connect to a standby.
Following is an example to enable the dashboard module:
[ceph: root@host01 /]# ceph mgr module enable dashboard
[ceph: root@host01 /]# ceph mgr module ls
MODULE
balancer on (always on)
crash on (always on)
devicehealth on (always on)
orchestrator on (always on)
pg_autoscaler on (always on)
progress on (always on)
rbd_support on (always on)
status on (always on)
telemetry on (always on)
volumes on (always on)
cephadm on
dashboard on
iostat on
nfs on
prometheus on
restful on
alerts -
diskprediction_local -
influx -
insights -
k8sevents -
localpool -
mds_autoscaler -
mirroring -
osd_perf_query -
osd_support -
rgw -
rook -
selftest -
snap_schedule -
stats -
telegraf -
test_orchestrator -
zabbix -
[ceph: root@host01 /]# ceph mgr services
{
"dashboard": "http://myserver.com:7789/",
"restful": "https://myserver.com:8789/"
}
The first time the cluster starts, it uses the mgr_initial_modules setting to override which modules to enable. However, this setting is ignored through the rest of the lifetime of the cluster: only use it for bootstrapping. For example, before starting your monitor daemons for the first time, you might add a section like this to your ceph.conf file:
[mon]
mgr initial modules = dashboard balancerWhere a module implements comment line hooks, the commands are accessible as ordinary Ceph commands and Ceph automatically incorporates module commands into the standard CLI interface and route them appropriately to the module:
[ceph: root@host01 /]# ceph <command | help>
You can use the following configuration parameters with the above command:
Table 5.1. Configuration parameters
| Configuration | Description | Type | Default |
|---|---|---|---|
|
| Path to load modules from. | String |
|
|
| Path to load daemon data (such as keyring) | String |
|
|
| How many seconds between manager beacons to monitors, and other periodic checks. | Integer |
|
|
| How long after last beacon should a manager be considered failed. | Integer |
|
5.5. Using the Ceph Manager balancer module
The balancer is a module for Ceph Manager (ceph-mgr) that optimizes the placement of placement groups (PGs) across OSDs in order to achieve a balanced distribution, either automatically or in a supervised fashion.
Currently the balancer module cannot be disabled. It can only be turned off to customize the configuration.
Modes
There are currently two supported balancer modes:
crush-compat: The CRUSH compat mode uses the compat
weight-setfeature, introduced in Ceph Luminous, to manage an alternative set of weights for devices in the CRUSH hierarchy. The normal weights should remain set to the size of the device to reflect the target amount of data that you want to store on the device. The balancer then optimizes theweight-setvalues, adjusting them up or down in small increments in order to achieve a distribution that matches the target distribution as closely as possible. Because PG placement is a pseudorandom process, there is a natural amount of variation in the placement; by optimizing the weights, the balancer counter-acts that natural variation.This mode is fully backwards compatible with older clients. When an OSDMap and CRUSH map are shared with older clients, the balancer presents the optimized weights as the real weights.
The primary restriction of this mode is that the balancer cannot handle multiple CRUSH hierarchies with different placement rules if the subtrees of the hierarchy share any OSDs. Because this configuration makes managing space utilization on the shared OSDs difficult, it is generally not recommended. As such, this restriction is normally not an issue.
upmap: Starting with Luminous, the OSDMap can store explicit mappings for individual OSDs as exceptions to the normal CRUSH placement calculation. These
upmapentries provide fine-grained control over the PG mapping. This CRUSH mode will optimize the placement of individual PGs in order to achieve a balanced distribution. In most cases, this distribution is "perfect", with an equal number of PGs on each OSD +/-1 PG, as they might not divide evenly.ImportantTo allow use of this feature, you must tell the cluster that it only needs to support luminous or later clients with the following command:
[ceph: root@host01 /]# ceph osd set-require-min-compat-client luminous
This command fails if any pre-luminous clients or daemons are connected to the monitors.
Due to a known issue, kernel CephFS clients report themselves as jewel clients. To work around this issue, use the
--yes-i-really-mean-itflag:[ceph: root@host01 /]# ceph osd set-require-min-compat-client luminous --yes-i-really-mean-it
You can check what client versions are in use with:
[ceph: root@host01 /]# ceph features
Prerequisites
- A running Red Hat Ceph Storage cluster.
Procedure
Ensure the balancer module is enabled:
Example
[ceph: root@host01 /]# ceph mgr module enable balancer
Turn on the balancer module:
Example
[ceph: root@host01 /]# ceph balancer on
The default mode is
upmap. The mode can be changed with:Example
[ceph: root@host01 /]# ceph balancer mode crush-compact
or
Example
[ceph: root@host01 /]# ceph balancer mode upmap
Status
The current status of the balancer can be checked at any time with:
Example
[ceph: root@host01 /]# ceph balancer status
Automatic balancing
By default, when turning on the balancer module, automatic balancing is used:
Example
[ceph: root@host01 /]# ceph balancer on
The balancer can be turned back off again with:
Example
[ceph: root@host01 /]# ceph balancer off
This will use the crush-compat mode, which is backward compatible with older clients and will make small changes to the data distribution over time to ensure that OSDs are equally utilized.
Throttling
No adjustments will be made to the PG distribution if the cluster is degraded, for example, if an OSD has failed and the system has not yet healed itself.
When the cluster is healthy, the balancer throttles its changes such that the percentage of PGs that are misplaced, or need to be moved, is below a threshold of 5% by default. This percentage can be adjusted using the target_max_misplaced_ratio setting. For example, to increase the threshold to 7%:
Example
[ceph: root@host01 /]# ceph config-key set mgr target_max_misplaced_ratio .07
For automatic balancing:
- Set the number of seconds to sleep in between runs of the automatic balancer:
Example
[ceph: root@host01 /]# ceph config set mgr mgr/balancer/sleep_interval 60
- Set the time of day to begin automatic balancing in HHMM format:
Example
[ceph: root@host01 /]# ceph config set mgr mgr/balancer/begin_time 0000
- Set the time of day to finish automatic balancing in HHMM format:
Example
[ceph: root@host01 /]# ceph config set mgr mgr/balancer/end_time 2359
-
Restrict automatic balancing to this day of the week or later. Uses the same conventions as crontab,
0is Sunday,1is Monday, and so on:
Example
[ceph: root@host01 /]# ceph config set mgr mgr/balancer/begin_weekday 0
-
Restrict automatic balancing to this day of the week or earlier. This uses the same conventions as crontab,
0is Sunday,1is Monday, and so on:
Example
[ceph: root@host01 /]# ceph config set mgr mgr/balancer/end_weekday 6
-
Define the pool IDs to which the automatic balancing is limited. The default for this is an empty string, meaning all pools are balanced. The numeric pool IDs can be gotten with the
ceph osd pool ls detailcommand:
Example
[ceph: root@host01 /]# ceph config set mgr mgr/balancer/pool_ids 1,2,3
Supervised optimization
The balancer operation is broken into a few distinct phases:
-
Building a
plan. -
Evaluating the quality of the data distribution, either for the current PG distribution, or the PG distribution that would result after executing a
plan. Executing the
plan.To evaluate and score the current distribution:
Example
[ceph: root@host01 /]# ceph balancer eval
To evaluate the distribution for a single pool:
Syntax
ceph balancer eval POOL_NAMEExample
[ceph: root@host01 /]# ceph balancer eval rbd
To see greater detail for the evaluation:
Example
[ceph: root@host01 /]# ceph balancer eval-verbose ...
To generate a plan using the currently configured mode:
Syntax
ceph balancer optimize PLAN_NAMEReplace PLAN_NAME with a custom plan name.
Example
[ceph: root@host01 /]# ceph balancer optimize rbd_123
To see the contents of a plan:
Syntax
ceph balancer show PLAN_NAMEExample
[ceph: root@host01 /]# ceph balancer show rbd_123
To discard old plans:
Syntax
ceph balancer rm PLAN_NAMEExample
[ceph: root@host01 /]# ceph balancer rm rbd_123
To see currently recorded plans use the status command:
[ceph: root@host01 /]# ceph balancer status
To calculate the quality of the distribution that would result after executing a plan:
Syntax
ceph balancer eval PLAN_NAMEExample
[ceph: root@host01 /]# ceph balancer eval rbd_123
To execute the plan:
Syntax
ceph balancer execute PLAN_NAMEExample
[ceph: root@host01 /]# ceph balancer execute rbd_123
NoteOnly execute the plan if it is expected to improve the distribution. After execution, the plan will be discarded.
5.6. Using the Ceph Manager alerts module
You can use the Ceph Manager alerts module to send simple alert messages about the Red Hat Ceph Storage cluster’s health by email.
This module is not intended to be a robust monitoring solution. The fact that it is run as part of the Ceph cluster itself is fundamentally limiting in that a failure of the ceph-mgr daemon prevents alerts from being sent. This module can, however, be useful for standalone clusters that exist in environments where existing monitoring infrastructure does not exist.
Prerequisites
- A running Red Hat Ceph Storage cluster.
- Root-level access to the Ceph Monitor node.
Procedure
Log into the Cephadm shell:
Example
[root@host01 ~]# cephadm shell
Enable the alerts module:
Example
[ceph: root@host01 /]# ceph mgr module enable alerts
Ensure the alerts module is enabled:
Example
[ceph: root@host01 /]# ceph mgr module ls | more { "always_on_modules": [ "balancer", "crash", "devicehealth", "orchestrator", "pg_autoscaler", "progress", "rbd_support", "status", "telemetry", "volumes" ], "enabled_modules": [ "alerts", "cephadm", "dashboard", "iostat", "nfs", "prometheus", "restful" ]Configure the Simple Mail Transfer Protocol (SMTP):
Syntax
ceph config set mgr mgr/alerts/smtp_host SMTP_SERVER ceph config set mgr mgr/alerts/smtp_destination RECEIVER_EMAIL_ADDRESS ceph config set mgr mgr/alerts/smtp_sender SENDER_EMAIL_ADDRESS
Example
[ceph: root@host01 /]# ceph config set mgr mgr/alerts/smtp_host smtp.example.com [ceph: root@host01 /]# ceph config set mgr mgr/alerts/smtp_destination example@example.com [ceph: root@host01 /]# ceph config set mgr mgr/alerts/smtp_sender example2@example.com
Optional: Change the port to 465.
Syntax
ceph config set mgr mgr/alerts/smtp_port PORT_NUMBERExample
[ceph: root@host01 /]# ceph config set mgr mgr/alerts/smtp_port 587
ImportantSSL is not supported in Red Hat Ceph Storage 5 cluster. Do not set the
smtp_sslparameter while configuring alerts.Authenticate to the SMTP server:
Syntax
ceph config set mgr mgr/alerts/smtp_user USERNAME ceph config set mgr mgr/alerts/smtp_password PASSWORD
Example
[ceph: root@host01 /]# ceph config set mgr mgr/alerts/smtp_user admin1234 [ceph: root@host01 /]# ceph config set mgr mgr/alerts/smtp_password admin1234
Optional: By default, SMTP
Fromname isCeph. To change that, set thesmtp_from_nameparameter:Syntax
ceph config set mgr mgr/alerts/smtp_from_name CLUSTER_NAMEExample
[ceph: root@host01 /]# ceph config set mgr mgr/alerts/smtp_from_name 'Ceph Cluster Test'
Optional: By default, the alerts module checks the storage cluster’s health every minute, and sends a message when there is a change in the cluster health status. To change the frequency, set the
intervalparameter:Syntax
ceph config set mgr mgr/alerts/interval INTERVALExample
[ceph: root@host01 /]# ceph config set mgr mgr/alerts/interval "5m"
In this example, the interval is set to 5 minutes.
Optional: Send an alert immediately:
Example
[ceph: root@host01 /]# ceph alerts send
Additional Resources
- See the Health messages of a Ceph cluster section in the Red Hat Ceph Storage Troubleshooting Guide for more information on Ceph health messages.
5.7. Using the Ceph manager crash module
Using the Ceph manager crash module, you can collect information about daemon crashdumps and store it in the Red Hat Ceph Storage cluster for further analysis.
By default, daemon crashdumps are dumped in /var/lib/ceph/crash. You can configure with the option crash dir. Crash directories are named by time, date, and a randomly-generated UUID, and contain a metadata file meta and a recent log file, with a crash_id that is the same.
You can use ceph-crash.service to submit these crash automatically and persist in the Ceph Monitors. The ceph-crash.service watches watches the crashdump directory and uploads them with ceph crash post.
The RECENT_CRASH heath message is one of the most common health messages in a Ceph cluster. This health message means that one or more Ceph daemons has crashed recently, and the crash has not yet been archived or acknowledged by the administrator. This might indicate a software bug, a hardware problem like a failing disk, or some other problem. The option mgr/crash/warn_recent_interval controls the time period of what recent means, which is two weeks by default. You can disable the warnings by running the following command:
Example
[ceph: root@host01 /]# ceph config set mgr/crash/warn_recent_interval 0
The option mgr/crash/retain_interval controls the period for which you want to retain the crash reports before they are automatically purged. The default for this option is one year.
Prerequisites
- A running Red Hat Ceph Storage cluster.
Procedure
Ensure the crash module is enabled:
Example
[ceph: root@host01 /]# ceph mgr module ls | more { "always_on_modules": [ "balancer", "crash", "devicehealth", "orchestrator_cli", "progress", "rbd_support", "status", "volumes" ], "enabled_modules": [ "dashboard", "pg_autoscaler", "prometheus" ]Save a crash dump: The metadata file is a JSON blob stored in the crash dir as
meta. You can invoke the ceph command-i -option, which reads from stdin.Example
[ceph: root@host01 /]# ceph crash post -i meta
List the timestamp or the UUID crash IDs for all the new and archived crash info:
Example
[ceph: root@host01 /]# ceph crash ls
List the timestamp or the UUID crash IDs for all the new crash information:
Example
[ceph: root@host01 /]# ceph crash ls-new
List the timestamp or the UUID crash IDs for all the new crash information:
Example
[ceph: root@host01 /]# ceph crash ls-new
List the summary of saved crash information grouped by age:
Example
[ceph: root@host01 /]# ceph crash stat 8 crashes recorded 8 older than 1 days old: 2022-05-20T08:30:14.533316Z_4ea88673-8db6-4959-a8c6-0eea22d305c2 2022-05-20T08:30:14.590789Z_30a8bb92-2147-4e0f-a58b-a12c2c73d4f5 2022-05-20T08:34:42.278648Z_6a91a778-bce6-4ef3-a3fb-84c4276c8297 2022-05-20T08:34:42.801268Z_e5f25c74-c381-46b1-bee3-63d891f9fc2d 2022-05-20T08:34:42.803141Z_96adfc59-be3a-4a38-9981-e71ad3d55e47 2022-05-20T08:34:42.830416Z_e45ed474-550c-44b3-b9bb-283e3f4cc1fe 2022-05-24T19:58:42.549073Z_b2382865-ea89-4be2-b46f-9a59af7b7a2d 2022-05-24T19:58:44.315282Z_1847afbc-f8a9-45da-94e8-5aef0738954e
View the details of the saved crash:
Syntax
ceph crash info CRASH_IDExample
[ceph: root@host01 /]# ceph crash info 2022-05-24T19:58:42.549073Z_b2382865-ea89-4be2-b46f-9a59af7b7a2d { "assert_condition": "session_map.sessions.empty()", "assert_file": "/builddir/build/BUILD/ceph-16.1.0-486-g324d7073/src/mon/Monitor.cc", "assert_func": "virtual Monitor::~Monitor()", "assert_line": 287, "assert_msg": "/builddir/build/BUILD/ceph-16.1.0-486-g324d7073/src/mon/Monitor.cc: In function 'virtual Monitor::~Monitor()' thread 7f67a1aeb700 time 2022-05-24T19:58:42.545485+0000\n/builddir/build/BUILD/ceph-16.1.0-486-g324d7073/src/mon/Monitor.cc: 287: FAILED ceph_assert(session_map.sessions.empty())\n", "assert_thread_name": "ceph-mon", "backtrace": [ "/lib64/libpthread.so.0(+0x12b30) [0x7f679678bb30]", "gsignal()", "abort()", "(ceph::__ceph_assert_fail(char const*, char const*, int, char const*)+0x1a9) [0x7f6798c8d37b]", "/usr/lib64/ceph/libceph-common.so.2(+0x276544) [0x7f6798c8d544]", "(Monitor::~Monitor()+0xe30) [0x561152ed3c80]", "(Monitor::~Monitor()+0xd) [0x561152ed3cdd]", "main()", "__libc_start_main()", "_start()" ], "ceph_version": "16.2.8-65.el8cp", "crash_id": "2022-07-06T19:58:42.549073Z_b2382865-ea89-4be2-b46f-9a59af7b7a2d", "entity_name": "mon.ceph-adm4", "os_id": "rhel", "os_name": "Red Hat Enterprise Linux", "os_version": "8.5 (Ootpa)", "os_version_id": "8.5", "process_name": "ceph-mon", "stack_sig": "957c21d558d0cba4cee9e8aaf9227b3b1b09738b8a4d2c9f4dc26d9233b0d511", "timestamp": "2022-07-06T19:58:42.549073Z", "utsname_hostname": "host02", "utsname_machine": "x86_64", "utsname_release": "4.18.0-240.15.1.el8_3.x86_64", "utsname_sysname": "Linux", "utsname_version": "#1 SMP Wed Jul 06 03:12:15 EDT 2022" }Remove saved crashes older than KEEP days: Here, KEEP must be an integer.
Syntax
ceph crash prune KEEPExample
[ceph: root@host01 /]# ceph crash prune 60
Archive a crash report so that it is no longer considered for the
RECENT_CRASHhealth check and does not appear in thecrash ls-newoutput. It appears in thecrash ls.Syntax
ceph crash archive CRASH_IDExample
[ceph: root@host01 /]# ceph crash archive 2022-05-24T19:58:42.549073Z_b2382865-ea89-4be2-b46f-9a59af7b7a2d
Archive all crash reports:
Example
[ceph: root@host01 /]# ceph crash archive-all
Remove the crash dump:
Syntax
ceph crash rm CRASH_IDExample
[ceph: root@host01 /]# ceph crash rm 2022-05-24T19:58:42.549073Z_b2382865-ea89-4be2-b46f-9a59af7b7a2d
Additional Resources
- See the Health messages of a Ceph cluster section in the Red Hat Ceph Storage Troubleshooting Guide for more information on Ceph health messages.
Chapter 6. Management of OSDs using the Ceph Orchestrator
As a storage administrator, you can use the Ceph Orchestrators to manage OSDs of a Red Hat Ceph Storage cluster.
6.1. Ceph OSDs
When a Red Hat Ceph Storage cluster is up and running, you can add OSDs to the storage cluster at runtime.
A Ceph OSD generally consists of one ceph-osd daemon for one storage drive and its associated journal within a node. If a node has multiple storage drives, then map one ceph-osd daemon for each drive.
Red Hat recommends checking the capacity of a cluster regularly to see if it is reaching the upper end of its storage capacity. As a storage cluster reaches its near full ratio, add one or more OSDs to expand the storage cluster’s capacity.
When you want to reduce the size of a Red Hat Ceph Storage cluster or replace the hardware, you can also remove an OSD at runtime. If the node has multiple storage drives, you might also need to remove one of the ceph-osd daemon for that drive. Generally, it’s a good idea to check the capacity of the storage cluster to see if you are reaching the upper end of its capacity. Ensure that when you remove an OSD that the storage cluster is not at its near full ratio.
Do not let a storage cluster reach the full ratio before adding an OSD. OSD failures that occur after the storage cluster reaches the near full ratio can cause the storage cluster to exceed the full ratio. Ceph blocks write access to protect the data until you resolve the storage capacity issues. Do not remove OSDs without considering the impact on the full ratio first.
6.2. Ceph OSD node configuration
Configure Ceph OSDs and their supporting hardware similarly as a storage strategy for the pool(s) that will use the OSDs. Ceph prefers uniform hardware across pools for a consistent performance profile. For best performance, consider a CRUSH hierarchy with drives of the same type or size.
If you add drives of dissimilar size, adjust their weights accordingly. When you add the OSD to the CRUSH map, consider the weight for the new OSD. Hard drive capacity grows approximately 40% per year, so newer OSD nodes might have larger hard drives than older nodes in the storage cluster, that is, they might have a greater weight.
Before doing a new installation, review the Requirements for Installing Red Hat Ceph Storage chapter in the Installation Guide.
6.3. Automatically tuning OSD memory
The OSD daemons adjust the memory consumption based on the osd_memory_target configuration option. The option osd_memory_target sets OSD memory based upon the available RAM in the system.
If Red Hat Ceph Storage is deployed on dedicated nodes that do not share memory with other services, cephadm automatically adjusts the per-OSD consumption based on the total amount of RAM and the number of deployed OSDs.
By default, the osd_memory_target_autotune parameter is set to true in Red Hat Ceph Storage 5.1.
Syntax
ceph config set osd osd_memory_target_autotune true
Once the storage cluster is upgraded to Red Hat Ceph Storage 5.0, for cluster maintenance such as addition of OSDs or replacement of OSDs, Red Hat recommends setting osd_memory_target_autotune parameter to true to autotune osd memory as per system memory.
Cephadm starts with a fraction mgr/cephadm/autotune_memory_target_ratio, which defaults to 0.7 of the total RAM in the system, subtract off any memory consumed by non-autotuned daemons such as non-OSDS and for OSDs for which osd_memory_target_autotune is false, and then divide by the remaining OSDs.
By default, autotune_memory_target_ratio is 0.2 for hyper-converged infrastructure and 0.7 for other environments.
The osd_memory_target parameter is calculated as follows:
Syntax
osd_memory_target = TOTAL_RAM_OF_THE_OSD_NODE (in Bytes) * (autotune_memory_target_ratio) / NUMBER_OF_OSDS_IN_THE_OSD_NODE - (SPACE_ALLOCATED_FOR_OTHER_DAEMONS (in Bytes))
SPACE_ALLOCATED_FOR_OTHER_DAEMONS may optionally include the following daemon space allocations:
- Alertmanager: 1 GB
- Grafana: 1 GB
- Ceph Manager: 4 GB
- Ceph Monitor: 2 GB
- Node-exporter: 1 GB
- Prometheus: 1 GB
For example, if a node has 24 OSDs and has 251 GB RAM space, then osd_memory_target is 7860684936.
The final targets are reflected in the configuration database with options. You can view the limits and the current memory consumed by each daemon from the ceph orch ps output under MEM LIMIT column.
In Red Hat Ceph Storage 5.1, the default setting of osd_memory_target_autotune true is unsuitable for hyperconverged infrastructures where compute and Ceph storage services are colocated. In a hyperconverged infrastructure, the autotune_memory_target_ratio can be set to 0.2 to reduce the memory consumption of Ceph.
Example
[ceph: root@host01 /]# ceph config set mgr mgr/cephadm/autotune_memory_target_ratio 0.2
You can manually set a specific memory target for an OSD in the storage cluster.
Example
[ceph: root@host01 /]# ceph config set osd.123 osd_memory_target 7860684936
You can manually set a specific memory target for an OSD host in the storage cluster.
Syntax
ceph config set osd/host:HOSTNAME osd_memory_target TARGET_BYTES
Example
[ceph: root@host01 /]# ceph config set osd/host:host01 osd_memory_target 1000000000
Enabling osd_memory_target_autotune overwrites existing manual OSD memory target settings. To prevent daemon memory from being tuned even when the osd_memory_target_autotune option or other similar options are enabled, set the _no_autotune_memory label on the host.
Syntax
ceph orch host label add HOSTNAME _no_autotune_memory
You can exclude an OSD from memory autotuning by disabling the autotune option and setting a specific memory target.
Example
[ceph: root@host01 /]# ceph config set osd.123 osd_memory_target_autotune false [ceph: root@host01 /]# ceph config set osd.123 osd_memory_target 16G
6.4. Listing devices for Ceph OSD deployment
You can check the list of available devices before deploying OSDs using the Ceph Orchestrator. The commands are used to print a list of devices discoverable by Cephadm. A storage device is considered available if all of the following conditions are met:
- The device must have no partitions.
- The device must not have any LVM state.
- The device must not be mounted.
- The device must not contain a file system.
- The device must not contain a Ceph BlueStore OSD.
- The device must be larger than 5 GB.
Ceph will not provision an OSD on a device that is not available.
Prerequisites
- A running Red Hat Ceph Storage cluster.
- Hosts are added to the cluster.
- All manager and monitor daemons are deployed.
Procedure
Log into the Cephadm shell:
Example
[root@host01 ~]# cephadm shell
List the available devices to deploy OSDs:
Syntax
ceph orch device ls [--hostname=HOSTNAME_1 HOSTNAME_2] [--wide] [--refresh]
Example
[ceph: root@host01 /]# ceph orch device ls --wide --refresh
Using the
--wideoption provides all details relating to the device, including any reasons that the device might not be eligible for use as an OSD. This option does not support NVMe devices.Optional: To enable Health, Ident, and Fault fields in the output of
ceph orch device ls, run the following commands:NoteThese fields are supported by
libstoragemgmtlibrary and currently supports SCSI, SAS, and SATA devices.As root user outside the Cephadm shell, check your hardware’s compatibility with
libstoragemgmtlibrary to avoid unplanned interruption to services:Example
[root@host01 ~]# cephadm shell lsmcli ldl
In the output, you see the Health Status as Good with the respective SCSI VPD 0x83 ID.
NoteIf you do not get this information, then enabling the fields might cause erratic behavior of devices.
Log back into the Cephadm shell and enable
libstoragemgmtsupport:Example
[root@host01 ~]# cephadm shell [ceph: root@host01 /]# ceph config set mgr mgr/cephadm/device_enhanced_scan true
Once this is enabled,
ceph orch device lsgives the output of Health field as Good.
Verification
List the devices:
Example
[ceph: root@host01 /]# ceph orch device ls
6.5. Zapping devices for Ceph OSD deployment
You need to check the list of available devices before deploying OSDs. If there is no space available on the devices, you can clear the data on the devices by zapping them.
Prerequisites
- A running Red Hat Ceph Storage cluster.
- Hosts are added to the cluster.
- All manager and monitor daemons are deployed.
Procedure
Log into the Cephadm shell:
Example
[root@host01 ~]# cephadm shell
List the available devices to deploy OSDs:
Syntax
ceph orch device ls [--hostname=HOSTNAME_1 HOSTNAME_2] [--wide] [--refresh]
Example
[ceph: root@host01 /]# ceph orch device ls --wide --refresh
Clear the data of a device:
Syntax
ceph orch device zap HOSTNAME FILE_PATH --force
Example
[ceph: root@host01 /]# ceph orch device zap host02 /dev/sdb --force
Verification
Verify the space is available on the device:
Example
[ceph: root@host01 /]# ceph orch device ls
You will see that the field under Available is Yes.
Additional Resources
- See the Listing devices for Ceph OSD deployment section in the Red Hat Ceph Storage Operations Guide for more information.
6.6. Deploying Ceph OSDs on all available devices
You can deploy all OSDS on all the available devices. Cephadm allows the Ceph Orchestrator to discover and deploy the OSDs on any available and unused storage device. To deploy OSDs all available devices, run the command without the unmanaged parameter and then re-run the command with the parameter to prevent from creating future OSDs.
The deployment of OSDs with --all-available-devices is generally used for smaller clusters. For larger clusters, use the OSD specification file.
Prerequisites
- A running Red Hat Ceph Storage cluster.
- Hosts are added to the cluster.
- All manager and monitor daemons are deployed.
Procedure
Log into the Cephadm shell:
Example
[root@host01 ~]# cephadm shell
List the available devices to deploy OSDs:
Syntax
ceph orch device ls [--hostname=HOSTNAME_1 HOSTNAME_2] [--wide] [--refresh]
Example
[ceph: root@host01 /]# ceph orch device ls --wide --refresh
Deploy OSDs on all available devices:
Example
[ceph: root@host01 /]# ceph orch apply osd --all-available-devices
The effect of
ceph orch applyis persistent which means that the Orchestrator automatically finds the device, adds it to the cluster, and creates new OSDs. This occurs under the following conditions:- New disks or drives are added to the system.
- Existing disks or drives are zapped.
An OSD is removed and the devices are zapped.
You can disable automatic creation of OSDs on all the available devices by using the
--unmanagedparameter.Example
[ceph: root@host01 /]# ceph orch apply osd --all-available-devices --unmanaged=true
Setting the parameter
--unmanagedtotruedisables the creation of OSDs and also there is no change if you apply a new OSD service.NoteThe command
ceph orch daemon addcreates new OSDs, but does not add an OSD service.
Verification
List the service:
Example
[ceph: root@host01 /]# ceph orch ls
View the details of the node and devices:
Example
[ceph: root@host01 /]# ceph osd tree
Additional Resources
- See the Listing devices for Ceph OSD deployment section in the Red Hat Ceph Storage Operations Guide.
6.7. Deploying Ceph OSDs on specific devices and hosts
You can deploy all the Ceph OSDs on specific devices and hosts using the Ceph Orchestrator.
Prerequisites
- A running Red Hat Ceph Storage cluster.
- Hosts are added to the cluster.
- All manager and monitor daemons are deployed.
Procedure
Log into the Cephadm shell:
Example
[root@host01 ~]# cephadm shell
List the available devices to deploy OSDs:
Syntax
ceph orch device ls [--hostname=HOSTNAME_1 HOSTNAME_2] [--wide] [--refresh]
Example
[ceph: root@host01 /]# ceph orch device ls --wide --refresh
Deploy OSDs on specific devices and hosts:
Syntax
ceph orch daemon add osd HOSTNAME:DEVICE_PATH
Example
[ceph: root@host01 /]# ceph orch daemon add osd host02:/dev/sdb
To deploy ODSs on a raw physical device, without an LVM layer, use the
--method rawoption.Syntax
ceph orch daemon add osd --method raw HOSTNAME:DEVICE_PATH
Example
[ceph: root@host01 /]# ceph orch daemon add osd --method raw host02:/dev/sdb
NoteIf you have separate DB or WAL devices, the ratio of block to DB or WAL devices MUST be 1:1.
Verification
List the service:
Example
[ceph: root@host01 /]# ceph orch ls osd
View the details of the node and devices:
Example
[ceph: root@host01 /]# ceph osd tree
List the hosts, daemons, and processes:
Syntax
ceph orch ps --service_name=SERVICE_NAMEExample
[ceph: root@host01 /]# ceph orch ps --service_name=osd
Additional Resources
- See the Listing devices for Ceph OSD deployment section in the Red Hat Ceph Storage Operations Guide.
6.8. Advanced service specifications and filters for deploying OSDs
Service Specification of type OSD is a way to describe a cluster layout using the properties of disks. It gives the user an abstract way to tell Ceph which disks should turn into an OSD with the required configuration without knowing the specifics of device names and paths. For each device and each host, define a yaml file or a json file.
General settings for OSD specifications
- service_type: 'osd': This is mandatory to create OSDS
- service_id: Use the service name or identification you prefer. A set of OSDs is created using the specification file. This name is used to manage all the OSDs together and represent an Orchestrator service.
placement: This is used to define the hosts on which the OSDs needs to be deployed.
You can use on the following options:
- host_pattern: '*' - A host name pattern used to select hosts.
- label: 'osd_host' - A label used in the hosts where OSD needs to be deployed.
- hosts: 'host01', 'host02' - An explicit list of host names where OSDs needs to be deployed.
selection of devices: The devices where OSDs are created. This allows to separate an OSD from different devices. You can create only BlueStore OSDs which have three components:
- OSD data: contains all the OSD data
- WAL: BlueStore internal journal or write-ahead Log
- DB: BlueStore internal metadata
- data_devices: Define the devices to deploy OSD. In this case, OSDs are created in a collocated schema. You can use filters to select devices and folders.
- wal_devices: Define the devices used for WAL OSDs. You can use filters to select devices and folders.
- db_devices: Define the devices for DB OSDs. You can use the filters to select devices and folders.
-
encrypted: An optional parameter to encrypt information on the OSD which can set to either
TrueorFalse - unmanaged: An optional parameter, set to False by default. You can set it to True if you do not want the Orchestrator to manage the OSD service.
- block_wal_size: User-defined value, in bytes.
- block_db_size: User-defined value, in bytes.
- osds_per_device: User-defined value for deploying more than one OSD per device.
-
method: An optional parameter to specify if an OSD is created with an LVM layer or not. Set to
rawif you want to create OSDs on raw physical devices that do not include an LVM layer. If you have separate DB or WAL devices, the ratio of block to DB or WAL devices MUST be 1:1.
Filters for specifying devices
Filters are used in conjunction with the data_devices, wal_devices and db_devices parameters.
| Name of the filter | Description | Syntax | Example |
| Model |
Target specific disks. You can get details of the model by running | Model: DISK_MODEL_NAME | Model: MC-55-44-XZ |
| Vendor | Target specific disks | Vendor: DISK_VENDOR_NAME | Vendor: Vendor Cs |
| Size Specification | Includes disks of an exact size | size: EXACT | size: '10G' |
| Size Specification | Includes disks size of which is within the range | size: LOW:HIGH | size: '10G:40G' |
| Size Specification | Includes disks less than or equal to in size | size: :HIGH | size: ':10G' |
| Size Specification | Includes disks equal to or greater than in size | size: LOW: | size: '40G:' |
| Rotational | Rotational attribute of the disk. 1 matches all disks that are rotational and 0 matches all the disks that are non-rotational. If rotational =0, then OSD is configured with SSD or NVME. If rotational=1 then the OSD is configured with HDD. | rotational: 0 or 1 | rotational: 0 |
| All | Considers all the available disks | all: true | all: true |
| Limiter | When you specified valid filters but want to limit the amount of matching disks you can use the ‘limit’ directive. It should be used only as a last resort. | limit: NUMBER | limit: 2 |
To create an OSD with non-collocated components in the same host, you have to specify the different type of devices used and the devices should be on the same host.
The devices used for deploying OSDs must be supported by libstoragemgmt.
Additional Resources
- See the Deploying Ceph OSDs using the advanced specifications section in the Red Hat Ceph Storage Operations Guide.
-
For more information on
libstoragemgmt, see the Listing devices for Ceph OSD deployment section in the Red Hat Ceph Storage Operations Guide.
6.9. Deploying Ceph OSDs using advanced service specifications
The service specification of type OSD is a way to describe a cluster layout using the properties of disks. It gives the user an abstract way to tell Ceph which disks should turn into an OSD with the required configuration without knowing the specifics of device names and paths.
You can deploy the OSD for each device and each host by defining a yaml file or a json file.
Prerequisites
- A running Red Hat Ceph Storage cluster.
- Hosts are added to the cluster.
- All manager and monitor daemons are deployed.
Procedure
On the monitor node, create the
osd_spec.yamlfile:Example
[root@host01 ~]# touch osd_spec.yaml
Edit the
osd_spec.yamlfile to include the following details:Syntax
service_type: osd
service_id: SERVICE_ID
placement:
  host_pattern: '*' # optional
data_devices: # optional
  model: DISK_MODEL_NAME # optional
  paths:
  - /DEVICE_PATH
osds_per_device: NUMBER_OF_DEVICES # optional
db_devices: # optional
  size: # optional
  all: true # optional
  paths:
   - /DEVICE_PATH
encrypted: true
Simple scenarios: In these cases, all the nodes have the same set-up.
Example
service_type: osd
service_id: osd_spec_default
placement:
  host_pattern: '*'
data_devices:
  all: true
  paths:
  - /dev/sdb
encrypted: true
Example
service_type: osd
service_id: osd_spec_default
placement:
  host_pattern: '*'
data_devices:
  size: '80G'
db_devices:
  size: '40G:'
  paths:
   - /dev/sdc
Simple scenario: In this case, all the nodes have the same setup with OSD devices created in raw mode, without an LVM layer.
Example
service_type: osd
service_id: all-available-devices
encrypted: "true"
method: raw
placement:
  host_pattern: "*"
data_devices:
  all: "true"
Advanced scenario: This would create the desired layout by using all HDDs as
data_deviceswith two SSD assigned as dedicated DB or WAL devices. The remaining SSDs aredata_devicesthat have the NVMEs vendors assigned as dedicated DB or WAL devices.Example
service_type: osd
service_id: osd_spec_hdd
placement:
  host_pattern: '*'
data_devices:
  rotational: 0
db_devices:
  model: Model-name
  limit: 2
---
service_type: osd
service_id: osd_spec_ssd
placement:
  host_pattern: '*'
data_devices:
  model: Model-name
db_devices:
  vendor: Vendor-name
Advanced scenario with non-uniform nodes: This applies different OSD specs to different hosts depending on the host_pattern key.
Example
service_type: osd
service_id: osd_spec_node_one_to_five
placement:
  host_pattern: 'node[1-5]'
data_devices:
  rotational: 1
db_devices:
  rotational: 0
---
service_type: osd
service_id: osd_spec_six_to_ten
placement:
  host_pattern: 'node[6-10]'
data_devices:
  model: Model-name
db_devices:
  model: Model-name
Advanced scenario with dedicated WAL and DB devices:
Example
service_type: osd
service_id: osd_using_paths
placement:
  hosts:
    - host01
    - host02
data_devices:
  paths:
    - /dev/sdb
db_devices:
  paths:
    - /dev/sdc
wal_devices:
  paths:
    - /dev/sdd
Advanced scenario with multiple OSDs per device:
Example
service_type: osd
service_id: multiple_osds
placement:
  hosts:
    - host01
    - host02
osds_per_device: 4
data_devices:
  paths:
    - /dev/sdb
For pre-created volumes, edit the
osd_spec.yamlfile to include the following details:Syntax
service_type: osd
service_id: SERVICE_ID
placement:
  hosts:
    - HOSTNAME
data_devices: # optional
  model: DISK_MODEL_NAME # optional
  paths:
  - /DEVICE_PATH
db_devices: # optional
  size: # optional
  all: true # optional
  paths:
   - /DEVICE_PATH
Example
service_type: osd
service_id: osd_spec
placement:
  hosts:
    - machine1
data_devices:
  paths:
    - /dev/vg_hdd/lv_hdd
db_devices:
  paths:
    - /dev/vg_nvme/lv_nvme
For OSDs by ID, edit the
osd_spec.yamlfile to include the following details:NoteThis configuration is applicable for Red Hat Ceph Storage 5.3z1 and later releases. For earlier releases, use pre-created lvm.
Syntax
service_type: osd
service_id: OSD_BY_ID_HOSTNAME
placement:
  hosts:
    - HOSTNAME
data_devices: # optional
  model: DISK_MODEL_NAME # optional
  paths:
  - /DEVICE_PATH
db_devices: # optional
  size: # optional
  all: true # optional
  paths:
   - /DEVICE_PATH
Example
service_type: osd
service_id: osd_by_id_host01
placement:
  hosts:
    - host01
data_devices:
  paths:
    - /dev/disk/by-id/scsi-0QEMU_QEMU_HARDDISK_drive-scsi0-0-0-5
db_devices:
  paths:
    - /dev/disk/by-id/nvme-nvme.1b36-31323334-51454d55204e564d65204374726c-00000001
For OSDs by path, edit the
osd_spec.yamlfile to include the following details:NoteThis configuration is applicable for Red Hat Ceph Storage 5.3z1 and later releases. For earlier releases, use pre-created lvm.
Syntax
service_type: osd
service_id: OSD_BY_PATH_HOSTNAME
placement:
  hosts:
    - HOSTNAME
data_devices: # optional
  model: DISK_MODEL_NAME # optional
  paths:
  - /DEVICE_PATH
db_devices: # optional
  size: # optional
  all: true # optional
  paths:
   - /DEVICE_PATH
Example
service_type: osd
service_id: osd_by_path_host01
placement:
  hosts:
    - host01
data_devices:
  paths:
    - /dev/disk/by-path/pci-0000:0d:00.0-scsi-0:0:0:4
db_devices:
  paths:
    - /dev/disk/by-path/pci-0000:00:02.0-nvme-1
Mount the YAML file under a directory in the container:
Example
[root@host01 ~]# cephadm shell --mount osd_spec.yaml:/var/lib/ceph/osd/osd_spec.yaml
Navigate to the directory:
Example
[ceph: root@host01 /]# cd /var/lib/ceph/osd/
Before deploying OSDs, do a dry run:
NoteThis step gives a preview of the deployment, without deploying the daemons.
Example
[ceph: root@host01 osd]# ceph orch apply -i osd_spec.yaml --dry-run
Deploy OSDs using service specification:
Syntax
ceph orch apply -i FILE_NAME.ymlExample
[ceph: root@host01 osd]# ceph orch apply -i osd_spec.yaml
Verification
List the service:
Example
[ceph: root@host01 /]# ceph orch ls osd
View the details of the node and devices:
Example
[ceph: root@host01 /]# ceph osd tree
Additional Resources
- See the Advanced service specifications and filters for deploying OSDs section in the Red Hat Ceph Storage Operations Guide.
6.10. Removing the OSD daemons using the Ceph Orchestrator
You can remove the OSD from a cluster by using Cephadm.
Removing an OSD from a cluster involves two steps:
- Evacuates all placement groups (PGs) from the cluster.
- Removes the PG-free OSDs from the cluster.
The --zap option removed the volume groups, logical volumes, and the LVM metadata.
After removing OSDs, if the drives the OSDs were deployed on once again become available, cephadm` might automatically try to deploy more OSDs on these drives if they match an existing drivegroup specification. If you deployed the OSDs you are removing with a spec and do not want any new OSDs deployed on the drives after removal, modify the drivegroup specification before removal. While deploying OSDs, if you have used --all-available-devices option, set unmanaged: true to stop it from picking up new drives at all. For other deployments, modify the specification. See the Deploying Ceph OSDs using advanced service specifications for more details.
Prerequisites
- A running Red Hat Ceph Storage cluster.
- Hosts are added to the cluster.
- Ceph Monitor, Ceph Manager and Ceph OSD daemons are deployed on the storage cluster.
Procedure
Log into the Cephadm shell:
Example
[root@host01 ~]# cephadm shell
Check the device and the node from which the OSD has to be removed:
Example
[ceph: root@host01 /]# ceph osd tree
Remove the OSD:
Syntax
ceph orch osd rm OSD_ID [--replace] [--force] --zapExample
[ceph: root@host01 /]# ceph orch osd rm 0 --zap
NoteIf you remove the OSD from the storage cluster without an option, such as
--replace, the device is removed from the storage cluster completely. If you want to use the same device for deploying OSDs, you have to first zap the device before adding it to the storage cluster.Optional: To remove multiple OSDs from a specific node, run the following command:
Syntax
ceph orch osd rm OSD_ID OSD_ID --zap
Example
[ceph: root@host01 /]# ceph orch osd rm 2 5 --zap
Check the status of the OSD removal:
Example
[ceph: root@host01 /]# ceph orch osd rm status

OSD  HOST   STATE                    PGS  REPLACE  FORCE  ZAP   DRAIN STARTED AT
9    host01 done, waiting for purge    0  False    False  True  2023-06-06 17:50:50.525690
10   host03 done, waiting for purge    0  False    False  True  2023-06-06 17:49:38.731533
11   host02 done, waiting for purge    0  False    False  True  2023-06-06 17:48:36.641105
When no PGs are left on the OSD, it is decommissioned and removed from the cluster.
Verification
Verify the details of the devices and the nodes from which the Ceph OSDs are removed:
Example
[ceph: root@host01 /]# ceph osd tree
Additional Resources
- See the Deploying Ceph OSDs on all available devices section in the Red Hat Ceph Storage Operations Guide for more information.
- See the Deploying Ceph OSDs on specific devices and hosts section in the Red Hat Ceph Storage Operations Guide for more information.
- See the Zapping devices for Ceph OSD deployment section in the Red Hat Ceph Storage Operations Guide for more information on clearing space on devices.
6.11. Replacing the OSDs using the Ceph Orchestrator
When disks fail, you can replace the physical storage device and reuse the same OSD ID to avoid having to reconfigure the CRUSH map.
You can replace the OSDs from the cluster using the --replace option.
If you want to replace a single OSD, see Deploying Ceph OSDs on specific devices and hosts. If you want to deploy OSDs on all available devices, see Deploying Ceph OSDs on all available devices.
This option preserves the OSD ID using the ceph orch rm command. The OSD is not permanently removed from the CRUSH hierarchy, but is assigned the destroyed flag. This flag is used to determine the OSD IDs that can be reused in the next OSD deployment. The destroyed flag is used to determine which OSD id is reused in the next OSD deployment.
Similar to rm command, replacing an OSD from a cluster involves two steps:
- Evacuating all placement groups (PGs) from the cluster.
- Removing the PG-free OSD from the cluster.
If you use OSD specification for deployment, the OSD ID of the disk being replaced is automatically assigned to the newly added disk as soon as it is inserted.
After removing OSDs, if the drives the OSDs were deployed on once again become available, cephadm` might automatically try to deploy more OSDs on these drives if they match an existing drivegroup specification. If you deployed the OSDs you are removing with a spec and do not want any new OSDs deployed on the drives after removal, modify the drivegroup specification before removal. While deploying OSDs, if you have used --all-available-devices option, set unmanaged: true to stop it from picking up new drives at all. For other deployments, modify the specification. See the Deploying Ceph OSDs using advanced service specifications for more details.
Prerequisites
- A running Red Hat Ceph Storage cluster.
- Hosts are added to the cluster.
- Monitor, Manager, and OSD daemons are deployed on the storage cluster.
- A new OSD that replaces the removed OSD must be created on the same host from which the OSD was removed.
Procedure
Log into the Cephadm shell:
Example
[root@host01 ~]# cephadm shell
Ensure to dump and save a mapping of your OSD configurations for future references:
Example
[ceph: root@node /]# ceph osd metadata -f plain | grep device_paths
"device_paths": "sde=/dev/disk/by-path/pci-0000:03:00.0-scsi-0:0:0:1,sdi=/dev/disk/by-path/pci-0000:03:00.0-scsi-0:1:0:1",
"device_paths": "sde=/dev/disk/by-path/pci-0000:03:00.0-scsi-0:0:0:1,sdf=/dev/disk/by-path/pci-0000:03:00.0-scsi-0:1:0:1",
"device_paths": "sdd=/dev/disk/by-path/pci-0000:03:00.0-scsi-0:0:0:2,sdg=/dev/disk/by-path/pci-0000:03:00.0-scsi-0:1:0:2",
"device_paths": "sdd=/dev/disk/by-path/pci-0000:03:00.0-scsi-0:0:0:2,sdh=/dev/disk/by-path/pci-0000:03:00.0-scsi-0:1:0:2",
"device_paths": "sdd=/dev/disk/by-path/pci-0000:03:00.0-scsi-0:0:0:2,sdk=/dev/disk/by-path/pci-0000:03:00.0-scsi-0:1:0:2",
"device_paths": "sdc=/dev/disk/by-path/pci-0000:03:00.0-scsi-0:0:0:3,sdl=/dev/disk/by-path/pci-0000:03:00.0-scsi-0:1:0:3",
"device_paths": "sdc=/dev/disk/by-path/pci-0000:03:00.0-scsi-0:0:0:3,sdj=/dev/disk/by-path/pci-0000:03:00.0-scsi-0:1:0:3",
"device_paths": "sdc=/dev/disk/by-path/pci-0000:03:00.0-scsi-0:0:0:3,sdm=/dev/disk/by-path/pci-0000:03:00.0-scsi-0:1:0:3",
[.. output omitted ..]
Check the device and the node from which the OSD has to be replaced:
Example
[ceph: root@host01 /]# ceph osd tree
Remove the OSD from the
cephadmmanaged cluster:ImportantIf the storage cluster has
health_warnor other errors associated with it, check and try to fix any errors before replacing the OSD to avoid data loss.Syntax
ceph orch osd rm OSD_ID --replace [--force]The
--forceoption can be used when there are ongoing operations on the storage cluster.Example
[ceph: root@host01 /]# ceph orch osd rm 0 --replace
Recreate the new OSD by applying the following OSD specification:
Example
service_type: osd
service_id: osd
placement:
  hosts:
  - myhost
data_devices:
  paths:
  - /path/to/the/device
Check the status of the OSD replacement:
Example
[ceph: root@host01 /]# ceph orch osd rm status
Stop the orchestrator to apply any existing OSD specification:
Example
[ceph: root@node /]# ceph orch pause
[ceph: root@node /]# ceph orch status
Backend: cephadm
Available: Yes
Paused: Yes
Zap the OSD devices that have been removed:
Example
[ceph: root@node /]# ceph orch device zap node.example.com /dev/sdi --force
zap successful for /dev/sdi on node.example.com

[ceph: root@node /]# ceph orch device zap node.example.com /dev/sdf --force
zap successful for /dev/sdf on node.example.com
Resume the Orcestrator from pause mode
Example
[ceph: root@node /]# ceph orch resume
Check the status of the OSD replacement:
Example
[ceph: root@node /]# ceph osd tree
ID  CLASS  WEIGHT   TYPE NAME      STATUS  REWEIGHT  PRI-AFF
-1         0.77112  root default
-3         0.77112      host node
 0    hdd  0.09639          osd.0      up   1.00000  1.00000
 1    hdd  0.09639          osd.1      up   1.00000  1.00000
 2    hdd  0.09639          osd.2      up   1.00000  1.00000
 3    hdd  0.09639          osd.3      up   1.00000  1.00000
 4    hdd  0.09639          osd.4      up   1.00000  1.00000
 5    hdd  0.09639          osd.5      up   1.00000  1.00000
 6    hdd  0.09639          osd.6      up   1.00000  1.00000
 7    hdd  0.09639          osd.7      up   1.00000  1.00000
 [.. output omitted ..]
Verification
Verify the details of the devices and the nodes from which the Ceph OSDs are replaced:
Example
[ceph: root@host01 /]# ceph osd tree
You can see an OSD with the same id as the one you replaced running on the same host.
Verify that the db_device for the new deployed OSDs is the replaced db_device:
Example
[ceph: root@host01 /]# ceph osd metadata 0 | grep bluefs_db_devices
"bluefs_db_devices": "nvme0n1",

[ceph: root@host01 /]# ceph osd metadata 1 | grep bluefs_db_devices
"bluefs_db_devices": "nvme0n1",
Additional Resources
- See the Deploying Ceph OSDs on all available devices section in the Red Hat Ceph Storage Operations Guide for more information.
- See the Deploying Ceph OSDs on specific devices and hosts section in the Red Hat Ceph Storage Operations Guide for more information.
6.12. Replacing the OSDs with pre-created LVM
After purging the OSD with the ceph-volume lvm zap command, if the directory is not present, then you can replace the OSDs with the OSd service specification file with the pre-created LVM.
Prerequisites
- A running Red Hat Ceph Storage cluster.
- Failed OSD
Procedure
Log into the Cephadm shell:
Example
[root@host01 ~]# cephadm shell
Remove the OSD:
Syntax
ceph orch osd rm OSD_ID [--replace]Example
[ceph: root@host01 /]# ceph orch osd rm 8 --replace
Scheduled OSD(s) for removal
Verify the OSD is destroyed:
Example
[ceph: root@host01 /]# ceph osd tree

ID   CLASS  WEIGHT   TYPE NAME        STATUS     REWEIGHT  PRI-AFF
 -1         0.32297  root default
 -9         0.05177      host host10
  3    hdd  0.01520          osd.3           up   1.00000  1.00000
 13    hdd  0.02489          osd.13          up   1.00000  1.00000
 17    hdd  0.01169          osd.17          up   1.00000  1.00000
-13         0.05177      host host11
  2    hdd  0.01520          osd.2           up   1.00000  1.00000
 15    hdd  0.02489          osd.15          up   1.00000  1.00000
 19    hdd  0.01169          osd.19          up   1.00000  1.00000
 -7         0.05835      host host12
 20    hdd  0.01459          osd.20          up   1.00000  1.00000
 21    hdd  0.01459          osd.21          up   1.00000  1.00000
 22    hdd  0.01459          osd.22          up   1.00000  1.00000
 23    hdd  0.01459          osd.23          up   1.00000  1.00000
 -5         0.03827      host host04
  1    hdd  0.01169          osd.1           up   1.00000  1.00000
  6    hdd  0.01129          osd.6           up   1.00000  1.00000
  7    hdd  0.00749          osd.7           up   1.00000  1.00000
  9    hdd  0.00780          osd.9           up   1.00000  1.00000
 -3         0.03816      host host05
  0    hdd  0.01169          osd.0           up   1.00000  1.00000
  8    hdd  0.01129          osd.8    destroyed         0  1.00000
 12    hdd  0.00749          osd.12          up   1.00000  1.00000
 16    hdd  0.00769          osd.16          up   1.00000  1.00000
-15         0.04237      host host06
  5    hdd  0.01239          osd.5           up   1.00000  1.00000
 10    hdd  0.01540          osd.10          up   1.00000  1.00000
 11    hdd  0.01459          osd.11          up   1.00000  1.00000
-11         0.04227      host host07
  4    hdd  0.01239          osd.4           up   1.00000  1.00000
 14    hdd  0.01529          osd.14          up   1.00000  1.00000
 18    hdd  0.01459          osd.18          up   1.00000  1.00000
Zap and remove the OSD using the
ceph-volumecommand:Syntax
ceph-volume lvm zap --osd-id OSD_IDExample
[ceph: root@host01 /]# ceph-volume lvm zap --osd-id 8

Zapping: /dev/vg1/data-lv2
Closing encrypted path /dev/mapper/l4D6ql-Prji-IzH4-dfhF-xzuf-5ETl-jNRcXC
Running command: /usr/sbin/cryptsetup remove /dev/mapper/l4D6ql-Prji-IzH4-dfhF-xzuf-5ETl-jNRcXC
Running command: /usr/bin/dd if=/dev/zero of=/dev/vg1/data-lv2 bs=1M count=10 conv=fsync
 stderr: 10+0 records in
10+0 records out
 stderr: 10485760 bytes (10 MB, 10 MiB) copied, 0.034742 s, 302 MB/s
Zapping successful for OSD: 8
Check the OSD topology:
Example
[ceph: root@host01 /]# ceph-volume lvm list
Recreate the OSD with a specification file corresponding to that specific OSD topology:
Example
[ceph: root@host01 /]# cat osd.yml
service_type: osd
service_id: osd_service
placement:
  hosts:
  - host03
data_devices:
  paths:
  - /dev/vg1/data-lv2
db_devices:
  paths:
   - /dev/vg1/db-lv1
Apply the updated specification file:
Example
[ceph: root@host01 /]# ceph orch apply -i osd.yml
Scheduled osd.osd_service update...
Verify the OSD is back:
Example
[ceph: root@host01 /]# ceph -s
[ceph: root@host01 /]# ceph osd tree
6.13. Replacing the OSDs in a non-colocated scenario
When the an OSD fails in a non-colocated scenario, you can replace the WAL/DB devices. The procedure is the same for DB and WAL devices. You need to edit the paths under db_devices for DB devices and paths under wal_devices for WAL devices.
Prerequisites
- A running Red Hat Ceph Storage cluster.
- Daemons are non-colocated.
- Failed OSD
Procedure
Identify the devices in the cluster:
Example
[root@host01 ~]# lsblk

NAME                                                                                                  MAJ:MIN RM  SIZE RO TYPE MOUNTPOINT
sda                                                                                                     8:0    0   20G  0 disk
├─sda1                                                                                                  8:1    0    1G  0 part /boot
└─sda2                                                                                                  8:2    0   19G  0 part
  ├─rhel-root                                                                                         253:0    0   17G  0 lvm  /
  └─rhel-swap                                                                                         253:1    0    2G  0 lvm  [SWAP]
sdb                                                                                                     8:16   0   10G  0 disk
└─ceph--5726d3e9--4fdb--4eda--b56a--3e0df88d663f-osd--block--3ceb89ec--87ef--46b4--99c6--2a56bac09ff0 253:2    0   10G  0 lvm
sdc                                                                                                     8:32   0   10G  0 disk
└─ceph--d7c9ab50--f5c0--4be0--a8fd--e0313115f65c-osd--block--37c370df--1263--487f--a476--08e28bdbcd3c 253:4    0   10G  0 lvm
sdd                                                                                                     8:48   0   10G  0 disk
├─ceph--1774f992--44f9--4e78--be7b--b403057cf5c3-osd--db--31b20150--4cbc--4c2c--9c8f--6f624f3bfd89    253:7    0  2.5G  0 lvm
└─ceph--1774f992--44f9--4e78--be7b--b403057cf5c3-osd--db--1bee5101--dbab--4155--a02c--e5a747d38a56    253:9    0  2.5G  0 lvm
sde                                                                                                     8:64   0   10G  0 disk
sdf                                                                                                     8:80   0   10G  0 disk
└─ceph--412ee99b--4303--4199--930a--0d976e1599a2-osd--block--3a99af02--7c73--4236--9879--1fad1fe6203d 253:6    0   10G  0 lvm
sdg                                                                                                     8:96   0   10G  0 disk
└─ceph--316ca066--aeb6--46e1--8c57--f12f279467b4-osd--block--58475365--51e7--42f2--9681--e0c921947ae6 253:8    0   10G  0 lvm
sdh                                                                                                     8:112  0   10G  0 disk
├─ceph--d7064874--66cb--4a77--a7c2--8aa0b0125c3c-osd--db--0dfe6eca--ba58--438a--9510--d96e6814d853    253:3    0    5G  0 lvm
└─ceph--d7064874--66cb--4a77--a7c2--8aa0b0125c3c-osd--db--26b70c30--8817--45de--8843--4c0932ad2429    253:5    0    5G  0 lvm
sr0
Log into the Cephadm shell:
Example
[root@host01 ~]# cephadm shell
Identify the OSDs and their DB device:
Example
[ceph: root@host01 /]# ceph-volume lvm list /dev/sdh


====== osd.2 =======

  [db]          /dev/ceph-d7064874-66cb-4a77-a7c2-8aa0b0125c3c/osd-db-0dfe6eca-ba58-438a-9510-d96e6814d853

      block device              /dev/ceph-5726d3e9-4fdb-4eda-b56a-3e0df88d663f/osd-block-3ceb89ec-87ef-46b4-99c6-2a56bac09ff0
      block uuid                GkWLoo-f0jd-Apj2-Zmwj-ce0h-OY6J-UuW8aD
      cephx lockbox secret
      cluster fsid              fa0bd9dc-e4c4-11ed-8db4-001a4a00046e
      cluster name              ceph
      crush device class
      db device                 /dev/ceph-d7064874-66cb-4a77-a7c2-8aa0b0125c3c/osd-db-0dfe6eca-ba58-438a-9510-d96e6814d853
      db uuid                   6gSPoc-L39h-afN3-rDl6-kozT-AX9S-XR20xM
      encrypted                 0
      osd fsid                  3ceb89ec-87ef-46b4-99c6-2a56bac09ff0
      osd id                    2
      osdspec affinity          non-colocated
      type                      db
      vdo                       0
      devices                   /dev/sdh

====== osd.5 =======

  [db]          /dev/ceph-d7064874-66cb-4a77-a7c2-8aa0b0125c3c/osd-db-26b70c30-8817-45de-8843-4c0932ad2429

      block device              /dev/ceph-d7c9ab50-f5c0-4be0-a8fd-e0313115f65c/osd-block-37c370df-1263-487f-a476-08e28bdbcd3c
      block uuid                Eay3I7-fcz5-AWvp-kRcI-mJaH-n03V-Zr0wmJ
      cephx lockbox secret
      cluster fsid              fa0bd9dc-e4c4-11ed-8db4-001a4a00046e
      cluster name              ceph
      crush device class
      db device                 /dev/ceph-d7064874-66cb-4a77-a7c2-8aa0b0125c3c/osd-db-26b70c30-8817-45de-8843-4c0932ad2429
      db uuid                   mwSohP-u72r-DHcT-BPka-piwA-lSwx-w24N0M
      encrypted                 0
      osd fsid                  37c370df-1263-487f-a476-08e28bdbcd3c
      osd id                    5
      osdspec affinity          non-colocated
      type                      db
      vdo                       0
      devices                   /dev/sdh
In the
osds.yamlfile, setunmanagedparameter totrue, elsecephadmredeploys the OSDs:Example
[ceph: root@host01 /]# cat osds.yml
service_type: osd
service_id: non-colocated
unmanaged: true
placement:
  host_pattern: 'ceph*'
data_devices:
  paths:
   - /dev/sdb
   - /dev/sdc
   - /dev/sdf
   - /dev/sdg
db_devices:
  paths:
   - /dev/sdd
   - /dev/sdh
Apply the updated specification file:
Example
[ceph: root@host01 /]# ceph orch apply -i osds.yml

Scheduled osd.non-colocated update...
Check the status:
Example
[ceph: root@host01 /]# ceph orch ls

NAME           PORTS        RUNNING  REFRESHED  AGE  PLACEMENT
alertmanager   ?:9093,9094      1/1  9m ago     4d   count:1
crash                           3/4  4d ago     4d   *
grafana        ?:3000           1/1  9m ago     4d   count:1
mgr                             1/2  4d ago     4d   count:2
mon                             3/5  4d ago     4d   count:5
node-exporter  ?:9100           3/4  4d ago     4d   *
osd.non-colocated                 8  4d ago     5s   <unmanaged>
prometheus     ?:9095           1/1  9m ago     4d   count:1
Remove the OSDs. Ensure to use the
--zapoption to remove hte backend services and the--replaceoption to retain the OSD IDs:Example
[ceph: root@host01 /]# ceph orch osd rm 2 5 --zap --replace
Scheduled OSD(s) for removal
Check the status:
Example
[ceph: root@host01 /]# ceph osd df tree | egrep -i "ID|host02|osd.2|osd.5"

ID  CLASS  WEIGHT   REWEIGHT  SIZE     RAW USE  DATA     OMAP  META     AVAIL   %USE   VAR   PGS  STATUS     TYPE NAME
-5         0.04877         -   55 GiB   15 GiB  4.1 MiB   0 B   60 MiB  40 GiB  27.27  1.17    -                 host02
 2    hdd  0.01219   1.00000   15 GiB  5.0 GiB  996 KiB   0 B   15 MiB  10 GiB  33.33  1.43    0  destroyed          osd.2
 5    hdd  0.01219   1.00000   15 GiB  5.0 GiB  1.0 MiB   0 B   15 MiB  10 GiB  33.33  1.43    0  destroyed          osd.5
Edit the
osds.yamlspecification file to changeunmanagedparameter tofalseand replace the path to the DB device if it has changed after the device got physically replaced:Example
[ceph: root@host01 /]# cat osds.yml
service_type: osd
service_id: non-colocated
unmanaged: false
placement:
  host_pattern: 'ceph01*'
data_devices:
  paths:
   - /dev/sdb
   - /dev/sdc
   - /dev/sdf
   - /dev/sdg
db_devices:
  paths:
   - /dev/sdd
   - /dev/sde
In the above example,
/dev/sdhis replaced with/dev/sde.ImportantIf you use the same host specification file to replace the faulty DB device on a single OSD node, modify the
host_patternoption to specify only the OSD node, else the deployment fails and you cannot find the new DB device on other hosts.Reapply the specification file with the
--dry-runoption to ensure the OSDs shall be deployed with the new DB device:Example
[ceph: root@host01 /]# ceph orch apply -i osds.yml --dry-run
WARNING! Dry-Runs are snapshots of a certain point in time and are bound
to the current inventory setup. If any of these conditions change, the
preview will be invalid. Please make sure to have a minimal
timeframe between planning and applying the specs.
####################
SERVICESPEC PREVIEWS
####################
+---------+------+--------+-------------+
|SERVICE  |NAME  |ADD_TO  |REMOVE_FROM  |
+---------+------+--------+-------------+
+---------+------+--------+-------------+
################
OSDSPEC PREVIEWS
################
+---------+-------+-------+----------+----------+-----+
|SERVICE  |NAME   |HOST   |DATA      |DB        |WAL  |
+---------+-------+-------+----------+----------+-----+
|osd      |non-colocated  |host02  |/dev/sdb  |/dev/sde  |-    |
|osd      |non-colocated  |host02  |/dev/sdc  |/dev/sde  |-    |
+---------+-------+-------+----------+----------+-----+
Apply the specification file:
Example
[ceph: root@host01 /]# ceph orch apply -i osds.yml
Scheduled osd.non-colocated update...
Check the OSDs are redeployed:
Example
[ceph: root@host01 /]# ceph osd df tree | egrep -i "ID|host02|osd.2|osd.5"

ID  CLASS  WEIGHT   REWEIGHT  SIZE     RAW USE  DATA     OMAP  META     AVAIL   %USE   VAR   PGS  STATUS  TYPE NAME
-5         0.04877         -   55 GiB   15 GiB  4.5 MiB   0 B   60 MiB  40 GiB  27.27  1.17    -              host host02
 2    hdd  0.01219   1.00000   15 GiB  5.0 GiB  1.1 MiB   0 B   15 MiB  10 GiB  33.33  1.43    0      up          osd.2
 5    hdd  0.01219   1.00000   15 GiB  5.0 GiB  1.1 MiB   0 B   15 MiB  10 GiB  33.33  1.43    0      up          osd.5
Verification
From the OSD host where the OSDS are redeployed, verify if they are on the new DB device:
Example
[ceph: root@host01 /]# ceph-volume lvm list /dev/sde

====== osd.2 =======

  [db]          /dev/ceph-15ce813a-8a4c-46d9-ad99-7e0845baf15e/osd-db-1998a02e-5e67-42a9-b057-e02c22bbf461

      block device              /dev/ceph-a4afcb78-c804-4daf-b78f-3c7ad1ed0379/osd-block-564b3d2f-0f85-4289-899a-9f98a2641979
      block uuid                ITPVPa-CCQ5-BbFa-FZCn-FeYt-c5N4-ssdU41
      cephx lockbox secret
      cluster fsid              fa0bd9dc-e4c4-11ed-8db4-001a4a00046e
      cluster name              ceph
      crush device class
      db device                 /dev/ceph-15ce813a-8a4c-46d9-ad99-7e0845baf15e/osd-db-1998a02e-5e67-42a9-b057-e02c22bbf461
      db uuid                   HF1bYb-fTK7-0dcB-CHzW-xvNn-dCym-KKdU5e
      encrypted                 0
      osd fsid                  564b3d2f-0f85-4289-899a-9f98a2641979
      osd id                    2
      osdspec affinity          non-colocated
      type                      db
      vdo                       0
      devices                   /dev/sde

====== osd.5 =======

  [db]          /dev/ceph-15ce813a-8a4c-46d9-ad99-7e0845baf15e/osd-db-6c154191-846d-4e63-8c57-fc4b99e182bd

      block device              /dev/ceph-b37c8310-77f9-4163-964b-f17b4c29c537/osd-block-b42a4f1f-8e19-4416-a874-6ff5d305d97f
      block uuid                0LuPoz-ao7S-UL2t-BDIs-C9pl-ct8J-xh5ep4
      cephx lockbox secret
      cluster fsid              fa0bd9dc-e4c4-11ed-8db4-001a4a00046e
      cluster name              ceph
      crush device class
      db device                 /dev/ceph-15ce813a-8a4c-46d9-ad99-7e0845baf15e/osd-db-6c154191-846d-4e63-8c57-fc4b99e182bd
      db uuid                   SvmXms-iWkj-MTG7-VnJj-r5Mo-Moiw-MsbqVD
      encrypted                 0
      osd fsid                  b42a4f1f-8e19-4416-a874-6ff5d305d97f
      osd id                    5
      osdspec affinity          non-colocated
      type                      db
      vdo                       0
      devices                   /dev/sde
6.14. Stopping the removal of the OSDs using the Ceph Orchestrator
You can stop the removal of only the OSDs that are queued for removal. This resets the initial state of the OSD and takes it off the removal queue.
If the OSD is in the process of removal, then you cannot stop the process.
Prerequisites
- A running Red Hat Ceph Storage cluster.
- Hosts are added to the cluster.
- Monitor, Manager and OSD daemons are deployed on the cluster.
- Remove OSD process initiated.
Procedure
Log into the Cephadm shell:
Example
[root@host01 ~]# cephadm shell
Check the device and the node from which the OSD was initiated to be removed:
Example
[ceph: root@host01 /]# ceph osd tree
Stop the removal of the queued OSD:
Syntax
ceph orch osd rm stop OSD_IDExample
[ceph: root@host01 /]# ceph orch osd rm stop 0
Check the status of the OSD removal:
Example
[ceph: root@host01 /]# ceph orch osd rm status
Verification
Verify the details of the devices and the nodes from which the Ceph OSDs were queued for removal:
Example
[ceph: root@host01 /]# ceph osd tree
Additional Resources
- See Removing the OSD daemons using the Ceph Orchestrator section in the Red Hat Ceph Storage Operations Guide for more information.
6.15. Activating the OSDs using the Ceph Orchestrator
You can activate the OSDs in the cluster in cases where the operating system of the host was reinstalled.
Prerequisites
- A running Red Hat Ceph Storage cluster.
- Hosts are added to the cluster.
- Monitor, Manager and OSD daemons are deployed on the storage cluster.
Procedure
Log into the Cephadm shell:
Example
[root@host01 ~]# cephadm shell
After the operating system of the host is reinstalled, activate the OSDs:
Syntax
ceph cephadm osd activate HOSTNAMEExample
[ceph: root@host01 /]# ceph cephadm osd activate host03
Verification
List the service:
Example
[ceph: root@host01 /]# ceph orch ls
List the hosts, daemons, and processes:
Syntax
ceph orch ps --service_name=SERVICE_NAMEExample
[ceph: root@host01 /]# ceph orch ps --service_name=osd
6.15.1. Observing the data migration
When you add or remove an OSD to the CRUSH map, Ceph begins rebalancing the data by migrating placement groups to the new or existing OSD(s). You can observe the data migration using ceph-w command.
Prerequisites
- A running Red Hat Ceph Storage cluster.
- Recently added or removed an OSD.
Procedure
To observe the data migration:
Example
[ceph: root@host01 /]# ceph -w
-
Watch as the placement group states change from
active+cleantoactive, some degraded objects, and finallyactive+cleanwhen migration completes. -
To exit the utility, press
Ctrl + C.
6.16. Recalculating the placement groups
Placement groups (PGs) define the spread of any pool data across the available OSDs. A placement group is built upon the given redundancy algorithm to be used. For a 3-way replication, the redundancy is defined to use three different OSDs. For erasure-coded pools, the number of OSDs to use is defined by the number of chunks.
When defining a pool the number of placement groups defines the grade of granularity the data is spread with across all available OSDs. The higher the number the better the equalization of capacity load can be. However, since handling the placement groups is also important in case of reconstruction of data, the number is significant to be carefully chosen upfront. To support calculation a tool is available to produce agile environments.
During lifetime of a storage cluster a pool may grow above the initially anticipated limits. With the growing number of drives a recalculation is recommended. The number of placement groups per OSD should be around 100. When adding more OSDs to the storage cluster the number of PGs per OSD will lower over time. Starting with 120 drives initially in the storage cluster and setting the pg_num of the pool to 4000 will end up in 100 PGs per OSD, given with the replication factor of three. Over time, when growing to ten times the number of OSDs, the number of PGs per OSD will go down to ten only. Because small number of PGs per OSD will tend to an unevenly distributed capacity, consider adjusting the PGs per pool.
Adjusting the number of placement groups can be done online. Recalculating is not only a recalculation of the PG numbers, but will involve data relocation, which will be a lengthy process. However, the data availability will be maintained at any time.
Very high numbers of PGs per OSD should be avoided, because reconstruction of all PGs on a failed OSD will start at once. A high number of IOPS is required to perform reconstruction in a timely manner, which might not be available. This would lead to deep I/O queues and high latency rendering the storage cluster unusable or will result in long healing times.
Additional Resources
- See the PG calculator for calculating the values by a given use case.
- See the Erasure Code Pools chapter in the Red Hat Ceph Storage Strategies Guide for more information.
Chapter 7. Management of monitoring stack using the Ceph Orchestrator
As a storage administrator, you can use the Ceph Orchestrator with Cephadm in the backend to deploy monitoring and alerting stack. The monitoring stack consists of Prometheus, Prometheus exporters, Prometheus Alertmanager, and Grafana. Users need to either define these services with Cephadm in a YAML configuration file, or they can use the command line interface to deploy them. When multiple services of the same type are deployed, a highly-available setup is deployed. The node exporter is an exception to this rule.
Red Hat Ceph Storage 5.0 does not support custom images for deploying monitoring services such as Prometheus, Grafana, Alertmanager, and node-exporter.
The following monitoring services can be deployed with Cephadm:
Prometheus is the monitoring and alerting toolkit. It collects the data provided by Prometheus exporters and fires preconfigured alerts if predefined thresholds have been reached. The Prometheus manager module provides a Prometheus exporter to pass on Ceph performance counters from the collection point in
ceph-mgr.The Prometheus configuration, including scrape targets, such as metrics providing daemons, is set up automatically by Cephadm. Cephadm also deploys a list of default alerts, for example, health error, 10% OSDs down, or pgs inactive.
- Alertmanager handles alerts sent by the Prometheus server. It deduplicates, groups, and routes the alerts to the correct receiver. By default, the Ceph dashboard is automatically configured as the receiver. The Alertmanager handles alerts sent by the Prometheus server. Alerts can be silenced using the Alertmanager, but silences can also be managed using the Ceph Dashboard.
Grafana is the visualization and alerting software. The alerting functionality of Grafana is not used by this monitoring stack. For alerting, the Alertmanager is used.
By default, traffic to Grafana is encrypted with TLS. You can either supply your own TLS certificate or use a self-signed one. If no custom certificate has been configured before Grafana has been deployed, then a self-signed certificate is automatically created and configured for Grafana. Custom certificates for Grafana can be configured using the following commands:
Syntax
 ceph config-key set mgr/cephadm/grafana_key -i PRESENT_WORKING_DIRECTORY/key.pem
 ceph config-key set mgr/cephadm/grafana_crt -i PRESENT_WORKING_DIRECTORY/certificate.pem
Node exporter is an exporter for Prometheus which provides data about the node on which it is installed. It is recommended to install the node exporter on all nodes. This can be done using the monitoring.yml file with the node-exporter service type.
7.1. Deploying the monitoring stack using the Ceph Orchestrator
The monitoring stack consists of Prometheus, Prometheus exporters, Prometheus Alertmanager, Grafana, and Ceph Exporter. Ceph Dashboard makes use of these components to store and visualize detailed metrics on cluster usage and performance.
You can deploy the monitoring stack using the service specification in YAML file format. All the monitoring services can have the network and port they bind to configured in the yml file.
Prerequisites
- A running Red Hat Ceph Storage cluster.
- Root-level access to the nodes.
Procedure
Enable the prometheus module in the Ceph Manager daemon. This exposes the internal Ceph metrics so that Prometheus can read them:
Example
[ceph: root@host01 /]# ceph mgr module enable prometheus
ImportantEnsure this command is run before Prometheus is deployed. If the command was not run before the deployment, you must redeploy Prometheus to update the configuration:
ceph orch redeploy prometheus
Navigate to the following directory:
Syntax
cd /var/lib/ceph/DAEMON_PATH/Example
[ceph: root@host01 mds/]# cd /var/lib/ceph/monitoring/
NoteIf the directory
monitoringdoes not exist, create it.Create the
monitoring.ymlfile:Example
[ceph: root@host01 monitoring]# touch monitoring.yml
Edit the specification file with a content similar to the following example:
Example
service_type: prometheus
service_name: prometheus
placement:
  hosts:
  - host01
networks:
- 192.169.142.0/24
---
service_type: node-exporter
---
service_type: alertmanager
service_name: alertmanager
placement:
  hosts:
  - host01
networks:
- 192.169.142.0/24
---
service_type: grafana
service_name: grafana
placement:
  hosts:
  - host01
networks:
- 192.169.142.0/24
---
service_type: ceph-exporter
NoteEnsure the monitoring stack components
alertmanager,prometheus, andgrafanaare deployed on the same host. Thenode-exporterandceph-exportercomponents should be deployed on all the hosts.Apply monitoring services:
Example
[ceph: root@host01 monitoring]# ceph orch apply -i monitoring.yml
Verification
List the service:
Example
[ceph: root@host01 /]# ceph orch ls
List the hosts, daemons, and processes:
Syntax
ceph orch ps --service_name=SERVICE_NAMEExample
[ceph: root@host01 /]# ceph orch ps --service_name=prometheus
Prometheus, Grafana, and the Ceph dashboard are all automatically configured to talk to each other, resulting in a fully functional Grafana integration in the Ceph dashboard.
7.2. Removing the monitoring stack using the Ceph Orchestrator
You can remove the monitoring stack using the ceph orch rm command.
Prerequisites
- A running Red Hat Ceph Storage cluster.
Procedure
Log into the Cephadm shell:
Example
[root@host01 ~]# cephadm shell
Use the
ceph orch rmcommand to remove the monitoring stack:Syntax
ceph orch rm SERVICE_NAME --forceExample
[ceph: root@host01 /]# ceph orch rm grafana
[ceph: root@host01 /]# ceph orch rm prometheus
[ceph: root@host01 /]# ceph orch rm node-exporter
[ceph: root@host01 /]# ceph orch rm alertmanager
[ceph: root@host01 /]# ceph orch rm ceph-exporter
[ceph: root@host01 /]# ceph mgr module disable prometheus
Check the status of the process:
Example
[ceph: root@host01 /]# ceph orch status
Verification
List the service:
Example
[ceph: root@host01 /]# ceph orch ls
List the hosts, daemons, and processes:
Syntax
ceph orch ps
Example
[ceph: root@host01 /]# ceph orch ps
Additional Resources
- See Deploying the monitoring stack using the Ceph Orchestrator section in the Red Hat Ceph Storage Operations Guide for more information.
Chapter 8. Basic Red Hat Ceph Storage client setup
As a storage administrator, you have to set up client machines with basic configuration to interact with the storage cluster. Most client machines only need the ceph-common package and its dependencies installed. It will supply the basic ceph and rados commands, as well as other commands like mount.ceph and rbd.
8.1. Configuring file setup on client machines
Client machines generally need a smaller configuration file than a full-fledged storage cluster member. You can generate a minimal configuration file which can give details to clients to reach the Ceph monitors.
Prerequisites
- A running Red Hat Ceph Storage cluster.
- Root access to the nodes.
Procedure
On the node where you want to set up the files, create a directory
cephin the/etcfolder:Example
[root@host01 ~]# mkdir /etc/ceph/
Navigate to
/etc/cephdirectory:Example
[root@host01 ~]# cd /etc/ceph/
Generate the configuration file in the
cephdirectory:Example
[root@host01 ceph]# ceph config generate-minimal-conf

# minimal ceph.conf for 417b1d7a-a0e6-11eb-b940-001a4a000740
[global]
	fsid = 417b1d7a-a0e6-11eb-b940-001a4a000740
	mon_host = [v2:10.74.249.41:3300/0,v1:10.74.249.41:6789/0]
The contents of this file should be installed in
/etc/ceph/ceph.confpath. You can use this configuration file to reach the Ceph monitors.
8.2. Setting-up keyring on client machines
Most Ceph clusters are run with the authentication enabled, and the client needs the keys in order to communicate with cluster machines. You can generate the keyring which can give details to clients to reach the Ceph monitors.
Prerequisites
- A running Red Hat Ceph Storage cluster.
- Root access to the nodes.
Procedure
On the node where you want to set up the keyring, create a directory
cephin the/etcfolder:Example
[root@host01 ~]# mkdir /etc/ceph/
Navigate to
/etc/cephdirectory in thecephdirectory:Example
[root@host01 ~]# cd /etc/ceph/
Generate the keyring for the client:
Syntax
ceph auth get-or-create client.CLIENT_NAME -o /etc/ceph/NAME_OF_THE_FILE
Example
[root@host01 ceph]# ceph auth get-or-create client.fs -o /etc/ceph/ceph.keyring
Verify the output in the
ceph.keyringfile:Example
[root@host01 ceph]# cat ceph.keyring

[client.fs]
	key = AQAvoH5gkUCsExAATz3xCBLd4n6B6jRv+Z7CVQ==
The resulting output should be put into a keyring file, for example
/etc/ceph/ceph.keyring.
Chapter 9. Management of MDS service using the Ceph Orchestrator
As a storage administrator, you can use Ceph Orchestrator with Cephadm in the backend to deploy the MDS service. By default, a Ceph File System (CephFS) uses only one active MDS daemon. However, systems with many clients benefit from multiple active MDS daemons.
This section covers the following administrative tasks:
9.1. Prerequisites
- A running Red Hat Ceph Storage cluster.
- Root-level access to all the nodes.
- Hosts are added to the cluster.
- All manager, monitor and OSD daemons are deployed.
9.2. Deploying the MDS service using the command line interface
Using the Ceph Orchestrator, you can deploy the Metadata Server (MDS) service using the placement specification in the command line interface. Ceph File System (CephFS) requires one or more MDS.
Ensure you have at least two pools, one for Ceph file system (CephFS) data and one for CephFS metadata.
Prerequisites
- A running Red Hat Ceph Storage cluster.
- Hosts are added to the cluster.
- All manager, monitor, and OSD daemons are deployed.
Procedure
Log into the Cephadm shell:
Example
[root@host01 ~]# cephadm shell
- There are two ways of deploying MDS daemons using placement specification:
Method 1
Use
ceph fs volumeto create the MDS daemons. This creates the CephFS volume and pools associated with the CephFS, and also starts the MDS service on the hosts.Syntax
ceph fs volume create FILESYSTEM_NAME --placement="NUMBER_OF_DAEMONS HOST_NAME_1 HOST_NAME_2 HOST_NAME_3"
NoteBy default, replicated pools are created for this command.
Example
[ceph: root@host01 /]# ceph fs volume create test --placement="2 host01 host02"
Method 2
Create the pools, CephFS, and then deploy MDS service using placement specification:
Create the pools for CephFS:
Syntax
ceph osd pool create DATA_POOL [PG_NUM]
ceph osd pool create METADATA_POOL [PG_NUM]
Example
[ceph: root@host01 /]# ceph osd pool create cephfs_data 64
[ceph: root@host01 /]# ceph osd pool create cephfs_metadata 64
Typically, the metadata pool can start with a conservative number of Placement Groups (PGs) as it generally has far fewer objects than the data pool. It is possible to increase the number of PGs if needed. The pool sizes range from 64 PGs to 512 PGs. Size the data pool is proportional to the number and sizes of files you expect in the file system.
ImportantFor the metadata pool, consider to use:
- A higher replication level because any data loss to this pool can make the whole file system inaccessible.
- Storage with lower latency such as Solid-State Drive (SSD) disks because this directly affects the observed latency of file system operations on clients.
Create the file system for the data pools and metadata pools:
Syntax
ceph fs new FILESYSTEM_NAME METADATA_POOL DATA_POOL
Example
[ceph: root@host01 /]# ceph fs new test cephfs_metadata cephfs_data
Deploy MDS service using the
ceph orch applycommand:Syntax
ceph orch apply mds FILESYSTEM_NAME --placement="NUMBER_OF_DAEMONS HOST_NAME_1 HOST_NAME_2 HOST_NAME_3"
Example
[ceph: root@host01 /]# ceph orch apply mds test --placement="2 host01 host02"
Verification
List the service:
Example
[ceph: root@host01 /]# ceph orch ls
Check the CephFS status:
Example
[ceph: root@host01 /]# ceph fs ls
[ceph: root@host01 /]# ceph fs status
List the hosts, daemons, and processes:
Syntax
ceph orch ps --daemon_type=DAEMON_NAMEExample
[ceph: root@host01 /]# ceph orch ps --daemon_type=mds
Additional Resources
- See the Red Hat Ceph Storage File System Guide for more information about creating the Ceph File System (CephFS).
- For information on pools, see Pools.
9.3. Deploying the MDS service using the service specification
Using the Ceph Orchestrator, you can deploy the MDS service using the service specification.
Ensure you have at least two pools, one for the Ceph File System (CephFS) data and one for the CephFS metadata.
Prerequisites
- A running Red Hat Ceph Storage cluster.
- Hosts are added to the cluster.
- All manager, monitor, and OSD daemons are deployed.
Procedure
Create the
mds.yamlfile:Example
[root@host01 ~]# touch mds.yaml
Edit the
mds.yamlfile to include the following details:Syntax
service_type: mds
service_id: FILESYSTEM_NAME
placement:
  hosts:
  - HOST_NAME_1
  - HOST_NAME_2
  - HOST_NAME_3
Example
service_type: mds
service_id: fs_name
placement:
  hosts:
  - host01
  - host02
Mount the YAML file under a directory in the container:
Example
[root@host01 ~]# cephadm shell --mount mds.yaml:/var/lib/ceph/mds/mds.yaml
Navigate to the directory:
Example
[ceph: root@host01 /]# cd /var/lib/ceph/mds/
Log into the Cephadm shell:
Example
[root@host01 ~]# cephadm shell
Navigate to the following directory:
Example
[ceph: root@host01 /]# cd /var/lib/ceph/mds/
Deploy MDS service using service specification:
Syntax
ceph orch apply -i FILE_NAME.yamlExample
[ceph: root@host01 mds]# ceph orch apply -i mds.yaml
Once the MDS services is deployed and functional, create the CephFS:
Syntax
ceph fs new CEPHFS_NAME METADATA_POOL DATA_POOL
Example
[ceph: root@host01 /]# ceph fs new test metadata_pool data_pool
Verification
List the service:
Example
[ceph: root@host01 /]# ceph orch ls
List the hosts, daemons, and processes:
Syntax
ceph orch ps --daemon_type=DAEMON_NAMEExample
[ceph: root@host01 /]# ceph orch ps --daemon_type=mds
Additional Resources
- See the Red Hat Ceph Storage File System Guide for more information about creating the Ceph File System (CephFS).
9.4. Removing the MDS service using the Ceph Orchestrator
You can remove the service using the ceph orch rm command. Alternatively, you can remove the file system and the associated pools.
Prerequisites
- A running Red Hat Ceph Storage cluster.
- Root-level access to all the nodes.
- Hosts are added to the cluster.
- At least one MDS daemon deployed on the hosts.
Procedure
- There are two ways of removing MDS daemons from the cluster:
Method 1
Remove the CephFS volume, associated pools, and the services:
Log into the Cephadm shell:
Example
[root@host01 ~]# cephadm shell
Set the configuration parameter
mon_allow_pool_deletetotrue:Example
[ceph: root@host01 /]# ceph config set mon mon_allow_pool_delete true
Remove the file system:
Syntax
ceph fs volume rm FILESYSTEM_NAME --yes-i-really-mean-itExample
[ceph: root@host01 /]# ceph fs volume rm cephfs-new --yes-i-really-mean-it
This command will remove the file system, its data, and metadata pools. It also tries to remove the MDS using the enabled
ceph-mgrOrchestrator module.
Method 2
Use the
ceph orch rmcommand to remove the MDS service from the entire cluster:List the service:
Example
[ceph: root@host01 /]# ceph orch ls
Remove the service
Syntax
ceph orch rm SERVICE_NAMEExample
[ceph: root@host01 /]# ceph orch rm mds.test
Verification
List the hosts, daemons, and processes:
Syntax
ceph orch ps
Example
[ceph: root@host01 /]# ceph orch ps
Additional Resources
- See Deploying the MDS service using the command line interface section in the Red Hat Ceph Storage Operations Guide for more information.
- See Deploying the MDS service using the service specification section in the Red Hat Ceph Storage Operations Guide for more information.
Chapter 10. Management of Ceph object gateway using the Ceph Orchestrator
As a storage administrator, you can deploy Ceph object gateway using the command line interface or by using the service specification.
You can also configure multisite object gateways, and remove the Ceph object gateway using the Ceph Orchestrator.
Cephadm deploys Ceph object gateway as a collection of daemons that manages a single-cluster deployment or a particular realm and zone in a multisite deployment.
With Cephadm, the object gateway daemons are configured using the monitor configuration database instead of a ceph.conf or the command line. If that configuration is not already in the client.rgw section, then the object gateway daemons will start up with default settings and binds to the port 80.
The .default.rgw.buckets.index pool is created only after the bucket is created in Ceph Object Gateway, while the .default.rgw.buckets.data pool is created after the data is uploaded to the bucket.
This section covers the following administrative tasks:
10.1. Prerequisites
- A running Red Hat Ceph Storage cluster.
- Root-level access to all the nodes.
- Hosts are added to the cluster.
- All the managers, monitors, and OSDs are deployed in the storage cluster.
10.2. Deploying the Ceph Object Gateway using the command line interface
Using the Ceph Orchestrator, you can deploy the Ceph Object Gateway with the ceph orch command in the command line interface.
Prerequisites
- A running Red Hat Ceph Storage cluster.
- Root-level access to all the nodes.
- Hosts are added to the cluster.
- All manager, monitor and OSD daemons are deployed.
Procedure
Log into the Cephadm shell:
Example
[root@host01 ~]# cephadm shell
- You can deploy the Ceph object gateway daemons in three different ways:
Method 1
Create realm, zone group, zone, and then use the placement specification with the host name:
Create a realm:
Syntax
radosgw-admin realm create --rgw-realm=REALM_NAME --defaultExample
[ceph: root@host01 /]# radosgw-admin realm create --rgw-realm=test_realm --default
Create a zone group:
Syntax
radosgw-admin zonegroup create --rgw-zonegroup=ZONE_GROUP_NAME --master --defaultExample
[ceph: root@host01 /]# radosgw-admin zonegroup create --rgw-zonegroup=default --master --default
Create a zone:
Syntax
radosgw-admin zone create --rgw-zonegroup=ZONE_GROUP_NAME --rgw-zone=ZONE_NAME --master --default
Example
[ceph: root@host01 /]# radosgw-admin zone create --rgw-zonegroup=default --rgw-zone=test_zone --master --default
Commit the changes:
Syntax
radosgw-admin period update --rgw-realm=REALM_NAME --commitExample
[ceph: root@host01 /]# radosgw-admin period update --rgw-realm=test_realm --commit
Run the
ceph orch applycommand:Syntax
ceph orch apply rgw NAME [--realm=REALM_NAME] [--zone=ZONE_NAME] --placement="NUMBER_OF_DAEMONS [HOST_NAME_1 HOST_NAME_2]"
Example
[ceph: root@host01 /]# ceph orch apply rgw test --realm=test_realm --zone=test_zone --placement="2 host01 host02"
Method 2
Use an arbitrary service name to deploy two Ceph Object Gateway daemons for a single cluster deployment:
Syntax
ceph orch apply rgw SERVICE_NAMEExample
[ceph: root@host01 /]# ceph orch apply rgw foo
Method 3
Use an arbitrary service name on a labeled set of hosts:
Syntax
ceph orch host label add HOST_NAME_1 LABEL_NAME
ceph orch host label add HOSTNAME_2 LABEL_NAME
ceph orch apply rgw SERVICE_NAME --placement="label:LABEL_NAME count-per-host:NUMBER_OF_DAEMONS" --port=8000
NoteNUMBER_OF_DAEMONS controls the number of Ceph object gateways deployed on each host. To achieve the highest performance without incurring an additional cost, set this value to 2.
Example
[ceph: root@host01 /]# ceph orch host label add host01 rgw  # the 'rgw' label can be anything
[ceph: root@host01 /]# ceph orch host label add host02 rgw
[ceph: root@host01 /]# ceph orch apply rgw foo --placement="2 label:rgw" --port=8000
Verification
List the service:
Example
[ceph: root@host01 /]# ceph orch ls
List the hosts, daemons, and processes:
Syntax
ceph orch ps --daemon_type=DAEMON_NAMEExample
[ceph: root@host01 /]# ceph orch ps --daemon_type=rgw
10.3. Deploying the Ceph Object Gateway using the service specification
You can deploy the Ceph Object Gateway using the service specification with either the default or the custom realms, zones, and zone groups.
Prerequisites
- A running Red Hat Ceph Storage cluster.
- Root-level access to the bootstrapped host.
- Hosts are added to the cluster.
- All manager, monitor, and OSD daemons are deployed.
Procedure
As a root user, create a specification file:
Example
[root@host01 ~]# touch radosgw.yml
Edit the
radosgw.ymlfile to include the following details for the default realm, zone, and zone group:Syntax
service_type: rgw
service_id: REALM_NAME.ZONE_NAME
placement:
  hosts:
  - HOST_NAME_1
  - HOST_NAME_2
  count_per_host: NUMBER_OF_DAEMONS
spec:
  rgw_realm: REALM_NAME
  rgw_zone: ZONE_NAME
  rgw_frontend_port: FRONT_END_PORT
networks:
  -  NETWORK_CIDR # Ceph Object Gateway service binds to a specific network
NoteNUMBER_OF_DAEMONS controls the number of Ceph Object Gateways deployed on each host. To achieve the highest performance without incurring an additional cost, set this value to 2.
Example
service_type: rgw
service_id: default
placement:
  hosts:
  - host01
  - host02
  - host03
  count_per_host: 2
spec:
  rgw_realm: default
  rgw_zone: default
  rgw_frontend_port: 1234
networks:
  - 192.169.142.0/24
Optional: For custom realm, zone, and zone group, create the resources and then create the
radosgw.ymlfile:Create the custom realm, zone, and zone group:
Example
[root@host01 ~]# radosgw-admin realm create --rgw-realm=test_realm --default
[root@host01 ~]# radosgw-admin zonegroup create --rgw-zonegroup=test_zonegroup --default
[root@host01 ~]# radosgw-admin zone create --rgw-zonegroup=test_zonegroup --rgw-zone=test_zone --default
[root@host01 ~]# radosgw-admin period update --rgw-realm=test_realm --commit
Create the
radosgw.ymlfile with the following details:Example
service_type: rgw
service_id: test_realm.test_zone
placement:
  hosts:
  - host01
  - host02
  - host03
  count_per_host: 2
spec:
  rgw_realm: test_realm
  rgw_zone: test_zone
  rgw_frontend_port: 1234
networks:
  - 192.169.142.0/24
Mount the
radosgw.ymlfile under a directory in the container:Example
[root@host01 ~]# cephadm shell --mount radosgw.yml:/var/lib/ceph/radosgw/radosgw.yml
NoteEvery time you exit the shell, you have to mount the file in the container before deploying the daemon.
Deploy the Ceph Object Gateway using the service specification:
Syntax
ceph orch apply -i FILE_NAME.ymlExample
[ceph: root@host01 /]# ceph orch apply -i radosgw.yml
Verification
List the service:
Example
[ceph: root@host01 /]# ceph orch ls
List the hosts, daemons, and processes:
Syntax
ceph orch ps --daemon_type=DAEMON_NAMEExample
[ceph: root@host01 /]# ceph orch ps --daemon_type=rgw
10.4. Deploying a multi-site Ceph Object Gateway using the Ceph Orchestrator
Ceph Orchestrator supports multi-site configuration options for the Ceph Object Gateway.
You can configure each object gateway to work in an active-active zone configuration allowing writes to a non-primary zone. The multi-site configuration is stored within a container called a realm.
The realm stores zone groups, zones, and a time period. The rgw daemons handle the synchronization eliminating the need for a separate synchronization agent, thereby operating with an active-active configuration.
You can also deploy multi-site zones using the command line interface (CLI).
The following configuration assumes at least two Red Hat Ceph Storage clusters are in geographically separate locations. However, the configuration also works on the same site.
Prerequisites
- At least two running Red Hat Ceph Storage clusters.
- At least two Ceph Object Gateway instances, one for each Red Hat Ceph Storage cluster.
- Root-level access to all the nodes.
- Nodes or containers are added to the storage cluster.
- All Ceph Manager, Monitor and OSD daemons are deployed.
Procedure
In the
cephadmshell, configure the primary zone:Create a realm:
Syntax
radosgw-admin realm create --rgw-realm=REALM_NAME --defaultExample
[ceph: root@host01 /]# radosgw-admin realm create --rgw-realm=test_realm --default
If the storage cluster has a single realm, then specify the
--defaultflag.Create a primary zone group:
Syntax
radosgw-admin zonegroup create --rgw-zonegroup=ZONE_GROUP_NAME --endpoints=http://RGW_PRIMARY_HOSTNAME:RGW_PRIMARY_PORT_NUMBER_1 --master --default
Example
[ceph: root@host01 /]# radosgw-admin zonegroup create --rgw-zonegroup=us --endpoints=http://rgw1:80 --master --default
Create a primary zone:
Syntax
radosgw-admin zone create --rgw-zonegroup=PRIMARY_ZONE_GROUP_NAME --rgw-zone=PRIMARY_ZONE_NAME --endpoints=http://RGW_PRIMARY_HOSTNAME:RGW_PRIMARY_PORT_NUMBER_1 --access-key=SYSTEM_ACCESS_KEY --secret=SYSTEM_SECRET_KEY
Example
[ceph: root@host01 /]# radosgw-admin zone create --rgw-zonegroup=us --rgw-zone=us-east-1 --endpoints=http://rgw1:80 --access-key=LIPEYZJLTWXRKXS9LPJC --secret-key=IsAje0AVDNXNw48LjMAimpCpI7VaxJYSnfD0FFKQ
Optional: Delete the default zone, zone group, and the associated pools.
ImportantDo not delete the default zone and its pools if you are using the default zone and zone group to store data. Also, removing the default zone group deletes the system user.
To access old data in the
defaultzone and zonegroup, use--rgw-zone defaultand--rgw-zonegroup defaultinradosgw-admincommands.Example
[ceph: root@host01 /]# radosgw-admin zonegroup delete --rgw-zonegroup=default
[ceph: root@host01 /]# ceph osd pool rm default.rgw.log default.rgw.log --yes-i-really-really-mean-it
[ceph: root@host01 /]# ceph osd pool rm default.rgw.meta default.rgw.meta --yes-i-really-really-mean-it
[ceph: root@host01 /]# ceph osd pool rm default.rgw.control default.rgw.control --yes-i-really-really-mean-it
[ceph: root@host01 /]# ceph osd pool rm default.rgw.data.root default.rgw.data.root --yes-i-really-really-mean-it
[ceph: root@host01 /]# ceph osd pool rm default.rgw.gc default.rgw.gc --yes-i-really-really-mean-it
Create a system user:
Syntax
radosgw-admin user create --uid=USER_NAME --display-name="USER_NAME" --access-key=SYSTEM_ACCESS_KEY --secret=SYSTEM_SECRET_KEY --system
Example
[ceph: root@host01 /]# radosgw-admin user create --uid=zone.user --display-name="Zone user" --system
Make a note of the
access_keyandsecret_key.Add the access key and system key to the primary zone:
Syntax
radosgw-admin zone modify --rgw-zone=PRIMARY_ZONE_NAME --access-key=ACCESS_KEY --secret=SECRET_KEY
Example
[ceph: root@host01 /]# radosgw-admin zone modify --rgw-zone=us-east-1 --access-key=NE48APYCAODEPLKBCZVQ --secret=u24GHQWRE3yxxNBnFBzjM4jn14mFIckQ4EKL6LoW
Commit the changes:
Syntax
radosgw-admin period update --commit
Example
[ceph: root@host01 /]# radosgw-admin period update --commit
Outside the
cephadmshell, fetch theFSIDof the storage cluster and the processes:Example
[root@host01 ~]# systemctl list-units | grep ceph
Start the Ceph Object Gateway daemon:
Syntax
systemctl start ceph-FSID@DAEMON_NAME
systemctl enable ceph-FSID@DAEMON_NAME
Example
[root@host01 ~]# systemctl start ceph-62a081a6-88aa-11eb-a367-001a4a000672@rgw.test_realm.us-east-1.host01.ahdtsw.service
[root@host01 ~]# systemctl enable ceph-62a081a6-88aa-11eb-a367-001a4a000672@rgw.test_realm.us-east-1.host01.ahdtsw.service
In the Cephadm shell, configure the secondary zone.
Pull the primary realm configuration from the host:
Syntax
radosgw-admin realm pull --rgw-realm=PRIMARY_REALM --url=URL_TO_PRIMARY_ZONE_GATEWAY --access-key=ACCESS_KEY --secret-key=SECRET_KEY --default
Example
[ceph: root@host04 /]# radosgw-admin realm pull --rgw-realm=test_realm --url=http://10.74.249.26:80 --access-key=LIPEYZJLTWXRKXS9LPJC --secret-key=IsAje0AVDNXNw48LjMAimpCpI7VaxJYSnfD0FFKQ --default
Pull the primary period configuration from the host:
Syntax
radosgw-admin period pull --url=URL_TO_PRIMARY_ZONE_GATEWAY --access-key=ACCESS_KEY --secret-key=SECRET_KEY
Example
[ceph: root@host04 /]# radosgw-admin period pull --url=http://10.74.249.26:80 --access-key=LIPEYZJLTWXRKXS9LPJC --secret-key=IsAje0AVDNXNw48LjMAimpCpI7VaxJYSnfD0FFKQ
Configure a secondary zone:
Syntax
radosgw-admin zone create --rgw-zonegroup=ZONE_GROUP_NAME \
             --rgw-zone=SECONDARY_ZONE_NAME --endpoints=http://RGW_SECONDARY_HOSTNAME:RGW_PRIMARY_PORT_NUMBER_1 \
             --access-key=SYSTEM_ACCESS_KEY --secret=SYSTEM_SECRET_KEY \
             --endpoints=http://FQDN:80 \
             [--read-only]
Example
[ceph: root@host04 /]# radosgw-admin zone create --rgw-zonegroup=us --rgw-zone=us-east-2 --endpoints=http://rgw2:80 --access-key=LIPEYZJLTWXRKXS9LPJC --secret-key=IsAje0AVDNXNw48LjMAimpCpI7VaxJYSnfD0FFKQ
Optional: Delete the default zone.
ImportantDo not delete the default zone and its pools if you are using the default zone and zone group to store data.
To access old data in the
defaultzone and zonegroup, use--rgw-zone defaultand--rgw-zonegroup defaultinradosgw-admincommands.Example
[ceph: root@host04 /]# radosgw-admin zone rm --rgw-zone=default
[ceph: root@host04 /]# ceph osd pool rm default.rgw.log default.rgw.log --yes-i-really-really-mean-it
[ceph: root@host04 /]# ceph osd pool rm default.rgw.meta default.rgw.meta --yes-i-really-really-mean-it
[ceph: root@host04 /]# ceph osd pool rm default.rgw.control default.rgw.control --yes-i-really-really-mean-it
[ceph: root@host04 /]# ceph osd pool rm default.rgw.data.root default.rgw.data.root --yes-i-really-really-mean-it
[ceph: root@host04 /]# ceph osd pool rm default.rgw.gc default.rgw.gc --yes-i-really-really-mean-it
Update the Ceph configuration database:
Syntax
ceph config set SERVICE_NAME rgw_zone SECONDARY_ZONE_NAME
Example
[ceph: root@host04 /]# ceph config set rgw rgw_zone us-east-2
Commit the changes:
Syntax
radosgw-admin period update --commit
Example
[ceph: root@host04 /]# radosgw-admin period update --commit
Outside the Cephadm shell, fetch the FSID of the storage cluster and the processes:
Example
[root@host04 ~]# systemctl list-units | grep ceph
Start the Ceph Object Gateway daemon:
Syntax
systemctl start ceph-FSID@DAEMON_NAME
systemctl enable ceph-FSID@DAEMON_NAME
Example
[root@host04 ~]# systemctl start ceph-62a081a6-88aa-11eb-a367-001a4a000672@rgw.test_realm.us-east-2.host04.ahdtsw.service
[root@host04 ~]# systemctl enable ceph-62a081a6-88aa-11eb-a367-001a4a000672@rgw.test_realm.us-east-2.host04.ahdtsw.service
Optional: Deploy multi-site Ceph Object Gateways using the placement specification:
Syntax
ceph orch apply rgw NAME --realm=REALM_NAME --zone=PRIMARY_ZONE_NAME --placement="NUMBER_OF_DAEMONS HOST_NAME_1 HOST_NAME_2"
Example
[ceph: root@host04 /]# ceph orch apply rgw east --realm=test_realm --zone=us-east-1 --placement="2 host01 host02"
Verification
Check the synchronization status to verify the deployment:
Example
[ceph: root@host04 /]# radosgw-admin sync status
10.5. Removing the Ceph Object Gateway using the Ceph Orchestrator
You can remove the Ceph object gateway daemons using the ceph orch rm command.
Prerequisites
- A running Red Hat Ceph Storage cluster.
- Root-level access to all the nodes.
- Hosts are added to the cluster.
- At least one Ceph object gateway daemon deployed on the hosts.
Procedure
Log into the Cephadm shell:
Example
[root@host01 ~]# cephadm shell
List the service:
Example
[ceph: root@host01 /]# ceph orch ls
Remove the service:
Syntax
ceph orch rm SERVICE_NAMEExample
[ceph: root@host01 /]# ceph orch rm rgw.test_realm.test_zone_bb
Verification
List the hosts, daemons, and processes:
Syntax
ceph orch ps
Example
[ceph: root@host01 /]# ceph orch ps
Additional Resources
- See Deploying the Ceph object gateway using the command line interface section in the Red Hat Ceph Storage Operations Guide for more information.
- See Deploying the Ceph object gateway using the service specification section in the Red Hat Ceph Storage Operations Guide for more information.
Chapter 11. Management of NFS-Ganesha gateway using the Ceph Orchestrator (Limited Availability)
As a storage administrator, you can use the Orchestrator with Cephadm in the backend to deploy the NFS-Ganesha gateway. Cephadm deploys NFS Ganesha using a predefined RADOS pool and optional namespace.
This technology is Limited Availability. See the Deprecated functionality chapter for additional information.
Red Hat supports CephFS exports only over the NFS v4.0+ protocol.
This section covers the following administrative tasks:
- Creating the NFS-Ganesha cluster using the Ceph Orchestrator.
- Deploying the NFS-Ganesha gateway using the command line interface.
- Deploying the NFS-Ganesha gateway using the service specification.
- Implementing HA for CephFS/NFS service.
- Updating the NFS-Ganesha cluster using the Ceph Orchestrator.
- Viewing the NFS-Ganesha cluster information using the Ceph Orchestrator.
- Fetching the NFS-Ganesha cluster logs using the Ceph Orchestrator.
- Setting custom NFS-Ganesha configuration using the Ceph Orchestrator.
- Resetting custom NFS-Ganesha configuration using the Ceph Orchestrator.
- Deleting the NFS-Ganesha cluster using the Ceph Orchestrator.
- Removing the NFS Ganesha gateway using the Ceph Orchestrator.
11.1. Prerequisites
- A running Red Hat Ceph Storage cluster.
- Root-level access to all the nodes.
- Hosts are added to the cluster.
- All manager, monitor and OSD daemons are deployed.
11.2. Creating the NFS-Ganesha cluster using the Ceph Orchestrator
You can create an NFS-Ganesha cluster using the mgr/nfs module of the Ceph Orchestrator. This module deploys the NFS cluster using Cephadm in the backend.
This creates a common recovery pool for all NFS-Ganesha daemons, new user based on clusterid, and a common NFS-Ganesha config RADOS object.
For each daemon, a new user and a common configuration is created in the pool. Although all the clusters have different namespaces with respect the cluster names, they use the same recovery pool.
Prerequisites
- A running Red Hat Ceph Storage cluster.
- Hosts are added to the cluster.
- All manager, monitor and OSD daemons are deployed.
Procedure
Log into the Cephadm shell:
Example
[root@host01 ~]# cephadm shell
Enable the
mgr/nfsmodule:Example
[ceph: root@host01 /]# ceph mgr module enable nfs
Create the cluster:
Syntax
ceph nfs cluster create CLUSTER_NAME ["HOST_NAME_1 HOST_NAME_2 HOST_NAME_3"]
The CLUSTER_NAME is an arbitrary string and HOST_NAME_1 is an optional string signifying the hosts to deploy NFS-Ganesha daemons.
Example
[ceph: root@host01 /]# ceph nfs cluster create nfsganesha "host01 host02"
NFS Cluster Created Successful
This creates an NFS_Ganesha cluster
nfsganeshawith one daemon onhost01andhost02.
Verification
List the cluster details:
Example
[ceph: root@host01 /]# ceph nfs cluster ls
Show NFS-Ganesha cluster information:
Syntax
ceph nfs cluster info CLUSTER_NAMEExample
[ceph: root@host01 /]# ceph nfs cluster info nfsganesha
Additional Resources
- See Exporting Ceph File System namespaces over the NFS protocol section in the Red Hat Ceph Storage File System Guide for more information.
- See Deploying the Ceph daemons using the service specification section in the Red Hat Ceph Storage Operations Guide for more information.
11.3. Deploying the NFS-Ganesha gateway using the command line interface
You can use the Ceph Orchestrator with Cephadm in the backend to deploy the NFS-Ganesha gateway using the placement specification. In this case, you have to create a RADOS pool and create a namespace before deploying the gateway.
Red Hat supports CephFS exports only over the NFS v4.0+ protocol.
Prerequisites
- A running Red Hat Ceph Storage cluster.
- Hosts are added to the cluster.
- All manager, monitor and OSD daemons are deployed.
Procedure
Log into the Cephadm shell:
Example
[root@host01 ~]# cephadm shell
Create the RADOS pool namespace, and enable the application. For RBD pools, enable RBD.
Syntax
ceph osd pool create POOL_NAME
ceph osd pool application enable POOL_NAME freeform/rgw/rbd/cephfs/nfs
rbd pool init -p POOL_NAME
Example
[ceph: root@host01 /]# ceph osd pool create nfs-ganesha
[ceph: root@host01 /]# ceph osd pool application enable nfs-ganesha nfs
[ceph: root@host01 /]# rbd pool init -p nfs-ganesha
Deploy NFS-Ganesha gateway using placement specification in the command line interface:
Syntax
ceph orch apply nfs SERVICE_ID --placement="NUMBER_OF_DAEMONS HOST_NAME_1 HOST_NAME_2 HOST_NAME_3"
Example
[ceph: root@host01 /]# ceph orch apply nfs foo --placement="2 host01 host02"
This deploys an NFS-Ganesha cluster
nfsganeshawith one daemon onhost01andhost02.
Verification
List the service:
Example
[ceph: root@host01 /]# ceph orch ls
List the hosts, daemons, and processes:
Syntax
ceph orch ps --daemon_type=DAEMON_NAMEExample
[ceph: root@host01 /]# ceph orch ps --daemon_type=nfs
Additional Resources
- See Deploying the Ceph daemons using the command line interface section in the Red Hat Ceph Storage Operations Guide for more information.
- See the Creating a block device pool section in the Red Hat Ceph Storage Block Device Guide for more information.
11.4. Deploying the NFS-Ganesha gateway using the service specification
You can use the Ceph Orchestrator with Cephadm in the backend to deploy the NFS-Ganesha gateway using the service specification. In this case, you have to create a RADOS pool and create a namespace before deploying the gateway.
Prerequisites
- A running Red Hat Ceph Storage cluster.
- Hosts are added to the cluster.
Procedure
Create the
nfs.yamlfile:Example
[root@host01 ~]# touch nfs.yaml
Edit the
nfs.yamlfile to include the following details:Syntax
service_type: nfs
service_id: SERVICE_ID
placement:
  hosts:
    - HOST_NAME_1
    - HOST_NAME_2
Example
service_type: nfs
service_id: foo
placement:
  hosts:
    - host01
    - host02
Mount the YAML file under a directory in the container:
Example
[root@host01 ~]# cephadm shell --mount nfs.yaml:/var/lib/ceph/nfs.yaml
Create the RADOS pool, namespace, and enable RBD:
Syntax
ceph osd pool create POOL_NAME
ceph osd pool application enable POOL_NAME rbd
rbd pool init -p POOL_NAME
Example
[ceph: root@host01 /]# ceph osd pool create nfs-ganesha
[ceph: root@host01 /]# ceph osd pool application enable nfs-ganesha rbd
[ceph: root@host01 /]# rbd pool init -p nfs-ganesha
Navigate to the directory:
Example
[ceph: root@host01 /]# cd /var/lib/ceph/
Deploy NFS-Ganesha gateway using service specification:
Syntax
ceph orch apply -i FILE_NAME.yamlExample
[ceph: root@host01 ceph]# ceph orch apply -i nfs.yaml
Verification
List the service:
Example
[ceph: root@host01 /]# ceph orch ls
List the hosts, daemons, and processes:
Syntax
ceph orch ps --daemon_type=DAEMON_NAMEExample
[ceph: root@host01 /]# ceph orch ps --daemon_type=nfs
Additional Resources
- See the Creating a block device pool section in the Red Hat Ceph Storage Block Device Guide for more information.
11.5. Implementing HA for CephFS/NFS service (Technology Preview)
You can deploy NFS with a high-availability (HA) front-end, virtual IP, and load balancer, by using the --ingress flag and by specifying a virtual IP address. This deploys a combination of keepalived and haproxy and provides a high-availability NFS frontend for the NFS service.
When a cluster is created with --ingress flag, an ingress service is additionally deployed to provide load balancing and high-availability for the NFS servers. A virtual IP is used to provide a known, stable NFS endpoint that all NFS clients can use to mount. Ceph handles the details of redirecting NFS traffic on the virtual IP to the appropriate backend NFS servers and redeploys NFS servers when they fail.
Deploying an ingress service for an existing service provides:
- A stable, virtual IP that can be used to access the NFS server.
- Load distribution across multiple NFS gateways.
- Failover between hosts in the event of a host failure.
HA for CephFS/NFS is a Technology Preview feature only. Technology Preview features are not supported with Red Hat production service level agreements (SLAs), might not be functionally complete, and Red Hat does not recommend using them for production. These features provide early access to upcoming product features, enabling customers to test functionality and provide feedback during the development process. See the support scope for Red Hat Technology Preview features for more details.
When an ingress service is deployed in front of the NFS cluster, the backend NFS-ganesha servers will see the haproxy’s IP address and not the client’s IP address. As a result, if you are restricting client access based on IP address, access restrictions for NFS exports will not work as expected.
If the active NFS server serving a client goes down, the client’s I/Os are interrupted until the replacement for the active NFS server is online and the NFS cluster is active again.
Prerequisites
- A running Red Hat Ceph Storage cluster.
- Hosts are added to the cluster.
- All the manager, monitor, and OSD daemons are deployed.
- Ensure the NFS module is enabled.
Procedure
Log into the Cephadm shell:
Example
[root@host01 ~]# cephadm shell
Create the NFS cluster with the
--ingressflag:Syntax
ceph nfs cluster create CLUSTER_ID [PLACEMENT] [--port PORT_NUMBER] [--ingress --virtual-ip IP_ADDRESS/CIDR_PREFIX]
- Replace CLUSTER_ID with a unique string to name the NFS Ganesha cluster.
- Replace PLACEMENT with the number of NFS servers to deploy and the host or hosts that you want to deploy the NFS Ganesha daemon containers on.
-
Use the
--portPORT_NUMBER flag to deploy NFS on a port other than the default port of 2049. -
The
--ingressflag combined with the--virtual-ipflag, deploys NFS with a high-availability front-end (virtual IP and load balancer). Replace
--virtual-ipIP_ADDRESS with an IP address to provide a known, stable NFS endpoint that all clients can use to mount NFS exports. The--virtual-ipmust include a CIDR prefix length. The virtual IP will normally be configured on the first identified network interface that has an existing IP in the same subnet.NoteThe number of hosts you allocate for the NFS service must be greater than the number of active NFS servers you request to deploy, specified by the
placement: countparameter. In the below example, one active NFS server is requested and two hosts are allocated.Example
[ceph: root@host01 /]# ceph nfs cluster create mycephnfs "1 host02 host03" --ingress --virtual-ip 10.10.128.75/22
NoteDeployment of NFS daemons and the ingress service is asynchronous and the command might return before the services have completely started.
Check that the services have successfully started:
Syntax
ceph orch ls --service_name=nfs.CLUSTER_ID
ceph orch ls --service_name=ingress.nfs.CLUSTER_ID
Example
[ceph: root@host01 /]# ceph orch ls --service_name=nfs.mycephnfs

NAME           PORTS    RUNNING  REFRESHED  AGE  PLACEMENT
nfs.mycephnfs  ?:12049      1/2  0s ago     20s  host02;host03

[ceph: root@host01 /]# ceph orch ls --service_name=ingress.nfs.mycephnfs

NAME                   PORTS                  RUNNING  REFRESHED  AGE  PLACEMENT
ingress.nfs.mycephnfs  10.10.128.75:2049,9049      4/4   46s ago    73s  count:2
Verification
View the IP endpoints, IPs for the individual NFS daemons, and the virtual IP for the
ingressservice:Syntax
ceph nfs cluster info CLUSTER_IDExample
[ceph: root@host01 /]# ceph nfs cluster info mycephnfs

{
    "mycephnfs": {
        "virtual_ip": "10.10.128.75",
        "backend": [
            {
                "hostname": "host02",
                "ip": "10.10.128.69",
                "port": 12049
            },
            {
                "hostname": "host03",
                "ip": "10.10.128.70",
                "port": 12049
            }
        ],
        "port": 2049,
        "monitor_port": 9049
    }
}
List the hosts and processes:
Example
[ceph: root@host01 /]# ceph orch ps | grep nfs

haproxy.nfs.cephnfs.host01.rftylv     host01  *:2049,9000  running (11m)    10m ago  11m    23.2M        -  2.2.19-7ea3822   5e6a41d77b38  f8cc61dc827e
haproxy.nfs.cephnfs.host02.zhtded     host02  *:2049,9000  running (11m)    53s ago  11m    21.3M        -  2.2.19-7ea3822   5e6a41d77b38  4cad324e0e23
keepalived.nfs.cephnfs.host01.zktmsk  host01               running (11m)    10m ago  11m    2349k        -  2.1.5            18fa163ab18f  66bf39784993
keepalived.nfs.cephnfs.host02.vyycvp  host02               running (11m)    53s ago  11m    2349k        -  2.1.5            18fa163ab18f  1ecc95a568b4
nfs.cephnfs.0.0.host02.fescmw         host02  *:12049      running (14m)     3m ago  14m    76.9M        -  3.5              cef6e7959b0a  bb0e4ee9484e
nfs.cephnfs.1.0.host03.avaddf         host03  *:12049      running (14m)     3m ago  14m    74.3M        -  3.5              cef6e7959b0a  ea02c0c50749
Additional resources
- For information about mounting NFS exports on client hosts, see the Exporting Ceph File System namespaces over the NFS protocol section in the Red Hat Ceph Storage File System Guide.
11.6. Upgrading a standalone CephFS/NFS cluster for HA
As a storage administrator, you can upgrade a standalone storage cluster to a high-availability (HA) cluster by deploying the ingress service on an existing NFS service.
Prerequisites
- A running Red Hat Ceph Storage cluster with an existing NFS service.
- Hosts are added to the cluster.
- All the manager, monitor, and OSD daemons are deployed.
- Ensure the NFS module is enabled.
Procedure
Log into the Cephadm shell:
Example
[root@host01 ~]# cephadm shell
List existing NFS clusters:
Example
[ceph: root@host01 /]# ceph nfs cluster ls

mynfs
NoteIf a standalone NFS cluster is created on one node, you need to increase it to two or more nodes for HA. To increase the NFS service, edit the
nfs.yamlfile and increase the placements with the same port number.The number of hosts you allocate for the NFS service must be greater than the number of active NFS servers you request to deploy, specified by the
placement: countparameter.Syntax
service_type: nfs
service_id: SERVICE_ID
placement:
  hosts:
    - HOST_NAME_1
    - HOST_NAME_2
  count: COUNT
spec:
  port: PORT_NUMBER
Example
service_type: nfs
service_id: mynfs
placement:
  hosts:
    - host02
    - host03
  count: 1
spec:
  port: 12345
In this example, the existing NFS service is running on port
12345and an additional node is added to the NFS cluster with the same port.Apply the
nfs.yamlservice specification changes to upgrade to a two node NFS service:Example
[ceph: root@host01 ceph]# ceph orch apply -i nfs.yaml
Edit the
ingress.yamlspecification file with the existing NFS cluster ID:Syntax
service_type: SERVICE_TYPE
service_id: SERVICE_ID
placement:
  count: PLACEMENT
spec:
  backend_service: SERVICE_ID_BACKEND 1
  frontend_port: FRONTEND_PORT
  monitor_port: MONITOR_PORT 2
  virtual_ip: VIRTUAL_IP_WITH_CIDR
Example
service_type: ingress
service_id: nfs.mynfs
placement:
  count: 2
spec:
  backend_service: nfs.mynfs
  frontend_port: 2049
  monitor_port: 9000
  virtual_ip: 10.10.128.75/22
Deploy the ingress service:
Example
[ceph: root@host01 /]# ceph orch apply -i ingress.yaml
NoteDeployment of NFS daemons and the ingress service is asynchronous and the command might return before the services have completely started.
Check that the ingress services have successfully started:
Syntax
ceph orch ls --service_name=ingress.nfs.CLUSTER_IDExample
[ceph: root@host01 /]# ceph orch ls --service_name=ingress.nfs.mynfs

NAME                   PORTS                  RUNNING  REFRESHED  AGE  PLACEMENT
ingress.nfs.mynfs  10.10.128.75:2049,9000      4/4   4m ago     22m  count:2
Verification
View the IP endpoints, IPs for the individual NFS daemons, and the virtual IP for the
ingressservice:Syntax
ceph nfs cluster info CLUSTER_IDExample
[ceph: root@host01 /]# ceph nfs cluster info mynfs

{
    "mynfs": {
        "virtual_ip": "10.10.128.75",
        "backend": [
            {
                "hostname": "host02",
                "ip": "10.10.128.69",
                "port": 12049
            },
            {
                "hostname": "host03",
                "ip": "10.10.128.70",
                "port": 12049
            }
        ],
        "port": 2049,
        "monitor_port": 9049
    }
}
List the hosts and processes:
Example
[ceph: root@host01 /]# ceph orch ps | grep nfs

haproxy.nfs.mynfs.host01.ruyyhq     host01  *:2049,9000  running (27m)     6m ago  34m    9.85M        -  2.2.19-7ea3822   5e6a41d77b38  328d27b3f706
haproxy.nfs.mynfs.host02.ctrhha     host02  *:2049,9000  running (34m)     6m ago  34m    4944k        -  2.2.19-7ea3822   5e6a41d77b38  4f4440dbfde9
keepalived.nfs.mynfs.host01.fqgjxd  host01               running (27m)     6m ago  34m    31.2M        -  2.1.5            18fa163ab18f  0e22b2b101df
keepalived.nfs.mynfs.host02.fqzkxb  host02               running (34m)     6m ago  34m    17.5M        -  2.1.5            18fa163ab18f  c1e3cc074cf8
nfs.mynfs.0.0.host02.emoaut         host02  *:12345      running (37m)     6m ago  37m    82.7M        -  3.5              91322de4f795  2d00faaa2ae5
nfs.mynfs.1.0.host03.nsxcfd         host03  *:12345      running (37m)     6m ago  37m    81.1M        -  3.5              91322de4f795  d4bda4074f17
Additional resources
- For information about mounting NFS exports on client hosts, see the Exporting Ceph File System namespaces over the NFS protocol section in the Red Hat Ceph Storage File System Guide.
11.7. Deploying HA for CephFS/NFS using a specification file
You can deploy HA for CephFS/NFS using a specification file by first deploying an NFS service and then deploying ingress to the same NFS service.
Prerequisites
- A running Red Hat Ceph Storage cluster.
- Hosts are added to the cluster.
- All the manager, monitor, and OSD daemons are deployed.
- Ensure the NFS module is enabled.
Procedure
Log into the Cephadm shell:
Example
[root@host01 ~]# cephadm shell
Ensure the NFS module is enabled:
Example
[ceph: root@host01 /]# ceph mgr module ls | more
Exit out of the Cephadm shell and create the
nfs.yamlfile:Example
[root@host01 ~]# touch nfs.yaml
Edit the
nfs.yamlfile to include the following details:Syntax
service_type: nfs
service_id: SERVICE_ID
placement:
  hosts:
    - HOST_NAME_1
    - HOST_NAME_2
  count: COUNT
spec:
  port: PORT_NUMBER
NoteThe number of hosts you allocate for the NFS service must be greater than the number of active NFS servers you request to deploy, specified by the
placement: countparameter.Example
service_type: nfs
service_id: cephfsnfs
placement:
  hosts:
    - host02
    - host03
  count: 1
spec:
  port: 12345
In this example, the server is run on the non-default port of
12345, instead of the default port of2049, on host02 and host03.Mount the YAML file under a directory in the container:
Example
[root@host01 ~]# cephadm shell --mount nfs.yaml:/var/lib/ceph/nfs.yaml
Log into the Cephadm shell and navigate to the directory:
Example
[ceph: root@host01 /]# cd /var/lib/ceph/
Deploy the NFS service using service specification:
Syntax
ceph orch apply -i FILE_NAME.yamlExample
[ceph: root@host01 ceph]# ceph orch apply -i nfs.yaml
NoteDeployment of the NFS service is asynchronous and the command might return before the services have completely started.
Check that the NFS services have successfully started:
Syntax
ceph orch ls --service_name=nfs.CLUSTER_IDExample
[ceph: root@host01 /]# ceph orch ls --service_name=nfs.cephfsnfs

NAME           PORTS    RUNNING  REFRESHED  AGE  PLACEMENT
nfs.cephfsnfs  ?:12345      2/2  3m ago     13m  host02;host03
Exit out of the Cephadm shell and create the
ingress.yamlfile:Example
[root@host01 ~]# touch ingress.yaml
Edit the
ingress.yamlfile to include the following details:Syntax
service_type: SERVICE_TYPE
service_id: SERVICE_ID
placement:
  count: PLACEMENT
spec:
  backend_service: SERVICE_ID_BACKEND
  frontend_port: FRONTEND_PORT
  monitor_port: MONITOR_PORT
  virtual_ip: VIRTUAL_IP_WITH_CIDR
Example
service_type: ingress
service_id: nfs.cephfsnfs
placement:
  count: 2
spec:
  backend_service: nfs.cephfsnfs
  frontend_port: 2049
  monitor_port: 9000
  virtual_ip: 10.10.128.75/22
NoteIn this example,
placement: count: 2deploys thekeepalivedandhaproxyservice on random nodes. To specify the nodes to deploykeepalivedandhaproxyon, use theplacement: hostsoption:Example
service_type: ingress
service_id: nfs.cephfsnfs
placement:
  hosts:
    - host02
    - host03
Mount the YAML file under a directory in the container:
Example
[root@host01 ~]# cephadm shell --mount ingress.yaml:/var/lib/ceph/ingress.yaml
Log into the Cephadm shell and navigate to the directory:
Example
[ceph: root@host01 /]# cd /var/lib/ceph/
Deploy the
ingressservice using service specification:Syntax
ceph orch apply -i FILE_NAME.yamlExample
[ceph: root@host01 ceph]# ceph orch apply -i ingress.yaml
Check that the ingress services have successfully started:
Syntax
ceph orch ls --service_name=ingress.nfs.CLUSTER_IDExample
[ceph: root@host01 /]# ceph orch ls --service_name=ingress.nfs.cephfsnfs

NAME                   PORTS                  RUNNING  REFRESHED  AGE  PLACEMENT
ingress.nfs.cephfsnfs  10.10.128.75:2049,9000      4/4   4m ago     22m  count:2
Verification
View the IP endpoints, IPs for the individual NFS daemons, and the virtual IP for the
ingressservice:Syntax
ceph nfs cluster info CLUSTER_IDExample
[ceph: root@host01 /]# ceph nfs cluster info cephfsnfs

{
    "cephfsnfs": {
        "virtual_ip": "10.10.128.75",
        "backend": [
            {
                "hostname": "host02",
                "ip": "10.10.128.69",
                "port": 12345
            },
            {
                "hostname": "host03",
                "ip": "10.10.128.70",
                "port": 12345
            }
        ],
        "port": 2049,
        "monitor_port": 9049
    }
}
List the hosts and processes:
Example
[ceph: root@host01 /]# ceph orch ps | grep nfs

haproxy.nfs.cephfsnfs.host01.ruyyhq     host01  *:2049,9000  running (27m)     6m ago  34m    9.85M        -  2.2.19-7ea3822   5e6a41d77b38  328d27b3f706
haproxy.nfs.cephfsnfs.host02.ctrhha     host02  *:2049,9000  running (34m)     6m ago  34m    4944k        -  2.2.19-7ea3822   5e6a41d77b38  4f4440dbfde9
keepalived.nfs.cephfsnfs.host01.fqgjxd  host01               running (27m)     6m ago  34m    31.2M        -  2.1.5            18fa163ab18f  0e22b2b101df
keepalived.nfs.cephfsnfs.host02.fqzkxb  host02               running (34m)     6m ago  34m    17.5M        -  2.1.5            18fa163ab18f  c1e3cc074cf8
nfs.cephfsnfs.0.0.host02.emoaut         host02  *:12345      running (37m)     6m ago  37m    82.7M        -  3.5              91322de4f795  2d00faaa2ae5
nfs.cephfsnfs.1.0.host03.nsxcfd         host03  *:12345      running (37m)     6m ago  37m    81.1M        -  3.5              91322de4f795  d4bda4074f17
Additional resources
- For information about mounting NFS exports on client hosts, see the Exporting Ceph File System namespaces over the NFS protocol section in the Red Hat Ceph Storage File System Guide.
11.8. Updating the NFS-Ganesha cluster using the Ceph Orchestrator
You can update the NFS-Ganesha cluster by changing the placement of the daemons on the hosts using the Ceph Orchestrator with Cephadm in the backend.
Prerequisites
- A running Red Hat Ceph Storage cluster.
- Hosts are added to the cluster.
- All manager, monitor and OSD daemons are deployed.
-
NFS-Ganesha cluster created using the
mgr/nfsmodule.
Procedure
Log into the Cephadm shell:
Example
[root@host01 ~]# cephadm shell
Update the cluster:
Syntax
ceph orch apply nfs CLUSTER_NAME ["HOST_NAME_1,HOST_NAME_2,HOST_NAME_3"]
The CLUSTER_NAME is an arbitrary string, HOST_NAME_1 is an optional string signifying the hosts to update the deployed NFS-Ganesha daemons.
Example
[ceph: root@host01 /]# ceph orch apply nfs nfsganesha "host02"
This updates the
nfsganeshacluster onhost02.
Verification
List the cluster details:
Example
[ceph: root@host01 /]# ceph nfs cluster ls
Show NFS-Ganesha cluster information:
Syntax
ceph nfs cluster info CLUSTER_NAMEExample
[ceph: root@host01 /]# ceph nfs cluster info nfsganesha
List the hosts, daemons, and processes:
Syntax
ceph orch ps --daemon_type=DAEMON_NAME
Example
[ceph: root@host01 /]# ceph orch ps --daemon_type=nfs
Additional Resources
- See Creating the NFS-Ganesha cluster using the Ceph Orchestrator section in the Red Hat Ceph Storage Operations Guide for more information.
11.9. Viewing the NFS-Ganesha cluster information using the Ceph Orchestrator
You can view the information of the NFS-Ganesha cluster using the Ceph Orchestrator. You can get the information about all the NFS Ganesha clusters or specific clusters with their port, IP address and the name of the hosts on which the cluster is created.
Prerequisites
- A running Red Hat Ceph Storage cluster.
- Hosts are added to the cluster.
- All manager, monitor and OSD daemons are deployed.
-
NFS-Ganesha cluster created using the
mgr/nfsmodule.
Procedure
Log into the Cephadm shell:
Example
[root@host01 ~]# cephadm shell
View the NFS-Ganesha cluster information:
Syntax
ceph nfs cluster info CLUSTER_NAMEExample
[ceph: root@host01 /]# ceph nfs cluster info nfsganesha

{
    "nfsganesha": [
        {
            "hostname": "host02",
            "ip": [
                "10.10.128.70"
            ],
            "port": 2049
        }
    ]
}
Additional Resources
- See Creating the NFS-Ganesha cluster using the Ceph Orchestrator section in the Red Hat Ceph Storage Operations Guide for more information.
11.10. Fetching the NFS-Ganesha cluster logs using the Ceph Orchestrator
With the Ceph Orchestrator, you can fetch the NFS-Ganesha cluster logs. You need to be on the node where the service is deployed.
Prerequisites
- A running Red Hat Ceph Storage cluster.
- Cephadm installed on the nodes where NFS is deployed.
- Root-level access to all the nodes.
- Hosts are added to the cluster.
-
NFS-Ganesha cluster created using the
mgr/nfsmodule.
Procedure
As a root user, fetch the FSID of the storage cluster:
Example
[root@host03 ~]# cephadm ls
Copy the FSID and the name of the service.
Fetch the logs:
Syntax
cephadm logs --fsid FSID --name SERVICE_NAME
Example
[root@host03 ~]# cephadm logs --fsid 499829b4-832f-11eb-8d6d-001a4a000635 --name nfs.foo.host03
Additional Resources
- See Deploying the Ceph daemons using the placement specification section in the Red Hat Ceph Storage Operations Guide for more information.
11.11. Setting custom NFS-Ganesha configuration using the Ceph Orchestrator
The NFS-Ganesha cluster is defined in default configuration blocks. Using Ceph Orchestrator you can customize the configuration and that will have precedence over the default configuration blocks.
Prerequisites
- A running Red Hat Ceph Storage cluster.
- Hosts are added to the cluster.
- All manager, monitor and OSD daemons are deployed.
-
NFS-Ganesha cluster created using the
mgr/nfsmodule.
Procedure
Log into the Cephadm shell:
Example
[root@host01 ~]# cephadm shell
The following is an example of the default configuration of NFS-Ganesha cluster:
Example
# {{ cephadm_managed }}
NFS_CORE_PARAM {
        Enable_NLM = false;
        Enable_RQUOTA = false;
        Protocols = 4;
}

MDCACHE {
        Dir_Chunk = 0;
}

EXPORT_DEFAULTS {
        Attr_Expiration_Time = 0;
}

NFSv4 {
        Delegations = false;
        RecoveryBackend = 'rados_cluster';
        Minor_Versions = 1, 2;
}

RADOS_KV {
        UserId = "{{ user }}";
        nodeid = "{{ nodeid}}";
        pool = "{{ pool }}";
        namespace = "{{ namespace }}";
}

RADOS_URLS {
        UserId = "{{ user }}";
        watch_url = "{{ url }}";
}

RGW {
        cluster = "ceph";
        name = "client.{{ rgw_user }}";
}

%url    {{ url }}
Customize the NFS-Ganesha cluster configuration. The following are two examples for customizing the configuration:
Change the log level:
Example
LOG {
 COMPONENTS {
     ALL = FULL_DEBUG;
 }
}
Add custom export block:
Create the user.
NoteUser specified in FSAL blocks should have proper caps for NFS-Ganesha daemons to access the Ceph cluster.
Syntax
ceph auth get-or-create client.USER_ID mon 'allow r' osd 'allow rw pool=.nfs namespace=NFS_CLUSTER_NAME, allow rw tag cephfs data=FS_NAME' mds 'allow rw path=EXPORT_PATH'
Example
[ceph: root@host01 /]# ceph auth get-or-create client.f64f341c-655d-11eb-8778-fa163e914bcc mon 'allow r' osd 'allow rw pool=.nfs namespace=nfs_cluster_name, allow rw tag cephfs data=fs_name' mds 'allow rw path=export_path'
Navigate to the following directory:
Syntax
cd /var/lib/ceph/DAEMON_PATH/Example
[ceph: root@host01 /]# cd /var/lib/ceph/nfs/
If the
nfsdirectory does not exist, create a directory in the path.Create a new configuration file:
Syntax
touch PATH_TO_CONFIG_FILEExample
[ceph: root@host01 nfs]# touch nfs-ganesha.conf
Edit the configuration file by adding the custom export block. It creates a single export and that is managed by the Ceph NFS export interface.
Syntax
EXPORT {
  Export_Id = NUMERICAL_ID;
  Transports = TCP;
  Path = PATH_WITHIN_CEPHFS;
  Pseudo = BINDING;
  Protocols = 4;
  Access_Type = PERMISSIONS;
  Attr_Expiration_Time = 0;
  Squash = None;
  FSAL {
    Name = CEPH;
    Filesystem = "FILE_SYSTEM_NAME";
    User_Id = "USER_NAME";
    Secret_Access_Key = "USER_SECRET_KEY";
  }
}
Example
EXPORT {
  Export_Id = 100;
  Transports = TCP;
  Path = /;
  Pseudo = /ceph/;
  Protocols = 4;
  Access_Type = RW;
  Attr_Expiration_Time = 0;
  Squash = None;
  FSAL {
    Name = CEPH;
    Filesystem = "filesystem name";
    User_Id = "user id";
    Secret_Access_Key = "secret key";
  }
}
Apply the new configuration the cluster:
Syntax
ceph nfs cluster config set CLUSTER_NAME -i PATH_TO_CONFIG_FILE
Example
[ceph: root@host01 nfs]# ceph nfs cluster config set nfs-ganesha -i /var/lib/ceph/nfs/nfs-ganesha.conf
This also restarts the service for the custom configuration.
Verification
List the service:
Example
[ceph: root@host01 /]# ceph orch ls
List the hosts, daemons, and processes:
Syntax
ceph orch ps --daemon_type=DAEMON_NAMEExample
[ceph: root@host01 /]# ceph orch ps --daemon_type=nfs
Verify the custom configuration:
Syntax
/bin/rados -p POOL_NAME -N CLUSTER_NAME get userconf-nfs.CLUSTER_NAME -
Example
[ceph: root@host01 /]# /bin/rados -p nfs-ganesha -N nfsganesha get userconf-nfs.nfsganesha -
Additional Resources
- See the Resetting custom NFS-Ganesha configuration using the Ceph Orchestrator section in the Red Hat Ceph Storage Operations Guide for more information.
11.12. Resetting custom NFS-Ganesha configuration using the Ceph Orchestrator
Using the Ceph Orchestrator, you can reset the user-defined configuration to the default configuration.
Prerequisites
- A running Red Hat Ceph Storage cluster.
- Hosts are added to the cluster.
- All manager, monitor and OSD daemons are deployed.
-
NFS-Ganesha deployed using the
mgr/nfsmodule. - Custom NFS cluster configuration is set-up
Procedure
Log into the Cephadm shell:
Example
[root@host01 ~]# cephadm shell
Reset the NFS-Ganesha configuration:
Syntax
ceph nfs cluster config reset CLUSTER_NAMEExample
[ceph: root@host01 /]# ceph nfs cluster config reset nfs-cephfs
Verification
List the service:
Example
[ceph: root@host01 /]# ceph orch ls
List the hosts, daemons, and processes:
Syntax
ceph orch ps --daemon_type=DAEMON_NAMEExample
[ceph: root@host01 /]# ceph orch ps --daemon_type=nfs
Verify the custom configuration is deleted:
Syntax
/bin/rados -p POOL_NAME -N CLUSTER_NAME get userconf-nfs.CLUSTER_NAME -
Example
[ceph: root@host01 /]# /bin/rados -p nfs-ganesha -N nfsganesha get userconf-nfs.nfsganesha -
Additional Resources
- See Creating the NFS-Ganesha cluster using the Ceph Orchestrator section in the Red Hat Ceph Storage Operations Guide for more information.
- See the Setting custom NFS-Ganesha configuration using the Ceph Orchestrator section in the Red Hat Ceph Storage Operations Guide for more information..
11.13. Deleting the NFS-Ganesha cluster using the Ceph Orchestrator
You can use the Ceph Orchestrator with Cephadm in the backend to delete the NFS-Ganesha cluster.
Prerequisites
- A running Red Hat Ceph Storage cluster.
- Hosts are added to the cluster.
- All manager, monitor and OSD daemons are deployed.
-
NFS-Ganesha cluster created using the
mgr/nfsmodule.
Procedure
Log into the Cephadm shell:
Example
[root@host01 ~]# cephadm shell
Delete the cluster:
Syntax
ceph nfs cluster rm CLUSTER_NAMEThe CLUSTER_NAME is an arbitrary string.
Example
[ceph: root@host01 /]# ceph nfs cluster rm nfsganesha
NFS Cluster Deleted Successfully
Verification
List the cluster details:
Example
[ceph: root@host01 /]# ceph nfs cluster ls
Additional Resources
- See Exporting Ceph File System namespaces over the NFS protocol section in the Red Hat Ceph Storage File System guide for more information.
- See Creating the NFS-Ganesha cluster using the Ceph Orchestrator section in the Red Hat Ceph Storage Operations Guide for more information.
11.14. Removing the NFS-Ganesha gateway using the Ceph Orchestrator
You can remove the NFS-Ganesha gateway using the ceph orch rm command.
Prerequisites
- A running Red Hat Ceph Storage cluster.
- Root-level access to all the nodes.
- Hosts are added to the cluster.
- At least one NFS-Ganesha gateway deployed on the hosts.
Procedure
Log into the Cephadm shell:
Example
[root@host01 ~]# cephadm shell
List the service:
Example
[ceph: root@host01 /]# ceph orch ls
Remove the service:
Syntax
ceph orch rm SERVICE_NAMEExample
[ceph: root@host01 /]# ceph orch rm nfs.foo
Verification
List the hosts, daemons, and processes:
Syntax
ceph orch ps
Example
[ceph: root@host01 /]# ceph orch ps
Additional Resources
- See Deploying the Ceph daemons using the service specification section in the Red Hat Ceph Storage Operations Guide for more information.
- See Deploying the NFS-Ganesha gateway using the service specification section in the Red Hat Ceph Storage Operations Guide for more information.
Chapter 12. Management of iSCSI gateway using the Ceph Orchestrator (Limited Availability)
As a storage administrator, you can use Ceph Orchestrator to deploy the iSCSI gateway. The iSCSI Gateway presents a Highly Available (HA) iSCSI target that exports RADOS Block Device (RBD) images as SCSI disks.
You can deploy an iSCSI gateway by either using the placement specification or the service specification, like an YAML file.
This technology is Limited Availability. See the Deprecated functionality chapter for additional information.
This section covers the following administrative tasks:
12.1. Prerequisites
- A running Red Hat Ceph Storage cluster.
- Root-level access to all the nodes.
- Hosts are added to the cluster.
- All manager, monitor and OSD daemons are deployed.
12.2. Deploying the iSCSI gateway using the command line interface
Using the Ceph Orchestrator, you can deploy the iSCSI gateway using the ceph orch command in the command line interface.
Prerequisites
- A running Red Hat Ceph Storage cluster.
- Hosts are added to the cluster.
- All manager, monitor and OSD daemons are deployed.
Procedure
Log into the Cephadm shell:
Example
[root@host01 ~]# cephadm shell
Create the pool:
Syntax
ceph osd pool create POOL_NAMEExample
[ceph: root@host01 /]# ceph osd pool create mypool
Deploy iSCSI gateway using command line interface:
Syntax
ceph orch apply iscsi POOLNAME admin admin --placement="NUMBER_OF_DAEMONS HOST_NAME_1 HOST_NAME_2"
Example
[ceph: root@host01 /]# ceph orch apply iscsi mypool admin admin --placement="1 host01"
Verification
List the service:
Example
[ceph: root@host01 /]# ceph orch ls
List the hosts and process:
Syntax
ceph orch ps --daemon_type=DAEMON_NAMEExample
[ceph: root@host01 /]# ceph orch ps --daemon_type=iscsi
12.3. Deploying the iSCSI gateway using the service specification
Using the Ceph Orchestrator, you can deploy the iSCSI gateway using the service specification.
Prerequisites
- A running Red Hat Ceph Storage cluster.
- Hosts are added to the cluster.
- All manager, monitor and OSD daemons are deployed.
Procedure
Create the
iscsi.ymlfile:Example
[root@host01 ~]# touch iscsi.yml
Edit the
iscsi.ymlfile to include the following details:Syntax
service_type: iscsi
service_id: iscsi
placement:
  hosts:
    - HOST_NAME_1
    - HOST_NAME_2
spec:
  pool: POOL_NAME  # RADOS pool where ceph-iscsi config data is stored.
  trusted_ip_list: "IP_ADDRESS_1,IP_ADDRESS_2" # optional
  api_port: ... # optional
  api_user: API_USERNAME # optional
  api_password: API_PASSWORD # optional
  api_secure: true/false # optional
  ssl_cert: | # optional
  ...
  ssl_key: | # optional
  ...
Example
service_type: iscsi
service_id: iscsi
placement:
  hosts:
    - host01
spec:
  pool: mypool
Mount the YAML file under a directory in the container:
Example
[root@host01 ~]# cephadm shell --mount iscsi.yaml:/var/lib/ceph/iscsi.yaml
Navigate to the following directory:
Syntax
cd /var/lib/ceph/DAEMON_PATH/Example
[ceph: root@host01 /]# cd /var/lib/ceph/
Deploy iSCSI gateway using service specification:
Syntax
ceph orch apply -i FILE_NAME.ymlExample
[ceph: root@host01 iscsi]# ceph orch apply -i iscsi.yml
Verification
List the service:
Example
[ceph: root@host01 /]# ceph orch ls
List the hosts, daemons, and processes:
Syntax
ceph orch ps --daemon_type=DAEMON_NAMEExample
[ceph: root@host01 /]# ceph orch ps --daemon_type=iscsi
12.4. Removing the iSCSI gateway using the Ceph Orchestrator
You can remove the iSCSI gateway daemons using the ceph orch rm command.
Prerequisites
- A running Red Hat Ceph Storage cluster.
- Root-level access to all the nodes.
- Hosts are added to the cluster.
- At least one iSCSI gateway daemon deployed on the hosts.
Procedure
Log into the Cephadm shell:
Example
[root@host01 ~]# cephadm shell
List the service:
Example
[ceph: root@host01 /]# ceph orch ls
Remove the service
Syntax
ceph orch rm SERVICE_NAMEExample
[ceph: root@host01 /]# ceph orch rm iscsi.iscsi
Verification
List the hosts, daemons, and processes:
Syntax
ceph orch ps
Example
[ceph: root@host01 /]# ceph orch ps
Additional Resources
- See Deploying the iSCSI gateway using the command line interface section in the Red Hat Ceph Storage Operations Guide for more information.
- See Deploying the iSCSI gateway using the service specification section in the Red Hat Ceph Storage Operations Guide for more information.
Chapter 13. Configuration of SNMP traps
As a storage administrator, you can deploy and configure the simple network management protocol (SNMP) gateway in a Red Hat Ceph Storage cluster to receive alerts from the Prometheus Alertmanager and route them as SNMP traps to the cluster.
13.1. Simple network management protocol
Simple network management protocol (SNMP) is one of the most widely used open protocols, to monitor distributed systems and devices across a variety of hardware and software platforms. Ceph’s SNMP integration focuses on forwarding alerts from its Prometheus Alertmanager cluster to a gateway daemon. The gateway daemon transforms the alert into an SNMP Notification and sends it on to a designated SNMP management platform. The gateway daemon is from the snmp_notifier_project, which provides SNMP V2c and V3 support with authentication and encryption.
The Red Hat Ceph Storage SNMP gateway service deploys one instance of the gateway by default. You can increase this by providing placement information. However, if you enable multiple SNMP gateway daemons, your SNMP management platform receives multiple notifications for the same event.
The SNMP traps are alert messages and the Prometheus Alertmanager sends these alerts to the SNMP notifier which then looks for object identifier (OID) in the given alerts’ labels. Each SNMP trap has a unique ID which allows it to send additional traps with updated status to a given SNMP poller. SNMP hooks into the Ceph health checks so that every health warning generates a specific SNMP trap.
In order to work correctly and transfer information on device status to the user to monitor, SNMP relies on several components. There are four main components that makeup SNMP:
- SNMP Manager- The SNMP manager, also called a management station, is a computer that runs network monitoring platforms. A platform that has the job of polling SNMP-enabled devices and retrieving data from them. An SNMP Manager queries agents, receives responses from agents and acknowledges asynchronous events from agents.
- SNMP Agent - An SNMP agent is a program that runs on a system to be managed and contains the MIB database for the system. These collect data like bandwidth and disk space, aggregates it, and sends it to the management information base (MIB).
- Management information base (MIB) - These are components contained within the SNMP agents. The SNMP manager uses this as a database and asks the agent for access to particular information. This information is needed for the network management systems (NMS). The NMS polls the agent to take information from these files and then proceeds to translate it into graphs and displays that can be viewed by the user. MIBs contain statistical and control values that are determined by the network device.
- SNMP Devices
The following versions of SNMP are compatible and supported for gateway implementation:
- V2c - Uses an community string without any authentication and is vulnerable to outside attacks.
- V3 authNoPriv - Uses the username and password authentication without encryption.
- V3 authPriv - Uses the username and password authentication with encryption to the SNMP management platform.
When using SNMP traps, ensure that you have the correct security configuration for your version number to minimize the vulnerabilities that are inherent to SNMP and keep your network protected from unauthorized users.
13.2. Configuring snmptrapd
It is important to configure the simple network management protocol (SNMP) target before deploying the snmp-gateway because the snmptrapd daemon contains the auth settings that you need to specify when creating the snmp-gateway service.
The SNMP gateway feature provides a means of exposing the alerts that are generated in the Prometheus stack to an SNMP management platform. You can configure the SNMP traps to the destination based on the snmptrapd tool. This tool allows you to establish one or more SNMP trap listeners.
The following parameters are important for configuration:
-
The
engine-idis a unique identifier for the device, in hex, and required for SNMPV3 gateway. Red Hat recommends to use `8000C53F_CLUSTER_FSID_WITHOUT_DASHES_`for this parameter. -
The
snmp-community, which is the SNMP_COMMUNITY_FOR_SNMPV2 parameter, ispublicfor SNMPV2c gateway. -
The
auth-protocolwhich is the AUTH_PROTOCOL, is mandatory for SNMPV3 gateway and isSHAby default. -
The
privacy-protocol, which is the PRIVACY_PROTOCOL, is mandatory for SNMPV3 gateway. - The PRIVACY_PASSWORD is mandatory for SNMPV3 gateway with encryption.
- The SNMP_V3_AUTH_USER_NAME is the user name and is mandatory for SNMPV3 gateway.
- The SNMP_V3_AUTH_PASSWORD is the password and is mandatory for SNMPV3 gateway.
Prerequisites
- A running Red Hat Ceph Storage cluster.
- Root-level access to the nodes.
-
Install
firewalldon Red Hat Enterprise Linux system.
Procedure
On the SNMP management host, install the SNMP packages:
Example
[root@host01 ~]# dnf install -y net-snmp-utils net-snmp
Open the port 162 for SNMP to receive alerts:
Example
[root@host01 ~]# firewall-cmd --zone=public --add-port=162/udp
[root@host01 ~]# firewall-cmd --zone=public --add-port=162/udp --permanent
Implement the management information base (MIB) to make sense of the SNMP notification and enhance SNMP support on the destination host. Copy the raw file from the main repository: https://github.com/ceph/ceph/blob/master/monitoring/snmp/CEPH-MIB.txt
Example
[root@host01 ~]# curl -o CEPH_MIB.txt -L https://raw.githubusercontent.com/ceph/ceph/master/monitoring/snmp/CEPH-MIB.txt
[root@host01 ~]# scp CEPH_MIB.txt root@host02:/usr/share/snmp/mibs
Create the
snmptrapddirectory.Example
[root@host01 ~]# mkdir /root/snmptrapd/
Create the configuration files in
snmptrapddirectory for each protocol based on the SNMP version:Syntax
format2 %V\n% Agent Address: %A \n Agent Hostname: %B \n Date: %H - %J - %K - %L - %M - %Y \n Enterprise OID: %N \n Trap Type: %W \n Trap Sub-Type: %q \n Community/Infosec Context: %P \n Uptime: %T \n Description: %W \n PDU Attribute/Value Pair Array:\n%v \n -------------- \n
createuser -e 0x_ENGINE_ID_ SNMPV3_AUTH_USER_NAME AUTH_PROTOCOL SNMP_V3_AUTH_PASSWORD PRIVACY_PROTOCOL PRIVACY_PASSWORD
authuser log,execute SNMP_V3_AUTH_USER_NAME
authCommunity   log,execute,net SNMP_COMMUNITY_FOR_SNMPV2
For SNMPV2c, create the
snmptrapd_public.conffile as follows:Example
format2 %V\n% Agent Address: %A \n Agent Hostname: %B \n Date: %H - %J - %K - %L - %M - %Y \n Enterprise OID: %N \n Trap Type: %W \n Trap Sub-Type: %q \n Community/Infosec Context: %P \n Uptime: %T \n Description: %W \n PDU Attribute/Value Pair Array:\n%v \n -------------- \n

authCommunity   log,execute,net public
The
publicsetting here must match thesnmp_communitysetting used when deploying thesnmp-gatewayservice.For SNMPV3 with authentication only, create the
snmptrapd_auth.conffile as follows:Example
format2 %V\n% Agent Address: %A \n Agent Hostname: %B \n Date: %H - %J - %K - %L - %M - %Y \n Enterprise OID: %N \n Trap Type: %W \n Trap Sub-Type: %q \n Community/Infosec Context: %P \n Uptime: %T \n Description: %W \n PDU Attribute/Value Pair Array:\n%v \n -------------- \n
createuser -e 0x8000C53Ff64f341c655d11eb8778fa163e914bcc myuser SHA mypassword
authuser log,execute myuser
The
0x8000C53Ff64f341c655d11eb8778fa163e914bccstring is theengine_id, andmyuserandmypasswordare the credentials. The password security is defined by theSHAalgorithm.This corresponds to the settings for deploying the
snmp-gatewaydaemon.Example
snmp_v3_auth_username: myuser
snmp_v3_auth_password: mypassword
For SNMPV3 with authentication and encryption, create the
snmptrapd_authpriv.conffile as follows:Example
format2 %V\n% Agent Address: %A \n Agent Hostname: %B \n Date: %H - %J - %K - %L - %M - %Y \n Enterprise OID: %N \n Trap Type: %W \n Trap Sub-Type: %q \n Community/Infosec Context: %P \n Uptime: %T \n Description: %W \n PDU Attribute/Value Pair Array:\n%v \n -------------- \n
createuser -e 0x8000C53Ff64f341c655d11eb8778fa163e914bcc myuser SHA mypassword DES mysecret
authuser log,execute myuser
The
0x8000C53Ff64f341c655d11eb8778fa163e914bccstring is theengine_id, andmyuserandmypasswordare the credentials. The password security is defined by theSHAalgorithm andDESis the type of privacy encryption.This corresponds to the settings for deploying the
snmp-gatewaydaemon.Example
snmp_v3_auth_username: myuser
snmp_v3_auth_password: mypassword
snmp_v3_priv_password: mysecret
Run the daemon on the SNMP management host:
Syntax
/usr/sbin/snmptrapd -M /usr/share/snmp/mibs -m CEPH-MIB.txt -f -C -c /root/snmptrapd/CONFIGURATION_FILE -Of -Lo :162Example
[root@host01 ~]# /usr/sbin/snmptrapd -M /usr/share/snmp/mibs -m CEPH-MIB.txt -f -C -c /root/snmptrapd/snmptrapd_auth.conf -Of -Lo :162
If any alert is triggered on the storage cluster, you can monitor the output on the SNMP management host. Verify the SNMP traps and also the traps decoded by MIB.
Example
NET-SNMP version 5.8
 Agent Address: 0.0.0.0
 Agent Hostname: <UNKNOWN>
 Date: 15 - 5 - 12 - 8 - 10 - 4461391
 Enterprise OID: .
 Trap Type: Cold Start
 Trap Sub-Type: 0
 Community/Infosec Context: TRAP2, SNMP v3, user myuser, context
 Uptime: 0
 Description: Cold Start
 PDU Attribute/Value Pair Array:
.iso.org.dod.internet.mgmt.mib-2.1.3.0 = Timeticks: (292276100) 3 days, 19:52:41.00
.iso.org.dod.internet.snmpV2.snmpModules.1.1.4.1.0 = OID: .iso.org.dod.internet.private.enterprises.ceph.cephCluster.cephNotifications.prometheus.promMgr.promMgrPrometheusInactive
.iso.org.dod.internet.private.enterprises.ceph.cephCluster.cephNotifications.prometheus.promMgr.promMgrPrometheusInactive.1 = STRING: "1.3.6.1.4.1.50495.1.2.1.6.2[alertname=CephMgrPrometheusModuleInactive]"
.iso.org.dod.internet.private.enterprises.ceph.cephCluster.cephNotifications.prometheus.promMgr.promMgrPrometheusInactive.2 = STRING: "critical"
.iso.org.dod.internet.private.enterprises.ceph.cephCluster.cephNotifications.prometheus.promMgr.promMgrPrometheusInactive.3 = STRING: "Status: critical
- Alert: CephMgrPrometheusModuleInactive
  Summary: Ceph's mgr/prometheus module is not available
  Description: The mgr/prometheus module at 10.70.39.243:9283 is unreachable. This could mean that the module has been disabled or the mgr itself is down.
Without the mgr/prometheus module metrics and alerts will no longer function. Open a shell to ceph and use 'ceph -s' to determine whether the mgr is active. If the mgr is not active, restart it, otherwise you can check the mgr/prometheus module is loaded with 'ceph mgr module ls'  and if it's not listed as enabled, enable it with 'ceph mgr module enable prometheus'"
In the above example, an alert is generated after the Prometheus module is disabled.
Additional Resources
- See the Deploying the SNMP gateway section in the Red Hat Ceph Storage Operations Guide.
13.3. Deploying the SNMP gateway
You can deploy the simple network management protocol (SNMP) gateway using either SNMPV2c or SNMPV3. There are two methods to deploy the SNMP gateway:
- By creating a credentials file.
- By creating one service configuration yaml file with all the details.
You can use the following parameters to deploy the SNMP gateway based on the versions:
-
The
service_typeis thesnmp-gateway. -
The
service_nameis any user-defined string. -
The
countis the number of SNMP gateways to be deployed in a storage cluster. -
The
snmp_destinationparameter must be of the format hostname:port. -
The
engine-idis a unique identifier for the device, in hex, and required for SNMPV3 gateway. Red Hat recommends to use `8000C53F_CLUSTER_FSID_WITHOUT_DASHES_`for this parameter. -
The
snmp_communityparameter ispublicfor SNMPV2c gateway. -
The
auth-protocolis mandatory for SNMPV3 gateway and isSHAby default. -
The
privacy-protocolis mandatory for SNMPV3 gateway with authentication and encryption. -
The port is
9464by default. -
You must provide a
-i FILENAMEto pass the secrets and passwords to the orchestrator.
Once the SNMP gateway service is deployed or updated, the Prometheus Alertmanager configuration is automatically updated to forward any alert that has an objectidentifier to the SNMP gateway daemon for further processing.
Prerequisites
- A running Red Hat Ceph Storage cluster.
- Root-level access to the nodes.
-
Configuring
snmptrapdon the destination host, which is the SNMP management host.
Procedure
Log into the Cephadm shell:
Example
[root@host01 ~]# cephadm shell
Create a label for the host on which SNMP gateway needs to be deployed:
Syntax
ceph orch host label add HOSTNAME snmp-gatewayExample
[ceph: root@host01 /]# ceph orch host label add host02 snmp-gateway
Create a credentials file or a service configuration file based on the SNMP version:
For SNMPV2c, create the file as follows:
Example
[ceph: root@host01 /]# cat snmp_creds.yml

snmp_community: public
OR
Example
[ceph: root@host01 /]# cat snmp-gateway.yml

service_type: snmp-gateway
service_name: snmp-gateway
placement:
  count: 1
spec:
  credentials:
    snmp_community: public
  port: 9464
  snmp_destination: 192.168.122.73:162
  snmp_version: V2c
For SNMPV3 with authentication only, create the file as follows:
Example
[ceph: root@host01 /]# cat snmp_creds.yml

snmp_v3_auth_username: myuser
snmp_v3_auth_password: mypassword
OR
Example
[ceph: root@host01 /]# cat snmp-gateway.yml

service_type: snmp-gateway
service_name: snmp-gateway
placement:
  count: 1
spec:
  credentials:
    snmp_v3_auth_password: mypassword
    snmp_v3_auth_username: myuser
  engine_id: 8000C53Ff64f341c655d11eb8778fa163e914bcc
  port: 9464
  snmp_destination: 192.168.122.1:162
  snmp_version: V3
For SNMPV3 with authentication and encryption, create the file as follows:
Example
[ceph: root@host01 /]# cat snmp_creds.yml

snmp_v3_auth_username: myuser
snmp_v3_auth_password: mypassword
snmp_v3_priv_password: mysecret
OR
Example
[ceph: root@host01 /]# cat snmp-gateway.yml

service_type: snmp-gateway
service_name: snmp-gateway
placement:
  count: 1
spec:
  credentials:
    snmp_v3_auth_password: mypassword
    snmp_v3_auth_username: myuser
    snmp_v3_priv_password: mysecret
  engine_id: 8000C53Ff64f341c655d11eb8778fa163e914bcc
  port: 9464
  snmp_destination: 192.168.122.1:162
  snmp_version: V3
Run the
ceph orchcommand:Syntax
ceph orch apply snmp-gateway --snmp_version=V2c_OR_V3 --destination=SNMP_DESTINATION [--port=PORT_NUMBER]\
[--engine-id=8000C53F_CLUSTER_FSID_WITHOUT_DASHES_] [--auth-protocol=MDS_OR_SHA] [--privacy_protocol=DES_OR_AES] -i FILENAME
OR
Syntax
ceph orch apply -i FILENAME.ymlFor SNMPV2c, with the
snmp_credsfile, run theceph orchcommand with thesnmp-versionasV2c:Example
[ceph: root@host01 /]# ceph orch apply snmp-gateway --snmp-version=V2c --destination=192.168.122.73:162 --port=9464 -i snmp_creds.yml
For SNMPV3 with authentication only, with the
snmp_credsfile, run theceph orchcommand with thesnmp-versionasV3andengine-id:Example
[ceph: root@host01 /]# ceph orch apply snmp-gateway --snmp-version=V3 --engine-id=8000C53Ff64f341c655d11eb8778fa163e914bcc--destination=192.168.122.73:162 -i snmp_creds.yml
For SNMPV3 with authentication and encryption, with the
snmp_credsfile, run theceph orchcommand with thesnmp-versionasV3,privacy-protocol, andengine-id:Example
[ceph: root@host01 /]# ceph orch apply snmp-gateway --snmp-version=V3 --engine-id=8000C53Ff64f341c655d11eb8778fa163e914bcc--destination=192.168.122.73:162 --privacy-protocol=AES -i snmp_creds.yml
OR
For all the SNMP versions, with the
snmp-gatewayfile, run the following command:Example
[ceph: root@host01 /]# ceph orch apply -i snmp-gateway.yml
Additional Resources
- See the Configuring `snmptrapd` section in the Red Hat Ceph Storage Operations Guide.
Chapter 14. Handling a node failure
As a storage administrator, you can experience a whole node failing within the storage cluster, and handling a node failure is similar to handling a disk failure. With a node failure, instead of Ceph recovering placement groups (PGs) for only one disk, all PGs on the disks within that node must be recovered. Ceph will detect that the OSDs are all down and automatically start the recovery process, known as self-healing.
There are three node failure scenarios. Here is the high-level workflow for each scenario when replacing a node:
Replacing the node, but using the root and Ceph OSD disks from the failed node.
- Disable backfilling.
- Replace the node, taking the disks from old node, and adding them to the new node.
- Enable backfilling.
Replacing the node, reinstalling the operating system, and using the Ceph OSD disks from the failed node.
- Disable backfilling.
- Create a backup of the Ceph configuration.
- Replace the node and add the Ceph OSD disks from failed node.
- Configuring disks as JBOD.
- Install the operating system.
- Restore the Ceph configuration.
- Add the new node to the storage cluster using the Ceph Orchestrator commands and Ceph daemons are placed automatically on the respective node.
- Enable backfilling.
Replacing the node, reinstalling the operating system, and using all new Ceph OSDs disks.
- Disable backfilling.
- Remove all OSDs on the failed node from the storage cluster.
- Create a backup of the Ceph configuration.
Replace the node and add the Ceph OSD disks from failed node.
- Configuring disks as JBOD.
- Install the operating system.
- Add the new node to the storage cluster using the Ceph Orchestrator commands and Ceph daemons are placed automatically on the respective node.
- Enable backfilling.
14.1. Prerequisites
- A running Red Hat Ceph Storage cluster.
- A failed node.
14.2. Considerations before adding or removing a node
One of the outstanding features of Ceph is the ability to add or remove Ceph OSD nodes at run time. This means that you can resize the storage cluster capacity or replace hardware without taking down the storage cluster.
The ability to serve Ceph clients while the storage cluster is in a degraded state also has operational benefits. For example, you can add or remove or replace hardware during regular business hours, rather than working overtime or on weekends. However, adding and removing Ceph OSD nodes can have a significant impact on performance.
Before you add or remove Ceph OSD nodes, consider the effects on storage cluster performance:
- Whether you are expanding or reducing the storage cluster capacity, adding or removing Ceph OSD nodes induces backfilling as the storage cluster rebalances. During that rebalancing time period, Ceph uses additional resources, which can impact storage cluster performance.
- In a production Ceph storage cluster, a Ceph OSD node has a particular hardware configuration that facilitates a particular type of storage strategy.
- Since a Ceph OSD node is part of a CRUSH hierarchy, the performance impact of adding or removing a node typically affects the performance of pools that use the CRUSH ruleset.
Additional Resources
- See the Red Hat Ceph Storage Storage Strategies Guide for more details.
14.3. Performance considerations
The following factors typically affect a storage cluster’s performance when adding or removing Ceph OSD nodes:
- Ceph clients place load on the I/O interface to Ceph; that is, the clients place load on a pool. A pool maps to a CRUSH ruleset. The underlying CRUSH hierarchy allows Ceph to place data across failure domains. If the underlying Ceph OSD node involves a pool that is experiencing high client load, the client load could significantly affect recovery time and reduce performance. Because write operations require data replication for durability, write-intensive client loads in particular can increase the time for the storage cluster to recover.
- Generally, the capacity you are adding or removing affects the storage cluster’s time to recover. In addition, the storage density of the node you add or remove might also affect recovery times. For example, a node with 36 OSDs typically takes longer to recover than a node with 12 OSDs.
-
When removing nodes, you MUST ensure that you have sufficient spare capacity so that you will not reach
full ratioornear full ratio. If the storage cluster reachesfull ratio, Ceph will suspend write operations to prevent data loss. - A Ceph OSD node maps to at least one Ceph CRUSH hierarchy, and the hierarchy maps to at least one pool. Each pool that uses a CRUSH ruleset experiences a performance impact when Ceph OSD nodes are added or removed.
-
Replication pools tend to use more network bandwidth to replicate deep copies of the data, whereas erasure coded pools tend to use more CPU to calculate
k+mcoding chunks. The more copies that exist of the data, the longer it takes for the storage cluster to recover. For example, a larger pool or one that has a greater number ofk+mchunks will take longer to recover than a replication pool with fewer copies of the same data. - Drives, controllers and network interface cards all have throughput characteristics that might impact the recovery time. Generally, nodes with higher throughput characteristics, such as 10 Gbps and SSDs, recover more quickly than nodes with lower throughput characteristics, such as 1 Gbps and SATA drives.
14.4. Recommendations for adding or removing nodes
Red Hat recommends adding or removing one OSD at a time within a node and allowing the storage cluster to recover before proceeding to the next OSD. This helps to minimize the impact on storage cluster performance. Note that if a node fails, you might need to change the entire node at once, rather than one OSD at a time.
To remove an OSD:
To add an OSD:
When adding or removing Ceph OSD nodes, consider that other ongoing processes also affect storage cluster performance. To reduce the impact on client I/O, Red Hat recommends the following:
Calculate capacity
Before removing a Ceph OSD node, ensure that the storage cluster can backfill the contents of all its OSDs without reaching the full ratio. Reaching the full ratio will cause the storage cluster to refuse write operations.
Temporarily disable scrubbing
Scrubbing is essential to ensuring the durability of the storage cluster’s data; however, it is resource intensive. Before adding or removing a Ceph OSD node, disable scrubbing and deep-scrubbing and let the current scrubbing operations complete before proceeding.
ceph osd set noscrub
ceph osd set nodeep-scrub
Once you have added or removed a Ceph OSD node and the storage cluster has returned to an active+clean state, unset the noscrub and nodeep-scrub settings.
ceph osd unset noscrub
ceph osd unset nodeep-scrub
Limit backfill and recovery
If you have reasonable data durability, there is nothing wrong with operating in a degraded state. For example, you can operate the storage cluster with osd_pool_default_size = 3 and osd_pool_default_min_size = 2. You can tune the storage cluster for the fastest possible recovery time, but doing so significantly affects Ceph client I/O performance. To maintain the highest Ceph client I/O performance, limit the backfill and recovery operations and allow them to take longer.
osd_max_backfills = 1
osd_recovery_max_active = 1
osd_recovery_op_priority = 1
You can also consider setting the sleep and delay parameters such as, osd_recovery_sleep.
Increase the number of placement groups
Finally, if you are expanding the size of the storage cluster, you may need to increase the number of placement groups. If you determine that you need to expand the number of placement groups, Red Hat recommends making incremental increases in the number of placement groups. Increasing the number of placement groups by a significant amount will cause a considerable degradation in performance.
14.5. Adding a Ceph OSD node
To expand the capacity of the Red Hat Ceph Storage cluster, you can add an OSD node.
Prerequisites
- A running Red Hat Ceph Storage cluster.
- A provisioned node with a network connection.
Procedure
- Verify that other nodes in the storage cluster can reach the new node by its short host name.
Temporarily disable scrubbing:
Example
[ceph: root@host01 /]# ceph osd set noscrub
[ceph: root@host01 /]# ceph osd set nodeep-scrub
Limit the backfill and recovery features:
Syntax
ceph tell DAEMON_TYPE.* injectargs --OPTION_NAME VALUE [--OPTION_NAME VALUE]
Example
[ceph: root@host01 /]# ceph tell osd.* injectargs --osd-max-backfills 1 --osd-recovery-max-active 1 --osd-recovery-op-priority 1
Extract the cluster’s public SSH keys to a folder:
Syntax
ceph cephadm get-pub-key > ~/PATHExample
[ceph: root@host01 /]# ceph cephadm get-pub-key > ~/ceph.pub
Copy ceph cluster’s public SSH keys to the root user’s
authorized_keysfile on the new host:Syntax
ssh-copy-id -f -i ~/PATH root@HOST_NAME_2
Example
[ceph: root@host01 /]# ssh-copy-id -f -i ~/ceph.pub root@host02
Add the new node to the CRUSH map:
Syntax
ceph orch host add NODE_NAME IP_ADDRESS
Example
[ceph: root@host01 /]# ceph orch host add host02 10.10.128.70
Add an OSD for each disk on the node to the storage cluster.
When adding an OSD node to a Red Hat Ceph Storage cluster, Red Hat recommends adding one OSD daemon at a time and allowing the cluster to recover to an active+clean state before proceeding to the next OSD.
Additional Resources
- See the Setting a Specific Configuration Setting at Runtime section in the Red Hat Ceph Storage Configuration Guide for more details.
- See Adding a Bucket and Moving a Bucket sections in the Red Hat Ceph Storage Storage Strategies Guide for details on placing the node at an appropriate location in the CRUSH hierarchy,.
14.6. Removing a Ceph OSD node
To reduce the capacity of a storage cluster, remove an OSD node.
Before removing a Ceph OSD node, ensure that the storage cluster can backfill the contents of all OSDs without reaching the full ratio. Reaching the full ratio will cause the storage cluster to refuse write operations.
Prerequisites
- A running Red Hat Ceph Storage cluster.
- Root-level access to all nodes in the storage cluster.
Procedure
Check the storage cluster’s capacity:
Syntax
ceph df
rados df
ceph osd df
Temporarily disable scrubbing:
Syntax
ceph osd set noscrub
ceph osd set nodeep-scrub
Limit the backfill and recovery features:
Syntax
ceph tell DAEMON_TYPE.* injectargs --OPTION_NAME VALUE [--OPTION_NAME VALUE]
Example
[ceph: root@host01 /]# ceph tell osd.* injectargs --osd-max-backfills 1 --osd-recovery-max-active 1 --osd-recovery-op-priority 1
Remove each OSD on the node from the storage cluster:
Using Removing the OSD daemons using the Ceph Orchestrator.
ImportantWhen removing an OSD node from the storage cluster, Red Hat recommends removing one OSD at a time within the node and allowing the cluster to recover to an
active+cleanstate before proceeding to remove the next OSD.After you remove an OSD, check to verify that the storage cluster is not getting to the
near-full ratio:Syntax
ceph -s
ceph df
- Repeat this step until all OSDs on the node are removed from the storage cluster.
Once all OSDs are removed, remove the host:
Additional Resources
- See the Setting a specific configuration at runtime section in the Red Hat Ceph Storage Configuration Guide for more details.
14.7. Simulating a node failure
To simulate a hard node failure, power off the node and reinstall the operating system.
Prerequisites
- A healthy running Red Hat Ceph Storage cluster.
- Root-level access to all nodes on the storage cluster.
Procedure
Check the storage cluster’s capacity to understand the impact of removing the node:
Example
[ceph: root@host01 /]# ceph df
[ceph: root@host01 /]# rados df
[ceph: root@host01 /]# ceph osd df
Optionally, disable recovery and backfilling:
Example
[ceph: root@host01 /]# ceph osd set noout
[ceph: root@host01 /]# ceph osd set noscrub
[ceph: root@host01 /]# ceph osd set nodeep-scrub
- Shut down the node.
If you are changing the host name, remove the node from CRUSH map:
Example
[ceph: root@host01 /]# ceph osd crush rm host03
Check the status of the storage cluster:
Example
[ceph: root@host01 /]# ceph -s
- Reinstall the operating system on the node.
Add the new node:
- Using the Adding hosts using the Ceph Orchestrator.
Optionally, enable recovery and backfilling:
Example
[ceph: root@host01 /]# ceph osd unset noout
[ceph: root@host01 /]# ceph osd unset noscrub
[ceph: root@host01 /]# ceph osd unset nodeep-scrub
Check Ceph’s health:
Example
[ceph: root@host01 /]# ceph -s
Additional Resources
- See the Red Hat Ceph Storage Installation Guide for more details.
Chapter 15. Handling a data center failure
As a storage administrator, you can take preventive measures to avoid a data center failure. These preventive measures include:
- Configuring the data center infrastructure.
- Setting up failure domains within the CRUSH map hierarchy.
- Designating failure nodes within the domains.
15.1. Prerequisites
- A healthy running Red Hat Ceph Storage cluster.
- Root-level access to all nodes in the storage cluster.
15.2. Avoiding a data center failure
Configuring the data center infrastructure
Each data center within a stretch cluster can have a different storage cluster configuration to reflect local capabilities and dependencies. Set up replication between the data centers to help preserve the data. If one data center fails, the other data centers in the storage cluster contain copies of the data.
Setting up failure domains within the CRUSH map hierarchy
Failure, or failover, domains are redundant copies of domains within the storage cluster. If an active domain fails, the failure domain becomes the active domain.
By default, the CRUSH map lists all nodes in a storage cluster within a flat hierarchy. However, for best results, create a logical hierarchical structure within the CRUSH map. The hierarchy designates the domains to which each node belongs and the relationships among those domains within the storage cluster, including the failure domains. Defining the failure domains for each domain within the hierarchy improves the reliability of the storage cluster.
When planning a storage cluster that contains multiple data centers, place the nodes within the CRUSH map hierarchy so that if one data center goes down, the rest of the storage cluster stays up and running.
Designating failure nodes within the domains
If you plan to use three-way replication for data within the storage cluster, consider the location of the nodes within the failure domain. If an outage occurs within a data center, it is possible that some data might reside in only one copy. When this scenario happens, there are two options:
- Leave the data in read-only status with the standard settings.
- Live with only one copy for the duration of the outage.
With the standard settings, and because of the randomness of data placement across the nodes, not all the data will be affected, but some data can have only one copy and the storage cluster would revert to read-only mode. However, if some data exist in only one copy, the storage cluster reverts to read-only mode.
15.3. Handling a data center failure
Red Hat Ceph Storage can withstand catastrophic failures to the infrastructure, such as losing one of the data centers in a stretch cluster. For the standard object store use case, configuring all three data centers can be done independently with replication set up between them. In this scenario, the storage cluster configuration in each of the data centers might be different, reflecting the local capabilities and dependencies.
A logical structure of the placement hierarchy should be considered. A proper CRUSH map can be used, reflecting the hierarchical structure of the failure domains within the infrastructure. Using logical hierarchical definitions improves the reliability of the storage cluster, versus using the standard hierarchical definitions. Failure domains are defined in the CRUSH map. The default CRUSH map contains all nodes in a flat hierarchy. In a three data center environment, such as a stretch cluster, the placement of nodes should be managed in a way that one data center can go down, but the storage cluster stays up and running. Consider which failure domain a node resides in when using 3-way replication for the data.
In the example below, the resulting map is derived from the initial setup of the storage cluster with 6 OSD nodes. In this example, all nodes have only one disk and hence one OSD. All of the nodes are arranged under the default root, that is the standard root of the hierarchy tree. Because there is a weight assigned to two of the OSDs, these OSDs receive fewer chunks of data than the other OSDs. These nodes were introduced later with bigger disks than the initial OSD disks. This does not affect the data placement to withstand a failure of a group of nodes.
Example
[ceph: root@host01 /]# ceph osd tree
ID WEIGHT  TYPE NAME           UP/DOWN REWEIGHT PRIMARY-AFFINITY
-1 0.33554 root default
-2 0.04779     host host03
 0 0.04779         osd.0            up  1.00000          1.00000
-3 0.04779     host host02
 1 0.04779         osd.1            up  1.00000          1.00000
-4 0.04779     host host01
 2 0.04779         osd.2            up  1.00000          1.00000
-5 0.04779     host host04
 3 0.04779         osd.3            up  1.00000          1.00000
-6 0.07219     host host06
 4 0.07219         osd.4            up  0.79999          1.00000
-7 0.07219     host host05
 5 0.07219         osd.5            up  0.79999          1.00000
Using logical hierarchical definitions to group the nodes into same data center can achieve data placement maturity. Possible definition types of root, datacenter, rack, row and host allow the reflection of the failure domains for the three data center stretch cluster:
- Nodes host01 and host02 reside in data center 1 (DC1)
- Nodes host03 and host05 reside in data center 2 (DC2)
- Nodes host04 and host06 reside in data center 3 (DC3)
- All data centers belong to the same structure (allDC)
Since all OSDs in a host belong to the host definition there is no change needed. All the other assignments can be adjusted during runtime of the storage cluster by:
Defining the bucket structure with the following commands:
ceph osd crush add-bucket allDC root
ceph osd crush add-bucket DC1 datacenter
ceph osd crush add-bucket DC2 datacenter
ceph osd crush add-bucket DC3 datacenter
Moving the nodes into the appropriate place within this structure by modifying the CRUSH map:
ceph osd crush move DC1 root=allDC
ceph osd crush move DC2 root=allDC
ceph osd crush move DC3 root=allDC
ceph osd crush move host01 datacenter=DC1
ceph osd crush move host02 datacenter=DC1
ceph osd crush move host03 datacenter=DC2
ceph osd crush move host05 datacenter=DC2
ceph osd crush move host04 datacenter=DC3
ceph osd crush move host06 datacenter=DC3
Within this structure any new hosts can be added too, as well as new disks. By placing the OSDs at the right place in the hierarchy the CRUSH algorithm is changed to place redundant pieces into different failure domains within the structure.
The above example results in the following:
Example
[ceph: root@host01 /]# ceph osd tree
ID  WEIGHT  TYPE NAME               UP/DOWN REWEIGHT PRIMARY-AFFINITY
 -8 6.00000 root allDC
 -9 2.00000     datacenter DC1
 -4 1.00000         host host01
  2 1.00000             osd.2            up  1.00000          1.00000
 -3 1.00000         host host02
  1 1.00000             osd.1            up  1.00000          1.00000
-10 2.00000     datacenter DC2
 -2 1.00000         host host03
  0 1.00000             osd.0            up  1.00000          1.00000
 -7 1.00000         host host05
  5 1.00000             osd.5            up  0.79999          1.00000
-11 2.00000     datacenter DC3
 -6 1.00000         host host06
  4 1.00000             osd.4            up  0.79999          1.00000
 -5 1.00000         host host04
  3 1.00000             osd.3            up  1.00000          1.00000
 -1       0 root default
The listing from above shows the resulting CRUSH map by displaying the osd tree. Easy to see is now how the hosts belong to a data center and all data centers belong to the same top level structure but clearly distinguishing between locations.
Placing the data in the proper locations according to the map works only properly within the healthy cluster. Misplacement might happen under circumstances, when some OSDs are not available. Those misplacements will be corrected automatically once it is possible to do so.
Additional Resources
- See the CRUSH administration chapter in the Red Hat Ceph Storage Storage Strategies Guide for more information.