
Scalability and performance
Scaling your OpenShift Container Platform cluster and tuning performance in production environments
Abstract
Chapter 1. Recommended host practices
This topic provides recommended host practices for OpenShift Container Platform.
These guidelines apply to OpenShift Container Platform with software-defined networking (SDN), not Open Virtual Network (OVN).
1.1. Recommended node host practices
The OpenShift Container Platform node configuration file contains important options. For example, two parameters control the maximum number of pods that can be scheduled to a node: podsPerCore and maxPods.
When both options are in use, the lower of the two values limits the number of pods on a node. Exceeding these values can result in:
- Increased CPU utilization.
- Slow pod scheduling.
- Potential out-of-memory scenarios, depending on the amount of memory in the node.
- Exhausting the pool of IP addresses.
- Resource overcommitting, leading to poor user application performance.
In Kubernetes, a pod that is holding a single container actually uses two containers. The second container is used to set up networking prior to the actual container starting. Therefore, a system running 10 pods will actually have 20 containers running.
Disk IOPS throttling from the cloud provider might have an impact on CRI-O and kubelet. They might get overloaded when there are large number of I/O intensive pods running on the nodes. It is recommended that you monitor the disk I/O on the nodes and use volumes with sufficient throughput for the workload.
podsPerCore sets the number of pods the node can run based on the number of processor cores on the node. For example, if podsPerCore is set to 10 on a node with 4 processor cores, the maximum number of pods allowed on the node will be 40.
kubeletConfig:
  podsPerCore: 10
Setting podsPerCore to 0 disables this limit. The default is 0. podsPerCore cannot exceed maxPods.
maxPods sets the number of pods the node can run to a fixed value, regardless of the properties of the node.
 kubeletConfig:
    maxPods: 250
1.2. Creating a KubeletConfig CRD to edit kubelet parameters
The kubelet configuration is currently serialized as an Ignition configuration, so it can be directly edited. However, there is also a new kubelet-config-controller added to the Machine Config Controller (MCC). This lets you use a KubeletConfig custom resource (CR) to edit the kubelet parameters.
As the fields in the kubeletConfig object are passed directly to the kubelet from upstream Kubernetes, the kubelet validates those values directly. Invalid values in the kubeletConfig object might cause cluster nodes to become unavailable. For valid values, see the Kubernetes documentation.
Consider the following guidance:
-
Create one
KubeletConfigCR for each machine config pool with all the config changes you want for that pool. If you are applying the same content to all of the pools, you need only oneKubeletConfigCR for all of the pools. -
Edit an existing
KubeletConfigCR to modify existing settings or add new settings, instead of creating a CR for each change. It is recommended that you create a CR only to modify a different machine config pool, or for changes that are intended to be temporary, so that you can revert the changes. -
As needed, create multiple
KubeletConfigCRs with a limit of 10 per cluster. For the firstKubeletConfigCR, the Machine Config Operator (MCO) creates a machine config appended withkubelet. With each subsequent CR, the controller creates anotherkubeletmachine config with a numeric suffix. For example, if you have akubeletmachine config with a-2suffix, the nextkubeletmachine config is appended with-3.
If you want to delete the machine configs, delete them in reverse order to avoid exceeding the limit. For example, you delete the kubelet-3 machine config before deleting the kubelet-2 machine config.
If you have a machine config with a kubelet-9 suffix, and you create another KubeletConfig CR, a new machine config is not created, even if there are fewer than 10 kubelet machine configs.
Example KubeletConfig CR
$ oc get kubeletconfig
NAME                AGE
set-max-pods        15m
Example showing a KubeletConfig machine config
$ oc get mc | grep kubelet
...
99-worker-generated-kubelet-1                  b5c5119de007945b6fe6fb215db3b8e2ceb12511   3.2.0             26m
...
The following procedure is an example to show how to configure the maximum number of pods per node on the worker nodes.
Prerequisites
Obtain the label associated with the static
MachineConfigPoolCR for the type of node you want to configure. Perform one of the following steps:View the machine config pool:
$ oc describe machineconfigpool <name>
For example:
$ oc describe machineconfigpool worker
Example output
apiVersion: machineconfiguration.openshift.io/v1 kind: MachineConfigPool metadata: creationTimestamp: 2019-02-08T14:52:39Z generation: 1 labels: custom-kubelet: set-max-pods 1- 1
- If a label has been added it appears under
labels.
If the label is not present, add a key/value pair:
$ oc label machineconfigpool worker custom-kubelet=set-max-pods
Procedure
View the available machine configuration objects that you can select:
$ oc get machineconfig
By default, the two kubelet-related configs are
01-master-kubeletand01-worker-kubelet.Check the current value for the maximum pods per node:
$ oc describe node <node_name>
For example:
$ oc describe node ci-ln-5grqprb-f76d1-ncnqq-worker-a-mdv94
Look for
value: pods: <value>in theAllocatablestanza:Example output
Allocatable:
 attachable-volumes-aws-ebs:  25
 cpu:                         3500m
 hugepages-1Gi:               0
 hugepages-2Mi:               0
 memory:                      15341844Ki
 pods:                        250
Set the maximum pods per node on the worker nodes by creating a custom resource file that contains the kubelet configuration:
apiVersion: machineconfiguration.openshift.io/v1 kind: KubeletConfig metadata: name: set-max-pods spec: machineConfigPoolSelector: matchLabels: custom-kubelet: set-max-pods 1 kubeletConfig: maxPods: 500 2NoteThe rate at which the kubelet talks to the API server depends on queries per second (QPS) and burst values. The default values,
50forkubeAPIQPSand100forkubeAPIBurst, are sufficient if there are limited pods running on each node. It is recommended to update the kubelet QPS and burst rates if there are enough CPU and memory resources on the node.apiVersion: machineconfiguration.openshift.io/v1 kind: KubeletConfig metadata: name: set-max-pods spec: machineConfigPoolSelector: matchLabels: custom-kubelet: set-max-pods kubeletConfig: maxPods: <pod_count> kubeAPIBurst: <burst_rate> kubeAPIQPS: <QPS>Update the machine config pool for workers with the label:
$ oc label machineconfigpool worker custom-kubelet=large-pods
Create the
KubeletConfigobject:$ oc create -f change-maxPods-cr.yaml
Verify that the
KubeletConfigobject is created:$ oc get kubeletconfig
Example output
NAME                AGE
set-max-pods        15m
Depending on the number of worker nodes in the cluster, wait for the worker nodes to be rebooted one by one. For a cluster with 3 worker nodes, this could take about 10 to 15 minutes.
Verify that the changes are applied to the node:
Check on a worker node that the
maxPodsvalue changed:$ oc describe node <node_name>
Locate the
Allocatablestanza:... Allocatable: attachable-volumes-gce-pd: 127 cpu: 3500m ephemeral-storage: 123201474766 hugepages-1Gi: 0 hugepages-2Mi: 0 memory: 14225400Ki pods: 500 1 ...- 1
- In this example, the
podsparameter should report the value you set in theKubeletConfigobject.
Verify the change in the
KubeletConfigobject:$ oc get kubeletconfigs set-max-pods -o yaml
This should show a
status: "True"andtype:Success:spec: kubeletConfig: maxPods: 500 machineConfigPoolSelector: matchLabels: custom-kubelet: set-max-pods status: conditions: - lastTransitionTime: "2021-06-30T17:04:07Z" message: Success status: "True" type: Success
1.4. Control plane node sizing
The control plane node resource requirements depend on the number of nodes in the cluster. The following control plane node size recommendations are based on the results of control plane density focused testing. The control plane tests create the following objects across the cluster in each of the namespaces depending on the node counts:
- 12 image streams
- 3 build configurations
- 6 builds
- 1 deployment with 2 pod replicas mounting two secrets each
- 2 deployments with 1 pod replica mounting two secrets
- 3 services pointing to the previous deployments
- 3 routes pointing to the previous deployments
- 10 secrets, 2 of which are mounted by the previous deployments
- 10 config maps, 2 of which are mounted by the previous deployments
| Number of worker nodes | Cluster load (namespaces) | CPU cores | Memory (GB) |
|---|---|---|---|
| 25 | 500 | 4 | 16 |
| 100 | 1000 | 8 | 32 |
| 250 | 4000 | 16 | 96 |
On a large and dense cluster with three masters or control plane nodes, the CPU and memory usage will spike up when one of the nodes is stopped, rebooted or fails. The failures can be due to unexpected issues with power, network or underlying infrastructure in addition to intentional cases where the cluster is restarted after shutting it down to save costs. The remaining two control plane nodes must handle the load in order to be highly available which leads to increase in the resource usage. This is also expected during upgrades because the masters are cordoned, drained, and rebooted serially to apply the operating system updates, as well as the control plane Operators update. To avoid cascading failures, keep the overall CPU and memory resource usage on the control plane nodes to at most 60% of all available capacity to handle the resource usage spikes. Increase the CPU and memory on the control plane nodes accordingly to avoid potential downtime due to lack of resources.
The node sizing varies depending on the number of nodes and object counts in the cluster. It also depends on whether the objects are actively being created on the cluster. During object creation, the control plane is more active in terms of resource usage compared to when the objects are in the running phase.
Operator Lifecycle Manager (OLM ) runs on the control plane nodes and it’s memory footprint depends on the number of namespaces and user installed operators that OLM needs to manage on the cluster. Control plane nodes need to be sized accordingly to avoid OOM kills. Following data points are based on the results from cluster maximums testing.
| Number of namespaces | OLM memory at idle state (GB) | OLM memory with 5 user operators installed (GB) |
|---|---|---|
| 500 | 0.823 | 1.7 |
| 1000 | 1.2 | 2.5 |
| 1500 | 1.7 | 3.2 |
| 2000 | 2 | 4.4 |
| 3000 | 2.7 | 5.6 |
| 4000 | 3.8 | 7.6 |
| 5000 | 4.2 | 9.02 |
| 6000 | 5.8 | 11.3 |
| 7000 | 6.6 | 12.9 |
| 8000 | 6.9 | 14.8 |
| 9000 | 8 | 17.7 |
| 10,000 | 9.9 | 21.6 |
If you used an installer-provisioned infrastructure installation method, you cannot modify the control plane node size in a running OpenShift Container Platform 4.8 cluster. Instead, you must estimate your total node count and use the suggested control plane node size during installation.
The recommendations are based on the data points captured on OpenShift Container Platform clusters with OpenShift SDN as the network plugin.
In OpenShift Container Platform 4.8, half of a CPU core (500 millicore) is now reserved by the system by default compared to OpenShift Container Platform 3.11 and previous versions. The sizes are determined taking that into consideration.
1.4.1. Increasing the flavor size of the Amazon Web Services (AWS) master instances
When you have overloaded AWS master nodes in a cluster and the master nodes require more resources, you can increase the flavor size of the master instances.
It is recommended to backup etcd before increasing the flavor size of the AWS master instances.
Prerequisites
- You have an IPI (installer-provisioned infrastructure) or UPI (user-provisioned infrastructure) cluster on AWS.
Procedure
- Open the AWS console, fetch the master instances.
- Stop one master instance.
- Select the stopped instance, and click Actions → Instance Settings → Change instance type.
-
Change the instance to a larger type, ensuring that the type is the same base as the previous selection, and apply changes. For example, you can change
m5.xlargetom5.2xlargeorm5.4xlarge. - Backup the instance, and repeat the steps for the next master instance.
Additional resources
1.5. Recommended etcd practices
Because etcd writes data to disk and persists proposals on disk, its performance depends on disk performance. Although etcd is not particularly I/O intensive, it requires a low latency block device for optimal performance and stability. Because etcd’s consensus protocol depends on persistently storing metadata to a log (WAL), etcd is sensitive to disk-write latency. Slow disks and disk activity from other processes can cause long fsync latencies.
Those latencies can cause etcd to miss heartbeats, not commit new proposals to the disk on time, and ultimately experience request timeouts and temporary leader loss. High write latencies also lead to an OpenShift API slowness, which affects cluster performance. Because of these reasons, avoid colocating other workloads on the control-plane nodes.
In terms of latency, run etcd on top of a block device that can write at least 50 IOPS of 8000 bytes long sequentially. That is, with a latency of 20ms, keep in mind that uses fdatasync to synchronize each write in the WAL. For heavy loaded clusters, sequential 500 IOPS of 8000 bytes (2 ms) are recommended. To measure those numbers, you can use a benchmarking tool, such as fio.
To achieve such performance, run etcd on machines that are backed by SSD or NVMe disks with low latency and high throughput. Consider single-level cell (SLC) solid-state drives (SSDs), which provide 1 bit per memory cell, are durable and reliable, and are ideal for write-intensive workloads.
The following hard disk features provide optimal etcd performance:
- Low latency to support fast read operation.
- High-bandwidth writes for faster compactions and defragmentation.
- High-bandwidth reads for faster recovery from failures.
- Solid state drives as a minimum selection, however NVMe drives are preferred.
- Server-grade hardware from various manufacturers for increased reliability.
- RAID 0 technology for increased performance.
- Dedicated etcd drives. Do not place log files or other heavy workloads on etcd drives.
Avoid NAS or SAN setups and spinning drives. Always benchmark by using utilities such as fio. Continuously monitor the cluster performance as it increases.
Avoid using the Network File System (NFS) protocol or other network based file systems.
Some key metrics to monitor on a deployed OpenShift Container Platform cluster are p99 of etcd disk write ahead log duration and the number of etcd leader changes. Use Prometheus to track these metrics.
To validate the hardware for etcd before or after you create the OpenShift Container Platform cluster, you can use fio.
Prerequisites
- Container runtimes such as Podman or Docker are installed on the machine that you’re testing.
-
Data is written to the
/var/lib/etcdpath.
Procedure
Run fio and analyze the results:
If you use Podman, run this command:
$ sudo podman run --volume /var/lib/etcd:/var/lib/etcd:Z quay.io/openshift-scale/etcd-perf
If you use Docker, run this command:
$ sudo docker run --volume /var/lib/etcd:/var/lib/etcd:Z quay.io/openshift-scale/etcd-perf
The output reports whether the disk is fast enough to host etcd by comparing the 99th percentile of the fsync metric captured from the run to see if it is less than 20 ms. A few of the most important etcd metrics that might affected by I/O performance are as follow:
-
etcd_disk_wal_fsync_duration_seconds_bucketmetric reports the etcd’s WAL fsync duration -
etcd_disk_backend_commit_duration_seconds_bucketmetric reports the etcd backend commit latency duration -
etcd_server_leader_changes_seen_totalmetric reports the leader changes
Because etcd replicates the requests among all the members, its performance strongly depends on network input/output (I/O) latency. High network latencies result in etcd heartbeats taking longer than the election timeout, which results in leader elections that are disruptive to the cluster. A key metric to monitor on a deployed OpenShift Container Platform cluster is the 99th percentile of etcd network peer latency on each etcd cluster member. Use Prometheus to track the metric.
The histogram_quantile(0.99, rate(etcd_network_peer_round_trip_time_seconds_bucket[2m])) metric reports the round trip time for etcd to finish replicating the client requests between the members. Ensure that it is less than 50 ms.
1.6. Defragmenting etcd data
For large and dense clusters, etcd can suffer from poor performance if the keyspace grows too large and exceeds the space quota. Periodically maintain and defragment etcd to free up space in the data store. Monitor Prometheus for etcd metrics and defragment it when required; otherwise, etcd can raise a cluster-wide alarm that puts the cluster into a maintenance mode that accepts only key reads and deletes.
Monitor these key metrics:
-
etcd_server_quota_backend_bytes, which is the current quota limit -
etcd_mvcc_db_total_size_in_use_in_bytes, which indicates the actual database usage after a history compaction -
etcd_debugging_mvcc_db_total_size_in_bytes, which shows the database size, including free space waiting for defragmentation
Defragment etcd data to reclaim disk space after events that cause disk fragmentation, such as etcd history compaction.
History compaction is performed automatically every five minutes and leaves gaps in the back-end database. This fragmented space is available for use by etcd, but is not available to the host file system. You must defragment etcd to make this space available to the host file system.
Because etcd writes data to disk, its performance strongly depends on disk performance. Consider defragmenting etcd every month, twice a month, or as needed for your cluster. You can also monitor the etcd_db_total_size_in_bytes metric to determine whether defragmentation is necessary.
You can also determine whether defragmentation is needed by checking the etcd database size in MB that will be freed by defragmentation with the PromQL expression: (etcd_mvcc_db_total_size_in_bytes - etcd_mvcc_db_total_size_in_use_in_bytes)/1024/1024
Defragmenting etcd is a blocking action. The etcd member will not response until defragmentation is complete. For this reason, wait at least one minute between defragmentation actions on each of the pods to allow the cluster to recover.
Follow this procedure to defragment etcd data on each etcd member.
Prerequisites
-
You have access to the cluster as a user with the
cluster-adminrole.
Procedure
Determine which etcd member is the leader, because the leader should be defragmented last.
Get the list of etcd pods:
$ oc get pods -n openshift-etcd -o wide | grep -v quorum-guard | grep etcd
Example output
etcd-ip-10-0-159-225.example.redhat.com                3/3     Running     0          175m   10.0.159.225   ip-10-0-159-225.example.redhat.com   <none>           <none>
etcd-ip-10-0-191-37.example.redhat.com                 3/3     Running     0          173m   10.0.191.37    ip-10-0-191-37.example.redhat.com    <none>           <none>
etcd-ip-10-0-199-170.example.redhat.com                3/3     Running     0          176m   10.0.199.170   ip-10-0-199-170.example.redhat.com   <none>           <none>
Choose a pod and run the following command to determine which etcd member is the leader:
$ oc rsh -n openshift-etcd etcd-ip-10-0-159-225.example.redhat.com etcdctl endpoint status --cluster -w table
Example output
Defaulting container name to etcdctl.
Use 'oc describe pod/etcd-ip-10-0-159-225.example.redhat.com -n openshift-etcd' to see all of the containers in this pod.
+---------------------------+------------------+---------+---------+-----------+------------+-----------+------------+--------------------+--------+
|         ENDPOINT          |        ID        | VERSION | DB SIZE | IS LEADER | IS LEARNER | RAFT TERM | RAFT INDEX | RAFT APPLIED INDEX | ERRORS |
+---------------------------+------------------+---------+---------+-----------+------------+-----------+------------+--------------------+--------+
|  https://10.0.191.37:2379 | 251cd44483d811c3 |   3.4.9 |  104 MB |     false |      false |         7 |      91624 |              91624 |        |
| https://10.0.159.225:2379 | 264c7c58ecbdabee |   3.4.9 |  104 MB |     false |      false |         7 |      91624 |              91624 |        |
| https://10.0.199.170:2379 | 9ac311f93915cc79 |   3.4.9 |  104 MB |      true |      false |         7 |      91624 |              91624 |        |
+---------------------------+------------------+---------+---------+-----------+------------+-----------+------------+--------------------+--------+
Based on the
IS LEADERcolumn of this output, thehttps://10.0.199.170:2379endpoint is the leader. Matching this endpoint with the output of the previous step, the pod name of the leader isetcd-ip-10-0-199-170.example.redhat.com.
Defragment an etcd member.
Connect to the running etcd container, passing in the name of a pod that is not the leader:
$ oc rsh -n openshift-etcd etcd-ip-10-0-159-225.example.redhat.com
Unset the
ETCDCTL_ENDPOINTSenvironment variable:sh-4.4# unset ETCDCTL_ENDPOINTS
Defragment the etcd member:
sh-4.4# etcdctl --command-timeout=30s --endpoints=https://localhost:2379 defrag
Example output
Finished defragmenting etcd member[https://localhost:2379]
If a timeout error occurs, increase the value for
--command-timeoutuntil the command succeeds.Verify that the database size was reduced:
sh-4.4# etcdctl endpoint status -w table --cluster
Example output
+---------------------------+------------------+---------+---------+-----------+------------+-----------+------------+--------------------+--------+
|         ENDPOINT          |        ID        | VERSION | DB SIZE | IS LEADER | IS LEARNER | RAFT TERM | RAFT INDEX | RAFT APPLIED INDEX | ERRORS |
+---------------------------+------------------+---------+---------+-----------+------------+-----------+------------+--------------------+--------+
|  https://10.0.191.37:2379 | 251cd44483d811c3 |   3.4.9 |  104 MB |     false |      false |         7 |      91624 |              91624 |        |
| https://10.0.159.225:2379 | 264c7c58ecbdabee |   3.4.9 |   41 MB |     false |      false |         7 |      91624 |              91624 |        | 1
| https://10.0.199.170:2379 | 9ac311f93915cc79 |   3.4.9 |  104 MB |      true |      false |         7 |      91624 |              91624 |        |
+---------------------------+------------------+---------+---------+-----------+------------+-----------+------------+--------------------+--------+
This example shows that the database size for this etcd member is now 41 MB as opposed to the starting size of 104 MB.
Repeat these steps to connect to each of the other etcd members and defragment them. Always defragment the leader last.
Wait at least one minute between defragmentation actions to allow the etcd pod to recover. Until the etcd pod recovers, the etcd member will not respond.
If any
NOSPACEalarms were triggered due to the space quota being exceeded, clear them.Check if there are any
NOSPACEalarms:sh-4.4# etcdctl alarm list
Example output
memberID:12345678912345678912 alarm:NOSPACE
Clear the alarms:
sh-4.4# etcdctl alarm disarm
1.7. OpenShift Container Platform infrastructure components
The following infrastructure workloads do not incur OpenShift Container Platform worker subscriptions:
- Kubernetes and OpenShift Container Platform control plane services that run on masters
- The default router
- The integrated container image registry
- The HAProxy-based Ingress Controller
- The cluster metrics collection, or monitoring service, including components for monitoring user-defined projects
- Cluster aggregated logging
- Service brokers
- Red Hat Quay
- Red Hat OpenShift Container Storage
- Red Hat Advanced Cluster Manager
- Red Hat Advanced Cluster Security for Kubernetes
- Red Hat OpenShift GitOps
- Red Hat OpenShift Pipelines
Any node that runs any other container, pod, or component is a worker node that your subscription must cover.
Additional resources
- For information on infrastructure nodes and which components can run on infrastructure nodes, see the "Red Hat OpenShift control plane and infrastructure nodes" section in the OpenShift sizing and subscription guide for enterprise Kubernetes document.
1.8. Moving the monitoring solution
The monitoring stack includes multiple components, including Prometheus, Grafana, and Alertmanager. The Cluster Monitoring Operator manages this stack. To redeploy the monitoring stack to infrastructure nodes, you can create and apply a custom config map.
Procedure
Edit the
cluster-monitoring-configconfig map and change thenodeSelectorto use theinfralabel:$ oc edit configmap cluster-monitoring-config -n openshift-monitoring
apiVersion: v1 kind: ConfigMap metadata: name: cluster-monitoring-config namespace: openshift-monitoring data: config.yaml: |+ alertmanagerMain: nodeSelector: 1 node-role.kubernetes.io/infra: "" tolerations: - key: node-role.kubernetes.io/infra value: reserved effect: NoSchedule - key: node-role.kubernetes.io/infra value: reserved effect: NoExecute prometheusK8s: nodeSelector: node-role.kubernetes.io/infra: "" tolerations: - key: node-role.kubernetes.io/infra value: reserved effect: NoSchedule - key: node-role.kubernetes.io/infra value: reserved effect: NoExecute prometheusOperator: nodeSelector: node-role.kubernetes.io/infra: "" tolerations: - key: node-role.kubernetes.io/infra value: reserved effect: NoSchedule - key: node-role.kubernetes.io/infra value: reserved effect: NoExecute grafana: nodeSelector: node-role.kubernetes.io/infra: "" tolerations: - key: node-role.kubernetes.io/infra value: reserved effect: NoSchedule - key: node-role.kubernetes.io/infra value: reserved effect: NoExecute k8sPrometheusAdapter: nodeSelector: node-role.kubernetes.io/infra: "" tolerations: - key: node-role.kubernetes.io/infra value: reserved effect: NoSchedule - key: node-role.kubernetes.io/infra value: reserved effect: NoExecute kubeStateMetrics: nodeSelector: node-role.kubernetes.io/infra: "" tolerations: - key: node-role.kubernetes.io/infra value: reserved effect: NoSchedule - key: node-role.kubernetes.io/infra value: reserved effect: NoExecute telemeterClient: nodeSelector: node-role.kubernetes.io/infra: "" tolerations: - key: node-role.kubernetes.io/infra value: reserved effect: NoSchedule - key: node-role.kubernetes.io/infra value: reserved effect: NoExecute openshiftStateMetrics: nodeSelector: node-role.kubernetes.io/infra: "" tolerations: - key: node-role.kubernetes.io/infra value: reserved effect: NoSchedule - key: node-role.kubernetes.io/infra value: reserved effect: NoExecute thanosQuerier: nodeSelector: node-role.kubernetes.io/infra: "" tolerations: - key: node-role.kubernetes.io/infra value: reserved effect: NoSchedule - key: node-role.kubernetes.io/infra value: reserved effect: NoExecuteWatch the monitoring pods move to the new machines:
$ watch 'oc get pod -n openshift-monitoring -o wide'
If a component has not moved to the
infranode, delete the pod with this component:$ oc delete pod -n openshift-monitoring <pod>
The component from the deleted pod is re-created on the
infranode.
1.9. Moving the default registry
You configure the registry Operator to deploy its pods to different nodes.
Prerequisites
- Configure additional machine sets in your OpenShift Container Platform cluster.
Procedure
View the
config/instanceobject:$ oc get configs.imageregistry.operator.openshift.io/cluster -o yaml
Example output
apiVersion: imageregistry.operator.openshift.io/v1
kind: Config
metadata:
  creationTimestamp: 2019-02-05T13:52:05Z
  finalizers:
  - imageregistry.operator.openshift.io/finalizer
  generation: 1
  name: cluster
  resourceVersion: "56174"
  selfLink: /apis/imageregistry.operator.openshift.io/v1/configs/cluster
  uid: 36fd3724-294d-11e9-a524-12ffeee2931b
spec:
  httpSecret: d9a012ccd117b1e6616ceccb2c3bb66a5fed1b5e481623
  logging: 2
  managementState: Managed
  proxy: {}
  replicas: 1
  requests:
    read: {}
    write: {}
  storage:
    s3:
      bucket: image-registry-us-east-1-c92e88cad85b48ec8b312344dff03c82-392c
      region: us-east-1
status:
...
Edit the
config/instanceobject:$ oc edit configs.imageregistry.operator.openshift.io/cluster
spec: affinity: podAntiAffinity: preferredDuringSchedulingIgnoredDuringExecution: - podAffinityTerm: namespaces: - openshift-image-registry topologyKey: kubernetes.io/hostname weight: 100 logLevel: Normal managementState: Managed nodeSelector: 1 node-role.kubernetes.io/infra: "" tolerations: - effect: NoSchedule key: node-role.kubernetes.io/infra value: reserved - effect: NoExecute key: node-role.kubernetes.io/infra value: reserved- 1
- Add a
nodeSelectorparameter with the appropriate value to the component you want to move. You can use anodeSelectorin the format shown or use<key>: <value>pairs, based on the value specified for the node. If you added a taint to the infrasructure node, also add a matching toleration.
Verify the registry pod has been moved to the infrastructure node.
Run the following command to identify the node where the registry pod is located:
$ oc get pods -o wide -n openshift-image-registry
Confirm the node has the label you specified:
$ oc describe node <node_name>
Review the command output and confirm that
node-role.kubernetes.io/infrais in theLABELSlist.
1.10. Moving the router
You can deploy the router pod to a different machine set. By default, the pod is deployed to a worker node.
Prerequisites
- Configure additional machine sets in your OpenShift Container Platform cluster.
Procedure
View the
IngressControllercustom resource for the router Operator:$ oc get ingresscontroller default -n openshift-ingress-operator -o yaml
The command output resembles the following text:
apiVersion: operator.openshift.io/v1
kind: IngressController
metadata:
  creationTimestamp: 2019-04-18T12:35:39Z
  finalizers:
  - ingresscontroller.operator.openshift.io/finalizer-ingresscontroller
  generation: 1
  name: default
  namespace: openshift-ingress-operator
  resourceVersion: "11341"
  selfLink: /apis/operator.openshift.io/v1/namespaces/openshift-ingress-operator/ingresscontrollers/default
  uid: 79509e05-61d6-11e9-bc55-02ce4781844a
spec: {}
status:
  availableReplicas: 2
  conditions:
  - lastTransitionTime: 2019-04-18T12:36:15Z
    status: "True"
    type: Available
  domain: apps.<cluster>.example.com
  endpointPublishingStrategy:
    type: LoadBalancerService
  selector: ingresscontroller.operator.openshift.io/deployment-ingresscontroller=default
Edit the
ingresscontrollerresource and change thenodeSelectorto use theinfralabel:$ oc edit ingresscontroller default -n openshift-ingress-operator
spec: nodePlacement: nodeSelector: 1 matchLabels: node-role.kubernetes.io/infra: "" tolerations: - effect: NoSchedule key: node-role.kubernetes.io/infra value: reserved - effect: NoExecute key: node-role.kubernetes.io/infra value: reserved- 1
- Add a
nodeSelectorparameter with the appropriate value to the component you want to move. You can use anodeSelectorin the format shown or use<key>: <value>pairs, based on the value specified for the node. If you added a taint to the infrastructure node, also add a matching toleration.
Confirm that the router pod is running on the
infranode.View the list of router pods and note the node name of the running pod:
$ oc get pod -n openshift-ingress -o wide
Example output
NAME                              READY     STATUS        RESTARTS   AGE       IP           NODE                           NOMINATED NODE   READINESS GATES
router-default-86798b4b5d-bdlvd   1/1      Running       0          28s       10.130.2.4   ip-10-0-217-226.ec2.internal   <none>           <none>
router-default-955d875f4-255g8    0/1      Terminating   0          19h       10.129.2.4   ip-10-0-148-172.ec2.internal   <none>           <none>
In this example, the running pod is on the
ip-10-0-217-226.ec2.internalnode.View the node status of the running pod:
$ oc get node <node_name> 1- 1
- Specify the
<node_name>that you obtained from the pod list.
Example output
NAME                          STATUS  ROLES         AGE   VERSION
ip-10-0-217-226.ec2.internal  Ready   infra,worker  17h   v1.21.0
Because the role list includes
infra, the pod is running on the correct node.
1.11. Infrastructure node sizing
Infrastructure nodes are nodes that are labeled to run pieces of the OpenShift Container Platform environment. The infrastructure node resource requirements depend on the cluster age, nodes, and objects in the cluster, as these factors can lead to an increase in the number of metrics or time series in Prometheus. The following infrastructure node size recommendations are based on the results of cluster maximums and control plane density focused testing.
| Number of worker nodes | CPU cores | Memory (GB) |
|---|---|---|
| 25 | 4 | 16 |
| 100 | 8 | 32 |
| 250 | 16 | 128 |
| 500 | 32 | 128 |
In general, three infrastructure nodes are recommended per cluster.
These sizing recommendations are based on scale tests, which create a large number of objects across the cluster. These tests include reaching some of the cluster maximums. In the case of 250 and 500 node counts on a OpenShift Container Platform 4.8 cluster, these maximums are 10000 namespaces with 61000 pods, 10000 deployments, 181000 secrets, 400 config maps, and so on. Prometheus is a highly memory intensive application; the resource usage depends on various factors including the number of nodes, objects, the Prometheus metrics scraping interval, metrics or time series, and the age of the cluster. The disk size also depends on the retention period. You must take these factors into consideration and size them accordingly.
These sizing recommendations are only applicable for the Prometheus, Router, and Registry infrastructure components, which are installed during cluster installation. Logging is a day-two operation and is not included in these recommendations.
In OpenShift Container Platform 4.8, half of a CPU core (500 millicore) is now reserved by the system by default compared to OpenShift Container Platform 3.11 and previous versions. This influences the stated sizing recommendations.
1.12. Additional resources
Chapter 2. Recommended host practices for IBM Z & LinuxONE environments
This topic provides recommended host practices for OpenShift Container Platform on IBM Z and LinuxONE.
The s390x architecture is unique in many aspects. Therefore, some recommendations made here might not apply to other platforms.
Unless stated otherwise, these practices apply to both z/VM and Red Hat Enterprise Linux (RHEL) KVM installations on IBM Z and LinuxONE.
2.1. Managing CPU overcommitment
In a highly virtualized IBM Z environment, you must carefully plan the infrastructure setup and sizing. One of the most important features of virtualization is the capability to do resource overcommitment, allocating more resources to the virtual machines than actually available at the hypervisor level. This is very workload dependent and there is no golden rule that can be applied to all setups.
Depending on your setup, consider these best practices regarding CPU overcommitment:
- At LPAR level (PR/SM hypervisor), avoid assigning all available physical cores (IFLs) to each LPAR. For example, with four physical IFLs available, you should not define three LPARs with four logical IFLs each.
- Check and understand LPAR shares and weights.
- An excessive number of virtual CPUs can adversely affect performance. Do not define more virtual processors to a guest than logical processors are defined to the LPAR.
- Configure the number of virtual processors per guest for peak workload, not more.
- Start small and monitor the workload. Increase the vCPU number incrementally if necessary.
- Not all workloads are suitable for high overcommitment ratios. If the workload is CPU intensive, you will probably not be able to achieve high ratios without performance problems. Workloads that are more I/O intensive can keep consistent performance even with high overcommitment ratios.
2.2. Disable Transparent Huge Pages
Transparent Huge Pages (THP) attempt to automate most aspects of creating, managing, and using huge pages. Since THP automatically manages the huge pages, this is not always handled optimally for all types of workloads. THP can lead to performance regressions, since many applications handle huge pages on their own. Therefore, consider disabling THP.
2.3. Boost networking performance with Receive Flow Steering
Receive Flow Steering (RFS) extends Receive Packet Steering (RPS) by further reducing network latency. RFS is technically based on RPS, and improves the efficiency of packet processing by increasing the CPU cache hit rate. RFS achieves this, and in addition considers queue length, by determining the most convenient CPU for computation so that cache hits are more likely to occur within the CPU. Thus, the CPU cache is invalidated less and requires fewer cycles to rebuild the cache. This can help reduce packet processing run time.
2.3.1. Use the Machine Config Operator (MCO) to activate RFS
Procedure
Copy the following MCO sample profile into a YAML file. For example,
enable-rfs.yaml:apiVersion: machineconfiguration.openshift.io/v1 kind: MachineConfig metadata: labels: machineconfiguration.openshift.io/role: worker name: 50-enable-rfs spec: config: ignition: version: 2.2.0 storage: files: - contents: source: data:text/plain;charset=US-ASCII,%23%20turn%20on%20Receive%20Flow%20Steering%20%28RFS%29%20for%20all%20network%20interfaces%0ASUBSYSTEM%3D%3D%22net%22%2C%20ACTION%3D%3D%22add%22%2C%20RUN%7Bprogram%7D%2B%3D%22/bin/bash%20-c%20%27for%20x%20in%20/sys/%24DEVPATH/queues/rx-%2A%3B%20do%20echo%208192%20%3E%20%24x/rps_flow_cnt%3B%20%20done%27%22%0A filesystem: root mode: 0644 path: /etc/udev/rules.d/70-persistent-net.rules - contents: source: data:text/plain;charset=US-ASCII,%23%20define%20sock%20flow%20enbtried%20for%20%20Receive%20Flow%20Steering%20%28RFS%29%0Anet.core.rps_sock_flow_entries%3D8192%0A filesystem: root mode: 0644 path: /etc/sysctl.d/95-enable-rps.confCreate the MCO profile:
$ oc create -f enable-rfs.yaml
Verify that an entry named
50-enable-rfsis listed:$ oc get mc
To deactivate, enter:
$ oc delete mc 50-enable-rfs
2.4. Choose your networking setup
The networking stack is one of the most important components for a Kubernetes-based product like OpenShift Container Platform. For IBM Z setups, the networking setup depends on the hypervisor of your choice. Depending on the workload and the application, the best fit usually changes with the use case and the traffic pattern.
Depending on your setup, consider these best practices:
- Consider all options regarding networking devices to optimize your traffic pattern. Explore the advantages of OSA-Express, RoCE Express, HiperSockets, z/VM VSwitch, Linux Bridge (KVM), and others to decide which option leads to the greatest benefit for your setup.
- Always use the latest available NIC version. For example, OSA Express 7S 10 GbE shows great improvement compared to OSA Express 6S 10 GbE with transactional workload types, although both are 10 GbE adapters.
- Each virtual switch adds an additional layer of latency.
- The load balancer plays an important role for network communication outside the cluster. Consider using a production-grade hardware load balancer if this is critical for your application.
- OpenShift Container Platform SDN introduces flows and rules, which impact the networking performance. Make sure to consider pod affinities and placements, to benefit from the locality of services where communication is critical.
- Balance the trade-off between performance and functionality.
2.5. Ensure high disk performance with HyperPAV on z/VM
DASD and ECKD devices are commonly used disk types in IBM Z environments. In a typical OpenShift Container Platform setup in z/VM environments, DASD disks are commonly used to support the local storage for the nodes. You can set up HyperPAV alias devices to provide more throughput and overall better I/O performance for the DASD disks that support the z/VM guests.
Using HyperPAV for the local storage devices leads to a significant performance benefit. However, you must be aware that there is a trade-off between throughput and CPU costs.
2.5.1. Use the Machine Config Operator (MCO) to activate HyperPAV aliases in nodes using z/VM full-pack minidisks
For z/VM-based OpenShift Container Platform setups that use full-pack minidisks, you can leverage the advantage of MCO profiles by activating HyperPAV aliases in all of the nodes. You must add YAML configurations for both control plane and compute nodes.
Procedure
Copy the following MCO sample profile into a YAML file for the control plane node. For example,
05-master-kernelarg-hpav.yaml:$ cat 05-master-kernelarg-hpav.yaml apiVersion: machineconfiguration.openshift.io/v1 kind: MachineConfig metadata: labels: machineconfiguration.openshift.io/role: master name: 05-master-kernelarg-hpav spec: config: ignition: version: 3.1.0 kernelArguments: - rd.dasd=800-805Copy the following MCO sample profile into a YAML file for the compute node. For example,
05-worker-kernelarg-hpav.yaml:$ cat 05-worker-kernelarg-hpav.yaml apiVersion: machineconfiguration.openshift.io/v1 kind: MachineConfig metadata: labels: machineconfiguration.openshift.io/role: worker name: 05-worker-kernelarg-hpav spec: config: ignition: version: 3.1.0 kernelArguments: - rd.dasd=800-805NoteYou must modify the
rd.dasdarguments to fit the device IDs.Create the MCO profiles:
$ oc create -f 05-master-kernelarg-hpav.yaml
$ oc create -f 05-worker-kernelarg-hpav.yaml
To deactivate, enter:
$ oc delete -f 05-master-kernelarg-hpav.yaml
$ oc delete -f 05-worker-kernelarg-hpav.yaml
Additional resources
2.6. RHEL KVM on IBM Z host recommendations
Optimizing a KVM virtual server environment strongly depends on the workloads of the virtual servers and on the available resources. The same action that enhances performance in one environment can have adverse effects in another. Finding the best balance for a particular setting can be a challenge and often involves experimentation.
The following section introduces some best practices when using OpenShift Container Platform with RHEL KVM on IBM Z and LinuxONE environments.
2.6.1. Use multiple queues for your VirtIO network interfaces
With multiple virtual CPUs, you can transfer packages in parallel if you provide multiple queues for incoming and outgoing packets. Use the queues attribute of the driver element to configure multiple queues. Specify an integer of at least 2 that does not exceed the number of virtual CPUs of the virtual server.
The following example specification configures two input and output queues for a network interface:
<interface type="direct">
    <source network="net01"/>
    <model type="virtio"/>
    <driver ... queues="2"/>
</interface>
Multiple queues are designed to provide enhanced performance for a network interface, but they also use memory and CPU resources. Start with defining two queues for busy interfaces. Next, try two queues for interfaces with less traffic or more than two queues for busy interfaces.
2.6.2. Use I/O threads for your virtual block devices
To make virtual block devices use I/O threads, you must configure one or more I/O threads for the virtual server and each virtual block device to use one of these I/O threads.
The following example specifies <iothreads>3</iothreads> to configure three I/O threads, with consecutive decimal thread IDs 1, 2, and 3. The iothread="2" parameter specifies the driver element of the disk device to use the I/O thread with ID 2.
Sample I/O thread specification
...
<domain>
 	<iothreads>3</iothreads>1
  	 ...
    	<devices>
       ...
          <disk type="block" device="disk">2
<driver ... iothread="2"/>
    </disk>
       ...
    	</devices>
   ...
</domain>
Threads can increase the performance of I/O operations for disk devices, but they also use memory and CPU resources. You can configure multiple devices to use the same thread. The best mapping of threads to devices depends on the available resources and the workload.
Start with a small number of I/O threads. Often, a single I/O thread for all disk devices is sufficient. Do not configure more threads than the number of virtual CPUs, and do not configure idle threads.
You can use the virsh iothreadadd command to add I/O threads with specific thread IDs to a running virtual server.
2.6.3. Avoid virtual SCSI devices
Configure virtual SCSI devices only if you need to address the device through SCSI-specific interfaces. Configure disk space as virtual block devices rather than virtual SCSI devices, regardless of the backing on the host.
However, you might need SCSI-specific interfaces for:
- A LUN for a SCSI-attached tape drive on the host.
- A DVD ISO file on the host file system that is mounted on a virtual DVD drive.
2.6.4. Configure guest caching for disk
Configure your disk devices to do caching by the guest and not by the host.
Ensure that the driver element of the disk device includes the cache="none" and io="native" parameters.
<disk type="block" device="disk">
    <driver name="qemu" type="raw" cache="none" io="native" iothread="1"/>
...
</disk>
2.6.5. Exclude the memory balloon device
Unless you need a dynamic memory size, do not define a memory balloon device and ensure that libvirt does not create one for you. Include the memballoon parameter as a child of the devices element in your domain configuration XML file.
Check the list of active profiles:
<memballoon model="none"/>
2.6.6. Tune the CPU migration algorithm of the host scheduler
Do not change the scheduler settings unless you are an expert who understands the implications. Do not apply changes to production systems without testing them and confirming that they have the intended effect.
The kernel.sched_migration_cost_ns parameter specifies a time interval in nanoseconds. After the last execution of a task, the CPU cache is considered to have useful content until this interval expires. Increasing this interval results in fewer task migrations. The default value is 500000 ns.
If the CPU idle time is higher than expected when there are runnable processes, try reducing this interval. If tasks bounce between CPUs or nodes too often, try increasing it.
To dynamically set the interval to 60000 ns, enter the following command:
# sysctl kernel.sched_migration_cost_ns=60000
To persistently change the value to 60000 ns, add the following entry to /etc/sysctl.conf:
kernel.sched_migration_cost_ns=60000
2.6.7. Disable the cpuset cgroup controller
This setting applies only to KVM hosts with cgroups version 1. To enable CPU hotplug on the host, disable the cgroup controller.
Procedure
-
Open
/etc/libvirt/qemu.confwith an editor of your choice. -
Go to the
cgroup_controllersline. - Duplicate the entire line and remove the leading number sign (#) from the copy.
Remove the
cpusetentry, as follows:cgroup_controllers = [ "cpu", "devices", "memory", "blkio", "cpuacct" ]
For the new setting to take effect, you must restart the libvirtd daemon:
- Stop all virtual machines.
Run the following command:
# systemctl restart libvirtd
- Restart the virtual machines.
This setting persists across host reboots.
2.6.8. Tune the polling period for idle virtual CPUs
When a virtual CPU becomes idle, KVM polls for wakeup conditions for the virtual CPU before allocating the host resource. You can specify the time interval, during which polling takes place in sysfs at /sys/module/kvm/parameters/halt_poll_ns. During the specified time, polling reduces the wakeup latency for the virtual CPU at the expense of resource usage. Depending on the workload, a longer or shorter time for polling can be beneficial. The time interval is specified in nanoseconds. The default is 50000 ns.
To optimize for low CPU consumption, enter a small value or write 0 to disable polling:
# echo 0 > /sys/module/kvm/parameters/halt_poll_ns
To optimize for low latency, for example for transactional workloads, enter a large value:
# echo 80000 > /sys/module/kvm/parameters/halt_poll_ns
Additional resources
Chapter 3. Recommended cluster scaling practices
The guidance in this section is only relevant for installations with cloud provider integration.
These guidelines apply to OpenShift Container Platform with software-defined networking (SDN), not Open Virtual Network (OVN).
Apply the following best practices to scale the number of worker machines in your OpenShift Container Platform cluster. You scale the worker machines by increasing or decreasing the number of replicas that are defined in the worker machine set.
3.1. Recommended practices for scaling the cluster
When scaling up the cluster to higher node counts:
- Spread nodes across all of the available zones for higher availability.
- Scale up by no more than 25 to 50 machines at once.
- Consider creating new machine sets in each available zone with alternative instance types of similar size to help mitigate any periodic provider capacity constraints. For example, on AWS, use m5.large and m5d.large.
Cloud providers might implement a quota for API services. Therefore, gradually scale the cluster.
The controller might not be able to create the machines if the replicas in the machine sets are set to higher numbers all at one time. The number of requests the cloud platform, which OpenShift Container Platform is deployed on top of, is able to handle impacts the process. The controller will start to query more while trying to create, check, and update the machines with the status. The cloud platform on which OpenShift Container Platform is deployed has API request limits and excessive queries might lead to machine creation failures due to cloud platform limitations.
Enable machine health checks when scaling to large node counts. In case of failures, the health checks monitor the condition and automatically repair unhealthy machines.
When scaling large and dense clusters to lower node counts, it might take large amounts of time as the process involves draining or evicting the objects running on the nodes being terminated in parallel. Also, the client might start to throttle the requests if there are too many objects to evict. The default client QPS and burst rates are currently set to 5 and 10 respectively and they cannot be modified in OpenShift Container Platform.
3.2. Modifying a machine set
To make changes to a machine set, edit the MachineSet YAML. Then, remove all machines associated with the machine set by deleting each machine or scaling down the machine set to 0 replicas. Then, scale the replicas back to the desired number. Changes you make to a machine set do not affect existing machines.
If you need to scale a machine set without making other changes, you do not need to delete the machines.
By default, the OpenShift Container Platform router pods are deployed on workers. Because the router is required to access some cluster resources, including the web console, do not scale the worker machine set to 0 unless you first relocate the router pods.
Prerequisites
-
Install an OpenShift Container Platform cluster and the
occommand line. -
Log in to
ocas a user withcluster-adminpermission.
Procedure
Edit the machine set:
$ oc edit machineset <machineset> -n openshift-machine-api
Scale down the machine set to
0:$ oc scale --replicas=0 machineset <machineset> -n openshift-machine-api
Or:
$ oc edit machineset <machineset> -n openshift-machine-api
TipYou can alternatively apply the following YAML to scale the machine set:
apiVersion: machine.openshift.io/v1beta1
kind: MachineSet
metadata:
  name: <machineset>
  namespace: openshift-machine-api
spec:
  replicas: 0
Wait for the machines to be removed.
Scale up the machine set as needed:
$ oc scale --replicas=2 machineset <machineset> -n openshift-machine-api
Or:
$ oc edit machineset <machineset> -n openshift-machine-api
TipYou can alternatively apply the following YAML to scale the machine set:
apiVersion: machine.openshift.io/v1beta1
kind: MachineSet
metadata:
  name: <machineset>
  namespace: openshift-machine-api
spec:
  replicas: 2
Wait for the machines to start. The new machines contain changes you made to the machine set.
3.3. About machine health checks
Machine health checks automatically repair unhealthy machines in a particular machine pool.
To monitor machine health, create a resource to define the configuration for a controller. Set a condition to check, such as staying in the NotReady status for five minutes or displaying a permanent condition in the node-problem-detector, and a label for the set of machines to monitor.
You cannot apply a machine health check to a machine with the master role.
The controller that observes a MachineHealthCheck resource checks for the defined condition. If a machine fails the health check, the machine is automatically deleted and one is created to take its place. When a machine is deleted, you see a machine deleted event.
To limit disruptive impact of the machine deletion, the controller drains and deletes only one node at a time. If there are more unhealthy machines than the maxUnhealthy threshold allows for in the targeted pool of machines, remediation stops and therefore enables manual intervention.
Consider the timeouts carefully, accounting for workloads and requirements.
- Long timeouts can result in long periods of downtime for the workload on the unhealthy machine.
-
Too short timeouts can result in a remediation loop. For example, the timeout for checking the
NotReadystatus must be long enough to allow the machine to complete the startup process.
To stop the check, remove the resource.
For example, you should stop the check during the upgrade process because the nodes in the cluster might become temporarily unavailable. The MachineHealthCheck might identify such nodes as unhealthy and reboot them. To avoid rebooting such nodes, remove any MachineHealthCheck resource that you have deployed before updating the cluster. However, a MachineHealthCheck resource that is deployed by default (such as machine-api-termination-handler) cannot be removed and will be recreated.
3.3.1. Limitations when deploying machine health checks
There are limitations to consider before deploying a machine health check:
- Only machines owned by a machine set are remediated by a machine health check.
- Control plane machines are not currently supported and are not remediated if they are unhealthy.
- If the node for a machine is removed from the cluster, a machine health check considers the machine to be unhealthy and remediates it immediately.
-
If the corresponding node for a machine does not join the cluster after the
nodeStartupTimeout, the machine is remediated. -
A machine is remediated immediately if the
Machineresource phase isFailed.
3.4. Sample MachineHealthCheck resource
The MachineHealthCheck resource for all cloud-based installation types, and other than bare metal, resembles the following YAML file:
apiVersion: machine.openshift.io/v1beta1
kind: MachineHealthCheck
metadata:
  name: example 1
  namespace: openshift-machine-api
spec:
  selector:
    matchLabels:
      machine.openshift.io/cluster-api-machine-role: <role> 2
      machine.openshift.io/cluster-api-machine-type: <role> 3
      machine.openshift.io/cluster-api-machineset: <cluster_name>-<label>-<zone> 4
  unhealthyConditions:
  - type:    "Ready"
    timeout: "300s" 5
    status: "False"
  - type:    "Ready"
    timeout: "300s" 6
    status: "Unknown"
  maxUnhealthy: "40%" 7
  nodeStartupTimeout: "10m" 8
- 1
- Specify the name of the machine health check to deploy.
- 2 3
- Specify a label for the machine pool that you want to check.
- 4
- Specify the machine set to track in
<cluster_name>-<label>-<zone>format. For example,prod-node-us-east-1a. - 5 6
- Specify the timeout duration for a node condition. If a condition is met for the duration of the timeout, the machine will be remediated. Long timeouts can result in long periods of downtime for a workload on an unhealthy machine.
- 7
- Specify the amount of machines allowed to be concurrently remediated in the targeted pool. This can be set as a percentage or an integer. If the number of unhealthy machines exceeds the limit set by
maxUnhealthy, remediation is not performed. - 8
- Specify the timeout duration that a machine health check must wait for a node to join the cluster before a machine is determined to be unhealthy.
The matchLabels are examples only; you must map your machine groups based on your specific needs.
3.4.1. Short-circuiting machine health check remediation
Short circuiting ensures that machine health checks remediate machines only when the cluster is healthy. Short-circuiting is configured through the maxUnhealthy field in the MachineHealthCheck resource.
If the user defines a value for the maxUnhealthy field, before remediating any machines, the MachineHealthCheck compares the value of maxUnhealthy with the number of machines within its target pool that it has determined to be unhealthy. Remediation is not performed if the number of unhealthy machines exceeds the maxUnhealthy limit.
If maxUnhealthy is not set, the value defaults to 100% and the machines are remediated regardless of the state of the cluster.
The appropriate maxUnhealthy value depends on the scale of the cluster you deploy and how many machines the MachineHealthCheck covers. For example, you can use the maxUnhealthy value to cover multiple machine sets across multiple availability zones so that if you lose an entire zone, your maxUnhealthy setting prevents further remediation within the cluster.
The maxUnhealthy field can be set as either an integer or percentage. There are different remediation implementations depending on the maxUnhealthy value.
3.4.1.1. Setting maxUnhealthy by using an absolute value
If maxUnhealthy is set to 2:
- Remediation will be performed if 2 or fewer nodes are unhealthy
- Remediation will not be performed if 3 or more nodes are unhealthy
These values are independent of how many machines are being checked by the machine health check.
3.4.1.2. Setting maxUnhealthy by using percentages
If maxUnhealthy is set to 40% and there are 25 machines being checked:
- Remediation will be performed if 10 or fewer nodes are unhealthy
- Remediation will not be performed if 11 or more nodes are unhealthy
If maxUnhealthy is set to 40% and there are 6 machines being checked:
- Remediation will be performed if 2 or fewer nodes are unhealthy
- Remediation will not be performed if 3 or more nodes are unhealthy
The allowed number of machines is rounded down when the percentage of maxUnhealthy machines that are checked is not a whole number.
3.5. Creating a MachineHealthCheck resource
You can create a MachineHealthCheck resource for all MachineSets in your cluster. You should not create a MachineHealthCheck resource that targets control plane machines.
Prerequisites
-
Install the
occommand line interface.
Procedure
-
Create a
healthcheck.ymlfile that contains the definition of your machine health check. Apply the
healthcheck.ymlfile to your cluster:$ oc apply -f healthcheck.yml
Chapter 4. Using the Node Tuning Operator
Learn about the Node Tuning Operator and how you can use it to manage node-level tuning by orchestrating the tuned daemon.
4.1. About the Node Tuning Operator
The Node Tuning Operator helps you manage node-level tuning by orchestrating the TuneD daemon. The majority of high-performance applications require some level of kernel tuning. The Node Tuning Operator provides a unified management interface to users of node-level sysctls and more flexibility to add custom tuning specified by user needs.
The Operator manages the containerized TuneD daemon for OpenShift Container Platform as a Kubernetes daemon set. It ensures the custom tuning specification is passed to all containerized TuneD daemons running in the cluster in the format that the daemons understand. The daemons run on all nodes in the cluster, one per node.
Node-level settings applied by the containerized TuneD daemon are rolled back on an event that triggers a profile change or when the containerized TuneD daemon is terminated gracefully by receiving and handling a termination signal.
The Node Tuning Operator is part of a standard OpenShift Container Platform installation in version 4.1 and later.
4.2. Accessing an example Node Tuning Operator specification
Use this process to access an example Node Tuning Operator specification.
Procedure
Run:
$ oc get Tuned/default -o yaml -n openshift-cluster-node-tuning-operator
The default CR is meant for delivering standard node-level tuning for the OpenShift Container Platform platform and it can only be modified to set the Operator Management state. Any other custom changes to the default CR will be overwritten by the Operator. For custom tuning, create your own Tuned CRs. Newly created CRs will be combined with the default CR and custom tuning applied to OpenShift Container Platform nodes based on node or pod labels and profile priorities.
While in certain situations the support for pod labels can be a convenient way of automatically delivering required tuning, this practice is discouraged and strongly advised against, especially in large-scale clusters. The default Tuned CR ships without pod label matching. If a custom profile is created with pod label matching, then the functionality will be enabled at that time. The pod label functionality might be deprecated in future versions of the Node Tuning Operator.
4.3. Default profiles set on a cluster
The following are the default profiles set on a cluster.
apiVersion: tuned.openshift.io/v1
kind: Tuned
metadata:
  name: default
  namespace: openshift-cluster-node-tuning-operator
spec:
  profile:
  - name: "openshift"
    data: |
      [main]
      summary=Optimize systems running OpenShift (parent profile)
      include=${f:virt_check:virtual-guest:throughput-performance}

      [selinux]
      avc_cache_threshold=8192

      [net]
      nf_conntrack_hashsize=131072

      [sysctl]
      net.ipv4.ip_forward=1
      kernel.pid_max=>4194304
      net.netfilter.nf_conntrack_max=1048576
      net.ipv4.conf.all.arp_announce=2
      net.ipv4.neigh.default.gc_thresh1=8192
      net.ipv4.neigh.default.gc_thresh2=32768
      net.ipv4.neigh.default.gc_thresh3=65536
      net.ipv6.neigh.default.gc_thresh1=8192
      net.ipv6.neigh.default.gc_thresh2=32768
      net.ipv6.neigh.default.gc_thresh3=65536
      vm.max_map_count=262144

      [sysfs]
      /sys/module/nvme_core/parameters/io_timeout=4294967295
      /sys/module/nvme_core/parameters/max_retries=10

  - name: "openshift-control-plane"
    data: |
      [main]
      summary=Optimize systems running OpenShift control plane
      include=openshift

      [sysctl]
      # ktune sysctl settings, maximizing i/o throughput
      #
      # Minimal preemption granularity for CPU-bound tasks:
      # (default: 1 msec#  (1 + ilog(ncpus)), units: nanoseconds)
      kernel.sched_min_granularity_ns=10000000
      # The total time the scheduler will consider a migrated process
      # "cache hot" and thus less likely to be re-migrated
      # (system default is 500000, i.e. 0.5 ms)
      kernel.sched_migration_cost_ns=5000000
      # SCHED_OTHER wake-up granularity.
      #
      # Preemption granularity when tasks wake up.  Lower the value to
      # improve wake-up latency and throughput for latency critical tasks.
      kernel.sched_wakeup_granularity_ns=4000000

  - name: "openshift-node"
    data: |
      [main]
      summary=Optimize systems running OpenShift nodes
      include=openshift

      [sysctl]
      net.ipv4.tcp_fastopen=3
      fs.inotify.max_user_watches=65536
      fs.inotify.max_user_instances=8192

  recommend:
  - profile: "openshift-control-plane"
    priority: 30
    match:
    - label: "node-role.kubernetes.io/master"
    - label: "node-role.kubernetes.io/infra"

  - profile: "openshift-node"
    priority: 40
4.4. Verifying that the TuneD profiles are applied
Verify the TuneD profiles that are applied to your cluster node.
$ oc get profile -n openshift-cluster-node-tuning-operator
Example output
NAME             TUNED                     APPLIED   DEGRADED   AGE
master-0         openshift-control-plane   True      False      6h33m
master-1         openshift-control-plane   True      False      6h33m
master-2         openshift-control-plane   True      False      6h33m
worker-a         openshift-node            True      False      6h28m
worker-b         openshift-node            True      False      6h28m
-
NAME: Name of the Profile object. There is one Profile object per node and their names match. -
TUNED: Name of the desired TuneD profile to apply. -
APPLIED:Trueif the TuneD daemon applied the desired profile. (True/False/Unknown). -
DEGRADED:Trueif any errors were reported during application of the TuneD profile (True/False/Unknown). -
AGE: Time elapsed since the creation of Profile object.
4.5. Custom tuning specification
The custom resource (CR) for the Operator has two major sections. The first section, profile:, is a list of TuneD profiles and their names. The second, recommend:, defines the profile selection logic.
Multiple custom tuning specifications can co-exist as multiple CRs in the Operator’s namespace. The existence of new CRs or the deletion of old CRs is detected by the Operator. All existing custom tuning specifications are merged and appropriate objects for the containerized TuneD daemons are updated.
Management state
The Operator Management state is set by adjusting the default Tuned CR. By default, the Operator is in the Managed state and the spec.managementState field is not present in the default Tuned CR. Valid values for the Operator Management state are as follows:
- Managed: the Operator will update its operands as configuration resources are updated
- Unmanaged: the Operator will ignore changes to the configuration resources
- Removed: the Operator will remove its operands and resources the Operator provisioned
Profile data
The profile: section lists TuneD profiles and their names.
profile:
- name: tuned_profile_1
  data: |
    # TuneD profile specification
    [main]
    summary=Description of tuned_profile_1 profile

    [sysctl]
    net.ipv4.ip_forward=1
    # ... other sysctl's or other TuneD daemon plugins supported by the containerized TuneD

# ...

- name: tuned_profile_n
  data: |
    # TuneD profile specification
    [main]
    summary=Description of tuned_profile_n profile

    # tuned_profile_n profile settings
Recommended profiles
The profile: selection logic is defined by the recommend: section of the CR. The recommend: section is a list of items to recommend the profiles based on a selection criteria.
recommend:
<recommend-item-1>
# ...
<recommend-item-n>
The individual items of the list:
- machineConfigLabels: 1
    <mcLabels> 2
  match: 3
    <match> 4
  priority: <priority> 5
  profile: <tuned_profile_name> 6
  operand: 7
    debug: <bool> 8
- 1
- Optional.
- 2
- A dictionary of key/value
MachineConfiglabels. The keys must be unique. - 3
- If omitted, profile match is assumed unless a profile with a higher priority matches first or
machineConfigLabelsis set. - 4
- An optional list.
- 5
- Profile ordering priority. Lower numbers mean higher priority (
0is the highest priority). - 6
- A TuneD profile to apply on a match. For example
tuned_profile_1. - 7
- Optional operand configuration.
- 8
- Turn debugging on or off for the TuneD daemon. Options are
truefor on orfalsefor off. The default isfalse.
<match> is an optional list recursively defined as follows:
- label: <label_name> 1
  value: <label_value> 2
  type: <label_type> 3
    <match> 4
If <match> is not omitted, all nested <match> sections must also evaluate to true. Otherwise, false is assumed and the profile with the respective <match> section will not be applied or recommended. Therefore, the nesting (child <match> sections) works as logical AND operator. Conversely, if any item of the <match> list matches, the entire <match> list evaluates to true. Therefore, the list acts as logical OR operator.
If machineConfigLabels is defined, machine config pool based matching is turned on for the given recommend: list item. <mcLabels> specifies the labels for a machine config. The machine config is created automatically to apply host settings, such as kernel boot parameters, for the profile <tuned_profile_name>. This involves finding all machine config pools with machine config selector matching <mcLabels> and setting the profile <tuned_profile_name> on all nodes that are assigned the found machine config pools. To target nodes that have both master and worker roles, you must use the master role.
The list items match and machineConfigLabels are connected by the logical OR operator. The match item is evaluated first in a short-circuit manner. Therefore, if it evaluates to true, the machineConfigLabels item is not considered.
When using machine config pool based matching, it is advised to group nodes with the same hardware configuration into the same machine config pool. Not following this practice might result in TuneD operands calculating conflicting kernel parameters for two or more nodes sharing the same machine config pool.
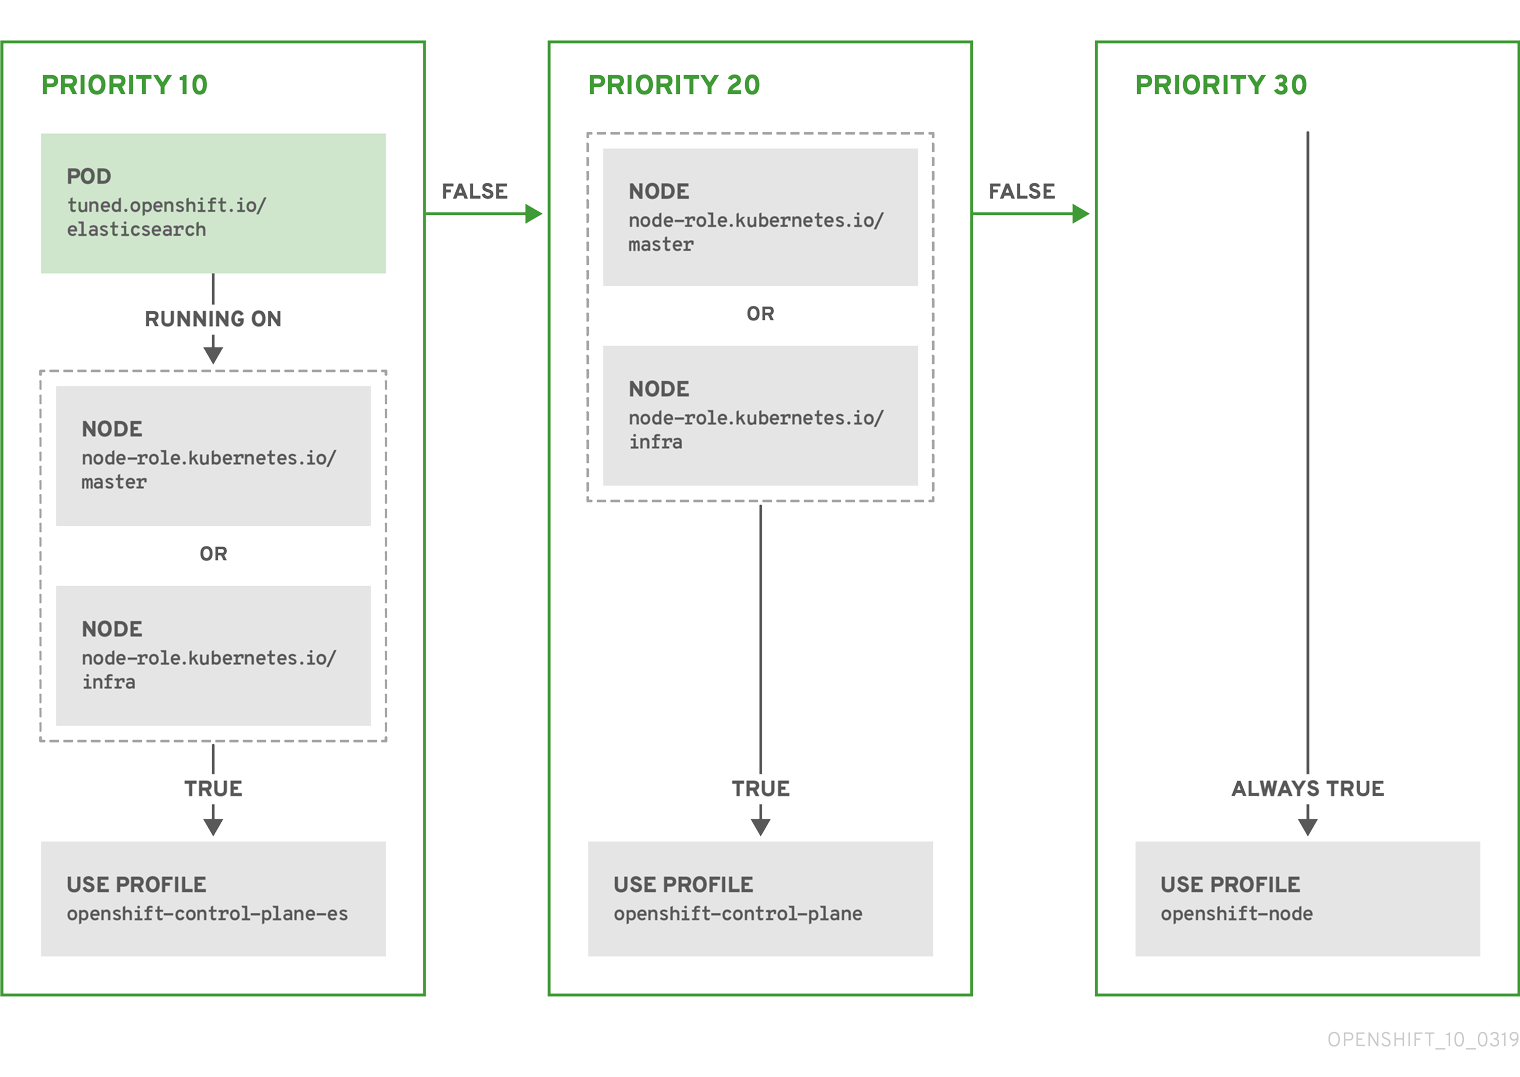
Example: node or pod label based matching
- match:
  - label: tuned.openshift.io/elasticsearch
    match:
    - label: node-role.kubernetes.io/master
    - label: node-role.kubernetes.io/infra
    type: pod
  priority: 10
  profile: openshift-control-plane-es
- match:
  - label: node-role.kubernetes.io/master
  - label: node-role.kubernetes.io/infra
  priority: 20
  profile: openshift-control-plane
- priority: 30
  profile: openshift-node
The CR above is translated for the containerized TuneD daemon into its recommend.conf file based on the profile priorities. The profile with the highest priority (10) is openshift-control-plane-es and, therefore, it is considered first. The containerized TuneD daemon running on a given node looks to see if there is a pod running on the same node with the tuned.openshift.io/elasticsearch label set. If not, the entire <match> section evaluates as false. If there is such a pod with the label, in order for the <match> section to evaluate to true, the node label also needs to be node-role.kubernetes.io/master or node-role.kubernetes.io/infra.
If the labels for the profile with priority 10 matched, openshift-control-plane-es profile is applied and no other profile is considered. If the node/pod label combination did not match, the second highest priority profile (openshift-control-plane) is considered. This profile is applied if the containerized TuneD pod runs on a node with labels node-role.kubernetes.io/master or node-role.kubernetes.io/infra.
Finally, the profile openshift-node has the lowest priority of 30. It lacks the <match> section and, therefore, will always match. It acts as a profile catch-all to set openshift-node profile, if no other profile with higher priority matches on a given node.
Example: machine config pool based matching
apiVersion: tuned.openshift.io/v1
kind: Tuned
metadata:
  name: openshift-node-custom
  namespace: openshift-cluster-node-tuning-operator
spec:
  profile:
  - data: |
      [main]
      summary=Custom OpenShift node profile with an additional kernel parameter
      include=openshift-node
      [bootloader]
      cmdline_openshift_node_custom=+skew_tick=1
    name: openshift-node-custom

  recommend:
  - machineConfigLabels:
      machineconfiguration.openshift.io/role: "worker-custom"
    priority: 20
    profile: openshift-node-custom
To minimize node reboots, label the target nodes with a label the machine config pool’s node selector will match, then create the Tuned CR above and finally create the custom machine config pool itself.
4.6. Custom tuning examples
Using TuneD profiles from the default CR
The following CR applies custom node-level tuning for OpenShift Container Platform nodes with label tuned.openshift.io/ingress-node-label set to any value.
Example: custom tuning using the openshift-control-plane TuneD profile
apiVersion: tuned.openshift.io/v1
kind: Tuned
metadata:
  name: ingress
  namespace: openshift-cluster-node-tuning-operator
spec:
  profile:
  - data: |
      [main]
      summary=A custom OpenShift ingress profile
      include=openshift-control-plane
      [sysctl]
      net.ipv4.ip_local_port_range="1024 65535"
      net.ipv4.tcp_tw_reuse=1
    name: openshift-ingress
  recommend:
  - match:
    - label: tuned.openshift.io/ingress-node-label
    priority: 10
    profile: openshift-ingress
Custom profile writers are strongly encouraged to include the default TuneD daemon profiles shipped within the default Tuned CR. The example above uses the default openshift-control-plane profile to accomplish this.
Using built-in TuneD profiles
Given the successful rollout of the NTO-managed daemon set, the TuneD operands all manage the same version of the TuneD daemon. To list the built-in TuneD profiles supported by the daemon, query any TuneD pod in the following way:
$ oc exec $tuned_pod -n openshift-cluster-node-tuning-operator -- find /usr/lib/tuned/ -name tuned.conf -printf '%h\n' | sed 's|^.*/||'
You can use the profile names retrieved by this in your custom tuning specification.
Example: using built-in hpc-compute TuneD profile
apiVersion: tuned.openshift.io/v1
kind: Tuned
metadata:
  name: openshift-node-hpc-compute
  namespace: openshift-cluster-node-tuning-operator
spec:
  profile:
  - data: |
      [main]
      summary=Custom OpenShift node profile for HPC compute workloads
      include=openshift-node,hpc-compute
    name: openshift-node-hpc-compute

  recommend:
  - match:
    - label: tuned.openshift.io/openshift-node-hpc-compute
    priority: 20
    profile: openshift-node-hpc-compute
In addition to the built-in hpc-compute profile, the example above includes the openshift-node TuneD daemon profile shipped within the default Tuned CR to use OpenShift-specific tuning for compute nodes.
4.7. Supported TuneD daemon plugins
Excluding the [main] section, the following TuneD plugins are supported when using custom profiles defined in the profile: section of the Tuned CR:
- audio
- cpu
- disk
- eeepc_she
- modules
- mounts
- net
- scheduler
- scsi_host
- selinux
- sysctl
- sysfs
- usb
- video
- vm
There is some dynamic tuning functionality provided by some of these plugins that is not supported. The following TuneD plugins are currently not supported:
- bootloader
- script
- systemd
See Available TuneD Plugins and Getting Started with TuneD for more information.
Chapter 5. Using Cluster Loader
Cluster Loader is a tool that deploys large numbers of various objects to a cluster, which creates user-defined cluster objects. Build, configure, and run Cluster Loader to measure performance metrics of your OpenShift Container Platform deployment at various cluster states.
Cluster Loader is now deprecated and will be removed in a future release.
5.1. Installing Cluster Loader
Procedure
To pull the container image, run:
$ podman pull quay.io/openshift/origin-tests:4.8
5.2. Running Cluster Loader
Prerequisites
- The repository will prompt you to authenticate. The registry credentials allow you to access the image, which is not publicly available. Use your existing authentication credentials from installation.
Procedure
Execute Cluster Loader using the built-in test configuration, which deploys five template builds and waits for them to complete:
$ podman run -v ${LOCAL_KUBECONFIG}:/root/.kube/config:z -i \
quay.io/openshift/origin-tests:4.8 /bin/bash -c 'export KUBECONFIG=/root/.kube/config && \
openshift-tests run-test "[sig-scalability][Feature:Performance] Load cluster \
should populate the cluster [Slow][Serial] [Suite:openshift]"'
Alternatively, execute Cluster Loader with a user-defined configuration by setting the environment variable for
VIPERCONFIG:$ podman run -v ${LOCAL_KUBECONFIG}:/root/.kube/config:z \ -v ${LOCAL_CONFIG_FILE_PATH}:/root/configs/:z \ -i quay.io/openshift/origin-tests:4.8 \ /bin/bash -c 'KUBECONFIG=/root/.kube/config VIPERCONFIG=/root/configs/test.yaml \ openshift-tests run-test "[sig-scalability][Feature:Performance] Load cluster \ should populate the cluster [Slow][Serial] [Suite:openshift]"'In this example,
${LOCAL_KUBECONFIG}refers to the path to thekubeconfigon your local file system. Also, there is a directory called${LOCAL_CONFIG_FILE_PATH}, which is mounted into the container that contains a configuration file calledtest.yaml. Additionally, if thetest.yamlreferences any external template files or podspec files, they should also be mounted into the container.
5.3. Configuring Cluster Loader
The tool creates multiple namespaces (projects), which contain multiple templates or pods.
5.3.1. Example Cluster Loader configuration file
Cluster Loader’s configuration file is a basic YAML file:
provider: local 1
ClusterLoader:
  cleanup: true
  projects:
    - num: 1
      basename: clusterloader-cakephp-mysql
      tuning: default
      ifexists: reuse
      templates:
        - num: 1
          file: cakephp-mysql.json

    - num: 1
      basename: clusterloader-dancer-mysql
      tuning: default
      ifexists: reuse
      templates:
        - num: 1
          file: dancer-mysql.json

    - num: 1
      basename: clusterloader-django-postgresql
      tuning: default
      ifexists: reuse
      templates:
        - num: 1
          file: django-postgresql.json

    - num: 1
      basename: clusterloader-nodejs-mongodb
      tuning: default
      ifexists: reuse
      templates:
        - num: 1
          file: quickstarts/nodejs-mongodb.json

    - num: 1
      basename: clusterloader-rails-postgresql
      tuning: default
      templates:
        - num: 1
          file: rails-postgresql.json

  tuningsets: 2
    - name: default
      pods:
        stepping: 3
          stepsize: 5
          pause: 0 s
        rate_limit: 4
          delay: 0 ms
- 1
- Optional setting for end-to-end tests. Set to
localto avoid extra log messages. - 2
- The tuning sets allow rate limiting and stepping, the ability to create several batches of pods while pausing in between sets. Cluster Loader monitors completion of the previous step before continuing.
- 3
- Stepping will pause for
Mseconds after eachNobjects are created. - 4
- Rate limiting will wait
Mmilliseconds between the creation of objects.
This example assumes that references to any external template files or pod spec files are also mounted into the container.
If you are running Cluster Loader on Microsoft Azure, then you must set the AZURE_AUTH_LOCATION variable to a file that contains the output of terraform.azure.auto.tfvars.json, which is present in the installer directory.
5.3.2. Configuration fields
Table 5.1. Top-level Cluster Loader Fields
| Field | Description |
|---|---|
|
|
Set to |
|
|
A sub-object with one or many definition(s). Under |
|
|
A sub-object with one definition per configuration. |
|
| An optional sub-object with one definition per configuration. Adds synchronization possibilities during object creation. |
Table 5.2. Fields under projects
| Field | Description |
|---|---|
|
| An integer. One definition of the count of how many projects to create. |
|
|
A string. One definition of the base name for the project. The count of identical namespaces will be appended to |
|
| A string. One definition of what tuning set you want to apply to the objects, which you deploy inside this namespace. |
|
|
A string containing either |
|
| A list of key-value pairs. The key is the config map name and the value is a path to a file from which you create the config map. |
|
| A list of key-value pairs. The key is the secret name and the value is a path to a file from which you create the secret. |
|
| A sub-object with one or many definition(s) of pods to deploy. |
|
| A sub-object with one or many definition(s) of templates to deploy. |
Table 5.3. Fields under pods and templates
| Field | Description |
|---|---|
|
| An integer. The number of pods or templates to deploy. |
|
| A string. The docker image URL to a repository where it can be pulled. |
|
| A string. One definition of the base name for the template (or pod) that you want to create. |
|
| A string. The path to a local file, which is either a pod spec or template to be created. |
|
|
Key-value pairs. Under |
Table 5.4. Fields under tuningsets
| Field | Description |
|---|---|
|
| A string. The name of the tuning set which will match the name specified when defining a tuning in a project. |
|
|
A sub-object identifying the |
|
|
A sub-object identifying the |
Table 5.5. Fields under tuningsets pods or tuningsets templates
| Field | Description |
|---|---|
|
| A sub-object. A stepping configuration used if you want to create an object in a step creation pattern. |
|
| A sub-object. A rate-limiting tuning set configuration to limit the object creation rate. |
Table 5.6. Fields under tuningsets pods or tuningsets templates, stepping
| Field | Description |
|---|---|
|
| An integer. How many objects to create before pausing object creation. |
|
|
An integer. How many seconds to pause after creating the number of objects defined in |
|
| An integer. How many seconds to wait before failure if the object creation is not successful. |
|
| An integer. How many milliseconds (ms) to wait between creation requests. |
Table 5.7. Fields under sync
| Field | Description |
|---|---|
|
|
A sub-object with |
|
|
A boolean. Wait for pods with labels matching |
|
|
A boolean. Wait for pods with labels matching |
|
|
A list of selectors to match pods in |
|
|
A string. The synchronization timeout period to wait for pods in |
5.4. Known issues
- Cluster Loader fails when called without configuration. (BZ#1761925)
If the
IDENTIFIERparameter is not defined in user templates, template creation fails witherror: unknown parameter name "IDENTIFIER". If you deploy templates, add this parameter to your template to avoid this error:{ "name": "IDENTIFIER", "description": "Number to append to the name of resources", "value": "1" }If you deploy pods, adding the parameter is unnecessary.
Chapter 6. Using CPU Manager
CPU Manager manages groups of CPUs and constrains workloads to specific CPUs.
CPU Manager is useful for workloads that have some of these attributes:
- Require as much CPU time as possible.
- Are sensitive to processor cache misses.
- Are low-latency network applications.
- Coordinate with other processes and benefit from sharing a single processor cache.
6.1. Setting up CPU Manager
Procedure
Optional: Label a node:
# oc label node perf-node.example.com cpumanager=true
Edit the
MachineConfigPoolof the nodes where CPU Manager should be enabled. In this example, all workers have CPU Manager enabled:# oc edit machineconfigpool worker
Add a label to the worker machine config pool:
metadata:
  creationTimestamp: 2020-xx-xxx
  generation: 3
  labels:
    custom-kubelet: cpumanager-enabled
Create a
KubeletConfig,cpumanager-kubeletconfig.yaml, custom resource (CR). Refer to the label created in the previous step to have the correct nodes updated with the new kubelet config. See themachineConfigPoolSelectorsection:apiVersion: machineconfiguration.openshift.io/v1 kind: KubeletConfig metadata: name: cpumanager-enabled spec: machineConfigPoolSelector: matchLabels: custom-kubelet: cpumanager-enabled kubeletConfig: cpuManagerPolicy: static 1 cpuManagerReconcilePeriod: 5s 2- 1
- Specify a policy:
-
none. This policy explicitly enables the existing default CPU affinity scheme, providing no affinity beyond what the scheduler does automatically. -
static. This policy allows pods with certain resource characteristics to be granted increased CPU affinity and exclusivity on the node.
-
- 2
- Optional. Specify the CPU Manager reconcile frequency. The default is
5s.
Create the dynamic kubelet config:
# oc create -f cpumanager-kubeletconfig.yaml
This adds the CPU Manager feature to the kubelet config and, if needed, the Machine Config Operator (MCO) reboots the node. To enable CPU Manager, a reboot is not needed.
Check for the merged kubelet config:
# oc get machineconfig 99-worker-XXXXXX-XXXXX-XXXX-XXXXX-kubelet -o json | grep ownerReference -A7
Example output
       "ownerReferences": [
            {
                "apiVersion": "machineconfiguration.openshift.io/v1",
                "kind": "KubeletConfig",
                "name": "cpumanager-enabled",
                "uid": "7ed5616d-6b72-11e9-aae1-021e1ce18878"
            }
        ]
Check the worker for the updated
kubelet.conf:# oc debug node/perf-node.example.com sh-4.2# cat /host/etc/kubernetes/kubelet.conf | grep cpuManager
Example output
cpuManagerPolicy: static        1
cpuManagerReconcilePeriod: 5s   2
Create a pod that requests a core or multiple cores. Both limits and requests must have their CPU value set to a whole integer. That is the number of cores that will be dedicated to this pod:
# cat cpumanager-pod.yaml
Example output
apiVersion: v1
kind: Pod
metadata:
  generateName: cpumanager-
spec:
  containers:
  - name: cpumanager
    image: gcr.io/google_containers/pause-amd64:3.0
    resources:
      requests:
        cpu: 1
        memory: "1G"
      limits:
        cpu: 1
        memory: "1G"
  nodeSelector:
    cpumanager: "true"
Create the pod:
# oc create -f cpumanager-pod.yaml
Verify that the pod is scheduled to the node that you labeled:
# oc describe pod cpumanager
Example output
Name:               cpumanager-6cqz7
Namespace:          default
Priority:           0
PriorityClassName:  <none>
Node:  perf-node.example.com/xxx.xx.xx.xxx
...
 Limits:
      cpu:     1
      memory:  1G
    Requests:
      cpu:        1
      memory:     1G
...
QoS Class:       Guaranteed
Node-Selectors:  cpumanager=true
Verify that the
cgroupsare set up correctly. Get the process ID (PID) of thepauseprocess:# ├─init.scope │ └─1 /usr/lib/systemd/systemd --switched-root --system --deserialize 17 └─kubepods.slice ├─kubepods-pod69c01f8e_6b74_11e9_ac0f_0a2b62178a22.slice │ ├─crio-b5437308f1a574c542bdf08563b865c0345c8f8c0b0a655612c.scope │ └─32706 /pause
Pods of quality of service (QoS) tier
Guaranteedare placed within thekubepods.slice. Pods of other QoS tiers end up in childcgroupsofkubepods:# cd /sys/fs/cgroup/cpuset/kubepods.slice/kubepods-pod69c01f8e_6b74_11e9_ac0f_0a2b62178a22.slice/crio-b5437308f1ad1a7db0574c542bdf08563b865c0345c86e9585f8c0b0a655612c.scope # for i in `ls cpuset.cpus tasks` ; do echo -n "$i "; cat $i ; done
Example output
cpuset.cpus 1
tasks 32706
Check the allowed CPU list for the task:
# grep ^Cpus_allowed_list /proc/32706/status
Example output
Cpus_allowed_list: 1
Verify that another pod (in this case, the pod in the
burstableQoS tier) on the system cannot run on the core allocated for theGuaranteedpod:# cat /sys/fs/cgroup/cpuset/kubepods.slice/kubepods-besteffort.slice/kubepods-besteffort-podc494a073_6b77_11e9_98c0_06bba5c387ea.slice/crio-c56982f57b75a2420947f0afc6cafe7534c5734efc34157525fa9abbf99e3849.scope/cpuset.cpus 0 # oc describe node perf-node.example.com
Example output
...
Capacity:
 attachable-volumes-aws-ebs:  39
 cpu:                         2
 ephemeral-storage:           124768236Ki
 hugepages-1Gi:               0
 hugepages-2Mi:               0
 memory:                      8162900Ki
 pods:                        250
Allocatable:
 attachable-volumes-aws-ebs:  39
 cpu:                         1500m
 ephemeral-storage:           124768236Ki
 hugepages-1Gi:               0
 hugepages-2Mi:               0
 memory:                      7548500Ki
 pods:                        250
-------                               ----                           ------------  ----------  ---------------  -------------  ---
  default                                 cpumanager-6cqz7               1 (66%)       1 (66%)     1G (12%)         1G (12%)       29m

Allocated resources:
  (Total limits may be over 100 percent, i.e., overcommitted.)
  Resource                    Requests          Limits
  --------                    --------          ------
  cpu                         1440m (96%)       1 (66%)
This VM has two CPU cores. The
system-reservedsetting reserves 500 millicores, meaning that half of one core is subtracted from the total capacity of the node to arrive at theNode Allocatableamount. You can see thatAllocatable CPUis 1500 millicores. This means you can run one of the CPU Manager pods since each will take one whole core. A whole core is equivalent to 1000 millicores. If you try to schedule a second pod, the system will accept the pod, but it will never be scheduled:NAME READY STATUS RESTARTS AGE cpumanager-6cqz7 1/1 Running 0 33m cpumanager-7qc2t 0/1 Pending 0 11s
Chapter 7. Using Topology Manager
Topology Manager collects hints from the CPU Manager, Device Manager, and other Hint Providers to align pod resources, such as CPU, SR-IOV VFs, and other device resources, for all Quality of Service (QoS) classes on the same non-uniform memory access (NUMA) node.
Topology Manager uses topology information from collected hints to decide if a pod can be accepted or rejected on a node, based on the configured Topology Manager policy and pod resources requested.
Topology Manager is useful for workloads that use hardware accelerators to support latency-critical execution and high throughput parallel computation.
To use Topology Manager you must use the CPU Manager with the static policy. For more information on CPU Manager, see Using CPU Manager.
7.1. Topology Manager policies
Topology Manager aligns Pod resources of all Quality of Service (QoS) classes by collecting topology hints from Hint Providers, such as CPU Manager and Device Manager, and using the collected hints to align the Pod resources.
To align CPU resources with other requested resources in a Pod spec, the CPU Manager must be enabled with the static CPU Manager policy.
Topology Manager supports four allocation policies, which you assign in the cpumanager-enabled custom resource (CR):
nonepolicy- This is the default policy and does not perform any topology alignment.
best-effortpolicy-
For each container in a pod with the
best-efforttopology management policy, kubelet calls each Hint Provider to discover their resource availability. Using this information, the Topology Manager stores the preferred NUMA Node affinity for that container. If the affinity is not preferred, Topology Manager stores this and admits the pod to the node. restrictedpolicy-
For each container in a pod with the
restrictedtopology management policy, kubelet calls each Hint Provider to discover their resource availability. Using this information, the Topology Manager stores the preferred NUMA Node affinity for that container. If the affinity is not preferred, Topology Manager rejects this pod from the node, resulting in a pod in aTerminatedstate with a pod admission failure. single-numa-nodepolicy-
For each container in a pod with the
single-numa-nodetopology management policy, kubelet calls each Hint Provider to discover their resource availability. Using this information, the Topology Manager determines if a single NUMA Node affinity is possible. If it is, the pod is admitted to the node. If a single NUMA Node affinity is not possible, the Topology Manager rejects the pod from the node. This results in a pod in a Terminated state with a pod admission failure.
7.2. Setting up Topology Manager
To use Topology Manager, you must configure an allocation policy in the cpumanager-enabled custom resource (CR). This file might exist if you have set up CPU Manager. If the file does not exist, you can create the file.
Prequisites
-
Configure the CPU Manager policy to be
static. See the Using CPU Manager in the Scalability and Performance section.
Procedure
To activate Topololgy Manager:
Configure the Topology Manager allocation policy in the
cpumanager-enabledcustom resource (CR).$ oc edit KubeletConfig cpumanager-enabled
apiVersion: machineconfiguration.openshift.io/v1
kind: KubeletConfig
metadata:
  name: cpumanager-enabled
spec:
  machineConfigPoolSelector:
    matchLabels:
      custom-kubelet: cpumanager-enabled
  kubeletConfig:
     cpuManagerPolicy: static 1
     cpuManagerReconcilePeriod: 5s
     topologyManagerPolicy: single-numa-node 2
Additional resources
- For more information on CPU Manager, see Using CPU Manager.
7.3. Pod interactions with Topology Manager policies
The example Pod specs below help illustrate pod interactions with Topology Manager.
The following pod runs in the BestEffort QoS class because no resource requests or limits are specified.
spec:
  containers:
  - name: nginx
    image: nginx
The next pod runs in the Burstable QoS class because requests are less than limits.
spec:
  containers:
  - name: nginx
    image: nginx
    resources:
      limits:
        memory: "200Mi"
      requests:
        memory: "100Mi"
If the selected policy is anything other than none, Topology Manager would not consider either of these Pod specifications.
The last example pod below runs in the Guaranteed QoS class because requests are equal to limits.
spec:
  containers:
  - name: nginx
    image: nginx
    resources:
      limits:
        memory: "200Mi"
        cpu: "2"
        example.com/device: "1"
      requests:
        memory: "200Mi"
        cpu: "2"
        example.com/device: "1"
Topology Manager would consider this pod. The Topology Manager consults the CPU Manager static policy, which returns the topology of available CPUs. Topology Manager also consults Device Manager to discover the topology of available devices for example.com/device.
Topology Manager will use this information to store the best Topology for this container. In the case of this pod, CPU Manager and Device Manager will use this stored information at the resource allocation stage.
Chapter 8. Scaling the Cluster Monitoring Operator
OpenShift Container Platform exposes metrics that the Cluster Monitoring Operator collects and stores in the Prometheus-based monitoring stack. As an administrator, you can view system resources, containers, and components metrics in one dashboard interface, Grafana.
8.1. Prometheus database storage requirements
Red Hat performed various tests for different scale sizes.
The Prometheus storage requirements below are not prescriptive. Higher resource consumption might be observed in your cluster depending on workload activity and resource use.
Table 8.1. Prometheus Database storage requirements based on number of nodes/pods in the cluster
| Number of Nodes | Number of pods | Prometheus storage growth per day | Prometheus storage growth per 15 days | RAM Space (per scale size) | Network (per tsdb chunk) |
|---|---|---|---|---|---|
| 50 | 1800 | 6.3 GB | 94 GB | 6 GB | 16 MB |
| 100 | 3600 | 13 GB | 195 GB | 10 GB | 26 MB |
| 150 | 5400 | 19 GB | 283 GB | 12 GB | 36 MB |
| 200 | 7200 | 25 GB | 375 GB | 14 GB | 46 MB |
Approximately 20 percent of the expected size was added as overhead to ensure that the storage requirements do not exceed the calculated value.
The above calculation is for the default OpenShift Container Platform Cluster Monitoring Operator.
CPU utilization has minor impact. The ratio is approximately 1 core out of 40 per 50 nodes and 1800 pods.
Recommendations for OpenShift Container Platform
- Use at least three infrastructure (infra) nodes.
- Use at least three openshift-container-storage nodes with non-volatile memory express (NVMe) drives.
8.2. Configuring cluster monitoring
You can increase the storage capacity for the Prometheus component in the cluster monitoring stack.
Procedure
To increase the storage capacity for Prometheus:
Create a YAML configuration file,
cluster-monitoring-config.yaml. For example:apiVersion: v1 kind: ConfigMap data: config.yaml: | prometheusK8s: retention: {{PROMETHEUS_RETENTION_PERIOD}} 1 nodeSelector: node-role.kubernetes.io/infra: "" volumeClaimTemplate: spec: storageClassName: {{STORAGE_CLASS}} 2 resources: requests: storage: {{PROMETHEUS_STORAGE_SIZE}} 3 alertmanagerMain: nodeSelector: node-role.kubernetes.io/infra: "" volumeClaimTemplate: spec: storageClassName: {{STORAGE_CLASS}} 4 resources: requests: storage: {{ALERTMANAGER_STORAGE_SIZE}} 5 metadata: name: cluster-monitoring-config namespace: openshift-monitoring- 1
- A typical value is
PROMETHEUS_RETENTION_PERIOD=15d. Units are measured in time using one of these suffixes: s, m, h, d. - 2 4
- The storage class for your cluster.
- 3
- A typical value is
PROMETHEUS_STORAGE_SIZE=2000Gi. Storage values can be a plain integer or as a fixed-point integer using one of these suffixes: E, P, T, G, M, K. You can also use the power-of-two equivalents: Ei, Pi, Ti, Gi, Mi, Ki. - 5
- A typical value is
ALERTMANAGER_STORAGE_SIZE=20Gi. Storage values can be a plain integer or as a fixed-point integer using one of these suffixes: E, P, T, G, M, K. You can also use the power-of-two equivalents: Ei, Pi, Ti, Gi, Mi, Ki.
- Add values for the retention period, storage class, and storage sizes.
- Save the file.
Apply the changes by running:
$ oc create -f cluster-monitoring-config.yaml
Chapter 9. The Node Feature Discovery Operator
Learn about the Node Feature Discovery (NFD) Operator and how you can use it to expose node-level information by orchestrating Node Feature Discovery, a Kubernetes add-on for detecting hardware features and system configuration.
9.1. About the Node Feature Discovery Operator
The Node Feature Discovery Operator (NFD) manages the detection of hardware features and configuration in a OpenShift Container Platform cluster by labeling the nodes with hardware-specific information. NFD labels the host with node-specific attributes, such as PCI cards, kernel, operating system version, and so on.
The NFD Operator can be found on the Operator Hub by searching for “Node Feature Discovery”.
9.2. Installing the Node Feature Discovery Operator
The Node Feature Discovery (NFD) Operator orchestrates all resources needed to run the NFD daemon set. As a cluster administrator, you can install the NFD Operator using the OpenShift Container Platform CLI or the web console.
9.2.1. Installing the NFD Operator using the CLI
As a cluster administrator, you can install the NFD Operator using the CLI.
Prerequisites
- An OpenShift Container Platform cluster
-
Install the OpenShift CLI (
oc). -
Log in as a user with
cluster-adminprivileges.
Procedure
Create a namespace for the NFD Operator.
Create the following
Namespacecustom resource (CR) that defines theopenshift-nfdnamespace, and then save the YAML in thenfd-namespace.yamlfile:apiVersion: v1 kind: Namespace metadata: name: openshift-nfd
Create the namespace by running the following command:
$ oc create -f nfd-namespace.yaml
Install the NFD Operator in the namespace you created in the previous step by creating the following objects:
Create the following
OperatorGroupCR and save the YAML in thenfd-operatorgroup.yamlfile:apiVersion: operators.coreos.com/v1 kind: OperatorGroup metadata: generateName: openshift-nfd- name: openshift-nfd namespace: openshift-nfd spec: targetNamespaces: - openshift-nfd
Create the
OperatorGroupCR by running the following command:$ oc create -f nfd-operatorgroup.yaml
Run the following command to get the
channelvalue required for the next step.$ oc get packagemanifest nfd -n openshift-marketplace -o jsonpath='{.status.defaultChannel}'Example output
4.8
Create the following
SubscriptionCR and save the YAML in thenfd-sub.yamlfile:Example Subscription
apiVersion: operators.coreos.com/v1alpha1
kind: Subscription
metadata:
  name: nfd
  namespace: openshift-nfd
spec:
  channel: "4.8"
  installPlanApproval: Automatic
  name: nfd
  source: redhat-operators
  sourceNamespace: openshift-marketplace
Create the subscription object by running the following command:
$ oc create -f nfd-sub.yaml
Change to the
openshift-nfdproject:$ oc project openshift-nfd
Verification
To verify that the Operator deployment is successful, run:
$ oc get pods
Example output
NAME                                      READY   STATUS    RESTARTS   AGE
nfd-controller-manager-7f86ccfb58-vgr4x   2/2     Running   0          10m
A successful deployment shows a
Runningstatus.
9.2.2. Installing the NFD Operator using the web console
As a cluster administrator, you can install the NFD Operator using the web console.
It is recommended to create the Namespace as mentioned in the previous section.
Procedure
- In the OpenShift Container Platform web console, click Operators → OperatorHub.
- Choose Node Feature Discovery from the list of available Operators, and then click Install.
- On the Install Operator page, select a specific namespace on the cluster, select the namespace created in the previous section, and then click Install.
Verification
To verify that the NFD Operator installed successfully:
- Navigate to the Operators → Installed Operators page.
Ensure that Node Feature Discovery is listed in the openshift-nfd project with a Status of InstallSucceeded.
NoteDuring installation an Operator might display a Failed status. If the installation later succeeds with an InstallSucceeded message, you can ignore the Failed message.
Troubleshooting
If the Operator does not appear as installed, troubleshoot further:
- Navigate to the Operators → Installed Operators page and inspect the Operator Subscriptions and Install Plans tabs for any failure or errors under Status.
-
Navigate to the Workloads → Pods page and check the logs for pods in the
openshift-nfdproject.
9.3. Using the Node Feature Discovery Operator
The Node Feature Discovery (NFD) Operator orchestrates all resources needed to run the Node-Feature-Discovery daemon set by watching for a NodeFeatureDiscovery CR. Based on the NodeFeatureDiscovery CR, the Operator will create the operand (NFD) components in the desired namespace. You can edit the CR to choose another namespace, image, imagePullPolicy, and nfd-worker-conf, among other options.
As a cluster administrator, you can create a NodeFeatureDiscovery instance using the OpenShift Container Platform CLI or the web console.
9.3.1. Create a NodeFeatureDiscovery instance using the CLI
As a cluster administrator, you can create a NodeFeatureDiscovery CR instance using the CLI.
Prerequisites
- An OpenShift Container Platform cluster
-
Install the OpenShift CLI (
oc). -
Log in as a user with
cluster-adminprivileges. - Install the NFD Operator.
Procedure
Create the following
NodeFeatureDiscoveryCustom Resource (CR), and then save the YAML in theNodeFeatureDiscovery.yamlfile:apiVersion: nfd.openshift.io/v1 kind: NodeFeatureDiscovery metadata: name: nfd-instance namespace: openshift-nfd spec: instance: "" # instance is empty by default operand: namespace: openshift-nfd image: quay.io/openshift/origin-node-feature-discovery:4.8 imagePullPolicy: Always workerConfig: configData: | #core: # labelWhiteList: # noPublish: false # sleepInterval: 60s # sources: [all] # klog: # addDirHeader: false # alsologtostderr: false # logBacktraceAt: # logtostderr: true # skipHeaders: false # stderrthreshold: 2 # v: 0 # vmodule: ## NOTE: the following options are not dynamically run-time configurable ## and require a nfd-worker restart to take effect after being changed # logDir: # logFile: # logFileMaxSize: 1800 # skipLogHeaders: false #sources: # cpu: # cpuid: ## NOTE: whitelist has priority over blacklist # attributeBlacklist: # - "BMI1" # - "BMI2" # - "CLMUL" # - "CMOV" # - "CX16" # - "ERMS" # - "F16C" # - "HTT" # - "LZCNT" # - "MMX" # - "MMXEXT" # - "NX" # - "POPCNT" # - "RDRAND" # - "RDSEED" # - "RDTSCP" # - "SGX" # - "SSE" # - "SSE2" # - "SSE3" # - "SSE4.1" # - "SSE4.2" # - "SSSE3" # attributeWhitelist: # kernel: # kconfigFile: "/path/to/kconfig" # configOpts: # - "NO_HZ" # - "X86" # - "DMI" # pci: # deviceClassWhitelist: # - "0200" # - "03" # - "12" # deviceLabelFields: # - "class" # - "vendor" # - "device" # - "subsystem_vendor" # - "subsystem_device" # usb: # deviceClassWhitelist: # - "0e" # - "ef" # - "fe" # - "ff" # deviceLabelFields: # - "class" # - "vendor" # - "device" # custom: # - name: "my.kernel.feature" # matchOn: # - loadedKMod: ["example_kmod1", "example_kmod2"] # - name: "my.pci.feature" # matchOn: # - pciId: # class: ["0200"] # vendor: ["15b3"] # device: ["1014", "1017"] # - pciId : # vendor: ["8086"] # device: ["1000", "1100"] # - name: "my.usb.feature" # matchOn: # - usbId: # class: ["ff"] # vendor: ["03e7"] # device: ["2485"] # - usbId: # class: ["fe"] # vendor: ["1a6e"] # device: ["089a"] # - name: "my.combined.feature" # matchOn: # - pciId: # vendor: ["15b3"] # device: ["1014", "1017"] # loadedKMod : ["vendor_kmod1", "vendor_kmod2"] customConfig: configData: | # - name: "more.kernel.features" # matchOn: # - loadedKMod: ["example_kmod3"] # - name: "more.features.by.nodename" # value: customValue # matchOn: # - nodename: ["special-.*-node-.*"]Create the
NodeFeatureDiscoveryCR instance by running the following command:$ oc create -f NodeFeatureDiscovery.yaml
Verification
To verify that the instance is created, run:
$ oc get pods
Example output
NAME                                      READY   STATUS    RESTARTS   AGE
nfd-controller-manager-7f86ccfb58-vgr4x   2/2     Running   0          11m
nfd-master-hcn64                          1/1     Running   0          60s
nfd-master-lnnxx                          1/1     Running   0          60s
nfd-master-mp6hr                          1/1     Running   0          60s
nfd-worker-vgcz9                          1/1     Running   0          60s
nfd-worker-xqbws                          1/1     Running   0          60s
A successful deployment shows a
Runningstatus.
9.3.2. Create a NodeFeatureDiscovery CR using the web console
Procedure
- Navigate to the Operators → Installed Operators page.
- Find Node Feature Discovery and see a box under Provided APIs.
- Click Create instance.
-
Edit the values of the
NodeFeatureDiscoveryCR. - Click Create.
9.4. Configuring the Node Feature Discovery Operator
9.4.1. core
The core section contains common configuration settings that are not specific to any particular feature source.
core.sleepInterval
core.sleepInterval specifies the interval between consecutive passes of feature detection or re-detection, and thus also the interval between node re-labeling. A non-positive value implies infinite sleep interval; no re-detection or re-labeling is done.
This value is overridden by the deprecated --sleep-interval command line flag, if specified.
Example usage
core:
  sleepInterval: 60s 1
The default value is 60s.
core.sources
core.sources specifies the list of enabled feature sources. A special value all enables all feature sources.
This value is overridden by the deprecated --sources command line flag, if specified.
Default: [all]
Example usage
core:
  sources:
    - system
    - custom
core.labelWhiteList
core.labelWhiteList specifies a regular expression for filtering feature labels based on the label name. Non-matching labels are not published.
The regular expression is only matched against the basename part of the label, the part of the name after '/'. The label prefix, or namespace, is omitted.
This value is overridden by the deprecated --label-whitelist command line flag, if specified.
Default: null
Example usage
core:
  labelWhiteList: '^cpu-cpuid'
core.noPublish
Setting core.noPublish to true disables all communication with the nfd-master. It is effectively a dry run flag; nfd-worker runs feature detection normally, but no labeling requests are sent to nfd-master.
This value is overridden by the --no-publish command line flag, if specified.
Example:
Example usage
core:
  noPublish: true 1
The default value is false.
core.klog
The following options specify the logger configuration, most of which can be dynamically adjusted at run-time.
The logger options can also be specified using command line flags, which take precedence over any corresponding config file options.
core.klog.addDirHeader
If set to true, core.klog.addDirHeader adds the file directory to the header of the log messages.
Default: false
Run-time configurable: yes
core.klog.alsologtostderr
Log to standard error as well as files.
Default: false
Run-time configurable: yes
core.klog.logBacktraceAt
When logging hits line file:N, emit a stack trace.
Default: empty
Run-time configurable: yes
core.klog.logDir
If non-empty, write log files in this directory.
Default: empty
Run-time configurable: no
core.klog.logFile
If not empty, use this log file.
Default: empty
Run-time configurable: no
core.klog.logFileMaxSize
core.klog.logFileMaxSize defines the maximum size a log file can grow to. Unit is megabytes. If the value is 0, the maximum file size is unlimited.
Default: 1800
Run-time configurable: no
core.klog.logtostderr
Log to standard error instead of files
Default: true
Run-time configurable: yes
core.klog.skipHeaders
If core.klog.skipHeaders is set to true, avoid header prefixes in the log messages.
Default: false
Run-time configurable: yes
core.klog.skipLogHeaders
If core.klog.skipLogHeaders is set to true, avoid headers when opening log files.
Default: false
Run-time configurable: no
core.klog.stderrthreshold
Logs at or above this threshold go to stderr.
Default: 2
Run-time configurable: yes
core.klog.v
core.klog.v is the number for the log level verbosity.
Default: 0
Run-time configurable: yes
core.klog.vmodule
core.klog.vmodule is a comma-separated list of pattern=N settings for file-filtered logging.
Default: empty
Run-time configurable: yes
9.4.2. sources
The sources section contains feature source specific configuration parameters.
sources.cpu.cpuid.attributeBlacklist
Prevent publishing cpuid features listed in this option.
This value is overridden by sources.cpu.cpuid.attributeWhitelist, if specified.
Default: [BMI1, BMI2, CLMUL, CMOV, CX16, ERMS, F16C, HTT, LZCNT, MMX, MMXEXT, NX, POPCNT, RDRAND, RDSEED, RDTSCP, SGX, SGXLC, SSE, SSE2, SSE3, SSE4.1, SSE4.2, SSSE3]
Example usage
sources:
  cpu:
    cpuid:
      attributeBlacklist: [MMX, MMXEXT]
sources.cpu.cpuid.attributeWhitelist
Only publish the cpuid features listed in this option.
sources.cpu.cpuid.attributeWhitelist takes precedence over sources.cpu.cpuid.attributeBlacklist.
Default: empty
Example usage
sources:
  cpu:
    cpuid:
      attributeWhitelist: [AVX512BW, AVX512CD, AVX512DQ, AVX512F, AVX512VL]
sources.kernel.kconfigFile
sources.kernel.kconfigFile is the path of the kernel config file. If empty, NFD runs a search in the well-known standard locations.
Default: empty
Example usage
sources:
  kernel:
    kconfigFile: "/path/to/kconfig"
sources.kernel.configOpts
sources.kernel.configOpts represents kernel configuration options to publish as feature labels.
Default: [NO_HZ, NO_HZ_IDLE, NO_HZ_FULL, PREEMPT]
Example usage
sources:
  kernel:
    configOpts: [NO_HZ, X86, DMI]
sources.pci.deviceClassWhitelist
sources.pci.deviceClassWhitelist is a list of PCI device class IDs for which to publish a label. It can be specified as a main class only (for example, 03) or full class-subclass combination (for example 0300). The former implies that all subclasses are accepted. The format of the labels can be further configured with deviceLabelFields.
Default: ["03", "0b40", "12"]
Example usage
sources:
  pci:
    deviceClassWhitelist: ["0200", "03"]
sources.pci.deviceLabelFields
sources.pci.deviceLabelFields is the set of PCI ID fields to use when constructing the name of the feature label. Valid fields are class, vendor, device, subsystem_vendor and subsystem_device.
Default: [class, vendor]
Example usage
sources:
  pci:
    deviceLabelFields: [class, vendor, device]
With the example config above, NFD would publish labels such as feature.node.kubernetes.io/pci-<class-id>_<vendor-id>_<device-id>.present=true
sources.usb.deviceClassWhitelist
sources.usb.deviceClassWhitelist is a list of USB device class IDs for which to publish a feature label. The format of the labels can be further configured with deviceLabelFields.
Default: ["0e", "ef", "fe", "ff"]
Example usage
sources:
  usb:
    deviceClassWhitelist: ["ef", "ff"]
sources.usb.deviceLabelFields
sources.usb.deviceLabelFields is the set of USB ID fields from which to compose the name of the feature label. Valid fields are class, vendor, and device.
Default: [class, vendor, device]
Example usage
sources:
  pci:
    deviceLabelFields: [class, vendor]
With the example config above, NFD would publish labels like: feature.node.kubernetes.io/usb-<class-id>_<vendor-id>.present=true.
sources.custom
sources.custom is the list of rules to process in the custom feature source to create user-specific labels.
Default: empty
Example usage
source:
  custom:
  - name: "my.custom.feature"
    matchOn:
    - loadedKMod: ["e1000e"]
    - pciId:
        class: ["0200"]
        vendor: ["8086"]
Chapter 10. The Driver Toolkit
Learn about the Driver Toolkit and how you can use it as a base image for driver containers for enabling special software and hardware devices on Kubernetes.
The Driver Toolkit is a Technology Preview feature only. Technology Preview features are not supported with Red Hat production service level agreements (SLAs) and might not be functionally complete. Red Hat does not recommend using them in production. These features provide early access to upcoming product features, enabling customers to test functionality and provide feedback during the development process.
For more information about the support scope of Red Hat Technology Preview features, see https://access.redhat.com/support/offerings/techpreview/.
10.1. About the Driver Toolkit
Background
The Driver Toolkit is a container image in the OpenShift Container Platform payload used as a base image on which you can build driver containers. The Driver Toolkit image contains the kernel packages commonly required as dependencies to build or install kernel modules, as well as a few tools needed in driver containers. The version of these packages will match the kernel version running on the Red Hat Enterprise Linux CoreOS (RHCOS) nodes in the corresponding OpenShift Container Platform release.
Driver containers are container images used for building and deploying out-of-tree kernel modules and drivers on container operating systems like RHCOS. Kernel modules and drivers are software libraries running with a high level of privilege in the operating system kernel. They extend the kernel functionalities or provide the hardware-specific code required to control new devices. Examples include hardware devices like Field Programmable Gate Arrays (FPGA) or GPUs, and software-defined storage (SDS) solutions, such as Lustre parallel file systems, which require kernel modules on client machines. Driver containers are the first layer of the software stack used to enable these technologies on Kubernetes.
The list of kernel packages in the Driver Toolkit includes the following and their dependencies:
-
kernel-core -
kernel-devel -
kernel-headers -
kernel-modules -
kernel-modules-extra
In addition, the Driver Toolkit also includes the corresponding real-time kernel packages:
-
kernel-rt-core -
kernel-rt-devel -
kernel-rt-modules -
kernel-rt-modules-extra
The Driver Toolkit also has several tools which are commonly needed to build and install kernel modules, including:
-
elfutils-libelf-devel -
kmod -
binutilskabi-dw -
kernel-abi-whitelists - dependencies for the above
Purpose
Prior to the Driver Toolkit’s existence, you could install kernel packages in a pod or build config on OpenShift Container Platform using entitled builds or by installing from the kernel RPMs in the hosts machine-os-content. The Driver Toolkit simplifies the process by removing the entitlement step, and avoids the privileged operation of accessing the machine-os-content in a pod. The Driver Toolkit can also be used by partners who have access to pre-released OpenShift Container Platform versions to prebuild driver-containers for their hardware devices for future OpenShift Container Platform releases.
The Driver Toolkit is also used by the Special Resource Operator (SRO), which is currently available as a community Operator on OperatorHub. SRO supports out-of-tree and third-party kernel drivers and the support software for the underlying operating system. Users can create recipes for SRO to build and deploy a driver container, as well as support software like a device plugin, or metrics. Recipes can include a build config to build a driver container based on the Driver Toolkit, or SRO can deploy a prebuilt driver container.
10.2. Pulling the Driver Toolkit container image
The driver-toolkit image is available from the Container images section of the Red Hat Ecosystem Catalog and in the OpenShift Container Platform release payload. The image corresponding to the most recent minor release of OpenShift Container Platform will be tagged with the version number in the catalog. The image URL for a specific release can be found using the oc adm CLI command.
10.2.1. Pulling the Driver Toolkit container image from registry.redhat.io
Instructions for pulling the driver-toolkit image from registry.redhat.io with podman or in OpenShift Container Platform can be found on the Red Hat Ecosystem Catalog. The driver-toolkit image for the latest minor release will be tagged with the minor release version on registry.redhat.io for example registry.redhat.io/openshift4/driver-toolkit-rhel8:v4.8.
10.2.2. Finding the Driver Toolkit image URL in the payload
Prerequisites
- You obtained the image pull secret from the Red Hat OpenShift Cluster Manager.
-
You installed the OpenShift CLI (
oc).
Procedure
The image URL of the
driver-toolkitcorresponding to a certain release can be extracted from the release image using theoc admcommand:$ oc adm release info 4.8.0 --image-for=driver-toolkit
Example output
quay.io/openshift-release-dev/ocp-v4.0-art-dev@sha256:0fd84aee79606178b6561ac71f8540f404d518ae5deff45f6d6ac8f02636c7f4
- This image can be pulled using a valid pull secret, such as the pull secret required to install OpenShift Container Platform.
$ podman pull --authfile=path/to/pullsecret.json quay.io/openshift-release-dev/ocp-v4.0-art-dev@sha256:<SHA>
10.3. Using the Driver Toolkit
As an example, the Driver Toolkit can be used as the base image for building a very simple kernel module called simple-kmod.
10.3.1. Build and run the simple-kmod driver container on a cluster
Prerequisites
- An OpenShift Container Platform cluster
-
Install the OpenShift CLI (
oc). -
Log in as a user with
cluster-adminprivileges.
Procedure
Create a namespace. For example:
$ oc new-project simple-kmod-demo
The YAML defines an
ImageStreamfor storing thesimple-kmoddriver container image, and aBuildConfigfor building the container. Save this YAML as0000-buildconfig.yaml.template.apiVersion: image.openshift.io/v1 kind: ImageStream metadata: labels: app: simple-kmod-driver-container name: simple-kmod-driver-container namespace: simple-kmod-demo spec: {} --- apiVersion: build.openshift.io/v1 kind: BuildConfig metadata: labels: app: simple-kmod-driver-build name: simple-kmod-driver-build namespace: simple-kmod-demo spec: nodeSelector: node-role.kubernetes.io/worker: "" runPolicy: "Serial" triggers: - type: "ConfigChange" - type: "ImageChange" source: git: ref: "master" uri: "https://github.com/openshift-psap/kvc-simple-kmod.git" type: Git dockerfile: | FROM DRIVER_TOOLKIT_IMAGE WORKDIR /build/ RUN yum -y install git make sudo gcc \ && yum clean all \ && rm -rf /var/cache/dnf # Expecting kmod software version as an input to the build ARG KMODVER # Grab the software from upstream RUN git clone https://github.com/openshift-psap/simple-kmod.git WORKDIR simple-kmod # Prep and build the module RUN make buildprep KVER=$(rpm -q --qf "%{VERSION}-%{RELEASE}.%{ARCH}" kernel-core) KMODVER=${KMODVER} \ && make all KVER=$(rpm -q --qf "%{VERSION}-%{RELEASE}.%{ARCH}" kernel-core) KMODVER=${KMODVER} \ && make install KVER=$(rpm -q --qf "%{VERSION}-%{RELEASE}.%{ARCH}" kernel-core) KMODVER=${KMODVER} # Add the helper tools WORKDIR /root/kvc-simple-kmod ADD Makefile . ADD simple-kmod-lib.sh . ADD simple-kmod-wrapper.sh . ADD simple-kmod.conf . RUN mkdir -p /usr/lib/kvc/ \ && mkdir -p /etc/kvc/ \ && make install RUN systemctl enable kmods-via-containers@simple-kmod strategy: dockerStrategy: buildArgs: - name: KMODVER value: DEMO output: to: kind: ImageStreamTag name: simple-kmod-driver-container:demoSubstitute the correct driver toolkit image for the OpenShift Container Platform version you are running in place of “DRIVER_TOOLKIT_IMAGE” with the following commands.
$ OCP_VERSION=$(oc get clusterversion/version -ojsonpath={.status.desired.version})$ DRIVER_TOOLKIT_IMAGE=$(oc adm release info $OCP_VERSION --image-for=driver-toolkit)
$ sed "s#DRIVER_TOOLKIT_IMAGE#${DRIVER_TOOLKIT_IMAGE}#" 0000-buildconfig.yaml.template > 0000-buildconfig.yamlNoteThe driver toolkit was introduced to OpenShift Container Platform 4.6 as of version 4.6.30, in 4.7 as of version 4.7.11, and in 4.8.
Create the image stream and build config with
$ oc create -f 0000-buildconfig.yaml
After the builder pod completes successfully, deploy the driver container image as a
DaemonSet.The driver container must run with the privileged security context in order to load the kernel modules on the host. The following YAML file contains the RBAC rules and the
DaemonSetfor running the driver container. Save this YAML as1000-drivercontainer.yaml.apiVersion: v1 kind: ServiceAccount metadata: name: simple-kmod-driver-container --- apiVersion: rbac.authorization.k8s.io/v1 kind: Role metadata: name: simple-kmod-driver-container rules: - apiGroups: - security.openshift.io resources: - securitycontextconstraints verbs: - use resourceNames: - privileged --- apiVersion: rbac.authorization.k8s.io/v1 kind: RoleBinding metadata: name: simple-kmod-driver-container roleRef: apiGroup: rbac.authorization.k8s.io kind: Role name: simple-kmod-driver-container subjects: - kind: ServiceAccount name: simple-kmod-driver-container userNames: - system:serviceaccount:simple-kmod-demo:simple-kmod-driver-container --- apiVersion: apps/v1 kind: DaemonSet metadata: name: simple-kmod-driver-container spec: selector: matchLabels: app: simple-kmod-driver-container template: metadata: labels: app: simple-kmod-driver-container spec: serviceAccount: simple-kmod-driver-container serviceAccountName: simple-kmod-driver-container containers: - image: image-registry.openshift-image-registry.svc:5000/simple-kmod-demo/simple-kmod-driver-container:demo name: simple-kmod-driver-container imagePullPolicy: Always command: ["/sbin/init"] lifecycle: preStop: exec: command: ["/bin/sh", "-c", "systemctl stop kmods-via-containers@simple-kmod"] securityContext: privileged: true nodeSelector: node-role.kubernetes.io/worker: ""Create the RBAC rules and daemon set:
$ oc create -f 1000-drivercontainer.yaml
After the pods are running on the worker nodes, verify that the
simple_kmodkernel module is loaded successfully on the host machines withlsmod.Verify that the pods are running:
$ oc get pod -n simple-kmod-demo
Example output
NAME                                 READY   STATUS      RESTARTS   AGE
simple-kmod-driver-build-1-build     0/1     Completed   0          6m
simple-kmod-driver-container-b22fd   1/1     Running     0          40s
simple-kmod-driver-container-jz9vn   1/1     Running     0          40s
simple-kmod-driver-container-p45cc   1/1     Running     0          40s
Execute the
lsmodcommand in the driver container pod:$ oc exec -it pod/simple-kmod-driver-container-p45cc -- lsmod | grep simple
Example output
simple_procfs_kmod     16384  0
simple_kmod            16384  0
Chapter 11. Planning your environment according to object maximums
Consider the following tested object maximums when you plan your OpenShift Container Platform cluster.
These guidelines are based on the largest possible cluster. For smaller clusters, the maximums are lower. There are many factors that influence the stated thresholds, including the etcd version or storage data format.
These guidelines apply to OpenShift Container Platform with software-defined networking (SDN), not Open Virtual Network (OVN).
In most cases, exceeding these numbers results in lower overall performance. It does not necessarily mean that the cluster will fail.
11.1. OpenShift Container Platform tested cluster maximums for major releases
Tested Cloud Platforms for OpenShift Container Platform 3.x: Red Hat OpenStack Platform (RHOSP), Amazon Web Services and Microsoft Azure. Tested Cloud Platforms for OpenShift Container Platform 4.x: Amazon Web Services, Microsoft Azure and Google Cloud Platform.
| Maximum type | 3.x tested maximum | 4.x tested maximum |
|---|---|---|
| Number of nodes | 2,000 | 2,000 |
| Number of pods [1] | 150,000 | 150,000 |
| Number of pods per node | 250 | 500 [2] |
| Number of pods per core | There is no default value. | There is no default value. |
| Number of namespaces [3] | 10,000 | 10,000 |
| Number of builds | 10,000 (Default pod RAM 512 Mi) - Pipeline Strategy | 10,000 (Default pod RAM 512 Mi) - Source-to-Image (S2I) build strategy |
| Number of pods per namespace [4] | 25,000 | 25,000 |
| Number of routes and back ends per Ingress Controller | 2,000 per router | 2,000 per router |
| Number of secrets | 80,000 | 80,000 |
| Number of config maps | 90,000 | 90,000 |
| Number of services [5] | 10,000 | 10,000 |
| Number of services per namespace | 5,000 | 5,000 |
| Number of back-ends per service | 5,000 | 5,000 |
| Number of deployments per namespace [4] | 2,000 | 2,000 |
| Number of build configs | 12,000 | 12,000 |
| Number of custom resource definitions (CRD) | There is no default value. | 512 [6] |
- The pod count displayed here is the number of test pods. The actual number of pods depends on the application’s memory, CPU, and storage requirements.
-
This was tested on a cluster with 100 worker nodes with 500 pods per worker node. The default
maxPodsis still 250. To get to 500maxPods, the cluster must be created with amaxPodsset to500using a custom kubelet config. If you need 500 user pods, you need ahostPrefixof22because there are 10-15 system pods already running on the node. The maximum number of pods with attached persistent volume claims (PVC) depends on storage backend from where PVC are allocated. In our tests, only OpenShift Container Storage (OCS v4) was able to satisfy the number of pods per node discussed in this document. - When there are a large number of active projects, etcd might suffer from poor performance if the keyspace grows excessively large and exceeds the space quota. Periodic maintenance of etcd, including defragmentation, is highly recommended to free etcd storage.
- There are a number of control loops in the system that must iterate over all objects in a given namespace as a reaction to some changes in state. Having a large number of objects of a given type in a single namespace can make those loops expensive and slow down processing given state changes. The limit assumes that the system has enough CPU, memory, and disk to satisfy the application requirements.
- Each service port and each service back-end has a corresponding entry in iptables. The number of back-ends of a given service impact the size of the endpoints objects, which impacts the size of data that is being sent all over the system.
-
OpenShift Container Platform has a limit of 512 total custom resource definitions (CRD), including those installed by OpenShift Container Platform, products integrating with OpenShift Container Platform and user created CRDs. If there are more than 512 CRDs created, then there is a possibility that
occommands requests may be throttled.
Red Hat does not provide direct guidance on sizing your OpenShift Container Platform cluster. This is because determining whether your cluster is within the supported bounds of OpenShift Container Platform requires careful consideration of all the multidimensional factors that limit the cluster scale.
11.2. OpenShift Container Platform environment and configuration on which the cluster maximums are tested
AWS cloud platform:
| Node | Flavor | vCPU | RAM(GiB) | Disk type | Disk size(GiB)/IOS | Count | Region |
|---|---|---|---|---|---|---|---|
| Master/etcd [1] | r5.4xlarge | 16 | 128 | gp3 | 220 | 3 | us-west-2 |
| Infra [2] | m5.12xlarge | 48 | 192 | gp3 | 100 | 3 | us-west-2 |
| Workload [3] | m5.4xlarge | 16 | 64 | gp3 | 500 [4] | 1 | us-west-2 |
| Worker | m5.2xlarge | 8 | 32 | gp3 | 100 | 3/25/250/500 [5] | us-west-2 |
- gp3 disks with a baseline performance of 3000 IOPS and 125 MiB per second are used for control plane/etcd nodes because etcd is latency sensitive. gp3 volumes do not use burst performance.
- Infra nodes are used to host Monitoring, Ingress, and Registry components to ensure they have enough resources to run at large scale.
- Workload node is dedicated to run performance and scalability workload generators.
- Larger disk size is used so that there is enough space to store the large amounts of data that is collected during the performance and scalability test run.
- Cluster is scaled in iterations and performance and scalability tests are executed at the specified node counts.
IBM Power Systems platform:
| Node | vCPU | RAM(GiB) | Disk type | Disk size(GiB)/IOS | Count |
|---|---|---|---|---|---|
| Master/etcd [1] | 16 | 32 | io1 | 120 / 10 IOPS per GiB | 3 |
| Infra [2] | 16 | 64 | gp2 | 120 | 2 |
| Workload [3] | 16 | 256 | gp2 | 120 [4] | 1 |
| Worker | 16 | 64 | gp2 | 120 | 3/25/250/500 [5] |
- io1 disks with 120 / 3 IOPS per GB are used for master/etcd nodes as etcd is I/O intensive and latency sensitive.
- Infra nodes are used to host Monitoring, Ingress, and Registry components to ensure they have enough resources to run at large scale.
- Workload node is dedicated to run performance and scalability workload generators.
- Larger disk size is used so that there is enough space to store the large amounts of data that is collected during the performance and scalability test run.
- Cluster is scaled in iterations and performance and scalability tests are executed at the specified node counts.
11.2.1. IBM Z platform
| Node | vCPU [4] | RAM(GiB)[5] | Disk type | Disk size(GiB)/IOS | Count |
|---|---|---|---|---|---|
| Control plane/etcd [1,2] | 8 | 32 | ds8k | 300 / LCU 1 | 3 |
| Compute [1,3] | 8 | 32 | ds8k | 150 / LCU 2 | 4 nodes (scaled to 100/250/500 pods per node) |
- Nodes are distributed between two logical control units (LCUs) to optimize disk I/O load of the control plane/etcd nodes as etcd is I/O intensive and latency sensitive. Etcd I/O demand should not interfere with other workloads.
- Four compute nodes are used for the tests running several iterations with 100/250/500 pods at the same time. First, idling pods were used to evaluate if pods can be instanced. Next, a network and CPU demanding client/server workload were used to evaluate the stability of the system under stress. Client and server pods were pairwise deployed and each pair was spread over two compute nodes.
- No separate workload node was used. The workload simulates a microservice workload between two compute nodes.
- Physical number of processors used is six Integrated Facilities for Linux (IFLs).
- Total physical memory used is 512 GiB.
11.3. How to plan your environment according to tested cluster maximums
Oversubscribing the physical resources on a node affects resource guarantees the Kubernetes scheduler makes during pod placement. Learn what measures you can take to avoid memory swapping.
Some of the tested maximums are stretched only in a single dimension. They will vary when many objects are running on the cluster.
The numbers noted in this documentation are based on Red Hat’s test methodology, setup, configuration, and tunings. These numbers can vary based on your own individual setup and environments.
While planning your environment, determine how many pods are expected to fit per node:
required pods per cluster / pods per node = total number of nodes needed
The current maximum number of pods per node is 250. However, the number of pods that fit on a node is dependent on the application itself. Consider the application’s memory, CPU, and storage requirements, as described in How to plan your environment according to application requirements.
Example scenario
If you want to scope your cluster for 2200 pods per cluster, you would need at least five nodes, assuming that there are 500 maximum pods per node:
2200 / 500 = 4.4
If you increase the number of nodes to 20, then the pod distribution changes to 110 pods per node:
2200 / 20 = 110
Where:
required pods per cluster / total number of nodes = expected pods per node
11.4. How to plan your environment according to application requirements
Consider an example application environment:
| Pod type | Pod quantity | Max memory | CPU cores | Persistent storage |
|---|---|---|---|---|
| apache | 100 | 500 MB | 0.5 | 1 GB |
| node.js | 200 | 1 GB | 1 | 1 GB |
| postgresql | 100 | 1 GB | 2 | 10 GB |
| JBoss EAP | 100 | 1 GB | 1 | 1 GB |
Extrapolated requirements: 550 CPU cores, 450GB RAM, and 1.4TB storage.
Instance size for nodes can be modulated up or down, depending on your preference. Nodes are often resource overcommitted. In this deployment scenario, you can choose to run additional smaller nodes or fewer larger nodes to provide the same amount of resources. Factors such as operational agility and cost-per-instance should be considered.
| Node type | Quantity | CPUs | RAM (GB) |
|---|---|---|---|
| Nodes (option 1) | 100 | 4 | 16 |
| Nodes (option 2) | 50 | 8 | 32 |
| Nodes (option 3) | 25 | 16 | 64 |
Some applications lend themselves well to overcommitted environments, and some do not. Most Java applications and applications that use huge pages are examples of applications that would not allow for overcommitment. That memory can not be used for other applications. In the example above, the environment would be roughly 30 percent overcommitted, a common ratio.
The application pods can access a service either by using environment variables or DNS. If using environment variables, for each active service the variables are injected by the kubelet when a pod is run on a node. A cluster-aware DNS server watches the Kubernetes API for new services and creates a set of DNS records for each one. If DNS is enabled throughout your cluster, then all pods should automatically be able to resolve services by their DNS name. Service discovery using DNS can be used in case you must go beyond 5000 services. When using environment variables for service discovery, the argument list exceeds the allowed length after 5000 services in a namespace, then the pods and deployments will start failing. Disable the service links in the deployment’s service specification file to overcome this:
---
apiVersion: template.openshift.io/v1
kind: Template
metadata:
  name: deployment-config-template
  creationTimestamp:
  annotations:
    description: This template will create a deploymentConfig with 1 replica, 4 env vars and a service.
    tags: ''
objects:
- apiVersion: apps.openshift.io/v1
  kind: DeploymentConfig
  metadata:
    name: deploymentconfig${IDENTIFIER}
  spec:
    template:
      metadata:
        labels:
          name: replicationcontroller${IDENTIFIER}
      spec:
        enableServiceLinks: false
        containers:
        - name: pause${IDENTIFIER}
          image: "${IMAGE}"
          ports:
          - containerPort: 8080
            protocol: TCP
          env:
          - name: ENVVAR1_${IDENTIFIER}
            value: "${ENV_VALUE}"
          - name: ENVVAR2_${IDENTIFIER}
            value: "${ENV_VALUE}"
          - name: ENVVAR3_${IDENTIFIER}
            value: "${ENV_VALUE}"
          - name: ENVVAR4_${IDENTIFIER}
            value: "${ENV_VALUE}"
          resources: {}
          imagePullPolicy: IfNotPresent
          capabilities: {}
          securityContext:
            capabilities: {}
            privileged: false
        restartPolicy: Always
        serviceAccount: ''
    replicas: 1
    selector:
      name: replicationcontroller${IDENTIFIER}
    triggers:
    - type: ConfigChange
    strategy:
      type: Rolling
- apiVersion: v1
  kind: Service
  metadata:
    name: service${IDENTIFIER}
  spec:
    selector:
      name: replicationcontroller${IDENTIFIER}
    ports:
    - name: serviceport${IDENTIFIER}
      protocol: TCP
      port: 80
      targetPort: 8080
    clusterIP: ''
    type: ClusterIP
    sessionAffinity: None
  status:
    loadBalancer: {}
parameters:
- name: IDENTIFIER
  description: Number to append to the name of resources
  value: '1'
  required: true
- name: IMAGE
  description: Image to use for deploymentConfig
  value: gcr.io/google-containers/pause-amd64:3.0
  required: false
- name: ENV_VALUE
  description: Value to use for environment variables
  generate: expression
  from: "[A-Za-z0-9]{255}"
  required: false
labels:
  template: deployment-config-template
The number of application pods that can run in a namespace is dependent on the number of services and the length of the service name when the environment variables are used for service discovery. ARG_MAX on the system defines the maximum argument length for a new process and it is set to 2097152 KiB by default. The Kubelet injects environment variables in to each pod scheduled to run in the namespace including:
-
<SERVICE_NAME>_SERVICE_HOST=<IP> -
<SERVICE_NAME>_SERVICE_PORT=<PORT> -
<SERVICE_NAME>_PORT=tcp://<IP>:<PORT> -
<SERVICE_NAME>_PORT_<PORT>_TCP=tcp://<IP>:<PORT> -
<SERVICE_NAME>_PORT_<PORT>_TCP_PROTO=tcp -
<SERVICE_NAME>_PORT_<PORT>_TCP_PORT=<PORT> -
<SERVICE_NAME>_PORT_<PORT>_TCP_ADDR=<ADDR>
The pods in the namespace will start to fail if the argument length exceeds the allowed value and the number of characters in a service name impacts it. For example, in a namespace with 5000 services, the limit on the service name is 33 characters, which enables you to run 5000 pods in the namespace.
Chapter 12. Optimizing storage
Optimizing storage helps to minimize storage use across all resources. By optimizing storage, administrators help ensure that existing storage resources are working in an efficient manner.
12.1. Available persistent storage options
Understand your persistent storage options so that you can optimize your OpenShift Container Platform environment.
Table 12.1. Available storage options
| Storage type | Description | Examples |
|---|---|---|
| Block |
| AWS EBS and VMware vSphere support dynamic persistent volume (PV) provisioning natively in OpenShift Container Platform. |
| File |
| RHEL NFS, NetApp NFS [1], and Vendor NFS |
| Object |
| AWS S3 |
- NetApp NFS supports dynamic PV provisioning when using the Trident plugin.
Currently, CNS is not supported in OpenShift Container Platform 4.8.
12.2. Recommended configurable storage technology
The following table summarizes the recommended and configurable storage technologies for the given OpenShift Container Platform cluster application.
Table 12.2. Recommended and configurable storage technology
| Storage type | ROX1 | RWX2 | Registry | Scaled registry | Metrics3 | Logging | Apps |
|---|---|---|---|---|---|---|---|
|
1
2 3 Prometheus is the underlying technology used for metrics. 4 This does not apply to physical disk, VM physical disk, VMDK, loopback over NFS, AWS EBS, and Azure Disk.
5 For metrics, using file storage with the 6 For logging, using any shared storage would be an anti-pattern. One volume per elasticsearch is required. 7 Object storage is not consumed through OpenShift Container Platform’s PVs or PVCs. Apps must integrate with the object storage REST API. | |||||||
| Block | Yes4 | No | Configurable | Not configurable | Recommended | Recommended | Recommended |
| File | Yes4 | Yes | Configurable | Configurable | Configurable5 | Configurable6 | Recommended |
| Object | Yes | Yes | Recommended | Recommended | Not configurable | Not configurable | Not configurable7 |
A scaled registry is an OpenShift Container Platform registry where two or more pod replicas are running.
12.2.1. Specific application storage recommendations
Testing shows issues with using the NFS server on Red Hat Enterprise Linux (RHEL) as storage backend for core services. This includes the OpenShift Container Registry and Quay, Prometheus for monitoring storage, and Elasticsearch for logging storage. Therefore, using RHEL NFS to back PVs used by core services is not recommended.
Other NFS implementations on the marketplace might not have these issues. Contact the individual NFS implementation vendor for more information on any testing that was possibly completed against these OpenShift Container Platform core components.
12.2.1.1. Registry
In a non-scaled/high-availability (HA) OpenShift Container Platform registry cluster deployment:
- The storage technology does not have to support RWX access mode.
- The storage technology must ensure read-after-write consistency.
- The preferred storage technology is object storage followed by block storage.
- File storage is not recommended for OpenShift Container Platform registry cluster deployment with production workloads.
12.2.1.2. Scaled registry
In a scaled/HA OpenShift Container Platform registry cluster deployment:
- The storage technology must support RWX access mode.
- The storage technology must ensure read-after-write consistency.
- The preferred storage technology is object storage.
- Amazon Simple Storage Service (Amazon S3), Google Cloud Storage (GCS), Microsoft Azure Blob Storage, and OpenStack Swift are supported.
- Object storage should be S3 or Swift compliant.
- For non-cloud platforms, such as vSphere and bare metal installations, the only configurable technology is file storage.
- Block storage is not configurable.
12.2.1.3. Metrics
In an OpenShift Container Platform hosted metrics cluster deployment:
- The preferred storage technology is block storage.
- Object storage is not configurable.
It is not recommended to use file storage for a hosted metrics cluster deployment with production workloads.
12.2.1.4. Logging
In an OpenShift Container Platform hosted logging cluster deployment:
- The preferred storage technology is block storage.
- Object storage is not configurable.
12.2.1.5. Applications
Application use cases vary from application to application, as described in the following examples:
- Storage technologies that support dynamic PV provisioning have low mount time latencies, and are not tied to nodes to support a healthy cluster.
- Application developers are responsible for knowing and understanding the storage requirements for their application, and how it works with the provided storage to ensure that issues do not occur when an application scales or interacts with the storage layer.
12.2.2. Other specific application storage recommendations
It is not recommended to use RAID configurations on Write intensive workloads, such as etcd. If you are running etcd with a RAID configuration, you might be at risk of encountering performance issues with your workloads.
- Red Hat OpenStack Platform (RHOSP) Cinder: RHOSP Cinder tends to be adept in ROX access mode use cases.
- Databases: Databases (RDBMSs, NoSQL DBs, etc.) tend to perform best with dedicated block storage.
- The etcd database must have enough storage and adequate performance capacity to enable a large cluster. Information about monitoring and benchmarking tools to establish ample storage and a high-performance environment is described in Recommended etcd practices.
12.3. Data storage management
The following table summarizes the main directories that OpenShift Container Platform components write data to.
Table 12.3. Main directories for storing OpenShift Container Platform data
| Directory | Notes | Sizing | Expected growth |
|---|---|---|---|
| /var/log | Log files for all components. | 10 to 30 GB. | Log files can grow quickly; size can be managed by growing disks or by using log rotate. |
| /var/lib/etcd | Used for etcd storage when storing the database. | Less than 20 GB. Database can grow up to 8 GB. | Will grow slowly with the environment. Only storing metadata. Additional 20-25 GB for every additional 8 GB of memory. |
| /var/lib/containers | This is the mount point for the CRI-O runtime. Storage used for active container runtimes, including pods, and storage of local images. Not used for registry storage. | 50 GB for a node with 16 GB memory. Note that this sizing should not be used to determine minimum cluster requirements. Additional 20-25 GB for every additional 8 GB of memory. | Growth is limited by capacity for running containers. |
| /var/lib/kubelet | Ephemeral volume storage for pods. This includes anything external that is mounted into a container at runtime. Includes environment variables, kube secrets, and data volumes not backed by persistent volumes. | Varies | Minimal if pods requiring storage are using persistent volumes. If using ephemeral storage, this can grow quickly. |
Chapter 13. Optimizing routing
The OpenShift Container Platform HAProxy router scales to optimize performance.
13.1. Baseline Ingress Controller (router) performance
The OpenShift Container Platform Ingress Controller, or router, is the Ingress point for all external traffic destined for OpenShift Container Platform services.
When evaluating a single HAProxy router performance in terms of HTTP requests handled per second, the performance varies depending on many factors. In particular:
- HTTP keep-alive/close mode
- Route type
- TLS session resumption client support
- Number of concurrent connections per target route
- Number of target routes
- Back end server page size
- Underlying infrastructure (network/SDN solution, CPU, and so on)
While performance in your specific environment will vary, Red Hat lab tests on a public cloud instance of size 4 vCPU/16GB RAM. A single HAProxy router handling 100 routes terminated by backends serving 1kB static pages is able to handle the following number of transactions per second.
In HTTP keep-alive mode scenarios:
| Encryption | LoadBalancerService | HostNetwork |
|---|---|---|
| none | 21515 | 29622 |
| edge | 16743 | 22913 |
| passthrough | 36786 | 53295 |
| re-encrypt | 21583 | 25198 |
In HTTP close (no keep-alive) scenarios:
| Encryption | LoadBalancerService | HostNetwork |
|---|---|---|
| none | 5719 | 8273 |
| edge | 2729 | 4069 |
| passthrough | 4121 | 5344 |
| re-encrypt | 2320 | 2941 |
Default Ingress Controller configuration with ROUTER_THREADS=4 was used and two different endpoint publishing strategies (LoadBalancerService/HostNetwork) were tested. TLS session resumption was used for encrypted routes. With HTTP keep-alive, a single HAProxy router is capable of saturating 1 Gbit NIC at page sizes as small as 8 kB.
When running on bare metal with modern processors, you can expect roughly twice the performance of the public cloud instance above. This overhead is introduced by the virtualization layer in place on public clouds and holds mostly true for private cloud-based virtualization as well. The following table is a guide to how many applications to use behind the router:
| Number of applications | Application type |
|---|---|
| 5-10 | static file/web server or caching proxy |
| 100-1000 | applications generating dynamic content |
In general, HAProxy can support routes for 5 to 1000 applications, depending on the technology in use. Ingress Controller performance might be limited by the capabilities and performance of the applications behind it, such as language or static versus dynamic content.
Ingress, or router, sharding should be used to serve more routes towards applications and help horizontally scale the routing tier.
For more information on Ingress sharding, see Configuring Ingress Controller sharding by using route labels and Configuring Ingress Controller sharding by using namespace labels.
13.2. Ingress Controller (router) performance optimizations
OpenShift Container Platform no longer supports modifying Ingress Controller deployments by setting environment variables such as ROUTER_THREADS, ROUTER_DEFAULT_TUNNEL_TIMEOUT, ROUTER_DEFAULT_CLIENT_TIMEOUT, ROUTER_DEFAULT_SERVER_TIMEOUT, and RELOAD_INTERVAL.
You can modify the Ingress Controller deployment, but if the Ingress Operator is enabled, the configuration is overwritten.
Chapter 14. Optimizing networking
The OpenShift SDN uses OpenvSwitch, virtual extensible LAN (VXLAN) tunnels, OpenFlow rules, and iptables. This network can be tuned by using jumbo frames, network interface controllers (NIC) offloads, multi-queue, and ethtool settings.
OVN-Kubernetes uses Geneve (Generic Network Virtualization Encapsulation) instead of VXLAN as the tunnel protocol.
VXLAN provides benefits over VLANs, such as an increase in networks from 4096 to over 16 million, and layer 2 connectivity across physical networks. This allows for all pods behind a service to communicate with each other, even if they are running on different systems.
VXLAN encapsulates all tunneled traffic in user datagram protocol (UDP) packets. However, this leads to increased CPU utilization. Both these outer- and inner-packets are subject to normal checksumming rules to guarantee data is not corrupted during transit. Depending on CPU performance, this additional processing overhead can cause a reduction in throughput and increased latency when compared to traditional, non-overlay networks.
Cloud, VM, and bare metal CPU performance can be capable of handling much more than one Gbps network throughput. When using higher bandwidth links such as 10 or 40 Gbps, reduced performance can occur. This is a known issue in VXLAN-based environments and is not specific to containers or OpenShift Container Platform. Any network that relies on VXLAN tunnels will perform similarly because of the VXLAN implementation.
If you are looking to push beyond one Gbps, you can:
- Evaluate network plugins that implement different routing techniques, such as border gateway protocol (BGP).
- Use VXLAN-offload capable network adapters. VXLAN-offload moves the packet checksum calculation and associated CPU overhead off of the system CPU and onto dedicated hardware on the network adapter. This frees up CPU cycles for use by pods and applications, and allows users to utilize the full bandwidth of their network infrastructure.
VXLAN-offload does not reduce latency. However, CPU utilization is reduced even in latency tests.
14.1. Optimizing the MTU for your network
There are two important maximum transmission units (MTUs): the network interface controller (NIC) MTU and the cluster network MTU.
The NIC MTU is only configured at the time of OpenShift Container Platform installation. The MTU must be less than or equal to the maximum supported value of the NIC of your network. If you are optimizing for throughput, choose the largest possible value. If you are optimizing for lowest latency, choose a lower value.
The SDN overlay’s MTU must be less than the NIC MTU by 50 bytes at a minimum. This accounts for the SDN overlay header. So, on a normal ethernet network, set this to 1450. On a jumbo frame ethernet network, set this to 8950.
For OVN and Geneve, the MTU must be less than the NIC MTU by 100 bytes at a minimum.
This 50 byte overlay header is relevant to the OpenShift SDN. Other SDN solutions might require the value to be more or less.
14.2. Recommended practices for installing large scale clusters
When installing large clusters or scaling the cluster to larger node counts, set the cluster network cidr accordingly in your install-config.yaml file before you install the cluster:
networking:
  clusterNetwork:
  - cidr: 10.128.0.0/14
    hostPrefix: 23
  machineCIDR: 10.0.0.0/16
  networkType: OpenShiftSDN
  serviceNetwork:
  - 172.30.0.0/16
The default cluster network cidr 10.128.0.0/14 cannot be used if the cluster size is more than 500 nodes. It must be set to 10.128.0.0/12 or 10.128.0.0/10 to get to larger node counts beyond 500 nodes.
14.3. Impact of IPsec
Because encrypting and decrypting node hosts uses CPU power, performance is affected both in throughput and CPU usage on the nodes when encryption is enabled, regardless of the IP security system being used.
IPSec encrypts traffic at the IP payload level, before it hits the NIC, protecting fields that would otherwise be used for NIC offloading. This means that some NIC acceleration features might not be usable when IPSec is enabled and will lead to decreased throughput and increased CPU usage.
Chapter 15. Managing bare metal hosts
When you install OpenShift Container Platform on a bare metal cluster, you can provision and manage bare metal nodes using machine and machineset custom resources (CRs) for bare metal hosts that exist in the cluster.
15.1. About bare metal hosts and nodes
To provision a Red Hat Enterprise Linux CoreOS (RHCOS) bare metal host as a node in your cluster, first create a MachineSet custom resource (CR) object that corresponds to the bare metal host hardware. Bare metal host machine sets describe infrastructure components specific to your configuration. You apply specific Kubernetes labels to these machine sets and then update the infrastructure components to run on only those machines.
Machine CR’s are created automatically when you scale up the relevant MachineSet containing a metal3.io/autoscale-to-hosts annotation. OpenShift Container Platform uses Machine CR’s to provision the bare metal node that corresponds to the host as specified in the MachineSet CR.
15.2. Maintaining bare metal hosts
You can maintain the details of the bare metal hosts in your cluster from the OpenShift Container Platform web console. Navigate to Compute → Bare Metal Hosts, and select a task from the Actions drop down menu. Here you can manage items such as BMC details, boot MAC address for the host, enable power management, and so on. You can also review the details of the network interfaces and drives for the host.
You can move a bare metal host into maintenance mode. When you move a host into maintenance mode, the scheduler moves all managed workloads off the corresponding bare metal node. No new workloads are scheduled while in maintenance mode.
You can deprovision a bare metal host in the web console. Deprovisioning a host does the following actions:
-
Annotates the bare metal host CR with
cluster.k8s.io/delete-machine: true - Scales down the related machine set
Powering off the host without first moving the daemon set and unmanaged static pods to another node can cause service disruption and loss of data.
Additional resources
15.2.1. Adding a bare metal host to the cluster using the web console
You can add bare metal hosts to the cluster in the web console.
Prerequisites
- Install an RHCOS cluster on bare metal.
-
Log in as a user with
cluster-adminprivileges.
Procedure
- In the web console, navigate to Compute → Bare Metal Hosts.
- Select Add Host → New with Dialog.
- Specify a unique name for the new bare metal host.
- Set the Boot MAC address.
- Set the Baseboard Management Console (BMC) Address.
- Optional: Enable power management for the host. This allows OpenShift Container Platform to control the power state of the host.
- Enter the user credentials for the host’s baseboard management controller (BMC).
- Select to power on the host after creation, and select Create.
- Scale up the number of replicas to match the number of available bare metal hosts. Navigate to Compute → MachineSets, and increase the number of machine replicas in the cluster by selecting Edit Machine count from the Actions drop-down menu.
You can also manage the number of bare metal nodes using the oc scale command and the appropriate bare metal machine set.
15.2.2. Adding a bare metal host to the cluster using YAML in the web console
You can add bare metal hosts to the cluster in the web console using a YAML file that describes the bare metal host.
Prerequisites
- Install a RHCOS compute machine on bare metal infrastructure for use in the cluster.
-
Log in as a user with
cluster-adminprivileges. -
Create a
SecretCR for the bare metal host.
Procedure
- In the web console, navigate to Compute → Bare Metal Hosts.
- Select Add Host → New from YAML.
Copy and paste the below YAML, modifying the relevant fields with the details of your host:
apiVersion: metal3.io/v1alpha1 kind: BareMetalHost metadata: name: <bare_metal_host_name> spec: online: true bmc: address: <bmc_address> credentialsName: <secret_credentials_name> 1 disableCertificateVerification: True bootMACAddress: <host_boot_mac_address> hardwareProfile: unknown- 1 1 1
credentialsNamemust reference a validSecretCR. Thebaremetal-operatorcannot manage the bare metal host without a validSecretreferenced in thecredentialsName. For more information about secrets and how to create them, see Understanding secrets.
- Select Create to save the YAML and create the new bare metal host.
Scale up the number of replicas to match the number of available bare metal hosts. Navigate to Compute → MachineSets, and increase the number of machines in the cluster by selecting Edit Machine count from the Actions drop-down menu.
NoteYou can also manage the number of bare metal nodes using the
oc scalecommand and the appropriate bare metal machine set.
15.2.3. Automatically scaling machines to the number of available bare metal hosts
To automatically create the number of Machine objects that matches the number of available BareMetalHost objects, add a metal3.io/autoscale-to-hosts annotation to the MachineSet object.
Prerequisites
-
Install RHCOS bare metal compute machines for use in the cluster, and create corresponding
BareMetalHostobjects. -
Install the OpenShift Container Platform CLI (
oc). -
Log in as a user with
cluster-adminprivileges.
Procedure
Annotate the machine set that you want to configure for automatic scaling by adding the
metal3.io/autoscale-to-hostsannotation. Replace<machineset>with the name of the machine set.$ oc annotate machineset <machineset> -n openshift-machine-api 'metal3.io/autoscale-to-hosts=<any_value>'
Wait for the new scaled machines to start.
When you use a BareMetalHost object to create a machine in the cluster and labels or selectors are subsequently changed on the BareMetalHost, the BareMetalHost object continues be counted against the MachineSet that the Machine object was created from.
15.2.4. Removing bare metal hosts from the provisioner node
In certain circumstances, you might want to temporarily remove bare metal hosts from the provisioner node. For example, during provisioning when a bare metal host reboot is triggered by using the OpenShift Container Platform administration console or as a result of a Machine Config Pool update, OpenShift Container Platform logs into the integrated Dell Remote Access Controller (iDrac) and issues a delete of the job queue.
To prevent the management of the number of Machine objects that matches the number of available BareMetalHost objects, add a baremetalhost.metal3.io/detached annotation to the MachineSet object.
This annotation has an effect for only BareMetalHost objects that are in either Provisioned, ExternallyProvisioned or Ready/Available state.
Prerequisites
-
Install RHCOS bare metal compute machines for use in the cluster and create corresponding
BareMetalHostobjects. -
Install the OpenShift Container Platform CLI (
oc). -
Log in as a user with
cluster-adminprivileges.
Procedure
Annotate the compute machine set that you want to remove from the provisioner node by adding the
baremetalhost.metal3.io/detachedannotation.$ oc annotate machineset <machineset> -n openshift-machine-api 'baremetalhost.metal3.io/detached'
Wait for the new machines to start.
NoteWhen you use a
BareMetalHostobject to create a machine in the cluster and labels or selectors are subsequently changed on theBareMetalHost, theBareMetalHostobject continues be counted against theMachineSetthat theMachineobject was created from.In the provisioning use case, remove the annotation after the reboot is complete by using the following command:
$ oc annotate machineset <machineset> -n openshift-machine-api 'baremetalhost.metal3.io/detached-'
Additional resources
Chapter 16. What huge pages do and how they are consumed by applications
16.1. What huge pages do
Memory is managed in blocks known as pages. On most systems, a page is 4Ki. 1Mi of memory is equal to 256 pages; 1Gi of memory is 256,000 pages, and so on. CPUs have a built-in memory management unit that manages a list of these pages in hardware. The Translation Lookaside Buffer (TLB) is a small hardware cache of virtual-to-physical page mappings. If the virtual address passed in a hardware instruction can be found in the TLB, the mapping can be determined quickly. If not, a TLB miss occurs, and the system falls back to slower, software-based address translation, resulting in performance issues. Since the size of the TLB is fixed, the only way to reduce the chance of a TLB miss is to increase the page size.
A huge page is a memory page that is larger than 4Ki. On x86_64 architectures, there are two common huge page sizes: 2Mi and 1Gi. Sizes vary on other architectures. To use huge pages, code must be written so that applications are aware of them. Transparent Huge Pages (THP) attempt to automate the management of huge pages without application knowledge, but they have limitations. In particular, they are limited to 2Mi page sizes. THP can lead to performance degradation on nodes with high memory utilization or fragmentation due to defragmenting efforts of THP, which can lock memory pages. For this reason, some applications may be designed to (or recommend) usage of pre-allocated huge pages instead of THP.
In OpenShift Container Platform, applications in a pod can allocate and consume pre-allocated huge pages.
16.2. How huge pages are consumed by apps
Nodes must pre-allocate huge pages in order for the node to report its huge page capacity. A node can only pre-allocate huge pages for a single size.
Huge pages can be consumed through container-level resource requirements using the resource name hugepages-<size>, where size is the most compact binary notation using integer values supported on a particular node. For example, if a node supports 2048KiB page sizes, it exposes a schedulable resource hugepages-2Mi. Unlike CPU or memory, huge pages do not support over-commitment.
apiVersion: v1
kind: Pod
metadata:
  generateName: hugepages-volume-
spec:
  containers:
  - securityContext:
      privileged: true
    image: rhel7:latest
    command:
    - sleep
    - inf
    name: example
    volumeMounts:
    - mountPath: /dev/hugepages
      name: hugepage
    resources:
      limits:
        hugepages-2Mi: 100Mi 1
        memory: "1Gi"
        cpu: "1"
  volumes:
  - name: hugepage
    emptyDir:
medium: HugePages- 1
- Specify the amount of memory for
hugepagesas the exact amount to be allocated. Do not specify this value as the amount of memory forhugepagesmultiplied by the size of the page. For example, given a huge page size of 2MB, if you want to use 100MB of huge-page-backed RAM for your application, then you would allocate 50 huge pages. OpenShift Container Platform handles the math for you. As in the above example, you can specify100MBdirectly.
Allocating huge pages of a specific size
Some platforms support multiple huge page sizes. To allocate huge pages of a specific size, precede the huge pages boot command parameters with a huge page size selection parameter hugepagesz=<size>. The <size> value must be specified in bytes with an optional scale suffix [kKmMgG]. The default huge page size can be defined with the default_hugepagesz=<size> boot parameter.
Huge page requirements
- Huge page requests must equal the limits. This is the default if limits are specified, but requests are not.
- Huge pages are isolated at a pod scope. Container isolation is planned in a future iteration.
-
EmptyDirvolumes backed by huge pages must not consume more huge page memory than the pod request. -
Applications that consume huge pages via
shmget()withSHM_HUGETLBmust run with a supplemental group that matches proc/sys/vm/hugetlb_shm_group.
16.3. Consuming huge pages resources using the Downward API
You can use the Downward API to inject information about the huge pages resources that are consumed by a container.
You can inject the resource allocation as environment variables, a volume plugin, or both. Applications that you develop and run in the container can determine the resources that are available by reading the environment variables or files in the specified volumes.
Procedure
Create a
hugepages-volume-pod.yamlfile that is similar to the following example:apiVersion: v1 kind: Pod metadata: generateName: hugepages-volume- labels: app: hugepages-example spec: containers: - securityContext: capabilities: add: [ "IPC_LOCK" ] image: rhel7:latest command: - sleep - inf name: example volumeMounts: - mountPath: /dev/hugepages name: hugepage - mountPath: /etc/podinfo name: podinfo resources: limits: hugepages-1Gi: 2Gi memory: "1Gi" cpu: "1" requests: hugepages-1Gi: 2Gi env: - name: REQUESTS_HUGEPAGES_1GI <.> valueFrom: resourceFieldRef: containerName: example resource: requests.hugepages-1Gi volumes: - name: hugepage emptyDir: medium: HugePages - name: podinfo downwardAPI: items: - path: "hugepages_1G_request" <.> resourceFieldRef: containerName: example resource: requests.hugepages-1Gi divisor: 1Gi<.> Specifies to read the resource use from
requests.hugepages-1Giand expose the value as theREQUESTS_HUGEPAGES_1GIenvironment variable. <.> Specifies to read the resource use fromrequests.hugepages-1Giand expose the value as the file/etc/podinfo/hugepages_1G_request.Create the pod from the
hugepages-volume-pod.yamlfile:$ oc create -f hugepages-volume-pod.yaml
Verification
Check the value of the
REQUESTS_HUGEPAGES_1GIenvironment variable:$ oc exec -it $(oc get pods -l app=hugepages-example -o jsonpath='{.items[0].metadata.name}') \ -- env | grep REQUESTS_HUGEPAGES_1GIExample output
REQUESTS_HUGEPAGES_1GI=2147483648
Check the value of the
/etc/podinfo/hugepages_1G_requestfile:$ oc exec -it $(oc get pods -l app=hugepages-example -o jsonpath='{.items[0].metadata.name}') \ -- cat /etc/podinfo/hugepages_1G_requestExample output
2
Additional resources
16.4. Configuring huge pages
Nodes must pre-allocate huge pages used in an OpenShift Container Platform cluster. There are two ways of reserving huge pages: at boot time and at run time. Reserving at boot time increases the possibility of success because the memory has not yet been significantly fragmented. The Node Tuning Operator currently supports boot time allocation of huge pages on specific nodes.
16.4.1. At boot time
Procedure
To minimize node reboots, the order of the steps below needs to be followed:
Label all nodes that need the same huge pages setting by a label.
$ oc label node <node_using_hugepages> node-role.kubernetes.io/worker-hp=
Create a file with the following content and name it
hugepages-tuned-boottime.yaml:apiVersion: tuned.openshift.io/v1 kind: Tuned metadata: name: hugepages 1 namespace: openshift-cluster-node-tuning-operator spec: profile: 2 - data: | [main] summary=Boot time configuration for hugepages include=openshift-node [bootloader] cmdline_openshift_node_hugepages=hugepagesz=2M hugepages=50 3 name: openshift-node-hugepages recommend: - machineConfigLabels: 4 machineconfiguration.openshift.io/role: "worker-hp" priority: 30 profile: openshift-node-hugepages
Create the Tuned
hugepagesobject$ oc create -f hugepages-tuned-boottime.yaml
Create a file with the following content and name it
hugepages-mcp.yaml:apiVersion: machineconfiguration.openshift.io/v1 kind: MachineConfigPool metadata: name: worker-hp labels: worker-hp: "" spec: machineConfigSelector: matchExpressions: - {key: machineconfiguration.openshift.io/role, operator: In, values: [worker,worker-hp]} nodeSelector: matchLabels: node-role.kubernetes.io/worker-hp: ""Create the machine config pool:
$ oc create -f hugepages-mcp.yaml
Given enough non-fragmented memory, all the nodes in the worker-hp machine config pool should now have 50 2Mi huge pages allocated.
$ oc get node <node_using_hugepages> -o jsonpath="{.status.allocatable.hugepages-2Mi}"
100Mi
This functionality is currently only supported on Red Hat Enterprise Linux CoreOS (RHCOS) 8.x worker nodes. On Red Hat Enterprise Linux (RHEL) 7.x worker nodes the TuneD [bootloader] plugin is currently not supported.
16.5. Disabling Transparent Huge Pages
Transparent Huge Pages (THP) attempt to automate most aspects of creating, managing, and using huge pages. Since THP automatically manages the huge pages, this is not always handled optimally for all types of workloads. THP can lead to performance regressions, since many applications handle huge pages on their own. Therefore, consider disabling THP. The following steps describe how to disable THP using the Node Tuning Operator (NTO).
Procedure
Create a file with the following content and name it
thp-disable-tuned.yaml:apiVersion: tuned.openshift.io/v1 kind: Tuned metadata: name: thp-workers-profile namespace: openshift-cluster-node-tuning-operator spec: profile: - data: | [main] summary=Custom tuned profile for OpenShift to turn off THP on worker nodes include=openshift-node [vm] transparent_hugepages=never name: openshift-thp-never-worker recommend: - match: - label: node-role.kubernetes.io/worker priority: 25 profile: openshift-thp-never-workerCreate the Tuned object:
$ oc create -f thp-disable-tuned.yaml
Check the list of active profiles:
$ oc get profile -n openshift-cluster-node-tuning-operator
Verification
Log in to one of the nodes and do a regular THP check to verify if the nodes applied the profile successfully:
$ cat /sys/kernel/mm/transparent_hugepage/enabled
Example output
always madvise [never]
Chapter 17. Performance Addon Operator for low latency nodes
17.1. Understanding low latency
The emergence of Edge computing in the area of Telco / 5G plays a key role in reducing latency and congestion problems and improving application performance.
Simply put, latency determines how fast data (packets) moves from the sender to receiver and returns to the sender after processing by the receiver. Obviously, maintaining a network architecture with the lowest possible delay of latency speeds is key for meeting the network performance requirements of 5G. Compared to 4G technology, with an average latency of 50ms, 5G is targeted to reach latency numbers of 1ms or less. This reduction in latency boosts wireless throughput by a factor of 10.
Many of the deployed applications in the Telco space require low latency that can only tolerate zero packet loss. Tuning for zero packet loss helps mitigate the inherent issues that degrade network performance. For more information, see Tuning for Zero Packet Loss in Red Hat OpenStack Platform (RHOSP).
The Edge computing initiative also comes in to play for reducing latency rates. Think of it as literally being on the edge of the cloud and closer to the user. This greatly reduces the distance between the user and distant data centers, resulting in reduced application response times and performance latency.
Administrators must be able to manage their many Edge sites and local services in a centralized way so that all of the deployments can run at the lowest possible management cost. They also need an easy way to deploy and configure certain nodes of their cluster for real-time low latency and high-performance purposes. Low latency nodes are useful for applications such as Cloud-native Network Functions (CNF) and Data Plane Development Kit (DPDK).
OpenShift Container Platform currently provides mechanisms to tune software on an OpenShift Container Platform cluster for real-time running and low latency (around <20 microseconds reaction time). This includes tuning the kernel and OpenShift Container Platform set values, installing a kernel, and reconfiguring the machine. But this method requires setting up four different Operators and performing many configurations that, when done manually, is complex and could be prone to mistakes.
OpenShift Container Platform provides a Performance Addon Operator to implement automatic tuning to achieve low latency performance for OpenShift applications. The cluster administrator uses this performance profile configuration that makes it easier to make these changes in a more reliable way. The administrator can specify whether to update the kernel to kernel-rt, reserve CPUs for cluster and operating system housekeeping duties, including pod infra containers, and isolate CPUs for application containers to run the workloads.
17.1.1. About hyperthreading for low latency and real-time applications
Hyperthreading is an Intel processor technology that allows a physical CPU processor core to function as two logical cores, executing two independent threads simultaneously. Hyperthreading allows for better system throughput for certain workload types where parallel processing is beneficial. The default OpenShift Container Platform configuration expects hyperthreading to be enabled by default.
For telecommunications applications, it is important to design your application infrastructure to minimize latency as much as possible. Hyperthreading can slow performance times and negatively affect throughput for compute intensive workloads that require low latency. Disabling hyperthreading ensures predictable performance and can decrease processing times for these workloads.
Hyperthreading implementation and configuration differs depending on the hardware you are running OpenShift Container Platform on. Consult the relevant host hardware tuning information for more details of the hyperthreading implementation specific to that hardware. Disabling hyperthreading can increase the cost per core of the cluster.
Additional resources
17.2. Installing the Performance Addon Operator
Performance Addon Operator provides the ability to enable advanced node performance tunings on a set of nodes. As a cluster administrator, you can install Performance Addon Operator using the OpenShift Container Platform CLI or the web console.
17.2.1. Installing the Operator using the CLI
As a cluster administrator, you can install the Operator using the CLI.
Prerequisites
- A cluster installed on bare-metal hardware.
-
Install the OpenShift CLI (
oc). -
Log in as a user with
cluster-adminprivileges.
Procedure
Create a namespace for the Performance Addon Operator by completing the following actions:
Create the following Namespace Custom Resource (CR) that defines the
openshift-performance-addon-operatornamespace, and then save the YAML in thepao-namespace.yamlfile:apiVersion: v1 kind: Namespace metadata: name: openshift-performance-addon-operator annotations: workload.openshift.io/allowed: managementCreate the namespace by running the following command:
$ oc create -f pao-namespace.yaml
Install the Performance Addon Operator in the namespace you created in the previous step by creating the following objects:
Create the following
OperatorGroupCR and save the YAML in thepao-operatorgroup.yamlfile:apiVersion: operators.coreos.com/v1 kind: OperatorGroup metadata: name: openshift-performance-addon-operator namespace: openshift-performance-addon-operator
Create the
OperatorGroupCR by running the following command:$ oc create -f pao-operatorgroup.yaml
Run the following command to get the
channelvalue required for the next step.$ oc get packagemanifest performance-addon-operator -n openshift-marketplace -o jsonpath='{.status.defaultChannel}'Example output
4.8
Create the following Subscription CR and save the YAML in the
pao-sub.yamlfile:Example Subscription
apiVersion: operators.coreos.com/v1alpha1
kind: Subscription
metadata:
  name: openshift-performance-addon-operator-subscription
  namespace: openshift-performance-addon-operator
spec:
  channel: "<channel>" 1
  name: performance-addon-operator
  source: redhat-operators 2
  sourceNamespace: openshift-marketplace
Create the Subscription object by running the following command:
$ oc create -f pao-sub.yaml
Change to the
openshift-performance-addon-operatorproject:$ oc project openshift-performance-addon-operator
17.2.2. Installing the Performance Addon Operator using the web console
As a cluster administrator, you can install the Performance Addon Operator using the web console.
You must create the Namespace CR and OperatorGroup CR as mentioned in the previous section.
Procedure
Install the Performance Addon Operator using the OpenShift Container Platform web console:
- In the OpenShift Container Platform web console, click Operators → OperatorHub.
- Choose Performance Addon Operator from the list of available Operators, and then click Install.
- On the Install Operator page, select All namespaces on the cluster. Then, click Install.
Optional: Verify that the performance-addon-operator installed successfully:
- Switch to the Operators → Installed Operators page.
Ensure that Performance Addon Operator is listed in the openshift-operators project with a Status of Succeeded.
NoteDuring installation an Operator might display a Failed status. If the installation later succeeds with a Succeeded message, you can ignore the Failed message.
If the Operator does not appear as installed, you can troubleshoot further:
- Go to the Operators → Installed Operators page and inspect the Operator Subscriptions and Install Plans tabs for any failure or errors under Status.
-
Go to the Workloads → Pods page and check the logs for pods in the
openshift-operatorsproject.
17.3. Upgrading Performance Addon Operator
You can manually upgrade to the next minor version of Performance Addon Operator and monitor the status of an update by using the web console.
17.3.1. About upgrading Performance Addon Operator
- You can upgrade to the next minor version of Performance Addon Operator by using the OpenShift Container Platform web console to change the channel of your Operator subscription.
- You can enable automatic z-stream updates during Performance Addon Operator installation.
- Updates are delivered via the Marketplace Operator, which is deployed during OpenShift Container Platform installation.The Marketplace Operator makes external Operators available to your cluster.
- The amount of time an update takes to complete depends on your network connection. Most automatic updates complete within fifteen minutes.
17.3.1.1. How Performance Addon Operator upgrades affect your cluster
- Neither the low latency tuning nor huge pages are affected.
- Updating the Operator should not cause any unexpected reboots.
17.3.1.2. Upgrading Performance Addon Operator to the next minor version
You can manually upgrade Performance Addon Operator to the next minor version by using the OpenShift Container Platform web console to change the channel of your Operator subscription.
Prerequisites
- Access to the cluster as a user with the cluster-admin role.
Procedure
- Access the web console and navigate to Operators → Installed Operators.
- Click Performance Addon Operator to open the Operator details page.
- Click the Subscription tab to open the Subscription details page.
- In the Update channel pane, click the pencil icon on the right side of the version number to open the Change Subscription update channel window.
- Select the next minor version. For example, if you want to upgrade to Performance Addon Operator 4.8, select 4.8.
- Click Save.
Check the status of the upgrade by navigating to Operators → Installed Operators. You can also check the status by running the following
occommand:$ oc get csv -n openshift-performance-addon-operator
17.3.1.3. Upgrading Performance Addon Operator when previously installed to a specific namespace
If you previously installed the Performance Addon Operator to a specific namespace on the cluster, for example openshift-performance-addon-operator, modify the OperatorGroup object to remove the targetNamespaces entry before upgrading.
Prerequisites
- Install the OpenShift Container Platform CLI (oc).
- Log in to the OpenShift cluster as a user with cluster-admin privileges.
Procedure
Edit the Performance Addon Operator
OperatorGroupCR and remove thespecelement that contains thetargetNamespacesentry by running the following command:$ oc patch operatorgroup -n openshift-performance-addon-operator openshift-performance-addon-operator --type json -p '[{ "op": "remove", "path": "/spec" }]'- Wait until the Operator Lifecycle Manager (OLM) processes the change.
Verify that the OperatorGroup CR change has been successfully applied. Check that the
OperatorGroupCRspecelement has been removed:$ oc describe -n openshift-performance-addon-operator og openshift-performance-addon-operator
- Proceed with the Performance Addon Operator upgrade.
17.3.2. Monitoring upgrade status
The best way to monitor Performance Addon Operator upgrade status is to watch the ClusterServiceVersion (CSV) PHASE. You can also monitor the CSV conditions in the web console or by running the oc get csv command.
The PHASE and conditions values are approximations that are based on available information.
Prerequisites
-
Access to the cluster as a user with the
cluster-adminrole. -
Install the OpenShift CLI (
oc).
Procedure
Run the following command:
$ oc get csv
Review the output, checking the
PHASEfield. For example:VERSION REPLACES PHASE 4.8.0 performance-addon-operator.v4.8.0 Installing 4.7.0 Replacing
Run
get csvagain to verify the output:# oc get csv
Example output
NAME                                DISPLAY                      VERSION   REPLACES                            PHASE
performance-addon-operator.v4.8.0   Performance Addon Operator   4.8.0     performance-addon-operator.v4.7.0   Succeeded
17.4. Provisioning real-time and low latency workloads
Many industries and organizations need extremely high performance computing and might require low and predictable latency, especially in the financial and telecommunications industries. For these industries, with their unique requirements, OpenShift Container Platform provides a Performance Addon Operator to implement automatic tuning to achieve low latency performance and consistent response time for OpenShift Container Platform applications.
The cluster administrator can use this performance profile configuration to make these changes in a more reliable way. The administrator can specify whether to update the kernel to kernel-rt (real-time), reserve CPUs for cluster and operating system housekeeping duties, including pod infra containers, and isolate CPUs for application containers to run the workloads.
The usage of execution probes in conjunction with applications that require guaranteed CPUs can cause latency spikes. It is recommended to use other probes, such as a properly configured set of network probes, as an alternative.
17.4.1. Known limitations for real-time
The RT kernel is only supported on worker nodes.
To fully utilize the real-time mode, the containers must run with elevated privileges. See Set capabilities for a Container for information on granting privileges.
OpenShift Container Platform restricts the allowed capabilities, so you might need to create a SecurityContext as well.
This procedure is fully supported with bare metal installations using Red Hat Enterprise Linux CoreOS (RHCOS) systems.
Establishing the right performance expectations refers to the fact that the real-time kernel is not a panacea. Its objective is consistent, low-latency determinism offering predictable response times. There is some additional kernel overhead associated with the real-time kernel. This is due primarily to handling hardware interruptions in separately scheduled threads. The increased overhead in some workloads results in some degradation in overall throughput. The exact amount of degradation is very workload dependent, ranging from 0% to 30%. However, it is the cost of determinism.
17.4.2. Provisioning a worker with real-time capabilities
- Install Performance Addon Operator to the cluster.
- Optional: Add a node to the OpenShift Container Platform cluster. See Setting BIOS parameters.
-
Add the label
worker-rtto the worker nodes that require the real-time capability by using theoccommand. Create a new machine config pool for real-time nodes:
apiVersion: machineconfiguration.openshift.io/v1
kind: MachineConfigPool
metadata:
  name: worker-rt
  labels:
    machineconfiguration.openshift.io/role: worker-rt
spec:
  machineConfigSelector:
    matchExpressions:
      - {
           key: machineconfiguration.openshift.io/role,
           operator: In,
           values: [worker, worker-rt],
        }
  paused: false
  nodeSelector:
    matchLabels:
      node-role.kubernetes.io/worker-rt: ""
Note that a machine config pool worker-rt is created for group of nodes that have the label
worker-rt.Add the node to the proper machine config pool by using node role labels.
NoteYou must decide which nodes are configured with real-time workloads. You could configure all of the nodes in the cluster, or a subset of the nodes. The Performance Addon Operator that expects all of the nodes are part of a dedicated machine config pool. If you use all of the nodes, you must point the Performance Addon Operator to the worker node role label. If you use a subset, you must group the nodes into a new machine config pool.
-
Create the
PerformanceProfilewith the proper set of housekeeping cores andrealTimeKernel: enabled: true. You must set
machineConfigPoolSelectorinPerformanceProfile:apiVersion: performance.openshift.io/v2 kind: PerformanceProfile metadata: name: example-performanceprofile spec: ... realTimeKernel: enabled: true nodeSelector: node-role.kubernetes.io/worker-rt: "" machineConfigPoolSelector: machineconfiguration.openshift.io/role: worker-rtVerify that a matching machine config pool exists with a label:
$ oc describe mcp/worker-rt
Example output
Name:         worker-rt
Namespace:
Labels:       machineconfiguration.openshift.io/role=worker-rt
- OpenShift Container Platform will start configuring the nodes, which might involve multiple reboots. Wait for the nodes to settle. This can take a long time depending on the specific hardware you use, but 20 minutes per node is expected.
- Verify everything is working as expected.
17.4.3. Verifying the real-time kernel installation
Use this command to verify that the real-time kernel is installed:
$ oc get node -o wide
Note the worker with the role worker-rt that contains the string 4.18.0-211.rt5.23.el8.x86_64:
NAME                               	STATUS   ROLES           	AGE 	VERSION                  	INTERNAL-IP
EXTERNAL-IP   OS-IMAGE                                       	KERNEL-VERSION
CONTAINER-RUNTIME
rt-worker-0.example.com	            Ready	 worker,worker-rt   5d17h   v1.22.1
128.66.135.107   <none>    	        Red Hat Enterprise Linux CoreOS 46.82.202008252340-0 (Ootpa)
4.18.0-211.rt5.23.el8.x86_64   cri-o://1.21.0-90.rhaos4.8.git4a0ac05.el8-rc.1
[...]
17.4.4. Creating a workload that works in real-time
Use the following procedures for preparing a workload that will use real-time capabilities.
Procedure
-
Create a pod with a QoS class of
Guaranteed. - Optional: Disable CPU load balancing for DPDK.
- Assign a proper node selector.
When writing your applications, follow the general recommendations described in Application tuning and deployment.
17.4.5. Creating a pod with a QoS class of Guaranteed
Keep the following in mind when you create a pod that is given a QoS class of Guaranteed:
- Every container in the pod must have a memory limit and a memory request, and they must be the same.
- Every container in the pod must have a CPU limit and a CPU request, and they must be the same.
The following example shows the configuration file for a pod that has one container. The container has a memory limit and a memory request, both equal to 200 MiB. The container has a CPU limit and a CPU request, both equal to 1 CPU.
apiVersion: v1
kind: Pod
metadata:
  name: qos-demo
  namespace: qos-example
spec:
  containers:
  - name: qos-demo-ctr
    image: <image-pull-spec>
    resources:
      limits:
        memory: "200Mi"
        cpu: "1"
      requests:
        memory: "200Mi"
        cpu: "1"
Create the pod:
$ oc apply -f qos-pod.yaml --namespace=qos-example
View detailed information about the pod:
$ oc get pod qos-demo --namespace=qos-example --output=yaml
Example output
spec: containers: ... status: qosClass: GuaranteedNoteIf a container specifies its own memory limit, but does not specify a memory request, OpenShift Container Platform automatically assigns a memory request that matches the limit. Similarly, if a container specifies its own CPU limit, but does not specify a CPU request, OpenShift Container Platform automatically assigns a CPU request that matches the limit.
17.4.6. Optional: Disabling CPU load balancing for DPDK
Functionality to disable or enable CPU load balancing is implemented on the CRI-O level. The code under the CRI-O disables or enables CPU load balancing only when the following requirements are met.
The pod must use the
performance-<profile-name>runtime class. You can get the proper name by looking at the status of the performance profile, as shown here:apiVersion: performance.openshift.io/v2 kind: PerformanceProfile ... status: ... runtimeClass: performance-manual
-
The pod must have the
cpu-load-balancing.crio.io: trueannotation.
The Performance Addon Operator is responsible for the creation of the high-performance runtime handler config snippet under relevant nodes and for creation of the high-performance runtime class under the cluster. It will have the same content as default runtime handler except it enables the CPU load balancing configuration functionality.
To disable the CPU load balancing for the pod, the Pod specification must include the following fields:
apiVersion: v1
kind: Pod
metadata:
  ...
  annotations:
    ...
    cpu-load-balancing.crio.io: "disable"
    ...
  ...
spec:
  ...
  runtimeClassName: performance-<profile_name>
...Only disable CPU load balancing when the CPU manager static policy is enabled and for pods with guaranteed QoS that use whole CPUs. Otherwise, disabling CPU load balancing can affect the performance of other containers in the cluster.
17.4.7. Assigning a proper node selector
The preferred way to assign a pod to nodes is to use the same node selector the performance profile used, as shown here:
apiVersion: v1
kind: Pod
metadata:
  name: example
spec:
  # ...
  nodeSelector:
    node-role.kubernetes.io/worker-rt: ""
For more information, see Placing pods on specific nodes using node selectors.
17.4.8. Scheduling a workload onto a worker with real-time capabilities
Use label selectors that match the nodes attached to the machine config pool that was configured for low latency by the Performance Addon Operator. For more information, see Assigning pods to nodes.
17.4.9. Managing device interrupt processing for guaranteed pod isolated CPUs
The Performance Addon Operator can manage host CPUs by dividing them into reserved CPUs for cluster and operating system housekeeping duties, including pod infra containers, and isolated CPUs for application containers to run the workloads. This allows you to set CPUs for low latency workloads as isolated.
Device interrupts are load balanced between all isolated and reserved CPUs to avoid CPUs being overloaded, with the exception of CPUs where there is a guaranteed pod running. Guaranteed pod CPUs are prevented from processing device interrupts when the relevant annotations are set for the pod.
In the performance profile, globallyDisableIrqLoadBalancing is used to manage whether device interrupts are processed or not. For certain workloads the reserved CPUs are not always sufficient for dealing with device interrupts, and for this reason, device interrupts are not globally disabled on the isolated CPUs. By default, Performance Addon Operator does not disable device interrupts on isolated CPUs.
To achieve low latency for workloads, some (but not all) pods require the CPUs they are running on to not process device interrupts. A pod annotation, irq-load-balancing.crio.io, is used to define whether device interrupts are processed or not. When configured, CRI-O disables device interrupts only as long as the pod is running.
17.4.9.1. Disabling CPU CFS quota
To reduce CPU throttling for individual guaranteed pods, create a pod specification with the annotation cpu-quota.crio.io: "disable". This annotation disables the CPU completely fair scheduler (CFS) quota at the pod run time. The following pod specification contains this annotation:
apiVersion: performance.openshift.io/v2
kind: Pod
metadata:
  annotations:
      cpu-quota.crio.io: "disable"
spec:
    runtimeClassName: performance-<profile_name>
...Only disable CPU CFS quota when the CPU manager static policy is enabled and for pods with guaranteed QoS that use whole CPUs. Otherwise, disabling CPU CFS quota can affect the performance of other containers in the cluster.
17.4.9.2. Disabling global device interrupts handling in Performance Addon Operator
To configure Performance Addon Operator to disable global device interrupts for the isolated CPU set, set the globallyDisableIrqLoadBalancing field in the performance profile to true. When true, conflicting pod annotations are ignored. When false, IRQ loads are balanced across all CPUs.
A performance profile snippet illustrates this setting:
apiVersion: performance.openshift.io/v2
kind: PerformanceProfile
metadata:
  name: manual
spec:
  globallyDisableIrqLoadBalancing: true
...
17.4.9.3. Disabling interrupt processing for individual pods
To disable interrupt processing for individual pods, ensure that globallyDisableIrqLoadBalancing is set to false in the performance profile. Then, in the pod specification, set the irq-load-balancing.crio.io pod annotation to disable. The following pod specification contains this annotation:
apiVersion: performance.openshift.io/v2
kind: Pod
metadata:
  annotations:
      irq-load-balancing.crio.io: "disable"
spec:
    runtimeClassName: performance-<profile_name>
...
17.4.10. Upgrading the performance profile to use device interrupt processing
When you upgrade the Performance Addon Operator performance profile custom resource definition (CRD) from v1 or v1alpha1 to v2, globallyDisableIrqLoadBalancing is set to true on existing profiles.
globallyDisableIrqLoadBalancing toggles whether IRQ load balancing will be disabled for the Isolated CPU set. When the option is set to true it disables IRQ load balancing for the Isolated CPU set. Setting the option to false allows the IRQs to be balanced across all CPUs.
17.4.10.1. Supported API Versions
The Performance Addon Operator supports v2, v1, and v1alpha1 for the performance profile apiVersion field. The v1 and v1alpha1 APIs are identical. The v2 API includes an optional boolean field globallyDisableIrqLoadBalancing with a default value of false.
17.4.10.1.1. Upgrading Performance Addon Operator API from v1alpha1 to v1
When upgrading Performance Addon Operator API version from v1alpha1 to v1, the v1alpha1 performance profiles are converted on-the-fly using a "None" Conversion strategy and served to the Performance Addon Operator with API version v1.
17.4.10.1.2. Upgrading Performance Addon Operator API from v1alpha1 or v1 to v2
When upgrading from an older Performance Addon Operator API version, the existing v1 and v1alpha1 performance profiles are converted using a conversion webhook that injects the globallyDisableIrqLoadBalancing field with a value of true.
17.4.11. Configuring a node for IRQ dynamic load balancing
To configure a cluster node to handle IRQ dynamic load balancing, do the following:
- Log in to the OpenShift Container Platform cluster as a user with cluster-admin privileges.
-
Set the performance profile
apiVersionto useperformance.openshift.io/v2. -
Remove the
globallyDisableIrqLoadBalancingfield or set it tofalse. Set the appropriate isolated and reserved CPUs. The following snippet illustrates a profile that reserves 2 CPUs. IRQ load-balancing is enabled for pods running on the
isolatedCPU set:apiVersion: performance.openshift.io/v2 kind: PerformanceProfile metadata: name: dynamic-irq-profile spec: cpu: isolated: 2-5 reserved: 0-1 ...NoteWhen you configure reserved and isolated CPUs, the infra containers in pods use the reserved CPUs and the application containers use the isolated CPUs.
Create the pod that uses exclusive CPUs, and set
irq-load-balancing.crio.ioandcpu-quota.crio.ioannotations todisable. For example:apiVersion: v1 kind: Pod metadata: name: dynamic-irq-pod annotations: irq-load-balancing.crio.io: "disable" cpu-quota.crio.io: "disable" spec: containers: - name: dynamic-irq-pod image: "quay.io/openshift-kni/cnf-tests:4.8" command: ["sleep", "10h"] resources: requests: cpu: 2 memory: "200M" limits: cpu: 2 memory: "200M" nodeSelector: node-role.kubernetes.io/worker-cnf: "" runtimeClassName: performance-dynamic-irq-profile ...-
Enter the pod
runtimeClassNamein the form performance-<profile_name>, where <profile_name> is thenamefrom thePerformanceProfileYAML, in this example,performance-dynamic-irq-profile. - Set the node selector to target a cnf-worker.
Ensure the pod is running correctly. Status should be
running, and the correct cnf-worker node should be set:$ oc get pod -o wide
Expected output
NAME              READY   STATUS    RESTARTS   AGE     IP             NODE          NOMINATED NODE   READINESS GATES
dynamic-irq-pod   1/1     Running   0          5h33m   <ip-address>   <node-name>   <none>           <none>
Get the CPUs that the pod configured for IRQ dynamic load balancing runs on:
$ oc exec -it dynamic-irq-pod -- /bin/bash -c "grep Cpus_allowed_list /proc/self/status | awk '{print $2}'"Expected output
Cpus_allowed_list: 2-3
Ensure the node configuration is applied correctly. SSH into the node to verify the configuration.
$ oc debug node/<node-name>
Expected output
Starting pod/<node-name>-debug ...
To use host binaries, run `chroot /host`

Pod IP: <ip-address>
If you don't see a command prompt, try pressing enter.

sh-4.4#
Verify that you can use the node file system:
sh-4.4# chroot /host
Expected output
sh-4.4#
Ensure the default system CPU affinity mask does not include the
dynamic-irq-podCPUs, for example, CPUs 2 and 3.$ cat /proc/irq/default_smp_affinity
Example output
33
Ensure the system IRQs are not configured to run on the
dynamic-irq-podCPUs:find /proc/irq/ -name smp_affinity_list -exec sh -c 'i="$1"; mask=$(cat $i); file=$(echo $i); echo $file: $mask' _ {} \;Example output
/proc/irq/0/smp_affinity_list: 0-5
/proc/irq/1/smp_affinity_list: 5
/proc/irq/2/smp_affinity_list: 0-5
/proc/irq/3/smp_affinity_list: 0-5
/proc/irq/4/smp_affinity_list: 0
/proc/irq/5/smp_affinity_list: 0-5
/proc/irq/6/smp_affinity_list: 0-5
/proc/irq/7/smp_affinity_list: 0-5
/proc/irq/8/smp_affinity_list: 4
/proc/irq/9/smp_affinity_list: 4
/proc/irq/10/smp_affinity_list: 0-5
/proc/irq/11/smp_affinity_list: 0
/proc/irq/12/smp_affinity_list: 1
/proc/irq/13/smp_affinity_list: 0-5
/proc/irq/14/smp_affinity_list: 1
/proc/irq/15/smp_affinity_list: 0
/proc/irq/24/smp_affinity_list: 1
/proc/irq/25/smp_affinity_list: 1
/proc/irq/26/smp_affinity_list: 1
/proc/irq/27/smp_affinity_list: 5
/proc/irq/28/smp_affinity_list: 1
/proc/irq/29/smp_affinity_list: 0
/proc/irq/30/smp_affinity_list: 0-5
Some IRQ controllers do not support IRQ re-balancing and will always expose all online CPUs as the IRQ mask. These IRQ controllers effectively run on CPU 0. For more information on the host configuration, SSH into the host and run the following, replacing <irq-num> with the CPU number that you want to query:
$ cat /proc/irq/<irq-num>/effective_affinity
17.4.12. Configuring hyperthreading for a cluster
To configure hyperthreading for an OpenShift Container Platform cluster, set the CPU threads in the performance profile to the same cores that are configured for the reserved or isolated CPU pools.
If you configure a performance profile, and subsequently change the hyperthreading configuration for the host, ensure that you update the CPU isolated and reserved fields in the PerformanceProfile YAML to match the new configuration.
Disabling a previously enabled host hyperthreading configuration can cause the CPU core IDs listed in the PerformanceProfile YAML to be incorrect. This incorrect configuration can cause the node to become unavailable because the listed CPUs can no longer be found.
Prerequisites
-
Access to the cluster as a user with the
cluster-adminrole. - Install the OpenShift CLI (oc).
Procedure
Ascertain which threads are running on what CPUs for the host you want to configure.
You can view which threads are running on the host CPUs by logging in to the cluster and running the following command:
$ lscpu --all --extended
Example output
CPU NODE SOCKET CORE L1d:L1i:L2:L3 ONLINE MAXMHZ    MINMHZ
0   0    0      0    0:0:0:0       yes    4800.0000 400.0000
1   0    0      1    1:1:1:0       yes    4800.0000 400.0000
2   0    0      2    2:2:2:0       yes    4800.0000 400.0000
3   0    0      3    3:3:3:0       yes    4800.0000 400.0000
4   0    0      0    0:0:0:0       yes    4800.0000 400.0000
5   0    0      1    1:1:1:0       yes    4800.0000 400.0000
6   0    0      2    2:2:2:0       yes    4800.0000 400.0000
7   0    0      3    3:3:3:0       yes    4800.0000 400.0000
In this example, there are eight logical CPU cores running on four physical CPU cores. CPU0 and CPU4 are running on physical Core0, CPU1 and CPU5 are running on physical Core 1, and so on.
Alternatively, to view the threads that are set for a particular physical CPU core (
cpu0in the example below), open a command prompt and run the following:$ cat /sys/devices/system/cpu/cpu0/topology/thread_siblings_list
Example output
0-4
Apply the isolated and reserved CPUs in the
PerformanceProfileYAML. For example, you can set logical cores CPU0 and CPU4 asisolated, and logical cores CPU1 to CPU3 and CPU5 to CPU7 asreserved. When you configure reserved and isolated CPUs, the infra containers in pods use the reserved CPUs and the application containers use the isolated CPUs.... cpu: isolated: 0,4 reserved: 1-3,5-7 ...NoteThe reserved and isolated CPU pools must not overlap and together must span all available cores in the worker node.
Hyperthreading is enabled by default on most Intel processors. If you enable hyperthreading, all threads processed by a particular core must be isolated or processed on the same core.
17.4.12.1. Disabling hyperthreading for low latency applications
When configuring clusters for low latency processing, consider whether you want to disable hyperthreading before you deploy the cluster. To disable hyperthreading, do the following:
- Create a performance profile that is appropriate for your hardware and topology.
Set
nosmtas an additional kernel argument. The following example performance profile illustrates this setting:apiVersion: performance.openshift.io/v2 kind: PerformanceProfile metadata: name: example-performanceprofile spec: additionalKernelArgs: - nmi_watchdog=0 - audit=0 - mce=off - processor.max_cstate=1 - idle=poll - intel_idle.max_cstate=0 - nosmt cpu: isolated: 2-3 reserved: 0-1 hugepages: defaultHugepagesSize: 1G pages: - count: 2 node: 0 size: 1G nodeSelector: node-role.kubernetes.io/performance: '' realTimeKernel: enabled: trueNoteWhen you configure reserved and isolated CPUs, the infra containers in pods use the reserved CPUs and the application containers use the isolated CPUs.
17.5. Tuning nodes for low latency with the performance profile
The performance profile lets you control latency tuning aspects of nodes that belong to a certain machine config pool. After you specify your settings, the PerformanceProfile object is compiled into multiple objects that perform the actual node level tuning:
-
A
MachineConfigfile that manipulates the nodes. -
A
KubeletConfigfile that configures the Topology Manager, the CPU Manager, and the OpenShift Container Platform nodes. - The Tuned profile that configures the Node Tuning Operator.
You can use a performance profile to specify whether to update the kernel to kernel-rt, to allocate huge pages, and to partition the CPUs for performing housekeeping duties or running workloads.
You can manually create the PerformanceProfile object or use the Performance Profile Creator (PPC) to generate a performance profile. See the additional resources below for more information on the PPC.
Sample performance profile
apiVersion: performance.openshift.io/v2
kind: PerformanceProfile
metadata:
 name: performance
spec:
 cpu:
  isolated: "5-15" 1
  reserved: "0-4" 2
 hugepages:
  defaultHugepagesSize: "1G"
  pages:
  - size: "1G"
    count: 16
    node: 0
 realTimeKernel:
  enabled: true  3
 numa:  4
  topologyPolicy: "best-effort"
 nodeSelector:
  node-role.kubernetes.io/worker-cnf: "" 5
- 1
- Use this field to isolate specific CPUs to use with application containers for workloads.
- 2
- Use this field to reserve specific CPUs to use with infra containers for housekeeping.
- 3
- Use this field to install the real-time kernel on the node. Valid values are
trueorfalse. Setting thetruevalue installs the real-time kernel. - 4
- Use this field to configure the topology manager policy. Valid values are
none(default),best-effort,restricted, andsingle-numa-node. For more information, see Topology Manager Policies. - 5
- Use this field to specify a node selector to apply the performance profile to specific nodes.
Additional resources
- For information on using the Performance Profile Creator (PPC) to generate a performance profile, see Creating a performance profile.
17.5.1. Configuring huge pages
Nodes must pre-allocate huge pages used in an OpenShift Container Platform cluster. Use the Performance Addon Operator to allocate huge pages on a specific node.
OpenShift Container Platform provides a method for creating and allocating huge pages. Performance Addon Operator provides an easier method for doing this using the performance profile.
For example, in the hugepages pages section of the performance profile, you can specify multiple blocks of size, count, and, optionally, node:
hugepages:
   defaultHugepagesSize: "1G"
   pages:
   - size:  "1G"
     count:  4
node: 0 1- 1
nodeis the NUMA node in which the huge pages are allocated. If you omitnode, the pages are evenly spread across all NUMA nodes.
Wait for the relevant machine config pool status that indicates the update is finished.
These are the only configuration steps you need to do to allocate huge pages.
Verification
To verify the configuration, see the
/proc/meminfofile on the node:$ oc debug node/ip-10-0-141-105.ec2.internal
# grep -i huge /proc/meminfo
Example output
AnonHugePages:    ###### ##
ShmemHugePages:        0 kB
HugePages_Total:       2
HugePages_Free:        2
HugePages_Rsvd:        0
HugePages_Surp:        0
Hugepagesize:       #### ##
Hugetlb:            #### ##
Use
oc describeto report the new size:$ oc describe node worker-0.ocp4poc.example.com | grep -i huge
Example output
                                   hugepages-1g=true
 hugepages-###:  ###
 hugepages-###:  ###
17.5.2. Allocating multiple huge page sizes
You can request huge pages with different sizes under the same container. This allows you to define more complicated pods consisting of containers with different huge page size needs.
For example, you can define sizes 1G and 2M and the Performance Addon Operator will configure both sizes on the node, as shown here:
spec:
  hugepages:
    defaultHugepagesSize: 1G
    pages:
    - count: 1024
      node: 0
      size: 2M
    - count: 4
      node: 1
      size: 1G
17.5.3. Restricting CPUs for infra and application containers
Generic housekeeping and workload tasks use CPUs in a way that may impact latency-sensitive processes. By default, the container runtime uses all online CPUs to run all containers together, which can result in context switches and spikes in latency. Partitioning the CPUs prevents noisy processes from interfering with latency-sensitive processes by separating them from each other. The following table describes how processes run on a CPU after you have tuned the node using the Performance Add-On Operator:
Table 17.1. Process' CPU assignments
| Process type | Details |
|---|---|
|
| Runs on any CPU except where low latency workload is running |
| Infrastructure pods | Runs on any CPU except where low latency workload is running |
| Interrupts | Redirects to reserved CPUs (optional in OpenShift Container Platform 4.7 and later) |
| Kernel processes | Pins to reserved CPUs |
| Latency-sensitive workload pods | Pins to a specific set of exclusive CPUs from the isolated pool |
| OS processes/systemd services | Pins to reserved CPUs |
The allocatable capacity of cores on a node for pods of all QoS process types, Burstable, BestEffort, or Guaranteed, is equal to the capacity of the isolated pool. The capacity of the reserved pool is removed from the node’s total core capacity for use by the cluster and operating system housekeeping duties.
Example 1
A node features a capacity of 100 cores. Using a performance profile, the cluster administrator allocates 50 cores to the isolated pool and 50 cores to the reserved pool. The cluster administrator assigns 25 cores to QoS Guaranteed pods and 25 cores for BestEffort or Burstable pods. This matches the capacity of the isolated pool.
Example 2
A node features a capacity of 100 cores. Using a performance profile, the cluster administrator allocates 50 cores to the isolated pool and 50 cores to the reserved pool. The cluster administrator assigns 50 cores to QoS Guaranteed pods and one core for BestEffort or Burstable pods. This exceeds the capacity of the isolated pool by one core. Pod scheduling fails because of insufficient CPU capacity.
The exact partitioning pattern to use depends on many factors like hardware, workload characteristics and the expected system load. Some sample use cases are as follows:
- If the latency-sensitive workload uses specific hardware, such as a network interface controller (NIC), ensure that the CPUs in the isolated pool are as close as possible to this hardware. At a minimum, you should place the workload in the same Non-Uniform Memory Access (NUMA) node.
- The reserved pool is used for handling all interrupts. When depending on system networking, allocate a sufficiently-sized reserve pool to handle all the incoming packet interrupts. In 4.8 and later versions, workloads can optionally be labeled as sensitive.
The decision regarding which specific CPUs should be used for reserved and isolated partitions requires detailed analysis and measurements. Factors like NUMA affinity of devices and memory play a role. The selection also depends on the workload architecture and the specific use case.
The reserved and isolated CPU pools must not overlap and together must span all available cores in the worker node.
To ensure that housekeeping tasks and workloads do not interfere with each other, specify two groups of CPUs in the spec section of the performance profile.
-
isolated- Specifies the CPUs for the application container workloads. These CPUs have the lowest latency. Processes in this group have no interruptions and can, for example, reach much higher DPDK zero packet loss bandwidth. -
reserved- Specifies the CPUs for the cluster and operating system housekeeping duties. Threads in thereservedgroup are often busy. Do not run latency-sensitive applications in thereservedgroup. Latency-sensitive applications run in theisolatedgroup.
Procedure
- Create a performance profile appropriate for the environment’s hardware and topology.
Add the
reservedandisolatedparameters with the CPUs you want reserved and isolated for the infra and application containers:apiVersion: performance.openshift.io/v2 kind: PerformanceProfile metadata: name: infra-cpus spec: cpu: reserved: "0-4,9" 1 isolated: "5-8" 2 nodeSelector: 3 node-role.kubernetes.io/worker: ""
17.6. Reducing NIC queues using the Performance Addon Operator
The Performance Addon Operator allows you to adjust the network interface controller (NIC) queue count for each network device by configuring the performance profile. Device network queues allows the distribution of packets among different physical queues and each queue gets a separate thread for packet processing.
In real-time or low latency systems, all the unnecessary interrupt request lines (IRQs) pinned to the isolated CPUs must be moved to reserved or housekeeping CPUs.
In deployments with applications that require system, OpenShift Container Platform networking or in mixed deployments with Data Plane Development Kit (DPDK) workloads, multiple queues are needed to achieve good throughput and the number of NIC queues should be adjusted or remain unchanged. For example, to achieve low latency the number of NIC queues for DPDK based workloads should be reduced to just the number of reserved or housekeeping CPUs.
Too many queues are created by default for each CPU and these do not fit into the interrupt tables for housekeeping CPUs when tuning for low latency. Reducing the number of queues makes proper tuning possible. Smaller number of queues means a smaller number of interrupts that then fit in the IRQ table.
17.6.1. Adjusting the NIC queues with the performance profile
The performance profile lets you adjust the queue count for each network device.
Supported network devices:
- Non-virtual network devices
- Network devices that support multiple queues (channels)
Unsupported network devices:
- Pure software network interfaces
- Block devices
- Intel DPDK virtual functions
Prerequisites
-
Access to the cluster as a user with the
cluster-adminrole. -
Install the OpenShift CLI (
oc).
Procedure
-
Log in to the OpenShift Container Platform cluster running the Performance Addon Operator as a user with
cluster-adminprivileges. - Create and apply a performance profile appropriate for your hardware and topology. For guidance on creating a profile, see the "Creating a performance profile" section.
Edit this created performance profile:
$ oc edit -f <your_profile_name>.yaml
Populate the
specfield with thenetobject. The object list can contain two fields:-
userLevelNetworkingis a required field specified as a boolean flag. IfuserLevelNetworkingistrue, the queue count is set to the reserved CPU count for all supported devices. The default isfalse. devicesis an optional field specifying a list of devices that will have the queues set to the reserved CPU count. If the device list is empty, the configuration applies to all network devices. The configuration is as follows:interfaceName: This field specifies the interface name, and it supports shell-style wildcards, which can be positive or negative.-
Example wildcard syntax is as follows:
<string> .* -
Negative rules are prefixed with an exclamation mark. To apply the net queue changes to all devices other than the excluded list, use
!<device>, for example,!eno1.
-
Example wildcard syntax is as follows:
-
vendorID: The network device vendor ID represented as a 16-bit hexadecimal number with a0xprefix. deviceID: The network device ID (model) represented as a 16-bit hexadecimal number with a0xprefix.NoteWhen a
deviceIDis specified, thevendorIDmust also be defined. A device that matches all of the device identifiers specified in a device entryinterfaceName,vendorID, or a pair ofvendorIDplusdeviceIDqualifies as a network device. This network device then has its net queues count set to the reserved CPU count.When two or more devices are specified, the net queues count is set to any net device that matches one of them.
-
Set the queue count to the reserved CPU count for all devices by using this example performance profile:
apiVersion: performance.openshift.io/v2
kind: PerformanceProfile
metadata:
  name: manual
spec:
  cpu:
    isolated: 3-51,54-103
    reserved: 0-2,52-54
  net:
    userLevelNetworking: true
  nodeSelector:
    node-role.kubernetes.io/worker-cnf: ""
Set the queue count to the reserved CPU count for all devices matching any of the defined device identifiers by using this example performance profile:
apiVersion: performance.openshift.io/v2
kind: PerformanceProfile
metadata:
  name: manual
spec:
  cpu:
    isolated: 3-51,54-103
    reserved: 0-2,52-54
  net:
    userLevelNetworking: true
    devices:
    - interfaceName: “eth0”
    - interfaceName: “eth1”
    - vendorID: “0x1af4”
    - deviceID: “0x1000”
  nodeSelector:
    node-role.kubernetes.io/worker-cnf: ""
Set the queue count to the reserved CPU count for all devices starting with the interface name
ethby using this example performance profile:apiVersion: performance.openshift.io/v2 kind: PerformanceProfile metadata: name: manual spec: cpu: isolated: 3-51,54-103 reserved: 0-2,52-54 net: userLevelNetworking: true devices: - interfaceName: “eth*” nodeSelector: node-role.kubernetes.io/worker-cnf: ""Set the queue count to the reserved CPU count for all devices with an interface named anything other than
eno1by using this example performance profile:apiVersion: performance.openshift.io/v2 kind: PerformanceProfile metadata: name: manual spec: cpu: isolated: 3-51,54-103 reserved: 0-2,52-54 net: userLevelNetworking: true devices: - interfaceName: “!eno1” nodeSelector: node-role.kubernetes.io/worker-cnf: ""Set the queue count to the reserved CPU count for all devices that have an interface name
eth0,vendorIDof0x1af4, anddeviceIDof0x1000by using this example performance profile:apiVersion: performance.openshift.io/v2 kind: PerformanceProfile metadata: name: manual spec: cpu: isolated: 3-51,54-103 reserved: 0-2,52-54 net: userLevelNetworking: true devices: - interfaceName: “eth0” - vendorID: “0x1af4” - deviceID: “0x1000” nodeSelector: node-role.kubernetes.io/worker-cnf: ""Apply the updated performance profile:
$ oc apply -f <your_profile_name>.yaml
Additional resources
17.6.2. Verifying the queue status
In this section, a number of examples illustrate different performance profiles and how to verify the changes are applied.
Example 1
In this example, the net queue count is set to the reserved CPU count (2) for all supported devices.
The relevant section from the performance profile is:
apiVersion: performance.openshift.io/v2
metadata:
  name: performance
spec:
  kind: PerformanceProfile
  spec:
    cpu:
      reserved: 0-1  #total = 2
      isolated: 2-8
    net:
      userLevelNetworking: true
# ...
Display the status of the queues associated with a device using the following command:
NoteRun this command on the node where the performance profile was applied.
$ ethtool -l <device>
Verify the queue status before the profile is applied:
$ ethtool -l ens4
Example output
Channel parameters for ens4:
Pre-set maximums:
RX:         0
TX:         0
Other:      0
Combined:   4
Current hardware settings:
RX:         0
TX:         0
Other:      0
Combined:   4
Verify the queue status after the profile is applied:
$ ethtool -l ens4
Example output
Channel parameters for ens4:
Pre-set maximums:
RX:         0
TX:         0
Other:      0
Combined:   4
Current hardware settings:
RX:         0
TX:         0
Other:      0
Combined:   2 1
- 1
- The combined channel shows that the total count of reserved CPUs for all supported devices is 2. This matches what is configured in the performance profile.
Example 2
In this example, the net queue count is set to the reserved CPU count (2) for all supported network devices with a specific vendorID.
The relevant section from the performance profile is:
apiVersion: performance.openshift.io/v2
metadata:
  name: performance
spec:
  kind: PerformanceProfile
  spec:
    cpu:
      reserved: 0-1  #total = 2
      isolated: 2-8
    net:
      userLevelNetworking: true
      devices:
      - vendorID = 0x1af4
# ...
Display the status of the queues associated with a device using the following command:
NoteRun this command on the node where the performance profile was applied.
$ ethtool -l <device>
Verify the queue status after the profile is applied:
$ ethtool -l ens4
Example output
Channel parameters for ens4:
Pre-set maximums:
RX:         0
TX:         0
Other:      0
Combined:   4
Current hardware settings:
RX:         0
TX:         0
Other:      0
Combined:   2 1
- 1
- The total count of reserved CPUs for all supported devices with
vendorID=0x1af4is 2. For example, if there is another network deviceens2withvendorID=0x1af4it will also have total net queues of 2. This matches what is configured in the performance profile.
Example 3
In this example, the net queue count is set to the reserved CPU count (2) for all supported network devices that match any of the defined device identifiers.
The command udevadm info provides a detailed report on a device. In this example the devices are:
# udevadm info -p /sys/class/net/ens4
...
E: ID_MODEL_ID=0x1000
E: ID_VENDOR_ID=0x1af4
E: INTERFACE=ens4
...
# udevadm info -p /sys/class/net/eth0
...
E: ID_MODEL_ID=0x1002
E: ID_VENDOR_ID=0x1001
E: INTERFACE=eth0
...
Set the net queues to 2 for a device with
interfaceNameequal toeth0and any devices that have avendorID=0x1af4with the following performance profile:apiVersion: performance.openshift.io/v2 metadata: name: performance spec: kind: PerformanceProfile spec: cpu: reserved: 0-1 #total = 2 isolated: 2-8 net: userLevelNetworking: true devices: - interfaceName = eth0 - vendorID = 0x1af4 ...Verify the queue status after the profile is applied:
$ ethtool -l ens4
Example output
Channel parameters for ens4: Pre-set maximums: RX: 0 TX: 0 Other: 0 Combined: 4 Current hardware settings: RX: 0 TX: 0 Other: 0 Combined: 2 1- 1
- The total count of reserved CPUs for all supported devices with
vendorID=0x1af4is set to 2. For example, if there is another network deviceens2withvendorID=0x1af4, it will also have the total net queues set to 2. Similarly, a device withinterfaceNameequal toeth0will have total net queues set to 2.
17.6.3. Logging associated with adjusting NIC queues
Log messages detailing the assigned devices are recorded in the respective Tuned daemon logs. The following messages might be recorded to the /var/log/tuned/tuned.log file:
An
INFOmessage is recorded detailing the successfully assigned devices:INFO tuned.plugins.base: instance net_test (net): assigning devices ens1, ens2, ens3
A
WARNINGmessage is recorded if none of the devices can be assigned:WARNING tuned.plugins.base: instance net_test: no matching devices available
17.7. Debugging low latency CNF tuning status
The PerformanceProfile custom resource (CR) contains status fields for reporting tuning status and debugging latency degradation issues. These fields report on conditions that describe the state of the operator’s reconciliation functionality.
A typical issue can arise when the status of machine config pools that are attached to the performance profile are in a degraded state, causing the PerformanceProfile status to degrade. In this case, the machine config pool issues a failure message.
The Performance Addon Operator contains the performanceProfile.spec.status.Conditions status field:
Status:
  Conditions:
    Last Heartbeat Time:   2020-06-02T10:01:24Z
    Last Transition Time:  2020-06-02T10:01:24Z
    Status:                True
    Type:                  Available
    Last Heartbeat Time:   2020-06-02T10:01:24Z
    Last Transition Time:  2020-06-02T10:01:24Z
    Status:                True
    Type:                  Upgradeable
    Last Heartbeat Time:   2020-06-02T10:01:24Z
    Last Transition Time:  2020-06-02T10:01:24Z
    Status:                False
    Type:                  Progressing
    Last Heartbeat Time:   2020-06-02T10:01:24Z
    Last Transition Time:  2020-06-02T10:01:24Z
    Status:                False
    Type:                  Degraded
The Status field contains Conditions that specify Type values that indicate the status of the performance profile:
Available- All machine configs and Tuned profiles have been created successfully and are available for cluster components are responsible to process them (NTO, MCO, Kubelet).
Upgradeable- Indicates whether the resources maintained by the Operator are in a state that is safe to upgrade.
Progressing- Indicates that the deployment process from the performance profile has started.
DegradedIndicates an error if:
- Validation of the performance profile has failed.
- Creation of all relevant components did not complete successfully.
Each of these types contain the following fields:
Status-
The state for the specific type (
trueorfalse). Timestamp- The transaction timestamp.
Reason string- The machine readable reason.
Message string- The human readable reason describing the state and error details, if any.
17.7.1. Machine config pools
A performance profile and its created products are applied to a node according to an associated machine config pool (MCP). The MCP holds valuable information about the progress of applying the machine configurations created by performance addons that encompass kernel args, kube config, huge pages allocation, and deployment of rt-kernel. The performance addons controller monitors changes in the MCP and updates the performance profile status accordingly.
The only conditions returned by the MCP to the performance profile status is when the MCP is Degraded, which leads to performaceProfile.status.condition.Degraded = true.
Example
The following example is for a performance profile with an associated machine config pool (worker-cnf) that was created for it:
The associated machine config pool is in a degraded state:
# oc get mcp
Example output
NAME         CONFIG                                                 UPDATED   UPDATING   DEGRADED   MACHINECOUNT   READYMACHINECOUNT   UPDATEDMACHINECOUNT   DEGRADEDMACHINECOUNT   AGE
master       rendered-master-2ee57a93fa6c9181b546ca46e1571d2d       True      False      False      3              3                   3                     0                      2d21h
worker       rendered-worker-d6b2bdc07d9f5a59a6b68950acf25e5f       True      False      False      2              2                   2                     0                      2d21h
worker-cnf   rendered-worker-cnf-6c838641b8a08fff08dbd8b02fb63f7c   False     True       True       2              1                   1                     1                      2d20h
The
describesection of the MCP shows the reason:# oc describe mcp worker-cnf
Example output
  Message:               Node node-worker-cnf is reporting: "prepping update:
  machineconfig.machineconfiguration.openshift.io \"rendered-worker-cnf-40b9996919c08e335f3ff230ce1d170\" not
  found"
    Reason:                1 nodes are reporting degraded status on sync
The degraded state should also appear under the performance profile
statusfield marked asdegraded = true:# oc describe performanceprofiles performance
Example output
Message: Machine config pool worker-cnf Degraded Reason: 1 nodes are reporting degraded status on sync.
Machine config pool worker-cnf Degraded Message: Node yquinn-q8s5v-w-b-z5lqn.c.openshift-gce-devel.internal is
reporting: "prepping update: machineconfig.machineconfiguration.openshift.io
\"rendered-worker-cnf-40b9996919c08e335f3ff230ce1d170\" not found".    Reason:  MCPDegraded
   Status:  True
   Type:    Degraded
17.8. Collecting low latency tuning debugging data for Red Hat Support
When opening a support case, it is helpful to provide debugging information about your cluster to Red Hat Support.
The must-gather tool enables you to collect diagnostic information about your OpenShift Container Platform cluster, including node tuning, NUMA topology, and other information needed to debug issues with low latency setup.
For prompt support, supply diagnostic information for both OpenShift Container Platform and low latency tuning.
17.8.1. About the must-gather tool
The oc adm must-gather CLI command collects the information from your cluster that is most likely needed for debugging issues, such as:
- Resource definitions
- Audit logs
- Service logs
You can specify one or more images when you run the command by including the --image argument. When you specify an image, the tool collects data related to that feature or product. When you run oc adm must-gather, a new pod is created on the cluster. The data is collected on that pod and saved in a new directory that starts with must-gather.local. This directory is created in your current working directory.
17.8.2. About collecting low latency tuning data
Use the oc adm must-gather CLI command to collect information about your cluster, including features and objects associated with low latency tuning, including:
- The Performance Addon Operator namespaces and child objects.
-
MachineConfigPooland associatedMachineConfigobjects. - The Node Tuning Operator and associated Tuned objects.
- Linux Kernel command line options.
- CPU and NUMA topology
- Basic PCI device information and NUMA locality.
To collect Performance Addon Operator debugging information with must-gather, you must specify the Performance Addon Operator must-gather image:
--image=registry.redhat.io/openshift4/performance-addon-operator-must-gather-rhel8:v4.8.
17.8.3. Gathering data about specific features
You can gather debugging information about specific features by using the oc adm must-gather CLI command with the --image or --image-stream argument. The must-gather tool supports multiple images, so you can gather data about more than one feature by running a single command.
To collect the default must-gather data in addition to specific feature data, add the --image-stream=openshift/must-gather argument.
Prerequisites
-
Access to the cluster as a user with the
cluster-adminrole. - The OpenShift Container Platform CLI (oc) installed.
Procedure
-
Navigate to the directory where you want to store the
must-gatherdata. Run the
oc adm must-gathercommand with one or more--imageor--image-streamarguments. For example, the following command gathers both the default cluster data and information specific to the Performance Addon Operator:$ oc adm must-gather \ --image-stream=openshift/must-gather \ 1 --image=registry.redhat.io/openshift4/performance-addon-operator-must-gather-rhel8:v4.8 2
Create a compressed file from the
must-gatherdirectory that was created in your working directory. For example, on a computer that uses a Linux operating system, run the following command:$ tar cvaf must-gather.tar.gz must-gather.local.5421342344627712289/ 1- 1
- Replace
must-gather-local.5421342344627712289/with the actual directory name.
- Attach the compressed file to your support case on the Red Hat Customer Portal.
Additional resources
- For more information about MachineConfig and KubeletConfig, see Managing nodes.
- For more information about the Node Tuning Operator, see Using the Node Tuning Operator.
- For more information about the PerformanceProfile, see Configuring huge pages.
- For more information about consuming huge pages from your containers, see How huge pages are consumed by apps.
Chapter 18. Performing latency tests for platform verification
You can use the Cloud-native Network Functions (CNF) tests image to run latency tests on a CNF-enabled OpenShift Container Platform cluster, where all the components required for running CNF workloads are installed. Run the latency tests to validate node tuning for your workload.
The cnf-tests container image is available at registry.redhat.io/openshift4/cnf-tests-rhel8:v4.8.
The cnf-tests image also includes several tests that are not supported by Red Hat at this time. Only the latency tests are supported by Red Hat.
18.1. Prerequisites for running latency tests
Your cluster must meet the following requirements before you can run the latency tests:
- You have configured a performance profile with the Performance Addon Operator.
- You have applied all the required CNF configurations in the cluster.
-
You have a pre-existing
MachineConfigPoolCR applied in the cluster. The default worker pool isworker-cnf.
Additional resources
- For more information about creating the cluster performance profile, see Provisioning real-time and low latency workloads.
18.2. About discovery mode for latency tests
Use discovery mode to validate the functionality of a cluster without altering its configuration. Existing environment configurations are used for the tests. The tests can find the configuration items needed and use those items to execute the tests. If resources needed to run a specific test are not found, the test is skipped, providing an appropriate message to the user. After the tests are finished, no cleanup of the pre-configured configuration items is done, and the test environment can be immediately used for another test run.
When running the latency tests, always run the tests with -e DISCOVERY_MODE=true and -ginkgo.focus set to the appropriate latency test. If you do not run the latency tests in discovery mode, your existing live cluster performance profile configuration will be modified by the test run.
Limiting the nodes used during tests
The nodes on which the tests are executed can be limited by specifying a NODES_SELECTOR environment variable, for example, -e NODES_SELECTOR=node-role.kubernetes.io/worker-cnf. Any resources created by the test are limited to nodes with matching labels.
If you want to override the default worker pool, pass the -e ROLE_WORKER_CNF=<custom_worker_pool> variable to the command specifying an appropriate label.
18.3. Measuring latency
The cnf-tests image uses the oslat tool to measure the latency of the system.
- oslat
- Behaves similarly to a CPU-intensive DPDK application and measures all the interruptions and disruptions to the busy loop that simulates CPU heavy data processing.
The tests introduce the following environment variables:
Table 18.1. Latency test environment variables
| Environment variables | Description |
|---|---|
|
| Specifies the amount of time in seconds after which the test starts running. You can use the variable to allow the CPU manager reconcile loop to update the default CPU pool. The default value is 0. |
|
| Specifies the number of CPUs that the pod running the latency tests uses. If you do not set the variable, the default configuration includes all isolated CPUs. |
|
| Specifies the amount of time in seconds that the latency test must run. The default value is 300 seconds. |
|
|
Specifies the maximum acceptable latency in microseconds for the |
|
|
Boolean parameter that indicates whether the tests should run. |
18.4. Running the latency tests
Run the cluster latency tests to validate node tuning for your Cloud-native Network Functions (CNF) workload.
Always run the latency tests with DISCOVERY_MODE=true set. If you don’t, the test suite will make changes to the running cluster configuration.
When executing podman commands as a non-root or non-privileged user, mounting paths can fail with permission denied errors. To make the podman command work, append :Z to the volumes creation; for example, -v $(pwd)/:/kubeconfig:Z. This allows podman to do the proper SELinux relabeling.
Procedure
Open a shell prompt in the directory containing the
kubeconfigfile.You provide the test image with a
kubeconfigfile in current directory and its related$KUBECONFIGenvironment variable, mounted through a volume. This allows the running container to use thekubeconfigfile from inside the container.Run the latency tests by entering the following command:
$ podman run -v $(pwd)/:/kubeconfig:Z -e KUBECONFIG=/kubeconfig/kubeconfig \
-e LATENCY_TEST_RUN=true -e DISCOVERY_MODE=true registry.redhat.io/openshift4/cnf-tests-rhel8:v4.8 \
/usr/bin/test-run.sh -ginkgo.focus="\[performance\]\ Latency\ Test"
-
Optional: Append
-ginkgo.dryRunto run the latency tests in dry-run mode. This is useful for checking what the tests run. -
Optional: Append
-ginkgo.vto run the tests with increased verbosity. Optional: To run the latency tests against a specific performance profile, run the following command, substituting appropriate values:
$ podman run -v $(pwd)/:/kubeconfig:Z -e KUBECONFIG=/kubeconfig/kubeconfig \
-e LATENCY_TEST_RUN=true -e LATENCY_TEST_RUNTIME=600 -e OSLAT_MAXIMUM_LATENCY=20 \
-e PERF_TEST_PROFILE=<performance_profile> registry.redhat.io/openshift4/cnf-tests-rhel8:v4.8 \
/usr/bin/test-run.sh -ginkgo.focus="[performance]\ Latency\ Test"
where:
- <performance_profile>
- Is the name of the performance profile you want to run the latency tests against.
ImportantFor valid latency tests results, run the tests for at least 12 hours.
18.4.1. Running oslat
The oslat test simulates a CPU-intensive DPDK application and measures all the interruptions and disruptions to test how the cluster handles CPU heavy data processing.
Always run the latency tests with DISCOVERY_MODE=true set. If you don’t, the test suite will make changes to the running cluster configuration.
When executing podman commands as a non-root or non-privileged user, mounting paths can fail with permission denied errors. To make the podman command work, append :Z to the volumes creation; for example, -v $(pwd)/:/kubeconfig:Z. This allows podman to do the proper SELinux relabeling.
Prerequisites
-
You have logged in to
registry.redhat.iowith your Customer Portal credentials. - You have applied a cluster performance profile by using the Performance addon operator.
Procedure
To perform the
oslattest, run the following command, substituting variable values as appropriate:$ podman run -v $(pwd)/:/kubeconfig:Z -e KUBECONFIG=/kubeconfig/kubeconfig \ -e LATENCY_TEST_RUN=true -e DISCOVERY_MODE=true -e ROLE_WORKER_CNF=worker-cnf \ -e LATENCY_TEST_CPUS=7 -e LATENCY_TEST_RUNTIME=600 -e OSLAT_MAXIMUM_LATENCY=20 \ registry.redhat.io/openshift4/cnf-tests-rhel8:v4.8 \ /usr/bin/test-run.sh -ginkgo.v -ginkgo.focus="oslat"
LATENCY_TEST_CPUSspecifices the list of CPUs to test with theoslatcommand.The command runs the
oslattool for 10 minutes (600 seconds). The test runs successfully when the maximum observed latency is lower thanOSLAT_MAXIMUM_LATENCY(20 μs).If the results exceed the latency threshold, the test fails.
ImportantFor valid results, the test should run for at least 12 hours.
Example failure output
running /usr/bin//validationsuite -ginkgo.v -ginkgo.focus=oslat I0829 12:36:55.386776 8 request.go:668] Waited for 1.000303471s due to client-side throttling, not priority and fairness, request: GET:https://api.cnfdc8.t5g.lab.eng.bos.redhat.com:6443/apis/authentication.k8s.io/v1?timeout=32s Running Suite: CNF Features e2e validation ========================================== Discovery mode enabled, skipping setup running /usr/bin//cnftests -ginkgo.v -ginkgo.focus=oslat I0829 12:37:01.219077 20 request.go:668] Waited for 1.050010755s due to client-side throttling, not priority and fairness, request: GET:https://api.cnfdc8.t5g.lab.eng.bos.redhat.com:6443/apis/snapshot.storage.k8s.io/v1beta1?timeout=32s Running Suite: CNF Features e2e integration tests ================================================= Random Seed: 1630240617 Will run 1 of 142 specs SSSSSSSSSSSSSSSSSSSSSSSSSSSSSSSSSSSSSSSSSSSSSSSSSSSSSS ------------------------------ [performance] Latency Test with the oslat image should succeed /go/src/github.com/openshift-kni/cnf-features-deploy/vendor/github.com/openshift-kni/performance-addon-operators/functests/4_latency/latency.go:134 STEP: Waiting two minutes to download the latencyTest image STEP: Waiting another two minutes to give enough time for the cluster to move the pod to Succeeded phase Aug 29 12:37:59.324: [INFO]: found mcd machine-config-daemon-wf4w8 for node cnfdc8.clus2.t5g.lab.eng.bos.redhat.com • Failure [49.246 seconds] [performance] Latency Test /go/src/github.com/openshift-kni/cnf-features-deploy/vendor/github.com/openshift-kni/performance-addon-operators/functests/4_latency/latency.go:59 with the oslat image /go/src/github.com/openshift-kni/cnf-features-deploy/vendor/github.com/openshift-kni/performance-addon-operators/functests/4_latency/latency.go:112 should succeed [It] /go/src/github.com/openshift-kni/cnf-features-deploy/vendor/github.com/openshift-kni/performance-addon-operators/functests/4_latency/latency.go:134 The current latency 27 is bigger than the expected one 20 1 Expected <bool>: false to be true /go/src/github.com/openshift-kni/cnf-features-deploy/vendor/github.com/openshift-kni/performance-addon-operators/functests/4_latency/latency.go:168 Log file created at: 2021/08/29 13:25:21 Running on machine: oslat-57c2g Binary: Built with gc go1.16.6 for linux/amd64 Log line format: [IWEF]mmdd hh:mm:ss.uuuuuu threadid file:line] msg I0829 13:25:21.569182 1 node.go:37] Environment information: /proc/cmdline: BOOT_IMAGE=(hd0,gpt3)/ostree/rhcos-612d89f4519a53ad0b1a132f4add78372661bfb3994f5fe115654971aa58a543/vmlinuz-4.18.0-305.10.2.rt7.83.el8_4.x86_64 ip=dhcp random.trust_cpu=on console=tty0 console=ttyS0,115200n8 ostree=/ostree/boot.0/rhcos/612d89f4519a53ad0b1a132f4add78372661bfb3994f5fe115654971aa58a543/0 ignition.platform.id=openstack root=UUID=5a4ddf16-9372-44d9-ac4e-3ee329e16ab3 rw rootflags=prjquota skew_tick=1 nohz=on rcu_nocbs=1-3 tuned.non_isolcpus=000000ff,ffffffff,ffffffff,fffffff1 intel_pstate=disable nosoftlockup tsc=nowatchdog intel_iommu=on iommu=pt isolcpus=managed_irq,1-3 systemd.cpu_affinity=0,4,5,6,7,8,9,10,11,12,13,14,15,16,17,18,19,20,21,22,23,24,25,26,27,28,29,30,31,32,33,34,35,36,37,38,39,40,41,42,43,44,45,46,47,48,49,50,51,52,53,54,55,56,57,58,59,60,61,62,63,64,65,66,67,68,69,70,71,72,73,74,75,76,77,78,79,80,81,82,83,84,85,86,87,88,89,90,91,92,93,94,95,96,97,98,99,100,101,102,103 default_hugepagesz=1G hugepagesz=2M hugepages=128 nmi_watchdog=0 audit=0 mce=off processor.max_cstate=1 idle=poll intel_idle.max_cstate=0 I0829 13:25:21.569345 1 node.go:44] Environment information: kernel version 4.18.0-305.10.2.rt7.83.el8_4.x86_64 I0829 13:25:21.569367 1 main.go:53] Running the oslat command with arguments \ [--duration 600 --rtprio 1 --cpu-list 4,6,52,54,56,58 --cpu-main-thread 2] I0829 13:35:22.632263 1 main.go:59] Succeeded to run the oslat command: oslat V 2.00 Total runtime: 600 seconds Thread priority: SCHED_FIFO:1 CPU list: 4,6,52,54,56,58 CPU for main thread: 2 Workload: no Workload mem: 0 (KiB) Preheat cores: 6 Pre-heat for 1 seconds... Test starts... Test completed. Core: 4 6 52 54 56 58 CPU Freq: 2096 2096 2096 2096 2096 2096 (Mhz) 001 (us): 19390720316 19141129810 20265099129 20280959461 19391991159 19119877333 002 (us): 5304 5249 5777 5947 6829 4971 003 (us): 28 14 434 47 208 21 004 (us): 1388 853 123568 152817 5576 0 005 (us): 207850 223544 103827 91812 227236 231563 006 (us): 60770 122038 277581 323120 122633 122357 007 (us): 280023 223992 63016 25896 214194 218395 008 (us): 40604 25152 24368 4264 24440 25115 009 (us): 6858 3065 5815 810 3286 2116 010 (us): 1947 936 1452 151 474 361 ... Minimum: 1 1 1 1 1 1 (us) Average: 1.000 1.000 1.000 1.000 1.000 1.000 (us) Maximum: 37 38 49 28 28 19 (us) Max-Min: 36 37 48 27 27 18 (us) Duration: 599.667 599.667 599.667 599.667 599.667 599.667 (sec)- 1
- In this example, the measured latency is outside the maximum allowed value.
18.5. Generating a latency test failure report
Use the following procedures to generate a JUnit latency test output and test failure report.
Prerequisites
-
You have installed the OpenShift CLI (
oc). -
You have logged in as a user with
cluster-adminprivileges.
Procedure
Create a test failure report with information about the cluster state and resources for troubleshooting by passing the
--reportparameter with the path to where the report is dumped:$ podman run -v $(pwd)/:/kubeconfig:Z -v $(pwd)/reportdest:<report_folder_path> \ -e KUBECONFIG=/kubeconfig/kubeconfig -e DISCOVERY_MODE=true \ registry.redhat.io/openshift4/cnf-tests-rhel8:v4.8 \ /usr/bin/test-run.sh --report <report_folder_path> \ -ginkgo.focus="\[performance\]\ Latency\ Test"
where:
- <report_folder_path>
- Is the path to the folder where the report is generated.
18.6. Generating a JUnit latency test report
Use the following procedures to generate a JUnit latency test output and test failure report.
Prerequisites
-
You have installed the OpenShift CLI (
oc). -
You have logged in as a user with
cluster-adminprivileges.
Procedure
Create a JUnit-compliant XML report by passing the
--junitparameter together with the path to where the report is dumped:$ podman run -v $(pwd)/:/kubeconfig:Z -v $(pwd)/junitdest:<junit_folder_path> \ -e KUBECONFIG=/kubeconfig/kubeconfig -e DISCOVERY_MODE=true \ registry.redhat.io/openshift4/cnf-tests-rhel8:v4.8 \ /usr/bin/test-run.sh --junit <junit_folder_path> \ -ginkgo.focus="\[performance\]\ Latency\ Test"
where:
- <junit_folder_path>
- Is the path to the folder where the junit report is generated
18.7. Running latency tests in a disconnected cluster
The CNF tests image can run tests in a disconnected cluster that is not able to reach external registries. This requires two steps:
-
Mirroring the
cnf-testsimage to the custom disconnected registry. - Instructing the tests to consume the images from the custom disconnected registry.
Mirroring the images to a custom registry accessible from the cluster
A mirror executable is shipped in the image to provide the input required by oc to mirror the test image to a local registry.
Run this command from an intermediate machine that has access to the cluster and registry.redhat.io:
$ podman run -v $(pwd)/:/kubeconfig:Z -e KUBECONFIG=/kubeconfig/kubeconfig \
registry.redhat.io/openshift4/cnf-tests-rhel8:v4.8 \
/usr/bin/mirror -registry <disconnected_registry> | oc image mirror -f -
where:
- <disconnected_registry>
-
Is the disconnected mirror registry you have configured, for example,
my.local.registry:5000/.
When you have mirrored the
cnf-testsimage into the disconnected registry, you must override the original registry used to fetch the images when running the tests, for example:$ podman run -v $(pwd)/:/kubeconfig:Z -e KUBECONFIG=/kubeconfig/kubeconfig \ -e DISCOVERY_MODE=true -e IMAGE_REGISTRY="<disconnected_registry>" \ -e CNF_TESTS_IMAGE="cnf-tests-rhel8:v4.8" \ /usr/bin/test-run.sh -ginkgo.focus="\[performance\]\ Latency\ Test"
Configuring the tests to consume images from a custom registry
You can run the latency tests using a custom test image and image registry using CNF_TESTS_IMAGE and IMAGE_REGISTRY variables.
To configure the latency tests to use a custom test image and image registry, run the following command:
$ podman run -v $(pwd)/:/kubeconfig:Z -e KUBECONFIG=/kubeconfig/kubeconfig \
-e IMAGE_REGISTRY="<custom_image_registry>" \
-e CNF_TESTS_IMAGE="<custom_cnf-tests_image>" \
registry.redhat.io/openshift4/cnf-tests-rhel8:v4.8 /usr/bin/test-run.sh
where:
- <custom_image_registry>
-
is the custom image registry, for example,
custom.registry:5000/. - <custom_cnf-tests_image>
-
is the custom cnf-tests image, for example,
custom-cnf-tests-image:latest.
Mirroring images to the cluster internal registry
OpenShift Container Platform provides a built-in container image registry, which runs as a standard workload on the cluster.
Procedure
Gain external access to the registry by exposing it with a route:
$ oc patch configs.imageregistry.operator.openshift.io/cluster --patch '{"spec":{"defaultRoute":true}}' --type=mergeFetch the registry endpoint by running the following command:
$ REGISTRY=$(oc get route default-route -n openshift-image-registry --template='{{ .spec.host }}')Create a namespace for exposing the images:
$ oc create ns cnftests
Make the image stream available to all the namespaces used for tests. This is required to allow the tests namespaces to fetch the images from the
cnf-testsimage stream. Run the following commands:$ oc policy add-role-to-user system:image-puller system:serviceaccount:cnf-features-testing:default --namespace=cnftests
$ oc policy add-role-to-user system:image-puller system:serviceaccount:performance-addon-operators-testing:default --namespace=cnftests
Retrieve the docker secret name and auth token by running the following commands:
$ SECRET=$(oc -n cnftests get secret | grep builder-docker | awk {'print $1'}$ TOKEN=$(oc -n cnftests get secret $SECRET -o jsonpath="{.data['\.dockercfg']}" | base64 --decode | jq '.["image-registry.openshift-image-registry.svc:5000"].auth')Create a
dockerauth.jsonfile, for example:$ echo "{\"auths\": { \"$REGISTRY\": { \"auth\": $TOKEN } }}" > dockerauth.jsonDo the image mirroring:
$ podman run -v $(pwd)/:/kubeconfig:Z -e KUBECONFIG=/kubeconfig/kubeconfig \
registry.redhat.io/openshift4/cnf-tests-rhel8:4.8 \
/usr/bin/mirror -registry $REGISTRY/cnftests |  oc image mirror --insecure=true \
-a=$(pwd)/dockerauth.json -f -
Run the tests:
$ podman run -v $(pwd)/:/kubeconfig:Z -e KUBECONFIG=/kubeconfig/kubeconfig \
-e DISCOVERY_MODE=true -e IMAGE_REGISTRY=image-registry.openshift-image-registry.svc:5000/cnftests \
cnf-tests-local:latest /usr/bin/test-run.sh -ginkgo.focus="\[performance\]\ Latency\ Test"
Mirroring a different set of test images
You can optionally change the default upstream images that are mirrored for the latency tests.
Procedure
The
mirrorcommand tries to mirror the upstream images by default. This can be overridden by passing a file with the following format to the image:[ { "registry": "public.registry.io:5000", "image": "imageforcnftests:4.8" } ]Pass the file to the
mirrorcommand, for example saving it locally asimages.json. With the following command, the local path is mounted in/kubeconfiginside the container and that can be passed to the mirror command.$ podman run -v $(pwd)/:/kubeconfig:Z -e KUBECONFIG=/kubeconfig/kubeconfig \ registry.redhat.io/openshift4/cnf-tests-rhel8:v4.8 /usr/bin/mirror \ --registry "my.local.registry:5000/" --images "/kubeconfig/images.json" \ | oc image mirror -f -
18.8. Troubleshooting errors with the cnf-tests container
To run latency tests, the cluster must be accessible from within the cnf-tests container.
Prerequisites
-
You have installed the OpenShift CLI (
oc). -
You have logged in as a user with
cluster-adminprivileges.
Procedure
Verify that the cluster is accessible from inside the
cnf-testscontainer by running the following command:$ podman run -v $(pwd)/:/kubeconfig:Z -e KUBECONFIG=/kubeconfig/kubeconfig \ registry.redhat.io/openshift4/cnf-tests-rhel8:v4.8 \ oc get nodes
If this command does not work, an error related to spanning across DNS, MTU size, or firewall access might be occurring.
Chapter 19. Creating a performance profile
Learn about the Performance Profile Creator (PPC) and how you can use it to create a performance profile.
19.1. About the Performance Profile Creator
The Performance Profile Creator (PPC) is a command-line tool, delivered with the Performance Addon Operator, used to create the performance profile. The tool consumes must-gather data from the cluster and several user-supplied profile arguments. The PPC generates a performance profile that is appropriate for your hardware and topology.
The tool is run by one of the following methods:
-
Invoking
podman - Calling a wrapper script
19.1.1. Gathering data about your cluster using the must-gather command
The Performance Profile Creator (PPC) tool requires must-gather data. As a cluster administrator, run the must-gather command to capture information about your cluster.
Prerequisites
-
Access to the cluster as a user with the
cluster-adminrole. - Access to the Performance Addon Operator image.
-
The OpenShift CLI (
oc) installed.
Procedure
-
Navigate to the directory where you want to store the
must-gatherdata. Run
must-gatheron your cluster:$ oc adm must-gather --image=<PAO_image> --dest-dir=<dir>
NoteThe
must-gathercommand must be run with theperformance-addon-operator-must-gatherimage. The output can optionally be compressed. Compressed output is required if you are running the Performance Profile Creator wrapper script.Example
$ oc adm must-gather --image=registry.redhat.io/openshift4/performance-addon-operator-must-gather-rhel8:v4.8 --dest-dir=must-gather
Create a compressed file from the
must-gatherdirectory:$ tar cvaf must-gather.tar.gz must-gather/
19.1.2. Running the Performance Profile Creator using podman
As a cluster administrator, you can run podman and the Performance Profile Creator to create a performance profile.
Prerequisites
-
Access to the cluster as a user with the
cluster-adminrole. - A cluster installed on bare metal hardware.
-
A node with
podmanand OpenShift CLI (oc) installed.
Procedure
Check the machine config pool:
$ oc get mcp
Example output
NAME         CONFIG                                                 UPDATED   UPDATING   DEGRADED   MACHINECOUNT   READYMACHINECOUNT   UPDATEDMACHINECOUNT   DEGRADEDMACHINECOUNT   AGE
master       rendered-master-acd1358917e9f98cbdb599aea622d78b       True      False      False      3              3                   3                     0                      22h
worker-cnf   rendered-worker-cnf-1d871ac76e1951d32b2fe92369879826   False     True       False      2              1                   1                     0                      22h
Use Podman to authenticate to
registry.redhat.io:$ podman login registry.redhat.io
Username: myrhusername
Password: ************
Optional: Display help for the PPC tool:
$ podman run --entrypoint performance-profile-creator registry.redhat.io/openshift4/performance-addon-rhel8-operator:v4.8 -h
Example output
A tool that automates creation of Performance Profiles

Usage:
  performance-profile-creator [flags]

Flags:
      --disable-ht                        Disable Hyperthreading
  -h, --help                              help for performance-profile-creator
      --info string                       Show cluster information; requires --must-gather-dir-path, ignore the other arguments. [Valid values: log, json] (default "log")
      --mcp-name string                   MCP name corresponding to the target machines (required)
      --must-gather-dir-path string       Must gather directory path (default "must-gather")
      --power-consumption-mode string     The power consumption mode.  [Valid values: default, low-latency, ultra-low-latency] (default "default")
      --profile-name string               Name of the performance profile to be created (default "performance")
      --reserved-cpu-count int            Number of reserved CPUs (required)
      --rt-kernel                         Enable Real Time Kernel (required)
      --split-reserved-cpus-across-numa   Split the Reserved CPUs across NUMA nodes
      --topology-manager-policy string    Kubelet Topology Manager Policy of the performance profile to be created. [Valid values: single-numa-node, best-effort, restricted] (default "restricted")
      --user-level-networking             Run with User level Networking(DPDK) enabled
Run the Performance Profile Creator tool in discovery mode:
NoteDiscovery mode inspects your cluster using the output from
must-gather. The output produced includes information on:- The NUMA cell partitioning with the allocated CPU ids
- Whether hyperthreading is enabled
Using this information you can set appropriate values for some of the arguments supplied to the Performance Profile Creator tool.
$ podman run --entrypoint performance-profile-creator -v /must-gather:/must-gather:z registry.redhat.io/openshift4/performance-addon-rhel8-operator:v4.8 --info log --must-gather-dir-path /must-gather
NoteThis command uses the performance profile creator as a new entry point to
podman. It maps themust-gatherdata for the host into the container image and invokes the required user-supplied profile arguments to produce themy-performance-profile.yamlfile.The
-voption can be the path to either:-
The
must-gatheroutput directory -
An existing directory containing the
must-gatherdecompressed tarball
The
infooption requires a value which specifies the output format. Possible values are log and JSON. The JSON format is reserved for debugging.Run
podman:$ podman run --entrypoint performance-profile-creator -v /must-gather:/must-gather:z registry.redhat.io/openshift4/performance-addon-rhel8-operator:v4.8 --mcp-name=worker-cnf --reserved-cpu-count=20 --rt-kernel=true --split-reserved-cpus-across-numa=false --topology-manager-policy=single-numa-node --must-gather-dir-path /must-gather --power-consumption-mode=ultra-low-latency > my-performance-profile.yaml
NoteThe Performance Profile Creator arguments are shown in the Performance Profile Creator arguments table. The following arguments are required:
-
reserved-cpu-count -
mcp-name -
rt-kernel
The
mcp-nameargument in this example is set toworker-cnfbased on the output of the commandoc get mcp. For Single Node OpenShift (SNO) use--mcp-name=master.-
Review the created YAML file:
$ cat my-performance-profile.yaml
Example output
apiVersion: performance.openshift.io/v2
kind: PerformanceProfile
metadata:
  name: performance
spec:
  additionalKernelArgs:
  - nmi_watchdog=0
  - audit=0
  - mce=off
  - processor.max_cstate=1
  - intel_idle.max_cstate=0
  - idle=poll
  cpu:
    isolated: 1,3,5,7,9,11,13,15,17,19-39,41,43,45,47,49,51,53,55,57,59-79
    reserved: 0,2,4,6,8,10,12,14,16,18,40,42,44,46,48,50,52,54,56,58
  nodeSelector:
    node-role.kubernetes.io/worker-cnf: ""
  numa:
    topologyPolicy: single-numa-node
  realTimeKernel:
    enabled: true
Apply the generated profile:
NoteInstall the Performance Addon Operator before applying the profile.
$ oc apply -f my-performance-profile.yaml
19.1.2.1. How to run podman to create a performance profile
The following example illustrates how to run podman to create a performance profile with 20 reserved CPUs that are to be split across the NUMA nodes.
Node hardware configuration:
- 80 CPUs
- Hyperthreading enabled
- Two NUMA nodes
- Even numbered CPUs run on NUMA node 0 and odd numbered CPUs run on NUMA node 1
Run podman to create the performance profile:
$ podman run --entrypoint performance-profile-creator -v /must-gather:/must-gather:z registry.redhat.io/openshift4/performance-addon-rhel8-operator:v4.8 --mcp-name=worker-cnf --reserved-cpu-count=20 --rt-kernel=true --split-reserved-cpus-across-numa=true --must-gather-dir-path /must-gather > my-performance-profile.yaml
The created profile is described in the following YAML:
  apiVersion: performance.openshift.io/v2
  kind: PerformanceProfile
  metadata:
    name: performance
  spec:
    cpu:
      isolated: 10-39,50-79
      reserved: 0-9,40-49
    nodeSelector:
      node-role.kubernetes.io/worker-cnf: ""
    numa:
      topologyPolicy: restricted
    realTimeKernel:
enabled: trueIn this case, 10 CPUs are reserved on NUMA node 0 and 10 are reserved on NUMA node 1.
19.1.3. Running the Performance Profile Creator wrapper script
The performance profile wrapper script simplifies the running of the Performance Profile Creator (PPC) tool. It hides the complexities associated with running podman and specifying the mapping directories and it enables the creation of the performance profile.
Prerequisites
- Access to the Performance Addon Operator image.
-
Access to the
must-gathertarball.
Procedure
Create a file on your local machine named, for example,
run-perf-profile-creator.sh:$ vi run-perf-profile-creator.sh
Paste the following code into the file:
#!/bin/bash

readonly CONTAINER_RUNTIME=${CONTAINER_RUNTIME:-podman}
readonly CURRENT_SCRIPT=$(basename "$0")
readonly CMD="${CONTAINER_RUNTIME} run --entrypoint performance-profile-creator"
readonly IMG_EXISTS_CMD="${CONTAINER_RUNTIME} image exists"
readonly IMG_PULL_CMD="${CONTAINER_RUNTIME} image pull"
readonly MUST_GATHER_VOL="/must-gather"

PAO_IMG="registry.redhat.io/openshift4/performance-addon-rhel8-operator:v4.8"
MG_TARBALL=""
DATA_DIR=""

usage() {
  print "Wrapper usage:"
  print "  ${CURRENT_SCRIPT} [-h] [-p image][-t path] -- [performance-profile-creator flags]"
  print ""
  print "Options:"
  print "   -h                 help for ${CURRENT_SCRIPT}"
  print "   -p                 Performance Addon Operator image"
  print "   -t                 path to a must-gather tarball"

  ${IMG_EXISTS_CMD} "${PAO_IMG}" && ${CMD} "${PAO_IMG}" -h
}

function cleanup {
  [ -d "${DATA_DIR}" ] && rm -rf "${DATA_DIR}"
}
trap cleanup EXIT

exit_error() {
  print "error: $*"
  usage
  exit 1
}

print() {
  echo  "$*" >&2
}

check_requirements() {
  ${IMG_EXISTS_CMD} "${PAO_IMG}" || ${IMG_PULL_CMD} "${PAO_IMG}" || \
      exit_error "Performance Addon Operator image not found"

  [ -n "${MG_TARBALL}" ] || exit_error "Must-gather tarball file path is mandatory"
  [ -f "${MG_TARBALL}" ] || exit_error "Must-gather tarball file not found"

  DATA_DIR=$(mktemp -d -t "${CURRENT_SCRIPT}XXXX") || exit_error "Cannot create the data directory"
  tar -zxf "${MG_TARBALL}" --directory "${DATA_DIR}" || exit_error "Cannot decompress the must-gather tarball"
  chmod a+rx "${DATA_DIR}"

  return 0
}

main() {
  while getopts ':hp:t:' OPT; do
    case "${OPT}" in
      h)
        usage
        exit 0
        ;;
      p)
        PAO_IMG="${OPTARG}"
        ;;
      t)
        MG_TARBALL="${OPTARG}"
        ;;
      ?)
        exit_error "invalid argument: ${OPTARG}"
        ;;
    esac
  done
  shift $((OPTIND - 1))

  check_requirements || exit 1

  ${CMD} -v "${DATA_DIR}:${MUST_GATHER_VOL}:z" "${PAO_IMG}" "$@" --must-gather-dir-path "${MUST_GATHER_VOL}"
  echo "" 1>&2
}

main "$@"
Add execute permissions for everyone on this script:
$ chmod a+x run-perf-profile-creator.sh
Optional: Display the
run-perf-profile-creator.shcommand usage:$ ./run-perf-profile-creator.sh -h
Expected output
Wrapper usage:
  run-perf-profile-creator.sh [-h] [-p image][-t path] -- [performance-profile-creator flags]

Options:
   -h                 help for run-perf-profile-creator.sh
   -p                 Performance Addon Operator image 1
   -t                 path to a must-gather tarball 2

A tool that automates creation of Performance Profiles

   Usage:
     performance-profile-creator [flags]

   Flags:
         --disable-ht                        Disable Hyperthreading
     -h, --help                              help for performance-profile-creator
         --info string                       Show cluster information; requires --must-gather-dir-path, ignore the other arguments. [Valid values: log, json] (default "log")
         --mcp-name string                   MCP name corresponding to the target machines (required)
         --must-gather-dir-path string       Must gather directory path (default "must-gather")
         --power-consumption-mode string     The power consumption mode.  [Valid values: default, low-latency, ultra-low-latency] (default "default")
         --profile-name string               Name of the performance profile to be created (default "performance")
         --reserved-cpu-count int            Number of reserved CPUs (required)
         --rt-kernel                         Enable Real Time Kernel (required)
         --split-reserved-cpus-across-numa   Split the Reserved CPUs across NUMA nodes
         --topology-manager-policy string    Kubelet Topology Manager Policy of the performance profile to be created. [Valid values: single-numa-node, best-effort, restricted] (default "restricted")
         --user-level-networking             Run with User level Networking(DPDK) enabled
NoteThere two types of arguments:
-
Wrapper arguments namely
-h,-pand-t - PPC arguments
-
Wrapper arguments namely
Run the performance profile creator tool in discovery mode:
NoteDiscovery mode inspects your cluster using the output from
must-gather. The output produced includes information on:- The NUMA cell partitioning with the allocated CPU IDs
- Whether hyperthreading is enabled
Using this information you can set appropriate values for some of the arguments supplied to the Performance Profile Creator tool.
$ ./run-perf-profile-creator.sh -t /must-gather/must-gather.tar.gz -- --info=log
NoteThe
infooption requires a value which specifies the output format. Possible values are log and JSON. The JSON format is reserved for debugging.Check the machine config pool:
$ oc get mcp
Example output
NAME         CONFIG                                                 UPDATED   UPDATING   DEGRADED   MACHINECOUNT   READYMACHINECOUNT   UPDATEDMACHINECOUNT   DEGRADEDMACHINECOUNT   AGE
master       rendered-master-acd1358917e9f98cbdb599aea622d78b       True      False      False      3              3                   3                     0                      22h
worker-cnf   rendered-worker-cnf-1d871ac76e1951d32b2fe92369879826   False     True       False      2              1                   1                     0                      22h
Create a performance profile:
$ ./run-perf-profile-creator.sh -t /must-gather/must-gather.tar.gz -- --mcp-name=worker-cnf --reserved-cpu-count=2 --rt-kernel=true > my-performance-profile.yaml
NoteThe Performance Profile Creator arguments are shown in the Performance Profile Creator arguments table. The following arguments are required:
-
reserved-cpu-count -
mcp-name -
rt-kernel
The
mcp-nameargument in this example is set toworker-cnfbased on the output of the commandoc get mcp. For Single Node OpenShift (SNO) use--mcp-name=master.-
Review the created YAML file:
$ cat my-performance-profile.yaml
Example output
apiVersion: performance.openshift.io/v2
kind: PerformanceProfile
metadata:
  name: performance
spec:
  cpu:
    isolated: 1-39,41-79
    reserved: 0,40
  nodeSelector:
    node-role.kubernetes.io/worker-cnf: ""
  numa:
    topologyPolicy: restricted
  realTimeKernel:
    enabled: false
Apply the generated profile:
NoteInstall the Performance Addon Operator before applying the profile.
$ oc apply -f my-performance-profile.yaml
19.1.4. Performance Profile Creator arguments
Table 19.1. Performance Profile Creator arguments
| Argument | Description |
|---|---|
|
| Disable hyperthreading.
Possible values:
Default: Warning
If this argument is set to |
|
|
This captures cluster information and is used in discovery mode only. Discovery mode also requires the Possible values:
Default: |
|
|
MCP name for example |
|
| Must gather directory path. This parameter is required.
When the user runs the tool with the wrapper script |
|
| The power consumption mode. Possible values:
Default: |
|
|
Name of the performance profile to create. Default: |
|
| Number of reserved CPUs. This parameter is required. Note This must be a natural number. A value of 0 is not allowed. |
|
| Enable real-time kernel. This parameter is required.
Possible values: |
|
| Split the reserved CPUs across NUMA nodes.
Possible values:
Default: |
|
| Kubelet Topology Manager policy of the performance profile to be created. Possible values:
Default: |
|
| Run with user level networking (DPDK) enabled.
Possible values:
Default: |
19.2. Additional resources
-
For more information about the
must-gathertool, see Gathering data about your cluster.