
CI/CD
Contains information on builds, pipelines and GitOps for OpenShift Container Platform
Abstract
Chapter 1. OpenShift Container Platform CI/CD overview
OpenShift Container Platform is an enterprise-ready Kubernetes platform for developers, which enables organizations to automate the application delivery process through DevOps practices, such as continuous integration (CI) and continuous delivery (CD). To meet your organizational needs, the OpenShift Container Platform provides the following CI/CD solutions:
- OpenShift Builds
- OpenShift Pipelines
- OpenShift GitOps
1.1. OpenShift Builds
With OpenShift Builds, you can create cloud-native apps by using a declarative build process. You can define the build process in a YAML file that you use to create a BuildConfig object. This definition includes attributes such as build triggers, input parameters, and source code. When deployed, the BuildConfig object typically builds a runnable image and pushes it to a container image registry.
OpenShift Builds provides the following extensible support for build strategies:
- Docker build
- Source-to-image (S2I) build
- Custom build
For more information, see Understanding image builds
1.2. OpenShift Pipelines
OpenShift Pipelines provides a Kubernetes-native CI/CD framework to design and run each step of the CI/CD pipeline in its own container. It can scale independently to meet the on-demand pipelines with predictable outcomes.
For more information, see Understanding OpenShift Pipelines
1.3. OpenShift GitOps
OpenShift GitOps is an Operator that uses Argo CD as the declarative GitOps engine. It enables GitOps workflows across multicluster OpenShift and Kubernetes infrastructure. Using OpenShift GitOps, administrators can consistently configure and deploy Kubernetes-based infrastructure and applications across clusters and development lifecycles.
For more information, see Understanding OpenShift GitOps
1.4. Jenkins
Jenkins automates the process of building, testing, and deploying applications and projects. OpenShift Developer Tools provides a Jenkins image that integrates directly with the OpenShift Container Platform. Jenkins can be deployed on OpenShift by using the Samples Operator templates or certified Helm chart.
Chapter 2. Builds
2.1. Understanding image builds
2.1.1. Builds
A build is the process of transforming input parameters into a resulting object. Most often, the process is used to transform input parameters or source code into a runnable image. A BuildConfig object is the definition of the entire build process.
OpenShift Container Platform uses Kubernetes by creating containers from build images and pushing them to a container image registry.
Build objects share common characteristics including inputs for a build, the requirement to complete a build process, logging the build process, publishing resources from successful builds, and publishing the final status of the build. Builds take advantage of resource restrictions, specifying limitations on resources such as CPU usage, memory usage, and build or pod execution time.
The OpenShift Container Platform build system provides extensible support for build strategies that are based on selectable types specified in the build API. There are three primary build strategies available:
- Docker build
- Source-to-image (S2I) build
- Custom build
By default, docker builds and S2I builds are supported.
The resulting object of a build depends on the builder used to create it. For docker and S2I builds, the resulting objects are runnable images. For custom builds, the resulting objects are whatever the builder image author has specified.
Additionally, the pipeline build strategy can be used to implement sophisticated workflows:
- Continuous integration
- Continuous deployment
2.1.1.1. Docker build
OpenShift Container Platform uses Buildah to build a container image from a Dockerfile. For more information on building container images with Dockerfiles, see the Dockerfile reference documentation.
If you set Docker build arguments by using the buildArgs array, see Understand how ARG and FROM interact in the Dockerfile reference documentation.
2.1.1.2. Source-to-image build
Source-to-image (S2I) is a tool for building reproducible container images. It produces ready-to-run images by injecting application source into a container image and assembling a new image. The new image incorporates the base image, the builder, and built source and is ready to use with the buildah run command. S2I supports incremental builds, which re-use previously downloaded dependencies, previously built artifacts, and so on.
2.1.1.3. Custom build
The custom build strategy allows developers to define a specific builder image responsible for the entire build process. Using your own builder image allows you to customize your build process.
A custom builder image is a plain container image embedded with build process logic, for example for building RPMs or base images.
Custom builds run with a high level of privilege and are not available to users by default. Only users who can be trusted with cluster administration permissions should be granted access to run custom builds.
2.1.1.4. Pipeline build
The Pipeline build strategy is deprecated in OpenShift Container Platform 4. Equivalent and improved functionality is present in the OpenShift Container Platform Pipelines based on Tekton.
Jenkins images on OpenShift Container Platform are fully supported and users should follow Jenkins user documentation for defining their jenkinsfile in a job or store it in a Source Control Management system.
The Pipeline build strategy allows developers to define a Jenkins pipeline for use by the Jenkins pipeline plugin. The build can be started, monitored, and managed by OpenShift Container Platform in the same way as any other build type.
Pipeline workflows are defined in a jenkinsfile, either embedded directly in the build configuration, or supplied in a Git repository and referenced by the build configuration.
2.2. Understanding build configurations
The following sections define the concept of a build, build configuration, and outline the primary build strategies available.
2.2.1. BuildConfigs
A build configuration describes a single build definition and a set of triggers for when a new build is created. Build configurations are defined by a BuildConfig, which is a REST object that can be used in a POST to the API server to create a new instance.
A build configuration, or BuildConfig, is characterized by a build strategy and one or more sources. The strategy determines the process, while the sources provide its input.
Depending on how you choose to create your application using OpenShift Container Platform, a BuildConfig is typically generated automatically for you if you use the web console or CLI, and it can be edited at any time. Understanding the parts that make up a BuildConfig and their available options can help if you choose to manually change your configuration later.
The following example BuildConfig results in a new build every time a container image tag or the source code changes:
BuildConfig object definition
kind: BuildConfig
apiVersion: build.openshift.io/v1
metadata:
  name: "ruby-sample-build" 1
spec:
  runPolicy: "Serial" 2
  triggers: 3
    -
      type: "GitHub"
      github:
        secret: "secret101"
    - type: "Generic"
      generic:
        secret: "secret101"
    -
      type: "ImageChange"
  source: 4
    git:
      uri: "https://github.com/openshift/ruby-hello-world"
  strategy: 5
    sourceStrategy:
      from:
        kind: "ImageStreamTag"
        name: "ruby-20-centos7:latest"
  output: 6
    to:
      kind: "ImageStreamTag"
      name: "origin-ruby-sample:latest"
  postCommit: 7
      script: "bundle exec rake test"
- 1
- This specification creates a new
BuildConfignamedruby-sample-build. - 2
- The
runPolicyfield controls whether builds created from this build configuration can be run simultaneously. The default value isSerial, which means new builds run sequentially, not simultaneously. - 3
- You can specify a list of triggers, which cause a new build to be created.
- 4
- The
sourcesection defines the source of the build. The source type determines the primary source of input, and can be eitherGit, to point to a code repository location,Dockerfile, to build from an inline Dockerfile, orBinary, to accept binary payloads. It is possible to have multiple sources at once. For more information about each source type, see "Creating build inputs". - 5
- The
strategysection describes the build strategy used to execute the build. You can specify aSource,Docker, orCustomstrategy here. This example uses theruby-20-centos7container image that Source-to-image (S2I) uses for the application build. - 6
- After the container image is successfully built, it is pushed into the repository described in the
outputsection. - 7
- The
postCommitsection defines an optional build hook.
2.3. Creating build inputs
Use the following sections for an overview of build inputs, instructions on how to use inputs to provide source content for builds to operate on, and how to use build environments and create secrets.
2.3.1. Build inputs
A build input provides source content for builds to operate on. You can use the following build inputs to provide sources in OpenShift Container Platform, listed in order of precedence:
- Inline Dockerfile definitions
- Content extracted from existing images
- Git repositories
- Binary (Local) inputs
- Input secrets
- External artifacts
You can combine multiple inputs in a single build. However, as the inline Dockerfile takes precedence, it can overwrite any other file named Dockerfile provided by another input. Binary (local) input and Git repositories are mutually exclusive inputs.
You can use input secrets when you do not want certain resources or credentials used during a build to be available in the final application image produced by the build, or want to consume a value that is defined in a secret resource. External artifacts can be used to pull in additional files that are not available as one of the other build input types.
When you run a build:
- A working directory is constructed and all input content is placed in the working directory. For example, the input Git repository is cloned into the working directory, and files specified from input images are copied into the working directory using the target path.
-
The build process changes directories into the
contextDir, if one is defined. - The inline Dockerfile, if any, is written to the current directory.
-
The content from the current directory is provided to the build process for reference by the Dockerfile, custom builder logic, or
assemblescript. This means any input content that resides outside thecontextDiris ignored by the build.
The following example of a source definition includes multiple input types and an explanation of how they are combined. For more details on how each input type is defined, see the specific sections for each input type.
source:
  git:
    uri: https://github.com/openshift/ruby-hello-world.git 1
    ref: "master"
  images:
  - from:
      kind: ImageStreamTag
      name: myinputimage:latest
      namespace: mynamespace
    paths:
    - destinationDir: app/dir/injected/dir 2
      sourcePath: /usr/lib/somefile.jar
  contextDir: "app/dir" 3
dockerfile: "FROM centos:7\nRUN yum install -y httpd" 4- 1
- The repository to be cloned into the working directory for the build.
- 2
/usr/lib/somefile.jarfrommyinputimageis stored in<workingdir>/app/dir/injected/dir.- 3
- The working directory for the build becomes
<original_workingdir>/app/dir. - 4
- A Dockerfile with this content is created in
<original_workingdir>/app/dir, overwriting any existing file with that name.
2.3.2. Dockerfile source
When you supply a dockerfile value, the content of this field is written to disk as a file named dockerfile. This is done after other input sources are processed, so if the input source repository contains a Dockerfile in the root directory, it is overwritten with this content.
The source definition is part of the spec section in the BuildConfig:
source:
dockerfile: "FROM centos:7\nRUN yum install -y httpd" 1- 1
- The
dockerfilefield contains an inline Dockerfile that is built.
Additional resources
- The typical use for this field is to provide a Dockerfile to a docker strategy build.
2.3.3. Image source
You can add additional files to the build process with images. Input images are referenced in the same way the From and To image targets are defined. This means both container images and image stream tags can be referenced. In conjunction with the image, you must provide one or more path pairs to indicate the path of the files or directories to copy the image and the destination to place them in the build context.
The source path can be any absolute path within the image specified. The destination must be a relative directory path. At build time, the image is loaded and the indicated files and directories are copied into the context directory of the build process. This is the same directory into which the source repository content is cloned. If the source path ends in /. then the content of the directory is copied, but the directory itself is not created at the destination.
Image inputs are specified in the source definition of the BuildConfig:
source:
  git:
    uri: https://github.com/openshift/ruby-hello-world.git
    ref: "master"
  images: 1
  - from: 2
      kind: ImageStreamTag
      name: myinputimage:latest
      namespace: mynamespace
    paths: 3
    - destinationDir: injected/dir 4
      sourcePath: /usr/lib/somefile.jar 5
  - from:
      kind: ImageStreamTag
      name: myotherinputimage:latest
      namespace: myothernamespace
    pullSecret: mysecret 6
    paths:
    - destinationDir: injected/dir
sourcePath: /usr/lib/somefile.jar- 1
- An array of one or more input images and files.
- 2
- A reference to the image containing the files to be copied.
- 3
- An array of source/destination paths.
- 4
- The directory relative to the build root where the build process can access the file.
- 5
- The location of the file to be copied out of the referenced image.
- 6
- An optional secret provided if credentials are needed to access the input image.Note
If your cluster uses an
ImageContentSourcePolicyobject to configure repository mirroring, you can use only global pull secrets for mirrored registries. You cannot add a pull secret to a project.
Optionally, if an input image requires a pull secret, you can link the pull secret to the service account used by the build. By default, builds use the builder service account. The pull secret is automatically added to the build if the secret contains a credential that matches the repository hosting the input image. To link a pull secret to the service account used by the build, run:
$ oc secrets link builder dockerhub
This feature is not supported for builds using the custom strategy.
2.3.4. Git source
When specified, source code is fetched from the supplied location.
If you supply an inline Dockerfile, it overwrites the Dockerfile in the contextDir of the Git repository.
The source definition is part of the spec section in the BuildConfig:
source:
  git: 1
    uri: "https://github.com/openshift/ruby-hello-world"
    ref: "master"
  contextDir: "app/dir" 2
  dockerfile: "FROM openshift/ruby-22-centos7\nUSER example" 3
- 1
- The
gitfield contains the URI to the remote Git repository of the source code. Optionally, specify thereffield to check out a specific Git reference. A validrefcan be a SHA1 tag or a branch name. - 2
- The
contextDirfield allows you to override the default location inside the source code repository where the build looks for the application source code. If your application exists inside a sub-directory, you can override the default location (the root folder) using this field. - 3
- If the optional
dockerfilefield is provided, it should be a string containing a Dockerfile that overwrites any Dockerfile that may exist in the source repository.
If the ref field denotes a pull request, the system uses a git fetch operation and then checkout FETCH_HEAD.
When no ref value is provided, OpenShift Container Platform performs a shallow clone (--depth=1). In this case, only the files associated with the most recent commit on the default branch (typically master) are downloaded. This results in repositories downloading faster, but without the full commit history. To perform a full git clone of the default branch of a specified repository, set ref to the name of the default branch (for example master).
Git clone operations that go through a proxy that is performing man in the middle (MITM) TLS hijacking or reencrypting of the proxied connection do not work.
2.3.4.1. Using a proxy
If your Git repository can only be accessed using a proxy, you can define the proxy to use in the source section of the build configuration. You can configure both an HTTP and HTTPS proxy to use. Both fields are optional. Domains for which no proxying should be performed can also be specified in the NoProxy field.
Your source URI must use the HTTP or HTTPS protocol for this to work.
source:
  git:
    uri: "https://github.com/openshift/ruby-hello-world"
    ref: "master"
    httpProxy: http://proxy.example.com
    httpsProxy: https://proxy.example.com
    noProxy: somedomain.com, otherdomain.com
For Pipeline strategy builds, given the current restrictions with the Git plugin for Jenkins, any Git operations through the Git plugin do not leverage the HTTP or HTTPS proxy defined in the BuildConfig. The Git plugin only uses the proxy configured in the Jenkins UI at the Plugin Manager panel. This proxy is then used for all git interactions within Jenkins, across all jobs.
Additional resources
- You can find instructions on how to configure proxies through the Jenkins UI at JenkinsBehindProxy.
2.3.4.2. Source Clone Secrets
Builder pods require access to any Git repositories defined as source for a build. Source clone secrets are used to provide the builder pod with access it would not normally have access to, such as private repositories or repositories with self-signed or untrusted SSL certificates.
The following source clone secret configurations are supported:
- .gitconfig File
- Basic Authentication
- SSH Key Authentication
- Trusted Certificate Authorities
You can also use combinations of these configurations to meet your specific needs.
2.3.4.2.1. Automatically adding a source clone secret to a build configuration
When a BuildConfig is created, OpenShift Container Platform can automatically populate its source clone secret reference. This behavior allows the resulting builds to automatically use the credentials stored in the referenced secret to authenticate to a remote Git repository, without requiring further configuration.
To use this functionality, a secret containing the Git repository credentials must exist in the namespace in which the BuildConfig is later created. This secrets must include one or more annotations prefixed with build.openshift.io/source-secret-match-uri-. The value of each of these annotations is a Uniform Resource Identifier (URI) pattern, which is defined as follows. When a BuildConfig is created without a source clone secret reference and its Git source URI matches a URI pattern in a secret annotation, OpenShift Container Platform automatically inserts a reference to that secret in the BuildConfig.
Prerequisites
A URI pattern must consist of:
-
A valid scheme:
*://,git://,http://,https://orssh:// -
A host: *` or a valid hostname or IP address optionally preceded by
*. -
A path:
/*or/followed by any characters optionally including*characters
In all of the above, a * character is interpreted as a wildcard.
URI patterns must match Git source URIs which are conformant to RFC3986. Do not include a username (or password) component in a URI pattern.
For example, if you use ssh://git@bitbucket.atlassian.com:7999/ATLASSIAN jira.git for a git repository URL, the source secret must be specified as ssh://bitbucket.atlassian.com:7999/* (and not ssh://git@bitbucket.atlassian.com:7999/*).
$ oc annotate secret mysecret \
    'build.openshift.io/source-secret-match-uri-1=ssh://bitbucket.atlassian.com:7999/*'
Procedure
If multiple secrets match the Git URI of a particular BuildConfig, OpenShift Container Platform selects the secret with the longest match. This allows for basic overriding, as in the following example.
The following fragment shows two partial source clone secrets, the first matching any server in the domain mycorp.com accessed by HTTPS, and the second overriding access to servers mydev1.mycorp.com and mydev2.mycorp.com:
kind: Secret
apiVersion: v1
metadata:
  name: matches-all-corporate-servers-https-only
  annotations:
    build.openshift.io/source-secret-match-uri-1: https://*.mycorp.com/*
data:
  ...
---
kind: Secret
apiVersion: v1
metadata:
  name: override-for-my-dev-servers-https-only
  annotations:
    build.openshift.io/source-secret-match-uri-1: https://mydev1.mycorp.com/*
    build.openshift.io/source-secret-match-uri-2: https://mydev2.mycorp.com/*
data:
  ...
Add a
build.openshift.io/source-secret-match-uri-annotation to a pre-existing secret using:$ oc annotate secret mysecret \ 'build.openshift.io/source-secret-match-uri-1=https://*.mycorp.com/*'
2.3.4.2.2. Manually adding a source clone secret
Source clone secrets can be added manually to a build configuration by adding a sourceSecret field to the source section inside the BuildConfig and setting it to the name of the secret that you created. In this example, it is the basicsecret.
apiVersion: "v1"
kind: "BuildConfig"
metadata:
  name: "sample-build"
spec:
  output:
    to:
      kind: "ImageStreamTag"
      name: "sample-image:latest"
  source:
    git:
      uri: "https://github.com/user/app.git"
    sourceSecret:
      name: "basicsecret"
  strategy:
    sourceStrategy:
      from:
        kind: "ImageStreamTag"
        name: "python-33-centos7:latest"
Procedure
You can also use the oc set build-secret command to set the source clone secret on an existing build configuration.
To set the source clone secret on an existing build configuration, enter the following command:
$ oc set build-secret --source bc/sample-build basicsecret
2.3.4.2.3. Creating a secret from a .gitconfig file
If the cloning of your application is dependent on a .gitconfig file, then you can create a secret that contains it. Add it to the builder service account and then your BuildConfig.
Procedure
-
To create a secret from a
.gitconfigfile:
$ oc create secret generic <secret_name> --from-file=<path/to/.gitconfig>
SSL verification can be turned off if sslVerify=false is set for the http section in your .gitconfig file:
[http]
        sslVerify=false
2.3.4.2.4. Creating a secret from a .gitconfig file for secured Git
If your Git server is secured with two-way SSL and user name with password, you must add the certificate files to your source build and add references to the certificate files in the .gitconfig file.
Prerequisites
- You must have Git credentials.
Procedure
Add the certificate files to your source build and add references to the certificate files in the .gitconfig file.
-
Add the
client.crt,cacert.crt, andclient.keyfiles to the/var/run/secrets/openshift.io/source/folder in the application source code. In the
.gitconfigfile for the server, add the[http]section shown in the following example:# cat .gitconfig
Example output
[user]
        name = <name>
        email = <email>
[http]
        sslVerify = false
        sslCert = /var/run/secrets/openshift.io/source/client.crt
        sslKey = /var/run/secrets/openshift.io/source/client.key
        sslCaInfo = /var/run/secrets/openshift.io/source/cacert.crt
Create the secret:
$ oc create secret generic <secret_name> \
--from-literal=username=<user_name> \ 1
--from-literal=password=<password> \ 2
--from-file=.gitconfig=.gitconfig \
--from-file=client.crt=/var/run/secrets/openshift.io/source/client.crt \
--from-file=cacert.crt=/var/run/secrets/openshift.io/source/cacert.crt \
--from-file=client.key=/var/run/secrets/openshift.io/source/client.key
To avoid having to enter your password again, be sure to specify the source-to-image (S2I) image in your builds. However, if you cannot clone the repository, you must still specify your user name and password to promote the build.
Additional resources
-
/var/run/secrets/openshift.io/source/folder in the application source code.
2.3.4.2.5. Creating a secret from source code basic authentication
Basic authentication requires either a combination of --username and --password, or a token to authenticate against the software configuration management (SCM) server.
Prerequisites
- User name and password to access the private repository.
Procedure
Create the secret first before using the
--usernameand--passwordto access the private repository:$ oc create secret generic <secret_name> \ --from-literal=username=<user_name> \ --from-literal=password=<password> \ --type=kubernetes.io/basic-authCreate a basic authentication secret with a token:
$ oc create secret generic <secret_name> \
    --from-literal=password=<token> \
    --type=kubernetes.io/basic-auth
2.3.4.2.6. Creating a secret from source code SSH key authentication
SSH key based authentication requires a private SSH key.
The repository keys are usually located in the $HOME/.ssh/ directory, and are named id_dsa.pub, id_ecdsa.pub, id_ed25519.pub, or id_rsa.pub by default.
Procedure
Generate SSH key credentials:
$ ssh-keygen -t ed25519 -C "your_email@example.com"
NoteCreating a passphrase for the SSH key prevents OpenShift Container Platform from building. When prompted for a passphrase, leave it blank.
Two files are created: the public key and a corresponding private key (one of
id_dsa,id_ecdsa,id_ed25519, orid_rsa). With both of these in place, consult your source control management (SCM) system’s manual on how to upload the public key. The private key is used to access your private repository.Before using the SSH key to access the private repository, create the secret:
$ oc create secret generic <secret_name> \ --from-file=ssh-privatekey=<path/to/ssh/private/key> \ --from-file=<path/to/known_hosts> \ 1 --type=kubernetes.io/ssh-auth- 1
- Optional: Adding this field enables strict server host key check.
WarningSkipping the
known_hostsfile while creating the secret makes the build vulnerable to a potential man-in-the-middle (MITM) attack.NoteEnsure that the
known_hostsfile includes an entry for the host of your source code.
2.3.4.2.7. Creating a secret from source code trusted certificate authorities
The set of Transport Layer Security (TLS) certificate authorities (CA) that are trusted during a Git clone operation are built into the OpenShift Container Platform infrastructure images. If your Git server uses a self-signed certificate or one signed by an authority not trusted by the image, you can create a secret that contains the certificate or disable TLS verification.
If you create a secret for the CA certificate, OpenShift Container Platform uses it to access your Git server during the Git clone operation. Using this method is significantly more secure than disabling Git SSL verification, which accepts any TLS certificate that is presented.
Procedure
Create a secret with a CA certificate file.
If your CA uses Intermediate Certificate Authorities, combine the certificates for all CAs in a
ca.crtfile. Enter the following command:$ cat intermediateCA.crt intermediateCA.crt rootCA.crt > ca.crt
Create the secret:
$ oc create secret generic mycert --from-file=ca.crt=</path/to/file> 1- 1
- You must use the key name
ca.crt.
2.3.4.2.8. Source secret combinations
You can combine the different methods for creating source clone secrets for your specific needs.
2.3.4.2.8.1. Creating a SSH-based authentication secret with a .gitconfig file
You can combine the different methods for creating source clone secrets for your specific needs, such as a SSH-based authentication secret with a .gitconfig file.
Prerequisites
- SSH authentication
- .gitconfig file
Procedure
To create a SSH-based authentication secret with a
.gitconfigfile, run:$ oc create secret generic <secret_name> \ --from-file=ssh-privatekey=<path/to/ssh/private/key> \ --from-file=<path/to/.gitconfig> \ --type=kubernetes.io/ssh-auth
2.3.4.2.8.2. Creating a secret that combines a .gitconfig file and CA certificate
You can combine the different methods for creating source clone secrets for your specific needs, such as a secret that combines a .gitconfig file and certificate authority (CA) certificate.
Prerequisites
- .gitconfig file
- CA certificate
Procedure
To create a secret that combines a
.gitconfigfile and CA certificate, run:$ oc create secret generic <secret_name> \ --from-file=ca.crt=<path/to/certificate> \ --from-file=<path/to/.gitconfig>
2.3.4.2.8.3. Creating a basic authentication secret with a CA certificate
You can combine the different methods for creating source clone secrets for your specific needs, such as a secret that combines a basic authentication and certificate authority (CA) certificate.
Prerequisites
- Basic authentication credentials
- CA certificate
Procedure
Create a basic authentication secret with a CA certificate, run:
$ oc create secret generic <secret_name> \
    --from-literal=username=<user_name> \
    --from-literal=password=<password> \
    --from-file=ca-cert=</path/to/file> \
    --type=kubernetes.io/basic-auth
2.3.4.2.8.4. Creating a basic authentication secret with a .gitconfig file
You can combine the different methods for creating source clone secrets for your specific needs, such as a secret that combines a basic authentication and .gitconfig file.
Prerequisites
- Basic authentication credentials
-
.gitconfigfile
Procedure
To create a basic authentication secret with a
.gitconfigfile, run:$ oc create secret generic <secret_name> \ --from-literal=username=<user_name> \ --from-literal=password=<password> \ --from-file=</path/to/.gitconfig> \ --type=kubernetes.io/basic-auth
2.3.4.2.8.5. Creating a basic authentication secret with a .gitconfig file and CA certificate
You can combine the different methods for creating source clone secrets for your specific needs, such as a secret that combines a basic authentication, .gitconfig file, and certificate authority (CA) certificate.
Prerequisites
- Basic authentication credentials
-
.gitconfigfile - CA certificate
Procedure
To create a basic authentication secret with a
.gitconfigfile and CA certificate, run:$ oc create secret generic <secret_name> \ --from-literal=username=<user_name> \ --from-literal=password=<password> \ --from-file=</path/to/.gitconfig> \ --from-file=ca-cert=</path/to/file> \ --type=kubernetes.io/basic-auth
2.3.5. Binary (local) source
Streaming content from a local file system to the builder is called a Binary type build. The corresponding value of BuildConfig.spec.source.type is Binary for these builds.
This source type is unique in that it is leveraged solely based on your use of the oc start-build.
Binary type builds require content to be streamed from the local file system, so automatically triggering a binary type build, like an image change trigger, is not possible. This is because the binary files cannot be provided. Similarly, you cannot launch binary type builds from the web console.
To utilize binary builds, invoke oc start-build with one of these options:
-
--from-file: The contents of the file you specify are sent as a binary stream to the builder. You can also specify a URL to a file. Then, the builder stores the data in a file with the same name at the top of the build context. -
--from-dirand--from-repo: The contents are archived and sent as a binary stream to the builder. Then, the builder extracts the contents of the archive within the build context directory. With--from-dir, you can also specify a URL to an archive, which is extracted. -
--from-archive: The archive you specify is sent to the builder, where it is extracted within the build context directory. This option behaves the same as--from-dir; an archive is created on your host first, whenever the argument to these options is a directory.
In each of the previously listed cases:
-
If your
BuildConfigalready has aBinarysource type defined, it is effectively ignored and replaced by what the client sends. -
If your
BuildConfighas aGitsource type defined, it is dynamically disabled, sinceBinaryandGitare mutually exclusive, and the data in the binary stream provided to the builder takes precedence.
Instead of a file name, you can pass a URL with HTTP or HTTPS schema to --from-file and --from-archive. When using --from-file with a URL, the name of the file in the builder image is determined by the Content-Disposition header sent by the web server, or the last component of the URL path if the header is not present. No form of authentication is supported and it is not possible to use custom TLS certificate or disable certificate validation.
When using oc new-build --binary=true, the command ensures that the restrictions associated with binary builds are enforced. The resulting BuildConfig has a source type of Binary, meaning that the only valid way to run a build for this BuildConfig is to use oc start-build with one of the --from options to provide the requisite binary data.
The Dockerfile and contextDir source options have special meaning with binary builds.
Dockerfile can be used with any binary build source. If Dockerfile is used and the binary stream is an archive, its contents serve as a replacement Dockerfile to any Dockerfile in the archive. If Dockerfile is used with the --from-file argument, and the file argument is named Dockerfile, the value from Dockerfile replaces the value from the binary stream.
In the case of the binary stream encapsulating extracted archive content, the value of the contextDir field is interpreted as a subdirectory within the archive, and, if valid, the builder changes into that subdirectory before executing the build.
2.3.6. Input secrets and config maps
In some scenarios, build operations require credentials or other configuration data to access dependent resources, but it is undesirable for that information to be placed in source control. You can define input secrets and input config maps for this purpose.
For example, when building a Java application with Maven, you can set up a private mirror of Maven Central or JCenter that is accessed by private keys. To download libraries from that private mirror, you have to supply the following:
-
A
settings.xmlfile configured with the mirror’s URL and connection settings. -
A private key referenced in the settings file, such as
~/.ssh/id_rsa.
For security reasons, you do not want to expose your credentials in the application image.
This example describes a Java application, but you can use the same approach for adding SSL certificates into the /etc/ssl/certs directory, API keys or tokens, license files, and more.
2.3.6.1. What is a secret?
The Secret object type provides a mechanism to hold sensitive information such as passwords, OpenShift Container Platform client configuration files, dockercfg files, private source repository credentials, and so on. Secrets decouple sensitive content from the pods. You can mount secrets into containers using a volume plugin or the system can use secrets to perform actions on behalf of a pod.
YAML Secret Object Definition
apiVersion: v1
kind: Secret
metadata:
  name: test-secret
  namespace: my-namespace
type: Opaque 1
data: 2
  username: dmFsdWUtMQ0K 3
  password: dmFsdWUtMg0KDQo=
stringData: 4
  hostname: myapp.mydomain.com 5
- 1
- Indicates the structure of the secret’s key names and values.
- 2
- The allowable format for the keys in the
datafield must meet the guidelines in theDNS_SUBDOMAINvalue in the Kubernetes identifiers glossary. - 3
- The value associated with keys in the
datamap must be base64 encoded. - 4
- Entries in the
stringDatamap are converted to base64 and the entry are then moved to thedatamap automatically. This field is write-only. The value is only be returned by thedatafield. - 5
- The value associated with keys in the
stringDatamap is made up of plain text strings.
2.3.6.1.1. Properties of secrets
Key properties include:
- Secret data can be referenced independently from its definition.
- Secret data volumes are backed by temporary file-storage facilities (tmpfs) and never come to rest on a node.
- Secret data can be shared within a namespace.
2.3.6.1.2. Types of Secrets
The value in the type field indicates the structure of the secret’s key names and values. The type can be used to enforce the presence of user names and keys in the secret object. If you do not want validation, use the opaque type, which is the default.
Specify one of the following types to trigger minimal server-side validation to ensure the presence of specific key names in the secret data:
-
kubernetes.io/service-account-token. Uses a service account token. -
kubernetes.io/dockercfg. Uses the.dockercfgfile for required Docker credentials. -
kubernetes.io/dockerconfigjson. Uses the.docker/config.jsonfile for required Docker credentials. -
kubernetes.io/basic-auth. Use with basic authentication. -
kubernetes.io/ssh-auth. Use with SSH key authentication. -
kubernetes.io/tls. Use with TLS certificate authorities.
Specify type= Opaque if you do not want validation, which means the secret does not claim to conform to any convention for key names or values. An opaque secret, allows for unstructured key:value pairs that can contain arbitrary values.
You can specify other arbitrary types, such as example.com/my-secret-type. These types are not enforced server-side, but indicate that the creator of the secret intended to conform to the key/value requirements of that type.
2.3.6.1.3. Updates to secrets
When you modify the value of a secret, the value used by an already running pod does not dynamically change. To change a secret, you must delete the original pod and create a new pod, in some cases with an identical PodSpec.
Updating a secret follows the same workflow as deploying a new container image. You can use the kubectl rolling-update command.
The resourceVersion value in a secret is not specified when it is referenced. Therefore, if a secret is updated at the same time as pods are starting, the version of the secret that is used for the pod is not defined.
Currently, it is not possible to check the resource version of a secret object that was used when a pod was created. It is planned that pods report this information, so that a controller could restart ones using an old resourceVersion. In the interim, do not update the data of existing secrets, but create new ones with distinct names.
2.3.6.2. Creating secrets
You must create a secret before creating the pods that depend on that secret.
When creating secrets:
- Create a secret object with secret data.
- Update the pod service account to allow the reference to the secret.
-
Create a pod, which consumes the secret as an environment variable or as a file using a
secretvolume.
Procedure
Use the create command to create a secret object from a JSON or YAML file:
$ oc create -f <filename>
For example, you can create a secret from your local
.docker/config.jsonfile:$ oc create secret generic dockerhub \ --from-file=.dockerconfigjson=<path/to/.docker/config.json> \ --type=kubernetes.io/dockerconfigjsonThis command generates a JSON specification of the secret named
dockerhuband creates the object.YAML Opaque Secret Object Definition
apiVersion: v1 kind: Secret metadata: name: mysecret type: Opaque 1 data: username: dXNlci1uYW1l password: cGFzc3dvcmQ=- 1
- Specifies an opaque secret.
Docker Configuration JSON File Secret Object Definition
apiVersion: v1
kind: Secret
metadata:
  name: aregistrykey
  namespace: myapps
type: kubernetes.io/dockerconfigjson 1
data:
  .dockerconfigjson:bm5ubm5ubm5ubm5ubm5ubm5ubm5ubmdnZ2dnZ2dnZ2dnZ2dnZ2dnZ2cgYXV0aCBrZXlzCg== 2
2.3.6.3. Using secrets
After creating secrets, you can create a pod to reference your secret, get logs, and delete the pod.
Procedure
Create the pod to reference your secret:
$ oc create -f <your_yaml_file>.yaml
Get the logs:
$ oc logs secret-example-pod
Delete the pod:
$ oc delete pod secret-example-pod
Additional resources
Example YAML files with secret data:
YAML Secret That Will Create Four Files
apiVersion: v1
kind: Secret
metadata:
  name: test-secret
data:
  username: dmFsdWUtMQ0K     1
  password: dmFsdWUtMQ0KDQo= 2
stringData:
  hostname: myapp.mydomain.com 3
  secret.properties: |-     4
    property1=valueA
    property2=valueB
YAML of a pod populating files in a volume with secret data
apiVersion: v1
kind: Pod
metadata:
  name: secret-example-pod
spec:
  containers:
    - name: secret-test-container
      image: busybox
      command: [ "/bin/sh", "-c", "cat /etc/secret-volume/*" ]
      volumeMounts:
          # name must match the volume name below
          - name: secret-volume
            mountPath: /etc/secret-volume
            readOnly: true
  volumes:
    - name: secret-volume
      secret:
        secretName: test-secret
  restartPolicy: Never
YAML of a pod populating environment variables with secret data
apiVersion: v1
kind: Pod
metadata:
  name: secret-example-pod
spec:
  containers:
    - name: secret-test-container
      image: busybox
      command: [ "/bin/sh", "-c", "export" ]
      env:
        - name: TEST_SECRET_USERNAME_ENV_VAR
          valueFrom:
            secretKeyRef:
              name: test-secret
              key: username
  restartPolicy: Never
YAML of a Build Config Populating Environment Variables with Secret Data
apiVersion: build.openshift.io/v1
kind: BuildConfig
metadata:
  name: secret-example-bc
spec:
  strategy:
    sourceStrategy:
      env:
      - name: TEST_SECRET_USERNAME_ENV_VAR
        valueFrom:
          secretKeyRef:
            name: test-secret
            key: username
2.3.6.4. Adding input secrets and config maps
In some scenarios, build operations require credentials or other configuration data to access dependent resources, but it is undesirable for that information to be placed in source control. You can define input secrets and input config maps for this purpose.
Procedure
To add an input secret, config maps, or both to an existing BuildConfig object:
Create the
ConfigMapobject, if it does not exist:$ oc create configmap settings-mvn \ --from-file=settings.xml=<path/to/settings.xml>This creates a new config map named
settings-mvn, which contains the plain text content of thesettings.xmlfile.Create the
Secretobject, if it does not exist:$ oc create secret generic secret-mvn \ --from-file=id_rsa=<path/to/.ssh/id_rsa>This creates a new secret named
secret-mvn, which contains the base64 encoded content of theid_rsaprivate key.Add the config map and secret to the
sourcesection in the existingBuildConfigobject:source: git: uri: https://github.com/wildfly/quickstart.git contextDir: helloworld configMaps: - configMap: name: settings-mvn secrets: - secret: name: secret-mvn
To include the secret and config map in a new BuildConfig object, run the following command:
$ oc new-build \
    openshift/wildfly-101-centos7~https://github.com/wildfly/quickstart.git \
    --context-dir helloworld --build-secret “secret-mvn” \
    --build-config-map "settings-mvn"
During the build, the settings.xml and id_rsa files are copied into the directory where the source code is located. In OpenShift Container Platform S2I builder images, this is the image working directory, which is set using the WORKDIR instruction in the Dockerfile. If you want to specify another directory, add a destinationDir to the definition:
source:
  git:
    uri: https://github.com/wildfly/quickstart.git
  contextDir: helloworld
  configMaps:
    - configMap:
        name: settings-mvn
      destinationDir: ".m2"
  secrets:
    - secret:
        name: secret-mvn
      destinationDir: ".ssh"
You can also specify the destination directory when creating a new BuildConfig object:
$ oc new-build \
    openshift/wildfly-101-centos7~https://github.com/wildfly/quickstart.git \
    --context-dir helloworld --build-secret “secret-mvn:.ssh” \
    --build-config-map "settings-mvn:.m2"
In both cases, the settings.xml file is added to the ./.m2 directory of the build environment, and the id_rsa key is added to the ./.ssh directory.
2.3.6.5. Source-to-image strategy
When using a Source strategy, all defined input secrets are copied to their respective destinationDir. If you left destinationDir empty, then the secrets are placed in the working directory of the builder image.
The same rule is used when a destinationDir is a relative path. The secrets are placed in the paths that are relative to the working directory of the image. The final directory in the destinationDir path is created if it does not exist in the builder image. All preceding directories in the destinationDir must exist, or an error will occur.
Input secrets are added as world-writable, have 0666 permissions, and are truncated to size zero after executing the assemble script. This means that the secret files exist in the resulting image, but they are empty for security reasons.
Input config maps are not truncated after the assemble script completes.
2.3.6.6. Docker strategy
When using a docker strategy, you can add all defined input secrets into your container image using the ADD and COPY instructions in your Dockerfile.
If you do not specify the destinationDir for a secret, then the files are copied into the same directory in which the Dockerfile is located. If you specify a relative path as destinationDir, then the secrets are copied into that directory, relative to your Dockerfile location. This makes the secret files available to the Docker build operation as part of the context directory used during the build.
Example of a Dockerfile referencing secret and config map data
FROM centos/ruby-22-centos7

USER root
COPY ./secret-dir /secrets
COPY ./config /

# Create a shell script that will output secrets and ConfigMaps when the image is run
RUN echo '#!/bin/sh' > /input_report.sh
RUN echo '(test -f /secrets/secret1 && echo -n "secret1=" && cat /secrets/secret1)' >> /input_report.sh
RUN echo '(test -f /config && echo -n "relative-configMap=" && cat /config)' >> /input_report.sh
RUN chmod 755 /input_report.sh

CMD ["/bin/sh", "-c", "/input_report.sh"]
Users normally remove their input secrets from the final application image so that the secrets are not present in the container running from that image. However, the secrets still exist in the image itself in the layer where they were added. This removal is part of the Dockerfile itself.
2.3.6.7. Custom strategy
When using a Custom strategy, all the defined input secrets and config maps are available in the builder container in the /var/run/secrets/openshift.io/build directory. The custom build image must use these secrets and config maps appropriately. With the Custom strategy, you can define secrets as described in Custom strategy options.
There is no technical difference between existing strategy secrets and the input secrets. However, your builder image can distinguish between them and use them differently, based on your build use case.
The input secrets are always mounted into the /var/run/secrets/openshift.io/build directory, or your builder can parse the $BUILD environment variable, which includes the full build object.
If a pull secret for the registry exists in both the namespace and the node, builds default to using the pull secret in the namespace.
2.3.7. External artifacts
It is not recommended to store binary files in a source repository. Therefore, you must define a build which pulls additional files, such as Java .jar dependencies, during the build process. How this is done depends on the build strategy you are using.
For a Source build strategy, you must put appropriate shell commands into the assemble script:
.s2i/bin/assemble File
#!/bin/sh
APP_VERSION=1.0
wget http://repository.example.com/app/app-$APP_VERSION.jar -O app.jar
.s2i/bin/run File
#!/bin/sh
exec java -jar app.jar
For a Docker build strategy, you must modify the Dockerfile and invoke shell commands with the RUN instruction:
Excerpt of Dockerfile
FROM jboss/base-jdk:8

ENV APP_VERSION 1.0
RUN wget http://repository.example.com/app/app-$APP_VERSION.jar -O app.jar

EXPOSE 8080
CMD [ "java", "-jar", "app.jar" ]
In practice, you may want to use an environment variable for the file location so that the specific file to be downloaded can be customized using an environment variable defined on the BuildConfig, rather than updating the Dockerfile or assemble script.
You can choose between different methods of defining environment variables:
-
Using the
.s2i/environmentfile] (only for a Source build strategy) -
Setting in
BuildConfig -
Providing explicitly using
oc start-build --env(only for builds that are triggered manually)
2.3.8. Using docker credentials for private registries
You can supply builds with a .docker/config.json file with valid credentials for private container registries. This allows you to push the output image into a private container image registry or pull a builder image from the private container image registry that requires authentication.
For the OpenShift Container Platform container image registry, this is not required because secrets are generated automatically for you by OpenShift Container Platform.
The .docker/config.json file is found in your home directory by default and has the following format:
auths:
  https://index.docker.io/v1/: 1
    auth: "YWRfbGzhcGU6R2labnRib21ifTE=" 2
    email: "user@example.com" 3
You can define multiple container image registry entries in this file. Alternatively, you can also add authentication entries to this file by running the docker login command. The file will be created if it does not exist.
Kubernetes provides Secret objects, which can be used to store configuration and passwords.
Prerequisites
-
You must have a
.docker/config.jsonfile.
Procedure
Create the secret from your local
.docker/config.jsonfile:$ oc create secret generic dockerhub \ --from-file=.dockerconfigjson=<path/to/.docker/config.json> \ --type=kubernetes.io/dockerconfigjsonThis generates a JSON specification of the secret named
dockerhuband creates the object.Add a
pushSecretfield into theoutputsection of theBuildConfigand set it to the name of thesecretthat you created, which in the previous example isdockerhub:spec: output: to: kind: "DockerImage" name: "private.registry.com/org/private-image:latest" pushSecret: name: "dockerhub"You can use the
oc set build-secretcommand to set the push secret on the build configuration:$ oc set build-secret --push bc/sample-build dockerhub
You can also link the push secret to the service account used by the build instead of specifying the
pushSecretfield. By default, builds use thebuilderservice account. The push secret is automatically added to the build if the secret contains a credential that matches the repository hosting the build’s output image.$ oc secrets link builder dockerhub
Pull the builder container image from a private container image registry by specifying the
pullSecretfield, which is part of the build strategy definition:strategy: sourceStrategy: from: kind: "DockerImage" name: "docker.io/user/private_repository" pullSecret: name: "dockerhub"You can use the
oc set build-secretcommand to set the pull secret on the build configuration:$ oc set build-secret --pull bc/sample-build dockerhub
NoteThis example uses
pullSecretin a Source build, but it is also applicable in Docker and Custom builds.You can also link the pull secret to the service account used by the build instead of specifying the
pullSecretfield. By default, builds use thebuilderservice account. The pull secret is automatically added to the build if the secret contains a credential that matches the repository hosting the build’s input image. To link the pull secret to the service account used by the build instead of specifying thepullSecretfield, run:$ oc secrets link builder dockerhub
NoteYou must specify a
fromimage in theBuildConfigspec to take advantage of this feature. Docker strategy builds generated byoc new-buildoroc new-appmay not do this in some situations.
2.3.9. Build environments
As with pod environment variables, build environment variables can be defined in terms of references to other resources or variables using the Downward API. There are some exceptions, which are noted.
You can also manage environment variables defined in the BuildConfig with the oc set env command.
Referencing container resources using valueFrom in build environment variables is not supported as the references are resolved before the container is created.
2.3.9.1. Using build fields as environment variables
You can inject information about the build object by setting the fieldPath environment variable source to the JsonPath of the field from which you are interested in obtaining the value.
Jenkins Pipeline strategy does not support valueFrom syntax for environment variables.
Procedure
Set the
fieldPathenvironment variable source to theJsonPathof the field from which you are interested in obtaining the value:env: - name: FIELDREF_ENV valueFrom: fieldRef: fieldPath: metadata.name
2.3.9.2. Using secrets as environment variables
You can make key values from secrets available as environment variables using the valueFrom syntax.
This method shows the secrets as plain text in the output of the build pod console. To avoid this, use input secrets and config maps instead.
Procedure
To use a secret as an environment variable, set the
valueFromsyntax:apiVersion: build.openshift.io/v1 kind: BuildConfig metadata: name: secret-example-bc spec: strategy: sourceStrategy: env: - name: MYVAL valueFrom: secretKeyRef: key: myval name: mysecret
Additional resources
2.3.10. Service serving certificate secrets
Service serving certificate secrets are intended to support complex middleware applications that need out-of-the-box certificates. It has the same settings as the server certificates generated by the administrator tooling for nodes and masters.
Procedure
To secure communication to your service, have the cluster generate a signed serving certificate/key pair into a secret in your namespace.
Set the
service.beta.openshift.io/serving-cert-secret-nameannotation on your service with the value set to the name you want to use for your secret.Then, your
PodSpeccan mount that secret. When it is available, your pod runs. The certificate is good for the internal service DNS name,<service.name>.<service.namespace>.svc.The certificate and key are in PEM format, stored in
tls.crtandtls.keyrespectively. The certificate/key pair is automatically replaced when it gets close to expiration. View the expiration date in theservice.beta.openshift.io/expiryannotation on the secret, which is in RFC3339 format.
In most cases, the service DNS name <service.name>.<service.namespace>.svc is not externally routable. The primary use of <service.name>.<service.namespace>.svc is for intracluster or intraservice communication, and with re-encrypt routes.
Other pods can trust cluster-created certificates, which are only signed for internal DNS names, by using the certificate authority (CA) bundle in the /var/run/secrets/kubernetes.io/serviceaccount/service-ca.crt file that is automatically mounted in their pod.
The signature algorithm for this feature is x509.SHA256WithRSA. To manually rotate, delete the generated secret. A new certificate is created.
2.3.11. Secrets restrictions
To use a secret, a pod needs to reference the secret. A secret can be used with a pod in three ways:
- To populate environment variables for containers.
- As files in a volume mounted on one or more of its containers.
- By kubelet when pulling images for the pod.
Volume type secrets write data into the container as a file using the volume mechanism. imagePullSecrets use service accounts for the automatic injection of the secret into all pods in a namespaces.
When a template contains a secret definition, the only way for the template to use the provided secret is to ensure that the secret volume sources are validated and that the specified object reference actually points to an object of type Secret. Therefore, a secret needs to be created before any pods that depend on it. The most effective way to ensure this is to have it get injected automatically through the use of a service account.
Secret API objects reside in a namespace. They can only be referenced by pods in that same namespace.
Individual secrets are limited to 1MB in size. This is to discourage the creation of large secrets that would exhaust apiserver and kubelet memory. However, creation of a number of smaller secrets could also exhaust memory.
2.4. Managing build output
Use the following sections for an overview of and instructions for managing build output.
2.4.1. Build output
Builds that use the docker or source-to-image (S2I) strategy result in the creation of a new container image. The image is then pushed to the container image registry specified in the output section of the Build specification.
If the output kind is ImageStreamTag, then the image will be pushed to the integrated OpenShift Container Platform registry and tagged in the specified imagestream. If the output is of type DockerImage, then the name of the output reference will be used as a docker push specification. The specification may contain a registry or will default to DockerHub if no registry is specified. If the output section of the build specification is empty, then the image will not be pushed at the end of the build.
Output to an ImageStreamTag
spec:
  output:
    to:
      kind: "ImageStreamTag"
      name: "sample-image:latest"
Output to a docker Push Specification
spec:
  output:
    to:
      kind: "DockerImage"
      name: "my-registry.mycompany.com:5000/myimages/myimage:tag"
2.4.2. Output image environment variables
docker and source-to-image (S2I) strategy builds set the following environment variables on output images:
| Variable | Description |
|---|---|
|
| Name of the build |
|
| Namespace of the build |
|
| The source URL of the build |
|
| The Git reference used in the build |
|
| Source commit used in the build |
Additionally, any user-defined environment variable, for example those configured with S2I] or docker strategy options, will also be part of the output image environment variable list.
2.4.3. Output image labels
docker and source-to-image (S2I)` builds set the following labels on output images:
| Label | Description |
|---|---|
|
| Author of the source commit used in the build |
|
| Date of the source commit used in the build |
|
| Hash of the source commit used in the build |
|
| Message of the source commit used in the build |
|
| Branch or reference specified in the source |
|
| Source URL for the build |
You can also use the BuildConfig.spec.output.imageLabels field to specify a list of custom labels that will be applied to each image built from the build configuration.
Custom Labels to be Applied to Built Images
spec:
  output:
    to:
      kind: "ImageStreamTag"
      name: "my-image:latest"
    imageLabels:
    - name: "vendor"
      value: "MyCompany"
    - name: "authoritative-source-url"
      value: "registry.mycompany.com"
2.5. Using build strategies
The following sections define the primary supported build strategies, and how to use them.
2.5.1. Docker build
OpenShift Container Platform uses Buildah to build a container image from a Dockerfile. For more information on building container images with Dockerfiles, see the Dockerfile reference documentation.
If you set Docker build arguments by using the buildArgs array, see Understand how ARG and FROM interact in the Dockerfile reference documentation.
2.5.1.1. Replacing Dockerfile FROM image
You can replace the FROM instruction of the Dockerfile with the from of the BuildConfig object. If the Dockerfile uses multi-stage builds, the image in the last FROM instruction will be replaced.
Procedure
To replace the FROM instruction of the Dockerfile with the from of the BuildConfig.
strategy:
  dockerStrategy:
    from:
      kind: "ImageStreamTag"
      name: "debian:latest"
2.5.1.2. Using Dockerfile path
By default, docker builds use a Dockerfile located at the root of the context specified in the BuildConfig.spec.source.contextDir field.
The dockerfilePath field allows the build to use a different path to locate your Dockerfile, relative to the BuildConfig.spec.source.contextDir field. It can be a different file name than the default Dockerfile, such as MyDockerfile, or a path to a Dockerfile in a subdirectory, such as dockerfiles/app1/Dockerfile.
Procedure
To use the dockerfilePath field for the build to use a different path to locate your Dockerfile, set:
strategy:
  dockerStrategy:
    dockerfilePath: dockerfiles/app1/Dockerfile
2.5.1.3. Using docker environment variables
To make environment variables available to the docker build process and resulting image, you can add environment variables to the dockerStrategy definition of the build configuration.
The environment variables defined there are inserted as a single ENV Dockerfile instruction right after the FROM instruction, so that it can be referenced later on within the Dockerfile.
Procedure
The variables are defined during build and stay in the output image, therefore they will be present in any container that runs that image as well.
For example, defining a custom HTTP proxy to be used during build and runtime:
dockerStrategy:
...
  env:
    - name: "HTTP_PROXY"
      value: "http://myproxy.net:5187/"
You can also manage environment variables defined in the build configuration with the oc set env command.
2.5.1.4. Adding docker build arguments
You can set docker build arguments using the buildArgs array. The build arguments are passed to docker when a build is started.
See Understand how ARG and FROM interact in the Dockerfile reference documentation.
Procedure
To set docker build arguments, add entries to the buildArgs array, which is located in the dockerStrategy definition of the BuildConfig object. For example:
dockerStrategy:
...
  buildArgs:
    - name: "foo"
      value: "bar"
Only the name and value fields are supported. Any settings on the valueFrom field are ignored.
2.5.1.5. Squash layers with docker builds
Docker builds normally create a layer representing each instruction in a Dockerfile. Setting the imageOptimizationPolicy to SkipLayers merges all instructions into a single layer on top of the base image.
Procedure
Set the
imageOptimizationPolicytoSkipLayers:strategy: dockerStrategy: imageOptimizationPolicy: SkipLayers
2.5.2. Source-to-image build
Source-to-image (S2I) is a tool for building reproducible container images. It produces ready-to-run images by injecting application source into a container image and assembling a new image. The new image incorporates the base image, the builder, and built source and is ready to use with the buildah run command. S2I supports incremental builds, which re-use previously downloaded dependencies, previously built artifacts, and so on.
2.5.2.1. Performing source-to-image incremental builds
Source-to-image (S2I) can perform incremental builds, which means it reuses artifacts from previously-built images.
Procedure
To create an incremental build, create a with the following modification to the strategy definition:
strategy: sourceStrategy: from: kind: "ImageStreamTag" name: "incremental-image:latest" 1 incremental: true 2- 1
- Specify an image that supports incremental builds. Consult the documentation of the builder image to determine if it supports this behavior.
- 2
- This flag controls whether an incremental build is attempted. If the builder image does not support incremental builds, the build will still succeed, but you will get a log message stating the incremental build was not successful because of a missing
save-artifactsscript.
Additional resources
- See S2I Requirements for information on how to create a builder image supporting incremental builds.
2.5.2.2. Overriding source-to-image builder image scripts
You can override the assemble, run, and save-artifacts source-to-image (S2I) scripts provided by the builder image.
Procedure
To override the assemble, run, and save-artifacts S2I scripts provided by the builder image, either:
-
Provide an
assemble,run, orsave-artifactsscript in the.s2i/bindirectory of your application source repository. Provide a URL of a directory containing the scripts as part of the strategy definition. For example:
strategy: sourceStrategy: from: kind: "ImageStreamTag" name: "builder-image:latest" scripts: "http://somehost.com/scripts_directory" 1- 1
- This path will have
run,assemble, andsave-artifactsappended to it. If any or all scripts are found they will be used in place of the same named scripts provided in the image.
Files located at the scripts URL take precedence over files located in .s2i/bin of the source repository.
2.5.2.3. Source-to-image environment variables
There are two ways to make environment variables available to the source build process and resulting image. Environment files and BuildConfig environment values. Variables provided will be present during the build process and in the output image.
2.5.2.3.1. Using source-to-image environment files
Source build enables you to set environment values, one per line, inside your application, by specifying them in a .s2i/environment file in the source repository. The environment variables specified in this file are present during the build process and in the output image.
If you provide a .s2i/environment file in your source repository, source-to-image (S2I) reads this file during the build. This allows customization of the build behavior as the assemble script may use these variables.
Procedure
For example, to disable assets compilation for your Rails application during the build:
-
Add
DISABLE_ASSET_COMPILATION=truein the.s2i/environmentfile.
In addition to builds, the specified environment variables are also available in the running application itself. For example, to cause the Rails application to start in development mode instead of production:
-
Add
RAILS_ENV=developmentto the.s2i/environmentfile.
The complete list of supported environment variables is available in the using images section for each image.
2.5.2.3.2. Using source-to-image build configuration environment
You can add environment variables to the sourceStrategy definition of the build configuration. The environment variables defined there are visible during the assemble script execution and will be defined in the output image, making them also available to the run script and application code.
Procedure
For example, to disable assets compilation for your Rails application:
sourceStrategy:
...
  env:
    - name: "DISABLE_ASSET_COMPILATION"
      value: "true"
Additional resources
- The build environment section provides more advanced instructions.
-
You can also manage environment variables defined in the build configuration with the
oc set envcommand.
2.5.2.4. Ignoring source-to-image source files
Source-to-image (S2I) supports a .s2iignore file, which contains a list of file patterns that should be ignored. Files in the build working directory, as provided by the various input sources, that match a pattern found in the .s2iignore file will not be made available to the assemble script.
2.5.2.5. Creating images from source code with source-to-image
Source-to-image (S2I) is a framework that makes it easy to write images that take application source code as an input and produce a new image that runs the assembled application as output.
The main advantage of using S2I for building reproducible container images is the ease of use for developers. As a builder image author, you must understand two basic concepts in order for your images to provide the best S2I performance, the build process and S2I scripts.
2.5.2.5.1. Understanding the source-to-image build process
The build process consists of the following three fundamental elements, which are combined into a final container image:
- Sources
- Source-to-image (S2I) scripts
- Builder image
S2I generates a Dockerfile with the builder image as the first FROM instruction. The Dockerfile generated by S2I is then passed to Buildah.
2.5.2.5.2. How to write source-to-image scripts
You can write source-to-image (S2I) scripts in any programming language, as long as the scripts are executable inside the builder image. S2I supports multiple options providing assemble/run/save-artifacts scripts. All of these locations are checked on each build in the following order:
- A script specified in the build configuration.
-
A script found in the application source
.s2i/bindirectory. -
A script found at the default image URL with the
io.openshift.s2i.scripts-urllabel.
Both the io.openshift.s2i.scripts-url label specified in the image and the script specified in a build configuration can take one of the following forms:
-
image:///path_to_scripts_dir: absolute path inside the image to a directory where the S2I scripts are located. -
file:///path_to_scripts_dir: relative or absolute path to a directory on the host where the S2I scripts are located. -
http(s)://path_to_scripts_dir: URL to a directory where the S2I scripts are located.
Table 2.1. S2I scripts
| Script | Description |
|---|---|
|
|
The
|
|
|
The |
|
|
The
These dependencies are gathered into a |
|
|
The |
|
|
The
Note
The suggested location to put the test application built by your |
Example S2I scripts
The following example S2I scripts are written in Bash. Each example assumes its tar contents are unpacked into the /tmp/s2i directory.
assemble script:
#!/bin/bash

# restore build artifacts
if [ "$(ls /tmp/s2i/artifacts/ 2>/dev/null)" ]; then
    mv /tmp/s2i/artifacts/* $HOME/.
fi

# move the application source
mv /tmp/s2i/src $HOME/src

# build application artifacts
pushd ${HOME}
make all

# install the artifacts
make install
popd
run script:
#!/bin/bash

# run the application
/opt/application/run.sh
save-artifacts script:
#!/bin/bash

pushd ${HOME}
if [ -d deps ]; then
    # all deps contents to tar stream
    tar cf - deps
fi
popd
usage script:
#!/bin/bash

# inform the user how to use the image
cat <<EOF
This is a S2I sample builder image, to use it, install
https://github.com/openshift/source-to-image
EOF
Additional resources
2.5.3. Custom build
The custom build strategy allows developers to define a specific builder image responsible for the entire build process. Using your own builder image allows you to customize your build process.
A custom builder image is a plain container image embedded with build process logic, for example for building RPMs or base images.
Custom builds run with a high level of privilege and are not available to users by default. Only users who can be trusted with cluster administration permissions should be granted access to run custom builds.
2.5.3.1. Using FROM image for custom builds
You can use the customStrategy.from section to indicate the image to use for the custom build
Procedure
Set the
customStrategy.fromsection:strategy: customStrategy: from: kind: "DockerImage" name: "openshift/sti-image-builder"
2.5.3.2. Using secrets in custom builds
In addition to secrets for source and images that can be added to all build types, custom strategies allow adding an arbitrary list of secrets to the builder pod.
Procedure
To mount each secret at a specific location, edit the
secretSourceandmountPathfields of thestrategyYAML file:strategy: customStrategy: secrets: - secretSource: 1 name: "secret1" mountPath: "/tmp/secret1" 2 - secretSource: name: "secret2" mountPath: "/tmp/secret2"
2.5.3.3. Using environment variables for custom builds
To make environment variables available to the custom build process, you can add environment variables to the customStrategy definition of the build configuration.
The environment variables defined there are passed to the pod that runs the custom build.
Procedure
Define a custom HTTP proxy to be used during build:
customStrategy:
...
  env:
    - name: "HTTP_PROXY"
      value: "http://myproxy.net:5187/"
To manage environment variables defined in the build configuration, enter the following command:
$ oc set env <enter_variables>
2.5.3.4. Using custom builder images
OpenShift Container Platform’s custom build strategy enables you to define a specific builder image responsible for the entire build process. When you need a build to produce individual artifacts such as packages, JARs, WARs, installable ZIPs, or base images, use a custom builder image using the custom build strategy.
A custom builder image is a plain container image embedded with build process logic, which is used for building artifacts such as RPMs or base container images.
Additionally, the custom builder allows implementing any extended build process, such as a CI/CD flow that runs unit or integration tests.
2.5.3.4.1. Custom builder image
Upon invocation, a custom builder image receives the following environment variables with the information needed to proceed with the build:
Table 2.2. Custom Builder Environment Variables
| Variable Name | Description |
|---|---|
|
|
The entire serialized JSON of the |
|
| The URL of a Git repository with source to be built. |
|
|
Uses the same value as |
|
| Specifies the subdirectory of the Git repository to be used when building. Only present if defined. |
|
| The Git reference to be built. |
|
| The version of the OpenShift Container Platform master that created this build object. |
|
| The container image registry to push the image to. |
|
| The container image tag name for the image being built. |
|
|
The path to the container registry credentials for running a |
2.5.3.4.2. Custom builder workflow
Although custom builder image authors have flexibility in defining the build process, your builder image must adhere to the following required steps necessary for running a build inside of OpenShift Container Platform:
-
The
Buildobject definition contains all the necessary information about input parameters for the build. - Run the build process.
- If your build produces an image, push it to the output location of the build if it is defined. Other output locations can be passed with environment variables.
2.5.4. Pipeline build
The Pipeline build strategy is deprecated in OpenShift Container Platform 4. Equivalent and improved functionality is present in the OpenShift Container Platform Pipelines based on Tekton.
Jenkins images on OpenShift Container Platform are fully supported and users should follow Jenkins user documentation for defining their jenkinsfile in a job or store it in a Source Control Management system.
The Pipeline build strategy allows developers to define a Jenkins pipeline for use by the Jenkins pipeline plugin. The build can be started, monitored, and managed by OpenShift Container Platform in the same way as any other build type.
Pipeline workflows are defined in a jenkinsfile, either embedded directly in the build configuration, or supplied in a Git repository and referenced by the build configuration.
2.5.4.1. Understanding OpenShift Container Platform pipelines
The Pipeline build strategy is deprecated in OpenShift Container Platform 4. Equivalent and improved functionality is present in the OpenShift Container Platform Pipelines based on Tekton.
Jenkins images on OpenShift Container Platform are fully supported and users should follow Jenkins user documentation for defining their jenkinsfile in a job or store it in a Source Control Management system.
Pipelines give you control over building, deploying, and promoting your applications on OpenShift Container Platform. Using a combination of the Jenkins Pipeline build strategy, jenkinsfiles, and the OpenShift Container Platform Domain Specific Language (DSL) provided by the Jenkins Client Plugin, you can create advanced build, test, deploy, and promote pipelines for any scenario.
OpenShift Container Platform Jenkins Sync Plugin
The OpenShift Container Platform Jenkins Sync Plugin keeps the build configuration and build objects in sync with Jenkins jobs and builds, and provides the following:
- Dynamic job and run creation in Jenkins.
- Dynamic creation of agent pod templates from image streams, image stream tags, or config maps.
- Injection of environment variables.
- Pipeline visualization in the OpenShift Container Platform web console.
- Integration with the Jenkins Git plugin, which passes commit information from OpenShift Container Platform builds to the Jenkins Git plugin.
- Synchronization of secrets into Jenkins credential entries.
OpenShift Container Platform Jenkins Client Plugin
The OpenShift Container Platform Jenkins Client Plugin is a Jenkins plugin which aims to provide a readable, concise, comprehensive, and fluent Jenkins Pipeline syntax for rich interactions with an OpenShift Container Platform API Server. The plugin uses the OpenShift Container Platform command line tool, oc, which must be available on the nodes executing the script.
The Jenkins Client Plugin must be installed on your Jenkins master so the OpenShift Container Platform DSL will be available to use within the jenkinsfile for your application. This plugin is installed and enabled by default when using the OpenShift Container Platform Jenkins image.
For OpenShift Container Platform Pipelines within your project, you will must use the Jenkins Pipeline Build Strategy. This strategy defaults to using a jenkinsfile at the root of your source repository, but also provides the following configuration options:
-
An inline
jenkinsfilefield within your build configuration. -
A
jenkinsfilePathfield within your build configuration that references the location of thejenkinsfileto use relative to the sourcecontextDir.
The optional jenkinsfilePath field specifies the name of the file to use, relative to the source contextDir. If contextDir is omitted, it defaults to the root of the repository. If jenkinsfilePath is omitted, it defaults to jenkinsfile.
2.5.4.2. Providing the Jenkins file for pipeline builds
The Pipeline build strategy is deprecated in OpenShift Container Platform 4. Equivalent and improved functionality is present in the OpenShift Container Platform Pipelines based on Tekton.
Jenkins images on OpenShift Container Platform are fully supported and users should follow Jenkins user documentation for defining their jenkinsfile in a job or store it in a Source Control Management system.
The jenkinsfile uses the standard groovy language syntax to allow fine grained control over the configuration, build, and deployment of your application.
You can supply the jenkinsfile in one of the following ways:
- A file located within your source code repository.
-
Embedded as part of your build configuration using the
jenkinsfilefield.
When using the first option, the jenkinsfile must be included in your applications source code repository at one of the following locations:
-
A file named
jenkinsfileat the root of your repository. -
A file named
jenkinsfileat the root of the sourcecontextDirof your repository. -
A file name specified via the
jenkinsfilePathfield of theJenkinsPipelineStrategysection of your BuildConfig, which is relative to the sourcecontextDirif supplied, otherwise it defaults to the root of the repository.
The jenkinsfile is run on the Jenkins agent pod, which must have the OpenShift Container Platform client binaries available if you intend to use the OpenShift Container Platform DSL.
Procedure
To provide the Jenkins file, you can either:
- Embed the Jenkins file in the build configuration.
- Include in the build configuration a reference to the Git repository that contains the Jenkins file.
Embedded Definition
kind: "BuildConfig"
apiVersion: "v1"
metadata:
  name: "sample-pipeline"
spec:
  strategy:
    jenkinsPipelineStrategy:
      jenkinsfile: |-
        node('agent') {
          stage 'build'
          openshiftBuild(buildConfig: 'ruby-sample-build', showBuildLogs: 'true')
          stage 'deploy'
          openshiftDeploy(deploymentConfig: 'frontend')
        }
Reference to Git Repository
kind: "BuildConfig"
apiVersion: "v1"
metadata:
  name: "sample-pipeline"
spec:
  source:
    git:
      uri: "https://github.com/openshift/ruby-hello-world"
  strategy:
    jenkinsPipelineStrategy:
      jenkinsfilePath: some/repo/dir/filename 1
- 1
- The optional
jenkinsfilePathfield specifies the name of the file to use, relative to the sourcecontextDir. IfcontextDiris omitted, it defaults to the root of the repository. IfjenkinsfilePathis omitted, it defaults tojenkinsfile.
2.5.4.3. Using environment variables for pipeline builds
The Pipeline build strategy is deprecated in OpenShift Container Platform 4. Equivalent and improved functionality is present in the OpenShift Container Platform Pipelines based on Tekton.
Jenkins images on OpenShift Container Platform are fully supported and users should follow Jenkins user documentation for defining their jenkinsfile in a job or store it in a Source Control Management system.
To make environment variables available to the Pipeline build process, you can add environment variables to the jenkinsPipelineStrategy definition of the build configuration.
Once defined, the environment variables will be set as parameters for any Jenkins job associated with the build configuration.
Procedure
To define environment variables to be used during build, edit the YAML file:
jenkinsPipelineStrategy:
...
  env:
    - name: "FOO"
      value: "BAR"
You can also manage environment variables defined in the build configuration with the oc set env command.
2.5.4.3.1. Mapping between BuildConfig environment variables and Jenkins job parameters
When a Jenkins job is created or updated based on changes to a Pipeline strategy build configuration, any environment variables in the build configuration are mapped to Jenkins job parameters definitions, where the default values for the Jenkins job parameters definitions are the current values of the associated environment variables.
After the Jenkins job’s initial creation, you can still add additional parameters to the job from the Jenkins console. The parameter names differ from the names of the environment variables in the build configuration. The parameters are honored when builds are started for those Jenkins jobs.
How you start builds for the Jenkins job dictates how the parameters are set.
-
If you start with
oc start-build, the values of the environment variables in the build configuration are the parameters set for the corresponding job instance. Any changes you make to the parameters' default values from the Jenkins console are ignored. The build configuration values take precedence. If you start with
oc start-build -e, the values for the environment variables specified in the-eoption take precedence.- If you specify an environment variable not listed in the build configuration, they will be added as a Jenkins job parameter definitions.
-
Any changes you make from the Jenkins console to the parameters corresponding to the environment variables are ignored. The build configuration and what you specify with
oc start-build -etakes precedence.
- If you start the Jenkins job with the Jenkins console, then you can control the setting of the parameters with the Jenkins console as part of starting a build for the job.
It is recommended that you specify in the build configuration all possible environment variables to be associated with job parameters. Doing so reduces disk I/O and improves performance during Jenkins processing.
2.5.4.4. Pipeline build tutorial
The Pipeline build strategy is deprecated in OpenShift Container Platform 4. Equivalent and improved functionality is present in the OpenShift Container Platform Pipelines based on Tekton.
Jenkins images on OpenShift Container Platform are fully supported and users should follow Jenkins user documentation for defining their jenkinsfile in a job or store it in a Source Control Management system.
This example demonstrates how to create an OpenShift Container Platform Pipeline that will build, deploy, and verify a Node.js/MongoDB application using the nodejs-mongodb.json template.
Procedure
Create the Jenkins master:
$ oc project <project_name>
Select the project that you want to use or create a new project with
oc new-project <project_name>.$ oc new-app jenkins-ephemeral 1If you want to use persistent storage, use
jenkins-persistentinstead.Create a file named
nodejs-sample-pipeline.yamlwith the following content:NoteThis creates a
BuildConfigobject that employs the Jenkins pipeline strategy to build, deploy, and scale theNode.js/MongoDBexample application.kind: "BuildConfig" apiVersion: "v1" metadata: name: "nodejs-sample-pipeline" spec: strategy: jenkinsPipelineStrategy: jenkinsfile: <pipeline content from below> type: JenkinsPipelineAfter you create a
BuildConfigobject with ajenkinsPipelineStrategy, tell the pipeline what to do by using an inlinejenkinsfile:NoteThis example does not set up a Git repository for the application.
The following
jenkinsfilecontent is written in Groovy using the OpenShift Container Platform DSL. For this example, include inline content in theBuildConfigobject using the YAML Literal Style, though including ajenkinsfilein your source repository is the preferred method.def templatePath = 'https://raw.githubusercontent.com/openshift/nodejs-ex/master/openshift/templates/nodejs-mongodb.json' 1 def templateName = 'nodejs-mongodb-example' 2 pipeline { agent { node { label 'nodejs' 3 } } options { timeout(time: 20, unit: 'MINUTES') 4 } stages { stage('preamble') { steps { script { openshift.withCluster() { openshift.withProject() { echo "Using project: ${openshift.project()}" } } } } } stage('cleanup') { steps { script { openshift.withCluster() { openshift.withProject() { openshift.selector("all", [ template : templateName ]).delete() 5 if (openshift.selector("secrets", templateName).exists()) { 6 openshift.selector("secrets", templateName).delete() } } } } } } stage('create') { steps { script { openshift.withCluster() { openshift.withProject() { openshift.newApp(templatePath) 7 } } } } } stage('build') { steps { script { openshift.withCluster() { openshift.withProject() { def builds = openshift.selector("bc", templateName).related('builds') timeout(5) { 8 builds.untilEach(1) { return (it.object().status.phase == "Complete") } } } } } } } stage('deploy') { steps { script { openshift.withCluster() { openshift.withProject() { def rm = openshift.selector("dc", templateName).rollout() timeout(5) { 9 openshift.selector("dc", templateName).related('pods').untilEach(1) { return (it.object().status.phase == "Running") } } } } } } } stage('tag') { steps { script { openshift.withCluster() { openshift.withProject() { openshift.tag("${templateName}:latest", "${templateName}-staging:latest") 10 } } } } } } }
- 1
- Path of the template to use.
- 1 2
- Name of the template that will be created.
- 3
- Spin up a
node.jsagent pod on which to run this build. - 4
- Set a timeout of 20 minutes for this pipeline.
- 5
- Delete everything with this template label.
- 6
- Delete any secrets with this template label.
- 7
- Create a new application from the
templatePath. - 8
- Wait up to five minutes for the build to complete.
- 9
- Wait up to five minutes for the deployment to complete.
- 10
- If everything else succeeded, tag the
$ {templateName}:latestimage as$ {templateName}-staging:latest. A pipeline build configuration for the staging environment can watch for the$ {templateName}-staging:latestimage to change and then deploy it to the staging environment.
NoteThe previous example was written using the declarative pipeline style, but the older scripted pipeline style is also supported.
Create the Pipeline
BuildConfigin your OpenShift Container Platform cluster:$ oc create -f nodejs-sample-pipeline.yaml
If you do not want to create your own file, you can use the sample from the Origin repository by running:
$ oc create -f https://raw.githubusercontent.com/openshift/origin/master/examples/jenkins/pipeline/nodejs-sample-pipeline.yaml
Start the Pipeline:
$ oc start-build nodejs-sample-pipeline
NoteAlternatively, you can start your pipeline with the OpenShift Container Platform web console by navigating to the Builds → Pipeline section and clicking Start Pipeline, or by visiting the Jenkins Console, navigating to the Pipeline that you created, and clicking Build Now.
Once the pipeline is started, you should see the following actions performed within your project:
- A job instance is created on the Jenkins server.
- An agent pod is launched, if your pipeline requires one.
The pipeline runs on the agent pod, or the master if no agent is required.
-
Any previously created resources with the
template=nodejs-mongodb-examplelabel will be deleted. -
A new application, and all of its associated resources, will be created from the
nodejs-mongodb-exampletemplate. A build will be started using the
nodejs-mongodb-exampleBuildConfig.- The pipeline will wait until the build has completed to trigger the next stage.
A deployment will be started using the
nodejs-mongodb-exampledeployment configuration.- The pipeline will wait until the deployment has completed to trigger the next stage.
-
If the build and deploy are successful, the
nodejs-mongodb-example:latestimage will be tagged asnodejs-mongodb-example:stage.
-
Any previously created resources with the
The agent pod is deleted, if one was required for the pipeline.
NoteThe best way to visualize the pipeline execution is by viewing it in the OpenShift Container Platform web console. You can view your pipelines by logging in to the web console and navigating to Builds → Pipelines.
2.5.5. Adding secrets with web console
You can add a secret to your build configuration so that it can access a private repository.
Procedure
To add a secret to your build configuration so that it can access a private repository from the OpenShift Container Platform web console:
- Create a new OpenShift Container Platform project.
- Create a secret that contains credentials for accessing a private source code repository.
- Create a build configuration.
-
On the build configuration editor page or in the
create app from builder imagepage of the web console, set the Source Secret. - Click Save.
2.5.6. Enabling pulling and pushing
You can enable pulling to a private registry by setting the pull secret and pushing by setting the push secret in the build configuration.
Procedure
To enable pulling to a private registry:
- Set the pull secret in the build configuration.
To enable pushing:
- Set the push secret in the build configuration.
2.6. Custom image builds with Buildah
With OpenShift Container Platform 4.8, a docker socket will not be present on the host nodes. This means the mount docker socket option of a custom build is not guaranteed to provide an accessible docker socket for use within a custom build image.
If you require this capability in order to build and push images, add the Buildah tool your custom build image and use it to build and push the image within your custom build logic. The following is an example of how to run custom builds with Buildah.
Using the custom build strategy requires permissions that normal users do not have by default because it allows the user to execute arbitrary code inside a privileged container running on the cluster. This level of access can be used to compromise the cluster and therefore should be granted only to users who are trusted with administrative privileges on the cluster.
2.6.1. Prerequisites
- Review how to grant custom build permissions.
2.6.2. Creating custom build artifacts
You must create the image you want to use as your custom build image.
Procedure
Starting with an empty directory, create a file named
Dockerfilewith the following content:FROM registry.redhat.io/rhel8/buildah # In this example, `/tmp/build` contains the inputs that build when this # custom builder image is run. Normally the custom builder image fetches # this content from some location at build time, by using git clone as an example. ADD dockerfile.sample /tmp/input/Dockerfile ADD build.sh /usr/bin RUN chmod a+x /usr/bin/build.sh # /usr/bin/build.sh contains the actual custom build logic that will be run when # this custom builder image is run. ENTRYPOINT ["/usr/bin/build.sh"]
In the same directory, create a file named
dockerfile.sample. This file is included in the custom build image and defines the image that is produced by the custom build:FROM registry.access.redhat.com/ubi8/ubi RUN touch /tmp/build
In the same directory, create a file named
build.sh. This file contains the logic that is run when the custom build runs:#!/bin/sh # Note that in this case the build inputs are part of the custom builder image, but normally this # is retrieved from an external source. cd /tmp/input # OUTPUT_REGISTRY and OUTPUT_IMAGE are env variables provided by the custom # build framework TAG="${OUTPUT_REGISTRY}/${OUTPUT_IMAGE}" # performs the build of the new image defined by dockerfile.sample buildah --storage-driver vfs bud --isolation chroot -t ${TAG} . # buildah requires a slight modification to the push secret provided by the service # account to use it for pushing the image cp /var/run/secrets/openshift.io/push/.dockercfg /tmp (echo "{ \"auths\": " ; cat /var/run/secrets/openshift.io/push/.dockercfg ; echo "}") > /tmp/.dockercfg # push the new image to the target for the build buildah --storage-driver vfs push --tls-verify=false --authfile /tmp/.dockercfg ${TAG}
2.6.3. Build custom builder image
You can use OpenShift Container Platform to build and push custom builder images to use in a custom strategy.
Prerequisites
- Define all the inputs that will go into creating your new custom builder image.
Procedure
Define a
BuildConfigobject that will build your custom builder image:$ oc new-build --binary --strategy=docker --name custom-builder-image
From the directory in which you created your custom build image, run the build:
$ oc start-build custom-builder-image --from-dir . -F
After the build completes, your new custom builder image is available in your project in an image stream tag that is named
custom-builder-image:latest.
2.6.4. Use custom builder image
You can define a BuildConfig object that uses the custom strategy in conjunction with your custom builder image to execute your custom build logic.
Prerequisites
- Define all the required inputs for new custom builder image.
- Build your custom builder image.
Procedure
Create a file named
buildconfig.yaml. This file defines theBuildConfigobject that is created in your project and executed:kind: BuildConfig apiVersion: build.openshift.io/v1 metadata: name: sample-custom-build labels: name: sample-custom-build annotations: template.alpha.openshift.io/wait-for-ready: 'true' spec: strategy: type: Custom customStrategy: forcePull: true from: kind: ImageStreamTag name: custom-builder-image:latest namespace: <yourproject> 1 output: to: kind: ImageStreamTag name: sample-custom:latest- 1
- Specify your project name.
Create the
BuildConfig:$ oc create -f buildconfig.yaml
Create a file named
imagestream.yaml. This file defines the image stream to which the build will push the image:kind: ImageStream apiVersion: image.openshift.io/v1 metadata: name: sample-custom spec: {}Create the imagestream:
$ oc create -f imagestream.yaml
Run your custom build:
$ oc start-build sample-custom-build -F
When the build runs, it launches a pod running the custom builder image that was built earlier. The pod runs the
build.shlogic that is defined as the entrypoint for the custom builder image. Thebuild.shlogic invokes Buildah to build thedockerfile.samplethat was embedded in the custom builder image, and then uses Buildah to push the new image to thesample-custom image stream.
2.7. Performing basic builds
The following sections provide instructions for basic build operations including starting and canceling builds, deleting BuildConfigs, viewing build details, and accessing build logs.
2.7.1. Starting a build
You can manually start a new build from an existing build configuration in your current project.
Procedure
To manually start a build, enter the following command:
$ oc start-build <buildconfig_name>
2.7.1.1. Re-running a build
You can manually re-run a build using the --from-build flag.
Procedure
To manually re-run a build, enter the following command:
$ oc start-build --from-build=<build_name>
2.7.1.2. Streaming build logs
You can specify the --follow flag to stream the build’s logs in stdout.
Procedure
To manually stream a build’s logs in
stdout, enter the following command:$ oc start-build <buildconfig_name> --follow
2.7.1.3. Setting environment variables when starting a build
You can specify the --env flag to set any desired environment variable for the build.
Procedure
To specify a desired environment variable, enter the following command:
$ oc start-build <buildconfig_name> --env=<key>=<value>
2.7.1.4. Starting a build with source
Rather than relying on a Git source pull or a Dockerfile for a build, you can also start a build by directly pushing your source, which could be the contents of a Git or SVN working directory, a set of pre-built binary artifacts you want to deploy, or a single file. This can be done by specifying one of the following options for the start-build command:
| Option | Description |
|---|---|
|
| Specifies a directory that will be archived and used as a binary input for the build. |
|
| Specifies a single file that will be the only file in the build source. The file is placed in the root of an empty directory with the same file name as the original file provided. |
|
|
Specifies a path to a local repository to use as the binary input for a build. Add the |
When passing any of these options directly to the build, the contents are streamed to the build and override the current build source settings.
Builds triggered from binary input will not preserve the source on the server, so rebuilds triggered by base image changes will use the source specified in the build configuration.
Procedure
Start a build from a source using the following command to send the contents of a local Git repository as an archive from the tag
v2:$ oc start-build hello-world --from-repo=../hello-world --commit=v2
2.7.2. Canceling a build
You can cancel a build using the web console, or with the following CLI command.
Procedure
To manually cancel a build, enter the following command:
$ oc cancel-build <build_name>
2.7.2.1. Canceling multiple builds
You can cancel multiple builds with the following CLI command.
Procedure
To manually cancel multiple builds, enter the following command:
$ oc cancel-build <build1_name> <build2_name> <build3_name>
2.7.2.2. Canceling all builds
You can cancel all builds from the build configuration with the following CLI command.
Procedure
To cancel all builds, enter the following command:
$ oc cancel-build bc/<buildconfig_name>
2.7.2.3. Canceling all builds in a given state
You can cancel all builds in a given state, such as new or pending, while ignoring the builds in other states.
Procedure
To cancel all in a given state, enter the following command:
$ oc cancel-build bc/<buildconfig_name>
2.7.3. Deleting a BuildConfig
You can delete a BuildConfig using the following command.
Procedure
To delete a
BuildConfig, enter the following command:$ oc delete bc <BuildConfigName>
This also deletes all builds that were instantiated from this
BuildConfig.To delete a
BuildConfigand keep the builds instatiated from theBuildConfig, specify the--cascade=falseflag when you enter the following command:$ oc delete --cascade=false bc <BuildConfigName>
2.7.4. Viewing build details
You can view build details with the web console or by using the oc describe CLI command.
This displays information including:
- The build source.
- The build strategy.
- The output destination.
- Digest of the image in the destination registry.
- How the build was created.
If the build uses the Docker or Source strategy, the oc describe output also includes information about the source revision used for the build, including the commit ID, author, committer, and message.
Procedure
To view build details, enter the following command:
$ oc describe build <build_name>
2.7.5. Accessing build logs
You can access build logs using the web console or the CLI.
Procedure
To stream the logs using the build directly, enter the following command:
$ oc describe build <build_name>
2.7.5.1. Accessing BuildConfig logs
You can access BuildConfig logs using the web console or the CLI.
Procedure
To stream the logs of the latest build for a
BuildConfig, enter the following command:$ oc logs -f bc/<buildconfig_name>
2.7.5.2. Accessing BuildConfig logs for a given version build
You can access logs for a given version build for a BuildConfig using the web console or the CLI.
Procedure
To stream the logs for a given version build for a
BuildConfig, enter the following command:$ oc logs --version=<number> bc/<buildconfig_name>
2.7.5.3. Enabling log verbosity
You can enable a more verbose output by passing the BUILD_LOGLEVEL environment variable as part of the sourceStrategy or dockerStrategy in a BuildConfig.
An administrator can set the default build verbosity for the entire OpenShift Container Platform instance by configuring env/BUILD_LOGLEVEL. This default can be overridden by specifying BUILD_LOGLEVEL in a given BuildConfig. You can specify a higher priority override on the command line for non-binary builds by passing --build-loglevel to oc start-build.
Available log levels for source builds are as follows:
| Level 0 |
Produces output from containers running the |
| Level 1 | Produces basic information about the executed process. |
| Level 2 | Produces very detailed information about the executed process. |
| Level 3 | Produces very detailed information about the executed process, and a listing of the archive contents. |
| Level 4 | Currently produces the same information as level 3. |
| Level 5 | Produces everything mentioned on previous levels and additionally provides docker push messages. |
Procedure
To enable more verbose output, pass the
BUILD_LOGLEVELenvironment variable as part of thesourceStrategyordockerStrategyin aBuildConfig:sourceStrategy: ... env: - name: "BUILD_LOGLEVEL" value: "2" 1- 1
- Adjust this value to the desired log level.
2.8. Triggering and modifying builds
The following sections outline how to trigger builds and modify builds using build hooks.
2.8.1. Build triggers
When defining a BuildConfig, you can define triggers to control the circumstances in which the BuildConfig should be run. The following build triggers are available:
- Webhook
- Image change
- Configuration change
2.8.1.1. Webhook triggers
Webhook triggers allow you to trigger a new build by sending a request to the OpenShift Container Platform API endpoint. You can define these triggers using GitHub, GitLab, Bitbucket, or Generic webhooks.
Currently, OpenShift Container Platform webhooks only support the analogous versions of the push event for each of the Git-based Source Code Management (SCM) systems. All other event types are ignored.
When the push events are processed, the OpenShift Container Platform control plane host (also known as the master host) confirms if the branch reference inside the event matches the branch reference in the corresponding BuildConfig. If so, it then checks out the exact commit reference noted in the webhook event on the OpenShift Container Platform build. If they do not match, no build is triggered.
oc new-app and oc new-build create GitHub and Generic webhook triggers automatically, but any other needed webhook triggers must be added manually. You can manually add triggers by setting triggers.
For all webhooks, you must define a secret with a key named WebHookSecretKey and the value being the value to be supplied when invoking the webhook. The webhook definition must then reference the secret. The secret ensures the uniqueness of the URL, preventing others from triggering the build. The value of the key is compared to the secret provided during the webhook invocation.
For example here is a GitHub webhook with a reference to a secret named mysecret:
type: "GitHub"
github:
  secretReference:
    name: "mysecret"
The secret is then defined as follows. Note that the value of the secret is base64 encoded as is required for any data field of a Secret object.
- kind: Secret
  apiVersion: v1
  metadata:
    name: mysecret
    creationTimestamp:
  data:
    WebHookSecretKey: c2VjcmV0dmFsdWUx
2.8.1.1.1. Using GitHub webhooks
GitHub webhooks handle the call made by GitHub when a repository is updated. When defining the trigger, you must specify a secret, which is part of the URL you supply to GitHub when configuring the webhook.
Example GitHub webhook definition:
type: "GitHub"
github:
  secretReference:
    name: "mysecret"
The secret used in the webhook trigger configuration is not the same as secret field you encounter when configuring webhook in GitHub UI. The former is to make the webhook URL unique and hard to predict, the latter is an optional string field used to create HMAC hex digest of the body, which is sent as an X-Hub-Signature header.
The payload URL is returned as the GitHub Webhook URL by the oc describe command (see Displaying Webhook URLs), and is structured as follows:
Example output
https://<openshift_api_host:port>/apis/build.openshift.io/v1/namespaces/<namespace>/buildconfigs/<name>/webhooks/<secret>/github
Prerequisites
-
Create a
BuildConfigfrom a GitHub repository.
Procedure
To configure a GitHub Webhook:
After creating a
BuildConfigfrom a GitHub repository, run:$ oc describe bc/<name-of-your-BuildConfig>
This generates a webhook GitHub URL that looks like:
Example output
<https://api.starter-us-east-1.openshift.com:443/apis/build.openshift.io/v1/namespaces/<namespace>/buildconfigs/<name>/webhooks/<secret>/github
- Cut and paste this URL into GitHub, from the GitHub web console.
- In your GitHub repository, select Add Webhook from Settings → Webhooks.
- Paste the URL output into the Payload URL field.
-
Change the Content Type from GitHub’s default
application/x-www-form-urlencodedtoapplication/json. Click Add webhook.
You should see a message from GitHub stating that your webhook was successfully configured.
Now, when you push a change to your GitHub repository, a new build automatically starts, and upon a successful build a new deployment starts.
NoteGogs supports the same webhook payload format as GitHub. Therefore, if you are using a Gogs server, you can define a GitHub webhook trigger on your
BuildConfigand trigger it by your Gogs server as well.
Given a file containing a valid JSON payload, such as
payload.json, you can manually trigger the webhook withcurl:$ curl -H "X-GitHub-Event: push" -H "Content-Type: application/json" -k -X POST --data-binary @payload.json https://<openshift_api_host:port>/apis/build.openshift.io/v1/namespaces/<namespace>/buildconfigs/<name>/webhooks/<secret>/github
The
-kargument is only necessary if your API server does not have a properly signed certificate.
Additional resources
2.8.1.1.2. Using GitLab webhooks
GitLab webhooks handle the call made by GitLab when a repository is updated. As with the GitHub triggers, you must specify a secret. The following example is a trigger definition YAML within the BuildConfig:
type: "GitLab"
gitlab:
  secretReference:
    name: "mysecret"
The payload URL is returned as the GitLab Webhook URL by the oc describe command, and is structured as follows:
Example output
https://<openshift_api_host:port>/apis/build.openshift.io/v1/namespaces/<namespace>/buildconfigs/<name>/webhooks/<secret>/gitlab
Procedure
To configure a GitLab Webhook:
Describe the
BuildConfigto get the webhook URL:$ oc describe bc <name>
-
Copy the webhook URL, replacing
<secret>with your secret value. - Follow the GitLab setup instructions to paste the webhook URL into your GitLab repository settings.
Given a file containing a valid JSON payload, such as
payload.json, you can manually trigger the webhook withcurl:$ curl -H "X-GitLab-Event: Push Hook" -H "Content-Type: application/json" -k -X POST --data-binary @payload.json https://<openshift_api_host:port>/apis/build.openshift.io/v1/namespaces/<namespace>/buildconfigs/<name>/webhooks/<secret>/gitlab
The
-kargument is only necessary if your API server does not have a properly signed certificate.
2.8.1.1.3. Using Bitbucket webhooks
Bitbucket webhooks handle the call made by Bitbucket when a repository is updated. Similar to the previous triggers, you must specify a secret. The following example is a trigger definition YAML within the BuildConfig:
type: "Bitbucket"
bitbucket:
  secretReference:
    name: "mysecret"
The payload URL is returned as the Bitbucket Webhook URL by the oc describe command, and is structured as follows:
Example output
https://<openshift_api_host:port>/apis/build.openshift.io/v1/namespaces/<namespace>/buildconfigs/<name>/webhooks/<secret>/bitbucket
Procedure
To configure a Bitbucket Webhook:
Describe the 'BuildConfig' to get the webhook URL:
$ oc describe bc <name>
-
Copy the webhook URL, replacing
<secret>with your secret value. - Follow the Bitbucket setup instructions to paste the webhook URL into your Bitbucket repository settings.
Given a file containing a valid JSON payload, such as
payload.json, you can manually trigger the webhook withcurl:$ curl -H "X-Event-Key: repo:push" -H "Content-Type: application/json" -k -X POST --data-binary @payload.json https://<openshift_api_host:port>/apis/build.openshift.io/v1/namespaces/<namespace>/buildconfigs/<name>/webhooks/<secret>/bitbucket
The
-kargument is only necessary if your API server does not have a properly signed certificate.
2.8.1.1.4. Using generic webhooks
Generic webhooks are invoked from any system capable of making a web request. As with the other webhooks, you must specify a secret, which is part of the URL that the caller must use to trigger the build. The secret ensures the uniqueness of the URL, preventing others from triggering the build. The following is an example trigger definition YAML within the BuildConfig:
type: "Generic"
generic:
  secretReference:
    name: "mysecret"
allowEnv: true 1- 1
- Set to
trueto allow a generic webhook to pass in environment variables.
Procedure
To set up the caller, supply the calling system with the URL of the generic webhook endpoint for your build:
Example output
https://<openshift_api_host:port>/apis/build.openshift.io/v1/namespaces/<namespace>/buildconfigs/<name>/webhooks/<secret>/generic
The caller must invoke the webhook as a
POSToperation.To invoke the webhook manually you can use
curl:$ curl -X POST -k https://<openshift_api_host:port>/apis/build.openshift.io/v1/namespaces/<namespace>/buildconfigs/<name>/webhooks/<secret>/generic
The HTTP verb must be set to
POST. The insecure-kflag is specified to ignore certificate validation. This second flag is not necessary if your cluster has properly signed certificates.The endpoint can accept an optional payload with the following format:
git: uri: "<url to git repository>" ref: "<optional git reference>" commit: "<commit hash identifying a specific git commit>" author: name: "<author name>" email: "<author e-mail>" committer: name: "<committer name>" email: "<committer e-mail>" message: "<commit message>" env: 1 - name: "<variable name>" value: "<variable value>"- 1
- Similar to the
BuildConfigenvironment variables, the environment variables defined here are made available to your build. If these variables collide with theBuildConfigenvironment variables, these variables take precedence. By default, environment variables passed by webhook are ignored. Set theallowEnvfield totrueon the webhook definition to enable this behavior.
To pass this payload using
curl, define it in a file namedpayload_file.yamland run:$ curl -H "Content-Type: application/yaml" --data-binary @payload_file.yaml -X POST -k https://<openshift_api_host:port>/apis/build.openshift.io/v1/namespaces/<namespace>/buildconfigs/<name>/webhooks/<secret>/generic
The arguments are the same as the previous example with the addition of a header and a payload. The
-Hargument sets theContent-Typeheader toapplication/yamlorapplication/jsondepending on your payload format. The--data-binaryargument is used to send a binary payload with newlines intact with thePOSTrequest.
OpenShift Container Platform permits builds to be triggered by the generic webhook even if an invalid request payload is presented, for example, invalid content type, unparsable or invalid content, and so on. This behavior is maintained for backwards compatibility. If an invalid request payload is presented, OpenShift Container Platform returns a warning in JSON format as part of its HTTP 200 OK response.
2.8.1.1.5. Displaying webhook URLs
You can use the following command to display webhook URLs associated with a build configuration. If the command does not display any webhook URLs, then no webhook trigger is defined for that build configuration.
Procedure
-
To display any webhook URLs associated with a
BuildConfig, run:
$ oc describe bc <name>
2.8.1.2. Using image change triggers
As a developer, you can configure your build to run automatically every time a base image changes.
You can use image change triggers to automatically invoke your build when a new version of an upstream image is available. For example, if a build is based on a RHEL image, you can trigger that build to run any time the RHEL image changes. As a result, the application image is always running on the latest RHEL base image.
Image streams that point to container images in v1 container registries only trigger a build once when the image stream tag becomes available and not on subsequent image updates. This is due to the lack of uniquely identifiable images in v1 container registries.
Procedure
Define an
ImageStreamthat points to the upstream image you want to use as a trigger:kind: "ImageStream" apiVersion: "v1" metadata: name: "ruby-20-centos7"
This defines the image stream that is tied to a container image repository located at
<system-registry>/<namespace>/ruby-20-centos7. The<system-registry>is defined as a service with the namedocker-registryrunning in OpenShift Container Platform.If an image stream is the base image for the build, set the
fromfield in the build strategy to point to theImageStream:strategy: sourceStrategy: from: kind: "ImageStreamTag" name: "ruby-20-centos7:latest"In this case, the
sourceStrategydefinition is consuming thelatesttag of the image stream namedruby-20-centos7located within this namespace.Define a build with one or more triggers that point to
ImageStreams:type: "ImageChange" 1 imageChange: {} type: "ImageChange" 2 imageChange: from: kind: "ImageStreamTag" name: "custom-image:latest"
- 1
- An image change trigger that monitors the
ImageStreamandTagas defined by the build strategy’sfromfield. TheimageChangeobject here must be empty. - 2
- An image change trigger that monitors an arbitrary image stream. The
imageChangepart, in this case, must include afromfield that references theImageStreamTagto monitor.
When using an image change trigger for the strategy image stream, the generated build is supplied with an immutable docker tag that points to the latest image corresponding to that tag. This new image reference is used by the strategy when it executes for the build.
For other image change triggers that do not reference the strategy image stream, a new build is started, but the build strategy is not updated with a unique image reference.
Since this example has an image change trigger for the strategy, the resulting build is:
strategy:
  sourceStrategy:
    from:
      kind: "DockerImage"
      name: "172.30.17.3:5001/mynamespace/ruby-20-centos7:<immutableid>"
This ensures that the triggered build uses the new image that was just pushed to the repository, and the build can be re-run any time with the same inputs.
You can pause an image change trigger to allow multiple changes on the referenced image stream before a build is started. You can also set the paused attribute to true when initially adding an ImageChangeTrigger to a BuildConfig to prevent a build from being immediately triggered.
type: "ImageChange"
imageChange:
  from:
    kind: "ImageStreamTag"
    name: "custom-image:latest"
  paused: true
In addition to setting the image field for all Strategy types, for custom builds, the OPENSHIFT_CUSTOM_BUILD_BASE_IMAGE environment variable is checked. If it does not exist, then it is created with the immutable image reference. If it does exist, then it is updated with the immutable image reference.
If a build is triggered due to a webhook trigger or manual request, the build that is created uses the <immutableid> resolved from the ImageStream referenced by the Strategy. This ensures that builds are performed using consistent image tags for ease of reproduction.
Additional resources
2.8.1.3. Identifying the image change trigger of a build
As a developer, if you have image change triggers, you can identify which image change initiated the last build. This can be useful for debugging or troubleshooting builds.
Example BuildConfig
apiVersion: build.openshift.io/v1
kind: BuildConfig
metadata:
  name: bc-ict-example
  namespace: bc-ict-example-namespace
spec:

# ...

  triggers:
  - imageChange:
      from:
        kind: ImageStreamTag
        name: input:latest
        namespace: bc-ict-example-namespace
  - imageChange:
      from:
        kind: ImageStreamTag
        name: input2:latest
        namespace: bc-ict-example-namespace
    type: ImageChange
status:
  imageChangeTriggers:
  - from:
      name: input:latest
      namespace: bc-ict-example-namespace
    lastTriggerTime: "2021-06-30T13:47:53Z"
    lastTriggeredImageID: image-registry.openshift-image-registry.svc:5000/bc-ict-example-namespace/input@sha256:0f88ffbeb9d25525720bfa3524cb1bf0908b7f791057cf1acfae917b11266a69
  - from:
      name: input2:latest
      namespace: bc-ict-example-namespace
    lastTriggeredImageID:  image-registry.openshift-image-registry.svc:5000/bc-ict-example-namespace/input2@sha256:0f88ffbeb9d25525720bfa3524cb2ce0908b7f791057cf1acfae917b11266a69

  lastVersion: 1
This example omits elements that are not related to image change triggers.
Prerequisites
- You have configured multiple image change triggers. These triggers have triggered one or more builds.
Procedure
In
buildConfig.status.imageChangeTriggersto identify thelastTriggerTimethat has the latest timestamp.This
ImageChangeTriggerStatusThen you use the `name` and `namespace` from that build to find the corresponding image change trigger in `buildConfig.spec.triggers`.
-
Under
imageChangeTriggers, compare timestamps to identify the latest
Image change triggers
In your build configuration, buildConfig.spec.triggers is an array of build trigger policies, BuildTriggerPolicy.
Each BuildTriggerPolicy has a type field and set of pointers fields. Each pointer field corresponds to one of the allowed values for the type field. As such, you can only set BuildTriggerPolicy to only one pointer field.
For image change triggers, the value of type is ImageChange. Then, the imageChange field is the pointer to an ImageChangeTrigger object, which has the following fields:
-
lastTriggeredImageID: This field, which is not shown in the example, is deprecated in OpenShift Container Platform 4.8 and will be ignored in a future release. It contains the resolved image reference for theImageStreamTagwhen the last build was triggered from thisBuildConfig. -
paused: You can use this field, which is not shown in the example, to temporarily disable this particular image change trigger. -
from: You use this field to reference theImageStreamTagthat drives this image change trigger. Its type is the core Kubernetes type,OwnerReference.
The from field has the following fields of note: kind: For image change triggers, the only supported value is ImageStreamTag. namespace: You use this field to specify the namespace of the ImageStreamTag. ** name: You use this field to specify the ImageStreamTag.
Image change trigger status
In your build configuration, buildConfig.status.imageChangeTriggers is an array of ImageChangeTriggerStatus elements. Each ImageChangeTriggerStatus element includes the from, lastTriggeredImageID, and lastTriggerTime elements shown in the preceding example.
The ImageChangeTriggerStatus that has the most recent lastTriggerTime triggered the most recent build. You use its name and namespace to identify the image change trigger in buildConfig.spec.triggers that triggered the build.
The lastTriggerTime with the most recent timestamp signifies the ImageChangeTriggerStatus of the last build. This ImageChangeTriggerStatus has the same name and namespace as the image change trigger in buildConfig.spec.triggers that triggered the build.
Additional resources
2.8.1.4. Configuration change triggers
A configuration change trigger allows a build to be automatically invoked as soon as a new BuildConfig is created.
The following is an example trigger definition YAML within the BuildConfig:
type: "ConfigChange"
Configuration change triggers currently only work when creating a new BuildConfig. In a future release, configuration change triggers will also be able to launch a build whenever a BuildConfig is updated.
2.8.1.4.1. Setting triggers manually
Triggers can be added to and removed from build configurations with oc set triggers.
Procedure
To set a GitHub webhook trigger on a build configuration, use:
$ oc set triggers bc <name> --from-github
To set an imagechange trigger, use:
$ oc set triggers bc <name> --from-image='<image>'
To remove a trigger, add
--remove:$ oc set triggers bc <name> --from-bitbucket --remove
When a webhook trigger already exists, adding it again regenerates the webhook secret.
For more information, consult the help documentation with by running:
$ oc set triggers --help
2.8.2. Build hooks
Build hooks allow behavior to be injected into the build process.
The postCommit field of a BuildConfig object runs commands inside a temporary container that is running the build output image. The hook is run immediately after the last layer of the image has been committed and before the image is pushed to a registry.
The current working directory is set to the image’s WORKDIR, which is the default working directory of the container image. For most images, this is where the source code is located.
The hook fails if the script or command returns a non-zero exit code or if starting the temporary container fails. When the hook fails it marks the build as failed and the image is not pushed to a registry. The reason for failing can be inspected by looking at the build logs.
Build hooks can be used to run unit tests to verify the image before the build is marked complete and the image is made available in a registry. If all tests pass and the test runner returns with exit code 0, the build is marked successful. In case of any test failure, the build is marked as failed. In all cases, the build log contains the output of the test runner, which can be used to identify failed tests.
The postCommit hook is not only limited to running tests, but can be used for other commands as well. Since it runs in a temporary container, changes made by the hook do not persist, meaning that running the hook cannot affect the final image. This behavior allows for, among other uses, the installation and usage of test dependencies that are automatically discarded and are not present in the final image.
2.8.2.1. Configuring post commit build hooks
There are different ways to configure the post build hook. All forms in the following examples are equivalent and run bundle exec rake test --verbose.
Procedure
Shell script:
postCommit:
  script: "bundle exec rake test --verbose"
The
scriptvalue is a shell script to be run with/bin/sh -ic. Use this when a shell script is appropriate to execute the build hook. For example, for running unit tests as above. To control the image entry point, or if the image does not have/bin/sh, usecommandand/orargs.NoteThe additional
-iflag was introduced to improve the experience working with CentOS and RHEL images, and may be removed in a future release.Command as the image entry point:
postCommit:
  command: ["/bin/bash", "-c", "bundle exec rake test --verbose"]
In this form,
commandis the command to run, which overrides the image entry point in the exec form, as documented in the Dockerfile reference. This is needed if the image does not have/bin/sh, or if you do not want to use a shell. In all other cases, usingscriptmight be more convenient.Command with arguments:
postCommit:
  command: ["bundle", "exec", "rake", "test"]
  args: ["--verbose"]
This form is equivalent to appending the arguments to
command.
Providing both script and command simultaneously creates an invalid build hook.
2.8.2.2. Using the CLI to set post commit build hooks
The oc set build-hook command can be used to set the build hook for a build configuration.
Procedure
To set a command as the post-commit build hook:
$ oc set build-hook bc/mybc \
    --post-commit \
    --command \
    -- bundle exec rake test --verbose
To set a script as the post-commit build hook:
$ oc set build-hook bc/mybc --post-commit --script="bundle exec rake test --verbose"
2.9. Performing advanced builds
The following sections provide instructions for advanced build operations including setting build resources and maximum duration, assigning builds to nodes, chaining builds, build pruning, and build run policies.
2.9.1. Setting build resources
By default, builds are completed by pods using unbound resources, such as memory and CPU. These resources can be limited.
Procedure
You can limit resource use in two ways:
- Limit resource use by specifying resource limits in the default container limits of a project.
Limit resource use by specifying resource limits as part of the build configuration. ** In the following example, each of the
resources,cpu, andmemoryparameters are optional:apiVersion: "v1" kind: "BuildConfig" metadata: name: "sample-build" spec: resources: limits: cpu: "100m" 1 memory: "256Mi" 2However, if a quota has been defined for your project, one of the following two items is required:
A
resourcessection set with an explicitrequests:resources: requests: 1 cpu: "100m" memory: "256Mi"- 1
- The
requestsobject contains the list of resources that correspond to the list of resources in the quota.
A limit range defined in your project, where the defaults from the
LimitRangeobject apply to pods created during the build process.Otherwise, build pod creation will fail, citing a failure to satisfy quota.
2.9.2. Setting maximum duration
When defining a BuildConfig object, you can define its maximum duration by setting the completionDeadlineSeconds field. It is specified in seconds and is not set by default. When not set, there is no maximum duration enforced.
The maximum duration is counted from the time when a build pod gets scheduled in the system, and defines how long it can be active, including the time needed to pull the builder image. After reaching the specified timeout, the build is terminated by OpenShift Container Platform.
Procedure
To set maximum duration, specify
completionDeadlineSecondsin yourBuildConfig. The following example shows the part of aBuildConfigspecifyingcompletionDeadlineSecondsfield for 30 minutes:spec: completionDeadlineSeconds: 1800
This setting is not supported with the Pipeline Strategy option.
2.9.3. Assigning builds to specific nodes
Builds can be targeted to run on specific nodes by specifying labels in the nodeSelector field of a build configuration. The nodeSelector value is a set of key-value pairs that are matched to Node labels when scheduling the build pod.
The nodeSelector value can also be controlled by cluster-wide default and override values. Defaults will only be applied if the build configuration does not define any key-value pairs for the nodeSelector and also does not define an explicitly empty map value of nodeSelector:{}. Override values will replace values in the build configuration on a key by key basis.
If the specified NodeSelector cannot be matched to a node with those labels, the build still stay in the Pending state indefinitely.
Procedure
Assign builds to run on specific nodes by assigning labels in the
nodeSelectorfield of theBuildConfig, for example:apiVersion: "v1" kind: "BuildConfig" metadata: name: "sample-build" spec: nodeSelector:1 key1: value1 key2: value2- 1
- Builds associated with this build configuration will run only on nodes with the
key1=value2andkey2=value2labels.
2.9.4. Chained builds
For compiled languages such as Go, C, C++, and Java, including the dependencies necessary for compilation in the application image might increase the size of the image or introduce vulnerabilities that can be exploited.
To avoid these problems, two builds can be chained together. One build that produces the compiled artifact, and a second build that places that artifact in a separate image that runs the artifact.
In the following example, a source-to-image (S2I) build is combined with a docker build to compile an artifact that is then placed in a separate runtime image.
Although this example chains a S2I build and a docker build, the first build can use any strategy that produces an image containing the desired artifacts, and the second build can use any strategy that can consume input content from an image.
The first build takes the application source and produces an image containing a WAR file. The image is pushed to the artifact-image image stream. The path of the output artifact depends on the assemble script of the S2I builder used. In this case, it is output to /wildfly/standalone/deployments/ROOT.war.
apiVersion: build.openshift.io/v1
kind: BuildConfig
metadata:
  name: artifact-build
spec:
  output:
    to:
      kind: ImageStreamTag
      name: artifact-image:latest
  source:
    git:
      uri: https://github.com/openshift/openshift-jee-sample.git
      ref: "master"
  strategy:
    sourceStrategy:
      from:
        kind: ImageStreamTag
        name: wildfly:10.1
        namespace: openshift
The second build uses image source with a path to the WAR file inside the output image from the first build. An inline dockerfile copies that WAR file into a runtime image.
apiVersion: build.openshift.io/v1
kind: BuildConfig
metadata:
  name: image-build
spec:
  output:
    to:
      kind: ImageStreamTag
      name: image-build:latest
  source:
    dockerfile: |-
      FROM jee-runtime:latest
      COPY ROOT.war /deployments/ROOT.war
    images:
    - from: 1
        kind: ImageStreamTag
        name: artifact-image:latest
      paths: 2
      - sourcePath: /wildfly/standalone/deployments/ROOT.war
        destinationDir: "."
  strategy:
    dockerStrategy:
      from: 3
        kind: ImageStreamTag
        name: jee-runtime:latest
  triggers:
  - imageChange: {}
type: ImageChange- 1
fromspecifies that the docker build should include the output of the image from theartifact-imageimage stream, which was the target of the previous build.- 2
pathsspecifies which paths from the target image to include in the current docker build.- 3
- The runtime image is used as the source image for the docker build.
The result of this setup is that the output image of the second build does not have to contain any of the build tools that are needed to create the WAR file. Also, because the second build contains an image change trigger, whenever the first build is run and produces a new image with the binary artifact, the second build is automatically triggered to produce a runtime image that contains that artifact. Therefore, both builds behave as a single build with two stages.
2.9.5. Pruning builds
By default, builds that have completed their lifecycle are persisted indefinitely. You can limit the number of previous builds that are retained.
Procedure
Limit the number of previous builds that are retained by supplying a positive integer value for
successfulBuildsHistoryLimitorfailedBuildsHistoryLimitin yourBuildConfig, for example:apiVersion: "v1" kind: "BuildConfig" metadata: name: "sample-build" spec: successfulBuildsHistoryLimit: 2 1 failedBuildsHistoryLimit: 2 2
Trigger build pruning by one of the following actions:
- Updating a build configuration.
- Waiting for a build to complete its lifecycle.
Builds are sorted by their creation timestamp with the oldest builds being pruned first.
Administrators can manually prune builds using the 'oc adm' object pruning command.
2.9.6. Build run policy
The build run policy describes the order in which the builds created from the build configuration should run. This can be done by changing the value of the runPolicy field in the spec section of the Build specification.
It is also possible to change the runPolicy value for existing build configurations, by:
-
Changing
ParalleltoSerialorSerialLatestOnlyand triggering a new build from this configuration causes the new build to wait until all parallel builds complete as the serial build can only run alone. -
Changing
SerialtoSerialLatestOnlyand triggering a new build causes cancellation of all existing builds in queue, except the currently running build and the most recently created build. The newest build runs next.
2.10. Using Red Hat subscriptions in builds
Use the following sections to run entitled builds on OpenShift Container Platform.
2.10.1. Creating an image stream tag for the Red Hat Universal Base Image
To use Red Hat subscriptions within a build, you create an image stream tag to reference the Universal Base Image (UBI).
To make the UBI available in every project in the cluster, you add the image stream tag to the openshift namespace. Otherwise, to make it available in a specific project, you add the image stream tag to that project.
The benefit of using image stream tags this way is that doing so grants access to the UBI based on the registry.redhat.io credentials in the install pull secret without exposing the pull secret to other users. This is more convenient than requiring each developer to install pull secrets with registry.redhat.io credentials in each project.
Procedure
To create an
ImageStreamTagin theopenshiftnamespace, so it is available to developers in all projects, enter:$ oc tag --source=docker registry.redhat.io/ubi7/ubi:latest ubi:latest -n openshift
To create an
ImageStreamTagin a single project, enter:$ oc tag --source=docker registry.redhat.io/ubi7/ubi:latest ubi:latest
2.10.2. Adding subscription entitlements as a build secret
Builds that use Red Hat subscriptions to install content must include the entitlement keys as a build secret.
Prerequisites
You must have access to Red Hat entitlements through your subscription. The entitlement secret is automatically created by the Insights Operator.
When you perform an Entitlement Build using Red Hat Enterprise Linux (RHEL) 7, you must have the following instructions in your Dockerfile before you run any yum commands:
RUN rm /etc/rhsm-host
Procedure
Add the etc-pki-entitlement secret as a build input in the build configuration:
source:
  secrets:
  - secret:
      name: etc-pki-entitlement
    destinationDir: etc-pki-entitlement
2.10.3. Running builds with Subscription Manager
2.10.3.1. Docker builds using Subscription Manager
Docker strategy builds can use the Subscription Manager to install subscription content.
Prerequisites
The entitlement keys, subscription manager configuration, and subscription manager certificate authority must be added as build inputs.
Procedure
Use the following as an example Dockerfile to install content with the Subscription Manager:
FROM registry.redhat.io/rhel7:latest
USER root
# Copy entitlements
COPY ./etc-pki-entitlement /etc/pki/entitlement
# Copy subscription manager configurations
COPY ./rhsm-conf /etc/rhsm
COPY ./rhsm-ca /etc/rhsm/ca
# Delete /etc/rhsm-host to use entitlements from the build container
RUN rm /etc/rhsm-host && \
    # Initialize /etc/yum.repos.d/redhat.repo
    # See https://access.redhat.com/solutions/1443553
    yum repolist --disablerepo=* && \
    subscription-manager repos --enable <enabled-repo> && \
    yum -y update && \
    yum -y install <rpms> && \
    # Remove entitlements and Subscription Manager configs
    rm -rf /etc/pki/entitlement && \
    rm -rf /etc/rhsm
# OpenShift requires images to run as non-root by default
USER 1001
ENTRYPOINT ["/bin/bash"]
2.10.4. Running builds with Red Hat Satellite subscriptions
2.10.4.1. Adding Red Hat Satellite configurations to builds
Builds that use Red Hat Satellite to install content must provide appropriate configurations to obtain content from Satellite repositories.
Prerequisites
You must provide or create a
yum-compatible repository configuration file that downloads content from your Satellite instance.Sample repository configuration
[test-<name>]
name=test-<number>
baseurl = https://satellite.../content/dist/rhel/server/7/7Server/x86_64/os
enabled=1
gpgcheck=0
sslverify=0
sslclientkey = /etc/pki/entitlement/...-key.pem
sslclientcert = /etc/pki/entitlement/....pem
Procedure
Create a
ConfigMapcontaining the Satellite repository configuration file:$ oc create configmap yum-repos-d --from-file /path/to/satellite.repo
Add the Satellite repository configuration to the
BuildConfig:source: configMaps: - configMap: name: yum-repos-d destinationDir: yum.repos.d
2.10.4.2. Docker builds using Red Hat Satellite subscriptions
Docker strategy builds can use Red Hat Satellite repositories to install subscription content.
Prerequisites
- The entitlement keys and Satellite repository configurations must be added as build inputs.
Procedure
Use the following as an example Dockerfile to install content with Satellite:
FROM registry.redhat.io/rhel7:latest
USER root
# Copy entitlements
COPY ./etc-pki-entitlement /etc/pki/entitlement
# Copy repository configuration
COPY ./yum.repos.d /etc/yum.repos.d
# Delete /etc/rhsm-host to use entitlements from the build container
RUN sed -i".org" -e "s#^enabled=1#enabled=0#g" /etc/yum/pluginconf.d/subscription-manager.conf 1
#RUN cat /etc/yum/pluginconf.d/subscription-manager.conf
RUN yum clean all
#RUN yum-config-manager
RUN rm /etc/rhsm-host && \
    # yum repository info provided by Satellite
    yum -y update && \
    yum -y install <rpms> && \
    # Remove entitlements
    rm -rf /etc/pki/entitlement
# OpenShift requires images to run as non-root by default
USER 1001
ENTRYPOINT ["/bin/bash"]- 1
- If adding Satellite configurations to builds using
enabled=1fails, addRUN sed -i".org" -e "s#^enabled=1#enabled=0#g" /etc/yum/pluginconf.d/subscription-manager.confto the Dockerfile.
2.10.5. Additional resources
2.11. Securing builds by strategy
Builds in OpenShift Container Platform are run in privileged containers. Depending on the build strategy used, if you have privileges, you can run builds to escalate their permissions on the cluster and host nodes. And as a security measure, it limits who can run builds and the strategy that is used for those builds. Custom builds are inherently less safe than source builds, because they can execute any code within a privileged container, and are disabled by default. Grant docker build permissions with caution, because a vulnerability in the Dockerfile processing logic could result in a privileges being granted on the host node.
By default, all users that can create builds are granted permission to use the docker and Source-to-image (S2I) build strategies. Users with cluster administrator privileges can enable the custom build strategy, as referenced in the restricting build strategies to a user globally section.
You can control who can build and which build strategies they can use by using an authorization policy. Each build strategy has a corresponding build subresource. A user must have permission to create a build and permission to create on the build strategy subresource to create builds using that strategy. Default roles are provided that grant the create permission on the build strategy subresource.
Table 2.3. Build Strategy Subresources and Roles
| Strategy | Subresource | Role |
|---|---|---|
| Docker | builds/docker | system:build-strategy-docker |
| Source-to-Image | builds/source | system:build-strategy-source |
| Custom | builds/custom | system:build-strategy-custom |
| JenkinsPipeline | builds/jenkinspipeline | system:build-strategy-jenkinspipeline |
2.11.1. Disabling access to a build strategy globally
To prevent access to a particular build strategy globally, log in as a user with cluster administrator privileges, remove the corresponding role from the system:authenticated group, and apply the annotation rbac.authorization.kubernetes.io/autoupdate: "false" to protect them from changes between the API restarts. The following example shows disabling the docker build strategy.
Procedure
Apply the
rbac.authorization.kubernetes.io/autoupdateannotation:$ oc edit clusterrolebinding system:build-strategy-docker-binding
Example output
apiVersion: rbac.authorization.k8s.io/v1 kind: ClusterRoleBinding metadata: annotations: rbac.authorization.kubernetes.io/autoupdate: "false" 1 creationTimestamp: 2018-08-10T01:24:14Z name: system:build-strategy-docker-binding resourceVersion: "225" selfLink: /apis/rbac.authorization.k8s.io/v1/clusterrolebindings/system%3Abuild-strategy-docker-binding uid: 17b1f3d4-9c3c-11e8-be62-0800277d20bf roleRef: apiGroup: rbac.authorization.k8s.io kind: ClusterRole name: system:build-strategy-docker subjects: - apiGroup: rbac.authorization.k8s.io kind: Group name: system:authenticated- 1
- Change the
rbac.authorization.kubernetes.io/autoupdateannotation’s value to"false".
Remove the role:
$ oc adm policy remove-cluster-role-from-group system:build-strategy-docker system:authenticated
Ensure the build strategy subresources are also removed from these roles:
$ oc edit clusterrole admin
$ oc edit clusterrole edit
For each role, specify the subresources that correspond to the resource of the strategy to disable.
Disable the docker Build Strategy for admin:
kind: ClusterRole metadata: name: admin ... - apiGroups: - "" - build.openshift.io resources: - buildconfigs - buildconfigs/webhooks - builds/custom 1 - builds/source verbs: - create - delete - deletecollection - get - list - patch - update - watch ...- 1
- Add
builds/customandbuilds/sourceto disable docker builds globally for users with the admin role.
2.11.2. Restricting build strategies to users globally
You can allow a set of specific users to create builds with a particular strategy.
Prerequisites
- Disable global access to the build strategy.
Procedure
Assign the role that corresponds to the build strategy to a specific user. For example, to add the
system:build-strategy-dockercluster role to the userdevuser:$ oc adm policy add-cluster-role-to-user system:build-strategy-docker devuser
WarningGranting a user access at the cluster level to the
builds/dockersubresource means that the user can create builds with the docker strategy in any project in which they can create builds.
2.11.3. Restricting build strategies to a user within a project
Similar to granting the build strategy role to a user globally, you can allow a set of specific users within a project to create builds with a particular strategy.
Prerequisites
- Disable global access to the build strategy.
Procedure
Assign the role that corresponds to the build strategy to a specific user within a project. For example, to add the
system:build-strategy-dockerrole within the projectdevprojectto the userdevuser:$ oc adm policy add-role-to-user system:build-strategy-docker devuser -n devproject
2.12. Build configuration resources
Use the following procedure to configure build settings.
2.12.1. Build controller configuration parameters
The build.config.openshift.io/cluster resource offers the following configuration parameters.
| Parameter | Description |
|---|---|
|
|
Holds cluster-wide information on how to handle builds. The canonical, and only valid name is
|
|
| Controls the default information for builds.
You can override values by setting the
Values that are not set here are inherited from DefaultProxy.
|
|
|
|
|
| Controls override settings for builds.
|
|
|
|
2.12.2. Configuring build settings
You can configure build settings by editing the build.config.openshift.io/cluster resource.
Procedure
Edit the
build.config.openshift.io/clusterresource:$ oc edit build.config.openshift.io/cluster
The following is an example
build.config.openshift.io/clusterresource:apiVersion: config.openshift.io/v1 kind: Build1 metadata: annotations: release.openshift.io/create-only: "true" creationTimestamp: "2019-05-17T13:44:26Z" generation: 2 name: cluster resourceVersion: "107233" selfLink: /apis/config.openshift.io/v1/builds/cluster uid: e2e9cc14-78a9-11e9-b92b-06d6c7da38dc spec: buildDefaults:2 defaultProxy:3 httpProxy: http://proxy.com httpsProxy: https://proxy.com noProxy: internal.com env:4 - name: envkey value: envvalue gitProxy:5 httpProxy: http://gitproxy.com httpsProxy: https://gitproxy.com noProxy: internalgit.com imageLabels:6 - name: labelkey value: labelvalue resources:7 limits: cpu: 100m memory: 50Mi requests: cpu: 10m memory: 10Mi buildOverrides:8 imageLabels:9 - name: labelkey value: labelvalue nodeSelector:10 selectorkey: selectorvalue tolerations:11 - effect: NoSchedule key: node-role.kubernetes.io/builds operator: Exists
- 1
Build: Holds cluster-wide information on how to handle builds. The canonical, and only valid name iscluster.- 2
buildDefaults: Controls the default information for builds.- 3
defaultProxy: Contains the default proxy settings for all build operations, including image pull or push and source download.- 4
env: A set of default environment variables that are applied to the build if the specified variables do not exist on the build.- 5
gitProxy: Contains the proxy settings for Git operations only. If set, this overrides any Proxy settings for all Git commands, such asgit clone.- 6
imageLabels: A list of labels that are applied to the resulting image. You can override a default label by providing a label with the same name in theBuildConfig.- 7
resources: Defines resource requirements to execute the build.- 8
buildOverrides: Controls override settings for builds.- 9
imageLabels: A list of labels that are applied to the resulting image. If you provided a label in theBuildConfigwith the same name as one in this table, your label will be overwritten.- 10
nodeSelector: A selector which must be true for the build pod to fit on a node.- 11
tolerations: A list of tolerations that overrides any existing tolerations set on a build pod.
2.13. Troubleshooting builds
Use the following to troubleshoot build issues.
2.13.1. Resolving denial for access to resources
If your request for access to resources is denied:
- Issue
- A build fails with:
requested access to the resource is denied
- Resolution
- You have exceeded one of the image quotas set on your project. Check your current quota and verify the limits applied and storage in use:
$ oc describe quota
2.13.2. Service certificate generation failure
If your request for access to resources is denied:
- Issue
-
If a service certificate generation fails with (service’s
service.beta.openshift.io/serving-cert-generation-errorannotation contains):
Example output
secret/ssl-key references serviceUID 62ad25ca-d703-11e6-9d6f-0e9c0057b608, which does not match 77b6dd80-d716-11e6-9d6f-0e9c0057b60
- Resolution
-
The service that generated the certificate no longer exists, or has a different
serviceUID. You must force certificates regeneration by removing the old secret, and clearing the following annotations on the service:service.beta.openshift.io/serving-cert-generation-errorandservice.beta.openshift.io/serving-cert-generation-error-num:
$ oc delete secret <secret_name>
$ oc annotate service <service_name> service.beta.openshift.io/serving-cert-generation-error-
$ oc annotate service <service_name> service.beta.openshift.io/serving-cert-generation-error-num-
The command removing annotation has a - after the annotation name to be removed.
2.14. Setting up additional trusted certificate authorities for builds
Use the following sections to set up additional certificate authorities (CA) to be trusted by builds when pulling images from an image registry.
The procedure requires a cluster administrator to create a ConfigMap and add additional CAs as keys in the ConfigMap.
-
The
ConfigMapmust be created in theopenshift-confignamespace. domainis the key in theConfigMapandvalueis the PEM-encoded certificate.-
Each CA must be associated with a domain. The domain format is
hostname[..port].
-
Each CA must be associated with a domain. The domain format is
-
The
ConfigMapname must be set in theimage.config.openshift.io/clustercluster scoped configuration resource’sspec.additionalTrustedCAfield.
2.14.1. Adding certificate authorities to the cluster
You can add certificate authorities (CA) to the cluster for use when pushing and pulling images with the following procedure.
Prerequisites
- You must have cluster administrator privileges.
-
You must have access to the public certificates of the registry, usually a
hostname/ca.crtfile located in the/etc/docker/certs.d/directory.
Procedure
Create a
ConfigMapin theopenshift-confignamespace containing the trusted certificates for the registries that use self-signed certificates. For each CA file, ensure the key in theConfigMapis the hostname of the registry in thehostname[..port]format:$ oc create configmap registry-cas -n openshift-config \ --from-file=myregistry.corp.com..5000=/etc/docker/certs.d/myregistry.corp.com:5000/ca.crt \ --from-file=otherregistry.com=/etc/docker/certs.d/otherregistry.com/ca.crt
Update the cluster image configuration:
$ oc patch image.config.openshift.io/cluster --patch '{"spec":{"additionalTrustedCA":{"name":"registry-cas"}}}' --type=merge
2.14.2. Additional resources
Chapter 3. Migrating from Jenkins to Tekton
3.1. Migrating from Jenkins to Tekton
Jenkins and Tekton are extensively used to automate the process of building, testing, and deploying applications and projects. However, Tekton is a cloud-native CI/CD solution that works seamlessly with Kubernetes and OpenShift Container Platform. This document helps you migrate your Jenkins CI/CD workflows to Tekton.
3.1.1. Comparison of Jenkins and Tekton concepts
This section summarizes the basic terms used in Jenkins and Tekton, and compares the equivalent terms.
3.1.1.1. Jenkins terminology
Jenkins offers declarative and scripted pipelines that are extensible using shared libraries and plugins. Some basic terms in Jenkins are as follows:
- Pipeline: Automates the entire process of building, testing, and deploying applications, using the Groovy syntax.
- Node: A machine capable of either orchestrating or executing a scripted pipeline.
- Stage: A conceptually distinct subset of tasks performed in a pipeline. Plugins or user interfaces often use this block to display status or progress of tasks.
- Step: A single task that specifies the exact action to be taken, either by using a command or a script.
3.1.1.2. Tekton terminology
Tekton uses the YAML syntax for declarative pipelines and consists of tasks. Some basic terms in Tekton are as follows:
- Pipeline: A set of tasks in a series, in parallel, or both.
- Task: A sequence of steps as commands, binaries, or scripts.
- PipelineRun: Execution of a pipeline with one or more tasks.
TaskRun: Execution of a task with one or more steps.
NoteYou can initiate a PipelineRun or a TaskRun with a set of inputs such as parameters and workspaces, and the execution results in a set of outputs and artifacts.
Workspace: In Tekton, workspaces are conceptual blocks that serve the following purposes:
- Storage of inputs, outputs, and build artifacts.
- Common space to share data among tasks.
- Mount points for credentials held in secrets, configurations held in config maps, and common tools shared by an organization.
NoteIn Jenkins, there is no direct equivalent of Tekton workspaces. You can think of the control node as a workspace, as it stores the cloned code repository, build history, and artifacts. In situations where a job is assigned to a different node, the cloned code and the generated artifacts are stored in that node, but the build history is maintained by the control node.
3.1.1.3. Mapping of concepts
The building blocks of Jenkins and Tekton are not equivalent, and a comparison does not provide a technically accurate mapping. The following terms and concepts in Jenkins and Tekton correlate in general:
Table 3.1. Jenkins and Tekton - basic comparison
| Jenkins | Tekton |
|---|---|
| Pipeline | Pipeline and PipelineRun |
| Stage | Task |
| Step | A step in a task |
3.1.2. Migrating a sample pipeline from Jenkins to Tekton
This section provides equivalent examples of pipelines in Jenkins and Tekton and helps you to migrate your build, test, and deploy pipelines from Jenkins to Tekton.
3.1.2.1. Jenkins pipeline
Consider a Jenkins pipeline written in Groovy for building, testing, and deploying:
pipeline {
   agent any
   stages {
       stage('Build') {
           steps {
               sh 'make'
           }
       }
       stage('Test'){
           steps {
               sh 'make check'
               junit 'reports/**/*.xml'
           }
       }
       stage('Deploy') {
           steps {
               sh 'make publish'
           }
       }
   }
}
3.1.2.2. Tekton pipeline
In Tekton, the equivalent example of the Jenkins pipeline comprises of three tasks, each of which can be written declaratively using the YAML syntax:
Example build task
apiVersion: tekton.dev/v1beta1
kind: Task
metadata:
  name: myproject-build
spec:
  workspaces:
  - name: source
  steps:
  - image: my-ci-image
    command: ["make"]
    workingDir: $(workspaces.source.path)
Example test task:
apiVersion: tekton.dev/v1beta1
kind: Task
metadata:
  name: myproject-test
spec:
  workspaces:
  - name: source
  steps:
  - image: my-ci-image
    command: ["make check"]
    workingDir: $(workspaces.source.path)
  - image: junit-report-image
    script: |
      #!/usr/bin/env bash
      junit-report reports/**/*.xml
    workingDir: $(workspaces.source.path)
Example deploy task:
apiVersion: tekton.dev/v1beta1
kind: Task
metadata:
  name: myprojectd-deploy
spec:
  workspaces:
  - name: source
  steps:
  - image: my-deploy-image
    command: ["make deploy"]
    workingDir: $(workspaces.source.path)
You can combine the three tasks sequentially to form a Tekton pipeline:
Example: Tekton pipeline for building, testing, and deployment
apiVersion: tekton.dev/v1beta1
kind: Pipeline
metadata:
  name: myproject-pipeline
spec:
  workspaces:
  - name: shared-dir
  tasks:
  - name: build
    taskRef:
      name: myproject-build
    workspaces:
    - name: source
      workspace: shared-dir
  - name: test
    taskRef:
      name: myproject-test
    workspaces:
    - name: source
      workspace: shared-dir
  - name: deploy
    taskRef:
      name: myproject-deploy
    workspaces:
    - name: source
      workspace: shared-dir
3.1.3. Migrating from Jenkins plugins to Tekton Hub tasks
You can exend the capability of Jenkins by using plugins. To achieve similar extensibility in Tekton, use any of the available tasks from Tekton Hub.
As an example, consider the git-clone task available in the Tekton Hub, that corresponds to the git plugin for Jenkins.
Example: git-clone task from Tekton Hub
apiVersion: tekton.dev/v1beta1
kind: Pipeline
metadata:
 name: demo-pipeline
spec:
 params:
   - name: repo_url
   - name: revision
 workspaces:
   - name: source
 tasks:
   - name: fetch-from-git
     taskRef:
       name: git-clone
     params:
       - name: url
         value: $(params.repo_url)
       - name: revision
         value: $(params.revision)
     workspaces:
     - name: output
       workspace: source
3.1.4. Extending Tekton capabilities using custom tasks and scripts
In Tekton, if you do not find the right task in Tekton Hub, or need greater control over tasks, you can create custom tasks and scripts to extend Tekton’s capabilities.
Example: Custom task for running the maven test command
apiVersion: tekton.dev/v1beta1
kind: Task
metadata:
  name: maven-test
spec:
  workspaces:
  - name: source
  steps:
  - image: my-maven-image
    command: ["mvn test"]
    workingDir: $(workspaces.source.path)
Example: Execute a custom shell script by providing its path
...
steps:
  image: ubuntu
  script: |
      #!/usr/bin/env bash
      /workspace/my-script.sh
...
Example: Execute a custom Python script by writing it in the YAML file
...
steps:
  image: python
  script: |
      #!/usr/bin/env python3
      print(“hello from python!”)
...
3.1.5. Comparison of Jenkins and Tekton execution models
Jenkins and Tekton offer similar functions but are different in architecture and execution. This section outlines a brief comparison of the two execution models.
Table 3.2. Comparison of execution models in Jenkins and Tekton
| Jenkins | Tekton |
|---|---|
| Jenkins has a control node. Jenkins executes pipelines and steps centrally, or orchestrates jobs running in other nodes. | Tekton is serverless and distributed, and there is no central dependency for execution. |
| The containers are launched by the control node through the pipeline. | Tekton adopts a 'container-first' approach, where every step is executed as a container running in a pod (equivalent to nodes in Jenkins). |
| Extensibility is achieved using plugins. | Extensibility is achieved using tasks in Tekton Hub, or by creating custom tasks and scripts. |
Chapter 4. Pipelines
4.1. Red Hat OpenShift Pipelines release notes
Red Hat OpenShift Pipelines is a cloud-native CI/CD experience based on the Tekton project which provides:
- Standard Kubernetes-native pipeline definitions (CRDs).
- Serverless pipelines with no CI server management overhead.
- Extensibility to build images using any Kubernetes tool, such as S2I, Buildah, JIB, and Kaniko.
- Portability across any Kubernetes distribution.
- Powerful CLI for interacting with pipelines.
- Integrated user experience with the Developer perspective of the OpenShift Container Platform web console.
For an overview of Red Hat OpenShift Pipelines, see Understanding OpenShift Pipelines.
4.1.1. Making open source more inclusive
Red Hat is committed to replacing problematic language in our code, documentation, and web properties. We are beginning with these four terms: master, slave, blacklist, and whitelist. Because of the enormity of this endeavor, these changes will be implemented gradually over several upcoming releases. For more details, see our CTO Chris Wright’s message.
4.1.2. Release notes for Red Hat OpenShift Pipelines General Availability 1.5
Red Hat OpenShift Pipelines General Availability (GA) 1.5 is now available on OpenShift Container Platform 4.8.
4.1.2.1. Compatibility and support matrix
Some features in this release are currently in Technology Preview. These experimental features are not intended for production use.
Technology Preview Features Support Scope
In the table, features are marked with the following statuses:
- TP: Technology Preview
- GA: General Availability
Note the following scope of support on the Red Hat Customer Portal for these features:
Table 4.1. Compatibility and support matrix
| Feature | Version | Support Status |
|---|---|---|
| Pipelines | 0.24 | GA |
| CLI | 0.19 | GA |
| Catalog | 0.24 | GA |
| Triggers | 0.14 | TP |
| Pipeline resources | - | TP |
For questions and feedback, you can send an email to the product team at pipelines-interest@redhat.com.
4.1.2.2. New features
In addition to the fixes and stability improvements, the following sections highlight what is new in Red Hat OpenShift Pipelines 1.5.
Pipeline run and task runs will be automatically pruned by a cron job in the target namespace. The cron job uses the
IMAGE_JOB_PRUNER_TKNenvironment variable to get the value oftkn image. With this enhancement, the following fields are introduced to theTektonConfigcustom resource:... pruner: resources: - pipelinerun - taskrun schedule: "*/5 * * * *" # cron schedule keep: 2 # delete all keeping n ...In OpenShift Container Platform, you can customize the installation of the Tekton Add-ons component by modifying the values of the new parameters
clusterTasksandpipelinesTemplatesin theTektonConfigcustom resource:apiVersion: operator.tekton.dev/v1alpha1 kind: TektonConfig metadata: name: config spec: profile: all targetNamespace: openshift-pipelines addon: params: - name: clusterTasks value: "true" - name: pipelineTemplates value: "true" ...The customization is allowed if you create the add-on using
TektonConfig, or directly by using Tekton Add-ons. However, if the parameters are not passed, the controller adds parameters with default values.Note-
If add-on is created using the
TektonConfigcustom resource, and you change the parameter values later in theAddoncustom resource, then the values in theTektonConfigcustom resource overwrites the changes. -
You can set the value of the
pipelinesTemplatesparameter totrueonly when the value of theclusterTasksparameter istrue.
-
If add-on is created using the
The
enableMetricsparameter is added to theTektonConfigcustom resource. You can use it to disable the service monitor, which is part of Tekton Pipelines for OpenShift Container Platform.apiVersion: operator.tekton.dev/v1alpha1 kind: TektonConfig metadata: name: config spec: profile: all targetNamespace: openshift-pipelines pipeline: params: - name: enableMetrics value: "true" ...- Eventlistener OpenCensus metrics, which captures metrics at process level, is added.
- Triggers now has label selector; you can configure triggers for an event listener using labels.
The
ClusterInterceptorcustom resource definition for registering interceptors is added, which allows you to register newInterceptortypes that you can plug in. In addition, the following relevant changes are made:-
In the trigger specifications, you can configure interceptors using a new API that includes a
reffield to refer to a cluster interceptor. In addition, you can use theparamsfield to add parameters that pass on to the interceptors for processing. -
The bundled interceptors CEL, GitHub, GitLab, and BitBucket, have been migrated. They are implemented using the new
ClusterInterceptorcustom resource definition. -
Core interceptors are migrated to the new format, and any new triggers created using the old syntax automatically switch to the new
reforparamsbased syntax.
-
In the trigger specifications, you can configure interceptors using a new API that includes a
-
To disable prefixing the name of the task or step while displaying logs, use the
--prefixoption forlogcommands. -
To display the version of a specific component, use the new
--componentflag in thetkn versioncommand. -
The
tkn hub check-upgradecommand is added, and other commands are revised to be based on the pipeline version. In addition, catalog names are displayed in thesearchcommand output. -
Support for optional workspaces are added to the
startcommand. -
If the plugins are not present in the
pluginsdirectory, they are searched in the current path. The
tkn start [task | clustertask | pipeline]command starts interactively and ask for theparamsvalue, even when you specify the default parameters are specified. To stop the interactive prompts, pass the--use-param-defaultsflag at the time of invoking the command. For example:$ tkn pipeline start build-and-deploy \ -w name=shared-workspace,volumeClaimTemplateFile=https://raw.githubusercontent.com/openshift/pipelines-tutorial/pipelines-1.5/01_pipeline/03_persistent_volume_claim.yaml \ -p deployment-name=pipelines-vote-api \ -p git-url=https://github.com/openshift/pipelines-vote-api.git \ -p IMAGE=image-registry.openshift-image-registry.svc:5000/pipelines-tutorial/pipelines-vote-api \ --use-param-defaults-
The
versionfield is added in thetkn task describecommand. -
The option to automatically select resources such as
TriggerTemplate, orTriggerBinding, orClusterTriggerBinding, orEventlistener, is added in thedescribecommand, if only one is present. -
In the
tkn pr describecommand, a section for skipped tasks is added. -
Support for the
tkn clustertask logsis added. -
The YAML merge and variable from
config.yamlis removed. In addition, therelease.yamlfile can now be more easily consumed by tools such askustomizeandytt. - The support for resource names to contain the dot character (".") is added.
-
The
hostAliasesarray in thePodTemplatespecification is added to the pod-level override of hostname resolution. It is achieved by modifying the/etc/hostsfile. -
A variable
$(tasks.status)is introduced to access the aggregate execution status of tasks. - An entry-point binary build for Windows is added.
4.1.2.3. Deprecated features
In the
whenexpressions, support for fields written is PascalCase is removed. Thewhenexpressions only support fields written in lowercase.NoteIf you had applied a pipeline with
whenexpressions in Tekton Pipelinesv0.16(Operatorv1.2.x), you have to reapply it.When you upgrade the Red Hat OpenShift Pipelines Operator to
v1.5, theopenshift-clientand theopenshift-client-v-1-5-0cluster tasks have theSCRIPTparameter. However, theARGSparameter and thegitresource are removed from the specification of theopenshift-clientcluster task. This is a breaking change, and only those cluster tasks that do not have a specific version in thenamefield of theClusterTaskresource upgrade seamlessly.To prevent the pipeline runs from breaking, use the
SCRIPTparameter after the upgrade because it moves the values previously specified in theARGSparameter into theSCRIPTparameter of the cluster task. For example:... - name: deploy params: - name: SCRIPT value: oc rollout status <deployment-name> runAfter: - build taskRef: kind: ClusterTask name: openshift-client ...When you upgrade from Red Hat OpenShift Pipelines Operator
v1.4tov1.5, the profile names in which theTektonConfigcustom resource is installed now change.Table 4.2. Profiles for
TektonConfigcustom resourceProfiles in Pipelines 1.5 Corresponding profile in Pipelines 1.4 Installed Tekton components All (default profile)
All (default profile)
Pipelines, Triggers, Add-ons
Basic
Default
Pipelines, Triggers
Lite
Basic
Pipelines
NoteIf you used
profile: allin theconfiginstance of theTektonConfigcustom resource, no change is necessary in the resource specification.However, if the installed Operator is either in the Default or the Basic profile before the upgrade, you must edit the
configinstance of theTektonConfigcustom resource after the upgrade. For example, if the configuration wasprofile: basicbefore the upgrade, ensure that it isprofile: liteafter upgrading to Pipelines 1.5.The
disable-home-env-overwriteanddisable-working-dir-overwritefields are now deprecated and will be removed in a future release. For this release, the default value of these flags is set totruefor backward compatibility.NoteIn the next release (Red Hat OpenShift Pipelines 1.6), the
HOMEenvironment variable will not be automatically set to/tekton/home, and the default working directory will not be set to/workspacefor task runs. These defaults collide with any value set by image Dockerfile of the step.-
The
ServiceTypeandpodTemplatefields are removed from theEventListenerspec. - The controller service account no longer requests cluster-wide permission to list and watch namespaces.
The status of the
EventListenerresource has a new condition calledReady.NoteIn the future, the other status conditions for the
EventListenerresource will be deprecated in favor of theReadystatus condition.-
The
eventListenerandnamespacefields in theEventListenerresponse are deprecated. Use theeventListenerUIDfield instead. The
replicasfield is deprecated from theEventListenerspec. Instead, thespec.replicasfield is moved tospec.resources.kubernetesResource.replicasin theKubernetesResourcespec.NoteThe
replicasfield will be removed in a future release.-
The old method of configuring the core interceptors is deprecated. However, it continues to work until it is removed in a future release. Instead, interceptors in a
Triggerresource are now configured using a newrefandparamsbased syntax. The resulting default webhook automatically switch the usages of the old syntax to the new syntax for new triggers. -
Use
rbac.authorization.k8s.io/v1instead of the deprecatedrbac.authorization.k8s.io/v1beta1for theClusterRoleBindingresource. -
In cluster roles, the cluster-wide write access to resources such as
serviceaccounts,secrets,configmaps, andlimitrangesare removed. In addition, cluster-wide access to resources such asdeployments,statefulsets, anddeployment/finalizersare removed. -
The
imagecustom resource definition in thecaching.internal.knative.devgroup is not used by Tekton anymore, and is excluded in this release.
4.1.2.4. Known issues
The git-cli cluster task is built off the alpine/git base image, which expects
/rootas the user’s home directory. However, this is not explicitly set in thegit-clicluster task.In Tekton, the default home directory is overwritten with
/tekton/homefor every step of a task, unless otherwise specified. This overwriting of the$HOMEenvironment variable of the base image causes thegit-clicluster task to fail.This issue is expected to be fixed in the upcoming releases. For Red Hat OpenShift Pipelines 1.5 and earlier versions, you can use any one of the following workarounds to avoid the failure of the
git-clicluster task:Set the
$HOMEenvironment variable in the steps, so that it is not overwritten.-
[OPTIONAL] If you installed Red Hat OpenShift Pipelines using the Operator, then clone the
git-clicluster task into a separate task. This approach ensures that the Operator does not overwrite the changes made to the cluster task. -
Execute the
oc edit clustertasks git-clicommand. Add the expected
HOMEenvironment variable to the YAML of the step:... steps: - name: git env: - name: HOME value: /root image: $(params.BASE_IMAGE) workingDir: $(workspaces.source.path) ...WarningFor Red Hat OpenShift Pipelines installed by the Operator, if you do not clone the
git-clicluster task into a separate task before changing theHOMEenvironment variable, then the changes are overwritten during Operator reconciliation.
-
[OPTIONAL] If you installed Red Hat OpenShift Pipelines using the Operator, then clone the
Disable overwriting the
HOMEenvironment variable in thefeature-flagsconfig map.-
Execute the
oc edit -n openshift-pipelines configmap feature-flagscommand. Set the value of the
disable-home-env-overwriteflag totrue.Warning- If you installed Red Hat OpenShift Pipelines using the Operator, then the changes are overwritten during Operator reconciliation.
-
Modifying the default value of the
disable-home-env-overwriteflag can break other tasks and cluster tasks, as it changes the default behavior for all tasks.
-
Execute the
Use a different service account for the
git-clicluster task, as the overwriting of theHOMEenvironment variable happens when the default service account for pipelines is used.- Create a new service account.
- Link your Git secret to the service account you just created.
- Use the service account while executing a task or a pipeline.
-
On IBM Power Systems, IBM Z, and LinuxONE, the
s2i-dotnetcluster task and thetkn hubcommand are unsupported. -
When you run Maven and Jib-Maven cluster tasks on IBM Power Systems (ppc64le), IBM Z, and LinuxONE (s390x) clusters, set the
MAVEN_IMAGEparameter value tomaven:3.6.3-adoptopenjdk-11.
4.1.2.5. Fixed issues
-
The
whenexpressions indagtasks are not allowed to specify the context variable accessing the execution status ($(tasks.<pipelineTask>.status)) of any other task. -
Use Owner UIDs instead of Owner names, as it helps avoid race conditions created by deleting a
volumeClaimTemplatePVC, in situations where aPipelineRunresource is quickly deleted and then recreated. -
A new Dockerfile is added for
pullrequest-initforbuild-baseimage triggered by non-root users. -
When a pipeline or task is executed with the
-foption and theparamin its definition does not have atypedefined, a validation error is generated instead of the pipeline or task run failing silently. -
For the
tkn start [task | pipeline | clustertask]commands, the description of the--workspaceflag is now consistent. - While parsing the parameters, if an empty array is encountered, the corresponding interactive help is displayed as an empty string now.
4.1.3. Release notes for Red Hat OpenShift Pipelines General Availability 1.4
Red Hat OpenShift Pipelines General Availability (GA) 1.4 is now available on OpenShift Container Platform 4.7.
In addition to the stable and preview Operator channels, the Red Hat OpenShift Pipelines Operator 1.4.0 comes with the ocp-4.6, ocp-4.5, and ocp-4.4 deprecated channels. These deprecated channels and support for them will be removed in the following release of Red Hat OpenShift Pipelines.
4.1.3.1. Compatibility and support matrix
Some features in this release are currently in Technology Preview. These experimental features are not intended for production use.
Technology Preview Features Support Scope
In the table below, features are marked with the following statuses:
- TP: Technology Preview
- GA: General Availability
Note the following scope of support on the Red Hat Customer Portal for these features:
Table 4.3. Compatibility and support matrix
| Feature | Version | Support Status |
|---|---|---|
| Pipelines | 0.22 | GA |
| CLI | 0.17 | GA |
| Catalog | 0.22 | GA |
| Triggers | 0.12 | TP |
| Pipeline resources | - | TP |
For questions and feedback, you can send an email to the product team at pipelines-interest@redhat.com.
4.1.3.2. New features
In addition to the fixes and stability improvements, the following sections highlight what is new in Red Hat OpenShift Pipelines 1.4.
The custom tasks have the following enhancements:
- Pipeline results can now refer to results produced by custom tasks.
- Custom tasks can now use workspaces, service accounts, and pod templates to build more complex custom tasks.
The
finallytask has the following enhancements:-
The
whenexpressions are supported infinallytasks, which provides efficient guarded execution and improved reusability of tasks. A
finallytask can be configured to consume the results of any task within the same pipeline.NoteSupport for
whenexpressions andfinallytasks are unavailable in the OpenShift Container Platform 4.7 web console.
-
The
-
Support for multiple secrets of the type
dockercfgordockerconfigjsonis added for authentication at runtime. -
Functionality to support sparse-checkout with the
git-clonetask is added. This enables you to clone only a subset of the repository as your local copy, and helps you to restrict the size of the cloned repositories. - You can create pipeline runs in a pending state without actually starting them. In clusters that are under heavy load, this allows Operators to have control over the start time of the pipeline runs.
-
Ensure that you set the
SYSTEM_NAMESPACEenvironment variable manually for the controller; this was previously set by default. -
A non-root user is now added to the build-base image of pipelines so that
git-initcan clone repositories as a non-root user. - Support to validate dependencies between resolved resources before a pipeline run starts is added. All result variables in the pipeline must be valid, and optional workspaces from a pipeline can only be passed to tasks expecting it for the pipeline to start running.
- The controller and webhook runs as a non-root group, and their superfluous capabilities have been removed to make them more secure.
-
You can use the
tkn pr logscommand to see the log streams for retried task runs. -
You can use the
--clustertaskoption in thetkn tr deletecommand to delete all the task runs associated with a particular cluster task. -
Support for using Knative service with the
EventListenerresource is added by introducing a newcustomResourcefield. - An error message is displayed when an event payload does not use the JSON format.
-
The source control interceptors such as GitLab, BitBucket, and GitHub, now use the new
InterceptorRequestorInterceptorResponsetype interface. -
A new CEL function
marshalJSONis implemented so that you can encode a JSON object or an array to a string. -
An HTTP handler for serving the CEL and the source control core interceptors is added. It packages four core interceptors into a single HTTP server that is deployed in the
tekton-pipelinesnamespace. TheEventListenerobject forwards events over the HTTP server to the interceptor. Each interceptor is available at a different path. For example, the CEL interceptor is available on the/celpath. The
pipelines-sccSecurity Context Constraint (SCC) is used with the defaultpipelineservice account for pipelines. This new service account is similar toanyuid, but with a minor difference as defined in the YAML for SCC of OpenShift Container Platform 4.7:fsGroup: type: MustRunAs
4.1.3.3. Deprecated features
-
The
build-gcssub-type in the pipeline resource storage, and thegcs-fetcherimage, are not supported. -
In the
taskRunfield of cluster tasks, the labeltekton.dev/taskis removed. -
For webhooks, the value
v1beta1corresponding to the fieldadmissionReviewVersionsis removed. -
The
creds-inithelper image for building and deploying is removed. In the triggers spec and binding, the deprecated field
template.nameis removed in favor oftemplate.ref. You should update alleventListenerdefinitions to use thereffield.NoteUpgrade from Pipelines 1.3.x and earlier versions to Pipelines 1.4.0 breaks event listeners because of the unavailability of the
template.namefield. For such cases, use Pipelines 1.4.1 to avail the restoredtemplate.namefield.-
For
EventListenercustom resources/objects, the fieldsPodTemplateandServiceTypeare deprecated in favor ofResource. - The deprecated spec style embedded bindings is removed.
-
The
specfield is removed from thetriggerSpecBinding. - The event ID representation is changed from a five-character random string to a UUID.
4.1.3.4. Known issues
- In the Developer perspective, the pipeline metrics and triggers features are available only on OpenShift Container Platform 4.7.6 or later versions.
-
On IBM Power Systems, IBM Z, and LinuxONE, the
tkn hubcommand is not supported. -
When you run Maven and Jib Maven cluster tasks on an IBM Power Systems (ppc64le), IBM Z, and LinuxONE (s390x) clusters, set the
MAVEN_IMAGEparameter value tomaven:3.6.3-adoptopenjdk-11. Triggers throw error resulting from bad handling of the JSON format, if you have the following configuration in the trigger binding:
params: - name: github_json value: $(body)To resolve the issue:
-
If you are using triggers v0.11.0 and above, use the
marshalJSONCEL function, which takes a JSON object or array and returns the JSON encoding of that object or array as a string. If you are using older triggers version, add the following annotation in the trigger template:
annotations: triggers.tekton.dev/old-escape-quotes: "true"
-
If you are using triggers v0.11.0 and above, use the
- When upgrading from Pipelines 1.3.x to 1.4.x, you must recreate the routes.
4.1.3.5. Fixed issues
-
Previously, the
tekton.dev/tasklabel was removed from the task runs of cluster tasks, and thetekton.dev/clusterTasklabel was introduced. The problems resulting from that change is resolved by fixing theclustertask describeanddeletecommands. In addition, thelastrunfunction for tasks is modified, to fix the issue of thetekton.dev/tasklabel being applied to the task runs of both tasks and cluster tasks in older versions of pipelines. -
When doing an interactive
tkn pipeline start pipelinename, aPipelineResourceis created interactively. Thetkn p startcommand prints the resource status if the resource status is notnil. -
Previously, the
tekton.dev/task=namelabel was removed from the task runs created from cluster tasks. This fix modifies thetkn clustertask startcommand with the--lastflag to check for thetekton.dev/task=namelabel in the created task runs. -
When a task uses an inline task specification, the corresponding task run now gets embedded in the pipeline when you run the
tkn pipeline describecommand, and the task name is returned as embedded. -
The
tkn versioncommand is fixed to display the version of the installed Tekton CLI tool, without a configuredkubeConfiguration namespaceor access to a cluster. -
If an argument is unexpected or more than one arguments are used, the
tkn completioncommand gives an error. -
Previously, pipeline runs with the
finallytasks nested in a pipeline specification would lose thosefinallytasks, when converted to thev1alpha1version and restored back to thev1beta1version. This error occurring during conversion is fixed to avoid potential data loss. Pipeline runs with thefinallytasks nested in a pipeline specification is now serialized and stored on the alpha version, only to be deserialized later. -
Previously, there was an error in the pod generation when a service account had the
secretsfield as{}. The task runs failed withCouldntGetTaskbecause the GET request with an empty secret name returned an error, indicating that the resource name may not be empty. This issue is fixed by avoiding an empty secret name in thekubeclientGET request. -
Pipelines with the
v1beta1API versions can now be requested along with thev1alpha1version, without losing thefinallytasks. Applying the returnedv1alpha1version will store the resource asv1beta1, with thefinallysection restored to its original state. -
Previously, an unset
selfLinkfield in the controller caused an error in the Kubernetes v1.20 clusters. As a temporary fix, theCloudEventsource field is set to a value that matches the current source URI, without the value of the auto-populatedselfLinkfield. -
Previously, a secret name with dots such as
gcr.ioled to a task run creation failure. This happened because of the secret name being used internally as part of a volume mount name. The volume mount name conforms to the RFC1123 DNS label and disallows dots as part of the name. This issue is fixed by replacing the dot with a dash that results in a readable name. -
Context variables are now validated in the
finallytasks. -
Previously, when the task run reconciler was passed a task run that did not have a previous status update containing the name of the pod it created, the task run reconciler listed the pods associated with the task run. The task run reconciler used the labels of the task run, which were propagated to the pod, to find the pod. Changing these labels while the task run was running, caused the code to not find the existing pod. As a result, duplicate pods were created. This issue is fixed by changing the task run reconciler to only use the
tekton.dev/taskRunTekton-controlled label when finding the pod. - Previously, when a pipeline accepted an optional workspace and passed it to a pipeline task, the pipeline run reconciler stopped with an error if the workspace was not provided, even if a missing workspace binding is a valid state for an optional workspace. This issue is fixed by ensuring that the pipeline run reconciler does not fail to create a task run, even if an optional workspace is not provided.
- The sorted order of step statuses matches the order of step containers.
-
Previously, the task run status was set to
unknownwhen a pod encountered theCreateContainerConfigErrorreason, which meant that the task and the pipeline ran until the pod timed out. This issue is fixed by setting the task run status tofalse, so that the task is set as failed when the pod encounters theCreateContainerConfigErrorreason. -
Previously, pipeline results were resolved on the first reconciliation, after a pipeline run was completed. This could fail the resolution resulting in the
Succeededcondition of the pipeline run being overwritten. As a result, the final status information was lost, potentially confusing any services watching the pipeline run conditions. This issue is fixed by moving the resolution of pipeline results to the end of a reconciliation, when the pipeline run is put into aSucceededorTruecondition. - Execution status variable is now validated. This avoids validating task results while validating context variables to access execution status.
- Previously, a pipeline result that contained an invalid variable would be added to the pipeline run with the literal expression of the variable intact. Therefore, it was difficult to assess whether the results were populated correctly. This issue is fixed by filtering out the pipeline run results that reference failed task runs. Now, a pipeline result that contains an invalid variable will not be emitted by the pipeline run at all.
-
The
tkn eventlistener describecommand is fixed to avoid crashing without a template. It also displays the details about trigger references. -
Upgrades from Pipelines 1.3.x and earlier versions to Pipelines 1.4.0 breaks event listeners because of the unavailability of
template.name. In Pipelines 1.4.1, thetemplate.namehas been restored to avoid breaking event listeners in triggers. -
In Pipelines 1.4.1, the
ConsoleQuickStartcustom resource has been updated to align with OpenShift Container Platform 4.7 capabilities and behavior.
4.1.4. Release notes for Red Hat OpenShift Pipelines Technology Preview 1.3
4.1.4.1. New features
Red Hat OpenShift Pipelines Technology Preview (TP) 1.3 is now available on OpenShift Container Platform 4.7. Red Hat OpenShift Pipelines TP 1.3 is updated to support:
- Tekton Pipelines 0.19.0
-
Tekton
tknCLI 0.15.0 - Tekton Triggers 0.10.2
- cluster tasks based on Tekton Catalog 0.19.0
- IBM Power Systems on OpenShift Container Platform 4.7
- IBM Z and LinuxONE on OpenShift Container Platform 4.7
In addition to the fixes and stability improvements, the following sections highlight what is new in Red Hat OpenShift Pipelines 1.3.
4.1.4.1.1. Pipelines
- Tasks that build images, such as S2I and Buildah tasks, now emit a URL of the image built that includes the image SHA.
-
Conditions in pipeline tasks that reference custom tasks are disallowed because the
Conditioncustom resource definition (CRD) has been deprecated. -
Variable expansion is now added in the
TaskCRD for the following fields:spec.steps[].imagePullPolicyandspec.sidecar[].imagePullPolicy. -
You can disable the built-in credential mechanism in Tekton by setting the
disable-creds-initfeature-flag totrue. -
Resolved when expressions are now listed in the
Skipped Tasksand theTask Runssections in theStatusfield of thePipelineRunconfiguration. -
The
git initcommand can now clone recursive submodules. -
A
TaskCR author can now specify a timeout for a step in theTaskspec. -
You can now base the entry point image on the
distroless/static:nonrootimage and give it a mode to copy itself to the destination, without relying on thecpcommand being present in the base image. -
You can now use the configuration flag
require-git-ssh-secret-known-hoststo disallow omitting known hosts in the Git SSH secret. When the flag value is set totrue, you must include theknown_hostfield in the Git SSH secret. The default value for the flag isfalse. - The concept of optional workspaces is now introduced. A task or pipeline might declare a workspace optional and conditionally change their behavior based on its presence. A task run or pipeline run might also omit that workspace, thereby modifying the task or pipeline behavior. The default task run workspaces are not added in place of an omitted optional workspace.
- Credentials initialization in Tekton now detects an SSH credential that is used with a non-SSH URL, and vice versa in Git pipeline resources, and logs a warning in the step containers.
- The task run controller emits a warning event if the affinity specified by the pod template is overwritten by the affinity assistant.
- The task run reconciler now records metrics for cloud events that are emitted once a task run is completed. This includes retries.
4.1.4.1.2. Pipelines CLI
-
Support for
--no-headers flagis now added to the following commands:tkn condition list,tkn triggerbinding list,tkn eventlistener list,tkn clustertask list,tkn clustertriggerbinding list. -
When used together, the
--lastor--useoptions override the--prefix-nameand--timeoutoptions. -
The
tkn eventlistener logscommand is now added to view theEventListenerlogs. -
The
tekton hubcommands are now integrated into thetknCLI. -
The
--nocolouroption is now changed to--no-color. -
The
--all-namespacesflag is added to the following commands:tkn triggertemplate list,tkn condition list,tkn triggerbinding list,tkn eventlistener list.
4.1.4.1.3. Triggers
-
You can now specify your resource information in the
EventListenertemplate. -
It is now mandatory for
EventListenerservice accounts to have thelistandwatchverbs, in addition to thegetverb for all the triggers resources. This enables you to useListersto fetch data fromEventListener,Trigger,TriggerBinding,TriggerTemplate, andClusterTriggerBindingresources. You can use this feature to create aSinkobject rather than specifying multiple informers, and directly make calls to the API server. -
A new
Interceptorinterface is added to support immutable input event bodies. Interceptors can now add data or fields to a newextensionsfield, and cannot modify the input bodies making them immutable. The CEL interceptor uses this newInterceptorinterface. -
A
namespaceSelectorfield is added to theEventListenerresource. Use it to specify the namespaces from where theEventListenerresource can fetch theTriggerobject for processing events. To use thenamespaceSelectorfield, the service account for theEventListenerresource must have a cluster role. -
The triggers
EventListenerresource now supports end-to-end secure connection to theeventlistenerpod. -
The escaping parameters behavior in the
TriggerTemplatesresource by replacing"with\"is now removed. -
A new
resourcesfield, supporting Kubernetes resources, is introduced as part of theEventListenerspec. - A new functionality for the CEL interceptor, with support for upper and lower-casing of ASCII strings, is added.
-
You can embed
TriggerBindingresources by using thenameandvaluefields in a trigger, or an event listener. -
The
PodSecurityPolicyconfiguration is updated to run in restricted environments. It ensures that containers must run as non-root. In addition, the role-based access control for using the pod security policy is moved from cluster-scoped to namespace-scoped. This ensures that the triggers cannot use other pod security policies that are unrelated to a namespace. -
Support for embedded trigger templates is now added. You can either use the
namefield to refer to an embedded template or embed the template inside thespecfield.
4.1.4.2. Deprecated features
-
Pipeline templates that use
PipelineResourcesCRDs are now deprecated and will be removed in a future release. -
The
template.namefield is deprecated in favor of thetemplate.reffield and will be removed in a future release. -
The
-cshorthand for the--checkcommand has been removed. In addition, globaltknflags are added to theversioncommand.
4.1.4.3. Known issues
-
CEL overlays add fields to a new top-level
extensionsfunction, instead of modifying the incoming event body.TriggerBindingresources can access values within this newextensionsfunction using the$(extensions.<key>)syntax. Update your binding to use the$(extensions.<key>)syntax instead of the$(body.<overlay-key>)syntax. -
The escaping parameters behavior by replacing
"with\"is now removed. If you need to retain the old escaping parameters behavior add thetekton.dev/old-escape-quotes: true"annotation to yourTriggerTemplatespecification. -
You can embed
TriggerBindingresources by using thenameandvaluefields inside a trigger or an event listener. However, you cannot specify bothnameandreffields for a single binding. Use thereffield to refer to aTriggerBindingresource and thenamefield for embedded bindings. -
An interceptor cannot attempt to reference a
secretoutside the namespace of anEventListenerresource. You must include secrets in the namespace of the `EventListener`resource. -
In Triggers 0.9.0 and later, if a body or header based
TriggerBindingparameter is missing or malformed in an event payload, the default values are used instead of displaying an error. -
Tasks and pipelines created with
WhenExpressionobjects using Tekton Pipelines 0.16.x must be reapplied to fix their JSON annotations. - When a pipeline accepts an optional workspace and gives it to a task, the pipeline run stalls if the workspace is not provided.
- To use the Buildah cluster task in a disconnected environment, ensure that the Dockerfile uses an internal image stream as the base image, and then use it in the same manner as any S2I cluster task.
4.1.4.4. Fixed issues
-
Extensions added by a CEL Interceptor are passed on to webhook interceptors by adding the
Extensionsfield within the event body. -
The activity timeout for log readers is now configurable using the
LogOptionsfield. However, the default behavior of timeout in 10 seconds is retained. -
The
logcommand ignores the--followflag when a task run or pipeline run is complete, and reads available logs instead of live logs. -
References to the following Tekton resources:
EventListener,TriggerBinding,ClusterTriggerBinding,Condition, andTriggerTemplateare now standardized and made consistent across all user-facing messages intkncommands. -
Previously, if you started a canceled task run or pipeline run with the
--use-taskrun <canceled-task-run-name>,--use-pipelinerun <canceled-pipeline-run-name>or--lastflags, the new run would be canceled. This bug is now fixed. -
The
tkn pr desccommand is now enhanced to ensure that it does not fail in case of pipeline runs with conditions. -
When you delete a task run using the
tkn tr deletecommand with the--taskoption, and a cluster task exists with the same name, the task runs for the cluster task also get deleted. As a workaround, filter the task runs by using theTaskRefKindfield. -
The
tkn triggertemplate describecommand would display only part of theapiVersionvalue in the output. For example, onlytriggers.tekton.devwas displayed instead oftriggers.tekton.dev/v1alpha1. This bug is now fixed. - The webhook, under certain conditions, would fail to acquire a lease and not function correctly. This bug is now fixed.
- Pipelines with when expressions created in v0.16.3 can now be run in v0.17.1 and later. After an upgrade, you do not need to reapply pipeline definitions created in previous versions because both the uppercase and lowercase first letters for the annotations are now supported.
-
By default, the
leader-election-hafield is now enabled for high availability. When thedisable-hacontroller flag is set totrue, it disables high availability support. - Issues with duplicate cloud events are now fixed. Cloud events are now sent only when a condition changes the state, reason, or message.
-
When a service account name is missing from a
PipelineRunorTaskRunspec, the controller uses the service account name from theconfig-defaultsconfig map. If the service account name is also missing in theconfig-defaultsconfig map, the controller now sets it todefaultin the spec. - Validation for compatibility with the affinity assistant is now supported when the same persistent volume claim is used for multiple workspaces, but with different subpaths.
4.1.5. Release notes for Red Hat OpenShift Pipelines Technology Preview 1.2
4.1.5.1. New features
Red Hat OpenShift Pipelines Technology Preview (TP) 1.2 is now available on OpenShift Container Platform 4.6. Red Hat OpenShift Pipelines TP 1.2 is updated to support:
- Tekton Pipelines 0.16.3
-
Tekton
tknCLI 0.13.1 - Tekton Triggers 0.8.1
- cluster tasks based on Tekton Catalog 0.16
- IBM Power Systems on OpenShift Container Platform 4.6
- IBM Z and LinuxONE on OpenShift Container Platform 4.6
In addition to the fixes and stability improvements, the following sections highlight what is new in Red Hat OpenShift Pipelines 1.2.
4.1.5.1.1. Pipelines
This release of Red Hat OpenShift Pipelines adds support for a disconnected installation.
NoteInstallations in restricted environments are currently not supported on IBM Power Systems, IBM Z, and LinuxONE.
-
You can now use the
whenfield, instead ofconditionsresource, to run a task only when certain criteria are met. The key components ofWhenExpressionresources areInput,Operator, andValues. If all the when expressions evaluate toTrue, then the task is run. If any of the when expressions evaluate toFalse, the task is skipped. - Step statuses are now updated if a task run is canceled or times out.
-
Support for Git Large File Storage (LFS) is now available to build the base image used by
git-init. -
You can now use the
taskSpecfield to specify metadata, such as labels and annotations, when a task is embedded in a pipeline. -
Cloud events are now supported by pipeline runs. Retries with
backoffare now enabled for cloud events sent by the cloud event pipeline resource. -
You can now set a default
Workspaceconfiguration for any workspace that aTaskresource declares, but that aTaskRunresource does not explicitly provide. -
Support is available for namespace variable interpolation for the
PipelineRunnamespace andTaskRunnamespace. -
Validation for
TaskRunobjects is now added to check that not more than one persistent volume claim workspace is used when aTaskRunresource is associated with an Affinity Assistant. If more than one persistent volume claim workspace is used, the task run fails with aTaskRunValidationFailedcondition. Note that by default, the Affinity Assistant is disabled in Red Hat OpenShift Pipelines, so you will need to enable the assistant to use it.
4.1.5.1.2. Pipelines CLI
The
tkn task describe,tkn taskrun describe,tkn clustertask describe,tkn pipeline describe, andtkn pipelinerun describecommands now:-
Automatically select the
Task,TaskRun,ClusterTask,PipelineandPipelineRunresource, respectively, if only one of them is present. -
Display the results of the
Task,TaskRun,ClusterTask,PipelineandPipelineRunresource in their outputs, respectively. -
Display workspaces declared in the
Task,TaskRun,ClusterTask,PipelineandPipelineRunresource in their outputs, respectively.
-
Automatically select the
-
You can now use the
--prefix-nameoption with thetkn clustertask startcommand to specify a prefix for the name of a task run. -
Interactive mode support has now been provided to the
tkn clustertask startcommand. -
You can now specify
PodTemplateproperties supported by pipelines using local or remote file definitions forTaskRunandPipelineRunobjects. -
You can now use the
--use-params-defaultsoption with thetkn clustertask startcommand to use the default values set in theClusterTaskconfiguration and create the task run. -
The
--use-param-defaultsflag for thetkn pipeline startcommand now prompts the interactive mode if the default values have not been specified for some of the parameters.
4.1.5.1.3. Triggers
-
The Common Expression Language (CEL) function named
parseYAMLhas been added to parse a YAML string into a map of strings. - Error messages for parsing CEL expressions have been improved to make them more granular while evaluating expressions and when parsing the hook body for creating the evaluation environment.
- Support is now available for marshaling boolean values and maps if they are used as the values of expressions in a CEL overlay mechanism.
The following fields have been added to the
EventListenerobject:-
The
replicasfield enables the event listener to run more than one pod by specifying the number of replicas in the YAML file. -
The
NodeSelectorfield enables theEventListenerobject to schedule the event listener pod to a specific node.
-
The
-
Webhook interceptors can now parse the
EventListener-Request-URLheader to extract parameters from the original request URL being handled by the event listener. - Annotations from the event listener can now be propagated to the deployment, services, and other pods. Note that custom annotations on services or deployment are overwritten, and hence, must be added to the event listener annotations so that they are propagated.
-
Proper validation for replicas in the
EventListenerspecification is now available for cases when a user specifies thespec.replicasvalues asnegativeorzero. -
You can now specify the
TriggerCRDobject inside theEventListenerspec as a reference using theTriggerReffield to create theTriggerCRDobject separately and then bind it inside theEventListenerspec. -
Validation and defaults for the
TriggerCRDobject are now available.
4.1.5.2. Deprecated features
-
$(params)parameters are now removed from thetriggertemplateresource and replaced by$(tt.params)to avoid confusion between theresourcetemplateandtriggertemplateresource parameters. -
The
ServiceAccountreference of the optionalEventListenerTrigger-based authentication level has changed from an object reference to aServiceAccountNamestring. This ensures that theServiceAccountreference is in the same namespace as theEventListenerTriggerobject. -
The
Conditionscustom resource definition (CRD) is now deprecated; use theWhenExpressionsCRD instead. -
The
PipelineRun.Spec.ServiceAccountNamesobject is being deprecated and replaced by thePipelineRun.Spec.TaskRunSpec[].ServiceAccountNameobject.
4.1.5.3. Known issues
- This release of Red Hat OpenShift Pipelines adds support for a disconnected installation. However, some images used by the cluster tasks must be mirrored for them to work in disconnected clusters.
-
Pipelines in the
openshiftnamespace are not deleted after you uninstall the Red Hat OpenShift Pipelines Operator. Use theoc delete pipelines -n openshift --allcommand to delete the pipelines. Uninstalling the Red Hat OpenShift Pipelines Operator does not remove the event listeners.
As a workaround, to remove the
EventListenerandPodCRDs:Edit the
EventListenerobject with theforegroundDeletionfinalizers:$ oc patch el/<eventlistener_name> -p '{"metadata":{"finalizers":["foregroundDeletion"]}}' --type=mergeFor example:
$ oc patch el/github-listener-interceptor -p '{"metadata":{"finalizers":["foregroundDeletion"]}}' --type=mergeDelete the
EventListenerCRD:$ oc patch crd/eventlisteners.triggers.tekton.dev -p '{"metadata":{"finalizers":[]}}' --type=merge
When you run a multi-arch container image task without command specification on an IBM Power Systems (ppc64le) or IBM Z (s390x) cluster, the
TaskRunresource fails with the following error:Error executing command: fork/exec /bin/bash: exec format error
As a workaround, use an architecture specific container image or specify the sha256 digest to point to the correct architecture. To get the sha256 digest enter:
$ skopeo inspect --raw <image_name>| jq '.manifests[] | select(.platform.architecture == "<architecture>") | .digest'
4.1.5.4. Fixed issues
- A simple syntax validation to check the CEL filter, overlays in the Webhook validator, and the expressions in the interceptor has now been added.
- Triggers no longer overwrite annotations set on the underlying deployment and service objects.
-
Previously, an event listener would stop accepting events. This fix adds an idle timeout of 120 seconds for the
EventListenersink to resolve this issue. -
Previously, canceling a pipeline run with a
Failed(Canceled)state gave a success message. This has been fixed to display an error instead. -
The
tkn eventlistener listcommand now provides the status of the listed event listeners, thus enabling you to easily identify the available ones. -
Consistent error messages are now displayed for the
triggers listandtriggers describecommands when triggers are not installed or when a resource cannot be found. -
Previously, a large number of idle connections would build up during cloud event delivery. The
DisableKeepAlives: trueparameter was added to thecloudeventclientconfig to fix this issue. Thus, a new connection is set up for every cloud event. -
Previously, the
creds-initcode would write empty files to the disk even if credentials of a given type were not provided. This fix modifies thecreds-initcode to write files for only those credentials that have actually been mounted from correctly annotated secrets.
4.1.6. Release notes for Red Hat OpenShift Pipelines Technology Preview 1.1
4.1.6.1. New features
Red Hat OpenShift Pipelines Technology Preview (TP) 1.1 is now available on OpenShift Container Platform 4.5. Red Hat OpenShift Pipelines TP 1.1 is updated to support:
- Tekton Pipelines 0.14.3
-
Tekton
tknCLI 0.11.0 - Tekton Triggers 0.6.1
- cluster tasks based on Tekton Catalog 0.14
In addition to the fixes and stability improvements, the following sections highlight what is new in Red Hat OpenShift Pipelines 1.1.
4.1.6.1.1. Pipelines
- Workspaces can now be used instead of pipeline resources. It is recommended that you use workspaces in OpenShift Pipelines, as pipeline resources are difficult to debug, limited in scope, and make tasks less reusable. For more details on workspaces, see the Understanding OpenShift Pipelines section.
Workspace support for volume claim templates has been added:
- The volume claim template for a pipeline run and task run can now be added as a volume source for workspaces. The tekton-controller then creates a persistent volume claim (PVC) using the template that is seen as a PVC for all task runs in the pipeline. Thus you do not need to define the PVC configuration every time it binds a workspace that spans multiple tasks.
- Support to find the name of the PVC when a volume claim template is used as a volume source is now available using variable substitution.
Support for improving audits:
-
The
PipelineRun.Statusfield now contains the status of every task run in the pipeline and the pipeline specification used to instantiate a pipeline run to monitor the progress of the pipeline run. -
Pipeline results have been added to the pipeline specification and
PipelineRunstatus. -
The
TaskRun.Statusfield now contains the exact task specification used to instantiate theTaskRunresource.
-
The
- Support to apply the default parameter to conditions.
-
A task run created by referencing a cluster task now adds the
tekton.dev/clusterTasklabel instead of thetekton.dev/tasklabel. -
The kube config writer now adds the
ClientKeyDataand theClientCertificateDataconfigurations in the resource structure to enable replacement of the pipeline resource type cluster with the kubeconfig-creator task. -
The names of the
feature-flagsand theconfig-defaultsconfig maps are now customizable. - Support for the host network in the pod template used by the task run is now available.
- An Affinity Assistant is now available to support node affinity in task runs that share workspace volume. By default, this is disabled on OpenShift Pipelines.
-
The pod template has been updated to specify
imagePullSecretsto identify secrets that the container runtime should use to authorize container image pulls when starting a pod. - Support for emitting warning events from the task run controller if the controller fails to update the task run.
- Standard or recommended k8s labels have been added to all resources to identify resources belonging to an application or component.
-
The
Entrypointprocess is now notified for signals and these signals are then propagated using a dedicated PID Group of theEntrypointprocess. - The pod template can now be set on a task level at runtime using task run specs.
Support for emitting Kubernetes events:
-
The controller now emits events for additional task run lifecycle events -
taskrun startedandtaskrun running. - The pipeline run controller now emits an event every time a pipeline starts.
-
The controller now emits events for additional task run lifecycle events -
- In addition to the default Kubernetes events, support for cloud events for task runs is now available. The controller can be configured to send any task run events, such as create, started, and failed, as cloud events.
-
Support for using the
$context.<task|taskRun|pipeline|pipelineRun>.namevariable to reference the appropriate name when in pipeline runs and task runs. - Validation for pipeline run parameters is now available to ensure that all the parameters required by the pipeline are provided by the pipeline run. This also allows pipeline runs to provide extra parameters in addition to the required parameters.
-
You can now specify tasks within a pipeline that will always execute before the pipeline exits, either after finishing all tasks successfully or after a task in the pipeline failed, using the
finallyfield in the pipeline YAML file. -
The
git-clonecluster task is now available.
4.1.6.1.2. Pipelines CLI
-
Support for embedded trigger binding is now available to the
tkn evenlistener describecommand. - Support to recommend subcommands and make suggestions if an incorrect subcommand is used.
-
The
tkn task describecommand now auto selects the task if only one task is present in the pipeline. -
You can now start a task using default parameter values by specifying the
--use-param-defaultsflag in thetkn task startcommand. -
You can now specify a volume claim template for pipeline runs or task runs using the
--workspaceoption with thetkn pipeline startortkn task startcommands. -
The
tkn pipelinerun logscommand now displays logs for the final tasks listed in thefinallysection. -
Interactive mode support has now been provided to the
tkn task startcommand and thedescribesubcommand for the followingtknresources:pipeline,pipelinerun,task,taskrun,clustertask, andpipelineresource. -
The
tkn versioncommand now displays the version of the triggers installed in the cluster. -
The
tkn pipeline describecommand now displays parameter values and timeouts specified for tasks used in the pipeline. -
Support added for the
--lastoption for thetkn pipelinerun describeand thetkn taskrun describecommands to describe the most recent pipeline run or task run, respectively. -
The
tkn pipeline describecommand now displays the conditions applicable to the tasks in the pipeline. -
You can now use the
--no-headersand--all-namespacesflags with thetkn resource listcommand.
4.1.6.1.3. Triggers
The following Common Expression Language (CEL) functions are now available:
-
parseURLto parse and extract portions of a URL -
parseJSONto parse JSON value types embedded in a string in thepayloadfield of thedeploymentwebhook
-
- A new interceptor for webhooks from Bitbucket has been added.
-
Event listeners now display the
Address URLand theAvailable statusas additional fields when listed with thekubectl getcommand. -
trigger template params now use the
$(tt.params.<paramName>)syntax instead of$(params.<paramName>)to reduce the confusion between trigger template and resource templates params. -
You can now add
tolerationsin theEventListenerCRD to ensure that event listeners are deployed with the same configuration even if all nodes are tainted due to security or management issues. -
You can now add a Readiness Probe for event listener Deployment at
URL/live. -
Support for embedding
TriggerBindingspecifications in event listener triggers is now added. -
Trigger resources are now annotated with the recommended
app.kubernetes.iolabels.
4.1.6.2. Deprecated features
The following items are deprecated in this release:
-
The
--namespaceor-nflags for all cluster-wide commands, including theclustertaskandclustertriggerbindingcommands, are deprecated. It will be removed in a future release. -
The
namefield intriggers.bindingswithin an event listener has been deprecated in favor of thereffield and will be removed in a future release. -
Variable interpolation in trigger templates using
$(params)has been deprecated in favor of using$(tt.params)to reduce confusion with the pipeline variable interpolation syntax. The$(params.<paramName>)syntax will be removed in a future release. -
The
tekton.dev/tasklabel is deprecated on cluster tasks. -
The
TaskRun.Status.ResourceResults.ResourceReffield is deprecated and will be removed. -
The
tkn pipeline create,tkn task create, andtkn resource create -fsubcommands have been removed. -
Namespace validation has been removed from
tkncommands. -
The default timeout of
1hand the-tflag for thetkn ct startcommand have been removed. -
The
s2icluster task has been deprecated.
4.1.6.3. Known issues
- Conditions do not support workspaces.
-
The
--workspaceoption and the interactive mode is not supported for thetkn clustertask startcommand. -
Support of backward compatibility for
$(params.<paramName>)syntax forces you to use trigger templates with pipeline specific params as the trigger s webhook is unable to differentiate trigger params from pipelines params. -
Pipeline metrics report incorrect values when you run a promQL query for
tekton_taskrun_countandtekton_taskrun_duration_seconds_count. -
pipeline runs and task runs continue to be in the
RunningandRunning(Pending)states respectively even when a non existing PVC name is given to a workspace.
4.1.6.4. Fixed issues
-
Previously, the
tkn task delete <name> --trscommand would delete both the task and cluster task if the name of the task and cluster task were the same. With this fix, the command deletes only the task runs that are created by the task<name>. -
Previously the
tkn pr delete -p <name> --keep 2command would disregard the-pflag when used with the--keepflag and would delete all the pipeline runs except the latest two. With this fix, the command deletes only the pipeline runs that are created by the pipeline<name>, except for the latest two. -
The
tkn triggertemplate describeoutput now displays resource templates in a table format instead of YAML format. -
Previously the
buildahcluster task failed when a new user was added to a container. With this fix, the issue has been resolved.
4.1.7. Release notes for Red Hat OpenShift Pipelines Technology Preview 1.0
4.1.7.1. New features
Red Hat OpenShift Pipelines Technology Preview (TP) 1.0 is now available on OpenShift Container Platform 4.4. Red Hat OpenShift Pipelines TP 1.0 is updated to support:
- Tekton Pipelines 0.11.3
-
Tekton
tknCLI 0.9.0 - Tekton Triggers 0.4.0
- cluster tasks based on Tekton Catalog 0.11
In addition to the fixes and stability improvements, the following sections highlight what is new in Red Hat OpenShift Pipelines 1.0.
4.1.7.1.1. Pipelines
- Support for v1beta1 API Version.
- Support for an improved limit range. Previously, limit range was specified exclusively for the task run and the pipeline run. Now there is no need to explicitly specify the limit range. The minimum limit range across the namespace is used.
- Support for sharing data between tasks using task results and task params.
-
Pipelines can now be configured to not overwrite the
HOMEenvironment variable and the working directory of steps. -
Similar to task steps,
sidecarsnow support script mode. -
You can now specify a different scheduler name in task run
podTemplateresource. - Support for variable substitution using Star Array Notation.
- Tekton controller can now be configured to monitor an individual namespace.
- A new description field is now added to the specification of pipelines, tasks, cluster tasks, resources, and conditions.
- Addition of proxy parameters to Git pipeline resources.
4.1.7.1.2. Pipelines CLI
-
The
describesubcommand is now added for the followingtknresources:EventListener,Condition,TriggerTemplate,ClusterTask, andTriggerSBinding. -
Support added for
v1beta1to the following resources along with backward compatibility forv1alpha1:ClusterTask,Task,Pipeline,PipelineRun, andTaskRun. The following commands can now list output from all namespaces using the
--all-namespacesflag option:tkn task list,tkn pipeline list,tkn taskrun list,tkn pipelinerun listThe output of these commands is also enhanced to display information without headers using the
--no-headersflag option.-
You can now start a pipeline using default parameter values by specifying
--use-param-defaultsflag in thetkn pipelines startcommand. -
Support for workspace is now added to
tkn pipeline startandtkn task startcommands. -
A new
clustertriggerbindingcommand is now added with the following subcommands:describe,delete, andlist. -
You can now directly start a pipeline run using a local or remote
yamlfile. -
The
describesubcommand now displays an enhanced and detailed output. With the addition of new fields, such asdescription,timeout,param description, andsidecar status, the command output now provides more detailed information about a specifictknresource. -
The
tkn task logcommand now displays logs directly if only one task is present in the namespace.
4.1.7.1.3. Triggers
-
Triggers can now create both
v1alpha1andv1beta1pipeline resources. -
Support for new Common Expression Language (CEL) interceptor function -
compareSecret. This function securely compares strings to secrets in CEL expressions. - Support for authentication and authorization at the event listener trigger level.
4.1.7.2. Deprecated features
The following items are deprecated in this release:
The environment variable
$HOME, and variableworkingDirin theStepsspecification are deprecated and might be changed in a future release. Currently in aStepcontainer, theHOMEandworkingDirvariables are overwritten to/tekton/homeand/workspacevariables, respectively.In a later release, these two fields will not be modified, and will be set to values defined in the container image and the
TaskYAML. For this release, use thedisable-home-env-overwriteanddisable-working-directory-overwriteflags to disable overwriting of theHOMEandworkingDirvariables.-
The following commands are deprecated and might be removed in the future release:
tkn pipeline create,tkn task create. -
The
-fflag with thetkn resource createcommand is now deprecated. It might be removed in the future release. -
The
-tflag and the--timeoutflag (with seconds format) for thetkn clustertask createcommand are now deprecated. Only duration timeout format is now supported, for example1h30s. These deprecated flags might be removed in the future release.
4.1.7.3. Known issues
- If you are upgrading from an older version of Red Hat OpenShift Pipelines, you must delete your existing deployments before upgrading to Red Hat OpenShift Pipelines version 1.0. To delete an existing deployment, you must first delete Custom Resources and then uninstall the Red Hat OpenShift Pipelines Operator. For more details, see the uninstalling Red Hat OpenShift Pipelines section.
-
Submitting the same
v1alpha1tasks more than once results in an error. Use theoc replacecommand instead ofoc applywhen re-submitting av1alpha1task. The
buildahcluster task does not work when a new user is added to a container.When the Operator is installed, the
--storage-driverflag for thebuildahcluster task is not specified, therefore the flag is set to its default value. In some cases, this causes the storage driver to be set incorrectly. When a new user is added, the incorrect storage-driver results in the failure of thebuildahcluster task with the following error:useradd: /etc/passwd.8: lock file already used useradd: cannot lock /etc/passwd; try again later.
As a workaround, manually set the
--storage-driverflag value tooverlayin thebuildah-task.yamlfile:Login to your cluster as a
cluster-admin:$ oc login -u <login> -p <password> https://openshift.example.com:6443
Use the
oc editcommand to editbuildahcluster task:$ oc edit clustertask buildah
The current version of the
buildahclustertask YAML file opens in the editor set by yourEDITORenvironment variable.Under the
Stepsfield, locate the followingcommandfield:command: ['buildah', 'bud', '--format=$(params.FORMAT)', '--tls-verify=$(params.TLSVERIFY)', '--layers', '-f', '$(params.DOCKERFILE)', '-t', '$(resources.outputs.image.url)', '$(params.CONTEXT)']
Replace the
commandfield with the following:command: ['buildah', '--storage-driver=overlay', 'bud', '--format=$(params.FORMAT)', '--tls-verify=$(params.TLSVERIFY)', '--no-cache', '-f', '$(params.DOCKERFILE)', '-t', '$(params.IMAGE)', '$(params.CONTEXT)']
- Save the file and exit.
Alternatively, you can also modify the
buildahcluster task YAML file directly on the web console by navigating to Pipelines → Cluster Tasks → buildah. Select Edit Cluster Task from the Actions menu and replace thecommandfield as shown in the previous procedure.
4.1.7.4. Fixed issues
-
Previously, the
DeploymentConfigtask triggered a new deployment build even when an image build was already in progress. This caused the deployment of the pipeline to fail. With this fix, thedeploy taskcommand is now replaced with theoc rollout statuscommand which waits for the in-progress deployment to finish. -
Support for
APP_NAMEparameter is now added in pipeline templates. -
Previously, the pipeline template for Java S2I failed to look up the image in the registry. With this fix, the image is looked up using the existing image pipeline resources instead of the user provided
IMAGE_NAMEparameter. - All the OpenShift Pipelines images are now based on the Red Hat Universal Base Images (UBI).
-
Previously, when the pipeline was installed in a namespace other than
tekton-pipelines, thetkn versioncommand displayed the pipeline version asunknown. With this fix, thetkn versioncommand now displays the correct pipeline version in any namespace. -
The
-cflag is no longer supported for thetkn versioncommand. - Non-admin users can now list the cluster trigger bindings.
-
The event listener
CompareSecretfunction is now fixed for the CEL Interceptor. -
The
list,describe, andstartsubcommands for tasks and cluster tasks now correctly display the output in case a task and cluster task have the same name. - Previously, the OpenShift Pipelines Operator modified the privileged security context constraints (SCCs), which caused an error during cluster upgrade. This error is now fixed.
-
In the
tekton-pipelinesnamespace, the timeouts of all task runs and pipeline runs are now set to the value ofdefault-timeout-minutesfield using the config map. - Previously, the pipelines section in the web console was not displayed for non-admin users. This issue is now resolved.
4.2. Understanding OpenShift Pipelines
Red Hat OpenShift Pipelines is a cloud-native, continuous integration and continuous delivery (CI/CD) solution based on Kubernetes resources. It uses Tekton building blocks to automate deployments across multiple platforms by abstracting away the underlying implementation details. Tekton introduces a number of standard custom resource definitions (CRDs) for defining CI/CD pipelines that are portable across Kubernetes distributions.
4.2.1. Key features
- Red Hat OpenShift Pipelines is a serverless CI/CD system that runs pipelines with all the required dependencies in isolated containers.
- Red Hat OpenShift Pipelines are designed for decentralized teams that work on microservice-based architecture.
- Red Hat OpenShift Pipelines use standard CI/CD pipeline definitions that are easy to extend and integrate with the existing Kubernetes tools, enabling you to scale on-demand.
- You can use Red Hat OpenShift Pipelines to build images with Kubernetes tools such as Source-to-Image (S2I), Buildah, Buildpacks, and Kaniko that are portable across any Kubernetes platform.
- You can use the OpenShift Container Platform Developer console to create Tekton resources, view logs of pipeline runs, and manage pipelines in your OpenShift Container Platform namespaces.
4.2.2. OpenShift Pipeline Concepts
This guide provides a detailed view of the various pipeline concepts.
4.2.2.1. Tasks
Tasks are the building blocks of a Pipeline and consists of sequentially executed steps. It is essentially a function of inputs and outputs. A Task can run individually or as a part of the pipeline. Tasks are reusable and can be used in multiple Pipelines.
Steps are a series of commands that are sequentially executed by the Task and achieve a specific goal, such as building an image. Every Task runs as a pod, and each Step runs as a container within that pod. Because Steps run within the same pod, they can access the same volumes for caching files, config maps, and secrets.
The following example shows the apply-manifests Task.
apiVersion: tekton.dev/v1beta1 1 kind: Task 2 metadata: name: apply-manifests 3 spec: 4 workspaces: - name: source params: - name: manifest_dir description: The directory in source that contains yaml manifests type: string default: "k8s" steps: - name: apply image: image-registry.openshift-image-registry.svc:5000/openshift/cli:latest workingDir: /workspace/source command: ["/bin/bash", "-c"] args: - |- echo Applying manifests in $(params.manifest_dir) directory oc apply -f $(params.manifest_dir) echo -----------------------------------
This Task starts the pod and runs a container inside that pod using the specified image to run the specified commands.
4.2.2.2. When expression
When expressions guard task execution by setting criteria for the execution of tasks within a pipeline. They contain a list of components that allows a task to run only when certain criteria are met. When expressions are also supported in the final set of tasks that are specified using the finally field in the pipeline YAML file.
The key components of a when expression are as follows:
-
input: Specifies static inputs or variables such as a parameter, task result, and execution status. You must enter a valid input. If you do not enter a valid input, its value defaults to an empty string. -
operator: Specifies the relationship of an input to a set ofvalues. Enterinornotinas your operator values. -
values: Specifies an array of string values. Enter a non-empty array of static values or variables such as parameters, results, and a bound state of a workspace.
The declared when expressions are evaluated before the task is run. If the value of a when expression is True, the task is run. If the value of a when expression is False, the task is skipped.
You can use the when expressions in various use cases. For example, whether:
- The result of a previous task is as expected.
- A file in a Git repository has changed in the previous commits.
- An image exists in the registry.
- An optional workspace is available.
The following example shows the when expressions for a pipeline run. The pipeline run will execute the create-file task only if the following criteria are met: the path parameter is README.md, and the echo-file-exists task executed only if the exists result from the check-file task is yes.
apiVersion: tekton.dev/v1beta1 kind: PipelineRun 1 metadata: generateName: guarded-pr- spec: serviceAccountName: 'pipeline' pipelineSpec: params: - name: path type: string description: The path of the file to be created workspaces: - name: source description: | This workspace is shared among all the pipeline tasks to read/write common resources tasks: - name: create-file 2 when: - input: "$(params.path)" operator: in values: ["README.md"] workspaces: - name: source workspace: source taskSpec: workspaces: - name: source description: The workspace to create the readme file in steps: - name: write-new-stuff image: ubuntu script: 'touch $(workspaces.source.path)/README.md' - name: check-file params: - name: path value: "$(params.path)" workspaces: - name: source workspace: source runAfter: - create-file taskSpec: params: - name: path workspaces: - name: source description: The workspace to check for the file results: - name: exists description: indicates whether the file exists or is missing steps: - name: check-file image: alpine script: | if test -f $(workspaces.source.path)/$(params.path); then printf yes | tee /tekton/results/exists else printf no | tee /tekton/results/exists fi - name: echo-file-exists when: 3 - input: "$(tasks.check-file.results.exists)" operator: in values: ["yes"] taskSpec: steps: - name: echo image: ubuntu script: 'echo file exists' ... - name: task-should-be-skipped-1 when: 4 - input: "$(params.path)" operator: notin values: ["README.md"] taskSpec: steps: - name: echo image: ubuntu script: exit 1 ... finally: - name: finally-task-should-be-executed when: 5 - input: "$(tasks.echo-file-exists.status)" operator: in values: ["Succeeded"] - input: "$(tasks.status)" operator: in values: ["Succeeded"] - input: "$(tasks.check-file.results.exists)" operator: in values: ["yes"] - input: "$(params.path)" operator: in values: ["README.md"] taskSpec: steps: - name: echo image: ubuntu script: 'echo finally done' params: - name: path value: README.md workspaces: - name: source volumeClaimTemplate: spec: accessModes: - ReadWriteOnce resources: requests: storage: 16Mi
- 1
- Specifies the type of Kubernetes object. In this example,
PipelineRun. - 2
- Task
create-fileused in the Pipeline. - 3
whenexpression that specifies to execute theecho-file-existstask only if theexistsresult from thecheck-filetask isyes.- 4
whenexpression that specifies to skip thetask-should-be-skipped-1task only if thepathparameter isREADME.md.- 5
whenexpression that specifies to execute thefinally-task-should-be-executedtask only if the execution status of theecho-file-existstask and the task status isSucceeded, theexistsresult from thecheck-filetask isyes, and thepathparameter isREADME.md.
The Pipeline Run details page of the OpenShift Container Platform web console shows the status of the tasks and when expressions as follows:
- All the criteria are met: Tasks and the when expression symbol, which is represented by a diamond shape are green.
- Any one of the criteria are not met: Task is skipped. Skipped tasks and the when expression symbol are grey.
- None of the criteria are met: Task is skipped. Skipped tasks and the when expression symbol are grey.
- Task run fails: Failed tasks and the when expression symbol are red.
4.2.2.3. Finally tasks
The finally tasks are the final set of tasks specified using the finally field in the pipeline YAML file. A finally task always executes the tasks within the pipeline, irrespective of whether the pipeline runs are executed successfully. The finally tasks are executed in parallel after all the pipeline tasks are run, before the corresponding pipeline exits.
You can configure a finally task to consume the results of any task within the same pipeline. This approach does not change the order in which this final task is run. It is executed in parallel with other final tasks after all the non-final tasks are executed.
The following example shows a code snippet of the clone-cleanup-workspace pipeline. This code clones the repository into a shared workspace and cleans up the workspace. After executing the pipeline tasks, the cleanup task specified in the finally section of the pipeline YAML file cleans up the workspace.
apiVersion: tekton.dev/v1beta1 kind: Pipeline metadata: name: clone-cleanup-workspace 1 spec: workspaces: - name: git-source 2 tasks: - name: clone-app-repo 3 taskRef: name: git-clone-from-catalog params: - name: url value: https://github.com/tektoncd/community.git - name: subdirectory value: application workspaces: - name: output workspace: git-source finally: - name: cleanup 4 taskRef: 5 name: cleanup-workspace workspaces: 6 - name: source workspace: git-source - name: check-git-commit params: 7 - name: commit value: $(tasks.clone-app-repo.results.commit) taskSpec: 8 params: - name: commit steps: - name: check-commit-initialized image: alpine script: | if [[ ! $(params.commit) ]]; then exit 1 fi
- 1
- Unique name of the Pipeline.
- 2
- The shared workspace where the git repository is cloned.
- 3
- The task to clone the application repository to the shared workspace.
- 4
- The task to clean-up the shared workspace.
- 5
- A reference to the task that is to be executed in the TaskRun.
- 6
- A shared storage volume that a Task in a Pipeline needs at runtime to receive input or provide output.
- 7
- A list of parameters required for a task. If a parameter does not have an implicit default value, you must explicitly set its value.
- 8
- Embedded task definition.
4.2.2.4. TaskRun
A TaskRun instantiates a Task for execution with specific inputs, outputs, and execution parameters on a cluster. It can be invoked on its own or as part of a PipelineRun for each Task in a pipeline.
A Task consists of one or more Steps that execute container images, and each container image performs a specific piece of build work. A TaskRun executes the Steps in a Task in the specified order, until all Steps execute successfully or a failure occurs. A TaskRun is automatically created by a PipelineRun for each Task in a Pipeline.
The following example shows a TaskRun that runs the apply-manifests Task with the relevant input parameters:
apiVersion: tekton.dev/v1beta1 1 kind: TaskRun 2 metadata: name: apply-manifests-taskrun 3 spec: 4 serviceAccountName: pipeline taskRef: 5 kind: Task name: apply-manifests workspaces: 6 - name: source persistentVolumeClaim: claimName: source-pvc
- 1
- TaskRun API version
v1beta1. - 2
- Specifies the type of Kubernetes object. In this example,
TaskRun. - 3
- Unique name to identify this TaskRun.
- 4
- Definition of the TaskRun. For this TaskRun, the Task and the required workspace are specified.
- 5
- Name of the Task reference used for this TaskRun. This TaskRun executes the
apply-manifestsTask. - 6
- Workspace used by the TaskRun.
4.2.2.5. Pipelines
A Pipeline is a collection of Task resources arranged in a specific order of execution. They are executed to construct complex workflows that automate the build, deployment and delivery of applications. You can define a CI/CD workflow for your application using pipelines containing one or more tasks.
A Pipeline resource definition consists of a number of fields or attributes, which together enable the pipeline to accomplish a specific goal. Each Pipeline resource definition must contain at least one Task resource, which ingests specific inputs and produces specific outputs. The pipeline definition can also optionally include Conditions, Workspaces, Parameters, or Resources depending on the application requirements.
The following example shows the build-and-deploy pipeline, which builds an application image from a Git repository using the buildah ClusterTask resource:
apiVersion: tekton.dev/v1beta1 1 kind: Pipeline 2 metadata: name: build-and-deploy 3 spec: 4 workspaces: 5 - name: shared-workspace params: 6 - name: deployment-name type: string description: name of the deployment to be patched - name: git-url type: string description: url of the git repo for the code of deployment - name: git-revision type: string description: revision to be used from repo of the code for deployment default: "pipelines-1.5" - name: IMAGE type: string description: image to be built from the code tasks: 7 - name: fetch-repository taskRef: name: git-clone kind: ClusterTask workspaces: - name: output workspace: shared-workspace params: - name: url value: $(params.git-url) - name: subdirectory value: "" - name: deleteExisting value: "true" - name: revision value: $(params.git-revision) - name: build-image 8 taskRef: name: buildah kind: ClusterTask params: - name: TLSVERIFY value: "false" - name: IMAGE value: $(params.IMAGE) workspaces: - name: source workspace: shared-workspace runAfter: - fetch-repository - name: apply-manifests 9 taskRef: name: apply-manifests workspaces: - name: source workspace: shared-workspace runAfter: 10 - build-image - name: update-deployment taskRef: name: update-deployment workspaces: - name: source workspace: shared-workspace params: - name: deployment value: $(params.deployment-name) - name: IMAGE value: $(params.IMAGE) runAfter: - apply-manifests
- 1
- Pipeline API version
v1beta1. - 2
- Specifies the type of Kubernetes object. In this example,
Pipeline. - 3
- Unique name of this Pipeline.
- 4
- Specifies the definition and structure of the Pipeline.
- 5
- Workspaces used across all the Tasks in the Pipeline.
- 6
- Parameters used across all the Tasks in the Pipeline.
- 7
- Specifies the list of Tasks used in the Pipeline.
- 8
- Task
build-image, which uses thebuildahClusterTask to build application images from a given Git repository. - 9
- Task
apply-manifests, which uses a user-defined Task with the same name. - 10
- Specifies the sequence in which Tasks are run in a Pipeline. In this example, the
apply-manifestsTask is run only after thebuild-imageTask is completed.
The Red Hat OpenShift Pipelines Operator installs the Buildah cluster task and creates the pipeline service account with sufficient permission to build and push an image. The Buildah cluster task can fail when associated with a different service account with insufficient permissions.
4.2.2.6. PipelineRun
A PipelineRun is a type of resource that binds a pipeline, workspaces, credentials, and a set of parameter values specific to a scenario to run the CI/CD workflow.
A pipeline run is the running instance of a pipeline. It instantiates a pipeline for execution with specific inputs, outputs, and execution parameters on a cluster. It also creates a task run for each task in the pipeline run.
The pipeline runs the tasks sequentially until they are complete or a task fails. The status field tracks and the progress of each task run and stores it for monitoring and auditing purposes.
The following example shows a PipelineRun to run the build-and-deploy Pipeline with relevant resources and parameters:
apiVersion: tekton.dev/v1beta1 1 kind: PipelineRun 2 metadata: name: build-deploy-api-pipelinerun 3 spec: pipelineRef: name: build-and-deploy 4 params: 5 - name: deployment-name value: vote-api - name: git-url value: https://github.com/openshift-pipelines/vote-api.git - name: IMAGE value: image-registry.openshift-image-registry.svc:5000/pipelines-tutorial/vote-api workspaces: 6 - name: shared-workspace volumeClaimTemplate: spec: accessModes: - ReadWriteOnce resources: requests: storage: 500Mi
- 1
- Pipeline run API version
v1beta1. - 2
- The type of Kubernetes object. In this example,
PipelineRun. - 3
- Unique name to identify this pipeline run.
- 4
- Name of the pipeline to be run. In this example,
build-and-deploy. - 5
- The list of parameters required to run the pipeline.
- 6
- Workspace used by the pipeline run.
Additional resources
4.2.2.7. Workspaces
It is recommended that you use Workspaces instead of PipelineResources in OpenShift Pipelines, as PipelineResources are difficult to debug, limited in scope, and make Tasks less reusable.
Workspaces declare shared storage volumes that a Task in a Pipeline needs at runtime to receive input or provide output. Instead of specifying the actual location of the volumes, Workspaces enable you to declare the filesystem or parts of the filesystem that would be required at runtime. A Task or Pipeline declares the Workspace and you must provide the specific location details of the volume. It is then mounted into that Workspace in a TaskRun or a PipelineRun. This separation of volume declaration from runtime storage volumes makes the Tasks reusable, flexible, and independent of the user environment.
With Workspaces, you can:
- Store Task inputs and outputs
- Share data among Tasks
- Use it as a mount point for credentials held in Secrets
- Use it as a mount point for configurations held in ConfigMaps
- Use it as a mount point for common tools shared by an organization
- Create a cache of build artifacts that speed up jobs
You can specify Workspaces in the TaskRun or PipelineRun using:
- A read-only ConfigMaps or Secret
- An existing PersistentVolumeClaim shared with other Tasks
- A PersistentVolumeClaim from a provided VolumeClaimTemplate
- An emptyDir that is discarded when the TaskRun completes
The following example shows a code snippet of the build-and-deploy Pipeline, which declares a shared-workspace Workspace for the build-image and apply-manifests Tasks as defined in the Pipeline.
apiVersion: tekton.dev/v1beta1 kind: Pipeline metadata: name: build-and-deploy spec: workspaces: 1 - name: shared-workspace params: ... tasks: 2 - name: build-image taskRef: name: buildah kind: ClusterTask params: - name: TLSVERIFY value: "false" - name: IMAGE value: $(params.IMAGE) workspaces: 3 - name: source 4 workspace: shared-workspace 5 runAfter: - fetch-repository - name: apply-manifests taskRef: name: apply-manifests workspaces: 6 - name: source workspace: shared-workspace runAfter: - build-image ...
- 1
- List of Workspaces shared between the Tasks defined in the Pipeline. A Pipeline can define as many Workspaces as required. In this example, only one Workspace named
shared-workspaceis declared. - 2
- Definition of Tasks used in the Pipeline. This snippet defines two Tasks,
build-imageandapply-manifests, which share a common Workspace. - 3
- List of Workspaces used in the
build-imageTask. A Task definition can include as many Workspaces as it requires. However, it is recommended that a Task uses at most one writable Workspace. - 4
- Name that uniquely identifies the Workspace used in the Task. This Task uses one Workspace named
source. - 5
- Name of the Pipeline Workspace used by the Task. Note that the Workspace
sourcein turn uses the Pipeline Workspace namedshared-workspace. - 6
- List of Workspaces used in the
apply-manifestsTask. Note that this Task shares thesourceWorkspace with thebuild-imageTask.
Workspaces help tasks share data, and allow you to specify one or more volumes that each task in the pipeline requires during execution. You can create a persistent volume claim or provide a volume claim template that creates a persistent volume claim for you.
The following code snippet of the build-deploy-api-pipelinerun PipelineRun uses a volume claim template to create a persistent volume claim for defining the storage volume for the shared-workspace Workspace used in the build-and-deploy Pipeline.
apiVersion: tekton.dev/v1beta1
kind: PipelineRun
metadata:
name: build-deploy-api-pipelinerun
spec:
pipelineRef:
name: build-and-deploy
params:
...
workspaces: 1
- name: shared-workspace 2
volumeClaimTemplate: 3
spec:
accessModes:
- ReadWriteOnce
resources:
requests:
storage: 500Mi- 1
- Specifies the list of Pipeline Workspaces for which volume binding will be provided in the PipelineRun.
- 2
- The name of the Workspace in the Pipeline for which the volume is being provided.
- 3
- Specifies a volume claim template that creates a persistent volume claim to define the storage volume for the workspace.
4.2.2.8. Triggers
Use Triggers in conjunction with pipelines to create a full-fledged CI/CD system where Kubernetes resources define the entire CI/CD execution. Triggers capture the external events, such as a Git pull request, and process them to extract key pieces of information. Mapping this event data to a set of predefined parameters triggers a series of tasks that can then create and deploy Kubernetes resources and instantiate the pipeline.
For example, you define a CI/CD workflow using Red Hat OpenShift Pipelines for your application. The pipeline must start for any new changes to take effect in the application repository. Triggers automate this process by capturing and processing any change event and by triggering a pipeline run that deploys the new image with the latest changes.
Triggers consist of the following main resources that work together to form a reusable, decoupled, and self-sustaining CI/CD system:
The
TriggerBindingresource extracts the fields from an event payload and stores them as parameters.The following example shows a code snippet of the
TriggerBindingresource, which extracts the Git repository information from the received event payload:apiVersion: triggers.tekton.dev/v1alpha1 1 kind: TriggerBinding 2 metadata: name: vote-app 3 spec: params: 4 - name: git-repo-url value: $(body.repository.url) - name: git-repo-name value: $(body.repository.name) - name: git-revision value: $(body.head_commit.id)
- 1
- The API version of the
TriggerBindingresource. In this example,v1alpha1. - 2
- Specifies the type of Kubernetes object. In this example,
TriggerBinding. - 3
- Unique name to identify the
TriggerBindingresource. - 4
- List of parameters which will be extracted from the received event payload and passed to the
TriggerTemplateresource. In this example, the Git repository URL, name, and revision are extracted from the body of the event payload.
The
TriggerTemplateresource acts as a standard for the way resources must be created. It specifies the way parameterized data from theTriggerBindingresource should be used. A trigger template receives input from the trigger binding, and then performs a series of actions that results in creation of new pipeline resources, and initiation of a new pipeline run.The following example shows a code snippet of a
TriggerTemplateresource, which creates a pipeline run using the Git repository information received from theTriggerBindingresource you just created:apiVersion: triggers.tekton.dev/v1alpha1 1 kind: TriggerTemplate 2 metadata: name: vote-app 3 spec: params: 4 - name: git-repo-url description: The git repository url - name: git-revision description: The git revision default: pipelines-1.5 - name: git-repo-name description: The name of the deployment to be created / patched resourcetemplates: 5 - apiVersion: tekton.dev/v1beta1 kind: PipelineRun metadata: name: build-deploy-$(tt.params.git-repo-name)-$(uid) spec: serviceAccountName: pipeline pipelineRef: name: build-and-deploy params: - name: deployment-name value: $(tt.params.git-repo-name) - name: git-url value: $(tt.params.git-repo-url) - name: git-revision value: $(tt.params.git-revision) - name: IMAGE value: image-registry.openshift-image-registry.svc:5000/pipelines-tutorial/$(tt.params.git-repo-name) workspaces: - name: shared-workspace volumeClaimTemplate: spec: accessModes: - ReadWriteOnce resources: requests: storage: 500Mi
- 1
- The API version of the
TriggerTemplateresource. In this example,v1alpha1. - 2
- Specifies the type of Kubernetes object. In this example,
TriggerTemplate. - 3
- Unique name to identify the
TriggerTemplateresource. - 4
- Parameters supplied by the
TriggerBindingresource. - 5
- List of templates that specify the way resources must be created using the parameters received through the
TriggerBindingorEventListenerresources.
The
Triggerresource combines theTriggerBindingandTriggerTemplateresources, and optionally, theinterceptorsevent processor.Interceptors process all the events for a specific platform that runs before the
TriggerBindingresource. You can use interceptors to filter the payload, verify events, define and test trigger conditions, and implement other useful processing. Interceptors use secret for event verification. After the event data passes through an interceptor, it then goes to the trigger before you pass the payload data to the trigger binding. You can also use an interceptor to modify the behavior of the associated trigger referenced in theEventListenerspecification.The following example shows a code snippet of a
Triggerresource, namedvote-triggerthat connects theTriggerBindingandTriggerTemplateresources, and theinterceptorsevent processor.apiVersion: triggers.tekton.dev/v1alpha1 1 kind: Trigger 2 metadata: name: vote-trigger 3 spec: serviceAccountName: pipeline 4 interceptors: - ref: name: "github" 5 params: 6 - name: "secretRef" value: secretName: github-secret secretKey: secretToken - name: "eventTypes" value: ["push"] bindings: - ref: vote-app 7 template: 8 ref: vote-app --- apiVersion: v1 kind: Secret 9 metadata: name: github-secret type: Opaque stringData: secretToken: "1234567"
- 1
- The API version of the
Triggerresource. In this example,v1alpha1. - 2
- Specifies the type of Kubernetes object. In this example,
Trigger. - 3
- Unique name to identify the
Triggerresource. - 4
- Service account name to be used.
- 5
- Interceptor name to be referenced. In this example,
github. - 6
- Desired parameters to be specified.
- 7
- Name of the
TriggerBindingresource to be connected to theTriggerTemplateresource. - 8
- Name of the
TriggerTemplateresource to be connected to theTriggerBindingresource. - 9
- Secret to be used to verify events.
The
EventListenerresource provides an endpoint, or an event sink, that listens for incoming HTTP-based events with a JSON payload. It extracts event parameters from eachTriggerBindingresource, and then processes this data to create Kubernetes resources as specified by the correspondingTriggerTemplateresource. TheEventListenerresource also performs lightweight event processing or basic filtering on the payload using eventinterceptors, which identify the type of payload and optionally modify it. Currently, pipeline triggers support five types of interceptors: Webhook Interceptors, GitHub Interceptors, GitLab Interceptors, Bitbucket Interceptors, and Common Expression Language (CEL) Interceptors.The following example shows an
EventListenerresource, which references theTriggerresource namedvote-trigger.apiVersion: triggers.tekton.dev/v1alpha1 1 kind: EventListener 2 metadata: name: vote-app 3 spec: serviceAccountName: pipeline 4 triggers: - triggerRef: vote-trigger 5
- 1
- The API version of the
EventListenerresource. In this example,v1alpha1. - 2
- Specifies the type of Kubernetes object. In this example,
EventListener. - 3
- Unique name to identify the
EventListenerresource. - 4
- Service account name to be used.
- 5
- Name of the
Triggerresource referenced by theEventListenerresource.
4.2.3. Additional resources
- For information on installing pipelines, see Installing OpenShift Pipelines.
- For more details on creating custom CI/CD solutions, see Creating applications with CI/CD Pipelines.
- For more details on re-encrypt TLS termination, see Re-encryption Termination.
- For more details on secured routes, see the Secured routes section.
4.3. Installing OpenShift Pipelines
This guide walks cluster administrators through the process of installing the Red Hat OpenShift Pipelines Operator to an OpenShift Container Platform cluster.
Prerequisites
-
You have access to an OpenShift Container Platform cluster using an account with
cluster-adminpermissions. -
You have installed
ocCLI. -
You have installed OpenShift Pipelines (
tkn) CLI on your local system.
4.3.1. Installing the Red Hat OpenShift Pipelines Operator in web console
You can install Red Hat OpenShift Pipelines using the Operator listed in the OpenShift Container Platform OperatorHub. When you install the Red Hat OpenShift Pipelines Operator, the custom resources (CRs) required for the pipelines configuration are automatically installed along with the Operator.
The default Operator custom resource definition (CRD) config.operator.tekton.dev is now replaced by tektonconfigs.operator.tekton.dev. In addition, the Operator provides the following additional CRDs to individually manage OpenShift Pipelines components: tektonpipelines.operator.tekton.dev, tektontriggers.operator.tekton.dev and tektonaddons.operator.tekton.dev.
If you have OpenShift Pipelines already installed on your cluster, the existing installation is seamlessly upgraded. The Operator will replace the instance of config.operator.tekton.dev on your cluster with an instance of tektonconfigs.operator.tekton.dev and additional objects of the other CRDs as necessary.
If you manually changed your existing installation, such as, changing the target namespace in the config.operator.tekton.dev CRD instance by making changes to the resource name - cluster field, then the upgrade path is not smooth. In such cases, the recommended workflow is to uninstall your installation and reinstall the Red Hat OpenShift Pipelines Operator.
The Red Hat OpenShift Pipelines Operator now provides the option to choose the components that you want to install by specifying profiles as part of the TektonConfig CR. The TektonConfig CR is automatically installed when the Operator is installed. The supported profiles are:
- Lite: This installs only Tekton Pipelines.
- Basic: This installs Tekton Pipelines and Tekton Triggers.
-
All: This is the default profile used when the
TektonConfigCR is installed. This profile installs all of the Tekton components: Tekton Pipelines, Tekton Triggers, Tekton Addons (which includeClusterTasks,ClusterTriggerBindings,ConsoleCLIDownload,ConsoleQuickStartandConsoleYAMLSampleresources).
Procedure
- In the Administrator perspective of the web console, navigate to Operators → OperatorHub.
-
Use the Filter by keyword box to search for
Red Hat OpenShift PipelinesOperator in the catalog. Click the Red Hat OpenShift Pipelines Operator tile. - Read the brief description about the Operator on the Red Hat OpenShift Pipelines Operator page. Click Install.
On the Install Operator page:
-
Select All namespaces on the cluster (default) for the Installation Mode. This mode installs the Operator in the default
openshift-operatorsnamespace, which enables the Operator to watch and be made available to all namespaces in the cluster. - Select Automatic for the Approval Strategy. This ensures that the future upgrades to the Operator are handled automatically by the Operator Lifecycle Manager (OLM). If you select the Manual approval strategy, OLM creates an update request. As a cluster administrator, you must then manually approve the OLM update request to update the Operator to the new version.
Select an Update Channel.
- The stable channel enables installation of the latest stable and supported release of the Red Hat OpenShift Pipelines Operator.
- The preview channel enables installation of the latest preview version of the Red Hat OpenShift Pipelines Operator, which may contain features that are not yet available from the stable channel and is not supported.
-
Select All namespaces on the cluster (default) for the Installation Mode. This mode installs the Operator in the default
Click Install. You will see the Operator listed on the Installed Operators page.
NoteThe Operator is installed automatically into the
openshift-operatorsnamespace.- Verify that the Status is set to Succeeded Up to date to confirm successful installation of Red Hat OpenShift Pipelines Operator.
4.3.2. Installing the OpenShift Pipelines Operator using the CLI
You can install Red Hat OpenShift Pipelines Operator from the OperatorHub using the CLI.
Procedure
Create a Subscription object YAML file to subscribe a namespace to the Red Hat OpenShift Pipelines Operator, for example,
sub.yaml:Example Subscription
apiVersion: operators.coreos.com/v1alpha1 kind: Subscription metadata: name: openshift-pipelines-operator namespace: openshift-operators spec: channel: <channel name> 1 name: openshift-pipelines-operator-rh 2 source: redhat-operators 3 sourceNamespace: openshift-marketplace 4
Create the Subscription object:
$ oc apply -f sub.yaml
The Red Hat OpenShift Pipelines Operator is now installed in the default target namespace
openshift-operators.
4.3.3. Red Hat OpenShift Pipelines Operator in a restricted environment
The Red Hat OpenShift Pipelines Operator enables support for installation of pipelines in a restricted network environment.
The Operator installs a proxy webhook that sets the proxy environment variables in the containers of the pod created by tekton-controllers based on the cluster proxy object. It also sets the proxy environment variables in the TektonPipelines, TektonTriggers, Controllers, Webhooks, and Operator Proxy Webhook resources.
By default, the proxy webhook is disabled for the openshift-pipelines namespace. To disable it for any other namespace, you can add the operator.tekton.dev/disable-proxy: true label to the namespace object.
4.3.4. Additional resources
- You can learn more about installing Operators on OpenShift Container Platform in the adding Operators to a cluster section.
For more information on using pipelines in a restricted environment see:
4.4. Uninstalling OpenShift Pipelines
Uninstalling the Red Hat OpenShift Pipelines Operator is a two-step process:
- Delete the Custom Resources (CRs) that were added by default when you installed the Red Hat OpenShift Pipelines Operator.
- Uninstall the Red Hat OpenShift Pipelines Operator.
Uninstalling only the Operator will not remove the Red Hat OpenShift Pipelines components created by default when the Operator is installed.
4.4.1. Deleting the Red Hat OpenShift Pipelines components and Custom Resources
Delete the Custom Resources (CRs) created by default during installation of the Red Hat OpenShift Pipelines Operator.
Procedure
- In the Administrator perspective of the web console, navigate to Administration → Custom Resource Definition.
-
Type
config.operator.tekton.devin the Filter by name box to search for the Red Hat OpenShift Pipelines Operator CRs. - Click CRD Config to see the Custom Resource Definition Details page.
Click the Actions drop-down menu and select Delete Custom Resource Definition.
NoteDeleting the CRs will delete the Red Hat OpenShift Pipelines components, and all the Tasks and Pipelines on the cluster will be lost.
- Click Delete to confirm the deletion of the CRs.
4.4.2. Uninstalling the Red Hat OpenShift Pipelines Operator
Procedure
-
From the Operators → OperatorHub page, use the Filter by keyword box to search for
Red Hat OpenShift Pipelines Operator. - Click the OpenShift Pipelines Operator tile. The Operator tile indicates it is installed.
- In the OpenShift Pipelines Operator descriptor page, click Uninstall.
Additional resources
- You can learn more about uninstalling Operators on OpenShift Container Platform in the deleting Operators from a cluster section.
4.5. Creating CI/CD solutions for applications using OpenShift Pipelines
With Red Hat OpenShift Pipelines, you can create a customized CI/CD solution to build, test, and deploy your application.
To create a full-fledged, self-serving CI/CD pipeline for an application, perform the following tasks:
- Create custom tasks, or install existing reusable tasks.
- Create and define the delivery pipeline for your application.
Provide a storage volume or filesystem that is attached to a workspace for the pipeline execution, using one of the following approaches:
- Specify a volume claim template that creates a persistent volume claim
- Specify a persistent volume claim
-
Create a
PipelineRunobject to instantiate and invoke the pipeline. - Add triggers to capture events in the source repository.
This section uses the pipelines-tutorial example to demonstrate the preceding tasks. The example uses a simple application which consists of:
-
A front-end interface,
pipelines-vote-ui, with the source code in thepipelines-vote-uiGit repository. -
A back-end interface,
pipelines-vote-api, with the source code in thepipelines-vote-apiGit repository. -
The
apply-manifestsandupdate-deploymenttasks in thepipelines-tutorialGit repository.
4.5.1. Prerequisites
- You have access to an OpenShift Container Platform cluster.
- You have installed OpenShift Pipelines using the Red Hat OpenShift Pipelines Operator listed in the OpenShift OperatorHub. After it is installed, it is applicable to the entire cluster.
- You have installed OpenShift Pipelines CLI.
-
You have forked the front-end
pipelines-vote-uiand back-endpipelines-vote-apiGit repositories using your GitHub ID, and have administrator access to these repositories. -
Optional: You have cloned the
pipelines-tutorialGit repository.
4.5.2. Creating a project and checking your pipeline service account
Procedure
Log in to your OpenShift Container Platform cluster:
$ oc login -u <login> -p <password> https://openshift.example.com:6443
Create a project for the sample application. For this example workflow, create the
pipelines-tutorialproject:$ oc new-project pipelines-tutorial
NoteIf you create a project with a different name, be sure to update the resource URLs used in the example with your project name.
View the
pipelineservice account:Red Hat OpenShift Pipelines Operator adds and configures a service account named
pipelinethat has sufficient permissions to build and push an image. This service account is used by thePipelineRunobject.$ oc get serviceaccount pipeline
4.5.3. Creating pipeline tasks
Procedure
Install the
apply-manifestsandupdate-deploymenttask resources from thepipelines-tutorialrepository, which contains a list of reusable tasks for pipelines:$ oc create -f https://raw.githubusercontent.com/openshift/pipelines-tutorial/pipelines-1.5/01_pipeline/01_apply_manifest_task.yaml $ oc create -f https://raw.githubusercontent.com/openshift/pipelines-tutorial/pipelines-1.5/01_pipeline/02_update_deployment_task.yaml
Use the
tkn task listcommand to list the tasks you created:$ tkn task list
The output verifies that the
apply-manifestsandupdate-deploymenttask resources were created:NAME DESCRIPTION AGE apply-manifests 1 minute ago update-deployment 48 seconds ago
Use the
tkn clustertasks listcommand to list the Operator-installed additional cluster tasks such asbuildahands2i-python:NoteTo use the
buildahcluster task in a restricted environment, you must ensure that the Dockerfile uses an internal image stream as the base image.$ tkn clustertasks list
The output lists the Operator-installed
ClusterTaskresources:NAME DESCRIPTION AGE buildah 1 day ago git-clone 1 day ago s2i-python 1 day ago tkn 1 day ago
4.5.4. Assembling a pipeline
A pipeline represents a CI/CD flow and is defined by the tasks to be executed. It is designed to be generic and reusable in multiple applications and environments.
A pipeline specifies how the tasks interact with each other and their order of execution using the from and runAfter parameters. It uses the workspaces field to specify one or more volumes that each task in the pipeline requires during execution.
In this section, you will create a pipeline that takes the source code of the application from GitHub, and then builds and deploys it on OpenShift Container Platform.
The pipeline performs the following tasks for the back-end application pipelines-vote-api and front-end application pipelines-vote-ui:
-
Clones the source code of the application from the Git repository by referring to the
git-urlandgit-revisionparameters. -
Builds the container image using the
buildahcluster task. -
Pushes the image to the internal image registry by referring to the
imageparameter. -
Deploys the new image on OpenShift Container Platform by using the
apply-manifestsandupdate-deploymenttasks.
Procedure
Copy the contents of the following sample pipeline YAML file and save it:
apiVersion: tekton.dev/v1beta1 kind: Pipeline metadata: name: build-and-deploy spec: workspaces: - name: shared-workspace params: - name: deployment-name type: string description: name of the deployment to be patched - name: git-url type: string description: url of the git repo for the code of deployment - name: git-revision type: string description: revision to be used from repo of the code for deployment default: "pipelines-1.5" - name: IMAGE type: string description: image to be built from the code tasks: - name: fetch-repository taskRef: name: git-clone kind: ClusterTask workspaces: - name: output workspace: shared-workspace params: - name: url value: $(params.git-url) - name: subdirectory value: "" - name: deleteExisting value: "true" - name: revision value: $(params.git-revision) - name: build-image taskRef: name: buildah kind: ClusterTask params: - name: IMAGE value: $(params.IMAGE) workspaces: - name: source workspace: shared-workspace runAfter: - fetch-repository - name: apply-manifests taskRef: name: apply-manifests workspaces: - name: source workspace: shared-workspace runAfter: - build-image - name: update-deployment taskRef: name: update-deployment params: - name: deployment value: $(params.deployment-name) - name: IMAGE value: $(params.IMAGE) runAfter: - apply-manifestsThe pipeline definition abstracts away the specifics of the Git source repository and image registries. These details are added as
paramswhen a pipeline is triggered and executed.Create the pipeline:
$ oc create -f <pipeline-yaml-file-name.yaml>
Alternatively, you can also execute the YAML file directly from the Git repository:
$ oc create -f https://raw.githubusercontent.com/openshift/pipelines-tutorial/pipelines-1.5/01_pipeline/04_pipeline.yaml
Use the
tkn pipeline listcommand to verify that the pipeline is added to the application:$ tkn pipeline list
The output verifies that the
build-and-deploypipeline was created:NAME AGE LAST RUN STARTED DURATION STATUS build-and-deploy 1 minute ago --- --- --- ---
4.5.5. Mirroring images to run pipelines in a restricted environment
To run OpenShift Pipelines in a disconnected cluster or a cluster provisioned in a restricted environment, ensure that either the Samples Operator is configured for a restricted network, or a cluster administrator has created a cluster with a mirrored registry.
The following procedure uses the pipelines-tutorial example to create a pipeline for an application in a restricted environment using a cluster with a mirrored registry. To ensure that the pipelines-tutorial example works in a restricted environment, you must mirror the respective builder images from the mirror registry for the front-end interface, pipelines-vote-ui; back-end interface, pipelines-vote-api; and the cli.
Procedure
Mirror the builder image from the mirror registry for the front-end interface,
pipelines-vote-ui.Verify that the required images tag is not imported:
$ oc describe imagestream python -n openshift
Example output
Name: python Namespace: openshift [...] 3.8-ubi8 (latest) tagged from registry.redhat.io/ubi8/python-38:latest prefer registry pullthrough when referencing this tag Build and run Python 3.8 applications on UBI 8. For more information about using this builder image, including OpenShift considerations, see https://github.com/sclorg/s2i-python-container/blob/master/3.8/README.md. Tags: builder, python Supports: python:3.8, python Example Repo: https://github.com/sclorg/django-ex.git [...]Mirror the supported image tag to the private registry:
$ oc image mirror registry.redhat.io/ubi8/python-38:latest <mirror-registry>:<port>/ubi8/python-38
Import the image:
$ oc tag <mirror-registry>:<port>/ubi8/python-38 python:latest --scheduled -n openshift
You must periodically re-import the image. The
--scheduledflag enables automatic re-import of the image.Verify that the images with the given tag have been imported:
$ oc describe imagestream python -n openshift
Example output
Name: python Namespace: openshift [...] latest updates automatically from registry <mirror-registry>:<port>/ubi8/python-38 * <mirror-registry>:<port>/ubi8/python-38@sha256:3ee3c2e70251e75bfeac25c0c33356add9cc4abcbc9c51d858f39e4dc29c5f58 [...]
Mirror the builder image from the mirror registry for the back-end interface,
pipelines-vote-api.Verify that the required images tag is not imported:
$ oc describe imagestream golang -n openshift
Example output
Name: golang Namespace: openshift [...] 1.14.7-ubi8 (latest) tagged from registry.redhat.io/ubi8/go-toolset:1.14.7 prefer registry pullthrough when referencing this tag Build and run Go applications on UBI 8. For more information about using this builder image, including OpenShift considerations, see https://github.com/sclorg/golang-container/blob/master/README.md. Tags: builder, golang, go Supports: golang Example Repo: https://github.com/sclorg/golang-ex.git [...]Mirror the supported image tag to the private registry:
$ oc image mirror registry.redhat.io/ubi8/go-toolset:1.14.7 <mirror-registry>:<port>/ubi8/go-toolset
Import the image:
$ oc tag <mirror-registry>:<port>/ubi8/go-toolset golang:latest --scheduled -n openshift
You must periodically re-import the image. The
--scheduledflag enables automatic re-import of the image.Verify that the images with the given tag have been imported:
$ oc describe imagestream golang -n openshift
Example output
Name: golang Namespace: openshift [...] latest updates automatically from registry <mirror-registry>:<port>/ubi8/go-toolset * <mirror-registry>:<port>/ubi8/go-toolset@sha256:59a74d581df3a2bd63ab55f7ac106677694bf612a1fe9e7e3e1487f55c421b37 [...]
Mirror the builder image from the mirror registry for the
cli.Verify that the required images tag is not imported:
$ oc describe imagestream cli -n openshift
Example output
Name: cli Namespace: openshift [...] latest updates automatically from registry quay.io/openshift-release-dev/ocp-v4.0-art-dev@sha256:65c68e8c22487375c4c6ce6f18ed5485915f2bf612e41fef6d41cbfcdb143551 * quay.io/openshift-release-dev/ocp-v4.0-art-dev@sha256:65c68e8c22487375c4c6ce6f18ed5485915f2bf612e41fef6d41cbfcdb143551 [...]
Mirror the supported image tag to the private registry:
$ oc image mirror quay.io/openshift-release-dev/ocp-v4.0-art-dev@sha256:65c68e8c22487375c4c6ce6f18ed5485915f2bf612e41fef6d41cbfcdb143551 <mirror-registry>:<port>/openshift-release-dev/ocp-v4.0-art-dev:latest
Import the image:
$ oc tag <mirror-registry>:<port>/openshift-release-dev/ocp-v4.0-art-dev cli:latest --scheduled -n openshift
You must periodically re-import the image. The
--scheduledflag enables automatic re-import of the image.Verify that the images with the given tag have been imported:
$ oc describe imagestream cli -n openshift
Example output
Name: cli Namespace: openshift [...] latest updates automatically from registry <mirror-registry>:<port>/openshift-release-dev/ocp-v4.0-art-dev * <mirror-registry>:<port>/openshift-release-dev/ocp-v4.0-art-dev@sha256:65c68e8c22487375c4c6ce6f18ed5485915f2bf612e41fef6d41cbfcdb143551 [...]
4.5.6. Running a pipeline
A PipelineRun resource starts a pipeline and ties it to the Git and image resources that should be used for the specific invocation. It automatically creates and starts the TaskRun resources for each task in the pipeline.
Procedure
Start the pipeline for the back-end application:
$ tkn pipeline start build-and-deploy \
    -w name=shared-workspace,volumeClaimTemplateFile=https://raw.githubusercontent.com/openshift/pipelines-tutorial/pipelines-1.5/01_pipeline/03_persistent_volume_claim.yaml \
    -p deployment-name=pipelines-vote-api \
    -p git-url=https://github.com/openshift/pipelines-vote-api.git \
    -p IMAGE=image-registry.openshift-image-registry.svc:5000/pipelines-tutorial/pipelines-vote-api \
    --use-param-defaults
The previous command uses a volume claim template, which creates a persistent volume claim for the pipeline execution.
To track the progress of the pipeline run, enter the following command::
$ tkn pipelinerun logs <pipelinerun_id> -f
The <pipelinerun_id> in the above command is the ID for the
PipelineRunthat was returned in the output of the previous command.Start the pipeline for the front-end application:
$ tkn pipeline start build-and-deploy \
    -w name=shared-workspace,volumeClaimTemplateFile=https://raw.githubusercontent.com/openshift/pipelines-tutorial/pipelines-1.5/01_pipeline/03_persistent_volume_claim.yaml \
    -p deployment-name=pipelines-vote-ui \
    -p git-url=https://github.com/openshift/pipelines-vote-ui.git \
    -p IMAGE=image-registry.openshift-image-registry.svc:5000/pipelines-tutorial/pipelines-vote-ui \
    --use-param-defaults
To track the progress of the pipeline run, enter the following command:
$ tkn pipelinerun logs <pipelinerun_id> -f
The <pipelinerun_id> in the above command is the ID for the
PipelineRunthat was returned in the output of the previous command.After a few minutes, use
tkn pipelinerun listcommand to verify that the pipeline ran successfully by listing all the pipeline runs:$ tkn pipelinerun list
The output lists the pipeline runs:
 NAME                         STARTED      DURATION     STATUS
 build-and-deploy-run-xy7rw   1 hour ago   2 minutes    Succeeded
 build-and-deploy-run-z2rz8   1 hour ago   19 minutes   Succeeded
Get the application route:
$ oc get route pipelines-vote-ui --template='http://{{.spec.host}}'Note the output of the previous command. You can access the application using this route.
To rerun the last pipeline run, using the pipeline resources and service account of the previous pipeline, run:
$ tkn pipeline start build-and-deploy --last
Additional resources
4.5.7. Adding triggers to a pipeline
Triggers enable pipelines to respond to external GitHub events, such as push events and pull requests. After you assemble and start a pipeline for the application, add the TriggerBinding, TriggerTemplate, Trigger, and EventListener resources to capture the GitHub events.
Procedure
Copy the content of the following sample
TriggerBindingYAML file and save it:apiVersion: triggers.tekton.dev/v1alpha1 kind: TriggerBinding metadata: name: vote-app spec: params: - name: git-repo-url value: $(body.repository.url) - name: git-repo-name value: $(body.repository.name) - name: git-revision value: $(body.head_commit.id)Create the
TriggerBindingresource:$ oc create -f <triggerbinding-yaml-file-name.yaml>
Alternatively, you can create the
TriggerBindingresource directly from thepipelines-tutorialGit repository:$ oc create -f https://raw.githubusercontent.com/openshift/pipelines-tutorial/pipelines-1.5/03_triggers/01_binding.yaml
Copy the content of the following sample
TriggerTemplateYAML file and save it:apiVersion: triggers.tekton.dev/v1alpha1 kind: TriggerTemplate metadata: name: vote-app spec: params: - name: git-repo-url description: The git repository url - name: git-revision description: The git revision default: pipelines-1.5 - name: git-repo-name description: The name of the deployment to be created / patched resourcetemplates: - apiVersion: tekton.dev/v1beta1 kind: PipelineRun metadata: generateName: build-deploy-$(tt.params.git-repo-name)- spec: serviceAccountName: pipeline pipelineRef: name: build-and-deploy params: - name: deployment-name value: $(tt.params.git-repo-name) - name: git-url value: $(tt.params.git-repo-url) - name: git-revision value: $(tt.params.git-revision) - name: IMAGE value: image-registry.openshift-image-registry.svc:5000/pipelines-tutorial/$(tt.params.git-repo-name) workspaces: - name: shared-workspace volumeClaimTemplate: spec: accessModes: - ReadWriteOnce resources: requests: storage: 500MiThe template specifies a volume claim template to create a persistent volume claim for defining the storage volume for the workspace. Therefore, you do not need to create a persistent volume claim to provide data storage.
Create the
TriggerTemplateresource:$ oc create -f <triggertemplate-yaml-file-name.yaml>
Alternatively, you can create the
TriggerTemplateresource directly from thepipelines-tutorialGit repository:$ oc create -f https://raw.githubusercontent.com/openshift/pipelines-tutorial/pipelines-1.5/03_triggers/02_template.yaml
Copy the contents of the following sample
TriggerYAML file and save it:apiVersion: triggers.tekton.dev/v1alpha1 kind: Trigger metadata: name: vote-trigger spec: serviceAccountName: pipeline bindings: - ref: vote-app template: ref: vote-appCreate the
Triggerresource:$ oc create -f <trigger-yaml-file-name.yaml>
Alternatively, you can create the
Triggerresource directly from thepipelines-tutorialGit repository:$ oc create -f https://raw.githubusercontent.com/openshift/pipelines-tutorial/pipelines-1.5/03_triggers/03_trigger.yaml
Copy the contents of the following sample
EventListenerYAML file and save it:apiVersion: triggers.tekton.dev/v1alpha1 kind: EventListener metadata: name: vote-app spec: serviceAccountName: pipeline triggers: - triggerRef: vote-triggerAlternatively, if you have not defined a trigger custom resource, add the binding and template spec to the
EventListenerYAML file, instead of referring to the name of the trigger:apiVersion: triggers.tekton.dev/v1alpha1 kind: EventListener metadata: name: vote-app spec: serviceAccountName: pipeline triggers: - bindings: - ref: vote-app template: ref: vote-appCreate the
EventListenerresource by performing the following steps:To create an
EventListenerresource using a secure HTTPS connection:Add a label to enable the secure HTTPS connection to the
Eventlistenerresource:$ oc label namespace <ns-name> operator.tekton.dev/enable-annotation=enabled
Create the
EventListenerresource:$ oc create -f <eventlistener-yaml-file-name.yaml>
Alternatively, you can create the
EvenListenerresource directly from thepipelines-tutorialGit repository:$ oc create -f https://raw.githubusercontent.com/openshift/pipelines-tutorial/pipelines-1.5/03_triggers/04_event_listener.yaml
Create a route with the re-encrypt TLS termination:
$ oc create route reencrypt --service=<svc-name> --cert=tls.crt --key=tls.key --ca-cert=ca.crt --hostname=<hostname>
Alternatively, you can create a re-encrypt TLS termination YAML file to create a secured route.
Example Re-encrypt TLS Termination YAML of the Secured Route
apiVersion: route.openshift.io/v1
kind: Route
metadata:
  name: route-passthrough-secured 1
spec:
  host: <hostname>
  to:
    kind: Service
    name: frontend 2
  tls:
    termination: reencrypt         3
    key: [as in edge termination]
    certificate: [as in edge termination]
    caCertificate: [as in edge termination]
    destinationCACertificate: |-   4
      -----BEGIN CERTIFICATE-----
      [...]
      -----END CERTIFICATE-----
- 1 2
- The name of the object, which is limited to 63 characters.
- 3
- The
terminationfield is set toreencrypt. This is the only requiredtlsfield. - 4
- Required for re-encryption.
destinationCACertificatespecifies a CA certificate to validate the endpoint certificate, securing the connection from the router to the destination pods. If the service is using a service signing certificate, or the administrator has specified a default CA certificate for the router and the service has a certificate signed by that CA, this field can be omitted.
See
oc create route reencrypt --helpfor more options.
To create an
EventListenerresource using an insecure HTTP connection:-
Create the
EventListenerresource. Expose the
EventListenerservice as an OpenShift Container Platform route to make it publicly accessible:$ oc expose svc el-vote-app
-
Create the
4.5.8. Creating webhooks
Webhooks are HTTP POST messages that are received by the event listeners whenever a configured event occurs in your repository. The event payload is then mapped to trigger bindings, and processed by trigger templates. The trigger templates eventually start one or more pipeline runs, leading to the creation and deployment of Kubernetes resources.
In this section, you will configure a webhook URL on your forked Git repositories pipelines-vote-ui and pipelines-vote-api. This URL points to the publicly accessible EventListener service route.
Adding webhooks requires administrative privileges to the repository. If you do not have administrative access to your repository, contact your system administrator for adding webhooks.
Procedure
Get the webhook URL:
For a secure HTTPS connection:
$ echo "URL: $(oc get route el-vote-app --template='https://{{.spec.host}}')"For an HTTP (insecure) connection:
$ echo "URL: $(oc get route el-vote-app --template='http://{{.spec.host}}')"Note the URL obtained in the output.
Configure webhooks manually on the front-end repository:
-
Open the front-end Git repository
pipelines-vote-uiin your browser. - Click Settings → Webhooks → Add Webhook
On the Webhooks/Add Webhook page:
- Enter the webhook URL from step 1 in Payload URL field
- Select application/json for the Content type
- Specify the secret in the Secret field
- Ensure that the Just the push event is selected
- Select Active
- Click Add Webhook
-
Open the front-end Git repository
-
Repeat step 2 for the back-end repository
pipelines-vote-api.
4.5.9. Triggering a pipeline run
Whenever a push event occurs in the Git repository, the configured webhook sends an event payload to the publicly exposed EventListener service route. The EventListener service of the application processes the payload, and passes it to the relevant TriggerBinding and TriggerTemplate resource pairs. The TriggerBinding resource extracts the parameters, and the TriggerTemplate resource uses these parameters and specifies the way the resources must be created. This may rebuild and redeploy the application.
In this section, you push an empty commit to the front-end pipelines-vote-ui repository, which then triggers the pipeline run.
Procedure
From the terminal, clone your forked Git repository
pipelines-vote-ui:$ git clone git@github.com:<your GitHub ID>/pipelines-vote-ui.git -b pipelines-1.5
Push an empty commit:
$ git commit -m "empty-commit" --allow-empty && git push origin pipelines-1.5
Check if the pipeline run was triggered:
$ tkn pipelinerun list
Notice that a new pipeline run was initiated.
4.5.10. Additional resources
- For more details on pipelines in the Developer perspective, see the working with pipelines in the Developer perspective section.
- To learn more about Security Context Constraints (SCCs), see the Managing Security Context Constraints section.
- For more examples of reusable tasks, see the OpenShift Catalog repository. Additionally, you can also see the Tekton Catalog in the Tekton project.
- For more details on re-encrypt TLS termination, see Re-encryption Termination.
- For more details on secured routes, see the Secured routes section.
4.6. Working with Red Hat OpenShift Pipelines using the Developer perspective
You can use the Developer perspective of the OpenShift Container Platform web console to create CI/CD pipelines for your software delivery process.
In the Developer perspective:
- Use the Add → Pipeline → Pipeline Builder option to create customized pipelines for your application.
- Use the Add → From Git option to create pipelines using operator-installed pipeline templates and resources while creating an application on OpenShift Container Platform.
After you create the pipelines for your application, you can view and visually interact with the deployed pipelines in the Pipelines view. You can also use the Topology view to interact with the pipelines created using the From Git option. You need to apply custom labels to a pipeline created using the Pipeline Builder to see it in the Topology view.
Prerequisites
- You have access to an OpenShift Container Platform cluster and have switched to the Developer perspective.
- You have the OpenShift Pipelines Operator installed in your cluster.
- You are a cluster administrator or a user with create and edit permissions.
- You have created a project.
4.6.1. Constructing Pipelines using the Pipeline Builder
In the Developer perspective of the console, you can use the +Add → Pipeline → Pipeline builder option to:
- Configure pipelines using either the Pipeline builder or the YAML view.
- Construct a pipeline flow using existing tasks and cluster tasks. When you install the OpenShift Pipelines Operator, it adds reusable pipeline cluster tasks to your cluster.
- Specify the type of resources required for the pipeline run, and if required, add additional parameters to the pipeline.
- Reference these pipeline resources in each of the tasks in the pipeline as input and output resources.
- If required, reference any additional parameters added to the pipeline in the task. The parameters for a task are prepopulated based on the specifications of the task.
- Use the Operator-installed, reusable snippets and samples to create detailed pipelines.
Procedure
- In the +Add view of the Developer perspective, click the Pipeline tile to see the Pipeline builder page.
Configure the pipeline using either the Pipeline builder view or the YAML view.
NoteThe Pipeline builder view supports a limited number of fields whereas the YAML view supports all available fields. Optionally, you can also use the Operator-installed, reusable snippets and samples to create detailed Pipelines.
Figure 4.1. YAML view
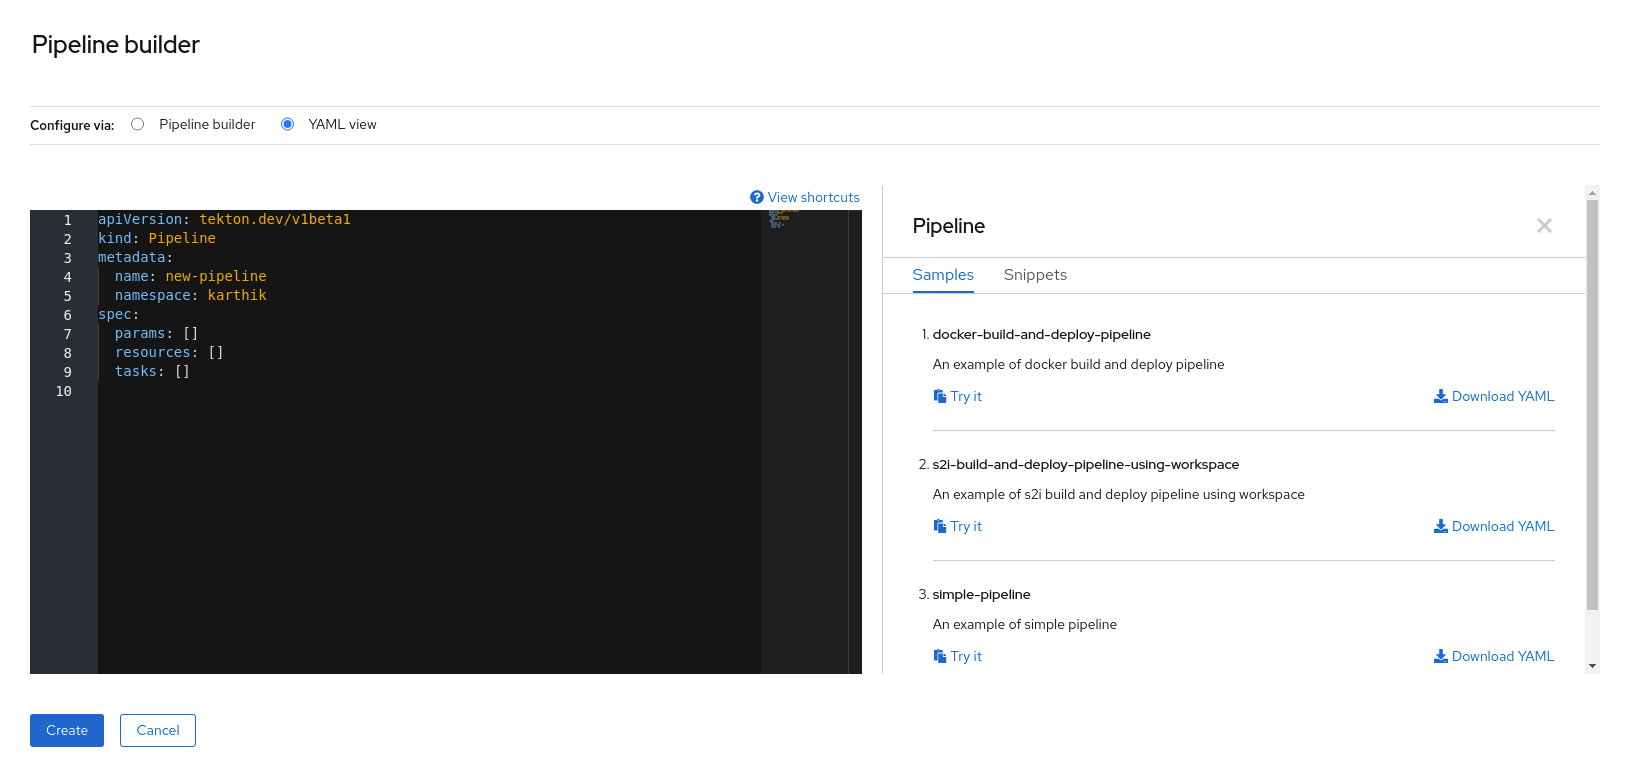
Configure your pipeline using the Pipeline Builder:
- In the Name field, enter a unique name for the pipeline.
In the Tasks section, select a task from the Select Task list to add a task to the pipeline. In this example, use the s2i-nodejs task.
- To add sequential tasks to the pipeline, click the plus icon to the right or left of the task, and from the Select Task list, select the task you want to add to the pipeline. For this example, use the plus icon to the right of the s2i-nodejs task to add an openshift-client task.
To add a parallel task to the existing task, click the plus icon displayed next to the task, and from the Select Task list, select the parallel task you want to add to the pipeline.
Figure 4.2. Pipeline Builder
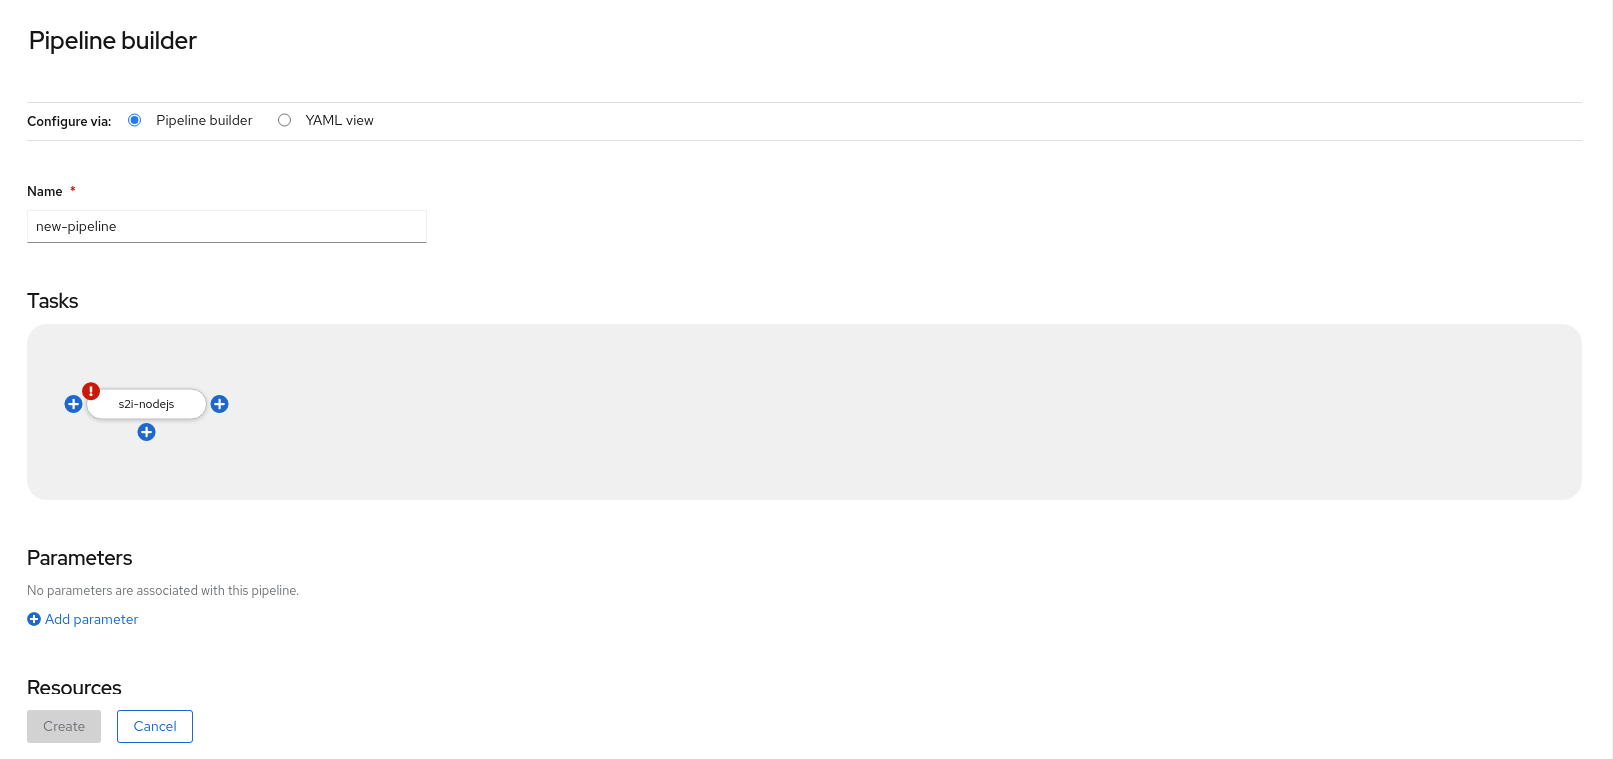
In the Resources section, click Add Resources to specify the name and type of resources for the pipeline run. These resources are then used by the tasks in the pipeline as inputs and outputs. For this example:
-
Add an input resource. In the Name field, enter
Source, and then from the Resource Type drop-down list, select Git. Add an output resource. In the Name field, enter
Img, and then from the Resource Type drop-down list, select Image.NoteA red icon appears next to the task if a resource is missing.
-
Add an input resource. In the Name field, enter
- Optional: The Parameters for a task are pre-populated based on the specifications of the task. If required, use the Add Parameters link in the Parameters section to add additional parameters.
- In the Workspaces section, click Add workspace and enter a unique workspace name in the Name field. You can add multiple workspaces to the pipeline.
In the Tasks section, click the s2i-nodejs task to see the side panel with details for the task. In the task side panel, specify the resources and parameters for the s2i-nodejs task:
- If required, in the Parameters section, add more parameters to the default ones, by using the $(params.<param-name>) syntax.
-
In the Image section, enter
Imgas specified in the Resources section. - Select a workspace from the source drop-down under Workspaces section.
- Add resources, parameters, and workspaces to the openshift-client task.
- Click Create to create and view the pipeline in the Pipeline Details page.
- Click the Actions drop-down menu then click Start, to see the Start Pipeline page.
- The Workspaces section lists the workspaces you created earlier. Use the respective drop-down to specify the volume source for your workspace. You have the following options: Empty Directory, Config Map, Secret, PersistentVolumeClaim, or VolumeClaimTemplate.
4.6.2. Creating applications with OpenShift Pipelines
To create pipelines along with applications, use the From Git option in the Add view of the Developer perspective. For more information, see Creating applications using the Developer perspective.
4.6.3. Interacting with pipelines using the Developer perspective
The Pipelines view in the Developer perspective lists all the pipelines in a project, along with the following details:
- The namespace in which the pipeline was created
- The last pipeline run
- The status of the tasks in the pipeline run
- The status of the pipeline run
- The creation time of the last pipeline run
Procedure
- In the Pipelines view of the Developer perspective, select a project from the Project drop-down list to see the pipelines in that project.
Click the required pipeline to see the Pipeline details page.
By default, the Details tab displays a visual representation of all the all the serial tasks, parallel tasks,
finallytasks, and when expressions in the pipeline. The tasks and thefinallytasks are listed in the lower right portion of the page. Click the listed Tasks and Finally tasks to view the task details.Figure 4.3. Pipeline details

Optional: On the Pipeline details page, click the Metrics tab to see the following information about pipelines:
- Pipeline Success Ratio
- Number of Pipeline Runs
- Pipeline Run Duration
Task Run Duration
You can use this information to improve the pipeline workflow and eliminate issues early in the pipeline lifecycle.
- Optional: Click the YAML tab to edit the YAML file for the pipeline.
Optional: Click the Pipeline Runs tab to see the completed, running, or failed runs for the pipeline.
The Pipeline Runs tab provides details about the pipeline run, the status of the task, and a link to debug failed pipeline runs. Use the Options menu
 to stop a running pipeline, to rerun a pipeline using the same parameters and resources as that of the previous pipeline execution, or to delete a pipeline run.
Click the required pipeline run to see the Pipeline Run details page. By default, the Details tab displays a visual representation of all the serial tasks, parallel tasks,
finallytasks, and when expressions in the pipeline run. The results for successful runs are displayed under the Pipeline Run results pane at the bottom of the page.NoteThe Details section of the Pipeline Run Details page displays a Log Snippet of the failed pipeline run. Log Snippet provides a general error message and a snippet of the log. A link to the Logs section provides quick access to the details about the failed run.
On the Pipeline Run details page, click the Task Runs tab to see the completed, running, and failed runs for the task.
The Task Runs tab provides information about the task run along with the links to its task and pod, and also the status and duration of the task run. Use the Options menu
to delete a task run.
Click the required task run to see the Task Run details page. The results for successful runs are displayed under the Task Run results pane at the bottom of the page.
NoteThe Details section of the Task Run details page displays a Log Snippet of the failed task run. Log Snippet provides a general error message and a snippet of the log. A link to the Logs section provides quick access to the details about the failed task run.
- Click the Parameters tab to see the parameters defined in the pipeline. You can also add or edit additional parameters, as required.
- Click the Resources tab to see the resources defined in the pipeline. You can also add or edit additional resources, as required.
4.6.4. Using a custom pipeline template for creating and deploying an application from a Git repository
As a cluster administrator, to create and deploy an application from a Git repository, you can use custom pipeline templates that override the default pipeline templates provided by Red Hat OpenShift Pipelines 1.5 and later.
This feature is unavailable in Red Hat OpenShift Pipelines 1.4 and earlier versions.
Prerequisites
Ensure that the Red Hat OpenShift Pipelines 1.5 or later is installed and available in all namespaces.
Procedure
- Log in to the OpenShift Container Platform web console as a cluster administrator.
In the Administrator perspective, use the left navigation panel to go to the Pipelines section.
-
From the Project drop-down, select the openshift project. This ensures that the subsequent steps are performed in the
openshiftnamespace. From the list of available pipelines, select a pipeline that is appropriate for building and deploying your application. For example, if your application requires a
node.jsruntime environment, select the s2i-nodejs pipeline.NoteDo not edit the default pipeline template. It may become incompatible with the UI and the back-end.
- Under the YAML tab of the selected pipeline, click Download and save the YAML file to your local machine. If your custom configuration file fails, you can use this copy to restore a working configuration.
-
From the Project drop-down, select the openshift project. This ensures that the subsequent steps are performed in the
Disable (delete) the default pipeline templates:
- Use the left navigation panel to go to Operators → Installed Operators.
- Click Red Hat OpenShift Pipelines → Tekton Configuration tab → config → YAML tab.
To disable (delete) the default pipeline templates in the
openshiftnamespace, set thepipelineTemplatesparameter tofalsein theTektonConfigcustom resource YAML, and save it.apiVersion: operator.tekton.dev/v1alpha1 kind: TektonConfig metadata: name: config spec: profile: all targetNamespace: openshift-pipelines addon: params: - name: clusterTasks value: "true" - name: pipelineTemplates value: "false" ...NoteIf you manually delete the default pipeline templates, the operator will restore the defaults during an upgrade.
WarningAs a cluster admin, you can disable installation of the default pipeline templates in the operator configuration. However, such a configuration will disable (delete) all default pipeline templates, and not only the one you want to customize.
Create a custom pipeline template:
- Use the left navigation panel to go to the Pipelines section.
- From the Create drop-down, select Pipeline.
Create the required pipeline in the
openshiftnamespace. Give it a different name than the default one (for example,custom-nodejs). You can use the downloaded default pipeline template as a starting point and customize it.NoteBecause
openshiftis the default namespace used by the operator-installed pipeline templates, you must create the custom pipeline template in theopenshiftnamespace. When an application uses a pipeline template, the template is automatically copied to the respective project’s namespace.Under the Details tab of the created pipeline, ensure that the Labels in the custom template match the labels in the default pipeline. The custom pipeline template must have the correct labels for the runtime, type, and strategy of the application. For example, the required labels for a
node.jsapplication deployed on OpenShift Container Platform are as follows:... pipeline.openshift.io/runtime: nodejs pipeline.openshift.io/type: openshift ...
NoteYou can use only one pipeline template for each combination of runtime environment and deployment type.
- In the Developer perspective, use the +Add → Git Repository → From Git option to select the kind of application you want to create and deploy. Based on the required runtime and type of the application, your custom template is automatically selected.
4.6.5. Starting pipelines
After you create a pipeline, you need to start it to execute the included tasks in the defined sequence. You can start a pipeline from the Pipelines view, the Pipeline Details page, or the Topology view.
Procedure
To start a pipeline using the Pipelines view:
-
In the Pipelines view of the Developer perspective, click the Options
menu adjoining a pipeline, and select Start.
The Start Pipeline dialog box displays the Git Resources and the Image Resources based on the pipeline definition.
NoteFor pipelines created using the From Git option, the Start Pipeline dialog box also displays an
APP_NAMEfield in the Parameters section, and all the fields in the dialog box are prepopulated by the pipeline template.- If you have resources in your namespace, the Git Resources and the Image Resources fields are prepopulated with those resources. If required, use the drop-downs to select or create the required resources and customize the pipeline run instance.
Optional: Modify the Advanced Options to add the credentials that authenticate the specified private Git server or the image registry.
- Under Advanced Options, click Show Credentials Options and select Add Secret.
In the Create Source Secret section, specify the following:
- A unique Secret Name for the secret.
- In the Designated provider to be authenticated section, specify the provider to be authenticated in the Access to field, and the base Server URL.
Select the Authentication Type and provide the credentials:
For the Authentication Type
Image Registry Credentials, specify the Registry Server Address that you want to authenticate, and provide your credentials in the Username, Password, and Email fields.Select Add Credentials if you want to specify an additional Registry Server Address.
-
For the Authentication Type
Basic Authentication, specify the values for the UserName and Password or Token fields. For the Authentication Type
SSH Keys, specify the value of the SSH Private Key field.NoteFor basic authentication and SSH authentication, you can use annotations such as:
-
tekton.dev/git-0: https://github.com -
tekton.dev/git-1: https://gitlab.com.
-
- Select the check mark to add the secret.
You can add multiple secrets based upon the number of resources in your pipeline.
- Click Start to start the pipeline.
The Pipeline Run Details page displays the pipeline being executed. After the pipeline starts, the tasks and steps within each task are executed. You can:
- Hover over the tasks to see the time taken to execute each step.
- Click on a task to see the logs for each step in the task.
- Click the Logs tab to see the logs relating to the execution sequence of the tasks. You can also expand the pane and download the logs individually or in bulk, by using the relevant button.
Click the Events tab to see the stream of events generated by a pipeline run.
You can use the Task Runs, Logs, and Events tabs to assist in debugging a failed pipeline run or a failed task run.
Figure 4.4. Pipeline run details
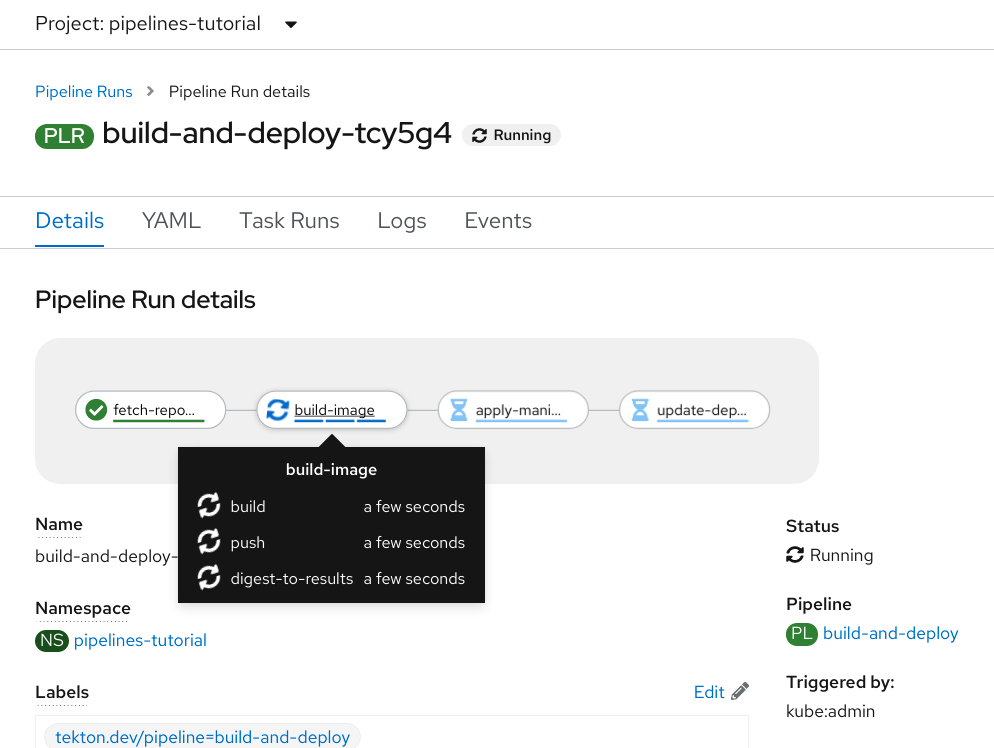
For pipelines created using the From Git option, you can use the Topology view to interact with pipelines after you start them:
NoteTo see the pipelines created using the Pipeline Builder in the Topology view, customize the pipeline labels to link the pipeline with the application workload.
- On the left navigation panel, click Topology, and click on the application to see the pipeline runs listed in the side panel.
In the Pipeline Runs section, click Start Last Run to start a new pipeline run with the same parameters and resources as the previous one. This option is disabled if a pipeline run has not been initiated.
Figure 4.5. Pipelines in Topology view

In the Topology page, hover to the left of the application to see the status of the pipeline run for the application.
NoteThe side panel of the application node in the Topology page displays a Log Snippet when a pipeline run fails on a specific task run. You can view the Log Snippet in the Pipeline Runs section, under the Resources tab. Log Snippet provides a general error message and a snippet of the log. A link to the Logs section provides quick access to the details about the failed run.
4.6.6. Editing Pipelines
You can edit the Pipelines in your cluster using the Developer perspective of the web console:
Procedure
- In the Pipelines view of the Developer perspective, select the Pipeline you want to edit to see the details of the Pipeline. In the Pipeline Details page, click Actions and select Edit Pipeline.
In the Pipeline Builder page:
- You can add additional Tasks, parameters, or resources to the Pipeline.
- You can click the Task you want to modify to see the Task details in the side panel and modify the required Task details, such as the display name, parameters and resources.
- Alternatively, to delete the Task, click the Task, and in the side panel, click Actions and select Remove Task.
- Click Save to save the modified Pipeline.
4.6.7. Deleting Pipelines
You can delete the Pipelines in your cluster using the Developer perspective of the web console.
Procedure
-
In the Pipelines view of the Developer perspective, click the Options
menu adjoining a Pipeline, and select Delete Pipeline.
- In the Delete Pipeline confirmation prompt, click Delete to confirm the deletion.
4.7. Reducing resource consumption of pipelines
If you use clusters in multi-tenant environments you must control the consumption of CPU, memory, and storage resources for each project and Kubernetes object. This helps prevent any one application from consuming too many resources and affecting other applications.
To define the final resource limits that are set on the resulting pods, Red Hat OpenShift Pipelines use resource quota limits and limit ranges of the project in which they are executed.
To restrict resource consumption in your project, you can:
- Set and manage resource quotas to limit the aggregate resource consumption.
- Use limit ranges to restrict resource consumption for specific objects, such as pods, images, image streams, and persistent volume claims.
4.7.1. Understanding resource consumption in pipelines
Each task consists of a number of required steps to be executed in a particular order defined in the steps field of the Task resource. Every task runs as a pod, and each step runs as a container within that pod.
Steps are executed one at a time. The pod that executes the task only requests enough resources to run a single container image (step) in the task at a time, and thus does not store resources for all the steps in the task.
The Resources field in the steps spec specifies the limits for resource consumption. By default, the resource requests for the CPU, memory, and ephemeral storage are set to BestEffort (zero) values or to the minimums set through limit ranges in that project.
Example configuration of resource requests and limits for a step
spec:
  steps:
  - name: <step_name>
    resources:
      requests:
        memory: 2Gi
        cpu: 600m
      limits:
        memory: 4Gi
        cpu: 900m
When the LimitRange parameter and the minimum values for container resource requests are specified in the project in which the pipeline and task runs are executed, Red Hat OpenShift Pipelines looks at all the LimitRange values in the project and uses the minimum values instead of zero.
Example configuration of limit range parameters at a project level
apiVersion: v1
kind: LimitRange
metadata:
  name: <limit_container_resource>
spec:
  limits:
  - max:
      cpu: "600m"
      memory: "2Gi"
    min:
      cpu: "200m"
      memory: "100Mi"
    default:
      cpu: "500m"
      memory: "800Mi"
    defaultRequest:
      cpu: "100m"
      memory: "100Mi"
    type: Container
...
4.7.2. Mitigating extra resource consumption in pipelines
When you have resource limits set on the containers in your pod, OpenShift Container Platform sums up the resource limits requested as all containers run simultaneously.
To consume the minimum amount of resources needed to execute one step at a time in the invoked task, Red Hat OpenShift Pipelines requests the maximum CPU, memory, and ephemeral storage as specified in the step that requires the most amount of resources. This ensures that the resource requirements of all the steps are met. Requests other than the maximum values are set to zero.
However, this behavior can lead to higher resource usage than required. If you use resource quotas, this could also lead to unschedulable pods.
For example, consider a task with two steps that uses scripts, and that does not define any resource limits and requests. The resulting pod has two init containers (one for entrypoint copy, the other for writing scripts) and two containers, one for each step.
OpenShift Container Platform uses the limit range set up for the project to compute required resource requests and limits. For this example, set the following limit range in the project:
apiVersion: v1
kind: LimitRange
metadata:
  name: mem-min-max-demo-lr
spec:
  limits:
  - max:
      memory: 1Gi
    min:
      memory: 500Mi
    type: Container
In this scenario, each init container uses a request memory of 1Gi (the max limit of the limit range), and each container uses a request memory of 500Mi. Thus, the total memory request for the pod is 2Gi.
If the same limit range is used with a task of ten steps, the final memory request is 5Gi, which is higher than what each step actually needs, that is 500Mi (since each step runs after the other).
Thus, to reduce resource consumption of resources, you can:
- Reduce the number of steps in a given task by grouping different steps into one bigger step, using the script feature, and the same image. This reduces the minimum requested resource.
- Distribute steps that are relatively independent of each other and can run on their own to multiple tasks instead of a single task. This lowers the number of steps in each task, making the request for each task smaller, and the scheduler can then run them when the resources are available.
4.7.3. Additional resources
4.8. Using pods in a privileged security context
The default configuration of OpenShift Pipelines 1.3.x and later versions does not allow you to run pods with privileged security context, if the pods result from pipeline run or task run. For such pods, the default service account is pipeline, and the security context constraint (SCC) associated with the pipelines service account is pipelines-scc. The pipelines-scc SCC is similar to the anyuid SCC, but with a minor difference as defined in the YAML file for the SCC of pipelines:
Example SecurityContextConstraints object
apiVersion: security.openshift.io/v1
kind: SecurityContextConstraints
...
fsGroup:
  type: MustRunAs
...
In addition, the Buildah cluster task, shipped as part of the OpenShift Pipelines, uses vfs as the default storage driver.
4.8.1. Running pipeline run and task run pods with privileged security context
Procedure
To run a pod (resulting from pipeline run or task run) with the privileged security context, do the following modifications:
Configure the associated user account or service account to have an explicit SCC. You can perform the configuration using any of the following methods:
Run the following command:
$ oc adm policy add-scc-to-user <scc-name> -z <service-account-name>
Alternatively, modify the YAML files for
RoleBinding, andRoleorClusterRole:Example
RoleBindingobjectapiVersion: rbac.authorization.k8s.io/v1 kind: RoleBinding metadata: name: service-account-name 1 namespace: default roleRef: apiGroup: rbac.authorization.k8s.io kind: ClusterRole name: pipelines-scc-clusterrole 2 subjects: - kind: ServiceAccount name: pipeline namespace: default
Example
ClusterRoleobjectapiVersion: rbac.authorization.k8s.io/v1 kind: ClusterRole metadata: name: pipelines-scc-clusterrole 1 rules: - apiGroups: - security.openshift.io resourceNames: - nonroot resources: - securitycontextconstraints verbs: - use- 1
- Substitute with an appropriate cluster role based on the role binding you use.
NoteAs a best practice, create a copy of the default YAML files and make changes in the duplicate file.
-
If you do not use the
vfsstorage driver, configure the service account associated with the task run or the pipeline run to have a privileged SCC, and set the security context asprivileged: true.
4.8.2. Running pipeline run and task run by using a custom SCC and a custom service account
When using the pipelines-scc security context constraint (SCC) associated with the default pipelines service account, the pipeline run and task run pods may face timeouts. This happens because in the default pipelines-scc SCC, the fsGroup.type parameter is set to MustRunAs.
For more information about pod timeouts, see BZ#1995779.
To avoid pod timeouts, you can create a custom SCC with the fsGroup.type parameter set to RunAsAny, and associate it with a custom service account.
As a best practice, use a custom SCC and a custom service account for pipeline runs and task runs. This approach allows greater flexibility and does not break the runs when the defaults are modified during an upgrade.
Procedure
Define a custom SCC with the
fsGroup.typeparameter set toRunAsAny:Example: Custom SCC
apiVersion: security.openshift.io/v1
kind: SecurityContextConstraints
metadata:
  annotations:
    kubernetes.io/description: my-scc is a close replica of anyuid scc. pipelines-scc has fsGroup - RunAsAny.
  name: my-scc
allowHostDirVolumePlugin: false
allowHostIPC: false
allowHostNetwork: false
allowHostPID: false
allowHostPorts: false
allowPrivilegeEscalation: true
allowPrivilegedContainer: false
allowedCapabilities: null
defaultAddCapabilities: null
fsGroup:
  type: RunAsAny
groups:
- system:cluster-admins
priority: 10
readOnlyRootFilesystem: false
requiredDropCapabilities:
- MKNOD
runAsUser:
  type: RunAsAny
seLinuxContext:
  type: MustRunAs
supplementalGroups:
  type: RunAsAny
volumes:
- configMap
- downwardAPI
- emptyDir
- persistentVolumeClaim
- projected
- secret
Create the custom SCC:
Example: Create the
my-sccSCC$ oc create -f my-scc.yaml
Create a custom service account:
Example: Create a
fsgroup-runasanyservice account$ oc create serviceaccount fsgroup-runasany
Associate the custom SCC with the custom service account:
Example: Associate the
my-sccSCC with thefsgroup-runasanyservice account$ oc adm policy add-scc-to-user my-scc -z fsgroup-runasany
If you want to use the custom service account for privileged tasks, you can associate the
privilegedSCC with the custom service account by running the following command:Example: Associate the
privilegedSCC with thefsgroup-runasanyservice account$ oc adm policy add-scc-to-user privileged -z fsgroup-runasany
Use the custom service account in the pipeline run and task run:
Example: Pipeline run YAML with
fsgroup-runasanycustom service accountapiVersion: tekton.dev/v1beta1 kind: PipelineRun metadata: name: <pipeline-run-name> spec: pipelineRef: name: <pipeline-cluster-task-name> serviceAccountName: 'fsgroup-runasany'Example: Task run YAML with
fsgroup-runasanycustom service accountapiVersion: tekton.dev/v1beta1 kind: TaskRun metadata: name: <task-run-name> spec: taskRef: name: <cluster-task-name> serviceAccountName: 'fsgroup-runasany'
4.8.3. Additional resources
- For information on managing SCCs, refer to Managing security context constraints.
4.9. Securing webhooks with event listeners
As an administrator, you can secure webhooks with event listeners. After creating a namespace, you enable HTTPS for the Eventlistener resource by adding the operator.tekton.dev/enable-annotation=enabled label to the namespace. Then, you create a Trigger resource and a secured route using the re-encrypted TLS termination.
Triggers in Red Hat OpenShift Pipelines support insecure HTTP and secure HTTPS connections to the Eventlistener resource. HTTPS secures connections within and outside the cluster.
Red Hat OpenShift Pipelines runs a tekton-operator-proxy-webhook pod that watches for the labels in the namespace. When you add the label to the namespace, the webhook sets the service.beta.openshift.io/serving-cert-secret-name=<secret_name> annotation on the EventListener object. This, in turn, creates secrets and the required certificates.
service.beta.openshift.io/serving-cert-secret-name=<secret_name>
In addition, you can mount the created secret into the Eventlistener pod to secure the request.
4.9.1. Providing secure connection with OpenShift routes
To create a route with the re-encrypted TLS termination, run:
$ oc create route reencrypt --service=<svc-name> --cert=tls.crt --key=tls.key --ca-cert=ca.crt --hostname=<hostname>
Alternatively, you can create a re-encrypted TLS termination YAML file to create a secure route.
Example re-encrypt TLS termination YAML to create a secure route
apiVersion: route.openshift.io/v1
kind: Route
metadata:
  name: route-passthrough-secured  1
spec:
  host: <hostname>
  to:
    kind: Service
    name: frontend 2
  tls:
    termination: reencrypt 3
    key: [as in edge termination]
    certificate: [as in edge termination]
    caCertificate: [as in edge termination]
    destinationCACertificate: |- 4
      -----BEGIN CERTIFICATE-----
      [...]
      -----END CERTIFICATE-----
- 1 2
- The name of the object, which is limited to only 63 characters.
- 3
- The termination field is set to
reencrypt. This is the only required TLS field. - 4
- This is required for re-encryption. The
destinationCACertificatefield specifies a CA certificate to validate the endpoint certificate, thus securing the connection from the router to the destination pods. You can omit this field in either of the following scenarios:- The service uses a service signing certificate.
- The administrator specifies a default CA certificate for the router, and the service has a certificate signed by that CA.
You can run the oc create route reencrypt --help command to display more options.
4.9.2. Creating a sample EventListener resource using a secure HTTPS connection
This section uses the pipelines-tutorial example to demonstrate creation of a sample EventListener resource using a secure HTTPS connection.
Procedure
Create the
TriggerBindingresource from the YAML file available in the pipelines-tutorial repository:$ oc create -f https://raw.githubusercontent.com/openshift/pipelines-tutorial/master/03_triggers/01_binding.yaml
Create the
TriggerTemplateresource from the YAML file available in the pipelines-tutorial repository:$ oc create -f https://raw.githubusercontent.com/openshift/pipelines-tutorial/master/03_triggers/02_template.yaml
Create the
Triggerresource directly from the pipelines-tutorial repository:$ oc create -f https://raw.githubusercontent.com/openshift/pipelines-tutorial/master/03_triggers/03_trigger.yaml
Create an
EventListenerresource using a secure HTTPS connection:Add a label to enable the secure HTTPS connection to the
Eventlistenerresource:$ oc label namespace <ns-name> operator.tekton.dev/enable-annotation=enabled
Create the
EventListenerresource from the YAML file available in the pipelines-tutorial repository:$ oc create -f https://raw.githubusercontent.com/openshift/pipelines-tutorial/master/03_triggers/04_event_listener.yaml
Create a route with the re-encrypted TLS termination:
$ oc create route reencrypt --service=<svc-name> --cert=tls.crt --key=tls.key --ca-cert=ca.crt --hostname=<hostname>
4.10. Authenticating pipelines using git secret
A Git secret consists of credentials to securely interact with a Git repository, and is often used to automate authentication. In Red Hat OpenShift Pipelines, you can use Git secrets to authenticate pipeline runs and task runs that interact with a Git repository during execution.
A pipeline run or a task run gains access to the secrets through the associated service account. Pipelines support the use of Git secrets as annotations (key-value pairs) for basic authentication and SSH-based authentication.
4.10.1. Credential selection
A pipeline run or task run might require multiple authentications to access different Git repositories. Annotate each secret with the domains where Pipelines can use its credentials.
A credential annotation key for Git secrets must begin with tekton.dev/git-, and its value is the URL of the host for which you want Pipelines to use that credential.
In the following example, Pipelines uses a basic-auth secret, which relies on a username and password, to access repositories at github.com and gitlab.com.
Example: Multiple credentials for basic authentication
apiVersion: v1
kind: Secret
metadata:
  annotations:
    tekton.dev/git-0: github.com
    tekton.dev/git-1: gitlab.com
type: kubernetes.io/basic-auth
stringData:
  username: 1
  password: 2
You can also use an ssh-auth secret (private key) to access a Git repository.
Example: Private key for SSH based authentication
apiVersion: v1
kind: Secret
metadata:
  annotations:
    tekton.dev/git-0: https://github.com
type: kubernetes.io/ssh-auth
stringData:
  ssh-privatekey: 1
- 1
- Name of the file containing the SSH private key string.
4.10.2. Configuring basic authentication for Git
For a pipeline to retrieve resources from password-protected repositories, you must configure the basic authentication for that pipeline.
To configure basic authentication for a pipeline, update the secret.yaml, serviceaccount.yaml, and run.yaml files with the credentials from the Git secret for the specified repository. When you complete this process, Pipelines can use that information to retrieve the specified pipeline resources.
For GitHub, authentication using plain password is deprecated. Instead, use a personal access token.
Procedure
In the
secret.yamlfile, specify the username and password or GitHub personal access token to access the target Git repository.apiVersion: v1 kind: Secret metadata: name: basic-user-pass 1 annotations: tekton.dev/git-0: https://github.com type: kubernetes.io/basic-auth stringData: username: 2 password: 3
In the
serviceaccount.yamlfile, associate the secret with the appropriate service account.apiVersion: v1 kind: ServiceAccount metadata: name: build-bot 1 secrets: - name: basic-user-pass 2
In the
run.yamlfile, associate the service account with a task run or a pipeline run.Associate the service account with a task run:
apiVersion: tekton.dev/v1beta1
kind: TaskRun
metadata:
  name: build-push-task-run-2 1
spec:
  serviceAccountName: build-bot 2
  taskRef:
    name: build-push 3
Associate the service account with a
PipelineRunresource:apiVersion: tekton.dev/v1beta1 kind: PipelineRun metadata: name: demo-pipeline 1 namespace: default spec: serviceAccountName: build-bot 2 pipelineRef: name: demo-pipeline 3
Apply the changes.
$ kubectl apply --filename secret.yaml,serviceaccount.yaml,run.yaml
4.10.3. Configuring SSH authentication for Git
For a pipeline to retrieve resources from repositories configured with SSH keys, you must configure the SSH-based authentication for that pipeline.
To configure SSH-based authentication for a pipeline, update the secret.yaml, serviceaccount.yaml, and run.yaml files with the credentials from the SSH private key for the specified repository. When you complete this process, Pipelines can use that information to retrieve the specified pipeline resources.
Consider using SSH-based authentication rather than basic authentication.
Procedure
-
Generate an SSH private key, or copy an existing private key, which is usually available in the
~/.ssh/id_rsafile. In the
secret.yamlfile, set the value ofssh-privatekeyto the name of the SSH private key file, and set the value ofknown_hoststo the name of the known hosts file.apiVersion: v1 kind: Secret metadata: name: ssh-key 1 annotations: tekton.dev/git-0: github.com type: kubernetes.io/ssh-auth stringData: ssh-privatekey: 2 known_hosts: 3
CautionIf you omit the private key, Pipelines accepts the public key of any server.
-
Optional: To specify a custom SSH port, add
:<port number>to the end of theannotationvalue. For example,tekton.dev/git-0: github.com:2222. In the
serviceaccount.yamlfile, associate thessh-keysecret with thebuild-botservice account.apiVersion: v1 kind: ServiceAccount metadata: name: build-bot 1 secrets: - name: ssh-key 2
In the
run.yamlfile, associate the service account with a task run or a pipeline run.Associate the service account with a task run:
apiVersion: tekton.dev/v1beta1 kind: TaskRun metadata: name: build-push-task-run-2 1 spec: serviceAccountName: build-bot 2 taskRef: name: build-push 3
Associate the service account with a pipeline run:
apiVersion: tekton.dev/v1beta1
kind: PipelineRun
metadata:
  name: demo-pipeline 1
  namespace: default
spec:
  serviceAccountName: build-bot 2
  pipelineRef:
    name: demo-pipeline 3
Apply the changes.
$ kubectl apply --filename secret.yaml,serviceaccount.yaml,run.yaml
4.10.4. Using SSH authentication in git type tasks
When invoking Git commands, you can use SSH authentication directly in the steps of a task. SSH authentication ignores the $HOME variable and only uses the user’s home directory specified in the /etc/passwd file. So each step in a task must symlink the /tekton/home/.ssh directory to the home directory of the associated user.
However, explicit symlinks are not necessary when you use a pipeline resource of the git type, or the git-clone task available in the Tekton catalog.
As an example of using SSH authentication in git type tasks, refer to authenticating-git-commands.yaml.
4.10.5. Using secrets as a non-root user
You might need to use secrets as a non-root user in certain scenarios, such as:
- The users and groups that the containers use to execute runs are randomized by the platform.
- The steps in a task define a non-root security context.
- A task specifies a global non-root security context, which applies to all steps in a task.
In such scenarios, consider the following aspects of executing task runs and pipeline runs as a non-root user:
-
SSH authentication for Git requires the user to have a valid home directory configured in the
/etc/passwddirectory. Specifying a UID that has no valid home directory results in authentication failure. -
SSH authentication ignores the
$HOMEenvironment variable. So you must or symlink the appropriate secret files from the$HOMEdirectory defined by Pipelines (/tekton/home), to the non-root user’s valid home directory.
In addition, to configure SSH authentication in a non-root security context, refer to the example for authenticating git commands.
4.10.6. Limiting secret access to specific steps
By default, the secrets for Pipelines are stored in the $HOME/tekton/home directory, and are available for all the steps in a task.
To limit a secret to specific steps, use the secret definition to specify a volume, and mount the volume in specific steps.
4.11. Viewing pipeline logs using the OpenShift Logging Operator
The logs generated by pipeline runs, task runs, and event listeners are stored in their respective pods. It is useful to review and analyze logs for troubleshooting and audits.
However, retaining the pods indefinitely leads to unnecessary resource consumption and cluttered namespaces.
To eliminate any dependency on the pods for viewing pipeline logs, you can use the OpenShift Elasticsearch Operator and the OpenShift Logging Operator. These Operators help you to view pipeline logs by using the Elasticsearch Kibana stack, even after you have deleted the pods that contained the logs.
4.11.1. Prerequisites
Before trying to view pipeline logs in a Kibana dashboard, ensure the following:
- The steps are performed by a cluster administrator.
- Logs for pipeline runs and task runs are available.
- The OpenShift Elasticsearch Operator and the OpenShift Logging Operator are installed.
4.11.2. Viewing pipeline logs in Kibana
To view pipeline logs in the Kibana web console:
Procedure
- Log in to OpenShift Container Platform web console as a cluster administrator.
- In the top right of the menu bar, click the grid icon → Observability → Logging. The Kibana web console is displayed.
Create an index pattern:
- On the left navigation panel of the Kibana web console, click Management.
- Click Create index pattern.
-
Under Step 1 of 2: Define index pattern → Index pattern, enter a
*pattern and click Next Step. - Under Step 2 of 2: Configure settings → Time filter field name, select @timestamp from the drop-down menu, and click Create index pattern.
Add a filter:
- On the left navigation panel of the Kibana web console, click Discover.
Click Add a filter + → Edit Query DSL.
Note- For each of the example filters that follows, edit the query and click Save.
- The filters are applied one after another.
Filter the containers related to pipelines:
Example query to filter pipelines containers
{
  "query": {
	"match": {
  	"kubernetes.flat_labels": {
    	"query": "app_kubernetes_io/managed-by=tekton-pipelines",
    	"type": "phrase"
  	}
	}
  }
}
Filter all containers that are not
place-toolscontainer. As an illustration of using the graphical drop-down menus instead of editing the query DSL, consider the following approach:Figure 4.6. Example of filtering using the drop-down fields
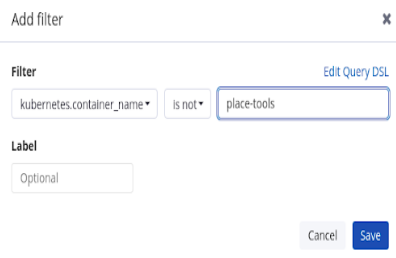
Filter
pipelinerunin labels for highlighting:Example query to filter
pipelinerunin labels for highlighting{ "query": { "match": { "kubernetes.flat_labels": { "query": "tekton_dev/pipelineRun=", "type": "phrase" } } } }Filter
pipelinein labels for highlighting:Example query to filter
pipelinein labels for highlighting{ "query": { "match": { "kubernetes.flat_labels": { "query": "tekton_dev/pipeline=", "type": "phrase" } } } }
From the Available fields list, select the following fields:
-
kubernetes.flat_labels messageEnsure that the selected fields are displayed under the Selected fields list.
-
The logs are displayed under the message field.
Figure 4.7. Filtered messages
4.11.3. Additional resources
Chapter 5. GitOps
5.1. Red Hat OpenShift GitOps release notes
Red Hat OpenShift GitOps is a declarative way to implement continuous deployment for cloud native applications. Red Hat OpenShift GitOps ensures consistency in applications when you deploy them to different clusters in different environments, such as: development, staging, and production. Red Hat OpenShift GitOps helps you automate the following tasks:
- Ensure that the clusters have similar states for configuration, monitoring, and storage
- Recover or recreate clusters from a known state
- Apply or revert configuration changes to multiple OpenShift Container Platform clusters
- Associate templated configuration with different environments
- Promote applications across clusters, from staging to production
For an overview of Red Hat OpenShift GitOps, see Understanding OpenShift GitOps.
5.1.1. Compatibility and support matrix
Some features in this release are currently in Technology Preview. These experimental features are not intended for production use.
In the table, features are marked with the following statuses:
- TP: Technology Preview
- GA: General Availability
| OpenShift GitOps | Component Versions | OpenShift Versions | Support status | |||||
|---|---|---|---|---|---|---|---|---|
| Version | kam | Helm | Kustomize | Argo CD | ApplicationSet | Dex | ||
| 1.6.0 | 0.0.46 TP | 3.8.1 GA | 4.4.1 GA | 2.4.5 GA | 2.4.5 GA | 2.30.3 GA | 4.8-4.11 | GA |
| 1.5.0 | 0.0.42 TP | 3.8.0 GA | 4.4.1 GA | 2.3.3 GA | 0.4.1 TP | 2.30.3 GA | 4.8-4.11 | GA |
| 1.4.0 | 0.0.41 TP | 3.7.1 GA | 4.2.0 GA | 2.2.2 GA | 0.2.0 TP | 2.30.0 GA | 4.7-4.11 | GA |
| 1.3.0 | 0.0.40 | 3.6.0 | 4.2.0 | 2.1.2 | 0.2.0 | 2.28.0 | 4.7-4.9 | GA |
| 1.2.0 | 0.0.38 | 3.5.0 | 3.9.4 | 2.0.5 | 0.1.0 | N/A | 4.8 | GA |
| 1.1.0 | 0.0.32 | 3.5.0 | 3.9.4 | 2.0.0 | N/A | N/A | 4.7 | GA |
To use Red Hat OpenShift GitOps v1.3 on OpenShift Container Platform 4.6, do a fresh installation of Red Hat OpenShift GitOps. There is no upgrade path from Red Hat OpenShift GitOps 1.0 (TP) on OpenShift 4.6.
5.1.2. Making open source more inclusive
Red Hat is committed to replacing problematic language in our code, documentation, and web properties. We are beginning with these four terms: master, slave, blacklist, and whitelist. Because of the enormity of this endeavor, these changes will be implemented gradually over several upcoming releases. For more details, see our CTO Chris Wright’s message.
5.1.3. Release notes for Red Hat OpenShift GitOps 1.6.6
Red Hat OpenShift GitOps 1.6.6 is now available on OpenShift Container Platform 4.8, 4.9, 4.10, and 4.11.
5.1.3.1. Fixed issues
The following issue has been resolved in the current release:
- Before this update, all versions of the Argo CD Operator, starting with v0.5.0 were vulnerable to an information disclosure flaw. As a result, unauthorized users could enumerate application names by inspecting API error messages and use the discovered application names as the starting point of another attack. For example, the attacker might use their knowledge of an application name to convince an administrator to grant higher privileges. This update fixes the CVE-2022-41354 error. GITOPS-2635, CVE-2022-41354
5.1.4. Release notes for Red Hat OpenShift GitOps 1.6.7
Red Hat OpenShift GitOps 1.6.7 is now available on OpenShift Container Platform 4.8, 4.9, 4.10, and 4.11.
5.1.4.1. Fixed issues
The following issue has been resolved in the current release:
- Before this update, all versions of the Argo CD Operator, starting with v0.5.0 were vulnerable to an information disclosure flaw. As a result, unauthorized users could enumerate application names by inspecting API error messages and use the discovered application names as the starting point of another attack. For example, the attacker might use their knowledge of an application name to convince an administrator to grant higher privileges. This update fixes the CVE-2022-41354 error. GITOPS-2635, CVE-2022-41354
5.1.5. Release notes for Red Hat OpenShift GitOps 1.6.2
Red Hat OpenShift GitOps 1.6.2 is now available on OpenShift Container Platform 4.8, 4.9, 4.10 and 4.11.
5.1.5.1. Fixed issues
The following issues have been resolved in the current release:
- Before this update, the subscription health check was marked degraded for missing InstallPlan when more than 5 Operators were installed in a project. This update fixes the issue. GITOPS-2018
- Before this update, the Red Hat OpenShift GitOps Operator would spam the cluster with a deprecation notice warning whenever it detected that an Argo CD instance used deprecated fields. This update fixes this issue and shows only one warning event for each instance that detects a field. GITOPS-2230
- From OpenShift Container Platform 4.12, it is optional to install the console. This fix updates the Red Hat OpenShift GitOps Operator to prevent errors with the Operator if the console is not installed. GITOPS-2352
5.1.6. Release notes for Red Hat OpenShift GitOps 1.6.1
Red Hat OpenShift GitOps 1.6.1 is now available on OpenShift Container Platform 4.8 and above.
5.1.6.1. Fixed issues
The following issues have been resolved in the current release:
-
Before this update, in a large set of applications the application controllers were restarted multiple times due to the unresponsiveness of liveness probes. This update fixes the issue by removing the liveness probe in the application controller
StatefulSetobject. GITOPS-2153 Before this update, the RHSSO certificate cannot be validated when it is set up with a certificate which is not signed by certificate authorities. This update fixes the issue and now you can provide a custom certificate which will be used in verifying the Keycloak’s TLS certificate when communicating with it. You can add the
rootCAto the Argo CD custom resource.spec.keycloak.rootCAfield. The Operator reconciles this change and updates theoidc.configfield in theargocd-cmConfigMapwith the PEM-encoded root certificate. GITOPS-2214NoteRestart the Argo CD server pod after updating the
.spec.keycloak.rootCAfield.For example:
apiVersion: argoproj.io/v1alpha1 kind: ArgoCD metadata: name: example-argocd labels: example: basic spec: sso: provider: keycloak keycloak: rootCA: | ---- BEGIN CERTIFICATE ---- This is a dummy certificate Please place this section with appropriate rootCA ---- END CERTIFICATE ---- server: route: enabled: true- Before this update, a terminating namespace that was managed by Argo CD would block the creation of roles and other configuration of other managed namespaces. This update fixes this issue. GITOPS-2277
-
Before this update, the Dex pods failed to start with
CreateContainerConfigErrorwhen an SCC ofanyuidwas assigned to the DexServiceAccountresource. This update fixes this issue by assigning a default user id to the Dex container. GITOPS-2235
5.1.7. Release notes for Red Hat OpenShift GitOps 1.6.0
Red Hat OpenShift GitOps 1.6.0 is now available on OpenShift Container Platform 4.8 and above.
5.1.7.1. New features
The current release adds the following improvements:
-
Previously, the Argo CD
ApplicationSetcontroller was a technology preview (TP) feature. With this update, it is a general availability (GA) feature. GITOPS-1958 -
With this update, the latest releases of the Red Hat OpenShift GitOps are available in
latestand version-based channels. To get these upgrades, update thechannelparameter in theSubscriptionobject YAML file: change its value fromstabletolatestor a version-based channel such asgitops-1.6. GITOPS-1791 -
With this update, the parameters of the
spec.ssofield that controlled the keycloak configurations are moved to.spec.sso.keycloak. The parameters of the.spec.dexfield have been added to.spec.sso.dex. Start using.spec.sso.providerto enable or disable Dex. The.spec.dexparameters are deprecated and planned to be removed in version 1.9, along with theDISABLE_DEXand.spec.ssofields for keycloak configuration. GITOPS-1983 -
With this update, the Argo CD Notifications controller is an optional workload that can be enabled or disabled by using the
.spec.notifications.enabledparameter in the Argo CD custom resource definition. The Argo CD Notifications controller is a Technical Preview feature. GITOPS-1917
Argo CD Notifications controller is a Technology Preview feature only. Technology Preview features are not supported with Red Hat production service level agreements (SLAs) and might not be functionally complete. Red Hat does not recommend using them in production. These features provide early access to upcoming product features, enabling customers to test functionality and provide feedback during the development process.
For more information about the support scope of Red Hat Technology Preview features, see https://access.redhat.com/support/offerings/techpreview/.
- With this update, resource exclusions for Tekton pipeline runs and task runs are added by default. Argo CD prunes these resources by default. These resource exclusions are added to new Argo CD instances created in OpenShift Container Platform. If the instances are created from the CLI, the resources are not added. GITOPS-1876
-
With this update, you can select the tracking method that Argo CD uses by setting the
resourceTrackingMethodparameter in the Argo CD Operand’s custom resource definition. GITOPS-1862 -
With this update, you can add entries to the
argocd-cmconfigMap using theextraConfigfield of Red Hat OpenShift GitOps Argo CD custom resource. The entries specified are reconciled to the liveconfig-cmconfigMap without validations. GITOPS-1964 - With this update, on OpenShift Container Platform 4.11 and later, the Red Hat OpenShift GitOps Environments Details page in the Red Hat OpenShift GitOps developer perspective shows the history of successful deployments of application environments, along with links to the revisions for each deployment. GITOPS-1269
- With this update, you can manage resources with Argo CD that are also being used as template resources or "source" by an Operator. GITOPS-982
- With this update, the Operator configures Argo CD workloads with the correct permissions to satisfy Pod Security admission, which was enabled in Kubernetes 1.24. GITOPS-2026
- With this update, Config Management Plugins 2.0 is supported. You can use the Argo CD custom resource to specify sidebar containers for the repo server. GITOPS-776
- With this update, all communication between the Argo CD components and the Redis cache is secured using modern TLS encryption. GITOPS-720
- This release of Red Hat OpenShift GitOps adds support for IBM Z and IBM Power on OpenShift Container Platform 4.10. Installations in restricted environments are not supported on IBM Z and IBM Power.
5.1.7.2. Fixed issues
The following issues have been resolved in the current release:
-
Before this update, the
system:serviceaccount:argocd:gitops-argocd-application-controllercontroller did not create a "prometheusrules" resource in themonitoring.coreos.comAPI group in the namespacewebapps-dev. This update fixes this issue, and Red Hat OpenShift GitOps can manage all resources from themonitoring.coreos.comAPI group. GITOPS-1638 -
Before this update, while reconciling cluster permissions, it was deleted if a secret belonged to a cluster config instance. This update fixes this issue. Now, the
namespacesfield from the secret is deleted instead of the secret. GITOPS-1777 -
Before this update, if you installed the HA variant of Argo CD through the Operator, the Operator created the Redis
StatefulSetobject withpodAffinityrules instead ofpodAntiAffinityrules. This update fixes this issue. Now, the Operator creates the RedisStatefulSetwithpodAntiAffinityrules. GITOPS-1645 -
Before this update, Argo CD ApplicationSet had too many
sshZombie processes. This update fixes this issue: it adds tini, a simple init daemon that spawns processes and reaps zombies, to the ApplicationSet controller. This ensures that aSIGTERMsignal is correctly passed to the running process, preventing it from being a zombie process. GITOPS-2108
5.1.7.3. Known issues
Red Hat OpenShift GitOps Operator can make use of RHSSO (KeyCloak) through OIDC in addition to Dex. However, with a recent security fix applied, the certificate of RHSSO cannot be validated in some scenarios. GITOPS-2214
As a workaround, disable TLS validation for the OIDC (Keycloak/RHSSO) endpoint in the ArgoCD specification.
spec:
  extraConfig:
    oidc.tls.insecure.skip.verify: "true"
...
5.1.8. Release notes for Red Hat OpenShift GitOps 1.5.7
Red Hat OpenShift GitOps 1.5.7 is now available on OpenShift Container Platform 4.8, 4.9, 4.10 and 4.11.
5.1.8.1. Fixed issues
The following issues have been resolved in the current release:
- From OpenShift Container Platform 4.12, it is optional to install the console. This fix updates the Red Hat OpenShift GitOps Operator to prevent errors with the Operator if the console is not installed. GITOPS-2353
5.1.9. Release notes for Red Hat OpenShift GitOps 1.5.6
Red Hat OpenShift GitOps 1.5.6 is now available on OpenShift Container Platform 4.8 and above.
5.1.9.1. Fixed issues
The following issues have been resolved in the current release:
-
Before this update, in a large set of applications the application controllers were restarted multiple times due to the unresponsiveness of liveness probes. This update fixes the issue by removing the liveness probe in the application controller
StatefulSetobject. GITOPS-2153 Before this update, the RHSSO certificate cannot be validated when it is set up with a certificate which is not signed by certificate authorities. This update fixes the issue and now you can provide a custom certificate which will be used in verifying the Keycloak’s TLS certificate when communicating with it. You can add the
rootCAto the Argo CD custom resource.spec.keycloak.rootCAfield. The Operator reconciles this change and updates theoidc.configfield in theargocd-cmConfigMapwith the PEM-encoded root certificate. GITOPS-2214NoteRestart the Argo CD server pod after updating the
.spec.keycloak.rootCAfield.For example:
apiVersion: argoproj.io/v1alpha1 kind: ArgoCD metadata: name: example-argocd labels: example: basic spec: sso: provider: keycloak keycloak: rootCA: | ---- BEGIN CERTIFICATE ---- This is a dummy certificate Please place this section with appropriate rootCA ---- END CERTIFICATE ---- server: route: enabled: true- Before this update, a terminating namespace that was managed by Argo CD would block the creation of roles and other configuration of other managed namespaces. This update fixes this issue. GITOPS-2277
-
Before this update, the Dex pods failed to start with
CreateContainerConfigErrorwhen an SCC ofanyuidwas assigned to the DexServiceAccountresource. This update fixes this issue by assigning a default user id to the Dex container. GITOPS-2235
5.1.10. Release notes for Red Hat OpenShift GitOps 1.5.5
Red Hat OpenShift GitOps 1.5.5 is now available on OpenShift Container Platform 4.8 and above.
5.1.10.1. New features
The current release adds the following improvements:
- With this update, the bundled Argo CD has been updated to version 2.3.7.
5.1.10.2. Fixed issues
The following issues have been resolved in the current release:
-
Before this update, the
redis-ha-haproxypods of an ArgoCD instance failed when more restrictive SCCs were present in the cluster. This update fixes the issue by updating the security context in workloads. GITOPS-2034
5.1.10.3. Known issues
Red Hat OpenShift GitOps Operator can use RHSSO (KeyCloak) with OIDC and Dex. However, with a recent security fix applied, the Operator cannot validate the RHSSO certificate in some scenarios. GITOPS-2214
As a workaround, disable TLS validation for the OIDC (Keycloak/RHSSO) endpoint in the ArgoCD specification.
apiVersion: argoproj.io/v1alpha1
kind: ArgoCD
metadata:
  name: example-argocd
spec:
  extraConfig:
    "admin.enabled": "true"
...
5.1.11. Release notes for Red Hat OpenShift GitOps 1.5.4
Red Hat OpenShift GitOps 1.5.4 is now available on OpenShift Container Platform 4.8 and above.
5.1.11.1. Fixed issues
The following issues have been resolved in the current release:
-
Before this update, the Red Hat OpenShift GitOps was using an older version of the REDIS 5 image tag. This update fixes the issue and upgrades the
rhel8/redis-5image tag. GITOPS-2037
5.1.12. Release notes for Red Hat OpenShift GitOps 1.5.3
Red Hat OpenShift GitOps 1.5.3 is now available on OpenShift Container Platform 4.8 and above.
5.1.12.1. Fixed issues
The following issues have been resolved in the current release:
- Before this update, all unpatched versions of Argo CD v1.0.0 and later were vulnerable to a cross-site scripting bug. As a result, an unauthorized user would be able to inject a javascript link in the UI. This issue is now fixed. CVE-2022-31035
- Before this update, all versions of Argo CD v0.11.0 and later were vulnerable to multiple attacks when SSO login was initiated from the Argo CD CLI or the UI. This issue is now fixed. CVE-2022-31034
- Before this update, all unpatched versions of Argo CD v1.0.0 and later were vulnerable to a cross-site scripting bug. As a result, unauthorized users were able to inject JavaScript links in the UI. This issue is now fixed. CVE-2022-31016
- Before this update, all unpatched versions of Argo CD v1.3.0 and later were vulnerable to a symlink-following bug. As a result, an unauthorized user with repository write access would be able to leak sensitive YAML files from Argo CD’s repo-server. This issue is now fixed. CVE-2022-31036
5.1.13. Release notes for Red Hat OpenShift GitOps 1.5.2
Red Hat OpenShift GitOps 1.5.2 is now available on OpenShift Container Platform 4.8 and above.
5.1.13.1. Fixed issues
The following issues have been resolved in the current release:
-
Before this update, images referenced by the
redhat-operator-indexwere missing. This issue is now fixed. GITOPS-2036
5.1.14. Release notes for Red Hat OpenShift GitOps 1.5.1
Red Hat OpenShift GitOps 1.5.1 is now available on OpenShift Container Platform 4.8 and above.
5.1.14.1. Fixed issues
The following issues have been resolved in the current release:
- Before this update, if Argo CD’s anonymous access was enabled, an unauthenticated user was able to craft a JWT token and get full access to the Argo CD instance. This issue is fixed now. CVE-2022-29165
- Before this update, an unauthenticated user was able to display error messages on the login screen while SSO was enabled. This issue is now fixed. CVE-2022-24905
- Before this update, all unpatched versions of Argo CD v0.7.0 and later were vulnerable to a symlink-following bug. As a result, an unauthorized user with repository write access would be able to leak sensitive files from Argo CD’s repo-server. This issue is now fixed. CVE-2022-24904
5.1.15. Release notes for Red Hat OpenShift GitOps 1.5.0
Red Hat OpenShift GitOps 1.5.0 is now available on OpenShift Container Platform 4.8 and above.
5.1.15.1. New features
The current release adds the following improvements:
- This enhancement upgrades Argo CD to version 2.3.3. GITOPS-1708
- This enhancement upgrades Dex to version 2.30.3. GITOPS-1850
- This enhancement upgrades Helm to version 3.8.0. GITOPS-1709
- This enhancement upgrades Kustomize to version 4.4.1. GITOPS-1710
- This enhancement upgrades Application Set to version 0.4.1.
- With this update, a new channel that is named latest has been added. This channel provides the latest release of the Red Hat OpenShift GitOps. For GitOps v1.5.0, the Operator is pushed to gitops-1.5, latest channel, and the existing stable channel. From GitOps v1.6, all of the latest releases will be pushed only to the latest channel and not the stable channel. GITOPS-1791
-
With this update, the new CSV adds the
olm.skipRange: '>=1.0.0 <1.5.0'annotation. As a result, all of the previous release versions are skipped. The Operator upgrades to v1.5.0 directly. GITOPS-1787 With this update, the Operator updates the Red Hat Single Sign-On (RH-SSO) to version v7.5.1, including the following enhancements:
-
You can log in to Argo CD using the OpenShift Container Platform credentials including the
kube:admincredential. - The RH-SSO supports and configures Argo CD instances for Role-based Access Control (RBAC) using OpenShift Container Platform groups.
The RH-SSO honors the
HTTP_Proxyenvironment variables. You can use the RH-SSO as an SSO for Argo CD running behind a proxy.
-
You can log in to Argo CD using the OpenShift Container Platform credentials including the
With this update, a new
.hostURL field is added to the.statusfield of the Argo CD operand. When a route or ingress is enabled with the priority given to route, the new URL field displays the route. If no URL is provided from the route or ingress, the.hostfield is not displayed.When the route or ingress is configured, but the corresponding controller is not set up properly and is not in the
Readystate or does not propagate its URL, the value of the.status.hostfield in the operand indicates asPendinginstead of displaying the URL. This affects the overall status of the operand by making itPendinginstead ofAvailable. GITOPS-654
5.1.15.2. Fixed issues
The following issues have been resolved in the current release:
- Before this update, RBAC rules specific to AppProjects would not allow the use of commas for the subject field of the role, thus preventing bindings to the LDAP account. This update fixes the issue and you can now specify complex role bindings in AppProject specific RBAC rules. GITOPS-1771
-
Before this update, when a
DeploymentConfigresource is scaled to0, Argo CD displayed it in a progressing state with a health status message as "replication controller is waiting for pods to run". This update fixes the edge case and the health check now reports the correct health status of theDeploymentConfigresource. GITOPS-1738 -
Before this update, the TLS certificate in the
argocd-tls-certs-cmconfiguration map was deleted by the Red Hat OpenShift GitOps unless the certificate was configured in theArgoCDCR specificationtls.initialCertsfield. This issue is fixed now. GITOPS-1725 -
Before this update, when creating a namespace with the
managed-bylabel, it created a lot ofRoleBindingresources on the new namespace. This update fixes the issue and now Red Hat OpenShift GitOps removes the irrelevantRoleandRoleBindingresources created by the previous versions. GITOPS-1550 -
Before this update, the TLS certificate of the route in pass-through mode did not have a CA name. As a result, Firefox 94 and later failed to connect to the Argo CD UI with error code SEC_ERROR_BAD_DER. This update fixes the issue. You must delete the
<openshift-gitops-ca>secrets and let it recreate. Then, you must delete the<openshift-gitops-tls>secrets. After the Red Hat OpenShift GitOps recreates it, the Argo CD UI is accessible by Firefox again. GITOPS-1548
5.1.15.3. Known issues
-
Argo CD
.status.hostfield is not updated when anIngressresource is in use instead of aRouteresource on OpenShift Container Platform clusters. GITOPS-1920
5.1.16. Release notes for Red Hat OpenShift GitOps 1.4.13
Red Hat OpenShift GitOps 1.4.13 is now available on OpenShift Container Platform 4.7, 4.8, 4.9, 4.10 and 4.11.
5.1.16.1. Fixed issues
The following issues have been resolved in the current release:
- From OpenShift Container Platform 4.12, it is optional to install the console. This fix updates the Red Hat OpenShift GitOps Operator to prevent errors with the Operator if the console is not installed. GITOPS-2354
5.1.17. Release notes for Red Hat OpenShift GitOps 1.4.12
Red Hat OpenShift GitOps 1.4.12 is now available on OpenShift Container Platform 4.7 and above.
5.1.17.1. Fixed issues
The following issues have been resolved in the current release:
-
Before this update, in a large set of applications the application controllers were restarted multiple times due to the unresponsiveness of liveness probes. This update fixes the issue by removing the liveness probe in the application controller
StatefulSetobject. GITOPS-2153 Before this update, the RHSSO certificate cannot be validated when it is set up with a certificate which is not signed by certificate authorities. This update fixes the issue and now you can provide a custom certificate which will be used in verifying the Keycloak’s TLS certificate when communicating with it. You can add the
rootCAto the Argo CD custom resource.spec.keycloak.rootCAfield. The Operator reconciles this change and updates theoidc.configfield in theargocd-cmConfigMapwith the PEM-encoded root certificate. GITOPS-2214NoteRestart the Argo CD server pod after updating the
.spec.keycloak.rootCAfield.For example:
apiVersion: argoproj.io/v1alpha1 kind: ArgoCD metadata: name: example-argocd labels: example: basic spec: sso: provider: keycloak keycloak: rootCA: | ---- BEGIN CERTIFICATE ---- This is a dummy certificate Please place this section with appropriate rootCA ---- END CERTIFICATE ---- server: route: enabled: true- Before this update, a terminating namespace that was managed by Argo CD would block the creation of roles and other configuration of other managed namespaces. This update fixes this issue. GITOPS-2277
-
Before this update, the Dex pods failed to start with
CreateContainerConfigErrorwhen an SCC ofanyuidwas assigned to the DexServiceAccountresource. This update fixes this issue by assigning a default user id to the Dex container. GITOPS-2235
5.1.18. Release notes for Red Hat OpenShift GitOps 1.4.5
Red Hat OpenShift GitOps 1.4.5 is now available on OpenShift Container Platform 4.7, and above.
5.1.18.1. Fixed issues
You should directly upgrade to Red Hat OpenShift GitOps v1.4.5 from Red Hat OpenShift GitOps v1.4.3. Do not use Red Hat OpenShift GitOps v1.4.4 in a production environment. Major issues that affected Red Hat OpenShift GitOps v1.4.4 are fixed in Red Hat OpenShift GitOps 1.4.5.
The following issue has been resolved in the current release:
-
Before this update, Argo CD pods were stuck in the
ErrImagePullBackOffstate. The following error message was shown:
reason: ErrImagePull
          message: >-
            rpc error: code = Unknown desc = reading manifest
            sha256:ff4ad30752cf0d321cd6c2c6fd4490b716607ea2960558347440f2f370a586a8
            in registry.redhat.io/openshift-gitops-1/argocd-rhel8: StatusCode:
            404, <HTML><HEAD><TITLE>Error</TITLE></HEAD><BODY>
This issue is now fixed. GITOPS-1848
5.1.19. Release notes for Red Hat OpenShift GitOps 1.4.3
Red Hat OpenShift GitOps 1.4.3 is now available on OpenShift Container Platform 4.7, 4.8, and 4.9.
5.1.19.1. Fixed issues
The following issue has been resolved in the current release:
-
Before this update, the TLS certificate in the
argocd-tls-certs-cmconfiguration map was deleted by the Red Hat OpenShift GitOps unless the certificate was configured in the ArgoCD CR specificationtls.initialCertsfield. This update fixes this issue. GITOPS-1725
5.1.20. Release notes for Red Hat OpenShift GitOps 1.4.2
Red Hat OpenShift GitOps 1.4.2 is now available on OpenShift Container Platform 4.7, 4.8, and 4.9.
5.1.20.1. Fixed issues
The following issue has been resolved in the current release:
-
All versions of Argo CD are vulnerable to a path traversal bug that allows to pass arbitrary values to be consumed by Helm charts. This update fixes the
CVE-2022-24348 gitopserror, path traversal and dereference of symlinks when passing Helm value files. GITOPS-1756 -
Before this update, the Route resources got stuck in
ProgressingHealth status if more than oneIngressis attached to the route. This update fixes the health check and reports the correct health status of Route resource. GITOPS-1751
5.1.21. Release notes for Red Hat OpenShift GitOps 1.4.1
Red Hat OpenShift GitOps 1.4.1 is now available on OpenShift Container Platform 4.7, 4.8, and 4.9.
5.1.21.1. Fixed issues
The following issue has been resolved in the current release:
Red Hat OpenShift GitOps Operator v1.4.0 introduced a regression which removes the description fields from
specfor the following CRDs:-
argoproj.io_applications.yaml -
argoproj.io_appprojects.yaml -
argoproj.io_argocds.yaml
-
Before this update, if you created an AppProject resource using the kubectl create, it failed to synchronize. This update restores the missing description fields in CustomResourceDefinitions: ArgoCD, AppProject, Application that caused kubectl create to fail. GITOPS-1721
5.1.22. Release notes for Red Hat OpenShift GitOps 1.4.0
Red Hat OpenShift GitOps 1.4.0 is now available on OpenShift Container Platform 4.7, 4.8, and 4.9.
5.1.22.1. New features
The current release adds the following improvements:
- This enhancement upgrades Red Hat OpenShift GitOps Application Manager (kam) to version 0.0.41. GITOPS-1669
- This enhancement upgrades Argo CD to version 2.2.2. GITOPS-1532
- This enhancement upgrades Helm to version 3.7.1. GITOPS-1530
-
This enhancement adds the health status of the
DeploymentConfig,Route, andOLM Operatoritems to the Argo CD Dashboard and OpenShift Container Platform web console. This information helps you monitor the overall health status of your application. GITOPS-655, GITOPS-915, GITOPS-916, GITOPS-1110 -
With this update, you can specify the number of desired replicas for the
argocd-serverandargocd-repo-servercomponents by setting the.spec.server.replicasand.spec.repo.replicasattributes in the Argo CD custom resource, respectively. If you configure the horizontal pod autoscaler (HPA) for theargocd-servercomponents, it takes precedence over the Argo CD custom resource attributes. GITOPS-1245 As an administrative user, when you give Argo CD access to a namespace by using the
argocd.argoproj.io/managed-bylabel, it assumes namespace-admin privileges. These privileges are an issue for administrators who provide namespaces to non-administrators, such as development teams, because the privileges enable non-administrators to modify objects such as network policies.With this update, administrators can configure a common cluster role for all the managed namespaces. In role bindings for the Argo CD application controller, the Operator refers to the
CONTROLLER_CLUSTER_ROLEenvironment variable. In role bindings for the Argo CD server, the Operator refers to theSERVER_CLUSTER_ROLEenvironment variable. If these environment variables contain custom roles, the Operator doesn’t create the default admin role. Instead, it uses the existing custom role for all managed namespaces. GITOPS-1290- With this update, the Environment page in the OpenShift Container Platform Developer Console displays a broken heart icon to indicate degraded resources, excluding ones whose status is Progressing, Missing, and Unknown. The console displays a yellow yield sign icon to indicate out-of-sync resources. GITOPS-1307
5.1.22.2. Fixed issues
The following issues have been resolved in the current release:
- Before this update, when the Route to the Red Hat OpenShift GitOps Application Manager (kam) was accessed without specifying a path in the URL, a default page without any helpful information was displayed to the user. This update fixes the issue so that the default page displays download links for kam. GITOPS-923
- Before this update, setting a resource quota in the namespace of the Argo CD custom resource might cause the setup of the Red Hat SSO (RH SSO) instance to fail. This update fixes this issue by setting a minimum resource request for the RH SSO deployment pods. GITOPS-1297
-
Before this update, if you changed the log level for the
argocd-repo-serverworkload, the Operator didn’t reconcile this setting. The workaround was to delete the deployment resource so that the Operator recreated it with the new log level. With this update, the log level is correctly reconciled for existingargocd-repo-serverworkloads. GITOPS-1387 -
Before this update, if the Operator managed an Argo CD instance that lacked the
.datafield in theargocd-secretSecret, the Operator on that instance crashed. This update fixes the issue so that the Operator doesn’t crash when the.datafield is missing. Instead, the secret regenerates and thegitops-operator-controller-managerresource is redeployed. GITOPS-1402 -
Before this update, the
gitopsserviceservice was annotated as an internal object. This update removes the annotation so you can update or delete the default Argo CD instance and run GitOps workloads on infrastructure nodes by using the UI. GITOPS-1429
5.1.22.3. Known issues
These are the known issues in the current release:
If you migrate from the Dex authentication provider to the Keycloak provider, you might experience login issues with Keycloak.
To prevent this issue, when migrating, uninstall Dex by removing the
.spec.dexsection from the Argo CD custom resource. Allow a few minutes for Dex to uninstall completely. Then, install Keycloak by adding.spec.sso.provider: keycloakto the Argo CD custom resource.As a workaround, uninstall Keycloak by removing
.spec.sso.provider: keycloak. Then, re-install it. GITOPS-1450, GITOPS-1331
5.1.23. Release notes for Red Hat OpenShift GitOps 1.3.7
Red Hat OpenShift GitOps 1.3.7 is now available on OpenShift Container Platform 4.7 and above.
5.1.23.1. Fixed issues
The following issue has been resolved in the current release:
- Before this update, a flaw was found in OpenSSL. This update fixes the issue by updating the base images for OpenSSL to the latest version to avoid the flaw. (CVE-2022-0778).
To install the current release of Red Hat OpenShift GitOps 1.3 and receive further updates during its product life cycle, switch to the GitOps-1.3 channel.
5.1.24. Release notes for Red Hat OpenShift GitOps 1.3.6
Red Hat OpenShift GitOps 1.3.6 is now available on OpenShift Container Platform 4.7 and above.
5.1.24.1. Fixed issues
The following issues have been resolved in the current release:
- In Red Hat OpenShift GitOps, improper access control allows admin privilege escalation (CVE-2022-1025). This update fixes the issue.
- A path traversal flaw allows leaking of out-of-bound files (CVE-2022-24731). This update fixes the issue.
- A path traversal flaw and improper access control allows leaking of out-of-bound files (CVE-2022-24730). This update fixes the issue.
5.1.25. Release notes for Red Hat OpenShift GitOps 1.3.2
Red Hat OpenShift GitOps 1.3.2 is now available on OpenShift Container Platform 4.6, 4.7, 4.8, and 4.9.
5.1.25.1. New features
In addition to the fixes and stability improvements, the following sections highlight what is new in Red Hat OpenShift GitOps 1.3.2:
- Upgraded Argo CD to version 2.1.8
- Upgraded Dex to version 2.30.0
5.1.25.2. Fixed issues
The following issues have been resolved in the current release:
-
Before this update, in the OperatorHub UI under the Infrastructure Features section, when you filtered by
Disconnected, the Red Hat OpenShift GitOps Operator did not show in the search results, as the Operator did not have the related annotation set in its CSV file. With this update, theDisconnected Clusterannotation has been added to the Red Hat OpenShift GitOps Operator as an infrastructure feature. GITOPS-1539 When using a
Namespace-scopedArgo CD instance, for example, an Argo CD instance that is not scoped to All Namepsaces in a cluster, Red Hat OpenShift GitOps dynamically maintains a list of managed namespaces. These namespaces include theargocd.argoproj.io/managed-bylabel. This list of namespaces is stored in a cache in Argo CD → Settings → Clusters → "in-cluster" → NAMESPACES. Before this update, if you deleted one of these namespaces, the Operator ignored that operation, and the namespace remained in the list. This behavior broke the CONNECTION STATE in that cluster configuration, and all sync attempts resulted in errors. For example:Argo service account does not have <random_verb> on <random_resource_type> in namespace <the_namespace_you_deleted>.
This bug is fixed. GITOPS-1521
- With this update, the Red Hat OpenShift GitOps Operator has been annotated with the Deep Insights capability level. GITOPS-1519
-
Previously, the Argo CD Operator managed the
resource.exclusionfield by itself but ignored theresource.inclusionfield. This prevented theresource.inclusionfield configured in theArgo CDCR from being generated in theargocd-cmconfiguration map. This issue is fixed in this release. GITOPS-1518
5.1.26. Release notes for Red Hat OpenShift GitOps 1.3.1
Red Hat OpenShift GitOps 1.3.1 is now available on OpenShift Container Platform 4.6, 4.7, 4.8, and 4.9.
5.1.26.1. Fixed issues
- If you upgrade to v1.3.0, the Operator does not return an ordered slice of environment variables. As a result, the reconciler fails causing the frequent recreation of Argo CD pods in OpenShift Container Platform clusters running behind a proxy. This update fixes the issue so that Argo CD pods are not recreated. GITOPS-1489
5.1.27. Release notes for Red Hat OpenShift GitOps 1.3
Red Hat OpenShift GitOps 1.3 is now available on OpenShift Container Platform 4.7, 4.8, and 4.9.
5.1.27.1. New features
In addition to the fixes and stability improvements, the following sections highlight what is new in Red Hat OpenShift GitOps 1.3.0:
-
For a fresh install of v1.3.0, Dex is automatically configured. You can log into the default Argo CD instance in the
openshift-gitopsnamespace using the OpenShift orkubeadmincredentials. As an admin you can disable the Dex installation after the Operator is installed which will remove the Dex deployment from theopenshift-gitopsnamespace. - The default Argo CD instance installed by the Operator as well as accompanying controllers can now run on the infrastructure nodes of the cluster by setting a simple configuration toggle.
- Internal communications in Argo CD can now be secured using the TLS and the OpenShift cluster certificates. The Argo CD routes can now leverage the OpenShift cluster certificates in addition to using external certificate managers such as the cert-manager.
- Use the improved environment details view in the Developer perspective of the console 4.9 to gain insights into the GitOps environments.
-
You can now access custom health checks in Argo CD for
DeploymentConfigresources,Routeresources, and Operators installed using OLM. The GitOps Operator now conforms to the naming conventions recommended by the latest Operator-SDK:
-
The prefix
gitops-operator-is added to all resources -
Service account is renamed to
gitops-operator-controller-manager
-
The prefix
5.1.27.2. Fixed issues
The following issues were resolved in the current release:
- Previously, if you set up a new namespace to be managed by a new instance of Argo CD, it would immediately be Out Of Sync due to the new roles and bindings that the Operator creates to manage that new namespace. This behavior is fixed. GITOPS-1384
5.1.27.3. Known issues
While migrating from the Dex authentication provider to the Keycloak provider, you may experience login issues with Keycloak. GITOPS-1450
To prevent the above issue, when migrating, uninstall Dex by removing the
.spec.dexsection found in the Argo CD custom resource. Allow a few minutes for Dex to uninstall completely, and then proceed to install Keycloak by adding.spec.sso.provider: keycloakto the Argo CD custom resource.As a workaround, uninstall Keycloak by removing
.spec.sso.provider: keycloakand then re-install.
5.1.28. Release notes for Red Hat OpenShift GitOps 1.2.2
Red Hat OpenShift GitOps 1.2.2 is now available on OpenShift Container Platform 4.8.
5.1.28.1. Fixed issues
The following issue was resolved in the current release:
- All versions of Argo CD are vulnerable to a path traversal bug that allows to pass arbitrary values to be consumed by Helm charts. This update fixes the CVE-2022-24348 gitops error, path traversal and dereference of symlinks when passing Helm value files. GITOPS-1756
5.1.29. Release notes for Red Hat OpenShift GitOps 1.2.1
Red Hat OpenShift GitOps 1.2.1 is now available on OpenShift Container Platform 4.7 and 4.8.
5.1.29.1. Support matrix
Some features in this release are currently in Technology Preview. These experimental features are not intended for production use.
Technology Preview Features Support Scope
In the table below, features are marked with the following statuses:
- TP: Technology Preview
- GA: General Availability
Note the following scope of support on the Red Hat Customer Portal for these features:
Table 5.1. Support matrix
| Feature | Red Hat OpenShift GitOps 1.2.1 |
|---|---|
| Argo CD | GA |
| Argo CD ApplicationSet | TP |
| Red Hat OpenShift GitOps Application Manager (kam) | TP |
5.1.29.2. Fixed issues
The following issues were resolved in the current release:
-
Previously, huge memory spikes were observed on the application controller on startup. The flag
--kubectl-parallelism-limitfor the application controller is now set to 10 by default, however this value can be overridden by specifying a number for.spec.controller.kubeParallelismLimitin the Argo CD CR specification. GITOPS-1255 -
The latest Triggers APIs caused Kubernetes build failure due to duplicate entries in the kustomization.yaml when using the
kam bootstrapcommand. The Pipelines and Tekton triggers components have now been updated to v0.24.2 and v0.14.2, respectively, to address this issue. GITOPS-1273 - Persisting RBAC roles and bindings are now automatically removed from the target namespace when the Argo CD instance from the source namespace is deleted. GITOPS-1228
- Previously, when deploying an Argo CD instance into a namespace, the Argo CD instance would change the "managed-by" label to be its own namespace. This fix would make namespaces unlabelled while also making sure the required RBAC roles and bindings are created and deleted for the namespace. GITOPS-1247
- Previously, the default resource request limits on Argo CD workloads, specifically for the repo-server and application controller, were found to be very restrictive. The existing resource quota has now been removed and the default memory limit has been increased to 1024M in the repo server. Please note that this change will only affect new installations; existing Argo CD instance workloads will not be affected. GITOPS-1274
5.1.30. Release notes for Red Hat OpenShift GitOps 1.2
Red Hat OpenShift GitOps 1.2 is now available on OpenShift Container Platform 4.7 and 4.8.
5.1.30.1. Support matrix
Some features in this release are currently in Technology Preview. These experimental features are not intended for production use.
Technology Preview Features Support Scope
In the table below, features are marked with the following statuses:
- TP: Technology Preview
- GA: General Availability
Note the following scope of support on the Red Hat Customer Portal for these features:
Table 5.2. Support matrix
| Feature | Red Hat OpenShift GitOps 1.2 |
|---|---|
| Argo CD | GA |
| Argo CD ApplicationSet | TP |
| Red Hat OpenShift GitOps Application Manager (kam) | TP |
5.1.30.2. New features
In addition to the fixes and stability improvements, the following sections highlight what is new in Red Hat OpenShift GitOps 1.2:
-
If you do not have read or write access to the openshift-gitops namespace, you can now use the
DISABLE_DEFAULT_ARGOCD_INSTANCEenvironment variable in the GitOps Operator and set the value toTRUEto prevent the default Argo CD instance from starting in theopenshift-gitopsnamespace. -
Resource requests and limits are now configured in Argo CD workloads. Resource quota is enabled in the
openshift-gitopsnamespace. As a result, out-of-band workloads deployed manually in the openshift-gitops namespace must be configured with resource requests and limits and the resource quota may need to be increased. Argo CD authentication is now integrated with Red Hat SSO and it is automatically configured with OpenShift 4 Identity Provider on the cluster. This feature is disabled by default. To enable Red Hat SSO, add SSO configuration in
ArgoCDCR as shown below. Currently,keycloakis the only supported provider.apiVersion: argoproj.io/v1alpha1 kind: ArgoCD metadata: name: example-argocd labels: example: basic spec: sso: provider: keycloak server: route: enabled: trueYou can now define hostnames using route labels to support router sharding. Support for setting labels on the
server(argocd server),grafana, andprometheusroutes is now available. To set labels on a route, addlabelsunder the route configuration for a server in theArgoCDCR.Example
ArgoCDCR YAML to set labels on argocd serverapiVersion: argoproj.io/v1alpha1 kind: ArgoCD metadata: name: example-argocd labels: example: basic spec: server: route: enabled: true labels: key1: value1 key2: value2-
The GitOps Operator now automatically grants permissions to Argo CD instances to manage resources in target namespaces by applying labels. Users can label the target namespace with the label
argocd.argoproj.io/managed-by: <source-namespace>, where thesource-namespaceis the namespace where the argocd instance is deployed.
5.1.30.3. Fixed issues
The following issues were resolved in the current release:
-
Previously, if a user created additional instances of Argo CD managed by the default cluster instance in the openshift-gitops namespace, the application responsible for the new Argo CD instance would get stuck in an
OutOfSyncstatus. This issue has now been resolved by adding an owner reference to the cluster secret. GITOPS-1025
5.1.30.4. Known issues
These are the known issues in Red Hat OpenShift GitOps 1.2:
-
When an Argo CD instance is deleted from the source namespace, the
argocd.argoproj.io/managed-bylabels in the target namespaces are not removed. GITOPS-1228 Resource quota has been enabled in the openshift-gitops namespace in Red Hat OpenShift GitOps 1.2. This can affect out-of-band workloads deployed manually and workloads deployed by the default Argo CD instance in the
openshift-gitopsnamespace. When you upgrade from Red Hat OpenShift GitOpsv1.1.2tov1.2such workloads must be configured with resource requests and limits. If there are any additional workloads, the resource quota in the openshift-gitops namespace must be increased.Current Resource Quota for
openshift-gitopsnamespace.Resource Requests Limits CPU
6688m
13750m
Memory
4544Mi
9070Mi
You can use the below command to update the CPU limits.
$ oc patch resourcequota openshift-gitops-compute-resources -n openshift-gitops --type='json' -p='[{"op": "replace", "path": "/spec/hard/limits.cpu", "value":"9000m"}]'You can use the below command to update the CPU requests.
$ oc patch resourcequota openshift-gitops-compute-resources -n openshift-gitops --type='json' -p='[{"op": "replace", "path": "/spec/hard/cpu", "value":"7000m"}]You can replace the path in the above commands from
cputomemoryto update the memory.
5.1.31. Release notes for Red Hat OpenShift GitOps 1.1
Red Hat OpenShift GitOps 1.1 is now available on OpenShift Container Platform 4.7.
5.1.31.1. Support matrix
Some features in this release are currently in Technology Preview. These experimental features are not intended for production use.
Technology Preview Features Support Scope
In the table below, features are marked with the following statuses:
- TP: Technology Preview
- GA: General Availability
Note the following scope of support on the Red Hat Customer Portal for these features:
Table 5.3. Support matrix
| Feature | Red Hat OpenShift GitOps 1.1 |
|---|---|
| Argo CD | GA |
| Argo CD ApplicationSet | TP |
| Red Hat OpenShift GitOps Application Manager (kam) | TP |
5.1.31.2. New features
In addition to the fixes and stability improvements, the following sections highlight what is new in Red Hat OpenShift GitOps 1.1:
-
The
ApplicationSetfeature is now added (Technology Preview). TheApplicationSetfeature enables both automation and greater flexibility when managing Argo CD applications across a large number of clusters and within monorepos. It also makes self-service usage possible on multitenant Kubernetes clusters. - Argo CD is now integrated with cluster logging stack and with the OpenShift Container Platform Monitoring and Alerting features.
- Argo CD auth is now integrated with OpenShift Container Platform.
- Argo CD applications controller now supports horizontal scaling.
- Argo CD Redis servers now support high availability (HA).
5.1.31.3. Fixed issues
The following issues were resolved in the current release:
- Previously, Red Hat OpenShift GitOps did not work as expected in a proxy server setup with active global proxy settings. This issue is fixed and now Argo CD is configured by the Red Hat OpenShift GitOps Operator using fully qualified domain names (FQDN) for the pods to enable communication between components. GITOPS-703
-
The Red Hat OpenShift GitOps backend relies on the
?ref=query parameter in the Red Hat OpenShift GitOps URL to make API calls. Previously, this parameter was not read from the URL, causing the backend to always consider the default reference. This issue is fixed and the Red Hat OpenShift GitOps backend now extracts the reference query parameter from the Red Hat OpenShift GitOps URL and only uses the default reference when there is no input reference provided. GITOPS-817 -
Previously, the Red Hat OpenShift GitOps backend failed to find the valid GitLab repository. This was because the Red Hat OpenShift GitOps backend checked for
mainas the branch reference, instead ofmasterin the GitLab repository. This issue is fixed now. GITOPS-768 -
The Environments page in the Developer perspective of the OpenShift Container Platform web console now shows the list of applications and the number of environments. This page also displays an Argo CD link that directs you to the Argo CD Applications page that lists all the applications. The Argo CD Applications page has LABELS (for example,
app.kubernetes.io/name=appName) that help you filter only the applications of your choice. GITOPS-544
5.1.31.4. Known issues
These are the known issues in Red Hat OpenShift GitOps 1.1:
- Red Hat OpenShift GitOps does not support Helm v2 and ksonnet.
- The Red Hat SSO (RH SSO) Operator is not supported in disconnected clusters. As a result, the Red Hat OpenShift GitOps Operator and RH SSO integration is not supported in disconnected clusters.
- When you delete an Argo CD application from the OpenShift Container Platform web console, the Argo CD application gets deleted in the user interface, but the deployments are still present in the cluster. As a workaround, delete the Argo CD application from the Argo CD console. GITOPS-830
5.1.31.5. Breaking Change
5.1.31.5.1. Upgrading from Red Hat OpenShift GitOps v1.0.1
When you upgrade from Red Hat OpenShift GitOps v1.0.1 to v1.1, the Red Hat OpenShift GitOps Operator renames the default Argo CD instance created in the openshift-gitops namespace from argocd-cluster to openshift-gitops.
This is a breaking change and needs the following steps to be performed manually, before the upgrade:
Go to the OpenShift Container Platform web console and copy the content of the
argocd-cm.ymlconfig map file in theopenshift-gitopsnamespace to a local file. The content may look like the following example:Example argocd config map YAML
kind: ConfigMap
apiVersion: v1
metadata:
selfLink: /api/v1/namespaces/openshift-gitops/configmaps/argocd-cm
resourceVersion: '112532'
name: argocd-cm
uid: f5226fbc-883d-47db-8b53-b5e363f007af
creationTimestamp: '2021-04-16T19:24:08Z'
managedFields:
...
namespace: openshift-gitops
labels:
  app.kubernetes.io/managed-by: argocd-cluster
  app.kubernetes.io/name: argocd-cm
  app.kubernetes.io/part-of: argocd
data: "" 1
admin.enabled: 'true'
statusbadge.enabled: 'false'
resource.exclusions: |
  - apiGroups:
    - tekton.dev
    clusters:
    - '*'
    kinds:
    - TaskRun
    - PipelineRun
ga.trackingid: ''
repositories: |
  - type: git
    url: https://github.com/user-name/argocd-example-apps
ga.anonymizeusers: 'false'
help.chatUrl: ''
url: >-
  https://argocd-cluster-server-openshift-gitops.apps.dev-svc-4.7-041614.devcluster.openshift.com   "" 2
help.chatText: ''
kustomize.buildOptions: ''
resource.inclusions: ''
repository.credentials: ''
users.anonymous.enabled: 'false'
configManagementPlugins: ''
application.instanceLabelKey: ''
-
Delete the default
argocd-clusterinstance. -
Edit the new
argocd-cm.ymlconfig map file to restore the entiredatasection manually. Replace the URL value in the config map entry with the new instance name
openshift-gitops. For example, in the preceding example, replace the URL value with the following URL value:url: >- https://openshift-gitops-server-openshift-gitops.apps.dev-svc-4.7-041614.devcluster.openshift.com
- Login to the Argo CD cluster and verify that the previous configurations are present.
5.2. Understanding OpenShift GitOps
5.2.1. About GitOps
GitOps is a declarative way to implement continuous deployment for cloud native applications. You can use GitOps to create repeatable processes for managing OpenShift Container Platform clusters and applications across multi-cluster Kubernetes environments. GitOps handles and automates complex deployments at a fast pace, saving time during deployment and release cycles.
The GitOps workflow pushes an application through development, testing, staging, and production. GitOps either deploys a new application or updates an existing one, so you only need to update the repository; GitOps automates everything else.
GitOps is a set of practices that use Git pull requests to manage infrastructure and application configurations. In GitOps, the Git repository is the only source of truth for system and application configuration. This Git repository contains a declarative description of the infrastructure you need in your specified environment and contains an automated process to make your environment match the described state. Also, it contains the entire state of the system so that the trail of changes to the system state are visible and auditable. By using GitOps, you resolve the issues of infrastructure and application configuration sprawl.
GitOps defines infrastructure and application definitions as code. Then, it uses this code to manage multiple workspaces and clusters to simplify the creation of infrastructure and application configurations. By following the principles of the code, you can store the configuration of clusters and applications in Git repositories, and then follow the Git workflow to apply these repositories to your chosen clusters. You can apply the core principles of developing and maintaining software in a Git repository to the creation and management of your cluster and application configuration files.
5.2.2. About Red Hat OpenShift GitOps
Red Hat OpenShift GitOps ensures consistency in applications when you deploy them to different clusters in different environments, such as: development, staging, and production. Red Hat OpenShift GitOps organizes the deployment process around the configuration repositories and makes them the central element. It always has at least two repositories:
- Application repository with the source code
- Environment configuration repository that defines the desired state of the application
These repositories contain a declarative description of the infrastructure you need in your specified environment. They also contain an automated process to make your environment match the described state.
Red Hat OpenShift GitOps uses Argo CD to maintain cluster resources. Argo CD is an open-source declarative tool for the continuous integration and continuous deployment (CI/CD) of applications. Red Hat OpenShift GitOps implements Argo CD as a controller so that it continuously monitors application definitions and configurations defined in a Git repository. Then, Argo CD compares the specified state of these configurations with their live state on the cluster.
Argo CD reports any configurations that deviate from their specified state. These reports allow administrators to automatically or manually resync configurations to the defined state. Therefore, Argo CD enables you to deliver global custom resources, like the resources that are used to configure OpenShift Container Platform clusters.
5.2.2.1. Key features
Red Hat OpenShift GitOps helps you automate the following tasks:
- Ensure that the clusters have similar states for configuration, monitoring, and storage
- Apply or revert configuration changes to multiple OpenShift Container Platform clusters
- Associate templated configuration with different environments
- Promote applications across clusters, from staging to production
5.3. Installing OpenShift GitOps
Red Hat Red Hat OpenShift GitOps uses Argo CD to manage specific cluster-scoped resources, including cluster Operators, optional Operator Lifecycle Manager (OLM) Operators, and user management.
This guide explains how to install the Red Hat Red Hat OpenShift GitOps Operator to an OpenShift Container Platform cluster and logging in to the Argo CD instance.
5.3.1. Installing OpenShift GitOps Operator in web console
Prerequisites
- Access to the OpenShift Container Platform web console.
-
An account with the
cluster-adminrole. - You are logged in to the OpenShift Container Platform cluster as an administrator.
If you have already installed the Community version of the Argo CD Operator, remove the Argo CD Community Operator before you install the Red Hat OpenShift GitOps Operator.
Procedure
- Open the Administrator perspective of the web console and navigate to Operators → OperatorHub in the menu on the left.
Search for
OpenShift GitOps, click the Red Hat OpenShift GitOps tile, and then click Install.Red Hat OpenShift GitOps will be installed in all namespaces of the cluster.
After the Red Hat OpenShift GitOps Operator is installed, it automatically sets up a ready-to-use Argo CD instance that is available in the openshift-gitops namespace, and an Argo CD icon is displayed in the console toolbar. You can create subsequent Argo CD instances for your applications under your projects.
5.3.2. Logging in to the Argo CD instance by using the Argo CD admin account
Red Hat OpenShift GitOps Operator automatically creates a ready-to-use Argo CD instance that is available in the openshift-gitops namespace.
Prerequisites
- You have installed the Red Hat OpenShift GitOps Operator in your cluster.
Procedure
- In the Administrator perspective of the web console, navigate to Operators → Installed Operators to verify that the Red Hat OpenShift GitOps Operator is installed.
-
Navigate to the
 menu → OpenShift GitOps → Cluster Argo CD. The login page of the Argo CD UI is displayed in a new window.
Obtain the password for the Argo CD instance:
- In the left panel of the console, use the perspective switcher to switch to the Developer perspective.
-
Use the Project drop-down list and select the
openshift-gitopsproject. - Use the left navigation panel to navigate to the Secrets page.
- Select the openshift-gitops-cluster instance to display the password.
- Copy the password.
To login with your OpenShift Container Platform credentials, select the LOG IN VIA OPENSHIFT option in the Argo CD user interface.
-
Use this password and
adminas the username to log in to the Argo CD UI in the new window.
You cannot create two Argo CD CRs in the same namespace.
5.4. Uninstalling OpenShift GitOps
Uninstalling the Red Hat OpenShift GitOps Operator is a two-step process:
- Delete the Argo CD instances that were added under the default namespace of the Red Hat OpenShift GitOps Operator.
- Uninstall the Red Hat OpenShift GitOps Operator.
Uninstalling only the Operator will not remove the Argo CD instances created.
5.4.1. Deleting the Argo CD instances
Delete the Argo CD instances added to the namespace of the GitOps Operator.
Procedure
- In the Terminal type the following command:
$ oc delete gitopsservice cluster -n openshift-gitops
You cannot delete an Argo CD cluster from the web console UI.
After the command runs successfully all the Argo CD instances will be deleted from the openshift-gitops namespace.
Delete any other Argo CD instances from other namespaces using the same command:
$ oc delete gitopsservice cluster -n <namespace>
5.4.2. Uninstalling the GitOps Operator
Procedure
-
From the Operators → OperatorHub page, use the Filter by keyword box to search for
Red Hat OpenShift GitOps Operatortile. - Click the Red Hat OpenShift GitOps Operator tile. The Operator tile indicates it is installed.
- In the Red Hat OpenShift GitOps Operator descriptor page, click Uninstall.
Additional resources
- You can learn more about uninstalling Operators on OpenShift Container Platform in the Deleting Operators from a cluster section.
5.5. Configuring an OpenShift cluster by deploying an application with cluster configurations
With Red Hat OpenShift GitOps, you can configure Argo CD to recursively sync the content of a Git directory with an application that contains custom configurations for your cluster.
Prerequisites
-
You have logged in to the
product-titlecluster as an administrator. -
You have installed the
gitops-titleOperator in your cluster. - You have logged into Argo CD instance.
5.5.1. Using an Argo CD instance to manage cluster-scoped resources
To manage cluster-scoped resources, update the existing Subscription object for the gitops-title Operator and add the namespace of the Argo CD instance to the ARGOCD_CLUSTER_CONFIG_NAMESPACES environment variable in the spec section.
Procedure
- In the Administrator perspective of the web console, navigate to Operators → Installed Operators → Red Hat OpenShift GitOps → Subscription.
- Click the Actions drop-down menu then click Edit Subscription.
On the openshift-gitops-operator Subscription details page, under the YAML tab, edit the
SubscriptionYAML file by adding the namespace of the Argo CD instance to theARGOCD_CLUSTER_CONFIG_NAMESPACESenvironment variable in thespecsection:apiVersion: operators.coreos.com/v1alpha1 kind: Subscription metadata: name: openshift-gitops-operator namespace: openshift-operators ... spec: config: env: - name: ARGOCD_CLUSTER_CONFIG_NAMESPACES value: openshift-gitops, <list of namespaces of cluster-scoped Argo CD instances> ...To verify that the Argo instance is configured with a cluster role to manage cluster-scoped resources, perform the following steps:
- Navigate to User Management → Roles and from the Filter drop-down menu select Cluster-wide Roles.
Search for the
argocd-application-controllerby using the Search by name field.The Roles page displays the created cluster role.
TipAlternatively, in the OpenShift CLI, run the following command:
oc auth can-i create oauth -n openshift-gitops --as system:serviceaccount:openshift-gitops:openshift-gitops-argocd-application-controller
The output
yesverifies that the Argo instance is configured with a cluster role to manage cluster-scoped resources. Else, check your configurations and take necessary steps as required.
5.5.2. Default permissions of an Argocd instance
By default Argo CD instance has the following permissions:
-
Argo CD instance has the
adminprivileges to manage resources only in the namespace where it is deployed. For instance, an Argo CD instance deployed in the foo namespace has theadminprivileges to manage resources only for that namespace. Argo CD has the following cluster-scoped permissions because Argo CD requires cluster-wide
readprivileges on resources to function appropriately:- verbs: - get - list - watch apiGroups: - '*' resources: - '*' - verbs: - get - list nonResourceURLs: - '*'
You can edit the cluster roles used by the
argocd-serverandargocd-application-controllercomponents where Argo CD is running such that thewriteprivileges are limited to only the namespaces and resources that you wish Argo CD to manage.$ oc edit clusterrole argocd-server $ oc edit clusterrole argocd-application-controller
5.5.3. Running the Argo CD instance at the cluster-level
The default Argo CD instance and the accompanying controllers, installed by the Red Hat OpenShift GitOps Operator, can now run on the infrastructure nodes of the cluster by setting a simple configuration toggle.
Procedure
Label the existing nodes:
$ oc label node <node-name> node-role.kubernetes.io/infra=""
Optional: If required, you can also apply taints and isolate the workloads on infrastructure nodes and prevent other workloads from scheduling on these nodes:
$ oc adm taint nodes -l node-role.kubernetes.io/infra \
infra=reserved:NoSchedule infra=reserved:NoExecute
Add the
runOnInfratoggle in theGitOpsServicecustom resource:apiVersion: pipelines.openshift.io/v1alpha1 kind: GitopsService metadata: name: cluster spec: runOnInfra: true
Optional: If taints have been added to the nodes, then add
tolerationsto theGitOpsServicecustom resource, for example:spec: runOnInfra: true tolerations: - effect: NoSchedule key: infra value: reserved - effect: NoExecute key: infra value: reserved-
Verify that the workloads in the
openshift-gitopsnamespace are now scheduled on the infrastructure nodes by viewing Pods → Pod details for any pod in the console UI.
Any nodeSelectors and tolerations manually added to the default Argo CD custom resource are overwritten by the toggle and tolerations in the GitOpsService custom resource.
5.5.4. Creating an application by using the Argo CD dashboard
Argo CD provides a dashboard which allows you to create applications.
This sample workflow walks you through the process of configuring Argo CD to recursively sync the content of the cluster directory to the cluster-configs application. The directory defines the OpenShift Container Platform web console cluster configurations that add a link to the Red Hat Developer Blog - Kubernetes under the
![]() menu in the web console, and defines a namespace
menu in the web console, and defines a namespace spring-petclinic on the cluster.
Procedure
- In the Argo CD dashboard, click NEW APP to add a new Argo CD application.
For this workflow, create a cluster-configs application with the following configurations:
- Application Name
-
cluster-configs - Project
-
default - Sync Policy
-
Manual - Repository URL
-
https://github.com/redhat-developer/openshift-gitops-getting-started - Revision
-
HEAD - Path
-
cluster - Destination
-
https://kubernetes.default.svc - Namespace
-
spring-petclinic - Directory Recurse
-
checked
- Click CREATE to create your application.
- Open the Administrator perspective of the web console and navigate to Administration → Namespaces in the menu on the left.
-
Search for and select the namespace, then enter
argocd.argoproj.io/managed-by=openshift-gitopsin the Label field so that the Argo CD instance in theopenshift-gitopsnamespace can manage your namespace.
5.5.5. Creating an application by using the oc tool
You can create Argo CD applications in your terminal by using the oc tool.
Procedure
Download the sample application:
$ git clone git@github.com:redhat-developer/openshift-gitops-getting-started.git
Create the application:
$ oc create -f openshift-gitops-getting-started/argo/cluster.yaml
Run the
oc getcommand to review the created application:$ oc get application -n openshift-gitops
Add a label to the namespace your application is deployed in so that the Argo CD instance in the
openshift-gitopsnamespace can manage it:$ oc label namespace spring-petclinic argocd.argoproj.io/managed-by=openshift-gitops
5.5.6. Synchronizing your application with your Git repository
Procedure
- In the Argo CD dashboard, notice that the cluster-configs Argo CD application has the statuses Missing and OutOfSync. Because the application was configured with a manual sync policy, Argo CD does not sync it automatically.
- Click SYNC on the cluster-configs tile, review the changes, and then click SYNCHRONIZE. Argo CD will detect any changes in the Git repository automatically. If the configurations are changed, Argo CD will change the status of the cluster-configs to OutOfSync. You can modify the synchronization policy for Argo CD to automatically apply changes from your Git repository to the cluster.
- Notice that the cluster-configs Argo CD application now has the statuses Healthy and Synced. Click the cluster-configs tile to check the details of the synchronized resources and their status on the cluster.
-
Navigate to the OpenShift Container Platform web console and click
to verify that a link to the Red Hat Developer Blog - Kubernetes is now present there.
Navigate to the Project page and search for the
spring-petclinicnamespace to verify that it has been added to the cluster.Your cluster configurations have been successfully synchronized to the cluster.
5.5.7. In-built permissions for cluster configuration
By default, the Argo CD instance has permissions to manage specific cluster-scoped resources such as cluster Operators, optional OLM Operators and user management.
Argo CD does not have cluster-admin permissions.
Permissions for the Argo CD instance:
| Resources | Descriptions |
| Resource Groups | Configure the user or administrator |
|
| Optional Operators managed by OLM |
|
| Groups, Users and their permissions |
|
| Control plane Operators managed by CVO used to configure cluster-wide build configuration, registry configuration and scheduler policies |
|
| Storage |
|
| Console customization |
5.5.8. Adding permissions for cluster configuration
You can grant permissions for an Argo CD instance to manage cluster configuration. Create a cluster role with additional permissions and then create a new cluster role binding to associate the cluster role with a service account.
Procedure
- Log in to the OpenShift Container Platform web console as an admin.
In the web console, select User Management → Roles → Create Role. Use the following
ClusterRoleYAML template to add rules to specify the additional permissions.apiVersion: rbac.authorization.k8s.io/v1 kind: ClusterRole metadata: name: secrets-cluster-role rules: - apiGroups: [""] resources: ["secrets"] verbs: ["*"]
- Click Create to add the cluster role.
- Now create the cluster role binding. In the web console, select User Management → Role Bindings → Create Binding.
- Select All Projects from the Project drop-down.
- Click Create binding.
- Select Binding type as Cluster-wide role binding (ClusterRoleBinding).
- Enter a unique value for the RoleBinding name.
- Select the newly created cluster role or an existing cluster role from the drop down list.
Select the Subject as ServiceAccount and the provide the Subject namespace and name.
-
Subject namespace:
openshift-gitops -
Subject name:
openshift-gitops-argocd-application-controller
-
Subject namespace:
Click Create. The YAML file for the
ClusterRoleBindingobject is as follows:kind: ClusterRoleBinding apiVersion: rbac.authorization.k8s.io/v1 metadata: name: cluster-role-binding subjects: - kind: ServiceAccount name: openshift-gitops-argocd-application-controller namespace: openshift-gitops roleRef: apiGroup: rbac.authorization.k8s.io kind: ClusterRole name: admin
5.5.9. Installing OLM Operators using Red Hat OpenShift GitOps
Red Hat OpenShift GitOps with cluster configurations manages specific cluster-scoped resources and takes care of installing cluster Operators or any namespace-scoped OLM Operators.
Consider a case where as a cluster administrator, you have to install an OLM Operator such as Tekton. You use the OpenShift Container Platform web console to manually install a Tekton Operator or the OpenShift CLI to manually install a Tekton subscription and Tekton Operator group on your cluster.
Red Hat OpenShift GitOps places your Kubernetes resources in your Git repository. As a cluster administrator, use Red Hat OpenShift GitOps to manage and automate the installation of other OLM Operators without any manual procedures. For example, after you place the Tekton subscription in your Git repository by using Red Hat OpenShift GitOps, the Red Hat OpenShift GitOps automatically takes this Tekton subscription from your Git repository and installs the Tekton Operator on your cluster.
5.5.9.1. Installing cluster-scoped Operators
Operator Lifecycle Manager (OLM) uses a default global-operators Operator group in the openshift-operators namespace for cluster-scoped Operators. Hence you do not have to manage the OperatorGroup resource in your Gitops repository. However, for namespace-scoped Operators, you must manage the OperatorGroup resource in that namespace.
To install cluster-scoped Operators, create and place the Subscription resource of the required Operator in your Git repository.
Example: Grafana Operator subscription
apiVersion: operators.coreos.com/v1alpha1 kind: Subscription metadata: name: grafana spec: channel: v4 installPlanApproval: Automatic name: grafana-operator source: redhat-operators sourceNamespace: openshift-marketplace
5.5.9.2. Installing namepace-scoped Operators
To install namespace-scoped Operators, create and place the Subscription and OperatorGroup resources of the required Operator in your Git repository.
Example: Ansible Automation Platform Resource Operator
...
apiVersion: v1
kind: Namespace
metadata:
labels:
openshift.io/cluster-monitoring: "true"
name: ansible-automation-platform
...
apiVersion: operators.coreos.com/v1
kind: OperatorGroup
metadata:
name: ansible-automation-platform-operator
namespace: ansible-automation-platform
spec:
targetNamespaces:
- ansible-automation-platform
...
apiVersion: operators.coreos.com/v1alpha1
kind: Subscription
metadata:
name: ansible-automation-platform
namespace: ansible-automation-platform
spec:
channel: patch-me
installPlanApproval: Automatic
name: ansible-automation-platform-operator
source: redhat-operators
sourceNamespace: openshift-marketplace
...
When deploying multiple Operators using Red Hat OpenShift GitOps, you must create only a single Operator group in the corresponding namespace. If more than one Operator group exists in a single namespace, any CSV created in that namespace transition to a failure state with the TooManyOperatorGroups reason. After the number of Operator groups in their corresponding namespaces reaches one, all the previous failure state CSVs transition to pending state. You must manually approve the pending install plan to complete the Operator installation.
5.6. Deploying a Spring Boot application with Argo CD
With Argo CD, you can deploy your applications to the OpenShift cluster either by using the Argo CD dashboard or by using the oc tool.
Prerequisites
- Red Hat OpenShift GitOps is installed in your cluster.
- Logged into Argo CD instance.
5.6.1. Creating an application by using the Argo CD dashboard
Argo CD provides a dashboard which allows you to create applications.
This sample workflow walks you through the process of configuring Argo CD to recursively sync the content of the cluster directory to the cluster-configs application. The directory defines the OpenShift Container Platform web console cluster configurations that add a link to the Red Hat Developer Blog - Kubernetes under the
![]() menu in the web console, and defines a namespace
menu in the web console, and defines a namespace spring-petclinic on the cluster.
Procedure
- In the Argo CD dashboard, click NEW APP to add a new Argo CD application.
For this workflow, create a cluster-configs application with the following configurations:
- Application Name
-
cluster-configs - Project
-
default - Sync Policy
-
Manual - Repository URL
-
https://github.com/redhat-developer/openshift-gitops-getting-started - Revision
-
HEAD - Path
-
cluster - Destination
-
https://kubernetes.default.svc - Namespace
-
spring-petclinic - Directory Recurse
-
checked
For this workflow, create a spring-petclinic application with the following configurations:
- Application Name
-
spring-petclinic - Project
-
default - Sync Policy
-
Automatic - Repository URL
-
https://github.com/redhat-developer/openshift-gitops-getting-started - Revision
-
HEAD - Path
-
app - Destination
-
https://kubernetes.default.svc - Namespace
-
spring-petclinic
- Click CREATE to create your application.
- Open the Administrator perspective of the web console and navigate to Administration → Namespaces in the menu on the left.
-
Search for and select the namespace, then enter
argocd.argoproj.io/managed-by=openshift-gitopsin the Label field so that the Argo CD instance in theopenshift-gitopsnamespace can manage your namespace.
5.6.2. Creating an application by using the oc tool
You can create Argo CD applications in your terminal by using the oc tool.
Procedure
Download the sample application:
$ git clone git@github.com:redhat-developer/openshift-gitops-getting-started.git
Create the application:
$ oc create -f openshift-gitops-getting-started/argo/app.yaml
$ oc create -f openshift-gitops-getting-started/argo/cluster.yaml
Run the
oc getcommand to review the created application:$ oc get application -n openshift-gitops
Add a label to the namespace your application is deployed in so that the Argo CD instance in the
openshift-gitopsnamespace can manage it:$ oc label namespace spring-petclinic argocd.argoproj.io/managed-by=openshift-gitops
$ oc label namespace spring-petclinic argocd.argoproj.io/managed-by=openshift-gitops
5.6.3. Verifying Argo CD self-healing behavior
Argo CD constantly monitors the state of deployed applications, detects differences between the specified manifests in Git and live changes in the cluster, and then automatically corrects them. This behavior is referred to as self-healing.
You can test and observe the self-healing behavior in Argo CD.
Prerequisites
-
The sample
app-spring-petclinicapplication is deployed and configured.
Procedure
-
In the Argo CD dashboard, verify that your application has the
Syncedstatus. -
Click the
app-spring-petclinictile in the Argo CD dashboard to view the application resources that are deployed to the cluster. - In the OpenShift Container Platform web console, navigate to the Developer perspective.
Modify the Spring PetClinic deployment and commit the changes to the
app/directory of the Git repository. Argo CD will automatically deploy the changes to the cluster.- Fork the OpenShift GitOps getting started repository.
-
In the
deployment.yamlfile, change thefailureThresholdvalue to5. In the deployment cluster, run the following command to verify the changed value of the
failureThresholdfield:$ oc edit deployment spring-petclinic -n spring-petclinic
Test the self-healing behavior by modifying the deployment on the cluster and scaling it up to two pods while watching the application in the OpenShift Container Platform web console.
Run the following command to modify the deployment:
$ oc scale deployment spring-petclinic --replicas 2 -n spring-petclinic
- In the OpenShift Container Platform web console, notice that the deployment scales up to two pods and immediately scales down again to one pod. Argo CD detected a difference from the Git repository and auto-healed the application on the OpenShift Container Platform cluster.
- In the Argo CD dashboard, click the app-spring-petclinic tile → APP DETAILS → EVENTS. The EVENTS tab displays the following events: Argo CD detecting out of sync deployment resources on the cluster and then resyncing the Git repository to correct it.
5.7. Configuring SSO for Argo CD using Dex
After the Red Hat OpenShift GitOps Operator is installed, Argo CD automatically creates a user with admin permissions. To manage multiple users, cluster administrators can use Argo CD to configure Single Sign-On (SSO).
5.7.1. Enabling the Dex OpenShift OAuth Connector
Dex uses the users and groups defined within OpenShift by checking the OAuth server provided by the platform. The following example shows the properties of Dex along with example configurations:
apiVersion: argoproj.io/v1alpha1
kind: ArgoCD
metadata:
name: example-argocd
labels:
example: openshift-oauth
spec:
dex:
openShiftOAuth: true 1
groups:2
- default
rbac:3
defaultPolicy: 'role:readonly'
policy: |
g, cluster-admins, role:admin
scopes: '[groups]'- 1
- The
openShiftOAuthproperty triggers the Operator to automatically configure the built-in OpenShiftOAuthserver when the value is set totrue. - 2
- The
groupsproperty assigns users to one group or all groups in the groups list. - 3
- The RBAC policy property assigns the admin role in the Argo CD cluster to users in the OpenShift
cluster-adminsgroup.
5.7.1.1. Mapping users to specific roles
Argo CD cannot map users to specific roles if they have a direct ClusterRoleBinding role. You can manually change the role as role:admin on SSO through OpenShift.
Procedure
Create a group named
cluster-admins.$ oc adm groups new cluster-admins
Add the user to the group.
$ oc adm groups add-users cluster-admins USER
Apply the
cluster-adminClusterRoleto the group:$ oc adm policy add-cluster-role-to-group cluster-admin cluster-admins
5.7.2. Disabling Dex
Dex is installed by default for all the Argo CD instances created by the Operator. You can disable Dex.
Procedure
Set the environmental variable
DISABLE_DEXto true in the YAML resource of the Operator:spec: config: env: - name: DISABLE_DEX value: "true"
5.8. Configuring SSO for Argo CD using Keycloak
After the Red Hat OpenShift GitOps Operator is installed, Argo CD automatically creates a user with admin permissions. To manage multiple users, cluster administrators can use Argo CD to configure Single Sign-On (SSO).
Prerequisites
- Red Hat SSO is installed on the cluster.
- Argo CD is installed on the cluster.
5.8.1. Configuring a new client in Keycloak
Dex is installed by default for all the Argo CD instances created by the Operator. However, you can delete the Dex configuration and add Keycloak instead to log in to Argo CD using your OpenShift credentials. Keycloak acts as an identity broker between Argo CD and OpenShift.
Procedure
To configure Keycloak, follow these steps:
Delete the Dex configuration by removing the following section from the Argo CD Custom Resource (CR), and save the CR:
dex: openShiftOAuth: true resources: limits: cpu: memory: requests: cpu: memory:Configure Keycloak by editing the Argo CD CR, and updating the value for the
providerparameter askeycloak. For example:apiVersion: argoproj.io/v1alpha1 kind: ArgoCD metadata: name: example-argocd labels: example: basic spec: sso: provider: keycloak server: route: enabled: true
The Keycloak instance takes 2-3 minutes to install and run.
5.8.2. Logging in to Keycloak
Log in to the Keycloak console to manage identities or roles and define the permissions assigned to the various roles.
Prerequisites
- The default configuration of Dex is removed.
- Your Argo CD CR must be configured to use the Keycloak SSO provider.
Procedure
Get the Keycloak route URL for login:
$ oc -n argocd get route keycloak NAME HOST/PORT PATH SERVICES PORT TERMINATION WILDCARD keycloak keycloak-default.apps.ci-ln-******.origin-ci-int-aws.dev.**.com keycloak <all> reencrypt None
Get the Keycloak pod name that stores the user name and password as environment variables:
$ oc -n argocd get pods NAME READY STATUS RESTARTS AGE keycloak-1-2sjcl 1/1 Running 0 45m
Get the Keycloak user name:
$ oc -n argocd exec keycloak-1-2sjcl -- "env" | grep SSO_ADMIN_USERNAME SSO_ADMIN_USERNAME=Cqid54Ih
Get the Keycloak password:
$ oc -n argocd exec keycloak-1-2sjcl -- "env" | grep SSO_ADMIN_PASSWORD SSO_ADMIN_PASSWORD=GVXxHifH
On the login page, click LOG IN VIA KEYCLOAK.
NoteYou only see the option LOGIN VIA KEYCLOAK after the Keycloak instance is ready.
Click Login with OpenShift.
NoteLogin using
kubeadminis not supported.- Enter the OpenShift credentials to log in.
Optional: By default, any user logged in to Argo CD has read-only access. You can manage the user level access by updating the
argocd-rbac-cmconfig map:policy.csv: <name>, <email>, role:admin
5.8.3. Integrating Keycloak with the OpenShift OAuth server in a disconnected cluster
In a disconnected cluster, Keycloak communicates with the OpenShift OAuth server through a proxy.
Procedure
Follow these steps to integrate Keycloak with the OpenShift OAuth server:
Log in to the Keycloak pod:
$ oc exec -it dc/keycloak -n argocd -- /bin/bash
Launch the JBoss CLI tool to set up the proxy mappings:
/opt/eap/bin/jboss-cli.sh
In the JBoss CLI tool, run the following command to start an embedded standalone server:
embed-server --server-config=standalone-openshift.xml
Set up proxy mappings for the OpenShift OAuth server host:
/subsystem=keycloak-server/spi=connectionsHttpClient/provider=default:write-attribute(name=properties.proxy-mappings,value=["<oauth-server-hostname>;http://<proxy-server-host>:<proxy-server-port>"])
Stop the embedded server:
quit
Reload the JBoss CLI tool to apply the proxy mappings:
/opt/eap/bin/jboss-cli.sh --connect --command=:reload
5.8.4. Uninstalling Keycloak
You can delete the Keycloak resources and their relevant configurations by removing the SSO field from the Argo CD Custom Resource (CR) file. After you remove the SSO field, the values in the file look similar to the following:
apiVersion: argoproj.io/v1alpha1
kind: ArgoCD
metadata:
name: example-argocd
labels:
example: basic
spec:
server:
route:
enabled: trueA Keycloak application created by using this method is currently not persistent. Additional configurations created in the Argo CD Keycloak realm are deleted when the server restarts.
5.9. Running GitOps control plane workloads on infrastructure nodes
You can use infrastructure nodes to prevent additional billing cost against subscription counts.
You can use the OpenShift Container Platform to run certain workloads on infrastructure nodes installed by the Red Hat OpenShift GitOps Operator. This comprises the workloads that are installed by the Red Hat OpenShift GitOps Operator by default in the openshift-gitops namespace, including the default Argo CD instance in that namespace.
Any other Argo CD instances installed to user namespaces are not eligible to run on Infrastructure nodes.
5.9.1. Moving GitOps workloads to infrastructure nodes
You can move the default workloads installed by the Red Hat OpenShift GitOps to the infrastructure nodes. The workloads that can be moved are:
-
kam deployment -
cluster deployment(backend service) -
openshift-gitops-applicationset-controller deployment -
openshift-gitops-dex-server deployment -
openshift-gitops-redis deployment -
openshift-gitops-redis-ha-haproxy deployment -
openshift-gitops-repo-sever deployment -
openshift-gitops-server deployment -
openshift-gitops-application-controller statefulset -
openshift-gitops-redis-server statefulset
Procedure
Label existing nodes as infrastructure by running the following command:
$ oc label node <node-name> node-role.kubernetes.io/infra=
Edit the
GitOpsServiceCustom Resource (CR) to add the infrastructure node selector:$ oc edit gitopsservice -n openshift-gitops
In the
GitOpsServiceCR file, addrunOnInfrafield to thespecsection and set it totrue. This field moves the workloads inopenshift-gitopsnamespace to the infrastructure nodes:apiVersion: pipelines.openshift.io/v1alpha1 kind: GitopsService metadata: name: cluster spec: runOnInfra: true
Optional: Apply taints and isolate the workloads on infrastructure nodes and prevent other workloads from scheduling on these nodes.
$ oc adm taint nodes -l node-role.kubernetes.io/infra infra=reserved:NoSchedule infra=reserved:NoExecute
Optional: If you apply taints to the nodes, you can add tolerations in the
GitOpsServiceCR:spec: runOnInfra: true tolerations: - effect: NoSchedule key: infra value: reserved - effect: NoExecute key: infra value: reserved
To verify that the workloads are scheduled on infrastructure nodes in the Red Hat OpenShift GitOps namespace, click any of the pod names and ensure that the Node selector and Tolerations have been added.
Any manually added Node selectors and Tolerations in the default Argo CD CR will be overwritten by the toggle and the tolerations in the GitOpsService CR.
5.10. Sizing requirements for GitOps Operator
The sizing requirements page displays the sizing requirements for installing Red Hat OpenShift GitOps on OpenShift Container Platform. It also provides the sizing details for the default ArgoCD instance that is instantiated by the GitOps Operator.
5.10.1. Sizing requirements for GitOps
Red Hat OpenShift GitOps is a declarative way to implement continuous deployment for cloud-native applications. Through GitOps, you can define and configure the CPU and memory requirements of your application.
Every time you install the Red Hat OpenShift GitOps Operator, the resources on the namespace are installed within the defined limits. If the default installation does not set any limits or requests, the Operator fails within the namespace with quotas. Without enough resources, the cluster cannot schedule ArgoCD related pods. The following table details the resource requests and limits for the default workloads:
| Workload | CPU requests | CPU limits | Memory requests | Memory limits |
|---|---|---|---|---|
| argocd-application-controller | 1 | 2 | 1024M | 2048M |
| applicationset-controller | 1 | 2 | 512M | 1024M |
| argocd-server | 0.125 | 0.5 | 128M | 256M |
| argocd-repo-server | 0.5 | 1 | 256M | 1024M |
| argocd-redis | 0.25 | 0.5 | 128M | 256M |
| argocd-dex | 0.25 | 0.5 | 128M | 256M |
| HAProxy | 0.25 | 0.5 | 128M | 256M |
Optionally, you can also use the ArgoCD custom resource with the oc command to see the specifics and modify them:
oc edit argocd <name of argo cd> -n namespace