
Deploying Ansible Automation Platform 2 on Red Hat OpenShift
Abstract
Comments and Feedback
In the spirit of open source, we invite anyone to provide feedback and comments on any reference architecture. Although we review our papers internally, sometimes issues or typographical errors are encountered. Feedback allows us to not only improve the quality of the papers we produce, but allows the reader to provide their thoughts on potential improvements and topic expansion to the papers. Feedback on the papers can be provided by emailing ansible-feedback@redhat.com. Please refer to the title within the email.
Chapter 1. Overview
The Ansible Automation Platform (AAP) 2.3 on Red Hat OpenShift reference architecture provides an opinionated setup of deploying an Ansible Automation Platform environment. It provides a step-by-step deployment procedure with the latest best practices to install and configure Ansible Automation Platform 2.3. It is best suited for system and platform administrators looking to deploy Ansible Automation Platform on Red Hat OpenShift.
By utilizing the power of Red Hat OpenShift, we can streamline the deployment of Ansible Automation Platform and significantly reduce the time and effort required to set it up.
Figure 1.1. automation controller architecture
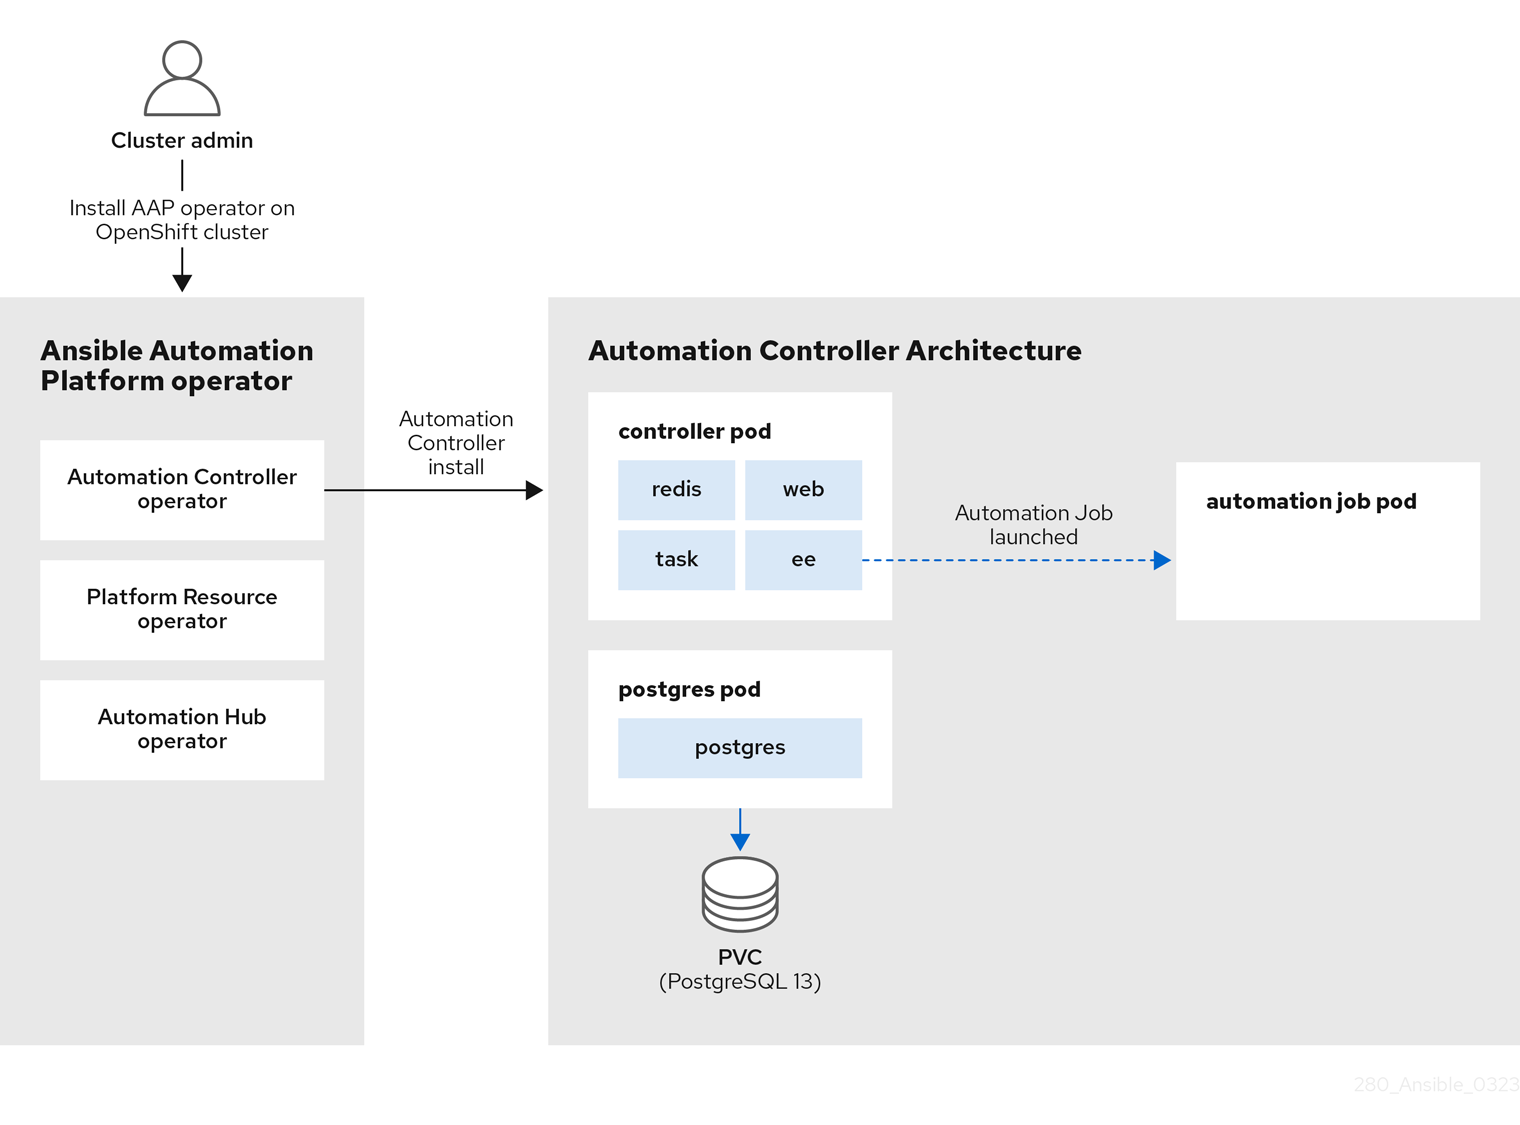
The Figure 1.1, “automation controller architecture”, shows the deployment process flow of the Ansible Automation Platform (AAP) operator deploying the automation controller component. The automation controller operator, one of the three operators that comprise the larger Ansible Automation Platform operator, is responsible for deploying the various pods including the controller, postgres and automation job pods.
Figure 1.2. automation hub architecture
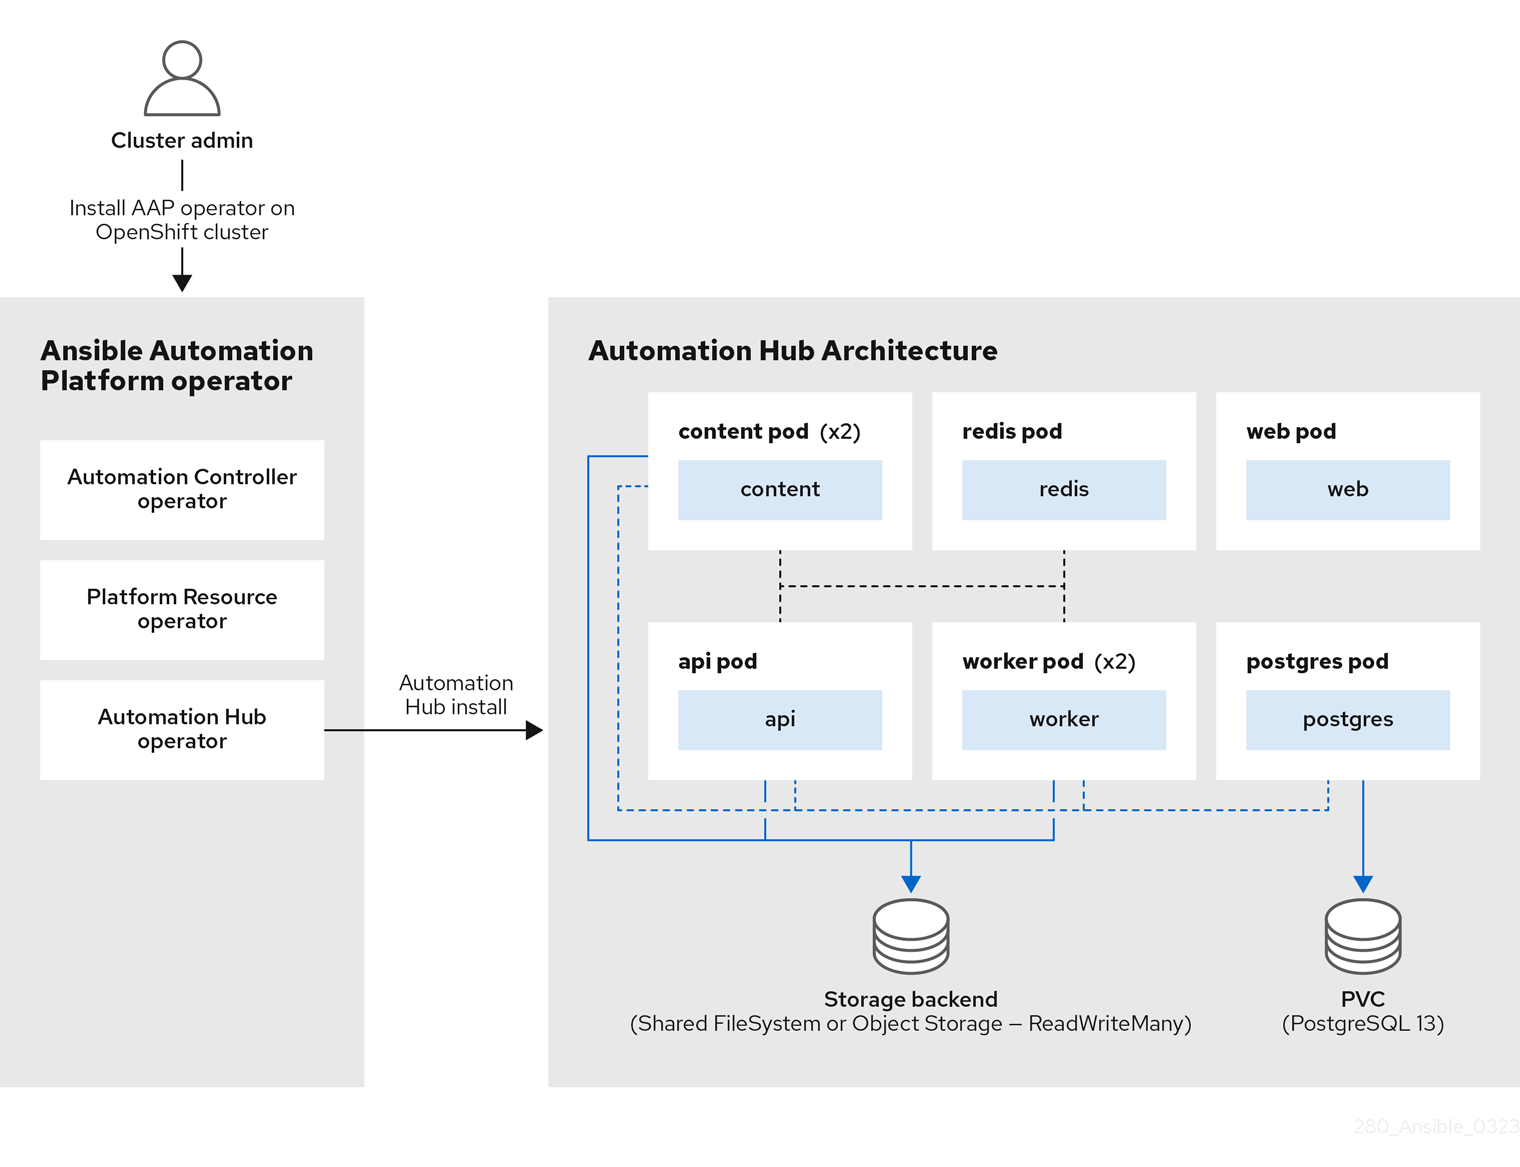
Similarly, the Figure 1.2, “automation hub architecture” shows the AAP operator deploying the automation hub component. The automation hub operator deploys various pods that communicate with each other to deliver automation hub to share internally generated content, Red Hat Ansible Certified Content, execution environments, and Ansible Validated Content with your teams.
In addition, this reference architecture highlights key steps involved in providing an efficient and scalable environment delivered by a solid foundation for any of your automation efforts.
Chapter 2. Why Ansible Automation Platform on Red Hat OpenShift?
Running Ansible Automation Platform 2.3 on Red Hat OpenShift 4.x can provide a more efficient and automated way to deploy and manage the platform, as well as better integration with Red Hat OpenShift’s built-in monitoring, logging, security, and scalability features.
Additionally, using Red Hat OpenShift’s Operator Lifecycle Manager (OLM) to deploy and manage the Ansible Automation Platform operator can simplify the update and upgrade process, allowing for more control and flexibility.
A further breakdown of those benefits can be seen below:
- Automation: The Ansible Automation Platform operator provides a way to automate the deployment and management of the Ansible Automation Platform on Red Hat OpenShift. This can help you to reduce the time and effort required to deploy and manage the platform, and ensure that it is running in a consistent and predictable way.
- Scalability: The operator can help you to scale the Ansible Automation Platform to meet the needs of your organization. You can easily deploy multiple instances of the platform and manage them from a single location.
- Flexibility: The operator provides a flexible way to deploy and manage the Ansible Automation Platform. You can customize the configuration of the platform to suit your specific needs, and deploy it in different environments, such as development, staging, and production.
- Monitoring and troubleshooting: The operator integrates with Red Hat OpenShift’s built-in monitoring and logging tools, like Prometheus and Grafana, which can be used to monitor the resource usage of the platform and identify any bottlenecks.
- Management and upgrade: Using the Operator Lifecycle Manager (OLM) that comes with Red Hat OpenShift 4.x, you can easily deploy, manage, and upgrade[1] the Ansible Automation Platform operator across your cluster.
Chapter 3. Before you start
Prior to deploying AAP on Red Hat OpenShift, it’s important to understand key considerations that need to be addressed before installation. These factors determine the health and scalability of your AAP environment throughout its lifecycle.
In this section, you will find a breakdown of those key considerations including:
- Red Hat OpenShift resource management
- Sizing recommendations for your automation controller pod containers
- Sizing recommendations for your Postgres pod
- Sizing recommendations for your automation job pods
- Sizing recommendations for your automation hub pods
One of the key aspects of a successful deployment is the proper resource management for pods and containers to ensure optimal performance and availability of your AAP application for your Red Hat OpenShift cluster.
3.1. Resource management for pods and containers
Two key resources regarding resource management are your CPU and memory (RAM). Red Hat OpenShift uses resource requests and resource limits to control the amount of resources that a container can consume in a pod.
3.1.1. What is a resource request?
A resource request is the minimum amount of resources a container needs to run and function properly. The Kubernetes scheduler uses this value to ensure that there are enough resources available for the container.
3.1.2. What is a resource limit?
Resource limits, on the other hand, are the maximum amount of resources that a container can consume. Setting resource limits ensures a container does not consume more resources than it should, which can cause other containers to suffer from resource starvation.
3.1.3. Why does resource management matter?
When it comes to AAP, setting the correct resource requests and limits is crucial. Inadequate resource allocation can result in the termination of the control pod, causing the loss of all automation jobs within the automation controller.
3.1.4. Planning of resources
While setting the proper resource management values, organizations need to consider which architecture best suits their needs based on the resources available. For example, determining whether high availability of their Ansible Automation Platform environment is more important than maximizing capacity to run automation jobs.
To better illustrate, let’s take the existing Red Hat OpenShift environment used in this reference architecture. It consists of:
- 3 control plane nodes
- 3 worker nodes
Each of these nodes consists of 4 vCPUs and 16 GiB of RAM.
Since the control plane nodes of a Red Hat OpenShift cluster do not run any applications, the example focuses on the 3 worker nodes that are available.
With these 3 worker nodes, we need to determine what is more important: maximizing Ansible Automation Platform availability or running as many automation jobs as possible or both?
If availability is of utmost importance, then the focus will be on ensuring that two control pods run on separate worker nodes (e.g. worker0 and worker1), while all automation jobs are run within the remaining worker node (e.g. worker2).
However, this reduces the resources available for running automation jobs in half, as the recommended practice is to separate control pods and automation pods from running in the same worker node.
If maximizing the amount of automation jobs to run is the main goal, then using one worker node (e.g. worker0) for the control pod and utilizing the remaining two worker nodes (e.g. worker1 and worker2) for running automation jobs would double the resources available for running jobs but at the cost of not having redundancy of the control pod.
Of course, the solution may be that both are equally important and if that is the case, additional resources (e.g. adding more worker nodes) would be needed to satisfy both requirements.
3.2. Size recommendations for your automation controller pod containers
Looking back at our Figure 1.1, “automation controller architecture” from the overview section, you will notice the control pod contains 4 containers:
- web
- ee
- redis
- task
Each of these containers performs a unique function in Ansible automation controller and it’s critical to understand how resource configurations affect the control pod. By default, Red Hat OpenShift provides low values that are sufficient for a minimal test installation but isn’t optimal for running Ansible Automation Platform in production.
The Red Hat OpenShift defaults for Ansible Automation Platform are:
- CPU: 100m
- Memory: 128Mi
Red Hat OpenShift, by default, does not configure any maximum resource limits and will attempt to assign all possible resources requested by the Ansible Automation Platform control pod. This configuration can cause starvation of resources and affect other applications running on the Red Hat OpenShift cluster.
To demonstrate a starting point for the resource requests and limits of our containers in the control Pod, I will be using the following assumptions:
- 3 Worker nodes available within a Red Hat OpenShift cluster each with 4 vCPU and 16GiB RAM
- Maximizing resources for automation jobs is more important than high availability
- One dedicated worker node for running automation controller
- Remaining two worker nodes for running automation jobs
When it comes to sizing the containers within the control pod, it is important to consider the specifics of your workload. While I have conducted performance tests that provide specific recommendations for this reference environment, these recommendations may not be applicable to all types of workloads.
As a starting point, I decided to take advantage of the performance collection playbooks, specifically the chatty_tasks.yml.
The performance benchmark consisted of:
- Creating an inventory with 1 host
-
Creating a job template that runs the
chatty_tasks.ymlfile
The chatty_tasks job template utilizes the ansible.builtin.debug module to generate a set number of debug messages per host and generates the necessary inventory. By utilizing the ansible.builtin.debug module, I can obtain an accurate representation of the automation controller’s performance without introducing any additional overhead.
The job template was executed with a specified concurrency level ranging from 10 to 50, indicating the number of simultaneous invocations of the job template.
The following resource requests and resource limits depicted below are the results of the performance benchmark and can be used as a starting baseline to run AAP with a Red Hat OpenShift cluster with similar resources.
spec:
...
  ee_resource_requirements:
    limits:
      cpu: 500m
      memory: 400Mi
    requests:
      cpu: 100m
      memory: 400Mi
  task_resource_requirements:
    limits:
      cpu: 4000m
      memory: 8Gi
    requests:
      cpu: 1000m
      memory: 8Gi
  web_resource_requirements:
    limits:
      cpu: 2000m
      memory: 1.5Gi
    requests:
      cpu: 500m
      memory: 1.5Gi
  redis_resource_requirements:
    limits:
      cpu: 500m
      memory: 1.5Gi
    requests:
      cpu: 250m
memory: 1.5GiMemory resource requests and limits are matched to prevent overutilization of memory resources within your Red Hat OpenShift cluster which can cause Out Of Memory (OOM) Kill of your pods. If resource limits are greater than resource requests, it can cause a scenario where you are allowing overutilization of your Red Hat OpenShift nodes.
CPU resource requests and limits differ from memory as CPU resources are considered compressible. This means that Red Hat OpenShift will attempt to throttle our container’s CPU when hitting the resource limit but it will not terminate the container. In the above containers within the control pod, CPU requests were provided that are sufficient CPU for the workload given, but allowed to burst higher under load by setting its threshold (CPU limit) to a higher value.
The scenario above is making the assumption that no other applications are using resources within that worker node that the control pod resides in as it uses a dedicated Red Hat OpenShift worker node. More details can be found Section 3.7, “Specifying dedicated nodes for automation controller pod”.
3.3. Size recommendations for your Postgres pod
After conducting the performance benchmark tests using the chatty_task playbook, it was observed that a CPU resource request below 500m may cause CPU throttling in a Postgres pod, as additional resources requested above the initial resource request, but below the resource limit, are not guaranteed to the pod. However, the CPU limit was set to 1000m (1 vCPU) because there were bursts during the the test that exceeded the 500m request.
With regards to memory, since memory is not a compressible resource, it was observed that during the chatty_task performance tests the Postgres pod at its highest levels in the tests consumed slightly over 650Mi of RAM.
Therefore, based on the results, my memory resource request and limit recommendation for this reference environment is 1Gi to provide a sufficient buffer and avoid a potential Out Of Memory (OOM) Kill of the Postgres pod.
The following resource requests and resource limits depicted below are the results of the performance benchmark test and can be used as a starting baseline to run your Postgres Pod.
spec:
...
  postgres_resource_requirements:
    limits:
      cpu: 1000m
      memory: 1Gi
    requests:
      cpu: 500m
memory: 1GiThe values below are specific to this reference environment and may not be sufficient for your workload. It is important to monitor the performance of your Postgres pod and adjust the resource allocations to meet your performance needs.
3.4. Size recommendations for your automation job pods
An Ansible Automation Platform job is an instance of automation controller launching an Ansible playbook against an inventory of hosts. When Ansible Automation Platform runs on Red Hat OpenShift, the default execution queue is a Container Group created by the operator at install time.
A container group consists of a Kubernetes credential and a default Pod specification. When jobs are launched into a Container Group, a pod is created by automation controller in the namespace specified by the Container Group pod specification. These pods are referred to as automation job pods.
In order to determine an appropriate size for the automation job pods, one must first understand the capabilities of how many jobs the automation controller control plane can launch concurrently.
In this example, we have 3 worker nodes (each 4 vCPU and 16GiB of RAM). One worker node hosts the control pod and the other two worker nodes are used for automation jobs.
Based on these values, we can determine the control capacity that the automation controller control plane can run.
The following formula provides the breakdown:
Total control capacity = Total Memory in MB / Fork size in MB
Based on a worker node, this can be expressed as:
Total control capacity = 16,000 MB / 100 MB = 160
For those interested in more details about the calculations, review Resource Determination for Capacity Algorithm
What this means is that the automation controller is configured to launch 160 jobs concurrently. However, adjustments to this value need to be made in order to match our container group/execution plane capacity that we will get into shortly.
For simplicity, 16GB is rounded to 16,000 MB, and the size of one fork is 100MB by default.
Now that we’ve calculated the available control capacity, we can determine the maximum number of concurrent automation jobs.
To determine this, we must be aware that an automation job pod specification within a container group/execution plane has a default request of vCPU 250m and 100Mi of RAM.
Using the total memory of one worker node:
16,000 MB / 100 MiB = 160 concurrent jobs
Using the total CPU of one worker node:
4000 millicpu / 250 millicpu = 16 concurrent jobs
Based on the above values, we must set the maximum concurrent jobs on a node to be the smallest of the two concurrent job values - 16. Since there are two worker nodes allocated to run automation jobs in our example, this number doubles to 32 (16 concurrent jobs per worker node).
Automation controller’s configuration is currently set to 160 concurrent jobs, and the available worker node capacity only allows for 32 concurrent jobs. This is an issue as the numbers are unbalanced.
What this means is automation controller’s control plane believes it can launch 160 jobs concurrently, while the Kubernetes scheduler will only schedule up to 32 automation job pods concurrently in the Container Group namespace.
Unbalanced values between the control plane and the container group/execution plane can lead to issues where:
-
If the control plane capacity is higher than the Container Group’s maximum number of concurrent job pods that it can schedule, the control plane will attempt to start jobs by submitting pods to be started. These pods, however, won’t actually begin to run until resources are made available. If the job pod does not start within the timeout of
AWX_CONTAINER_GROUP_POD_PENDING_TIMEOUT, the job will be aborted (default is 2 hours). - If the Container Group is able to support more concurrent automation jobs than the control plane believes it can launch, this capacity will be effectively wasted as the automation controller will not launch enough automation jobs to ever reach the max number of concurrent automation jobs the Container Group could support.
To avoid risking aborted jobs or unused resources, it is recommended to balance the effective control capacity with the max number of concurrent jobs that the default Container Group can support.
The term "effective control capacity" is used because the max number of jobs the control plane will launch is affected by a setting called AWX_CONTROL_NODE_TASK_IMPACT. The AWX_CONTROL_NODE_TASK_IMPACT variable defines the amount of capacity that can be consumed on the control pod per automation job, effectively controlling the number of automation jobs that the control pod will attempt to start.
To achieve a balance between the effective control capacity and the available execution capacity, we can set the AWX_CONTROL_NODE_TASK_IMPACT variable to a value that limits the number of concurrent jobs that are to run on the automation controller control plane to match the number of automation job pods that are to be launched by the container group/execution plane.
To calculate the optimal value of AWX_CONTROL_NODE_TASK_IMPACT to avoid launching more concurrent automation jobs than the Container Group can support, we can use the following formula:
AWX_CONTROL_NODE_TASK_IMPACT = control capacity / max concurrent jobs the container group can launch
For our reference environment, this is:
AWX_CONTROL_NODE_TASK_IMPACT = 160 / 32 = 5
This concludes that for this reference environment, AWX_CONTROL_NODE_TASK_IMPACT should equal 5. This value will be set within the extra_setting portion of the Chapter 6, Installing automation controller chapter, which we’ll cover later in this document.
3.5. Summary of automation controller pod size recommendations
Properly setting the resource requests and limits of our control plane (control pod) and our container group/execution plane (automation job pods) is necessary to ensure the control and execution capacity is balanced. The correct configuration can be determined by:
- Calculating the control capacity
- Calculating the number of automation jobs that can run concurrently
-
Setting the
AWX_CONTROL_NODE_TASK_IMPACTvariable with the appropriate balance value within the install of automation controller
3.6. Size recommendations for your automation hub pods
Within the Figure 1.2, “automation hub architecture” outlined in the overview section, you’ll notice that the deployment is composed of seven pods, each hosting a container.
The list of pods consists of:
- content (x2)
- redis
- api
- postgres
- worker (x2)
The seven pods that comprise the automation hub architecture work together to efficiently manage and distribute content, and are critical to the overall performance and scalability of your automation hub environment.
Among these pods, the worker pods are particularly important as they are responsible for processing, synchronizing, and distributing content. Due to this, it is important to set the appropriate amount of resources to the worker pods to ensure they can perform their tasks.
The following are guidelines intended to provide an estimate of the resource requests and limits required for your automation hub environment. The actual resource needs will vary depending on the setup.
For example, an environment with a large number of repositories that are performing frequent updates or synchronizations may require more resources to handle the processing load.
In this reference environment, to determine the size of the pods, preliminary tests were done using one of the highest memory consumption tasks that can take place in an automation hub environment — synchronization of remote repositories.
The findings determined that to successfully sync remote repositories within automation hub the following resource requests and resource limits needed to be set for each of the pods:
spec:
...
content:
  resource_requirements:
    limits:
      cpu: 250mm
      memory: 400Mi
    requests:
      cpu: 100m
      memory: 400Mi

redis:
  resource_requirements:
    limits:
      cpu: 250m
      memory: 200Mi
    requests:
      cpu: 100m
      memory: 200Mi

api:
  resource_requirements:
    limits:
      cpu: 250m
      memory: 400Mi
    requests:
      cpu: 150m
      memory: 400Mi

postgres_resource_requirements:
  resource_requirements:
    limits:
      cpu: 500m
      memory: 1Gi
    requests:
      cpu: 200m
      memory: 1Gi

worker:
  resource_requirements:
    limits:
      cpu: 1000m
      memory: 3Gi
    requests:
      cpu: 400m
      memory: 3Gi
3.7. Specifying dedicated nodes for automation controller pod
Running control pods on dedicated nodes is important in order to separate control pods and automation job pods and prevent resource contention between these two types of pods. This separation helps to maintain the stability and reliability of the control pods and the services they provide, without the risk of degradation due to resource constraints.
In this reference environment, the focus is on maximizing the number of automation jobs that can be run. This means that of the available 3 worker nodes within the Red Hat OpenShift environment, one worker node is dedicated to running the control pod, while the other 2 worker nodes are used for execution of automation jobs.
Dedicating only one worker node to run the control pod runs the potential risk of losing the service as it won’t have anywhere else to start up if the dedicated worker node were to go down. To remedy this situation, reducing the number of worker nodes that run automation jobs or adding an additional worker node to run an additional control pod replica within the Red Hat OpenShift cluster are viable options.
3.7.1. Assigning control pods to specific worker nodes for automation controller
To assign a control pod to a specific node in Red Hat OpenShift, a combination of using the node_selector field in the pod specification, as well as, the topology_spread_constraints fields are used. The node_selector field allows you to specify the label criteria that a node must match in order to be eligible to host the pod. For example, if you have a node with the label aap_node_type: control, specify the following in the pod specification to assign the pod to this node:
spec:
...
  node_selector: |
    aap_node_type: control
The topology_spread_constraints sets the maximum number of pods (maxSkew) that can be scheduled on a node with label aap_node_type: control to 1. The topologyKey is set to kubernetes.io/hostname, a built-in label that indicates the hostname of the node. The whenUnsatisfiable setting is set to ScheduleAnyway, that allows the pod to be scheduled when there aren’t enough nodes with the required label to meet the constraints. The labelSelector matches pods with the label aap_node_type: control. The impact of this is that Red Hat OpenShift prioritizes scheduling a single controller pod per node. However, if there are more replica requests than available worker nodes, Red Hat OpenShift permits scheduling multiple controller pods in the same existing worker node if sufficient resources are available.
The tolerations section specifies that pods can only be scheduled on nodes with the label dedicated: AutomationController, and the effect of the toleration is set to NoSchedule ensuring that pods will not be scheduled on nodes that don’t have the required label. This is used in combination with topology_spread_contstraints to not only specify how to spread the pods across nodes, but also to indicate which nodes they can be scheduled on.
spec:
...
  topology_spread_constraints: |
    - maxSkew: 1
      topologyKey: "kubernetes.io/hostname"
      whenUnsatisfiable: "ScheduleAnyway"
      labelSelector:
        matchLabels:
          aap_node_type: control
  tolerations: |
    - key: "dedicated"
      operator: "Equal"
      value: "AutomationController"
effect: "NoSchedule"The application of the node label and taints can be found within Appendix C, Applying labels and taints to Red Hat OpenShift node. The steps to add a node selector, topology constraints and tolerations to the spec file are shown in Chapter 6, Installing automation controller.
3.8. Handling Database High Availability
The deployment of automation controller and automation hub components within Ansible Automation Platform take advantage of PVCs for their PostgreSQL database. Ensuring the availability of these PVCs is critical for the stability of running Ansible Automation Platform.
There are several strategies that can be used to handle PVC availability within a Red Hat OpenShift cluster, such as those provided by Crunchy Data via the Postgres Operator (PGO) and OpenShift Data Foundation (ODF).
Crunchy Data provides PGO, the Postgres Operator that gives you a declarative Postgres solution that automatically manages your PostgreSQL clusters. With PGO, users can create their Postgres cluster, scale and create a high availability (HA) Postgres cluster and connect it to their applications such as Ansible Automation Platform.
OpenShift Data Foundation (ODF) is a highly available storage solution that can manage persistent storage for your containerized applications. It consists of multiple open source operators and technologies including Ceph, NooBaa, and Rook. These different operators allow you to provision and manage your File, Block, and Object storage that can then be connected to your applications such as Ansible Automation Platform.
The steps to provide highly available PVCs for the PostgreSQL database are beyond the scope of this reference architecture.
Chapter 4. Prerequisites
The installation of Ansible Automation Platform 2.3 for this reference environment uses the following:
- Red Hat OpenShift Platform 4.12
- Appendix C, Applying labels and taints to Red Hat OpenShift node
-
An Amazon S3 bucket to handle the
ReadWriteManystorage requirement for automation hub
The installation of AAP 2.3 requires at least version Red Hat OpenShift 4.9. For more details, visit the Red Hat Ansible Automation Platform Life Cycle page.
There are many methods to deploy Red Hat OpenShift. The size of your Red Hat OpenShift cluster will depend on the specific requirements of your applications (not just Ansible Automation Platform). Factors to consider include the number of users accessing the cluster, the amount of data and resources that the applications require to run, and your scalability and redundancy requirements.
For details on how to deploy Red Hat OpenShift, visit the Install Guide
In addition to the install guide above, review the OpenShift 4 Resources Configuration: Methodology and Tools blog article to assist in determining the appropriate cluster size based on your needs.
Automation hub requires ReadWriteMany file-based storage, Azure Blob storage, or Amazon S3-compliant storage for operation so that multiple pods can access shared content, such as collections.
This reference environment takes advantage of creating an Amazon S3 bucket to fulfill the request of ReadWriteMany storage. Details Appendix D, Create an Amazon S3 bucket.
Chapter 5. Installing the Ansible Automation Platform Operator
When installing the Ansible Automation Platform operator the preferred method of deployment is to install the cluster-scoped operator on a targeted namespace with manual update approval.
The main advantage of this deployment method is it impacts only resources within the targeted namespace(s) that can in turn provide flexibility when wanting to limit the scope of the AAP operator in how it is handled over different namespaces.
For instance, if you intend to have separate devel and prod namespaces to manage your different AAP deployments while testing upgrades.
The steps to deploy the Ansible Automation Platform operator are as follows.
- Log in to the Red Hat OpenShift web console using your cluster credentials.
- In the left-hand navigation menu, select Operators → OperatorHub.
- Search for Ansible Automation Platform and select it.
- On the Ansible Automation Platform Install page, select "Install".
On the "Install Operator" page,
-
select the appropriate update channel,
stable-2.3-cluster-scoped -
select the appropriate installation mode,
A specific namespace on the cluster -
select the appropriate installed namespace,
Operator recommended Namespace: aap -
select the appropriate update approval, e.g.
Manual.
-
select the appropriate update channel,
-
Click
Install. -
Click
Approveon the Manual approval required.
The process to install the Ansible Automation Platform may take a few minutes prior to being available.
Once the installation is complete, select the View Operator button to view the installed operator in the namespace specified during the installation (e.g. aap).
This AAP operator deployment only targets the namespace aap. If additional namespaces are to be targeted (managed) by the AAP operator, one must add them to the OperatorGroup spec file. Details Appendix F, Adding additional managed namespaces to the AAP Operator.
The default resource values for the Ansible Automation Platform operator are suitable for typical installations. However, if deploying a large number of automation controller and automation hub environments, it is recommended to increase the resource threshold for the Ansible Automation Platform operator within the subscription spec using subscription.spec.config.resources. This ensures that the operator has sufficient resources to handle the increased workload and prevent performance issues.
Chapter 6. Installing automation controller
With the installation of the Ansible Automation Platform operator completed, the following steps install an automation controller within a Red Hat OpenShift cluster.
The resource requests and limits values are specific to this reference environment. Ensure to read the Chapter 3, Before you start section to properly calculate the values for your Red Hat OpenShift environment.
When an instance of automation controller is removed, the associated Persistent Volume Claims (PVCs) are not automatically deleted. This can cause issues during migration if the new deployment has the same name as the previous deployment. It is recommended to remove old PVCs prior to deploying a new automation controller instance in the same namespace. The steps to remove previous deployment PVCs can be found within Appendix B, Delete existing PVCs from previous AAP installations.
- Log in to the Red Hat OpenShift web console using your cluster credentials.
- In the left-hand navigation menu, select Operators → Installed Operators, select Ansible Automation Platform.
- Navigate to the Automation Controller tab, then click Create AutomationController.
- Within the Form view, provide a Name, e.g. my-automation-controller and select the Advanced configuration to expand the additional options.
Within the Additional configuration, set the appropriate Resource Requirements for each container as calculated from the Before you Start section.
Expand Web Container Resource Requirements
- Limits: CPU cores: 2000m, Memory: 1.5Gi
- Requests: CPU cores: 500m, Memory: 1.5Gi
Expand Task Container Resource Requirements
- Limits: CPU cores: 4000m, Memory: 8Gi
- Requests: CPU cores: 1000m, Memory: 8Gi
Expand EE Control Plane Container Resource Requirements
- Limits: CPU cores: 500m, Memory: 400Mi
- Requests: CPU cores: 100m, Memory: 400Mi
Expand Redis Container Resource Requirements
- Limits: CPU cores: 500m, Memory: 1.5Gi
- Requests: CPU cores: 250m, Memory: 1.5Gi
Expand PostgreSQL Container Resource Requirements
- Limits: CPU cores: 1000m, Memory: 1Gi
- Requests: CPU cores: 500m, Memory: 1Gi
At the top of the Create AutomationController page, toggle the YAML view
Within the
spec:section add theextra_settingsparameter to pass theAWX_CONTROL_NODE_TASK_IMPACTvalue calculated in the Chapter 3, Before you start sectionspec: ... extra_settings: - setting: AWX_CONTROL_NODE_TASK_IMPACT value: "5"
Within the YAML view, add the following to the spec section to add dedicated node for your control pod.
spec: ... node_selector: | aap_node_type: control topology_spread_constraints: | - maxSkew: 1 topologyKey: "kubernetes.io/hostname" whenUnsatisfiable: "ScheduleAnyway" labelSelector: matchLabels: aap_node_type: control tolerations: | - key: "dedicated" operator: "Equal" value: "AutomationController" effect: "NoSchedule"NoteEnsure to have your node label and taints to the appropriate dedicated worker node that shall run the control pods. Details to set can be found within Appendix C, Applying labels and taints to Red Hat OpenShift node.
- Click the Create button
Chapter 7. Installing automation hub
With the installation of the Ansible Automation Platform operator completed, the following steps install automation hub within a Red Hat OpenShift cluster.
The resource requests and limits values are specific to this reference environment. Ensure to read the Chapter 3, Before you start section to properly calculate the values for your Red Hat OpenShift environment.
When an instance of automation hub is removed, the associated Persistent Volume Claims (PVCs) are not automatically deleted. This can cause issues during migration if the new deployment has the same name as the previous deployment. It is recommended to remove old PVCs prior to deploying a new automation hub instance in the same namespace. The steps to remove previous deployment PVCs can be found within Appendix B, Delete existing PVCs from previous AAP installations.
Automation hub requires ReadWriteMany file-based storage, Azure Blob storage or Amazon S3-compliant storage for operation to ensure multiple pods can access shared content, such as collections.
- Log in to the Red Hat OpenShift web console using your cluster credentials.
- In the left-hand navigation menu, select Operators → Installed Operators, select Ansible Automation Platform.
- Navigate to the Automation Hub tab, then click Create AutomationHub.
Within the Form view
- provide a Name, e.g. my-automation-hub
Within the Storage type, select your
ReadWriteManycompliant storage.NoteThis reference environment uses Amazon S3 as its
ReadWriteManystorage. Details to create an Amazon S3 bucket can be found in Appendix D, Create an Amazon S3 bucket.- Provide S3 storage secret. Details on how to create within Appendix E, Creating an AWS S3 Secret.
- Select the Advanced configuration to expand the additional options.
Within PostgreSQL container storage requirements (when using a managed instance)
- set storage limit to 50Gi
- set storage requests to 8Gi
Within PostgreSQL container resource requirements (when using a managed instance)
- Limits: CPU cores: 500m, Memory: 1Gi
- Requests: CPU cores: 200m, Memory: 1Gi
Within Redis deployment configuration, select Advanced configuration
Select In-memory data store resource requirements
- Limits: CPU cores: 250m, Memory: 200Mi
- Requests: CPU cores: 100m, Memory: 200Mi
Within API server configuration, select Advanced configuration
Select API server resource requirements
- Limits: CPU cores: 250m, Memory: 400Mi
- Requests: CPU cores: 150m, Memory: 400Mi
Within Content server configuration, select Advanced configuration
Select Content server resource requirements
- Limits: CPU cores: 250m, Memory: 400Mi
- Requests: CPU cores: 100m, Memory: 400Mi
Within Worker configuration, select Advanced configuration
Select Worker resource requirements
- Limits: CPU cores: 1000m, Memory: 3Gi
- Requests: CPU cores: 500m, Memory: 3Gi
- Click the Create button
Chapter 8. Login to your automation controller dashboard
With a successful installation of automation controller, one can access the dashboard via the following steps:
- Within your Red Hat OpenShift web console, in the left navigation menu, select Operators→ Installed Operators.
- Select Ansible Automation Platform.
- Within Operator Details, select the Automation Controller tab.
- Select the Name of the installed automation controller.
- Within the Automation Controller overview, the details including URL, Admin user, and Admin password are provided.
Chapter 9. Login to your automation hub dashboard
- Within your Red Hat OpenShift web console, in the left navigation menu, select Operators→ Installed Operators.
- Select Ansible Automation Platform.
- Within Operator Details, select the Automation Hub tab.
- Select the Name of the installed automation hub.
- Within the Automation Hub overview, the details including URL, Admin user, and Admin password are provided.
Chapter 10. Monitoring your Ansible Automation Platform
After a successful installation of Ansible Automation Platform, it is crucial to prioritize the maintenance of its health and the ability to monitor key metrics.
This section focuses on how to monitor the API metrics provided by the newly installed Ansible Automation Platform environment that resides within Red Hat OpenShift.
10.1. What will be used to monitor the API metrics?
Prometheus and Grafana.
Prometheus is an open source monitoring solution for collecting and aggregating metrics. Partner Prometheus’ monitoring capabilities with Grafana, an open source solution for running data analytics and pulling up metrics in customizable dashboards, and you get a real-time visualization of metrics to track the status and health of your Ansible Automation Platform.
10.2. What metrics can I expect to see?
The Grafana pre-built dashboard displays:
- Ansible Automation Platform version
- Number of controller nodes
- Number of hosts available in the license
- Number of hosts used
- Total users
- Jobs successful
- Jobs failed
- Quantity by type of job execution
- Graphics showing the number of jobs running and pending jobs
- Graph showing the growth of the tool showing the amount of workflow, hosts, inventories, jobs, projects, organizations, etc.
This Grafana dashboard can be customized to capture other metrics you may be interested in. However, customizing the Grafana dashboard is out of scope of this reference architecture.
10.3. Installation via an Ansible Playbook
The process to monitor Ansible Automation Platform via Prometheus with a customized Grafana dashboard can be installed in a matter of minutes. The following provides the steps to do just that, taking advantage of the pre-built Ansible playbook.
The following steps are required to run the Ansible Playbook successfully:
- Creation of a custom credential type within automation controller
- Creation of a kubeconfig credential within automation controller
- Creation of a project and job template to run the Ansible Playbook
10.3.1. Create a custom credential type
Within your Ansible Automation Platform dashboard,
- Under Administration→Credential Types click the blue Add button.
- Provide a Name, e.g. Kubeconfig
Within the input configuration, input the following YAML:
fields:
  - id: kube_config
    type: string
    label: kubeconfig
    secret: true
    multiline: true
Within the injector configuration, input the following YAML:
env: K8S_AUTH_KUBECONFIG: '{{ tower.filename.kubeconfig }}' file: template.kubeconfig: '{{ kube_config }}'- Click Save.
10.3.2. Create a kubeconfig credential
Within your Ansible Automation Platform dashboard,
- Under Resources→Credentials click the blue Add button.
- Provide a Name, e.g. OpenShift-Kubeconfig
- Within the Credential Type dropdown, select Kubeconfig.
- Within the Type Details text box, insert your kubeconfig file for your Red Hat OpenShift cluster
- Click Save.
10.3.3. Create a project
Within your Ansible Automation Platform dashboard,
- Under Resources→Projects click the blue Add button.
- Provide a Name, e.g. Monitoring AAP Project
- Select Default as the Organization.
- Select Default execution environment as the Execution Environment.
- Select Git as the Source Control Credential Type.
Within the Type Details,
- Add the Source Control URL (https://github.com/ansible/aap_ocp_refarch)
Within Options,
- Select Clean, Delete, Update Revision on Launch.
- Click Save.
10.3.4. Create a job template & run the Ansible Playbook
Within your Ansible Automation Platform dsahboard,
- Under Resources→Templates click the blue Add→Add job template
- Provide a Name, e.g. Monitoring AAP Job
- Select Run as the Job Type.
- Select Demo Inventory as the Inventory.
- Select Monitoring AAP Project as the Project.
- Select Default execution environment as the Execution Environment.
- Select aap-prometheus-grafana/playbook.yml as the Playbook.
- Select Credentials and switch the category from Machine to Kubeconfig.
- Select the appropriate kubeconfig for access to the Red Hat OpenShift cluster, e.g. OpenShift-Kubeconfig
Optional Step: Within the Variables, the following variables may be modified:
- prometheus_namespace: <your-specified-value>
- ansible_namespace: <your-specified-value>
- Click Save.
- Click Launch to run the Ansible Playbook
- Details to login to Grafana and Prometheus are shown within the job output
Appendix A. About the Author
Appendix B. Delete existing PVCs from previous AAP installations
Open a terminal window and login to your Red Hat OpenShift cluster, e.g. exporting your KUBECONFIG file
$ export KUBECONFIG=/path/to/kubeconfig
Verify the list of PVCs in the specified Ansible Automation Platform namespace, e.g.
aap$ oc get pvc -n aap
NoteThis shows a list of all the PVCs within the
aapnamespace including their name, status, capacity, access modes and storage class.- Identify the PVC you wish to remove from the list
Remove the PVC using the
oc deletecommandoc delete pvc <pvc-name-to-remove> -n aap
Verify the list of PVCs available within the
aapnamespace and ensure the PVC is no longer displayed.$ oc get pvc -n aap
Appendix C. Applying labels and taints to Red Hat OpenShift node
In order to have our control pods run on a dedicated Red Hat OpenShift node, one must set the appropriate labels and taints to the specified node.
In this example, we will select one of our Red Hat OpenShift nodes with the role worker the label aap_node_type=control.
Get the name of one of the nodes you want to label running
$ oc get nodes
-
Choose a node from the list and note its name, e.g.
worker1 Apply the
aap_node_type=controllabel to the node$ oc label node <node-name> aap_node_type=control
NoteReplace
<node-name>with the name of the node you want to label.Verify the creation of the label as follows:
$ oc get nodes --show-labels | grep <node-name>
With the label created, the next step is to add a
NoScheduletaint to the worker node we have already created a label for.The following command adds a
NoScheduletaint to our node:oc adm taint nodes <node-name> dedicated=AutomationController:NoSchedule
dedicated: This is the key of the taint that is an arbitrary string supplied that identifies the taint.AutomationController: This is an arbitrary value given to the taint.NoSchedule: This is the effect of the taint which specifies no pods that don’t tolerate this taint will be scheduled onto this node.By applying this taint to our node, we are telling the Kubernetes scheduler to reserve this node for certain types of workloads that tolerate the taint. In this case, we are reserving the node for workloads with the dedicated=AutomationController toleration.
Verify the taint has been applied
$ oc get nodes \
-o jsonpath='{range.items[*]}{@.metadata.name}{"\t"}{@.spec.taints[*].key}:{@.spec.taints[*].value}{"\n"}{end}' \
| grep AutomationController
Appendix D. Create an Amazon S3 bucket
- Open a terminal and ensure that the AWS CLI is installed and configured with your AWS credentials.
Run the following command to create a new S3 bucket:
$ aws s3 mb s3://<bucket-name> --region <region-name>
WarningThe bucket name must be a unique name.
Run the following command to check that the bucket has been successfully created
$ aws s3 ls | grep <bucket-name>
Appendix E. Creating an AWS S3 Secret
In Red Hat OpenShift, one has the ability to store secrets and use them to authenticate with external services such as Amazon S3. This reference environment takes advantage of an Amazon S3 bucket to satisfy the ReadWriteMany requirement to run automation hub.
The following steps show how to create a secret within your Red Hat OpenShift cluster that is to be used during the Chapter 7, Installing automation hub chapter.
$ cat s3-secret.yml
apiVersion: v1
kind: Secret
metadata:
  name: s3-secret
  namespace: aap
stringData:
  s3-access-key-id: my_key
  s3-secret-access-key: my_access_key
  s3-bucket-name: my_bucket
  s3-region: my_region
$ oc create -f s3-secret.yml
Appendix F. Adding additional managed namespaces to the AAP Operator
The following are the steps to add an additional managed namespace to the already existing AAP operator that resides in the aap namespace.
- Login to the Red Hat OpenShift UI.
- Within the Operators→Installed Operators, select Ansible Automation Platform
Within the Details page, scroll down to the ClusterServiceVersion Details
-
On the right column, click on the
OperatorGroup
-
On the right column, click on the
Within the
OperatorGroupdetails, select YAMLUnder the
specsection add any additional namespaces, e.g.aap-develspec: ... targetNamespaces: - aap - aap-devel
- Click Save
The targeted namespace must already exist prior to adding to the OperatorGroup spec file.
Appendix G. References
- What everyone should know about Kubernetes memory limits, OOMKilled pods, and pizza parties
- Pulp Project Hardware requirements
- Red Hat Ansible Automation Platform Performance Considerations for Operator Based Installations
- Deploying the Red Hat Ansible Automation Platform operator on OpenShift Container Platform
- Pulp Operator storage configuration
- AWX Operator
- Resources consumed by idle PostgreSQL connections
- Operator scoping with OperatorGroups
- Ansible Tower and Grafana Dashboards
Appendix H. Revision History
| Revision History | ||
|---|---|---|
| Revision 1.0-0 | 2023-03-07 | Roger Lopez |
| ||