
Deploying Ansible Automation Platform 2.1
Abstract
Comments and Feedback
In the spirit of open source, we invite anyone to provide feedback and comments on any reference architecture. Although we review our papers internally, sometimes issues or typographical errors are encountered. Feedback allows us to not only improve the quality of the papers we produce, but allows the reader to provide their thoughts on potential improvements and topic expansion to the papers. Feedback on the papers can be provided by emailing ansible-feedback@redhat.com. Please refer to the title within the email.
Chapter 1. Overview
The Ansible Automation Platform 2.1 reference architecture provides an opinionated setup of deploying a highly available Ansible Automation Platform environment. It provides a step-by-step deployment procedure with the latest best practices to install and configure Ansible Automation Platform 2.1. It is best suited for system and platform administrators looking to deploy Ansible Automation Platform.
A pictorial representation of the environment used in this reference environment is shown in Figure 1.1, “Reference Architecture Overview”
Figure 1.1. Reference Architecture Overview
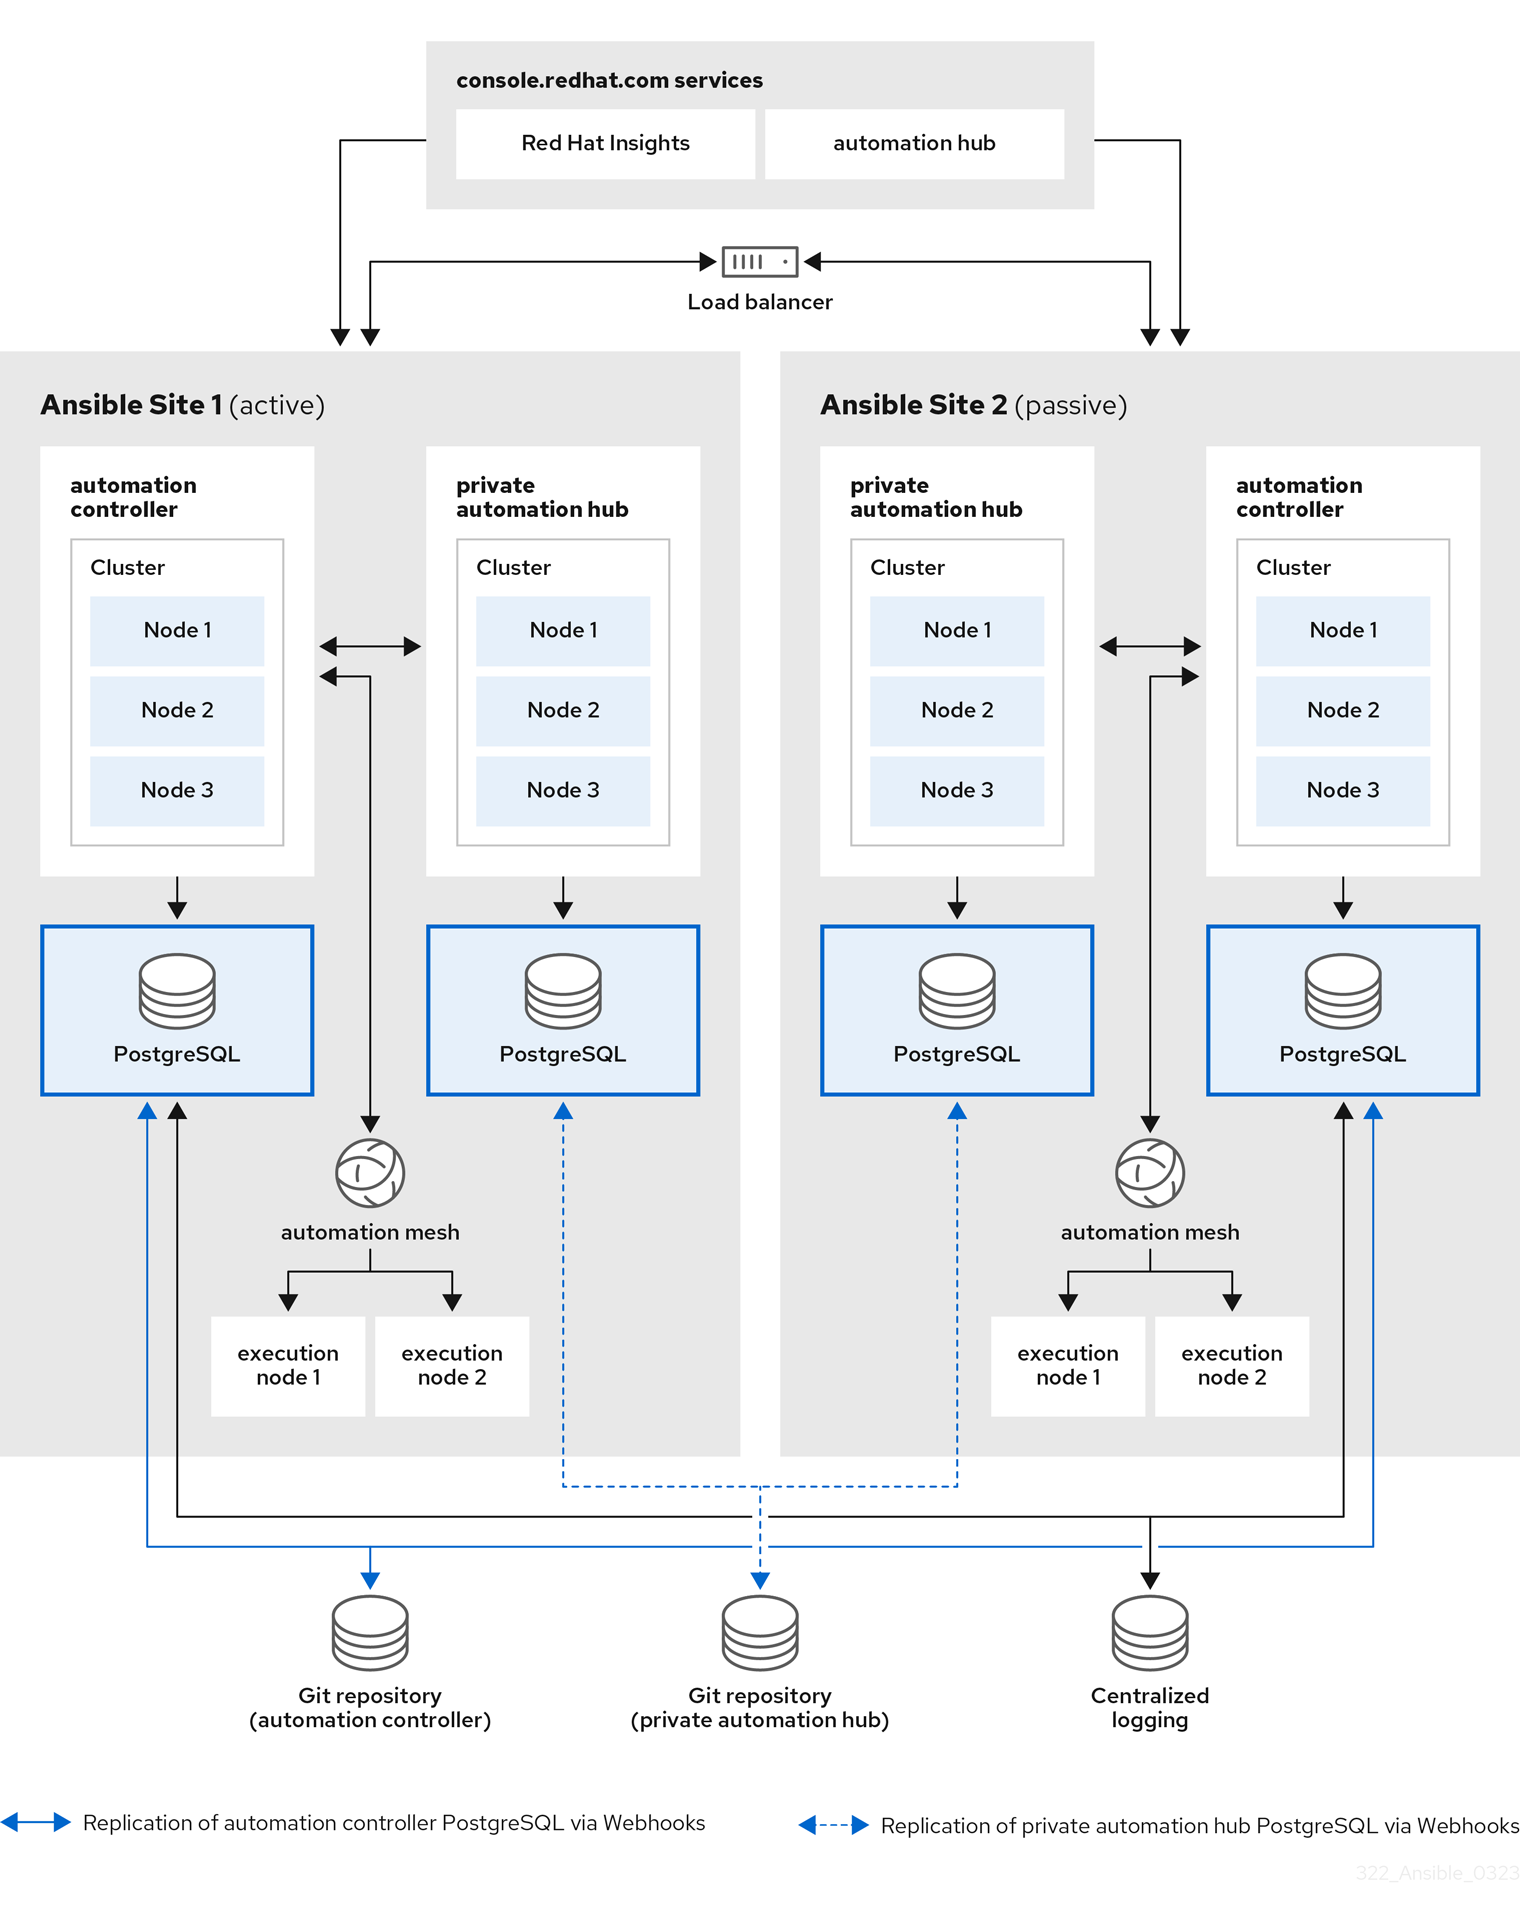
The image above consists of two sites, Ansible Site 1 and Ansible Site 2 for high availability. Site one is an active environment while site two is a passive environment. Each site consists of:
- three node automation controller cluster with one PostgreSQL database
- three node automation hub cluster with one PostgreSQL database
- Two execution nodes per automation controller cluster
- Access to console.redhat.com services such as Red Hat Insights and Service Catalog
In order to achieve HA for the PostgreSQL databases, configuration as code in conjunction with Git webhooks are used when push or merge events are triggered on a Git repository which in turn will configure the specified event on both Ansible Site 1 and Ansible Site 2.
Finally, to ensure logging consistency, a highly available centralized logging environment is installed that both Ansible Automation Platform environments will use.
Chapter 2. Prerequisites
The installation of this highly available Ansible Automation Platform 2.1 reference environment uses the following on each site:
- Three control plane nodes
- One control plane database node
- Two execution nodes
- Three automation hub nodes
- One automation hub database node
- Shared filesystem for automation hub installation (/var/lib/pulp)
These nodes are not required to be physical servers.
2.1. Node requirements
Table 2.1. execution nodes
| Execution nodes | Required | Notes |
| RAM | 16Gb | |
| CPUs | 4 |
|
Table 2.2. automation controller nodes
| Control nodes | Required | Notes |
| RAM | 16Gb | |
| CPUs | 4 |
|
| Disk: service node | 40Gb dedicated hard disk space |
|
| Disk: database node | 20Gb dedicated hard disk space |
|
| Browser | A currently supported version of Mozilla FireFox or Google Chrome | |
| Database | PostgreSQL version 12 |
Table 2.3. automation hub nodes
| automation hub nodes | Required | Notes |
| RAM | 8Gb minimum |
|
| CPUs | 2 minimum |
|
| Disk: service node | 40Gb dedicated hard disk space |
|
| Disk: database node | 20Gb dedicated hard disk space |
|
| Browser | A currently supported version of Mozilla FireFox or Google Chrome | |
| Database | PostgreSQL version 12 |
Table 2.4. database nodes
| database nodes | Required | Notes |
| RAM | 16GB | |
| CPUs | 4 | |
| Disk | 20Gb dedicated hard disk space |
|
All automation controller data is stored in the PostgreSQL database. Database storage increases with the number of hosts managed, number of jobs run, number of facts stored in the fact cache, and number of tasks in any individual job. For example, a playbook run every hour (24 times a day) across 250, hosts, with 20 tasks will store over 800,000 events in the database every week.
If not enough space is reserved in the database, old job runs and facts will need cleaned on a regular basis. Refer to Management Jobs in the Automation Controller Administration Guide for more information
2.2. Network Requirements
Ansible Automation Platform 2.1 requires at least one network across all nodes within the Ansible Automation Platform cluster.
In order to access the Ansible Automation Platform dashboard, a browser that can access the network that the control plane nodes reside on is required. If you wish to access the Ansible Automation Platform dashboard externally, ensure to add a public IP address to your control plane nodes.
It is recommended that network administrators setup a static DHCP address for all nodes and an appropriate DNS record. This ensures each node’s IP address remains constant in the absence of a DHCP server. To use static IP addresses, reserve the IP addresses with an infinite lease.
For the purposes of this reference architecture, setup of a DHCP server, setting up DNS records and setting up a load balancer is out of scope.
A network administrator should reserve at least the following number of IP addresses, including:
- One IP address for each control plane node.
- One IP address for each execution node.
- One IP address for each automation hub node.
- One IP address for the control plane database.
- One IP address for the automation hub database.
- One IP address for the load balancer automation controller cluster address for Ansible Automation Platform Site 1.
- One IP address for the load balancer automation controller cluster address for Ansible Automation Platform Site 2.
- One IP address for the load balancer private automation hub cluster address for Ansible Automation Platform Site 1.
- One IP address for the load balancer private automation hub cluster address for Ansible Automation Platform Site 2.
This reference environment reserves 12 IP addresses per site.
The following table provides an example of Ansible Site 1 of the reference environment.
| Usage | Host Name | IP |
| Control Plane 1 | controlplane-1.site1.example.com | 192.168.0.10 |
| Control Plane 2 | controlplane-2.site1.example.com | 192.168.0.11 |
| Control Plane 3 | controlplane-3.site1.example.com | 192.168.0.12 |
| Control Plane Database | controlplane-db.site1.example.com | 192.168.0.13 |
| Control Plane Cluster address | controlplane-cluster.site1.example.com | 192.168.0.14 |
| Execution Node 1 | executionnode-1.site1.example.com | 192.168.0.15 |
| Execution Node 2 | executionnode-2.site1.example.com | 192.168.0.16 |
| Automation Hub Node 1 | automationhub-1.site1.example.com | 192.168.0.17 |
| Automation Hub Node 2 | automationhub-2.site1.example.com | 192.168.0.18 |
| Automation Hub Node 3 | automationhub-3.site1.example.com | 192.168.0.19 |
| Automation Hub Database | automationhub-db.site1.example.com | 192.168.0.20 |
| Automation Hub Cluster | automationhub-cluster.site1.example.com | 192.168.0.21 |
2.3. Validation checklist for nodes
The following is a summary of all the requirements:
- ❏ 16 GB of RAM for controller nodes and execution nodes
- ❏ 8 GB of RAM for private automation hub nodes
- ❏ 4 CPUs for controller nodes and execution nodes
- ❏ 2 CPUs for private automation hub nodes
- ❏ 20 GB+ disk space for database node
- ❏ 40 GB+ disk space for non database nodes
- ❏ DHCP reservations use infinite leases to deploy the cluster with static IP addresses.
- ❏ DNS records for all nodes
- ❏ Red Hat Enterprise Linux 8.4 or later 64-bit (x86) installed for all nodes
- ❏ Chrony configurationed for all nodes
- ❏ ansible-core version 2.11 or later installed for all nodes
Chapter 3. Ansible Automation Platform Controller Configuration Details
This reference architecture focuses on the deployment of Ansible Automation Platform 2.1 using automation mesh on Red Hat Enterprise Linux 8.4 x86_64. The configuration is intended to provide a comprehensive Ansible Automation Platform solution. The key solution components covered within this reference archtiecture consists of:
- Red Hat Enterprise Linux 8.4
- Ansible Automation Platform 2.1
- automation mesh
- private automation hub
3.1. Network Configuration
3.1.1. Chrony Configuration
Each Ansible Automation Platform node in the cluster must have access to an NTP server. The chronyd is a daemon for synchronization of the system clock. It can synchronize the clock with NTP servers. This ensures that when cluster nodes use SSL certificates that require validation, they don’t fail if the date and time between the nodes are not in sync.
On all the nodes,
If not installed, install
chronyas follows# dnf install chrony --assumeyes
Edit the
/etc/chrony.conffile with a text editor such asvi.# vi /etc/chrony.conf
Locate the following public server pool section, and modify to include the appropriate servers. Only one server is required, but three is recommended. The iburst option is added to speed up the time that it takes to properly sync with the servers.
# Use public servers from the pool.ntp.org project. # Please consider joining the pool (http://www.pool.ntp.org/join.html). server <ntp-server-address> iburst-
Save all the changes within the
/etc/chrony.conffile. Start and enable that the
chronyddaemon is started when the host is booted.# systemctl --now enable chronyd.service
Verify the chronyd daemon status.
# systemctl status chronyd.service
3.2. OS Configuration
3.2.1. Red Hat Subscription Manager
The subscription-manager command registers a system to the Red Hat Network (RHN) and manages the subscription entitlements for a system. The --help option specifies on the command line to query the command for the available options. If the --help option is issued along with a command directive, then options available for the specific command directive are listed.
To use Red Hat Subscription Management for providing packages to a system, the system must first register with the service. In order to register a system, use the subscription-manager command and pass the register command directive. If the --username and --password options are specified, then the command does not prompt for the RHN Network authentication credentials.
An example of registering a system using subscription-manager is shown below.
# subscription-manager register --username [User] --password '[Password]'
The system has been registered with id: abcd1234-ab12-ab12-ab12-481ba8187f60
After a system is registered, it must be attached to an entitlement pool. For the purposes of this reference environment, the Red Hat Ansible Automation Platform is the pool chosen. Identify and subscribe to the Red Hat Ansible Automation Platform entitlement pool, the following command directives are required.
# subscription-manager list --available | grep -A8 "Red Hat Ansible Automation Platform"
---
Subscription Name:   Red Hat Ansible Automation Platform, Premium (5000 Managed Nodes)
Provides:            Red Hat Ansible Engine
                     Red Hat Single Sign-On
                     Red Hat Ansible Automation Platform
SKU:                 MCT3695
Contract:            <contract>
Pool ID:             <pool_id>
Provides Management: No
Available:           9990
Suggested:           1
Service Type:        L1-L3
Roles:
# subscription-manager attach --pool <pool_id>
Successfully attached a subscription for: Red Hat Ansible Automation Platform, Premium (5000 Managed Nodes)# subscription-manager repos --enable=ansible-automation-platform-2.1-for-rhel-8-x86_64-rpms
3.2.2. User Accounts
Prior to the installation of Ansible Automation Platform 2.1, it is recommended to create a non-root user with sudo privileges for the deployment process. This user is used for:
- SSH connectivity
- passwordless authentication during installation
For the purposes of this reference environment, the user ansible was chosen, however, any user name would suffice.
On all nodes, create a user named ansible and generate an ssh key.
Create a non-root user
# useradd ansible
Set a password for your
ansibleuser.# passwd ansible
Generate an
sshkey as theansibleuser.$ ssh-keygen -t rsa
Disable password requirements when using
sudoas theansibleuser# echo "ansible ALL=(ALL) NOPASSWD:ALL" | sudo tee -a /etc/sudoers.d/ansible
3.2.3. Copying SSH keys to all nodes
With the ansible user created, as the ansible user, copy the ssh key to all the nodes. This ensures that when the Ansible Automation Platform installation runs, it can ssh to all the nodes without a password.
This can be done using the ssh-copy-id command as follows:
$ ssh-copy-id ansible@hostname.example.com
If running within a cloud provider, you may need to instead create an ~/.ssh/authorized_keys file containing the public key for the ansible user on all your nodes and set the permissions to the authorized_keys file to only the owner (ansible) having read and write access (permissions 644).
3.2.4. Configuring Firewall Settings
Firewall access and restrictions play a critical role in securing Ansible Automation Platform 2.1 environment. The use of Red Hat Enterprise Linux 8.4 defaults to using firewalld, a dynamic firewall daemon. firewalld works by assigning network zones to assign a level of trust to a network and its associated connections and interfaces.
It is recommended that firewall settings be configured to permit access to the appropriate services and ports for a success Ansible Automation Platform 2.1 installation.
On all nodes, ensure that firewalld is installed, started and enabled.
Install the
firewalldpackage# dnf install firewalld --assumeyes
Start the
firewalldservice# systemctl start firewalld
Enable the
firewalldservice# systemctl enable firewalld
Chapter 4. Ansible Automation Platform Controller Database Configuration Details
4.1. Configuring Controller Database Firewall Settings
For a successful Ansible Automation Platform installation, one of the prerequisites is to enable the database port on the database node. The port used is configured by the pg_port within your inventory file.
Snippet of inventory file
pg_port='5432'
Within your database node, as the ansible user, set the firewalld port to be used for installation.
Ensure that
firewalldis running.$ sudo systemctl status firewalld
Add the
firewalldport on your controller database node (e.g. port 5432)$ sudo firewall-cmd --permanent --zone=public --add-port=5432/tcp
Reload
firewalld$ sudo firewall-cmd --reload
Confirm that the port is open
$ sudo firewall-cmd --list-ports
Chapter 5. Ansible Automation Platform Execution and Hop Node Configuration Details
5.1. Configuring firewall settings for execution and hop nodes
For a successful Ansible Automation Platform installation, one of the prerequisites is to enable the automation mesh port on the mesh nodes (execution and hop nodes). The default port used for the mesh networks on all the nodes is set to 27199/tcp, however, it can be configured to use a different port by specifying receptor_listener_port as each node’s variable within your inventory file.
Snippet of inventory file
receptor_listener_port=27199
For this reference environment all the Ansible Automation Platform 2 controller nodes are designated as node type control. If control nodes are designated as hybrid nodes (default node type), they require mesh port (default: 27199/tcp) to be enabled.
Within your hop and execution node(s), as the ansible user:
Ensure that
firewalldis running.$ sudo systemctl status firewalld
Add the
firewalldport on your hop and execution nodes (e.g. port 27199)$ sudo firewall-cmd --permanent --zone=public --add-port=27199/tcp
Reload
firewalld$ sudo firewall-cmd --reload
Confirm that the port is open
$ sudo firewall-cmd --list-ports
Chapter 6. Installing Ansible Automation Platform 2.1
The installation of Ansible Automation Platform 2.1 takes advantage of automation controller and automation mesh to provide a simple, secure and flexible method of handling your automation workloads.
Automation controller provides the control plane for automation through its UI, Restful API, RBAC workflows and CI/CD integrations.
Automation mesh is an overlay network that provides the ability to ease the distribution of work across a large and dispersed collection of workers through nodes that establish peer-to-peer connections with each other using existing networks.
With automation mesh in place, you can:
- Dynamically scale cluster capacity without downtime
- Decouple the execution and control plane
- Re-route execution to a different path when outages may exist automatically
The following steps provide a step-by-step on deploying a clustered Ansible Automation Platform 2.1 using automation mesh.
The following installation is done on Ansible Site 1 of this reference environment Ansible Automation Platform cluster. After completion, ensure to follow the same steps for Ansible Site 2.
On controlplane-1.site1.example.com, as the ansible user, perform the following:
- Download Ansible Automation Platform 2.1 Setup tar ansible-automation-platform-setup-2.1.0-1.tar.gz
Untar the ansible-automation-platform-setup-2.1.0-1.tar.gz
$ tar zxvf ansible-automation-platform-setup-2.1.0-1.tar.gz
Change directory into ansible-automation-platform-setup-2.1.0-1.tar.gz
cd ansible-automation-platform-setup-2.1.0-1/
Backup the existing inventory file
$ cp inventory inventory.bkup
Install the
ansible-corepackage$ sudo dnf install ansible-core --assumeyes
Modify the inventory to include with the appropriate information about your environment. Below is an example of this reference environment.
[automationcontroller]
controlplane-1.site1.example.com ansible_connection=local
controlplane-2.site1.example.com
controlplane-3.site1.example.com

[automationcontroller:vars]
node_type=control 1
peers=execution_nodes 2

[execution_nodes]
executionnode-1.site1.example.com peers=executionnode-2.site1.example.com 3
executionnode-2.site1.example.com

[database]
controldatabase.site1.example.com 4

[all:vars]
#Handled by Ansible Vault
admin_password='' 5

pg_host='controldatabase.site1.example.com' 6
pg_port='5432' 7

pg_database='awx'
pg_username='awx'

#Handled by Ansible Vault
pg_password='' 8

pg_sslmode='prefer'

registry_url=’registry.redhat.io’ 9
registry_username='myusername' 10

#Handled by Ansible Vault
registry_password='' 11
- 1
- control nodes run project and inventory updates and system jobs, but not execution jobs. Execution capabilities are disabled on these nodes.
- 2
- Peer relationships define node-to-node connections. Setting peer relationship between control plane nodes and execution nodes.
- 3
- Setting peer relationships between the execution nodes.
- 4
- Set the node that will install the PostgreSQL database for the controller installation.
- 5
- Set the password for admin user to access the UI upon install completion.
- 6
- Set the PostgreSQL host (database node).
- 7
- Set the PostgreSQL port to use for the database node.
- 8
- Set the password for the PostgreSQL database.
- 9
- Execution Environment images are downloaded and included in your installation. Proper credentials required to download the images.
- 10
- User credential for access to registry_url.
- 11
- Password credential for access to registry_url.
Create a file labeled credentials.yml that will store the encrypted credentials.
$ cat credentials.yml
admin_password: my_long_admin_pw
pg_password: my_long_pg_pw
registry_password: my_long_registry_pw
Encrypt the credentials.yml file using
ansible-vault.$ ansible-vault encrypt credentials.yml
New Vault password:
Confirm New Vault password:
Encryption successful
WarningStore your encrypted vault password in a safe place.
Verify the credentials.yml file is encrypted
$ cat credentials.yml
$ANSIBLE_VAULT;1.1;AES256
36383639653562386534316333333961383336306465336465613831353435313530376464616539
3765393063303065323466663330646232363065316666310a373062303133376339633831303033
34313534383962613632303761636632623932653062343839613639653635643365616233313365
3636616639313864300a353239373433313339613465326339313035633565353464356538653631
63346434383534643237663862353361366632613634333231316334363939396461326561643336
3430633534303935646264633034383966336232303365383763
Run the
setup.shfor installation of Ansible Automation Platform 2.1 and pass the credentials.yml, as well as, the --ask-vault-pass option$ ANSIBLE_BECOME_METHOD='sudo' ANSIBLE_BECOME=True ANSIBLE_HOST_KEY_CHECKING=False ./setup.sh -e @credentials.yml -- --ask-vault-pass
NoteThe following ANSIBLE*_ variables are set to ensure a successful install.
NoteFor more information regarding the different values that can be set within your inventory file, visit: Setting up the inventory file
- Login to the Ansible Automation Platform dashboard, e.g. controlplane-cluster.site1.example.com
Activate your Ansible Automation Platform subscription via Subscription manifest or username/password.
 Note
NoteThe steps to generate your subscription manifest can be found Appendix D, Generate a subscription manifest
Chapter 7. Private Automation Hub
Automation Hub is the central place for the certified collections. It functions as the main source of trusted, tested and supported content. Private automation hub provides automation developers the ability to collaborate and publish their own automation content and streamline delivery of Ansible code within their organization.
Private automation hub in Ansible Automation Platform 2.1 primarily delivers support for automation execution environments. Execution environments are a standardized way to define, build and distribute the environments that the automation runs in. In a nutshell, automation execution environments are container images that allow for easier administration of Ansible by the platform administrator.
7.1. Requirements for a High Availability Automation Hub
7.1.1. Enabling firewall services
As part of a highly available automation hub environment, due to the requirement of using a shared filesystem, the following firewall services should be enabled to ensure successful mounting of the filesystem as shown in the next section.
On each automation hub node, as the ansible user:
Ensure the following
firewalldservices (nfs,mountd,rpc-bind) are enabled.$ sudo firewall-cmd --zone=public --add-service=nfs $ sudo firewall-cmd --zone=public --add-service=mountd $ sudo firewall-cmd --zone=public --add-service=rpc-bind
Reload
firewalldfor changes to take effect.$ sudo firewall-cmd --reload
Verify the
firewalldservices are enabled$ sudo firewall-cmd --get-services
Chapter 8. Install Private Automation Hub
With all the prerequisites set and in place, the final step is to modify the inventory file for a clustered automation hub installation and run setup.sh.
Within this reference environment, the controlplane-1.site1.example.com system is used to run the setup.sh for the clustered automation hub environment as it can access all the nodes.
The following installation is done on site Ansible Site 1 of this reference environment Ansible Automation Platform cluster. After completion, ensure to follow the same steps for Ansible Site 2.
On controlplane-1.site1.example.com, as the ansible user, perform the following:
Change directory into ansible-automation-platform-setup-2.1.0-1.tar.gz
cd ansible-automation-platform-setup-2.1.0-1/
Backup the existing inventory file
$ cp inventory inventory-controller.bkup
Modify the inventory file to include with the appropriate information about your environment. Below is an example of this reference environment.
[automationcontroller]

[automationcontroller:vars]

[execution_nodes]

[automationhub]
ahub-1.site1.example.com 1
ahub-2.site1.example.com
ahub-3.site1.example.com


[database]
ahub-db.site1.example.com 2

[servicescatalog_workers]

[sso]

[all:vars]
admin_password=''

pg_host=''
pg_port=''

pg_database=''
pg_username=''
pg_password=''
pg_sslmode=''  # set to 'verify-full' for client-side enforced SSL

registry_url= 'registry.redhat.io' 3
registry_username='myusername' 4


#Handled by Ansible vault
registry_password='' 5

receptor_listener_port=27199

#Handled by Ansible vault
automationhub_admin_password='' 6

automationhub_pg_host='ahub-db.site1.example.com' 7
automationhub_pg_port='5432' 8

automationhub_pg_database='automationhub'
automationhub_pg_username='automationhub'

#Handled by Ansible vault
automationhub_pg_password='' 9

automationhub_pg_sslmode='prefer'

sso_console_admin_password=''
- 1
- automation hub nodes.
- 2
- Set the node that will install the PostgreSQL database for the automation hub installation.
- 3
- Execution Environment images are downloaded and included in your installation. Proper credentials required to download the images.
- 4
- User credential for access to registry_url.
- 5
- Password credential for access to registry_url.
- 6
- Set the password for admin user to access the UI upon install completion.
- 7
- Set the PostgreSQL host (database node).
- 8
- Set the PostgreSQL port to use for the automation hub database node.
- 9
- Set the password for the PostgreSQL database.
NoteAll the information regarding the Ansible Automation Platform controller installation was removed.
Create a file labeled credentials_ah.yml that will store the encrypted credentials.
$ cat credentials_ah.yml
automationhub_admin_password: my_long_ahub_pw
automationhub_pg_password: my_long_ahub_pw
registry_password: my_long_registry_pw
Encrypt the credentials_ah.yml file using
ansible-vault.$ ansible-vault encrypt credentials_ah.yml
New Vault password:
Confirm New Vault password:
Encryption successful
WarningStore your encrypted vault password in a safe place.
Verify the credentials_ah.yml file is encrypted
$ cat credentials_ah.yml
$ANSIBLE_VAULT;1.1;AES256
36383639653562386534316333333961383336306465336465613831353435313530376464616539
3765393063303065323466663330646232363065316666310a373062303133376339633831303033
34313534383962613632303761636632623932653062343839613639653635643365616233313365
3636616639313864300a353239373433313339613465326339313035633565353464356538653631
63346434383534643237663862353361366632613634333231316334363939396461326561643336
3430633534303935646264633034383966336232303365383763
Run the
setup.shfor installation of Ansible Automation Platform 2.1 and pass the credentials_ah.yml, as well as, the --ask-vault-pass option$ ANSIBLE_BECOME_METHOD='sudo' ANSIBLE_BECOME=True ANSIBLE_HOST_KEY_CHECKING=False ./setup.sh -e @credentials_ah.yml -- --ask-vault-pass
NoteThe following ANSIBLE*_ variables are set to ensure a successful install.
NoteFor more information regarding the different values that can be set within your inventory file, visit: Setting up the inventory file
- Login to the private automation hub dashboard, e.g. automationhub-cluster.site1.example.com
Chapter 9. Centralized Logging
When we think about logging, the first thought that comes to mind for most is its ability to troubleshoot a particular issue. As technology continues to evolve and the enormous amounts of data that many applications capture, logs play a vital role in not only capturing data but to allow for operational intelligence methods to be applied.
Ansible Automation Platform provides a logging feature that allows for the capability to send detailed logs to several kinds of third party external log aggregation services. Services connected to this data feed serve as a useful means in gaining insight into automation controller usage or technical trends. The data can be used to analyze events in the infrastructure, monitor for anomalies, and correlate events from one service with events in another.
The types of data that are most useful to automation controller are job fact data, job events/job runs, activity stream data, and log messages. The data is sent in JSON format over a HTTP connection using minimal service-specific tweaks engineered in a custom handler or via an imported library.
The logging feature within Ansible Automation Platform is currently set up to easily work with Splunk, Logstash, Loggly, Sumologic and provides an other option if you’d like to use a different third party external log aggregation service.
For the purposes of this reference environment, the focus is on using Splunk Enterprise 8.2.2 to setup centralized logging across both our Ansible Automation Platform sites.
Installation of Splunk Enterprise is out of scope for this reference architecture. For details, visit: How to install Splunk Enterprise
9.1. Setting up the Splunk HTTP Event Collector (HEC)
The HTTP Event Collector is an endpoint that lets developers send application events directly to the Splunk platform via HTTP or HTTPS using a token-based authentication model.
In order to use HEC, the first step is to enable HEC within our Splunk deployment.
As a Splunk admin,
- Log into your Splunk dashboard.
- Click on Settings → Data Inputs → HTTP Event Collector.
- Click on Global Settings in the upper right corner.
- Select Enabled (default) in the All Tokens toggle options.
-
Choose a Default Source Type for all HEC tokens, e.g.
_json - Checkmark the Enable SSL if your Splunk deployment uses HTTPS.
- Set a dedicated port for HTTP input via the HTTP Port Number. Defaults to 8088.
- Click Save.
Figure 9.1. Global Settings

Ensure that port 8088 (or the assigned port) is open on your Splunk deployment.
With HEC enabled in our Splunk deployment, generate an HEC token that is going to be used for automation controller authentication with Splunk.
While there are different methods on how to configure your token for receiving data over HTTP, the following are the configuration settings used for this reference environment.
For more information on HEC visit: HTTP Event Collector
- Click Settings → Add Data.
- Select Monitor at the bottom of the page.
- Click HTTP Event Collector.
- Enter your token name in the Name field, e.g. AAP
- Change Source Type to Select and enter _json in the dropdown.
- Within Index, create an Index labeled ansible.
Add the newly created Index into the selected items box.

Click Review at the top right corner.

- Click Submit.
Store the created Token value as it will be used to authenticate Splunk on Ansible Automation Platform
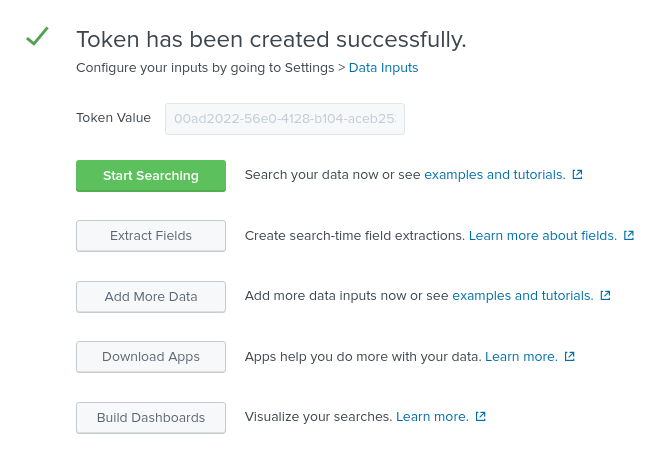
Click the Start Search green button and copy the supplied sample query for later use.
source="http:AAP" (index="ansible") sourcetype="_json"
9.2. Configuring Ansible Automation Platform automation controller
With HEC enabled and an HEC token created, our Splunk environment is ready to receive events from Ansible Automation Platform.
The final step is to configure our Ansible Automation Platform automation controller cluster to use the Splunk environment for centralized logging as shown below.
On each Ansible Automation Platform environment,
-
Login as an
adminuser to the Ansible Automation Platform dashboard. - Scroll to the bottom of the page and click on Settings.
Under System, select Logging settings.

Within Logging Aggregator enter the location that the logs should be sent to.
This Splunk environment uses https://splunk.example.com:8088/services/collector/event
NoteModify your location Protocol (HTTP/HTTPS) and the port if not using the default 8088.
- Within Logging Aggregator Type select splunk from the drop down.
- Within Logging Aggregator Password/Token, copy and paste the HEC token previously created.
- Within Logging Aggregator Protocol, select HTTPS/HTTP from the drop down.
- Within Logging Aggregator Level Threshold, select the appriopriate level of logging for your environment, e.g. INFO
Figure 9.2. Reference Environment Logging Setup
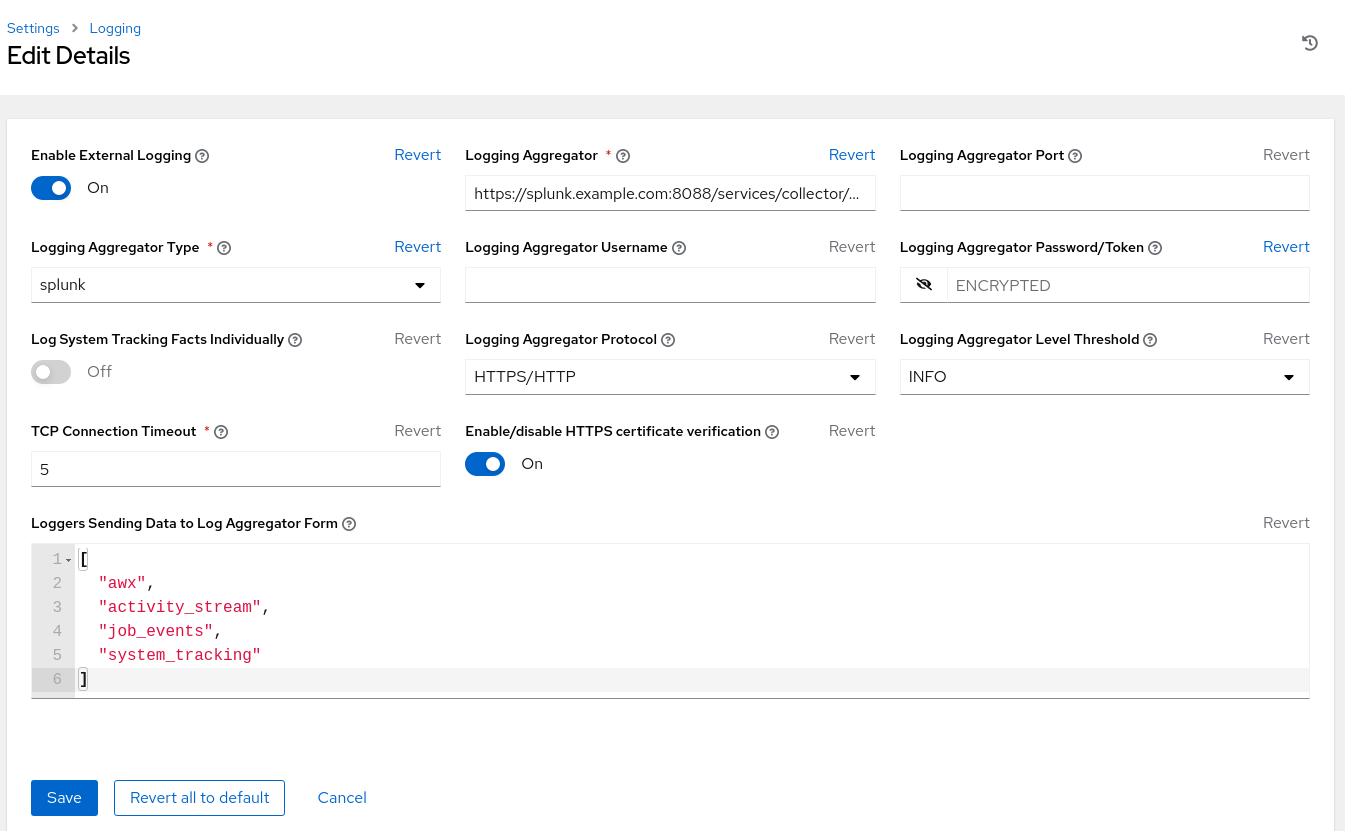
The settings above include the minimum to achieve logging with Splunk. Adjust the logging settings to best fit your environment.
Repeat the logging feature configuration on site two once complete. This ensures both sites are using the same centralized logging environment.
9.3. Verifying events sent to Splunk
Lastly, verify that the Ansible Automation Platform events are being appropriately sent to Splunk. In order to accomplish this, an ad-hoc command via Ansible Automation Platform automation controller is run to confirm.
Within the Ansible Automation Platform dashboard,
- Under Resources → Inventories, select Demo Inventory.
- Within Details, select Hosts.
- Click on the Run Command button.
- Within the Run command Details window section, select the module ping from the drop down and click Next.
- Within the Run command Execution Environment section, select Default execution environment and click Next.
- Within the Run command Credential section, select Demo Credential and click Next.
- Within the Run command Preview section, click the blue Launch button.
The output provided should look as follows:
localhost | SUCCESS => {
    "changed": false,
    "ping": "pong"
}
Now head over to your Splunk dashboard and within the Search see if the Ansible Automation Platform event triggered within Splunk.
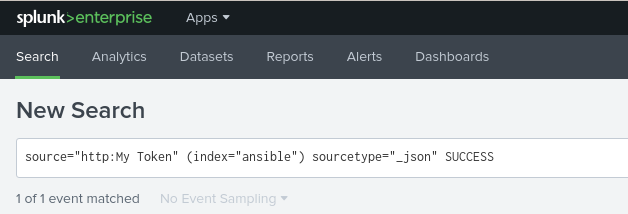
The search should show one event similar to the following

Repeat the same verification process for each Ansible Automation Platform site setup.
Chapter 10. Configuration consistency across multi Ansible Automation Platform deployments
10.1. Why configuration as code?
Traditionally, when we think about having consistency across multiple Ansible Automation Platform deployment sites, we think of using database replication to copy the data from one Ansible Automation Platform environment and importing that data to another Ansible Automation Platform site.
This could be done with scripts, specialized software, manual export of the database followed by an import the Ansible Automation Platform database to the new site, or even running custom Ansible playbooks that do something similar.
While there are many different methods, typically, these methods have cons associated with them.
For example, database replication requires investments in storage infrastructure and concurrency could be hard to achieve without the right expertise.
10.2. What is configuration as code?
Configuration as code is defined as the practice of managing configuration files in a repository. In the case of Ansible Automation Platform, these configuration files establish the settings we wish to apply across our Ansible Automation Platform environments.
By storing and managing Ansible Automation Platform configuration files as code, we can:
- standardize the settings being applied to all our Ansible Automation Platform environments
- inherit the benefits of version control of our configurations
- easily scale additional Ansible Automation Platform deployments to use the same configuration settings
- easily track changes of the configuration settings making fixing issues easier
While configuration as code provides numerous benefits and best practices that can be applied across an Ansible Automation Platform environment, in order to streamline and automate the delivery of the configurations to our multiple Ansible Automation Platform sites automatically, immediately and consistently, we must pair our configuration as code solution with Git webhooks.
10.3. What are Git webhooks?
Git webhooks are defined as a method for notifications to be delivered to an external web server whenever certain actions occur on a repository or organization.
For example, when a repository is updated, this could trigger an event that could trigger CI builds, deploy an environment, or in our case, update configurations to our Ansible Automation Platform environments.
With the solution of configuration as code and Git webhooks, we can setup a Ansible Automation Platform work flow that immediately updates all of our Ansible Automation Platform sites simultaneously with the exact configurations across all the platforms.
In effect, removing the overhead of having to maintain database backups or enable an expensive database replication solution while achieving the pros of those solutions.
With this methodology in mind, the following sections focus on how an admin can take advantage of configuration as code to ensure consistency across multiple Ansible Automation Platform environments using Git webhooks.
10.4. Working with webhooks
A webhook provides the ability to execute specified commands between apps over the web. Ansible automation controller currently provides webhook integration with GitHub and GitLab. This reference environment describes the procedure for setting up a webhook in automation controller using GitHub.
10.4.1. GitHub webhook setup
Automation controller has the ability to run jobs based on a triggered webhook event. The following provides the step-by-step for that setup.
Create a GitHub personal access token
Generate a personal access token (PAT) for use with automation controller.
- In the profile settings of your GitHub account, click Settings.
Below the Personal settings, click Developer Settings.

- In the Developer settings, click Personal access tokens.
- From the Personal access tokens screen, click Generate new token button.
- When prompted, enter your GitHub account password to continue.
- In the Note field, enter a brief description about what this PAT will be used for.
- In the Expiration drop down, select No expiration.
In the Scope fields, automation controller webhook only needs repo scope access, with the exception of invites. For information about other scopes, click the link right above the table to access the docs.
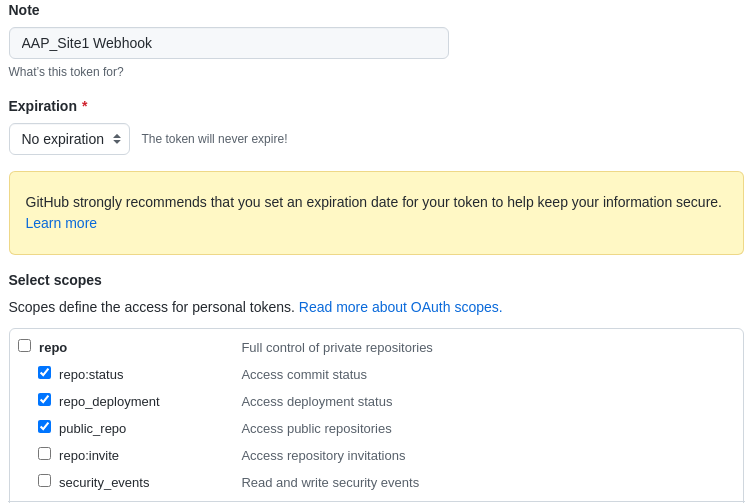
Click the Generate Token button at the bottom of the page.
WarningOnce the token is generated, make sure you copy the PAT, as it will be used by Ansible Automation Platform automation controller cluster in a later step. You will not be able to access this token again in GitHub.
Create a GitHub repository
Once we have our PAT in place, the next step is to create a Git repository that will be triggered by our GitHub webhooks when changes are made to the repository.
Since the focus is to be able to easily update or modify our automation controller configurations, this reference environment takes advantage of an Ansible collection named redhat_cop.controller_configuration.
This Ansible collection allows for easy interaction with Ansible controller servers via Ansible roles using the controller collection modules.
With the help of this collection, we can use these pre-existing roles to modify or update our automation controller environments across all our sites.
The redhat_cop.controller_configuration collection is a community project and officially not supported by Red Hat.
In GitHub, create a new repository.
Ensure to select the appropriate Owner and provide a Repository name.
- This reference environment uses the repository name aap_refarch.
- Provide an optional description to describe your repository.
Set your repository to public or private.
- This reference environment sets the repository to Public.
- Initialize the repository with an Add a README file.
- Click on the create repository button.
Within the newly created GitHub repository, three files are created.
- playbook.yml - A playbook with all the appropriate roles to update or modify our automation controller.
- requirements.yml - A requirements.yml file with all the collections required to run the playbook.
- group_vars/all.yml - An all.yml file containing all the variables we wish to modify for a specific configuration (role).
The purpose of these three files is to provide a method that when the group_vars/all.yml is modified and updated to the repository, this will kick off a job template within our Ansible Automation Platform automation controller cluster to make the appropriate change or update.
A sample of these three files can be found within the Appendix C, Supplemental section of this guide or https://github.com/ansible/aap_refarch
Setting up resource credentials within Ansible Automation Platform automation controller cluster
Prior to using our repository as configuration as code, setup the appropriate credential resources within our Ansible Automation Platform sites.
This ensures that as new projects, work flows and job templates are created, we can easily attach those credentials to those resources.
The following steps show how to create our two required credentials.
One credential associated with the GitHub (PAT) token we created previously.
The other credential associated with the Ansible Automation Platform site that will get updated. Each Ansible Automation Platform site will get updated by its own environment, e.g. site1 gets updated by site1.
On each Ansible Automation Platform site:
- Login to your Ansible Automation Platform automation controller dashboard
Under Resources→ Credentials click the blue Add button.
- Provide a Name, e.g. GitHub PAT
- Select GitHub Personal Access Token as the Credential Type .
- Within Type Details, add the secret using the previously generated token from GitHub.
Click Save.
NoteMake note of the name of this credential, as it will be used in the job template that posts back to GitHub.
With the GitHub PAT credential set, create a second credential for the the existing Ansible Automation Platform environment.
Under Resources→ Credentials click the blue Add button.
- Provide a Name, e.g. AAP_Site1
- Provide Red Hat Ansible Automation Platform as the Credential Type .
Within Type Details, add the appropriate details
- Red Hat Ansible Automation Platform, e.g. controlplane-cluster.site1.example.com
- Username, e.g. admin
- Password, e.g. redhat
- If the SSL certificate is signed, ensure to select Verify SSL within Options.
- Click Save.
Repeat this section on Ansible Automation Platform site two.
controlplane-cluster.site1.example.com is used as this reference environment takes advantage of a load balancer. Setup of a load balancer is out of scope for this reference environment.
Creating the configuration as code project
The purpose of the configuration as code project is to create a work flow that contains a job template that automatically runs every time an update to the configuration as code repository takes place.
This ensures that as you make changes such as setting variables, the Git repository playbook runs the appropriate roles for the numerous automation controller configurations.
This section creates a project, work flow and job template to achieve the above.
Within your Ansible Automation Platform site one dashboard,
- Under Resources→ Projects click the blue Add button.
- Provide a Name, e.g. Configuration as Code Project
- Select Default as the Organization
- Select Default execution environment as the Execution Environment
- Select Git as the Source Control Credential Type
Within Type Details,
- Add the Source Control URL (your GitHub repository)
Within Options
- Select Clean, Delete, Update Revision on Launch
- Click Save.
Next, create a work flow template.
- Under Resources→ Templates click the blue Add → Add workflow template.
- Provide a Name, e.g. Configuration as Code Workflow
Within Options, checkmark Enable Webhook.
- Within Webhook details, select GitHub as the Webhook Service.
- Within Webhook details, select your GitHub PAT token previously created as the Webhook Credential, e.g. GitHub PAT
- Click Save.
- Within the Please click the Start button to begin window, click the Save at the top right corner.
- Copy the Webhook URL and the Webhook Key as they will be used later.
Repeat the above process on Ansible Automation Platform site two.
Enabling GitHub Webhooks for the Repository
With our Ansible Automation Platform Workflow template created and our GitHub repository with the required files in place, the next step is to enable webhooks for our repository, e.g. aap_refarch.
- At the homepage of your GitHub repository, select the Settings tab.
Within the Settings tab, select Webhooks.
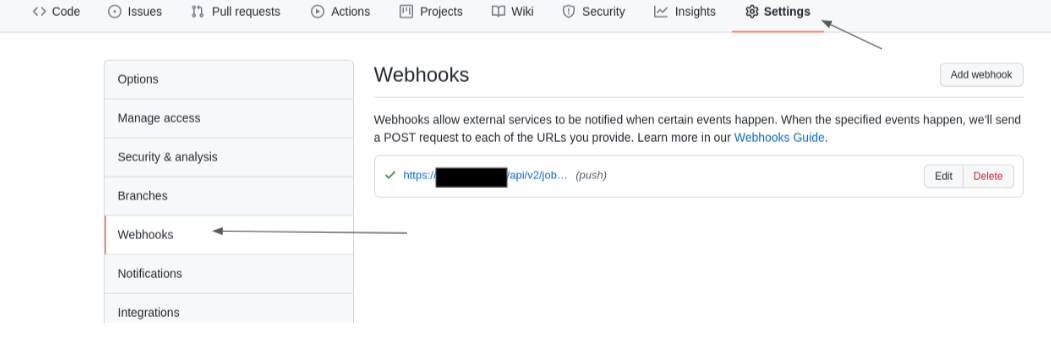
- Within the Webhooks section, select the Add webhook button.
- Enter the Payload URL (Webhook URL of the workflow).
- Change the Content type drop down to application/json.
- Enter the Secret (Webhook key of the workflow).
Leave the defaults to use push events, and click the button Add webhook.
WarningBy default, GitHub verifies SSL certificates when delivering payloads. If your automation controller SSL certificates are not signed, ensure to disableSSL verfication.
Repeat the above process on Ansible Automation Platform site two.
Creating the configuration as code job template
The job template to be created for our configuration as code project runs the playbook.yml file automatically every time an update to the Git repository takes places.
This ensures as configuration changes are desired, we can use the Ansible Automation Platform controller API to make those changes appropriately. When we combine the same methodology across all our Ansible Automation Platform sites, all the changes become global across the configured sites.
- Under Resources→ Templates click the blue Add → Add job template.
- Provide a Name, e.g. Configuration as Code Job
- Select Run as the Job Type
- Select Demo Inventory as the Inventory
- Select Configuration as Code Project as the Project
- Select Default execution environment as the Execution Environment
- Select playbook.yml as the Playbook
- Select Credentials and switch the category from Machine to Red Hat Ansible Automation Platform
- Select the appropriate credential for the Ansible Automation Platform site, e.g. AAP_Site1
- Within Options, select Enable webhook.
- Select GitHub as the Webhook Service.
- Select your GitHub PAT token previously created as the Webhook Credential, e.g. GitHub PAT
- Click Save.
Repeat the above process on Ansible Automation Platform site two.
Updating the created Configuration as Code Workflow
Previously, the Configuration as Code workflow was created. The purpose of this workflow is to ensure that the Configuration as Code Project is always in sync and that the Configuration as Code Job runs the configuration as code playbook whenever changes are made to the repository.
- Under Resources→ Templates, select your template. e.g Configuration as Code Workflow
- Within the Details section, select the Visualizer tab and click the green Start.
- For Node Type select Project Sync and select the appropriate project, e.g. Configuration as Code Project and click Save.
- Hover over the Configuration as Code Project and select the plus "+" symbol.
- Within the Add Node window, select Always as to when this node should be executed and click Next.
- Select the Configuration as Code Job as the Node Type and click Save.
- Once brought back to the Visualizer, select the Save button at the top right corner.
Verifying Configuration as Code setup
With many of the roles already included in the redhat_cop.controller_configuration, a simple method to verify if everything is working as expected is to create a user by updating the group_vars/all.yml file with the appropriate yaml.
If we wanted to create a user, we would take a closer look at the users role documentation to further see all the variables at our disposable.
After further review, we notice creating a non-admin user, named John would look as follows:
group_vars/all.yml
---
controller_user_accounts:
  - user: "john"
    is_superuser: false
    password: "redhat"
Once the group_vars/all.yml file is updated with the above and pushed to the Git repository, a job within Ansible Automation Platform automation controller should start.
This can be verified by selecting Jobs under the Views section within the automation controller dashboard. The job in reference should have the number of the job followed by the job name. For this reference environment, you’d see something similar to 8-Configuration as Code Job with the TypePlaybook Run

Once the job is complete, it will have a status of Successful.
Logging out as admin and relogging in as the user john with the password redhat should confirm that the job was successful.
If you followed this entire chapter and set the webhooks appropriately for each Ansible Automation Platform site, you will notice that the user john was created simultaneously by the corresponding Ansible Automation Platform platform.
While this example is a simplified one, many of the configurations (roles) that allow for the configuration of Ansible Automation Platform automation controller are provided within the redhat_cop.controller_configuration.
Additional examples may be found at: Example configs.
While the Ansible collection has many of the key roles you’ll ever need, you are not limited to only what can be found within this Ansible collection. New roles can be implemented or created by your organization to further enhance your capabilities.
Appendix A. About the Author

Appendix B. Contributors
We would like to thank the following individuals for their time and patience as we collaborated on this process. This document would not have been possible without their many contributions.
| Contributor | Title | Contribution |
|---|---|---|
| Landon Holley | Senior Consulting Architect | Technical Review |
| Ajay Chenampara | Principal Specialist Solution Architect | Technical Review |
| Will Tome | Principal Specialist Solution Architect | Technical Review |
| Sean Sullivan | Senior Consultant | Technical Review |
| Vinny Valdez | Senior Managing Architect | Technical Review |
| Chris Budzilowicz | Principal Technical Writer | Content Review |
| Phil Avery | Senior Ansible Specialist Solutions Architect | Technical Review |
Appendix C. Supplemental
C.1. Configuring automation controller playbook
---
- name: Playbook to configure ansible Controller post installation
  hosts: localhost
  connection: local
  vars:
    controller_validate_certs: false
  collections:
    - awx.awx
    - redhat_cop.controller_configuration

  roles:
    - {role: settings, when: controller_settings is defined, tags: settings}
    - {role: organizations, when: controller_organizations is defined, tags: organizations}
    - {role: labels, when: controller_labels is defined, tags: labels}
    - {role: users, when: controller_user_accounts is defined, tags: users}
    - {role: teams, when: controller_teams is defined, tags: teams}
    - {role: credential_types, when: controller_credential_types is defined, tags: credential_types}
    - {role: credentials, when: controller_credentials is defined, tags: credentials}
    - {role: credential_input_sources, when: controller_credential_input_sources is defined, tags: credential_input_sources}
    - {role: notification_templates, when: controller_notifications is defined, tags: notification_templates}
    - {role: projects, when: controller_projects is defined, tags: projects}
    - {role: execution_environments, when: controller_execution_environments is defined, tags: execution_environments}
    - {role: applications, when: controller_applications is defined, tags: applications}
    - {role: inventories, when: controller_inventories is defined, tags: inventories}
    - {role: instance_groups, when: controller_instance_groups is defined, tags: instance_groups}
    - {role: project_update, when: controller_projects is defined, tags: projects}
    - {role: inventory_sources, when: controller_inventory_sources is defined, tags: inventory_sources}
    - {role: inventory_source_update, when: controller_inventory_sources is defined, tags: inventory_sources}
    - {role: hosts, when: controller_hosts is defined, tags: hosts}
    - {role: groups, when: controller_groups is defined, tags: inventories}
    - {role: job_templates, when: controller_templates is defined, tags: job_templates}
    - {role: workflow_job_templates, when: controller_workflows is defined, tags: workflow_job_templates}
    - {role: schedules, when: controller_schedules is defined, tags: schedules}
    - {role: roles, when: controller_roles is defined, tags: roles}
C.2. group_vars/all.yml vars file for automation controller configuration (user creation sample)
---
controller_user_accounts:
  - user: "colin"
    is_superuser: false
    password: "redhat"
C.3. requirements.yml for automation controller configuration
collections:
- name: redhat_cop.controller_configuration
- name: awx.awx
Appendix D. Generate a subscription manifest
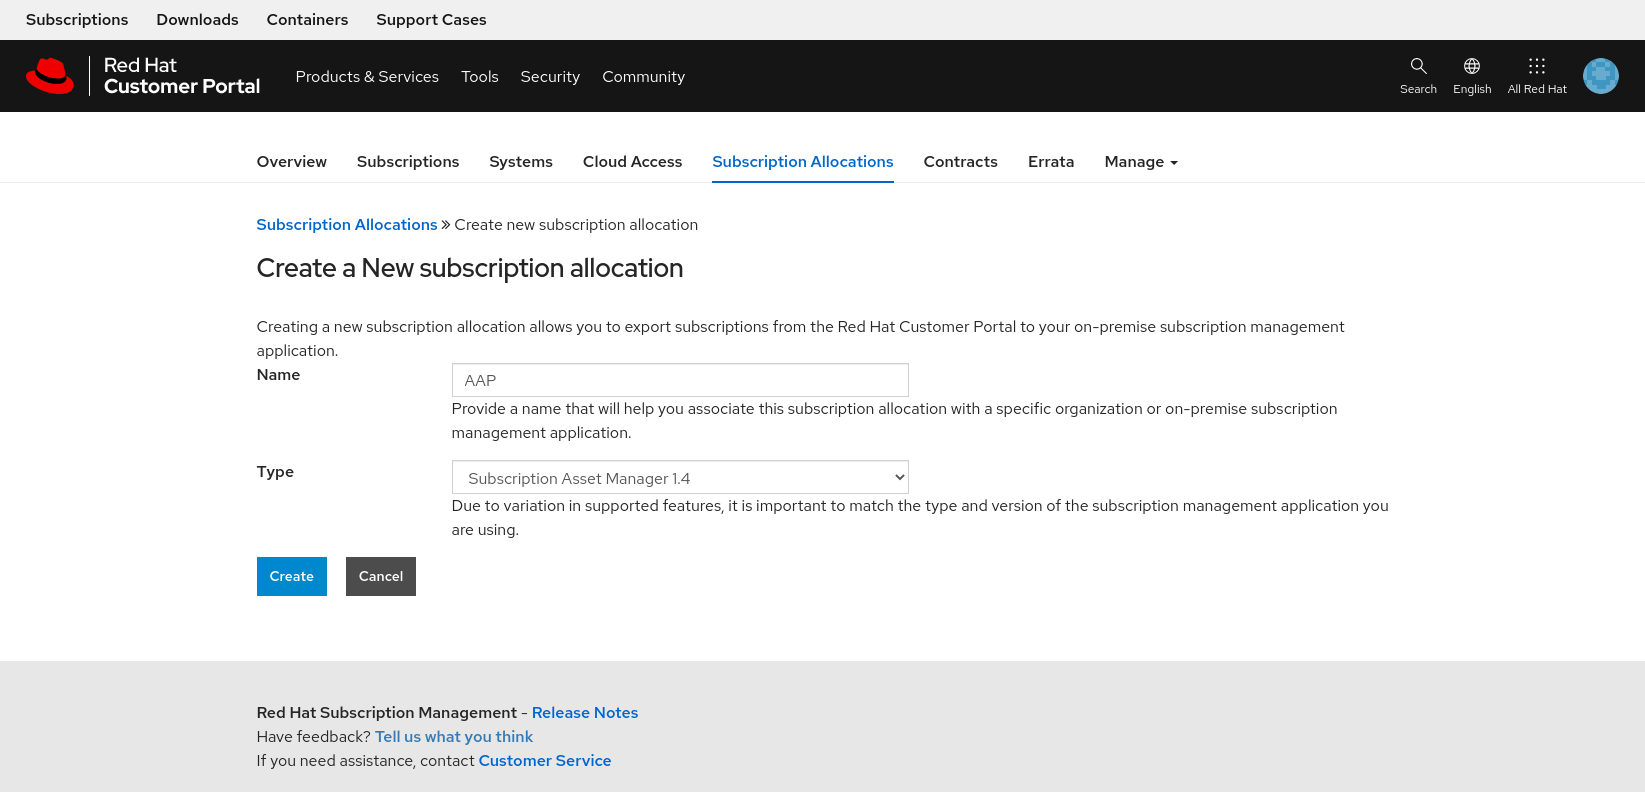
In order to successfully generate your subscription manifest:
- Login to access.redhat.com and click Subscriptions at the top left corner.
- Select the Subscriptions Allocations tab.
Select the button labeled New Subscription Allocation.

Within the Create a New subscription allocation page, enter a Name and for Type select Subscription Asset Manager 1.4 from the dropdown box and click Create.
- Once created, select the Subscriptions tab and select the Ansible Automation Platform subscription and the number of entitlements you wish to provide.
Click on the Details tab, review the number of entitlements are correct and select the Export Manifest button.

Return to the Ansible Automation Platform dashboard, and import manifest.zip and click Next.
- (Recommended) Enable user analytics and Insights for Ansible Automation Platform by providing your Red Hat or Red Hat Satellite credentials and click Next.
- Accept the end user license agreement.
Appendix E. References
- Red Hat Ansible Automation Platform Installation Guide
- Aggregating Ansible Tower logs to Splunk by Joseph Tejal
- Centralize your Automation Logs with Ansible Tower and Splunk Enterprise by Leonardo Araujo
- Tower Logging and Aggregation
- Set up and use HTTP Event Collector in Splunk Web
- Splunk - Managing Indexers and Clusters of Indexers
- Fun with Private Automation Hub by Daniel Leroux
- Fun with Private Automation Hub Part II by Daniel Leroux
- Automation Controller Workflow Deployment as Code by Sean Sullivan
Appendix F. Revision History
| Revision History | ||
|---|---|---|
| Revision 1.2-0 | 2022-05-03 | Anshul Behl,Roger Lopez |
| ||
| Revision 1.1-0 | 2022-04-11 | Roger Lopez |
| ||
| Revision 1.0-0 | 2021-12-02 | Roger Lopez |
| ||