
Migrating from a standalone Manager to a self-hosted engine
How to migrate the Red Hat Virtualization Manager from a standalone server to a self-managed virtual machine
Abstract
Preface
You can convert a standalone Red Hat Virtualization Manager to a self-hosted engine by backing up the standalone Manager and restoring it in a new self-hosted environment.
The difference between the two environment types is explained below:
Standalone Manager Architecture
The Red Hat Virtualization Manager runs on a physical server, or a virtual machine hosted in a separate virtualization environment. A standalone Manager is easier to deploy and manage, but requires an additional physical server. The Manager is only highly available when managed externally with a product such as Red Hat’s High Availability Add-On.
The minimum setup for a standalone Manager environment includes:
- One Red Hat Virtualization Manager machine. The Manager is typically deployed on a physical server. However, it can also be deployed on a virtual machine, as long as that virtual machine is hosted in a separate environment. The Manager must run on Red Hat Enterprise Linux 8.
- A minimum of two hosts for virtual machine high availability. You can use Red Hat Enterprise Linux hosts or Red Hat Virtualization Hosts (RHVH). VDSM (the host agent) runs on all hosts to facilitate communication with the Red Hat Virtualization Manager.
- One storage service, which can be hosted locally or on a remote server, depending on the storage type used. The storage service must be accessible to all hosts.
Figure 1. Standalone Manager Red Hat Virtualization Architecture

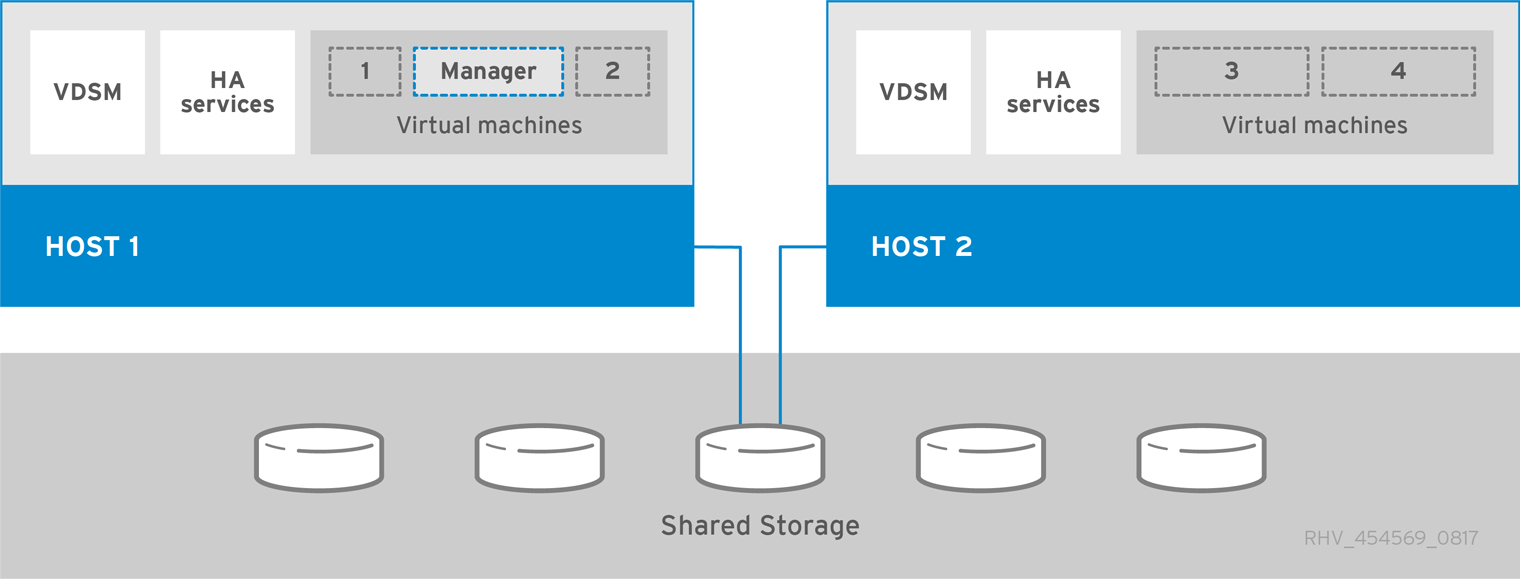
Self-Hosted Engine Architecture
The Red Hat Virtualization Manager runs as a virtual machine on self-hosted engine nodes (specialized hosts) in the same environment it manages. A self-hosted engine environment requires one less physical server, but requires more administrative overhead to deploy and manage. The Manager is highly available without external HA management.
The minimum setup of a self-hosted engine environment includes:
- One Red Hat Virtualization Manager virtual machine that is hosted on the self-hosted engine nodes. The RHV-M Appliance is used to automate the installation of a Red Hat Enterprise Linux 8 virtual machine, and the Manager on that virtual machine.
- A minimum of two self-hosted engine nodes for virtual machine high availability. You can use Red Hat Enterprise Linux hosts or Red Hat Virtualization Hosts (RHVH). VDSM (the host agent) runs on all hosts to facilitate communication with the Red Hat Virtualization Manager. The HA services run on all self-hosted engine nodes to manage the high availability of the Manager virtual machine.
- One storage service, which can be hosted locally or on a remote server, depending on the storage type used. The storage service must be accessible to all hosts.
Figure 2. Self-Hosted Engine Red Hat Virtualization Architecture
Chapter 1. Migration Overview
When you specify a backup file during self-hosted engine deployment, the Manager backup is restored on a new virtual machine, with a dedicated self-hosted engine storage domain. Deploying on a fresh host is highly recommended; if the host used for deployment existed in the backed up environment, it will be removed from the restored database to avoid conflicts in the new environment. If you deploy on a new host, you must assign a unique name to the host. Reusing the name of an existing host included in the backup can cause conflicts in the new environment.
At least two self-hosted engine nodes are required for the Manager virtual machine to be highly available. You can add new nodes, or convert existing hosts.
The migration involves the following key steps:
Install a new host to deploy the self-hosted engine on. You can use either host type:
Prepare storage for the self-hosted engine storage domain. You can use one of the following storage types:
- Update the original Manager to the latest minor version before you back it up.
-
Back up the original Manager using the
engine-backuptool. - Deploy a new self-hosted engine and restore the backup.
- Enable the Manager repositories on the new Manager virtual machine.
- Convert regular hosts to self-hosted engine nodes that can host the new Manager.
This procedure assumes that you have access and can make changes to the original Manager.
Prerequisites
- FQDNs prepared for your Manager and the deployment host. Forward and reverse lookup records must both be set in the DNS. The new Manager must have the same FQDN as the original Manager.
- The management network (ovirtmgmt by default) must be configured as a VM network, so that it can manage the Manager virtual machine.
Chapter 2. Installing the Self-hosted Engine Deployment Host
A self-hosted engine can be deployed from a Red Hat Virtualization Host or a Red Hat Enterprise Linux host.
If you plan to use bonded interfaces for high availability or VLANs to separate different types of traffic (for example, for storage or management connections), you should configure them on the host before beginning the self-hosted engine deployment. See Networking Recommendations in the Planning and Prerequisites Guide.
2.1. Installing Red Hat Virtualization Hosts
Red Hat Virtualization Host (RHVH) is a minimal operating system based on Red Hat Enterprise Linux that is designed to provide a simple method for setting up a physical machine to act as a hypervisor in a Red Hat Virtualization environment. The minimal operating system contains only the packages required for the machine to act as a hypervisor, and features a Cockpit web interface for monitoring the host and performing administrative tasks. See Running Cockpit for the minimum browser requirements.
RHVH supports NIST 800-53 partitioning requirements to improve security. RHVH uses a NIST 800-53 partition layout by default.
The host must meet the minimum host requirements.
When installing or reinstalling the host’s operating system, Red Hat strongly recommends that you first detach any existing non-OS storage that is attached to the host to avoid accidental initialization of these disks, and with that, potential data loss.
Procedure
- Go to the Get Started with Red Hat Virtualization on the Red Hat Customer Portal and log in.
- Click Download Latest to access the product download page.
- Choose the appropriate Hypervisor Image for RHV from the list and click Download Now.
- Start the machine on which you are installing RHVH, booting from the prepared installation media.
From the boot menu, select Install RHVH 4.4 and press
Enter.NoteYou can also press the
Tabkey to edit the kernel parameters. Kernel parameters must be separated by a space, and you can boot the system using the specified kernel parameters by pressing theEnterkey. Press theEsckey to clear any changes to the kernel parameters and return to the boot menu.- Select a language, and click .
- Select a keyboard layout from the Keyboard Layout screen and click .
Select the device on which to install RHVH from the Installation Destination screen. Optionally, enable encryption. Click .
ImportantUse the Automatically configure partitioning option.
- Select a time zone from the Time & Date screen and click .
Select a network from the Network & Host Name screen and click Configure… to configure the connection details.
NoteTo use the connection every time the system boots, select the Connect automatically with priority check box. For more information, see Configuring network and host name options in the Red Hat Enterprise Linux 8 Installation Guide.
Enter a host name in the Host Name field, and click Done.
- Optional: Configure Security Policy and Kdump. See Customizing your RHEL installation using the GUI in Performing a standard RHEL installation for Red Hat Enterprise Linux 8 for more information on each of the sections in the Installation Summary screen.
- Click Begin Installation.
Set a root password and, optionally, create an additional user while RHVH installs.
WarningDo not create untrusted users on RHVH, as this can lead to exploitation of local security vulnerabilities.
Click Reboot to complete the installation.
NoteWhen RHVH restarts,
nodectl checkperforms a health check on the host and displays the result when you log in on the command line. The messagenode status: OKornode status: DEGRADEDindicates the health status. Runnodectl checkto get more information.NoteIf necessary, you can prevent kernel modules from loading automatically.
2.1.1. Enabling the Red Hat Virtualization Host Repository
Register the system to receive updates. Red Hat Virtualization Host only requires one repository. This section provides instructions for registering RHVH with the Content Delivery Network, or with Red Hat Satellite 6.
Registering RHVH with the Content Delivery Network
Enable the
Red Hat Virtualization Host 8repository to allow later updates to the Red Hat Virtualization Host:# subscription-manager repos --enable=rhvh-4-for-rhel-8-x86_64-rpms
Registering RHVH with Red Hat Satellite 6
-
Log in to the Cockpit web interface at
https://HostFQDNorIP:9090. - Click Terminal.
Register RHVH with Red Hat Satellite 6:
  # rpm -Uvh http://satellite.example.com/pub/katello-ca-consumer-latest.noarch.rpm
  # subscription-manager register --org="org_id"
  # subscription-manager list --available
  # subscription-manager attach --pool=pool_id
  # subscription-manager repos \
    --disable='*' \
    --enable=rhvh-4-for-rhel-8-x86_64-rpms
You can also configure virtual machine subscriptions in Red Hat Satellite using virt-who. See Using virt-who to manage host-based subscriptions.
2.2. Installing Red Hat Enterprise Linux hosts
A Red Hat Enterprise Linux host is based on a standard basic installation of Red Hat Enterprise Linux 8 on a physical server, with the Red Hat Enterprise Linux Server and Red Hat Virtualization subscriptions attached.
For detailed installation instructions, see the Performing a standard RHEL installation.
The host must meet the minimum host requirements.
When installing or reinstalling the host’s operating system, Red Hat strongly recommends that you first detach any existing non-OS storage that is attached to the host to avoid accidental initialization of these disks, and with that, potential data loss.
Virtualization must be enabled in your host’s BIOS settings. For information on changing your host’s BIOS settings, refer to your host’s hardware documentation.
Do not install third-party watchdogs on Red Hat Enterprise Linux hosts. They can interfere with the watchdog daemon provided by VDSM.
2.2.1. Enabling the Red Hat Enterprise Linux host Repositories
To use a Red Hat Enterprise Linux machine as a host, you must register the system with the Content Delivery Network, attach the Red Hat Enterprise Linux Server and Red Hat Virtualization subscriptions, and enable the host repositories.
Procedure
Register your system with the Content Delivery Network, entering your Customer Portal user name and password when prompted:
# subscription-manager register
Find the
Red Hat Enterprise Linux ServerandRed Hat Virtualizationsubscription pools and record the pool IDs:# subscription-manager list --available
Use the pool IDs to attach the subscriptions to the system:
# subscription-manager attach --pool=poolidNoteTo view currently attached subscriptions:
# subscription-manager list --consumed
To list all enabled repositories:
# dnf repolist
Configure the repositories:
# subscription-manager repos \
    --disable='*' \
    --enable=rhel-8-for-x86_64-baseos-eus-rpms \
    --enable=rhel-8-for-x86_64-appstream-eus-rpms \
    --enable=rhv-4-mgmt-agent-for-rhel-8-x86_64-rpms \
    --enable=fast-datapath-for-rhel-8-x86_64-rpms \
    --enable=advanced-virt-for-rhel-8-x86_64-rpms \
    --enable=openstack-16.2-cinderlib-for-rhel-8-x86_64-rpms \
    --enable=rhceph-4-tools-for-rhel-8-x86_64-rpms \
    --enable=rhel-8-for-x86_64-appstream-tus-rpms \
    --enable=rhel-8-for-x86_64-baseos-tus-rpms
Set the RHEL version to 8.6:
# subscription-manager release --set=8.6
Reset the
virtmodule:# dnf module reset virt
NoteIf this module is already enabled in the Advanced Virtualization stream, this step is not necessary, but it has no negative impact.
You can see the value of the stream by entering:
# dnf module list virt
-
Enable the
virtmodule in the Advanced Virtualization stream with the following command:
For RHV 4.4.2:
# dnf module enable virt:8.2
For RHV 4.4.3 to 4.4.5:
# dnf module enable virt:8.3
For RHV 4.4.6 to 4.4.10:
# dnf module enable virt:av
For RHV 4.4 and later:
# dnf module enable virt:rhel
NoteStarting with RHEL 8.6 the Advanced virtualization packages will use the standard
virt:rhelmodule. For RHEL 8.4 and 8.5, only one Advanced Virtualization stream is used,rhel:av.Ensure that all packages currently installed are up to date:
# dnf upgrade --nobest
Reboot the machine.
NoteIf necessary, you can prevent kernel modules from loading automatically.
Although the existing storage domains will be migrated from the standalone Manager, you must prepare additional storage for a self-hosted engine storage domain that is dedicated to the Manager virtual machine.
Chapter 3. Preparing Storage for Red Hat Virtualization
You need to prepare storage to be used for storage domains in the new environment. A Red Hat Virtualization environment must have at least one data storage domain, but adding more is recommended.
When installing or reinstalling the host’s operating system, Red Hat strongly recommends that you first detach any existing non-OS storage that is attached to the host to avoid accidental initialization of these disks, and with that, potential data loss.
A data domain holds the virtual hard disks and OVF files of all the virtual machines and templates in a data center, and cannot be shared across data centers while active (but can be migrated between data centers). Data domains of multiple storage types can be added to the same data center, provided they are all shared, rather than local, domains.
You can use one of the following storage types:
Prerequisites
Self-hosted engines must have an additional data domain with at least 74 GiB dedicated to the Manager virtual machine. The self-hosted engine installer creates this domain. Prepare the storage for this domain before installation.
WarningExtending or otherwise changing the self-hosted engine storage domain after deployment of the self-hosted engine is not supported. Any such change might prevent the self-hosted engine from booting.
- When using a block storage domain, either FCP or iSCSI, a single target LUN is the only supported setup for a self-hosted engine.
- If you use iSCSI storage, the self-hosted engine storage domain must use a dedicated iSCSI target. Any additional storage domains must use a different iSCSI target.
- It is strongly recommended to create additional data storage domains in the same data center as the self-hosted engine storage domain. If you deploy the self-hosted engine in a data center with only one active data storage domain, and that storage domain is corrupted, you cannot add new storage domains or remove the corrupted storage domain. You must redeploy the self-hosted engine.
3.1. Preparing NFS Storage
Set up NFS shares on your file storage or remote server to serve as storage domains on Red Hat Enterprise Virtualization Host systems. After exporting the shares on the remote storage and configuring them in the Red Hat Virtualization Manager, the shares will be automatically imported on the Red Hat Virtualization hosts.
For information on setting up, configuring, mounting and exporting NFS, see Managing file systems for Red Hat Enterprise Linux 8.
Specific system user accounts and system user groups are required by Red Hat Virtualization so the Manager can store data in the storage domains represented by the exported directories. The following procedure sets the permissions for one directory. You must repeat the chown and chmod steps for all of the directories you intend to use as storage domains in Red Hat Virtualization.
Prerequisites
Install the NFS
utilspackage.# dnf install nfs-utils -y
To check the enabled versions:
# cat /proc/fs/nfsd/versions
Enable the following services:
# systemctl enable nfs-server
# systemctl enable rpcbind
Procedure
Create the group
kvm:# groupadd kvm -g 36
Create the user
vdsmin the groupkvm:# useradd vdsm -u 36 -g kvm
Create the
storagedirectory and modify the access rights.# mkdir /storage # chmod 0755 /storage # chown 36:36 /storage/
Add the
storagedirectory to/etc/exportswith the relevant permissions.# vi /etc/exports # cat /etc/exports /storage *(rw)
Restart the following services:
# systemctl restart rpcbind
# systemctl restart nfs-server
To see which export are available for a specific IP address:
# exportfs
 /nfs_server/srv
               10.46.11.3/24
 /nfs_server       <world>
If changes in /etc/exports have been made after starting the services, the exportfs -ra command can be used to reload the changes. After performing all the above stages, the exports directory should be ready and can be tested on a different host to check that it is usable.
3.2. Preparing iSCSI Storage
Red Hat Virtualization supports iSCSI storage, which is a storage domain created from a volume group made up of LUNs. Volume groups and LUNs cannot be attached to more than one storage domain at a time.
For information on setting up and configuring iSCSI storage, see Configuring an iSCSI target in Managing storage devices for Red Hat Enterprise Linux 8.
If you are using block storage and intend to deploy virtual machines on raw devices or direct LUNs and manage them with the Logical Volume Manager (LVM), you must create a filter to hide guest logical volumes. This will prevent guest logical volumes from being activated when the host is booted, a situation that could lead to stale logical volumes and cause data corruption. Use the vdsm-tool config-lvm-filter command to create filters for the LVM. See Creating an LVM filter
Red Hat Virtualization currently does not support block storage with a block size of 4K. You must configure block storage in legacy (512b block) mode.
If your host is booting from SAN storage and loses connectivity to the storage, the storage file systems become read-only and remain in this state after connectivity is restored.
To prevent this situation, add a drop-in multipath configuration file on the root file system of the SAN for the boot LUN to ensure that it is queued when there is a connection:
# cat /etc/multipath/conf.d/host.conf
multipaths {
    multipath {
        wwid boot_LUN_wwid
        no_path_retry queue
    }
3.3. Preparing FCP Storage
Red Hat Virtualization supports SAN storage by creating a storage domain from a volume group made of pre-existing LUNs. Neither volume groups nor LUNs can be attached to more than one storage domain at a time.
Red Hat Virtualization system administrators need a working knowledge of Storage Area Networks (SAN) concepts. SAN usually uses Fibre Channel Protocol (FCP) for traffic between hosts and shared external storage. For this reason, SAN may occasionally be referred to as FCP storage.
For information on setting up and configuring FCP or multipathing on Red Hat Enterprise Linux, see the Storage Administration Guide and DM Multipath Guide.
If you are using block storage and intend to deploy virtual machines on raw devices or direct LUNs and manage them with the Logical Volume Manager (LVM), you must create a filter to hide guest logical volumes. This will prevent guest logical volumes from being activated when the host is booted, a situation that could lead to stale logical volumes and cause data corruption. Use the vdsm-tool config-lvm-filter command to create filters for the LVM. See Creating an LVM filter
Red Hat Virtualization currently does not support block storage with a block size of 4K. You must configure block storage in legacy (512b block) mode.
If your host is booting from SAN storage and loses connectivity to the storage, the storage file systems become read-only and remain in this state after connectivity is restored.
To prevent this situation, add a drop-in multipath configuration file on the root file system of the SAN for the boot LUN to ensure that it is queued when there is a connection:
# cat /etc/multipath/conf.d/host.conf
multipaths {
    multipath {
        wwid boot_LUN_wwid
        no_path_retry queue
    }
  }
3.4. Preparing Red Hat Gluster Storage
For information on setting up and configuring Red Hat Gluster Storage, see the Red Hat Gluster Storage Installation Guide.
For the Red Hat Gluster Storage versions that are supported with Red Hat Virtualization, see Red Hat Gluster Storage Version Compatibility and Support.
3.5. Customizing Multipath Configurations for SAN Vendors
If your RHV environment is configured to use multipath connections with SANs, you can customize the multipath configuration settings to meet requirements specified by your storage vendor. These customizations can override both the default settings and settings that are specified in /etc/multipath.conf.
To override the multipath settings, do not customize /etc/multipath.conf. Because VDSM owns /etc/multipath.conf, installing or upgrading VDSM or Red Hat Virtualization can overwrite this file including any customizations it contains. This overwriting can cause severe storage failures.
Instead, you create a file in the /etc/multipath/conf.d directory that contains the settings you want to customize or override.
VDSM executes the files in /etc/multipath/conf.d in alphabetical order. So, to control the order of execution, you begin the filename with a number that makes it come last. For example, /etc/multipath/conf.d/90-myfile.conf.
To avoid causing severe storage failures, follow these guidelines:
-
Do not modify
/etc/multipath.conf. If the file contains user modifications, and the file is overwritten, it can cause unexpected storage problems.
Not following these guidelines can cause catastrophic storage errors.
Prerequisites
VDSM is configured to use the multipath module. To verify this, enter:
# vdsm-tool is-configured --module multipath
Procedure
-
Create a new configuration file in the
/etc/multipath/conf.ddirectory. -
Copy the individual setting you want to override from
/etc/multipath.confto the new configuration file in/etc/multipath/conf.d/<my_device>.conf. Remove any comment marks, edit the setting values, and save your changes. Apply the new configuration settings by entering:
# systemctl reload multipathd
NoteDo not restart the multipathd service. Doing so generates errors in the VDSM logs.
Verification steps
- Test that the new configuration performs as expected on a non-production cluster in a variety of failure scenarios. For example, disable all of the storage connections.
- Enable one connection at a time and verify that doing so makes the storage domain reachable.
3.6. Recommended Settings for Multipath.conf
Do not override the following settings:
- user_friendly_names no
Device names must be consistent across all hypervisors. For example,
/dev/mapper/{WWID}. The default value of this setting,no, prevents the assignment of arbitrary and inconsistent device names such as/dev/mapper/mpath{N}on various hypervisors, which can lead to unpredictable system behavior.WarningDo not change this setting to
user_friendly_names yes. User-friendly names are likely to cause unpredictable system behavior or failures, and are not supported.find_multipaths noThis setting controls whether RHVH tries to access devices through multipath only if more than one path is available. The current value,
no, allows RHV to access devices through multipath even if only one path is available.WarningDo not override this setting.
Avoid overriding the following settings unless required by the storage system vendor:
no_path_retry 4-
This setting controls the number of polling attempts to retry when no paths are available. Before RHV version 4.2, the value of
no_path_retrywasfailbecause QEMU had trouble with the I/O queuing when no paths were available. Thefailvalue made it fail quickly and paused the virtual machine. RHV version 4.2 changed this value to4so when multipathd detects the last path has failed, it checks all of the paths four more times. Assuming the default 5-second polling interval, checking the paths takes 20 seconds. If no path is up, multipathd tells the kernel to stop queuing and fails all outstanding and future I/O until a path is restored. When a path is restored, the 20-second delay is reset for the next time all paths fail. For more details, see the commit that changed this setting. polling_interval 5- This setting determines the number of seconds between polling attempts to detect whether a path is open or has failed. Unless the vendor provides a clear reason for increasing the value, keep the VDSM-generated default so the system responds to path failures sooner.
Before backing up the Manager, ensure it is updated to the latest minor version. The Manager version in the backup file must match the version of the new Manager.
Chapter 4. Updating the Red Hat Virtualization Manager
Prerequisites
- The data center compatibility level must be set to the latest version to ensure compatibility with the updated storage version.
Procedure
On the Manager machine, check if updated packages are available:
# engine-upgrade-check
Update the setup packages:
# yum update ovirt\*setup\* rh\*vm-setup-plugins
Update the Red Hat Virtualization Manager with the
engine-setupscript. Theengine-setupscript prompts you with some configuration questions, then stops theovirt-engineservice, downloads and installs the updated packages, backs up and updates the database, performs post-installation configuration, and starts theovirt-engineservice.# engine-setup
When the script completes successfully, the following message appears:
Execution of setup completed successfully
NoteThe
engine-setupscript is also used during the Red Hat Virtualization Manager installation process, and it stores the configuration values supplied. During an update, the stored values are displayed when previewing the configuration, and might not be up to date ifengine-configwas used to update configuration after installation. For example, ifengine-configwas used to updateSANWipeAfterDeletetotrueafter installation,engine-setupwill output "Default SAN wipe after delete: False" in the configuration preview. However, the updated values will not be overwritten byengine-setup.ImportantThe update process might take some time. Do not stop the process before it completes.
Update the base operating system and any optional packages installed on the Manager:
# yum update --nobest
ImportantIf you encounter a required Ansible package conflict during the update, see Cannot perform yum update on my RHV manager (ansible conflict).
ImportantIf any kernel packages were updated, reboot the machine to complete the update.
Chapter 5. Backing up the Original Manager
Back up the original Manager using the engine-backup command, and copy the backup file to a separate location so that it can be accessed at any point during the process.
For more information about engine-backup --mode=backup options, see Backing Up and Restoring the Red Hat Virtualization Manager in the Administration Guide.
Procedure
Log in to the original Manager and stop the
ovirt-engineservice:# systemctl stop ovirt-engine # systemctl disable ovirt-engine
NoteThough stopping the original Manager from running is not obligatory, it is recommended as it ensures no changes are made to the environment after the backup is created. Additionally, it prevents the original Manager and the new Manager from simultaneously managing existing resources.
Run the
engine-backupcommand, specifying the name of the backup file to create, and the name of the log file to create to store the backup log:# engine-backup --mode=backup --file=file_name --log=log_file_name
Copy the files to an external server. In the following example,
storage.example.comis the fully qualified domain name of a network storage server that will store the backup until it is needed, and/backup/is any designated folder or path.# scp -p file_name log_file_name storage.example.com:/backup/
If you do not require the Manager machine for other purposes, unregister it from Red Hat Subscription Manager:
# subscription-manager unregister
After backing up the Manager, deploy a new self-hosted engine and restore the backup on the new virtual machine.
Chapter 6. Restoring the Backup on a New Self-Hosted Engine
Run the hosted-engine script on a new host, and use the --restore-from-file=path/to/file_name option to restore the Manager backup during the deployment.
If you are using iSCSI storage, and your iSCSI target filters connections according to the initiator’s ACL, the deployment may fail with a STORAGE_DOMAIN_UNREACHABLE error. To prevent this, you must update your iSCSI configuration before beginning the self-hosted engine deployment:
-
If you are redeploying on an existing host, you must update the host’s iSCSI initiator settings in
/etc/iscsi/initiatorname.iscsi. The initiator IQN must be the same as was previously mapped on the iSCSI target, or updated to a new IQN, if applicable. - If you are deploying on a fresh host, you must update the iSCSI target configuration to accept connections from that host.
Note that the IQN can be updated on the host side (iSCSI initiator), or on the storage side (iSCSI target).
Procedure
Copy the backup file to the new host. In the following example,
host.example.comis the FQDN for the host, and/backup/is any designated folder or path.# scp -p file_name host.example.com:/backup/- Log in to the new host.
If you are deploying on Red Hat Virtualization Host,
ovirt-hosted-engine-setupis already installed, so skip this step. If you are deploying on Red Hat Enterprise Linux, install theovirt-hosted-engine-setuppackage:# dnf install ovirt-hosted-engine-setup
Use the
tmuxwindow manager to run the script to avoid losing the session in case of network or terminal disruption.Install and run
tmux:# dnf -y install tmux # tmux
Run the
hosted-enginescript, specifying the path to the backup file:# hosted-engine --deploy --restore-from-file=backup/file_nameTo escape the script at any time, use CTRL+D to abort deployment.
- Select Yes to begin the deployment.
- Configure the network. The script detects possible NICs to use as a management bridge for the environment.
- If you want to use a custom appliance for the virtual machine installation, enter the path to the OVA archive. Otherwise, leave this field empty to use the RHV-M Appliance.
- Enter the root password for the Manager.
- Enter an SSH public key that will allow you to log in to the Manager as the root user, and specify whether to enable SSH access for the root user.
Enter the virtual machine’s CPU and memory configuration.
NoteThe virtual machine must have the same amount of RAM as the physical machine from which the Manager is being migrated. If you must migrate to a virtual machine that has less RAM than the physical machine from which the Manager is migrated, see Configuring the amount of RAM in Red Hat Virtualization Hosted Engine.
- Enter a MAC address for the Manager virtual machine, or accept a randomly generated one. If you want to provide the Manager virtual machine with an IP address via DHCP, ensure that you have a valid DHCP reservation for this MAC address. The deployment script will not configure the DHCP server for you.
Enter the virtual machine’s networking details. If you specify Static, enter the IP address of the Manager.
ImportantThe static IP address must belong to the same subnet as the host. For example, if the host is in 10.1.1.0/24, the Manager virtual machine’s IP must be in the same subnet range (10.1.1.1-254/24).
-
Specify whether to add entries for the Manager virtual machine and the base host to the virtual machine’s
/etc/hostsfile. You must ensure that the host names are resolvable. - Provide the name and TCP port number of the SMTP server, the email address used to send email notifications, and a comma-separated list of email addresses to receive these notifications:
Enter a password for the
admin@internaluser to access the Administration Portal.The script creates the virtual machine. This can take some time if the RHV-M Appliance needs to be installed.
NoteIf the host becomes non operational, due to a missing required network or a similar problem, the deployment pauses and a message such as the following is displayed:
[ INFO  ] You can now connect to https://<host name>:6900/ovirt-engine/ and check the status of this host and eventually remediate it, please continue only when the host is listed as 'up'
[ INFO  ] TASK [ovirt.ovirt.hosted_engine_setup : include_tasks]
[ INFO  ] ok: [localhost]
[ INFO  ] TASK [ovirt.ovirt.hosted_engine_setup : Create temporary lock file]
[ INFO  ] changed: [localhost]
[ INFO  ] TASK [ovirt.ovirt.hosted_engine_setup : Pause execution until /tmp/ansible.<random>_he_setup_lock is removed, delete it once ready to proceed]
Pausing the process allows you to:
- Connect to the Administration Portal using the provided URL.
- Assess the situation, find out why the host is non operational, and fix whatever is needed. For example, if this deployment was restored from a backup, and the backup included required networks for the host cluster, configure the networks, attaching the relevant host NICs to these networks.
- Once everything looks OK, and the host status is Up, remove the lock file presented in the message above. The deployment continues.
Select the type of storage to use:
- For NFS, enter the version, full address and path to the storage, and any mount options.
For iSCSI, enter the portal details and select a target and LUN from the auto-detected lists. You can only select one iSCSI target during the deployment, but multipathing is supported to connect all portals of the same portal group.
NoteTo specify more than one iSCSI target, you must enable multipathing before deploying the self-hosted engine. See Red Hat Enterprise Linux DM Multipath for details. There is also a Multipath Helper tool that generates a script to install and configure multipath with different options.
For Gluster storage, enter the full address and path to the storage, and any mount options.
ImportantOnly replica 1 and replica 3 Gluster storage are supported. Ensure you configure the volume as follows:
gluster volume set VOLUME_NAME group virt
gluster volume set VOLUME_NAME performance.strict-o-direct on
gluster volume set VOLUME_NAME network.remote-dio off
gluster volume set VOLUME_NAME storage.owner-uid 36
gluster volume set VOLUME_NAME storage.owner-gid 36
gluster volume set VOLUME_NAME network.ping-timeout 30
- For Fibre Channel, select a LUN from the auto-detected list. The host bus adapters must be configured and connected, and the LUN must not contain any existing data. To reuse an existing LUN, see Reusing LUNs in the Administration Guide.
Enter the Manager disk size.
The script continues until the deployment is complete.
-
The deployment process changes the Manager’s SSH keys. To allow client machines to access the new Manager without SSH errors, remove the original Manager’s entry from the
.ssh/known_hostsfile on any client machines that accessed the original Manager.
When the deployment is complete, log in to the new Manager virtual machine and enable the required repositories.
Chapter 7. Enabling the Red Hat Virtualization Manager Repositories
You need to log in and register the Manager machine with Red Hat Subscription Manager, attach the Red Hat Virtualization Manager subscription, and enable the Manager repositories.
Procedure
Register your system with the Content Delivery Network, entering your Customer Portal user name and password when prompted:
# subscription-manager register
NoteIf you are using an IPv6 network, use an IPv6 transition mechanism to access the Content Delivery Network and subscription manager.
Find the
Red Hat Virtualization Managersubscription pool and record the pool ID:# subscription-manager list --available
Use the pool ID to attach the subscription to the system:
# subscription-manager attach --pool=pool_idNoteTo view currently attached subscriptions:
# subscription-manager list --consumed
To list all enabled repositories:
# dnf repolist
Configure the repositories:
# subscription-manager repos \
    --disable='*' \
    --enable=rhel-8-for-x86_64-baseos-eus-rpms \
    --enable=rhel-8-for-x86_64-appstream-eus-rpms \
    --enable=rhv-4.4-manager-for-rhel-8-x86_64-rpms \
    --enable=fast-datapath-for-rhel-8-x86_64-rpms \
    --enable=jb-eap-7.4-for-rhel-8-x86_64-rpms \
    --enable=openstack-16.2-cinderlib-for-rhel-8-x86_64-rpms \
    --enable=rhceph-4-tools-for-rhel-8-x86_64-rpms \
    --enable=rhel-8-for-x86_64-appstream-tus-rpms \
    --enable=rhel-8-for-x86_64-baseos-tus-rpms
Set the RHEL version to 8.6:
# subscription-manager release --set=8.6
Enable the
pki-depsmodule.# dnf module -y enable pki-deps
Enable version 12 of the
postgresqlmodule.# dnf module -y enable postgresql:12
Enable version 14 of the
nodejsmodule:# dnf module -y enable nodejs:14
Synchronize installed packages to update them to the latest available versions.
# dnf distro-sync --nobest
Additional resources
For information on modules and module streams, see the following sections in Installing, managing, and removing user-space components
The Red Hat Virtualization Manager has been migrated to a self-hosted engine setup. The Manager is now operating on a virtual machine on the new self-hosted engine node.
The hosts will be running in the new environment, but cannot host the Manager virtual machine. You can convert some or all of these hosts to self-hosted engine nodes.
Chapter 8. Reinstalling an Existing Host as a Self-Hosted Engine Node
You can convert an existing, standard host in a self-hosted engine environment to a self-hosted engine node capable of hosting the Manager virtual machine.
When installing or reinstalling the host’s operating system, Red Hat strongly recommends that you first detach any existing non-OS storage that is attached to the host to avoid accidental initialization of these disks, and with that, potential data loss.
Procedure
- Click → and select the host.
- Click → and .
- Click → .
- Click the Hosted Engine tab and select DEPLOY from the drop-down list.
- Click .
The host is reinstalled with self-hosted engine configuration, and is flagged with a crown icon in the Administration Portal.
After reinstalling the hosts as self-hosted engine nodes, you can check the status of the new environment by running the following command on one of the nodes:
# hosted-engine --vm-status
If the new environment is running without issue, you can decommission the original Manager machine.
Appendix A. Preventing kernel modules from loading automatically
You can prevent a kernel module from being loaded automatically, whether the module is loaded directly, loaded as a dependency from another module, or during the boot process.
Procedure
The module name must be added to a configuration file for the
modprobeutility. This file must reside in the configuration directory/etc/modprobe.d.For more information on this configuration directory, see the man page
modprobe.d.Ensure the module is not configured to get loaded in any of the following:
-
/etc/modprobe.conf -
/etc/modprobe.d/* -
/etc/rc.modules -
/etc/sysconfig/modules/*
# modprobe --showconfig <_configuration_file_name_>
-
If the module appears in the output, ensure it is ignored and not loaded:
# modprobe --ignore-install <_module_name_>
Unload the module from the running system, if it is loaded:
# modprobe -r <_module_name_>
Prevent the module from being loaded directly by adding the
blacklistline to a configuration file specific to the system - for example/etc/modprobe.d/local-dontload.conf:# echo "blacklist <_module_name_> >> /etc/modprobe.d/local-dontload.conf
NoteThis step does not prevent a module from loading if it is a required or an optional dependency of another module.
Prevent optional modules from being loading on demand:
# echo "install <_module_name_>/bin/false" >> /etc/modprobe.d/local-dontload.conf
ImportantIf the excluded module is required for other hardware, excluding it might cause unexpected side effects.
Make a backup copy of your
initramfs:# cp /boot/initramfs-$(uname -r).img /boot/initramfs-$(uname -r).img.$(date +%m-%d-%H%M%S).bak
If the kernel module is part of the
initramfs, rebuild your initialramdiskimage, omitting the module:# dracut --omit-drivers <_module_name_> -f
Get the current kernel command line parameters:
# grub2-editenv - list | grep kernelopts
Append
<_module_name_>.blacklist=1 rd.driver.blacklist=<_module_name_>to the generated output:# grub2-editenv - set kernelopts="<> <_module_name_>.blacklist=1 rd.driver.blacklist=<_module_name_>"
For example:
# grub2-editenv - set kernelopts="root=/dev/mapper/rhel_example-root ro crashkernel=auto resume=/dev/mapper/rhel_example-swap rd.lvm.lv=rhel_example/root rd.lvm.lv=rhel_example/swap <_module_name_>.blacklist=1 rd.driver.blacklist=<_module_name_>"
Make a backup copy of the
kdump initramfs:# cp /boot/initramfs-$(uname -r)kdump.img /boot/initramfs-$(uname -r)kdump.img.$(date +%m-%d-%H%M%S).bak
Append
rd.driver.blacklist=<_module_name_>to theKDUMP_COMMANDLINE_APPENDsetting in/etc/sysconfig/kdumpto omit it from thekdump initramfs:# sed -i '/^KDUMP_COMMANDLINE_APPEND=/s/"$/ rd.driver.blacklist=module_name"/' /etc/sysconfig/kdump
Restart the
kdumpservice to pick up the changes to thekdump initrd:# kdumpctl restart
Rebuild the
kdumpinitialramdiskimage:# mkdumprd -f /boot/initramfs-$(uname -r)kdump.img
- Reboot the system.
A.1. Removing a module temporarily
You can remove a module temporarily.
Procedure
Run
modprobeto remove any currently-loaded module:# modprobe -r <module name>
-
If the module cannot be unloaded, a process or another module might still be using the module. If so, terminate the process and run the
modpolecommand written above another time to unload the module.
Appendix B. Legal notice
Copyright © 2022 Red Hat, Inc.
Licensed under the (Creative Commons Attribution–ShareAlike 4.0 International License). Derived from documentation for the (oVirt Project). If you distribute this document or an adaptation of it, you must provide the URL for the original version.
Modified versions must remove all Red Hat trademarks.
Red Hat, Red Hat Enterprise Linux, the Red Hat logo, the Shadowman logo, JBoss, OpenShift, Fedora, the Infinity logo, and RHCE are trademarks of Red Hat, Inc., registered in the United States and other countries.
Linux® is the registered trademark of Linus Torvalds in the United States and other countries.
Java® is a registered trademark of Oracle and/or its affiliates.
XFS® is a trademark of Silicon Graphics International Corp. or its subsidiaries in the United States and/or other countries.
MySQL® is a registered trademark of MySQL AB in the United States, the European Union and other countries.
Node.js® is an official trademark of Joyent. Red Hat Software Collections is not formally related to or endorsed by the official Joyent Node.js open source or commercial project.
The OpenStack® Word Mark and OpenStack logo are either registered trademarks/service marks or trademarks/service marks of the OpenStack Foundation, in the United States and other countries and are used with the OpenStack Foundation’s permission. We are not affiliated with, endorsed or sponsored by the OpenStack Foundation, or the OpenStack community.
All other trademarks are the property of their respective owners.