
Installing Red Hat Virtualization as a standalone Manager with local databases
ALTERNATIVE method — Installing the Red Hat Virtualization Manager and its databases on the same server
Abstract
Preface
Standalone Manager installation is manual and customizable. You must install a Red Hat Enterprise Linux machine, then run the configuration script (engine-setup) and provide information about how you want to configure the Red Hat Virtualization Manager. Add hosts and storage after the Manager is running. At least two hosts are required for virtual machine high availability.
In a local database environment, the Manager database and Data Warehouse database can be created automatically by the Manager configuration script. Alternatively, you can create these databases manually on the Manager machine before running engine-setup.
See the Planning and Prerequisites Guide for information on environment options and recommended configuration.
Table 1. Red Hat Virtualization Key Components
| Component Name | Description |
|---|---|
| Red Hat Virtualization Manager | A service that provides a graphical user interface and a REST API to manage the resources in the environment. The Manager is installed on a physical or virtual machine running Red Hat Enterprise Linux. |
| Hosts | Red Hat Enterprise Linux hosts (RHEL hosts) and Red Hat Virtualization Hosts (image-based hypervisors) are the two supported types of host. Hosts use Kernel-based Virtual Machine (KVM) technology and provide resources used to run virtual machines. |
| Shared Storage | A storage service is used to store the data associated with virtual machines. |
| Data Warehouse | A service that collects configuration information and statistical data from the Manager. |
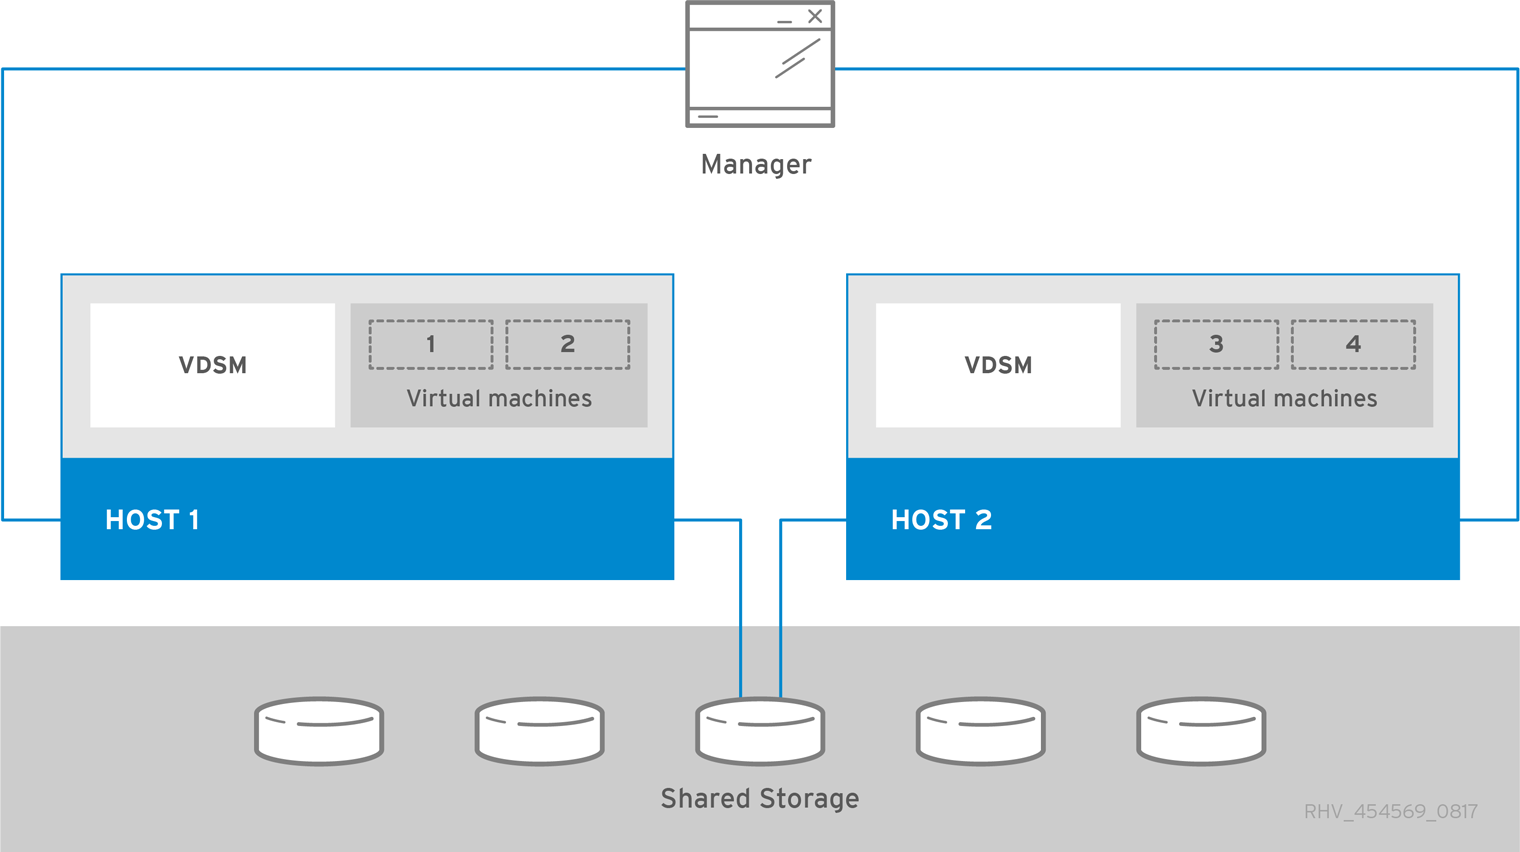
Standalone Manager Architecture
The Red Hat Virtualization Manager runs on a physical server, or a virtual machine hosted in a separate virtualization environment. A standalone Manager is easier to deploy and manage, but requires an additional physical server. The Manager is only highly available when managed externally with a product such as Red Hat’s High Availability Add-On.
The minimum setup for a standalone Manager environment includes:
- One Red Hat Virtualization Manager machine. The Manager is typically deployed on a physical server. However, it can also be deployed on a virtual machine, as long as that virtual machine is hosted in a separate environment. The Manager must run on Red Hat Enterprise Linux 7.
- A minimum of two hosts for virtual machine high availability. You can use Red Hat Enterprise Linux hosts or Red Hat Virtualization Hosts (RHVH). VDSM (the host agent) runs on all hosts to facilitate communication with the Red Hat Virtualization Manager.
- One storage service, which can be hosted locally or on a remote server, depending on the storage type used. The storage service must be accessible to all hosts.
Figure 1. Standalone Manager Red Hat Virtualization Architecture
Chapter 1. Installation Overview
Installing a standalone Manager environment with local databases involves the following steps:
Install and configure the Red Hat Virtualization Manager:
- Install a Red Hat Enterprise Linux machine for the Manager.
- Register the Manager machine with the Content Delivery Network and enable the Red Hat Virtualization Manager repositories.
-
Install and Configure the Red Hat Virtualization Manager using
engine-setup. - Connect to the Administration Portal to add hosts and storage domains.
Install hosts to run virtual machines on:
Use either host type, or both:
- Add the hosts to the Manager.
Prepare storage to use for storage domains. You can use one of the following storage types:
- Add storage domains to the Manager.
Keep the environment up to date. See https://access.redhat.com/articles/2974891 for more information. Since bug fixes for known issues are frequently released, Red Hat recommends using scheduled tasks to update the hosts and the Manager.
Chapter 2. Requirements
2.1. Red Hat Virtualization Manager Requirements
2.1.1. Hardware Requirements
The minimum and recommended hardware requirements outlined here are based on a typical small to medium-sized installation. The exact requirements vary between deployments based on sizing and load.
Hardware certification for Red Hat Virtualization is covered by the hardware certification for Red Hat Enterprise Linux. For more information, see https://access.redhat.com/solutions/725243. To confirm whether specific hardware items are certified for use with Red Hat Enterprise Linux, see https://access.redhat.com/ecosystem/#certifiedHardware.
Table 2.1. Red Hat Virtualization Manager Hardware Requirements
| Resource | Minimum | Recommended |
|---|---|---|
| CPU | A dual core CPU. | A quad core CPU or multiple dual core CPUs. |
| Memory | 4 GB of available system RAM if Data Warehouse is not installed and if memory is not being consumed by existing processes. | 16 GB of system RAM. |
| Hard Disk | 25 GB of locally accessible, writable disk space. | 50 GB of locally accessible, writable disk space. You can use the RHV Manager History Database Size Calculator to calculate the appropriate disk space for the Manager history database size. |
| Network Interface | 1 Network Interface Card (NIC) with bandwidth of at least 1 Gbps. | 1 Network Interface Card (NIC) with bandwidth of at least 1 Gbps. |
2.1.2. Browser Requirements
The following browser versions and operating systems can be used to access the Administration Portal and the VM Portal.
Browser support is divided into tiers:
- Tier 1: Browser and operating system combinations that are fully tested and fully supported. Red Hat Engineering is committed to fixing issues with browsers on this tier.
- Tier 2: Browser and operating system combinations that are partially tested, and are likely to work. Limited support is provided for this tier. Red Hat Engineering will attempt to fix issues with browsers on this tier.
- Tier 3: Browser and operating system combinations that are not tested, but may work. Minimal support is provided for this tier. Red Hat Engineering will attempt to fix only minor issues with browsers on this tier.
Table 2.2. Browser Requirements
| Support Tier | Operating System Family | Browser |
|---|---|---|
| Tier 1 | Red Hat Enterprise Linux | Mozilla Firefox Extended Support Release (ESR) version |
| Any | Most recent version of Google Chrome, Mozilla Firefox, or Microsoft Edge | |
| Tier 2 | ||
| Tier 3 | Any | Earlier versions of Google Chrome or Mozilla Firefox |
| Any | Other browsers |
2.1.3. Client Requirements
Virtual machine consoles can only be accessed using supported Remote Viewer (virt-viewer) clients on Red Hat Enterprise Linux and Windows. To install virt-viewer, see Installing Supporting Components on Client Machines in the Virtual Machine Management Guide. Installing virt-viewer requires Administrator privileges.
Virtual machine consoles are accessed through the SPICE, VNC, or RDP (Windows only) protocols. The QXL graphical driver can be installed in the guest operating system for improved/enhanced SPICE functionalities. SPICE currently supports a maximum resolution of 2560x1600 pixels.
Supported QXL drivers are available on Red Hat Enterprise Linux, Windows XP, and Windows 7.
SPICE support is divided into tiers:
- Tier 1: Operating systems on which Remote Viewer has been fully tested and is supported.
- Tier 2: Operating systems on which Remote Viewer is partially tested and is likely to work. Limited support is provided for this tier. Red Hat Engineering will attempt to fix issues with remote-viewer on this tier.
Table 2.3. Client Operating System SPICE Support
| Support Tier | Operating System |
|---|---|
| Tier 1 | Red Hat Enterprise Linux 7.2 and later |
| Microsoft Windows 7 | |
| Tier 2 | Microsoft Windows 8 |
| Microsoft Windows 10 |
2.1.4. Operating System Requirements
The Red Hat Virtualization Manager must be installed on a base installation of Red Hat Enterprise Linux 7 that has been updated to the latest minor release.
Do not install any additional packages after the base installation, as they may cause dependency issues when attempting to install the packages required by the Manager.
Do not enable additional repositories other than those required for the Manager installation.
2.2. Host Requirements
Hardware certification for Red Hat Virtualization is covered by the hardware certification for Red Hat Enterprise Linux. For more information, see https://access.redhat.com/solutions/725243. To confirm whether specific hardware items are certified for use with Red Hat Enterprise Linux, see https://access.redhat.com/ecosystem/#certifiedHardware.
For more information on the requirements and limitations that apply to guests see https://access.redhat.com/articles/rhel-limits and https://access.redhat.com/articles/906543.
2.2.1. CPU Requirements
All CPUs must have support for the Intel® 64 or AMD64 CPU extensions, and the AMD-V™ or Intel VT® hardware virtualization extensions enabled. Support for the No eXecute flag (NX) is also required.
The following CPU models are supported:
AMD
- Opteron G4
- Opteron G5
- EPYC
Intel
- Nehalem
- Westmere
- Sandybridge
- Haswell
- Haswell-noTSX
- Broadwell
- Broadwell-noTSX
- Skylake (client)
- Skylake (server)
- IBM POWER8
2.2.1.1. Checking if a Processor Supports the Required Flags
You must enable virtualization in the BIOS. Power off and reboot the host after this change to ensure that the change is applied.
- At the Red Hat Enterprise Linux or Red Hat Virtualization Host boot screen, press any key and select the Boot or Boot with serial console entry from the list.
-
Press
Tabto edit the kernel parameters for the selected option. -
Ensure there is a space after the last kernel parameter listed, and append the parameter
rescue. -
Press
Enterto boot into rescue mode. At the prompt, determine that your processor has the required extensions and that they are enabled by running this command:
# grep -E 'svm|vmx' /proc/cpuinfo | grep nx
If any output is shown, the processor is hardware virtualization capable. If no output is shown, your processor may still support hardware virtualization; in some circumstances manufacturers disable the virtualization extensions in the BIOS. If you believe this to be the case, consult the system’s BIOS and the motherboard manual provided by the manufacturer.
2.2.2. Memory Requirements
The minimum required RAM is 2 GB. The maximum supported RAM per VM in Red Hat Virtualization Host is 4 TB.
However, the amount of RAM required varies depending on guest operating system requirements, guest application requirements, and guest memory activity and usage. KVM can also overcommit physical RAM for virtualized guests, allowing you to provision guests with RAM requirements greater than what is physically present, on the assumption that the guests are not all working concurrently at peak load. KVM does this by only allocating RAM for guests as required and shifting underutilized guests into swap.
2.2.3. Storage Requirements
Hosts require storage to store configuration, logs, kernel dumps, and for use as swap space. Storage can be local or network-based. Red Hat Virtualization Host (RHVH) can boot with one, some, or all of its default allocations in network storage. Booting from network storage can result in a freeze if there is a network disconnect. Adding a drop-in multipath configuration file can help address losses in network connectivity. If RHVH boots from SAN storage and loses connectivity, the files become read-only until network connectivity restores. Using network storage might result in a performance downgrade.
The minimum storage requirements of RHVH are documented in this section. The storage requirements for Red Hat Enterprise Linux hosts vary based on the amount of disk space used by their existing configuration but are expected to be greater than those of RHVH.
The minimum storage requirements for host installation are listed below. However, Red Hat recommends using the default allocations, which use more storage space.
- / (root) - 6 GB
- /home - 1 GB
- /tmp - 1 GB
- /boot - 1 GB
- /var - 15 GB
- /var/crash - 10 GB
- /var/log - 8 GB
- /var/log/audit - 2 GB
- swap - 1 GB (for the recommended swap size, see https://access.redhat.com/solutions/15244)
- Anaconda reserves 20% of the thin pool size within the volume group for future metadata expansion. This is to prevent an out-of-the-box configuration from running out of space under normal usage conditions. Overprovisioning of thin pools during installation is also not supported.
- Minimum Total - 55 GB
If you are also installing the RHV-M Appliance for self-hosted engine installation, /var/tmp must be at least 5 GB.
If you plan to use memory overcommitment, add enough swap space to provide virtual memory for all of virtual machines. See Memory Optimization.
2.2.4. PCI Device Requirements
Hosts must have at least one network interface with a minimum bandwidth of 1 Gbps. Red Hat recommends that each host have two network interfaces, with one dedicated to supporting network-intensive activities, such as virtual machine migration. The performance of such operations is limited by the bandwidth available.
For information about how to use PCI Express and conventional PCI devices with Intel Q35-based virtual machines, see Using PCI Express and Conventional PCI Devices with the Q35 Virtual Machine.
2.2.5. Device Assignment Requirements
If you plan to implement device assignment and PCI passthrough so that a virtual machine can use a specific PCIe device from a host, ensure the following requirements are met:
- CPU must support IOMMU (for example, VT-d or AMD-Vi). IBM POWER8 supports IOMMU by default.
- Firmware must support IOMMU.
- CPU root ports used must support ACS or ACS-equivalent capability.
- PCIe devices must support ACS or ACS-equivalent capability.
- Red Hat recommends that all PCIe switches and bridges between the PCIe device and the root port support ACS. For example, if a switch does not support ACS, all devices behind that switch share the same IOMMU group, and can only be assigned to the same virtual machine.
- For GPU support, Red Hat Enterprise Linux 7 supports PCI device assignment of PCIe-based NVIDIA K-Series Quadro (model 2000 series or higher), GRID, and Tesla as non-VGA graphics devices. Currently up to two GPUs may be attached to a virtual machine in addition to one of the standard, emulated VGA interfaces. The emulated VGA is used for pre-boot and installation and the NVIDIA GPU takes over when the NVIDIA graphics drivers are loaded. Note that the NVIDIA Quadro 2000 is not supported, nor is the Quadro K420 card.
Check vendor specification and datasheets to confirm that your hardware meets these requirements. The lspci -v command can be used to print information for PCI devices already installed on a system.
2.2.6. vGPU Requirements
A host must meet the following requirements in order for virtual machines on that host to use a vGPU:
- vGPU-compatible GPU
- GPU-enabled host kernel
- Installed GPU with correct drivers
- Predefined mdev_type set to correspond with one of the mdev types supported by the device
- vGPU-capable drivers installed on each host in the cluster
- vGPU-supported virtual machine operating system with vGPU drivers installed
2.3. Networking Requirements
2.3.1. General Requirements
Red Hat Virtualization requires IPv6 to remain enabled on the computer or virtual machine where you are running the Manager (also called "the Manager machine"). Do not disable IPv6 on the Manager machine, even if your systems do not use it.
2.3.2. Firewall Requirements for DNS, NTP, IPMI Fencing, and Metrics Store
The firewall requirements for all of the following topics are special cases that require individual consideration.
DNS and NTP
Red Hat Virtualization does not create a DNS or NTP server, so the firewall does not need to have open ports for incoming traffic.
By default, Red Hat Enterprise Linux allows outbound traffic to DNS and NTP on any destination address. If you disable outgoing traffic, define exceptions for requests that are sent to DNS and NTP servers.
- The Red Hat Virtualization Manager and all hosts (Red Hat Virtualization Host and Red Hat Enterprise Linux host) must have a fully qualified domain name and full, perfectly-aligned forward and reverse name resolution.
- Running a DNS service as a virtual machine in the Red Hat Virtualization environment is not supported. All DNS services the Red Hat Virtualization environment uses must be hosted outside of the environment.
-
Red Hat strongly recommends using DNS instead of the
/etc/hostsfile for name resolution. Using a hosts file typically requires more work and has a greater chance for errors.
IPMI and Other Fencing Mechanisms (optional)
For IPMI (Intelligent Platform Management Interface) and other fencing mechanisms, the firewall does not need to have open ports for incoming traffic.
By default, Red Hat Enterprise Linux allows outbound IPMI traffic to ports on any destination address. If you disable outgoing traffic, make exceptions for requests being sent to your IPMI or fencing servers.
Each Red Hat Virtualization Host and Red Hat Enterprise Linux host in the cluster must be able to connect to the fencing devices of all other hosts in the cluster. If the cluster hosts are experiencing an error (network error, storage error…) and cannot function as hosts, they must be able to connect to other hosts in the data center.
The specific port number depends on the type of the fence agent you are using and how it is configured.
The firewall requirement tables in the following sections do not represent this option.
Metrics Store, Kibana, and ElasticSearch
For Metrics Store, Kibana, and ElasticSearch, see Network Configuration for Metrics Store virtual machines.
2.3.3. Red Hat Virtualization Manager Firewall Requirements
The Red Hat Virtualization Manager requires that a number of ports be opened to allow network traffic through the system’s firewall.
The engine-setup script can configure the firewall automatically, but this overwrites any pre-existing firewall configuration if you are using iptables. If you want to keep the existing firewall configuration, you must manually insert the firewall rules required by the Manager. The engine-setup command saves a list of the iptables rules required in the /etc/ovirt-engine/iptables.example file. If you are using firewalld, engine-setup does not overwrite the existing configuration.
The firewall configuration documented here assumes a default configuration.
A diagram of these firewall requirements is available at https://access.redhat.com/articles/3932211. You can use the IDs in the table to look up connections in the diagram.
Table 2.4. Red Hat Virtualization Manager Firewall Requirements
| ID | Port(s) | Protocol | Source | Destination | Purpose | Encrypted by default |
|---|---|---|---|---|---|---|
| M1 | - | ICMP | Red Hat Virtualization Hosts Red Hat Enterprise Linux hosts | Red Hat Virtualization Manager | Optional. May help in diagnosis. | No |
| M2 | 22 | TCP | System(s) used for maintenance of the Manager including backend configuration, and software upgrades. | Red Hat Virtualization Manager | Secure Shell (SSH) access. Optional. | Yes |
| M3 | 2222 | TCP | Clients accessing virtual machine serial consoles. | Red Hat Virtualization Manager | Secure Shell (SSH) access to enable connection to virtual machine serial consoles. | Yes |
| M4 | 80, 443 | TCP | Administration Portal clients VM Portal clients Red Hat Virtualization Hosts Red Hat Enterprise Linux hosts REST API clients | Red Hat Virtualization Manager | Provides HTTP (port 80, not encrypted) and HTTPS (port 443, encrypted) access to the Manager. HTTP redirects connections to HTTPS. | Yes |
| M5 | 6100 | TCP | Administration Portal clients VM Portal clients | Red Hat Virtualization Manager |
Provides websocket proxy access for a web-based console client, | No |
| M6 | 7410 | UDP | Red Hat Virtualization Hosts Red Hat Enterprise Linux hosts | Red Hat Virtualization Manager |
If Kdump is enabled on the hosts, open this port for the fence_kdump listener on the Manager. See fence_kdump Advanced Configuration. | No |
| M7 | 54323 | TCP | Administration Portal clients | Red Hat Virtualization Manager (ImageIO Proxy server) |
Required for communication with the ImageIO Proxy ( | Yes |
| M8 | 6442 | TCP | Red Hat Virtualization Hosts Red Hat Enterprise Linux hosts | Open Virtual Network (OVN) southbound database | Connect to Open Virtual Network (OVN) database | Yes |
| M9 | 9696 | TCP | Clients of external network provider for OVN | External network provider for OVN | OpenStack Networking API | Yes, with configuration generated by engine-setup. |
| M10 | 35357 | TCP | Clients of external network provider for OVN | External network provider for OVN | OpenStack Identity API | Yes, with configuration generated by engine-setup. |
| M11 | 53 | TCP, UDP | Red Hat Virtualization Manager | DNS Server | DNS lookup requests from ports above 1023 to port 53, and responses. Open by default. | No |
| M12 | 123 | UDP | Red Hat Virtualization Manager | NTP Server | NTP requests from ports above 1023 to port 123, and responses. Open by default. | No |
-
A port for the OVN northbound database (6641) is not listed because, in the default configuration, the only client for the OVN northbound database (6641) is
ovirt-provider-ovn. Because they both run on the same host, their communication is not visible to the network. - By default, Red Hat Enterprise Linux allows outbound traffic to DNS and NTP on any destination address. If you disable outgoing traffic, make exceptions for the Manager to send requests to DNS and NTP servers. Other nodes may also require DNS and NTP. In that case, consult the requirements for those nodes and configure the firewall accordingly.
2.3.4. Host Firewall Requirements
Red Hat Enterprise Linux hosts and Red Hat Virtualization Hosts (RHVH) require a number of ports to be opened to allow network traffic through the system’s firewall. The firewall rules are automatically configured by default when adding a new host to the Manager, overwriting any pre-existing firewall configuration.
To disable automatic firewall configuration when adding a new host, clear the Automatically configure host firewall check box under Advanced Parameters.
To customize the host firewall rules, see https://access.redhat.com/solutions/2772331.
A diagram of these firewall requirements is available at https://access.redhat.com/articles/3932211. You can use the IDs in the table to look up connections in the diagram.
Table 2.5. Virtualization Host Firewall Requirements
| ID | Port(s) | Protocol | Source | Destination | Purpose | Encrypted by default |
|---|---|---|---|---|---|---|
| H1 | 22 | TCP | Red Hat Virtualization Manager | Red Hat Virtualization Hosts Red Hat Enterprise Linux hosts | Secure Shell (SSH) access. Optional. | Yes |
| H2 | 2223 | TCP | Red Hat Virtualization Manager | Red Hat Virtualization Hosts Red Hat Enterprise Linux hosts | Secure Shell (SSH) access to enable connection to virtual machine serial consoles. | Yes |
| H3 | 161 | UDP | Red Hat Virtualization Hosts Red Hat Enterprise Linux hosts | Red Hat Virtualization Manager | Simple network management protocol (SNMP). Only required if you want Simple Network Management Protocol traps sent from the host to one or more external SNMP managers. Optional. | No |
| H4 | 111 | TCP | NFS storage server | Red Hat Virtualization Hosts Red Hat Enterprise Linux hosts | NFS connections. Optional. | No |
| H5 | 5900 - 6923 | TCP | Administration Portal clients VM Portal clients | Red Hat Virtualization Hosts Red Hat Enterprise Linux hosts | Remote guest console access via VNC and SPICE. These ports must be open to facilitate client access to virtual machines. | Yes (optional) |
| H6 | 5989 | TCP, UDP | Common Information Model Object Manager (CIMOM) | Red Hat Virtualization Hosts Red Hat Enterprise Linux hosts | Used by Common Information Model Object Managers (CIMOM) to monitor virtual machines running on the host. Only required if you want to use a CIMOM to monitor the virtual machines in your virtualization environment. Optional. | No |
| H7 | 9090 | TCP | Red Hat Virtualization Manager Client machines | Red Hat Virtualization Hosts Red Hat Enterprise Linux hosts | Required to access the Cockpit web interface, if installed. | Yes |
| H8 | 16514 | TCP | Red Hat Virtualization Hosts Red Hat Enterprise Linux hosts | Red Hat Virtualization Hosts Red Hat Enterprise Linux hosts | Virtual machine migration using libvirt. | Yes |
| H9 | 49152 - 49215 | TCP | Red Hat Virtualization Hosts Red Hat Enterprise Linux hosts | Red Hat Virtualization Hosts Red Hat Enterprise Linux hosts | Virtual machine migration and fencing using VDSM. These ports must be open to facilitate both automated and manual migration of virtual machines. | Yes. Depending on agent for fencing, migration is done through libvirt. |
| H10 | 54321 | TCP | Red Hat Virtualization Manager Red Hat Virtualization Hosts Red Hat Enterprise Linux hosts | Red Hat Virtualization Hosts Red Hat Enterprise Linux hosts | VDSM communications with the Manager and other virtualization hosts. | Yes |
| H11 | 54322 | TCP | Red Hat Virtualization Manager (ImageIO Proxy server) | Red Hat Virtualization Hosts Red Hat Enterprise Linux hosts | Required for communication with the ImageIO daemon (ovirt-imageio-daemon). | Yes |
| H12 | 6081 | UDP | Red Hat Virtualization Hosts Red Hat Enterprise Linux hosts | Red Hat Virtualization Hosts Red Hat Enterprise Linux hosts | Required, when Open Virtual Network (OVN) is used as a network provider, to allow OVN to create tunnels between hosts. | No |
| H13 | 53 | TCP, UDP | Red Hat Virtualization Hosts Red Hat Enterprise Linux hosts | DNS Server | DNS lookup requests from ports above 1023 to port 53, and responses. This port is required and open by default. | No |
By default, Red Hat Enterprise Linux allows outbound traffic to DNS and NTP on any destination address. If you disable outgoing traffic, make exceptions for the Red Hat Virtualization Hosts
Red Hat Enterprise Linux hosts to send requests to DNS and NTP servers. Other nodes may also require DNS and NTP. In that case, consult the requirements for those nodes and configure the firewall accordingly.
2.3.5. Database Server Firewall Requirements
Red Hat Virtualization supports the use of a remote database server for the Manager database (engine) and the Data Warehouse database (ovirt-engine-history). If you plan to use a remote database server, it must allow connections from the Manager and the Data Warehouse service (which can be separate from the Manager).
Similarly, if you plan to access a local or remote Data Warehouse database from an external system, such as Red Hat CloudForms, the database must allow connections from that system.
Accessing the Manager database from external systems is not supported.
A diagram of these firewall requirements is available at https://access.redhat.com/articles/3932211. You can use the IDs in the table to look up connections in the diagram.
Table 2.6. Database Server Firewall Requirements
| ID | Port(s) | Protocol | Source | Destination | Purpose | Encrypted by default |
|---|---|---|---|---|---|---|
| D1 | 5432 | TCP, UDP | Red Hat Virtualization Manager Data Warehouse service |
Manager (
Data Warehouse ( | Default port for PostgreSQL database connections. | |
| D2 | 5432 | TCP, UDP | External systems |
Data Warehouse ( | Default port for PostgreSQL database connections. | Disabled by default. No, but can be enabled. |
Chapter 3. Installing the Red Hat Virtualization Manager
Installing the Red Hat Virtualization Manager involves the following steps:
3.1. Preparing the Red Hat Virtualization Manager Machine
The Red Hat Virtualization Manager must run on Red Hat Enterprise Linux 7. For detailed instructions on installing Red Hat Enterprise Linux, see the Red Hat Enterprise Linux 7 Installation Guide.
This machine must meet the minimum Manager hardware requirements.
To install the Red Hat Virtualization Manager on a system that does not have access to the Content Delivery Network, see Appendix A, Configuring a Local Repository for Offline Red Hat Virtualization Manager Installation before configuring the Manager.
By default, the Red Hat Virtualization Manager’s configuration script, engine-setup, creates and configures the Manager database and Data Warehouse database automatically on the Manager machine. To set up either database, or both, manually, see Appendix B, Preparing a Local Manually Configured PostgreSQL Database before configuring the Manager.
3.2. Enabling the Red Hat Virtualization Manager Repositories
Register the system with Red Hat Subscription Manager, attach the Red Hat Virtualization Manager subscription, and enable Manager repositories.
Procedure
Register your system with the Content Delivery Network, entering your Customer Portal user name and password when prompted:
# subscription-manager register
NoteIf you are using an IPv6 network, use an IPv6 transition mechanism to access the Content Delivery Network and subscription manager.
Find the
Red Hat Virtualization Managersubscription pool and record the pool ID:# subscription-manager list --available
Use the pool ID to attach the subscription to the system:
# subscription-manager attach --pool=pool_idNoteTo view currently attached subscriptions:
# subscription-manager list --consumed
To list all enabled repositories:
# yum repolist
Configure the repositories:
# subscription-manager repos \
    --disable='*' \
    --enable=rhel-7-server-rpms \
    --enable=rhel-7-server-supplementary-rpms \
    --enable=rhel-7-server-rhv-4.3-manager-rpms \
    --enable=rhel-7-server-rhv-4-manager-tools-rpms \
    --enable=rhel-7-server-ansible-2.9-rpms \
    --enable=jb-eap-7.2-for-rhel-7-server-rpms
3.3. Installing and Configuring the Red Hat Virtualization Manager
Install the package and dependencies for the Red Hat Virtualization Manager, and configure it using the engine-setup command. The script asks you a series of questions and, after you provide the required values for all questions, applies that configuration and starts the ovirt-engine service.
The engine-setup command guides you through several distinct configuration stages, each comprising several steps that require user input. Suggested configuration defaults are provided in square brackets; if the suggested value is acceptable for a given step, press Enter to accept that value.
You can run engine-setup --accept-defaults to automatically accept all questions that have default answers. This option should be used with caution and only if you are familiar with engine-setup.
Procedure
Ensure all packages are up to date:
# yum update
NoteReboot the machine if any kernel-related packages were updated.
Install the
rhvmpackage and dependencies.# yum install rhvm
Run the
engine-setupcommand to begin configuring the Red Hat Virtualization Manager:# engine-setup
Press
Enterto configure the Manager on this machine:Configure Engine on this host (Yes, No) [Yes]:
Optionally install Open Virtual Network (OVN). Selecting
Yeswill install an OVN central server on the Manager machine, and add it to Red Hat Virtualization as an external network provider. The default cluster will use OVN as its default network provider, and hosts added to the default cluster will automatically be configured to communicate with OVN.Configure ovirt-provider-ovn (Yes, No) [Yes]:
For more information on using OVN networks in Red Hat Virtualization, see Adding Open Virtual Network (OVN) as an External Network Provider in the Administration Guide.
Optionally allow
engine-setupto configure the Image I/O Proxy (ovirt-imageio-proxy) to allow the Manager to upload virtual disks into storage domains.Configure Image I/O Proxy on this host? (Yes, No) [Yes]:
Optionally allow
engine-setupto configure a websocket proxy server for allowing users to connect to virtual machines through the noVNC console:Configure WebSocket Proxy on this machine? (Yes, No) [Yes]:
ImportantThe websocket proxy and noVNC are Technology Preview features only. Technology Preview features are not supported with Red Hat production service-level agreements (SLAs) and might not be functionally complete, and Red Hat does not recommend using them for production. These features provide early access to upcoming product features, enabling customers to test functionality and provide feedback during the development process. For more information see Red Hat Technology Preview Features Support Scope.
Choose whether to configure Data Warehouse on this machine.
Please note: Data Warehouse is required for the engine. If you choose to not configure it on this host, you have to configure it on a remote host, and then configure the engine on this host so that it can access the database of the remote Data Warehouse host.
Configure Data Warehouse on this host (Yes, No) [Yes]:
Optionally allow access to a virtual machines’s serial console from the command line.
Configure VM Console Proxy on this host (Yes, No) [Yes]:
Additional configuration is required on the client machine to use this feature. See Opening a Serial Console to a Virtual Machine in the Virtual Machine Management Guide.
Press
Enterto accept the automatically detected host name, or enter an alternative host name and pressEnter. Note that the automatically detected host name may be incorrect if you are using virtual hosts.Host fully qualified DNS name of this server [autodetected host name]:The
engine-setupcommand checks your firewall configuration and offers to open the ports used by the Manager for external communication, such as ports 80 and 443. If you do not allowengine-setupto modify your firewall configuration, you must manually open the ports used by the Manager.firewalldis configured as the firewall manager;iptablesis deprecated.Setup can automatically configure the firewall on this system. Note: automatic configuration of the firewall may overwrite current settings. NOTICE: iptables is deprecated and will be removed in future releases Do you want Setup to configure the firewall? (Yes, No) [Yes]:
If you choose to automatically configure the firewall, and no firewall managers are active, you are prompted to select your chosen firewall manager from a list of supported options. Type the name of the firewall manager and press
Enter. This applies even in cases where only one option is listed.Specify whether to configure the Data Warehouse database on this machine, or on another machine:
Where is the DWH database located? (Local, Remote) [Local]:
If you select
Local, theengine-setupscript can configure your database automatically (including adding a user and a database), or it can connect to a preconfigured local database:Setup can configure the local postgresql server automatically for the DWH to run. This may conflict with existing applications. Would you like Setup to automatically configure postgresql and create DWH database, or prefer to perform that manually? (Automatic, Manual) [Automatic]:
-
If you select
Automaticby pressingEnter, no further action is required here. If you select
Manual, input the following values for the manually configured local database:DWH database secured connection (Yes, No) [No]: DWH database name [ovirt_engine_history]: DWH database user [ovirt_engine_history]: DWH database password:
Noteengine-setuprequests these values after the Manager database is configured in the next step.
-
If you select
If you select
Remote(for example, if you are installing the Data Warehouse service on the Manager machine, but have configured a remote Data Warehouse database), input the following values for the remote database server:DWH database host [localhost]: DWH database port [5432]: DWH database secured connection (Yes, No) [No]: DWH database name [ovirt_engine_history]: DWH database user [ovirt_engine_history]: DWH database password:
Noteengine-setuprequests these values after the Manager database is configured in the next step.
Specify whether to configure the Manager database on this machine, or on another machine:
Where is the Engine database located? (Local, Remote) [Local]:
If you select
Local, theengine-setupcommand can configure your database automatically (including adding a user and a database), or it can connect to a preconfigured local database:Setup can configure the local postgresql server automatically for the engine to run. This may conflict with existing applications. Would you like Setup to automatically configure postgresql and create Engine database, or prefer to perform that manually? (Automatic, Manual) [Automatic]:
-
If you select
Automaticby pressingEnter, no further action is required here. If you select
Manual, input the following values for the manually configured local database:Engine database secured connection (Yes, No) [No]: Engine database name [engine]: Engine database user [engine]: Engine database password:
-
If you select
Set a password for the automatically created administrative user of the Red Hat Virtualization Manager:
Engine admin password:
Confirm engine admin password:
Select Gluster, Virt, or Both:
Application mode (Both, Virt, Gluster) [Both]:
Both offers the greatest flexibility. In most cases, select
Both. Virt allows you to run virtual machines in the environment; Gluster only allows you to manage GlusterFS from the Administration Portal.If you installed the OVN provider, you can choose to use the default credentials, or specify an alternative.
Use default credentials (admin@internal) for ovirt-provider-ovn (Yes, No) [Yes]:
oVirt OVN provider user[admin@internal]:
oVirt OVN provider password:
Set the default value for the
wipe_after_deleteflag, which wipes the blocks of a virtual disk when the disk is deleted.Default SAN wipe after delete (Yes, No) [No]:
The Manager uses certificates to communicate securely with its hosts. This certificate can also optionally be used to secure HTTPS communications with the Manager. Provide the organization name for the certificate:
Organization name for certificate [autodetected domain-based name]:Optionally allow
engine-setupto make the landing page of the Manager the default page presented by the Apache web server:Setup can configure the default page of the web server to present the application home page. This may conflict with existing applications. Do you wish to set the application as the default web page of the server? (Yes, No) [Yes]:
By default, external SSL (HTTPS) communication with the Manager is secured with the self-signed certificate created earlier in the configuration to securely communicate with hosts. Alternatively, choose another certificate for external HTTPS connections; this does not affect how the Manager communicates with hosts:
Setup can configure apache to use SSL using a certificate issued from the internal CA.
Do you wish Setup to configure that, or prefer to perform that manually? (Automatic, Manual) [Automatic]:
Choose how long Data Warehouse will retain collected data:
Please choose Data Warehouse sampling scale:
(1) Basic
(2) Full
(1, 2)[1]:
Fulluses the default values for the data storage settings listed in the Data Warehouse Guide (recommended when Data Warehouse is installed on a remote server).Basicreduces the values ofDWH_TABLES_KEEP_HOURLYto720andDWH_TABLES_KEEP_DAILYto0, easing the load on the Manager machine. UseBasicwhen the Manager and Data Warehouse are installed on the same machine.Review the installation settings, and press
Enterto accept the values and proceed with the installation:Please confirm installation settings (OK, Cancel) [OK]:
When your environment has been configured,
engine-setupdisplays details about how to access your environment. If you chose to manually configure the firewall,engine-setupprovides a custom list of ports that need to be opened, based on the options selected during setup.engine-setupalso saves your answers to a file that can be used to reconfigure the Manager using the same values, and outputs the location of the log file for the Red Hat Virtualization Manager configuration process.- If you intend to link your Red Hat Virtualization environment with a directory server, configure the date and time to synchronize with the system clock used by the directory server to avoid unexpected account expiry issues. See Synchronizing the System Clock with a Remote Server in the Red Hat Enterprise Linux System Administrator’s Guide for more information.
-
Install the certificate authority according to the instructions provided by your browser. You can get the certificate authority’s certificate by navigating to
http://manager-fqdn/ovirt-engine/services/pki-resource?resource=ca-certificate&format=X509-PEM-CA, replacing manager-fqdn with the FQDN that you provided during the installation.
Log in to the Administration Portal, where you can add hosts and storage to the environment:
3.4. Connecting to the Administration Portal
Access the Administration Portal using a web browser.
In a web browser, navigate to
https://manager-fqdn/ovirt-engine, replacing manager-fqdn with the FQDN that you provided during installation.NoteYou can access the Administration Portal using alternate host names or IP addresses. To do so, you need to add a configuration file under /etc/ovirt-engine/engine.conf.d/. For example:
# vi /etc/ovirt-engine/engine.conf.d/99-custom-sso-setup.conf
SSO_ALTERNATE_ENGINE_FQDNS="alias1.example.com alias2.example.com"
The list of alternate host names needs to be separated by spaces. You can also add the IP address of the Manager to the list, but using IP addresses instead of DNS-resolvable host names is not recommended.
- Click Administration Portal. An SSO login page displays. SSO login enables you to log in to the Administration and VM Portal at the same time.
- Enter your User Name and Password. If you are logging in for the first time, use the user name admin along with the password that you specified during installation.
- Select the Domain to authenticate against. If you are logging in using the internal admin user name, select the internal domain.
- Click Log In.
- You can view the Administration Portal in multiple languages. The default selection is chosen based on the locale settings of your web browser. If you want to view the Administration Portal in a language other than the default, select your preferred language from the drop-down list on the welcome page.
To log out of the Red Hat Virtualization Administration Portal, click your user name in the header bar and click Sign Out. You are logged out of all portals and the Manager welcome screen displays.
Chapter 4. Installing Hosts for Red Hat Virtualization
Red Hat Virtualization supports two types of hosts: Red Hat Virtualization Hosts (RHVH) and Red Hat Enterprise Linux hosts. Depending on your environment, you may want to use one type only, or both. At least two hosts are required for features such as migration and high availability.
See Section 4.3, “Recommended Practices for Configuring Host Networks” for networking information.
SELinux is in enforcing mode upon installation. To verify, run getenforce. SELinux must be in enforcing mode on all hosts and Managers for your Red Hat Virtualization environment to be supported.
Table 4.1. Host Types
| Host Type | Other Names | Description |
|---|---|---|
| Red Hat Virtualization Host | RHVH, thin host | This is a minimal operating system based on Red Hat Enterprise Linux. It is distributed as an ISO file from the Customer Portal and contains only the packages required for the machine to act as a host. |
| Red Hat Enterprise Linux host | RHEL host, thick host | Red Hat Enterprise Linux systems with the appropriate subscriptions attached can be used as hosts. |
Host Compatibility
When you create a new data center, you can set the compatibility version. Select the compatibility version that suits all the hosts in the data center. Once set, version regression is not allowed. For a fresh Red Hat Virtualization installation, the latest compatibility version is set in the default data center and default cluster; to use an earlier compatibility version, you must create additional data centers and clusters. For more information about compatibility versions see Red Hat Virtualization Manager Compatibility in Red Hat Virtualization Life Cycle.
4.1. Red Hat Virtualization Hosts
4.1.1. Installing Red Hat Virtualization Hosts
Red Hat Virtualization Host (RHVH) is a minimal operating system based on Red Hat Enterprise Linux that is designed to provide a simple method for setting up a physical machine to act as a hypervisor in a Red Hat Virtualization environment. The minimal operating system contains only the packages required for the machine to act as a hypervisor, and features a Cockpit web interface for monitoring the host and performing administrative tasks. See http://cockpit-project.org/running.html for the minimum browser requirements.
RHVH supports NIST 800-53 partitioning requirements to improve security. RHVH uses a NIST 800-53 partition layout by default.
The host must meet the minimum host requirements.
Procedure
Download the RHVH ISO image from the Customer Portal:
- Log in to the Customer Portal at https://access.redhat.com.
- Click Downloads in the menu bar.
- Click Red Hat Virtualization. Scroll up and click Download Latest to access the product download page.
- Go to Hypervisor Image for RHV 4.3 and and click Download Now.
- Create a bootable media device. See Making Media in the Red Hat Enterprise Linux Installation Guide for more information.
- Start the machine on which you are installing RHVH, booting from the prepared installation media.
From the boot menu, select Install RHVH 4.3 and press
Enter.NoteYou can also press the
Tabkey to edit the kernel parameters. Kernel parameters must be separated by a space, and you can boot the system using the specified kernel parameters by pressing theEnterkey. Press theEsckey to clear any changes to the kernel parameters and return to the boot menu.- Select a language, and click Continue.
- Select a time zone from the Date & Time screen and click Done.
- Select a keyboard layout from the Keyboard screen and click Done.
Select the device on which to install RHVH from the Installation Destination screen. Optionally, enable encryption. Click Done.
ImportantRed Hat strongly recommends using the Automatically configure partitioning option.
Select a network from the Network & Host Name screen and click Configure… to configure the connection details.
NoteTo use the connection every time the system boots, select the Automatically connect to this network when it is available check box. For more information, see Edit Network Connections in the Red Hat Enterprise Linux 7 Installation Guide.
Enter a host name in the Host name field, and click Done.
- Optionally configure Language Support, Security Policy, and Kdump. See Installing Using Anaconda in the Red Hat Enterprise Linux 7 Installation Guide for more information on each of the sections in the Installation Summary screen.
- Click Begin Installation.
Set a root password and, optionally, create an additional user while RHVH installs.
WarningRed Hat strongly recommends not creating untrusted users on RHVH, as this can lead to exploitation of local security vulnerabilities.
Click Reboot to complete the installation.
NoteWhen RHVH restarts,
nodectl checkperforms a health check on the host and displays the result when you log in on the command line. The messagenode status: OKornode status: DEGRADEDindicates the health status. Runnodectl checkto get more information. The service is enabled by default.
4.1.2. Enabling the Red Hat Virtualization Host Repository
Register the system to receive updates. Red Hat Virtualization Host only requires one repository. This section provides instructions for registering RHVH with the Content Delivery Network, or with Red Hat Satellite 6.
Registering RHVH with the Content Delivery Network
-
Log in to the Cockpit web interface at
https://HostFQDNorIP:9090. - Navigate to Subscriptions, click Register System, and enter your Customer Portal user name and password. The Red Hat Virtualization Host subscription is automatically attached to the system.
- Click Terminal.
Enable the
Red Hat Virtualization Host 7repository to allow later updates to the Red Hat Virtualization Host:# subscription-manager repos --enable=rhel-7-server-rhvh-4-rpms
Registering RHVH with Red Hat Satellite 6
-
Log in to the Cockpit web interface at
https://HostFQDNorIP:9090. - Click Terminal.
Register RHVH with Red Hat Satellite 6:
  # rpm -Uvh http://satellite.example.com/pub/katello-ca-consumer-latest.noarch.rpm
  # subscription-manager register --org="org_id"
  # subscription-manager list --available
  # subscription-manager attach --pool=pool_id
  # subscription-manager repos \
    --disable='*' \
    --enable=rhel-7-server-rhvh-4-rpms
4.1.3. Advanced Installation
4.1.3.1. Custom Partitioning
Custom partitioning on Red Hat Virtualization Host (RHVH) is not recommended. Red Hat strongly recommends using the Automatically configure partitioning option in the Installation Destination window.
If your installation requires custom partitioning, select the I will configure partitioning option during the installation, and note that the following restrictions apply:
- Ensure the default LVM Thin Provisioning option is selected in the Manual Partitioning window.
The following directories are required and must be on thin provisioned logical volumes:
-
root (
/) -
/home -
/tmp -
/var -
/var/crash -
/var/log /var/log/auditImportantDo not create a separate partition for
/usr. Doing so will cause the installation to fail./usrmust be on a logical volume that is able to change versions along with RHVH, and therefore should be left on root (/).For information about the required storage sizes for each partition, see Section 2.2.3, “Storage Requirements”.
-
root (
-
The
/bootdirectory should be defined as a standard partition. -
The
/vardirectory must be on a separate volume or disk. - Only XFS or Ext4 file systems are supported.
Configuring Manual Partitioning in a Kickstart File
The following example demonstrates how to configure manual partitioning in a Kickstart file.
clearpart --all
part /boot --fstype xfs --size=1000 --ondisk=sda
part pv.01 --size=42000 --grow
volgroup HostVG pv.01 --reserved-percent=20
logvol swap --vgname=HostVG --name=swap --fstype=swap --recommended
logvol none --vgname=HostVG --name=HostPool --thinpool --size=40000 --grow
logvol / --vgname=HostVG --name=root --thin --fstype=ext4 --poolname=HostPool --fsoptions="defaults,discard" --size=6000 --grow
logvol /var --vgname=HostVG --name=var --thin --fstype=ext4 --poolname=HostPool
--fsoptions="defaults,discard" --size=15000
logvol /var/crash --vgname=HostVG --name=var_crash --thin --fstype=ext4 --poolname=HostPool --fsoptions="defaults,discard" --size=10000
logvol /var/log --vgname=HostVG --name=var_log --thin --fstype=ext4 --poolname=HostPool --fsoptions="defaults,discard" --size=8000
logvol /var/log/audit --vgname=HostVG --name=var_audit --thin --fstype=ext4 --poolname=HostPool --fsoptions="defaults,discard" --size=2000
logvol /home --vgname=HostVG --name=home --thin --fstype=ext4 --poolname=HostPool --fsoptions="defaults,discard" --size=1000
logvol /tmp --vgname=HostVG --name=tmp --thin --fstype=ext4 --poolname=HostPool --fsoptions="defaults,discard" --size=1000
If you use logvol --thinpool --grow, you must also include volgroup --reserved-space or volgroup --reserved-percent to reserve space in the volume group for the thin pool to grow.
4.1.3.2. Automating Red Hat Virtualization Host Deployment
You can install Red Hat Virtualization Host (RHVH) without a physical media device by booting from a PXE server over the network with a Kickstart file that contains the answers to the installation questions.
General instructions for installing from a PXE server with a Kickstart file are available in the Red Hat Enterprise Linux Installation Guide, as RHVH is installed in much the same way as Red Hat Enterprise Linux. RHVH-specific instructions, with examples for deploying RHVH with Red Hat Satellite, are described below.
The automated RHVH deployment has 3 stages:
4.1.3.2.1. Preparing the Installation Environment
- Log in to the Customer Portal.
- Click Downloads in the menu bar.
- Click Red Hat Virtualization. Scroll up and click Download Latest to access the product download page.
- Go to Hypervisor Image for RHV 4.3 and and click Download Now.
- Make the RHVH ISO image available over the network. See Installation Source on a Network in the Red Hat Enterprise Linux Installation Guide.
Extract the squashfs.img hypervisor image file from the RHVH ISO:
# mount -o loop /path/to/RHVH-ISO /mnt/rhvh # cp /mnt/rhvh/Packages/redhat-virtualization-host-image-update* /tmp # cd /tmp # rpm2cpio redhat-virtualization-host-image-update* | cpio -idmvNoteThis squashfs.img file, located in the
/tmp/usr/share/redhat-virtualization-host/image/directory, is called redhat-virtualization-host-version_number_version.squashfs.img. It contains the hypervisor image for installation on the physical machine. It should not be confused with the /LiveOS/squashfs.img file, which is used by the Anacondainst.stage2option.
4.1.3.2.2. Configuring the PXE Server and the Boot Loader
- Configure the PXE server. See Preparing for a Network Installation in the Red Hat Enterprise Linux Installation Guide.
Copy the RHVH boot images to the
/tftpbootdirectory:# cp mnt/rhvh/images/pxeboot/{vmlinuz,initrd.img} /var/lib/tftpboot/pxelinux/Create a
rhvhlabel specifying the RHVH boot images in the boot loader configuration:LABEL rhvh MENU LABEL Install Red Hat Virtualization Host KERNEL /var/lib/tftpboot/pxelinux/vmlinuz APPEND initrd=/var/lib/tftpboot/pxelinux/initrd.img inst.stage2=URL/to/RHVH-ISORHVH Boot Loader Configuration Example for Red Hat Satellite
If you are using information from Red Hat Satellite to provision the host, you must create a global or host group level parameter called
rhvh_imageand populate it with the directory URL where the ISO is mounted or extracted:<%# kind: PXELinux name: RHVH PXELinux %> # Created for booting new hosts # DEFAULT rhvh LABEL rhvh KERNEL <%= @kernel %> APPEND initrd=<%= @initrd %> inst.ks=<%= foreman_url("provision") %> inst.stage2=<%= @host.params["rhvh_image"] %> intel_iommu=on console=tty0 console=ttyS1,115200n8 ssh_pwauth=1 local_boot_trigger=<%= foreman_url("built") %> IPAPPEND 2Make the content of the RHVH ISO locally available and export it to the network, for example, using an HTTPD server:
# cp -a /mnt/rhvh/ /var/www/html/rhvh-install
# curl URL/to/RHVH-ISO/rhvh-install
4.1.3.2.3. Creating and Running a Kickstart File
- Create a Kickstart file and make it available over the network. See Kickstart Installations in the Red Hat Enterprise Linux Installation Guide.
Ensure that the Kickstart file meets the following RHV-specific requirements:
The
%packagessection is not required for RHVH. Instead, use theliveimgoption and specify the redhat-virtualization-host-version_number_version.squashfs.img file from the RHVH ISO image:liveimg --url=example.com/tmp/usr/share/redhat-virtualization-host/image/redhat-virtualization-host-version_number_version.squashfs.img
Autopartitioning is highly recommended:
autopart --type=thinp
NoteThin provisioning must be used with autopartitioning.
The
--no-homeoption does not work in RHVH because/homeis a required directory.If your installation requires manual partitioning, see Section 4.1.3.1, “Custom Partitioning” for a list of limitations that apply to partitions and an example of manual partitioning in a Kickstart file.
A
%postsection that calls thenodectl initcommand is required:%post nodectl init %end
Kickstart Example for Deploying RHVH on Its Own
This Kickstart example shows you how to deploy RHVH. You can include additional commands and options as required.
liveimg --url=http://FQDN/tmp/usr/share/redhat-virtualization-host/image/redhat-virtualization-host-version_number_version.squashfs.img
clearpart --all
autopart --type=thinp
rootpw --plaintext ovirt
timezone --utc America/Phoenix
zerombr
text

reboot

%post --erroronfail
nodectl init
%end
Kickstart Example for Deploying RHVH with Registration and Network Configuration from Satellite
This Kickstart example uses information from Red Hat Satellite to configure the host network and register the host to the Satellite server. You must create a global or host group level parameter called
rhvh_imageand populate it with the directory URL to the squashfs.img file.ntp_server1is also a global or host group level variable.<%# kind: provision name: RHVH Kickstart default oses: - RHVH %> install liveimg --url=<%= @host.params['rhvh_image'] %>squashfs.img network --bootproto static --ip=<%= @host.ip %> --netmask=<%= @host.subnet.mask %> --gateway=<%= @host.subnet.gateway %> --nameserver=<%= @host.subnet.dns_primary %> --hostname <%= @host.name %> zerombr clearpart --all autopart --type=thinp rootpw --iscrypted <%= root_pass %> # installation answers lang en_US.UTF-8 timezone <%= @host.params['time-zone'] || 'UTC' %> keyboard us firewall --service=ssh services --enabled=sshd text reboot %post --log=/root/ks.post.log --erroronfail nodectl init <%= snippet 'subscription_manager_registration' %> <%= snippet 'kickstart_networking_setup' %> /usr/sbin/ntpdate -sub <%= @host.params['ntp_server1'] || '0.fedora.pool.ntp.org' %> /usr/sbin/hwclock --systohc /usr/bin/curl <%= foreman_url('built') %> sync systemctl reboot %end
Add the Kickstart file location to the boot loader configuration file on the PXE server:
APPEND initrd=/var/tftpboot/pxelinux/initrd.img inst.stage2=URL/to/RHVH-ISO inst.ks=URL/to/RHVH-ks.cfg
- Install RHVH following the instructions in Booting from the Network Using PXE in the Red Hat Enterprise Linux Installation Guide.
4.2. Red Hat Enterprise Linux hosts
4.2.1. Installing Red Hat Enterprise Linux hosts
A Red Hat Enterprise Linux host is based on a standard basic installation of Red Hat Enterprise Linux 7 on a physical server, with the Red Hat Enterprise Linux Server and Red Hat Virtualization subscriptions attached.
For detailed installation instructions, see the Performing a standard {enterprise-linux-shortname} installation.
The host must meet the minimum host requirements.
Virtualization must be enabled in your host’s BIOS settings. For information on changing your host’s BIOS settings, refer to your host’s hardware documentation.
Third-party watchdogs should not be installed on Red Hat Enterprise Linux hosts, as they can interfere with the watchdog daemon provided by VDSM.
4.2.2. Enabling the Red Hat Enterprise Linux host Repositories
To use a Red Hat Enterprise Linux machine as a host, you must register the system with the Content Delivery Network, attach the Red Hat Enterprise Linux Server and Red Hat Virtualization subscriptions, and enable the host repositories.
Procedure
Register your system with the Content Delivery Network, entering your Customer Portal user name and password when prompted:
# subscription-manager register
Find the
Red Hat Enterprise Linux ServerandRed Hat Virtualizationsubscription pools and record the pool IDs:# subscription-manager list --available
Use the pool IDs to attach the subscriptions to the system:
# subscription-manager attach --pool=poolidNoteTo view currently attached subscriptions:
# subscription-manager list --consumed
To list all enabled repositories:
# yum repolist
Configure the repositories:
# subscription-manager repos \
    --disable='*' \
    --enable=rhel-7-server-rpms \
    --enable=rhel-7-server-rhv-4-mgmt-agent-rpms \
    --enable=rhel-7-server-ansible-2.9-rpms
For Red Hat Enterprise Linux 7 hosts, little endian, on IBM POWER8 hardware:
# subscription-manager repos \
    --disable='*' \
    --enable=rhel-7-server-rhv-4-mgmt-agent-for-power-le-rpms \
    --enable=rhel-7-for-power-le-rpms
For Red Hat Enterprise Linux 7 hosts, little endian, on IBM POWER9 hardware:
# subscription-manager repos \
    --disable='*' \
    --enable=rhel-7-server-rhv-4-mgmt-agent-for-power-9-rpms \
    --enable=rhel-7-for-power-9-rpms
Ensure that all packages currently installed are up to date:
# yum update
- Reboot the machine.
4.2.3. Installing Cockpit on Red Hat Enterprise Linux hosts
You can install Cockpit for monitoring the host’s resources and performing administrative tasks.
Procedure
Install the dashboard packages:
# yum install cockpit-ovirt-dashboard
Enable and start the
cockpit.socketservice:# systemctl enable cockpit.socket # systemctl start cockpit.socket
Check if Cockpit is an active service in the firewall:
# firewall-cmd --list-services
You should see
cockpitlisted. If it is not, enter the following with root permissions to addcockpitas a service to your firewall:# firewall-cmd --permanent --add-service=cockpit
The
--permanentoption keeps thecockpitservice active after rebooting.
You can log in to the Cockpit web interface at https://HostFQDNorIP:9090.
4.3. Recommended Practices for Configuring Host Networks
If your network environment is complex, you may need to configure a host network manually before adding the host to the Red Hat Virtualization Manager.
Red Hat recommends the following practices for configuring a host network:
-
Configure the network with Cockpit. Alternatively, you can use
nmtuiornmcli. - If a network is not required for a self-hosted engine deployment or for adding a host to the Manager, configure the network in the Administration Portal after adding the host to the Manager. See Creating a New Logical Network in a Data Center or Cluster.
Use the following naming conventions:
-
VLAN devices:
VLAN_NAME_TYPE_RAW_PLUS_VID_NO_PAD -
VLAN interfaces:
physical_device.VLAN_ID(for example,eth0.23,eth1.128,enp3s0.50) -
Bond interfaces:
bondnumber(for example,bond0,bond1) -
VLANs on bond interfaces:
bondnumber.VLAN_ID(for example,bond0.50,bond1.128)
-
VLAN devices:
- Use network bonding. Networking teaming is not supported in Red Hat Virtualization and will cause errors if the host is used to deploy a self-hosted engine or added to the Manager.
Use recommended bonding modes:
-
If the
ovirtmgmtnetwork is not used by virtual machines, the network may use any supported bonding mode. -
If the
ovirtmgmtnetwork is used by virtual machines, see Which bonding modes work when used with a bridge that virtual machine guests or containers connect to?. -
Red Hat Virtualization’s default bonding mode is
(Mode 4) Dynamic Link Aggregation. If your switch does not support Link Aggregation Control Protocol (LACP), use(Mode 1) Active-Backup. See Bonding Modes for details.
-
If the
Configure a VLAN on a physical NIC as in the following example (although
nmcliis used, you can use any tool):# nmcli connection add type vlan con-name vlan50 ifname eth0.50 dev eth0 id 50 # nmcli con mod vlan50 +ipv4.dns 8.8.8.8 +ipv4.addresses 123.123.0.1/24 +ivp4.gateway 123.123.0.254
Configure a VLAN on a bond as in the following example (although
nmcliis used, you can use any tool):# nmcli connection add type bond con-name bond0 ifname bond0 bond.options "mode=active-backup,miimon=100" ipv4.method disabled ipv6.method ignore # nmcli connection add type ethernet con-name eth0 ifname eth0 master bond0 slave-type bond # nmcli connection add type ethernet con-name eth1 ifname eth1 master bond0 slave-type bond # nmcli connection add type vlan con-name vlan50 ifname bond0.50 dev bond0 id 50 # nmcli con mod vlan50 +ipv4.dns 8.8.8.8 +ipv4.addresses 123.123.0.1/24 +ivp4.gateway 123.123.0.254
-
Do not disable
firewalld. - Customize the firewall rules in the Administration Portal after adding the host to the Manager. See Configuring Host Firewall Rules.
When creating a management bridge that uses a static IPv6 address, disable network manager control in its interface configuration (ifcfg) file before adding a host. See https://access.redhat.com/solutions/3981311 for more information.
4.4. Adding Standard Hosts to the Red Hat Virtualization Manager
Adding a host to your Red Hat Virtualization environment can take some time, as the following steps are completed by the platform: virtualization checks, installation of packages, and creation of a bridge.
When creating a management bridge that uses a static IPv6 address, disable network manager control in its interface configuration (ifcfg) file before adding a host. See https://access.redhat.com/solutions/3981311 for more information.
Procedure
- From the Administration Portal, click → .
- Click .
- Use the drop-down list to select the Data Center and Host Cluster for the new host.
- Enter the Name and the Address of the new host. The standard SSH port, port 22, is auto-filled in the SSH Port field.
Select an authentication method to use for the Manager to access the host.
- Enter the root user’s password to use password authentication.
- Alternatively, copy the key displayed in the SSH PublicKey field to /root/.ssh/authorized_keys on the host to use public key authentication.
Optionally, click the Advanced Parameters button to change the following advanced host settings:
- Disable automatic firewall configuration.
- Add a host SSH fingerprint to increase security. You can add it manually, or fetch it automatically.
- Optionally configure power management, where the host has a supported power management card. For information on power management configuration, see Host Power Management Settings Explained in the Administration Guide.
- Click .
The new host displays in the list of hosts with a status of Installing, and you can view the progress of the installation in the Events section of the Notification Drawer (
 ). After a brief delay the host status changes to
 Up.
Chapter 5. Preparing Storage for Red Hat Virtualization
Prepare storage to be used for storage domains in the new environment. A Red Hat Virtualization environment must have at least one data storage domain, but adding more is recommended.
A data domain holds the virtual hard disks and OVF files of all the virtual machines and templates in a data center, and cannot be shared across data centers while active (but can be migrated between data centers). Data domains of multiple storage types can be added to the same data center, provided they are all shared, rather than local, domains.
You can use one of the following storage types:
5.1. Preparing NFS Storage
Set up NFS shares on your file storage or remote server to serve as storage domains on Red Hat Enterprise Virtualization Host systems. After exporting the shares on the remote storage and configuring them in the Red Hat Virtualization Manager, the shares will be automatically imported on the Red Hat Virtualization hosts.
For information on setting up and configuring NFS, see Network File System (NFS) in the Red Hat Enterprise Linux 7 Storage Administration Guide.
For information on how to export an 'NFS' share, see How to export 'NFS' share from NetApp Storage / EMC SAN in Red Hat Virtualization
Specific system user accounts and system user groups are required by Red Hat Virtualization so the Manager can store data in the storage domains represented by the exported directories. The following procedure sets the permissions for one directory. You must repeat the chown and chmod steps for all of the directories you intend to use as storage domains in Red Hat Virtualization.
Procedure
Create the group
kvm:# groupadd kvm -g 36
Create the user
vdsmin the groupkvm:# useradd vdsm -u 36 -g 36
Set the ownership of your exported directory to 36:36, which gives
vdsm:kvmownership:# chown -R 36:36 /exports/dataChange the mode of the directory so that read and write access is granted to the owner, and so that read and execute access is granted to the group and other users:
# chmod 0755 /exports/data
5.2. Preparing iSCSI Storage
Red Hat Virtualization supports iSCSI storage, which is a storage domain created from a volume group made up of LUNs. Volume groups and LUNs cannot be attached to more than one storage domain at a time.
For information on setting up and configuring iSCSI storage, see Online Storage Management in the Red Hat Enterprise Linux 7 Storage Administration Guide.
If you are using block storage and you intend to deploy virtual machines on raw devices or direct LUNs and to manage them with the Logical Volume Manager, you must create a filter to hide the guest logical volumes. This will prevent guest logical volumes from being activated when the host is booted, a situation that could lead to stale logical volumes and cause data corruption. See https://access.redhat.com/solutions/2662261 for details.
Red Hat Virtualization currently does not support block storage with a block size of 4K. You must configure block storage in legacy (512b block) mode.
If your host is booting from SAN storage and loses connectivity to the storage, the storage file systems become read-only and remain in this state after connectivity is restored.
To prevent this situation, Red Hat recommends adding a drop-in multipath configuration file on the root file system of the SAN for the boot LUN to ensure that it is queued when there is a connection:
# cat /etc/multipath/conf.d/host.conf
multipaths {
    multipath {
        wwid boot_LUN_wwid
        no_path_retry queue
    }
5.3. Preparing FCP Storage
Red Hat Virtualization supports SAN storage by creating a storage domain from a volume group made of pre-existing LUNs. Neither volume groups nor LUNs can be attached to more than one storage domain at a time.
Red Hat Virtualization system administrators need a working knowledge of Storage Area Networks (SAN) concepts. SAN usually uses Fibre Channel Protocol (FCP) for traffic between hosts and shared external storage. For this reason, SAN may occasionally be referred to as FCP storage.
For information on setting up and configuring FCP or multipathing on Red Hat Enterprise Linux, see the Storage Administration Guide and DM Multipath Guide.
If you are using block storage and you intend to deploy virtual machines on raw devices or direct LUNs and to manage them with the Logical Volume Manager, you must create a filter to hide the guest logical volumes. This will prevent guest logical volumes from being activated when the host is booted, a situation that could lead to stale logical volumes and cause data corruption. See https://access.redhat.com/solutions/2662261 for details.
Red Hat Virtualization currently does not support block storage with a block size of 4K. You must configure block storage in legacy (512b block) mode.
If your host is booting from SAN storage and loses connectivity to the storage, the storage file systems become read-only and remain in this state after connectivity is restored.
To prevent this situation, Red Hat recommends adding a drop-in multipath configuration file on the root file system of the SAN for the boot LUN to ensure that it is queued when there is a connection:
# cat /etc/multipath/conf.d/host.conf
multipaths {
    multipath {
        wwid boot_LUN_wwid
        no_path_retry queue
    }
5.4. Preparing POSIX-compliant File System Storage
POSIX file system support allows you to mount file systems using the same mount options that you would normally use when mounting them manually from the command line. This functionality is intended to allow access to storage not exposed using NFS, iSCSI, or FCP.
Any POSIX-compliant file system used as a storage domain in Red Hat Virtualization must be a clustered file system, such as Global File System 2 (GFS2), and must support sparse files and direct I/O. The Common Internet File System (CIFS), for example, does not support direct I/O, making it incompatible with Red Hat Virtualization.
For information on setting up and configuring POSIX-compliant file system storage, see Red Hat Enterprise Linux Global File System 2.
Do not mount NFS storage by creating a POSIX-compliant file system storage domain. Always create an NFS storage domain instead.
5.5. Preparing Local Storage
A local storage domain can be set up on a host. When you set up a host to use local storage, the host is automatically added to a new data center and cluster that no other hosts can be added to. Multiple-host clusters require that all hosts have access to all storage domains, which is not possible with local storage. Virtual machines created in a single-host cluster cannot be migrated, fenced, or scheduled.
On Red Hat Virtualization Host (RHVH), local storage should always be defined on a file system that is separate from / (root). Red Hat recommends using a separate logical volume or disk, to prevent possible loss of data during upgrades.
Preparing Local Storage for Red Hat Enterprise Linux hosts
On the host, create the directory to be used for the local storage:
# mkdir -p /data/images
Ensure that the directory has permissions allowing read/write access to the vdsm user (UID 36) and kvm group (GID 36):
# chown 36:36 /data /data/images
# chmod 0755 /data /data/images
Preparing Local Storage for Red Hat Virtualization Hosts
Red Hat recommends creating the local storage on a logical volume as follows:
Create a local storage directory:
# mkdir /data
# lvcreate -L $SIZE rhvh -n data
# mkfs.ext4 /dev/mapper/rhvh-data
# echo "/dev/mapper/rhvh-data /data ext4 defaults,discard 1 2" >> /etc/fstab
# mount /data
Mount the new local storage, and then modify the permissions and ownership:
# mount -a
# chown 36:36 /data /rhvh-data
# chmod 0755 /data /rhvh-data
5.6. Preparing Red Hat Gluster Storage
For information on setting up and configuring Red Hat Gluster Storage, see the Red Hat Gluster Storage Installation Guide.
For the Red Hat Gluster Storage versions that are supported with Red Hat Virtualization, see https://access.redhat.com/articles/2356261.
5.7. Customizing Multipath Configurations for SAN Vendors
To customize the multipath configuration settings, do not modify /etc/multipath.conf. Instead, create a new configuration file that overrides /etc/multipath.conf.
Upgrading Virtual Desktop and Server Manager (VDSM) overwrites the /etc/multipath.conf file. If multipath.conf contains customizations, overwriting it can trigger storage issues.
Prerequisites
-
This topic only applies to systems that have been configured to use multipath connections storage domains, and therefore have a
/etc/multipath.conffile. -
Do not override the
user_friendly_namesandfind_multipathssettings. For more information, see Section 5.8, “Recommended Settings for Multipath.conf” -
Avoid overriding
no_path_retryandpolling_intervalunless required by the storage vendor. For more information, see Section 5.8, “Recommended Settings for Multipath.conf”
Procedure
To override the values of settings in
/etc/multipath.conf, create a new configuration file in the/etc/multipath/conf.d/directory.NoteThe files in
/etc/multipath/conf.d/execute in alphabetical order. Follow the convention of naming the file with a number at the beginning of its name. For example,/etc/multipath/conf.d/90-myfile.conf.-
Copy the settings you want to override from
/etc/multipath.confto the new configuration file in/etc/multipath/conf.d/. Edit the setting values and save your changes. Apply the new configuration settings by entering the
systemctl reload multipathdcommand.NoteAvoid restarting the multipathd service. Doing so generates errors in the VDSM logs.
Verification steps
If you override the VDSM-generated settings in /etc/multipath.conf, verify that the new configuration performs as expected in a variety of failure scenarios.
For example, disable all of the storage connections. Then enable one connection at a time and verify that doing so makes the storage domain reachable.
Troubleshooting
If a Red Hat Virtualization Host has trouble accessing shared storage, check /etc/multpath.conf and files under /etc/multipath/conf.d/ for values that are incompatible with the SAN.
Additional resources
- Red Hat Enterprise Linux DM Multipath in the RHEL documentation.
- Configuring iSCSI Multipathing in the Administration Guide.
-
How do I customize /etc/multipath.conf on my RHVH hypervisors? What values must not change and why? on the Red Hat Customer Portal, which shows an example
multipath.conffile and was the basis for this topic.
5.8. Recommended Settings for Multipath.conf
When overriding /etc/multipath.conf, Do not override the following settings:
user_friendly_names no- This setting controls whether user-friendly names are assigned to devices in addition to the actual device names. Multiple hosts must use the same name to access devices. Disabling this setting prevents user-friendly names from interfering with this requirement.
find_multipaths no- This setting controls whether RHVH tries to access all devices through multipath, even if only one path is available. Disabling this setting prevents RHV from using the too-clever behavior when this setting is enabled.
Avoid overriding the following settings unless required by the storage system vendor:
no_path_retry 4-
This setting controls the number of polling attempts to retry when no paths are available. Before RHV version 4.2, the value of
no_path_retrywasfailbecause QEMU had trouble with the I/O queuing when no paths were available. Thefailvalue made it fail quickly and paused the virtual machine. RHV version 4.2 changed this value to4so when multipathd detects the last path has failed, it checks all of the paths four more times. Assuming the default 5-second polling interval, checking the paths takes 20 seconds. If no path is up, multipathd tells the kernel to stop queuing and fails all outstanding and future I/O until a path is restored. When a path is restored, the 20-second delay is reset for the next time all paths fail. For more details, see the commit that changed this setting. polling_interval 5- This setting determines the number of seconds between polling attempts to detect whether a path is open or has failed. Unless the vendor provides a clear reason for increasing the value, keep the VDSM-generated default so the system responds to path failures sooner.
Chapter 6. Adding Storage for Red Hat Virtualization
Add storage as data domains in the new environment. A Red Hat Virtualization environment must have at least one data domain, but adding more is recommended.
Add the storage you prepared earlier:
6.1. Adding NFS Storage
This procedure shows you how to attach existing NFS storage to your Red Hat Virtualization environment as a data domain.
If you require an ISO or export domain, use this procedure, but select ISO or Export from the Domain Function list.
Procedure
- In the Administration Portal, click → .
- Click New Domain.
- Enter a Name for the storage domain.
- Accept the default values for the Data Center, Domain Function, Storage Type, Format, and Host lists.
- Enter the Export Path to be used for the storage domain. The export path should be in the format of 123.123.0.10:/data (for IPv4), [2001:0:0:0:0:0:0:5db1]:/data (for IPv6), or domain.example.com:/data.
Optionally, you can configure the advanced parameters:
- Click Advanced Parameters.
- Enter a percentage value into the Warning Low Space Indicator field. If the free space available on the storage domain is below this percentage, warning messages are displayed to the user and logged.
- Enter a GB value into the Critical Space Action Blocker field. If the free space available on the storage domain is below this value, error messages are displayed to the user and logged, and any new action that consumes space, even temporarily, will be blocked.
- Select the Wipe After Delete check box to enable the wipe after delete option. This option can be edited after the domain is created, but doing so will not change the wipe after delete property of disks that already exist.
- Click OK.
The new NFS data domain has a status of Locked until the disk is prepared. The data domain is then automatically attached to the data center.
6.2. Adding iSCSI Storage
This procedure shows you how to attach existing iSCSI storage to your Red Hat Virtualization environment as a data domain.
Procedure
- Click → .
- Click New Domain.
- Enter the Name of the new storage domain.
- Select a Data Center from the drop-down list.
- Select Data as the Domain Function and iSCSI as the Storage Type.
Select an active host as the Host.
ImportantCommunication to the storage domain is from the selected host and not directly from the Manager. Therefore, all hosts must have access to the storage device before the storage domain can be configured.
The Manager can map iSCSI targets to LUNs or LUNs to iSCSI targets. The New Domain window automatically displays known targets with unused LUNs when the iSCSI storage type is selected. If the target that you are using to add storage does not appear, you can use target discovery to find it; otherwise proceed to the next step.
Click Discover Targets to enable target discovery options. When targets have been discovered and logged in to, the New Domain window automatically displays targets with LUNs unused by the environment.
NoteLUNs used externally to the environment are also displayed.
You can use the Discover Targets options to add LUNs on many targets or multiple paths to the same LUNs.
- Enter the FQDN or IP address of the iSCSI host in the Address field.
-
Enter the port with which to connect to the host when browsing for targets in the Port field. The default is
3260. If CHAP is used to secure the storage, select the User Authentication check box. Enter the CHAP user name and CHAP password.
NoteYou can define credentials for an iSCSI target for a specific host with the REST API. See StorageServerConnectionExtensions: add in the REST API Guide for more information.
- Click Discover.
Select one or more targets from the discovery results and click Login for one target or Login All for multiple targets.
ImportantIf more than one path access is required, you must discover and log in to the target through all the required paths. Modifying a storage domain to add additional paths is currently not supported.
- Click the + button next to the desired target. This expands the entry and displays all unused LUNs attached to the target.
- Select the check box for each LUN that you are using to create the storage domain.
Optionally, you can configure the advanced parameters:
- Click Advanced Parameters.
- Enter a percentage value into the Warning Low Space Indicator field. If the free space available on the storage domain is below this percentage, warning messages are displayed to the user and logged.
- Enter a GB value into the Critical Space Action Blocker field. If the free space available on the storage domain is below this value, error messages are displayed to the user and logged, and any new action that consumes space, even temporarily, will be blocked.
- Select the Wipe After Delete check box to enable the wipe after delete option. This option can be edited after the domain is created, but doing so will not change the wipe after delete property of disks that already exist.
- Select the Discard After Delete check box to enable the discard after delete option. This option can be edited after the domain is created. This option is only available to block storage domains.
- Click OK.
If you have configured multiple storage connection paths to the same target, follow the procedure in Configuring iSCSI Multipathing to complete iSCSI bonding.
If you want to migrate your current storage network to an iSCSI bond, see Migrating a Logical Network to an iSCSI Bond.
6.3. Adding FCP Storage
This procedure shows you how to attach existing FCP storage to your Red Hat Virtualization environment as a data domain.
Procedure
- Click → .
- Click New Domain.
- Enter the Name of the storage domain.
Select an FCP Data Center from the drop-down list.
If you do not yet have an appropriate FCP data center, select
(none).- Select the Domain Function and the Storage Type from the drop-down lists. The storage domain types that are not compatible with the chosen data center are not available.
Select an active host in the Host field. If this is not the first data domain in a data center, you must select the data center’s SPM host.
ImportantAll communication to the storage domain is through the selected host and not directly from the Red Hat Virtualization Manager. At least one active host must exist in the system and be attached to the chosen data center. All hosts must have access to the storage device before the storage domain can be configured.
- The New Domain window automatically displays known targets with unused LUNs when Fibre Channel is selected as the storage type. Select the LUN ID check box to select all of the available LUNs.
Optionally, you can configure the advanced parameters.
- Click Advanced Parameters.
- Enter a percentage value into the Warning Low Space Indicator field. If the free space available on the storage domain is below this percentage, warning messages are displayed to the user and logged.
- Enter a GB value into the Critical Space Action Blocker field. If the free space available on the storage domain is below this value, error messages are displayed to the user and logged, and any new action that consumes space, even temporarily, will be blocked.
- Select the Wipe After Delete check box to enable the wipe after delete option. This option can be edited after the domain is created, but doing so will not change the wipe after delete property of disks that already exist.
- Select the Discard After Delete check box to enable the discard after delete option. This option can be edited after the domain is created. This option is only available to block storage domains.
- Click OK.
The new FCP data domain remains in a Locked status while it is being prepared for use. When ready, it is automatically attached to the data center.
6.4. Adding POSIX-compliant File System Storage
This procedure shows you how to attach existing POSIX-compliant file system storage to your Red Hat Virtualization environment as a data domain.
Procedure
- Click → .
- Click New Domain.
- Enter the Name for the storage domain.
-
Select the Data Center to be associated with the storage domain. The data center selected must be of type POSIX (POSIX compliant FS). Alternatively, select
(none). Select
Datafrom the Domain Function drop-down list, andPOSIX compliant FSfrom the Storage Type drop-down list.If applicable, select the Format from the drop-down menu.
- Select a host from the Host drop-down list.
-
Enter the Path to the POSIX file system, as you would normally provide it to the
mountcommand. -
Enter the VFS Type, as you would normally provide it to the
mountcommand using the-targument. Seeman mountfor a list of valid VFS types. -
Enter additional Mount Options, as you would normally provide them to the
mountcommand using the-oargument. The mount options should be provided in a comma-separated list. Seeman mountfor a list of valid mount options. Optionally, you can configure the advanced parameters.
- Click Advanced Parameters.
- Enter a percentage value in the Warning Low Space Indicator field. If the free space available on the storage domain is below this percentage, warning messages are displayed to the user and logged.
- Enter a GB value in the Critical Space Action Blocker field. If the free space available on the storage domain is below this value, error messages are displayed to the user and logged, and any new action that consumes space, even temporarily, will be blocked.
- Select the Wipe After Delete check box to enable the wipe after delete option. This option can be edited after the domain is created, but doing so will not change the wipe after delete property of disks that already exist.
- Click OK.
6.5. Adding Local Storage
Adding local storage to a host places the host in a new data center and cluster. The local storage configuration window combines the creation of a data center, a cluster, and storage into a single process.
Procedure
- Click → and select the host.
- Click → and click OK.
- Click → .
- Click the Edit buttons next to the Data Center, Cluster, and Storage fields to configure and name the local storage domain.
- Set the path to your local storage in the text entry field.
- If applicable, click the Optimization tab to configure the memory optimization policy for the new local storage cluster.
- Click OK.
Your host comes online in a data center of its own.
6.6. Adding Red Hat Gluster Storage
To use Red Hat Gluster Storage with Red Hat Virtualization, see Configuring Red Hat Virtualization with Red Hat Gluster Storage.
For the Red Hat Gluster Storage versions that are supported with Red Hat Virtualization, see https://access.redhat.com/articles/2356261.
Appendix A. Configuring a Local Repository for Offline Red Hat Virtualization Manager Installation
To install Red Hat Virtualization Manager on a system that does not have a direct connection to the Content Delivery Network, download the required packages on a system that has Internet access, then create a repository that can be shared with the offline Manager machine. The system hosting the repository must be connected to the same network as the client systems where the packages are to be installed.
Prerequisites
- A Red Hat Enterprise Linux 7 Server installed on a system that has access to the Content Delivery Network. This system downloads all the required packages, and distributes them to your offline system(s).
- A large amount of free disk space available. This procedure downloads a large number of packages, and requires up to 50GB of free disk space.
Enable the Red Hat Virtualization Manager repositories on the online system:
Enabling the Red Hat Virtualization Manager Repositories
Register the system with Red Hat Subscription Manager, attach the Red Hat Virtualization Manager subscription, and enable Manager repositories.
Procedure
Register your system with the Content Delivery Network, entering your Customer Portal user name and password when prompted:
# subscription-manager register
NoteIf you are using an IPv6 network, use an IPv6 transition mechanism to access the Content Delivery Network and subscription manager.
Find the
Red Hat Virtualization Managersubscription pool and record the pool ID:# subscription-manager list --available
Use the pool ID to attach the subscription to the system:
# subscription-manager attach --pool=pool_idNoteTo view currently attached subscriptions:
# subscription-manager list --consumed
To list all enabled repositories:
# yum repolist
Configure the repositories:
# subscription-manager repos \
    --disable='*' \
    --enable=rhel-7-server-rpms \
    --enable=rhel-7-server-supplementary-rpms \
    --enable=rhel-7-server-rhv-4.3-manager-rpms \
    --enable=rhel-7-server-rhv-4-manager-tools-rpms \
    --enable=rhel-7-server-ansible-2.9-rpms \
    --enable=jb-eap-7.2-for-rhel-7-server-rpms
Configuring the Offline Repository
Servers that are not connected to the Internet can access software repositories on other systems using File Transfer Protocol (FTP). To create the FTP repository, install and configure
vsftpd:Install the
vsftpdpackage:# yum install vsftpd
Start the vsftpd service, and ensure the service starts on boot:
# systemctl start vsftpd.service
# systemctl enable vsftpd.service
Create a sub-directory inside the /var/ftp/pub/ directory. This is where the downloaded packages will be made available:
# mkdir /var/ftp/pub/rhvrepo
Download packages from all configured software repositories to the
rhvrepodirectory. This includes repositories for all Content Delivery Network subscription pools attached to the system, and any locally configured repositories:# reposync -l -p /var/ftp/pub/rhvrepo
This command downloads a large number of packages, and takes a long time to complete. The
-loption enables yum plug-in support.Install the
createrepopackage:# yum install createrepo
Create repository metadata for each of the sub-directories where packages were downloaded under
/var/ftp/pub/rhvrepo:# for DIR in $(find /var/ftp/pub/rhvrepo -maxdepth 1 -mindepth 1 -type d); do createrepo $DIR; done
Create a repository file, and copy it to the /etc/yum.repos.d/ directory on the offline machine on which you will install the Manager.
The configuration file can be created manually or with a script. Run the script below on the system hosting the repository, replacing ADDRESS in the
baseurlwith the IP address or FQDN of the system hosting the repository:#!/bin/sh REPOFILE="/etc/yum.repos.d/rhev.repo" echo -e " " > $REPOFILE for DIR in $(find /var/ftp/pub/rhvrepo -maxdepth 1 -mindepth 1 -type d); do echo -e "[$(basename $DIR)]" >> $REPOFILE echo -e "name=$(basename $DIR)" >> $REPOFILE echo -e "baseurl=ftp://_ADDRESS_/pub/rhvrepo/`basename $DIR`" >> $REPOFILE echo -e "enabled=1" >> $REPOFILE echo -e "gpgcheck=0" >> $REPOFILE echo -e "\n" >> $REPOFILE done
Return to Section 3.3, “Installing and Configuring the Red Hat Virtualization Manager”. Packages are installed from the local repository, instead of from the Content Delivery Network.
Appendix B. Preparing a Local Manually Configured PostgreSQL Database
Use this procedure to set up the Manager database or Data Warehouse database with custom values. Set up this database before you configure the Manager; you must supply the database credentials during engine-setup.
The engine-setup and engine-backup --mode=restore commands only support system error messages in the en_US.UTF8 locale, even if the system locale is different.
The locale settings in the postgresql.conf file must be set to en_US.UTF8.
The database name must contain only numbers, underscores, and lowercase letters.
Enabling the Red Hat Virtualization Manager Repositories
Register the system with Red Hat Subscription Manager, attach the Red Hat Virtualization Manager subscription, and enable Manager repositories.
Procedure
Register your system with the Content Delivery Network, entering your Customer Portal user name and password when prompted:
# subscription-manager register
NoteIf you are using an IPv6 network, use an IPv6 transition mechanism to access the Content Delivery Network and subscription manager.
Find the
Red Hat Virtualization Managersubscription pool and record the pool ID:# subscription-manager list --available
Use the pool ID to attach the subscription to the system:
# subscription-manager attach --pool=pool_idNoteTo view currently attached subscriptions:
# subscription-manager list --consumed
To list all enabled repositories:
# yum repolist
Configure the repositories:
# subscription-manager repos \
    --disable='*' \
    --enable=rhel-7-server-rpms \
    --enable=rhel-7-server-supplementary-rpms \
    --enable=rhel-7-server-rhv-4.3-manager-rpms \
    --enable=rhel-7-server-rhv-4-manager-tools-rpms \
    --enable=rhel-7-server-ansible-2.9-rpms \
    --enable=jb-eap-7.2-for-rhel-7-server-rpms
Initializing the PostgreSQL Database
Install the PostgreSQL server package:
# yum install rh-postgresql10 rh-postgresql10-postgresql-contrib
Initialize the PostgreSQL database, start the
postgresqlservice, and ensure that this service starts on boot:# scl enable rh-postgresql10 -- postgresql-setup --initdb # systemctl enable rh-postgresql10-postgresql # systemctl start rh-postgresql10-postgresql
Connect to the
psqlcommand line interface as thepostgresuser:su - postgres -c 'scl enable rh-postgresql10 -- psql'
Create a default user. The Manager’s default user is
engineand Data Warehouse’s default user isovirt_engine_history:postgres=# create role user_name with login encrypted password 'password';
Create a database. The Manager’s default database name is
engineand Data Warehouse’s default database name isovirt_engine_history:postgres=# create database database_name owner user_name template template0 encoding 'UTF8' lc_collate 'en_US.UTF-8' lc_ctype 'en_US.UTF-8';
Connect to the new database:
postgres=# \c database_nameAdd the
uuid-osspextension:database_name=# CREATE EXTENSION "uuid-ossp";Add the
plpgsqllanguage if it does not exist:database_name=# CREATE LANGUAGE plpgsql;Quit the
psqlinterface:database_name=# \qEnsure the database can be accessed remotely by enabling md5 client authentication. Edit the
/var/opt/rh/rh-postgresql10/lib/pgsql/data/pg_hba.conffile, and add the following line immediately underneath the line starting withlocalat the bottom of the file, replacingX.X.X.Xwith the IP address of the Manager or the Data Warehouse machine, and0-32or0-128with the CIDR mask length:host database_name user_name X.X.X.X/0-32 md5 host database_name user_name X.X.X.X::/0-128 md5
Update the PostgreSQL server’s configuration. Edit the
/var/opt/rh/rh-postgresql10/lib/pgsql/data/postgresql.conffile and add the following lines to the bottom of the file:autovacuum_vacuum_scale_factor=0.01 autovacuum_analyze_scale_factor=0.075 autovacuum_max_workers=6 maintenance_work_mem=65536 max_connections=150 work_mem=8192
Restart the
postgresqlservice:# systemctl restart rh-postgresql10-postgresql
- Optionally, set up SSL to secure database connections using the instructions at http://www.postgresql.org/docs/10/static/ssl-tcp.html#SSL-FILE-USAGE.
Return to Section 3.3, “Installing and Configuring the Red Hat Virtualization Manager”, and answer Local and Manual when asked about the database.
Appendix C. Configuring a Host for PCI Passthrough
This is one in a series of topics that show how to set up and configure SR-IOV on Red Hat Virtualization. For more information, see Setting Up and Configuring SR-IOV
Enabling PCI passthrough allows a virtual machine to use a host device as if the device were directly attached to the virtual machine. To enable the PCI passthrough function, you must enable virtualization extensions and the IOMMU function. The following procedure requires you to reboot the host. If the host is attached to the Manager already, ensure you place the host into maintenance mode first.
Prerequisites
- Ensure that the host hardware meets the requirements for PCI device passthrough and assignment. See PCI Device Requirements for more information.
Configuring a Host for PCI Passthrough
- Enable the virtualization extension and IOMMU extension in the BIOS. See Enabling Intel VT-x and AMD-V virtualization hardware extensions in BIOS in the Red Hat Enterprise Linux Virtualization Deployment and Administration Guide for more information.
Enable the IOMMU flag in the kernel by selecting the Hostdev Passthrough & SR-IOV check box when adding the host to the Manager or by editing the grub configuration file manually.
- To enable the IOMMU flag from the Administration Portal, see Adding Standard Hosts to the Red Hat Virtualization Manager and Kernel Settings Explained.
- To edit the grub configuration file manually, see Enabling IOMMU Manually.
- For GPU passthrough, you need to run additional configuration steps on both the host and the guest system. See GPU device passthrough: Assigning a host GPU to a single virtual machine in Setting up an NVIDIA GPU for a virtual machine in Red Hat Virtualization for more information.
Enabling IOMMU Manually
Enable IOMMU by editing the grub configuration file.
NoteIf you are using IBM POWER8 hardware, skip this step as IOMMU is enabled by default.
For Intel, boot the machine, and append
intel_iommu=onto the end of theGRUB_CMDLINE_LINUXline in the grub configuration file.# vi /etc/default/grub ... GRUB_CMDLINE_LINUX="nofb splash=quiet console=tty0 ... intel_iommu=on ...
For AMD, boot the machine, and append
amd_iommu=onto the end of theGRUB_CMDLINE_LINUXline in the grub configuration file.# vi /etc/default/grub ... GRUB_CMDLINE_LINUX="nofb splash=quiet console=tty0 ... amd_iommu=on ...
NoteIf
intel_iommu=onoramd_iommu=onworks, you can try addingiommu=ptoramd_iommu=pt. Theptoption only enables IOMMU for devices used in passthrough and provides better host performance. However, the option might not be supported on all hardware. Revert to previous option if theptoption doesn’t work for your host.If the passthrough fails because the hardware does not support interrupt remapping, you can consider enabling the
allow_unsafe_interruptsoption if the virtual machines are trusted. Theallow_unsafe_interruptsis not enabled by default because enabling it potentially exposes the host to MSI attacks from virtual machines. To enable the option:# vi /etc/modprobe.d options vfio_iommu_type1 allow_unsafe_interrupts=1
Refresh the grub.cfg file and reboot the host for these changes to take effect:
# grub2-mkconfig -o /boot/grub2/grub.cfg
# reboot
To enable SR-IOV and assign dedicated virtual NICs to virtual machines, see https://access.redhat.com/articles/2335291.
Appendix D. Removing the Red Hat Virtualization Manager
You can use the engine-cleanup command to remove specific components or all components of the Red Hat Virtualization Manager.
A backup of the Manager database and a compressed archive of the PKI keys and configuration are always automatically created. These files are saved under /var/lib/ovirt-engine/backups/, and include the date and engine- and engine-pki- in their file names respectively.
Procedure
Run the following command on the Manager machine:
# engine-cleanup
You are prompted whether to remove all Red Hat Virtualization Manager components:
Type
Yesand pressEnterto remove all components:Do you want to remove all components? (Yes, No) [Yes]:
Type
Noand pressEnterto select the components to remove. You can select whether to retain or remove each component individually:Do you want to remove Engine database content? All data will be lost (Yes, No) [No]: Do you want to remove PKI keys? (Yes, No) [No]: Do you want to remove PKI configuration? (Yes, No) [No]: Do you want to remove Apache SSL configuration? (Yes, No) [No]:
You are given another opportunity to change your mind and cancel the removal of the Red Hat Virtualization Manager. If you choose to proceed, the
ovirt-engineservice is stopped, and your environment’s configuration is removed in accordance with the options you selected.During execution engine service will be stopped (OK, Cancel) [OK]: ovirt-engine is about to be removed, data will be lost (OK, Cancel) [Cancel]:OK
Remove the Red Hat Virtualization packages:
# yum remove rhvm* vdsm-bootstrap
Appendix E. Securing Red Hat Virtualization
This topic includes limited information about how to secure Red Hat Virtualization. This information will increase over time.
This information is specific to Red Hat Virtualization; it and does not cover fundamental security practices related to:
- Disabling unnecessary services
- Authentication
- Authorization
- Accounting
- Penetration testing and hardening of non-RHV services
- Encryption of sensitive application data
Prerequisites
- You should be proficient in your organization’s security standards and practices. If possible, consult with your organization’s Security Officer.
- Consult the Red Hat Enterprise Linux Security Guide before deploying RHEL hosts.
E.1. DISA STIG for Red Hat Linux 7
The Defense Information Systems Agency (DISA) distributes Security Technical Implementation Guides (STIGs) for various platforms and operating systems.
While installing Red Hat Virtualization Host (RHVH), the DISA STIG for Red Hat Linux 7 profile is one of the security policies available. Enabling this profile as your security policy during installation removes the need regenerate SSH keys, SSL certificates, or otherwise re-configure the host later in the deployment process.
The DISA STIG security policy is the only security policy that Red Hat officially tests and certifies.
DISA STIGs are "configuration standards for DOD IA and IA-enabled devices/systems. Since 1998, DISA has played a critical role in enhancing the security posture of DoD’s security systems by providing the Security Technical Implementation Guides (STIGs). The STIGs contain technical guidance to 'lock down' information systems/software that might otherwise be vulnerable to a malicious computer attack."
These STIGs are based on requirements put forth by the National Institute of Standards and Technology (NIST) Special Publication 800-53, a catalog of security controls for all U.S. federal information systems except those related to national security.
To determine which various profiles overlap, Red Hat refers to the Cloud Security Alliance’s Cloud Controls Matrix (CCM). This CCM specifies a comprehensive set of cloud-specific security controls, and maps each one to the requirements of leading standards, best practices, and regulations.
To help you verify your security policy, Red Hat provides OpenSCAP tools and Security Content Automation Protocol (SCAP) profiles for various Red Hat platforms, including RHEL and RHV.
Red Hat’s OpenSCAP project provides open source tools for administrators and auditors to assess, measure, and enforce of SCAP baselines. NIST awarded SCAP 1.2 certification to OpenSCAP in 2014.
NIST maintains the SCAP standard. SCAP-compliant profiles provide detailed low-level guidance on setting the security configuration of operating systems and applications.
Red Hat publishes SCAP baselines for various products and platforms to two locations:
- The NIST National Checklist Program (NCP), the U.S. government repository of publicly available security checklists (or benchmarks).
- The Department of Defense (DoD) Cyber Exchange
E.2. Applying the DISA STIG for Red Hat Linux 7 Profile
This topic shows you how to enable the DISA STIG for Red Hat Linux 7 security profile while installing the Red Hat Virtualization (RHV) Manager ("the Manager"), the Red Hat Virtualization Host (RHVH), and the Red Hat Enterprise Linux host.
Enable DISA STIG for Red Hat Linux 7 for RHVH
The following procedure applies to installing Red Hat Virtualization Host (RHVH) for two different purposes:
- Using RHVH as the host for the Manager virtual machine when you deploy the Manager as a self-hosted engine.
- Using RHVH as an ordinary host in an RHV cluster.
If you use the Anaconda installer to install RHVH:
-
On the Installation Summary screen, select Security Policy.
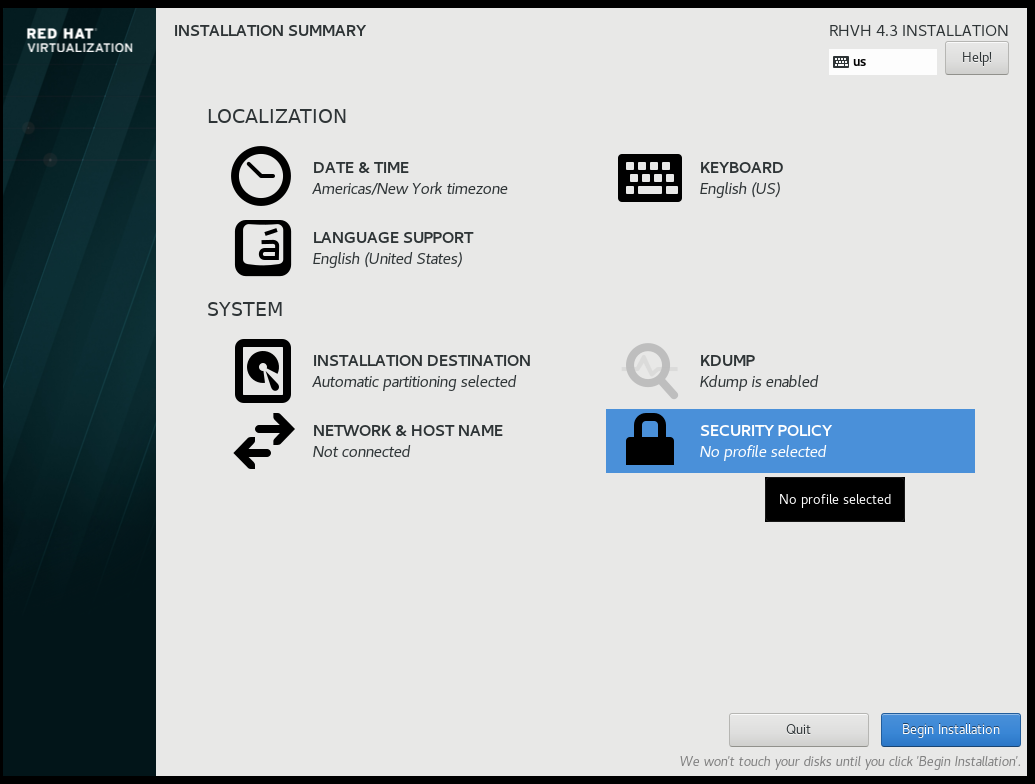
- On the Security Policy screen that opens, toggle the Apply security policy setting to On.
- Scroll down the list of profiles and select DISA STIG for Red Hat Linux 7.
Click the Select profile button. This action adds a green checkmark next to the profile and adds packages to the list of Changes that were done or need to be done.
NoteThese packages are already part of the RHVH image. RHVH ships as a single system image. Installation of packages required by any other selected security profiles which are not part of the RHVH image may not be possible. Please see the RHVH package manifest for a list of included packages.

- Click Done.
- On the Installation Summary screen, verify that the status of Security Policy is Everything okay.
-
Later, when you log into RHVH, the command line displays the following information.
If you deploy RHV as a Self-Hosted Engine using the command line, during the series of prompts after you enter ovirt-hosted-engine-setup, the command line will ask Do you want to apply a default OpenSCAP security profile? Enter Yes and follow the instructions to select the DISA STIG for Red Hat Linux 7 profile.
Additional resources