
Red Hat Training
A Red Hat training course is available for Red Hat Virtualization
Installation Guide
Installing Red Hat Virtualization
Abstract
Part I. Introduction to Red Hat Virtualization
Chapter 1. Introduction to Red Hat Virtualization
- The installation and configuration of a Red Hat Virtualization Manager.
- The installation and configuration of hosts.
- Attach existing FCP storage to your Red Hat Virtualization environment. More storage options can be found in the Administration Guide.
Table 1.1. Red Hat Virtualization Key Components
| Component Name | Description |
|---|---|
| Red Hat Virtualization Manager | A server that manages and provides access to the resources in the environment. |
| Hosts | Hosts are servers that provide the processing capabilities and memory resources used to run virtual machines. |
| Storage | Storage is used to store the data associated with virtual machines. |
Important
Chapter 2. System Requirements
2.1. Red Hat Virtualization Manager Requirements
2.1.1. Hardware Requirements
Table 2.1. Red Hat Virtualization Manager Hardware Requirements
| Resource | Minimum | Recommended |
|---|---|---|
| CPU | A dual core CPU. | A quad core CPU or multiple dual core CPUs. |
| Memory | 4 GB of available system RAM if Data Warehouse is not installed and if memory is not being consumed by existing processes. | 16 GB of system RAM. |
| Hard Disk | 25 GB of locally accessible, writable, disk space. |
50 GB of locally accessible, writable, disk space.
You can use the RHEV Manager History Database Size Calculator to calculate the appropriate disk space to have for the Manager history database size.
|
| Network Interface | 1 Network Interface Card (NIC) with bandwidth of at least 1 Gbps. | 1 Network Interface Card (NIC) with bandwidth of at least 1 Gbps. |
2.1.2. Browser Requirements
- Tier 1: Browser and operating system combinations that are fully tested and fully supported. Red Hat Engineering is committed to fixing issues with browsers on this tier.
- Tier 2: Browser and operating system combinations that are partially tested, and are likely to work. Limited support is provided for this tier. Red Hat Engineering will attempt to fix issues with browsers on this tier.
- Tier 3: Browser and operating system combinations that are not tested, but may work. Minimal support is provided for this tier. Red Hat Engineering will attempt to fix only minor issues with browsers on this tier.
Table 2.2. Browser Requirements
| Support Tier | Operating System Family | Browser | Portal Access |
|---|---|---|---|
| Tier 1 | Red Hat Enterprise Linux | Mozilla Firefox Extended Support Release (ESR) version | Administration Portal and User Portal |
| Tier 2 | Windows | Internet Explorer 10 or later | Administration Portal and User Portal |
| Any | Most recent version of Google Chrome or Mozilla Firefox | Administration Portal and User Portal | |
| Tier 3 | Any | Earlier versions of Google Chrome or Mozilla Firefox | Administration Portal and User Portal |
| Any | Other browsers | Administration Portal and User Portal |
2.1.3. Client Requirements
- Tier 1: Operating systems on which remote-viewer has been fully tested and is supported.
- Tier 2: Operating systems on which remote-viewer is partially tested and is likely to work. Limited support is provided for this tier. Red Hat Engineering will attempt to fix issues with remote-viewer on this tier.
Table 2.3. Client Operating System SPICE Support
| Support Tier | Operating System | SPICE Support |
|---|---|---|
| Tier 1 | Red Hat Enterprise Linux 7 | Fully supported on Red Hat Enterprise Linux 7.2 and above |
| Microsoft Windows 7 | Fully supported on Microsoft Windows 7 | |
| Tier 2 | Microsoft Windows 8 | Supported when spice-vdagent is running on these guest operating systems |
| Microsoft Windows 10 | Supported when spice-vdagent is running on these guest operating systems |
2.1.4. Operating System Requirements
2.1.5. DNS Requirements
Note
/etc/hosts file is not sufficient because it does not provide reverse DNS lookup.
2.2. Hypervisor Requirements
2.2.1. CPU Requirements
Table 2.4. Supported Hypervisor CPU Models
| AMD | Intel | IBM |
|---|---|---|
| AMD Opteron G1 | Intel Conroe | IBM POWER8 |
| AMD Opteron G2 | Intel Penryn | |
| AMD Opteron G3 | Intel Nehalem | |
| AMD Opteron G4 | Intel Westmere | |
| AMD Opteron G5 | Intel Sandybridge | |
| Intel Haswell |
Procedure 2.1. Checking if a Processor Supports the Required Flags
- At the Red Hat Enterprise Linux or Red Hat Virtualization Host boot screen, press any key and select the Boot or Boot with serial console entry from the list.
- Press Tab to edit the kernel parameters for the selected option.
- Ensure there is a Space after the last kernel parameter listed, and append the
rescueparameter. - Press Enter to boot into rescue mode.
- At the prompt which appears, determine that your processor has the required extensions and that they are enabled by running this command:
# grep -E 'svm|vmx' /proc/cpuinfo | grep nx
If any output is shown, then the processor is hardware virtualization capable. If no output is shown, then it is still possible that your processor supports hardware virtualization. In some circumstances manufacturers disable the virtualization extensions in the BIOS. If you believe this to be the case, consult the system's BIOS and the motherboard manual provided by the manufacturer.
2.2.2. Memory Requirements
Table 2.5. Memory Requirements
| Minimum | Maximum |
|---|---|
| 2 GB of RAM | 2 TB of RAM |
2.2.3. Storage Requirements
Table 2.6. Red Hat Virtualization Host Minimum Storage Requirements
| / | /boot | /var | swap | Minimum Total |
|---|---|---|---|---|
| 6 GB | 1 GB | 15 GB | 1 GB | 23 GB |
Important
2.2.4. PCI Device Requirements
2.2.5. Hardware Considerations For Device Assignment
- CPU must support IOMMU (for example, VT-d or AMD-Vi). IBM POWER8 supports IOMMU by default.
- Firmware must support IOMMU.
- CPU root ports used must support ACS or ACS-equivalent capability.
- PCIe device must support ACS or ACS-equivalent capability.
- It is recommended that all PCIe switches and bridges between the PCIe device and the root port should support ACS. For example, if a switch does not support ACS, all devices behind that switch share the same IOMMU group, and can only be assigned to the same virtual machine.
- For GPU support, Red Hat Enterprise Linux 7 supports PCI device assignment of NVIDIA K-Series Quadro (model 2000 series or higher), GRID, and Tesla as non-VGA graphics devices. Currently up to two GPUs may be attached to a virtual machine in addition to one of the standard, emulated VGA interfaces. The emulated VGA is used for pre-boot and installation and the NVIDIA GPU takes over when the NVIDIA graphics drivers are loaded. Note that the NVIDIA Quadro 2000 is not supported, nor is the Quadro K420 card.
lspci -v command can be used to print information for PCI devices already installed on a system.
2.3. Firewalls
2.3.1. Red Hat Virtualization Manager Firewall Requirements
engine-setup script can configure the firewall automatically, but this overwrites any pre-existing firewall configuration.
engine-setup command saves a list of the iptables rules required in the /usr/share/ovirt-engine/conf/iptables.example file.
80 and 443) listed here.
Table 2.7. Red Hat Virtualization Manager Firewall Requirements
| Port(s) | Protocol | Source | Destination | Purpose |
|---|---|---|---|---|
| - | ICMP |
Red Hat Virtualization Host(s)
Red Hat Enterprise Linux host(s)
|
Red Hat Virtualization Manager
| When registering to the Red Hat Virtualization Manager, virtualization hosts send an ICMP ping request to the Manager to confirm that it is online. |
| 22 | TCP |
System(s) used for maintenance of the Manager including backend configuration, and software upgrades.
|
Red Hat Virtualization Manager
|
Secure Shell (SSH) access.
Optional.
|
| 2222 | TCP |
Clients accessing virtual machine serial consoles.
|
Red Hat Virtualization Manager
|
Secure Shell (SSH) access to enable connection to virtual machine serial consoles.
|
| 80, 443 | TCP |
Administration Portal clients
User Portal clients
Red Hat Virtualization Host(s)
Red Hat Enterprise Linux host(s)
REST API clients
|
Red Hat Virtualization Manager
|
Provides HTTP and HTTPS access to the Manager.
|
| 6100 | TCP |
Administration Portal clients
User Portal clients
|
Red Hat Virtualization Manager
|
Provides websocket proxy access for web-based console clients (
noVNC and spice-html5) when the websocket proxy is running on the Manager. If the websocket proxy is running on a different host, however, this port is not used.
|
| 7410 | UDP |
Red Hat Virtualization Host(s)
Red Hat Enterprise Linux host(s)
|
Red Hat Virtualization Manager
| Must be open for the Manager to receive Kdump notifications. |
Important
NFSv4
- TCP port
2049for NFS.
NFSv3
- TCP and UDP port
2049for NFS. - TCP and UDP port
111(rpcbind/sunrpc). - TCP and UDP port specified with
MOUNTD_PORT="port" - TCP and UDP port specified with
STATD_PORT="port" - TCP port specified with
LOCKD_TCPPORT="port" - UDP port specified with
LOCKD_UDPPORT="port"
MOUNTD_PORT, STATD_PORT, LOCKD_TCPPORT, and LOCKD_UDPPORT ports are configured in the /etc/sysconfig/nfs file.
2.3.2. Hypervisor Firewall Requirements
Table 2.8. Virtualization Host Firewall Requirements
| Port(s) | Protocol | Source | Destination | Purpose |
|---|---|---|---|---|
| 22 | TCP |
Red Hat Virtualization Manager
|
Red Hat Virtualization Host(s)
Red Hat Enterprise Linux host(s)
|
Secure Shell (SSH) access.
Optional.
|
| 2223 | TCP |
Red Hat Virtualization Manager
|
Red Hat Virtualization Host(s)
Red Hat Enterprise Linux host(s)
|
Secure Shell (SSH) access to enable connection to virtual machine serial consoles.
|
| 161 | UDP |
Red Hat Virtualization Host(s)
Red Hat Enterprise Linux host(s)
|
Red Hat Virtualization Manager
|
Simple network management protocol (SNMP). Only required if you want Simple Network Management Protocol traps sent from the host to one or more external SNMP managers.
Optional.
|
| 5900 - 6923 | TCP |
Administration Portal clients
User Portal clients
|
Red Hat Virtualization Host(s)
Red Hat Enterprise Linux host(s)
|
Remote guest console access via VNC and SPICE. These ports must be open to facilitate client access to virtual machines.
|
| 5989 | TCP, UDP |
Common Information Model Object Manager (CIMOM)
|
Red Hat Virtualization Host(s)
Red Hat Enterprise Linux host(s)
|
Used by Common Information Model Object Managers (CIMOM) to monitor virtual machines running on the host. Only required if you want to use a CIMOM to monitor the virtual machines in your virtualization environment.
Optional.
|
| 9090 | TCP |
Red Hat Virtualization Manager
Client machines
|
Red Hat Virtualization Host(s)
Red Hat Enterprise Linux host(s)
|
Cockpit user interface access.
Optional.
|
| 16514 | TCP |
Red Hat Virtualization Host(s)
Red Hat Enterprise Linux host(s)
|
Red Hat Virtualization Host(s)
Red Hat Enterprise Linux host(s)
|
Virtual machine migration using
libvirt.
|
| 49152 - 49216 | TCP |
Red Hat Virtualization Host(s)
Red Hat Enterprise Linux host(s)
|
Red Hat Virtualization Host(s)
Red Hat Enterprise Linux host(s)
|
Virtual machine migration and fencing using VDSM. These ports must be open facilitate both automated and manually initiated migration of virtual machines.
|
| 54321 | TCP |
Red Hat Virtualization Manager
Red Hat Virtualization Host(s)
Red Hat Enterprise Linux host(s)
|
Red Hat Virtualization Host(s)
Red Hat Enterprise Linux host(s)
|
VDSM communications with the Manager and other virtualization hosts.
|
2.3.3. Directory Server Firewall Requirements
Table 2.9. Host Firewall Requirements
| Port(s) | Protocol | Source | Destination | Purpose |
|---|---|---|---|---|
| 88, 464 | TCP, UDP |
Red Hat Virtualization Manager
|
Directory server
| Kerberos authentication. |
| 389, 636 | TCP |
Red Hat Virtualization Manager
|
Directory server
| Lightweight Directory Access Protocol (LDAP) and LDAP over SSL. |
2.3.4. Database Server Firewall Requirements
Table 2.10. Host Firewall Requirements
| Port(s) | Protocol | Source | Destination | Purpose |
|---|---|---|---|---|
| 5432 | TCP, UDP |
Red Hat Virtualization Manager
|
PostgreSQL database server
| Default port for PostgreSQL database connections. |
Part II. Installing the Red Hat Virtualization Manager
Chapter 3. Red Hat Virtualization Manager
3.1. Subscribing to the Required Entitlements
- Register your system with the Content Delivery Network, entering your Customer Portal user name and password when prompted:
# subscription-manager register
- Find the
Red Hat Enterprise Linux ServerandRed Hat Virtualizationsubscription pools and note down the pool IDs.# subscription-manager list --available
- Use the pool IDs located in the previous step to attach the entitlements to the system:
# subscription-manager attach --pool=pool_id
Note
To find out what subscriptions are currently attached, run:# subscription-manager list --consumed
To list all enabled repositories, run:# yum repolist
- Disable all existing repositories:
# subscription-manager repos --disable=*
- Enable the required repositories:
# subscription-manager repos --enable=rhel-7-server-rpms
# subscription-manager repos --enable=rhel-7-server-supplementary-rpms
# subscription-manager repos --enable=rhel-7-server-rhv-4.0-rpms
# subscription-manager repos --enable=jb-eap-7.0-for-rhel-7-server-rpms
3.2. Installing the Red Hat Virtualization Manager Packages
Procedure 3.1. Installing the Red Hat Virtualization Manager Packages
- To ensure all packages are up to date, run the following command on the machine where you are installing the Red Hat Virtualization Manager:
# yum update
Note
Reboot the machine if any kernel related packages have been updated. - Run the following command to install the rhevm package and dependencies.
# yum install rhevm
3.3. Configuring the Red Hat Virtualization Manager
engine-setup command. This command asks you a series of questions and, after you provide the required values for all questions, applies that configuration and starts the ovirt-engine service.
engine-setup creates and configures the Manager database locally on the Manager machine. Alternatively, you can configure the Manager to use a remote database or a manually-configured local database; however, you must set up that database before running engine-setup. To set up a remote database see Appendix D, Preparing a Remote PostgreSQL Database for Use with the Red Hat Virtualization Manager. To set up a manually-configured local database, see Appendix E, Preparing a Local Manually-Configured PostgreSQL Database for Use with the Red Hat Virtualization Manager.
engine-setup will configure a websocket proxy on the Manager. However, for security and performance reasons, the user can choose to configure it on a separate host. See Appendix F, Installing a Websocket Proxy on a Separate Machine for instructions.
Note
engine-setup command guides you through several distinct configuration stages, each comprising several steps that require user input. Suggested configuration defaults are provided in square brackets; if the suggested value is acceptable for a given step, press Enter to accept that value.
Procedure 3.2. Configuring the Red Hat Virtualization Manager
- Run the
engine-setupcommand to begin configuration of the Red Hat Virtualization Manager:# engine-setup
- Press Enter to configure the Manager:
Configure Engine on this host (Yes, No) [Yes]:
- Optionally allow
engine-setupto configure the Image I/O Proxy to allow the Manager to upload virtual disk images into storage domains. See Uploading a Disk Image to a Storage Domain in the Administration Guide for more information.Configure Image I/O Proxy on this host? (Yes, No) [Yes]:
- Optionally allow
engine-setupto configure a websocket proxy server for allowing users to connect to virtual machines via the noVNC or HTML 5 consoles:Configure WebSocket Proxy on this machine? (Yes, No) [Yes]:
To configure the websocket proxy on a separate machine, selectNoand refer to Appendix F, Installing a Websocket Proxy on a Separate Machine for configuration instructions. - Choose whether to configure Data Warehouse on the Manager machine.
Please note: Data Warehouse is required for the engine. If you choose to not configure it on this host, you have to configure it on a remote host, and then configure the engine on this host so that it can access the database of the remote Data Warehouse host.
Configure Data Warehouse on this host (Yes, No) [Yes]:
To configure Data Warehouse on a separate machine, selectNoand see Installing and Configuring Data Warehouse on a Separate Machine in the Data Warehouse Guide for installation and configuration instructions. - Optionally allow access to a virtual machines's serial console from the command line.
Configure VM Console Proxy on this host (Yes, No) [Yes]:
Additional configuration is required on the client machine to use this feature. See Opening a Serial Console to a Virtual Machine in the Virtual Machine Management Guide. - Press Enter to accept the automatically detected hostname, or enter an alternative hostname and press Enter. Note that the automatically detected hostname may be incorrect if you are using virtual hosts.
Host fully qualified DNS name of this server [autodetected host name]:
- The
engine-setupcommand checks your firewall configuration and offers to modify that configuration to open the ports used by the Manager for external communication such as TCP ports 80 and 443. If you do not allowengine-setupto modify your firewall configuration, then you must manually open the ports used by the Manager.Setup can automatically configure the firewall on this system. Note: automatic configuration of the firewall may overwrite current settings. Do you want Setup to configure the firewall? (Yes, No) [Yes]:
If you choose to automatically configure the firewall, and no firewall managers are active, you are prompted to select your chosen firewall manager from a list of supported options. Type the name of the firewall manager and press Enter. This applies even in cases where only one option is listed. - Choose to use either a local or remote PostgreSQL database as the Data Warehouse database:
Where is the DWH database located? (Local, Remote) [Local]:
- If you select
Local, theengine-setupcommand can configure your database automatically (including adding a user and a database), or it can connect to a preconfigured local database:Setup can configure the local postgresql server automatically for the DWH to run. This may conflict with existing applications. Would you like Setup to automatically configure postgresql and create DWH database, or prefer to perform that manually? (Automatic, Manual) [Automatic]:
- If you select
Automaticby pressing Enter, no further action is required here. - If you select
Manual, input the following values for the manually-configured local database:DWH database secured connection (Yes, No) [No]: DWH database name [ovirt_engine_history]: DWH database user [ovirt_engine_history]: DWH database password:
Note
engine-setuprequests these values after the Manager database is configured in the next step.
- If you select
Remote, input the following values for the preconfigured remote database host:DWH database host [localhost]: DWH database port [5432]: DWH database secured connection (Yes, No) [No]: DWH database name [ovirt_engine_history]: DWH database user [ovirt_engine_history]: DWH database password:
Note
engine-setuprequests these values after the Manager database is configured in the next step.
- Choose to use either a local or remote PostgreSQL database as the Manager database:
Where is the Engine database located? (Local, Remote) [Local]:
- If you select
Local, theengine-setupcommand can configure your database automatically (including adding a user and a database), or it can connect to a preconfigured local database:Setup can configure the local postgresql server automatically for the engine to run. This may conflict with existing applications. Would you like Setup to automatically configure postgresql and create Engine database, or prefer to perform that manually? (Automatic, Manual) [Automatic]:
- If you select
Automaticby pressing Enter, no further action is required here. - If you select
Manual, input the following values for the manually-configured local database:Engine database secured connection (Yes, No) [No]: Engine database name [engine]: Engine database user [engine]: Engine database password:
- If you select
Remote, input the following values for the preconfigured remote database host:Engine database host [localhost]: Engine database port [5432]: Engine database secured connection (Yes, No) [No]: Engine database name [engine]: Engine database user [engine]: Engine database password:
- Set a password for the automatically created administrative user of the Red Hat Virtualization Manager:
Engine admin password:
Confirm engine admin password:
- Select Gluster, Virt, or Both:
Application mode (Both, Virt, Gluster) [Both]:
Both offers the greatest flexibility. In most cases, selectBoth. Virt application mode allows you to run virtual machines in the environment; Gluster application mode only allows you to manage GlusterFS from the Administration Portal. - Set the default value for the
wipe_after_deleteflag, which wipes the blocks of a virtual disk when the disk is deleted.Default SAN wipe after delete (Yes, No) [No]:
- The Manager uses certificates to communicate securely with its hosts. This certificate can also optionally be used to secure HTTPS communications with the Manager. Provide the organization name for the certificate:
Organization name for certificate [autodetected domain-based name]:
- Optionally allow
engine-setupto make the landing page of the Manager the default page presented by the Apache web server:Setup can configure the default page of the web server to present the application home page. This may conflict with existing applications. Do you wish to set the application as the default web page of the server? (Yes, No) [Yes]:
- By default, external SSL (HTTPS) communication with the Manager is secured with the self-signed certificate created earlier in the configuration to securely communicate with hosts. Alternatively, choose another certificate for external HTTPS connections; this does not affect how the Manager communicates with hosts:
Setup can configure apache to use SSL using a certificate issued from the internal CA.
	Do you wish Setup to configure that, or prefer to perform that manually? (Automatic, Manual) [Automatic]:
- Optionally create an NFS share on the Manager to use as an ISO storage domain. The local ISO domain provides a selection of images that can be used in the initial setup of virtual machines:
Configure an NFS share on this server to be used as an ISO Domain? (Yes, No) [Yes]:
- Specify the path for the ISO domain:
Local ISO domain path [/var/lib/exports/iso]:
- Specify the networks or hosts that require access to the ISO domain:
Local ISO domain ACL: 10.1.2.0/255.255.255.0(rw) host01.example.com(rw) host02.example.com(rw)
The example above allows access to a single /24 network and two specific hosts. See theexports(5)man page for further formatting options. - Specify a display name for the ISO domain:
Local ISO domain name [ISO_DOMAIN]:
- Choose how long Data Warehouse will retain collected data:
Note
This step is skipped if you chose not to configure Data Warehouse on the Manager machine.Please choose Data Warehouse sampling scale: (1) Basic (2) Full (1, 2)[1]:
Fulluses the default values for the data storage settings listed in the Data Warehouse Guide (recommended when Data Warehouse is installed on a remote host).Basicreduces the values ofDWH_TABLES_KEEP_HOURLYto720andDWH_TABLES_KEEP_DAILYto0, easing the load on the Manager machine (recommended when the Manager and Data Warehouse are installed on the same machine). - Review the installation settings, and press Enter to accept the values and proceed with the installation:
Please confirm installation settings (OK, Cancel) [OK]:
- If you intend to link your Red Hat Virtualization environment with a directory server, configure the date and time to synchronize with the system clock used by the directory server to avoid unexpected account expiry issues. See Synchronizing the System Clock with a Remote Server in the Red Hat Enterprise Linux System Administrator's Guide for more information.
engine-setup displays details about how to access your environment. If you chose to manually configure the firewall, engine-setup provides a custom list of ports that need to be opened, based on the options selected during setup. The engine-setup command also saves your answers to a file that can be used to reconfigure the Manager using the same values, and outputs the location of the log file for the Red Hat Virtualization Manager configuration process.
admin@internal user. Then, proceed with setting up hosts, and attaching storage.
3.4. Logging In to and Out of the Administration Portal
- In a web browser, navigate to
https://your-manager-fqdn/ovirt-engine, replacing your-manager-fqdn with the fully qualified domain name that you provided during installation.Important
The first time that you connect to the Administration Portal, you are prompted to trust the certificate being used to secure communications between your browser and the web server. You must accept this certificate. Refer to the instructions to install the certificate authority in Firefox, Internet Explorer, or Google Chrome. - Click . An SSO login page displays. SSO login enables you to log in to the Administration and User Portals at the same time.
- Enter your User Name and Password. If you are logging in for the first time, use the user name
adminin conjunction with the password that you specified during installation. - Select the domain against which to authenticate from the Domain list. If you are logging in using the internal
adminuser name, select theinternaldomain. - Click Log In.
- You can view the Administration Portal in multiple languages. The default selection will be chosen based on the locale settings of your web browser. If you would like to view the Administration Portal in a language other than the default, select your preferred language from the drop-down list on the welcome page.
Chapter 4. Red Hat Virtualization Manager Related Tasks
4.1. Removing the Red Hat Virtualization Manager
engine-cleanup command to remove specific components or all components of the Red Hat Virtualization Manager.
Note
/var/lib/ovirt-engine/backups/, and include the date and engine- and engine-pki- in their file names respectively.
Procedure 4.1. Removing the Red Hat Virtualization Manager
- Run the following command on the machine on which the Red Hat Virtualization Manager is installed:
# engine-cleanup
- You are prompted whether to remove all Red Hat Virtualization Manager components:
- Type
Yesand press Enter to remove all components:Do you want to remove all components? (Yes, No) [Yes]:
- Type
Noand press Enter to select the components to remove. You can select whether to retain or remove each component individually:Do you want to remove Engine database content? All data will be lost (Yes, No) [No]: Do you want to remove PKI keys? (Yes, No) [No]: Do you want to remove PKI configuration? (Yes, No) [No]: Do you want to remove Apache SSL configuration? (Yes, No) [No]:
- You are given another opportunity to change your mind and cancel the removal of the Red Hat Virtualization Manager. If you choose to proceed, the
ovirt-engineservice is stopped, and your environment's configuration is removed in accordance with the options you selected.During execution engine service will be stopped (OK, Cancel) [OK]: ovirt-engine is about to be removed, data will be lost (OK, Cancel) [Cancel]:OK
- Remove the Red Hat Virtualization packages:
# yum remove rhevm* vdsm-bootstrap
4.2. Configuring a Local Repository for Offline Red Hat Virtualization Manager Installation
- Install Red Hat Enterprise Linux 7 Server on a system that has access to the Content Delivery Network. This system downloads all the required packages, and distributes them to your offline system(s).
Important
Ensure that the system used in this procedure has a large amount of free disk space available. This procedure downloads a large number of packages, and requires up to 50GB of free disk space. - Register your system with the Content Delivery Network, entering your Customer Portal user name and password when prompted:
# subscription-manager register
- Subscribe the system to all required entitlements:
- Find the
Red Hat Enterprise Linux ServerandRed Hat Virtualizationsubscription pools and note down the pool IDs.# subscription-manager list --available
- Use the pool IDs located in the previous step to attach the entitlements to the system:
# subscription-manager attach --pool=pool_id
- Disable all existing repositories:
# subscription-manager repos --disable=*
- Enable the required repositories:
# subscription-manager repos --enable=rhel-7-server-rpms
# subscription-manager repos --enable=rhel-7-server-supplementary-rpms
# subscription-manager repos --enable=rhel-7-server-rhv-4.0-rpms
# subscription-manager repos --enable=jb-eap-7.0-for-rhel-7-server-rpms
- Ensure that all packages currently installed are up to date:
# yum update
Note
Reboot the machine if any kernel related packages have been updated.
- Servers that are not connected to the Internet can access software repositories on other systems using File Transfer Protocol (FTP). To create the FTP repository, install and configure vsftpd:
- Install the vsftpd package:
# yum install vsftpd
- Start the
vsftpdservice, and ensure the service starts on boot:# systemctl start vsftpd.service # systemctl enable vsftpd.service
- Create a sub-directory inside the
/var/ftp/pub/directory. This is where the downloaded packages will be made available:# mkdir /var/ftp/pub/rhevrepo
- Download packages from all configured software repositories to the
rhevrepodirectory. This includes repositories for all Content Delivery Network subscription pools the system is subscribed to, and any locally configured repositories:# reposync -l -p /var/ftp/pub/rhevrepo
This command downloads a large number of packages, and takes a long time to complete. The-loption enables yum plug-in support. - Install the createrepo package:
# yum install createrepo
- Create repository metadata for each of the sub-directories where packages were downloaded under
/var/ftp/pub/rhevrepo:# for DIR in `find /var/ftp/pub/rhevrepo -maxdepth 1 -mindepth 1 -type d`; do createrepo $DIR; done;
- Create a repository file, and copy it to the
/etc/yum.repos.d/directory on the offline machine on which you will install the Manager.The configuration file can be created manually or with a script. Run the script below on the system hosting the repository, replacing ADDRESS in thebaseurlwith the IP address or fully qualified domain name of the system hosting the repository:#!/bin/sh REPOFILE="/etc/yum.repos.d/rhev.repo" echo -e " " > $REPOFILE for DIR in `find /var/ftp/pub/rhevrepo -maxdepth 1 -mindepth 1 -type d`; do echo -e "[`basename $DIR`]" >> $REPOFILE echo -e "name=`basename $DIR`" >> $REPOFILE echo -e "baseurl=ftp://ADDRESS/pub/rhevrepo/`basename $DIR`" >> $REPOFILE echo -e "enabled=1" >> $REPOFILE echo -e "gpgcheck=0" >> $REPOFILE echo -e "\n" >> $REPOFILE done; - Install the Manager packages on the offline system. See Section 3.2, “Installing the Red Hat Virtualization Manager Packages” for instructions. Packages are installed from the local repository, instead of from the Content Delivery Network.
- Configure the Manager. See Section 3.3, “Configuring the Red Hat Virtualization Manager” for initial configuration instructions.
- Continue with host, storage, and virtual machine configuration.
Part III. Installing Hosts
Chapter 5. Introduction to Hosts
Important
getenforce. SELinux is required to be in enforcing mode on all hypervisors and Managers for your Red Hat Virtualization environment to be supported by Red Hat.
Table 5.1. Hosts
| Host Type | Other Names | Description |
|---|---|---|
|
Red Hat Virtualization Host
|
RHVH, thin host
|
This is a minimal operating system based on Red Hat Enterprise Linux. It is distributed as an ISO file from the Customer Portal and contains only the packages required for the machine to act as a host.
|
|
Red Hat Enterprise Linux Host
|
RHEL-based hypervisor, thick host
|
Red Hat Enterprise Linux hosts subscribed to the appropriate channels can be used as hosts.
|
5.1. Host Compatibility
Chapter 6. Red Hat Virtualization Hosts
yum and uses an Anaconda installation interface based on the one used by Red Hat Enterprise Linux hosts.
6.1. Installing Red Hat Virtualization Host
- Download the RHVH ISO image from the Customer Portal.
- Write the RHVH ISO image to a USB, CD, or DVD.
- Install the RHVH minimal operating system.
Procedure 6.1. Installing Red Hat Virtualization Host
- Download the RHVH ISO image from the Customer Portal:
- Log in to the Customer Portal at https://access.redhat.com.
- Click Downloads in the menu bar.
- Click Red Hat Virtualization, scroll up, and click to access the product download page.
- Choose the appropriate hypervisor image and click .
- Create a bootable media device. See Making Media in the Red Hat Enterprise Linux Installation Guide for more information.
- Start the machine on which to install RHVH using the prepared installation media.
- From the boot menu, select the option, and press Enter.
Note
You can also press the Tab key to edit the kernel parameters. Kernel parameters must be separated by a space, and you can boot the system using the specified kernel parameters by pressing the Enter key. Press the Esc key to clear any changes to the kernel parameters and return to the boot menu. - Select a language, and click .
- Select a time zone from the Date & Time screen and click .
- Select a keyboard layout from the Keyboard screen and click .
- Select the device on which to install RHVH from the Installation Destination screen. Optionally, enable encryption. Click .
Important
Red Hat strongly recommends using the Automatically configure partitioning option.Note
For information on preserving local storage domains when reinstalling RHVH, see Upgrading to RHVH While Preserving Local Storage in the Upgrade Guide. - Select a network from the Network & Host Name screen and click to configure the connection details. Enter a host name in the Host name field, and click .
- Optionally configure Language Support, Security Policy, and Kdump. See Installing Using Anaconda in the Red Hat Enterprise Linux 7 Installation Guide for more information on each of the sections in the Installation Summary screen.
- Click .
- Set a root password and, optionally, create an additional user while RHVH installs.
Warning
Red Hat strongly recommends not creating untrusted users on RHVH, as this can lead to exploitation of local security vulnerabilities. - Click to complete the installation.
Note
When RHVH restarts,imgbase-motd.serviceperforms a health check on the host and displays the result when you log in on the command line. The messageimgbase status: OKorimgbase status: DEGRADEDindicates the health status. Runimgbase checkto get more information. The service is enabled by default. - Once the installation is complete, log in to the Cockpit user interface at https://HostFQDNorIP:9090 to subscribe the host to the Content Delivery Network. Click Tools > Subscriptions > and enter your Customer Portal username and password. The system automatically subscribes to the Red Hat Virtualization Host entitlement.
- Click Terminal, and enable the
Red Hat Virtualization Host 7repository to allow later updates to the Red Hat Virtualization Host:# subscription-manager repos --enable=rhel-7-server-rhvh-4-rpms
Warning
nmcli, nmtui, and the Cockpit user interface) is currently not supported. If additional network configuration is required before adding a host to the Manager, you must manually write ifcfg files. See the Red Hat Enterprise Linux Networking Guide for more information.
6.2. Advanced Installation
6.2.1. Custom Partitioning
- You must select the LVM Thin Provisioning option in the Manual Partitioning window.
- The root (
/) directory must be on a thinly provisioned logical volume. - The root (
/) directory must be at least 6 GB. - The
/vardirectory must be on a separate volume or disk. - Only XFS or Ext4 file systems are supported.
6.2.2. Automating Red Hat Virtualization Host Deployment
Procedure 6.2. Automating Deployment using PXE and Kickstart
- Download the RHVH ISO image from the Customer Portal:
- Log in to the Customer Portal at https://access.redhat.com.
- Click Downloads in the menu bar.
- Click Red Hat Virtualization, scroll up, and click to access the product download page.
- Choose the appropriate hypervisor image and click .
- Make the RHVH ISO image available over the network using the instructions in Installation Source on a Network.
- Configure the PXE server using the instructions in Preparing for a Network Installation.The following requirements apply in order to boot RHVH from the PXE server:
- Ensure that you copy the RHVH boot images to the
tftp/root directory.# cp URL/to/RHVH-ISO/images/pxeboot/{vmlinuz,initrd.img} /var/lib/tftpboot/pxelinux/ - The boot loader configuration file must include a RHVH label that specifies the RHVH boot images.
KERNEL URL/to/vmlinuz
APPEND initrd=URL/to/initrd.img inst.stage2=URL/to/RHVH-ISO
- Create a Kickstart file and make it available over the network using the instructions in Kickstart Installations.The following constraints apply to RHVH Kickstart files:
- The
%packagessection is not required for RHVH. Instead, use theliveimgoption and specify thesquashfs.imgfile from the RHVH ISO image.liveimg --url=URL/to/squashfs.img
- The
autopartcommand is highly recommended. Thin provisioning must be used.autopart --type=thinp
If your installation requires manual partitioning instead, the following limitations apply:- The root (
/) directory must be on a thinly provisioned logical volume. - The
/vardirectory must be on a separate volume. - The
/bootdirectory must be on a separate partition.
- A
%postsection that calls thenodectl initcommand is required.%post nodectl init %end
To fully automate the installation process, you can add this Kickstart file to the boot loader configuration file on the PXE server. Specify the Kickstart location by addinginst.ks=to theAPPENDline:APPEND initrd=URL/to/initrd.img inst.stage2=URL/to/RHVH-ISO inst.ks=URL/to/RHVH-ks.cfg
Example 6.1. Red Hat Virtualization Host Kickstart File
The following is an example of a Kickstart file used to deploy Red Hat Virtualization Host. You can include additional commands and options as required.liveimg --url=http://1.2.3.4/path/to/squashfs.img clearpart --all autopart --type=thinp rootpw --plaintext ovirt timezone --utc America/Phoenix zerombr text reboot %post --erroronfail nodectl init %end
- Install RHVH using the instructions in Booting the Installation on AMD64 and Intel 64 Systems from the Network Using PXE.
Chapter 7. Red Hat Enterprise Linux Hosts
7.1. Installing Red Hat Enterprise Linux Hosts
Red Hat Enterprise Linux Server and the Red Hat Virtualization entitlements enabled. For detailed installation instructions, see Red Hat Enterprise Linux 7 Installation Guide.
Important
Important
7.2. Subscribing to the Required Entitlements
Red Hat Enterprise Linux Server and Red Hat Virtualization entitlements to the host.
Procedure 7.1. Subscribing to Required Entitlements using Subscription Manager
- Register your system with the Content Delivery Network, entering your Customer Portal Username and Password when prompted:
# subscription-manager register
- Find the
Red Hat Enterprise Linux ServerandRed Hat Virtualizationsubscription pools and note down the pool IDs.# subscription-manager list --available
- Use the pool IDs located in the previous step to attach the entitlements to the system:
# subscription-manager attach --pool=poolid
Note
To find out what subscriptions are currently attached, run:# subscription-manager list --consumed
To list all enabled repositories, run:# yum repolist
- Disable all existing repositories:
# subscription-manager repos --disable=*
- Enable the required repositories:
# subscription-manager repos --enable=rhel-7-server-rpms
# subscription-manager repos --enable=rhel-7-server-rhv-4-mgmt-agent-rpms
If you are installing Red Hat Enterprise Linux 7 hosts, little endian on IBM POWER8 hardware, enable the following repositories instead:# subscription-manager repos --enable=rhel-7-server-rhv-4-mgmt-agent-for-power-le-rpms # subscription-manager repos --enable=rhel-7-for-power-le-rpms
- Ensure that all packages currently installed are up to date:
# yum update
Note
Reboot the machine if any kernel related packages have been updated.
Warning
nmcli and nmtui) is currently not supported. If additional network configuration is required before adding a host to the Manager, you must manually write ifcfg files. See the Red Hat Enterprise Linux Networking Guide for more information.
Chapter 8. Adding a Host to the Red Hat Virtualization Manager
Procedure 8.1. Adding a Host to the Red Hat Virtualization Manager
- From the Administration Portal, click the Hosts resource tab.
- Click .
- Use the drop-down list to select the Data Center and Host Cluster for the new host.
- Enter the Name and the Address of the new host. The standard SSH port, port 22, is auto-filled in the SSH Port field.
- Select an authentication method to use for the Manager to access the host.
- Enter the root user's password to use password authentication.
- Alternatively, copy the key displayed in the SSH PublicKey field to
/root/.ssh/authorized_keyson the host to use public key authentication.
- Click the button to expand the advanced host settings.
- Optionally disable automatic firewall configuration.
- Optionally add a host SSH fingerprint to increase security. You can add it manually, or fetch it automatically.
- Optionally configure power management, where the host has a supported power management card. For information on power management configuration, see Host Power Management Settings Explained in the Administration Guide.
- Click .
Installing, and you can view the progress of the installation in the details pane. After a brief delay the host status changes to Up.
Part IV. Attaching Storage
Chapter 9. Storage
9.1. Introduction to Storage
- Data Domain: A data domain holds the virtual hard disks and OVF files of all the virtual machines and templates in a data center, and cannot be shared across data centers. Data domains of multiple types (iSCSI, NFS, FC, POSIX, and Gluster) can be added to the same data center, provided they are all shared, rather than local, domains.
Important
You must have one host with the status ofUpand have attached a data domain to a data center before you can attach an ISO domain and an export domain. - ISO Domain: ISO domains store ISO files (or logical CDs) used to install and boot operating systems and applications for the virtual machines, and can be shared across different data centers. An ISO domain removes the data center's need for physical media. ISO domains can only be NFS-based. Only one ISO domain can be added to a data center.
- Export Domain: Export domains are temporary storage repositories that are used to copy and move images between data centers and Red Hat Virtualization environments. Export domains can be used to backup virtual machines. An export domain can be moved between data centers, however, it can only be active in one data center at a time. Export domains can only be NFS-based. Only one export domain can be added to a data center.
9.2. Adding FCP Storage
Procedure 9.1. Adding FCP Storage
- Click the resource tab to list all storage domains.
- Click to open the New Domain window.
- Enter the Name of the storage domain.
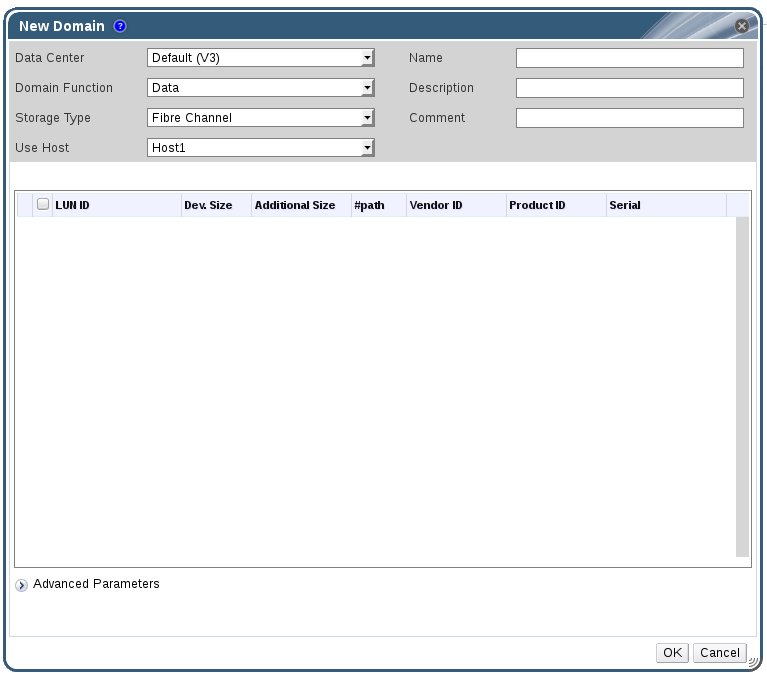
Figure 9.1. Adding FCP Storage
- Use the Data Center drop-down menu to select an FCP data center.If you do not yet have an appropriate FCP data center, select
(none). - Use the drop-down menus to select the Domain Function and the Storage Type. The storage domain types that are not compatible with the chosen data center are not available.
- Select an active host in the Use Host field. If this is not the first data domain in a data center, you must select the data center's SPM host.
Important
All communication to the storage domain is through the selected host and not directly from the Red Hat Virtualization Manager. At least one active host must exist in the system and be attached to the chosen data center. All hosts must have access to the storage device before the storage domain can be configured. - The New Domain window automatically displays known targets with unused LUNs when Data / Fibre Channel is selected as the storage type. Select the LUN ID check box to select all of the available LUNs.
- Optionally, you can configure the advanced parameters.
- Click Advanced Parameters.
- Enter a percentage value into the Warning Low Space Indicator field. If the free space available on the storage domain is below this percentage, warning messages are displayed to the user and logged.
- Enter a GB value into the Critical Space Action Blocker field. If the free space available on the storage domain is below this value, error messages are displayed to the user and logged, and any new action that consumes space, even temporarily, will be blocked.
- Select the Wipe After Delete check box to enable the wipe after delete option. This option can be edited after the domain is created, but doing so will not change the wipe after delete property of disks that already exist.
- Click to create the storage domain and close the window.
Locked status while it is being prepared for use. When ready, it is automatically attached to the data center.
Appendix A. Changing the Permissions for the Local ISO Domain
Procedure A.1. Changing the Permissions for the Local ISO Domain
- Log in to the Manager machine.
- Edit the
/etc/exportsfile, and add the hosts, or the subnets to which they belong, to the access control list:/var/lib/exports/iso 10.1.2.0/255.255.255.0(rw) host01.example.com(rw) host02.example.com(rw)
The example above allows read and write access to a single /24 network and two specific hosts./var/lib/exports/isois the default file path for the ISO domain. See theexports(5)man page for further formatting options. - Apply the changes:
# exportfs -ra
/etc/exports file after running engine-setup, running engine-cleanup later will not undo the changes.
Appendix B. Attaching the Local ISO Domain to a Data Center
Procedure B.1. Attaching the Local ISO Domain to a Data Center
- In the Administration Portal, click the Data Centers resource tab and select the appropriate data center.
- Select the Storage tab in the details pane to list the storage domains already attached to the data center.
- Click to open the Attach ISO Library window.
- Click the radio button for the local ISO domain.
- Click .
Appendix C. Enabling Gluster Processes on Red Hat Gluster Storage Nodes
- In the Navigation Pane, select the Clusters tab.
- Select .
- Select the "Enable Gluster Service" radio button. Provide the address, SSH fingerprint, and password as necessary. The address and password fields can be filled in only when the Import existing Gluster configuration check box is selected.
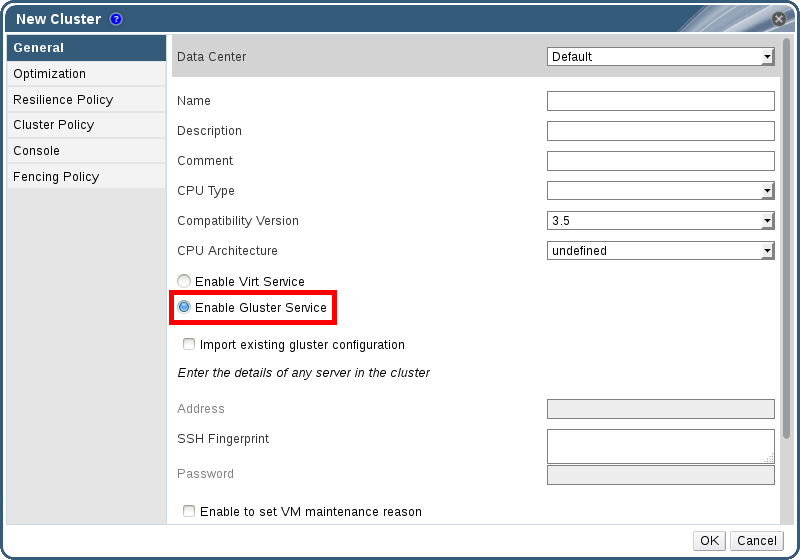
Figure C.1. Selecting the "Enable Gluster Service" Radio Button
- Click .
Appendix D. Preparing a Remote PostgreSQL Database for Use with the Red Hat Virtualization Manager
engine-setup, creates and configures the Manager database locally on the Manager machine. For automatic database configuration, see Section 3.3, “Configuring the Red Hat Virtualization Manager”. To set up the Manager database with custom values on the Manager machine, see Appendix E, Preparing a Local Manually-Configured PostgreSQL Database for Use with the Red Hat Virtualization Manager.
engine-setup.
Note
engine-setup and engine-backup --mode=restore commands only support system error messages in the en_US.UTF8 locale, even if the system locale is different.
postgresql.conf file must be set to en_US.UTF8.
Important
Procedure D.1. Preparing a Remote PostgreSQL Database for use with the Red Hat Virtualization Manager
- Install the PostgreSQL server package:
# yum install postgresql-server
- Initialize the PostgreSQL database, start the
postgresqlservice, and ensure that this service starts on boot:# su -l postgres -c "/usr/bin/initdb --locale=en_US.UTF8 --auth='ident' --pgdata=/var/lib/pgsql/data/" # systemctl start postgresql.service # systemctl enable postgresql.service
- Connect to the psql command line interface as the
postgresuser:# su - postgres $ psql
- Create a user for the Manager to use when it writes to and reads from the database. The default user name on the Manager is
engine:postgres=# create role user_name with login encrypted password 'password';
- Create a database in which to store data about the Red Hat Virtualization environment. The default database name on the Manager is
engine:postgres=# create database database_name owner user_name template template0 encoding 'UTF8' lc_collate 'en_US.UTF-8' lc_ctype 'en_US.UTF-8';
- Connect to the new database and add the
plpgsqllanguage:postgres=# \c database_name database_name=# CREATE LANGUAGE plpgsql;
- Ensure the database can be accessed remotely by enabling md5 client authentication. Edit the
/var/lib/pgsql/data/pg_hba.conffile, and add the following line immediately underneath the line starting withlocalat the bottom of the file, replacing X.X.X.X with the IP address of the Manager:host database_name user_name X.X.X.X/32 md5
- Allow TCP/IP connections to the database. Edit the
/var/lib/pgsql/data/postgresql.conffile and add the following line:listen_addresses='*'
This example configures thepostgresqlservice to listen for connections on all interfaces. You can specify an interface by giving its IP address. - Open the default port used for PostgreSQL database connections, and save the updated firewall rules:
# yum install iptables-services
# iptables -I INPUT 5 -p tcp --dport 5432 -j ACCEPT
# service iptables save
- Restart the
postgresqlservice:# systemctl restart postgresql.service
Appendix E. Preparing a Local Manually-Configured PostgreSQL Database for Use with the Red Hat Virtualization Manager
engine-setup, creates and configures the Manager database locally on the Manager machine. For automatic database configuration, see Section 3.3, “Configuring the Red Hat Virtualization Manager”. To configure the Manager database on a machine that is separate from the machine where the Manager is installed, see Appendix D, Preparing a Remote PostgreSQL Database for Use with the Red Hat Virtualization Manager.
engine-setup. To set up the database, you must first install the rhevm package on the Manager machine; the postgresql-server package is installed as a dependency.
Note
engine-setup and engine-backup --mode=restore commands only support system error messages in the en_US.UTF8 locale, even if the system locale is different.
postgresql.conf file must be set to en_US.UTF8.
Important
Procedure E.1. Preparing a Local Manually-Configured PostgreSQL Database for use with the Red Hat Virtualization Manager
- Initialize the PostgreSQL database, start the
postgresqlservice, and ensure that this service starts on boot:# su -l postgres -c "/usr/bin/initdb --locale=en_US.UTF8 --auth='ident' --pgdata=/var/lib/pgsql/data/" # systemctl start postgresql.service # systemctl enable postgresql.service
- Connect to the psql command line interface as the
postgresuser:# su - postgres $ psql
- Create a user for the Manager to use when it writes to and reads from the database. The default user name on the Manager is
engine:postgres=# create role user_name with login encrypted password 'password';
- Create a database in which to store data about the Red Hat Virtualization environment. The default database name on the Manager is
engine:postgres=# create database database_name owner user_name template template0 encoding 'UTF8' lc_collate 'en_US.UTF-8' lc_ctype 'en_US.UTF-8';
- Connect to the new database and add the
plpgsqllanguage:postgres=# \c database_name database_name=# CREATE LANGUAGE plpgsql;
- Ensure the database can be accessed remotely by enabling md5 client authentication. Edit the
/var/lib/pgsql/data/pg_hba.conffile, and add the following line immediately underneath the line starting withlocalat the bottom of the file:host [database name] [user name] 0.0.0.0/0 md5 host [database name] [user name] ::0/0 md5
- Restart the
postgresqlservice:# systemctl restart postgresql.service
Appendix F. Installing a Websocket Proxy on a Separate Machine
Note
Procedure F.1. Installing and Configuring a Websocket Proxy on a Separate Machine
- Install the websocket proxy:
# yum install ovirt-engine-websocket-proxy
- Run the
engine-setupcommand to configure the websocket proxy.# engine-setup
Note
If the rhevm package has also been installed, chooseNowhen asked to configure the engine on this host. - Press Enter to allow
engine-setupto configure a websocket proxy server on the machine.Configure WebSocket Proxy on this machine? (Yes, No) [Yes]:
- Press Enter to accept the automatically detected hostname, or enter an alternative hostname and press Enter. Note that the automatically detected hostname may be incorrect if you are using virtual hosts:
Host fully qualified DNS name of this server [host.example.com]:
- Press Enter to allow
engine-setupto configure the firewall and open the ports required for external communication. If you do not allowengine-setupto modify your firewall configuration, then you must manually open the required ports.Setup can automatically configure the firewall on this system. Note: automatic configuration of the firewall may overwrite current settings. Do you want Setup to configure the firewall? (Yes, No) [Yes]:
- Enter the fully qualified DNS name of the Manager machine and press Enter.
Host fully qualified DNS name of the engine server []: engine_host.example.com
- Press Enter to allow
engine-setupto perform actions on the Manager machine, or press 2 to manually perform the actions.Setup will need to do some actions on the remote engine server. Either automatically, using ssh as root to access it, or you will be prompted to manually perform each such action. Please choose one of the following: 1 - Access remote engine server using ssh as root 2 - Perform each action manually, use files to copy content around (1, 2) [1]:
- Press Enter to accept the default SSH port number, or enter the port number of the Manager machine.
ssh port on remote engine server [22]:
- Enter the root password to log in to the Manager machine and press Enter.
root password on remote engine server engine_host.example.com:
- Select whether to review iptables rules if they differ from the current settings.
Generated iptables rules are different from current ones.
Do you want to review them? (Yes, No) [No]:
- Press Enter to confirm the configuration settings.
--== CONFIGURATION PREVIEW ==--

Firewall manager                        : iptables
Update Firewall                         : True
Host FQDN                               : host.example.com
Configure WebSocket Proxy               : True
Engine Host FQDN                        : engine_host.example.com

Please confirm installation settings (OK, Cancel) [OK]:
Instructions are provided to configure the Manager machine to use the configured websocket proxy.Manual actions are required on the engine host in order to enroll certs for this host and configure the engine about it. Please execute this command on the engine host: engine-config -s WebSocketProxy=host.example.com:6100 and than restart the engine service to make it effective - Log in to the Manager machine and execute the provided instructions.
# engine-config -s WebSocketProxy=host.example.com:6100
# systemctl restart ovirt-engine.service
Appendix G. Configuring a Host for PCI Passthrough
Prerequisites:
- Ensure that the host hardware meets the requirements for PCI device passthrough and assignment. See Section 2.2.4, “PCI Device Requirements” for more information.
Procedure G.1. Configuring a Host for PCI Passthrough
- Enable the virtualization extension and IOMMU extension in the BIOS. See Enabling Intel VT-x and AMD-V virtualization hardware extensions in BIOS in the Red Hat Enterprise Linux Virtualization and Administration Guide for more information.
- Enable the IOMMU flag in the kernel by selecting the Hostdev Passthrough & SR-IOV check box when adding the host to the Manager or by editing the
grubconfiguration file manually.- To enable the IOMMU flag from the Administration Portal, see Adding a Host to the Red Hat Virtualization Manager and Kernel Settings Explained in the Administration Guide.
- To edit the
grubconfiguration file manually, see Procedure G.2, “Enabling IOMMU Manually”.
- For GPU passthrough, you need to run additional configuration steps on both the host and the guest system. See Preparing Host and Guest Systems for GPU Passthrough in the Administration Guide for more information.
Procedure G.2. Enabling IOMMU Manually
- Enable IOMMU by editing the grub configuration file.
Note
If you are using IBM POWER8 hardware, skip this step as IOMMU is enabled by default.- For Intel, boot the machine, and append
intel_iommu=onto the end of theGRUB_CMDLINE_LINUXline in thegrubconfiguration file.# vi /etc/default/grub ... GRUB_CMDLINE_LINUX="nofb splash=quiet console=tty0 ... intel_iommu=on ...
- For AMD, boot the machine, and append
amd_iommu=onto the end of theGRUB_CMDLINE_LINUXline in thegrubconfiguration file.# vi /etc/default/grub ... GRUB_CMDLINE_LINUX="nofb splash=quiet console=tty0 ... amd_iommu=on ...
Note
Ifintel_iommu=onoramd_iommu=onworks, you can try replacing them withiommu=ptoramd_iommu=pt. Theptoption only enables IOMMU for devices used in passthrough and will provide better host performance. However, the option may not be supported on all hardware. Revert to previous option if theptoption doesn't work for your host.If the passthrough fails because the hardware does not support interrupt remapping, you can consider enabling theallow_unsafe_interruptsoption if the virtual machines are trusted. Theallow_unsafe_interruptsis not enabled by default because enabling it potentially exposes the host to MSI attacks from virtual machines. To enable the option:# vi /etc/modprobe.d options vfio_iommu_type1 allow_unsafe_interrupts=1
- Refresh the
grub.cfgfile and reboot the host for these changes to take effect:# grub2-mkconfig -o /boot/grub2/grub.cfg
# reboot