
Upgrading Guide
For Use with Red Hat Single Sign-On 7.6
Abstract
Making open source more inclusive
Red Hat is committed to replacing problematic language in our code, documentation, and web properties. We are beginning with these four terms: master, slave, blacklist, and whitelist. Because of the enormity of this endeavor, these changes will be implemented gradually over several upcoming releases. For more details, see our CTO Chris Wright’s message.
Chapter 1. Upgrading Red Hat Single Sign-On
Red Hat Single Sign-On (RH-SSO) 7.6 is based on the Keycloak project and provides security for your web applications by providing Web single sign-on capabilities based on popular standards such as SAML 2.0, OpenID Connect, and OAuth 2.0. The Red Hat Single Sign-On Server can act as a SAML or OpenID Connect-based identity provider, mediating with your enterprise user directory or third-party SSO provider for identity information and your applications using standards-based tokens.
RH-SSO provides two operating modes: standalone server or managed domain. The standalone server operating mode represents running RH-SSO as a single server instance. The managed domain operating mode allows for the management of multiple RH-SSO instances from a single control point. The upgrade process differs depending on which operating mode has been implemented. Specific instructions for each mode are provided where applicable.
The purpose of this guide is to document the steps that are required to successfully upgrade from Red Hat Single Sign-On 7.x to Red Hat Single Sign-On 7.6.
1.1. About upgrades
Depending on your version of RH-SSO, you choose one of three types of upgrade. However, if you starting from Keycloak, you choose this procedure.
1.1.1. Major upgrades
A major upgrade or migration is required when RH-SSO is upgraded from one major release to another, for example, from Red Hat Single Sign-On 7.2 to Red Hat Single Sign-On 8.0. There may be breaking API changes between major releases that could require rewriting parts of applications or server extensions.
1.1.2. Minor updates
Red Hat Single Sign-On periodically provides point releases, which are minor updates that include bug fixes, security fixes, and new features. If you plan to upgrade from one Red Hat Single Sign-On point release to another, for example, from Red Hat Single Sign-On 7.3 to Red Hat Single Sign-On 7.6, code changes should not be required for applications or custom server extensions as long as no private, unsupported, or tech preview APIs are used.
1.1.3. Micro updates
Red Hat Single Sign-On 7.6 also periodically provides micro releases that contain bug and security fixes. Micro releases increment the minor release version by the last digit, for example from 7.6.0 to 7.6.1. These releases do not require migration and should not impact the server configuration files. The patch management system for ZIP installations can also rollback the patch and server configuration.
A micro release only contains the artifacts that have changed. For example if Red Hat Single Sign-On 7.6.1 contains changes to the server and the JavaScript adapter, but not the EAP adapter, only the server and JavaScript adapter are released and require updating.
1.2. Migrating Keycloak to RH-SSO
You can migrate to Red Hat Single Sign-On, the supported Red Hat product, from Keycloak, the community project.
Prerequisites
- To learn about new features before the upgrade, review the changes.
- Verify that you have installed the correct version of Keycloak as a starting point. To migrate to Red Hat Single Sign-On 7.6, first install Keycloak 18.0.0.
Procedure
- Perform the Minor Upgrades procedure. Although this procedure is labelled Minor Upgrade, the same steps apply for this migration.
- Perform the Adapter Upgrade procedure.
Chapter 2. Release-specific changes
Review these changes carefully before upgrading.
2.1. RH SSO 7.6
The following changes have occurred from Red Hat Single Sign-On 7.5 to Red Hat Single Sign-On 7.6.
2.1.1. Step-up authentication
Step-up authentication is a new feature. This feature provides the acr client scope, which contains a protocol mapper that is supposed to add the acr claim in the token. The acr claim is not added automatically now as it was before this version, but it is added with the usage of this client scope and protocol mapper.
The client scope is added as a realm "default" client scope and hence will be added to all newly created clients. For performance reasons, the client scope is not automatically added to all existing clients during migration. The clients will not have an acr claim by default after the migration. Consider these possible actions:
-
If you do not plan to use step-up authentication feature, but you rely on the
acrclaim in the token, you can disablestep_up_authenticationfeature as described in the Server Installation and Configuration Guide. The claim will be added with the value1in case of normal authentication and0in case of SSO authentication. -
Add
acrclient scope to your clients manually by admin REST API or admin console. This is needed especially if you want to use step-up authentication. If you have a large number of clients in the realm and want to useacrclaim for all of them, you can trigger some SQL similar to this against your DB. However, remember to clear the cache or restart the server if Red Hat Single Sign-On is already started:
insert into CLIENT_SCOPE_CLIENT (CLIENT_ID, SCOPE_ID, DEFAULT_SCOPE) select CLIENT.ID as CLIENT_ID, CLIENT_SCOPE.ID as SCOPE_ID, true as DEFAULT_SCOPE
from CLIENT_SCOPE, CLIENT where CLIENT_SCOPE.REALM_ID='test' and CLIENT_SCOPE.NAME='acr' and CLIENT.REALM_ID='test' and CLIENT.PROTOCOL='openid-connect';
2.1.2. OpenID Connect Logout
Previous versions of Red Hat Single Sign-On had supported automatic logout of the user and redirecting to the application by opening logout endpoint URL such as http(s)://example-host/auth/realms/my-realm-name/protocol/openid-connect/logout?redirect_uri=encodedRedirectUri. While that implementation was easy to use, it had potentially negative impact on performance and security. The new version has better support for logout based on the OpenID Connect RP-Initiated Logout specification. The parameter redirect_uri is no longer supported; also, in the new version, the user needs to confirm the logout. It is possible to omit the confirmation and do automatic redirect to the application when you include parameter post_logout_redirect_uri together with the parameter id_token_hint with the ID Token used for login.
The existing deployments are affected in the following ways:
-
If your application directly uses links to logout endpoint with the
redirect_uriparameter, you may be required to change this as described above. Consider either removing theredirect_uriparameter entirely or replacing it with theid_token_hintandpost_logout_redirect_uriparameters. -
If you use java adapters and your application does logout by call
httpServletRequest.logout(), you are not affected because this call uses the backchannel variant of the logout endpoint and that one was not changed. -
If you use the latest javascript adapter, you are also not affected. However if your application uses an older version of the JavaScript adapter, you are affected as this adapter uses the variant of the logout endpoint with the deprecated
redirect_uriparameter. In this case, you may need to upgrade to the latest version of the JavaScript adapter. -
For the Node.js adapter, the same guideline applies as for the JavaScript adapter. You are encouraged to update to the latest version as the older version of the adapter uses the deprecated
redirect_uriparameter. With the latest Node.js adapter, you are not affected as long as you use the logout based on the/logoutURL as described in the documentation or in the Node.js adapter example. However, in the case when your application directly uses the methodkeycloak.logoutUrl, you can consider addingidTokenHintas the second argument to this method. The possibility to addidTokenHintas second argument was newly added in this version. TheidTokenHintneeds to be a valid ID Token that was obtained during the login. AddingidTokenHintis optional, but if you omit it, your users will need to confirm the logout screen as described earlier. Also they will not be redirected back to the application after logout.
There is a backwards compatibility option, which allows your application to still use the old format of the redirect_uri parameter.
You can enable this parameter by including the following configuration in the standalone-*.xml file
<spi name="login-protocol">
    <provider name="openid-connect" enabled="true">
        <properties>
            <property name="legacy-logout-redirect-uri" value="true"/>
        </properties>
    </provider>
</spi>
With this configuration, you can still use the format with the redirect_uri parameter. Note the confirmation screen will be needed if the id_token_hint is omitted.
The backwards compatibility switch will be removed in some future version. You are encouraged to update your clients as soon as possible as described above rather than rely on this switch.
2.1.3. Removal of the upload-scripts feature
Previous versions of Red Hat Single Sign-On had supported managing JavaScript code through the management interfaces like the administrations console and REST API. Starting from this version this is no longer possible, and you should now deploy your scripts to the server in order to configure the following providers:
- OpenID Connect Script Mapper
- Script Authenticator (Authentication Execution)
- JavaScript Policies
More details about how to deploy scripts to the server are available in the documentation. Note that to use scripts, you are still required to enable the scripts technology preview feature.
./standalone.sh -Dkeycloak.profile=preview
When deploying scripts, the server is going to automatically create their corresponding providers so that you can select them when configuring authentication flows, mappers, and authorization policies.
In general, the steps to update your realms are the following:
- Before upgrading, remove any script provider you are using.
- After the upgrade, deploy your scripts following the instructions in the documentation.
- Update your authentication flows, mappers, and the client authorization settings to use the providers created from the scripts deployed to the server.
2.1.4. Account console Patternfly upgrade
The Patternfly (PF) React libraries have been updated updated, @patternfly/react-core from v3.153.3 to v4.147.0, @patternfly/react-icons from v3.15.16 to v 4.11.8, and @patternfly/react-styles from v3.7.14 to v4.11.8. Several minor UI updates were made to bring the account console into alignment with PF design standards.
Custom developed account UIs might not be compatible with these updates due to the breaking changes in PF. Most breaking changes should be resovlable by updating props on PF components.
Resources:
- [Patternfly docs](https://www.patternfly.org)
Components known to have breaking changes:
- Alert
-
actionprop changed toactionClose - Expandable
-
renamed to
ExpandableSection - Title
-
size attr now uses
TitleSizes - DataListContent
-
noPaddingchanged tohasNoPadding - Grid, Stack, Level, Gallery
-
gutterattr changed tohasGutter - Modal
-
sizing control changed from, e.g.
isLarge, to useModalVariant, e.g.variant={ModalVariant.large} - Select
-
ariaLabelTypeAheadtotypeAheadAriaLabel -
isExpandedtoisOpen -
ariaLabelledBytoaria-labelledby - DataListContent
-
noPaddingtohasNoPadding
2.1.5. Client Policies Migration : client-scopes
If you used a policy including client-scopes condition and edited JSON document directly, you will need to change the "scope" field name in a JSON document to "scopes".
2.1.6. Liquibase upgraded to version 4.6.2
Liquibase was updated from version 3.5.5 to 4.6.2, which includes, among other things, several bug fixes, and a new way of registering custom extensions using ServiceLoader.
Closely follow the Upgrading Guide, specifically of backing up existing database before upgrade. While we did our best to test the consequences of the Liquibase upgrade, some installations could be using specific setup unknown to us.
2.1.7. Deprecated features in the Red Hat Single Sign-On Operator
With this release, we have deprecated podDisruptionBudget field in the Keycloak CR of Red Hat Single Sign-On Operator. This optional field will be ignored when the Operator is deployed on OCP 4.12 and higher versions.
As a workaround, you can manually create the Pod Disruption Budget in your cluster, for example:
apiVersion: policy/v1
kind: PodDisruptionBudget
metadata:
  labels:
    app: keycloak
  name: keycloak
spec:
  maxUnavailable: 1
  selector:
    matchLabels:
      component: keycloak
See also the Kubernetes Documentation.
2.1.8. Critical bug fix in the Red Hat Single Sign-On Operator
Due to a critical bug introduced in the previous versions of the Operator, Selector field on the RH-SSO StatefulSet was misconfigured. The misconfiguration may break the upgrade process from 7.5 to 7.6, preventing a successful RH-SSO deployment.
With an Operator patch release we introduced a fix. Please note that as part of the fix the Operator may delete and recreate the RH-SSO StatefulSet during the upgrade from 7.5 to 7.6. For the fix to work properly, make sure you use the recreate upgrade strategy. Refer to the related chapter of Server Installation and Configuration Guide.
2.1.9. Changes to probes when using the Red Hat Single Sign-On Operator 7.6.2
In order to align with changes in Red Hat Single Sign-On OpenShift images introduced in 7.6.2, the Operator now leverages the default liveness and readiness probes present in the image instead of using custom ones. For existing Red Hat Single Sign-On deployments, the Operator will try to update the probes automatically during the upgrade. However, if you have customized the probes by performing manual changes to the keycloak-probes ConfigMap, the Operator will not update the probes to avoid overriding user modifications. In this situation, you have to update the probes manually (or delete the ConfigMap in order for the Operator to recreate it); otherwise the upgraded Red Hat Single Sign-On 7.6.2 deployment will appear as not ready.
2.1.10. Changes to probes when using the Red Hat Single Sign-On Operator 7.6.5
In order to allow running in a FIPS enabled environment, the probes authentication hash algorithm was changed. For template based installations that have the default timeout of 1 second for probes, and that also specify a CPU limit less than 1, this may result in ongoing probe failures. If these failures result in restarts, you should increase the probe timeouts either by changing your DeploymentConfig or by realigning to the newly released templates, which have greater timeout values that match what is used in the operator.
2.2. RH SSO 7.5
The following changes have occurred from Red Hat Single Sign-On 7.4 to Red Hat Single Sign-On 7.5.
2.2.1. Upgrade to EAP 7.4
The Red Hat Single Sign-On server was upgraded to use EAP 7.4 as the underlying container. This change does not directly involve any specific Red Hat Single Sign-On server functionality, but a few changes relate to the migration.
2.2.1.1. Dependency updates
The dependencies were updated to the versions used by EAP 7.4 server. For example, the Infinispan component version is now 11.0.
2.2.1.2. Configuration changes
There are a few configuration changes in the standalone(-ha).xml and domain.xml files. You should follow the Section 3.1.2, “Upgrading the Red Hat Single Sign-On server” section to handle the migration of configuration files automatically.
2.2.1.3. SmallRye manual changes
Manual changes are required when standalone.xml contains references to SmallRye modules. These modules were removed from the underlying JBoss EAP distribution, and the server does not start if the configuration references them. The server configuration migration via migrate-standalone.cli fails before any changes are made to the configuration.
To correct this problem, remove all the lines that refer to SmallRye modules. In the default configuration, you need to remove specifically the following lines:
<extension module="org.wildfly.extension.microprofile.config-smallrye"/>
<extension module="org.wildfly.extension.microprofile.health-smallrye"/>
<extension module="org.wildfly.extension.microprofile.metrics-smallrye"/>
<subsystem xmlns="urn:wildfly:microprofile-config-smallrye:1.0"/>
<subsystem xmlns="urn:wildfly:microprofile-health-smallrye:2.0" security-enabled="false" empty-liveness-checks-status="${env.MP_HEALTH_EMPTY_LIVENESS_CHECKS_STATUS:UP}" empty-readiness-checks-status="${env.MP_HEALTH_EMPTY_READINESS_CHECKS_STATUS:UP}"/>
<subsystem xmlns="urn:wildfly:microprofile-metrics-smallrye:2.0" security-enabled="false" exposed-subsystems="*" prefix="${wildfly.metrics.prefix:wildfly}"/>
2.2.1.4. Cross-Datacenter replication changes
- You will need to upgrade RHDG server to version 8.x. The older version may still work, but it is not guaranteed as it is no longer tested.
-
We recommend that you use the
protocolVersionproperty added to the remote-store element when configuring Infinispan caches. When connecting to the RHDG server 8.x, the recommended version of the hotrod protocol version is 2.9. The Infinispan library version differs among Red Hat Single Sign-On server and RHDG server. For more details, see the Cross-Datacenter documentation. -
We recommend that you use
remoteStoreSecurityEnabledproperty under theconnectionsinfinispansubsystem. For more details, see the Cross-Datacenter documentation.
2.2.2. UserModel Migration
The UserModel includes certain fields, username, email, firstName and lastName, which are now converted to custom attributes. This change was made to prepare for adding more sophisticated user profiles to Red Hat Single Sign-On in an upcoming version.
If a database contains users with custom attributes of that exact name, these attributes will no longer be read from the database and may be deleted. Therefore, before upgrading to RH SSO 7.5, rename any custom attribute that matches one of these names.
This situation implies that the username can now also be accessed and set by UserModel.getFirstAttribute(UserModel.USERNAME). Similar implications exist for other fields. Implementors of SPIs subclassing the UserModel directly or indirectly should ensure that the behavior between setUsername and setSingleAttribute(UserModel.USERNAME, …) (and similar for the other fields) is consistent.
Users of the policy evaluation feature should adapt their policies if they use the number of attributes in their evaluations. Every user will now have four new attributes by default.
The public API of UserModel did not change. No changes to frontend resources or SPIs accessing user data are necessary. Also, the database did not change yet.
2.2.3. Upgrade to PatternFly 4
The Red Hat Single Sign-On login theme components have been upgraded to PatternFly 4. The old PatternFly 3 runs simultaneously with the new one, so it’s possible to keep PF3 components.
However, some changes to the design of the login theme were performed. Please upgrade your custom login theme to the new version. An example with the necessary changes can be found in the examples/themes/theme/sunrise directory. No additional setup is required.
2.2.4. New API for Instagram IdP
Instagram IdP now uses a new API. The old legacy API was deprecated. This change requires new API credentials. For details, please refer to the Server Administration Guide.
For users who use Instagram IdP to log into Instagram, those users need a different authentication method, such as a password. They can log in to manually update their Instagram social links or create a new account in Red Hat Single Sign-On. This restriction exists because Instagram user IDs in the previous API are incompatible with the new API. However the new API temporarily returns both new and old user IDs to allow migration. Red Hat Single Sign-On automatically migrates the ID once the user logs in.
2.2.5. Valid Request URIs for SSRF protection
If you use the OpenID Connect parameter request_uri, your client needs to have Valid Request URIs configured to protect against SSRF attacks
You can configure this feature through the Admin Console on the client details page, or through the admin REST API or client registration API. Valid Request URIs need to contain the list of Request URI values that are permitted for the particular client.
You could instead use wildcards or relative paths, such as the Valid Redirect URIs option. However, we recommend using as specific value as possible for security purposes.
2.2.6. Read-only user attributes
Read-only user attributes are now available. Some of these user attributes are not to be edited by the user or administrator when updating users with the REST API or with the Red Hat Single Sign-On user interfaces. In particular, this change is important when you use any of the following:
- Custom user storage providers
- Custom authenticators
- Custom JavaScript authorization policies that establish authorization based on a user attribute
- X.509 authenticator with a custom attribute for mapping the X.509 certificate to the user identity
- Any other custom functionality where some of the user attributes are used as the metadata for storing authentication/authorization/identity context rather than simple user profile information.
For more details, see the Threat model mitigation chapter.
2.2.7. No user session needed after Docker authentication
No user session is created after successful authentication with the Docker protocol. For details, please refer to the Server Administration Guide.
2.2.8. Client Credentials Grant without default refresh token
For this Red Hat Single Sign-On version, the OAuth2 Client Credentials Grant endpoint does not issue refresh tokens by default. This behavior is aligned with the OAuth2 specification.
As a result, no user session is created on the Red Hat Single Sign-On server side after successful Client Credentials authentication. The result is improved performance and memory consumption. Clients that use Client Credentials Grant are encouraged to stop using refresh tokens and instead authenticate at every request with grant_type=client_credentials instead of using refresh_token as grant type.
In relation to this, Red Hat Single Sign-On supports revocation of access tokens in the OAuth2 Revocation Endpoint. Therefore, clients are allowed to revoke individual access tokens if needed.
For backwards compatibility, you could stay with the previous version’s behavior. With that approach, the refresh token is still issued after a successful authentication with the Client Credentials Grant and also the user session is created. For a particular client, you can enable the previous behavior in the Admin Console as follows:
Procedure
- Click Clients in the menu.
- Click the client you want to modify.
- Expand the OpenID Connect Compatibility Modes section.
- Toggle Use Refresh Tokens For Client Credentials Grant to ON.
- Click Save.
2.2.9. Non-standard token introspection endpoint removed
In previous versions, Red Hat Single Sign-On advertised two introspection endpoints: token_introspection_endpoint and introspection_endpoint. The latter is the one defined by RFC-8414. The former was deprecated and is now removed.
2.2.10. LDAP no-import fix
In the previous Red Hat Single Sign-On version, when the LDAP provider was configured with Import Users OFF, it was possible to update the user even if some non-LDAP mapped attributes were changed. This situation resulted in confusing behavior. The attribute appeared to be updated, but it was not updated.
For example, if you had tried to update a user with the admin REST API and the user had some incorrect attribute changes, the update was possible. With the current version, the update is not possible and you are immediately informed about the reason.
2.3. RH SSO 7.4
The following changes have occurred from Red Hat Single Sign-On 7.3 to Red Hat Single Sign-On 7.4.
2.3.1. Upgrade to EAP 7.3
The Red Hat Single Sign-On server was upgraded to use EAP 7.3 as the underlying container. This change does not directly involve any specific Red Hat Single Sign-On server functionality, but a few changes relate to the migration.
2.3.1.1. Dependency updates
The dependencies were updated to the versions used by EAP 7.3 server. For example, the Infinispan component version is now 9.3.1.Final.
2.3.1.2. Configuration changes
There are a few configuration changes in the standalone(-ha).xml and domain.xml files. Follow the Upgrading the Red Hat Single Sign-On server section to handle the migration of configuration files automatically.
2.3.1.3. Cross-Datacenter replication changes
You will need to upgrade RHDG to version 7.3. The older version may still work, but it is not tested so it is not guaranteed to work.
2.3.2. Authentication flows changes
We did some refactoring and improvements related to the authentication flows, which requires attention during migration.
2.3.2.1. REQUIRED and ALTERNATIVE executions not supported at same authentication flow
Previously, it was possible to have REQUIRED and ALTERNATIVE executions in the same authentication flow at the same level. There were some issues with this approach and we did the refactoring in the Authentication SPI, which means that this is no longer valid. If ALTERNATIVE and REQUIRED executions are configured at the same level, the ALTERNATIVE executions are considered disabled.
So when migrating to this version, your existing authentication flows will be migrated but retain the behavior of the previous version. If an authentication flow contains ALTERNATIVE executions at the same level as REQUIRED executions, the ALTERNATIVE executions are added to the separate REQUIRED subflow.
This strategy should ensure the same or similar behavior of the each authentication flow as in the previous version. However, you may review the configuration of your authentication flow and double check that it works as expected. This recommendation applies in particular for customized authentication flows with custom authenticator implementations.
2.3.2.2. OPTIONAL execution requirement removed
Regarding migration, the most important change is removing support for the OPTIONAL requirement from authentication executions and replacing it with the CONDITIONAL requirement, which allows more flexibility.
OPTIONAL authenticators configured in the previous version are replaced with the CONDITIONAL subflows. These subflows have the Condition - User Configured condition configured as first execution, and the previously OPTIONAL authenticator (for example OTP Form) as second execution. For the user, the behavior during authentication matches the behavior of the previous version.
2.3.2.3. SPI Changes
Some changes exist in the Java Authentication SPI and Credential Provider SPI.
The interface Authenticator is not changed, but you may be affected if you develop advanced authenticators that introduce some new credential types (subclasses of CredentialModel). Changes exist on the CredentialProvider interface and introduction of some new interfaces such as CredentialValidator.
Also, you may be affected if your authenticator supported the OPTIONAL execution requirement. It is recommended that you double check the latest authentication examples in the server development guide for more details.
2.3.2.4. Freemarker template changes
Changes exist in the freemarker templates. You may be affected if you have your own theme with custom freemarker templates for login forms or some account forms, especially for the forms related to OTP. We recommend that you review the changes in the Freemarker templates in this version and align your templates according to it.
2.3.3. Duplicated top level groups
This release fixes a problem which could create duplicated top level groups in the realm. Nevertheless the existence of previous duplicated groups makes the upgrade process fail. The Red Hat Single Sign-On server can be affected by this issue if it is using an H2, MariaDB, MySQL or PostgreSQL database. Before launching the upgrade, check if the server contains duplicated top level groups. For example, the following SQL query can be executed at database level to list them:
SELECT REALM_ID, NAME, COUNT(*) FROM KEYCLOAK_GROUP WHERE PARENT_GROUP is NULL GROUP BY REALM_ID, NAME HAVING COUNT(*) > 1;
Only one top level group can exist in each realm with the same name. Duplicates should be reviewed and deleted before the upgrade. The error in the upgrade contains the message Change Set META-INF/jpa-changelog-9.0.1.xml::9.0.1- KEYCLOAK-12579-add-not-null-constraint::keycloak failed.
2.3.4. User credentials changes
We added more flexibility around storing user credentials. Among other things, every user can have multiple credentials of the same type, such as multiple OTP credentials. Some changes exist in the database schema in relation to that, however the credentials from the previous version are updated to the new format. Users can still log in with the passwords or OTP credentials defined in the previous version.
2.3.5. New optional client scope
We have added a microprofile-jwt optional client scope to handle the claims defined in the MicroProfile/JWT Auth Specification. This new client scope defines protocol mappers to set the username of the authenticated user to the upn claim and to set the realm roles to the groups claim.
2.3.6. Improved handling of user locale
A number of improvements have been made to how the locale for the login page is selected, as well as when the locale is updated for a user. See the Server Administration Guide for more details.
2.3.7. Legacy promise in JavaScript adapter
You no longer need to set promiseType in the JavaScript adapter, and both are available at the same time. It is recommended to update applications to use native promise API (then and catch) as soon as possible, as the legacy API (success and error) will be removed at some point.
2.3.8. Deploying Scripts to the Server
Until now, administrators were allowed to upload scripts to the server through the Red Hat Single Sign-On Admin Console and the RESTful Admin API. This capability is now disabled. Users should deploy scripts directly to the server. For more details, review the JavaScript Providers.
2.3.9. Client Credentials in the JavaScript adapter
In the previous releases, developers were allowed to provide client credentials to the JavaScript adapter. For now on, this capability was removed, because client-side apps are not safe to keep secrets. Ability to propagate prompt=none to default IDP
We have added a switch in the OIDC identity provider configuration named Accepts prompt=none forward from client to identify IDPs that are able to handle forwarded requests that include the prompt=none query parameter.
Until now, when receiving an auth request with prompt=none, a realm would return a login_required error if the user is not authenticated in the realm without checking if the user has been authenticated by an IDP. From now on, if a default IDP can be determined for the auth request (either by the use of the kc_idp_hint query param or by setting up a default IDP for the realm) and if the Accepts prompt=none forward from client switch has been enabled for the IDP, the auth request is forwarded to the IDP to check if the user has been authenticated there.
It is important to note that this switch is only taken into account if a default IDP is specified, in which case we know where to forward the auth request without having to prompt the user to select an IDP. If a default IDP cannot be determined, we cannot assume which one will be used to fulfill the auth request so the request forwarding is not performed.
2.3.10. New Default Hostname provider
The request and fixed hostname providers have been replaced with a new default hostname provider. The request and fixed hostname providers are now deprecated and we recommend that you switch to the default hostname provider as soon as possible.
2.3.11. Deprecated or removed features
Certain features have a change in status.
2.3.11.1. Deprecated methods in token representation Java classes
In the year 2038, an int is no longer able to hold the value of seconds since 1970, as such we are working on updating these to long values. In token representation there is a further issue. An int will by default result in 0 in the JSON representation, while it should not be included.
See the JavaDocs Documentation for further details on exact methods that have been deprecated and replacement methods.
2.3.11.2. Uploading scripts
Upload of scripts through admin rest endpoints/console is deprecated. It will be removed at a future release.
2.3.12. Authorization Services Drools Policy
The Authorization Services Drools Policy has been removed.
2.4. RH-SSO 7.3
The following changes have occurred from RH-SSO 7.2 to RH-SSO 7.3.
2.4.1. Changes to authorization services
We added support for UMA 2.0. This version of the UMA specification introduced some important changes on how permissions are obtained from the server.
Here are the main changes introduced by UMA 2.0 support. See Authorization Services Guide for details.
- Authorization API was removed
- Prior to UMA 2.0 (UMA 1.0), client applications were using the Authorization API to obtain permissions from the server in the format of a RPT. The new version of UMA specification has removed the Authorization API which was also removed from Red Hat Single Sign-On. In UMA 2.0, RPTs can now be obtained from the token endpoint by using a specific grant type. See Authorization Services Guide for details.
- Entitlement API was removed
- With the introduction of UMA 2.0, we decided to leverage the token endpoint and UMA grant type to allow obtaining RPTs from Red Hat Single Sign-On and avoid having different APIs. The functionality provided by the Entitlement API was kept the same and is still possible to obtain permissions for a set of one or more resources and scopes or all permissions from the server in case no resource or scope is provided. See Authorization Services Guide for details.
- Changes to UMA Discovery Endpoint
- UMA Discovery document changed, see Authorization Services Guide for details.
- Changes to Red Hat Single Sign-On Authorization JavaScript adapter
The Red Hat Single Sign-On Authorization JavaScript adapter (keycloak-authz.js) changed in order to comply with the changes introduced by UMA 2.0 while keeping the same behavior as before. The main change is on how you invoke both
authorizationandentitlementmethods which now expect a specific object type representing an authorization request. This new object type provides more flexibility on how permissions can be obtained from the server by supporting the different parameters supported by the UMA grant type. See Authorization Services Guide for details.One of the main changes introduced by this release is that you are no longer required to exchange access tokens with RPTs in order to access resources protected by a resource server (when not using UMA). Depending on how the policy enforcer is configured on the resource server side, you can just send regular access tokens as a bearer token and permissions will still be enforced.
- Changes to Red Hat Single Sign-On Authorization Client Java API
-
When upgrading to the new version of Red Hat Single Sign-On Authorization Client Java API, you’ll notice that some representation classes were moved to a different package in
org.keycloak:keycloak-core.
2.4.2. Client Templates changed to Client Scopes
We added support for Client Scopes, which requires some attention during migration.
- Client Templates changed to Client Scopes
- Client Templates were changed to Client Scopes. If you had any Client Templates, their protocol mappers and role scope mappings will be preserved.
- Spaces replaced in the names
-
Client templates with the space character in the name were renamed by replacing spaces with an underscore, because spaces are not allowed in the name of client scopes. For example, a client template
my templatewill be changed to client scopemy_template. - Linking Client Scopes to Clients
-
For clients which had the client template, the corresponding client scope is now added as
Default Client Scopeto the client. So protocol mappers and role scope mappings will be preserved on the client. - Realm Default Client Scopes not linked with existing clients
-
During the migration, the list of built-in client scopes is added to each realm as well as list of
Realm Default Client Scopes. However, existing clients are NOT upgraded and new client scopes are NOT automatically added to them. Also all the protocol mappers and role scope mappings are kept on existing clients. In the new version, when you create a new client, it automatically has Realm Default Client Scopes attached to it and it does not have any protocol mappers attached to it. We did not change existing clients during migration as it would be impossible to properly detect customizations, which you will have for protocol mappers of the clients, for example. If you want to update existing clients (remove protocol mappers from them and link them with client scopes), you will need to do it manually. - Consents need to be confirmed again
- The client scopes change required the refactoring of consents. Consents now point to client scopes, not to roles or protocol mappers. Because of this change, the previously confirmed persistent consents by users are not valid anymore and users need to confirm the consent page again after the migration.
- Some configuration switches removed
-
The switch
Scope Param Requiredwas removed from Role Detail. The switchesConsent RequiredandConsent Textwere removed from the Protocol Mapper details. Those switches were replaced by the Client Scope feature.
2.4.3. New default client scopes
We have added new realm default client scopes roles and web-origins. These client scopes contain protocol mappers to add the roles of the user and allowed web origins to the token. During migration, these client scopes should be automatically added to all the OpenID Connect clients as default client scopes. Hence no setup should be required after database migration is finished.
2.4.3.1. Protocol mapper SPI addition
Related to this, there is a small addition in the (unsupported) Protocol Mappers SPI. You can be affected only if you implemented a custom ProtocolMapper. There is a new getPriority() method on the ProtocolMapper interface. The method has the default implementation set to return 0. If your protocol mapper implementation relies on the roles in the access token realmAccess or resourceAccess properties, you may need to increase the priority of your mapper.
2.4.3.2. Audience resolving
Audiences of all the clients, for which authenticated user has at least one client role in the token, are automatically added to the aud claim in the access token now. On the other hand, an access token may not automatically contain the audience of the frontend client, for which it was issued. See the Server Administration Guide for more details.
2.4.4. Upgrade to EAP 7.2
The Red Hat Single Sign-On server was upgraded to use EAP 7.2 as the underlying container. This does not directly involve any specific Red Hat Single Sign-On server functionality, but there are few changes related to the migration, which worth mentioning.
- Dependency updates
- The dependencies were updated to the versions used by EAP 7.2 server. For example, Infinispan is now 9.3.1.Final.
- Configuration changes
-
There are few configuration changes in the
standalone(-ha).xmlanddomain.xmlfiles. You should follow the Section 3.1.2, “Upgrading the Red Hat Single Sign-On server” section to handle the migration of configuration files automatically. - Cross-Datacenter Replication changes
- You will need to upgrade RHDG server to version 7.3. The older version may still work, but it is not guaranteed as we don’t test it anymore.
-
There is a need to add
protocolVersionproperty with the value2.6to the configuration of theremote-storeelement in the Red Hat Single Sign-On configuration. This is required as there is a need to downgrade the version of HotRod protocol to be compatible with the version used by RHDG 7.3.
2.4.5. Hostname configuration
In previous versions it was recommended to use a filter to specify permitted hostnames. It is now possible to set a fixed hostname which makes it easier to make sure the valid hostname is used and also allows internal applications to invoke Red Hat Single Sign-On through an alternative URL, for example an internal IP address. It is recommended that you switch to this approach in production.
2.4.6. JavaScript adapter promise
To use native JavaScript promise with the JavaScript adapter it is now required to set promiseType to native in the init options.
In the past if native promise was available a wrapper was returned that provided both the legacy Keycloak promise and the native promise. This was causing issues as the error handler was not always set prior to the native error event, which resulted in Uncaught (in promise) error.
2.4.7. Microsoft Identity Provider updated to use the Microsoft Graph API
The Microsoft Identity Provider implementation in Red Hat Single Sign-On used to rely on the Live SDK endpoints for authorization and obtaining the user profile. From November 2018 onwards, Microsoft is removing support for the Live SDK API in favor of the new Microsoft Graph API. The Red Hat Single Sign-On identity provider has been updated to use the new endpoints so if this integration is in use make sure you upgrade to the latest Red Hat Single Sign-On version.
Legacy client applications registered under "Live SDK applications" won’t work with the Microsoft Graph endpoints due to changes in the id format of the applications. If you run into an error saying that the application identifier was not found in the directory, you will have to register the client application again in the Microsoft Application Registration portal to obtain a new application id.
2.4.8. Google Identity Provider updated to use Google Sign-in authentication system
The Google Identity Provider implementation in Red Hat Single Sign-On used to rely on the Google+ API endpoints endpoints for authorization and obtaining the user profile. From March 2019 onwards, Google is removing support for the Google+ API in favor of the new Google Sign-in authentication system. The Red Hat Single Sign-On identity provider has been updated to use the new endpoints so if this integration is in use make sure you upgrade to the latest Red Hat Single Sign-On version.
If you run into an error saying that the application identifier was not found in the directory, you will have to register the client application again in the Google API Console portal to obtain a new application id and secret.
It is possible that you will need to adjust custom mappers for non-standard claims that were provided by Google+ user information endpoint and are provided under different name by Google Sign-in API. Please consult Google documentation for the most up-to-date information on available claims.
2.4.9. LinkedIn Social Broker Updated to Version 2 of LinkedIn APIs
Accordingly with LinkedIn, all developers need to migrate to version 2.0 of their APIs and OAuth 2.0. As such, we have updated our LinkedIn Social Broker.
Existing deployments using this broker may start experiencing errors when fetching user’s profile using version 2 of LinkedIn APIs. This error may be related with the lack of permissions granted to the client application used to configure the broker which may not be authorized to access the Profile API or request specific OAuth2 scopes during the authentication process.
Even for newly created LinkedIn client applications, you need to make sure that the client is able to request the r_liteprofile and r_emailaddress OAuth2 scopes, at least, as well that the client application can fetch current member’s profile from the https://api.linkedin.com/v2/me endpoint.
Due to these privacy restrictions imposed by LinkedIn in regards to access to member’s information and the limited set of claims returned by the current member’s Profile API, the LinkedIn Social Broker is now using the member’s email address as the default username. That means that the r_emailaddress is always set when sending authorization requests during the authentication.
2.5. RH-SSO 7.2
The following changes have occurred from RH-SSO 7.1 to RH-SSO 7.2.
2.5.1. New password hashing algorithms
We have added two new password hashing algorithms (pbkdf2-sha256 and pbkdf2-sha512). New realms will use the pbkdf2-sha256 hashing algorithm with 27500 hashing iterations. Since pbkdf2-sha256 is slightly faster than pbkdf2 the iterations was increased to 27500 from 20000.
Existing realms are upgraded if the password policy contains the default value for the hashing algorithm (not specified) and iteration (20000). If you have changed the hashing iterations, you need to manually change to pbkdf2-sha256 if you’d like to use the more secure hashing algorithm.
2.5.2. ID Token requires scope=openid
In RH-SSO 7.0, the ID Token was returned regardless if scope=openid query parameter was present or not in authorization request. This is incorrect according to the OpenID Connect specification.
In RH-SSO 7.1, we added this query parameter to adapters, but left the old behavior to accommodate migration.
In RH-SSO 7.2, this behavior has changed and the scope=openid query parameter is now required to mark the request as an OpenID Connect request. If this query parameter is omitted the ID Token will not be generated.
2.5.3. Microsoft SQL Server requires extra dependency
Microsoft JDBC Driver 6.0 requires additional dependency added to the JDBC driver module. If you observe an NoClassDefFoundError error when using Microsoft SQL Server please add the following dependency to your JDBC driver module.xml file:
<module name="javax.xml.bind.api"/>
2.5.4. Added session_state parameter to OpenID Connect Authentication Response
The OpenID Connect Session Management specification requires that the parameter session_state is present in the OpenID Connect Authentication Response.
In RH-SSO 7.1, we did not have this parameter, but now Red Hat Single Sign-On adds this parameter by default, as required by the specification.
However, some OpenID Connect / OAuth2 adapters, and especially older Red Hat Single Sign-On adapters (such as RH-SSO 7.1 and older), may have issues with this new parameter.
For example, the parameter will be always present in the browser URL after successful authentication to the client application. If you use RH-SSO 7.1 or a legacy OAuth2 / OpenID Connect adapter, it may be useful to disable adding the session_state parameter to the authentication response. This can be done for the particular client in the Red Hat Single Sign-On admin console, in client details in the section with OpenID Connect Compatibility Modes, described in Section 4.1, “Compatibility with older adapters”. There is the Exclude Session State From Authentication Response switch, which can be turned on to prevent adding the session_state parameter to the Authentication Response.
2.5.5. Microsoft Identity Provider updated to use the Microsoft Graph API
The Microsoft Identity Provider implementation in Red Hat Single Sign-On up to version 7.2.4 relies on the Live SDK endpoints for authorization and obtaining the user profile. From November 2018 onwards, Microsoft is removing support for the Live SDK API in favor of the new Microsoft Graph API. The Red Hat Single Sign-On identity provider has been updated to use the new endpoints so if this integration is in use make sure you upgrade to Red Hat Single Sign-On version 7.2.5 or later.
Legacy client applications registered under "Live SDK applications" won’t work with the Microsoft Graph endpoints due to changes in the id format of the applications. If you run into an error saying that the application identifier was not found in the directory, you will have to register the client application again in the Microsoft Application Registration portal to obtain a new application id.
2.5.6. Google Identity Provider updated to use Google Sign-in authentication system
The Google Identity Provider implementation in Red Hat Single Sign-On up to version 7.2.5 relies on the Google+ API endpoints endpoints for authorization and obtaining the user profile. From March 2019 onwards, Google is removing support for the Google+ API in favor of the new Google Sign-in authentication system. The Red Hat Single Sign-On identity provider has been updated to use the new endpoints so if this integration is in use make sure you upgrade to Red Hat Single Sign-On version 7.2.6 or later.
If you run into an error saying that the application identifier was not found in the directory, you will have to register the client application again in the Google API Console portal to obtain a new application id and secret.
It is possible that you will need to adjust custom mappers for non-standard claims that were provided by Google+ user information endpoint and are provided under different name by Google Sign-in API. Please consult Google documentation for the most up-to-date information on available claims.
2.5.7. LinkedIn Social Broker updated to Version 2 of LinkedIn APIs
Accordingly with LinkedIn, all developers need to migrate to version 2.0 of their APIs and OAuth 2.0. As such, we have updated our LinkedIn Social Broker so if this integration is in use make sure you upgrade to Red Hat Single Sign-On version 7.2.6 or later.
Existing deployments using this broker may start experiencing errors when fetching user’s profile using version 2 of LinkedIn APIs. This error may be related with the lack of permissions granted to the client application used to configure the broker which may not be authorized to access the Profile API or request specific OAuth2 scopes during the authentication process.
Even for newly created LinkedIn client applications, you need to make sure that the client is able to request the r_liteprofile and r_emailaddress OAuth2 scopes, at least, as well that the client application can fetch current member’s profile from the https://api.linkedin.com/v2/me endpoint.
Due to these privacy restrictions imposed by LinkedIn in regards to access to member’s information and the limited set of claims returned by the current member’s Profile API, the LinkedIn Social Broker is now using the member’s email address as the default username. That means that the r_emailaddress is always set when sending authorization requests during the authentication.
2.6. RH-SSO 7.1
The following changes have occurred from RH-SSO 7.0 to RH-SSO 7.1.
2.6.1. Realm keys
For RH-SSO 7.0, only one set of keys could be associated with a realm. This meant that when changing the keys, all current cookies and tokens would be invalidated and all users would have to re-authenticate. For RH-SSO 7.1, support for multiple keys for one realm has been added. At any given time, one set of keys is the active set used for creating signatures, but there can be multiple keys used to verify signatures. This means that old cookies and tokens can be verified, then refreshed with the new signatures, allowing users to remain authenticated when keys are changed. There are also some changes to how keys are managed through the Admin Console and Admin REST API; for more details see Realm Keys in the Server Administration Guide.
To allow seamless key rotation you must remove hard-coded keys from client adapters. The client adapters will automatically retrieve keys from the server as long as the realm key is not specified. Client adapters will also retrieve new keys automatically when keys are rotated.
2.6.2. Client redirect URI matching
For RH-SSO 7.0, query parameters are ignored when matching valid redirect URIs for a client. For RH-SSO 7.1, query parameters are no longer ignored. If you need to include query parameters in the redirect URI you must specify the query parameters in the valid redirect URI for the client (for example, https://hostname/app/login?foo=bar) or use a wildcard (for example, https://hostname/app/login/*). Fragments are also no longer permitted in Valid Redirect URIs (that is, https://hostname/app#fragment).
2.6.3. Automatically redirect to Identity Provider
For RH-SSO 7.1, identity providers cannot be set as the default authentication provider. To automatically redirect to an identity provider for RH-SSO 7.1, you must now configure the identity provider redirector. For more information see Default Identity Provider in the Server Administration Guide. If you previously had an identity provider with the default authentication provider option set, this value is automatically used as the value for the identity provider redirector when the server is upgraded to RH-SSO 7.1.
2.6.4. Admin REST API
For RH-SSO 7.0, paginated endpoints in the Admin REST API return all results if the maxResults query parameter was not specified. This could cause issues with a temporary high load and requests timing out when a large number of results were returned (for example, users). For RH-SSO 7.1, a maximum of 100 results are returned if a value for maxResults is not specified. You can return all results by specifying maxResults as -1.
2.6.5. Server configuration
For RH-SSO 7.0, server configuration is split between the keycloak-server.json file and the standalone/domain.xml or domain.xml file. For RH-SSO 7.1, the keycloak-server.json file has been removed and all server configuration is done through the standalone.xml or domain.xml file. The upgrading procedure for RH-SSO 7.1 automatically migrates the server configuration from the keycloak-server.json file to the standalone.xml or domain.xml file.
2.6.6. Key encryption algorithm in SAML assertions
For RH-SSO 7.1, keys in SAML assertions and documents are now encrypted using the RSA-OAEP encryption scheme. To use encrypted assertions, ensure your service providers support this encryption scheme. In the event that you have service providers that do not support RSA-OAEP, RH-SSO can be configured to use the legacy RSA-v1.5 encryption scheme by starting the server with the system property "keycloak.saml.key_trans.rsa_v1.5" set to true. If you do this, you should upgrade your service providers as soon as possible to be able to revert to the more secure RSA-OAEP encryption scheme.
Chapter 3. Upgrading the Red Hat Single Sign-On server
The upgrade or migration process for the Red Hat Single Sign-On server depends on the previous version of the software.
- If you are upgrading to a new minor release, for example from 7.5.x to 7.6, follow the steps in Minor Upgrades.
- If you are migrating from Keycloak 18.0.0, follow the steps in Minor Upgrades.
- If you are upgrading to a new micro release, for example from 7.5.2 to 7.5.3, follow the steps in Micro Upgrades.
3.1. Performing a minor upgrade
3.1.1. Preparing for upgrading
Before you upgrade, be aware of the order in which you need to perform the upgrade steps. In particular, be sure to upgrade Red Hat Single Sign-On server before you upgrade the adapters.
In a minor upgrade of Red Hat Single Sign-On, all user sessions are lost. After the upgrade, all users will have to log in again.
Procedure
- Back up the old installation (configuration, themes, and so on).
- Back up the database using instructions in the documentation for your relational database.
Upgrade the Red Hat Single Sign-On server.
The database will no longer be compatible with the old server after the upgrade.
- If you need to revert the upgrade, first restore the old installation, and then restore the database from the backup copy.
- Upgrade the adapters.
3.1.2. Upgrading the Red Hat Single Sign-On server
Follow these guidelines to be sure the server upgrade is successful:
- Test the upgrade in a non-production environment first to prevent any installation issues in production,
- Upgrade the Red Hat Single Sign-On server before upgrading the adapters. Also ensure the upgraded server is functional in production before upgrading adapters.
This upgrade procedure may require modification due to manual changes that are specific to your installation. For details on manual changes that might affect the upgrade, see Release-specific changes.
Upgrade the server from a ZIP file or an RPM based on the method you had used for installation.
3.1.2.1. Upgrading the server from a ZIP file
Prerequisites
- Handle any open transactions and delete the data/tx-object-store/ transaction directory.
Procedure
- Download the new server archive.
- Move the downloaded archive to the desired location.
- Extract the archive. This step installs a clean instance of the latest Red Hat Single Sign-On release.
For standalone installations, copy the
RHSSO_HOME/standalone/directory from the previous installation over the directory in the new installation.For domain installations, copy the
RHSSO_HOME/domain/directory from the previous installation over the directory in the new installation.For domain installations, create the empty directory
RHSSO_HOME/domain/deployments.NOTE: Files in the bin directory should not be overwritten by the files from previous versions. Changes should be made manually.
- Copy any custom modules that have been added to the modules directory.
- Continue with the section, Running the server upgrade script.
3.1.2.2. Upgrading the server from an RPM
Prerequisites
- Handle any open transactions and delete the /var/opt/rh/rh-sso7/lib/keycloak/standalone/data/tx-object-store/ transaction directory.
Procedure
Subscribe to the proper repository containing Red Hat Single Sign-On.
For Red Hat Enterprise Linux 7:
subscription-manager repos --enable=rh-sso-7.6-for-rhel-7-x86_64-rpms
For Red Hat Enterprise Linux 8:
subscription-manager repos --enable=rh-sso-7.6-for-rhel-8-x86_64-rpms
Disable the older product repository for Red Hat Single Sign-On:
subscription-manager repos --disable=rh-sso-7.5-for-rhel-8-x86_64-rpms
Check the list of repositories:
dnf repolist
Updating Subscription Management repositories.
repo id repo name
rh-sso-7.6-for-rhel-8-x86_64-rpms Single Sign-On 7.6 for RHEL 8 x86_64 (RPMs)
rhel-8-for-x86_64-appstream-rpms Red Hat Enterprise Linux 8 for x86_64 - AppStream (RPMs)
rhel-8-for-x86_64-baseos-rpms Red Hat Enterprise Linux 8 for x86_64 - BaseOS (RPMs)
- Back up any modified configuration files and custom modules.
Use
dnf upgradeto upgrade to the new Red Hat Single Sign-On version.The RPM upgrade process does not replace any modified configuration files. Instead, this process creates .rpmnew files for the default configuration of the new Red Hat Single Sign-On version.
- To activate any new features in the new release, such as new subsystems, manually merge each .rpmnew file into your existing configuration files.
- Copy any custom modules that have been added to the modules directory.
Continue with the section, Running the server upgrade script.
NoteRed Hat Single Sign-On RPM server distribution is using
RHSSO_HOME=/opt/rh/rh-sso7/root/usr/share/keycloakUse it when calling migration scripts below.
3.1.3. Running the server upgrade script
Based on your previous installation, run the appropriate upgrade script that applies to your situation:
3.1.3.1. Running the Standalone Mode upgrade script
Procedure
- If you are using a different configuration file than the default one, edit the migration script to specify the new file name.
- Stop the server.
Run the upgrade script:
bin/jboss-cli.sh --file=bin/migrate-standalone.cli
3.1.3.2. Running the Standalone-High Availability Mode upgrade script
For standalone-high availability (HA) mode, all instances must be upgraded at the same time.
Procedure
- If you are using a different configuration file than the default one, edit the migration script to specify the new file name.
- Stop the server.
Run the upgrade script:
bin/jboss-cli.sh --file=bin/migrate-standalone-ha.cli
3.1.3.3. Running the Domain Mode upgrade script
For domain mode, all instances must be upgraded at the same time.
Procedure
- If you have changed the profile name, you must edit the upgrade script to change a variable near the beginning of the script.
- Edit the domain script to include the location of the keycloak-server.json file.
- Stop the server.
Run the upgrade script on the domain controller
bin/jboss-cli.sh --file=bin/migrate-domain.cli
3.1.3.4. Running the Domain-clustered Mode upgrade script
For domain-clustered mode, all instances must be upgraded at the same time.
Procedure
- If you have changed the profile name, you must edit the upgrade script to change a variable near the beginning of the script.
- Edit the domain-clustered script to include the location of the keycloak-server.json file.
- Stop the server.
Run the upgrade script on the domain controller only:
bin/jboss-cli.sh --file=bin/migrate-domain-clustered.cli
3.1.4. Database migration
Red Hat Single Sign-On can automatically migrate the database schema, or you can choose to do it manually. By default the database is automatically migrated when you start the new installation for the first time.
3.1.4.1. Automatic relational database migration
To enable automatic upgrading of the database schema, set the migrationStrategy property value to update for the default connectionsJpa provider:
 <spi name="connectionsJpa">
    <provider name="default" enabled="true">
        <properties>
            ...
            <property name="migrationStrategy" value="update"/>
        </properties>
    </provider>
</spi>
Or run this CLI command:
/subsystem=keycloak-server/spi=connectionsJpa/provider=default/:map-put(name=properties,key=migrationStrategy,value=update)
When you start the server with this setting your database is automatically migrated if the database schema has changed in the new version.
Creating an index on huge tables with millions of records can easily take a huge amount of time and potentially cause major service disruption on upgrades. For those cases, we added a threshold (the number of records) for automated index creation. By default, this threshold is 300000 records. When the number of records is higher than the threshold, the index is not created automatically, and there will be a warning message in server logs including SQL commands which can be applied later manually.
To change the threshold, set the indexCreationThreshold property, value for the default connectionsLiquibase provider:
<spi name="connectionsLiquibase">
    <provider name="default" enabled="true">
        <properties>
            <property name="indexCreationThreshold" value="300000"/>
        </properties>
    </provider>
</spi>
Or run this CLI command:
/subsystem=keycloak-server/spi=connectionsLiquibase/:add(default-provider=default)
/subsystem=keycloak-server/spi=connectionsLiquibase/provider=default/:add(properties={indexCreationThreshold => "300000"},enabled=true)
3.1.4.2. Manual relational database migration
To enable manual upgrading of the database schema, set the migrationStrategy property value to manual for the default connectionsJpa provider:
 <spi name="connectionsJpa">
    <provider name="default" enabled="true">
        <properties>
            ...
            <property name="migrationStrategy" value="manual"/>
        </properties>
    </provider>
</spi>
Or run this CLI command:
/subsystem=keycloak-server/spi=connectionsJpa/provider=default/:map-put(name=properties,key=migrationStrategy,value=manual)
When you start the server with this configuration it checks if the database needs to be migrated. The required changes are written to an SQL file that you can review and manually run against the database. For further details on how to apply this file to the database, see the documentation for the relational database you’re using. After the changes have been written to the file, the server exits.
3.1.5. Theme migration
If you have created any custom themes they must be migrated to the new server. Any changes to the built-in themes might need to be reflected in your custom themes, depending on which aspects you have customized.
You must copy your custom themes from the old server themes directory to the new server themes directory. After that you need to review the changes below and consider if the changes need to be applied to your custom theme.
In summary:
- If you have customized any of the changed templates listed below you need to compare the template from the base theme to see if there are changes you need to apply.
- If you have customized any of the styles and are extending the Red Hat Single Sign-On themes you need to review the changes to the styles. If you are extending the base theme you can skip this step.
- If you have customized messages you might need to change the key or value or to add additional messages.
Each step is described in more detail below the list of changes.
3.1.5.1. Theme changes RH-SSO 7.3
Templates
- Account: account.ftl
- Account: applications.ftl
- Account: resource-detail.ftl (new)
- Account: resources.ftl (new)
- Account: template.ftl
- Account: totp.ftl
- Email-html: email-test.ftl
- Email-html: email-verification-with-code.ftl (new)
- Email-html: email-verification.ftl
- Email-html: event-login_error.ftl
- Email-html: event-removed_totp.ftl
- Email-html: event-update_password.ftl
- Email-html: event-update_totp.ftl
- Email-html: executeActions.ftl
- Email-html: identity-provider-link.ftl
- Email-html: password-reset.ftl
- Email-text: email-verification-with-code.ftl (new)
- Email-text: email-verification.ftl
- Email-text: executeActions.ftl
- Email-text: identity-provider-link.ftl
- Email-text: password-reset.ftl
- Login: cli_splash.ftl (new)
- Login: code.ftl
- Login: error.ftl
- Login: info.ftl
- Login: login-config-totp-text.ftl (new)
- Login: login-config-totp.ftl
- Login: login-idp-link-confirm.ftl
- Login: login-idp-link-email.ftl
- Login: login-oauth-grant.ftl
- Login: login-page-expired.ftl
- Login: login-reset-password.ftl
- Login: login-totp.ftl
- Login: login-update-password.ftl
- Login: login-update-profile.ftl
- Login: login-verify-email-code-text.ftl (new)
- Login: login-verify-email.ftl
- Login: login-x509-info.ftl
- Login: login.ftl
- Login: register.ftl
- Login: template.ftl
- Login: terms.ftl
- Welcome: index.ftl (new)
Messages
- Account: messages_en.properties
- Admin: admin-messages_en.properties
- Email: messages_en.properties
- Login: messages_en.properties
Styles
- Login: login-rhsso.css (new)
- Welcome: welcome-rhsso.css
3.1.5.2. Theme changes RH-SSO 7.2
Templates
- Account: account.ftl
- Account: applications.ftl
- Account: federatedIdentity.ftl
- Account: password.ftl
- Account: sessions.ftl
- Account: template.ftl
- Account: totp.ftl
- Admin: index.ftl
- Email: email-test.ftl (new)
- Email: email-verification.ftl
- Email: event-login_error.ftl
- Email: event-removed_totp.ftl
- Email: event-update_password.ftl
- Email: event-update_totp.ftl
- Email: executeActions.ftl
- Email: identity-provider-link.ftl
- Email: password-reset.ftl
- Login: bypass_kerberos.ftl (removed)
- Login: error.ftl
- Login: info.ftl
- Login: login-config-totp.ftl
- Login: login-idp-link-email.ftl
- Login: login-oauth-grant.ftl
- Login: login-page-expired.ftl (new)
- Login: login-reset-password.ftl
- Login: login-totp.ftl
- Login: login-update-password.ftl
- Login: login-update-profile.ftl
- Login: login-verify-email.ftl
- Login: login-x509-info.ftl (new)
- Login: login.ftl (new)
- Login: register.ftl (new)
- Login: template.ftl (new)
- Login: terms.ftl (new)
Messages
- Account: messages_en.properties
- Admin: admin-messages_en.properties
- Admin: messages_en.properties
- Email: messages_en.properties
- Login: messages_en.properties
Styles
- Account: account.css
- Login: login.css
3.1.5.3. Theme changes RH-SSO 7.1
Templates
- Account: account.ftl
- Account: federatedIdentity.ftl
- Account: totp.ftl
- Login: info.ftl
- Login: login-config-totp.ftl
- Login: login-reset-password.ftl
- Login: login.ftl
Messages
- Account: editAccountHtmlTtile renamed to editAccountHtmlTitle
- Account: role_uma_authorization added
- Login: loginTotpStep1 value changed
- Login: invalidPasswordGenericMessage added
- Login: invlidRequesterMessage renamed to invalidRequesterMessage
- Login: clientDisabledMessage added
Styles
- Account: account.css
- Login: login.css
3.1.5.4. Migrating templates
If you have customized any of the templates you need to carefully review the changes that have been made to the templates to decide if you need to apply these changes to your customized templates. Most likely you will need to apply the same changes to your customized templates. If you have not customized any of the listed templates you can skip this section.
A best practice is to use a diff tool to compare the templates to see what changes you might need to make to your customized template. If you have only made minor changes it is simpler to compare the updated template to your customized template. However, if you have made many changes it might be easier to compare the new template to your customized old template, as this will show you what changes you need to make.
The following screenshot compares the info.ftl template from the Login theme and an example custom theme:
Comparison of the updated version of a Login theme template with an example custom Login theme template
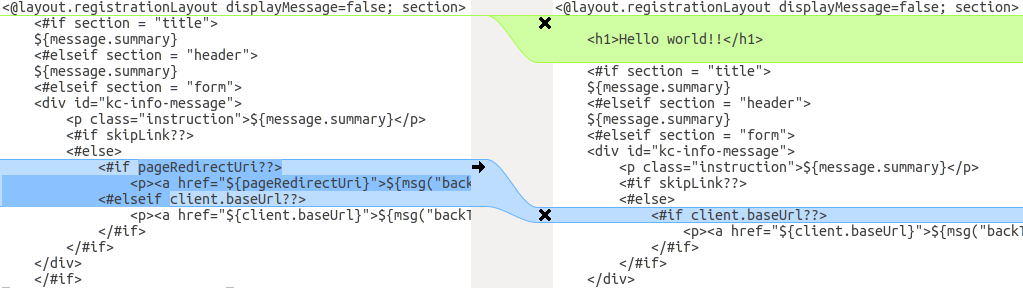
From this comparison it is easy to identify that the first change (Hello world!!) was a customization, while the second change (if pageRedirectUri) is a change to the base theme. By copying the second change to your custom template, you have successfully updated your customized template.
For the alternative approach the following screenshot compares the info.ftl template from the old installation with the updated info.ftl template from the new installation:
Comparison of the Login theme template from the old installation with the updated version of the Login theme template
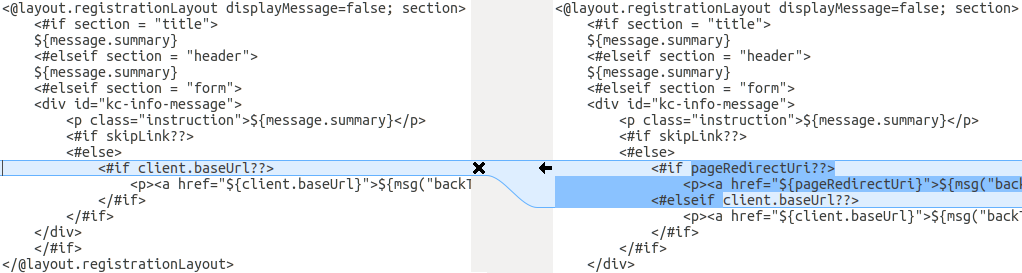
From this comparison it is easy to identify what has been changed in the base template. You will then manually have to make the same changes to your modified template. Since this approach is not as simple as the first approach, only use this approach if the first one is not feasible.
3.1.5.5. Migrating messages
If you have added support for another language, you need to apply all the changes listed above. If you have not added support for another language, you might not need to change anything; you only have to make changes if you have changed an affected message in your theme.
For added values, review the value of the message in the base theme to determine if you need to customize that message.
For renamed keys, rename the key in your custom theme.
For changed values, check the value in the base theme to determine if you need to make changes to your custom theme.
3.1.5.6. Migrating styles
If you are inheriting styles from the keycloak or rh-sso themes you might need to update your custom styles to reflect changes made to the styles from the built-in themes.
A best practice is to use a diff tool to compare the changes to stylesheets between the old server installation and the new server installation.
For example, using the diff command:
$ diff RHSSO_HOME_OLD/themes/keycloak/login/resources/css/login.css \
RHSSO_HOME_NEW/themes/keycloak/login/resources/css/login.css
Review the changes and determine if they affect your custom styling.
3.2. Performing a micro upgrade
3.2.1. ZIP/installer installation patching
Patches for a ZIP installation of RH-SSO are available to download from the Red Hat Customer Portal.
For multiple RH-SSO hosts in a managed domain environment, individual hosts can be patched from your RH-SSO domain controller.
In addition to applying a patch, you can also roll back the application of a patch.
3.2.1.1. Important notes on ZIP installation patching
-
If you apply a patch that updates a module, the new patched JARs that are used at runtime are stored in
RHSSO_HOME/modules/system/layers/base/.overlays/PATCH_ID/MODULE. The original unpatched files are left inRHSSO_HOME/modules/system/layers/base/MODULE, but these JARs are not used at runtime. In order to significantly decrease the size of cumulative patch releases for RH-SSO 7 you cannot perform a partial roll back of a cumulative patch. For a patch that has been applied, you will only be able to roll back the whole patch.
For example, if you apply CP03 to RH-SSO 7.0.0, you will not be able to roll back to CP01 or CP02. If you would like the ability to roll back to each cumulative patch release, each cumulative patch must be applied separately in the order they were released.
3.2.1.2. Applying a patch
RH-SSO servers that have been installed using the RPM method cannot be updated using these instructions. See the RPM instructions for applying a patch instead.
You can apply downloaded patches to a RH-SSO server using either the management CLI or the management console.
Procedure
- Download the patch file from the Red Hat Customer Portal at https://access.redhat.com/downloads/.
From the management CLI, apply the patch using the following command, including the appropriate path to the patch file:
patch apply /path/to/downloaded-patch.zip
NoteTo patch another RH-SSO host in a managed domain, you can specify the RH-SSO host name using the
--host=argument. For example:patch apply /path/to/downloaded-patch.zip --host=my-host
The patch tool will warn if there are any conflicts in attempting to apply the patch. If there are conflicts, enter
patch --helpfor the available arguments to re-run the command with an argument specifying how to resolve the conflicts.Restart the RH-SSO server for the patch to take effect:
shutdown --restart=true
Procedure
- Download the patch file from the Red Hat Customer Portal at https://access.redhat.com/downloads/.
Open the management console and navigate to the Patch Management view.
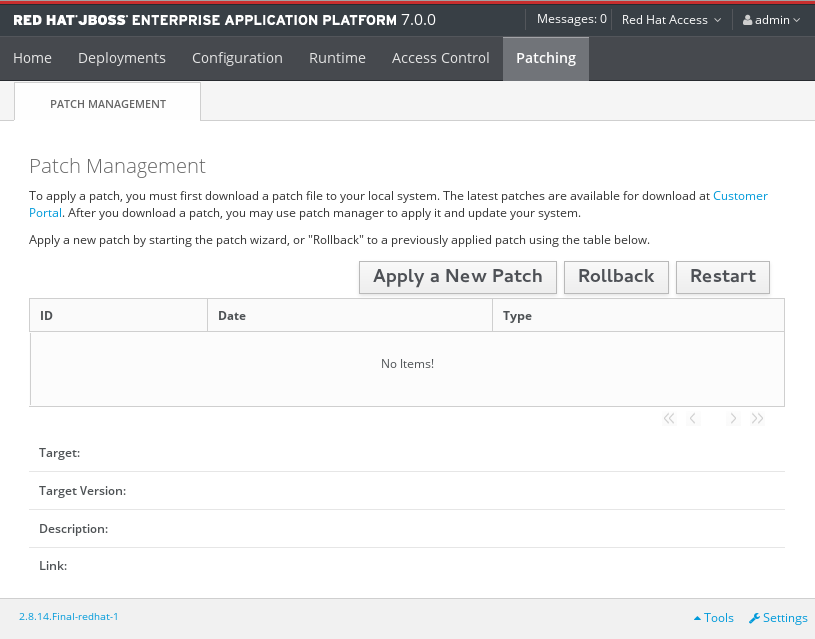
For a standalone server, click the Patching tab.
The Patch Management Screen for a Standalone Server
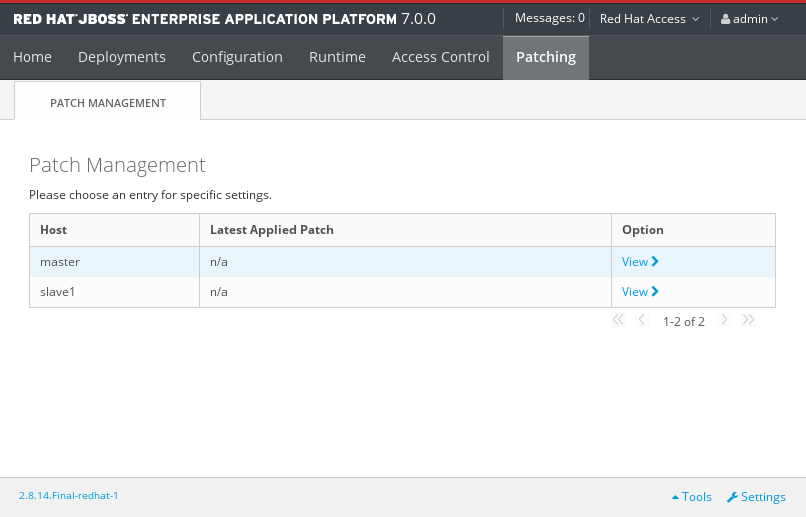
For a server in a managed domain, click the Patching tab, then select the host that you want to patch from the table, and click View.
The Patch Management Screen for a Managed Domain
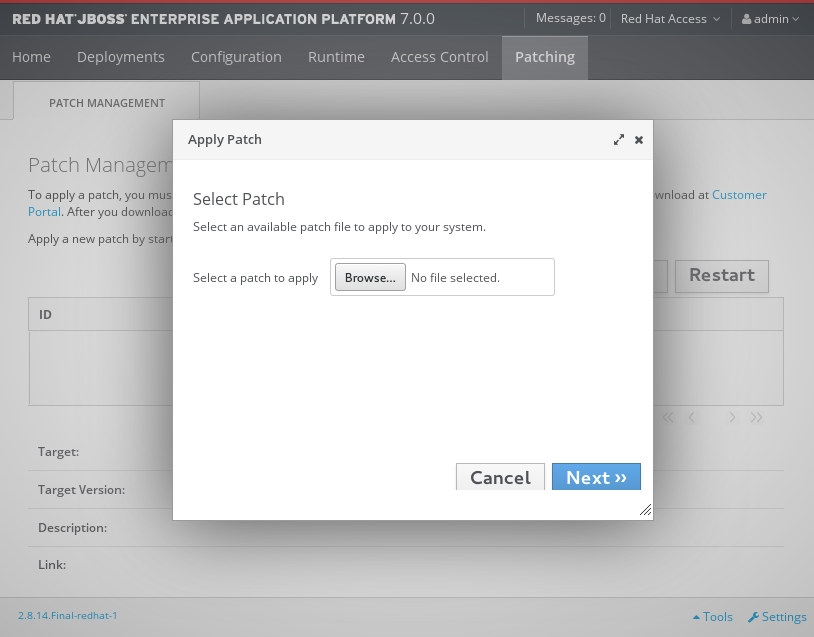
Click Apply a New Patch.
- If you are patching a managed domain host, on the next screen select whether to shutdown the servers on the host, and click Next.
Click the Browse button, select the downloaded patch you want to apply, and then click Next.
Apply Patch Screen
 .. If there are any conflicts in attempting to apply the patch, a warning will be displayed. Click View error details to see the detail of the conflicts. If there is a conflict, you can either cancel the operation, or select the Override all conflicts check box and click Next. Overriding conflicts will result in the content of the patch overriding any user modifications.
- After the patch has been successfully applied, select whether to restart RH-SSO now for the patch to take effect, and click Finish.
3.2.1.3. Rolling back a patch
You can roll back a previously applied RH-SSO patch using either the management CLI or the management console.
Rolling back a patch using the patch management system is not intended as a general uninstall functionality. It is only intended to be used immediately after the application of a patch that had undesirable effects.
Prerequisites
- A patch that was previously applied.
When following either procedure, use caution when specifying the value of the Reset Configuration option:
If set to TRUE, the patch rollback process will also roll back the RH-SSO server configuration files to their pre-patch state. Any changes that were made to the RH-SSO server configuration files after the patch was applied will be lost.
If set to FALSE, the server configuration files will not be rolled back. In this situation, it is possible that the server will not start after the rollback, as the patch may have altered configurations, such as namespaces, which may no longer be valid and will have to be fixed manually.
Procedure
From the management CLI, use the
patch historycommand to find the ID of the patch that you want to roll back.NoteIf you are using a managed domain, you must add the
--host=HOSTNAMEargument to the commands in this procedure to specify the RH-SSO host.Roll back the patch with the appropriate patch ID from the previous step.
patch rollback --patch-id=PATCH_ID --reset-configuration=TRUE
The patch tool will warn if there are any conflicts in attempting to roll back the patch. If there are conflicts, enter
patch --helpfor the available arguments to re-run the command with an argument specifying how to resolve the conflicts.Restart the RH-SSO server for the patch roll back to take effect:
shutdown --restart=true
Procedure
Open the management console and navigate to the Patch Management view.
- For a standalone server, click the Patching tab.
- For a server in a managed domain, click the Patching tab, then select the host that you want to patch from the table, and click View.
Select the patch that you want to rollback from those listed in the table, then click Rollback.
Recent Patch History Screen
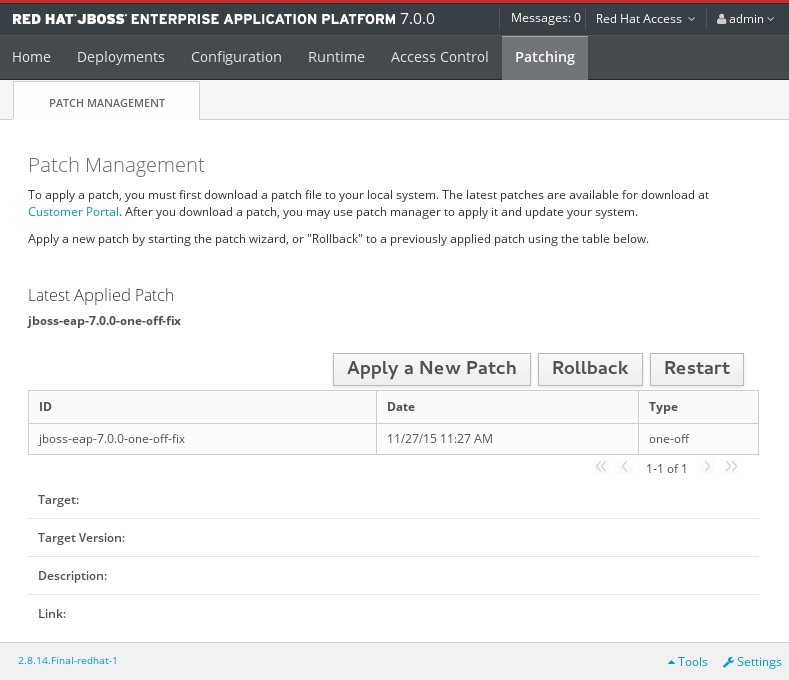 .. If you are rolling back a patch on a managed domain host, on the next screen select whether to shutdown the servers on the host, and click Next.
Choose your options for the rollback process, then click Next.
Patch Rollback Options
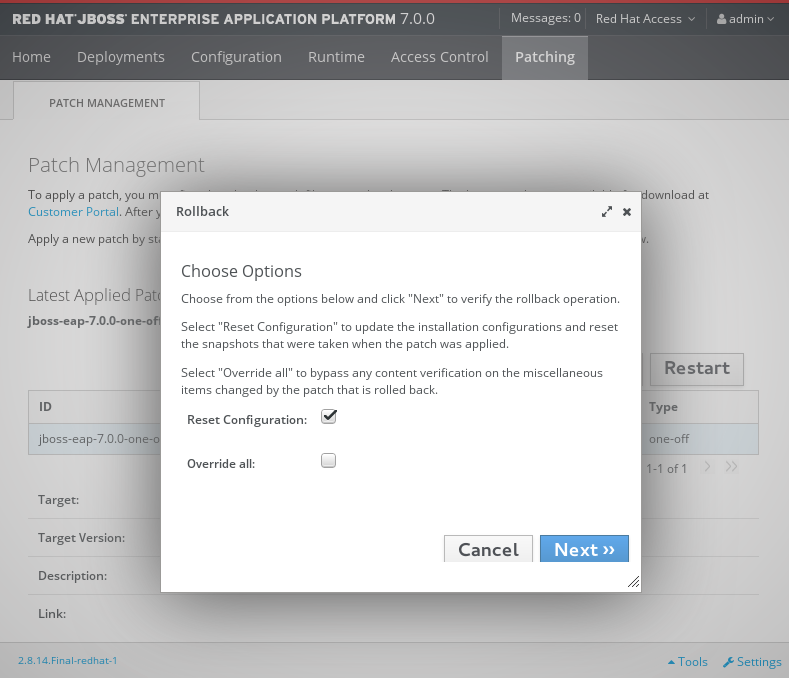
Confirm the options and the patch to be rolled back, then click Next.
- If there are any conflicts in attempting to rollback the patch and the Override all option was not selected, a warning will be displayed. Click View error details to see the detail of the conflicts. If there is a conflict, you can either cancel the operation, or click Choose Options and try the operation again with the Override all check box selected. Overriding conflicts will result in the rollback operation overriding any user modifications.
- After the patch has been successfully rolled back, select whether to restart the RH-SSO server now for the changes to take effect, and click Finish.
3.2.1.4. Clearing patch history
When patches are applied to a RH-SSO server, the content and history of the patches are preserved for use in rollback operations. If multiple cumulative patches are applied, the patch history may use a significant amount of disk space.
You can use the following management CLI command to remove all older patches that are not currently in use. When using this command, only the latest cumulative patch is preserved along with the GA release. This is only useful for freeing space if multiple cumulative patches have previously been applied.
/core-service=patching:ageout-history
If you clear the patch history, you will not be able to roll back a previously applied patch.
3.2.2. Patching an RPM Installation
Prerequisites
- Ensure that the base operating system is up to date, and is subscribed and enabled to get updates from the standard Red Hat Enterprise Linux repositories.
- Ensure that you are subscribed to the relevant RH-SSO repository for the update.
- Back up all configuration files, deployments, and user data.
For a managed domain, the RH-SSO domain controller should be updated first.
To install a RH-SSO patch via RPM from your subscribed repository, update your Red Hat Enterprise Linux system using the following command:
yum update
Chapter 4. Upgrading Red Hat Single Sign-On adapters
It is important that you upgrade Red Hat Single Sign-On server first, and then upgrade the adapters. Earlier versions of the adapter might work with later versions of Red Hat Single Sign-On server, but earlier versions of Red Hat Single Sign-On server might not work with later versions of the adapter.
4.1. Compatibility with older adapters
As mentioned above, we try to support newer release versions of Red Hat Single Sign-On server working with older release versions of the adapters. However, in some cases we need to include fixes on the Red Hat Single Sign-On server side which may break compatibility with older versions of the adapters. For example, when we implement new aspects of the OpenID Connect specification, which older client adapter versions were not aware of.
In those cases, we added Compatibility modes. For OpenId Connect clients, there is a section named OpenID Connect Compatibility Modes in the Red Hat Single Sign-On admin console, on the page with client details. Here, you can disable some new aspects of the Red Hat Single Sign-On server to preserve compatibility with older client adapters. More details are available in the tool tips of individual switches.
4.2. Upgrading the EAP adapter
Procedure
If you originally installed the adapter using a downloaded archive, to upgrade the JBoss EAP adapter, perform the following procedure.
- Download the new adapter archive.
-
Remove the previous adapter modules by deleting the
EAP_HOME/modules/system/add-ons/keycloak/directory. -
Unzip the downloaded archive into
EAP_HOME.
Procedure
If you originally installed the adapter using RPM, to upgrade the adapter, complete the following steps, which are different depending on whether you are performing a minor or a micro upgrade:
- For minor upgrades, use Yum to uninstall any adapters you currently have installed and then use Yum to install the new version of the adapters.
For micro upgrades, use Yum to upgrade the adapter. This is the only step for micro upgrades.
yum update
4.3. Upgrading the JavaScript adapter
To upgrade a JavaScript adapter that has been copied to your web application, perform the following procedure.
Procedure
- Download the new adapter archive.
- Overwrite the keycloak.js file in your application with the keycloak.js file from the downloaded archive.
4.4. Upgrading the Node.js adapter
To upgrade a Node.js adapter that has been copied to your web application, perform the following procedure.
Procedure
- Download the new adapter archive.
- Remove the existing Node.js adapter directory
- Unzip the updated file into its place
- Change the dependency for keycloak-connect in the package.json of your application