
Server Installation and Configuration Guide
For Use with Red Hat Single Sign-On 7.6
Abstract
Making open source more inclusive
Red Hat is committed to replacing problematic language in our code, documentation, and web properties. We are beginning with these four terms: master, slave, blacklist, and whitelist. Because of the enormity of this endeavor, these changes will be implemented gradually over several upcoming releases. For more details, see our CTO Chris Wright’s message.
Chapter 1. Guide Overview
The purpose of this guide is to walk through the steps that need to be completed prior to booting up the Red Hat Single Sign-On server for the first time. If you just want to test drive Red Hat Single Sign-On, it pretty much runs out of the box with its own embedded and local-only database. For actual deployments that are going to be run in production you’ll need to decide how you want to manage server configuration at runtime (standalone or domain mode), configure a shared database for Red Hat Single Sign-On storage, set up encryption and HTTPS, and finally set up Red Hat Single Sign-On to run in a cluster. This guide walks through each and every aspect of any pre-boot decisions and setup you must do prior to deploying the server.
One thing to particularly note is that Red Hat Single Sign-On is derived from the JBoss EAP Application Server. Many aspects of configuring Red Hat Single Sign-On revolve around JBoss EAP configuration elements. Often this guide will direct you to documentation outside of the manual if you want to dive into more detail.
1.1. Recommended additional external documentation
Red Hat Single Sign-On is built on top of the JBoss EAP application server and its sub-projects like Infinispan (for caching) and Hibernate (for persistence). This guide only covers basics for infrastructure-level configuration. It is highly recommended that you peruse the documentation for JBoss EAP and its sub projects. Here is the link to the documentation:
Chapter 2. Installing the software
You can install Red Hat Single Sign-On by downloading a ZIP file and unzipping it, or by using an RPM. This chapter reviews system requirements as well as the directory structure.
2.1. Installation prerequisites
These prerequisites exist for installing the Red Hat Single Sign-On server:
- Java 8 JRE or Java 11 JRE
- An operating system that supports the Java version you have chosen. See Supported Configurations.
- zip or gzip and tar
- At least 512M of RAM
- At least 1G of diskspace
- A shared external database like PostgreSQL, MySQL, Oracle, etc. Red Hat Single Sign-On requires an external shared database if you want to run in a cluster. Please see the database configuration section of this guide for more information.
- Network multicast support on your machine if you want to run in a cluster. Red Hat Single Sign-On can be clustered without multicast, but this requires a bunch of configuration changes. Please see the clustering section of this guide for more information.
-
On Linux, it is recommended to use
/dev/urandomas a source of random data to prevent Red Hat Single Sign-On hanging due to lack of available entropy, unless/dev/randomusage is mandated by your security policy. To achieve that on Oracle JDK 8 and OpenJDK 8, set thejava.security.egdsystem property on startup tofile:/dev/urandom.
2.2. Installing RH-SSO from a ZIP file
The Red Hat Single Sign-On server download ZIP file contains the scripts and binaries to run the Red Hat Single Sign-On server. You install the 7.6 server first, then the 7.6.7 server patch.
Procedure
- Go to the Red Hat customer portal.
- Download the Red Hat Single Sign-On 7.6 server.
-
Unpack the ZIP file using the appropriate
unziputility, such as unzip, tar, or Expand-Archive. - Return to the Red Hat customer portal.
-
Click the
Patchestab. - Download the Red Hat Single Sign-On 7.6.7 server patch.
- Place the downloaded file in a directory you choose.
-
Go to the
bindirectory of JBoss EAP. Start the JBoss EAP command line interface.
Linux/Unix
$ jboss-cli.sh
Windows
> jboss-cli.bat
Apply the patch.
$ patch apply <path-to-zip>/rh-sso-7.6.7-patch.zip
Additional resources
For more details on applying patches, see Patching a ZIP/Installer Installation.
2.3. Installing RH-SSO from an RPM
With Red Hat Enterprise Linux 7 and 8, the term channel was replaced with the term repository. In these instructions only the term repository is used.
You must subscribe to both the JBoss EAP 7.4 and RH-SSO 7.6 repositories before you can install RH-SSO from an RPM.
You cannot continue to receive upgrades to EAP RPMs but stop receiving updates for RH-SSO.
2.3.1. Subscribing to the JBoss EAP 7.4 repository
Prerequisites
- Ensure that your Red Hat Enterprise Linux system is registered to your account using Red Hat Subscription Manager. For more information see the Red Hat Subscription Management documentation.
- If you are already subscribed to another JBoss EAP repository, you must unsubscribe from that repository first.
For Red Hat Enterprise Linux 6, 7: Using Red Hat Subscription Manager, subscribe to the JBoss EAP 7.4 repository using the following command. Replace <RHEL_VERSION> with either 6 or 7 depending on your Red Hat Enterprise Linux version.
subscription-manager repos --enable=jb-eap-7.4-for-rhel-<RHEL_VERSION>-server-rpms --enable=rhel-<RHEL_VERSION>-server-rpms
For Red Hat Enterprise Linux 8: Using Red Hat Subscription Manager, subscribe to the JBoss EAP 7.4 repository using the following command:
subscription-manager repos --enable=jb-eap-7.4-for-rhel-8-x86_64-rpms --enable=rhel-8-for-x86_64-baseos-rpms --enable=rhel-8-for-x86_64-appstream-rpms
2.3.2. Subscribing to the RH-SSO 7.6 repository and installing RH-SSO 7.6
Prerequisites
- Ensure that your Red Hat Enterprise Linux system is registered to your account using Red Hat Subscription Manager. For more information see the Red Hat Subscription Management documentation.
- Ensure that you have already subscribed to the JBoss EAP 7.4 repository. For more information see Subscribing to the JBoss EAP 7.4 repository.
Procedure
For Red Hat Enterprise Linux 6, 7: Using Red Hat Subscription Manager, subscribe to the RH-SSO 7.6 repository using the following command. Replace <RHEL_VERSION> with either 6 or 7 depending on your Red Hat Enterprise Linux version.
subscription-manager repos --enable=rh-sso-7.6-for-rhel-<RHEL-VERSION>-server-rpms
For Red Hat Enterprise Linux 8: Using Red Hat Subscription Manager, subscribe to the RH-SSO 7.6 repository using the following command:
subscription-manager repos --enable=rh-sso-7.6-for-rhel-8-x86_64-rpms
For Red Hat Enterprise Linux 6, 7: Install RH-SSO from your subscribed RH-SSO 7.6 repository using the following command:
yum groupinstall rh-sso7
For Red Hat Enterprise Linux 8: Install RH-SSO from your subscribed RH-SSO 7.6 repository using the following command:
dnf groupinstall rh-sso7
Your installation is complete. The default RH-SSO_HOME path for the RPM installation is /opt/rh/rh-sso7/root/usr/share/keycloak.
Additional resources
For details on installing the 7.6.7 patch for Red Hat Single Sign-On, see RPM patching.
2.4. Important directories
The following are some important directories in the server distribution.
- bin/
- This contains various scripts to either boot the server or perform some other management action on the server.
- domain/
- This contains configuration files and working directory when running Red Hat Single Sign-On in domain mode.
- modules/
- These are all the Java libraries used by the server.
- standalone/
- This contains configuration files and working directory when running Red Hat Single Sign-On in standalone mode.
- standalone/deployments/
- If you are writing extensions to Red Hat Single Sign-On, you can put your extensions here. See the Server Developer Guide for more information on this.
- themes/
- This directory contains all the html, style sheets, JavaScript files, and images used to display any UI screen displayed by the server. Here you can modify an existing theme or create your own. See the Server Developer Guide for more information on this.
Chapter 3. Using operating modes
Before deploying Red Hat Single Sign-On in a production environment you need to decide which type of operating mode you are going to use.
- Will you run Red Hat Single Sign-On within a cluster?
- Do you want a centralized way to manage your server configurations?
Your choice of operating mode affects how you configure databases, configure caching and even how you boot the server.
The Red Hat Single Sign-On is built on top of the JBoss EAP Application Server. This guide will only go over the basics for deployment within a specific mode. If you want specific information on this, a better place to go would be the JBoss EAP Configuration Guide.
3.1. Using standalone mode
Standalone operating mode is only useful when you want to run one, and only one Red Hat Single Sign-On server instance. It is not usable for clustered deployments and all caches are non-distributed and local-only. It is not recommended that you use standalone mode in production as you will have a single point of failure. If your standalone mode server goes down, users will not be able to log in. This mode is really only useful to test drive and play with the features of Red Hat Single Sign-On
3.1.1. Booting in standalone mode
When running the server in standalone mode, there is a specific script you need to boot the server depending on your operating system. These scripts live in the bin/ directory of the server distribution.
Standalone Boot Scripts
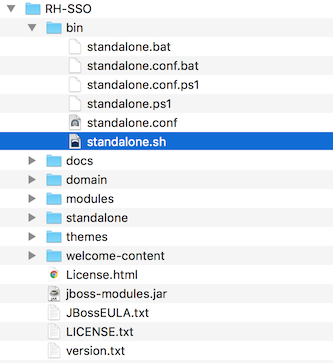
To boot the server:
Linux/Unix
$ .../bin/standalone.sh
Windows
> ...\bin\standalone.bat
3.1.2. Standalone configuration
The bulk of this guide walks you through how to configure infrastructure level aspects of Red Hat Single Sign-On. These aspects are configured in a configuration file that is specific to the application server that Red Hat Single Sign-On is a derivative of. In the standalone operation mode, this file lives in …/standalone/configuration/standalone.xml. This file is also used to configure non-infrastructure level things that are specific to Red Hat Single Sign-On components.
Standalone Config File
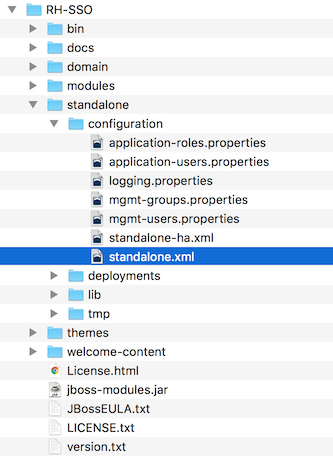
Any changes you make to this file while the server is running will not take effect and may even be overwritten by the server. Instead use the command line scripting or the web console of JBoss EAP. See the JBoss EAP Configuration Guide for more information.
3.2. Using standalone clustered mode
Standalone clustered operation mode applies when you want to run Red Hat Single Sign-On within a cluster. This mode requires that you have a copy of the Red Hat Single Sign-On distribution on each machine where you want to run a server instance. This mode can be very easy to deploy initially, but can become quite cumbersome. To make a configuration change, you modify each distribution on each machine. For a large cluster, this mode can become time consuming and error prone.
3.2.1. Standalone clustered configuration
The distribution has a mostly pre-configured app server configuration file for running within a cluster. It has all the specific infrastructure settings for networking, databases, caches, and discovery. This file resides in …/standalone/configuration/standalone-ha.xml. There’s a few things missing from this configuration. You can’t run Red Hat Single Sign-On in a cluster without configuring a shared database connection. You also need to deploy some type of load balancer in front of the cluster. The clustering and database sections of this guide walk you through these things.
Standalone HA Config
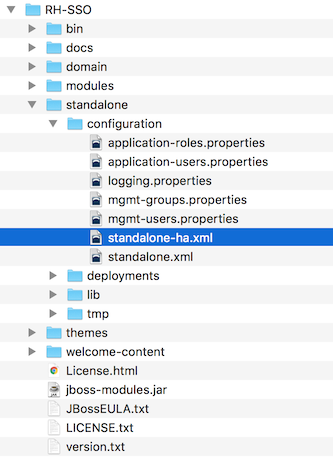
Any changes you make to this file while the server is running will not take effect and may even be overwritten by the server. Instead use the command line scripting or the web console of JBoss EAP. See the JBoss EAP Configuration Guide for more information.
3.2.2. Booting in standalone clustered mode
You use the same boot scripts to start Red Hat Single Sign-On as you do in standalone mode. The difference is that you pass in an additional flag to point to the HA config file.
Standalone Clustered Boot Scripts
To boot the server:
Linux/Unix
$ .../bin/standalone.sh --server-config=standalone-ha.xml
Windows
> ...\bin\standalone.bat --server-config=standalone-ha.xml
3.3. Using domain clustered mode
Domain mode is a way to centrally manage and publish the configuration for your servers.
Running a cluster in standard mode can quickly become aggravating as the cluster grows in size. Every time you need to make a configuration change, you perform it on each node in the cluster. Domain mode solves this problem by providing a central place to store and publish configurations. It can be quite complex to set up, but it is worth it in the end. This capability is built into the JBoss EAP Application Server which Red Hat Single Sign-On derives from.
The guide will go over the very basics of domain mode. Detailed steps on how to set up domain mode in a cluster should be obtained from the JBoss EAP Configuration Guide.
Here are some of the basic concepts of running in domain mode.
- domain controller
- The domain controller is a process that is responsible for storing, managing, and publishing the general configuration for each node in the cluster. This process is the central point from which nodes in a cluster obtain their configuration.
- host controller
- The host controller is responsible for managing server instances on a specific machine. You configure it to run one or more server instances. The domain controller can also interact with the host controllers on each machine to manage the cluster. To reduce the number of running process, a domain controller also acts as a host controller on the machine it runs on.
- domain profile
- A domain profile is a named set of configuration that can be used by a server to boot from. A domain controller can define multiple domain profiles that are consumed by different servers.
- server group
- A server group is a collection of servers. They are managed and configured as one. You can assign a domain profile to a server group and every service in that group will use that domain profile as their configuration.
In domain mode, a domain controller is started on a master node. The configuration for the cluster resides in the domain controller. Next a host controller is started on each machine in the cluster. Each host controller deployment configuration specifies how many Red Hat Single Sign-On server instances will be started on that machine. When the host controller boots up, it starts as many Red Hat Single Sign-On server instances as it was configured to do. These server instances pull their configuration from the domain controller.
In some environments, such as Microsoft Azure, the domain mode is not applicable. Please consult the JBoss EAP documentation.
3.3.1. Domain configuration
Various other chapters in this guide walk you through configuring various aspects like databases, HTTP network connections, caches, and other infrastructure related things. While standalone mode uses the standalone.xml file to configure these things, domain mode uses the …/domain/configuration/domain.xml configuration file. This is where the domain profile and server group for the Red Hat Single Sign-On server are defined.
domain.xml
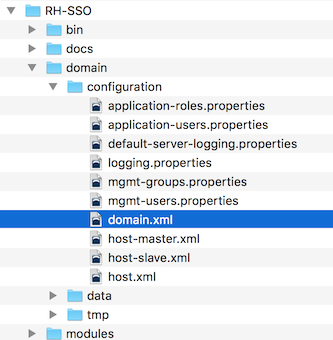
Any changes you make to this file while the domain controller is running will not take effect and may even be overwritten by the server. Instead use the command line scripting or the web console of JBoss EAP. See the JBoss EAP Configuration Guide for more information.
Let’s look at some aspects of this domain.xml file. The auth-server-standalone and auth-server-clustered profile XML blocks are where you are going to make the bulk of your configuration decisions. You’ll be configuring things here like network connections, caches, and database connections.
auth-server profile
    <profiles>
        <profile name="auth-server-standalone">
            ...
        </profile>
        <profile name="auth-server-clustered">
            ...
        </profile>
The auth-server-standalone profile is a non-clustered setup. The auth-server-clustered profile is the clustered setup.
If you scroll down further, you’ll see various socket-binding-groups defined.
socket-binding-groups
    <socket-binding-groups>
        <socket-binding-group name="standard-sockets" default-interface="public">
           ...
        </socket-binding-group>
        <socket-binding-group name="ha-sockets" default-interface="public">
           ...
        </socket-binding-group>
        <!-- load-balancer-sockets should be removed in production systems and replaced with a better software or hardware based one -->
        <socket-binding-group name="load-balancer-sockets" default-interface="public">
           ...
        </socket-binding-group>
    </socket-binding-groups>
This configration defines the default port mappings for various connectors that are opened with each Red Hat Single Sign-On server instance. Any value that contains ${…} is a value that can be overridden on the command line with the -D switch, i.e.
$ domain.sh -Djboss.http.port=80
The definition of the server group for Red Hat Single Sign-On resides in the server-groups XML block. It specifies the domain profile that is used (default) and also some default boot arguments for the Java VM when the host controller boots an instance. It also binds a socket-binding-group to the server group.
server group
    <server-groups>
        <!-- load-balancer-group should be removed in production systems and replaced with a better software or hardware based one -->
        <server-group name="load-balancer-group" profile="load-balancer">
            <jvm name="default">
                <heap size="64m" max-size="512m"/>
            </jvm>
            <socket-binding-group ref="load-balancer-sockets"/>
        </server-group>
        <server-group name="auth-server-group" profile="auth-server-clustered">
            <jvm name="default">
                <heap size="64m" max-size="512m"/>
            </jvm>
            <socket-binding-group ref="ha-sockets"/>
        </server-group>
    </server-groups>
3.3.2. Host controller configuration
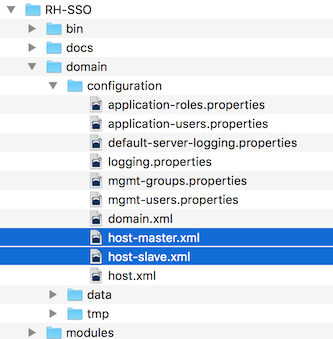
Red Hat Single Sign-On comes with two host controller configuration files that reside in the …/domain/configuration/ directory: host-master.xml and host-slave.xml. host-master.xml is configured to boot up a domain controller, a load balancer, and one Red Hat Single Sign-On server instance. host-slave.xml is configured to talk to the domain controller and boot up one Red Hat Single Sign-On server instance.
The load balancer is not a required service. It exists so that you can easily test drive clustering on your development machine. While usable in production, you have the option of replacing it if you have a different hardware or software based load balancer you want to use.
Host Controller Config
To disable the load balancer server instance, edit host-master.xml and comment out or remove the "load-balancer" entry.
    <servers>
        <!-- remove or comment out next line -->
        <server name="load-balancer" group="loadbalancer-group"/>
        ...
    </servers>
Another interesting thing to note about this file is the declaration of the authentication server instance. It has a port-offset setting. Any network port defined in the domain.xml socket-binding-group or the server group will have the value of port-offset added to it. For this sample domain setup, we do this so that ports opened by the load balancer server don’t conflict with the authentication server instance that is started.
    <servers>
        ...
        <server name="server-one" group="auth-server-group" auto-start="true">
             <socket-bindings port-offset="150"/>
        </server>
    </servers>
3.3.3. Server instance working directories
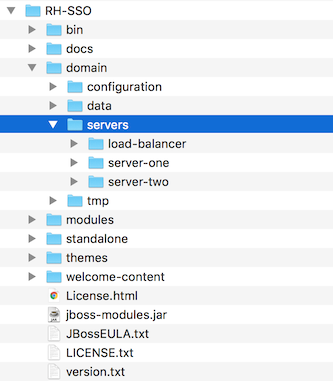
Each Red Hat Single Sign-On server instance defined in your host files creates a working directory under …/domain/servers/{SERVER NAME}. Additional configuration can be put there, and any temporary, log, or data files the server instance needs or creates go there too. The structure of these per server directories ends up looking like any other JBoss EAP booted server.
Working Directories
3.3.4. Booting in domain clustered mode
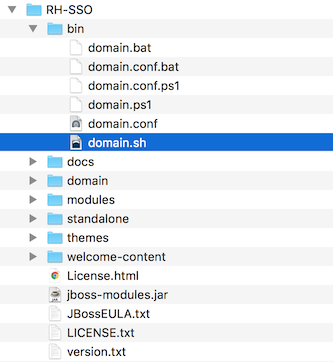
When running the server in domain mode, there is a specific script you need to run to boot the server depending on your operating system. These scripts live in the bin/ directory of the server distribution.
Domain Boot Script
To boot the server:
Linux/Unix
$ .../bin/domain.sh --host-config=host-master.xml
Windows
> ...\bin\domain.bat --host-config=host-master.xml
When running the boot script you will need to pass in the host controlling configuration file you are going to use via the --host-config switch.
3.3.5. Testing with a sample clustered domain
You can test drive clustering using the sample domain.xml configuration. This sample domain is meant to run on one machine and boots up:
- a domain controller
- an HTTP load balancer
- two Red Hat Single Sign-On server instances
Procedure
Run the
domain.shscript twice to start two separate host controllers.The first one is the master host controller that starts a domain controller, an HTTP load balancer, and one Red Hat Single Sign-On authentication server instance. The second one is a slave host controller that starts up only an authentication server instance.
Configure the slave host controller so that it can talk securely to the domain controller. Perform these steps:
If you omit these steps, the slave host cannot obtain the centralized configuration from the domain controller.
Set up a secure connection by creating a server admin user and a secret that are shared between the master and the slave.
Run the
…/bin/add-user.shscript.Select
Management Userwhen the script asks about the type of user to add.This choice generates a secret that you cut and paste into the …/domain/configuration/host-slave.xml file.
Add App Server Admin
$ add-user.sh What type of user do you wish to add? a) Management User (mgmt-users.properties) b) Application User (application-users.properties) (a): a Enter the details of the new user to add. Using realm 'ManagementRealm' as discovered from the existing property files. Username : admin Password recommendations are listed below. To modify these restrictions edit the add-user.properties configuration file. - The password should not be one of the following restricted values {root, admin, administrator} - The password should contain at least 8 characters, 1 alphabetic character(s), 1 digit(s), 1 non-alphanumeric symbol(s) - The password should be different from the username Password : Re-enter Password : What groups do you want this user to belong to? (Please enter a comma separated list, or leave blank for none)[ ]: About to add user 'admin' for realm 'ManagementRealm' Is this correct yes/no? yes Added user 'admin' to file '/.../standalone/configuration/mgmt-users.properties' Added user 'admin' to file '/.../domain/configuration/mgmt-users.properties' Added user 'admin' with groups to file '/.../standalone/configuration/mgmt-groups.properties' Added user 'admin' with groups to file '/.../domain/configuration/mgmt-groups.properties' Is this new user going to be used for one AS process to connect to another AS process? e.g. for a slave host controller connecting to the master or for a Remoting connection for server to server EJB calls. yes/no? yes To represent the user add the following to the server-identities definition <secret value="bWdtdDEyMyE=" />NoteThe add-user.sh script does not add the user to the Red Hat Single Sign-On server but to the underlying JBoss Enterprise Application Platform. The credentials used and generated in this script are only for demonstration purposes. Please use the ones generated on your system.
Cut and paste the secret value into the …/domain/configuration/host-slave.xml file as follows:
     <management>
         <security-realms>
             <security-realm name="ManagementRealm">
                 <server-identities>
                     <secret value="bWdtdDEyMyE="/>
                 </server-identities>
Add the username of the created user in the …/domain/configuration/host-slave.xml file:
<remote security-realm="ManagementRealm" username="admin">
Run the boot script twice to simulate a two node cluster on one development machine.
Boot up master
$ domain.sh --host-config=host-master.xml
Boot up slave
$ domain.sh --host-config=host-slave.xml
- Open your browser and go to http://localhost:8080/auth to try it out.
3.4. Using cross-site replication mode
Cross-site replication, which was introduced as a Technology Preview feature in Red Hat Single Sign-On 7.2, is no longer available as a supported feature in any Red Hat SSO 7.x release including the latest RH-SSO 7.6 release. Red Hat does not recommend any customer implement or use this feature in their environment because it is not supported. Also, support exceptions for this feature are no longer considered or accepted.
A new solution for cross-site replication is being discussed and tentatively considered for a future release of Red Hat build of Keycloak (RHBK), which is the product that will be introduced instead of Red Hat SSO 8. More details will be available soon.
Chapter 4. Managing the subsystem configuration
Low-level configuration of Red Hat Single Sign-On is done by editing the standalone.xml, standalone-ha.xml, or domain.xml file in your distribution. The location of this file depends on your operating mode.
While there are endless settings you can configure here, this section will focus on configuration of the keycloak-server subsystem. No matter which configuration file you are using, configuration of the keycloak-server subsystem is the same.
The keycloak-server subsystem is typically declared toward the end of the file like this:
<subsystem xmlns="urn:jboss:domain:keycloak-server:1.1">
   <web-context>auth</web-context>
   ...
</subsystem>
Note that anything changed in this subsystem will not take effect until the server is rebooted.
4.1. Configure SPI providers
The specifics of each configuration setting is discussed elsewhere in context with that setting. However, it is useful to understand the format used to declare settings on SPI providers.
Red Hat Single Sign-On is a highly modular system that allows great flexibility. There are more than 50 service provider interfaces (SPIs), and you are allowed to swap out implementations of each SPI. An implementation of an SPI is known as a provider.
All elements in an SPI declaration are optional, but a full SPI declaration looks like this:
<spi name="myspi">
    <default-provider>myprovider</default-provider>
    <provider name="myprovider" enabled="true">
        <properties>
            <property name="foo" value="bar"/>
        </properties>
    </provider>
    <provider name="mysecondprovider" enabled="true">
        <properties>
            <property name="foo" value="foo"/>
        </properties>
    </provider>
</spi>
Here we have two providers defined for the SPI myspi. The default-provider is listed as myprovider. However it is up to the SPI to decide how it will treat this setting. Some SPIs allow more than one provider and some do not. So default-provider can help the SPI to choose.
Also notice that each provider defines its own set of configuration properties. The fact that both providers above have a property called foo is just a coincidence.
The type of each property value is interpreted by the provider. However, there is one exception. Consider the jpa provider for the eventsStore SPI:
<spi name="eventsStore">
<provider name="jpa" enabled="true">
<properties>
<property name="exclude-events" value="["EVENT1",
"EVENT2"]"/>
</properties>
</provider>
</spi>
We see that the value begins and ends with square brackets. That means that the value will be passed to the provider as a list. In this example, the system will pass the provider a list with two element values EVENT1 and EVENT2. To add more values to the list, just separate each list element with a comma. Unfortunately, you do need to escape the quotes surrounding each list element with ".
Follow the steps in Server Developer Guide for more details on custom providers and the configuration of providers.
4.2. Starting the JBoss EAP CLI
Besides editing the configuration by hand, you also have the option of changing the configuration by issuing commands via the jboss-cli tool. CLI allows you to configure servers locally or remotely. And it is especially useful when combined with scripting.
To start the JBoss EAP CLI, you need to run jboss-cli.
Linux/Unix
$ .../bin/jboss-cli.sh
Windows
> ...\bin\jboss-cli.bat
This will bring you to a prompt like this:
Prompt
[disconnected /]
If you wish to execute commands on a running server, you will first execute the connect command.
connect
[disconnected /] connect
connect
[standalone@localhost:9990 /]
You may be thinking to yourself, "I didn’t enter in any username or password!". If you run jboss-cli on the same machine as your running standalone server or domain controller and your account has appropriate file permissions, you do not have to setup or enter in an admin username and password. See the JBoss EAP Configuration Guide for more details on how to make things more secure if you are uncomfortable with that setup.
4.3. CLI embedded mode
If you do happen to be on the same machine as your standalone server and you want to issue commands while the server is not active, you can embed the server into CLI and make changes in a special mode that disallows incoming requests. To do this, first execute the embed-server command with the config file you wish to change.
embed-server
[disconnected /] embed-server --server-config=standalone.xml
[standalone@embedded /]
4.4. Using CLI GUI mode
The CLI can also run in GUI mode. GUI mode launches a Swing application that allows you to graphically view and edit the entire management model of a running server. GUI mode is especially useful when you need help formatting your CLI commands and learning about the options available. The GUI can also retrieve server logs from a local or remote server.
Procedure
Start the CLI in GUI mode
$ .../bin/jboss-cli.sh --gui
Note: to connect to a remote server, you pass the
--connectoption as well. Use the --help option for more details.-
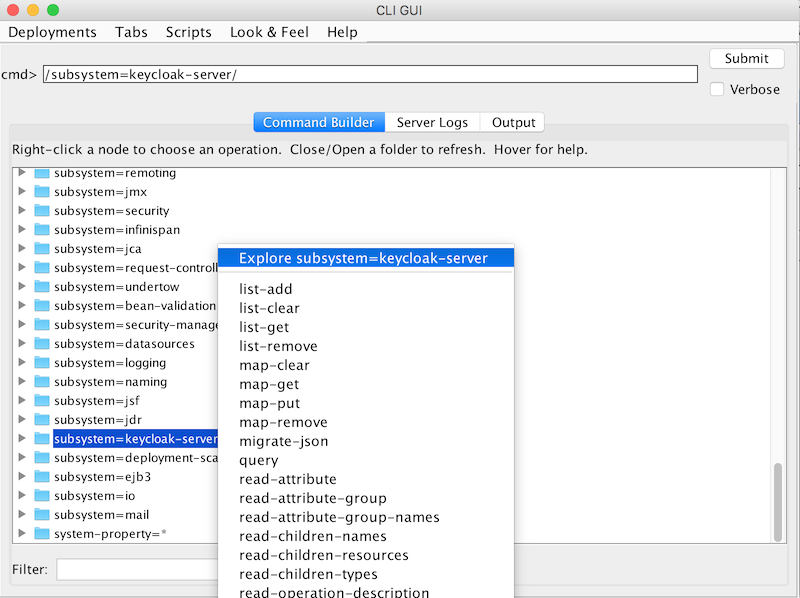
Scroll down to find the node
subsystem=keycloak-server. Right-click the node and select
Explore subsystem=keycloak-server.A new tab displays only the keycloak-server subsystem.
keycloak-server subsystem
4.5. CLI scripting
The CLI has extensive scripting capabilities. A script is just a text file with CLI commands in it. Consider a simple script that turns off theme and template caching.
turn-off-caching.cli
/subsystem=keycloak-server/theme=defaults/:write-attribute(name=cacheThemes,value=false)
/subsystem=keycloak-server/theme=defaults/:write-attribute(name=cacheTemplates,value=false)
To execute the script, you can follow the Scripts menu in CLI GUI, or execute the script from the command line as follows:
$ .../bin/jboss-cli.sh --file=turn-off-caching.cli
4.6. CLI recipes
Here are some configuration tasks and how to perform them with CLI commands. Note that in all but the first example, we use the wildcard path ** to mean you should substitute or the path to the keycloak-server subsystem.
For standalone, this just means:
** = /subsystem=keycloak-server
For domain mode, this would mean something like:
** = /profile=auth-server-clustered/subsystem=keycloak-server
4.6.1. Changing the web context of the server
/subsystem=keycloak-server/:write-attribute(name=web-context,value=myContext)
4.6.2. Setting the global default theme
**/theme=defaults/:write-attribute(name=default,value=myTheme)
4.6.3. Adding a new SPI and a provider
**/spi=mySPI/:add
**/spi=mySPI/provider=myProvider/:add(enabled=true)
4.6.4. Disabling a provider
**/spi=mySPI/provider=myProvider/:write-attribute(name=enabled,value=false)
4.6.5. Changing the default provider for an SPI
**/spi=mySPI/:write-attribute(name=default-provider,value=myProvider)
4.6.6. Configuring the dblock SPI
**/spi=dblock/:add(default-provider=jpa)
**/spi=dblock/provider=jpa/:add(properties={lockWaitTimeout => "900"},enabled=true)
4.6.7. Adding or changing a single property value for a provider
**/spi=dblock/provider=jpa/:map-put(name=properties,key=lockWaitTimeout,value=3)
4.6.8. Remove a single property from a provider
**/spi=dblock/provider=jpa/:map-remove(name=properties,key=lockRecheckTime)
4.6.9. Setting values on a provider property of type List
**/spi=eventsStore/provider=jpa/:map-put(name=properties,key=exclude-events,value=[EVENT1,EVENT2])
Chapter 5. Profiles
There are features in Red Hat Single Sign-On that are not enabled by default, these include features that are not fully supported. In addition there are some features that are enabled by default, but that can be disabled.
The features that can be enabled and disabled are:
| Name | Description | Enabled by default | Support level |
|---|---|---|---|
| account2 | New Account Management Console | Yes | Supported |
| account_api | Account Management REST API | Yes | Supported |
| admin_fine_grained_authz | Fine-Grained Admin Permissions | No | Preview |
| ciba | OpenID Connect Client Initiated Backchannel Authentication (CIBA) | Yes | Supported |
| client_policies | Add client configuration policies | Yes | Supported |
| client_secret_rotation | Enables client secret rotation for confidential clients | Yes | Preview |
| par | OAuth 2.0 Pushed Authorization Requests (PAR) | Yes | Supported |
| declarative_user_profile | Configure user profiles using a declarative style | No | Preview |
| docker | Docker Registry protocol | No | Supported |
| impersonation | Ability for admins to impersonate users | Yes | Supported |
| openshift_integration | Extension to enable securing OpenShift | No | Preview |
| recovery_codes | Recovery codes for authentication | No | Preview |
| scripts | Write custom authenticators using JavaScript | No | Preview |
| step_up_authentication | Step-up authentication | Yes | Supported |
| token_exchange | Token Exchange Service | No | Preview |
| upload_scripts | Upload scripts | No | Deprecated |
| web_authn | W3C Web Authentication (WebAuthn) | Yes | Supported |
| update_email | Update Email Workflow | No | Preview |
To enable all preview features start the server with:
bin/standalone.sh|bat -Dkeycloak.profile=preview
You can set this permanently by creating the file standalone/configuration/profile.properties (or domain/servers/server-one/configuration/profile.properties for server-one in domain mode). Add the following to the file:
profile=preview
To enable a specific feature start the server with:
bin/standalone.sh|bat -Dkeycloak.profile.feature.<feature name>=enabled
For example to enable Docker use -Dkeycloak.profile.feature.docker=enabled.
You can set this permanently in the profile.properties file by adding:
feature.docker=enabled
To disable a specific feature start the server with:
bin/standalone.sh|bat -Dkeycloak.profile.feature.<feature name>=disabled
For example to disable Impersonation use -Dkeycloak.profile.feature.impersonation=disabled.
You can set this permanently in the profile.properties file by adding:
feature.impersonation=disabled
Chapter 6. Setting up the relational database
Red Hat Single Sign-On comes with its own embedded Java-based relational database called H2. This is the default database that Red Hat Single Sign-On will use to persist data and really only exists so that you can run the authentication server by default.
The H2 database is intended only for example purposes. It is not a supported database, so it is not tested for database migration. We highly recommend that you replace it with a more production ready external database. The H2 database is not very viable in high concurrency situations and should not be used in a cluster either. The purpose of this chapter is to show you how to connect Red Hat Single Sign-On to a more mature database.
Red Hat Single Sign-On uses two layered technologies to persist its relational data. The bottom layered technology is JDBC. JDBC is a Java API that is used to connect to a RDBMS. There are different JDBC drivers per database type that are provided by your database vendor. This chapter discusses how to configure Red Hat Single Sign-On to use one of these vendor-specific drivers.
The top layered technology for persistence is Hibernate JPA. This is an object to relational mapping API that maps Java Objects to relational data. Most deployments of Red Hat Single Sign-On will never have to touch the configuration aspects of Hibernate, but we will discuss how that is done if you run into that rare circumstance.
Datasource configuration is covered much more thoroughly in the datasource configuration chapter in the JBoss EAP Configuration Guide.
6.1. Database setup checklist
Following are the steps you perform to get an RDBMS configured for Red Hat Single Sign-On.
- Locate and download a JDBC driver for your database
- Package the driver JAR into a module and install this module into the server
- Declare the JDBC driver in the configuration profile of the server
- Modify the datasource configuration to use your database’s JDBC driver
- Modify the datasource configuration to define the connection parameters to your database
This chapter will use PostgresSQL for all its examples. Other databases follow the same steps for installation.
6.2. Packaging the JDBC driver
Find and download the JDBC driver JAR for your RDBMS. Before you can use this driver, you must package it up into a module and install it into the server. Modules define JARs that are loaded into the Red Hat Single Sign-On classpath and the dependencies those JARs have on other modules.
Procedure
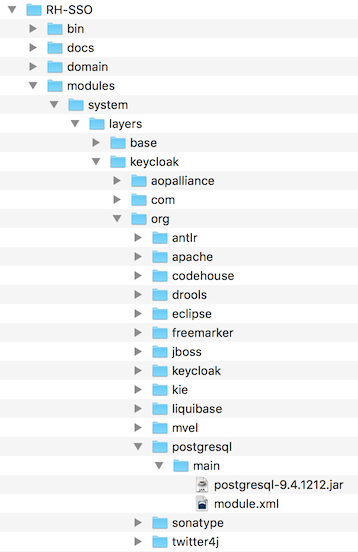
Create a directory structure to hold your module definition within the …/modules/ directory of your Red Hat Single Sign-On distribution.
The convention is use the Java package name of the JDBC driver for the name of the directory structure. For PostgreSQL, create the directory org/postgresql/main.
Copy your database driver JAR into this directory and create an empty module.xml file within it too.
Module Directory
Open up the module.xml file and create the following XML:
Module XML
<?xml version="1.0" encoding="UTF-8"?> <module xmlns="urn:jboss:module:1.3" name="org.postgresql"> <resources> <resource-root path="postgresql-VERSION.jar"/> </resources> <dependencies> <module name="javax.api"/> <module name="javax.transaction.api"/> </dependencies> </module>-
The module name should match the directory structure of your module. So, org/postgresql maps to
org.postgresql. -
The
resource-root pathattribute should specify the JAR filename of the driver. - The rest are just the normal dependencies that any JDBC driver JAR would have.
-
The module name should match the directory structure of your module. So, org/postgresql maps to
6.3. Declaring and loading the JDBC driver
You declare your JDBC into your deployment profile so that it loads and becomes available when the server boots up.
Prerequisites
You have packaged the JDBC driver.
Procedure
Declare your JDBC driver by editing one of these files based on your deployment mode:
- For standalone mode, edit …/standalone/configuration/standalone.xml.
- For standalone clustering mode, edit …/standalone/configuration/standalone-ha.xml.
For domain mode, edit …/domain/configuration/domain.xml.
In domain mode, make sure you edit the profile you are using: either
auth-server-standaloneorauth-server-clustered
Within the profile, search for the
driversXML block within thedatasourcessubsystem.You should see a pre-defined driver declared for the H2 JDBC driver. This is where you’ll declare the JDBC driver for your external database.
JDBC Drivers
  <subsystem xmlns="urn:jboss:domain:datasources:6.0">
     <datasources>
       ...
       <drivers>
          <driver name="h2" module="com.h2database.h2">
              <xa-datasource-class>org.h2.jdbcx.JdbcDataSource</xa-datasource-class>
          </driver>
       </drivers>
     </datasources>
  </subsystem>
Within the
driversXML block, declare an additional JDBC driver.-
Assign any
nameto this driver. -
Specify the
moduleattribute which points to themodulepackage that you created earlier for the driver JAR. Specify the driver’s Java class.
Here’s an example of installing a PostgreSQL driver that lives in the module example defined earlier in this chapter.
Declare Your JDBC Drivers
  <subsystem xmlns="urn:jboss:domain:datasources:6.0">
     <datasources>
       ...
       <drivers>
          <driver name="postgresql" module="org.postgresql">
              <xa-datasource-class>org.postgresql.xa.PGXADataSource</xa-datasource-class>
          </driver>
          <driver name="h2" module="com.h2database.h2">
              <xa-datasource-class>org.h2.jdbcx.JdbcDataSource</xa-datasource-class>
          </driver>
       </drivers>
     </datasources>
  </subsystem>
-
Assign any
6.4. Modifying the Red Hat Single Sign-On datasource
You modify the existing datasource configuration that Red Hat Single Sign-On uses to connect it to your new external database. You’ll do this within the same configuration file and XML block that you registered your JDBC driver in. Here’s an example that sets up the connection to your new database:
Declare Your JDBC Drivers
  <subsystem xmlns="urn:jboss:domain:datasources:6.0">
     <datasources>
       ...
       <datasource jndi-name="java:jboss/datasources/KeycloakDS" pool-name="KeycloakDS" enabled="true" use-java-context="true">
           <connection-url>jdbc:postgresql://localhost/keycloak</connection-url>
           <driver>postgresql</driver>
           <pool>
               <max-pool-size>20</max-pool-size>
           </pool>
           <security>
               <user-name>William</user-name>
               <password>password</password>
           </security>
       </datasource>
        ...
     </datasources>
  </subsystem>
Prerequisites
- You have already declared your JDBC driver.
Procedure
Search for the
datasourcedefinition forKeycloakDS.You’ll first need to modify the
connection-url. The documentation for your vendor’s JDBC implementation should specify the format for this connection URL value.Define the
driveryou will use.This is the logical name of the JDBC driver you declared in the previous section of this chapter.
It is expensive to open a new connection to a database every time you want to perform a transaction. To compensate, the datasource implementation maintains a pool of open connections. The
max-pool-sizespecifies the maximum number of connections it will pool. You may want to change the value of this depending on the load of your system.- Define the database username and password that is needed to connect to the database. This step is necessary for at least PostgreSQL. You may be concerned that these credentials are in clear text in the example. Methods exist to obfuscate these credentials, but these methods are beyond the scope of this guide.
For more information about datasource features, see the datasource configuration chapter in the JBoss EAP Configuration Guide.
6.5. Database Configuration
The configuration for this component is found in the standalone.xml, standalone-ha.xml, or domain.xml file in your distribution. The location of this file depends on your operating mode.
Database Config
<subsystem xmlns="urn:jboss:domain:keycloak-server:1.1">
    ...
    <spi name="connectionsJpa">
     <provider name="default" enabled="true">
         <properties>
             <property name="dataSource" value="java:jboss/datasources/KeycloakDS"/>
             <property name="initializeEmpty" value="false"/>
             <property name="migrationStrategy" value="manual"/>
             <property name="migrationExport" value="${jboss.home.dir}/keycloak-database-update.sql"/>
         </properties>
     </provider>
    </spi>
    ...
</subsystem>
Possible configuration options are:
- dataSource
- JNDI name of the dataSource
- jta
- boolean property to specify if datasource is JTA capable
- driverDialect
- Value of database dialect. In most cases you don’t need to specify this property as dialect will be autodetected by Hibernate.
- initializeEmpty
-
Initialize database if empty. If set to false the database has to be manually initialized. If you want to manually initialize the database set migrationStrategy to
manualwhich will create a file with SQL commands to initialize the database. Defaults to true. - migrationStrategy
-
Strategy to use to migrate database. Valid values are
update,manualandvalidate. Update will automatically migrate the database schema. Manual will export the required changes to a file with SQL commands that you can manually execute on the database. Validate will simply check if the database is up-to-date. - migrationExport
- Path for where to write manual database initialization/migration file.
- showSql
- Specify whether Hibernate should show all SQL commands in the console (false by default). This is very verbose!
- formatSql
- Specify whether Hibernate should format SQL commands (true by default)
- globalStatsInterval
- Will log global statistics from Hibernate about executed DB queries and other things. Statistics are always reported to server log at specified interval (in seconds) and are cleared after each report.
- schema
- Specify the database schema to use
These configuration switches and more are described in the JBoss EAP Development Guide.
6.6. Unicode considerations for databases
Database schema in Red Hat Single Sign-On only accounts for Unicode strings in the following special fields:
- Realms: display name, HTML display name, localization texts (keys and values)
- Federation Providers: display name
- Users: username, given name, last name, attribute names and values
- Groups: name, attribute names and values
- Roles: name
- Descriptions of objects
Otherwise, characters are limited to those contained in database encoding which is often 8-bit. However, for some database systems, it is possible to enable UTF-8 encoding of Unicode characters and use full Unicode character set in all text fields. Often, this is counterbalanced by shorter maximum length of the strings than in case of 8-bit encodings.
Some of the databases require special settings to database and/or JDBC driver to be able to handle Unicode characters. Please find the settings for your database below. Note that if a database is listed here, it can still work properly provided it handles UTF-8 encoding properly both on the level of database and JDBC driver.
Technically, the key criterion for Unicode support for all fields is whether the database allows setting of Unicode character set for VARCHAR and CHAR fields. If yes, there is a high chance that Unicode will be plausible, usually at the expense of field length. If it only supports Unicode in NVARCHAR and NCHAR fields, Unicode support for all text fields is unlikely as Keycloak schema uses VARCHAR and CHAR fields extensively.
6.6.1. Oracle database
Unicode characters are properly handled provided the database was created with Unicode support in VARCHAR and CHAR fields (e.g. by using AL32UTF8 character set as the database character set). No special settings is needed for JDBC driver.
If the database character set is not Unicode, then to use Unicode characters in the special fields, the JDBC driver needs to be configured with the connection property oracle.jdbc.defaultNChar set to true. It might be wise, though not strictly necessary, to also set the oracle.jdbc.convertNcharLiterals connection property to true. These properties can be set either as system properties or as connection properties. Please note that setting oracle.jdbc.defaultNChar may have negative impact on performance. For details, please refer to Oracle JDBC driver configuration documentation.
6.6.2. Microsoft SQL Server database
Unicode characters are properly handled only for the special fields. No special settings of JDBC driver or database is necessary.
6.6.3. MySQL database
Unicode characters are properly handled provided the database was created with Unicode support in VARCHAR and CHAR fields in the CREATE DATABASE command (e.g. by using utf8 character set as the default database character set in MySQL 5.5. Please note that utf8mb4 character set does not work due to different storage requirements to utf8 character set [1]). Note that in this case, length restriction to non-special fields does not apply because columns are created to accommodate given amount of characters, not bytes. If the database default character set does not allow storing Unicode, only the special fields allow storing Unicode values.
At the side of JDBC driver settings, it is necessary to add a connection property characterEncoding=UTF-8 to the JDBC connection settings.
6.6.4. PostgreSQL database
Unicode is supported when the database character set is UTF8. In that case, Unicode characters can be used in any field, there is no reduction of field length for non-special fields. No special settings of JDBC driver is necessary.
The character set of a PostgreSQL database is determined at the time it is created. You can determine the default character set for a PostgreSQL cluster with the SQL command
show server_encoding;
If the default character set is not UTF 8, then you can create the database with UTF8 as its character set like this:
create database keycloak with encoding 'UTF8';
Chapter 7. Use of the public hostname
Red Hat Single Sign-On uses the public hostname for a number of things. For example, in the token issuer fields and URLs sent in password reset emails.
The Hostname SPI provides a way to configure the hostname for a request. The default provider allows setting a fixed URL for frontend requests, while allowing backend requests to be based on the request URI. It is also possible to develop your own provider in the case the built-in provider does not provide the functionality needed.
7.1. Default provider
The default hostname provider uses the configured frontendUrl as the base URL for frontend requests (requests from user-agents) and uses the request URL as the basis for backend requests (direct requests from clients).
Frontend request do not have to have the same context-path as the Keycloak server. This means you can expose Keycloak on for example https://auth.example.org or https://example.org/keycloak while internally its URL could be https://10.0.0.10:8080/auth.
This makes it possible to have user-agents (browsers) send requests to Red Hat Single Sign-On through the public domain name, while internal clients can use an internal domain name or IP address.
This is reflected in the OpenID Connect Discovery endpoint for example where the authorization_endpoint uses the frontend URL, while token_endpoint uses the backend URL. As a note here a public client for instance would contact Keycloak through the public endpoint, which would result in the base of authorization_endpoint and token_endpoint being the same.
To set the frontendUrl for Keycloak you can either pass add -Dkeycloak.frontendUrl=https://auth.example.org to the startup or you can configure it in standalone.xml. See the example below:
<spi name="hostname">
    <default-provider>default</default-provider>
    <provider name="default" enabled="true">
        <properties>
            <property name="frontendUrl" value="https://auth.example.com"/>
            <property name="forceBackendUrlToFrontendUrl" value="false"/>
        </properties>
    </provider>
</spi>
To update the frontendUrl with jboss-cli use the following command:
/subsystem=keycloak-server/spi=hostname/provider=default:write-attribute(name=properties.frontendUrl,value="https://auth.example.com")
If you want all requests to go through the public domain name you can force backend requests to use the frontend URL as well by setting forceBackendUrlToFrontendUrl to true.
It is also possible to override the default frontend URL for individual realms. This can be done in the admin console.
If you do not want to expose the admin endpoints and console on the public domain use the property adminUrl to set a fixed URL for the admin console, which is different to the frontendUrl. It is also required to block access to /auth/admin externally, for details on how to do that refer to the Server Administration Guide.
7.2. Custom provider
To develop a custom hostname provider you need to implement org.keycloak.urls.HostnameProviderFactory and org.keycloak.urls.HostnameProvider.
Follow the instructions in the Service Provider Interfaces section in Server Developer Guide for more information on how to develop a custom provider.
Chapter 8. Setting up the network
The default installation of Red Hat Single Sign-On can run with some networking limitations. For one, all network endpoints bind to localhost so the auth server is really only usable on one local machine. For HTTP based connections, it does not use default ports like 80 and 443. HTTPS/SSL is not configured out of the box and without it, Red Hat Single Sign-On has many security vulnerabilities. Finally, Red Hat Single Sign-On may often need to make secure SSL and HTTPS connections to external servers and thus need a trust store set up so that endpoints can be validated correctly. This chapter discusses all of these things.
8.1. Bind addresses
By default Red Hat Single Sign-On binds to the localhost loopback address 127.0.0.1. That’s not a very useful default if you want the authentication server available on your network. Generally, what we recommend is that you deploy a reverse proxy or load balancer on a public network and route traffic to individual Red Hat Single Sign-On server instances on a private network. In either case though, you still need to set up your network interfaces to bind to something other than localhost.
Setting the bind address is quite easy and can be done on the command line with either the standalone.sh or domain.sh boot scripts discussed in the Choosing an Operating Mode chapter.
$ standalone.sh -b 192.168.0.5
The -b switch sets the IP bind address for any public interfaces.
Alternatively, if you don’t want to set the bind address at the command line, you can edit the profile configuration of your deployment. Open up the profile configuration file (standalone.xml or domain.xml depending on your operating mode) and look for the interfaces XML block.
    <interfaces>
        <interface name="management">
            <inet-address value="${jboss.bind.address.management:127.0.0.1}"/>
        </interface>
        <interface name="public">
            <inet-address value="${jboss.bind.address:127.0.0.1}"/>
        </interface>
    </interfaces>
The public interface corresponds to subsystems creating sockets that are available publicly. An example of one of these subsystems is the web layer which serves up the authentication endpoints of Red Hat Single Sign-On. The management interface corresponds to sockets opened up by the management layer of the JBoss EAP. Specifically the sockets which allow you to use the jboss-cli.sh command line interface and the JBoss EAP web console.
In looking at the public interface you see that it has a special string ${jboss.bind.address:127.0.0.1}. This string denotes a value 127.0.0.1 that can be overridden on the command line by setting a Java system property, i.e.:
$ domain.sh -Djboss.bind.address=192.168.0.5
The -b is just a shorthand notation for this command. So, you can either change the bind address value directly in the profile config, or change it on the command line when you boot up.
There are many more options available when setting up interface definitions. For more information, see the network interface in the JBoss EAP Configuration Guide.
8.2. Socket port bindings
The ports opened for each socket have a pre-defined default that can be overridden at the command line or within configuration. To illustrate this configuration, let’s pretend you are running in standalone mode and open up the …/standalone/configuration/standalone.xml. Search for socket-binding-group.
    <socket-binding-group name="standard-sockets" default-interface="public" port-offset="${jboss.socket.binding.port-offset:0}">
        <socket-binding name="management-http" interface="management" port="${jboss.management.http.port:9990}"/>
        <socket-binding name="management-https" interface="management" port="${jboss.management.https.port:9993}"/>
        <socket-binding name="ajp" port="${jboss.ajp.port:8009}"/>
        <socket-binding name="http" port="${jboss.http.port:8080}"/>
        <socket-binding name="https" port="${jboss.https.port:8443}"/>
        <socket-binding name="txn-recovery-environment" port="4712"/>
        <socket-binding name="txn-status-manager" port="4713"/>
        <outbound-socket-binding name="mail-smtp">
            <remote-destination host="localhost" port="25"/>
        </outbound-socket-binding>
    </socket-binding-group>
socket-bindings define socket connections that will be opened by the server. These bindings specify the interface (bind address) they use as well as what port number they will open. The ones you will be most interested in are:
- http
- Defines the port used for Red Hat Single Sign-On HTTP connections
- https
- Defines the port used for Red Hat Single Sign-On HTTPS connections
- ajp
-
This socket binding defines the port used for the AJP protocol. This protocol is used by Apache HTTPD server in conjunction
mod-clusterwhen you are using Apache HTTPD as a load balancer. - management-http
- Defines the HTTP connection used by JBoss EAP CLI and web console.
When running in domain mode setting the socket configurations is a bit trickier as the example domain.xml file has multiple socket-binding-groups defined. If you scroll down to the server-group definitions you can see what socket-binding-group is used for each server-group.
domain socket bindings
    <server-groups>
        <server-group name="load-balancer-group" profile="load-balancer">
            ...
            <socket-binding-group ref="load-balancer-sockets"/>
        </server-group>
        <server-group name="auth-server-group" profile="auth-server-clustered">
            ...
            <socket-binding-group ref="ha-sockets"/>
        </server-group>
    </server-groups>
There are many more options available when setting up socket-binding-group definitions. For more information, see the socket binding group in the JBoss EAP Configuration Guide.
8.3. HTTPS/SSL
Red Hat Single Sign-On is not set up by default to handle SSL/HTTPS. It is highly recommended that you either enable SSL on the Red Hat Single Sign-On server itself or on a reverse proxy in front of the Red Hat Single Sign-On server.
This default behavior is defined by the SSL/HTTPS mode of each Red Hat Single Sign-On realm. This is discussed in more detail in the Server Administration Guide, but let’s give some context and a brief overview of these modes.
- external requests
-
Red Hat Single Sign-On can run out of the box without SSL so long as you stick to private IP addresses like
localhost,127.0.0.1,10.x.x.x,192.168.x.x, and172.16.x.x. If you don’t have SSL/HTTPS configured on the server or you try to access Red Hat Single Sign-On over HTTP from a non-private IP adress you will get an error. - none
- Red Hat Single Sign-On does not require SSL. This should really only be used in development when you are playing around with things.
- all requests
- Red Hat Single Sign-On requires SSL for all IP addresses.
The SSL mode for each realm can be configured in the Red Hat Single Sign-On admin console.
8.4. Enabling HTTPS/SSL for the Red Hat Single Sign-On server
If you are not using a reverse proxy or load balancer to handle HTTPS traffic for you, you’ll need to enable HTTPS for the Red Hat Single Sign-On server. This involves
- Obtaining or generating a keystore that contains the private key and certificate for SSL/HTTP traffic
- Configuring the Red Hat Single Sign-On server to use this keypair and certificate.
8.4.1. Creating the Certificate and Java Keystore
In order to allow HTTPS connections, you need to obtain a self signed or third-party signed certificate and import it into a Java keystore before you can enable HTTPS in the web container where you are deploying the Red Hat Single Sign-On Server.
8.4.1.1. Self Signed Certificate
In development, you will probably not have a third party signed certificate available to test a Red Hat Single Sign-On deployment so you’ll need to generate a self-signed one using the keytool utility that comes with the Java JDK.
$ keytool -genkey -alias localhost -keyalg RSA -keystore keycloak.jks -validity 10950
    Enter keystore password: secret
    Re-enter new password: secret
    What is your first and last name?
    [Unknown]:  localhost
    What is the name of your organizational unit?
    [Unknown]:  Keycloak
    What is the name of your organization?
    [Unknown]:  Red Hat
    What is the name of your City or Locality?
    [Unknown]:  Westford
    What is the name of your State or Province?
    [Unknown]:  MA
    What is the two-letter country code for this unit?
    [Unknown]:  US
    Is CN=localhost, OU=Keycloak, O=Test, L=Westford, ST=MA, C=US correct?
    [no]:  yes
When you see the question What is your first and last name ?, supply the DNS name of the machine where you are installing the server. For testing purposes, localhost should be used. After executing this command, the keycloak.jks file will be generated in the same directory as you executed the keytool command in.
If you want a third-party signed certificate, but don’t have one, you can obtain one for free at cacert.org. However, you first need to use the following procedure.
Procedure
Generate a Certificate Request:
$ keytool -certreq -alias yourdomain -keystore keycloak.jks > keycloak.careq
Where
yourdomainis a DNS name for which this certificate is generated. Keytool generates the request:-----BEGIN NEW CERTIFICATE REQUEST----- MIIC2jCCAcICAQAwZTELMAkGA1UEBhMCVVMxCzAJBgNVBAgTAk1BMREwDwYDVQQHEwhXZXN0Zm9y ZDEQMA4GA1UEChMHUmVkIEhhdDEQMA4GA1UECxMHUmVkIEhhdDESMBAGA1UEAxMJbG9jYWxob3N0 MIIBIjANBgkqhkiG9w0BAQEFAAOCAQ8AMIIBCgKCAQEAr7kck2TaavlEOGbcpi9c0rncY4HhdzmY Ax2nZfq1eZEaIPqI5aTxwQZzzLDK9qbeAd8Ji79HzSqnRDxNYaZu7mAYhFKHgixsolE3o5Yfzbw1 29RvyeUVe+WZxv5oo9wolVVpdSINIMEL2LaFhtX/c1dqiqYVpfnvFshZQaIg2nL8juzZcBjj4as H98gIS7khql/dkZKsw9NLvyxgJvp7PaXurX29fNf3ihG+oFrL22oFyV54BWWxXCKU/GPn61EGZGw Ft2qSIGLdctpMD1aJR2bcnlhEjZKDksjQZoQ5YMXaAGkcYkG6QkgrocDE2YXDbi7GIdf9MegVJ35 2DQMpwIDAQABoDAwLgYJKoZIhvcNAQkOMSEwHzAdBgNVHQ4EFgQUQwlZJBA+fjiDdiVzaO9vrE/i n2swDQYJKoZIhvcNAQELBQADggEBAC5FRvMkhal3q86tHPBYWBuTtmcSjs4qUm6V6f63frhveWHf PzRrI1xH272XUIeBk0gtzWo0nNZnf0mMCtUBbHhhDcG82xolikfqibZijoQZCiGiedVjHJFtniDQ 9bMDUOXEMQ7gHZg5q6mJfNG9MbMpQaUVEEFvfGEQQxbiFK7hRWU8S23/d80e8nExgQxdJWJ6vd0X MzzFK6j4Dj55bJVuM7GFmfdNC52pNOD5vYe47Aqh8oajHX9XTycVtPXl45rrWAH33ftbrS8SrZ2S vqIFQeuLL3BaHwpl3t7j2lMWcK1p80laAxEASib/fAwrRHpLHBXRcq6uALUOZl4Alt8= -----END NEW CERTIFICATE REQUEST-----
Send this CA request to your Certificate Authority (CA).
The CA will issue you a signed certificate and send it to you.
Obtain and import the root certificate of the CA.
You can download the cert from CA (in other words: root.crt) and import as follows:
$ keytool -import -keystore keycloak.jks -file root.crt -alias root
Import your new CA generated certificate to your keystore:
$ keytool -import -alias yourdomain -keystore keycloak.jks -file your-certificate.cer
8.4.2. Configuring Red Hat Single Sign-On to use the keystore
Now that you have a Java keystore with the appropriate certificates, you need to configure your Red Hat Single Sign-On installation to use it. Use the configuration procedure that applies to your installation:
8.4.2.1. JBoss Security Legacy
Procedure
- Edit the standalone.xml, standalone-ha.xml, or host.xml file to use the keystore and enable HTTPS.
Either move the keystore file to the configuration directory of your deployment or the file in a location you choose and provide an absolute path to it.
If you are using absolute paths, remove the optional
relative-toparameter from your configuration (See operating mode).-
Create a batch file named
sso_legacy.cliin thebindirectory of JBoss EAP. Add the following content to the batch file:
# Start batching commands

batch

/core-service=management/security-realm=UndertowRealm:add()
/core-service=management/security-realm=UndertowRealm/server-identity=ssl:add(keystore-path=keycloak.jks, keystore-relative-to=jboss.server.config.dir, keystore-password=secret)
/subsystem=undertow/server=default-server/https-listener=https:write-attribute(name=security-realm, value=UndertowRealm)

# Run the batch commands

run-batch
- Start the Red Hat Single Sign-On server.
-
Change to the
bindirectory of JBoss EAP. Run the following script.
$ sh jboss-cli.sh --connect --file=sso_legacy.cli

The batch executed successfully
process-state: reload-required
-
Restart the Red Hat Single Sign-On server so that the
sso_legacy.clichanges take effect.
8.4.2.2. Elytron TLS v1.2
Procedure
-
Create a batch file named
sso.cliin thebindirectory of JBoss EAP. Add the following content to the batch file:
# Start batching commands batch # Add the keystore, key manager and ssl context configuration in the elytron subsystem /subsystem=elytron/key-store=httpsKS:add(relative-to=jboss.server.config.dir,path=keycloak.jks,credential-reference={clear-text=secret},type=JKS) /subsystem=elytron/key-manager=httpsKM:add(key-store=httpsKS,credential-reference={clear-text=secret}) /subsystem=elytron/server-ssl-context=httpsSSC:add(key-manager=httpsKM,protocols=["TLSv1.2"]) # Change the undertow subsystem configuration to use the ssl context defined in the previous step for https /subsystem=undertow/server=default-server/https-listener=https:undefine-attribute(name=security-realm) /subsystem=undertow/server=default-server/https-listener=https:write-attribute(name=ssl-context, value=httpsSSC) # Run the batch commands run-batch- Start the Red Hat Single Sign-On server.
-
Change to the
bindirectory of JBoss EAP. Run the following script.
$ sh jboss-cli.sh --connect --file=sso.cli

The batch executed successfully
process-state: reload-required
-
Restart the Red Hat Single Sign-On server so that the
sso.clichanges take effect.
For more information on configuring TLS, refer to the WildFly documentation.
8.4.2.3. Elytron TLS 1.3
Procedure
-
Create a batch file named
sso.cliin thebindirectory of JBoss EAP. Add the following content to the batch file:
batch # Add the keystore, key manager and ssl context configuration in the elytron subsystem /subsystem=elytron/key-store=httpsKS:add(relative-to=jboss.server.config.dir,path=keycloak.jks,credential-reference={clear-text=secret},type=JKS) /subsystem=elytron/key-manager=httpsKM:add(key-store=httpsKS,credential-reference={clear-text=secret}) /subsystem=elytron/server-ssl-context=httpsSSC:add(key-manager=httpsKM,protocols=["TLSv1.3"]) /subsystem=elytron/server-ssl-context=httpsSSC:write-attribute(name=cipher-suite-names,value=TLS_AES_256_GCM_SHA384:TLS_CHACHA20_POLY1305_SHA256:TLS_AES_128_GCM_SHA256) # Change the undertow subsystem configuration to use the ssl context defined in the previous step for https /subsystem=undertow/server=default-server/https-listener=https:undefine-attribute(name=security-realm) /subsystem=undertow/server=default-server/https-listener=https:write-attribute(name=ssl-context, value=httpsSSC) # Run the batch commands run-batch- Start the Red Hat Single Sign-On server.
-
Change to the
bindirectory of JBoss EAP. Run the following script.
$ sh jboss-cli.sh --connect --file=sso.cli

The batch executed successfully
process-state: reload-required
-
Restart the Red Hat Single Sign-On server so that the
sso.clichanges take effect.
For more information on configuring TLS, refer to the WildFly documentation.
8.5. Outgoing HTTP requests
The Red Hat Single Sign-On server often needs to make non-browser HTTP requests to the applications and services it secures. The auth server manages these outgoing connections by maintaining an HTTP client connection pool. There are some things you’ll need to configure in standalone.xml, standalone-ha.xml, or domain.xml. The location of this file depends on your operating mode.
HTTP client Config example
<spi name="connectionsHttpClient">
    <provider name="default" enabled="true">
        <properties>
            <property name="connection-pool-size" value="256"/>
        </properties>
    </provider>
</spi>
Possible configuration options are:
- establish-connection-timeout-millis
- Timeout for establishing a socket connection.
- socket-timeout-millis
- If an outgoing request does not receive data for this amount of time, timeout the connection.
- connection-pool-size
- How many connections can be in the pool (128 by default).
- max-pooled-per-route
- How many connections can be pooled per host (64 by default).
- connection-ttl-millis
- Maximum connection time to live in milliseconds. Not set by default.
- max-connection-idle-time-millis
-
Maximum time the connection might stay idle in the connection pool (900 seconds by default). Will start background cleaner thread of Apache HTTP client. Set to
-1to disable this checking and the background thread. - disable-cookies
-
trueby default. When set to true, this will disable any cookie caching. - client-keystore
- This is the file path to a Java keystore file. This keystore contains client certificate for two-way SSL.
- client-keystore-password
-
Password for the client keystore. This is REQUIRED if
client-keystoreis set. - client-key-password
-
Password for the client’s key. This is REQUIRED if
client-keystoreis set. - proxy-mappings
- Denotes proxy configurations for outgoing HTTP requests. See the section on Proxy Mappings for Outgoing HTTP Requests for more details.
- disable-trust-manager
-
If an outgoing request requires HTTPS and this config option is set to
trueyou do not have to specify a truststore. This setting should only be used during development and never in production as it will disable verification of SSL certificates. This is OPTIONAL. The default value isfalse.
8.5.1. Proxy mappings for outgoing HTTP requests
Outgoing HTTP requests sent by Red Hat Single Sign-On can optionally use a proxy server based on a comma delimited list of proxy-mappings. A proxy-mapping denotes the combination of a regex based hostname pattern and a proxy-uri in the form of hostnamePattern;proxyUri, e.g.:
.*\.(google|googleapis)\.com;http://www-proxy.acme.com:8080
To determine the proxy for an outgoing HTTP request the target hostname is matched against the configured hostname patterns. The first matching pattern determines the proxy-uri to use. If none of the configured patterns match for the given hostname then no proxy is used.
If the proxy server requires authentication, include the proxy user’s credentials in this format username:password@. For example:
.*\.(google|googleapis)\.com;http://user01:pas2w0rd@www-proxy.acme.com:8080
The special value NO_PROXY for the proxy-uri can be used to indicate that no proxy should be used for hosts matching the associated hostname pattern. It is possible to specify a catch-all pattern at the end of the proxy-mappings to define a default proxy for all outgoing requests.
The following example demonstrates the proxy-mapping configuration.
# All requests to Google APIs should use http://www-proxy.acme.com:8080 as proxy
.*\.(google|googleapis)\.com;http://www-proxy.acme.com:8080

# All requests to internal systems should use no proxy
.*\.acme\.com;NO_PROXY

# All other requests should use http://fallback:8080 as proxy
.*;http://fallback:8080
This can be configured via the following jboss-cli command. Note that you need to properly escape the regex-pattern as shown below.
echo SETUP: Configure proxy routes for HttpClient SPI

# In case there is no connectionsHttpClient definition yet
/subsystem=keycloak-server/spi=connectionsHttpClient/provider=default:add(enabled=true)

# Configure the proxy-mappings
/subsystem=keycloak-server/spi=connectionsHttpClient/provider=default:write-attribute(name=properties.proxy-mappings,value=[".*\\.(google|googleapis)\\.com;http://www-proxy.acme.com:8080",".*\\.acme\\.com;NO_PROXY",".*;http://fallback:8080"])
The jboss-cli command results in the following subsystem configuration. Note that one needs to encode " characters with ".
<spi name="connectionsHttpClient">
<provider name="default" enabled="true">
<properties>
<property
name="proxy-mappings"
value="[".*\\.(google|googleapis)\\.com;http://www-proxy.acme.com:8080",".*\\.acme\\.com;NO_PROXY",".*;http://fallback:8080"]"/>
</properties>
</provider>
</spi>8.5.2. Using standard environment variables
Alternatively, it is possible to use standard environment variables to configure the proxy mappings, that is HTTP_PROXY, HTTPS_PROXY and NO_PROXY variables.
The HTTP_PROXY and HTTPS_PROXY variables represent the proxy server that should be used for all outgoing HTTP requests. Red Hat Single Sign-On does not differ between the two. If both are specified, HTTPS_PROXY takes the precedence regardless of the actual scheme the proxy server uses.
The NO_PROXY variable is used to define a comma separated list of hostnames that should not use the proxy. If a hostname is specified, all its prefixes (subdomains) are also excluded from using proxy.
Take the following example:
HTTPS_PROXY=https://www-proxy.acme.com:8080
NO_PROXY=google.com,login.facebook.com
In this example, all outgoing HTTP requests will use https://www-proxy.acme.com:8080 proxy server except for requests to for example login.google.com, google.com, auth.login.facebook.com. However, for example groups.facebook.com will be routed through the proxy.
The environment variables can be lowercase or uppercase. Lowercase takes precedence. For example if both HTTP_PROXY and http_proxy are defined, http_proxy will be used.
If proxy mappings are defined using the subsystem configuration (as described above), the environment variables are not considered by Red Hat Single Sign-On. This scenario applies in case no proxy server should be used despite having for example HTTP_PROXY environment variable defined. To do so, you can specify a generic no proxy route as follows:
<spi name="connectionsHttpClient">
    <provider name="default" enabled="true">
        <properties>
            <property name="proxy-mappings" value=".*;NO_PROXY"/>
        </properties>
    </provider>
</spi>
8.5.3. Outgoing HTTPS request truststore
When Red Hat Single Sign-On invokes on remote HTTPS endpoints, it has to validate the remote server’s certificate in order to ensure it is connecting to a trusted server. This is necessary in order to prevent man-in-the-middle attacks. The certificates of these remote server’s or the CA that signed these certificates must be put in a truststore. This truststore is managed by the Red Hat Single Sign-On server.
The configuration of the trustore is always done by the Red Hat Single Sign-On truststore SPI. The instructions in this section apply if the keystore was configured bye the JBoss Security Legacy or Elytron TLS.
The truststore is used when connecting securely to identity brokers, LDAP identity providers, when sending emails, and for backchannel communication with client applications.
By default, a truststore provider is not configured, and any https connections fall back to standard java truststore configuration as described in Java’s JSSE Reference Guide. If there is no trust established, then these outgoing HTTPS requests will fail.
You can use keytool to create a new truststore file or add trusted host certificates to an existing one:
$ keytool -import -alias HOSTDOMAIN -keystore truststore.jks -file host-certificate.cer
The truststore is configured within the standalone.xml, standalone-ha.xml, or domain.xml file in your distribution. The location of this file depends on your operating mode. You can add your truststore configuration by using the following template:
<spi name="truststore">
    <provider name="file" enabled="true">
        <properties>
            <property name="file" value="path to your .jks file containing public certificates"/>
            <property name="password" value="password"/>
            <property name="hostname-verification-policy" value="WILDCARD"/>
        </properties>
    </provider>
</spi>
Possible configuration options for this setting are:
- file
- The path to a Java keystore file. HTTPS requests need a way to verify the host of the server they are talking to. This is what the trustore does. The keystore contains one or more trusted host certificates or certificate authorities. This truststore file should only contain public certificates of your secured hosts. This is REQUIRED if any of these properties are defined.
- password
- Password of the keystore. This is REQUIRED if any of these properties are defined.
- hostname-verification-policy
-
WILDCARDby default. For HTTPS requests, this verifies the hostname of the server’s certificate.ANYmeans that the hostname is not verified.WILDCARDAllows wildcards in subdomain names i.e. *.foo.com.STRICTCN must match hostname exactly.
Chapter 9. Configuring Red Hat Single Sign-On to run in a cluster
To configure Red Hat Single Sign-On to run in a cluster, you perform these actions:
- Pick an operation mode
- Configure a shared external database
- Set up a load balancer
- Supplying a private network that supports IP multicast
Picking an operation mode and configuring a shared database have been discussed earlier in this guide. This chapter describes setting up a load balancer and supplying a private network as well as booting up a host in the cluster.
It is possible to cluster Red Hat Single Sign-On without IP Multicast, but this topic is beyond the scope of this guide. For more information, see JGroups chapter of the JBoss EAP Configuration Guide.
9.1. Recommended network architecture
The recommended network architecture for deploying Red Hat Single Sign-On is to set up an HTTP/HTTPS load balancer on a public IP address that routes requests to Red Hat Single Sign-On servers sitting on a private network. This isolates all clustering connections and provides a nice means of protecting the servers.
By default, there is nothing to prevent unauthorized nodes from joining the cluster and broadcasting multicast messages. This is why cluster nodes should be in a private network, with a firewall protecting them from outside attacks.
9.2. Clustering example
Red Hat Single Sign-On does come with an out of the box clustering demo that leverages domain mode. Review the Clustered Domain Example chapter for more details.
9.3. Setting Up a load balancer or proxy
This section discusses a number of things you need to configure before you can put a reverse proxy or load balancer in front of your clustered Red Hat Single Sign-On deployment. It also covers configuring the built-in load balancer that was Clustered Domain Example.
The following diagram illustrates the use of a load balancer. In this example, the load balancer serves as a reverse proxy between three clients and a cluster of three Red Hat Single Sign-On servers.
Example Load Balancer Diagram
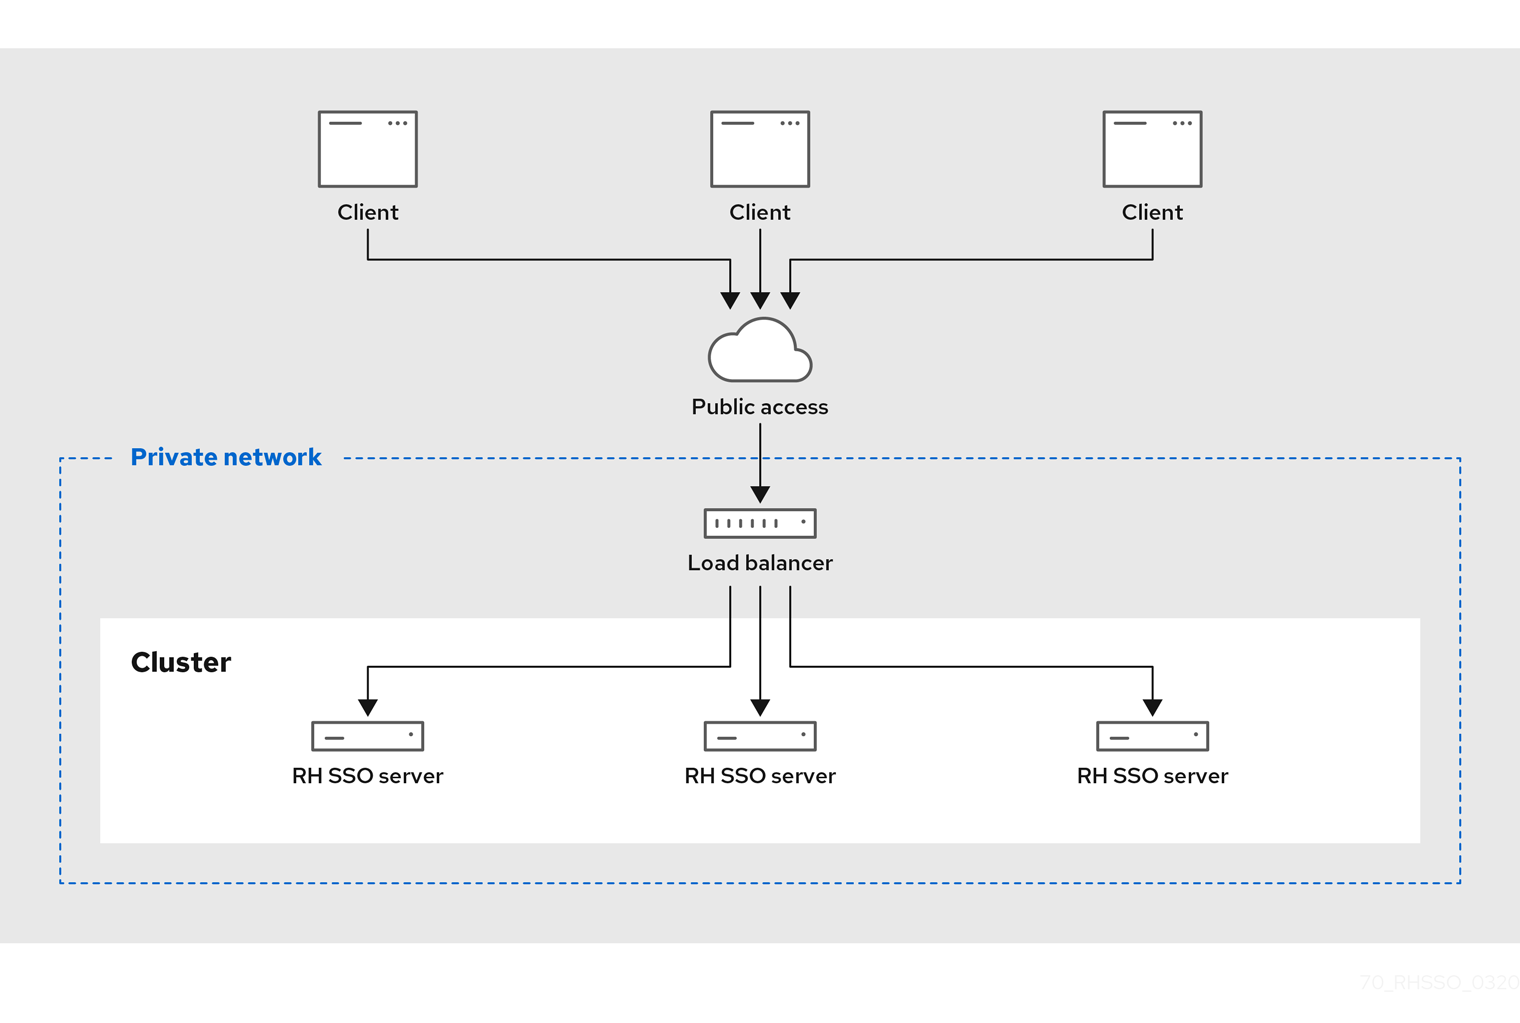
9.3.1. Identifying client IP addresses
A few features in Red Hat Single Sign-On rely on the fact that the remote address of the HTTP client connecting to the authentication server is the real IP address of the client machine. Examples include:
- Event logs - a failed login attempt would be logged with the wrong source IP address
- SSL required - if the SSL required is set to external (the default) it should require SSL for all external requests
- Authentication flows - a custom authentication flow that uses the IP address to for example show OTP only for external requests
- Dynamic Client Registration
This can be problematic when you have a reverse proxy or loadbalancer in front of your Red Hat Single Sign-On authentication server. The usual setup is that you have a frontend proxy sitting on a public network that load balances and forwards requests to backend Red Hat Single Sign-On server instances located in a private network. There is some extra configuration you have to do in this scenario so that the actual client IP address is forwarded to and processed by the Red Hat Single Sign-On server instances. Specifically:
-
Configure your reverse proxy or loadbalancer to properly set
X-Forwarded-ForandX-Forwarded-ProtoHTTP headers. - Configure your reverse proxy or loadbalancer to preserve the original 'Host' HTTP header.
-
Configure the authentication server to read the client’s IP address from
X-Forwarded-Forheader.
Configuring your proxy to generate the X-Forwarded-For and X-Forwarded-Proto HTTP headers and preserving the original Host HTTP header is beyond the scope of this guide. Take extra precautions to ensure that the X-Forwarded-For header is set by your proxy. If your proxy isn’t configured correctly, then rogue clients can set this header themselves and trick Red Hat Single Sign-On into thinking the client is connecting from a different IP address than it actually is. This becomes really important if you are doing any black or white listing of IP addresses.
Beyond the proxy itself, there are a few things you need to configure on the Red Hat Single Sign-On side of things. If your proxy is forwarding requests via the HTTP protocol, then you need to configure Red Hat Single Sign-On to pull the client’s IP address from the X-Forwarded-For header rather than from the network packet. To do this, open up the profile configuration file (standalone.xml, standalone-ha.xml, or domain.xml depending on your operating mode) and look for the urn:jboss:domain:undertow:12.0 XML block.
X-Forwarded-For HTTP Config
<subsystem xmlns="urn:jboss:domain:undertow:12.0">
   <buffer-cache name="default"/>
   <server name="default-server">
      <ajp-listener name="ajp" socket-binding="ajp"/>
      <http-listener name="default" socket-binding="http" redirect-socket="https"
          proxy-address-forwarding="true"/>
      ...
   </server>
   ...
</subsystem>
Add the proxy-address-forwarding attribute to the http-listener element. Set the value to true.
If your proxy is using the AJP protocol instead of HTTP to forward requests (i.e. Apache HTTPD + mod-cluster), then you have to configure things a little differently. Instead of modifying the http-listener, you need to add a filter to pull this information from the AJP packets.
X-Forwarded-For AJP Config
<subsystem xmlns="urn:jboss:domain:undertow:12.0">
     <buffer-cache name="default"/>
     <server name="default-server">
         <ajp-listener name="ajp" socket-binding="ajp"/>
         <http-listener name="default" socket-binding="http" redirect-socket="https"/>
         <host name="default-host" alias="localhost">
             ...
             <filter-ref name="proxy-peer"/>
         </host>
     </server>
        ...
     <filters>
         ...
         <filter name="proxy-peer"
                 class-name="io.undertow.server.handlers.ProxyPeerAddressHandler"
                 module="io.undertow.core" />
     </filters>
 </subsystem>
9.3.2. Enabling HTTPS/SSL with a reverse proxy
Assuming that your reverse proxy doesn’t use port 8443 for SSL you also need to configure to what port the HTTPS traffic is redirected.
<subsystem xmlns="urn:jboss:domain:undertow:12.0">
    ...
    <http-listener name="default" socket-binding="http"
        proxy-address-forwarding="true" redirect-socket="proxy-https"/>
    ...
</subsystem>
Procedure
-
Add the
redirect-socketattribute to thehttp-listenerelement. The value should beproxy-httpswhich points to a socket binding you also need to define. Add a new
socket-bindingelement to thesocket-binding-groupelement:<socket-binding-group name="standard-sockets" default-interface="public" port-offset="${jboss.socket.binding.port-offset:0}"> ... <socket-binding name="proxy-https" port="443"/> ... </socket-binding-group>
9.3.3. Verifying the configuration
You can verify the reverse proxy or load balancer configuration
Procedure
Open the path
/auth/realms/master/.well-known/openid-configurationthrough the reverse proxy.For example if the reverse proxy address is
https://acme.com/then open the URLhttps://acme.com/auth/realms/master/.well-known/openid-configuration. This will show a JSON document listing a number of endpoints for Red Hat Single Sign-On.- Make sure the endpoints starts with the address (scheme, domain and port) of your reverse proxy or load balancer. By doing this you make sure that Red Hat Single Sign-On is using the correct endpoint.
Verify that Red Hat Single Sign-On sees the correct source IP address for requests.
To check this, you can try to login to the Admin Console with an invalid username and/or password. This should show a warning in the server log something like this:
08:14:21,287 WARN XNIO-1 task-45 [org.keycloak.events] type=LOGIN_ERROR, realmId=master, clientId=security-admin-console, userId=8f20d7ba-4974-4811-a695-242c8fbd1bf8, ipAddress=X.X.X.X, error=invalid_user_credentials, auth_method=openid-connect, auth_type=code, redirect_uri=http://localhost:8080/auth/admin/master/console/?redirect_fragment=%2Frealms%2Fmaster%2Fevents-settings, code_id=a3d48b67-a439-4546-b992-e93311d6493e, username=admin
-
Check that the value of
ipAddressis the IP address of the machine you tried to login with and not the IP address of the reverse proxy or load balancer.
9.3.4. Using the built-in load balancer
This section covers configuring the built-in load balancer that is discussed in the Clustered Domain Example.
The Clustered Domain Example is only designed to run on one machine. To bring up a slave on another host, you’ll need to
- Edit the domain.xml file to point to your new host slave
- Copy the server distribution. You don’t need the domain.xml, host.xml, or host-master.xml files. Nor do you need the standalone/ directory.
- Edit the host-slave.xml file to change the bind addresses used or override them on the command line
Procedure
- Open domain.xml so you can registering the new host slave with the load balancer configuration.
Go to the undertow configuration in the
load-balancerprofile. Add a newhostdefinition calledremote-host3within thereverse-proxyXML block.domain.xml reverse-proxy config
<subsystem xmlns="urn:jboss:domain:undertow:12.0">
  ...
  <handlers>
      <reverse-proxy name="lb-handler">
         <host name="host1" outbound-socket-binding="remote-host1" scheme="ajp" path="/" instance-id="myroute1"/>
         <host name="host2" outbound-socket-binding="remote-host2" scheme="ajp" path="/" instance-id="myroute2"/>
         <host name="remote-host3" outbound-socket-binding="remote-host3" scheme="ajp" path="/" instance-id="myroute3"/>
      </reverse-proxy>
  </handlers>
  ...
</subsystem>
The
output-socket-bindingis a logical name pointing to asocket-bindingconfigured later in the domain.xml file. Theinstance-idattribute must also be unique to the new host as this value is used by a cookie to enable sticky sessions when load balancing.Go down to the
load-balancer-socketssocket-binding-groupand add theoutbound-socket-bindingforremote-host3.This new binding needs to point to the host and port of the new host.
domain.xml outbound-socket-binding
<socket-binding-group name="load-balancer-sockets" default-interface="public">
    ...
    <outbound-socket-binding name="remote-host1">
        <remote-destination host="localhost" port="8159"/>
    </outbound-socket-binding>
    <outbound-socket-binding name="remote-host2">
        <remote-destination host="localhost" port="8259"/>
    </outbound-socket-binding>
    <outbound-socket-binding name="remote-host3">
        <remote-destination host="192.168.0.5" port="8259"/>
    </outbound-socket-binding>
</socket-binding-group>
9.3.4.1. Master bind addresses
Next thing you’ll have to do is to change the public and management bind addresses for the master host. Either edit the domain.xml file as discussed in the Bind Addresses chapter or specify these bind addresses on the command line as follows:
$ domain.sh --host-config=host-master.xml -Djboss.bind.address=192.168.0.2 -Djboss.bind.address.management=192.168.0.2
9.3.4.2. Host slave bind addresses
Next you’ll have to change the public, management, and domain controller bind addresses (jboss.domain.master-address). Either edit the host-slave.xml file or specify them on the command line as follows:
$ domain.sh --host-config=host-slave.xml
     -Djboss.bind.address=192.168.0.5
      -Djboss.bind.address.management=192.168.0.5
       -Djboss.domain.master.address=192.168.0.2
The values of jboss.bind.address and jboss.bind.address.management pertain to the host slave’s IP address. The value of jboss.domain.master.address needs to be the IP address of the domain controller, which is the management address of the master host.
Additional resources
- See the load balancing section in the JBoss EAP Configuration Guide for information how to use other software-based load balancers.
9.4. Sticky sessions
Typical cluster deployment consists of the load balancer (reverse proxy) and 2 or more Red Hat Single Sign-On servers on private network. For performance purposes, it may be useful if load balancer forwards all requests related to particular browser session to the same Red Hat Single Sign-On backend node.
The reason is, that Red Hat Single Sign-On is using Infinispan distributed cache under the covers for save data related to current authentication session and user session. The Infinispan distributed caches are configured with one owner by default. That means that particular session is saved just on one cluster node and the other nodes need to lookup the session remotely if they want to access it.
For example if authentication session with ID 123 is saved in the Infinispan cache on node1, and then node2 needs to lookup this session, it needs to send the request to node1 over the network to return the particular session entity.
It is beneficial if particular session entity is always available locally, which can be done with the help of sticky sessions. The workflow in the cluster environment with the public frontend load balancer and two backend Red Hat Single Sign-On nodes can be like this:
- User sends initial request to see the Red Hat Single Sign-On login screen
- This request is served by the frontend load balancer, which forwards it to some random node (eg. node1). Strictly said, the node doesn’t need to be random, but can be chosen according to some other criterias (client IP address etc). It all depends on the implementation and configuration of underlying load balancer (reverse proxy).
- Red Hat Single Sign-On creates authentication session with random ID (eg. 123) and saves it to the Infinispan cache.
-
Infinispan distributed cache assigns the primary owner of the session based on the hash of session ID. See Infinispan documentation for more details around this. Let’s assume that Infinispan assigned
node2to be the owner of this session. -
Red Hat Single Sign-On creates the cookie
AUTH_SESSION_IDwith the format like<session-id>.<owner-node-id>. In our example case, it will be123.node2. - Response is returned to the user with the Red Hat Single Sign-On login screen and the AUTH_SESSION_ID cookie in the browser
From this point, it is beneficial if load balancer forwards all the next requests to the node2 as this is the node, who is owner of the authentication session with ID 123 and hence Infinispan can lookup this session locally. After authentication is finished, the authentication session is converted to user session, which will be also saved on node2 because it has same ID 123 .
The sticky session is not mandatory for the cluster setup, however it is good for performance for the reasons mentioned above. You need to configure your loadbalancer to sticky over the AUTH_SESSION_ID cookie. How exactly do this is dependent on your loadbalancer.
It is recommended on the Red Hat Single Sign-On side to use the system property jboss.node.name during startup, with the value corresponding to the name of your route. For example, -Djboss.node.name=node1 will use node1 to identify the route. This route will be used by Infinispan caches and will be attached to the AUTH_SESSION_ID cookie when the node is the owner of the particular key. Here is an example of the start up command using this system property:
cd $RHSSO_NODE1
./standalone.sh -c standalone-ha.xml -Djboss.socket.binding.port-offset=100 -Djboss.node.name=node1
Typically in production environment the route name should use the same name as your backend host, but it is not required. You can use a different route name. For example, if you want to hide the host name of your Red Hat Single Sign-On server inside your private network.
9.4.1. Disable adding the route
Some load balancers can be configured to add the route information by themselves instead of relying on the back end Red Hat Single Sign-On node. However, as described above, adding the route by the Red Hat Single Sign-On is recommended. This is because when done this way performance improves, since Red Hat Single Sign-On is aware of the entity that is the owner of particular session and can route to that node, which is not necessarily the local node.
You are permitted to disable adding route information to the AUTH_SESSION_ID cookie by Red Hat Single Sign-On, if you prefer, by adding the following into your RHSSO_HOME/standalone/configuration/standalone-ha.xml file in the Red Hat Single Sign-On subsystem configuration:
<subsystem xmlns="urn:jboss:domain:keycloak-server:1.1">
  ...
    <spi name="stickySessionEncoder">
        <provider name="infinispan" enabled="true">
            <properties>
                <property name="shouldAttachRoute" value="false"/>
            </properties>
        </provider>
    </spi>

</subsystem>
9.5. Setting up multicast networking
The default clustering support needs IP Multicast. Multicast is a network broadcast protocol. This protocol is used at boot time to discover and join the cluster. It is also used to broadcast messages for the replication and invalidation of distributed caches used by Red Hat Single Sign-On.
The clustering subsystem for Red Hat Single Sign-On runs on the JGroups stack. Out of the box, the bind addresses for clustering are bound to a private network interface with 127.0.0.1 as default IP address.
Procedure
Edit your the standalone-ha.xml or domain.xml sections discussed in the Bind Address chapter.
private network config
    <interfaces>
        ...
        <interface name="private">
            <inet-address value="${jboss.bind.address.private:127.0.0.1}"/>
        </interface>
    </interfaces>
    <socket-binding-group name="standard-sockets" default-interface="public" port-offset="${jboss.socket.binding.port-offset:0}">
        ...
        <socket-binding name="jgroups-mping" interface="private" port="0" multicast-address="${jboss.default.multicast.address:230.0.0.4}" multicast-port="45700"/>
        <socket-binding name="jgroups-tcp" interface="private" port="7600"/>
        <socket-binding name="jgroups-tcp-fd" interface="private" port="57600"/>
        <socket-binding name="jgroups-udp" interface="private" port="55200" multicast-address="${jboss.default.multicast.address:230.0.0.4}" multicast-port="45688"/>
        <socket-binding name="jgroups-udp-fd" interface="private" port="54200"/>
        <socket-binding name="modcluster" port="0" multicast-address="224.0.1.105" multicast-port="23364"/>
        ...
    </socket-binding-group>
Configure the
jboss.bind.address.privateandjboss.default.multicast.addressas well as the ports of the services on the clustering stack.NoteIt is possible to cluster Red Hat Single Sign-On without IP Multicast, but this topic is beyond the scope of this guide. For more information, see JGroups in the JBoss EAP Configuration Guide.
9.6. Secure cluster communication
When cluster nodes are isolated on a private network it requires access to the private network to be able to join a cluster or to view communication in the cluster. In addition you can also enable authentication and encryption for cluster communication. As long as your private network is secure it is not necessary to enable authentication and encryption. Red Hat Single Sign-On does not send very sensitive information on the cluster in either case.
If you want to enable authentication and encryption for clustering communication, see Securing a Cluster in the JBoss EAP Configuration Guide.
9.7. Serialized cluster startup
Red Hat Single Sign-On cluster nodes are allowed to boot concurrently. When Red Hat Single Sign-On server instance boots up it may do some database migration, importing, or first time initializations. A DB lock is used to prevent start actions from conflicting with one another when cluster nodes boot up concurrently.
By default, the maximum timeout for this lock is 900 seconds. If a node is waiting on this lock for more than the timeout it will fail to boot. Typically you won’t need to increase/decrease the default value, but just in case it’s possible to configure it in standalone.xml, standalone-ha.xml, or domain.xml file in your distribution. The location of this file depends on your operating mode.
<spi name="dblock">
    <provider name="jpa" enabled="true">
        <properties>
            <property name="lockWaitTimeout" value="900"/>
        </properties>
    </provider>
</spi>
9.8. Booting the cluster
Booting Red Hat Single Sign-On in a cluster depends on your operating mode
Standalone Mode
$ bin/standalone.sh --server-config=standalone-ha.xml
Domain Mode
$ bin/domain.sh --host-config=host-master.xml
$ bin/domain.sh --host-config=host-slave.xml
You may need to use additional parameters or system properties. For example, the parameter -b for the binding host or the system property jboss.node.name to specify the name of the route, as described in Sticky Sessions section.
9.9. Troubleshooting
Note that when you run a cluster, you should see message similar to this in the log of both cluster nodes:
INFO  [org.infinispan.remoting.transport.jgroups.JGroupsTransport] (Incoming-10,shared=udp)
ISPN000094: Received new cluster view: [node1/keycloak|1] (2) [node1/keycloak, node2/keycloak]
If you see just one node mentioned, it’s possible that your cluster hosts are not joined together.
Usually it’s best practice to have your cluster nodes on private network without firewall for communication among them. Firewall could be enabled just on public access point to your network instead. If for some reason you still need to have firewall enabled on cluster nodes, you will need to open some ports. Default values are UDP port 55200 and multicast port 45688 with multicast address 230.0.0.4. Note that you may need more ports opened if you want to enable additional features like diagnostics for your JGroups stack. Red Hat Single Sign-On delegates most of the clustering work to Infinispan/JGroups. For more information, see JGroups in the JBoss EAP Configuration Guide.
- If you are interested in failover support (high availability), evictions, expiration and cache tuning, see Chapter 10, Server cache configuration.
Chapter 10. Server cache configuration
Red Hat Single Sign-On has two types of caches. One type of cache sits in front of the database to decrease load on the DB and to decrease overall response times by keeping data in memory. Realm, client, role, and user metadata is kept in this type of cache. This cache is a local cache. Local caches do not use replication even if you are in the cluster with more Red Hat Single Sign-On servers. Instead, they only keep copies locally and if the entry is updated an invalidation message is sent to the rest of the cluster and the entry is evicted. There is separate replicated cache work, which task is to send the invalidation messages to the whole cluster about what entries should be evicted from local caches. This greatly reduces network traffic, makes things efficient, and avoids transmitting sensitive metadata over the wire.
The second type of cache handles managing user sessions, offline tokens, and keeping track of login failures so that the server can detect password phishing and other attacks. The data held in these caches is temporary, in memory only, but is possibly replicated across the cluster.
This chapter discusses some configuration options for these caches for both clustered and non-clustered deployments.
More advanced configuration of these caches can be found in the Infinispan section of the JBoss EAP Configuration Guide.
10.1. Eviction and expiration
There are multiple different caches configured for Red Hat Single Sign-On. There is a realm cache that holds information about secured applications, general security data, and configuration options. There is also a user cache that contains user metadata. Both caches default to a maximum of 10000 entries and use a least recently used eviction strategy. Each of them is also tied to an object revisions cache that controls eviction in a clustered setup. This cache is created implicitly and has twice the configured size. The same applies for the authorization cache, which holds the authorization data. The keys cache holds data about external keys and does not need to have dedicated revisions cache. Rather it has expiration explicitly declared on it, so the keys are periodically expired and forced to be periodically downloaded from external clients or identity providers.
The eviction policy and max entries for these caches can be configured in the standalone.xml, standalone-ha.xml, or domain.xml depending on your operating mode. In the configuration file, there is the part with infinispan subsystem, which looks similar to this:
<subsystem xmlns="urn:jboss:domain:infinispan:12.0">
    <cache-container name="keycloak">
        <local-cache name="realms">
            <object-memory size="10000"/>
        </local-cache>
        <local-cache name="users">
            <object-memory size="10000"/>
        </local-cache>
        ...
        <local-cache name="keys">
            <object-memory size="1000"/>
            <expiration max-idle="3600000"/>
        </local-cache>
        ...
    </cache-container>
To limit or expand the number of allowed entries simply add or edit the object element or the expiration element of particular cache configuration.
In addition, there are also separate caches sessions, clientSessions, offlineSessions, offlineClientSessions, loginFailures and actionTokens. These caches are distributed in cluster environment and they are unbounded in size by default. If they are bounded, it would then be possible that some sessions will be lost. Expired sessions are cleared internally by Red Hat Single Sign-On itself to avoid growing the size of these caches without limit. If you see memory issues due to a large number of sessions, you can try to:
- Increase the size of cluster (more nodes in cluster means that sessions are spread more equally among nodes)
- Increase the memory for Red Hat Single Sign-On server process
- Decrease the number of owners to ensure that caches are saved in one single place. See Section 10.2, “Replication and failover” for more details
- Disable l1-lifespan for distributed caches. See Infinispan documentation for more details
- Decrease session timeouts, which could be done individually for each realm in Red Hat Single Sign-On admin console. But this could affect usability for end users. See Timeouts for more details.
There is an additional replicated cache, work, which is mostly used to send messages among cluster nodes; it is also unbounded by default. However, this cache should not cause any memory issues as entries in this cache are very short-lived.
10.2. Replication and failover
There are caches like sessions, authenticationSessions, offlineSessions, loginFailures and a few others (See Section 10.1, “Eviction and expiration” for more details), which are configured as distributed caches when using a clustered setup. Entries are not replicated to every single node, but instead one or more nodes is chosen as an owner of that data. If a node is not the owner of a specific cache entry it queries the cluster to obtain it. What this means for failover is that if all the nodes that own a piece of data go down, that data is lost forever. By default, Red Hat Single Sign-On only specifies one owner for data. So if that one node goes down that data is lost. This usually means that users will be logged out and will have to login again.
You can change the number of nodes that replicate a piece of data by change the owners attribute in the distributed-cache declaration.
owners
<subsystem xmlns="urn:jboss:domain:infinispan:12.0">
   <cache-container name="keycloak">
       <distributed-cache name="sessions" owners="2"/>
...
Here we’ve changed it so at least two nodes will replicate one specific user login session.
The number of owners recommended is really dependent on your deployment. If you do not care if users are logged out when a node goes down, then one owner is good enough and you will avoid replication.
It is generally wise to configure your environment to use loadbalancer with sticky sessions. It is beneficial for performance as Red Hat Single Sign-On server, where the particular request is served, will be usually the owner of the data from the distributed cache and will therefore be able to look up the data locally. See Section 9.4, “Sticky sessions” for more details.
10.3. Disabling caching
You can disable the realm or user cache.
Procedure
Edit the
standalone.xml,standalone-ha.xml, ordomain.xmlfile in your distribution.The location of this file depends on your operating mode. Here is a sample config file.
<spi name="userCache"> <provider name="default" enabled="true"/> </spi> <spi name="realmCache"> <provider name="default" enabled="true"/> </spi>-
Set the
enabledattribute to false for the cache you want to disable. - Reboot your server for this change to take effect.
10.4. Clearing cache at runtime
You can clear the realm cache, user cache, or the external public keys.
Procedure
- Log into the Admin Console.
- Click Realm Settings.
- Click the Cache tab.
- Clear the realm cache, the user cache or cache of external public keys.
The cache will be cleared for all realms!
Chapter 11. Red Hat Single Sign-On Operator
The Red Hat Single Sign-On Operator automates Red Hat Single Sign-On administration in Openshift. You use this Operator to create custom resources (CRs), which automate administrative tasks. For example, instead of creating a client or a user in the Red Hat Single Sign-On admin console, you can create custom resources to perform those tasks. A custom resource is a YAML file that defines the parameters for the administrative task.
You can create custom resources to perform the following tasks:
After you create custom resources for realms, clients, and users, you can manage them by using the Red Hat Single Sign-On admin console or as custom resources using the oc command. However, you cannot use both methods, because the Operator performs a one way sync for custom resources that you modify. For example, if you modify a realm custom resource, the changes show up in the admin console. However, if you modify the realm using the admin console, those changes have no effect on the custom resource.
Begin using the Operator by Installing the Red Hat Single Sign-On Operator on a cluster.
11.1. Installing the Red Hat Single Sign-On Operator on a cluster
To install the Red Hat Single Sign-On Operator, you can use:
11.1.1. Installing using the Operator Lifecycle Manager
Prerequisites
- You have cluster-admin permission or an equivalent level of permissions granted by an administrator.
Procedure
Perform this procedure on an OpenShift cluster.
- Open the OpenShift Container Platform web console.
-
In the left column, click
Operators, OperatorHub. Search for Red Hat Single Sign-On Operator.
OperatorHub tab in OpenShift
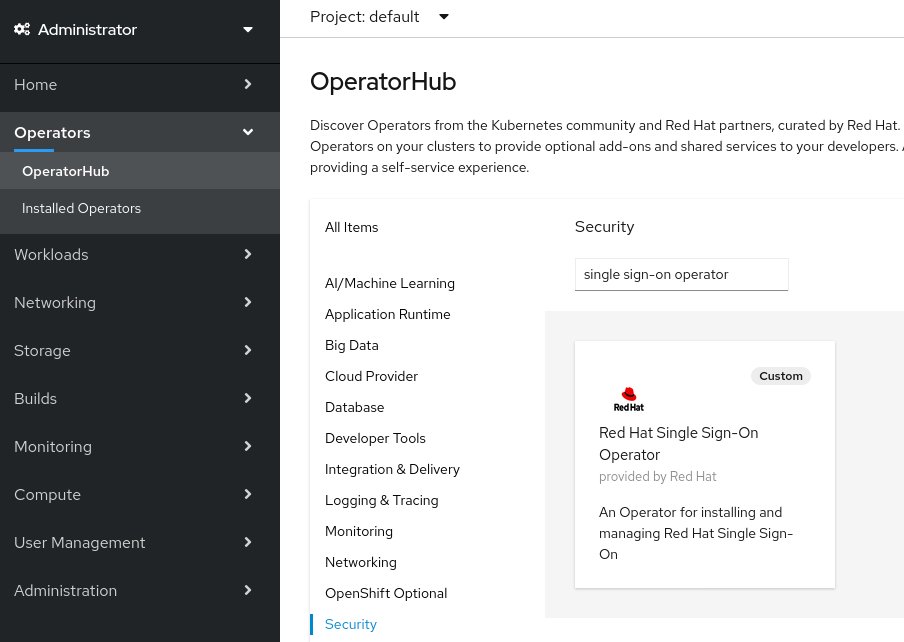
Click the Red Hat Single Sign-On Operator icon.
An Install page opens.
Operator Install page on OpenShift
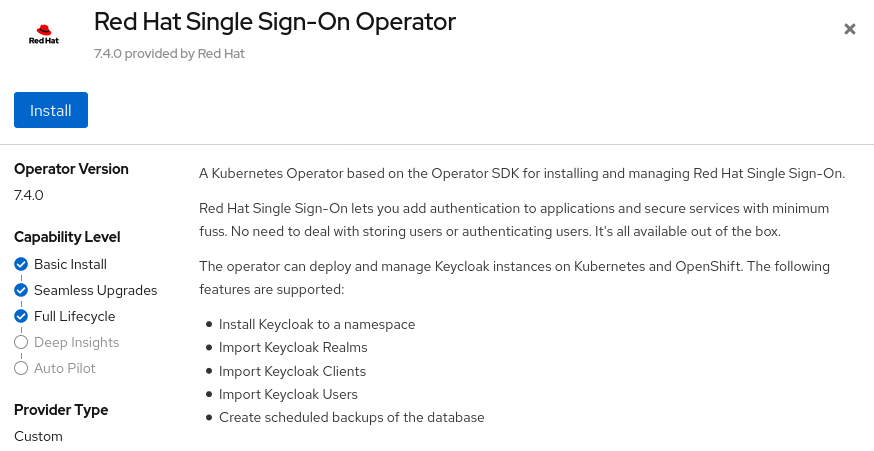
-
Click
Install. Select a namespace and click Subscribe.
Be sure you are on the
stablechannel.Namespace selection in OpenShift
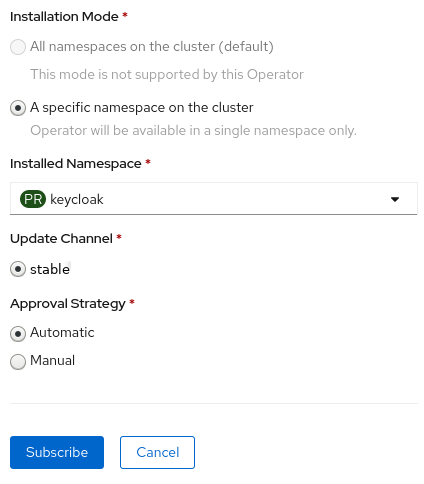
The Operator starts installing.
Additional resources
- When the Operator installation completes, you are ready to create your first custom resource. See Red Hat Single Sign-On installation using a custom resource.
- For more information on OpenShift Operators, see the OpenShift Operators guide.
11.1.2. Installing from the command line
You can install the Red Hat Single Sign-On Operator from the command line.
Prerequisites
- You have cluster-admin permission or an equivalent level of permissions granted by an administrator.
Procedure
Create a project.
$ oc new-project <namespace>
Create a file named
rhsso-operator-olm.yamlto define a YAML group and a subscription operator.Update the
targetNamespacesto thenamespacefor RH-SSO.apiVersion: operators.coreos.com/v1 kind: OperatorGroup metadata: name: rhsso-operator-group spec: targetNamespaces: - <namespace> # change this to the namespace you will use for RH-SSO --- apiVersion: operators.coreos.com/v1alpha1 kind: Subscription metadata: name: rhsso-operator spec: channel: stable installPlanApproval: Manual name: rhsso-operator source: redhat-operators sourceNamespace: openshift-marketplace # Here you can specify a specific Operator version, otherwise it will use the latest # startingCSV: rhsso-operator.7.6.0-opr-001
Install the operator group and subscription.
$ oc apply -f rhsso-operator-olm.yaml
Approve the install plan and fill in the appropriate
namespace.oc patch installplan $(oc get ip -n <namespace> -o=jsonpath='{.items[?(@.spec.approved==false)].metadata.name}') -n <namespace> --type merge --patch '{"spec":{"approved":true}}'Verify the operator is running.
$ oc get pods
NAME                              READY   STATUS    RESTARTS   AGE
rhsso-operator-558876f75c-m25mt   1/1     Running   0          28s
Additional resources
- When the Operator installation completes, you are ready to create your first custom resource. See Red Hat Single Sign-On installation using a custom resource.
- For more information on OpenShift Operators, see the OpenShift Operators guide.
11.2. Using the Red Hat Single Sign-On Operator in production environment
- The usage of embedded DB is not supported in a production environment.
- Backup CRD is deprecated and not supported in a production environment.
-
The
podDisruptionBudgetfield in the Keycloak CR is deprecated and will be ignored when the Operator is deployed on Kubernetes version 1.25 and higher. -
We fully support using the rest of the CRDs in production, despite the
v1alpha1version. We do not plan to make any breaking changes in this CRDs version.
11.3. Installing Red Hat Single Sign-On using a custom resource
You can use the Operator to automate the installation of Red Hat Single Sign-On by creating a Keycloak custom resource. When you use a custom resource to install Red Hat Single Sign-On, you create the components and services that are described here and illustrated in the graphic that follows.
-
keycloak-db-secret- Stores properties such as the database username, password, and external address (if you connect to an external database) -
credentials-<CR-Name>- Admin username and password to log into the Red Hat Single Sign-On admin console (the<CR-Name>is based on theKeycloakcustom resource name) -
keycloak- Keycloak deployment specification that is implemented as a StatefulSet with high availability support -
keycloak-postgresql- Starts a PostgreSQL database installation -
keycloak-discoveryService - PerformsJDBC_PINGdiscovery -
keycloakService - Connects to Red Hat Single Sign-On through HTTPS (HTTP is not supported) -
keycloak-postgresqlService - Connects an internal and external, if used, database instance -
keycloakRoute - The URL for accessing the Red Hat Single Sign-On admin console from OpenShift
How Operator components and services interact
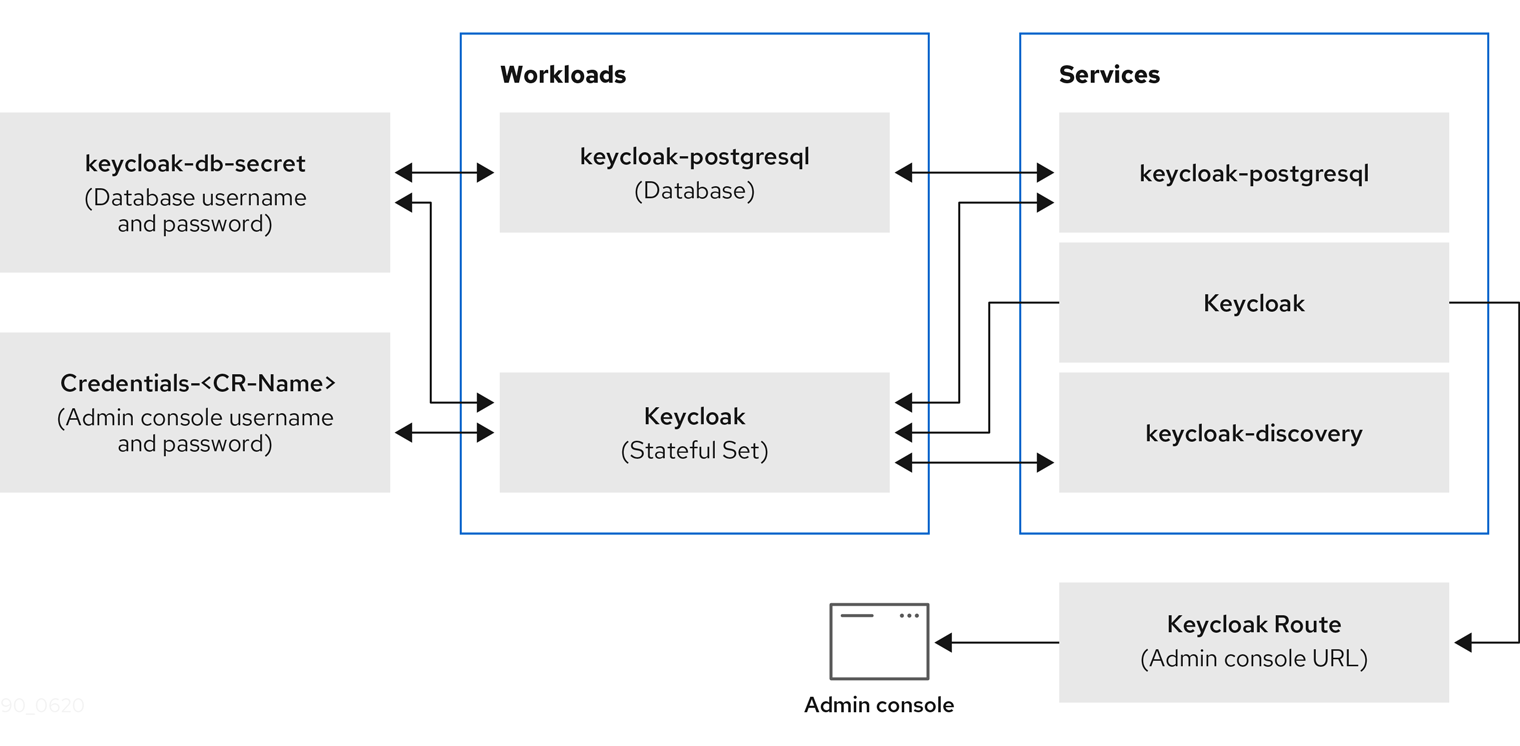
11.3.1. The Keycloak custom resource
The Keycloak custom resource is a YAML file that defines the parameters for installation. This file contains three properties.
-
instances- controls the number of instances running in high availability mode. -
externalAccess- if theenabledisTrue, the Operator creates a route for OpenShift for the Red Hat Single Sign-On cluster. You can sethostto override the automatically chosen host name for Route -
externalDatabase- in order to connect to an externally hosted database. That topic is covered in the external database section of this guide. Setting it to false should be used only for testing purposes and will install an embedded PostgreSQL database. Be aware that externalDatabase:false is NOT supported in production environments.
Example YAML file for a Keycloak custom resource
apiVersion: keycloak.org/v1alpha1
kind: Keycloak
metadata:
  name: example-sso
  labels:
    app: sso
spec:
  instances: 1
  externalAccess:
    enabled: True
You can update the YAML file and the changes appear in the Red Hat Single Sign-On admin console, however changes to the admin console do not update the custom resource.
11.3.2. Creating a Keycloak custom resource on OpenShift
On OpenShift, you use the custom resource to create a route, which is the URL of the admin console, and find the secret, which holds the username and password for the admin console.
Prerequisites
- You have a YAML file for this custom resource.
- You have cluster-admin permission or an equivalent level of permissions granted by an administrator.
Procedure
Create a route using your YAML file:
oc create -f <filename>.yaml -n <namespace>. For example:$ oc create -f sso.yaml -n sso keycloak.keycloak.org/example-sso created
A route is created in OpenShift.
- Log into the OpenShift web console.
Select
Networking,Routesand search for Keycloak.Routes screen in OpenShift web console

On the screen with the Keycloak route, click the URL under
Location.The Red Hat Single Sign-On admin console login screen appears.
Admin console login screen
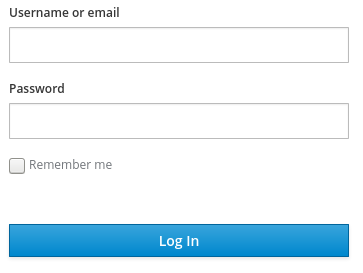
Locate the username and password for the admin console in the OpenShift web console; under
Workloads, clickSecretsand search for Keycloak.Secrets screen in OpenShift web console
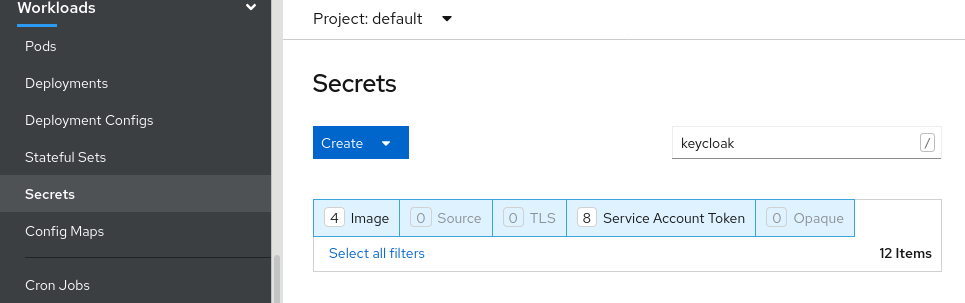
Enter the username and password into the admin console login screen.
Admin console login screen
You are now logged into an instance of Red Hat Single Sign-On that was installed by a Keycloak custom resource. You are ready to create custom resources for realms, clients, and users.
Red Hat Single Sign-On master realm
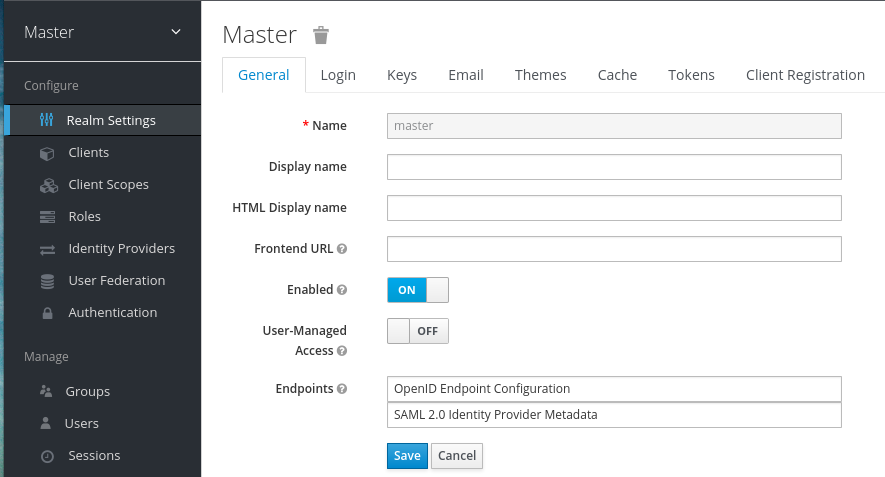
Check the status of the custom resource:
$ oc describe keycloak <CR-name>
Results
After the Operator processes the custom resource, view the status with this command:
$ oc describe keycloak <CR-name>
Keycloak custom resource Status
Name:         example-keycloak
Namespace:    keycloak
Labels:       app=sso
Annotations:  <none>
API Version:  keycloak.org/v1alpha1
Kind:         Keycloak
Spec:
  External Access:
    Enabled:  true
  Instances:  1
Status:
  Credential Secret:  credential-example-keycloak
  Internal URL:       https://<External URL to the deployed instance>
  Message:
  Phase:              reconciling
  Ready:              true
  Secondary Resources:
    Deployment:
      keycloak-postgresql
    Persistent Volume Claim:
      keycloak-postgresql-claim
    Prometheus Rule:
      keycloak
    Route:
      keycloak
    Secret:
      credential-example-keycloak
      keycloak-db-secret
    Service:
      keycloak-postgresql
      keycloak
      keycloak-discovery
    Service Monitor:
      keycloak
    Stateful Set:
      keycloak
  Version:
Events:
Additional resources
- Once the installation of Red Hat Single Sign-On completes, you are ready to create a realm custom resource.
- An external database is the supported option and needs to be enabled in the Keycloak custom resource. You can disable this option only for testing and enable it when you switch to a production environment. See Connecting to an external database.
11.4. Creating a realm custom resource
You can use the Operator to create realms in Red Hat Single Sign-On as defined by a custom resource. You define the properties of the realm custom resource in a YAML file.
You can only create or delete realms by creating or deleting the YAML file, and changes appear in the Red Hat Single Sign-On admin console. However changes to the admin console are not reflected back and updates of the CR after the realm is created are not supported.
Example YAML file for a Realm custom resource
apiVersion: keycloak.org/v1alpha1
kind: KeycloakRealm
metadata:
  name: test
  labels:
    app: sso
spec:
  realm:
    id: "basic"
    realm: "basic"
    enabled: True
    displayName: "Basic Realm"
  instanceSelector:
    matchLabels:
      app: sso
Prerequisites
- You have a YAML file for this custom resource.
-
In the YAML file, the
appunderinstanceSelectormatches the label of a Keycloak custom resource. Matching these values ensures that you create the realm in the right instance of Red Hat Single Sign-On. - You have cluster-admin permission or an equivalent level of permissions granted by an administrator.
Procedure
Use this command on the YAML file that you created:
oc create -f <realm-name>.yaml. For example:$ oc create -f initial_realm.yaml keycloak.keycloak.org/test created
- Log into the admin console for the related instance of Red Hat Single Sign-On.
Click Select Realm and locate the realm that you created.
The new realm opens.
Admin console master realm
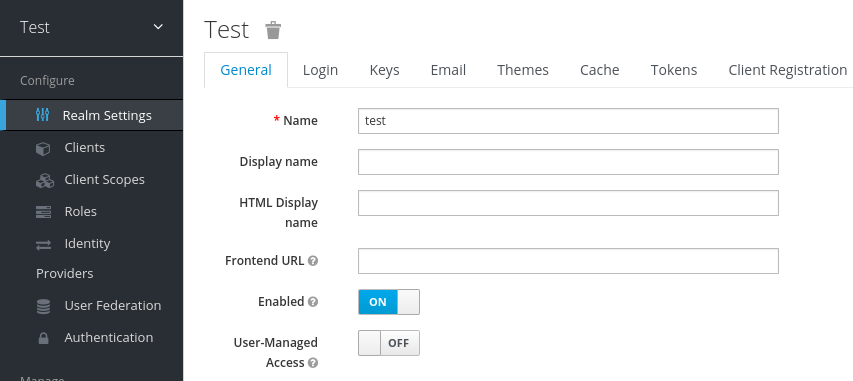
Results
After the Operator processes the custom resource, view the status with this command:
$ oc describe keycloak <CR-name>
Realm custom resource status
Name:         example-keycloakrealm
Namespace:    keycloak
Labels:       app=sso
Annotations:  <none>
API Version:  keycloak.org/v1alpha1
Kind:         KeycloakRealm
Metadata:
  Creation Timestamp:  2019-12-03T09:46:02Z
  Finalizers:
    realm.cleanup
  Generation:        1
  Resource Version:  804596
  Self Link:         /apis/keycloak.org/v1alpha1/namespaces/keycloak/keycloakrealms/example-keycloakrealm
  UID:               b7b2f883-15b1-11ea-91e6-02cb885627a6
Spec:
  Instance Selector:
    Match Labels:
      App: sso
  Realm:
    Display Name:  Basic Realm
    Enabled:       true
    Id:            basic
    Realm:         basic
Status:
  Login URL:
  Message:
  Phase:      reconciling
  Ready:      true
Events:       <none>
Additional resources
- When the realm creation completes, you are ready to create a client custom resource.
11.5. Creating a client custom resource
You can use the Operator to create clients in Red Hat Single Sign-On as defined by a custom resource. You define the properties of the realm in a YAML file.
You can update the YAML file and changes appear in the Red Hat Single Sign-On admin console, however changes to the admin console do not update the custom resource.
Example YAML file for a Client custom resource
apiVersion: keycloak.org/v1alpha1
kind: KeycloakClient
metadata:
  name: example-client
  labels:
    app: sso
spec:
  realmSelector:
     matchLabels:
      app: <matching labels for KeycloakRealm custom resource>
  client:
    # auto-generated if not supplied
    #id: 123
    clientId: client-secret
    secret: client-secret
    # ...
    # other properties of Keycloak Client
Prerequisites
- You have a YAML file for this custom resource.
- You have cluster-admin permission or an equivalent level of permissions granted by an administrator.
Procedure
Use this command on the YAML file that you created:
oc create -f <client-name>.yaml. For example:$ oc create -f initial_client.yaml keycloak.keycloak.org/example-client created
- Log into the Red Hat Single Sign-On admin console for the related instance of Red Hat Single Sign-On.
Click Clients.
The new client appears in the list of clients.
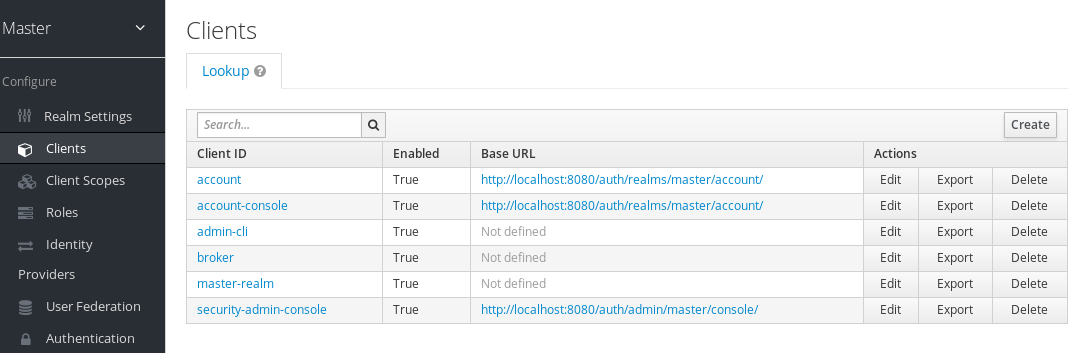
Results
After a client is created, the Operator creates a Secret containing the Client ID and the client’s secret using the following naming pattern: keycloak-client-secret-<custom resource name>. For example:
Client’s Secret
apiVersion: v1
data:
  CLIENT_ID: <base64 encoded Client ID>
  CLIENT_SECRET: <base64 encoded Client Secret>
kind: Secret
After the Operator processes the custom resource, view the status with this command:
$ oc describe keycloak <CR-name>
Client custom resource Status
Name:         client-secret
Namespace:    keycloak
Labels:       app=sso
API Version:  keycloak.org/v1alpha1
Kind:         KeycloakClient
Spec:
  Client:
    Client Authenticator Type:     client-secret
    Client Id:                     client-secret
    Id:                            keycloak-client-secret
  Realm Selector:
    Match Labels:
      App:  sso
Status:
  Message:
  Phase:    reconciling
  Ready:    true
  Secondary Resources:
    Secret:
      keycloak-client-secret-client-secret
Events:  <none>
Additional resources
- When the client creation completes, you are ready to create a user custom resource.
11.6. Creating a user custom resource
You can use the Operator to create users in Red Hat Single Sign-On as defined by a custom resource. You define the properties of the user custom resource in a YAML file.
You can update properties in the YAML file and changes appear in the Red Hat Single Sign-On admin console, however changes to the admin console do not update the custom resource.
Be aware that the same applies for the credentials. If the credentials field is defined, a user’s credentials will always match the value set in the CR. In other words, if a user changes password via the Account Console, the Operator will reset it in order to match the value set in the CR.
Example YAML file for a user custom resource
apiVersion: keycloak.org/v1alpha1
kind: KeycloakUser
metadata:
  name: example-user
spec:
  user:
    username: "realm_user"
    firstName: "John"
    lastName: "Doe"
    email: "user@example.com"
    enabled: True
    emailVerified: False
    credentials:
      - type: "password"
        value: "12345"
    realmRoles:
      - "offline_access"
    clientRoles:
      account:
        - "manage-account"
      realm-management:
        - "manage-users"
  realmSelector:
    matchLabels:
      app: sso
Prerequisites
- You have a YAML file for this custom resource.
-
The
realmSelectormatches the labels of an existing realm custom resource. - You have cluster-admin permission or an equivalent level of permissions granted by an administrator.
Procedure
Use this command on the YAML file that you created:
oc create -f <user_cr>.yaml. For example:$ oc create -f initial_user.yaml keycloak.keycloak.org/example-user created
- Log into the admin console for the related instance of Red Hat Single Sign-On.
- Click Users.
Search for the user that you defined in the YAML file.
You may need to switch to a different realm to find the user.
Results
After a user is created, the Operator creates a Secret using the following naming pattern: credential-<realm name>-<username>-<namespace>, containing the username and, if it has been specified in the CR credentials attribute, the password.
Here’s an example:
KeycloakUser Secret
kind: Secret
apiVersion: v1
data:
  password: <base64 encoded password>
  username: <base64 encoded username>
type: Opaque
Once the Operator processes the custom resource, view the status with this command:
$ oc describe keycloak <CR-name>
User custom resource Status
Name:         example-realm-user
Namespace:    keycloak
Labels:       app=sso
API Version:  keycloak.org/v1alpha1
Kind:         KeycloakUser
Spec:
  Realm Selector:
    Match Labels:
      App: sso
  User:
    Email:           realm_user@redhat.com
    Credentials:
      Type:          password
      Value:         <user password>
    Email Verified:  false
    Enabled:         true
    First Name:      John
    Last Name:       Doe
    Username:        realm_user
Status:
  Message:
  Phase:    reconciled
Events:     <none>
Additional resources
- If you have an external database, you can modify the Keycloak custom resource to support it. See Connecting to an external database.
- To back up your database using custom resources, see schedule database backups.
11.7. Connecting to an external database
You can use the Operator to connect to an external PostgreSQL database by creating a keycloak-db-secret YAML file and setting Keycloak CR externalDatabase property to enabled. Note that values are Base64 encoded.
Example YAML file for keycloak-db-secret
apiVersion: v1
kind: Secret
metadata:
    name: keycloak-db-secret
    namespace: keycloak
stringData:
    POSTGRES_DATABASE: <Database Name>
    POSTGRES_EXTERNAL_ADDRESS: <External Database URL (resolvable by K8s)>
    POSTGRES_EXTERNAL_PORT: <External Database Port>
    POSTGRES_PASSWORD: <Database Password>
    # Required for AWS Backup functionality
    POSTGRES_SUPERUSER: "true"
    POSTGRES_USERNAME: <Database Username>
    SSLMODE: <TLS configuration for the Database connection>
type: Opaque
The following properties set the hostname or IP address and port of the database.
-
POSTGRES_EXTERNAL_ADDRESS- hostname of the external database. If you only have an IP for your database instead of a hostname, then create a Service and corresponding EndpointSlice or Endpoint to provide a hostname. -
POSTGRES_EXTERNAL_PORT- (Optional) A database port.
The other properties work in the same way for a hosted or external database. Set them as follows:
-
POSTGRES_DATABASE- Database name to be used. -
POSTGRES_USERNAME- Database username -
POSTGRES_PASSWORD- Database password -
POSTGRES_SUPERUSER- Indicates whether backups should run as super user. Typicallytrue. -
SSLMODE- Indicates whether to use TLS on the connection to the external PostgreSQL database. Check the possible values
When SSLMODE is enabled, the operator searches for a secret called keycloak-db-ssl-cert-secret containing the root.crt that has been used by the PostgreSQL database. Creating the secret is optional and the secret is used only when you want to verify the Database’s certificate (for example SSLMODE: verify-ca). Here is an example :
Example YAML file for TLS Secret to be used by the operator.
apiVersion: v1
kind: Secret
metadata:
  name: keycloak-db-ssl-cert-secret
  namespace: keycloak
type: Opaque
data:
  root.crt: {root.crt base64}
The Operator will create a Service named keycloak-postgresql. This Service is configured by the Operator to expose the external database based on the content of POSTGRES_EXTERNAL_ADDRESS. Red Hat Single Sign-On uses this Service to connect to the Database, which means it does not connect to the Database directly but rather through this Service.
The Keycloak custom resource requires updates to enable external database support.
Example YAML file for Keycloak custom resource that supports an external database
apiVersion: keycloak.org/v1alpha1
kind: Keycloak
metadata:
  labels:
      app: sso
  name: example-keycloak
  namespace: keycloak
spec:
  externalDatabase:
    enabled: true
  instances: 1
Prerequisites
-
You have a YAML file for
keycloak-db-secret. -
You have modified the Keycloak custom resource to set
externalDatabasetotrue. - You have cluster-admin permission or an equivalent level of permissions granted by an administrator.
Procedure
Locate the secret for your PostgreSQL database:
oc get secret <secret_for_db> -o yaml. For example:$ oc get secret keycloak-db-secret -o yaml apiVersion: v1 data POSTGRES_DATABASE: cm9vdA== POSTGRES_EXTERNAL_ADDRESS: MTcyLjE3LjAuMw== POSTGRES_EXTERNAL_PORT: NTQzMg==
The
POSTGRES_EXTERNAL_ADDRESSis in Base64 format.Decode the value for the secret:
echo "<encoded_secret>" | base64 -decode. For example:$ echo "MTcyLjE3LjAuMw==" | base64 -decode 192.0.2.3
Confirm that the decoded value matches the IP address for your database:
$ oc get pods -o wide
NAME                        READY  STATUS    RESTARTS   AGE   IP
keycloak-0                  1/1    Running   0          13m   192.0.2.0
keycloak-postgresql-c8vv27m 1/1    Running   0          24m   192.0.2.3
Confirm that
keycloak-postgresqlappears in a list of running services:$ oc get svc NAME TYPE CLUSTER-IP EXTERNAL-IP PORT(S) AGE keycloak ClusterIP 203.0.113.0 <none> 8443/TCP 27m keycloak-discovery ClusterIP None <none> 8080/TCP 27m keycloak-postgresql ClusterIP 203.0.113.1 <none> 5432/TCP 27m
The
keycloak-postgresqlservice sends requests to a set of IP addresses in the backend. These IP addresses are called endpoints.View the endpoints used by the
keycloak-postgresqlservice to confirm that they use the IP addresses for your database:$ oc get endpoints keycloak-postgresql NAME ENDPOINTS AGE keycloak-postgresql 192.0.2.3.5432 27m
Confirm that Red Hat Single Sign-On is running with the external database. This example shows that everything is running:
$ oc get pods
NAME                        READY  STATUS    RESTARTS   AGE   IP
keycloak-0                  1/1    Running   0          26m   192.0.2.0
keycloak-postgresql-c8vv27m 1/1    Running   0          36m   192.0.2.3
11.8. Connecting to an external Red Hat Single Sign-On
This operator can also be used to partially manage an external Red Hat Single Sign-On instance. In it’s current state, it will only be able to create clients.
To do this, you’ll need to create unmanaged versions of the Keycloak and KeycloakRealm CRDs to use for targeting and configuration.
Example YAML file for external-keycloak
apiVersion: keycloak.org/v1alpha1
kind: Keycloak
metadata:
  name: external-ref
  labels:
    app: external-sso
spec:
  unmanaged: true
  external:
    enabled: true
    url: https://some.external.url
In order to authenticate against this keycloak, the operator infers the secret name from the CRD by prefixing the CRD name with credential-.
Example YAML file for credential-external-ref
apiVersion: v1
kind: Secret
metadata:
  name: credential-external-ref
type: Opaque
data:
  ADMIN_USERNAME: YWRtaW4=
  ADMIN_PASSWORD: cGFzcw==
Example YAML file for external-realm
apiVersion: keycloak.org/v1alpha1
kind: KeycloakRealm
metadata:
  name: external-realm
  labels:
    app: external-sso
spec:
  unmanaged: true
  realm:
    id: "basic"
    realm: "basic"
  instanceSelector:
    matchLabels:
      app: external-sso
You can now use the realm reference in your client as usual, and it will create the client on the external Red Hat Single Sign-On instance.
11.9. Scheduling database backups
Backup CR is deprecated and could be removed in future releases.
You can use the Operator to schedule automatic backups of the database as defined by custom resources. The custom resource triggers a backup job and reports back its status.
You can use Operator to create a backup job that performs a one-time backup to a local Persistent Volume.
Example YAML file for a Backup custom resource
apiVersion: keycloak.org/v1alpha1
kind: KeycloakBackup
metadata:
  name: test-backup
Prerequisites
- You have a YAML file for this custom resource.
-
You have a
PersistentVolumewith aclaimRefto reserve it only for aPersistentVolumeClaimcreated by the Red Hat Single Sign-On Operator.
Procedure
Create a backup job:
oc create -f <backup_crname>. For example:$ oc create -f one-time-backup.yaml keycloak.keycloak.org/test-backup
The Operator creates a
PersistentVolumeClaimwith the following naming scheme:Keycloak-backup-<CR-name>.View a list of volumes:
$ oc get pvc
NAME                          STATUS   VOLUME
keycloak-backup-test-backup   Bound    pvc-e242-ew022d5-093q-3134n-41-adff
keycloak-postresql-claim      Bound    pvc-e242-vs29202-9bcd7-093q-31-zadj
View a list of backup jobs:
$ oc get jobs
NAME           COMPLETIONS     DURATION     AGE
test-backup    0/1             6s           6s
View the list of executed backup jobs:
$ oc get pods
NAME                               READY    STATUS       RESTARTS    AGE
test-backup-5b4rf                  0/1      Completed    0           24s
keycloak-0                         1/1      Running      0           52m
keycloak-postgresql-c824c6-vv27m   1/1      Running      0           71m
View the log of your completed backup job:
$ oc logs test-backup-5b4rf
==> Component data dump completed
.
.
.
.
Additional resources
- For more details on persistent volumes, see Understanding persistent storage.
11.10. Installing extensions and themes
You can use the operator to install extensions and themes that you need for your company or organization. The extension or theme can be anything that Red Hat Single Sign-On can consume. For example, you can add a metrics extension. You add the extension or theme to the Keycloak custom resource.
Example YAML file for a Keycloak custom resource
apiVersion: keycloak.org/v1alpha1
kind: Keycloak
metadata:
  name: example-keycloak
  labels:
   app: sso
spec:
  instances: 1
  extensions:
   - <url_for_extension_or_theme>
  externalAccess:
    enabled: True
You can package and deploy themes in the same way as any other extensions. See Deploying Themes manual entry for more information.
Prerequisites
- You have a YAML file for the Keycloak custom resource.
- You have cluster-admin permission or an equivalent level of permissions granted by an administrator.
Procedure
-
Edit the YAML file for the Keycloak custom resource:
oc edit <CR-name> -
Add a line called
extensions:after theinstancesline. - Add a URL to a JAR file for your custom extension or theme.
- Save the file.
The Operator downloads the extension or theme and installs it.
11.11. Command options for managing custom resources
After you create a custom request, you can edit it or delete using the oc command.
-
To edit a custom request, use this command:
oc edit <CR-name> -
To delete a custom request, use this command:
oc delete <CR-name>
For example, to edit a realm custom request named test-realm, use this command:
$ oc edit test-realm
A window opens where you can make changes.
You can update the Keycloak CR YAML file and changes will be applied to the deployment.
Updates to the other resources are limited:
Keycloak Realm CR only supports basic creation and deletion without sync options. Keycloak User and Client CRs support unidirectional updates (changes to the CR are reflected in Keycloak but changes done in Keycloak are not updated in the CR).
11.12. Upgrade strategy
You can configure how the operator performs Red Hat Single Sign-On upgrades. You can choose from the following upgrade strategies.
-
recreate: This is the default strategy. The operator removes all Red Hat Single Sign-On replicas, optionally creates a backup and then creates the replicas based on a newer Red Hat Single Sign-On image. This strategy is suitable for major upgrades as a single Red Hat Single Sign-On version is accessing the underlying database. The downside is Red Hat Single Sign-On needs to be shut down during the upgrade. -
rolling: The operator removes one replica at a time and creates it again based on a newer Red Hat Single Sign-On image. This ensures a zero-downtime upgrade but is more suitable for minor version upgrades that do not require database migration since the database is accessed by multiple Red Hat Single Sign-On versions concurrently. Automatic backups are not supported with this strategy.
Example YAML file for a Keycloak custom resource
apiVersion: keycloak.org/v1alpha1
kind: Keycloak
metadata:
  name: example-keycloak
  labels:
   app: sso
spec:
  instances: 2
  migration:
    strategy: recreate
    backups:
      enabled: True
  externalAccess:
    enabled: True
Due to a bug introduced in a previous version of the Operator, Selector field on the Red Hat Single Sign-On StatefulSet might be misconfigured depending on your configuration. If such state is detected by the Operator and you are using the recreate strategy, it will delete and recreate the StatefulSet with the correct Selector field. This is required as the Selector field is immutable.
As a "delete" operation can have potentially dangerous side effects in very rare cases, for example when you have added custom functionality unknown to the Operator to the StatefulSet definition, you can instead delete the StatefulSet manually.