
Chapter 8. Configuring authentication
This chapter covers several authentication topics. These topics include:
- Enforcing strict password and One Time Password (OTP) policies.
- Managing different credential types.
- Logging in with Kerberos.
- Disabling and enabling built-in credential types.
8.1. Password policies
When Red Hat Single Sign-On creates a realm, it does not associate password policies with the realm. You can set a simple password with no restrictions on its length, security, or complexity. Simple passwords are unacceptable in production environments. Red Hat Single Sign-On has a set of password policies available through the Admin Console.
Procedure
- Click Authentication in the menu.
- Click the Password Policy tab.
- Select the policy to add in the Add policy drop-down box.
- Enter a value for the Policy Value corresponding with the policy chosen.
Click Save.
Password policy

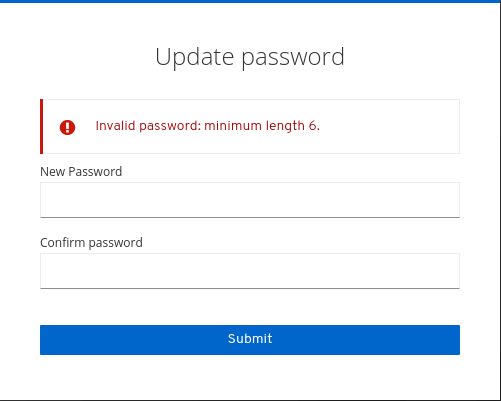
After saving the policy, Red Hat Single Sign-On enforces the policy for new users and sets an Update Password action for existing users to ensure they change their password the next time they log in. For example:
Failed password policy
8.1.1. Password policy types
8.1.1.1. Hashing algorithm
Passwords are not stored in clear text. Before storage or validation, Red Hat Single Sign-On hashes passwords using standard hashing algorithms Red Hat Single Sign-On that support the PBKDF2, PBKDF2-SHA256 and PBKDF-SHA512 hashing algorithms.
8.1.1.2. Hashing iterations
Specifies the number of times Red Hat Single Sign-On hashes passwords before storage or verification. The default value is 27,500.
Red Hat Single Sign-On hashes passwords to ensure that hostile actors with access to the password database cannot read passwords through reverse engineering.
A high hashing iteration value can impact performance as it requires higher CPU power.
8.1.1.3. Digits
The number of numerical digits required in the password string.
8.1.1.4. Lowercase characters
The number of lower case letters required in the password string.
8.1.1.5. Uppercase characters
The number of upper case letters required in the password string.
8.1.1.6. Special characters
The number of special characters required in the password string.
8.1.1.7. Not username
The password cannot be the same as the username.
8.1.1.8. Not email
The password cannot be the same as the email address of the user.
8.1.1.9. Regular expression
Password must match one or more defined regular expression patterns.
8.1.1.10. Expire password
The number of days the password is valid. When the number of days has expired, the user must change their password.
8.1.1.11. Not recently used
Password cannot be already used by the user. Red Hat Single Sign-On stores a history of used passwords. The number of old passwords stored is configurable in Red Hat Single Sign-On.
8.1.1.12. Password blacklist
Password must not be in a blacklist file.
- Blacklist files are UTF-8 plain-text files with Unix line endings. Every line represents a blacklisted password.
- Red Hat Single Sign-On compares passwords in a case-insensitive manner. All passwords in the blacklist must be lowercase.
- The value of the blacklist file must be the name of the blacklist file.
Blacklist files resolve against
${jboss.server.data.dir}/password-blacklists/by default. Customize this path using:-
The
keycloak.password.blacklists.pathproperty. -
The
blacklistsPathproperty of thepasswordBlacklistpolicy SPI configuration.
-
The
8.2. One Time Password (OTP) policies
Red Hat Single Sign-On has several policies for setting up a FreeOTP or Google Authenticator One-Time Password generator. Click the Authentication menu and click the OTP Policy tab.
Otp policy
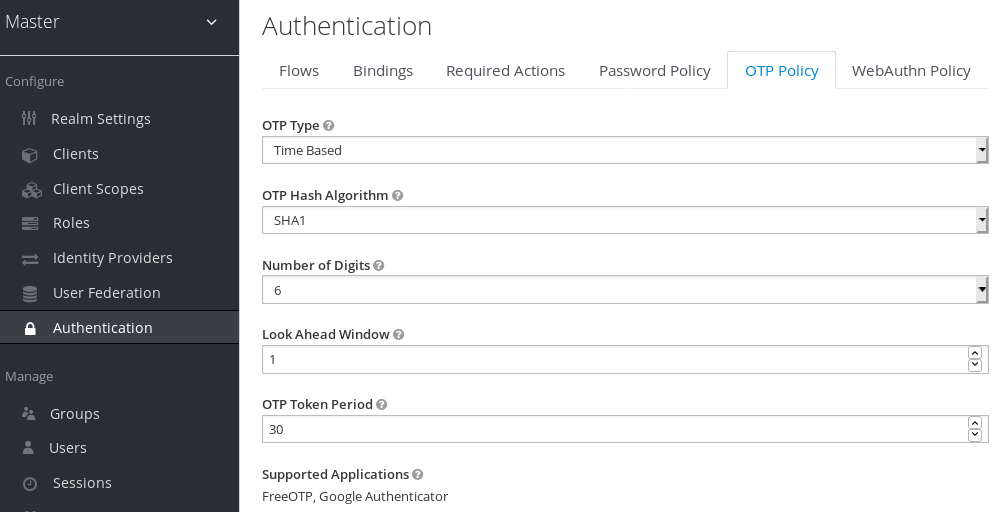
Red Hat Single Sign-On generates a QR code on the OTP set-up page, based on information configured in the OTP Policy tab. FreeOTP and Google Authenticator scan the QR code when configuring OTP.
8.2.1. Time-based or counter-based one time passwords
The algorithms available in Red Hat Single Sign-On for your OTP generators are time-based and counter-based.
With Time-Based One Time Passwords (TOTP), the token generator will hash the current time and a shared secret. The server validates the OTP by comparing the hashes within a window of time to the submitted value. TOTPs are valid for a short window of time.
With Counter-Based One Time Passwords (HOTP), Red Hat Single Sign-On uses a shared counter rather than the current time. The Red Hat Single Sign-On server increments the counter with each successful OTP login. Valid OTPs change after a successful login.
TOTP is more secure than HOTP because the matchable OTP is valid for a short window of time, while the OTP for HOTP is valid for an indeterminate amount of time. HOTP is more user-friendly than TOTP because no time limit exists to enter the OTP.
HOTP requires a database update every time the server increments the counter. This update is a performance drain on the authentication server during heavy load. To increase efficiency, TOTP does not remember passwords used, so there is no need to perform database updates. The drawback is that it is possible to re-use TOTPs in the valid time interval.
8.2.2. TOTP configuration options
8.2.2.1. OTP hash algorithm
The default algorithm is SHA1. The other, more secure options are SHA256 and SHA512.
8.2.2.2. Number of digits
The length of the OTP. Short OTP’s are user-friendly, easier to type, and easier to remember. Longer OTP’s are more secure than shorter OTP’s.
8.2.2.3. Look around window
The number of intervals the server attempts to match the hash. This option is present in Red Hat Single Sign-On if the clock of the TOTP generator or authentication server become out-of-sync. The default value of 1 is adequate. For example, if the time interval for a token is 30 seconds, the default value of 1 means it will accept valid tokens in the 30-second window. Every increment of this value increases the valid window by 30 seconds.
8.2.2.4. OTP token period
The time interval in seconds the server matches a hash. Each time the interval passes, the token generator generates a TOTP.
8.2.3. HOTP configuration options
8.2.3.1. OTP hash algorithm
The default algorithm is SHA1. The other, more secure options are SHA256 and SHA512.
8.2.3.2. Number of digits
The length of the OTP. Short OTPs are user-friendly, easier to type, and easier to remember. Longer OTPs are more secure than shorter OTPs.
8.2.3.3. Look ahead window
The number of intervals the server attempts to match the hash. This option is present in Red Hat Single Sign-On if the clock of the TOTP generator or authentication server become out-of-sync. The default value of 1 is adequate. This option is present in Red Hat Single Sign-On to cover when the user’s counter gets ahead of the server.
8.2.3.4. Initial counter
The value of the initial counter.
8.3. Authentication flows
An authentication flow is a container of authentications, screens, and actions, during log in, registration, and other Red Hat Single Sign-On workflows. To view all the flows, actions, and checks, each flow requires:
Procedure
- Click Authentication in the menu.
- Click the Flows tab.
8.3.1. Built-in flows
Red Hat Single Sign-On has several built-in flows. You cannot modify these flows, but you can alter the flow’s requirements to suit your needs.
In the drop-down list, select browser to display the Browser Flow screen.
Browser flow

Hover over the question-mark tooltip of the drop-down list to view a description of the flow. Two sections exist.
8.3.1.1. Auth type
The name of the authentication or the action to execute. If an authentication is indented, it is in a sub-flow. It may or may not be executed, depending on the behavior of its parent.
Cookie
The first time a user logs in successfully, Red Hat Single Sign-On sets a session cookie. If the cookie is already set, this authentication type is successful. Since the cookie provider returned success and each execution at this level of the flow is alternative, Red Hat Single Sign-On does not perform any other execution. This results in a successful login.
Kerberos
This authenticator is disabled by default and is skipped during the Browser Flow.
Identity Provider Redirector
This action is configured through the Actions > Config link. It redirects to another IdP for identity brokering.
Forms
Since this sub-flow is marked as alternative, it will not be executed if the Cookie authentication type passed. This sub-flow contains an additional authentication type that needs to be executed. Red Hat Single Sign-On loads the executions for this sub-flow and processes them.
The first execution is the Username Password Form, an authentication type that renders the username and password page. It is marked as required, so the user must enter a valid username and password.
The second execution is the Browser - Conditional OTP sub-flow. This sub-flow is conditional and executes depending on the result of the Condition - User Configured execution. If the result is true, Red Hat Single Sign-On loads the executions for this sub-flow and processes them.
The next execution is the Condition - User Configured authentication. This authentication checks if Red Hat Single Sign-On has configured other executions in the flow for the user. The Browser - Conditional OTP sub-flow executes only when the user has a configured OTP credential.
The final execution is the OTP Form. Red Hat Single Sign-On marks this execution as required but it runs only when the user has an OTP credential set up because of the setup in the conditional sub-flow. If not, the user does not see an OTP form.
8.3.1.2. Requirement
A set of radio buttons that control the execution of an action executes.
8.3.1.2.1. Required
All Required elements in the flow must be successfully sequentially executed. The flow terminates if a required element fails.
8.3.1.2.2. Alternative
Only a single element must successfully execute for the flow to evaluate as successful. Because the Required flow elements are sufficient to mark a flow as successful, any Alternative flow element within a flow containing Required flow elements will not execute.
8.3.1.2.3. Disabled
The element does not count to mark a flow as successful.
8.3.1.2.4. Conditional
This requirement type is only set on sub-flows.
- A Conditional sub-flow contains executions. These executions must evaluate to logical statements.
- If all executions evaluate as true, the Conditional sub-flow acts as Required.
- If all executions evaluate as false, the Conditional sub-flow acts as Disabled.
- If you do not set an execution, the Conditional sub-flow acts as Disabled.
- If a flow contains executions and the flow is not set to Conditional, Red Hat Single Sign-On does not evaluate the executions, and the executions are considered functionally Disabled.
8.3.2. Creating flows
Important functionality and security considerations apply when you design a flow.
To create a flow, perform the following:
Procedure
- Click Authentication in the menu.
- Click New.
You can copy and then modify an existing flow. Select a flow, click Copy, and enter a name for the new flow.
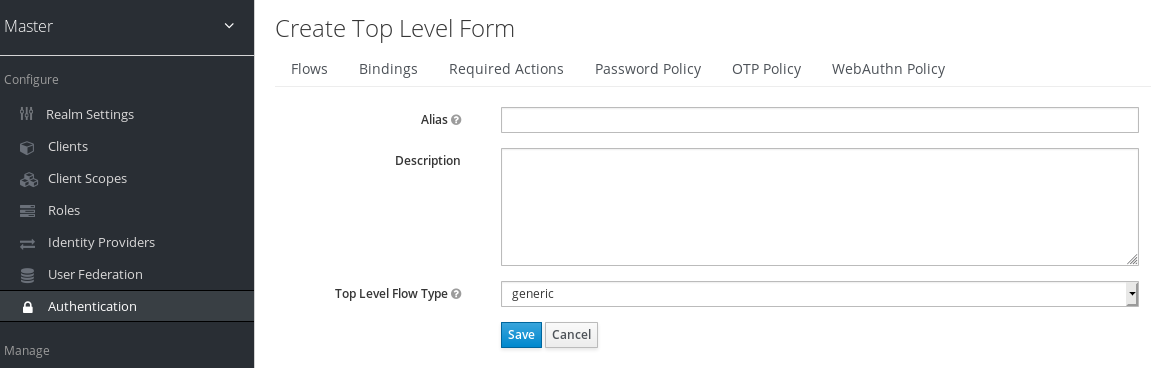
When creating a new flow, you must create a top-level flow first with the following options:
- Alias
- The name of the flow.
- Description
- The description you can set to the flow.
- Top-Level Flow Type
- The type of flow. The type client is used only for the authentication of clients (applications). For all other cases, choose generic.
Create a top-level flow
When Red Hat Single Sign-On has created the flow, Red Hat Single Sign-On displays the Delete, Add execution, and Add flow buttons.
An empty new flow

Three factors determine the behavior of flows and sub-flows.
- The structure of the flow and sub-flows.
- The executions within the flows
- The requirements set within the sub-flows and the executions.
Executions have a wide variety of actions, from sending a reset email to validating an OTP. Add executions with the Add execution button. Hover over the question mark next to Provider, to see a description of the execution.
Adding an authentication execution
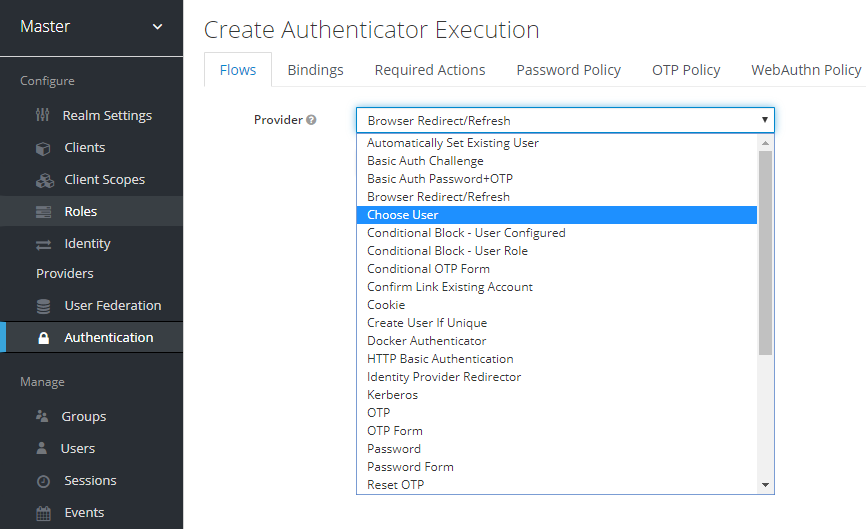
Two types of executions exist, automatic executions and interactive executions. Automatic executions are similar to the Cookie execution and will automatically perform their action in the flow. Interactive executions halt the flow to get input. Executions executing successfully set their status to success. For a flow to complete, it needs at least one execution with a status of success.
You can add sub-flows to top-level flows with the Add flow button. The Add flow button displays the Create Execution Flow page. This page is similar to the Create Top Level Form page. The difference is that the Flow Type can be generic (default) or form. The form type constructs a sub-flow that generates a form for the user, similar to the built-in Registration flow. Sub-flows success depends on how their executions evaluate, including their contained sub-flows. See the execution requirements section for an in-depth explanation of how sub-flows work.
After adding an execution, check the requirement has the correct value.
All elements in a flow have a Delete option in the Actions menu. This action removes the element from the flow. Executions have a Config menu option to configure the execution. It is also possible to add executions and sub-flows to sub-flows with the Add execution and Add flow menu options.
Since the order of execution is important, you can move executions and sub-flows up and down within their flows using the up and down buttons beside their names.
8.3.3. Creating a password-less browser login flow
To illustrate the creation of flows, this section describes creating an advanced browser login flow. The purpose of this flow is to allow a user a choice between logging in using a password-less manner with WebAuthn, or two-factor authentication with a password and OTP.
Procedure
- Click Authentication in the menu.
- Click the Flows tab.
- Click New.
-
Enter
Browser Password-lessas an alias. - Click Save.
- Click Add execution.
- Select Cookie from the drop-down list.
- Click Save.
- Click Alternative for the Cookie authentication type to set its requirement to alternative.
- Click Add execution.
- Select Kerberos from the drop-down list.
- Click Add execution.
- Select Identity Provider Redirector from the drop-down list.
- Click Save.
- Click Alternative for the Identity Provider Redirector authentication type to set its requirement to alternative.
- Click Add flow.
- Enter Forms as an alias.
- Click Save.
Click Alternative for the Forms authentication type to set its requirement to alternative.
The common part with the browser flow

- Click Actions for the *Forms execution.
- Select Add execution.
- Select Username Form from the drop-down list.
- Click Save.
- Click Required for the Username Form authentication type to set its requirement to required.
At this stage, the form requires a username but no password. We must enable password authentication to avoid security risks.
- Click Actions for the Forms sub-flow.
- Click Add flow.
-
Enter
Authenticationas an alias. - Click Save.
- Click Required for the Authentication authentication type to set its requirement to required.
- Click Actions for the Authentication sub-flow.
- Click Add execution.
- Select Webauthn Passwordless Authenticator from the drop-down list.
- Click Save.
- Click Alternative for the Webauthn Passwordless Authenticator authentication type to set its requirement to alternative.
- Click Actions for the Authentication sub-flow.
- Click Add flow.
-
Enter
Password with OTPas an alias. - Click Save.
- Click Alternative for the Password with OTP authentication type to set its requirement to alternative.
- Click Actions for the Password with OTP sub-flow.
- Click Add execution.
- Select Password Form from the drop-down list.
- Click Save.
- Click Required for the Password Form authentication type to set its requirement to required.
- Click Actions for the Password with OTP sub-flow.
- Click Add execution.
- Select OTP Form from the drop-down list.
- Click Save.
- Click Required for the OTP Form authentication type to set its requirement to required.
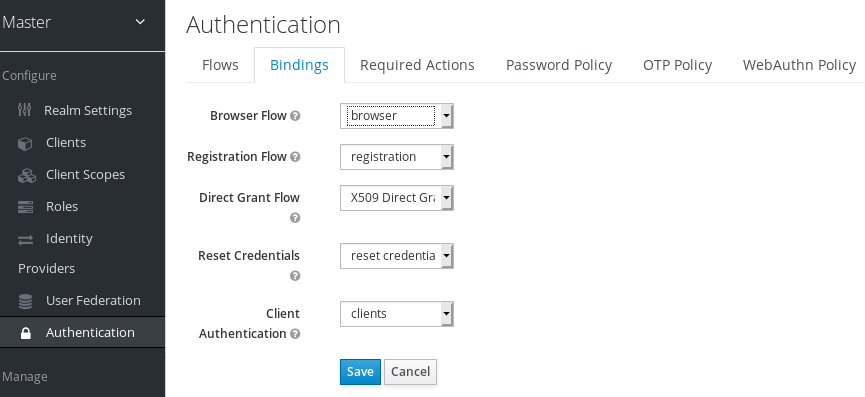
Finally, change the bindings.
- Click the Bindings tab.
- Click the Browser Flow drop-down list.
- Select Browser Password-less from the drop-down list.
- Click Save.
A password-less browser login

After entering the username, the flow works as follows:
If users have WebAuthn passwordless credentials recorded, they can use these credentials to log in directly. This is the password-less login. The user can also select Password with OTP because the WebAuthn Passwordless execution and the Password with OTP flow are set to Alternative. If they are set to Required, the user has to enter WebAuthn, password, and OTP.
If the user selects the Try another way link with WebAuthn passwordless authentication, the user can choose between Password and Security Key (WebAuthn passwordless). When selecting the password, the user will need to continue and log in with the assigned OTP. If the user has no WebAuthn credentials, the user must enter the password and then the OTP. If the user has no OTP credential, they will be asked to record one.
Since the WebAuthn Passwordless execution is set to Alternative rather than Required, this flow will never ask the user to register a WebAuthn credential. For a user to have a Webauthn credential, an administrator must add a required action to the user. Do this by:
- Enabling the Webauthn Register Passwordless required action in the realm (see the WebAuthn documentation).
- Setting the required action using the Credential Reset part of a user’s Credentials management menu.
Creating an advanced flow such as this can have side effects. For example, if you enable the ability to reset the password for users, this would be accessible from the password form. In the default Reset Credentials flow, users must enter their username. Since the user has already entered a username earlier in the Browser Password-less flow, this action is unnecessary for Red Hat Single Sign-On and sub-optimal for user experience. To correct this problem, you can:
-
Copy the
Reset Credentialsflow. Set its name toReset Credentials for password-less, for example. - Select Delete in the Actions menu of the Choose user execution.
- In the Bindings menu, change the reset credential flow from Reset Credentials to Reset Credentials for password-less
8.4. Kerberos
Red Hat Single Sign-On supports login with a Kerberos ticket through the Simple and Protected GSSAPI Negotiation Mechanism (SPNEGO) protocol. SPNEGO authenticates transparently through the web browser after the user authenticates the session. For non-web cases, or when a ticket is not available during login, Red Hat Single Sign-On supports login with Kerberos username and password.
A typical use case for web authentication is the following:
- The user logs into the desktop.
- The user accesses a web application secured by Red Hat Single Sign-On using a browser.
- The application redirects to Red Hat Single Sign-On login.
-
Red Hat Single Sign-On renders the HTML login screen with status 401 and HTTP header
WWW-Authenticate: Negotiate -
If the browser has a Kerberos ticket from desktop login, the browser transfers the desktop sign-on information to Red Hat Single Sign-On in header
Authorization: Negotiate 'spnego-token'. Otherwise, it displays the standard login screen, and the user enters the login credentials. - Red Hat Single Sign-On validates the token from the browser and authenticates the user.
- If using LDAPFederationProvider with Kerberos authentication support, Red Hat Single Sign-On provisions user data from LDAP. If using KerberosFederationProvider, Red Hat Single Sign-On lets the user update the profile and pre-fill login data.
- Red Hat Single Sign-On returns to the application. Red Hat Single Sign-On and the application communicate through OpenID Connect or SAML messages. Red Hat Single Sign-On acts as a broker to Kerberos/SPNEGO login. Therefore Red Hat Single Sign-On authenticating through Kerberos is hidden from the application.
Perform the following steps to set up Kerberos authentication:
- The setup and configuration of the Kerberos server (KDC).
- The setup and configuration of the Red Hat Single Sign-On server.
- The setup and configuration of the client machines.
8.4.1. Setup of Kerberos server
The steps to set up a Kerberos server depends on the operating system (OS) and the Kerberos vendor. Consult Windows Active Directory, MIT Kerberos, and your OS documentation for instructions on setting up and configuring a Kerberos server.
During setup, perform these steps:
- Add some user principals to your Kerberos database. You can also integrate your Kerberos with LDAP, so user accounts provision from the LDAP server.
Add service principal for "HTTP" service. For example, if the Red Hat Single Sign-On server runs on
www.mydomain.org, add the service principalHTTP/www.mydomain.org@<kerberos realm>.On MIT Kerberos, you run a "kadmin" session. On a machine with MIT Kerberos, you can use the command:
sudo kadmin.local
Then, add HTTP principal and export its key to a keytab file with commands such as:
addprinc -randkey HTTP/www.mydomain.org@MYDOMAIN.ORG
ktadd -k /tmp/http.keytab HTTP/www.mydomain.org@MYDOMAIN.ORG
Ensure the keytab file /tmp/http.keytab is accessible on the host where Red Hat Single Sign-On is running.
8.4.2. Setup and configuration of Red Hat Single Sign-On server
Install a Kerberos client on your machine.
Procedure
- Install a Kerberos client. If your machine runs Fedora, Ubuntu, or RHEL, install the freeipa-client package, containing a Kerberos client and other utilities.
Configure the Kerberos client (on Linux, the configuration settings are in the /etc/krb5.conf file ).
Add your Kerberos realm to the configuration and configure the HTTP domains your server runs on.
For example, for the MYDOMAIN.ORG realm, you can configure the
domain_realmsection like this:[domain_realm] .mydomain.org = MYDOMAIN.ORG mydomain.org = MYDOMAIN.ORG
Export the keytab file with the HTTP principal and ensure the file is accessible to the process running the Red Hat Single Sign-On server. For production, ensure that the file is readable by this process only.
For the MIT Kerberos example above, we exported keytab to the
/tmp/http.keytabfile. If your Key Distribution Centre (KDC) and Red Hat Single Sign-On run on the same host, the file is already available.
8.4.2.1. Enabling SPNEGO processing
By default, Red Hat Single Sign-On disables SPNEGO protocol support. To enable it, go to the browser flow and enable Kerberos.
Browser flow
Set the Kerberos requirement from disabled to alternative (Kerberos is optional) or required (browser must have Kerberos enabled). If you have not configured the browser to work with SPNEGO or Kerberos, Red Hat Single Sign-On falls back to the regular login screen.
8.4.2.2. Configure Kerberos user storage federation providerxs
You must now use User Storage Federation to configure how Red Hat Single Sign-On interprets Kerberos tickets. Two different federation providers exist with Kerberos authentication support.
To authenticate with Kerberos backed by an LDAP server, configure the LDAP Federation Provider.
Procedure
Go to the configuration page for your LDAP provider.
Ldap kerberos integration
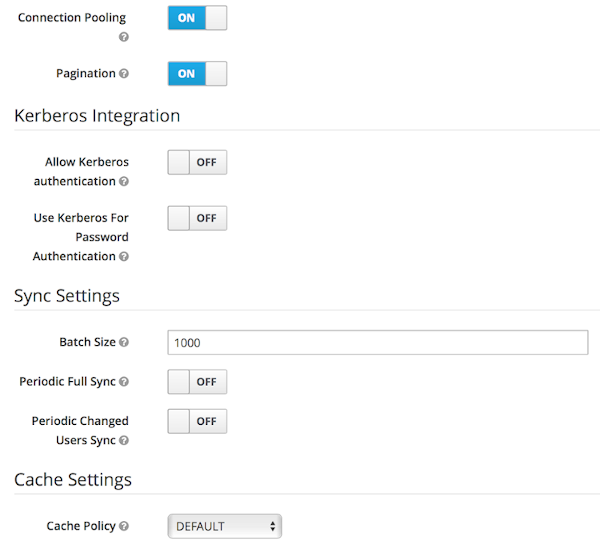
- Toggle Allow Kerberos authentication to ON
Allow Kerberos authentication makes Red Hat Single Sign-On use the Kerberos principal access user information so information can import into the Red Hat Single Sign-On environment.
If an LDAP server is not backing up your Kerberos solution, use the Kerberos User Storage Federation Provider.
Procedure
- Click User Federation in the menu.
Select Kerberos from the Add provider select box.
Kerberos user storage provider
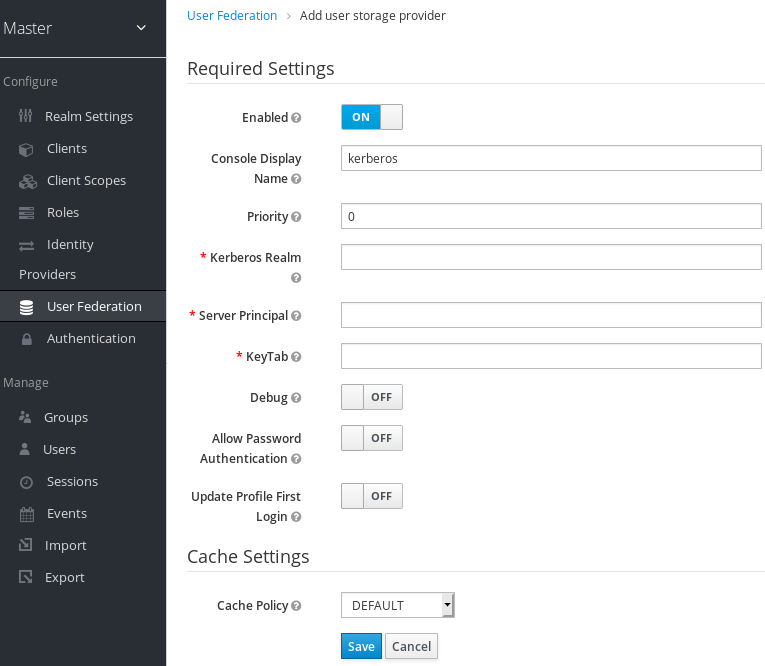
The Kerberos provider parses the Kerberos ticket for simple principal information and imports the information into the local Red Hat Single Sign-On database. User profile information, such as first name, last name, and email, are not provisioned.
8.4.3. Setup and configuration of client machines
Client machines must have a Kerberos client and set up the krb5.conf as described above. The client machines must also enable SPNEGO login support in their browser. See configuring Firefox for Kerberos if you are using the Firefox browser.
The .mydomain.org URI must be in the network.negotiate-auth.trusted-uris configuration option.
In Windows domains, clients do not need to adjust their configuration. Internet Explorer and Edge can already participate in SPNEGO authentication.
8.4.4. Credential delegation
Kerberos supports the credential delegation. Applications may need access to the Kerberos ticket so they can re-use it to interact with other services secured by Kerberos. Because the Red Hat Single Sign-On server processed the SPNEGO protocol, you must propagate the GSS credential to your application within the OpenID Connect token claim or a SAML assertion attribute. Red Hat Single Sign-On transmits this to your application from the Red Hat Single Sign-On server. To insert this claim into the token or assertion, each application must enable the built-in protocol mapper gss delegation credential. This mapper is available in the Mappers tab of the application’s client page. See Protocol Mappers chapter for more details.
Applications must deserialize the claim it receives from Red Hat Single Sign-On before using it to make GSS calls against other services. When you deserialize the credential from the access token to the GSSCredential object, create the GSSContext with this credential passed to the GSSManager.createContext method. For example:
// Obtain accessToken in your application.
KeycloakPrincipal keycloakPrincipal = (KeycloakPrincipal) servletReq.getUserPrincipal();
AccessToken accessToken = keycloakPrincipal.getKeycloakSecurityContext().getToken();

// Retrieve Kerberos credential from accessToken and deserialize it
String serializedGssCredential = (String) accessToken.getOtherClaims().
    get(org.keycloak.common.constants.KerberosConstants.GSS_DELEGATION_CREDENTIAL);

GSSCredential deserializedGssCredential = org.keycloak.common.util.KerberosSerializationUtils.
    deserializeCredential(serializedGssCredential);

// Create GSSContext to call other Kerberos-secured services
GSSContext context = gssManager.createContext(serviceName, krb5Oid,
    deserializedGssCredential, GSSContext.DEFAULT_LIFETIME);
Configure forwardable Kerberos tickets in krb5.conf file and add support for delegated credentials to your browser.
Credential delegation has security implications, so use it only if necessary and only with HTTPS. See this article for more details and an example.
8.4.5. Cross-realm trust
In the Kerberos protocol, the realm is a set of Kerberos principals. The definition of these principals exists in the Kerberos database, which is typically an LDAP server.
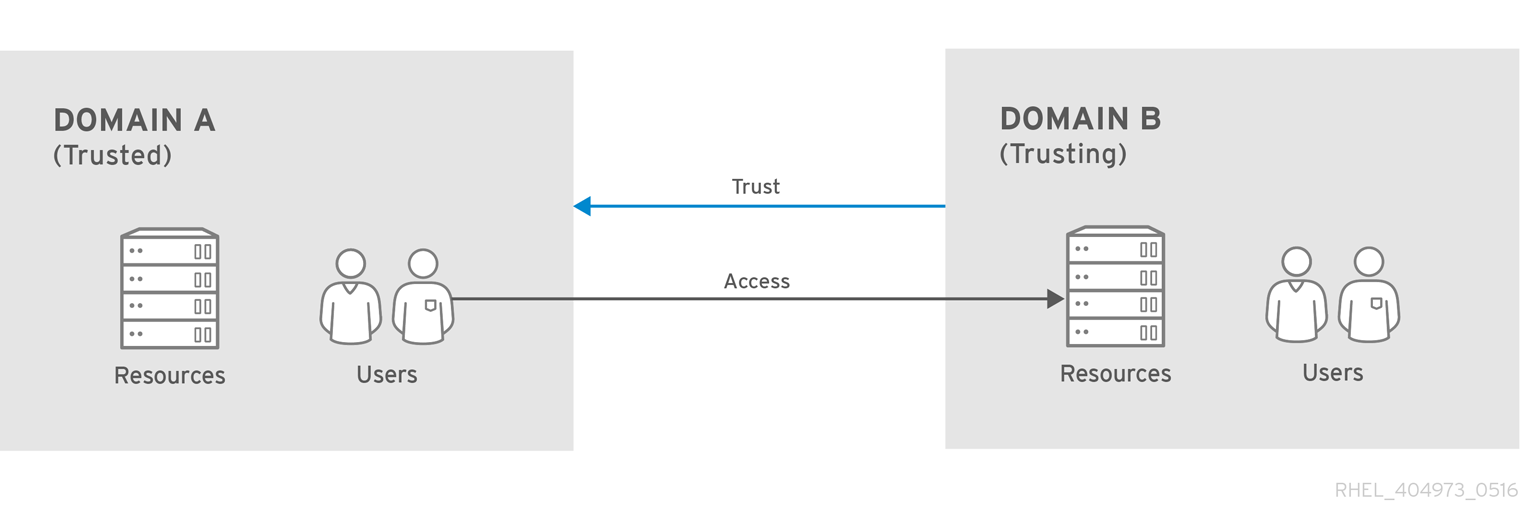
The Kerberos protocol allows cross-realm trust. For example, if 2 Kerberos realms, A and B, exist, then cross-realm trust will allow the users from realm A to access realm B’s resources. Realm B trusts realm A.
Kerberos cross-realm trust
The Red Hat Single Sign-On server supports cross-realm trust. To implement this, perform the following:
-
Configure the Kerberos servers for the cross-realm trust. Implementing this step depends on the Kerberos server implementations. This step is necessary to add the Kerberos principal
krbtgt/B@Ato the Kerberos databases of realm A and B. This principal must have the same keys on both Kerberos realms. The principals must have the same password, key version numbers, and ciphers in both realms. Consult the Kerberos server documentation for more details.
The cross-realm trust is unidirectional by default. You must add the principal krbtgt/A@B to both Kerberos databases for bidirectional trust between realm A and realm B. However, trust is transitive by default. If realm B trusts realm A and realm C trusts realm B, then realm C trusts realm A without the principal, krbtgt/C@A, available. Additional configuration (for example, capaths) may be necessary on the Kerberos client-side so clients can find the trust path. Consult the Kerberos documentation for more details.
Configure Red Hat Single Sign-On server
-
When using an LDAP storage provider with Kerberos support, configure the server principal for realm B, as in this example:
HTTP/mydomain.com@B. The LDAP server must find the users from realm A if users from realm A are to successfully authenticate to Red Hat Single Sign-On, because Red Hat Single Sign-On must perform the SPNEGO flow and then find the users.
-
When using an LDAP storage provider with Kerberos support, configure the server principal for realm B, as in this example:
For example, Kerberos principal user john@A must be available in the LDAP under an LDAP DN such as uid=john,ou=People,dc=example,dc=com. If you want users from realm A and B to authenticate, ensure that LDAP can find users from both realms A and B.
-
When using a Kerberos user storage provider (typically, Kerberos without LDAP integration), configure the server principal as
HTTP/mydomain.com@B, and users from Kerberos realms A and B must be able to authenticate.
When using the Kerberos user storage provider, there cannot be conflicting users among Kerberos realms. If conflicting users exist, Red Hat Single Sign-On maps them to the same user.
8.4.6. Troubleshooting
If you have issues, enable additional logging to debug the problem:
-
Enable
Debugflag in the Admin Console for Kerberos or LDAP federation providers -
Enable TRACE logging for category
org.keycloakin the logging section ofstandalone/configuration/standalone.xmlto receive more information instandalone/log/server.log -
Add system properties
-Dsun.security.krb5.debug=trueand-Dsun.security.spnego.debug=true
8.5. X.509 client certificate user authentication
Red Hat Single Sign-On supports logging in with an X.509 client certificate if you have configured the server to use mutual SSL authentication.
A typical workflow:
- A client sends an authentication request over SSL/TLS channel.
- During the SSL/TLS handshake, the server and the client exchange their x.509/v3 certificates.
- The container (JBoss EAP) validates the certificate PKIX path and the certificate expiration date.
The x.509 client certificate authenticator validates the client certificate by using the following methods:
- Checks the certificate revocation status by using CRL or CRL Distribution Points.
- Checks the Certificate revocation status by using OCSP (Online Certificate Status Protocol).
- Validates whether the key in the certificate matches the expected key.
- Validates whether the extended key in the certificate matches the expected extended key.
- If any of the these checks fail, the x.509 authentication fails. Otherwise, the authenticator extracts the certificate identity and maps it to an existing user.
When the certificate maps to an existing user, the behavior diverges depending on the authentication flow:
- In the Browser Flow, the server prompts users to confirm their identity or sign in with a username and password.
- In the Direct Grant Flow, the server signs in the user.
Note that it is the responsibility of the web container to validate certificate PKIX path. X.509 authenticator on the Red Hat Single Sign-On side provides just the additional support for check the certificate expiration, certificate revocation status and key usage. If you are using Red Hat Single Sign-On deployed behind reverse proxy, make sure that your reverse proxy is configured to validate PKIX path. If you do not use reverse proxy and users directly access the JBoss EAP, you should be fine as JBoss EAP makes sure that PKIX path is validated as long as it is configured as described below.
8.5.1. Features
Supported Certificate Identity Sources:
- Match SubjectDN by using regular expressions
- X500 Subject’s email attribute
- X500 Subject’s email from Subject Alternative Name Extension (RFC822Name General Name)
- X500 Subject’s other name from Subject Alternative Name Extension. This other name is the User Principal Name (UPN), typically.
- X500 Subject’s Common Name attribute
- Match IssuerDN by using regular expressions
- Certificate Serial Number
- Certificate Serial Number and IssuerDN
- SHA-256 Certificate thumbprint
- Full certificate in PEM format
8.5.1.1. Regular expressions
Red Hat Single Sign-On extracts the certificate identity from Subject DN or Issuer DN by using a regular expression as a filter. For example, this regular expression matches the email attribute:
emailAddress=(.*?)(?:,|$)
The regular expression filtering applies if the Identity Source is set to either Match SubjectDN using regular expression or Match IssuerDN using regular expression.
8.5.1.1.1. Mapping certificate identity to an existing user
The certificate identity mapping can map the extracted user identity to an existing user’s username, email, or a custom attribute whose value matches the certificate identity. For example, setting Identity source to Subject’s email or User mapping method to Username or email makes the X.509 client certificate authenticator use the email attribute in the certificate’s Subject DN as the search criteria when searching for an existing user by username or by email.
- If you disable Login with email at realm settings, the same rules apply to certificate authentication. Users are unable to log in by using the email attribute.
-
Using
Certificate Serial Number and IssuerDNas an identity source requires two custom attributes for the serial number and the IssuerDN. -
SHA-256 Certificate thumbprintis the lowercase hexadecimal representation of SHA-256 certificate thumbprint. -
Using
Full certificate in PEM formatas an identity source is limited to the custom attributes mapped to external federation sources, such as LDAP. Red Hat Single Sign-On cannot store certificates in its database due to length limitations, so in the case of LDAP, you must enableAlways Read Value From LDAP.
8.5.1.1.2. Extended certificate validation
- Revocation status checking using CRL.
- Revocation status checking using CRL/Distribution Point.
- Revocation status checking using OCSP/Responder URI.
- Certificate KeyUsage validation.
- Certificate ExtendedKeyUsage validation.
8.5.2. Enable X.509 client certificate user authentication
The following sections describe how to configure JBoss EAP/Undertow and the Red Hat Single Sign-On Server to enable X.509 client certificate authentication.
8.5.2.1. Enable mutual SSL in JBoss EAP
See Enable SSL for the instructions to enable SSL in JBoss EAP.
- Open RHSSO_HOME/standalone/configuration/standalone.xml and add a new realm:
<security-realms>
    <security-realm name="ssl-realm">
        <server-identities>
            <ssl>
                <keystore path="servercert.jks"
                          relative-to="jboss.server.config.dir"
                          keystore-password="servercert password"/>
            </ssl>
        </server-identities>
        <authentication>
            <truststore path="truststore.jks"
                        relative-to="jboss.server.config.dir"
                        keystore-password="truststore password"/>
        </authentication>
    </security-realm>
</security-realms>ssl/keystore-
The
sslelement contains thekeystoreelement that contains the details to load the server public key pair from a JKS keystore. ssl/keystore/path- The path to the JKS keystore.
ssl/keystore/relative-to- The path that the keystore path is relative to.
ssl/keystore/keystore-password- The password to open the keystore.
ssl/keystore/alias(optional)- The alias of the entry in the keystore. Set if the keystore contains multiple entries.
ssl/keystore/key-password(optional)- The private key password, if different from the keystore password.
authentication/truststore- Defines how to load a trust store to verify the certificate presented by the remote side of the inbound/outgoing connection. Typically, the truststore contains a collection of trusted CA certificates.
authentication/truststore/path- The path to the JKS keystore containing the certificates of the trusted certificate authorities.
authentication/truststore/relative-to- The path that the truststore path is relative to.
authentication/truststore/keystore-password- The password to open the truststore.
8.5.2.2. Enable HTTPS listener
See HTTPS Listener for the instructions to enable HTTPS in WildFly.
- Add the <https-listener> element.
<subsystem xmlns="urn:jboss:domain:undertow:12.0">
	....
    <server name="default-server">
	    <https-listener name="default"
                        socket-binding="https"
                        security-realm="ssl-realm"
                        verify-client="REQUESTED"/>
    </server>
</subsystem>https-listener/security-realm- This value must match the name of the realm from the previous section.
https-listener/verify-client- If set to REQUESTED, the server optionally asks for a client certificate. If set to REQUIRED, the server refuses inbound connections if no client certificate has been provided.
8.5.3. Adding X.509 client certificate authentication to browser flows
- Click Authentication in the menu.
- Click the "Browser" flow.
- Click Copy to make a copy of the built-in "Browser" flow.
- Enter a name for the copy.
- Click Ok.
- Click the copy in the Add policy drop-down box.
- Click Add execution.
- Click "X509/Validate Username Form".
Click Save.
X509 execution

- Click the up/down arrow buttons to move the "X509/Validate Username Form" over the "Browser Forms" execution.
Set the requirement to "ALTERNATIVE".
X509 browser flow

- Click the Bindings tab.
- Click the Browser Flow drop-down list.
- Click the copy of the browser flow from the drop-down list.
Click Save.
X509 browser flow bindings

8.5.4. Configuring X.509 client certificate authentication
X509 configuration
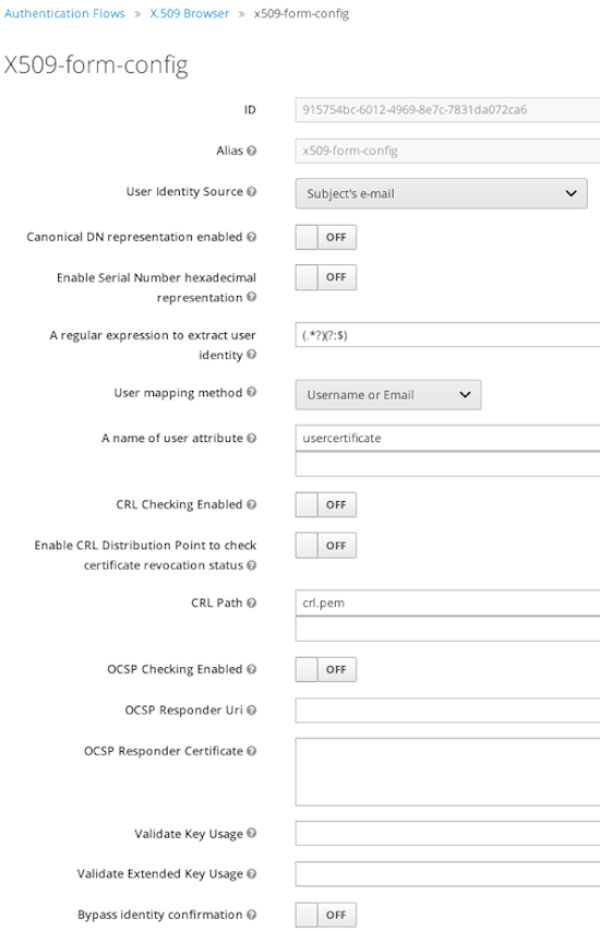
- User Identity Source
- Defines the method for extracting the user identity from a client certificate.
- Canonical DN representation enabled
- Defines whether to use canonical format to determine a distinguished name. The official Java API documentation describes the format. This option affects the two User Identity Sources Match SubjectDN using regular expression and Match IssuerDN using regular expression only. Enable this option when you set up a new Red Hat Single Sign-On instance. Disable this option to retain backward compatibility with existing Red Hat Single Sign-On instances.
- Enable Serial Number hexadecimal representation
- Represent the serial number as hexadecimal. The serial number with the sign bit set to 1 must be left padded with 00 octet. For example, a serial number with decimal value 161, or a1 in hexadecimal representation is encoded as 00a1, according to RFC5280. See RFC5280, appendix-B for more details.
- A regular expression
- A regular expression to use as a filter for extracting the certificate identity. The expression must contain a single group.
- User Mapping Method
- Defines the method to match the certificate identity with an existing user. Username or email searches for existing users by username or email. Custom Attribute Mapper searches for existing users with a custom attribute that matches the certificate identity. The name of the custom attribute is configurable.
- A name of user attribute
- A custom attribute whose value matches against the certificate identity. Use multiple custom attributes when attribute mapping is related to multiple values, For example, 'Certificate Serial Number and IssuerDN'.
- CRL Checking Enabled
- Check the revocation status of the certificate by using the Certificate Revocation List. The location of the list is defined in the CRL file path attribute.
- Enable CRL Distribution Point to check certificate revocation status
- Use CDP to check the certificate revocation status. Most PKI authorities include CDP in their certificates.
- CRL file path
- The path to a file containing a CRL list. The value must be a path to a valid file if the CRL Checking Enabled option is enabled.
- OCSP Checking Enabled
- Checks the certificate revocation status by using Online Certificate Status Protocol.
- OCSP Responder URI
- Override the value of the OCSP responder URI in the certificate.
- Validate Key Usage
- Verifies the certificate’s KeyUsage extension bits are set. For example, "digitalSignature,KeyEncipherment" verifies if bits 0 and 2 in the KeyUsage extension are set. Leave this parameter empty to disable the Key Usage validation. See RFC5280, Section-4.2.1.3 for more information. Red Hat Single Sign-On raises an error when a key usage mismatch occurs.
- Validate Extended Key Usage
- Verifies one or more purposes defined in the Extended Key Usage extension. See RFC5280, Section-4.2.1.12 for more information. Leave this parameter empty to disable the Extended Key Usage validation. Red Hat Single Sign-On raises an error when flagged as critical by the issuing CA and a key usage extension mismatch occurs.
- Bypass identity confirmation
- If enabled, X.509 client certificate authentication does not prompt the user to confirm the certificate identity. Red Hat Single Sign-On signs in the user upon successful authentication.
Revalidate client certificate- If set, the client certificate trust chain will be always verified at the application level using the certificates present in the configured trust store. This can be useful if the underlying web server does not enforce client certificate chain validation, for example because it is behind a non-validating load balancer or reverse proxy, or when the number of allowed CAs is too large for the mutual SSL negotiation (most browsers cap the maximum SSL negotiation packet size at 32767 bytes, which corresponds to about 200 advertised CAs). By default this option is off.
8.5.5. Adding X.509 Client Certificate Authentication to a Direct Grant Flow
- Click Authentication in the menu.
- Click the "Direct Grant" flow.
- Click Copy to make a copy of the "Direct Grant" flow.
- Enter a name for the copy.
- Click Ok.
- Click on the Actions link for "Username Validation" and click Delete.
- Click Delete.
- Click on the Actions link for "Password" and click Delete.
- Click Delete.
- Click Add execution.
- Click "X509/Validate Username".
Click Save.
X509 direct grant execution

- Set up the x509 authentication configuration by following the steps described in the x509 Browser Flow section.
- Click the Bindings tab.
- Click the Direct Grant Flow drop-down list.
- Click the newly created "x509 Direct Grant" flow.
Click Save.
X509 direct grant flow bindings
8.5.6. Client certificate lookup
When the Red Hat Single Sign-On server receives a direct HTTP request, the JBoss EAP undertow subsystem establishes an SSL handshake and extracts the client certificate. The JBoss EAP saves the client certificate to the javax.servlet.request.X509Certificate attribute of the HTTP request, as specified in the servlet specification. The Red Hat Single Sign-On X509 authenticator can look up the certificate from this attribute.
However, when the Red Hat Single Sign-On server listens to HTTP requests behind a load balancer or reverse proxy, the proxy server may extract the client certificate and establish a mutual SSL connection. A reverse proxy generally puts the authenticated client certificate in the HTTP header of the underlying request. The proxy forwards the request to the back end Red Hat Single Sign-On server. In this case, Red Hat Single Sign-On must look up the X.509 certificate chain from the HTTP headers rather than the attribute of the HTTP request.
If Red Hat Single Sign-On is behind a reverse proxy, you generally need to configure the alternative provider of the x509cert-lookup SPI in RHSSO_HOME/standalone/configuration/standalone.xml. With the default provider looking up the HTTP header certificate, two additional built-in providers exist: haproxy and apache.
8.5.6.1. HAProxy certificate lookup provider
You use this provider when your Red Hat Single Sign-On server is behind an HAProxy reverse proxy. Use the following configuration for your server:
<spi name="x509cert-lookup">
    <default-provider>haproxy</default-provider>
    <provider name="haproxy" enabled="true">
        <properties>
            <property name="sslClientCert" value="SSL_CLIENT_CERT"/>
            <property name="sslCertChainPrefix" value="CERT_CHAIN"/>
            <property name="certificateChainLength" value="10"/>
        </properties>
    </provider>
</spi>
In this example configuration, the client certificate is looked up from the HTTP header, SSL_CLIENT_CERT, and the other certificates from its chain are looked up from HTTP headers such as CERT_CHAIN_0 through CERT_CHAIN_9. The attribute certificateChainLength is the maximum length of the chain so the last attribute is CERT_CHAIN_9.
Consult the HAProxy documentation for the details of configuring the HTTP Headers for the client certificate and client certificate chain.
8.5.6.2. Apache certificate lookup provider
You can use this provider when your Red Hat Single Sign-On server is behind an Apache reverse proxy. Use the following configuration for your server:
<spi name="x509cert-lookup">
    <default-provider>apache</default-provider>
    <provider name="apache" enabled="true">
        <properties>
            <property name="sslClientCert" value="SSL_CLIENT_CERT"/>
            <property name="sslCertChainPrefix" value="CERT_CHAIN"/>
            <property name="certificateChainLength" value="10"/>
        </properties>
    </provider>
</spi>
This configuration is the same as the haproxy provider. Consult the Apache documentation on mod_ssl and mod_headers for details on how the HTTP Headers for the client certificate and client certificate chain are configured.
8.5.6.3. NGINX certificate lookup provider
You can use this provider when your Red Hat Single Sign-On server is behind an NGINX reverse proxy. Use the following configuration for your server:
<spi name="x509cert-lookup">
    <default-provider>nginx</default-provider>
    <provider name="nginx" enabled="true">
        <properties>
            <property name="sslClientCert" value="ssl-client-cert"/>
            <property name="sslCertChainPrefix" value="USELESS"/>
            <property name="certificateChainLength" value="2"/>
        </properties>
    </provider>
</spi>The NGINX SSL/TLS module does not expose the client certificate chain. Red Hat Single Sign-On’s NGINX certificate lookup provider rebuilds it by using the Keycloak truststore. Populate the Red Hat Single Sign-On truststore by using the keytool CLI with all root and intermediate CA’s for rebuilding client certificate chain.
Consult the NGINX documentation for the details of configuring the HTTP Headers for the client certificate.
Example of NGINX configuration file :
 ...
 server {
    ...
    ssl_client_certificate                  trusted-ca-list-for-client-auth.pem;
    ssl_verify_client                       optional_no_ca;
    ssl_verify_depth                        2;
    ...
    location / {
      ...
      proxy_set_header ssl-client-cert        $ssl_client_escaped_cert;
      ...
    }
    ...
}All certificates in trusted-ca-list-for-client-auth.pem must be added to Keycloak truststore.
8.5.6.4. Other reverse proxy implementations
Red Hat Single Sign-On does not have built-in support for other reverse proxy implementations. However, you can make other reverse proxies behave in a similar way to apache or haproxy. If none of these work, create your implementation of the org.keycloak.services.x509.X509ClientCertificateLookupFactory and org.keycloak.services.x509.X509ClientCertificateLookup providers. See the Server Developer Guide for details on how to add your provider.
8.5.7. Troubleshooting
- Dumping HTTP headers
-
To view what the reverse proxy sends to Keycloak, enable the
RequestDumpingHandlerUndertow filter and consult theserver.logfile. - Enable TRACE logging under the logging subsystem
...
    <profile>
        <subsystem xmlns="urn:jboss:domain:logging:8.0">
...
            <logger category="org.keycloak.authentication.authenticators.x509">
                <level name="TRACE"/>
            </logger>
            <logger category="org.keycloak.services.x509">
                <level name="TRACE"/>
</logger>Do not use RequestDumpingHandler or TRACE logging in production.
- Direct Grant authentication with X.509
- You can use the following template to request a token by using the Resource Owner Password Credentials Grant:
$ curl https://[host][:port]/auth/realms/master/protocol/openid-connect/token \
       --insecure \
       --data "grant_type=password&scope=openid profile&username=&password=&client_id=CLIENT_ID&client_secret=CLIENT_SECRET" \
       -E /path/to/client_cert.crt \
--key /path/to/client_cert.key[host][:port]- The host and the port number of the remote Red Hat Single Sign-On server.
CLIENT_ID- The client id.
CLIENT_SECRET- For confidential clients, a client secret.
client_cert.crt- A public key certificate to verify the identity of the client in mutual SSL authentication. The certificate must be in PEM format.
client_cert.key- A private key in the public key pair. This key must be in PEM format.
8.6. W3C Web Authentication (WebAuthn)
Red Hat Single Sign-On provides limited support for W3C Web Authentication (WebAuthn). Red Hat Single Sign-On works as a WebAuthn’s Relying Party (RP).
WebAuthn is Technology Preview and is not fully supported. This feature is disabled by default.
To enable start the server with -Dkeycloak.profile=preview or -Dkeycloak.profile.feature.web_authn=enabled . For more details see Profiles.
WebAuthn’s operations success depends on the user’s WebAuthn supporting authenticator, browser, and platform. Make sure your authenticator, browser, and platform support the WebAuthn specification.
8.6.1. Setup
The setup procedure of WebAuthn support for 2FA is the following :
8.6.1.1. Enable WebAuthn authenticator registration
- Click Authentication in the menu.
- Click the Required Actions tab.
- Click Register.
- Click the Required Action drop-down list.
- Click Webauthn Register.
- Click Ok.
Mark the Default Action checkbox if you want all new users to be required to register their WebAuthn credentials.
8.6.1.2. Adding WebAuthn authentication to a browser flow
- Click Authentication in the menu.
- Click the Browser flow.
- Click Copy to make a copy of the built-in Browser flow.
- Enter a name for the copy.
- Click Ok.
- Click the Actions link for WebAuthn Browser Browser - Conditional OTP and click Delete.
- Click Delete.
If you require WebAuthn for all users:
- Click on the Actions link for WebAuthn Browser Forms.
- Click Add execution.
- Click the Provider drop-down list.
- Click WebAuthn Authenticator.
- Click Save.
Click REQUIRED for WebAuthn Authenticator
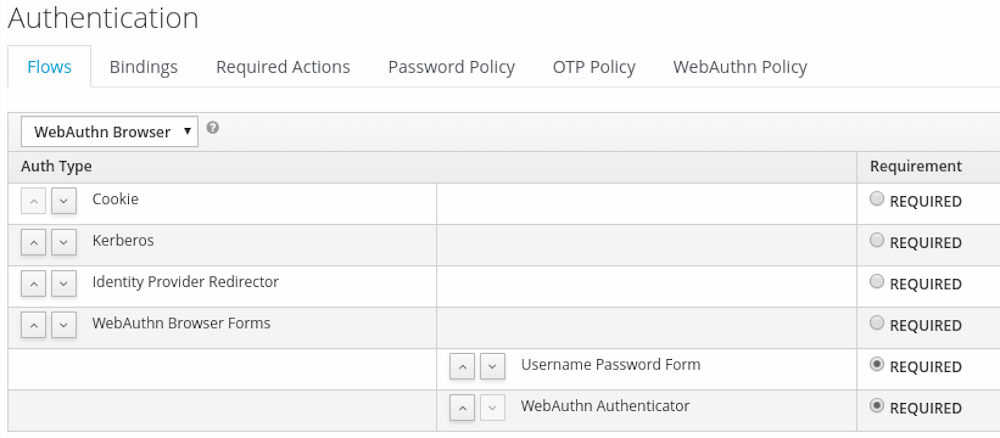
- Click the Bindings tab.
- Click the Browser Flow drop-down list.
- Click WebAuthn Browser.
- Click Save.
If a user does not have WebAuthn credentials, the user must register WebAuthn credentials.
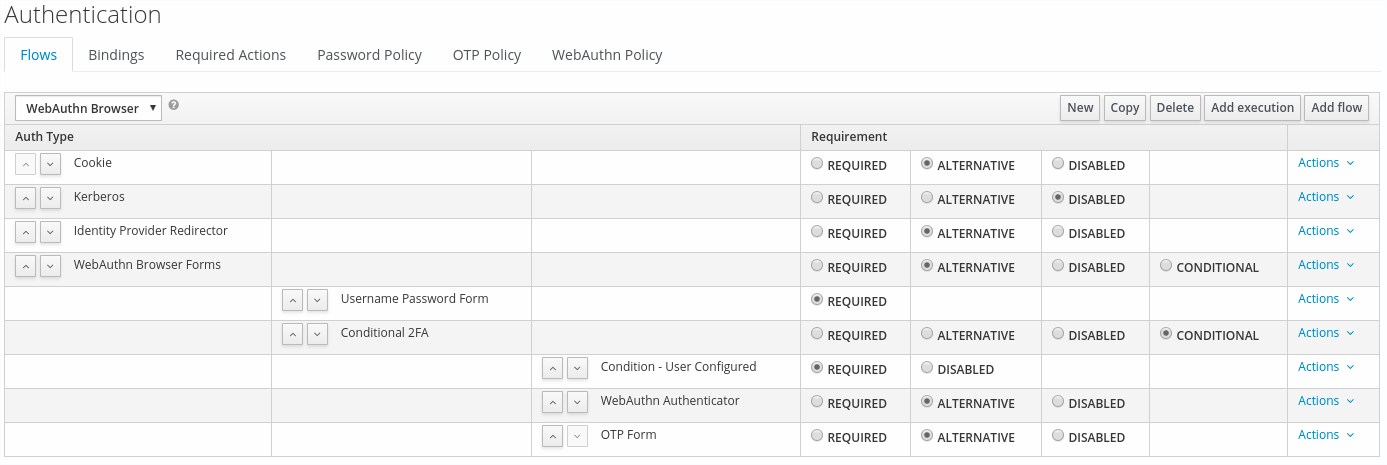
Users can log in with WebAuthn if they have a WebAuthn credential registered only. So instead of adding the WebAuthn Authenticator execution, you can:
Procedure
- Click on the Actions link for WebAuthn Browser Forms.
- Click Add flow.
- Enter "Conditional 2FA" for the Alias field.
- Click Save.
- Click CONDITIONAL for Conditional 2FA
- Click on the Actions link for Conditional 2FA.
- Click Add execution.
- Click the Provider drop-down list.
- Click Condition - User Configured.
- Click Save.
- Click REQUIRED for Conditional 2FA
- Click on the Actions link for Conditional 2FA.
- Click Add execution.
- Click the Provider drop-down list.
- Click WebAuthn Authenticator.
- Click Save.
Click ALTERNATIVE for Conditional 2FA

The user can choose between using WebAuthn and OTP for the second factor:
Procedure
- Click the Actions link for Conditional 2FA.
- Click Add execution.
- Click the Provider drop-down list.
- Click ITP Form.
- Click Save.
Click ALTERNATIVE for Conditional 2FA
8.6.2. Authenticate with WebAuthn authenticator
After registering a WebAuthn authenticator, the user carries out the following operations:
- Open the login form. The user must authenticate with a username and password.
- The user’s browser asks the user to authenticate by using their WebAuthn authenticator.
8.6.3. Managing WebAuthn as an administrator
8.6.3.1. Managing credentials
Red Hat Single Sign-On manages WebAuthn credentials similarly to other credentials from User credential management:
- Red Hat Single Sign-On assigns users a required action to create a WebAuthn credential from the Reset Actions list and select Webauthn Register.
- Administrators can delete a WebAuthn credential by clicking Delete.
- Administrators can view the credential’s data, such as the AAGUID, by selecting Show data….
- Administrators can set a label for the credential by setting a value in the User Label field and saving the data.
8.6.3.2. Managing policy
Administrators can configure WebAuthn related operations as WebAuthn Policy per realm.
Procedure
- Click Authentication in the menu.
- Click the WebAuthn Policy tab.
- Configure the items within the policy (see description below).
- Click Save.
The configurable items and their description are as follows:
| Configuration | Description |
|---|---|
| Relying Party Entity Name | The readable server name as a WebAuthn Relying Party. This item is mandatory and applies to the registration of the WebAuthn authenticator. The default setting is "keycloak". For more details, see WebAuthn Specification. |
| Signature Algorithms | The algorithms telling the WebAuthn authenticator which signature algorithms to use for the Public Key Credential. Red Hat Single Sign-On uses the Public Key Credential to sign and verify Authentication Assertions. If no algorithms exist, the default ES256 is adapted. ES256 is an optional configuration item applying to the registration of WebAuthn authenticators. For more details, see WebAuthn Specification. |
| Relying Party ID | The ID of a WebAuthn Relying Party that determines the scope of Public Key Credentials. The ID must be the origin’s effective domain. This ID is an optional configuration item applied to the registration of WebAuthn authenticators. If this entry is blank, Red Hat Single Sign-On adapts the host part of Red Hat Single Sign-On’s base URL. For more details, see WebAuthn Specification. |
| Attestation Conveyance Preference | The WebAuthn API implementation on the browser (WebAuthn Client) is the preferential method to generate Attestation statements. This preference is an optional configuration item applying to the registration of the WebAuthn authenticator. If no option exists, its behavior is the same as selecting "none". For more details, see WebAuthn Specification. |
| Authenticator Attachment | The acceptable attachment pattern of a WebAuthn authenticator for the WebAuthn Client. This pattern is an optional configuration item applying to the registration of the WebAuthn authenticator. For more details, see WebAuthn Specification. |
| Require Resident Key | The option requiring that the WebAuthn authenticator generates the Public Key Credential as Client-side-resident Public Key Credential Source. This option applies to the registration of the WebAuthn authenticator. If left blank, its behavior is the same as selecting "No". For more details, see WebAuthn Specification. |
| User Verification Requirement | The option requiring that the WebAuthn authenticator confirms the verification of a user. This is an optional configuration item applying to the registration of a WebAuthn authenticator and the authentication of a user by a WebAuthn authenticator. If no option exists, its behavior is the same as selecting "preferred". For more details, see WebAuthn Specification for registering a WebAuthn authenticator and WebAuthn Specification for authenticating the user by a WebAuthn authenticator. |
| Timeout | The timeout value, in seconds, for registering a WebAuthn authenticator and authenticating the user by using a WebAuthn authenticator. If set to zero, its behavior depends on the WebAuthn authenticator’s implementation. The default value is 0. For more details, see WebAuthn Specification for registering a WebAuthn authenticator and WebAuthn Specification for authenticating the user by a WebAuthn authenticator. |
| Avoid Same Authenticator Registration | If enabled, Red Hat Single Sign-On cannot re-register an already registered WebAuthn authenticator. |
| Acceptable AAGUIDs | The white list of AAGUIDs which a WebAuthn authenticator must register against. |
8.6.4. Attestation statement verification
When registering a WebAuthn authenticator, Red Hat Single Sign-On verifies the trustworthiness of the attestation statement generated by the WebAuthn authenticator. Red Hat Single Sign-On requires the trust anchor’s certificates for this. Red Hat Single Sign-On uses the Keycloak truststore, so you must import these certificates into it in advance.
To omit this validation, disable this truststore or set the WebAuthn policy’s configuration item "Attestation Conveyance Preference" to "none".
8.6.5. Managing WebAuthn credentials as a user
8.6.5.1. Register WebAuthn authenticator
The appropriate method to register a WebAuthn authenticator depends on whether the user has already registered an account on Red Hat Single Sign-On.
8.6.5.2. New user
If the WebAuthn Register required action is Default Action in a realm, new users must set up the WebAuthn security key after their first login.
Procedure
- Open the login form.
- Click Register.
- Fill in the items on the form.
- Click Register.
After successfully registering, the browser asks the user to enter the text of their WebAuthn authenticator’s label.
8.6.5.3. Existing user
If WebAuthn Authenticator is set up as required as shown in the first example, then when existing users try to log in, they are required to register their WebAuthn authenticator automatically:
Procedure
- Open the login form.
- Enter the items on the form.
- Click Save.
- Click Login.
After successful registration, the user’s browser asks the user to enter the text of their WebAuthn authenticator’s label.
8.6.6. Passwordless WebAuthn together with Two-Factor
Red Hat Single Sign-On uses WebAuthn for two-factor authentication, but you can use WebAuthn as the first-factor authentication. In this case, users with passwordless WebAuthn credentials can authenticate to Red Hat Single Sign-On without a password. Red Hat Single Sign-On can use WebAuthn as both the passwordless and two-factor authentication mechanism in the context of a realm and a single authentication flow.
An administrator typically requires that Security Keys registered by users for the WebAuthn passwordless authentication meet different requirements. For example, the security keys may require users to authenticate to the security key using a PIN, or the security key attests with a stronger certificate authority.
Because of this, Red Hat Single Sign-On permits administrators to configure a separate WebAuthn Passwordless Policy. There is a required Webauthn Register Passwordless action of type and separate authenticator of type WebAuthn Passwordless Authenticator.
8.6.6.1. Setup
Set up WebAuthn passwordless support as follows:
-
Register a new required action for WebAuthn passwordless support. Use the steps described in Enable WebAuthn Authenticator Registration. Register the
Webauthn Register Passwordlessaction. - Configure the policy. You can use the steps and configuration options described in Managing Policy. Perform the configuration in the Admin Console in the tab WebAuthn Passwordless Policy. Typically the requirements for the security key will be stronger than for the two-factor policy. For example, you can set the User Verification Requirement to Required when you configure the passwordless policy.
Configure the authentication flow. Use the WebAuthn Browser flow described in Adding WebAuthn Authentication to a Browser Flow. Configure the flow as follows:
- The WebAuthn Browser Forms subflow contains Username Form as the first authenticator. Delete the default Username Password Form authenticator and add the Username Form authenticator. This action requires the user to provide a username as the first step.
- There will be a required subflow, which can be named Passwordless Or Two-factor, for example. This subflow indicates the user can authenticate with Passwordless WebAuthn credential or with Two-factor authentication.
- The flow contains WebAuthn Passwordless Authenticator as the first alternative.
- The second alternative will be a subflow named Password And Two-factor Webauthn, for example. This subflow contains a Password Form and a WebAuthn Authenticator.
The final configuration of the flow looks similar to this:

You can now add WebAuthn Register Passwordless as the required action to a user, already known to Red Hat Single Sign-On, to test this. During the first authentication, the user must use the password and second-factor WebAuthn credential. The user does not need to provide the password and second-factor WebAuthn credential if they use the WebAuthn Passwordless credential. === Conditions in conditional flows
As was mentioned in Execution requirements, Condition executions can be only contained in Conditional subflow. If all Condition executions evaluate as true, then the Conditional sub-flow acts as Required. You can process the next execution in the Conditional sub-flow. If some executions included in the Conditional sub-flow evaluate as false, then the whole sub-flow is considered as Disabled.
8.6.7. Available conditions
Condition - User RoleThis execution has the ability to determine if the user has a role defined by User role field. If the user has the required role, the execution is considered as true and other executions are evaluated. The administrator has to define the following fields:
- Alias
- Describes a name of the execution, which will be shown in the authentication flow.
- User role
-
Role the user should have to execute this flow. To specify an application role the syntax is
appname.approle(for examplemyapp.myrole).
Condition - User Configured- This checks if the other executions in the flow are configured for the user. The Execution requirements section includes an example of the OTP form.
Condition - User AttributeThis checks if the user has set up the required attribute. There is a possibility to negate output, which means the user should not have the attribute. The User Attributes section shows how to add a custom attribute. You can provide these fields:
- Alias
- Describes a name of the execution, which will be shown in the authentication flow.
- Attribute name
- Name of the attribute to check.
- Expected attribute value
- Expected value in the attribute.
- Negate output
- You can negate the output. In other words, the attribute should not be present.
8.6.8. Explicitly deny/allow access in conditional flows
You can allow or deny access to resources in a conditional flow. The two authenticators Deny Access and Allow Access control access to the resources by conditions.
Allow Access- Authenticator will always successfully authenticate. This authenticator is not configurable.
Deny AccessAccess will always be denied. You can define an error message, which will be shown to the user. You can provide these fields:
- Alias
- Describes a name of the execution, which will be shown in the authentication flow.
- Error message
-
Error message which will be shown to the user. The error message could be provided as a particular message or as a property in order to use it with localization. (i.e "You do not have the role 'admin'.", my-property-deny in messages properties) Leave blank for the default message defined as property
access-denied.
Here is an example how to deny access to all users who do not have the role role1 and show an error message defined by a property deny-role1. This example includes Condition - User Role and Deny Access executions.
Browser flow

Condition - user role configuration
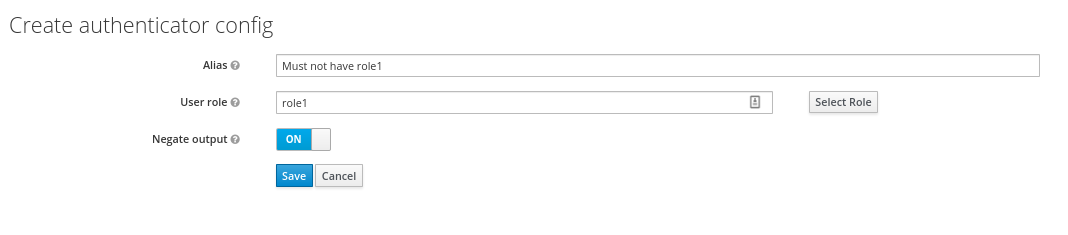
Configuration of the Deny Access is really easy. You can specify an arbitrary Alias and required message like this:

The last thing is defining the property with an error message in the login theme messages_en.properties (for English):
deny-role1 = You do not have required role!