
Chapter 4. Tutorials
The tutorials in this chapter assume that you have an OpenShift instance similar to the one created by performing the installation of the OpenShift Container Platform cluster.
4.1. Updating a database for a new Red Hat Single Sign-On for OpenShift image version
Note the following points related to the update:
- Rolling updates from a previous versions of Red Hat Single Sign-On for OpenShift to version 7.5.3 are not supported as databases and caches are not backward compatible.
- PostgreSQL server version 13.5 is required for the templates used for Red Hat Single Sign-On for OpenShift 7.5.3. If you have an obsolete PostgreSQL version, you update the PostgreSQL version before you update the database.
- Instances from versions of the Red Hat Single Sign-On for OpenShift cannot be runnng before upgrade. They cannot run concurrently against the same database.
- Pre-generated scripts are not available. They are generated dynamically depending on the database.
You have three choices for updating the database:
- If you have an obsolete PostgreSQL server version, upgrade the PostgreSQL server and then migrate the database.
- Allow Red Hat Single Sign-On 7.5.3 to automatically migrate the database schema
- Update the database manually
By default the database is automatically migrated when you start Red Hat Single Sign-On 7.5.3 for the first time.
4.1.1. PostgreSQL version upgrade and database migration
The PostgreSQL server present in the Red Hat Single Sign-On 7.5.3 templates may be different from the previously used version. For example, consider this scenario:
- You are running a Red Hat Single Sign-On for OpenShift container image with PostgreSQL pods using version 10 of the PostgreSQL server.
- The Red Hat Single Sign-On 7.5.3 container images require the PostgreSQL pods to use version 13.5 of the PostgreSQL server.
The following procedure describes how to upgrade the PostgreSQL version to 13.5 and then migrate the database.
Procedure
Start by performing a database level backup.
$ oc rsh <POSTGRE-SQL-POD> pg_dump -C <DATABASE> rhsso_db.bak
Scale down the
ssopod.$ oc scale dc/sso --replicas=0
Edit
dc/sso-postgresql.$ oc edit dc/sso-postgresql
Switch
ImageStreamTagto:postgresql:13-el8.- imageChangeParams: automatic: true containerNames: - sso-postgresql from: kind: ImageStreamTag name: postgresql:13-el8 namespace: openshift-
Wait again for the
sso-postgresqlpod to be running and stable. Ensure the pod
sso-postgresqlhas the correct version.$ oc rsh dc/sso-postgresql /bin/bash -c "psql --version" psql (PostgreSQL) 13.5
Unset the variable
POSTGRESQL_UPGRADEand let thesso-postgresqlpod deploy again.$ oc set env dc/sso-postgresql POSTGRESQL_UPGRADE-
-
Confirm for the last time that the pod
sso-posgresqlis running. Run the following commands to update the core set of Red Hat Single Sign-On 7.5.3 resources for OpenShift in the
openshiftproject:$ for resource in sso75-image-stream.json \ sso75-https.json \ sso75-postgresql.json \ sso75-postgresql-persistent.json \ sso75-x509-https.json \ sso75-x509-postgresql-persistent.json do oc replace -n openshift --force -f \ https://raw.githubusercontent.com/jboss-container-images/redhat-sso-7-openshift-image/sso75-dev/templates/${resource} doneRun the following command to install the Red Hat Single Sign-On 7.5.3 OpenShift image streams in the
openshiftproject:$ oc -n openshift import-image rh-sso-7/sso75-openshift-rhel8:7.5 --from=registry.redhat.io/rh-sso-7/sso75-openshift-rhel8:7.5 --confirm
Update the image change trigger in the existing deployment config to reference the Red Hat Single Sign-On 7.5.3 image.
$ oc patch dc/sso --type=json -p '[{"op": "replace", "path": "/spec/triggers/0/imageChangeParams/from/name", "value": "sso75-openshift-rhel8:7.5"}]'
"sso" patched
Start rollout of the new Red Hat Single Sign-On 7.5.3 images based on the latest image defined in the image change triggers.
$ oc rollout latest dc/sso
Scale the
ssopod back up to one replica.NoteYou might want to temporarily increase the Liveness and Readiness Probes thresholds and values in seconds from
dc/sso. This step performs a Database Upgrade on the first boot, which might take a while.$ oc scale --replicas=1 dc/sso
NoteIf you have more than one replica, consider scaling up to a single replica. After Red Hat Single Sign-On starts, you can scale back to the original number of replicas.
4.1.2. Automatic database migration
This process assumes that you are running a previous version of the Red Hat Single Sign-On for OpenShift image, backed by a PostgreSQL database (deployed in ephemeral or persistent mode) that is running in a separate pod.
Prerequisites
- Perform the steps described in Preparing Red Hat Single Sign-On Authentication for OpenShift Deployment.
Procedure
Use the following steps to automatically migrate the database schema:
Identify the deployment config used to deploy the containers, running previous version of the Red Hat Single Sign-On for OpenShift image.
$ oc get dc -o name --selector=application=sso
deploymentconfig/sso
deploymentconfig/sso-postgresql
Stop all pods running the previous version of the Red Hat Single Sign-On for OpenShift image in the current namespace. They cannot run concurrently against the same database.
$ oc scale --replicas=0 dc/sso
deploymentconfig "sso" scaled
Update the image change trigger in the existing deployment config to reference the Red Hat Single Sign-On 7.5.3 image.
$ oc patch dc/sso --type=json -p '[{"op": "replace", "path": "/spec/triggers/0/imageChangeParams/from/name", "value": "sso75-openshift-rhel8:7.5"}]'
"sso" patched
Start rollout of the new Red Hat Single Sign-On 7.5.3 images based on the latest image defined in the image change triggers.
$ oc rollout latest dc/sso
deploymentconfig "sso" rolled out
Deploy Red Hat Single Sign-On 7.5.3 containers using the modified deployment config.
$ oc scale --replicas=1 dc/sso
deploymentconfig "sso" scaled
(Optional) Verify the database has been successfully updated.
$ oc get pods --selector=application=sso
NAME                     READY     STATUS    RESTARTS   AGE
sso-4-vg21r              1/1       Running   0          1h
sso-postgresql-1-t871r   1/1       Running   0          2h
$ oc logs sso-4-vg21r | grep 'Updating'
11:23:45,160 INFO  [org.keycloak.connections.jpa.updater.liquibase.LiquibaseJpaUpdaterProvider] (ServerService Thread Pool -- 58) Updating database. Using changelog META-INF/jpa-changelog-master.xml
4.1.3. Manual database migration
The database migration process updates the data schema and performs manipulation of the data. This process also stops all pods running the previous version of the Red Hat Single Sign-On for OpenShift image before dynamic generation of the SQL migration file.
This process assumes that you are running a previous version of the Red Hat Single Sign-On for OpenShift image that is backed by a PostgreSQL database (deployed in ephemeral or persistent mode) and is running on a separate pod.
Procedure
Prepare your environment for script generation.
- Configure Red Hat Single Sign-On 7.5.3 with the correct datasource,
Set the following configuration options in the
standalone-openshift.xmlfile:-
initializeEmpty=false, -
migrationStrategy=manual, and -
migrationExportto the location on the file system of the pod, where the output SQL migration file should be stored (for example,migrationExport="${jboss.home.dir}/keycloak-database-update.sql").
-
Additional resources
Procedure
Perform the following to generate the SQL migration file for the database:
Prepare template of OpenShift database migration job to generate the SQL file.
$ cat job-to-migrate-db-to-sso75.yaml.orig
apiVersion: batch/v1
kind: Job
metadata:
  name: job-to-migrate-db-to-sso75
spec:
  autoSelector: true
  parallelism: 0
  completions: 1
  template:
    metadata:
      name: job-to-migrate-db-to-sso75
    spec:
      containers:
      - env:
        - name: DB_SERVICE_PREFIX_MAPPING
          value: <<DB_SERVICE_PREFIX_MAPPING_VALUE>>
        - name: <<PREFIX>>_JNDI
          value: <<PREFIX_JNDI_VALUE>>
        - name: <<PREFIX>>_USERNAME
          value: <<PREFIX_USERNAME_VALUE>>
        - name: <<PREFIX>>_PASSWORD
          value: <<PREFIX_PASSWORD_VALUE>>
        - name: <<PREFIX>>_DATABASE
          value: <<PREFIX_DATABASE_VALUE>>
        - name: TX_DATABASE_PREFIX_MAPPING
          value: <<TX_DATABASE_PREFIX_MAPPING_VALUE>>
        - name: <<SERVICE_HOST>>
          value: <<SERVICE_HOST_VALUE>>
        - name: <<SERVICE_PORT>>
          value: <<SERVICE_PORT_VALUE>>
        image: <<SSO_IMAGE_VALUE>>
        imagePullPolicy: Always
        name: job-to-migrate-db-to-sso75
        # Keep the pod running after the SQL migration
        # file was generated, so we can retrieve it
        command:
          - "/bin/bash"
          - "-c"
          - "/opt/eap/bin/openshift-launch.sh || sleep 600"
      restartPolicy: Never
$ cp job-to-migrate-db-to-sso75.yaml.orig \ job-to-migrate-db-to-sso75.yamlFrom deployment config used to run the previous version of the Red Hat Single Sign-On for OpenShift image, copy the datasource definition and database access credentials to appropriate places of the template of the database migration job.
Use the following script to copy
DB_SERVICE_PREFIX_MAPPINGandTX_DATABASE_PREFIX_MAPPINGvariable values, together with values of environment variables specific to particular datasource (<PREFIX>_JNDI,<PREFIX>_USERNAME,<PREFIX>_PASSWORD, and<PREFIX>_DATABASE) from the deployment config namedssoto the database job migration template namedjob-to-migrate-db-to-sso75.yaml.NoteAlthough the
DB_SERVICE_PREFIX_MAPPINGenvironment variable allows a comma-separated list of <name>-<database_type>=<PREFIX> triplets as its value, this example script accepts only one datasource triplet definition for demonstration purposes. You can modify the script for handling multiple datasource definition triplets.$ cat mirror_sso_dc_db_vars.sh #!/bin/bash # IMPORTANT: # # If the name of the SSO deployment config differs from 'sso' # or if the file name of the YAML definition of the migration # job is different, update the following two variables SSO_DC_NAME="sso" JOB_MIGRATION_YAML="job-to-migrate-db-to-sso75.yaml" # Get existing variables of the $SSO_DC_NAME deployment config # in an array declare -a SSO_DC_VARS=( \ $(oc set env dc/${SSO_DC_NAME} --list \ | sed '/^#/d') \ ) # Get the PREFIX used in the names of environment variables PREFIX=$( \ grep -oP 'DB_SERVICE_PREFIX_MAPPING=[^ ]+' \ <<< "${SSO_DC_VARS[@]}" \ ) PREFIX=${PREFIX##*=} # Substitute: # * <<PREFIX>> with actual $PREFIX value and # * <<PREFIX with "<<$PREFIX" value # The order in which these replacements are made is important! sed -i "s#<<PREFIX>>#${PREFIX}#g" ${JOB_MIGRATION_YAML} sed -i "s#<<PREFIX#<<${PREFIX}#g" ${JOB_MIGRATION_YAML} # Construct the array of environment variables # specific to the datasource declare -a DB_VARS=(JNDI USERNAME PASSWORD DATABASE) # Prepend $PREFIX to each item of the datasource array DB_VARS=( "${DB_VARS[@]/#/${PREFIX}_}" ) # Add DB_SERVICE_PREFIX_MAPPING and TX_DATABASE_PREFIX_MAPPING # variables to datasource array DB_VARS=( \ "${DB_VARS[@]}" \ DB_SERVICE_PREFIX_MAPPING \ TX_DATABASE_PREFIX_MAPPING \ ) # Construct the SERVICE from DB_SERVICE_PREFIX_MAPPING SERVICE=$( \ grep -oP 'DB_SERVICE_PREFIX_MAPPING=[^ ]' \ <<< "${SSO_DC_VARS[@]}" \ ) SERVICE=${SERVICE#*=} SERVICE=${SERVICE%=*} SERVICE=${SERVICE^^} SERVICE=${SERVICE//-/_} # If the deployment config contains <<SERVICE>>_SERVICE_HOST # and <<SERVICE>>_SERVICE_PORT variables, add them to the # datasource array. Their values also need to be propagated into # yaml definition of the migration job. HOST_PATTERN="${SERVICE}_SERVICE_HOST=[^ ]" PORT_PATTERN="${SERVICE}_SERVICE_PORT=[^ ]" if grep -Pq "${HOST_PATTERN}" <<< "${SSO_DC_VARS[@]}" && grep -Pq "${PORT_PATTERN}" <<< "${SSO_DC_VARS[@]}" then DB_VARS=( \ "${DB_VARS[@]}" \ "${SERVICE}_SERVICE_HOST" \ "${SERVICE}_SERVICE_PORT" \ ) # If they are not defined, delete their placeholder rows in # yaml definition file (since if not defined they are not # expanded which make the yaml definition invalid). else for KEY in "HOST" "PORT" do sed -i "/SERVICE_${KEY}/d" ${JOB_MIGRATION_YAML} done fi # Substitute: # * <<SERVICE_HOST>> with ${SERVICE}_SERVICE_HOST and # * <<SERVICE_HOST_VALUE>> with <<${SERVICE}_SERVICE_HOST_VALUE>> # The order in which replacements are made is important! # Do this for both "HOST" and "PORT" for KEY in "HOST" "PORT" do PATTERN_1="<<SERVICE_${KEY}>>" REPL_1="${SERVICE}_SERVICE_${KEY}" sed -i "s#${PATTERN_1}#${REPL_1}#g" ${JOB_MIGRATION_YAML} PATTERN_2="<<SERVICE_${KEY}_VALUE>>" REPL_2="<<${SERVICE}_SERVICE_${KEY}_VALUE>>" sed -i "s#${PATTERN_2}#${REPL_2}#g" ${JOB_MIGRATION_YAML} done # Propagate the values of the datasource array items into # yaml definition of the migration job for VAR in "${SSO_DC_VARS[@]}" do IFS=$'=' read KEY VALUE <<< $VAR if grep -q $KEY <<< ${DB_VARS[@]} then KEY+="_VALUE" # Enwrap integer port value with double quotes if [[ ${KEY} =~ ${SERVICE}_SERVICE_PORT_VALUE ]] then sed -i "s#<<${KEY}>>#\"${VALUE}\"#g" ${JOB_MIGRATION_YAML} # Character values do not need quotes else sed -i "s#<<${KEY}>>#${VALUE}#g" ${JOB_MIGRATION_YAML} fi # Verify that the value has been successfully propagated. if grep -q '(JNDI|USERNAME|PASSWORD|DATABASE)' <<< "${KEY}" && grep -q "<<PREFIX${KEY#${PREFIX}}" ${JOB_MIGRATION_YAML} || grep -q "<<${KEY}>>" ${JOB_MIGRATION_YAML} then echo "Failed to update value of ${KEY%_VALUE}! Aborting." exit 1 else printf '%-60s%-40s\n' \ "Successfully updated ${KEY%_VALUE} to:" \ "$VALUE" fi fi doneRun the script.
$ chmod +x ./mirror_sso_dc_db_vars.sh
$ ./mirror_sso_dc_db_vars.sh
Successfully updated DB_SERVICE_PREFIX_MAPPING to:          sso-postgresql=DB
Successfully updated DB_JNDI to:                            java:jboss/datasources/KeycloakDS
Successfully updated DB_USERNAME to:                        userxOp
Successfully updated DB_PASSWORD to:                        tsWNhQHK
Successfully updated DB_DATABASE to:                        root
Successfully updated TX_DATABASE_PREFIX_MAPPING to:         sso-postgresql=DB
Build the Red Hat Single Sign-On 7.5.3 database migration image using the pre-configured source and wait for the build to finish.
$ oc get is -n openshift | grep sso75 | cut -d ' ' -f1
sso75-openshift-rhel8
$ oc new-build sso75-openshift-rhel8:7.5~https://github.com/iankko/openshift-examples.git#KEYCLOAK-8500 \
  --context-dir=sso-manual-db-migration \
  --name=sso75-db-migration-image
--> Found image bf45ac2 (7 days old) in image stream "openshift/sso75-openshift-rhel8" under tag "7.5" for "sso75-openshift-rhel8:7.5"

    Red Hat SSO 7.5.3
    ---------------
    Platform for running Red Hat SSO

    Tags: sso, sso7, keycloak

    * A source build using source code from https://github.com/iankko/openshift-examples.git#KEYCLOAK-8500 will be created
      * The resulting image will be pushed to image stream "sso75-db-migration-image:latest"
      * Use 'start-build' to trigger a new build

--> Creating resources with label build=sso75-db-migration-image ...
    imagestream "sso75-db-migration-image" created
    buildconfig "sso75-db-migration-image" created
--> Success
    Build configuration "sso75-db-migration-image" created and build triggered.
    Run 'oc logs -f bc/sso75-db-migration-image' to stream the build progress.
$ oc logs -f bc/sso75-db-migration-image --follow Cloning "https://github.com/iankko/openshift-examples.git#KEYCLOAK-8500" ... ... Push successful
Update the template of the database migration job (
job-to-migrate-db-to-sso75.yaml) with reference to the builtsso75-db-migration-imageimage.Get the docker pull reference for the image.
$ PULL_REF=$(oc get istag -n $(oc project -q) --no-headers | grep sso75-db-migration-image | tr -s ' ' | cut -d ' ' -f 2)
Replace the <<SSO_IMAGE_VALUE>> field in the job template with the pull specification.
$ sed -i "s#<<SSO_IMAGE_VALUE>>#$PULL_REF#g" job-to-migrate-db-to-sso75.yaml
- Verify that the field is updated.
Instantiate database migration job from the job template.
$ oc create -f job-to-migrate-db-to-sso75.yaml
job "job-to-migrate-db-to-sso75" created
ImportantThe database migration process handles the data schema update and performs manipulation of the data, therefore, stop all pods running the previous version of the Red Hat Single Sign-On for OpenShift image before dynamic generation of the SQL migration file.
Identify the deployment config used to deploy the containers, running previous version of the Red Hat Single Sign-On for OpenShift image.
$ oc get dc -o name --selector=application=sso
deploymentconfig/sso
deploymentconfig/sso-postgresql
Stop all pods running the previous version of the Red Hat Single Sign-On for OpenShift image in the current namespace.
$ oc scale --replicas=0 dc/sso
deploymentconfig "sso" scaled
Run the database migration job and wait for the pod to be running correctly.
$ oc get jobs
NAME                            DESIRED   SUCCESSFUL   AGE
job-to-migrate-db-to-sso75   1         0            3m
$ oc scale --replicas=1 job/job-to-migrate-db-to-sso75
job "job-to-migrate-db-to-sso75" scaled
$ oc get pods
NAME                                  READY     STATUS      RESTARTS   AGE
sso-postgresql-1-n5p16                1/1       Running     1          19h
job-to-migrate-db-to-sso75-b87bb   1/1       Running     0          1m
sso75-db-migration-image-1-build      0/1       Completed   0          27m
NoteBy default, the database migration job terminates automatically after
600 secondsafter the migration file is generated. You can adjust this time period.Get the dynamically generated SQL database migration file from the pod.
$ mkdir -p ./db-update
$ oc rsync job-to-migrate-db-to-sso75-b87bb:/opt/eap/keycloak-database-update.sql ./db-update
receiving incremental file list
keycloak-database-update.sql

sent 30 bytes  received 29,726 bytes  59,512.00 bytes/sec
total size is 29,621  speedup is 1.00
-
Inspect the
keycloak-database-update.sqlfile for changes to be performed within manual database update to Red Hat Single Sign-On 7.5.3 version. Apply the database update manually.
Run the following commands if running some previous version of the Red Hat Single Sign-On for OpenShift image, backed by the PostgreSQL database deployed in ephemeral or persistent mode, running on a separate pod:
Copy the generated SQL migration file to the PostgreSQL pod.
$ oc rsync --no-perms=true ./db-update/ sso-postgresql-1-n5p16:/tmp
sending incremental file list

sent 77 bytes  received 11 bytes  176.00 bytes/sec
total size is 26,333  speedup is 299.24
Start a shell session to the PostgreSQL pod.
$ oc rsh sso-postgresql-1-n5p16
sh-4.2$
Use the
psqltool to apply database update manually.sh-4.2$ alias psql="/opt/rh/rh-postgresql95/root/bin/psql" sh-4.2$ psql --version psql (PostgreSQL) 9.5.4 sh-4.2$ psql -U <PREFIX>_USERNAME -d <PREFIX>_DATABASE -W -f /tmp/keycloak-database-update.sql Password for user <PREFIX>_USERNAME: INSERT 0 1 INSERT 0 1 ...
ImportantReplace
<PREFIX>_USERNAMEand<PREFIX>_DATABASEwith the actual database credentials retrieved in previous section. Also use value of<PREFIX>_PASSWORDas the password for the database, when prompted.- Close the shell session to the PostgreSQL pod. Continue with updating image change trigger step.
Update the image change trigger in the existing deployment config to reference the Red Hat Single Sign-On 7.5.3 image.
$ oc patch dc/sso --type=json -p '[{"op": "replace", "path": "/spec/triggers/0/imageChangeParams/from/name", "value": "sso75-openshift-rhel8:7.5"}]'
"sso" patched
Start rollout of the new Red Hat Single Sign-On 7.5.3 images based on the latest image defined in the image change triggers.
$ oc rollout latest dc/sso
deploymentconfig "sso" rolled out
Deploy the Red Hat Single Sign-On 7.5.3 containers using the modified deployment config.
$ oc scale --replicas=1 dc/sso
deploymentconfig "sso" scaled
4.2. Migrating the Red Hat Single Sign-On server’s database across environments
This tutorial focuses on migrating the Red Hat Single Sign-On server database from one environment to another or migrating to a different database.
Export and import of Red Hat Single Sign-On 7.5.3 database is triggered at Red Hat Single Sign-On server boot time and its parameters are passed in via Java system properties. This means during one Red Hat Single Sign-On server boot, only one of the possible migration actions, export or import, is performed.
4.2.1. Deploying the Red Hat Single Sign-On PostgreSQL application template
Prerequisites
- The steps described in the Preparing Red Hat Single Sign-On Authentication for OpenShift Deployment section have been performed already.
Procedure
- Log in to the OpenShift web console and select the sso-app-demo project space.
- Click Add to project to list the default image streams and templates.
- Use the Filter by keyword search bar to limit the list to those that match sso. You may need to click See all to show the desired application template.
Select sso75-postgresql Red Hat Single Sign-On application template. When deploying the template ensure to keep the SSO_REALM variable unset (default value).
WarningWhen the SSO_REALM configuration variable is set on the Red Hat Single Sign-On for OpenShift image, a database import is performed in order to create the Red Hat Single Sign-On server realm requested in the variable. For the database export to be performed correctly, the SSO_REALM configuration variable cannot be simultaneously defined on such image.
Click Create to deploy the application template and start pod deployment. This may take a couple of minutes.
Then access the Red Hat Single Sign-On web console at https://secure-sso-<sso-app-demo>.<openshift32.example.com>/auth/admin using the administrator account.
NoteThis example workflow uses a self-generated CA to provide an end-to-end workflow for demonstration purposes. Accessing the Red Hat Single Sign-On web console will prompt an insecure connection warning.
For production environments, Red Hat recommends that you use an SSL certificate purchased from a verified Certificate Authority.
Additional resources
4.2.2. (Optional) Creating additional realms and users to be exported
When performing Red Hat Single Sign-On 7.5.3 server database export, only realms and users currently in the database are exported. If the exported JSON file should include also additional Red Hat Single Sign-On realms and users, these need to be created. Use these procedures.
Upon their creation, the database can be exported.
Additional resources
4.2.3. Export the Red Hat Single Sign-On database as a JSON file on the OpenShift pod
Prerequisites
- New realms and users are created.
Procedure
Get the Red Hat Single Sign-On deployment config and scale it down to zero.
$ oc get dc -o name
deploymentconfig/sso
deploymentconfig/sso-postgresql

$ oc scale --replicas=0 dc sso
deploymentconfig "sso" scaled
Instruct the Red Hat Single Sign-On 7.5.3 server deployed on Red Hat Single Sign-On for OpenShift image to perform database export at Red Hat Single Sign-On server boot time.
$ oc set env dc/sso \
  -e "JAVA_OPTS_APPEND= \
    -Dkeycloak.migration.action=export \
    -Dkeycloak.migration.provider=singleFile \
    -Dkeycloak.migration.file=/tmp/demorealm-export.json"
Scale the Red Hat Single Sign-On deployment config back up. This will start the Red Hat Single Sign-On server and export its database.
$ oc scale --replicas=1 dc sso
deploymentconfig "sso" scaled
(Optional) Verify that the export was successful.
$ oc get pods
NAME                     READY     STATUS    RESTARTS   AGE
sso-4-ejr0k              1/1       Running   0          27m
sso-postgresql-1-ozzl0   1/1       Running   0          4h

$ oc logs sso-4-ejr0k | grep 'Export'
09:24:59,503 INFO  [org.keycloak.exportimport.singlefile.SingleFileExportProvider] (ServerService Thread Pool -- 57) Exporting model into file /tmp/demorealm-export.json
09:24:59,998 INFO  [org.keycloak.services] (ServerService Thread Pool -- 57) KC-SERVICES0035: Export finished successfully
4.2.4. Retrieve and import the exported JSON file
Procedure
Retrieve the JSON file of the Red Hat Single Sign-On database from the pod.
$ oc get pods
NAME                     READY     STATUS    RESTARTS   AGE
sso-4-ejr0k              1/1       Running   0          2m
sso-postgresql-1-ozzl0   1/1       Running   0          4h

$ oc rsync sso-4-ejr0k:/tmp/demorealm-export.json .
(Optional) Import the JSON file of the Red Hat Single Sign-On database into an Red Hat Single Sign-On server running in another environment.
NoteFor importing into an Red Hat Single Sign-On server not running on OpenShift, see the Importing and exporting the database.
When the Red Hat Single Sign-On server is running as a Red Hat Single Sign-On 7.5.3 container on OpenShift, use the Admin Console Export/Import function to import the resources from a previously exported JSON file into the Red Hat Single Sign-On server’s database.
-
Log into the
masterrealm’s Admin Console of the Red Hat Single Sign-On server using the credentials used to create the administrator user. In the browser, navigate to http://sso-<project-name>.<hostname>/auth/admin for the Red Hat Single Sign-On web server, or to https://secure-sso-<project-name>.<hostname>/auth/admin for the encrypted Red Hat Single Sign-On web server. -
At the top of the sidebar choose the name of the Red Hat Single Sign-On realm, the users, clients, realm roles, and client roles should be imported to. This example uses
masterrealm. - Click the Import link under Manage section at the bottom of the sidebar.
-
In the page that opens, click Select file and then specify the location of the exported
demorealm-export.jsonJSON file on the local file system. -
From the Import from realm drop-down menu, select the name of the Red Hat Single Sign-On realm from which the data should be imported. This example uses
masterrealm. - Choose which of users, clients, realm roles, and client roles should be imported (all of them are imported by default).
Choose a strategy to perform, when a resource already exists (one of Fail, Skip, or Overwrite).
NoteThe attempt to import an object (user, client, realm role, or client role) fails if object with the same identifier already exists in the current database. Use Skip strategy to import the objects that are present in the
demorealm-export.jsonfile, but do not exist in current database.Click Import to perform the import.
When importing objects from a non-master realm to
masterrealm or vice versa, after clicking the Import button, it is sometimes possible to encounter an error like the following one:
In such cases, it is necessary first to create the missing clients, having the Access Type set to bearer-only. These clients can be created by manual copy of their characteristics from the source Red Hat Single Sign-On server, on which the export JSON file was created, to the target Red Hat Single Sign-On server, where the JSON file is imported. After creation of the necessary clients, click the Import button again.
To suppress the above error message, it is needed to create the missing
realm-managementclient, of the bearer-only Access Type, and click the Import button again.For Skip import strategy, the newly added objects are marked as ADDED and the object which were skipped are marked as SKIPPED, in the Action column on the import result page.
The Admin Console import allows you to overwrite resources if you choose (Overwrite strategy). On a production system use this feature with caution.
-
Log into the
4.3. Configuring OpenShift 3.11 to use Red Hat Single Sign-On for Authentication
Configure OpenShift 3.11 to use the Red Hat Single Sign-On deployment as the authorization gateway for OpenShift.
This example adds Red Hat Single Sign-On as an authentication method alongside the identity providers configured during the installation of the OpenShift Container Platform cluster. Once configured, the Red Hat Single Sign-On method will be also available (together with the configured identity providers) for the user login to your OpenShift web console.
Additional resources
4.3.1. Configuring Red Hat Single Sign-On Credentials
Prerequisites
- The steps described in the Preparing Red Hat Single Sign-On Authentication for OpenShift Deployment section have been performed already.
Procedure
Log in to the encrypted Red Hat Single Sign-On web server at https://secure-sso-sso-app-demo.openshift32.example.com/auth/admin using the xref:sso-administrator-setup[administrator account created during the Red Hat Single Sign-On deployment.
Create a Realm
- Hover your cursor over the realm namespace (default is Master) at the top of the sidebar and click Add Realm.
- Enter a realm name (this example uses OpenShift) and click Create.
Create a User
Create a test user that can be used to demonstrate the Red Hat Single Sign-On-enabled OpenShift login:
- Click Users in the Manage sidebar to view the user information for the realm.
- Click Add User.
- Enter a valid Username (this example uses testuser) and any additional optional information and click Save.
Edit the user configuration:
- Click the Credentials tab in the user space and enter a password for the user.
- Ensure the Temporary Password option is set to Off so that it does not prompt for a password change later on, and click Reset Password to set the user password. A pop-up window prompts for additional confirmation.
Create and Configure an OpenID-Connect Client
- Click Clients in the Manage sidebar and click Create.
- Enter the Client ID. This example uses openshift-demo.
- Select a Client Protocol from the drop-down menu (this example uses openid-connect) and click Save. You will be taken to the configuration Settings page of the openshift-demo client.
- From the Access Type drop-down menu, select confidential. This is the access type for server-side applications.
- In the Valid Redirect URIs dialog, enter the URI for the OpenShift web console, which is https://openshift.example.com:8443/* in this example.
The client Secret is needed to configure OpenID-Connect on the OpenShift master in the next section. You can copy it now from under the Credentials tab. The secret is <7b0384a2-b832-16c5-9d73-2957842e89h7> for this example.
Additional resources
4.3.2. Configuring OpenShift Master for Red Hat Single Sign-On authentication
Log in to the OpenShift master CLI.
Prerequisites
You must have the permissions to edit the /etc/origin/master/master-config.yaml file.
Procedure
Edit the /etc/origin/master/master-config.yaml file and find the identityProviders section. For example, in the case the OpenShift master is configured with the HTPassword identity provider, the identityProviders section will look similar to the following one:
identityProviders:
- challenge: true
  login: true
  name: htpasswd_auth
  provider:
    apiVersion: v1
    file: /etc/origin/openshift-passwd
    kind: HTPasswdPasswordIdentityProvider
Add Red Hat Single Sign-On as a secondary identity provider with content similar to the following snippet:
- name: rh_sso challenge: false login: true mappingMethod: add provider: apiVersion: v1 kind: OpenIDIdentityProvider clientID: openshift-demo clientSecret: 7b0384a2-b832-16c5-9d73-2957842e89h7 ca: xpaas.crt urls: authorize: https://secure-sso-sso-app-demo.openshift32.example.com/auth/realms/OpenShift/protocol/openid-connect/auth token: https://secure-sso-sso-app-demo.openshift32.example.com/auth/realms/OpenShift/protocol/openid-connect/token userInfo: https://secure-sso-sso-app-demo.openshift32.example.com/auth/realms/OpenShift/protocol/openid-connect/userinfo claims: id: - sub preferredUsername: - preferred_username name: - name email: - email- The Red Hat Single Sign-On Secret hash for the clientSecret can be found in the Red Hat Single Sign-On web console: Clients → openshift-demo → Credentials
The endpoints for the urls can be found by making a request with the Red Hat Single Sign-On application. For example:
<curl -k https://secure-sso-sso-app-demo.openshift32.example.com/auth/realms/OpenShift/.well-known/openid-configuration | python -m json.tool>The response includes the authorization_endpoint, token_endpoint, and userinfo_endpoint.
- This example workflow uses a self-generated CA to provide an end-to-end workflow for demonstration purposes. For this reason, the ca is provided as <ca: xpaas.crt>. This CA certificate must also be copied into the /etc/origin/master folder. This is not necessary if using a certificate purchased from a verified Certificate Authority.
Save the configuration and restart the OpenShift master:
$ systemctl restart atomic-openshift-master
4.3.3. Logging in to OpenShift
Procedure
Navigate to the OpenShift web console, which in this example is https://openshift.example.com:8443/console.
The OpenShift login page now offers the options to log in either using htpasswd_auth or rh-sso identity providers? The former is still available because it is present in the /etc/origin/master/master-config.yaml.
Select rh-sso and log in to OpenShift with the testuser user created earlier in Red Hat Single Sign-On.
No projects are visible to testuser until they are added in the OpenShift CLI. This is the only way to provide user privileges in OpenShift because it currently does not accept external role mapping.
To provide testuser
viewprivileges for the sso-app-demo, use the OpenShift CLI:$ oc adm policy add-role-to-user view testuser -n sso-app-demo
4.4. Creating an OpenShift application from maven binaries and securing it using Red Hat Single Sign-On
To deploy existing applications on OpenShift, you can use the binary source capability.
4.4.1. Deploy Binary Build of EAP 6.4 / 7.1 JSP Service Invocation Application and Secure it Using Red Hat Single Sign-On
The following example uses both app-jee-jsp and service-jee-jaxrs quickstarts to deploy EAP 6.4 / 7.1 JSP service application that authenticates using the Red Hat Single Sign-On.
Prerequisites
- The Red Hat Single Sign-On for OpenShift image has been previously deployed using one of the following templates:
- sso75-postgresql
- sso75-postgresql-persistent
- sso75-x509-postgresql-persistent
4.4.1.1. Create Red Hat Single Sign-On Realm, Roles, and User for the EAP 6.4 / 7.1 JSP Application
The EAP 6.4 / 7.1 JSP service application requires dedicated Red Hat Single Sign-On realm, username, and password to be able to authenticate using Red Hat Single Sign-On. Perform the following steps after the Red Hat Single Sign-On for OpenShift image has been deployed:
Create the Red Hat Single Sign-On Realm
Login to the Admin Console of the Red Hat Single Sign-On server.
https://secure-sso-sso-app-demo.openshift.example.com/auth/admin
Use the credentials of the Red Hat Single Sign-On administrator user.
- Hover your cursor over the realm namespace (default is Master) at the top of the sidebar and click Add Realm.
-
Enter a realm name (this example uses
demo) and click Create.
Copy the Public Key
In the newly created demo realm, click the Keys tab, then select Active tab, and copy the public key of type RSA that has been generated.
The Red Hat Single Sign-On for OpenShift image version 7.5.3 generates multiple keys by default, for example HS256, RS256, or AES. To copy the public key information for the Red Hat Single Sign-On for OpenShift 7.5.3 image, click the Keys tab, then select Active tab, and click the Public key button of that row in the keys table, where type of the key matches RSA. Then select and copy the content of the pop-up window that appears.
The information about the public key is necessary later to deploy the Red Hat Single Sign-On-enabled EAP 6.4 / 7.1 JSP application.
Create Red Hat Single Sign-On Roles
The service-jee-jaxrs quickstart exposes three endpoints by the service:
-
public- Requires no authentication. -
secured- Can be invoked by users with theuserrole. -
admin- Can be invoked by users with theadminrole.
Create user and admin roles in Red Hat Single Sign-On. These roles will be assigned to an Red Hat Single Sign-On application user to authenticate access to user applications.
Click Roles in the Configure sidebar to list the roles for this realm.
NoteThis is a new realm, so there should only be the default (
offline_accessanduma_authorization) roles.- Click Add Role.
-
Enter the role name (
user) and click Save.
Repeat these steps for the admin role.
Create the Red Hat Single Sign-On Realm Management User
- Click Users in the Manage sidebar to view the user information for the realm.
- Click Add User.
-
Enter a valid Username (this example uses the user
appuser) and click Save. Edit the user configuration:
-
Click the Credentials tab in the user space and enter a password for the user (this example uses the password
apppassword). - Ensure the Temporary Password option is set to Off so that it does not prompt for a password change later on, and click Reset Password to set the user password. A pop-up window will prompt you to confirm.
-
Click the Credentials tab in the user space and enter a password for the user (this example uses the password
4.4.1.2. Assign the user role to the realm management user
Perform the following steps to tie the previously created appuser with the user Red Hat Single Sign-On role:
-
Click Role Mappings to list the realm and client role configuration. In Available Roles, select the
userrole created earlier, and click Add selected>. Click Client Roles, select realm-management entry from the list, select each record in the Available Roles list.
NoteYou can select multiple items at once by holding the Ctrl key and simultaneously clicking the first
impersonationentry. While keeping the Ctrl key and the left mouse button pressed, move to the end of the list to theview-clientsentry and ensure each record is selected.- Click Add selected> to assign the roles to the client.
4.4.1.3. Prepare Red Hat Single Sign-On Authentication for OpenShift Deployment of the EAP 6.4 / 7.1 JSP Application
Procedure
Create a new project for the EAP 6.4 / 7.1 JSP application.
$ oc new-project eap-app-demo
Add the
viewrole to thedefaultservice account. This enables the service account to view all the resources in theeap-app-demonamespace, which is necessary for managing the cluster.$ oc policy add-role-to-user view system:serviceaccount:$(oc project -q):default
The EAP template requires an SSL keystore and a JGroups keystore. This example uses
keytool, a package included with the Java Development Kit, to generate self-signed certificates for these keystores.Generate a secure key for the SSL keystore (this example uses
passwordas password for the keystore).$ keytool -genkeypair \ -dname "CN=secure-eap-app-eap-app-demo.openshift.example.com" \ -alias https \ -storetype JKS \ -keystore eapkeystore.jks
Generate a secure key for the JGroups keystore (this example uses
passwordas password for the keystore).$ keytool -genseckey \ -alias jgroups \ -storetype JCEKS \ -keystore eapjgroups.jceks
Generate the EAP 6.4 / 7.1 for OpenShift secrets with the SSL and JGroup keystore files.
$ oc create secret generic eap-ssl-secret --from-file=eapkeystore.jks
$ oc create secret generic eap-jgroup-secret --from-file=eapjgroups.jceks
Add the EAP application secret to the
defaultservice account.$ oc secrets link default eap-ssl-secret eap-jgroup-secret
4.4.1.4. Deploy binary build of the EAP 6.4 / 7.1 JSP application
Procedure
Clone the source code.
$ git clone https://github.com/keycloak/keycloak-quickstarts.git
Build both the service-jee-jaxrs and app-jee-jsp applications.
Build the
service-jee-jaxrsapplication.$ cd keycloak-quickstarts/service-jee-jaxrs/
$ mvn clean package -DskipTests
[INFO] Scanning for projects...
[INFO]
[INFO] ------------------------------------------------------------------------
[INFO] Building Keycloak Quickstart: service-jee-jaxrs 3.1.0.Final
[INFO] ------------------------------------------------------------------------
...
[INFO] ------------------------------------------------------------------------
[INFO] BUILD SUCCESS
[INFO] ------------------------------------------------------------------------
[INFO] Total time: 2.153 s
[INFO] Finished at: 2017-06-26T12:06:12+02:00
[INFO] Final Memory: 25M/241M
[INFO] ------------------------------------------------------------------------
Comment out the
app-jee-jsp/config/keycloak.jsonrequirement of themaven-enforcer-pluginplugin and build theapp-jee-jspapplication.service-jee-jaxrs]$ cd ../app-jee-jsp/
app-jee-jsp]$ sed -i /\<executions\>/s/^/\<\!--/ pom.xml
app-jee-jsp]$ sed -i '/\(<\/executions>\)/a\-->' pom.xml
app-jee-jsp]$ mvn clean package -DskipTests
[INFO] Scanning for projects...
[INFO]
[INFO] ------------------------------------------------------------------------
[INFO] Building Keycloak Quickstart: app-jee-jsp 3.1.0.Final
[INFO] ------------------------------------------------------------------------
...
[INFO] Building war: /tmp/github/keycloak-quickstarts/app-jee-jsp/target/app-jsp.war
[INFO] ------------------------------------------------------------------------
[INFO] BUILD SUCCESS
[INFO] ------------------------------------------------------------------------
[INFO] Total time: 3.018 s
[INFO] Finished at: 2017-06-26T12:22:25+02:00
[INFO] Final Memory: 35M/310M
[INFO] ------------------------------------------------------------------------
ImportantThe app-jee-jsp quickstart requires you to configure the adapter, and that the adapter configuration file (
keycloak.json) is present in theconfig/directory in the root of the quickstart to successfully build the quickstart. But since this example configures the adapter later via selected environment variables available for the EAP 6.4 / 7.1 for OpenShift image, it is not necessary to specify the form ofkeycloak.jsonadapter configuration file at this moment.
Prepare the directory structure on the local file system.
Application archives in the deployments/ subdirectory of the main binary build directory are copied directly to the standard deployments directory of the image being built on OpenShift. For the application to deploy, the directory hierarchy containing the web application data must be correctly structured.
Create the main directory for the binary build on the local file system and deployments/ subdirectory within it. Copy the previously built WAR archives of both the service-jee-jaxrs and app-jee-jsp quickstarts to the deployments/ subdirectory:
app-jee-jsp]$ ls
config  pom.xml  README.md  src  target
app-jee-jsp]$ mkdir -p sso-eap7-bin-demo/deployments
app-jee-jsp]$ cp target/app-jsp.war sso-eap7-bin-demo/deployments/
app-jee-jsp]$ cp ../service-jee-jaxrs/target/service.war sso-eap7-bin-demo/deployments/
app-jee-jsp]$ tree sso-eap7-bin-demo/ sso-eap7-bin-demo/ |__ deployments |__ app-jsp.war |__ service.war 1 directory, 2 filesNoteThe location of the standard deployments directory depends on the underlying base image, that was used to deploy the application. See the following table:
Table 4.1. Standard Location of the Deployments Directory
Name of the Underlying Base Image(s) Standard Location of the Deployments Directory EAP for OpenShift 6.4 and 7.1
$JBOSS_HOME/standalone/deployments
Java S2I for OpenShift
/deployments
JWS for OpenShift
$JWS_HOME/webapps
Identify the image stream for EAP 6.4 / 7.1 image.
$ oc get is -n openshift | grep eap | cut -d ' ' -f 1
jboss-eap64-openshift
jboss-eap71-openshift
Create new binary build, specifying image stream and application name.
NoteReplace
--image-stream=jboss-eap71-openshiftparameter with the--image-stream=jboss-eap64-openshiftone in the following oc command to deploy the JSP application on top of JBoss EAP 6.4 for OpenShift image.$ oc new-build --binary=true \ --image-stream=jboss-eap71-openshift \ --name=eap-app --> Found image 31895a4 (3 months old) in image stream "openshift/jboss-eap71-openshift" under tag "latest" for "jboss-eap71-openshift" JBoss EAP 7.4 ------------- Platform for building and running Jakarta EE applications on JBoss EAP 7.4 Tags: builder, javaee, eap, eap7 * A source build using binary input will be created * The resulting image will be pushed to image stream "eap-app:latest" * A binary build was created, use 'start-build --from-dir' to trigger a new build --> Creating resources with label build=eap-app ... imagestream "eap-app" created buildconfig "eap-app" created --> SuccessStart the binary build. Instruct
ocexecutable to use main directory of the binary build we created in previous step as the directory containing binary input for the OpenShift build. In the working directory of app-jee-jsp issue the following command.app-jee-jsp]$ oc start-build eap-app \ --from-dir=./sso-eap7-bin-demo/ \ --follow Uploading directory "sso-eap7-bin-demo" as binary input for the build ... build "eap-app-1" started Receiving source from STDIN as archive ... Copying all war artifacts from /home/jboss/source/. directory into /opt/eap/standalone/deployments for later deployment... Copying all ear artifacts from /home/jboss/source/. directory into /opt/eap/standalone/deployments for later deployment... Copying all rar artifacts from /home/jboss/source/. directory into /opt/eap/standalone/deployments for later deployment... Copying all jar artifacts from /home/jboss/source/. directory into /opt/eap/standalone/deployments for later deployment... Copying all war artifacts from /home/jboss/source/deployments directory into /opt/eap/standalone/deployments for later deployment... '/home/jboss/source/deployments/app-jsp.war' -> '/opt/eap/standalone/deployments/app-jsp.war' '/home/jboss/source/deployments/service.war' -> '/opt/eap/standalone/deployments/service.war' Copying all ear artifacts from /home/jboss/source/deployments directory into /opt/eap/standalone/deployments for later deployment... Copying all rar artifacts from /home/jboss/source/deployments directory into /opt/eap/standalone/deployments for later deployment... Copying all jar artifacts from /home/jboss/source/deployments directory into /opt/eap/standalone/deployments for later deployment... Pushing image 172.30.82.129:5000/eap-app-demo/eap-app:latest ... Pushed 6/7 layers, 86% complete Pushed 7/7 layers, 100% complete Push successful
Create a new OpenShift application based on the build.
$ oc new-app eap-app
--> Found image 6b13d36 (2 minutes old) in image stream "eap-app-demo/eap-app" under tag "latest" for "eap-app"

    eap-app-demo/eap-app-1:aa2574d9
    -------------------------------
    Platform for building and running Jakarta EE applications on JBoss EAP 7.4

    Tags: builder, javaee, eap, eap7

    * This image will be deployed in deployment config "eap-app"
    * Ports 8080/tcp, 8443/tcp, 8778/tcp will be load balanced by service "eap-app"
      * Other containers can access this service through the hostname "eap-app"

--> Creating resources ...
    deploymentconfig "eap-app" created
    service "eap-app" created
--> Success
    Run 'oc status' to view your app.
Stop all running containers of the EAP 6.4 / 7.1 JSP application in the current namespace.
$ oc get dc -o name
deploymentconfig/eap-app
$ oc scale dc/eap-app --replicas=0
deploymentconfig "eap-app" scaled
Further configure the EAP 6.4 / 7.1 JSP application prior the deployment.
Configure the application with proper details about the Red Hat Single Sign-On server instance.
WarningEnsure to replace the value of SSO_PUBLIC_KEY variable below with the actual content of the RSA public key for the
demorealm, that has been copied.$ oc set env dc/eap-app \ -e HOSTNAME_HTTP="eap-app-eap-app-demo.openshift.example.com" \ -e HOSTNAME_HTTPS="secure-eap-app-eap-app-demo.openshift.example.com" \ -e SSO_DISABLE_SSL_CERTIFICATE_VALIDATION="true" \ -e SSO_USERNAME="appuser" \ -e SSO_PASSWORD="apppassword" \ -e SSO_REALM="demo" \ -e SSO_URL="https://secure-sso-sso-app-demo.openshift.example.com/auth" \ -e SSO_PUBLIC_KEY="MIIBIjANBgkqhkiG9w0BAQEFAAOCAQ8AMIIBCgKCAQEAkdhXyKx97oIoO6HwnV/MiX2EHO55Sn+ydsPzbjJevI5F31UvUco9uA8dGl6oM8HrnaWWv+i8PvmlaRMhhl6Xs68vJTEc6d0soP+6A+aExw0coNRp2PDwvzsXVWPvPQg3+iytStxu3Icndx+gC0ZYnxoRqL7rY7zKcQBScGEr78Nw6vZDwfe6d/PQ6W4xVErNytX9KyLFVAE1VvhXALyqEM/EqYGLmpjw5bMGVKRXnhmVo9E88CkFDH8E+aPiApb/gFul1GJOv+G8ySLoR1c8Y3L29F7C81odkVBp2yMm3RVFIGSPTjHqjO/nOtqYIfY4Wyw9mRIoY5SyW7044dZXRwIDAQAB" \ -e SSO_SECRET="0bb8c399-2501-4fcd-a183-68ac5132868d" deploymentconfig "eap-app" updated
Configure the application with details about both the SSL and JGroups keystore.
$ oc set env dc/eap-app \
-e HTTPS_KEYSTORE_DIR="/etc/eap-secret-volume" \
-e HTTPS_KEYSTORE="eapkeystore.jks" \
-e HTTPS_PASSWORD="password" \
-e JGROUPS_ENCRYPT_SECRET="eap-jgroup-secret" \
-e JGROUPS_ENCRYPT_KEYSTORE_DIR="/etc/jgroups-encrypt-secret-volume" \
-e JGROUPS_ENCRYPT_KEYSTORE="eapjgroups.jceks" \
-e JGROUPS_ENCRYPT_PASSWORD="password"
deploymentconfig "eap-app" updated
Define OpenShift volumes for both the SSL and JGroups secrets created earlier.
$ oc volume dc/eap-app --add \
--name="eap-keystore-volume" \
--type=secret \
--secret-name="eap-ssl-secret" \
--mount-path="/etc/eap-secret-volume"
deploymentconfig "eap-app" updated
$ oc volume dc/eap-app --add \
--name="eap-jgroups-keystore-volume" \
--type=secret \
--secret-name="eap-jgroup-secret" \
--mount-path="/etc/jgroups-encrypt-secret-volume"
deploymentconfig "eap-app" updated
Configure the deployment config of the application to run application pods under the
defaultOpenShift service account (default setting).$ oc patch dc/eap-app --type=json \ -p '[{"op": "add", "path": "/spec/template/spec/serviceAccountName", "value": "default"}]' "eap-app" patched
Deploy container of the EAP 6.4 / 7.1 JSP application using the modified deployment config.
$ oc scale dc/eap-app --replicas=1
deploymentconfig "eap-app" scaled
Expose the service as route.
$ oc get svc -o name
service/eap-app
$ oc get route
No resources found.
$ oc expose svc/eap-app
route "eap-app" exposed
$ oc get route
NAME      HOST/PORT                                    PATH      SERVICES   PORT       TERMINATION   WILDCARD
eap-app   eap-app-eap-app-demo.openshift.example.com             eap-app    8080-tcp                 None
4.4.1.5. Access the application
Access the application in your browser using the URL http://eap-app-eap-app-demo.openshift.example.com/app-jsp. You should see output like on the following image:
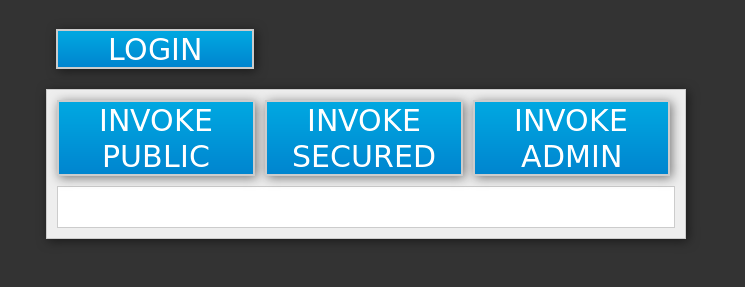
Procedure
Perform the following to test the application:
Click the INVOKE PUBLIC button to access the
publicendpoint that doesn’t require authentication.You should see the Message: public output.
Click the LOGIN button to be redirected for user authentication to the Red Hat Single Sign-On server instance against the
demorealm.Specify the username and password of the Red Hat Single Sign-On user configured earlier (
appuser/apppassword). Click Log in. The look of the application changes as detailed in the following image: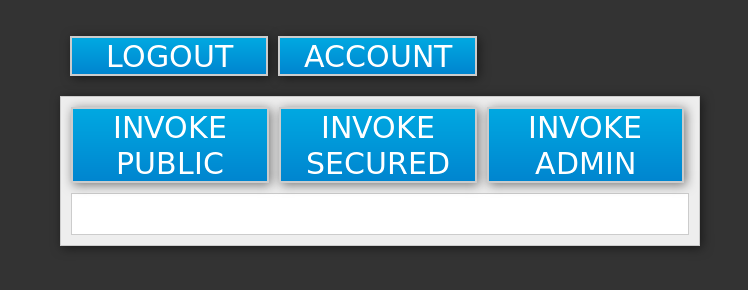
Click the INVOKE SECURED button to access the
securedendpoint.You should see the Message: secured output.
Click the INVOKE ADMIN button to access the
adminendpoint.You should see 403 Forbidden output.
NoteThe
adminendpoint requires users withadminRed Hat Single Sign-On role to invoke properly. Access for theappuseris forbidden because they only haveuserrole privilege, which allows them to access thesecuredendpoint.
Procedure
Perform the following steps to add the appuser to the admin Red Hat Single Sign-On role:
Access the Admin Console of the Red Hat Single Sign-On server’s instance.
https://secure-sso-sso-app-demo.openshift.example.com/auth/admin.
Use the credentials of the Red Hat Single Sign-On administrator user.
-
Click Users in the Manage sidebar to view the user information for the
demorealm. - Click View all users button.
- Click the ID link for the appuser or alternatively click the Edit button in the Actions column.
- Click the Role Mappings tab.
-
Select
adminentry from the Available Roles list in the Realm Roles row. -
Click Add selected> button to add the
adminrole to the user. Return to EAP 6.4 / 7.1 JSP service application.
http://eap-app-eap-app-demo.openshift.example.com/app-jsp.
-
Click the LOGOUT button to reload role mappings for the
appuser. -
Click the LOGIN button again and provider
appusercredentials. Click the INVOKE ADMIN button again.
You should see the Message: admin output already.
4.5. Automatically registering an EAP application in Red Hat Single Sign-On with an OpenID-Connect client
This example prepares Red Hat Single Sign-On realm, role, and user credentials for an EAP project using an OpenID-Connect client adapter. These credentials are then provided in the EAP for OpenShift template for automatic Red Hat Single Sign-On client registration. Once deployed, the Red Hat Single Sign-On user can be used to authenticate and access JBoss EAP.
This example uses a OpenID-Connect client but an SAML client could also be used. See Red Hat Single Sign-On Clients and Automatic and Manual Red Hat Single Sign-On Client Registration Methods for more information on the differences between OpenID-Connect and SAML clients.
Prerequisites
- The steps described in the Preparing Red Hat Single Sign-On Authentication for OpenShift Deployment section have been performed already.
4.5.1. Preparing Red Hat Single Sign-On authentication for OpenShift deployment
Log in to the OpenShift CLI with a user that holds the cluster:admin role.
Create a new project:
$ oc new-project eap-app-demo
Add the
viewrole to thedefaultservice account. This enables the service account to view all the resources in theeap-app-demonamespace, which is necessary for managing the cluster.$ oc policy add-role-to-user view system:serviceaccount:$(oc project -q):default
The EAP template requires an SSL keystore and a JGroups keystore.
This example useskeytool, a package included with the Java Development Kit, to generate self-signed certificates for these keystores. The following commands will prompt for passwords.
Generate a secure key for the SSL keystore:
$ keytool -genkeypair -alias https -storetype JKS -keystore eapkeystore.jks
Generate a secure key for the JGroups keystore:
$ keytool -genseckey -alias jgroups -storetype JCEKS -keystore eapjgroups.jceks
Generate the EAP for OpenShift secrets with the SSL and JGroup keystore files:
$ oc create secret generic eap-ssl-secret --from-file=eapkeystore.jks
$ oc create secret generic eap-jgroup-secret --from-file=eapjgroups.jceks
Add the EAP secret to the
defaultservice account:$ oc secrets link default eap-ssl-secret eap-jgroup-secret
4.5.2. Preparing the Red Hat Single Sign-On credentials
Log in to the encrypted Red Hat Single Sign-On web server at https://secure-sso-<project-name>.<hostname>/auth/admin using the administrator account created during the Red Hat Single Sign-On deployment.
Procedure
Create a Realm
- Hover your cursor over the realm namespace at the top of the sidebar and click Add Realm.
- Enter a realm name (this example uses eap-demo) and click Create.
Copy the Public Key
In the newly created eap-demo realm, click the Keys tab and copy the generated public key. This example uses the variable <realm-public-key> for brevity. This is used later to deploy the Red Hat Single Sign-On-enabled JBoss EAP image.
Create a Role
Create a role in Red Hat Single Sign-On with a name that corresponds to the JEE role defined in the web.xml of the example EAP application. This role is assigned to an Red Hat Single Sign-On application user to authenticate access to user applications.
- Click Roles in the Configure sidebar to list the roles for this realm. This is a new realm, so there should only be the default offline_access role.
- Click Add Role.
- Enter the role name (this example uses the role eap-user-role) and click Save.
Create Users and Assign Roles
Create two users: - Assign the realm management user the realm-management roles to handle automatic Red Hat Single Sign-On client registration in the Red Hat Single Sign-On server. - Assign the application user the JEE role, created in the previous step, to authenticate access to user applications.
Create the realm management user:
- Click Users in the Manage sidebar to view the user information for the realm.
- Click Add User.
- Enter a valid Username (this example uses the user eap-mgmt-user) and click Save.
- Edit the user configuration. Click the Credentials tab in the user space and enter a password for the user. After the password has been confirmed you can click Reset Password to set the user password. A pop-up window prompts for additional confirmation.
- Click Role Mappings to list the realm and client role configuration. In the Client Roles drop-down menu, select realm-management and add all of the available roles to the user. This provides the user Red Hat Single Sign-On server rights that can be used by the JBoss EAP image to create clients.
Create the application user:
- Click Users in the Manage sidebar to view the user information for the realm.
- Click Add User.
- Enter a valid Username and any additional optional information for the application user and click Save.
- Edit the user configuration. Click the Credentials tab in the user space and enter a password for the user. After the password has been confirmed you can click Reset Password to set the user password. A pop-up window prompts for additional confirmation.
- Click Role Mappings to list the realm and client role configuration. In Available Roles, add the role created earlier.
4.5.3. Deploy the Red Hat Single Sign-On-enabled JBoss EAP image
,Procedure
- Return to the OpenShift web console and click Add to project to list the default image streams and templates.
- Use the Filter by keyword search bar to limit the list to those that match sso. You may need to click See all to show the desired application template.
Select the eap71-sso-s2i image to list all of the deployment parameters. Include the following Red Hat Single Sign-On parameters to configure the Red Hat Single Sign-On credentials during the EAP build:
Variable Example Value APPLICATION_NAME
sso
HOSTNAME_HTTPS
secure-sample-jsp.eap-app-demo.openshift32.example.com
HOSTNAME_HTTP
sample-jsp.eap-app-demo.openshift32.example.com
SOURCE_REPOSITORY_URL
https://repository-example.com/developer/application
SSO_URL
https://secure-sso-sso-app-demo.openshift32.example.com/auth
SSO_REALM
eap-demo
SSO_USERNAME
eap-mgmt-user
SSO_PASSWORD
password
SSO_PUBLIC_KEY
<realm-public-key>
HTTPS_KEYSTORE
eapkeystore.jks
HTTPS_PASSWORD
password
HTTPS_SECRET
eap-ssl-secret
JGROUPS_ENCRYPT_KEYSTORE
eapjgroups.jceks
JGROUPS_ENCRYPT_PASSWORD
password
JGROUPS_ENCRYPT_SECRET
eap-jgroup-secret
- Click Create to deploy the JBoss EAP image.
It may take several minutes for the JBoss EAP image to deploy.
4.5.4. Log in to the JBoss EAP Server using Red Hat Single Sign-On
Procedure
- Access the JBoss EAP application server and click Login. You are redirected to the Red Hat Single Sign-On login.
- Log in using the Red Hat Single Sign-On user created in the example. You are authenticated against the Red Hat Single Sign-On server and returned to the JBoss EAP application server.
4.6. Manually registering EAP application in Red Hat Single Sign-On with SAML client
This example prepares Red Hat Single Sign-On realm, role, and user credentials for an EAP project and configures an EAP for OpenShift deployment. Once deployed, the Red Hat Single Sign-On user can be used to authenticate and access JBoss EAP.
This example uses a SAML client but an OpenID-Connect client could also be used. See Red Hat Single Sign-On Clients and Automatic and Manual Red Hat Single Sign-On Client Registration Methods for more information on the differences between SAML and OpenID-Connect clients.
Prerequisites
- The steps described in the Preparing Red Hat Single Sign-On Authentication for OpenShift Deployment section have been performed already.
4.6.1. Preparing the Red Hat Single Sign-On credentials
Procedure
Log in to the encrypted Red Hat Single Sign-On web server at https://secure-sso-<project-name>.<hostname>/auth/admin using the administrator account created during the Red Hat Single Sign-On deployment.
Create a Realm
- Hover your cursor over the realm namespace (default is Master) at the top of the sidebar and click Add Realm.
- Enter a realm name (this example uses saml-demo) and click Create.
Copy the Public Key
In the newly created saml-demo realm, click the Keys tab and copy the generated public key. This example uses the variable realm-public-key for brevity. This is needed later to deploy the Red Hat Single Sign-On-enabled JBoss EAP image.
Create a Role
Create a role in Red Hat Single Sign-On with a name that corresponds to the JEE role defined in the web.xml of the example EAP application. This role will be assigned to an Red Hat Single Sign-On application user to authenticate access to user applications.
- Click Roles in the Configure sidebar to list the roles for this realm. This is a new realm, so there should only be the default offline_access role.
- Click Add Role.
- Enter the role name (this example uses the role saml-user-role) and click Save.
Create Users and Assign Roles
Create two users: - Assign the realm management user the realm-management roles to handle automatic Red Hat Single Sign-On client registration in the Red Hat Single Sign-On server. - Assign the application user the JEE role, created in the previous step, to authenticate access to user applications.
Create the realm management user:
- Click Users in the Manage sidebar to view the user information for the realm.
- Click Add User.
- Enter a valid Username (this example uses the user app-mgmt-user) and click Save.
- Edit the user configuration. Click the Credentials tab in the user space and enter a password for the user. After the password has been confirmed you can click Reset Password to set the user password. A pop-up window prompts for additional confirmation.
Create the application user:
- Click Users in the Manage sidebar to view the user information for the realm.
- Click Add User.
- Enter a valid Username and any additional optional information for the application user and click Save.
- Edit the user configuration. Click the Credentials tab in the user space and enter a password for the user. After the password has been confirmed you can click Reset Password to set the user password. A pop-up window prompts for additional confirmation.
- Click Role Mappings to list the realm and client role configuration. In Available Roles, add the role created earlier.
Create and Configure a SAML Client:
Clients are Red Hat Single Sign-On entities that request user authentication. This example configures a SAML client to handle authentication for the EAP application. This section saves two files, keystore.jks and keycloak-saml-subsystem.xml that are needed later in the procedure.
Create the SAML Client:
- Click Clients in the Configure sidebar to list the clients in the realm. Click Create.
- Enter a valid Client ID. This example uses sso-saml-demo.
- In the Client Protocol drop-down menu, select saml.
- Enter the Root URL for the application. This example uses https://demoapp-eap-app-demo.openshift32.example.com.
- Click Save.
Configure the SAML Client:
In the Settings tab, set the Root URL and the Valid Redirect URLs for the new sso-saml-demo client:
- For the Root URL, enter the same address used when creating the client. This example uses https://demoapp-eap-app-demo.openshift32.example.com.
- For the Valid Redirect URLs, enter an address for users to be redirected to at when they log in or out. This example uses a redirect address relative to the root https://demoapp-eap-app-demo.openshift32.example.com/*.
Export the SAML Keys:
- Click the SAML Keys tab in the sso-saml-demo client space and click Export.
- For this example, leave the Archive Format as JKS. This example uses the default Key Alias of sso-saml-demo and default Realm Certificate Alias of saml-demo.
- Enter the Key Password and the Store Password. This example uses password for both.
- Click Download and save the keystore-saml.jks file for use later.
- Click the sso-saml-demo client to return to the client space ready for the next step.
Download the Client Adapter:
- Click Installation.
- Use the Format Option drop-down menu to select a format. This example uses Keycloak SAML Wildfly/JBoss Subsystem.
- Click Download and save the file keycloak-saml-subsystem.xml.
The keystore-saml.jks will be used with the other EAP keystores in the next section to create an OpenShift secret for the EAP application project. Copy the keystore-saml.jks file to an OpenShift node.
The keycloak-saml-subsystem.xml will be modified and used in the application deployment. Copy it into the /configuration folder of the application as secure-saml-deployments.
4.6.2. Preparing Red Hat Single Sign-On authentication for OpenShift deployment
Log in to the OpenShift CLI with a user that holds the cluster:admin role.
Procedure
Create a new project:
$ oc new-project eap-app-demo
Add the
viewrole to thedefaultservice account. This enables the service account to view all the resources in theeap-app-demonamespace, which is necessary for managing the cluster.$ oc policy add-role-to-user view system:serviceaccount:$(oc project -q):default
The EAP template requires an SSL keystore and a JGroups keystore.
This example useskeytool, a package included with the Java Development Kit, to generate self-signed certificates for these keystores. The following commands will prompt for passwords.
Generate a secure key for the SSL keystore:
$ keytool -genkeypair -alias https -storetype JKS -keystore eapkeystore.jks
Generate a secure key for the JGroups keystore:
$ keytool -genseckey -alias jgroups -storetype JCEKS -keystore eapjgroups.jceks
Generate the EAP for OpenShift secrets with the SSL and JGroup keystore files:
$ oc create secret generic eap-ssl-secret --from-file=eapkeystore.jks
$ oc create secret generic eap-jgroup-secret --from-file=eapjgroups.jceks
Add the EAP application secret to the EAP service account created earlier:
$ oc secrets link default eap-ssl-secret eap-jgroup-secret
4.6.3. Modifying the secure-saml-deployments file
Prerequisites
- The keycloak-saml-subsystem.xml, exported from the Red Hat Single Sign-On client in a previous section, should have been copied into the /configuration folder of the application and renamed secure-saml-deployments. EAP searches for this file when it starts and copies it to the standalone-openshift.xml file inside the Red Hat Single Sign-On SAML adapter configuration.
Procedure
- Open the /configuration/secure-saml-deployments file in a text editor.
- Replace the YOUR-WAR.war value of the secure-deployment name tag with the application .war file. This example uses sso-saml-demo.war.
- Replace the SPECIFY YOUR LOGOUT PAGE! value of the logout page tag with the url to redirect users when they log out of the application. This example uses /index.jsp.
Delete the <PrivateKeyPem> and <CertificatePem> tags and keys and replace it with keystore information:
...
<Keys>
  <Key signing="true">
    <KeyStore file= "/etc/eap-secret-volume/keystore-saml.jks" password="password">
      <PrivateKey alias="sso-saml-demo" password="password"/>
      <Certificate alias="sso-saml-demo"/>
    </KeyStore>
  </Key>
</Keys>
The mount path of the keystore-saml.jks (in this example /etc/eap-secret-volume/keystore-saml.jks) can be specified in the application template with the parameter EAP_HTTPS_KEYSTORE_DIR.
The aliases and passwords for the PrivateKey and the Certificate were configured when the SAML Keys were exported from the Red Hat Single Sign-On client.Delete the second <CertificatePem> tag and key and replace it with the the realm certificate information:
...
<Keys>
  <Key signing="true">
    <KeyStore file="/etc/eap-secret-volume/keystore-saml.jks" password="password">
      <Certificate alias="saml-demo"/>
    </KeyStore>
  </Key>
</Keys>
...
The certificate alias and password were configured when the SAML Keys were exported from the Red Hat Single Sign-On client.
- Save and close the /configuration/secure-saml-deployments file.
4.6.4. Configuring SAML Client Registration in the application web.xml
The client type must also be specified by the <auth-method> key in the application web.xml. This file is read by the image at deployment.
Open the application web.xml file and ensure it includes the following:
...
<login-config>
  <auth-method>KEYCLOAK-SAML</auth-method>
</login-config>
...
4.6.5. Deploying the application
You do not need to include any Red Hat Single Sign-On configuration for the image because that has been configured in the application itself. Navigating to the application login page redirects you to the Red Hat Single Sign-On login. Log in to the application through Red Hat Single Sign-On using the application user user created earlier.