
Chapter 3. Upgrading Red Hat Single Sign-On Server
The upgrade or migration process for the Red Hat Single Sign-On server depends on the previous version of the software.
- If you are upgrading to a new minor release, for example from 7.0.0 to 7.1.0, follow the steps in Minor Upgrades.
- If you are migrating from Keycloak 9.0.x, follow the steps in Minor Upgrades.
- If you are upgrading to a new micro release, for example from 7.1.0 to 7.1.1, follow the steps in Micro Upgrades.
3.1. Minor Upgrades
3.1.1. Preparing for Upgrading
Before you upgrade, be aware of the order in which you need to perform the upgrade steps. Also note potential issues that can occur within the upgrade process. In general, you must upgrade Red Hat Single Sign-On server first, and then upgrade the adapters.
- Prior to applying the upgrade, handle any open transactions and delete the data/tx-object-store/ transaction directory.
- Back up the old installation (configuration, themes, and so on).
- Back up the database. For detailed information on how to back up the database, see the documentation for the relational database you are using.
Upgrade Red Hat Single Sign-On server.
- Testing the upgrade in a non-production environment first, to prevent any installation issues from being exposed in production, is a best practice.
- Be aware that after the upgrade the database will no longer be compatible with the old server
- Ensure the upgraded server is functional before upgrading adapters in production.
- If you need to revert the upgrade, first restore the old installation, and then restore the database from the backup copy.
- Upgrade the adapters.
3.1.2. Upgrading Red Hat Single Sign-On server
It is important that you upgrade Red Hat Single Sign-On server before upgrading the adapters.
To upgrade Red Hat Single Sign-On server, complete the following steps:
- Prior to applying the upgrade, handle any open transactions and delete the data/tx-object-store/ transaction directory.
- Download the new server archive
- Move the downloaded archive to the desired location.
- Extract the archive. This step installs a clean instance of the latest Red Hat Single Sign-On release.
For standalone installations, copy the RHSSO_HOME/standalone/ directory from the previous installation over the directory in the new installation.
For domain installations, copy the RHSSO_HOME/domain/ directory from the previous installation over the directory in the new installation.
For domain installations, create the empty directory RHSSO_HOME/domain/deployments.
NOTE: Files in the bin directory should not be overwritten by the files from previous versions. Changes should be made manually.
- Copy any custom modules that have been added to the modules directory.
- Run the applicable upgrade script below.
To upgrade Red Hat Single Sign-On server RPM distribution, complete the following steps:
- Prior to applying the upgrade, handle any open transactions and delete the /var/opt/rh/rh-sso7/lib/keycloak/standalone/data/tx-object-store/ transaction directory.
Make sure you have subscribed to proper repositories containing JBOSS EAP and Red Hat Single Sign-On.
subscription-manager repos --enable=jb-eap-7.1-for-rhel-7-server-rpms
subscription-manager repos --enable=rh-sso-7.2-for-rhel-7-server-rpms
NoteTo disable older product repositories for both JBOSS EAP and Red Hat Single Sign-On use:
subscription-manager repos --disable=<OLDER_PRODUCT_REPO>
To check the repositories use:
yum repolist
The RPM upgrade process will not replace any of your modified configuration files, and will instead create .rpmnew files for the default configuration of the new Red Hat Single Sign-On version.
To activate any new features in the new release, such as new subsystems, you must manually merge each .rpmnew file into your existing configuration files
- Copy any custom modules that have been added to the modules directory.
Run the applicable upgrade script as described below.
NoteRed Hat Single Sign-On RPM server distribution is using
RHSSO_HOME=/opt/rh/rh-sso7/root/usr/share/keycloakUse it when calling migration scripts below.
3.1.2.1. Running the Standalone Mode Upgrade Script
To run the upgrade script for standalone mode, complete the following steps:
- If you are using a different configuration file than the default one, edit the migration script to specify the new file name.
- Stop the server.
Run the upgrade script:
bin/jboss-cli.sh --file=bin/migrate-standalone.cli
3.1.2.2. Running the Standalone-High Availability Mode Upgrade Script
For standalone-high availability (HA) mode, all instances must be upgraded at the same time.
To run the upgrade script for standalone-HA mode, complete the following steps:
- If you are using a different configuration file than the default one, edit the migration script to specify the new file name.
- Stop the server.
Run the upgrade script:
bin/jboss-cli.sh --file=bin/migrate-standalone-ha.cli
3.1.2.3. Running the Domain Mode Upgrade Script
For domain mode, all instances must be upgraded at the same time.
To run the upgrade script for domain mode, complete the following steps:
- If you have changed the profile name, you must edit the upgrade script to change a variable near the beginning of the script.
- Edit the domain script to include the location of the keycloak-server.json file.
- Stop the server.
Run the upgrade script on the domain controller only:
bin/jboss-cli.sh --file=bin/migrate-domain.cli
3.1.3. Migrating the Database
Red Hat Single Sign-On can automatically migrate the database schema, or you can choose to do it manually. By default the database is automatically migrated when you start the new installation for the first time.
3.1.3.1. Automatic Relational Database Migration
To enable automatic upgrading of the database schema, set the migrationStrategy property value to "update" for the default connectionsJpa provider:
 <spi name="connectionsJpa">
    <provider name="default" enabled="true">
        <properties>
            ...
            <property name="migrationStrategy" value="update"/>
        </properties>
    </provider>
</spi>
Or run this CLI command:
/subsystem=keycloak-server/spi=connectionsJpa/provider=default/:map-put(name=properties,key=migrationStrategy,value=update)
When you start the server with this setting your database is automatically migrated if the database schema has changed in the new version.
3.1.3.2. Manual Relational Database Migration
To enable manual upgrading of the database schema, set the migrationStrategy property value to "manual" for the default connectionsJpa provider:
 <spi name="connectionsJpa">
    <provider name="default" enabled="true">
        <properties>
            ...
            <property name="migrationStrategy" value="manual"/>
        </properties>
    </provider>
</spi>
Or run this CLI command:
/subsystem=keycloak-server/spi=connectionsJpa/provider=default/:map-put(name=properties,key=migrationStrategy,value=manual)
When you start the server with this configuration it checks if the database needs to be migrated. The required changes are written to an SQL file that you can review and manually run against the database. For further details on how to apply this file to the database, see the documentation for the relational database you’re using. After the changes have been written to the file, the server exits.
3.1.4. Migrating Themes
If you have created any custom themes they must be migrated to the new server. Any changes to the built-in themes might need to be reflected in your custom themes, depending on which aspects you have customized.
You must copy your custom themes from the old server "themes" directory to the new server "themes" directory. After that you need to review the changes below and consider if the changes need to be applied to your custom theme.
In summary:
- If you have customized any of the changed templates listed below you need to compare the template from the base theme to see if there are changes you need to apply.
- If you have customized any of the styles and are extending the Red Hat Single Sign-On themes you need to review the changes to the styles. If you are extending the base theme you can skip this step.
- If you have customized messages you might need to change the key or value or to add additional messages.
Each step is described in more detail below the list of changes.
3.1.4.1. Theme changes RH-SSO 7.3
Templates
- Account: account.ftl
- Account: applications.ftl
- Account: resource-detail.ftl (new)
- Account: resources.ftl (new)
- Account: template.ftl
- Account: totp.ftl
- Email-html: email-test.ftl
- Email-html: email-verification-with-code.ftl (new)
- Email-html: email-verification.ftl
- Email-html: event-login_error.ftl
- Email-html: event-removed_totp.ftl
- Email-html: event-update_password.ftl
- Email-html: event-update_totp.ftl
- Email-html: executeActions.ftl
- Email-html: identity-provider-link.ftl
- Email-html: password-reset.ftl
- Email-text: email-verification-with-code.ftl (new)
- Email-text: email-verification.ftl
- Email-text: executeActions.ftl
- Email-text: identity-provider-link.ftl
- Email-text: password-reset.ftl
- Login: cli_splash.ftl (new)
- Login: code.ftl
- Login: error.ftl
- Login: info.ftl
- Login: login-config-totp-text.ftl (new)
- Login: login-config-totp.ftl
- Login: login-idp-link-confirm.ftl
- Login: login-idp-link-email.ftl
- Login: login-oauth-grant.ftl
- Login: login-page-expired.ftl
- Login: login-reset-password.ftl
- Login: login-totp.ftl
- Login: login-update-password.ftl
- Login: login-update-profile.ftl
- Login: login-verify-email-code-text.ftl (new)
- Login: login-verify-email.ftl
- Login: login-x509-info.ftl
- Login: login.ftl
- Login: register.ftl
- Login: template.ftl
- Login: terms.ftl
- Welcome: index.ftl (new)
Messages
- Account: messages_en.properties
- Admin: admin-messages_en.properties
- Email: messages_en.properties
- Login: messages_en.properties
Styles
- Login: login-rhsso.css (new)
- Welcome: welcome-rhsso.css
3.1.4.2. Theme changes RH-SSO 7.2
Templates
- Account: account.ftl
- Account: applications.ftl
- Account: federatedIdentity.ftl
- Account: password.ftl
- Account: sessions.ftl
- Account: template.ftl
- Account: totp.ftl
- Admin: index.ftl
- Email: email-test.ftl (new)
- Email: email-verification.ftl
- Email: event-login_error.ftl
- Email: event-removed_totp.ftl
- Email: event-update_password.ftl
- Email: event-update_totp.ftl
- Email: executeActions.ftl
- Email: identity-provider-link.ftl
- Email: password-reset.ftl
- Login: bypass_kerberos.ftl (removed)
- Login: error.ftl
- Login: info.ftl
- Login: login-config-totp.ftl
- Login: login-idp-link-email.ftl
- Login: login-oauth-grant.ftl
- Login: login-page-expired.ftl (new)
- Login: login-reset-password.ftl
- Login: login-totp.ftl
- Login: login-update-password.ftl
- Login: login-update-profile.ftl
- Login: login-verify-email.ftl
- Login: login-x509-info.ftl (new)
- Login: login.ftl (new)
- Login: register.ftl (new)
- Login: template.ftl (new)
- Login: terms.ftl (new)
Messages
- Account: messages_en.properties
- Admin: admin-messages_en.properties
- Admin: messages_en.properties
- Email: messages_en.properties
- Login: messages_en.properties
Styles
- Account: account.css
- Login: login.css
3.1.4.3. Theme changes RH-SSO 7.1
Templates
- Account: account.ftl
- Account: federatedIdentity.ftl
- Account: totp.ftl
- Login: info.ftl
- Login: login-config-totp.ftl
- Login: login-reset-password.ftl
- Login: login.ftl
Messages
- Account: editAccountHtmlTtile renamed to editAccountHtmlTitle
- Account: role_uma_authorization added
- Login: loginTotpStep1 value changed
- Login: invalidPasswordGenericMessage added
- Login: invlidRequesterMessage renamed to invalidRequesterMessage
- Login: clientDisabledMessage added
Styles
- Account: account.css
- Login: login.css
3.1.4.4. Migrating Templates
If you have customized any of the templates you need to carefully review the changes that have been made to the templates to decide if you need to apply these changes to your customized templates. Most likely you will need to apply the same changes to your customized templates. If you have not customized any of the listed templates you can skip this section.
A best practice is to use a diff tool to compare the templates to see what changes you might need to make to your customized template. If you have only made minor changes it is simpler to compare the updated template to your customized template. However, if you have made many changes it might be easier to compare the new template to your customized old template, as this will show you what changes you need to make.
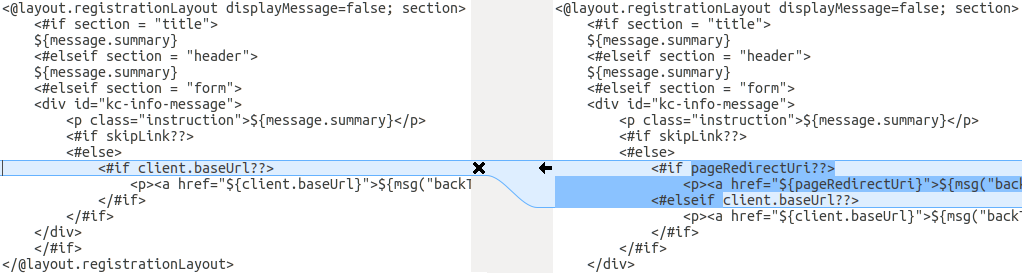
The following screenshot compares the info.ftl template from the Login theme and an example custom theme:
Comparison of the updated version of a Login theme template with an example custom Login theme template

From this comparison it is easy to identify that the first change ("Hello world!!") was a customization, while the second change ("if pageRedirectUri") is a change to the base theme. By copying the second change to your custom template, you have successfully updated your customized template.
For the alternative approach the following screenshot compares the info.ftl template from the old installation with the updated info.ftl template from the new installation:
Comparison of an example custom Login theme template with the updated version of the Login theme template
From this comparison it is easy to identify what has been changed in the base template. You will then manually have to make the same changes to your modified template. Since this approach is not as simple as the first approach, only use this approach if the first one is not feasible.
3.1.4.5. Migrating Messages
If you have added support for another language, you need to apply all the changes listed above. If you have not added support for another language, you might not need to change anything; you only have to make changes if you have changed an affected message in your theme.
For added values, review the value of the message in the base theme to determine if you need to customize that message.
For renamed keys, rename the key in your custom theme.
For changed values, check the value in the base theme to determine if you need to make changes to your custom theme.
3.1.4.6. Migrating Styles
If you are inheriting styles from the keycloak or rh-sso themes you might need to update your custom styles to reflect changes made to the styles from the built-in themes.
A best practice is to use a diff tool to compare the changes to stylesheets between the old server installation and the new server installation.
For example, using the diff command:
$ diff RHSSO_HOME_OLD/themes/keycloak/login/resources/css/login.css \
RHSSO_HOME_NEW/themes/keycloak/login/resources/css/login.css
Review the changes and determine if they affect your custom styling.
3.2. Micro Upgrades
3.2.1. Patching a ZIP/Installer Installation
Patches for a ZIP installation of RH-SSO are available to download from the Red Hat Customer Portal.
For multiple RH-SSO hosts in a managed domain environment, individual hosts can be patched from your RH-SSO domain controller.
In addition to applying a patch, you can also roll back the application of a patch.
3.2.1.1. Important Notes on ZIP Installation Patching
-
If you apply a patch that updates a module, the new patched JARs that are used at runtime are stored in
RHSSO_HOME/modules/system/layers/base/.overlays/PATCH_ID/MODULE. The original unpatched files are left inRHSSO_HOME/modules/system/layers/base/MODULE, but these JARs are not used at runtime. In order to significantly decrease the size of cumulative patch releases for RH-SSO 7 you cannot perform a partial roll back of a cumulative patch. For a patch that has been applied, you will only be able to roll back the whole patch.
For example, if you apply CP03 to RH-SSO 7.0.0, you will not be able to roll back to CP01 or CP02. If you would like the ability to roll back to each cumulative patch release, each cumulative patch must be applied separately in the order they were released.
3.2.1.2. Applying a Patch
RH-SSO servers that have been installed using the RPM method cannot be updated using these instructions. See the RPM instructions for applying a patch instead.
You can apply downloaded patches to a RH-SSO server using either the management CLI or the management console.
Applying a Patch to RH-SSO Using the Management CLI
- Download the patch file from the Red Hat Customer Portal at https://access.redhat.com/downloads/.
From the management CLI, apply the patch using the following command, including the appropriate path to the patch file:
patch apply /path/to/downloaded-patch.zip
NoteTo patch another RH-SSO host in a managed domain, you can specify the RH-SSO host name using the
--host=argument. For example:patch apply /path/to/downloaded-patch.zip --host=my-host
The patch tool will warn if there are any conflicts in attempting to apply the patch. If there are conflicts, enter
patch --helpfor the available arguments to re-run the command with an argument specifying how to resolve the conflicts.Restart the RH-SSO server for the patch to take effect:
shutdown --restart=true
Applying a Patch to RH-SSO Using the Management Console
- Download the patch file from the Red Hat Customer Portal at https://access.redhat.com/downloads/.
Open the management console and navigate to the Patch Management view.
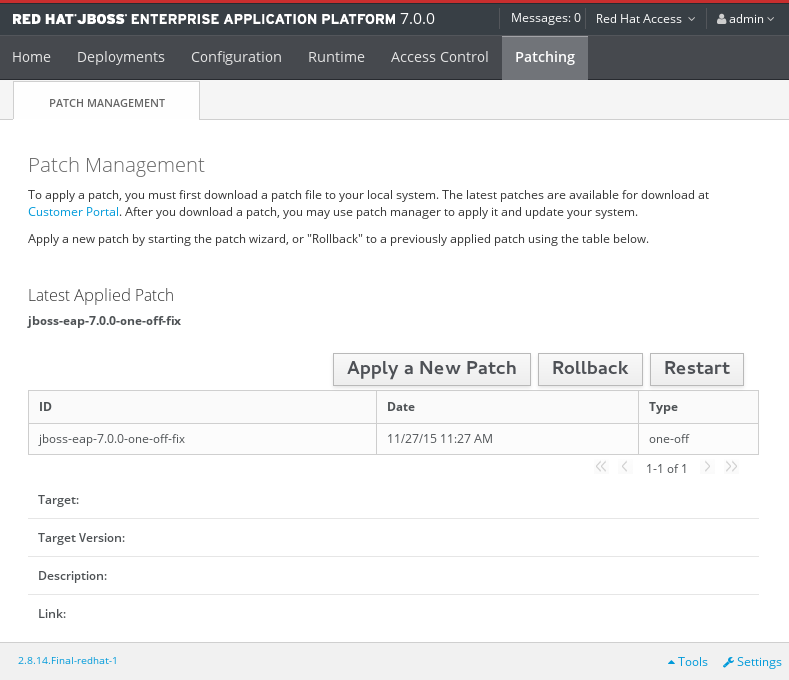
For a standalone server, click the Patching tab.
The Patch Management Screen for a Standalone Server

For a server in a managed domain, click the Patching tab, then select the host that you want to patch from the table, and click View.
The Patch Management Screen for a Managed Domain

Click Apply a New Patch.
- If you are patching a managed domain host, on the next screen select whether to shutdown the servers on the host, and click Next.
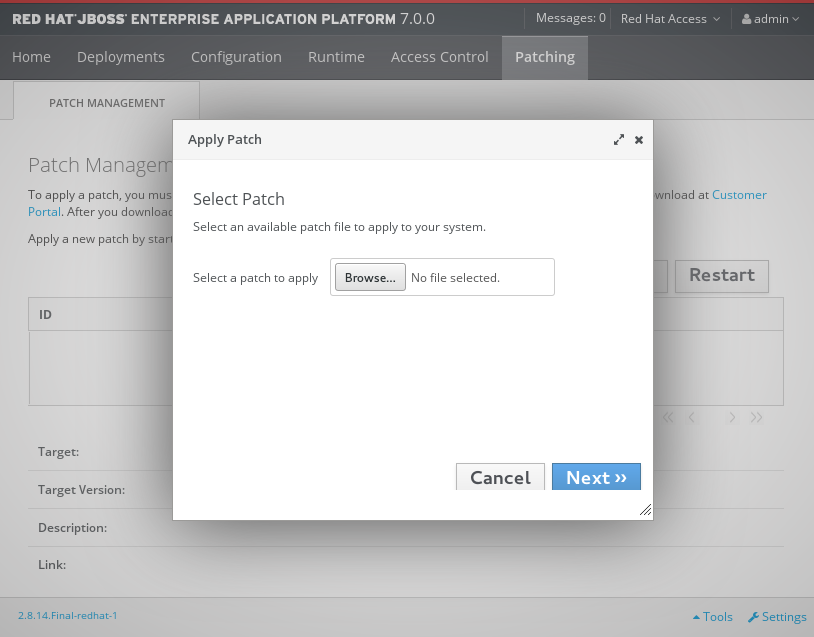
Click the Browse button, select the downloaded patch you want to apply, and then click Next.
Apply Patch Screen
 .. If there are any conflicts in attempting to apply the patch, a warning will be displayed. Click View error details to see the detail of the conflicts. If there is a conflict, you can either cancel the operation, or select the Override all conflicts check box and click Next. Overriding conflicts will result in the content of the patch overriding any user modifications.
- After the patch has been successfully applied, select whether to restart RH-SSO now for the patch to take effect, and click Finish.
3.2.1.3. Rolling Back a Patch
You can roll back a previously applied RH-SSO patch using either the management CLI or the management console.
Rolling back a patch using the patch management system is not intended as a general uninstall functionality. It is only intended to be used immediately after the application of a patch that had undesirable effects.
Prerequisites
- A patch that was previously applied.
When following either procedure, use caution when specifying the value of the Reset Configuration option:
If set to TRUE, the patch rollback process will also roll back the RH-SSO server configuration files to their pre-patch state. Any changes that were made to the RH-SSO server configuration files after the patch was applied will be lost.
If set to FALSE, the server configuration files will not be rolled back. In this situation, it is possible that the server will not start after the rollback, as the patch may have altered configurations, such as namespaces, which may no longer be valid and will have to be fixed manually.
Rolling Back a Patch Using the Management CLI
From the management CLI, use the
patch historycommand to find the ID of the patch that you want to roll back.NoteIf you are using a managed domain, you must add the
--host=HOSTNAMEargument to the commands in this procedure to specify the RH-SSO host.Roll back the patch with the appropriate patch ID from the previous step.
patch rollback --patch-id=PATCH_ID --reset-configuration=TRUE
The patch tool will warn if there are any conflicts in attempting to roll back the patch. If there are conflicts, enter
patch --helpfor the available arguments to re-run the command with an argument specifying how to resolve the conflicts.Restart the RH-SSO server for the patch roll back to take effect:
shutdown --restart=true
Rolling Back a Patch Using the Management Console
Open the management console and navigate to the Patch Management view.
- For a standalone server, click the Patching tab.
- For a server in a managed domain, click the Patching tab, then select the host that you want to patch from the table, and click View.
Select the patch that you want to rollback from those listed in the table, then click Rollback.
Recent Patch History Screen
 .. If you are rolling back a patch on a managed domain host, on the next screen select whether to shutdown the servers on the host, and click Next.
Choose your options for the rollback process, then click Next.
Patch Rollback Options

Confirm the options and the patch to be rolled back, then click Next.
- If there are any conflicts in attempting to rollback the patch and the Override all option was not selected, a warning will be displayed. Click View error details to see the detail of the conflicts. If there is a conflict, you can either cancel the operation, or click Choose Options and try the operation again with the Override all check box selected. Overriding conflicts will result in the rollback operation overriding any user modifications.
- After the patch has been successfully rolled back, select whether to restart the RH-SSO server now for the changes to take effect, and click Finish.
3.2.1.4. Clearing Patch History
When patches are applied to a RH-SSO server, the content and history of the patches are preserved for use in rollback operations. If multiple cumulative patches are applied, the patch history may use a significant amount of disk space.
You can use the following management CLI command to remove all older patches that are not currently in use. When using this command, only the latest cumulative patch is preserved along with the GA release. This is only useful for freeing space if multiple cumulative patches have previously been applied.
/core-service=patching:ageout-history
If you clear the patch history, you will not be able to roll back a previously applied patch.
3.2.2. Patching an RPM Installation
Prerequisites
- Ensure that the base operating system is up to date, and is subscribed and enabled to get updates from the standard Red Hat Enterprise Linux repositories.
- Ensure that you are subscribed to the relevant RH-SSO repository for the update.
- Back up all configuration files, deployments, and user data.
For a managed domain, the RH-SSO domain controller should be updated first.
To install a RH-SSO patch via RPM from your subscribed repository, update your Red Hat Enterprise Linux system using the following command:
yum update
3.2.3. Patching a local Maven installation
If you have installed the RH-SSO Client Adapters Maven Repository using a ZIP file downloaded from the Red Hat Customer Portal, it may also need to be patched.
The RH-SSO Client Adapters Maven Repository is available online or as a downloaded ZIP file. If you use the publicly hosted online Maven repository, updates are automatically applied, and no action is required to update it. However, if you installed the Maven repository locally using the ZIP file, you are responsible for applying updates to the repository.
Whenever a cumulative patch is released for RH-SSO, a corresponding patch is provided for the RH-SSO Client Adapters Maven Repository. This patch is available in the form of an incremental ZIP file that is unzipped into the existing local repository. It does not overwrite or remove any existing files, so there is no rollback requirement.
Use the following procedure to apply updates to your locally installed RH-SSO Client Adapters Maven Repository.
3.2.3.1. Prerequisites
- Valid access and subscription to the Red Hat Customer Portal.
- The RH-SSO Client Adapters Maven Repository, previously downloaded and installed locally.
3.2.3.2. Update a locally installed RH-SSO Client Adapters Maven Repository
- Open a browser and log into the Red Hat Customer Portal.
- Select Downloads from the menu at the top of the page.
-
Select
Red Hat Single Sign-Onfrom the list. - Select the correct version of Red Hat Single Sign-On from the Version drop-down menu, then select the Patches tab.
-
Find
Red Hat Single Sign-On 7.x.y Client Adapters Incremental Maven Repositoryfrom the list, wherex.ymatch the cumulative patch number you want to update to. Select Download. Locate the path to your RH-SSO Client Adapters Maven Repository. This is referred to in the commands below as
RH-SSO_MAVEN_REPOSITORY_PATH. Unzip the downloaded Maven patch file directly into this directory, like this:For Red Hat Enterprise Linux, open a terminal and run the following command, replacing the values for the cumulative patch number and your Maven repository path:
$ unzip -o rh-sso-7.x.y-incremental-maven-repository.zip -d RH-SSO_MAVEN_REPOSITORY_PATH
-
For Microsoft Windows, use the Windows extraction utility to extract the ZIP file into the root of the
RH-SSO_MAVEN_REPOSITORY_PATHdirectory.