
Chapter 6. Authentication
There are a few features you should be aware of when configuring authentication for your realm. Many organizations have strict password and OTP policies that you can enforce via settings in the Admin Console. You may or may not want to require different credential types for authentication. You may want to give users the option to login via Kerberos or disable or enable various built-in credential types. This chapter covers all of these topics.
6.1. Password Policies
Each new realm created has no password policies associated with it. Users can have as short, as long, as complex, as insecure a password, as they want. Simple settings are fine for development or learning Red Hat Single Sign-On, but unacceptable in production environments. Red Hat Single Sign-On has a rich set of password policies you can enable through the Admin Console.
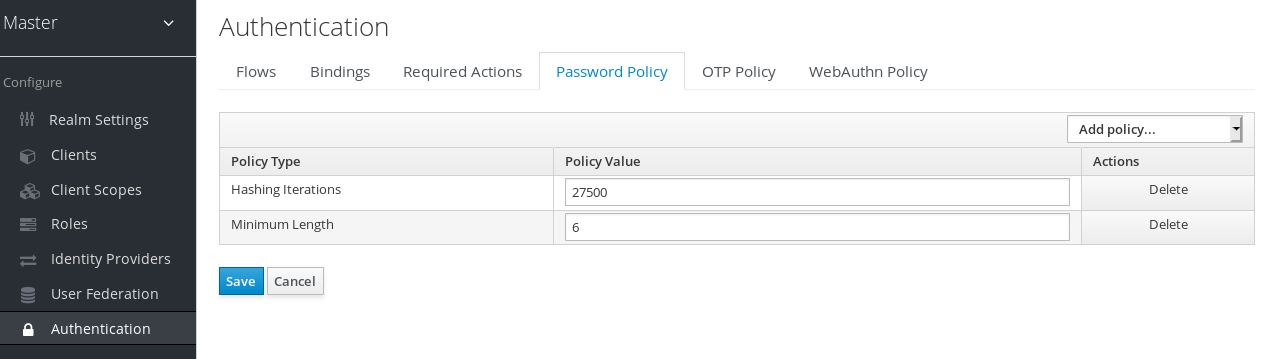
Click on the Authentication left menu item and go to the Password Policy tab. Choose the policy you want to add in the right side drop down list box. This will add the policy in the table on the screen. Choose the parameters for the policy. Hit the Save button to store your changes.
Password Policy
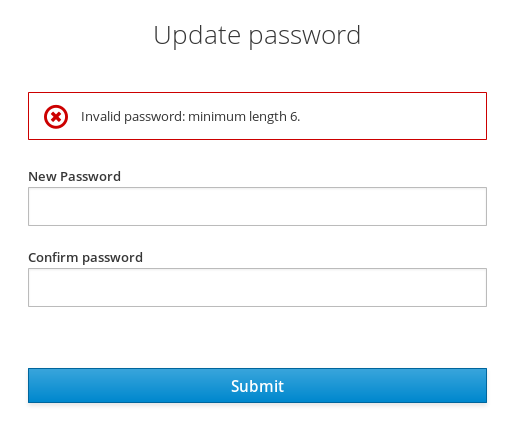
After saving your policy, user registration and the Update Password required action will enforce your new policy. An example of a user failing the policy check:
Failed Password Policy
If the password policy is updated, an Update Password action must be set for every user. An automatic trigger is scheduled as a future enhancement.
6.1.1. Password Policy Types
Here’s an explanation of each policy type:
- Hashing Algorithm
- Passwords are not stored as clear text. Instead they are hashed using standard hashing algorithms before they are stored or validated. Supported values are pbkdf2, pbkdf2-sha256 and pbkdf2-sha512.
- Hashing Iterations
- This value specifies the number of times a password will be hashed before it is stored or verified. The default value is 27,500. This hashing is done in the rare case that a hacker gets access to your password database. Once they have access to the database, they can reverse engineer user passwords. The industry recommended value for this parameter changes every year as CPU power improves. A higher hashing iteration value takes more CPU power for hashing, and can impact performance. You’ll have to weigh what is more important to you: performance or protecting your passwords stores. There may be more cost effective ways of protecting your password stores.
- Digits
- The number of digits required to be in the password string.
- Lowercase Characters
- The number of lower case letters required to be in the password string.
- Uppercase Characters
- The number of upper case letters required to be in the password string.
- Special Characters
- The number of special characters like '?!#%$' required to be in the password string.
- Not Username
- When set, the password is not allowed to be the same as the username.
- Regular Expression
-
Define one or more regular expression patterns (defined in
java.util.regex.Pattern) that passwords must match. - Expire Password
- The number of days for which the password is valid. After the number of days has expired, the user is required to change their password.
- Not Recently Used
- This policy saves a history of previous passwords. The number of old passwords stored is configurable. When a user changes their password they cannot use any stored passwords.
- Password Blacklist
-
This policy checks if a given password (converted to lowercase) is contained in a blacklist file, which is potentially a very large file. Password blacklists are UTF-8 plain-text files with Unix line endings where every line represents a blacklisted password. All passwords in the blacklist must be lowercased to facilitate case-insensitive comparison. The file name of the blacklist file must be provided as the password policy value, e.g.
10_million_password_list_top_1000000.txt. Blacklist files are resolved against${jboss.server.data.dir}/password-blacklists/by default. This path can be customized via thekeycloak.password.blacklists.pathsystem property, or theblacklistsPathproperty of thepasswordBlacklistpolicy SPI configuration.
6.2. OTP Policies
Red Hat Single Sign-On has a number of policies you can set up for your FreeOTP or Google Authenticator One-Time Password generator. Click on the Authentication left menu item and go to the OTP Policy tab.
OTP Policy
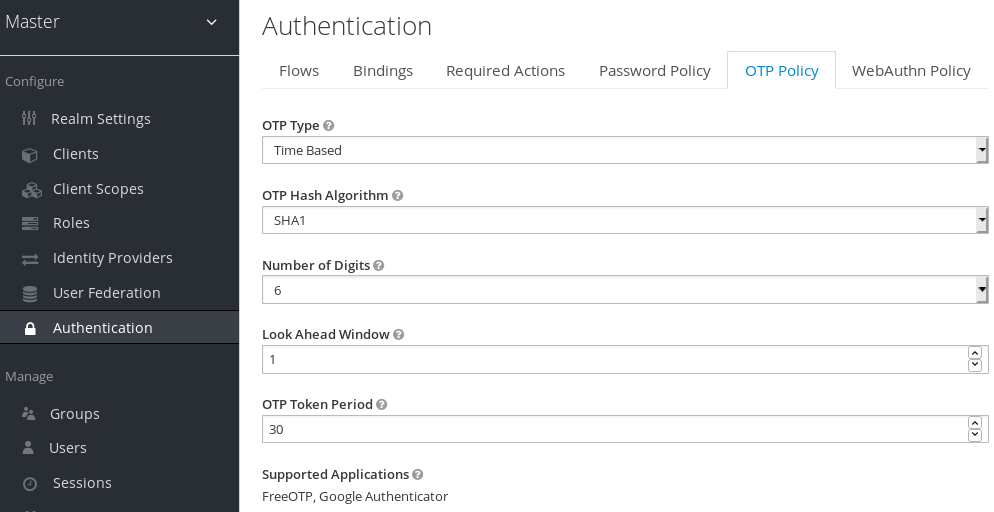
Any policies you set here will be used to validate one-time passwords. When configuring OTP, FreeOTP and Google Authenticator can scan a QR code that is generated on the OTP set up page that Red Hat Single Sign-On has. The bar code is also generated from information configured on the OTP Policy tab.
6.2.1. TOTP vs. HOTP
There are two different algorithms to choose from for your OTP generators. Time Based (TOTP) and Counter Based (HOTP). For TOTP, your token generator will hash the current time and a shared secret. The server validates the OTP by comparing all the hashes within a certain window of time to the submitted value. So, TOTPs are valid only for a short window of time (usually 30 seconds). For HOTP a shared counter is used instead of the current time. The server increments the counter with each successful OTP login. So, valid OTPs only change after a successful login.
TOTP is considered a little more secure because the matchable OTP is only valid for a short window of time while the OTP for HOTP can be valid for an indeterminate amount of time. HOTP is much more user friendly as the user won’t have to hurry to enter in their OTP before the time interval is up. With the way Red Hat Single Sign-On has implemented TOTP this distinction becomes a little more blurry. HOTP requires a database update every time the server wants to increment the counter. This can be a performance drain on the authentication server when there is heavy load. So, to provide a more efficient alternative, TOTP does not remember passwords used. This bypasses the need to do any DB updates, but the downside is that TOTPs can be re-used in the valid time interval. For future versions of Red Hat Single Sign-On it is planned that you will be able to configure whether TOTP checks older OTPs in the time interval.
6.2.2. TOTP Configuration Options
- OTP Hash Algorithm
- Default is SHA1, more secure options are SHA256 and SHA512.
- Number of Digits
- How many characters is the OTP? Short means more user friendly as it is less the user has to type. More means more security.
- Look Ahead Window
- How many intervals ahead should the server try and match the hash? This exists so just in case the clock of the TOTP generator or authentication server get out of sync. The default value of 1 is usually good enough. For example, if the time interval for a new token is every 30 seconds, the default value of 1 means that it will only accept valid tokens in that 30 second window. Each increment of this config value will increase the valid window by 30 seconds.
- OTP Token Period
- Time interval in seconds during which the server will match a hash. Each time the interval passes, a new TOTP will be generated by the token generator.
6.2.3. HOTP Configuration Options
- OTP Hash Algorithm
- Default is SHA1, more secure options are SHA256 and SHA512.
- Number of Digits
- How many characters is the OTP? Short means more user friendly as it is less the user has to type. More means more security.
- Look Ahead Window
- How many counters ahead should the server try and match the hash? The default value is 1. This exists to cover the case where the user’s counter gets ahead of the server’s. This can often happen as users often increment the counter manually too many times by accident. This value really should be increased to a value of 10 or so.
- Initial Counter
- What is the value of the initial counter?
6.3. Authentication Flows
An authentication flow is a container for all authentications, screens, and actions that must happen during login, registration, and other Red Hat Single Sign-On workflows. If you go to the admin console Authentication left menu item and go to the Flows tab, you can view all the defined flows in the system and what actions and checks each flow requires.
6.3.1. Built-in flows
Red Hat Single Sign-On comes with a certain number of built-in flows. These flows cannot be modified, but the requirements can be modified to suit your needs.
This section does a walk-through of the built-in browser login flow. In the left drop-down list select browser to come to the screen shown below:
Browser Flow

If you hover over the tooltip (the tiny question mark) to the right of the flow selection list, this will describe what the flow is and does.
The Auth Type column is the name of authentication or action that will be executed. If an authentication is indented this means it is in a sub-flow and may or may not be executed depending on the behavior of its parent. The Requirement column is a set of radio buttons which define whether or not the action will execute. Let’s describe what each radio button means in this context.
6.3.1.1. Execution requirements
- Required
- For a flow to be evaluated as successful, all required elements in the flow must evaluate as successful. This means that all Required elements in the flow must be sequentially executed, from top to bottom, unless one of the elements causes the flow to fail. However, this is only true for the current flow. Any Required element within a sub-flow is only processed if that sub-flow is entered.
- Alternative
- When a flow contains only Alternative elements, only a single element must evaluate as successful for the flow to evaluate as successful. Because the Required flow elements within a flow are sufficient to mark a flow as successful, any Alternative flow element within a flow that contains Required flow elements will never be executed. In this case, they are functionally Disabled.
- Disabled
- Any Disabled element is not evaluated and does not count to mark a flow as successful.
- Conditional
- This requirement type can only be set on sub-flows. A Conditional sub-flow can contain a "Condition" execution. These "Condition" executions must evaluate as logical statements. If all "Condition" executions evaluate as true then the Conditional sub-flow acts as Required. If not, the Conditional sub-flow acts as Disabled. If no "Condition" execution is set, the Conditional sub-flow acts as Disabled. If a flow contains "Condition" executions and is not set to Conditional, the "Condition" executions are not evaluated, and can be considered functionally Disabled.
This is better described in an example. Let’s walk through the browser authentication flow.
-
The first authentication type is
Cookie. When a user successfully logs in for the first time, a session cookie is set. If this cookie has already been set, then this authentication type is successful. In this case, since the cookie provider returned success and each execution at this level of the flow is alternative, no other execution is executed and this results in a successful login. -
The second execution of the flow looks at the
Kerberosexecution. This authenticator is disabled by default and will be skipped. -
The third execution is the
Identity Provider Redirector. It can be configured through theActions>Configlink to automatically redirect to another IdP for identity brokering. -
The next execution is a sub-flow called
Forms. Since this sub-flow is marked as alternative it will not be executed if theCookieauthentication type passed. This sub-flow contains additional authentication type that needs to be executed. The executions for this sub-flow are loaded and the same processing logic occurs. - The first execution in the Forms sub-flow is the Username Password Form. This authentication type renders the username and password page. It is marked as required so the user must enter in a valid username and password.
-
The second execution in the Forms sub-flow is a new sub-flow: the
Browser - Conditional OTPsub-flow. Since this sub-flow is conditional, whether it is executed depends on the result of the evaluation of theCondition - User Configuredexecution. If it is, the executions for this sub-flow are loaded and the same processing logic occurs -
The next execution is the
Condition - User Configured. This checks if the other executions in the flow are configured for the user. Meaning that theBrowser - Conditional OTPsub-flow will only be executed if the user has an OTP credential configured. -
The final execution is the
OTP Form. This is marked as required, but because of the setup in the conditional subflow, it will only be run if the user has an OTP credential set up. If he doesn’t, the user will not see an OTP form.
6.3.2. Creating flows
This section explains in greater depth how flows work, and how to create your own flows. Note that there are important functionality and security considerations when designing your own flow. A badly created flow could either let no one log in, let users in with less verification than you would like, or simply result in an error.
To create a flow, you can either:
-
Copy and then modify an existing flow. To do this select an existing flow (for example the
Browserflow), and press theCopybutton. This will then ask you to set a name for the new flow, before creating it. -
Create a new flow from scratch. To do this press the
Newbutton. Since this is the more general case, we will use this for our example.
When creating a new flow, you will have to create a top level flow
Create a top level flow

With the following options:
- Alias
- The name of the flow.
- Description
- The description you can set to the flow.
- Top Level Flow Type
-
The type of flow. the type
clientis used only for the authentication of clients (applications). For all other cases choosegeneric.
Once the flow is created, in addition to the New and Copy buttons, you now have, Delete, Add execution and Add flow.
An empty new flow

What a flow finally does is determined by the structure of the flow and sub-flows, the executions in those flows, and the requirements set on the sub-flows and the executions.
Executions can be added with the Add execution button. Executions can have a wide variety of actions, from sending a reset email to validating an OTP. If you hover over the tooltip (the tiny question mark) next to Provider, this will describe what the execution does.
Adding an authentication execution

These can be divided into automatic executions and interactive executions. Automatic executions are similar to the Cookie execution, and will automatically perform their action when they are encountered in the flow. Interactive executions will halt the flow, usually to get some user input. Executions that execute successfully will get the success status. This is important, because this is part of whether a flow is successful or not. For example, an empty Browser flow would not allow anyone to log in. For that it would need at least one execution that successfully evaluates, for example a Username Password Form that is corrected filled and submitted.
Sub-flows can be added in top level flow with the Add flow button, which opens a Create Execution Flow page that is very similar to the Create Top Level Form page. The only difference is that the Flow Type can be either generic (like before), or form. The form type is used to construct a sub-flow that generates a single form for the user, like what is done for the built-in Registration flow. Sub-flows are a special type of execution that evaluate as successful depending on how the executions they contain evaluate (and this includes the evaluation of their contained sub-flows). And the logic of this evaluation depends on the Requirement of each execution and sub-flow.
Fully understanding this requires a more complete explanation of how requirements work when evaluating a flow, and this also applies to sub-flows. Refer to the execution requirements section above for more details.
Note that after adding an execution, you should check that the Requirement is set to the correct value. Even if there is only a single possible Requirement, it can happen that it is not set.
When constructing a flow, all elements added to the flow will have an Actions menu on the right-hand side. All elements added to the flow have a Delete option in this menu to remove it from the flow. Executions can contain a Config menu option to configure the execution, as is the case for the Identity Provider Redirector. Sub-flows can also have executions and sub-flows added to them, with their Add execution and Add flow menu options.
Finally, since the order of execution is important, you can move executions and sub-flows up and down within their respective flows with the up and down buttons that are set to left of their name.
6.3.3. Creating a password-less browser login flow
To illustrate the creation of flows, this section describes the creation of a more advanced browser login flow. The purpose of this flow is to allow a user to choose between logging in in a password-less manner using WebAuthn, and a two-factor authentication with password and OTP. The flow to create is similar to the standard browser login, but diverges when reaching the username selection. Instead of copying the flow however, you’ll be creating the flow from the start:
- Select a realm, click on Authentication link
- Select "new", and give the new flow a distinctive Alias, i.e. "Browser Password-less"
- Select "Add execution", and using the drop-down select "Cookie". After pressing "Save", set its Requirement to Alternative.
- Select "Add execution", and using the drop-down select "Kerberos".
- Select "Add execution", and using the drop-down select "Identity Provider Redirector". After pressing "Save", set its Requirement to Alternative.
- Select "Add flow", and choose an representative Alias, e.g. "Forms". After pressing "Save", set its Requirement to Alternative.
The common part with the browser flow

-
Using the
Actionsmenu on the right-hand side of the "Forms" subflow, select "Add execution". Using the drop-down select "Username Form". After pressing "Save", set its Requirement to Required.
The Username form is similar to "Browser" flow’s Username Password Form, but only asks for a username, allowing a user to perform a password-less login. However, note that this inevitably allows a user enumeration attack on your Red Hat Single Sign-On server. This is an unavoidable security risk for the convenience, so the flow should make sure that an attacker cannot just have to guess a password to be able to enter.
-
Using the
Actionsmenu on the right-hand side of the "Forms" subflow, select "Add flow". Choose an representative Alias, e.g. "Authentication". After pressing "Save", set its Requirement to Required. -
Using the
Actionsmenu on the right-hand side of the "Authentication" subflow, select "Add execution". Using the drop-down select "Webauthn Passwordless Authenticator". After pressing "Save", set its Requirement to Alternative. -
Using the
Actionsmenu on the right-hand side of the "Authentication" subflow, select "Add flow". Choose an representative Alias, e.g. "Password with OTP". After pressing "Save", set its Requirement to Alternative. -
Using the
Actionsmenu on the right-hand side of the "Password with OTP" subflow, select "Add execution". Using the drop-down select "Password Form". After pressing "Save", set its Requirement to Required. -
Using the
Actionsmenu on the right-hand side of the "Password with OTP" subflow, select "Add execution". Using the drop-down select "OTP Form". After pressing "Save", set its Requirement to Required. - In the "Bindings" menu, change the browser flow from "Browser" to "Browser Password-less"
The final flow that is produced is the following:
A password-less browser login
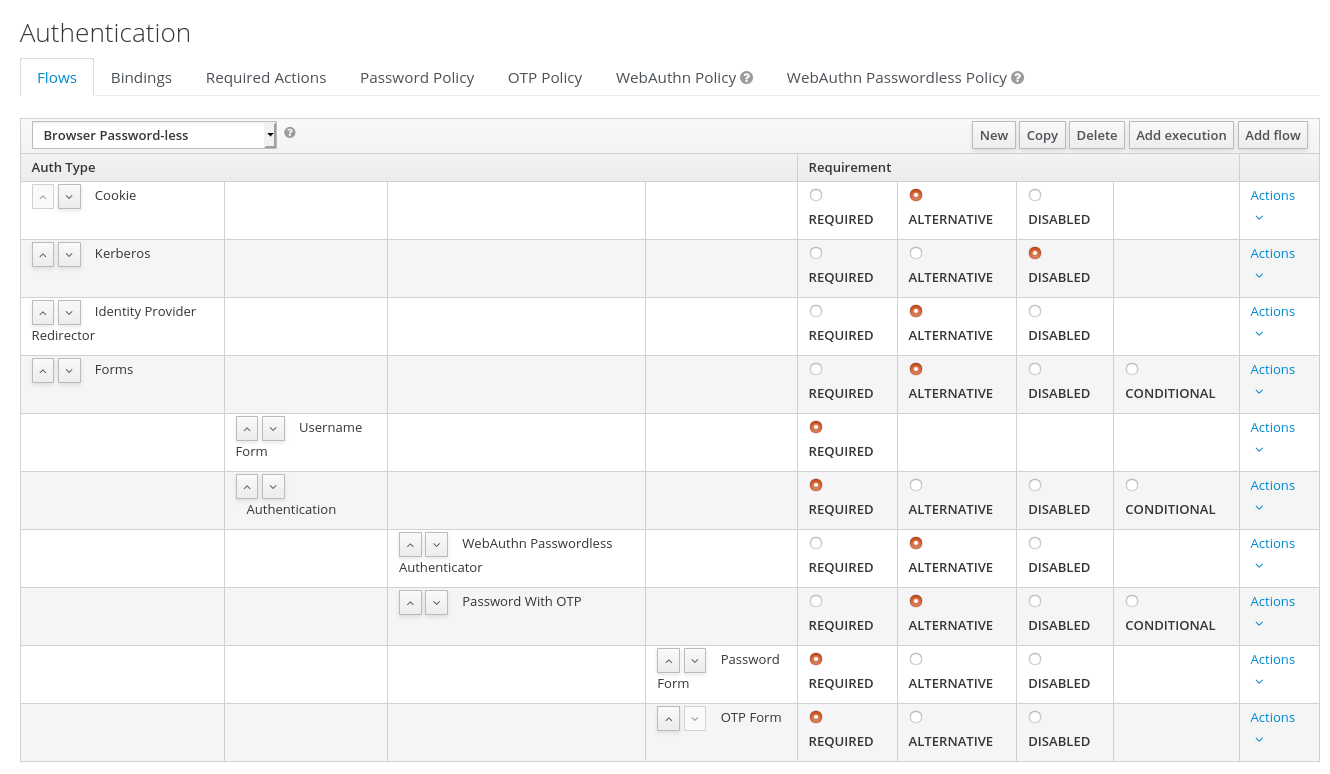
After entering the username, the way this flow works is the following:
- If the user has any WebAuthn passwordless credentials recorded, that user will be able to use any of them to log in directly. This is the password-less login. The user can instead select "Password with OTP". The user can do this because the "WebAuthn Passwordless" execution and the "Password with OTP" flow are set to Alternative. Were they set to Required the user would have to enter WebAuthn, password, and OTP.
-
If the user selects
Try another waylink on the screen with "WebAuthn passwordless" authentication, the user can choose between "Password" and "Security Key" (WebAuthn passwordless). When selecting the password, the user will need to continue and log in with the assigned OTP as well. If the user has no WebAuthn credentials, he will have to first enter his password, and then his OTP. If the user has no OTP credential, he will be asked to record one.
It is important to note that since the WebAuthn Passwordless execution is set to Alternative instead of Required, this flow will never ask the user to register a WebAuthn credential. For a user to have a Webauthn credential, that user must have a required action added by an administrator. This is done first by making sure that the Webauthn Register Passwordless required action is enabled in the realm (see the WebAuthn documentation), and then by setting the required action by using the Credential Reset part of a user’s Credentials management menu.
Creating a more advanced flow such as this one can have some subtle side effects. For example, if you were to enable the ability to reset the password for the user, then this would be accessible from the password form. In the default "Reset Credentials" flow, the user has to enter his username. Since he’s already entered his username earlier in the "Browser Password-less" flow, this would be unnecessary for Red Hat Single Sign-On, and a sub-optimal in terms of user experience. To correct this, you could:
- Copy the "Reset Credentials" flow, setting its name to, for example "Reset Credentials for password-less"
-
Use the
Actionsmenu on the right-hand side of the "Choose user" execution, select "Delete" - In the "Bindings" menu, change the reset credential flow from "Reset Credentials" to "Reset Credentials for password-less"
6.4. Kerberos
Red Hat Single Sign-On supports login with a Kerberos ticket through the SPNEGO protocol. SPNEGO (Simple and Protected GSSAPI Negotiation Mechanism) is used to authenticate transparently through the web browser after the user has been authenticated when logging-in his session. For non-web cases or when ticket is not available during login, Red Hat Single Sign-On also supports login with Kerberos username/password.
A typical use case for web authentication is the following:
- User logs into his desktop (Such as a Windows machine in Active Directory domain or Linux machine with Kerberos integration enabled).
- User then uses his browser (IE/Firefox/Chrome) to access a web application secured by Red Hat Single Sign-On.
- Application redirects to Red Hat Single Sign-On login.
-
Red Hat Single Sign-On renders HTML login screen together with status 401 and HTTP header
WWW-Authenticate: Negotiate -
In case that the browser has Kerberos ticket from desktop login, it transfers the desktop sign on information to the Red Hat Single Sign-On in header
Authorization: Negotiate 'spnego-token'. Otherwise it just displays the login screen. - Red Hat Single Sign-On validates token from the browser and authenticates the user. It provisions user data from LDAP (in case of LDAPFederationProvider with Kerberos authentication support) or let user to update his profile and prefill data (in case of KerberosFederationProvider).
- Red Hat Single Sign-On returns back to the application. Communication between Red Hat Single Sign-On and application happens through OpenID Connect or SAML messages. The fact that Red Hat Single Sign-On was authenticated through Kerberos is hidden from the application. So Red Hat Single Sign-On acts as broker to Kerberos/SPNEGO login.
For setup there are 3 main parts:
- Setup and configuration of Kerberos server (KDC)
- Setup and configuration of Red Hat Single Sign-On server
- Setup and configuration of client machines
6.4.1. Setup of Kerberos server
This is platform dependent. Exact steps depend on your OS and the Kerberos vendor you’re going to use. Consult Windows Active Directory, MIT Kerberos and your OS documentation for how exactly to setup and configure Kerberos server.
At least you will need to:
- Add some user principals to your Kerberos database. You can also integrate your Kerberos with LDAP, which means that user accounts will be provisioned from LDAP server.
Add service principal for "HTTP" service. For example if your Red Hat Single Sign-On server will be running on
www.mydomain.orgyou may need to add principalHTTP/www.mydomain.org@MYDOMAIN.ORGassuming that MYDOMAIN.ORG will be your Kerberos realm.For example on MIT Kerberos you can run a "kadmin" session. If you are on the same machine where is MIT Kerberos, you can simply use the command:
sudo kadmin.local
Then add HTTP principal and export his key to a keytab file with the commands like:
addprinc -randkey HTTP/www.mydomain.org@MYDOMAIN.ORG
ktadd -k /tmp/http.keytab HTTP/www.mydomain.org@MYDOMAIN.ORG
The Keytab file /tmp/http.keytab will need to be accessible on the host where Red Hat Single Sign-On server will be running.
6.4.2. Setup and configuration of Red Hat Single Sign-On server
You need to install a kerberos client on your machine. This is also platform dependent. If you are on Fedora, Ubuntu or RHEL, you can install the package freeipa-client, which contains a Kerberos client and several other utilities. Configure the kerberos client (on Linux it’s in file /etc/krb5.conf ). You need to put your Kerberos realm and at least configure the HTTP domains your server will be running on. For the example realm MYDOMAIN.ORG you may configure the domain_realm section like this:
[domain_realm]
  .mydomain.org = MYDOMAIN.ORG
  mydomain.org = MYDOMAIN.ORG
Next you need to export the keytab file with the HTTP principal and make sure the file is accessible to the process under which Red Hat Single Sign-On server is running. For production, it’s ideal if it’s readable just by this process and not by someone else. For the MIT Kerberos example above, we already exported keytab to /tmp/http.keytab . If your KDC and Red Hat Single Sign-On are running on same host, you have that file already available.
6.4.2.1. Enable SPNEGO Processing
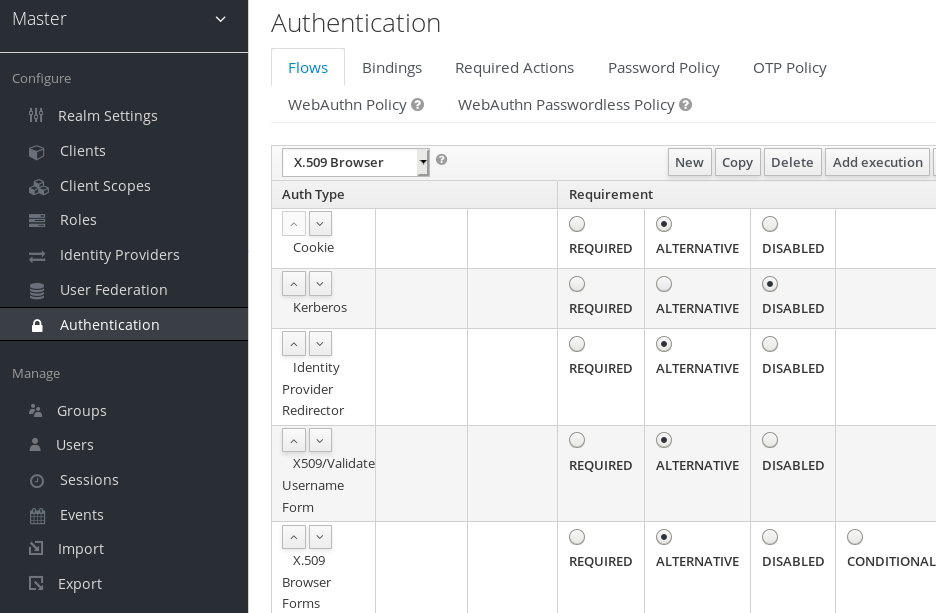
Red Hat Single Sign-On does not have the SPNEGO protocol support turned on by default. So, you have to go to the browser flow and enable Kerberos.
Browser Flow
Switch the Kerberos requirement from disabled to either alternative or required. Alternative basically means that Kerberos is optional. If the user’s browser hasn’t been configured to work with SPNEGO/Kerberos, then Red Hat Single Sign-On will fall back to the regular login screens. If you set the requirement to required then all users must have Kerberos enabled for their browser.
6.4.2.2. Configure Kerberos User Storage Federation Provider
Now that the SPNEGO protocol is turned on at the authentication server, you’ll need to configure how Red Hat Single Sign-On interprets the Kerberos ticket. This is done through User Storage Federation. We have 2 different federation providers with Kerberos authentication support.
If you want to authenticate with Kerberos backed by an LDAP server, you have to first configure the LDAP Federation Provider. If you look at the configuration page for your LDAP provider you’ll see a Kerberos Integration section.
LDAP Kerberos Integration
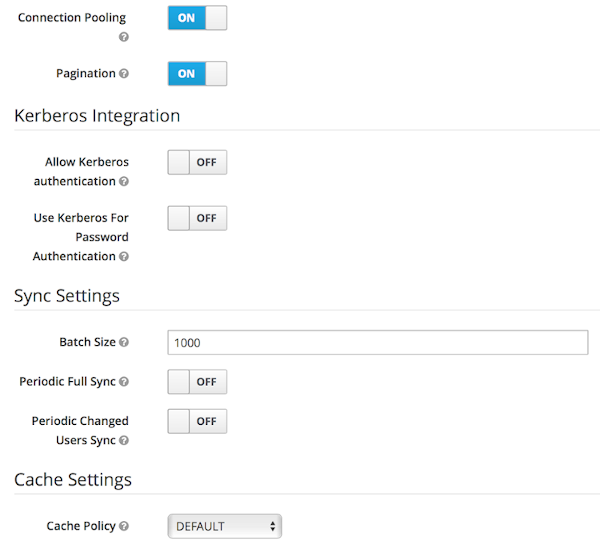
Turning on the switch Allow Kerberos authentication will make Red Hat Single Sign-On use the Kerberos principal to lookup information about the user so that it can be imported into the Red Hat Single Sign-On environment.
If your Kerberos solution is not backed by an LDAP server, you have to use the Kerberos User Storage Federation Provider. Go to the User Federation left menu item and select Kerberos from the Add provider select box.
Kerberos User Storage Provider
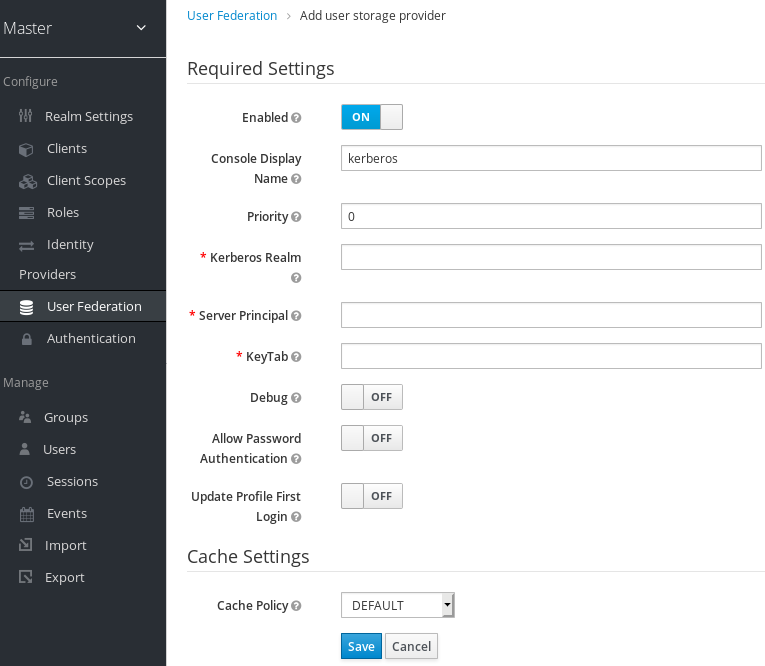
This provider parses the Kerberos ticket for simple principal information and does a small import into the local Red Hat Single Sign-On database. User profile information like first name, last name, and email are not provisioned.
6.4.3. Setup and configuration of client machines
Clients need to install kerberos client and setup krb5.conf as described above. Additionally they need to enable SPNEGO login support in their browser. See configuring Firefox for Kerberos if you are using that browser. URI .mydomain.org must be allowed in the network.negotiate-auth.trusted-uris config option.
In a Windows domain, clients usually don’t need to configure anything special as IE is already able to participate in SPNEGO authentication for the Windows domain.
6.4.4. Credential Delegation
Kerberos 5 supports the concept of credential delegation. In this scenario, your applications may want access to the Kerberos ticket so that they can re-use it to interact with other services secured by Kerberos. Since the SPNEGO protocol is processed in the Red Hat Single Sign-On server, you have to propagate the GSS credential to your application within the OpenID Connect token claim or a SAML assertion attribute that is transmitted to your application from the Red Hat Single Sign-On server. To have this claim inserted into the token or assertion, each application will need to enable the built-in protocol mapper called gss delegation credential. This is enabled in the Mappers tab of the application’s client page. See Protocol Mappers chapter for more details.
Applications will need to deserialize the claim it receives from Red Hat Single Sign-On before it can use it to make GSS calls against other services. Once you deserialize the credential from the access token to the GSSCredential object, the GSSContext will need to be created with this credential passed to the method GSSManager.createContext for example like this:
// Obtain accessToken in your application.
KeycloakPrincipal keycloakPrincipal = (KeycloakPrincipal) servletReq.getUserPrincipal();
AccessToken accessToken = keycloakPrincipal.getKeycloakSecurityContext().getToken();

// Retrieve kerberos credential from accessToken and deserialize it
String serializedGssCredential = (String) accessToken.getOtherClaims().
    get(org.keycloak.common.constants.KerberosConstants.GSS_DELEGATION_CREDENTIAL);

GSSCredential deserializedGssCredential = org.keycloak.common.util.KerberosSerializationUtils.
    deserializeCredential(serializedGssCredential);

// Create GSSContext to call other kerberos-secured services
GSSContext context = gssManager.createContext(serviceName, krb5Oid,
    deserializedGssCredential, GSSContext.DEFAULT_LIFETIME);
Note that you also need to configure forwardable kerberos tickets in krb5.conf file and add support for delegated credentials to your browser.
Credential delegation has some security implications so only use it if you really need it. It’s highly recommended to use it together with HTTPS. See for example this article for more details.
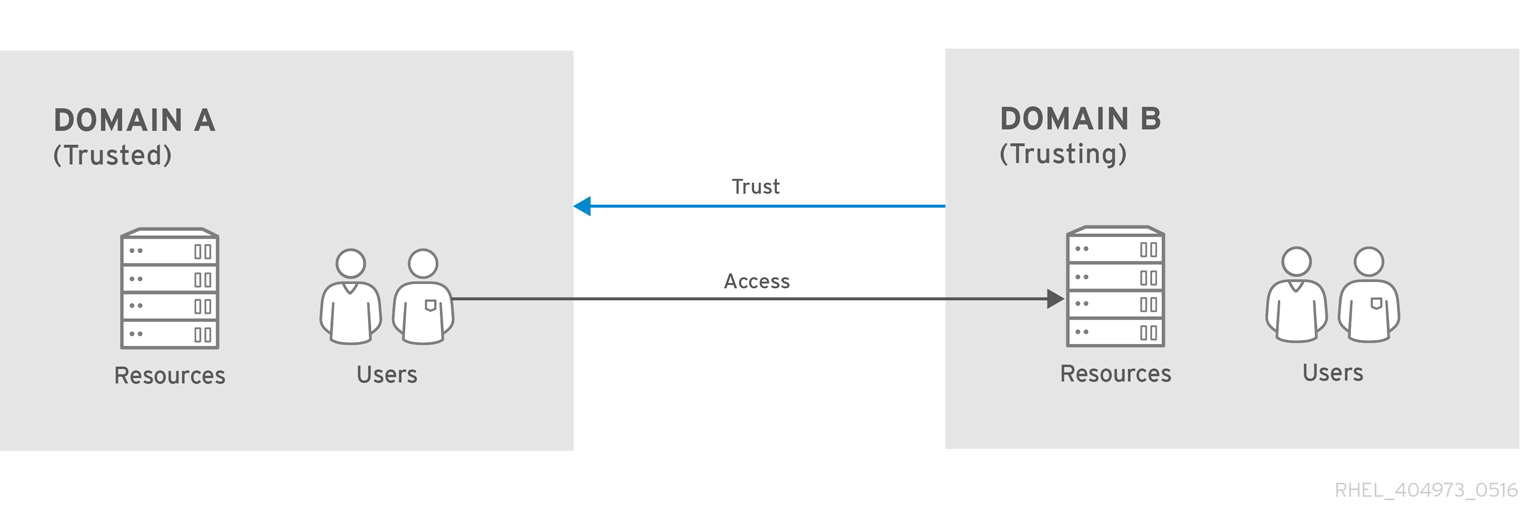
6.4.5. Cross-realm trust
In the Kerberos V5 protocol, the realm is a set of Kerberos principals defined in the Kerberos database (typically LDAP server). The Kerberos protocol has a concept of cross-realm trust. For example, if there are 2 kerberos realms A and B, the cross-realm trust will allow the users from realm A to access resources (services) of realm B. This means that realm B trusts the realm A.
Kerberos cross-realm trust
The Red Hat Single Sign-On server has support for cross-realm trust. There are few things which need to be done to achieve this:
-
Configure the Kerberos servers for the cross-realm trust. This step is dependent on the concrete Kerberos server implementations used. In general, it is needed to add the Kerberos principal
krbtgt/B@Ato both Kerberos databases of realm A and B. It is needed that this principal has same keys on both Kerberos realms. This is usually achieved when the principals have same password, key version number and there are same ciphers used in both realms. It is recommended to consult the Kerberos server documentation for more details.
The cross-realm trust is unidirectional by default. If you want bidirectional trust to have realm A also trust realm B, you must also add the principal krbtgt/A@B to both Kerberos databases. However, trust is transitive by default. If realm B trusts realm A and realm C trusts realm B, then realm C automatically trusts realm A without a need to have principal krbtgt/C@A available. Some additional configuration (for example capaths) may be needed to configure on Kerberos client side, so that the clients are able to find the trust path. Consult the Kerberos documentation for more details.
Configure Red Hat Single Sign-On server
-
If you use an LDAP storage provider with Kerberos support, you need to configure the server principal for realm B as in this example:
HTTP/mydomain.com@B. The LDAP server must be able to find the users from realm A if you want users from realm A to successfully authenticate to Red Hat Single Sign-On, as Red Hat Single Sign-On server must be able to do SPNEGO flow and then find the users. For example, kerberos principal userjohn@Amust be available as a user in the LDAP under an LDAP DN such asuid=john,ou=People,dc=example,dc=com. If you want both users from realm A and B to authenticate, you need to ensure that LDAP is able to find users from both realms A and B. We want to improve this limitation in future versions, so you can potentially create more separate LDAP providers for separate realms and ensure that SPNEGO works for both of them. -
If you use a Kerberos user storage provider (typically the Kerberos without LDAP integration), you need to configure the server principal as
HTTP/mydomain.com@Band users from both Kerberos realms A and B should be able to authenticate.
-
If you use an LDAP storage provider with Kerberos support, you need to configure the server principal for realm B as in this example:
For the Kerberos user storage provider, it is recommended that there are no conflicting users among kerberos realms. If conflicting users exist, they will be mapped to the same Red Hat Single Sign-On user. This is also something, which we want to improve in future versions and provide some more flexible mappings from Kerberos principals to Red Hat Single Sign-On usernames.
6.4.6. Troubleshooting
If you have issues, we recommend that you enable additional logging to debug the problem:
-
Enable
Debugflag in admin console for Kerberos or LDAP federation providers -
Enable TRACE logging for category
org.keycloakin logging section ofstandalone/configuration/standalone.xmlto receive more infostandalone/log/server.log -
Add system properties
-Dsun.security.krb5.debug=trueand-Dsun.security.spnego.debug=true
6.5. X.509 Client Certificate User Authentication
Red Hat Single Sign-On supports login with a X.509 client certificate if the server is configured for mutual SSL authentication.
A typical workflow is as follows:
- A client sends an authentication request over SSL/TLS channel
- During SSL/TLS handshake, the server and the client exchange their x.509/v3 certificates
- The container (JBoss EAP) validates the certificate PKIX path and the certificate expiration
The x.509 client certificate authenticator validates the client certificate as follows:
- Optionally checks the certificate revocation status using CRL and/or CRL Distribution Points
- Optionally checks the Certificate revocation status using OCSP (Online Certificate Status Protocol)
- Optionally validates whether the key usage in the certificate matches the expected key usage
- Optionally validates whether the extended key usage in the certificate matches the expected extended key usage
- If any of the above checks fails, the x.509 authentication fails
- Otherwise, the authenticator extracts the certificate identity and maps it to an existing user
Once the certificate is mapped to an existing user, the behavior diverges depending on the authentication flow:
- In the Browser Flow, the server prompts the user to confirm identity or to ignore it and instead sign in with username/password
- In the case of the Direct Grant Flow, the server signs in the user
6.5.1. Features
- Supported Certificate Identity Sources
- Match SubjectDN using regular expression
- X500 Subject’s e-mail attribute
- X500 Subject’s e-mail from Subject Alternative Name Extension (RFC822Name General Name)
- X500 Subject’s other name from Subject Alternative Name Extension. This is typically UPN (User Principal Name)
- X500 Subject’s Common Name attribute
- Match IssuerDN using regular expression
- Certificate Serial Number
- Certificate Serial Number and IssuerDN
- SHA-256 Certificate thumbprint
- Full certificate in PEM format
- Regular Expressions
- The certificate identity can be extracted from either Subject DN or Issuer DN using a regular expression as a filter. For example, the regular expression below will match the e-mail attribute:
emailAddress=(.*?)(?:,|$)
The regular expression filtering is applicable only if the Identity Source is set to either Match SubjectDN using regular expression or Match IssuerDN using regular expression.
- Mapping certificate identity to an existing user
-
The certificate identity mapping can be configured to map the extracted user identity to an existing user’s username or e-mail or to a custom attribute which value matches the certificate identity. For example, setting the
Identity sourceto Subject’s e-mail andUser mapping methodto Username or email will have the X.509 client certificate authenticator use the e-mail attribute in the certificate’s Subject DN as a search criteria to look up an existing user by username or by e-mail.
Please notice that if we disable Login with email at realm settings, the same rules will be applied to certificate authentication. In other words, users won’t be able to log in using e-mail attribute.
Usage of Certificate Serial Number and IssuerDN as an identity source requires two custom attributes - one for serial number and the other for IssuerDN.
SHA-256 Certificate thumbprint is lowercase hexadecimal representation of SHA-256 certificate thumbprint.
Usage of Full certificate in PEM format as an identity source is limited to custom attributes mapped to external federation sources like LDAP. You must enable Always Read Value From LDAP in this case, because certificates cannot be stored in Keycloak database due to a length limitation.
- Other Features: Extended Certificate Validation
- Revocation status checking using CRL
- Revocation status checking using CRL/Distribution Point
- Revocation status checking using OCSP/Responder URI
- Certificate KeyUsage validation
- Certificate ExtendedKeyUsage validation
6.5.2. Enable X.509 Client Certificate User Authentication
The following sections describe how to configure JBoss EAP/Undertow and the Red Hat Single Sign-On Server to enable X.509 client certificate authentication.
- Enable mutual SSL in JBoss EAP
See Enable SSL for the instructions how to enable SSL in JBoss EAP.
- Open RHSSO_HOME/standalone/configuration/standalone.xml and add a new realm:
<security-realms>
    <security-realm name="ssl-realm">
        <server-identities>
            <ssl>
                <keystore path="servercert.jks"
                          relative-to="jboss.server.config.dir"
                          keystore-password="servercert password"/>
            </ssl>
        </server-identities>
        <authentication>
            <truststore path="truststore.jks"
                        relative-to="jboss.server.config.dir"
                        keystore-password="truststore password"/>
        </authentication>
    </security-realm>
</security-realms>ssl/keystore-
The
sslelement contains thekeystoreelement that defines how to load the server public key pair from a JKS keystore ssl/keystore/path- A path to a JKS keystore
ssl/keystore/relative-to- Defines a path the keystore path is relative to
ssl/keystore/keystore-password- The password to open the keystore
ssl/keystore/alias(optional)- The alias of the entry in the keystore. Set it if the keystore contains multiple entries
ssl/keystore/key-password(optional)- The private key password, if different from the keystore password.
authentication/truststore- Defines how to load a trust store to verify the certificate presented by the remote side of the inbound/outgoing connection. Typically, the truststore contains a collection of trusted CA certificates.
authentication/truststore/path- A path to a JKS keystore that contains the certificates of the trusted CAs (certificate authorities)
authentication/truststore/relative-to- Defines a path the truststore path is relative to
authentication/truststore/keystore-password- The password to open the truststore
- Enable https listener
See HTTPS Listener for the instructions how to enable HTTPS in WildFly.
- Add the <https-listener> element as shown below:
<subsystem xmlns="urn:jboss:domain:undertow:10.0">
	....
    <server name="default-server">
	    <https-listener name="default"
                        socket-binding="https"
                        security-realm="ssl-realm"
                        verify-client="REQUESTED"/>
    </server>
</subsystem>https-listener/security-realm- The value must match the name of the realm from the previous section
https-listener/verify-client-
If set to
REQUESTED, the server will optionally ask for a client certificate. Setting the attribute toREQUIREDwill have the server to refuse inbound connections if no client certificate has been provided.
6.5.3. Adding X.509 Client Certificate Authentication to a Browser Flow
- Select a realm, click on Authentication link, select the "Browser" flow
- Make a copy of the built-in "Browser" flow. You may want to give the new flow a distinctive name, i.e. "X.509 Browser"
- Using the drop down, select the copied flow, and click on "Add execution"
- Select "X509/Validate Username Form" using the drop down and click on "Save"

- Using the up/down arrows, change the order of the "X509/Validate Username Form" by moving it above the "Browser Forms" execution, and set the requirement to "ALTERNATIVE"
- Select the "Bindings" tab, find the drop down for "Browser Flow". Select the newly created X509 browser flow from the drop down and click on "Save".
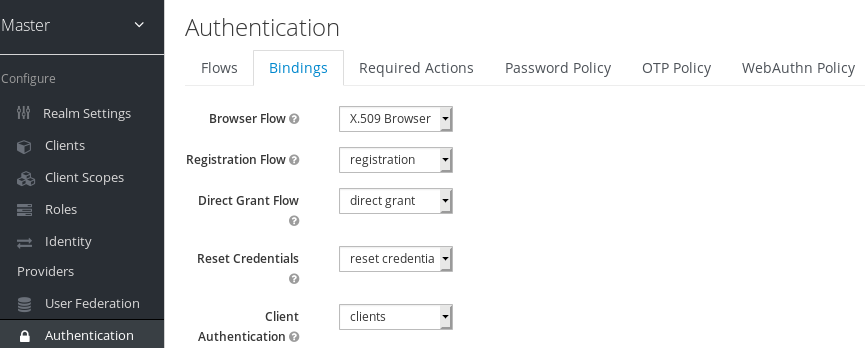
- Configuring X.509 Client Certificate Authentication
-
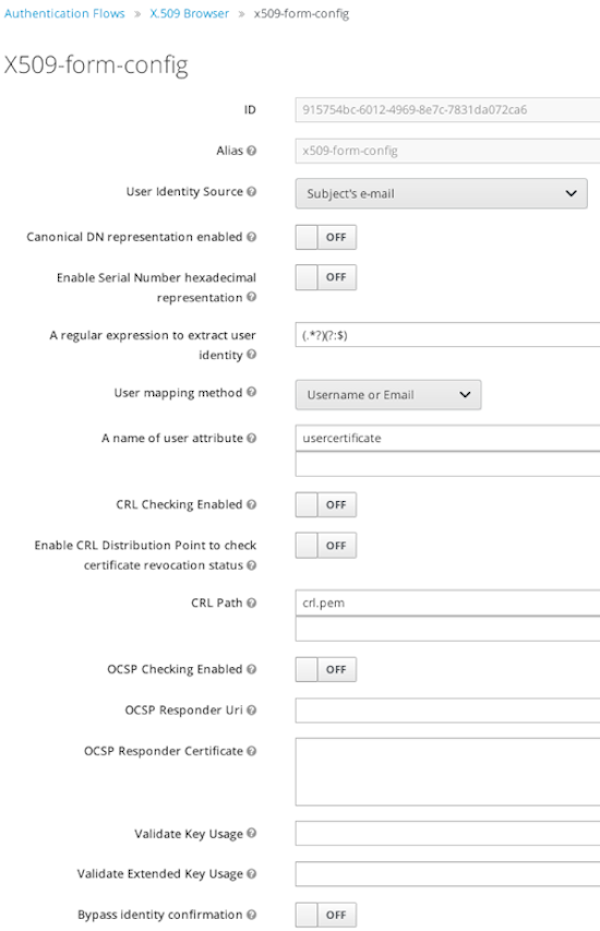
User Identity Source- Defines how to extract the user identity from a client certificate.
Canonical DN representation enabled(optional)- Defines whether to use the canonical format to determine a distinguished name. The format is described in detail in the official Java API documentation . This option only affects the two User Identity Sources Match SubjectDN using regular expression and Match IssuerDN using regular expression. If you setup a new Red Hat Single Sign-On instance it is recommended to enable this option. Leave this option disabled to remain beckward compatible with existing Red Hat Single Sign-On instances.
Enable Serial Number hexadecimal representation(optional)- An option to use hexadecimal representation of the Serial Number. See RFC5280, Section-4.1.2.2. Serial Number with sign bit set to 1 should be left padded with 00 octet. E.g. Serial number with decimal value 161, or a1 in hexadecimal representation according to RFC5280 must be encoded as 00a1. More details can be found: RFC5280, appendix-B.
A regular expression(optional)- Defines a regular expression to use as a filter to extract the certificate identity. The regular expression must contain a single group.
User Mapping Method- Defines how to match the certificate identity to an existing user. Username or e-mail will search for an existing user by username or e-mail. Custom Attribute Mapper will search for an existing user with a custom attribute which value matches the certificate identity. The name of the custom attribute is configurable.
A name of user attribute(optional)- A custom attribute which value will be matched against the certificate identity. Multiple custom attributes are relevant when attribute mapping is related to multiple values, e.g. 'Certificate Serial Number and IssuerDN'.
CRL Checking Enabled(optional)- Defines whether to check the revocation status of the certificate using Certificate Revocation List.
Enable CRL Distribution Point to check certificate revocation status(optional)- Defines whether to use CDP to check the certificate revocation status. Most PKI authorities include CDP in their certificates.
CRL file path(optional)-
Defines a path to a file that contains a CRL list. The value must be a path to a valid file if
CRL Checking Enabledoption is turned on. OCSP Checking Enabled(optional)- Defines whether to check the certificate revocation status using Online Certificate Status Protocol.
OCSP Responder URI(optional)- Allows to override a value of the OCSP responder URI in the certificate.
Validate Key Usage(optional)- Verifies whether the certificate’s KeyUsage extension bits are set. For example, "digitalSignature,KeyEncipherment" will verify if bits 0 and 2 in the KeyUsage extension are asserted. Leave the parameter empty to disable the Key Usage validation. See RFC5280, Section-4.2.1.3. The server will raise an error only when flagged as critical by the issuing CA and there is a key usage extension mismatch.
Validate Extended Key Usage(optional)- Verifies one or more purposes as defined in the Extended Key Usage extension. See RFC5280, Section-4.2.1.12. Leave the parameter empty to disable the Extended Key Usage validation. The server will raise an error only when flagged as critical by the issuing CA and there is a key usage extension mismatch.
Bypass identity confirmation- If set, X.509 client certificate authentication will not prompt the user to confirm the certificate identity and will automatically sign in the user upon successful authentication.
6.5.4. Adding X.509 Client Certificate Authentication to a Direct Grant Flow
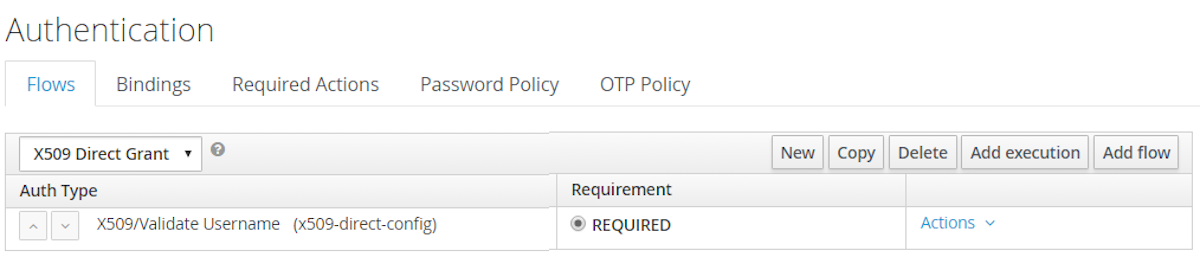
- Using Red Hat Single Sign-On admin console, click on "Authentication" and select the "Direct Grant" flow,
- Make a copy of the build-in "Direct Grant" flow. You may want to give the new flow a distinctive name, i.e. "X509 Direct Grant",
- Delete "Username Validation" and "Password" authenticators,
- Click on "Add execution" and add "X509/Validate Username" and click on "Save" to add the execution step to the parent flow.

-
Change the
Requirementto REQUIRED.
- Set up the x509 authentication configuration by following the steps described earlier in the x.509 Browser Flow section.
- Select the "Bindings" tab, find the drop down for "Direct Grant Flow". Select the newly created X509 direct grant flow from the drop down and click on "Save".

6.5.5. Client certificate lookup
When an HTTP request is sent directly to Red Hat Single Sign-On server, the JBoss EAP undertow subsystem will establish an SSL handshake and extract the client certificate. The client certificate will be then saved to the attribute javax.servlet.request.X509Certificate of the HTTP request, as specified in the servlet specification. The Red Hat Single Sign-On X509 authenticator will be then able to lookup the certificate from this attribute.
However, when the Red Hat Single Sign-On server listens to HTTP requests behind a load balancer or reverse proxy, it may be the proxy server which extracts the client certificate and establishes the mutual SSL connection. A reverse proxy usually puts the authenticated client certificate in the HTTP header of the underlying request and forwards it to the back end Red Hat Single Sign-On server. In this case, Red Hat Single Sign-On must be able to look up the X.509 certificate chain from the HTTP headers instead of from the attribute of HTTP request, as is done for Undertow.
If Red Hat Single Sign-On is behind a reverse proxy, you usually need to configure alternative provider of the x509cert-lookup SPI in RHSSO_HOME/standalone/configuration/standalone.xml. Along with the default provider, which looks up the certificate from the HTTP header, we also have two additional built-in providers: haproxy and apache, which are described next.
6.5.5.1. HAProxy certificate lookup provider
You can use this provider when your Red Hat Single Sign-On server is behind an HAProxy reverse proxy. Configure the server like this:
<spi name="x509cert-lookup">
    <default-provider>haproxy</default-provider>
    <provider name="haproxy" enabled="true">
        <properties>
            <property name="sslClientCert" value="SSL_CLIENT_CERT"/>
            <property name="sslCertChainPrefix" value="CERT_CHAIN"/>
            <property name="certificateChainLength" value="10"/>
        </properties>
    </provider>
</spi>
In this example configuration, the client certificate will be looked up from the HTTP header, SSL_CLIENT_CERT, and the other certificates from its chain will be looked up from HTTP headers like CERT_CHAIN_0 , CERT_CHAIN_1, …, CERT_CHAIN_9 . The attribute certificateChainLength is the maximum length of the chain, so the last one tried attribute would be CERT_CHAIN_9 .
Consult the HAProxy documentation for the details of how the HTTP Headers for the client certificate and client certificate chain can be configured and their proper names.
6.5.5.2. Apache certificate lookup provider
You can use this provider when your Red Hat Single Sign-On server is behind an Apache reverse proxy. Configure the server like this:
<spi name="x509cert-lookup">
    <default-provider>apache</default-provider>
    <provider name="apache" enabled="true">
        <properties>
            <property name="sslClientCert" value="SSL_CLIENT_CERT"/>
            <property name="sslCertChainPrefix" value="CERT_CHAIN"/>
            <property name="certificateChainLength" value="10"/>
        </properties>
    </provider>
</spi>
The configuration is same as for the haproxy provider. Consult the Apache documentation on mod_ssl and mod_headers for the details of how the HTTP Headers for the client certificate and client certificate chain can be configured and their proper names.
6.5.5.3. Nginx certificate lookup provider
You can use this provider when your Red Hat Single Sign-On server is behind an Nginx reverse proxy. Configure the server like this:
<spi name="x509cert-lookup">
    <default-provider>nginx</default-provider>
    <provider name="nginx" enabled="true">
        <properties>
            <property name="sslClientCert" value="ssl-client-cert"/>
            <property name="sslCertChainPrefix" value="USELESS"/>
            <property name="certificateChainLength" value="2"/>
        </properties>
    </provider>
</spi>NGINX SSL/TLS module does not expose the client certificate chain, so Keycloak NGINX certificate lookup provider is rebuilding it using the Keycloak truststore. Please populate Keycloak truststore using keytool CLI with all root and intermediate CA’s needed for rebuilding client certificate chain.
Consult the NGINX documentation for the details of how the HTTP Headers for the client certificate can be configured. Example of NGINX configuration file :
 ...
 server {
    ...
    ssl_client_certificate                  trusted-ca-list-for-client-auth.pem;
    ssl_verify_client                       optional_no_ca;
    ssl_verify_depth                        2;
    ...
    location / {
      ...
      proxy_set_header ssl-client-cert        $ssl_client_escaped_cert;
      ...
    }
    ...
}all certificates in trusted-ca-list-for-client-auth.pem must be added to Keycloak truststore.
6.5.5.4. Other reverse proxy implementations
We do not have built-in support for other reverse proxy implementations. However, it is possible that other reverse proxies can be made to behave in a similar way to apache or haproxy and that some of those providers can be used. If none of those works, you may need to create your own implementation of the org.keycloak.services.x509.X509ClientCertificateLookupFactory and org.keycloak.services.x509.X509ClientCertificateLookup provider. See the Server Developer Guide for the details on how to add your own provider.
6.5.6. Troubleshooting
- Dumping HTTP headers
-
If you want to view what the reverse proxy is sending to Keycloak, enable the
RequestDumpingHandlerUndertow filter and consultserver.logfile. - Enable TRACE logging under the logging subsystem
...
    <profile>
        <subsystem xmlns="urn:jboss:domain:logging:3.0">
...
            <logger category="org.keycloak.authentication.authenticators.x509">
                <level name="TRACE"/>
            </logger>
            <logger category="org.keycloak.services.x509">
                <level name="TRACE"/>
            </logger>
WARNING: Don't use RequestDumpingHandler or TRACE logging in production.
- Direct Grant authentication with X.509
- The following template can be used to request a token using the Resource Owner Password Credentials Grant:
$ curl https://[host][:port]/auth/realms/master/protocol/openid-connect/token \
       --insecure \
       --data "grant_type=password&scope=openid profile&username=&password=&client_id=CLIENT_ID&client_secret=CLIENT_SECRET" \
       -E /path/to/client_cert.crt \
--key /path/to/client_cert.key[host][:port]- The host and the port number of a remote Red Hat Single Sign-On server that has been configured to allow users authenticate with x.509 client certificates using the Direct Grant Flow.
CLIENT_ID- A client id.
CLIENT_SECRET- For confidential clients, a client secret; otherwise, leave it empty.
client_cert.crt- A public key certificate that will be used to verify the identity of the client in mutual SSL authentication. The certificate should be in PEM format.
client_cert.key- A private key in the public key pair. Also expected in PEM format.
6.6. W3C Web Authentication (WebAuthn)
Red Hat Single Sign-On provides the limited support for W3C Web Authentication (WebAuthn). Red Hat Single Sign-On works as a WebAuthn’s Relying Party (RP).
WebAuthn is Technology Preview and is not fully supported. This feature is disabled by default.
To enable start the server with -Dkeycloak.profile=preview or -Dkeycloak.profile.feature.web_authn=enabled . For more details see Profiles.
Whether WebAuthn’s operations succeed depends on a user’s WebAuthn supporting authenticator, browser and platform. If you use this WebAuthn support, please clarify to what extent those entities support the WebAuthn specification.
6.6.1. Setup
The setup procedure of WebAuthn support for 2FA is the following :
6.6.1.1. Enable Webauthn Authenticator Registration
An administrator carries out the following operations on the Admin Console :
-
Open the
Authentication → Required Actionstab. -
Click
Register. -
Select
Webauthn RegisterasRequired Action. -
Mark
Enabledcheckbox. Optionally markDefault Actioncheckbox if you want all new created users to be required to register WebAuthn credential.
6.6.1.2. Adding WebAuthn Authentication to a Browser Flow
-
Select a realm, click on
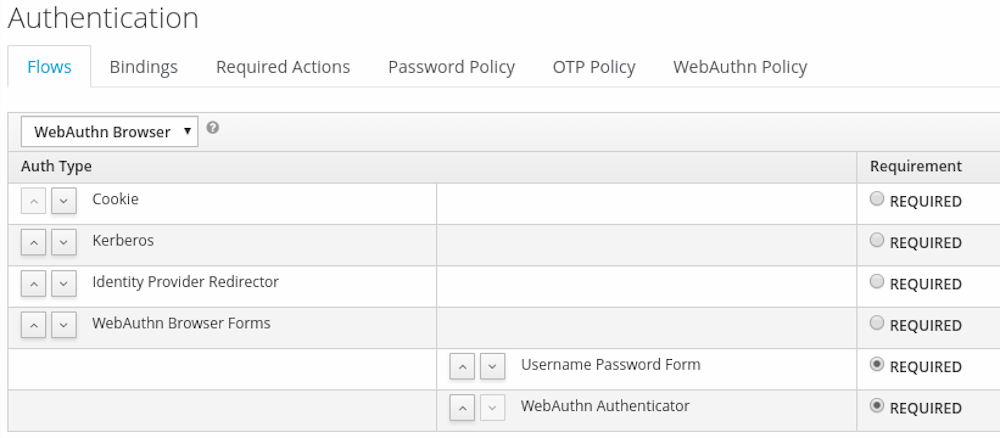
Authenticationlink, select theBrowserflow - Make a copy of the built-in "Browser" flow. You may want to give the new flow a distinctive name, for example "WebAuthn Browser"
- Using the drop down, select the copied flow
-
Delete the
WebAuthn Browser Browser - Conditional OTPsub-flow using itsActionsmenu
If you want to have WebAuthn required for all users:
-
Using the
Actionsmenu of theWebAuthn Browser Forms, click onAdd execution -
Select
WebAuthn Authenticatorusing the drop down and click onSave - Set its Requirement to Required.
-
In the
Bindingsmenu, change the browser flow toWebAuthn Browser
Note that in this scenario, if a user doesn’t have a WebAuthn credential, a required action will be set that forces that user to register one.
Alternatively, you can have users log in with WebAuthn only if they have a WebAuthn credential registered, so instead of adding the WebAuthn Authenticator execution:
-
Using the
Actionsmenu of theWebAuthn Browser Forms, click onAdd flow -
Set the alias to "Conditional 2FA" and click on
Save -
Set the Requirement of
Conditional 2FAto Conditional -
Using the
Actionsmenu of theConditional 2FA, click onAdd execution -
Select
Condition - User Configuredusing the drop down and click onSave -
Set the Requirement of
Condition - User Configuredexecution to Required -
Using the
Actionsmenu of theConditional 2FA, click onAdd execution -
Select
WebAuthn Authenticatorusing the drop down and click onSave - Set its Requirement to Alternative.

You can also allow the user to choose between using WebAuthn and OTP for his second factor:
-
Using the
Actionsmenu of theConditional 2FA, click onAdd execution -
Select
OTP Formusing the drop down and click onSave - Set its Requirement to Alternative.

6.6.2. Authenticate with WebAuthn Authenticator
After registering a WebAuthn authenticator, the user carries out the following operations assuming that authentication flow configuration above with the conditional subflow using WebAuthn Authenticator was used:
- Open the login form. The user must authenticate with a username and password.
- The user’s browser asks the user to authenticate by their WebAuthn authenticator.
6.6.3. Managing WebAuthn as an administrator
6.6.3.1. Managing Credentials
WebAuthn credentials are managed in a similar manner as other credentials, such as OTP, from the User credential management:
-
Users can be assigned a required action to create a WebAuthn credential from the
Reset Actionslist, and selectingWebauthn Register -
The administrator can delete a WebAuthn credential by pressing
Delete. -
The administrator can view the credential’s data such as the AAGUID by selecting
Show data…. -
The administrator can set a label for the credential by setting a value in the
User Labelfield and saving the data.
6.6.3.2. Managing Policy
An administrator can configure WebAuthn related operations as WebAuthn Policy per realm.
An administrator carries out the following operations on the Admin Console :
-
Open the
Authentication → WebAuthn Policytab. -
Configure items and click
Save.
The configurable items and their description follow.
| Configuration | Description |
|---|---|
| Relying Party Entity Name | Human-readable server name as a WebAuthn Relying Party. This is a mandatory configuration, which is applied to the operation of registering the WebAuthn authenticator. The default setting is "keycloak". For more details, see WebAuthn Specification. |
| Signature Algorithms | It tells the WebAuthn authenticator which signature algorithms to use for the Public Key Credential that can be used for signing and verifying the Authentication Assertion. Multiple algorithms can be specified. If no algorithm is specified, ES256 is adapted. The default setting is ES256. This is an optional configuration item that is applied to the operation of registering a WebAuthn authenticator. For more details, see WebAuthn Specification. |
| Relying Party ID | This is the ID as a WebAuthn Relying Party and determines the scope of Public Key Credentials. It must be origin’s effective domain. This is an optional configuration item that is applied to the operation of registering a WebAuthn authenticator. If no entry is entered, the host part of the base URL of Red Hat Single Sign-On’s server is adapted. For more details, see WebAuthn Specification. |
| Attestation Conveyance Preference | It tells the WebAuthn API implementation on the browser (WebAuthn Client) the preference of how to generate an Attestation Statement. This is an optional configuration item that is applied to the operation of registering a WebAuthn authenticator. If no option is selected, its behavior is the same as selecting "none". For more details, see WebAuthn Specification. |
| Authenticator Attachment | It tells the WebAuthn Client an acceptable attachment pattern of a WebAuthn authenticator. This is an optional configuration item that is applied to the operation of registering a WebAuthn authenticator. If no option is selected, the WebAuthn Client does not consider the attachment pattern. For more details, see WebAuthn Specification. |
| Require Resident Key | It tells the WebAuthn authenticator to generate the Public Key Credential as Client-side-resident Public Key Credential Source. This is an optional configuration item that is applied to the operation of registering a WebAuthn authenticator. If no option is selected, its behavior is the same as selecting "No". For more details, see WebAuthn Specification. |
| User Verification Requirement | It tells the WebAuthn authenticator to confirm actually verifying a user. This is an optional configuration item that is applied to the operation of registering a WebAuthn authenticator and authenticating the user by a WebAuthn authenticator. If no option is selected, its behavior is the same as selecting "preferred". For more details, see WebAuthn Specification for registering a WebAuthn authenticator and WebAuthn Specification for authenticating the user by a WebAuthn authenticator. |
| Timeout | It specifies the timeout value in seconds for registering a WebAuthn authenticator and authenticating the user by a WebAuthn authenticator. If set to 0, its behavior depends on the WebAuthn authenticator’s implementation. The default value is 0. For more details, see WebAuthn Specification for registering a WebAuthn authenticator and WebAuthn Specification for authenticating the user by a WebAuthn authenticator. |
| Avoid Same Authenticator Registration | If set to "ON", the WebAuthn authenticator that has already been registered can not be newly registered. This is applied to the operation of registering a WebAuthn authenticator. The default setting is "OFF". |
| Acceptable AAGUIDs | The white list of AAGUID of which a WebAuthn authenticator can be registered. This is applied to the operation of registering a WebAuthn authenticator. If no entry is set on this list, any WebAuthn authenticator can be registered. |
6.6.4. Attestation Statement Verification
When registering a WebAuthn authenticator, Red Hat Single Sign-On verifies an attestation statement generated by this WebAuthn authenticator. On this verification process, Red Hat Single Sign-On validates this attestation statement’s trustworthiness. It requires trust anchor’s certificates. Red Hat Single Sign-On uses the Keycloak truststore so that you need to import these certificates onto it in advance.
If you want to omit this attestation statement trustworthiness validation, please disable this truststore or set the WebAuthn policy’s configuration item "Attestation Conveyance Preference" to "none".
6.6.5. Managing WebAuthn credentials as a user
6.6.5.1. Register WebAuthn Authenticator
The appropriate method to register a WebAuthn authenticator depends on if the user has or has not already registered an account on Red Hat Single Sign-On.
- New user
If the
WebAuthn Registerrequired action is set asDefault Actionin a realm, new users are required to set up the WebAuthn security key after the first successful login. A new user carries out the following operations :- Open the login form.
-
Click the
Registerlink. -
Fill in items on the register form and click
Register. - The user’s browser asks the user to register their WebAuthn authenticator.
- After successful registration, the user’s browser asks the user to enter the text as their just registered WebAuthn authenticator’s label.
- Existing user
If
WebAuthn Authenticatoris set up as required as shown in the first example, then when existing users try to log in, they are required to register their WebAuthn authenticator automatically :- Open the login form.
-
Fill in items, click
Saveand clickLogin. - When the users log in, they are required to register their WebAuthn authenticator.
- After successful registration, the user’s browser asks the user to enter the text as their just registered WebAuthn authenticator’s label.
6.6.6. Passwordless WebAuthn together with Two-Factor
WebAuthn is often used for two-factor authentication, however it can be desired to use it also as first factor authentication. In this case, a user with passwordless WebAuthn credential will be able to authenticate to Red Hat Single Sign-On without a password. Red Hat Single Sign-On allows to use WebAuthn as both the passwordless and two-factor authentication mechanism in the context of a single realm and even in the context of a single authentication flow.
Administrator may typically require that Security Keys registered by users for the WebAuthn passwordless authentication must meet different (usually stronger) requirements. For example, those security keys may require users to authenticate to that security key using a PIN, or the security key should be attested with stronger certificate authority.
Because of this situation, Red Hat Single Sign-On allows administrator to configure separate WebAuthn Passwordless Policy. There is a separate required action of type Webauthn Register Passwordless and separate authenticator of type WebAuthn Passwordless Authenticator.
6.6.6.1. Setup
The setup procedure of WebAuthn passwordless support is the following :
-
Register new required action for WebAuthn passwordless support. Use the same steps as described above with the only difference, that you need to register the action called
Webauthn Register Passwordless. -
Configure the policy. You can use same steps and configuration options as described above, however you need to configure them in the admin console in the tab
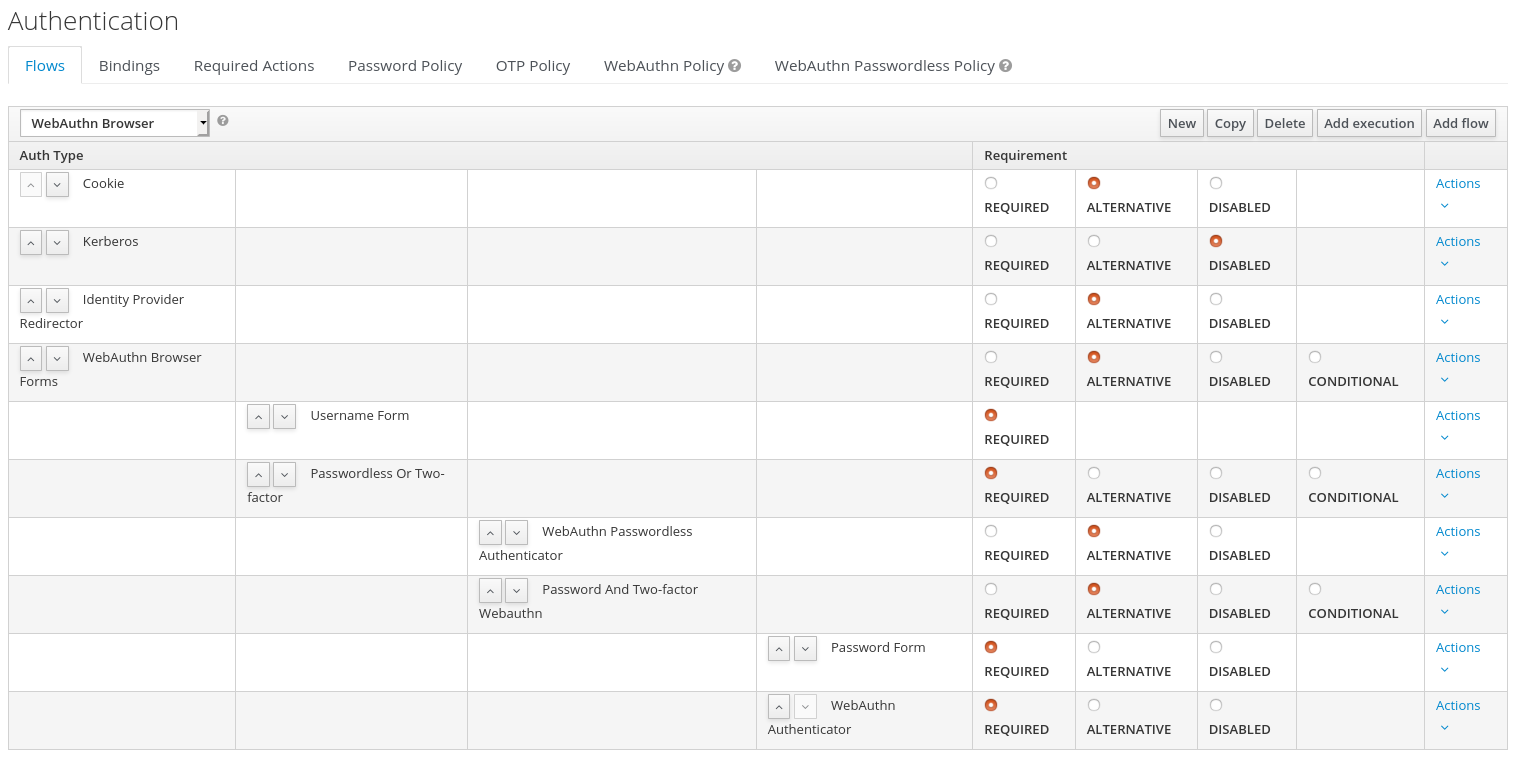
WebAuthn Passwordless Policy. You can configure this policy as you want, however typically the requirements for the security key will be stronger than for the two-factor policy. For example theUser Verification Requirementcan be set toRequiredwhen you configure the passwordless policy. Finally configure the authentication flow. Let’s assume that we will use same flow called
WebAuthn Browseras described above, but we will configure it as follows:-
The
WebAuthn Browser Formssubflow will containUsername Formas the first authenticator. Delete the defaultUsername Password Formauthenticator and add theUsername Formauthenticator instead. This setting means that the user will provide just his or her username as the first step. -
There will be a required subflow, which can be named for example
Passwordless Or Two-factor. This setting indicates that user can authenticate either with Passwordless WebAuthn credential or with Two-factor authentication. -
Flow will contain
WebAuthn Passwordless Authenticatoras the first alternative. -
The second alternative will be a subflow named for example
Password And Two-factor Webauthn. This subflow will contain aPassword Formand aWebAuthn Authenticator.
-
The
The final configuration of the flow will look like the following:
You can now add WebAuthn Register Passwordless as the required action to some user, already known to Red Hat Single Sign-On, to test this. During the first authentication, the user will be still required to use the password and second-factor WebAuthn credential. However, once the user registers the credentials, that user will be able to choose during future authentications. If he uses his or her WebAuthn Passwordless credential, he won’t need to provide the password and second-factor WebAuthn credential at all.