
Chapter 11. Admin Console Access Control and Permissions
Each realm created on the Red Hat Single Sign-On has a dedicated Admin Console from which that realm can be managed. The master realm is a special realm that allows admins to manage more than one realm on the system. You can also define fine-grained access to users in different realms to manage the server. This chapter goes over all the scenarios for this.
11.1. Master Realm Access Control
The master realm in Red Hat Single Sign-On is a special realm and treated differently than other realms. Users in the Red Hat Single Sign-On master realm can be granted permission to manage zero or more realms that are deployed on the Red Hat Single Sign-On server. When a realm is created, Red Hat Single Sign-On automatically creates various roles that grant fine-grain permissions to access that new realm. Access to The Admin Console and Admin REST endpoints can be controlled by mapping these roles to users in the master realm. It’s possible to create multiple super users, as well as users that can only manage specific realms.
11.1.1. Global Roles
There are two realm-level roles in the master realm. These are:
- admin
- create-realm
Users with the admin role are super users and have full access to manage any realm on the server. Users with the create-realm role are allowed to create new realms. They will be granted full access to any new realm they create.
11.1.2. Realm Specific Roles
Admin users within the master realm can be granted management privileges to one or more other realms in the system. Each realm in Red Hat Single Sign-On is represented by a client in the master realm. The name of the client is <realm name>-realm. These clients each have client-level roles defined which define varying level of access to manage an individual realm.
The roles available are:
- view-realm
- view-users
- view-clients
- view-events
- manage-realm
- manage-users
- create-client
- manage-clients
- manage-events
- view-identity-providers
- manage-identity-providers
- impersonation
Assign the roles you want to your users and they will only be able to use that specific part of the administration console.
Admins with the manage-users role will only be able to assign admin roles to users that they themselves have. So, if an admin has the manage-users role but doesn’t have the manage-realm role, they will not be able to assign this role.
11.2. Dedicated Realm Admin Consoles
Each realm has a dedicated Admin Console that can be accessed by going to the url /auth/admin/{realm-name}/console. Users within that realm can be granted realm management permissions by assigning specific user role mappings.
Each realm has a built-in client called realm-management. You can view this client by going to the Clients left menu item of your realm. This client defines client-level roles that specify permissions that can be granted to manage the realm.
- view-realm
- view-users
- view-clients
- view-events
- manage-realm
- manage-users
- create-client
- manage-clients
- manage-events
- view-identity-providers
- manage-identity-providers
- impersonation
Assign the roles you want to your users and they will only be able to use that specific part of the administration console.
11.3. Fine Grain Admin Permissions
Fine Grain Admin Permissions is Technology Preview and is not fully supported. This feature is disabled by default.
To enable start the server with -Dkeycloak.profile=preview or -Dkeycloak.profile.feature.admin_fine_grained_authz=enabled . For more details see Profiles.
Sometimes roles like manage-realm or manage-users are too coarse grain and you want to create restricted admin accounts that have more fine grain permissions. Red Hat Single Sign-On allows you to define and assign restricted access policies for managing a realm. Things like:
- Managing one specific client
- Managing users that belong to a specific group
- Managing membership of a group
- Limited user management.
- Fine grain impersonization control
- Being able to assign a specific restricted set of roles to users.
- Being able to assign a specific restricted set of roles to a composite role.
- Being able to assign a specific restricted set of roles to a client’s scope.
- New general policies for viewing and managing users, groups, roles, and clients.
There’s some important things to note about fine grain admin permissions:
- Fine grain admin permissions were implemented on top of Authorization Services. It is highly recommended that you read up on those features before diving into fine grain permissions.
- Fine grain permissions are only available within dedicated admin consoles and admins defined within those realms. You cannot define cross-realm fine grain permissions.
- Fine grain permissions are used to grant additional permissions. You cannot override the default behavior of the built in admin roles.
11.3.1. Managing One Specific Client
Let’s look first at allowing an admin to manage one client and one client only. In our example we have a realm called test and a client called sales-application. In realm test we will give a user in that realm permission to only manage that application.
You cannot do cross realm fine grain permissions. Admins in the master realm are limited to the predefined admin roles defined in previous chapters.
11.3.1.1. Permission Setup
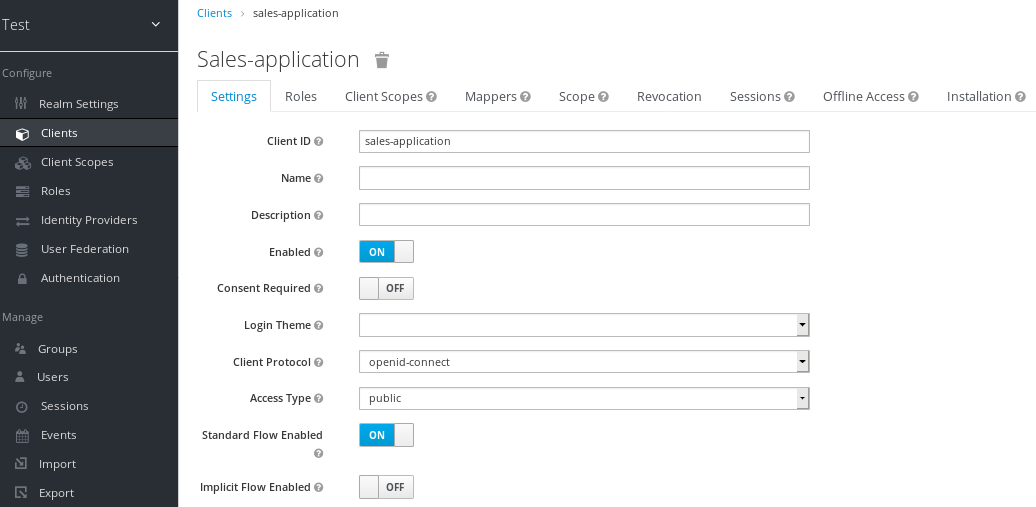
The first thing we must do is login to the Admin Console so we can set up permissions for that client. We navigate to the management section of the client we want to define fine-grain permissions for.
Client Management
You should see a tab menu item called Permissions. Click on that tab.
Client Permissions Tab
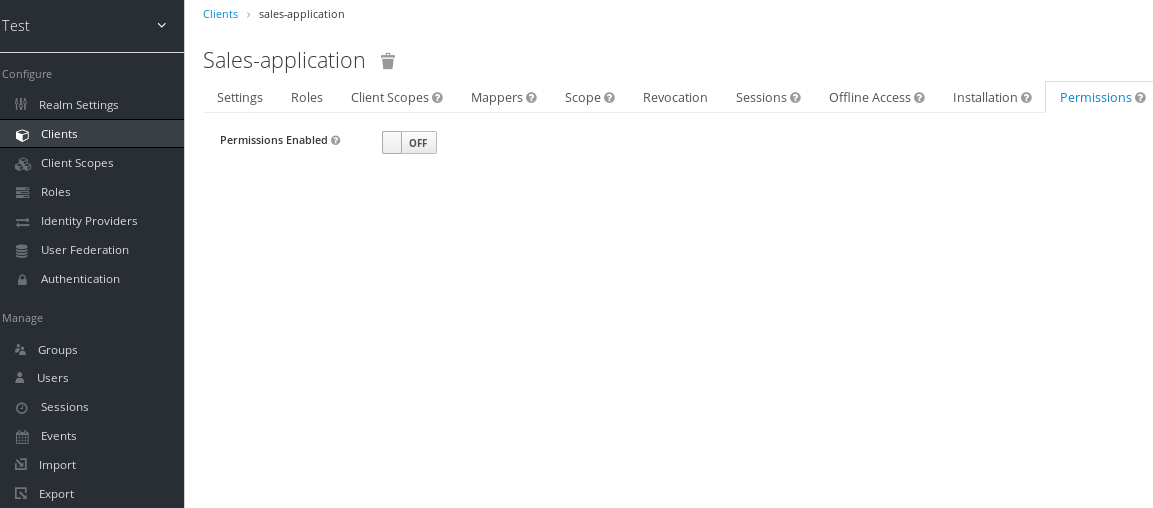
By default, each client is not enabled to do fine grain permissions. So turn the Permissions Enabled switch to on to initialize permissions.
If you turn the Permissions Enabled switch to off, it will delete any and all permissions you have defined for this client.
Client Permissions Tab

When you switch Permissions Enabled to on, it initializes various permission objects behind the scenes using Authorization Services. For this example, we’re interested in the manage permission for the client. Clicking on that will redirect you to the permission that handles the manage permission for the client. All authorization objects are contained in the realm-management client’s Authorization tab.
Client Manage Permission

When first initialized the manage permission does not have any policies associated with it. You will need to create one by going to the policy tab. To get there fast, click on the Authorization link shown in the above image. Then click on the policies tab.
There’s a pull down menu on this page called Create policy. There’s a multitude of policies you can define. You can define a policy that is associated with a role or a group or even define rules in JavaScript. For this simple example, we’re going to create a User Policy.
User Policy
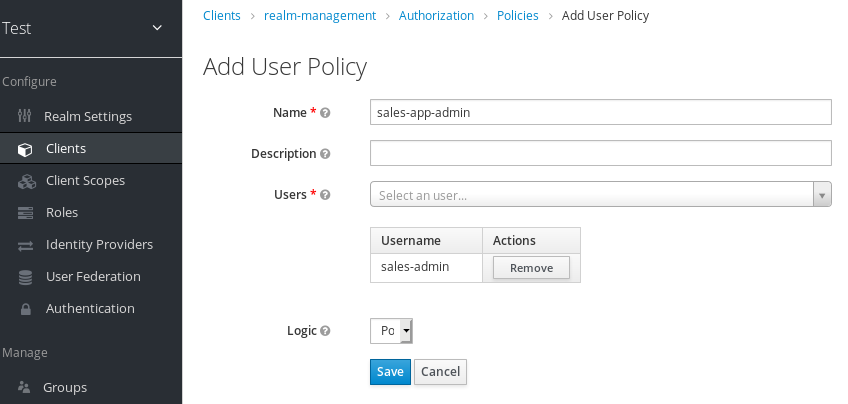
This policy will match a hard-coded user in the user database. In this case it is the sales-admin user. We must then go back to the sales-application client’s manage permission page and assign the policy to the permission object.
Assign User Policy
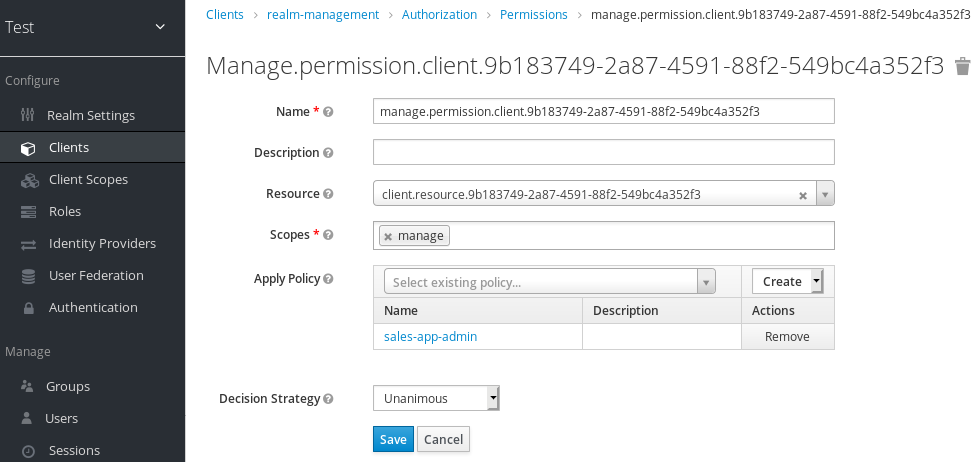
The sales-admin user can now has permission to manage the sales-application client.
There’s one more thing we have to do. Go to the Role Mappings tab and assign the query-clients role to the sales-admin.
Assign query-clients
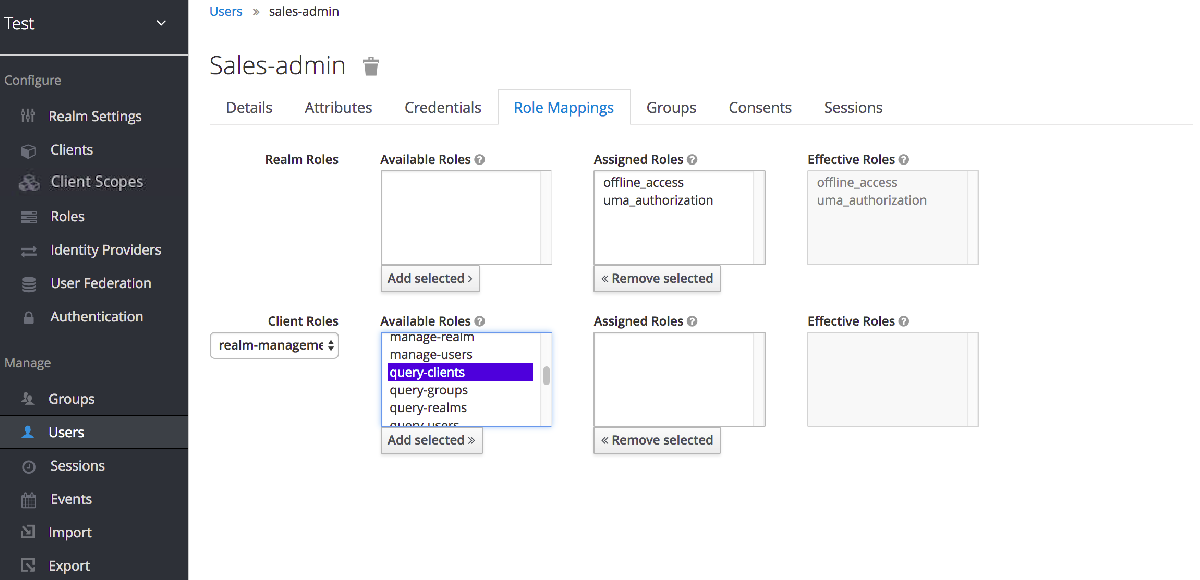
Why do you have to do this? This role tells the Admin Console what menu items to render when the sales-admin visits the Admin Console. The query-clients role tells the Admin Console that it should render client menus for the sales-admin user.
IMPORTANT If you do not set the query-clients role, restricted admins like sales-admin will not see any menu options when they log into the Admin Console
11.3.1.2. Testing It Out.
Next we log out of the master realm and re-login to the dedicated admin console for the test realm using the sales-admin as a username. This is located under /auth/admin/test/console.
Sales Admin Login

This admin is now able to manage this one client.
11.3.2. Restrict User Role Mapping
Another thing you might want to do is to restrict the set a roles an admin is allowed to assign to a user. Continuing our last example, let’s expand the permission set of the 'sales-admin' user so that he can also control which users are allowed to access this application. Through fine grain permissions we can enable it so that the sales-admin can only assign roles that grant specific access to the sales-application. We can also restrict it so that the admin can only map roles and not perform any other types of user administration.
The sales-application has defined three different client roles.
Sales Application Roles
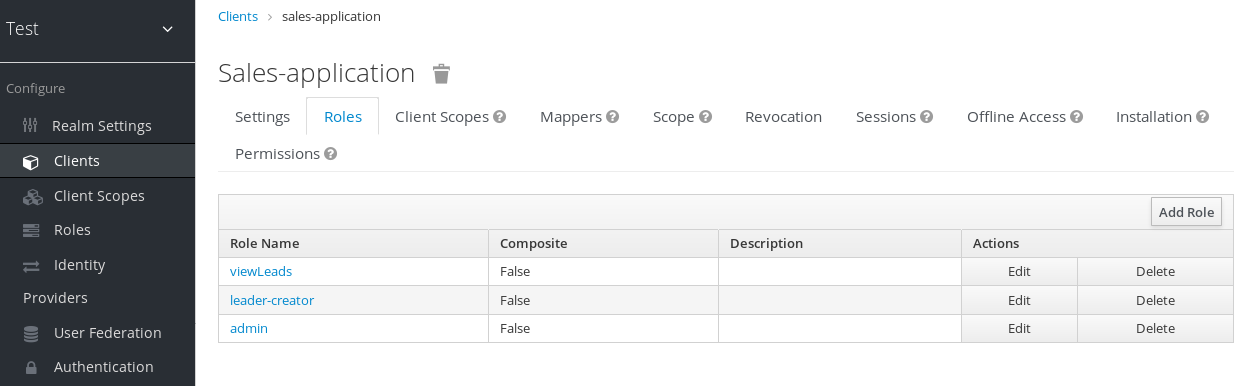
We want the sales-admin user to be able to map these roles to any user in the system. The first step to do this is to allow the role to be mapped by the admin. If we click on the viewLeads role, you’ll see that there is a Permissions tab for this role.
View Leads Role Permission Tab

If we click on that tab and turn the Permissions Enabled on, you’ll see that there are a number of actions we can apply policies to.
View Leads Permissions
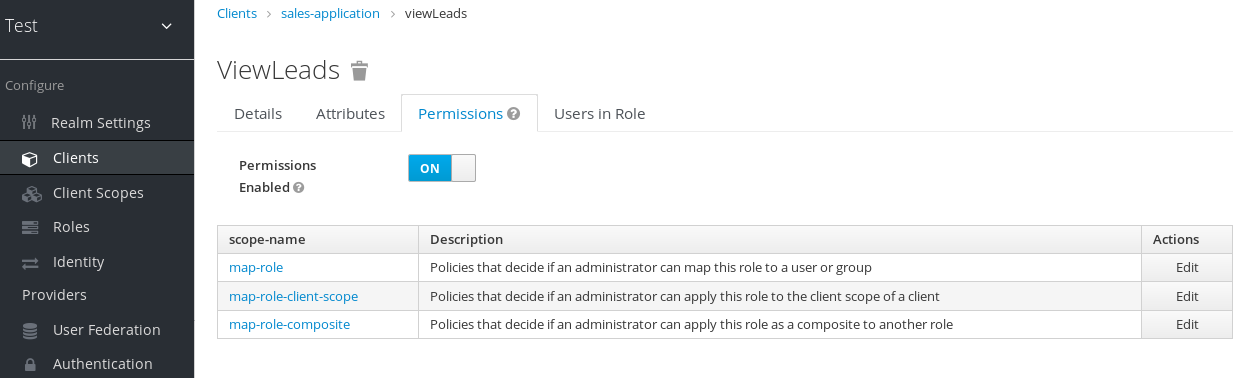
The one we are interested in is map-role. Click on this permission and add the same User Policy that was created in the earlier example.
Map-roles Permission
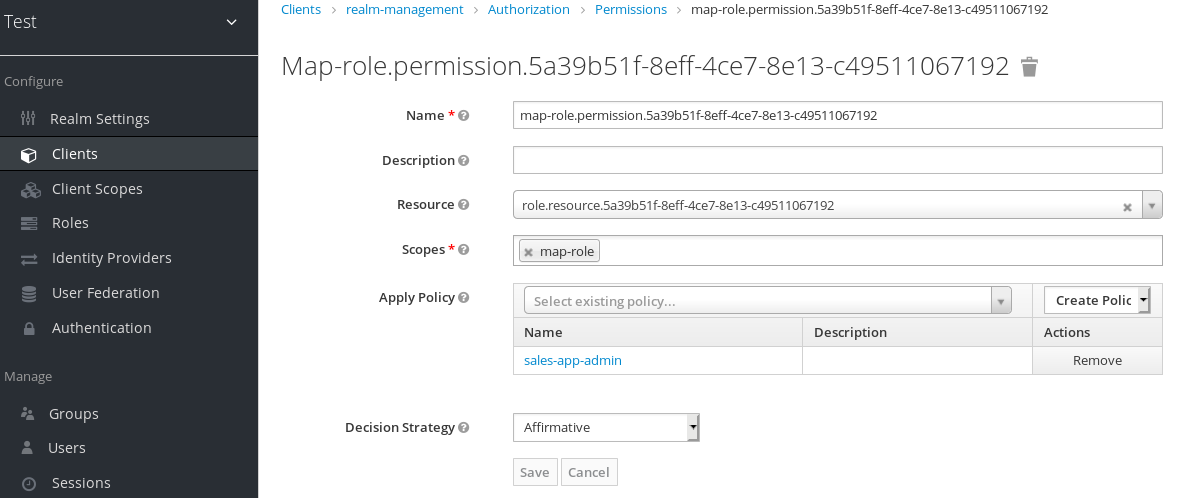
What we’ve done is say that the sales-admin can map the viewLeads role. What we have not done is specify which users the admin is allowed to map this role too. To do that we must go to the Users section of the admin console for this realm. Clicking on the Users left menu item brings us to the users interface of the realm. You should see a Permissions tab. Click on that and enable it.
Users Permissions
The permission we are interested in is map-roles. This is a restrictive policy in that it only allows admins the ability to map roles to a user. If we click on the map-roles permission and again add the User Policy we created for this, our sales-admin will be able to map roles to any user.
The last thing we have to do is add the view-users role to the sales-admin. This will allow the admin to view users in the realm he wants to add the sales-application roles to.
Add view-users
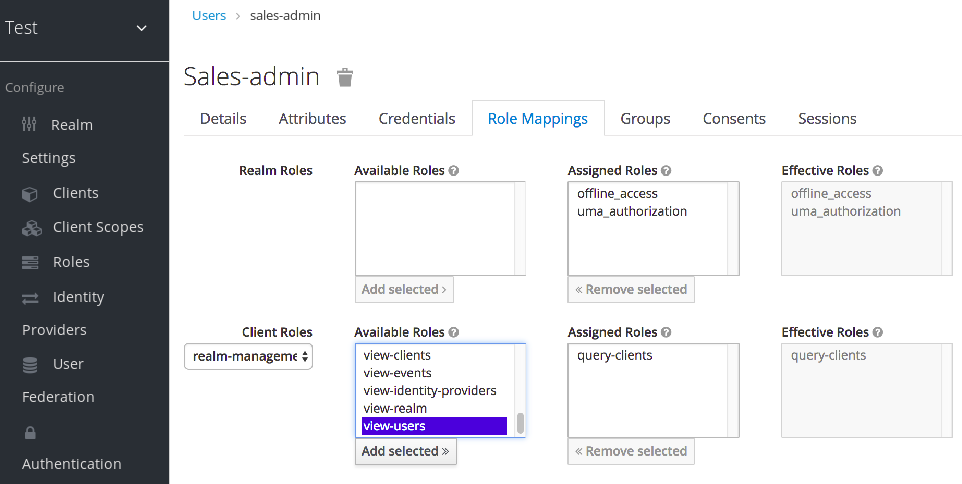
11.3.2.1. Testing It Out.
Next we log out of the master realm and re-login to the dedicated admin console for the test realm using the sales-admin as a username. This is located under /auth/admin/test/console.
You will see that now the sales-admin can view users in the system. If you select one of the users you’ll see that each user detail page is read only, except for the Role Mappings tab. Going to these tab you’ll find that there are no Available roles for the admin to map to the user except when we browse the sales-application roles.
Add viewLeads

We’ve only specified that the sales-admin can map the viewLeads role.
11.3.2.2. Per Client map-roles Shortcut
It would be tedious if we had to do this for every client role that the sales-application published. to make things easier, there’s a way to specify that an admin can map any role defined by a client. If we log back into the admin console to our master realm admin and go back to the sales-application permissions page, you’ll see the map-roles permission.
Client map-roles Permission
If you grant access to this particular parmission to an admin, that admin will be able map any role defined by the client.
11.3.3. Full List of Permissions
You can do a lot more with fine grain permissions beyond managing a specific client or the specific roles of a client. This chapter defines the whole list of permission types that can be described for a realm.
11.3.3.1. Role
When going to the Permissions tab for a specific role, you will see these permission types listed.
- map-role
- Policies that decide if an admin can map this role to a user. These policies only specify that the role can be mapped to a user, not that the admin is allowed to perform user role mapping tasks. The admin will also have to have manage or role mapping permissions. See Users Permissions for more information.
- map-role-composite
-
Policies that decide if an admin can map this role as a composite to another role. An admin can define roles for a client if he has manage permissions for that client but he will not be able to add composites to those roles unless he has the
map-role-compositeprivileges for the role he wants to add as a composite. - map-role-client-scope
- Policies that decide if an admin can apply this role to the scope of a client. Even if the admin can manage the client, he will not have permission to create tokens for that client that contain this role unless this privilege is granted.
11.3.3.2. Client
When going to the Permissions tab for a specific client, you will see these permission types listed.
- view
- Policies that decide if an admin can view the client’s configuration.
- manage
- Policies that decide if an admin can view and manage the client’s configuration. There is some issues with this in that privileges could be leaked unintentionally. For example, the admin could define a protocol mapper that hardcoded a role even if the admin does not have privileges to map the role to the client’s scope. This is currently the limitation of protocol mappers as they don’t have a way to assign individual permissions to them like roles do.
- configure
-
Reduced set of prileges to manage the client. Its like the
managescope except the admin is not allowed to define protocol mappers, change the client template, or the client’s scope. - map-roles
- Policies that decide if an admin can map any role defined by the client to a user. This is a shortcut, easy-of-use feature to avoid having to defin policies for each and every role defined by the client.
- map-roles-composite
- Policies that decide if an admin can map any role defined by the client as a composite to another role. This is a shortcut, easy-of-use feature to avoid having to define policies for each and every role defined by the client.
- map-roles-client-scope
- Policies that decide if an admin can map any role defined by the client to the scope of another client. This is a shortcut, easy-of-use feature to avoid having to define policies for each and every role defined by the client.
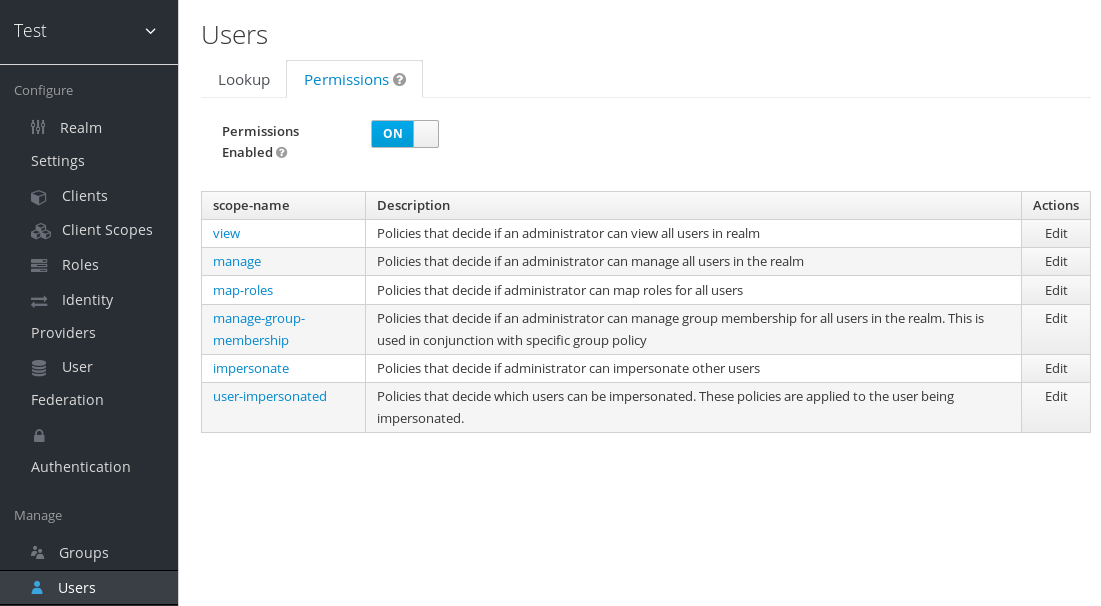
11.3.3.3. Users
When going to the Permissions tab for all users, you will see these permission types listed.
- view
- Policies that decide if an admin can view all users in the realm.
- manage
- Policies that decide if an admin can manage all users in the realm. This permission grants the admin the privilege to perfor user role mappings, but it does not specify which roles the admin is allowed to map. You’ll need to define the privilege for each role you want the admin to be able to map.
- map-roles
-
This is a subset of the privileges granted by the
managescope. In this case the admin is only allowed to map roles. The admin is not allowed to perform any other user management operation. Also, likemanage, the roles that the admin is allowed to apply must be specified per role or per set of roles if dealing with client roles. - manage-group-membership
-
Similar to
map-rolesexcept that it pertains to group membership: which groups a user can be added or removed from. These policies just grant the admin permission to manage group membership, not which groups the admin is allowed to manage membership for. You’ll have to specify policies for each group’smanage-memberspermission. - impersonate
- Policies that decide if the admin is allowed to impersonate other users. These policies are applied to the admin’s attributes and role mappings.
- user-impersonated
- Policies that decide which users can be impersonated. These policies will be applied to the user being impersonated. For example, you might want to define a policy that will forbid anybody from impersonating a user that has admin privileges.
11.3.3.4. Group
When going to the Permissions tab for a specific group, you will see these permission types listed.
- view
- Policies that decide if the admin can view information about the group.
- manage
- Policies that decide if the admin can manage the configuration of the group.
- view-members
- Policies that decide if the admin can view the user details of members of the group.
- manage-members
- Policies that decide if the admin can manage the users that belong to this group.
- manage-membership
- Policies that decide if an admin can change the membership of the group. Add or remove members from the group.
11.4. Realm Keys
The authentication protocols that are used by Red Hat Single Sign-On require cryptographic signatures and sometimes encryption. Red Hat Single Sign-On uses asymmetric key pairs, a private and public key, to accomplish this.
Red Hat Single Sign-On has a single active keypair at a time, but can have several passive keys as well. The active keypair is used to create new signatures, while the passive keypairs can be used to verify previous signatures. This makes it possible to regularly rotate the keys without any downtime or interruption to users.
When a realm is created a key pair and a self-signed certificate is automatically generated.
To view the active keys for a realm select the realm in the admin console click on Realm settings then Keys. This will show the currently active keys for the realm.
To view passive or disabled keys select Passive or Disabled. A keypair can have the status Active, but still not be selected as the currently active keypair for the realm. The selected active pair which is used for signatures is selected based on the first key provider sorted by priority that is able to provide an active keypair.
11.4.1. Rotating keys
It’s recommended to regularly rotate keys. To do so you should start by creating new keys with a higher priority than the existing active keys. Or create new keys with the same priority and making the previous keys passive.
Once new keys are available all new tokens and cookies will be signed with the new keys. When a user authenticates to an application the SSO cookie is updated with the new signature. When OpenID Connect tokens are refreshed new tokens are signed with the new keys. This means that over time all cookies and tokens will use the new keys and after a while the old keys can be removed.
How long you wait to delete old keys is a tradeoff between security and making sure all cookies and tokens are updated. In general it should be acceptable to drop old keys after a few weeks. Users that have not been active in the period between the new keys where added and the old keys removed will have to re-authenticate.
This also applies to offline tokens. To make sure they are updated the applications need to refresh the tokens before the old keys are removed.
As a guideline, it may be a good idea to create new keys every 3-6 months and delete old keys 1-2 months after the new keys were created.
11.4.2. Adding a generated keypair
To add a new generated keypair select Providers and choose rsa-generated from the dropdown. You can change the priority to make sure the new keypair becomes the active keypair. You can also change the keysize if you want smaller or larger keys (default is 2048, supported values are 1024, 2048 and 4096).
Click Save to add the new keys. This will generated a new keypair including a self-signed certificate.
Changing the priority for a provider will not cause the keys to be re-generated, but if you want to change the keysize you can edit the provider and new keys will be generated.
11.4.3. Adding an existing keypair and certificate
To add a keypair and certificate obtained elsewhere select Providers and choose rsa from the dropdown. You can change the priority to make sure the new keypair becomes the active keypair.
Click on Select file for Private RSA Key to upload your private key. The file should be encoded in PEM format. You don’t need to upload the public key as it is automatically extracted from the private key.
If you have a signed certificate for the keys click on Select file next to X509 Certificate. If you don’t have one you can skip this and a self-signed certificate will be generated.
11.4.4. Loading keys from a Java Keystore
To add a keypair and certificate stored in a Java Keystore file on the host select Providers and choose java-keystore from the dropdown. You can change the priority to make sure the new keypair becomes the active keypair.
Fill in the values for Keystore, Keystore Password, Key Alias and Key Password and click on Save.
11.4.5. Making keys passive
Locate the keypair in Active then click on the provider in the Provider column. This will take you to the configuration screen for the key provider for the keys. Click on Active to turn it OFF, then click on Save. The keys will no longer be active and can only be used for verifying signatures.
11.4.6. Disabling keys
Locate the keypair in Active then click on the provider in the Provider column. This will take you to the configuration screen for the key provider for the keys. Click on Enabled to turn it OFF, then click on Save. The keys will no longer be enabled.
Alternatively, you can delete the provider from the Providers table.
11.4.7. Compromised keys
Red Hat Single Sign-On has the signing keys stored just locally and they are never shared with the client applications, users or other entities. However if you think that your realm signing key was compromised, you should first generate new keypair as described above and then immediately remove the compromised keypair.
Then to ensure that client applications won’t accept the tokens signed by the compromised key, you should update and push not-before policy for the realm, which is doable from the admin console. Pushing new policy will ensure that client applications won’t accept the existing tokens signed by the compromised key, but also the client application will be forced to download new keypair from the Red Hat Single Sign-On, hence the tokens signed by the compromised key won’t be valid anymore. Note that your REST and confidential clients must have set Admin URL, so that Red Hat Single Sign-On is able to send them the request about pushed not-before policy.