
Server Administration Guide
Server Administration Guide
Abstract
Chapter 1. Overview
Red Hat Single Sign-On is a single sign on solution for web apps and RESTful web services. The goal of Red Hat Single Sign-On is to make security simple so that it is easy for application developers to secure the apps and services they have deployed in their organization. Security features that developers normally have to write for themselves are provided out of the box and are easily tailorable to the individual requirements of your organization. Red Hat Single Sign-On provides customizable user interfaces for login, registration, administration, and account management. You can also use Red Hat Single Sign-On as an integration platform to hook it into existing LDAP and Active Directory servers. You can also delegate authentication to third party identity providers like Facebook and Google+.
1.1. Features
- Single-Sign On and Single-Sign Out for browser applications
- OpenID Connect support.
- OAuth 2.0 support.
- SAML support.
- Identity Brokering - Authenticate with external OpenID Connect or SAML Identity Providers.
- Social Login - Enable login with Google, GitHub, Facebook, Twitter, and other social networks.
- User Federation - Sync users from LDAP and Active Directory servers.
- Kerberos bridge - Automatically authenticate users that are logged-in to a Kerberos server.
- Admin Console for central management of users, roles, role mappings, clients and configuration.
- Account Management console that allows users to centrally manage their account.
- Theme support - Customize all user facing pages to integrate with your applications and branding.
- Two-factor Authentication - Support for TOTP/HOTP via Google Authenticator or FreeOTP
- Login flows - optional user self-registration, recover password, verify email, require password update, etc.
- Session management - Admins and users themselves can view and manage user sessions.
- Token mappers - Map user attributes, roles, etc. how you want into tokens and statements.
- Not-before revocation policies per realm, application and user.
- CORS support - Client adapters have built-in support for CORS
- Client adapters for JavaScript applications, JBoss EAP, Fuse, etc.
- Supports any platform/language that has an OpenID Connect Resource Provider library or SAML 2.0 Service Provider library
1.2. How Does Security Work?
Red Hat Single Sign-On is a separate server that you manage on your network. Applications are configured to point to and be secured by this server. Red Hat Single Sign-On uses open protocol standards like Open ID Connect or SAML 2.0 to secure your applications. Browser applications redirect a user’s browser from the application to the Red Hat Single Sign-On authentication server where they enter their credentials. This is important because users are completely isolated from applications and applications never see a user’s credentials. Applications instead are given an identity token or assertion that is cryptographically signed. These tokens can have identity information like username, address, email, and other profile data. They can also hold permission data so that applications can make authorization decisions. These tokens can also be used to make secure invocations on REST-based services.
1.3. Core Concepts and Terms
There are some key concepts and terms you should be aware of before attempting to use Red Hat Single Sign-On to secure your web applications and REST services.
- users
- Users are entities that are able to log into your system. They can have attributes associated with themselves like email, username, address, phone number, and birth day. They can be assigned group membership and have specific roles assigned to them.
- authentication
- The process of identifying and validating a user.
- authorization
- The process of granting access to a user.
- credentials
- Credentials are pieces of data that Red Hat Single Sign-On uses to verify the identity of a user. Some examples are passwords, one-time-passwords, digital certificates, or even fingerprints.
- roles
-
Roles identify a type or category of user.
Admin,user,manager, andemployeeare all typical roles that may exist in an organization. Applications often assign access and permissions to specific roles rather than individual users as dealing with users can be too fine grained and hard to manage. - user role mapping
- A user role mapping defines a mapping between a role and a user. A user can be associated with zero or more roles. This role mapping information can be encapsulated into tokens and assertions so that applications can decide access permissions on various resources they manage
- composite roles
-
A composite role is a role that can be associated with other roles. For example a
superusercomposite role could be associated with thesales-adminandorder-entry-adminroles. If a user is mapped to thesuperuserrole they also inherit thesales-adminandorder-entry-adminroles. - groups
- Groups manage groups of users. Attributes can be defined for a group. You can map roles to a group as well. Users that become members of a group inherit the attributes and role mappings that group defines.
- realms
- A realm manages a set of users, credentials, roles, and groups. A user belongs to and logs into a realm. Realms are isolated from one another and can only manage and authenticate the users that they control.
- clients
- Clients are entities that can request Red Hat Single Sign-On to authenticate a user. Most often, clients are applications and services that want to use Red Hat Single Sign-On to secure themselves and provide a single sign-on solution. Clients can also be entities that just want to request identity information or an access token so that they can securely invoke other services on the network that are secured by Red Hat Single Sign-On
- client adapters
- Client adapters are plugins that you install into your application environment to be able to communicate and be secured by Red Hat Single Sign-On. Red Hat Single Sign-On has a number of adapters for different platforms that you can download. There are also third-party adapters you can get for environments that we don’t cover.
- consent
- Consent is when you as an admin want a user to give permission to a client before that client can participate in the authentication process. After a user provides their credentials, Red Hat Single Sign-On will pop up a screen identifying the client requesting a login and what identity information is requested of the user. User can decide whether or not to grant the request.
- client templates
- When a client is registered you need to enter configuration information about that client. It is often useful to store a template of this to make create new clients easier. Red Hat Single Sign-On provides the concept of a client template for this.
- client role
- Clients can define roles that are specific to them. This is basically a role namespace dedicated to the client.
- identity token
- A token that provides identity information about the user. Part of the OpenID Connect specification.
- access token
- A token that can be provided as part of an HTTP request that grants access to the service being invoked on. This is part of the OpenID Connect and OAuth 2.0 specification.
- assertion
- Information about a user. This usually pertains to an XML blob that is included in a SAML authentication response that provided identity metadata about an authenticated user.
- service account
- Each client has a built in service account which allows it to obtain an access token.
- direct grant
- A way for a client to obtain an access token on behalf of a user via a REST invocation.
- protocol mappers
- For each client you can tailor what claims and assertions are stored in the OIDC token or SAML assertion. You do this per client by creating and configuring protocol mappers.
- session
- When a user logs in, a session is created to manage the login session. A session contains information like when the user logged in and what applications have participated within single-sign on during that session. Both admins and users can view session information.
- user federation provider
- Red Hat Single Sign-On can store and manage users. Often, companies already have LDAP or Active Directory services that store user and credential information. You can point Red Hat Single Sign-On to validate credentials from those external stores and pull in identity information.
- identity provider
- An identity provider (IDP) is a service that can authenticate a user. Red Hat Single Sign-On is an IDP.
- identity provider federation
- Red Hat Single Sign-On can be configured to delegate authentication to one or more IDPs. Social login via Facebook or Google+ is an example of identity provider federation. You can also hook Red Hat Single Sign-On to delegate authentication to any other Open ID Connect or SAML 2.0 IDP.
- identity provider mappers
- When doing IDP federation you can map incoming tokens and assertions to user and session attributes. This helps you propagate identity information from the external IDP to your client requesting authentication.
- required actions
-
Required actions are actions a user must perform during the authentication process. A user will not be able to complete the authentication process until these actions are complete. For example, an admin may schedule users to reset their passwords every month. An
update passwordrequired action would be set for all these users. - authentication flows
- Authentication flows are work flows a user must perform when interacting with certain aspects of the system. A login flow can define what credential types are required. A registration flow defines what profile information a user must enter and whether something like reCAPTCHA must be used to filter out bots. Credential reset flow defines what actions a user must do before they can reset their password.
- events
- Events are audit streams that admins can view and hook into.
- themes
- Every screen provided by Red Hat Single Sign-On is backed by a theme. Themes define HTML templates and stylesheets which you can override as needed.
Chapter 2. Server Initialization
After performing all the installation and configuration tasks defined in the Server Installation and Configuration Guide, you will need to create an initial admin account. Red Hat Single Sign-On does not have any configured admin account out of the box. This account will allow you to create an admin that can log into the master realm’s administration console so that you can start creating realms, users and registering applications to be secured by Red Hat Single Sign-On.
If your server is accessible from localhost, you can boot it up and create this admin user by going to the http://localhost:8080/auth URL.
Welcome Page
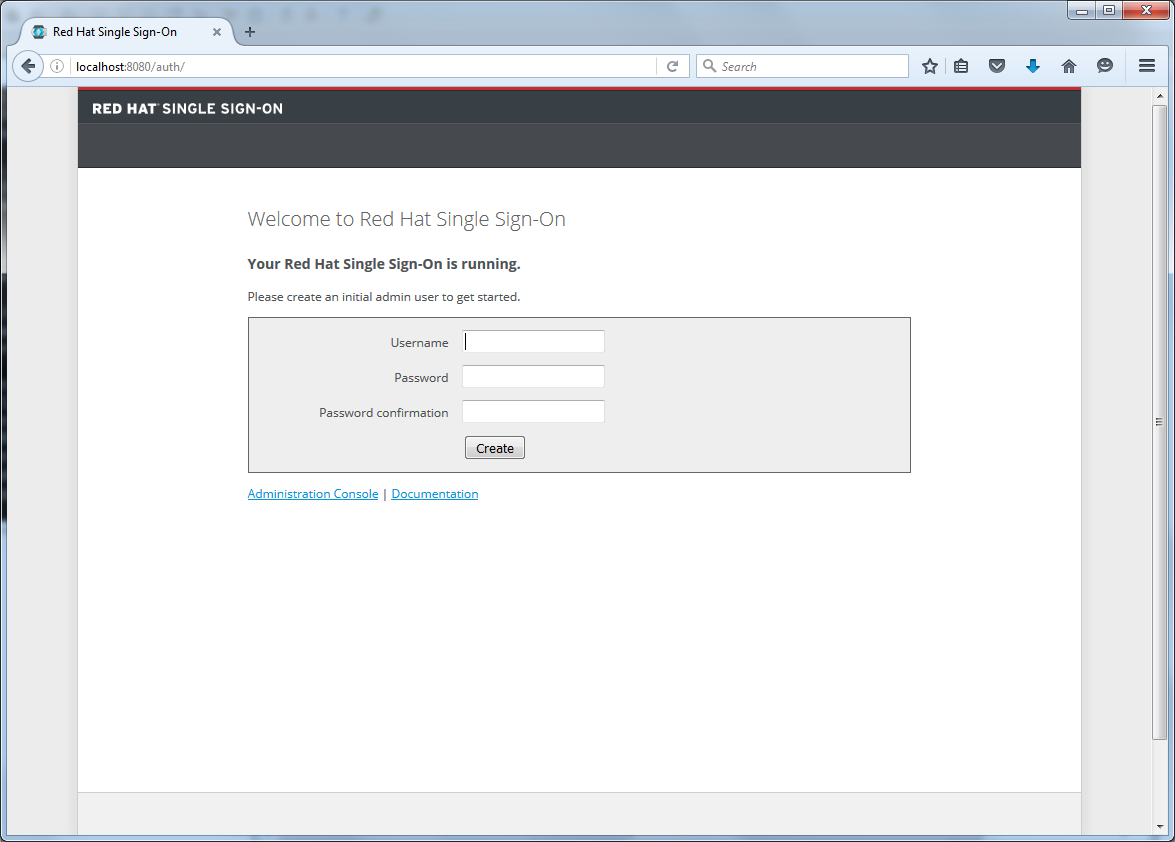
Simply specify the username and password you want for this initial admin.
If you cannot access the server via a localhost address, or just want to provision Red Hat Single Sign-On from the command line you can do this with the …/bin/add-user-keycloak script.
add-user-keycloak script

The parameters are a little different depending if you are using the standalone operation mode or domain operation mode. For standalone mode, here is how you use the script.
Linux/Unix
$ .../bin/add-user-keycloak.sh -r master -u <username> -p <password>
Windows
> ...\bin\add-user-keycloak.bat -r master -u <username> -p <password>
For domain mode, you have to point the script to one of your server hosts using the -sc switch.
Linux/Unix
$ .../bin/add-user-keycloak.sh --sc domain/servers/server-one/configuration -r master -u <username> -p <password>
Windows
> ...\bin\add-user-keycloak.bat --sc domain/servers/server-one/configuration -r master -u <username> -p <password>
Chapter 3. Admin Console
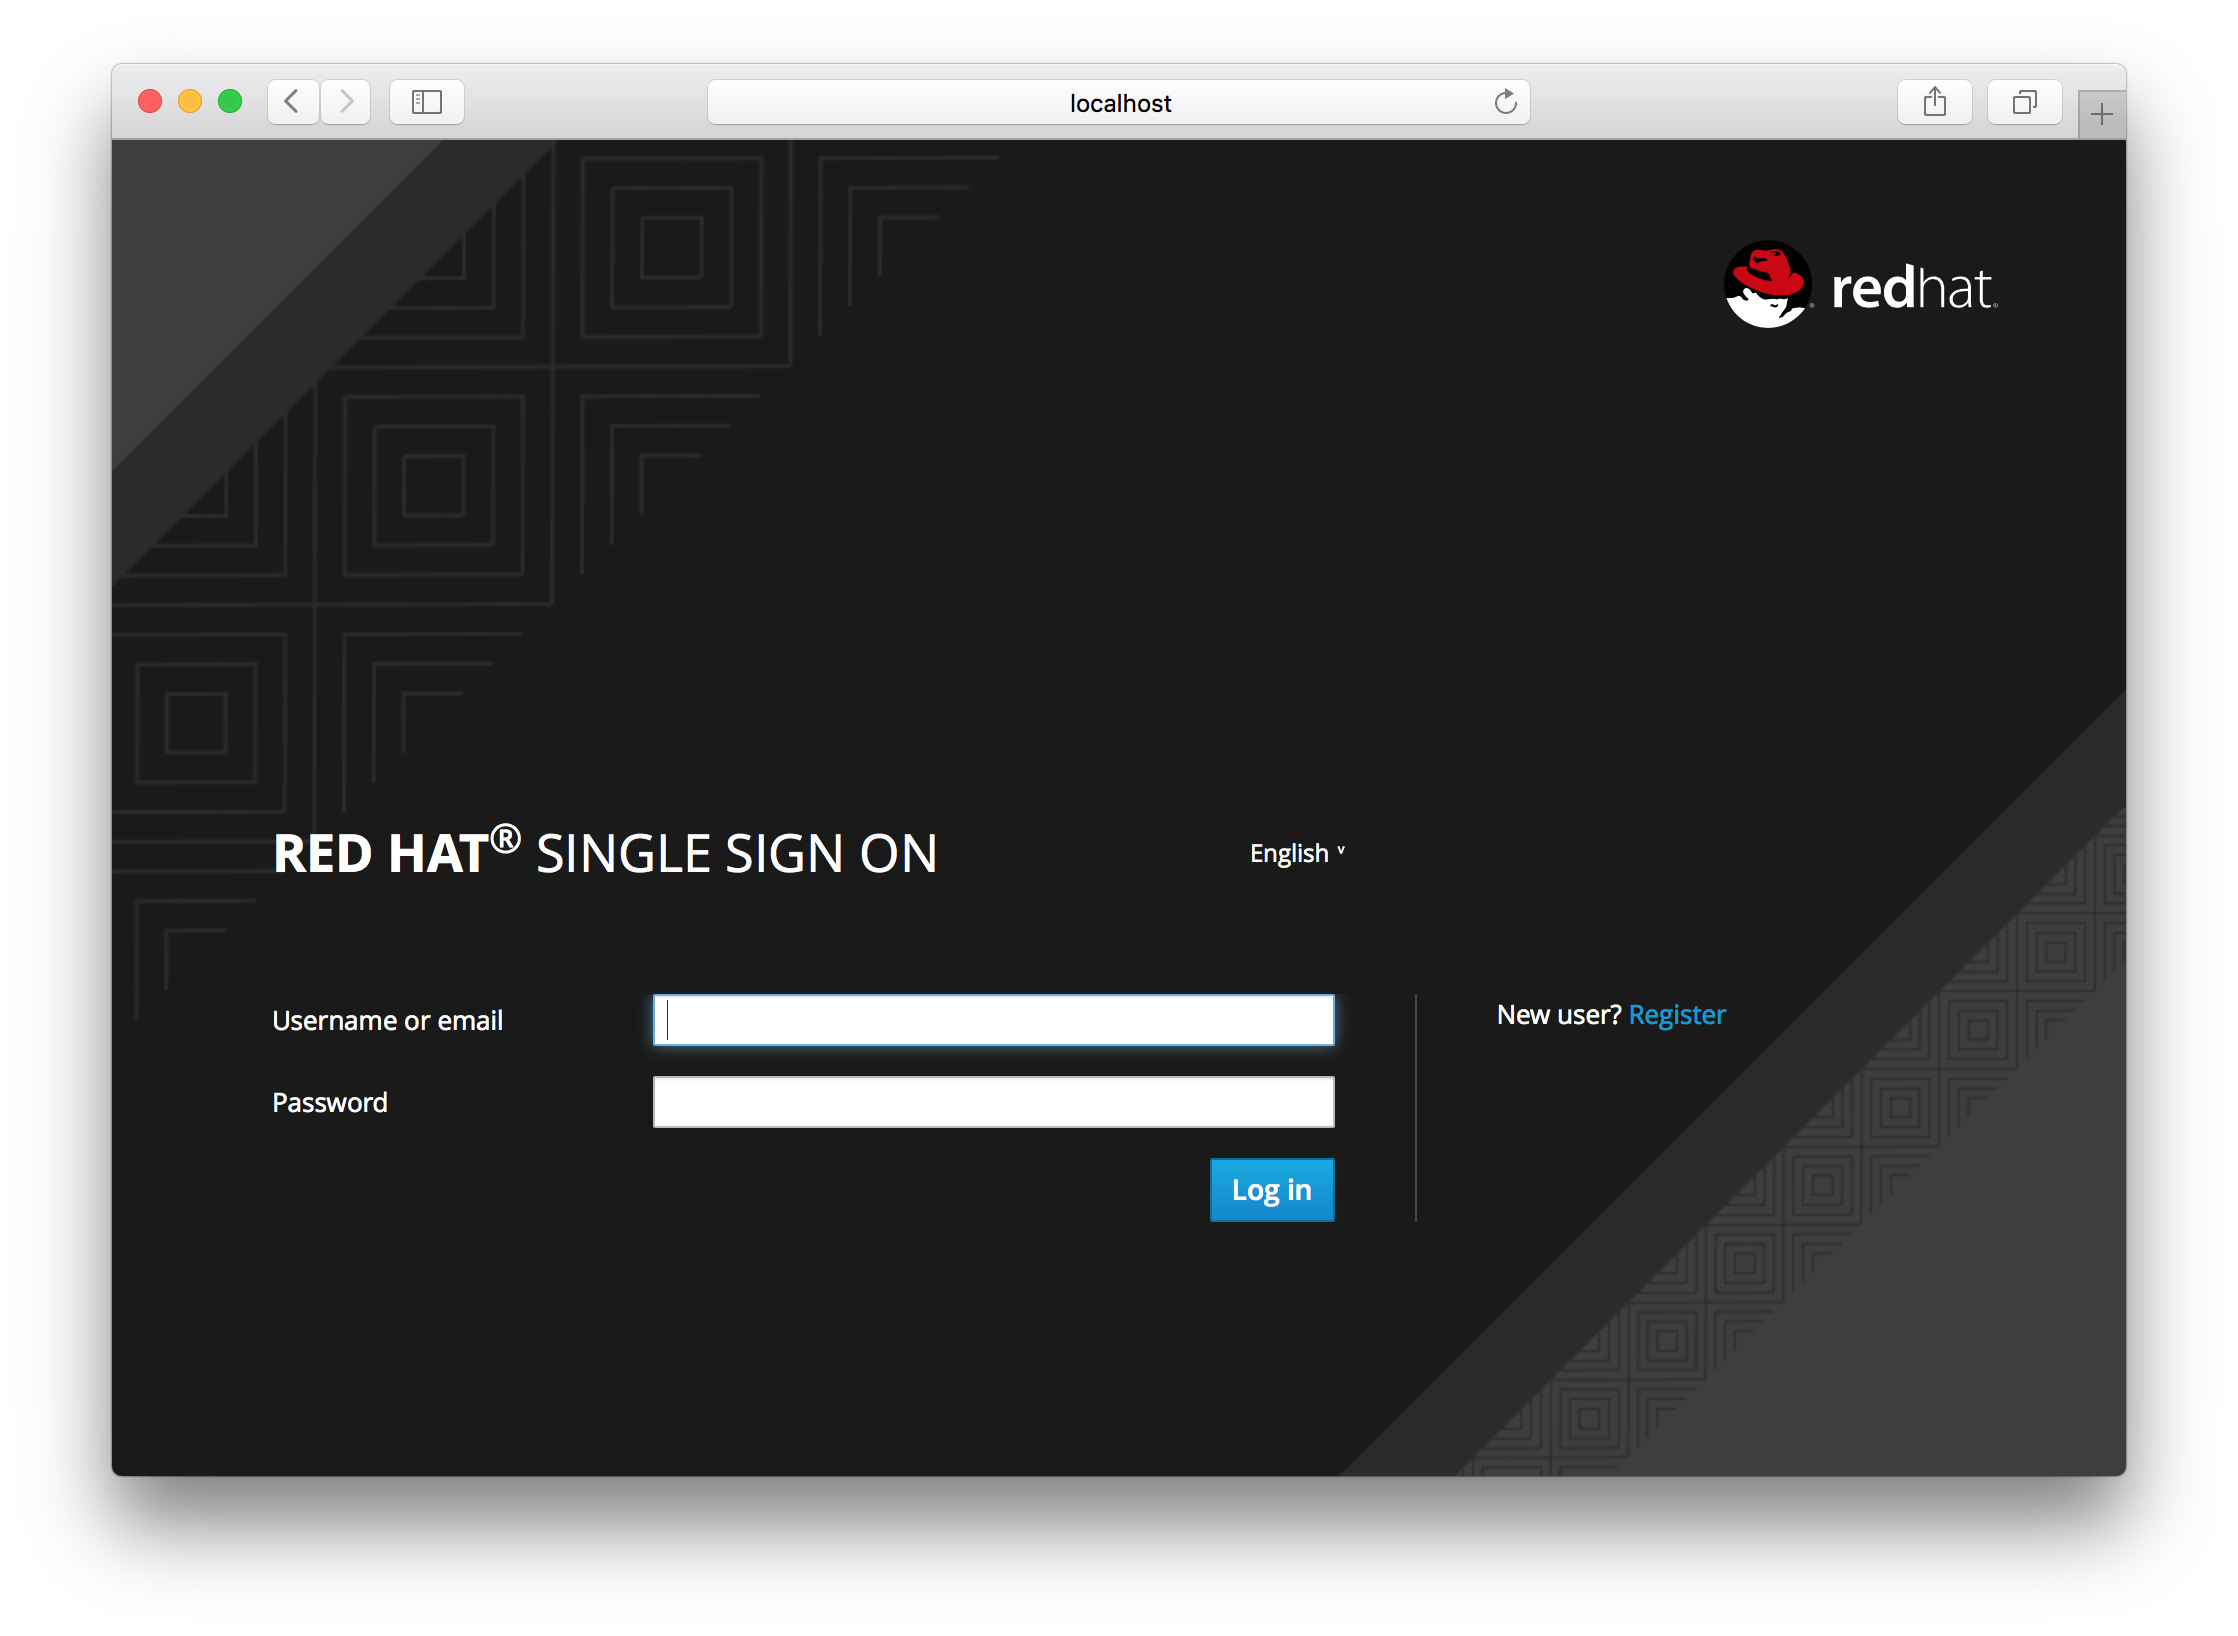
The bulk of your administrative tasks will be done through the Red Hat Single Sign-On Admin Console. You can go to the console url directly at http://localhost:8080/auth/admin/
Login Page
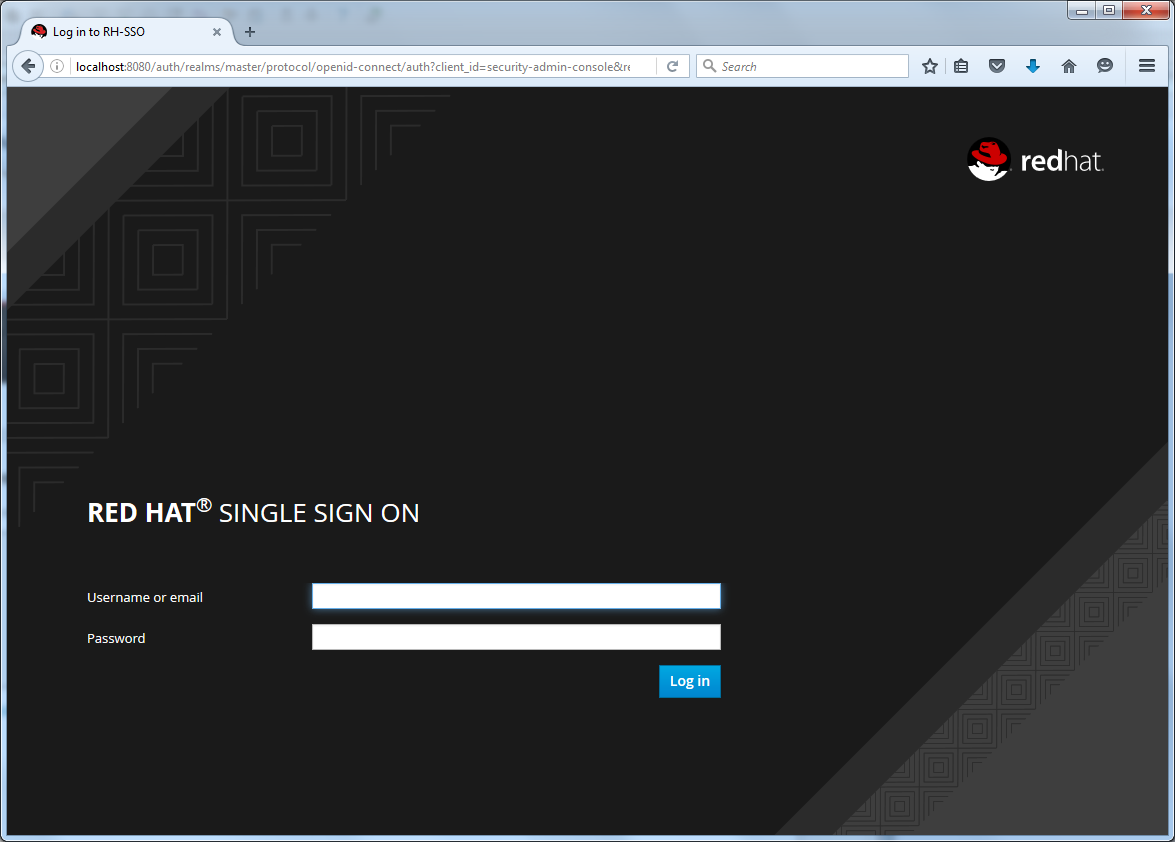
Enter the username and password you created on the Welcome Page or the add-user-keycloak script. This will bring you to the Red Hat Single Sign-On Admin Console
Admin Console
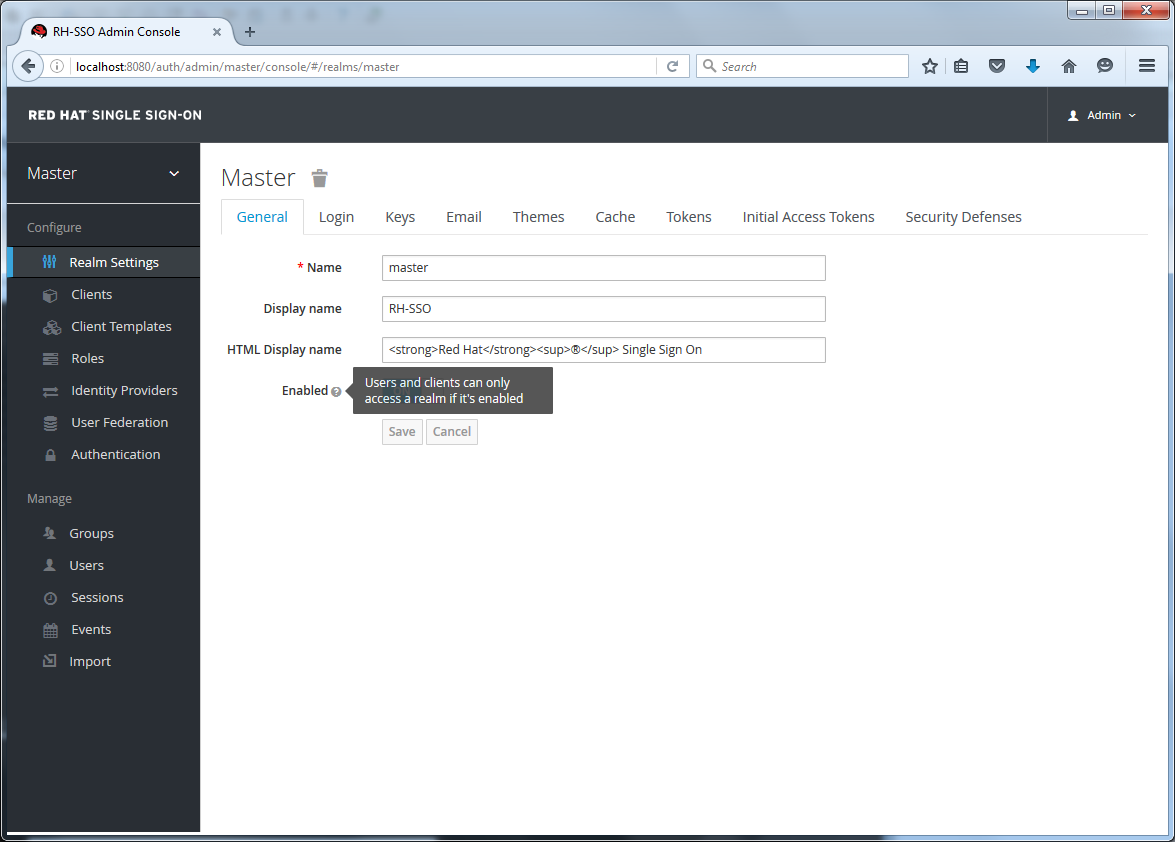
The left drop down menu allows you to pick a realm you want to manage or to create a new one. The right drop down menu allows you to view your user account or logout. If you are curious about a certain feature, button, or field within the Admin Console, simply hover your mouse over any question mark ? icon. This will pop up tooltip text to describe the area of the console you are interested in. The image above shows the tooltip in action.
3.1. The Master Realm
When you boot Red Hat Single Sign-On for the first time a pre-defined realm is created for you. This initial realm is called the master realm and is the king of all realms. Admins in this realm have permissions to view and manage any other realm created on the server instance. When you define your initial admin account, you are creating an account in the master realm. Your initial login to the admin console will also be through the master realm.
It is recommended that you do not use the master realm to manage the users and applications in your organization. Keep the master realm as a place for super admins to create and manage the realms in your system. This keeps things clean and organized.
It is possible to disable the master realm and define admin accounts at each individual new realm you create. Each realm has its own dedicated Admin Console that you can log into with local accounts. This guide talks more about this in the Dedicated Realm Admin Consoles chapter.
3.2. Create a New Realm
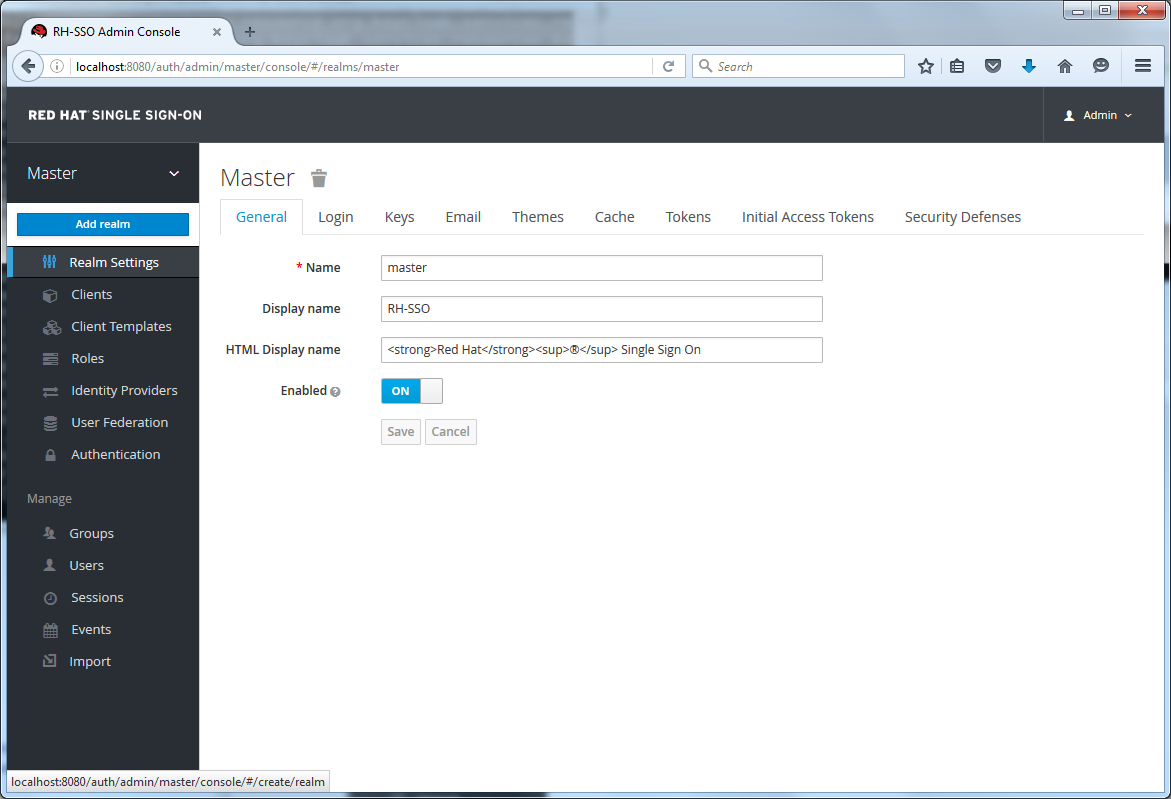
Creating a new realm is very simple. Mouse over the top left corner drop down menu that is titled with Master. If you are logged in the master realm this drop down menu lists all the realms created. The last entry of this drop down menu is always Add Realm. Click this to add a realm.
Add Realm Menu
This menu option will bring you to the Add Realm page. Specify the realm name you want to define and click the Create button. Alternatively you can import a JSON document that defines your new realm. We’ll go over this in more detail in the Export and Import chapter.
Create Realm
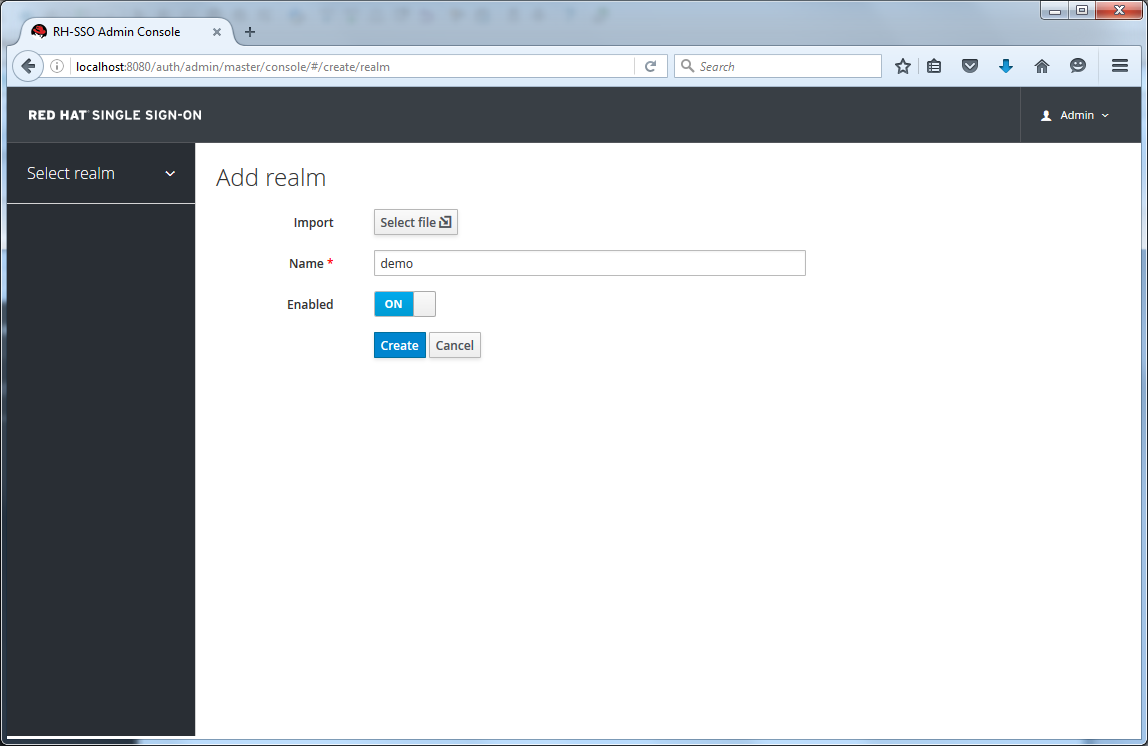
After creating the realm you are brought back to the main Admin Console page. The current realm will now be set to the realm you just created. You can switch between managing different realms by doing a mouse over on the top left corner drop down menu.
3.3. SSL Mode
Each realm has an SSL Mode associated with it. The SSL Mode defines the SSL/HTTPS requirements for interacting with the realm. Browsers and applications that interact with the realm must honor the SSL/HTTPS requirements defined by the SSL Mode or they will not be allowed to interact with the server.
Red Hat Single Sign-On is not set up by default to handle SSL/HTTPS. It is highly recommended that you either enable SSL on the Red Hat Single Sign-On server itself or on a reverse proxy in front of the Red Hat Single Sign-On server.
To configure the SSL Mode of your realm, you need to click on the Realm Settings left menu item and go to the Login tab.
Login Tab
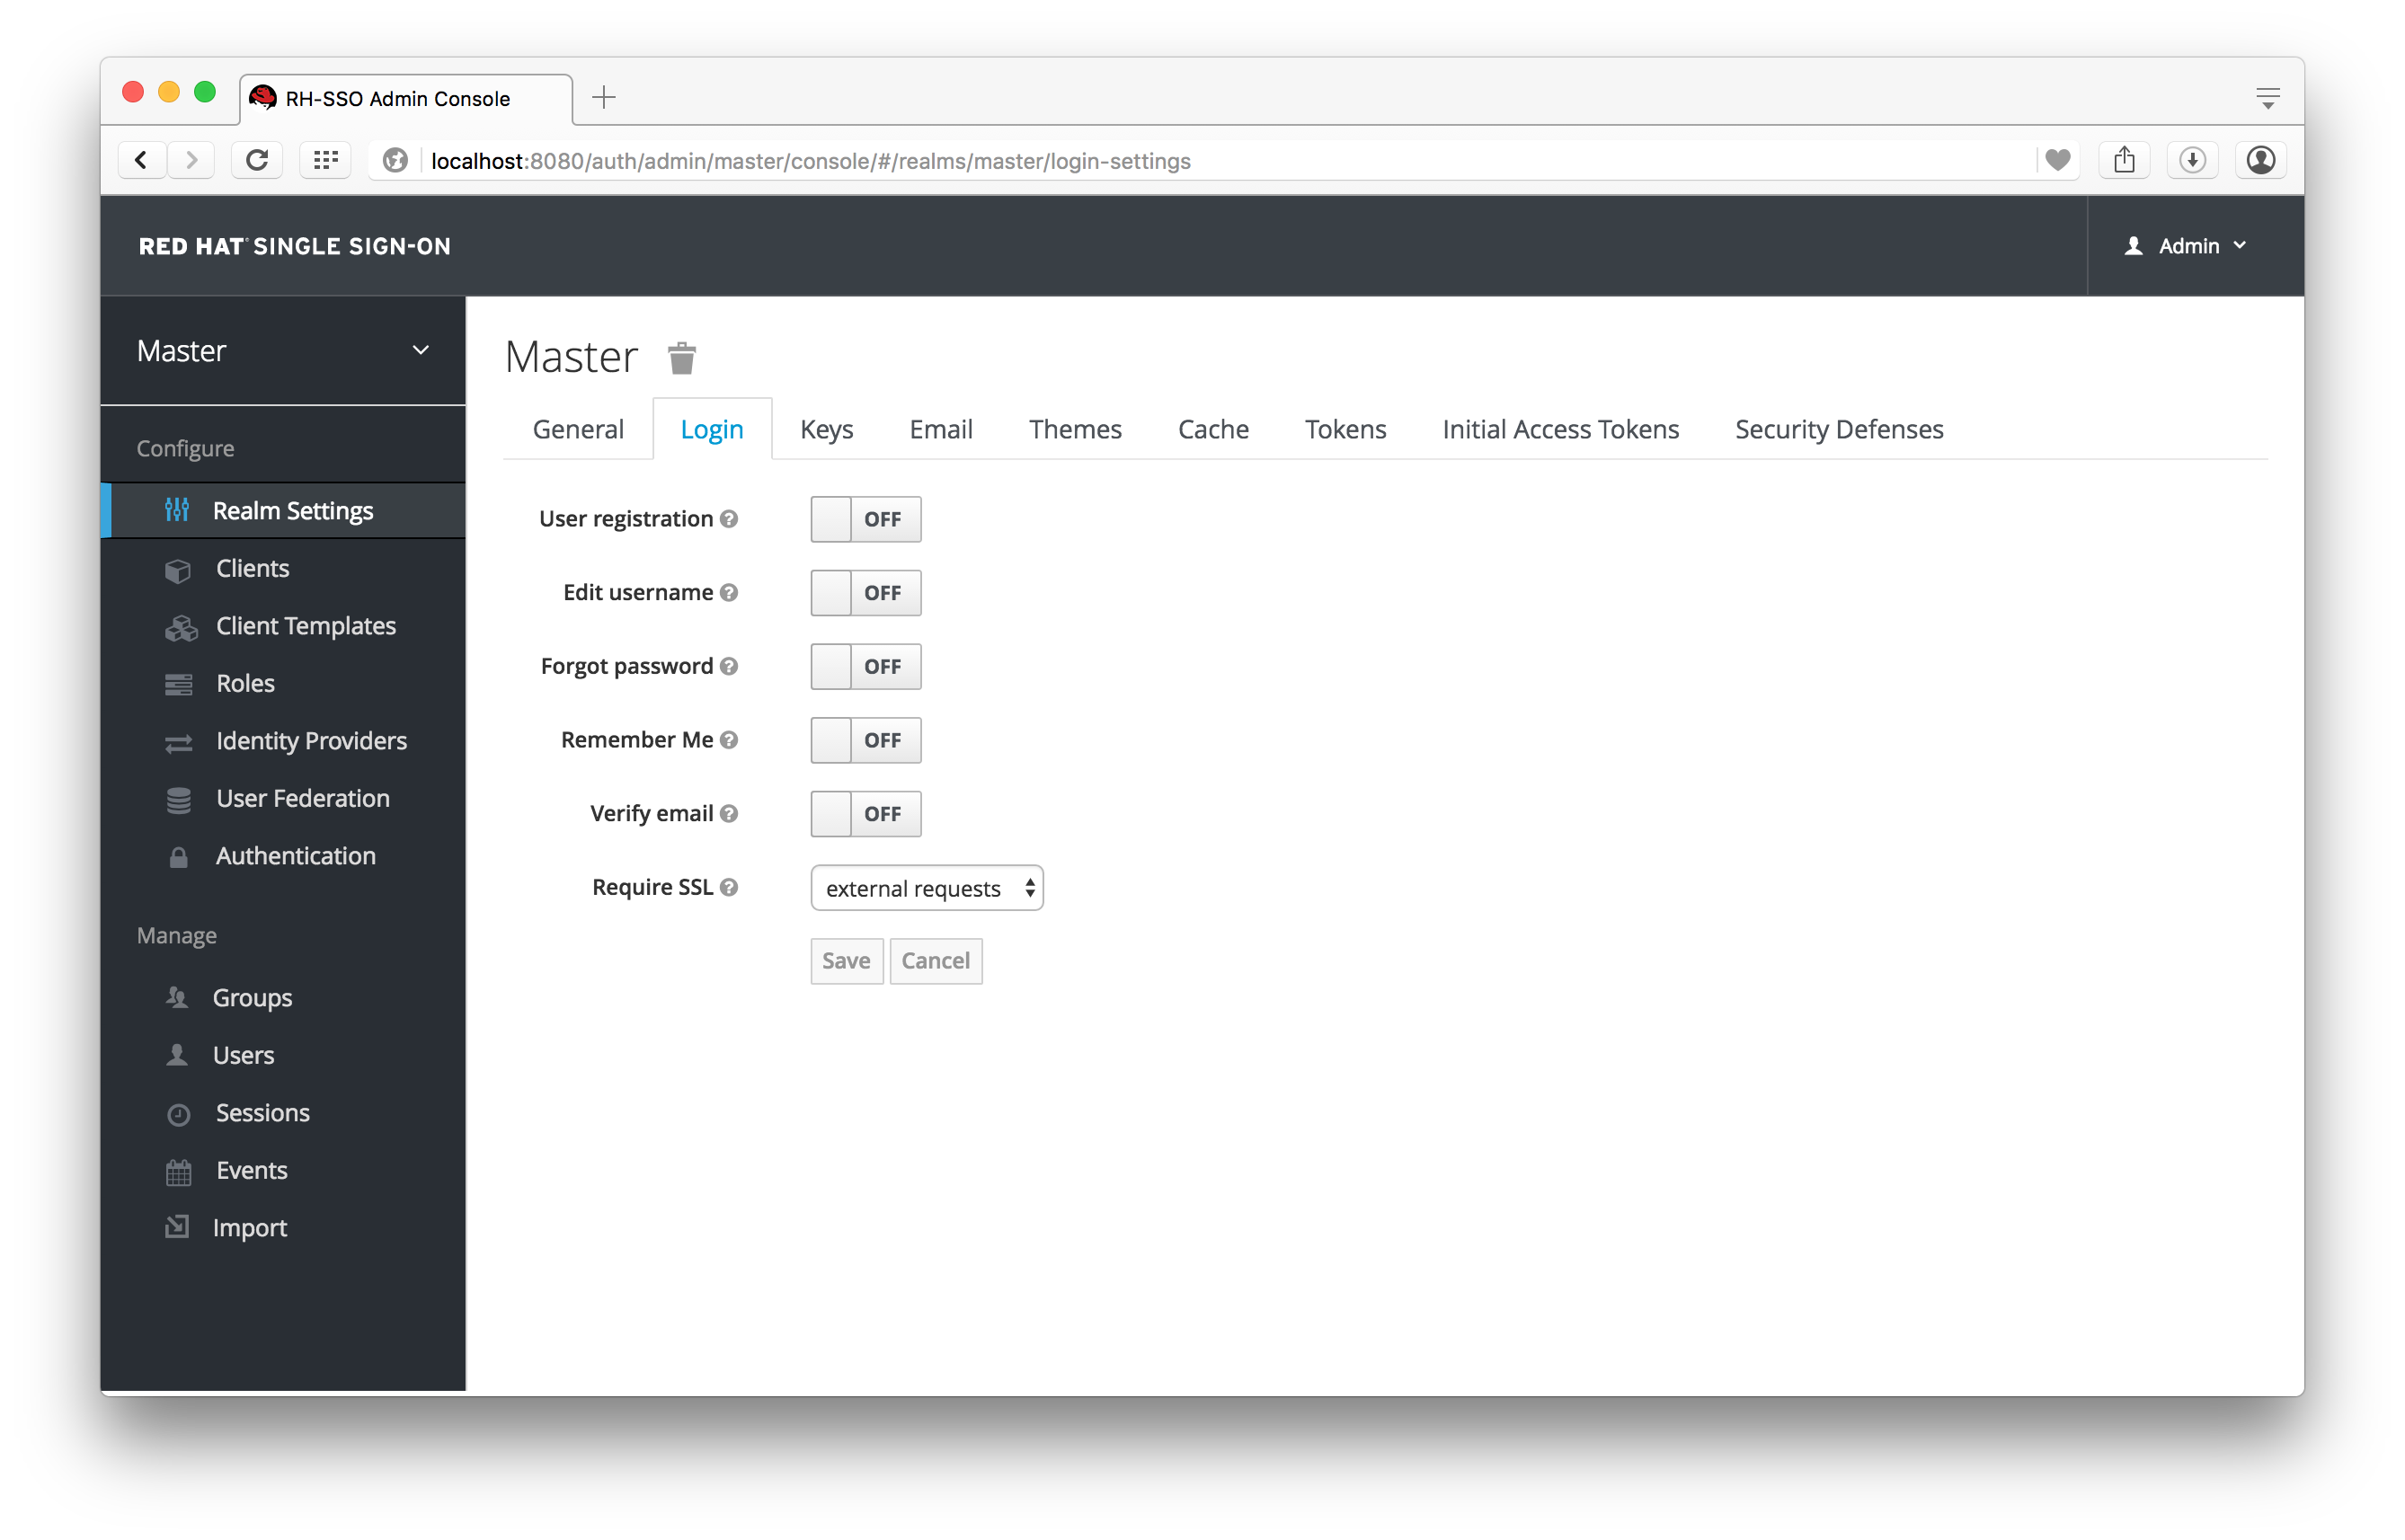
The Require SSL option allows you to pick the SSL Mode you want. Here is an explanation of each mode:
- external requests
-
Users can interact with Red Hat Single Sign-On so long as they stick to private IP addresses like
localhost,127.0.0.1,10.0.x.x,192.168.x.x, and172..16.x.x. If you try to access Red Hat Single Sign-On from a non-private IP address you will get an error. - none
- Red Hat Single Sign-On does not require SSL. This should really only be used in development when you are playing around with things and don’t want to bother configuring SSL on your server.
- all
- Red Hat Single Sign-On requires SSL for all IP addresses.
3.4. Realm Key Pairs
The authentication protocols that are used by Red Hat Single Sign-On require cryptographic signatures and sometimes even encryption. Red Hat Single Sign-On uses an asymmetric key pair, a private and public key to accomplish this. When a realm is created a key pair is automatically generated. It is recommended that you cycle this key pair occasionally. How often you do this is dependent on your organizational needs and security requirements as you have to make sure every application that needs the public key or certificate of your realm gets this updated. This can be a lot of work!
To cycle a key pair click on the Realm Settings left menu item, go to the Keys tab, and push the Generate new keys button.
Keys tab
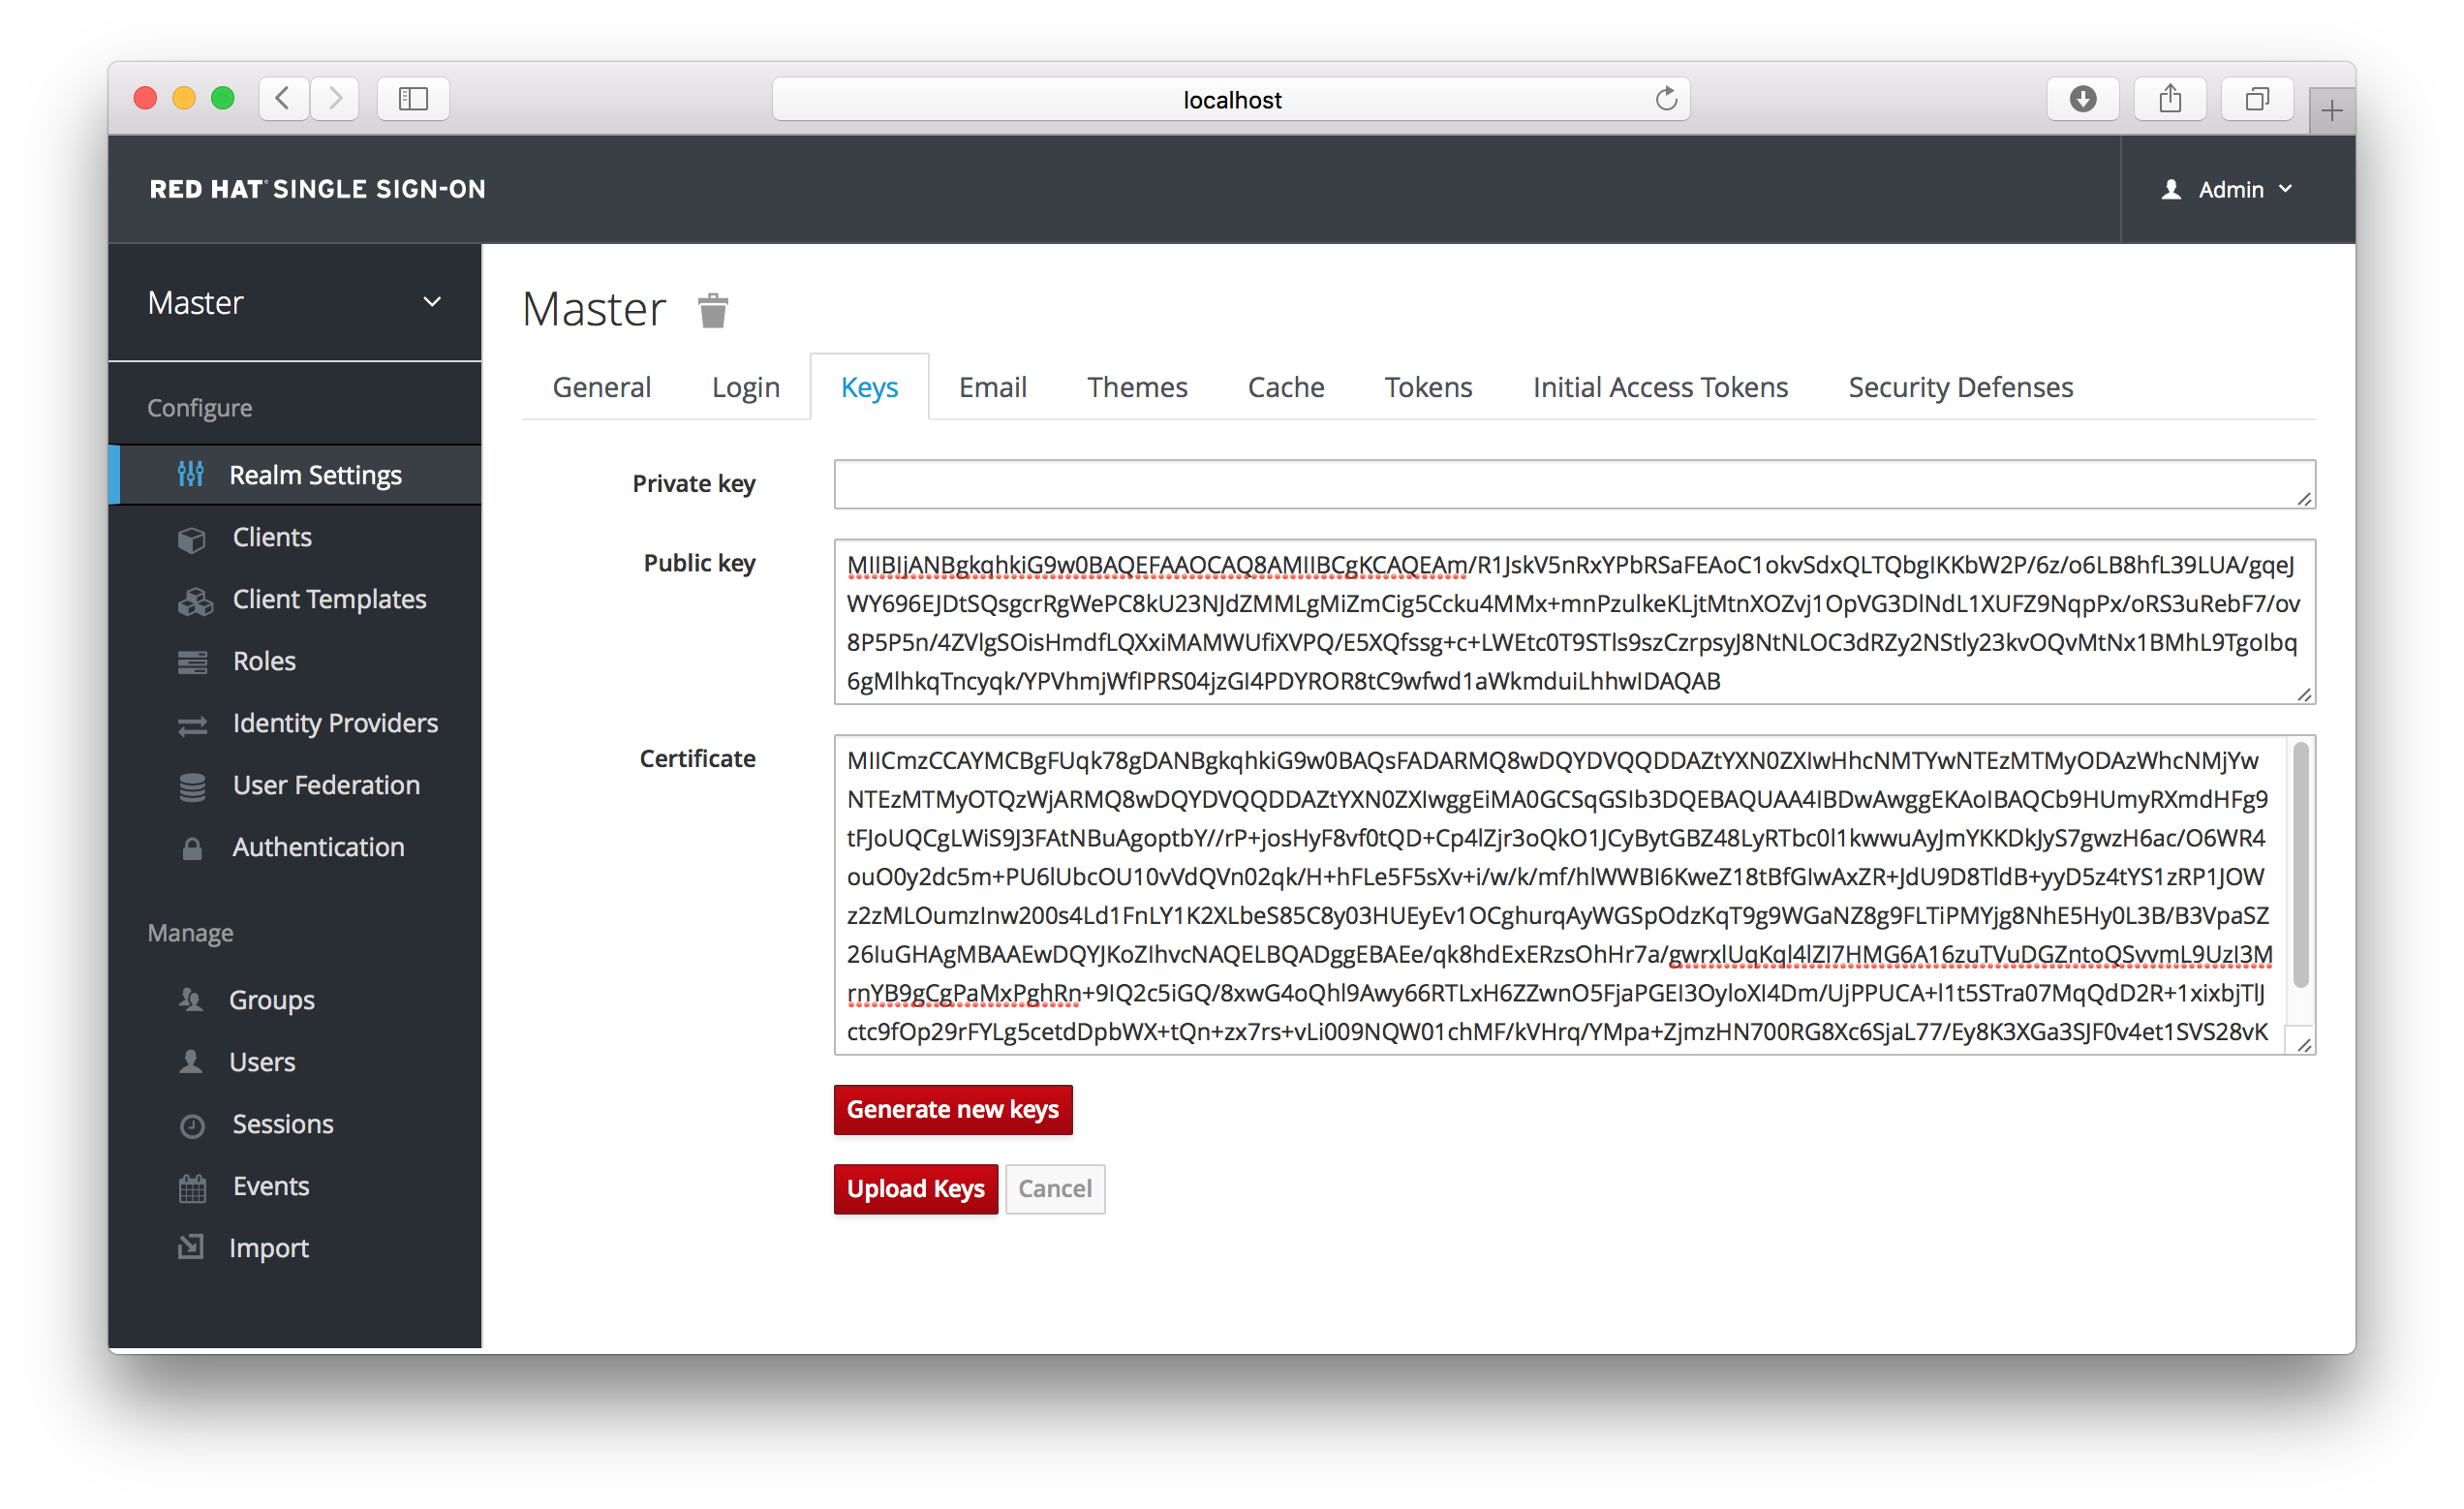
This will create a brand new key pair for your realm.
3.5. Clearing Server Caches
Red Hat Single Sign-On will cache everything it can in memory within the limits of your JVM and/or the limits you’ve configured it for. If the Red Hat Single Sign-On database is modified by a third party (i.e. a DBA) outside the scope of the server’s REST APIs or Admin Console there’s a chance parts of the in-memory cache may be stale. You can clear the realm and user caches from the Admin Console by going to the Realm Settings left menu item and the Cache tab.
Keys tab

Just click the clear button on the cache you want to evict.
3.6. Email Settings
Red Hat Single Sign-On sends emails to users to verify their email address, when they forget their passwords, or when an admin needs to receive notifications about a server event. To enable Red Hat Single Sign-On to send emails you need to provide Red Hat Single Sign-On with your SMTP server settings. This is configured per realm. Go to the Realm Settings left menu item and click the Email tab.
Email Tab
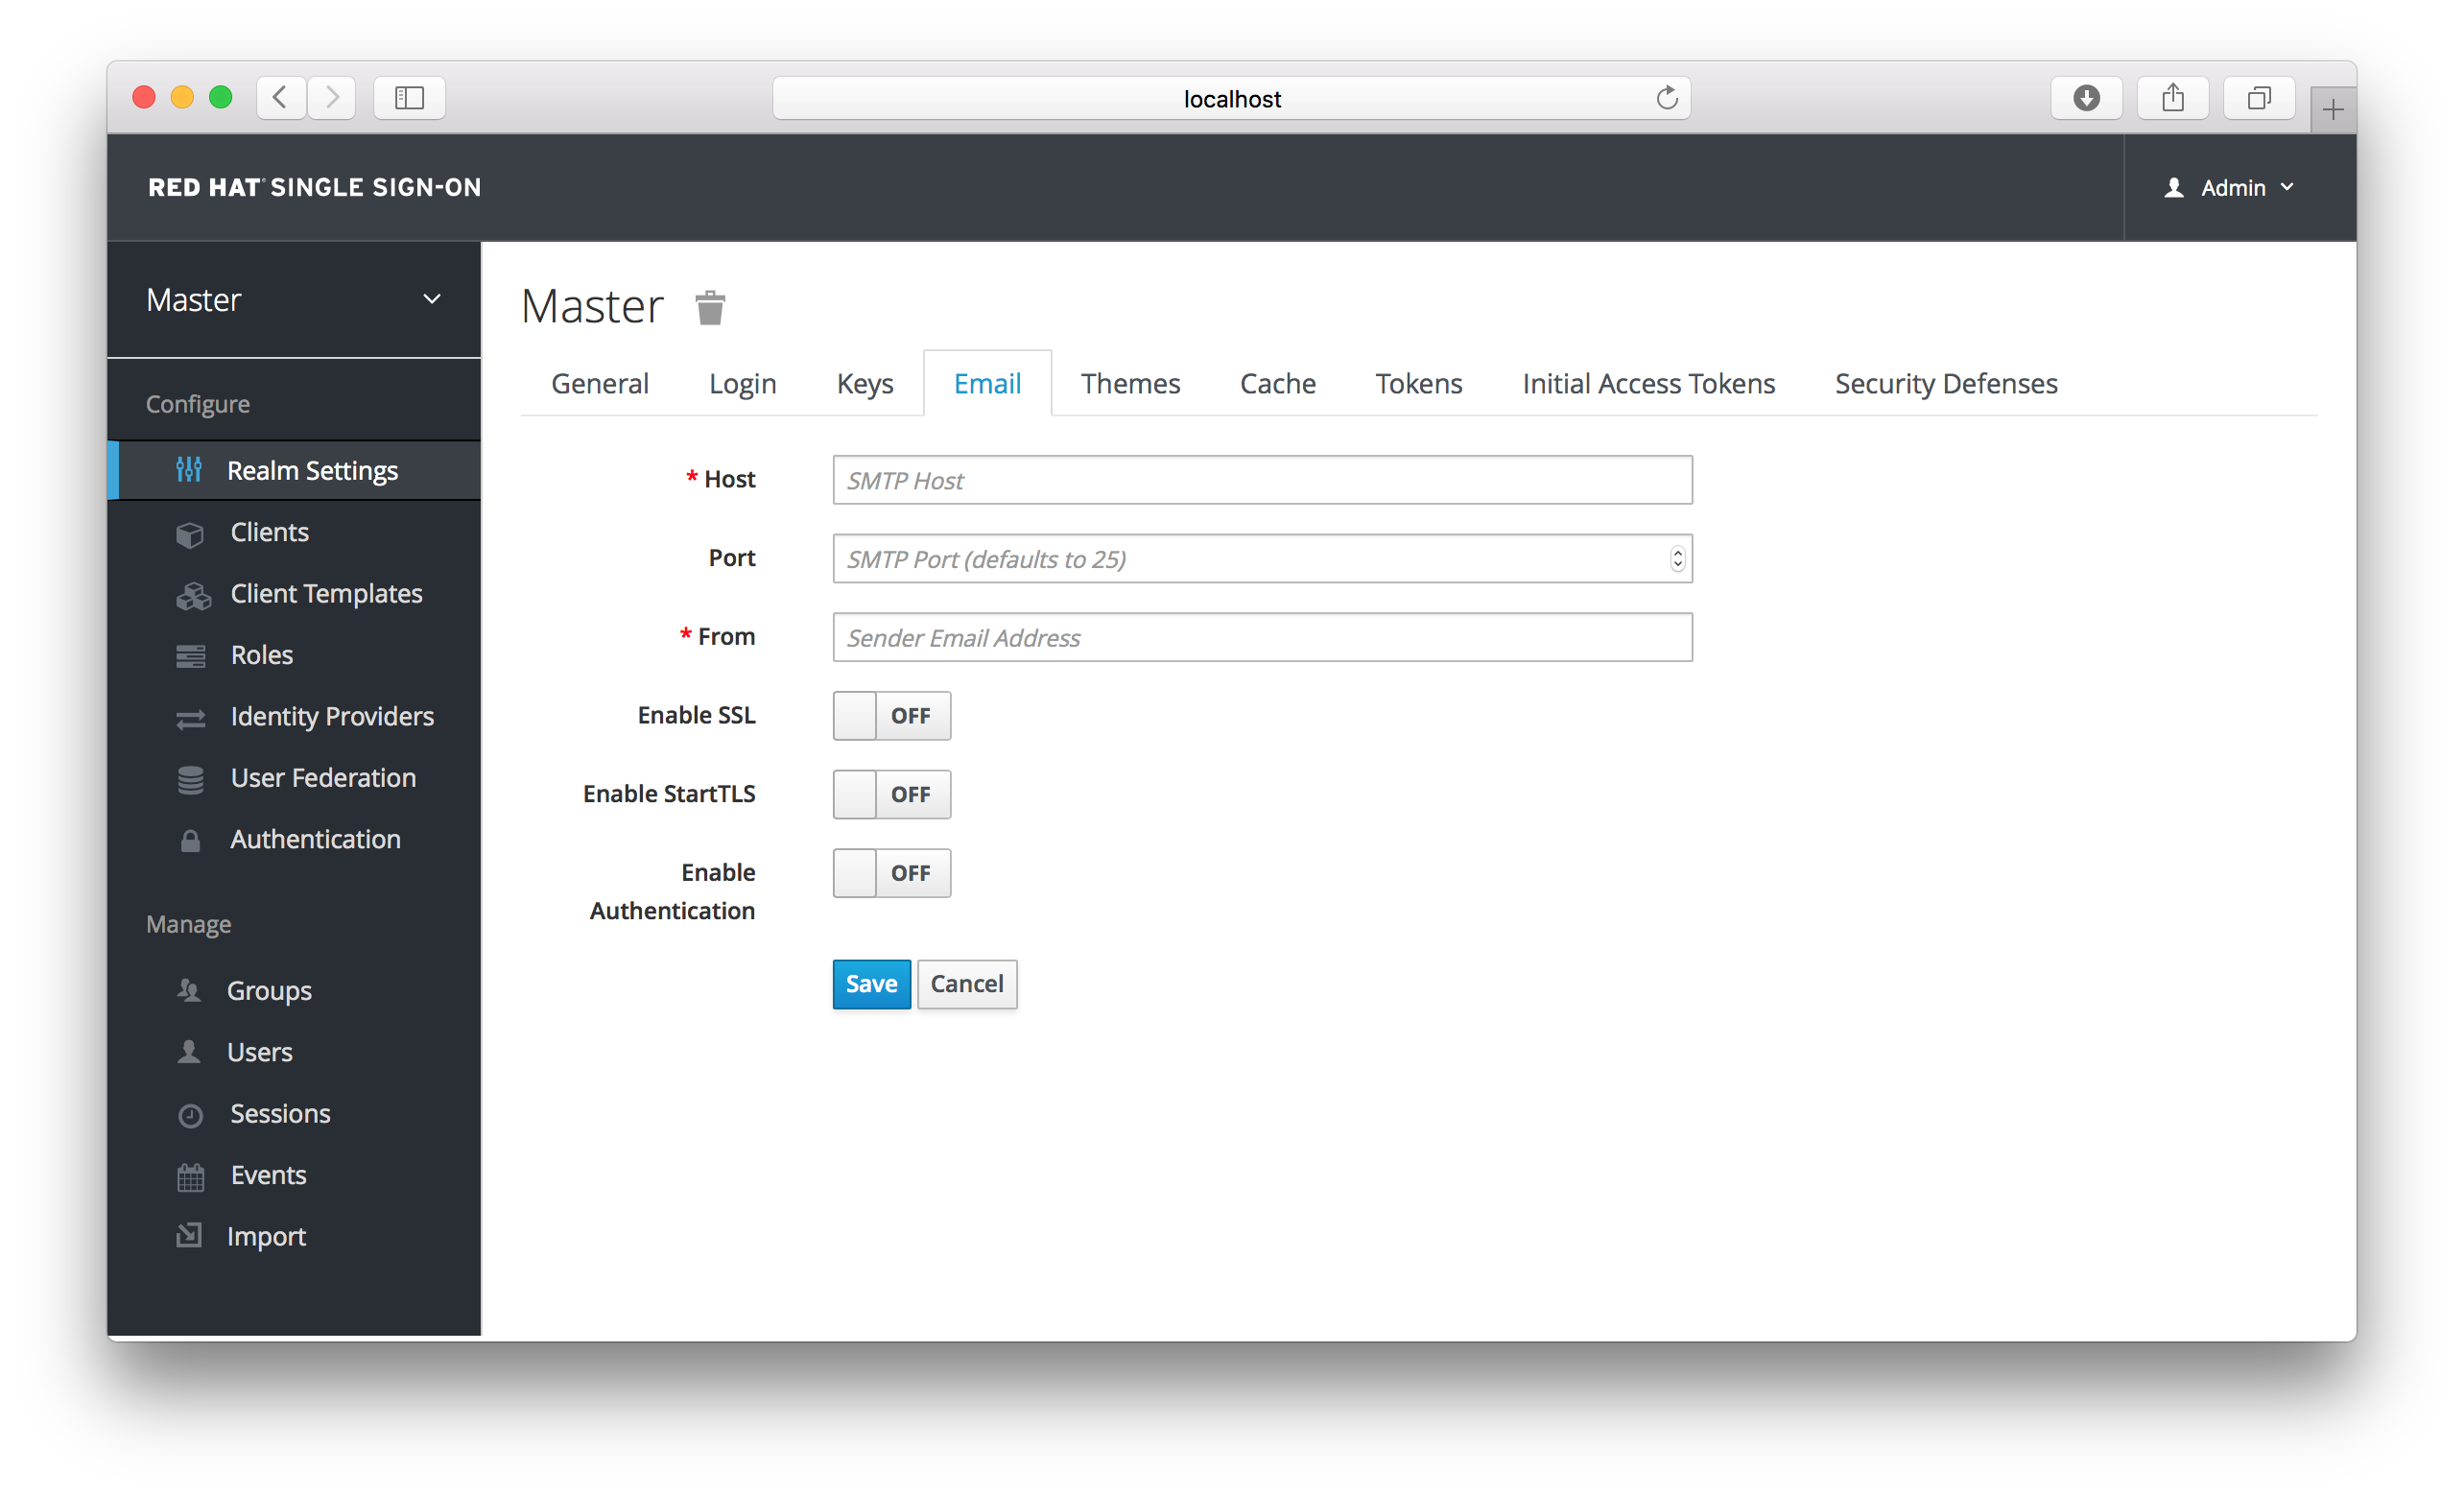
As emails are used for recovering usernames and passwords it’s recommended to use SSL or TLS, especially if the SMTP server is on an external network. To enable SSL click on Enable SSL or to enable TLS click on Enable TLS. You will most likely also need to change the Port (the default port for SSL/TLS is 465).
If your SMTP server requires authentication click on Enable Authentication and insert the Username and Password.
3.7. Themes and Internationalization
Themes allow you to change the look and feel of any UI in Red Hat Single Sign-On. Themes are configured per realm. To change a theme go to the Realm Settings left menu item and click on the Themes tab.
Themes Tab
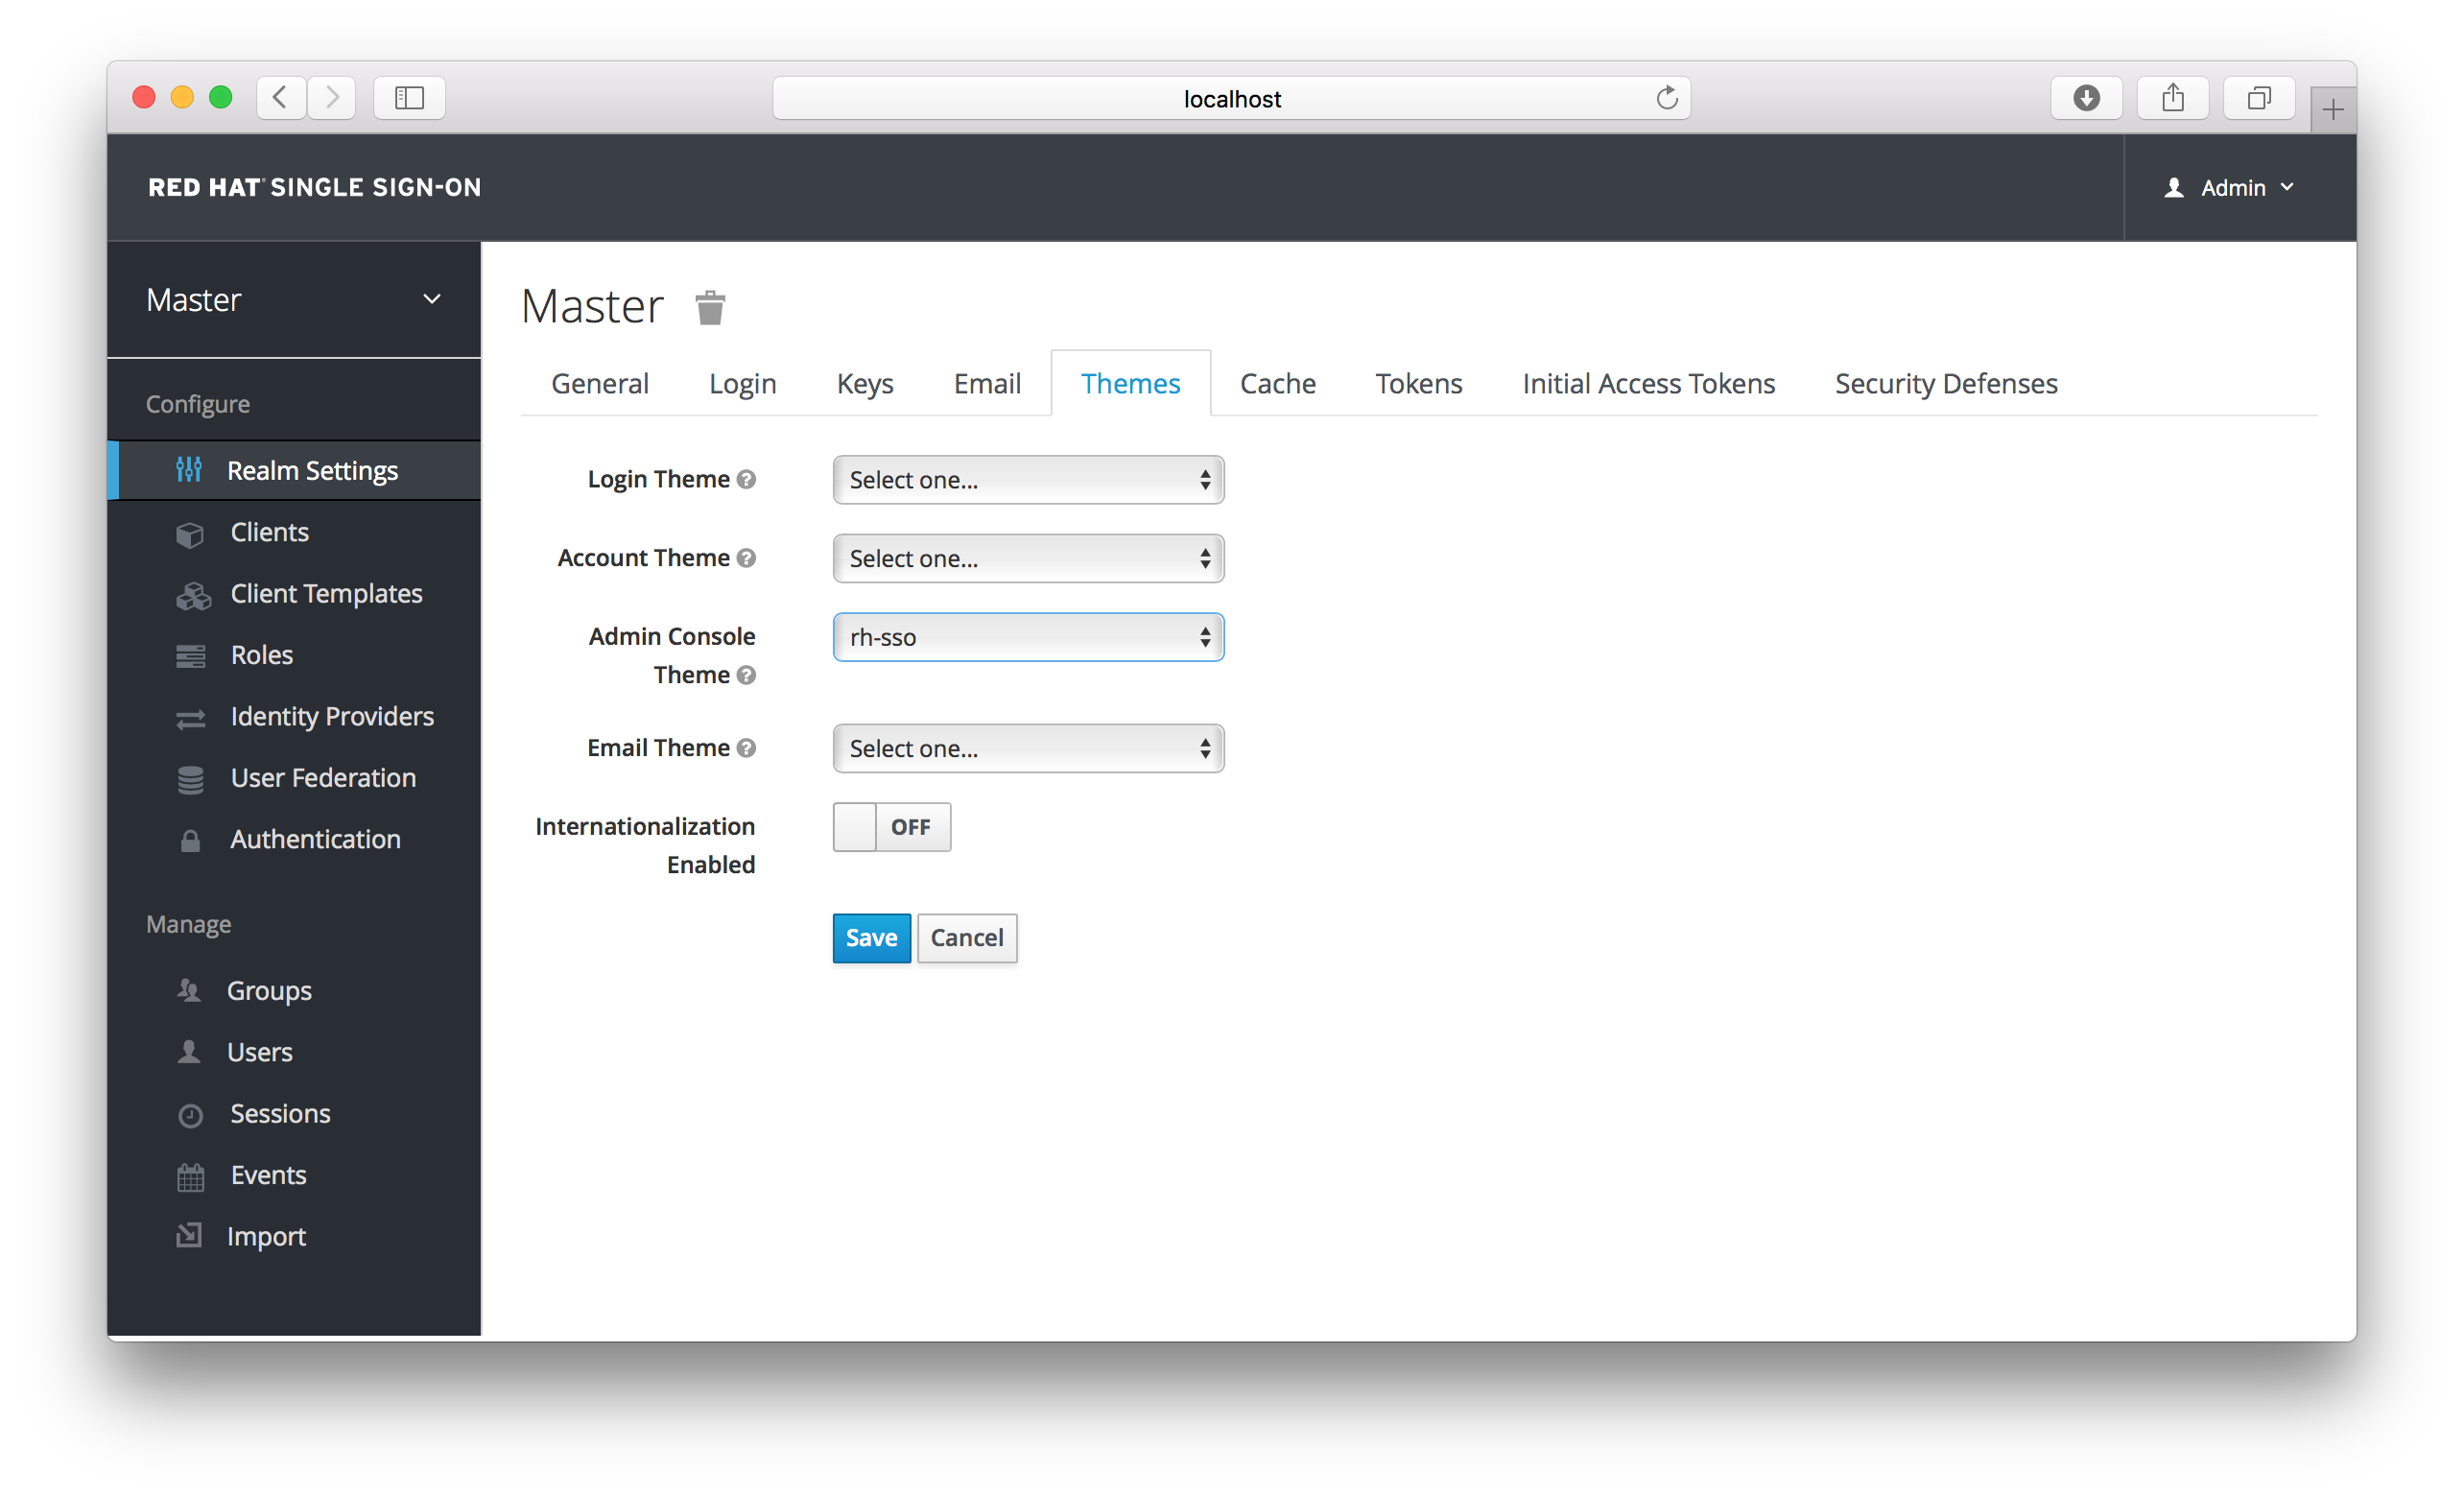
Pick the theme you want for each UI category and click Save.
- Login Theme
- Username password entry, OTP entry, new user registration, and other similar screens related to login.
- Account Theme
- Each user has an User Account Management UI.
- Admin Console Theme
- The skin of the Red Hat Single Sign-On Admin Console.
- Email Theme
- Whenever Red Hat Single Sign-On has to send out an email, it uses templates defined in this theme to craft the email.
The Server Developer Guide goes into how to create a new themes or modify existing ones.
3.7.1. Internationalization
Every UI screen is internationalized in Red Hat Single Sign-On. The default language is English, but if you turn on the Internationalization switch on the Theme tab you can choose which locales you want to support and what the default locale will be. The next time a user logs in, they will be able to choose a language on the login page to use for the login screens, User Account Management UI, and Admin Console. The Server Developer Guide explains how you can offer additional languages.
Chapter 4. User Management
This section describes the administration functions for managing users.
4.1. Searching For Users
If you need to manage a specific user, click on Users in the left menu bar.
Users
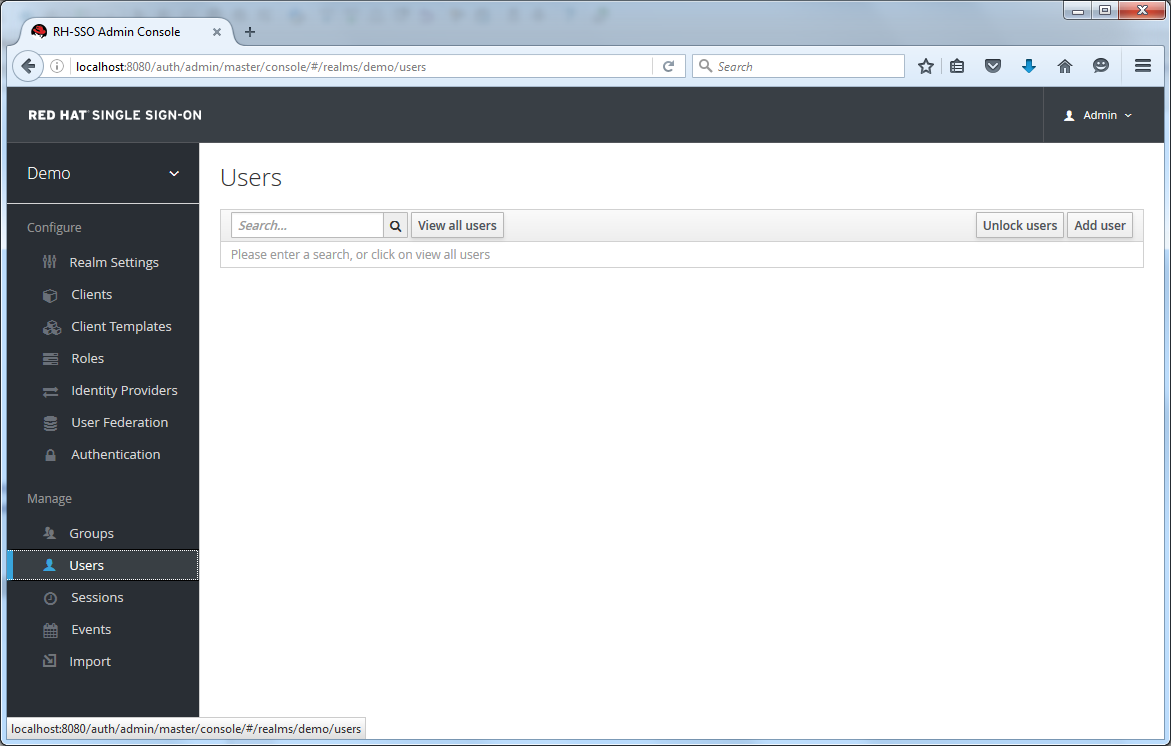
This menu option brings you to the user list page. In the search box you can type in a full name, last name, or email address you want to search for in the user database. The query will bring up all users that match your criteria. The View all users button will list every user in the system. This will search just local Red Hat Single Sign-On database and not the federated database (ie. LDAP) because some backends like LDAP don’t have a way to page through users. So if you want the users from federated backend to be synced into Red Hat Single Sign-On database you need to either:
- Adjust search criteria. That will sync just the backend users matching the criteria into Red Hat Single Sign-On database.
-
Go to
User Federationtab and clickSync all usersorSync changed usersin the page with your federation provider.
See User Federation for more details.
4.2. Creating New Users
To create a user click on Users in the left menu bar.
Users
This menu option brings you to the user list page. On the right side of the empty user list, you should see an Add User button. Click that to start creating your new user.
Add User
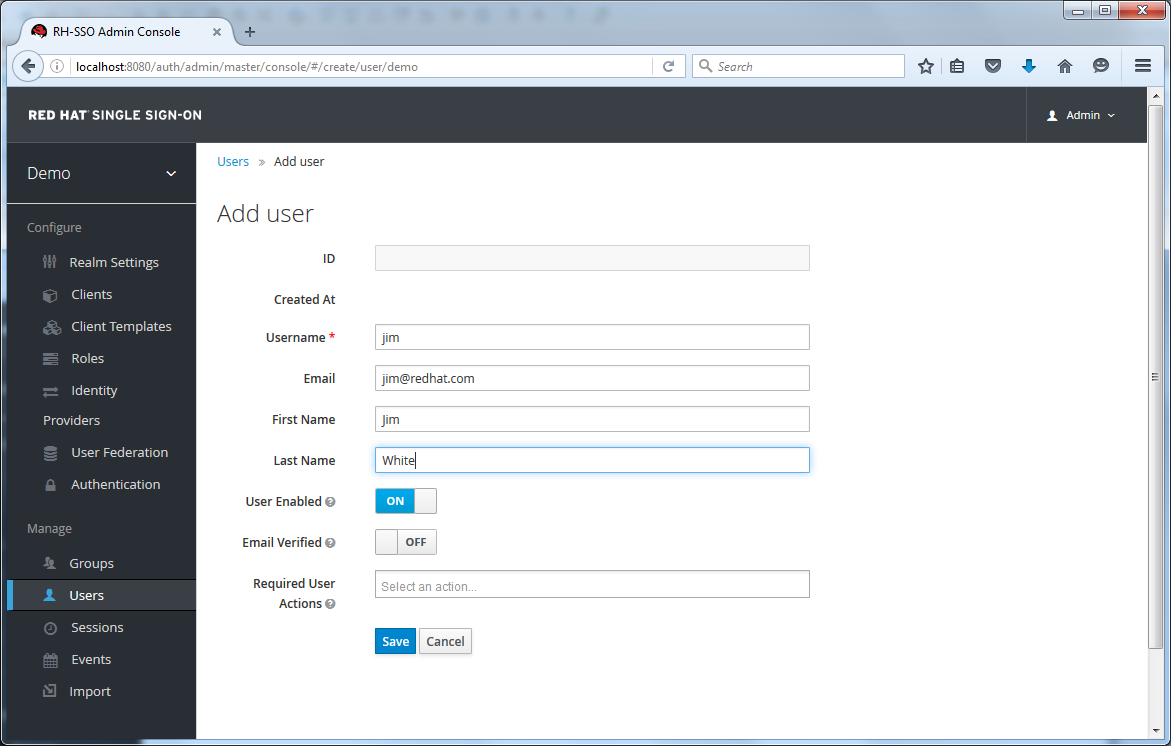
The only required field is Username. Click save. This will bring you to the management page for your new user.
4.3. User Attributes
Beyond basic user metadata like name and email, you can store arbitrary user attributes. Choose a user to manage then click on the Attributes tab.
Users
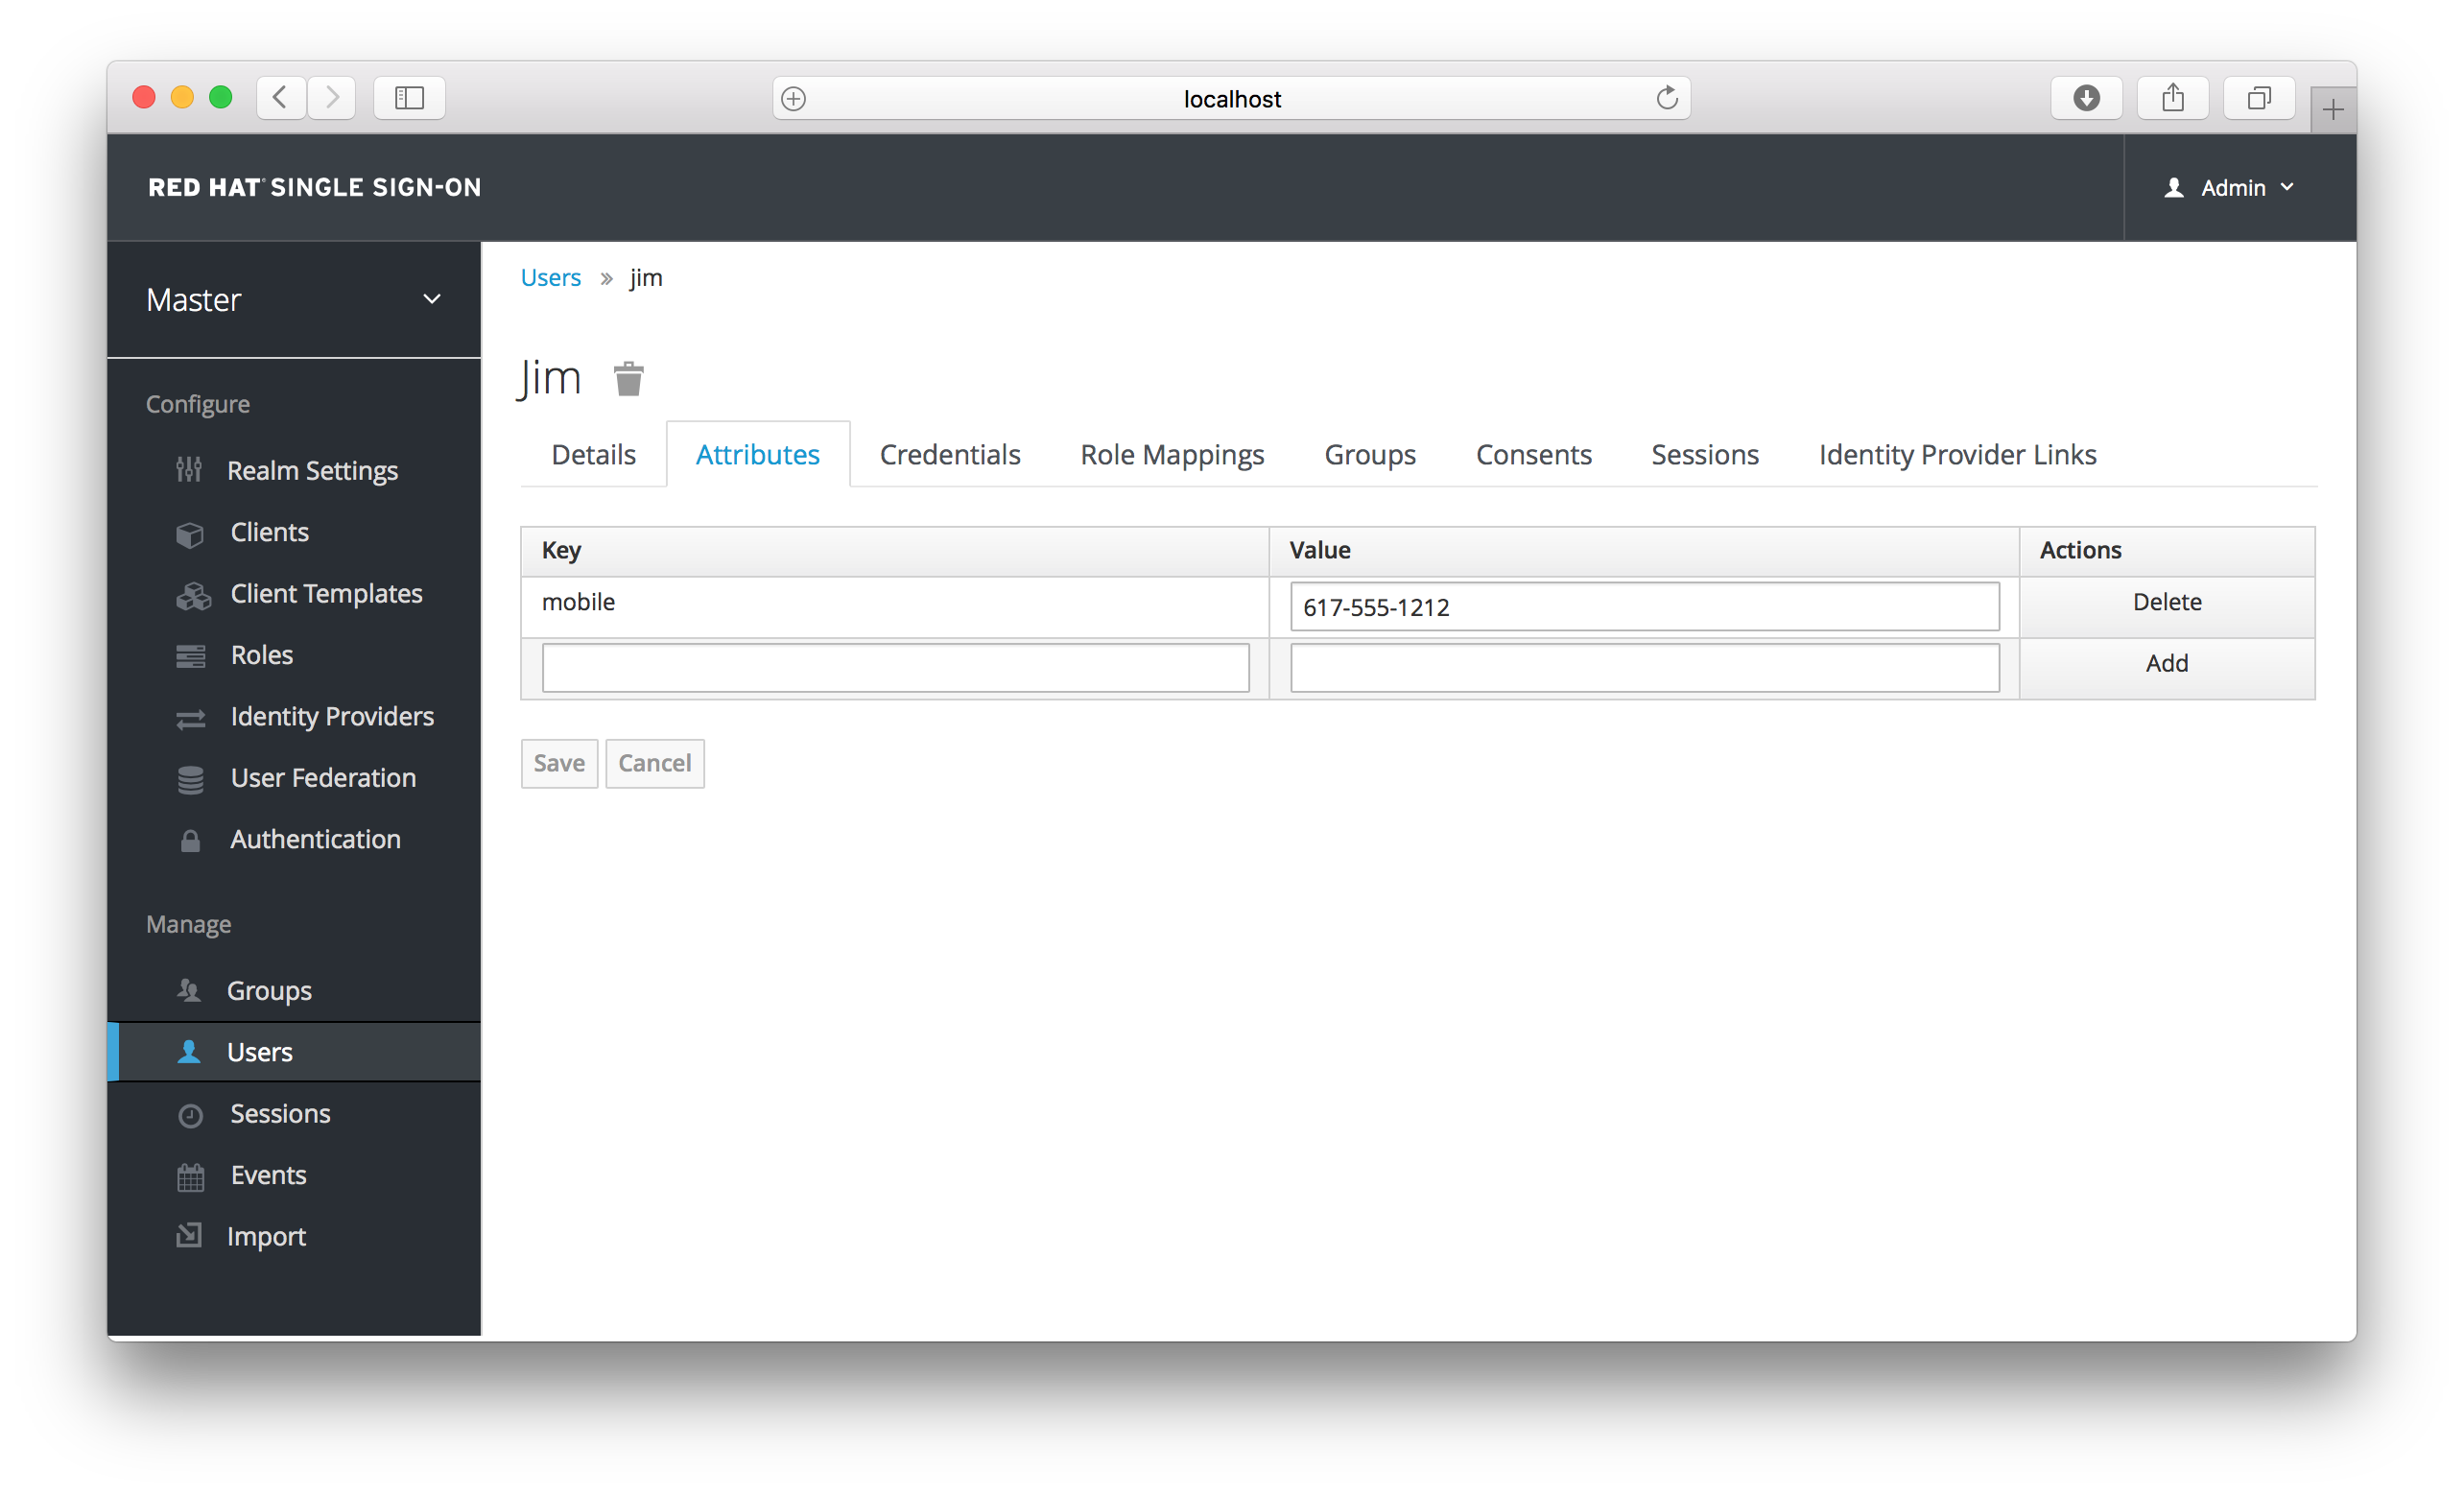
Enter in the attribute name and value in the empty fields and click the Add button next to it to add a new field. Note that any edits you make on this page will not be stored until you hit the Save button.
4.4. User Credentials
When viewing a user if you go to the Credentials tab you can manage a user’s credentials.
Credential Management
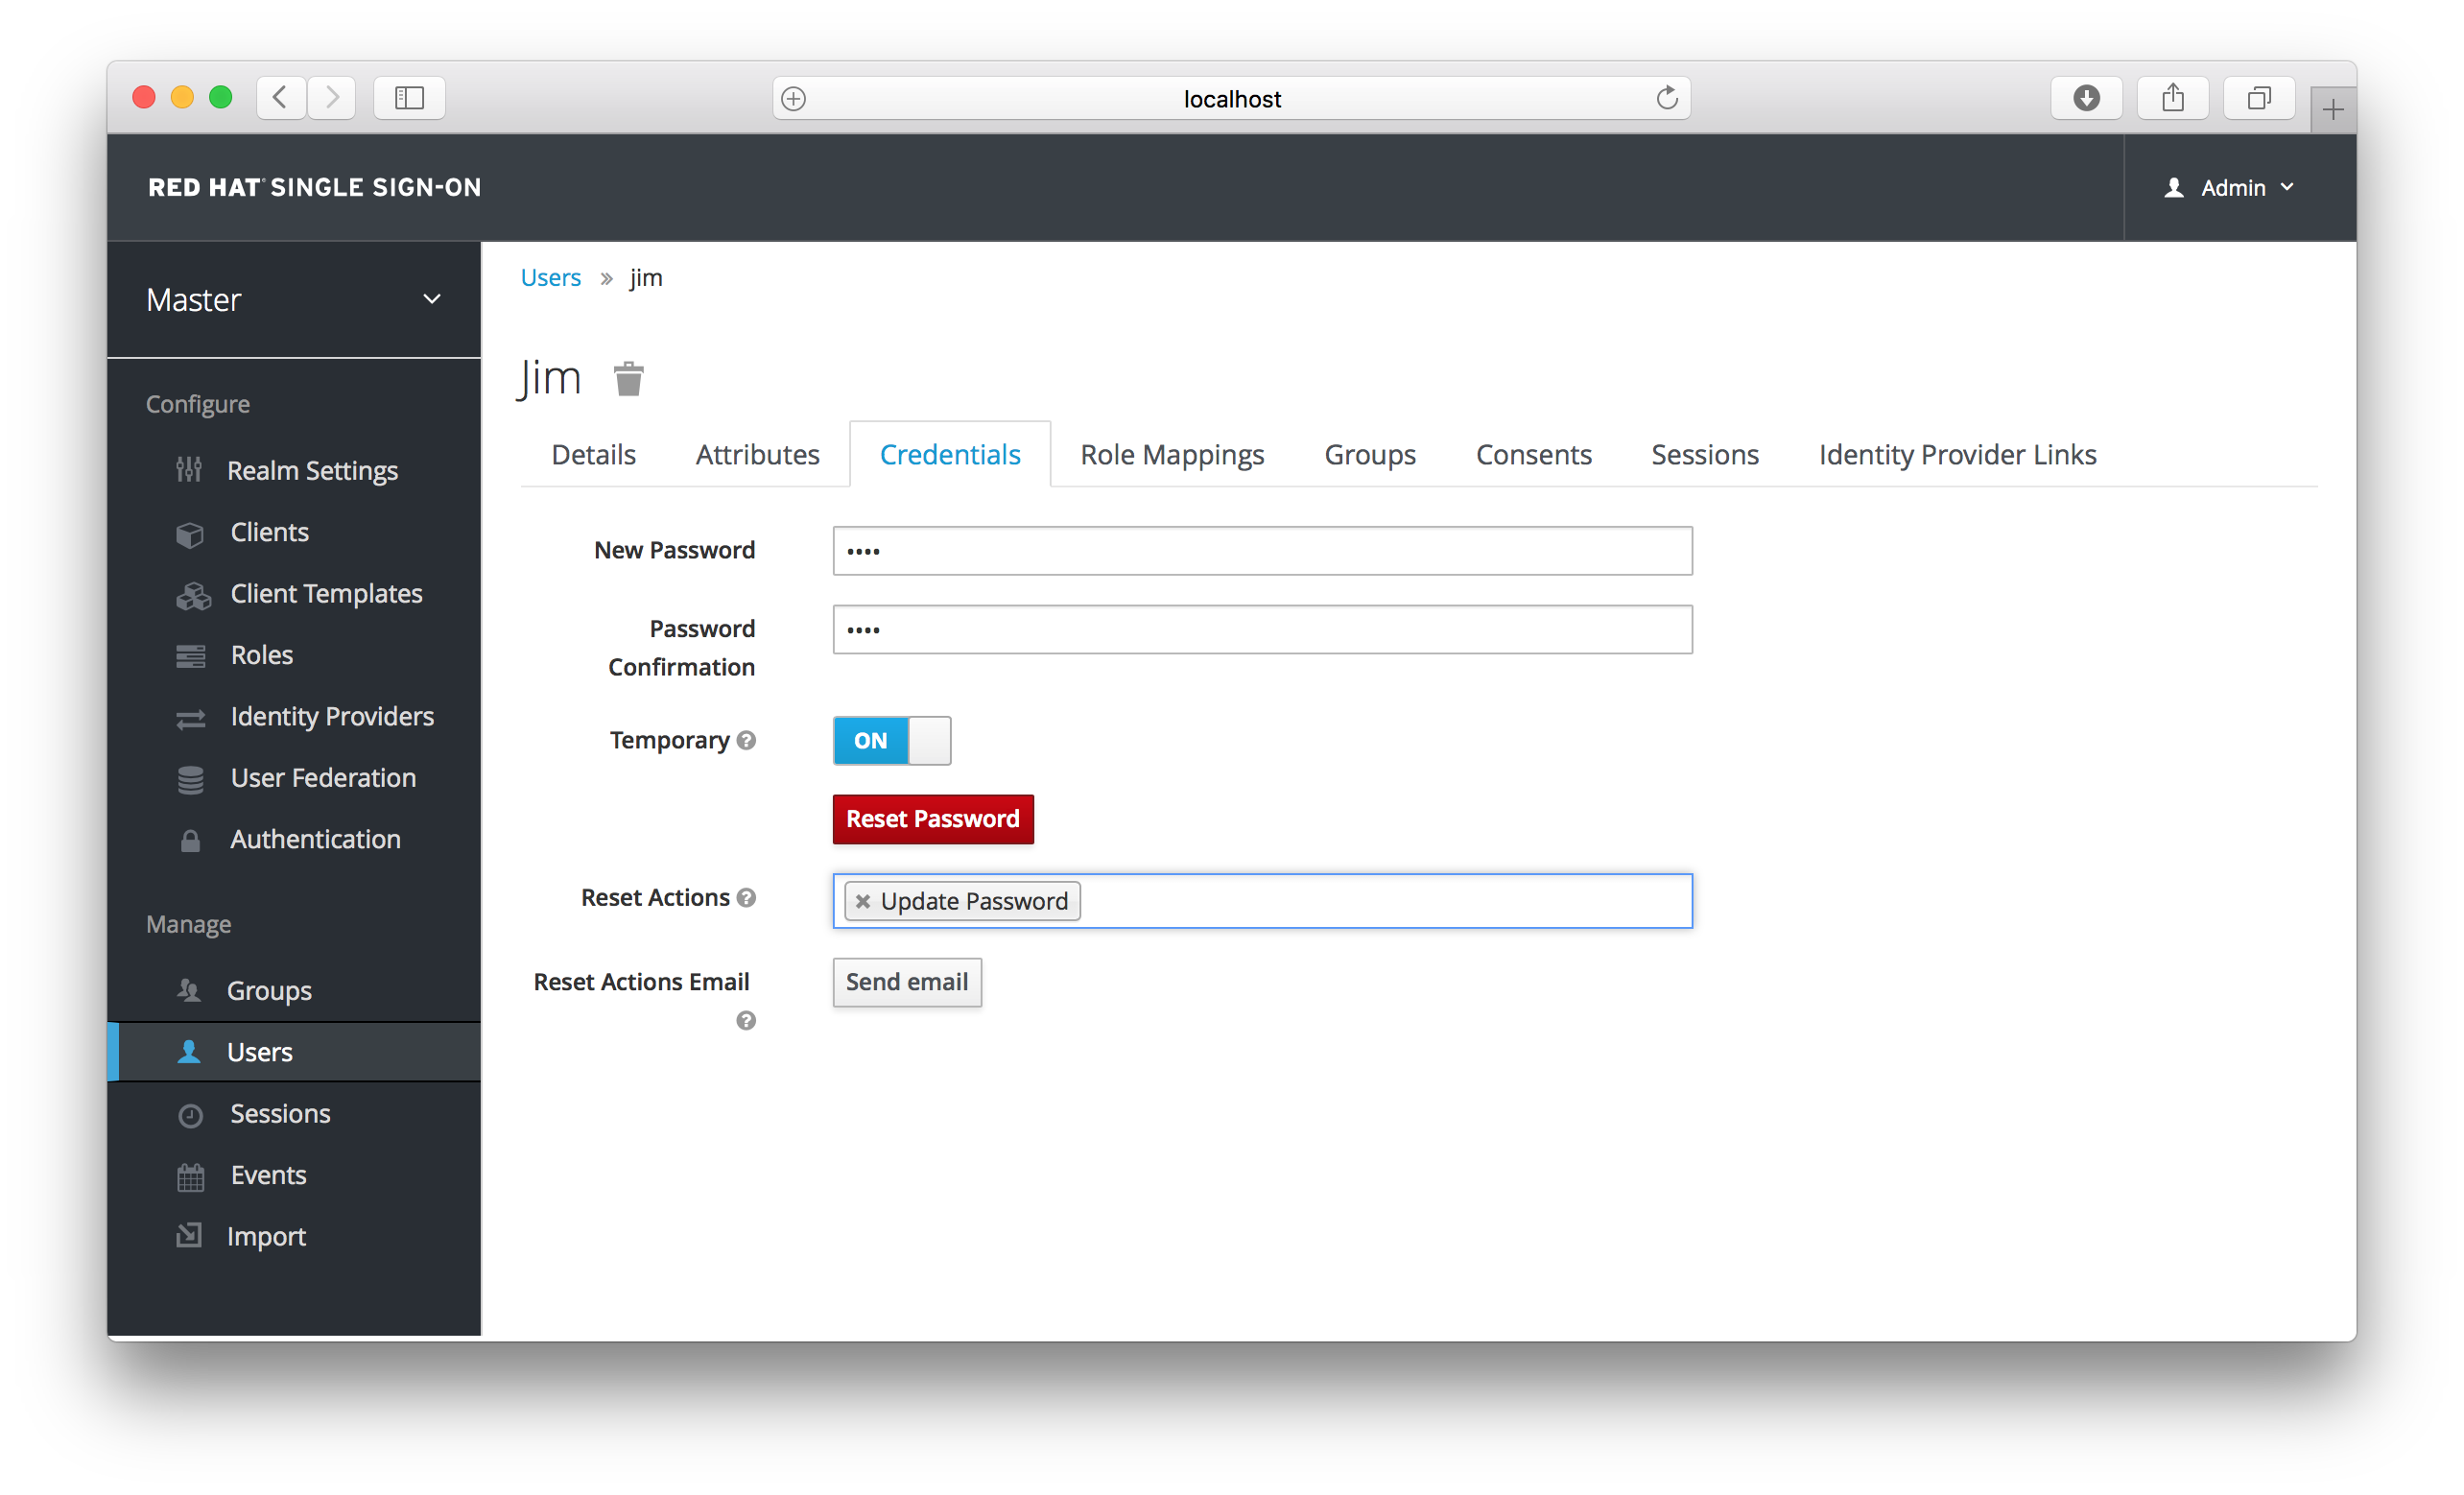
4.4.1. Changing Passwords
To change a user’s password, type in a new one. A Reset Password button will show up that you click after you’ve typed everything in. If the Temporary switch is on, this new password can only be used once and the user will be asked to change their password after they have logged in.
Alternatively, if you have email set up, you can send an email to the user that asks them to reset their password. Choose Update Password from the Reset Actions list box and click the Reset Actions Email. The sent email contains a link that will bring the user to the update password screen.
4.4.2. Changing OTPs
You cannot configure One-Time Passwords for a specific user within the Admin Console. This is the responsibility of the user. If the user has lost their OTP generator all you can do is disable OTP for them on the Credentials tab. If OTP is optional in your realm, the user will have to go to the User Account Management service to re-configure a new OTP generator. If OTP is required, then the user will be asked to re-configure a new OTP generator when they log in.
Like passwords, you can alternatively send an email to the user that will ask them to reset their OTP generator. Choose Configure OTP in the Reset Actions list box and click the Send Email button. The sent email contains a link that will bring the user to the OTP setup screen.
4.5. Required Actions
Required Actions are tasks that a user must finish before they are allowed to log in. A user must provide their credentials before required actions are executed. Once a required action is completed, the user will not have to perform the action again. Here are an explanation of some of the built in required action types:
- Update Password
- When set, a user must change their password.
- Configure OTP
- When set, a user must configure a one-time password generator on their mobile device using either the Free OTP or Google Authenticator appliation.
- Verify Email
- When set, a user must verify that they have a valid email account. An email will be sent to the user with a link they have to click. Once this workflow is successfully completed, they will be allowed to log in.
- Update Profile
- This required action asks the user to update their profile information, i.e. their name, address, email, and/or phone number.
Admins can add required actions for each individual user within the user’s Details tab in the Admin Console.
Setting Required Action
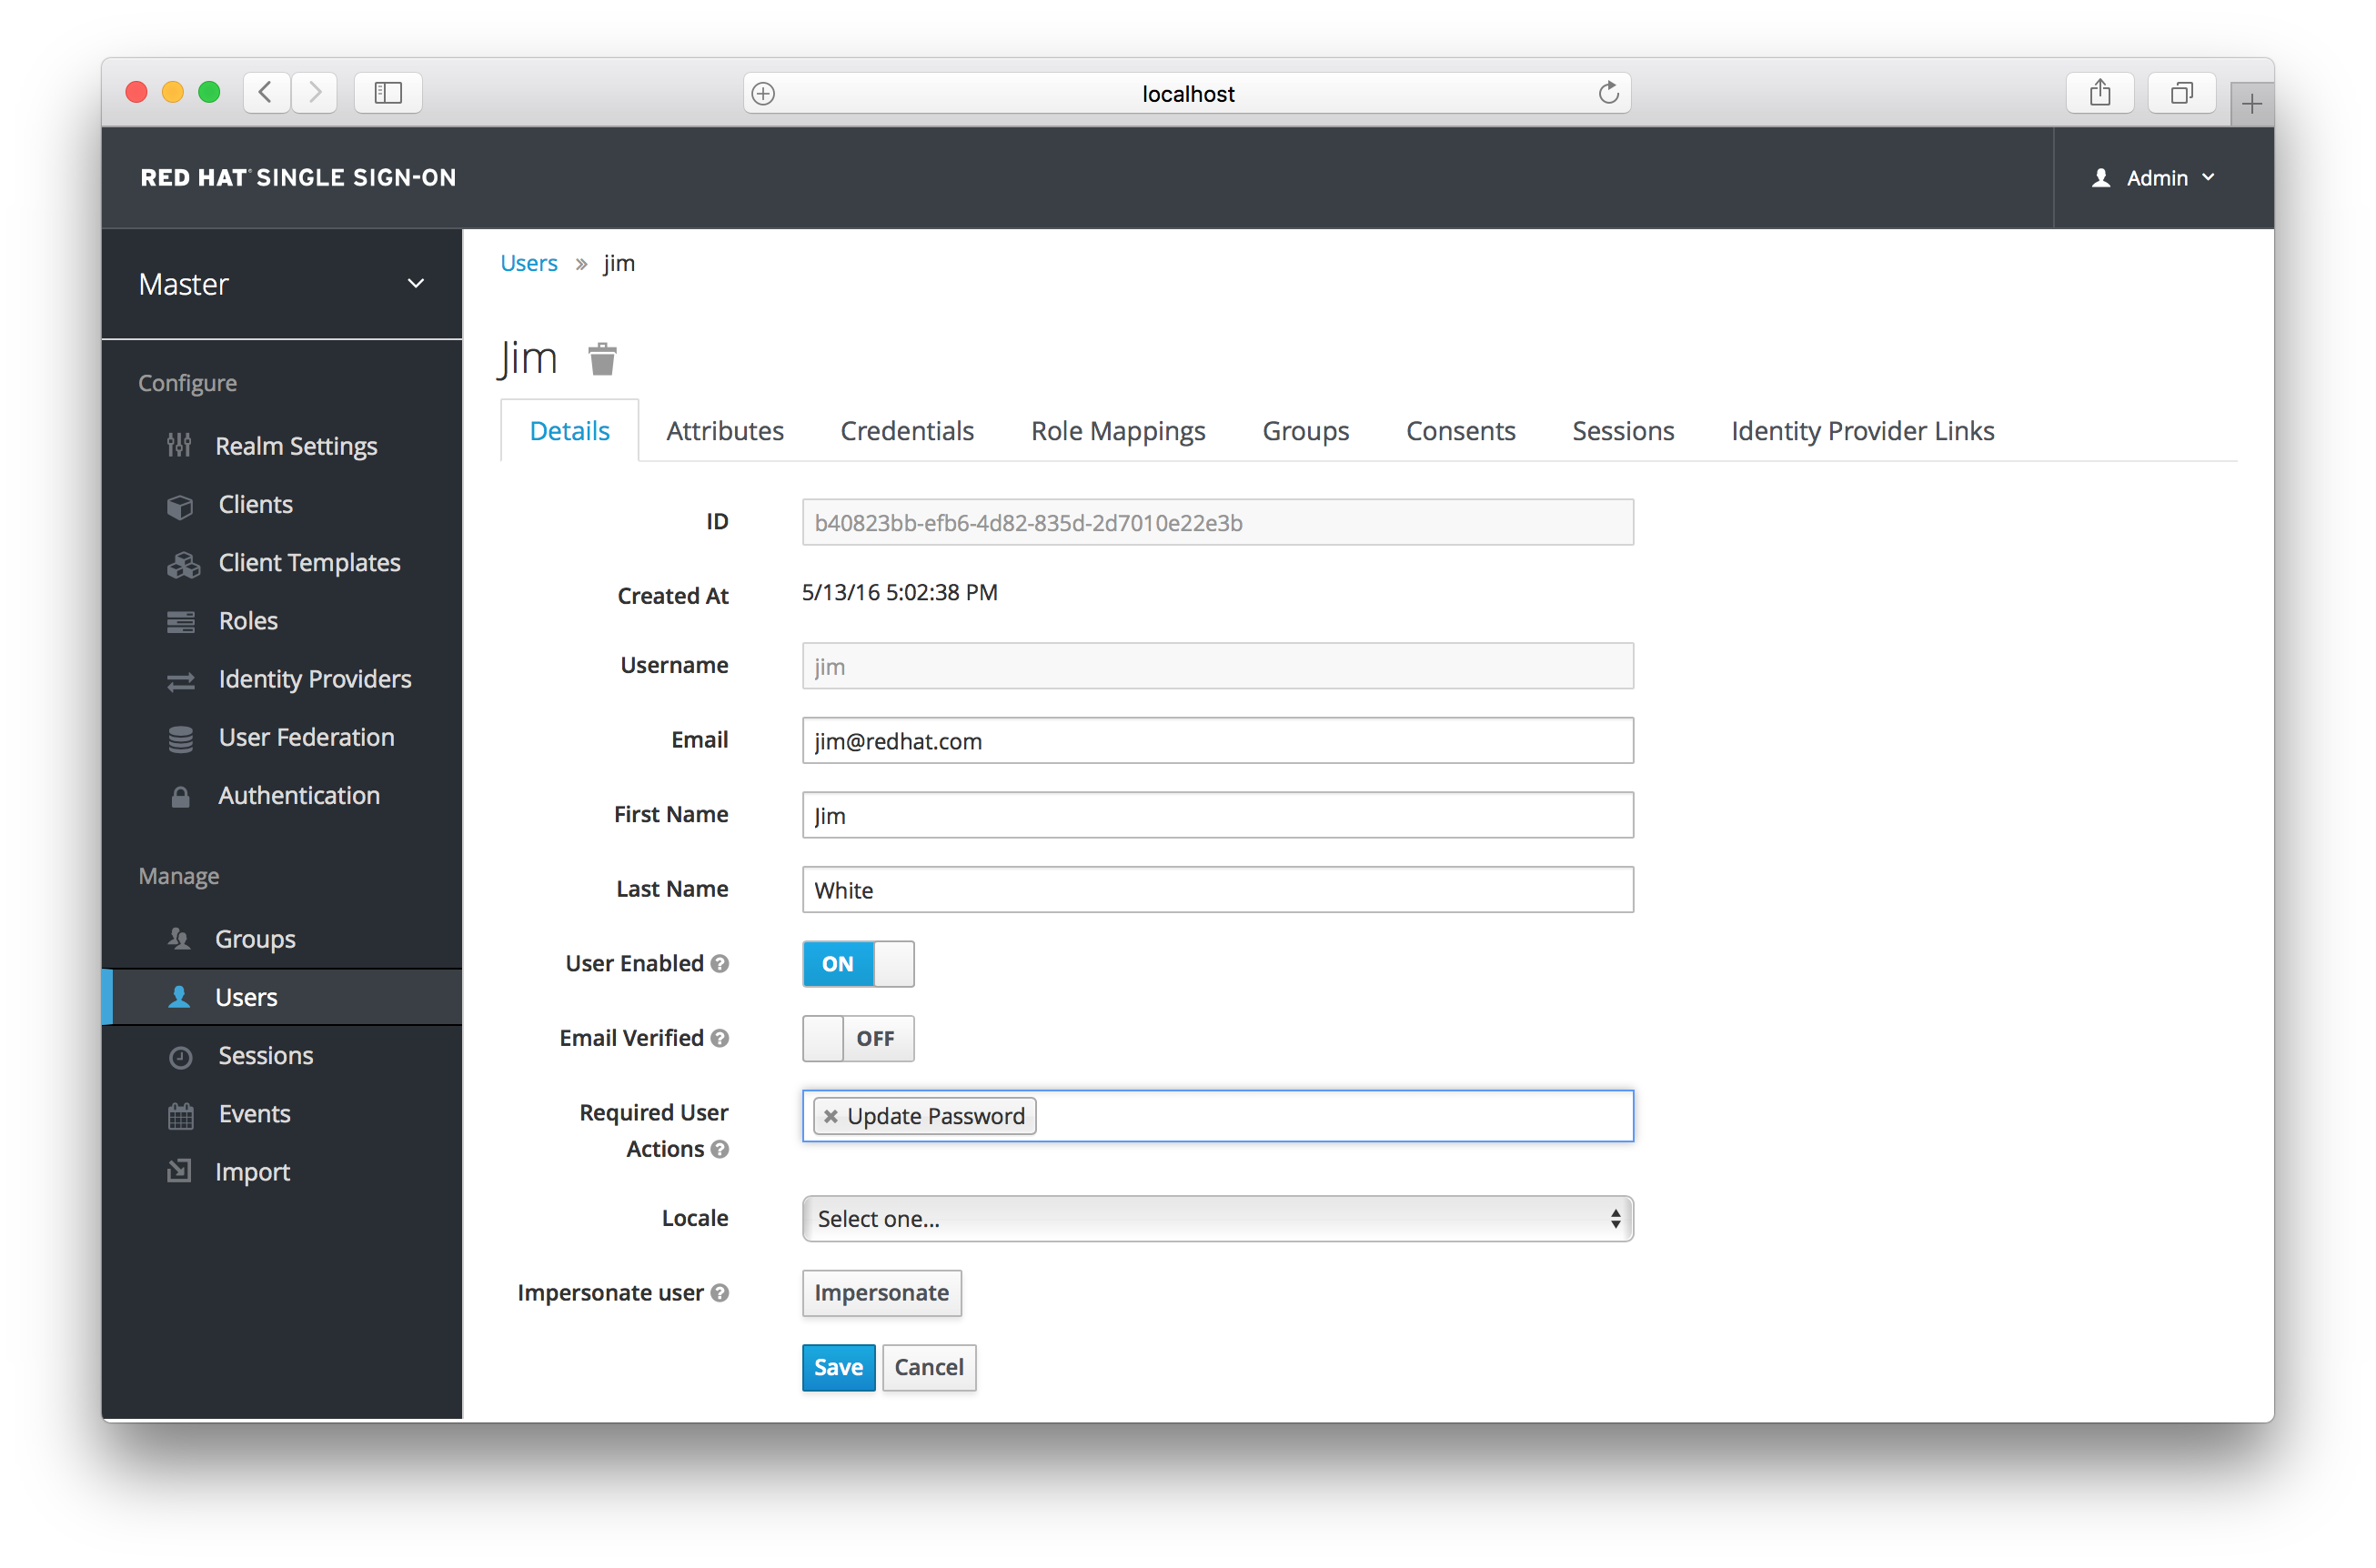
In the Required User Actions list box, select all the actions you want to add to the account. If you want to remove one, click the X next to the action name. Also remember to click the Save button after you’ve decided what actions to add.
4.5.1. Default Required Actions
You can also specify required actions that will be added to an account whenever a new user is created, i.e. through the Add User button the user list screen, or via the user registration link on the login page. To specify the default required actions go to the Authentication left menu item and click on the Required Actions tab.
Default Required Actions

Simply click the checkbox in the Default Action column of the required actions that you want to be executed when a brand new user logs in.
4.5.2. Terms and Conditions
Many organizations have a requirement that when a new user logs in for the first time, they need to agree to the terms and conditions of the website. Red Hat Single Sign-On has this functionality implemented as a required action, but it requires some configuration. For one, you have to go to the Required Actions tab described earlier and enable the Terms and Conditions action. You must also edit the terms.ftl file in the base login theme. See the Server Developer Guide for more information on extending and creating themes.
4.6. Impersonation
It is often useful for an admin to impersonate a user. For example, a user may be experiencing a bug in one of your applications and an admin may want to impersonate the user to see if they can duplicate the problem. Admins with the appropriate permission can impersonate a user. There are two locations an admin can initiate impersonation. The first is on the Users list tab.
Users

You can see here that the admin has searched for jim. Next to Jim’s account you can see an impersonate button. Click that to impersonate the user.
Also, you can impersonate the user from the user Details tab.
User Details
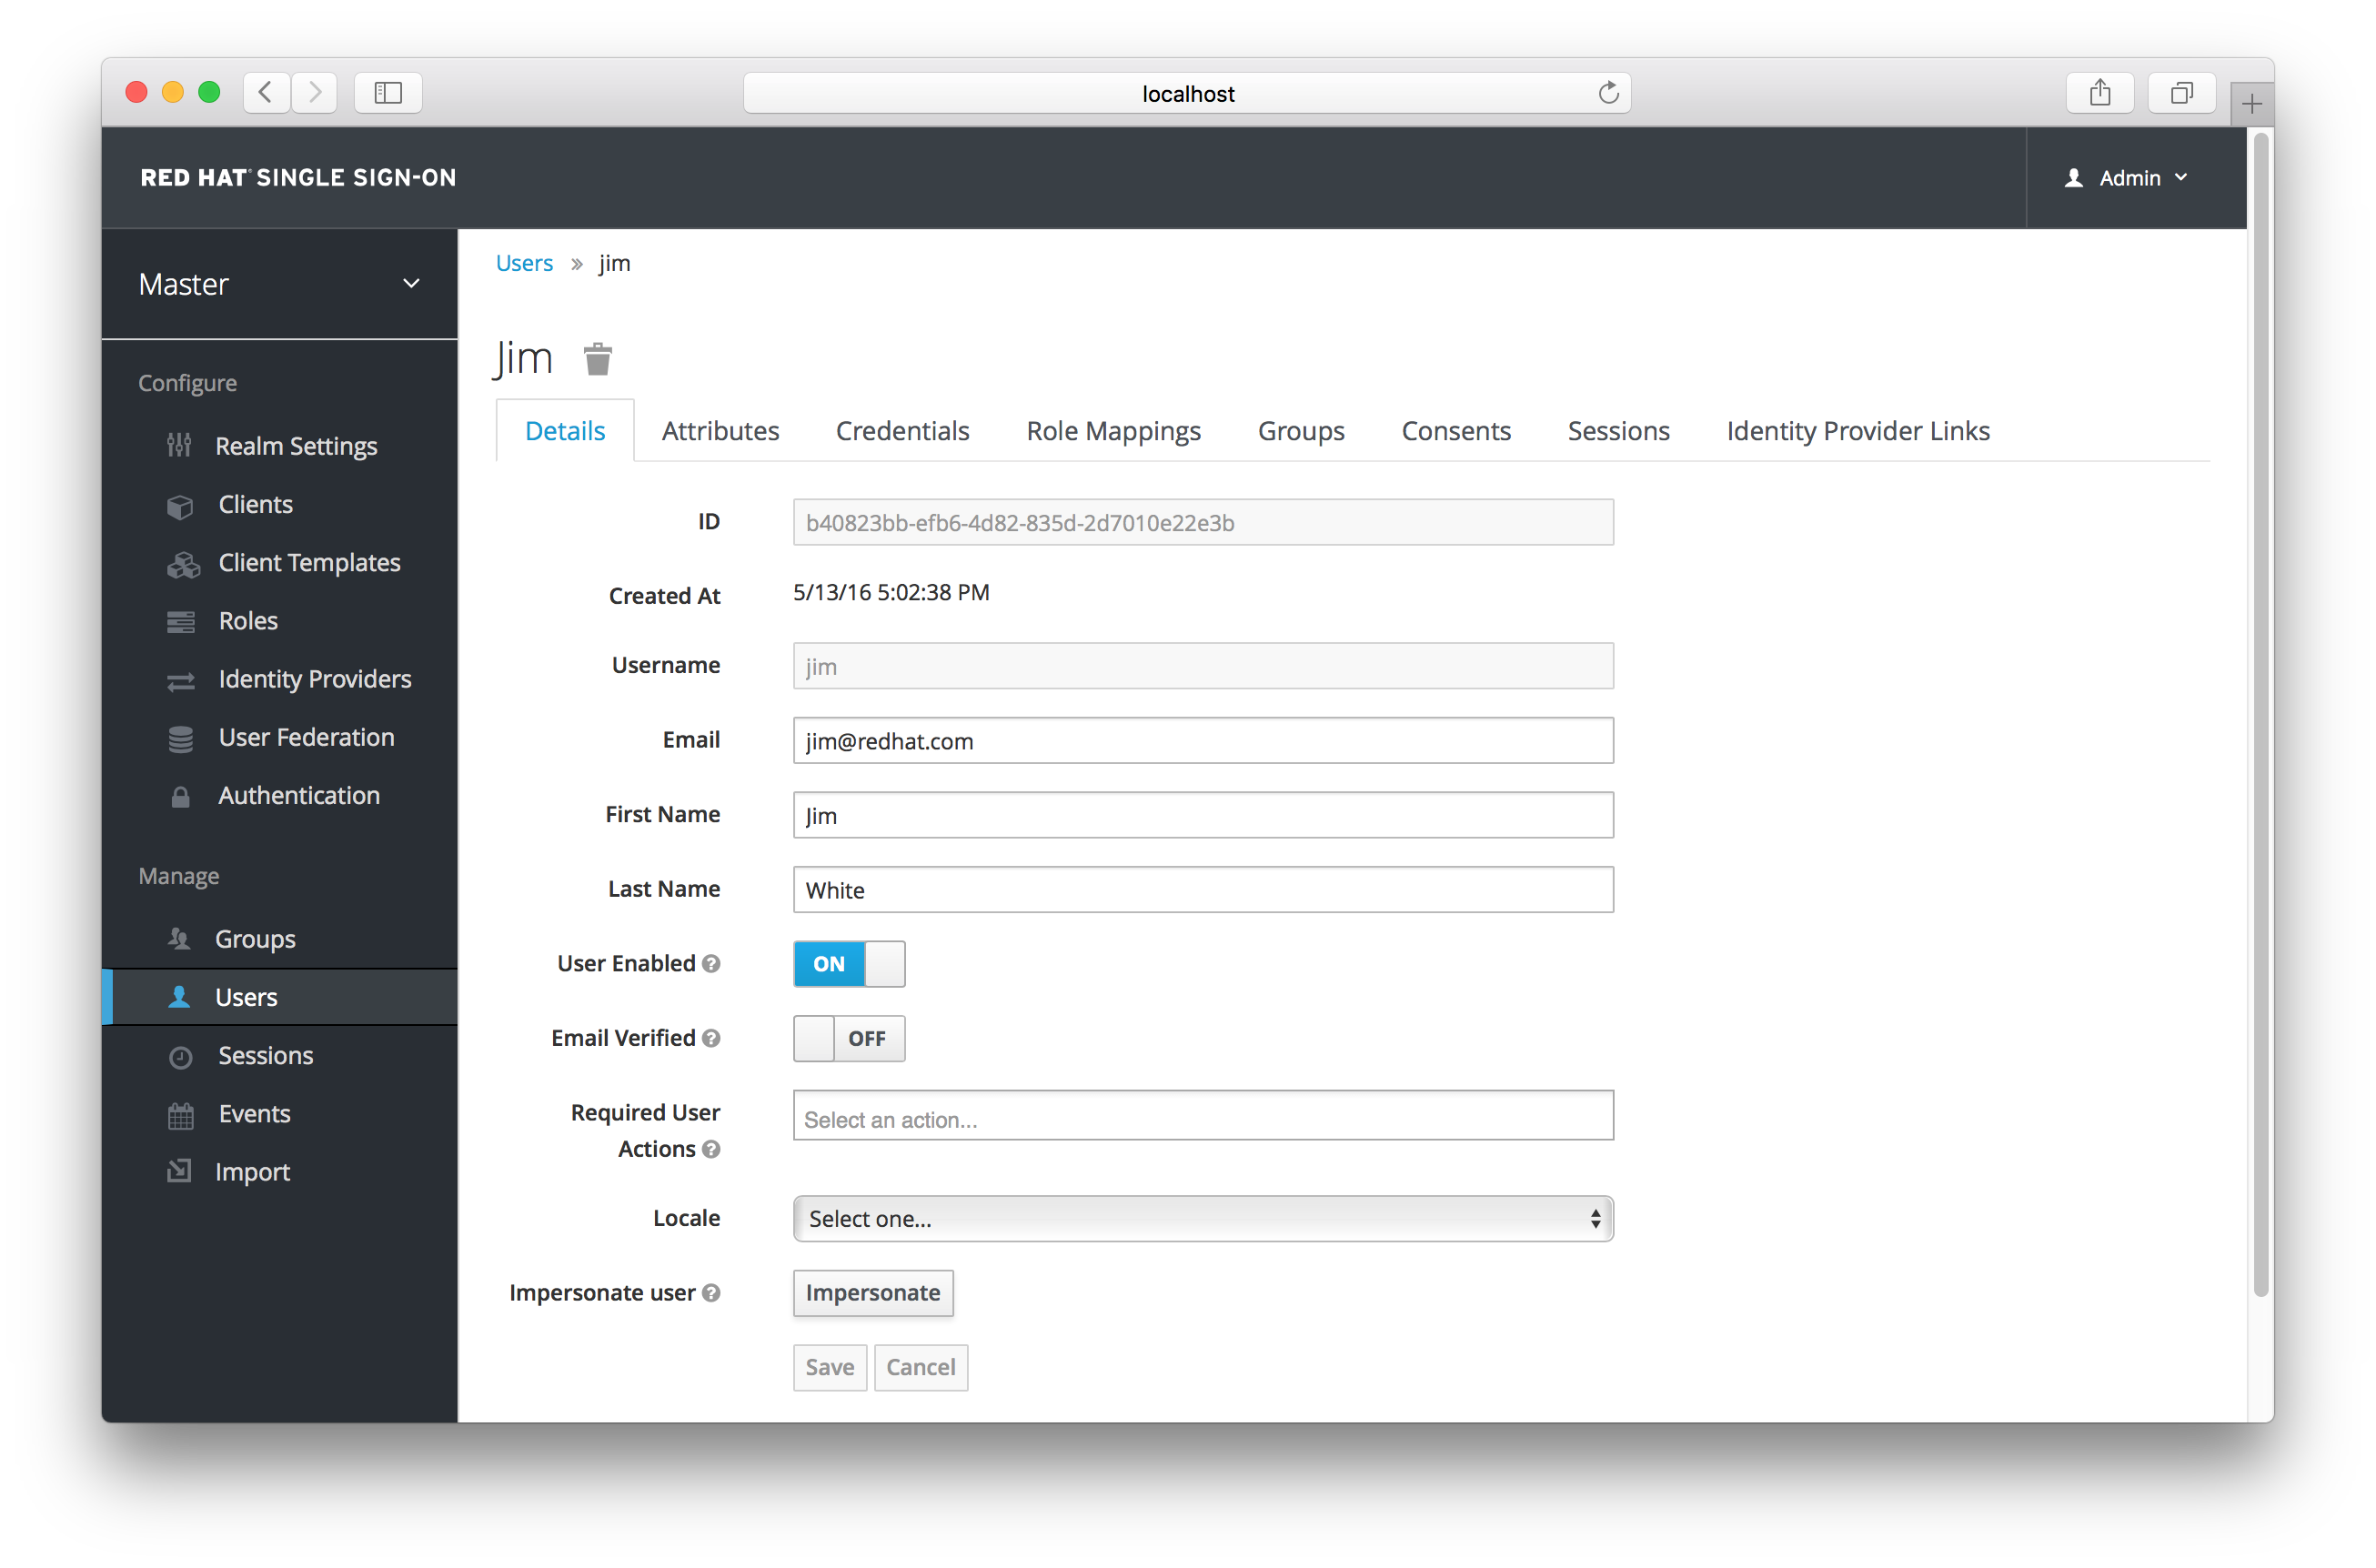
Near the bottom of the page you can see the Impersonate button. Click that to impersonate the user.
When impersonating, if the admin and the user are in the same realm, then the admin will be logged out and automatically logged in as the user being impersonated. If the admin and user are not in the same realm, the admin will remain logged in, but additionally be logged in as the user in that user’s realm. In both cases, the browser will be redirected to the impersonated user’s User Account Management page.
Any user with the realm’s impersonation role can impersonate a user. Please see the Admin Console Access Control chapter for more details on assigning administration permissions.
4.7. User Registration
You can enable Red Hat Single Sign-On to allow user self registration. When enabled, the login page has a registration link the user can click on to create their new account. Enabling registration is pretty simple. Go to the Realm Settings left menu and click it. Then go to the Login tab. There is a User Registration switch on this tab. Turn it on, then click the Save button.
Login Tab
After you enable this setting, a Register link should show up on the login page.
Registration Link
Clicking on this link will bring the user to the registration page where they have to enter in some user profile information and a new password.
Registration Form
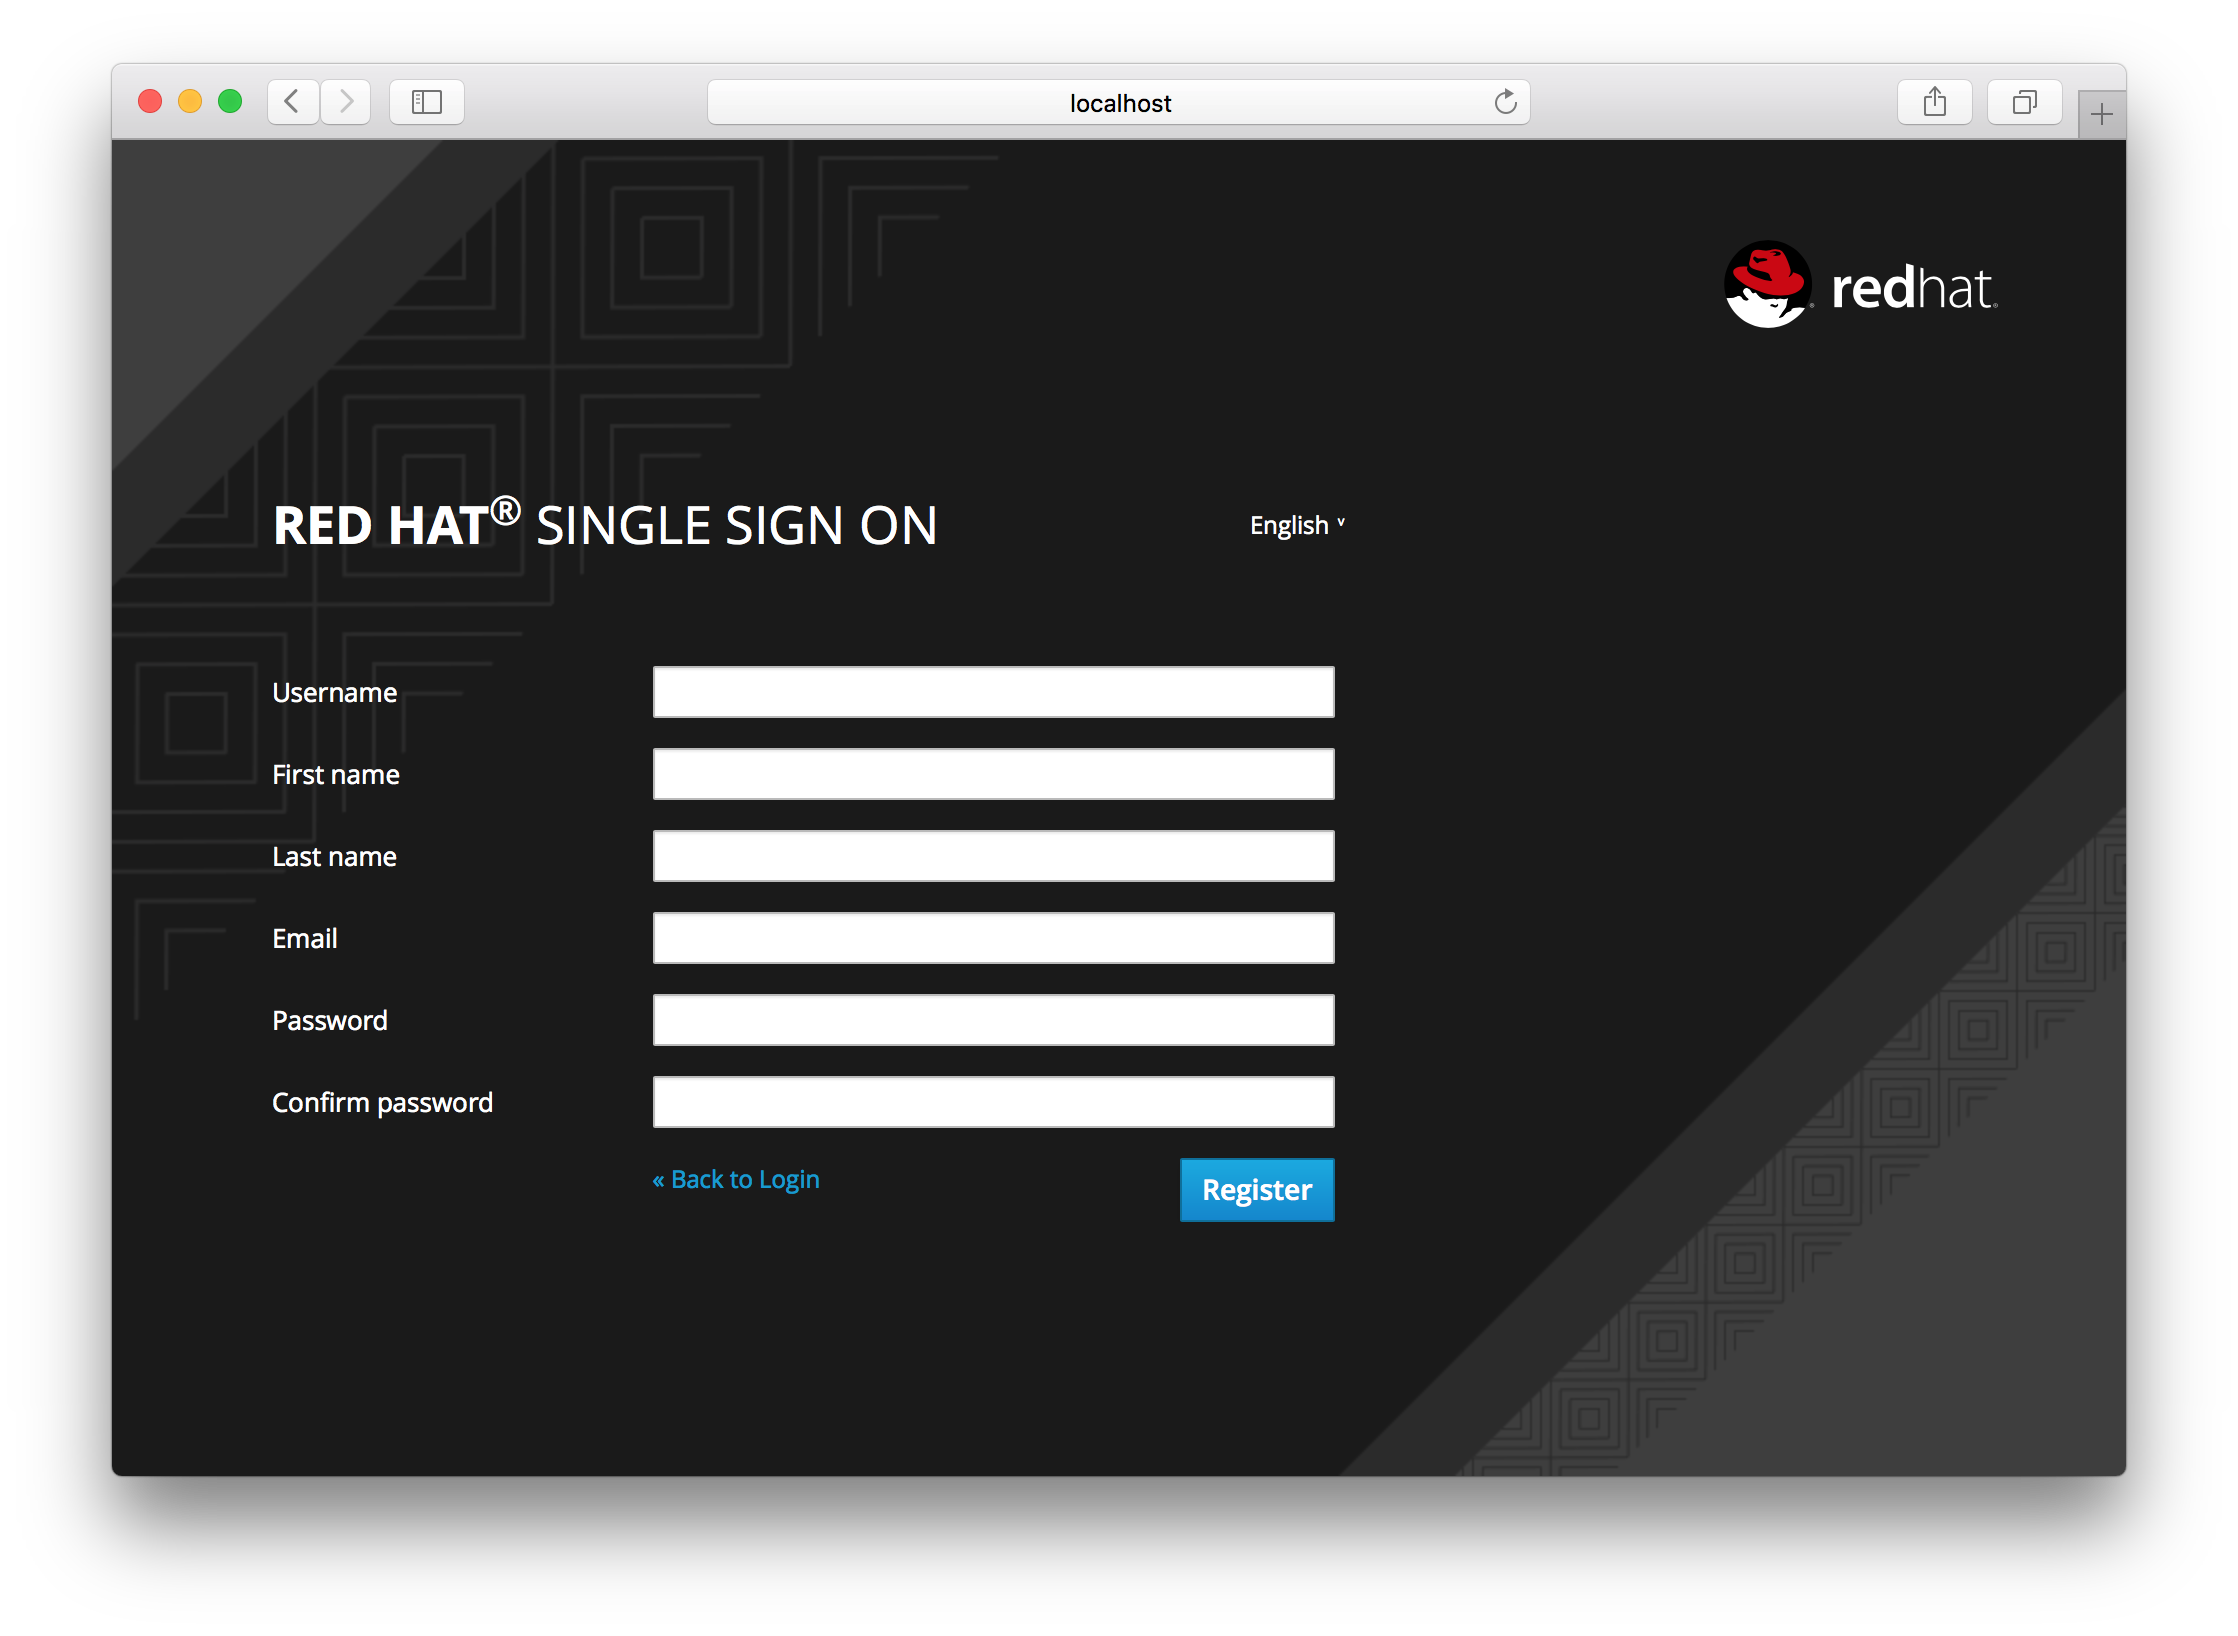
You can change the look and feel of the registration form as well as removing or adding additional fields that must be entered. See the Server Developer Guide for more information.
4.7.1. reCAPTCHA Support
To safeguard registration against bots, Red Hat Single Sign-On has integration with Google reCAPTCHA. To enable this you need to first go to Google Recaptcha Website and create an API key so that you can get your reCAPTCHA site key and secret. (FYI, localhost works by default so you don’t have to specify a domain).
Next, there are a few steps you need to perform in the Red Hat Single Sign-On Admin Console. Click the Authentication left menu item and go to the Flows tab. Select the Registration flow from the drop down list on this page.
Registration Flow
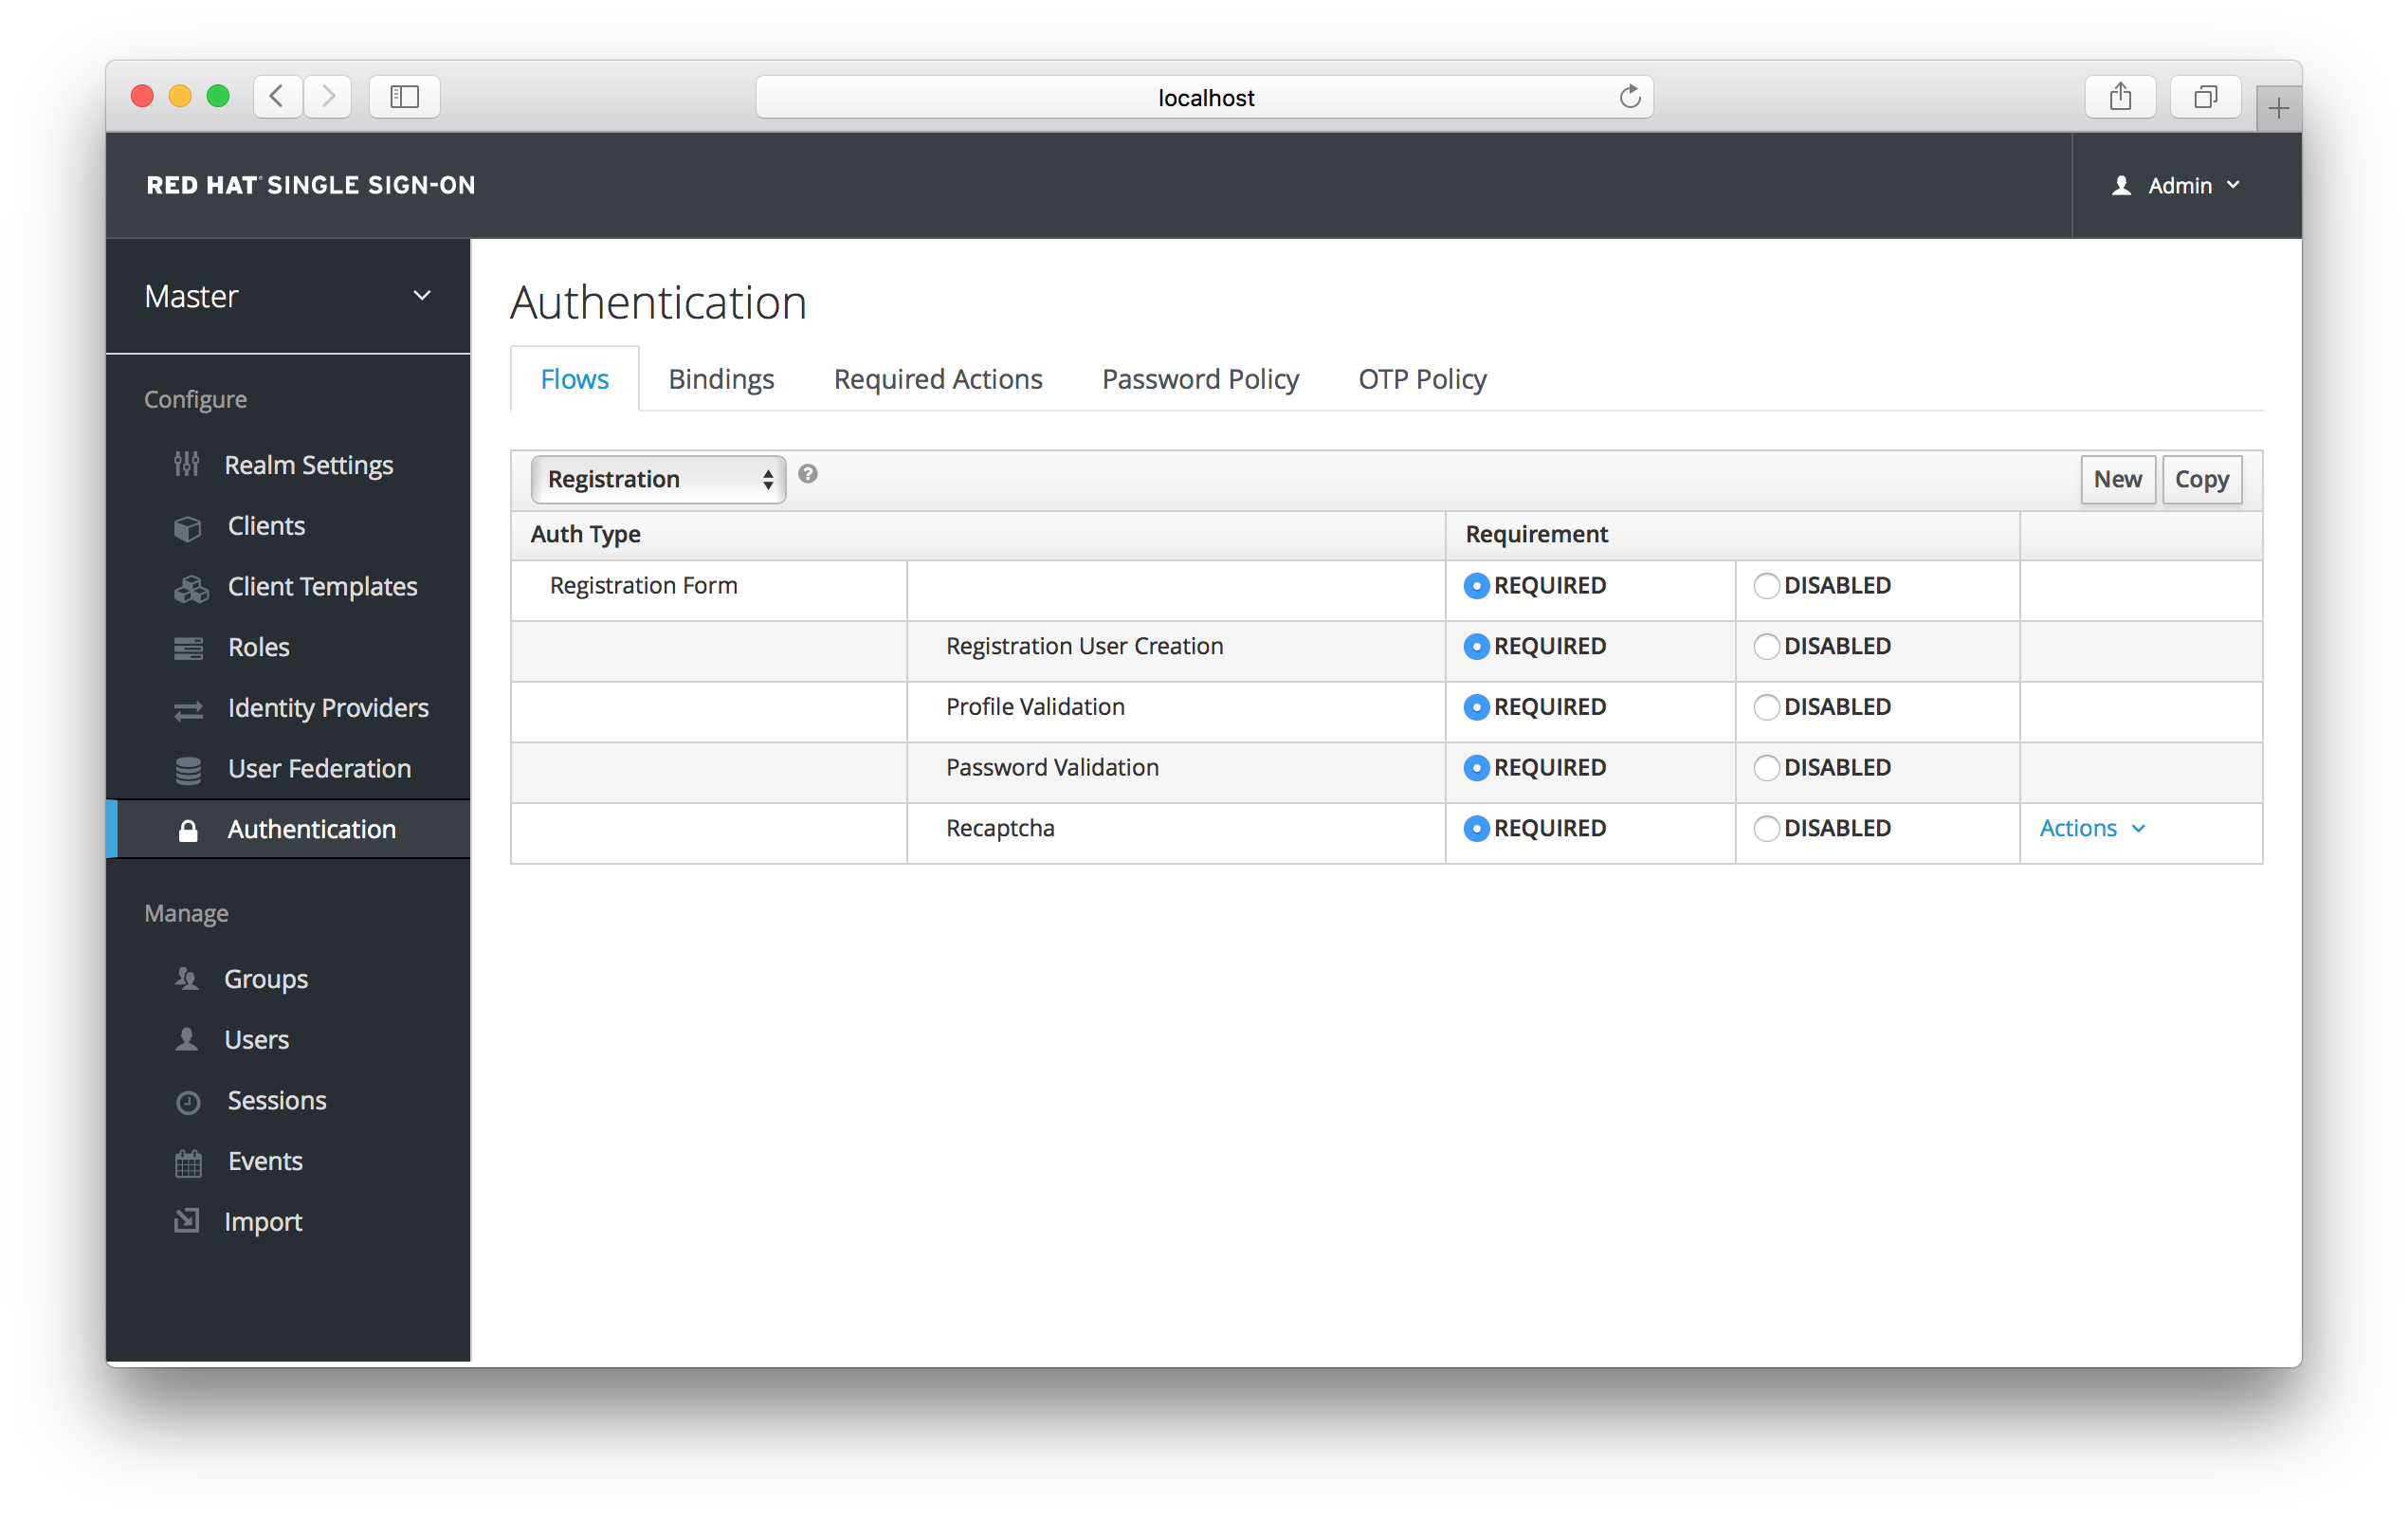
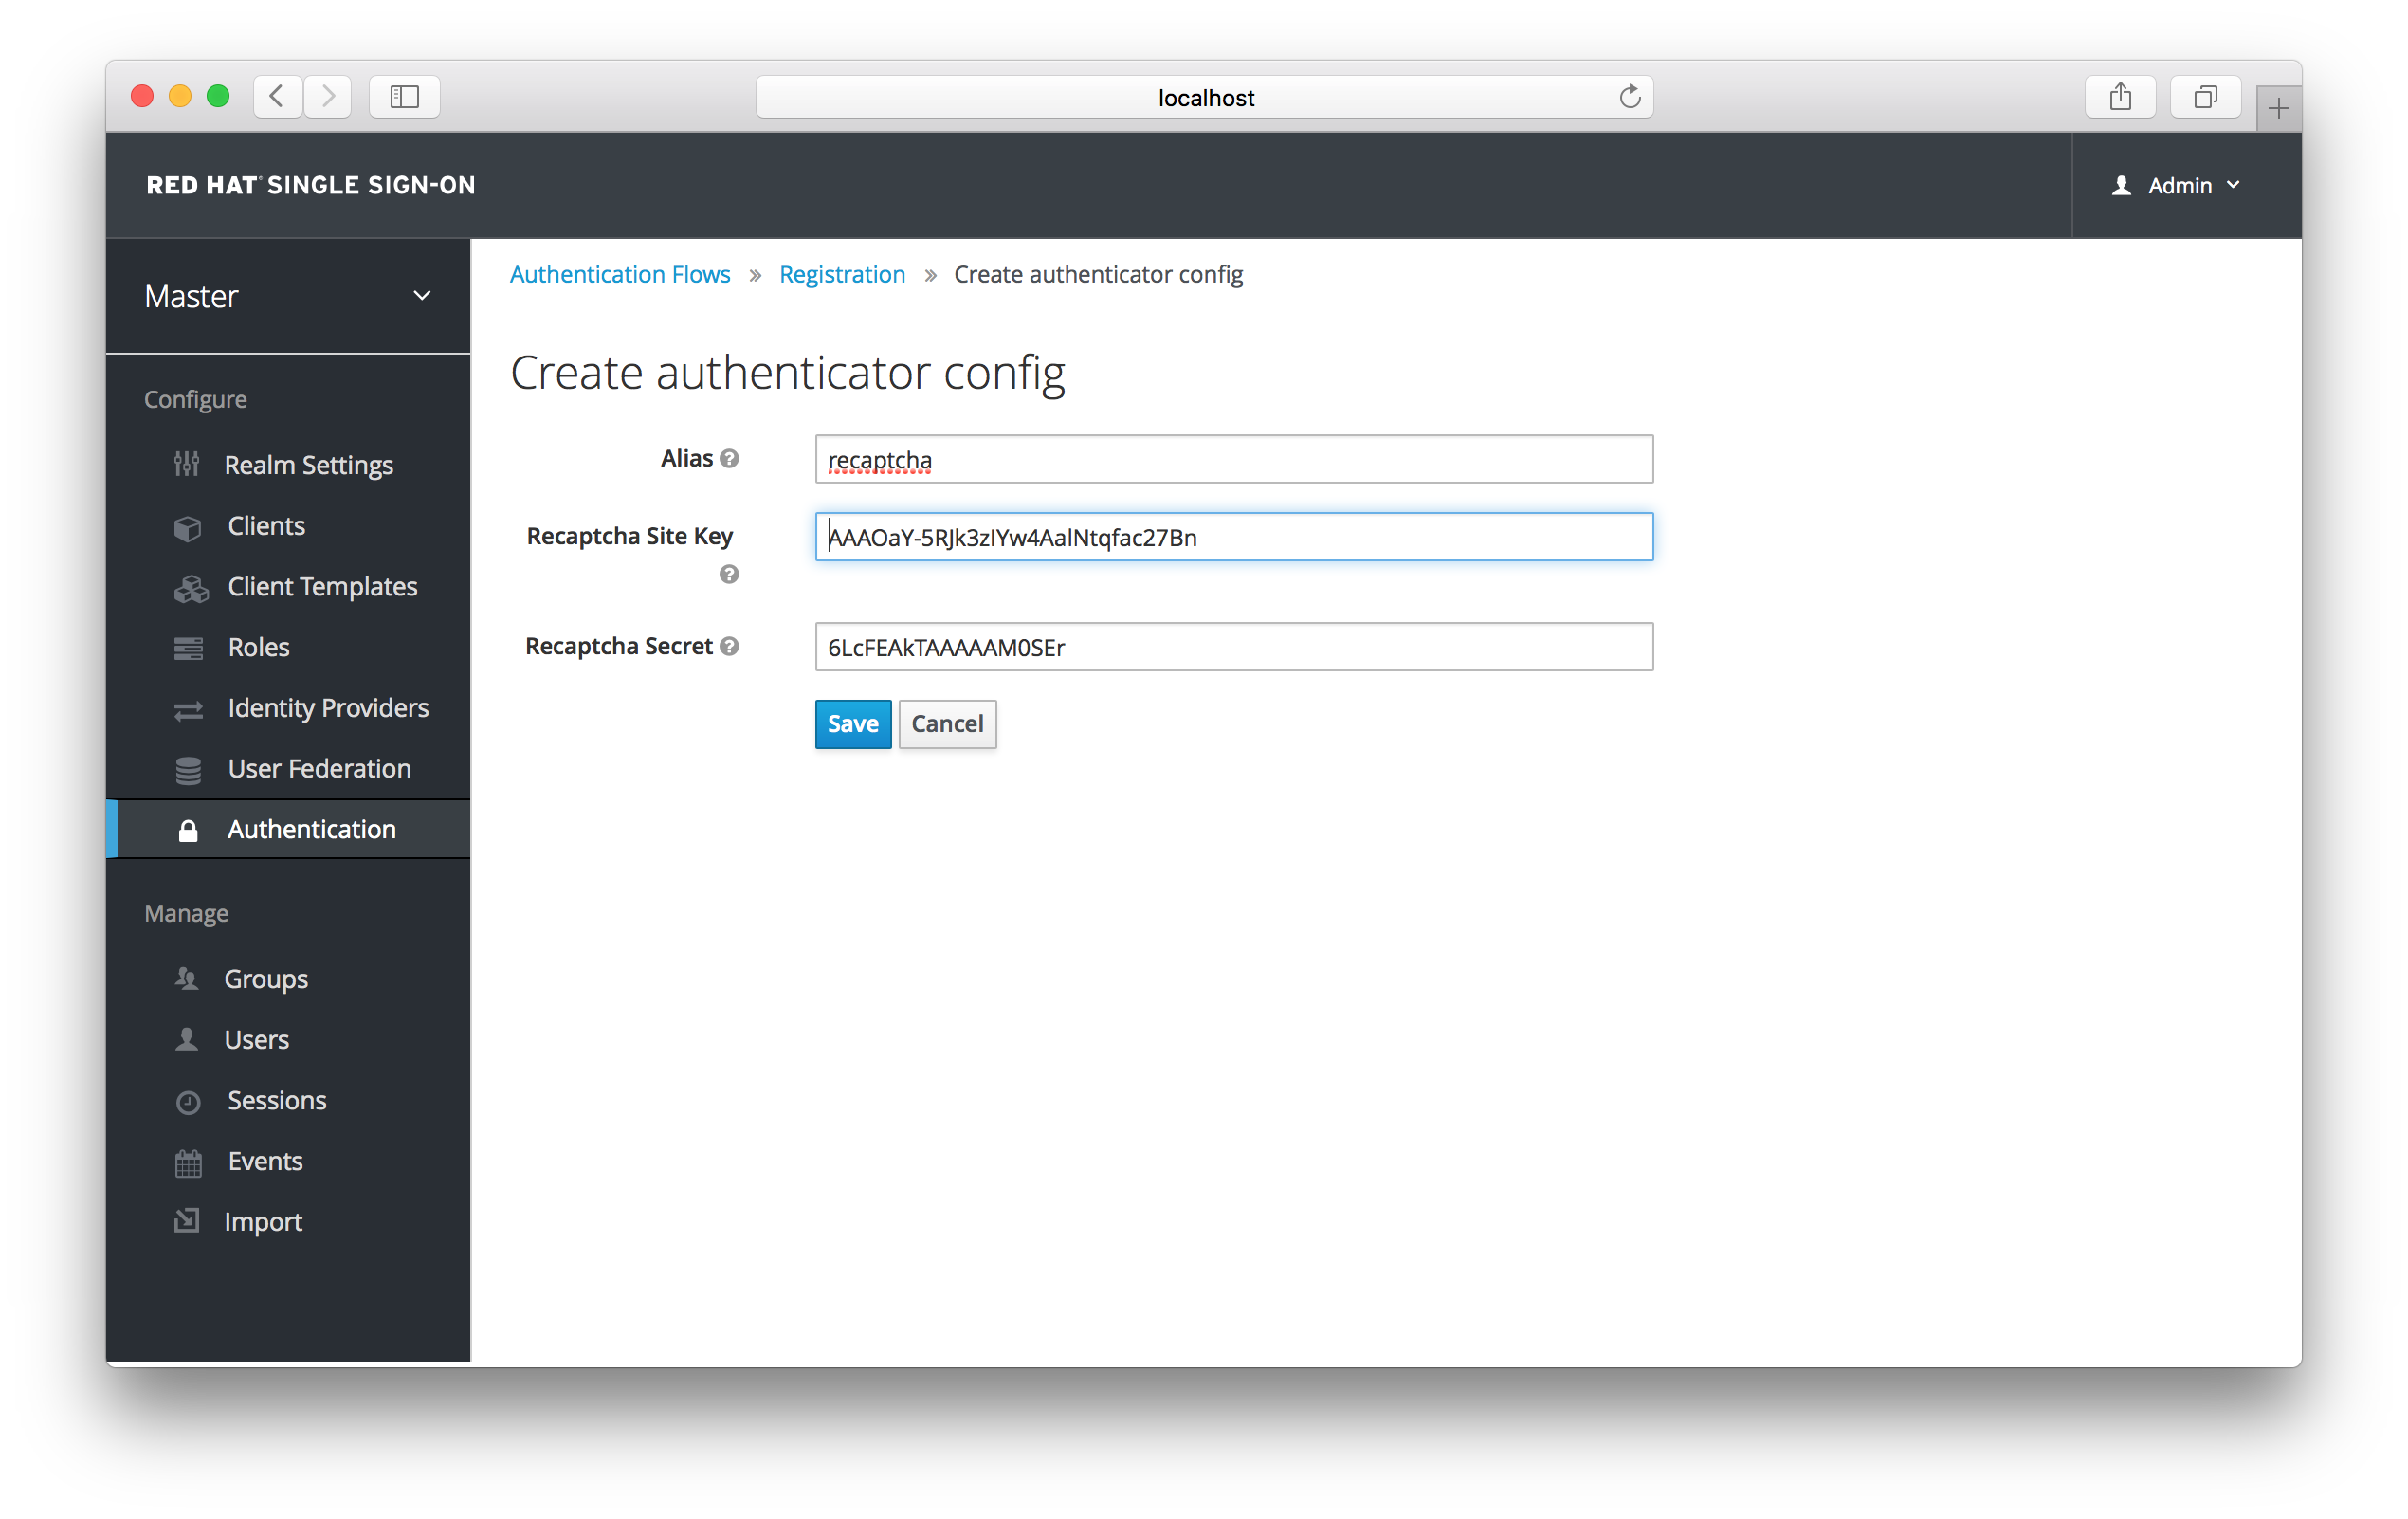
Set the 'reCAPTCHA' requirement to Required by clicking the appropriate radio button. This will enable reCAPTCHA on the screen. Next, you have to enter in the reCAPTCHA site key and secret that you generated at the Google reCAPTCHA Website. Click on the 'Configure' button that is to the right of the reCAPTCHA flow entry and enter in the reCAPTCHA site key and secret on this config page.
Recaptcha Config Page
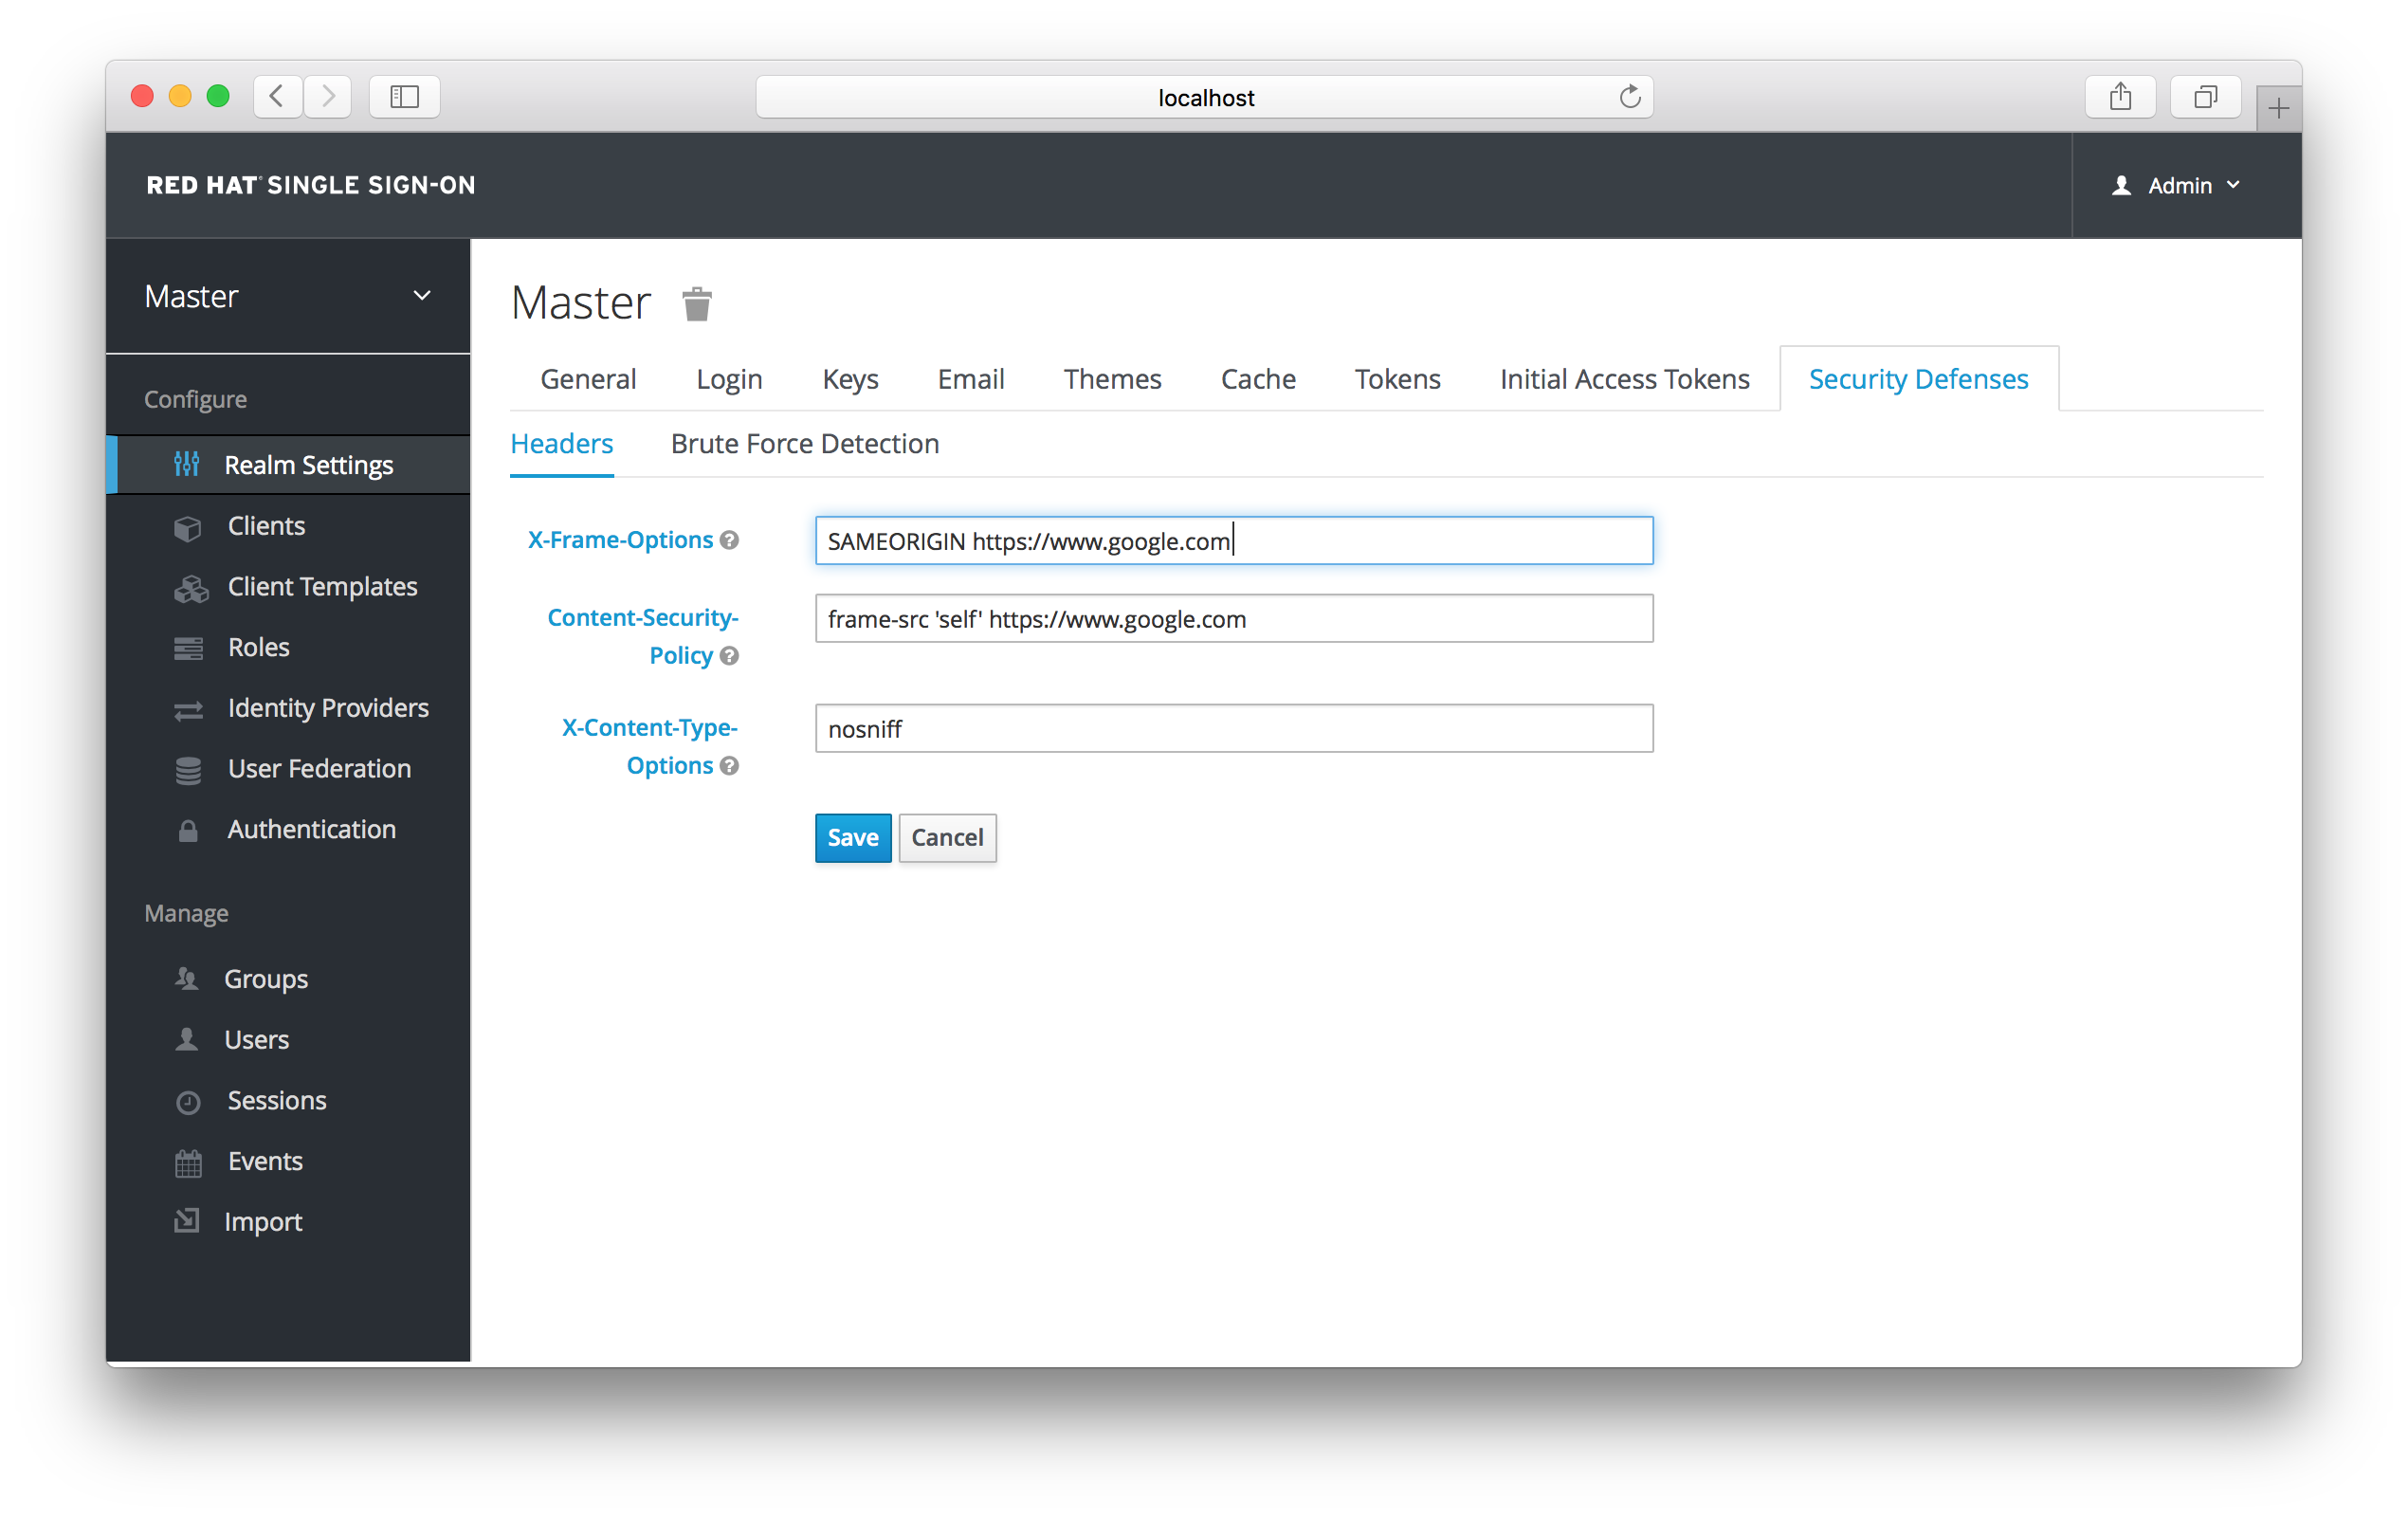
The final step you have to do is to change some default HTTP response headers that Red Hat Single Sign-On sets. Red Hat Single Sign-On will prevent a website from including any login page within an iframe. This is to prevent clickjacking attacks. You need to authorize Google to use the registration page within an iframe. Go to the Realm Settings left menu item and then go to the Security Defenses tab. You will need to add https://www.google.com to the values of both the X-Frame-Options and Content-Security-Policy headers.
Authorizing Iframes
Once you do this, reCAPTCHA should show up on your registration page. You may want to edit register.ftl in your login theme to muck around with the placement and styling of the reCAPTCHA button. See the Server Developer Guide for more information on extending and creating themes.
Chapter 5. Login Page Settings
There are several nice built in login page features you can enable if you need the functionality.
5.1. Forgot Password
If you enable it, users are able to reset their credentials if they forget their password or lose their OTP generator. Go to the Realm Settings left menu item, and click on the Login tab. Switch on the Forgot Password switch.
Login Tab
A forgot password link will now show up on your login pages.
Forgot Password Link

Clicking on this link will bring the user to a page where they can enter in their username or email and receive an email with a link to reset their credentials.
Forgot Password Page
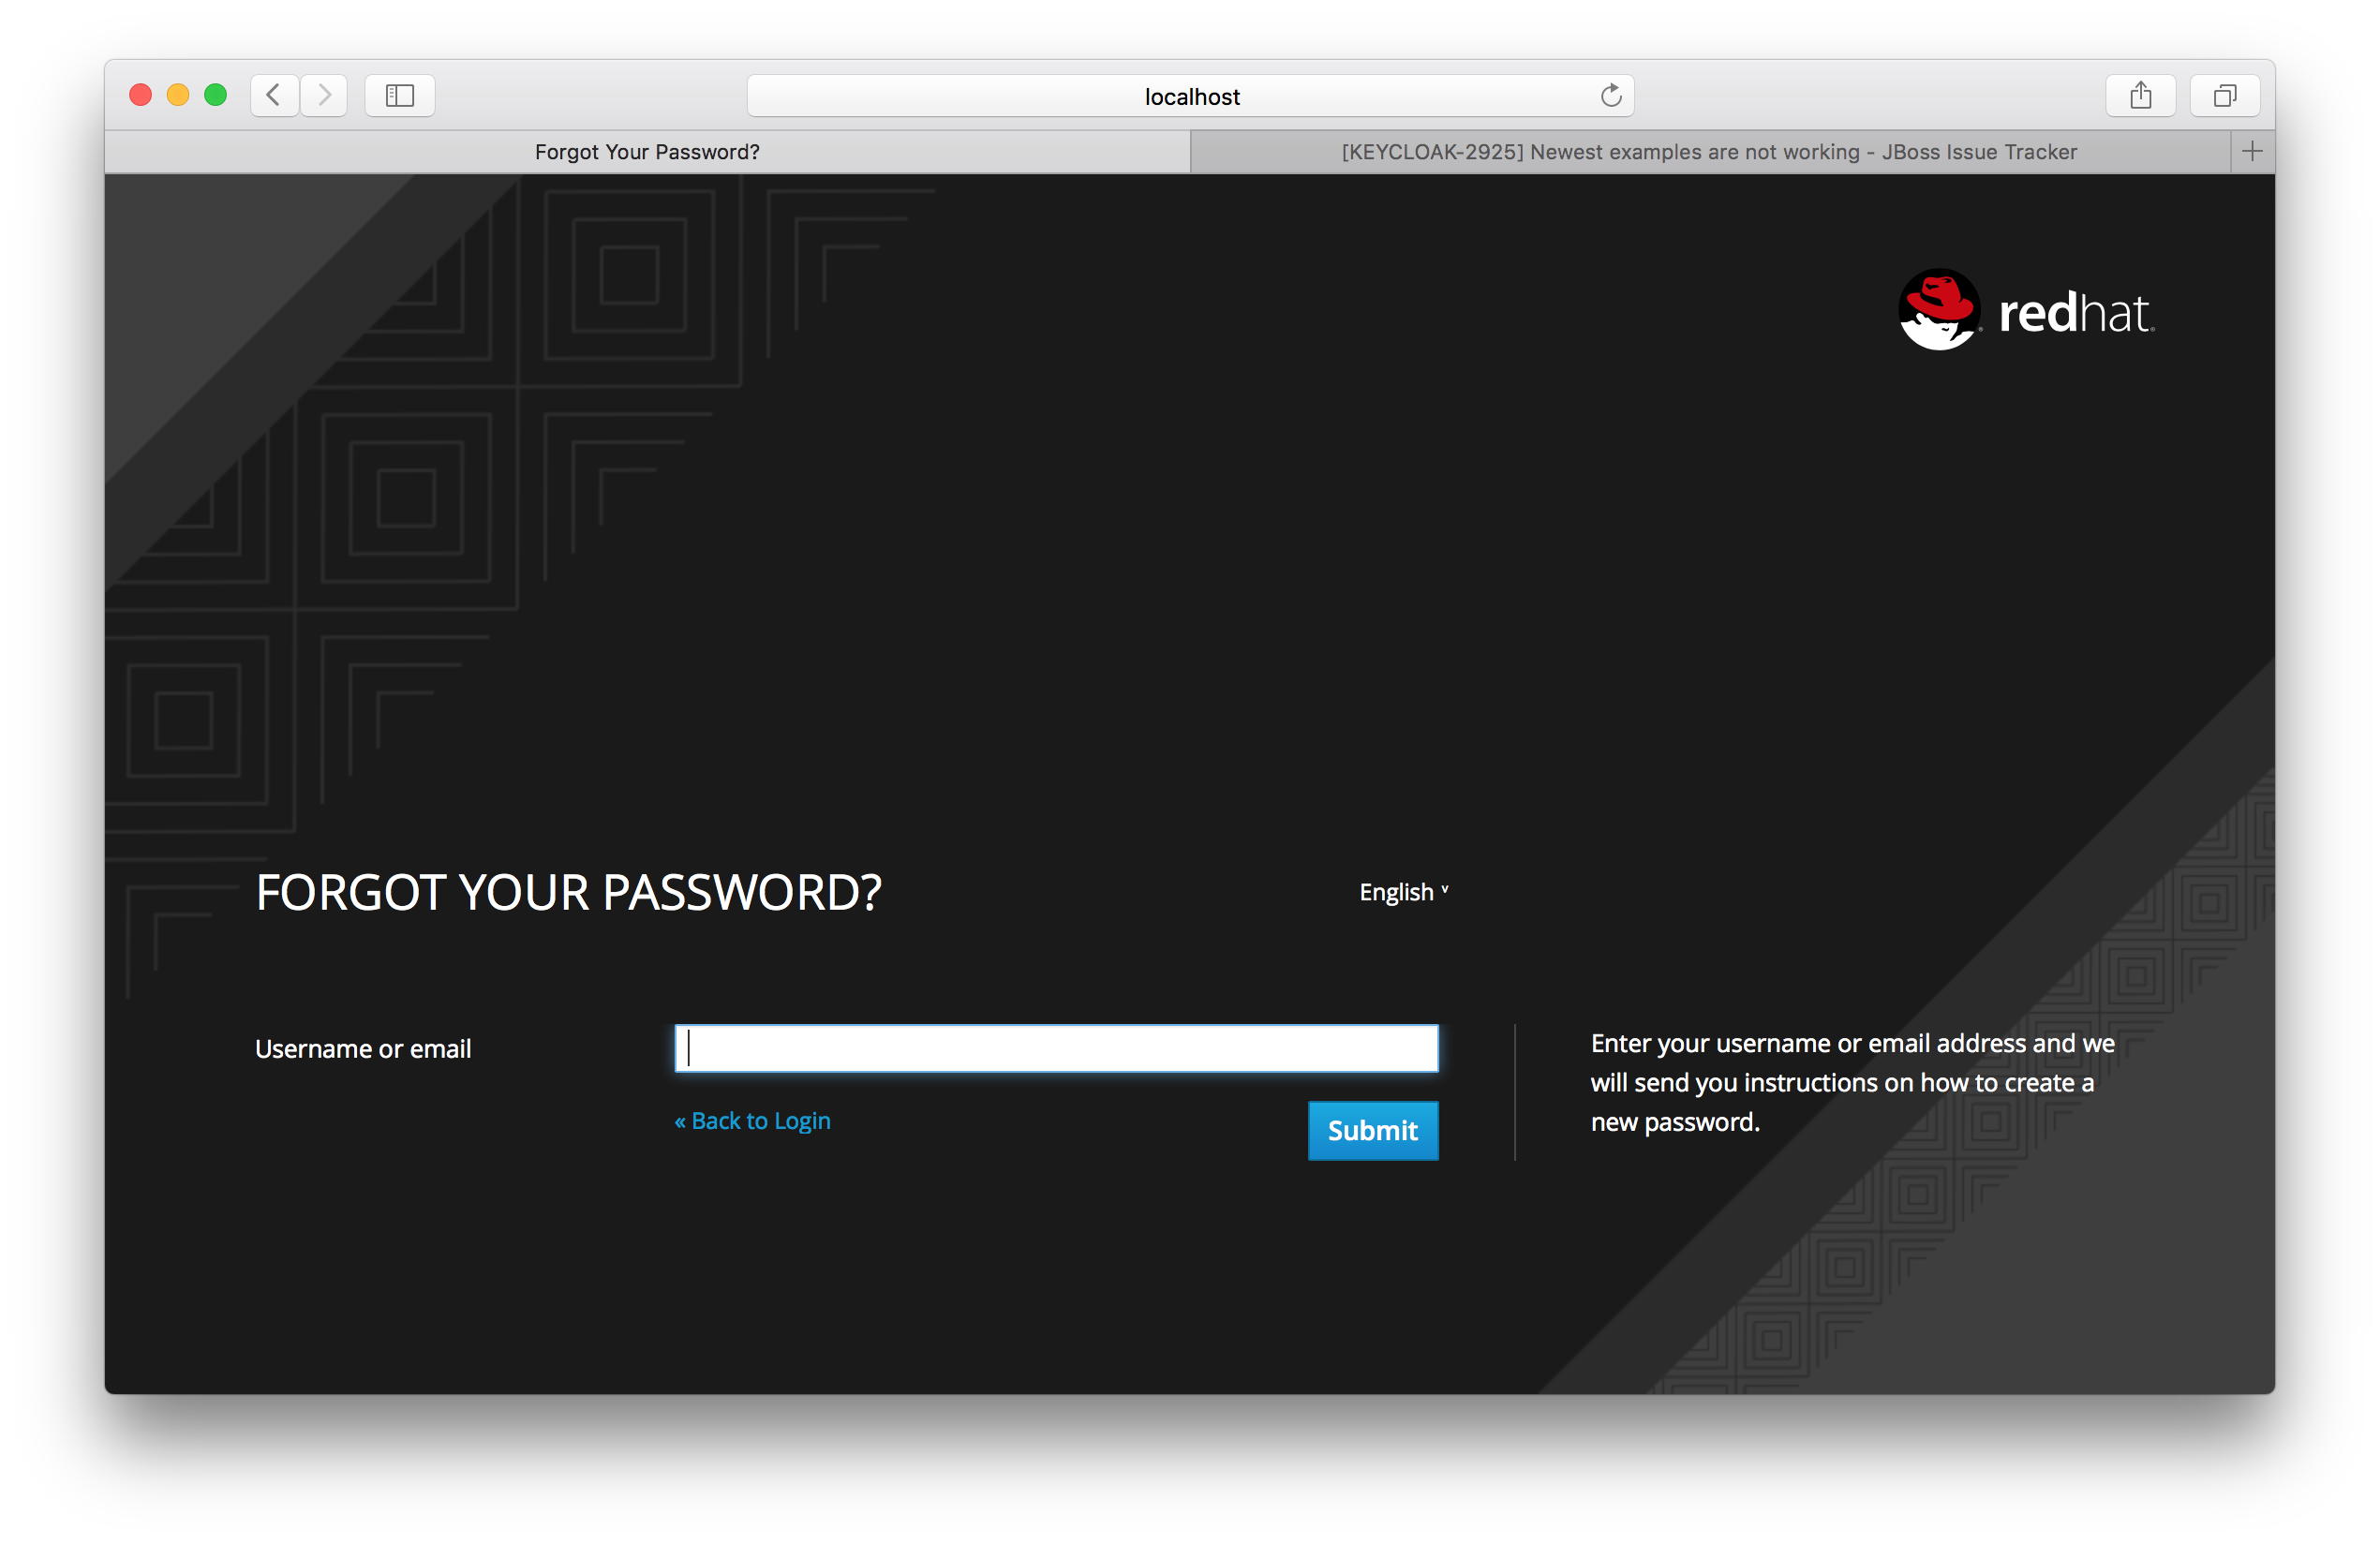
The text sent in the email is completely configurable. You just need to extend or edit the theme associated with it. See the Server Developer Guide for more information.
When the user clicks on the email link, they will be asked to update their password, and, if they have an OTP generator set up, they will also be asked to reconfigure this as well. Depending on the security requirements of your organization you may not want users to be able to reset their OTP generator through email. You can change this behavior by going to the Authentication left menu item, clicking on the Flows tab, and selecting the Reset Credentials flow:
Reset Credentials Flow
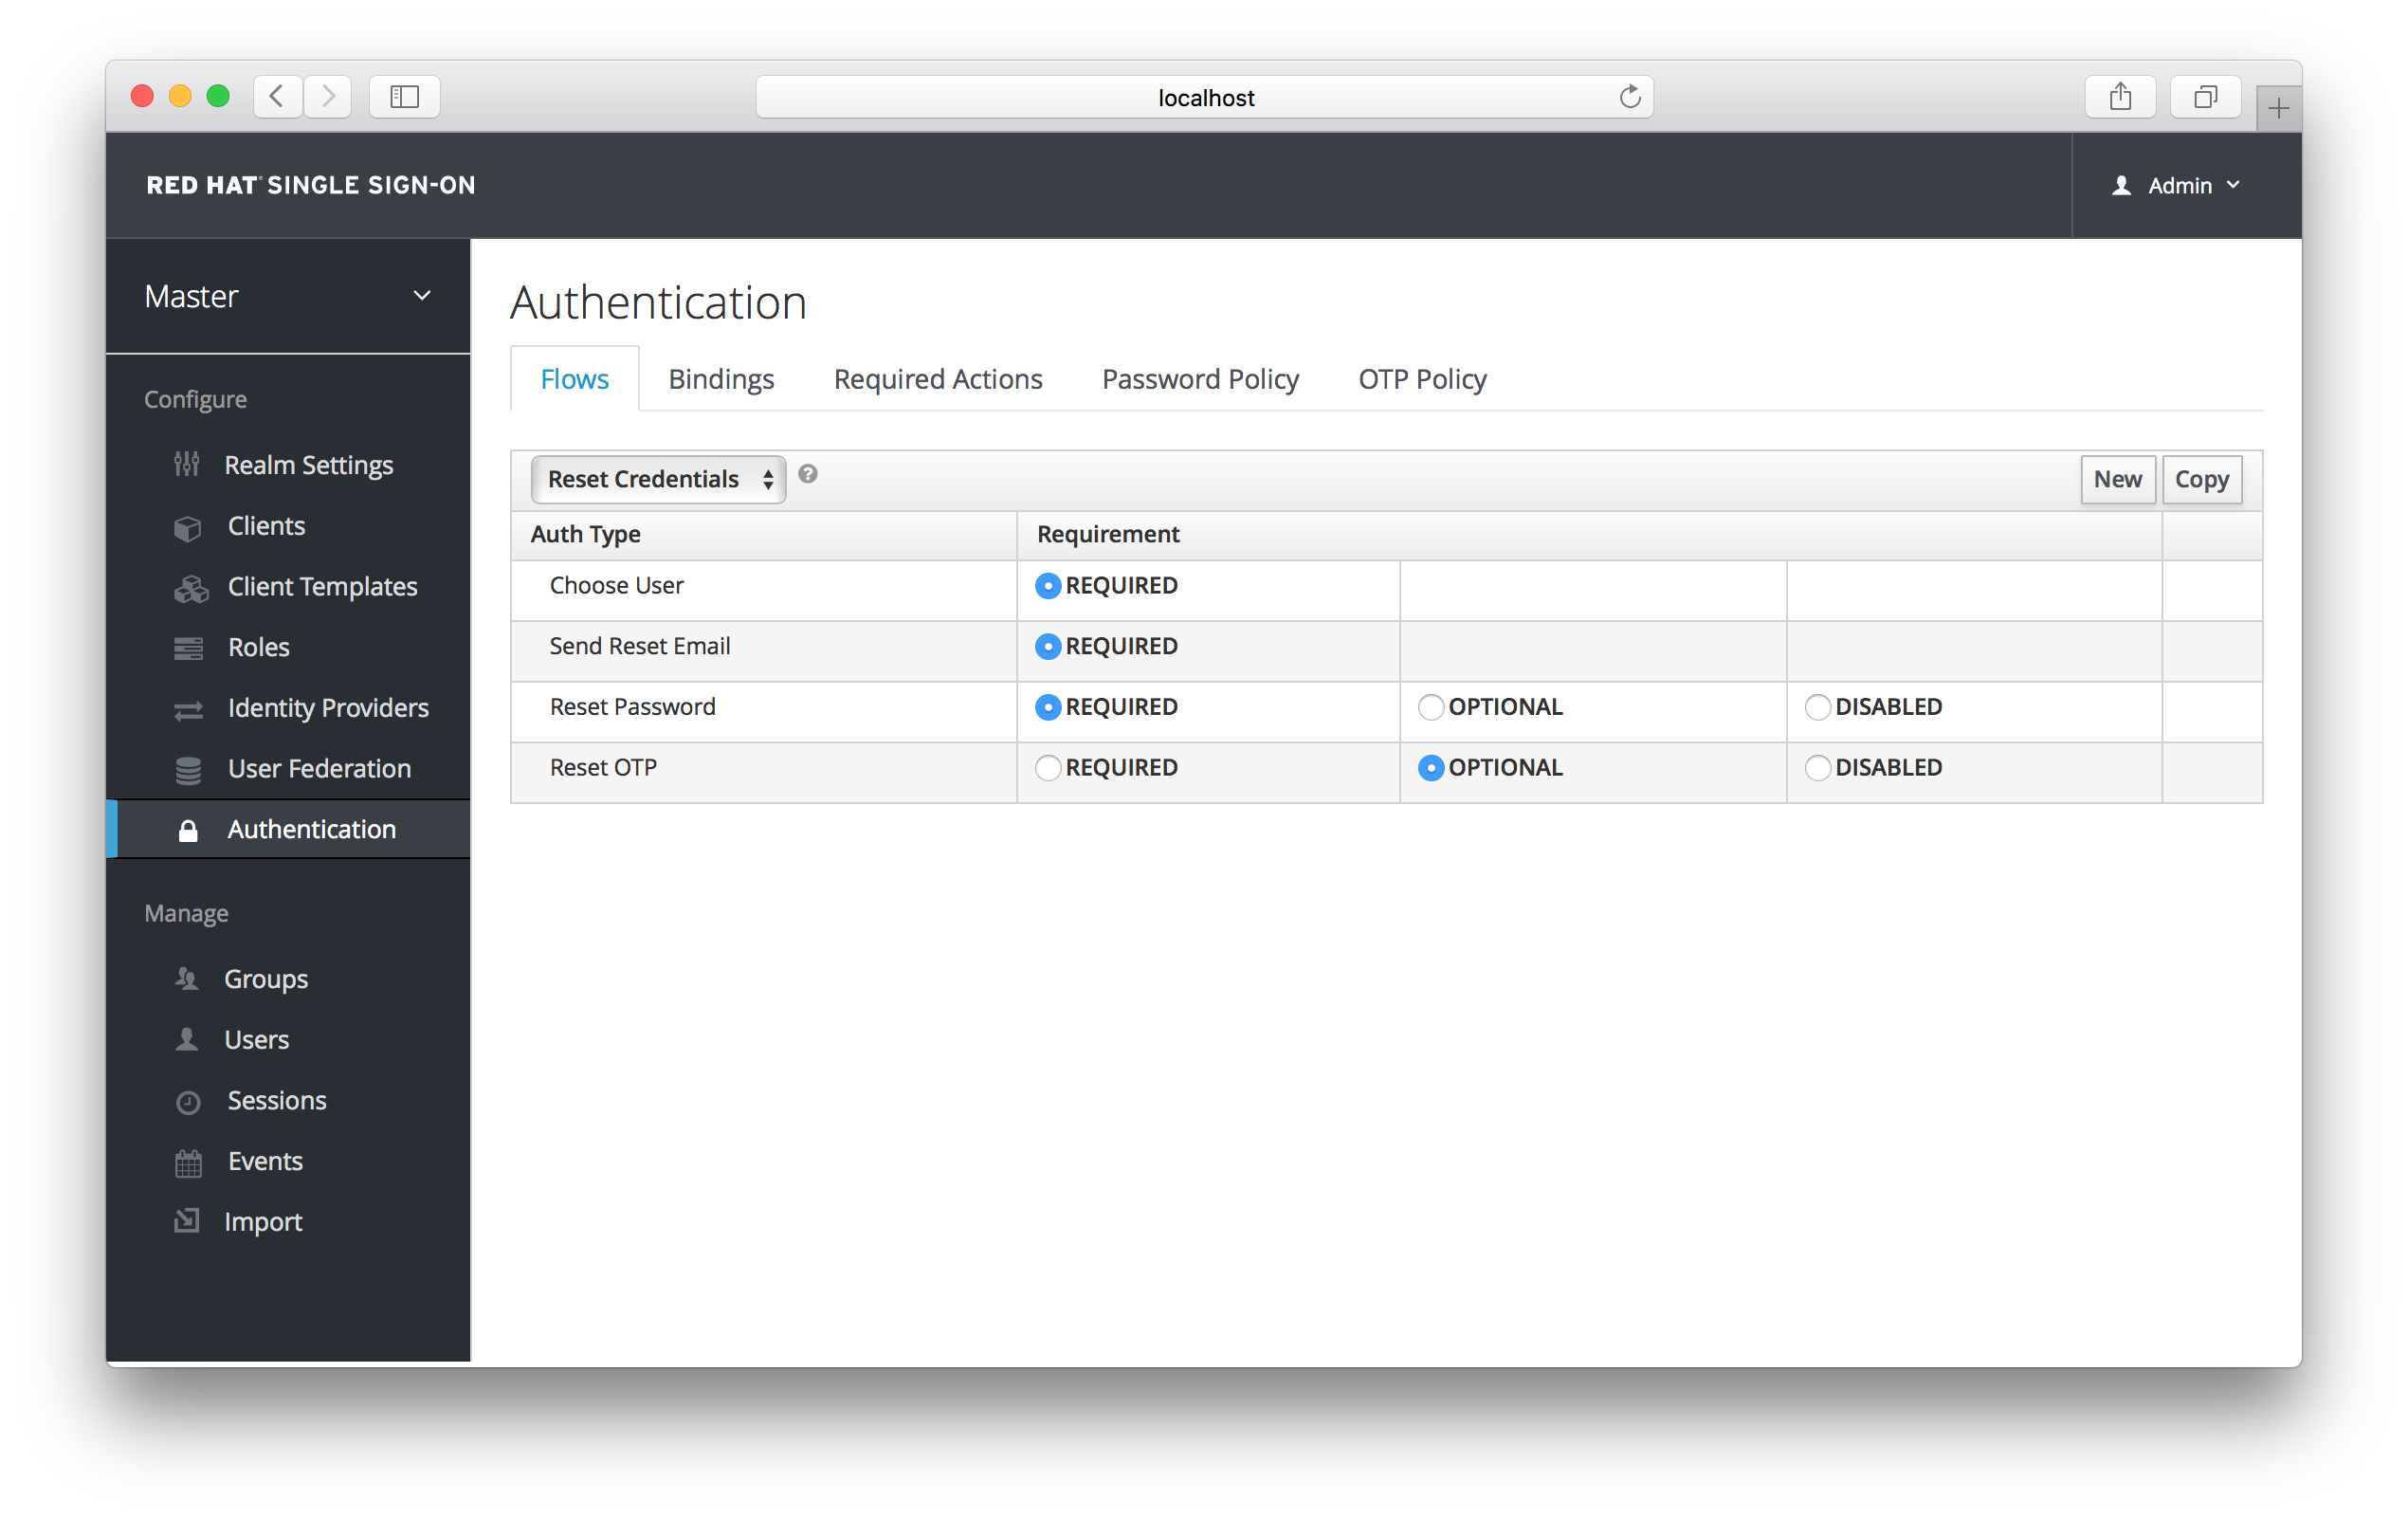
If you do not want OTP reset, then just chose the disabled radio button to the right of Reset OTP.
5.2. Remember Me
If a logged in user closes their browser, their session is destroyed and they will have to log in again. You can set things up so that if a user checks a remember me checkbox, they will remain logged in even if the browser is closed. This basically turns the login cookie from a session-only cookie to a persistence cookie.
To enable this feature go to Realm Settings left menu item and click on the Login tab and turn on the Remember Me switch:
Login Tab
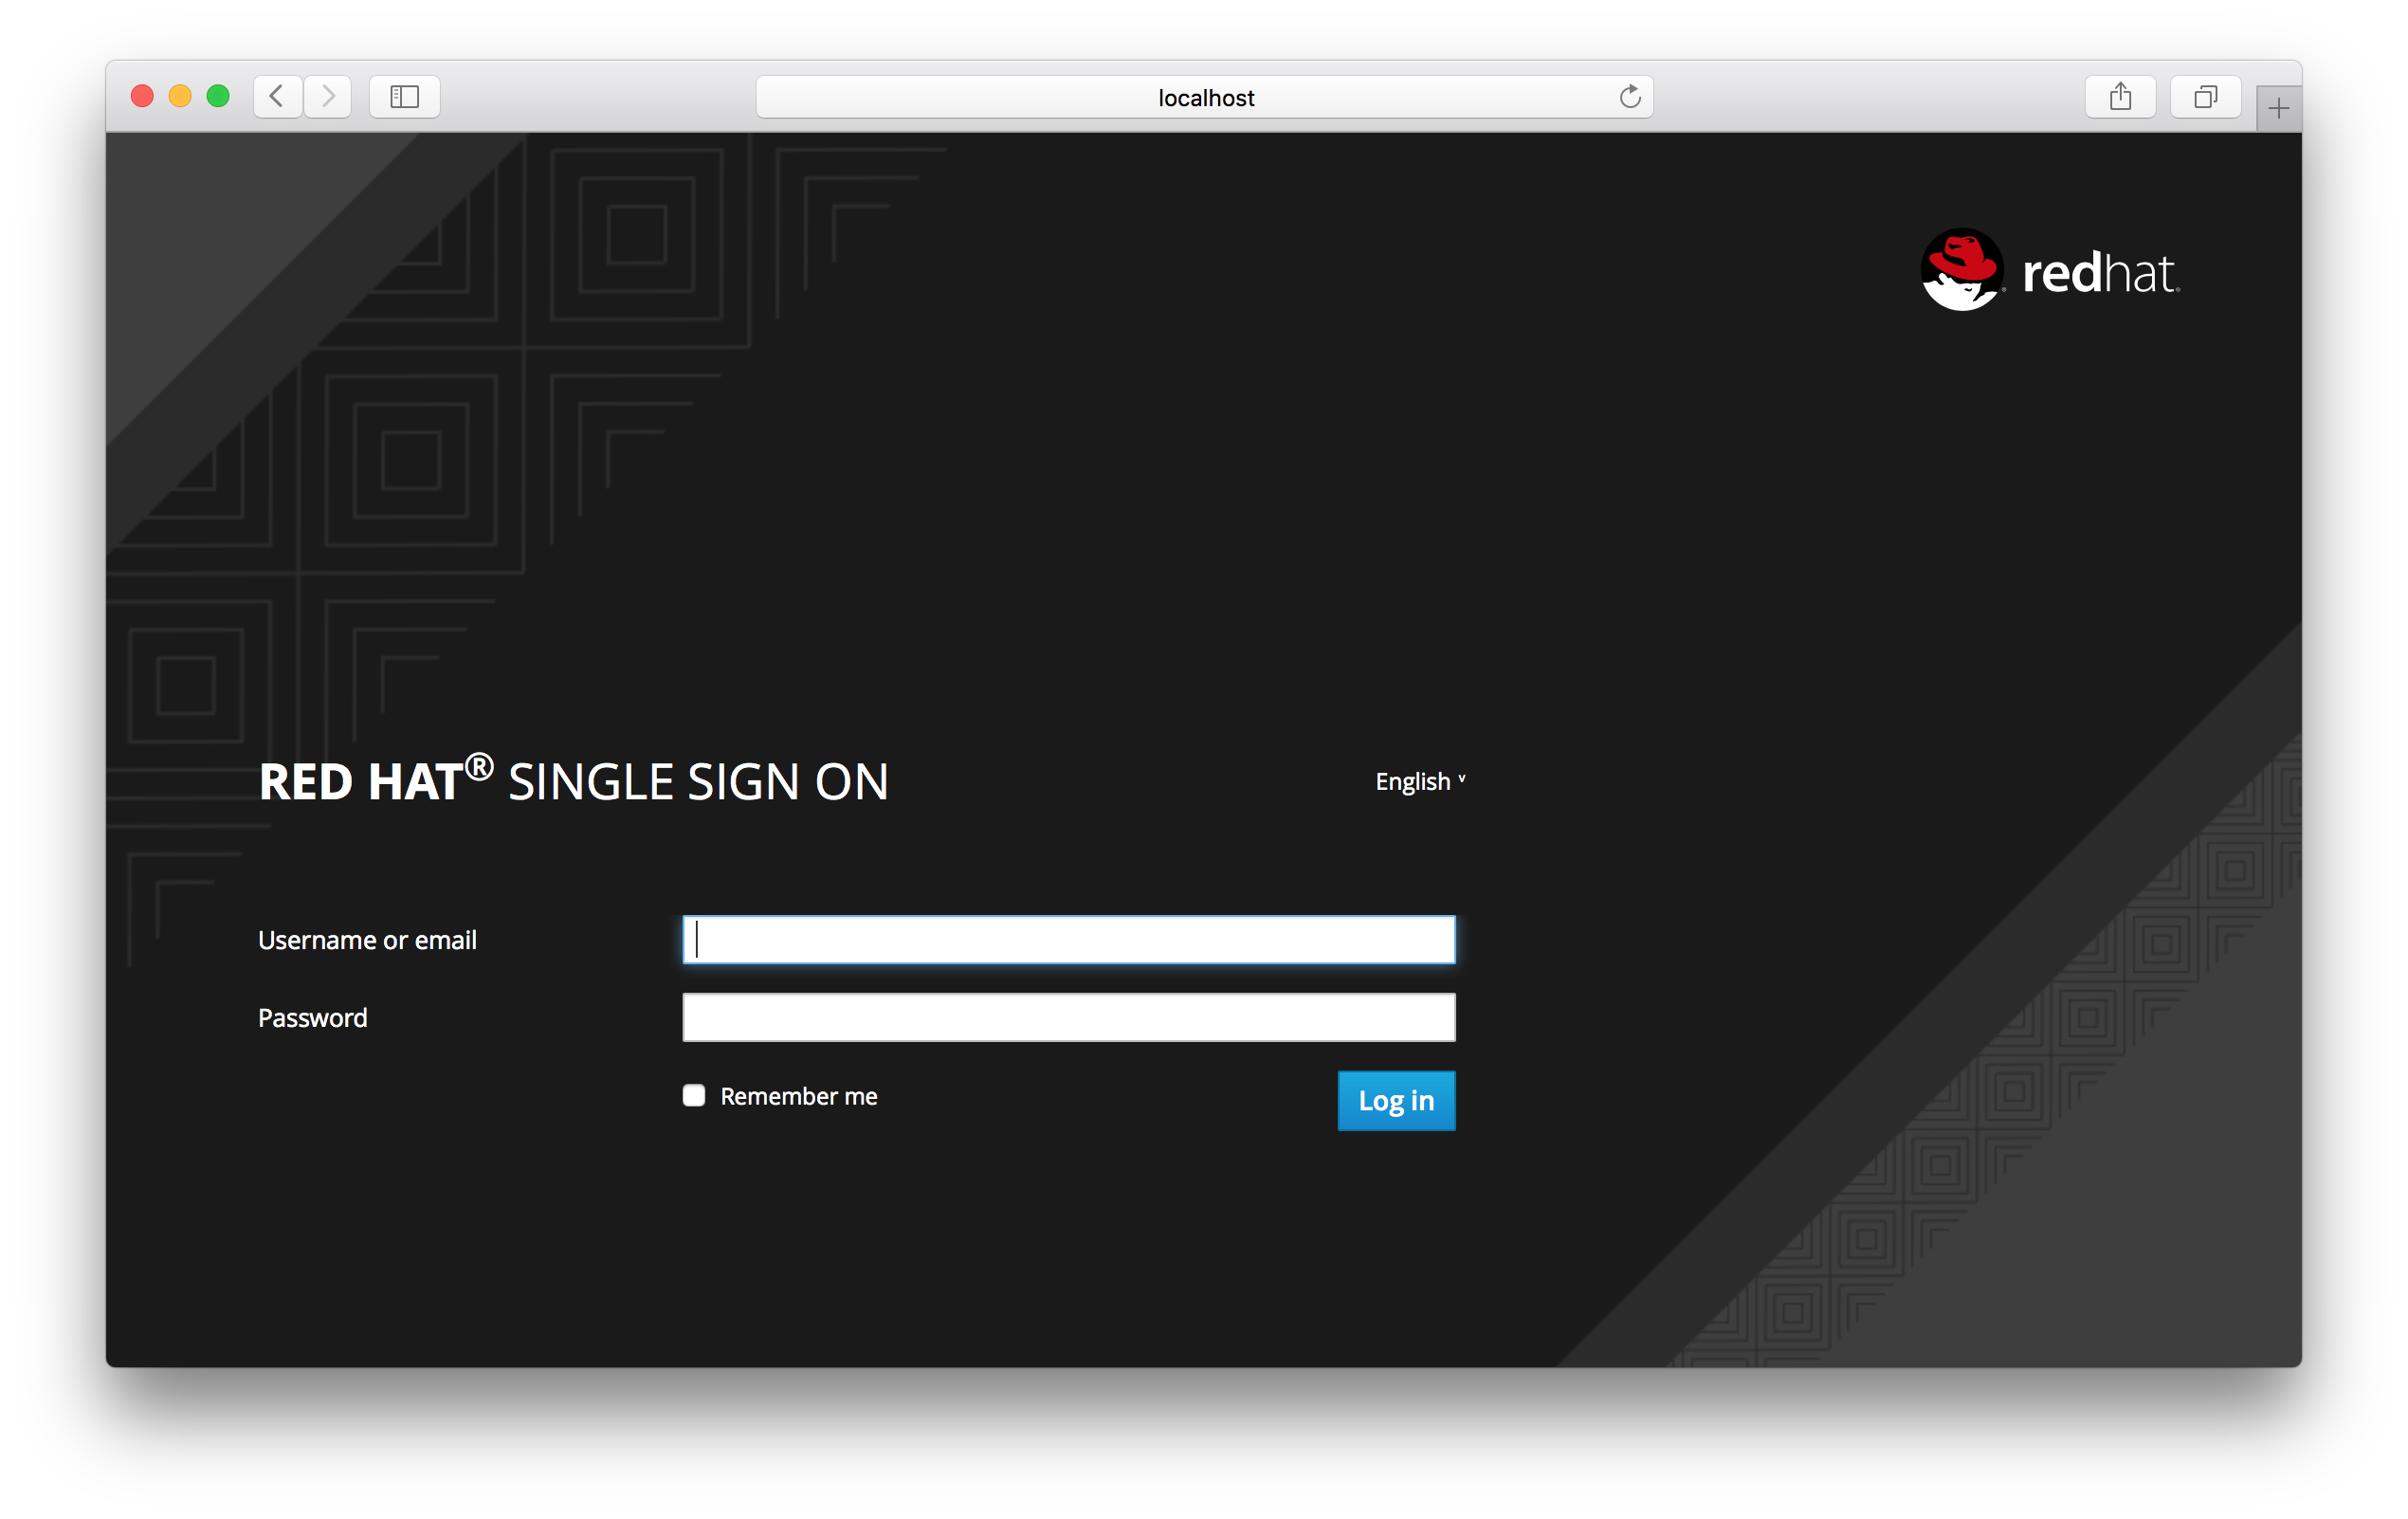
Once you save this setting, a remember me checkbox will be displayed on the realm’s login page.
Remember Me
Chapter 6. Authentication
There are a few features you should be aware of when configuring authentication for your realm. Many organizations have strict password and OTP policies that you can enforce via settings in the Admin Console. You may or may not want to require different credential types for authentication. You may want to give users the option to login via Kerberos or disable or enable various built in credential types. This chapter covers all of these topics.
6.1. Password Policies
Each new realm created has no password policies associated with it. This means users can have as short, as long, as complex, as insecure a password as they want. This is great for development or if you are just learning and playing around with Red Hat Single Sign-On, but pretty much unacceptable in production environment. Red Hat Single Sign-On has a rich set of password policies you can enable through the Admin Console.
Click on the Authentication left menu item and go to the Password Policy tab. Choose the policy you want to add in the right side drop down list box. This will add the policy in the table on the screen. Choose the parameters for the policy. Hit the Save button to store your changes.
Password Policy

After saving your policy, user registration and the Update Password required action will enforce your new policy. Here’s what it would look like if the user failed the policy check:
Failed Password Policy
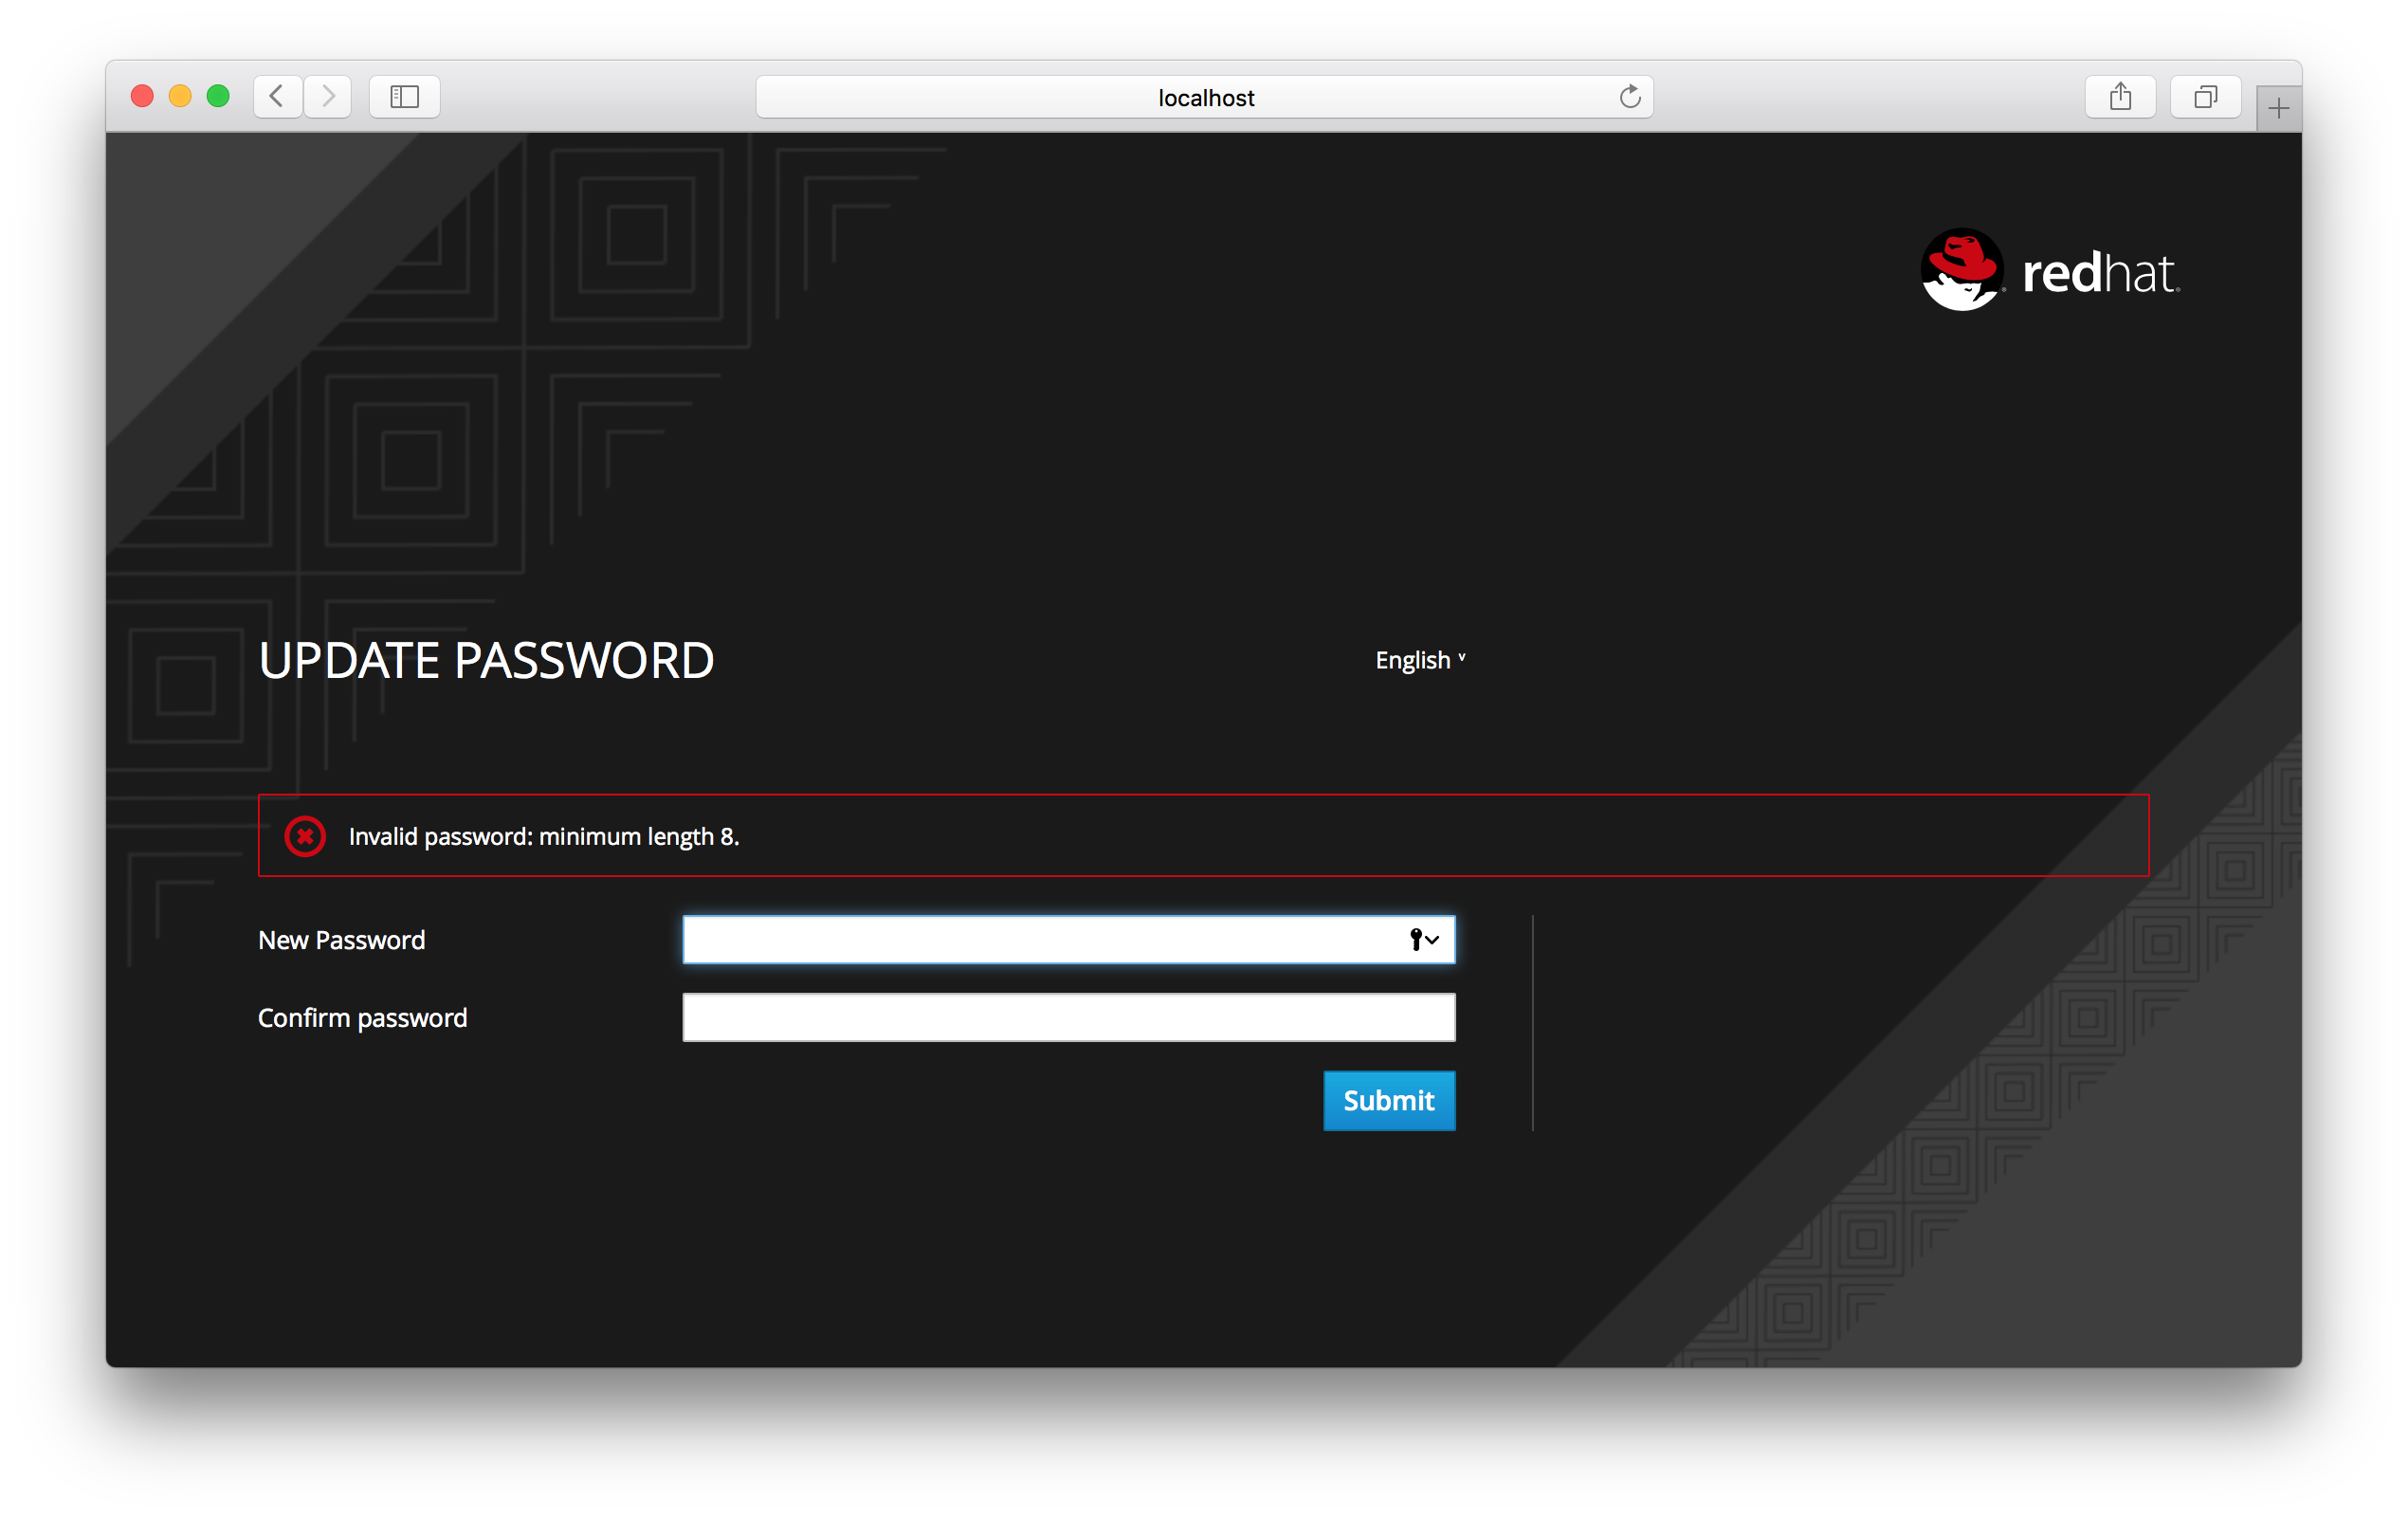
Unfortunately, users are not required to update their password if the password policy changes and there is no nice way of triggering an Update Password required action other than setting it manually for every user. This is scheduled as a future enhancement.
6.1.1. Password Policy Types
Here’s an explanation of each policy type:
- HashAlgorithm
- Passwords are not stored as clear text. Instead they are hashed using standard hashing algorithms before they are stored or validated. The only currently supported algorithm is PBKDF2.
- HashIterations
- This value specifies the number of times a password will be hashed before it is stored or verified. The default value is 20,000. This hashing is done in the rare case that a hacker gets access to your password database. Once they have the database they can reverse engineer user passwords. The industry recommended value for this parameter changes every year as CPU power improves. The current recommended value is 20,000. Yes, 20,000 iterations! This is a very intensive CPU operation and with this high of a setting your servers are going to be spending most of their CPU power on hashing. You’ll have to weigh what is more important to you. Performance or protecting your passwords stores. There may be more cost effective ways of protecting your password stores.
- Digits
- How many digits are required to be in the password string?
- LowerCase
- How many lower case letters are required to be in the password string?
- UpperCase
- How many upper case letters are required to be in the password string?
- SpecialChars
- How many special characters like '?!#%$' are required to be in the password string?
- NotUsername
- When set, password is not allowed to be the same as the username.
- RegexPattern
- Define a Perl regular expression pattern that passwords must match.
- ForceExpiredPasswordChange
- How many days is a password valid for? After the number of days has expired, the user will be required to change their password.
- PasswordHistory
- This policy saves a history of previous passwords. The number of old passwords stored is configurable. When a user changes their password they will not be able to re-use any password stored in history.
6.2. OTP Policies
Red Hat Single Sign-On has a number of policies you can set up for your FreeOTP or Google Authenticator One-Time Password generator. Click on the Authentication left menu item and go to the OTP Policy tab.
OTP Policy

Any policies you set here will be used to validate one-time passwords. When configuring OTP, FreeOTP and Google Authenticator can scan a QR code that is generated on the OTP set up page that Red Hat Single Sign-On has. The bar code is also generated from information configured on the OTP Policy tab.
6.2.1. TOTP vs. HOTP
There are two different algorithms to choose from for your OTP generators. Time Based (TOTP) and Counter Based (HOTP). For TOTP, your token generator will hash the current time and a shared secret. The server validates the OTP by comparing the all hashes within a certain window of time to the submitted value. So, TOTPs are valid only for a short window of time (usually 30 seconds). For HOTP a shared counter is used instead of the current time. The server increments the counter with each successful OTP login. So, valid OTPs only change after a successful login.
TOTP is considered a little more secure because the matchable OTP is only valid for a short window of time while the OTP for HOTP can be valid for an indeterminate amount of time. HOTP is much more user friendly as the user won’t have to hurry to enter in their OTP before the time interval is up. With the way Red Hat Single Sign-On has implemented TOTP this distinction becomes a little more blurry. HOTP requires a database update every time the server wants to increment the counter. This can be a performance drain on the authentication server when there is heavy load. So, to provide a more efficient alternative, TOTP does not remember passwords used. This bypasses the need to do any DB updates, but the downside is that TOTPs can be re-used in the valid time interval. For future versions of Red Hat Single Sign-On it is planned that you will be able to configure whether TOTP checks older OTPs in the time interval.
6.2.2. TOTP Configuration Options
- Hashing Algorithm
- Default is SHA1, more secure options are SHA256 and SHA512.
- Number of Digits
- How many characters is the OTP? Short means more user friendly as it is less the user has to type. More means more security.
- Look Ahead Window
- How many intervals ahead should the server try and match the hash? This exists so just in case the clock of the TOTP generator or authentication server get out of sync. The default value of 1 is usually good enough. For example, if the time interval for a new token is every 30 seconds, the default value of 1 means that it will only accept valid tokens in that 30 second window. Each increment of this config value will increase the valid window by 30 seconds.
- OTP Token Period
- Time interval in seconds a new TOTP will be generated by the token generator. And, the time window the server is matching a hash.
6.2.3. HOTP Configuration Options
- Hashing Algorithm
- Default is SHA1, more secure options are SHA256 and SHA512.
- Number of Digits
- How many characters is the OTP? Short means more user friendly as it is less the user has to type. More means more security.
- Look Ahead Window
- How many counters ahead should the server try and match the hash? The default value is 1. This exists to cover the case where the user’s counter gets ahead of the server’s. This can often happen as users often increment the counter manually too many times by accident. This value really should be increased to a value of 10 or so.
- Initial Counter
- What is the value of the initial counter?
6.3. Authentication Flows
An authentication flow is a container for all authentications, screens, and actions that must happen during login, registration, and other Red Hat Single Sign-On workflows. If you go to the admin console Authentication left menu item and go to the Flows tab, you can view all the defined flows in the system and what actions and checks each flow requires. This section does a walk through of the browser login flow. In the left drop down list select browser to come to the screen shown below:
Browser Flow
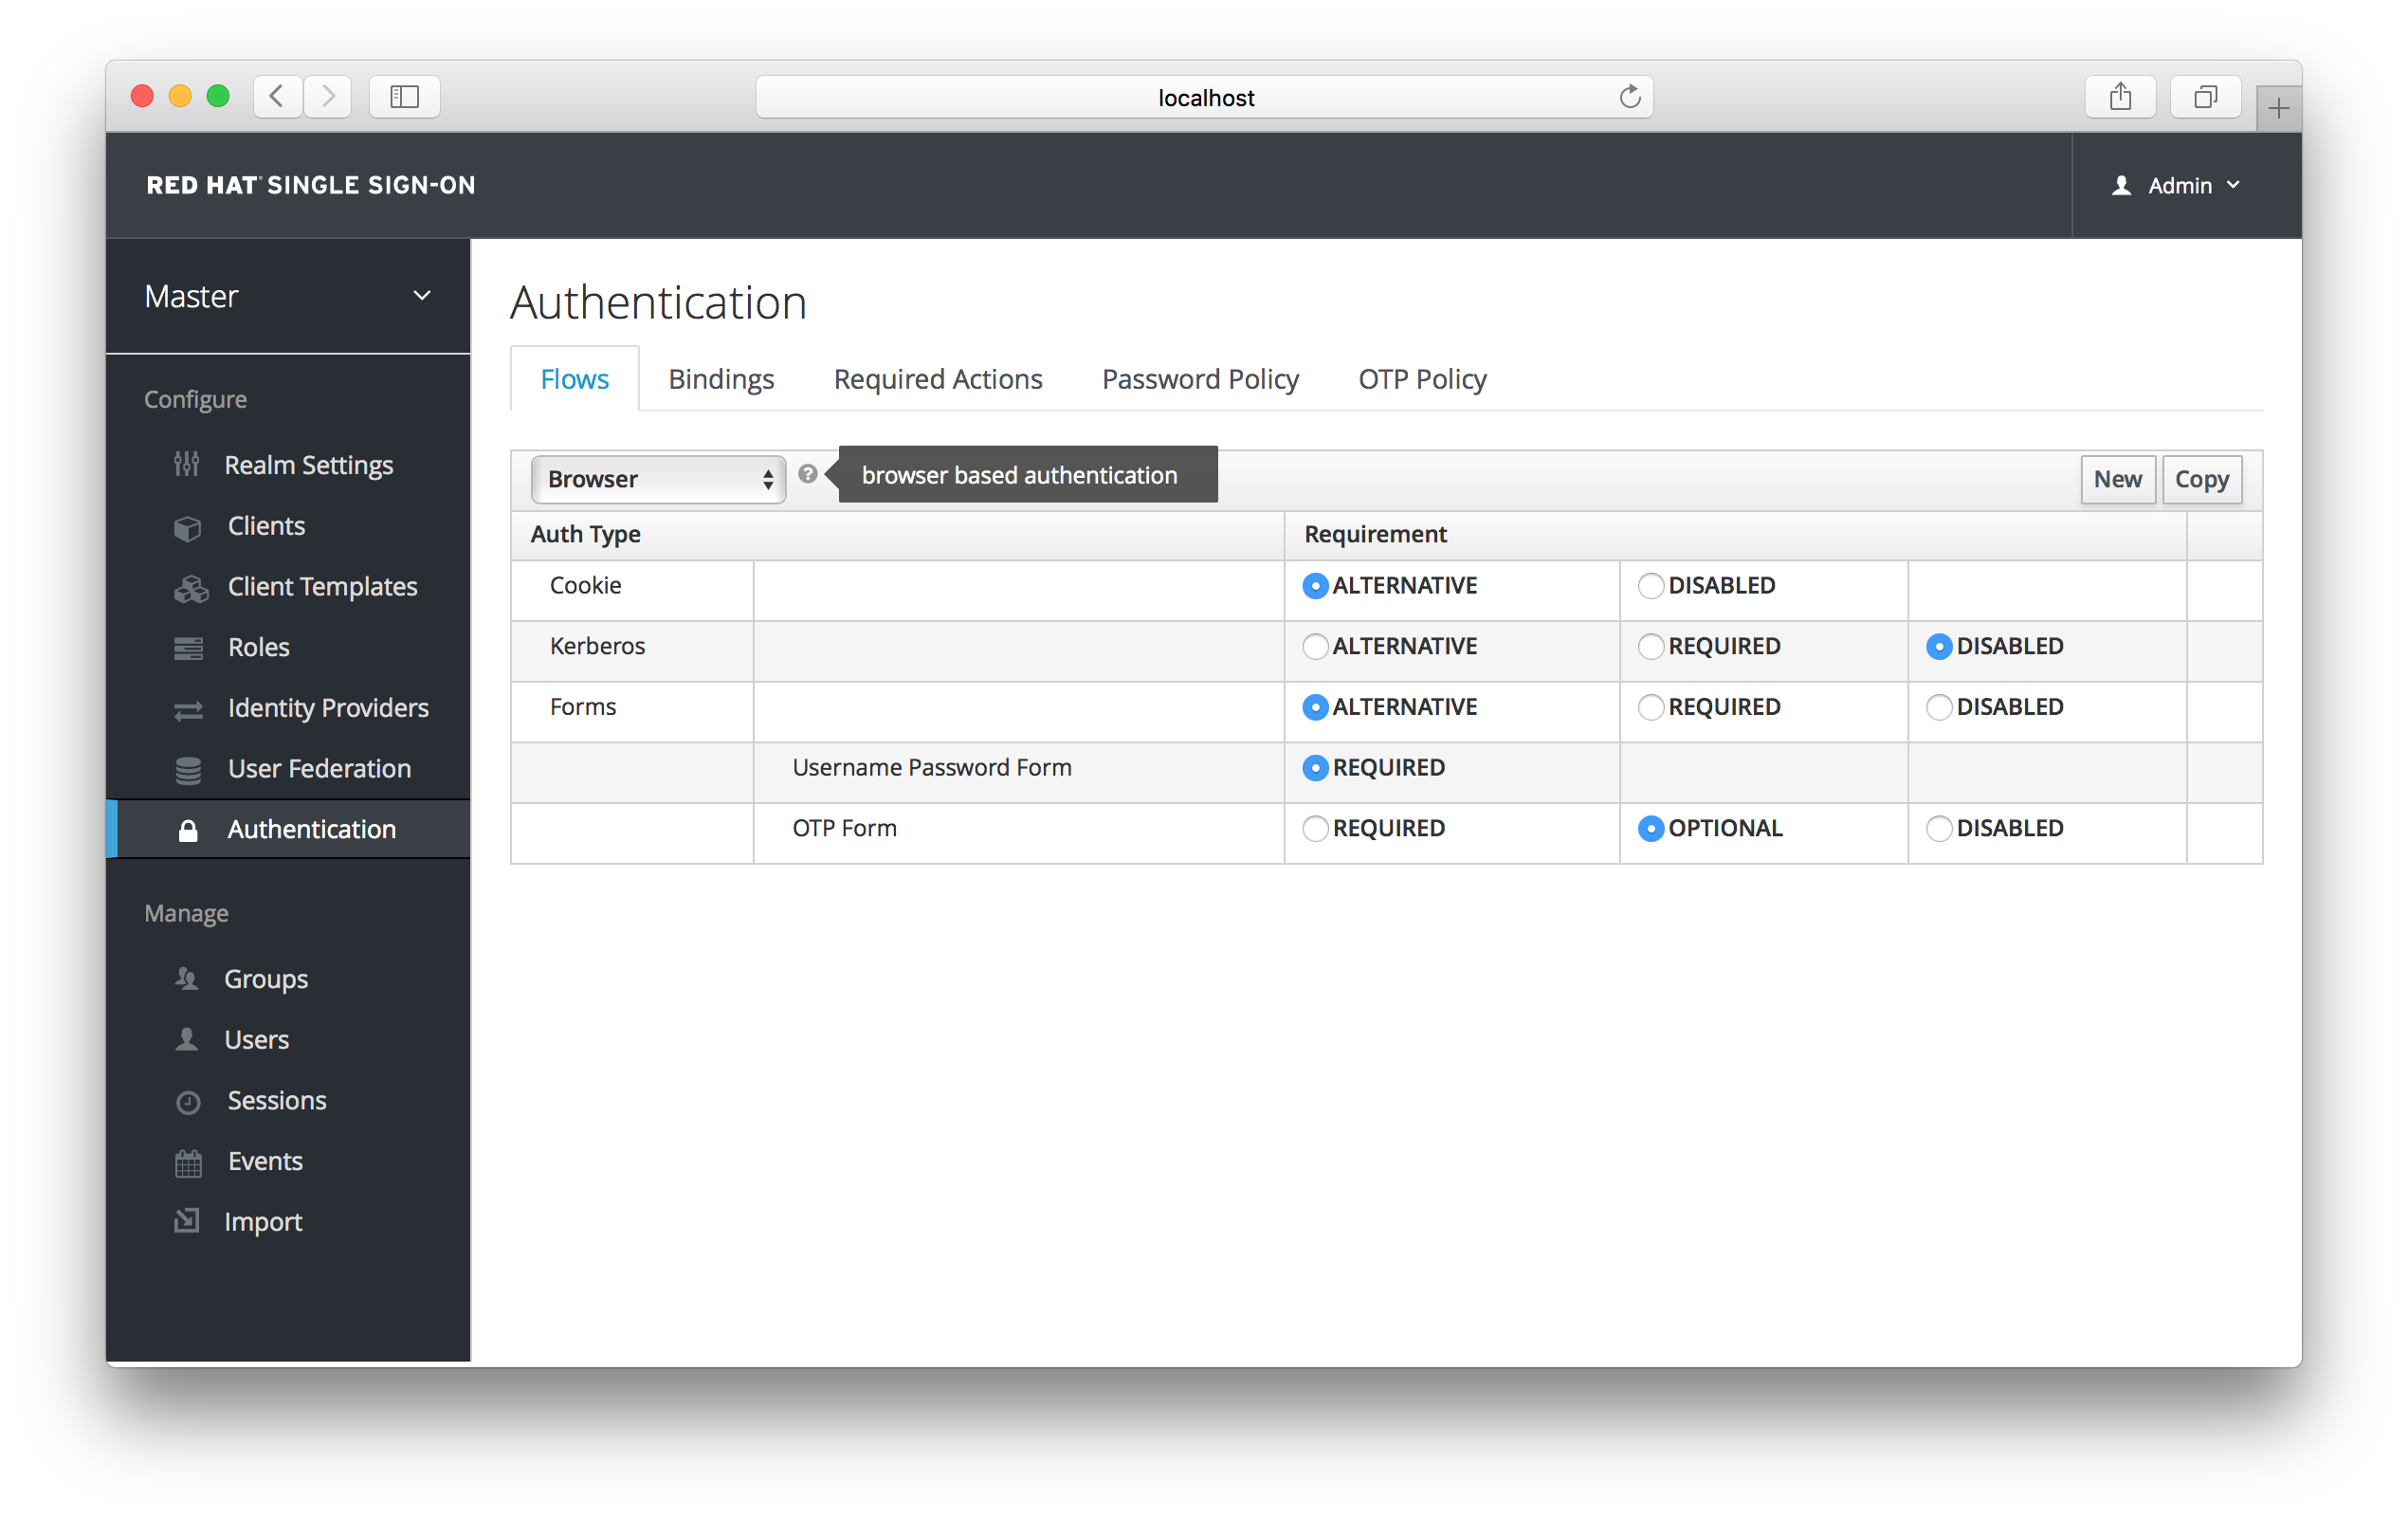
If you hover over the tooltip (the tiny question mark) to the right of the flow selection list, this will describe what the flow is and does.
The Auth Type column is the name of authentication or action that will be executed. If an authentication is indented this means it is in a sub-flow and may or may not be executed depending on the behavior of its parent. The Requirement column is a set of radio buttons which define whether or not the action will execute. Let’s describe what each radio button means:
- Required
-
This authentication execution must execute successfully. If the user doesn’t have that type of authentication mechanism configured and there is a required action associated with that authentication type, then a required action will be attached to that account. For example, if you switch
OTP FormtoRequired, users that don’t have an OTP generator configured will be asked to do so. - Optional
- If the user has the authentication type configured, it will be executed. Otherwise, it will be ignored.
- Disabled
- If disabled, the authentication type is not executed.
- Alternative
- This means that at least one alternative authentication type must execute successfully at that level of the flow.
This is better described in an example. Let’s walk through the browser authentication flow.
-
The first authentication type is
Cookie. When a user successfully logs in for the first time, a session cookie is set. If this cookie has already been set, then this authentication type is successful. Since the cookie provider returned success and each execution at this level of the flow is alternative, no other execution is executed and this results in a successful login. - Next the flow looks at the Kerberos execution. This authenticator is disabled by default and will be skipped.
-
The next execution is a subflow called Forms. Since this subflow is marked as alternative it will not be executed if the
Cookieauthentication type passed. This subflow contains additional authentication type that needs to be executed. The executions for this subflow are loaded and the same processing logic occurs - The first execution in the Forms subflow is the Username Password Form. This authentication type renders the username and password page. It is marked as required so the user must enter in a valid username and password.
- The next execution is the OTP Form. This is marked as optional. If the user has OTP set up, then this authentication type must run and be successful. If the user doesn’t have OTP set up, this authentication type is ignored.
6.4. Kerberos
Red Hat Single Sign-On supports login with a Kerberos ticket through the SPNEGO protocol. SPNEGO (Simple and Protected GSSAPI Negotiation Mechanism) is used to authenticate transparently through the web browser after the user has been authenticated when logging-in his session. For non-web cases or when ticket is not available during login, Red Hat Single Sign-On also supports login with Kerberos username/password.
A typical use case for web authentication is the following:
- User logs into his desktop (Such as a Windows machine in Active Directory domain or Linux machine with Kerberos integration enabled).
- User then uses his browser (IE/Firefox/Chrome) to access a web application secured by Red Hat Single Sign-On.
- Application redirects to Red Hat Single Sign-On login.
-
Red Hat Single Sign-On renders HTML login screen together with status 401 and HTTP header
WWW-Authenticate: Negotiate -
In case that the browser has Kerberos ticket from desktop login, it transfers the desktop sign on information to the Red Hat Single Sign-On in header
Authorization: Negotiate 'spnego-token'. Otherwise it just displays the login screen. - Red Hat Single Sign-On validates token from the browser and authenticates the user. It provisions user data from LDAP (in case of LDAPFederationProvider with Kerberos authentication support) or let user to update his profile and prefill data (in case of KerberosFederationProvider).
- Red Hat Single Sign-On returns back to the application. Communication between Red Hat Single Sign-On and application happens through OpenID Connect or SAML messages. The fact that Red Hat Single Sign-On was authenticated through Kerberos is hidden from the application. So Red Hat Single Sign-On acts as broker to Kerberos/SPNEGO login.
For setup there are 3 main parts:
- Setup and configuration of Kerberos server (KDC)
- Setup and configuration of Red Hat Single Sign-On server
- Setup and configuration of client machines
6.4.1. Setup of Kerberos server
This is platform dependent. Exact steps depend on your OS and the Kerberos vendor you’re going to use. Consult Windows Active Directory, MIT Kerberos and your OS documentation for how exactly to setup and configure Kerberos server.
At least you will need to:
- Add some user principals to your Kerberos database. You can also integrate your Kerberos with LDAP, which means that user accounts will be provisioned from LDAP server.
Add service principal for "HTTP" service. For example if your Red Hat Single Sign-On server will be running on
www.mydomain.orgyou may need to add principalHTTP/www.mydomain.org@MYDOMAIN.ORGassuming that MYDOMAIN.ORG will be your Kerberos realm.For example on MIT Kerberos you can run a "kadmin" session. If you are on the same machine where is MIT Kerberos, you can simply use the command:
sudo kadmin.local
Then add HTTP principal and export his key to a keytab file with the commands like:
addprinc -randkey HTTP/www.mydomain.org@MYDOMAIN.ORG
ktadd -k /tmp/http.keytab HTTP/www.mydomain.org@MYDOMAIN.ORG
The Keytab file /tmp/http.keytab will need to be accessible on the host where Red Hat Single Sign-On server will be running.
6.4.2. Setup and configuration of Red Hat Single Sign-On server
You need to install a kerberos client on your machine. This is also platform dependent. If you are on Fedora, Ubuntu or RHEL, you can install the package freeipa-client, which contains a Kerberos client and several other utilities. Configure the kerberos client (on linux it’s in file /etc/krb5.conf ). You need to put your Kerberos realm and at least configure the HTTP domains your server will be running on. For the example realm MYDOMAIN.ORG you may configure the domain_realm section like this:
[domain_realm]
  .mydomain.org = MYDOMAIN.ORG
  mydomain.org = MYDOMAIN.ORG
Next you need to export the keytab file with the HTTP principal and make sure the file is accessible to the process under which Red Hat Single Sign-On server is running. For production, it’s ideal if it’s readable just by this process and not by someone else. For the MIT Kerberos example above, we already exported keytab to /tmp/http.keytab . If your KDC and Red Hat Single Sign-On are running on same host, you have that file already available.
6.4.2.1. Enable SPNEGO Processing
Red Hat Single Sign-On does not have the SPNEGO protocol support turned on by default. So, you have to go to the browser flow and enable Kerberos.
Browser Flow
Switch the Kerberos requirement from disabled to either alternative or required. Alternative basically means that Kerberos is optional. If the user’s browser hasn’t been configured to work with SPNEGO/Kerberos, then Red Hat Single Sign-On will fall back to the regular login screens. If you set the requirement to required then all users must have Kerberos enabled for their browser.
6.4.2.2. Configure Kerberos User Storage Federation Provider
Now that the SPNEGO protocol is turned on at the authentication server, you’ll need to configure how Red Hat Single Sign-On interprets the Kerberos ticket. This is done through User Storage Federation. We have 2 different federation providers with Kerberos authentication support.
If you want to authenticate with Kerberos backed by an LDAP server, you have to first configure the LDAP Federation Provider. If you look at the configuration page for your LDAP provider you’ll see a Kerberos Integration section.
LDAP Kerberos Integration

Turning on the switch Allow Kerberos authentication will make Red Hat Single Sign-On use the Kerberos principal to lookup information about the user so that it can be imported into the Red Hat Single Sign-On environment.
If your Kerberos solution is not backed by an LDAP server, you have to use the Kerberos User Storage Federation Provider. Go to the User Federation left menu item and select Kerberos from the right Add provider select box.
Kerberos User Storage Provider
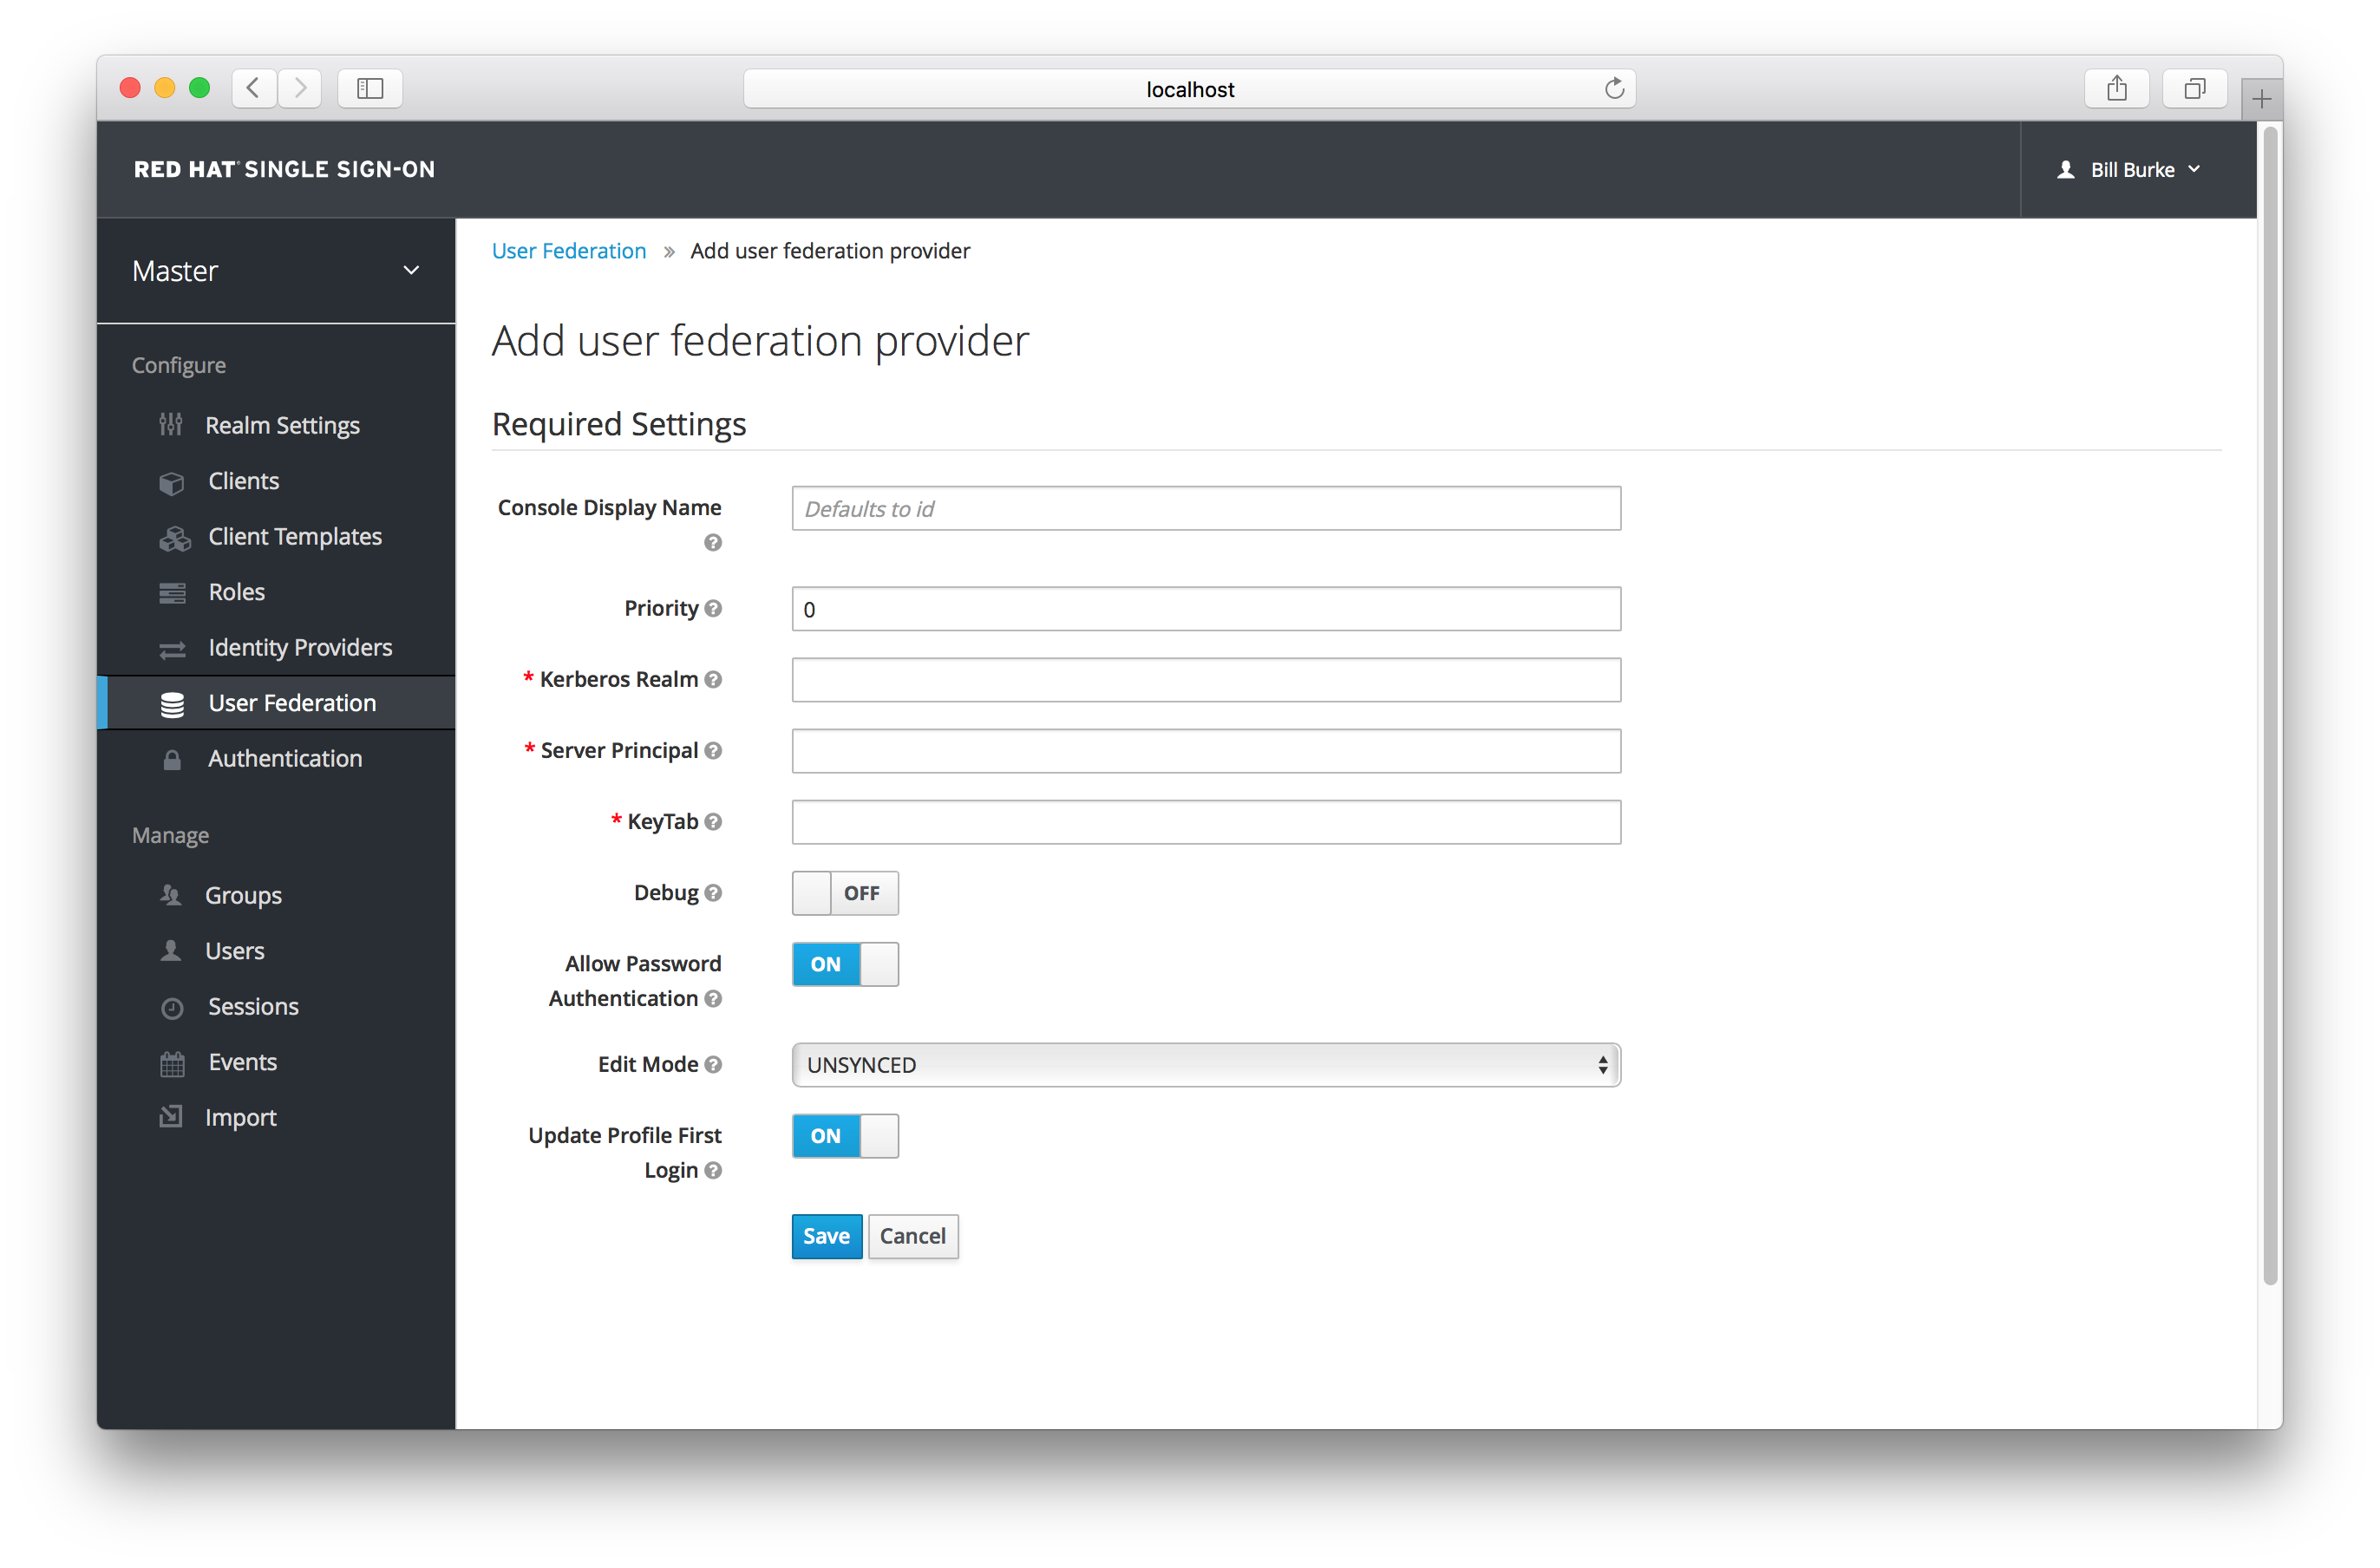
This provider parses the Kerberos ticket for simple principal information and does a small import into the local Red Hat Single Sign-On database. User profile information like first name, last name, and email are not provisioned.
6.4.3. Setup and configuration of client machines
Clients need to install kerberos client and setup krb5.conf as described above. Additionally they need to enable SPNEGO login support in their browser. See configuring Firefox for Kerberos if you are using that browser. URI .mydomain.org must be allowed in the network.negotiate-auth.trusted-uris config option.
In a Windows domain, clients usually don’t need to configure anything special as IE is already able to participate in SPNEGO authentication for the Windows domain.
6.4.4. Credential Delegation
Kerberos 5 supports the concept of credential delegation. In this scenario, your applications may want access to the Kerberos ticket so that they can re-use it to interact with other services secured by Kerberos. Since the SPNEGO protocol is processed in the Red Hat Single Sign-On server, you have to propagate the GSS credential to your application within the OpenID Connect token claim or a SAML assertion attribute that is transmitted to your application from the Red Hat Single Sign-On server. To have this claim inserted into the token or assertion, each application will need to enable the built-in protocol mapper called gss delegation credential. This is enabled in the Mappers tab of the application’s client page. See Protocol Mappers chapter for more details.
Applications will need to deserialize the claim it receives from Red Hat Single Sign-On before it can use it to make GSS calls against other services. Once you deserialize the credential from the access token to the GSSCredential object, the GSSContext will need to be created with this credential passed to the method GSSManager.createContext for example like this:
// Obtain accessToken in your application.
KeycloakPrincipal keycloakPrincipal = (KeycloakPrincipal) servletReq.getUserPrincipal();
AccessToken accessToken = keycloakPrincipal.getKeycloakSecurityContext().getToken();

// Retrieve kerberos credential from accessToken and deserialize it
String serializedGssCredential = (String) accessToken.getOtherClaims().
    get(org.keycloak.common.constants.KerberosConstants.GSS_DELEGATION_CREDENTIAL);

GSSCredential deserializedGssCredential = org.keycloak.common.util.KerberosSerializationUtils.
    deserializeCredential(serializedGssCredential);

// Create GSSContext to call other kerberos-secured services
GSSContext context = gssManager.createContext(serviceName, krb5Oid,
    deserializedGssCredential, GSSContext.DEFAULT_LIFETIME);
Note that you also need to configure forwardable kerberos tickets in krb5.conf file and add support for delegated credentials to your browser.
Credential delegation has some security implications so only use it if you really need it. It’s highly recommended to use it together with HTTPS. See for example this article for more details.
6.4.5. Troubleshooting
If you have issues, we recommend that you enable additional logging to debug the problem:
-
Enable
Debugflag in admin console for Kerberos or LDAP federation providers -
Enable TRACE logging for category
org.keycloakin logging section ofstandalone/configuration/standalone.xmlto receive more infostandalone/log/server.log -
Add system properties
-Dsun.security.krb5.debug=trueand-Dsun.security.spnego.debug=true
Chapter 7. SSO Protocols
The chapter gives a brief overview of the authentication protocols and how the Red Hat Single Sign-On authentication server and the applications it secures interact with these protocols.
7.1. Open ID Connect
Open ID Connect (OIDC) is an authentication protocol that is an extension of OAuth 2.0. While OAuth 2.0 is only a framework for building authorization protocols and is mainly incomplete, OIDC is a full-fledged authentication and authorization protocol. OIDC also makes heavy use of the Json Web Token (JWT) set of standards. These standards define an identity token JSON format and ways to digitally sign and encrypt that data in a compact and web-friendly way.
There are really two types of use cases when using OIDC. The first is an application that asks the Red Hat Single Sign-On server to authenticate a user for them. After a successful login, the application will receive an identity token and an access token. The identity token contains information about the user such as username, email, and other profile information. The access token is digitally signed by the realm and contains access information (like user role mappings) that the application can use to determine what resources the user is allowed to access on the application.
The second type of use cases is that of a client that wants to gain access to remote services. In this case, the client asks Red Hat Single Sign-On to obtain an access token it can use to invoke on other remote services on behalf of the user. Red Hat Single Sign-On authenticates the user then asks the user for consent to grant access to the client requesting it. The client then receives the access token. This access token is digitally signed by the realm. The client can make REST invocations on remote services using this access token. The REST service extracts the access token, verifies the signature of the token, then decides based on access information within the token whether or not to process the request.
7.1.1. OIDC Auth Flows
OIDC has different ways for a client or application to authenticate a user and receive an identity and access token. Which path you use depends greatly on the type of application or client requesting access. All of these flows are described in the OIDC and OAuth 2.0 specifications so only a brief overview will be provided here.
7.1.1.1. Authorization Code Flow
This is a browser-based protocol and it is what we recommend you use to authenticate and authorize browser-based applications. It makes heavy use of browser redirects to obtain an identity and access token. Here’s a brief summary:
- Browser visits application. The application notices the user is not logged in, so it redirects the browser to Red Hat Single Sign-On to be authenticated. The application passes along a callback URL (a redirect URL) as a query parameter in this browser redirect that Red Hat Single Sign-On will use when it finishes authentication.
- Red Hat Single Sign-On authenticates the user and creates a one-time, very short lived, temporary code. Red Hat Single Sign-On redirects back to the application using the callback URL provided earlier and additionally adds the temporary code as a query parameter in the callback URL.
- The application extracts the temporary code and makes a background out of band REST invocation to Red Hat Single Sign-On to exchange the code for an identity, access and refresh token. Once this temporary code has been used once to obtain the tokens, it can never be used again. This prevents potential reply attacks.
It is important to note that access tokens are usually short lived and often expired after only minutes. The additional refresh token that was transmitted by the login protocol allows the application to obtain a new access token after it expires. This refresh protocol is important in the situation of a compromised system. If access tokens are short lived, the whole system is only vulnerable to a stolen token for the lifetime of the access token. Future refresh token requests will fail if an admin has revoked access. This makes things more secure and more scalable.
Another important aspect of this flow is the concept of a public vs. a confidential client. Confidential clients are required to provide a client secret when they exchange the temporary codes for tokens. Public clients are not required to provide this client secret. Public clients are perfectly fine so long as HTTPS is strictly enforced and you are very strict about what redirect URIs are registered for the client. HTML5/JavaScript clients always have to be public clients because there is no way to transmit the client secret to them in a secure manner. Again, this is ok so long as you use HTTPS and strictly enforce redirect URI registration. This guide goes more detail into this in the Managing Clients chapter.
7.1.1.2. Implicit Flow
This is a browser-based protocol that is similar to Authorization Code Flow except there are fewer requests and no refresh tokens involved. We do not recommend this flow as there remains the possibility of access tokens being leaked in the browser history as tokens are transmitted via redirect URIs (see below). Also, since this flow doesn’t provide the client with a refresh token, access tokens would either have to be long-lived or users would have to re-authenticate when they expired. This flow is supported because it is in the OIDC and OAuth 2.0 specification. Here’s a brief summary of the protocol:
- Browser visits application. The application notices the user is not logged in, so it redirects the browser to Red Hat Single Sign-On to be authenticated. The application passes along a callback URL (a redirect URL) as a query parameter in this browser redirect that Red Hat Single Sign-On will use when it finishes authentication.
- Red Hat Single Sign-On authenticates the user and creates an identity and access token. Red Hat Single Sign-On redirects back to the application using the callback URL provided earlier and additionally adding the identity and access tokens as query parameters in the callback URL.
- The application extracts the the identity and access tokens from the callback URL.
7.1.1.3. Resource Owner Password Credentials Grant (Direct Grants)
This is referred to in the Admin Console as Direct Grants. This is used by REST clients that want to obtain a token on behalf of a user. It is one HTTP POST request that contains the credentials of the user as well as the id of the client and the client’s secret (if it is a confidential client). The user’s credentials are sent within form parameters. The HTTP response contains identity, access, and refresh tokens.
7.1.1.4. Client Credentials Grant
This is also used by REST clients, but instead of obtaining a token that works on behalf of an external user, a token is created based on the metadata and permissions of a service account that is associated with the client. More info together with example is in Service Accounts chapter.
7.1.2. Red Hat Single Sign-On Server OIDC URI Endpoints
Here’s a list of OIDC endpoints that the Red Hat Single Sign-On publishes. These URLs are useful if you are using a non-Red Hat Single Sign-On client adapter to talk OIDC with the auth server. These are all relative URLs and the root of the URL being the HTTP(S) protocol, hostname, and usually path prefixed with /auth: i.e. https://localhost:8080/auth
- /realms/{realm-name}/protocol/openid-connect/token
- This is the URL endpoint for obtaining a temporary code in the Authorization Code Flow or for obtaining tokens via the Implicit Flow, Direct Grants, or Client Grants.
- /realms/{realm-name}/protocol/openid-connect/auth
- This is the URL endpoint for the Authorization Code Flow to turn a temporary code into a token.
- /realms/{realm-name}/protocol/openid-connect/logout
- This is the URL endpoint for performing logouts.
- /realms/{realm-name}/protocol/openid-connect/userinfo
- This is the URL endpoint for the User Info service described in the OIDC specification.
In all of these replace {realm-name} with the name of the realm.
7.2. SAML
SAML 2.0 is a similar specification to OIDC but a lot older and more mature. It has its roots in SOAP and the plethora of WS-* specifications so it tends to be a bit more verbose than OIDC. SAML 2.0 is primarily an authentication protocol that works by exchanging XML documents between the authentication server and the application. XML signatures and encryption is used to verify requests and responses.
There is really two types of use cases when using SAML. The first is an application that asks the Red Hat Single Sign-On server to authenticate a user for them. After a successful login, the application will receive an XML document that contains something called a SAML assertion that specify various attributes about the user. This XML document is digitally signed by the realm and contains access information (like user role mappings) that the application can use to determine what resources the user is allowed to access on the application.
The second type of use cases is that of a client that wants to gain access to remote services. In this case, the client asks Red Hat Single Sign-On to obtain an SAML assertion it can use to invoke on other remote services on behalf of the user.
7.2.1. SAML Bindings
SAML defines a few different ways to exchange XML documents when executing the authentication protocol. The Redirect and Post bindings cover browser based applications. The ECP binding covers REST invocations. There are other binding types but Red Hat Single Sign-On only supports those three.
7.2.1.1. Redirect Binding
The Redirect Binding uses a series of browser redirect URIs to exchange information. This is a rough overview of how it works.
- The user visits the application and the application finds the user is not authenticated. It generates an XML authentication request document and encodes it as a query param in a URI that is used to redirect to the Red Hat Single Sign-On server. Depending on your settings, the application may also digitally sign this XML document and also stuff this signature as a query param in the redirect URI to Red Hat Single Sign-On. This signature is used to validate the client that sent this request.
- The browser is redirected to Red Hat Single Sign-On. The server extracts the XML auth request document and verifies the digital signature if required. The user then has to enter in their credentials to be authenticated.
- After authentication, the server generates an XML authentication response document. This document contains a SAML assertion that holds metadata about the user like name, address, email, and any role mappings the user might have. This document is almost always digitally signed using XML signatures, and may also be encrypted.
- The XML auth response document is then encoded as a query param in a redirect URI that brings the browser back to the application. The digital signature is also included as a query param.
- The application receives the redirect URI and extracts the XML document and verifies the realm’s signature to make sure it is receiving a valid auth response. The information inside the SAML assertion is then used to make access decisions or display user data.
7.2.1.2. POST Binding
The SAML POST binding works almost the exact same way as the Redirect binding, but instead of GET requests, XML documents are exchanged by POST requests. The POST Binding uses JavaScript to trick the browser into making a POST request to the Red Hat Single Sign-On server or application when exchanging documents. Basically HTTP responses contain an HTML document that contains an HTML form with embedded JavaScript. When the page is loaded, the JavaScript automatically invokes the form. You really don’t need to know about this stuff, but it is a pretty clever trick.
7.2.1.3. ECP
ECP stands for "Enhanced Client or Proxy", a SAML v.2.0 profile which allows for the exchange of SAML attributes outside the context of a web browser. This is used most often for REST or SOAP-based clients.
7.2.2. Red Hat Single Sign-On Server SAML URI Endpoints
Red Hat Single Sign-On really only has one endpoint for all SAML requests.
http(s)://authserver.host/auth/realms/{realm-name}/protocol/saml
All bindings use this endpoint.
7.3. OpenID Connect vs. SAML
Choosing between OpenID Connect and SAML is not just a matter of using a newer protocol (OIDC) instead of the older more mature protocol (SAML).
In most cases Red Hat Single Sign-On recommends using OIDC.
SAML tends to be a bit more verbose than OIDC.
Beyond verbosity of exchanged data, if you compare the specifications you’ll find that OIDC was designed to work with the web while SAML was retrofitted to work on top of the web. For example, OIDC is also more suited for HTML5/JavaScript applications because it is easier to implement on the client side than SAML. As tokens are in the JSON format, they are easier to consume by JavaScript. You will also find several nice features that make implementing security in your web applications easier. For example, check out the iframe trick that the specification uses to easily determine if a user is still logged in or not.
SAML has its uses though. As you see the OIDC specifications evolve you see they implement more and more features that SAML has had for years. What we often see is that people pick SAML over OIDC because of the perception that it is more mature and also because they already have existing applications that are secured with it.
Chapter 8. Managing Clients
Clients are entities that can request authentication of a user. Clients come in two forms. The first type of client is an application that wants to participate in single-sign-on. These clients just want Red Hat Single Sign-On to provide security for them. The other type of client is one that is requesting an access token so that it can invoke other services on behalf of the authenticated user. This section discusses various aspects around configuring clients and various ways to do it.
8.1. OIDC Clients
OpenID Connect is the preferred protocol to secure applications. It was designed from the ground up to be web friendly and work best with HTML5/JavaScript applications.
To create an OIDC client go to the Clients left menu item. On this page you’ll see a Create button on the right.
Clients
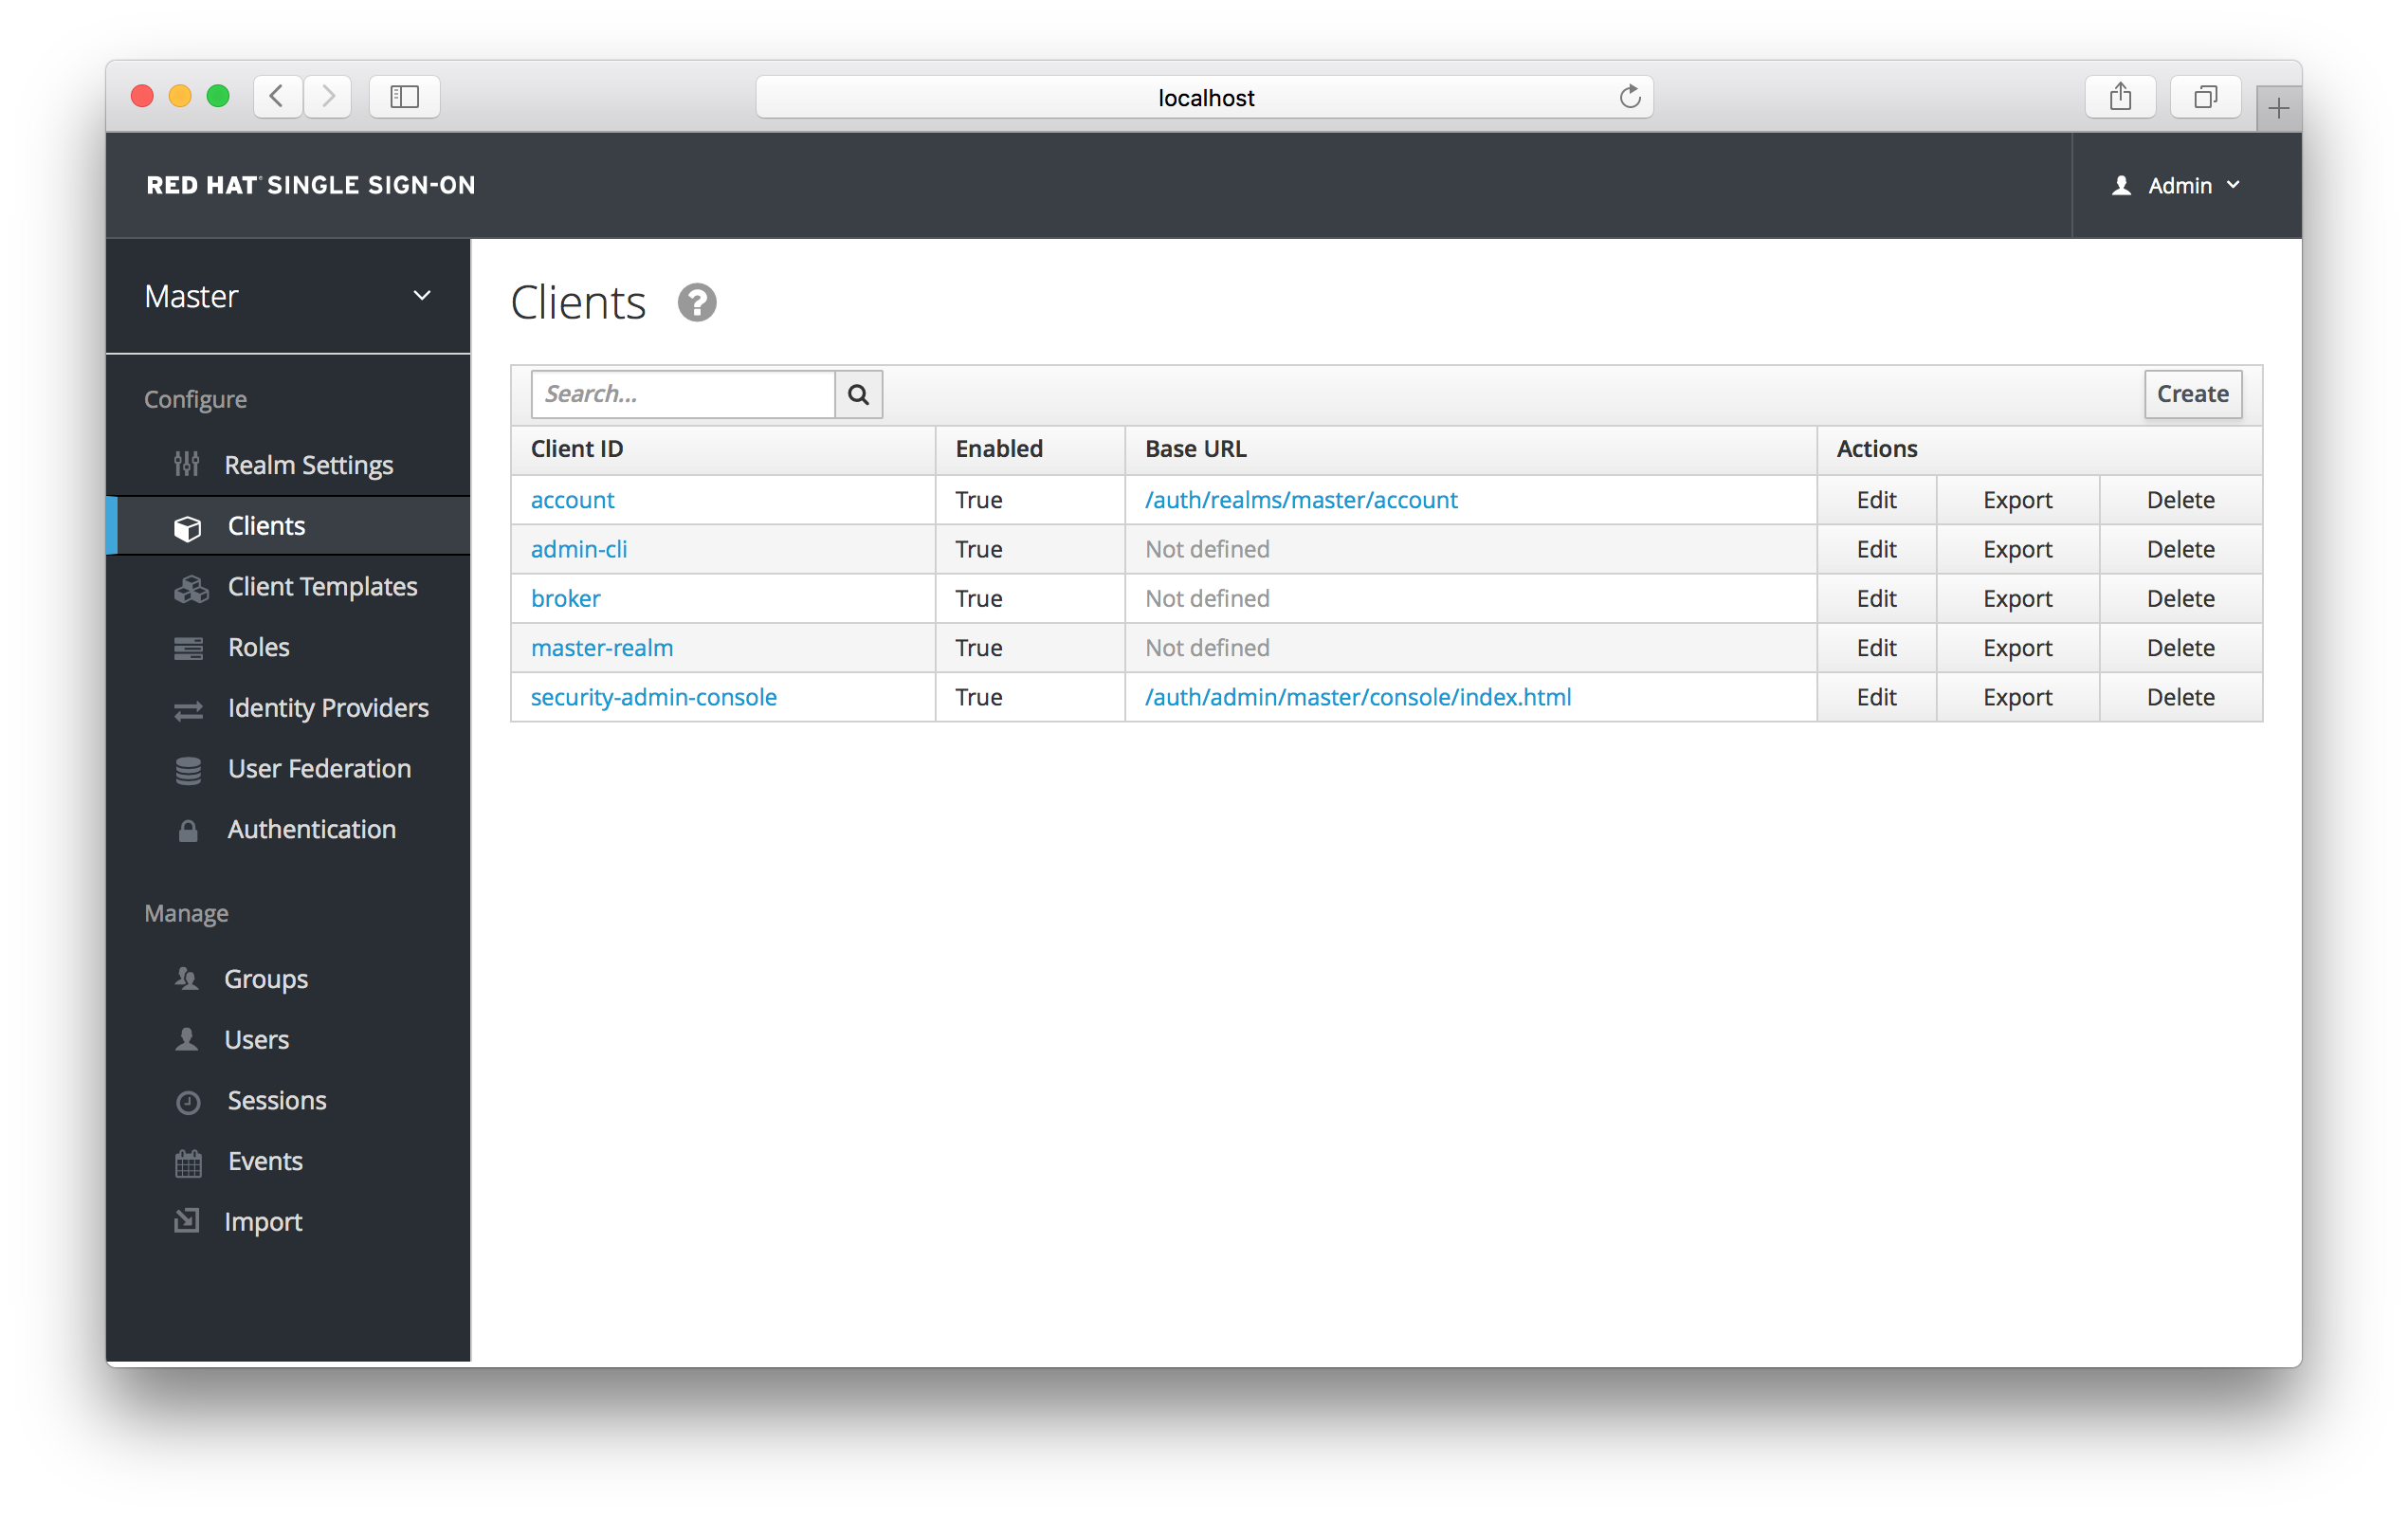
This will bring you to the Add Client page.
Add Client

Enter in the Client ID of the client. This should be a simple alpha-numeric string that will be used in requests and in the Red Hat Single Sign-On database to identity the client. Next select openid-connect in the Client Protocol drop down box. Ignore the Client Template listbox for now, we’ll go over that later in this chapter. Finally enter in the base URL of your application in the Root URL field and click Save. This will create the client and bring you to the client Settings tab.
Client Settings
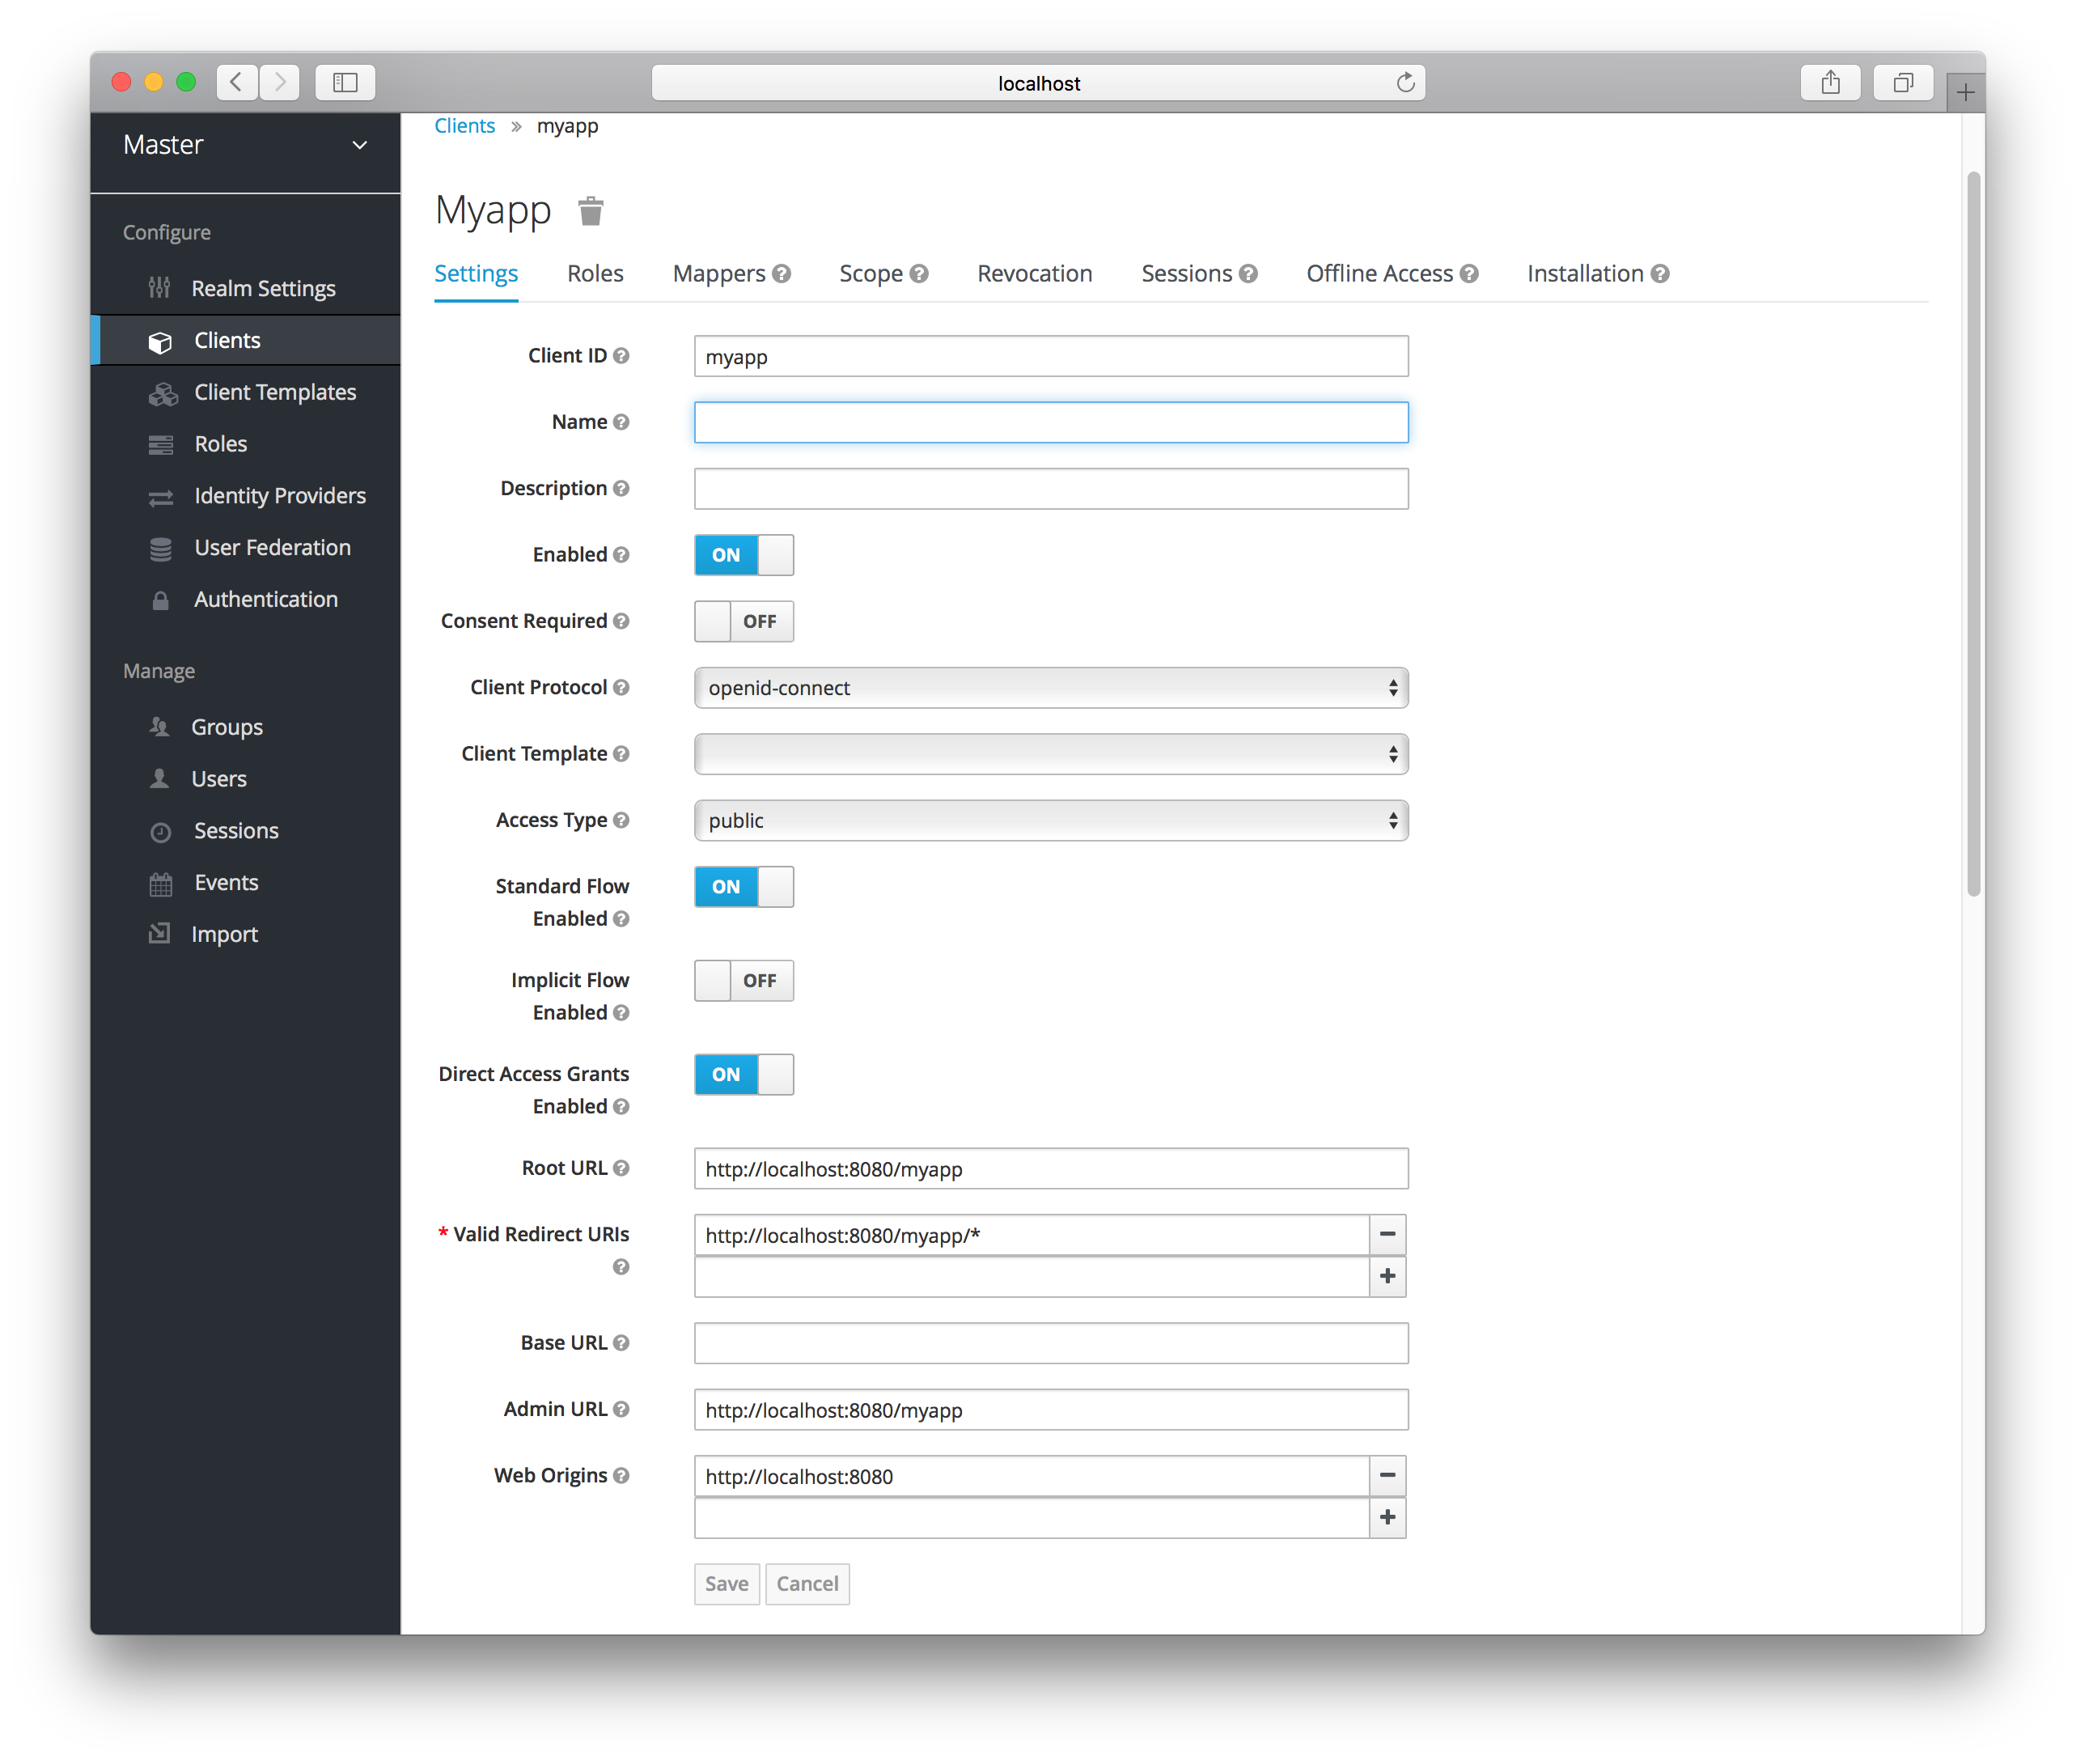
Let’s walk through each configuration item on this page.
Client ID
This specifies an alpha-numeric string that will be used as the client identifier for OIDC requests.
Name
This is the display name for the client whenever it is displayed in a Red Hat Single Sign-On UI screen. You can localize the value of this field by setting up a replacement string value i.e. ${myapp}. See the Server Developer Guide for more information.
Description
This specifies the description of the client. This can also be localized.
Enabled
If this is turned off, the client will not be allowed to request authentication.
Consent Required
If this is on, then users will get a consent page which asks the user if they grant access to that application. It will also display the metadata that the client is interested in so that the user knows exactly what information the client is getting access to. If you’ve ever done a social login to Google, you’ll often see a similar page. Red Hat Single Sign-On provides the same functionality.
Access Type
This defines the type of the OIDC client.
- confidential
- Confidential access type is for server-side clients that need to perform a browser login and require a client secret when they turn an access code into an access token, (see Access Token Request in the OAuth 2.0 spec for more details). This type should be used for server-side applications.
- public
- Public access type is for client-side clients that need to perform a browser login. With a client-side application there is no way to keep a secret safe. Instead it is very important to restrict access by configuring correct redirect URIs for the client.
- bearer-only
- Bearer-only access type means that the application only allows bearer token requests. If this is turned on, this application cannot participate in browser logins.
Root URL
If Red Hat Single Sign-On uses any configured relative URLs, this value is prepended to them.
Valid Redirect URIs
This is a required field. Enter in a URL pattern and click the + sign to add. Click the - sign next to URLs you want to remove. Remember that you still have to click the Save button! Wildcards (\*) are only allowed at the end of a URI, i.e. http://host.com/*
You should take extra precautions when registering valid redirect URI patterns. If you make them too general you are vulnerable to attacks. See Threat Model Mitigation chapter for more information.
Base URL
If Red Hat Single Sign-On needs to link to the client, this URL is used.
Standard Flow Enabled
If this is on, clients are allowed to use the OIDC Authorization Code Flow.
Implicit Flow Enabled
If this is on, clients are allowed to use the OIDC Implicit Flow.
Direct Grants Enabled
If this is on, clients are allowed to use the OIDC Direct Grants.
Admin URL
For Red Hat Single Sign-On specific client adapters, this is the callback endpoint for the client. The Red Hat Single Sign-On server will use this URI to make callbacks like pushing revocation policies, performing backchannel logout, and other administrative operations. For Red Hat Single Sign-On servlet adapters, this can be the root URL of the servlet application. See Securing Applications and Services Guide for more information.
Web Origins
This option centers around CORS which stands for Cross-Origin Resource Sharing. If browser JavaScript tries to make an AJAX HTTP request to a server whose domain is different from the one the JavaScript code came from, then the request must use CORS. The server must handle CORS requests in a special way, otherwise the browser will not display or allow the request to be processed. This protocol exists to protect against XSS, CSRF and other JavaScript-based attacks.
Red Hat Single Sign-On has support for validated CORS requests. The way it works is that the domains listed in the Web Origins setting for the client are embedded within the access token sent to the client application. The client application can then use this information to decide whether or not to allow a CORS request to be invoked on it. This is an extension to the OIDC protocol so only Red Hat Single Sign-On client adapters support this feature. See Securing Applications and Services Guide for more information.
To fill in the Web Origins data, enter in a base URL and click the + sign to add. Click the - sign next to URLs you want to remove. Remember that you still have to click the Save button!
8.1.1. Confidential Client Credentials
If you’ve set the client’s access type to confidential in the client’s Settings tab, a new Credentials tab will show up. As part of dealing with this type of client you have to configure the client’s credentials.
Credentials Tab
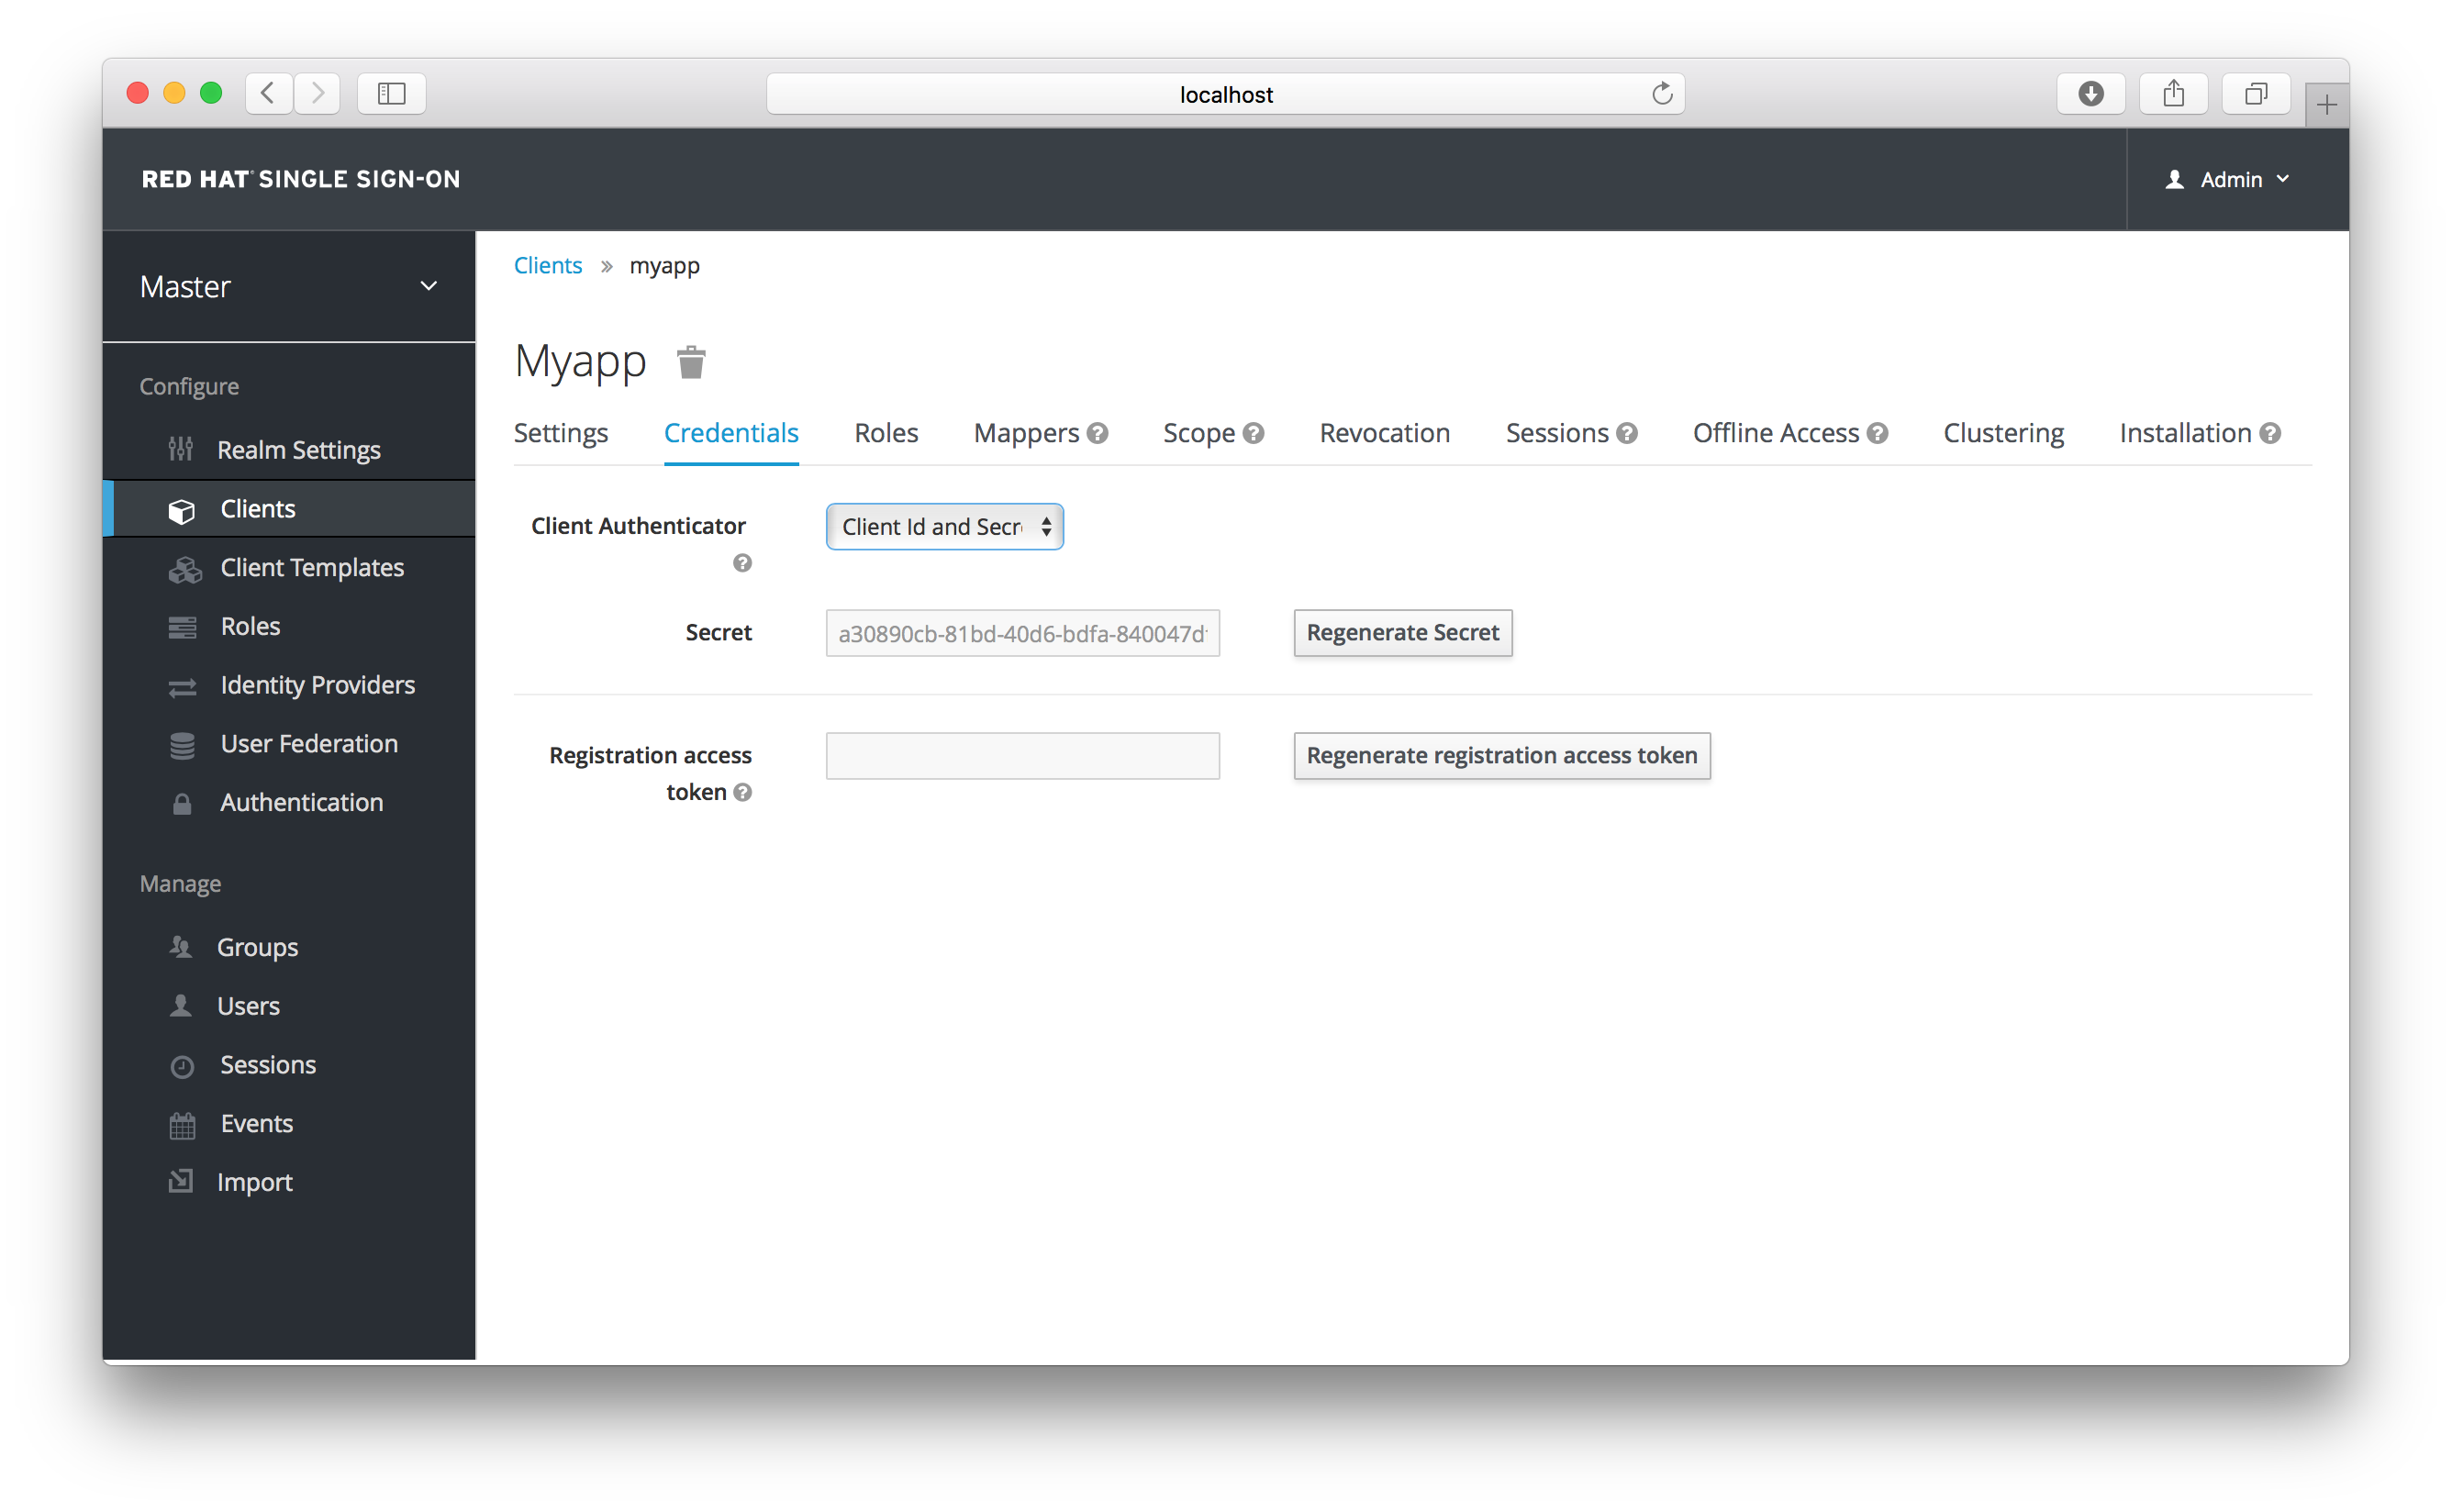
The Client Authenticator list box specifies the type of credential you are going to use for your confidential client. It defaults to client ID and secret. The secret is automatically generated for you and the Regenerate Secret button allows you to recreate this secret if you want or need to.
Alternatively, you can opt to use a signed Json Web Token (JWT) instead of a secret.
Signed JWT
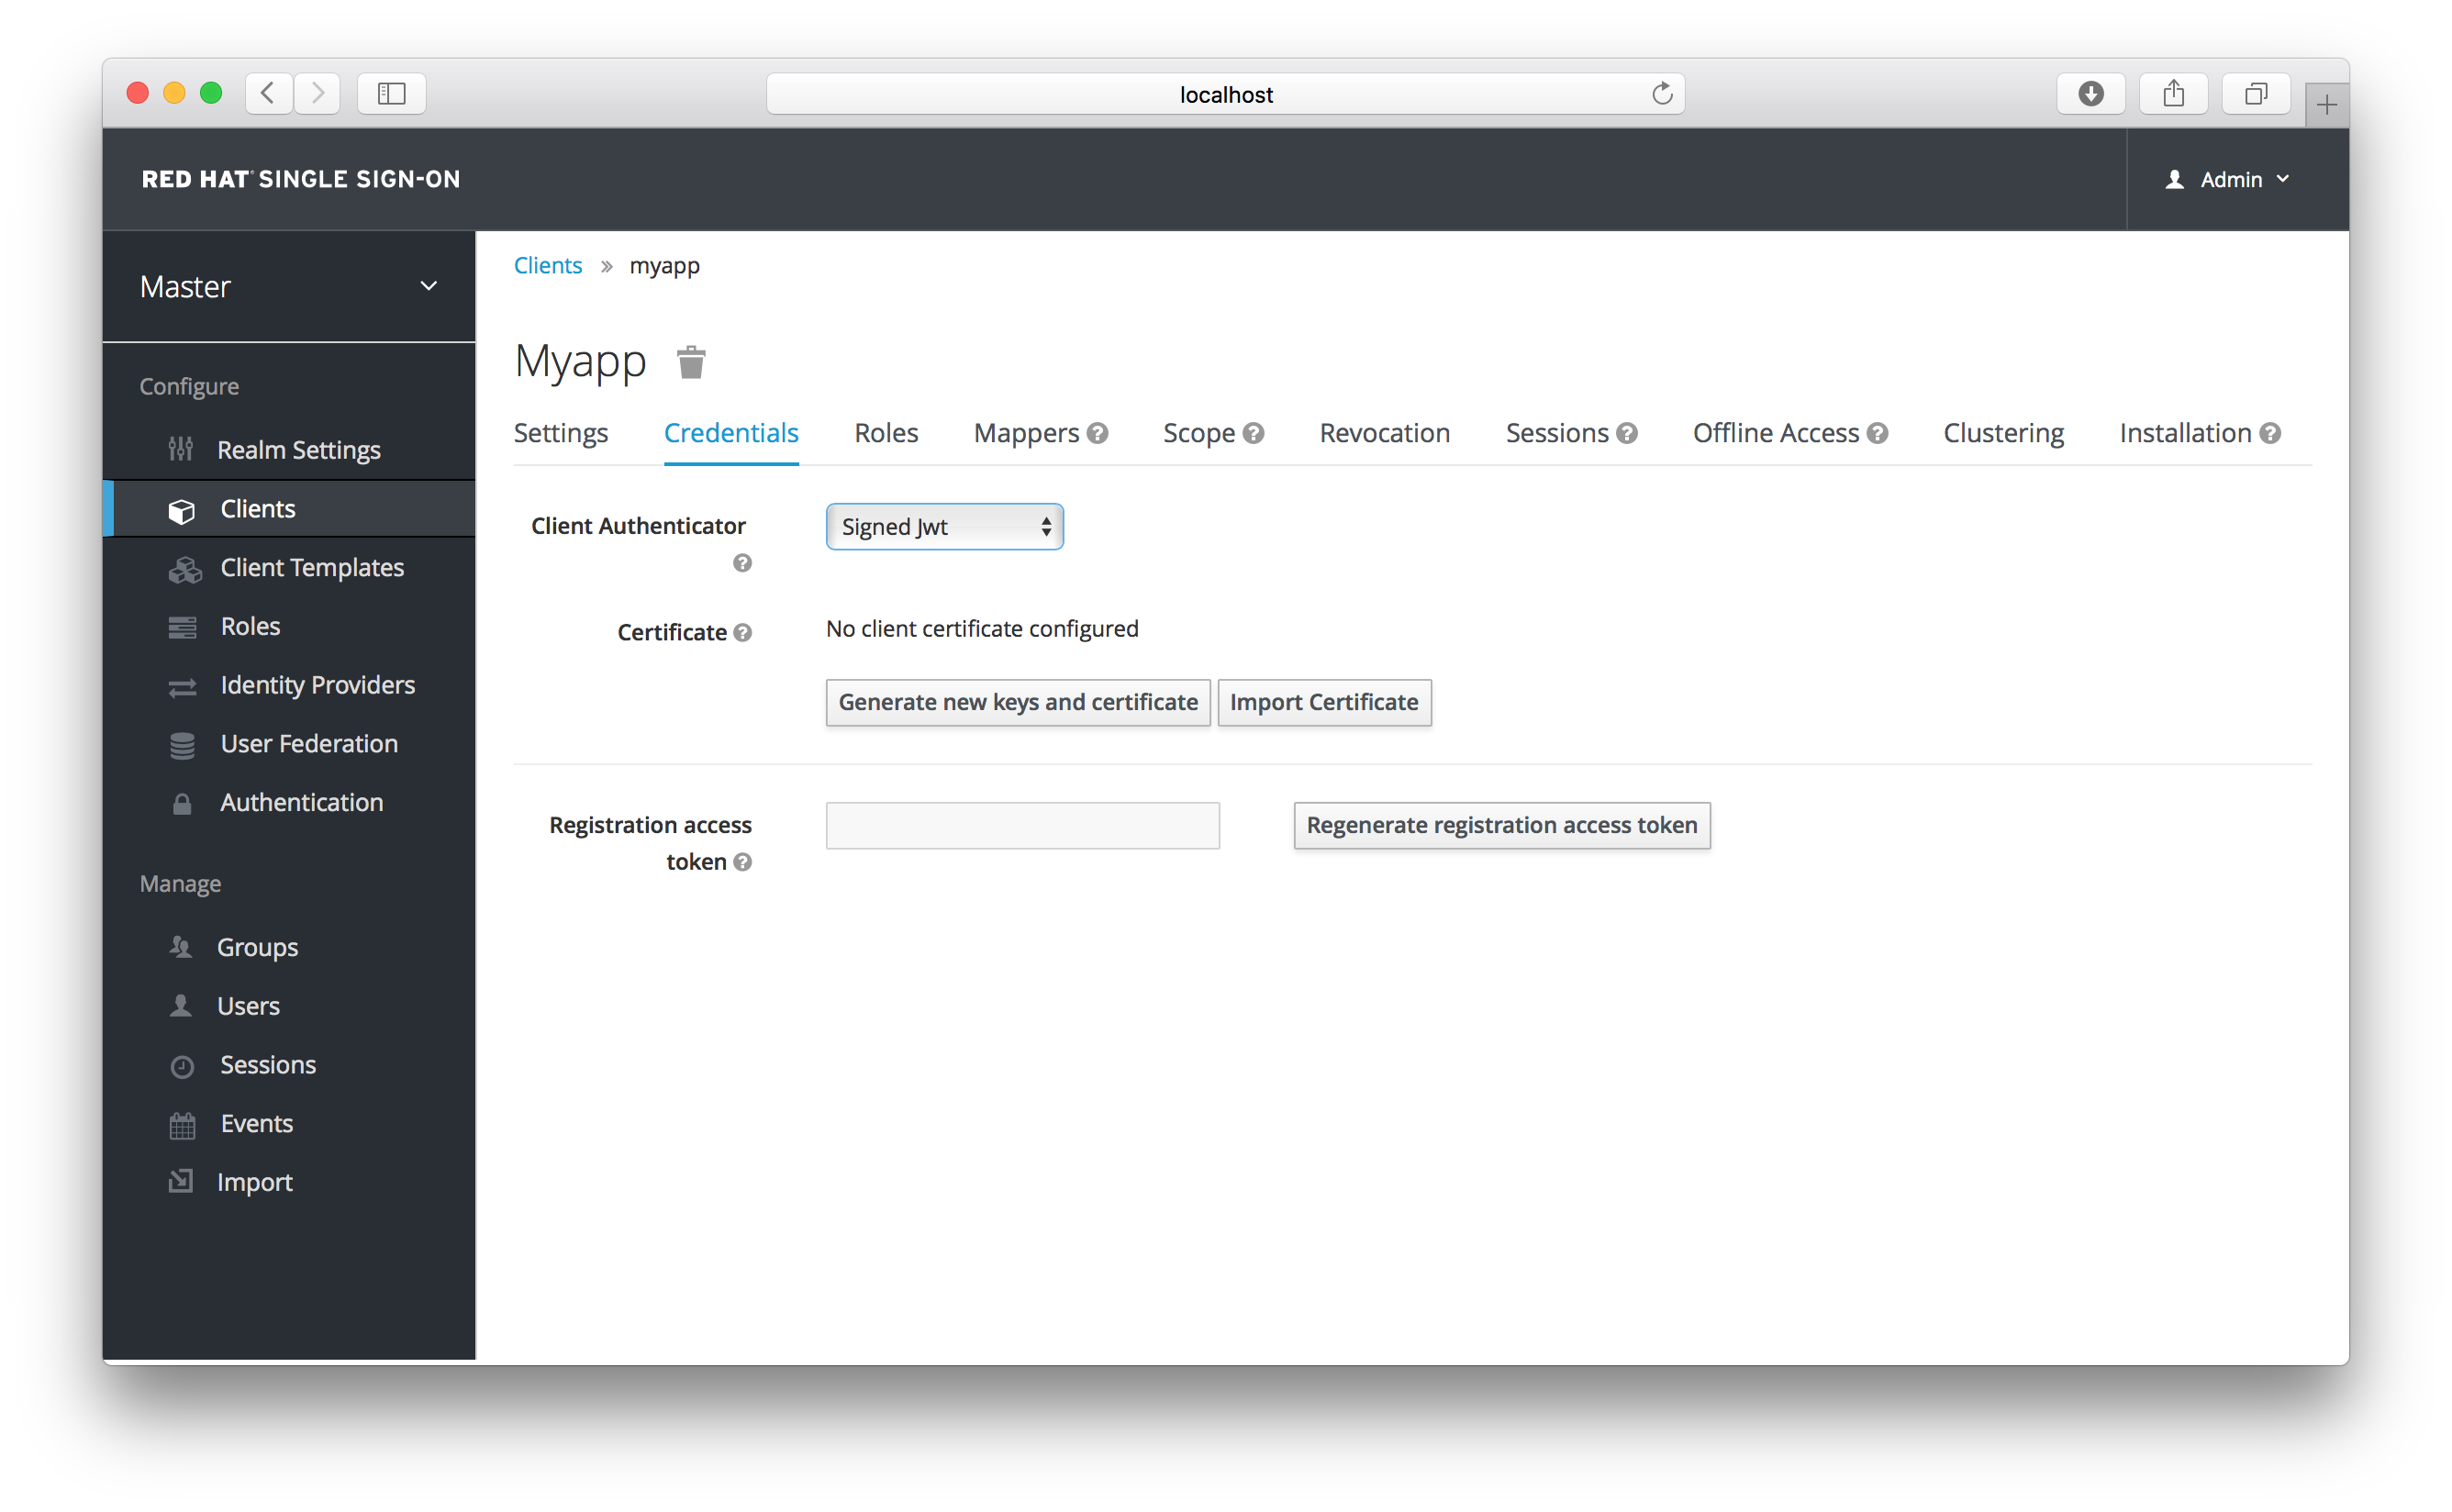
When choosing this credential type you will have to also generate a private key and certificate for the client. The private key will be used to sign the JWT, while the certificate is used by the server to verify the signature. Click on the Generate new keys and certificate button to start this process.
Generate Keys
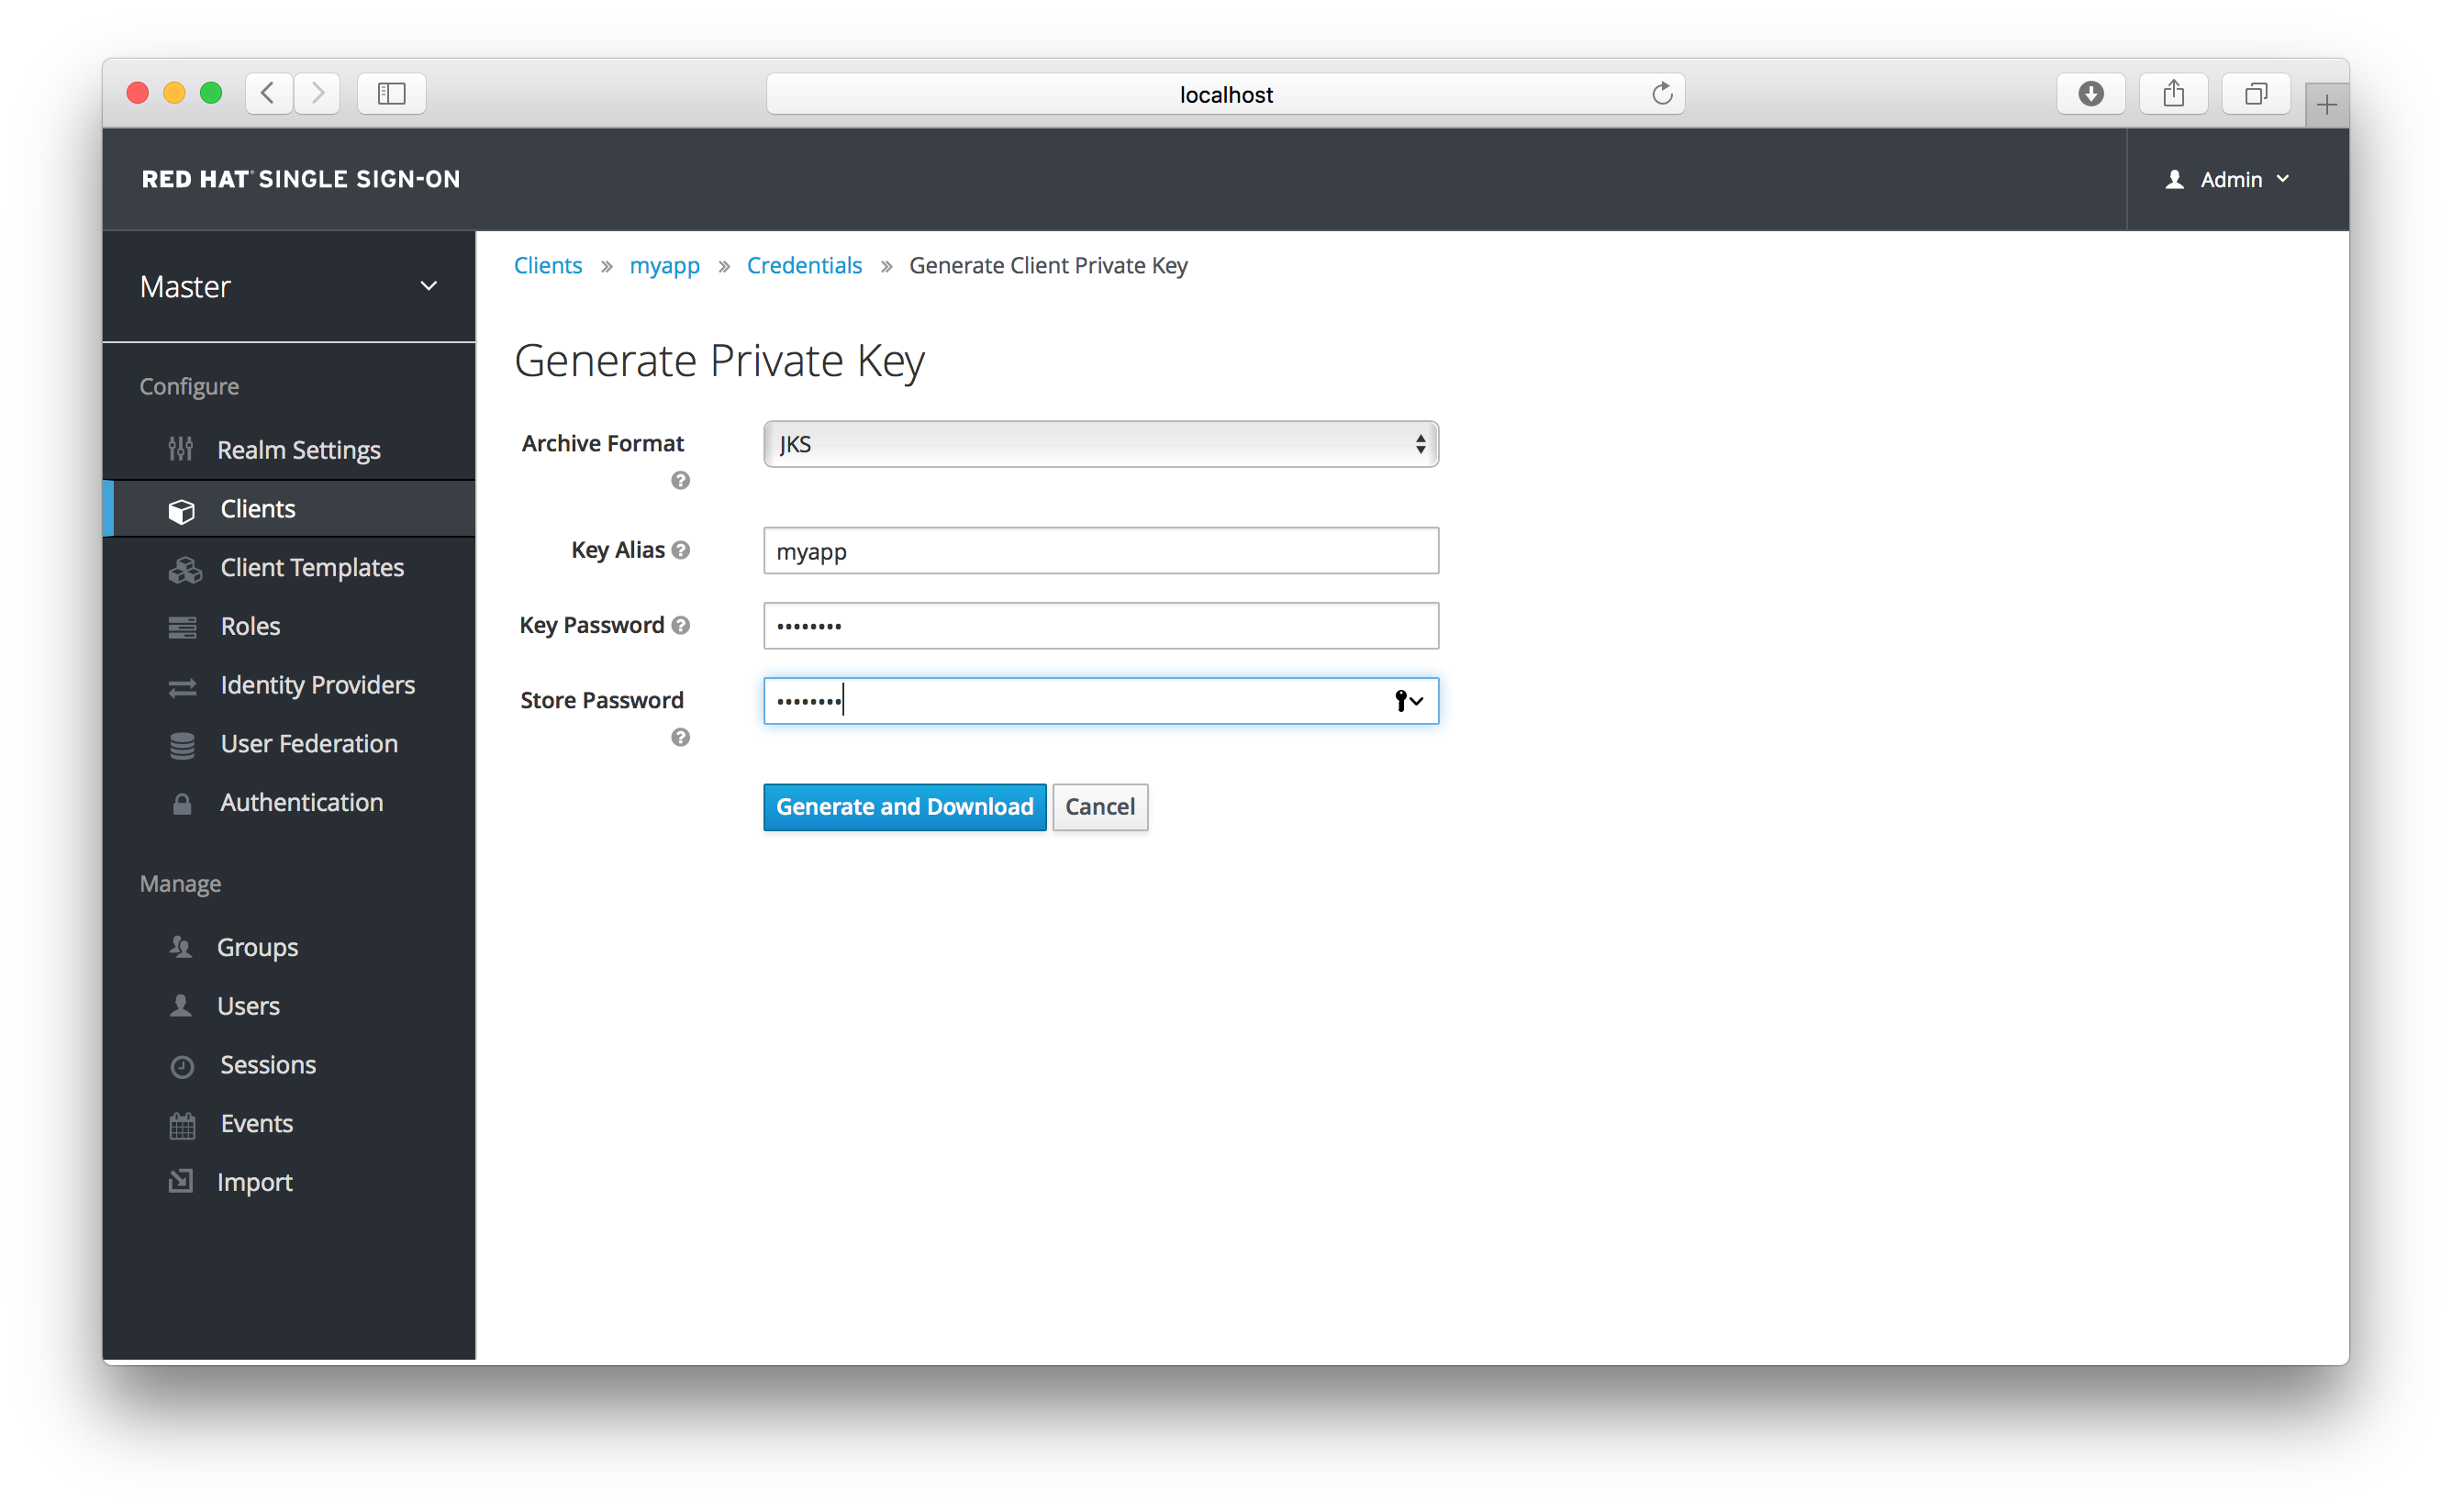
When you generate these keys, Red Hat Single Sign-On will store the certificate, and you’ll need to download the private key and certificate for your client to use. Pick the archive format you want and specify the password for the private key and store.
You can also opt to generate these via an external tool and just import the client’s certificate.
Import Certificate
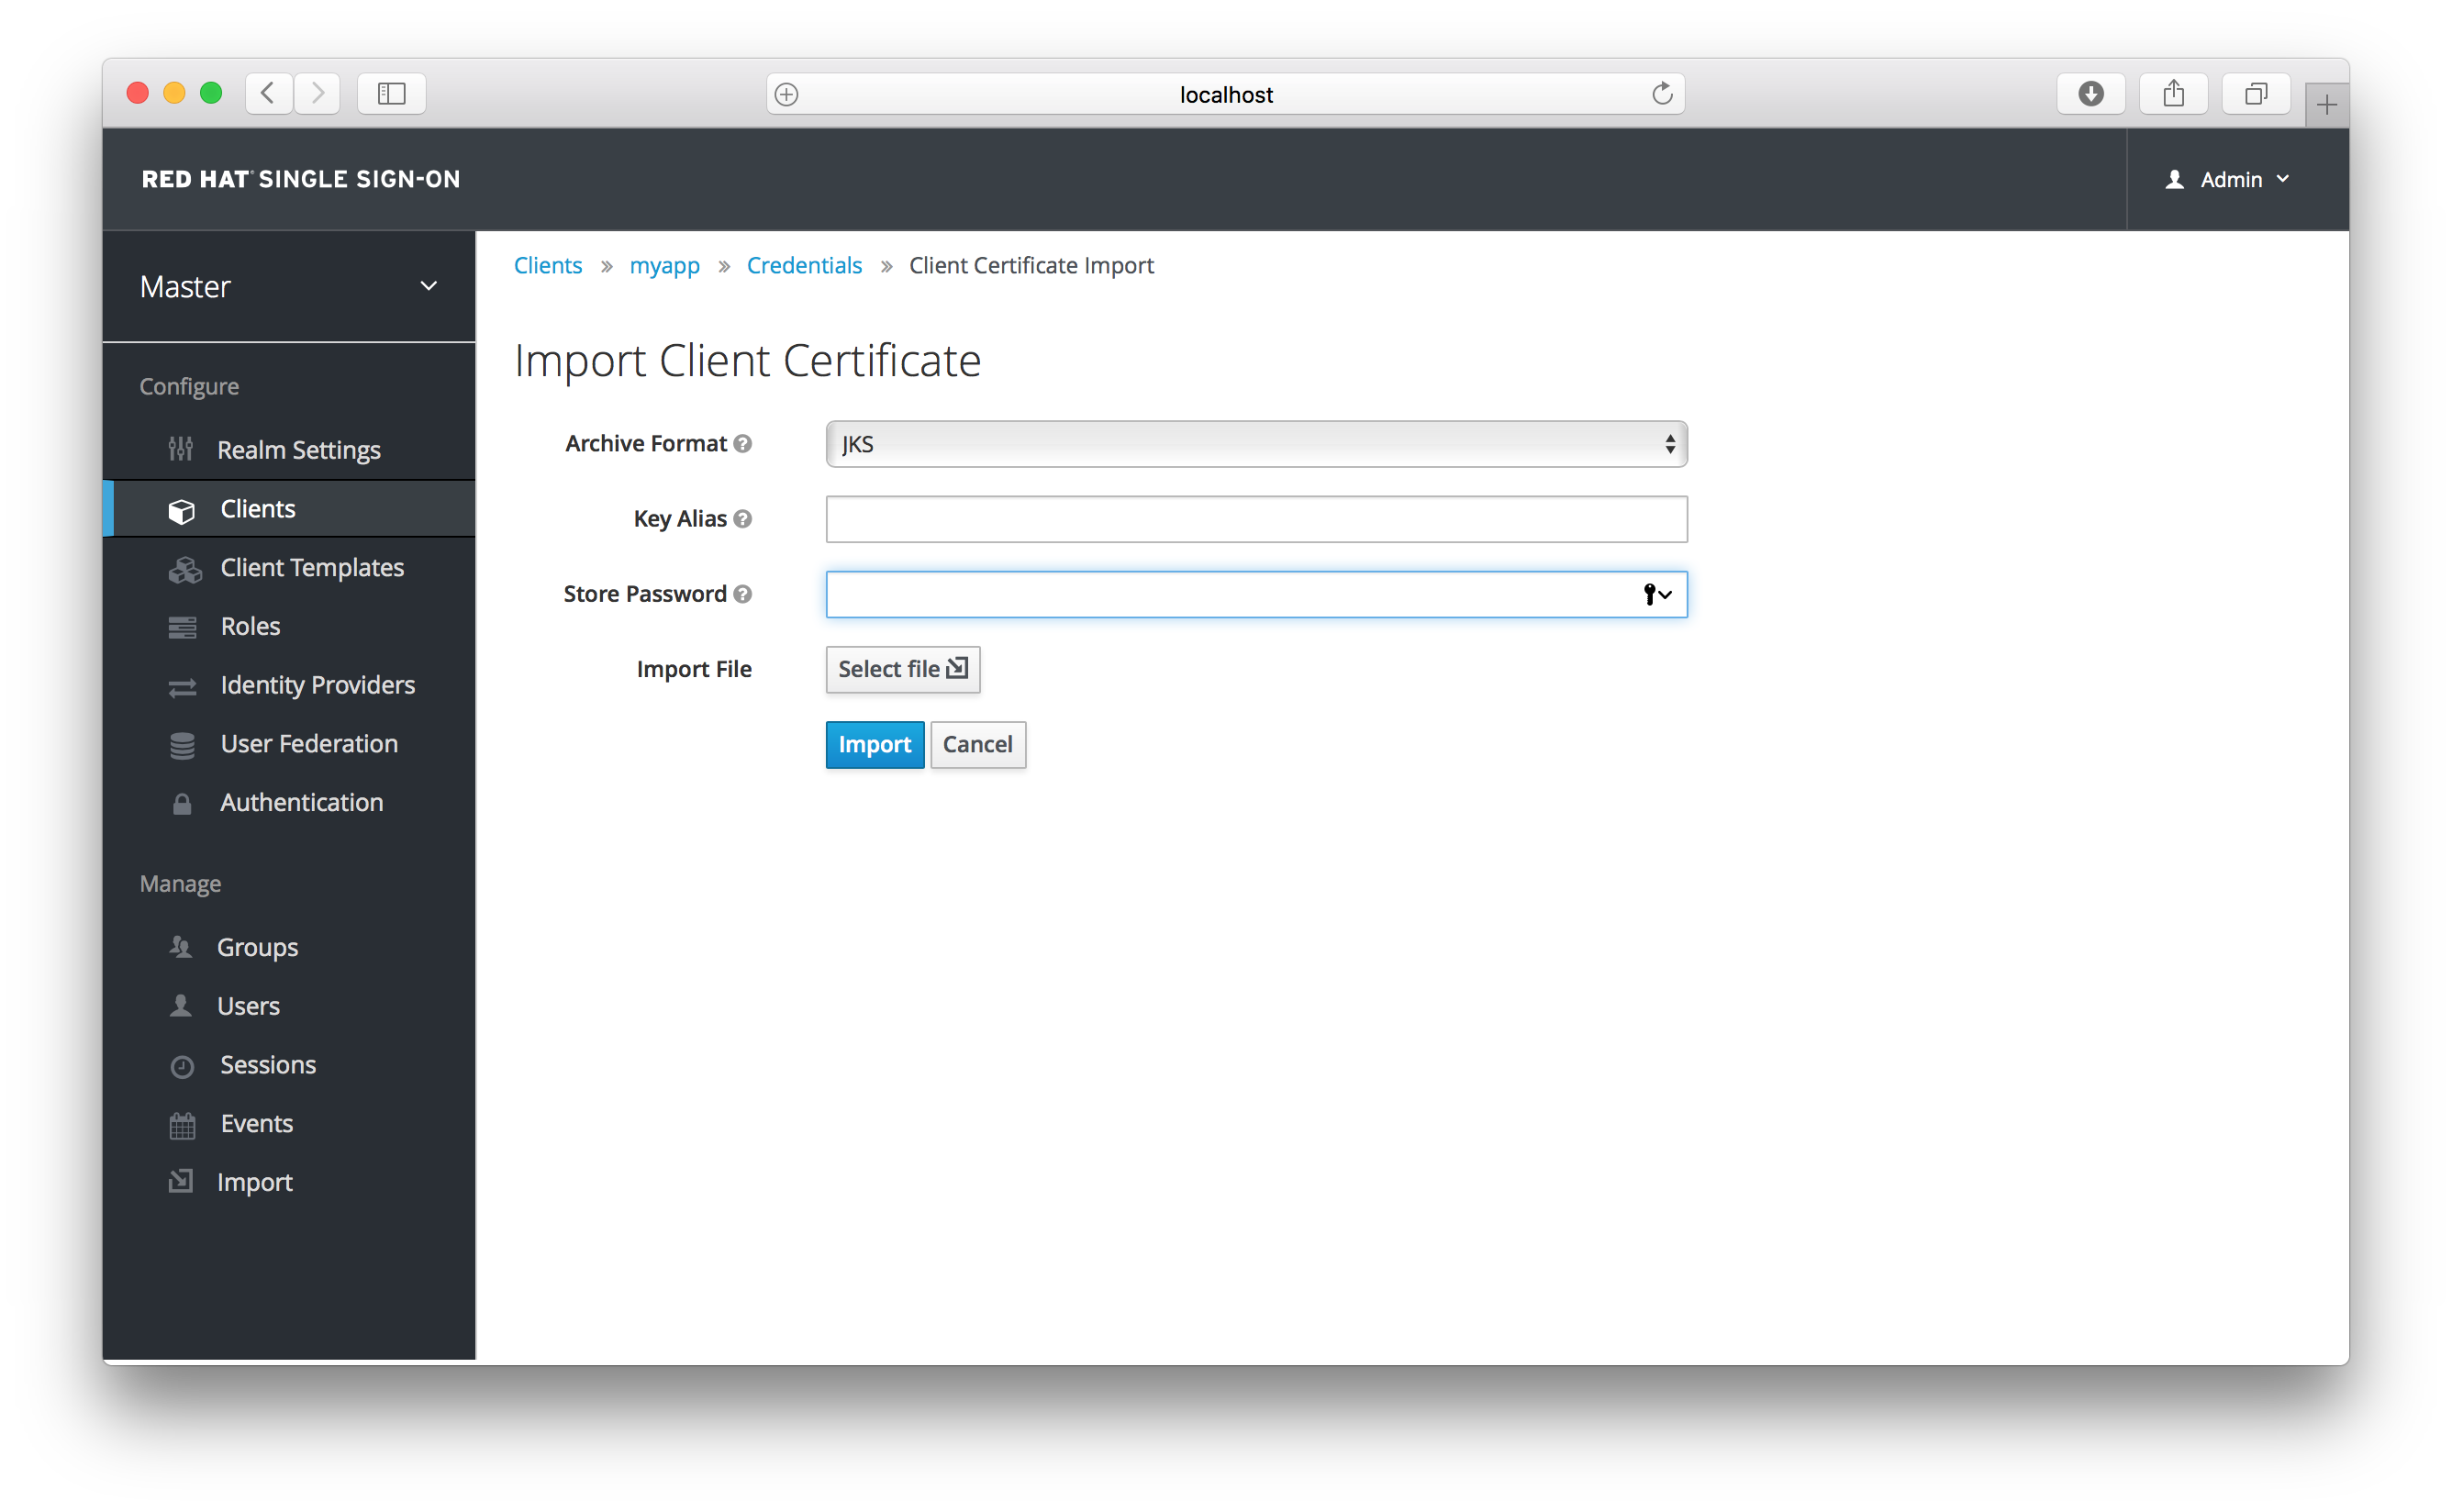
There are multiple formats you can import from, just choose the archive format you have the certificate stored in, select the file, and click the Import button.
8.2. Service Accounts
Each OIDC client has a built in service account which allows it to obtain an access token. This is covered in the OAuth 2.0 specifiation under Client Credentials Grant To use this feature you must set the Access Type of your client to confidential. When you do this, the Service Accounts Enabled switch will appear. You need to turn on this switch. Also make sure that you have configured your client credentials.
To use it you must have registered a valid confidential Client and you need to check the switch Service Accounts Enabled in Red Hat Single Sign-On admin console for this client. In tab Service Account Roles you can configure the roles available to the service account retrieved on behalf of this client. Don’t forget that you need those roles to be available in Scopes of this client as well (unless you have Full Scope Allowed on). As in normal login, roles from access token are the intersection of scopes and the service account roles.
The REST URL to invoke on is /{server-root-usualy-auth}/realms/{realm-name}/protocol/openid-connect/token. Invoking on this URL is a POST request and requires you to post the client credentials. By default, client credentials are represented by clientId and clientSecret of the client in Authorization: Basic header, but you can also authenticate the client with a signed JWT assertion or any other custom mechanism for client authentication. You also need to use the parameter grant_type=client_credentials as per the OAuth2 specification.
For example the POST invocation to retrieve a service account can look like this:
    POST /auth/realms/demo/protocol/openid-connect/token
    Authorization: Basic cHJvZHVjdC1zYS1jbGllbnQ6cGFzc3dvcmQ=
    Content-Type: application/x-www-form-urlencoded

    grant_type=client_credentials
The response would be this standard JSON document from the OAuth 2.0 specification.
HTTP/1.1 200 OK
Content-Type: application/json;charset=UTF-8
Cache-Control: no-store
Pragma: no-cache

{
    "access_token":"2YotnFZFEjr1zCsicMWpAA",
    "token_type":"bearer",
    "expires_in":60,
    "refresh_token":"tGzv3JOkF0XG5Qx2TlKWIA",
    "refresh_expires_in":600,
    "id_token":"tGzv3JOkF0XG5Qx2TlKWIA",
    "not-before-policy":0,
    "session_state":"234234-234234-234234"
}
The retrieved access token can be refreshed or logged out by an out-of-bound request.
8.3. SAML Clients
Red Hat Single Sign-On supports SAML 2.0 for registered applications. Both POST and Redirect bindings are supported. You can choose to require client signature validation and can have the server sign and/or encrypt responses as well.
To create a SAML client go to the Clients left menu item. On this page you’ll see a Create button on the right.
Clients
This will bring you to the Add Client page.
Add Client
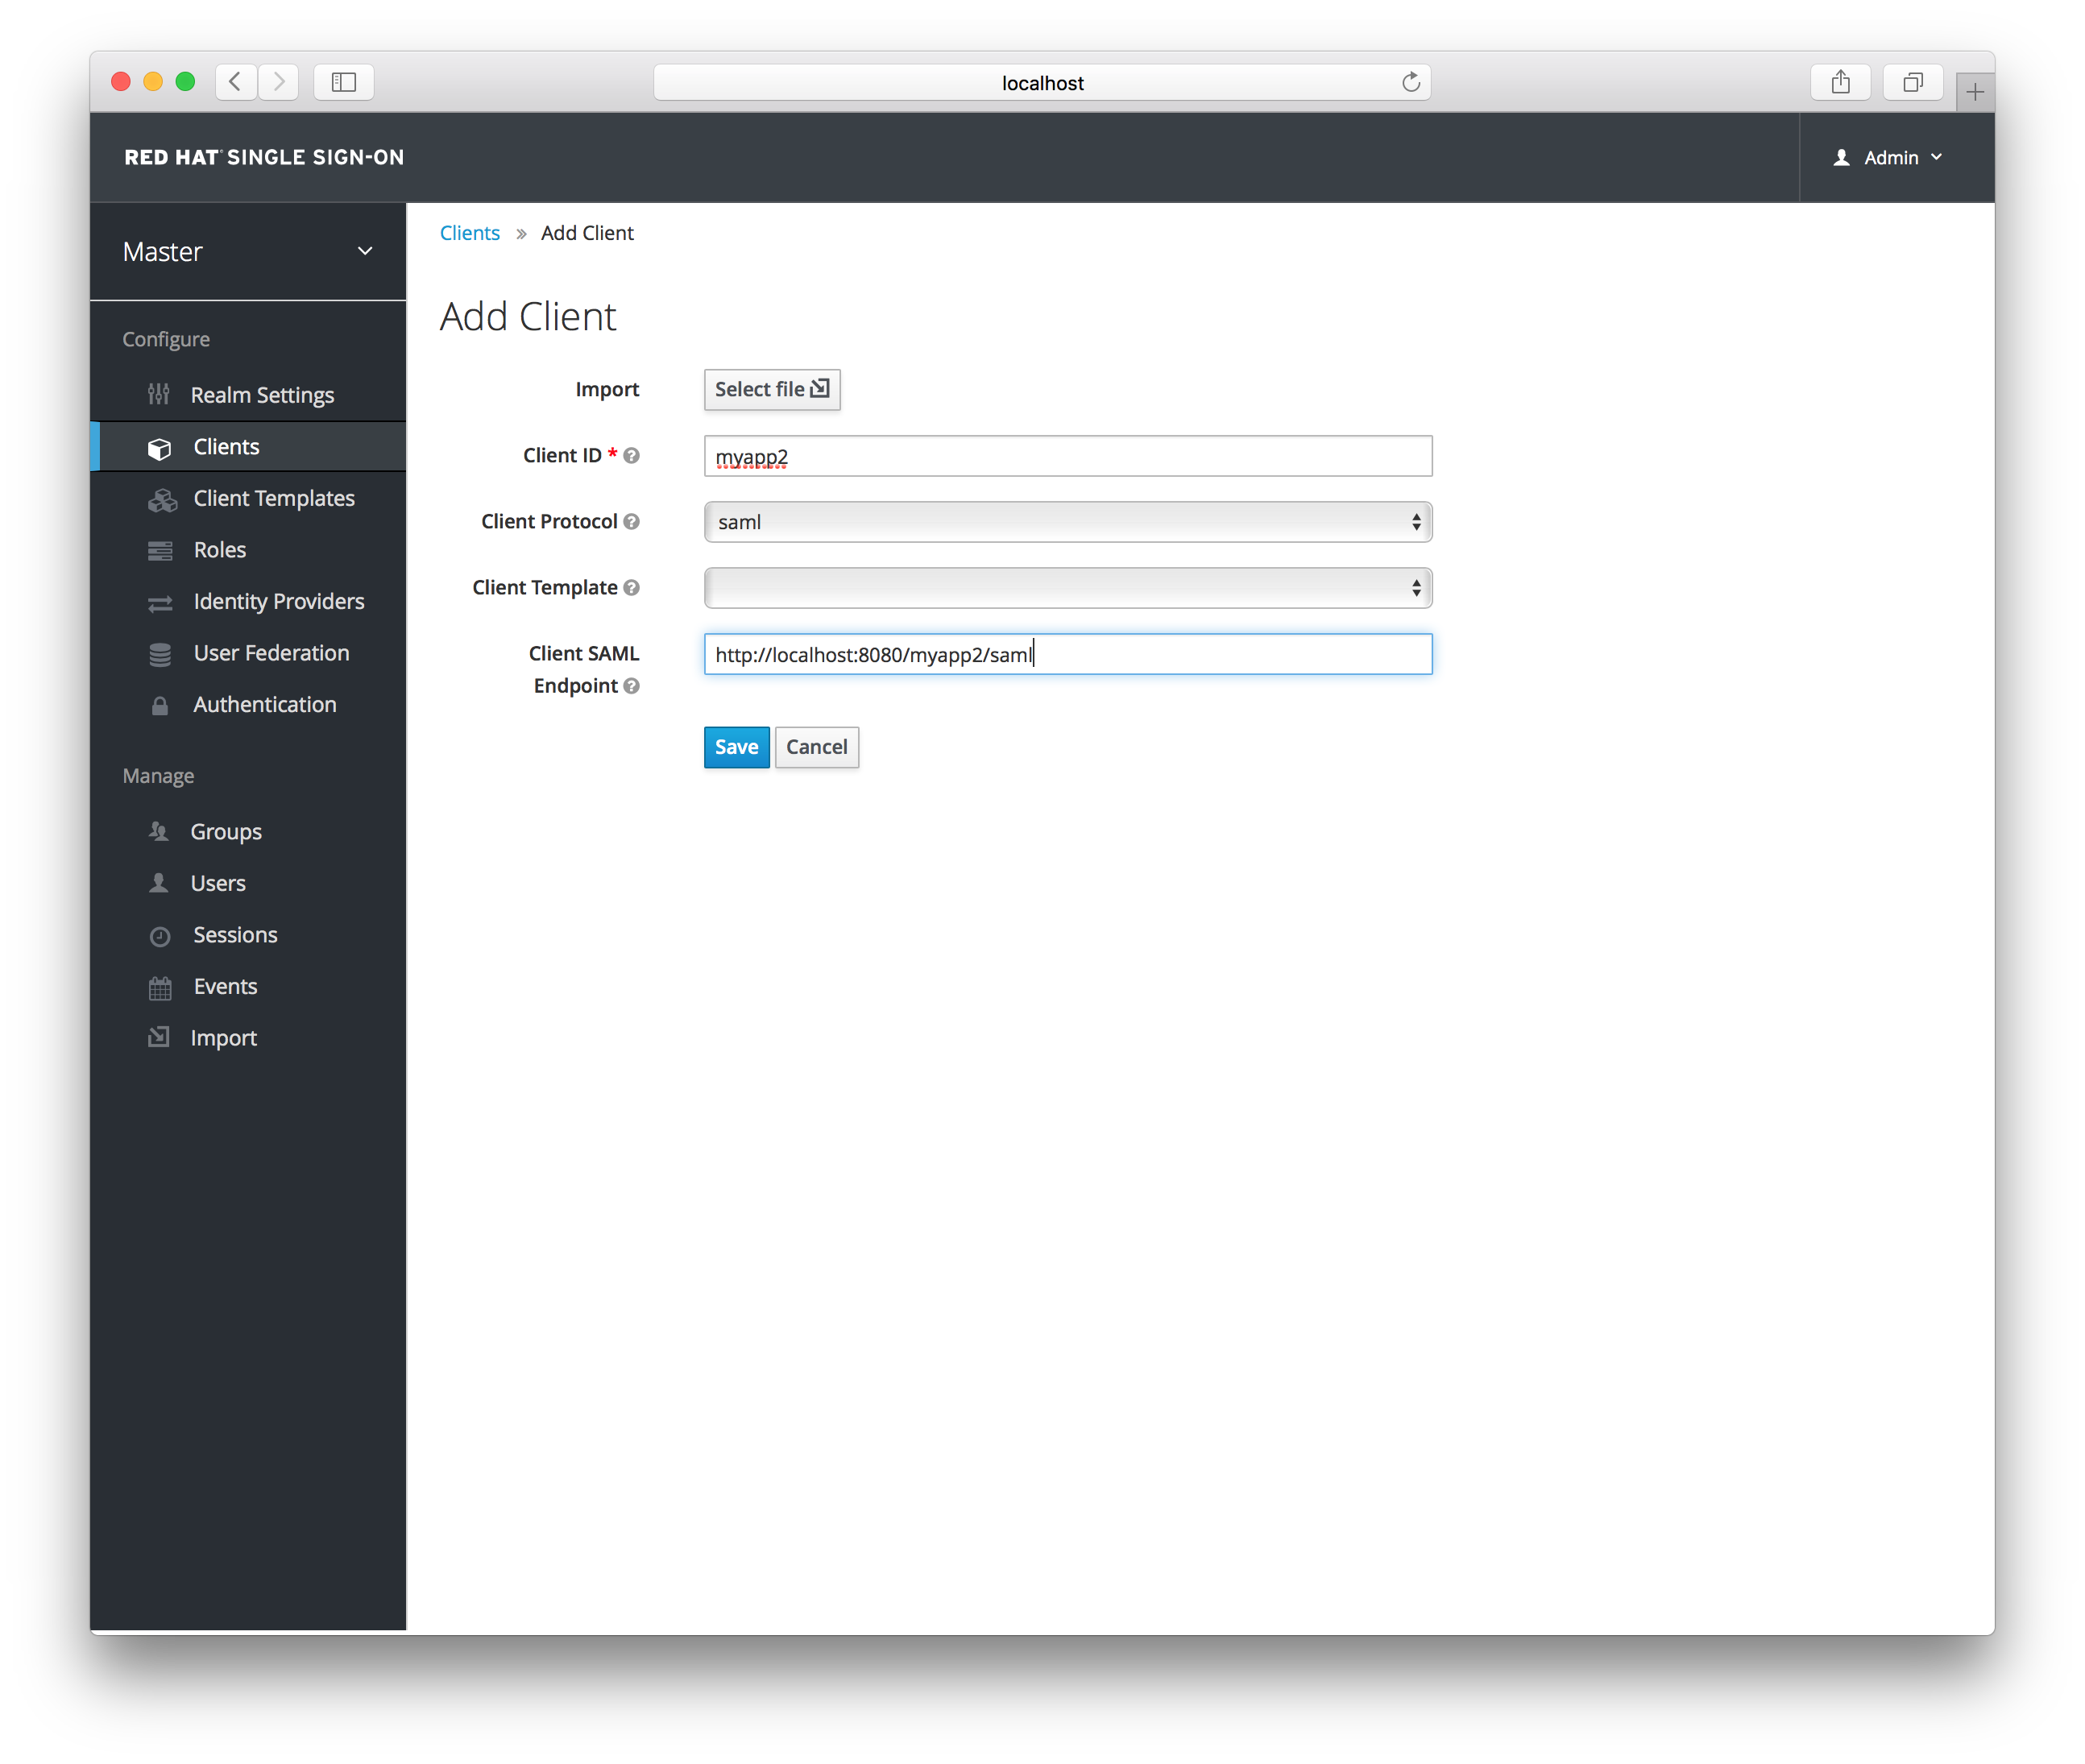
Enter in the Client ID of the client. This is often a URL and will be the expected issuer value in SAML requests sent by the application. Next select saml in the Client Protocol drop down box. Ignore the Client Template listbox for now, we’ll go over that later in this chapter. Finally enter in the Client SAML Endpoint URL. Enter the URL you want the Red Hat Single Sign-On server to send SAML requests and responses to. Usually applications have only one URL for processing SAML requests. If your application has different URLs for its bindings, don’t worry, you can fix this in the Settings tab of the client. Click Save. This will create the client and bring you to the client Settings tab.
Client Settings
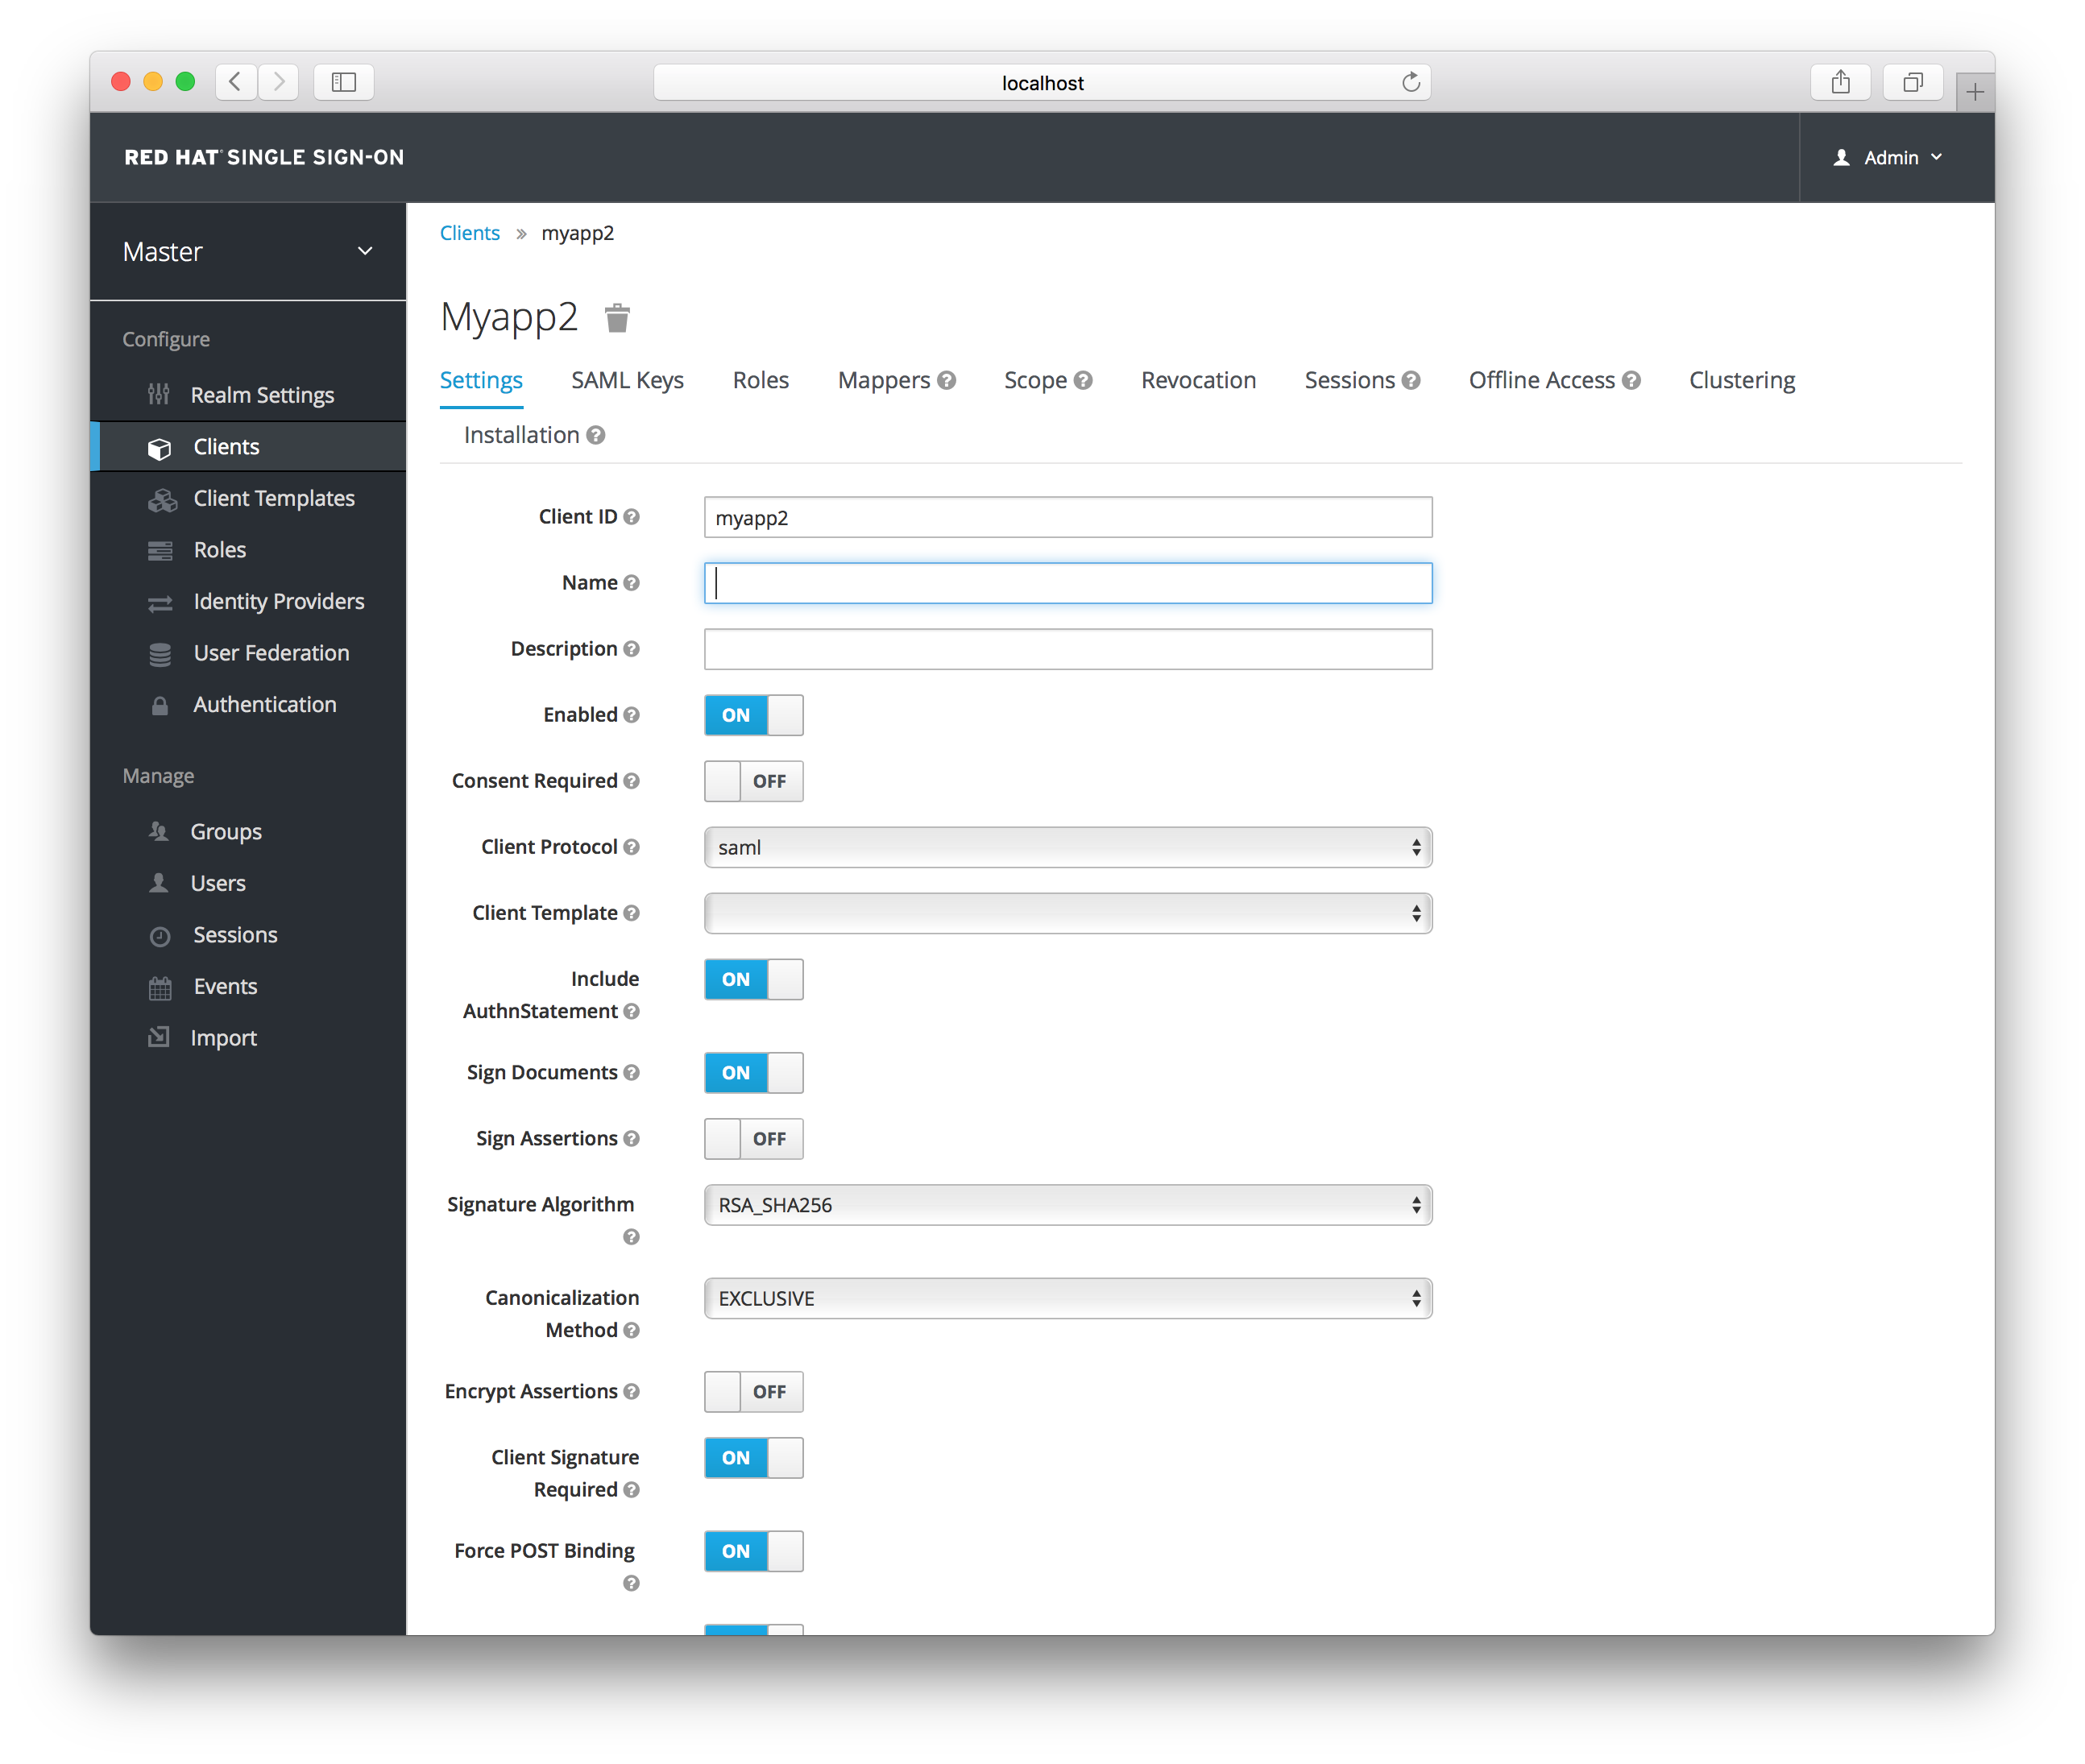
- Client ID
- This value must match the issuer value sent with AuthNRequests. Red Hat Single Sign-On will pull the issuer from the Authn SAML request and match it to a client by this value.
- Name
- This is the display name for the client whenever it is displayed in a Red Hat Single Sign-On UI screen. You can localize the value of this field by setting up a replacement string value i.e. ${myapp}. See the Server Developer Guide for more information.
- Description
- This specifies the description of the client. This can also be localized.
- Enabled
- If this is turned off, the client will not be allowed to request authentication.
- Consent Required
- If this is on, then users will get a consent page which asks the user if they grant access to that application. It will also display the metadata that the client is interested in so that the user knows exactly what information the client is getting access to. If you’ve ever done a social login to Google, you’ll often see a similar page. Red Hat Single Sign-On provides the same functionality.
- Include AuthnStatement
- SAML login responses may specify the authentication method used (password, etc.) as well as a timestamp of the login. Setting this to on will include that statement in the response document.
- Sign Documents
- When turned on, Red Hat Single Sign-On will sign the document using the realm’s private key.
- Sign Assertions
-
The
Sign Documentsswitch signs the whole document. With this setting the assertion is also signed and embedded within the SAML XML Auth response. - Signature Algorithm
- Choose between a variety of algorithms for signing SAML documents.
- Canonicalization Method
- Canonicalization method for XML signatures.
- Encrypt Assertions
- Encrypt assertions in SAML documents with the realm’s private key. The AES algorithm is used with a key size of 128 bits.
- Client Signature Required
-
Expect that documents coming from a client are signed. Red Hat Single Sign-On will validate this signature using the client public key or cert set up in the
SAML Keystab. - Force POST Binding
- By default, Red Hat Single Sign-On will respond using the initial SAML binding of the original request. By turning on this switch, you will force Red Hat Single Sign-On to always respond using the SAML POST Binding even if the original request was the Redirect binding.
- Front Channel Logout
- If true, this application requires a browser redirect to be able to perform a logout. For example, the application may require a cookie to be reset which could only be done via a redirect. If this switch is false, then Red Hat Single Sign-On will invoke a background SAML request to logout the application.
- Force Name ID Format
- If the request has a name ID policy, ignore it and used the value configured in the admin console under Name ID Format
- Name ID Format
- Name ID Format for the subject. If no name ID policy is specified in the request or if the Force Name ID Format attribute is true, this value is used. Properties used for each of the respective formats are defined below.
- Root URL
- If Red Hat Single Sign-On uses any configured relative URLs, this value is prepended to them.
- Valid Redirect URIs
-
This is an optional field. Enter in a URL pattern and click the + sign to add. Click the - sign next to URLs you want to remove. Remember that you still have to click the
Savebutton! Wildcards (\*) are only allowed at the end of of a URI, i.e. http://host.com/*. This field is used when the exact SAML endpoints are not registered and Red Hat Single Sign-On is pull the Assertion Consumer URL from the request. - Base URL
- If Red Hat Single Sign-On needs to link to the client, this URL would be used.
- Master SAML Processing URL
- This URL will be used for all SAML requests and the response will be directed to the SP. It will be used as the Assertion Consumer Service URL and the Single Logout Service URL. If a login request contains the Assertion Consumer Service URL, that will take precedence, but this URL must be valided by a registered Valid Redirect URI pattern
- Assertion Consumer Service POST Binding URL
- POST Binding URL for the Assertion Consumer Service.
- Assertion Consumer Service Redirect Binding URL
- Redirect Binding URL for the Assertion Consumer Service.
- Logout Service POST Binding URL
- POST Binding URL for the Logout Service.
- Logout Service Redirect Binding URL
- Redirect Binding URL for the Logout Service.
8.3.1. IDP Initiated Login
IDP Initiated Login is a feature that allows you to set up an endpoint on the Red Hat Single Sign-On server that will log you into a specific application/client. In the Settings tab for your client, you need to specify the IDP Initiated SSO URL Name. This is a simple string with no whitespace in it. After this you can reference your client at the following URL: root/auth/realms/{realm}/protocol/saml/clients/{url-name}
If your client requires a special relay state, you can also configure this on the Settings tab in the IDP Initiated SSO Relay State field. Alternatively, browsers can specify the relay state in a RelayState query parameter, i.e. root/auth/realms/{realm}/protocol/saml/clients/{url-name}?RelayState=thestate.
8.3.2. SAML Entity Descriptors
Instead of manually registering a SAML 2.0 client, you can import it via a standard SAML Entity Descriptor XML file. There is an Import option on the Add Client page.
Add Client
Click the Select File button and load your entity descriptor file. You should review all the information there to make sure everything is set up correctly.
Some SAML client adapters like mod-auth-mellon need the XML Entity Descriptor for the IDP. You can obtain this by going to this public URL: root/auth/realms/{realm}/protocol/saml/descriptor
8.4. OIDC Token and SAML Assertion Mappings
Applications that receive ID Tokens, Access Tokens, or SAML assertions may need or want different user metadata and roles. Red Hat Single Sign-On allows you to define what exactly is transferred. You can hardcode roles, claims and custom attributes. You can pull user metadata into a token or assertion. You can rename roles. Basically you have a lot of control of what exactly goes back to the client.
Within the Admin Console, if you go to an application you’ve registered, you’ll see a Mappers tab. Here’s one for an OIDC based client.
Mappers Tab
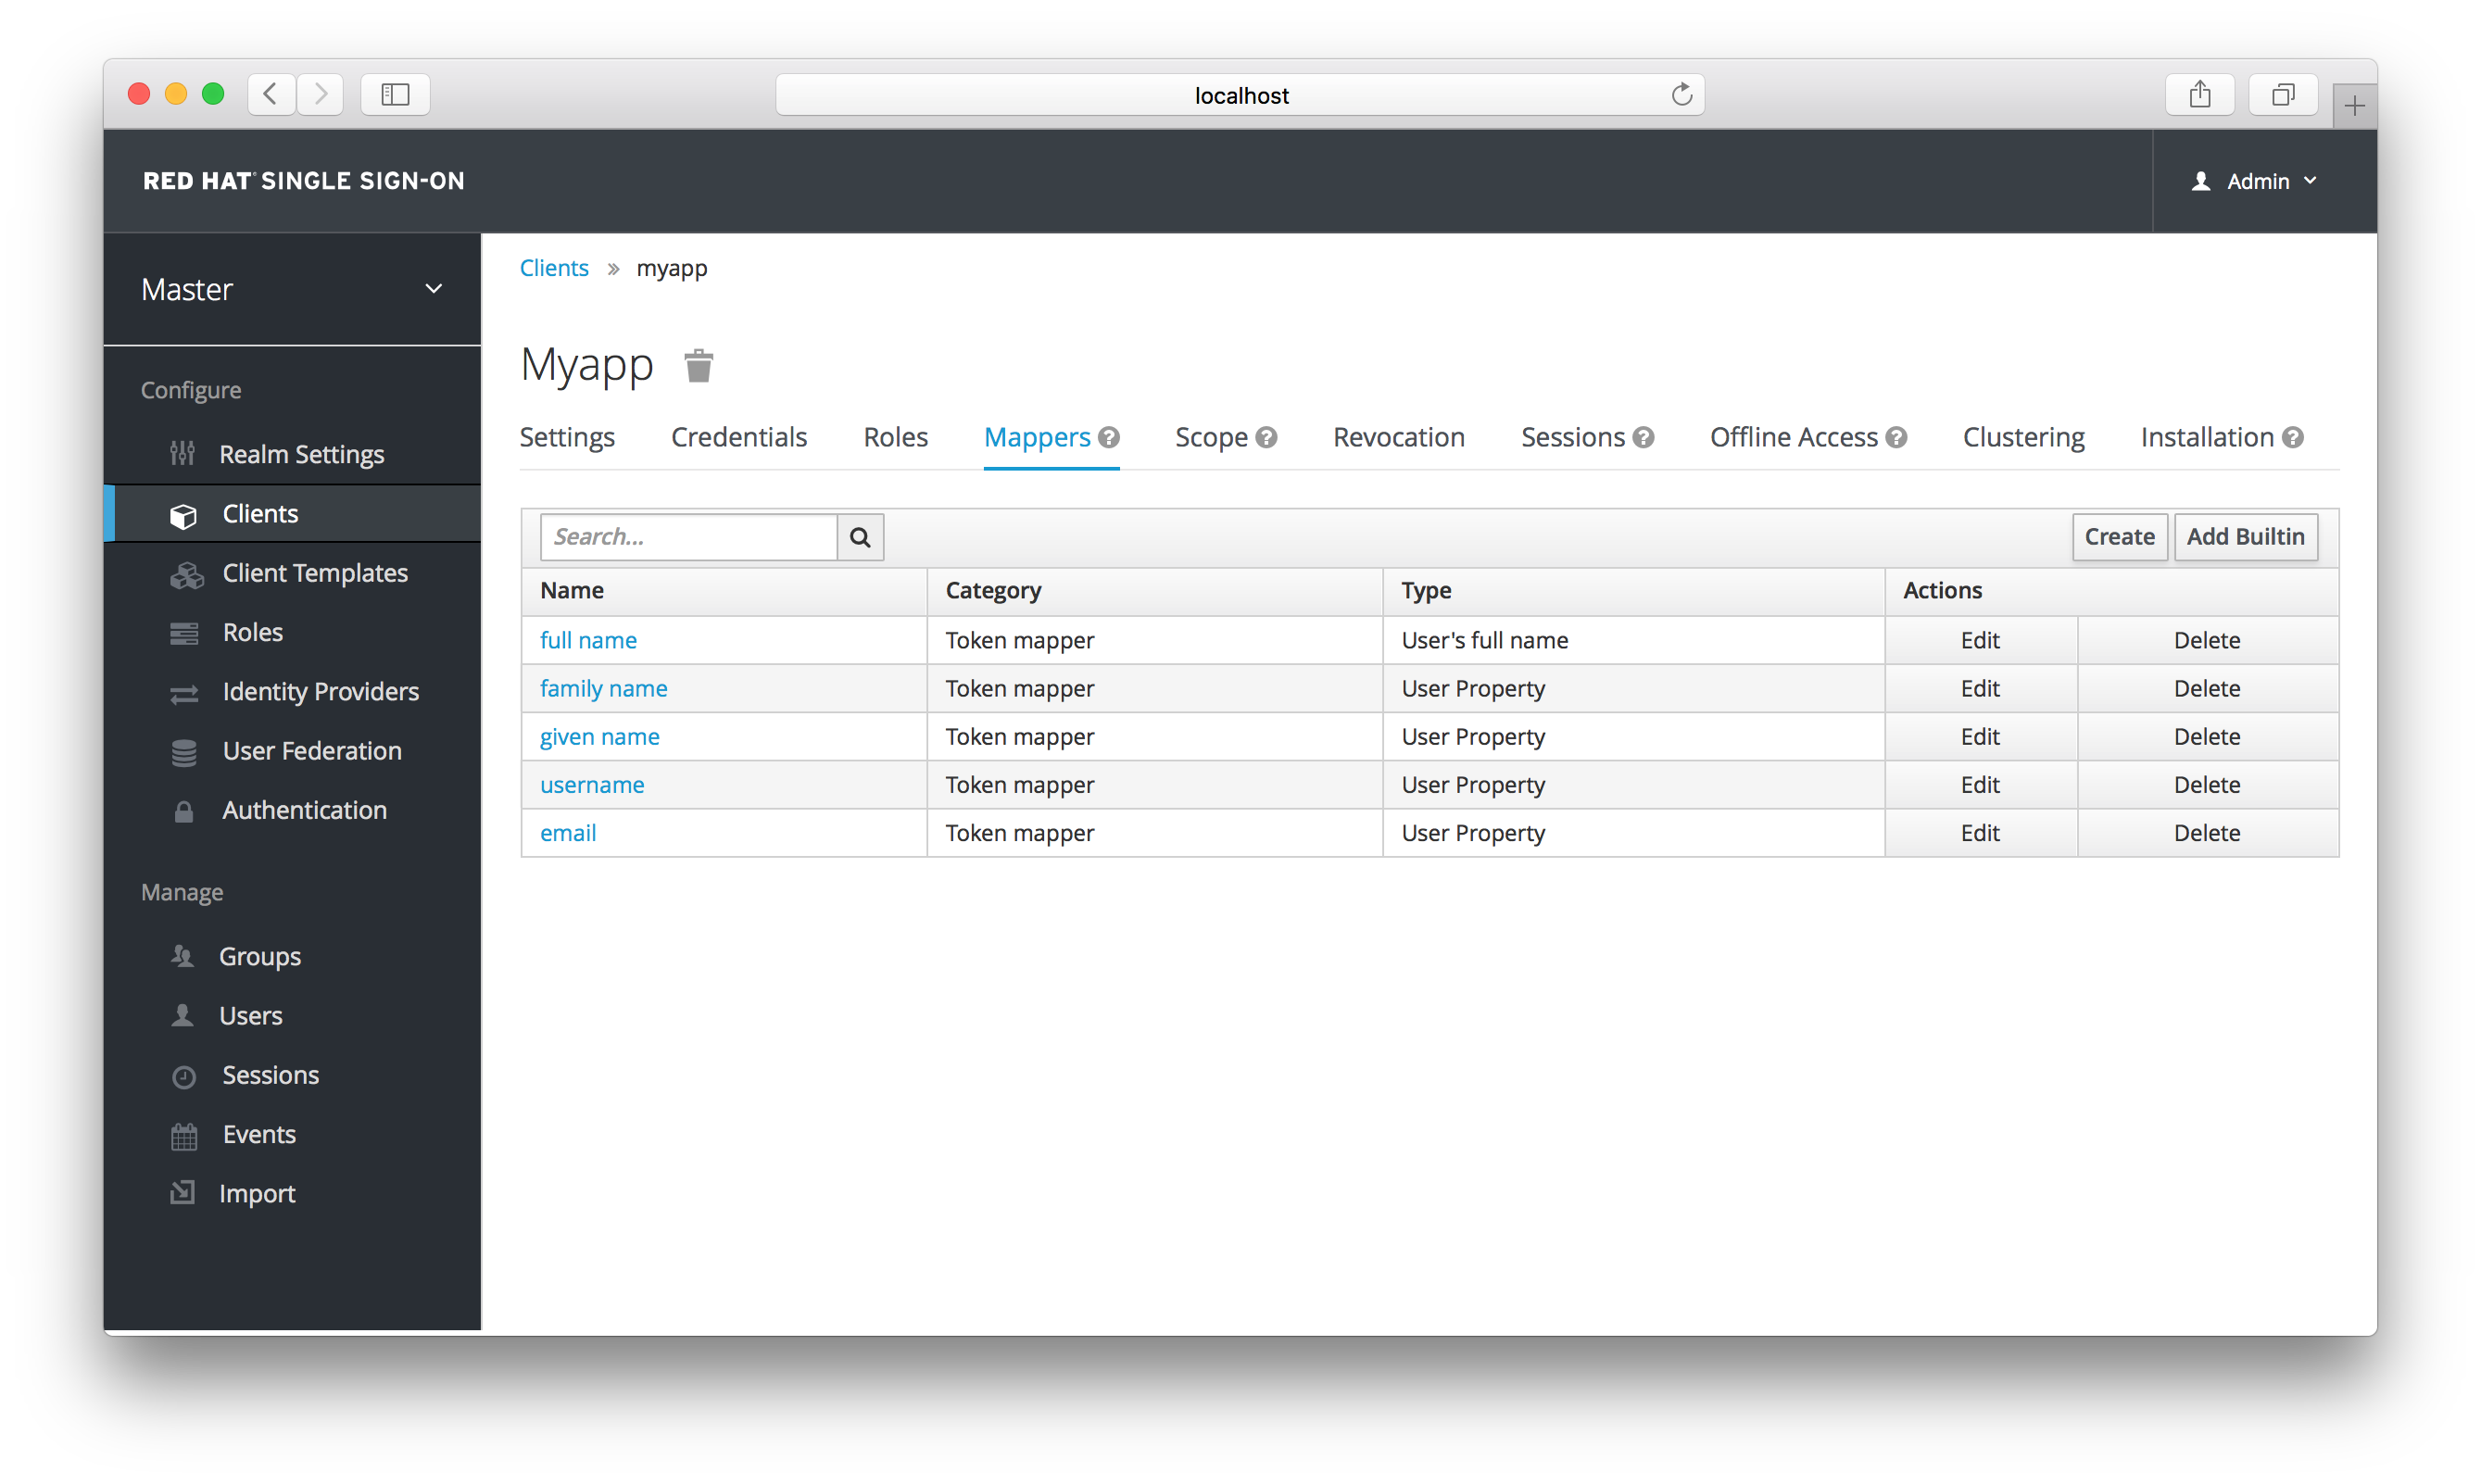
Each client has several built-in mappers that are created for it by default. They map things like, for example, email address to a specific claim in the identity and access token. Their function should each be self explanatory from their name. There are additional pre-configured mappers that are not attached to the client that you can add by clicking the Add Builtin button.
Each mapper has common settings as well as additional ones depending on which type of mapper you are adding. Click the Edit button next to one of the mappers in the list to get to the config screen.
Mapper Config
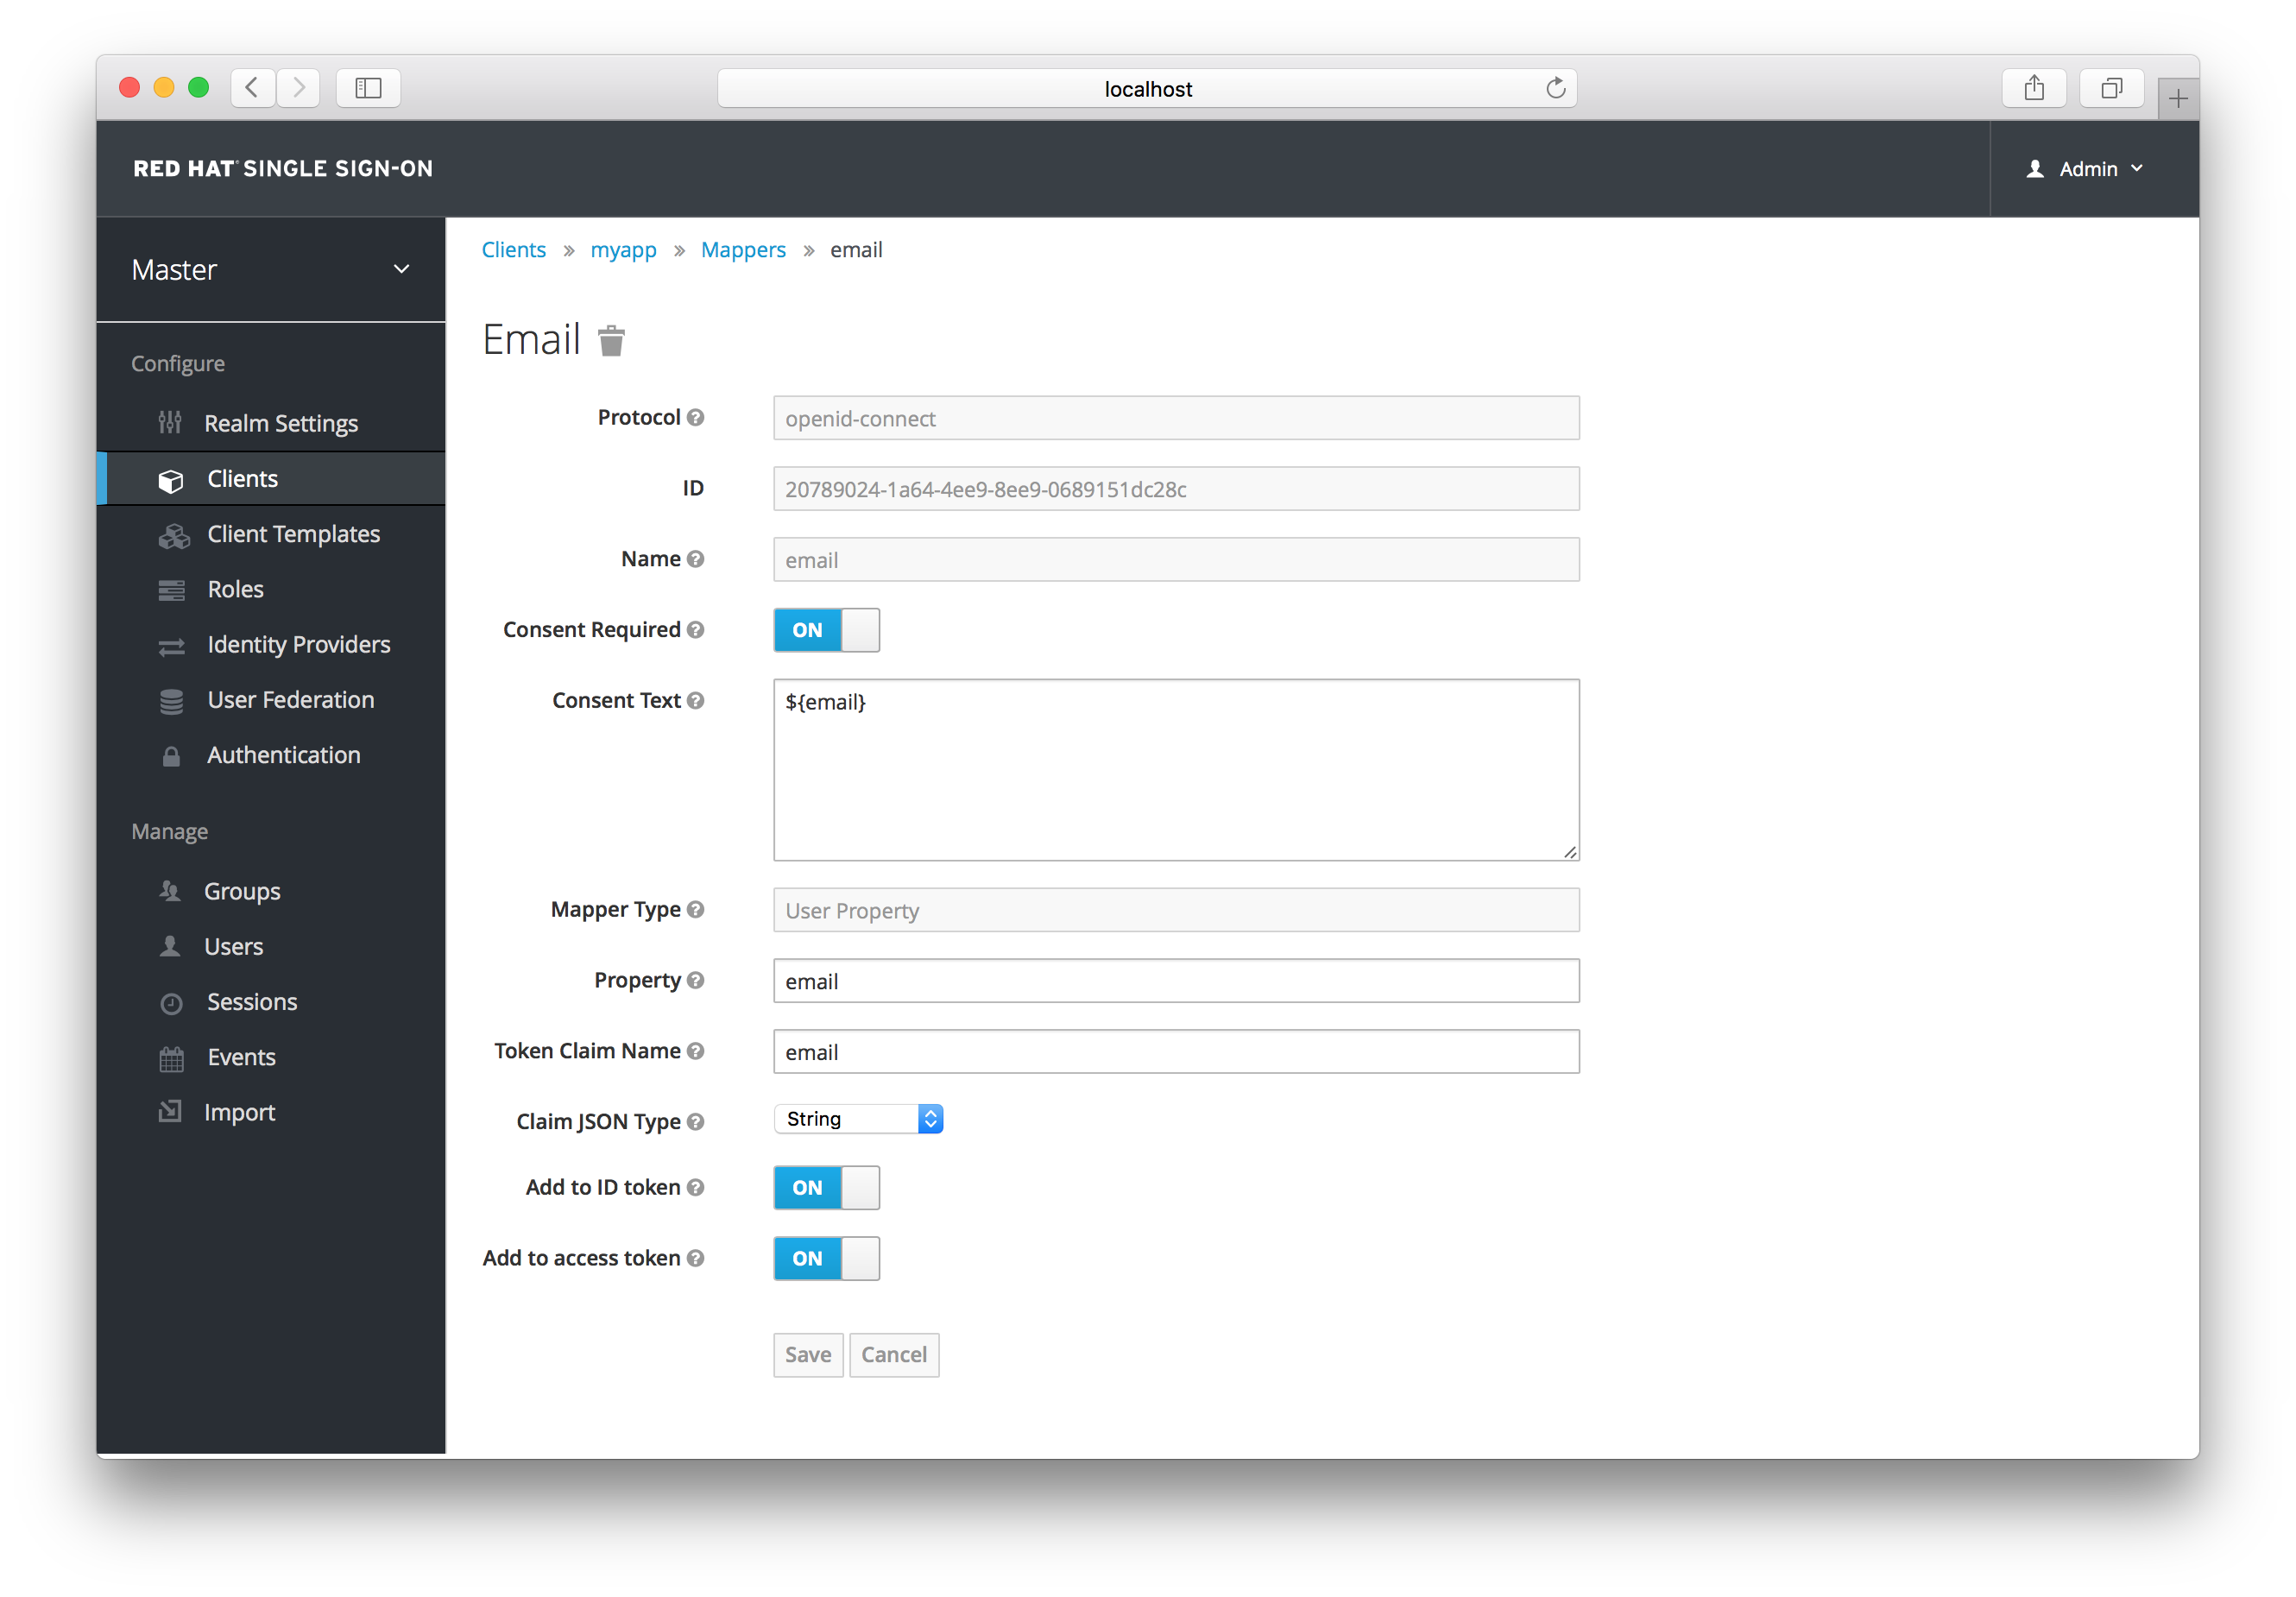
The best way to learn about a config option is to hover over its tooltip. There are a few config options that are common to all mappers:
- Consent
- If your client requires consent, this mapper will be displayed on the consent screen shown to the user.
- Consent Text
-
If your client requires consent and the
Consentswitch is on, this is the text that will be displayed by the user. The value for this text is localizable by specifying a substitution variable with${var-name}strings. The localized value is then configured within property files in your theme. See the Server Developer Guide for more information on localization.
Most OIDC mappers also allow you to control where the claim gets put. You can opt to include or exclude the claim from both the id and access tokens by fiddling with the Add to ID token and Add to access token switches.
Finally, you can also add other mapper types. If you go back to the Mappers tab, click the Create button.
Add Mapper
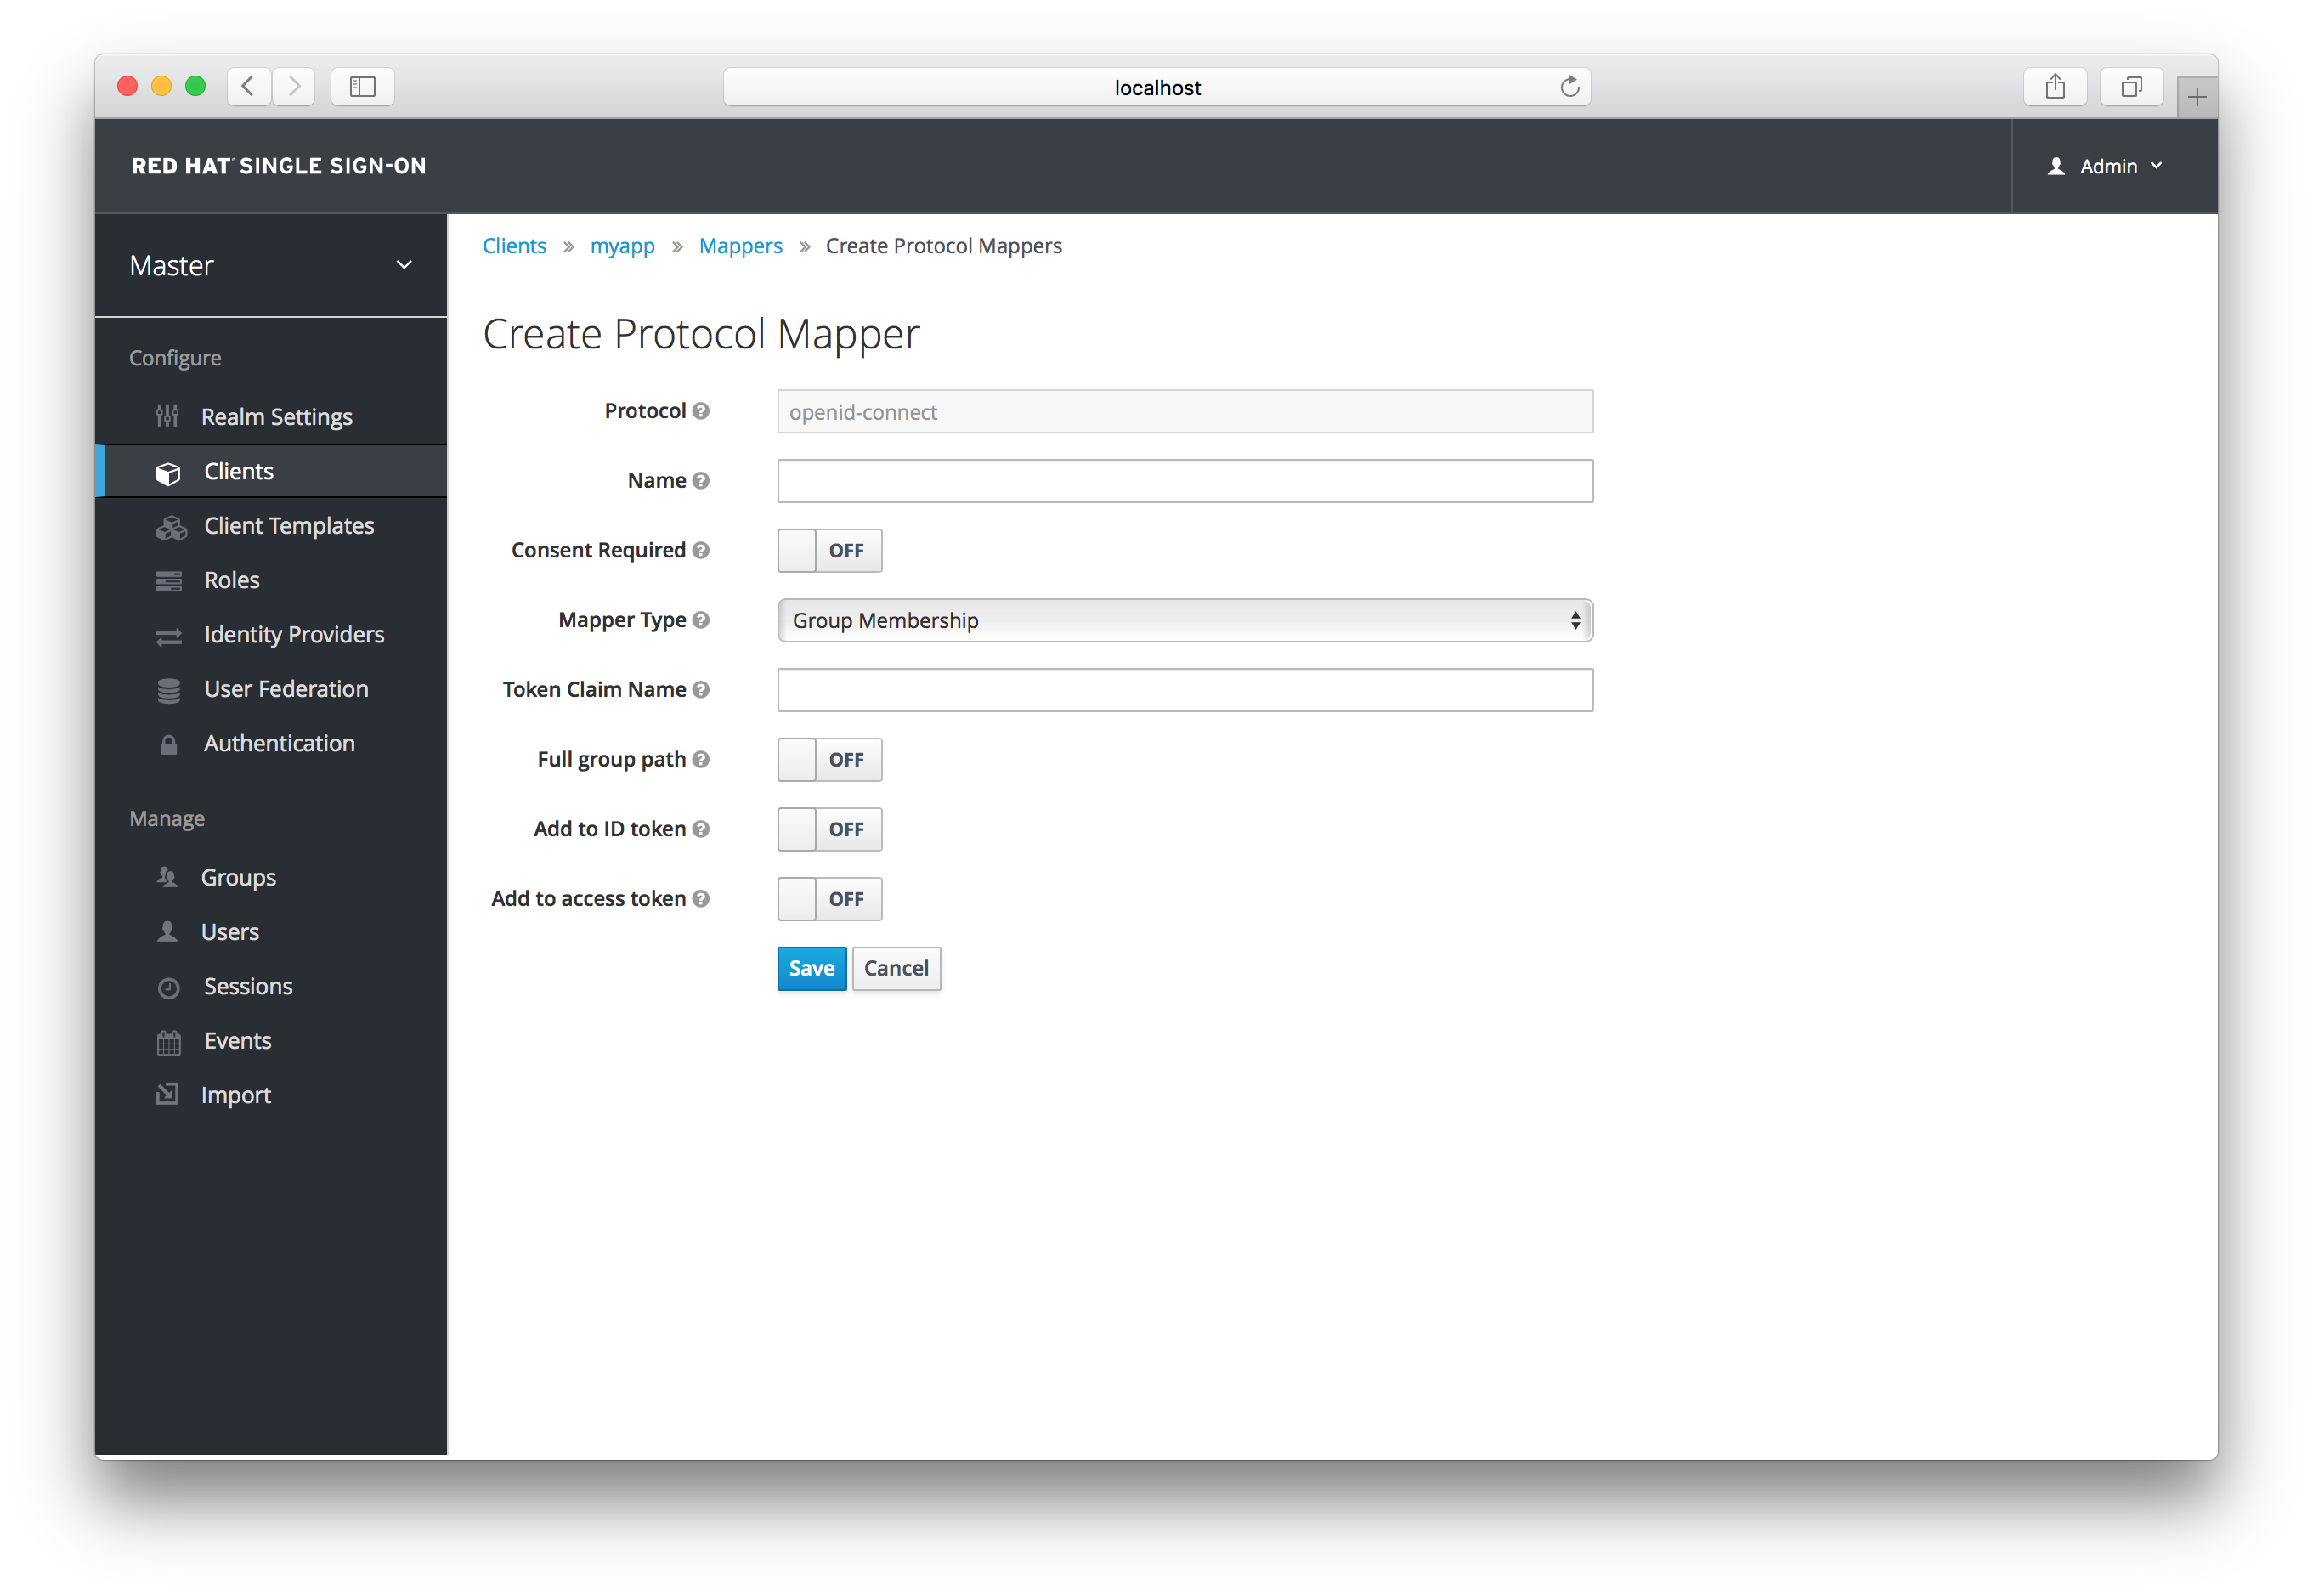
Pick a Mapper Type from the list box. If you hover over the tooltip, you’ll see a description of what that mapper type does. Different config parameters will appear for different mapper types.
8.5. Generating Client Adapter Config
The Red Hat Single Sign-On can pre-generate configuration files that you can use to install a client adapter for in your application’s deployment environment. A number of adapter types are supported for both OIDC and SAML. Go to the Installation tab of the client you want to generate configuration for.

Select the Format Option you want configuration generated for. All Red Hat Single Sign-On client adapters for OIDC and SAML are supported. The mod-auth-mellon Apache HTTPD adapter for SAML is supported as well as standard SAML entity descriptor files.
8.6. Client Templates
If you have a lot of applications you need to secure and register within your organization it can become quite tedious to configure the protocol mappers and scope for each of these clients. Red Hat Single Sign-On allows you to define shared client configuration in an entity called a client template.
To create a client template, go to the Client Templates left menu item. This initial screen shows you a list of currently defined templates.
To create a template click the Create button. This brings you to a simple screen in which you name the template and hit save. A client template will have similar tabs to regular clients. You’ll be able to define protocol mappers and scope which can be inherited by other clients.
Having a client inherit from a template is as simple as choosing the template from the Client Template drop down list on either the Add Client or client Settings tab. You will see the Mappers and Scope tabs get additional switches which allow you to turn on or off inheriting from the parent template.
Future versions of client templating may get more inheritable configuration options, but for now, that’s all there is to talk about.
Chapter 9. Roles
Roles identify a type or category of user. Admin, user, manager, and employee are all typical roles that may exist in an organization. Applications often assign access and permissions to specific roles rather than individual users as dealing with users can be too fine grained and hard to manage. For example, the Admin Console has specific roles which give permission to users to access parts of the Admin Console UI and perform certain actions. There is a global namespace for roles and each client also has its own dedicated namespace where roles can be defined.
9.1. Realm Roles
Realm level roles are a global namespace to define your roles. You can see the list of built-in and created roles by clicking on the Roles left menu item.
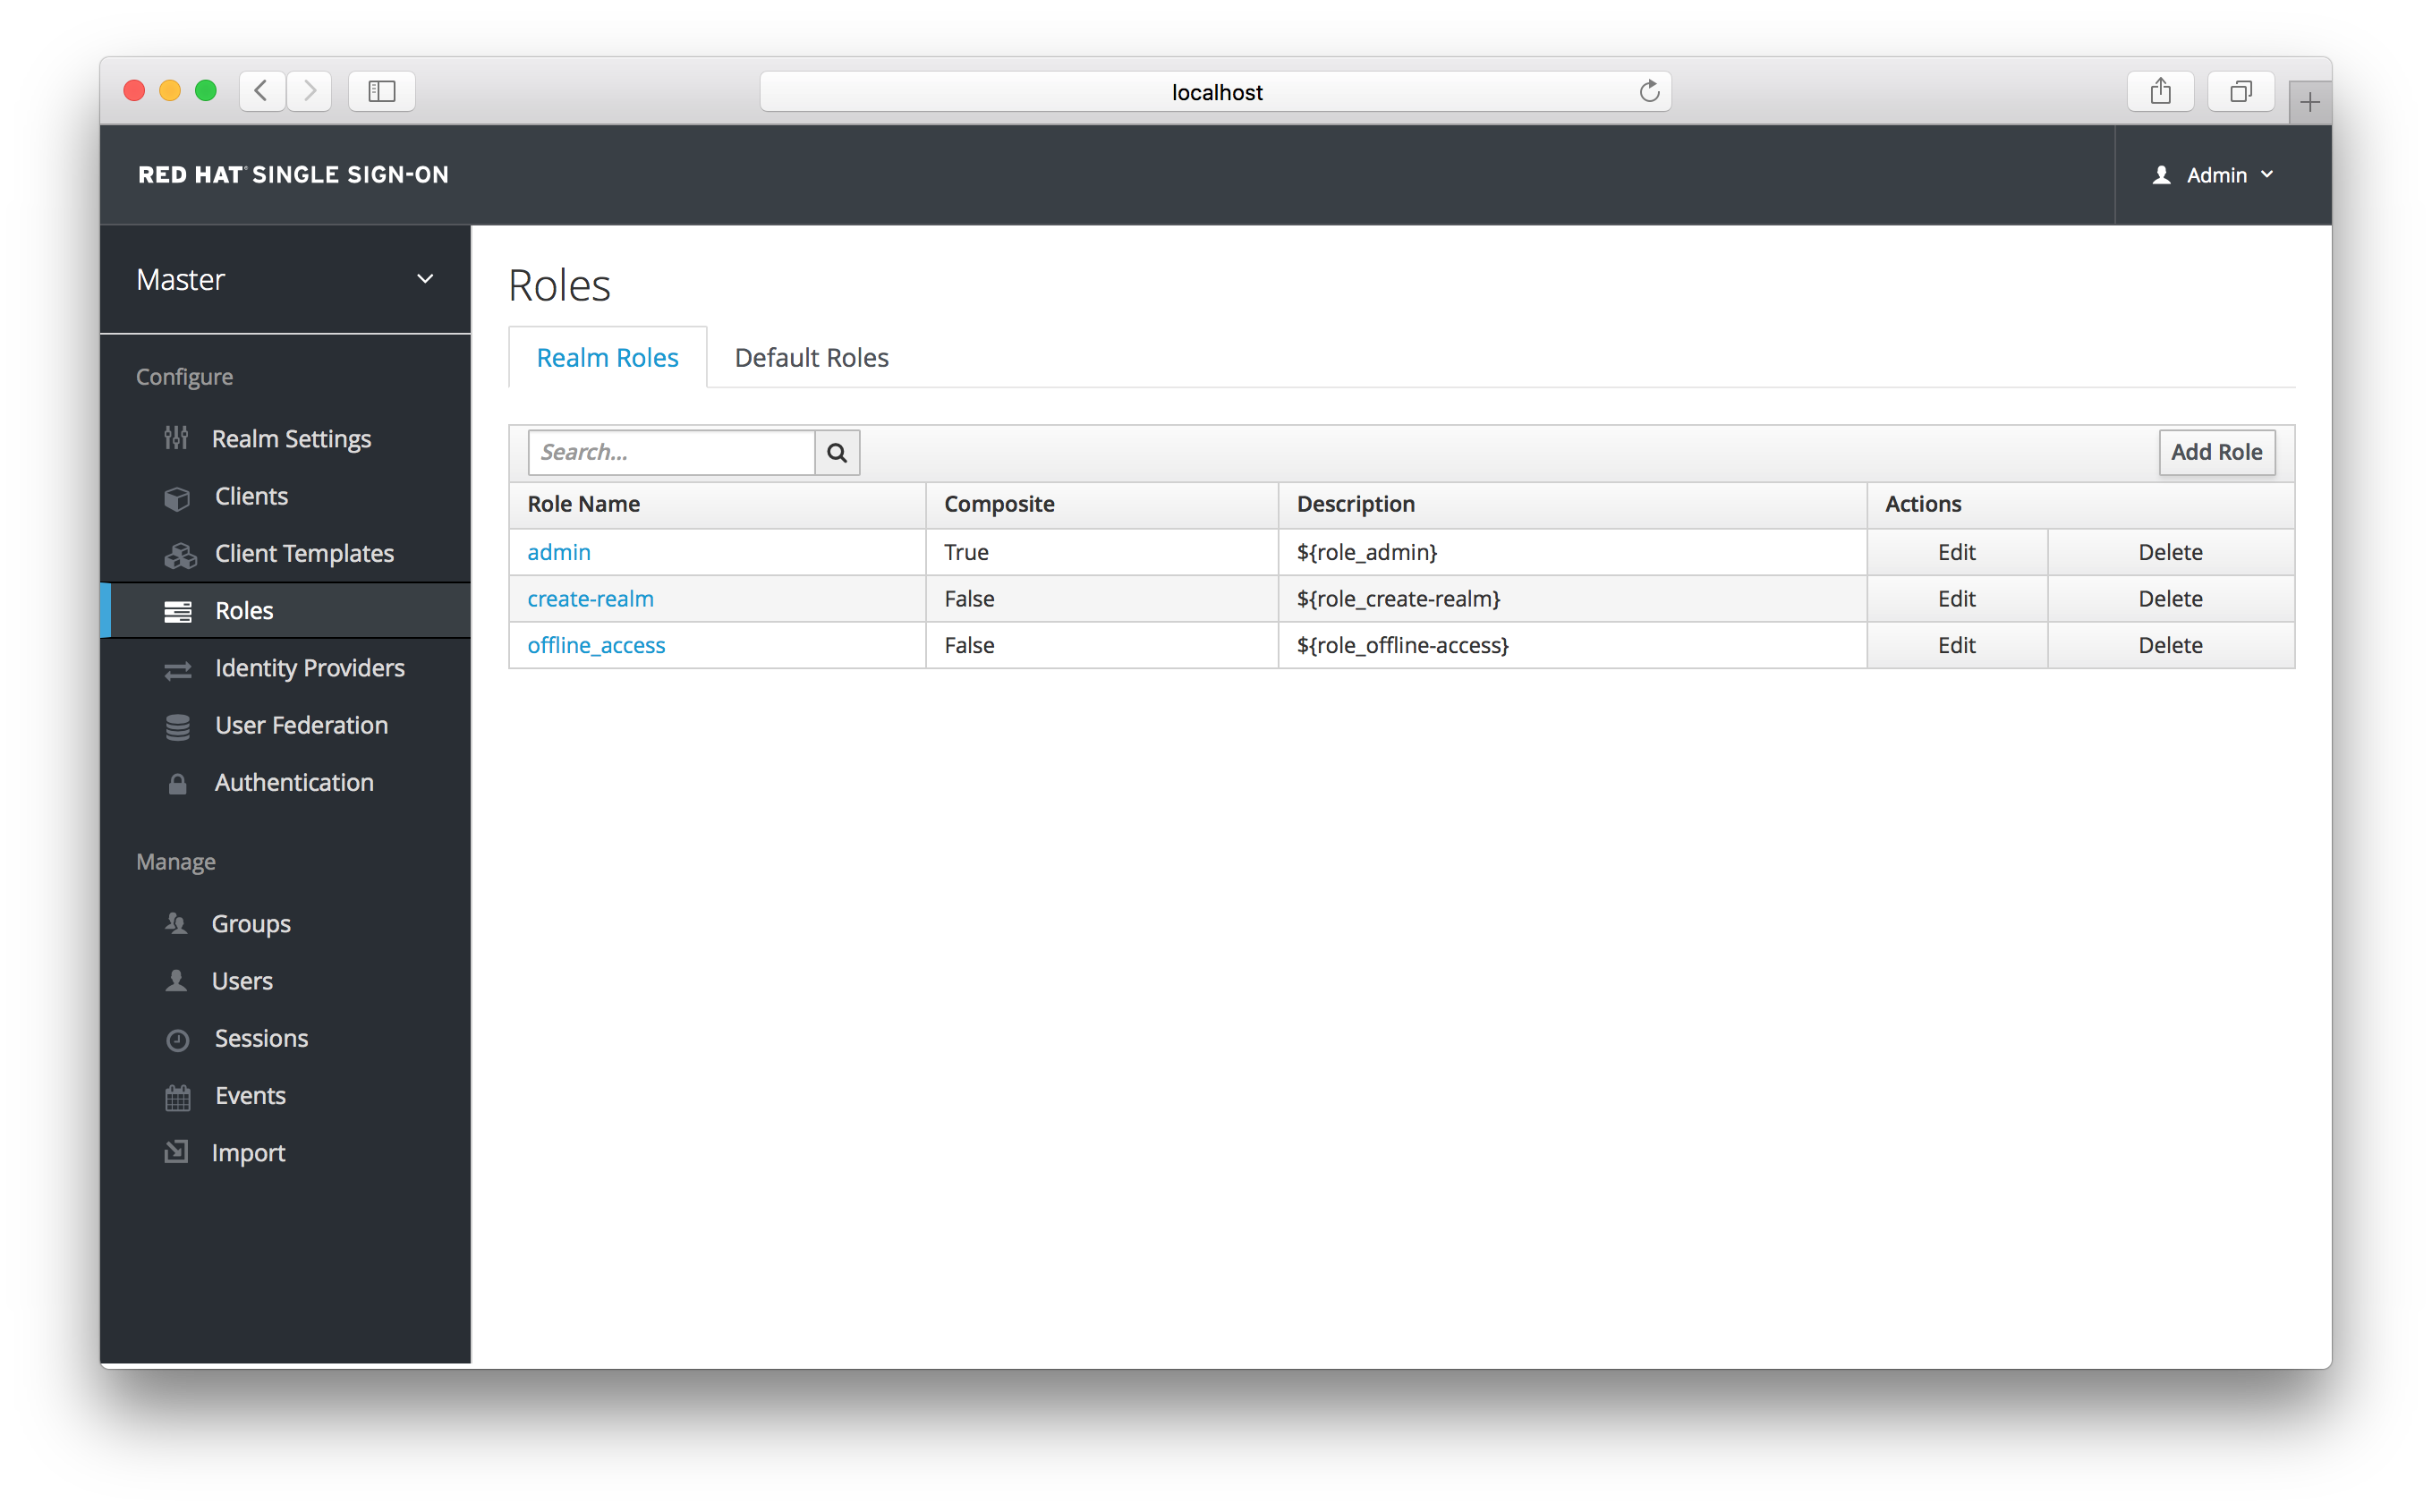
To create a role just click on the Add Role button on this page, enter in the name and description of the role and hit the Save button.
Add Role
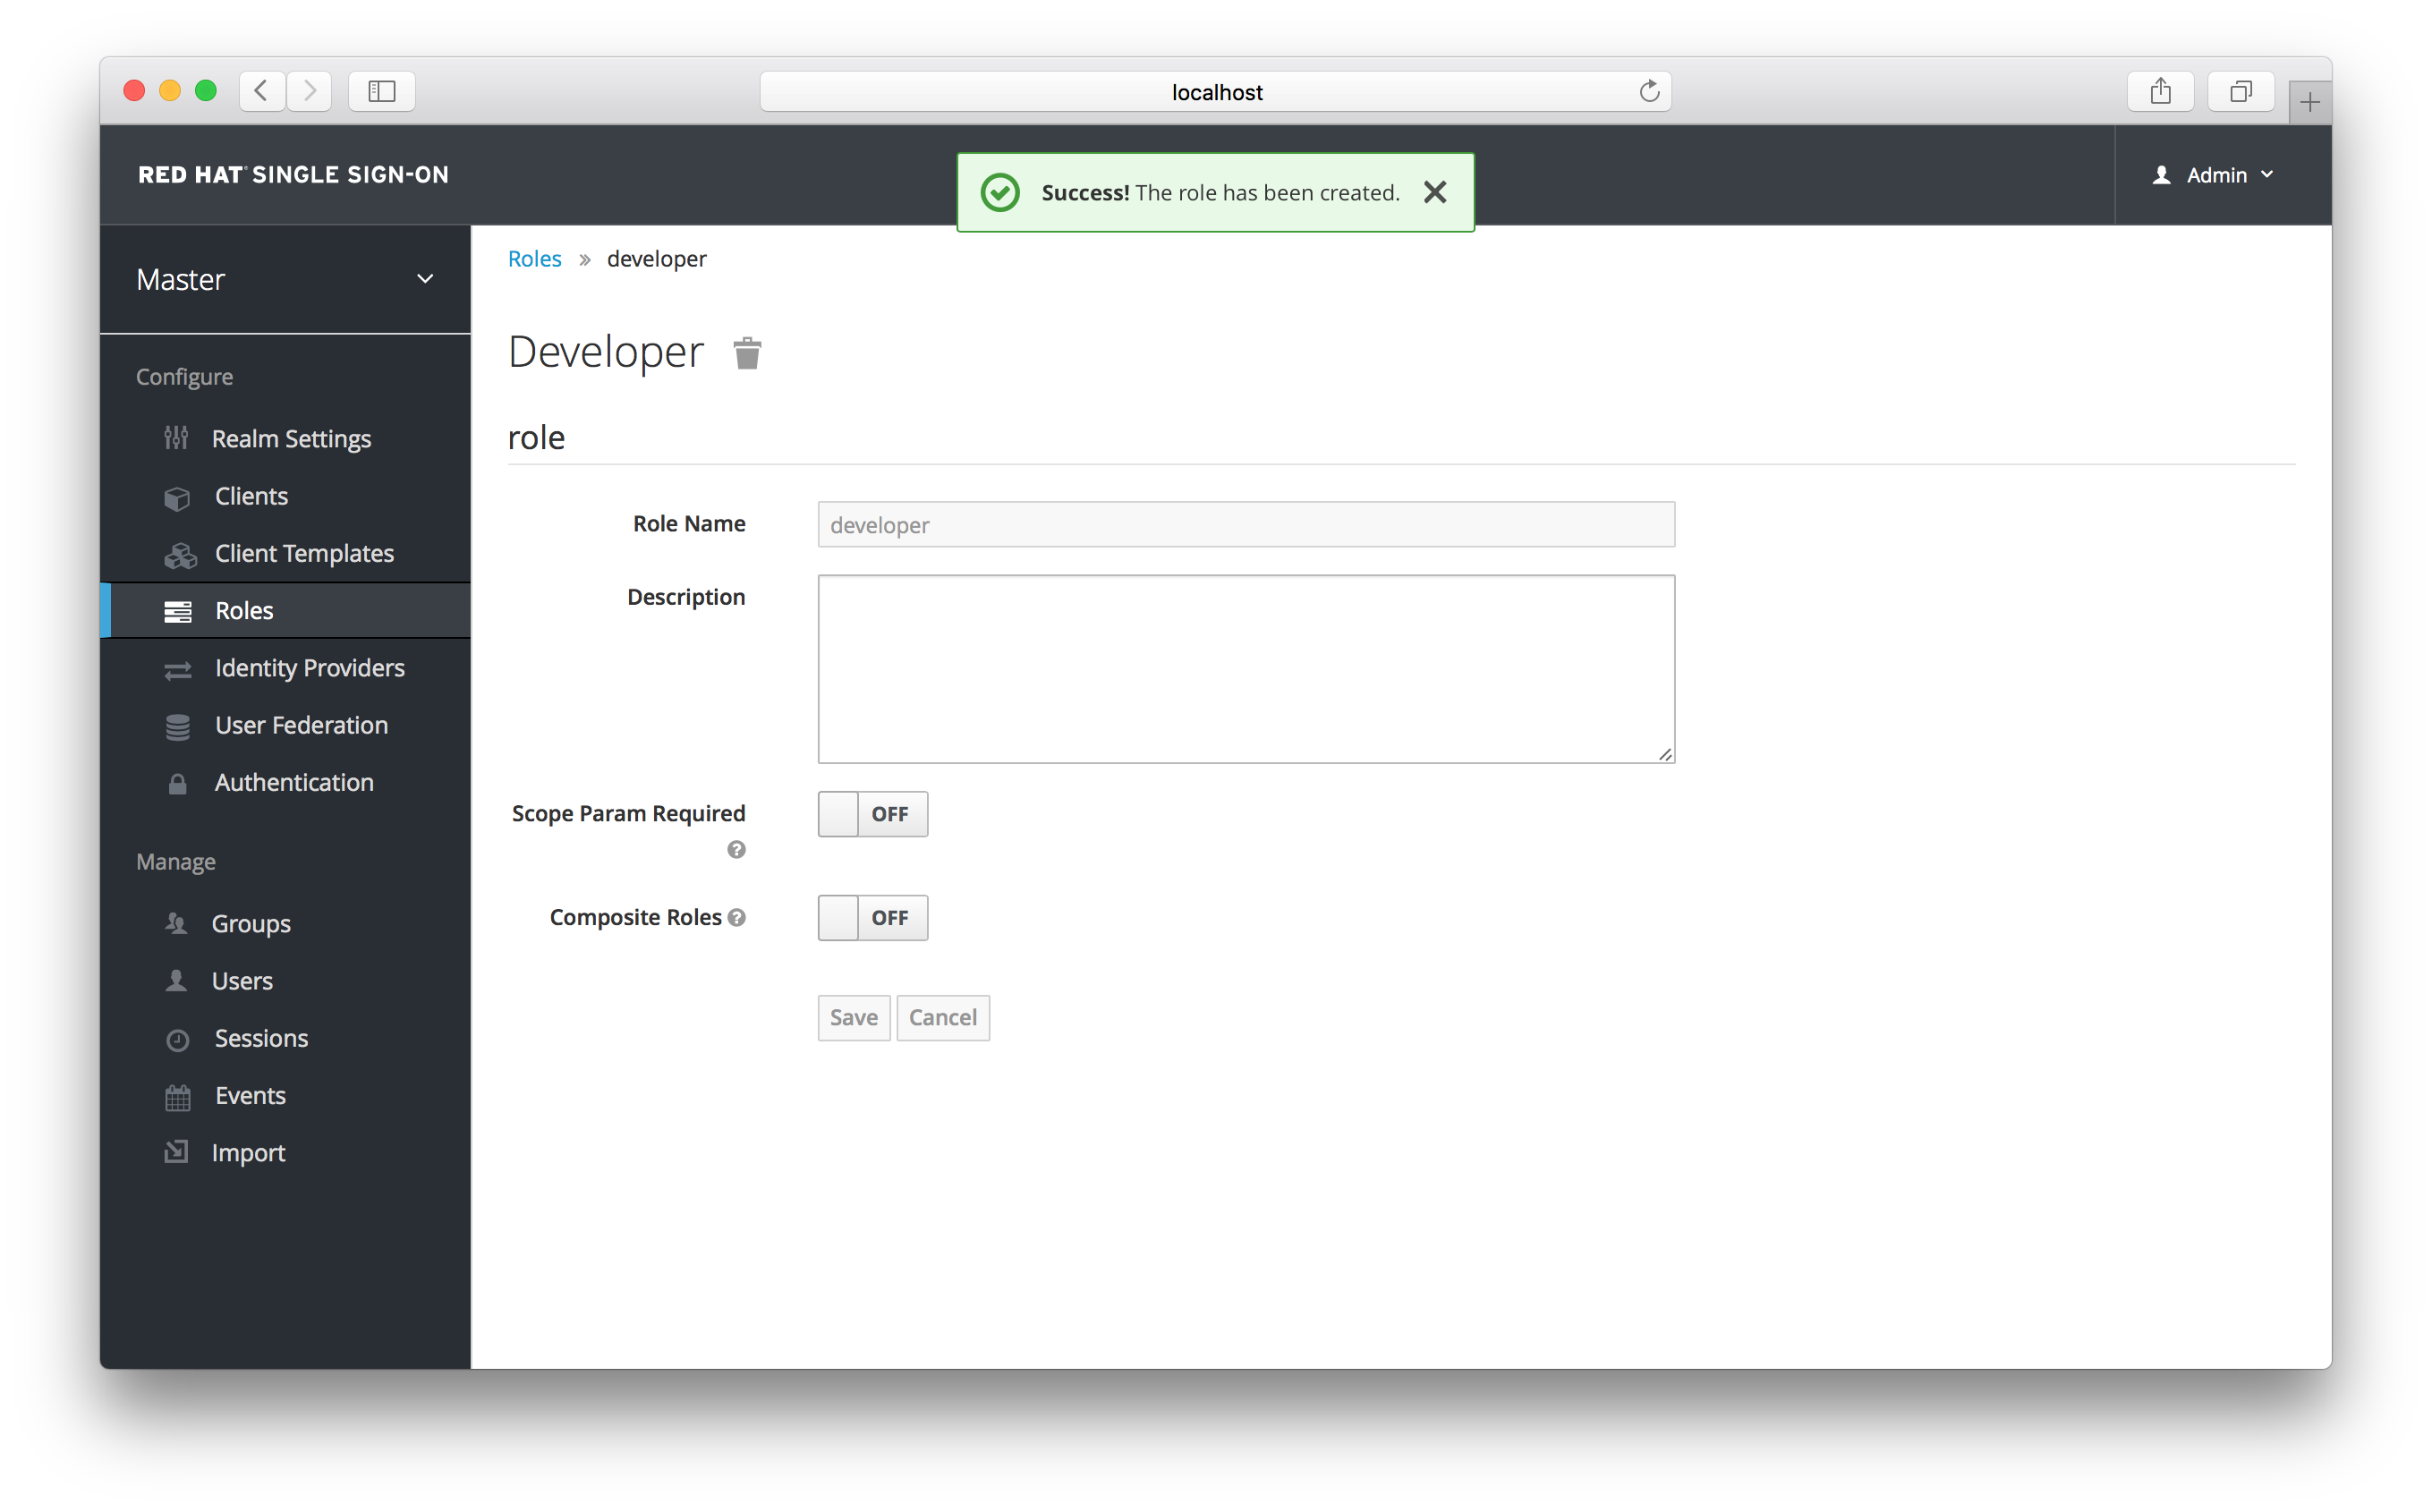
The value for the description field is localizable by specifying a substitution variable with ${var-name} strings. The localized value is then configured within property files in your theme. See the Server Developer Guide for more information on localization. If a client requires user consent, this description string will be displayed on the consent page for the user.
9.2. Client Roles
Client roles are basically a namespace dedicated to a client. Each client gets its own namespace. Client roles are managed under the Roles tab under each individual client. You interact with this UI the same way you do for realm level roles.
9.3. Composite Roles
Any realm or client level role can be turned into a composite role. A composite role is a role that has one or more additional roles associated with it. When a composite role is mapped to the user, the user also gains the roles associated with that composite. This inheritance is recursive so any composite of composites also gets inherited.
To turn a regular role into a composite role, go to the role detail page and flip the Composite Role switch on.
Composite Role
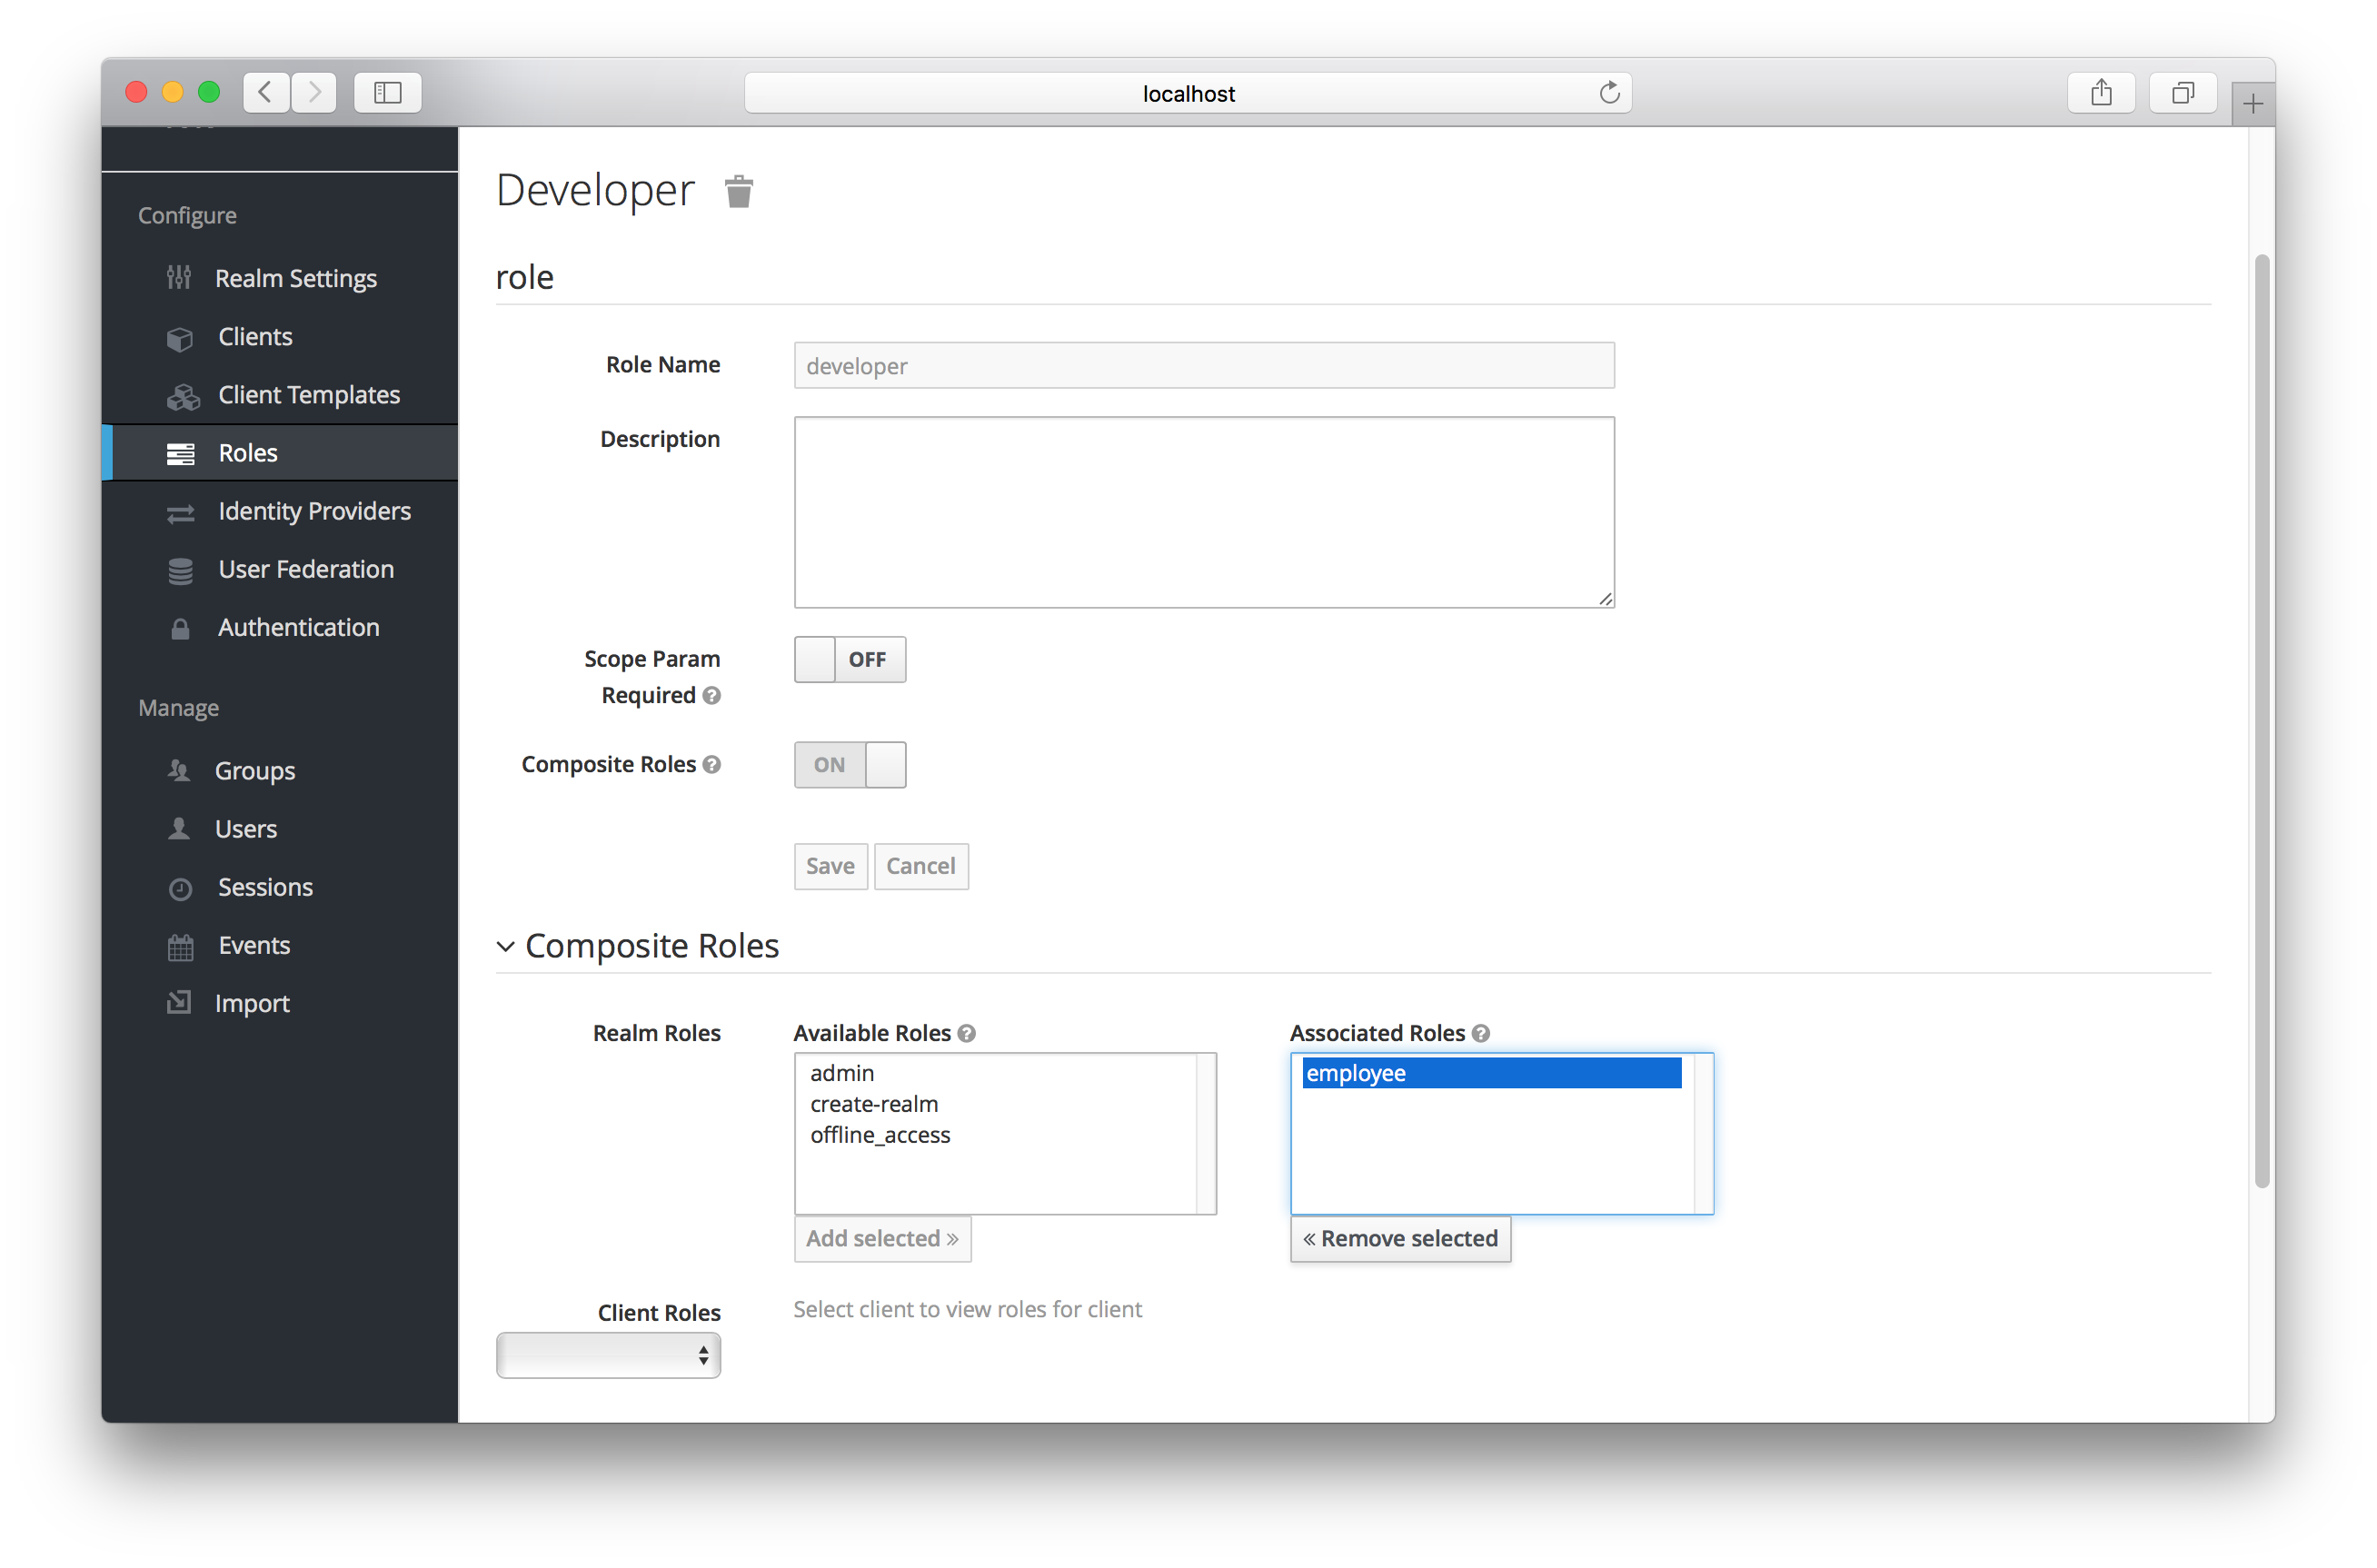
Once you flip this switch the role selection UI will be displayed lower on the page and you’ll be able to associate realm level and client level roles to the composite you are creating. In this example, the employee realm-level role was associated with the developer composite role. Any user with the developer role will now also inherit the employee role too.
When tokens and SAML assertions are created, any composite will also have its associated roles added to the claims and assertions of the authentication response sent back to the client.
9.4. User Role Mappings
User role mappings can be assigned individually to each user through the Role Mappings tab for that single user.
Role Mappings
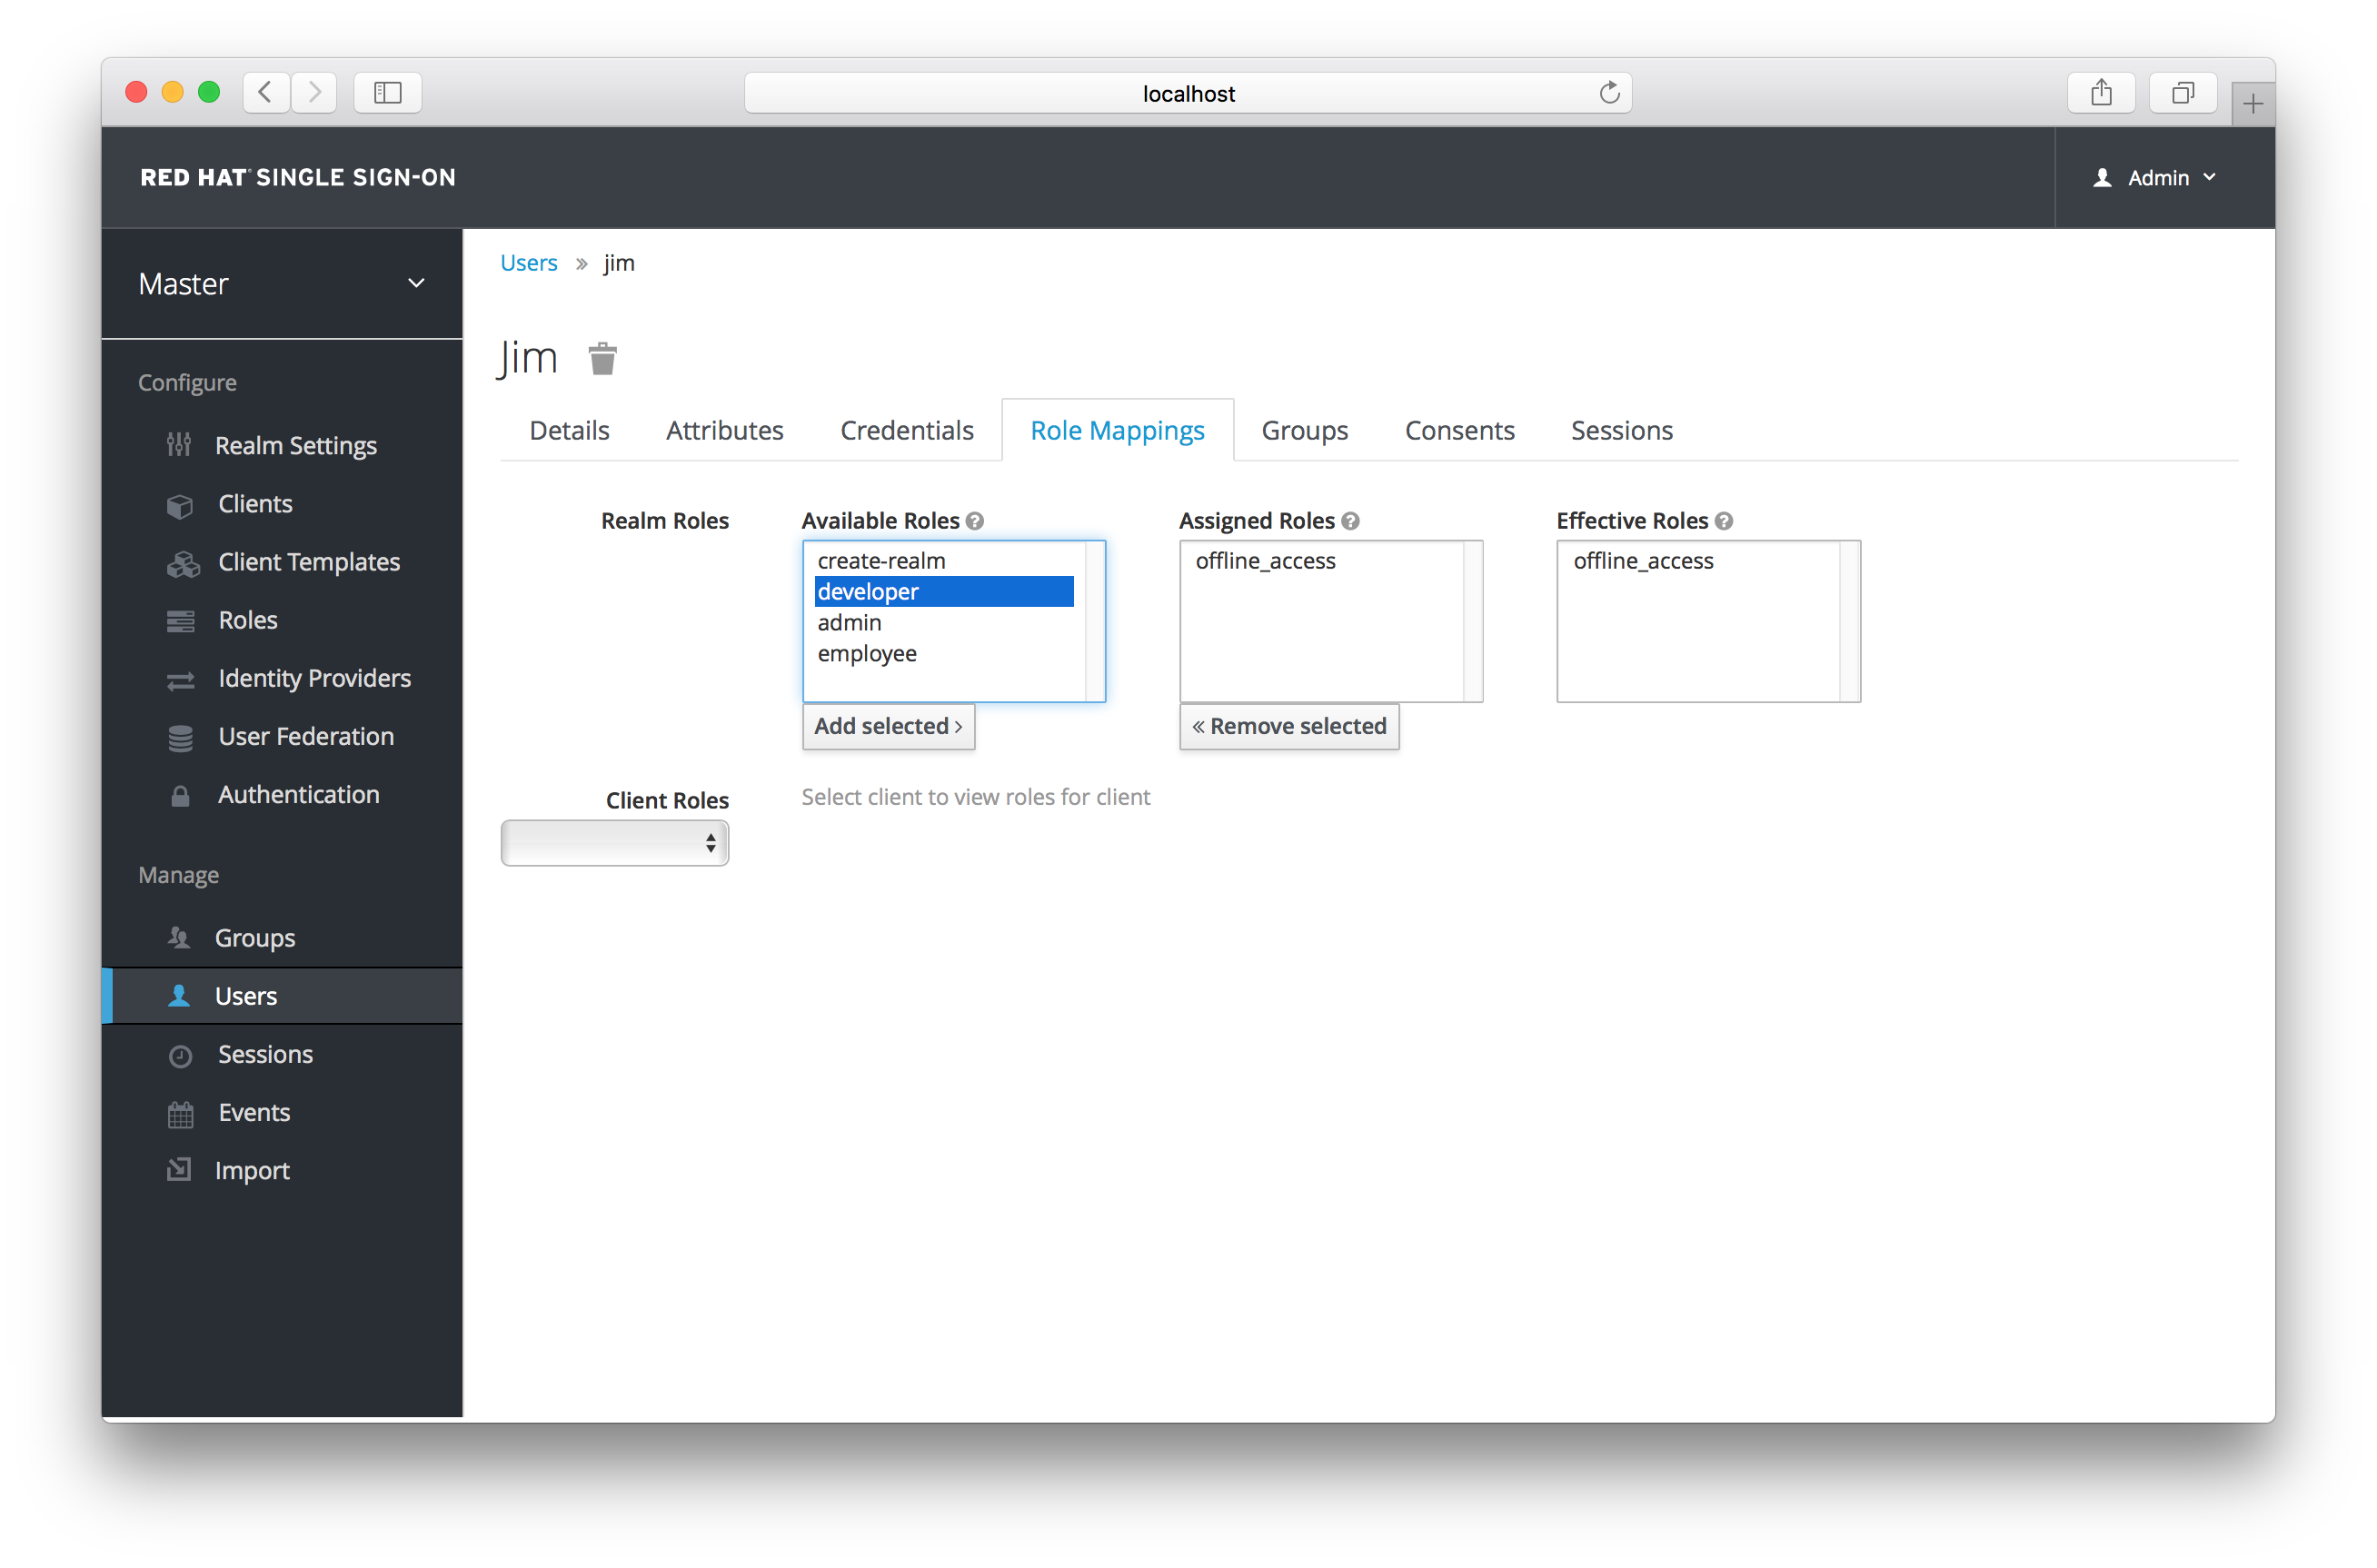
In the above example, we are about to assign the composite role developer that was created in the Composite Roles chapter.
Effective Role Mappings

Once the developer role is assigned, you see that the employee role that is associated with the developer composite shows up in the Effective Roles. Effective Roles are all roles that are explicitly assigned to the user as well as any roles that are inherited from composites.
9.4.1. Default Roles
Default roles allow you to automatically assign user role mappings when any user is newly created or imported through Identity Brokering. To specify default roles go to the Roles left menu item, and click the Default Roles tab.
Default Roles
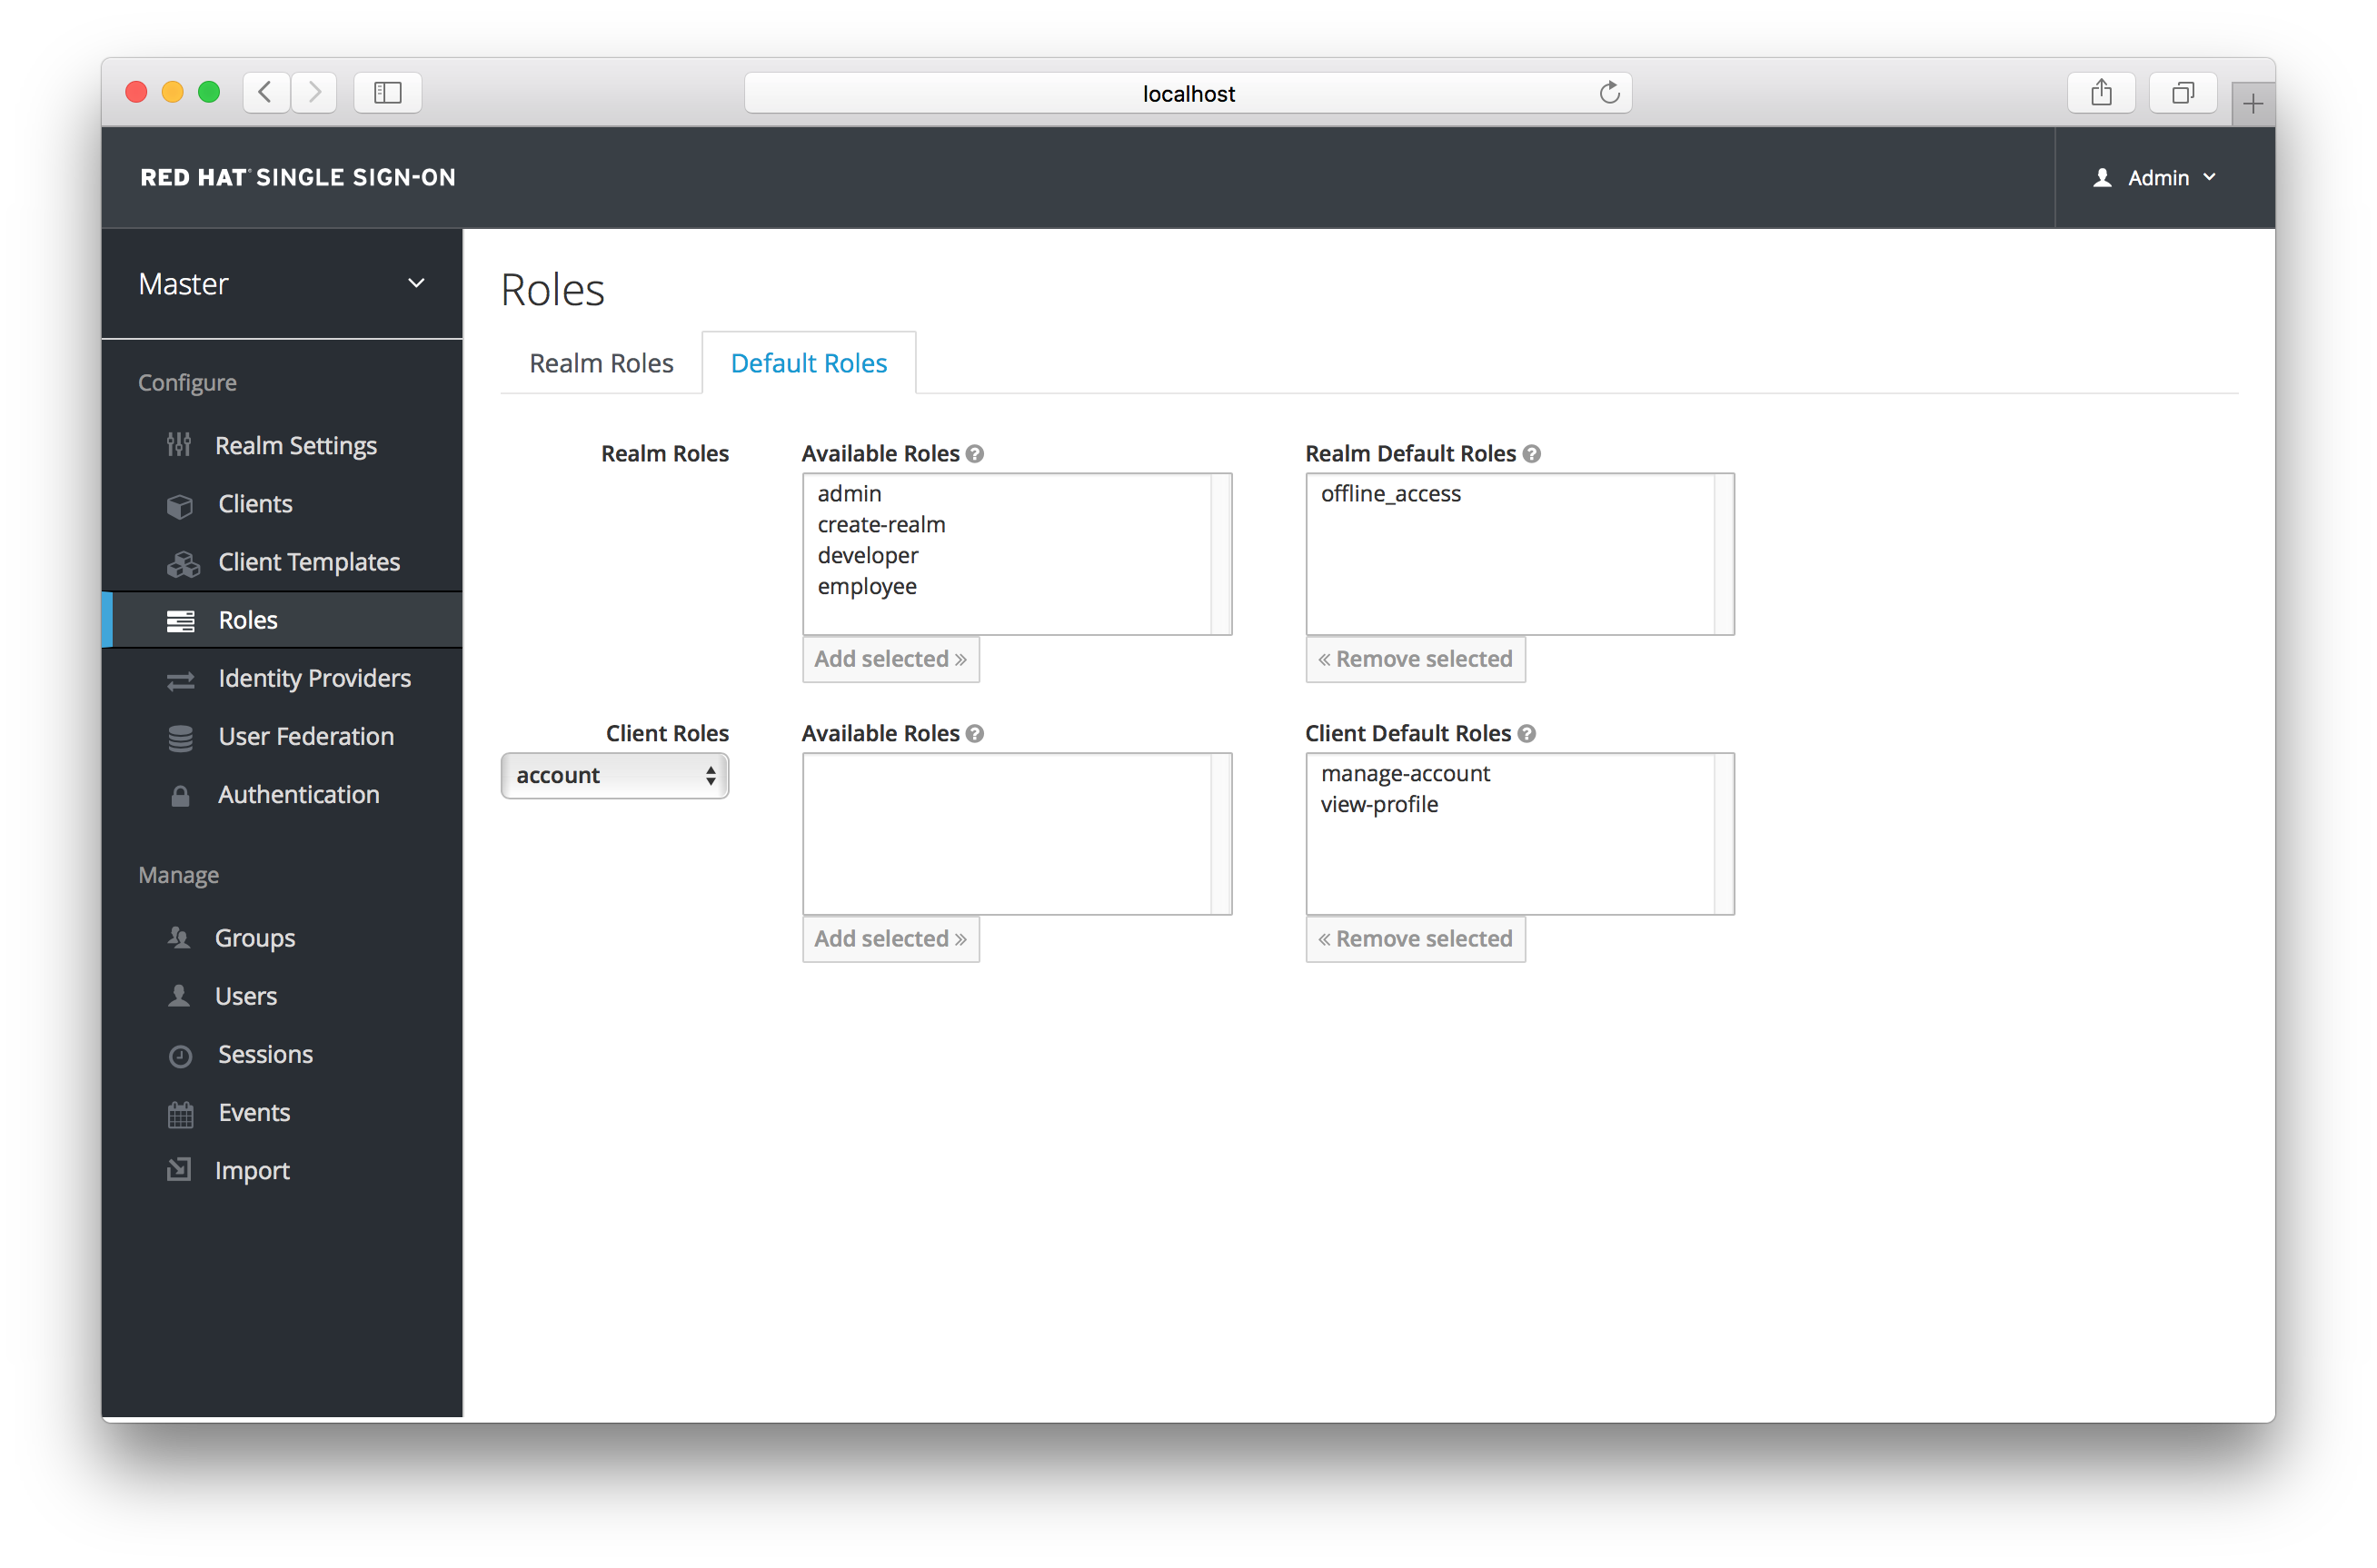
As you can see from the screenshot, there are already a number of default roles set up by default.
9.5. Client Scope
When an OIDC access token or SAML assertion is created, all the user role mappings of the user are, by default, added as claims within the token or assertion. Applications use this information to make access decisions on the resources controlled by that application. In Red Hat Single Sign-On, access tokens are digitally signed and can actually be re-used by the application to invoke on other remotely secured REST services. This means that if an application gets compromised or there is a rogue client registered with the realm, attackers can get access tokens that have a broad range of permissions and your whole network is compromised. This is where client scope becomes important.
Client scope is a way to limit the roles that get declared inside an access token. When a client requests that a user be authenticated, the access token they receive back will only contain the role mappings you’ve explicitly specified for the client’s scope. This allows you to limit the permissions each individual access token has rather than giving the client access to all of the user’s permissions. By default, each client gets all the role mappings of the user. You can view this in the Scope tab of each client.
Full Scope

You can see from the picture that the effective roles of the scope are every declared role in the realm. To change this default behavior, you must explicitly turn off the Full Scope Allowed switch and declare the specific roles you want in each individual client. Alternatively, you can also use client templates to define the scope for a whole set of clients.
Partial Scope
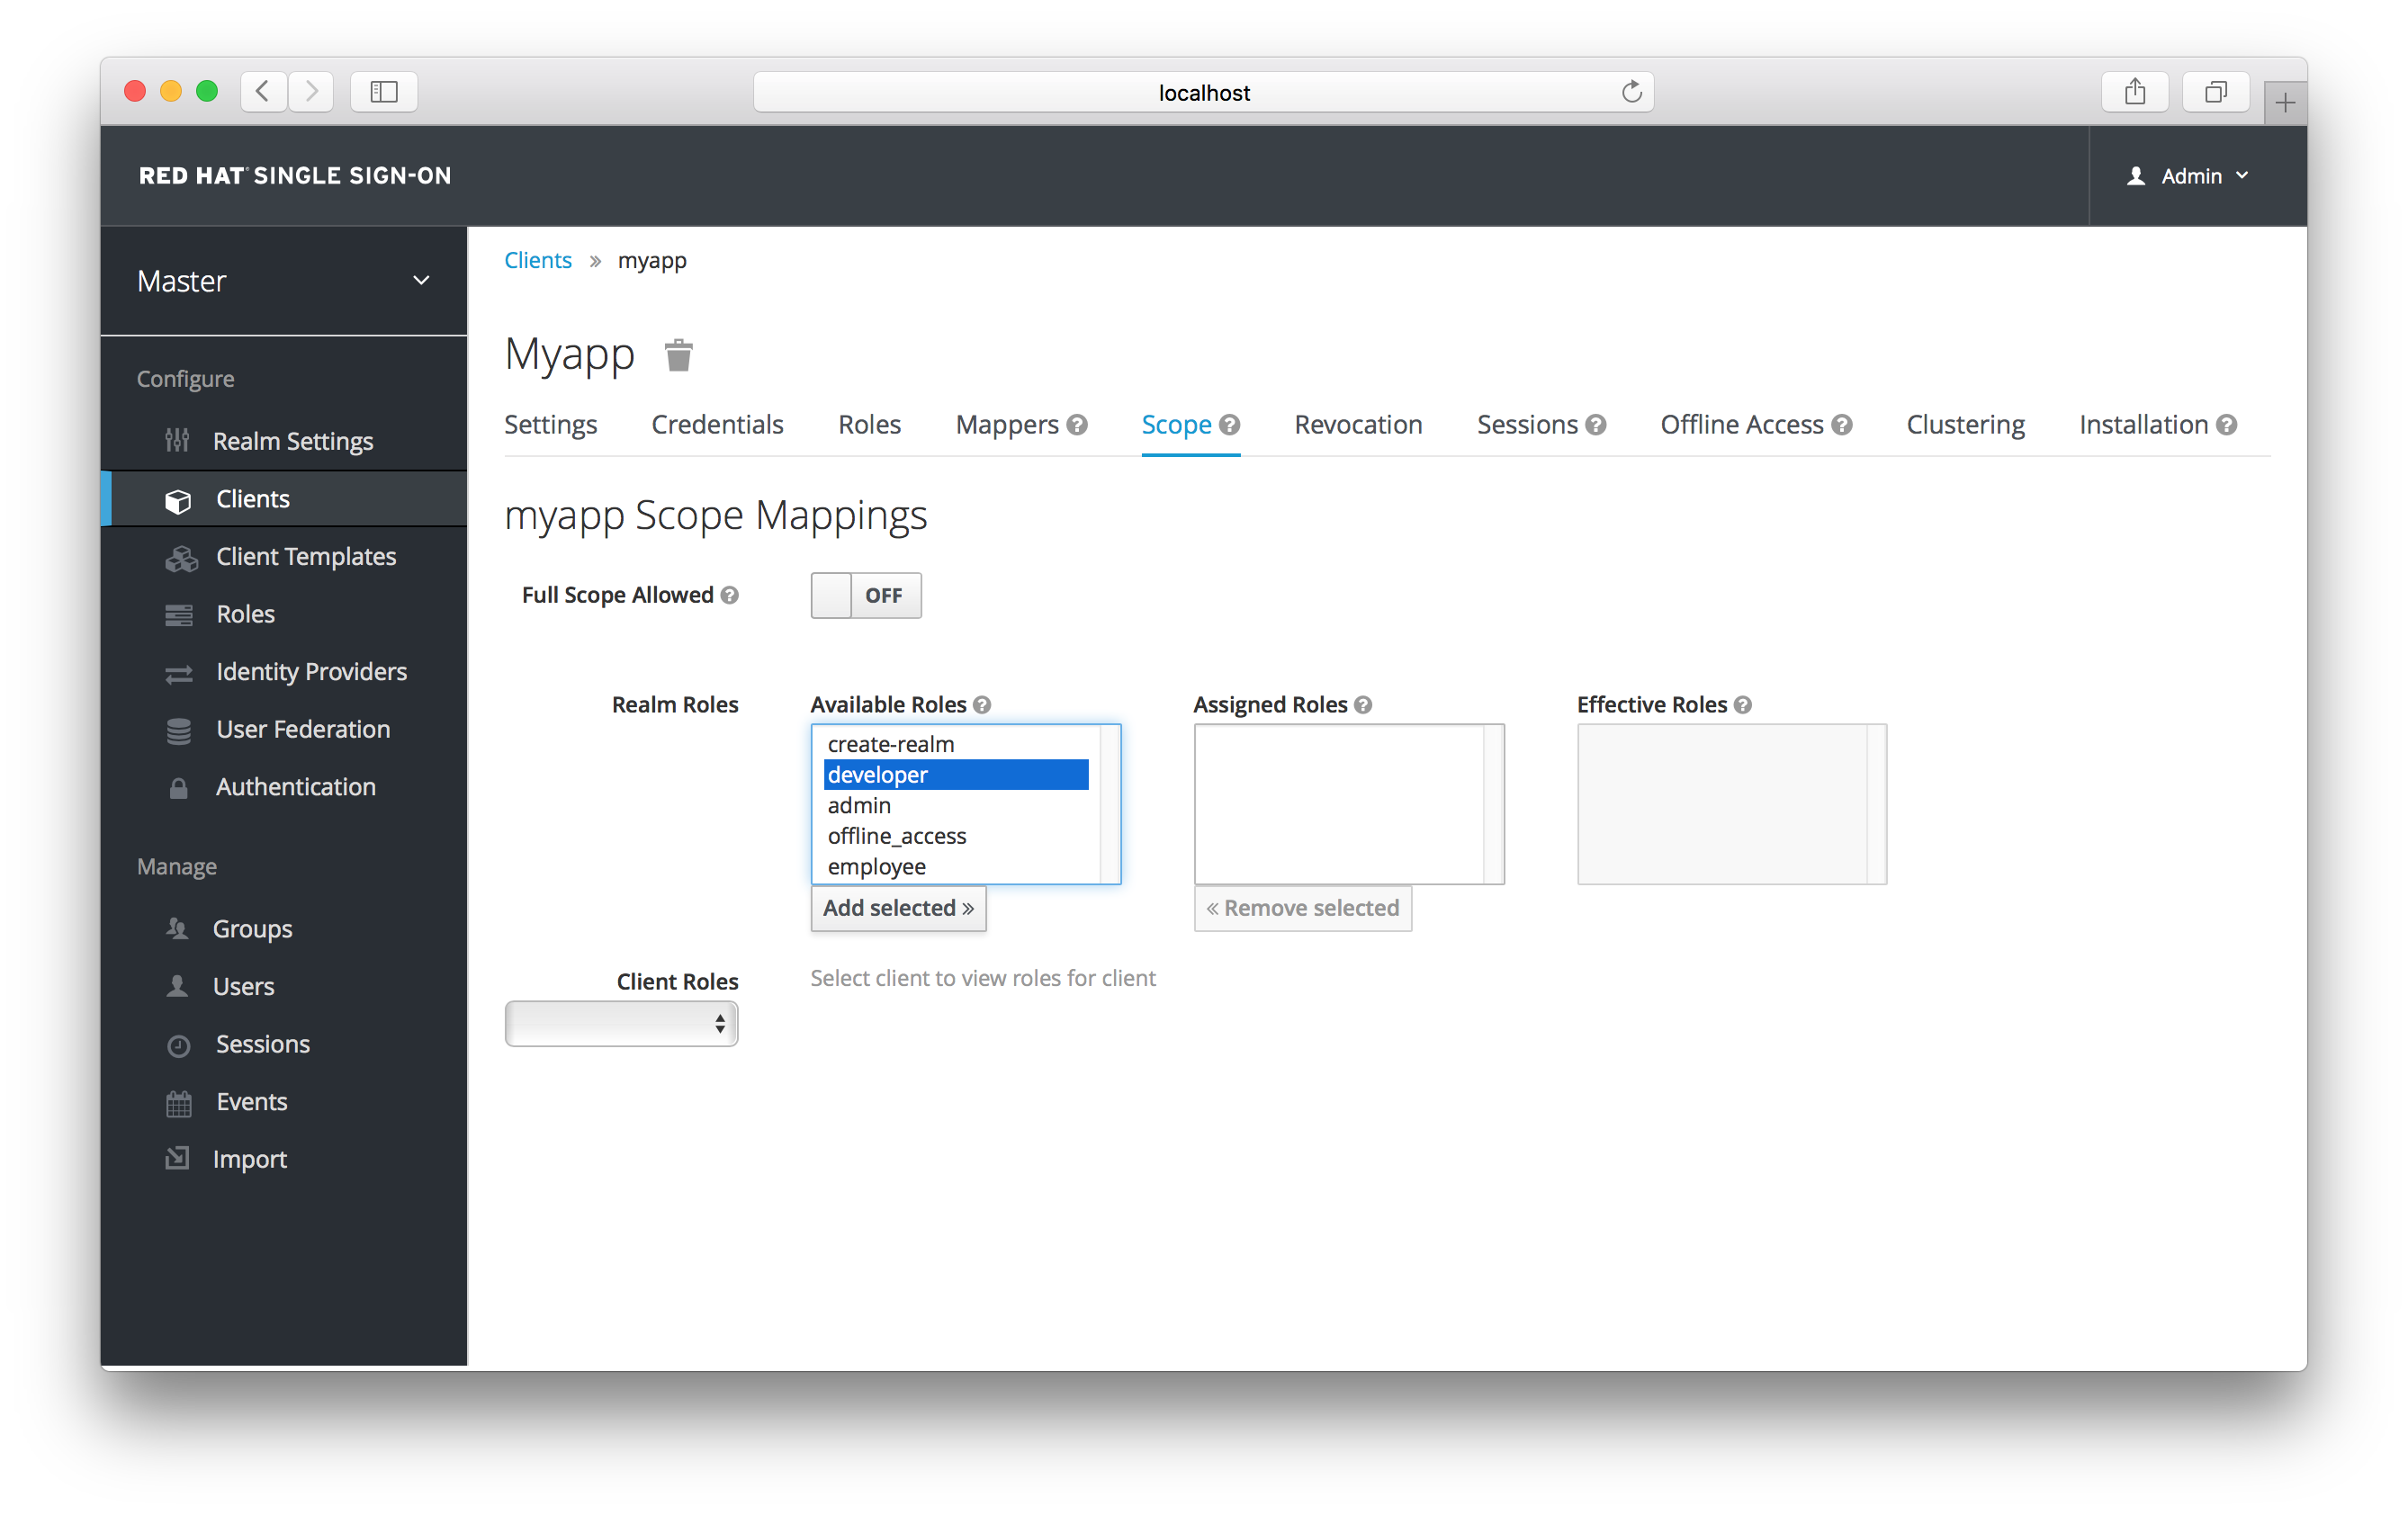
Chapter 10. Groups
Groups in Red Hat Single Sign-On allow you to manage a common set of attributes and role mappings for a set of users. Users can be members of zero or more groups. Users inherit the attributes and role mappings assigned to each group. To manage groups go to the Groups left menu item.
Groups

Groups are hierarchical. A group can have many subgroups, but a group can only have one parent. Subgroups inherit the attributes and role mappings from the parent. This applies to the user as well. So, if you have a parent group and a child group and a user that only belongs to the child group, the user inherits the attributes and role mappings of both the parent and child. In this example, we have a top level Sales group and a child North America subgroup. To add a group, click on the parent you want to add a new child to and click New button. Select the Groups icon in the tree to make a top-level group. Entering in a group name in the Create Group screen and hitting Save will bring you to the individual group management page.
Group

The Attributes and Role Mappings tab work exactly as the tabs with similar names under a user. Any attributes and role mappings you define will be inherited by the groups and users that are members of this group.
To add a user to a group you need to go all the way back to the user detail page and click on the Groups tab there.
User Groups
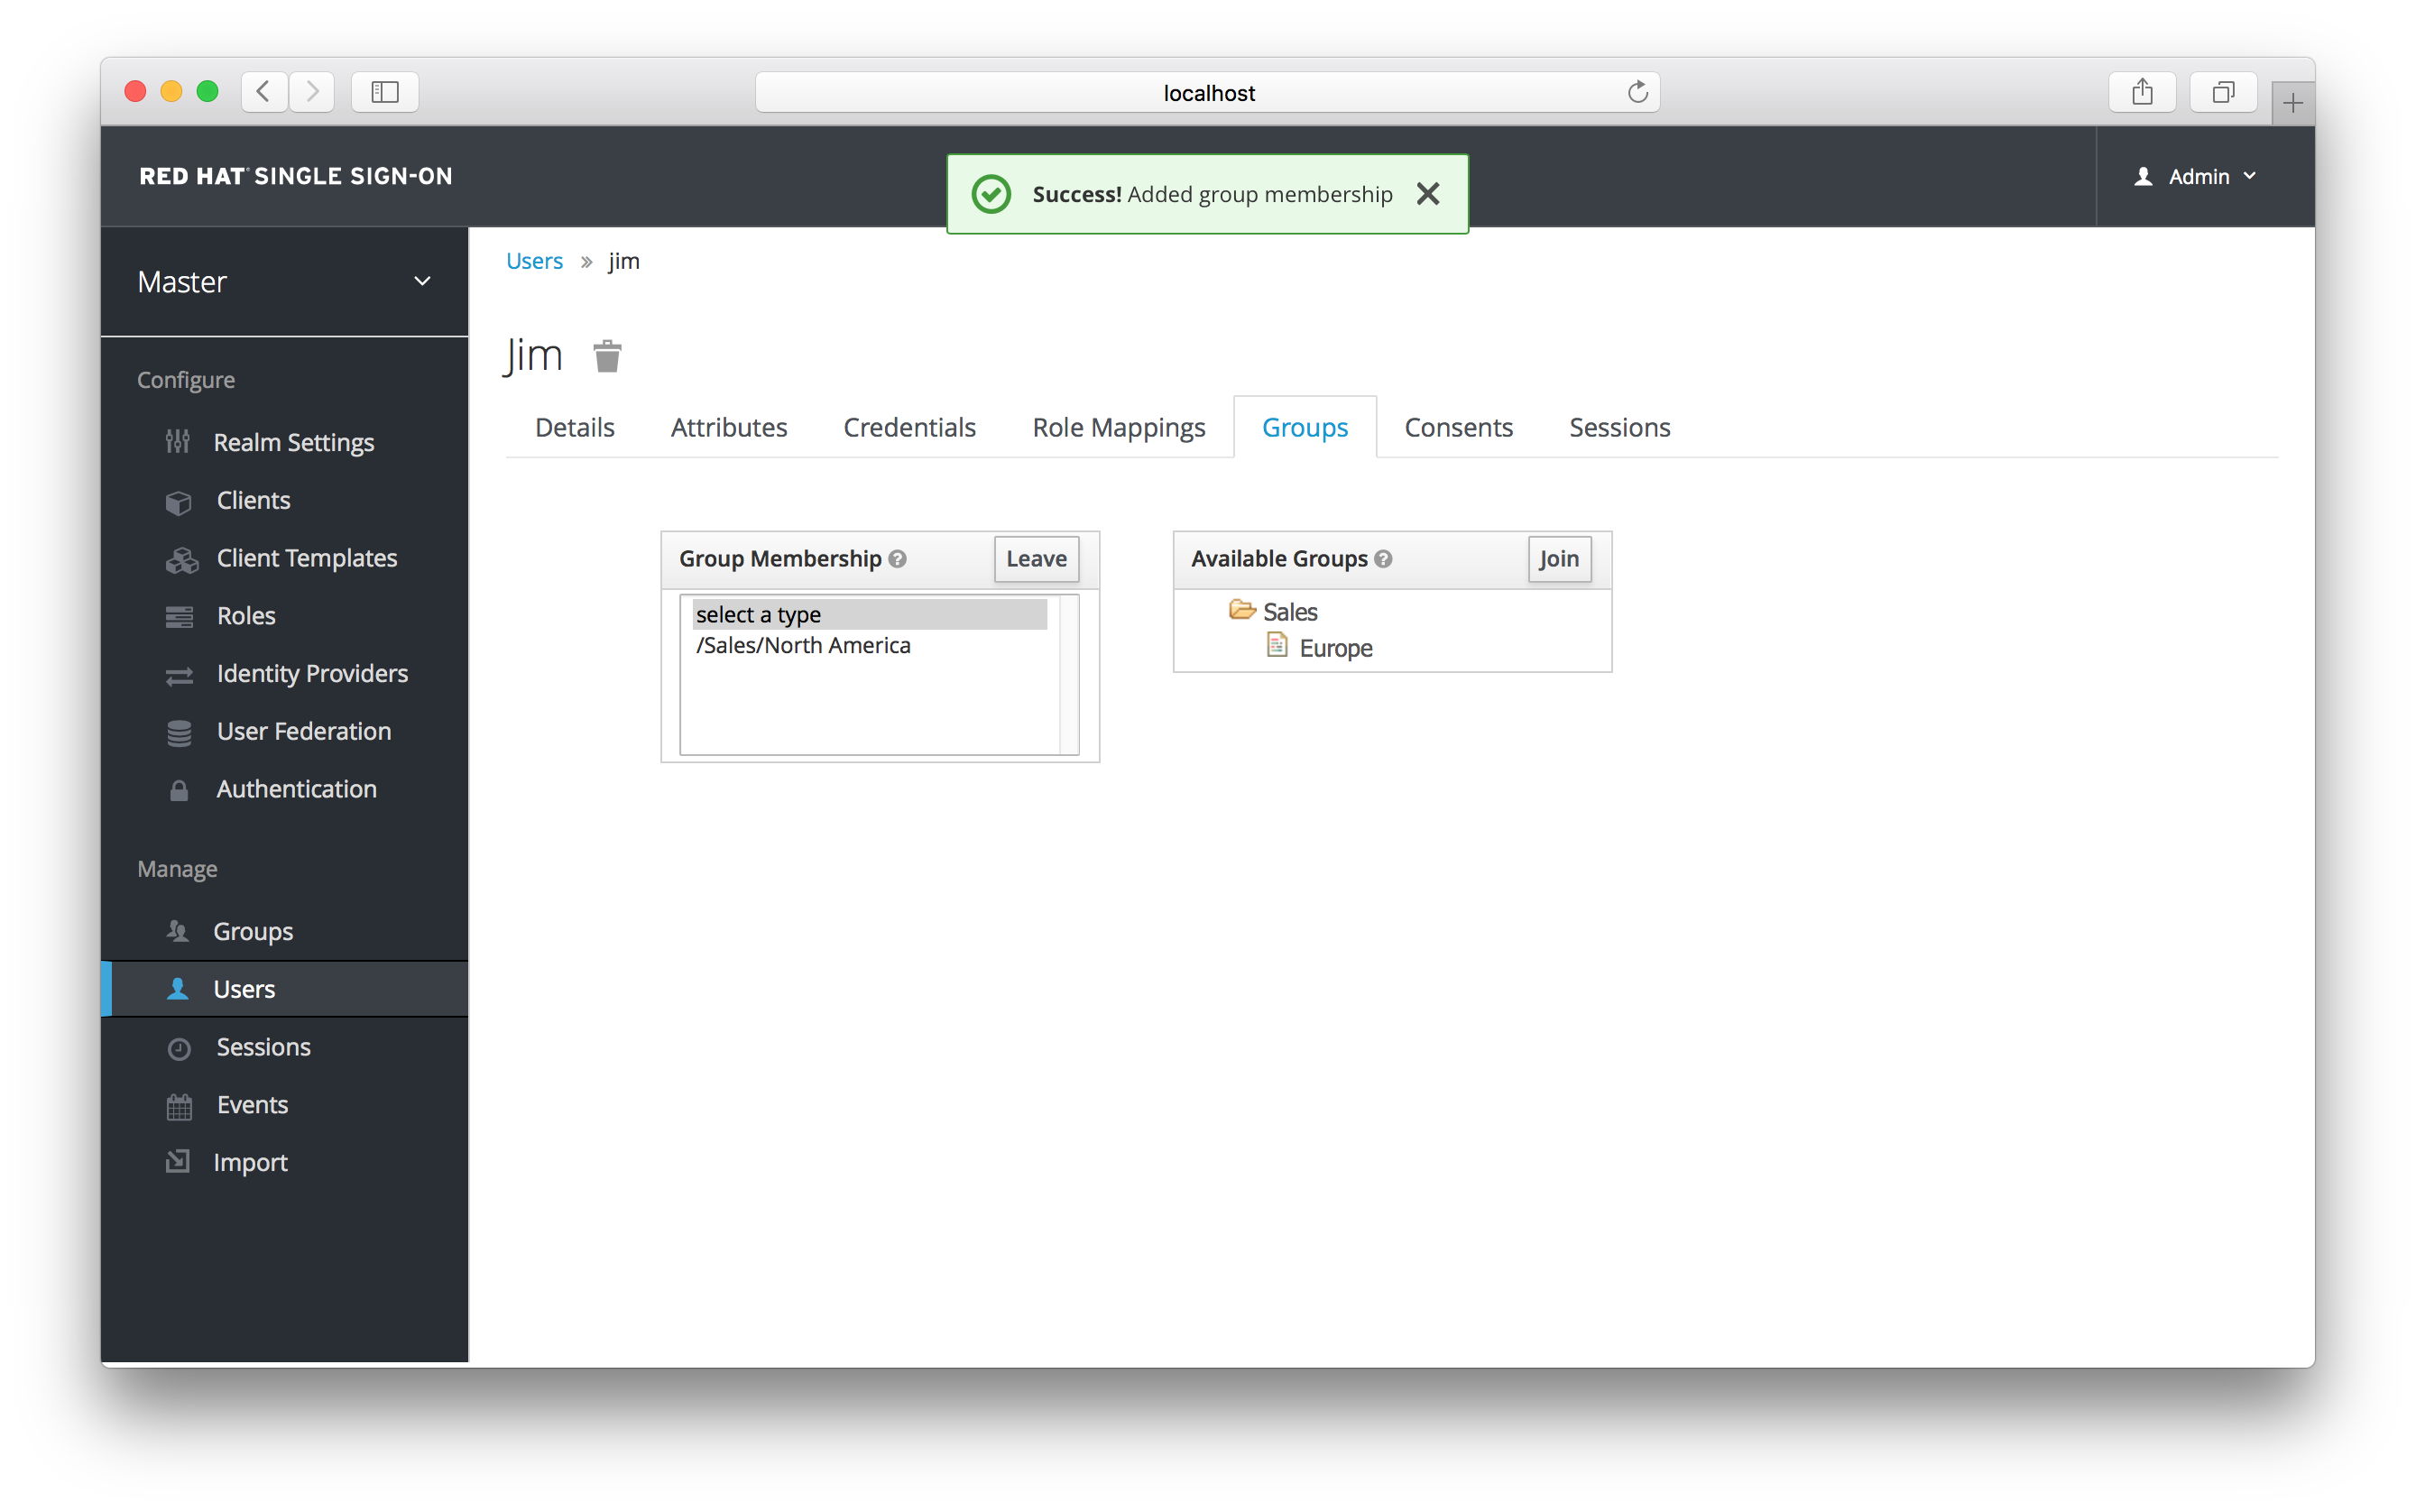
Select a group from the Available Groups tree and hit the join button to add the user to a group. Vice versa to remove a group. Here we’ve added the user Jim to the North America sales group. If you go back to the detail page for that group and select the Membership tab, Jim is now displayed there.
Group Membership

10.1. Groups vs. Roles
In the IT world the concepts of Group and Role are often blurred and interchangeable. In Red Hat Single Sign-On, Groups are just a collection of users that you can apply roles and attributes to in one place. Roles define a type of user and applications assign permission and access control to roles
Aren’t Composite Roles also similar to Groups? Logically they provide the same exact functionality, but the difference is conceptual. Composite roles should be used to apply the permission model to your set of services and applications. Groups should focus on collections of users and their roles in your organization. Use groups to manage users. Use composite roles to manage applications and services.
10.2. Default Groups
Default groups allow you to automatically assign group membership whenever any new user is created or imported through Identity Brokering. To specify default groups go to the Groups left menu item, and click the Default Groups tab.
Default Groups

Chapter 11. Admin Console Access Control and Permissions
Each realm created on the Red Hat Single Sign-On has a dedicated Admin Console from which that realm can be managed. The master realm is a special realm that allows admins to manage more than one realm on the system. You can also define fine-grained access to users in different realms to manage the server. This chapter goes over all the scenarios for this.
11.1. Master Realm Access Control
The master realm in Red Hat Single Sign-On is a special realm and treated differently than other realms. Users in the Red Hat Single Sign-On master realm can be granted permission to manage zero or more realms that are deployed on the Red Hat Single Sign-On server. When a realm is created, Red Hat Single Sign-On automatically creates various roles that grant fine-grain permissions to access that new realm. Access to The Admin Console and Admin REST endpoints can be controlled by mapping these roles to users in the master realm. It’s possible to create multiple super users, as well as users that can only manage specific realms.
11.1.1. Global Roles
There are two realm-level roles in the master realm. These are:
- admin
- create-realm
Users with the admin role are super users and have full access to manage any realm on the server. Users with the create-realm role are allowed to create new realms. They will be granted full access to any new realm they create.
11.1.2. Realm Specific Roles
Admin users within the master realm can be granted management privileges to one or more other realms in the system. Each realm in Red Hat Single Sign-On is represented by a client in the master realm. The name of the client is <realm name>-realm. These clients each have client-level roles defined which define varying level of access to manage an individual realm.
The roles available are:
- view-realm
- view-users
- view-clients
- view-events
- manage-realm
- manage-users
- create-client
- manage-clients
- manage-events
- view-identity-providers
- manage-identity-providers
- impersonation
Assign the roles you want to your users and they will only be able to use that specific part of the administration console.
11.2. Dedicated Realm Admin Consoles
Each realm has a dedicated Admin Console that can be accessed by going to the url /auth/admin/{realm-name}/console. Users within that realm can be granted realm management permissions by assigning specific user role mappings.
Each realm has a built-in client called realm-management. You can view this client by going to the Clients left menu item of your realm. This client defines client-level roles that specify permissions that can be granted to manage the realm.
- view-realm
- view-users
- view-clients
- view-events
- manage-realm
- manage-users
- create-client
- manage-clients
- manage-events
- view-identity-providers
- manage-identity-providers
- impersonation
Assign the roles you want to your users and they will only be able to use that specific part of the administration console.
Chapter 12. Identity Brokering
An Identity Broker is an intermediary service that connects multiple service providers with different identity providers. As an intermediary service, the identity broker is responsible for creating a trust relationship with an external identity provider in order to use its identities to access internal services exposed by service providers.
From a user perspective, an identity broker provides a user-centric and centralized way to manage identities across different security domains or realms. An existing account can be linked with one or more identities from different identity providers or even created based on the identity information obtained from them.
An identity provider is usually based on a specific protocol that is used to authenticate and communicate authentication and authorization information to their users. It can be a social provider such as Facebook, Google or Twitter. It can be a business partner whose users need to access your services. Or it an be a cloud-based identity service that you want to integrate with.
Usually, identity providers are based on the following protocols:
-
SAML v2.0 -
OpenID Connect v1.0 -
OAuth v2.0
In the next sections we’ll see how to configure and use Red Hat Single Sign-On as an identity broker, covering some important aspects such as:
-
Social Authentication -
OpenID Connect v1.0 Brokering -
SAML v2.0 Brokering -
Identity Federation
12.1. Brokering Overview
When using Red Hat Single Sign-On as an identity broker, users are not forced to provide their credentials in order to authenticate in a specific realm. Instead, they are presented with a list of identity providers from which they can authenticate.
You can also configure a default broker. In this case the user will not be given a choice, but instead be redirected directly to the parent broker. The following diagram demonstrates the steps involved when using Red Hat Single Sign-On to broker an external identity provider:
Identity Broker Flow
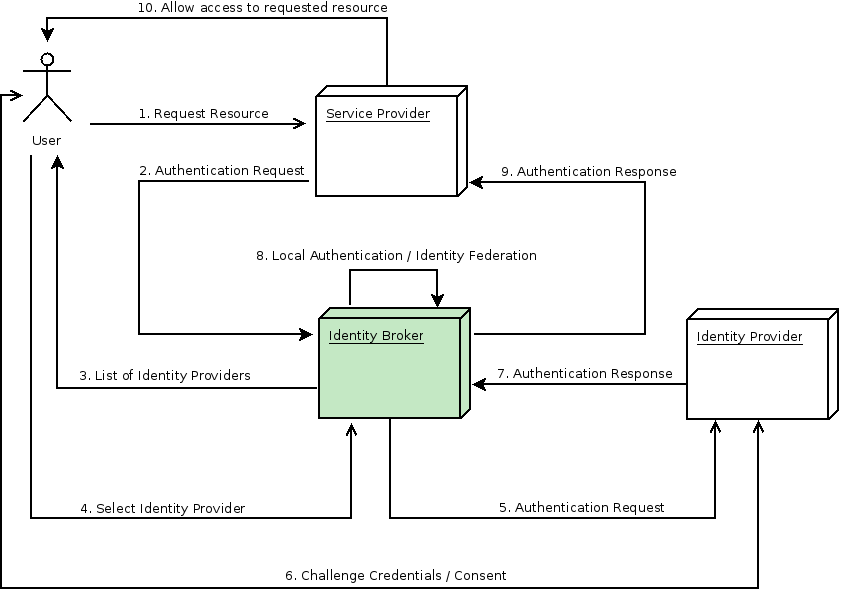
- User is not authenticated and requests a protected resource in a client application.
- The client applications redirects the user to Red Hat Single Sign-On to authenticate.
- At this point the user is presented with the login page where there is a list of identity providers supported by a realm.
- User selects one of the identity providers by clicking on its respective button or link.
- Red Hat Single Sign-On issues an authentication request to the target identity provider asking for authentication and the user is redirected to the login page of the identity provider. The connection properties and other configuration options for the identity provider were previously set by the administrator in the Admin Console.
- User provides his credentials or consent in order to authenticate in the identity provider.
- Upon a successful authentication by the identity provider, the user is redirected back to Red Hat Single Sign-On with an authentication response. Usually this response contains a security token that will be used by Red Hat Single Sign-On to trust the authentication performed by the identity provider and retrieve information about the user.
- Now Red Hat Single Sign-On is going to check if the response from the identity provider is valid. If valid, it will import and create a new user or just skip that if the user already exists. If it is a new user, Red Hat Single Sign-On may ask the identity provider for information about the user if that info doesn’t already exist in the token. This is what we call identity federation. If the user already exists Red Hat Single Sign-On may ask him to link the identity returned from the identity provider with his existing account. We call this process account linking. What exactly is done is configurable and can be specified by setup of First Login Flow . At the end of this step, Red Hat Single Sign-On authenticates the user and issues its own token in order to access the requested resource in the service provider.
- Once the user is locally authenticated, Red Hat Single Sign-On redirects the user to the service provider by sending the token previously issued during the local authentication.
- The service provider receives the token from Red Hat Single Sign-On and allows access to the protected resource.
There are some variations of this flow that we will talk about later. For instance, instead of presenting a list of identity providers, the client application can request a specific one. Or you can tell Red Hat Single Sign-On to force the user to provide additional information before federating his identity.
Different protocols may require different authentication flows. At this moment, all the identity providers supported by Red Hat Single Sign-On use a flow just like described above. However, despite the protocol in use, user experience should be pretty much the same.
As you may notice, at the end of the authentication process Red Hat Single Sign-On will always issue its own token to client applications. What this means is that client applications are completely decoupled from external identity providers. They don’t need to know which protocol (eg.: SAML, OpenID Connect, OAuth, etc) was used or how the user’s identity was validated. They only need to know about Red Hat Single Sign-On.
12.2. General Configuration
The identity broker configuration is all based on identity providers. Identity providers are created for each realm and by default they are enabled for every single application. That means that users from a realm can use any of the registered identity providers when signing in to an application.
In order to create an identity provider click the Identity Providers left menu item.
Identity Providers

In the right hand drop down list box, choose the identity provider you want to add. This will bring you to the configuration page for that identity provider type.
Add Identity Provider

Above is an example of configuring a Google social login provider. Once you configure an IDP, it will appear on the Red Hat Single Sign-On login page as an option.
IDP login page
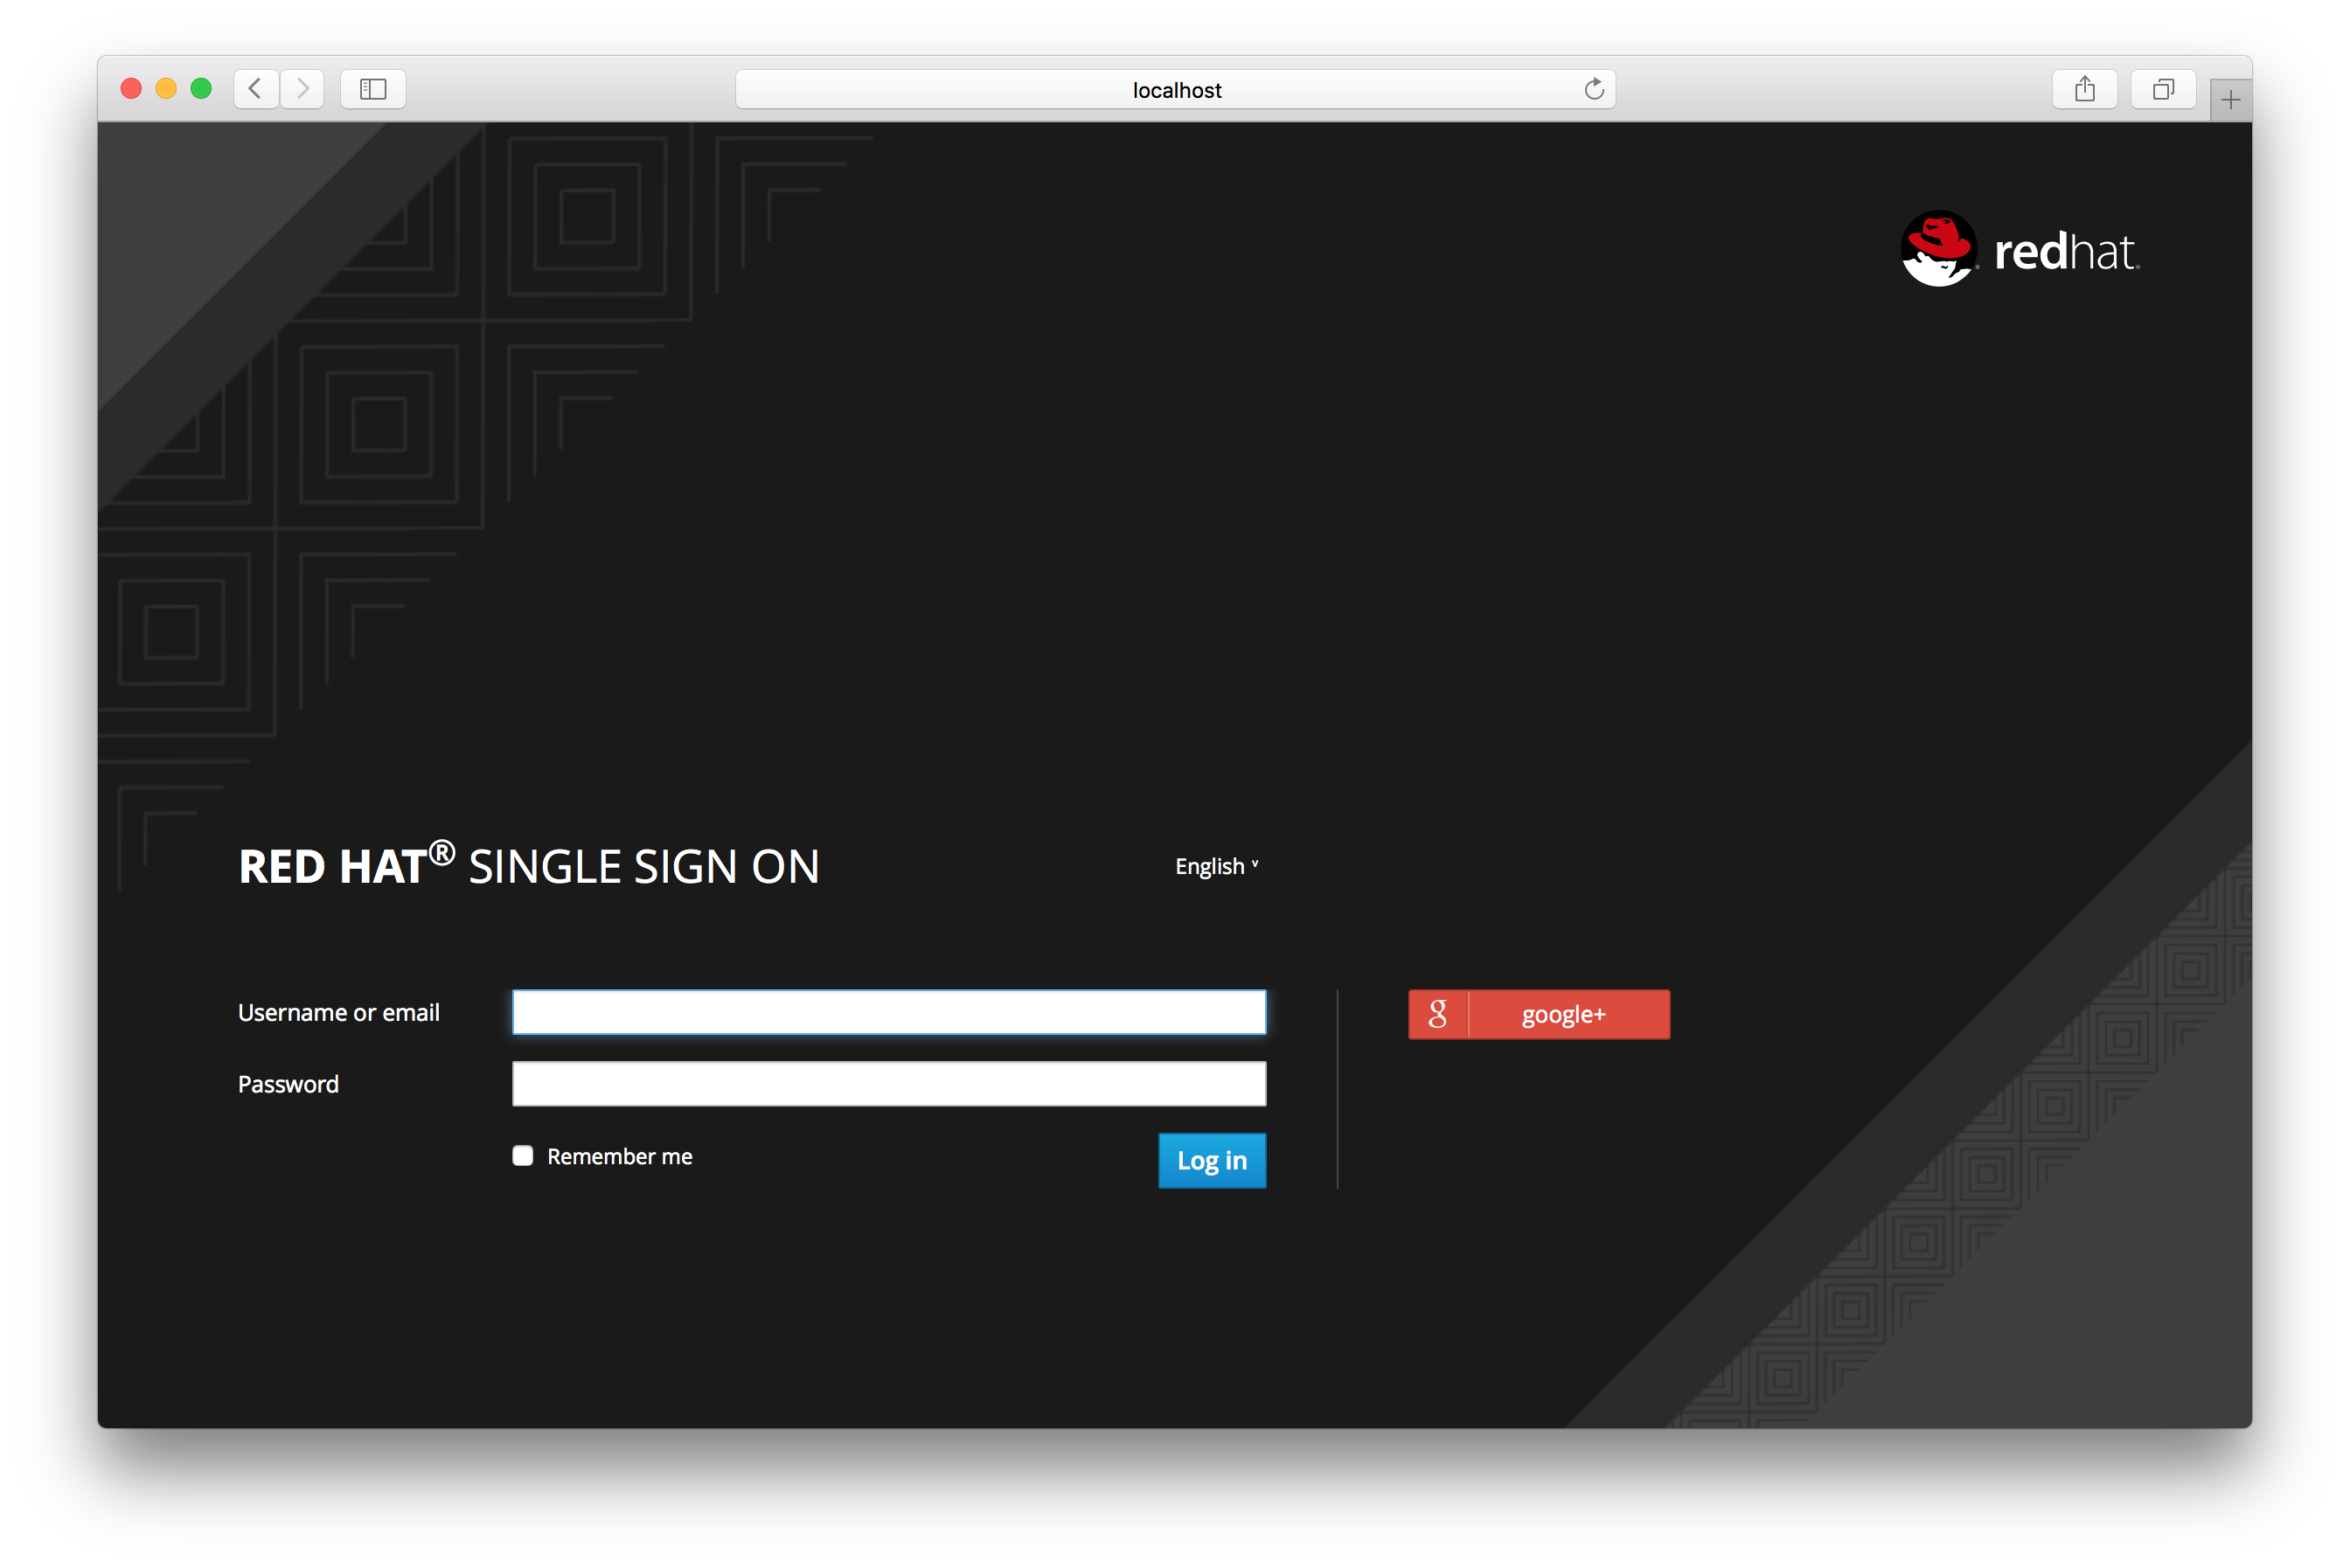
- Social
- Social providers allow you to enable social authentication in your realm. Red Hat Single Sign-On makes it easy to let users log in to your application using an existing account with a social network. Currently Facebook, Google, Twitter, GitHub, LinkedIn, Microsoft, and StackOverflow are supported with more planned for the future.
- Protocol-based
- Protocol-based providers are those that rely on a specific protocol in order to authenticate and authorize users. They allow you to connect to any identity provider compliant with a specific protocol. Red Hat Single Sign-On provides support for SAML v2.0 and OpenID Connect v1.0 protocols. It makes it easy to configure and broker any identity provider based on these open standards.
Although each type of identity provider has its own configuration options, all of them share some very common configuration. Regardless the identity provider you are creating, you’ll see the following configuration options avaivable:
Table 12.1. Common Configuration
| Configuration | Description |
|---|---|
| Alias | The alias is an unique identifier for an identity provider. It is used to reference an identity provider internally. Some protocols such as OpenID Connect require a redirect URI or callback url in order to communicate with an identity provider. In this case, the alias is used to build the redirect URI. Every single identity provider must have an alias. Examples are facebook, google, idp.acme.com, etc. |
| Enabled | Turn the provider on/off |
| Store Tokens | Whether or not to store the token received from the identity provider. |
| Stored Tokens Readable | Whether or not users are allowed to retrieve the stored identity provider token. This also applies to the broker client-level role read token |
| Trust email | If the identity provider supplies an email address this email address will be trusted. If the realm required email validation, users that log in from this IDP will not have to go through the email verification process. |
| Authenticate By Default | If checked, the Red Hat Single Sign-On login screen will be completely bypassed and the browser will be redirected directly to the IDP. |
| GUI order | The order number that sorts how the available IDPs are listed on the Red Hat Single Sign-On login page. |
| First Login Flow | This is the authentication flow that will be triggered for users that log into Red Hat Single Sign-On through this IDP for the first time ever. |
| Post Login Flow | Authentication flow that is triggered after the user finishes logging in with the external identity provider. |
12.4. OpenID Connect v1.0 Identity Providers
Red Hat Single Sign-On can broker identity providers based on the OpenID Connect protocol. These IDPs must support the Authorization Code Flow as defined by the specification in order to authenticate the user and authorize access.
To begin configuring an OIDC provider, go to the Identity Providers left menu item and select OpenID Connect v1.0 from the Add provider drop down list. This will bring you to the Add identity provider page.
Add Identity Provider
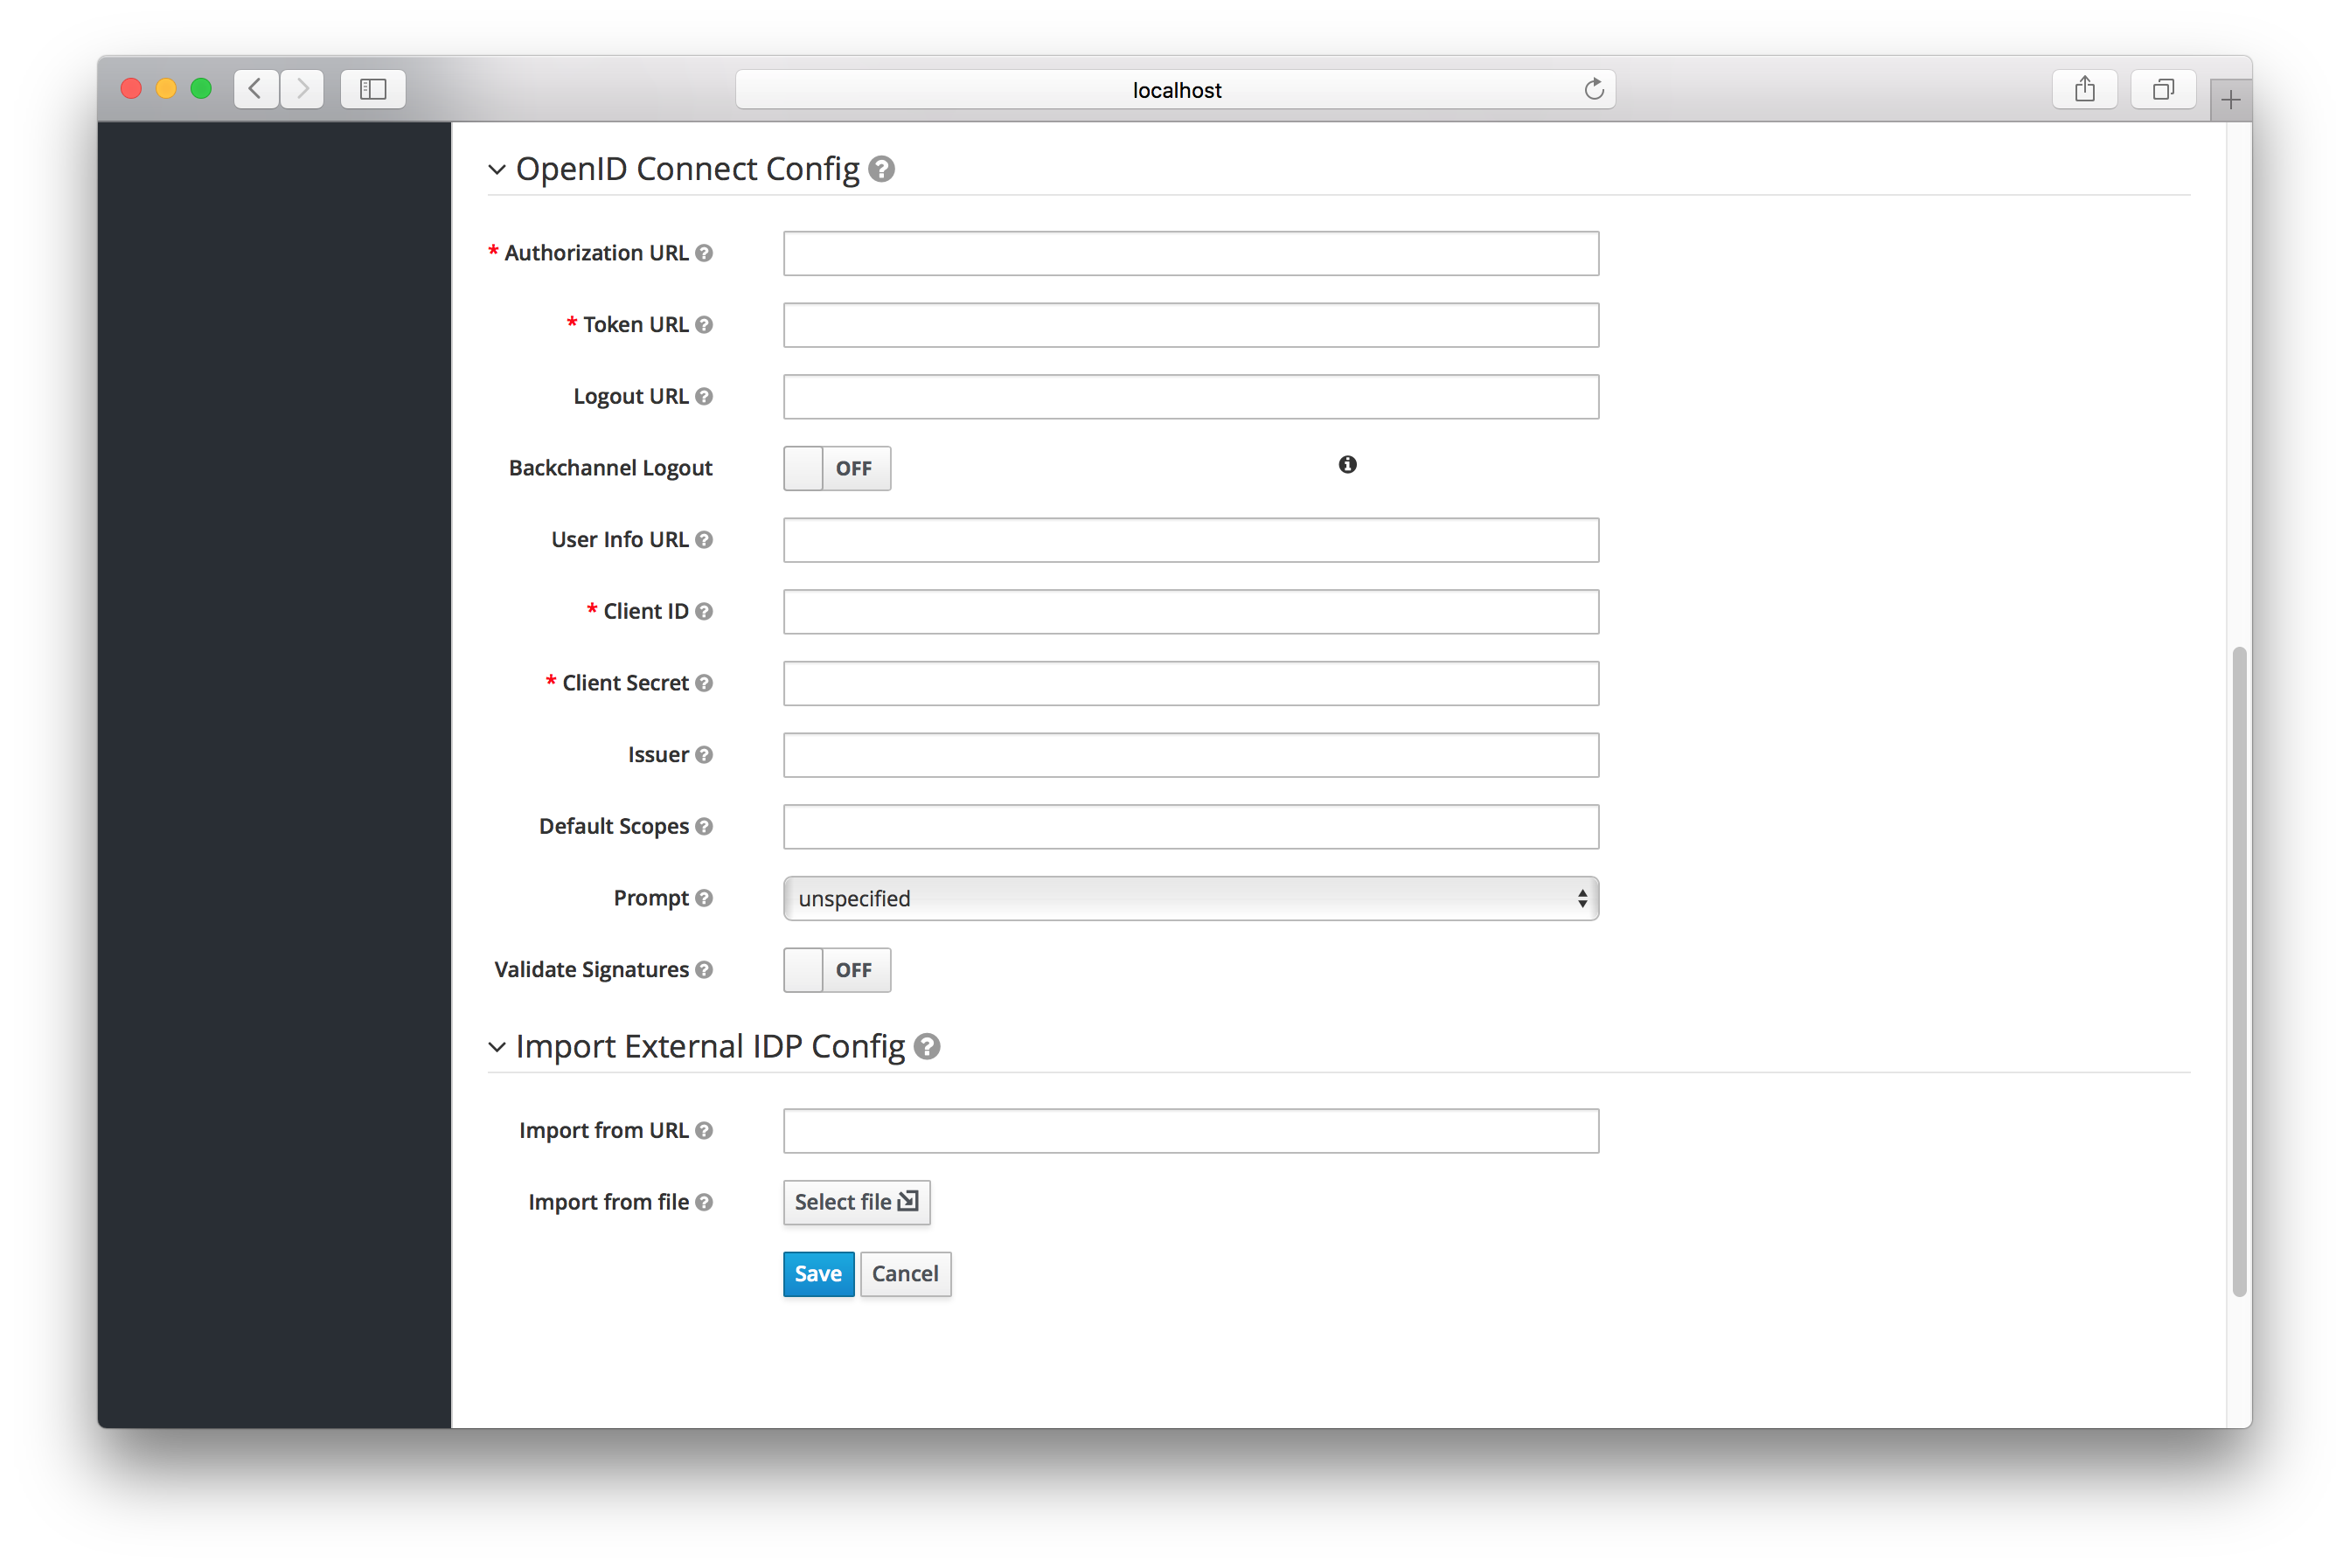
The initial configuration options on this page are described in General IDP Configuration. You must define the OpenID Connection configuration options as well. They basically describe the OIDC IDP you are communicating with.
Table 12.2. OpenID Connect Config
| Configuration | Description |
|---|---|
| Authorization URL | Authorization URL endpoint required by the OIDC protocol |
| Token URL | Token URL endpoint required by the OIDC protocol |
| Logout URL | Logout URL endpoint defined in the OIDC protocol. This value is optional. |
| Backchannel Logout | Backchannel logout is a background, out-of-band, REST invocation to the IDP to logout the user. Some IDPs can only perform logout through browser redirects as they may only be able to identity sessions via a browser cookie. |
| User Info URL | User Info URL endpoint defined by the OIDC protocol. This is an endpoint from which user profile information can be downloaded. |
| Client ID | This realm will act as an OIDC client to the external federation IDP you are configuring here. Your realm will need a OIDC client ID when using the Authorization Code Flow to interact with the external IDP |
| Client Secret | This realm will need a client secret to use when using the Authorization Code Flow. |
| Issuer | Responses from the IDP may contain an issuer claim. This config value is optional. If specified, this claim will be validated against the value you provide. |
| Default Scopes |
Space-separated list of OIDC scopes to send with the authentication request. The default is |
| Prompt | Another optional switch. This is the prompt parameter defined by the OIDC specification. Through it you can force re-authentication and other options. See the specification for more details |
You can also import all this configuration data by providing a URL or file that points to OpenID Provider Metadata (see OIDC Discovery specification). If you are connecting to a Red Hat Single Sign-On external IDP, you can import the IDP setttings from the url <root>/auth/realms/{realm-name}/.well-known/openid-configuration. This link is a JSON document describing metadata about the IDP.
12.5. SAML v2.0 Identity Providers
Red Hat Single Sign-On can broker identity providers based on the SAML v2.0 protocol.
To begin configuring an OIDC provider, go to the Identity Providers left menu item and select SAML v2.0 from the Add provider drop down list. This will bring you to the Add identity provider page.
Add Identity Provider
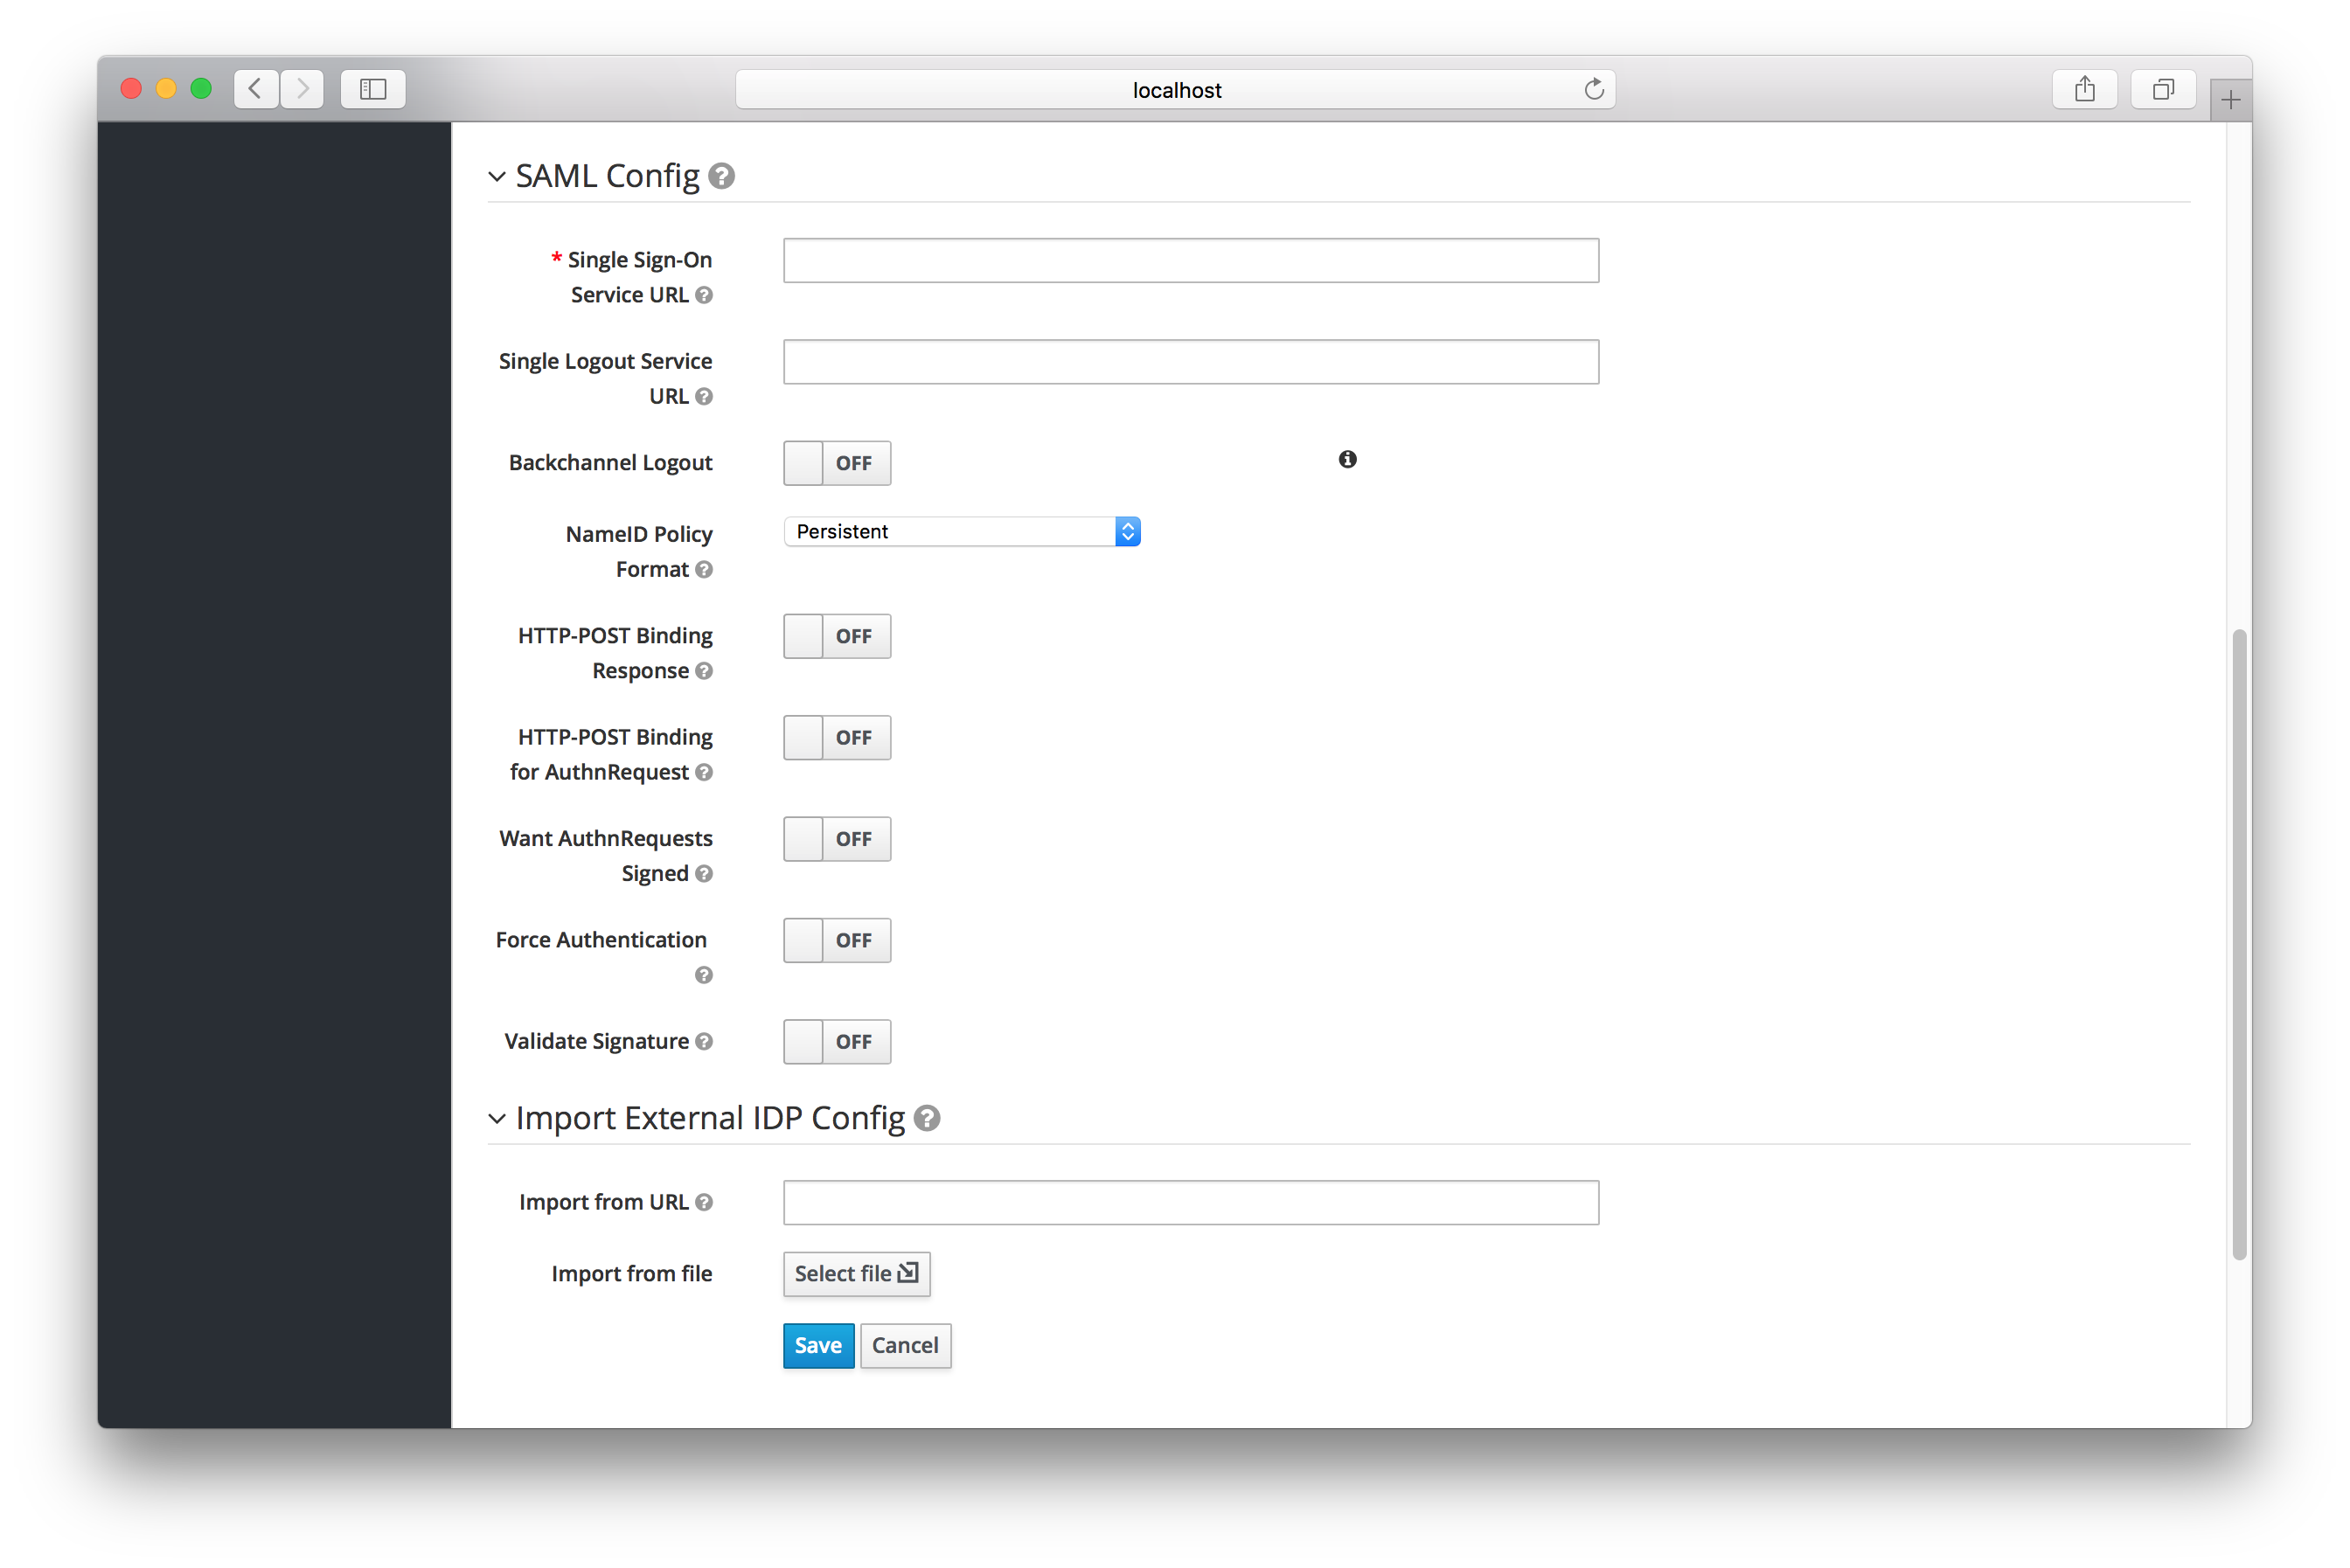
The initial configuration options on this page are described in General IDP Configuration. You must define the SAML configuration options as well. They basically describe the SAML IDP you are communicating with.
Table 12.3. SAML Config
| Configuration | Description |
|---|---|
| Single Sign-On Service URL | This is a required field and specifies the SAML endpoint to start the authentication process. If your SAML IDP publishes an IDP entity descriptor, the value of this field will be specified there. |
| Single Logout Service URL | This is an optional field that specifies the SAML logout endpoint. If your SAML IDP publishes an IDP entity descriptor, the value of this field will be specified there. |
| Backchannel Logout | Enable if your SAML IDP supports backchannel logout |
| NameID Policy Format | Specifies the URI reference corresponding to a name identifier format. Defaults to urn:oasis:names:tc:SAML:2.0:nameid-format:persistent. |
| HTTP-POST Binding Response |
When this realm responds to any SAML requests sent by the external IDP, which SAML binding should be used? If set to |
| HTTP-POST Binding for AuthnRequest |
When this realm requests authentication from the external SAML IDP, which SAML binding should be used? If set to |
| Want AuthnRequests Signed | If true, it will use the realm’s keypair to sign requests sent to the external SAML IDP |
| Signature Algorithm |
If |
| Force Authentication | Indicates that the user will be forced to enter in their credentials at the external IDP even if they are already logged in. |
| Validate Signature | Whether or not the realm should expect that SAML requests and responses from the external IDP be digitally signed. It is highly recommended you turn this on! |
| Validating X509 Certificate | The public certificate that will be used to validate the signatures of SAML requests and responses from the external IDP. |
You can also import all this configuration data by providing a URL or file that points to the SAML IDP entity descriptor of the external IDP. If you are connecting to a Red Hat Single Sign-On external IDP, you can import the IDP setttings from the url <root>/auth/realms/{realm-name}/protocol/saml/descriptor. This link is an XML document describing metadata about the IDP.
You can also import all this configuration data by providing a URL or XML file that points to the entity descriptor of the external SAML IDP you want to connect to.
12.5.1. SP Descriptor
Once you create a SAML provider, there is an EXPORT button that appears when viewing that provider. Clicking this button will export a SAML SP entity descriptor which you can use to import into the external SP provider.
This metadata is also available publicly by going to the URL
http[s]://{host:port}/auth/realms/{realm-name}/broker/{broker-alias}/endpoint/descriptor12.6. Client Suggested Identity Provider
Each identity provider has an option Authenticate By Default, which allows that Identity provider to be automatically selected during authentication. The user won’t see the Red Hat Single Sign-On login page and will instead be automatically redirected to the default identity provider.
OIDC applications can also bypass the Red Hat Single Sign-On login page by specifying a hint on which identity provider they want to use. This is done by appending the kc_idp_hint query parameter in the Authorization Code Flow authorization endpoint.
Red Hat Single Sign-On OIDC client adapters also allow you to specify this query parameter when you access a secured resource at the application.
For example
GET /myapplication.com?kc_idp_hint=facebook HTTP/1.1
Host: localhost:8080
In this case, is expected that your realm has an identity provider with an alias facebook.
If you are using keycloak.js adapter, you can also achieve the same behavior:
var keycloak = new Keycloak('keycloak.json');

keycloak.createLoginUrl({
	idpHint: 'facebook'
});
12.7. Mapping Claims and Assertions
You can import the SAML and OpenID Connect metadata provided by the external IDP you are authenticating with into the environment of the realm. This allows you to extract user profile metadata and other information so that you can make it available to your applications.
Each new user that logs into your realm via an external identity provider will have an entry for it created in the local Red Hat Single Sign-On database. The act of importing metadata from the SAML or OIDC assertions and claims will create this data with the local realm database.
If you click on an identity provider listed in the Identity Providers page for your realm, you will be brought to the IDPs Settings tab. On this page is also a Mappers tab. Click on that tab to start mapping your incoming IDP metadata.
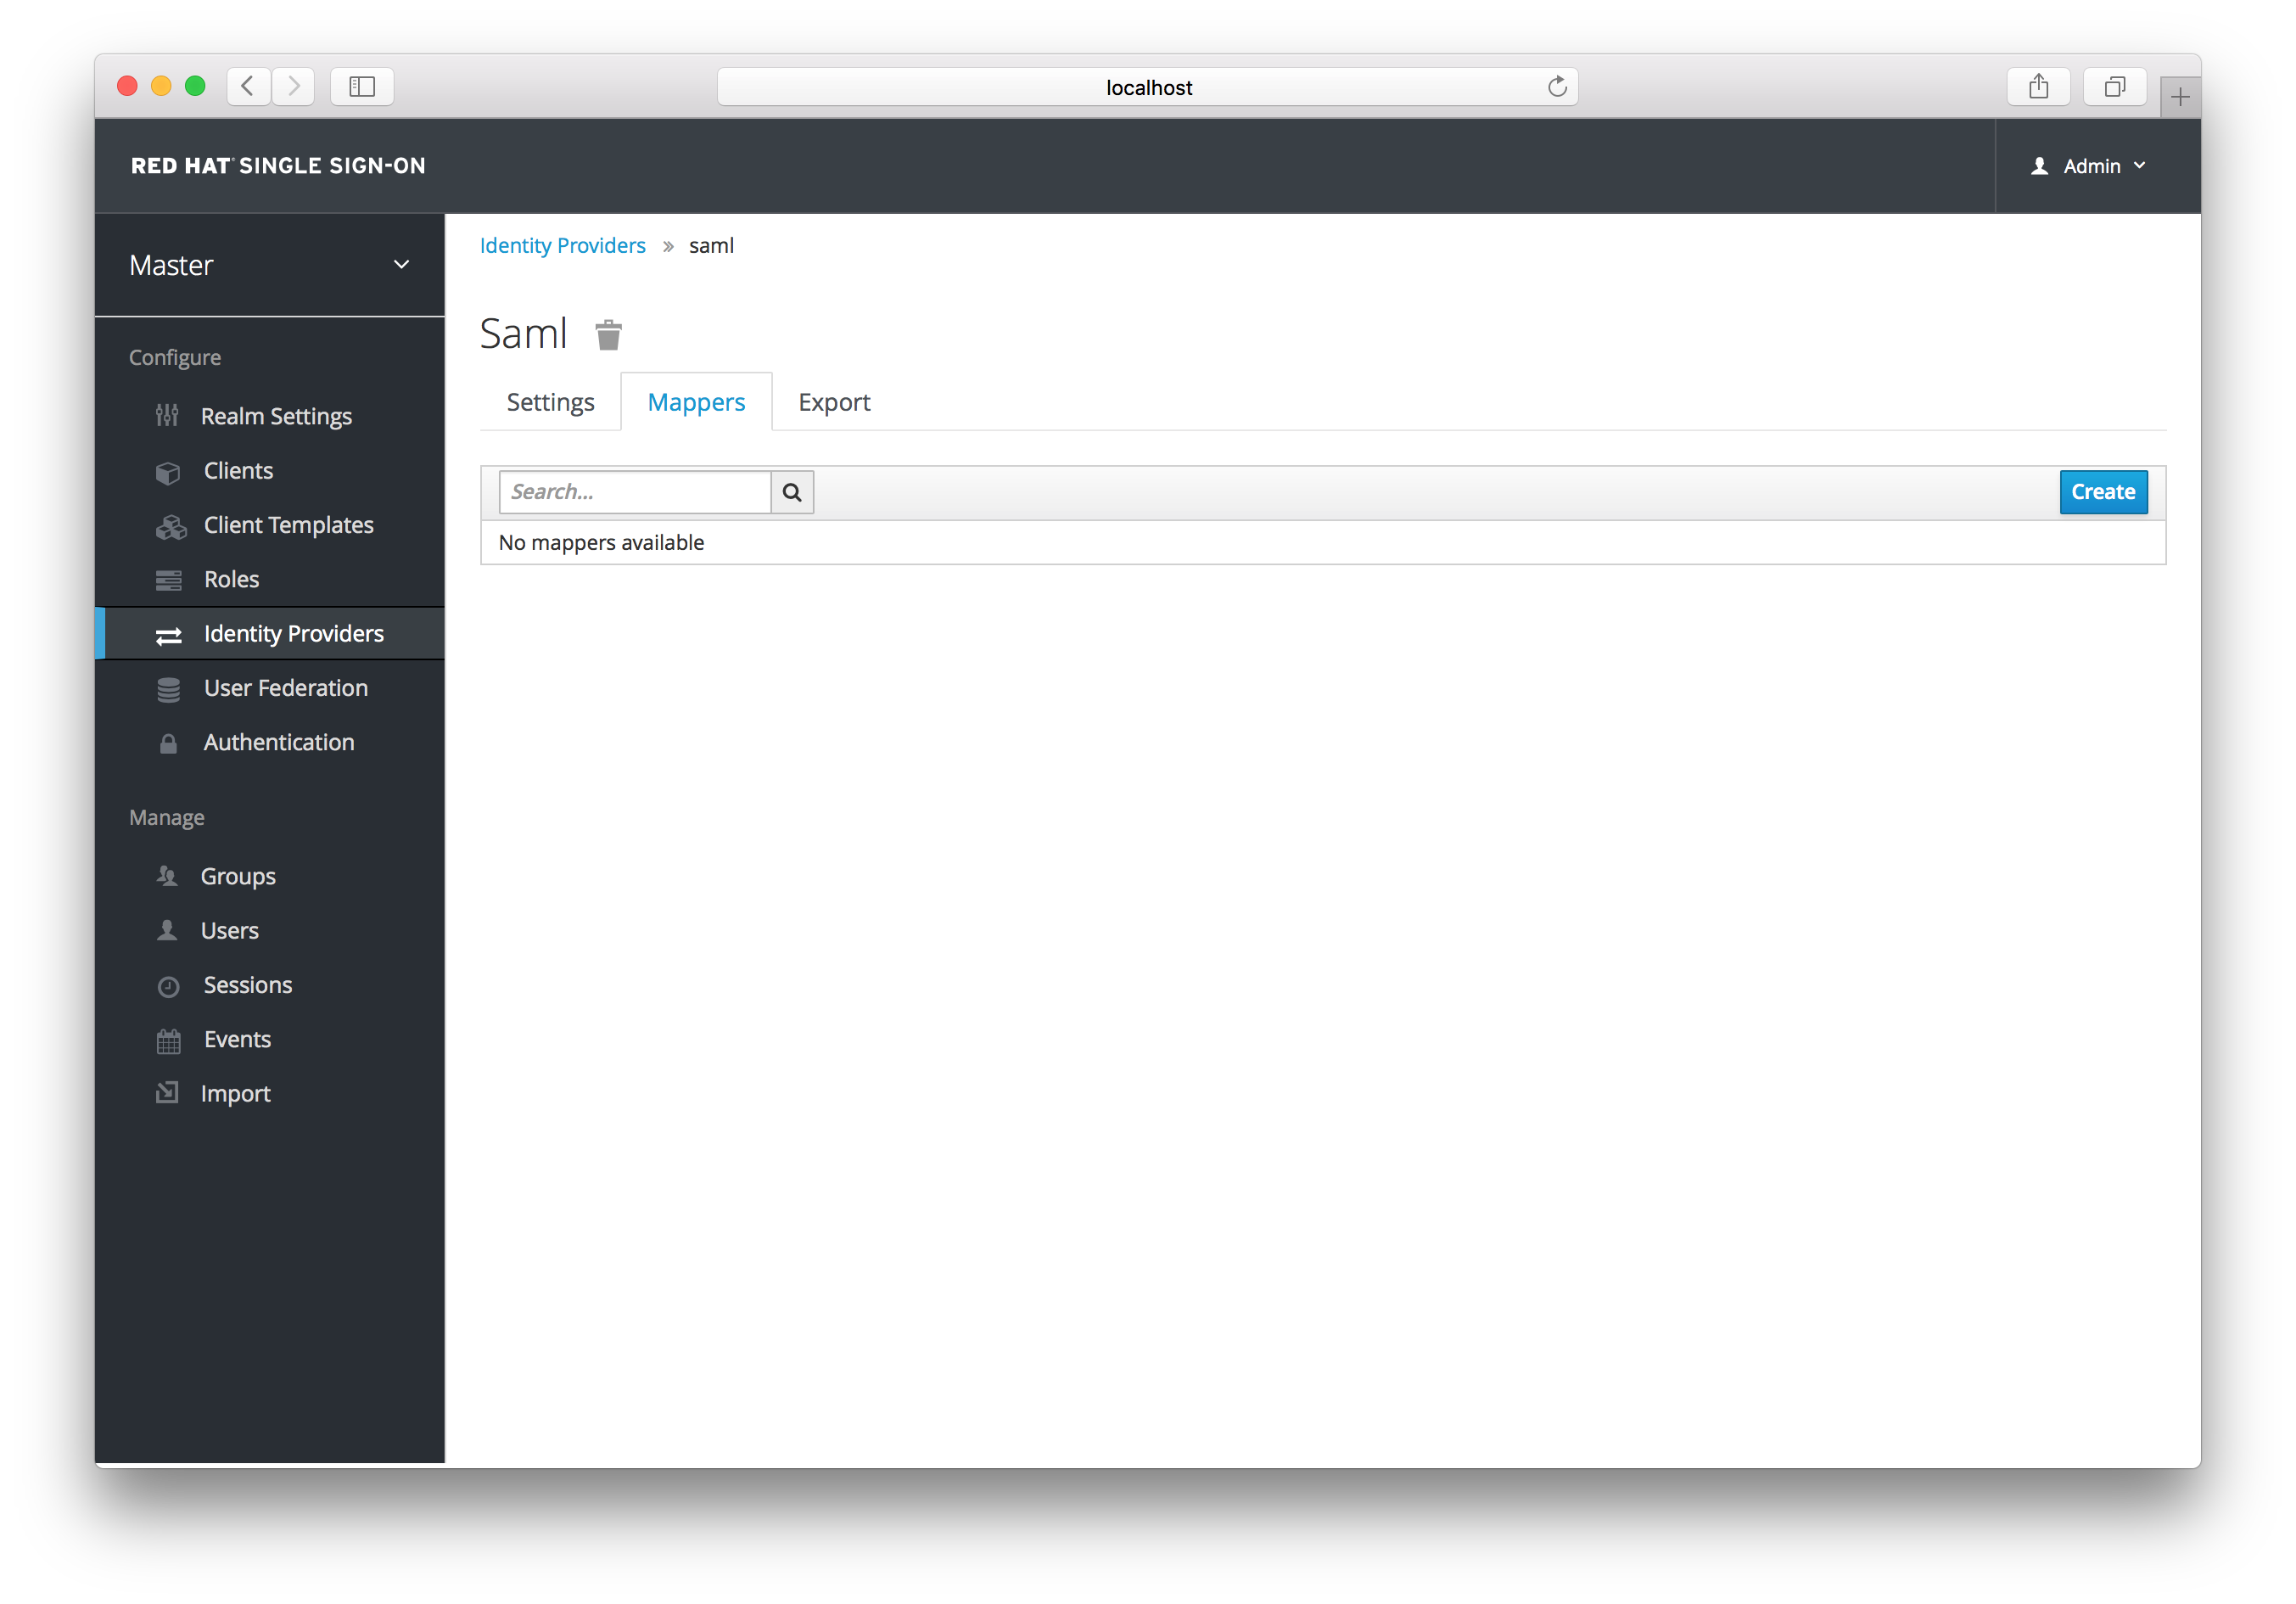
There is a Create button on this page. Clicking on this create button allows you to create a broker mapper. Broker mappers can import SAML attributes or OIDC ID/Access token claims into user attributes and user role mappings.

Select a mapper from the Mapper Type list. Hover over the tooltip to see a description of what the mapper does. The tooltips also describe what configuration information you need to enter. Click Save and your new mapper will be added.
For JSON based claims, you can use dot notation for nesting and square brackets to access array fields by index. For example 'contact.address[0].country'.
To investigate the structure of user profile JSON data provided by social providers you can enable the DEBUG level logger org.keycloak.social.user_profile_dump. This is done in the server’s app-server configuration file (domain.xml or standalone.xml).
12.8. Available User Session Data
After a user logs in from the external IDP, there’s some additional user session note data that Red Hat Single Sign-On stores that you can access. This data can be propagated to the client requesting a login via the token or SAML assertion being passed back to it by using an appropriate client mapper.
- BROKER_PROVIDER_ID
- This is the IDP alias of the broker used to perform the login.
You can use a Protocol Mapper to propagate this information to your clients.
12.9. First Login Flow
When a user logs in through identity brokering some aspects of the user are imported and linked within the realm’s local database. When Red Hat Single Sign-On successfully authenticates users through an external identity provider there can be two situations:
- There is already a Red Hat Single Sign-On user account imported and linked with the authenticated identity provider account. In this case, Red Hat Single Sign-On will just authenticate as the existing user and redirect back to application.
- There is not yet an existing Red Hat Single Sign-On user account imported and linked for this external user. Usually you just want to register and import the new account into Red Hat Single Sign-On database, but what if there is an existing Red Hat Single Sign-On account with the same email? Automatically linking the existing local account to the external identity provider is a potential security hole as you can’t always trust the information you get from the external identity provider.
Different organizations have different requirements when dealing with some of the conflicts and situations listed above. For this, there is a First Login Flow option in the IDP settings which allows you to choose a workflow that will be used after a user logs in from an external IDP the first time. By default it points to first broker login flow, but you can configure and use your own flow and use different flows for different identity providers.
The flow itself is configured in admin console under Authentication tab. When you choose First Broker Login flow, you will see what authenticators are used by default. You can re-configure the existing flow. (For example you can disable some authenticators, mark some of them as required, configure some authenticators, etc).
12.9.1. Default First Login Flow
Let’s describe the default behaviour provided by First Broker Login flow.
- Review Profile
-
This authenticator might display the profile info page, where the user can review his profile retrieved from an identity provider. The authenticator is configurable. You can set the
Update Profile On First Loginoption. WhenOn, users will be always presented with the profile page asking for additional information in order to federate their identities. Whenmissing, users will be presented with the profile page only if some mandatory information (email, first name, last name) is not provided by the identity provider. IfOff, the profile page won’t be displayed, unless user clicks in later phase onReview profile infolink (page displayed in later phase byConfirm Link Existing Accountauthenticator) - Create User If Unique
-
This authenticator checks if there is already an existing Red Hat Single Sign-On account with same email or username like the account from the identity provider. If it’s not, then the authenticator just creates a new local Red Hat Single Sign-On account and links it with the identity provider and the whole flow is finished. Otherwise it goes to the next
Handle Existing Accountsubflow. If you always want to ensure that there is no duplicated account, you can mark this authenticator asREQUIRED. In this case, the user will see the error page if there is existing Red Hat Single Sign-On account and the user will need to link his identity provider account through Account management. - Confirm Link Existing Account
-
On the info page, the user will see that there is an existing Red Hat Single Sign-On account with same email. He can review his profile again and use different email or username (flow is restarted and goes back to
Review Profileauthenticator). Or he can confirm that he wants to link the identity provider account with his existing Red Hat Single Sign-On account. Disable this authenticator if you don’t want users to see this confirmation page, but go straight to linking identity provider account by email verification or re-authentication. - Verify Existing Account By Email
-
This authenticator is
ALTERNATIVEby default, so it’s used only if the realm has SMTP setup configured. It will send mail to the user, where he can confirm that he wants to link the identity provider with his Red Hat Single Sign-On account. Disable this if you don’t want to confirm linking by email, but instead you always want users to reauthenticate with their password (and alternatively OTP). - Verify Existing Account By Re-authentication
- This authenticator is used if email authenticator is disabled or non-available (SMTP not configured for realm). It will display a login screen where the user needs to authenticate with his password to link his Red Hat Single Sign-On account with the Identity provider. User can also re-authenticate with some different identity provider, which is already linked to his Red Hat Single Sign-On account. You can also force users to use OTP. Otherwise it’s optional and used only if OTP is already set for the user account.
12.10. Retrieving External IDP Tokens
Red Hat Single Sign-On allows you to store tokens and responses from the authentication process with the external IDP. For that, you can use the Store Token configuration option on the IDP’s settings page.
Application code can retrieve these tokens and responses to pull in extra user information, or to securely invoke requests on the external IDP. For example, an application might want to use the Google token to invoke on other Google services and REST APIs. To retrieve a token for a particular identity provider you need to send a request as follows:
GET /auth/realms/{realm}/broker/{provider_alias}/token HTTP/1.1
Host: localhost:8080
Authorization: Bearer {keycloak_access_token}
An application must have authenticated with Red Hat Single Sign-On and have received an access token. This access token will need to have the broker client-level role read-token set. This means that the user must have a role mapping for this role and the client application must have that role within its scope. In this case, given that you are accessing a protected service in Red Hat Single Sign-On, you need to send the access token issued by Red Hat Single Sign-On during the user authentication.
In the broker configuration page you can automatically assign this role to newly imported users by turning on the Stored Tokens Readable switch.
Chapter 13. User Session Management
When a user logs into a realm, Red Hat Single Sign-On maintains a user session for them and remembers each and every client they have visited within the session. There are a lot of administrative functions that realm admins can perform on these user sessions. They can view login stats for the entire realm and dive down into each client to see who is logged in and where. Admins can logout a user or set of users from the Admin Console. They can revoke tokens and set up all the token and session timeouts there too.
13.1. Administering Sessions
If you go to the Sessions left menu item you can see a top level view of the number of sessions that are currently active in the realm.
Sessions

A list of clients is given and how many active sessions there currently are for that client. You can also logout all users in the realm by clicking the Logout all button on the right side of this list.
13.1.1. Logout All Limitations
Any SSO cookies set will now be invalid and clients that request authentication in active browser sessions will now have to re-login. Only certain clients are notified of this logout event, specifically clients that are using the Red Hat Single Sign-On OIDC client adapter. Other client types (i.e. SAML) will not receive a backchannel logout request.
It is important to note that any outstanding access tokens are not revoked by clicking Logout all. They have to expire naturally. You have to push a revocation policy out to clients, but that also only works with clients using the Red Hat Single Sign-On OIDC client adapter.
13.1.2. Application Drilldown
On the Sessions page, you can also drill down to each client. This will bring you to the Sessions tab of that client. Clicking on the Show Sessions button there allows you to see which users are logged into that application.
Application Sessions
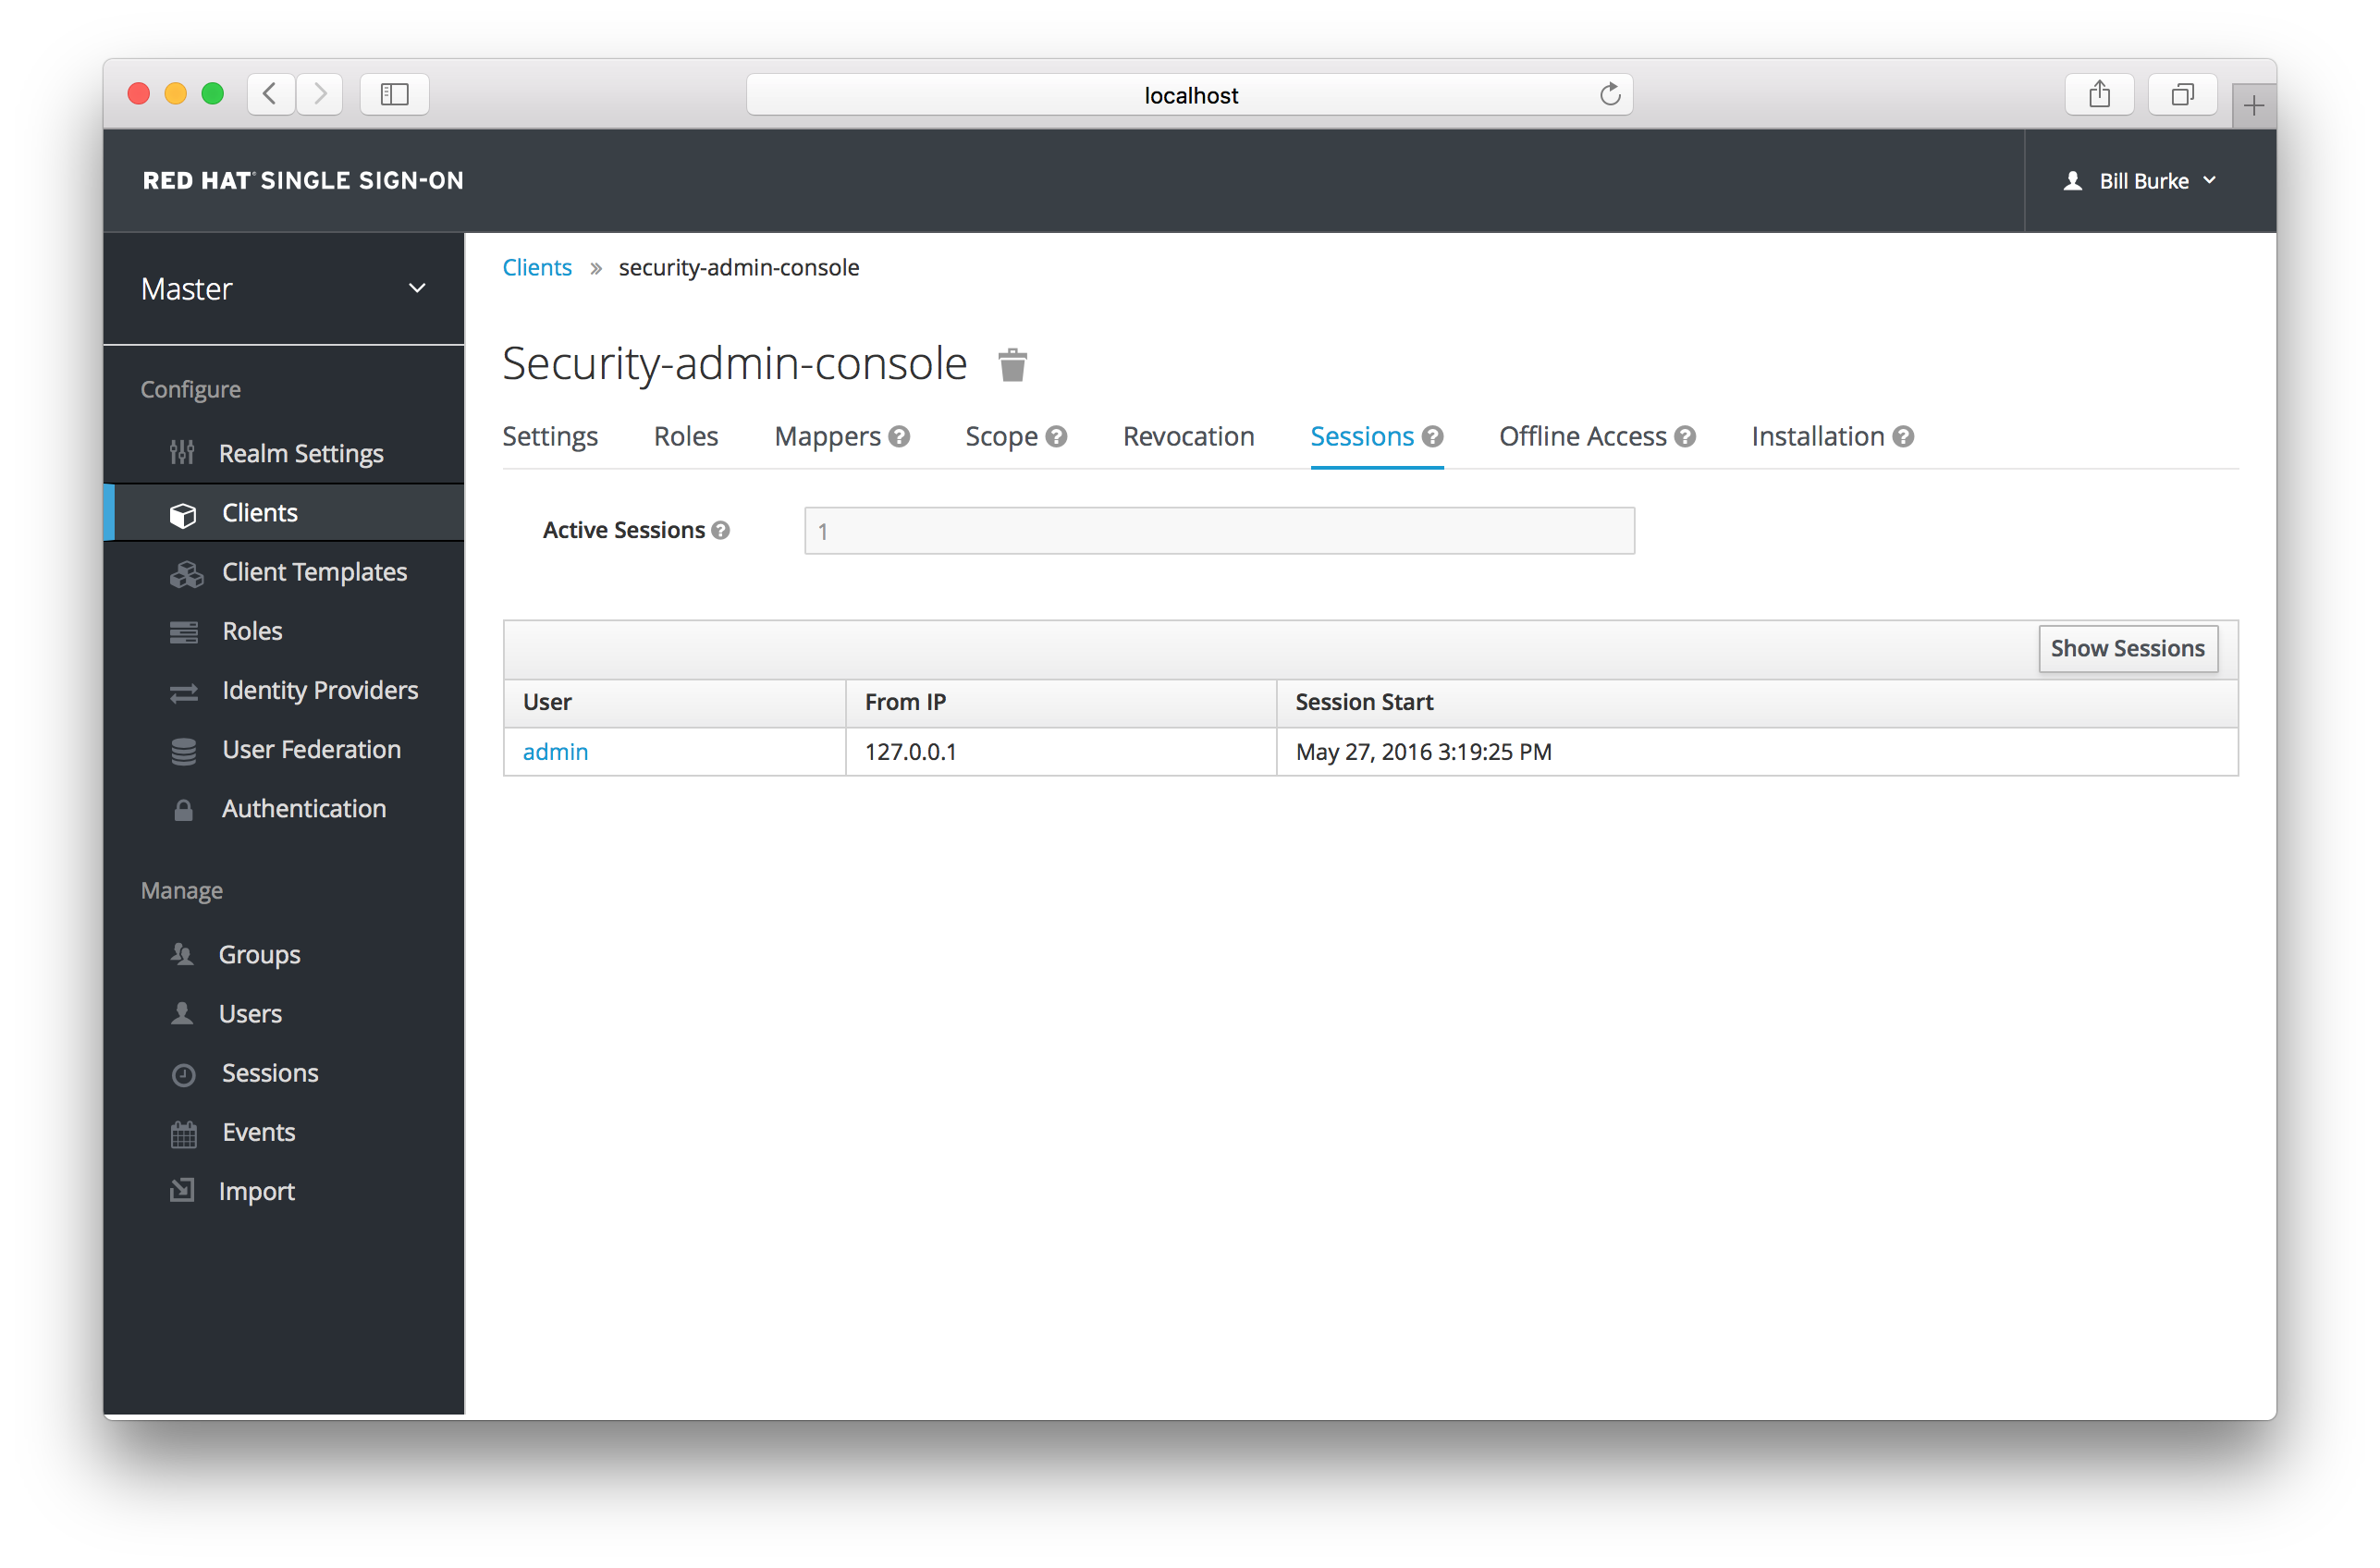
13.1.3. User Drilldown
If you go to the Sessions tab of an individual user, you can also view the session information.
User Sessions

13.2. Revocation Policies
If your system is compromised you will want a way to revoke all sessions and access tokens that have been handed out. You can do this by going to the Revocation tab of the Sessions screen.
Revocation
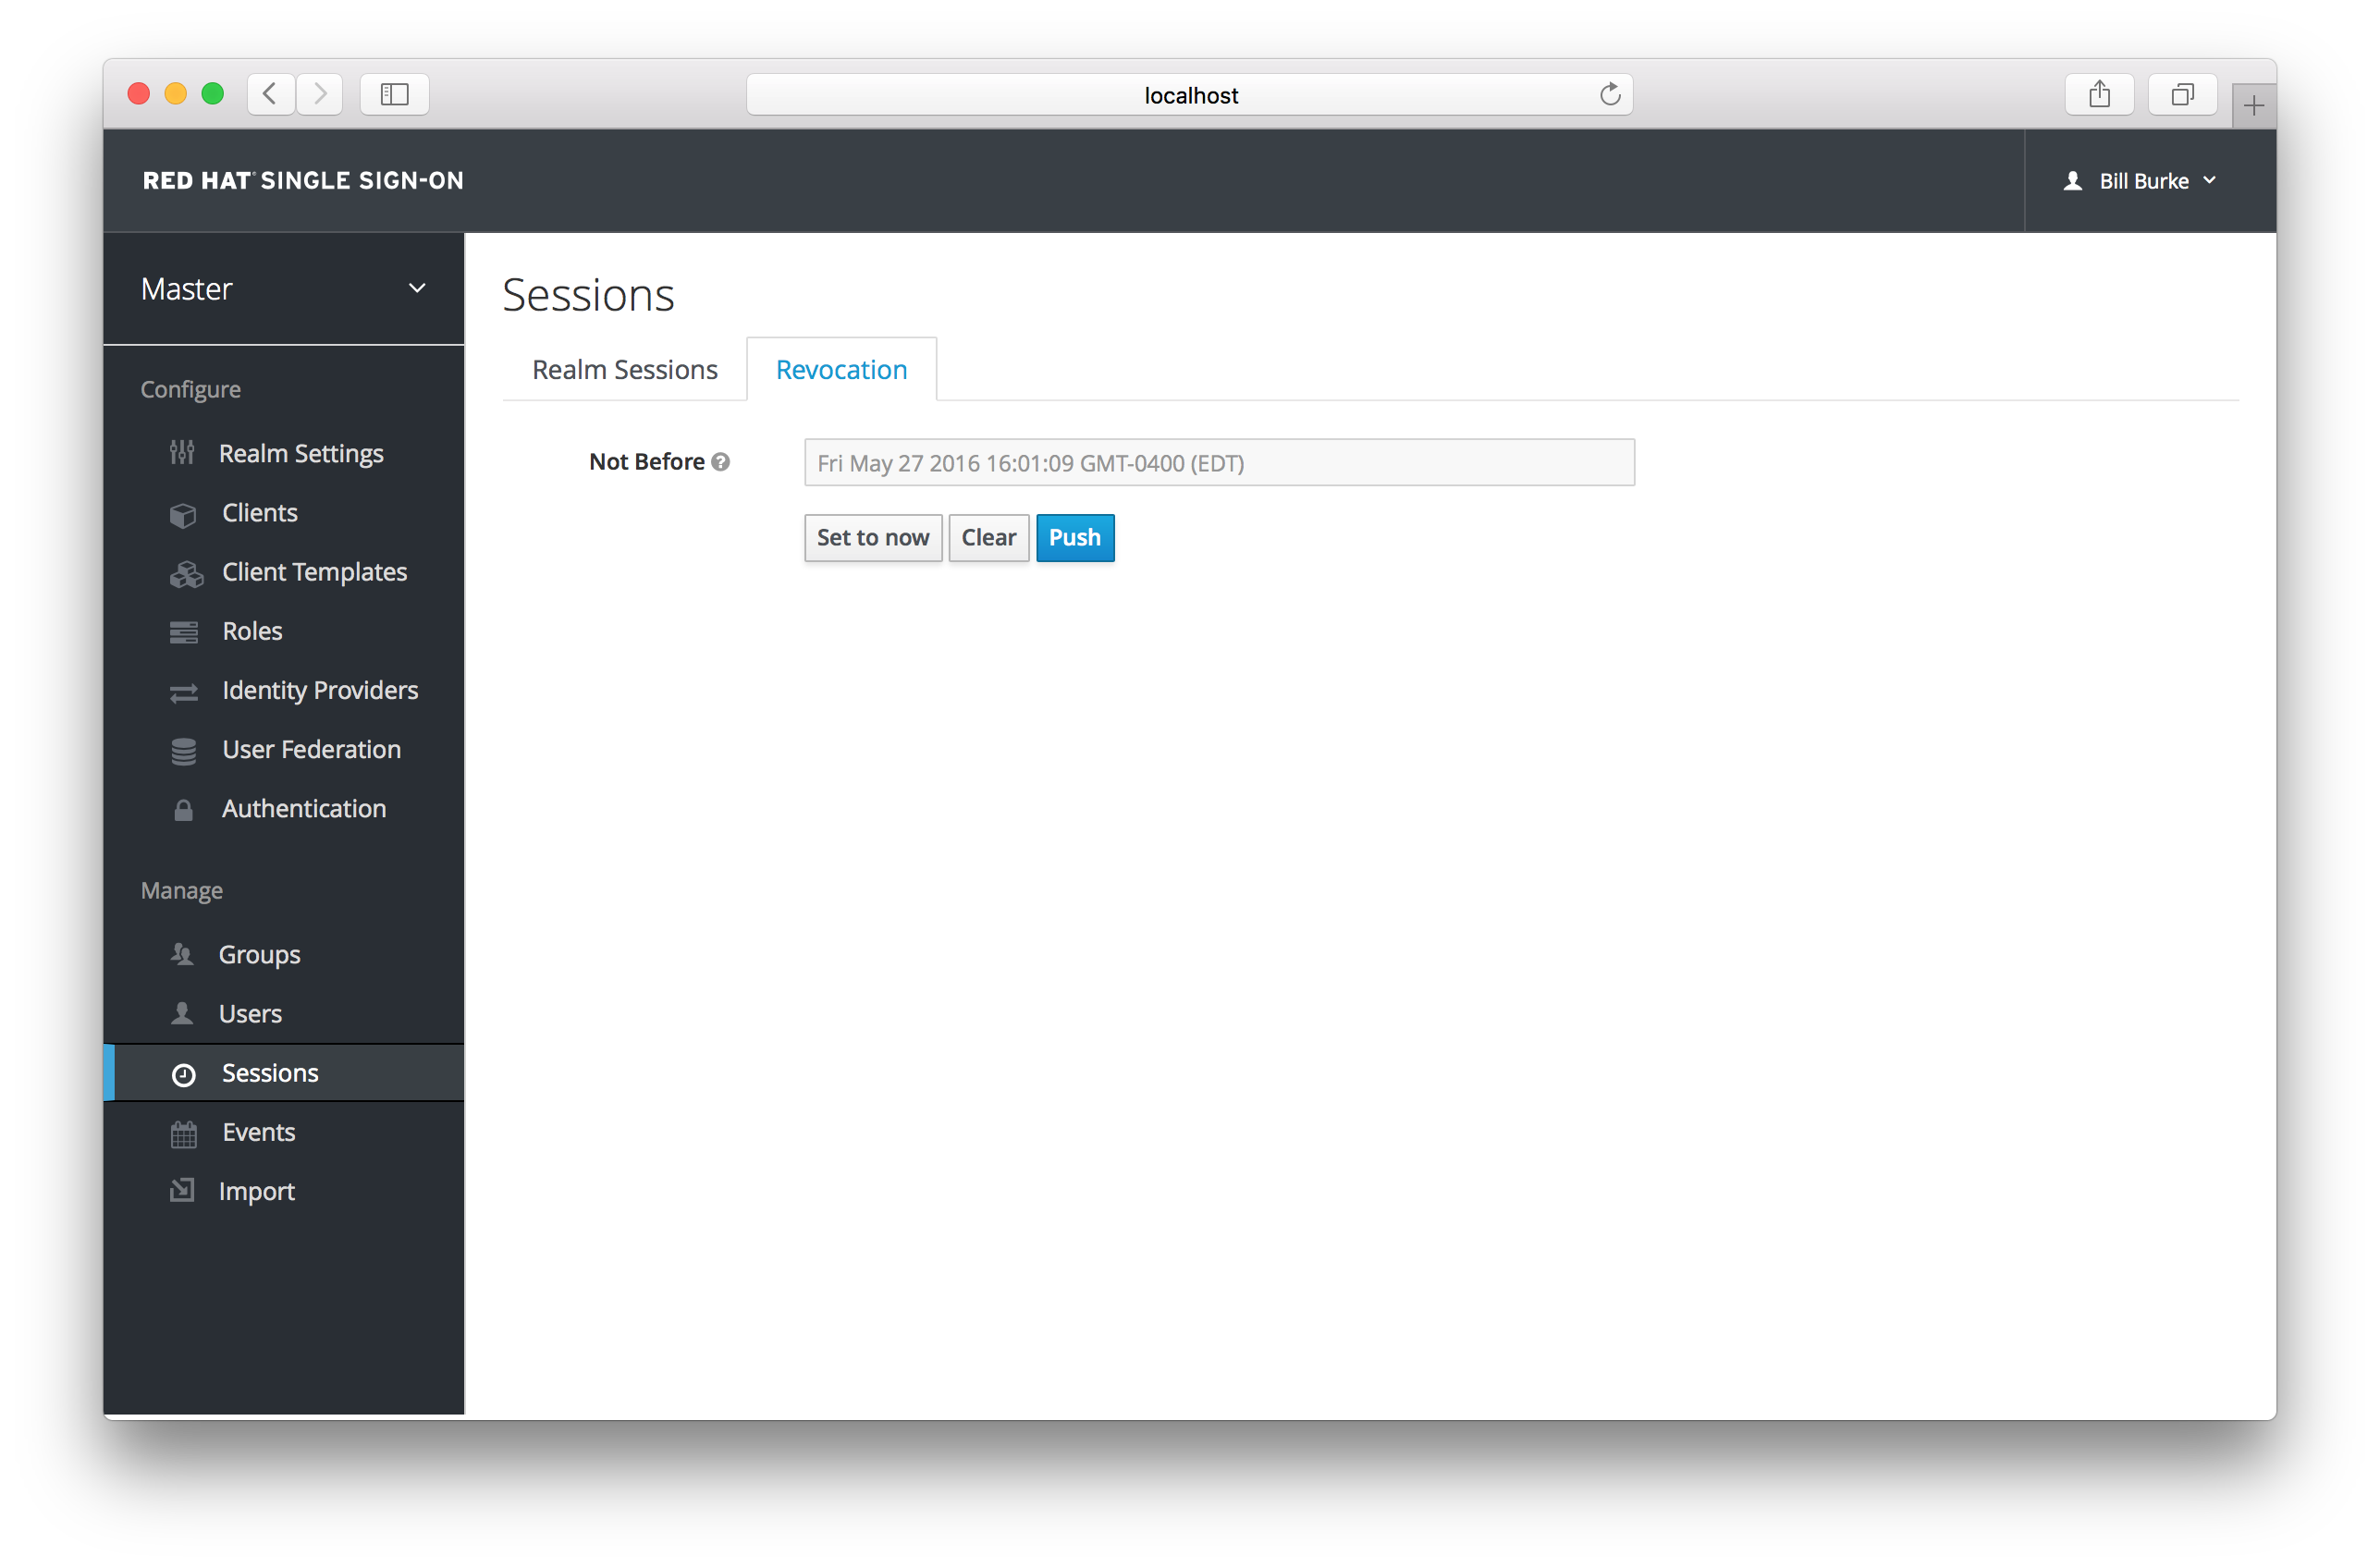
You can only set a time-based revocation policy. The console allows you to specify a time and date where any session or token issued before that time and date is invalid. The Set to now will set the policy to the current time and date. The Push button will push this revocation policy to any registered OIDC client that has the Red Hat Single Sign-On OIDC client adapter installed.
13.3. Session and Token Timeouts
Red Hat Single Sign-On gives you fine grain control of session, cookie, and token timeouts. This is all done on the Tokens tab in the Realm Settings left menu item.
Tokens Tab

Let’s walk through each of the items on this page.
| Configuration | Description |
|---|---|
| Revoke Refresh Token | For OIDC clients that are doing the refresh token flow, this flag, if on, will revoke that refresh token and issue another with the request that the client has to use. This basically means that refresh tokens have a one time use. |
| SSO Session Idle | Also pertains to OIDC clients. If the user is not active for longer than this timeout, the user session will be invalidated. How is idle time checked? A client requesting authentication will bump the idle timeout. Referesh token requests will also bump the idle timeout. |
| SSO Session Max | Maximum time before a user session is expired and invalidated. This is a hard number and time. It controls the maximum time a user session can remain active, regardless of activity. |
| Offline Session Idle | For offline access, this is the time the session is allowed to remain idle before the offline token is revoked. |
| Access Token Lifespan | When an OIDC access token is created, this value affects the expiration. |
| Access Token Lifespan For Implicit Flow | With the Implicit Flow no refresh token is provided. For this reason there’s a separate timeout for access tokens created with the Implicit Flow. |
| Client login timeout | This is the maximum time that a client has to finish the Authentication Code Flow in OIDC. |
| Login timeout | Total time a login must take. If authentication takes longer than this time then the user will have to start the authentication process over. |
| Login action timeout | Maximum time a user can spend on any one page in the authentication process. |
13.4. Offline Access
Offline access is a feature described in OpenID Connect specification . The idea is that during login, your client application will request an Offline token instead of a classic Refresh token. The application can save this offline token in a database or on disk and can use it later even if user is logged out. This is useful if your application needs to do some "offline" actions on behalf of user even when the user is not online. An example is a periodic backup of some data every night.
Your application is responsible for persisting the offline token in some storage (usually a database) and then using it to manually retrieve new access token from Red Hat Single Sign-On server.
The difference between a classic Refresh token and an Offline token is, that an offline token will never expire and is not subject of SSO Session Idle timeout . The offline token is valid even after a user logout or server restart. However by default you do need to use the offline token for a refresh token action at least once per 30 days (this value, Offline Session Idle timeout, can be changed in the administration console in the Tokens tab under Realm Settings). Also if you enable the option Revoke refresh tokens, then each offline token can be used just once. So after refresh, you always need to store the new offline token from refresh response into your DB instead of the previous one.
Users can view and revoke offline tokens that have been granted by them in the User Account Service. The admin user can revoke offline tokens for individual users in admin console in the Consents tab of a particular user. The admin can also view all the offline tokens issued in the Offline Access tab of each client. Offline tokens can also be revoked by setting a revocation policy.
To be able to issue an offline token, users need to have the role mapping for the realm-level role offline_access. Clients also need to have that role in their scope.
The client can request an offline token by adding the parameter scope=offline_access when sending authorization request to Red Hat Single Sign-On. The Red Hat Single Sign-On OIDC client adapter automatically adds this parameter when you use it to access secured URL of your application (i.e. http://localhost:8080/customer-portal/secured?scope=offline_access). The Direct Access Grant and Service Accounts also support offline tokens if you include scope=offline_access in the body of the authentication request.
Chapter 14. User Storage Federation
Red Hat Single Sign-On can federate external user databases. Out of the box we have support for LDAP and Active Directory. Before you dive into this, you should understand how Red Hat Single Sign-On does federation.
Red Hat Single Sign-On performs federation a bit differently than other products/projects. The vision of Red Hat Single Sign-On is that it is an out of the box solution that should provide a core set of features regardless of the backend user storage you want to use. Because of this requirement/vision, Red Hat Single Sign-On has a set data model that all of its services use. Most of the time when you want to federate an external user store, much of the metadata that would be needed to provide this complete feature set does not exist in that external store. For example your LDAP server may only provide password validation, but not support TOTP or user role mappings. The Red Hat Single Sign-On User Federation SPI was written to support these completely variable configurations.
The way user federation works is that Red Hat Single Sign-On will import your federated users on demand to its local storage. How much metadata is imported depends on the underlying federation plugin and how that plugin is configured. Some federation plugins may only import the username into Red Hat Single Sign-On storage. Others might import everything from name, address, and phone number, to user role mappings. Some plugins might want to import credentials directly into Red Hat Single Sign-On storage and let Red Hat Single Sign-On handle credential validation. Others might want to handle credential validation themselves. The goal of the User Storage Federation SPI is to support all of these scenarios.
14.1. Adding a Provider
To add a storage provider go to the User Federation left menu item in the Admin Console.
User Federation

On the right side, there is an Add Provider list box. Choose the provider you want to add and you will be brought to the configuration page of that provider.
14.2. LDAP and Active Directory
Red Hat Single Sign-On comes with a built-in LDAP/AD plugin. By default, it is set up only to import username, email, first name, and last name. But you are free to configure additional mappers and add more attributes or delete the default ones. It supports password validation via LDAP/AD protocols and different user metadata synchronization modes. To configure a federated LDAP store go to the Admin Console. Click on the User Federation left menu option. When you get to this page there is an Add Provider select box. You should see ldap within this list. Selecting ldap will bring you to the ldap configuration page.
14.2.1. Edit Mode
Users, through the User Account Service, and admins through the Admin Console have the ability to modify user metadata. Depending on your setup you may or may not have LDAP update privileges. The Edit Mode configuration option defines the edit policy you have with your LDAP store.
- READONLY
- Username, email, first name, last name, and other mapped attributes will be unchangeable. Red Hat Single Sign-On will show an error anytime anybody tries to update these fields. Also, password updates will not be supported.
- WRITABLE
- Username, email, first name, last name, and other mapped attributes and passwords can all be updated and will be synchronized automatically with your LDAP store.
- UNSYNCED
- Any changes to username, email, first name, last name, and passwords will be stored in Red Hat Single Sign-On local storage. It is up to you to figure out how to synchronize back to LDAP. This allows Red Hat Single Sign-On deployments to support updates of user metadata on a read-only LDAP server.
14.2.2. Other config options
- Console Display Name
- Name used when this provider is referenced in the admin console
- Priority
- The priority of this provider when looking up users or for adding registrations.
- Sync Registrations
- If a new user is added through a registration page or admin console, should the user be eligible to be synchronized to this provider?
- Allow Kerberos authentication
- Enable Kerberos/SPNEGO authentication in realm with users data provisioned from LDAP. More info in Kerberos section.
- Other options
- The rest of the configuration options should be self explanatory. You can mouseover the tooltips in Admin Console to see some more details about them.
14.2.3. Connect to LDAP over SSL
When you configure a secured connection URL to your LDAP store(for example ldaps://myhost.com:636 ), Red Hat Single Sign-On will use SSL for the communication with LDAP server. The important thing is to properly configure a truststore on the Red Hat Single Sign-On server side, otherwise Red Hat Single Sign-On can’t trust the SSL connection to LDAP.
The global truststore for the Red Hat Single Sign-On can be configured with the Truststore SPI. Please check out the Server Installation and Configuration Guide for more detail. If you don’t configure the truststore SPI, the truststore will fallback to the default mechanism provided by Java (either the file provided by system property javax.net.ssl.trustStore or the cacerts file from the JDK if the system property is not set).
There is a configuration property Use Truststore SPI in the LDAP federation provider configuration, where you can choose whether the Truststore SPI is used. By default, the value is Only for ldaps, which is fine for most deployments. The Truststore SPI will only be used if the connection to LDAP starts with ldaps.
14.2.4. Sync of LDAP users to Red Hat Single Sign-On
LDAP Federation Provider will automatically take care of synchronization (import) of needed LDAP users into the Red Hat Single Sign-On local database. As users log in, the LDAP Federation provider will import the LDAP user into the Red Hat Single Sign-On database and then authenticate against the LDAP password. This is the only time users will be imported. If you go to the Users left menu item in the Admin Console and click the View all users button, you will only see those LDAP users that have been authenticated at least once by Red Hat Single Sign-On. It is implemented this way so that admins don’t accidentally try to import a huge LDAP DB of users.
If you want to sync all LDAP users into the Red Hat Single Sign-On database, you may configure and enable the Sync Settings of the LDAP provider you configured. There are 2 types of synchronization:
- Periodic Full sync
-
This will synchronize all LDAP users into Red Hat Single Sign-On DB. Those LDAP users, which already exist in Red Hat Single Sign-On and were changed in LDAP directly will be updated in Red Hat Single Sign-On DB (For example if user
Mary Kellywas changed in LDAP toMary Smith). - Periodic Changed users sync
- When syncing occurs, only those users that were created or updated after the last sync will be updated and/or imported.
The best way to handle syncing is to click the Synchronize all users button when you first create the LDAP provider, then set up a periodic sync of changed users. The configuration page for your LDAP Provider has several options to support you.
14.2.5. LDAP/Federation mappers
LDAP mappers are listeners, which are triggered by the LDAP Federation provider at various points, provide another extension point to LDAP integration. They are triggered when a user logs in via LDAP and needs to be imported, during Red Hat Single Sign-On initiated registration, or when a user is queried from the Admin Console. When you create an LDAP Federation provider, Red Hat Single Sign-On will automatically provide set of builtin mappers for this provider. You are free to change this set and create a new mapper or update/delete existing ones.
- User Attribute Mapper
-
This allows you to specify which LDAP attribute is mapped to which attribute of Red Hat Single Sign-On user. So, for example, you can configure that LDAP attribute
mailto the attributeemailin the Red Hat Single Sign-On database. For this mapper implementation, there is always a one-to-one mapping (one LDAP attribute is mapped to one Red Hat Single Sign-On attribute) - FullName Mapper
-
This allows you to specify that the full name of the user, which is saved in some LDAP attribute (usually
cn) will be mapped tofirstNameandlastnameattributes in the Red Hat Single Sign-On database. Havingcnto contain full name of user is a common case for some LDAP deployments. - Role Mapper
-
This allows you to configure role mappings from LDAP into Red Hat Single Sign-On role mappings. One Role mapper can be used to map LDAP roles (usually groups from a particular branch of LDAP tree) into roles corresponding to either realm roles or client roles of a specified client. It’s not a problem to configure more Role mappers for the same LDAP provider. So for example you can specify that role mappings from groups under
ou=main,dc=example,dc=orgwill be mapped to realm role mappings and role mappings from groups underou=finance,dc=example,dc=orgwill be mapped to client role mappings of clientfinance. - Hardcoded Role Mapper
- This mapper will grant a specified Red Hat Single Sign-On role to each Red Hat Single Sign-On user linked with LDAP.
- Group Mapper
- This allows you to configure group mappings from LDAP into Red Hat Single Sign-On group mappings. Group mapper can be used to map LDAP groups from a particular branch of an LDAP tree into groups in Red Hat Single Sign-On. It will also propagate user-group mappings from LDAP into user-group mappings in Red Hat Single Sign-On.
- MSAD User Account Mapper
-
This mapper is specific to Microsoft Active Directory (MSAD). It’s able to tightly integrate the MSAD user account state into the Red Hat Single Sign-On account state (account enabled, password is expired etc). It’s using the
userAccountControlandpwdLastSetLDAP attributes. (both are specific to MSAD and are not LDAP standard). For example ifpwdLastSetis0, the Red Hat Single Sign-On user is required to update their password and there will be an UPDATE_PASSWORD required action added to the user. IfuserAccountControlis514(disabled account) the Red Hat Single Sign-On user is disabled as well.
By default, there is set of User Attribute mappers that map basic Red Hat Single Sign-On user attributes like username, first name, lastname, and email to corresponding LDAP attributes. You are free to extend these and provide additional attribute mappings. Admin console provides tooltips, which should help with configuring the corresponding mappers.
Chapter 15. Auditing and Events
Red Hat Single Sign-On provides a rich set of auditing capabilities. Every single login action can be recorded and stored in the database and reviewed in the Admin Console. All admin actions can also be recorded and reviewed. There is also a Listener SPI with which plugins can listen for these events and perform some action. Built in listeners include a simple log file and the ability to send an email if an event occurs.
15.1. Login Events
Login events occur for things like when a user logs in successfully, when somebody enters in a bad password, or when a user account is updated. Every single event that happens to a user can be recorded and viewed. By default, no events are stored or viewed in the Admin Console. Only error events are logged to the console and the server’s log file. To start persisting you’ll need to enable storage. Go to the Events left menu item and select the Config tab.
Event Configuration
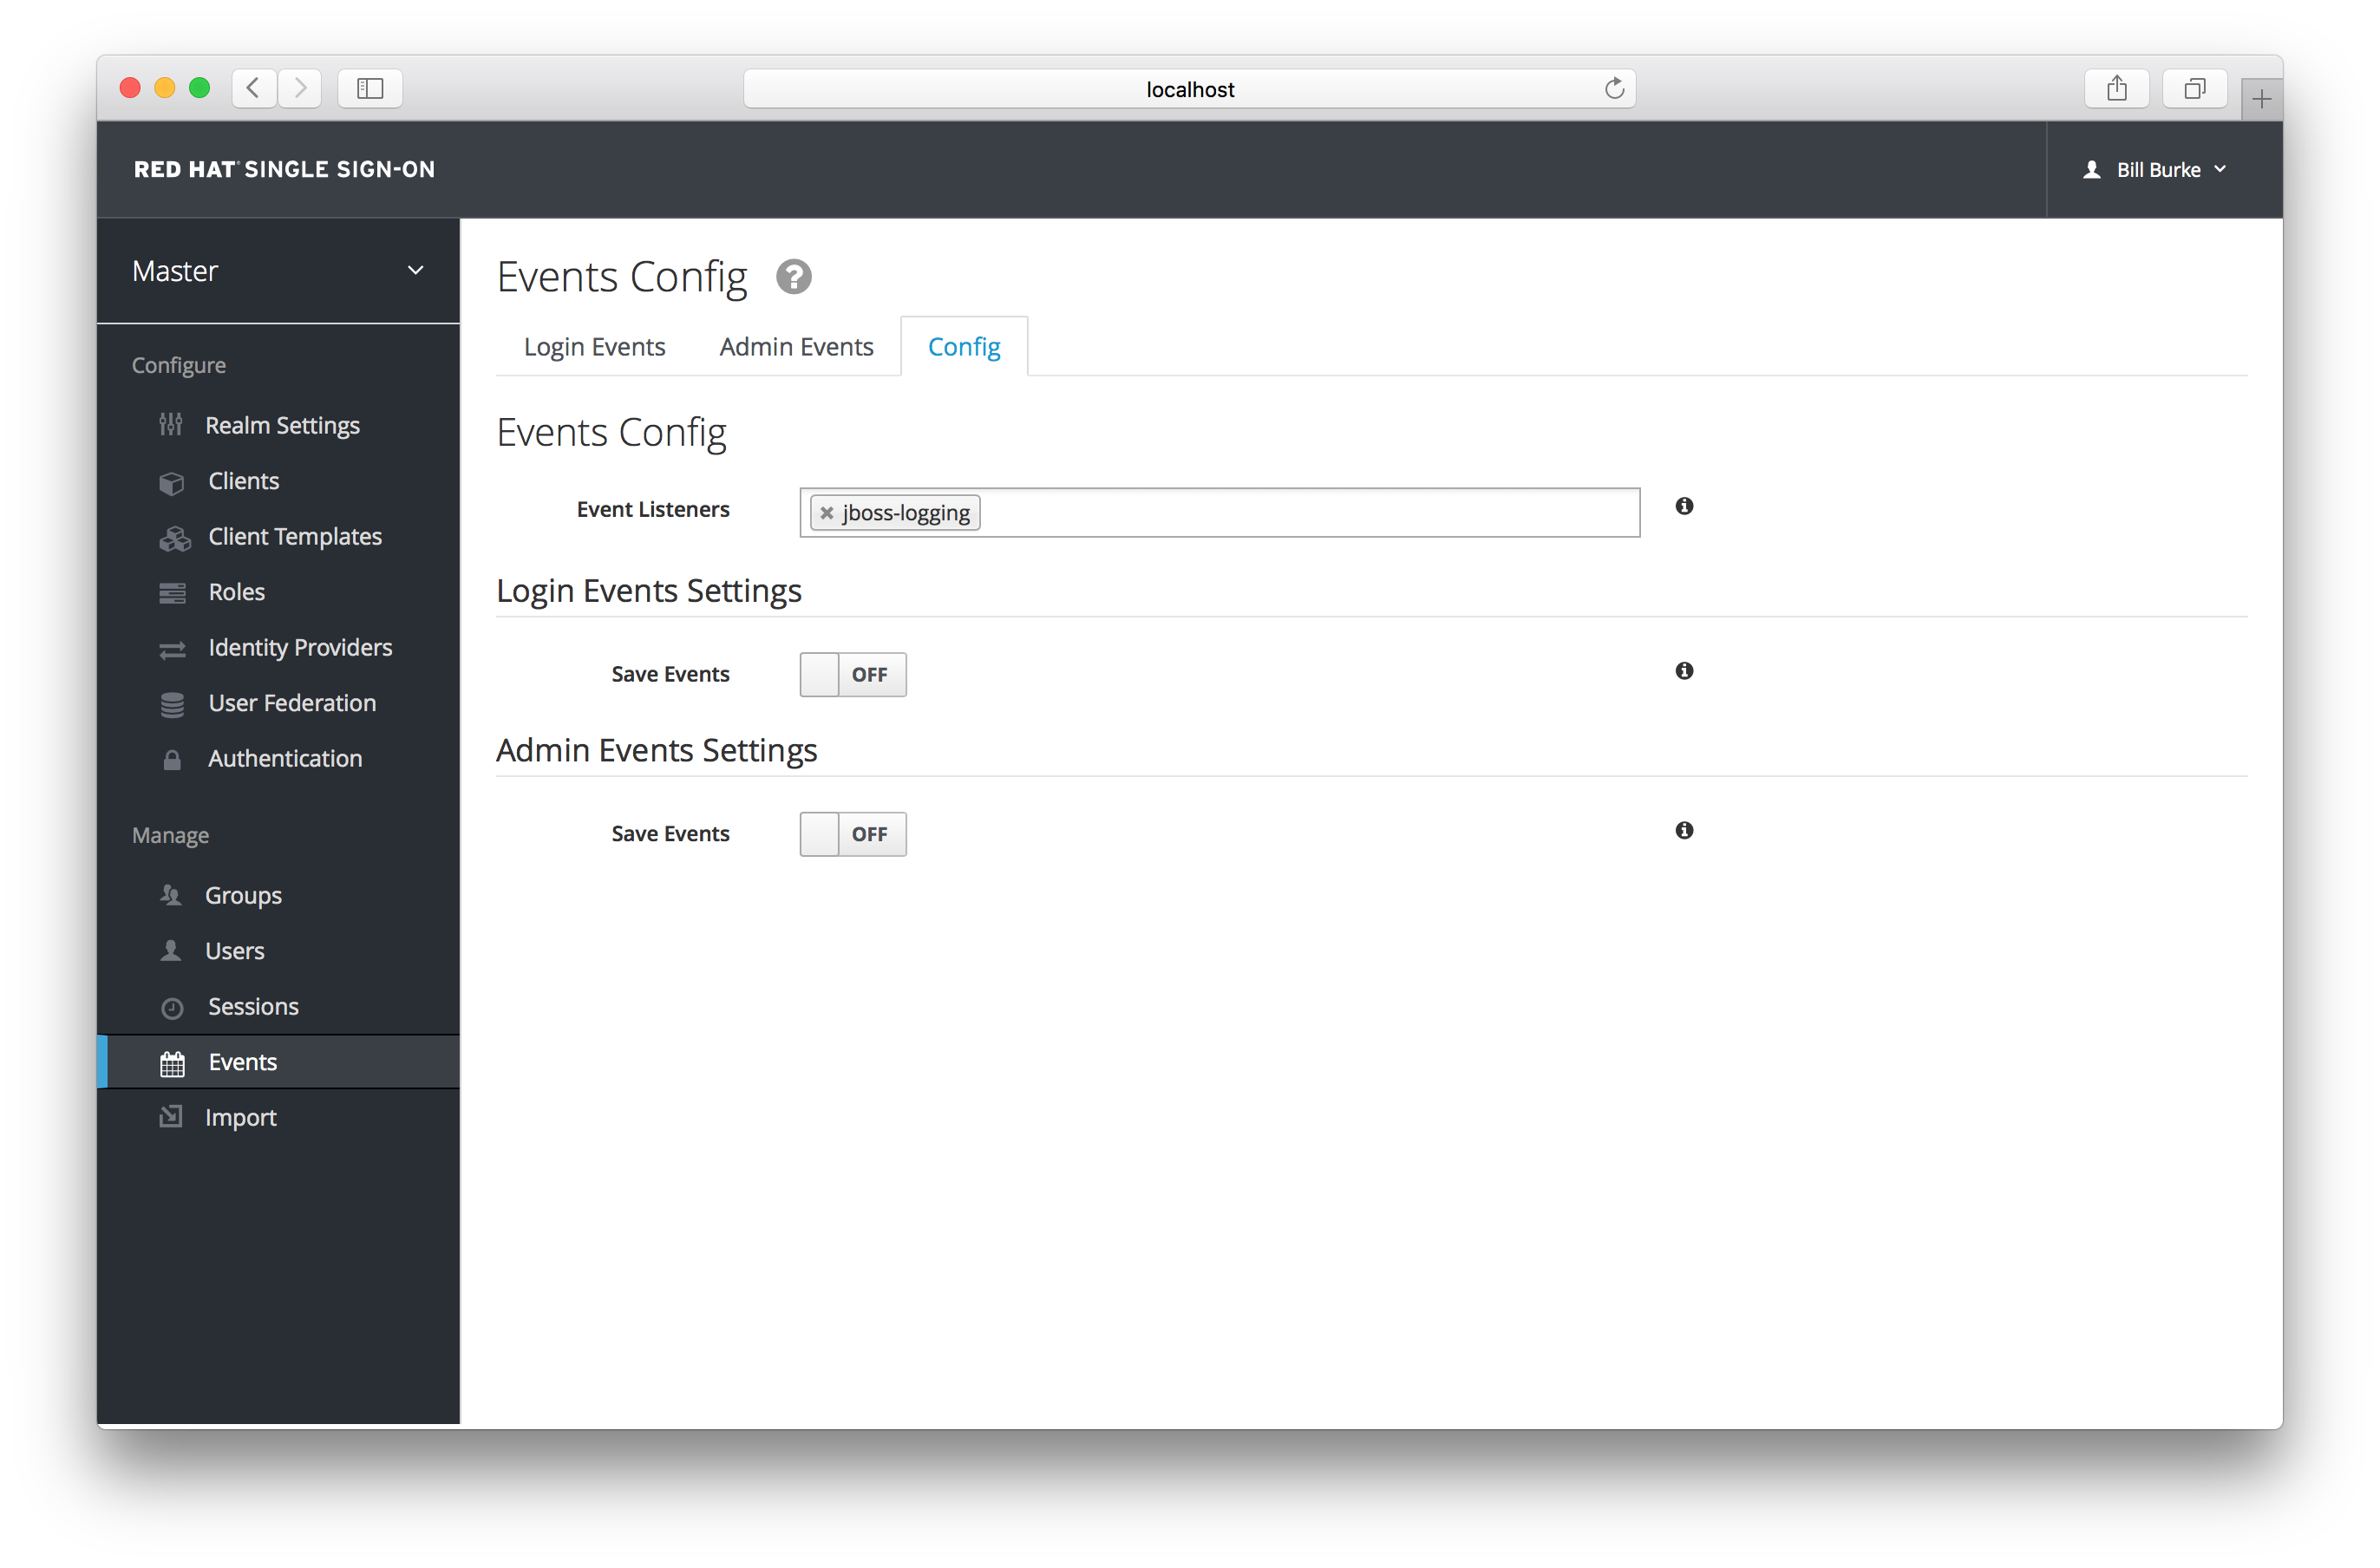
To start storing events you’ll need to turn the Save Events switch to on under the Login Events Settings.
Save Events
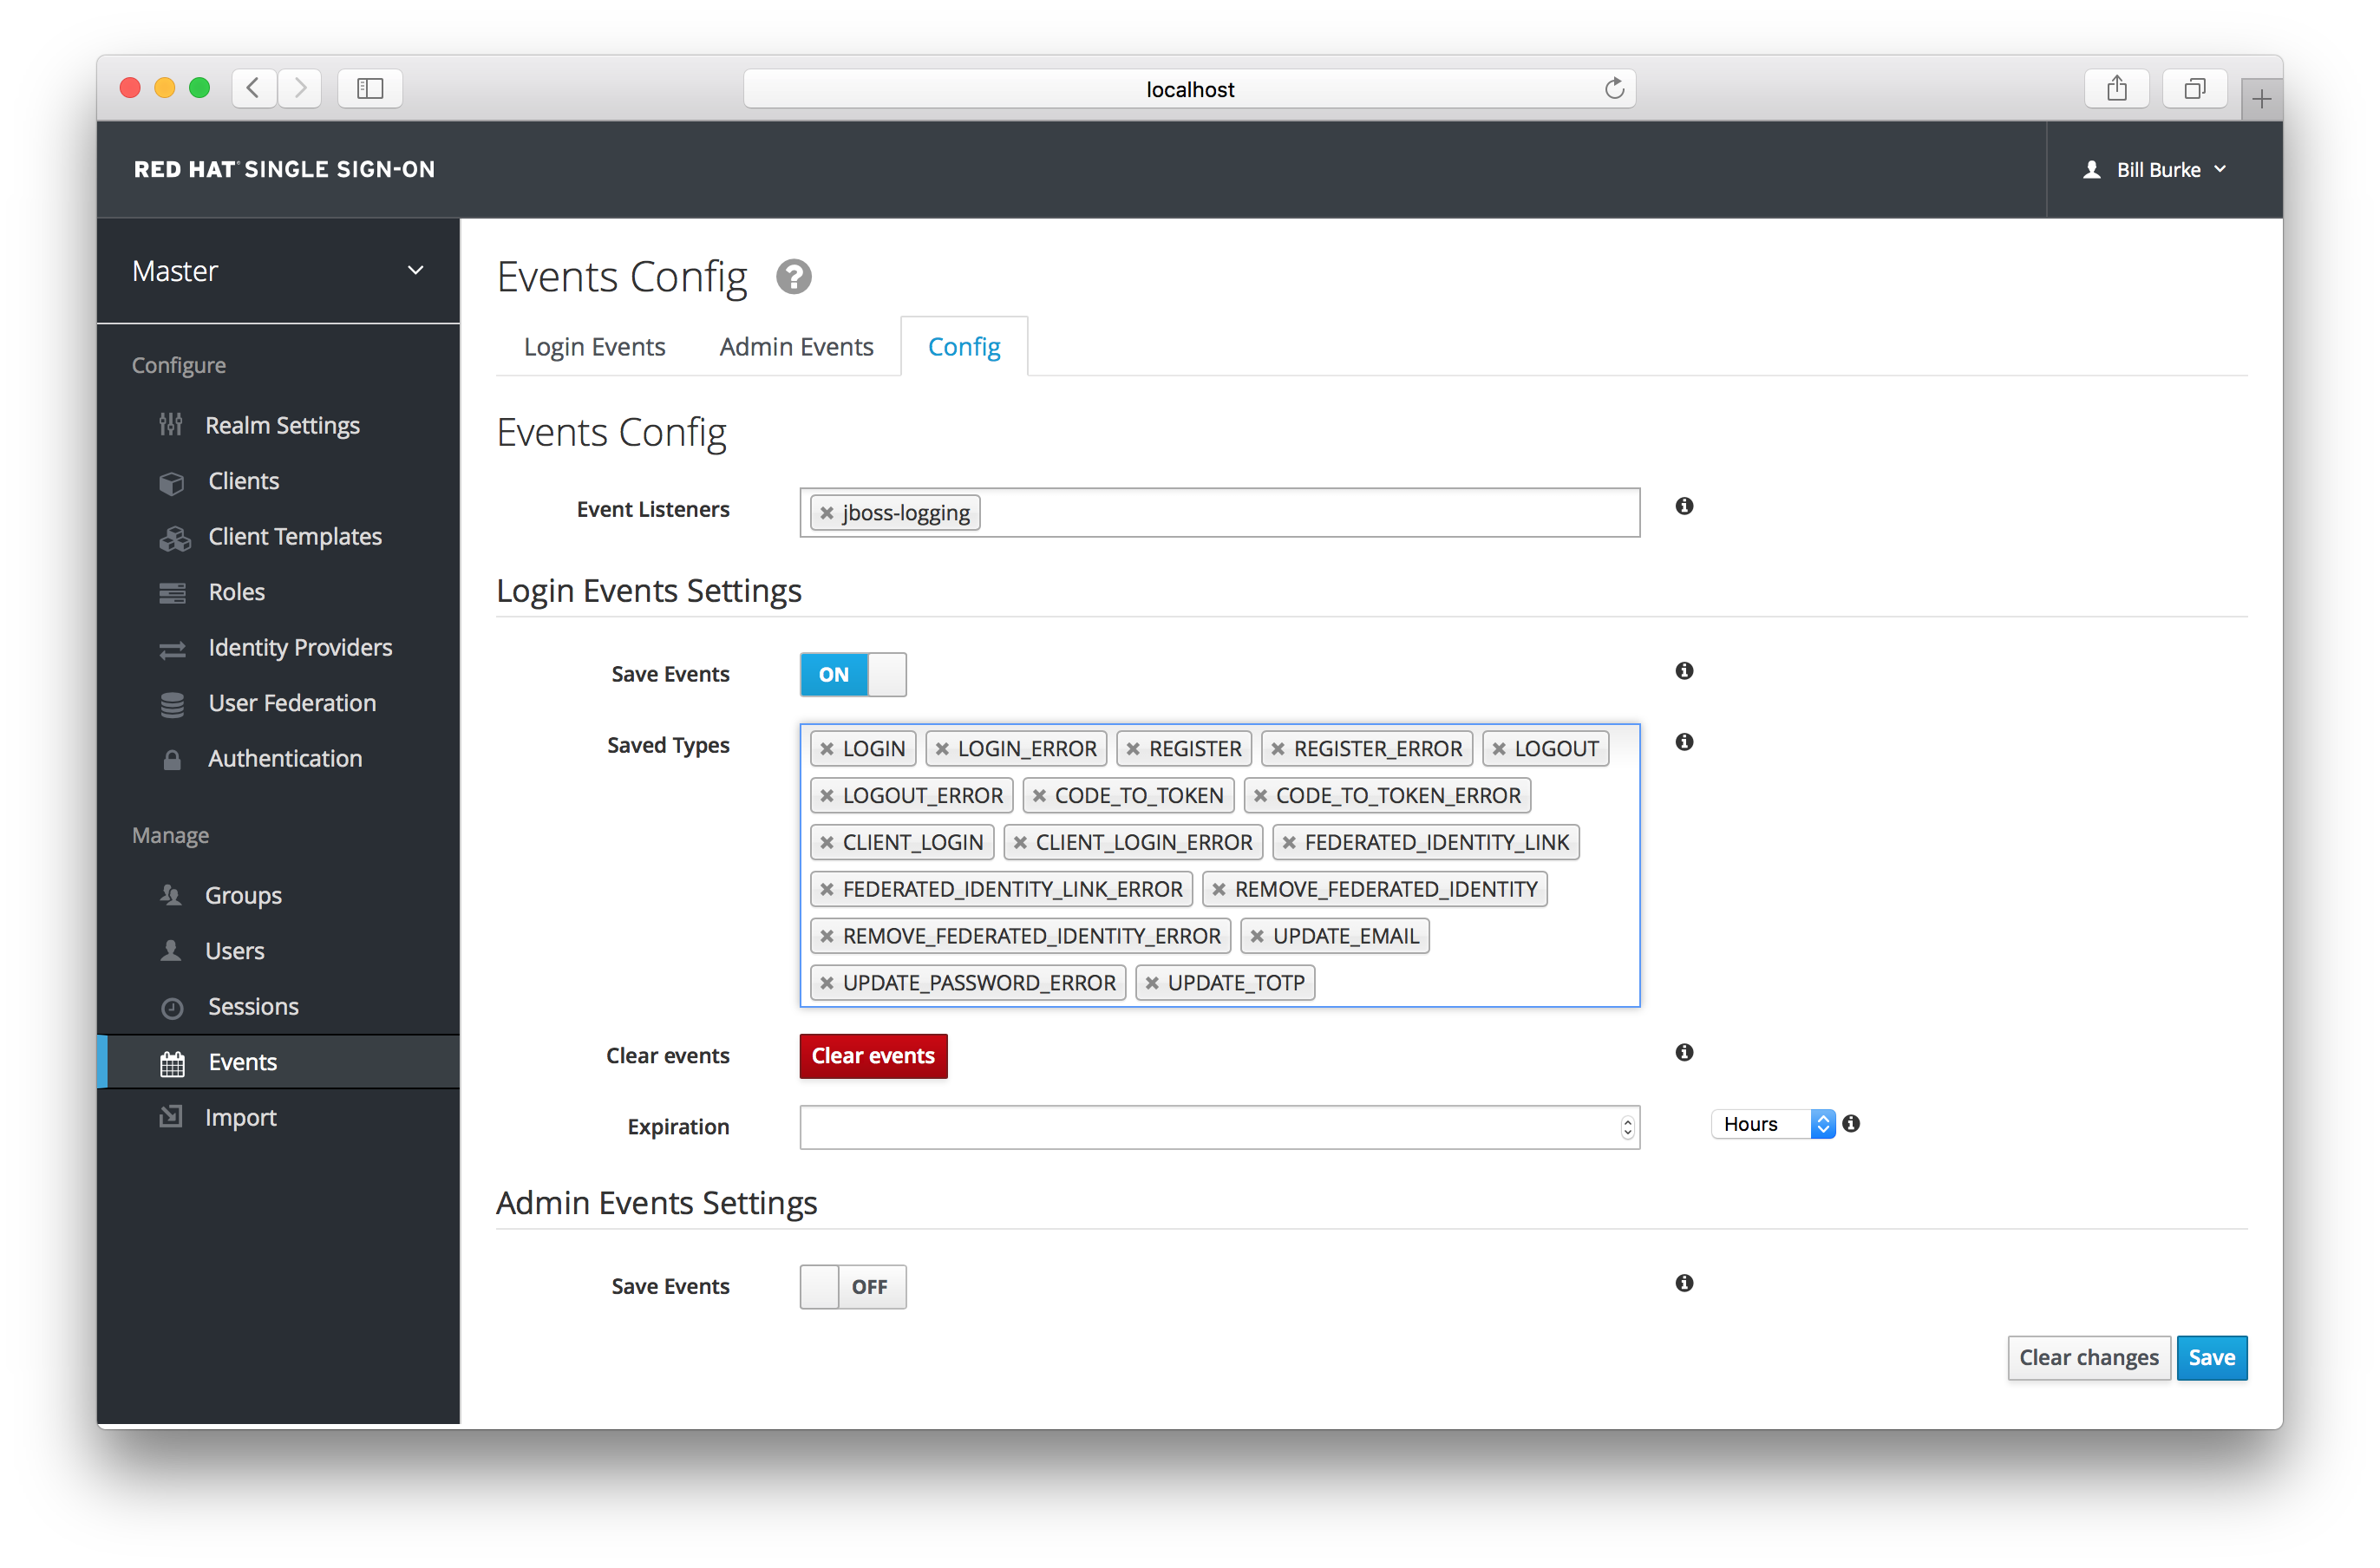
The Saved Types field allows you to specify which event types you want to store in the event store. The Clear events button allows you to delete all the events in the database. The Expiration field allows you to specify how long you want to keep events stored. Once you’ve enabled storage of login events and decided on your settings, don’t forget to click the Save button on the bottom of this page.
To view events, go to the Login Events tab.
Login Events
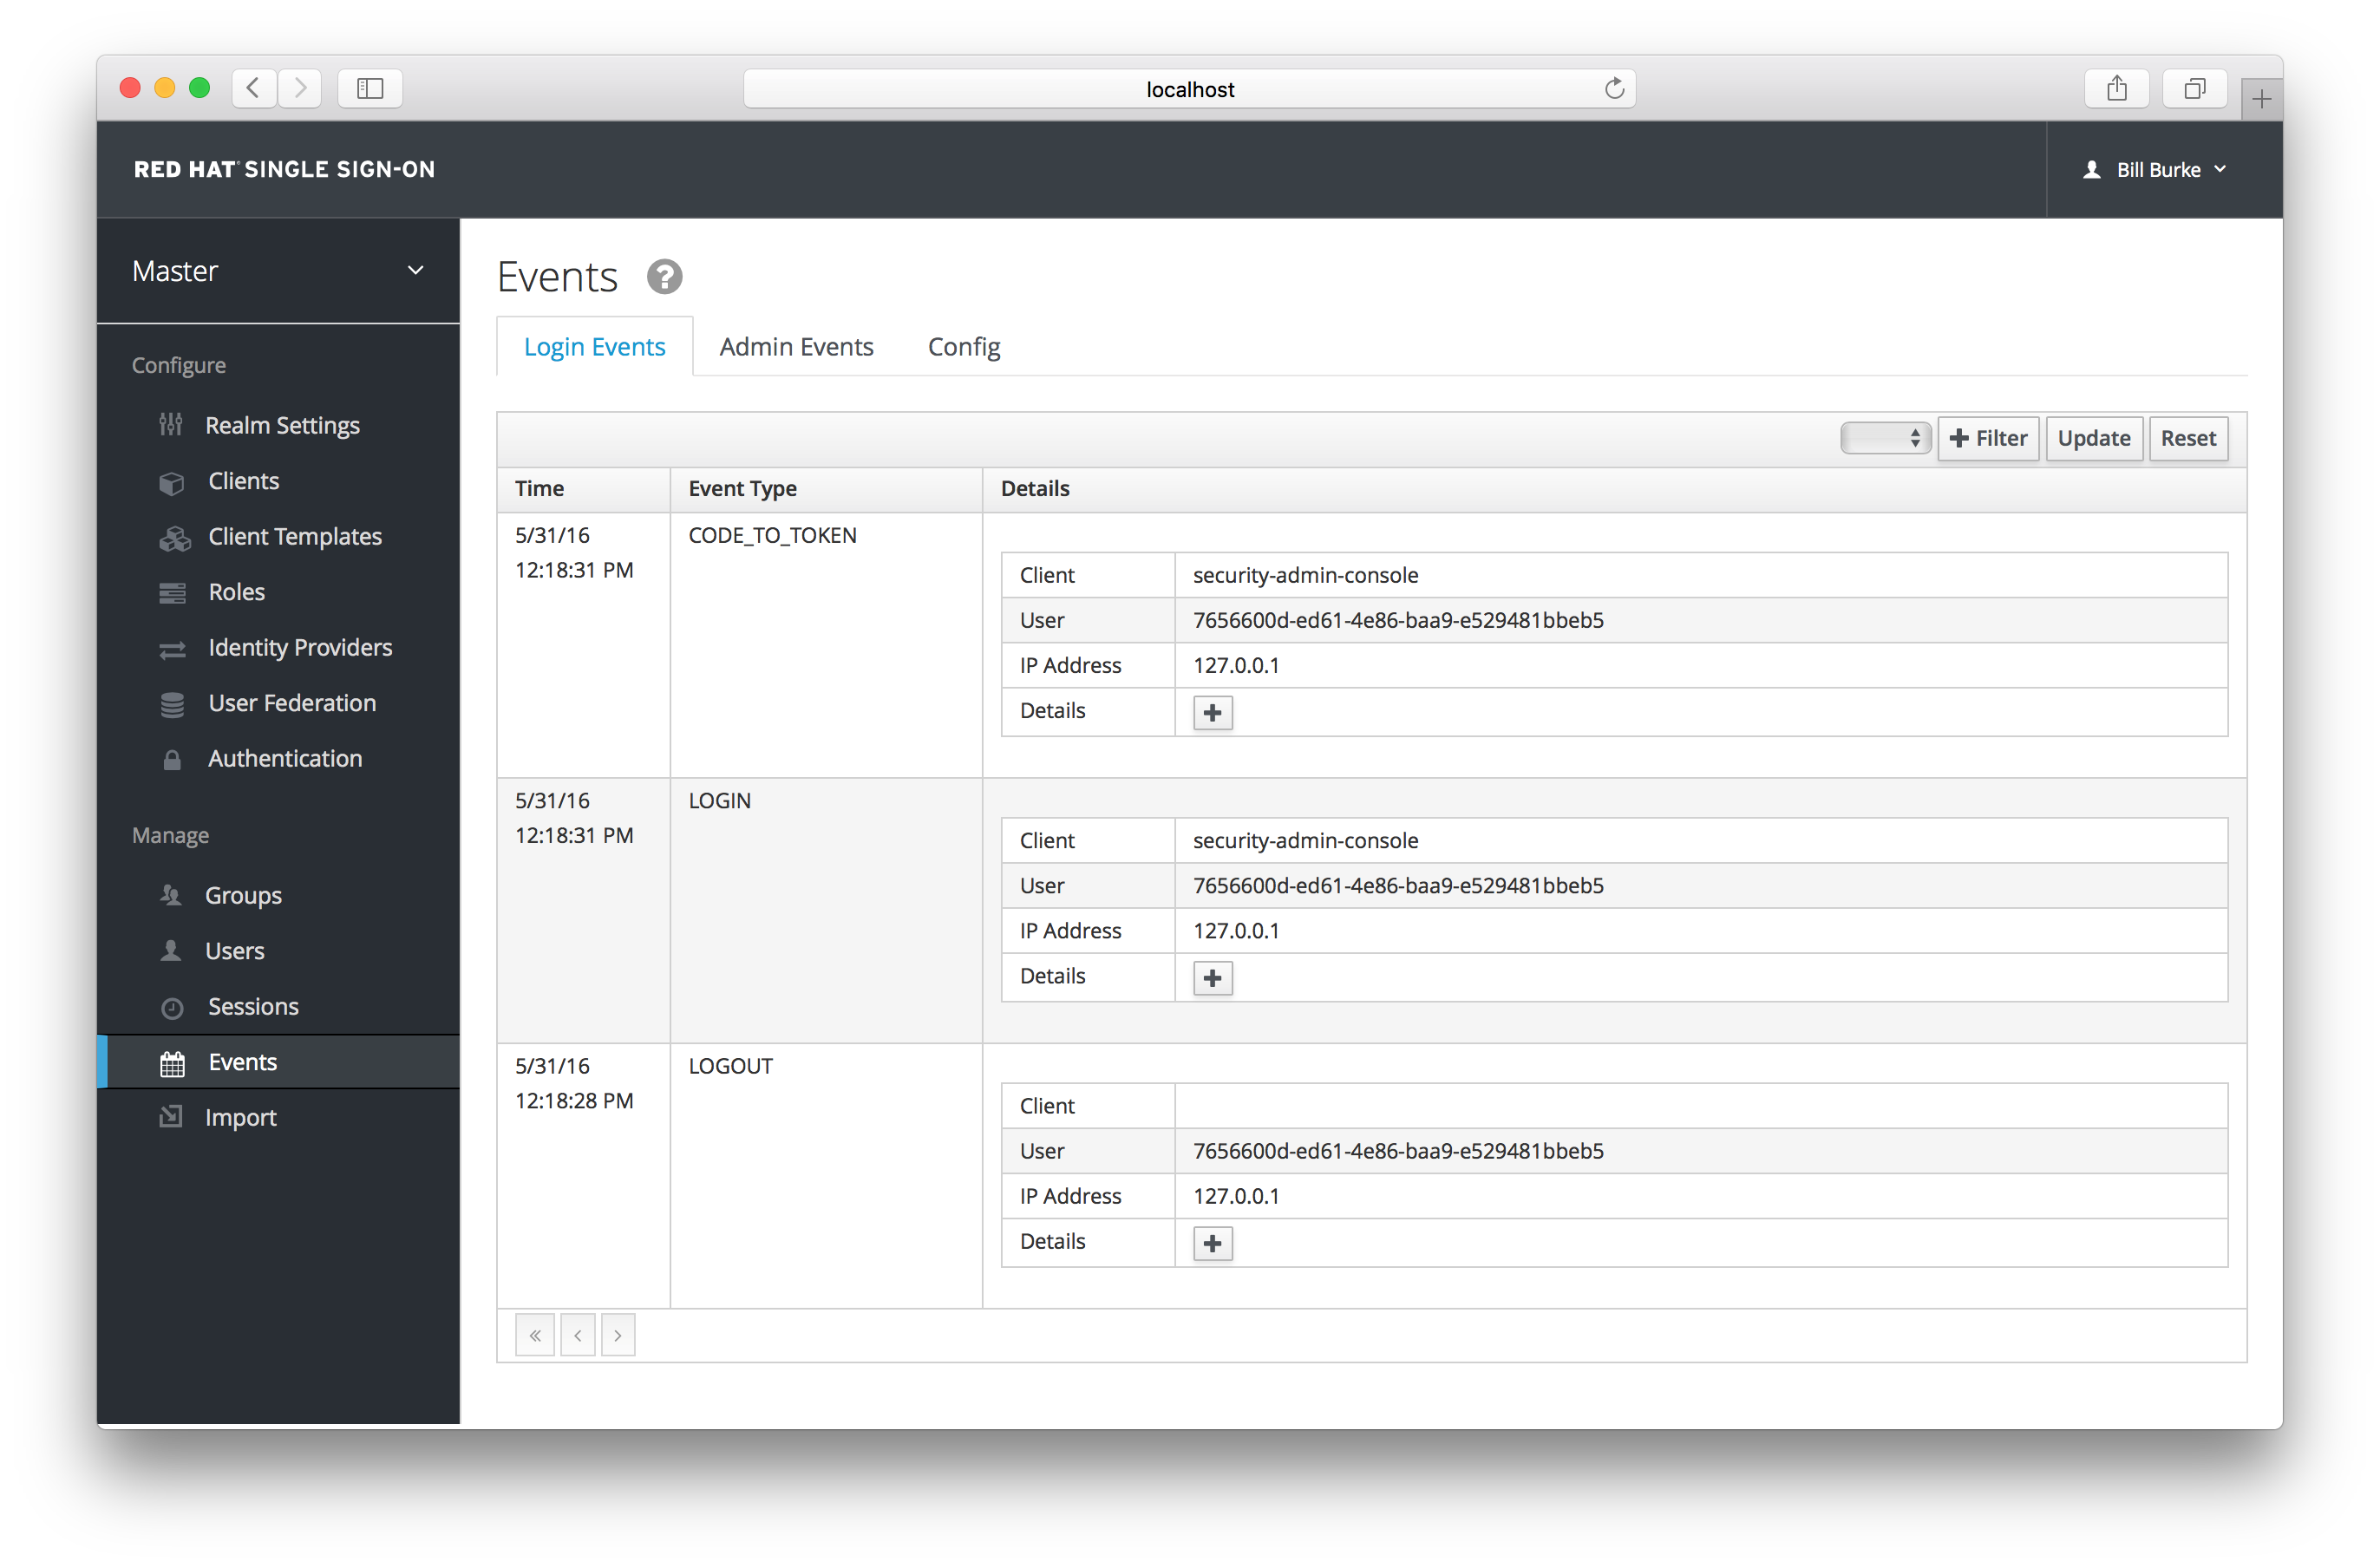
As you can see, there’s a lot of information stored and, if you are storing every event, there are a lot of events stored for each login action. The Filter button on this page allows you to filter which events you are actually interested in.
Login Event Filter

In this screenshot, we’re filtering only Login events. Clicking the Update button runs the filter.
15.1.1. Event Types
Login events:
- Login - A user has logged in.
- Register - A user has registered.
- Logout - A user has logged out.
- Code to Token - An application/client has exchanged a code for a token.
- Refresh Token - An application/client has refreshed a token.
Account events:
- Social Link - An account has been linked to a social provider.
- Remove Social Link - A social provider has been removed from an account.
- Update Email - The email address for an account has changed.
- Update Profile - The profile for an account has changed.
- Send Password Reset - A password reset email has been sent.
- Update Password - The password for an account has changed.
- Update TOTP - The TOTP settings for an account have changed.
- Remove TOTP - TOTP has been removed from an account.
- Send Verify Email - An email verification email has been sent.
- Verify Email - The email address for an account has been verified.
For all events there is a corresponding error event.
15.1.2. Event Listener
Event listeners listen for events and perform an action based on that event. There are two built in listeners that come with Red Hat Single Sign-On: Logging Event Listener and Email Event Listener.
The Logging Event Listener writes to a log file whenever an error event occurs and is enabled by default. Here’s an example log message:
11:36:09,965 WARN  [org.keycloak.events] (default task-51) type=LOGIN_ERROR, realmId=master,
                    clientId=myapp,
                    userId=19aeb848-96fc-44f6-b0a3-59a17570d374, ipAddress=127.0.0.1,
                    error=invalid_user_credentials, auth_method=openid-connect, auth_type=code,
                    redirect_uri=http://localhost:8180/myapp,
                    code_id=b669da14-cdbb-41d0-b055-0810a0334607, username=admin
This logging is very useful if you want to use a tool like Fail2Ban to detect if there is a hacker bot somewhere that is trying to guess user passwords. You can parse the log file for LOGIN_ERROR and pull out the IP Address. Then feed this information into Fail2Ban so that it can help prevent attacks.
The Email Event Listener sends an email to the user’s account when an event occurs. The Email Event Listener only supports the following events at the moment:
- Login Error
- Update Password
- Update TOTP
- Remove TOTP
To enable the Email Listener go to the Config tab and click on the Event Listeners field. This will show a drop down list box where you can select email.
You can exclude one or more events by editing the keycloak-server.json that comes with your distribution and adding for example:
"eventsListener": {
    "email": {
        "exclude-events": [ "UPDATE_TOTP", "REMOVE_TOTP" ]
    }
}
See the Server Installation and Configuration Guide for more details on where the keycloak-server.json file lives.
15.2. Admin Events
Any action an admin performs within the admin console can be recorded for auditing purposes. The Admin Console performs administrative functions by invoking on the Red Hat Single Sign-On REST interface. Red Hat Single Sign-On audits these REST invocations. The resulting events can then be viewed in the Admin Console.
To enable auditing of Admin actions, go to the Events left menu item and select the Config tab.
Event Configuration
In the Admin Events Settings section, turn on the Save Events switch.
Admin Event Configuration

The Include Representation switch will include any JSON document that is sent through the admin REST API. This allows you to view exactly what an admin has done, but can lead to a lot of information stored in the database. The Clear admin events button allows you to wipe out the current information stored.
To view the admin events go to the Admin Events tab.
Admin Events
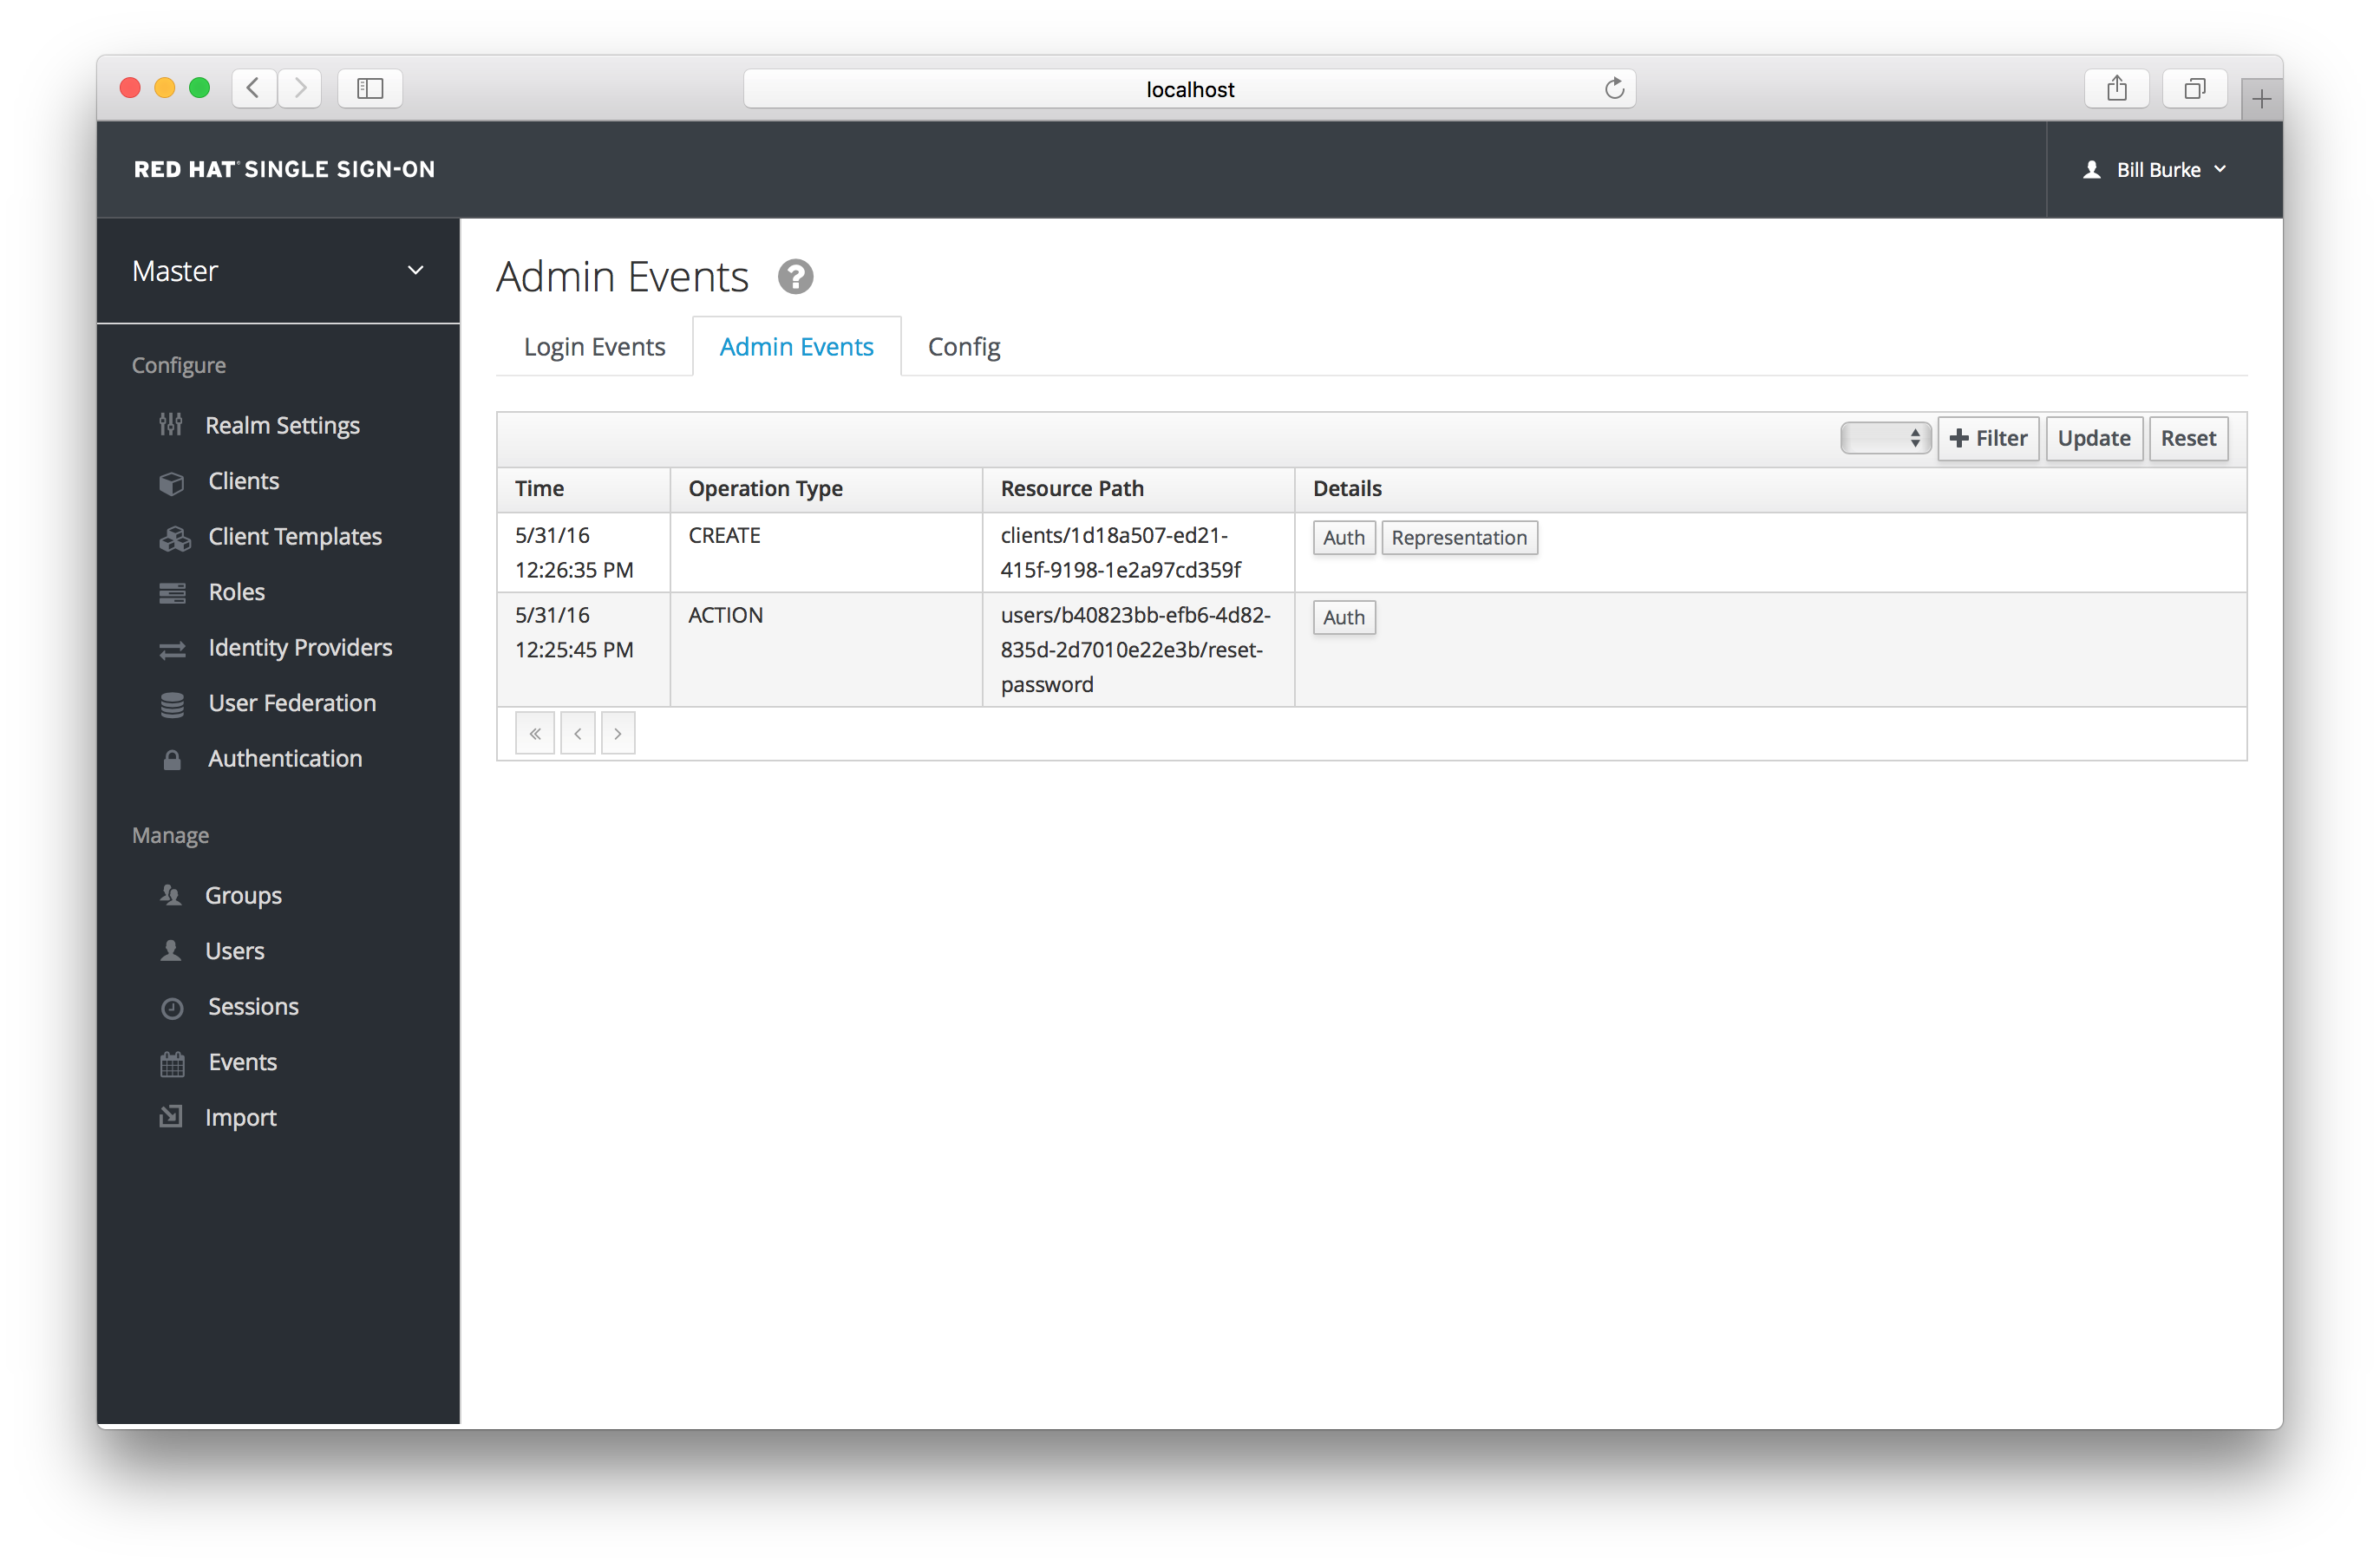
If the Details column has a Representation box, you can click on that to view the JSON that was sent with that operation.
Admin Representation
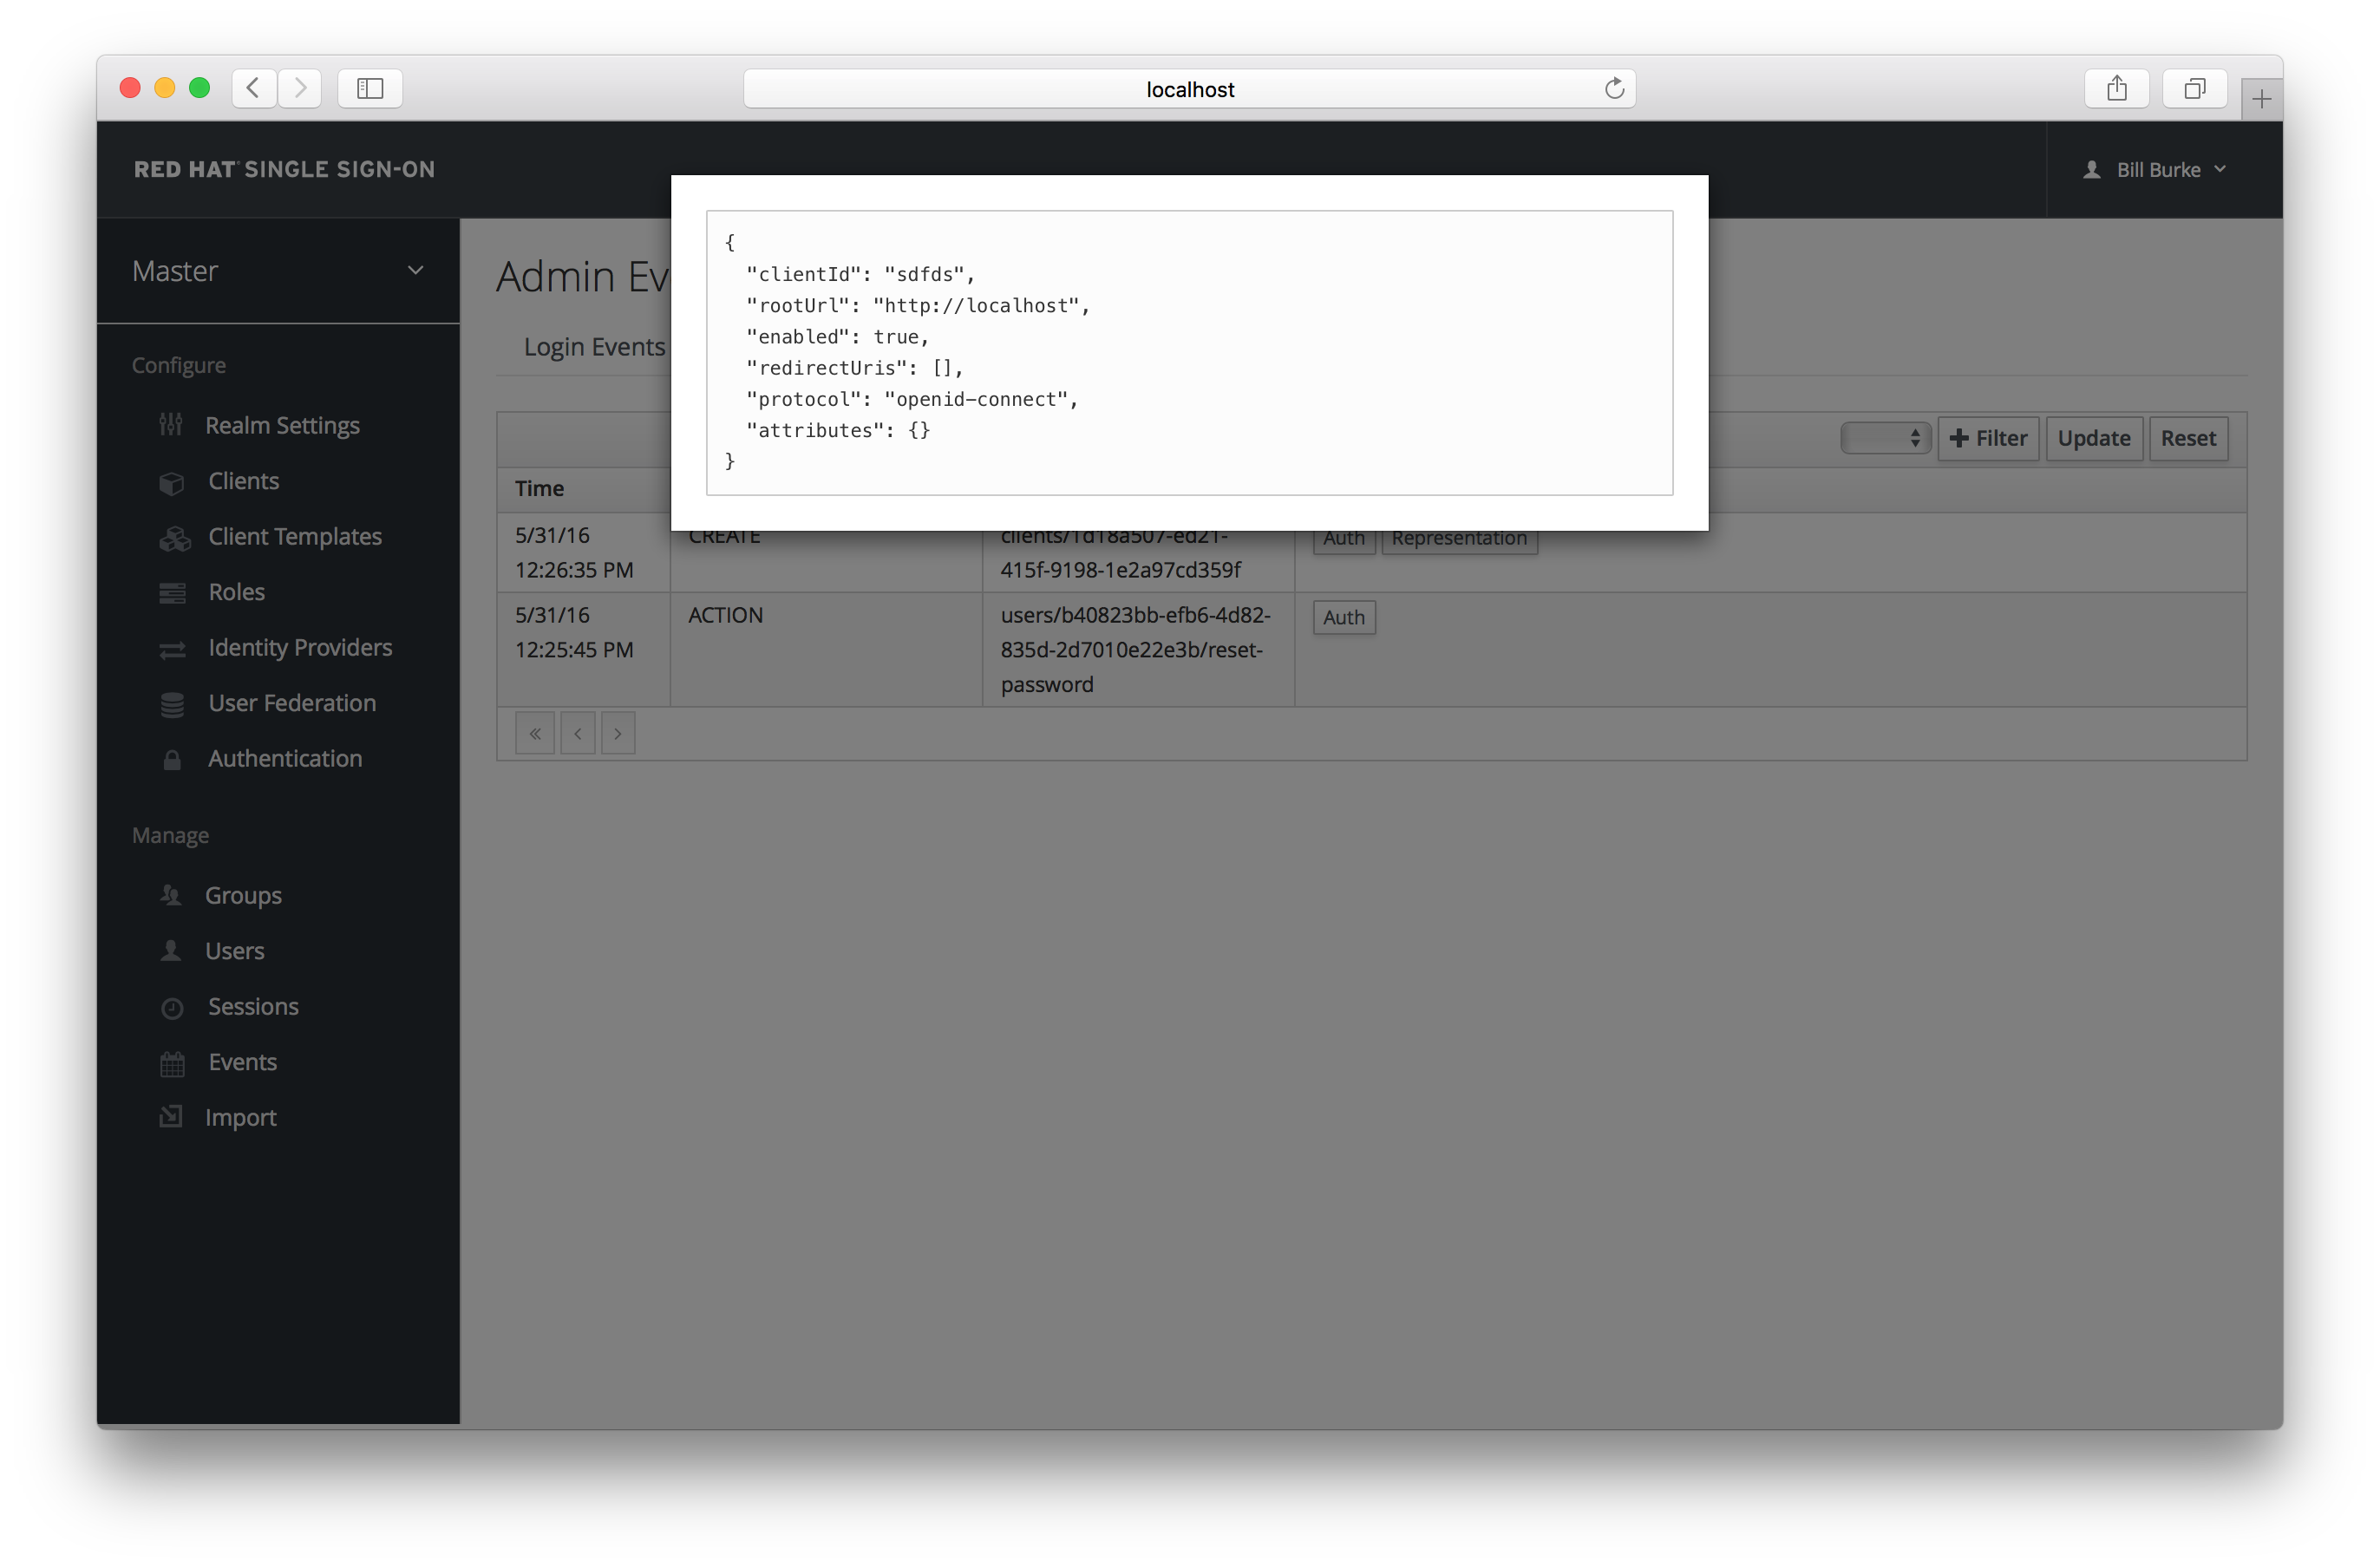
You can also filter for the events you are interested in by clicking the Filter button.
Admin Event Filter

Chapter 16. Export and Import
Red Hat Single Sign-On has the ability export and import the entire database. This can be especially useful if you want to migrate your whole Red Hat Single Sign-On database from one environment to another or migrate to a different database (for example from MySQL to Oracle). Export and import is triggered at server boot time and its parameters are passed in via Java system properties. It is important to note that because import and export happens at server startup, no other actions should be taken on the server or the database while this happens.
You can export/import your database either to:
- Directory on local filesystem
- Single JSON file on your filesystem
When importing using the directory strategy, note that the files need to follow the naming convention specified below. If you are importing files which were previously exported, the files already follow this convention.
- {REALM_NAME}-realm.json, such as "acme-roadrunner-affairs-realm.json" for the realm named "acme-roadrunner-affairs"
- {REALM_NAME}-users-{INDEX}.json, such as "acme-roadrunner-affairs-users-0.json" for the first users file of the realm named "acme-roadrunner-affairs"
If you export to a directory, you can also specify the number of users that will be stored in each JSON file.
If you have bigger amount of users in your database (500 or more), it’s highly recommended to export into directory rather than to single file. Exporting into single file may lead to the very big file. Also the directory provider is using separate transaction for each "page" (file with users), which leads to much better performance. Default count of users per file (and transaction) is 50, which showed us best performance, but you have possibility to override (See below). Exporting to single file is using one transaction per whole export and one per whole import, which results in bad performance with large amount of users.
To export into unencrypted directory you can use:
bin/standalone.sh -Dkeycloak.migration.action=export
-Dkeycloak.migration.provider=dir -Dkeycloak.migration.dir=<DIR TO EXPORT TO>
And similarly for import just use -Dkeycloak.migration.action=import instead of export . To export into single JSON file you can use:
bin/standalone.sh -Dkeycloak.migration.action=export
-Dkeycloak.migration.provider=singleFile -Dkeycloak.migration.file=<FILE TO EXPORT TO>
Here’s an example of importing:
bin/standalone.sh -Dkeycloak.migration.action=import
-Dkeycloak.migration.provider=singleFile -Dkeycloak.migration.file=<FILE TO IMPORT>
-Dkeycloak.migration.strategy=OVERWRITE_EXISTING
Other available options are:
- -Dkeycloak.migration.realmName
- This property is used if you want to export just one specified realm instead of all. If not specified, then all realms will be exported.
- -Dkeycloak.migration.usersExportStrategy
This property is used to specify where users are exported. Possible values are:
- DIFFERENT_FILES - Users will be exported into different files according to the maximum number of users per file. This is default value.
- SKIP - Exporting of users will be skipped completely.
- REALM_FILE - All users will be exported to same file with the realm settings. (The result will be a file like "foo-realm.json" with both realm data and users.)
- SAME_FILE - All users will be exported to same file but different from the realm file. (The result will be a file like "foo-realm.json" with realm data and "foo-users.json" with users.)
- -Dkeycloak.migration.usersPerFile
- This property is used to specify the number of users per file (and also per DB transaction). It’s 50 by default. It’s used only if usersExportStrategy is DIFFERENT_FILES
- -Dkeycloak.migration.strategy
This property is used during import. It can be used to specify how to proceed if a realm with same name already exists in the database where you are going to import data. Possible values are:
- IGNORE_EXISTING - Ignore importing if a realm of this name already exists.
- OVERWRITE_EXISTING - Remove existing realm and import it again with new data from the JSON file. If you want to fully migrate one environment to another and ensure that the new environment will contain the same data as the old one, you can specify this.
When importing realm files that weren’t exported before, the option keycloak.import can be used. If more than one realm file needs to be imported, a comma separated list of file names can be specified. This is more appropriate than the cases before, as this will happen only after the master realm has been initialized. Examples:
- -Dkeycloak.import=/tmp/realm1.json
- -Dkeycloak.import=/tmp/realm1.json,/tmp/realm2.json
16.1. Admin console export/import
Import of most resources can be performed from the admin console. Exporting resources will be supported in future versions.
The files created during a "startup" export can be used to import from the admin UI. This way, you can export from one realm and import to another realm. Or, you can export from one server and import to another.
The admin console import allows you to "overwrite" resources if you choose. Use this feature with caution, especially on a production system.
Chapter 17. User Account Service
Red Hat Single Sign-On has a built in User Account Service which every user has access to. This service allows users to manage their account, change their credentials, update their profile, and view their login sessions. The URL to this service is <server-root>/auth/realms/{realm-name}/account.
Account Service
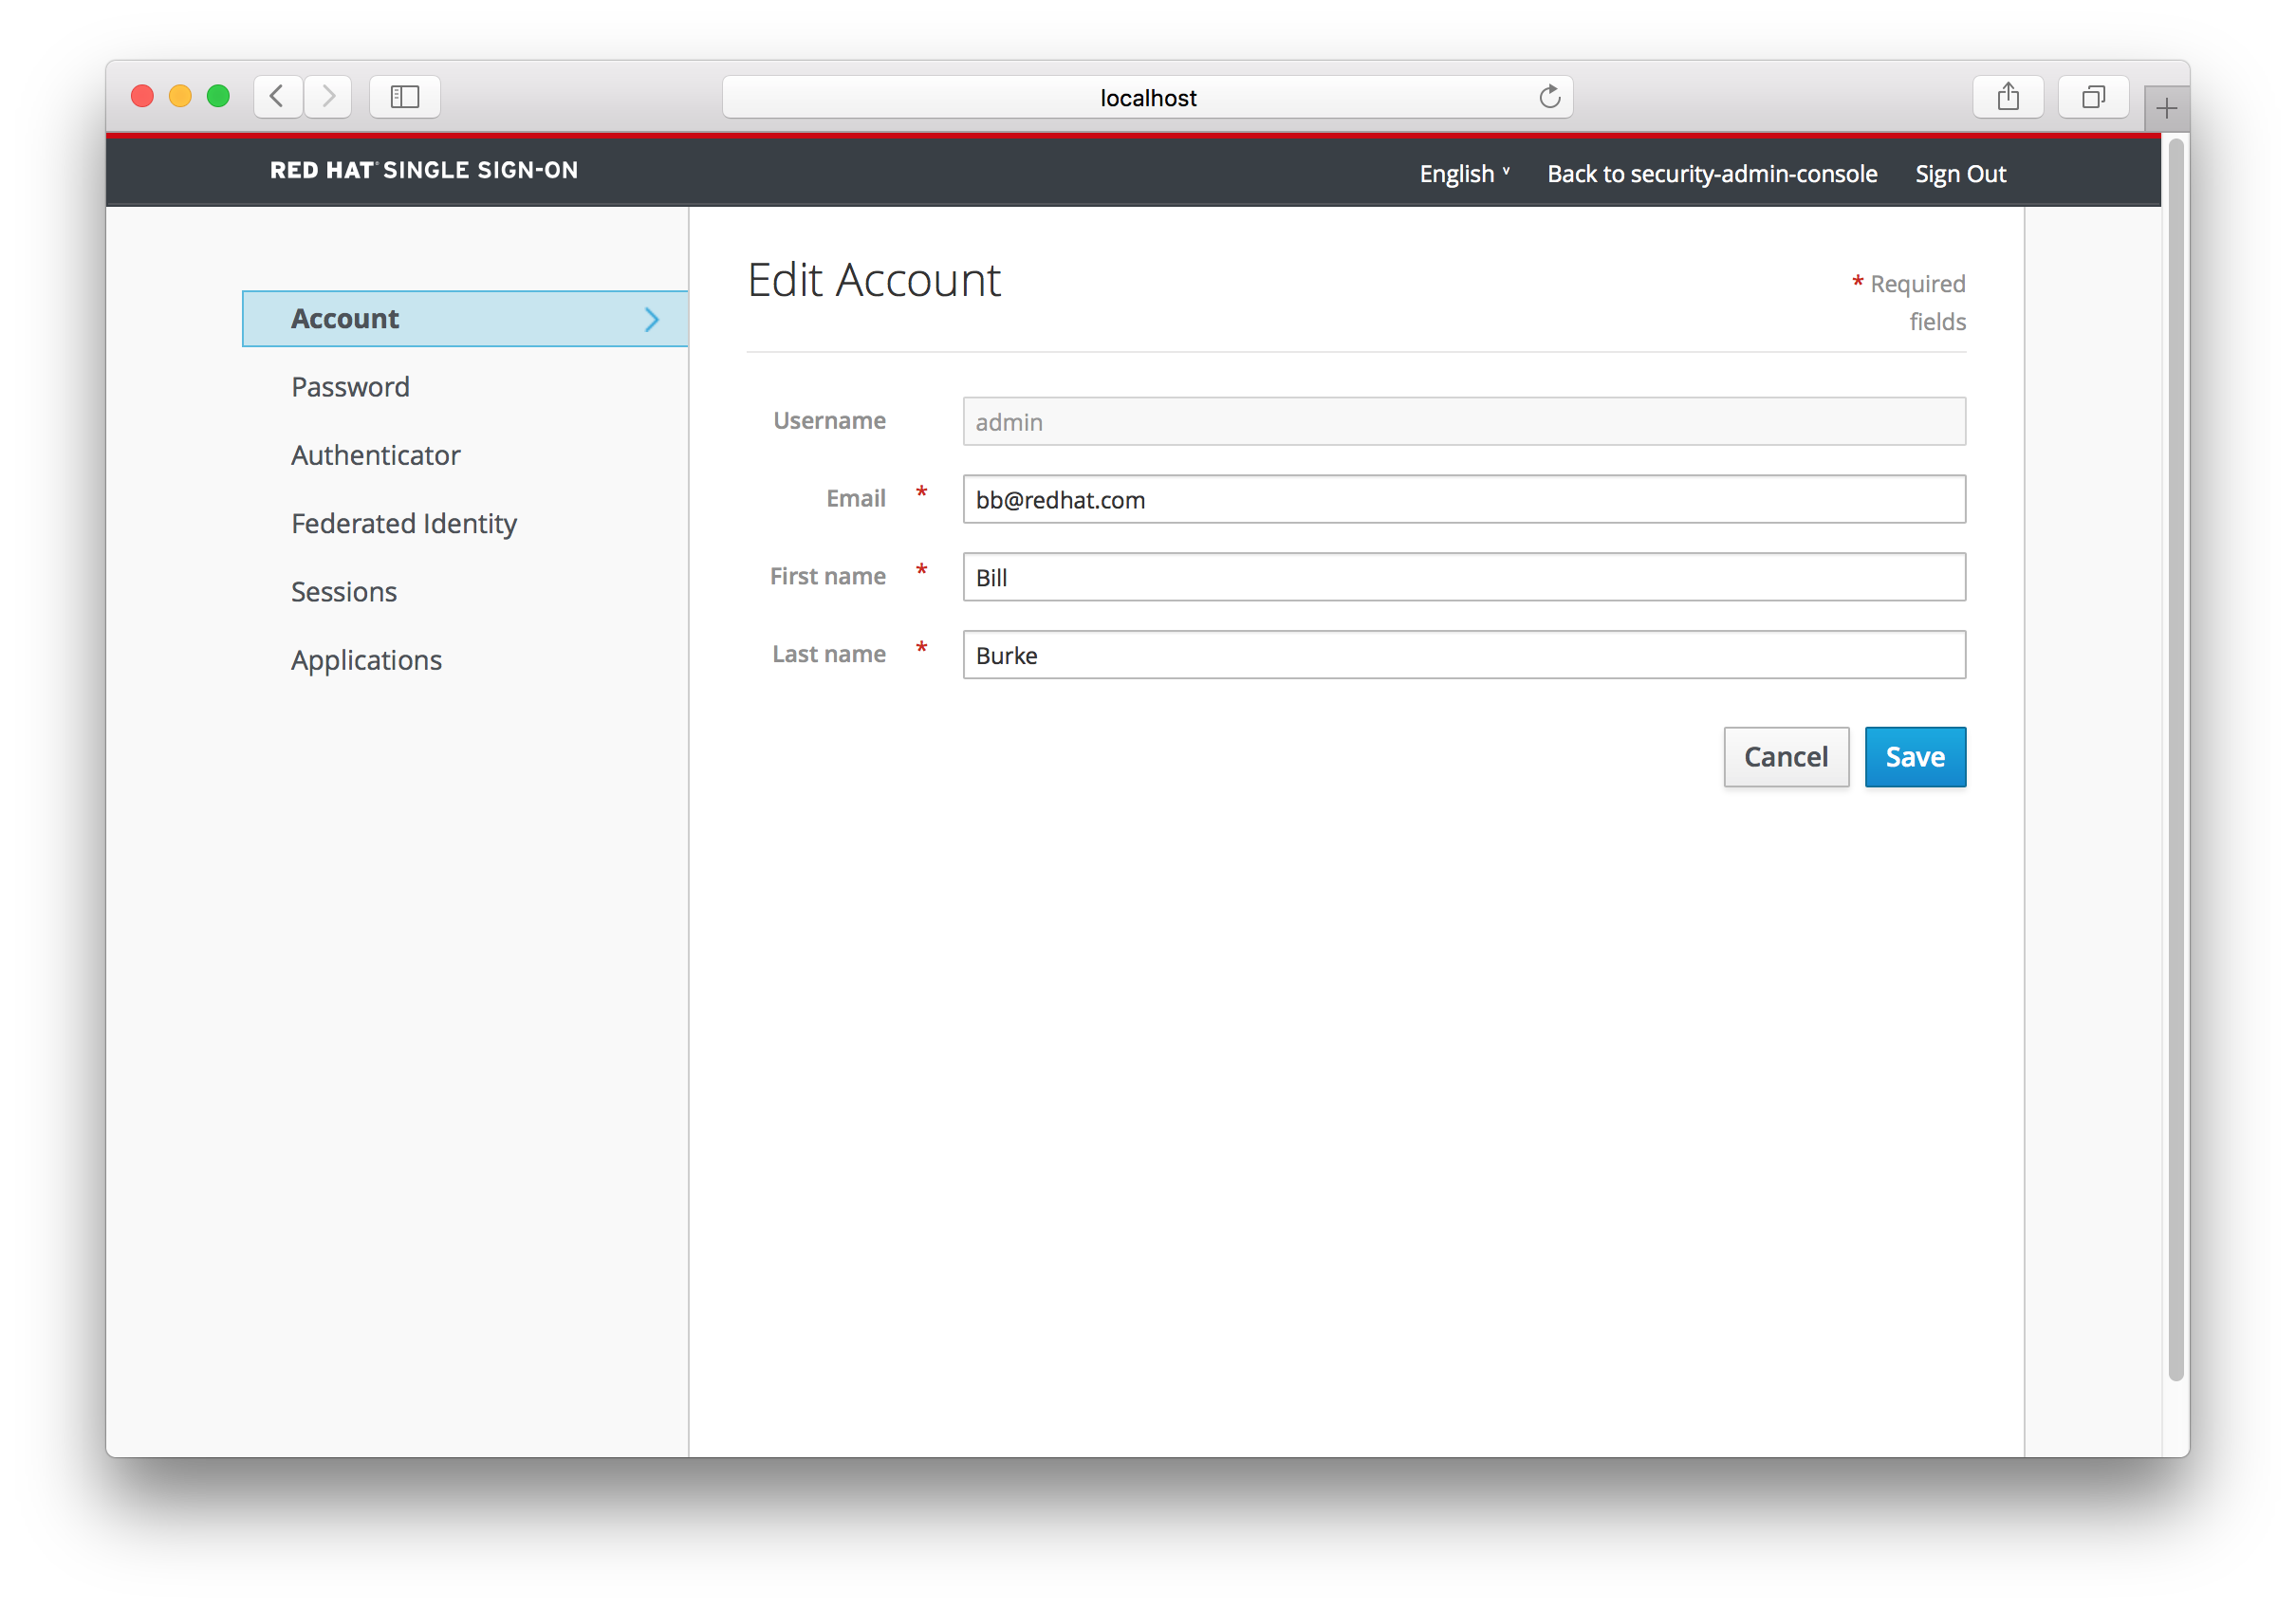
The initial page is the user’s profile, which is the Account left menu item. This is where they specify basic data about themselves. This screen can be extended to allow the user to manage additional attributes. See the Server Developer Guide for more details.
The Password left menu item allows the user to change their password.
Password Update

The Authenticator menu item allows the user to set up OTP if they desire. This will only show up if OTP is a valid authentication mechanism for your realm. Users are given directions to install FreeOTP or Google Authenticator on their mobile device to be their OTP generator. The QR code you see in the screen shot can be scanned into the FreeOTP or Google Authenticator mobile application for nice and easy setup.
OTP Authenticator
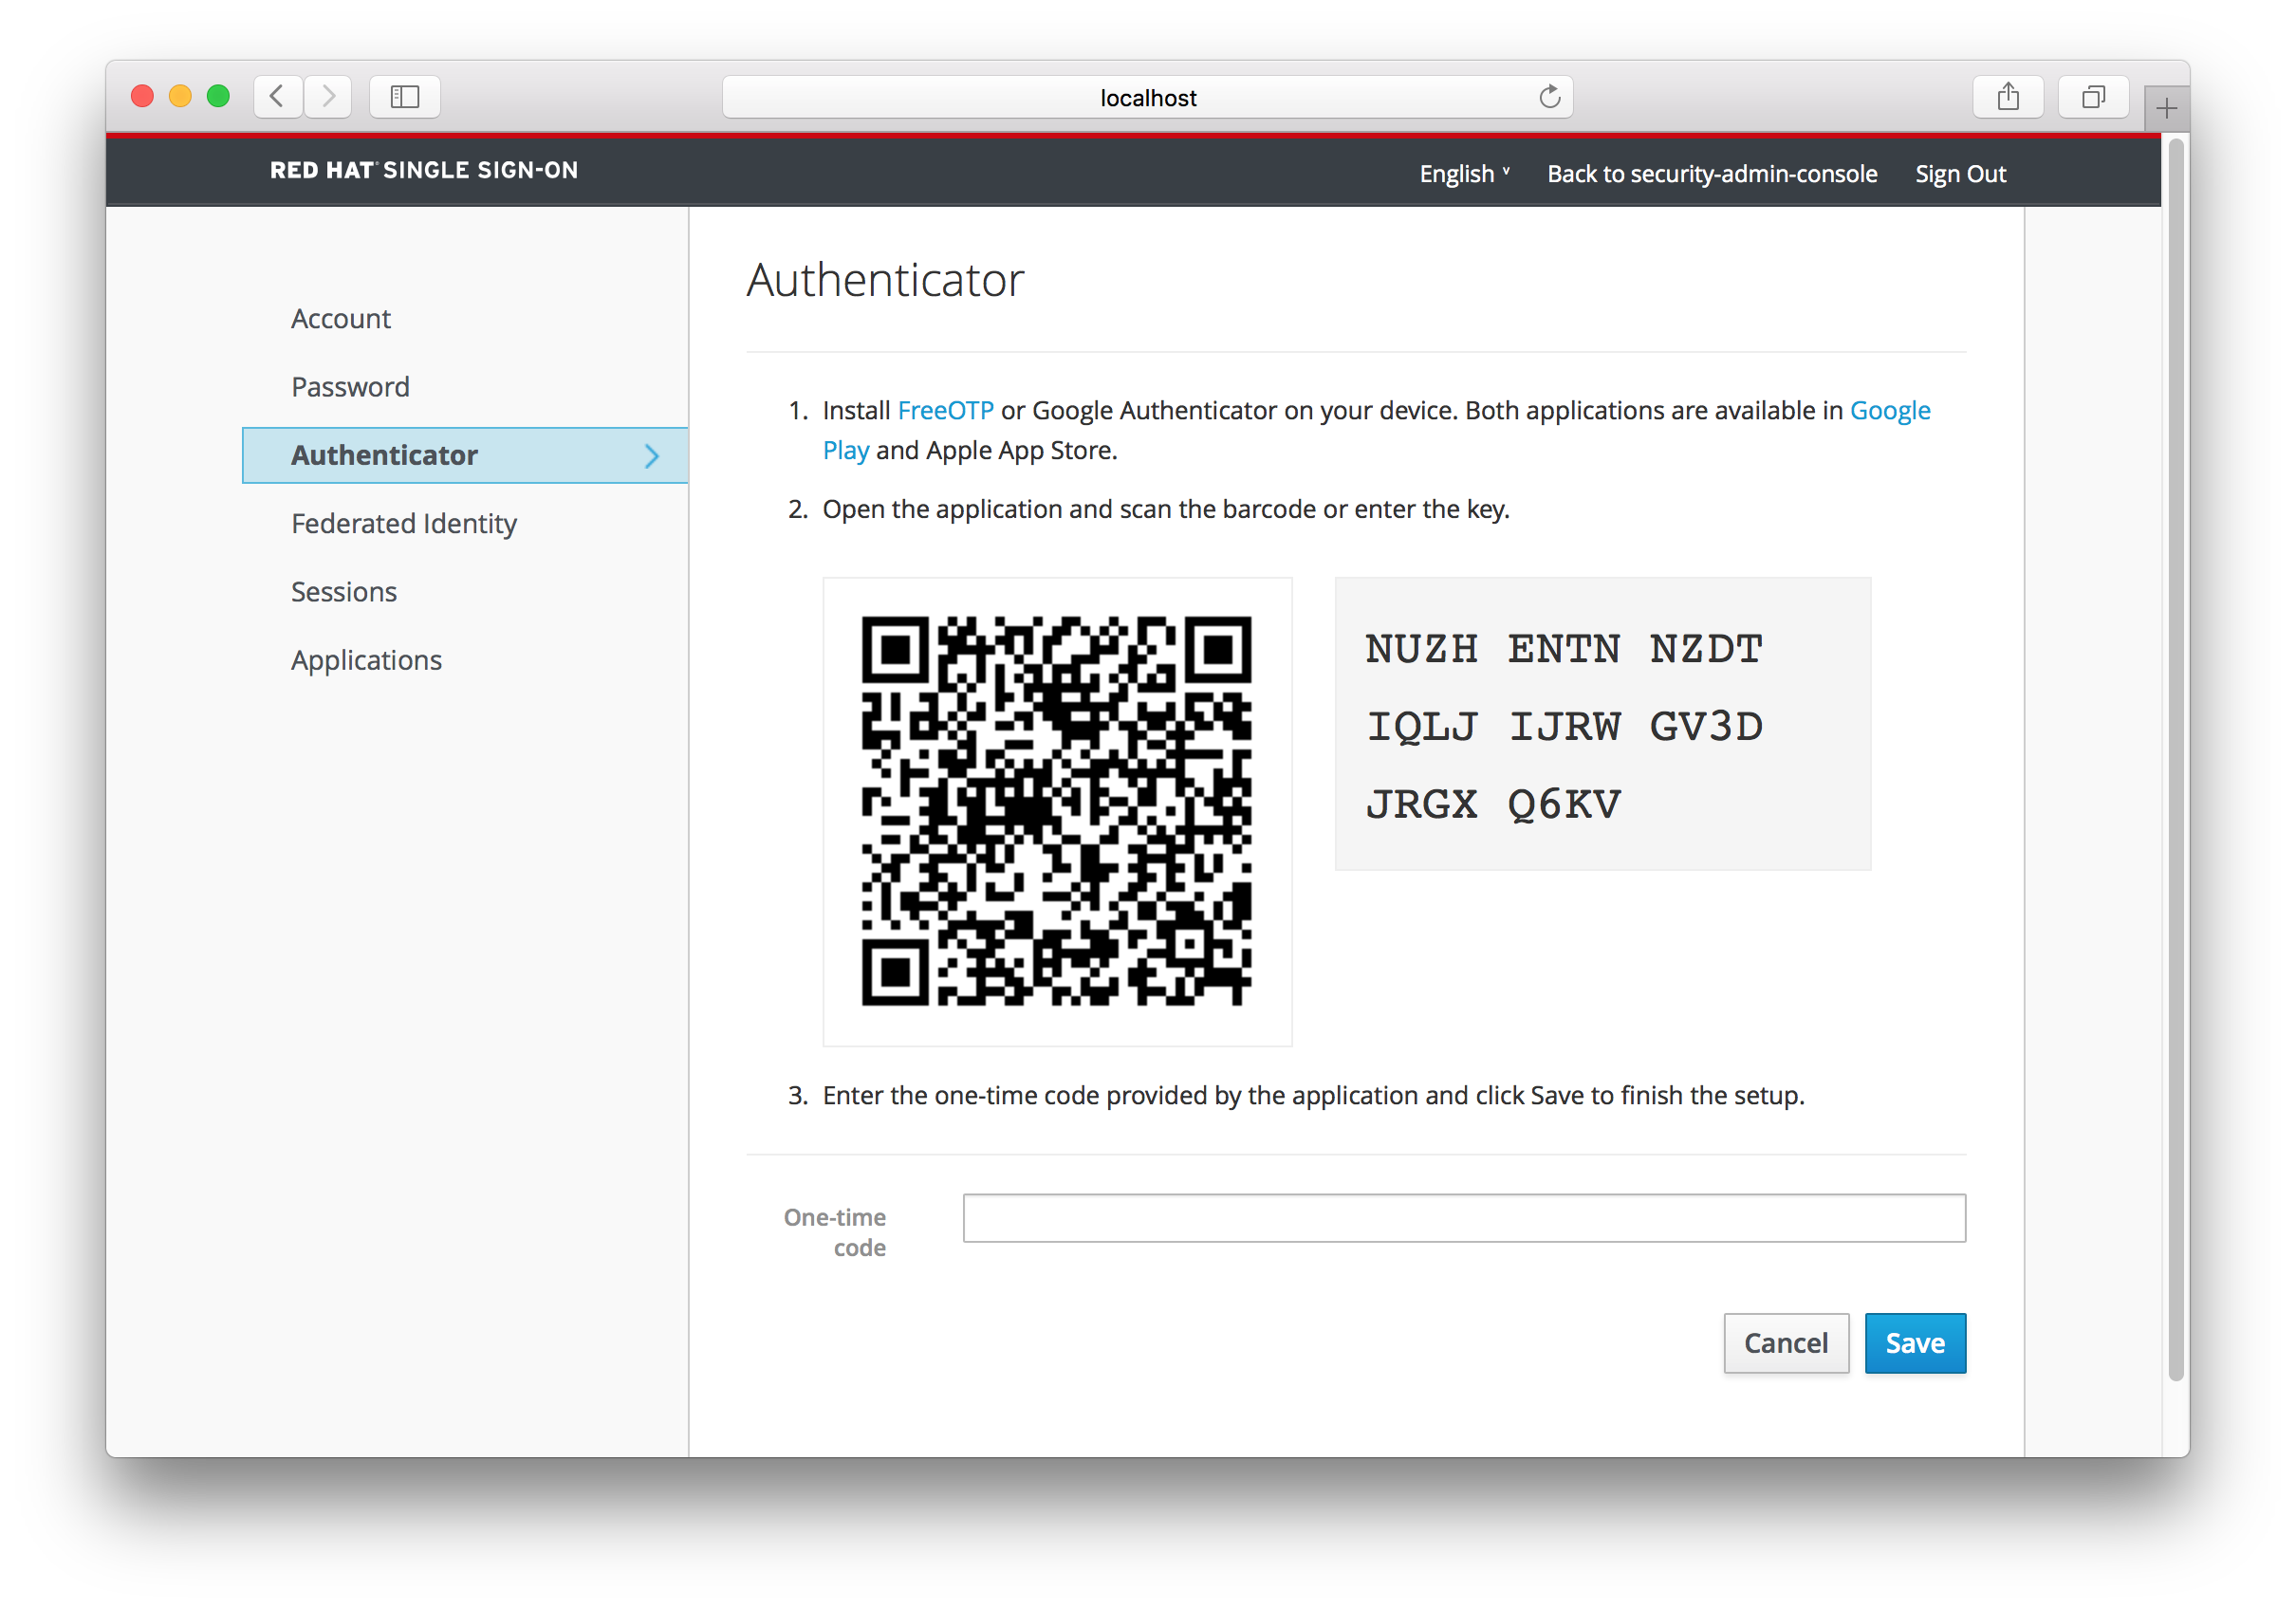
The Federated Identity menu item allows the user to link their account with an identity broker (this is usually used to link social provier accounts together). This will show the list of external identity providers you have configured for your realm.
Federated Identity
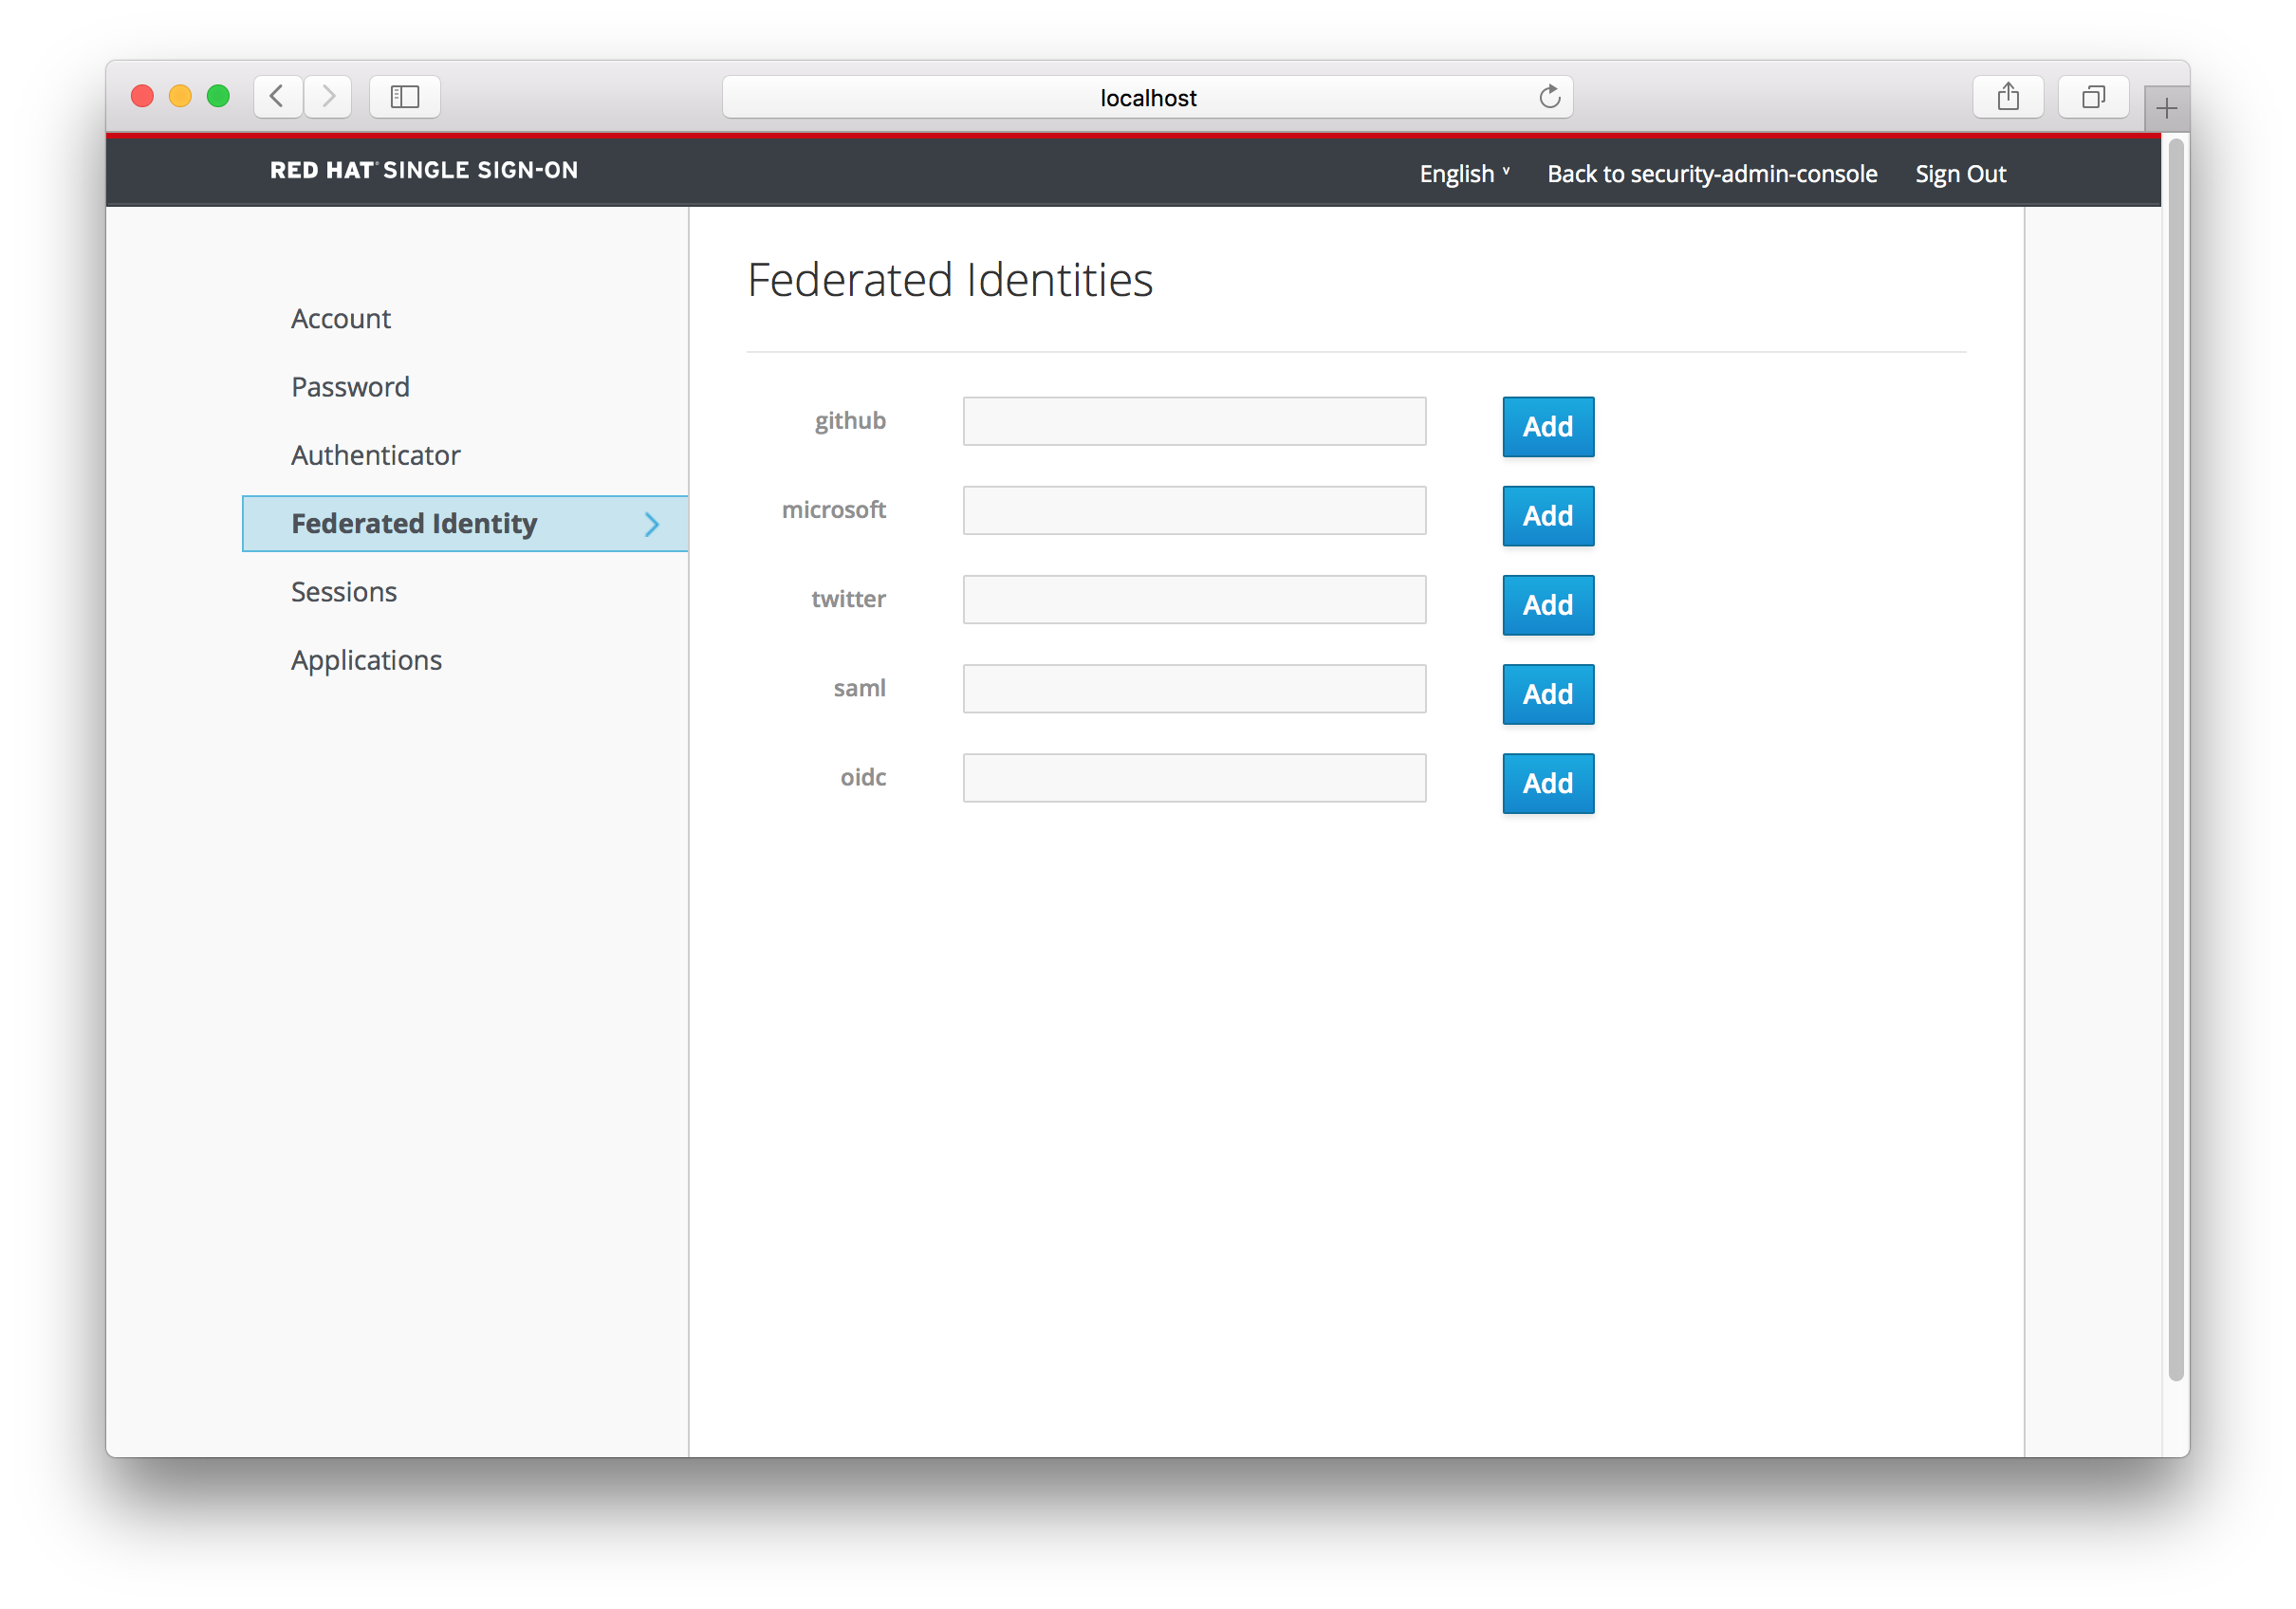
The Sessions menu item allows the user to view and manage which devices are logged in and from where. They can perform logout of these sessions from this screen too.
Sessions
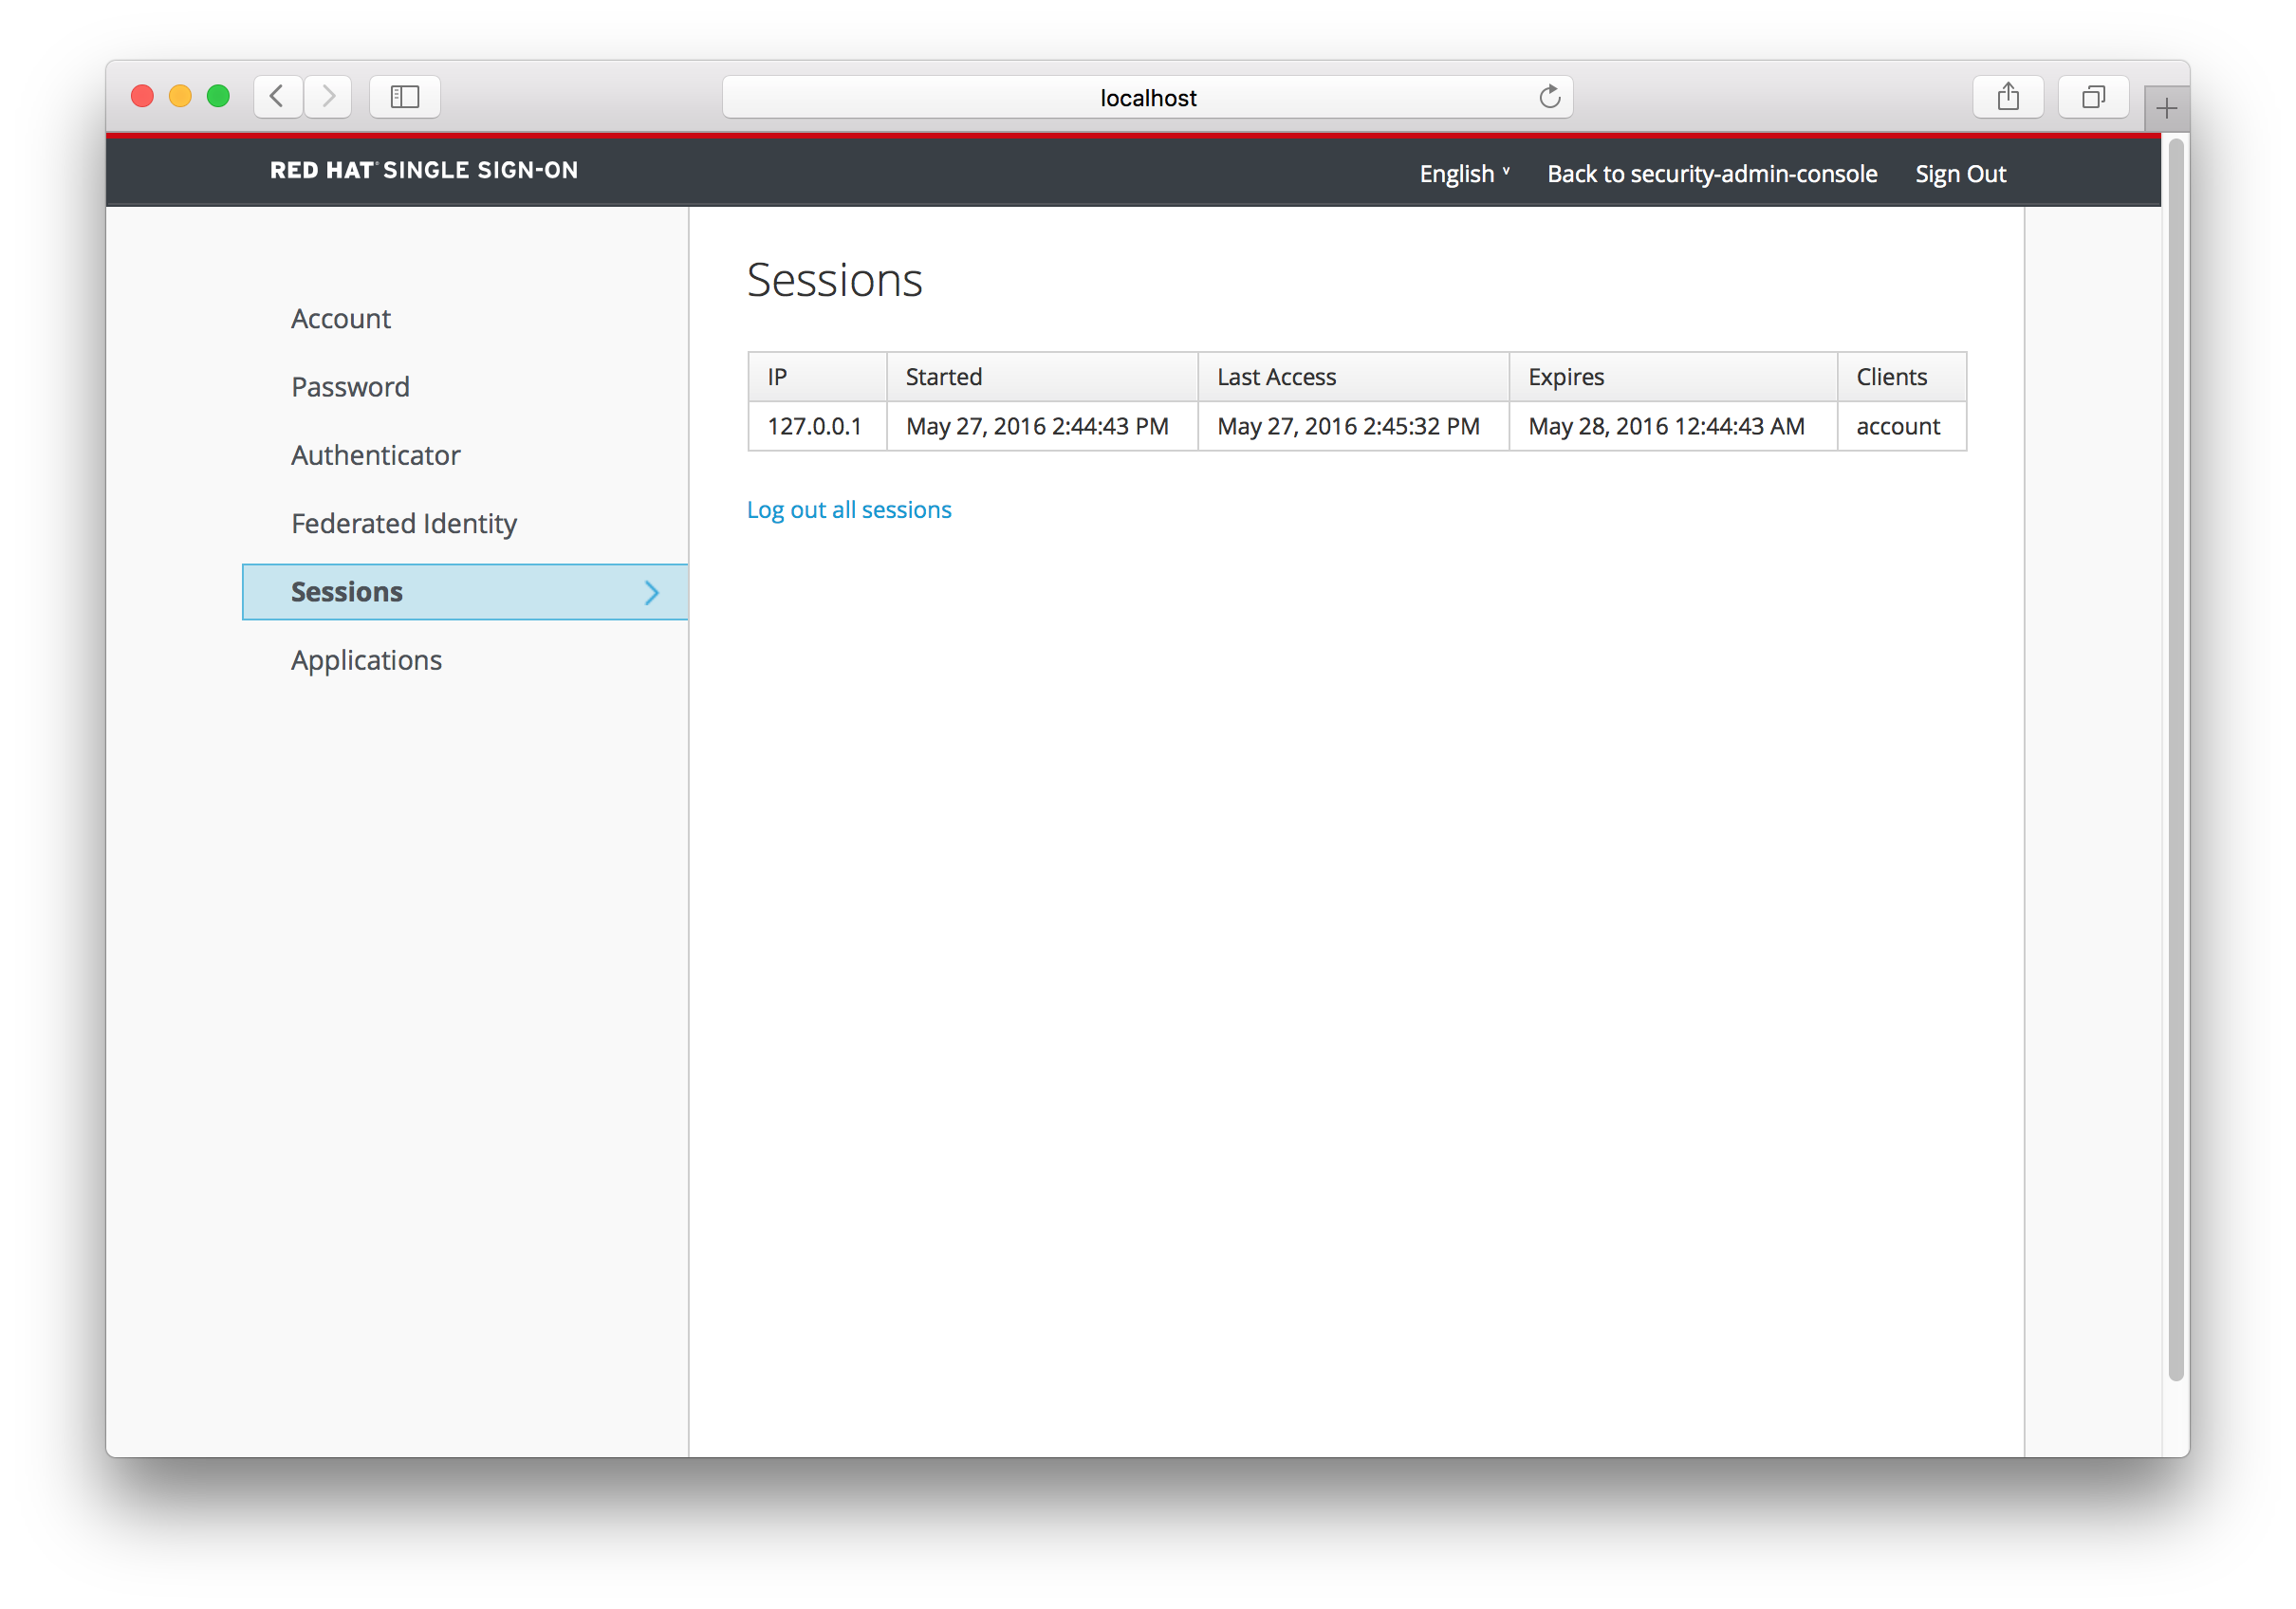
The Applications menu item shows users which applications they have access to.
Applications
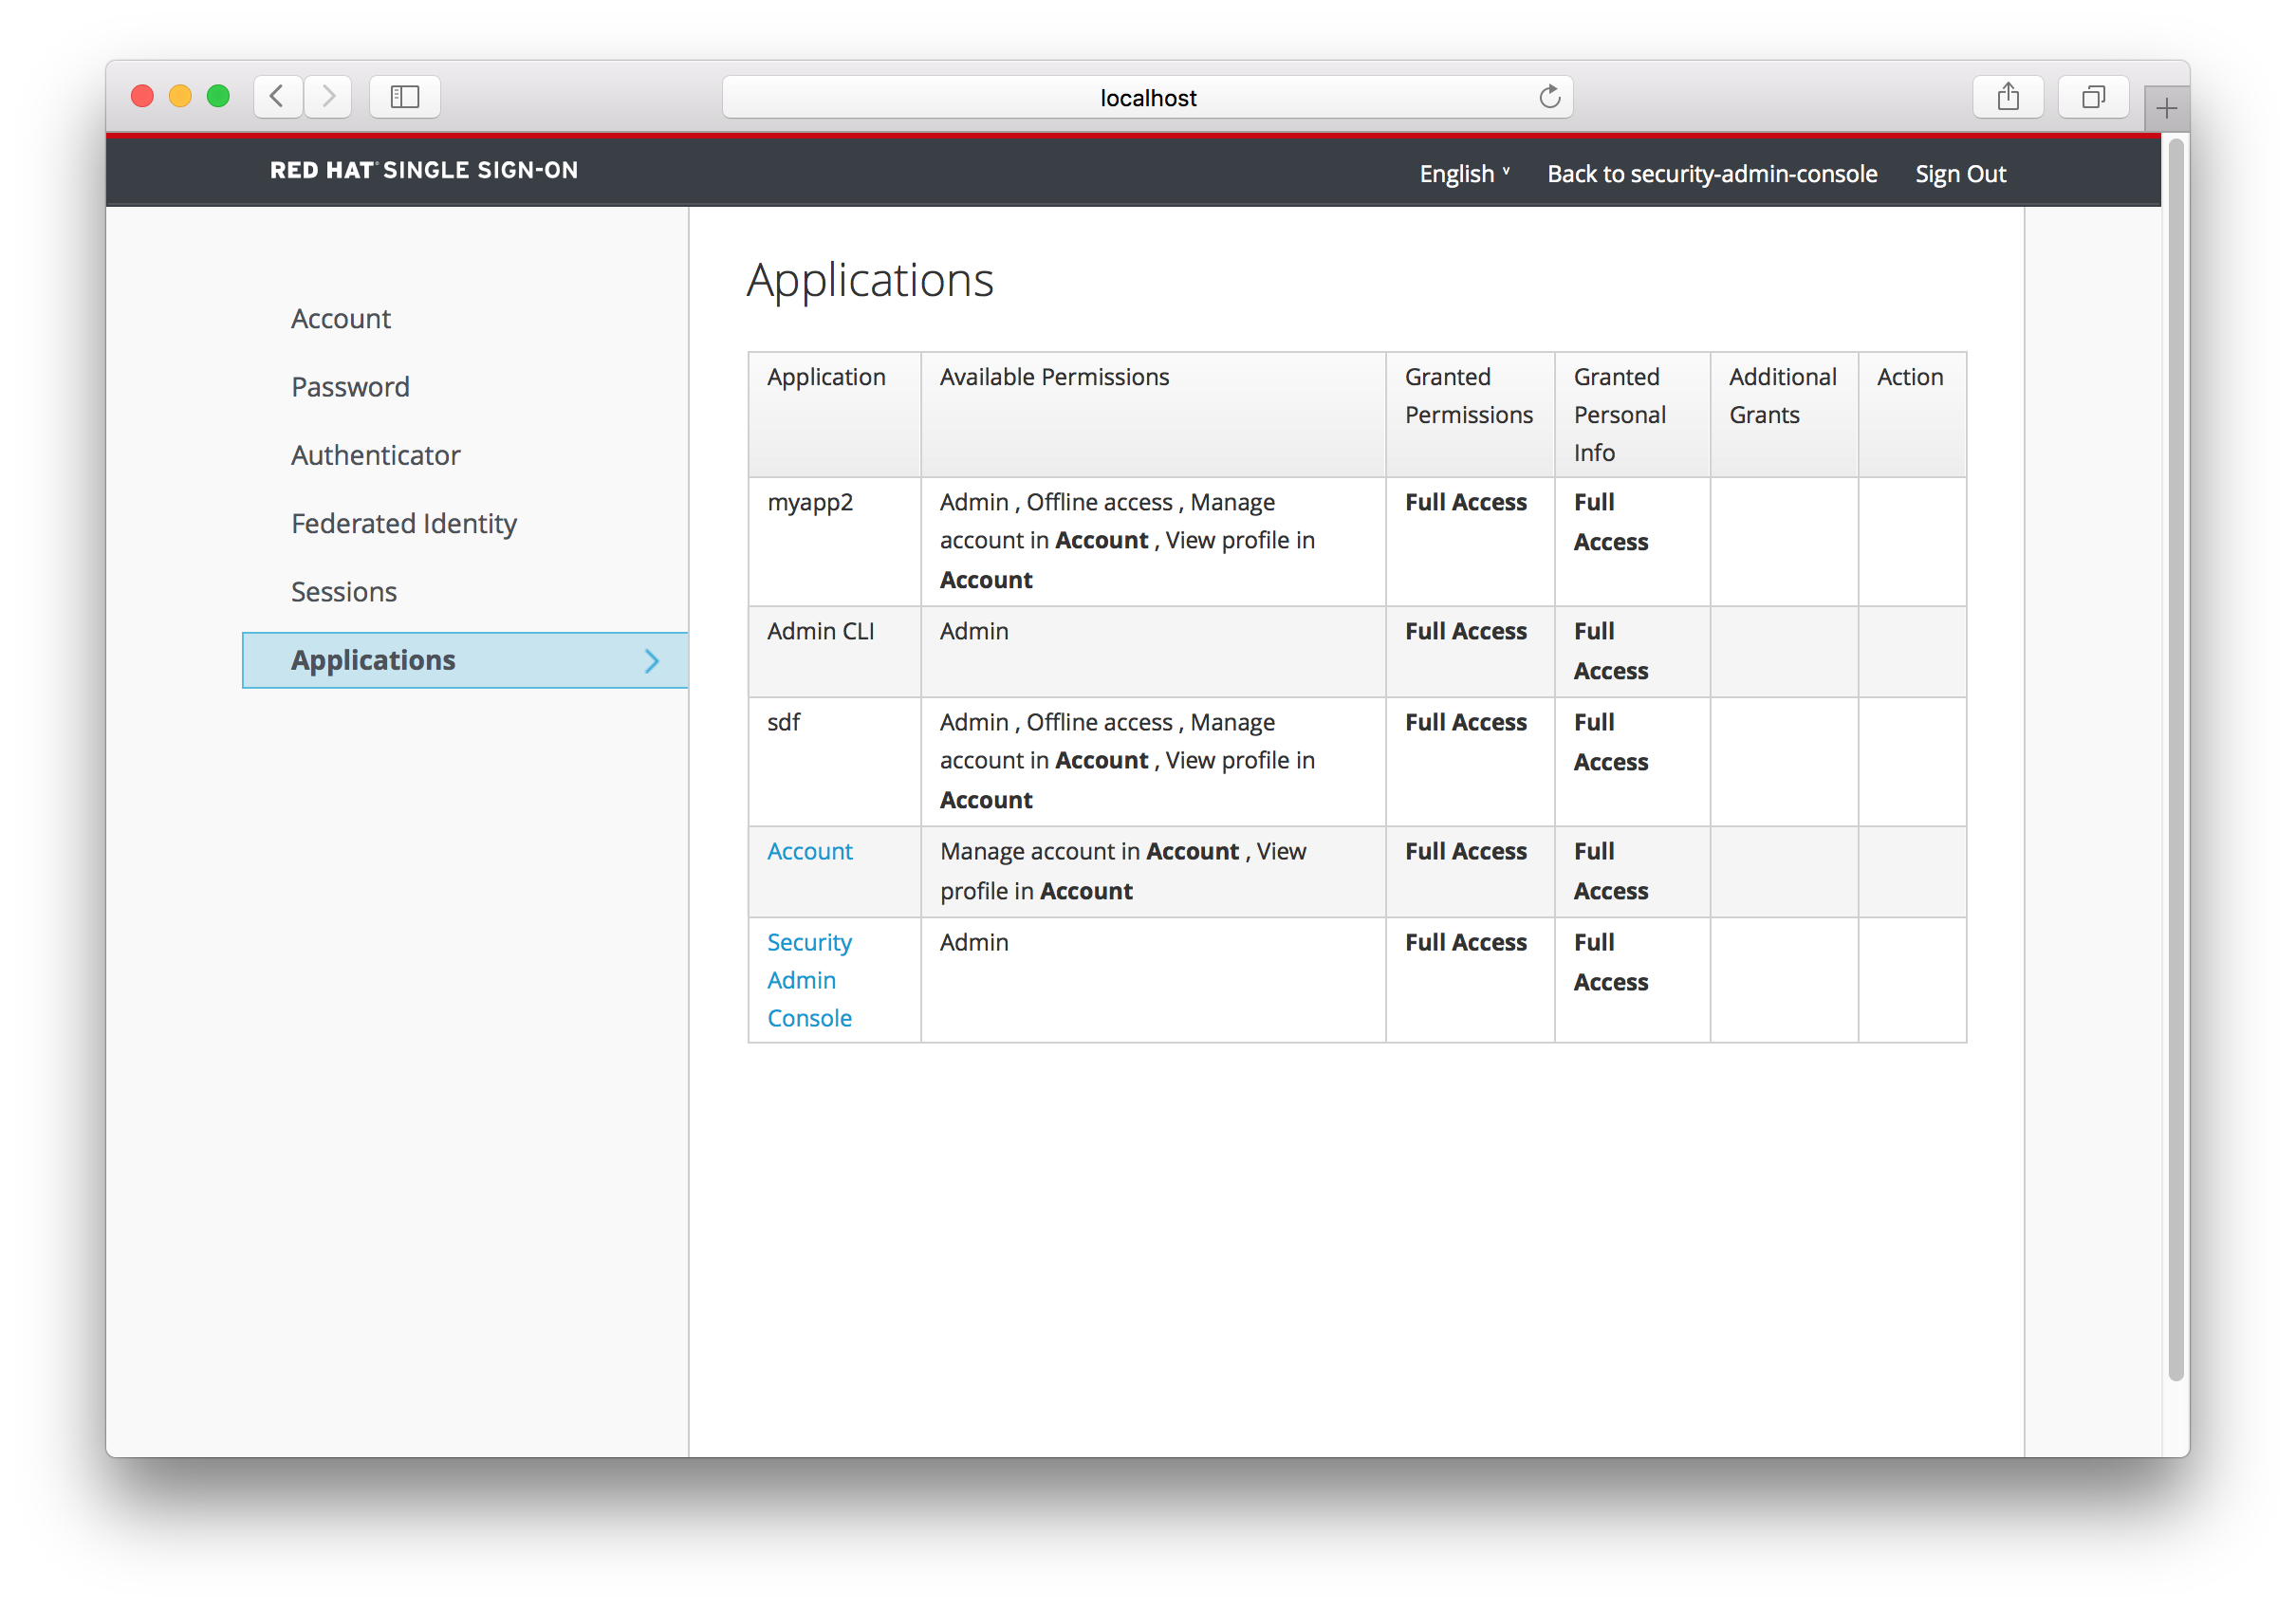
17.1. Themeable
Like all UIs in Red Hat Single Sign-On, the User Account Service is completely themeable and internationalizable. See the Server Developer Guide for more details.
Chapter 18. Threat Model Mitigation
This chapter discusses possible security vulnerabilities any authentication server could have and how Red Hat Single Sign-On mitigates those vulnerabilities. A good list of potential vulnerabilities and what security implementations should do to mitigate them can be found in the OAuth 2.0 Threat Model document put out by the IETF. Many of those vulnerabilities are discussed here.
18.1. Password guess: brute force attacks
A brute force attack happens when an attacker is trying to guess a user’s password. Red Hat Single Sign-On has some limited brute force detection capabilities. If turned on, a user account will be temporarily disabled if a threshold of login failures is reached. To enable this feature go to the Realm Settings left menu item, click on the Security Defenses tab, then additional go to the Brute Force Detection sub-tab.
Brute Force Detection

The way this works is that if there are Max Login Failures during a period of Failure Reset Time, the account is temporarily disabled for the Wait Increment multiplied by the number of failures over the max. After Failure Reset Time is reached all failures are wiped clean. The Max Wait is the maximum amount of time an account can be disabled. Another preventive measure is that if there are subsequent login failures for one account that are too quick for a human to initiate the account will be disabled. This is controlled by the Quick Login Check Milli Seconds value. So, if there are two login failures for the same account within that value, the account will be disabled for Minimum Quick Login Wait.
The downside of Red Hat Single Sign-On brute force detection is that the server becomes vulnerable to denial of service attacks. An attacker can simply try to guess passwords for any accounts it knows and these account will be disabled. Eventually we will expand this functionality to take client IP address into account when deciding whether to block a user.
A better option might be a tool like Fail2Ban. You can point this service at the Red Hat Single Sign-On server’s log file. Red Hat Single Sign-On logs every login failure and client IP address that had the failure. Fail2Ban can be used to modify firewalls after it detects an attack to block connections from specific IP addresses.
18.1.1. Password Policies
Another thing you should do to prevent password guess is to have a complex enough password policy to ensure that users pick hard to guess passwords. See the Password Policies chapter for more details.
The best way to prevent password guessing though is to set up the server to use a one-time-password (OTP).
18.2. Clickjacking
With clickjacking, a malicious site loads the target site in a transparent iFrame overlaid on top of a set of dummy buttons that are carefully constructed to be placed directly under important buttons on the target site. When a user clicks a visible button, they are actually clicking a button (such as a "login" button) on the hidden page. An attacker can steal a user’s authentication credentials and access their resources.
By default, every response by Red Hat Single Sign-On sets some specific browser headers that can prevent this from happening. Specifically, it sets X-FRAME_OPTIONS and Content-Security-Policy. You should take a look at the definition of both of these headers as there is a lot of fine-grain browser access you can control. In the admin console you can specify the values these headers will have. Go to the Realm Settings left menu item and click the Security Defenses tab and make sure you are on the Headers sub-tab.
By default, Red Hat Single Sign-On only sets up a same-origin policy for iframes.
18.3. SSL/HTTPS Requirement
If you do not use SSL/HTTPS for all communication between the Red Hat Single Sign-On auth server and the clients it secures you will be very vulnerable to man in the middle attacks. OAuth 2.0/OpenID Connect uses access tokens for security. Without SSL/HTTPS, attackers can sniff your network and obtain an access token. Once they have an access token they can do any operation that the token has been given permission for.
Red Hat Single Sign-On has three modes for SSL/HTTPS. SSL can be hard to set up, so out of the box, Red Hat Single Sign-On allows non-HTTPS communication over private IP addresses like localhost, 192.168.x.x, and other private IP addresses. In production, you should make sure SSL is enabled and required across the board.
On the adapter/client side, Red Hat Single Sign-On allows you to turn off the SSL trust manager. The trust manager ensures identity the client is talking to. It checks the DNS domain name against the server’s certificate. In production you should make sure that each of your client adapters is configured to use a truststore. Otherwise you are vulnerable to DNS man in the middle attacks.
18.4. CSRF Attacks
Cross-site request forgery (CSRF) is a web-based attack whereby HTTP requests are transmitted from a user that the web site trusts or has authenticated with(e.g. via HTTP redirects or HTML forms). Any site that uses cookie based authentication is vulnerable to these types of attacks. These attacks are mitigated by matching a state cookie against a posted form or query parameter.
The OAuth 2.0 login specification requires that a state cookie be used and matched against a transmitted state parameter. Red Hat Single Sign-On fully implements this part of the specification so all logins are protected.
The Red Hat Single Sign-On Admin Console is a pure JavaScript/HTML5 application that makes REST calls to the backend Red Hat Single Sign-On admin REST API. These calls all require bearer token authentication and are made via JavaScript Ajax calls. CSRF does not apply here. The admin REST API can also be configured to validate the CORS origins as well.
The only part of Red Hat Single Sign-On that really falls into CSRF is the user account management pages. To mitigate this Red Hat Single Sign-On sets a state cookie and also embeds the value of this state cookie within hidden form fields or query parameters in action links. This query or form parameter is checked against the state cookie to verify that the call was made by the user.
18.5. Unspecific Redirect URIs
For the Authorization Code Flow, if you register redirect URIs that are too general, then it would be possible for a rogue client to impersonate a different client that has a broader scope of access. This could happen for instance if two clients live under the same domain. So, it’s a good idea to make your registered redirect URIs as specific as feasible.
18.6. Compromised Access and Refresh tokens
There are a few things you can do to mitigate access tokens and refresh tokens from being stolen. The most important thing is to enforce SSL/HTTPS communication between Red Hat Single Sign-On and its clients and applications. This might seem like a no-brainer, but since Red Hat Single Sign-On does not have SSL enabled by default, many naive admins might not realize they have to do this.
Another thing you can do to mitigate leaked access tokens is to shorten their lifespans. You can specify this within the timeouts page. Short lifespans (minutes) for access tokens for clients and applications to refresh their access tokens after a short amount of time. If an admin detects a leak, they can logout all user sessions to invalidate these refresh tokens or set up a revocation policy. Making sure refresh tokens always stay private to the client and are never transmitted ever is very important as well.
If an access token or refresh token is compromised, the first thing you should do is go to the admin console and push a not-before revocation policy to all applications. This will enforce that any tokens issued prior to that date are now invalid. You can also disable specific applications, clients, and users if you feel that any one of those entities is completely compromised.
18.7. Compromised Access Codes
For the OIDC Auth Code Flow, it would be very hard for an attacker to compromise Red Hat Single Sign-On access codes. Red Hat Single Sign-On generates a cryptographically strong random value for its access codes so it would be very hard to guess an access token. An access code can only be used once to obtain an access token. In the admin console you can specify how long an access token is valid for on the timeouts page. This value should be really short, as short as a few seconds and just long enough for the client to make the request to obtain a token from the code.
18.8. Open redirectors
An attacker could use the end-user authorization endpoint and the redirect URI parameter to abuse the authorization server as an open redirector. An open redirector is an endpoint using a parameter to automatically redirect a user agent to the location specified by the parameter value without any validation. An attacker could utilize a user’s trust in an authorization server to launch a phishing attack.
Red Hat Single Sign-On requires that all registered applications and clients register at least one redirection URI pattern. Any time a client asks Red Hat Single Sign-On to perform a redirect (on login or logout for example), Red Hat Single Sign-On will check the redirect URI vs. the list of valid registered URI patterns. It is important that clients and applications register as specific a URI pattern as possible to mitigate open redirector attacks.
18.9. Password database compromised
Red Hat Single Sign-On does not store passwords in raw text. It stores a hash of them using the PBKDF2 algorithm. It actually uses a default of 20,000 hasing iterations! This is the security community’s recommended number of iterations. This can be a rather large performance hit on your system as PBKDF2, by design, gobbles up a significant amount of CPU. It is up to you to decide how serious you want to be to protect your password database.
18.10. Limiting Scope
By default, each new client application has an unlimited scope. This means that every access token that is created for that client will contain all the permissions the user has. If the client gets compromised and the access token is leaked, then each system that the user has permission to access is now also compromised. It is highly suggested that you limit the roles an access token is assigned by using the Scope menu for each client.
18.11. SQL Injection Attacks
At this point in time, there is no knowledge of any SQL injection vulnerabilities in Red Hat Single Sign-On.
12.3. Social Identity Providers
For Internet facing applications, it is quite burdensome for users to have to register at your site to obtain access. It requires them to remember yet another username and password combination. Social identity providers allow you to delegate authentication to a semi-trusted and respected entity where the user probably already has an account. Red Hat Single Sign-On provides built-in support for the most common social networks out there, such as Google, Facebook, Twitter, Github, LinkedIn, Microsoft and StackOverflow.
12.3.1. Google
There are a number of steps you have to complete to be able to login to Google. First, go to the
Identity Providersleft menu item and selectGooglefrom theAdd providerdrop down list. This will bring you to theAdd identity providerpage.Add Identity Provider
You can’t click save yet, as you’ll need to obtain a
Client IDandClient Secretfrom Google. One piece of data you’ll need from this page is theRedirect URI. You’ll have to provide that to Google when you register Red Hat Single Sign-On as a client there, so copy this URI to your clipboard.To enable login with Google you first have to create a project and a client in the Google Developer Console. Then you need to copy the client id and secret into the Red Hat Single Sign-On Admin Console.
Google often changes the look and feel of the Google Developer Console, so these directions might not always be up to date and the configuration steps might be slightly different.
Let’s see first how to create a project with Google.
Log in to the Google Developer Console.
Google Developer Console
Click the
Create Projectbutton. Use any value forProject nameandProject IDyou want, then click theCreatebutton. Wait for the project to be created (this may take a while). Once created you will be brought to the project’s dashboard.Dashboard
To be able to retrieve the profiles of Google users, you need to turn on the Google+ APIs. Select the
Enable and manage APIsand click theGoogle+ APIlink.APIs
Click the
Enablebutton on this page. You will get a message that you must create the credentials of your project. So click theGo to Credentialsbutton.Go To Credentials
You will then be brought to the credentials page.
If you logout in the middle of this, there is a menu in the top left hand corner. Select
API Managerand it will bring you to your desired screen.You will then be asked to specify what credentials you need and what type of data you will be accessing.
Add Credentials
Select
Web serverandUser dataand click theWhat credentials do I need?button.Create OAuth ID
Next you’ll need to create an OAuth 2.0 client ID. Specify the name you want for your client. You’ll also need to copy and paste the
Redirect URIfrom the Red Hat Single Sign-OnAdd Identity Providerpage into theAuthorized redirect URIsfield. After you do this, click theCreate client IDbutton.When users log into Google from Red Hat Single Sign-On they will see a consent screen from Google which will ask the user if Red Hat Single Sign-On is allowed to view information about their user profile. The next Google config screen asks you for information about this screen.
Once you click
Doneyou will be brought to theCredentialspage. Click on your new OAuth 2.0 Client ID to view the settings of your new Google Client.Google Client Credentials
You will need to obtain the client ID and secret from this page so you can enter them into the Red Hat Single Sign-On
Add identity providerpage. Go back to Red Hat Single Sign-On and specify those items.One config option to note on the
Add identity providerpage for Google is theDefault Scopesfield. This field allows you to manually specify the scopes that users must authorize when authenticating with this provider. For a complete list of scopes, please take a look at https://developers.google.com/oauthplayground/ . By default, Red Hat Single Sign-On uses the following scopes:openidprofileemail.12.3.2. Facebook
There are a number of steps you have to complete to be able to login to Facebook. First, go to the
Identity Providersleft menu item and selectFacebookfrom theAdd providerdrop down list. This will bring you to theAdd identity providerpage.Add Identity Provider
You can’t click save yet, as you’ll need to obtain a
Client IDandClient Secretfrom Facebook. One piece of data you’ll need from this page is theRedirect URI. You’ll have to provide that to Facebook when you register Red Hat Single Sign-On as a client there, so copy this URI to your clipboard.To enable login with Facebook you first have to create a project and a client in the Facebook Developer Console.
Facebook often changes the look and feel of the Facebook Developer Console, so these directions might not always be up to date and the configuration steps might be slightly different.
Once you’ve logged into the console there is a pull down menu in the top right corner of the screen that says
My Apps. Select theAdd a New Appmenu item.Add a New App
Select the
Websiteicon. Click theSkip and Create App IDbutton.Create a New App ID
The email address and app category are required fields. Once you’re done with that, you will be brought to the dashboard for the application. Click the
Settingsleft menu item.Create a New App ID
Click on the
+ Add Platformbutton at the end of this page and select theWebsiteicon. Copy and paste theRedirect URIfrom the Red Hat Single Sign-OnAdd identity providerpage into theSite URLof the FacebookWebsitesettings block.Specify Website
After this it is necessary to make the Facebook app public. Click
App Reviewleft menu item and switch button to "Yes".You will need also to obtain the App ID and App Secret from this page so you can enter them into the Red Hat Single Sign-On
Add identity providerpage. To obtain this click on theDashboardleft menu item and click onShowunderApp Secret. Go back to Red Hat Single Sign-On and specify those items and finally save your Facebook Identity Provider.One config option to note on the
Add identity providerpage for Facebook is theDefault Scopesfield. This field allows you to manually specify the scopes that users must authorize when authenticating with this provider. For a complete list of scopes, please take a look at https://developers.facebook.com/docs/graph-api. By default, Red Hat Single Sign-On uses the following scopes:email.12.3.3. Twitter
There are a number of steps you have to complete to be able to login to Twitter. First, go to the
Identity Providersleft menu item and selectTwitterfrom theAdd providerdrop down list. This will bring you to theAdd identity providerpage.Add Identity Provider
You can’t click save yet, as you’ll need to obtain a
Client IDandClient Secretfrom Twitter. One piece of data you’ll need from this page is theRedirect URI. You’ll have to provide that to Twitter when you register Red Hat Single Sign-On as a client there, so copy this URI to your clipboard.To enable login with Twtter you first have to create an application in the Twitter Application Management.
Register Application
Click on the
Create New Appbutton. This will bring you to theCreate an Applicationpage.Register Application
Enter in a Name and Description. The Website can be anything, but cannot have a
localhostaddress. For theCallback URLyou must copy theRedirect URIfrom the Red Hat Single Sign-OnAdd Identity Providerpage.You cannot use
localhostin theCallback URL. Instead replace it with127.0.0.1if you are trying to testdrive Twitter login on your laptop.After clicking save you will be brought to the
Detailspage.App Details
Next go to the
Keys and Access Tokenstab.Keys and Access Tokens
Finally, you will need to obtain the API Key and secret from this page and copy them back into the
Client IDandClient Secretfields on the Red Hat Single Sign-OnAdd identity providerpage.12.3.4. Github
There are a number of steps you have to complete to be able to login to Github. First, go to the
Identity Providersleft menu item and selectGithubfrom theAdd providerdrop down list. This will bring you to theAdd identity providerpage.Add Identity Provider
You can’t click save yet, as you’ll need to obtain a
Client IDandClient Secretfrom Github. One piece of data you’ll need from this page is theRedirect URI. You’ll have to provide that to Github when you register Red Hat Single Sign-On as a client there, so copy this URI to your clipboard.To enable login with Github you first have to register an application project in GitHub Application Settings. Select the
Developer applicationstab.Github often changes the look and feel of application registration, so these directions might not always be up to date and the configuration steps might be slightly different.
Add a New App
Click the
Register a new applicationbutton.Register App
You’ll have to copy the
Redirect URIfrom the Red Hat Single Sign-OnAdd Identity Providerpage and enter it into theAuthorization callback URLfield on the GithubRegister a new OAuth applicationpage. Once you’ve completed this page you will be brought to the application’s management page.Github App Page
You will need to obtain the client ID and secret from this page so you can enter them into the Red Hat Single Sign-On
Add identity providerpage. Go back to Red Hat Single Sign-On and specify those items.12.3.5. LinkedIn
There are a number of steps you have to complete to be able to login to LinkedIn. First, go to the
Identity Providersleft menu item and selectLinkedInfrom theAdd providerdrop down list. This will bring you to theAdd identity providerpage.Add Identity Provider
You can’t click save yet, as you’ll need to obtain a
Client IDandClient Secretfrom LinkedIn. One piece of data you’ll need from this page is theRedirect URI. You’ll have to provide that to LinkedIn when you register Red Hat Single Sign-On as a client there, so copy this URI to your clipboard.To enable login with LinkedIn you first have to create an application in LinkedIn Developer Network.
LinkedIn may change the look and feel of application registration, so these directions may not always be up to date.
Developer Network
Click on the
Create Applicationbutton. This will bring you to theCreate a New ApplicationPage.Create App
Fill in the form with the approriate values, then click the
Submitbutton. This will bring you to the new application’s settings page.App Settings
Select
r_basicprofileandr_emailaddressin theDefault Application Permissionssection. You’ll have to copy theRedirect URIfrom the Red Hat Single Sign-OnAdd Identity Providerpage and enter it into theOAuth 2.0Authorized Redirect URLsfield on the LinkedIn app settings page. Don’t forget to click theUpdatebutton after you do this!You will then need to obtain the client ID and secret from this page so you can enter them into the Red Hat Single Sign-On
Add identity providerpage. Go back to Red Hat Single Sign-On and specify those items.12.3.6. Microsoft
There are a number of steps you have to complete to be able to login to Microsoft. First, go to the
Identity Providersleft menu item and selectMicrosoftfrom theAdd providerdrop down list. This will bring you to theAdd identity providerpage.Add Identity Provider
You can’t click save yet, as you’ll need to obtain a
Client IDandClient Secretfrom Microsoft. One piece of data you’ll need from this page is theRedirect URI. You’ll have to provide that to Microsoft when you register Red Hat Single Sign-On as a client there, so copy this URI to your clipboard.To enable login with Microsoft account you first have to register an OAuth application at Microsoft. Go to the Microsoft Application Registration url.
Microsoft often changes the look and feel of application registration, so these directions might not always be up to date and the configuration steps might be slightly different.
Register Application
Enter in the application name and click
Create application. This will bring you to the application settings page of your new application.Settings
You’ll have to copy the
Redirect URIfrom the Red Hat Single Sign-OnAdd Identity Providerpage and add it to theRedirect URIsfield on the Microsoft application page. Be sure to click theAdd Urlbutton andSaveyour changes.Finally, you will need to obtain the Application ID and secret from this page so you can enter them back on the Red Hat Single Sign-On
Add identity providerpage. Go back to Red Hat Single Sign-On and specify those items.12.3.7. StackOverflow
There are a number of steps you have to complete to be able to login to StackOverflow. First, go to the
Identity Providersleft menu item and selectStackOverflowfrom theAdd providerdrop down list. This will bring you to theAdd identity providerpage.Add Identity Provider
To enable login with StackOverflow you first have to register an OAuth application on StackApps. Go to registering your application on Stack Apps url and login.
StackOverflow often changes the look and feel of application registration, so these directions might not always be up to date and the configuration steps might be slightly different.
Register Application
Enter in the application name and the OAuth Domain Name of your application and click
Register your Application. Type in anything you want for the other items.Settings
Finally, you will need to obtain the client ID, secret, and key from this page so you can enter them back on the Red Hat Single Sign-On
Add identity providerpage. Go back to Red Hat Single Sign-On and specify those items.