
Chapter 7. Configuring the Discovery Service
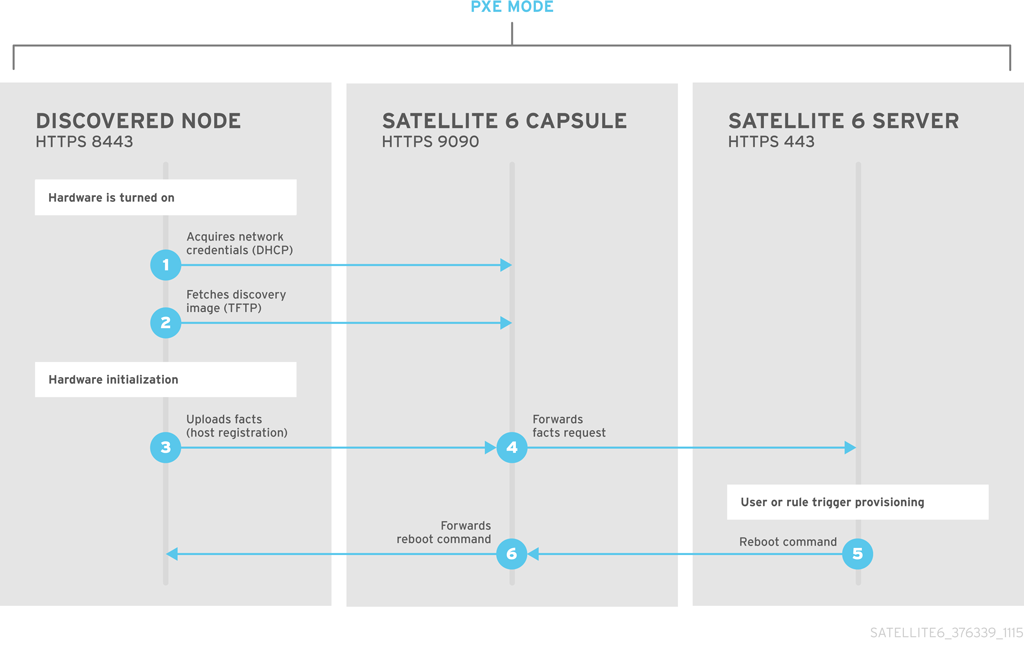
Red Hat Satellite can detect hosts on a network that are not in your Satellite inventory. These hosts boot the discovery image that performs hardware detection and relays this information back to Satellite Server. This method creates a list of ready-to-provision hosts in Satellite Server without needing to enter the MAC address of each host.
When you boot a blank bare-metal host, the boot menu has two options: local and discovery. If you select discovery to boot the Discovery image, after a few minutes, the Discovery image completes booting and a status screen is displayed.
The Discovery service is enabled by default on Satellite Server. However, the default setting of the global templates is to boot from the local hard drive. To change the default setting, in the Satellite web UI, navigate to Administer > Settings, and click the Provisioning tab. Locate the Default PXE global template entry row, and in the Value column, enter discovery.
To use Satellite Server to provide the Discovery image, install the following RPM packages:
-
tfm-rubygem-foreman_discovery -
foreman-discovery-image -
rubygem-smart_proxy_discovery
The tfm-rubygem-foreman_discovery package contains the Satellite plug-in to handle discovered nodes, connections, and necessary database structures, and API.
The foreman-discovery-image package installs the Discovery ISO to the /usr/share/foreman-discovery-image/ directory. You can build a PXE boot image from this ISO using the livecd-iso-to-pxeboot tool. The tool saves this PXE boot image in the /var/lib/tftpboot/boot directory. For more information, see Section 7.8, “Building a Discovery Image”.
The rubygem-smart_proxy_discovery package configures Capsule Server, such as the integrated Capsule of Satellite Server, to act as a proxy for the Discovery service.
When the installation completes, you can view the new menu option by navigating to Hosts > Discovered Hosts.
7.1. Installing the Discovery Service
Complete the following procedure to enable the Discovery service on Capsule Server.
Procedure
Enter the following commands on Capsule Server:
# satellite-maintain packages install foreman-discovery-image rubygem-smart_proxy_discovery
Restart the satellite-maintain services:
# satellite-maintain service restart
- In the Satellite web UI, navigate to Infrastructure > Capsule.
- Click the Capsule Server and select Refresh from the Actions list. Locate Discovery in the list of features to confirm the Discovery service is now running.
Subnets
All subnets with discoverable hosts require an appropriate Capsule Server selected to provide the Discovery service.
To check this, navigate to Infrastructure > Capsules and verify if the Capsule Server that you want to use lists the Discovery feature. If not, click Refresh features.
In the Satellite web UI, navigate to Infrastructure > Subnets, select a subnet, click the Capsules tab, and select the Discovery Proxy that you want to use. Perform this for each subnet that you want to use.
7.2. The Provisioning Template PXELinux Discovery Snippet
For BIOS provisioning, the PXELinux global default template in the Hosts > Provisioning Templates window contains the snippet pxelinux_discovery. The snippet has the following lines:
LABEL discovery
  MENU LABEL Foreman Discovery Image
  KERNEL boot/fdi-image/vmlinuz0
  APPEND initrd=boot/fdi-image/initrd0.img rootflags=loop root=live:/fdi.iso rootfstype=auto ro rd.live.image acpi=force rd.luks=0 rd.md=0 rd.dm=0 rd.lvm=0 rd.bootif=0 rd.neednet=0 nomodeset proxy.url=<%= foreman_server_url %> proxy.type=foreman
  IPAPPEND 2
The KERNEL and APPEND options boot the Discovery image and ramdisk. The APPEND option contains a proxy.url parameter, with the foreman_server_url macro as its argument. This macro resolves to the full URL of Satellite Server.
For UEFI provisioning, the PXEgrub2 global default template in the Hosts > Provisioning Templates window contains the snippet pxegrub2_discovery:
menuentry 'Foreman Discovery Image' --id discovery {
  linuxefi boot/fdi-image/vmlinuz0 rootflags=loop root=live:/fdi.iso rootfstype=auto ro rd.live.image acpi=force rd.luks=0 rd.md=0 rd.dm=0 rd.lvm=0 rd.bootif=0 rd.neednet=0 nomodeset proxy.url=<%= foreman_server_url %> proxy.type=foreman BOOTIF=01-$mac
  initrdefi boot/fdi-image/initrd0.img
}
To use Capsule to proxy the discovery steps, edit /var/lib/tftpboot/pxelinux.cfg/default or /var/lib/tftpboot/grub2/grub.cfg and change the URL to the Capsule Server FQDN you want to use.
The global template is available on Satellite Server and all Capsules that have the TFTP feature enabled.
7.3. Automatic Contexts for Discovered Hosts
Satellite Server assigns an organization and location to discovered hosts according to the following sequence of rules:
- If a discovered host uses a subnet defined in Satellite, the host uses the first organization and location associated with the subnet.
-
If the
discovery_organizationordiscovery_locationfact values are set, the discovered host uses these fact values as an organization and location. To set these fact values, navigate to Administer > Settings > Discovered, and add these facts to the Default organization and Default location fields. Ensure that the discovered host’s subnet also belongs to the organization and location set by the fact, otherwise Satellite refuses to set it for security reasons. - If none of the previous conditions exists, Satellite assigns the first Organization and Location ordered by name.
You can change the organization or location using the bulk actions menu of the Discovered hosts page. Select the discovered hosts to modify and select Assign Organization or Assign Location from the Select Action menu.
Note that the foreman_organization and foreman_location facts are no longer valid values for assigning context for discovered hosts. You still can use these facts to configure the host for Puppet runs. To do this, navigate to Administer > Settings > Puppet section and add the foreman_organization and foreman_location facts to the Default organization and Default location fields.
7.4. Discovery Templates and Snippets Settings
To use the Discovery service, you must configure provisioning settings to set Discovery as the default service and set the templates that you want to use.
Setting Discovery Service as Default
For both BIOS and UEFI, to set the Discovery service as the default service that boots for hosts that are not present in your current Satellite inventory, complete the following steps:
- In the Satellite web UI, navigate to Administer > Settings and click the Provisioning tab.
-
For the Default PXE global template entry, in the Value column, enter
discovery.
To use a template, in the Satellite web UI, navigate to Administer > Settings and click the Provisioning tab and set the templates that you want to use.
Customizing Templates and Snippets
Templates and snippets are locked to prevent changes. If you want to edit a template or snippet, clone it, save it with a unique name, and then edit the clone.
When you change the template or a snippet it includes, the changes must be propagated to Satellite Server’s default PXE template.
In the Satellite web UI, navigate to Hosts > Provisioning Templates and click Build PXE Default.
This refreshes the default PXE template on Satellite Server.
Additional Settings
- The proxy.url argument
-
During the Satellite installation process, if you use the default option
--enable-foreman-plugin-discovery, you can edit theproxy.urlargument in the template to set the URL of Capsule Server that provides the discovery service. You can change theproxy.urlargument to the IP address or FQDN of another provisioning Capsule that you want to use, but ensure that you append the port number, for example,9090. If you use an alternative port number with the--foreman-proxy-ssl-portoption during Satellite installation, you must add that port number. You can also edit theproxy.urlargument to use a Satellite IP address or FQDN so that the discovered hosts communicate directly with Satellite Server. - The proxy.type argument
If you use a Capsule Server FQDN for the
proxy.urlargument, ensure that you set theproxy.typeargument toproxy. If you use a Satellite FQDN, update theproxy.typeargument toforeman.proxy.url=https://capsule.example.com:9090 proxy.type=proxy
Rendering the Capsule's Host Name
Satellite 6 deploys the same template to all TFTP Capsules and there is no variable or macro available to render the Capsule’s host name. The hard-coded proxy.url does not not work with two or more TFTP Capsules. As a workaround, every time you click Build PXE Defaults, edit the configuration file in the TFTP directory using SSH, or use a common DNS alias for appropriate subnets.
Tagged VLAN Provisioning
If you want to use tagged VLAN provisioning, and you want the discovery service to send a discovery request, add the following information to the KERNEL option in the discovery template:
fdi.vlan.primary=example_VLAN_ID7.5. Creating Hosts from Discovered Hosts
Provisioning discovered hosts follows a provisioning process that is similar to PXE provisioning. The main difference is that instead of manually entering the host’s MAC address, you can select the host to provision from the list of discovered hosts.
Prerequisites
- Configure a domain and subnet on Satellite. For more information about networking requirements, see Chapter 3, Configuring Networking.
- Configure the discovery service on Satellite. For more information, see Section 7.1, “Installing the Discovery Service”.
- A bare metal host or a blank VM.
- Synchronized content repositories for Red Hat Enterprise Linux. For more information, see Synchronizing Red Hat Repositories in the Content Management Guide.
- An activation key for host registration. For more information, see Creating An Activation Key in the Content Management guide.
For information about the security token for unattended and PXE-less provisioning, see Section 6.2, “Configuring the Security Token Validity Duration”.
Procedure
To create a host from a discovered host, complete the following steps:
- In the Satellite web UI, navigate to Hosts > Discovered host. Select the host you want to use and click Provision to the right of the list.
Select from one of the two following options:
- To provision a host from a host group, select a host group, organization, and location, and then click Create Host.
- To provision a host with further customization, click Customize Host and enter the additional details you want to specify for the new host.
Verify that the fields are populated with values. Note in particular:
- The Name from the Host tab becomes the DNS name.
- Satellite Server automatically assigns an IP address for the new host.
- Satellite Server automatically populates the MAC address from the Discovery results.
- Ensure that Satellite Server automatically selects the Managed, Primary, and Provision options for the first interface on the host. If not, select them.
- Click the Operating System tab, and verify that all fields contain values. Confirm each aspect of the operating system.
Click Resolve in Provisioning template to check the new host can identify the right provisioning templates to use. The host must resolve to the following provisioning templates:
-
kexec Template:
Discovery Red Hat kexec provision Template:
Satellite Kickstart DefaultFor more information about associating provisioning templates, see Section 2.11, “Provisioning Templates”.
-
kexec Template:
- Click Submit to save the host details.
When the host provisioning is complete, the discovered host becomes a content host. To view the host, navigate to Hosts > Content Hosts.
For CLI Users
Identify the discovered host to use for provisioning:
# hammer discovery list
Select a host and provision it using a host group. Set a new host name with the
--new-nameoption:# hammer discovery provision --name "host_name" \ --new-name "new_host_name" --organization "My_Organization" \ --location "My_Location" --hostgroup "My_Host_Group" --build true \ --enabled true --managed true
This removes the host from the discovered host listing and creates a host entry with the provisioning settings. The Discovery image automatically resets the host so that it can boot to PXE. The host detects the DHCP service on Satellite Server’s integrated Capsule and starts installing the operating system. The rest of the process is identical to normal PXE workflow described in Section 6.3, “Creating Hosts with Unattended Provisioning”.
7.6. Creating Discovery Rules
As a method of automating the provisioning process for discovered hosts, Satellite provides a feature to create discovery rules. These rules define how discovered hosts automatically provision themselves, based on the assigned host group. For example, you can automatically provision hosts with a high CPU count as hypervisors. Likewise, you can provision hosts with large hard disks as storage servers.
NIC Considerations
Auto provisioning does not currently allow configuring NICs; all systems are being provisioned with the NIC configuration that was detected during discovery. However, you can set the NIC in the kickstart scriplet, using a script, or using configuration management at a later stage.
Procedure
To create a rule, complete the following steps:
- In the Satellite web UI, navigate to Configure > Discovery rules, and select Create Rule.
- In the Name field, enter a name for the rule.
-
In the Search field, enter the rules to determine whether to provision a host. This field provides suggestions for values you enter and allows operators for multiple rules. For example:
cpu_count > 8. - From the Host Group list, select the host group to use as a template for this host.
In the Hostname field, enter the pattern to determine host names for multiple hosts. This uses the same ERB syntax that provisioning templates use. The host name can use the
@hostattribute for host-specific values and therandfunction for a random number. For more information about provisioning templates, see Section 2.11, “Provisioning Templates”.-
myhost-<%= rand(99999) %> -
abc-<%= @host.facts['bios_vendor'] %>-<%= rand(99999) %> -
xyz-<%= @host.hostgroup.name %> -
srv-<%= @host.discovery_rule.name %> server-<%= @host.ip.gsub('.','-') + '-' + @host.hostgroup.subnet.name %>When creating host name patterns, ensure that the resulting host names are unique, do not start with numbers, and do not contain underscores or dots. A good approach is to use unique information provided by Facter, such as the MAC address, BIOS, or serial ID.
-
-
In the Hosts limit field, enter the maximum number of hosts that you can provision with the rule. Enter
0for unlimited. - In the Priority field, enter a number to set the precedence the rule has over other rules. Rules with lower values have a higher priority.
- From the Enabled list, select whether you want to enable the rule.
- To set a different provisioning context for the rule, click the Organizations and Locations tabs and select the contexts you want to use.
- Click Submit to save your rule.
Navigate to Hosts > Discovered Host and select one of the following two options:
- From the Discovered hosts list on the right, select Auto-Provision to automatically provisions a single host.
- On the upper right of the window, click Auto-Provision All to automatically provisions all hosts.
For CLI Users
Create the rule with the hammer discovery-rule create command:
# hammer discovery-rule create --name "Hypervisor" \
--search "cpu_count  > 8" --hostgroup "My_Host_Group" \
--hostname "hypervisor-<%= rand(99999) %>" \
--hosts-limit 5 --priority 5 --enabled true
Automatically provision a host with the hammer discovery auto-provision command:
# hammer discovery auto-provision --name "macabcdef123456"
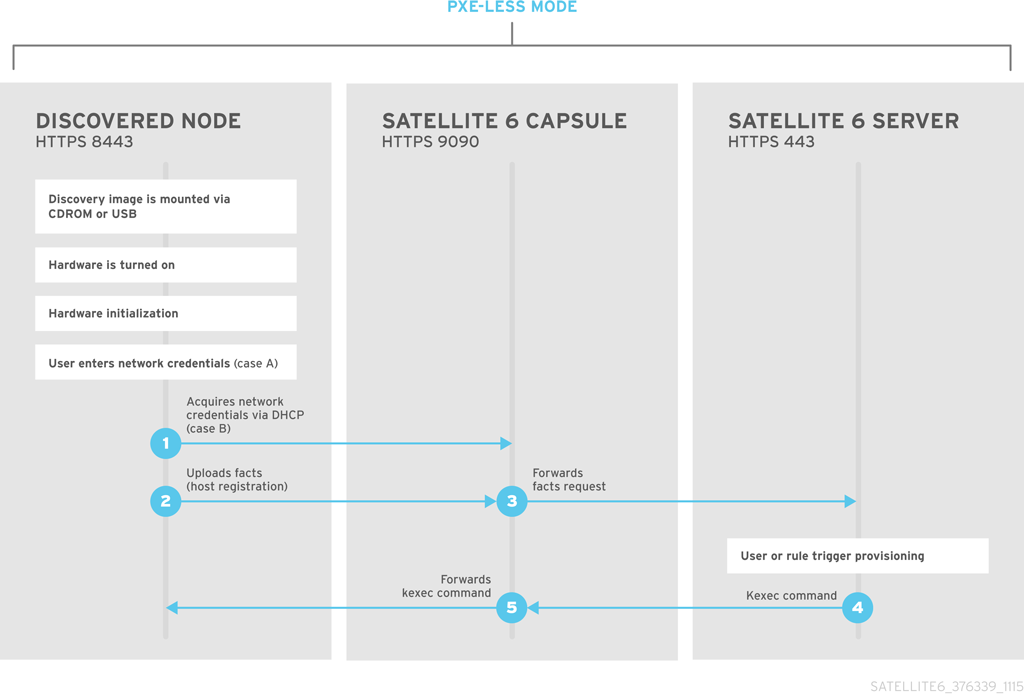
7.7. Implementing PXE-less Discovery
Satellite provides a PXE-less Discovery service that operates without the need for PXE-based services (DHCP and TFTP). You accomplish this using Satellite Server’s Discovery image. Once a discovered node is scheduled for installation, it uses kexec command to reload Linux kernel with OS installer without rebooting the node.
Discovery kexec is a Technology Preview feature only. Technology Preview features are not supported with Red Hat production service level agreements (SLAs) and might not be functionally complete. Red Hat does not recommend using them in production. These features provide early access to upcoming product features, enabling customers to test functionality and provide feedback during the development process. For more information about the support scope of Red Hat Technology Preview features, see https://access.redhat.com/support/offerings/techpreview/.
Known Issues
The console might freeze during the process. On some hardware, you might experience graphical hardware problems.
If you have not yet installed the Discovery service or image, see Section 7.8, “Building a Discovery Image”.
The ISO for the Discovery service resides at /usr/share/foreman-discovery-image/ and is installed using the foreman-discovery-image package.
Attended Use
Copy this media to either a CD, DVD, or a USB stick. For example, to copy to a USB stick at
/dev/sdb:# dd bs=4M \ if=/usr/share/foreman-discovery-image/foreman-discovery-image-3.4.4-5.iso \ of=/dev/sdb
Insert the Discovery boot media into a bare metal host, start the host, and boot from the media. The Discovery Image displays an option for either Manual network setup or Discovery with DHCP:
If you select Manual network setup, the Discovery image requests a set of network options. This includes the primary network interface that connects to Satellite Server. This Discovery image also asks for network interface configuration options, such as an IPv4 Address, IPv4 Gateway, and an IPv4 DNS server.
- After entering these details, select Next.
- If you select Discovery with DHCP, the Discovery image requests only the primary network interface that connects to Satellite Server. It attempts to automatically configure the network interface using a DHCP server, such as one that a Capsule Server provides.
After the primary interface configuration, the Discovery image requests the Server URL, which is the URL of Satellite Server or Capsule Server offering the Discovery service. For example, to use the integrated Capsule on Satellite Server, use the following URL:
https://satellite.example.com:9090
-
Set the Connection type to
Proxy, then select Next. - Optional: The Discovery image also provides a set of fields to input Custom facts for the Facter tool to relay back to Satellite Server. These are entered in a name-value format. Provide any custom facts you require and select Confirm to continue.
Satellite reports a successful communication with Satellite Server’s Discovery service. Navigate to Hosts > Discovered Hosts and view the newly discovered host.
For more information about provisioning discovered hosts, see Section 7.5, “Creating Hosts from Discovered Hosts”.
7.8. Building a Discovery Image
The Discovery image is a minimal operating system that is PXE-booted on hosts to acquire initial hardware information and to check in with Satellite. Discovered hosts keep running the Discovery image until they are rebooted into Anaconda, which then initiates the provisioning process.
The operating system image is based on Red Hat Enterprise Linux 7.
The foreman-discovery-image package contains this image. You must install the package on the Capsule that provides TFTP services.
Use this procedure to build a Satellite discovery image or rebuild an image if you change configuration files.
Do not use this procedure on your production Satellite or Capsule. Use either a dedicated environment or copy the synchronized repositories and a kickstart file to a separate server.
Prerequisites
Install the
livecd-toolspackage:# satellite-maintain packages install livecd-tools
For the following Red Hat Enterprise Linux 7 repositories required to build the Discovery image, change the download policy to Immediate. This is required because Satellite downloads all packages only during synchronization of repositories with the immediate download policy.
- The latest Red Hat Enterprise Linux 7 Server (Kickstart) repository. For example, Red Hat Enterprise Linux 7 Server Kickstart x86_64 7.7.
- Red Hat Satellite Capsule 6.7 for RHEL 7 Server RPMs x86_64.
For more information about changing download policies, see Changing the Download Policy for a Repository in the Content Management Guide.
Synchronize the following Red Hat Enterprise Linux 7 repositories required to build the Discovery image:
- The latest Red Hat Enterprise Linux 7 Server (Kickstart) repository. For example, Red Hat Enterprise Linux 7 Server Kickstart x86_64 7.7.
- Red Hat Satellite Capsule 6.7 for RHEL 7 Server RPMs x86_64.
For more information about synchronizing repositories, see Synchronizing Red Hat Repositories in the Content Management Guide.
Procedure
To build the Satellite discovery image, complete the following steps:
Open the
/usr/share/foreman-discovery-image/foreman-discovery-image.ksfile for editing:# vim /usr/share/foreman-discovery-image/foreman-discovery-image.ks
Replace the
repolines in the kickstart file with the repository URLs:repo --name=rhel --baseurl=file:///var/lib/pulp/published/yum/https/repos/Default_Organization/Library/content/dist/rhel/server/7/7.7/x86_64 repo --name=sat --baseurl=file:///var/lib/pulp/published/yum/https/repos/Default_Organization/Library/content/dist/rhel/server/7/7Server/x86_64/sat-capsule/6.7/os
Run the
livecd-creatortool:# livecd-creator --title="Discovery-Image" \ --compression-type=xz \ --cache=var/cache/build-fdi \ --config /usr/share/foreman-discovery-image/foreman-discovery-image.ks \ --fslabel fdi \ --tmpdir /var/tmp
If you change
fdiin the--fslabeloption, you must also change the root label on the kernel command line when loading the image.fdior the alternative name is appended to the.isofile that is created as part of this procedure. The PXE Discovery tool uses this name when converting from.isoto PXE.Use
/var/tmpbecause this process requires close to 3GB of space and/tmpmight have problems if the system is low on swap space.Verify that your
fdi.isofile is created:# ls *.iso -h
When you create the .iso file, you can boot the .iso file over a network or locally. Complete one of the following procedures.
To boot the iso file over a network:
To extract the initial ramdisk and kernel files from the
.isofile over a network, enter the following command:# discovery-iso-to-pxe fdi.iso
Create a directory to store your boot files:
# mkdir /var/lib/tftpboot/boot/myimage-
Copy the
initrd0.imgandvmlinuz0files to your new directory. -
Edit the
KERNELandAPPENDentries in the/var/lib/tftpboot/pxelinux.cfgfile to add the information about your own initial ramdisk and kernel files.
To boot the iso file locally:
If you want to create a hybrid .iso file for booting locally, complete the following steps:
To convert the
.isofile to an.isohybrid file for PXE provisioning, enter the following command:# isohybrid --partok fdi.iso
If you have
grub2packages installed, you can also use the following command to install agrub2bootloader:# isohybrid --partok --uefi fdi.iso
To add
md5checksum to the.isofile so it can pass installation media validation tests in Satellite, enter the following command:# implantisomd5 fdi.iso
7.9. Unattended Use, Customization, and Image Remastering
You can create a customized Discovery ISO to automate the image configuration process after booting. The Discovery image uses a Linux kernel for the operating system, which passes kernel parameters to configure the discovery service. These kernel parameters include the following entries:
- proxy.url
- The URL of the Capsule Server or Satellite Server providing the Discovery service.
- proxy.type
-
The proxy type. This is usually set to
proxyto connect to Capsule Server. This parameter also supports a legacyforemanoption, where communication goes directly to Satellite Server instead of a Capsule Server. - fdi.pxmac
-
The MAC address of the primary interface in the format of
AA:BB:CC:DD:EE:FF. This is the interface you aim to use for communicating with Capsule Server. In automated mode, the first NIC (using network identifiers in alphabetical order) with a link is used. In semi-automated mode, a screen appears and requests you to select the correct interface. - fdi.pxip, fdi.pxgw, fdi.pxdns
-
Manually configures IP address (
fdi.pxip), the gateway (fdi.pxgw), and the DNS (fdi.pxdns) for the primary network interface. If your omit these parameters, the image uses DHCP to configure the network interface. - fdi.pxfactname1, fdi.pxfactname2 … fdi.pxfactnameN
- Use to specify custom fact names.
- fdi.pxfactvalue1, fdi.pxfactvalue2 … fdi.pxfactvalueN
-
The values for each custom fact. Each value corresponds to a fact name. For example,
fdi.pxfactvalue1sets the value for the fact named withfdi.pxfactname1. - fdi.pxauto
- To set automatic or semi-automatic mode. If set to 0, the image uses semi-automatic mode, which allows you to confirm your choices through a set of dialog options. If set to 1, the image uses automatic mode and proceeds without any confirmation.
- fdi.initnet
-
By default, the image initializes all network interfaces (value
all). When this setting is set tobootif, only the network interface it was network-booted from will be initialized. - fdi.rootpw
-
By default, the
rootaccount is locked. Use this option to set a root password. You can enter both clear and encrypted passwords. - fdi.ssh
-
By default, the SSH service is disabled. Set this to
1ortrueto enable SSH access. - fdi.ipv4.method
-
By default, NetworkManager IPv4 method setting is set to
auto. This option overrides it, set it toignoreto disable the IPv4 stack. This option works only in DHCP mode. - fdi.ipv6.method
-
By default, NetworkManager IPv6 method setting is set to
auto. This option overrides it, set it toignoreto disable the IPv6 stack. This option only works in DHCP mode.
Using the discovery-remaster Tool to Remaster an OS Image
Satellite Server provides the discovery-remaster tool in the foreman-discovery-image package. This tool remasters the image to include these kernel parameters. To remaster the image, run the discovery-remaster tool. For example:
# discovery-remaster ~/iso/foreman-discovery-image-3.4.4-5.iso \ "fdi.pxip=192.168.140.20/24 fdi.pxgw=192.168.140.1 \ fdi.pxdns=192.168.140.2 proxy.url=https://satellite.example.com:9090 \ proxy.type=proxy fdi.pxfactname1=customhostname fdi.pxfactvalue1=myhost fdi.pxmac=52:54:00:be:8e:8c fdi.pxauto=1"
Copy this media to either a CD, DVD, or a USB stick. For example, to copy to a USB stick at /dev/sdb:
# dd bs=4M \
if=/usr/share/foreman-discovery-image/foreman-discovery-image-3.4.4-5.iso \
of=/dev/sdb
Insert the Discovery boot media into a bare metal host, start the host, and boot from the media.
For more information about provisioning discovered hosts, see Section 7.5, “Creating Hosts from Discovered Hosts”.
7.10. Extending the Discovery Image
You can extend the Satellite Discovery image with custom facts, software, or device drivers. You can also provide a compressed archive file containing extra code for the image to use.
Procedure
Create the following directory structure:
. ├── autostart.d │ └── 01_zip.sh ├── bin │ └── ntpdate ├── facts │ └── test.rb └── lib ├── libcrypto.so.1.0.0 └── ruby └── test.rb-
The
autostart.ddirectory contains scripts that are executed in POSIX order by the image when it starts, but before the host is registered to Satellite. -
The
bindirectory is added to the$PATHvariable; you can place binary files in this directory and use them in theautostartscripts. -
The
factsdirectory is added to theFACTERLIBvariable so that custom facts can be configured and sent to Satellite. -
The
libdirectory is added to theLD_LIBRARY_PATHvariable andlib/rubyis added to theRUBYLIBvariable, so that binary files in/bincan be executed correctly.
-
The
After creating the directory structure, create a
.zipfile archive with the following command:zip -r my_extension.zip .
To inform the Discovery image of the extensions it must use, place your zip files on your TFTP server with the Discovery image, and then update the
APPENDline of the PXELinux template with thefdi.zipsoption where the paths are relative to the TFTP root. For example, if you have two archives at$TFTP/zip1.zipand$TFTP/boot/zip2.zip, use the following syntax:fdi.zips=zip1.zip,boot/zip2.zip
You can append new directives and options to the existing environment variables (PATH, LD_LIBRARY_PATH, RUBYLIB and FACTERLIB). If you want to specify the path explicitly in your scripts, the .zip file contents are extracted to the /opt/extension directory on the image.
You can create multiple .zip files but be aware that they are extracted to the same location on the Discovery image. Files extracted from in later .zip files overwrite earlier versions if they have the same file name.
7.11. Troubleshooting Discovery
If a machine is not listed in the Satellite web UI in Hosts > Discovered Hosts, inspect the following configuration areas to help isolate the error:
- Navigate to Hosts > Provisioning Templates and redeploy the default PXELinux template using the Build PXE Default button.
-
Verify the
pxelinux.cfg/defaultconfiguration file on the TFTP Capsule. - Ensure adequate network connectivity between hosts, Capsule Server, and Satellite Server.
-
Check the PXELinux template in use and determine the PXE discovery snippet it includes. Snippets are named as follows:
pxelinux_discovery,pxegrub_discovery, orpxegrub2_discovery. Verify theproxy.urlandproxy.typeoptions in the PXE discovery snippet. -
Ensure that DNS is working correctly for the discovered nodes, or use an IP address in the
proxy.urloption in the PXE discovery snippet included in the PXELinux template you are using. - Ensure that the DHCP server is delivering IP addresses to the booted image correctly.
- Ensure the discovered host or virtual machine has at least 1200 MB of memory. Less memory can lead to various random kernel panic errors because the image is extracted in-memory.
For gathering important system facts, use the discovery-debug command. It prints out system logs, network configuration, list of facts, and other information on the standard output. The typical use case is to redirect this output and copy it with the scp command for further investigation.
The first virtual console on the discovered host is reserved for systemd logs. Particularly useful system logs are tagged as follows:
-
discover-host— initial facts upload -
foreman-discovery— facts refresh, reboot remote commands -
nm-prepare— boot script which pre-configures NetworkManager -
NetworkManager— networking information
Use TTY2 or higher to log in to a discovered host. The root account and SSH access are disabled by default, but you can enable SSH and set the root password using the following kernel command-line options in the Default PXELinux template on the APPEND line:
fdi.ssh=1 fdi.rootpw=My_Password