
Red Hat Training
A Red Hat training course is available for Red Hat Satellite
Upgrading and Updating Red Hat Satellite
Upgrading and updating Red Hat Satellite Server and Capsule Server
Abstract
Chapter 1. Upgrade Overview
This chapter details the prerequisites and available upgrade paths to Red Hat Satellite 6.4. Review this information before upgrading your current Red Hat Satellite 6 installation.
In this guide, the terms update, upgrade, and migrate have the following meanings:
- Upgrading
- The process of advancing your Satellite Server and Capsule Server installations from a y-stream release to the next, for example Satellite 6.3 to Satellite 6.4.
- Updating
- The process of advancing your Satellite Server and Capsule Server installations from a z-stream release to the next, for example Satellite 6.4.0 to Satellite 6.4.1.
- Migrating
- The process of moving an existing Satellite installation to another Red Hat Enterprise Linux server.
For interactive upgrade instructions, you can also use the Red Hat Satellite Upgrade Helper on the Red Hat Customer Portal. This application provides you with an exact guide to match your current version number. You can find instructions that are specific to your upgrade path, as well as steps to prevent known issues. For more information, see Satellite Upgrade Helper on the customer portal.
The Red Hat Satellite Server and Capsule Server y-stream versions must match. For example, a 6.3 Satellite Server is not compatible with a 6.4 Capsule Server and a 6.4 Satellite Server is not compatible with a 6.3 Capsule Server. Mismatching Satellite Server and Capsule Server versions will result in the Capsule Server failing silently. However, a Capsule Server using one z-stream version older than the Satellite Server is supported. For example, a Satellite 6.4.1 Satellite Server is compatible with a 6.4.0 Capsule Server.
1.1. Prerequisites
Upgrading to Satellite 6.4 affects your entire Satellite infrastructure. Before proceeding, complete the following:
- Read the Red Hat Satellite 6.4 Release Notes.
- Review this guide so that you are aware of the upgrade process and its impact.
- Plan your upgrade path. For more information, see Section 1.2, “Upgrade Paths”.
- Red Hat Satellite 6.4 uses Puppet 5. Only Puppet 4 to Puppet 5 migrations are supported. You must upgrade to Puppet 4 prior to upgrading to Satellite 6.4. For information about upgrading to Puppet 4, see the Upgrading Puppet section in the Satellite 6.3 Upgrading and Updating Red Hat Satellite guide.
- Plan for the required Satellite downtime. The upgrade process requires that Satellite services be shut down for the duration.
- Plan for the storage requirements. The storage requirements for Red Hat Satellite 6.4 have changed from the previous version. For more information, see Storage Requirements and Guidelines in Installing Satellite Server from a Connected Network.
- Back up your Satellite Server and all Capsule Servers. For more information, see Backing Up and Restoring Satellite Server and Capsule Server in the Administering Red Hat Satellite 6.3 guide.
- Plan for updating any scripts you use that contain Satellite API commands because some API commands differ between versions of Satellite. For more information about changes in the API, see the Knowledgebase article API Changes Between Satellite Versions on the Red Hat Customer Portal.
If you customize configuration files, manually or use a tool such as Hiera, these customizations are overwritten when the installation script runs during upgrading or updating. You can use the --noop option with the satellite-installer script to test for changes. For more information, see the Red Hat Knowledgebase solution How to use the noop option to check for changes in Satellite config files during an upgrade.
1.2. Upgrade Paths
You can upgrade to Red Hat Satellite 6.4 from Red Hat Satellite 6.3. Satellite Servers and Capsule Servers on earlier versions must first be upgraded to Satellite 6.3. For more details, see the Satellite 6.3 Upgrading and Updating Red Hat Satellite guide.
Figure 1.1. Overview of Satellite 6.4 Upgrade Paths
Upgrading from the Beta to GA version is not supported.
The high level steps in upgrading to Satellite 6.4 are as follows.
- Clone your existing Satellite Servers. For more information, see Chapter 2, Cloning Satellite Server.
- Upgrade Satellite Server and all Capsule Servers to Satellite 6.4. For more information, see Section 3.1, “Upgrading Satellite Server”.
- Upgrade the Satellite tools on all Satellite clients. For more information, see Section 3.4, “Upgrading Satellite Clients”.
Self-Registered Satellites
You cannot upgrade a self-registered Satellite. You must migrate a self-registered Satellite to the Red Hat Content Delivery Network (CDN) and then perform the upgrade. To migrate a self-registered Satellite to the CDN, see Migrating Self-Registered Satellites in the Satellite 6.3 Upgrading and Updating Red Hat Satellite guide.
1.3. Following the Progress of the Upgrade
Because of the lengthy upgrade time, use a utility such as screen to suspend and reattach a communication session. You can then check the upgrade progress without staying connected to the command shell continuously. For more information about using the screen command, see How do I use the screen command? article in the Red Hat Knowledge Base. You can also see the screen manual page for more information.
If you lose connection to the command shell where the upgrade command is running you can see the logs in /var/log/foreman-installer/satellite.log to check if the process completed successfully.
Chapter 2. Cloning Satellite Server
When you upgrade Satellite Server, you can optionally create a clone of your Satellite to ensure that you do not lose any data while you upgrade. After your upgrade is complete, you can then decommission the earlier version of Satellite Server.
Use the following procedures to clone your Satellite instances to preserve your environments in preparation for upgrade.
The Satellite clone tool does not support migrating a Capsule Server to Red Hat Enterprise Linux 7. Instead you must backup the existing Capsule Server, restore it on Red Hat Enterprise Linux 7, then reconfigure the Capsule Server.
Terminology
Ensure that you understand the following terms:
Source server: the server that you clone
Target server: the new server that you copy files to and clone the source server to.
2.1. Cloning Process Overview
- Back up the source server.
- Clone the source server to the target server.
- Power off the source server.
- Update the network configuration on the target server to match the target server’s IP address with its new host name.
- Restart goferd in Content hosts and Capsules to refresh the connection.
- Test the new target server.
2.2. Prerequisites
To clone Satellite Server, ensure that you have the following resources available:
- A minimal install of Red Hat Enterprise Linux 7 server to become the target server. Do not install Red Hat Enterprise Linux 7 software groups, or third-party applications. Ensure that your server complies with all the specifications of Preparing your Environment for Installation in Installing Satellite Server from a Connected Network.
-
A backup from Satellite versions 6.1, 6.2, or 6.3 that you make using the
katello-backupscript. You can use a backup with or without Pulp data. - A Satellite subscription for the target server.
Before you begin cloning, ensure the following conditions exist:
- The target server is on an isolated network. This avoids unwanted communication with Capsule Servers and hosts
- The target server has the capacity to store all your backup files from the source server.
2.3. Pulp Data Considerations
You can clone Satellite server without including Pulp data. However, for your cloned environment to work, you do require Pulp data. If the target server does not have Pulp data. it is not a fully working Satellite.
To transfer Pulp data to a target server, you have two options:
- Clone using backup with Pulp data
-
Clone using backup without Pulp data and copy
/var/lib/pulpmanually from source server.
If your pulp_data.tar file is greater than 500 GB, or if you use a slow storage system, such as NFS, and your pulp_data.tar file is greater than 100 GB, do not include pulp_data.tar in the backup because this can cause memory errors during extraction. Copy the pulp_data.tar file from the source server to the target server.
To back up without Pulp data
Follow the steps in the procedure in Section 2.4, “Cloning Satellite Server” and replace the steps that involve cloning with Pulp data with the following steps:
Perform a backup with MongoDB and PostgreSQL databases active excluding the Pulp data:
# katello-service stop
# katello-service start --only mongod,postgresql
# katello-backup --skip-pulp-content /var/backup --assumeyes
Stop and disable all Satellite services
# katello-service stop
# for i in $(katello-service list| awk '{print $1}'|grep service); \
do systemctl disable $i ;done
Copy the Pulp data to the target server:
# rsync --archive --partial --progress --compress \
/var/lib/pulp target_server.example.com:/var/lib/pulp
Proceed to Section 2.4.2, “Cloning to the Target Server”.
2.4. Cloning Satellite Server
Use the following procedures to clone Satellite Server. Note that because of the high volume of data that you must copy and transfer as part of these procedures, it can take a significant amount of time to complete.
2.4.1. Preparing the source server for cloning
On the source server, complete the following steps:
Verify the Pool ID of your Satellite subscription:
# subscription-manager list --consumed \
--matches 'Red Hat Satellite'|grep "Pool ID:"|awk '{print $3}'
Remove the Red Hat Satellite subscription.
# subscription-manager remove --serial=$(subscription-manager list \
--consumed \
--matches 'Red Hat Satellite'|grep "Serial:"|awk '{print $2}')
Determine the size of the Pulp data:
# du -sh /var/lib/pulp/
If you have less than 500 GB of Pulp data, perform a backup with MongoDB and PostgreSQL databases active including the Pulp data. If you have more than 500 GB of Pulp data, skip the following steps and complete the steps in Section 2.3, “Pulp Data Considerations” before you continue.
# katello-service stop
# katello-service start --only mongod,postgresql
# katello-backup /var/backup --assumeyes
Stop and disable all Satellite services:
# katello-service stop
# for i in $(katello-service list| awk '{print $1}'|grep service); \
do systemctl disable $i ;done
Proceed to Section 2.4.2, “Cloning to the Target Server”.
2.4.2. Cloning to the Target Server
To clone your server, complete the following steps on your target server:
-
The
satellite-clonetool defaults to using/backup/as the backup folder. If you copy to a different folder, update thebackup_dirvariable in the/etc/satellite-clone/satellite-clone-vars.ymlfile. -
Place the backup files from the source Satellite in the
/backup/folder on the target server. You can either mount the shared storage or copy the backup files to the/backup/folder on the target server. - Power off the source server.
Enter the following commands to register to the Customer Portal, attach subscriptions, and enable only the required subscriptions:
# subscription-manager register your_customer_portal_credentials
# subscription-manager attach --pool=pool_ID
# subscription-manager repos --disable=*
# subscription-manager repos \
--enable=rhel-7-server-rpms \
--enable=rhel-server-rhscl-7-rpms \
--enable=rhel-7-server-satellite-maintenance-6-rpms \
--enable=rhel-7-server-satellite-6.3-rpms
Install the
satellite-clonepackage# yum install satellite-clone
After you install the
satellite-clonetool, you can adjust any configuration to suit your own deployment in the/etc/satellite-clone/satellite-clone-vars.ymlfile.Run the
satellite-clonetool.# satellite-clone
- Reconfigure DHCP, DNS, TFTP and remote execution services. The cloning process disables these services on the target Satellite Server to avoid conflict with the source Satellite Server.
- Reconfigure and enable DHCP, DNS, TFTP in the Satellite web UI. For more information, see Configuring DNS, DHCP, and TFTP on Satellite Server in Installing Satellite Server from a Connected Network.
Enable remote execution:
# satellite-installer --scenario satellite \
--enable-foreman-plugin-remote-execution \
--enable-foreman-proxy-plugin-remote-execution-ssh
-
Log on to the Satellite web UI, with the username
adminand the passwordchangeme. Immediately update the admin password to secure credentials. - Ensure that the correct organization is selected.
- Navigate to Content > Subscriptions, then click Manage Manifest.
- Click the Refresh button, then click Close to return to the list of subscriptions.
- Verify that the available subscriptions are correct.
-
Follow the instructions in the
/usr/share/satellite-clone/logs/reassociate_capsules.txtfile to restore the associations between Capsules and their lifecycle environments. -
Update your network configuration, for example, DNS, to match the target server’s IP address with its new host name. The
satellite-clonetool changes the hostname to the source server’s hostname. If you want to change the hostname to something different, you can use thesatellite-change-hostnametool. For more information, see Renaming a Satellite or Capsule Server in Administrating Red Hat Satellite. -
If the source server uses the
virt-whodaemon, install and configure it on the target server. Copy all thevirt-whoconfiguration files in the/etc/virt-who.d/directory from the source server to the same directory on the target server. For more information, see Virt-who Installation and Configuration Overview in the Virtual instances Guide.
After you perform an upgrade using the following chapters, you can safely decommission the source server.
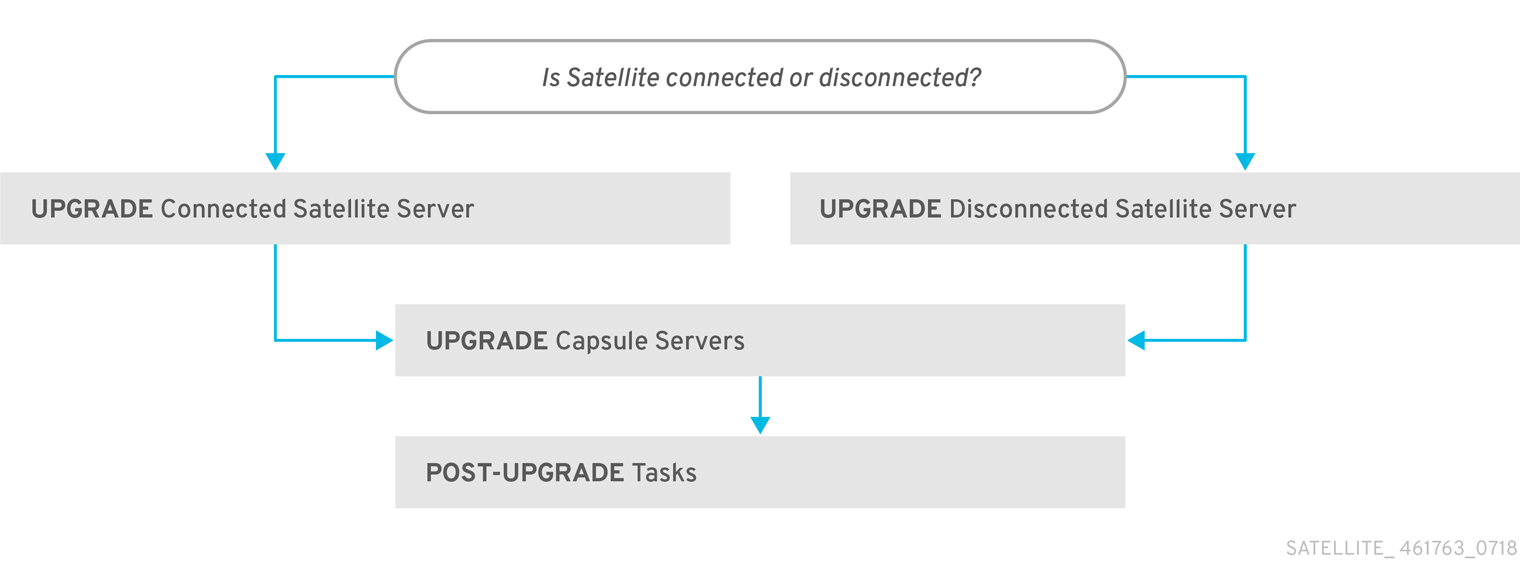
Chapter 3. Upgrading Red Hat Satellite
If you have Satellite 6 installed in a high availability configuration, contact Red Hat Support before upgrading to Satellite 6.4.
Use the following procedures to upgrade your existing Red Hat Satellite to Red Hat Satellite 6.4:
Before upgrading, see Section 1.1, “Prerequisites”.
3.1. Upgrading Satellite Server
This section describes how to upgrade Satellite Server from 6.3 to 6.4. You can upgrade from any minor version of Red Hat Satellite Server 6.3.
Before You Begin
- Review and update your firewall configuration prior to upgrading your Satellite Server. For more information, see Ports and Firewalls Requirements in Installing Satellite Server from a Connected Network.
- Ensure that you do not delete the manifest from the Customer Portal or in the Satellite Web UI because this removes all the entitlements of your content hosts.
- Back up and remove all Foreman hooks before upgrading. Restore any hooks only after Satellite is known to be working after the upgrade is complete.
- If you have edited any of the default templates, back up the files either by cloning or exporting them. Cloning is the recommended method because that prevents them being overwritten in future updates or upgrades. To confirm if a template has been edited, you can view its History before you upgrade or view the changes in the audit log after an upgrade. In the web UI, Navigate to Monitor > Audits and search for the template to see a record of changes made. If you use the export method, restore your changes by comparing the exported template and the default template, manually applying your changes.
-
If the
/root/.hammer/defaults.ymlfile exists on your Satellite Server, create a back up of the file, and then delete/root/.hammer/defaults.ymlbefore upgrading. Restore the file only after Satellite is known to be working after the upgrade is complete. You must apply this workaround until Red Hat Bug 1632768 is resolved.
Capsule Considerations
- Ensure the Red Hat Satellite Capsule 6.4 repository is enabled in Satellite Server and synchronized. Until Red Hat Bug 1305040 is resolved, allow time for the Capsules to synchronize these changes.
- If you use Content Views to control updates to a Capsule Server’s base operating system, or for the Capsule Server repository, you must publish updated versions of those Content Views.
If you implemented custom certificates, you must retain the content of both the /root/ssl-build directory and the directory in which you created any source files associated with your custom certificates.
Failure to retain these files during an upgrade causes the upgrade to fail. If these files have been deleted, they must be restored from a backup in order for the upgrade to proceed.
Configuring the BASH shell
The BASH shell stores the location of a binary in a hash table. During the upgrade, the location of the katello-service script is changed, but BASH does not register this change, and foreman-maintain fails if it calls the script after the change.
Optional: Before the upgrade, users of the BASH shell can set the
checkhashoption temporarily to ensurekatello-serviceworks after the installer completes. Enter a command as follows in your BASH shell:# shopt -s checkhash
After a successful or failed upgrade, in all currently running BASH shells, enter the following command:
# hash -d katello-service 2> /dev/null
Upgrade Scenarios
- To upgrade a Satellite Server connected to the Red Hat Content Delivery Network, proceed to Section 3.1.1, “Upgrading a Connected Satellite Server”.
- To upgrade a Satellite Server not connected to the Red Hat Content Delivery Network, proceed to Section 3.1.2, “Upgrading a Disconnected Satellite Server”.
You cannot upgrade a self-registered Satellite. You must migrate a self-registered Satellite to the Red Hat Content Delivery Network (CDN) and then perform the upgrade. To migrate a self-registered Satellite to the CDN, see Migrating Self-Registered Satellites in the Satellite 6.3 Upgrading and Updating Red Hat Satellite guide.
3.1.1. Upgrading a Connected Satellite Server
Use this procedure for a Satellite Server connected to the Red Hat Content Delivery Network.
If you customize configuration files, manually or using a tool such as Hiera, these changes are overwritten when the installation script runs during upgrading or updating. You can use the --noop option with the satellite-installer script to test for changes. For more information, see the Red Hat Knowledgebase solution How to use the noop option to check for changes in Satellite config files during an upgrade.
Upgrade Satellite Server
Create a backup.
- On a virtual machine, take a snapshot.
On a physical machine, create a backup.
For more information about backups, see Backing Up and Restoring Satellite Server and Capsule Server in the Administering Red Hat Satellite 6.3 guide.
-
Back up the DNS and DHCP configuration files
/etc/zones.confand/etc/dhcp/dhcpd.confas the installer only supports one domain or subnet, and therefore restoring changes from these backups might be required. If you have made manual edits to DNS or DHCP configuration files and do not want to overwrite the changes, enter the following command:
# satellite-installer --foreman-proxy-dns-managed=false \
--foreman-proxy-dhcp-managed=false
- In the Satellite web UI, navigate to Hosts > Discovered hosts. On the Discovered Hosts page, power off and then delete the discovered hosts. From the Select an Organization menu, select each organization in turn and repeat the process to power off and delete the discovered hosts. Make a note to reboot these hosts when the upgrade is complete.
Refresh your subscription:
# subscription-manager refresh
Enable the Satellite Maintenance and Red Hat Enterprise Linux Ansible repositories:
# subscription-manager repos \
--enable rhel-7-server-satellite-maintenance-6-rpms \
--enable rhel-7-server-ansible-2.6-rpms
Enter the following command to install
foreman-maintainor to update it to the latest version:# yum install rubygem-foreman_maintain
Check the available versions to confirm the version you want is listed:
# foreman-maintain upgrade list-versions
Use the health check option to determine if the system is ready for upgrade. When prompted, enter the hammer admin user credentials to configure
foreman-maintainwith hammer credentials. These changes are applied to the/etc/foreman-maintain/foreman-maintain-hammer.ymlfile.# foreman-maintain upgrade check --target-version 6.4
Review the results and address any highlighted error conditions before performing the upgrade.
Because of the lengthy upgrade time, use a utility such as
screento suspend and reattach a communication session. You can then check the upgrade progress without staying connected to the command shell continuously. For more information about using the screen command, see How do I use the screen command? article in the Red Hat Knowledge Base.If you lose connection to the command shell where the upgrade command is running you can see the logged messages in the
/var/log/foreman-installer/satellite.logfile to check if the process completed successfully.Perform the upgrade:
# foreman-maintain upgrade run --target-version 6.4
Check when the kernel packages were last updated:
# rpm -qa --last | grep kernel
If a kernel update occurred since the last reboot, reboot the system:
# reboot
If using a BASH shell, after a successful or failed upgrade, enter:
# hash -d foreman-maintain service 2> /dev/null
- Check and restore any changes required to the DNS and DHCP configuration files using the backups that you make.
If you make changes in the previous step, restart Satellite services.
# foreman-maintain service restart
If you have the OpenSCAP plug-in installed, but do not have the default OpenSCAP content available, enter the following command:
# foreman-rake foreman_openscap:bulk_upload:default
3.1.2. Upgrading a Disconnected Satellite Server
Use this procedure for a Satellite Server not connected to the Red Hat Content Delivery Network.
If you customize configuration files, manually or using a tool such as Hiera, these changes are overwritten when the installation script runs during upgrading or updating. You can use the --noop option with the satellite-installer script to test for changes. For more information, see the Red Hat Knowledgebase solution How to use the noop option to check for changes in Satellite config files during an upgrade.
Before You Begin
- Review and update your firewall configuration before upgrading your Satellite Server. For more information, see Ports and Firewalls Requirements in Installing Satellite Server from a Disconnected Network.
- Ensure that you do not delete the manifest from the Customer Portal or in the Satellite Web UI because this removes all the entitlements of your content hosts.
- Back up and remove all Foreman hooks before upgrading. Reinstate hooks only after Satellite is known to be working after the upgrade is complete.
If you implemented custom certificates, you must retain the content of both the /root/ssl-build directory and the directory in which you created any source files associated with your custom certificates.
Failure to retain these files during an upgrade causes the upgrade to fail. If these files have been deleted, they must be restored from a backup in order for the upgrade to proceed.
Upgrade Disconnected Satellite Server
Create a backup.
- On a virtual machine, take a snapshot.
- On a physical machine, create a backup.
A pre-upgrade script is available to detect conflicts and list hosts which have duplicate entries in Satellite Server that can be unregistered and deleted after upgrade. In addition, it will detect hosts which are not assigned to an organization. If a host is listed under Hosts > All hosts without an organization association and if a content host with same name has an organization already associated with it then the content host will automatically be unregistered. This can be avoided by associating such hosts to an organization before upgrading.
Run the pre-upgrade check script to get a list of hosts that can be deleted after upgrading. If any unassociated hosts are found, associating them to an organization before upgrading is recommended.
# foreman-rake katello:upgrade_check
If the upgrade check reports a failure due to running tasks, then it is recommended that you wait for the tasks to complete. It is possible to cancel some tasks, but you should follow the guidance in the Red Hat Knowledgebase solution How to manage paused tasks on Red Hat Satellite 6 to understand which tasks are safe to cancel and which are not safe to cancel.
-
Back up the DNS and DHCP configuration files
/etc/zones.confand/etc/dhcp/dhcpd.confas the installer only supports one domain or subnet, and therefore restoring changes from these backups might be required. If you have made manual edits to DNS or DHCP configuration files and do not want to overwrite the changes, run the installer script as follows:
# satellite-installer --foreman-proxy-dns-managed=false \
--foreman-proxy-dhcp-managed=false
-
In the Satellite web UI, navigate to Hosts > Discovered hosts. If there are discovered hosts available, turn them off and then delete all entries under the
Discovered hostspage. Select all other organizations in turn using the organization setting menu and repeat this action as required. Reboot these hosts after the upgrade has completed. - Make sure all external Capsule Servers are assigned to an organization, otherwise they might get unregistered due to host-unification changes.
Remove old repositories:
# rm /etc/yum.repos.d/*
Stop Satellite services.
# katello-service stop
- Obtain the latest ISO files by following the Downloading the Binary DVD Images procedure in the Installing Satellite Server from a Disconnected Network guide.
-
Create directories to serve as a mount point, mount the ISO images, and configure the
rhel7-serverrepository by following the Configuring the Base System with Offline Repositories procedure in the Installing Satellite Server from a Disconnected Network guide. Do not install or update any packages at this stage. Configure the Satellite 6.4 repository from the ISO file.
Copy the ISO file’s repository data file for the Red Hat Satellite packages:
# cp /media/sat6/media.repo /etc/yum.repos.d/sat6.repo
Edit the
/etc/yum.repos.d/sat6.repofile:# vi /etc/yum.repos.d/sat6.repo
Change the default
InstallMediarepository name toSatellite-6.4:[Satellite-6.4]
Add the
baseurldirective:baseurl=file:///media/sat6/
Configure the Red Hat Software Collections repository from the ISO file.
Copy the ISO file’s repository data file for Red Hat Software Collections packages:
# cp /media/sat6/RHSCL/media.repo /etc/yum.repos.d/RHSCL.repo
Edit the
/etc/yum.repos.d/RHSCL.repofile:# vi /etc/yum.repos.d/RHSCL.repo
Change the default
InstallMediarepository name toRHSCL:[RHSCL]
Add the
baseurldirective:baseurl=file:///media/sat6/RHSCL/
Configure the Red Hat Satellite Maintenance repository from the ISO file.
Copy the ISO file’s repository data file for Red Hat Satellite Maintenance packages:
# cp /media/sat6/sat-maintenance/media.repo /etc/yum.repos.d/sat-maintenance.repo
Edit the
/etc/yum.repos.d/sat-maintenance.repofile:# vi /etc/yum.repos.d/sat-maintenance.repo
Change the default
InstallMediarepository name toSatellite-Maintenance:[Satellite-Maintenance]
Add the
baseurldirective:baseurl=file:///media/sat6/sat-maintenance/
If you have custom Apache server configurations, they will be reverted to the installation defaults in the next step. If you want to see what will be changed when you perform the upgrade, you can enter the upgrade command with the
--noop(no operation) option and review the changes that will be applied when you enter the upgrade command in the following step. If you choose not to do this test, skip to the next step now. Alternatively, proceed as follows:Add the following line to the
/etc/httpd/conf/httpd.confconfiguration file.Include /etc/httpd/conf.modules.d/*.conf
Restart the
httpdservice.# systemctl restart httpd
Start the
postgresqlandmongoddatabase services.# systemctl start postgresql # systemctl start mongod
Run the installer script with the
--noopoption:# satellite-installer --scenario satellite --upgrade --verbose --noop
Review the
/var/log/foreman-installer/satellite.logto see what changes would be applied if the--noopoption was omitted. Look for the+++and---symbols indicating changes to configurations files. Because the above "no operation" option does not actually create the files, and some Puppet resources in the module expect them to be there, some failure messages are to be expected.Stop Satellite services:
# katello-service stop
Because of the lengthy upgrade time, use a utility such as
screento suspend and reattach a communication session. You can then check the upgrade progress without staying connected to the command shell continuously. For more information about using the screen command, see How do I use the screen command? article in the Red Hat Knowledge Base.If you lose connection to the command shell where the upgrade command is running you can see the logs in
/var/log/foreman-installer/satellite.logto check if the process completed successfully.Enter the following command to install
foreman-maintainor to update it to the latest version:# yum install rubygem-foreman_maintain
Check the available versions to confirm the version you want is listed:
# foreman-maintain upgrade list-versions
Use the health check option to determine if the system is ready for upgrade. When prompted, enter the hammer admin user credentials to configure
foreman-maintainwith hammer credentials. These changes are applied to the/etc/foreman-maintain/foreman-maintain-hammer.ymlfile.# foreman-maintain upgrade check --target-version 6.4 \ --whitelist="repositories-validate,repositories-setup"
Review the results and address any highlighted error conditions before performing the upgrade.
Perform the upgrade:
# foreman-maintain upgrade run --target-version 6.4 \
--whitelist="repositories-validate,repositories-setup"
WarningIf you run the command from a directory containing a config subdirectory, you will encounter the following error:
ERROR: Scenario (config/satellite.yaml) was not found, can not continue.
In such a case, change directory, for example to the root user’s home directory, and run the command again.
If the script fails due to missing or outdated packages, you must download and install these separately. For more information, see the Downloading Packages Manually section in the Installing Satellite Server from a Disconnected Network guide.
If using a BASH shell, after a successful or failed upgrade, enter:
# hash -d foreman-maintain service 2> /dev/null
Check when the kernel packages were last updated:
# rpm -qa --last | grep kernel
If a kernel update occurred since the last reboot, reboot the system:
# reboot
- Check and restore any changes required to the DNS and DHCP configuration files using the backups that you make.
If you make changes in the previous step, restart Satellite services.
# foreman-maintain service restart
If you have the OpenSCAP plug-in installed, but do not have the default OpenSCAP content available, enter the following command.
# foreman-rake foreman_openscap:bulk_upload:default
- In the Satellite web UI, go to Configure > Discovery Rules and associate selected organizations and locations with discovery rules.
3.2. Synchronizing the New Repositories
You must enable and synchronize the Red Hat Satellite Tools and Red Hat Satellite Capsule repositories for 6.4 before you can upgrade Capsule Servers and Satellite clients.
Procedure
- In the Satellite web UI, navigate to Content > Red Hat Repositories.
-
In the Search field, enter
Satellite 6.4. From the list of results, expand the following repositories and click the Enable icon to enable the repositories:
- Red Hat Satellite Tools 6.4 (for RHEL7 Server) (RPMs)
- Red Hat Satellite Capsule 6.4 (for RHEL 7 Server) (RPMs)
- Red Hat Satellite Maintenance 6 (for RHEL 7 Server) (RPMs)
Red Hat Ansible Engine 2.6 RPMs for Red Hat Enterprise Linux 7 Server
NoteIf the 6.4 repositories are not available, refresh the Subscription Manifest. Navigate to Content > Subscriptions, click Manage Manifest, then click Refresh.
- Navigate to Content > Sync Status.
- Click the arrow next to the product to view the available repositories.
- Select the repositories for 6.4.
Click Synchronize Now.
ImportantIf an error occurs when you try to synchronize a repository, refresh the manifest. If the problem persists, raise a support request. Do not delete the manifest from the Customer Portal or in the Satellite web UI; this removes all the entitlements of your content hosts.
- Update any pre-existing Content Views that use version 6.3 repositories with the new version for 6.4. Publish and promote updated versions of any Content Views that now have the new 6.4 repositories. For more information, see Managing Content Views in the Content Management Guide.
3.3. Upgrading Capsule Servers
This section describes how to upgrade Capsule Servers from 6.3 to 6.4.
Before You Begin
- You must upgrade Satellite Server before you can upgrade any Capsule Servers.
- You must upgrade Capsule Server to Puppet 4. For more information, see the Upgrading Puppet chapter in the Red Hat Satellite 6.3 Upgrading and Updating Guide.
- Ensure the Red Hat Satellite Capsule 6.4 repository is enabled in Satellite Server and synchronized.
- If you use Content Views to control updates to a Capsule Server’s base operating system, or for the Capsule Server repository, you must publish updated versions of those Content Views.
- Ensure the Capsule’s base system is registered to the newly upgraded Satellite Server.
- Ensure the Capsule has the correct organization and location settings in the newly upgraded Satellite Server.
- Review and update your firewall configuration prior to upgrading your Capsule Server. For more information, see Ports and Firewalls Requirements in Installing Capsule Server.
If you implemented custom certificates, you must retain the content of both the /root/ssl-build directory and the directory in which you created any source files associated with your custom certificates.
Failure to retain these files during an upgrade causes the upgrade to fail. If these files have been deleted, they must be restored from a backup in order for the upgrade to proceed.
Upgrading Capsule Servers
Create a backup.
- On a virtual machine, take a snapshot.
On a physical machine, create a backup.
For information on backups, see Backing Up and Restoring Satellite Server and Capsule Server in the Administering Red Hat Satellite 6.3 guide.
-
Back up the DNS and DHCP configuration files
/etc/zones.confand/etc/dhcp/dhcpd.confas the installer only supports one domain or subnet, and therefore restoring changes from these backups might be required. If you have made manual edits to DNS or DHCP configuration files and do not want to overwrite the changes, enter the following command:
# satellite-installer --foreman-proxy-dns-managed=false \
--foreman-proxy-dhcp-managed=false
Disable the repositories for the previous version of Satellite Server:
# subscription-manager repos \
--disable rhel-7-server-satellite-capsule-6.3-rpms \
--disable rhel-7-server-satellite-tools-6.3-rpms
Disable the Puppet 4 repository:
# subscription-manager repos \
--disable rhel-7-server-satellite-capsule-6.3-puppet4-rpms
Enable the new repositories.
The Red Hat Software Collections repository provides a later version of Ruby required by some Red Hat Satellite features, including the Remote Execution feature. The Satellite tools repository provides
goferandkatello-agentwhich provide communication services for managing Errata.Enter the following command:
# subscription-manager repos \
--enable rhel-7-server-satellite-capsule-6.4-rpms \
--enable rhel-server-rhscl-7-rpms \
--enable rhel-7-server-satellite-tools-6.4-rpms \
--enable rhel-7-server-satellite-maintenance-6-rpms \
--enable rhel-7-server-ansible-2.6-rpms
-
In the Satellite web UI, go to Hosts > Discovered hosts. If there are discovered hosts available, power off the hosts and then delete all entries under the
Discovered hostspage. Select all other organizations in turn using the organization setting menu and repeat this action as required. Reboot these hosts after the upgrade has completed. Clear the repository cache.
# yum clean all
Stop Katello services:
# katello-service stop
Until BZ#1649764 is resolved, update the
goferpackage:# yum update gofer
Restart goferd.
# systemctl restart goferd
Update all packages.
# yum update
If you plan to use Capsule Server as a proxy for discovered hosts, install the Discovery plug-in.
# yum install rubygem-smart_proxy_discovery.noarch
On the Capsule Server, verify that the
foreman_urlsetting is correct.# grep foreman_url /etc/foreman-proxy/settings.yml
The fully qualified domain name of the Satellite Server should display.
Perform the upgrade by running the installer script with the
--upgradeoption:# satellite-installer --scenario capsule --upgrade
WarningIf you run the command from a directory containing a config subdirectory, you will encounter the following error:
ERROR: Scenario (config/capsule.yaml) was not found, can not continue.
In such a case, change directory, for example to the root user’s home directory, and run the command again.
Check when the kernel packages were last updated:
# rpm -qa --last | grep kernel
If a kernel update occurred since the last reboot, reboot the system:
# reboot
- Check and restore any changes required to the DNS and DHCP configuration files using the backups made earlier.
- Upgrade the foreman-discovery package on Satellite Server and turn on the hosts that were shut down prior to the upgrade.
3.4. Upgrading Satellite Clients
Currently, the Satellite 6.3 version of katello-agent and other client libraries in the Satellite Tools repository are not formally tested or supported against Satellite 6.4.
Upgrade all clients to the new version of katello-agent as soon as possible so that your clients are fully compatible with Satellite Server. This requires changing the Satellite Tools repository from 6.3 to 6.4. In the Satellite web UI, navigate to Content > Red Hat Repositories to change the repository.
Prerequisites
- You must have upgraded Satellite Server.
- You must have enabled the new Satellite Tools repositories on the Satellite.
- You must have synchronized the new repositories in the Satellite.
-
If you have not previously installed
katello-agenton your clients, use the manual method.
If you implemented custom certificates, you must retain the content of both the /root/ssl-build directory and the directory in which you created any source files associated with your custom certificates.
Failure to retain these files during an upgrade causes the upgrade to fail. If these files have been deleted, they must be restored from a backup in order for the upgrade to proceed.
Upgrade Satellite Clients Using the Bulk Repository Set UI:
- In the Satellite web UI, navigate to Hosts > Content Hosts and select the Content Hosts that you want to upgrade.
- From the Select Action list, select Manage Repository Sets.
- From the Repository Sets Management list, select the Red Hat Satellite Tools 6.3 check box.
- From the Select Action list, select Override to Disabled, and click Done.
- When the process completes, on the same set of hosts from the previous steps, select Manage Repository Sets.
- From the Repository Sets Management list, select the Red Hat Satellite Tools 6.4 check box.
- From the Select Action list, select Override to Enabled, and click Done.
- When the process completes, on the same set of hosts from the previous steps, from the Select Action list, select Manage Packages.
-
In the Package search field, enter
katello-agent. - Until BZ#1649764 is resolved, from the Update list, you must select via remote execution. This is required because if you update the package using the Katello agent, the package update disrupts the communication between the client and Satellite or Capsule Server, which causes the update to fail. For more information, see Running Jobs on Hosts in the Managing Hosts guide.
Upgrade Satellite Clients Manually
- Log into the client system.
Disable the repositories for the previous version of Satellite.
# subscription-manager repos \
--disable rhel-7-server-satellite-tools-6.3-rpms
Enable the Satellite tools repository for this version of Satellite.
# subscription-manager repos \
--enable=rhel-7-server-satellite-tools-6.4-rpms
Upgrade the Katello agent:
# yum upgrade katello-agent
Chapter 4. Upgrading Puppet
Red Hat Satellite 6.4 only supports Puppet 5. The migration path for Puppet 5 supports only Puppet 4 to Puppet 5 migrations. Therefore, if you are using a version of Puppet prior to version 4, you must upgrade to Puppet 4 prior to upgrading to Satellite 6.4. Satellite 6.3 includes an upgrade path to Puppet 4, for more information, see the Upgrading Puppet section in the Satellite 6.3 Upgrading and Updating Red Hat Satellite guide.
During the Satellite upgrade process, Puppet is upgraded from Puppet 4 to Puppet 5. It is not a separate process. This chapter describes the process of preparing for the upgrade from Puppet 4 to Puppet 5.
Red Hat Satellite and Capsules do not have to be upgraded at the same time. You have the flexibility to upgrade Capsules depending on your progress with testing and upgrading Puppet modules. An alternative is to install new Capsules and move hosts to them after testing. You can use Satellite web UI, the Hammer CLI, or the bootstrap script to move hosts from a Puppet 4 Capsule to a Puppet 5 Capsule.
Cloning an existing Capsule to use for final testing of upgraded Puppet modules is also recommended. Cloning an existing Capsule can take a long time depending on the size of the repositories.
4.1. Configuring Puppet Host Parameters
By default, Satellite 6.4 sets the global parameter enable-puppet5. Provisioning templates, such as Kickstart files, use enable-puppet5 to provision new hosts to use the Puppet 5 agent if available. However, if the Puppet 4 agent is in a Content View attached to a host, this will be used in place of Puppet 5. If you want hosts to use Puppet 5, you must update Content Views associated with the hosts to contain the Puppet 5 agent.
Removing Puppet 4 Host Parameter
If you set the parameter enable-puppet4 in Satellite 6.3, it can now be safely removed.
- In the web UI, navigate to Configure > Host Groups and select the name of the host group you want to configure.
-
Click the Parameters tab, and in the Host Group Parameters area, locate
enable-puppet4. - In the Actions column, click Remove.
- Click Submit to save the changes.
For CLI Users
Remove the enable-puppet4 parameter for all hosts in a hostgroup:
# hammer hostgroup delete-parameter \
--hostgroup my_hostgroup \
--name enable-puppet4
4.2. Testing Puppet Modules
Before upgrading to Satellite 6.4, you must first review your Puppet modules, and make changes, to ensure they are compatible with Puppet 5. For information on the changes in Puppet 5, see the Puppet 5.0 Release Notes on the Puppet website.
Use the Puppet 5.0 Release Notes on the Puppet website and the following guidelines to test your Puppet modules before you begin upgrading:
- Test Puppet modules first on a workstation, separate from Satellite.
-
Check the command syntax using the
puppet parser validatecommand. -
Check for capital letters in the name of a class reference because this is no longer supported. Change class names to lower case; for example, change
Class[MyClass]toClass[myclass]. -
If you have custom version comparison code in Ruby, note that the
Range#intersectioncode to handle SemVer range matches has been removed. -
If you have custom Ruby code that makes use of the deprecated string formatting methods in the
TypeCalculatorclass, change your code to use the replacementTypeFormatterclass because the string formatting methods in theTypeCalculatorhave been removed. For more information, see the Type mismatch describer should expand aliases issue on the Puppet website. -
Previously, if a class was defined more than once their bodies were merged. A warning or error was displayed depending on the status of the
--strictflag. Now, an error is always displayed except for the top scope class indicated by‘’(also known as‘main’).
4.3. Upgrading Satellite Hosts to Puppet 5
Use this section to upgrade Satellite hosts to Puppet 5. Satellite Server and Capsule Server are upgraded to Puppet 5 as part of their respective upgrade procedures.
Prerequisites
- Ensure you complete the upgrade to Satellite 6.4 for Satellite Server. For more information, see Section 3.1, “Upgrading Satellite Server”.
- Ensure you complete the upgrade for the Capsule Server with the hosts attached that you want to upgrade. For more information, see Section 3.3, “Upgrading Capsule Servers”.
-
Ensure there is no
enable-puppet4parameter set for the host or host group to override the globalenable-puppet5parameter. For more information, see Section 4.1, “Configuring Puppet Host Parameters”. - Ensure you have reviewed your Puppet modules and upgraded them where required for Puppet 5. For more information, see Section 4.2, “Testing Puppet Modules”.
- Ensure the associated Content Views have been updated to include Puppet 5 agent.
Procedure
To upgrade a host to Puppet 5, complete the following steps:
- In the Satellite web UI, navigate to Hosts > Content Hosts and select the Content Hosts that you want to upgrade.
- From the Select Action list, select Manage Repository Sets.
- From the Repository Sets Management list, select the Red Hat Satellite 6.3 - Puppet 4 (for RHEL 7 Server) (RPMs) check box.
- From the Select Action list, select Override to Disabled.
- Click Yes to confirm the action.
- When the process completes, on the same set of hosts from the previous steps, from the Select Action list, select Manage Packages.
- Click Update All Packages.
- Click Yes to confirm the action.
For CLI Users
On the host, search for the Puppet 4 RPM repository:
# subscription-manager repos --list-enabled |grep puppet4
Disable the Puppet 4 repository you find on the host, for example:
# subscription-manager repos \
--disable=rhel-7-server-satellite-tools-6.3-puppet4-rpms
For more information about format of Puppet repositories, see Red Hat Satellite Tools - Puppet 4 in the Red Hat Satellite {PreviousVersion} Release Notes.
Until BZ#1649764 is resolved, update the
goferpackage:# yum update gofer
Restart goferd.
# systemctl restart goferd
Update all packages:
# yum update
Chapter 5. Post-Upgrade Tasks
Some of the procedures in this section are optional. You can choose to perform only those procedures that are relevant to your installation.
If you use the PXE-based discovery process, then you must complete the discovery upgrade procedure on Satellite and on any Capsule Server with hosts that you want to be listed in Satellite on the Hosts > Discovered hosts page.
5.1. Updating Backup and Restore Scripts
If you have scripts for backing up and restoring Satellite or Capsule, ensure that you update the scripts to replace katello-backup and katello-restore with foreman-maintain backup and foreman-maintain restore.
5.2. Upgrading Discovery
This section describes updating the PXELinux template and the boot image passed to hosts that use PXE booting to register themselves with Satellite Server.
From Satellite 6.4, provisioning templates now have a separate association with a subnet, and do not default to using the TFTP Capsule for that subnet. If you create subnets after the upgrade, you must specifically enable the Satellite or a Capsule to provide a proxy service for discovery templates and then configure all subnets with discovered hosts to use a specific template Capsule.
During the upgrade, for every subnet with a TFTP proxy enabled, the template Capsule is set to be the same as the TFTP Capsule. After the upgrade, check all subnets to verify this was set correctly.
These procedures are not required if you do not use PXE booting of hosts to enable Satellite to discover new hosts.
5.2.1. Upgrading Discovery on Satellite Server
Update the Discovery template in the Satellite web UI:
- Navigate to Hosts > Provisioning templates.
-
On the
PXELinux global defaultline, click Clone. -
Enter a new name for the template in the Name field, for example
ACME PXE global default. -
In the template editor field, change the line
ONTIMEOUT localtoONTIMEOUT discoveryand click Submit. - Navigate to Administer > Settings.
-
Locate
Global default PXELinux templateand click on its Value. - Select the name of the newly created template from the menu and click the tick button.
- Navigate to Hosts > Provisioning templates.
- Click Build PXE Default, then click OK.
- In the Satellite web UI, go to Configure > Discovery Rules and associate selected organizations and locations with discovery rules.
5.2.2. Upgrading Discovery on Capsule Servers
Verify that the Foreman Discovery package is current on Satellite Server.
# yum upgrade tfm-rubygem-foreman_discovery
If an update occurred in the previous step, restart Satellite services.
# katello-service restart
Upgrade the Discovery image on the Satellite Capsule that is either connected to the provisioning network with discovered hosts or provides TFTP services for discovered hosts.
# yum upgrade foreman-discovery-image
On the same instance, install the package which provides the Proxy service, and then restart
foreman-proxyservice.# yum install rubygem-smart_proxy_discovery # service foreman-proxy restart
- In the Satellite web UI, go to Infrastructure > Capsules and verify that the relevant Capsule lists Discovery in the features column. Select Refresh from the Actions drop-down menu if necessary.
Go to Infrastructure > Subnets and for each subnet on which you want to use discovery:
- Click the subnet name.
- On the Capsules tab, ensure the Discovery Capsule is set to a Capsule you configured above.
5.2.3. Verifying Subnets have a Template Capsule
Ensure all subnets with discovered hosts have a template Capsule:
- In the Satellite web UI, navigate to Infrastructure > Subnets.
- Select the subnet you want to check.
- On the Capsules tab, ensure a Template Capsule has been set for this subnet.
For more information about configuring subnets with template Capsules, see Configuring Discovery Subnets in the Red Hat Satellite Managing Hosts guide.
5.3. Upgrading virt-who
If virt-who is installed on Satellite Server or a Capsule Server, it will be upgraded when they are upgraded. No further action is required. If virt-who is installed elsewhere, it must be upgraded manually.
Before You Begin
If virt-who is installed on a host registered to Satellite Server or a Capsule Server, first upgrade the host to the latest packages available in the Satellite Tools repository. For information about upgrading hosts, see Section 3.4, “Upgrading Satellite Clients”.
Upgrade virt-who Manually
Upgrade virt-who.
# yum upgrade virt-who
Restart the virt-who service so the new version is activated.
# systemctl restart virt-who.service
5.4. Removing the Previous Version of the Satellite Tools Repository
After completing the upgrade to Satellite 6.4, the Red Hat Satellite Tools 6.3 repository can be removed from Content Views and then disabled.
Disable Version 6.3 of the Satellite Tools Repository:
- In the Satellite web UI, navigate to Content > Red Hat Repositories.
- In the Enabled Repositories area, locate Red Hat Satellite Tools 6.3 for RHEL 7 Server RPMs x86_64.
- Click the Disable icon to the right.
If the repository is still contained in a Content View then you cannot disable it. Packages from a disabled repository are removed automatically by a scheduled task.
5.5. Updating Templates, Parameters, Lookup Keys and Values
During the upgrade process, Satellite attempts to locate macros that are deprecated for Satellite 6.4 and converts old syntax to new syntax for the default Satellite templates, parameters, and lookup keys and values. However, Satellite does not convert old syntax in the custom templates that you have created and in the cloned templates.
The process uses simple text replacement, for example:
@host.params['parameter1'] -> host_param('parameter1')
@host.param_true?('parameter1') -> host_param_true?('parameter1')
@host.param_false?('parameter1') -> host_param_false?('parameter1')
@host.info['parameters'] -> host_enc['parameters']If you use cloned templates in Satellite, verify whether the cloned templates have diverged from the latest version of the original templates in Satellite. The syntax for the same template can differ between versions of Satellite. If your cloned templates contain outdated syntax, update the syntax to match the latest version of the template.
To ensure that this text replacement does not break or omit any variables in your files during the upgrade, check all templates, parameters, and lookup keys and values for the old syntax and replace manually.
The following error occurs because of old syntax remaining in files after the upgrade:
undefined method '#params' for Host::Managed::Jail
Fixing the outdated subscription_manager_registration snippet
Satellite 6.4 onwards uses the redhat_register snippet instead of the subscription_manager_registration snippet.
If you upgrade from Satellite 6.3 and earlier, ensure to replace the subscription_manager_registration snippet in your custom templates as follows:
<%= snippet "subscription_manager_registration" %>
               ↓
<%= snippet 'redhat_register' %>
5.6. Validating the Mirror on Sync Setting for Red Hat Repositories
After the upgrade, ensure that you set the Mirror-on-Sync setting to Yes for the Red Hat repositories, excluding the repositories for which you intentionally set Mirror-on-Sync to No. For more information, see the Searching Red Hat repositories with the Mirror on Sync setting set to No article in the Red Hat Knowledge Base.
Chapter 6. Updating Satellite Server, Capsule Server, and Content Hosts
Use this chapter to update your existing Red Hat Satellite environment to a new minor version of Red Hat Satellite, for example, from 6.4.0 to 6.4.1. For more information, see Chapter 6, Updating Satellite Server, Capsule Server, and Content Hosts.
This chapter includes update procedures for Satellite Server, Capsule Server, and Content Hosts.
Updating Between Minor Versions of Satellite
Updating is the process of migrating Satellite Server, Capsule Server, and Content Hosts to a new minor version. Updates typically patch security vulnerabilities and correct minor issues discovered after code is released. Generally speaking, updates require little time and are non-disruptive to your operating environment.
Before updating, check the Red Hat Satellite Release Notes for potential conflicts and back up your Satellite Server and all Capsule Servers. For more information, see Backing Up and Restoring Satellite Server and Capsule Server in the Administering Red Hat Satellite guide.
Follow these procedures to update between minor versions, for example, from 6.4.0 to 6.4.1.
6.1. Updating Satellite Server
Prerequisites
- Ensure that you have synchronized Satellite Server repositories for Satellite, Capsule, and Satellite Tools.
- Ensure each external Capsule and Content Host can be updated by promoting the updated repositories to all relevant Content Views.
If you customize configuration files, manually or use a tool such as Hiera, these customizations are overwritten when the installation script runs during upgrading or updating. You can use the --noop option with the satellite-installer script to test for changes. For more information, see the Red Hat Knowledgebase solution How to use the noop option to check for changes in Satellite config files during an upgrade.
Updating Satellite Server to the Next Minor Version
To Update Satellite Server:
Ensure the Satellite Maintenance repository is enabled:
# subscription-manager repos --enable \
rhel-7-server-satellite-maintenance-6-rpms
Ensure
foreman-maintainis installed and up to date:# yum install rubygem-foreman_maintain
Check the available versions to confirm the next minor version is listed:
# foreman-maintain upgrade list-versions
Use the health check option to determine if the system is ready for upgrade. On first use of this command,
foreman-maintainprompts you to enter the hammer admin user credentials and saves them in the/etc/foreman-maintain/foreman-maintain-hammer.ymlfile.# foreman-maintain upgrade check --target-version 6.4.zReview the results and address any highlighted error conditions before performing the upgrade.
Because of the lengthy update time, use a utility such as
screento suspend and reattach a communication session. You can then check the upgrade progress without staying connected to the command shell continuously. For more information about using the screen command, see How do I use the screen command? article in the Red Hat Knowledge Base.If you lose connection to the command shell where the upgrade command is running, you can see the logged messages in the
/var/log/foreman-installer/satellite.logfile to check if the process completed successfully.Perform the upgrade:
# foreman-maintain upgrade run --target-version 6.4.zCheck when the kernel packages were last updated:
# rpm -qa --last | grep kernel
If a kernel update occurred since the last reboot, reboot the system:
# reboot
6.2. Updating Capsule Server
Updating Capsule Servers to the Next Minor Version
To Update a Capsule Server:
Check that only the correct repositories are enabled:
List the enabled repositories:
# subscription-manager repos --list-enabled
Ensure that you only have the following repositories enabled:
rhel-7-server-rpms
rhel-7-server-satellite-capsule-6.4-rpms
rhel-server-rhscl-7-rpms
rhel-7-server-satellite-tools-6.4-rpms
rhel-7-server-satellite-maintenance-6-rpms
rhel-7-server-ansible-2.6-rpms
For more information about disabling and enabling repositories, see Configuring Repositories in Installing Capsule Server. The
rhel-7-server-satellite-tools-6.4-rpmsrepository provides Katello Agent. For more information, see Installing the katello Agent in Installing Capsule Server. The Red Hat Software Collections repository is optional, it is required for the Remote Execution feature.
Stop Katello services:
# katello-service stop
Until BZ#1649764 is resolved, update the
goferpackage:# yum update gofer
Restart goferd.
# systemctl restart goferd
Update all packages:
# yum update
If a kernel update occurs, make a note to reboot after the upgrade is complete. Do not reboot at this point.
Perform the update by running the installer script with the
--upgradeoption.# satellite-installer --scenario capsule --upgrade
If a kernel update occurred during the
yum updatestep, reboot the system:# reboot
6.3. Updating Content Hosts
Updating Content Hosts to the Next Minor Version
To Update a Content Host, enter the following commands:
Until BZ#1649764 is resolved, update the
goferpackage:# yum update gofer
Restart goferd:
# systemctl restart goferd
Update all packages:
# yum update
If a kernel update occurs, reboot the system:
# reboot