
Red Hat Training
A Red Hat training course is available for Red Hat Satellite
Content Management Guide
An end-to-end guide on managing content from Red Hat and custom sources
Abstract
Chapter 1. Introduction
In the context of system management, we define content as the software installed on systems. This includes, but is not limited to, the base operating system, middleware services, and end user applications. Red Hat Satellite 6 provides tools to manage the various types of content for Red Hat Enterprise Linux systems. This provides system administrators with an easy way to collect a range of content, keep it up to date, and use it to provision new systems and update existing systems.
This guide aims to provide an end-to-end scenario to demonstrate how to manage your content. This guide is targeted at system administrators with a newly installed Satellite Server.
1.1. Overview of Red Hat Satellite 6 Content Management
Content management in the context of Red Hat Satellite 6 means a work flow that provides a sustainable repository for multiple content types. For Red Hat content, Red Hat Satellite 6 also uses subscription information so that it knows what content is available to a user. This means Red Hat Satellite 6 uses components to manage the following:
- Subscription management, which includes tools to manage Red Hat software subscriptions, and associated content, over a secure connection. This provides a means for organizations to manage their Red Hat subscription information.
- Content management, which includes applications to download and store content in custom repositories. This provides organizations with a method to store Red Hat content and organize it in various ways.
1.2. Defining the Application Life Cycle
The application life cycle is a concept central to Red Hat Satellite 6’s content management functions. The application life cycle defines how a particular system and its software look at a particular stage. For example, an application life cycle might be simple; you might only have a development stage and production stage. In this case the application life cycle might look like this:
- Development
- Production
However, a more complex application life cycle might have further stages, such as a phase for testing or a beta release. This adds extra stages to the application life cycle:
- Development
- Testing
- Beta Release
- Production
Ultimately, the stages in an application life cycle depend on your organization and its software development methods. However, Red Hat Satellite 6 provides methods to customize each application life cycle stage so that it suits your specifications.
Each stage in the application life cycle is called an environment in Red Hat Satellite 6. Each environment uses a specific collection of content. Red Hat Satellite 6 defines these content collections as a Content View. Each Content View acts as a filter where we can define what repositories, packages, and Puppet modules to include in a particular environment. This provides a method for you to define specific sets of content to designate to each environment.
The concept of the application life cycle depends on a certain level of progression. For example, environments in the early stages of an application life cycle might use newer and pre-release packages for development and testing of new features. Likewise, environments in the later stages might use only stable packages to suit production-level software. If the packages in development pass testing, you can promote the development Content View across the application life cycle so that it becomes the Content View for the production environment. This ensures that your application life cycle progresses with the development of your application.
Figure 1.1. The Red Hat Satellite 6 Application Life Cycle

1.3. Defining Content Management Types
Red Hat Satellite 6 manages different content types. This includes:
- RPM Packages
- Red Hat Satellite 6 provides a method to import RPM files from repositories related to your Red Hat subscriptions. This means Satellite Server downloads the RPM files from Red Hat’s Content Delivery Network and stores them locally. You can use these repositories and their RPM files in Content Views.
- Kickstart Trees
- Red Hat Satellite 6 obtains the kickstart trees for creating a new system. New systems access these kickstart trees over a network to use as base content for their installation. Red Hat Satellite 6 also contains some predefined kickstart templates (and the ability to create your own), which are used to provision new systems and customize the installation.
- ISO and KVM Images
- Red Hat Satellite 6 downloads and manages media for installation and provisioning. For example, Satellite downloads, stores and manages ISO images and KVM guest images for specific Red Hat Enterprise Linux versions.
- Puppet Modules
- Red Hat Satellite 6 offers the ability to upload Puppet modules alongside RPM content so that it can configure the system’s state after provisioning. Users can also manage Puppet classes and parameters as part of the provisioning process.
- Container Images
- Red Hat Satellite 6 can act as a registry for container images. This provides a method to create containers using Red Hat Enterprise Linux Atomic Host.
- OSTree
- Red Hat Satellite 6 can import OSTree branches and publish this content to a HTTP location.
1.4. Defining our Scenario
This guide uses an example scenario to demonstrate Red Hat Satellite 6’s features. In this scenario, a software development company called ACME recently installed Red Hat Satellite 6 and its system administrators want to start importing and managing Red Hat content. The end goal for ACME is to:
- Have a set of content sources imported for their organization. This includes content from their Red Hat subscription and their own custom content.
- Have an application life cycle defined based on their software development process.
- Have their Satellite Server ready so they can provision new Red Hat Enterprise Linux hosts and register existing Red Hat Enterprise Linux hosts.
This guide only focuses on content management. Further features, such as host provisioning, environment architecture, and Satellite Server management, are covered in other guides in the Red Hat Satellite 6 series.
This guide provides both steps for using either the Red Hat Satellite 6 Web UI or its CLI tool (hammer). Use either depending on your preferred method of interacting with Red Hat Satellite 6. If using the CLI and do not want to include authentication details each time you enter a hammer command, create a CLI configuration file for the local user:
# mkdir ~/.hammer
# cat > .hammer/cli_config.yml <<EOF
:foreman:
    :host: 'https://satellite.example.com/'
    :username: 'admin'
    :password: 'p@55w0rd!'

EOF
All uses of the hammer command in this guide use the configuration file and omit the authentication details.
Some CLI commands can use the --async option to perform certain tasks asynchronously. For example, you can synchronize content and publish Content Views as a asynchronous task rather than monitoring it. This guide omits the --async so that users can monitor progress of tasks to completion. If including the --async option for certain tasks, ensure the task completes before moving on to the next task.
1.5. Defining Content Management Storage
Red Hat Satellite 6 hosts repositories for RPM and Puppet content, including content synchronized with Red Hat’s Content Delivery Network and your own custom repositories. Such repositories grow in size over time. This means you must estimate adequate size requirements to suit your environment and scale future requirements accordingly.
Red Hat Satellite 6 stores and manages repository content in /var/lib/pulp. It is recommended to mount this directory onto a large local partition that you can scale. For example, use Logical Volume Manager (LVM) to create this partition.
Do not mount /var/lib/pulp on an NFS share. Parts of Red Hat Satellite 6 use transient SQLite databases, which have issues over NFS. If you aim to use an NFS share, only mount the /var/lib/pulp/content directory, which contains the main source content units. Red Hat recommends the use of high-bandwidth, low-latency storage for the /var/lib/pulp file system. Red Hat Satellite has many operations that are I/O-intensive so usage of high-latency, low-bandwidth storage could result in performance degradation.
Red Hat Satellite 6 synchronize and stores packages from Red Hat’s Content Delivery Network. This includes repositories for Red Hat Enterprise Linux and other Red Hat software. The recommended storage requirements for Red Hat content are as follows:
During Production Phase 1 of a major Red Hat Enterprise Linux version:
- At least 40GB for each binary package repository
- At least 80GB for each debug-info repository
After Production Phase 1 of a major Red Hat Enterprise Linux version:
- The estimated annual growth rates of these repositories are 10GB per binary package repository and 20GB per debug-info repository
For more information about Red Hat Production Phases, see "Red Hat Enterprise Linux Life Cycle".
All repositories vary in size. These specifications are recommendations and must be adjusted according to the repositories you want to synchronize.
Red Hat Satellite 6 provides users with the ability to create Content Views. Content Views act as a snapshot of a user-defined content collection at a particular point in time. This provides a means to create customized content collections from preexisting repositories.
Each unit of content in a Content View uses a symbolic link to the Definitive Media Library stored in the /var/lib/pulp/content directory. In addition, each repository in a Content View contains metadata about the content belonging to the Content View. This means a Content View using a minimal number of packages uses a small amount of storage. However, the storage size adds up when you use multiple Content Views and a large number of packages per view.
For example, a Content View using the Red Hat Enterprise Linux 7 RPMs repository might contain over 7000 packages. In terms of disk space, this might only result in less than 100MB of symbolic links. However, take into account the following:
- The number of Content Views containing this repository
- The number of versions per Content View
- The number of life cycle environments using the promoted view
- Any additional content, such as kickstart trees or Live CD content
To help reduce the amount of storage that Content Views consume, use the following recommendations:
- Remove unused versions of Content Views. If you are not using a Content View in a life cycle environment and you have no intention of reusing it, delete it to reclaim the storage used.
- Use filters in Content Views. Filters limit the content that appears in a Content View. This helps you define only the necessary content required for your view and excludes redundant content. This reduces the size of each Content View significantly.
-
Monitor the
/var/lib/pulp/nodesdirectory. Red Hat Satellite 6 uses this directory to construct Content Views. -
Monitor the
/var/lib/pulp/publisheddirectory. Red Hat Satellite 6 uses this directory to publish Content Views.
Red Hat Satellite 6 also uses the following databases for its content management components:
-
Main database - PostgreSQL database stored in
/var/lib/pgsql. The storage requirements depend on a number of factors including organizations, environments, registered systems, and Content Views. -
Content database - MongoDB database stored in
/var/lib/mongodb. The storage requirements depend on the number of packages and Content Views for your Red Hat Satellite 6 environment. This usually takes a large amount of storage. Reserve at minimum 10GB for the Content database and plan for an estimated 5GB per repository. It is recommended to mount this directory onto a large local partition that you can scale. For example, use Logical Volume Manager (LVM) to create this partition.
Do not mount /var/lib/mongodb on an NFS share. Red Hat recommends the usage of high-bandwidth, low-latency storage for the /var/lib/mongodb file system. Red Hat Satellite has many operations that are I/O-intensive so usage of high-latency, low-bandwidth storage could result in performance degradation.
1.6. Chapter Summary
In this chapter, we explored the base concept of content management in the context of Red Hat Satellite 6. This includes defining phases of the Red Hat Satellite 6 application life cycle and the different types of content that Red Hat Satellite 6 manages. This chapter also defined the scope of our example scenario and provided storage requirements to suit your content management needs.
The next chapter looks at creating organizations to store content.
Chapter 2. Creating Organizations
Organizations divide Red Hat Satellite 6 resources into logical groups based on ownership, purpose, content, security level, or other divisions. You can create and manage multiple organizations through Red Hat Satellite 6, then divide and assign your Red Hat subscriptions to each individual organization. This provides a method of managing the content of several individual organizations under one management system. Here are some examples of organization management:
- Single Organization
- A small business with a simple system administration chain. In this case, we create a single organization for the business and assign content to it.
- Multiple Organizations
- A large company that owns several smaller business units. For example, a company with separate system administration and software development groups. In this case, we create organizations for the company and each of the business units it owns. This keeps the system infrastructure for each separate. We then assign content to each organization based on their needs.
- External Organizations
- A company that manages external systems for other organizations. For example, a company offering cloud computing and web hosting resources to customers. In this case, we might create an organization for the company’s own system infrastructure and then an organization for each external business. We then assign content to each organization where necessary.
For our scenario, ACME acts as a single entity organization so the aim is to create and manage the organization for it. A default installation of Red Hat Satellite 6 provides a default organization called Default_Organization. However, this scenario steps through the creation and configuration of a custom organization for ACME.
If a new user is not assigned a default organization their access is limited. To grant systems rights to users, assign them to a default organization and have them log out and log back in again.
2.1. Creating an Organization
For Web UI Users
Navigate to Administer > Organizations. This displays the list of organizations that your Satellite Server currently manages.
Click New Organization.
A creation wizard appears with three sections:
- Create Organization
Provide the base details for the organization. This includes:
-
Name - A plain text name for the organization. For our scenario, use
ACME. -
Label - A unique identifier for the organization. This is used for creating and mapping certain assets, such as directories for content storage. Use letters, numbers, underscores, and dashes, but no spaces. For our scenario, use
ACMEtoo. -
Description - An optional plain text description for our organization. For our scenario, use
Our example organization.
-
Name - A plain text name for the organization. For our scenario, use
- Select Hosts
- All hosts must have an organization. However, in some circumstances, hosts might become orphaned. For example, deleting an old organization might orphan its hosts. In these situations, you can assign orphaned hosts to your newly created organization if necessary. Select Assign All to assign all orphaned hosts or Manually Assign to select which orphaned hosts to assign. In our scenario for ACME, no orphaned hosts exist yet, so click Proceed to Edit to move to the Edit Properties section.
- Edit Properties
- This section allows us to assign certain infrastructure resources to our organization. This includes networking resources, installation media, kickstart templates, and other parameters. You can return to this screen at any time by navigating to Administer > Organization and then selecting an organization to edit. In terms of our scenario, no further configuration is required. However, we return to this section later in this guide after we synchronize a kickstart tree.
After completing your organization creation, click Submit.
For CLI Users
# hammer organization create \
--name "ACME" \
--label "ACME" \
--description "Our example organization for managing content."
This creates your first organization.
2.2. Setting the Context
Before managing content in Red Hat Satellite 6, we must set the context. A context defines which organization to use for our content.
For Web UI Users
The Context menu is in the top-left corner of the screen. If you have not selected a context, the menu says "Any Context". Hover over this menu, then select ACME for the Organization selector. This changes the context to our ACME organization.
For CLI Users
If using the CLI, ensure to include either --organization "ACME" or --organization-label "ACME" as an option. For example:
# hammer subscription list --organization "ACME"
This sets the context for each interaction through the CLI.
2.3. Creating an Organization Debug Certificate
To Create a New Organization Debug Certificate:
- Navigate to Administer > Organizations.
- Select an organization for which you want to generate a debug certificate.
- Click Generate and Download. This generates a debug certificate.
- Save the certificate file in a secure location.
Debug Certificates are automatically generated for provisioning template downloads if they do not already exist in the organization for which they are being downloaded.
2.4. Using an Organization Debug Certificate
You can view an organization’s repository content using a browser or using the API if you have a debug certificate for that organization. The previous section describes creating and downloading the certificate which is in the X.509 format. To use a browser you must first convert the X.509 certificate to a format your browser supports and then import the certificate. The curl utility only requires extracting the certificate and key into separate files.
To Use an Organization Debug Certificate in Firefox.
- Create and download an organization certificate as described in Section 2.3, “Creating an Organization Debug Certificate”.
Open the X.509 certificate, for example, for the default organization:
$ vi 'Default Organization-key-cert.pem'
-
Copy the contents of the file from:
-----BEGIN RSA PRIVATE KEY-----to-----END RSA PRIVATE KEY-----inclusive, into a file calledkey.pem. -
Copy the contents of the file from
-----BEGIN CERTIFICATE-----to-----END CERTIFICATE-----inclusive, into a file calledcert.pem. Enter a command as follows to create a PKCS12 format certificate and enter a password or phrase when prompted:
$ openssl pkcs12 -keypbe PBE-SHA1-3DES -certpbe PBE-SHA1-3DES -export -in cert.pem -inkey key.pem -out organization_label.pfx -name organization_name
Enter Export Password:
Verifying - Enter Export Password:
-
Using the preferences tab, import the resulting
pfxfile into your browser: Navigate to Edit > Preferences > Advanced Tab. Select View Certificates in the Certificates view to open the Certificate Manager. On the Your Certificates tab, click Import and select thepfxfile to load. You are prompted for the password or phrase used when making the certificate. Enter a URL in the following format into your browser’s address bar to begin browsing for repositories:
http://satellite.example.com/pulp/repos/organization_label
Pulp uses the organization label so the URL must use the organization label too.
To Use an Organization Debug Certificate with Curl:
- Create and download an organization certificate as described in Section 2.3, “Creating an Organization Debug Certificate”
Open the X.509 certificate, for example, for the default organization:
$ vi 'Default Organization-key-cert.pem'
-
Copy the contents of the file from:
-----BEGIN RSA PRIVATE KEY-----to-----END RSA PRIVATE KEY-----inclusive, into a file calledkey.pem. -
Copy the contents of the file from
-----BEGIN CERTIFICATE-----to-----END CERTIFICATE-----inclusive, into a file calledcert.pem. - Find a valid URL for a repository. You can use the browsing method described in the previous procedure or use the web UI. For example, using the web UI, navigate to Content > Products and select a Product by name. On the Repositories tab, select a repository by name and look for the Published At entry.
To use
curlto access a repository, enter the following command:$ curl -k --cert cert.pem --key key.pem http://satellite.example.com/pulp/repos/Default_Organization/Library/content/dist/rhel/server/7/7Server/x86_64/sat-tools/6.3/os/Ensure the paths to
cert.pemandkey.pemare the correct absolute paths otherwise the command fails silently.
2.5. Removing an Organization
To Remove an Organization:
You can delete an organization if the organization is not associated with any life cycle environments or host groups. If there are any life cycle environments or host groups associated with the organization you are about to delete, remove them by going to Organizations and clicking the relevant tabs. It is not recommended to delete the default organization created during installation because the default organization is a placeholder for any unassociated hosts in the Satellite environment. There must be at least one organization in the environment in any given time.
- Navigate to Administer > Organizations.
- Select Delete from the list to the right of the name of the organization you want to remove.
An alert box appears:
Delete Organization?- Click OK to delete the organization.
2.6. Chapter Summary
This chapter showed how to create new organizations, create organization debug certificates, remove organizations, and set an organization as our context for content management.
The next chapter explores how Red Hat Satellite 6 imports your subscriptions into your organization. After the subscriptions are imported, so you can start managing Red Hat content.
Chapter 3. Managing Subscriptions
Red Hat Satellite 6 imports content from Red Hat’s Content Delivery Network (CDN). Satellite Server must have a manifest that contains the subscription allocation for each organization in your Satellite. This enables Satellite to find, access, and download from the corresponding repositories. All subscription information is available in your Red Hat Customer Portal account.
Red Hat Satellite 6.3 adds the ability to use future-dated subscriptions in the allocation. This enables uninterrupted access to repositories when future-dated subscriptions are added to content hosts before the expiry date of existing subscriptions. Red Hat recommends that you manually attach the future-dated subscriptions to your content hosts before the current subscriptions expire and not rely on the auto-attach method. See Section 3.7, “Attaching Subscriptions to a Content Host” for more information.
For this chapter, we examine how to create a subscription allocation containing a subset of your subscriptions.
3.1. Managing Multiple Organizations Using Multiple Allocations
You can have more than one allocation in a Satellite Server if you want to manage more than one organization. Satellite 6 requires a single allocation for each organization configured in Satellite. The advantage of this is that since each organization maintains completely separate subscriptions, you can support multiple organizations each with their own Red Hat accounts.
3.2. Creating a Subscription Allocation in Customer Portal
You can access your subscription information on the Red Hat Customer Portal. You can also assign subscriptions for use in on-premise management applications, such as Red Hat Satellite, using subscription allocations.
- Open https://access.redhat.com/ in your browser and log in to your Red Hat account.
- Navigate to Subscriptions in the upper-left corner of the Customer Portal.
- Navigate to Subscription Allocations.
- Click Create New subscription allocation.
- In the Name field, enter a name.
- From the Type list, select the type and version that corresponds to your Satellite Server.
- Click Create.
3.3. Adding Subscriptions to an Allocation
The following procedure explains how to add subscriptions to an allocation.
- Navigate to Subscription Allocations.
- Select the name of the subscription you want to change.
- Click the Subscriptions tab.
- Click Add Subscriptions.
- A list of your Red Hat product subscriptions appears. Enter the Entitlement Quantity for each product.
- Click Submit to complete the assignment.
When you have added subscriptions to the allocation, export the manifest file.
3.4. Exporting a Subscription Manifest from the Customer Portal
While viewing a subscription allocation that has at least one subscription, you can export a manifest in either of two places:
- From the Details tab, under the Subscription section, by clicking the Export Manifest button.
- From the Subscriptions tab, by clicking the Export Manifest button.
When the manifest is exported, the Customer Portal encodes the selected subscription certificates and creates a .zip archive. This is the Subscription Manifest, which can be uploaded into the Satellite Server.
3.5. Importing a Subscription Manifest into Satellite Server
Both the Red Hat Satellite 6 Web UI and CLI provide methods for importing the manifest.
For Web UI Users
- Ensure the context is set to the organization you want to use.
- Navigate to Content > Red Hat Subscriptions.
- Click Manage Manifest to display the manifest page for the organization.
- Click Choose file, select our Subscription Manifest, then click Upload.
For CLI Users
The Red Hat Satellite 6 CLI requires the manifest to be on Satellite Server. On your local client system, copy the manifest to Satellite Server:
[user@client ~]$ scp ~/manifest_file.zip root@satellite.example.com:~/.Then enter the following command to import it:
[root@satellite ~]# hammer subscription upload \
--file ~/manifest_file.zip \
--organization "organization_name"
After a few minutes, the CLI reports a successful manifest import.
3.6. Updating and Refreshing a Manifest
Manifests must not be deleted. If you delete the manifest from the Red Hat Customer Portal or in the Satellite Web UI it unentitles all of your content hosts.
Every time that you change a subscription allocation, you must refresh the manifest to reflect these changes. For example, you must refresh the manifest if you take any of the following actions:
- Renew a subscription
- Adjust subscription quantities
- Purchase additional subscriptions
You can updated the manifest in Satellite in one of the three following ways:
- By using the refresh button in the Satellite web UI as follows: In the web UI, navigate to Content > Red Hat Subscriptions > Manage Manifests and select the Refresh Manifest button.
- By downloading it from the Customer Portal and uploading it in the Satellite web UI as follows: In the web UI, navigate to Content > Red Hat Subscriptions > Manage Manifests and click Choose file. Select the Subscription Manifest, and then click Upload.
- By downloading it from the Customer Portal and uploading it to Satellite Server using the CLI as follows:
[root@satellite ~]# hammer subscription upload \
--file ~/manifest_file.zip \
--organization "organization_name"
3.7. Attaching Subscriptions to a Content Host
Using Activation Keys is the recommended way to attach subscriptions to content hosts during provisioning. However, an Activation key cannot update an existing host. If you need to attach new or additional subscriptions, such as future-dated subscriptions, to one host, follow the method below. If you need to update multiple hosts, see Section 3.8, “Bulk Updating Content Hosts' Subscriptions”. For more information on Activation keys, see Chapter 8, Managing Activation Keys.
Smart Management Subscriptions
In Satellite 6, the number of Red Hat Enterprise Linux Smart Management subscriptions correspond with how many systems Satellite can manage. You must maintain a Smart Management subscription for every Red Hat Enterprise Linux subscription that you want to manage with Satellite.
However, you are not required to attach Smart Management subscriptions to each content host. Smart Management subscriptions cannot attach automatically to content hosts in Satellite because they are not associated with any product certificates. Adding a Smart Management subscription to a content host does not provide any content or repository access. If you want, you can add a smart management subscription to a manifest for your own recording or tracking purposes.
For Web UI Users
- Navigate to Hosts > Content Hosts.
- Select the check box to the left of the host whose subscription you want to change.
- From the Select Action list, select Manage Subscriptions.
- Optionally, enter a key and value in the Search field to filter the subscriptions displayed.
- Select the check box to the left of the subscriptions to be added or removed and click Add Selected or Remove Selected as required.
- Click Done to save the changes.
For CLI Users
List the available subscriptions:
# hammer subscription list --organization-id 1
Attach a subscription to the host:
# hammer host subscription attach --host host_name --subscription-id subscription_id
3.8. Bulk Updating Content Hosts' Subscriptions
The methods described here are intended for post installation changes to multiple content hosts at the same time. You can use the web UI and the filter function to select the content hosts to be changed, or use the Hammer command-line tool’s CSV file export function, edit the configuration settings in the CSV file, and upload the changes.
For Web UI Users
- Navigate to Hosts > Content Hosts.
- Select the check box to the left of the hosts whose subscriptions you want to change.
- From the Select Action list, select Manage Subscriptions.
- Optionally, enter a key and value in the Search field to filter the subscriptions displayed.
- Select the check box to the left of the subscriptions to be added or removed and click Add Selected or Remove Selected as required.
- Click Done to save the changes.
For CLI Users
Export the current state of content hosts to a CSV file.
# hammer --server https://satellite.example.com csv content-hosts --export --file content_hosts.csv
Change the required values in the CSV file. You can use an editor, with a CSV plug-in, or
sedto change strings in the CSV file.Make a backup of the file:
# cp content_hosts.csv content_hosts.csv.backup
Edit the string you want to change. For example:
# sed -i "s/1|RH1234|Red Hat Enterprise Linux Server/1|RH5678|Red Hat Enterprise Linux Server/g" content_hosts.csvConfirm only the required changes were made. For example:
# diff content_hosts.csv content_hosts.csv.backup
Upload the changed file to Satellite Server:
# hammer --server https://satellite.example.com csv content-hosts --file content_hosts.csv
3.9. Chapter Summary
This chapter showed how to use a Subscription Allocation and Manifest to take subscription information from the Red Hat Customer Portal and import it into our Satellite Server.
The next chapter looks at how to start importing content, specifically Red Hat’s RPM repositories.
Chapter 4. Importing Red Hat Content
Our Satellite Server now has the necessary subscription information imported. We are ready to add content to our system. For this chapter, we explore the concept of a Definitive Media Library (DML) and how to synchronize content to create our DML.
4.1. Creating a Definitive Media Library
A DML is a repository that stores and protects the definitive, authorized versions of software and configurations. In other words, the DML acts as a master version of any content imported into Satellite. This includes Red Hat content, such as RPM files, kickstart trees, and ISO images. As mentioned in Section 1.1, “Overview of Red Hat Satellite 6 Content Management”, Red Hat Satellite 6 stores and manages content in a DML.
4.2. Using Products and Repositories in Satellite
In Satellite, we use the concept of a Product as an organizational unit to group multiple repositories together. Such repository collections are analogous to the concept of real life products. For example, if we view Red Hat Enterprise Linux Server as a Product in Satellite, the repositories for that product might consist of different versions (6.0, 6.1, 7.0), different architectures (i386, x86_64, s390x, arm), and different add-ons (Optional repositories, Supplementary repositories, Virt V2V tools). This unifies all related repositories within the DML. Using Products ensures repositories that depend on each other are synchronized together. For Red Hat repositories, products are created automatically after enabling the repository.
In this chapter, our aim is to start creating our DML using Red Hat content. To do this, we synchronize our DML with Red Hat’s Products and their repositories.
4.3. Synchronizing Content
When you select which repositories form the DML, Satellite Server synchronizes its own repositories with the repositories on the Red Hat CDN. This ensures that Satellite Server retains an exact copy of Red Hat’s repositories as a part of its DML. Satellite Server fetches this repository information and stores it on Satellite Server’s file system. After an initial synchronization, you can create a synchronization plan that checks to ensure the repositories in the DML is up to date with the CDN’s repositories.
It is possible to perform an initial synchronization using ISO images. See Appendix C, Importing Content ISOs into a Connected Satellite for more information on using Content ISOs. For locations with bandwidth limitations, using an On Demand or Background download policy as described below might be quicker than downloading and importing Content ISOs.
4.4. Using Download Policies
Red Hat Satellite provides multiple download policies for synchronizing RPM content. For example, you might aim to save time and only download the content metadata while deferring the actual content download for later.
Satellite Server offers the following policies:
- Immediate — Satellite Server downloads all metadata and packages during synchronization.
- On Demand — Satellite Server only downloads the metadata during synchronization. Satellite Server only fetches and stores packages on the file system when Capsules or directly connected clients request them. This setting has no effect if you set a corresponding repository on a Capsule to Immediate because Satellite Server is forced to download all the packages.
- Background — Satellite Server creates a background task to download all packages after the initial synchronization.
The latter two policies act as a Lazy Synchronization feature because they save time synchronizing content. The lazy sync feature must only be used for yum repositories. The packages can be added to Content Views and promoted to life cycle environments as normal.
Capsule Server offers the following policies:
- Immediate — Capsule Server downloads all metadata and packages during synchronization. Do not use this setting if the corresponding repository on Satellite Server is set to On Demand as Satellite Server is forced to download all the packages.
On Demand — Capsule Server only downloads the metadata during synchronization. The Capsule only fetches and stores packages on the file system when directly connected clients request them.
NoteWhen using an On Demand download policy, content is downloaded from Satellite Server if it is not available on the Capsule Server.
- Background — Capsule Server creates a background task to download all packages after the initial synchronization.
- Inherit — Capsule Server inherits the download policy for the repository from the corresponding repository on Satellite Server.
These policies are not available if a Capsule was installed or updated with --enable-foreman-proxy-plugin-pulp set to false.
4.5. Selecting Red Hat Repositories to Synchronize
The first step in selecting the repositories to synchronize is to identify the product that contains the repository, then enable that repository based on release version and base architecture.
If using a Disconnected Satellite, you need to import the Content ISOs for Red Hat Satellite and change the CDN URL on Satellite Server before synchronizing content. For more information, see Appendix B, Importing Content ISOs into a Disconnected Satellite.
For Web UI Users
Navigate to Content > Red Hat Repositories. This displays a set of tabs for different content types. Each tab contains a list of products. The RPMs tab is the default tab upon loading this page. This tab contains list of all subscribed products that provide RPM content.
The relationship between products and specific repositories is connected through a cascading hierarchy. Select a product and this opens a list of repository sets for that product. Select a repository set and this opens a list of repositories that you can enable. For our scenario, select Red Hat Enterprise Linux Server, then Red Hat Enterprise Linux 7 Server (RPMs), then enable Red Hat Enterprise Linux 7 Server RPMs x86_64 7Server. This enables the latest RPM files for Red Hat Enterprise Linux 7.
The difference between associating Red Hat Enterprise Linux Operating System with either 7 Server repositories or 7.X repositories is that 7 Server repositories contain all the latest updates while Red Hat Enterprise Linux 7.X repositories stop getting updates after the next minor version release. Note that Kickstart repositories only have minor versions.
For CLI Users
The relationship between products and repositories is the same. To search for your product, enter the following command:
# hammer product list --organization "ACME"
List the repository set for the product:
# hammer repository-set list \
--product "Red Hat Enterprise Linux Server" \
--organization "ACME"
This displays the repositories in the product’s repository set, including their name and ID number. Enable the repository using either the name or ID number. Also include the release version (7Server) and base architecture (x86_64). For example:
# hammer repository-set enable \
--name "Red Hat Enterprise Linux 7 Server (RPMs)" \
--releasever "7Server" \
--basearch "x86_64" \
--product "Red Hat Enterprise Linux Server" \
--organization "ACME"
For this scenario, use either the Web UI or the CLI to enable the following repositories for ACME:
| Repository | Type | Description |
|---|---|---|
| Red Hat Enterprise Linux 7 Server RPMs x86_64 7Server | RPM |
Repositories for the latest version of Red Hat Enterprise Linux 7. Use the |
| Red Hat Satellite Tools 6.3 for RHEL 7 Server RPMs x86_64 | RPM |
The Satellite Tools repository, which contains system management agents and tools for client systems. After provisioning a new system, Satellite installs tools such as |
| Red Hat Enterprise Linux 7.2 Kickstart x86_64 7Server | Kickstart | The kickstart tree for Red Hat Enterprise Linux 7.2. Use this as installation media for provisioning new systems over PXE. |
These repositories provide some initial content for our scenario’s DML. You can select more repositories based upon your needs.
For this scenario, all repositories use x86_64 as the base architecture.
4.6. Synchronizing Red Hat Repositories
We have enabled specific repositories to form our initial DML. Now we synchronize the repositories with the Red Hat CDN’s repositories.
For Web UI Users
Navigate to Content > Products and select Red Hat Enterprise Linux Server. This displays all enabled repositories in our product. Select all repositories and click Sync Now. You can also view the progress of the synchronization in the Web UI. Navigate to Content > Sync Status and expanding the Product/Repository tree (or click Expand All).
For CLI Users
Synchronize the enabled repositories in the Red Hat Enterprise Linux Server product:
# hammer product synchronize \
--name "Red Hat Enterprise Linux Server" \
--organization "ACME"
You can also synchronize each repository individually. List all repositories in the product, then synchronize using the ID number for the corresponding repositories. For example:
# hammer repository list \
--product "Red Hat Enterprise Linux Server" \
--organization "ACME"
# hammer repository synchronize \
--name "Red Hat Enterprise Linux 7 Server RPMs x86_64 7Server" \
--product "Red Hat Enterprise Linux Server" \
--organization "ACME"
The synchronization duration depends on the size of each repository and the speed of your network connection. The following table provides estimates of how long it would take to synchronize content, depending on the available Internet bandwidth:
| Single Package (10Mb) | Minor Release (750Mb) | Major Release (6Gb) | |
|---|---|---|---|
| 256 Kbps | 5 Mins 27 Secs | 6 Hrs 49 Mins 36 Secs | 2 Days 7 Hrs 55 Mins |
| 512 Kbps | 2 Mins 43.84 Secs | 3 Hrs 24 Mins 48 Secs | 1 Day 3 Hrs 57 Mins |
| T1 (1.5 Mbps) | 54.33 Secs | 1 Hr 7 Mins 54.78 Secs | 9 Hrs 16 Mins 20.57 Secs |
| 10 Mbps | 8.39 Secs | 10 Mins 29.15 Secs | 1 Hr 25 Mins 53.96 Secs |
| 100 Mbps | 0.84 Secs | 1 Min 2.91 Secs | 8 Mins 35.4 Secs |
| 1000 Mbps | 0.08 Secs | 6.29 Secs | 51.54 Secs |
A manual synchronization is often required for the initial content import into the DML. However, it is recommended to create a synchronization plan to ensure that our DML updates on a regular basis.
You can change the download policy for a Red Hat repository. Select a repository in the Red Hat Enterprise Linux Server product and navigate to the Download Policy field. If using the CLI, enter the hammer repository update command with the --download-policy option.
4.6.1. Recovering a Repository
In the case of repository corruption, you can recover it by using an advanced synchronization, which has three options:
- Optimized Sync - it synchronizes the repository bypassing RPMs that have no detected differences from the upstream RPMs.
- Complete Sync - it synchronizes all RPMs regardless of detected changes. Use this option if specific RPMs could not be downloaded to the local repository even though they exist in the upstream repository.
Validate Content Sync - it synchronizes all RPMs and then verifies the checksum of all RPMs locally. If the checksum of an RPM differs from the upstream, it re-downloads the RPM. This option is relevant for
yumrepositories only. Use this option if you have one of the following errors:-
Specific RPMs cause a
404error while synchronizing withyum. -
Package does not match intended downloaderror, which means that specific RPMs are corrupted.
-
Specific RPMs cause a
To synchronize a specific repository with an advanced option:
For Web UI users
- Navigate to Content > Products.
- Select the product containing the corrupted repository.
- Click on the name of a repository you want to synchronize.
- Extend the Select Action menu and select Advanced Sync.
- Select the option and click Sync.
For CLI users
Obtain a list of repository IDs:
# hammer repository list --organization "Default Organization"Synchronize a corrupted repository using the necessary option:
For the optimized synchronization:
# hammer repository synchronize --incremental true --id 1For the complete synchronization:
# hammer repository synchronize --skip-metadata-check true --id 1For the validate content synchronization:
# hammer repository synchronize --validate-contents true --id 1
4.6.2. Limiting Synchronization Speed
You can control the speed of synchronization to avoid exhaustion of available bandwidth and prevent other performance issues. This is done by configuring PULP_CONCURRENCY and max_speed parameters. Note that these settings are overwritten on an upgrade. It is recommended to backup changed files prior to an upgrade to be able to restore the configuration.
To control the number of synchronization jobs that run in parallel, configure the PULP_CONCURRENCY parameter in the
/etc/default/pulp_workersfile. For example, to set the number of jobs that run in parallel to 1, changePULP_CONCURRENCYto 1:PULP_CONCURRENCY=1
By default, on a system with less than 8 CPUs,
PULP_CONCURRENCYis set to the number of CPUs. On a system with more than 8 CPUs, it is set to 8.To set the maximum network speed for synchronizing in bytes per second, configure the max_speed parameter. This parameter must be configured separately for each importer in the
/etc/pulp/server/plugins.conf.d/directory.For example, to set the maximum speed for synchronizing RPM content to 10 bytes per second, set the
"max_speed"parameter in the/etc/pulp/server/plugins.conf.d/yum_importer.jsonfile to 10:# cat /etc/pulp/server/plugins.conf.d/yum_importer.json { "proxy_host": null, "proxy_port": null, "proxy_username": null, "proxy_password": null, "max_speed": 10 }Verify the syntax of the file after editing:
# json_verify < /etc/pulp/server/plugins.conf.d/yum_importer.json
JSON is valid
Restart Satellite services to apply the changes:
# katello-service restart
4.7. Creating a Synchronization Plan
A synchronization plan checks and updates the content in your DML at a regularly scheduled date and time. Red Hat Satellite 6 provides users with the ability to create a synchronization plan and assign products to it.
For Web UI Users
Navigate to Content > Sync Plans and click New Sync Plan. The UI provides a set of fields where you can input details about your synchronization plan:
-
Name - A plain text name for the plan. Enter
Example Plan. -
Description - A plain text description of the plan. Enter
Example Plan for ACME’s repositories. -
Interval - Defines when to run the synchronization. Select
daily. - Start Date and Start Time - Defines when to run the synchronization. We already completed a synchronization today, so set the synchronization for tomorrow at 1:00 (1AM).
Click Save to create a plan. The plan details page displays along with two tabs for Details and Products.
Now add your products. Click the Products tab, then click Add. Select the Red Hat Enterprise Linux Server product and click Add Selected.
For CLI Users
To create the synchronization plan, enter the following command:
# hammer sync-plan create \
--name "Red Hat Products 2" \
--description "Example Plan for ACME's Red Hat Products" \
--interval daily \
--sync-date "2016-02-01 01:00:00" \
--enabled true \
--organization "ACME"
Then assign the Red Hat Enterprise Linux Server product to it:
# hammer product set-sync-plan \
--name "Red Hat Enterprise Linux Server" \
--sync-plan "Red Hat Products" \
--organization "ACME"
Now Satellite Server checks its DML content against the Red Hat CDN on a daily basis and keeps its Red Hat repositories up to date.
4.8. Chapter Summary
This chapter showed how to import Red Hat content into ACME’s Satellite Server and keep it up to date through synchronization plans.
The next chapter explores a importing custom content into Satellite Server’s DML. This process is similar to importing Red Hat content except we create and manage custom products.
Chapter 5. Importing Custom Content
The previous chapter examined how to import Red Hat content into the Definitive Media Library (DML). This chapter focuses on custom content, which differs slightly from Red Hat content. We create our own product beforehand, customize it, and add our own repositories. In addition, you can add Puppet modules to a custom repository.
5.1. Using Custom Products in Satellite
In Section 4.2, “Using Products and Repositories in Satellite”, we explored the concept of a Product in Red Hat Satellite 6 and how it is used to group repositories together. Red Hat Satellite 6 also provides the ability to create custom Products so you can add multiple related repositories. Both Red Hat content and custom content in Red Hat Satellite 6 share some similarities:
- The relationship between a product and its repositories is the same and the repositories still require synchronization.
- Custom Products require a subscription for clients to access, similar to subscriptions to Red Hat Products. Red Hat Satellite 6 creates a new subscription for each custom Product you create.
In this chapter, we aim to create a product that contains two related repositories: an RPM repository containing RPM content and a Puppet repository for modules to configure the RPM content.
For more information about creating and packaging RPMs, see the RPM Packaging Guide in the Red Hat Enterprise Linux documentation.
5.2. Creating a Custom Product
In our scenario, ACME is aiming to develop a product called Exampleware, which is a web-based application that requires a PostgreSQL database. ACME might aim to use production-level Exampleware in the field using PostgreSQL from the Red Hat Enterprise Linux repositories but test Exampleware with newer versions of PostgreSQL. For this situation, let’s create a custom product for PostgreSQL so that we can synchronize the newer versions.
For Web UI Users
Navigate to Content > Products, click New Product and enter the following details:
-
Name - The plain text name for the product. Enter
PostgreSQL. - Label - An internal ID for the product. Red Hat Satellite 6 automatically completes this field based on what you have entered for Name.
- GPG Key - The GPG Key for the entire product. Leave this blank as we import a GPG for a specific version of PostgreSQL and attach it to the repository instead of the product.
-
Sync Plan - A synchronization plan for the product. We can attach this to the
Example Planwe created in the previous chapter. -
Description - A plain text description of the product. Enter
Content from PostgreSQL repositories.
When you have entered this information, click Save.
For CLI Users
To create the product, enter the following command:
# hammer product create \
--name "PostgreSQL" \
--sync-plan "Example Plan" \
--description "Content from PostgreSQL repositories" \
--organization "ACME"
This creates a new product where we can create our own custom repositories and synchronize their content.
5.3. Importing a Custom GPG Key
Before we create a custom product, we might need to create a custom GPG key. This is used to provide a certain level of security for RPM transactions with the PostgreSQL repository.
First download a copy of the version specific repository package to your client system. In our case, we download pgdg-redhat95:
[user@client ~]$ wget http://yum.postgresql.org/9.5/redhat/rhel-7-x86_64/pgdg-redhat95-9.5-2.noarch.rpm
Extract the RPM file without installing it:
[user@client ~]$ rpm2cpio pgdg-redhat95-9.5-2.noarch.rpm | cpio -idmv
The GPG key is located relative to the extraction at etc/pki/rpm-gpg/RPM-GPG-KEY-PGDG-95.
For Web UI Users
Navigate to Content > GPG keys. Click New Gpg Key. Provide the GPG key with a name (PostgreSQL 9.5) and select Upload GPG Key. Click Browse and select the GPG key you extracted. Click Save.
For CLI Users
Copy the GPG key to your Satellite Server:
[user@client ~]$ scp ~/etc/pki/rpm-gpg/RPM-GPG-KEY-PGDG-95 root@satellite.example.com:~/.
Upload the GPG key to Satellite:
[root@satellite ~]# hammer gpg create \
--key ~/RPM-GPG-KEY-PGDG-95 \
--name "PostgreSQL 9.5" \
--organization "ACME"
Now we have a GPG key we can associate with our repository.
5.4. Creating a Custom RPM Repository
Normally, a production-level server would use the version of PostgreSQL included with Red Hat Enterprise Linux for stability purposes. However, ACME’s developers might aim to test Exampleware with a more recent version of PostgreSQL. In this instance, they can create a custom repository for a newer version of PostgreSQL.
For Web UI Users
We follow on from creating our custom PostgreSQL product. After creating our custom product, the repositories screen appears. Click Create Repository, which displays a form for a new repository. Enter the following details:
-
Name - A plain text name for the repository. Enter
PostgreSQL 9.5. - Label - An internal ID for the repository. Red Hat Satellite 6 automatically completes this field based on what you have entered for Name.
-
Type - The type of repository. You can select either a repository for RPM files (
yum), Puppet modules (puppet), or Docker images (docker). For our scenario, selectyum. A new set of fields appear. -
URL - The URL of the external repository to use as a source. Enter
http://yum.postgresql.org/9.5/redhat/rhel-7-x86_64/. -
Download Policy - Determines the type of synchronization Satellite Server performs. Select
Immediate. See Section 4.4, “Using Download Policies” for more information. - Mirror on Sync - Ensures the content that is no longer part of the upstream repository is removed during synchronization. Leave this checked, which is the default.
-
Checksum - The checksum for the repository. For this example, leave this as the
Default, which defaults to SHA256. This is the checksum required for Red Hat Enterprise Linux 7. For Red Hat Enterprise Linux 5 or previous versions, select SHA1 for the checksum. - Publish via HTTP - Enables this repository for publication through HTTP. This option is automatically selected.
- GPG Key - The GPG Key for this repository. Select the PostgreSQL 9.5 GPG key we created previously.
Click Save to save this repository entry.
The repository uses the synchronization plan to periodically keep it up to date. However, let’s perform an initial synchronization. Select the PostgreSQL 9.5 repository and click Sync Now. This starts a task to synchronize our repository with the external PostgreSQL repository.
Monitor the progress of this synchronization on the Content > Sync Status page.
For CLI Users
Enter the following command to create the repository:
# hammer repository create \
--name "PostgreSQL 9.5" \
--content-type "yum" \
--publish-via-http true \
--url http://yum.postgresql.org/9.5/redhat/rhel-7-x86_64/ \
--gpg-key "PostgreSQL 9.5" \
--product "PostgreSQL" \
--organization "ACME"
Then synchronize the repository:
# hammer repository synchronize \
--name "PostgreSQL 9.5" \
--product "PostgreSQL" \
--organization "ACME"
Now we have a synchronized copy of PostgreSQL 9.5. Let’s take this a step further and include a Puppet module to configure a PostgreSQL server.
The Products page in the Web UI also provides a Repo Discovery function that finds all repositories from a URL and allows you to select which ones to add to your custom Product. For example, you can use the Repo Discovery to search http://yum.postgresql.org/9.5/redhat/ and list all PostgreSQL 9.5 repositories for different Red Hat Enterprise Linux versions and architectures. This helps users save time importing multiple repositories from a single source.
Red Hat does not support the upstream RPMs directly from the PostgreSQL site. These RPMs are used to demonstrate the synchronization process. For any issues with these RPMs, contact the developers for PostgreSQL.
5.5. Creating a Custom Puppet Repository
Custom products can also include repositories for Puppet modules. This provides a method to incorporate state configuration of hosts.
First, let’s create a repository for our PostgreSQL product.
For Web UI Users
Ensure you are on the Product page (Content > Products). Click on the PostgreSQL product, which displays our repository listing. Click Create Repository, which displays a form for a new repository. Enter the following details:
-
Name - A plain text name for the repository. Enter
PostgreSQL Puppet Modules. - Label - An internal ID for the repository. Red Hat Satellite 6 automatically completes this field based on what you have entered for Name.
-
Type - The type of repository. Select
puppetand a URL field appears. - URL - The URL of the external repository to use as a source. We manually import our Puppet module, but you can use a repository source to synchronize your own Puppet modules.
Click Save to save this repository entry.
For CLI Users
Enter the following command to create our Puppet module repository:
# hammer repository create \
--name "PostgreSQL Puppet Modules" \
--content-type "puppet" \
--product "PostgreSQL" \
--organization "ACME"
Now we have a custom repository for our Puppet modules. Let’s add one now.
5.6. Managing Individual Puppet Modules
For this scenario, we manually import a Puppet module for configuring PostgreSQL.
Download this module from the Puppet Forge site (https://forge.puppetlabs.com/puppetlabs/postgresql). Open the page in your browser and click download latest tar.gz to save to your local file system.
For Web UI Users
Ensure you are on the repository listing page for the PostgreSQL product. Click on the PostgreSQL Puppet Modules repository, which displays the details page for that repository.
Navigate to the Upload Puppet Module section, click Browse, select the PostgreSQL Puppet Module we downloaded previously, and click Upload. After a few seconds, Satellite Server reports Content successfully uploaded.
Click on the Manage Puppet Modules page to manage and remove Puppet modules from a product.
For CLI Users
Copy the Puppet module to your Satellite Server’s file system:
[user@client ~]$ scp ~/puppet_module.tar.gz root@satellite.example.com:~/.Import the Puppet module to the PostgreSQL Puppet Modules repository:
[root@satellite ~]# hammer repository upload-content \
--path ~/puppet_module.tar.gz \
--name "PostgreSQL Puppet Modules" \
--product "PostgreSQL" \
--organization "ACME"
Now we have a custom repository that contains both RPM content and a Puppet module to install and configure a server using the RPM content.
Red Hat does not support the modules from Puppet Forge. The PostgreSQL module is used to demonstrate the module management process. For any issues with these modules, contact the module developer.
5.7. Synchronizing Puppet Repositories
In addition to creating a repository of uploaded Puppet modules, Satellite Server can synchronize a complete Puppet module repository. In this example, Satellite Server synchronizes the entire Puppet Forge repository.
For Web UI Users
Navigate to Content > Products and click New Product. A form for a new Product appears. Enter the following details:
-
Name - The plain text name for the product. Enter
Puppet Forge. - Label - An internal ID for the product. Red Hat Satellite 6 automatically completes this field based on what you have entered for Name.
- GPG Key - The GPG Key for the entire product. Leave this blank.
-
Sync Plan - A synchronization plan for the product. We can attach this to the
Example Planwe created in the previous chapter. -
Description - A plain text description of the product. Enter
All modules from Puppet Forge.
When you have entered this information, click Save.
After creating our custom product, the repositories screen appears. Click Create Repository, which displays a form for a new repository. Enter the following details:
-
Name - A plain text name for the repository. Enter
Puppet Forge Modules. - Label - An internal ID for the repository. Red Hat Satellite 6 automatically completes this field based on what you have entered for Name.
-
Type - The type of repository. Select
puppetand a URL field appears. -
URL - The URL of the external repository to use as a source. Enter
http://forge.puppetlabs.com/.
Click Save to save this repository entry.
Select the Puppet Forge Modules repository and click Sync Now. This imports all modules from Puppet Forge into Satellite Server.
For CLI Users
Create the product:
# hammer product create \
--name "Puppet Forge" \
--sync-plan "Example Plan" \
--description "All modules from Puppet Forge" \
--organization "ACME"
Create the Puppet Forge repository:
# hammer repository create \
--name "Puppet Forge Modules" \
--content-type "puppet" \
--product "Puppet Forge" \
--organization "ACME" \
--url http://forge.puppetlabs.com/
Synchronize the repository:
# hammer repository synchronize \
--name "Puppet Forge Modules" \
--product "Puppet Forge" \
--organization "ACME"
The Puppet Forge repository contains several thousand modules and can take a long time to synchronize.
Red Hat does not support the modules from Puppet Forge. The modules are used to demonstrate the synchronization process. For any issues with these modules, contact the module developer.
5.8. Synchronizing Puppet Modules from a Git Repository
Red Hat Satellite 6 includes a utility called pulp-puppet-module-builder, which you can install on other systems from the pulp-puppet-tools RPM. This tool checks out a Git repository, builds all the modules, and publishes them in a structure that Satellite 6 can synchronize. One common method is to run the utility on Satellite Server itself, publish to a local directory, and synchronize against that directory. For example:
# mkdir /modules
# chmod 755 /modules
# pulp-puppet-module-builder \
--output-dir=/modules \
--url=git@mygitserver.com:mymodules.git \
--branch=develop
This checks out the develop branch of the Git repository from git@mygitserver.com:mymodules.git and publishes it to /modules. Add this directory as the URL (file:///modules) for a new repository on Satellite Server. For example:
For Web UI Users
Open a custom product (in this case, we use MyProduct as an example) and click Create Repository. Enter the following details:
-
Name - A plain text name for the repository. Enter
Modules from Git. - Label - An internal ID for the repository. Red Hat Satellite 6 automatically completes this field based on what you have entered for Name.
-
Type - The type of repository. Select
puppetand a URL field appears. -
URL - The URL of the external repository to use as a source. Enter
file:///modules.
For CLI Users
Create the Puppet Forge repository:
# hammer repository create \
--name "Modules from Git" \
--content-type "puppet" \
--product "MyProduct" \
--organization "ACME" \
--url file:///modules
The same process also applies to publishing modules on a remote HTTP server. For example, if you use webserver.example.com as a standard web host to publish the Puppet modules, log into the host and enter the following commands:
# mkdir /var/www/html/modules/
# chmod 755 /var/www/html/modules/
# pulp-puppet-module-builder \
--output-dir=/var/www/html/modules/ \
--url=git@mygitserver.com:mymodules.git \
--branch=develop
On Satellite Server, set the repository’s URL to http://webserver.example.com/modules/.
5.9. Creating a Custom File Type Repository in Red Hat Satellite
Custom products in Red Hat Satellite can also include repositories for custom file types. This provides a generic method to incorporate arbitrary files in a Product. Applications range from distributing SSH keys and source code files to larger files such as virtual machine images and ISO files.
You can upload files to the repository or synchronize it from an upstream Satellite Server. When you add files to a custom file type repository, you can use the normal Satellite management functions such as adding a specific version to a Content View to provide version control and making the repository of files available on various Capsule Servers. Clients must download the files over HTTP or HTTPS using curl -O.
A file type repository in Satellite Server can be created only in a custom product, but you can create an independent file type repository in a directory on the system where Satellite is installed, or on a remote HTTP server, and then synchronize the contents of that directory into Satellite. This method is useful when you have multiple files to add to a Satellite repository.
This example creates a Product My File Product, and then creates a file type repository My Files within that product. For more information about file type repositories outside of Satellite, see Appendix E, Creating a Remote File Type Repository.
For Web UI Users
Create a Custom Product
Navigate to Content > Products, click Create Product and enter the following details:
-
Name - The plain text name for the product. Enter
My File Product. - Label - An internal ID for the product. Red Hat Satellite 6 automatically completes this field based on what you have entered for Name.
- GPG Key - The GPG Key for the entire product. You can leave this blank.
-
Sync Plan - A synchronization plan for the product. For example, the
Example Plancreated in the previous chapter. -
Description - A plain text description of the product. Enter
My files.
-
Name - The plain text name for the product. Enter
Create a File Type Repository
Navigate to Content > Products. Click the name of a product, in this example My File Product. On the Repositories tab, click New Repository and enter the following details:
-
Name - A plain text name for the repository. Enter
My Files. - Label - An internal ID for the repository. Red Hat Satellite 6 automatically completes this field based on what you have entered for Name.
-
Type - The content type of the repository. Select
file. - Upstream URL - The URL of the upstream repository to use as a source. You can leave this blank if you plan to only upload files manually.
- Verify SSL - Leave this option selected if you want to verify that the upstream repository’s SSL certificates are signed by a trusted CA. Alternatively, clear this check box.
- Upstream Username - If required for authentication, enter the user name for the upstream repository. Clear this field if the repository does not require authentication.
- Upstream Password - Enter the password for the upstream repository. Clear this field if the repository does not require authentication.
-
Name - A plain text name for the repository. Enter
- Click Save to save this repository entry.
For CLI Users
Create a Custom Product
# hammer product create \
--name "My File Product" \
--sync-plan "Example Plan" \
--description "My files" \
--organization "ACME"
Optional Parameters
gpg-keygpg_key_nameKey name to search by
gpg-key-idgpg_key_idGPG key numeric identifier
sync-plansync_plan_nameSync plan name to search by
sync-plan-idsync_plan_idSync plan numeric identifier
Create a File Type Repository
# hammer repository create \
--name "My Files" \
--content-type "file" \
--product "My File Product" \
--organization "ACME"
Optional Parameters
checksum-typesha_versionRepository checksum, currently 'sha1' & 'sha256' are supported
download-policypolicy_nameDownload policy for yum repos (either 'immediate', 'on_demand', or 'background').
gpg-keygpg_key_nameKey name to search by
gpg-key-idgpg_key_idGPG key numeric identifier
mirror-on-syncbooleanMust this repo be mirrored from the source, and stale RPMs removed, when synced? Set to
trueorfalse,yesorno,1or0.publish-via-httpbooleanMust this also be published using HTTP? Set to
trueorfalse,yesorno,1or0.upstream-usernamerepository_usernameUpstream repository user, if required for authentication
upstream-passwordrepository_passwordPassword for the upstream repository user
urlsource_repo_urlURL of the Source repository
verify-ssl-on-syncbooleanMust Katello verify that the upstream URL’s SSL certificates are signed by a trusted CA? Set to
trueorfalse,yesorno,1or0.
5.10. Uploading Files To a Custom File Type Repository in Red Hat Satellite
For Web UI Users
- Navigate to Content > Products.
-
Select a custom product by name. For example,
My File Product. -
Select a file type repository by name. For example,
My Files. - Click Browse to search and select the file you want to upload.
- Click Upload to upload the selected file to Satellite Server.
- Visit the URL where the repository is published to see the file.
For CLI Users
# hammer repository upload-content \
--product "My File Product" \
--name "My Files" \
--organization "ACME" \
--path example_file
The --path option can indicate a file, a directory of files, or a glob expression of files. Globs must be escaped by single or double quotes.
5.11. Downloading Files to a Host From a Custom File Type Repository in Red Hat Satellite
You can download files to a client over HTTPS using curl -O, and optionally over HTTP if the Publish via HTTP repository option is selected.
Prerequisites
- You have a custom file type repository. See Section 5.9, “Creating a Custom File Type Repository in Red Hat Satellite” for more information.
- You know the name of the file you want to download to clients from the file type repository.
To use HTTPS you need the following certificates on the client:
-
The
katello-server-ca.crt. Ensure you obtain this in a secure way. You can export it from your browser or download it over HTTPS fromhttps://satellite.example.com/pub/. - An Organization Debug Certificate. See Section 2.3, “Creating an Organization Debug Certificate” for more information.
-
The
For Web UI Users
- Navigate to Content > Products.
- Select a custom product by name. For example, My File Product.
- Select a file type repository by name. For example, My Files.
- Check to see if Publish via HTTP is enabled. If it is not, you need the certificates to use HTTPS.
- Copy the URL where the repository is published.
For CLI Users
List the file type repositories.
# hammer repository list --content-type file
---|----------|-----------------|--------------|----
ID | NAME     | PRODUCT         | CONTENT TYPE | URL
---|----------|-----------------|--------------|----
7  | My Files | My File Product | file         |
---|----------|-----------------|--------------|----
Display the repository information.
# hammer repository info --name "My Files" --product "My File Product" --organization-id 1
- If HTTP is enabled, the output looks something like this:
Publish Via HTTP:   yes
Published At:       http://satellite.example.com/pulp/isos/uuid/
- If HTTP is not enabled, the output looks something like this:
Publish Via HTTP:   no
Published At:       https://satellite.example.com/pulp/isos/uuid/
On the client, enter a command in the appropriate format for HTTP or HTTPS:
for HTTP:
# curl -O satellite.example.com/pulp/isos/uuid/my_file
for HTTPS:
# curl -O --cert ./Default\ Organization-key-cert.pem --cacert katello-server-ca.crt satellite.example.com/pulp/isos/uuid/my_file
5.12. Creating a Custom File Type Repository in a Local Directory
You can create a custom file type repository, from a directory of files, external to Satellite Server using the pulp-manifest command. You can then synchronize the files into Satellite Server. When you add files to a file type repository, you can work with the files as with any other repository.
This procedure describes configuring a repository in a directory on the base system where Satellite is installed. To create a file type repository in a directory on a remote server, see Appendix E, Creating a Remote File Type Repository.
To Create a File Type Repository in a Local Directory:
Ensure the Server and Satellite Tools repositories are enabled:
# subscription-manager repos --enable=rhel-7-server-rpms \
--enable=rhel-7-server-satellite-tools-6.3-rpms
Install the Pulp Manifest package:
# yum install python-pulp-manifest
Create a directory that you want to use as the file type repository in the HTTP server’s public folder:
# mkdir my_file_repoAdd files to the directory or create a test file:
# touch my_file_repo/test.txt
Enter the Pulp Manifest command to create the manifest:
# pulp-manifest my_file_repoVerify the manifest was created:
# ls my_file_repo
PULP_MANIFEST  test.txt
To Import Files From a File Type Repo in a Local Directory
- Ensure a custom product exists in Satellite Server. This example uses My File Product.
Create a File Type Repository:
- In the Satellite web UI, navigate to Content > Products.
- Select the name of a product, in this example My File Product.
On the Repositories tab, select New Repository and enter the following details:
-
Name - A plain text name for the repository. Enter
My Files. - Label - An internal ID for the repository. Red Hat Satellite 6 automatically completes this field based on what you enter for Name.
-
Type - The content type of the repository. Select
file. -
Upstream URL - The path to the local directory with the repository to use as the source, in the form
file:///my_file_repo. - Verify SSL - Ensure this field is clear.
- Upstream Username - Ensure this field is clear.
- Upstream Password - Ensure this field is clear.
-
Name - A plain text name for the repository. Enter
- Select Save to save this repository entry.
Update the file type repository:
- Navigate to Content > Products.
- Select the name of a product, in this example My File Product.
- Select the name of the repository you want to update, in this example My Files.
- From the Select Action menu, select Sync Now.
- Visit the URL where the repository is published to see the files.
5.13. Chapter Summary
This chapter demonstrated how to create custom repositories for non-Red Hat content. This includes RPM files, Puppet modules, and custom file types.
At this point we have all our base content imported into our Satellite Server’s DML. This means we can start using it in our application life cycle.
The next chapter looks at developing an application life cycle to match the development and production process of ACME.
Chapter 6. Creating an Application Life Cycle
In Section 1.2, “Defining the Application Life Cycle”, we defined what an application life cycle is and why it is important to Red Hat Satellite 6. In this chapter, we take a closer look at planning the application life cycle and implementing it in Red Hat Satellite 6.
6.1. Revisiting the Application Life Cycle
As we discussed, the application life cycle defines how systems appear at a certain stage. However, the actual application life cycle depends on your organization and how it structures a particular production chain.
For example, an email server might only require a simple application life cycle where you have a production-level server for real world use and a test server for trying out the latest mail server packages. When the test server passes the initial phase, we can set the production-level server to use the new packages.
Another example might be an development life cycle for a software product. You might aim to develop a new piece of software in a development environment, have it tested in a quality assurance environment, pre-release it as a beta, then release it as a production-level application.
Each application life cycle uses a set of stages called environments. Each environment act as a particular state for our systems. Each environment also follows on from a previous environment, creating a chain of environments that becomes our application life cycle. Each application life cycle starts with an initial Library, which acts as a central source in our Definitive Media Library (DML). The Library environment contains all of the content we previously synchronized in our previous chapters. From this point, we create additional environments that link starting from the Library environment.
6.2. Creating a New Application Life Cycle
For our scenario, we aim to create simple application life cycle for developing and releasing ACME’s Exampleware. We use the Library environment as our initial environment, then chain an additional three environments in this order: Development, Testing, and Production.
For Web UI Users
Navigate to Content > Lifecycle Environments. This screen displays the current environments in your application life cycle. At the moment, only the Library environment exists.
Click New Environment Path to start a new application life cycle. A form appears for adding a new environment to Library. Enter Development for the Name and the Label automatically completes. Enter Environment for ACME’s Development Team for the Description. Click Save.
We return to the environments listing. A new table appears with our Development environment. This new table represents our new application life cycle. Now we add the rest of the environments to the application life cycle.
Click Add New Environment just above the new table. This time, enter Testing for Name and Environment for ACME’s Quality Engineering Team for the Description. Click Save.
Finally, click Add New Environment again. Enter Production for Name and Environment for ACME’s Product Releases for the Description. Click Save.
The final application life cycle appears as a table with our three environments: Development, Testing, and Production.
For CLI Users
Run the hammer lifecycle-environment create for each environment. Use the --prior option to specify the previous environment. For example:
# hammer lifecycle-environment create \
--name "Development" \
--description "Environment for ACME's Development Team" \
--prior "Library" \
--organization "ACME"
# hammer lifecycle-environment create \
--name "Testing" \
--description "Environment for ACME's Quality Engineering Team" \
--prior "Development" \
--organization "ACME"
# hammer lifecycle-environment create \
--name "Production" \
--description "Environment for ACME's Product Releases" \
--prior "Testing" \
--organization "ACME"
View your chain with the hammer lifecycle-environment paths command:
# hammer lifecycle-environment paths --organization "ACME"
-----------------------------------------------
LIFECYCLE PATH
-----------------------------------------------
Library >> Development >> Testing >> Production
-----------------------------------------------
6.3. Adding Life Cycle Environments to Capsule Servers
The following is an optional step for environments that use Capsule Servers to provision content.
If your Capsule Server has content functionality enabled, you must add an environment. Adding an environment enables Capsule Server to synchronize content from Satellite Server and provide content to host systems.
Capsule Server is configurable using Hammer CLI on Satellite Server, or through the web UI.
For Web UI Users
Under Infrastructure > Capsules, select the capsule.
Click Edit.
Select Env in the Life Cycle Environments tab.
To synchronize capsule’s content, click the Synchronize button in the Overview tab.
Select one of two options:
- Optimized Sync
- Complete Sync
For CLI Users
Display a list of all Capsule Servers and note the ID:
# hammer capsule list
Using the ID, verify the details of your Capsule Server:
# hammer capsule info --id capsule_id_numberVerify the life cycle environments available and note the environment ID:
# hammer capsule content available-lifecycle-environments \
--id capsule_id_number
Available life cycle environments are available for Capsule Server, but not currently attached.
Add the life cycle environment to your Capsule Server:
# hammer capsule content add-lifecycle-environment \
--id capsule_id_number --environment-id environment_id_number
Repeat for each life cycle environment you want to add to Capsule Server.
To synchronize all content from your Satellite Server environment to Capsule Server, enter the following command:
# hammer capsule content synchronize --id capsule_id_numberTo synchronize a specific life cycle environment from your Satellite Server to Capsule Server, enter the following command:
# hammer capsule content synchronize --id external_capsule_id_number \
--environment-id environment_id_number
For more information on working with Life Cycle Environments, see Life Cycle Environments in the Architecture Guide.
6.4. Promoting Content across the Application Life Cycle
Content moves from one environment to the next in an application life cycle chain. This is a process called promotion. Promotion is an important concept to understand because it is the basis for managing content across an application life cycle.
For our scenario, let’s say that ACME’s Exampleware is in full development and production. ACME packages their Exampleware content into a RPM file, which becomes part of a separate product. In this situation, ACME might have version 1.0 of Exampleware released, which means exampleware-1.0-0.noarch.rpm is in the Production environment.
ACME wants to release a patch for Exampleware, so they start development on version 1.1 of Exampleware. In this instance, the environments in the application life cycle would contain the following version of Exampleware:
| Development | Testing | Production |
|---|---|---|
| exampleware-1.1-0.noarch.rpm | exampleware-1.0-0.noarch.rpm | exampleware-1.0-0.noarch.rpm |
After completing development on the patch, ACME promotes the RPM to the Testing environment so ACME’s Quality Engineering team can review the patch. The application life cycle then contains the following package versions in each environment:
| Development | Testing | Production |
|---|---|---|
| exampleware-1.1-0.noarch.rpm | exampleware-1.1-0.noarch.rpm | exampleware-1.0-0.noarch.rpm |
While the Quality Engineering team reviews the patch, the Development team starts work on Exampleware 2.0. This results in the following application life cycle:
| Development | Testing | Production |
|---|---|---|
| exampleware-2.0-0.noarch.rpm | exampleware-1.1-0.noarch.rpm | exampleware-1.0-0.noarch.rpm |
The Quality Engineering team completes their review of the patch. Now Exampleware 1.1 is ready for release. ACME promotes 1.1 to the Production environment:
| Development | Testing | Production |
|---|---|---|
| exampleware-2.0-0.noarch.rpm | exampleware-1.1-0.noarch.rpm | exampleware-1.1-0.noarch.rpm |
The Development team completes their work on Exampleware 2.0 and promotes it to the Testing environment:
| Development | Testing | Production |
|---|---|---|
| exampleware-2.0-0.noarch.rpm | exampleware-2.0-0.noarch.rpm | exampleware-1.1-0.noarch.rpm |
Finally, the Quality Engineering team reviews the package. After a successful review, we promote the package to the Production environment:
| Development | Testing | Production |
|---|---|---|
| exampleware-2.0-0.noarch.rpm | exampleware-2.0-0.noarch.rpm | exampleware-2.0-0.noarch.rpm |
This example demonstrates the mapping of ACME’s development process into a Red Hat Satellite 6 application life cycle. Each environment contains a set of systems registered to Red Hat Satellite 6. These systems only have access to repositories relevant to their environment. When we promote packages from one environment to the next, the target environment’s repositories receive new package versions. As a result, each system in the target environment can update to the new package versions.
Another concept we explore in the next chapter is Content Views. A Content View is essentially a collection of content gathered and filtered from the Library and published in its own repository. The Red Hat and custom repositories we synchronized previously act as source content, while the Content Views customize exactly how the end repositories appear. Content Views contain packages and Satellite Server promotes Content Views across environments in the application life cycle. An environment might use one Content View (Version 1.0) but then might receive a new version of the Content View (Version 1.1). The repositories from Version 1.0 are replaced with the repositories for Version 1.1, which might include a new version of the Exampleware RPMs.
6.5. Adding Life Cycle Environments to a Red Hat Satellite Capsule Server
If a newly created Red Hat Satellite Capsule Server has content functionality enabled, the Capsule Server needs an environment added to enable it to synchronize content from Satellite Server and provide content to host systems.
Satellite Capsule Server is configured through Satellite Server’s command line interface (CLI). Enter all hammer commands on Satellite Server.
To Add Environments to Satellite Capsule Server:
- Log in to Satellite Server CLI as root.
Select the Red Hat Satellite Capsule Server that you want from the list and take note of its id:
# hammer capsule list
To verify Satellite Capsule Server’s details, enter the following command:
# hammer capsule info \
--id capsule_id_number
Verify the list of life cycle environments available for the Red Hat Capsule Server and note down the environment id:
# hammer capsule content available-lifecycle-environments \
--id capsule_id_number
Where:
available-lifecycle-environments are life cycle environments that are available to Satellite Capsule but are currently not attached to Satellite Capsule.
Add the life cycle environment to Satellite Capsule Server:
# hammer capsule content add-lifecycle-environment \
--id capsule_id_number \
--environment-id environment_id_number
Where:
-
capsule_id_numberstands for Satellite Capsule Server’s identification number. -
environment_id_numberstands for the life cycle environment’s identification number.
Repeat this step for every life cycle environment to be added to the Capsule Server.
-
Synchronize the content from Satellite Server’s environment to Satellite Capsule Server:
# hammer capsule content synchronize \
--id capsule_id_number
When an external Satellite Capsule Server has various life cycle environments, and only one life cycle environment needs to be synchronized, it is possible to target a specific environment by specifying the environment identification number:
# hammer capsule content synchronize \
--id external_capsule_id_number \
--environment-id environment_id_number
6.6. Promoting Content Views
After you have created a Content View and an environment path consisting of two or more life cycle environments, you can promote the Content View from one environment to the next as required. This means that the most recent version of the Content View that exists in a specified environment is promoted, or copied, to the next environment in the life cycle environment path.
You can promote a Content View to any environment where that version does not exist. The system automatically suggests the next environment in the life cycle environment path, but you can override this and promote to a different environment if required.
To Promote a Content View:
- On the main menu, click Content > Content Views.
- In the Name column, click the name of the Content View that you want to promote.
- On the Versions tab, identify the latest version, and click Promote.
- Identify the promotion path where you want to promote the Content View, select the appropriate life cycle environment, and click Promote Version.
- After the promotion has completed, the Versions tab updates to display the new status of your Content Views.
6.7. Removing Life Cycle Environments from Satellite Server
This procedure describes how to remove a life cycle environment from Red Hat Satellite.
To Remove a Life Cycle Environment:
- On the main menu, click Content > Life Cycle Environments.
- Click the name of the life cycle environment that you want to remove, and then click Remove Environment.
- In the confirmation dialog box, click Remove to remove the environment.
You can only delete the latest environment in an environment path. For example, if three environments exist in the order Library, Dev, and Prod, you need to delete Prod before you can delete Dev. You cannot delete the Library environment.
6.8. Removing Life Cycle Environments from Capsule Server
There are multiple reasons to remove life cycle environments from Capsule Server. For example:
- When life cycle environments are no longer relevant to the host systems
- When life cycle environments have been incorrectly added to Capsule Server
To remove a life cycle environment from Capsule Server:
- Log in to Satellite Server CLI as the root user.
Select the Capsule Server that you want from the list and take note of its id:
# hammer capsule list
To verify the Capsule Server’s details, enter the following command:
# hammer capsule info \
--id capsule_id_number
Verify the list of life cycle environments currently attached to the Capsule Server and take note of the environment id:
# hammer capsule content lifecycle-environments \
--id capsule_id_number
Remove the life cycle environment from Capsule Server:
# hammer capsule content remove-lifecycle-environment \
--id capsule_id_number \
--environment-id environment_id_number
Where:
-
capsule_id_numberis the Capsule Server’s identification number. environment_id_numberis the life cycle environment’s identification number.Repeat this step for every life cycle environment to be removed from the Capsule Server.
-
Synchronize the content from Satellite Server’s environment to Capsule Server:
# hammer capsule content synchronize \
--id capsule_id_number
6.9. Chapter Summary
This chapter returned to the concept of the application life cycle and how it applied to Red Hat Satellite 6’s content management. This chapter also explored how Red Hat Satellite 6 promoted content across the environments in the application life cycle.
The next chapter discusses Content Views and how they are used to create custom filtered repositories from our existing DML.
Chapter 7. Managing Content Views
This chapter shows how to create different types of Content Views and apply various filters to them.
7.1. Understanding Content Views
Red Hat Satellite 6 uses Content Views to create customized repositories from the core repositories in your Definitive Media Library (DML). It achieves this through defining which repositories to use and then applying certain filters to the content. These filters include both package filters, package group filters, and errata filters. We use Content Views as a method to define which software versions a particular environment uses. As mentioned in the previous chapter, a Production environment might use a Content View containing older package versions, while a Development environment might use a Content View containing newer package versions.
Each Content View creates a set of repositories across each environment, which Satellite Server stores and manages. When we promote a Content View from one environment to the next environment in the application life cycle, the respective repository on Satellite Server updates and publishes the packages. For example, let’s say that we use a Content View that contains our Exampleware package:
| Development | Testing | Production | |
|---|---|---|---|
| Content View Version and Contents | Version 2 - exampleware-1.1-0.noarch.rpm | Version 1 - exampleware-1.0-0.noarch.rpm | Version 1 - exampleware-1.0-0.noarch.rpm |
The repositories for Testing and Production contain the exampleware-1.0-0.noarch.rpm package. If we promote Version 2 of the Content View from Development to Testing, the repository for Testing regenerates and then contains the exampleware-1.1-0.noarch.rpm package:
| Development | Testing | Production | |
|---|---|---|---|
| Content View Version and Contents | Version 2 - exampleware-1.1-0.noarch.rpm | Version 2 - exampleware-1.1-0.noarch.rpm | Version 1 - exampleware-1.0-0.noarch.rpm |
This ensures systems are designated to a specific environment but receive updates when that environment uses a new version of the Content View.
The general workflow for creating Content Views for filtering and snapshotting is as follows:
- Create a Content View.
- Add the repository and the Puppet modules that you want to the Content View.
- Optionally create one or more Filters to fine tune the content of the Content View.
- Publish the Content View.
- Attach the Content Host to the Content View.
- Optionally promote the Content View to another environment.
If a repository is not associated with the Content View, the file /etc/yum.repos.d/redhat.repo remains empty and systems registered to it cannot receive updates.
Systems can only be associated with a single Content View. To associate a system with multiple Content Views, create a composite Content View. For more information, see Section 7.3.1, “Creating a Composite Content View”.
7.2. Standard Content Views
A standard Content View is a single Content View that can be associated with a single host.
7.2.1. Creating a Simple Content View
For this example, we’ll create a simple Content View using just two repositories and no filters. The repositories to include are the Red Hat Enterprise Linux repository and the Satellite Tools repository. Note that this Content View contains all RPMs for Red Hat Enterprise Linux and takes several minutes to publish.
For Web UI Users
Navigate to Content > Content Views and click Create New View. This displays a form for View Details. Enter the following information:
-
Name - The plain text name for the view. Enter
Base. - Label - An internal ID for the view. Red Hat Satellite 6 automatically completes this field based on what you have entered for Name.
-
Description - A plain text description of the view. Enter
Base operating system. - Composite View? - Defines whether to use a Composite Content View. Leave this check box clear.
Click Save to complete.
This creates a new Content View entry and now you can add repositories to it. Select the repositories for Red Hat Enterprise Linux 7 Server RPMs (not the Kickstart RPMs) and Red Hat Satellite Tools. Click Add Repository. This adds all packages from these repositories to the Content View.
Our Content View is ready to publish. Navigate to Versions and click Publish New Version. Satellite Server provides some details about the new version (Version 1) and allows you to enter a Description for the version, which is useful to logging changes for new content versions. Enter Initial content view for our operating system and click Save.
Satellite Server creates the new version of the view and publishes it to the Library environment.
For CLI Users
Obtain a list of repository IDs:
# hammer repository list --organization "ACME"
For our example, the two repositories we require are using 1 and 2 for their IDs:
| ID | Name |
|---|---|
| 1 | Red Hat Enterprise Linux 7 Server RPMs x86_64 7Server |
| 2 | Red Hat Satellite Tools 6.3 for RHEL 7 Server RPMs x86_64 |
Create the Content View and add repositories:
# hammer content-view create \
--name "Base" \
--description "Base operating system" \
--repository-ids 1,2 \
--organization "ACME"
Now publish the view:
# hammer content-view publish \
--name "Base" \
--description "Initial content view for our operating system" \
--organization "ACME"
Satellite Server creates the new version of the view and publishes it to the Library environment.
7.2.2. Creating a Content View with a Puppet Module
For this example, we’ll create another Content View using one repository and no filters. The repository to include is the PostgreSQL repository.
For Web UI Users
Navigate to Content > Content Views and click Create New View. This displays a form for View Details. Enter the following information:
-
Name - The plain text name for the view. Enter
Database. - Label - An internal ID for the view. Red Hat Satellite 6 automatically completes this field based on what you have entered for Name.
-
Description - A plain text description of the view. Enter
PostgreSQL Database. - Composite View? - Defines whether to use a Composite Content View. Leave this check box clear.
Click Save to complete.
This creates a new Content View entry. Select the repositories for PostgreSQL and click Add Repository. This adds all packages from the PostgreSQL repository to the Content View.
Navigate to Puppet Modules. Click Add New Module. This shows all our imported Puppet modules. Navigate to the postgresql module and click Select a Version.
Navigate to the entry for Use Latest and click Select Version in the Actions column.
The Puppet module is now added to the Content View. Let’s publish a new version.
Navigate to Versions and click Publish New Version. Enter Initial RPMs and Puppet module for database in the Description and click Save.
Satellite Server creates the new version of the view and publishes it to the Library environment.
For CLI Users
Obtain a list of repository IDs:
# hammer repository list --organization "ACME"
We only require the PostgreSQL RPM repository, not the Puppet module repository. In our example, we use the 4 for the ID of the PostgreSQL RPMs:
| ID | Name |
|---|---|
| 4 | PostgreSQL 9.5 |
Create the Content View and add repositories:
# hammer content-view create \
--name "Database" --description "PostgreSQL Database" \
--repository-ids 4 \
--organization "ACME"
Now publish the view:
# hammer content-view publish \
--name "Database" \
--description "Initial RPMs and Puppet module for database" \
--organization "ACME"
Satellite Server creates the new version of the view and publishes it to the Library environment.
7.3. Composite Content Views
A Composite Content View combines the content from several Content Views. For example, you might have separate Content Views to manage a base OS and an application individually. A Composite Content View allows you to merge the contents of both Content Views into a new repository. The repositories for the original Content Views still exist but a new repository now exists for the combined content.
As a use case scenario, a company might aim to develop an application that supports different database servers. The general application stack appears as:
| Exampleware Stack |
|---|
| Application |
| Database |
| Operating System |
The company might develop four individual Content Views:
- Red Hat Enterprise Linux (Operating System)
- PostgreSQL (Database)
- MariaDB (Database)
- Exampleware (Application)
The company can then create two Composite Content Views. One with a PostgreSQL database:
| Composite Content View 1 - Exampleware on PostgreSQL |
|---|
| Exampleware (Application) |
| PostgreSQL (Database) |
| Red Hat Enterprise Linux (Operating System) |
And one with MariaDB:
| Composite Content View 2 - Exampleware on MariaDB |
|---|
| Exampleware (Application) |
| MariaDB (Database) |
| Red Hat Enterprise Linux (Operating System) |
Each individual Content View is then managed and published separately. When we create a new version of the application stack, we publish a new version of the Composite Content Views.
Composite Content Views do not allow more than one of each repository. For example, if you attempt to include two Content Views using the same repository in a Composite Content View, Satellite Server reports an error.
7.3.1. Creating a Composite Content View
Let’s create a Content View for ACME that combines our two existing Content Views.
For Web UI Users
Navigate to Content > Content Views and click Create New View. Provide the following details for the view:
-
Name -
Stack -
Description -
A stack that includes a base operating system and a database - Composite View? - Selected
The Content View listing for the Composite Content View appears. Select both the Base and Database Content Views. Also, the Base Content View contains two versions, which means we need to select a version. Select Version 2, which contains the errata filter. After selecting the Content Views and their versions, click Add Content Views.
Click Publish New Version to publish the Composite Content View. Enter Initial version of Stack for Description and click Save.
When the publication completes, notice that the Content column reports the total package, errata, and Puppet module count for all included Content Views.
Now Promote the Composite Content View across all environments: Development, Testing, Production.
As you can see, Composite Content Views are published and promoted across application life cycle environments similar to regular Content Views.
For CLI Users
Before we create the Composite Content Views, we need the version IDs for our existing Content Views:
# hammer content-view version list \
--full-results true \
--organization "ACME"
For our scenario, the Database v1.0 version ID is 5 and the Base v2.0 version ID is 6. Create a new Composite Content View called Stack and include the version IDs with the --component-ids option:
# hammer content-view create \
--composite \
--name "Stack" \
--description "A stack that includes a base operating system and a database" \
--component-ids 4,14 \
--organization "ACME"
Publish the Composite Content View:
# hammer content-view publish \
--name "Stack" \
--description "Initial version of Stack" \
--organization "ACME"
Promote the Composite Content View across all environments:
# hammer content-view version promote \
--content-view "Stack" \
--version 1 \
--to-lifecycle-environment "Development" \
--organization "ACME"
# hammer content-view version promote \
--content-view "Stack" \
--version 1 \
--to-lifecycle-environment "Testing" \
--organization "ACME"
# hammer content-view version promote \
--content-view "Stack" \
--version 1 \
--to-lifecycle-environment "Production" \
--organization "ACME"
7.4. Content Filters
Content Views also use filters to include or restrict certain RPM content. Without these filters, a Content View includes everything from selected repositories.
Content filters are either one of the following types:
- Include - Defines the content to include in the view. This filter’s behavior follows a pattern where you start with no content, then select which content to add from the selected repositories. Use this filter to combine multiple content items.
- Exclude - Defines the content to exclude in the view. This filter’s behavior follows a pattern where you start with all content from selected repositories, then select which content to remove. Use this filter when you want to use most of a particular content repository but exclude certain packages, such as blacklisted packages. The filter uses all content in the repository except for the content you select.
If using a combination of Include and Exclude filters, publishing a Content View triggers the Include filters first, then the exclude filters. In this situation, select which content to include, then which content to exclude from the inclusive subset.
There are also four types of content to filter:
- Package - Filter packages based on their name and version number.
- Package Group - Select which package groups to add to the filter. The list of package groups is based on the repositories added to the Content View.
- Erratum (by ID) - Select which specific errata to add to the filter. The list of Errata is based on the repositories added to the Content View.
- Erratum (by Date and Type) - Select a issued or updated date range and errata type (Bugfix, Enhancement, or Security) to add to the filter.
Filters do not resolve any dependencies of the packages listed in the filters. Ensure to add package dependencies to the filter. This might require some level of testing to determine what dependencies are required.
Let’s look at some examples of using content filters.
Example 1
Create a repository with the base Red Hat Enterprise Linux packages. This filter requires a Red Hat Enterprise Linux repository added to the Content View.
Filter:
- Inclusion Type: Include
- Content Type: Package Group
- Filter: Select only the Base package group
Example 2
Create a repository that excludes all errata, except for security updates, after a certain date. This is useful if your aim to perform system updates on a regularly scheduled basis with the exception of critical security updates, which must be applied immediately. This filter requires a Red Hat Enterprise Linux repository added to the Content View.
Filter:
- Inclusion Type: Exclude
- Content Type: Erratum (by Date and Type)
- Filter: Select only the Bugfix and Enhancement errata types, and clear the Security errata type. Set the Date Type to Updated On. Set the Start Date to the date you want to restrict errata. Leave the End Date blank to ensure any new non-security errata is filtered.
Example 3
A combination of Example 1 and Example 2 where we only require the Base OS packages but want to filter out recent bug fix and enhancement errata. This requires two filters attached to the same Content View. The Content View processes the Include filter first, then the Exclude filter.
Filter 1:
- Inclusion Type: Include
- Content Type: Package Group
- Filter: Select only the Base package group
Filter 2:
- Inclusion Type: Exclude
- Content Type: Erratum (by Date and Type)
- Filter: Select only the Bugfix and Enhancement errata types, and clear the Security errata type. Set the Date Type to Updated On. Set the Start Date to the date you want to restrict errata. Leave the End Date blank to ensure any new non-security errata is filtered.
For another example of how content filters work, see the following article: "How do content filters work in Satellite 6"
7.4.1. Creating a Content Filter
For our scenario, we aim to create a content filter that restricts errata items after a certain date for ACME’s base operating system.
For Web UI Users
Navigate to Content > Content Views and select the Base Content View. Navigate to Yum Content > Filters and click New Filter. Enter the following details for your filter:
-
Name -
Errata Filter - Content Type - Erratum - Date and Type
- Inclusion Type - Exclude
-
Description -
Exclude errata items from the last year, with the exception of security updates
Click Save.
The Erratum Date Range screen appears, which allows you to select the errata type to filter and the date range. Select only Enhancement and Bugfix:
[ ] Security
[X] Enhancement
[X] Bugfix
For the Date Type, select either Issued On (the issued date of the erratum) or Updated On (the date of the erratum’s last update). If the erratum has not been updated after the creation date, then the Issued On and Updated On date are the same for that erratum. Note that Issued On just means that the errata items are filtered based on the issued date. The filter does not exclude any updates that have been made to that erratum.
For the Start Date, select today’s date from one year ago.
For the End Date, leave this field blank.
Click Save.
You can also select which specific repositories use this filter. Select the Affected repositories tab to select these repositories. For this example, there is only one repository to use in our filter.
Our filter is complete. Click Publish New Version to publish the resulting repository. For the Version Details enter Adding errata filter in the Description. Click Save.
When the Content View completes publication, notice the Content column reports a reduced number of packages and errata (except Security errata) from the initial repository. This means the filter successfully excluded the all non-security errata from the last year.
Promote this Content View across all environments: Development, Testing, Production.
For CLI Users
Add a filter to the Content View. Use the --inclusion false option to set the filter to an Exclude filter:
# hammer content-view filter create \
--name "Errata Filter" \
--type erratum --content-view "Base" \
--description "Exclude errata items from the last year, with the exception of security updates" \
--inclusion false  \
--organization "ACME"
Add a rule to the filter:
# hammer content-view filter rule create \
--content-view "Base" \
--content-view-filter "Errata Filter" \
--start-date "2015-01-01" \
--types enhancement,bugfix \
--date-type updated \
--organization "ACME"
Publish the Content View:
# hammer content-view publish \
--name "Base" \
--description "Adding errata filter" \
--organization "ACME"
Promote the view across all environments:
# hammer content-view version promote \
--content-view "Base" \
--version 1 \
--to-lifecycle-environment "Development" \
--organization "ACME"
# hammer content-view version promote \
--content-view "Base" \
--version 1 \
--to-lifecycle-environment "Testing" \
--organization "ACME"
# hammer content-view version promote \
--content-view "Base" \
--version 1 \
--to-lifecycle-environment "Production" \
--organization "ACME"
7.5. Promoting a Content View
Satellite Server has published two Content Views and the repositories are now available to the Library environment. Let’s promote one of these Content Views so the repository appears available to the other environments.
Non-administrator users require two permissions to promote a Content View to an environment:
-
promote_or_remove_content_views -
promote_or_remove_content_views_to_environment.
The promote_or_remove_content_views permission restricts which Content Views a user is allowed to promote.
The promote_or_remove_content_views_to_environment permission restricts the environments to which a user is allowed to promote Content Views.
These permissions make it possible to designate that certain users are permitted to promote certain Content Views to certain environments, but not to other environments. For example, these permissions can be used to limit a user so that they are permitted to promote to test environments, but not to production environments. This provides a kind of multi-level authentication.
Both permissions must be assigned to a user to allow them to promote Content Views.
For Web UI Users
Ensure you are on the Versions screen for the Database Content View. In the versions table, navigate to Version 1.0 of our view and click Promote in the Actions column. A new screen appears where you can select the target environment. Select the Development environment and click Promote Version. After a few minutes, the promotion completes.
Click on the Promote button again. This time select the Testing environment and click Promote Version.
Finally click on the Promote button again. Select the Production environment and click Promote Version.
Now the repository for the Content View appears in all environments.
For CLI Users
Promote the Content View using the hammer content-view version promote each time:
# hammer content-view version promote \
--content-view "Database" \
--version 1 \
--to-lifecycle-environment "Development" \
--organization "ACME"
# hammer content-view version promote \
--content-view "Database" \
--version 1 \
--to-lifecycle-environment "Testing" \
--organization "ACME"
# hammer content-view version promote \
--content-view "Database" \
--version 1 \
--to-lifecycle-environment "Production" \
--organization "ACME"
Now the database content is available in all environments.
7.6. Registering Systems to Environments and their Content Views
With Content Views in place, we can register systems to these environments and views.
7.6.1. Registering a RHEL System with Subscription Manager
First, log into a test Red Hat Enterprise Linux 7 client system as the root user and download the consumer RPM for your Satellite Server. This is located in the pub directory on the host. For example, for a Satellite Server with the host name satellite.example.com, enter the following command on the client to register:
[root@client ~]# rpm -Uvh http://satellite.example.com/pub/katello-ca-consumer-latest.noarch.rpm
Enter the following command to view a list of environments and their Content Views on Satellite Server:
[root@client ~]# subscription-manager environments --org="acme"
Register the client system to an environment and Content View on Satellite Server:
[root@client ~]# subscription-manager register --org="acme" --environment="Development/Stack"
The client system asks for the user name and password for a Satellite Server user that belongs to the ACME organization. As an alternative, you can use an activation key to register a system, which is discussed in Chapter 8, Managing Activation Keys.
The client system now uses the published repositories from the Stack Content View in the Development environment.
7.6.2. Registering an Atomic Host with Subscription Manager
The following procedure explains how to register an Atomic Host with Subscription Manager.
Retrieve katello-rhsm-consumer from Satellite server:
[root@atomic_client ~]# wget http://satellite.example.com/pub/katello-rhsm-consumer
Change the mode of katello-rhsm-consumer in order to make it executable:
[root@atomic_client ~]# chmod +x katello-rhsm-consumer
Run katello-rhsm-consumer:
[root@atomic_client ~]# ./katello-rhsm-consumer
Register with Red Hat Subscription Manager:
[root@atomic_client ~]# subscription-manager register
Because Atomic is functionally an appliance, we do not recommend that you try to install katello-agent on it.
7.7. Chapter Summary
This chapter explain how to use Content Views to customize your own repositories from existing content in the DML. This includes:
- Creating basic Content Views with RPMs
- Creating Content Views with RPMs and Puppet modules
- Using content filters to include and exclude RPM content
- Combining several Content Views into a Composite Content View
- Registering systems to Satellite Server and consuming content from a specific Content Views
The next chapter discusses activation keys and how systems use them to register and access content from application life cycle environments.
Chapter 8. Managing Activation Keys
At this point, we have published some Content Views, which resulted in Satellite Server publishing repositories. Systems now can register to Satellite Server and consume content from these repositories. Systems register in a similar way to how they register to the Red Hat Customer Portal. For example, users can use Red Hat Subscription Manager (subscription-manager) with the --baseurl pointing to Satellite Server instead of the Red Hat Content Delivery Network.
There are two methods to register a system. The first is to authenticate with a Satellite Server user name and password, which we explored in the previous chapter. An alternative and preferred method is to use an activation key, which acts as an authentication token. Activation keys provide a method for easy system registration and subscription attachment. Users can create multiple keys and associate them with different environments and Content Views. For example, you might create a basic activation key with a subscription for Red Hat Enterprise Linux workstations and associate it with Content Views from a particular environment.
Activation keys define selected properties of content hosts. You can use activation keys during content host registration to improve the speed, simplicity and consistency of the process. Activation can specify:
- Associated subscriptions and subscription attach behavior.
- Available products and repositories.
- A life cycle environment and a Content View.
- Host collection membership.
The same activation key can be applied to multiple content hosts, as long as it contains enough subscriptions. However, activation keys only set the initial configuration for a content host. When it is registered to an organization, other content which that organization possesses can be attached to the content host manually.
A content host can be associated with multiple activation keys that are combined to define the host settings. In case of conflicting settings, the last specified activation key takes precedence.
Note that activation keys are only used when hosts are registered. If changes are made to an activation key, it is only applicable to hosts that are registered with the amended activation key in the future. The changes are not made to existing hosts.
For more information about activation keys and more use case examples outside of this guide, see "Activation Key Enhancements with Red Hat Satellite 6.1" on the Red Hat Customer Portal.
8.1. Creating an Activation Key
With activation keys you can define how the content host is subscribed during registration. The subscription behavior defined by the activation key depends on two factors:
- Are there any subscriptions associated with the activation key?
- Is the auto-attach option enabled?
Based on the above factors, there are three possible scenarios for subscribing with activation keys:
-
Activation key with no subscriptions specified. With no subscriptions specified and auto-attach enabled, hosts using the activation key search for the best fitting subscription from the ones provided by Satellite Server. This is similar to entering the
subscription-manager --auto-attachcommand. - Activation key providing a custom subscription pool for auto-attach. If there are subscriptions specified and auto-attach is enabled, hosts using the activation key select the best fitting subscription from the list specified in the activation key.
- Activation key with the exact set of subscriptions. If there are subscriptions specified and auto-attach is disabled, hosts using the activation key are associated with all subscriptions specified in the activation key.
If a custom product (typically containing content not provided by Red Hat) is assigned to an activation key, this product is always enabled for the registered content host regardless of the auto-attach setting.
For Web UI Users
Navigate to Content → Activation keys and click Create Activation Key. Provide the activation key with the following information:
-
Name - The name of the activation key. We use this name during the system registration process. In the Name field, type
development-stack. - Limit - Defines the maximum number of systems you can register with the activation key. Select the Unlimited Hosts check box.
-
Description - A plain text description for the activation key. In the Description field, type
Exampleware Stack in the Development Environment. - Environment - The environment to use. In the Environment area, select Development.
- Content View - The Content View (and, by extension, the repository) in the environment to use. From the Content View list, select Stack.
Click Save. The activation key details screen displays.
-
Name - The name of the activation key. We use this name during the system registration process. In the Name field, type
To define which products to attach and repositories to enable upon registration, navigate to the Subscriptions tab. Click Add, select both the
Red Hat Enterprise Linuxsubscription and thePostgreSQLproduct, and click Add Selected.NoteThe Auto-Attach option is enabled. This automatically attaches these products to the system upon registration and enables the required repositories. If Auto-Attach is disabled for the activation key, the system only registers to Satellite Server without attaching any subscriptions or content.
Navigate to the Product Content page. As default, Satellite Server only enables:
- The repository that best matches the system requirements. In this case, it is only the Red Hat Enterprise Linux 7 Server RPMs.
- Any custom content.
Our scenario must have the following defaults set:
PostgreSQL:
-
PostgreSQL 9.5 - Enabled:
Yes (Default) -
PostgreSQL Puppet Modules - Enabled:
Yes (Default)
Red Hat Enterprise Linux Server:
-
Red Hat Enterprise Linux 7 Server (Kickstart) - Enabled:
No (Default) -
Red Hat Satellite Tools 6.3 (for RHEL 7 Server) (RPMs) - Enabled:
No (Default) -
Red Hat Enterprise Linux 7 Server (RPMs) - Enabled:
Yes (Default)
However, we want to enable the Red Hat Satellite Tools repository because that contains our configuration tools (such as
katello-agentandpuppet). Change it to the following:-
Red Hat Satellite Tools 6.3 (for RHEL 7 Server) (RPMs) - Enabled:
Override to Yes
- Click Save
For CLI Users
Create the activation key:
# hammer activation-key create \
--name "development-stack" \
--unlimited-hosts true \
--description "Exampleware Stack in the Development Environment" \
--lifecycle-environment "Development" \
--content-view "Stack"  \
--organization "ACME"
Obtain a list of your subscription IDs:
# hammer subscription list --organization "ACME"Attach the Red Hat Enterprise Linux subscription UUID to the activation key:
# hammer activation-key add-subscription \
--name "development-stack" \
--subscription-id ff808181533518d50152354246e901aa \
--organization "ACME"
Attach the PostgreSQL product to the activation key:
# hammer activation-key add-subscription \
--name "development-stack" \
--subscription-id ff8081815239acdc015238fefaa10002 \
--organization "ACME"
List the product content associated with the activation key:
# hammer activation-key product-content \
--name "development-stack" \
--organization "ACME"
Override the default auto-enable status for the Red Hat Satellite Tools 6.3 repository. The default status is set to disabled. To enable, enter the following command:
# hammer activation-key content-override \
--name "development-stack" \
--content-label rhel-7-server-satellite-tools-6.3-rpms \
--value 1 \
--organization "ACME"
8.2. Using Activation Keys
The activation keys are used for registration. This includes:
- Registering new systems during provisioning through Red Hat Satellite 6. The kickstart provisioning templates in Red Hat Satellite 6 contain commands to register the system using an activation key defined when creating a new host.
-
Registering existing Red Hat Enterprise Linux systems. Configure Red Hat Subscription Manager to use Satellite Server for registration and specify the activation key when running the
subscription-manager registercommand.
You can test the activation key we created. Register an existing Red Hat Enterprise Linux 7 system to Satellite Server.
First, download the consumer RPM for your Satellite Server. This is usually located in the pub directory on the host’s web server. For example, for a Satellite Server with the host name satellite.example.com, enter the following command on the client to register:
# rpm -Uvh http://satellite.example.com/pub/katello-ca-consumer-latest.noarch.rpm
This RPM installs the necessary certificates for accessing repositories on Satellite Server and configures Red Hat Subscription Manager to use the server’s URL.
Next, run Red Hat Subscription Manager on the client:
# subscription-manager register --activationkey="development-stack" \
--org="ACME"
The system has been registered with id: 744fb31c-c983-00f5-ca14-bddd0f711353
Check Satellite Server to confirm the registration.
For Web UI Users
Navigate to Hosts > Content Hosts and the system appears in the list.
For CLI Users
Enter the following command:
# hammer host list --organization "ACME"
After registering a client system to Satellite Server, install the katello-agent package on the system so that it can report back to Satellite Server:
# yum install katello-agent
The Red Hat Satellite Tools 6.3 repository provides this package.
You can use multiple activation keys when registering a content host. This allows you to create activation keys for specific subscription sets and then combine them according to content host requirements. For example, the following command registers a content host to the ACME organization with both VDC and OpenShift subscriptions:
# subscription-manager register --org="ACME" \
--activationkey="ak-VDC,ak-OpenShift"
If there are conflicting settings in activation keys, the rightmost key takes precedence.
- Settings that conflict: Service Level, Release Version, Environment, Content View, and Product Content.
- Settings that do not conflict and the host gets the union of them: Subscriptions and Host Collections.
- Settings that influence the behavior of the key itself and not the host configuration: Content Host Limit and Auto-Attach.
8.3. Updating Subscriptions Associated with an Activation Key
You can change the subscriptions associated with an Activation Key using the web UI or using the Hammer command-line tool. The Hammer CLI method requires downloading a CSV file, making changes to the Activation Key settings, and then uploading the changed CSV file.
Note that changes to an Activation Key applies only to machines provisioned after the change. To update subscriptions on existing content hosts, see Section 3.8, “Bulk Updating Content Hosts' Subscriptions”.
For Web UI Users
- Navigate to Content > Activation keys and click the name of the Activation Key.
- Select the Subscriptions tab.
- To remove subscriptions, select List/Remove, select the check boxes to the left of the subscriptions to be removed and then click Remove Selected.
- To add subscriptions, select Add, select the check boxes to the left of the subscriptions to be added and then click Add Selected.
- Select Repository Sets and review the repositories' status settings.
- To enable or disable a repository, select the check box for a repository and then change the status using the Select Action list.
- Select the Details tab, select a Content View for this Activation Key, and then click Save.
For CLI Users
Export the subscriptions from Satellite Server to a CSV file. For this example,
a_keys.csv:# hammer --server https://satellite.example.com csv activation-keys \ --export --file a_keys.csv --organization "Default Organization"You can view the columns of the file as follows:
# column -s, -t < a_keys.csv | less -S
Name  Organization  Description  Limit  Environment  Content View  Host Collections  Auto-Attach  Service Level  Release Version  Subscriptions
The last column has the subscription information. Note that it is one field in the CSV file and can include a comma in quoted text. Examples of the Subscriptions field include:
- '"""Automatic|RH1234|Red Hat Enterprise Linux Server, Standard (Physical or Virtual Nodes)|11223344|55667788"""'
'1|MCT0369|Red Hat Satellite Capsule Server|11223344|55667788'
The Subscriptions field has the following format:
- Number of subscriptions allocated (can be set to Automatic).
- The subscription’s identification number.
- The subscription’s name.
- The contract number.
- The account number.
Change the required values in the CSV file. You can use an editor, with a CSV plug-in, or
sedto change strings in the Subscriptions field.Make a backup of the file.
# cp a_keys.csv a_keys.csv.backup
Edit the string you want to change. For example:
# sed -i "s/Automatic|RH1234|Red Hat Enterprise Linux Server/Automatic|RH4567|Red Hat Enterprise Linux Server/g" a_keys.csv
Confirm only the required changes were made. For example:
# diff a_keys.csv a_keys.csv.backup
2c2
< """Automatic|RH4567|Red Hat Enterprise Linux Server, Standard (Physical or Virtual Nodes)|11223344|55667788"""
---
> """Automatic|RH1234|Red Hat Enterprise Linux Server, Standard (Physical or Virtual Nodes)|11223344|55667788"""
Upload the changed file to Satellite Server.
# hammer --server https://satellite.example.com csv activation-keys \
--file a_keys.csv
8.4. Enabling Auto-Attach
When auto-attach is enabled on an activation key and there are subscriptions associated with the key, the subscription management service selects and attaches the best-matched associated subscriptions based on a set of criteria like currently-installed products, architecture, and preferences like service level.
You can enable auto-attach and have no subscriptions associated with the key. This type of key is commonly used to register virtual machines when you do not want the virtual machine to consume a RHEL subscription but to inherit a RHEL Virtual Data Center (VDC) subscription from the hypervisor.
Auto-attach is enabled by default. Disable the option if you want to force attach all subscriptions associated with the activation key.
For Web UI Users
- Click Content > Activation Keys.
- Click the activation key name that you want to edit.
- Click the Subscriptions tab.
- Click the edit icon next to Auto-Attach.
- Select or clear the check box to enable or disable auto-attach.
- Click Save.
To register virtual content hosts to Satellite Server using an auto-attach activation key, first use the virt-who utility to map those hosts to a hypervisor entitled with the Virtual Datacenter (VDC) subscription. Without this prerequisite, virtual hosts are registered only with a temporary virtual subscription for 24 hours. For more information, see Applying Virtual Guest Subscriptions in the Virtual Instances Guide.
For CLI Users
To enable auto-attach on the activation key development-stack:
# hammer activation-key update --name "development-stack" \
--organization "ACME" --auto-attach true
8.5. Setting the Service Level
An activation key can be configured to define a default service level for the new host created with the activation key. Setting a default service level selects only the matching subscriptions to be attached to the host. For example, if the default service level on an activation key is set to Premium, only subscriptions with premium service levels are attached to the host upon registration.
For Web UI Users
- Click Content > Activation Keys.
- Click the activation key name you want to edit.
- Click the edit icon next to Service Level.
- Select the required service level from the list. The list only contains service levels available to the activation key.
- Click Save.
For CLI Users
To set a default service level to Premium on the activation key development-stack:
# hammer activation-key update --name "development-stack" \
--organization "ACME" --service-level premium
8.6. Chapter Summary
This chapter discussed activation keys, demonstrated how to create them, and how systems register to a Satellite Server with them.
The next chapter explores errata management, including how to apply errata to a system.
Chapter 9. Managing Errata
As a part of Red Hat’s quality control and release process, we provide customers with updates for each release of official Red Hat RPMs. Red Hat compiles groups of related package into an erratum along with an advisory that provides a description of the update. There are three types of advisories (in order of importance):
- Security Advisory
- Describes fixed security issues found in the package. The security impact of the issue can be Low, Moderate, Important, or Critical.
- Bug Fix Advisory
- Describes bug fixes for the package.
- Product Enhancement Advisory
- Describes enhancements and new features added to the package.
Red Hat Satellite 6 imports this errata information when synchronizing repositories with Red Hat’s Content Delivery Network (CDN). Red Hat Satellite 6 also provides tools to inspect and filter errata, allowing for precise update management. This way, you can select relevant updates and propagate them through Content Views to selected content hosts.
Errata are labeled according to the most important advisory type they contain. Therefore, errata labeled as Product Enhancement Advisory can contain only enhancement updates, while Bug Fix Advisory errata can contain both bug fixes and enhancements, and Security Advisory can contain all three types.
In Red Hat Satellite, there are two keywords that describe an erratum’s relationship to the available content hosts:
- Applicable
- Erratum applies to one or more content hosts, which means it updates packages present on the content host. Applicable errata are not yet accessible by the content host.
- Installable
- Erratum applies to one or more content hosts and it has been made available to the content host. Installable errata are present in the content host’s life cycle environment and Content View, but are not yet installed. This way, errata can be installed by users who have permissions to manage content hosts, but are not entitled for errata management at higher levels.
This chapter shows how to manage errata and apply them to either a single system or multiple systems.
Install the katello-agent package on hosts registered to Satellite Server. This package provides the necessary services for errata management.
9.1. Managing Errata with Content Views
Red Hat Satellite 6 provides various methods to manage and apply errata. As discussed in Section 7.4, “Content Filters”, we can use Content Views and content filters to limit errata. Such filters include:
- ID - We can create a filter to select specific erratum to allow into our resulting repositories.
- Date Range - We can define a date range and include a set of errata released during that date range.
- Type - We can select the type of errata to include such as bug fixes, enhancements, and security updates.
As an example, we can create a content filter to exclude errata after a certain date. This ensures our production systems in the application life cycle are kept up to date to a certain point. Then we can modify the filter’s start date to introduce new errata into our testing environment. This is so we can test the compatibility of new packages into our application life cycle.
For instructions on creating a content filter, see Section 7.4.1, “Creating a Content Filter”.
When a Content View contains errata, we can apply it to our systems. Each system registered to your Red Hat Satellite 6 includes an errata management screen where you can apply multiple errata to the system. In addition, Red Hat Satellite 6 contains an errata management feature where you can search, review, and apply errata to multiple systems.
9.2. Inspecting Available Errata
The following procedure describes how to view and filter the available errata and how to display metadata of the selected advisory.
- Navigate to Content > Errata to view the list of available errata.
Use the filtering tools at the top of the page to limit the number of displayed errata:
- Select the repository to be inspected from the list. All Repositories is selected by default.
- The Applicable check box is selected by default to view only errata applicable to the selected repository. Select the Installable check box to view only errata marked as installable.
- To search the table of errata, type the query in the Search field in the form of:
parameter operator valueSee Table 9.1, “Parameters Available for Errata Search” for the list of parameters available for search. Find the list of applicable operators in Supported Operators for Granular Search in Administering Red Hat Satellite. Automatic suggestion works as you type. You can also combine queries with the use of and and or operators. For example, to display only security advisories related to the kernel package, type:
type = security and package_name = kernel
Press Enter to start the search.
Click the Errata ID of the erratum you want to inspect:
- The Details tab contains the description of the updated package as well as documentation of important fixes and enhancements provided by the update.
- On the Content Hosts tab, you can apply the erratum to selected content hosts as described in Section 9.4, “Applying Errata to Multiple Systems”.
- The Repositories tab lists repositories that already contain the erratum. You can filter repositories by the environment and Content View, and search for them by the repository name.
Table 9.1. Parameters Available for Errata Search
| Parameter | Description | Example |
|---|---|---|
| bug | Search by the Bugzilla number. | bug = 1172165 |
| cve | Search by the CVE number. | cve = CVE-2015-0235 |
| id | Search by the errata ID. The auto-suggest system displays a list of available IDs as you type. | id = RHBA-2014:2004 |
| issued | Search by the issue date. You can specify the exact date, like "Feb16,2015", or use keywords, for example "Yesterday", or "1 hour ago". The time range can be specified with the use of the "<" and ">" operators. | issued < "Jan 12,2015" |
| package | Search by the full package build name. The auto-suggest system displays a list of available packages as you type. | package = glib2-2.22.5-6.el6.i686 |
| package_name | Search by the package name. The auto-suggest system displays a list of available packages as you type. | package_name = glib2 |
| severity | Search by the severity of the issue fixed by the security update. Specify Critical, Important, or Moderate. | severity = Critical |
| title | Search by the advisory title. | title ~ openssl |
| type | Search by the advisory type. Specify security, bugfix, or enhancement. | type = bugfix |
| updated |
Search by the date of the last update. You can use the same formats as with the | updated = "6 days ago" |
9.3. Applying Errata to Individual Systems
For this procedure, we aim to apply some errata to a system. This procedure follows on from Section 8.2, “Using Activation Keys” and assumes you registered a test Red Hat Enterprise Linux 7 system to your Satellite Server. In this example, we aim to apply the following erratum:
Errata ID:   RHSA-2016:0008
Title:       Moderate: openssl security update
Type:        security
Severity:    Moderate
Issued:      2016-01-07
Updated:     2016-01-07
Description: OpenSSL is a toolkit that implements the Secure Sockets Layer (SSL v2/v3) and Transport Layer Security (TLS v1) protocols, as well as a full-strength, general purpose cryptography library.
For Web UI Users
Navigate to Hosts > Content Hosts and click on your test system. Navigate to the Errata tab. Due to the filter set up in Section 7.4.1, “Creating a Content Filter”, a list of security errata appears.
Let’s apply errata for OpenSSL. Navigate to the search bar and enter title ~ openssl. This searches for any errata with openssl in the title. Select the RHSA-2016:0008 errata and click Apply Selected. A confirmation message appears. Click Apply.
Satellite Server starts a task to update all packages associated with the selected errata. When the task completes, Satellite Server lists the packages updated and their new versions in the Details section. For example:
1:openssl-1.0.1e-51.el7_2.2.x86_64
1:openssl-libs-1.0.1e-51.el7_2.2.x86_64
Log in to the client system and confirm the errata updates:
[root@client ~]# yum list openssl openssl-libs
For CLI Users
List the OpenSSL errata for the client system:
# hammer host errata list \
--host client.example.com \
--search "title ~ openssl" \
--organization "ACME"
Apply the most recent erratum to the client system. Identify the erratum to apply using the Errata ID:
# hammer host errata apply \
--host client.danssat.net \
--errata-ids RHSA-2016:0008 \
--organization "ACME"
Log in to the client system and confirm the errata updates:
[root@client ~]# yum list openssl openssl-libs
9.4. Applying Errata to Multiple Systems
The Red Hat Satellite 6 Web UI provides an errata management tool to help review and apply errata to multiple systems. For this example, we use the same erratum (RHSA-2016:0008) from Section 9.3, “Applying Errata to Individual Systems”.
For Web UI Users
Navigate to Content > Errata. This displays all errata from synchronized repositories. In addition, the Content Host Counts shows the number of registered hosts that can apply and install each erratum.
Let’s apply a single OpenSSL errata to our systems through this tool. Navigate to the search field and enter title ~ openssl. This shows all errata relating to OpenSSL. Although this includes bug fixes and enhancements, note that Satellite Server cannot install these errata to our test system due to the filter we created in Section 7.4.1, “Creating a Content Filter”.
Click on the most recent OpenSSL errata. In our example, this is RHSA-2016:0008.
The Details screen for this erratum appears and provides a description of what the erratum resolves.
Navigate to the Content Hosts subtab. This displays a list of all applicable systems for this errata. We select Only show content hosts where the errata is currently installable in the host’s Lifecycle Environment to limit this list to systems that can actually install the errata.
Select our test system and click Apply to Hosts. A confirmation screen appears regarding the errata installation. Click Confirm.
Satellite Server starts a task to update the erratum’s packages for each selected system. When the task completes, log in to the client system and confirm the errata updates:
[root@client ~]# yum list openssl openssl-libs
For CLI Users
Although the CLI does not have the same tools as the Web UI, you can replicate a similar procedure with CLI commands.
List all OpenSSL errata:
# hammer erratum list --search "title ~ openssl" --organization "ACME"
Search again, restricting the list to installable errata:
# hammer erratum list \
--errata-restrict-installable true \
--search "title ~ openssl" --organization "ACME"
Find out details about this errata:
# hammer erratum info --id RHSA-2016:0008
List the systems that this erratum is applicable:
# hammer host list \
--search "applicable_errata = RHSA-2016:0008" \
--organization "ACME"
Apply the errata to a single system:
# hammer host errata apply \
--host client.example.com \
--errata-ids RHSA-2016:0008
Enter the following command for each client system and replace --host with the name of the system for each execution.
# for HOST in `hammer \
--csv --csv-separator "|" host list \
--search "applicable_errata = RHSA-2016:0008" \
--organization "ACME" | tail -n+2 | awk \
-F "|" '{ print $2 }'` ; do echo \
"== Applying to $HOST ==" ; hammer host errata apply \
--host $HOST --errata-ids RHSA-2016:0008 ; done
This command identifies all hosts with RHSA-2016:0008 as an applicable erratum and then applies the erratum to each host.
Log in to the client system and confirm the errata updates:
[root@client ~]# yum list openssl openssl-libs
9.5. Subscribing to Errata Notifications
You can configure email notifications for Satellite users as described in Configuring Email Notifications in Administering Red Hat Satellite. Users can receive a summary of applicable and installable errata, notifications on Content View promotion or after synchronizing a repository.
9.6. Chapter Summary
This chapter provided some guidelines on how Red Hat Satellite 6 manage errata and applies them to systems.
The next chapter explores container management in Red Hat Satellite 6.
Chapter 10. Managing Container Images
Containerization is an operating system-level virtualization method. While standard virtual machines consume resources that a hypervisor allocates to each system, containers act as individual systems that directly use a host’s kernel. This means that processes in containers share resources alongside the host and other containers. This provides an efficient method to run multiple systems from a single host. Linux containers also provide rapid application deployment, simpler testing, maintenance, and troubleshooting while improving security.
For more information about containers, see the Getting Started with Containers guide for Red Hat Enterprise Linux Atomic Host 7.
Docker is an open source project that automates the deployment Linux containers and their applications. It provides the capability to package an application with its runtime dependencies into a container.
A container in the Docker format is composed of the following parts:
- Container
- An application sandbox. Each container is based on an image that holds necessary configuration data. When you launch a container from an image, a writable layer is added on top of this image. Every time you commit a container a new image layer is added to store your changes.
- Image
- A static snapshot of the container’s configuration that is never modified. Any changes made to the container can be saved only by creating a new image layer. Each image depends on one or more parent images.
- Platform image
- An image that has no parent. Platform images define the runtime environment, packages and utilities necessary for containerized applications to run. The platform image is not writable, so any changes are reflected in the copied images stacked on top of it.
- Registry
- A public or private archive that contains images available for download. Some registries allow users to upload images to make them available to others. Red Hat Satellite allows you to import images from local and external registries. Satellite itself can act as an image registry for hosts. However, hosts cannot push changes back to the registry.
- Tag
-
A mark used to differentiate images in a repository, typically by the version of the application stored in the image. Repositories are used to group similar images in a container registry. Images only have unique alphanumeric identifiers, so naming them in the form
repository:tagprovides a human-readable way of identifying images.
With Red Hat Satellite 6, you can create an on-premise registry, import images from various sources and distribute them to containers using Content Views. Satellite Server supports creating one or more Docker compute resources that act as servers for running containers. This way, you can import an image, start a container based on this image, monitor the container’s activity, and commit its state to a new image layer that can be further propagated.
Importing content and managing the life cycle of container images is similar to managing other content types, such as RPMs and Puppet modules. You configure repositories bundled with Products and include those repositories in Content Views.
10.1. Importing Container Images from the Red Hat Container Catalog
The Red Hat Container Catalog provides a set of container images that you can import into your Satellite Server. The process for importing this content differs to how we enable repositories for Red Hat content. The process is:
- Create a custom product for Red Hat Container Catalog.
- Add a repository that links to the Red Hat Container Catalog registry (http://registry.access.redhat.com/).
- Synchronize with the registry’s repository.
For Web UI Users
Navigate to Content > Products and click New Product. A form for a new Product appears. Enter the following details:
-
Name - The plain text name for the product. Enter
Red Hat Container Catalog. -
Label - An internal ID for the repository. Enter
rhcc. - GPG Key - The GPG Key for the entire product. Leave this blank.
-
Sync Plan - A synchronization plan for the product. We can attach this to our
Example Plan. -
Description - A plain text description of the product. Enter
Red Hat Container Catalog content.
Click Save.
After creating the custom product, the product’s repositories screen appears. Click Create Repository, which displays a form for a new repository. Enter the following details:
-
Name - A plain text name for the repository. Enter
RHEL7. -
Label - An internal ID for the repository. Enter
RHEL7. -
Type - The type of repository. Select
docker. A new set of fields appear. -
URL - The URL of the registry to use as a source. Enter
http://registry.access.redhat.com/. -
Upstream Repository Name - The name of the repository on the registry. For our example, enter
rhel7.
You can search and view other repositories at https://access.redhat.com/containers/ .
Click Save. We return to the product’s repository screen with our new repository listed. Select it and click Sync Now to start the synchronization process. After a few minutes, Satellite Server completes the synchronization. Click Manage Docker Manifests to list the available manifests. From the list, you can optionally remove any manifests that are not required.
You can also view the progress of the synchronization in the Web UI. Navigate to Content > Sync Status and expanding the Product/Repository tree (or click Expand All).
For CLI Users
Create the custom Red Hat Container Catalog product:
# hammer product create \
--name "Red Hat Container Catalog" \
--sync-plan "Example Plan" \
--description "Red Hat Container Catalog content" \
--organization "ACME"
Create the repository for the container images:
# hammer repository create \
--name "RHEL7" \
--content-type "docker" \
--url "http://registry.access.redhat.com/" \
--docker-upstream-name "rhel7" \
--product "Red Hat Container Catalog" \
--organization "ACME"
Then synchronize the repository:
# hammer repository synchronize \
--name "RHEL7" \
--product "Red Hat Container Catalog" \
--organization "ACME"
Now we have a synchronized set of container images.
10.2. Importing Container Images from Other Image Registries
In addition to importing container images from Red Hat Container Catalog, Red Hat Satellite 6 can also import content from other image registries, such as community-based or internal registries. The process for importing from third-party registries is the similar to importing images from the Red Hat Container Catalog:
- Create a custom product.
- Add a repository for container images to the product and link it to a repository on an external registry.
- Synchronize with the registry’s repository.
The following procedure demonstrates how to accomplish this using the official Fedora images from the DockerHub registry (https://registry.hub.docker.com).
For Web UI Users
Navigate to Content > Products and click New Product. A form for a new Product appears. Enter the following details:
-
Name - The plain text name for the product. Enter
Fedora. - Label - An internal ID for the product. Red Hat Satellite 6 automatically completes this field based on what you have entered for Name.
- GPG Key - The GPG Key for the entire product. Leave this blank.
-
Sync Plan - A synchronization plan for the product. We can attach this to our
Example Plan. -
Description - A plain text description of the product. Enter
Fedora content.
Click Save.
After creating the custom product for Fedora, the product’s repositories screen appears. Click Create Repository, which displays a form for a new repository. Enter the following details:
-
Name - A plain text name for the repository. Enter
Fedora Docker Images. - Label - An internal ID for the repository. Red Hat Satellite 6 automatically completes this field based on what you have entered for Name.
-
Type - The type of repository. Select
docker. A new set of fields appear. -
URL - The URL of the registry to use as a source. Enter
https://registry.hub.docker.com. -
Upstream Repository Name - The name of the repository on the registry. For our example, enter
fedora/ssh
You can search and view other repositories at https://hub.docker.com/explore/ .
Click Save. We return to the product’s repository screen with our new repository listed. Select it and click Sync Now to start the synchronization process. After a few minutes, Satellite Server completes the synchronization. Click Manage Docker Manifests to list the available manifests. From the list, you can optionally remove any manifests that are not required.
You can also view the progress of the synchronization in the Web UI. Navigate to Content > Sync Status and expanding the Product/Repository tree (or click Expand All).
For CLI Users
Create the custom fedora product:
# hammer product create \
--name "Fedora" \
--sync-plan "Example Plan" \
--description "Fedora content" \
--organization "ACME"
Create the repository for the container images:
# hammer repository create \
--name "Fedora/SSH" \
--content-type "docker" \
--url "https://registry.hub.docker.com" \
--docker-upstream-name "fedora/ssh" \
--product "Fedora" \
--organization "ACME"
Then synchronize the repository:
# hammer repository synchronize \
--name "Fedora/SSH" \
--product "Fedora" \
--organization "ACME"
Now we have a synchronized set of container images.
10.3. Managing Container Images with Content Views
Use Content Views to manage container images across the application life cycle. This process uses the same publication and promotion method that RPMs and Puppet modules use.
For Web UI Users
Navigate to Content > Content Views and click Create New View. This displays a form for View Details. Enter the following information:
-
Name - The plain text name for the view. Enter
Containers. - Label - An internal ID for the view. Red Hat Satellite 6 automatically completes this field based on what you have entered for Name.
-
Description - A plain text description of the view. Enter
Container image for Red Hat Enterprise Linux 7. - Composite View? - Defines whether to use a Composite Content View. Leave this check box clear.
Click Save to complete.
This creates a new Content View entry. Navigate to the Docker Content subtab, then click Add. Select the container repository for our Red Hat Enterprise Linux 7 Server image. Click Add Repository. This adds the container images from this repository to the Content View.
Our Content View is ready to publish. Navigate to Versions and click Publish New Version. Satellite Server provides some details about the new version (Version 1) and allows you to enter a Description for the version, which is useful to logging changes for new content versions. Enter Initial content view for our container image and click Save.
Satellite Server creates the new version of the view and publishes it to the Library environment.
You can also click Promote to promote this Content View across environments in the application life cycle.
For CLI Users
Obtain a list of repository IDs:
# hammer repository list --organization "ACME"
For our example, the container rhel7 repository uses 8 for its IDs. Create the Content View and add the repository:
# hammer content-view create \
--name "Containers" \
--description "Container image for Red Hat Enterprise Linux 7" \
--repository-ids 8 \
--organization "ACME"
Now publish the view:
# hammer content-view publish \
--name "Containers" \
--description "Initial content view for our container image" \
--organization "ACME"
Satellite Server creates the new version of the view and publishes it to the Library environment.
10.4. Managing Container Images with Docker Tags
Some of the container images use Docker tags to identify version numbers and basic information about each version.
For Web UI Users
Navigate to Content > Docker Tags to view a list of tags for container-based products. Click on a tag to view information about a specific image.
For CLI Users
View a list of Docker tags and their IDs:
# hammer docker tag info --id 218 --organization "ACME"
View a Docker tag using the tag ID:
# hammer docker tag info --id 218
10.5. Chapter Summary
This chapter provided a basic overview of managing container image content in Red Hat Satellite 6, including how to create your own registry and how to manage container images across the application life cycle.
The next chapter examines how to manage OSTree content.
Chapter 11. Managing OSTree Content
OSTree is a tool to manage bootable, immutable, versioned file system trees. You can use any build system you like to place content into it on a build server then export an OSTree repository to a static HTTP. Red Hat Enterprise Linux Atomic Server uses OSTree content composed from RPM files as a method to keep the operating system up to date.
The Red Hat Satellite 6 offers tools to synchronize and manage OSTree branches from an OSTree repository.
11.1. Configuring OSTree Management on Satellite Server
In Satellite Server 6.3, OSTree management tools are enabled by default. If required, to ensure that they are enabled, enter the following command:
# satellite-installer --katello-enable-ostree=true
11.2. Selecting Red Hat OSTree Content to Synchronize
Red Hat’s CDN provides OSTree Content for you to select and synchronize.
For Web UI Users
Navigate to Content > Red Hat Repositories. This displays a set of tabs for different content types. Select the OSTree tab. Locate the OSTree set you aim to use. For our example, we import the Red Hat Enterprise Linux Atomic Host Trees set from the Red Hat Enterprise Linux Atomic Host product group. Ensure you have a repository enabled.
Navigate to Content > Products and click on the Red Hat Enterprise Linux Atomic Host. This product now includes a repository for our Red Hat Enterprise Linux Atomic Host Trees branch set. Select this repository and click Sync Now.
You can also view the progress of the synchronization in the Web UI. Navigate to Content > Sync Status and expanding the Product/Repository tree (or click Expand All).
After a few minutes, Satellite Server completes the import of all images relating to the rhel7 repository.
For CLI Users
Search the Red Hat Enterprise Linux Server product for ostree repositories:
# hammer repository-set list \
--product "Red Hat Enterprise Linux Atomic Host" \
--organization "ACME" | grep "ostree"
Enable the ostree repository for Red Hat Enterprise Linux Atomic Host. In our example, the ID for this repository is 3822:
# hammer repository-set enable \
--product "Red Hat Enterprise Linux Atomic Host" \
--name "Red Hat Enterprise Linux Atomic Host (Trees)" \
--organization "ACME"
Find and synchronize the repository in our product. In our example, the ID for our version of the repository is 5:
# hammer repository list \
--product "Red Hat Enterprise Linux Atomic Host" \
--organization "ACME"
# hammer repository synchronize \
--name "Red Hat Enterprise Linux Atomic Host Trees" \
--product "Red Hat Enterprise Linux Atomic Host" \
--organization "ACME"
11.3. Importing Custom OSTree Content
In addition to importing OSTree content from Red Hat’s CDN, Red Hat Satellite 6 also imports content from other sources. This requires a published HTTP location for the OSTree to import.
For Web UI Users
Navigate to Content > Products and click New Product. A form for a new Product appears. Enter the following details:
-
Name - The plain text name for the product. Enter
OSTree Content. - Label - An internal ID for the product. Red Hat Satellite 6 automatically completes this field based on what you have entered for Name.
- GPG Key - The GPG Key for the entire product. Leave this blank.
-
Sync Plan - A synchronization plan for the product. We can attach this to our
Example Plan. -
Description - A plain text description of the product. Enter
OSTree Content.
Click Save.
After creating the custom product for Fedora, the product’s repositories screen appears. Click Create Repository, which displays a form for a new repository. Enter the following details:
-
Name - A plain text name for the repository. Enter
Custom OSTree. - Label - An internal ID for the repository. Red Hat Satellite 6 automatically completes this field based on what you have entered for Name.
-
Type - The type of repository. Select
ostree. A new field appears for the URL. -
URL - The URL of the registry to use as a source. For example
http://www.example.com/rpm-ostree/.
Click Save. We return to the product’s repository screen with our new repository listed. Select it and click Sync Now to start the synchronization process. After the a few minutes, Satellite Server completes the synchronization.
You can also view the progress of the synchronization in the Web UI. Navigate to Content > Sync Status and expanding the Product/Repository tree (or click Expand All).
For CLI Users
Create the custom OSTree Content product:
# hammer product create \
--name "OSTree Content" \
--sync-plan "Example Plan" \
--description "OSTree Content" \
--organization "ACME"
Create the repository for the OSTree:
# hammer repository create \
--name "Custom OSTree" \
--content-type "ostree" \
--url "http://www.example.com/rpm-ostree/" \
--product "OSTree Content" \
--organization "ACME"
Then synchronize the repository:
# hammer repository synchronize \
--name "Custom OStree" \
--product "OSTree Content" \
--organization "ACME"
Now we have a synchronized set of OSTree branches.
11.4. Managing OSTree Content with Content Views
Use Content Views to manage OSTree branches across the application life cycle. This process uses the same publication and promotion method that RPMs and Puppet modules use.
For Web UI Users
Navigate to Content > Content Views and click Create New View. This displays a form for View Details. Enter the following information:
-
Name - The plain text name for the view. Enter
OSTree. - Label - An internal ID for the view. Red Hat Satellite 6 automatically completes this field based on what you have entered for Name.
-
Description - A plain text description of the view. Enter
OSTree branches for Red Hat Enterprise Atomic Host. - Composite View? - Defines whether to use a Composite Content View. Leave this check box clear.
Click Save to complete.
This creates a new Content View entry. Navigate to the OSTree Content subtab, then click Add. Select the OSTree repository for our Red Hat Enterprise Linux Atomic Host Trees. Click Add Repository. This adds the OSTree content from this repository to the Content View.
Our Content View is ready to publish. Navigate to Versions and click Publish New Version. Satellite Server provides some details about the new version (Version 1) and allows you to enter a Description for the version, which is useful to logging changes for new content versions. Enter Initial content view for our OSTree and click Save.
Satellite Server creates the new version of the view and publishes it to the Library environment.
You can also click Promote to promote this Content View across environments in the application life cycle.
For CLI Users
Obtain a list of repository IDs:
# hammer repository list --organization "ACME"
For our example, the OSTree repository uses 5 for its IDs. Create the Content View and add the repository:
# hammer content-view create \
--name "OSTree" \
--description "OSTree for Red Hat Enterprise Linux Atomic Host" \
--repository-ids 5 \
--organization "ACME"
Now publish the view:
# hammer content-view publish \
--name "OSTree" \
--description "Initial content view for our OSTree" \
--organization "ACME"
Satellite Server creates the new version of the view and publishes it to the Library environment.
11.5. Chapter Summary
This chapter provided a basic overview of managing OSTree content in Red Hat Satellite 6, including how to import and synchronize your OSTree content from Red Hat and custom sources. This chapter also showed how to manage this content across the application life cycle.
The next chapter examines how to manage ISO files.
Chapter 12. Managing ISO Images and Files
Red Hat Satellite 6 has the ability to store ISO images, either from Red Hat’s Content Delivery Network or other sources. In addition, Satellite Server provides a means to upload other files, such as virtual machine images, and publish them in repositories. This chapter provides some basic procedures to import ISOs images and other files.
12.1. Importing ISO Images from Red Hat
The Red Hat Content Delivery Network provides ISO images for certain products. The process for importing this content is similar to how we enable repositories for RPM content.
For Web UI Users
Navigate to Content > Red Hat Repositories. This displays a set of tabs for different content types. Select the ISOs tab. Locate the image set you aim to use. For our example, select Red Hat Enterprise Linux Server > Red Hat Enterprise Linux 7 Server (ISOs) and select the image for Red Hat Enterprise Linux 7 Server ISOs x86_64 7.2.
Navigate to Content > Products and click on Red Hat Enterprise Linux Server. The repository screen for this product appears. This product now includes a repository for our ISO image set. Select this repository and click Sync Now.
You can also view the progress of the synchronization in the Web UI. Navigate to Content > Sync Status and expanding the Product/Repository tree (or click Expand All).
After a few minutes, Satellite Server completes the import of all chosen images.
For CLI Users
Search the Red Hat Enterprise Linux Server product for file repositories:
# hammer repository-set list \
--product "Red Hat Enterprise Linux Server" \
--organization "ACME" | grep "file"
Enable the file repository for Red Hat Enterprise Linux 7.2 Server ISO:
# hammer repository-set enable \
--product "Red Hat Enterprise Linux Server" \
--name "Red Hat Enterprise Linux 7 Server (ISOs)" \
--releasever 7.2 \
--basearch x86_64 \
--organization "ACME"
Find and synchronize the repository in our product. In our example, the ID for our version of the repository is 40:
# hammer repository list \
--product "Red Hat Enterprise Linux Server" \
--organization "ACME"
# hammer repository synchronize \
--name "Red Hat Enterprise Linux 7 Server ISOs x86_64 7.2" \
--product "Red Hat Enterprise Linux Server" \
--organization "ACME"
12.2. Importing Individual ISO Images and Files
This section provides a method to manually import ISO content and other files to Satellite Server. For this example, we upload a file called bootdisk.iso to Satellite Server. The process is similar to uploading custom Puppet modules:
- Create a custom product.
- Add a repository for files to the product.
- Select a file to upload to the repository.
For Web UI Users
Navigate to Content > Products and click New Product. A form for a new Product appears. Enter the following details:
-
Name - The plain text name for the product. Enter
Custom ISOs. - Label - An internal ID for the product. Red Hat Satellite 6 automatically completes this field based on what you have entered for Name.
- GPG Key - The GPG Key for the entire product. Leave this blank.
-
Sync Plan - A synchronization plan for the product. We can attach this to our
Example Plan. -
Description - A plain text description of the product. Enter
Custom ISO collection.
Click Save.
After creating the custom product for our ISOs, the product’s repositories screen appears. Click Create Repository, which displays a form for a new repository. Enter the following details:
-
Name - A plain text name for the repository. Enter
Bootdisk. - Label - An internal ID for the repository. Red Hat Satellite 6 automatically completes this field based on what you have entered for Name.
-
Type - The type of repository. Select
file. A new set of fields appear. -
URL - The URL of the registry to use as a source. This is to synchronize other Satellite-generated repositories, which contain a
PULP_MANIFESTfile. For our example, leave this field blank.
Click Save. We return to the product’s repository screen with our new Bootdisk repository listed. Click on the Bootdisk repository.
Navigate to the Upload File section and click Browse. Select the ISO file (bootdisk.iso in our example) and click Upload. After a few seconds, Satellite Server reports Content successfully uploaded.
Click on the Manage Puppet Modules page to manage and remove Puppet modules from a product.
For CLI Users
Create the custom product:
# hammer product create \
--name "Custom ISOs" \
--sync-plan "Example Plan" \
--description "Custom ISO collection" \
--organization "ACME"
Create the repository:
# hammer repository create \
--name "Bootdisk" \
--content-type "file" \
--product "Custom ISOs" \
--organization "ACME"
Upload the ISO file to the repository:
# hammer repository upload-content \
--path ~/bootdisk.iso \
--name "Bootdisk" \
--product "Custom ISOs" \
--organization "ACME"
Now we have a custom repository that contains an ISO image.
12.3. Importing the Red Hat OVAL Repository
Open Vulnerability and Assessment Language (OVAL) files contain information about public security content. Red Hat Satellite 6 uses OVAL files as part of its SCAP auditing process. Red Hat also provides a repository (https://www.redhat.com/security/data/oval/) that contains multiple OVAL files. Satellite Server can synchronize this repository so that you have local access to files for SCAP auditing.
For Web UI Users
Navigate to Content > Products, and click New Product. A form for a new product appears. Enter the following details:
-
Name - The plain text name for the product. Enter
OVAL Files. - Label - An internal ID for the product. Red Hat Satellite 6 automatically completes this field based on the value you entered for Name.
- GPG Key - The GPG Key for the entire product. Leave this blank.
-
Sync Plan - A synchronization plan for the product. We can attach this to our
Example Plan. -
Description - A plain text description of the product. Enter
OVAL file collections.
Click Save.
After creating the custom product for our OVAL files, the product’s repositories screen appears. Click Create Repository, which displays a form for a new repository. Enter the following details:
-
Name - A plain text name for the repository. Enter
Red Hat OVAL Files. - Label - An internal ID for the repository. Red Hat Satellite 6 automatically completes this field based on the value you entered for Name.
-
Type - The type of repository. Select
file. A new set of fields appear. -
URL - The URL of the registry to use as a source. Enter
https://www.redhat.com/security/data/oval/. This repository contains aPULP_MANIFESTfile that Satellite Server uses for synchronization.
Click Save. We return to the product’s repository screen with our new repository listed. Select this repository and click Sync Now.
For CLI Users
Create the custom OVAL product:
# hammer product create \
--name "OVAL Files" \
--sync-plan "Example Plan" \
--description "OVAL file collections" \
--organization "ACME"
Create the OVAL repository:
# hammer repository create \
--name "Red Hat OVAL Files" \
--content-type "file" \
--product "OVAL Files" \
--publish-via-http true \
--url https://www.redhat.com/security/data/oval/ \
--organization "ACME"
Then synchronize the OVAL repository:
# hammer repository synchronize \
--name "Red Hat OVAL Files" \
--product "OVAL Files" \
--organization "ACME"
Testing the Local Red Hat OVAL Repository
When the OVAL content completes synchronization, you can perform a test evaluation with an OVAL file from the repository.
On a test Red Hat Enterprise Linux 7 system, install the openscap-scanner package, which contains the oscap tool:
# yum install openscap-scanner
Download a copy of the Red Hat Enterprise Linux 7 OVAL file from Satellite Server.
# cd /tmp
# wget http://satellite.example.com/pulp/isos/ACME-OVAL_Files-Red_Hat_OVAL_Files/Red_Hat_Enterprise_Linux_7.xml
Scan the test Red Hat Enterprise Linux 7 machine for vulnerabilities with the oscap tool:
# oscap oval eval \
--results results.xml \
--report report.html ./Red_Hat_Enterprise_Linux_7.xml
This performs the evaluation and generates an OVAL report with information on whether each definition is compliant or not.
12.4. Chapter Summary
This chapter provided a basic overview of managing ISOs and file content in Red Hat Satellite 6.
The next chapter examines completing the content management process.
Chapter 13. Finalizing Content Management
Content management is only part of Red Hat Satellite 6’s functionality. Red Hat Satellite 6 also provides features for system provisioning, system management, capsule control, monitoring, and reporting. However, content management acts as the initial stage of the Red Hat Satellite 6 ecosystem. In this chapter, we recap on what we have learned about content management through the course of this guide and how it impacts other Red Hat Satellite 6 features.
13.1. Completing Scenario Objectives
This guide presented an end-to-end scenario involving a fictional company called ACME. Through this scenario, this guide has demonstrated how to achieve the following:
- Managing Red Hat Subscriptions
- Access your Red Hat content in Red Hat Satellite 6 with a Subscription Manifest. Generate the Subscription Manifest, download it from the Customer Portal, and import it into your organization on your Satellite Server. This provides your Satellite environment with access to RPMs, kickstart content, ISOs, and container images from Red Hat’s Content Delivery Network.
- Creating a Definitive Media Library (DML)
- The foundation for content management involves the creation of a DML. A DML acts as a central library for all master copies of content. Synchronize content from external sources into Red Hat Satellite 6 to form a DML. Such external sources include both Red Hat and custom sources. In addition, use synchronization plans to keep the DML up to date.
- Managing Different Content Types
- This guide provided examples to manage different content types, such as RPM files, Puppet modules, and container images.
- Creating an Application Life Cycle
- The application life cycle is a central concept in content management. Create environments in the application life cycle based on the production cycle of your organization. Then, define Content Views to filter content, publish resulting repositories, and promote them across the environments in the application life cycle. Use activation keys to register systems to a particular environment.
- Managing Errata
- Use Red Hat Satellite 6’s tools to review and apply errata to registered systems. Each errata contains a set of associated packages, which you can remotely install on applicable systems.
- Managing Container Images
- Enable your Satellite Server to act as a registry for container images. Synchronize container images from Red Hat and other sources, then use Content Views to manage and publish them.
13.2. Provisioning Systems
Satellite Server in our scenario now contains content managed across an application life cycle. Now we can provision systems in specific environments. Let’s look at how this happens when provisioning bare metal systems.
When provisioning systems from Capsule, the Content View assigned to the Capsule must contain the kickstart repositories for the Red Hat Enterprise Linux version being provisioned.
13.2.1. Using a Kickstart Repository as an Installation Medium
Satellite contains a set of kickstart repositories that you can use as an installation medium for hosts.
To Use a Kickstart Repository as an Installation Medium
- Add the synchronized kickstart repository that you want to use as an installation medium to the existing Content View or create a new Content View and add the kickstart repository there.
- Publish a new version of the Content View where the kickstart repository is added and promote it to a required lifecycle environment. See Chapter 7, Managing Content Views for more information.
Create a host that uses a kickstart repository as an installation medium:
- Navigate to Hosts > All Hosts and click Create Host.
- Select the corresponding lifecycle environment from the Lifecycle Environment list.
- Select the corresponding Content View from the Content View list.
- Select the corresponding content source from the Content Source list.
- Navigate to the Operating System tab and select the corresponding architecture and operating system.
- Complete all the remaining required fields and click Submit.
To View the Kickstart Tree
To view the kickstart tree enter the following command:
# hammer medium list --organization "your_organization"13.2.2. Registering to an Environment
As a part of the kickstart process, Satellite Server creates a kickstart file using a set of provisioning templates and snippets. The subscription_manager_registration snippet controls the registration process. This snippet does two main functions:
- It registers your provisioned system to Satellite Server using an activation key that you select during provisioning.
-
It installs
katello-agent, which Satellite Server uses to communicate with the system. Most of the default kickstart provisioning templates include this snippet to register systems.
For Web UI Users
Navigate to Hosts > Provisioning templates and click on the subscription_manager_registration snippet to view it.
For CLI Users
Enter the following command to view the subscription_manager_registration snippet:
# hammer template dump --name subscription_manager_registration
If creating your own kickstart template, ensure that you reference this snippet using the following line in your template:
<%= snippet "subscription_manager_registration" %>
13.2.3. Provisioning a New System
When creating a new system, users select certain aspects from their content management configuration:
- The application life cycle environment
- The Content View in that environment
- Puppet classes from the selected environment
- The installation medium to use
These aspects of the new host have an effect on packages installed during provisioning, the activation key used for registration, the repositories used for updates, the Puppet modules and their classes to apply to the system during configuration. In addition, you must also specify additional aspects of the host, such as networking information, partitioning tables, capsules, and system-specific parameters used as variables in provisioning templates. See the Creating a Host section in the Managing Hosts guide to create a host and begin the provisioning process.
Appendix B. Importing Content ISOs into a Disconnected Satellite
In high security environments where hosts are required to function in a closed network disconnected from the Internet, Satellite Server can provision systems with the latest security updates, errata, and packages. To accomplish this, download the Content ISOs for Red Hat Satellite from the Red Hat Customer Portal and import them into Satellite Server.
This section is not required if your Satellite Server is connected to the Internet.
Download the product ISO from the Red Hat Customer Portal, as follows:
- Navigate to Downloads (at the very top of the window) and select Red Hat Satellite.
- Open the Content ISOs tab. All products in your subscription are listed here.
- Click the link for the product name, such as Red Hat Enterprise Linux 6 Server (x86_64) to download the ISO.
-
Copy all of Satellite Content ISOs to a directory Satellite can access. This example uses
/root/isos. Create a local directory that are shared through httpd on the Satellite. This example uses
/var/www/html/pub/sat-import/.# mkdir -p /var/www/html/pub/sat-import/
Mount and recursively copy the contents of the first ISO to the local directory:
# mkdir /mnt/iso
# mount -o loop /root/isos/first_iso /mnt/iso
# cp -ruv /mnt/iso/* /var/www/html/pub/sat-import/
# umount /mnt/iso
# rmdir /mnt/iso
-
Repeat the above step for each ISO until you have copied all the data from the Content ISOs into
/var/www/html/pub/sat-import/. Ensure the SELinux contexts for the directory are correct:
# restorecon -rv /var/www/html/pub/sat-import/
- Satellite Server now contains the content from the Content ISOs. However, Satellite Server needs to point to this location as the CDN URL. In the Satellite Web UI, navigate to Content > Red Hat Subscriptions. .
- Click Manage Manifest.
- On the Subscription Manifest information screen, select the Actions tab.
Navigate to Red Hat Provider Details. Click the edit icon on the Red Hat CDN URL and change the URL to the Satellite host name with the newly created directory, for example:
- Click Save and then upload your manifest using Section 3.5, “Importing a Subscription Manifest into Satellite Server”.
Satellite is now acting as its own CDN with the files located in http://server.example.com/pub/sat-import/. This is not a requirement. The CDN can be hosted on a different machine inside the same disconnected network as long as it is accessible to Satellite Server using HTTP.
If your environment changes from disconnected to connected, you can reconfigure a disconnected Satellite to pull content directly from Red Hat Customer Portal:
- In the Satellite Web UI, navigate to Content > Red Hat Subscriptions.
- Click Manage Manifest.
- On the Subscription Manifest information screen, select the Actions tab.
Navigate to Red Hat Provider Details. Click the edit icon on the Red Hat CDN URL and change the URL to the Red Hat CDN URL:
- Click Save
Satellite Server pulls content directly from Red Hat Customer Portal on the next synchronization.
Appendix C. Importing Content ISOs into a Connected Satellite
Even if Satellite Server can connect directly to the Red Hat Customer Portal, you can perform the initial synchronization from locally mounted content ISOs. When the initial synchronization is completed from the content ISOs, you can switch back to downloading content through the network connection. To accomplish this, download the Content ISOs for Red Hat Satellite from the Red Hat Customer Portal and import them into Satellite Server. For locations with bandwidth limitations, using an On Demand or Background download policy might be more efficient than downloading and importing Content ISOs.
This section is not required if your Satellite Server is connected to the Internet.
This example shows how to perform the first synchronization of the Red Hat Enterprise Linux 6 repository from content ISOs. At the time of writing there are 21 DVD size ISO files.
Downloading the content ISOs from the Red Hat Customer Portal
- In your browser, navigate to Red Hat Customer Portal and log in.
- Click DOWNLOADS.
- Select Red Hat Satellite.
- Select the Content ISOs tab. All products in your subscription are listed there.
- Search for the section required, in this example Red Hat Enterprise Linux 6.
-
Click the link for the product name, such as
RHEL 6 Server (x86_64)(2017-04-14T01:27:00)to reveal the ISO files. -
Using your browser, download the required ISOs to a location accessible by your browser. For example, to your workstation’s
Downloadsdirectory.
Importing the Content ISOs
In a terminal connected to Satellite Server, create a directory to act as a temporary store for all of the required Satellite Content ISOs. This example uses
/tmp/isos/rhel6:# mkdir -p /tmp/isos/rhel6
On your workstation, copy the ISO files to Satellite Server:
$ scp ~/Downloads/iso_file root@satellite.example.com:/tmp/isos/rhel6On Satellite Server, create a directory to serve as a mount point for the ISOs:
# mkdir /mnt/iso
Create a working directory to hold the contents of all the ISOs:
# mkdir /mnt/rhel6
Mount and recursively copy the contents of the first ISO to the working directory:
# mount -o loop /tmp/isos/iso_file /mnt/iso # cp -ruv /mnt/iso/* /mnt/rhel6/ # umount /mnt/iso-
Repeat the above step for each ISO until you have copied all the data from the Content ISOs into
/mnt/rhel6. If required, remove the empty directory used as the mount point:
# rmdir /mnt/iso
If required, remove the temporary working directory and its contents to regain the space:
# rm -rf /tmp/isos/
Performing the Initial Synchronization
Set the owner and the SELinux context for the directory and its contents to be the same as
/var/lib/pulp:# chcon -R --reference /var/lib/pulp /mnt/rhel6/ # chown -R apache:apache /mnt/rhel6/
Create or edit the
/etc/pulp/content/sources/conf.d/local.conffile. Insert the following text into the file:[rhel-6-server] enabled: 1 priority: 0 expires: 3d name: Red Hat Enterprise Linux 6 Server type: yum base_url: file:///mnt/rhel6/content/dist/rhel/server/6/6Server/x86_64/os/
The
base_urlpath might differ in your content ISO. The directory specified inbase_urlmust contain therepodatadirectory, otherwise the synchronization fails. To synchronize multiple repositories, create a separate entry for each of them in the configuration file/etc/pulp/content/sources/conf.d/local.conf.- In the Satellite web UI, navigate to Content > Red Hat Repositories and select the repository to be enabled, in this example Red Hat Enterprise Linux 6 Server RPMs x86_64 6Server.
- Under Content > Sync Status select the repository to be synchronized and click Synchronize Now.
Note that there is no indication in the Satellite web UI of which source is being used. In case of problems with a local source, Satellite pulls content through the network. To monitor the process, enter the following command in a terminal (limited to Red Hat Enterprise Linux 7 base systems):
# journalctl -f -l SYSLOG_IDENTIFIER=pulp | grep -v worker[\-,\.]heartbeat
The above command displays interactive logs. First, Satellite Server connects to the Red Hat Customer Portal to download and process repository metadata. Then, the local repository is loaded. In case of any errors, cancel the synchronization in the Satellite web UI and verify your configuration.
After successful synchronization you can detach the local source by removing its entry from /etc/pulp/content/sources/conf.d/local.conf.
Appendix D. Synchronizing Content Between Satellite Servers
Red Hat Satellite 6.3 uses Inter-Satellite Synchronization (ISS) to synchronize content between upstream and downstream servers. In the context of ISS, upstream refers to the server from which content is exported; downstream refers to the server into which content is imported.
ISS is designed to address two scenarios:
- If you have both connected and disconnected Satellite Servers, and want to propagate content from the connected servers to the disconnected servers.
-
If you have a primary Satellite Server and want to propagate some, but not all, content to other Satellite Servers. For example, you might have Content Views (CVs) that are validated by the IT department, and you want to propagate the
yumcontent from those CVs to a downstream Satellite.
Be aware that you cannot use ISS to synchronize content from a Satellite Server to a Capsule Server. Capsule Server supports synchronization natively. For more information, see the Capsule Server Overview in the Architecture Guide.
Satellite 6.3 supports exports as a set of directories (default) or as ISO files. You can then import the resulting export to another Satellite Server. This replaces the katello-disconnected script in earlier Satellite versions, which exported repositories into a directory structure that could be later imported into another Satellite Server. In Satellite 6.3, all export and import functions are performed on the command line.
Only RPM, kickstart, and ISO files are exported. Content View definitions and metadata, such as package filters, is not transferred. Satellite 6.3 does not support the export of Puppet, Docker, or OSTree content. Imports occur as a normal repository synchronization, and consequently always arrive in the Library environment.
The disconnected use case is used extensively by customers who have air-gapped networks where a Satellite and its clients are on a network that is never connected to the Internet. The only way that these disconnected Satellites are populated with content is by exports from a connected Satellite.
Bidirectional synchronization is NOT used in a disconnected environment. Content never passes from the disconnected server to the connected server.
Figure D.1. Information Flow in ISS in an Air-gapped Network
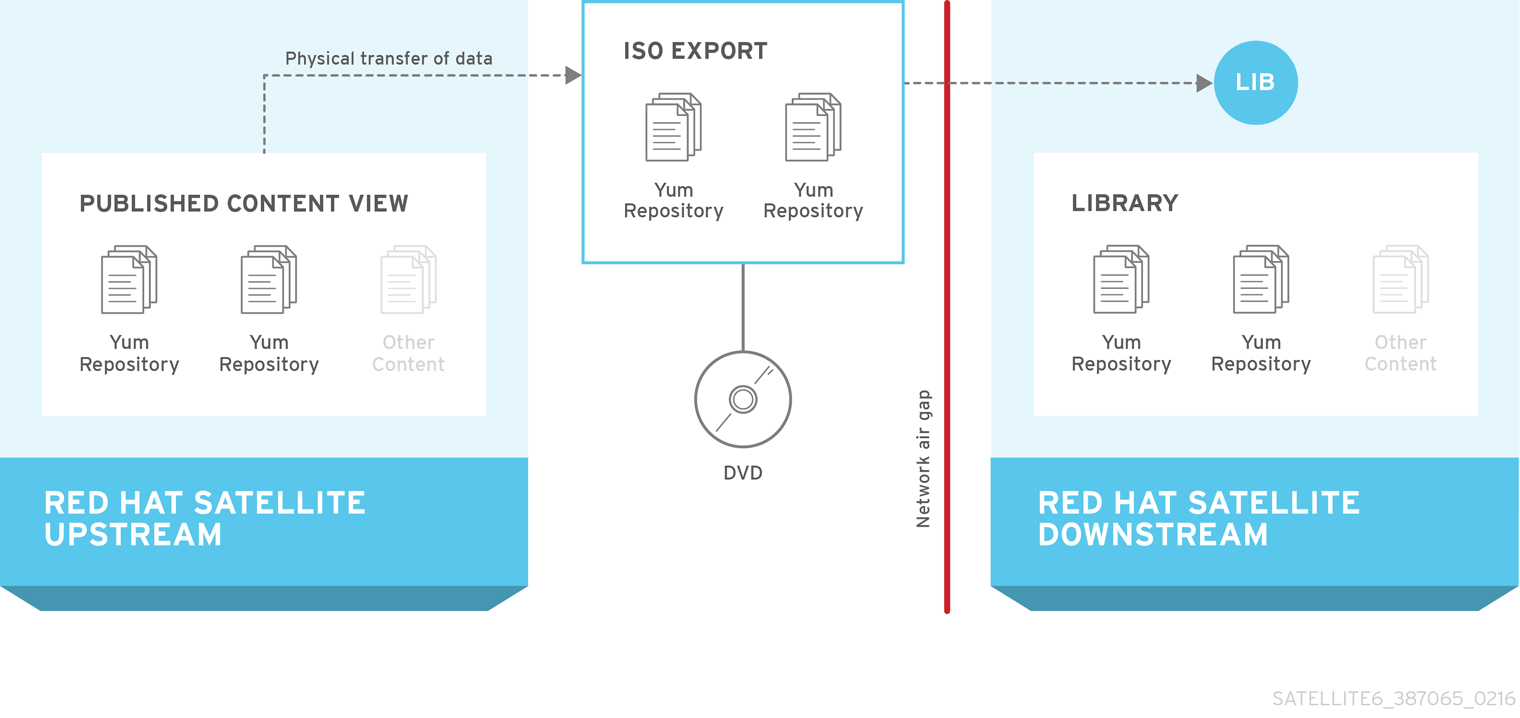
D.1. Satellite Servers, Capsule Servers, and ISS
ISS serves a distinct purpose in a Red Hat Satellite deployment. If you intend to include ISS as part of your deployment, it equates to keeping a separate Satellite Server that you need to maintain, back up, and so on. ISS does not provide a failover mechanism for clients, and neither is it designed as a backup and recovery system. It is a means of providing information sharing between Satellite Servers. The primary use case for implementing ISS is when you have a Satellite Server that is not connected to the Internet or to external content, and you need to synchronize content with a Satellite that is connected to the Internet. This can apply when you need complete isolation of management infrastructure for security or other purposes.
If you do not want to maintain another management web UI and platform, and you want to perform management and provisioning to local clients, consider setting up a Capsule Server.
D.2. Prerequisites
- In Red Hat Satellite 6, ISS is only available in Satellite 6.2 and later, which requires Red Hat Enterprise Linux 6.7, 7.2, or later.
- The export directory needs to be large enough to accommodate at least one Red Hat Enterprise Linux export. By default, the export directory is /var/lib/pulp/katello-export/.
- The /var/lib/pulp/ directory must have free storage space equivalent to the size of the repository being exported for temporary files created during the export process. This is in addition to the space required by the default export directory.
- The downstream Satellite Server must have the required manifests and entitlements for any content that you intend to enable. You cannot enable repositories on a downstream Satellite for which no entitlements exist.
- The repository download policy needs to be set to immediate. This policy specifies whether or not Satellite first downloads metadata and other repository information, and only downloads actual repositories when requested. ISS does not function correctly if this policy is not set to immediate.
Section D.5, “Configuring ISS” describes how to configure required options.
D.3. Supported Synchronization Options
Satellite 6.3 supports the following synchronization options:
- Exporting repositories to a directory or ISO file.
- Exporting all repositories in an Environment or CV version to a directory or ISO file. You can also recreate any custom products during the import process, but Red Hat products are not recreated because they must be created using a manifest.
- Date-based incremental exports of RPM files and errata.
These synchronization options include a range of history details about the export and import, depending on the type of content. For example:
- The repository synchronization history includes upstream source information, as well as the time the export occurred.
- The CV synchronization history includes the export time and version, as well as the import time, version, and upstream source.
D.4. Using Chunked ISO Files
Satellite 6.3 supports exports to chunked ISO files. A chunked ISO is similar to a split ISO but with one significant difference. Satellite tracks the size of the ISO file, and if the total size of the files being added to the ISO exceeds that value, Satellite stops writing to the ISO and creates a new one in the series. The advantage of this is that you can specify the ISO file size (for example, 4.7 GB), and still export larger repositories. The result is multiple 4.7 GB ISO files that you can burn to DVDs.
The difference between this and splitting large files is that the split utility is not aware of the ISO file format, which means that it does not create a new burnable ISO file for the next file in the series. This method requires that you copy all of the files to one place, concatenate those files, and then mount that single large ISO through loopback.
You can add the --iso-mb-size parameter to specify the size of ISO export files. The default value is 4380 MB, the size of a single-sided, single-layer DVD.
D.5. Configuring ISS
This section describes how to configure the required settings for ISS. It is important that these settings be configured correctly or your synchronization may fail.
D.5.1. Configuring an Export Destination
Inter-Satellite Synchronization by default uses the /var/lib/pulp/katello-export/ directory, as indicated by the 'pulp_export_destination' setting. To change this directory you must create the new directory and configure the Pulp export destination setting. Only Satellite Administrators can specify this directory, and SELinux and other permissions are also in place to prevent Satellite from writing to arbitrary file systems.
It can be helpful to create symbolic links to commonly used directories after they are exported. Exported repositories and CVs have the organization name and environment name prepended to the repository directory structure, which might create paths of overlong length.
The directory used in this example is for demonstration purposes only. Confirm that the export directory has adequate space for the required export RPM and ISO files. Section 1.5, “Defining Content Management Storage” provides information on estimating storage requirements. A temporary file is created during the export process in the /var/lib/pulp/ directory. This means that storage space equal to twice the size of the repository being exported is required during the export process. The temporary file is deleted when the export is completed.
Create the Export Directory
Create the export directory:
# mkdir /var/www/html/pub/exportEnsure the
foremanuser has read and write permissions on the export directory:# chown foreman:foreman /var/www/html/pub/exportConfigure the SELinux context:
# semanage fcontext -a -t httpd_sys_rw_content_t \
"/var/www/html/pub/export(/.*)?"
# restorecon -RvF /var/www/html/pub/export
# ls -Zd /var/www/html/pub/export
drwxr-xr-x. foreman foreman system_u:object_r:httpd_sys_rw_content_t:s0 /var/www/html/pub/export
Configure the Export Destination
For CLI Users
To change the export destination, enter the following hammer command:
# hammer settings set \
--name pulp_export_destination \
--value your-export-directory
For example, to specify /var/www/html/pub/export/ as the export destination, enter:
# hammer settings set \
--name pulp_export_destination \
--value /var/www/html/pub/export
For Web UI Users
- In the web UI, navigate to Administer > Settings, and click the Content tab.
-
Locate the 'pulp_export_destination' variable in the
Namecolumn, and click theValuefield. -
Enter the export destination, for example /var/www/html/pub/export, in the
Valuefield and clickSave.
D.5.2. Configuring the Download Policy
ISS requires that the 'Download Policy' be set to immediate. You can set this globally so that it applies to new repositories created in all Organizations, or you can set it individually for every repository. Changing the default value does not change existing settings.
For CLI Users
To change the global default Download Policy, enter the following command:
# hammer settings set \
--name default_download_policy \
--value immediate
If required to change the policy for a specific repository, you can list the repositories for an organization as follows:
# hammer repository list \
--organization-label organization-label
To change the download policy for an existing repository, enter the following command:
# hammer repository update \
--organization-label organization-label  \
--product "Red Hat Enterprise Linux Server" \
--name "Red Hat Enterprise Linux 7 Server Kickstart x86_64 7.2"  \
--download-policy immediate
For Web UI Users
To change the global default Download Policy using the web UI:
- Navigate to Administer > Settings.
-
On the Content tab, locate
default_download_policy. - In the Value field, click the edit icon.
-
Set the value to immediate, and then click
Save.
To change the Download Policy for an existing repository using the web UI:
- In the web UI, navigate to Content > Products, and click the required product name.
- On the Repositories tab, click the required repository name, locate the 'Download Policy' field, and click the edit icon.
-
From the list, select Immediate, and then click
Save.
D.6. Exporting Content
This section describes how to export different types of content from your upstream server, ready to be imported into to one or more downstream servers. For details on importing content, see Section D.7, “Importing Content”.
Synchronization between upstream and downstream servers is currently supported in disconnected deployments, for example in an air-gapped environment, where complete isolation is required.
D.6.1. Exporting Repositories
-
Enter the
hammer repository listcommand to list the repositories which can be exported and identify their IDs, which are used in the export. Enter the
hammer repository exportcommand to export content from your upstream server. This command exports content to the directory specified in 'pulp_export_destination' setting. ISS exports to a directory by default. You can add the '--export-to-iso 1' parameter to export to an ISO file instead. For example:# hammer repository export --id 1 [--export-to-iso 1]
If you use the '--export-to-iso' parameter, you need to specify either 1 (ISO) or 0 (directory). This parameter does not have a default value.
D.6.2. Exporting Content View Version to a Directory
You can export a specific version of a Content View to a directory. That means that you can label a particular version of a CV to suit your requirements. This way you can curate and track your exports and facilitate updates.
Prerequisites
- Ensure all repositories within the CV have their download policy set to Immediate. You cannot export repositories with policies other than Immediate.
- Ensure Products are synchronized to the required date.
For Web UI Users
Navigate to Content > Content Views. Click Create New View. Enter following details to create a CV:
- Name — A plain text name for the CV. Enter Export_CV.
- Label — An internal ID for the CV. Red Hat Satellite 6 automatically completes this field based on what you have entered for Name.
- Description — An optional plain text description of the CV.
- Composite View — Defines whether or not to use a Composite Content View. Leave this option unselected.
- Click Save to submit your changes.
- On the Repository Selection screen, select the repositories to be added to the new CV from the Repository Selection table. Click Add Repositories to add selected packages to the CV.
Navigate to Yum Content > Filters and click New Filter. Enter following details to create a filter for including non-errata packages:
- Name — A plain text name for the filter. Enter Non-errata Products.
- Content type — A list of the types of content to be included into the filter. Select Package.
- Inclusion type — A list defining whether the content are included or excluded from the CV. Select Include.
- Description — An optional plain text description of the filter. Enter Include all non-errata Products.
- Click Save.
- On the Include RPM screen, select the Include all RPMs with no errata check box.
Navigate to Yum Content > Filters and click New Filter. Enter following details to create a filter for including errata packages in accordance with the required date range:
- Name — A plain text name for the filter. Enter Erratas untill YYYY-MM-DD.
- Content type — A list of the types of content to be included into the filter. Select Erratum - Date and Type.
- Inclusion type — A list defining whether the content is included or excluded from the CV. Select Include.
- Description — An optional plain text description of the filter. Enter Include errata products untill YYYY-MM-DD.
- Click Save.
- On the Erratum Date Range screen, select all Security, Enhancement and Bugfix errata types.
- Select the Updated On check box in Data type.
- Fill in the Start Date and End Date menus to configure the date range of Products for the filter.
- Click Save.
- Click Publish New Version, it is recommended to fill in the date ranges of repositories into the Description field. Ensure the Force Yum Metadata Regeneration check box is not selected.
- Click Save to publish the CV version ready for exporting.
For CLI Users
Enter the
hammer content-view createcommand to create a new CV:# hammer content-view create \ --name "Export_CV" \ --organization "Default Organization"
Enter the
hammer content-view add-repositorycommand to add repositories to the CV:# hammer content-view add-repository \ --name "Export_CV" \ --product "Red Hat Satellite" \ --repository "Red Hat Satellite Tools 6 for RHEL 7 Server RPMs x86_64" \ --organization "Default Organization" # hammer content-view add-repository \ --name "Export_CV" \ --product "Red Hat Satellite Capsule" \ --repository "Red Hat Satellite Capsule Tools 6.2 for RHEL 7 Server RPMs x86_64" \ --organization "Default Organization"
Create filters for the new CV:
Enter the
hammer content-view filter createcommand to create a filter for including non-errata packages:# hammer content-view filter create \ --content-view "Export_CV" \ --inclusion true \ --name "Non-errata_Products" \ --type rpm \ --original-packages true \ --organization "Default Organization"
Enter the
hammer content-view filter createcommand to create a filter for including errata packages:# hammer content-view filter create \ --content-view "Export_CV" \ --inclusion true \ --name "Erratas until YYYY-MM-DD" \ --type erratum \ --organization "Default Organization"
Enter the
hammer content-view filter rule createcommand to create a rule defining the date range:# hammer content-view filter rule create \ --content-view "Export_CV" \ --content-view-filter "Erratas until YYYY-MM-DD" \ --end-date YYYY-MM-DD \ --types security,enhancement,bugfix \ --organization "Default Organization"
Enter the
hammer content-view publishcommand to publish the CV version ready for exporting. It is recommended to fill in the date ranges of repositories under the--descriptionoption.# hammer content-view publish \ --name "Export_CV" \ --description "Repositories until YYYY-MM-DD" \ --force-yum-metadata-regeneration true \ --async \ --organization "Default Organization"
To Determine Which Content View Version to Export:
Enter the
hammer content-view version listcommand to determine which version of a Content View to export. For example:$ hammer content-view version list \ --organization "Default Organization" ---|-------------------------------|---------|----------------------- ID | NAME | VERSION | LIFECYCLE ENVIRONMENTS ---|-------------------------------|---------|----------------------- 3 | Export_CV 2.0 | 2.0 | Library 2 | Export_CV 1.0 | 1.0 | Library 1 | Default Organization View 1.0 | 1.0 | Library ---|-------------------------------|---------|-----------------------
To Export a Content View Version:
Enter the
hammer content-view version exportcommand to export a version of a Content View:# hammer content-view version export --id 3
D.6.3. Incremental Export
To avoid exporting large repositories when updating, you can use incremental updates to only export the recent updates from a Satellite Server. Incremental updates export the recent changes made in the local repository by using synchronization events set to a particular date and time.
To make an incremental-update repository, enter the hammer repository export command with the --since option. For example:
# hammer repository export \
--id 1 [--export-to-iso 1] \
--since ISO_Date
Where ISO_Date is in ISO 8601 format. For example, 2010-01-01T12:00:00Z.
The time stamp used for the calculations is the time that the RPMs were synchronized on Satellite Server. For example, if Red Hat adds RPMs to a repository on a Monday and then again on a Wednesday, you cannot synchronize your local repository on Thursday and then use a date of Tuesday to get only the Wednesday update.
In addition to exporting changes to a repository, this feature is useful with the Default Organization View Content View, but is not as useful for published CVs.
D.7. Importing Content
Red Hat Satellite 6.3 currently supports importing content that has been exported from an upstream Satellite Server in a disconnected environment. This method is used for disconnected Satellite Servers that have no Internet access, and requires the physical transfer of content between the servers, for example using a DVD.
D.7.1. Importing a Repository
Prerequisites
- Export the repository from the upstream Satellite Server. For more details, see Section D.6.1, “Exporting Repositories”.
To Import a Repository:
-
Make the data available for a repository over HTTP, not HTTPS. For example, copy the exported directory to the
/var/www/html/pub/export/directory on the downstream server, which is available over HTTP by default. - In the web UI, navigate to Content > Subscriptions.
- Select Manage Manifests.
On the Import/Remove Manifest tab, set the Red Hat CDN URL address field to match the location of a
contentdirectory and alistingfile within the exported repository.For example, if the exported repository is located in
/var/www/html/pub/export/Default_Organization-Red_Hat_Enterprise_Linux_7_Server_RPMs_x68_64, set the URL to behttp://satellite.example.com/pub/export/Default_Organization-Red_Hat_Enterprise_Linux_7_Server_RPMs_x68_64/Default_Organization/Library/.- Click Save.
- Navigate to Content > Red Hat Repositories and select the check box of the repository you have exported.
D.7.2. Importing a Content View as a Red Hat Repository
Prerequisites
- You have a Content View with Red Hat repositories on the upstream Satellite Server.
- Export the Content View from the upstream Satellite Server. For more details, see Section D.6.2, “Exporting Content View Version to a Directory”.
A custom repository can also be imported to a custom product, for example a disconnected Satellite. For more information about Red Hat Content Delivery Network (CDN) see Content Delivery Network (CDN) Structure in the Architecture Guide.
To Import a Content View:
-
Make the data available for a repository over HTTP, not HTTPS. For example, copy it to the
/var/www/html/pub/export/directory on the downstream server. - In the web UI, navigate to Content > Subscriptions.
- Select Manage Manifests.
On the Import/Remove Manifest tab, set the Red Hat CDN URL address field to match the location of a
contentdirectory and alistingfile within the exported Content View.For example, if the exported CV is located in
/var/www/html/pub/export/Default_Organization-Export_CV-v1.0, set the URL to behttp://satellite.example.com/pub/export/Default_Organization-Export_CV-v1.0/Default_Organization/content_views/Export_CV/1.0/- Click Save.
- Navigate to Content > Red Hat Repositories and check the repository you have exported.
On a downstream server, enter the
hammer organization updatecommand to add new repositories to an organization. Set the address to the directory corresponding to the version you want within the exported Content View as shown:$ hammer organization update \ --name "Default Organization" \ --redhat-repository-url \ http://satellite.example.com/pub/export/Default_Organization-Export_CV-v1.0/Default_Organization/content_views/Export_CV/1.0/ Organization updated
D.7.3. Incremental Import
When synchronizing from an incremental update, you must use the incremental synchronization settings. In the Satellite web UI, ensure the "Mirror on Sync" setting is disabled for the repositories before synchronizing. If you are using the Hammer CLI, you must add the "--incremental" option. If you do not use the incremental synchronization settings, the repository content will be deleted and only the content from the incremental update will remain. Recovering from an accidental overwrite requires a full export and then synchronizing again.
Appendix E. Creating a Remote File Type Repository
You can create a custom file type repository, from a directory of files, external to Satellite Server using the pulp-manifest command. You can then synchronize the files into Satellite Server over HTTP or HTTPS. When you add files to a file type repository, you can work with the files as with any other repository.
This procedure describes configuring a repository in a directory on a remote server. To create a file type repository in a directory on the base system where Satellite Server is installed, see Section 5.12, “Creating a Custom File Type Repository in a Local Directory”.
Prerequisites
To configure a remote file type repository, ensure the following conditions have been met:
- You have a Red Hat Enterprise Linux 7 server registered to your Satellite or the Red Hat CDN.
- Your server has an entitlement to the Red Hat Enterprise Linux Server and Satellite Tools repositories.
- You have installed an HTTP server. For more information about configuring a web server, see The Apache HTTP Server in the Red Hat Enterprise Linux 7 System Administrator’s Guide.
To Create a File Type Repository in a Remote Directory:
Ensure the Server and Satellite Tools repositories are enabled:
# subscription-manager repos --enable=rhel-7-server-rpms \
--enable=rhel-7-server-satellite-tools-6.3-rpms
Install the Pulp Manifest package:
# yum install python-pulp-manifest
Create a directory that you want to use as the file type repository in the HTTP server’s public folder:
# mkdir /var/www/html/pub/my_file_repoAdd files to the directory or create a test file:
# touch /var/www/html/pub/my_file_repo/test.txtEnter the Pulp Manifest command to create the manifest:
# pulp-manifest /var/www/html/pub/my_file_repoVerify the manifest was created:
# ls /var/www/html/pub/my_file_repo
PULP_MANIFEST  test.txt
To Import Files From a Remote File Type Repo
Create a File Type Repository
In the Satellite web UI, navigate to Content > Products. Select the name of a product, in this example My File Product. On the Repositories tab, select New Repository and enter the following details:
-
Name - A plain text name for the repository. Enter
My Files. - Label - An internal ID for the repository. Red Hat Satellite 6 automatically completes this field based on what you enter for Name.
-
Type - The content type of the repository. Select
file. - Upstream URL - The URL of the remote repository to use as the source.
- Verify SSL - Leave this option selected if you want to verify that the upstream repository’s SSL certificates are signed by a trusted CA. Alternatively, clear this check box.
- Upstream Username - If required for authentication, enter the user name for the upstream repository. Clear this field if the repository does not require authentication.
- Upstream Password - Enter the password for the upstream repository. Clear this field if the repository does not require authentication.
-
Name - A plain text name for the repository. Enter
- Select Save to save this repository entry.
- To update the file type repository, navigate to Content > Products. Select the name of a product, in this example My File Product. Select the name of the repository you want to update, in this example My Files.
- From the Select Action menu, select Sync Now.
- Visit the URL where the repository is published to see the files.
Appendix F. Synchronizing Templates with Git
Red Hat Satellite 6 enables synchronization of Job Templates, Provisioning Templates, and Partition Table Templates between Satellite Server and a Git repository or a local directory.
Synchronizing templates between Satellite Server and a Git repository or a local directory is a Technology Preview feature. Technology Preview features are not fully supported under Red Hat Subscription Service Level Agreements (SLAs), may not be functionally complete, and are not intended for production use. However, these features provide early access to upcoming product innovations, enabling customers to test functionality and provide feedback during the development process.
This section details the workflow for:
- installing and configuring the TemplateSync plug-in
- performing exporting and importing tasks
F.1. Enabling the TemplateSync plug-in
To enable the plug-in on your Satellite Server:
# satellite-installer --enable-foreman-plugin-templates
- To verify that the plug-in is installed correctly, ensure Administer > Settings includes the TemplateSync menu.
F.2. Configuring the TemplateSync plug-in
Navigate to Administer > Settings > TemplateSync to configure the plug-in. The following table explains the attributes behavior. Note that some attributes are only used on importing or exporting tasks.
Table F.1. Synchronizing Templates Plug-in configuration
| Parameter | API parameter name | Meaning on importing | Meaning on exporting |
|---|---|---|---|
| Associate |
Accepted values: | Associates templates with OS, Organization, and Location based on metadata. | N/A |
| Branch |
| Specifies the default branch in Git repository to read from. | Specifies the default branch in Git repository to write to. |
| Dirname |
| Specifies the subdirectory under the repository to read from. | Specifies the subdirectory under the repository to write to. |
| Filter |
| Imports only templates with names that match this regular expression. | Exports only templates with names that match this regular expression. |
| Force import |
| Imported templates overwrite locked templates with the same name. | N/A |
| Metadata export mode |
Accepted values: | N/A | Defines how metadata is handled when exporting:
|
| Negate |
Accepted values: | Imports templates ignoring the filter attribute. | Exports templates ignoring the filter attribute. |
| Prefix |
| Adds specified string to the beginning of the template if the template name does not start with the prefix already. | N/A |
| Repo |
| Defines the path to the repository to synchronize from. | Defines the path to a repository to export to. |
| Verbosity |
Accepted values: | Enables writing verbose messages to the logs for this action. | N/A |
F.3. Importing and Exporting Templates
Importing and exporting tasks are available through a series of API calls. API calls use the role-based access control system, which enables the tasks to be executed as any user. The TemplateSync plug-in allows synchronizing with a Git repository or a local directory.
Prerequisites
For imported templates to appear in the Satellite web UI, each template must contain the location and organization that the template belongs to. This applies to all template types. Before you import a template, ensure that you add the following section to the template:
<%#
kind: provision
name: My Kickstart File
oses:
- RedHat 7
- RedHat 6
locations:
- First Location
- Second Location
organizations:
- Default Organization
- Extra Organization
%>
F.3.1. Synchronizing Templates with a Git repository
- Configure a Git server that uses SSH authorization, for example gitosis, gitolite, or git daemon.
Configure the TemplateSync plug-in settings on a TemplateSync tab.
- Change the Branch setting to match the target branch on a Git server.
-
Change the Repo setting to match the Git repository. For example, for the repository located in
git@git.example.com/templates.gitset the setting intossh://git@git.example.com/templates.git.
Accept Git SSH host key as the foreman user:
# sudo -u foreman ssh git.example.comYou can see the
Permission denied, please try again.message in the output, which is expected, because the SSH connection cannot succeed yet.Create an SSH key pair if you do not already have it. Do not specify any passphrase.
# sudo -u foreman ssh-keygen
-
Configure your Git server with the public key from your Satellite, which resides in
/usr/share/foreman/.ssh/id_rsa.pub. Export templates from your Satellite Server to the Git repository specified in the TemplateSync menu:
$ curl -H "Accept:application/json,version=2" \
-H "Content-Type:application/json" \
-u login:password \
-k https://satellite.example.com/api/v2/templates/export \
-X POST

{"message":"Success"}
Import templates to Satellite Server after their content was changed:
$ curl -H "Accept:application/json,version=2" \
-H "Content-Type:application/json" \
-u login:password \
-k https://satellite.example.com/api/v2/templates/import \
-X POST

{“message”:”Success”}
Note that templates provided by Satellite are locked and you cannot import them by default. To overwrite this behavior, change the
Force importsetting in the TemplateSync menu toyesor add theforceparameter-d '{ "force": "true" }’to the import command.
F.3.2. Synchronizing templates with a local directory
Synchronizing templates with a local directory is useful if you have configured any revision control system repository in the local directory. That way, you can edit templates and track the history of edits in the directory. You can also synchronize changes to Satellite Server after editing the templates.
Create the directory where templates are stored and apply appropriate permissions and SELinux context:
# mkdir -p /usr/share/templates_dir/
# chown foreman /usr/share/templates_dir/
# chcon -t httpd_sys_rw_content_t /usr/share/templates_dir/ -R
-
Change the Repo setting on the TemplateSync tab to match the export directory
/usr/share/templates_dir/. Export templates from your Satellite Server to a local directory:
$ curl -H "Accept:application/json,version=2" \
-H "Content-Type:application/json" \
-u login:password \
-k https://satellite.example.com/api/v2/templates/export \
-X POST \

{"message":"Success"}
Import templates to Satellite Server after their content was changed:
$ curl -H "Accept:application/json,version=2" \
-H "Content-Type:application/json" \
-u login:password \
-k https://satellite.example.com/api/v2/templates/import \
-X POST

{“message”:”Success”}
Note that templates provided by Satellite are locked and you cannot import them by default. To overwrite this behavior, change the
Force importsetting in the TemplateSync menu toyesor add theforceparameter-d '{ "force": "true" }’to the import command.
You can override default API settings by specifying them in the request with the -d parameter. The following example exports templates to the git.example.com/templates repository:
$ curl -H "Accept:application/json,version=2" \
-H "Content-Type:application/json" \
-u login:password \
-k https://satellite.example.com/api/v2/templates/export \
-X POST \
-d "{\"repo\":\"git.example.com/templates\"}"
F.4. Advanced Git Configuration
You can perform additional Git configuration for the TemplateSync plug-in using the command line or editing the .gitconfig file.
Accepting a self-signed Git certificate
If you are using a self-signed certificate authentification on your Git server, validate the certificate with the git config http.sslCAPath command.
For example, the following command verifies a self-signed certificate stored in /cert/cert.pem:
# sudo -u foreman git config --global http.sslCAPath cert/cert.pem
For a complete list of advanced options, see the git-config manual page.
F.5. Uninstalling the plug-in
To avoid errors after uninstallation:
Disable the plug-in using the Satellite installer:
# satellite-installer --no-enable-foreman-plugin-templates
Clean custom data of the plug-in. The command does not affect any templates that you created.
# foreman-rake templates:cleanup
Uninstall the plug-in:
# yum remove tfm-rubygem-foreman_templates