
Red Hat Training
A Red Hat training course is available for Red Hat Satellite
Provisioning Guide
A guide to provisioning physical and virtual hosts on Red Hat Satellite Servers.
1.0 Edition
Abstract
Chapter 1. Introduction
Provisioning refers to a process that starts with a bare physical or virtual machine and ends with a fully configured, ready-to-use operating system. Red Hat Satellite provides an ability to define and automate fine-grained provisioning for a large number of hosts. Provisioning can be achieved through various methods. For example, the Satellite Server can provision bare metal systems using both PXE based and non-PXE based methods. Likewise, the Satellite Server can provision cloud instances from specific providers through their APIs. These provisioning methods are part of the Red Hat Satellite 6 application life cycle which allows users to create new systems, manage them, and keep them up-to-date with Red Hat content.
1.1. Provisioning Systems in the Application Life Cycle
The application life cycle defines how a particular system and its software are provisioned at a particular stage. For example, an application life cycle might be simple, and only contain two stages, such as the following:
- Development
- Production
However, a more complex application life cycle might have further stages, such as a phase for testing or a beta release. This adds extra stages to the application life cycle:
- Development
- Testing
- Beta Release
- Production
The Satellite Server allows you to provision new hosts at any stage of the application life cycle. For example, to create a set of hosts for product development, you provision a set of hosts within the Development environment. Likewise, to create a set of hosts for product testing, you provision a set of hosts within the Testing environments.
1.2. Defining Provisioning Types
Red Hat Satellite 6 provides different methods for provisioning hosts. This includes:
- Bare Metal Provisioning
- The Satellite Server provisions bare metal systems primarily through PXE boot and MAC address identification. A system administrator creates new host entries and specifies the MAC address of the physical host to be provisioned. A system administrator can also boot blank hosts to use the Satellite Server’s discovery service, which creates a pool of ready-to-provision hosts. Systems can also boot and be provisioned through PXE-less methods.
- Cloud Providers
- The Satellite Server connects to private (Red Hat OpenStack Platform) and public (Amazon EC2) cloud providers. This provides a way to provision new instances from images stored with the Cloud environment. This also includes the ability to define which hardware profile (or flavor) to use.
- Virtualization Infrastructure
- The Satellite Server connects to virtualization infrastructure services such as Red Hat Enterprise Virtualization and VMware. This provides a method to provision virtual machines from virtual image templates or using the same PXE-based boot methods as bare metal providers.
- Linux Containers
- The Satellite Server has the ability to create and manage containers on Red Hat Enterprise Linux Atomic Server.
1.3. Defining our Scenario
This guide follows on from the scenario in the Red Hat Satellite 6 Content Management Guide. In this guide, a software development company called ACME aims to use Red Hat Satellite 6 to provision new systems using a variety of provisioning types. The goal is to provide multiple use case scenarios that ACME can follow to achieve their provisioning purpose.
At this point, ACME has a Satellite Server synchronized with content from Red Hat’s Content Delivery Network and other sources. Likewise, your own Satellite Server should contain synchronized content before any provisioning attempts, which is why it is recommended to follow the scenario in the Red Hat Satellite 6 Content Management Guide before following this guide.
If you have not followed steps in the Content Management Guide and would like to proceed the examples in this guide, use the script in Appendix A, Initialization Script for Provisioning Examples to import the necessary Red Hat content for these examples.
This guide provides steps for using either the Red Hat Satellite 6 Web UI or its CLI tool (hammer). Use either depending on your preferred method of interacting with Red Hat Satellite 6. If you are using the CLI and you do not want to include authentication details each time you run the hammer command, create a CLI configuration file for the local user:
mkdir ~/.hammer
cat > .hammer/cli_config.yml <<EOF
:foreman:
    :host: 'https://satellite.example.com/'
    :username: 'admin'
    :password: 'p@55w0rd!'

EOF
All uses of the hammer command in this guide omit the authentication details, which you can add through the configuration file.
1.4. Chapter Summary
In this chapter, we explored the concept of provisioning in the context of Red Hat Satellite 6. This included discussing how provisioning fits into the Red Hat Satellite 6 application life cycle. This chapter also provided a brief summary of different provisioning types in Red Hat Satellite 6. This provides multiple provisioning scenarios that this guide explores in future chapters.
The next chapter looks at defining our provisioning context, which you define using organizations and locations.
Chapter 2. Configuring Provisioning Contexts
This chapter defines some of the foundational elements required for your Satellite Server before you start provisioning new hosts. This includes defining placement strategies using a provisioning context.
2.1. Defining a Provisioning Context
A provisioning context defines the organization and location to use for a host and its associated resources. In other words, the combination of organization and location defines who owns the system and where it is located.
Organizations divide Red Hat Satellite 6 resources into logical groups based on ownership, purpose, content, security level, or other divisions. You can create and manage multiple organizations through Red Hat Satellite 6 and assign resources to each individual organization. This ensures the Satellite Server provisions hosts within a certain organization and only uses resources assigned to that organization. For more information about organizations, see Creating Organizations in the Content Management Guide.
Locations function similar to organizations in that they provide a method to group resources and assign hosts. The difference is that locations are based on physical or geographical setting. In addition, users can nest locations in a hierarchy. For example, consider the following location map:
United States
New York
- Datacenter 1
- Datacenter 2
- Datacenter 3
San Francisco
- Datacenter 4
- Datacenter 5
- Datacenter 6
Japan
Tokyo
- Datacenter 7
- Datacenter 8
- Datacenter 9
This example uses nine data centers spread across three cities. The Satellite Server manages resources and provisions hosts in each data center.
This scenario uses a simple provisioning context. The Red Hat Satellite 6 Content Management Guide shows how to create an organization for ACME, which we also use for scenarios in this guide. This guide also shows how to create a location.
2.2. Creating an Organization
This procedure shows how to create an organization. This procedure is also contained in the Red Hat Satellite 6 Content Management Guide. If you followed the organization creation scenario in that guide and already have an organization, you do not need to follow this procedure. Note that some modifications to the organization are required, which require you to edit the organization’s properties.
For Web UI Users
Navigate to Administer > Organizations. This displays the list of organizations that your Satellite Server currently manages.
Click New Organization.
A creation wizard appears with three sections:
- Create Organization
Provide the base details for the organization. This includes:
-
Name - A plain text name for the organization. For example:
ACME. -
Label - A unique identifier for the organization. This is used for creating and mapping certain assets, such as directories for content storage. Use letters, numbers, underscores, and dashes, but no spaces. For example:
ACME. -
Description - An optional plain text description for our organization. For example:
Our example organization.
-
Name - A plain text name for the organization. For example:
- Select Hosts
All hosts should have an organization. However, in some circumstances, hosts might become orphaned. For example:
- Deleting an old organization might orphan its hosts.
- Hosts not provisioned but imported through Puppet.
-
Hosts not provisioned but registered through
subscription-manager.
In these situations, you can assign orphaned hosts to your newly created organization if necessary. Choose Assign All to assign all orphaned hosts or Manually Assign to select which orphaned hosts to assign. In our scenario for ACME, no orphaned hosts should exist yet, so click Proceed to Edit to move to the Edit Properties section.
- Edit Properties
- This section allows us to assign certain infrastructure resources to our organization. This includes networking resources, installation media, kickstart templates, and other parameters. You can return to this screen at any time by navigating to Administer > Organization and then selecting an organization to edit.
The ACME organization should have the following resources attached for this scenario:
- Capsules: The Satellite Server’s integrated Capsule, which uses the same host name as the Satellite Server.
- Media: The Red Hat Enterprise Linux 7.2 kickstart tree synchronized from the Red Hat Satellite 6 Content Management Guide.
- Provisioning Templates: All templates selected.
- Partition Tables: All tables selected.
- Domains: The domain this organization uses and manages.
-
Environments: All Puppet environments, including
productionand the ones created in the Red Hat Satellite 6 Content Management Guide.
Check each resource type in the Edit Properties section for these resources.
After completing your organization creation, click Submit.
For CLI Users
# hammer organization create --name "ACME" --label "ACME" \
--description "Our example organization"
This creates our example organization.
2.3. Creating a Location
This procedure shows how to create a location, which helps define the provisioning context for new hosts and their resources.
For Web UI Users
Navigate to Administer > Locations. This displays the list of locations that your Satellite Server currently manages.
Click New Location.
A creation wizard appears with three sections:
- Create Organization
Provide the base details for the location. This includes:
- Parent - Defines the parent location for this location. This creates a location hierarchy. Since the Satellite has no locations, leave this blank to create a top-level location.
-
Name - A plain text name for the location. For example:
New York. -
Description - An optional plain text description for our organization. For example:
Our example location.
- Select Hosts
All hosts should have a location. However, in some circumstances, hosts might become orphaned. For example,
- Deleting an old location might orphan its hosts.
- Hosts not provisioned but imported through Puppet.
-
Hosts not provisioned but registered through
subscription-manager.
In these situations, you can assign orphaned hosts to your newly created location if necessary. Choose Assign All to assign all orphaned hosts or Manually Assign to select which orphaned hosts to assign. In our scenario for ACME, no orphaned hosts should exist yet, so click Proceed to Edit to move to the Edit Properties section.
- Edit Properties
- This section allows us to assign certain infrastructure resources to our location. This includes networking resources, installation media, kickstart templates, and other parameters. You can return to this screen at any time by navigating to Administer > Location and then selecting a location to edit.
The New York location should have the following resources attached for this scenario:
- Capsules: The Satellite Server’s integrated Capsule, which uses the same host name as the Satellite Server.
- Media: The Red Hat Enterprise Linux 7.2 kickstart tree synchronized from the Red Hat Satellite 6 Content Management Guide.
- Provisioning Templates: All templates selected.
- Partition Tables: All tables selected.
- Domains: The domain this location uses and manages.
-
Environments: All Puppet environments, including
productionand the ones created in the Red Hat Satellite 6 Content Management Guide. - Organizations: The ACME organization.
Check each resource type in the Edit Properties section for these resources.
After completing your location creation, click Submit.
For CLI Users
# hammer location create --name "New York" \
--description "Our example location"
This creates our example location.
2.4. Setting the Context
Before provisioning in Red Hat Satellite 6, we must set the context. A context defines which organization and location to use for provisioning new systems. In addition, any new infrastructure resources are added to this context.
For Web UI Users
The Context menu is in the top-left corner of the screen. If you have not selected a context, the menu will say "Any Context". Hover over this menu, then select ACME for the Organization selector. This changes the context to our ACME organization. Next, hover over the context menu, then select New York for the Location selector. This changes the context to our example location.
Each user can set their default context in their account settings. Navigate to the username in the top-right corner of the Web UI and select My account to edit your user account settings.
For CLI Users
If using the CLI, ensure to include either --organization or --organization-id and --location or --location-id as an option at the end of your command. For example:
# hammer host list --organization "ACME" --location "New York"
This sets the context for each interaction through the CLI.
2.5. Chapter Summary
This chapter showed how to create new organizations and locations, and set them as our context for provisioning.
The next chapter explores some of the resources that compose the Red Hat Satellite 6 provisioning infrastructure.
Chapter 3. Configuring Provisioning Resources
Red Hat Satellite 6 provides a set of provisioning resources that contribute to the creation of a new host. This section explores some of these resources and how they contribute to host provisioning.
Supported Architectures
Only Intel x86_64 architecture is supported for provisioning via PXE, Discovery, and boot disk. For full details see Red Hat Knowledgebase solution Architectures Supported for Satellite 6 Provisioning.
3.1. Creating Installation Media
Installation media are sources of files the Satellite Server uses to install the base operating system on a machine. Installation media must be in the format of an operating system installation tree, and must be accessible to the machine hosting the installer through a HTTP URL. Available installation media appears in the Hosts > Installation Media menu.
Importing kickstart trees from Red Hat’s CDN creates new entries in the Installation Media page. This process is described in Selecting Red Hat Repositories to Synchronize in the Red Hat Satellite 6 Content Management Guide. For installation media that has been synchronized from a repository, there is no need to define it manually. The installation media will be available as Synced content in the Operating System tab when creating a host or a host group.
For other installation media, for example, a locally mounted ISO image, users can add their own custom media paths using the following procedure:
For Web UI Users
Navigate to Hosts > Installation Media and click New Medium. The UI provides a set of fields where you can input details for the installation medium:
- Name - A name to represent the installation media entry in the user interface.
Path - The URL containing the installation tree. The following variables can be used in the path to represent multiple different system architectures and versions:
-
$arch- The system architecture, for example x86_64. -
$version- The operating system version, for example 7.2. -
$major- The operating system major version, for example 7. $minor- The operating system minor version, for example 2.Example HTTP path:
http://download.example.com/rhel/$version/Server/$arch/os/
NoteSynchronized content on Capsule Servers always use a HTTP path.
-
-
Operating system family - The distribution or family of the medium. For example, Red Hat Enterprise Linux, CentOS, and Fedora would be in the
Red Hatfamily.
The Satellite Server adds the installation medium to the current provisioning context. You can choose additional contexts from the Organizations and Locations tabs, which will help with future debugging.
Click Submit to save your installation medium.
For CLI Users
Create the installation medium using the hammer medium create command:
# hammer medium create --name "CustomOS" --os-family "Redhat" \
--path 'http://download.example.com/rhel/$version/Server/$arch/os/' \
--organizations "ACME" --locations "New York"
3.2. Creating Partition Tables
A partition table is a set of directives that defines the way the Satellite Server configures the disks available on a new host. Red Hat Satellite 6 contains a set of default partition tables to use, including a Kickstart default. You can also edit partition table entries to configure the preferred partitioning scheme, or create a new partition table entry and add it to the Red Hat Enterprise Linux operating system entry.
For Web UI Users
Navigate to Hosts > Partition tables and click New Partition Table. The UI provides a set of fields where you can input details for the partition table:
- Name - A name to represent the partition table.
- Default - Defines if the partition is automatically associated with new organizations or locations.
- Snippet - Defines if the partition is a reusable snippet for other partition table layouts.
-
Operating system family - The distribution or family of the partitioning layout. For example, Red Hat Enterprise Linux, CentOS, and Fedora would be in the
Red Hatfamily. Template editor - A text area to enter the layout for the disk partition. For example:
zerombr
clearpart --all --initlabel
autopart
You can also use the Template file browser to upload a template file.
NoteThe format of the layout must match that for the intended operating system. For example, Red Hat Enterprise Linux 7.2 requires a layout that matches a kickstart file.
- Audit Comment - A field for a summary of changes to the partition layout.
Satellite adds the partition table to the current provisioning context. You can choose additional contexts from the Organizations and Locations tabs.
Click Submit to save your partition table.
For CLI Users
Before creating a partition table with the CLI, create a plain text file that contains the partition layout. This example uses the ~/my-partition file. Create the installation medium using the hammer partition-table create command:
# hammer partition-table create --name "My Partition" --snippet false \
--os-family Redhat --file ~/my-partition --organizations "ACME" \
--locations "New York"
3.3. Creating Provisioning Templates
A provisioning template defines the way the Satellite Server installs an operating system on a host. There are various types of provisioning templates, including:
-
provision- The main template that defines the provisioning process. For example, a kickstart template. For more information about kickstart template syntax, see the Kickstart Syntax Reference in the Red Hat Enterprise Linux 7 Installation Guide. -
PXELinux,iPXE,PXEGrub- PXE-based network boot templates. -
finish- Post-configuration scripts for after the completion of the main provisioning process. This is completed as a SSH task. -
Bootdisk- Templates for PXE-less boot methods. -
kexec- Kernel execution templates for PXE-less boot methods. -
user_data- Post-configuration scripts for providers that accept user data, such ascloud-initscripts. -
script- An arbitrary script not used by default but useful for custom tasks. -
ZTP- Zero Touch Provisioning templates. -
POAP- PowerOn Auto Provisioning templates.
Red Hat Satellite includes many template examples. Navigate to Hosts > Provisioning templates to view them. You can clone and adjust any of them, or create your own. Templates accept the Embedded Ruby (ERB) syntax, for more information see Template Writing Reference in the Red Hat Satellite 6 Host Configuration Guide.
Provisioning templates can be downloaded. In order to be allowed to do that, you will need to create a debug certificate first, see Creating an Organization Debug Certificate in the Red Hat Satellite 6 Server Administration Guide.
To view the history of changes applied to a template, navigate to Hosts > Provisioning templates, select one of the templates, and click History. Click Revert to override the editor content with the previous version. It is possible to revert to an earlier change as well. Click Show Diff to see information about a specific change:
- Template Diff tab shows changes in the body of a provisioning template.
- Details tab shows changes in the template description.
- History tab shows the user who made a change to the template and date of the change.
Finishing templates are only designed to be used for imaged based provisioning in virtual environments. Do not confuse an image with a foreman discovery ISO, which is sometimes called a Foreman discovery image. An image in this context is an install image in a virtualized environment for easy deployment.
For Web UI Users
Navigate to Hosts > Provisioning templates and click New Template. The UI provides a set of fields where you can input details for the provisioning template. Alternatively, you can select one of the template examples, click Clone to duplicate it, and modify its preset details:
In the Template tab:
- Name - Plain text name for the provisioning template.
- Default - Defines if the template is automatically associated with new organizations or locations.
- Template editor - A text area to enter the body of the provisioning template. You can also use the Template file browser to upload a template file.
- Audit Comment - A field for a summary of changes to the provisioning template.
In the Type tab:
- Snippet - Designates the provisioning template as a snippet. A snippet is not a standalone provisioning template, but a part of a provisioning template that can be inserted into other provisioning templates.
-
Type - Defines the type of template. For example,
Provisioning template.
In the Association tab.
- From the All items list in the Applicable Operating Systems section, click the name of an operating system entry to move that operating system entry to the Selected items list and make the provisioning template available to that operating system entry.
- Optionally, click Add combination and select a host group from the Host Group list or an environment from the Environment list to make the provisioning template available to the specified combination of host groups and environments.
Satellite adds the provisioning template to the current provisioning context. You can choose additional contexts from the Organizations and Locations tabs.
Click Submit to save your provisioning template.
For CLI Users
Before creating a template with the CLI, create a plain text file that contains the template. This example uses the ~/my-template file. Create the installation medium using the hammer template create command and specify the type with the --type option:
# hammer template create --name "My Provisioning Template" \
--file ~/my-template --type provision --organizations "ACME" \
--locations "New York"
3.4. Creating Operating Systems
An operating system is a collection of resources that define how the Satellite Server installs a base operating system on a host. Operating system entries combine previously defined resources, such as installation media, partition tables, provisioning templates, and others.
Importing operating systems from Red Hat’s CDN creates new entries in the Hosts > Operating Systems page. Users can also add custom operating systems using the following procedure:
For Web UI Users
Navigate to Hosts > Operating systems and click New Operating system. The UI provides a set of fields where you can input details for the operating system:
In the Operating System tab:
- Name - A plain text name to represent the operating system entry.
- Major version - The number corresponding to the major version of the operating system.
- Minor version - The number corresponding to the minor version of the operating system.
- Description - A text field for the operating system’s description.
- Family - The operating system family to categorize the new operating system.
- Root password hash - Defines the encoding method for the root password.
- Architectures - Select the architectures the operating system uses. Create additional architectures in the Hosts > Architectures menu.
In the Partition table tab:
- Select the possible partition tables that apply to this operating system.
In the Installation media tab:
- Select the installation media that apply to this operating system. Kickstart trees should be available automatically upon repository synchronization. See Section 3.1, “Creating Installation Media” for more information.
In the Templates tab:
- Select a template for each type applicable to the operating system.
Click Submit to save your provisioning template.
For CLI Users
Create the operating system using the hammer os create command:
# hammer os create --name "MyOS" \
--description "My custom operating system" \
--major 7 --minor 3 --family "Redhat" --architectures "x86_64" \
--partition-tables "My Partition" --media "Red Hat" \
--provisioning-templates "My Provisioning Template"
Note the following:
- We use the resources created in previous sections in this example: installation media, partition tables, and provisioning templates.
- Operating systems do not have a provisioning context. Only the resources that form an operating system have a provisioning context.
3.5. Creating Compute Profiles
Compute profiles are used in conjunction with compute resources, such as virtualization infrastructure and cloud providers. Compute profiles allow users to predefine hardware such as CPUs, memory, and storage. A default installation of Red Hat Satellite 6 contains three predefined profiles:
-
1-Small -
2-Medium -
3-Large
For our example, we create a fourth profile called 4-Example.
For Web UI Users
Navigate to Infrastructure > Compute profiles, which displays a list of existing profiles. Click New Compute Profile.
Enter the Name of the profile (for example 4-Example) and click Submit.
For CLI Users
The compute profile CLI commands are not yet implemented in Red Hat Satellite 6.2.
3.6. Creating an Activation Key
Before creating new hosts, it is recommended to have an activation key. This activation key is used to register systems in the provisioning scenarios. For the scenarios in this guide, the aim is to create an example activation key to attach subscriptions and repositories from the Red Hat Satellite 6 Content Management Guide.
For Web UI Users
Navigate to Content > Activation keys and click Create Activation Key. Provide the activation key with the following information:
-
Name - The name of the activation key. We use this name during the system registration process. Enter
example. -
Content Host Limit - Defines how many systems the Satellite Server allows to register for this activation key. Select
Unlimited Content Hosts. -
Description - A plain text description for the activation key. Enter
Example activation key. -
Environment - The environment to use. Select
Production. -
Content View - The Content View (and, by extension, the repository) in the environment to use. Select
Base.
Click Save. The activation key details screen displays.
Now we must define which products to attach and repositories to enable upon registration. Navigate to the Subscriptions tab. An empty subscription listing appears. Click Add, select both the Red Hat Enterprise Linux subscription, and click Add Selected.
The Auto-Attach option is enabled by default. When auto-attach is enabled on an activation key and there are subscriptions associated with the key, the subscription management service selects and attaches the best-matched associated subscriptions based on a set of criteria. You can enable auto-attach and have no subscriptions associated with the key. This type of key is commonly used to register virtual machines when you do not want the virtual machine to consume a RHEL subscription but to inherit a RHEL Virtual Data Center (VDC) subscription from the hypervisor. If auto-attach is disabled, the subscription management service will attempt to attach all associated subscriptions during host registration. If any of the subscriptions cannot be attached, host registration will fail.
Navigate to the Product Content page. This displays all the repositories associated with the activation key’s products. As default, the Satellite Server only enables:
- The repository that best matches the system requirements. In this case, it is only the Red Hat Enterprise Linux 7 Server RPMs.
- Any custom content.
Our scenario should have the following defaults set:
Red Hat Enterprise Linux Server:
-
Red Hat Enterprise Linux 7 Server (Kickstart) - Enabled:
No (Default) -
Red Hat Satellite Tools 6.2 (for RHEL 7 Server) (RPMs) - Enabled:
No (Default) -
Red Hat Enterprise Linux 7 Server (RPMs) - Enabled:
Yes (Default)
Enable the Red Hat Satellite Tools repository because that contains the configuration tools (such as katello-agent and puppet). Change it to the following:
-
Red Hat Satellite Tools 6.2 (for RHEL 7 Server) (RPMs) - Enabled:
Override to Yes
Click Save
For CLI Users
Create the activation key:
# hammer activation-key create --name "example" \
--unlimited-content-hosts true --description "Example activation key" \
--lifecycle-environment "Production" --content-view "Base"  \
--organization "ACME"
Obtain a list of your subscription IDs:
# hammer subscription list --organization "ACME"
Attach the Red Hat Enterprise Linux subscription UUID to the activation key:
# hammer activation-key add-subscription --name "example" \
--subscription-id ff808181533518d50152354246e901aa \
--organization "ACME"
List the product content associated with the activation key:
# hammer activation-key product-content --name "example" \
--organization "ACME"
Override the default auto-enable status for the Red Hat Satellite Tools 6.2 repository. The default status is set to disabled. This command enables it:
# hammer activation-key content-override --name "example" \
--content-label rhel-7-server-satellite-tools-6.2-rpms \
--value 1 --organization "ACME"
The example activation key is ready for registering our provisioned systems.
3.7. Chapter Summary
In this chapter, we examined the resources used for provisioning new hosts. This includes installation media, partition tables, provisioning templates, compute profiles, and activation keys. Future scenarios in this guide show how to apply these resources to the host provisioning process.
The next chapter looks at configuring our network infrastructures for provisioning.
Chapter 4. Configuring Networking
Each provisioning type requires some network configuration. Ensure that new hosts can access either your Satellite Server’s integrated Capsule or an external Capsule Server. Configuring your Satellite Server or Capsule Server has two basic requirements:
Configuration of network services on the integrated Capsule or Capsule Server. This includes:
- Content delivery services
- Network services (DHCP, DNS, and TFTP)
- Puppet configuration
- Defining network resource data in the Satellite Server to help configure network interfaces on new hosts.
This chapter focuses on configuring network services on the Satellite Server’s integrated Capsule. However, these instructions have similar applications to configuring standalone Capsule Servers managing a specific network.
For this example, ACME has a private network to provision hosts. The details for this private network are:
| Subnet | 192.168.140.0/24 | |
| External Gateway | 192.168.140.1 | |
| Satellite Server | 192.168.140.2 | |
| DHCP Allocation Pool for Discovered and Unmanaged Hosts | 192.168.140.10 - 192.168.140.110 | |
| DHCP Allocation Pool for Host Provisioning | 192.168.140.111 - 192.168.140.250 |
While it is possible to define the same DHCP range on the Satellite Server for both Discovered and Provisioned systems, it is recommended to use a separate range for each service but still within the same subnet.
4.1. Considerations for Image Based Provisioning
Post-Boot Configuration Method
Images that use the finish post-boot configuration scripts require a managed DHCP server, such as Satellite’s integrated Capsule or an external Capsule. The host must be created with a subnet associated with a DHCP Capsule, and the IP address of the host must be a valid IP address from the DHCP range. It is possible to use an external DHCP service, but IP addresses must be entered manually. The SSH credentials corresponding to the configuration in the image must be configured in Satellite to enable the post-boot configuration to be made.
The following items should be checked when troubleshooting a virtual machine booted from an image that depends on post-configuration scripts:
- The host has a subnet assigned in Satellite Server.
- The subnet has a DHCP Capsule assigned in Satellite Server.
- The host has a valid IP address assigned in Satellite Server.
- The IP address acquired by the virtual machine from DHCP matches the address configured in Satellite Server.
- The virtual machine created from an image responds to SSH requests.
- The virtual machine created from an image authorizes the user and password, via SSH, which are associated with the image being deployed.
Pre-Boot Initialization Configuration Method
Images that use the cloud-init scripts usually require a DHCP server to avoid having to include the IP address in the image. A managed DHCP Capsule is preferred. The image must have the cloud-init service configured to start when the system boots and fetch a script or configuration data to use in completing the configuration.
The following items should be checked when troubleshooting a virtual machine booted from an image that depends on initialization scripts included in the image:
- There is a DHCP server on the subnet.
- The virtual machine has the cloud-init service installed and enabled.
For information on the differing levels of support for finish and cloud-init scripts in virtual-machine images, see the Red Hat Knowledgebase Solution What are the supported compute resources for the finish and cloud-init scripts on the Red Hat Customer Portal.
4.2. Configuring Network Services
Some of our provisioning methods use Capsule Server services for various purposes. For example, a network might require the Capsule Server to act as a DHCP server. A network might also require PXE boot services as a means to install the operating system to new hosts. This requires configuring the Capsule Server to use the main PXE boot services: DHCP, DNS, and TFTP. To accomplish this, we run the satellite-installer script with the options to configure these services.
In this example, ACME aims to connect the Satellite Server’s integrated Capsule to a provisioning network to provide PXE boot services. The Satellite Server uses the following NIC configuration:
# ip addr
1: lo: <LOOPBACK,UP,LOWER_UP> mtu 65536 qdisc noqueue state UNKNOWN
    link/loopback 00:00:00:00:00:00 brd 00:00:00:00:00:00
    inet 127.0.0.1/8 scope host lo
       valid_lft forever preferred_lft forever
    inet6 ::1/128 scope host
       valid_lft forever preferred_lft forever
2: eth0: <BROADCAST,MULTICAST,UP,LOWER_UP> mtu 1500 qdisc pfifo_fast state UP qlen 1000
    link/ether 52:54:00:33:e3:1c brd ff:ff:ff:ff:ff:ff
    inet 192.168.125.35/24 brd 192.168.125.255 scope global dynamic ens3
       valid_lft 3042sec preferred_lft 3042sec
    inet6 fe80::5054:ff:fe33:e31c/64 scope link
       valid_lft forever preferred_lft forever
3: eth1: <BROADCAST,MULTICAST,UP,LOWER_UP> mtu 1500 qdisc pfifo_fast state UP qlen 1000
   link/ether 52:54:00:fd:24:ae brd ff:ff:ff:ff:ff:ff
   inet 192.168.140.2/24 brd 192.168.140.255 scope global ens8
      valid_lft forever preferred_lft forever
   inet6 fe80::5054:ff:fefd:24ae/64 scope link
      valid_lft forever preferred_lft forever
The Satellite Server uses eth0 for external communication, such as connection to Red Hat’s CDN. ACME aims to use the eth1 interface to connect to a private provisioning network for hosts using the 192.168.140.0/24 subnet. The goal is for the Satellite Server’s integrated Capsule to act as a DHCP, DNS, and TFTP server for new hosts on this network.
The Satellite Server’s integrated Capsule provides these services. You can also configure these services on additional Satellite Capsules in other networks.
For this example, the satellite-installer script uses the following options to configure these services:
DHCP Options
- --foreman-proxy-dhcp
-
Enables the DHCP service. Set this option to
true. - --foreman-proxy-dhcp-gateway
-
Defines the DHCP pool gateway. For this example, set this to
192.168.140.1, which is the address of the external gateway for hosts on ACME’s private network. - --foreman-proxy-dhcp-interface
-
Sets the interface for the DHCP service to listen for requests. For this example, set this to
eth1. - --foreman-proxy-dhcp-nameservers
-
Sets the addresses of the nameservers provided to clients through DHCP. For this example, set this to
192.168.140.1, which is the address for the Satellite Server oneth1. - --foreman-proxy-dhcp-range
-
Defines a space-separated DHCP pool range for Discovered and Unmanaged services. For this example, set this to
192.168.140.10 192.168.140.110, which provides a pool with 100 addresses. - --foreman-proxy-dhcp-server
-
Sets the address of the DHCP server to manage. For this example, it is
192.168.140.2.
DNS Options
- --foreman-proxy-dns
-
Enables DNS service. Set this option to
true. - --foreman-proxy-dns-forwarders
-
Sets the DNS forwarders. This example sets this to
8.8.8.8; 4.4.4.4, which uses two public DNS servers. For your purposes, use your own DNS servers instead. - --foreman-proxy-dns-interface
-
Sets the interface to listen for DNS requests. For this example, set this to
eth1. - --foreman-proxy-dns-reverse
-
Defines DNS reverse zone name. This example uses
140.168.192.in-addr.arpa. - --foreman-proxy-dns-server
-
Sets the address of the DNS server to manage. For this example, it is
192.168.140.2. - --foreman-proxy-dns-zone
-
Sets the DNS zone name. This example uses
example.com.
TFTP Options
- --foreman-proxy-tftp
-
Enables TFTP service. Set this option to
true.
Run satellite-installer --scenario capsule --help to view more options related to DHCP, DNS, TFTP, and other Satellite Capsule services
The following is an example configuration command:
# satellite-installer --foreman-proxy-dhcp true \
--foreman-proxy-dhcp-gateway "192.168.140.1" \
--foreman-proxy-dhcp-interface "eth1" \
--foreman-proxy-dhcp-nameservers "192.168.140.2" \
--foreman-proxy-dhcp-range "192.168.140.10 192.168.140.110" \
--foreman-proxy-dhcp-server "192.168.140.2" \
--foreman-proxy-dns true \
--foreman-proxy-dns-forwarders "8.8.8.8; 4.4.4.4" \
--foreman-proxy-dns-interface "eth1" \
--foreman-proxy-dns-reverse "140.168.192.in-addr.arpa" \
--foreman-proxy-dns-server "192.168.140.2" \
--foreman-proxy-dns-zone "example.com" \
--foreman-proxy-tftp true
The satellite-installer script applies these configuration options and sets up the required network services. After the configuration completes, use the hammer proxy info command to verify these services on the chosen Capsule Server. In this example, we use satellite.example.com as the domain name of the Satellite Server’s integrated Capsule:
# hammer proxy info --name "satellite.example.com"
The output shows a list of enabled features, including DNS, DHCP, and TFTP:
Features:
    Pulp
    TFTP
    DNS
    DHCP
    Puppet
    Puppet CA
    Dynflow
    SSH
4.3. Adding a Domain to the Satellite Server
The Satellite Server defines domain names for each host on the network. This means the Satellite Server needs to know about the domain and the Capsule Server responsible for domain name assignment. For this example, we create the example.com domain for ACME’s internal network.
The Satellite Server might already have the relevant domain created as part of the Satellite Server installation. Switch the context to Any Organization and Any Location then check the domain list to see if it exists. If so, modify this domain entry, define the DNS capsule, set the organization, and set the location.
For Web UI Users
Navigate to Infrastructure > Domains and click New Domain. The UI provides a set of fields where you can input details for the domain:
In the Domain tab:
-
DNS Domain - The domain name. For this example:
example.com -
Description - A plain text description of the domain. For this example:
ACME's example domain. - DNS Capsule - The capsule to use for DNS assignments. For this example, use the Satellite Server’s integrated Capsule.
-
DNS Domain - The domain name. For this example:
In the Locations tab:
-
Select the locations that use this domain. For example, select the
New Yorklocation.
-
Select the locations that use this domain. For example, select the
In the Organizations tab:
-
Select the organizations that use this domain. For example, select
ACME.
-
Select the organizations that use this domain. For example, select
For CLI Users
Create the domain with the following command:
# hammer domain create --name "example.com" \
--description "ACME's example domain" --dns_id 1 \
--locations "New York" --organizations "ACME"
In this example, the --dns-id option uses 1, which is the ID of the Satellite Server’s integrated Capsule.
4.4. Adding a Subnet to the Satellite Server
The Satellite Server configures interfaces for new hosts. This is why the Satellite Server needs to know about the network that connects these interfaces. This means you must add information for each of your subnets into the Satellite Server. This includes information such as the gateway, DHCP, and DNS. For this example, we create a subnet mapping for the ‘192.168.140.0/24’ network, which the Satellite Server’s integrated Capsule manages.
For Web UI Users
Navigate to Infrastructure > Subnets and click New Subnet. The UI provides a set of fields where you can input details for the subnet:
In the Subnet tab:
-
Name - Plain text name for the subnet. For this example:
ACME's Internal Network -
Network address - The network address for the subnet. For this example:
192.168.140.0 -
Network mask - The network mask for the subnet. For this example:
255.255.255.0 -
Gateway address - The external gateway for the subnet. For this example:
192.168.140.1 -
Primary DNS server - Primary DNS for the subnet. For this example:
192.168.140.2 -
Secondary DNS server - Primary DNS for the subnet. For this example:
8.8.8.8 IPAM - The method to use for IP address management (IPAM):
- DHCP - The subnet contains a DHCP server.
- Internal DB - The subnet does not contain a DHCP server but you aim for the Satellite to manage IP address assignment and record IP addresses in its internal database.
None - No IP address management.
For this example, use
DHCPsince the Satellite Server acts as a DHCP server.
-
Start of IP range - Defines the start of the IP assignment range for provisioning services. For this example:
192.168.140.111. -
End of IP range - Defines the end of the IP assignment range for provisioning services. For this example:
192.168.140.250. - VLAN ID - Defines a VLAN ID number for the subnet to isolate broadcasts. This example does not use VLANs, so leave this field blank.
Boot mode - Defines the default boot mode for network interfaces on this network.
- Static boot mode means that network interfaces assigned to this subnet will set the IP address and network mask directly to the configuration file, avoiding using DHCP to obtain them. Note that gateway and DNS servers won’t be fetched from DHCP. Therefore, if you need to configure them, provide correct values in Gateway address and Primary DNS server fields. You can omit these only if you don’t route traffic outside your network (installation medium is local) and you use IP addresses directly without DNS resolution.
- DHCP boot mode means that network interfaces assigned to this subnet are configured via DHCP.
-
Name - Plain text name for the subnet. For this example:
In the Remote Execution tab:
- Select the capsule that controls the remote execution. In this example, it is the Satellite Server itself.
In the Domains tab:
- Select the domains that apply to this subnet.
In the Capsules tab:
- Select the capsule that applies to each service in the subnet, including DHCP, TFTP, and reverse DNS services. This example uses the Satellite Server’s integrated Capsule for each.
In the Locations tab:
-
Select the locations that use this capsule. For example, select the
New Yorklocation.
-
Select the locations that use this capsule. For example, select the
In the Organizations tab:
-
Select the organizations that use this capsule. For example, select
ACME.
-
Select the organizations that use this capsule. For example, select
Click Submit to save the subnet information.
For CLI Users
Create the subnet with the following command:
# hammer subnet create --name "ACME's Internal Network" \
--network "192.168.140.0" --mask "255.255.255.0" \
--gateway "192.168.140.1" --dns-primary "192.168.140.2" \
--dns-secondary "8.8.8.8" --ipam "DHCP" \
--from "192.168.140.111" --to "192.168.140.250" --boot-mode "DHCP" \
--domains "example.com" --dhcp-id 1 --dns-id 1 --tftp-id 1 \
--locations "New York" --organizations "ACME"
In this example, the --dhcp-id, --dns-id, and --tftp-id options use 1, which is the ID of the integrated Capsule on the Satellite Server.
4.5. Chapter Summary
In this chapter, we examined how to configure certain network services on the Satellite Server’s integrated Capsule and map the domain and subnet details of the network that the Satellite Server controls. This provides a network for our new hosts and provides the hosts with key services, such as PXE booting and network configuration.
The next chapter looks at the basic provisioning workflow, which includes how to create new hosts and host groups.
Chapter 5. Understanding the Provisioning Workflow
This chapter explores the basic workflow for provisioning in Red Hat Satellite 6. The content in this chapter becomes the foundation for further chapters that use specific provisioning methods.
5.1. Defining the Provisioning Workflow
The provisioning process follows a basic workflow that is outlined as the following:
- You create a new host, either through the New Host page at Hosts > New host in the Web UI or through the Hammer CLI. The Satellite Server also requests an unused IP address from the DHCP Capsule Server associated with the subnet. The New Hosts page uses this IP address for the IP address field. After completing all options for the new host, you submit the new host request.
- The DHCP Capsule Server associated with the subnet reserves an entry for the host.
The Satellite Server configures DNS records:
- A forward DNS record is created on the Capsule Server associated with the domain.
- A reverse DNS record is created on the DNS Capsule Server associated with the subnet.
- A PXELinux menu is created for the host in the TFTP Capsule Server associated with the subnet.
- The new host requests a DHCP lease from the DHCP server.
-
The DHCP server responds to the lease request and returns TFTP options (
next-server,filename). - The host requests the bootloader and menu from the TFTP server.
- The PXELinux menu and OS installer for the host is returned over TFTP.
-
The installer requests the chosen
provisiontemplate or script from the Satellite Server. - The Satellite Server renders the template and returns the resulting kickstart to the host.
-
The host enters a build process that installs the operating system, registers the host to the Satellite Server, and installs management tools (
katello-agent,puppet). -
The installer notifies the Satellite of a successful build in the
postinstallscript. - The PXELinux menu reverts to a local boot template.
- The host boots its operating system. If you configured the host to use any Puppet classes, the host configures itself using the modules stored on the Satellite Server.
This workflow differs depending on certain options, which are explored in detail in later chapters. For example:
- Discovery - If using the Discovery service, the Satellite Server automatically detects the MAC address of the new host and reboots the host after you submit a request. Note that TCP port 8443 must be reachable by the Capsule to which the host is attached for the Satellite to be able to reboot the host.
- PXE-less Provisioning - After you submit a new host request, you need to boot the specific host with a boot disk that you download from the Satellite Server.
- Compute Resources - The compute resource creates the virtual machine for the new host and returns the MAC address to the Satellite Server. Also, if using image-based provisioning, the host does not follow the standard PXE boot and operating system installation. Instead, the compute resource creates a copy of the chosen image for the new host to use.
- Containers - The container provisioning process does not follow the workflow process.
5.2. Creating a Host on Satellite Server
To configure host provisioning, start with creating a host entry on Satellite Server. You can achieve this through either the Web UI or the Hammer CLI. This provides the fundamentals for host provisioning, which you can use as a reference for later chapters on specific provisioning methods.
For Web UI Users
Navigate to Hosts > New host. The UI provides a set of fields where you can input details for the host:
In the Host tab, you define the main details about the host and its placement.
- Name - The name of the host.
- Organization - The organization that owns this host.
- Location - The location of this host.
- Host Group - Defines which host group to use as a template for this host.
- Deploy on - Defines the type of host deployment, either on a bare metal host or through a Compute resource.
- Lifecycle Environment - Defines the host’s stage in the application life cycle.
- Content View - Defines the Content View to use for repositories.
- Puppet Environment - Defines the Puppet environment containing the host. This is usually defined using the previously selected Content View and life cycle environment.
- Content Source - The Capsule Server to use for providing content from the Content View.
- Puppet CA - The Capsule Server to use for agent certification.
- Puppet Master - The Capsule Server to use as the master server for agent communication.
- Openscap Capsule - The Capsule Server to use as an OpenSCAP proxy.
In the Puppet Classes tab, you select which Puppet classes to apply to the host after provisioning. These classes are taken from the Content View and Puppet environment selected on the Hosts tab. The Included Classes section shows the classes to apply to the host and the Available Classes section shows what classes you can add to the host.
In the Interfaces tab, you define the network interface configuration for the host. Click Add Interface to create a new interface or Edit to edit a specific interface. New or modified interfaces use a form with the following fields:
-
Type - The type of interface to use, which not only includes basic Ethernet connections (
Interface), but also baseboard management controller (BMC), bonds (Bond), and bridges (Bridge). This allows you to create complex networking configurations for a host. - MAC address - The interface’s MAC address, which allows you to map network details to a specific interface. In addition, the MAC address for a provisioning interface is used to identify bare metal hosts during PXE boot.
-
Device identifier - The interface ID, such as
eth0,ens8,bond0, andbr0. - DNS name - The domain name of the host. This is usually automatically populated with the host name from the Host tab.
- Domain - The domain to provision the host. This combines with the DNS name to create a fully qualified domain name (FQDN) for the host.
- Subnet - The network that connects this interface.
- IP address - The IP address for this interface. Depending on the Subnet chosen and its options, this field might automatically populate.
A selection of interface types, including:
- Managed - This interface provides DHCP, DNS, and TFTP services during provisioning. Additionally, the interface settings are used to generate an interface configuration file for the host. To disable an individual service, go to Infrastructure > Subnets and Infrastructure > Domains and set the corresponding Capsule setting to None.
- Primary - This defines the main interface and constructs the host’s FQDN from the interface details.
- Provision - This interface is used for PXE boot services. In the case of image based provisioning, the IP address from this interface is used for the SSH connection to the client.
- Remote execution - This interface is used for remote execution features.
This form also displays additional fields relevant to the network interface Type chosen. For example, choosing Bond provides options for setting the bonding mode, bonding options, and choosing which devices to attach to the bond.
In the Operating System tab, you define the operating system and related aspects to install on the host. You select the host’s Architecture and then choose an Operating System related to that architecture. The form provides further options based on the chosen operating system:
- Build mode - Defines whether to provision the host and install the operating system. This option is required for all provisioning tasks. You only need to disable this option if creating an entry for an already existing and provisioned host.
-
Media Selection - Defines whether to select from only synchronized kickstart repositories or from all repositories. Select the installation media type that will be used to provision this host. Choose
Synced Contentfor synchronized kickstart repositories, orAll Mediato select from other installation media, typically those that have been added manually under Hosts > Installation media > New Medium. - Media - Defines the operating system’s installation media. This is usually a kickstart tree, but it can also be a locally mounted ISO image.
- Partition Table - Defines the partition table template to use for the root disk layout. You can also define a Custom partition table directly on this form.
- Root password - The password for the root user on the operating system.
- Provisioning templates - This shows the templates chosen to provision the host. Click Resolve to see how the Satellite Server assigns templates to specific functions in the provisioning process (PXE, provisioning, user data, and others).
Operating System tab provides additional options if you selected a Compute resource from Deploy on in the Host tab. These options are covered in a later chapter.
In the Parameters tab, you set variable data for both the provisioning process and Puppet configuration. The Puppet class parameters section allows you to modify data sent to Puppet’s parameters. The Global parameters and Host parameters define custom parameters that you can use within the Satellite Server, such as provisioning templates.
If you aim to attach your activation key to the host, add a new host parameter with the Name set to kt_activation_keys and the Value set to the name of your activation key.
In the Additional Information tab, you define miscellaneous data about the host including it’s owner, whether to include it in reporting, the hardware model, and any additional comments.
To save the host entry, click Submit.
For CLI Users
Create the host with the hammer host create command. For example:
# hammer host create --name "testhost" --organization "ACME" \
--location "New York" --environment "Test" --architecture "x86_64" \
--build true --domain "example.com" --enabled true \
--mac "aa:aa:aa:aa:aa:aa" --subnet "ACME's Internal Network" \
--managed true --medium "Red Hat Kickstart Tree" \
--operatingsystem "RedHat 7.2" --owner admin \
--partition-table "Kickstart Default" \
--puppet-proxy "satellite.example.com" \
--puppet-ca-proxy "satellite.example.com" --root-password "p@55w0rd!"
Use the --interface option to configure specific interface settings. See Appendix B, Additional Host Parameters for Hammer CLI for more information. You can also define specific network interface configurations with the hammer host interface create command. Use the --host or --host-id options to choose the host that receives the interface. For example:
# hammer host interface create --host "testhost" --type interface \
--mac "aa:aa:aa:aa:aa:aa" --identifier "eth0" --name "testhost" \
--domain "example.com" --subnet "ACME's Internal Network" \
--managed true --primary true --provision true
This procedure acts as foundation for most provisioning methods. However, the process of defining all this information for each host is time consuming. Therefore, it is recommended to create a host group to define common settings among all hosts.
5.3. Creating a Host Group on Satellite Server
If provisioning many hosts, it is time consuming to enter all host details each time. However, Red Hat Satellite 6 uses the concept of host groups to help reduce the time to provision a host.
A host group acts as a template for common host settings. It contains a lot of the same details that you provide to hosts. When you provision a new host with a host group, the host inherits the defined settings from the host group. You can then provide additional details where necessary to individualize the host.
In addition, you can create a hierarchy of host groups. Typically, you will aim to have one base level host group that will represent all hosts in your organization and provide general settings, and then nested groups to provide specific settings. For example, you can have a base host level (parent) group that defines the operating system, and two nested (child) host groups that inherit the base level host group:
Hostgroup:
Base(Red Hat Enterprise Linux 7.2)Hostgroup:
Webserver(applies thehttpdPuppet class)-
Host:
webserver1.example.com(web server) -
Host:
webserver2.example.com(web server)
-
Host:
Hostgroup:
Storage(applies thenfsPuppet class)-
Host:
storage1.example.com(storage server) -
Host:
storage2.example.com(storage server)
-
Host:
-
Host:
custom.example.com(custom host)
In this example, all provisioned hosts use Red Hat Enterprise Linux 7.2 as their operating system due to their inheritance of the Base host group. The two web server hosts inherit the settings from the Webserver host group, which includes the httpd Puppet class and the settings from the Base host group. Likewise, the two storage servers inherit the settings from the Storage host group, which includes the nfs Puppet class and the settings from the Base host group. The custom host only inherits the settings from the Base host group.
This scenario shows how to create a host group for ACME. Later chapters in this guide use this host group to help with the provisioning process.
For Web UI Users
Navigate to Configure > Host groups and click New Host Group. The UI provides a form with fields similar to the host creation form. Enter the following details:
In the Host Group tab:
- Parent - The parent host group to inherit basic settings from. Not applicable when creating the very parent group, so leave blank in this scenario.
-
Name - The name of the host group. For this scenario, enter
Base. -
Lifecycle Environment - Defines the hosts' stage in the application life cycle. Choose the
Productionenvironment created in the Red Hat Satellite 6 Content Management Guide. -
Content View - Defines the Content View to use for repositories. Choose the
Baseview created in the Red Hat Satellite 6 Content Management Guide. -
Puppet Environment - Defines the Puppet environment containing the hosts. This is usually defined using the previously selected Content View and life cycle environment. For this example, choose the
productionenvironment, which does not contain Puppet modules. - Content Source - The Capsule Server to use for providing content from the Content View. Choose the Satellite Server’s integrated Capsule.
- Puppet CA - The Capsule Server to use for agent certification. Choose the Satellite Server’s integrated Capsule.
- Puppet Master - The Capsule Server to use as the master server for agent communication. Choose the Satellite Server’s integrated Capsule.
- Openscap Proxy - The server to use as an OpenSCAP proxy. Leave this blank.
- In the Puppet Classes tab, you select which Puppet classes to apply to the host after provisioning. This scenario does not use Puppet classes, so skip this tab for the moment.
In the Network tab:
-
Domain - The domain to provision the host. This combines with the DNS name to create a fully qualified domain name (FQDN) for the host. Select ACME’s
example.comdomain. -
Subnet - The network that connects this interface. Select
ACME's Internal Network. - Realm - Defines authentication realm for the host. This scenario does not use realms so leave this field blank.
-
Domain - The domain to provision the host. This combines with the DNS name to create a fully qualified domain name (FQDN) for the host. Select ACME’s
In the Operating System tab:
-
Architecture - The hosts' architecture. Select
x86_64. -
Operating System - The base operating system to install. An entry for Red Hat Enterprise Linux 7.2 should appear after performing the synchronization steps, which are described in Synchronizing Red Hat Repositories in the Red Hat Satellite 6 Content Management Guide. Select the entry. Media Selection - Defines whether to select from only synchronized kickstart repositories or from all repositories. Select the installation media type that will be used to provision this host group:
Synced Contentfor synchronized kickstart repositories, orAll Mediafor other installation media, typically those that have been added manually under Hosts > Installation media > New Medium. - Media - Defines the operating system’s installation media. Select the kickstart tree from Red Hat Enterprise Linux 7.2, which should be present after performing the synchronization steps, which are described in Synchronizing Red Hat Repositories in the Red Hat Satellite 6 Content Management Guide.
-
Partition Table - Defines the partition table template to use for the root disk layout. Select
Default Kickstart. - Root password - The password for the root user on the operating system. Enter a root password.
-
Architecture - The hosts' architecture. Select
- In the Parameters tab, you set variable data for both the provisioning process and Puppet configuration. Leave this section empty.
-
In the Locations tab, set the location for the host group. For this example, select
New York. -
In the Organizations tab, set the organizations that are allowed to use the host group. For this example, select
ACME. -
In the Activation Keys tab, select the
exampleactivation key. This adds a new parameter (kt_activation_keys) to each host that defines the activation key to use for registration.
Click Submit to save the host group.
For CLI Users
Create the host group with the hammer hostgroup create command. For example:
# hammer hostgroup create --name "Base" \
--lifecycle-environment "Production" --content-view "Base" \
--environment "production" --content-source-id 1 \
--puppet-ca-proxy-id 1 --puppet-proxy-id 1 --domain "example.com" \
--subnet `ACME's Internal Network` --architecture "x86_64" \
--operatingsystem "RedHat 7.2" --medium-id 9 \
--partition-table "Kickstart default" --root-pass "p@55w0rd!" \
--locations "New York" --organizations "ACME"
The server creates the host group entry. This scenario uses this host group for provisioning examples.
5.4. Chapter Summary
This chapter showed the basic workflow for creating new hosts entries in Red Hat Satellite 6. This chapter also demonstrated how to create a host group to predefine certain parameters when creating new hosts.
The next chapter explores how to provision bare metal hosts. We use the Base host group to predefine settings for hosts in the next chapter.
Chapter 6. Provisioning Bare Metal Hosts
In this chapter, we explore four main ways to provision bare metal instances with Red Hat Satellite 6. These include:
- Unattended Provisioning - You identify a host using a MAC address and the Satellite Server provisions it using a PXE boot process.
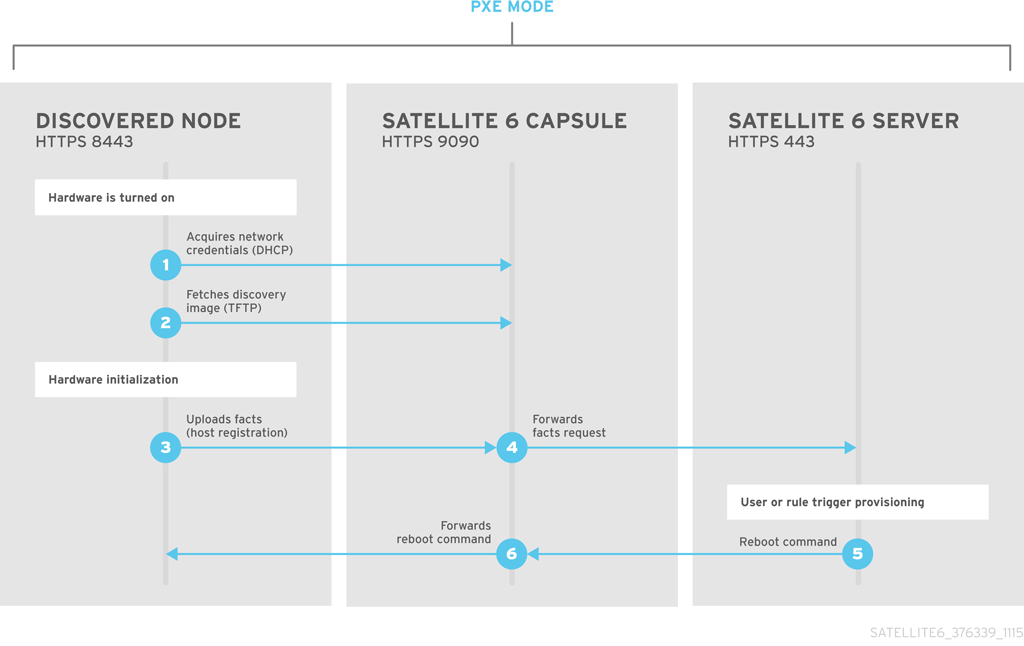
- Unattended Provisioning with Discovery - New hosts use PXE boot to load the Satellite Discovery service. This service identifies hardware information about the host and lists it as an available host to provision.
- PXE-less Provisioning - The ability to provision new hosts using a boot disk or PXE-less discovery image that the Satellite Server generates.
- PXE-less Provisioning with Discovery - New hosts use an ISO boot disk that loads the Satellite Discovery service. This service identifies hardware information about the host and lists it as an available host to provision.
Previous versions of Red Hat Satellite provided the use of a host group-based template rendering feature during provisioning. This feature allowed users to render templates for a host group instead of a single host. This feature is not supported for Red Hat Satellite 6.2 due to certain limitations such as a lack of host records or audit trail. It is recommended to use Discovery features, which provide similar functionality.
6.1. Defining Requirements for Bare Metal Provisioning
The requirements for bare metal provisioning include:
- Synchronized content repositories for Red Hat Enterprise Linux 7. See Synchronizing Red Hat Repositories in the Red Hat Satellite 6 Content Management Guide for more information.
- A Capsule Server managing the network for bare metal hosts. For unattended provisioning and discovery-based provisioning, the Satellite Server requires PXE server settings. See Chapter 4, Configuring Networking for more information.
- An example activation key for host registration. See Section 3.6, “Creating an Activation Key” for more information.
- A blank bare metal host for testing purposes.
6.2. Creating New Hosts with Unattended Provisioning
Unattended provisioning is the simplest form of host provisioning. This method requires you to enter the host details on the Satellite Server and boot your host. The Satellite Server automatically manages the PXE configuration, organizes networking services, and provides the operating system and configuration for the host. This method of provisioning hosts uses minimal interaction during the process.
This scenario demonstrates how to provision a host on ACME’s private network. In this example, the bare metal host connects to ACME’s private network at 192.168.140.0/24 and uses an interface with aa:aa:aa:aa:aa:aa as the MAC address.
For Web UI Users
Navigate to Hosts > New host. The UI provides a set of fields where you can input details for the host.
In the Host tab:
-
Enter the Name of the host. This becomes the provisioned system’s host name. For this example, enter
baremetal-test1. -
The provisioning context (Organization and Location) automatically sets to
ACMEandNew York. -
Select
Basefrom the Host Group field. This should automatically populate most of the new host’s fields.
-
Enter the Name of the host. This becomes the provisioned system’s host name. For this example, enter
In the Interface tab:
- Click Edit on the host’s interface.
Most of the fields should automatically contain values. Note in particular:
- The Name from the Host tab becomes the DNS name.
- The Satellite Server automatically assigns an IP address for the new host.
-
Enter the MAC address for the host. In this example, the MAC address is
aa:aa:aa:aa:aa:aa. This is important as it ensures the identification of the host during the PXE boot process. - The Satellite Server should automatically select the Managed, Primary, and Provision options for the first interface on the host. If not, select them.
In the Operating System tab:
- All fields should automatically contain values. Confirm each aspect of the operating system.
Click Resolve in Provisioning template to check the new host can identify the right provisioning templates to use. This should include:
-
PXELinux Template:
Kickstart default PXELinux provision Template:
Satellite Kickstart DefaultFor instructions on associating provisioning templates, see Section 3.3, “Creating Provisioning Templates”.
-
PXELinux Template:
In the Parameters tab:
-
Confirm the
kt_activation_keysparameter exists and is using theexampleactivation key.
-
Confirm the
Click Submit.
For CLI Users
Create the host with the hammer host create command. For example:
# hammer host create --name "baremetal-test1" --organization "ACME" \
--location "New York" --hostgroup "Base" --mac "aa:aa:aa:aa:aa:aa" \
--build true --enabled true --managed true
Ensure our network interface options are set using the hammer host interface update command. For example:
# hammer host interface update --host "test1" --managed true \
--primary true --provision true
This creates the host entry and the relevant provisioning settings. This also includes creating the necessary directories and files for PXE booting the bare metal host. If you power the physical host and set its boot mode to PXE, the host detects the DHCP service of the Satellite Server’s integrated Capsule and starts installing Red Hat Enterprise Linux 7.2 from its kickstart tree. When installation completes, the host also registers to the Satellite Server using the example activation key and installs the necessary configuration and management tools from the Red Hat Satellite Tools repository.
6.3. Configuring Red Hat Satellite’s Discovery Service
Red Hat Satellite provides a Discovery feature. This provides a method to automatically detect blank hosts on a network. These hosts boot a special image that performs hardware detection and relays this information back to the Satellite Server. This provides a method to create a pool of ready-to-provision hosts on the Satellite Server and without needing to enter the MAC address of each host.
Installation
Before using the Discovery service, you must install the Discovery image and enable the Discovery plugin on the Satellite Server.
Enable the plugin using the --enable-foreman-plugin-discovery option with the satellite-installer command:
# satellite-installer --enable-foreman-plugin-discovery
This installs and enables the Discovery service plugin on the Satellite Server. After installation completes, install the following packages:
# yum install foreman-discovery-image rubygem-smart_proxy_discovery
-
The
foreman-discovery-imagepackage installs the Discovery ISO to the/usr/share/foreman-discovery-image/directory and also creates a PXE boot image from this ISO using thelivecd-iso-to-pxeboottool. The tool saves this PXE boot image in the/var/lib/tftpboot/bootdirectory. -
The
rubygem-smart_proxy_discoverypackage configures a Capsule Server (such as the Satellite Server’s integrated Capsule) to act as a proxy for the Discovery service.
After installation completes, a new menu option appears in the Satellite Server’s Web UI under Hosts > Discovered hosts.
Enabling Discovery service on a Capsule Server
Complete the following procedure to enable the Discovery service on a Capsule Server.
Run the following commands in order on the Capsule Server that you want:
# yum install foreman-discovery-image rubygem-smart_proxy_discovery -y
# katello-service restart
- Log in to the Satellite web UI, navigate to Infrastructure > Capsule.
- Click on the Capsule Server and click on the refresh button. The Capsule Server will have responded to the commands that you have run. If you look at the services configured, you will now see that discovery is listed. This means that the Discovery service is now running.
Provisioning Templates
The PXELinux global default template in the Hosts > Provisioning templates section includes an entry for the Discovery service.
LABEL discovery
   MENU LABEL (discovery)
   KERNEL boot/fdi-image-rhel_7-vmlinuz
   APPEND initrd=boot/fdi-image-rhel_7-img rootflags=loop root=live:/fdi.iso rootfstype=auto ro rd.live.image acpi=force rd.luks=0 rd.md=0 rd.dm=0 rd.lvm=0 rd.bootif=0 rd.neednet=0 nomodeset proxy.url=https://SATELLITE_CAPSULE_URL:9090 proxy.type=proxy
   IPAPPEND 2
The KERNEL and APPEND options boot the Discovery image and ramdisk. Also note the APPEND option contains a proxy.url parameter, which specifies the URL of the Capsule Server to use for provisioning. Edit the SATELLITE_CAPSULE_URL to the name of the provisioning capsule that you want. In this scenario, it is the Satellite Server’s integrated Capsule:
proxy.url=https://satellite.example.com:9090
You can change the Discovery service to be the default service that boots for blank hosts. Edit the ONTIMEOUT value in the PXELinux global default to the following
ONTIMEOUT discovery
You need to push the changes from the PXELinux global default template to the Satellite Server’s default PXE template. Navigate to Hosts > Provisioning templates and click Build PXE Default. This refreshes the default PXE template on the Satellite Server.
Subnets
All subnets with discoverable hosts require an appropriate Capsule Server selected to provide the Discovery service. To do this, navigate to Infrastructure > Capsules and verify if the Capsule Server that you want to use lists the Discovery feature. If not, click Refresh features and it appears immediately.
Navigate to Infrastructure > Subnets, select a subnet, click the Capsules tab, and select the Discovery Proxy that you want to use. Perform this for each appropriate subnet.
Testing
Test the Discovery service and boot a blank bare metal host on the 192.168.140.0/24 network. A boot menu displays and shows two options:
-
(local), which boots from the hard disk -
(discovery), which boots to the Discovery service
Select (discovery) to boot the Discovery image. After a few minutes, the Discovery image completes booting and shows a status screen.
Navigate to Hosts > Discovered hosts and the list includes the newly discovered host. The discovered hosts automatically define their host name based on their MAC address. For example, Satellite sets a discovered host with a MAC address of ab:cd:ef:12:34:56 to have macabcdef123456 as the host name. You can change this host name when provisioning the host.
The Satellite Server assigns organization and location to discovered hosts according to the following rules from top to bottom:
-
Setting the
discovery_organizationordiscovery_location, if present. These can be set under Administer > Settings > Discovered. -
Setting
foreman_organizationorforeman_locationfacts for a host. The fact names that are looked up can be configured in Administer > Settings > Puppet section as the Organization and Location fact setting. - If a discovered host uses a subnet defined in Satellite, use the first organization and location associated with the subnet.
- Select the first Organization and Location ordered by name.
Organization or Location can be changed using the bulk actions menu of the Discovered hosts page. Select the discovered hosts to modify and select Assign Organization or Assign Location from the Select Action menu.
6.4. Creating New Hosts from Discovered Hosts
Provisioning discovered hosts follows the same basic provisioning process. The difference is we identify the host to provision from the list of discovered hosts instead of manually entering the host’s MAC address.
For Web UI Users
Navigate to Hosts > Discovered host. This displays a list of ACME’s discovered hosts. Select one and click Provision on the right side of the list. The UI provides a set of fields where you can input details for the host.
In the Host tab:
-
Enter a new Name of the Host. This becomes the provisioned system’s host name. For this example, enter
baremetal-test2. -
The provisioning context (Organization and Location) should automatically set to
ACMEandNew York. -
Select
Basefrom the Host Group field. This should automatically populate most of the new host’s fields.
-
Enter a new Name of the Host. This becomes the provisioned system’s host name. For this example, enter
In the Interface tab:
- Click Edit on the host’s interface.
Most of the fields should automatically contain values. Note in particular:
- The Name from the Host tab becomes the DNS name.
- The Satellite Server automatically assigns an IP address for the new host.
- The Satellite Server automatically populates the MAC address from the Discovery results.
- Confirm these details.
- The Satellite Server should automatically select the Managed, Primary, and Provision options for this host. If not, select them.
In the Operating System tab:
- All fields should automatically contain values. Confirm each aspect of the operating system.
Click Resolve in Provisioning template to check the new host can identify the right provisioning templates to use. This should include:
-
PXELinux Template:
Kickstart default PXELinux -
provision Template:
Satellite Kickstart Default
-
PXELinux Template:
For instructions on associating provisioning templates, see Section 3.3, “Creating Provisioning Templates”.
In the Parameters tab:
-
Confirm the
kt_activation_keysparameter exists and is using theexampleactivation key.
-
Confirm the
Click Submit.
For CLI Users
Identify the discovered host to use for provisioning:
# hammer discovery list
Select a host and provision it using the Base host group. Set a new host name with the --new-name options:
# hammer host create --name "macaaaaaaaaaaaa" \
--new-name "baremetal-test2" --organization "ACME" \
--location "New York" --hostgroup "Base" --build true \
--enabled true --managed true
This removes the host from the discovered host listing and creates a host entry with the relevant provisioning settings. The Discovery image automatically resets the host so that it can boot to PXE. The host detects the DHCP service on the Satellite Server’s Integrated Capsule and starts installing Red Hat Enterprise Linux 7.2 from its kickstart tree. When installation completes, the host also registers to the Satellite Server using the example activation key and installs the necessary configuration and management tools from the Red Hat Satellite Tools repository.
6.5. Creating Discovery Rules
As a method of automating the provisioning process for discovered hosts, Red Hat Satellite 6 provides a feature to create discovery rules. These rules define how discovered hosts automatically provision themselves, based on the assigned host group. For example, you might aim to automatically provision hosts with a high CPU count as hypervisors. Likewise, you might aim to provision hosts with large hard disks as storage servers.
Auto provisioning does not currently allow configuring NICs; all systems are being provisioned with the NIC configuration that was detected during discovery. However, NIC can be set in an Anaconda kickstart, scriptlet, or via configuration management later on.
For Web UI Users
To create a rule, navigate to Configure > Discovery rules. This displays a list of existing rules. Select New Rule and the UI provides a set of fields for the rule details:
-
Name - A plain text name to represent the rule. For example:
Hypervisor -
Search - Defines the rules to use to determine whether to provision a host. This field provides suggestions for values you enter and allows operators for multiple rules. For example:
cpu_count > 8 - Host Group - Defines the host group to use.
Hostname - Defines a pattern for determining host names for multiple hosts. This uses the same ERB syntax that provisioning templates use. The host name can use the
@hostattribute for host-specific values and therandfunction for a random number. For example:-
myhost-<%= rand(99999) %> -
abc-<%= @host.facts['bios_vendor'] + '-' + rand(99999) %> -
xyz-<%= @host.hostgroup.name %> -
srv-<%= @host.discovery_rule.name %> -
server-<%= @host.ip.gsub('.','-') + '-' + @host.hostgroup.subnet.name %>
When creating host name patterns, make sure the resulting host names are unique. Hostnames must not start with numbers. A good approach is to use unique information provided by Facter, such as the MAC address, BIOS, or serial ID.
-
- Hosts limit - The maximum hosts you can provision with the rule. Use 0 for unlimited.
- Priority - Defines the precedence a rule has over other rules. Rules with lower values have a higher priority.
- Enabled - Defines whether the rule is currently in action or not.
The Satellite Server uses current provisioning context for the rule. You can choose additional contexts from the Organizations and Locations tabs.
Click Submit to save your rule.
Navigate to Hosts > Discovered host and select either:
-
Auto-Provisionfrom a discovered host’s menu on the right. This automatically provisions a single host. -
Auto-Provision Allfrom the top-right of the table. This automatically provisions all hosts.
For CLI Users
Create the rule with the hammer discovery_rule create command:
# hammer discovery_rule create --name "Hypervisor" \
--search "cpu_count  > 8" --hostgroup "Base" \
--hostname "hypervisor-<%= rand(99999) %>" \
--hosts-limit 5 --priority 5 --enabled true
Automatically provision a host with the hammer discovery auto-provision command:
# hammer discovery auto-provision --name "macabcdef123456"
6.6. Creating New Hosts with PXE-less Provisioning
Some hardware does not provide a PXE boot interface. However, it is possible to provision a new host in Red Hat Satellite 6 without the need for PXE boot. This involves generating a boot ISO that hosts can use. This ISO enables the host to connect to the Satellite Server, boot the installation media, and install the operating system. The process for creating a boot ISO for a host follows the same basic provisioning process. The difference is you generate an ISO file from the new host entry.
For Web UI Users
Navigate to Hosts > New host. The UI provides a set of fields where you can input details for the host.
In the Host tab:
-
Enter the Name of the Host. This becomes the provisioned system’s host name. For this example, enter
baremetal-test3. -
The provisioning context (Organization and Location) should automatically set to
ACMEandNew York. -
Select
Basefrom the Host Group field. This should automatically populate most of the new host’s fields.
-
Enter the Name of the Host. This becomes the provisioned system’s host name. For this example, enter
In the Interface tab:
- Click Edit on the host’s interface.
Most of the fields should automatically contain values. Note in particular:
- The Name from the Host tab becomes the DNS name.
- The Satellite Server automatically assigns an IP address for the new host.
-
Enter the MAC address for the host. In this example, the MAC address is
aa:aa:aa:aa:aa:aa. - The Satellite Server should automatically select the Managed, Primary, and Provision options for this host. If not, select them.
In the Operating System tab:
- All fields should automatically contain values. Confirm each aspect of the operating system.
Click Resolve in Provisioning template to check the new host can identify the right provisioning templates to use. This should include:
-
bootdisk Template:
Boot disk iPXE - host -
kexec Template:
Discovery Red Hat kexec -
provision Template:
Satellite Kickstart Default
-
bootdisk Template:
For instructions on associating provisioning templates, see Section 3.3, “Creating Provisioning Templates”.
In the Parameters tab:
-
Confirm the
kt_activation_keysparameter exists and is using theexampleactivation key.
-
Confirm the
Click Submit.
This creates a host entry and the host details page appears. The options on the top-right of the page show a Boot disk menu, which provides:
- Host image - A boot ISO for the specific host. This only contains the boot files necessary to access the installation media on the Satellite Server.
- Full host image - A boot ISO containing the kernel and initial RAM disk image for the specific host.
-
Generic image - A boot ISO not tied to any specific host. In this situation, the ISO sends the host’s MAC address to the Satellite Server, which matches it against the host entry. This image is also available from the
/bootdisk/disks/genericURL on your Satellite Server. For example,https://satellite.example.com/bootdisk/disks/generic. - Subnet image - A generic boot ISO that communicates through a Capsule Server.
The Full host image is based on SYSLINUX and works with most hardware. When using an iPXE-based boot disk (Host image, Generic image, or Subnet image), see http://ipxe.org/appnote/hardware_drivers for a list of hardware drivers expected to work with an iPXE-based boot disk.
For CLI Users
Create the host with the hammer host create command. For example:
# hammer host create --name "baremetal-test3" --organization "ACME" \
--location "New York" --hostgroup "Base" --mac "aa:aa:aa:aa:aa:aa" \
--build true --enabled true --managed true
Ensure our network interface options are set using the hammer host interface update command. For example:
# hammer host interface update --host "test3" --managed true \
--primary true --provision true
Download the boot disk from Satellite Server with the hammer bootdisk host command:
# hammer bootdisk host --host test3.example.com
Use the --full option to download the full host image.
# hammer bootdisk host --host test3.example.com --full true
Download the generic image with the hammer bootdisk generic command:
# hammer bootdisk generic
This creates a boot ISO for your host to use. If you power the physical host and boot from the ISO, the host connects to the Satellite Server and starts installing Red Hat Enterprise Linux 7.2 from its kickstart tree. When installation completes, the host also registers to the Satellite Server using the example activation key and installs the necessary configuration and management tools from the Red Hat Satellite Tools repository.
6.7. Implementing PXE-less Discovery
Red Hat Satellite 6 also provides a PXE-less Discovery service that operates without the need for PXE-based services (DHCP and TFTP). You accomplish this using the Satellite Server’s Discovery image.
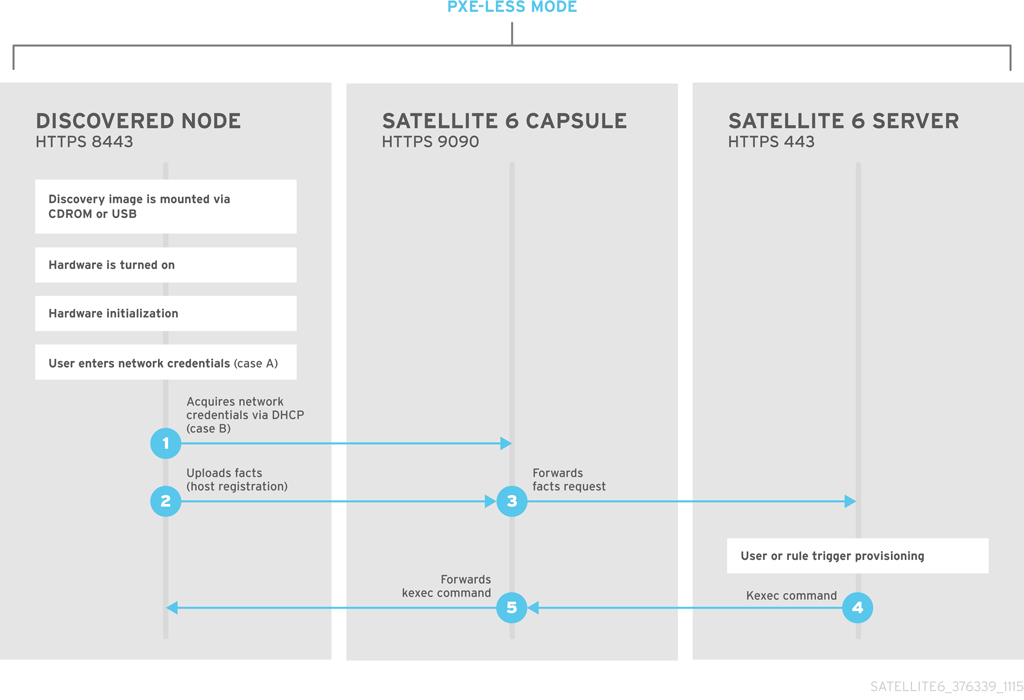
If you have not yet installed the Discovery service or image, follow the "Installation" section in Section 6.3, “Configuring Red Hat Satellite’s Discovery Service”.
The ISO for the Discovery service resides at /usr/share/foreman-discovery-image/ and is installed using the foreman-discover-image package.
Attended Use
This ISO acts as bootable media. Copy this media to either a CD, DVD, or a USB stick. For example, to copy to a USB stick at /dev/sdb:
# dd bs=4M \
if=/usr/share/foreman-discovery-image/foreman-discovery-image-3.1.1-10.iso \
of=/dev/sdb
Insert the Discovery boot media into a bare metal host, start the host, and boot from the media. The Discovery Image displays an option for either Manual network setup or Discovery with DHCP:
If selecting Manual network setup, the Discovery image requests a set of network options. This includes the primary network interface that connects to the Satellite Server. This Discovery image also asks for network interface configuration options, such as an IPv4 Address, IPv4 Gateway, and an IPv4 DNS server. As an example, ACME might use the following details:
- IPv4 Address: 192.168.140.20
- IPv4 Gateway: 192.168.140.1
IPv4 DNS: 192.168.140.2 (The Satellite Server’s integrated Capsule)
After entering these details, select Next.
- If selecting Discovery with DHCP, the Discovery image requests only the primary network interface that connects to the Satellite Server. It attempts to automatically configure the network interface using a DHCP server, such as one that a Capsule Server provides.
After the primary interface configuration, the Discovery image requests the Server URL, which is the URL of the Satellite Server or Capsule Server offering the Discovery service. For example, to use the integrated Capsule on ACME’s Satellite Server, use the following URL:
https://satellite.example.com:9090
And set the Connection type to Proxy. When ready, select Next.
The Discovery image also provides a set of fields to input Custom facts for the Facter tool to relay back to the Satellite Server. These are entered in a name-value format. Provide any custom facts you require and select Confirm to continue.
The Satellite reports a successful communication with the Satellite Server’s Discovery service. Navigate to Hosts > Discovered hosts and the list includes the newly discovered host.
To provision discovered hosts, see Section 6.4, “Creating New Hosts from Discovered Hosts”.
Unattended Use and Customization
It is possible to create a customized Discovery ISO, which automates the process of configuring the image after booting. The Discovery image uses a Linux kernel for the operating system, which means you pass kernel parameters to the configure the image’s operating system. These kernel parameters include:
- proxy.url
- The URL of the Capsule Server providing the Discovery service.
- proxy.type
-
The proxy type. This is usually set to
proxyto connect to the Capsule Server. This parameter also supports a legacyforemanoption, where communication goes directly to the Satellite Server instead of a Capsule Server. - fdi.pxmac
-
The MAC address of the primary interface in the format of
AA:BB:CC:DD:EE:FF. This is the interface you aim to use for communicating with the Capsule Server. In automated mode, the first NIC (using network identifiers in alphabetical order) with a link is used. In semi-automated mode, a screen appears and requests you to select the correct interface. - fdi.pxip, fdi.pxgw, fdi.pxdns
-
Manually configures IP address (
fdi.pxip), the gateway (fdi.pxgw), and the DNS (fdi.pxdns) for the primary network interface. If your omit these parameters, the image uses DHCP to configure the network interface. - fdi.pxfactname1, fdi.pxfactname2 … fdi.pxfactnameN
- Allows you to specify custom fact names.
- fdi.pxfactvalue1, fdi.pxfactvalue2 … fdi.pxfactvalueN
-
The values for each custom fact. Each value corresponds to a fact name. For example,
fdi.pxfactvalue1sets the value for the fact named withfdi.pxfactname1. - fdi.pxauto
- Defines whether to use automatic or semi-automatic mode. If set to 0, the image uses semi-automatic mode, which allows you to confirm your choices through a set of dialog options. If set to 1, the image uses automatic mode and proceeds without any confirmation.
The Satellite Server also provides a tool (discovery-remaster) in the foreman-discovery-image package. This tool remasters the image to include these kernel parameters. To remaster the image, run the discovery-remaster tool. For example:
# discovery-remaster ~/iso/foreman-discovery-image-3.1.1-10.iso \
"fdi.pxip=192.168.140.20/24 fdi.pxgw=192.168.140.1 \
fdi.pxdns=192.168.140.2 proxy.url=https://satellite.example.com:9090 \
proxy.type=proxy fdi.pxfactname1=customhostname \
fdi.pxfactvalue1=myhost fdi.pxmac=52:54:00:be:8e:8c fdi.pxauto=1"
The tool creates a new ISO file in the same directory as the original discovery image. In this scenario, it saves under /usr/share/foreman-discovery-image/.
Copy this media to either a CD, DVD, or a USB stick. For example, to copy to a USB stick at /dev/sdb:
# dd bs=4M \
if=/usr/share/foreman-discovery-image/foreman-discovery-image-3.1.1-10.iso \
of=/dev/sdb
Insert the Discovery boot media into a bare metal host, start the host, and boot from the media.
To provision discovered hosts, see Section 6.4, “Creating New Hosts from Discovered Hosts”.
Final Notes
The host needs to resolve to the following provisioning templates:
-
kexec Template:
Discovery Red Hat kexec -
provision Template:
Satellite Kickstart Default
For instructions on associating provisioning templates, see Section 3.3, “Creating Provisioning Templates”.
6.8. Chapter Summary
This chapter explored bare metal host provisioning, which includes several different methods such as unattended provisioning, discovery-based provisioning, and PXE-less provisioning. You can use some of these same methods when provisioning hosts from virtualization infrastructure, such as Kernel-based Virtual Machine (KVM) servers, Red Hat Enterprise Virtualization, and VMware vSphere.
The next chapter explores methods of provisioning from a KVM server using libvirt virtualization.
Chapter 7. Provisioning Virtual Machines on a KVM Server (libvirt)
Kernel-based Virtual Machines (KVMs) use an open source virtualization daemon and API called libvirt running on Red Hat Enterprise Linux. Red Hat Satellite 6 can connect to the libvirt API on a KVM server, provision hosts on the hypervisor, and control certain virtualization functions. In this chapter, the aim is to add a connection to ACME’s KVM server and provision a virtual machine.
7.1. Defining Requirements for KVM Provisioning
The requirements for KVM provisioning include:
- Synchronized content repositories for Red Hat Enterprise Linux 7. See Synchronizing Red Hat Repositories in the Red Hat Satellite 6 Content Management Guide for more information.
- A Capsule Server managing a network on the KVM server. Ensure no other DHCP services run on this network to avoid conflicts with the Capsule Server. See Chapter 4, Configuring Networking for more information on network service configuration for Capsule Servers.
- An example activation key for host registration. See Section 3.6, “Creating an Activation Key” for more information.
- A Red Hat Enterprise Linux server running KVM virtualization tools. For more information, see the Red Hat Enterprise Linux 7 Virtualization Getting Started Guide.
-
An existing virtual machine image if you aim to use image-based provisioning. Make sure this image exists in a storage pool on the KVM host. The
defaultstorage pool is usually located in/var/lib/libvirt/images.
7.2. Configuring the Satellite Server for KVM Connections
Before adding the KVM connection, the Satellite Server requires some configuration to ensure a secure connection. This means creating an SSH key pair for the user that performs the connection, which is the foreman user.
On the Satellite Server, switch to the foreman user:
# su foreman -s /bin/bash
Generate the key pair:
$ ssh-keygen
Copy the public key to the KVM server. For example:
$ ssh-copy-id root@kvm.example.com
Use the following command to test the connection to the KVM server:
$ virsh -c qemu+ssh://root@kvm.example.com/system list
When you add the KVM connection in Satellite Server, use the qemu+ssh protocol and the address to the server. For example, qemu+ssh://root@kvm.example.com/system.
7.3. Adding a KVM Connection to the Satellite Server
This process adds the KVM connection in the Satellite Server’s compute resources.
For Web UI Users
Navigate to Infrastructure > Compute resource and click New Compute Resource. The UI provides a set of fields for the compute resource:
-
Name - A plain text name for the resource. For example,
ACME's KVM Server. -
Provider - A field for selecting the compute resource provider. Select
Libvirtand a new set of fields appear. -
Description - A plain text description for the resource. For example,
KVM server at kvm.example.com. -
URL - The
libvirtconnection URL to the KVM server. For example,qemu+ssh://root@kvm.example.com/system. -
Display type - Selects the remote access protocol to use, either
VNCorSpice. - Console passwords - Secures console access for new hosts with a randomly generated password.
Click Test Connection to make sure the Satellite Server connects to the KVM server without fault.
The Locations and Organizations tabs are automatically set to your current context. Add additional contexts to these tabs.
Click Submit to save the KVM connection.
For CLI Users
Create the connection with the hammer compute-resource create command:
# hammer compute-resource create --name "ACME's KVM Server" \
--provider "Libvirt" --description "KVM server at kvm.example.com" \
--url "qemu+ssh://root@kvm.example.com/system" --locations "New York" \
--organizations "ACME"
7.4. Adding KVM Images on the Satellite Server
If using image-based provisioning to create new hosts, you need to add image details to your Satellite Server. This includes access details and image location.
For Web UI Users
Navigate to Infrastructure > Compute resource and click the name of your KVM connection. The UI displays information about the connection, including an Images tab. This tab contains no images for new providers but you can add new ones. Click New Image and the UI provides a set of fields for the KVM image:
-
Name - A plain text name for the image. For example,
Test KVM Image. -
Operatingsystem - A field for selecting the image’s base operating system. For example,
RedHat 7.2. -
Architecture - A field for selecting the operating system architecture. For example,
x86_64. -
Username - The SSH user name for image access. This is normally the
rootuser. - Password - The SSH password for image access.
-
User data - Defines if the image supports user data input, such as
cloud-initdata. -
Image path - The full path pointing to the image on the KVM server. For example,
/var/lib/KVM/images/TestImage.qcow2.
Click Submit to save the image details.
For CLI Users
Create the image with the hammer compute-resource image create command. Use the --uuid field to store the full path of the image location on the KVM server.
# hammer compute-resource image create --name "Test KVM Image" \
--operatingsystem "RedHat 7.2" --architecture "x86_64" --username root \
--user-data false --uuid "/var/lib/libvirt/images/TestImage.qcow2" \
--compute-resource "ACME's KVM Server"
7.5. Adding KVM Details to a Compute Profile
We can predefine certain hardware settings for KVM-based virtual machines. You achieve this through adding these hardware settings to a compute profile. For this example, we aim to include some basic hardware settings to the 4-Example profile you created in Section 3.5, “Creating Compute Profiles”.
For Web UI Users
Navigate to Infrastructure > Compute profiles and click the name of your profile. For example, use the 4-Example profile you previously created in Section 3.5, “Creating Compute Profiles”. The UI displays a list of your compute resources. Click on the KVM connection.
The UI provides a set of fields where you can input KVM-specific details for the profile. This includes:
- CPUs - The number of CPUs to allocate to the new host.
- Memory - The amount of memory to allocate to the new host.
-
Image - The image to use if performing image-based provisioning. For this example, use the
Test KVM Image. Network Interfaces - Defines the KVM network parameters for the host’s network interface. You can create multiple network interfaces. However, at least one interface should point to a Capsule-managed network. The network interface options include:
-
Network Type - Defines the type of network for the host and its NIC. This can either be
Physical (Bridge)orVirtual(Nat). - Network - Depending on your choice for Network Type, this is either the physical interface for hosts to use or the virtual network on the KVM server.
-
NIC type - Defines the virtual NIC type, such as
virtio.
-
Network Type - Defines the type of network for the host and its NIC. This can either be
Storage - Defines volumes for the host. You can create multiple volumes for the host. The storage options include:
- Storage pool - Defines the pool on the KVM server that contains the volume.
- Size - Defines the size of volume in GB.
- Allocation - Defines the size of physical preallocated space for the volume.
-
Type - Defines the volume type. Either
RAWorQCOW2.
Click Submit to save the compute profile.
For CLI Users
The compute profile CLI commands are not yet implemented in Red Hat Satellite 6.2. As an alternative, you can include the same settings directly during the host creation process.
7.6. Creating Network-Based Hosts on a KVM Server
The KVM provisioning process provides the option to create new hosts over a network connection. This requires the new host to access either the Satellite Server’s integrated Capsule or an external Capsule Server on a KVM virtual network. This is so the host has access to PXE provisioning services.
If using a virtual network on the KVM server for provisioning, make sure to select one that does not provide DHCP assignments. This causes DHCP conflicts with the Satellite Server when booting new hosts.
For Web UI Users
Navigate to Hosts > New host. The UI provides a set of fields where you can input details for the host.
In the Host tab:
-
Enter the Name of the Host. This becomes the provisioned system’s host name. For this example:
kvm-test1. -
The provisioning context (Organization and Location) should automatically set to the current context. For example:
ACMEandNew York. -
Select
Basefrom the Host Group field. This should automatically populate most of the new host’s fields. -
In Deploy on, select the KVM connection. For our example,
ACME's KVM Server. A new tab for virtual machines appears. -
In Compute profile, select a profile to use to automatically populate virtual machine-based settings. For our example:
4-Example.
-
Enter the Name of the Host. This becomes the provisioned system’s host name. For this example:
In the Interface tab:
- Click Edit on the host’s interface.
Most of the fields should automatically contain values. Note in particular:
- The Name from the Host tab becomes the DNS name.
- The Satellite Server automatically assigns an IP address for the new host.
- Leave the MAC address blank. The KVM server assigns one to the host.
- The Satellite Server should automatically select the Managed, Primary, and Provision options for the first interface on the host. If not, select them.
- The interface screen shows the KVM-specific fields populated with settings from our compute profile. Modify these settings to suit your needs.
In the Operating System tab:
- All fields should automatically contain values. Confirm each aspect of the operating system.
-
Make sure the Provisioning Method is set to
Network Based - Click Resolve in Provisioning templates to check the new host can identify the right provisioning templates to use.
In the Virtual Machine tab:
- These settings should be populated with details from the chosen host group and compute profile. Modify these settings to suit your needs.
In the Parameters tab:
-
Confirm the
kt_activation_keysparameter exists and is using theexampleactivation key.
-
Confirm the
Click Submit.
For CLI Users
Create the host with the hammer host create command and include --provision-method build to use network-based provisioning. For example:
# hammer host create --name "kvm-test1" --organization "ACME" \
--location "New York" --hostgroup "Base" \
--compute-resource "ACME's KVM Server" --provision-method build \
--build true --enabled true --managed true \
--interface "managed=true,primary=true,provision=true,compute_type=network,compute_network=acmenetwork" \
--compute-attributes="cpus=1,memory=1073741824" \
--volume="pool_name=default,capacity=20G,format_type=qcow2"
See Appendix B, Additional Host Parameters for Hammer CLI for more information on additional host creation parameters for this compute resource.
This new host entry triggers the KVM server to create the virtual machine and start it. If the virtual machine detects the defined Capsule Server through the virtual network, the virtual machine boots to PXE and begins to install the chosen operating system.
7.7. Creating Image-Based Hosts on a KVM Server
The KVM provisioning process also provides the option to create new hosts from existing images on the KVM server.
For Web UI Users
Navigate to Hosts > New host. The UI provides a set of fields where you can input details for the host.
In the Host tab:
-
Enter the Name of the Host. This becomes the provisioned system’s host name. For this example, enter
kvm-test2. -
The provisioning context (Organization and Location) should automatically set to
ACMEandNew York. -
Select
Basefrom the Host Group field. This should automatically populate most of the new host’s fields. -
In Deploy on, select the KVM connection. For our example,
ACME's KVM Server. A new tab for virtual machines appears. -
In Compute profile, select a profile to use to automatically populate virtual machine-based settings. For our example:
4-Example.
-
Enter the Name of the Host. This becomes the provisioned system’s host name. For this example, enter
In the Interface tab:
- Click Edit on the host’s interface.
Most of the fields should automatically contain values. Note in particular:
- The Name from the Host tab becomes the DNS name.
- The Satellite Server automatically assigns an IP address for the new host.
- Leave the MAC address blank. The KVM server assigns one to the host.
- The Satellite Server should automatically select the Managed, Primary, and Provision options for this host. If not, select them.
- The interface screen shows the KVM-specific fields populated with settings from our compute profile. Modify these settings to suit your needs.
In the Operating System tab:
- All fields should automatically contain values. Confirm each aspect of the operating system.
-
Make sure the Provisioning Method is set to
Image Based. A new Image field appears. This field allows you to select the image as a basis for the new host’s root volume. This is also automatically populated from the compute profile you chose in the Host tab. - Click Resolve in Provisioning templates to check the new host can identify the right provisioning templates to use.
In the Virtual Machine tab:
- These settings should be populated with details from the chosen host group and compute profile. Modify these settings to suit your needs.
In the Parameters tab:
-
Confirm the
kt_activation_keysparameter exists and is using theexampleactivation key.
-
Confirm the
Click Submit.
For CLI Users
Create the host with the hammer host create command and include --provision-method image to use image-based provisioning. For example:
# hammer host create --name "kvm-test2" --organization "ACME" \
--location "New York" --hostgroup "Base" \
--compute-resource "ACME's KVM Server" --provision-method image \
--image "Test KVM Image" --enabled true --managed true \
--interface "managed=true,primary=true,provision=true,compute_type=network,compute_network=acmenetwork" \
--compute-attributes="cpus=1,memory=1073741824" \
--volume="pool_name=default,capacity=20G,format_type=qcow2"
See Appendix B, Additional Host Parameters for Hammer CLI for more information on additional host creation parameters for this compute resource.
This new host entry triggers the KVM server to create the virtual machine, using the pre-existing image as a basis for the new volume.
7.8. Chapter Summary
This chapter showed how to configure Red Hat Satellite 6 to use a KVM server and how to provision new hosts through a KVM server. This included both network-based hosts and image-based hosts.
If you have no further compute resources to configure with Red Hat Satellite 6, see Chapter 13, Finalizing Provisioning for some final notes on provisioning.
The next chapter explores methods of provisioning from a Red Hat Enterprise Virtualization environment.
Chapter 8. Provisioning Virtual Machines in Red Hat Enterprise Virtualization
Red Hat Enterprise Virtualization is an enterprise-grade server and desktop virtualization platform built on Red Hat Enterprise Linux. Red Hat Satellite 6 can mange virtualization functions through Red Hat Enterprise Virtualization’s REST API. This include creating new virtual machines and controlling their power states. In this chapter, the aim is to add a connection to ACME’s Red Hat Enterprise Virtualization environment and provision a virtual machine.
8.1. Defining Requirements for Red Hat Enterprise Virtualization Provisioning
The requirements for Red Hat Enterprise Virtualization provisioning include:
- Synchronized content repositories for Red Hat Enterprise Linux 7. See Synchronizing Red Hat Repositories in the Red Hat Satellite 6 Content Management Guide for more information.
- A Capsule Server managing a logical network on the Red Hat Enterprise Virtualization environment. Ensure no other DHCP services run on this network to avoid conflicts with the Capsule Server. See Chapter 4, Configuring Networking for more information.
-
An existing template, other than the
blanktemplate, if you aim to use image-based provisioning. See Templates in the Virtual Machine Management Guide for information on creating templates for virtual machines. - An example activation key for host registration. See Section 3.6, “Creating an Activation Key” for more information.
8.2. Creating a Red Hat Enterprise Virtualization User
The Red Hat Enterprise Virtualization server requires an administration-like user for Satellite Server communication. For security reasons, Red Hat advises against using the admin@internal user for such communication. Instead, create a new Red Hat Enterprise Virtualization user with the following permissions:
System
Configure System
- Login Permissions
Network
Configure vNIC Profile
- Create
- Edit Properties
- Delete
- Assign vNIC Profile to VM
- Assign vNIC Profile to Template
Template
Provisioning Operations
- Import/Export
VM
Provisioning Operations
- Create
- Delete
- Import/Export
- Edit Storage
Disk
Provisioning Operations
- Create
Disk Profile
- Attach Disk Profile
For information on how to create a new user and add permissions in Red Hat Enterprise Virtualization, see Adding Users and Assigning User Portal Permissions in the Red Hat Enterprise Virtualization Administration Guide.
8.3. Adding a Red Hat Enterprise Virtualization Connection to the Satellite Server
This process adds a Red Hat Enterprise Virtualization connection in the Satellite Server’s compute resources.
For Web UI Users
Navigate to Infrastructure > Compute resource and click New Compute Resource. The UI provides a set of fields for the compute resource:
-
Name - A plain text name for the resource. For example,
ACME's RHEV. -
Provider - A field for selecting the compute resource provider. Select
RHEVand a new set of fields appear. -
Description - A plain text description for the resource. For example,
RHEV-M server at rhevm.example.com. -
URL - The connection URL to the Red Hat Enterprise Virtualization Manager’s API. For example, in versions of RHV less than 4.0, this URL is of the form
https://rhevm.example.com/api. In versions of RHV 4.0 and higher, this URL is of the formhttps://rhevm.example.com/ovirt-engine/api/v3. -
Username - The user with permission to access the Red Hat Enterprise Virtualization Manager’s resources. For example,
satellite@internal. - Password - The password for the chosen user.
- Datacenter - Once the URL, Username, and Password are entered, click Load Datacenters to populate the list of data centers from your Red Hat Enterprise Virtualization environment. Select a specific data center to manage from this list.
- Quota ID - Select a quota to limit resources available to the Satellite Server.
- X509 Certification Authorities - The certificate authority for SSL/TLS access.
The Locations and Organizations tabs are automatically set to your current context. Add additional contexts to these tabs.
Click Submit to save the connection.
For CLI Users
Create the connection with the hammer compute-resource create command. Select Ovirt as the --provider and set the UUID of the data center to use as --uuid:
# hammer compute-resource create --name "ACME's RHEV" \
--provider "Ovirt" --description "RHEV-M server at rhevm.example.com" \
--url "https://rhevm.example.com/api" --user "satellite@internal" \
--password "p@55w0rd!" --locations "New York" --organizations "ACME" \
--uuid 72cb9454-81cd-4231-a863-d9baf0f399f8
In versions of RHV less than 4.0, this URL is of the form https://rhevm.example.com/api. In versions of RHV 4.0 and higher, this URL is of the form https://rhevm.example.com/ovirt-engine/api/v3 .
8.4. Adding Red Hat Enterprise Virtualization Images on the Satellite Server
Red Hat Enterprise Virtualization uses templates as images for creating new virtual machines. If using image-based provisioning to create new hosts, you need to add Red Hat Enterprise Virtualization template details to your Satellite Server. This includes access details and the template name.
For Web UI Users
Navigate to Infrastructure > Compute resource and click the name of your Red Hat Enterprise Virtualization connection. The UI displays information about the connection, including an Images tab. This tab contains no images for new providers but you can add new ones. Click New Image and the UI provides a set of fields for the Red Hat Enterprise Virtualization template:
-
Name - A plain text name for the image. For example,
Test RHEV Image. -
Operatingsystem - A field for selecting the image’s base operating system. For example,
RedHat 7.2. -
Architecture - A field for selecting the operating system architecture. For example,
x86_64. -
Username - The SSH user name for image access. This is normally the
rootuser. - Password - The SSH password for image access.
- Image - The name of the image on Red Hat Enterprise Virtualization. Select the image name from the list.
Click Submit to save the image details.
For CLI Users
Create the image with the hammer compute-resource image create command. Use the --uuid field to store the template UUID on the Red Hat Enterprise Virtualization server.
# hammer compute-resource image create --name "Test RHEV Image" \
--operatingsystem "RedHat 7.2" --architecture "x86_64" --username root \
--uuid "9788910c-4030-4ae0-bad7-603375dd72b1" \
--compute-resource "ACME's RHEV"
8.5. Adding Red Hat Enterprise Virtualization Details to a Compute Profile
You can predefine certain hardware settings for virtual machines on Red Hat Enterprise Virtualization. You achieve this through adding these hardware settings to a compute profile. For this example, the aim is to include some basic hardware settings to the 4-Example profile.
For Web UI Users
Navigate to Infrastructure > Compute profiles and click the name of your profile. For example, use the 4-Example profile you previously created. The UI displays a list of your compute resources. Click on the Red Hat Enterprise Virtualization connection.
The UI provides a set of fields where you can input Red Hat Enterprise Virtualization-specific details for the profile. This includes:
- Cluster - The target host cluster in the Red Hat Enterprise Virtualization environment.
- Template - The RHEV template to use for the Cores and Memory settings.
- Cores - The number of CPU cores to allocate to the new host.
- Memory - The amount of memory to allocate to the new host.
-
Image - The image to use if performing image-based provisioning. For this example, use the
Test RHEV Image. Network Interfaces - Defines the network parameters for the host’s network interface. You can create multiple network interfaces. However, at least one interface should point to a Capsule-managed network. The network interface options include:
- Name - Defines the name of the network interface.
- Network - Defines the logical network to use.
Storage - Defines volumes for the host. You can create multiple volumes for the host. The storage options include:
- Size (GB) - Defines the size of volume in GB.
- Storage domain - Defines the storage domain for the volume.
- Preallocate disk - Defines whether to use thin provisioning or preallocation of the full disk.
- Bootable - Defines the boot volume.
Click Submit to save the compute profile.
For CLI Users
The compute profile CLI commands are not yet implemented in Red Hat Satellite 6.2. As an alternative, you can include the same settings directly during the host creation process.
8.6. Creating Network-Based Hosts on a Red Hat Enterprise Virtualization Server
The Red Hat Enterprise Virtualization provisioning process provides the option to create new hosts over a network connection. This requires the new host to access either the Satellite Server’s integrated Capsule or an external Capsule Server on a Red Hat Enterprise Virtualization virtual network. This is so the host has access to PXE provisioning services.
If using a virtual network on the Red Hat Enterprise Virtualization server for provisioning, make sure to select one that does not provide DHCP assignments. This causes DHCP conflicts with the Satellite Server when booting new hosts.
For Web UI Users
Navigate to Hosts > New host. The UI provides a set of fields where you can input details for the host.
In the Host tab:
-
Enter the Name of the Host. This becomes the provisioned system’s host name. For this example, enter
rhev-test1. -
The provisioning context (Organization and Location) should automatically set to the current context. For example:
ACMEandNew York. -
Select
Basefrom the Host Group field. This should automatically populate most of the new host’s fields. -
In Deploy on, select the Red Hat Enterprise Virtualization connection. For our example,
ACME's RHEV. A new tab for virtual machines appears. -
In Compute profile, select a profile to use to automatically populate virtual machine-based settings. For our example:
4-Example.
-
Enter the Name of the Host. This becomes the provisioned system’s host name. For this example, enter
In the Interface tab:
- Click Edit on the host’s interface.
Most of the fields should automatically contain values. Note in particular:
- The Name from the Host tab becomes the DNS name.
- The Satellite Server automatically assigns an IP address for the new host.
- Leave the MAC address blank. The server assigns one to the host.
- The Satellite Server should automatically select the Managed, Primary, and Provision options for the first interface on the host. If not, select them.
- The interface screen shows the Red Hat Enterprise Virtualization-specific fields populated with settings from our compute profile. Modify these settings to suit your needs.
In the Operating System tab:
- All fields should automatically contain values. Confirm each aspect of the operating system.
-
Make sure the Provisioning Method is set to
Network Based - Click Resolve in Provisioning templates to check the new host can identify the right provisioning templates to use.
In the Virtual Machine tab:
- These settings should be populated with details from the chosen host group and compute profile. Modify these settings to suit your needs.
In the Parameters tab:
-
Confirm the
kt_activation_keysparameter exists and is using theexampleactivation key.
-
Confirm the
Click Submit.
For CLI Users
Create the host with the hammer host create command and include --provision-method build to use network-based provisioning. For example:
# hammer host create --name "rhev-test1" --organization "ACME" \
--location "New York" --hostgroup "Base" \
--compute-resource "ACME's RHEV" --provision-method build \
--build true --enabled true --managed true \
--interface "managed=true,primary=true,provision=true,compute_name=eth0,compute_network=satnetwork" \
--compute-attributes="cluster=Default,cores=1,memory=1073741824,start=true" \
--volume="size_gb=20G,storage_domain=Data,bootable=true"
See Appendix B, Additional Host Parameters for Hammer CLI for more information on additional host creation parameters for this compute resource.
This new host entry triggers the Red Hat Enterprise Virtualization server to create the virtual machine. If the virtual machine detects the defined Capsule Server through the virtual network, the virtual machine boots to PXE and begins to install the chosen operating system.
8.7. Creating Image-Based Hosts on a Red Hat Enterprise Virtualization Server
The Red Hat Enterprise Virtualization provisioning process also provides the option to create new hosts from existing images on the Red Hat Enterprise Virtualization server.
For Web UI Users
Navigate to Hosts > New host. The UI provides a set of fields where you can input details for the host.
In the Host tab:
-
Enter the Name of the Host. This becomes the provisioned system’s host name. For this example, enter
rhev-test2. -
The provisioning context (Organization and Location) should automatically set to the current context. For example:
ACMEandNew York. -
Select
Basefrom the Host Group field. This should automatically populate most of the new host’s fields. -
In Deploy on, select the Red Hat Enterprise Virtualization connection. For our example,
ACME's RHEV. A new tab for virtual machines appears. -
In Compute profile, select a profile to use to automatically populate virtual machine-based settings. For our example:
4-Example.
-
Enter the Name of the Host. This becomes the provisioned system’s host name. For this example, enter
In the Interface tab:
- Click Edit on the host’s interface.
Most of the fields should automatically contain values. Note in particular:
- The Name from the Host tab becomes the DNS name.
- The Satellite Server automatically assigns an IP address for the new host.
- Leave the MAC address blank. The Red Hat Enterprise Virtualization server assigns one to the host.
- The Satellite Server should automatically select the Managed, Primary, and Provision options for this host. If not, select them.
- The interface screen shows the Red Hat Enterprise Virtualization-specific fields populated with settings from our compute profile. Modify these settings to suit your needs.
In the Operating System tab:
- All fields should automatically contain values. Confirm each aspect of the operating system.
-
Make sure the Provisioning Method is set to
Image Based. A new Image field appears. This field allows you to select the image as a basis for the new host’s root volume. This is also automatically populated from the compute profile you chose in the Host tab. - Click Resolve in Provisioning templates to check the new host can identify the right provisioning templates to use.
In the Virtual Machine tab:
- These settings should be populated with details from the chosen host group and compute profile. Modify these settings to suit your needs.
In the Parameters tab:
-
Confirm the
kt_activation_keysparameter exists and is using theexampleactivation key.
-
Confirm the
Click Submit.
For CLI Users
Create the host with the hammer host create command and include --provision-method image to use image-based provisioning. For example:
# hammer host create --name "rhev-test2" --organization "ACME" \
--location "New York" --hostgroup "Base" \
--compute-resource "ACME's RHEV" --provision-method image \
--image "Test RHEV Image" --enabled true --managed true \
--interface "managed=true,primary=true,provision=true,compute_name=eth0,compute_network=satnetwork" \
--compute-attributes="cluster=Default,cores=1,memory=1073741824,start=true" \
--volume="size_gb=20G,storage_domain=Data,bootable=true"
See Appendix B, Additional Host Parameters for Hammer CLI for more information on additional host creation parameters for this compute resource.
This new host entry triggers the Red Hat Enterprise Virtualization server to create the virtual machine, using the pre-existing image as a basis for the new volume.
8.8. Chapter Summary
This chapter showed how to configure Red Hat Satellite 6 to use a Red Hat Enterprise Virtualization server and how to provision new hosts through a Red Hat Enterprise Virtualization server. This included both network-based hosts and image-based hosts.
If you have no further compute resources to configure with Red Hat Satellite 6, see Chapter 13, Finalizing Provisioning for some final notes on provisioning.
The next chapter explores methods of provisioning from a VMware vSphere platform.
Chapter 9. Provisioning Virtual Machines in VMware vSphere
VMware vSphere is an enterprise-level virtualization platform from VMware. Red Hat Satellite 6 can interact with the vSphere platform, including creating new virtual machines and controlling their power management states. In this chapter, the aim is to add a connection to ACME’s vSphere environment and provision a virtual machine.
9.1. Defining Requirements for VMware vSphere Provisioning
The requirements for VMware vSphere provisioning include:
- Synchronized content repositories for Red Hat Enterprise Linux 7. See Synchronizing Red Hat Repositories in the Red Hat Satellite 6 Content Management Guide for more information.
- A Capsule Server managing a network on the vSphere environment. Ensure no other DHCP services run on this network to avoid conflicts with the Capsule Server. See Chapter 4, Configuring Networking for more information.
- An existing VMware template if you aim to use image-based provisioning.
- An example activation key for host registration. See Section 3.6, “Creating an Activation Key” for more information.
9.2. Creating a VMware vSphere User
The VMware vSphere server requires an administration-like user for Satellite Server communication. For security reasons, Red Hat advises against using the administrator user for such communication. Instead, create a new user with the following permissions:
- All Privileges → Datastore → Allocate Space
- All Privileges → Network → Assign Network
- All Privileges → Resource → Assign virtual machine to resource pool
- All Privileges → Virtual Machine → Configuration (All)
- All Privileges → Virtual Machine → Interaction
- All Privileges → Virtual Machine → Inventory
- All Privileges → Virtual Machine → Provisioning
9.3. Adding a VMware vSphere Connection to the Satellite Server
This process adds a VMware vSphere connection in the Satellite Server’s compute resources.
For Web UI Users
Navigate to Infrastructure > Compute resource and click New Compute Resource. The UI provides a set of fields for the compute resource:
-
Name - A plain text name for the resource. For example,
ACME's vSphere. -
Provider - A field for selecting the compute resource provider. Select
VMwareand a new set of fields appear. -
Description - A plain text description for the resource. For example,
VMware vSphere at vsphere.example.com. -
VCenter/Server - The IP address or host name of the vCenter server. For example,
vsphere.example.com. -
Username - The user with permission to access the vCenter’s resources. For example,
SatelliteUser. - Password - The password for the chosen user.
- Datacenter - Once the URL, Username, and Password are entered, click Load Datacenters to populate the list of data centers from your VMware vSphere environment. Select a specific data center to manage from this list.
- Fingerprint - The certificate fingerprint for accessing your vSphere environment. This field is usually populated with the fingerprint from your chosen data center.
- Console passwords - Secures console access for new hosts with a randomly generated password.
The Locations and Organizations tabs are automatically set to your current context. Add additional contexts to these tabs.
Click Submit to save the connection.
For CLI Users
Create the connection with the hammer compute-resource create command. Select Vmware as the --provider and set the instance UUID of the data center as the --uuid:
# hammer compute-resource create --name "ACME's vSphere" \
--provider "Vmware" \
--description "vSphere server at vsphere.example.com" \
--server "vsphere.example.com" --user "SatelliteUser" \
--password "p@55w0rd!" --locations "New York" --organizations "ACME" \
--uuid 72cb9454-81cd-4231-a863-d9baf0f399f8
Ensure that the host and network-based firewalls are configured to allow Satellite to vCenter communication on TCP port 443. Verify that Satellite is able to resolve the host name of vCenter and vCenter is able to resolve the Satellite Server host name.
9.4. Adding VMware vSphere Images on the Satellite Server
VMware vSphere uses templates as images for creating new virtual machines. If using image-based provisioning to create new hosts, you need to add VMware template details to your Satellite Server. This includes access details and the template name.
For Web UI Users
Navigate to Infrastructure > Compute resource and click the name of your VMware vSphere connection. The UI displays information about the connection, including an Images tab. This tab contains no images for new providers but you can add new ones. Click New Image and the UI provides a set of fields for the VMware vSphere template:
-
Name - A plain text name for the image. For example,
Test vSphere Image. -
Operatingsystem - A field for selecting the image’s base operating system. For example,
RedHat 7.2. -
Architecture - A field for selecting the operating system architecture. For example,
x86_64. -
Username - The SSH user name for image access. This is normally the
rootuser. -
User data - Defines if the image supports user data input, such as
cloud-initdata. - Password - The SSH password for image access.
-
Image - The relative path and name of the template on the vSphere environment. For example
Templates/RHEL72. Do not include the data center in the relative path.
Click Submit to save the image details.
For CLI Users
Create the image with the hammer compute-resource image create command. Use the --uuid field to store the relative template path on the vSphere environment.
# hammer compute-resource image create --name "Test vSphere Image" \
--operatingsystem "RedHat 7.2" --architecture "x86_64" \
--username root --uuid "Templates/RHEL72" \
--compute-resource "ACME's vSphere"
9.5. Adding VMware vSphere Details to a Compute Profile
You can predefine certain hardware settings for virtual machines on VMware vSphere. You achieve this through adding these hardware settings to a compute profile. For this example, the aim is to include some basic hardware settings to the 4-Example profile.
For Web UI Users
Navigate to Infrastructure > Compute profiles and click the name of your profile. For example, use the 4-Example profile you previously created. The UI displays a list of your compute resources. Click on the vSphere connection.
The UI provides a set of fields where you can input VMware-specific details for the profile. This includes:
- CPUs - The number of CPUs to allocate to the new host.
- Cores per socket - The number of cores to allocate to each CPU.
- Memory - The amount of memory to allocate to the new host.
- Cluster - The target host cluster on the VMware environment.
- Resource pool - The resource pool containing the available resource allocations for the host.
- Folder - The folder to organize the host.
- Guest OS - Defines the underlying operating system in VMware vSphere.
- SCSI controller - Defines the disk access method.
- Virtual H/W version - Defines the underlying VMware hardware abstraction to use for virtual machines.
- Memory hot add or CPU hot add - Define whether you can add more resources while the virtual machine is powered.
-
Image - The image to use if performing image-based provisioning. For this example, use the
Test VMware Image. Network Interfaces - Defines the network parameters for the host’s network interface. You can create multiple network interfaces. However, at least one interface should point to a Capsule-managed network. The network interface options include:
- NIC type - Defines the VMware network interface type.
- Network - Defines the virtual network to use.
Storage - Defines volumes for the host. You can create multiple volumes for the host. The storage options include:
- Data store - Defines the storage location for the volume.
- Size (GB) - Defines the size of the volume in GB.
- Thin provision - Defines whether to use thin provisioning or preallocation of the full disk.
- Eager zero - Defines whether to use eager zero thick provisioning. If unchecked, the disk uses lazy zero thick provisioning.
Click Submit to save the compute profile.
For CLI Users
The compute profile CLI commands are not yet implemented in Red Hat Satellite 6.2. As an alternative, you can include the same settings directly during the host creation process.
9.6. Creating Network-Based Hosts on a VMware vSphere Server
The VMware vSphere provisioning process provides the option to create new hosts over a network connection. This requires the new host to access either the Satellite Server’s integrated Capsule or an external Capsule Server on a VMware vSphere virtual network. This is so the host has access to PXE provisioning services.
If using a virtual network on the VMware vSphere server for provisioning, make sure to select one that does not provide DHCP assignments. This causes DHCP conflicts with the Satellite Server when booting new hosts.
For Web UI Users
Navigate to Hosts > New host. The UI provides a set of fields where you can input details for the host.
In the Host tab:
-
Enter the Name of the Host. This becomes the provisioned system’s host name. For this example:
vmware-test1. -
The provisioning context (Organization and Location) should automatically set to the current context. For this example:
ACMEandNew York. -
Select the Host Group. This should automatically populate most of the new host’s fields. For this example:
Base. -
In Deploy on, select the VMware vSphere connection. For this example:
ACME's vSphere. A new tab for virtual machines appears. -
In Compute profile, select a profile to use to automatically populate virtual machine-based settings. For our example:
4-Example.
-
Enter the Name of the Host. This becomes the provisioned system’s host name. For this example:
In the Interface tab:
- Click Edit on the host’s interface.
Most of the fields should automatically contain values. Note in particular:
- The Name from the Host tab becomes the DNS name.
- The Satellite Server automatically assigns an IP address for the new host.
- Leave the MAC address blank. The VMware vSphere server assigns one to the host.
- The Satellite Server should automatically select the Managed, Primary, and Provision options for the first interface on the host. If not, select them.
- The interface screen shows the VMware vSphere-specific fields populated with settings from our compute profile. Modify these settings to suit your needs.
In the Operating System tab:
- All fields should automatically contain values. Confirm each aspect of the operating system.
-
Make sure the Provisioning Method is set to
Network Based - Click Resolve in Provisioning templates to check the new host can identify the right provisioning templates to use.
In the Virtual Machine tab:
- These settings should be populated with details from the chosen host group and compute profile. Modify these settings to suit your needs.
In the Parameters tab:
-
Confirm the
kt_activation_keysparameter exists and is using theexampleactivation key.
-
Confirm the
Click Submit.
For CLI Users
Create the host with the hammer host create command and include --provision-method build to use network-based provisioning. For example:
# hammer host create --name "vmware-test1" --organization "ACME" \
--location "New York" --hostgroup "Base" \
--compute-resource "ACME's vSphere" --provision-method build \
--build true --enabled true --managed true \
--interface "managed=true,primary=true,provision=true,compute_type=VirtualE1000,compute_network=mynetwork" \
--compute-attributes="cpus=1,corespersocket=2,memory_mb=1024,cluster=MyCluster,path=MyVMs,start=true" \
--volume="size_gb=20G,datastore=Data,name=myharddisk,thin=true"
See Appendix B, Additional Host Parameters for Hammer CLI for more information on additional host creation parameters for this compute resource.
This new host entry triggers the VMware vSphere server to create the virtual machine. If the virtual machine detects the defined Capsule Server through the virtual network, the virtual machine boots to PXE and begins to install the chosen operating system.
9.7. Creating Image-Based Hosts on a VMware vSphere Server
The VMware vSphere provisioning process also provides the option to create new hosts from existing images on the VMware vSphere server.
For Web UI Users
Navigate to Hosts > New host. The UI provides a set of fields where you can input details for the host.
In the Host tab:
-
Enter the Name of the Host. This becomes the provisioned system’s host name. For this example:
vmware-test1. -
The provisioning context (Organization and Location) should automatically set to the current context. For this example:
ACMEandNew York. -
Select the Host Group. This should automatically populate most of the new host’s fields. For this example:
Base. -
In Deploy on, select the VMware vSphere connection. For this example:
ACME's vSphere. A new tab for virtual machines appears. -
In Compute profile, select a profile to use to automatically populate virtual machine-based settings. For our example:
4-Example.
-
Enter the Name of the Host. This becomes the provisioned system’s host name. For this example:
In the Interface tab:
- Click Edit on the host’s interface.
Most of the fields should automatically contain values. Note in particular:
- The Name from the Host tab becomes the DNS name.
- The Satellite Server automatically assigns an IP address for the new host.
- Leave the MAC address blank. The VMware vSphere server assigns one to the host.
- The Satellite Server should automatically select the Managed, Primary, and Provision options for the first interface on the host. If not, select them.
- The interface screen shows the VMware vSphere-specific fields populated with settings from our compute profile. Modify these settings to suit your needs.
In the Operating System tab:
- All fields should automatically contain values. Confirm each aspect of the operating system.
-
Make sure the Provisioning Method is set to
Image Based. A new Image field appears. This field allows you to select the image as a basis for the new host’s root volume. This is also automatically populated from the compute profile you chose in the Host tab. - Click Resolve in Provisioning templates to check the new host can identify the right provisioning templates to use.
In the Virtual Machine tab:
- These settings should be populated with details from the chosen host group and compute profile. Modify these settings to suit your needs.
In the Parameters tab:
-
Confirm the
kt_activation_keysparameter exists and is using theexampleactivation key.
-
Confirm the
Click Submit.
For CLI Users
Create the host with the hammer host create command and include --provision-method image to use image-based provisioning. For example:
# hammer host create --name "vmware-test2" --organization "ACME" \
--location "New York" --hostgroup "Base" \
--compute-resource "ACME's RHEV" --provision-method image \
--image "Test RHEV Image" --enabled true --managed true \
--interface "managed=true,primary=true,provision=true,compute_type=VirtualE1000,compute_network=mynetwork" \
--compute-attributes="cpus=1,corespersocket=2,memory_mb=1024,cluster=MyCluster,path=MyVMs,start=true" \
--volume="size_gb=20G,datastore=Data,name=myharddisk,thin=true"
See Appendix B, Additional Host Parameters for Hammer CLI for more information on additional host creation parameters for this compute resource.
This new host entry triggers the VMware vSphere server to create the virtual machine, using the pre-existing image as a basis for the new volume.
9.8. Chapter Summary
This chapter showed how to configure Red Hat Satellite 6 to use a VMware vSphere server and how to provision new hosts through a VMware vSphere server. This included both network-based hosts and image-based hosts.
If you have no further compute resources to configure with Red Hat Satellite 6, see Chapter 13, Finalizing Provisioning for some final notes on provisioning.
The next chapter explores methods of provisioning from a Red Hat OpenStack Platform environment.
Chapter 10. Provisioning Cloud Instances in Red Hat OpenStack Platform
Red Hat OpenStack Platform provides the foundation to build a private or public Infrastructure-as-a-Service (IaaS) cloud on Red Hat Enterprise Linux. It offers a massively scalable, fault-tolerant platform for the development of cloud-enabled workloads. Red Hat Satellite 6 can interact with Red Hat OpenStack Platforms REST API to create new cloud instances and control their power management states. In this chapter, the aim is to add a connection to ACME’s Red Hat OpenStack Platform environment and provision a cloud instance.
10.1. Defining Requirements for Red Hat OpenStack Platform Provisioning
The requirements for Red Hat OpenStack Platform provisioning include:
- Synchronized content repositories for Red Hat Enterprise Linux 7. See Synchronizing Red Hat Repositories in the Red Hat Satellite 6 Content Management Guide for more information.
- A Capsule Server managing a network in your OpenStack environment. See Chapter 4, Configuring Networking for more information.
- An image added to OpenStack Image Storage (glance) service for image-based provisioning. See the Red Hat OpenStack Platform Instances and Images Guide for more information.
- An example activation key for host registration. See Section 3.6, “Creating an Activation Key” for more information.
10.2. Adding a Red Hat OpenStack Platform Connection to the Satellite Server
This process adds the Red Hat OpenStack Platform connection in the Satellite Server’s compute resources.
For Web UI Users
Navigate to Infrastructure > Compute resource and click New Compute Resource. The UI provides a set of fields for the compute resource:
-
Name - A plain text name for the resource. For example,
ACME's OpenStack. -
Provider - A field for selecting the compute resource provider. Select
RHEL OpenStack Platformand a new set of fields appear. -
Description - A plain text description for the resource. For example,
ACME's OpenStack environment at openstack.example.com. -
URL - A URL pointing to the OpenStack Authentication (keystone) service’s API at the
tokensresource. For example:http://openstack.example.com:5000/v2.0/tokens - Username and Password - The authentication user and password for Satellite to access the environment.
- Tenant - Defines the tenant or project for the Satellite Server to manage.
- Allow external network as main network - Select to allow external networks for use as primary networks for hosts.
The Locations and Organizations tabs are automatically set to your current context. Add additional contexts to these tabs.
Click Submit to save the Red Hat OpenStack Platform connection.
For CLI Users
Create the connection with the hammer compute-resource create command:
# hammer compute-resource create --name "ACME's OpenStack" \
--provider "OpenStack" \
--description "ACME's OpenStack environment at openstack.example.com" \
--url "http://openstack.example.com:5000/v2.0/tokens" --user "admin" \
--password "p@55w0rd!" --tenant "openstack" --locations "New York" \
--organizations "ACME"
10.3. Adding Red Hat OpenStack Platform Images on the Satellite Server
Red Hat OpenStack Platform uses image-based provisioning to create new hosts. This means you need to add image details to your Satellite Server. This includes access details and image location.
For Web UI Users
Navigate to Infrastructure > Compute resource and click the name of your Red Hat OpenStack Platform connection. The UI displays information about the connection, including an Images tab. This tab contains no images for new providers but you can add new ones. Click New Image and the UI provides a set of fields for the Red Hat OpenStack Platform image:
-
Name - A plain text name for the image. For example,
Test OpenStack Image. -
Operatingsystem - A field for selecting the image’s base operating system. For example,
RedHat 7.2. -
Architecture - A field for selecting the operating system architecture. For example,
x86_64. -
Username - The SSH user name for image access. This is normally the
rootuser. - Password - The SSH password for image access.
- Image - The image in OpenStack Image Storage.
-
User data - Defines if the image supports user data input, such as
cloud-initdata.
Click Submit to save the image details.
For CLI Users
Create the image with the hammer compute-resource image create command. Use the --uuid field to store the full path of the image location on the Red Hat OpenStack Platform server.
# hammer compute-resource image create --name "Test OpenStack Image" \
--operatingsystem "RedHat 7.2" --architecture "x86_64" \
--username root --user-data true \
--compute-resource "ACME's OpenStack Platform"
10.4. Adding Red Hat OpenStack Platform Details to a Compute Profile
You can predefine certain hardware settings for instances on Red Hat OpenStack Platform. You achieve this through adding these hardware settings to a compute profile. For this example, the aim is to include some basic hardware settings to the 4-Example profile.
For Web UI Users
Navigate to Infrastructure > Compute profiles and click the name of your profile. For example, use the 4-Example profile you previously created. The UI displays a list of your compute resources. Click on the OpenStack Platform connection.
The UI provides a set of fields where you can input Amazon-specific details for the profile. This includes:
- Flavor - The hardware profile on OpenStack Platform to use for the host.
- Availability zone - The target cluster to use within the OpenStack Platform environment.
-
Image - The image to use for image-based provisioning. For this example, use the
Test OpenStack Image. - Tenant - The tenant or project for the OpenStack Platform instance.
- Security Group - Defines the cloud-based access rules for ports and IP addresses.
- Internal network - Defines the private networks for the host to join.
- Floating IP network - Defines the external networks for the host to join and assign a floating IP address.
- Boot from volume - Defines whether to create a volume from the image. If not selected, the instance boots the image directly.
- New boot volume size (GB) - Defines the size of the new boot volume in GB.
Click Submit to save the compute profile.
For CLI Users
The compute profile CLI commands are not yet implemented in Red Hat Satellite 6.2. As an alternative, you can include the same settings directly during the host creation process.
10.5. Creating Image-Based Hosts on Red Hat OpenStack Platform
The Red Hat OpenStack Platform provisioning process creates new hosts from existing images on the Red Hat OpenStack Platform server.
For Web UI Users
Navigate to Hosts > New host. The UI provides a set of fields where you can input details for the host.
In the Host tab:
-
Enter the Name of the Host. This becomes the provisioned system’s host name. For this example, enter
openstack-test1. -
The provisioning context (Organization and Location) should automatically set to the current context. For this example:
ACMEandNew York. -
Select the Host Group. This should automatically populate most of the new host’s fields. For this example:
Base. -
In Deploy on, select the OpenStack Platform connection. For this example:
ACME's OpenStack Platform. A new tab for virtual machines appears. -
In Compute profile, select a profile to use to automatically populate cloud instance-based settings. For our example:
4-Example.
-
Enter the Name of the Host. This becomes the provisioned system’s host name. For this example, enter
In the Interface tab:
- Click Edit on the host’s interface.
Most of the fields should automatically contain values. Note in particular:
- The Name from the Host tab becomes the DNS name.
- The Satellite Server automatically assigns an IP address for the new host.
- Leave the MAC address blank. The Red Hat OpenStack Platform server assigns one to the host.
- The Satellite Server should automatically select the Managed, Primary, and Provision options for the first interface on the host. If not, select them.
In the Operating System tab:
- All fields should automatically contain values. Confirm each aspect of the operating system.
- The Image field contains the chosen image from your compute profile. This field also allows you to select a different image to base the new host’s root volume.
- Click Resolve in Provisioning templates to check the new host can identify the right provisioning templates to use.
In the Virtual Machine tab:
- These settings should be populated with details from the chosen host group and compute profile. Modify these settings to suit your needs.
In the Parameters tab:
-
Confirm the
kt_activation_keysparameter exists and is using theexampleactivation key.
-
Confirm the
Click Submit.
For CLI Users
Create the host with the hammer host create command and include --provision-method image to use image-based provisioning. For example:
# hammer host create --name "openstack-test1" --organization "ACME" \
--location "New York" --hostgroup "Base" \
--compute-resource "ACME's OpenStack Platform" --provision-method image \
--image "Test OpenStack Image" --enabled true --managed true \
--interface "managed=true,primary=true,provision=true" \
--compute-attributes="flavor_ref=m1.small,tenant_id=openstack,security_groups=default,network=mynetwork"
See Appendix B, Additional Host Parameters for Hammer CLI for more information on additional host creation parameters for this compute resource.
This new host entry triggers the Red Hat OpenStack Platform server to create the instance, using the pre-existing image as a basis for the new volume.
10.6. Chapter Summary
This chapter showed how to configure Red Hat Satellite 6 to use a Red Hat OpenStack Platform server and how to provision new hosts through a Red Hat OpenStack Platform server. This included both network-based hosts and image-based hosts.
If you have no further compute resources to configure with Red Hat Satellite 6, see Chapter 13, Finalizing Provisioning for some final notes on provisioning.
The next chapter explores methods of provisioning from Amazon’s EC2 public cloud service.
Chapter 11. Provisioning Cloud Instances in Amazon EC2
Amazon Elastic Compute Cloud (Amazon EC2) is a web service that provides public cloud compute resources. Red Hat Satellite 6 can interact with Amazon EC2’s public API to create new cloud instances and control their power management states. In this chapter, the aim is to add a connection to ACME’s Amazon EC2 account and provision a cloud instance.
11.1. Defining Requirements for Amazon EC2 Provisioning
The requirements for Amazon EC2 provisioning include:
- Synchronized content repositories for Red Hat Enterprise Linux 7. See Synchronizing Red Hat Repositories in the Red Hat Satellite 6 Content Management Guide for more information.
- A Capsule Server managing a network in your EC2 environment. Ideally, this should be a Virtual Private Cloud (VPC) to ensure a secure network between the hosts and the Capsule Server.
- A chosen Amazon Machine Image (AMI) for image-based provisioning.
- An example activation key for host registration. See Section 3.6, “Creating an Activation Key” for more information.
11.2. Adding a Amazon EC2 Connection to the Satellite Server
This process adds the Amazon EC2 connection in the Satellite Server’s compute resources.
Amazon Web Services uses time settings as part of the authentication process. This means the time on the Satellite Server should be correctly synchronized. Ensure that an NTP service, such as ntpd or chronyd, is running properly on the Satellite Server. Failure to provide the correct time to Amazon Web Services can lead to authentication failures. For more information, see Synchronizing Time in the Red Hat Satellite 6 Installation Guide.
For Web UI Users
Navigate to Infrastructure > Compute resource and click New Compute Resource. The UI provides a set of fields for the compute resource:
-
Name - A plain text name for the resource. For example,
ACME's EC2. -
Provider - A field for selecting the compute resource provider. Select
EC2and a new set of fields appear. -
Description - A plain text description for the resource. For example,
Amazon EC2 Public Cloud. - Access Key and Secret Key - The access keys for your Amazon EC2 account. You generate these keys on the Amazon EC2 Management Console under Security Credentials. For more information, see Managing Access Keys for your AWS Account on the Amazon documentation website.
- Region - Defines the Amazon EC2 region/data center to use. Once you enter your access keys, click Load Regions to show the regions available.
The Locations and Organizations tabs are automatically set to your current context. Add additional contexts to these tabs.
Click Submit to save the Amazon EC2 connection.
For CLI Users
Create the connection with the hammer compute-resource create command. The --user and --password fields acts as the access key and secret key respectively. For example:
# hammer compute-resource create --name "ACME's EC2" --provider "EC2" \
--description "Amazon EC2 Public Cloud` --user "ABCDEFGHIJ1234567" \
--password "*********" --region "us-east-1" --locations "New York" \
--organizations "ACME"
11.3. Adding Amazon EC2 Images on the Satellite Server
Amazon EC2 uses image-based provisioning to create new hosts. This means you need to add image details to your Satellite Server. This includes access details and image location.
For Web UI Users
Navigate to Infrastructure > Compute resource and click the name of your Amazon EC2 connection. The UI displays information about the connection, including an Images tab. This tab contains no images for new providers but you can add new ones. Click New Image and the UI provides a set of fields for the Amazon EC2 image:
-
Name - A plain text name for the image. For example,
Test Amazon EC2 Image. -
Operatingsystem - A field for selecting the image’s base operating system. For example,
RedHat 7.2. -
Architecture - A field for selecting the operating system architecture. For example,
x86_64. -
Username - The SSH user name for image access. This is normally the
rootuser. - Password - The SSH password for image access.
-
Image ID - The Amazon Machine Image (AMI) ID for the image. This is usually in the following format:
ami-xxxxxxxx. For example,ami-b32c14ad. -
User data - Defines if the image supports user data input, such as
cloud-initdata. - IAM role - The Amazon security role used for creating the image.
Click Submit to save the image details.
For CLI Users
Create the image with the hammer compute-resource image create command. Use the --uuid field to store the full path of the image location on the Amazon EC2 server.
# hammer compute-resource image create --name "Test Amazon EC2 Image" \
--operatingsystem "RedHat 7.2" --architecture "x86_64" --username root \
--user-data true --uuid "ami-b32c14ad" --compute-resource "ACME's EC2"
11.4. Adding Amazon EC2 Details to a Compute Profile
We can predefine certain hardware settings for instances on Amazon EC2. You achieve this through adding these hardware settings to a compute profile. For this example, we aim to include some basic hardware settings to the 4-Example profile.
For Web UI Users
Navigate to Infrastructure > Compute profiles and click the name of your profile. For example, use the 4-Example profile you previously created. The UI displays a list of your compute resources. Click on the EC2 connection.
The UI provides a set of fields where you can input Amazon-specific details for the profile. This includes:
- Flavor - The hardware profile on EC2 to use for the host.
-
Image - The image to use for image-based provisioning. For this example, use the
Test EC2 Image. - Availability zone - The target cluster to use within the chosen EC2 region.
- Subnet - The subnet for the EC2 instance. If you have a VPC for provisioning new hosts, use its subnet.
- Security Groups - Defines the cloud-based access rules for ports and IP addresses. Select the groups to apply to the host.
-
Managed IP - Defines the IP address assignment type. This is either a
PublicIP or aPrivateIP.
Click Submit to save the compute profile.
For CLI Users
The compute profile CLI commands are not yet implemented in Red Hat Satellite 6.2. As an alternative, you can include the same settings directly during the host creation process.
11.5. Creating Image-Based Hosts on Amazon EC2
The Amazon EC2 provisioning process creates new hosts from existing images on the Amazon EC2 server.
For Web UI Users
Navigate to Hosts > New host. The UI provides a set of fields where you can input details for the host.
In the Host tab:
-
Enter the Name of the Host. This becomes the provisioned system’s host name. For this example, enter
ec2-test1. -
The provisioning context (Organization and Location) should automatically set to the current context. For this example:
ACMEandNew York. -
Select the Host Group. This should automatically populate most of the new host’s fields. For this example:
Base. -
In Deploy on, select the EC2 connection. For this example:
ACME's EC2. A new tab for virtual machines appears. -
In Compute profile, select a profile to use to automatically populate virtual machine-based settings. For our example:
4-Example.
-
Enter the Name of the Host. This becomes the provisioned system’s host name. For this example, enter
In the Interface tab:
- Click Edit on the host’s interface.
Most of the fields should automatically contain values. Note in particular:
- The Name from the Host tab becomes the DNS name.
- The Satellite Server automatically assigns an IP address for the new host.
- Leave the MAC address blank. The Amazon EC2 server assigns one to the host.
- The Satellite Server should automatically select the Managed, Primary, and Provision options for the first interface on the host. If not, select them.
In the Operating System tab:
- All fields should automatically contain values. Confirm each aspect of the operating system.
- The Image field contains the chosen image from your compute profile. This field also allows you to select a different image to base the new host’s root volume.
- Click Resolve in Provisioning templates to check the new host can identify the right provisioning templates to use.
In the Virtual Machine tab:
- These settings should be populated with details from the chosen host group and compute profile. Modify these settings to suit your needs.
In the Parameters tab:
-
Confirm the
kt_activation_keysparameter exists and is using theexampleactivation key.
-
Confirm the
Click Submit.
For CLI Users
Create the host with the hammer host create command and include --provision-method image to use image-based provisioning. For example:
# hammer host create --name "ec2-test1" --organization "ACME" \
--location "New York" --hostgroup "Base" \
--compute-resource "ACME's EC2" --provision-method image \
--image "Test Amazon EC2 Image" --enabled true --managed true \
--interface "managed=true,primary=true,provision=true,subnet_id=EC2" \
--compute-attributes="flavor_id=m1.small,image_id=TestImage,availability_zones=us-east-1a,security_group_ids=Default,managed_ip=Public"
See Appendix B, Additional Host Parameters for Hammer CLI for more information on additional host creation parameters for this compute resource.
This new host entry triggers the Amazon EC2 server to create the instance, using the pre-existing image as a basis for the new volume.
11.6. Chapter Summary
This chapter showed how to configure Red Hat Satellite 6 to use a Amazon EC2 server and how to provision new hosts through a Amazon EC2 server. This included both network-based hosts and image-based hosts.
If you have no further compute resources to configure with Red Hat Satellite 6, see Chapter 13, Finalizing Provisioning for some final notes on provisioning.
The next chapter explores methods of provisioning containers on a Red Hat Enterprise Linux Atomic Server.
Chapter 12. Provisioning Containers
Containerization is a virtualization method that uses the kernel of an operating system to provide multiple isolated user-space instances. Docker is an open source project that automates the deployment of applications inside Linux containers, and provides the capability to package an application with its runtime dependencies into a container. Linux containers enable rapid application deployment, simpler testing, maintenance, and troubleshooting while improving security.
Red Hat Enterprise Linux Atomic Host is a secure, lightweight, and minimal-footprint operating system optimized to run Linux containers. Red Hat Satellite 6 provides the ability to connect to Red Hat Enterprise Linux Atomic Host and other Docker-based servers. This includes creating new containers from images. In this chapter, the aim is to add a connection to ACME’s Red Hat Enterprise Linux Atomic Host and provision a container.
12.1. Defining Requirements for Container Provisioning
The requirements for provisioning on Red Hat Enterprise Linux Atomic Host include:
A source for images, such as a Docker registry. Red Hat Satellite 6 uses three sources of container images:
- Synchronized Docker images that are a part of the Satellite Server’s application life cycle.
- Public images from Docker Hub.
- Other External registries, including Red Hat’s container image registry. This is explored in Section 12.4, “Adding External Registries to the Satellite Server”.
12.2. Configuring the Red Hat Enterprise Linux Atomic Host
The Atomic Host requires some configuration before adding it to Satellite. This includes exposing the Docker API to the Satellite Server.
Log into the Atomic Host and edit the /etc/sysconfig/docker file:
$ vi /etc/sysconfig/docker
Find the OPTIONS parameter and modify it to expose the API:
OPTIONS='--selinux-enabled -H unix:///var/run/docker.sock -H tcp://0.0.0.0:2375'
Use either port 2375 or 2376 for the connection. This is because the Satellite Server contains special SELinux rules to allow access to these ports. Using an alternative port results in authentication failure.
Import the Satellite Server certificate:
$ curl http://satellite.example.com/pub/katello-server-ca.crt \
-o /etc/pki/ca-trust/source/anchors/katello-server-ca.crt
$ update-ca-trust
Restart the docker service:
$ systemctl restart docker
Check the port is exposed:
$ netstat -tulnp | grep 2375
12.3. Adding an Atomic Host Connection to the Satellite Server
This process adds the Red Hat Enterprise Linux Atomic connection in the Satellite Server’s compute resources.
For Web UI Users
Navigate to Infrastructure > Compute resource and click New Compute Resource. The UI provides a set of fields for the compute resource:
-
Name - A plain text name for the resource. For example,
ACME's Atomic. -
Provider - A field for selecting the compute resource provider. Select
Dockerand a new set of fields appear. -
Description - A plain text description for the resource. For example,
ACME's Atomic Host at atomic.example.com. -
URL - A URL pointing to the Docker API on the Atomic Host. For example:
http://atomic.example.com:2375 - Username, Password, Email - The authentication details for the Docker hub. The Satellite Server uses these details to make the Atomic host download images from the Docker hub. These details are not required if using public images or images managed on the Satellite Server.
The Locations and Organizations tabs are automatically set to your current context. Add additional contexts to these tabs.
Click Submit to save the Red Hat OpenStack Platform connection.
For CLI Users
Create the connection with the hammer compute-resource create command:
# hammer compute-resource create --provider docker \
--name "ACME's Atomic" --url "http://atomic.example.com:2375" \
--organizations 'Default Organization' --locations 'Default Location'
12.4. Adding External Registries to the Satellite Server
The Red Hat Satellite 6 Content Management Guide discusses how Red Hat Satellite 6 can synchronize Docker images and manage them through Content Views. However, in others circumstances, you might only require access to an external registry without needing to synchronize the content. Red Hat Satellite 6 provides the ability to add an external Docker registry.
For Web UI Users
Navigate to Containers > Registries and click New Registry. The UI displays a set of fields for the new registry:
-
Name - A plain text name for the registry. For example:
Red Hat. -
URL - The location of the registry. For example:
https://registry.access.redhat.com. -
Description - A plain text description of the registry. For example:
Red Hat Docker Image Registry. - Username and Password - Authentication details for private registries.
The Locations and Organizations tabs are automatically set to your current context. Add additional contexts to these tabs.
Click Submit to save the external registry.
For CLI Users
Create the registry with the hammer docker registry create command:
# hammer docker registry create --name "Red Hat" \
--url "https://registry.access.redhat.com" \
--description "Red Hat Docker Image Registry"
12.5. Creating Containers with the Satellite Server
The container provisioning process differs from the standard host creation process. Instead of creating containers through the Hosts > New host menu, you use the Containers > New container option.
For Web UI Users
Navigate to Containers > New container. The UI provides a wizard to create the container:
- Preliminary
This section defines the Atomic host to use and the provisioning context.
- Select the Docker compute resource. For our example: "ACME’s Atomic"
-
The provisioning context (Organization and Location) should automatically set to the current context. For this example:
ACMEandNew York.
- Image
This section provides the image selection methods, which includes three different methods:
- Content View - Select an image from the Satellite Server’s application life cycle. Select the Lifecycle Environment, the Content View, the Repository, the Docker Tag, and the Capsule Server containing the docker content.
- Docker Hub - Provides a search feature for Docker images on the Docker hub. Type a Search keyword, click the magnifying glass icon, and a list of images displays. Select an image, then select a Tag for that image.
- External registry - Provides a search feature for Docker images on external Docker registries. Type a Search keyword, click the magnifying glass icon, and a list of images displays. Select an image, then select a Tag for that image.
- Configuration
This section provides some initial configuration for the container:
In the Basic options:
- Enter a Name for the container.
- Enter a Command to run on the container.
-
Enter an Entry point. The default is
/bin/sh -c.
In the Compute options:
- Enter the CPU sets, which assigns individual CPUs.
- Enter the CPU share, which set the share of CPU time available to containerized tasks.
- Enter an amount for Memory, which allocates memory usage for the container.
- Environment
This section provides some configuration to the Atomic host for when the container runs:
-
Environment variables - Allows you to define a set of environment variables. For example:
LANG=en_US.UTF-8. - Exposed Ports - Opens ports in the container. For example, you can open SSH communication to the container on port 22.
- DNS - Enter DNS servers for the container.
- Run? - Choose whether to run the container after creation.
-
Shell - Provides shell options, including a TTY console and standard streams (
STDIN,STDOUT, andSTDERR).
-
Environment variables - Allows you to define a set of environment variables. For example:
After completing all options in the wizard, click Submit.
For CLI Users
The following are three examples of the hammer docker container create command. First, creating a container from a Content View:
# hammer docker container create --compute-resource "ACME's Atomic" \
--repository-name "rhel7" --tag "latest" --name "docker-test1" \
--command "bash" --organizations "ACME" --locations "New York"
Next, provisioning from the Docker hub:
# hammer docker container create --compute-resource "ACME's Atomic" \
--repository-name "docker.io/fedora" --tag latest \
--name "docker-test2" --command bash --organizations "ACME" \
--locations "New York"
And finally, provisioning from an external registry:
# hammer docker container create --compute-resource "ACME's Atomic" \
--registry-id 1 --repository-name "rhel" --tag latest \
--name "docker-test3 --command bash --organizations "ACME" \
--locations "New York"
This creates a new container from the chosen image and runs it on the chosen Red Hat Enterprise Linux Atomic Host.
12.6. Chapter Summary
This chapter showed how to configure Red Hat Satellite 6 to add and manage a Red Hat Enterprise Linux Atomic Host and how to provision containers on the Atomic host.
This guide has no further provisioning scenarios. See Chapter 13, Finalizing Provisioning for some final notes on provisioning.
Chapter 13. Finalizing Provisioning
Provisioning new hosts is a central part of Red Hat Satellite 6’s functionality. This chapter recaps on the topics discussed through the course of this guide and how it impacts other Red Hat Satellite 6 features.
13.1. Completing Scenario Objectives
This guide presented multiple provisioning scenarios involving a fictional company called ACME. Through this scenario, this guide has demonstrated how to achieve the following:
- Configuring Red Hat Satellite 6 for Provisioning
- This guide has explored how to configure Red Hat Satellite 6’s resources and services for provisioning purposes. This includes the installation media, templates, compute resources, and networking. In addition, this guide demonstrated how to configure a Capsule Server to use DHCP, DNS, and TFTP services for PXE-based provisioning.
- Provisioning Bare Metal Hosts
- This guide showed how to provision bare metal hosts through different methods, such as unattended provisioning, Discovery-based provisioning, and PXE-less provisioning.
- Provisioning Virtual Machines
- This guide provided examples on provisioning from virtualization environments, such as KVM servers, Red Hat Enterprise Virtualization, and VMware vSphere.
- Provisioning Cloud Instances
- This guide demonstrated how to provision cloud instances from public clouds (Amazon EC2) and private clouds (Red Hat OpenStack Platform).
- Provisioning Container
- This guide showed how to provision containers on Red Hat Enterprise Linux Atomic Host.
13.2. Integrating with Other Applications
Red Hat Satellite 6 extends the provisioning process with the following applications:
- Puppet
- Each Capsule Server (including the integrated Capsule) can act as a Puppet Master. The Satellite Server installs a Puppet Agent on each new host. This provides a method to automatically configure resources and services on hosts. You can add Puppet classes during the host provisioning process under the Puppet Classes tab. For more information, see the Red Hat Satellite 6 Puppet Guide.
- Red Hat CloudForms
- Red Hat CloudForms can connect to Red Hat Satellite 6 and control certain levels of provisioning and host management. For more information, see the Red Hat CloudForms Integration with Red Hat Satellite 6 Guide.
13.3. Referring to Other Documentation
The following guides provide information on related aspects of Red Hat Satellite 6 and provide further examples:
- Red Hat Satellite 6 Host Configuration Guide
A guide to using the main Red Hat Satellite 6 features, including infrastructure management and provisioning.
https://access.redhat.com/documentation/en/red-hat-satellite/6.2/paged/host-configuration-guide/
- Red Hat Satellite 6 Server Administration Guide
A guide on administering a Red Hat Satellite 6 Server.
https://access.redhat.com/documentation/en/red-hat-satellite/6.2/paged/server-administration-guide
- Red Hat Satellite 6 Virtual Instances Guide
A guide on managing virtual instances with the
virt-whotool.https://access.redhat.com/documentation/en/red-hat-satellite/6.2/paged/virtual-instances-guide
- Red Hat Satellite 6 Puppet Guide
A guide to building your own Puppet module and importing it into Red Hat Satellite 6.
https://access.redhat.com/documentation/en/red-hat-satellite/6.2/paged/puppet-guide/
Appendix A. Initialization Script for Provisioning Examples
If you have not followed the examples in the Red Hat Satellite 6 Content Management Guide, you can use the following initialization script to create an environment for provisioning examples.
Create a script file (sat6-content-init.sh) and include the following:
#!/bin/bash

MANIFEST=$1

# Import the content from Red Hat CDN
hammer organization create --name "ACME" --label "ACME" \
--description "Our example organization for managing content."
hammer subscription upload --file ~/$MANIFEST --organization "ACME"
hammer repository-set enable \
--name "Red Hat Enterprise Linux 7 Server (RPMs)" \
--releasever "7Server" --basearch "x86_64" \
--product "Red Hat Enterprise Linux Server" --organization "ACME"
hammer repository-set enable \
--name "Red Hat Enterprise Linux 7 Server (Kickstart)" \
--releasever "7Server" --basearch "x86_64" \
--product "Red Hat Enterprise Linux Server" --organization "ACME"
hammer repository-set enable \
--name "Red Hat Satellite Tools 6.2 (for RHEL 7 Server) (RPMs)" \
--basearch "x86_64" --product "Red Hat Enterprise Linux Server" \
--organization "ACME"
hammer product synchronize --name "Red Hat Enterprise Linux Server" \
--organization "ACME"

# Create our application life cycle
hammer lifecycle-environment create --name "Development" \
--description "Environment for ACME's Development Team" \
--prior "Library" --organization "ACME"
hammer lifecycle-environment create --name "Testing" \
--description "Environment for ACME's Quality Engineering Team" \
--prior "Development" --organization "ACME"
hammer lifecycle-environment create --name "Production" \
--description "Environment for ACME's Product Releases" \
--prior "Testing" --organization "ACME"

# Create and publish our Content View
hammer content-view create --name "Base" \
--description "Base operating system" \
--repositories "Red Hat Enterprise Linux 7 Server RPMs x86_64 7Server,Red Hat Satellite Tools 6.2 for RHEL 7 Server RPMs x86_64" \
--organization "ACME"
hammer content-view publish --name "Base" \
--description "Initial content view for our operating system" \
--organization "ACME"
hammer content-view version promote --content-view "Base" --version 1 \
--to-lifecycle-environment "Development" --organization "ACME"
hammer content-view version promote --content-view "Base" --version 1 \
--to-lifecycle-environment "Testing" --organization "ACME"
hammer content-view version promote --content-view "Base" --version 1 \
--to-lifecycle-environment "Production" --organization "ACME"
Set executable permissions on the script:
# chmod +x sat6-content-init.sh
Download a copy of your Subscription Manifest from the Red Hat Customer Portal and run the script on the manifest:
# ./sat6-content-init.sh manifest_98f4290e-6c0b-4f37-ba79-3a3ec6e405ba.zip
This imports the necessary Red Hat content for the provisioning examples in this guide.
Appendix B. Additional Host Parameters for Hammer CLI
This appendix provides some information on additional parameters for the hammer host create command.
B.1. Common Interface Parameters
These parameters are used with the --interface option for all provisioning types:
| Parameter | Description | |
|---|---|---|
| mac | MAC address for the interface | |
| ip | IP address for the interface | |
| type |
The type of interface. For example: | |
| name | The host name associated with this interface` | |
| subnet_id | The subnet ID on the Satellite Server | |
| domain_id | The domain ID on the Satellite Server | |
| identifier |
The device identifier. For example: | |
| managed |
Boolean for managed interfaces. Set to | |
| primary |
Boolean for primary interfaces. Managed hosts needs to have one primary interface. Set to | |
| provision |
Boolean for whether to provision on this interface. Set to | |
| virtual |
Boolean for whether the interface is a VLAN interface. Set to |
Use the following parameters if virtual is true:
| Parameter | Description | |
|---|---|---|
| tag | VLAN tag, this attribute has precedence over the subnet VLAN ID. Only for virtual interfaces. | |
| attached_to |
Identifier of the interface to which this interface belongs. For example: |
Use the following parameters if type is bond:
| Parameter | Description | |
|---|---|---|
| mode |
The bonding mode. One of | |
| attached_devices |
Identifiers of slave interfaces. For example: |
Use the following parameters if type is bmc:
| Parameter | Description | |
|---|---|---|
| provider |
The BMC provider. Only | |
| username | The username for the BMC device | |
| password | The password for the BMC device |
B.2. EC2 Parameters
Available parameters for --compute-attributes:
| Parameter | Description | |
|---|---|---|
| flavor_id | The EC2 flavor to use | |
| image_id | The AMI ID of the image to use | |
| availability_zone | The availability zone within the region of the EC2 provider | |
| security_group_ids | The IDs for security groups to use | |
| managed_ip | Defines whether to use a public or private IP |
B.3. Libvirt Parameters
Available keys for --compute-attributes:
| Parameter | Description | |
|---|---|---|
| cpus | Number of CPUs | |
| memory | Amount of memory in bytes | |
| start | Boolean value that defines whether to start the machine or not |
Available keys for --interface:
| Parameter | Description | |
|---|---|---|
| compute_type |
Either | |
| compute_network / compute_bridge | Name of the network or physical interface | |
| compute_model |
The interface model. One of |
Available keys for --volume:
| Parameter | Description | |
|---|---|---|
| pool_name | The storage pool to store the volume | |
| capacity |
The capacity of the volume. For example: | |
| format_type |
The disk type. Either |
B.4. Red Hat OpenStack Platform Parameters
Available keys for --compute-attributes:
| Parameter | Description | |
|---|---|---|
| flavor_ref | The flavor to use | |
| image_ref | The image to use | |
| tenant_id | The tenant to use | |
| security_groups | A list of security groups to use | |
| network | The network to connect the instance |
B.5. Red Hat Enterprise Virtualization Parameters
Available keys for --compute-attributes:
| Parameter | Description | |
|---|---|---|
| cluster | The cluster ID to contain the host | |
| template | The hardware profile to use | |
| cores | The number of CPU cores to use | |
| memory | The amount of memory in bytes |
Available keys for --interface:
| Parameter | Description | |
|---|---|---|
| compute_name |
The interface name. For example: | |
| compute_network | The network in the cluster to use |
Available keys for --volume:
| Parameter | Description | |
|---|---|---|
| size_gb | Volume size in GB | |
| storage_domain | Defines the storage domain to use | |
| bootable | Boolean value that defines the root volume. Only one volume can be bootable |
B.6. VMware Interface Parameters
Available keys for --compute-attributes:
| Parameter | Description | |
|---|---|---|
| cpus | Number of CPUs for the host | |
| corespersocket | Number of cores per CPU socket. Applicable to hosts using hardware versions less than v10. | |
| memory_mb | Amount of memory in MB | |
| cluster | Cluster ID for the host | |
| path | Path to folder to organize the host | |
| guest_id | Guest OS ID | |
| scsi_controller_type | ID of the VMware controller | |
| hardware_version | VMware hardware version ID | |
| start | Boolean value that defines whether to start the machine or not |
Available keys for --interface:
| Parameter | Description | |
|---|---|---|
| compute_type |
Type of the network adapter. One of | |
| compute_network | VMware network ID |
Available keys for --volume:
| Parameter | Description | |
|---|---|---|
| datastore | The datastore ID | |
| name | The name of the volume | |
| size_gb | The size in GB | |
| thin | Boolean value that defines whether to use thin provisioning or not | |
| eager_zero | Boolean value that defines whether to use Eager Zero thick provisioning |
Appendix C. Provisioning FIPS Compliant Hosts
Red Hat Satellite 6 supports provisioning hosts that comply with the National Institute of Standards and Technology’s Security Requirements for Cryptographic Modules standard, reference number FIPS 140-2, referred to here as FIPS.
Red Hat Satellite 6 is not supported on a FIPS enabled host.
To enable the provisioning of hosts that are FIPS compliant, complete the following changes:
- Identify the relevant operating systems, locations, and organizations
- Create and enable the FIPS provisioning templates
- Change the provisioning password hashing algorithm
- Change the Puppet message digest algorithm
- Set the FIPS enabled parameter
When these changes are complete, the new provisioning templates will be associated with those operating systems, locations, and organizations you specify. When you provision a host to those operating systems, locations, and organizations, the host will have the FIPS-compliant settings applied. To confirm that these settings have been successful, complete the steps in Section C.6, “Verifying FIPS Mode is Enabled”.
Prerequisites
- Complete the configuration steps from the Authentication section in the Red Hat Satellite 6 Hammer CLI Guide. This allows you to run Hammer commands without providing your Satellite username and password each time.
C.1. Identifying the Relevant Operating Systems, Locations, and Organizations
Before creating the FIPS-compliant templates in Satellite, you must identify those locations, organizations and operating systems to which you want to deploy FIPS-compliant hosts. For example, if you will only deploy Red Hat Enterprise Linux 7 hosts as FIPS compliant, associate the template with only Red Hat Enterprise Linux 7.
List all locations.
Example
$ hammer location list
---|-----------------
ID | NAME
---|-----------------
2  | Default Location
---|-----------------
Note the value in the
NAMEcolumn of those locations to which you want to deploy FIPS-compliant hosts.List all organizations.
Example
---|----------------------|----------------------|------------
ID | NAME                 | LABEL                | DESCRIPTION
---|----------------------|----------------------|------------
1  | Default Organization | Default_Organization |
2  | Sales                | Sales_Department     |
---|----------------------|----------------------|------------
Note the value in the
NAMEcolumn of those organizations to which you want to deploy FIPS-compliant hosts.List all operating systems.
Example
$ hammer os list
---|-----------------|--------------|-------
ID | TITLE           | RELEASE NAME | FAMILY
---|-----------------|--------------|-------
2  | RedHat 6.6      |              | Redhat
3  | RedHat 7.1      |              | Redhat
1  | RedHat 7.2      |              | Redhat
4  | RedHat 6.7      |              | Redhat
---|-----------------|--------------|-------
Note the value in the
TITLEcolumn of those operating systems to which you want to deploy FIPS-compliant hosts.
C.2. Creating and Enabling the FIPS Provisioning Templates
The FIPS provisioning templates are provided in a git repository. In this procedure you import them into the Satellite environment, then associate them with the desired operating systems, locations, and organizations.
On the Satellite Server, clone the git repository containing the FIPS enabled templates, then change into the repository’s directory.
$ git clone https://github.com/RedHatSatellite/satellite6-fips-client
$ cd satellite6-fips-client
This repository contains the following Embedded RuBy (ERB) templates. These are plain text files, which you can view to see in detail the configuration settings they contain.
Kickstart_Default_PXELinux_FIPS.erb- Updated PXELinux template
fips_packages.erb-
Packages required by FIPS mode (for example,
dracut-fips)
-
Packages required by FIPS mode (for example,
Satellite_Kickstart_Default_FIPS.erb-
Kickstart template with modifications to call the
fips_packagessnippet
-
Kickstart template with modifications to call the
puppet.conf.erb-
Updated
puppet.confconfiguration file with updated (SHA256) message digest algorithm
-
Updated
Add the PXELinux FIPS template.
$ hammer template create  --name "Kickstart Default PXELinux FIPS" \
  --file Kickstart_Default_PXELinux_FIPS.erb  \
  --locations LOCATIONS \
  --organizations ORGANIZATION \
  --operatingsystems OS \
  --type PXELinux
Replace the placeholder values
LOCATIONS,ORGANIZATION, andOSwith the values you noted in Section C.1, “Identifying the Relevant Operating Systems, Locations, and Organizations”. If any value contains non-aphabetical characters, enclose the value in quotation marks (").The message
Config template createdindicates success.Example
$ hammer template create  --name "Kickstart Default PXELinux FIPS" \
  --file Kickstart_Default_PXELinux_FIPS.erb \
  --locations "Default Location" \
  --organizations "Default Organization","Sales" \
  --operatingsystems "RedHat 6.6","RedHat 7.1","RedHat 7.2","RedHat 6.7" \
  --type PXELinux
Add the Satellite Kickstart Default FIPS template.
$ hammer template create  --name "Satellite Kickstart Default FIPS" \
  --file Satellite_Kickstart_Default_FIPS.erb  \
  --locations LOCATIONS \
  --organizations ORGANIZATION \
  --operatingsystems OS \
  --type provision
Replace the placeholder values
LOCATIONS,ORGANIZATION, andOSwith the values you noted in Section C.1, “Identifying the Relevant Operating Systems, Locations, and Organizations”. If any value contains non-aphabetical characters, enclose the value in quotation marks (").The message
Config template createdindicates success.Example
$ hammer template create  --name "Satellite Kickstart Default FIPS" \
  --file Satellite_Kickstart_Default_FIPS.erb  \
  --locations "Default Location" \
  --organizations "Default Organization","Sales" \
  --operatingsystems "RedHat 6.6","RedHat 7.1","RedHat 7.2","RedHat 6.7" \
  --type provision
Add the FIPS Packages snippet.
$ hammer template create  --name "fips_packages" \
  --file fips_packages.erb \
  --locations LOCATIONS \
  --organizations ORGANIZATION \
  --type snippet
Replace the placeholder values LOCATIONS and ORGANIZATION with the values you noted in Section C.1, “Identifying the Relevant Operating Systems, Locations, and Organizations”. If any value contains non-aphabetical characters, enclose the value in quotation marks (").
The message
Config template createdindicates success.Example
$ hammer template create  --name "fips_packages" \
  --file fips_packages.erb \
  --locations "Default Location" \
  --organizations "Default Organization","Sales" \
  --type snippet
Update the default Puppet configuration snippet.
$ hammer template update --name puppet.conf \
  --file puppet.conf.erb  \
  --type snippet
The message
Config template createdindicates success.Update the Operating System Object to use the new templates.
Now that the new FIPS templates have been added to Satellite, they must be set as default templates for the desired operating system.
Identify the IDs of the Satellite Kickstart Default FIPS and Kickstart Default PXELinux FIPS templates.
Example
$ hammer template list
---|---------------------------------------|----------
ID | NAME                                  | TYPE
---|---------------------------------------|----------
41 | redhat_register                       | snippet
42 | saltstack_minion                      | snippet
53 | Kickstart Default PXELinux FIPS       | PXELinux
46 | Satellite Kickstart Default           | provision
48 | Satellite Kickstart Default Finish    | finish
54 | Satellite Kickstart Default FIPS      | provision
47 | Satellite Kickstart Default User Data | user_data
50 | subscription_manager_registration     | snippet
29 | UserData default                      | user_data
30 | WAIK default PXELinux                 | PXELinux
---|---------------------------------------|----------
In this example, the IDs are 54 and 53 respectively. These IDs are installation specific.
Specify the FIPS templates as default.
$ hammer os set-default-template --config-template-id TEMPLATE \
--id OS
Replace the placeholders TEMPLATE and OS with the IDs of the FIPS templates, and the desired operating system, noted earlier. Repeat this command for every combination of FIPS template and operating system. It does not accept a comma-separated list of values.
In this example, the FIPS templates are set as default for Red Hat Enterprise Linux 7.2, identified in an earlier example as ID 1.
Example
$ hammer os set-default-template --config-template-id 54 --id 1
$ hammer os set-default-template --config-template-id 53 --id 1
C.3. Change the Provisioning Password Hashing Algorithm
This sets the password hashing algorithm used in provisioning to SHA256. This configuration setting must be applied for each operating system you want to deploy as FIPS compliant.
This is required ONLY if Red Hat Satellite 6 was upgraded from Satellite 6.1. Satellite 6.2 uses SHA256 by default.
Identify the Operating System IDs.
Example
$ hammer os list
---|-----------------|--------------|-------
ID | TITLE           | RELEASE NAME | FAMILY
---|-----------------|--------------|-------
2  | RedHat 6.6      |              | Redhat
3  | RedHat 7.1      |              | Redhat
1  | RedHat 7.2      |              | Redhat
4  | RedHat 6.7      |              | Redhat
---|-----------------|--------------|-------
Update each operating system’s password hash value.
$ hammer os update --title OS \
  --password-hash SHA256
Repeat this command for each of the desired operating systems, using the matching value in the
TITLEcolumn. It does not accept a comma-separated list of values.Example
$ hammer os update --title "RedHat 7.2" \
  --password-hash SHA256
C.4. Switching to a FIPS Compliant Message Algorithm for Puppet
On the Satellite Server, all external Capsule Servers, and all existing hosts, configure Puppet to use the SHA256 message digest algorithm.
Edit the /etc/puppet/puppet.conf file, adding the line digest_algorithm = sha256 in the [main] stanza.
This change will be overwritten on every upgrade of Satellite, so needs to be reapplied afterward.
Because the Puppet message digest algorithm is changed on the Satellite Server and all Capsule Servers, it must also be changed on all hosts, including those that are not FIPS compliant.
In the event of a message digest algorithm mismatch, the client will download its facts again. This will result in a noticeable increased load on the Satellite Server or external Capsule Servers.
C.5. Setting the FIPS Enabled Parameter
To provision a FIPS compliant host, the FIPS templates require a parameter named fips_enabled to be set to true. If this is not set to true, or is absent, the FIPS specific changes will not be applied. This parameter may be specified when provisioning an individual host, or set for a hostgroup. Retrospectively enabling FIPS compliance on a host is outside the scope of this guide and likely to cause issues.
To set this parameter when provisioning a host, append --parameters fips_enabled=true to the Hammer command.
To set this parameter on an existing host group, use the Hammer sub-command set-parameter. For more information, see the output of the command hammer hostgroup set-parameter --help. Any host provisioned to this hostgroup will inherit the fips_enabled parameter from the hostgroup.
Example
$ hammer hostgroup set-parameter --name fips_enabled \
 --value true \
 --hostgroup prod_servers
C.6. Verifying FIPS Mode is Enabled
To verify these FIPS compliance changes have been successful, you must provision a host and check its configuration.
-
Deploy a host using the FIPS templates, ensuring that parameter named fips_enabled is set to
true. - Log in to the new host as a root-equivalent account.
-
Enter the command
cat /proc/sys/crypto/fips_enabled. A value of1confirms that FIPS mode is enabled.