
Configuring Capsules with a Load Balancer
Distributing load between Capsule Servers
Abstract
Providing Feedback on Red Hat Documentation
We appreciate your input on our documentation. Please let us know how we could make it better.
You can submit feedback by filing a ticket in Bugzilla:
- Navigate to the Bugzilla website.
-
In the Component field, use
Documentation. - In the Description field, enter your suggestion for improvement. Include a link to the relevant parts of the documentation.
- Click Submit Bug.
Chapter 1. Load Balancing Solution Architecture
You can configure Satellite Server to use a load balancer to distribute client requests and network load across multiple Capsule Servers. This results in an overall performance improvement on Capsule Servers.
This guide outlines how to prepare Satellite Server and Capsule Server for load balancing, and provides guidelines on how to configure a load balancer and register clients in a load-balanced setup.
A load-balanced setup consists of the following components:
- Satellite Server
- Two or more Capsule Servers
- A load balancer
- Multiple clients
Figure 1.1. Satellite Load Balancing Solution Architecture
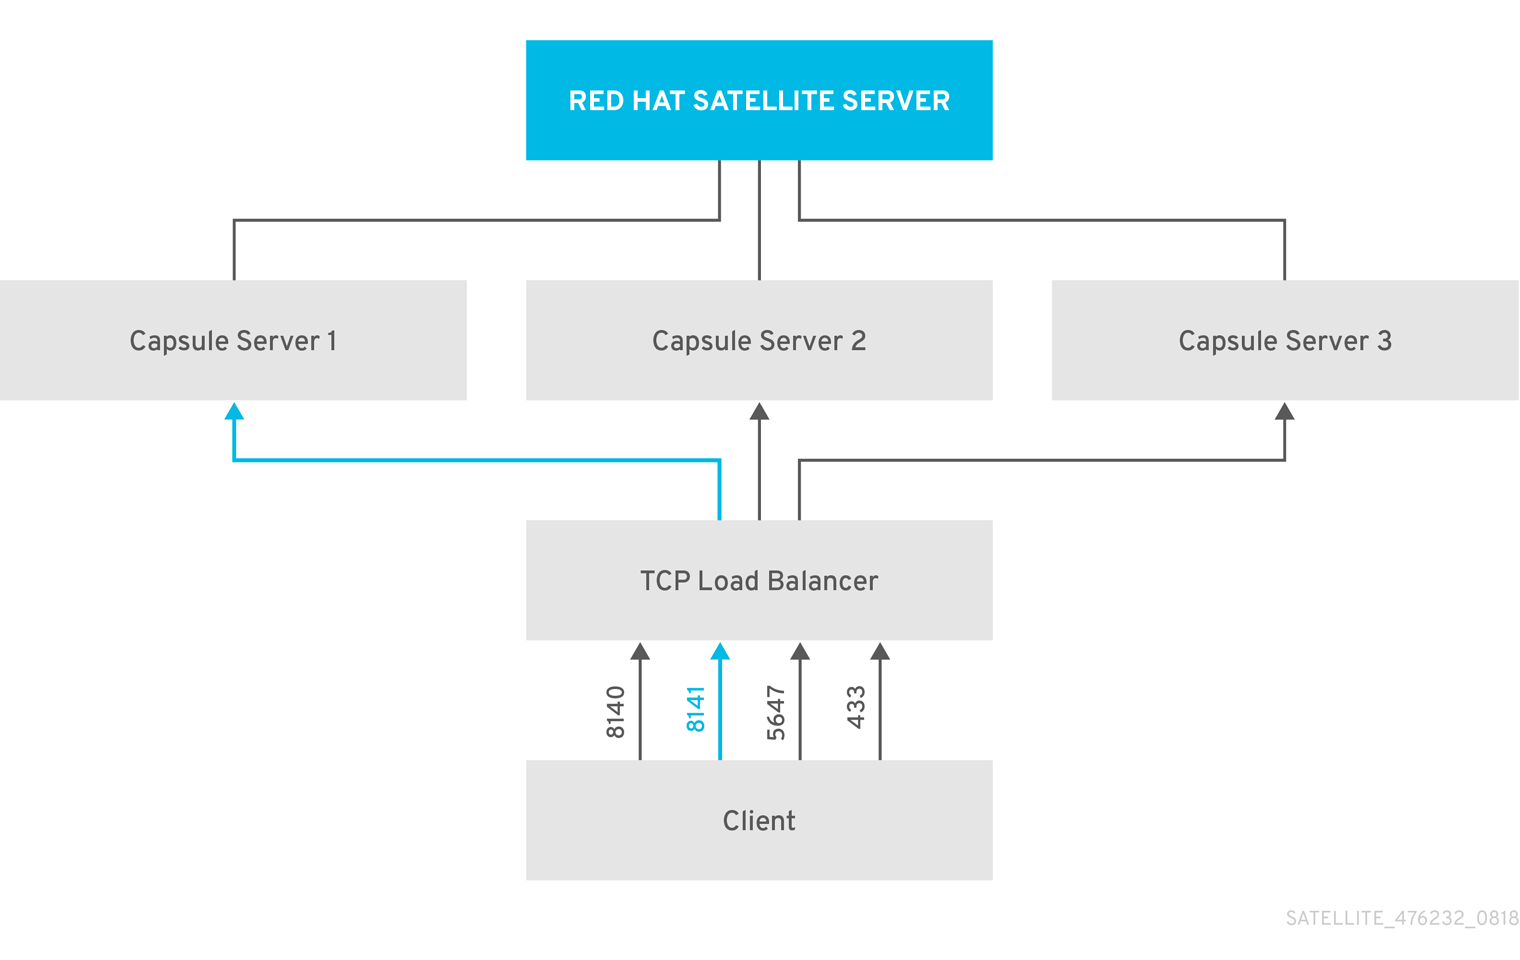
In a load-balanced setup, nearly all Capsule functionality continues to work as expected when one Capsule Server is down, for planned or unplanned maintenance. Load balancer works with the following services and features:
-
Registration using
subscription-manager -
Content Management with
yumrepositories - Optional: Puppet
In the load-balanced setup, a load balancer distributes load only for the services and features mentioned above. If other services, such as provisioning or virt-who, are running on the individual Capsules, you must access them directly through Capsules and not through the load balancer.
Managing Puppet Limitations
Puppet Certificate Authority (CA) management does not support certificate signing in a load-balanced setup. Puppet CA stores certificate information, such as the serial number counter and CRL, on the file system. Multiple writer processes that attempt to use the same data can corrupt it.
To manage this Puppet limitation, complete the following steps:
- Configure Puppet certificate signing on one Capsule Server, typically the first system where you configure Capsule Server for load balancing.
- Configure the clients to send CA requests to port 8141 on a load balancer.
- Configure a load balancer to redirect CA requests from port 8141 to port 8140 on the system where you configure Capsule Server to sign Puppet certificates.
Chapter 2. Load Balancing Considerations
Distributing load between several Capsule Servers prevents any one Capsule from becoming a single point of failure. Configuring Capsules to use a load balancer can provide resilience against planned and unplanned outages. This improves availability and responsiveness.
Consider the following guidelines when configuring load balancing:
- If you use Puppet, Puppet certificate signing is assigned to the first Capsule that you configure. If the first Capsule is down, clients cannot obtain Puppet content.
- This solution does not use Pacemaker or other similar HA tools to maintain one state across all Capsules. To troubleshoot issues, reproduce the issue on each Capsule, bypassing the load balancer.
Additional Maintenance Required for Load Balancing
Configuring Capsules to use a load balancer results in a more complex environment and requires additional maintenance.
The following additional steps are required for load balancing:
- You must ensure that all Capsules have the same Content Views and synchronize all Capsules to the same Content View versions
- You must upgrade each Capsule in sequence
- You must backup each Capsule that you configure regularly
Upgrading Capsule Servers in a Load Balancing Configuration
To upgrade Capsule Servers from 6.10 to 6.11, complete the Upgrading Capsule Servers procedure in Upgrading and Updating Red Hat Satellite. There are no additional steps required for Capsule Servers in a load balancing configuration.
Chapter 3. Prerequisites for Configuring Capsule Servers for Load Balancing
To configure Capsule Servers for load balancing, complete the following procedures described in Installing Capsule Server. Satellite does not support configuring existing Capsule Servers for load balancing.
Chapter 4. Configuring Capsule Servers for Load Balancing
This chapter outlines how to configure Capsule Servers for load balancing. Proceed to one of the following sections depending on your Satellite Server configuration:
- Section 4.1, “Configuring Capsule Server with Default SSL Certificates for Load Balancing without Puppet”
- Section 4.2, “Configuring Capsule Server with Default SSL Certificates for Load Balancing with Puppet”
- Section 4.3, “Configuring Capsule Server with Custom SSL Certificates for Load Balancing without Puppet”
- Section 4.4, “Configuring Capsule Server with Custom SSL Certificates for Load Balancing with Puppet”
Use different file names for the Katello certificates you create for each Capsule Server. For example, name the certificate archive file with Capsule Server FQDN.
4.1. Configuring Capsule Server with Default SSL Certificates for Load Balancing without Puppet
The following section describes how to configure Capsule Servers that use default SSL certificates for load balancing without Puppet.
Complete this procedure on each Capsule Server that you want to configure for load balancing.
Procedure
On Satellite Server, generate Katello certificates for Capsule Server, for example:
# capsule-certs-generate \
--foreman-proxy-fqdn capsule.example.com \
--certs-tar "/root/capsule.example.com-certs.tar" \
--foreman-proxy-cname loadbalancer.example.com
Retain a copy of the example
satellite-installercommand that is output by thecapsule-certs-generatecommand for installing Capsule Server certificate.Copy the certificate archive file from Satellite Server to Capsule Server.
# scp /root/capsule.example.com-certs.tar \
root@capsule.example.com:/root/capsule.example.com-certs.tar
Append the following options to the
satellite-installercommand that you obtain from the output of thecapsule-certs-generatecommand.--certs-cname "loadbalancer.example.com" \ --enable-foreman-proxy-plugin-remote-execution-sshOn Capsule Server, enter the
satellite-installercommand, for example:# satellite-installer --scenario capsule \ --foreman-proxy-register-in-foreman "true" \ --foreman-proxy-foreman-base-url "https://satellite.example.com" \ --foreman-proxy-trusted-hosts "satellite.example.com" \ --foreman-proxy-trusted-hosts "capsule.example.com" \ --foreman-proxy-oauth-consumer-key "oauth key" \ --foreman-proxy-oauth-consumer-secret "oauth secret" \ --certs-tar-file "capsule.example.com-certs.tar" \ --certs-cname "loadbalancer.example.com" \ --enable-foreman-proxy-plugin-remote-execution-ssh
4.2. Configuring Capsule Server with Default SSL Certificates for Load Balancing with Puppet
The following section describes how to configure Capsule Servers that use default SSL certificates for load balancing with Puppet.
If you use Puppet in your Satellite configuration, you must complete the following procedures:
Configuring Capsule Server to Generate and Sign Puppet Certificates
Complete this procedure only for the system where you want to configure Capsule Server to generate and sign Puppet certificates for all other Capsule Servers that you configure for load balancing. In the examples in this procedure, the FQDN of this Capsule Server is capsule-ca.example.com.
On Satellite Server, generate Katello certificates for the system where you configure Capsule Server to generate and sign Puppet certificates:
# capsule-certs-generate \
--foreman-proxy-fqdn capsule-ca.example.com \
--certs-tar "/root/capsule-ca.example.com-certs.tar" \
--foreman-proxy-cname loadbalancer.example.com
Retain a copy of the example
satellite-installercommand that is output by thecapsule-certs-generatecommand for installing Capsule Server certificate.Copy the certificate archive file from Satellite Server to Capsule Server:
# scp /root/capsule-ca.example.com-certs.tar \
root@capsule-ca.example.com:capsule-ca.example.com-certs.tar
Append the following options to the
satellite-installercommand that you obtain from the output of thecapsule-certs-generatecommand:--certs-cname "loadbalancer.example.com" \ --puppet-dns-alt-names "loadbalancer.example.com" \ --puppet-ca-server "capsule-ca.example.com" \ --foreman-proxy-puppetca "true" \ --puppet-server-ca "true" \ --enable-foreman-proxy-plugin-remote-execution-ssh
On Capsule Server, enter the
satellite-installercommand, for example:# satellite-installer --scenario capsule \ --foreman-proxy-register-in-foreman "true" \ --foreman-proxy-foreman-base-url "https://satellite.example.com" \ --foreman-proxy-trusted-hosts "satellite.example.com" \ --foreman-proxy-trusted-hosts "capsule-ca.example.com" \ --foreman-proxy-oauth-consumer-key "oauth key" \ --foreman-proxy-oauth-consumer-secret "oauth secret" \ --certs-tar-file "capsule-ca.example.com-certs.tar" \ --puppet-server-foreman-url "https://satellite.example.com" \ --certs-cname "loadbalancer.example.com" \ --puppet-dns-alt-names "loadbalancer.example.com" \ --puppet-ca-server "capsule-ca.example.com" \ --foreman-proxy-puppetca "true" \ --puppet-server-ca "true" \ --enable-foreman-proxy-plugin-remote-execution-script \ --foreman-proxy-content-puppet true \ --enable-puppet \ --puppet-server true \ --puppet-server-foreman-ssl-ca /etc/pki/katello/puppet/puppet_client_ca.crt \ --puppet-server-foreman-ssl-cert /etc/pki/katello/puppet/puppet_client.crt \ --puppet-server-foreman-ssl-key /etc/pki/katello/puppet/puppet_client.key
On Capsule Server, stop the Puppet server:
# puppet resource service puppetserver ensure=stopped
Generate Puppet certificates for all other Capsule Servers that you configure for load balancing, except the first system where you configure Puppet certificates signing:
# puppetserver ca generate --certname capsule.example.com \
--subject-alt-names loadbalancer.example.com --ca-client
This command creates the following files on the system where you configure Capsule Server to sign Puppet certificates:
-
/etc/puppetlabs/puppet/ssl/certs/ca.pem -
/etc/puppetlabs/puppet/ssl/certs/capsule.example.com.pem -
/etc/puppetlabs/puppet/ssl/private_keys/capsule.example.com.pem -
/etc/puppetlabs/puppet/ssl/public_keys/capsule.example.com.pem
-
Resume the Puppet server:
# puppet resource service puppetserver ensure=running
Configuring Remaining Capsule Servers for Load Balancing
Complete this procedure on each Capsule Server excluding the system where you configure Capsule Server to sign Puppet certificates.
On Satellite Server, generate Katello certificates for Capsule Server:
# capsule-certs-generate \
--foreman-proxy-fqdn capsule.example.com \
--certs-tar "/root/capsule.example.com-certs.tar" \
--foreman-proxy-cname loadbalancer.example.com
Retain a copy of the example
satellite-installercommand that is output by thecapsule-certs-generatecommand for installing Capsule Server certificate.Copy the certificate archive file from Satellite Server to Capsule Server:
# scp /root/capsule.example.com-certs.tar \
root@capsule.example.com:/root/capsule.example.com-certs.tar
On Capsule Server, install the
puppetserverpackage:# satellite-maintain packages install puppetserver
On Capsule Server, create directories for puppet certificates:
# mkdir -p /etc/puppetlabs/puppet/ssl/certs/ \
/etc/puppetlabs/puppet/ssl/private_keys/ \
/etc/puppetlabs/puppet/ssl/public_keys/
On Capsule Server, copy the Puppet certificates for this Capsule Server from the system where you configure Capsule Server to sign Puppet certificates:
# scp root@capsule-ca.example.com:/etc/puppetlabs/puppet/ssl/certs/ca.pem \
/etc/puppetlabs/puppet/ssl/certs/ca.pem
# scp root@capsule-ca.example.com:/etc/puppetlabs/puppet/ssl/certs/capsule.example.com.pem \
/etc/puppetlabs/puppet/ssl/certs/capsule.example.com.pem
# scp root@capsule-ca.example.com:/etc/puppetlabs/puppet/ssl/private_keys/capsule.example.com.pem \
/etc/puppetlabs/puppet/ssl/private_keys/capsule.example.com.pem
# scp root@capsule-ca.example.com:/etc/puppetlabs/puppet/ssl/public_keys/capsule.example.com.pem \
/etc/puppetlabs/puppet/ssl/public_keys/capsule.example.com.pem
On Capsule Server, change the directory ownership to user
puppet, grouppuppetand set the SELinux contexts:# chown -R puppet:puppet /etc/puppetlabs/puppet/ssl/ # restorecon -Rv /etc/puppetlabs/puppet/ssl/
Append the following options to the
satellite-installercommand that you obtain from the output of thecapsule-certs-generatecommand:--certs-cname "loadbalancer.example.com" \ --puppet-dns-alt-names "loadbalancer.example.com" \ --puppet-ca-server "capsule-ca.example.com" \ --foreman-proxy-puppetca "false" \ --puppet-server-ca "false" \ --enable-foreman-proxy-plugin-remote-execution-ssh
On Capsule Server, enter the
satellite-installercommand, for example:# satellite-installer --scenario capsule \ --foreman-proxy-register-in-foreman "true" \ --foreman-proxy-foreman-base-url "https://satellite.example.com" \ --foreman-proxy-trusted-hosts "satellite.example.com" \ --foreman-proxy-trusted-hosts "capsule.example.com" \ --foreman-proxy-oauth-consumer-key "oauth key" \ --foreman-proxy-oauth-consumer-secret "oauth secret" \ --certs-tar-file "capsule.example.com-certs.tar" \ --puppet-server-foreman-url "https://satellite.example.com" \ --certs-cname "loadbalancer.example.com" \ --puppet-dns-alt-names "loadbalancer.example.com" \ --puppet-ca-server "capsule-ca.example.com" \ --foreman-proxy-puppetca "false" \ --puppet-server-ca "false" \ --enable-foreman-proxy-plugin-remote-execution-ssh
4.3. Configuring Capsule Server with Custom SSL Certificates for Load Balancing without Puppet
The following section describes how to configure Capsule Servers that use custom SSL certificates for load balancing without Puppet.
4.3.1. Creating Custom SSL Certificates for Capsule Server
This procedure outlines how to create a configuration file for the Certificate Signing Request and include the load balancer and Capsule Server as Subject Alternative Names (SAN). Complete this procedure on each Capsule Server that you want to configure for load balancing.
Procedure
On Capsule Server, create a directory to contain all the source certificate files, accessible to only the
rootuser:# mkdir /root/capsule_cert # cd /root/capsule_cert
Create a private key with which to sign the Certificate Signing Request (CSR).
Note that the private key must be unencrypted. If you use a password-protected private key, remove the private key password.
If you already have a private key for this Capsule Server, skip this step.
# openssl genrsa -out /root/capsule_cert/capsule_cert_key.pem 4096
Create the certificate request configuration file with the following content:
[ req ]
default_bits       = 4096
distinguished_name = req_distinguished_name
req_extensions     = req_ext
prompt = no

[ req_distinguished_name ]
countryName=2 Letter Country Code
stateOrProvinceName=State or Province Full Name
localityName=Locality Name
0.organizationName=Organization Name
organizationalUnitName=Capsule Organization Unit Name
commonName=capsule.example.com  1
emailAddress=Email Address

[ req_ext ]
#authorityKeyIdentifier=keyid,issuer
#basicConstraints=CA:FALSE
keyUsage = digitalSignature, nonRepudiation, keyEncipherment, dataEncipherment
subjectAltName = @alt_names

[alt_names]                  2
DNS.1 = loadbalancer.example.com
DNS.2 = capsule.example.com
- 1
- The certificate’s common name must match the FQDN of Capsule Server. Ensure to change this when running the command on each Capsule Server that you configure for load balancing. You can also set a wildcard value
*. If you set a wildcard value, you must add the-t capsuleoption when you use thekatello-certs-checkcommand. - 2
- Under
[alt_names], include the FQDN of the load balancer asDNS.1and the FQDN of Capsule Server asDNS.2.
Create a Certificate Signing Request (CSR) for the SAN certificate.
# openssl req -new \
-key /root/capsule_cert/capsule_cert_key.pem \ 1
-config SAN_config.cfg \                   2
-out /root/capsule_cert/capsule_cert_csr.pem   3
Send the certificate request to the Certificate Authority:
When you submit the request, specify the lifespan of the certificate. The method for sending the certificate request varies, so consult the Certificate Authority for the preferred method. In response to the request, you can expect to receive a Certificate Authority bundle and a signed certificate, in separate files.
- Copy the Certificate Authority bundle and Capsule Server certificate file that you receive from the Certificate Authority, and Capsule Server private key to your Satellite Server.
On Satellite Server, validate Capsule Server certificate input files:
# katello-certs-check \
-c /root/capsule_cert/capsule_cert.pem \      1
-k /root/capsule_cert/capsule_cert_key.pem \  2
-b /root/capsule_cert/ca_cert_bundle.pem      3
If you set the
commonName=to a wildcard value*, you must add the-t capsuleoption to thekatello-certs-checkcommand.Retain a copy of the example
capsule-certs-generatecommand that is output by thekatello-certs-checkcommand for creating the Certificate Archive File for this Capsule Server.
4.3.2. Configuring Capsule Server with Custom SSL Certificates for Load Balancing without Puppet
Complete this procedure on each Capsule Server that you want to configure for load balancing.
Procedure
Append the following option to the
capsule-certs-generatecommand that you obtain from the output of thekatello-certs-checkcommand:--foreman-proxy-cname loadbalancer.example.comOn Satellite Server, enter the
capsule-certs-generatecommand to generate Capsule certificates. For example:# capsule-certs-generate \ --foreman-proxy-fqdn capsule.example.com \ --certs-tar /root/capsule_cert/capsule.tar \ --server-cert /root/capsule_cert/capsule.pem \ --server-key /root/capsule_cert/capsule.pem \ --server-ca-cert /root/capsule_cert/ca_cert_bundle.pem \ --foreman-proxy-cname loadbalancer.example.com
Retain a copy of the example
satellite-installercommand from the output for installing Capsule Server certificates.Copy the certificate archive file from Satellite Server to Capsule Server:
# scp /root/capsule.example.com-certs.tar \
root@capsule.example.com:capsule.example.com-certs.tar
Append the following options to the
satellite-installercommand that you obtain from the output of thecapsule-certs-generatecommand.--certs-cname "loadbalancer.example.com" \ --enable-foreman-proxy-plugin-remote-execution-sshOn Capsule Server, enter the
satellite-installercommand, for example:# satellite-installer --scenario capsule \ --foreman-proxy-register-in-foreman "true" \ --foreman-proxy-foreman-base-url "https://satellite.example.com" \ --foreman-proxy-trusted-hosts "satellite.example.com" \ --foreman-proxy-trusted-hosts "capsule.example.com" \ --foreman-proxy-oauth-consumer-key "oauth key" \ --foreman-proxy-oauth-consumer-secret "oauth secret" \ --certs-tar-file "capsule.example.com-certs.tar" \ --certs-cname "loadbalancer.example.com" \ --enable-foreman-proxy-plugin-remote-execution-ssh
4.4. Configuring Capsule Server with Custom SSL Certificates for Load Balancing with Puppet
The following section describes how to configure Capsule Servers that use custom SSL certificates for load balancing with Puppet.
4.4.1. Creating Custom SSL Certificates for Capsule Server
This procedure outlines how to create a configuration file for the Certificate Signing Request and include the load balancer and Capsule Server as Subject Alternative Names (SAN). Complete this procedure on each Capsule Server that you want to configure for load balancing.
Procedure
On Capsule Server, create a directory to contain all the source certificate files, accessible to only the
rootuser:# mkdir /root/capsule_cert # cd /root/capsule_cert
Create a private key with which to sign the Certificate Signing Request (CSR).
Note that the private key must be unencrypted. If you use a password-protected private key, remove the private key password.
If you already have a private key for this Capsule Server, skip this step.
# openssl genrsa -out /root/capsule_cert/capsule.pem 4096
Create the certificate request configuration file with the following content:
[ req ]
default_bits       = 4096
distinguished_name = req_distinguished_name
req_extensions     = req_ext
prompt = no

[ req_distinguished_name ]
countryName=2 Letter Country Code
stateOrProvinceName=State or Province Full Name
localityName=Locality Name
0.organizationName=Organization Name
organizationalUnitName=Capsule Organization Unit Name
commonName=capsule.example.com  1
emailAddress=Email Address

[ req_ext ]
#authorityKeyIdentifier=keyid,issuer
#basicConstraints=CA:FALSE
keyUsage = digitalSignature, nonRepudiation, keyEncipherment, dataEncipherment
subjectAltName = @alt_names

[alt_names]                  2
DNS.1 = loadbalancer.example.com
DNS.2 = capsule.example.com
- 1
- The certificate’s common name must match the FQDN of Capsule Server. Ensure to change this when running the command on each Capsule Server. You can also set a wildcard value
*. If you set a wildcard value, you must add the-t capsuleoption when you use thekatello-certs-checkcommand. - 2
- Under
[alt_names], include the FQDN of the load balancer asDNS.1and the FQDN of Capsule Server asDNS.2.
Create a Certificate Signing Request (CSR) for the SAN certificate:
# openssl req -new \
-key /root/capsule_cert/capsule.pem \ 1
-config SAN_config.cfg \          2
-out /root/capsule_cert/capsule.pem   3
Send the certificate request to the Certificate Authority:
When you submit the request, specify the lifespan of the certificate. The method for sending the certificate request varies, so consult the Certificate Authority for the preferred method. In response to the request, you can expect to receive a Certificate Authority bundle and a signed certificate, in separate files.
- Copy the Certificate Authority bundle and Capsule Server certificate file that you receive from the Certificate Authority, and Capsule Server private key to your Satellite Server to validate them.
On Satellite Server, validate Capsule Server certificate input files:
# katello-certs-check \
-c /root/capsule_cert/capsule.pem \      1
-k /root/capsule_cert/capsule.pem \      2
-b /root/capsule_cert/ca_cert_bundle.pem 3
- 1
- Capsule Server certificate file, provided by your Certificate Authority
- 2
- Capsule Server’s private key that you used to sign the certificate
- 3
- Certificate Authority bundle, provided by your Certificate Authority
If you set the
commonName=to a wildcard value*, you must add the-t capsuleoption to thekatello-certs-checkcommand.Retain a copy of the example
capsule-certs-generatecommand that is output by thekatello-certs-checkcommand for creating the Certificate Archive File for this Capsule Server.
4.4.2. Configuring Capsule Server with Custom SSL Certificates for Load Balancing with Puppet
If you use Puppet in your Satellite configuration, then you must complete the following procedures:
Configuring Capsule Server to Generate and Sign Puppet Certificates
Complete this procedure only for the system where you want to configure Capsule Server to generate Puppet certificates for all other Capsule Servers that you configure for load balancing. In the examples in this procedure, the FQDN of this Capsule Server is capsule-ca.example.com.
Append the following option to the
capsule-certs-generatecommand that you obtain from the output of thekatello-certs-checkcommand:--foreman-proxy-cname loadbalancer.example.comOn Satellite Server, enter the
capsule-certs-generatecommand to generate Capsule certificates. For example:# capsule-certs-generate \ --foreman-proxy-fqdn capsule-ca.example.com \ --certs-tar /root/capsule_cert/capsule-ca.tar \ --server-cert /root/capsule_cert/capsule-ca.pem \ --server-key /root/capsule_cert/capsule-ca.pem \ --server-ca-cert /root/capsule_cert/ca_cert_bundle.pem \ --foreman-proxy-cname loadbalancer.example.com
Retain a copy of the example
satellite-installercommand from the output for installing Capsule Server certificates.- Copy the certificate archive file from Satellite Server to Capsule Server.
Append the following options to the
satellite-installercommand that you obtain from the output of thecapsule-certs-generatecommand:--puppet-dns-alt-names "loadbalancer.example.com" \ --puppet-ca-server "capsule-ca.example.com" \ --foreman-proxy-puppetca "true" \ --puppet-server-ca "true" \ --enable-foreman-proxy-plugin-remote-execution-ssh
On Capsule Server, enter the
satellite-installercommand, for example:satellite-installer --scenario capsule \ --foreman-proxy-register-in-foreman "true" \ --foreman-proxy-foreman-base-url "https://satellite.example.com" \ --foreman-proxy-trusted-hosts "satellite.example.com" \ --foreman-proxy-trusted-hosts "capsule-ca.example.com" \ --foreman-proxy-oauth-consumer-key "oauth key" \ --foreman-proxy-oauth-consumer-secret "oauth secret" \ --certs-tar-file "certs.tgz" \ --puppet-server-foreman-url "https://satellite.example.com" \ --certs-cname "loadbalancer.example.com" \ --puppet-dns-alt-names "loadbalancer.example.com" \ --puppet-ca-server "capsule-ca.example.com" \ --foreman-proxy-puppetca "true" \ --puppet-server-ca "true" \ --enable-foreman-proxy-plugin-remote-execution-script \ --foreman-proxy-content-puppet true \ --enable-puppet \ --puppet-server true \ --puppet-server-foreman-ssl-ca /etc/pki/katello/puppet/puppet_client_ca.crt \ --puppet-server-foreman-ssl-cert /etc/pki/katello/puppet/puppet_client.crt \ --puppet-server-foreman-ssl-key /etc/pki/katello/puppet/puppet_client.key
On Capsule Server, generate Puppet certificates for all other Capsules that you configure for load balancing, except this first system where you configure Puppet certificates signing:
# puppet cert generate capsule.example.com \
--dns_alt_names=loadbalancer.example.com
This command creates the following files on the Puppet certificate signing Capsule Server instance:
-
/etc/puppetlabs/puppet/ssl/certs/ca.pem -
/etc/puppetlabs/puppet/ssl/certs/capsule.example.com.pem -
/etc/puppetlabs/puppet/ssl/private_keys/capsule.example.com.pem -
/etc/puppetlabs/puppet/ssl/public_keys/capsule.example.com.pem
-
Configuring Remaining Capsule Servers for Load Balancing
Complete this procedure for each Capsule Server excluding the system where you configure Capsule Server to sign Puppet certificates.
Append the following option to the
capsule-certs-generatecommand that you obtain from the output of thekatello-certs-checkcommand:--foreman-proxy-cname loadbalancer.example.comOn Satellite Server, enter the
capsule-certs-generatecommand to generate Capsule certificates. For example:# capsule-certs-generate \ --foreman-proxy-fqdn capsule.example.com \ --certs-tar /root/capsule_cert/capsule.tar \ --server-cert /root/capsule_cert/capsule.pem \ --server-key /root/capsule_cert/capsule.pem \ --server-ca-cert /root/capsule_cert/ca_cert_bundle.pem \ --foreman-proxy-cname loadbalancer.example.com
Retain a copy of the example
satellite-installercommand from the output for installing Capsule Server certificates.Copy the certificate archive file from Satellite Server to Capsule Server.
# scp /root/capsule.example.com-certs.tar \
root@capsule.example.com:capsule.example.com-certs.tar
On Capsule Server, install the
puppetserverpackage:# satellite-maintain packages install puppetserver
On Capsule Server, create directories for puppet certificates:
# mkdir -p /etc/puppetlabs/puppet/ssl/certs/ \
/etc/puppetlabs/puppet/ssl/private_keys/ \
/etc/puppetlabs/puppet/ssl/public_keys/
On Capsule Server, copy the Puppet certificates for this Capsule Server from the system where you configure Capsule Server to sign Puppet certificates:
# scp root@capsule-ca.example.com:/etc/puppetlabs/puppet/ssl/certs/ca.pem \
/etc/puppetlabs/puppet/ssl/certs/ca.pem
# scp root@capsule-ca.example.com:/etc/puppetlabs/puppet/ssl/certs/capsule.example.com.pem \
/etc/puppetlabs/puppet/ssl/certs/capsule.example.com.pem
# scp root@capsule-ca.example.com:/etc/puppetlabs/puppet/ssl/private_keys/capsule.example.com.pem \
/etc/puppetlabs/puppet/ssl/private_keys/capsule.example.com.pem
# scp root@capsule-ca.example.com:/etc/puppetlabs/puppet/ssl/public_keys/capsule.example.com.pem \
/etc/puppetlabs/puppet/ssl/public_keys/capsule.example.com.pem
On Capsule Server, change the directory ownership to user
puppet, grouppuppetand set the SELinux contexts:# chown -R puppet:puppet /etc/puppetlabs/puppet/ssl/ # restorecon -Rv /etc/puppetlabs/puppet/ssl/
Append the following options to the
satellite-installercommand that you obtain from the output of thecapsule-certs-generatecommand:--certs-cname "loadbalancer.example.com" \ --puppet-dns-alt-names "loadbalancer.example.com" \ --puppet-ca-server "capsule-ca.example.com" \ --foreman-proxy-puppetca "false" \ --puppet-server-ca "false" \ --enable-foreman-proxy-plugin-remote-execution-ssh
On Capsule Server, enter the
satellite-installercommand, for example:# satellite-installer --scenario capsule \ --foreman-proxy-register-in-foreman "true" \ --foreman-proxy-foreman-base-url "https://satellite.example.com" \ --foreman-proxy-trusted-hosts "satellite.example.com" \ --foreman-proxy-trusted-hosts "capsule.example.com" \ --foreman-proxy-oauth-consumer-key "oauth key" \ --foreman-proxy-oauth-consumer-secret "oauth secret" \ --certs-tar-file "capsule.example.com-certs.tar" \ --puppet-server-foreman-url "https://satellite.example.com" \ --certs-cname "loadbalancer.example.com" \ --puppet-dns-alt-names "loadbalancer.example.com" \ --puppet-ca-server "capsule-ca.example.com" \ --foreman-proxy-puppetca "false" \ --puppet-server-ca "false" \ --enable-foreman-proxy-plugin-remote-execution-ssh
Chapter 5. Installing the Load Balancer
The following example provides general guidance for configuring an HAProxy load balancer. However, you can install any suitable load balancing software solution that supports TCP forwarding.
On a Red Hat Enterprise Linux 7 host, install HAProxy:
# yum install haproxy
Install the following package that includes the
semanagetool:# yum install policycoreutils-python
Configure SELinux to allow HAProxy to bind any port:
# semanage boolean --modify --on haproxy_connect_any
Configure the load balancer to balance the network load for the ports as described in Table 5.1, “Ports Configuration for the Load Balancer”. For example, to configure ports for HAProxy, edit the
/etc/haproxy/haproxy.cfgfile to correspond with the table. For more information, see Configuration example for haproxy.cfg for HAProxy load balancer with Satellite 6 in the Red Hat Knowledgebase.Table 5.1. Ports Configuration for the Load Balancer
Service Port Mode Balance Mode Destination HTTP
80
TCP
roundrobin
port 80 on all Capsule Servers
HTTPS and RHSM
443
TCP
source
port 443 on all Capsule Servers
AMQP
5647
TCP
roundrobin
port 5647 on all Capsule Servers
Puppet (Optional)
8140
TCP
roundrobin
port 8140 on all Capsule Servers
PuppetCA (Optional)
8141
TCP
roundrobin
port 8140 only on the system where you configure Capsule Server to sign Puppet certificates
SmartProxy (Optional for OpenScap)
9090
TCP
roundrobin
port 9090 on all Capsule Servers
- Configure the load balancer to disable SSL offloading and allow client-side SSL certificates to pass through to back end servers. This is required because communication from clients to Capsule Servers depends on client-side SSL certificates.
Start and enable the HAProxy service:
# systemctl start haproxy
# systemctl enable haproxy
Chapter 6. Registering Clients
You can register a client running a Red Hat Enterprise Linux 6, 7, or 8 operating system to Capsule Servers that you configure for load balancing. For more information about registering clients and configuring them to use Puppet, see Registering Hosts in the Managing Hosts guide.
To register clients, proceed to one of the following procedures:
6.1. Red Hat Satellite host registration
You can register hosts with Satellite using the host registration feature, the Satellite API, or Hammer CLI.
Procedure
- In the Satellite web UI, navigate to Hosts > Register Host.
- Click Generate to create the registration command.
- Click on the files icon to copy the command to your clipboard.
- Log in to the host you want register and run the previously generated command.
Update subscription manager configuration for
rhsm.baseurlandserver.hostname:# subscription-manager config \ --rhsm.baseurl=https://loadbalancer.example.com/pulp/content \ --server.hostname=loadbalancer.example.com
-
Check the
/etc/yum.repos.d/redhat.repofile and ensure that the appropriate repositories have been enabled.
CLI procedure
Generate the host registration command using the Hammer CLI:
# hammer host-registration generate-command \
--activation-keys "My_Activation_Key"
If your hosts do not trust the SSL certificate of Satellite Server, you can disable SSL validation by adding the
--insecureflag to the registration command.# hammer host-registration generate-command \ --activation-keys "My_Activation_Key" \ --insecure true- Log in to the host you want register and run the previously generated command.
Update subscription manager configuration for
rhsm.baseurlandserver.hostname:# subscription-manager config \ --rhsm.baseurl=https://loadbalancer.example.com/pulp/content \ --server.hostname=loadbalancer.example.com
-
Check the
/etc/yum.repos.d/redhat.repofile and ensure that the appropriate repositories have been enabled.
API procedure
Generate the host registration command using the Satellite API:
# curl -X POST https://satellite.example.com/api/registration_commands \
--user "My_User_Name" \
-H 'Content-Type: application/json' \
-d '{ "registration_command": { "activation_keys": ["My_Activation_Key_1, My_Activation_Key_2"] }}'
If your hosts do not trust the SSL certificate of Satellite Server, you can disable SSL validation by adding the
--insecureflag to the registration command.# curl -X POST https://satellite.example.com/api/registration_commands \ --user "My_User_Name" \ -H 'Content-Type: application/json' \ -d '{ "registration_command": { "activation_keys": ["My_Activation_Key_1, My_Activation_Key_2"], "insecure": true }}'
Use an activation key to simplify specifying the environments. For more information, see Managing Activation Keys in the Content Management guide.
To enter a password as command line argument, use
username:passwordsyntax. Keep in mind this can save the password in the shell history.For more information about registration see Registering a Host to Red Hat Satellite in Managing Hosts.
- Log in to the host you want register and run the previously generated command.
Update subscription manager configuration for
rhsm.baseurlandserver.hostname:# subscription-manager config \ --rhsm.baseurl=https://loadbalancer.example.com/pulp/content \ --server.hostname=loadbalancer.example.com
-
Check the
/etc/yum.repos.d/redhat.repofile and ensure that the appropriate repositories have been enabled.
6.2. (Deprecated) Registering Clients Using the Bootstrap Script
To register clients, enter the following command on the client. You must complete the registration procedure for each client.
Prerequisite
Ensure that you install the bootstrap script on the client and change the script’s file permissions to executable. For more information, see Registering Hosts to Red Hat Satellite Using The Bootstrap Script in the Managing Hosts guide.
On Red Hat Enterprise Linux 8, enter the following command:
# /usr/libexec/platform-python bootstrap.py \
--login=admin \
--server loadbalancer.example.com \
--organization="My_Organization" \
--location="My_Location" \
--hostgroup="My_Hostgroup" \
--activationkey="My_Activation_Key" \
--enablerepos=satellite-client-6-for-rhel-8-<arch>-rpms \
--puppet-ca-port 8141 \    1
--force                    2
On Red Hat Enterprise Linux 7, 6, or 5, enter the following command:
# python bootstrap.py --login=admin \
--server loadbalancer.example.com \
--organization="My_Organization" \
--location="My_Location" \
--hostgroup="My_Hostgroup" \
--activationkey="My_Activation_Key" \
--enablerepos=rhel-7-server-satellite-client-6-rpms \
--puppet-ca-port 8141 \    1
--force                    2
The script prompts for the password corresponding to the Satellite user name you entered with the --login option.
6.3. (Deprecated) Registering Clients Manually with katello-ca-consumer rpm
To register clients manually, complete the following procedure on each client that you register.
Procedure
Remove the
katello-ca-consumerpackage if it is installed:# yum remove 'katello-ca-consumer*'
Install the
katello-ca-consumerpackage from the load balancer:# rpm -Uvh http://loadbalancer.example.com/pub/katello-ca-consumer-latest.noarch.rpmRegister the client and include the
--serverurland--baseurloptions:# subscription-manager register \ --activationkey=My_Activation_Key \ --baseurl=https://loadbalancer.example.com/pulp/content/ \ --org=Your_Organization \ --serverurl=https://loadbalancer.example.com/rhsm
Chapter 7. Verifying the Load Balancing Configuration
You can verify the load balancing configuration by completing the following steps for each Capsule Server that you configure:
- Shut down the base operating system for your Capsule Server.
-
Verify that content or subscription management features are available on the client registered to this Capsule. For example, enter the
subscription-manager refreshcommand on the client. - Restart the base operating system for your Capsule Server.
Chapter 8. Propagating SCAP Content through the Load Balancer
If you use OpenSCAP to manage security compliance on your clients, you must configure the SCAP client to send ARF reports to the load balancer instead of Capsule. The configuration procedure depends on the method you have selected to deploy compliance policies.
8.1. Propagating SCAP Content using Ansible Deployment
Using this procedure, you can promote Security Content Automation Protocol (SCAP) content through the load balancer in the scope of the Ansible deployment method.
Prerequisite
- Ensure that you have configured Satellite for Ansible deployment of compliance policies. For more information, see Configuring Compliance Policy Deployment Methods in Administering Red Hat Satellite.
Procedure
- In the Satellite web UI, navigate to Configure > Variables.
-
Search for the
foreman_scap_client_portvariable and click its name. - In the Default Behavior area, ensure that the Override checkbox is selected.
-
In the Parameter Type list, ensure that
integeris selected. -
In the Default Value field, enter
9090. - In the Specify Matchers area, remove all matchers that override the default value.
- Click Submit.
-
Search for the
foreman_scap_client_servervariable and click its name. - In the Default Behavior area, ensure that the Override checkbox is selected.
-
In the Parameter Type list, ensure that
stringis selected. -
In the Default Value field, enter the FQDN of your load balancer, such as
loadbalancer.example.com. - In the Specify Matchers area, remove all matchers that override the default value.
- Click Submit.
Continue with deploying a compliance policy using Ansible. For more information, see:
- Deploying a Policy in a Host Group Using Ansible in Administering Red Hat Satellite
- Deploying a Policy on a Host Using Ansible in Administering Red Hat Satellite
Verification
On the client, verify that the
/etc/foreman_scap_client/config.yamlfile contains the following lines:# Foreman proxy to which reports should be uploaded :server: 'loadbalancer.example.com' :port: 9090
8.2. Propagating SCAP Content using Puppet Deployment
Using this procedure, you can promote Security Content Automation Protocol (SCAP) content through the load balancer in the scope of the Puppet deployment method.
Prerequisite
- Ensure that you have configured Satellite for Puppet deployment of compliance policies. For more information, see Configuring Compliance Policy Deployment Methods in Administering Red Hat Satellite.
Procedure
-
In the Satellite web UI, navigate to Configure > Classes and click
foreman_scap_client. - Click the Smart Class Parameter tab.
-
In the pane to the left of the Smart Class Parameter window, click
port. - In the Default Behavior area, select the Override checkbox.
-
From the Key Type list, select
integer. -
In the Default Value field, enter
9090. -
In the pane to the left of the Smart Class Parameter window, click
server. - In the Default Behavior area, select the Override checkbox.
-
From the Key Type list, select
string. -
In the Default Value field, enter the FQDN of your load balancer, such as
loadbalancer.example.com. - In the lower left of the Smart Class Parameter window, click Submit.
Continue with deploying a compliance policy using Puppet. For more information, see:
- Deploying a Policy in a Host Group Using Puppet in Administering Red Hat Satellite
- Deploying a Policy on a Host Using Puppet in Administering Red Hat Satellite
Verification
On the client, verify that the
/etc/foreman_scap_client/config.yamlfile contains the following lines:# Foreman proxy to which reports should be uploaded :server: 'loadbalancer.example.com' :port: 9090