
Red Hat Training
A Red Hat training course is available for Red Hat Satellite
4.3. Disconnected Satellite
In high security environments where hosts are required to function in a closed network, disconnected from the internet, the Red Hat Satellite Server can provision systems with the latest security updates, errata, and packages. This is achieved by using two important components: the
katello-disconnected utility and a synchronization host.
The diagram below illustrates how a disconnected Satellite is able to keep its content updated even without an internet connection. An intermediary system with an internet connection is needed to act as a synchronization host. This synchronization host is in a separate network from the Satellite server.
The synchronization host imports content from the Red Hat Content Delivery Network (CDN) through pulp. The content is then exported onto a media, such as DVDs, CDs, or external hard drives and transferred to the disconnected Satellite server. The following sections in this chapter will guide you through the whole process.
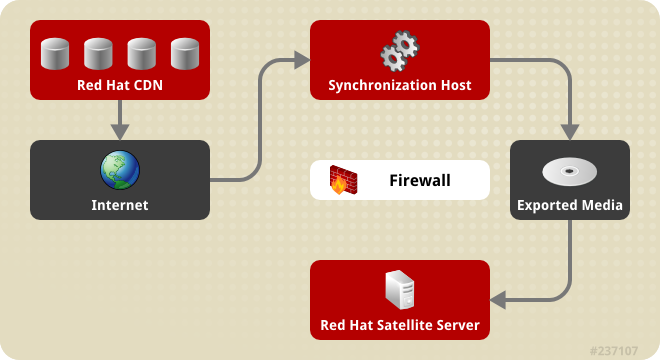
Figure 4.1. Disconnected Satellite
4.3.1. Configuring the Synchronization Host
Prerequisites
To import content from the Red Hat Content Distribution Network (CDN), the synchronization host requires:
- An Internet connection
- Valid Red Hat Network subscriptions
- A valid manifest (See Section 4.2.1.1, “Setting up a Manifest” for instructions on how to obtain one.)
Procedure 4.11. To Configure a Host to Synchronize and Export Content from the Red Hat CDN:
- Use Red Hat Subscription Manager to register the synchronization host to RHN.
- List all the available subscriptions to find the correct Red Hat Satellite product to allocate to your system:
# subscription-manager list --available --all
This command displays output similar to the following:+-------------------------------------------+ Available Subscriptions +-------------------------------------------+ ProductName: Red Hat Satellite ProductId: SKU123456 PoolId: e1730d1f4eaa448397bfd30c8c7f3d334bd8b Quantity: 10 Multi-Entitlement: No Expires: 08/20/2013 MachineType: physicalNote
The SKU and Pool ID depend on the Red Hat Satellite product type that corresponds to your system version and product type. - Subscribe to the pool using the following command:
# subscription-manager subscribe --pool=Red_Hat_Satellite_Pool_Id
# subscription-manager subscribe --pool=Red_Hat_Enterprise_Linux_Pool_Id
# subscription-manager subscribe --pool=Red_Hat_Enterprise_Linux_Software_Collections_Pool_Id
- Disable all existing repositories:
# subscription-manager repos --disable "*"
- Enable the Red Hat Satellite and Red Hat Enterprise Linux and Red Hat Software Collections repositories. Ensure the Red Hat Enterprise Linux repository matches the specific version you are using.
# subscription-manager repos --enable rhel-6-server-rpms \
--enable rhel-server-rhscl-6-rpms \
--enable rhel-6-server-satellite-6.0-rpms
Note
The commands above are based on Red Hat Enterprise Linux 6. If you are using a different version of Red Hat Enterprise Linux, change the repository based on your specific version. - Install katello-utils and associated RPMs:
# yum install python-qpid-qmf python-qpid qpid-cpp-server katello-utils
katello-utils includes thekatello-disconnectedutility that is required to set up repositories for import while qpid related packages are necessary for pulp configuration. - Generate a secret 32-character alphanumeric string for the
oauth_secretentry in the/etc/pulp/server.conffile:# tr -dc "[:alnum:]" < /dev/urandom | head -c 32 randomly_generated_value
- In the
/etc/pulp/server.conf, uncomment the[oauth]entry and add the randomly generated value from the previous step as theoauth_secretvalue:[oauth] enabled: true oauth_key: katello oauth_secret: randomly_generated_value
- Disable authentication in
/etc/qpid/qpidd.conf:# Configuration file for qpidd. Entries are of the form: # name=value # # (Note: no spaces on either side of '='). # Run "qpidd --help" or see "man qpidd" for more details. auth=no
All incoming connections authenticate using the Satellite's default realm. - Configure the connection from
katello-disconnectedto Pulp with the previously generated value as your--oauth-secretoption:# katello-disconnected setup --oauth-key=katello --oauth-secret=randomly_generated_value
This places a configuration value in~/.katello-disconnected. - Configure Pulp on the Synchronization Server:
sudo service qpidd start
sudo chkconfig qpidd on
sudo service mongod start
sleep 10
sudo chkconfig mongod on
sudo -u apache pulp-manage-db
sudo service httpd restart
sudo chkconfig pulp_workers on
sudo service pulp_workers start
sudo chkconfig pulp_celerybeat on
sudo service pulp_celerybeat start
sudo chkconfig pulp_resource_manager on
sudo service pulp_resource_manager start
- Import the manifest:
# katello-disconnected import -m ./manifest.zip
Importing the manifest sets up the list of available repositories to synchronize to based on the subscriptions you selected.
The synchronization host is now ready to synchronize content from the Red Hat CDN.
4.3.2. Synchronizing Content
By default,
katello-disconnected enables all repositories that are included in the manifest for synchronization. Synchronization time is directly related to the amount of repositories to be synchronized. If the manifest has a large amount of repositories, the synchronization will take time and network resources.
katello-disconnected allows for the synchronization of specific repositories. This section will set up Pulp for synchronizing content.
- Disable all repositories:
# katello-disconnected disable --all
katello-disconnectedenables all repositories by default. - Choose which repositories you wish to sync by listing all available repositories from the manifest:
# katello-disconnected list --disabled
rhel-5-server-debug-rpms-5Server-i386
rhel-5-server-debug-rpms-5Server-ia64
rhel-5-server-debug-rpms-5Server-x86_64
rhel-5-server-debug-rpms-5_7-i386
rhel-5-server-debug-rpms-5_7-ia64
rhel-5-server-debug-rpms-5_7-x86_64
rhel-5-server-debug-rpms-5_8-i386
rhel-5-server-debug-rpms-5_8-ia64
rhel-5-server-debug-rpms-5_8-x86_64
rhel-5-server-debug-rpms-5_9-i386
rhel-5-server-debug-rpms-5_9-ia64
rhel-5-server-debug-rpms-5_9-x86_64
rhel-5-server-isos-5Server-i386
- Enable the chosen repositories for synchronization:
# katello-disconnected enable -r rhel-6-server-sam-rpms-6_4-x86_64
- Create the repositories and push them to Pulp to allow synchronization:
# katello-disconnected configure
Note
The configure option forkatello-disconnectedreads the manifest, creates pulp repositories, and generates scripts before synchronization. It needs to be run each time a repository is enabled or disabled. - Synchronize the repositories:
# katello-disconnected sync
You can use thewatchoption to monitor the synchronization process.# katello-disconnected watch Watching sync... (this may be safely interrupted with Ctrl+C) running: rhel-6-server-sam-rpms-6_4-x86_64 running: rhel-6-server-sam-rpms-6_4-x86_64 ... finished: rhel-6-server-sam-rpms-6_4-x86_64 Watching finished
Content is now synchronized.
4.3.3. Exporting Content
Prerequisites
An external export media such as a CD, DVD, or external hard drive.
The synchronized content needs to be exported to enable importing into the disconnected Red Hat Satellite. To do so:
- Export the synchronized repositories:
# katello-disconnected export -t /var/tmp/export
The output will look similar to:# katello-disconnected export -t /var/tmp/export # katello-disconnected watch Watching sync... (this may be safely interrupted with Ctrl+C) running: rhel-6-server-sam-rpms-6_4-x86_64 finished: rhel-6-server-sam-rpms-6_4-x86_64 Watching finished Done watching ... Copying content to /var/tmp/export Archiving contents of /var/tmp/export into 4600M tar archives. NOTE: This may take a while. tar: Removing leading `/' from member names Done exporting content, please copy /var/tmp/export/* to your disconnected host
This operation will create the following files in/var/tmp/export:# ls /var/tmp/export/ content-export-00 content-export-01 content-export-02 expand_export.sh
- Copy the files from /var/tmp/export into the external media.
Note
If the files are too big for your external media, the files can be copied sequentially in a series of DVDs.
The synchronized content has now been exported and ready for importing to the disconnected Satellite server.
4.3.4. Importing Content to a Disconnected Satellite Server
Prerequisites
Ensure that the directory and file system containing the exports has enough space to contain the extracted archives. For example, if your export is 40 GB, the disconnected Satellite Server directory and file system where you are importing the content will need an extra 40 GB of space to expand it on the same file system.
- Copy ALL of the Satellite Content ISOs to a directory that the Satellite can access. This example uses
/root/isos. - Create a local directory that will be shared via
httpdon the Satellite. This example uses/var/www.html/sat-import/.# mkdir -p /var/www/html/sat-import/
- Recursively copy the contents of the first ISO to the local directory:
# mount -o loop /root/isos/first iso /mnt/iso
# cp -ruv /mnt/iso/* /var/www/html/sat-import/
# umount /mnt/iso
- Repeat the above step for each ISO until you have copied all the data from the series of ISOs into the local directory
/var/www/html/sat-import/. - Ensure that the SELinux contexts is correct:
# restorecon -rv /var/www/html/sat-import/
- Change the CDN URL to reference the loaction that the ISOs were copied to. This example uses the Satellite fully qualified domain name (FQDN)
server.example.com, so the URL is:http //server.example.com/sat-import/
Note
The Satellite is now acting as its own CDN with the files located inhttp://localhost/content. This is not a requirement. The CDN can be hosted on a different machine inside the same disconnected network as long as it is accessible to the Satellite server via HTTP. - Add the CDN address to the Satellite web interface:
- Log in to the Satellite web interface.
- Click → and then click .
- On the Subscription Manifest information screen, scroll to Red Hat Provider Details. Click the edit icon on the Repository URL entry and change the entry to the CDN's repository URL.
- Click to choose the manifest file.
- Click to import your manifest.
- Enable the repositories from the local CDN:
- Click →
- Enable the repositories that were enabled and synchronized in the Synchronizing Content section.
- Click → .
- Select the repositories you want to synchronize and click .
Once the synchronize finishes, the disconnected Satellite is now ready to serve the content to client systems.