
Red Hat Training
A Red Hat training course is available for Red Hat Satellite
Installation Guide
Installing and Configuring Satellite
Abstract
Chapter 1. Introduction
1.1. Red Hat Satellite 6 System Architecture
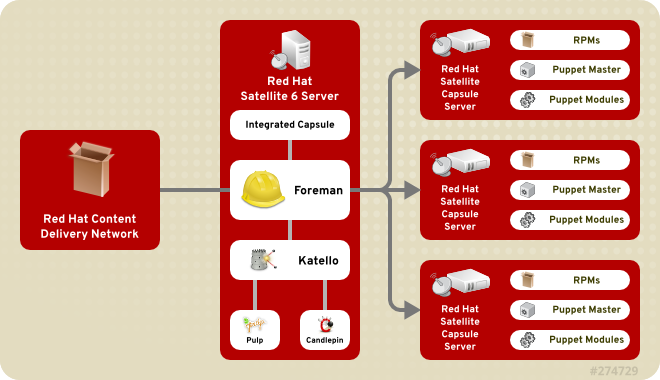
Figure 1.1. Red Hat Satellite 6 System Architecture
- Foreman
- Foreman is an open source application used for provisioning and life cycle management of physical and virtual systems. Foreman automatically configures these systems using various methods, including kickstart and Puppet modules. Foreman also provides historical data for reporting, auditing, and troubleshooting.
- Katello
- Katello is a subscription and repository management application. It provides a means to subscribe to Red Hat repositories and download content. You can create and manage different versions of this content and apply them to specific systems within user-defined stages of the application life cycle.
- Candlepin
- Candlepin is a service within Katello that handles subscription management.
- Pulp
- Pulp is a service within Katello that handles repository and content management.
- Hammer
- Hammer is a CLI tool that provides command line and shell equivalents of most Web UI functions.
- REST API
- Red Hat Satellite 6 includes a RESTful API service that allows system administrators and developers to write custom scripts and third-party applications that interface with Red Hat Satellite.
- Capsule
- Red Hat Satellite Capsule Server acts as a proxy for some of the main Satellite functions including repository storage,
DNS,DHCP, and Puppet Master configuration. Each Satellite Server also contains integrated Capsule Server services.
1.2. Red Hat Satellite 6 Layout and Topology
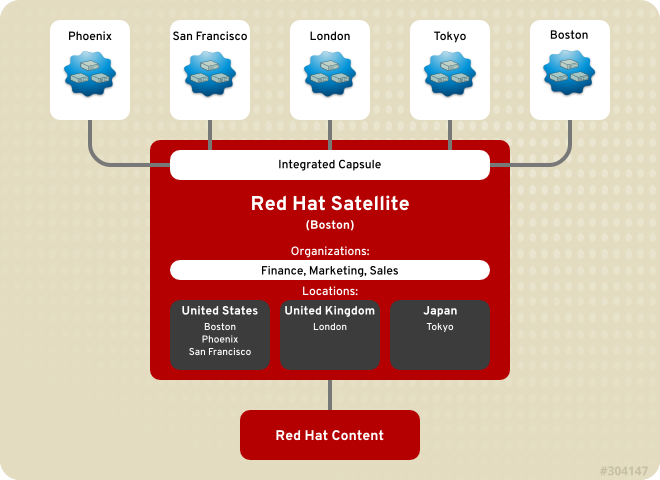
Figure 1.2. Single Satellite with Integrated Capsule
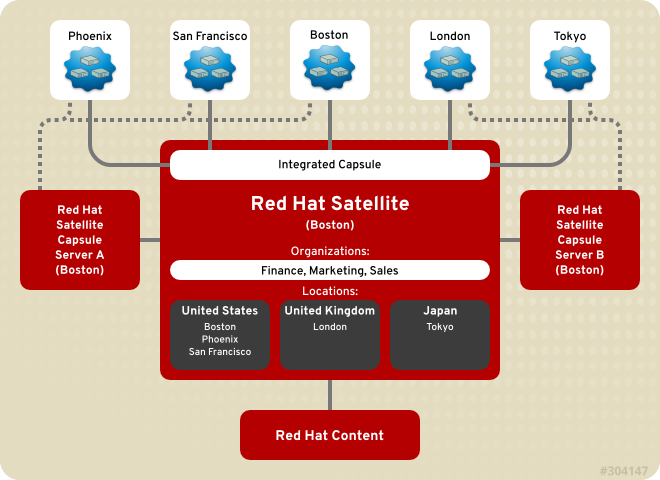
Figure 1.3. Single Satellite with Integrated Capsule and Backup Capsules
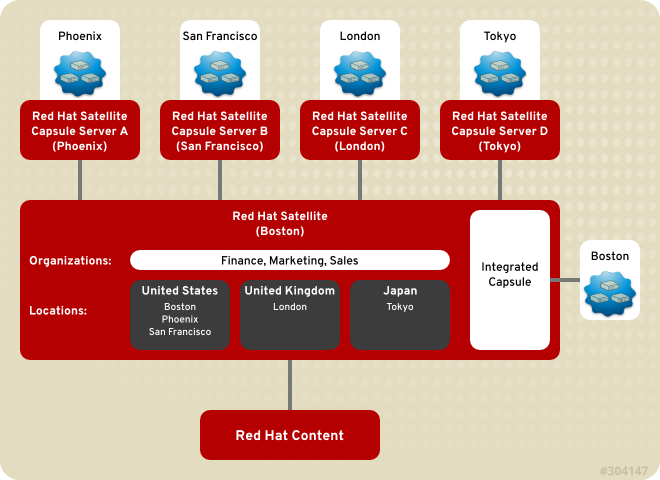
Figure 1.4. Remote Capsules Based on Location
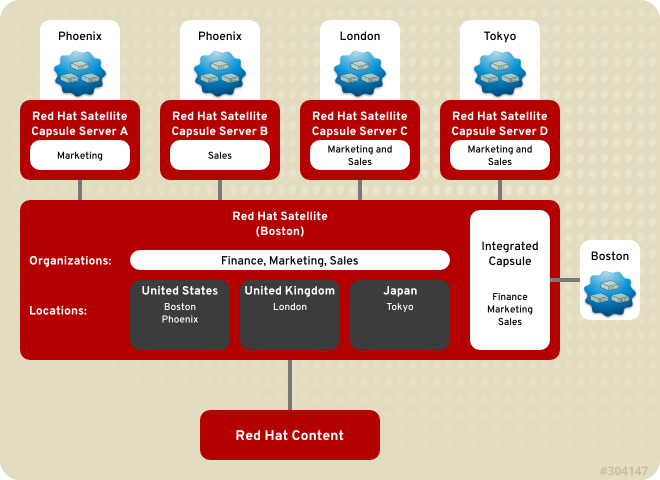
Figure 1.5. Remote Capsules Based on Location and Organization
1.3. Red Hat Satellite 6 Server Installation Workflow
This installation workflow covers preparing the host system for the installation and the installation of the Red Hat Satellite Server, including setting up basic infrastructure to provision a host machine.
- Install the host system with Red Hat Enterprise Linux 6.5 or later.
- Prepare the host system for the Satellite Server installation by configuring network ports and SELinux settings, as well as checking for correct package versions. See Section 1.5, “Prerequisites” for more information.
- Install the Satellite Server. There are two methods available:
- Configure the initial setup of the Satellite Server using
katello-installer. See Section 2.3, “Configuring Red Hat Satellite Manually” for more information.
These are the initial configuration procedures to provide a basic Satellite Server and populating it with content from Red Hat subscriptions:
- Create a manifest from the Red Hat Customer Portal. See Section 4.1.1.1, “Setting up a Manifest” for more information.
- Log in to the Satellite Server. This requires the administration user and password. See Chapter 3, Logging in to Red Hat Satellite for more information.
- Create an Organization. Satellite is pre-populated with a "Default Organization" and this organization can be used if needed. It is, however, highly recommended to create an organization that matches the ones in your own organizational structure. See Section 3.1.1, “Creating an Organization” for more information.
- Remove the "Default Organization". See Section 3.1.3, “Removing an Organization” for more information.
- Set your default Organization and Location context so that subsequent logins will place you in the right context within the Red Hat Satellite Server. See Section 3.2, “Changing Your Account Preferences” for more information.
- Logout and re-login. Your default organization and location preferences should now be visible on the upper left corner of the main menu.
- Upload the manifest in the Satellite Server web interface. This will propagate the subscription information into the Satellite Server. See Section 4.1.1.2, “Uploading a Subscription Manifest” for more information.
- Once the manifest has been uploaded, the Red Hat Repositories available from valid Red Hat Subscriptions are imported into the Satellite Server. Choose which repositories are relevant to your organization. See Section 4.1.1.3, “Enabling Red Hat Repositories” for more information.A common basic set of subscriptions which contain repositories with the latest packages for Red Hat Enterprise Linux 6 would be:
- Red Hat Enterprise Linux 6 Server Kickstart x86_64 6Server Repository
- Red Hat Enterprise Linux 6 Server RPMs x86_64 6Server Repository
- Red Hat Enterprise Linux 6 Server - RH Common RPMs x86_64 Repository
- Manually synchronize the repositories. This is a required step after enabling them. It is at this point that the local repository in the Satellite Server is populated by the required packages. See Section 4.1.3.1, “Synchronization Status” for more information.
- With content synchronized locally to the Red Hat Satellite Server, set up lifecycle environments and environment paths according to your organization's requirements. For example, creating a Test or Development environment to simulate the lifecycle environment currently in your organization. See Lifecycle Environments from the Red Hat Satellite 6 User Guide to create environments and environment paths.
- Create a content view to add to the lifecycle environment. For more information on Content Views, see Using Content Views, as well as Creating a Content View from the Red Hat Satellite 6 User Guide.
- After creating the content view, add repositories and puppet modules to the content view based on your organization's needs. Adding Repositories to the Content View from the Red Hat Satellite 6 User Guide will guide you through the steps.
- Publish the content view to use it. See Publishing Content View from the Red Hat Satellite 6 User Guide for instructions. After the content view has been published, it can be promoted through the promotion paths in the lifecycle environments.
- Now that the content and promotional paths have been set up, create an activation key to prepare for system provisioning. An activation key is used during the provisioning process to ensure that the system is associated with the correct Host Group. It also ensures that the system consumes the correct subscription. See the Creating an Activation Key section of the Red Hat Satellite 6 User Guide for more information.
- Now that you have completed your basic setup, the Red Hat Satellite 6 Server is ready to manage content on existing hosts. Register an existing system in your organization to your Satellite Server using the created activation key. See Registering a Host in the Red Hat Satellite 6 User Guide for more details.
The Red Hat Satellite Capsule Server is a Red Hat Satellite component that provides federated services to discover, provision, and configure hosts outside of the primary Satellite Server. Follow these steps to install and configure Satellite Capsule Server:
- Install the host system with Red Hat Enterprise Linux 6.5 or Later.
- Prepare the system for the Red Hat Satellite Capsule Server installation by fulfilling the requirements outlined in Section 5.2, “Red Hat Satellite Capsule Server Prerequisites”. This includes configuring your network ports, SELinux settings, etc.
- Install the Red Hat Satellite Capsule Server. See Section 5.3, “Installing a Red Hat Satellite Capsule Server” for more information.
- Configure the initial setup of the Satellite Capsule Server. See Section 5.4, “Configuring a Red Hat Satellite Capsule Server” for more information.
- For Satellite Capsule Servers with content node functionality, the procedure outlined in Section 5.5, “Adding Lifecycle Environments to a Red Hat Satellite Capsule Server” is required to have been completed in order to synchronize content from the central Satellite Server to the Satellite Capsule Server.
- Your Satellite Capsule Server is now installed, configured, and ready for use. Register hosts in the Satellite Capsule Server's location proximity. See Section 5.7, “Registering Host Systems to a Red Hat Satellite Capsule Server” for more information.
1.4. Red Hat Satellite 6 Supported Usage
Note
Red Hat Satellite 6 includes supported puppet packages. The installation program allows users to install and configure Puppet Masters as a part of Red Hat Satellite Capsule Servers. The server installs hiera, which can be used to refine how puppet modules are applied. A puppet module, running on a puppet master on the Red Hat Satellite Server or Satellite Capsule Server, using hiera, is supported by Red Hat.
Pulp is the content management subsystem within Red Hat Satellite 6. Pulp usage is only supported via the Satellite Server WebUI, CLI and API. Direct modification or interaction with Pulp's local API or database is not within Red Hat's scope of support.
Foreman is an upstream component that makes up a large amount of Red Hat Satellite's core functionality including the WebUI container, users, organizations, security and other significant functions. Foreman can be extended using plug-ins. However, only Red Hat Satellite packaged plug-ins are supported. Red Hat does not support plug-ins in the Red Hat Satellite Optional channel.
Katello is the upstream component for Red Hat Satellite 6's Content and Subscription user interface and API. The only supported method of using Katello is through the Red Hat Satellite 6 WebUI, API and database. Red Hat does not support direct interactions and modifications to Katello.
Candlepin is the subscription management subsystem within Red Hat Satellite 6. The only supported method of using Candlepin is through the Red Hat Satellite 6 WebUI, CLI and API only.
The only supported method of using the embedded tomcat application server is through the Red Hat Satellite 6 WebUI, API and database. Red Hat does not support direct interactions and modifications of the embedded tomcat application server's local API or database.
1.5. Prerequisites
Red Hat Satellite is only supported on either:
- Red Hat Enterprise Linux 6 Server
- Red Hat Enterprise Linux 7 Server
Important
- Red Hat Satellite Server requires Red Hat Enterprise Linux installations with the @Base package group with no other package-set modifications, and without third-party configurations or software that is not directly necessary for the direct operation of the server. This restriction includes hardening or other non-Red Hat security software. If such software is required in your infrastructure, install and verify a complete working Satellite Server first, then create a backup of the system before adding any non-Red Hat software.
- Your subscription-manager 'Release' field must be set to 6Server or 7Server in order to receive the latest version of Red Hat Enterprise Linux and Red Hat Satellite during the installation. Set the field by using the command:
subscription-manager release --set=Release
Only release versions 6Server and 7Server are supported by Red Hat Satellite.
- There should be at least one networked host with the following minimum specifications:
- 64-bit architecture
- Red Hat Enterprise Linux 6.5 or later
- A minimum of two CPU cores, but four CPU cores are recommended.
- A minimum of 8 GB memory but ideally 12 GB of memory for each instance of Satellite. Use 4 GB of swap space where possible.
- No Java virtual machine installed on the system, remove any if they exist.
- No Puppet RPM files installed on the system.
- No third-party unsupported yum repositories enabled. Third-party repositories may offer conflicting or unsupported package versions that may cause installation or configuration errors.
- A current Red Hat Network subscription.
- Administrative user (
root) access. - Full forward and reverse DNS resolution using a fully qualified domain name. Ensure that
hostnameandlocalhostresolve correctly, using the following commands:# ping -c1 localhost # ping -c1 `hostname -s` # my_system # ping -c1 `hostname -f` # my_system.domain.com
Important
Browser support is divided into 4 levels:
- Level 1: Fully supported preferred browsers for ideal experience.
- Level 2: Mostly supported. The interface functions but some design elements may not align correctly, UI controls and layout may be misaligned and there maybe degraded performance experienced.
- Level 3: Design elements may not align correctly.
- Level 4: Unsupported
Table 1.1. Supported Browser Matrix
| Browser | Version | Support Level |
|---|---|---|
| Firefox | 3.6 | L3 |
| Firefox | 17, 18, 19, 20 | L4 |
| Firefox | 21 | L2 |
| Firefox | 22, 23, 24 | L1 |
| Firefox | Latest | L1 |
| Chrome | 19, 20 | L4 |
| Chrome | 21, 27 | L2 |
| Chrome | Latest | L1 |
| Internet Explorer | 7, 8 | L4 |
| Internet Explorer | 9, 10, 11 | L2 |
| Safari | ALL | L4 |
Note
Satellite Server storage specifications are as follows:
- A minimum of 6 GB storage for base operating system installation of Red Hat Enterprise Linux
- A minimum of 400 MB storage for the Red Hat Satellite 6 software installation
- A minimum of 20 GB storage for each unique software repository. Packages that are duplicated in different channels are only stored once on the disk. Additional repositories containing duplicate packages will require less additional storage. The bulk of storage resides on the
/var/lib/mongodband/var/lib/pulpdirectories. These end points are not manually configurable. Make sure that storage is available on the /var file system to prevent storage issues. - A minimum of 2 GB of available storage in
/var/lib/pgsqlwith the ability to grow the partition containing this directory as data storage requirements grow.
Note
Satellite Server application installation specifications are as follows:
ntpd service and have it persist across restarts:
# service ntpd start; chkconfig ntpd on
chronyd service and have it persist across restarts:
systemctl start chronyd; systemctl enable chronyd
The following network ports need to be open and free before continuing with the installation:
Table 1.2. Required Network Ports
| Port | Protocol | Service |
|---|---|---|
| 443 | tcp | HTTPS |
| 5671 | tcp | SSL |
| 80 | tcp | HTTP |
| 8080 | tcp | Tomcat6 |
| 8140 | tcp | Puppet |
| 9090 | tcp | Foreman Smart Proxy |
iptables command to configure the firewall, or the system-config-firewall-tui command-line utility. To modify the firewall with the iptables command:
- Port 443 for HTTPS (secure WWW) must be open for incoming connections.
- Port 5671 must be open for SSL communication with managed systems.
- Port 80 for HTTP (WWW) must be open to download the bootstrap files.
- Port 8080 for TCP must be free for java connections.
- Port 8140 must be open for incoming Puppet connections with the managed systems.
- Port 9090 must be open for Foreman Smart Proxy connections with the managed systems.
- Run the following commands to configure the firewall with the
iptablescommand and to make these rules persistent during reboots:Note
Run the firewall commands as the root user.- For Red Hat Enterprise Linux 6:
iptables -I INPUT -m state --state NEW -p tcp --dport 443 -j ACCEPT \
&& iptables -I INPUT -m state --state NEW -p tcp --dport 5671 -j ACCEPT \
&& iptables -I INPUT -m state --state NEW -p tcp --dport 80 -j ACCEPT \
&& iptables -I INPUT -m state --state NEW -p tcp --dport 8140 -j ACCEPT \
&& iptables -I INPUT -m state --state NEW -p tcp --dport 9090 -j ACCEPT \
&& iptables -I INPUT -m state --state NEW -p tcp --dport 8080 -j ACCEPT \
iptables-save > /etc/sysconfig/iptables
- For Red Hat Enterprise Linux 7:
firewall-cmd --permanent --add-port="443/tcp" --add-port="5671/tcp" --add-port="80/tcp" --add-port="8140/tcp" --add-port="9090/tcp" --add-port="8080/tcp" \
&& firewall-cmd --complete-reload
The following tables provide details about the network connections made to and from the Red Hat Satellite Server.
Table 1.3. Advanced Firewall Considerations with a Red Hat Satellite Server
| Flow | Action | Initiator | Initiator Detail | Endpoint | Endpoint Detail | Port | Protocol | SELinux Type |
|---|---|---|---|---|---|---|---|---|
| Capsule Registration | Capsule Registration (Content Host) | Capsule | subscription-manager | Satellite Server | Apache | 443 | https | http_port_t |
| Capsule Registration (Smart Proxy) | Capsule | Smart Proxy | Satellite Server | Passenger | 8443/9090 | https | http_port_t, websm_port_t | |
| Broker Connections | Capsule | AMQP Broker | Satellite Server | AMQP Broker | 5671 | amqp | amqp_port_t | |
| Content Promotion | Initiation | Server | AMQP Broker | Capsule | AMQP Broker | 5671 | amqp | amqp_port_t |
| Content Mirroring | Capsule | Pulp Node | Server | Apache | 443 | https/http | http_port_t | |
| Puppet Run | Manifest Request | Client | Puppet Agent | Capsule | Puppet Master | 8140 | https | puppet_port_t |
| External Node Classification | Capsule | Puppet Master | Server | Passenger | 443 | https | http_port_t | |
| Run Report | Capsule | Puppet Master | Server | Passenger | 443 | https | http_port_t | |
| Provisioning | IP/TFTP/Etc | Server | Passenger | Capsule | Smart Proxy | 8140/8443/9090 | https | puppet_port_t, http_port_t, websm_port_t |
| Installation | Client | Anaconda/Yum | Capsule | Pulp Node | 8443/80 | https/http | http_port_t | |
| Installation Templates | Client | Anaconda | Server | Passenger | 443/80 | https/http | http_port_t | |
| Orchestration | DNS records | Capsule | nsupdate | DNS server | bind | 53 | dns | dns_port_t |
| DHCP records | Capsule | omapi | DHCP server | ISC dhcp | 7911 | omapi | dhcp_port_t | |
| Yum Run | Yum Execution | Client | Yum | Capsule | Apache | 8443/80 | https/http | http_port_t |
| Power Management | BMC On/Off/Cycle/Status | Capsule | User Initiated API/UI | Client | IPMI Device | n/a | ipmi | n/a |
Table 1.4. Advanced Firewall Considerations without a Red Hat Satellite Capsule Server
| Flow | Action | Initiator | Initiator Detail | Endpoint | Endpoint Detail | Port | Protocol | SELinux Type |
|---|---|---|---|---|---|---|---|---|
| Subscription Management | Subscription-Manager-Execution | Client | subscription-manager | Satellite Server | Passenger | 443 | https | http_port_t |
| Action Initiation | Server | AMQP Broker | Client | katello-agent | 5671 | amqp | amqp_port_t | |
| Installation/Removal/Update | Client | Anaconda/Yum | Capsule | Apache | 8443/80 | https/http | http_port_t | |
| Provisioning | Installation Templates | Client | Anaconda | Server | Passenger | 443/80 | https/http | http_port_t |
| Compute Resources | Fog interactions (query/create destroy/etc) | Server | Fog | Compute Resource | Openstack | 5000 | http | commplex_main_port_t |
| EC2 | 443 | https | http_port_t | |||||
| oVirt | 443 | https | https_port_t | |||||
| Libvirt | 22/16514 | ssh/tls | ssh_port_t, virt_port_t |
Red Hat recommends that the SELinux policy on Satellite 6 systems be set to enforcing.
Important
Red Hat recommends that the sos package is installed on Satellite. The sos packages provides the sosreport command. The sosreport command is a tool that collects configuration and diagnostic information from a Red Hat Enterprise Linux system and is used to provide the initial analysis of a system required when opening a service request with Red Hat Technical Support.
# yum install sos
Chapter 2. Red Hat Satellite Installation
2.1. Installing Red Hat Satellite
Procedure 2.1. To Install Satellite Server on a Certificate-managed System:
- List all the available subscriptions to find the correct Red Hat Satellite and Red Hat Enterprise Linux product to allocate to your system:
# subscription-manager list --available --all
This command displays output similar to the following:+-------------------------------------------+ Available Subscriptions +-------------------------------------------+ Subscription Name: Red Hat Satellite Subscription Provides: Red Hat Red Hat Satellite Capsule 6 Red Hat Enterprise Linux 7 Red Hat Satellite 6 SKU: SKU123456 Pool ID: e1730d1f4eaa448397bfd30c8c7f3d334bd8b Available: 6 Suggested: 1 Service Level: Self-Support Service Type: L1-L3 Multi-Entitlement: No Ends: 01/01/2022 System Type: PhysicalNote
The SKU and Pool ID depend on the Red Hat Satellite product type that corresponds to your system version and product type. Take note of the pool IDs of Red Hat Satellite 6, Red Hat Enterprise Linux and Red Hat Software collections that correspond to your system version and product type. - Attach a subscription to the registered system:
# subscription-manager subscribe --pool=Red_Hat_Satellite_Pool_Id
# subscription-manager subscribe --pool=Red_Hat_Enterprise_Linux_Pool_Id
# subscription-manager subscribe --pool=Red_Hat_Enterprise_Linux_Software_Collections_Pool_Id
- Disable all existing repositories:
# subscription-manager repos --disable "*"
- Enable the Red Hat Satellite and Red Hat Enterprise Linux and Red Hat Software Collections repositories. Ensure the Red Hat Enterprise Linux repository matches the specific version you are using.
# subscription-manager repos --enable rhel-6-server-rpms \
--enable rhel-server-rhscl-6-rpms \
--enable rhel-6-server-satellite-6.0-rpms
Note
The commands above are based on Red Hat Enterprise Linux 6. If you are using a different version of Red Hat Enterprise Linux, change the repository based on your specific version. - Install the katello package:
# yum install katello
Satellite Server is installed on your host system.
Important
2.2. Installing Red Hat Satellite with an ISO Image
ISO installations require imported Red Hat GPG keys before installation. Run the following command as root prior to running the installation script:
# rpm --import /etc/pki/rpm-gpg/RPM-GPG-KEY-redhat-release
- Download the ISO image from the Red Hat Satellite 6 Channel in the Red Hat Customer Portal.
- As the root user, mount the ISO image to a directory:
#
mkdir/media/iso #mount-o loop [iso_filename] /media/iso - Change directory to
/media/iso. - Run the installer script in the mounted directory:
# ./install_packages
Satellite Server is installed on your host system.
Important
2.3. Configuring Red Hat Satellite Manually
katello-installer script supports the ability to override various default settings within the different components of Satellite Server. For example, for organizations that have an existing HTTP proxy, additional configuration options need to be passed to the Satellite Server installer. See Section 2.3.1, “Configuring Red Hat Satellite Manually with an HTTP Proxy” for HTTP proxy options and Section 2.3.2, “Configuring Red Hat Satellite with a Custom Server Certificate” for custom Certificate Authority (CA) certificates.
Procedure 2.2. Running the Installer Script
- As the root user, configure Red Hat Satellite Server manually by running the
katello-installerscript:katello-installer --foreman-admin-username desired_username --foreman-admin-password desired_password
Where:- desired_username is the username that will replace the default "admin" user.
- desired_password is the password that will replace the default password generated.
Additional configuration options can be passed to thekatello-installercommand to adjust various aspects of the configuration. View a complete list of options using the command:# katello-installer --help
This script can be run multiple times without any issues.Important
The default username isadmin. The default organization name isDefault Organization. It is strongly recommended that you override these default settings once you log in to the Satellite Server interface and navigate to → and → .When the configuration script has completed successfully, it displays:# katello-installer Installing Done [100%] [........................................] Success! * Katello is running at https://sat6.example.com Default credentials are 'admin:changeme' * Capsule is running at https://sat6.example.com:9090 * To install additional capsule on separate machine continue by running:" capsule-certs-generate --capsule-fqdn "$CAPSULE" --certs-tar "~/$CAPSULE-certs.tar" The full log is at /var/log/katello/installer/katello-installer.log - After configuration, run the following commands to configure the firewall to limit elasticsearch to the
foreman,katelloand root users and make these rules persistent during reboots:- For Red Hat Enterprise Linux 6:
iptables -A OUTPUT -o lo -p tcp -m tcp --dport 9200 -m owner --uid-owner foreman -j ACCEPT \
&& iptables -A OUTPUT -o lo -p tcp -m tcp --dport 9200 -m owner --uid-owner katello -j ACCEPT \
&& iptables -A OUTPUT -o lo -p tcp -m tcp --dport 9200 -m owner --uid-owner root -j ACCEPT \
&& iptables -A OUTPUT -o lo -p tcp -m tcp --dport 9200 -j DROP
iptables-save > /etc/sysconfig/iptables
- For Red Hat Enterprise Linux 7:
firewall-cmd --permanent --direct --add-rule ipv4 filter OUTPUT 0 -o lo -p tcp -m tcp --dport 9200 -m owner --uid-owner foreman -j ACCEPT \
&& firewall-cmd --permanent --direct --add-rule ipv6 filter OUTPUT 0 -o lo -p tcp -m tcp --dport 9200 -m owner --uid-owner foreman -j ACCEPT \
&& firewall-cmd --permanent --direct --add-rule ipv4 filter OUTPUT 0 -o lo -p tcp -m tcp --dport 9200 -m owner --uid-owner katello -j ACCEPT \
&& firewall-cmd --permanent --direct --add-rule ipv6 filter OUTPUT 0 -o lo -p tcp -m tcp --dport 9200 -m owner --uid-owner katello -j ACCEPT \
&& firewall-cmd --permanent --direct --add-rule ipv4 filter OUTPUT 0 -o lo -p tcp -m tcp --dport 9200 -m owner --uid-owner root -j ACCEPT \
&& firewall-cmd --permanent --direct --add-rule ipv6 filter OUTPUT 0 -o lo -p tcp -m tcp --dport 9200 -m owner --uid-owner root -j ACCEPT \
&& firewall-cmd --permanent --direct --add-rule ipv4 filter OUTPUT 1 -o lo -p tcp -m tcp --dport 9200 -j DROP \
&& firewall-cmd --permanent --direct --add-rule ipv6 filter OUTPUT 1 -o lo -p tcp -m tcp --dport 9200 -j DROP
2.3.1. Configuring Red Hat Satellite Manually with an HTTP Proxy
katello-installer --katello-proxy-url=http://myproxy.example.com --katello-proxy-port=8080 --katello-proxy-username=proxy_username --katello-proxy-password=proxy_password
--katello-proxy-url- the URL of the HTTP proxy server.--katello-proxy-port- the port the HTTP proxy server is listening on.--katello-proxy-username- (optional) the HTTP proxy username for authentication. If your HTTP proxy server does not require a username, you are not required to specify the username.--katello-proxy-password- (optional) the HTTP proxy password for authentication. If your HTTP proxy server does not require a password, you are not required to specify the password.
Procedure 2.3. Configuring the Satellite Server to Allow Red Hat Subscription Manager Access to the CDN
- On the network gateway and the HTTP Proxy, open the following hostnames, ports and protocols:
Table 2.1. Required Hostnames, Ports and Protocols
Hostname Port Protocol subscription.rhn.redhat.com 443 https cdn.redhat.com 443 https *.akamaiedge.net 443 https - On the Satellite Server, fill in the following details in the
/etc/rhsm/rhsm.conffile:# an http proxy server to use (enter server FQDN) proxy_hostname = http_proxy.example.com # port for http proxy server proxy_port = 3128 # user name for authenticating to an http proxy, if needed proxy_user = # password for basic http proxy auth, if needed proxy_password =
2.3.2. Configuring Red Hat Satellite with a Custom Server Certificate
katello-installer comes with a default CA used both for the server ssl certificates as well as the client certificates used for authentication of the subservices. These certificates can be replaced with custom ones.
- When
katello-installeris run the first time - After
katello-installerhas already been run
Procedure 2.4. Setting a Custom Server Certificate while running katello-installer for the first time
- Run this command on the Red Hat Satellite Server:
katello-installer --certs-server-cert ~/path/to/server.crt\ --certs-server-cert-req ~/path/to/server.crt.req\ --certs-server-key ~/path/to/server.crt.key\ --certs-server-ca-cert ~/path/to/cacert.crtWhere:certs-server-certis the path to your certificate, signed by your certificate authority (or self signed)certs-server-cert-reqis the path to your certificate signing request file that was used to create the certificate.certs-server-keythe private key used to sign the certificatecerts-server-ca-cert~/path/to/cacert.crt the path to the CA certificate on this system.
Procedure 2.5. Setting a Custom Server Certificate after running katello-installer
- The initial run of
katello-installeruses the default CA for both server and client certificates. To enforce custom certificates deployment, set the--certs-update-serverparameter and the--certs-update-server-caparameter to update the CA certificate:katello-installer --certs-server-cert ~/path/to/server.crt\ --certs-server-cert-req ~/path/to/server.crt.req\ --certs-server-key ~/path/to/server.crt.key\ --certs-server-ca-cert ~/path/to/cacert.crt\ --certs-update-server --certs-update-server-ca
This will regenerate the katello-ca-consumer package and the server CA certificate. - After the server CA changes, install the new version of the consumer-ca-consumer package on the client systems:
rpm -Uvh http://katello.example.com/pub/katello-ca-consumer-latest.noarch.rpm
Important
2.4. Configuring Red Hat Satellite with an Answer File
Procedure 2.6. Configuration Using an Answer File
- Copy the default answer file located at
/etc/katello-installer/answers.katello-installer.yamlto a location on your local filesystem:#
cp/etc/katello-installer/answers.katello-installer.yaml /etc/katello-installer/my-answer-file.yamlNote
The initial answer file will be sparsely populated. However, oncekatello-installeris run for the first time, the answer file is populated with the standard parameter values for installation. - Open your copy of the answer file in your preferred text editor and edit the values to suit your environment. Save your answer file once you have finished editing it.
Note
The parameters for each module are specified in the module'sparams.ppfile. Available modules with parameter files can be viewed by executing the command:#
rpm -qlkatello-installer | grep params.pp - Open the
/etc/katello-installer/katello-installer.yamlfile in your preferred text editor and edit the answer file entry to point to your custom answer file::answer_file: /etc/katello-installer/my-answerfile.yaml
- Run the
katello-installercommand.# katello-installer
Satellite is configured on your host system with your desired configuration.
Chapter 3. Logging in to Red Hat Satellite
- Access the Satellite server using a web browser pointed to the following address:
https://HOSTNAME/To identify your hostname, use thehostnamecommand at the prompt:# hostname
Important
An untrusted connection warning appears on your web browser when accessing Satellite for the first time. Accept the self-signed certificate and add the Satellite URL as a security exception to override the settings. This procedure might differ depending on the browser being used.Only do this if you are sure that the Satellite URL is a trusted source.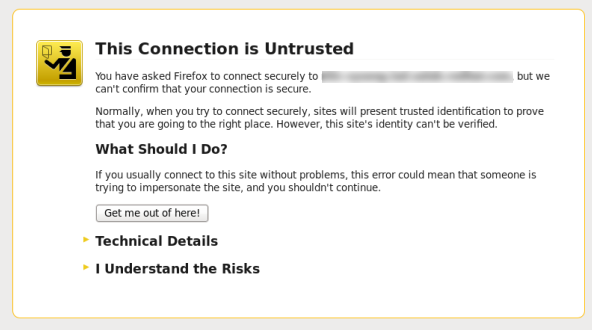
Figure 3.1. Untrusted Connection Warning
- Enter the user name and password created during the configuration process. If a user was not created during the configuration process, the default user name is admin.
When you have successfully logged in, you are taken to the Satellite dashboard. The dashboard contains an overview of the Satellite and the hosts registered.
Note
# foreman-rake permissions:reset
Reset to user: admin, password: qwJxBptxb7Gfcjj5
3.1. Organizations
Default Organization, which can be modified to suit your own installation, or deleted.
Important
3.1.1. Creating an Organization
Procedure 3.1. Creating an Organization
- Click the → menu on the top right hand corner.
- Click the button.
- Type in the name of the new organization in the Name field.
- Type in the label of the new organization in the Label field.
- Type in a description of the new organization in the Description field.
- Click the button.
- Select the hosts to assign to the new organization.
- Click the button to assign all hosts with no organization to the new organization.
- Click the button to manually select and assign the hosts with no organization.
- Click the button to skip assigning hosts.
A new organization is created.
3.1.2. Editing an Organization
Procedure 3.2. Editing an Organization
- Click the → menu on the top right hand corner.
- Click the name of the organization to be edited.
- Select the resource to edit from the list on the left.
- Click the name of the desired items to add them to the Selected Items list.
- Click the button.
The organization is updated and saved.
3.1.3. Removing an Organization
Procedure 3.3. Removing an Organization
- Click the → menu on the top right hand corner.
- Select from the drop down menu to the right of the name of the organization you want to remove.
- An alert box appears:
Delete Organization Name?
- Click the button.
The organization is removed from Red Hat Satellite.
3.2. Changing Your Account Preferences
- - Change personal data about your login name, as well as your password and default location/organization.
- First Name
- Surname
- Email Address
- Default Location
- Default Organization
- Password
- - Add or remove locations on your account based on the locations created within the Red Hat Satellite Server.
- - Add or remove organizations on your user account based on the organizations created within the Red Hat Satellite Server.
- - Add or remove roles on your user account based on a set of roles created within the Red Hat Satellite Server.
Procedure 3.4. Changing your Account Preferences
- At the upper right corner, hover your mouse over the user and on the drop-down menu that appears, click on .
- Choose the subtab of the preference you wish to change and click on the subtab.
- Change the preferences you wish to change and click on .
Note
3.3. Configuring LDAP Authentication for Red Hat Satellite
Procedure 3.5. To Configure LDAP Authentication:
- Log in as the Satellite administrator.
- Click → on the upper right of the page.
- Click on the upper right of the page.
- Fill in the information in the following tabs:
- Tab. For the LDAP server tab, enter the following information:
- Name - LDAP server's name.
- Server - the LDAP server's hostname.
- Port - the LDAP port. This defaults to port 389.
- TLS - Enables Transport Layer Security. Tick the check box to enable encryption.
- Tab. For the Account Tab, enter the following information:
- Account Username - an LDAP user who has read access to the LDAP server. This field cannot remain blank. Use the full path to the user's object. For example:
uid=$login,cn=users,cn=accounts,dc=example,dc=com
- Account password - the LDAP password for the user defined in the Account username field. This field can remain blank if the Account username is using the "$login" variable.
- Base DN - the top level domain name of your LDAP directory. For example:
cn=users,cn=accounts,dc=redhat,dc=com
- LDAP filter
- Automatically create accounts in Foreman - creates Satellite accounts automatically for LDAP users who log in for the first time in Satellite. Tick the check box to enable this feature.
- tab. LDAP attributes such as login, name, and email addresses, need to be mapped to Satellite attributes for LDAP to work on Satellite. The following attributes can be mapped to Satellite:
- Login name attribute
- First Name attribute
- Surname attribute
- Email address attribute
- Photo attribute
- Click .
LDAP authentication is now configured on the Satellite.
Chapter 4. Populating Red Hat Satellite with Content
4.1. Connected Satellite
4.1.1. Using Red Hat Content Providers
4.1.1.1. Setting up a Manifest
You must meet the following conditions before continuing with this task:
- A Customer Portal user name and password.
- Sufficient subscriptions to add to the manifest.
- Log in to the Customer Portal.
- Click . On the Red Hat Subscription Management Page, scroll down and click on Subscription Management Applications, then, click .
- On the upper right corner of the Subscriptions Management Applications page, click .
- Create a name to distinguish your Satellite from the other Satellite systems in your account.
- Select from the drop-down menu as the Satellite version. It is important to select the correct version as each version requires a certain subset of packages.
- Click .
- Click , add the subscriptions required for Red Hat Satellite, and then click . See How to generate a certificate for more information.The minimum requirements for generating a manifest are:
- A valid Red Hat Satellite subscription on your Customer Portal account
- At least one Red Hat Enterprise Linux subscription to attach to the manifest
Warning
If a valid Red Hat Satellite subscription is not in the account, the will not be clickable. - Click to generate an archive in .zip format that contains the manifest for Red Hat Satellite.
A subscription manifest is created and downloaded for Red Hat Satellite.
4.1.1.2. Uploading a Subscription Manifest
Procedure 4.1. To Upload a Subscription Manifest
- Log in to the Satellite server.
- Click → and select the organization that you want to assign the subscription manifest to.
- Click → and then click at the upper right of the page.
- In the Subscription Manifest section, click Actions and under the Upload New Manifest subsection, click .
- Select the manifest file to upload, and then click Upload.
4.1.1.3. Enabling Red Hat Repositories
Procedure 4.2. Enabling Repositories
- Click → .
- Click on the tab of the type of content to be enabled. The tabs are: RPMs, Source RPMs, Debug RPMs, Beta, ISOs, Other.
- Expand each Red Hat product to examine the different repository sets available by clicking on the arrow by the product name.
- Choose which Red Hat repository sets you wish to add. Choosing it will automatically enable that repository for your Red Hat Satellite server.For example, a common basic set of subscriptions which contain repositories with the latest packages for Red Hat Enterprise Linux 6 would be:
- Red Hat Enterprise Linux 6 Server Kickstart x86_64 6Server Repository
- Red Hat Enterprise Linux 6 Server RPMs x86_64 6Server Repository
- Red Hat Enterprise Linux 6 Server - RH Common RPMs x86_64 Repository
Note
The Red Hat Common repository must be enabled as it provides client systems registered to the Satellite Server katello-agent and puppet packages for both katello-agent and puppet.
Repositories have been enabled and are ready to be synchronized.
Note
4.1.2. Using Products
4.1.2.1. Creating a Product
Procedure 4.3. Creating a Product
- Click → .
- Click the link.
- Type in the name of the new product in the Name field.
- Type in label for the new product in the Label field.
- Select a GPG key from the GPG Key drop down menu.
- Select a synchronization plan from the Sync Plan drop down menu. Alternatively select the + New Sync Plan link to create a new synchronization plan.
- Type in a description of the new product in the Description field.
- Click the button to save your new product.
A new product is created.
4.1.2.2. Adding Repositories to a Product
Procedure 4.4. Adding Repositories to a Product
- Click → .
- Click the product you wish to add a repository to.
- Click the subtab.
- Click the button.
- Type in the name of the new repository in the Name field.
- Type in a label for the new repository in the Label field.
- Select the type of the repository from the Type drop down menu.
- Type in the URL of the repository in the URL field.
- Choose whether to publish the repository via HTTP by clicking the Publish via HTTP checkbox.
- Select a GPG key for the repository from the GPG Key drop down menu.
- Click the button to save your new repository.
A new repository is added to your product.
4.1.2.3. Using Bulk Actions for Products
Procedure 4.5. To Perform Tasks on Multiple Products:
- Click → .
- Select the check box for the products you want to work with.
- Click .
- To synchronize all selected products, click the tab and then click .
- To remove all selected products, click and then click .
You can also update the synchronization plans for multiple products at the same time.
- To create a new synchronization plan, click .
- To remove the synchronization plans from the selected products, click .
- To update the synchronization plans for the selected products, click .
4.1.2.4. Using Repository Discovery
Procedure 4.6. Using Repository Discovery
- Click the → menu.
- Click the button.
- Enter the URL where the repositories are located in the Yum Repo Discovery field.
- Click the button.
- A list of the repositories at the URL is displayed under Results.
- Click the Discovered URLs check box for the repositories to be added to a product.
- Click the button.
- Choose whether to add the repositories to an existing product or create a new product.
- To add the repositories to an existing product:
- Select the Existing Product radio button.
- Select the required product from the drop down menu.
- To create a new product to add the repositories to:
- Select the New Product radio button.
- Enter the Name and Label for the new product and select a GPG Key from the drop down menu.
- Select the Serve via HTTP check box to serve the repository via HTTP.
- Edit the Name and Label for the Selected URLs.
- Click the button.
The repositories have been discovered and added to a product.
4.1.2.5. Removing a Product
Procedure 4.7. To Remove a Product from Satellite:
- Click → .
- Select the check box next to the products you want to remove.
- Click and then click .
- Click to confirm that you want to remove the products.
4.1.3. Synchronizing Content from Source Repositories to Red Hat Satellite
- Data integrity between packages
- Updated packages, security fixes, and errata
4.1.3.1. Synchronization Status
Important
Procedure 4.8. Synchronize Products
- Click → . Based on the subscriptions and repositories enabled, the list of product channels available for synchronization is displayed.
- Click the arrow next to the product name to see available content.
- Select the content you wish to synchronize.
- Click the button to starting synchronizing. The status of the synchronization process will appear in the Result column. If synchronization is successful, Sync complete will appear in the Result column. If synchronization failed, Error syncing will appear.
A product is synchronized.
Note
4.1.3.2. Creating a Synchronization Plan
Procedure 4.9. To Create a Synchronization Plan:
- Click → .
- Click the link to create a new synchronization plan.
- Enter the Name, Description and other details for the plan.
- Click to create the synchronization plan.
4.1.3.3. Applying a Synchronization Schedule
Procedure 4.10. To Create a Synchronization Schedule:
- Click → and select the synchronization plan you want to implement.
- Click → in the synchronization plan main page.
- Select the check box of the product to associate with the synchronization plan.
- Click .
4.2. Disconnected Satellite
katello-disconnected utility and a synchronization host.

Figure 4.1. Disconnected Satellite
4.2.1. Configuring the Synchronization Host
To import content from the Red Hat Content Distribution Network (CDN), the synchronization host requires:
- An Internet connection
- Valid Red Hat Network subscriptions
- A valid manifest (See Section 4.1.1.1, “Setting up a Manifest” for instructions on how to obtain one.)
Procedure 4.11. To Configure a Host to Synchronize and Export Content from the Red Hat CDN:
- Use Red Hat Subscription Manager to register the synchronization host to RHN.
- List all the available subscriptions to find the correct Red Hat Satellite product to allocate to your system:
# subscription-manager list --available --all
This command displays output similar to the following:+-------------------------------------------+ Available Subscriptions +-------------------------------------------+ ProductName: Red Hat Satellite ProductId: SKU123456 PoolId: e1730d1f4eaa448397bfd30c8c7f3d334bd8b Quantity: 10 Multi-Entitlement: No Expires: 08/20/2013 MachineType: physicalNote
The SKU and Pool ID depend on the Red Hat Satellite product type that corresponds to your system version and product type. - Subscribe to the pool using the following command:
# subscription-manager subscribe --pool=Red_Hat_Satellite_Pool_Id
# subscription-manager subscribe --pool=Red_Hat_Enterprise_Linux_Pool_Id
# subscription-manager subscribe --pool=Red_Hat_Enterprise_Linux_Software_Collections_Pool_Id
- Disable all existing repositories:
# subscription-manager repos --disable "*"
- Enable the Red Hat Satellite and Red Hat Enterprise Linux and Red Hat Software Collections repositories. Ensure the Red Hat Enterprise Linux repository matches the specific version you are using.
# subscription-manager repos --enable rhel-6-server-rpms \
--enable rhel-server-rhscl-6-rpms \
--enable rhel-6-server-satellite-6.0-rpms
Note
The commands above are based on Red Hat Enterprise Linux 6. If you are using a different version of Red Hat Enterprise Linux, change the repository based on your specific version. - Install katello-utils and associated RPM files:
# yum install python-qpid-qmf python-qpid qpid-cpp-server-store katello-utils
katello-utils includes thekatello-disconnectedutility that is required to set up repositories for import while qpid related packages are necessary for pulp configuration. - Generate a 32-character alphanumeric string for the
oauth_secretentry in the/etc/pulp/server.conffile:$ tr -dc "[:alnum:]" < /dev/urandom | head -c 32
- In the
/etc/pulp/server.conf, uncomment the[oauth]entry and add the randomly-generated value from the previous step as theoauth_secretvalue:[oauth] enabled: true oauth_key: katello oauth_secret: v8SeYqvS5QUfmg0dIrJOBG58lAHDRZnN
- Disable authentication in
/etc/qpid/qpidd.conf:# Configuration file for qpidd. Entries are of the form: # name=value # # (Note: no spaces on either side of '='). # Run "qpidd --help" or see "man qpidd" for more details. auth=no
All incoming connections authenticate using the Satellite's default realm. - Configure the connection from
katello-disconnectedto Pulp with the previously generated value as your--oauth-secretoption:# katello-disconnected setup --oauth-key=katello --oauth-secret=v8SeYqvS5QUfmg0dIrJOBG58lAHDRZnN
This places a configuration value in~/.katello-disconnected. - Configure Pulp on the synchronization server:
sudo service qpidd start
sudo chkconfig qpidd on
sudo service mongod start
sleep 10
sudo chkconfig mongod on
sudo -u apache pulp-manage-db
sudo service httpd restart
sudo chkconfig pulp_workers on
sudo service pulp_workers start
sudo chkconfig pulp_celerybeat on
sudo service pulp_celerybeat start
sudo chkconfig pulp_resource_manager on
sudo service pulp_resource_manager start
- Import the manifest to set up the list of available repositories to synchronize based on the selected subscriptions:
# katello-disconnected import -m ./manifest.zip
4.2.2. Synchronizing Content
katello-disconnected enables all repositories that are included in the manifest for synchronization. Synchronization time is directly related to the amount of repositories to be synchronized. If the manifest has a large amount of repositories, the synchronization will take time and network resources.
katello-disconnected allows for the synchronization of specific repositories. This section will set up Pulp for synchronizing content.
- Disable all repositories:
# katello-disconnected disable --all
katello-disconnectedenables all repositories by default. - Choose which repositories you wish to sync by listing all available repositories from the manifest:
# katello-disconnected list --disabled
rhel-5-server-debug-rpms-5Server-i386
rhel-5-server-debug-rpms-5Server-ia64
rhel-5-server-debug-rpms-5Server-x86_64
rhel-5-server-debug-rpms-5_7-i386
rhel-5-server-debug-rpms-5_7-ia64
rhel-5-server-debug-rpms-5_7-x86_64
rhel-5-server-debug-rpms-5_8-i386
rhel-5-server-debug-rpms-5_8-ia64
rhel-5-server-debug-rpms-5_8-x86_64
rhel-5-server-debug-rpms-5_9-i386
rhel-5-server-debug-rpms-5_9-ia64
rhel-5-server-debug-rpms-5_9-x86_64
rhel-5-server-isos-5Server-i386
- Enable the chosen repositories for synchronization:
# katello-disconnected enable -r rhel-6-server-sam-rpms-6_4-x86_64
- Create the repositories and push them to Pulp to allow synchronization:
# katello-disconnected configure
Note
The configure option forkatello-disconnectedreads the manifest, creates pulp repositories, and generates scripts before synchronization. It needs to be run each time a repository is enabled or disabled. - Synchronize the repositories:
# katello-disconnected sync
You can use thewatchoption to monitor the synchronization process.# katello-disconnected watch Watching sync... (this may be safely interrupted with Ctrl+C) running: rhel-6-server-sam-rpms-6_4-x86_64 running: rhel-6-server-sam-rpms-6_4-x86_64 ... finished: rhel-6-server-sam-rpms-6_4-x86_64 Watching finished
4.2.3. Exporting Content
An external export media such as a CD, DVD, or external hard drive.
- Export the synchronized repositories:
# katello-disconnected export -t /var/tmp/export
The output will look similar to:# katello-disconnected export -t /var/tmp/export # katello-disconnected watch Watching sync... (this may be safely interrupted with Ctrl+C) running: rhel-6-server-sam-rpms-6_4-x86_64 finished: rhel-6-server-sam-rpms-6_4-x86_64 Watching finished Done watching ... Copying content to /var/tmp/export Archiving contents of /var/tmp/export into 4600M tar archives. NOTE: This may take a while. tar: Removing leading `/' from member names Done exporting content, please copy /var/tmp/export/* to your disconnected host
This operation will create the following files in/var/tmp/export:# ls /var/tmp/export/ content-export-00 content-export-01 content-export-02 expand_export.sh
- Copy the files from /var/tmp/export into the external media.
Note
If the files are too big for your external media, the files can be copied sequentially in a series of DVDs.
4.2.4. Importing Content to a Disconnected Satellite Server
Ensure that the directory and filesystem containing the exports has enough space to expand out the archives. For example, if your export is 40GB, the disconnected Satellite Server directory and filesystem where you are importing the content will need an extra 40GB of space to expand it on the same filesystem.
- Copy the exported contents of the external media to a directory on the disconnected Satellite.
Note
If the exported content was placed in different external media devices, ensure that you copy all the contents in one directory on the disconnected Satellite. - Run the
expand_export.shscript copied along with your exported content:# ./expand_export.sh *** Done expanding archives. ***
Warning
The disconnected Satellite needs to have equal to the same space as the exported archive before you expand the exported content. The script will fail otherwise.The script will expand the archive into a directory. - Move the expanded directory tree's content to
/var/www/htmlon the Satellite Server and restore the SELinux contexts on the moved files:# mv var/tmp/export/* /var/www/html/ # cd /var/www/html # restorecon -r *
Note
The Satellite is now acting as its own CDN with the files located inhttp://localhost/content. This is not a requirement. The CDN can be hosted on a different machine inside the same disconnected network as long as it is accessible to the Satellite server via HTTP. - Add the CDN address to the Satellite web interface:
- Log in to the Satellite web interface.
- Click → and then click .
- On the Subscription Manifest information screen, scroll to Red Hat Provider Details. Click the edit icon on the Repository URL entry and change the entry to the CDN's repository URL.
- Click to choose the manifest file.
- Click to import your manifest.
- Enable the repositories from the local CDN:
- Click →
- Enable the repositories that were enabled and synchronized in the Synchronizing Content section.
- Click → .
- Select the repositories you want to synchronize and click .
Chapter 5. Red Hat Satellite Capsule Servers
- Pulp Server/Content Node features, including:
- Repository synchronization
- Content delivery
- Red Hat Satellite Provisioning Smart Proxy features, including:
- DHCP, including ISC DHCP servers
- DNS, including Bind and MS DNS servers
- Any UNIX-based TFTP server
- Puppet Master servers from 0.24
- Puppet CA to manage certificate signing and cleaning
- Baseboard Management Controller (BMC) for power management
5.1. Red Hat Satellite Capsule Server Scalability
5.1.1. Capsule Scalability with Puppet Clients
- Number of CPUs
- Run-interval distribution
- Number of puppet classes
- There are no external puppet clients reporting directly to the Satellite 6 integrated capsule.
- All other puppet clients report directly to an external capsule.
- On the minimum amount of CPUs (two CPUs):
- At 1 puppet class per host: Not tested
- At 10 puppet classes per host: Maximum of 1020-860
- At 20 puppet classes per host: Maximum of 375-330
- On the recommended amount of CPUs (four CPUs):
- At 1 puppet class per host: Maximum of 2250-1875
- At 10 puppet classes per host: Maximum of 1600-1250
- At 20 puppet classes per host: Maximum of 700-560
Note
5.2. Red Hat Satellite Capsule Server Prerequisites
Red Hat Satellite Capsule is supported on Red Hat Enterprise Linux 6.5 or later, as well as Red Hat Enterprise Linux 7. Install the operating system from disc, local ISO image, kickstart, or any other methods that Red Hat supports. Red Hat Satellite Capsule requires Red Hat Enterprise Linux installations with the @Base package group with no other package-set modifications, and without third-party configurations or software that is not directly necessary for the direct operation of the server. This restriction includes hardening or other non-Red Hat security software. If such software is required in your infrastructure, install and verify a complete working Red Hat Satellite Capsule first, then create a backup of the system before adding any non-Red Hat software.
- There should be at least one networked host with the following minimum specifications:
- 64-bit architecture
- Red Hat Enterprise Linux 6.5 or later
- A minimum of two CPU cores, but four CPU cores are recommended
- A minimum of 8 GB memory but ideally 12 GB of memory for each Satellite instance. It is also recommended to use 4 GB of swap space where possible.
- A minimum of 5 GB storage for the base install of Red Hat Enterprise Linux, 300 MB for the installation of Red Hat Satellite Capsule and at least 10 GB storage for each unique software repository to be synchronized in the /var file system.Packages that are duplicated in different channels are only stored once on the disk. Additional repositories containing duplicate packages will require less additional storage.
Note
The bulk of storage resides on the/var/lib/mongodband/var/lib/pulpdirectories. These end points are not manually configurable. Ensure that storage is available on the/varfile system to prevent storage issues. - No Java virtual machine installed on the system, remove any if they exist.
- No Puppet RPM files installed on the system
- No third-party unsupported yum repositories enabled. Third-party repositories may offer conflicting or unsupported package versions that may cause installation or configuration errors.
- Administrative user (
root) access - Full forward and reverse DNS resolution using a fully qualified domain name. Check that
hostnameandlocalhostresolve correctly, using the following commands:# ping -c1 localhost # ping -c1 `hostname -s` # my_system # ping -c1 `hostname -f` # my_system.domain.com
- Available subscriptions on the Red Hat Satellite Server.
Important
Satellite application installation specifications are as follows:
ntpd service and have it persist across restarts:
# service ntpd start; chkconfig ntpd on
The following conditions must be met before continuing with this task:
- Port 443 for HTTPS (secure WWW) must be open for incoming connections.
- Port 5671 must be open for SSL communication with managed systems.
- Port 80 for HTTP (WWW) must be open to download the bootstrap files.
- Port 8080 for TCP must be free for java connections.
- Port 8140 must be open for incoming Puppet connections with the managed systems.
- Port 9090 must be open for Foreman Smart Proxy connections with the managed systems.
iptables command and to make these rules persistent during reboots:
- For Red Hat Enterprise Linux 6:
# iptables -I INPUT -m state --state NEW -p tcp --dport 443 -j ACCEPT \
&& iptables -I INPUT -m state --state NEW -p tcp --dport 5671 -j ACCEPT \
&& iptables -I INPUT -m state --state NEW -p tcp --dport 80 -j ACCEPT \
&& iptables -I INPUT -m state --state NEW -p tcp --dport 8140 -j ACCEPT \
&& iptables -I INPUT -m state --state NEW -p tcp --dport 9090 -j ACCEPT \
&& iptables -I INPUT -m state --state NEW -p tcp --dport 8080 -j ACCEPT \
# iptables-save > /etc/sysconfig/iptables
- For Red Hat Enterprise Linux 7:
# firewall-cmd --permanent --add-port="443/tcp" --add-port="5671/tcp" --add-port="80/tcp" --add-port="8140/tcp" --add-port="9090/tcp" --add-port="8080/tcp"
# firewall-cmd --complete-reload
The Satellite Server must have the Red Hat Software Collections repositories enabled and synchronized prior to the Capsule Server installation.
Important
5.3. Installing a Red Hat Satellite Capsule Server
The Capsule Server must be registered to the Red Hat Satellite Server to use the Red Hat Satellite Server products and subscriptions:
- Install the Red Hat Satellite Server's CA certificate in the Capsule Server:
# rpm -Uvh http://satellite.example.com/pub/katello-ca-consumer-latest.noarch.rpm
- Register the Capsule Server under your chosen organization's name:
# subscription-manager register --org "your organization"
Procedure 5.1. To Install a Satellite Capsule Server on a Certificate-managed System:
- List all the available subscriptions to find the correct Red Hat Satellite and Red Hat Enterprise Linux product to allocate to your system:
# subscription-manager list --available --all
The screen displays:+-------------------------------------------+ Available Subscriptions +-------------------------------------------+ ProductName: Red Hat Satellite ProductId: SKU123456 PoolId: e1730d1f4eaa448397bfd30c8c7f3d334bd8b Quantity: 10 Multi-Entitlement: No Expires: 08/20/2013 MachineType: physicalNote
The SKU and Pool ID depend on the Red Hat Satellite product type that corresponds to your system version and product type. - Subscribe to the pool using the following command:
# subscription-manager subscribe --pool=Red_Hat_Satellite_Pool_Id
# subscription-manager subscribe --pool=Red_Hat_Enterprise_Linux_Pool_Id
# subscription-manager subscribe --pool=Red_Hat_Enterprise_Linux_Software_Collections_Pool_Id
- Disable all existing repositories:
# subscription-manager repos --disable "*"
- Enable the Satellite and Red Hat Enterprise Linux repositories by running
subscription-manager. You might need to alter the Red Hat Enterprise Linux repository to match the specific version you are using.# subscription-manager repos --enable rhel-6-server-rpms \ --enable rhel-server-rhscl-6-rpms \ --enable rhel-6-server-satellite-capsule-6.0-rpms
- Install the katello-installer and cyrus-sasl-plain packages using the
yum installcommand as the root user:# yum install katello-installer cyrus-sasl-plain
The katello-installer provides thecapsule-installerfunctionality while cyrus-sasl-plain is required for pulp.
The Satellite Capsule Server is installed on your host system. The Satellite Capsule Server must be configured before it can be used.
5.4. Configuring a Red Hat Satellite Capsule Server
You must meet the following conditions before continuing on this task:
- Install the Red Hat Satellite Server.
- Set the SELinux permissions on the system designated as the Satellite Capsule Server as enforcing.
- Satellite Capsule Server with Smart Proxy
- Satellite Capsule Server as a Content Node
- Satellite Capsule Server as a Content Node with Smart Proxy
- On the Satellite Server:
- Generate a Satellite Capsule Server certificate:
capsule-certs-generate --capsule-fqdn capsule_FQDN --certs-tar ~/capsule.example.com-certs.tar
Where:capsule_FQDNis the Satellite Capsule Server's fully qualified domain name. (REQUIRED)certs-taris the name of the tar file to be generated that contains the certificate to be used by the Satellite Capsule installer.
Runningcapsule-certs-generatewill generate the following output message:To finish the installation, follow these steps: 1. Ensure that the capsule-installer is available on the system. The capsule-installer comes from the katello-installer package and should be acquired through the means that are appropriate to your deployment. 2. Copy ~/capsule.example.com-certs.tar to the capsule system capsule.example.com 3. Run the following commands on the capsule (possibly with the customized parameters, see capsule-installer --help and documentation for more info on setting up additional services): rpm -Uvh http://master.com/pub/katello-ca-consumer-latest.noarch.rpm subscription-manager register --org "Default Organization" capsule-installer --parent-fqdn "sat6.example.com"\ --register-in-foreman "true"\ --foreman-oauth-key "xmmQCGYdkoCRcbviGfuPdX7ZiCsdExf"\ --foreman-oauth-secret "w5ZDpyPJ24eSBNo53AFybcnqoDYXgLUA"\ --pulp-oauth-secret "doajBEXqNcANy93ZbciFyysWaiwt6BWU"\ --certs-tar "~/capsule.example.com-certs.tar"\ --puppet "true"\ --puppetca "true"\ --pulp "true" - Copy the generated tarball, capsule.example.com-certs.tar, from the Satellite Server to the Satellite Capsule host system.
- On the Satellite Capsule Server:
- Register your Satellite Capsule Server to the Satellite Server:
# rpm -Uvh http://sat6host.example.redhat.com/pub/katello-ca-consumer-latest.noarch.rpm
# subscription-manager register --org "Default Organization" --env [environment]/[content_view_name]
Note
The Satellite Capsule Server must be assigned to an organization as the Satellite Capsule Server requires an environment to synchronize content from the Satellite Server. Only organizations have environments.Assigning a location is optional though recommended to indicate proximity to the hosts that the Satellite Capsule Server is managing. - Depending on the desired Satellite Capsule Server type, choose one of the following options:
- Option 1: Satellite Capsule Server with Smart Proxy: This installs a Satellite Capsule Server with Smart Proxy features (DHCP, DNS, Puppet). Run the following commands as the root user on the Satellite Capsule Server:
# capsule-installer --parent-fqdn "satellite.example.com"\ --register-in-foreman "true"\ --foreman-oauth-key "xmmQCGYdkoCRcbviGfuPdX7ZiCsdExf"\ --foreman-oauth-secret "w5ZDpyPJ24eSBNo53AFybcnqoDYXgLUA"\ --pulp-oauth-secret "doajBEXqNcANy93ZbciFyysWaiwt6BWU"\ --certs-tar "/root/capsule.example.com-certs.tar"\ --puppet "true"\ --puppetca "true"\ --pulp "true"\ --tftp "true"\ --dhcp "true"\ --dhcp-interface "virbr1"\ --dns "true"\ --dns-forwarders "8.8.8.8"\ --dns-forwarders "8.8.4.4"\ --dns-interface "virbr1"\ --dns-zone "example.com" - Option 2 - Satellite Capsule Server as a Content Node with Smart Proxy: This installs a Satellite Capsule Server with all the features. Run the following commands as the root user on the Satellite Capsule Server:
# capsule-installer --parent-fqdn          "sat6.example.com"\
                    --register-in-foreman  "true"\
                    --foreman-oauth-key    "xmmQCGYdkoCRcbviGfuPdX7ZiCsdExf"\
                    --foreman-oauth-secret "w5ZDpyPJ24eSBNo53AFybcnqoDYXgLUA"\
                    --pulp-oauth-secret    "doajBEXqNcANy93ZbciFyysWaiwt6BWU"\
                    --certs-tar            "/root/capsule.example.com-certs.tar"\
                    --puppet               "true"\
                    --puppetca             "true"\
                    --pulp                 "true"\
                    --tftp                 "true"\
                    --dhcp                 "true"\
                    --dhcp-interface       "virbr1"\
                   --dns                  "true"\
                   --dns-forwarders       "8.8.8.8"\
                   --dns-forwarders       "8.8.4.4"\
                   --dns-interface        "virbr1"\
                   --dns-zone             "example.com"
- Run the following commands to configure the firewall to limit elasticsearch to the
foreman,katelloand root users and make these rules persistent during reboots:- For Red Hat Enterprise Linux 6:
iptables -A OUTPUT -o lo -p tcp -m tcp --dport 9200 -m owner --uid-owner foreman -j ACCEPT \
&& iptables -A OUTPUT -o lo -p tcp -m tcp --dport 9200 -m owner --uid-owner katello -j ACCEPT \
&& iptables -A OUTPUT -o lo -p tcp -m tcp --dport 9200 -m owner --uid-owner root -j ACCEPT \
&& iptables -A OUTPUT -o lo -p tcp -m tcp --dport 9200 -j DROP
iptables-save > /etc/sysconfig/iptables
- For Red Hat Enterprise Linux 7:
firewall-cmd --permanent --direct --add-rule ipv4 filter OUTPUT 0 -o lo -p tcp -m tcp --dport 9200 -m owner --uid-owner foreman -j ACCEPT \
&& firewall-cmd --permanent --direct --add-rule ipv6 filter OUTPUT 0 -o lo -p tcp -m tcp --dport 9200 -m owner --uid-owner foreman -j ACCEPT \
&& firewall-cmd --permanent --direct --add-rule ipv4 filter OUTPUT 0 -o lo -p tcp -m tcp --dport 9200 -m owner --uid-owner katello -j ACCEPT \
&& firewall-cmd --permanent --direct --add-rule ipv6 filter OUTPUT 0 -o lo -p tcp -m tcp --dport 9200 -m owner --uid-owner katello -j ACCEPT \
&& firewall-cmd --permanent --direct --add-rule ipv4 filter OUTPUT 0 -o lo -p tcp -m tcp --dport 9200 -m owner --uid-owner root -j ACCEPT \
&& firewall-cmd --permanent --direct --add-rule ipv6 filter OUTPUT 0 -o lo -p tcp -m tcp --dport 9200 -m owner --uid-owner root -j ACCEPT \
&& firewall-cmd --permanent --direct --add-rule ipv4 filter OUTPUT 1 -o lo -p tcp -m tcp --dport 9200 -j DROP \
&& firewall-cmd --permanent --direct --add-rule ipv6 filter OUTPUT 1 -o lo -p tcp -m tcp --dport 9200 -j DROP
Note
# echo $?
/var/log/kafo to debug the cause of failure. /var/log/kafo is the log file for the output generated by the commands capsule-certs-generate and capsule-installer.
The Satellite Capsule Server is now configured and registered with the Satellite Server.
5.4.1. Configuring Red Hat Satellite Capsule Server with a Custom Server Certificate
katello-installer comes with a default CA used both for the server ssl certificates as well as the client certificates used for authentication of the subservices. These certificates can be replaced with custom ones.
- When
capsule-certs-generateis run the first time - After
capsule-certs-generatehas already been run
Procedure 5.2. Setting a Custom Server Certificate while running capsule-certs-generate for the first time
- Run this command on the Red Hat Satellite Server:
capsule-certs-generate --capsule-fqdn "$CAPSULE"\ --certs-tar "~/$CAPSULE-certs.tar"\ --server-cert ~/path/to/server.crt\ --server-cert-req ~/path/to/server.crt.req\ --server-key ~/path/to/server.key\ --server-ca-cert ~/cacert.crtWhere:capsule_FQDNis the Satellite Capsule Server's fully qualified domain name. (REQUIRED)certs-taris the name of the tar file to be generated that contains the certificate to be used by the Satellite Capsule installer.server-certis the path to your certificate, signed by your certificate authority (or self signed)server-cert-reqis the path to your certificate signing request file that was used to create the certificate.server-keyis the private key used to sign the certificateserver-ca-cert~/path/to/cacert.crt the path to the CA certificate on this system.
- Copy the generated tarball, capsule.example.com-certs.tar, from the Satellite Server to the Satellite Capsule host system.
- On the Satellite Capsule Server:
- Register your Satellite Capsule Server to the Satellite Server:
# rpm -Uvh http://sat6host.example.redhat.com/pub/katello-ca-consumer-latest.noarch.rpm
# subscription-manager register --org "ACME_Corporation" --env [environment]/[content_view_name]
Note
The Satellite Capsule Server must be assigned to an organization as the Satellite Capsule Server requires an environment to synchronize content from the Satellite Server. Only organizations have environments.Assigning a location is optional though recommended to indicate proximity to the hosts that the Satellite Capsule Server is managing. - Depending on the desired Satellite Capsule Server type, choose one of the following options:
- Option 1: Satellite Capsule Server with Smart Proxy: This installs a Satellite Capsule Server with Smart Proxy features (DHCP, DNS, Puppet). Run the following commands as the root user on the Satellite Capsule Server:
# capsule-installer --parent-fqdn "satellite.example.com"\ --register-in-foreman "true"\ --foreman-oauth-key "xmmQCGYdkoCRcbviGfuPdX7ZiCsdExf"\ --foreman-oauth-secret "w5ZDpyPJ24eSBNo53AFybcnqoDYXgLUA"\ --pulp-oauth-secret "doajBEXqNcANy93ZbciFyysWaiwt6BWU"\ --certs-tar "/root/capsule.example.com-certs.tar"\ --puppet "true"\ --puppetca "true"\ --pulp "true"\ --tftp "true"\ --dhcp "true"\ --dhcp-interface "virbr1"\ --dns "true"\ --dns-forwarders "8.8.8.8"\ --dns-forwarders "8.8.4.4"\ --dns-interface "virbr1"\ --dns-zone "example.com" - Option 2 - Satellite Capsule Server as a Content Node: This installs a Satellite Capsule Server with content management features and a Puppet Master. Run the following commands as the root user on the Satellite Capsule Server:
# capsule-installer --parent-fqdn "sat6.example.com"\ --register-in-foreman "true"\ --pulp-oauth-secret "doajBEXqNcANy93ZbciFyysWaiwt6BWU"\ --certs-tar "~/capsule.example.com-certs.tar"\ --puppet "false"\ --puppetca "false"\ --pulp "true" - Option 3 - Satellite Capsule Server as a Content Node with Smart Proxy: This installs a Satellite Capsule Server with all the features. Run the following commands as the root user on the Satellite Capsule Server:
# capsule-installer --parent-fqdn          "sat6.example.com"\
                    --register-in-foreman  "true"\
                    --foreman-oauth-key    "xmmQCGYdkoCRcbviGfuPdX7ZiCsdExf"\
                    --foreman-oauth-secret "w5ZDpyPJ24eSBNo53AFybcnqoDYXgLUA"\
                    --pulp-oauth-secret    "doajBEXqNcANy93ZbciFyysWaiwt6BWU"\
                    --certs-tar            "/root/capsule.example.com-certs.tar"\
                    --puppet               "true"\
                    --puppetca             "true"\
                    --pulp                 "true"\
                    --tftp                 "true"\
                    --dhcp                 "true"\
                    --dhcp-interface       "virbr1"\
                   --dns                  "true"\
                   --dns-forwarders       "8.8.8.8"\
                   --dns-forwarders       "8.8.4.4"\
                   --dns-interface        "virbr1"\
                   --dns-zone             "example.com"
Procedure 5.3. Setting a Custom Server Certificate after running capsule-certs-generate
- Generate a new certificate based on your custom server certificate:
capsule-certs-generate --capsule-fqdn "satcapsule.example.com"\ --certs-tar "~/$CAPSULE-certs.tar"\ --server-cert ~/path/to/server.crt\ --server-cert-req ~/path/to/server.crt.req\ --server-key ~/path/to/server.key\ --server-ca-cert ~/cacert.crt\ --certs-update-server --certs-update-server-ca - Copy the generated tarball, capsule.example.com-certs.tar, from the Satellite Server to the Satellite Capsule host system.
- On the Satellite Capsule Server, re-run the capsule-installer command to refresh the certificates. Depending on the desired Satellite Capsule Server type, choose one of the following options:
- Option 1: Satellite Capsule Server with Smart Proxy: This installs a Satellite Capsule Server with Smart Proxy features (DHCP, DNS, Puppet). Run the following commands as the root user on the Satellite Capsule Server:
# capsule-installer --parent-fqdn "satellite.example.com"\ --register-in-foreman "true"\ --foreman-oauth-key "xmmQCGYdkoCRcbviGfuPdX7ZiCsdExf"\ --foreman-oauth-secret "w5ZDpyPJ24eSBNo53AFybcnqoDYXgLUA"\ --pulp-oauth-secret "doajBEXqNcANy93ZbciFyysWaiwt6BWU"\ --certs-tar "/root/capsule.example.com-certs.tar"\ --puppet "true"\ --puppetca "true"\ --pulp "true"\ --tftp "true"\ --dhcp "true"\ --dhcp-interface "virbr1"\ --dns "true"\ --dns-forwarders "8.8.8.8"\ --dns-forwarders "8.8.4.4"\ --dns-interface "virbr1"\ --dns-zone "example.com" - Option 2 - Satellite Capsule Server as a Content Node: This installs a Satellite Capsule Server with content management features and a Puppet Master. Run the following commands as the root user on the Satellite Capsule Server:
# capsule-installer --parent-fqdn "sat6.example.com"\ --register-in-foreman "true"\ --pulp-oauth-secret "doajBEXqNcANy93ZbciFyysWaiwt6BWU"\ --certs-tar "~/capsule.example.com-certs.tar"\ --puppet "false"\ --puppetca "false"\ --pulp "true" - Option 3 - Satellite Capsule Server as a Content Node with Smart Proxy: This installs a Satellite Capsule Server with all the features. Run the following commands as the root user on the Satellite Capsule Server:
# capsule-installer --parent-fqdn          "sat6.example.com"\
                    --register-in-foreman  "true"\
                    --foreman-oauth-key    "xmmQCGYdkoCRcbviGfuPdX7ZiCsdExf"\
                    --foreman-oauth-secret "w5ZDpyPJ24eSBNo53AFybcnqoDYXgLUA"\
                    --pulp-oauth-secret    "doajBEXqNcANy93ZbciFyysWaiwt6BWU"\
                    --certs-tar            "/root/capsule.example.com-certs.tar"\
                    --puppet               "true"\
                    --puppetca             "true"\
                    --pulp                 "true"\
                    --tftp                 "true"\
                    --dhcp                 "true"\
                    --dhcp-interface       "virbr1"\
                   --dns                  "true"\
                   --dns-forwarders       "8.8.8.8"\
                   --dns-forwarders       "8.8.4.4"\
                   --dns-interface        "virbr1"\
                   --dns-zone             "example.com"
Important
5.5. Adding Lifecycle Environments to a Red Hat Satellite Capsule Server
Important
hammer commands on the Satellite Server.
- Log in to the Satellite Server CLI as root.
- Choose the desired Red Hat Satellite Capsule Server from the list and take note of its
id:# hammer capsule list
The Satellite Capsule Server's details can be verified using the command:# hammer capsule info --id capsule_id_number
- Verify the list of lifecycle environments available for the Red Hat Capsule Server and note down the
environment id:# hammer capsule content available-lifecycle-environments --id capsule_id_number
Where:available-lifecycle-environmentsare lifecycle environments that are available to the Satellite Capsule but are currently not attached to the Satellite Capsule.
- Add the lifecycle environment to the Satellite Capsule Server:
# hammer capsule content add-lifecycle-environment --id capsule_id_number --lifecycle-environment-id environment_id_number
Where:--idis the Satellite Capsule Server's identification number.--lifecycle-environment-idis the lifecycle environment's identification number.
Repeat this step for every lifecycle environment to be added to the Capsule Server. - Synchronize the content from the Satellite Server's environment to the Satellite Capsule Server:
# hammer capsule content synchronize --id capsule_id_number
When an external Satellite Capsule Server has various lifecycle environments, and only one lifecycle environment needs to be synchronized, it is possible to target a specific environment by specifying the environment identification:# hammer capsule content synchronize --id external_capsule_id_number --environment-id environment_id_number
The chosen environments now consume packages from repositories on the desired Satellite Capsule Server.
5.6. Removing Lifecycle Environments from the Red Hat Satellite Capsule Server
- When lifecycle environments are no longer relevant to the host systems
- When lifecycle environments have been incorrectly added to the Satellite Capsule Server
- Log in to the Satellite Server CLI as the root user.
- Choose the desired Red Hat Satellite Capsule Server from the list and take note of its
id:# hammer capsule list
The Satellite Capsule Server's details can be verified using the command:# hammer capsule info --id capsule_id_number
- Verify the list of lifecycle environments currently attached to the Red Hat Capsule Server and note down the
environment id:hammer capsule content lifecycle-environments --id capsule_id_number
- Remove the lifecycle environment from the Satellite Capsule Server:
# hammer capsule content remove-lifecycle-environment --id capsule_id_number --environment-id environment_id
Where:--idis the Satellite Capsule Server's identification number.--environment-idis the lifecycle environment's identification number.
Repeat this step for every lifecycle environment to be removed from the Capsule Server. - Synchronize the content from the Satellite Server's environment to the Satellite Capsule Server:
# hammer capsule content synchronize --id capsule_id_number
The chosen environments are removed from the Satellite Capsule Server.
5.7. Registering Host Systems to a Red Hat Satellite Capsule Server
Client system must be configured for registration. The following chapters in the Red Hat Satellite User Guide can assist with configuration:
- Configuring Hosts for Registration
- Automated Configuration
- Manual Configuration
- Creating a New Activation Key
subscription-manager but reference the Satellite Capsule by using the --baseurl flag provided by Subscription Manager using /pulp/repos as the prefix.
# subscription-manager register --org [org_name] --activationkey [your_activation_key] --baseurl https://satcapsule.example.com/pulp/repos
Chapter 6. Uninstalling Red Hat Satellite Server and Capsule Server
Warning
katello-remove. The uninstall script will issue a warning twice, requiring confirmation before it removes all packages and configuration files in the system. Below is a sample output of the command:
# katello-remove
WARNING: This script will erase many packages and config files.
Important packages such as the following will be removed:
  * elasticsearch
  * httpd (apache)
  * mongodb
  * tomcat6
  * puppet
  * ruby
  * rubygems
  * All Katello and Foreman Packages
Once these packages and configuration files are removed there is no going back.
If you use this system for anything other than Katello and Foreman you probably
do not want to execute this script.
Read the source for a list of what is removed.  Are you sure(Y/N)? y
ARE YOU SURE?: This script peramently deletes data and configuration.
Read the source for a list of what is removed.  Type [remove] to continue? remove
Shutting down Katello services...
...
All Red Hat Satellite packages and configuration files are removed from the system.
Chapter 7. Next Steps
Appendix A. Glossary of Terms
- Activation Key
- A registration token used in a Kickstart file to control actions at registration. These are similar to Activation Keys in Red Hat Satellite 5, but provide a subset of features because Puppet controls package and configuration management after registration.
- Application Life Cycle Environment
- An Application Life Cycle Environment represents a step, or stage, in a promotion path through the Software Development Life Cycle (SDLC). Promotion paths are also known as development paths. Content such as packages and Puppet modules move through life cycle environments by publishing and promoting Content Views. All Content Views have versions, which means you can promote a specific version through a typical promotion path; for example, from development to test to production. Channel cloning implements this concept in Red Hat Satellite 5.
- Attach
- The process of associating a Subscription to a Host that provides access to RPM content.
- Capsule
- A Capsule is an additional server that can be used in a Red Hat Satellite 6 deployment to facilitate content federation and distribution in addition to other localized services (Puppet Master,
DHCP,DNS,TFTP, and more). - Compute Profile
- Compute Profiles specify default attributes for new virtual machines on a compute resource.
- Compute Resource
- A Compute Resource is virtual or cloud infrastructure, which Red Hat Satellite 6 uses for deployment of hosts and systems. Examples include Red Hat Enterprise Virtualization Manager, OpenStack, EC2, and VMWare.
- Content
- Content includes software packages (RPM files) and Puppet modules. These are synchronized into the Library and then promoted into Life Cycle Environments using Content Views so that they can be consumed by Hosts.
- Content Delivery Network (CDN)
- The Content Delivery Network (CDN) is the mechanism used to deliver Red Hat content in a geographically co-located fashion. For example, content that is synchronized by a Satellite in Europe pulls content from a source in Europe.
- Content View
- A Content View is a definition of content that combines products, packages, and Puppet modules with capabilities for intelligent filtering and creating snapshots. Content Views are a refinement of the combination of channels and cloning from Red Hat Satellite 5.
- External Node Classifier
- An External Node Classifier is a Puppet construct that provides additional data for a Puppet Master to use when configuring Hosts. Red Hat Satellite 6 acts as an External Node Classifier to Puppet Masters in a Satellite deployment.
- Facter
- Facter is a program that provides information (facts) about the system on which it is run; for example, Facter can report total memory, operating system version, architecture, and more. Puppet modules enable specific configurations based on host data gathered by Facter.
- Hammer
- Hammer is a command line tool for Red Hat Satellite 6. Use Hammer to manage Red Hat Satellite 6 as a standard CLI, for scripts, and also through an interactive shell.
- Hiera
- Hiera is a key/value look-up tool for configuration data which allows keeping site-specific data out of puppet manifests.
- Host
- A Host refers to any system, either physical or virtual, that Red Hat Satellite 6 manages.
- Host Collection
- A Host Collection is equivalent to a Satellite 5 System Group, that is, a user defined group of one or more Hosts.
- Host Group
- A Host Group is a template for building a Host. This includes the content view (which defines the available RPM files and Puppet modules) and the Puppet classes to apply (which ultimately determines the software and configuration).
- Location
- A Location is collection of default settings that represent a physical place. These can be nested so that you can set up an hierarchical collection of locations. For example, you can set up defaults for "Middle East", which are refined by "Tel Aviv", which are further refined by "Data Center East", and then finally by "Rack 22".
- Library
- The Library contains every version, including the latest synchronized version, of the software that the user will ever deploy. For an Information Technology Infrastructure Library (ITIL) [1] organization or department, this is the Definitive Media Library [2] (previously named the Definitive Software Library).
- Manifest
- A Manifest transfers subscriptions from the Customer Portal to Red Hat Satellite 6. This is similar in function to certificates used with Red Hat Satellite 5.For more information about certificates and subscription types, see:
- Organization
- An Organization is an isolated collection of systems, content, and other functionality within a Satellite 6 deployment.
- Permission
- The ability to perform an action.
- Product
- A collection of content repositories. Products can be Red Hat products or newly-created products made up of software and configuration content.
- Promote
- The act of moving a content view comprised of software and configuration content from one Application Life Cycle Environment to another, such as moving from development to QA to production.
- Provisioning Template
- A Provisioning Template is a user-defined template for Kickstart files, snippets, and other provisioning actions. In Satellite 6 they provide similar functionality to Kickstart Profiles and cobbler Snippets in Red Hat Satellite 5.
- Pulp Node
- A Pulp Node is a Capsule Server component that mirrors content. This is similar to the Red Hat Satellite 5 Proxy. The main difference is that content can be staged on the Pulp Node before it is used by a Host.
- Puppet Agent
- The Puppet Agent is an agent that runs on a Host and applies configuration changes to that Host.
- Puppet Master
- A Puppet Master is a Capsule Server component that provides Puppet manifests to Hosts for execution by the Puppet Agent.
- Repository
- A Repository provides storage for a collection of content. For example, a YUM repository or a Puppet repository.
- Role
- A Role specifies a collection of permissions that are applied to a set of resources, such as Hosts.
- Smart Proxy
- A Smart Proxy is a Capsule Server component that can integrate with external services, such as
DNSorDHCP. - Smart Variable
- A Smart Variable is a configuration value that controls how a Puppet Class behaves. This can be set on a Host, a Host Group, an Organization, or a Location.
- Standard Operating Environment (SOE)
- A Standard Operating Environment (SOE) is a controlled version of the operating system on which applications are deployed.
- Subscription
- Subscriptions are the means by which you receive content and service from Red Hat.
- Synchronizing
- Synchronizing refers to mirroring content from external resources into the Red Hat Satellite 6 Library.
- Synchronization Plans
- Synchronization Plans provide scheduled execution of content synchronization.
- User Group
- A User Group is a collection of roles which can be assigned to a collection of users. This is similar to a Role in Red Hat Satellite 5.
- User
- A user is anyone registered to use Red Hat Satellite. Authentication and authorization is possible through built-in logic, through external LDAP resources, or with Kerberos.
Appendix B. Revision History
| Revision History | ||||||||||||||||||||
|---|---|---|---|---|---|---|---|---|---|---|---|---|---|---|---|---|---|---|---|---|
| Revision 1-11 | Fri Jan 23 2015 | |||||||||||||||||||
| ||||||||||||||||||||
| Revision 1-10 | Fri Jan 23 2015 | |||||||||||||||||||
| ||||||||||||||||||||
| Revision 1-9 | Fri Jan 23 2015 | |||||||||||||||||||
| ||||||||||||||||||||
| Revision 1-8 | Wed Jan 21 2015 | |||||||||||||||||||
| ||||||||||||||||||||
| Revision 1-7 | Thu Dec 18 2014 | |||||||||||||||||||
| ||||||||||||||||||||
| Revision 1-6.2 | Thu Nov 19 2014 | |||||||||||||||||||
| ||||||||||||||||||||
| Revision 1-6.1 | Friday Nov 14 2014 | |||||||||||||||||||
| ||||||||||||||||||||
| Revision 1-6 | Thu Nov 13 2014 | |||||||||||||||||||
| ||||||||||||||||||||
| Revision 1-5 | Tue Nov 11 2014 | |||||||||||||||||||
| ||||||||||||||||||||
| Revision 1-4 | Mon Nov 10 2014 | |||||||||||||||||||
| ||||||||||||||||||||
| Revision 1-3 | Fri Nov 7 2014 | |||||||||||||||||||
| ||||||||||||||||||||
| Revision 1-2.02 | Fri Oct 3 2014 | |||||||||||||||||||
| ||||||||||||||||||||
| Revision 1-2.01 | Fri Sep 12 2014 | |||||||||||||||||||
| ||||||||||||||||||||
| Revision 1-2 | Thu Sep 11 2014 | |||||||||||||||||||
| ||||||||||||||||||||
| Revision 1-1 | Wed Sep 10 2014 | |||||||||||||||||||
| ||||||||||||||||||||
| Revision 1-0 | Tue Sep 9 2014 | |||||||||||||||||||
| ||||||||||||||||||||
| Revision 0-34 | Thu Aug 21 2014 | |||||||||||||||||||
| ||||||||||||||||||||
| Revision 0-33 | Tue Aug 12 2014 | |||||||||||||||||||
| ||||||||||||||||||||
| Revision 0-32 | Fri Jul 11 2014 | |||||||||||||||||||
| ||||||||||||||||||||
| Revision 0-31 | Mon Jun 30 2014 | |||||||||||||||||||
| ||||||||||||||||||||
| Revision 0-30 | Tue Jun 24 2014 | |||||||||||||||||||
| ||||||||||||||||||||
| Revision 0-29 | Tue Jun 24 2014 | |||||||||||||||||||
| ||||||||||||||||||||
| Revision 0-28 | Mon Nov 11 2013 | |||||||||||||||||||
| ||||||||||||||||||||
| Revision 0-27 | Mon 11 Nov 2013 | |||||||||||||||||||
| ||||||||||||||||||||
| Revision 0-26 | Mon 11 Nov 2013 | |||||||||||||||||||
| ||||||||||||||||||||
| Revision 0-25 | Thu 7 Nov 2013 | |||||||||||||||||||
| ||||||||||||||||||||
| Revision 0-24 | Thu 7 Nov 2013 | |||||||||||||||||||
| ||||||||||||||||||||
| Revision 0-23 | Wed 30 Oct 2013 | |||||||||||||||||||
| ||||||||||||||||||||
| Revision 0-22 | Tue 29 Oct 2013 | |||||||||||||||||||
| ||||||||||||||||||||
| Revision 0-21 | Wed 09 Oct 2013 | |||||||||||||||||||
| ||||||||||||||||||||
| Revision 0-20 | Wed 2 Oct 2013 | |||||||||||||||||||
| ||||||||||||||||||||
| Revision 0-19 | Wed 2 Oct 2013 | |||||||||||||||||||
| ||||||||||||||||||||
| Revision 0-18 | Tue 1 Oct 2013 | |||||||||||||||||||
| ||||||||||||||||||||
| Revision 0-17 | Thu 19 Sep 2013 | |||||||||||||||||||
| ||||||||||||||||||||
| Revision 0-16 | Tue 17 Sep 2013 | |||||||||||||||||||
| ||||||||||||||||||||
| Revision 0-15 | Wed 11 Sep 2013 | |||||||||||||||||||
| ||||||||||||||||||||
| Revision 0-14 | Mon 12 Aug 2013 | |||||||||||||||||||
| ||||||||||||||||||||
| Revision 0-13 | Mon 12 Aug 2013 | |||||||||||||||||||
| ||||||||||||||||||||
| Revision 0-09 | Thu 20 June 2013 | |||||||||||||||||||
| ||||||||||||||||||||
| Revision 0-08 | Thu 20 June 2013 | |||||||||||||||||||
| ||||||||||||||||||||
| Revision 0-07 | Wed 19 June 2013 | |||||||||||||||||||
| ||||||||||||||||||||
| Revision 0-06 | Thu 13 June 2013 | |||||||||||||||||||
| ||||||||||||||||||||
| Revision 0-05 | Tue 11 June 2013 | |||||||||||||||||||
| ||||||||||||||||||||
| Revision 0-04 | Fri 31 May 2013 | |||||||||||||||||||
| ||||||||||||||||||||
| Revision 0-03 | Thu 30 May 2013 | |||||||||||||||||||
| ||||||||||||||||||||
| Revision 0-02 | Tue 28 May 2013 | |||||||||||||||||||
| ||||||||||||||||||||
| Revision 0-01 | Fri 17 May 2013 | |||||||||||||||||||
| ||||||||||||||||||||