
Chapter 14. Red Hat Quay quota management and enforcement overview
With Red Hat Quay, users have the ability to report storage consumption and to contain registry growth by establishing configured storage quota limits. On-premise Red Hat Quay users are now equipped with the following capabilities to manage the capacity limits of their environment:
- Quota reporting: With this feature, a superuser can track the storage consumption of all their organizations. Additionally, users can track the storage consumption of their assigned organization.
- Quota management: With this feature, a superuser can define soft and hard checks for Red Hat Quay users. Soft checks tell users if the storage consumption of an organization reaches their configured threshold. Hard checks prevent users from pushing to the registry when storage consumption reaches the configured limit.
Together, these features allow service owners of a Red Hat Quay registry to define service level agreements and support a healthy resource budget.
14.1. Quota management limitations
Quota management helps organizations to maintain resource consumption. One limitation of quota management is that calculating resource consumption on push results in the calculation becoming part of the push’s critical path. Without this, usage data might drift.
The maximum storage quota size is dependent on the selected database:
Table 14.1. Worker count environment variables
| Variable | Description |
|---|---|
| Postgres | 8388608 TB |
| MySQL | 8388608 TB |
| SQL Server | 16777216 TB |
14.2. Quota management for Red Hat Quay 3.9
If you are upgrading to Red Hat Quay 3.9, you must reconfigure the quota management feature. This is because with Red Hat Quay 3.9, calculation is done differently. As a result, totals prior to Red Hat Quay 3.9 are no longer valid. There are two methods for configuring quota management in Red Hat Quay 3.9, which are detailed in the following sections.
- This is a one time calculation that must be done after you have upgraded to Red Hat Quay 3.9.
- Superuser privileges are required to create, update and delete quotas. While quotas can be set for users as well as organizations, you cannot reconfigure the user quota using the Red Hat Quay UI and you must use the API instead.
14.2.1. Option A: Configuring quota management for Red Hat Quay 3.9 by adjusting the QUOTA_TOTAL_DELAY feature flag
Use the following procedure to recalculate Red Hat Quay 3.9 quota management by adjusting the QUOTA_TOTAL_DELAY feature flag.
With this recalculation option, the totals appear as 0.00 KB until the allotted time designated for QUOTA_TOTAL_DELAY.
Prerequisites
- You have upgraded to Red Hat Quay 3.9.
- You are logged into Red Hat Quay 3.9 as a superuser.
Procedure
Deploy Red Hat Quay 3.9 with the following
config.yamlsettings:FEATURE_QUOTA_MANAGEMENT: true FEATURE_GARBAGE_COLLECTION: true PERMANENTLY_DELETE_TAGS: true QUOTA_TOTAL_DELAY_SECONDS: 1800 1 RESET_CHILD_MANIFEST_EXPIRATION: true- 1
- The
QUOTA_TOTAL_DELAY_SECONDSflag defaults to1800seconds, or 30 minutes. This allows Red Hat Quay 3.9 to successfully deploy before the quota management feature begins calculating storage consumption for every blob that has been pushed. Setting this flag to a lower number might result in miscalculation; it must be set to a number that is greater than the time it takes your Red Hat Quay deployment to start.1800is the recommended setting, however larger deployments that take longer than 30 minutes to start might require a longer duration than1800.
- Navigate to the Red Hat Quay UI and click the name of your Organization.
- The Total Quota Consumed should read 0.00 KB. Additionally, the Backfill Queued indicator should be present.
- After the allotted time, for example, 30 minutes, refresh your Red Hat Quay deployment page and return to your Organization. Now, the Total Quota Consumed should be present.
14.2.2. Option B: Configuring quota management for Red Hat Quay 3.9 by setting QUOTA_TOTAL_DELAY_SECONDS to 0
Use the following procedure to recalculate Red Hat Quay 3.9 quota management by setting QUOTA_TOTAL_DELAY_SECONDS to 0.
Using this option prevents the possibility of miscalculations, however is more time intensive. Use the following procedure for when your Red Hat Quay deployment swaps the FEATURE_QUOTA_MANAGEMENT parameter from false to true. Most users will find xref:
Prerequisites
- You have upgraded to Red Hat Quay 3.9.
- You are logged into Red Hat Quay 3.9 as a superuser.
Procedure
Deploy Red Hat Quay 3.9 with the following
config.yamlsettings:FEATURE_GARBAGE_COLLECTION: true FEATURE_QUOTA_MANAGEMENT: true QUOTA_BACKFILL: false QUOTA_TOTAL_DELAY_SECONDS: 0 PERMANENTLY_DELETE_TAGS: true RESET_CHILD_MANIFEST_EXPIRATION: true
- Navigate to the Red Hat Quay UI and click the name of your Organization.
- The Total Quota Consumed should read 0.00 KB.
Redeploy Red Hat Quay and set the
QUOTA_BACKFILLflag set totrue. For example:QUOTA_BACKFILL: true
NoteIf you choose to disable quota management after it has calculated totals, Red Hat Quay marks those totals as stale. If you re-enable the quota management feature again in the future, those namespaces and repositories are recalculated by the backfill worker.
14.3. Testing quota management for Red Hat Quay 3.9
With quota management configured for Red Hat Quay 3.9, duplicative images are now only counted once towards the repository total.
Use the following procedure to test that a duplicative image is only counted once toward the repository total.
Prerequisites
- You have configured quota management for Red Hat Quay 3.9.
Procedure
Pull a sample image, for example,
ubuntu:18.04, by entering the following command:$ podman pull ubuntu:18.04
Tag the same image twice by entering the following command:
$ podman tag docker.io/library/ubuntu:18.04 quay-server.example.com/quota-test/ubuntu:tag1
$ podman tag docker.io/library/ubuntu:18.04 quay-server.example.com/quota-test/ubuntu:tag2
Push the sample image to your organization by entering the following commands:
$ podman push --tls-verify=false quay-server.example.com/quota-test/ubuntu:tag1
$ podman push --tls-verify=false quay-server.example.com/quota-test/ubuntu:tag2
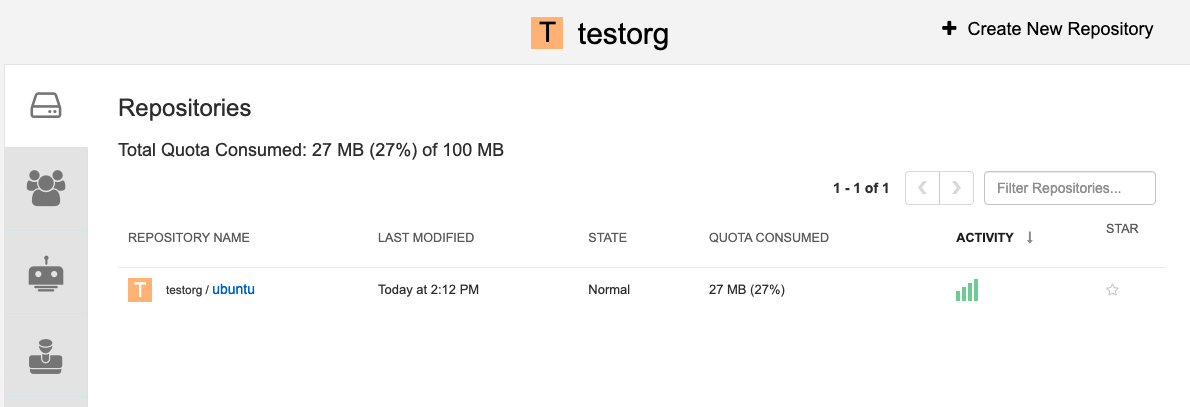
On the Red Hat Quay UI, navigate to Organization and click the Repository Name, for example, quota-test/ubuntu. Then, click Tags. There should be two repository tags,
tag1andtag2, each with the same manifest. For example: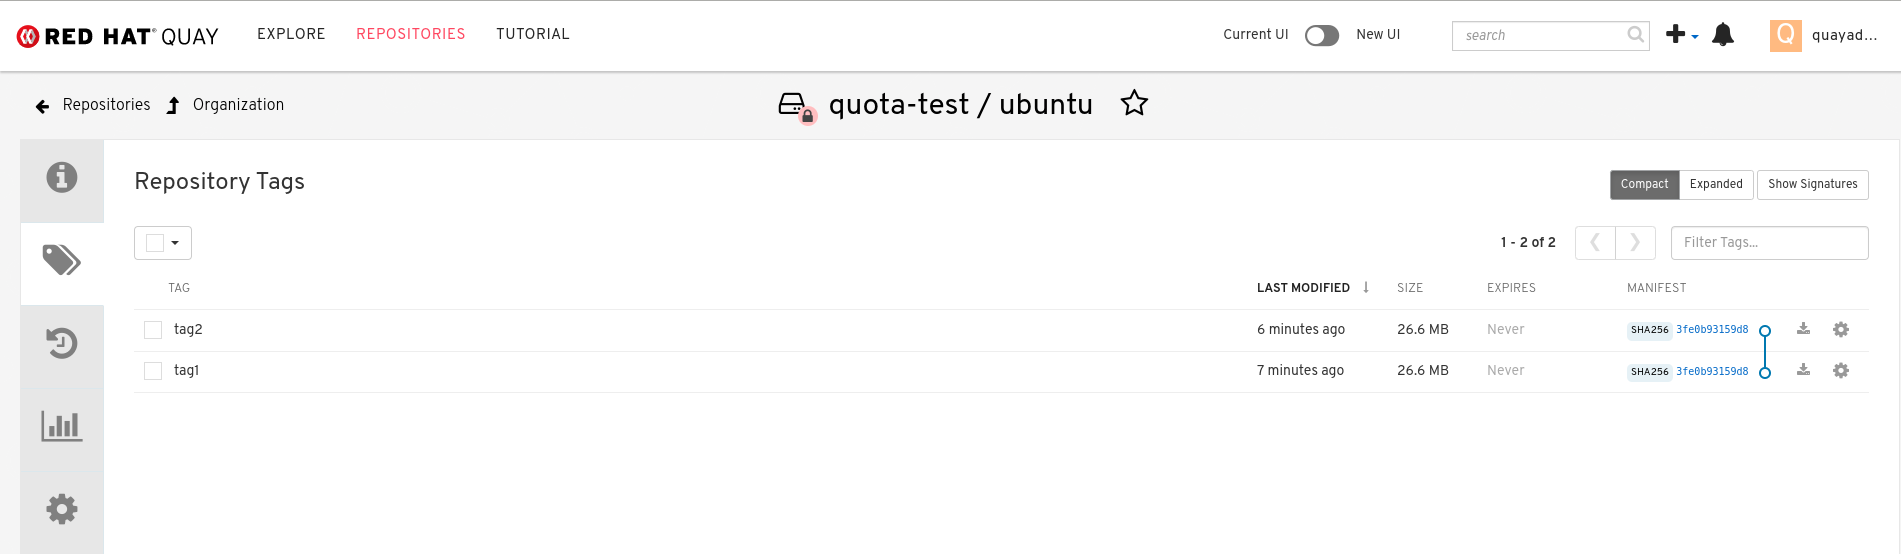
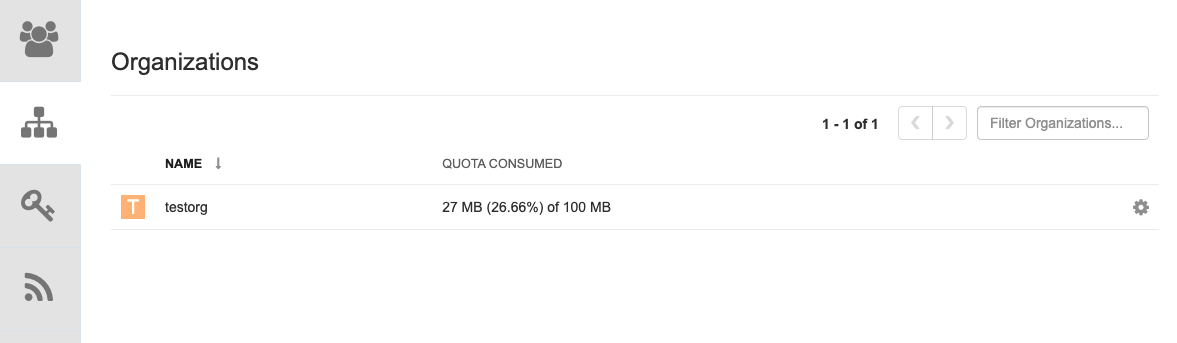
However, by clicking on the Organization link, we can see that the Total Quota Consumed is 27.94 MB, meaning that the Ubuntu image has only been accounted for once:

If you delete one of the Ubuntu tags, the Total Quota Consumed remains the same.
NoteIf you have configured the Red Hat Quay time machine to be longer than
0seconds, subtraction will not happen until those tags pass the time machine window. If you want to expedite permanent deletion, see Permanently deleting an image tag in Red Hat Quay 3.9.
14.4. Setting default quota
To specify a system-wide default storage quota that is applied to every organization and user, you can use the DEFAULT_SYSTEM_REJECT_QUOTA_BYTES configuration flag.
If you configure a specific quota for an organization or user, and then delete that quota, the system-wide default quota will apply if one has been set. Similarly, if you have configured a specific quota for an organization or user, and then modify the system-wide default quota, the updated system-wide default will override any specific settings.
For more information about the DEFAULT_SYSTEM_REJECT_QUOTA_BYTES flag,
see link:
14.5. Establishing quota in Red Hat Quay UI
The following procedure describes how you can report storage consumption and establish storage quota limits.
Prerequisites
- A Red Hat Quay registry.
- A superuser account.
- Enough storage to meet the demands of quota limitations.
Procedure
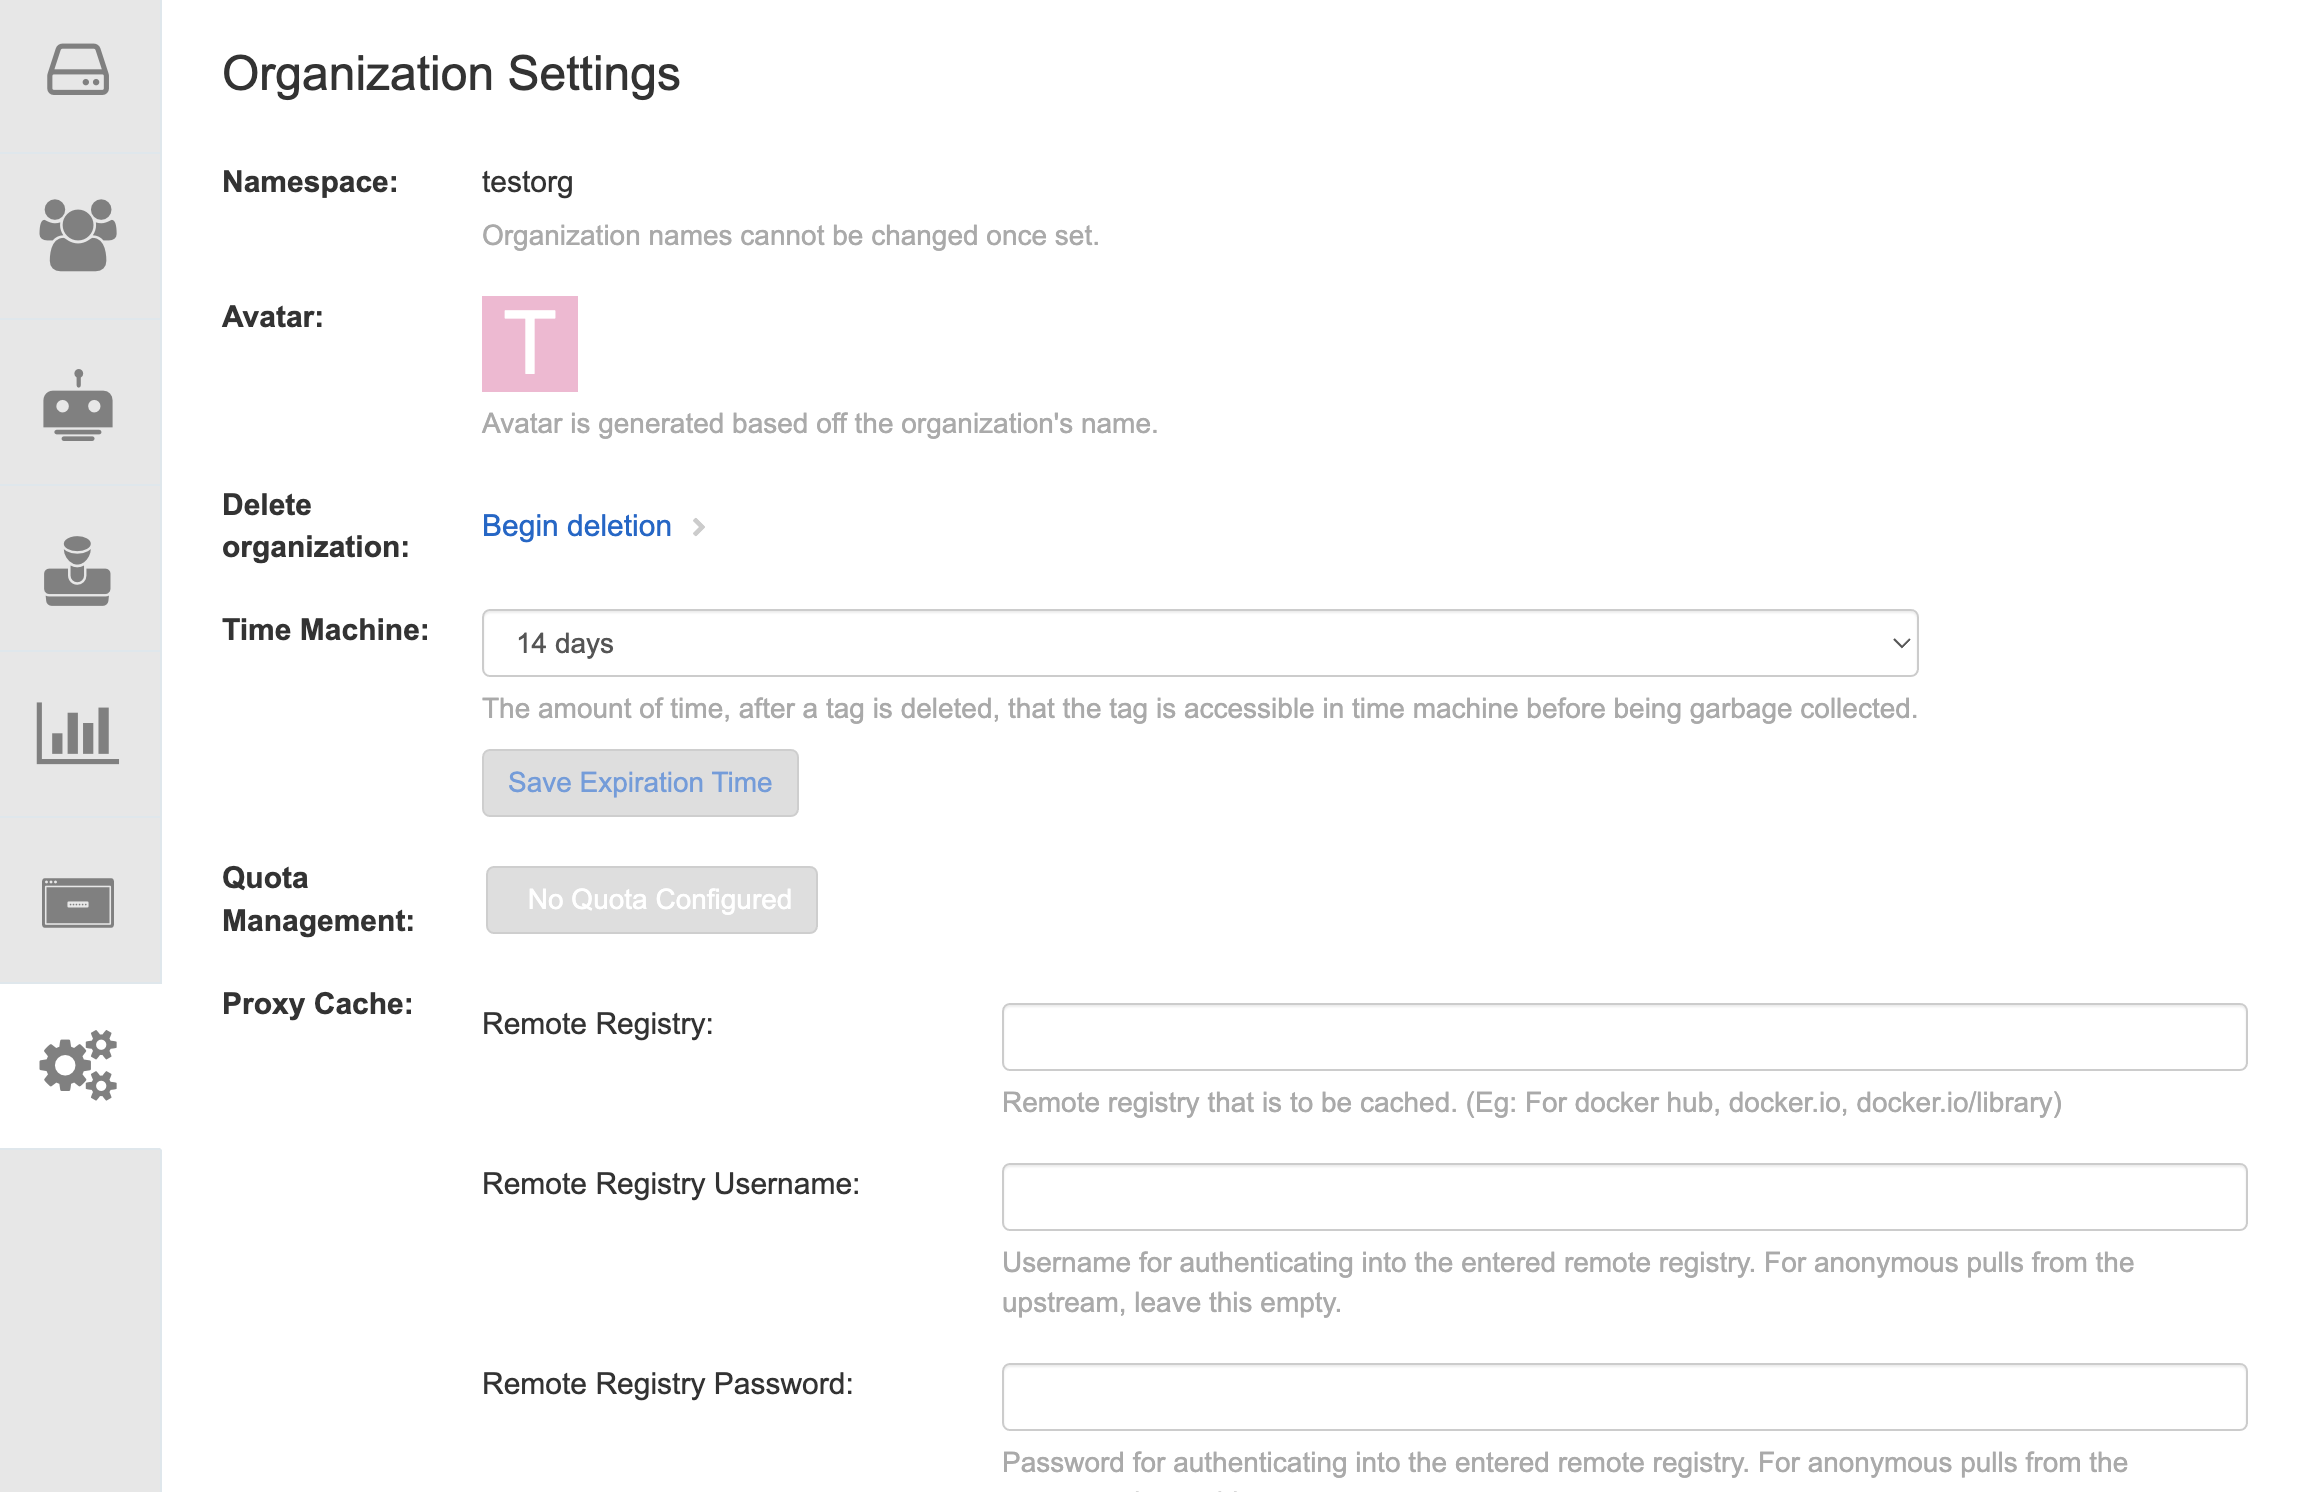
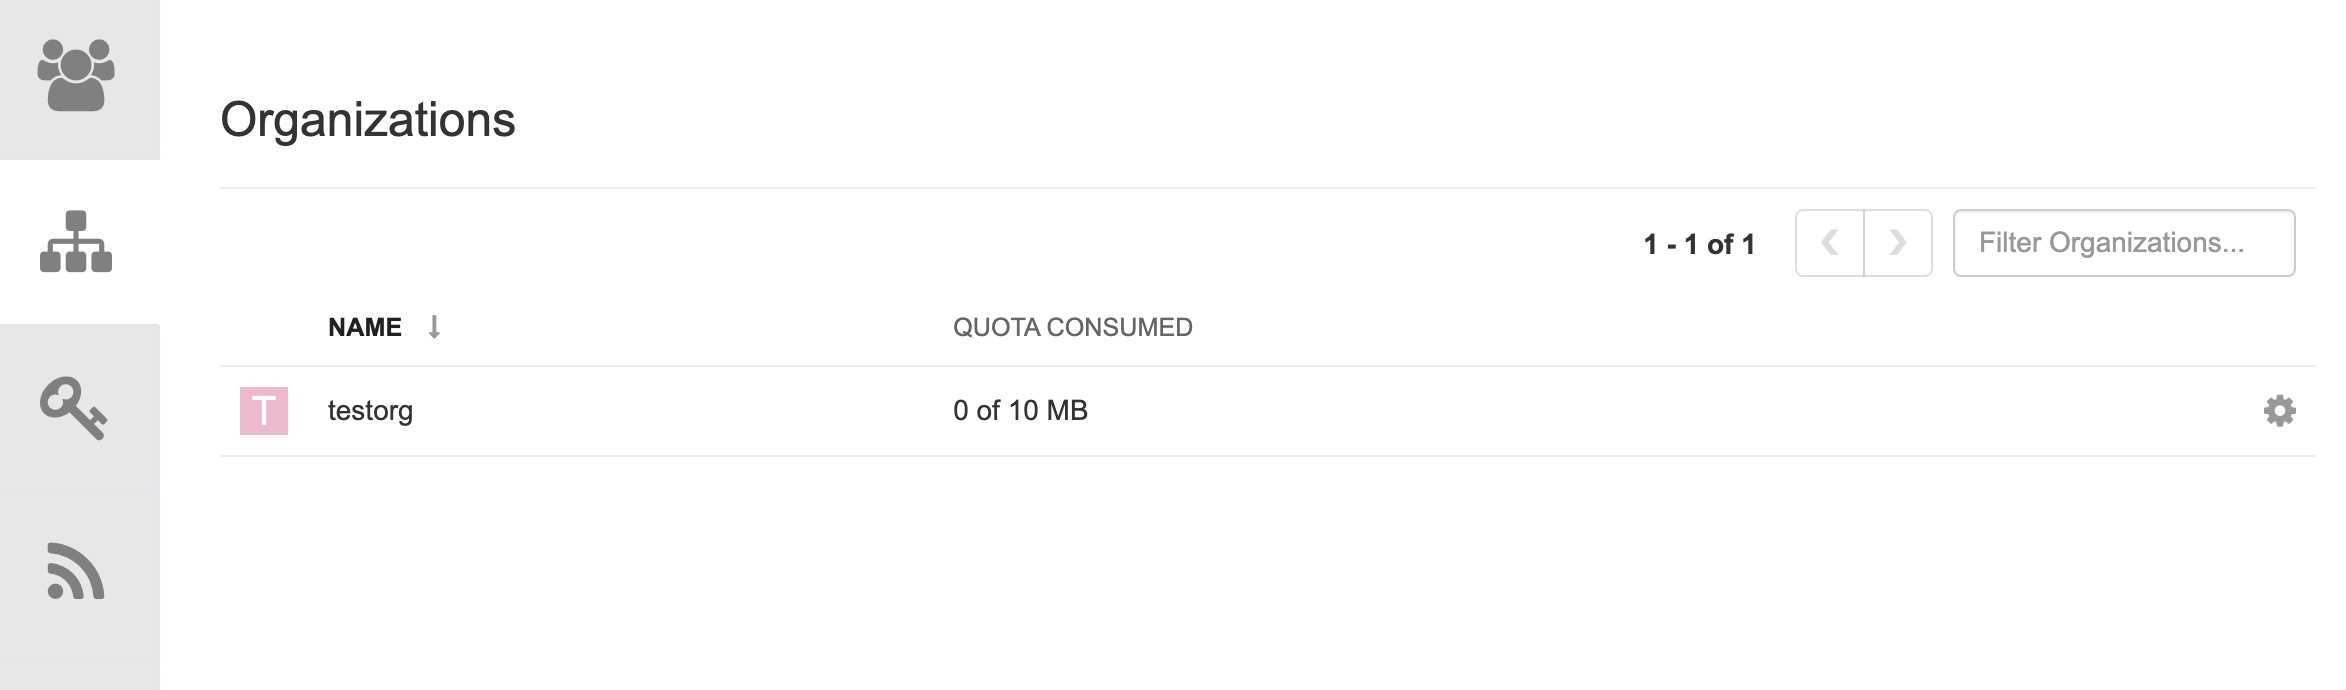
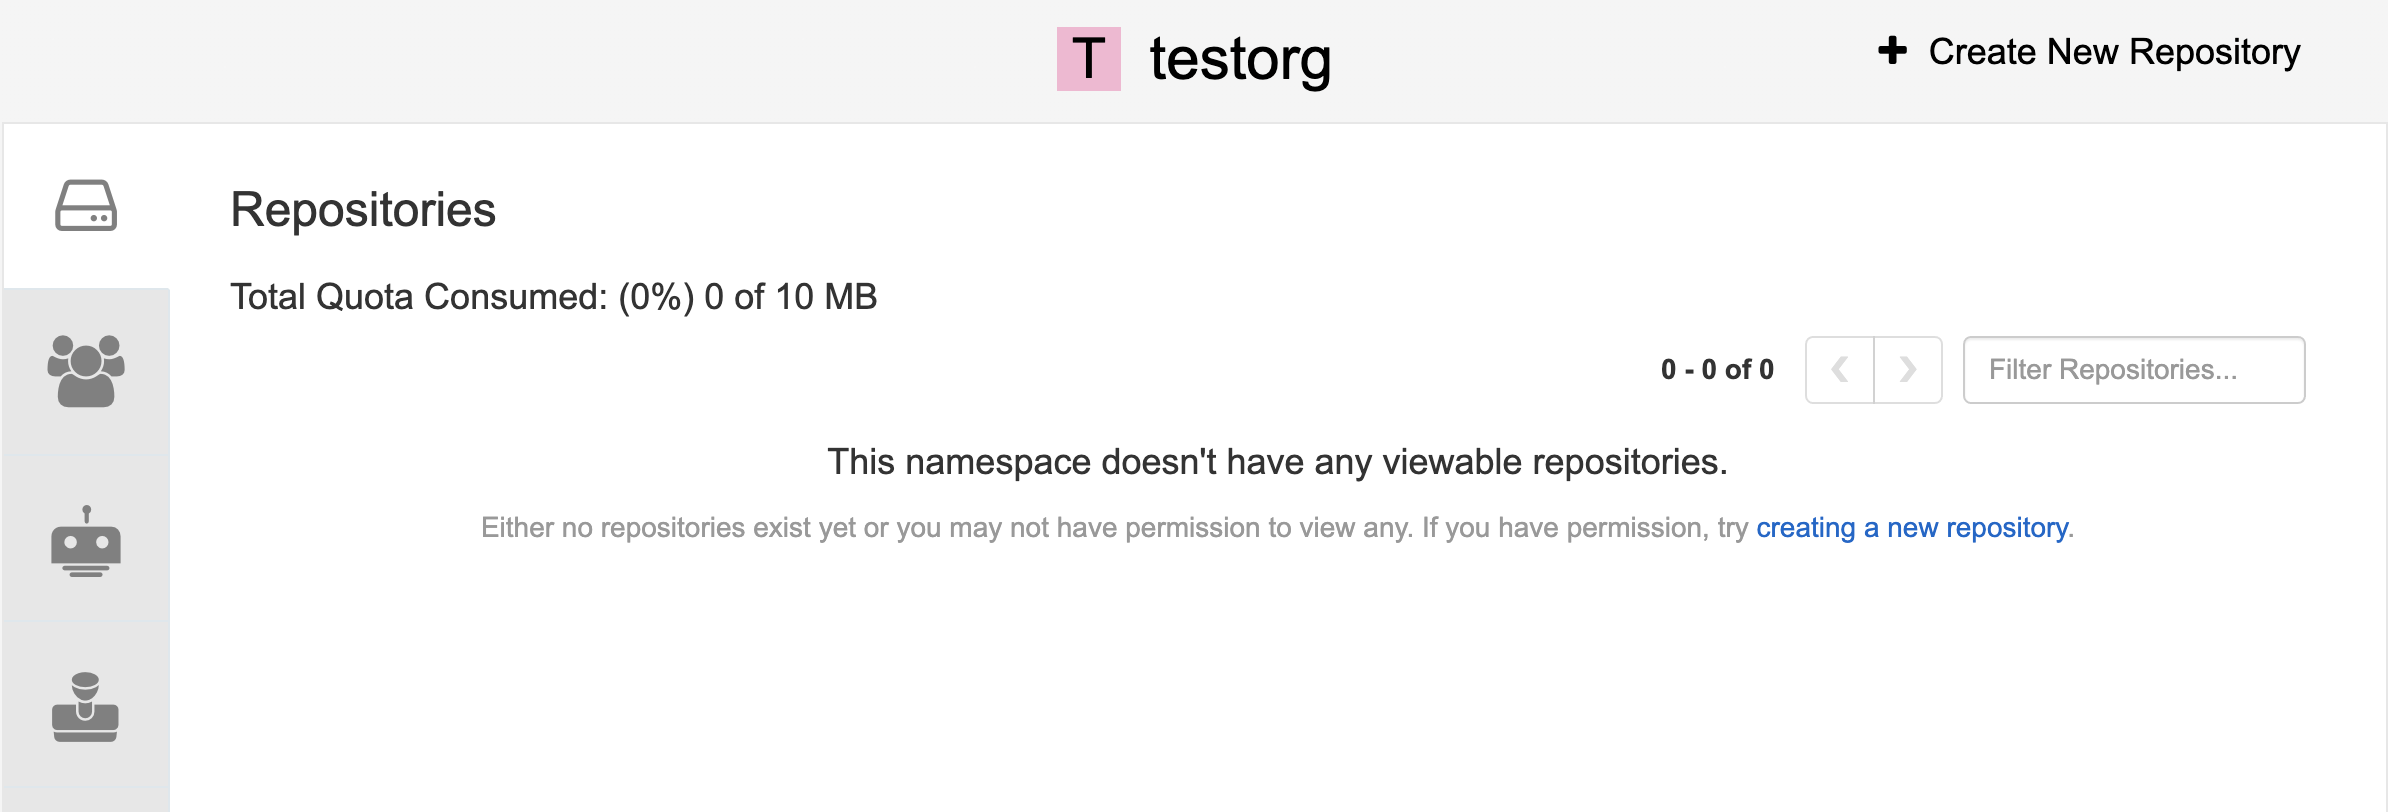
Create a new organization or choose an existing one. Initially, no quota is configured, as can be seen on the Organization Settings tab:
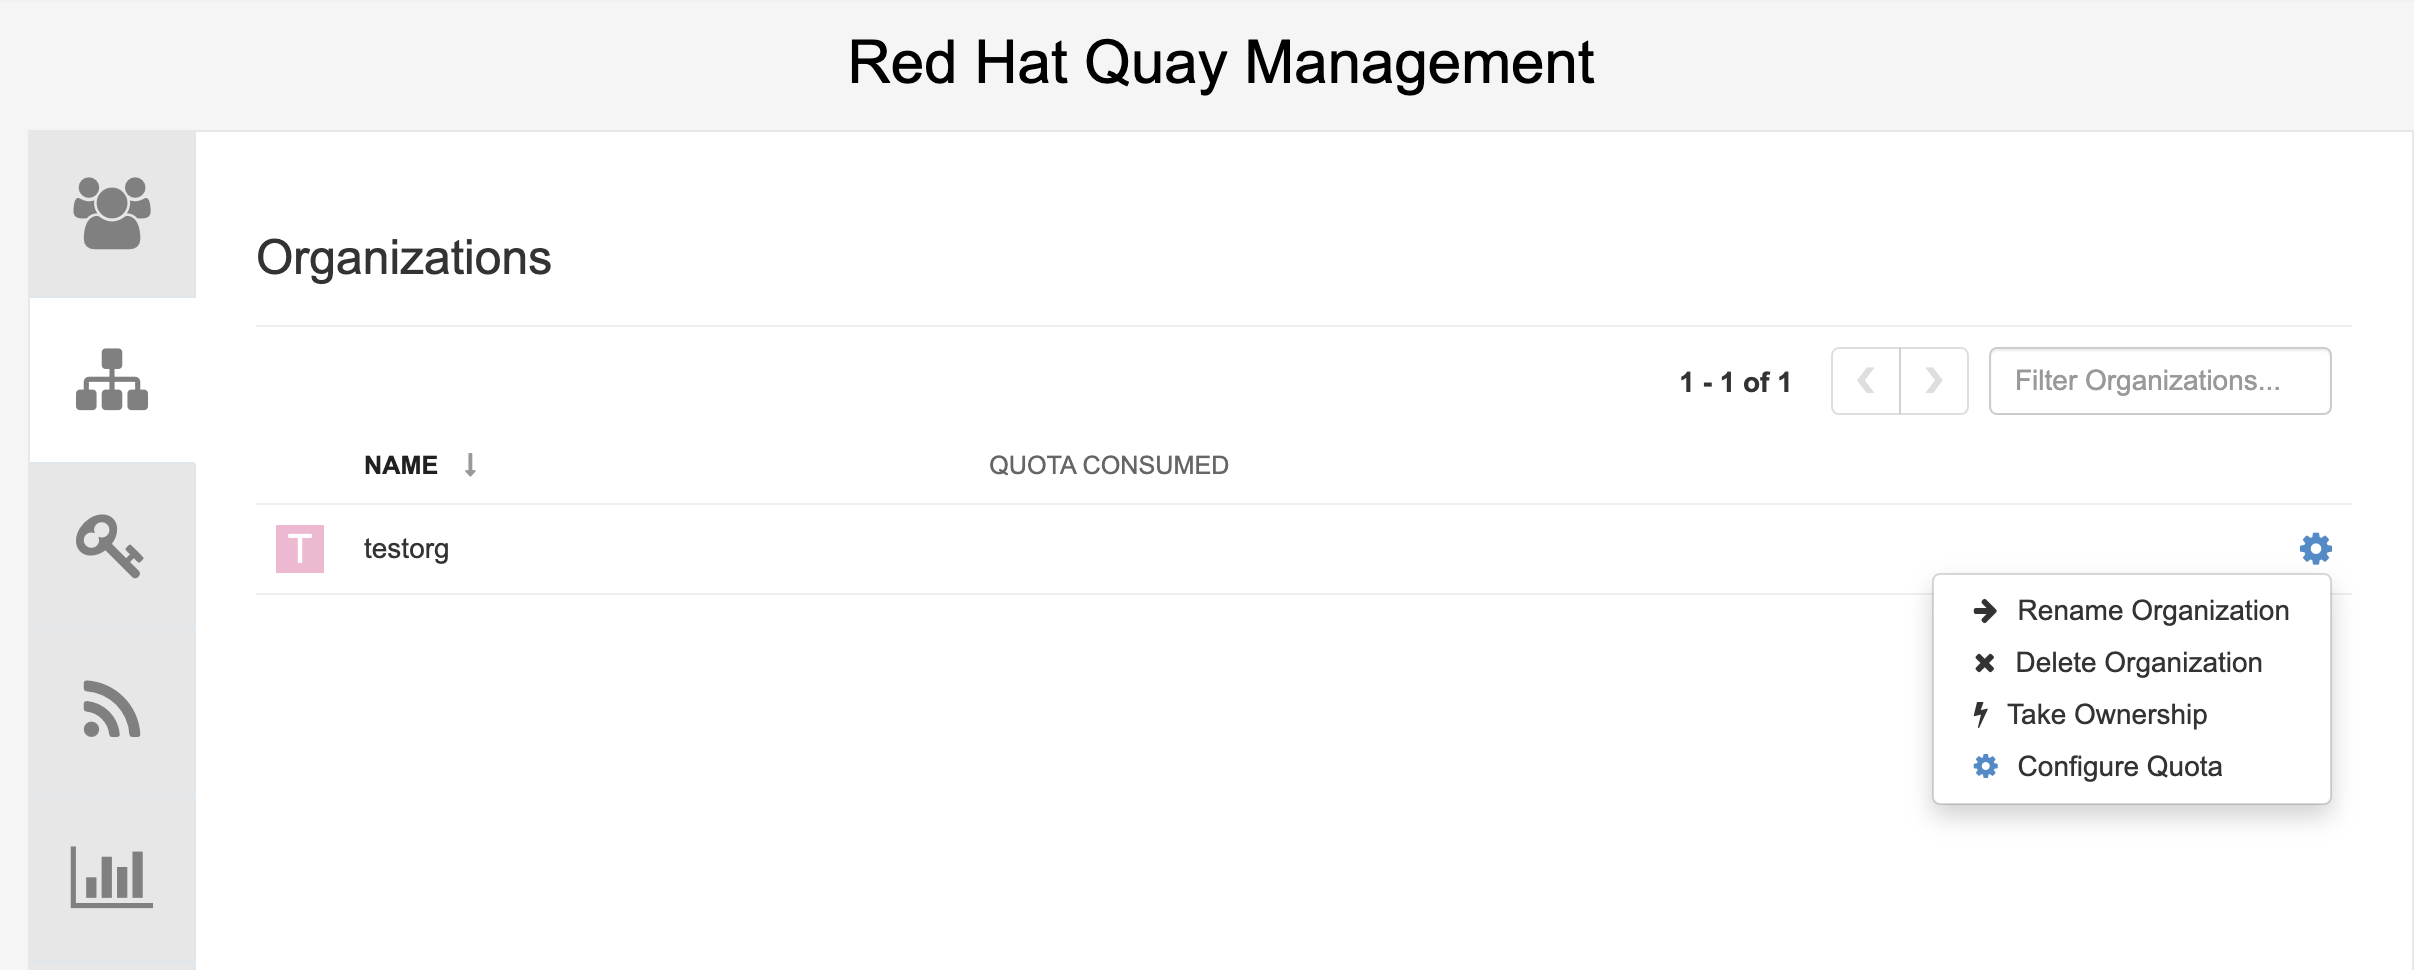
Log in to the registry as a superuser and navigate to the Manage Organizations tab on the Super User Admin Panel. Click the Options icon of the organization for which you want to create storage quota limits:
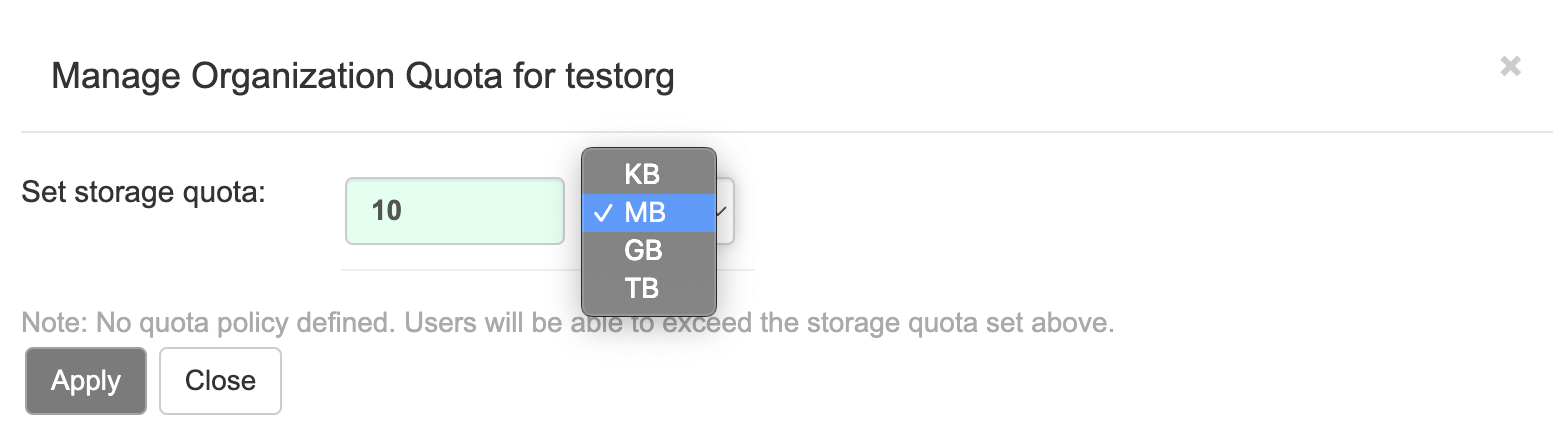
Click Configure Quota and enter the initial quota, for example, 10 MB. Then click Apply and Close:
Check that the quota consumed shows 0 of 10 MB on the Manage Organizations tab of the superuser panel:
The consumed quota information is also available directly on the Organization page:
Initial consumed quota
To increase the quota to 100MB, navigate to the Manage Organizations tab on the superuser panel. Click the Options icon and select Configure Quota, setting the quota to 100 MB. Click Apply and then Close:

Pull a sample image by entering the following command:
$ podman pull ubuntu:18.04
Tag the sample image by entering the following command:
$ podman tag docker.io/library/ubuntu:18.04 example-registry-quay-quay-enterprise.apps.docs.gcp.quaydev.org/testorg/ubuntu:18.04
Push the sample image to the organization by entering the following command:
$ podman push --tls-verify=false example-registry-quay-quay-enterprise.apps.docs.gcp.quaydev.org/testorg/ubuntu:18.04
On the superuser panel, the quota consumed per organization is displayed:
The Organization page shows the total proportion of the quota used by the image:
Total Quota Consumed for first image
Pull a second sample image by entering the following command:
$ podman pull nginx
Tag the second image by entering the following command:
$ podman tag docker.io/library/nginx example-registry-quay-quay-enterprise.apps.docs.gcp.quaydev.org/testorg/nginx
Push the second image to the organization by entering the following command:
$ podman push --tls-verify=false example-registry-quay-quay-enterprise.apps.docs.gcp.quaydev.org/testorg/nginx
The Organization page shows the total proportion of the quota used by each repository in that organization:
Total Quota Consumed for each repository

Create reject and warning limits:
From the superuser panel, navigate to the Manage Organizations tab. Click the Options icon for the organization and select Configure Quota. In the Quota Policy section, with the Action type set to Reject, set the Quota Threshold to 80 and click Add Limit:
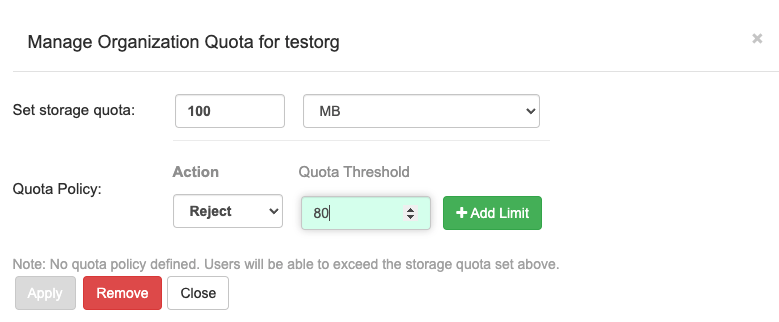
To create a warning limit, select Warning as the Action type, set the Quota Threshold to 70 and click Add Limit:
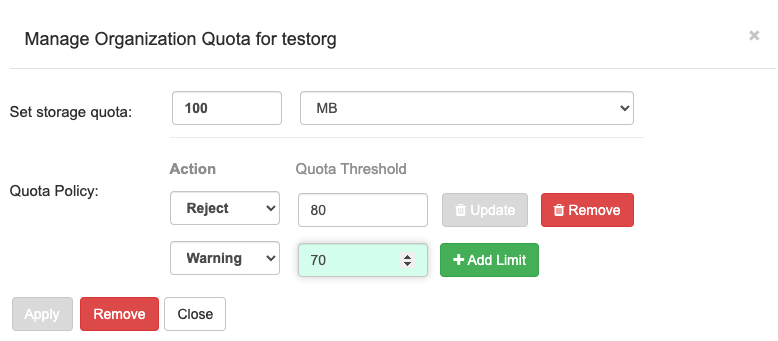
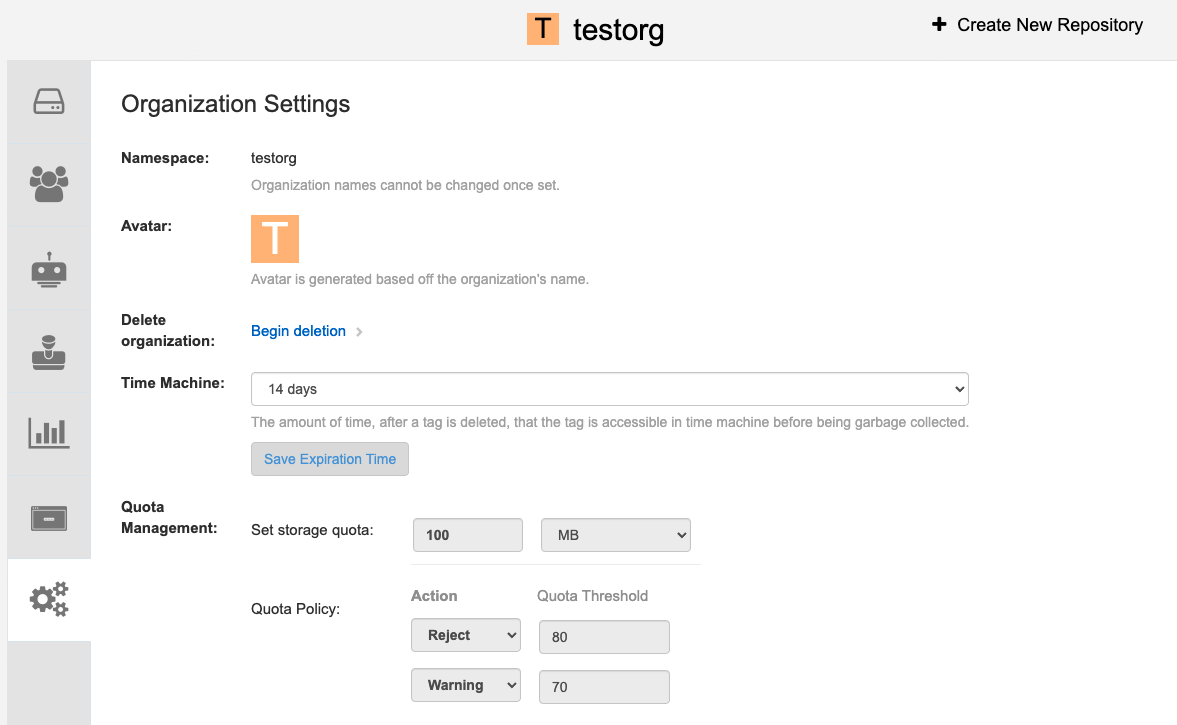
Click Close on the quota popup. The limits are viewable, but not editable, on the Settings tab of the Organization page:
Push an image where the reject limit is exceeded:
Because the reject limit (80%) has been set to below the current repository size (~83%), the next pushed image is rejected automatically.
Sample image push
$ podman pull ubuntu:20.04

$ podman tag docker.io/library/ubuntu:20.04 example-registry-quay-quay-enterprise.apps.docs.gcp.quaydev.org/testorg/ubuntu:20.04

$ podman push --tls-verify=false example-registry-quay-quay-enterprise.apps.docs.gcp.quaydev.org/testorg/ubuntu:20.04
Sample output when quota exceeded
Getting image source signatures
Copying blob d4dfaa212623 [--------------------------------------] 8.0b / 3.5KiB
Copying blob cba97cc5811c [--------------------------------------] 8.0b / 15.0KiB
Copying blob 0c78fac124da [--------------------------------------] 8.0b / 71.8MiB
WARN[0002] failed, retrying in 1s ... (1/3). Error: Error writing blob: Error initiating layer upload to /v2/testorg/ubuntu/blobs/uploads/ in example-registry-quay-quay-enterprise.apps.docs.gcp.quaydev.org: denied: Quota has been exceeded on namespace
Getting image source signatures
Copying blob d4dfaa212623 [--------------------------------------] 8.0b / 3.5KiB
Copying blob cba97cc5811c [--------------------------------------] 8.0b / 15.0KiB
Copying blob 0c78fac124da [--------------------------------------] 8.0b / 71.8MiB
WARN[0005] failed, retrying in 1s ... (2/3). Error: Error writing blob: Error initiating layer upload to /v2/testorg/ubuntu/blobs/uploads/ in example-registry-quay-quay-enterprise.apps.docs.gcp.quaydev.org: denied: Quota has been exceeded on namespace
Getting image source signatures
Copying blob d4dfaa212623 [--------------------------------------] 8.0b / 3.5KiB
Copying blob cba97cc5811c [--------------------------------------] 8.0b / 15.0KiB
Copying blob 0c78fac124da [--------------------------------------] 8.0b / 71.8MiB
WARN[0009] failed, retrying in 1s ... (3/3). Error: Error writing blob: Error initiating layer upload to /v2/testorg/ubuntu/blobs/uploads/ in example-registry-quay-quay-enterprise.apps.docs.gcp.quaydev.org: denied: Quota has been exceeded on namespace
Getting image source signatures
Copying blob d4dfaa212623 [--------------------------------------] 8.0b / 3.5KiB
Copying blob cba97cc5811c [--------------------------------------] 8.0b / 15.0KiB
Copying blob 0c78fac124da [--------------------------------------] 8.0b / 71.8MiB
Error: Error writing blob: Error initiating layer upload to /v2/testorg/ubuntu/blobs/uploads/ in example-registry-quay-quay-enterprise.apps.docs.gcp.quaydev.org: denied: Quota has been exceeded on namespace
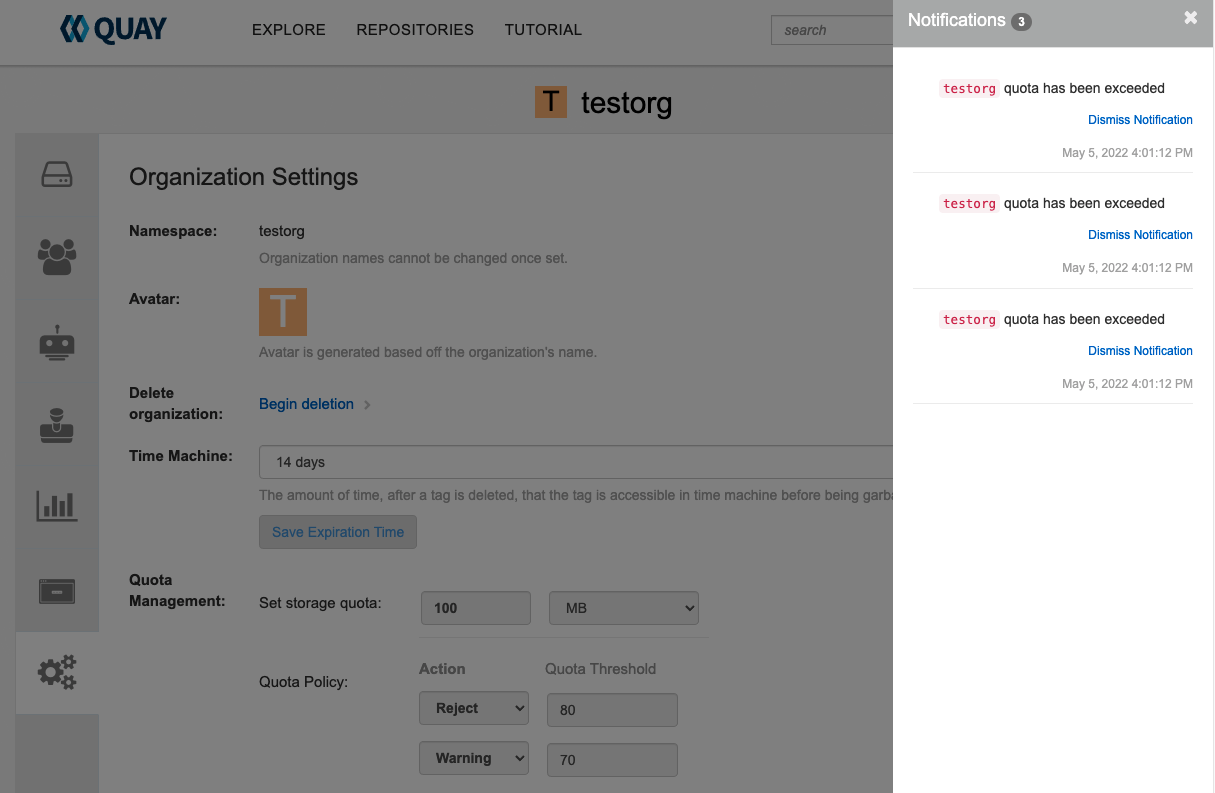
When limits are exceeded, notifications are displayed in the UI:
Quota notifications
14.6. Establishing quota with the Red Hat Quay API
When an organization is first created, it does not have a quota applied. Use the /api/v1/organization/{organization}/quota endpoint:
Sample command
$ curl -k -X GET -H "Authorization: Bearer <token>" -H 'Content-Type: application/json' https://example-registry-quay-quay-enterprise.apps.docs.gcp.quaydev.org/api/v1/organization/testorg/quota | jq
Sample output
[]
14.6.1. Setting the quota
To set a quota for an organization, POST data to the /api/v1/organization/{orgname}/quota endpoint: .Sample command
$ curl -k -X POST -H "Authorization: Bearer <token>" -H 'Content-Type: application/json' -d '{"limit_bytes": 10485760}' https://example-registry-quay-quay-enterprise.apps.docs.quayteam.org/api/v1/organization/testorg/quota | jqSample output
"Created"
14.6.2. Viewing the quota
To see the applied quota, GET data from the /api/v1/organization/{orgname}/quota endpoint:
Sample command
$ curl -k -X GET -H "Authorization: Bearer <token>" -H 'Content-Type: application/json' https://example-registry-quay-quay-enterprise.apps.docs.gcp.quaydev.org/api/v1/organization/testorg/quota | jq
Sample output
[
  {
    "id": 1,
    "limit_bytes": 10485760,
    "default_config": false,
    "limits": [],
    "default_config_exists": false
  }
]
14.6.3. Modifying the quota
To change the existing quota, in this instance from 10 MB to 100 MB, PUT data to the /api/v1/organization/{orgname}/quota/{quota_id} endpoint:
Sample command
$ curl -k -X PUT -H "Authorization: Bearer <token>" -H 'Content-Type: application/json' -d '{"limit_bytes": 104857600}' https://example-registry-quay-quay-enterprise.apps.docs.gcp.quaydev.org/api/v1/organization/testorg/quota/1 | jq
Sample output
{
  "id": 1,
  "limit_bytes": 104857600,
  "default_config": false,
  "limits": [],
  "default_config_exists": false
}
14.6.4. Pushing images
To see the storage consumed, push various images to the organization.
14.6.4.1. Pushing ubuntu:18.04
Push ubuntu:18.04 to the organization from the command line:
Sample commands
$ podman pull ubuntu:18.04

$ podman tag docker.io/library/ubuntu:18.04 example-registry-quay-quay-enterprise.apps.docs.gcp.quaydev.org/testorg/ubuntu:18.04

$ podman push --tls-verify=false example-registry-quay-quay-enterprise.apps.docs.gcp.quaydev.org/testorg/ubuntu:18.04
14.6.4.2. Using the API to view quota usage
To view the storage consumed, GET data from the /api/v1/repository endpoint:
Sample command
$ curl -k -X GET -H "Authorization: Bearer <token>" -H 'Content-Type: application/json' 'https://example-registry-quay-quay-enterprise.apps.docs.gcp.quaydev.org/api/v1/repository?last_modified=true&namespace=testorg&popularity=true&public=true"a=true' | jq
Sample output
{
  "repositories": [
    {
      "namespace": "testorg",
      "name": "ubuntu",
      "description": null,
      "is_public": false,
      "kind": "image",
      "state": "NORMAL",
      "quota_report": {
        "quota_bytes": 27959066,
        "configured_quota": 104857600
      },
      "last_modified": 1651225630,
      "popularity": 0,
      "is_starred": false
    }
  ]
}
14.6.4.3. Pushing another image
Pull, tag, and push a second image, for example,
nginx:Sample commands
$ podman pull nginx

$ podman tag docker.io/library/nginx example-registry-quay-quay-enterprise.apps.docs.gcp.quaydev.org/testorg/nginx

$ podman push --tls-verify=false example-registry-quay-quay-enterprise.apps.docs.gcp.quaydev.org/testorg/nginx
To view the quota report for the repositories in the organization, use the /api/v1/repository endpoint:
Sample command
$ curl -k -X GET -H "Authorization: Bearer <token>" -H 'Content-Type: application/json' 'https://example-registry-quay-quay-enterprise.apps.docs.gcp.quaydev.org/api/v1/repository?last_modified=true&namespace=testorg&popularity=true&public=true"a=true'
Sample output
{
  "repositories": [
    {
      "namespace": "testorg",
      "name": "ubuntu",
      "description": null,
      "is_public": false,
      "kind": "image",
      "state": "NORMAL",
      "quota_report": {
        "quota_bytes": 27959066,
        "configured_quota": 104857600
      },
      "last_modified": 1651225630,
      "popularity": 0,
      "is_starred": false
    },
    {
      "namespace": "testorg",
      "name": "nginx",
      "description": null,
      "is_public": false,
      "kind": "image",
      "state": "NORMAL",
      "quota_report": {
        "quota_bytes": 59231659,
        "configured_quota": 104857600
      },
      "last_modified": 1651229507,
      "popularity": 0,
      "is_starred": false
    }
  ]
}
To view the quota information in the organization details, use the /api/v1/organization/{orgname} endpoint:
Sample command
$ curl -k -X GET -H "Authorization: Bearer <token>" -H 'Content-Type: application/json' 'https://example-registry-quay-quay-enterprise.apps.docs.gcp.quaydev.org/api/v1/organization/testorg' | jq
Sample output
{
  "name": "testorg",
  ...
  "quotas": [
    {
      "id": 1,
      "limit_bytes": 104857600,
      "limits": []
    }
  ],
  "quota_report": {
    "quota_bytes": 87190725,
    "configured_quota": 104857600
  }
}
14.6.5. Rejecting pushes using quota limits
If an image push exceeds defined quota limitations, a soft or hard check occurs:
- For a soft check, or warning, users are notified.
- For a hard check, or reject, the push is terminated.
14.6.5.1. Setting reject and warning limits
To set reject and warning limits, POST data to the /api/v1/organization/{orgname}/quota/{quota_id}/limit endpoint:
Sample reject limit command
$ curl -k -X POST -H "Authorization: Bearer <token>" -H 'Content-Type: application/json' -d '{"type":"Reject","threshold_percent":80}' https://example-registry-quay-quay-enterprise.apps.docs.gcp.quaydev.org/api/v1/organization/testorg/quota/1/limit
Sample warning limit command
$ curl -k -X POST -H "Authorization: Bearer <token>" -H 'Content-Type: application/json' -d '{"type":"Warning","threshold_percent":50}' https://example-registry-quay-quay-enterprise.apps.docs.gcp.quaydev.org/api/v1/organization/testorg/quota/1/limit
14.6.5.2. Viewing reject and warning limits
To view the reject and warning limits, use the /api/v1/organization/{orgname}/quota endpoint:
View quota limits
$ curl -k -X GET -H "Authorization: Bearer <token>" -H 'Content-Type: application/json' https://example-registry-quay-quay-enterprise.apps.docs.gcp.quaydev.org/api/v1/organization/testorg/quota | jq
Sample output for quota limits
[
  {
    "id": 1,
    "limit_bytes": 104857600,
    "default_config": false,
    "limits": [
      {
        "id": 2,
        "type": "Warning",
        "limit_percent": 50
      },
      {
        "id": 1,
        "type": "Reject",
        "limit_percent": 80
      }
    ],
    "default_config_exists": false
  }
]
14.6.5.3. Pushing an image when the reject limit is exceeded
In this example, the reject limit (80%) has been set to below the current repository size (~83%), so the next push should automatically be rejected.
Push a sample image to the organization from the command line:
Sample image push
$ podman pull ubuntu:20.04

$ podman tag docker.io/library/ubuntu:20.04 example-registry-quay-quay-enterprise.apps.docs.gcp.quaydev.org/testorg/ubuntu:20.04

$ podman push --tls-verify=false example-registry-quay-quay-enterprise.apps.docs.gcp.quaydev.org/testorg/ubuntu:20.04
Sample output when quota exceeded
Getting image source signatures
Copying blob d4dfaa212623 [--------------------------------------] 8.0b / 3.5KiB
Copying blob cba97cc5811c [--------------------------------------] 8.0b / 15.0KiB
Copying blob 0c78fac124da [--------------------------------------] 8.0b / 71.8MiB
WARN[0002] failed, retrying in 1s ... (1/3). Error: Error writing blob: Error initiating layer upload to /v2/testorg/ubuntu/blobs/uploads/ in example-registry-quay-quay-enterprise.apps.docs.gcp.quaydev.org: denied: Quota has been exceeded on namespace
Getting image source signatures
Copying blob d4dfaa212623 [--------------------------------------] 8.0b / 3.5KiB
Copying blob cba97cc5811c [--------------------------------------] 8.0b / 15.0KiB
Copying blob 0c78fac124da [--------------------------------------] 8.0b / 71.8MiB
WARN[0005] failed, retrying in 1s ... (2/3). Error: Error writing blob: Error initiating layer upload to /v2/testorg/ubuntu/blobs/uploads/ in example-registry-quay-quay-enterprise.apps.docs.gcp.quaydev.org: denied: Quota has been exceeded on namespace
Getting image source signatures
Copying blob d4dfaa212623 [--------------------------------------] 8.0b / 3.5KiB
Copying blob cba97cc5811c [--------------------------------------] 8.0b / 15.0KiB
Copying blob 0c78fac124da [--------------------------------------] 8.0b / 71.8MiB
WARN[0009] failed, retrying in 1s ... (3/3). Error: Error writing blob: Error initiating layer upload to /v2/testorg/ubuntu/blobs/uploads/ in example-registry-quay-quay-enterprise.apps.docs.gcp.quaydev.org: denied: Quota has been exceeded on namespace
Getting image source signatures
Copying blob d4dfaa212623 [--------------------------------------] 8.0b / 3.5KiB
Copying blob cba97cc5811c [--------------------------------------] 8.0b / 15.0KiB
Copying blob 0c78fac124da [--------------------------------------] 8.0b / 71.8MiB
Error: Error writing blob: Error initiating layer upload to /v2/testorg/ubuntu/blobs/uploads/ in example-registry-quay-quay-enterprise.apps.docs.gcp.quaydev.org: denied: Quota has been exceeded on namespace
14.6.5.4. Notifications for limits exceeded
When limits are exceeded, a notification appears:
Quota notifications
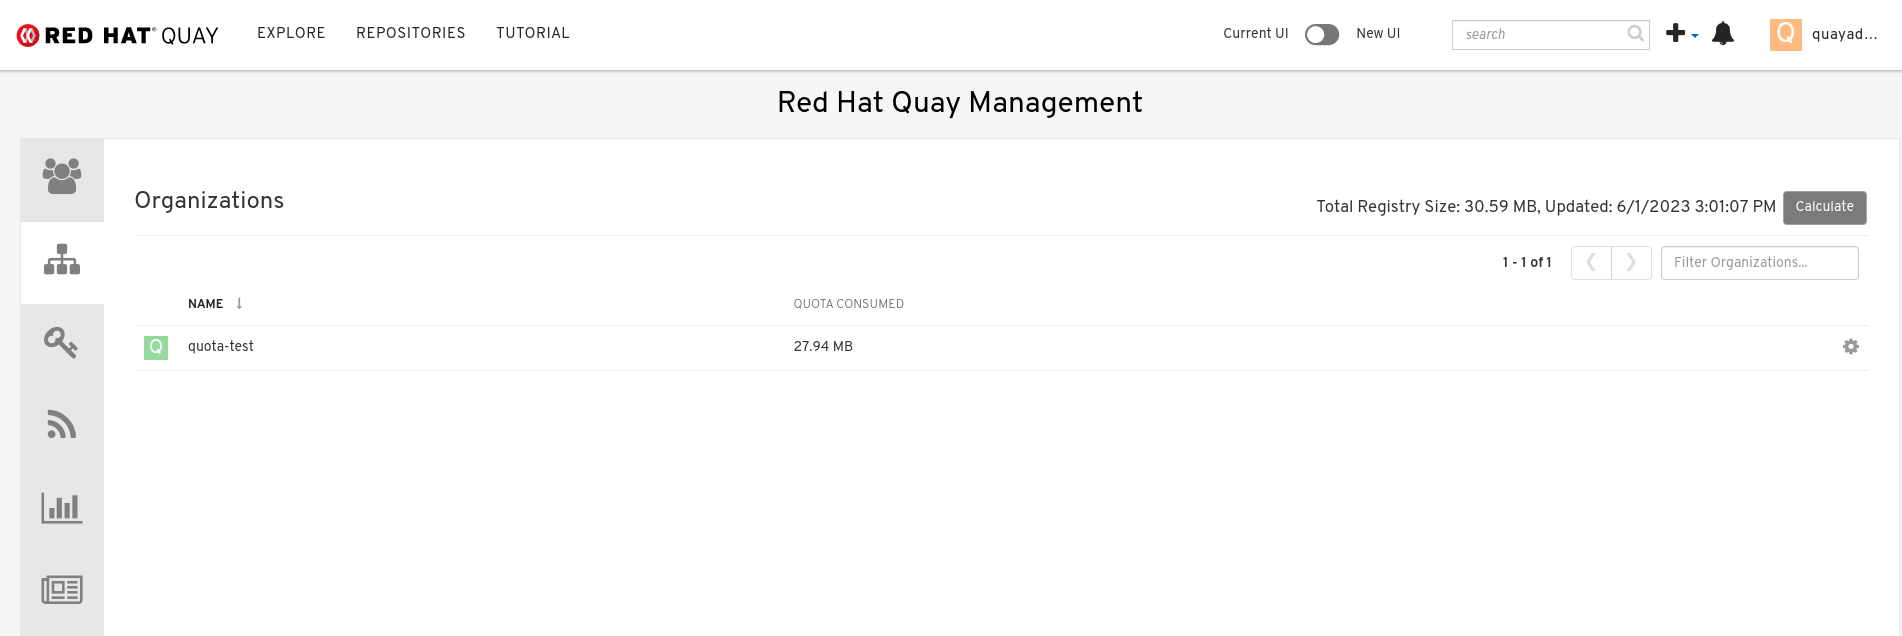
14.7. Calculating the total registry size in Red Hat Quay 3.9
Use the following procedure to queue a registry total calculation.
This feature is done on-demand, and calculating a registry total is database intensive. Use with caution.
Prerequisites
- You have upgraded to Red Hat Quay 3.9.
- You are logged in as a Red Hat Quay superuser.
Procedure
- On the Red Hat Quay UI, click your username → Super User Admin Panel.
- In the navigation pane, click Manage Organizations.
- Click Calculate, next to Total Registry Size: 0.00 KB, Updated: Never , Calculation required. Then, click Ok.
After a few minutes, depending on the size of your registry, refresh the page. Now, the Total Registry Size should be calculated. For example:
14.8. Permanently deleting an image tag
In some cases, users might want to delete an image tag outside of the time machine window. Use the following procedure to manually delete an image tag permanently.
The results of the following procedure cannot be undone. Use with caution.
14.8.1. Permanently deleting an image tag using the Red Hat Quay v2 UI
Use the following procedure to permanently delete an image tag using the Red Hat Quay v2 UI.
Prerequisites
-
You have set
FEATURE_UI_V2totruein yourconfig.yamlfile.
Procedure
Ensure that the
PERMANENTLY_DELETE_TAGSandRESET_CHILD_MANIFEST_EXPIRATIONparameters are set totruein yourconfig.yamlfile. For example:PERMANENTLY_DELETE_TAGS: true RESET_CHILD_MANIFEST_EXPIRATION: true
- In the navigation pane, click Repositories.
- Click the name of the repository, for example, quayadmin/busybox.
- Check the box of the image tag that will be deleted, for example, test.
Click Actions → Permanently Delete.
ImportantThis action is permanent and cannot be undone.
14.8.2. Permanently deleting an image tag using the Red Hat Quay legacy UI
Use the following procedure to permanently delete an image tag using the Red Hat Quay legacy UI.
Procedure
Ensure that the
PERMANENTLY_DELETE_TAGSandRESET_CHILD_MANIFEST_EXPIRATIONparameters are set totruein yourconfig.yamlfile. For example:PERMANENTLY_DELETE_TAGS: true RESET_CHILD_MANIFEST_EXPIRATION: true
- On the Red Hat Quay UI, click Repositories and the name of the repository that contains the image tag you will delete, for example, quayadmin/busybox.
- In the navigation pane, click Tags.
- Check the box of the name of the tag you want to delete, for example, test.
- Click the Actions drop down menu and select Delete Tags → Delete Tag.
- Click Tag History in the navigation pane.
On the name of the tag that was just deleted, for example,
test, click Delete test under the Permanently Delete category. For example:Permanently delete image tag
 Important
This action is permanent and cannot be undone.