
Chapter 2. Creating a repository
A repository provides a central location for storing a related set of container images. There are two ways to create a repository in Red Hat Quay: via a push (from docker or podman) and via the Red Hat Quay UI. These are essentially the same, whether you are using Quay.io or your own instance of Red Hat Quay.
2.1. Creating an image repository via the UI
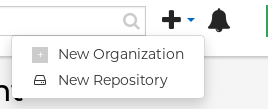
To create a repository in the Red Hat Quay UI under a user account: . Log in to the user account through the web UI. . Click the + icon in the top right of the header on the home page (or other page related to the user) and choose New Repository, as shown in the following figure:
+
On the Create New Repository page that appears
- Add the new repository name to your user name
- Click Repository Description and type a description of the repository
- In Repository Visibility, select whether you want the repository to be public or private
- Click the Create Repository button.
The new repository is created, starting out empty. A docker pull command you could use to pull an image from this repository (minus the image name) appears on the screen.
To create a repository in the Red Hat Quay UI under an organization:
- Log in as a user that has Admin or Write permission to the organization.
- From the Repositories view, select the organization name from the right column under Users and Organizations. The page for the organization appears, similar to the page shown in Figure 2.x:
- Click +Create New Repository in the upper-right part of the page.
On the Create New Repository page that appears:
- Add the new repository name to the organization name
- Click Repository Description and type a description of the repository
- In Repository Visibility, select whether you want the repository to be public or private
- Click the Create Repository button.
The new repository is created, starting out empty. A docker pull command you could use to pull an image from this repository (minus the image name) appears on the screen.
2.2. Creating an image repository via docker or podman
Assuming you have the proper credentials, pushing an image to a repository that does not yet exist in your Red Hat Quay instance will create that repository as it pushes the image to that repository. Either the docker or podman commands will work for these examples.
Tag the image: With an image available from
dockerorpodmanon your local system, tag that image with the new repository name and image name. Here are examples for pushing images to Quay.io or your own Red Hat Quay setup (for example, reg.example.com). For the examples, replace namespace with your Red Hat Quay user name or organization and repo_name with the name of the repository you want to create:# sudo podman tag myubi-minimal quay.io/namespace/repo_name # sudo podman tag myubi-standard reg.example.com/namespace/repo_name
Push to the appropriate registry. For example:
# sudo podman push quay.io/namespace/repo_name
# sudo podman push reg.example.com/namespace/repo_name
To create an application repository, follow the same procedure you did for creating a container image repository.