
Use Red Hat Quay
Preface
Red Hat Quay container image registries let you store container images in a central location. As a regular user of a Red Hat Quay registry, you can create repositories to organize your images and selectively add read (pull) and write (push) access to the repositories you control. A user with administrative privileges can perform a broader set of tasks, such as the ability to add users and control default settings.
This guide assumes you have a Red Hat Quay deployed and are ready to start setting it up and using it.
Chapter 1. Users and organizations in Red Hat Quay
Before you begin creating repositories to hold your container images in Red Hat Quay, you should consider how you want to organize those repositories. Every repository in a Red Hat Quay instance must be associated with either an Organization or a User.
1.1. Red Hat Quay tenancy model
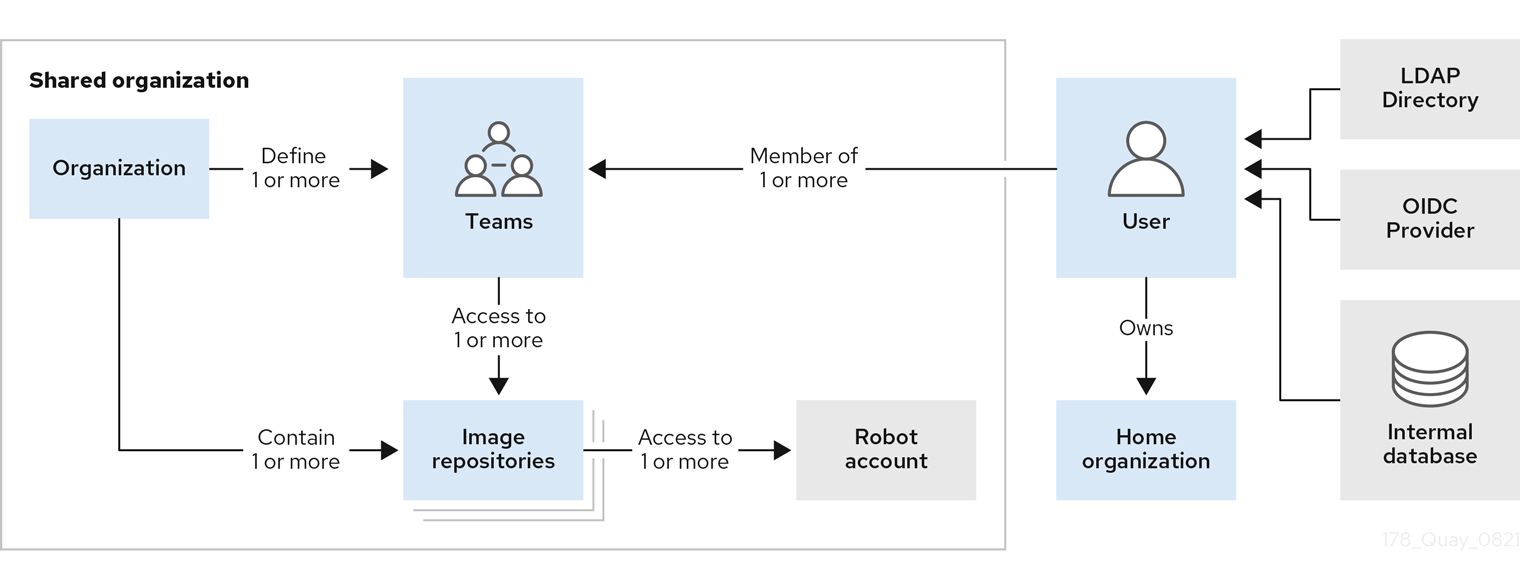
- Organizations provide a way of sharing repositories under a common namespace which does not belong to a single user, but rather to many users in a shared setting (such as a company).
- Teams provide a way for an organization to delegate permissions (both global and on specific repositories) to sets or groups of users.
-
Users can log in to a registry through the Red Hat Quay web UI or a client (such as
podman login). Each user automatically gets a user namespace, for example,quay-server.example.com/user/<username>. - Super users have enhanced access and privileges via the Super User Admin Panel in the user interface and through Super User API calls that are not visible or accessible to normal users.
- Robot accounts provide automated access to repositories for non-human users such as pipeline tools and are similar in nature to OpenShift service accounts. Permissions can be granted to a robot account in a repository by adding that account like any other user or team.
1.2. Creating user accounts
To create a new user for your Red Hat Quay instance:
- Log in to Red Hat Quay as the superuser (quay by default).
- Select your account name from the upper right corner of the home page and choose Super User Admin Panel.
- Select the Users icon from the left column.
- Select the Create User button.
- Enter the new user’s Username and Email address, then select the Create User button.
Back on the Users page, select the Options icon to the right of the new Username. A drop-down menu appears, as shown in the following figure:
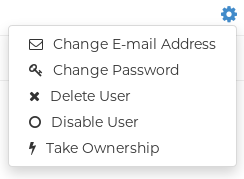
- Choose Change Password from the menu.
- Add the new password and verify it, then select the Change User Password button.
The new user can now use that username and password to log in via the web ui or through some container client.
1.3. Creating organization accounts
Any user can create their own organization to share repositories of container images. To create a new organization:
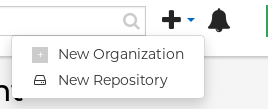
- While logged in as any user, select the plus sign (+) from the upper right corner of the home page and choose New Organization.
- Type the name of the organization. The name must be alphanumeric, all lower case, and between 2 and 255 characters long
Select Create Organization. The new organization appears, ready for you to begin adding repositories, teams, robot accounts and other features from icons on the left column. The following figure shows an example of the new organization’s page with the settings tab selected.

Chapter 2. Creating a repository
A repository provides a central location for storing a related set of container images. There are two ways to create a repository in Red Hat Quay: via a push (from docker or podman) and via the Red Hat Quay UI. These are essentially the same, whether you are using Quay.io or your own instance of Red Hat Quay.
2.1. Creating an image repository via the UI
To create a repository in the Red Hat Quay UI under a user account: . Log in to the user account through the web UI. . Click the + icon in the top right of the header on the home page (or other page related to the user) and choose New Repository, as shown in the following figure:
+
On the Create New Repository page that appears
- Add the new repository name to your user name
- Click Repository Description and type a description of the repository
- In Repository Visibility, select whether you want the repository to be public or private
- Click the Create Repository button.
The new repository is created, starting out empty. A docker pull command you could use to pull an image from this repository (minus the image name) appears on the screen.
To create a repository in the Red Hat Quay UI under an organization:
- Log in as a user that has Admin or Write permission to the organization.
- From the Repositories view, select the organization name from the right column under Users and Organizations. The page for the organization appears, similar to the page shown in Figure 2.x:
- Click +Create New Repository in the upper-right part of the page.
On the Create New Repository page that appears:
- Add the new repository name to the organization name
- Click Repository Description and type a description of the repository
- In Repository Visibility, select whether you want the repository to be public or private
- Click the Create Repository button.
The new repository is created, starting out empty. A docker pull command you could use to pull an image from this repository (minus the image name) appears on the screen.
2.2. Creating an image repository via docker or podman
Assuming you have the proper credentials, pushing an image to a repository that does not yet exist in your Red Hat Quay instance will create that repository as it pushes the image to that repository. Either the docker or podman commands will work for these examples.
Tag the image: With an image available from
dockerorpodmanon your local system, tag that image with the new repository name and image name. Here are examples for pushing images to Quay.io or your own Red Hat Quay setup (for example, reg.example.com). For the examples, replace namespace with your Red Hat Quay user name or organization and repo_name with the name of the repository you want to create:# sudo podman tag myubi-minimal quay.io/namespace/repo_name # sudo podman tag myubi-standard reg.example.com/namespace/repo_name
Push to the appropriate registry. For example:
# sudo podman push quay.io/namespace/repo_name
# sudo podman push reg.example.com/namespace/repo_name
To create an application repository, follow the same procedure you did for creating a container image repository.
Chapter 3. Managing access to repositories
As a Red Hat Quay user, you can create your own repositories and make them accessible to other users on your Red Hat Quay instance. As an alternative, you can create organizations to allow access to repositories based on teams. In both user and organization repositories, you can allow access to those repositories by creating credentials associated with robot accounts. Robot accounts make it easy for a variety of container clients (such as docker or podman) to access your repos, without requiring that the client have a Red Hat Quay user account.
3.1. Allowing access to user repositories
When you create a repository in a user namespace, you can add access to that repository to user accounts or through robot accounts.
3.1.1. Allowing user access to a user repository
To allow access to a repository associated with a user account, do the following:
- Log into your Red Hat Quay user account.
- Select a repository under your user namespace to which you want to share access.
- Select the Settings icon from the left column.
Type the name of the user to which you want to grant access to your repository. The user name should appear as you type, as shown in the following figure:
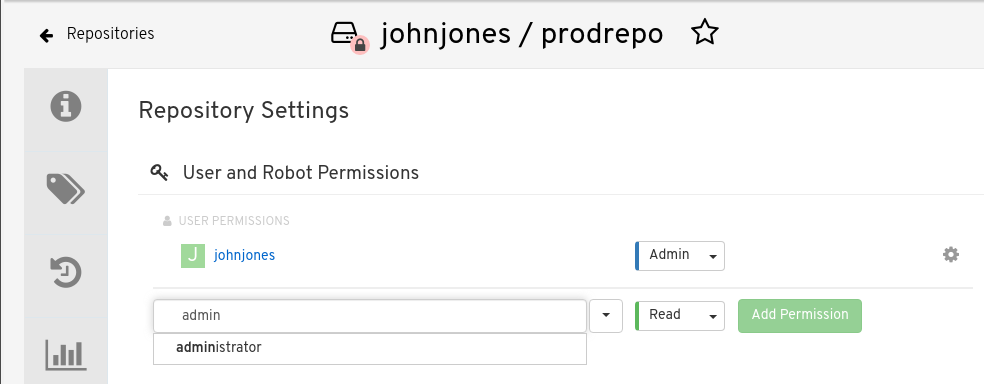
In the permissions box, select one of the following:
- Read - Allows the user to view the repository and pull from it.
- Write - Allows the user to view the repository, as well as pull images from or push images to the repository.
- Admin - Allows all administrative settings to the repository, as well as all Read and Write permissions.
- Select the Add Permission button. The user now has the assigned permission.
To remove the user permissions to the repository, select the Options icon to the right of the user entry, then select Delete Permission.
3.2. Allowing robot access to a user repository
Robot accounts are used to set up automated access to the repositories in your Red Hat Quay registry. They are similar to OpenShift service accounts. When you set up a robot account, you:
- Generate credentials that are associated with the robot account
- Identify repositories and images that the robot can push images to or pull images from
- Copy and paste generated credentials to use with different container clients (such as Docker, podman, Kubernetes, Mesos and others) to access each defined repository
Keep in mind that each robot account is limited to a single user namespace or organization. So, for example, the robot could provide access to all repositories accessible to a user jsmith, but not to any that are not in the user’s list of repositories.
The following procedure steps you through setting up a robot account to allow access to your repositories.
- Select Robot icon: From the Repositories view, select the Robot icon from the left column.
- Create Robot account: Select the Create Robot Account button.
- Set Robot name: Enter the name and description, then select the Create robot account button. The robot name becomes a combination of your user name, plus the robot name you set (for example, jsmith+myrobot)
Add permission to the robot account: From the Add permissions screen for the robot account, define the repositories you want the robot to access as follows:
- Put a check mark next to each repository the robot can access
For each repository, select one of the following, and click Add permissions:
- None - Robot has no permission to the repository
- Read - Robot can view and pull from the repository
- Write - Robot can read (pull) from and write (push) to the repository
- Admin - Full access to pull from and push to the repository, plus the ability to do administrative tasks associated with the repository
- Select the Add permissions button to apply the settings
- Get credentials to access repositories via the robot: Back on the Robot Accounts page, select the Robot account name to see credential information for that robot.
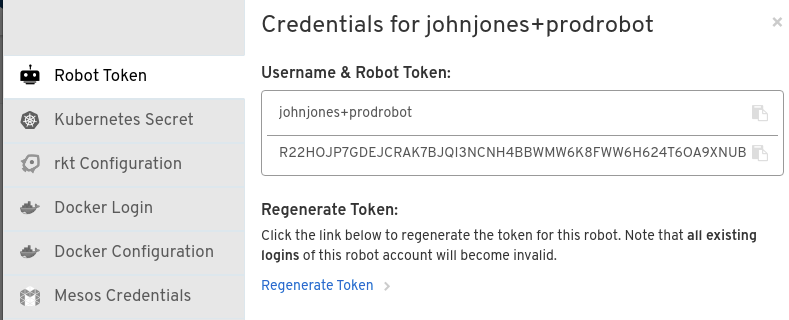
Get the token: Select Robot Token, as shown in the following figure, to see the token that was generated for the robot. If you want to reset the token, select Regenerate Token.
NoteIt is important to understand that regenerating a token makes any previous tokens for this robot invalid.
Get credentials: Once you are satisfied with the generated token, get the resulting credentials in the following ways:
- Kubernetes Secret: Select this to download credentials in the form of a Kubernetes pull secret yaml file.
- rkt Configuration: Select this to download credentials for the rkt container runtime in the form of a json file.
-
Docker Login: Select this to copy a full
docker logincommand line that includes the credentials. - Docker Configuration: Select this to download a file to use as a Docker config.json file, to permanently store the credentials on your client system.
- Mesos Credentials: Select this to download a tarball that provides the credentials that can be identified in the uris field of a Mesos configuration file.
3.3. Allowing access to organization repositories
Once you have created an organization, you can associate a set of repositories directly to that organization. To add access to the repositories in that organization, you can add Teams (sets of users with the same permissions) and individual users. Essentially, an organization has the same ability to create repositories and robot accounts as a user does, but an organization is intended to set up shared repositories through groups of users (in teams or individually).
Other things to know about organizations:
- You cannot have an organization in another organization. To subdivide an organization, you use teams.
- Organizations can’t contain users directly. You must first add a team, then add one or more users to each team.
- Teams can be set up in organizations as just members who use the repos and associated images or as administrators with special privileges for managing the organization
3.3.1. Adding a Team to an organization
When you create a team for your organization you can select the team name, choose which repositories to make available to the team, and decide the level of access to the team.
- From the Organization view, select the Teams and Membership icon from the left column. You will see that an owners Team exists with Admin privilege for the user who created the Organization.
- Select Create New Team. You are prompted for the new team name to be associated with the organization. Type the team name, which must start with a lowercase letter, with the rest of the team name as any combination of lowercase letters and numbers (no capitals or special characters allowed).
- Select the Create team button. The Add permissions window appears, displaying a list of repositories in the organization.
Check each repository you want the team to be able to access. Then select one of the following permissions for each:
- Read - Team members are able to view and pull images
- Write - Team members can view, pull, and push images
- Admin - Team members have full read/write privilege, plus the ability to do administrative tasks related to the repository
- Select Add permissions to save the repository permissions for the team.
3.3.2. Setting a Team role
After you have added a team, you can set the role of that team within the organization. From the Teams and Membership screen within the organization, select the TEAM ROLE drop-down menu, as shown in the following figure:
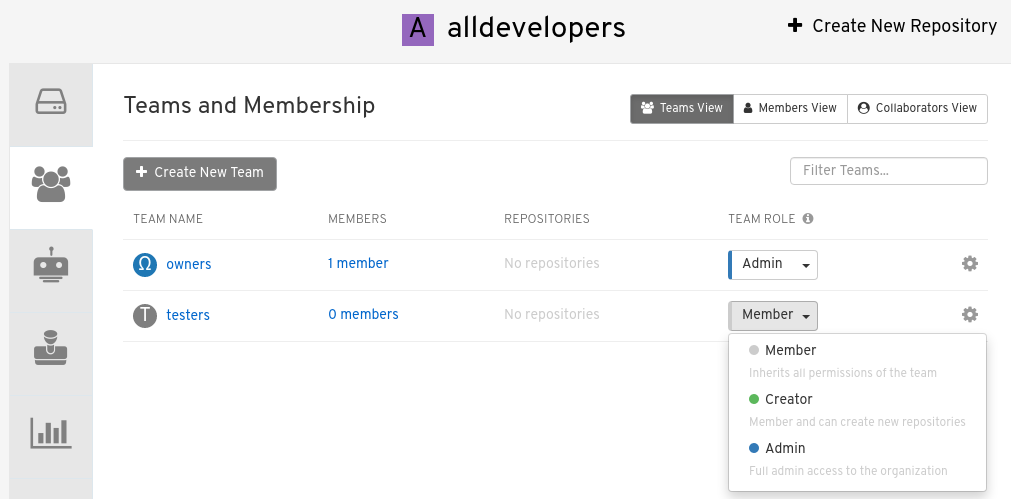
For the selected team, choose one of the following roles:
- Member - Inherits all permissions set for the team
- Creator - All member permissions, plus the ability to create new repositories
- Admin - Full administrative access to the organization, including the ability to create teams, add members, and set permissions.
3.3.3. Adding users to a Team
As someone with Admin privilege to an organization, you can add users and robots to a team. When you add a user, it sends an email to that user. The user remains pending until that user accepts the invitation.
To add users or robots to a team, start from the organization’s screen and do the following:
- Select the team you want to add users or robots to.
In the Team Members box, type one of the following:
- A username from an account on the Red Hat Quay registry
- The email address for a user account on the registry
- The name of a robot account. The name must be in the form of orgname+robotname
- In the case of the robot account, it is immediately added to the team. For a user account, an invitation to join is mailed to the user. Until the user accepts that invitation, the user remains in the INVITED TO JOIN state.
Next, the user accepts the email invitation to join the team. The next time the user logs in to the Red Hat Quay instance, the user moves from the INVITED TO JOIN list to the MEMBERS list for the organization.
Chapter 4. Working with tags
Tags provide a way to identify the version of an image, as well as offering a means of naming the same image in different ways. Besides an image’s version, an image tag can identify its uses (such as devel, testing, or prod) or the fact that it is the most recent version (latest).
From the Tags tab of an image repository, you can view, modify, add, move, delete, and see the history of tags. You also can fetch command-lines you can use to download (pull) a specific image (based on its name and tag) using different commands.
4.1. Viewing and modifying tags
The tags of a repository can be viewed and modified in the tags panel of the repository page, found by clicking on the Tags tab.

4.1.1. Adding a new tag to a tagged image
A new tag can be added to a tagged image by clicking on the gear icon next to the tag and choosing Add New Tag. Red Hat Quay will confirm the addition of the new tag to the image.
4.1.2. Moving a tag
Moving a tag to a different image is accomplished by performing the same operation as adding a new tag, but giving an existing tag name. Red Hat Quay will confirm that you want the tag moved, rather than added.
4.1.3. Deleting a tag
A specific tag and all its images can be deleted by clicking on the tag’s gear icon and choosing Delete Tag. This will delete the tag and any images unique to it. Images will not be deleted until no tag references them either directly or indirectly through a parent child relationship.
4.1.4. Viewing tag history and going back in time
4.1.4.1. Viewing tag history
To view the image history for a tag, click on the View Tags History menu item located under the Actions menu. The page shown will display each image to which the tag pointed in the past and when it pointed to that image.
4.1.4.2. Going back in time
To revert the tag to a previous image, find the history line where your desired image was overwritten, and click on the Restore link.
4.1.5. Fetching an image by tag or digest
From the Tags tab, you can view different ways of pulling images from the clients that are ready to use those images.
- Select a particular repository/image
- Select Tags in the left column
- Select the Fetch Tag icon for a particular image/tag combination
- When the Fetch Tag pop-up appears, select the Image format box to see a drop-down menu that shows different ways that are available to pull the image. The selections offer full command lines for pulling a specific container image to the local system:
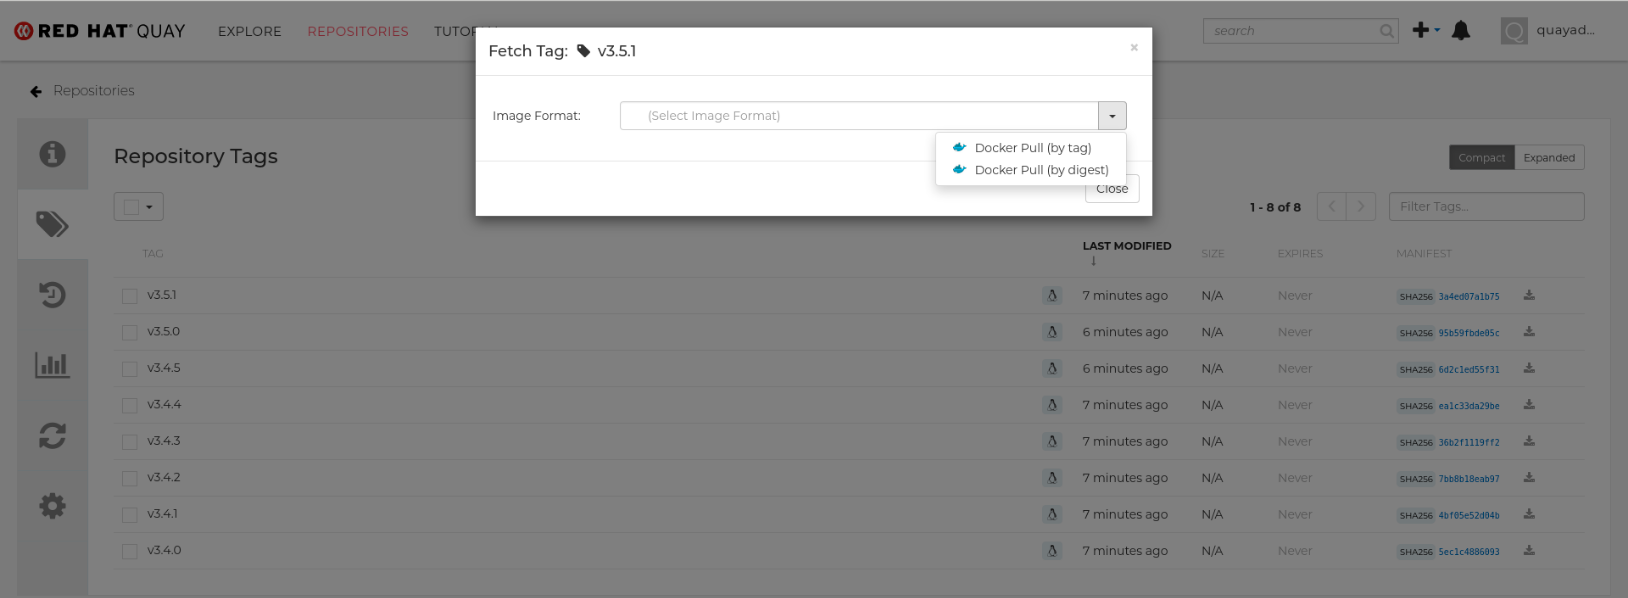
You can select to pull a regular of an image by tag name or by digest name using the docker command. . Choose the type of pull you want, then select Copy Command. The full command-line is copied into your clipboard. These two commands show a docker pull by tag and by digest:
docker pull quay.io/cnegus/whatever:latest
docker pull quay.io/cnegus/whatever@sha256:e02231a6aa8ba7f5da3859a359f99d77e371cb47e643ce78e101958782581fb9
Paste the command into a command-line shell on a system that has the docker command and service available, and press Enter. At this point, the container image is ready to run on your local system.
On RHEL and Fedora systems, you can substitute podman for docker to pull and run the selected image.
4.2. Tag Expiration
Images can be set to expire from a Red Hat Quay repository at a chosen date and time using a feature called tag expiration. Here are a few things to know about about tag expiration:
- When a tag expires, the tag is deleted from the repository. If it is the last tag for a specific image, the image is set to be deleted.
- Expiration is set on a per-tag basis, not for a repository on the whole.
- When a tag expires or is deleted, it is not immediately removed from the registry. The value of Time Machine (in User settings) defines when the deleted tag is actually removed and garbage collected. By default, that value is 14 days. Up until that time, a tag can be repointed to an expired or deleted image.
- The Red Hat Quay superuser has no special privilege related to deleting expired images from user repositories. There is no central mechanism for the superuser to gather information and act on user repositories. It is up to the owners of each repository to manage expiration and ultimate deletion of their images.
Tag expiration can be set in different ways:
-
By setting the
quay.expires-after=LABEL in the Dockerfile when the image is created. This sets a time to expire from when the image is built. - By choosing the expiration date from the EXPIRES column for the repository tag and selecting a specific date and time to expire.
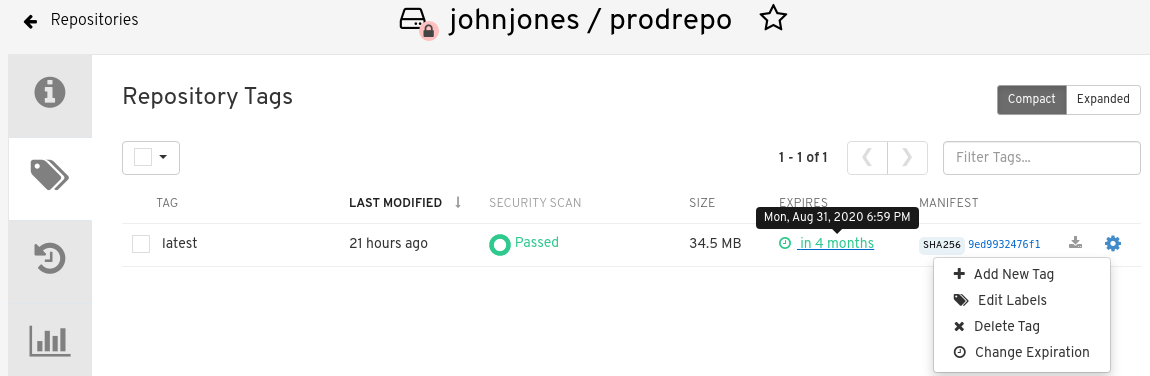
The following figure shows the Options entry for changing tag expiration and the EXPIRES field for when the tag expires. Hover over the EXPIRES field to see the expiration date and time that is currently set.
4.2.1. Setting tag expiration from a Dockerfile
Adding a label like quay.expires-after=20h via the Dockerfile LABEL command will cause a tag to automatically expire after the time indicated. The time values could be something like 1h, 2d, 3w for hours, days, and weeks, respectively, from the time the image is built.
4.2.2. Setting tag expiration from the repository
On the Repository Tag page there is a UI column titled EXPIRES that indicates when a tag will expire. Users can set this by clicking on the time that it will expire or by clicking the Settings button (gear icon) on the right and choosing Change Expiration.
Choose the date and time when prompted and select Change Expiration. The tag will be set to be deleted from the repository when the expiration time is reached.
4.3. Security scanning
By clicking the on the vulnerability or fixable count next to a tab you can jump into the security scanning information for that tag. There you can find which CVEs your image is susceptible to, and what remediation options you may have available.
Keep in mind that image scanning only lists vulnerabilities found by the Clair image scanner. What each user does about the vulnerabilities that are uncovered is completely up to that user. The Red Hat Quay superuser does not act on those vulnerabilities found.
Chapter 5. Viewing and exporting logs
Activity logs are gathered for all repositories and namespaces (users and organizations) in Red Hat Quay. There are multiple ways of accessing log files, including:
- Viewing logs through the web UI
- Exporting logs so they can be saved externally.
- Accessing log entries via the API
To access logs, you must have Admin privilege to the selected repository or namespace.
A maximum of 100 log results are available at a time via the API. To gather more results that that, you must use the log exporter feature described in this chapter.
5.1. Viewing logs
To view log entries for a repository or namespace from the web UI, do the following:
- Select a repository or namespace (organization or user) for which you have Admin privileges.
Select the Usage Logs icon from the left column. A Usage Logs screen appears, like the one shown in the following figure:

From the Usage Logs page, you can:
- Set the date range for viewing log entries by adding dates to the From and to boxes. By default, the most recent one week of log entries is displayed.
- Type a string into the Filter Logs box to display log entries that container the given string.
- Toggle the arrow to the left of any log entry to see more or less text associated with that log entry.
5.2. Exporting repository logs
To be able to grab a larger number of log files and save them outside of the Red Hat Quay database, you can use the Export Logs feature. Here are a few things you should know about using Export Logs:
- You can choose a range of dates for the logs you want to gather from a repository.
- You can request that the logs be sent to you via an email attachment or directed to a callback URL.
- You need Admin privilege to the repository or namespace to export logs
- A maximum of 30 days of log data can be exported at a time
- Export Logs only gathers log data that was previously produced. It does not stream logging data.
- Your Red Hat Quay instance must be configured for external storage for this feature (local storage will not work).
- Once the logs are gathered and available, you should immediately copy that data if you want to save it. By default, the data expires in an hour.
To use the Export Logs feature:
- Select a repository for which you have Admin privileges.
- Select the Usage Logs icon from the left column. A Usage Logs screen appears.
- Choose the From and to date range of the log entries you want to gather.
Select the Export Logs button. An Export Usage Logs pop-up appears, as shown
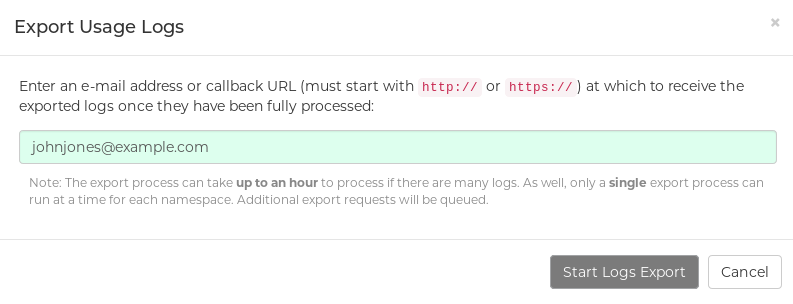
- Enter the email address or callback URL you want to receive the exported logs. For the callback URL, you could use a URL to a place such as webhook.site.
- Select Start Logs Export. This causes Red Hat Quay to begin gathering the selected log entries. Depending on the amount of logging data being gathered, this can take anywhere from one minute to an hour to complete.
When the log export is completed you will either:
- Receive an email, alerting you to the availability of your requested exported log entries.
- See a successful status of your log export request from the webhook URL. A link to the exported data will be available for you to select to download the logs.
Keep in mind that the URL points to a location in your Red Hat Quay external storage and is set to expire within an hour. So make sure you copy the exported logs before that expiration time if you intend to keep them.
Chapter 6. Automatically building Dockerfiles with Build workers
Red Hat Quay supports building Dockerfiles using a set of worker nodes on OpenShift or Kubernetes. Build triggers, such as GitHub webhooks can be configured to automatically build new versions of your repositories when new code is committed. This document will walk you through enabling builds with your Red Hat Quay installation and setting up one or more OpenShift/K8s clusters to accept builds from Red Hat Quay. With Red Hat Quay 3.4, the underlying Build Manager has been completely re-written as part of Red Hat Quay’s migration from Python 2 to Python 3. As a result, builder nodes are now dynamically created as Kubernetes Jobs versus builder nodes that ran continuously in Red Hat Quay 3.3 and earlier. This greatly simplifies how Red Hat Quay manages builds and provides the same mechanism quay.io utilizes to handle thousands of container image builds daily. Customers who are currently running static (“Enterprise” builders under Red Hat Quay 3.3) will be required to migrate to a Kubernetes-based build mechanism.
6.1. Architecture Overview
The Red Hat Quay Build system is designed for scalability (since it is used to host all builds at quay.io). The Build Manager component of Red Hat Quay provides an orchestration layer that tracks build requests and ensures that a Build Executor (OpenShift/K8s cluster) will carry out each request. Each build is handled by a Kubernetes Job which launches a small virtual machine to completely isolate and contain the image build process. This ensures that container builds do not affect each other or the underlying build system. Multiple Executors can be configured to ensure that builds are performed even in the event of infrastructure failures. Red Hat Quay will automatically send builds to a different Executor if it detects that one Executor is having difficulties.
The upstream version of Red Hat Quay provides instructions on how to configure an AWS/EC2 based Executor. This configuration is not supported for Red Hat Quay customers.
6.1.1. Build manager
The build manager is responsible for the lifecycle of scheduled build. Operations requiring updating the build queue, build phase and running jobs’ status is handled by the build manager.
6.1.2. Build workers’ control plane
Build jobs are run on separate worker nodes, and are scheduled on separate control planes (executor). Currently, Red Hat Quay supports running jobs on AWS and Kubernetes. Builds are executed using quay.io/quay/quay-builder. On AWS, builds are scheduled on EC2 instances. On k8s, the builds are scheduled as job resources.
6.1.3. Orchestrator
The orchestrator is used to store the state of currently running build jobs, and publish events for the build manager to consume. e.g expiry events. Currently, the supported orchestrator backend is Redis.
6.2. OpenShift Requirements
Red Hat Quay builds are supported on Kubernetes and OpenShift 4.5 and higher. A bare metal (non-virtualized) worker node is required since build pods require the ability to run kvm virtualization. Each build is done in an ephemeral virtual machine to ensure complete isolation and security while the build is running. In addition, your OpenShift cluster should permit the ServiceAccount associated with Red Hat Quay builds to run with the necessary SecurityContextConstraint to support privileged containers.
6.3. Orchestrator Requirements
The Red Hat Quay builds need access to a Redis instance to track build status information. It is acceptable to use the same Redis instance already deployed with your Red Hat Quay installation. All build queues are managed in the Red Hat Quay database so there is no need for a highly available Redis instance.
6.4. Setting Up Red Hat Quay Builders With OpenShift
6.4.1. OpenShift TLS component
The tls component allows you to control TLS configuration.
Red Hat Quay 3.7 does not support builders when the TLS component is managed by the Operator.
If you set tls to unmanaged, you supply your own ssl.cert and ssl.key files. In this instance, if you want your cluster to support builders, you must add both the Quay route and the builder route name to the SAN list in the cert, or alternatively use a wildcard. To add the builder route, use the following format:
[quayregistry-cr-name]-quay-builder-[ocp-namespace].[ocp-domain-name]
6.4.2. Prepare OpenShift for Red Hat Quay Builds
There are several actions that are needed on an OpenShift cluster before it can accept builds from Red Hat Quay.
Create a project where builds will be run (e.g. ‘builder’)
$ oc new-project builder
Create a
ServiceAccountin thisProjectthat will be used to run builds. Ensure that it has sufficient privileges to createJobsandPods. Copy theServiceAccount’s token for use later.$ oc create sa -n builder quay-builder $ oc policy add-role-to-user -n builder edit system:serviceaccount:builder:quay-builder $ oc sa get-token -n builder quay-builder
- Identify the URL for the OpenShift cluster’s API server. This can be found from the OpenShift Console.
-
Identify a worker node label to be used when scheduling build
Jobs. Because build pods need to run on bare metal worker nodes, typically these are identified with specific labels. Check with your cluster administrator to determine exactly which node label should be used. If the cluster is using a self-signed certificate, get the kube apiserver’s CA to add to Red Hat Quay’s extra certs.
Get the name of the secret containing the CA:
$ oc get sa openshift-apiserver-sa --namespace=openshift-apiserver -o json | jq '.secrets[] | select(.name | contains("openshift-apiserver-sa-token"))'.name-
Get the
ca.crtkey value from the secret in the Openshift console. The value should begin with “-----BEGIN CERTIFICATE-----” -
Import the CA in Red Hat Quay using the ConfigTool. Ensure the name of this file matches
K8S_API_TLS_CA.
-
Create the necessary security contexts/role bindings for the
ServiceAccount:
apiVersion: security.openshift.io/v1
kind: SecurityContextConstraints
metadata:
  name: quay-builder
priority: null
readOnlyRootFilesystem: false
requiredDropCapabilities: null
runAsUser:
  type: RunAsAny
seLinuxContext:
  type: RunAsAny
seccompProfiles:
- '*'
supplementalGroups:
  type: RunAsAny
volumes:
- '*'
allowHostDirVolumePlugin: true
allowHostIPC: true
allowHostNetwork: true
allowHostPID: true
allowHostPorts: true
allowPrivilegeEscalation: true
allowPrivilegedContainer: true
allowedCapabilities:
- '*'
allowedUnsafeSysctls:
- '*'
defaultAddCapabilities: null
fsGroup:
  type: RunAsAny
---
apiVersion: rbac.authorization.k8s.io/v1
kind: Role
metadata:
  name: quay-builder-scc
  namespace: builder
rules:
- apiGroups:
  - security.openshift.io
  resourceNames:
  - quay-builder
  resources:
  - securitycontextconstraints
  verbs:
  - use
---
apiVersion: rbac.authorization.k8s.io/v1
kind: RoleBinding
metadata:
  name: quay-builder-scc
  namespace: builder
subjects:
- kind: ServiceAccount
  name: quay-builder
roleRef:
  apiGroup: rbac.authorization.k8s.io
  kind: Role
  name: quay-builder-scc
6.4.3. Enable Builders and add Build Configuration to Red Hat Quay’s Configuration Bundle
- Ensure that you’ve got Builds enabled in your Red Hat Quay configuration.
FEATURE_BUILD_SUPPORT: True
- Add the following to your Red Hat Quay configuration bundle, replacing each value with a value specific to your installation.
Currently only the Build feature itself can be enabled via the Red Hat Quay Config Tool. The actual configuration of the Build Manager and Executors must be done manually in the config.yaml file.
BUILD_MANAGER:
- ephemeral
- ALLOWED_WORKER_COUNT: 1
  ORCHESTRATOR_PREFIX: buildman/production/
  ORCHESTRATOR:
    REDIS_HOST: quay-redis-host
    REDIS_PASSWORD: quay-redis-password
    REDIS_SSL: true
    REDIS_SKIP_KEYSPACE_EVENT_SETUP: false
  EXECUTORS:
  - EXECUTOR: kubernetes
    BUILDER_NAMESPACE: builder
    K8S_API_SERVER: api.openshift.somehost.org:6443
    K8S_API_TLS_CA: /conf/stack/extra_ca_certs/build_cluster.crt
    VOLUME_SIZE: 8G
    KUBERNETES_DISTRIBUTION: openshift
    CONTAINER_MEMORY_LIMITS: 5120Mi
    CONTAINER_CPU_LIMITS: 1000m
    CONTAINER_MEMORY_REQUEST: 3968Mi
    CONTAINER_CPU_REQUEST: 500m
    NODE_SELECTOR_LABEL_KEY: beta.kubernetes.io/instance-type
    NODE_SELECTOR_LABEL_VALUE: n1-standard-4
    CONTAINER_RUNTIME: podman
    SERVICE_ACCOUNT_NAME: *****
    SERVICE_ACCOUNT_TOKEN: *****
    QUAY_USERNAME: quay-username
    QUAY_PASSWORD: quay-password
    WORKER_IMAGE: <registry>/quay-quay-builder
    WORKER_TAG: some_tag
    BUILDER_VM_CONTAINER_IMAGE: <registry>/quay-quay-builder-qemu-rhcos:v3.4.0
    SETUP_TIME: 180
    MINIMUM_RETRY_THRESHOLD:
    SSH_AUTHORIZED_KEYS:
    - ssh-rsa 12345 someuser@email.com
    - ssh-rsa 67890 someuser2@email.com
Each configuration field is explained below.
- ALLOWED_WORKER_COUNT
- Defines how many Build Workers are instantiated per Red Hat Quay Pod. Typically this is ‘1’.
- ORCHESTRATOR_PREFIX
- Defines a unique prefix to be added to all Redis keys (useful to isolate Orchestrator values from other Redis keys).
- REDIS_HOST
- Hostname for your Redis service.
- REDIS_PASSWORD
- Password to authenticate into your Redis service.
- REDIS_SSL
- Defines whether or not your Redis connection uses SSL.
- REDIS_SKIP_KEYSPACE_EVENT_SETUP
-
By default, Red Hat Quay does not set up the keyspace events required for key events at runtime. To do so, set REDIS_SKIP_KEYSPACE_EVENT_SETUP to
false. - EXECUTOR
- Starts a definition of an Executor of this type. Valid values are ‘kubernetes’ and ‘ec2’
- BUILDER_NAMESPACE
- Kubernetes namespace where Red Hat Quay builds will take place
- K8S_API_SERVER
- Hostname for API Server of OpenShift cluster where builds will take place
- K8S_API_TLS_CA
-
The filepath in the
Quaycontainer of the build cluster’s CA certificate for the Quay app to trust when making API calls. - KUBERNETES_DISTRIBUTION
- Indicates which type of Kubernetes is being used. Valid values are ‘openshift’ and ‘k8s’.
- CONTAINER_*
- Define the resource requests and limits for each build pod.
- NODE_SELECTOR_*
- Defines the node selector label name/value pair where build Pods should be scheduled.
- CONTAINER_RUNTIME
-
Specifies whether the builder should run
dockerorpodman. Customers using Red Hat’squay-builderimage should set this topodman. - SERVICE_ACCOUNT_NAME/SERVICE_ACCOUNT_TOKEN
- Defines the Service Account name/token that will be used by build Pods.
- QUAY_USERNAME/QUAY_PASSWORD
- Defines the registry credentials needed to pull the Red Hat Quay build worker image that is specified in the WORKER_IMAGE field. Customers should provide a Red Hat Service Account credential as defined in the section "Creating Registry Service Accounts" against registry.redhat.io in the article at https://access.redhat.com/RegistryAuthentication.
- WORKER_IMAGE
- Image reference for the Red Hat Quay builder image. registry.redhat.io/quay/quay-builder
- WORKER_TAG
- Tag for the builder image desired. The latest version is v3.4.0.
- BUILDER_VM_CONTAINER_IMAGE
-
The full reference to the container image holding the internal VM needed to run each Red Hat Quay build (
registry.redhat.io/quay/quay-builder-qemu-rhcos:v3.4.0). - SETUP_TIME
- Specifies the number of seconds at which a build times out if it has not yet registered itself with the Build Manager (default is 500 seconds). Builds that time out are attempted to be restarted three times. If the build does not register itself after three attempts it is considered failed.
- MINIMUM_RETRY_THRESHOLD
-
This setting is used with multiple Executors; it indicates how many retries are attempted to start a build before a different Executor is chosen. Setting to 0 means there are no restrictions on how many tries the build job needs to have. This value should be kept intentionally small (three or less) to ensure failovers happen quickly in the event of infrastructure failures. E.g Kubernetes is set as the first executor and EC2 as the second executor. If we want the last attempt to run a job to always be executed on EC2 and not Kubernetes, we would set the Kubernetes executor’s
MINIMUM_RETRY_THRESHOLDto 1 and EC2’sMINIMUM_RETRY_THRESHOLDto 0 (defaults to 0 if not set). In this case, kubernetes’MINIMUM_RETRY_THRESHOLD> retries_remaining(1) would evaluate to False, thus falling back to the second executor configured - SSH_AUTHORIZED_KEYS
- List of ssh keys to bootstrap in the ignition config. This allows other keys to be used to ssh into the EC2 instance or QEMU VM
6.5. OpenShift Routes Limitation
This section only applies if you are using the Quay Operator on OpenShift with managed route component.
Due to a limitation of OpenShift Routes to only be able to serve traffic to a single port, additional steps are required to set up builds. Ensure that your kubectl or oc CLI tool is configured to work with the cluster where the Quay Operator is installed and that your QuayRegistry exists (not necessarily the same as the bare metal cluster where your builders run).
- Ensure that HTTP/2 ingress is enabled on the OpenShift cluster by following these steps.
The Quay Operator will create a
Routewhich directs gRPC traffic to the build manager server running inside the existing Quay pod(s). If you want to use a custom hostname (such as a subdomain likebuilder.registry.example.com), ensure that you create a CNAME record with your DNS provider which points to thestatus.ingress[0].hostof the createdRoute:$ kubectl get -n <namespace> route <quayregistry-name>-quay-builder -o jsonpath={.status.ingress[0].host}Using the OpenShift UI or CLI, update the
Secretreferenced byspec.configBundleSecretof theQuayRegistrywith the build cluster CA certificate (name the keyextra_ca_cert_build_cluster.cert), and update theconfig.yamlentry with the correct values referenced in the builder config above (depending on your build executor) along with theBUILDMAN_HOSTNAMEfield:BUILDMAN_HOSTNAME: <build-manager-hostname> BUILD_MANAGER: - ephemeral - ALLOWED_WORKER_COUNT: 1 ORCHESTRATOR_PREFIX: buildman/production/ ORCHESTRATOR: REDIS_HOST: quay-redis-host REDIS_PASSWORD: quay-redis-password REDIS_SSL: true REDIS_SKIP_KEYSPACE_EVENT_SETUP: false EXECUTORS: - EXECUTOR: kubernetes BUILDER_NAMESPACE: builder ...
The extra configuration field is explained below:
- BUILDMAN_HOSTNAME
-
The externally accessible server hostname which the build jobs use to communicate back to the build manager. Default is the same as
SERVER_HOSTNAME. For OpenShiftRoute, it is eitherstatus.ingress[0].hostor the CNAME entry if using a custom hostname.BUILDMAN_HOSTNAMEneeds to include the port number, e.gsomehost:443for Openshift Route, as the gRPC client used to communicate with the build manager does not infer any port if omitted.
6.6. Troubleshooting Builds
The builder instances started by the build manager are ephemeral. This means that they will either get shut down by Red Hat Quay} on timeouts/failure or garbage collected by the control plane (EC2/K8s). This means that in order to get the builder logs, one needs to do so while the builds are running.
6.6.1. DEBUG config flag
A DEBUG flag can be set in order to prevent the builder instances from getting cleaned up after completion/failure. To do so, in the desired executor configuration, set DEBUG to true. For example:
  EXECUTORS:
    - EXECUTOR: ec2
      DEBUG: true
      ...
    - EXECUTOR: kubernetes
      DEBUG: true
      ...
When set to true, DEBUG will prevent the build nodes from shutting down after the quay-builder service is done or fails, and will prevent the build manager from cleaning up the instances (terminating EC2 instances or deleting k8s jobs). This will allow debugging builder node issues, and should not be set in a production environment. The lifetime service will still exist. i.e The instance will still shutdown after approximately 2 hours (EC2 instances will terminate, k8s jobs will complete) Setting DEBUG will also affect ALLOWED_WORKER_COUNT, as the unterminated instances/jobs will still count towards the total number of running workers. This means the existing builder workers will need to manually be deleted if ALLOWED_WORKER_COUNT is reached to be able to schedule new builds.
Use the followings steps:
The guest VM forwards its SSH port (22) to its host’s (the pod) port 2222. Port forward the builder pod’s port 2222 to a port on localhost. e.g
$ kubectl port-forward <builder pod> 9999:2222
SSH into the VM running inside the container using a key set from SSH_AUTHORIZED_KEYS:
$ ssh -i /path/to/ssh/key/set/in/ssh_authorized_keys -p 9999 core@localhost
Get the quay-builder service logs:
$ systemctl status quay-builder
$ journalctl -f -u quay-builder
Step 2-3 can also be done in a single SSH command:
$ ssh -i /path/to/ssh/key/set/in/ssh_authorized_keys -p 9999 core@localhost ‘systemctl status quay-builder’
$ ssh -i /path/to/ssh/key/set/in/ssh_authorized_keys -p 9999 core@localhost ‘journalctl -f -u quay-builder’
6.7. Setting up GitHub builds (optional)
If your organization plans to have builds be conducted via pushes to GitHub (or GitHub Enterprise), continue with Creating an OAuth application in GitHub.
Chapter 7. Building Dockerfiles
Red Hat Quay supports the ability to build Dockerfiles on our build fleet and push the resulting image to the repository.
7.1. Viewing and managing builds
Repository Builds can be viewed and managed by clicking the Builds tab in the Repository View.
7.2. Manually starting a build
To manually start a repository build, click the + icon in the top right of the header on any repository page and choose New Dockerfile Build. An uploaded Dockerfile, .tar.gz, or an HTTP URL to either can be used for the build.
You will not be able to specify the Docker build context when manually starting a build.
7.3. Build Triggers
Repository builds can also be automatically triggered by events such as a push to an SCM (GitHub, BitBucket or GitLab) or via a call to a webhook.
7.3.1. Creating a new build trigger
To setup a build trigger, click the Create Build Trigger button on the Builds view page and follow the instructions of the dialog. You will need to grant Red Hat Quay access to your repositories in order to setup the trigger and your account requires admin access on the SCM repository.
7.3.2. Manually triggering a build trigger
To trigger a build trigger manually, click the icon next to the build trigger and choose Run Now.
7.3.3. Build Contexts
When building an image with Docker, a directory is specified to become the build context. This holds true for both manual builds and build triggers because the builds conducted by Red Hat Quay are no different from running docker build on your own machine.
Red Hat Quay build contexts are always the specified subdirectory from the build setup and fallback to the root of the build source if none is specified. When a build is triggered, Red Hat Quay build workers clone the git repository to the worker machine and enter the build context before conducting a build.
For builds based on tar archives, build workers extract the archive and enter the build context. For example:
example
├── .git
├── Dockerfile
├── file
└── subdir
    └── Dockerfile
Imagine the example above is the directory structure for a GitHub repository called "example". If no subdirectory is specified in the build trigger setup or while manually starting a build, the build will operate in the example directory.
If subdir is specified to be the subdirectory in the build trigger setup, only the Dockerfile within it is visible to the build. This means that you cannot use the ADD command in the Dockerfile to add file, because it is outside of the build context.
Unlike the Docker Hub, the Dockerfile is part of the build context on Red Hat Quay. Thus, it must not appear in the .dockerignore file.
Chapter 8. Setting up a Custom Git Trigger
A Custom Git Trigger is a generic way for any git server to act as a build trigger. It relies solely on SSH keys and webhook endpoints; everything else is left to the user to implement.
8.1. Creating a Trigger
Creating a Custom Git Trigger is similar to the creation of any other trigger with a few subtle differences:
- It is not possible for Red Hat Quay to automatically detect the proper robot account to use with the trigger. This must be done manually in the creation process.
- There are extra steps after the creation of the trigger that must be done in order to use the trigger. These steps are detailed below.
8.2. Post trigger-creation setup
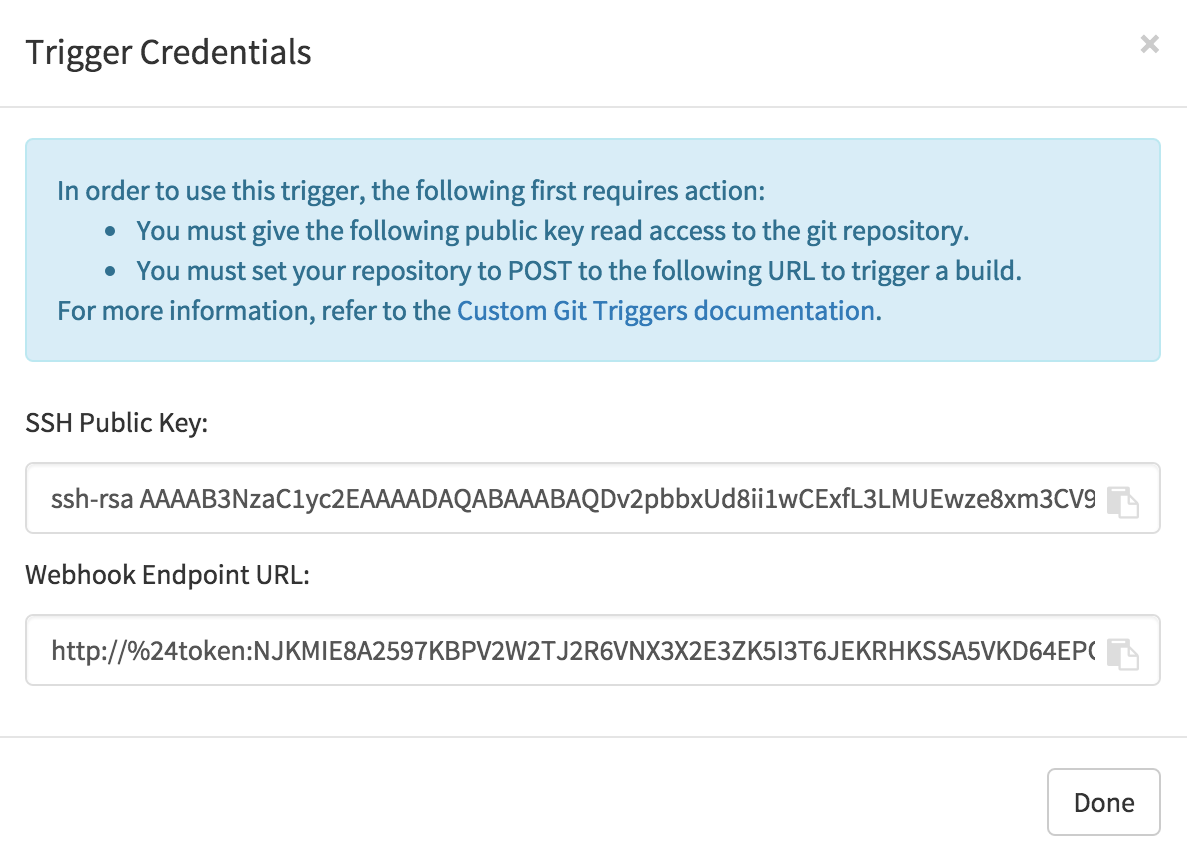
Once a trigger has been created, there are 2 additional steps required before the trigger can be used:
- Provide read access to the SSH public key generated when creating the trigger.
- Setup a webhook that POSTs to the Red Hat Quay endpoint to trigger a build.
The key and the URL are both available at all times by selecting View Credentials from the gear located in the trigger listing.
8.2.1. SSH public key access
Depending on the Git server setup, there are various ways to install the SSH public key that Red Hat Quay generates for a custom git trigger. For example, Git documentation describes a small server setup in which simply adding the key to $HOME/.ssh/authorize_keys would provide access for builders to clone the repository. For any git repository management software that isn’t officially supported, there is usually a location to input the key often labeled as Deploy Keys.
8.2.2. Webhook
In order to automatically trigger a build, one must POST a JSON payload to the webhook URL with the following format:
{
  "commit": "1c002dd",                                   // required
  "ref": "refs/heads/master",                            // required
  "default_branch": "master",                            // required
  "commit_info": {                                       // optional
    "url": "gitsoftware.com/repository/commits/1234567", // required
    "message": "initial commit",                         // required
    "date": "timestamp",                                 // required
    "author": {                                          // optional
      "username": "user",                                // required
      "avatar_url": "gravatar.com/user.png",             // required
      "url": "gitsoftware.com/users/user"                // required
    },
    "committer": {                                       // optional
      "username": "user",                                // required
      "avatar_url": "gravatar.com/user.png",             // required
      "url": "gitsoftware.com/users/user"                // required
    }
  }
}
This request requires a Content-Type header containing application/json in order to be valid.
Once again, this can be accomplished in various ways depending on the server setup, but for most cases can be done via a post-receive git hook.
Chapter 9. Skipping a source control-triggered build
To specify that a commit should be ignored by the Red Hat Quay build system, add the text [skip build] or [build skip] anywhere in the commit message.
Chapter 10. Set up GitHub build trigger tags
Red Hat Quay supports using GitHub or GitHub Enterprise as a trigger to building images. If you have not yet done so, go ahead and enable build support in Red Hat Quay.
10.1. Understanding tag naming for build triggers
Prior to Red Hat Quay 3.3, how images created from build triggers were named was limited. Images built by build triggers were named:
- With the branch or tag whose change invoked the trigger
-
With a
latesttag for images that used the default branch
As of Red Hat Quay 3.3 and later, you have more flexibility in how you set image tags. The first thing you can do is enter custom tags, to have any string of characters assigned as a tag for each built image. However, as an alternative, you could use the following tag templates to to tag images with information from each commit:
- ${commit_info.short_sha}: The commit’s short SHA
- ${commit_info.date}: The timestamp for the commit
- ${commit_info.author}: The author from the commit
- ${commit_info.committer}: The committer of the commit
- ${parsed_ref.branch}: The branch name
The following procedure describes how you set up tagging for build triggers.
10.2. Setting tag names for build triggers
Follow these steps to configure custom tags for build triggers:
- From the repository view, select the Builds icon from the left navigation.
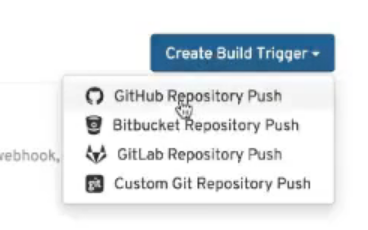
Select the Create Build Trigger menu, and select the type of repository push you want (GitHub, Bitbucket, GitLab, or Custom Git repository push). For this example, GitHub Repository Push is chosen, as illustrated in the following figure.
- When the Setup Build Trigger page appears, select the repository and namespace in which you want the trigger set up.
Under Configure Trigger, select either Trigger for all branches and tags or Trigger only on branches and tags matching a regular expression. Then select Continue. The Configure Tagging section appears, as shown in the following figure:

Scroll down to Configure Tagging and select from the following options:
- Tag manifest with the branch or tag name: Check this box to use the name of the branch or tag in which the commit occurred as the tag used on the image. This is enabled by default.
-
Add latest tag if on default branch: Check this box to use the
latesttag for the image if it is on the default branch for the repository. This is enabled by default. - Add custom tagging templates: Enter a custom tag or a template into the Enter a tag template box. There are multiple tag templates you can enter here, as described earlier in this section. They include ways of using short SHA, timestamps, author name, committer, and branch name from the commit as tags.
- Select Continue. You are prompted to select the directory build context for the Docker build. The build context directory identifies the location of the directory containing the Dockerfile, along with other files needed when the build is triggered. Enter "/" if the Dockerfile is in the root of the git repository.
- Select Continue. You are prompted to add an optional Robot Account. Do this if you want to pull a private base image during the build process. The robot account would need access to the build.
- Select Continue to complete the setup of the build trigger.
If you were to return to the Repository Builds page for the repository, the build triggers you set up will be listed under the Build Triggers heading.

Chapter 11. Creating an OAuth application in GitHub
You can authorize your registry to access a GitHub account and its repositories by registering it as a GitHub OAuth application.
11.1. Create new GitHub application
- Log into GitHub (Enterprise)
- Visit the Applications page under your organization’s settings.
-
Click Register New Application. The
Register a new OAuth applicationconfiguration screen is displayed: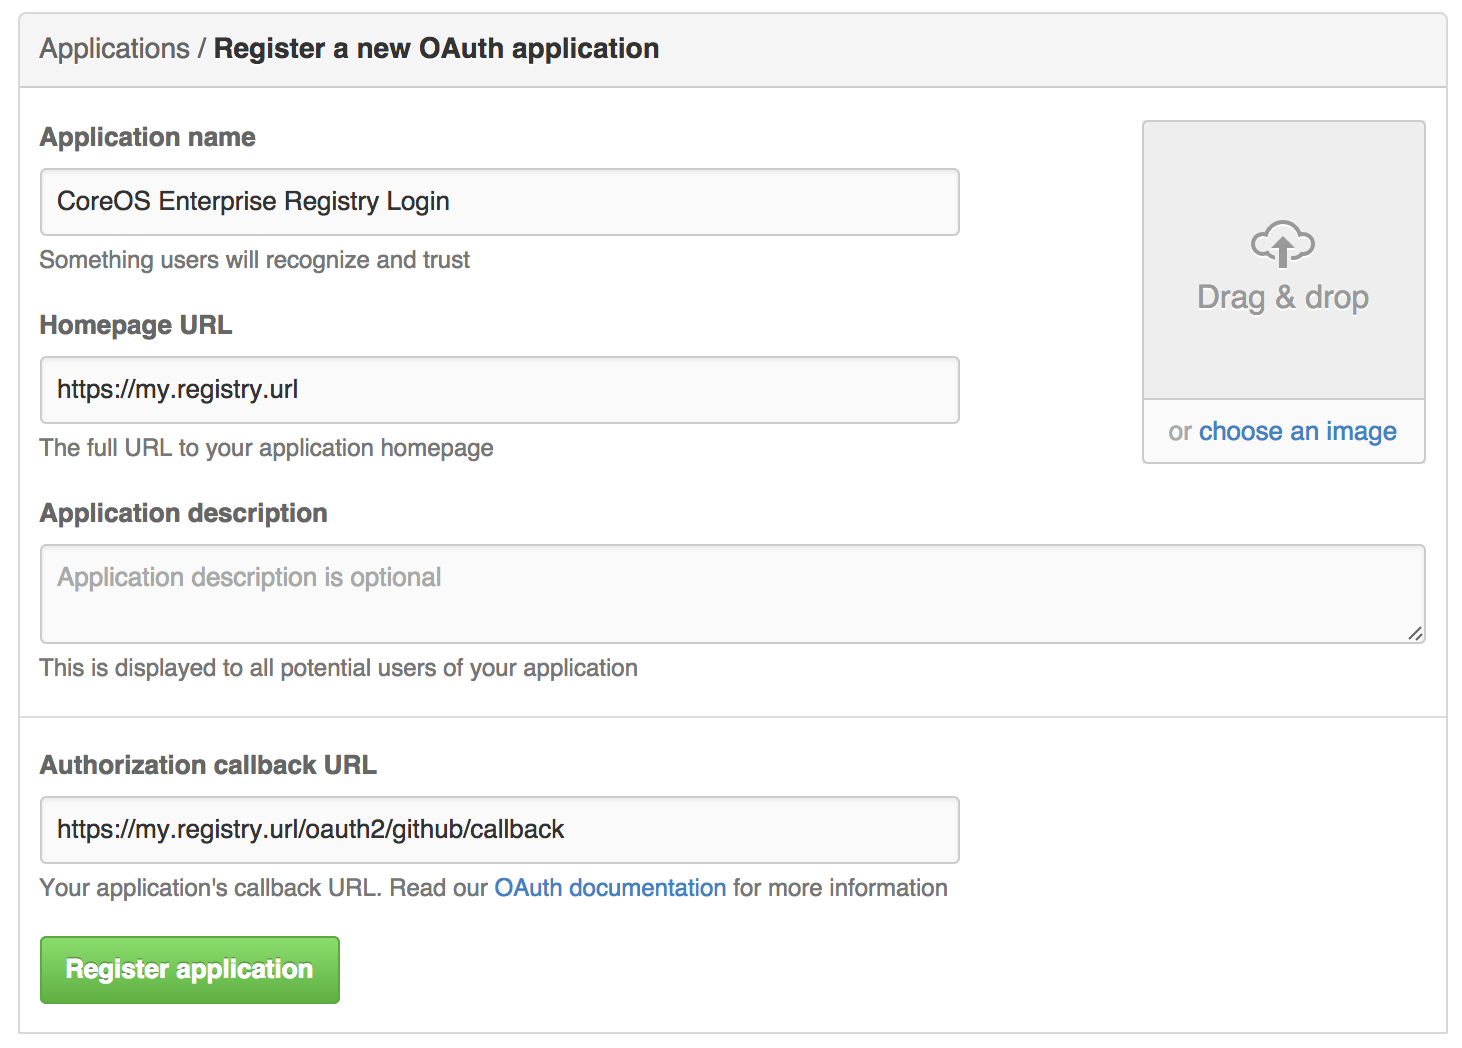
Set Homepage URL: Enter the Quay Enterprise URL as the
Homepage URLNoteIf using public GitHub, the Homepage URL entered must be accessible by your users. It can still be an internal URL.
- Set Authorization callback URL: Enter https://{$RED_HAT_QUAY_URL}/oauth2/github/callback as the Authorization callback URL.
- Save your settings by clicking the Register application button. The new new application’s summary is shown:
- Record the Client ID and Client Secret shown for the new application.
Chapter 12. Repository Notifications
Quay supports adding notifications to a repository for various events that occur in the repository’s lifecycle. To add notifications, click the Settings tab while viewing a repository and select Create Notification. From the When this event occurs field, select the items for which you want to receive notifications:
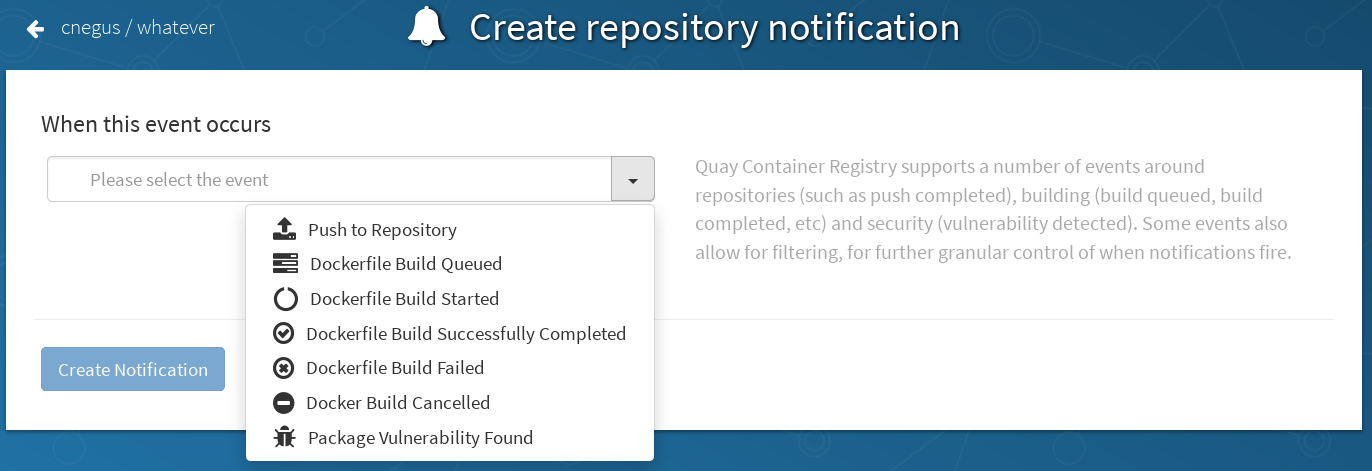
After selecting an event, further configure it by adding how you will be notified of that event.
Adding notifications requires repository admin permission.
The following are examples of repository events.
12.1. Repository Events
12.1.1. Repository Push
A successful push of one or more images was made to the repository:
{
  "name": "repository",
  "repository": "dgangaia/test",
  "namespace": "dgangaia",
  "docker_url": "quay.io/dgangaia/test",
  "homepage": "https://quay.io/repository/dgangaia/repository",
  "updated_tags": [
    "latest"
  ]
}
12.1.2. Dockerfile Build Queued
Here is a sample response for a Dockerfile build has been queued into the build system. The response can differ based on the use of optional attributes.
{
  "build_id": "296ec063-5f86-4706-a469-f0a400bf9df2",
  "trigger_kind": "github",                                                       //Optional
  "name": "test",
  "repository": "dgangaia/test",
  "namespace": "dgangaia",
  "docker_url": "quay.io/dgangaia/test",
  "trigger_id": "38b6e180-9521-4ff7-9844-acf371340b9e",                           //Optional
  "docker_tags": [
    "master",
    "latest"
  ],
  "repo": "test",
  "trigger_metadata": {
    "default_branch": "master",
    "commit": "b7f7d2b948aacbe844ee465122a85a9368b2b735",
    "ref": "refs/heads/master",
    "git_url": "git@github.com:dgangaia/test.git",
    "commit_info": {                                                             //Optional
      "url": "https://github.com/dgangaia/test/commit/b7f7d2b948aacbe844ee465122a85a9368b2b735",
      "date": "2019-03-06T12:48:24+11:00",
      "message": "adding 5",
      "author": {                                                                //Optional
        "username": "dgangaia",
        "url": "https://github.com/dgangaia",                                    //Optional
        "avatar_url": "https://avatars1.githubusercontent.com/u/43594254?v=4"    //Optional
      },
      "committer": {
        "username": "web-flow",
        "url": "https://github.com/web-flow",
        "avatar_url": "https://avatars3.githubusercontent.com/u/19864447?v=4"
      }
    }
  },
  "is_manual": false,
  "manual_user": null,
  "homepage": "https://quay.io/repository/dgangaia/test/build/296ec063-5f86-4706-a469-f0a400bf9df2"
}
12.1.3. Dockerfile Build Started
Here is an example of a Dockerfile build being started by the build system. The response can differ based on some attributes being optional.
{
  "build_id": "a8cc247a-a662-4fee-8dcb-7d7e822b71ba",
  "trigger_kind": "github",                                                     //Optional
  "name": "test",
  "repository": "dgangaia/test",
  "namespace": "dgangaia",
  "docker_url": "quay.io/dgangaia/test",
  "trigger_id": "38b6e180-9521-4ff7-9844-acf371340b9e",                         //Optional
  "docker_tags": [
    "master",
    "latest"
  ],
  "build_name": "50bc599",
  "trigger_metadata": {                                                         //Optional
    "commit": "50bc5996d4587fd4b2d8edc4af652d4cec293c42",
    "ref": "refs/heads/master",
    "default_branch": "master",
    "git_url": "git@github.com:dgangaia/test.git",
    "commit_info": {                                                            //Optional
      "url": "https://github.com/dgangaia/test/commit/50bc5996d4587fd4b2d8edc4af652d4cec293c42",
      "date": "2019-03-06T14:10:14+11:00",
      "message": "test build",
      "committer": {                                                            //Optional
        "username": "web-flow",
        "url": "https://github.com/web-flow",                                   //Optional
        "avatar_url": "https://avatars3.githubusercontent.com/u/19864447?v=4"   //Optional
      },
      "author": {                                                               //Optional
        "username": "dgangaia",
        "url": "https://github.com/dgangaia",                                   //Optional
        "avatar_url": "https://avatars1.githubusercontent.com/u/43594254?v=4"   //Optional
      }
    }
  },
  "homepage": "https://quay.io/repository/dgangaia/test/build/a8cc247a-a662-4fee-8dcb-7d7e822b71ba"
}
12.1.4. Dockerfile Build Successfully Completed
Here is a sample response of a Dockerfile build that has been successfully completed by the build system.
This event will occur simultaneously with a Repository Push event for the built image(s)
{
  "build_id": "296ec063-5f86-4706-a469-f0a400bf9df2",
  "trigger_kind": "github",                                                       //Optional
  "name": "test",
  "repository": "dgangaia/test",
  "namespace": "dgangaia",
  "docker_url": "quay.io/dgangaia/test",
  "trigger_id": "38b6e180-9521-4ff7-9844-acf371340b9e",                           //Optional
  "docker_tags": [
    "master",
    "latest"
  ],
  "build_name": "b7f7d2b",
  "image_id": "sha256:0339f178f26ae24930e9ad32751d6839015109eabdf1c25b3b0f2abf8934f6cb",
  "trigger_metadata": {
    "commit": "b7f7d2b948aacbe844ee465122a85a9368b2b735",
    "ref": "refs/heads/master",
    "default_branch": "master",
    "git_url": "git@github.com:dgangaia/test.git",
    "commit_info": {                                                              //Optional
      "url": "https://github.com/dgangaia/test/commit/b7f7d2b948aacbe844ee465122a85a9368b2b735",
      "date": "2019-03-06T12:48:24+11:00",
      "message": "adding 5",
      "committer": {                                                              //Optional
        "username": "web-flow",
        "url": "https://github.com/web-flow",                                     //Optional
        "avatar_url": "https://avatars3.githubusercontent.com/u/19864447?v=4"                                                        //Optional
      },
      "author": {                                                                 //Optional
        "username": "dgangaia",
        "url": "https://github.com/dgangaia",                                     //Optional
        "avatar_url": "https://avatars1.githubusercontent.com/u/43594254?v=4"     //Optional
      }
    }
  },
  "homepage": "https://quay.io/repository/dgangaia/test/build/296ec063-5f86-4706-a469-f0a400bf9df2",
  "manifest_digests": [
    "quay.io/dgangaia/test@sha256:2a7af5265344cc3704d5d47c4604b1efcbd227a7a6a6ff73d6e4e08a27fd7d99",
    "quay.io/dgangaia/test@sha256:569e7db1a867069835e8e97d50c96eccafde65f08ea3e0d5debaf16e2545d9d1"
  ]
}
12.1.5. Dockerfile Build Failed
A Dockerfile build has failed
{
  "build_id": "5346a21d-3434-4764-85be-5be1296f293c",
  "trigger_kind": "github",                                                       //Optional
  "name": "test",
  "repository": "dgangaia/test",
  "docker_url": "quay.io/dgangaia/test",
  "error_message": "Could not find or parse Dockerfile: unknown instruction: GIT",
  "namespace": "dgangaia",
  "trigger_id": "38b6e180-9521-4ff7-9844-acf371340b9e",                           //Optional
  "docker_tags": [
    "master",
    "latest"
  ],
  "build_name": "6ae9a86",
  "trigger_metadata": {                                                           //Optional
    "commit": "6ae9a86930fc73dd07b02e4c5bf63ee60be180ad",
    "ref": "refs/heads/master",
    "default_branch": "master",
    "git_url": "git@github.com:dgangaia/test.git",
    "commit_info": {                                                              //Optional
      "url": "https://github.com/dgangaia/test/commit/6ae9a86930fc73dd07b02e4c5bf63ee60be180ad",
      "date": "2019-03-06T14:18:16+11:00",
      "message": "failed build test",
      "committer": {                                                              //Optional
        "username": "web-flow",
        "url": "https://github.com/web-flow",                                     //Optional
        "avatar_url": "https://avatars3.githubusercontent.com/u/19864447?v=4"     //Optional
      },
      "author": {                                                                 //Optional
        "username": "dgangaia",
        "url": "https://github.com/dgangaia",                                     //Optional
        "avatar_url": "https://avatars1.githubusercontent.com/u/43594254?v=4"     //Optional
      }
    }
  },
  "homepage": "https://quay.io/repository/dgangaia/test/build/5346a21d-3434-4764-85be-5be1296f293c"
}
12.1.6. Dockerfile Build Cancelled
A Dockerfile build was cancelled
{
  "build_id": "cbd534c5-f1c0-4816-b4e3-55446b851e70",
  "trigger_kind": "github",
  "name": "test",
  "repository": "dgangaia/test",
  "namespace": "dgangaia",
  "docker_url": "quay.io/dgangaia/test",
  "trigger_id": "38b6e180-9521-4ff7-9844-acf371340b9e",
  "docker_tags": [
    "master",
    "latest"
  ],
  "build_name": "cbce83c",
  "trigger_metadata": {
    "commit": "cbce83c04bfb59734fc42a83aab738704ba7ec41",
    "ref": "refs/heads/master",
    "default_branch": "master",
    "git_url": "git@github.com:dgangaia/test.git",
    "commit_info": {
      "url": "https://github.com/dgangaia/test/commit/cbce83c04bfb59734fc42a83aab738704ba7ec41",
      "date": "2019-03-06T14:27:53+11:00",
      "message": "testing cancel build",
      "committer": {
        "username": "web-flow",
        "url": "https://github.com/web-flow",
        "avatar_url": "https://avatars3.githubusercontent.com/u/19864447?v=4"
      },
      "author": {
        "username": "dgangaia",
        "url": "https://github.com/dgangaia",
        "avatar_url": "https://avatars1.githubusercontent.com/u/43594254?v=4"
      }
    }
  },
  "homepage": "https://quay.io/repository/dgangaia/test/build/cbd534c5-f1c0-4816-b4e3-55446b851e70"
}
12.1.7. Vulnerability Detected
A vulnerability was detected in the repository
{
  "repository": "dgangaia/repository",
  "namespace": "dgangaia",
  "name": "repository",
  "docker_url": "quay.io/dgangaia/repository",
  "homepage": "https://quay.io/repository/dgangaia/repository",

  "tags": ["latest", "othertag"],

  "vulnerability": {
    "id": "CVE-1234-5678",
    "description": "This is a bad vulnerability",
    "link": "http://url/to/vuln/info",
    "priority": "Critical",
    "has_fix": true
  }
}
12.2. Notification Actions
12.2.1. Quay Notification
A notification will be added to the Quay.io notification area. The notification area can be found by clicking on the bell icon in the top right of any Quay.io page.
Quay.io notifications can be setup to be sent to a User, Team, or the organization as a whole.
12.2.2. E-mail
An e-mail will be sent to the specified address describing the event that occurred.
All e-mail addresses will have to be verified on a per-repository basis
12.2.3. Webhook POST
An HTTP POST call will be made to the specified URL with the event’s data (see above for each event’s data format).
When the URL is HTTPS, the call will have an SSL client certificate set from Quay.io. Verification of this certificate will prove the call originated from Quay.io. Responses with status codes in the 2xx range are considered successful. Responses with any other status codes will be considered failures and result in a retry of the webhook notification.
12.2.4. Flowdock Notification
Posts a message to Flowdock.
12.2.5. Hipchat Notification
Posts a message to HipChat.
12.2.6. Slack Notification
Posts a message to Slack.
Chapter 13. OCI Support and Red Hat Quay
Container registries such as Red Hat Quay were originally designed to support container images in the Docker image format. To promote the use of additional runtimes apart from Docker, the Open Container Initiative (OCI) was created to provide a standardization surrounding container runtimes and image formats. Most container registries support the OCI standardization as it is based on the Docker image manifest V2, Schema 2 format.
In addition to container images, a variety of artifacts have emerged that support not just individual applications, but the Kubernetes platform as a whole. These range from Open Policy Agent (OPA) policies for security and governance to Helm charts and Operators to aid in application deployment.
Red Hat Quay is a private container registry that not only stores container images, but supports an entire ecosystem of tooling to aid in the management of containers. Support for OCI based artifacts in Red Hat Quay 3.6 has extended from solely Helm to include cosign and ztsd compression schemes by default. As such, FEATURE_HELM_OCI_SUPPORT has been deprecated.
When Red Hat Quay 3.6 is deployed using the OpenShift Operator, support for Helm and OCI artifacts is now enabled by default under the FEATURE_GENERAL_OCI_SUPPORT configuration. If you need to explicitly enable the feature, for example, if it has previously been disabled or if you have upgraded from a version where it is not enabled by default, see the section Explicitly enabling OCI and Helm support.
13.1. Helm and OCI prerequisites
Trusted certificates: Communication between the Helm client and Quay is facilitated over HTTPS and as of Helm 3.5, support is only available for registries communicating over HTTPS with trusted certificates. In addition, the operating system must trust the certificates exposed by the registry. Support in future Helm releases will allow for communicating with remote registries insecurely. With that in mind, ensure that your operating system has been configured to trust the certificates used by Quay, for example:
$ sudo cp rootCA.pem   /etc/pki/ca-trust/source/anchors/
$ sudo update-ca-trust extract
- Generally available: As of Helm 3.8, OCI registry support for charts is now generally available.
Install Helm client: Download your desired version from the Helm releases page. Unpack it and move the helm binary to its desired destination:
$ tar -zxvf helm-v3.8.2-linux-amd64.tar.gz
$ mv linux-amd64/helm /usr/local/bin/helm
-
Create organization in Quay: Create a new organization for storing the Helm charts, using the Quay registry UI. For example, create an organization named
helm.
13.2. Helm charts with Red Hat Quay
Helm, as a graduated project of the Cloud Native Computing Foundation (CNCF), has become the de facto package manager for Kubernetes as it simplifies how applications are packaged and deployed. Helm uses a packaging format called Charts which contain the Kubernetes resources representing an application. Charts can be made available for general distribution and consumption in repositories. A Helm repository is an HTTP server that serves an index.yaml metadata file and optionally a set of packaged charts. Beginning with Helm version 3, support was made available for distributing charts in OCI registries as an alternative to a traditional repository.
13.2.1. Using Helm charts with Red Hat Quay
Use the following example to download and push an etherpad chart from the Red Hat Community of Practice (CoP) repository.
Procedure
Add a chart repository:
$ helm repo add redhat-cop https://redhat-cop.github.io/helm-charts
Update the information of available charts locally from the chart repository:
$ helm repo update
Download a chart from a repository:
$ helm pull redhat-cop/etherpad --version=0.0.4 --untar
Package the chart into a chart archive:
$ helm package ./etherpad
Example output
Successfully packaged chart and saved it to: /home/user/linux-amd64/etherpad-0.0.4.tgz
Log in to your Quay repository using
helm registry login:$ helm registry login quay370.apps.quayperf370.perfscale.devcluster.openshift.com
Push the chart to your Quay repository using the
helm pushcommand:$ helm push etherpad-0.0.4.tgz oci://quay370.apps.quayperf370.perfscale.devcluster.openshift.com
Example output:
Pushed: quay370.apps.quayperf370.perfscale.devcluster.openshift.com/etherpad:0.0.4
Digest: sha256:a6667ff2a0e2bd7aa4813db9ac854b5124ff1c458d170b70c2d2375325f2451b
Ensure that the push worked by deleting the local copy, and then pulling the chart from the repository:
$ rm -rf etherpad-0.0.4.tgz
$ helm pull oci://quay370.apps.quayperf370.perfscale.devcluster.openshift.com/etherpad --version 0.0.4
Example output:
Pulled: quay370.apps.quayperf370.perfscale.devcluster.openshift.com/etherpad:0.0.4
Digest: sha256:4f627399685880daf30cf77b6026dc129034d68c7676c7e07020b70cf7130902
13.3. OCI and Helm configuration fields
Support for Helm is now supported under the FEATURE_GENERAL_OCI_SUPPORT property. If you need to explicitly enable the feature, for example, if it has previously been disabled or if you have upgraded from a version where it is not enabled by default, you need to add two properties in the Quay configuration to enable the use of OCI artifacts:
FEATURE_GENERAL_OCI_SUPPORT: true
FEATURE_HELM_OCI_SUPPORT: true
Table 13.1. OCI and Helm configuration fields
| Field | Type | Description |
|---|---|---|
| FEATURE_GENERAL_OCI_SUPPORT | Boolean |
Enable support for OCI artifacts |
| FEATURE_HELM_OCI_SUPPORT | Boolean |
Enable support for Helm artifacts |
As of Red Hat Quay 3.6, FEATURE_HELM_OCI_SUPPORT has been deprecated and will be removed in a future version of Red Hat Quay. In Red Hat Quay 3.6, Helm artifacts are supported by default and included under the FEATURE_GENERAL_OCI_SUPPORT property. Users are no longer required to update their config.yaml files to enable support.
13.4. Cosign OCI support with Red Hat Quay
Cosign is a tool that can be used to sign and verify container images. It uses the ECDSA-P256 signature algorithm and Red Hat’s Simple Signing payload format to create public keys that are stored in PKIX files. Private keys are stored as encrypted PEM files.
Cosign currently supports the following:
- Hardware and KMS Signing
- Bring-your-own PKI
- OIDC PKI
- Built-in binary transparency and timestamping service
13.5. Using cosign with quay
If you have Go 1.16+, you can directly install cosign with the following command:
$ go install github.com/sigstore/cosign/cmd/cosign@v1.0.0
go: downloading github.com/sigstore/cosign v1.0.0
go: downloading github.com/peterbourgon/ff/v3 v3.1.0
...
Next, generate a keypair:
$ cosign generate-key-pair
Enter password for private key:
Enter again:
Private key written to cosign.key
Public key written to cosign.pub
Sign the keypair with the following command:
$ cosign sign -key cosign.key quay-server.example.com/user1/busybox:test
Enter password for private key:
Pushing signature to: quay-server.example.com/user1/busybox:sha256-ff13b8f6f289b92ec2913fa57c5dd0a874c3a7f8f149aabee50e3d01546473e3.sig
Some users may experience the following error:
error: signing quay-server.example.com/user1/busybox:test: getting remote image: GET https://quay-server.example.com/v2/user1/busybox/manifests/test: UNAUTHORIZED: access to the requested resource is not authorized; map[]
Because cosign relies on ~/.docker/config.json for authorization, you might need to execute the following command:
$ podman login --authfile ~/.docker/config.json quay-server.example.com
Username:
Password:
Login Succeeded!
You can see the updated authorization configuration using the following command:
$ cat ~/.docker/config.json
{
	"auths": {
		"quay-server.example.com": {
			"auth": "cXVheWFkbWluOnBhc3N3b3Jk"
		}
	}
13.6. Adding other OCI media types to Quay
Helm, cosign, and ztsd compression scheme artifacts are built into Red Hat Quay 3.6 by default. For any other OCI media type that is not supported by default, you can add them to the ALLOWED_OCI_ARTIFACT_TYPES configuration in Quay’s config.yaml using the following format:
ALLOWED_OCI_ARTIFACT_TYPES:
  <oci config type 1>:
  - <oci layer type 1>
  - <oci layer type 2>

  <oci config type 2>:
  - <oci layer type 3>
  - <oci layer type 4>
...
For example, you can add Singularity (SIF) support by adding the following to your config.yaml:
...
ALLOWED_OCI_ARTIFACT_TYPES:
  application/vnd.oci.image.config.v1+json:
  - application/vnd.dev.cosign.simplesigning.v1+json
  application/vnd.cncf.helm.config.v1+json:
  - application/tar+gzip
  application/vnd.sylabs.sif.config.v1+json:
  - application/vnd.sylabs.sif.layer.v1+tar
...
When adding OCI media types that are not configured by default, users will also need to manually add support for cosign and Helm if desired. The ztsd compression scheme is supported by default, so users will not need to add that OCI media type to their config.yaml to enable support.
13.7. Disabling OCI artifacts in Quay
If you want to disable OCI artifact support, you can set FEATURE_GENERAL_OCI_SUPPORT to False in your config.yaml:
...
FEATURE_GENERAL_OCI_SUPPORT = False
...
Chapter 14. Red Hat Quay quota management and enforcement
With Red Hat Quay 3.7, users have the ability to report storage consumption and to contain registry growth by establishing configured storage quota limits. On-premise Quay users are now equipped with the following capabilities to manage the capacity limits of their environment:
- Quota reporting: With this feature, a superuser can track the storage consumption of all their organizations. Additionally, users can track the storage consumption of their assigned organization.
- Quota management: With this feature, a superuser can define soft and hard checks for Red Hat Quay users. Soft checks tell users if the storage consumption of an organization reaches their configured threshold. Hard checks prevent users from pushing to the registry when storage consumption reaches the configured limit.
Together, these features allow service owners of a Quay registry to define service level agreements and support a healthy resource budget.
14.1. Quota management architecture
The RepositorySize database table holds the storage consumption, in bytes, of a Red Hat Quay repository within an organization. The sum of all repository sizes for an organization defines the current storage size of a Red Hat Quay organization. When an image push is initialized, the user’s organization storage is validated to check if it is beyond the configured quota limits. If an image push exceeds defined quota limitations, a soft or hard check occurs:
- For a soft check, users are notified.
- For a hard check, the push is stopped.
If storage consumption is within configured quota limits, the push is allowed to proceed.
Image manifest deletion follows a similar flow, whereby the links between associated image tags and the manifest are deleted. Additionally, after the image manifest is deleted, the repository size is recalculated and updated in the RepositorySize table.
14.2. Quota management limitations
Quota management helps organizations to maintain resource consumption. One limitation of quota management is that calculating resource consumption on push results in the calculation becoming part of the push’s critical path. Without this, usage data might drift.
The maximum storage quota size is dependent on the selected database:
Table 14.1. Worker count environment variables
| Variable | Description |
|---|---|
| Postgres | 8388608 TB |
| MySQL | 8388608 TB |
| SQL Server | 16777216 TB |
14.3. Quota management configuration
Quota management is now supported under the FEATURE_QUOTA_MANAGEMENT property and is turned off by default. To enable quota management, set the feature flag in your config.yaml to true:
FEATURE_QUOTA_MANAGEMENT: true
In Red Hat Quay 3.7, superuser privileges are required to create, update and delete quotas. While quotas can be set for users as well as organizations, you cannot reconfigure the user quota using the Red Hat Quay UI and you must use the API instead.
14.3.1. Default quota
To specify a system-wide default storage quota that is applied to every organization and user, use the DEFAULT_SYSTEM_REJECT_QUOTA_BYTES configuration flag.
Table 14.2. Default quota configuration
| Field | Type | Description |
|---|---|---|
| DEFAULT_SYSTEM_REJECT_QUOTA_BYTES | String |
The quota size to apply to all organizations and users. |
If you configure a specific quota for an organization or user, and then delete that quota, the system-wide default quota will apply if one has been set. Similarly, if you have configured a specific quota for an organization or user, and then modify the system-wide default quota, the updated system-wide default will override any specific settings.
14.4. Establishing quota with the Red Hat Quay API
When an organization is first created, it does not have a quota applied. Use the /api/v1/organization/{organization}/quota endpoint:
Sample command
$ curl -k -X GET -H "Authorization: Bearer <token>" -H 'Content-Type: application/json' https://example-registry-quay-quay-enterprise.apps.docs.gcp.quaydev.org/api/v1/organization/testorg/quota | jq
Sample output
[]
14.4.1. Setting the quota
To set a quota for an organization, POST data to the /api/v1/organization/{orgname}/quota endpoint: .Sample command
$ curl -k -X POST -H "Authorization: Bearer <token>" -H 'Content-Type: application/json' -d '{"limit_bytes": 10485760}' https://example-registry-quay-quay-enterprise.apps.docs.quayteam.org/api/v1/organization/testorg/quota | jqSample output
"Created"
14.4.2. Viewing the quota
To see the applied quota, GET data from the /api/v1/organization/{orgname}/quota endpoint:
Sample command
$ curl -k -X GET -H "Authorization: Bearer <token>" -H 'Content-Type: application/json' https://example-registry-quay-quay-enterprise.apps.docs.gcp.quaydev.org/api/v1/organization/testorg/quota | jq
Sample output
[
  {
    "id": 1,
    "limit_bytes": 10485760,
    "default_config": false,
    "limits": [],
    "default_config_exists": false
  }
]
14.4.3. Modifying the quota
To change the existing quota, in this instance from 10 MB to 100 MB, PUT data to the /api/v1/organization/{orgname}/quota/{quota_id} endpoint:
Sample command
$ curl -k -X PUT -H "Authorization: Bearer <token>" -H 'Content-Type: application/json' -d '{"limit_bytes": 104857600}' https://example-registry-quay-quay-enterprise.apps.docs.gcp.quaydev.org/api/v1/organization/testorg/quota/1 | jq
Sample output
{
  "id": 1,
  "limit_bytes": 104857600,
  "default_config": false,
  "limits": [],
  "default_config_exists": false
}
14.4.4. Pushing images
To see the storage consumed, push various images to the organization.
14.4.4.1. Pushing ubuntu:18.04
Push ubuntu:18.04 to the organization from the command line:
Sample commands
$ podman pull ubuntu:18.04

$ podman tag docker.io/library/ubuntu:18.04 example-registry-quay-quay-enterprise.apps.docs.gcp.quaydev.org/testorg/ubuntu:18.04

$ podman push --tls-verify=false example-registry-quay-quay-enterprise.apps.docs.gcp.quaydev.org/testorg/ubuntu:18.04
14.4.4.2. Using the API to view quota usage
To view the storage consumed, GET data from the /api/v1/repository endpoint:
Sample command
$ curl -k -X GET -H "Authorization: Bearer <token>" -H 'Content-Type: application/json' 'https://example-registry-quay-quay-enterprise.apps.docs.gcp.quaydev.org/api/v1/repository?last_modified=true&namespace=testorg&popularity=true&public=true"a=true' | jq
Sample output
{
  "repositories": [
    {
      "namespace": "testorg",
      "name": "ubuntu",
      "description": null,
      "is_public": false,
      "kind": "image",
      "state": "NORMAL",
      "quota_report": {
        "quota_bytes": 27959066,
        "configured_quota": 104857600
      },
      "last_modified": 1651225630,
      "popularity": 0,
      "is_starred": false
    }
  ]
}
14.4.4.3. Pushing another image
Pull, tag, and push a second image, for example,
nginx:Sample commands
$ podman pull nginx

$ podman tag docker.io/library/nginx example-registry-quay-quay-enterprise.apps.docs.gcp.quaydev.org/testorg/nginx

$ podman push --tls-verify=false example-registry-quay-quay-enterprise.apps.docs.gcp.quaydev.org/testorg/nginx
To view the quota report for the repositories in the organization, use the /api/v1/repository endpoint:
Sample command
$ curl -k -X GET -H "Authorization: Bearer <token>" -H 'Content-Type: application/json' 'https://example-registry-quay-quay-enterprise.apps.docs.gcp.quaydev.org/api/v1/repository?last_modified=true&namespace=testorg&popularity=true&public=true"a=true'
Sample output
{
  "repositories": [
    {
      "namespace": "testorg",
      "name": "ubuntu",
      "description": null,
      "is_public": false,
      "kind": "image",
      "state": "NORMAL",
      "quota_report": {
        "quota_bytes": 27959066,
        "configured_quota": 104857600
      },
      "last_modified": 1651225630,
      "popularity": 0,
      "is_starred": false
    },
    {
      "namespace": "testorg",
      "name": "nginx",
      "description": null,
      "is_public": false,
      "kind": "image",
      "state": "NORMAL",
      "quota_report": {
        "quota_bytes": 59231659,
        "configured_quota": 104857600
      },
      "last_modified": 1651229507,
      "popularity": 0,
      "is_starred": false
    }
  ]
}
To view the quota information in the organization details, use the /api/v1/organization/{orgname} endpoint:
Sample command
$ curl -k -X GET -H "Authorization: Bearer <token>" -H 'Content-Type: application/json' 'https://example-registry-quay-quay-enterprise.apps.docs.gcp.quaydev.org/api/v1/organization/testorg' | jq
Sample output
{
  "name": "testorg",
  ...
  "quotas": [
    {
      "id": 1,
      "limit_bytes": 104857600,
      "limits": []
    }
  ],
  "quota_report": {
    "quota_bytes": 87190725,
    "configured_quota": 104857600
  }
}
14.4.5. Rejecting pushes using quota limits
If an image push exceeds defined quota limitations, a soft or hard check occurs:
- For a soft check, or warning, users are notified.
- For a hard check, or reject, the push is terminated.
14.4.5.1. Setting reject and warning limits
To set reject and warning limits, POST data to the /api/v1/organization/{orgname}/quota/{quota_id}/limit endpoint:
Sample reject limit command
$ curl -k -X POST -H "Authorization: Bearer <token>" -H 'Content-Type: application/json' -d '{"type":"Reject","threshold_percent":80}' https://example-registry-quay-quay-enterprise.apps.docs.gcp.quaydev.org/api/v1/organization/testorg/quota/1/limit
Sample warning limit command
$ curl -k -X POST -H "Authorization: Bearer <token>" -H 'Content-Type: application/json' -d '{"type":"Warning","threshold_percent":50}' https://example-registry-quay-quay-enterprise.apps.docs.gcp.quaydev.org/api/v1/organization/testorg/quota/1/limit
14.4.5.2. Viewing reject and warning limits
To view the reject and warning limits, use the /api/v1/organization/{orgname}/quota endpoint:
View quota limits
$ curl -k -X GET -H "Authorization: Bearer <token>" -H 'Content-Type: application/json' https://example-registry-quay-quay-enterprise.apps.docs.gcp.quaydev.org/api/v1/organization/testorg/quota | jq
Sample output for quota limits
[
  {
    "id": 1,
    "limit_bytes": 104857600,
    "default_config": false,
    "limits": [
      {
        "id": 2,
        "type": "Warning",
        "limit_percent": 50
      },
      {
        "id": 1,
        "type": "Reject",
        "limit_percent": 80
      }
    ],
    "default_config_exists": false
  }
]
14.4.5.3. Pushing an image when the reject limit is exceeded
In this example, the reject limit (80%) has been set to below the current repository size (~83%), so the next push should automatically be rejected.
Push a sample image to the organization from the command line:
Sample image push
$ podman pull ubuntu:20.04

$ podman tag docker.io/library/ubuntu:20.04 example-registry-quay-quay-enterprise.apps.docs.gcp.quaydev.org/testorg/ubuntu:20.04

$ podman push --tls-verify=false example-registry-quay-quay-enterprise.apps.docs.gcp.quaydev.org/testorg/ubuntu:20.04
Sample output when quota exceeded
Getting image source signatures
Copying blob d4dfaa212623 [--------------------------------------] 8.0b / 3.5KiB
Copying blob cba97cc5811c [--------------------------------------] 8.0b / 15.0KiB
Copying blob 0c78fac124da [--------------------------------------] 8.0b / 71.8MiB
WARN[0002] failed, retrying in 1s ... (1/3). Error: Error writing blob: Error initiating layer upload to /v2/testorg/ubuntu/blobs/uploads/ in example-registry-quay-quay-enterprise.apps.docs.gcp.quaydev.org: denied: Quota has been exceeded on namespace
Getting image source signatures
Copying blob d4dfaa212623 [--------------------------------------] 8.0b / 3.5KiB
Copying blob cba97cc5811c [--------------------------------------] 8.0b / 15.0KiB
Copying blob 0c78fac124da [--------------------------------------] 8.0b / 71.8MiB
WARN[0005] failed, retrying in 1s ... (2/3). Error: Error writing blob: Error initiating layer upload to /v2/testorg/ubuntu/blobs/uploads/ in example-registry-quay-quay-enterprise.apps.docs.gcp.quaydev.org: denied: Quota has been exceeded on namespace
Getting image source signatures
Copying blob d4dfaa212623 [--------------------------------------] 8.0b / 3.5KiB
Copying blob cba97cc5811c [--------------------------------------] 8.0b / 15.0KiB
Copying blob 0c78fac124da [--------------------------------------] 8.0b / 71.8MiB
WARN[0009] failed, retrying in 1s ... (3/3). Error: Error writing blob: Error initiating layer upload to /v2/testorg/ubuntu/blobs/uploads/ in example-registry-quay-quay-enterprise.apps.docs.gcp.quaydev.org: denied: Quota has been exceeded on namespace
Getting image source signatures
Copying blob d4dfaa212623 [--------------------------------------] 8.0b / 3.5KiB
Copying blob cba97cc5811c [--------------------------------------] 8.0b / 15.0KiB
Copying blob 0c78fac124da [--------------------------------------] 8.0b / 71.8MiB
Error: Error writing blob: Error initiating layer upload to /v2/testorg/ubuntu/blobs/uploads/ in example-registry-quay-quay-enterprise.apps.docs.gcp.quaydev.org: denied: Quota has been exceeded on namespace
14.4.5.4. Notifications for limits exceeded
When limits are exceeded, a notification appears:
Quota notifications
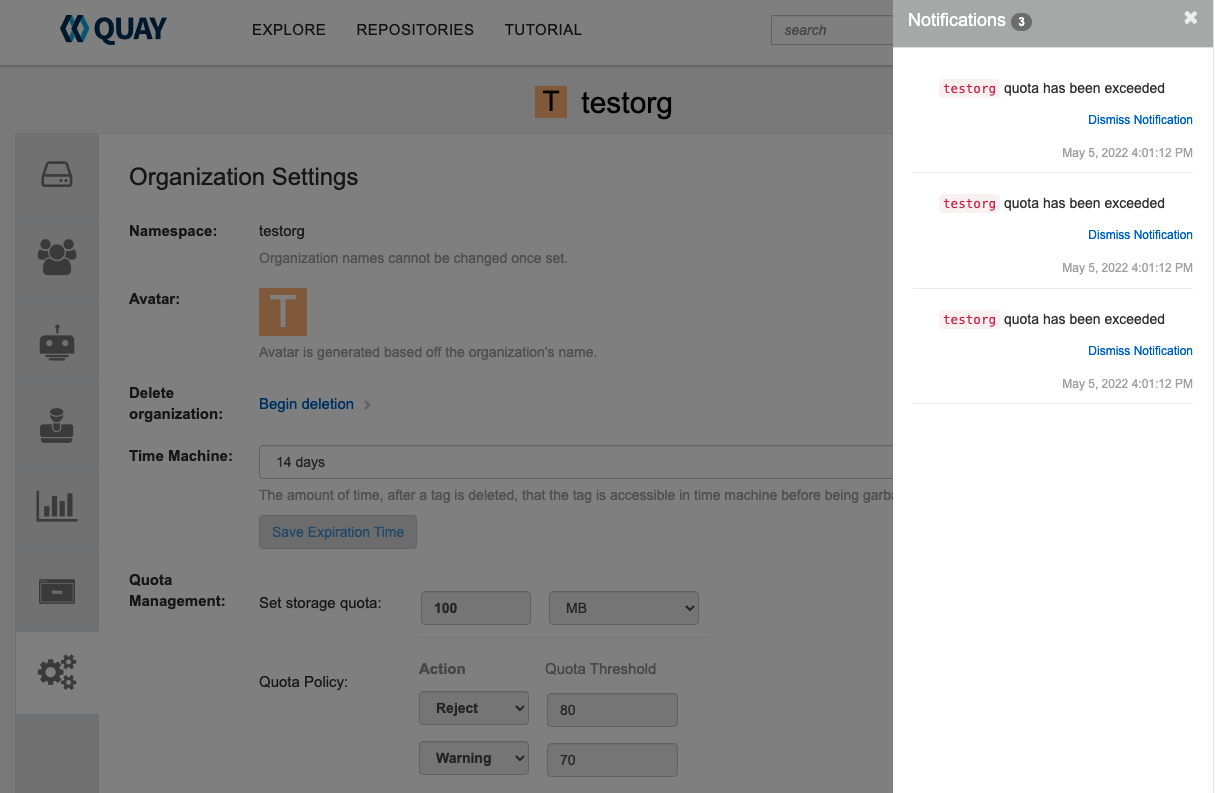
Chapter 15. Red Hat Quay as a proxy cache for upstream registries
With the growing popularity of container development, customers increasingly rely on container images from upstream registries like Docker or Google Cloud Platform to get services up and running. Today, registries have rate limitations and throttling on the number of times users can pull from these registries.
With this feature, Red Hat Quay will act as a proxy cache to circumvent pull-rate limitations from upstream registries. Adding a cache feature also accelerates pull performance, because images are pulled from the cache rather than upstream dependencies. Cached images are only updated when the upstream image digest differs from the cached image, reducing rate limitations and potential throttling.
With the Red Hat Quay cache proxy technology preview, the following features are available:
- Specific organizations can be defined as a cache for upstream registries.
Configuration of a Quay organization that acts as a cache for a specific upstream registry. This repository can be defined by using the Quay UI, and offers the following configurations:
- Upstream registry credentials for private repositories or increased rate limiting.
Expiration timer to avoid surpassing cache organization size.
NoteBecause cache proxy is still marked as
Technology Preview, there is no storage quota support yet. When this feature goesGeneral Availabilityin a future release of Red Hat Quay, the expiration timer will be supplemented by another timer that protects against intermittent upstream registry issues.
- Global on/off configurable via the configuration application.
-
Caching of entire upstream registries or just a single namespace, for example, all of
\docker.ioor just\docker.io/library. - Logging of all cache pulls.
- Cached images scannability by Clair.
15.1. Proxy cache architecture
The following image shows the expected design flow and architecture of the proxy cache feature.

When a user pulls an image, for example, postgres:14, from an upstream repository on Red Hat Quay, the repository checks to see if an image is present. If the image does not exist, a fresh pull is initiated. After being pulled, the image layers are saved to cache and server to the user in parallel. The following image depicts an architectural overview of this scenario:
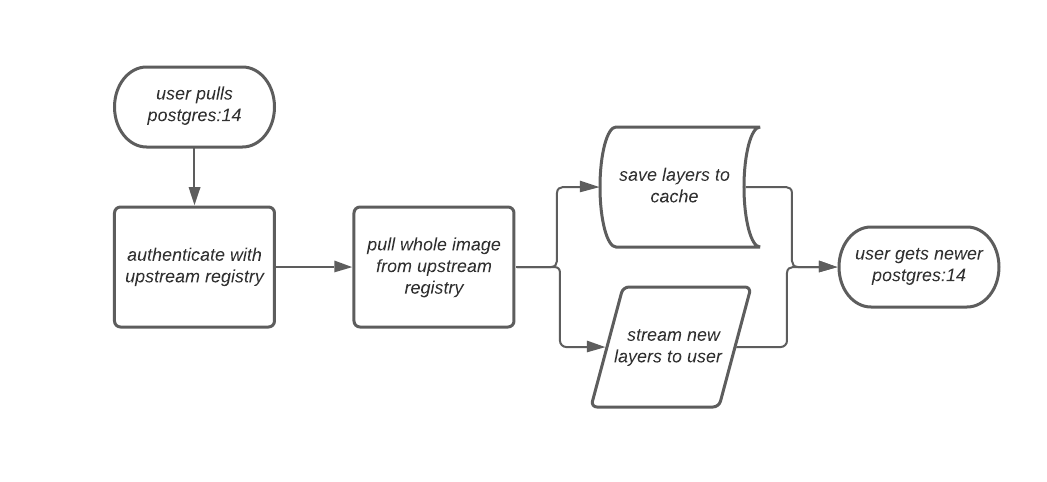
If the image in the cache exists, users can rely on Quay’s cache to stay up-to-date with the upstream source so that newer images from the cache are automatically pulled. This happens when tags of the original image have been overwritten in the upstream registry. The following image depicts an architectural overview of what happens when the upstream image and cached version of the image are different:
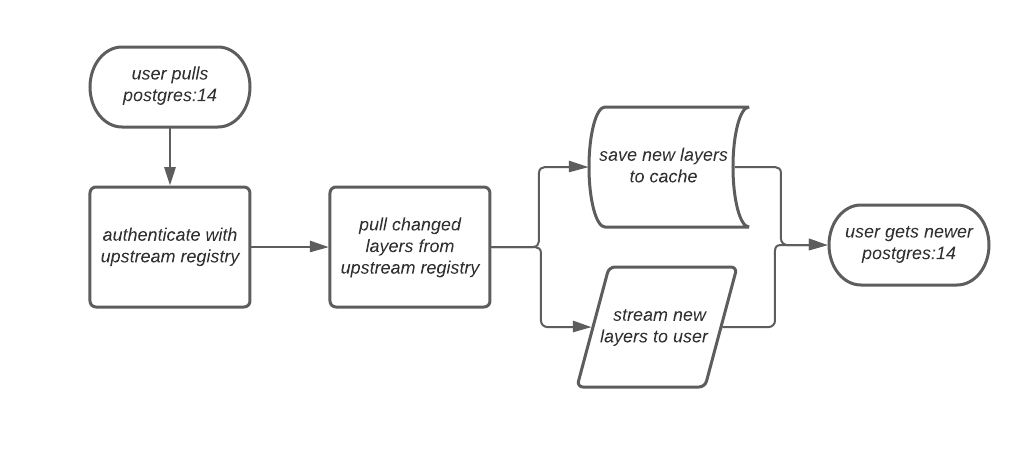
If the upstream image and cached version are the same, no layers are pulled and the cached image is delivered to the user.
In some cases, users initiate pulls when the upstream registry is down. If this happens with the configured staleness period, the image stored in cache is delivered. If the pull happens after the configured staleness period, the error is propagated to the user. The following image depicts an architectural overview when a pull happens after the configured staleness period:
image: cache-proxy-staleness-pull.png[Staleness pull overview]
Quay administrators can leverage the configurable size limit of an organization to limit cache size so that backend storage consumption remains predictable. This is achieved by discarding images from the cache according to the frequency in which an image is used. The following image depicts an architectural overview of this scenario:
15.2. Proxy cache limitations
Proxy caching with Red Hat Quay has the following limitations:
- Your proxy cache must have a size limit of greater than, or equal to, the image you want to cache. For example, if your proxy cache organization has a maximum size of 500 MB, and the image a user wants to pull is 700 MB, the image will be cached and will overflow beyond the configured limit.
- Cached images must have the same properties that images on a Quay repository must have.
15.3. Using Red Hat Quay to proxy a remote registry
The following procedure describes how you can use Red Hat Quay to proxy a remote registry. This procedure is set up to proxy quay.io, which allows users to use podman to pull any public image from any namespace on quay.io.
Prerequisites
-
FEATURE_PROXY_CACHEin your config.yaml is set totrue. - Assigned the Member team role. For more information about team roles, see Users and organizations in Red Hat Quay.
Procedure
-
In your Quay organization on the UI, for example,
cache-quayio, click Organization Settings on the left hand pane. Optional: Click Add Storage Quota to configure quota management for your organization. For more information about quota management, see Quota Management.
NoteIn some cases, pulling images with Podman might return the following error when quota limit is reached during a pull:
unable to pull image: Error parsing image configuration: Error fetching blob: invalid status code from registry 403 (Forbidden). Error403is inaccurate, and occurs because Podman hides the correct API error:Quota has been exceeded on namespace. This known issue will be fixed in a future Podman update.In Remote Registry enter the name of the remote registry to be cached, for example,
quay.io, and click Save.NoteBy adding a namespace to the Remote Registry, for example,
quay.io/<namespace>, users in your organization will only be able to proxy from that namespace.Optional: Add a Remote Registry Username and Remote Registry Password.
NoteIf you do not set a Remote Registry Username and Remote Registry Password, you cannot add one without removing the proxy cache and creating a new registry.
Optional: Set a time in the Expiration field.
Note- The default tag Expiration field for cached images in a proxy organization is set to 86400 seconds. In the proxy organization, the tag expiration is refreshed to the value set in the UI’s Expiration field every time the tag is pulled. This feature is different than Quay’s default individual tag expiration feature. In a proxy organization, it is possible to override the individual tag feature. When this happens, the individual tag’s expiration is reset according to the Expiration field of the proxy organization.
- Expired images will disappear after the allotted time, but are still stored in Quay. The time in which an image is completely deleted, or collected, depends on the Time Machine setting of your organization. The default time for garbage collection is 14 days unless otherwise specified.
- Click Save.
On the CLI, pull a public image from the registry, for example, quay.io, acting as a proxy cache:
$ podman pull <registry_url>/<organization_name>/<quayio_namespace>/<image_name>
ImportantIf your organization is set up to pull from a single namespace in the remote registry, the remote registry namespace must be omitted from the URL. For example,
podman pull <registry_url>/<organization_name>/<image_name>.
Chapter 16. Red Hat Quay build enhancements
Prior to Red Hat Quay 3.7, Quay ran podman commands in virtual machines launched by pods. Running builds on virtual platforms requires enabling nested virtualization, which is not featured in Red Hat Enterprise Linux or OpenShift Container Platform. As a result, builds had to run on bare-metal clusters, which is an inefficient use of resources.
With Red Hat Quay 3.7., the bare-metal constraint required to run builds has been removed by adding an additional build option which does not contain the virtual machine layer. As a result, builds can be run on virtualized platforms. Backwards compatibility to run previous build configurations are also available.
16.1. Red Hat Quay enhanced build architecture
The preceding image shows the expected design flow and architecture of the enhanced build features:
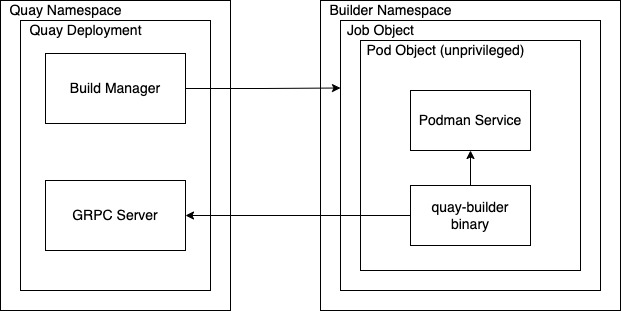
With this enhancement, the build manager first creates the Job Object. Then, the Job Object then creates a pod using the quay-builder-image. The quay-builder-image will contain the quay-builder binary and the Podman service. The created pod runs as unprivileged. The quay-builder binary then builds the image while communicating status and retrieving build information from the Build Manager.
16.2. Red Hat Quay build limitations
Running builds in Red Hat Quay in an unprivileged context might cause some commands that were working under the previous build strategy to fail. Attempts to change the build strategy could potentially cause performance issues and reliability with the build.
Running builds directly in a container will not have the same isolation as using virtual machines. Changing the build environment might also caused builds that were previously working to fail.
16.3. Creating a Red Hat Quay builders environment with OpenShift
16.3.1. OpenShift TLS component
The tls component allows you to control TLS configuration.
Red Hat Quay 3.7 does not support builders when the TLS component is managed by the Operator.
If you set tls to unmanaged, you supply your own ssl.cert and ssl.key files. In this instance, if you want your cluster to support builders, you must add both the Quay route and the builder route name to the SAN list in the cert, or alternatively use a wildcard. To add the builder route, use the following format:
[quayregistry-cr-name]-quay-builder-[ocp-namespace].[ocp-domain-name]:443
16.3.2. Using OpenShift Container Platform for Red Hat Quay builders
The following procedure describes how you can implement the builders feature in Red Hat Quay.
Prerequisites
- Builders require SSL certificates. For more information, see Adding TLS certificates to the Red Hat Quay container.
- If you are using AWS S3 storage, you must modify your storage bucket in the AWS console, prior to running builders. See "Modifying your AWS S3 storage bucket" in the following section for the required parameters.
- This procedure assumes you already have a cluster provisioned and a Quay Operator running.
- This procedure is for setting up a virtual namespace on OpenShift Container Platform.
16.3.2.1. Preparing OpenShift Container Platform for virtual builders
- Log in to your Red Hat Quay cluster using a cluster admin account.
Create a new project where your virtual builders will be run (e.g.,
virtual-builders).$ oc new-project virtual-builders
Create a
ServiceAccountin thisProjectthat will be used to run builds.$ oc create sa -n virtual-builders quay-builder
Provide the created service account with editing permissions so that it can run the build:
$ oc adm policy -n virtual-builders add-role-to-user edit system:serviceaccount:virtual-builders:quay-builder
Grant the Quay builder
anyuid sccpermissions:$ oc adm policy -n virtual-builders add-scc-to-user anyuid -z quay-builder
NoteThis action requires cluster admin privileges. This is required because builders must run as the Podman user for unprivileged or rootless builds to work.
Obtain the token for the Quay builder service account.
If using OpenShift Container Platform 4.10 or an earlier version, enter the following command:
oc sa get-token -n virtual-builders quay-builder
If using OpenShift Container Platform 4.11 or later, enter the following command:
$ oc create token quay-builder -n virtual-builders
Sample output
eyJhbGciOiJSUzI1NiIsImtpZCI6IldfQUJkaDVmb3ltTHZ0dGZMYjhIWnYxZTQzN2dJVEJxcDJscldSdEUtYWsifQ...
Determine the builder route:
$ oc get route -n quay-enterprise
Sample output
NAME                                  HOST/PORT                                                                    PATH   SERVICES                              PORT   TERMINATION     WILDCARD
...
example-registry-quay-builder         example-registry-quay-builder-quay-enterprise.apps.docs.quayteam.org                example-registry-quay-app             grpc   edge/Redirect   None
...
Generate a self-signed SSL certificate with the .crt extension:
$ oc extract cm/kube-root-ca.crt -n openshift-apiserver ca.crt
$ mv ca.crt extra_ca_cert_build_cluster.crt
Locate the secret for you config bundle in the Console, and choose Actions → Edit Secret and add the appropriate builder configuration:
FEATURE_USER_INITIALIZE: true
BROWSER_API_CALLS_XHR_ONLY: false
SUPER_USERS:
- <superusername>
FEATURE_USER_CREATION: false
FEATURE_QUOTA_MANAGEMENT: true
FEATURE_BUILD_SUPPORT: True
BUILDMAN_HOSTNAME: <sample_build_route> 1
BUILD_MANAGER:
  - ephemeral
  - ALLOWED_WORKER_COUNT: 1
    ORCHESTRATOR_PREFIX: buildman/production/
    JOB_REGISTRATION_TIMEOUT: 3600 2
    ORCHESTRATOR:
      REDIS_HOST: <sample_redis_hostname> 3
      REDIS_PASSWORD: ""
      REDIS_SSL: false
      REDIS_SKIP_KEYSPACE_EVENT_SETUP: false
    EXECUTORS:
      - EXECUTOR: kubernetesPodman
        NAME: openshift
        BUILDER_NAMESPACE: <sample_builder_namespace> 4
        SETUP_TIME: 180
        MINIMUM_RETRY_THRESHOLD:
        BUILDER_CONTAINER_IMAGE: <sample_builder_container_image> 5
        # Kubernetes resource options
        K8S_API_SERVER: <sample_k8s_api_server> 6
        K8S_API_TLS_CA: <sample_crt_file> 7
        VOLUME_SIZE: 8G
        KUBERNETES_DISTRIBUTION: openshift
        CONTAINER_MEMORY_LIMITS: 300m 8
        CONTAINER_CPU_LIMITS: 1G 9
        CONTAINER_MEMORY_REQUEST: 300m 10
        CONTAINER_CPU_REQUEST: 1G 11
        NODE_SELECTOR_LABEL_KEY: ""
        NODE_SELECTOR_LABEL_VALUE: ""
        SERVICE_ACCOUNT_NAME: <sample_service_account_name>
        SERVICE_ACCOUNT_TOKEN: <sample_account_token> 12
- 1
- The build route is obtained by running
oc get route -nwith the name of your OpenShift Operators namespace. A port must be provided at the end of the route, for example, and it should follow the following format:[quayregistry-cr-name]-quay-builder-[ocp-namespace].[ocp-domain-name]:443. - 2
- If the
JOB_REGISTRATION_TIMEOUTparameter is set too low, you might receive the following error:failed to register job to build manager: rpc error: code = Unauthenticated desc = Invalid build token: Signature has expired. It is suggested that this parameter be set to at least 240. - 3
- If your Redis host has a password or SSL certificates, you must update accordingly.
- 4
- Set to match the name of your virtual builders namespace, for example,
virtual-builders. - 5
- For early access, the
BUILDER_CONTAINER_IMAGEis currentlyquay.io/projectquay/quay-builder:3.7.0-rc.2. Note that this might change during the early access window. In the event this happens, customers will be alerted. - 6
- Obtained by running
oc cluster-info. - 7
- You must manually create and add your custom CA cert, for example,
K8S_API_TLS_CA: /conf/stack/extra_ca_certs/build_cluster.crt. - 8
- Defaults to 5120Mi if left unspecified.
- 9
- For virtual builds, you must ensure that there are enough resources in your cluster. Defaults to 1000m if left unspecified.
- 10
- Defaults to 3968Mi if left unspecified.
- 11
- Defaults to 500m if left unspecified.
- 12
- Obtained when running
oc create sa.
Sample config
FEATURE_USER_INITIALIZE: true
BROWSER_API_CALLS_XHR_ONLY: false
SUPER_USERS:
- quayadmin
FEATURE_USER_CREATION: false
FEATURE_QUOTA_MANAGEMENT: true
FEATURE_BUILD_SUPPORT: True
BUILDMAN_HOSTNAME: example-registry-quay-builder-quay-enterprise.apps.docs.quayteam.org:443
BUILD_MANAGER:
  - ephemeral
  - ALLOWED_WORKER_COUNT: 1
    ORCHESTRATOR_PREFIX: buildman/production/
    JOB_REGISTRATION_TIMEOUT: 3600
    ORCHESTRATOR:
      REDIS_HOST: example-registry-quay-redis
      REDIS_PASSWORD: ""
      REDIS_SSL: false
      REDIS_SKIP_KEYSPACE_EVENT_SETUP: false
    EXECUTORS:
      - EXECUTOR: kubernetesPodman
        NAME: openshift
        BUILDER_NAMESPACE: virtual-builders
        SETUP_TIME: 180
        MINIMUM_RETRY_THRESHOLD:
        BUILDER_CONTAINER_IMAGE: quay.io/projectquay/quay-builder:3.7.0-rc.2
        # Kubernetes resource options
        K8S_API_SERVER: api.docs.quayteam.org:6443
        K8S_API_TLS_CA: /conf/stack/extra_ca_certs/build_cluster.crt
        VOLUME_SIZE: 8G
        KUBERNETES_DISTRIBUTION: openshift
        CONTAINER_MEMORY_LIMITS: 1G
        CONTAINER_CPU_LIMITS: 1080m
        CONTAINER_MEMORY_REQUEST: 1G
        CONTAINER_CPU_REQUEST: 580m
        NODE_SELECTOR_LABEL_KEY: ""
        NODE_SELECTOR_LABEL_VALUE: ""
        SERVICE_ACCOUNT_NAME: quay-builder
        SERVICE_ACCOUNT_TOKEN: "eyJhbGciOiJSUzI1NiIsImtpZCI6IldfQUJkaDVmb3ltTHZ0dGZMYjhIWnYxZTQzN2dJVEJxcDJscldSdEUtYWsifQ"
16.3.2.2. Manually adding SSL certificates.
- Due to a known issue with the configuration tool, you must manually add your custom SSL certificates to properly run builders. Use the following procedure to manually add custom SSL certificates. For more information creating SSL certificates, see Adding TLS certificates to the Red Hat Quay container.
16.3.2.2.1. Create and sign certs
Create a certificate authority and sign a certificate. For more information, see Create a Certificate Authority and sign a certificate.
Note-
Add an
alt_namefor the URL of your Quay registry. -
Add an
alt_namefor theBUILDMAN_HOSTNAMEthat is specified in your config.yaml.
openssl.cnf
[req]
req_extensions = v3_req
distinguished_name = req_distinguished_name
[req_distinguished_name]
[ v3_req ]
basicConstraints = CA:FALSE
keyUsage = nonRepudiation, digitalSignature, keyEncipherment
subjectAltName = @alt_names
[alt_names]
DNS.1 = example-registry-quay-quay-enterprise.apps.docs.quayteam.org
DNS.2 = example-registry-quay-builder-quay-enterprise.apps.docs.quayteam.org
Sample commands
$ openssl genrsa -out rootCA.key 2048
$ openssl req -x509 -new -nodes -key rootCA.key -sha256 -days 1024 -out rootCA.pem
$ openssl genrsa -out ssl.key 2048
$ openssl req -new -key ssl.key -out ssl.csr
$ openssl x509 -req -in ssl.csr -CA rootCA.pem -CAkey rootCA.key -CAcreateserial -out ssl.cert -days 356 -extensions v3_req -extfile openssl.cnf
-
Add an
16.3.2.2.2. Set TLS to unmanaged
In your Quay Registry yaml, set kind: tls to managed: false:
  - kind: tls
    managed: false
In the events, you should see that the change is blocked until you set up the appropriate config:
    - lastTransitionTime: '2022-03-28T12:56:49Z'
      lastUpdateTime: '2022-03-28T12:56:49Z'
      message: >-
        required component `tls` marked as unmanaged, but `configBundleSecret`
        is missing necessary fields
      reason: ConfigInvalid
      status: 'True'
16.3.2.2.3. Create temporary secrets
Create a secret in your default namespace for the CA cert:
$ oc create secret generic -n quay-enterprise temp-crt --from-file extra_ca_cert_build_cluster.crt
Create a secret in your default namespace for the ssl.key and ssl.cert files:
$ oc create secret generic -n quay-enterprise quay-config-ssl --from-file ssl.cert --from-file ssl.key
16.3.2.2.4. Copy secret data to config.yaml
- Locate the new secrets in the console UI at Workloads → Secrets.
For each secret, locate the YAML view:
kind: Secret
apiVersion: v1
metadata:
  name: temp-crt
  namespace: quay-enterprise
  uid: a4818adb-8e21-443a-a8db-f334ace9f6d0
  resourceVersion: '9087855'
  creationTimestamp: '2022-03-28T13:05:30Z'
...
data:
  extra_ca_cert_build_cluster.crt: >-
    LS0tLS1CRUdJTiBDRVJUSUZJQ0FURS0tLS0tCk1JSURNakNDQWhxZ0F3SUJBZ0l....
type: Opaque
kind: Secret apiVersion: v1 metadata: name: quay-config-ssl namespace: quay-enterprise uid: 4f5ae352-17d8-4e2d-89a2-143a3280783c resourceVersion: '9090567' creationTimestamp: '2022-03-28T13:10:34Z' ... data: ssl.cert: >- LS0tLS1CRUdJTiBDRVJUSUZJQ0FURS0tLS0tCk1JSUVaakNDQTA2Z0F3SUJBZ0lVT... ssl.key: >- LS0tLS1CRUdJTiBSU0EgUFJJVkFURSBLRVktLS0tLQpNSUlFcFFJQkFBS0NBUUVBc... type: OpaqueLocate the secret for your Quay Registry configuration bundle in the UI, or via the command line by running a command such as:
$ oc get quayregistries.quay.redhat.com -o jsonpath="{.items[0].spec.configBundleSecret}{'\n'}" -n quay-enterpriseIn the OpenShift console, select the YAML tab for your config bundle secret, and add the data from the two secrets you created:
kind: Secret
apiVersion: v1
metadata:
  name: init-config-bundle-secret
  namespace: quay-enterprise
  uid: 4724aca5-bff0-406a-9162-ccb1972a27c1
  resourceVersion: '4383160'
  creationTimestamp: '2022-03-22T12:35:59Z'
...
data:
  config.yaml: >-
    RkVBVFVSRV9VU0VSX0lOSVRJQUxJWkU6IHRydWUKQlJ...
  extra_ca_cert_build_cluster.crt: >-
    LS0tLS1CRUdJTiBDRVJUSUZJQ0FURS0tLS0tCk1JSURNakNDQWhxZ0F3SUJBZ0ldw....
  ssl.cert: >-
    LS0tLS1CRUdJTiBDRVJUSUZJQ0FURS0tLS0tCk1JSUVaakNDQTA2Z0F3SUJBZ0lVT...
  ssl.key: >-
    LS0tLS1CRUdJTiBSU0EgUFJJVkFURSBLRVktLS0tLQpNSUlFcFFJQkFBS0NBUUVBc...
type: Opaque
Click Save. You should see the pods being re-started:
$ oc get pods -n quay-enterprise
Sample output
NAME                                                   READY   STATUS              RESTARTS   AGE
...
example-registry-quay-app-6786987b99-vgg2v             0/1     ContainerCreating   0          2s
example-registry-quay-app-7975d4889f-q7tvl             1/1     Running             0          5d21h
example-registry-quay-app-7975d4889f-zn8bb             1/1     Running             0          5d21h
example-registry-quay-app-upgrade-lswsn                0/1     Completed           0          6d1h
example-registry-quay-config-editor-77847fc4f5-nsbbv   0/1     ContainerCreating   0          2s
example-registry-quay-config-editor-c6c4d9ccd-2mwg2    1/1     Running             0          5d21h
example-registry-quay-database-66969cd859-n2ssm        1/1     Running             0          6d1h
example-registry-quay-mirror-764d7b68d9-jmlkk          1/1     Terminating         0          5d21h
example-registry-quay-mirror-764d7b68d9-jqzwg          1/1     Terminating         0          5d21h
example-registry-quay-redis-7cc5f6c977-956g8           1/1     Running             0          5d21h
After your Quay registry has reconfigured, check that your Quay app pods are running:
$ oc get pods -n quay-enterprise
Sample output
example-registry-quay-app-6786987b99-sz6kb             1/1     Running            0          7m45s
example-registry-quay-app-6786987b99-vgg2v             1/1     Running            0          9m1s
example-registry-quay-app-upgrade-lswsn                0/1     Completed          0          6d1h
example-registry-quay-config-editor-77847fc4f5-nsbbv   1/1     Running            0          9m1s
example-registry-quay-database-66969cd859-n2ssm        1/1     Running            0          6d1h
example-registry-quay-mirror-758fc68ff7-5wxlp          1/1     Running            0          8m29s
example-registry-quay-mirror-758fc68ff7-lbl82          1/1     Running            0          8m29s
example-registry-quay-redis-7cc5f6c977-956g8           1/1     Running            0          5d21h
In your browser, access the registry endpoint and validate that the certificate has been updated appropriately:
Common Name (CN)	example-registry-quay-quay-enterprise.apps.docs.quayteam.org
Organisation (O)	DOCS
Organisational Unit (OU)	QUAY
16.3.2.3. Using the UI to create a build trigger
- Log in to your Quay repository.
-
Click Create New Repository and create a new registry, for example,
testrepo. On the Repositories page, click Builds tab on the left hand pane. Alternatively, use the corresponding URL directly, for example:
https://example-registry-quay-quay-enterprise.apps.docs.quayteam.org/repository/quayadmin/testrepo?tab=builds
ImportantIn some cases, the builder might have issues resolving hostnames. This issue might be related to the
dnsPolicybeing set todefaulton the job object. Currently, there is no workaround for this issue. It will be resolved in a future version of Red Hat Quay.- Click Create Build Trigger → Custom Git Repository Push.
Enter the HTTPS or SSH style URL used to clone your Git repository, then click Continue. For example:
https://github.com/gabriel-rh/actions_test.git
- Check Tag manifest with the branch or tag name and then click Continue.
-
Enter the location of the Dockerfile to build when the trigger is invoked, for example,
/Dockerfileand click Continue. -
Enter the location of the context for the Docker build, for example,
/, and click Continue. - If warranted, create a Robot Account. Otherwise, click Continue.
- Click Continue to verify the parameters.
- On the Builds page, click Options icon of your Trigger Name, and then click Run Trigger Now.
- Enter a commit SHA from the Git repository and click Start Build.
You can check the status of your build by clicking the commit in the Build History page, or by running
oc get pods -n virtual-builders.$ oc get pods -n virtual-builders NAME READY STATUS RESTARTS AGE f192fe4a-c802-4275-bcce-d2031e635126-9l2b5-25lg2 1/1 Running 0 7s
$ oc get pods -n virtual-builders
NAME                                               READY   STATUS        RESTARTS   AGE
f192fe4a-c802-4275-bcce-d2031e635126-9l2b5-25lg2   1/1     Terminating   0          9s
$ oc get pods -n virtual-builders
No resources found in virtual-builders namespace.
When the build is finished, you can check the status of the tag under Tags on the left hand pane.
NoteWith early access, full build logs and timestamps of builds are currently unavailable.
16.3.2.4. Modifying your AWS S3 storage bucket
If you are using AWS S3 storage, you must modify your storage bucket in the AWS console, prior to running builders.
- Log in to your AWS console at s3.console.aws.com.
-
In the search bar, search for
S3and then click S3. -
Click the name of your bucket, for example,
myawsbucket. - Click the Permissions tab.
Under Cross-origin resource sharing (CORS), include the following parameters:
  [
      {
          "AllowedHeaders": [
              "Authorization"
          ],
          "AllowedMethods": [
              "GET"
          ],
          "AllowedOrigins": [
              "*"
          ],
          "ExposeHeaders": [],
          "MaxAgeSeconds": 3000
      },
      {
          "AllowedHeaders": [
              "Content-Type",
              "x-amz-acl",
              "origin"
          ],
          "AllowedMethods": [
              "PUT"
          ],
          "AllowedOrigins": [
              "*"
          ],
          "ExposeHeaders": [],
          "MaxAgeSeconds": 3000
      }
  ]
Chapter 17. Using the Red Hat Quay API
Red Hat Quay provides a full OAuth 2, RESTful API that:
- Is available from endpoints of each Red Hat Quay instance from the URL https://<yourquayhost>/api/v1
- Lets you connect to endpoints, via a browser, to get, delete, post, and put Red Hat Quay settings by enabling the Swagger UI
- Can be accessed by applications that make API calls and use OAuth tokens
- Sends and receives data as JSON
The following text describes how to access the Red Hat Quay API and use it to view and modify setting in your Red Hat Quay cluster. The next section lists and describes API endpoints.
17.1. Accessing the Quay API from Quay.io
If you don’t have your own Red Hat Quay cluster running yet, you can explore the Red Hat Quay API available from Quay.io from your web browser:
https://docs.quay.io/api/swagger/
The API Explorer that appears shows Quay.io API endpoints. You will not see superuser API endpoints or endpoints for Red Hat Quay features that are not enabled on Quay.io (such as Repository Mirroring).
From API Explorer, you can get, and sometimes change, information on:
- Billing, subscriptions, and plans
- Repository builds and build triggers
- Error messages and global messages
- Repository images, manifests, permissions, notifications, vulnerabilities, and image signing
- Usage logs
- Organizations, members and OAuth applications
- User and robot accounts
- and more…
Select to open an endpoint to view the Model Schema for each part of the endpoint. Open an endpoint, enter any required parameters (such as a repository name or image), then select the Try it out! button to query or change settings associated with a Quay.io endpoint.
17.2. Create OAuth access token
To create an OAuth access token so you can access the API for your organization:
- Log in to Red Hat Quay and select your Organization (or create a new one).
- Select the Applications icon from the left navigation.
- Select Create New Application and give the new application a name when prompted.
- Select the new application.
- Select Generate Token from the left navigation.
- Select the checkboxes to set the scope of the token and select Generate Access Token.
- Review the permissions you are allowing and select Authorize Application to approve it.
- Copy the newly generated token to use to access the API.
17.3. Accessing your Quay API from a web browser
By enabling Swagger, you can access the API for your own Red Hat Quay instance through a web browser. This URL exposes the Red Hat Quay API explorer via the Swagger UI and this URL:
https://<yourquayhost>/api/v1/discovery.
That way of accessing the API does not include superuser endpoints that are available on Red Hat Quay installations. Here is an example of accessing a Red Hat Quay API interface running on the local system by running the swagger-ui container image:
# export SERVER_HOSTNAME=<yourhostname>
# sudo podman run -p 8888:8080 -e API_URL=https://$SERVER_HOSTNAME:8443/api/v1/discovery docker.io/swaggerapi/swagger-ui
With the swagger-ui container running, open your web browser to localhost port 8888 to view API endpoints via the swagger-ui container.
To avoid errors in the log such as "API calls must be invoked with an X-Requested-With header if called from a browser," add the following line to the config.yaml on all nodes in the cluster and restart Red Hat Quay:
BROWSER_API_CALLS_XHR_ONLY: false
17.4. Accessing the Red Hat Quay API from the command line
You can use the curl command to GET, PUT, POST, or DELETE settings via the API for your Red Hat Quay cluster. Replace <token> with the OAuth access token you created earlier to get or change settings in the following examples.
17.4.1. Get superuser information
$ curl -X GET -H "Authorization: Bearer <token_here>" \
    "https://<yourquayhost>/api/v1/superuser/users/"
For example:
$ curl -X GET -H "Authorization: Bearer mFCdgS7SAIoMcnTsHCGx23vcNsTgziAa4CmmHIsg" http://quay-server:8080/api/v1/superuser/users/ | jq

{
  "users": [
    {
      "kind": "user",
      "name": "quayadmin",
      "username": "quayadmin",
      "email": "quayadmin@example.com",
      "verified": true,
      "avatar": {
        "name": "quayadmin",
        "hash": "357a20e8c56e69d6f9734d23ef9517e8",
        "color": "#5254a3",
        "kind": "user"
      },
      "super_user": true,
      "enabled": true
    }
  ]
}
17.4.2. Creating a superuser using the API
Configure a superuser name, as described in the Deploy Quay book:
- Use the configuration editor UI or
-
Edit the
config.yamlfile directly, with the option of using the configuration API to validate (and download) the updated configuration bundle
Create the user account for the superuser name:
Obtain an authorization token as detailed above, and use
curlto create the user:$ curl -H "Content-Type: application/json" -H "Authorization: Bearer Fava2kV9C92p1eXnMawBZx9vTqVnksvwNm0ckFKZ" -X POST --data '{ "username": "quaysuper", "email": "quaysuper@example.com" }' http://quay-server:8080/api/v1/superuser/users/ | jqThe returned content includes a generated password for the new user account:
{
  "username": "quaysuper",
  "email": "quaysuper@example.com",
  "password": "EH67NB3Y6PTBED8H0HC6UVHGGGA3ODSE",
  "encrypted_password": "fn37AZAUQH0PTsU+vlO9lS0QxPW9A/boXL4ovZjIFtlUPrBz9i4j9UDOqMjuxQ/0HTfy38goKEpG8zYXVeQh3lOFzuOjSvKic2Vq7xdtQsU="
}
Now, when you request the list of users , it will show quaysuper as a superuser:
$ curl -X GET -H "Authorization: Bearer mFCdgS7SAIoMcnTsHCGx23vcNsTgziAa4CmmHIsg" http://quay-server:8080/api/v1/superuser/users/ | jq

{
  "users": [
  {
      "kind": "user",
      "name": "quayadmin",
      "username": "quayadmin",
      "email": "quayadmin@example.com",
      "verified": true,
      "avatar": {
        "name": "quayadmin",
        "hash": "357a20e8c56e69d6f9734d23ef9517e8",
        "color": "#5254a3",
        "kind": "user"
      },
      "super_user": true,
      "enabled": true
    },
    {
      "kind": "user",
      "name": "quaysuper",
      "username": "quaysuper",
      "email": "quaysuper@example.com",
      "verified": true,
      "avatar": {
        "name": "quaysuper",
        "hash": "c0e0f155afcef68e58a42243b153df08",
        "color": "#969696",
        "kind": "user"
      },
      "super_user": true,
      "enabled": true
    }
  ]
}
17.4.3. List usage logs
An intrnal API, /api/v1/superuser/logs, is available to list the usage logs for the current system. The results are paginated, so in the following example, more than 20 repos were created to show how to use multiple invocations to access the entire result set.
17.4.3.1. Example for pagination
First invocation
$ curl -X GET -k -H "Authorization: Bearer qz9NZ2Np1f55CSZ3RVOvxjeUdkzYuCp0pKggABCD" https://example-registry-quay-quay-enterprise.apps.example.com/api/v1/superuser/logs | jq
Initial output
{
  "start_time": "Sun, 12 Dec 2021 11:41:55 -0000",
  "end_time": "Tue, 14 Dec 2021 11:41:55 -0000",
  "logs": [
    {
      "kind": "create_repo",
      "metadata": {
        "repo": "t21",
        "namespace": "namespace1"
      },
      "ip": "10.131.0.13",
      "datetime": "Mon, 13 Dec 2021 11:41:16 -0000",
      "performer": {
        "kind": "user",
        "name": "user1",
        "is_robot": false,
        "avatar": {
          "name": "user1",
          "hash": "5d40b245471708144de9760f2f18113d75aa2488ec82e12435b9de34a6565f73",
          "color": "#ad494a",
          "kind": "user"
        }
      },
      "namespace": {
        "kind": "org",
        "name": "namespace1",
        "avatar": {
          "name": "namespace1",
          "hash": "6cf18b5c19217bfc6df0e7d788746ff7e8201a68cba333fca0437e42379b984f",
          "color": "#e377c2",
          "kind": "org"
        }
      }
    },
    {
      "kind": "create_repo",
      "metadata": {
        "repo": "t20",
        "namespace": "namespace1"
      },
      "ip": "10.131.0.13",
      "datetime": "Mon, 13 Dec 2021 11:41:05 -0000",
      "performer": {
        "kind": "user",
        "name": "user1",
        "is_robot": false,
        "avatar": {
          "name": "user1",
          "hash": "5d40b245471708144de9760f2f18113d75aa2488ec82e12435b9de34a6565f73",
          "color": "#ad494a",
          "kind": "user"
        }
      },
      "namespace": {
        "kind": "org",
        "name": "namespace1",
        "avatar": {
          "name": "namespace1",
          "hash": "6cf18b5c19217bfc6df0e7d788746ff7e8201a68cba333fca0437e42379b984f",
          "color": "#e377c2",
          "kind": "org"
        }
      }
    },
...

   {
      "kind": "create_repo",
      "metadata": {
        "repo": "t2",
        "namespace": "namespace1"
      },
      "ip": "10.131.0.13",
      "datetime": "Mon, 13 Dec 2021 11:25:17 -0000",
      "performer": {
        "kind": "user",
        "name": "user1",
        "is_robot": false,
        "avatar": {
          "name": "user1",
          "hash": "5d40b245471708144de9760f2f18113d75aa2488ec82e12435b9de34a6565f73",
          "color": "#ad494a",
          "kind": "user"
        }
      },
      "namespace": {
        "kind": "org",
        "name": "namespace1",
        "avatar": {
          "name": "namespace1",
          "hash": "6cf18b5c19217bfc6df0e7d788746ff7e8201a68cba333fca0437e42379b984f",
          "color": "#e377c2",
          "kind": "org"
        }
      }
    }
  ],
  "next_page": "gAAAAABhtzGDsH38x7pjWhD8MJq1_2FAgqUw2X9S2LoCLNPH65QJqB4XAU2qAxYb6QqtlcWj9eI6DUiMN_q3e3I0agCvB2VPQ8rY75WeaiUzM3rQlMc4i6ElR78t8oUxVfNp1RMPIRQYYZyXP9h6E8LZZhqTMs0S-SedaQJ3kVFtkxZqJwHVjgt23Ts2DonVoYwtKgI3bCC5"
}
Second invocation using next_page
$ curl -X GET -k -H "Authorization: Bearer qz9NZ2Np1f55CSZ3RVOvxjeUdkzYuCp0pKggABCD" https://example-registry-quay-quay-enterprise.apps.example.com/api/v1/superuser/logs?next_page=gAAAAABhtzGDsH38x7pjWhD8MJq1_2FAgqUw2X9S2LoCLNPH65QJqB4XAU2qAxYb6QqtlcWj9eI6DUiMN_q3e3I0agCvB2VPQ8rY75WeaiUzM3rQlMc4i6ElR78t8oUxVfNp1RMPIRQYYZyXP9h6E8LZZhqTMs0S-SedaQJ3kVFtkxZqJwHVjgt23Ts2DonVoYwtKgI3bCC5 | jq
Output from second invocation
{
  "start_time": "Sun, 12 Dec 2021 11:42:46 -0000",
  "end_time": "Tue, 14 Dec 2021 11:42:46 -0000",
  "logs": [
    {
      "kind": "create_repo",
      "metadata": {
        "repo": "t1",
        "namespace": "namespace1"
      },
      "ip": "10.131.0.13",
      "datetime": "Mon, 13 Dec 2021 11:25:07 -0000",
      "performer": {
        "kind": "user",
        "name": "user1",
        "is_robot": false,
        "avatar": {
          "name": "user1",
          "hash": "5d40b245471708144de9760f2f18113d75aa2488ec82e12435b9de34a6565f73",
          "color": "#ad494a",
          "kind": "user"
        }
      },
      "namespace": {
        "kind": "org",
        "name": "namespace1",
        "avatar": {
          "name": "namespace1",
          "hash": "6cf18b5c19217bfc6df0e7d788746ff7e8201a68cba333fca0437e42379b984f",
          "color": "#e377c2",
          "kind": "org"
        }
      }
    },
    ...
  ]
}
17.4.4. Directory synchronization
To enable directory synchronization for the team newteam in organization testadminorg, where the corresponding group name in LDAP is ldapgroup:
$ curl -X POST -H "Authorization: Bearer 9rJYBR3v3pXcj5XqIA2XX6Thkwk4gld4TCYLLWDF" \
       -H "Content-type: application/json" \
       -d '{"group_dn": "cn=ldapgroup,ou=Users"}' \
       http://quay1-server:8080/api/v1/organization/testadminorg/team/newteam/syncing
To disable synchronization for the same team:
$ curl -X DELETE -H "Authorization: Bearer 9rJYBR3v3pXcj5XqIA2XX6Thkwk4gld4TCYLLWDF" \
       http://quay1-server:8080/api/v1/organization/testadminorg/team/newteam/syncing
17.4.5. Create a repository build via API
In order to build a repository from the specified input and tag the build with custom tags, users can use requestRepoBuild endpoint. It takes the following data:
{
"docker_tags": [
   "string"
],
"pull_robot": "string",
"subdirectory": "string",
"archive_url": "string"
}
The archive_url parameter should point to a tar or zip archive that includes the Dockerfile and other required files for the build. The file_id parameter was apart of our older build system. It cannot be used anymore. If Dockerfile is in a sub-directory it needs to be specified as well.
The archive should be publicly accessible. OAuth app should have "Administer Organization" scope because only organization admins have access to the robots' account tokens. Otherwise, someone could get robot permissions by simply granting a build access to a robot (without having access themselves), and use it to grab the image contents. In case of errors, check the json block returned and ensure the archive location, pull robot, and other parameters are being passed correctly. Click "Download logs" on the top-right of the individual build’s page to check the logs for more verbose messaging.
17.4.6. Create an org robot
$ curl -X PUT https://quay.io/api/v1/organization/{orgname}/robots/{robot shortname} \
   -H 'Authorization: Bearer <token>''
17.4.7. Trigger a build
$ curl -X POST https://quay.io/api/v1/repository/YOURORGNAME/YOURREPONAME/build/ \
   -H 'Authorization: Bearer <token>'
Python with requests
import requests
r = requests.post('https://quay.io/api/v1/repository/example/example/image', headers={'content-type': 'application/json', 'Authorization': 'Bearer <redacted>'}, data={[<request-body-contents>})
print(r.text)
17.4.8. Create a private repository
$ curl -X POST https://quay.io/api/v1/repository \
    -H 'Authorization: Bearer {token}' \
    -H 'Content-Type: application/json' \
    -d '{"namespace":"yournamespace", "repository":"yourreponame",
    "description":"descriptionofyourrepo", "visibility": "private"}' | jq