
Chapter 8. Advanced Concepts
8.1. Deploying Quay on infrastructure nodes
By default, Quay-related pods are placed on arbitrary worker nodes when using the Operator to deploy the registry. The OpenShift Container Platform documentation shows how to use machine sets to configure nodes to only host infrastructure components (see https://docs.openshift.com/container-platform/4.7/machine_management/creating-infrastructure-machinesets.html).
If you are not using OCP MachineSet resources to deploy infra nodes, this section shows you how to manually label and taint nodes for infrastructure purposes.
Once you have configured your infrastructure nodes, either manually or using machine sets, you can then control the placement of Quay pods on these nodes using node selectors and tolerations.
8.1.1. Label and taint nodes for infrastructure use
In the cluster used in this example, there are three master nodes and six worker nodes:
$ oc get nodes
NAME                                               STATUS   ROLES    AGE     VERSION
user1-jcnp6-master-0.c.quay-devel.internal         Ready    master   3h30m   v1.20.0+ba45583
user1-jcnp6-master-1.c.quay-devel.internal         Ready    master   3h30m   v1.20.0+ba45583
user1-jcnp6-master-2.c.quay-devel.internal         Ready    master   3h30m   v1.20.0+ba45583
user1-jcnp6-worker-b-65plj.c.quay-devel.internal   Ready    worker   3h21m   v1.20.0+ba45583
user1-jcnp6-worker-b-jr7hc.c.quay-devel.internal   Ready    worker   3h21m   v1.20.0+ba45583
user1-jcnp6-worker-c-jrq4v.c.quay-devel.internal   Ready    worker   3h21m   v1.20.0+ba45583
user1-jcnp6-worker-c-pwxfp.c.quay-devel.internal   Ready    worker   3h21m   v1.20.0+ba45583
user1-jcnp6-worker-d-h5tv2.c.quay-devel.internal   Ready    worker   3h22m   v1.20.0+ba45583
user1-jcnp6-worker-d-m9gg4.c.quay-devel.internal   Ready    worker   3h21m   v1.20.0+ba45583
Label the final three worker nodes for infrastructure use:
$ oc label node --overwrite user1-jcnp6-worker-c-pwxfp.c.quay-devel.internal node-role.kubernetes.io/infra=
$ oc label node --overwrite user1-jcnp6-worker-d-h5tv2.c.quay-devel.internal node-role.kubernetes.io/infra=
$ oc label node --overwrite user1-jcnp6-worker-d-m9gg4.c.quay-devel.internal node-role.kubernetes.io/infra=
Now, when you list the nodes in the cluster, the last 3 worker nodes will have an added role of infra:
$ oc get nodes
NAME                                               STATUS   ROLES          AGE     VERSION
user1-jcnp6-master-0.c.quay-devel.internal         Ready    master         4h14m   v1.20.0+ba45583
user1-jcnp6-master-1.c.quay-devel.internal         Ready    master         4h15m   v1.20.0+ba45583
user1-jcnp6-master-2.c.quay-devel.internal         Ready    master         4h14m   v1.20.0+ba45583
user1-jcnp6-worker-b-65plj.c.quay-devel.internal   Ready    worker         4h6m    v1.20.0+ba45583
user1-jcnp6-worker-b-jr7hc.c.quay-devel.internal   Ready    worker         4h5m    v1.20.0+ba45583
user1-jcnp6-worker-c-jrq4v.c.quay-devel.internal   Ready    worker         4h5m    v1.20.0+ba45583
user1-jcnp6-worker-c-pwxfp.c.quay-devel.internal   Ready    infra,worker   4h6m    v1.20.0+ba45583
user1-jcnp6-worker-d-h5tv2.c.quay-devel.internal   Ready    infra,worker   4h6m    v1.20.0+ba45583
user1-jcnp6-worker-d-m9gg4.c.quay-devel.internal   Ready    infra,worker   4h6m    v1.20.0+ba45583
With an infra node being assigned as a worker, there is a chance that user workloads could get inadvertently assigned to an infra node. To avoid this, you can apply a taint to the infra node and then add tolerations for the pods you want to control.
$ oc adm taint nodes user1-jcnp6-worker-c-pwxfp.c.quay-devel.internal node-role.kubernetes.io/infra:NoSchedule
$ oc adm taint nodes user1-jcnp6-worker-d-h5tv2.c.quay-devel.internal node-role.kubernetes.io/infra:NoSchedule
$ oc adm taint nodes user1-jcnp6-worker-d-m9gg4.c.quay-devel.internal node-role.kubernetes.io/infra:NoSchedule
8.1.2. Create a Project with node selector and toleration
If you have already deployed Quay using the Quay Operator, remove the installed operator and any specific namespace(s) you created for the deployment.
Create a Project resource, specifying a node selector and toleration as shown in the following example:
quay-registry.yaml
kind: Project
apiVersion: project.openshift.io/v1
metadata:
  name: quay-registry
  annotations:
    openshift.io/node-selector: 'node-role.kubernetes.io/infra='
    scheduler.alpha.kubernetes.io/defaultTolerations: >-
      [{"operator": "Exists", "effect": "NoSchedule", "key":
      "node-role.kubernetes.io/infra"}
      ]
Use the oc apply command to create the project:
$ oc apply -f quay-registry.yaml
project.project.openshift.io/quay-registry created
Any subsequent resources created in the quay-registry namespace should now be scheduled on the dedicated infrastructure nodes.
8.1.3. Install the Quay Operator in the namespace
When installing the Quay Operator, specify the appropriate project namespace explicitly, in this case quay-registry. This will result in the operator pod itself landing on one of the three infrastructure nodes:
$ oc get pods -n quay-registry -o wide
NAME                                    READY   STATUS    RESTARTS   AGE   IP            NODE
quay-operator.v3.4.1-6f6597d8d8-bd4dp   1/1     Running   0          30s   10.131.0.16   user1-jcnp6-worker-d-h5tv2.c.quay-devel.internal
8.1.4. Create the registry
Create the registry as explained earlier, and then wait for the deployment to be ready. When you list the Quay pods, you should now see that they have only been scheduled on the three nodes that you have labelled for infrastructure purposes:
$ oc get pods -n quay-registry -o wide
NAME                                                   READY   STATUS      RESTARTS   AGE     IP            NODE
example-registry-clair-app-789d6d984d-gpbwd            1/1     Running     1          5m57s   10.130.2.80   user1-jcnp6-worker-d-m9gg4.c.quay-devel.internal
example-registry-clair-postgres-7c8697f5-zkzht         1/1     Running     0          4m53s   10.129.2.19   user1-jcnp6-worker-c-pwxfp.c.quay-devel.internal
example-registry-quay-app-56dd755b6d-glbf7             1/1     Running     1          5m57s   10.129.2.17   user1-jcnp6-worker-c-pwxfp.c.quay-devel.internal
example-registry-quay-config-editor-7bf9bccc7b-dpc6d   1/1     Running     0          5m57s   10.131.0.23   user1-jcnp6-worker-d-h5tv2.c.quay-devel.internal
example-registry-quay-database-8dc7cfd69-dr2cc         1/1     Running     0          5m43s   10.129.2.18   user1-jcnp6-worker-c-pwxfp.c.quay-devel.internal
example-registry-quay-mirror-78df886bcc-v75p9          1/1     Running     0          5m16s   10.131.0.24   user1-jcnp6-worker-d-h5tv2.c.quay-devel.internal
example-registry-quay-postgres-init-8s8g9              0/1     Completed   0          5m54s   10.130.2.79   user1-jcnp6-worker-d-m9gg4.c.quay-devel.internal
example-registry-quay-redis-5688ddcdb6-ndp4t           1/1     Running     0          5m56s   10.130.2.78   user1-jcnp6-worker-d-m9gg4.c.quay-devel.internal
quay-operator.v3.4.1-6f6597d8d8-bd4dp                  1/1     Running     0          22m     10.131.0.16   user1-jcnp6-worker-d-h5tv2.c.quay-devel.internal
8.2. Enabling monitoring when Operator is installed in a single namespace
When Red Hat Quay Operator is installed in a single namespace, the monitoring component is unmanaged. To configure monitoring, you need to enable it for user-defined namespaces in OpenShift Container Platform. For more information, see the OCP documentation for Configuring the monitoring stack and Enabling monitoring for user-defined projects.
The following steps show you how to configure monitoring for Quay, based on the OCP documentation.
8.2.1. Creating a cluster monitoring config map
Check whether the
cluster-monitoring-configConfigMap object exists:$ oc -n openshift-monitoring get configmap cluster-monitoring-config Error from server (NotFound): configmaps "cluster-monitoring-config" not found
If the ConfigMap object does not exist:
Create the following YAML manifest. In this example, the file is called
cluster-monitoring-config.yaml:$ cat cluster-monitoring-config.yaml apiVersion: v1 kind: ConfigMap metadata: name: cluster-monitoring-config namespace: openshift-monitoring data: config.yaml: |
Create the ConfigMap object:
$ oc apply -f cluster-monitoring-config.yaml configmap/cluster-monitoring-config created
$ oc -n openshift-monitoring get configmap cluster-monitoring-config

NAME                        DATA   AGE
cluster-monitoring-config   1      12s
8.2.2. Creating a user-defined workload monitoring config map
Check whether the
user-workload-monitoring-configConfigMap object exists:$ oc -n openshift-user-workload-monitoring get configmap user-workload-monitoring-config Error from server (NotFound): configmaps "user-workload-monitoring-config" not found
If the ConfigMap object does not exist:
Create the following YAML manifest. In this example, the file is called
user-workload-monitoring-config.yaml:$ cat user-workload-monitoring-config.yaml apiVersion: v1 kind: ConfigMap metadata: name: user-workload-monitoring-config namespace: openshift-user-workload-monitoring data: config.yaml: |
Create the ConfigMap object:
$ oc apply -f user-workload-monitoring-config.yaml

configmap/user-workload-monitoring-config created
8.2.3. Enable monitoring for user-defined projects
Check whether monitoring for user-defined projects is running:
$ oc get pods -n openshift-user-workload-monitoring

No resources found in openshift-user-workload-monitoring namespace.
Edit the
cluster-monitoring-configConfigMap:$ oc -n openshift-monitoring edit configmap cluster-monitoring-config
Set
enableUserWorkload: trueto enable monitoring for user-defined projects on the cluster:apiVersion: v1 data: config.yaml: | enableUserWorkload: true kind: ConfigMap metadata: annotations:Save the file to apply the changes and then check that the appropriate pods are running:
$ oc get pods -n openshift-user-workload-monitoring

NAME                                   READY   STATUS    RESTARTS   AGE
prometheus-operator-6f96b4b8f8-gq6rl   2/2     Running   0          15s
prometheus-user-workload-0             5/5     Running   1          12s
prometheus-user-workload-1             5/5     Running   1          12s
thanos-ruler-user-workload-0           3/3     Running   0          8s
thanos-ruler-user-workload-1           3/3     Running   0          8s
8.2.4. Create a Service object to expose Quay metrics
Create a YAML file for the Service object:
$ cat quay-service.yaml

apiVersion: v1
kind: Service
metadata:
  annotations:
  labels:
    quay-component: monitoring
    quay-operator/quayregistry: example-registry
  name: example-registry-quay-metrics
  namespace: quay-enterprise
spec:
  ports:
  - name: quay-metrics
    port: 9091
    protocol: TCP
    targetPort: 9091
  selector:
    quay-component: quay-app
    quay-operator/quayregistry: example-registry
  type: ClusterIP
Create the Service object:
$  oc apply -f quay-service.yaml

service/example-registry-quay-metrics created
8.2.5. Create a ServiceMonitor object
Configure OpenShift Monitoring to scrape the metrics by creating a ServiceMonitor resource.
Create a YAML file for the ServiceMonitor resource:
$ cat quay-service-monitor.yaml

apiVersion: monitoring.coreos.com/v1
kind: ServiceMonitor
metadata:
  labels:
    quay-operator/quayregistry: example-registry
  name: example-registry-quay-metrics-monitor
  namespace: quay-enterprise
spec:
  endpoints:
  - port: quay-metrics
  namespaceSelector:
    any: true
  selector:
    matchLabels:
      quay-component: monitoring
Create the ServiceMonitor:
$  oc apply -f quay-service-monitor.yaml

servicemonitor.monitoring.coreos.com/example-registry-quay-metrics-monitor created
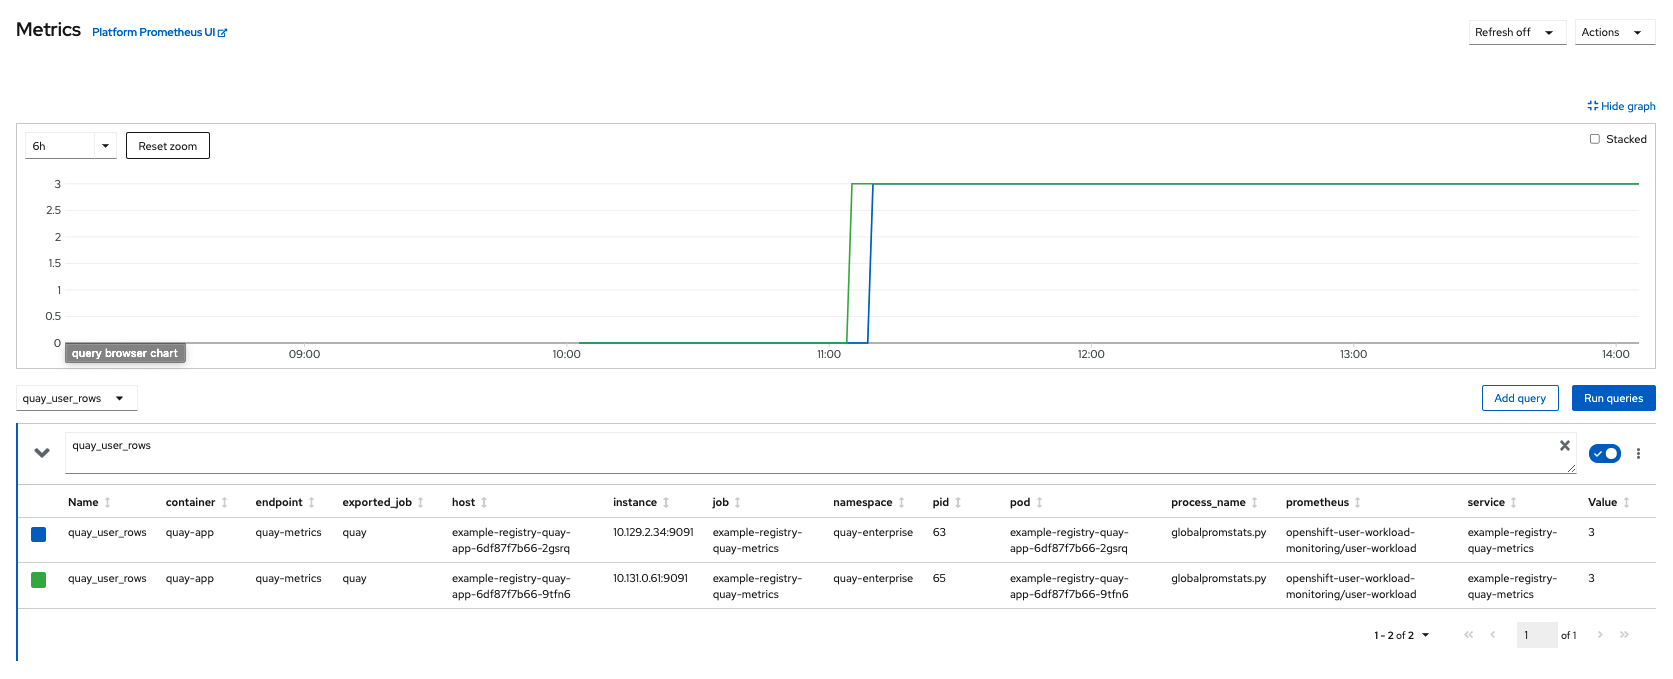
8.2.6. View the metrics in OpenShift
You can access the metrics in the OpenShift console under Monitoring → Metrics. In the Expression field, enter the text quay_ to see the list of metrics available:

For example, if you have added users to your registry, select the quay-users_rows metric:
8.3. Resizing Managed Storage
The Quay Operator creates default object storage using the defaults provided by RHOCS when creating a NooBaa object (50 Gib). There are two ways to extend this storage; you can resize an existing PVC or add more PVCs to a new storage pool.
8.3.1. Resize Noobaa PVC
-
Log into the OpenShift console and select
Storage→Persistent Volume Claims. -
Select the
PersistentVolumeClaimnamed likenoobaa-default-backing-store-noobaa-pvc-*. -
From the Action menu, select
Expand PVC. -
Enter the new size of the Persistent Volume Claim and select
Expand.
After a few minutes (depending on the size of the PVC), the expanded size should reflect in the PVC’s Capacity field.
Expanding CSI volumes is a Technology Preview feature only. For more information, see https://access.redhat.com/documentation/en-us/openshift_container_platform/4.6/html/storage/expanding-persistent-volumes.
8.3.2. Add Another Storage Pool
-
Log into the OpenShift console and select
Networking→Routes. Make sure theopenshift-storageproject is selected. -
Click on the
Locationfield for thenoobaa-mgmtRoute. - Log into the Noobaa Management Console.
-
On the main dashboard, under
Storage Resources, selectAdd Storage Resources. -
Select
Deploy Kubernetes Pool -
Enter a new pool name. Click
Next. -
Choose the number of Pods to manage the pool and set the size per node. Click
Next. -
Click
Deploy.
After a few minutes, the additional storage pool will be added to the Noobaa resources and available for use by Red Hat Quay.
8.4. Customizing Default Operator Images
Using this mechanism is not supported for production Quay environments and is strongly encouraged only for development/testing purposes. There is no guarantee your deployment will work correctly when using non-default images with the Quay Operator.
In certain circumstances, it may be useful to override the default images used by the Operator. This can be done by setting one or more environment variables in the Quay Operator ClusterServiceVersion.
8.4.1. Environment Variables
The following environment variables are used in the Operator to override component images:
| Environment Variable | Component |
|
|
|
|
|
|
|
|
|
|
|
|
Override images must be referenced by manifest (@sha256:), not by tag (:latest).
8.4.2. Applying Overrides to a Running Operator
When the Quay Operator is installed in a cluster via the Operator Lifecycle Manager (OLM), the managed component container images can be easily overridden by modifying the ClusterServiceVersion object, which is OLM’s representation of a running Operator in the cluster. Find the Quay Operator’s ClusterServiceVersion either by using a Kubernetes UI or kubectl/oc:
$ oc get clusterserviceversions -n <your-namespace>
Using the UI, oc edit, or any other method, modify the Quay ClusterServiceVersion to include the environment variables outlined above to point to the override images:
JSONPath: spec.install.spec.deployments[0].spec.template.spec.containers[0].env
- name: RELATED_IMAGE_COMPONENT_QUAY
  value: quay.io/projectquay/quay@sha256:c35f5af964431673f4ff5c9e90bdf45f19e38b8742b5903d41c10cc7f6339a6d
- name: RELATED_IMAGE_COMPONENT_CLAIR
  value: quay.io/projectquay/clair@sha256:70c99feceb4c0973540d22e740659cd8d616775d3ad1c1698ddf71d0221f3ce6
- name: RELATED_IMAGE_COMPONENT_POSTGRES
  value: centos/postgresql-10-centos7@sha256:de1560cb35e5ec643e7b3a772ebaac8e3a7a2a8e8271d9e91ff023539b4dfb33
- name: RELATED_IMAGE_COMPONENT_REDIS
  value: centos/redis-32-centos7@sha256:06dbb609484330ec6be6090109f1fa16e936afcf975d1cbc5fff3e6c7cae7542
Note that this is done at the Operator level, so every QuayRegistry will be deployed using these same overrides.
8.5. AWS S3 CloudFront
If you use AWS S3 CloudFront for backend registry storage, specify the private key as shown in the following example:
$ oc create secret generic --from-file config.yaml=./config_awss3cloudfront.yaml --from-file default-cloudfront-signing-key.pem=./default-cloudfront-signing-key.pem test-config-bundle