
Deploy Red Hat Quay for proof-of-concept (non-production) purposes
Preface
Red Hat Quay is an enterprise-quality registry for building, securing and serving container images. This procedure describes how to deploy Red Hat Quay for proof-of-concept (non-production) purposes.
Chapter 1. Overview
Features of Red Hat Quay include:
- High availability
- Geo-replication
- Repository mirroring
- Docker v2, schema 2 (multiarch) support
- Continuous integration
- Security scanning with Clair
- Custom log rotation
- Zero downtime garbage collection
- 24/7 support
Red Hat Quay provides support for:
- Multiple authentication and access methods
- Multiple storage backends
- Custom certificates for Quay, Clair, and storage backends
- Application registries
- Different container image types
1.1. Architecture
Red Hat Quay consists of a number of core components, both internal and external.
1.1.1. Internal components
-
Quay (container registry): Runs the
Quaycontainer as a service, consisting of several components in the pod. - Clair: Scans container images for vulnerabilities and suggests fixes.
1.1.2. External components
- Database: Used by Red Hat Quay as its primary metadata storage. Note that this is not for image storage.
- Redis (key-value store): Stores live builder logs and the Red Hat Quay tutorial.
Cloud storage:For supported deployments, you need to use one of the following types of storage:
- Public cloud storage: In public cloud environments, you should use the cloud provider’s object storage, such as Amazon Web Services’s Amazon S3 or Google Cloud’s Google Cloud Storage.
- Private cloud storage: In private clouds, an S3 or Swift compliant Object Store is needed, such as Ceph RADOS, or OpenStack Swift.
Do not use "Locally mounted directory" Storage Engine for any production configurations. Mounted NFS volumes are not supported. Local storage is meant for Red Hat Quay test-only installations.
Chapter 2. Getting started with Red Hat Quay
The Red Hat Quay registry can be deployed for non-production purposes on a single machine, either physical or virtual, with the following specifications.
2.1. Prerequisites
- Red Hat Enterprise Linux (RHEL): Obtain the latest Red Hat Enterprise Linux 8 server media from the Downloads page and follow the installation instructions available in the Product Documentation for Red Hat Enterprise Linux 8.
- Valid Red Hat Subscription: Configure a valid Red Hat Enterprise Linux 8 server subscription.
- CPUs: Two or more virtual CPUs.
- RAM: 4GB or more.
Disk space: The required disk space depends on the storage needs for the registry. Approximately 30GB of disk space should be enough for a test system, broken down as follows:
- At least 10GB of disk space for the Red Hat Enterprise Linux operating system.
- At least 10GB of disk space for docker storage (to run 3 containers).
- At least 10GB of disk space for Quay local storage. Note that CEPH or other local storage might require more memory.
More information on sizing can be found at Quay 3.x Sizing Guidlines.
2.1.1. Using Podman
This document uses Podman for creating and deploying containers. If you do not have Podman installed on your system, you should be able to use the equivalent Docker commands. For more information on Podman and related technologies, see Building, running, and managing Linux containers on Red Hat Enterprise Linux 8.
2.2. Configuring the Red Hat Enterprise Linux server
2.2.1. Install and register the RHEL server
- Install the latest RHEL 8 server. You can do a minimal, shell-access only install, or Server plus GUI if you want a desktop.
- Register and subscribe your RHEL server system as described in How to register and subscribe a system….
Use the following commands to register your system and list available subscriptions. Choose an available RHEL server subscription, attach to its pool ID and upgrade to the latest software:
# subscription-manager register --username=<user_name> --password=<password>
# subscription-manager refresh
# subscription-manager list --available
# subscription-manager attach --pool=<pool_id>
# yum update -y
2.2.2. Installing Podman
Install Podman if it is not already on your system:
$ sudo yum install -y podman
Alternatively, you can install the
container-toolsmodule, which pulls in the full set of container software packages:$ sudo yum module install -y container-tools
2.2.3. Registry authentication
Set up authentication to
registry.redhat.io, so that you can pull theQuaycontainer, as described in Red Hat Container Registry Authentication. Note that this differs from earlier Red Hat Quay releases where the images were hosted onquay.io.You can log in to the registry using the following command:
$ sudo podman login registry.redhat.io
Username: <username>
Password: <password>
2.2.4. Firewall configuration
If you have a firewall running on your system, you might have to add rules that allow access to Red Hat Quay. The commands required depend on the ports you have mapped, for example:
$ firewall-cmd --permanent --add-port=80/tcp
$ firewall-cmd --permanent --add-port=443/tcp
$ firewall-cmd --permanent --add-port=5432/tcp
$ firewall-cmd --permanent --add-port=5433/tcp
$ firewall-cmd --permanent --add-port=6379/tcp
$ firewall-cmd --reload
2.2.5. IP addressing and naming services
There are a number of ways to configure the component containers in Red Hat Quay so that they can talk to each other:
Using the IP addresses for the containers: You can determine the IP address for containers with
podman inspectand then use these values in the configuration tool when specifying the connection strings, for example:$ sudo podman inspect -f "{{.NetworkSettings.IPAddress}}" postgresql-quayThis approach is susceptible to host restarts, as the IP addresses for the containers will change after a reboot.
- Using a naming service: If you want your deployment to survive container restarts, which typically result in changed IP addresses, you can implement a naming service. For example, the dnsname plugin is used to allow containers to resolve each other by name.
-
Using the host network: You can use the
podman runcommand with the--net=hostoption and then use container ports on the host when specifying the addresses in the configuration. This option is susceptible to port conflicts when two containers want to use the same port, and as a result it is not recommended. - Configuring port mapping: You can use port mappings to expose ports on the host and then use these ports in combination with the host IP address or host name.
This document uses port mapping and assumes a static IP address for your host system. Throughout this deployment, we use quay-server.example.com with our system’s IP address, 192.168.1.112, and establish this information in the /etc/hosts file:
$ cat /etc/hosts
...
192.168.1.112   quay-server.example.com
| Component | Port mapping | Address |
|---|---|---|
| Quay |
| http://quay-server.example.com |
| Postgres for Quay |
| quay-server.example.com:5432 |
| Redis |
| quay-server.example.com:6379 |
| Postgres for Clair V4 |
| quay-server.example.com:5433 |
| Clair V4 |
| http://quay-server.example.com:8081 |
2.3. Configuring the database
Quay requires a database for storing metadata. Postgres is used throughout this document and is recommended for highly available configurations. Alternatively, you can use MySQL with a similar approach to configuration as described below.
2.3.1. Setting up Postgres
In this proof-of-concept scenario, you will use a directory on the local file system to persist database data.
In the installation folder, denoted here by the variable $QUAY, create a directory for the database data and set the permissions appropriately:
$ mkdir -p $QUAY/postgres-quay
$ setfacl -m u:26:-wx $QUAY/postgres-quay
Use
podman runto start thePostgrescontainer, specifying the username, password, database name and port, together with the volume definition for database data:$ sudo podman run -d --rm --name postgresql-quay \ -e POSTGRESQL_USER=quayuser \ -e POSTGRESQL_PASSWORD=quaypass \ -e POSTGRESQL_DATABASE=quay \ -e POSTGRESQL_ADMIN_PASSWORD=adminpass \ -p 5432:5432 \ -v $QUAY/postgres-quay:/var/lib/pgsql/data:Z \ registry.redhat.io/rhel8/postgresql-10:1
Ensure that the Postgres
pg_trgmmodule is installed, as it is required by Quay:$ sudo podman exec -it postgresql-quay /bin/bash -c 'echo "CREATE EXTENSION IF NOT EXISTS pg_trgm" | psql -d quay -U postgres'
2.4. Configuring Redis
Redis ia a key-value store that is used by Quay for live builder logs and the Red Hat Quay tutorial.
2.4.1. Setting up Redis
Use
podman runto start theRediscontainer, specifying the port and password:$ sudo podman run -d --rm --name redis \ -p 6379:6379 \ -e REDIS_PASSWORD=strongpassword \ registry.redhat.io/rhel8/redis-5:1
2.5. Configuring Red Hat Quay
Before running the Red Hat Quay service, you need to generate a configuration file that details of all the components, including registry settings, and database and Redis connection parameters.
To generate a configuration file, run the
Quaycontainer inconfigmode, specifying a password, for example, the stringsecret.$ sudo podman run --rm -it --name quay_config -p 80:8080 -p 443:8443 registry.redhat.io/quay/quay-rhel8:v3.5.7 config secret
-
Use your browser to access the user interface for the configuration tool at
http://quay-server.example.com. Note this documentation assumes you have configured thequay-server.example.comhostname in your/etc/hostsfile. -
Log in with the username
quayconfigand passwordsecret, or whatever values were specified in thepodman runcommand above.
2.5.1. Red Hat Quay setup
In the configuration editor, the following details are entered:
- Basic configuration
- Server configuration
- Database
- Redis
2.5.1.1. Basic configuration
In the basic configuration setting, complete the registry title and the registry short title fields. The default values can be used if they are populated.
2.5.1.2. Server configuration
Specify the HTTP host and port for the location where the registry will be accessible on the network. If you followed the instructions in this document, enter quay-server.example.com.
2.5.1.3. Database
In the database section, specify connection details for the database that Red Hat Quay uses to store metadata. If you followed the instructions in this document for deploying a proof-of-concept system, the following values would be entered:
- Database Type: Postgres
- Database Server: quay-server.example.com:5432
- Username: quayuser
- Password: quaypass
- Database Name: quay
2.5.1.4. Redis
The Redis key-value store is used to store real-time events and build logs. If you followed the instructions in this document for deploying a proof-of-concept system, the following values would be entered:
- Redis Hostname: quay-server.example.com
- Redis port: 6379 (default)
- Redis password: strongpassword
2.5.2. Validate and download configuration
When all required fields have been set, validate your settings by clicking Validate Configuration Changes. If any errors are reported, continue editing your configuration until all required fields are valid and Red Hat Quay can connect to your database and Redis servers.
Once your configuration is valid, download the configuration file. Stop the Quay container that is running the configuration editor.
2.6. Deploying Red Hat Quay
2.6.1. Prerequisites
- Your Quay database and Redis servers are running.
- You have generated a valid configuration bundle.
-
You have stopped the
Quaycontainer that you used to run the configuration editor.
2.6.2. Prepare config folder
Unpack the configuration bundle so that Quay can use it:
$ mkdir $QUAY/config
$ cp ~/Downloads/quay-config.tar.gz $QUAY/config
$ cd $QUAY/config
$ tar xvf quay-config.tar.gz
2.6.3. Prepare local storage for image data
For this proof-of-concept deployment, use the local file system to store the registry images:
$ mkdir $QUAY/storage
$ setfacl -m u:1001:-wx $QUAY/storage
2.6.4. Deploy the Red Hat Quay registry
Use
podman runto start theQuaycontainer. Specify the appropriate volumes for your configuration data and local storage for image data:$ sudo podman run -d --rm -p 80:8080 -p 443:8443 \ --name=quay \ -v $QUAY/config:/conf/stack:Z \ -v $QUAY/storage:/datastorage:Z \ registry.redhat.io/quay/quay-rhel8:v3.5.7
2.7. Using Red Hat Quay
The following steps allow you to use the interface and create new organizations and repositories , and to search and browse existing repositories. Following step 3, you can use the command line interface to interact with the registry, and to push and pull images.
-
Use your browser to access the user interface for the Red Hat Quay registry at
http://quay-server.example.com, assuming you have configuredquay-server.example.comas your hostname in your/etc/hostsfile. -
Click
Create Accountand add a user, for example,quayadminwith a passwordpassword. From the command line, log in to the registry:
$ sudo podman login --tls-verify=false quay-server.example.com
Username: quayadmin
Password: password
Login Succeeded!
2.7.1. Push and pull images
To test pushing and pulling images from the Red Hat Quay registry, first pull a sample image from an external registry:
$ sudo podman pull busybox
Trying to pull docker.io/library/busybox...
Getting image source signatures
Copying blob 4c892f00285e done
Copying config 22667f5368 done
Writing manifest to image destination
Storing signatures
22667f53682a2920948d19c7133ab1c9c3f745805c14125859d20cede07f11f9
Use the
podman imagescommand to see the local copy:$ sudo podman images REPOSITORY TAG IMAGE ID CREATED SIZE docker.io/library/busybox latest 22667f53682a 14 hours ago 1.45 MB ...
Tag this image, in preparation for pushing it to the Red Hat Quay registry:
$ sudo podman tag docker.io/library/busybox quay-server.example.com/quayadmin/busybox:test
Next, push the image to the Red Hat Quay registry. Following this step, you can use your browser to see the tagged image in your repository.
$ sudo podman push --tls-verify=false quay-server.example.com/quayadmin/busybox:test
Getting image source signatures
Copying blob 6b245f040973 done
Copying config 22667f5368 done
Writing manifest to image destination
Storing signatures
To test access to the image from the command line, first delete the local copy of the image:
$ sudo podman rmi quay-server.example.com/quayadmin/busybox:test
Untagged: quay-server.example.com/quayadmin/busybox:test
Pull the image again, this time from your Red Hat Quay registry:
$ sudo podman pull --tls-verify=false quay-server.example.com/quayadmin/busybox:test
Trying to pull quay-server.example.com/quayadmin/busybox:test...
Getting image source signatures
Copying blob 6ef22a7134ba [--------------------------------------] 0.0b / 0.0b
Copying config 22667f5368 done
Writing manifest to image destination
Storing signatures
22667f53682a2920948d19c7133ab1c9c3f745805c14125859d20cede07f11f9
Chapter 3. Advanced Red Hat Quay deployment
3.1. Using SSL to protect connections to Red Hat Quay
3.1.1. Introduction to using SSL
To configure Red Hat Quay with a self-signed certificate, you need to create a Certificate Authority (CA) and then generate the required key and certificate files.
The following examples assume you have configured the server hostname quay-server.example.com using DNS or another naming mechanism, such as adding an entry in your /etc/hosts file:
$ cat /etc/hosts
...
192.168.1.112   quay-server.example.com
3.1.2. Create a Certificate Authority and sign a certificate
At the end of this procedure, you will have a certificate file and a primary key file named ssl.cert and ssl.key, respectively.
3.1.2.1. Create a Certificate Authority
Generate the root CA key:
$ openssl genrsa -out rootCA.key 2048
Generate the root CA cert:
$ openssl req -x509 -new -nodes -key rootCA.key -sha256 -days 1024 -out rootCA.pem
Enter the information that will be incorporated into your certificate request, including the server hostname, for example:
Country Name (2 letter code) [XX]:IE
State or Province Name (full name) []:GALWAY
Locality Name (eg, city) [Default City]:GALWAY
Organization Name (eg, company) [Default Company Ltd]:QUAY
Organizational Unit Name (eg, section) []:DOCS
Common Name (eg, your name or your server's hostname) []:quay-server.example.com
3.1.2.2. Sign a certificate
Generate the server key:
$ openssl genrsa -out ssl.key 2048
Generate a signing request:
$ openssl req -new -key ssl.key -out ssl.csr
Enter the information that will be incorporated into your certificate request, including the server hostname, for example:
Country Name (2 letter code) [XX]:IE
State or Province Name (full name) []:GALWAY
Locality Name (eg, city) [Default City]:GALWAY
Organization Name (eg, company) [Default Company Ltd]:QUAY
Organizational Unit Name (eg, section) []:DOCS
Common Name (eg, your name or your server's hostname) []:quay-server.example.com
Create a configuration file
openssl.cnf, specifying the server hostname, for example:opensssl.cnf
[req]
req_extensions = v3_req
distinguished_name = req_distinguished_name
[req_distinguished_name]
[ v3_req ]
basicConstraints = CA:FALSE
keyUsage = nonRepudiation, digitalSignature, keyEncipherment
subjectAltName = @alt_names
[alt_names]
DNS.1 = quay-server.example.com
IP.1 = 192.168.1.112
Use the configuration file to generate the certificate
ssl.cert:$ openssl x509 -req -in ssl.csr -CA rootCA.pem -CAkey rootCA.key -CAcreateserial -out ssl.cert -days 356 -extensions v3_req -extfile openssl.cnf
3.1.3. Configuring SSL using the UI
This section configures SSL using the Quay UI. To configure SSL using the command line interface, see the following section.
Start the
Quaycontainer in configuration mode:$ sudo podman run --rm -it --name quay_config -p 80:8080 -p 443:8443 registry.redhat.io/quay/quay-rhel8:v3.5.7 config secret
-
In the Server Configuration section, select
Red Hat Quay handles TLSfor TLS. Upload the certificate file and private key file created earlier, ensuring that the Server Hostname matches the value used when creating the certs. Validate and download the updated configuration. Stop the
Quaycontainer and then restart the registry:$ sudo podman rm -f quay $ sudo podman run -d --rm -p 80:8080 -p 443:8443 \ --name=quay \ -v $QUAY/config:/conf/stack:Z \ -v $QUAY/storage:/datastorage:Z \ registry.redhat.io/quay/quay-rhel8:v3.5.7
3.1.4. Configuring SSL using the command line
Another option when configuring SSL is to use the command line interface.
Copy the certificate file and primary key file to your configuration directory, ensuring they are named
ssl.certandssl.keyrespectively:$ cp ~/ssl.cert $QUAY/config $ cp ~/ssl.key $QUAY/config $ cd $QUAY/config
Edit the
config.yamlfile and specify that you want Quay to handle TLS:config.yaml
... SERVER_HOSTNAME: quay-server.example.com ... PREFERRED_URL_SCHEME: https ...
Stop the
Quaycontainer and restart the registry:$ sudo podman rm -f quay $ sudo podman run -d --rm -p 80:8080 -p 443:8443 \ --name=quay \ -v $QUAY/config:/conf/stack:Z \ -v $QUAY/storage:/datastorage:Z \ registry.redhat.io/quay/quay-rhel8:v3.5.7
3.1.5. Testing SSL configuration using the command line
Use the
podman logincommand to attempt to log in to the Quay registry with SSL enabled:$ sudo podman login quay-server.example.com Username: quayadmin Password: Error: error authenticating creds for "quay-server.example.com": error pinging docker registry quay-server.example.com: Get "https://quay-server.example.com/v2/": x509: certificate signed by unknown authority
Podman does not trust self-signed certificates. As a workaround, use the
--tls-verifyoption:$ sudo podman login --tls-verify=false quay-server.example.com Username: quayadmin Password: Login Succeeded!
Configuring Podman to trust the root Certificate Authority (CA) is covered in a subsequent section.
3.1.6. Testing SSL configuration using the browser
When you attempt to access the Quay registry, in this case, https://quay-server.example.com, the browser warns of the potential risk:

Proceed to the log in screen, and the browser will notify you that the connection is not secure:
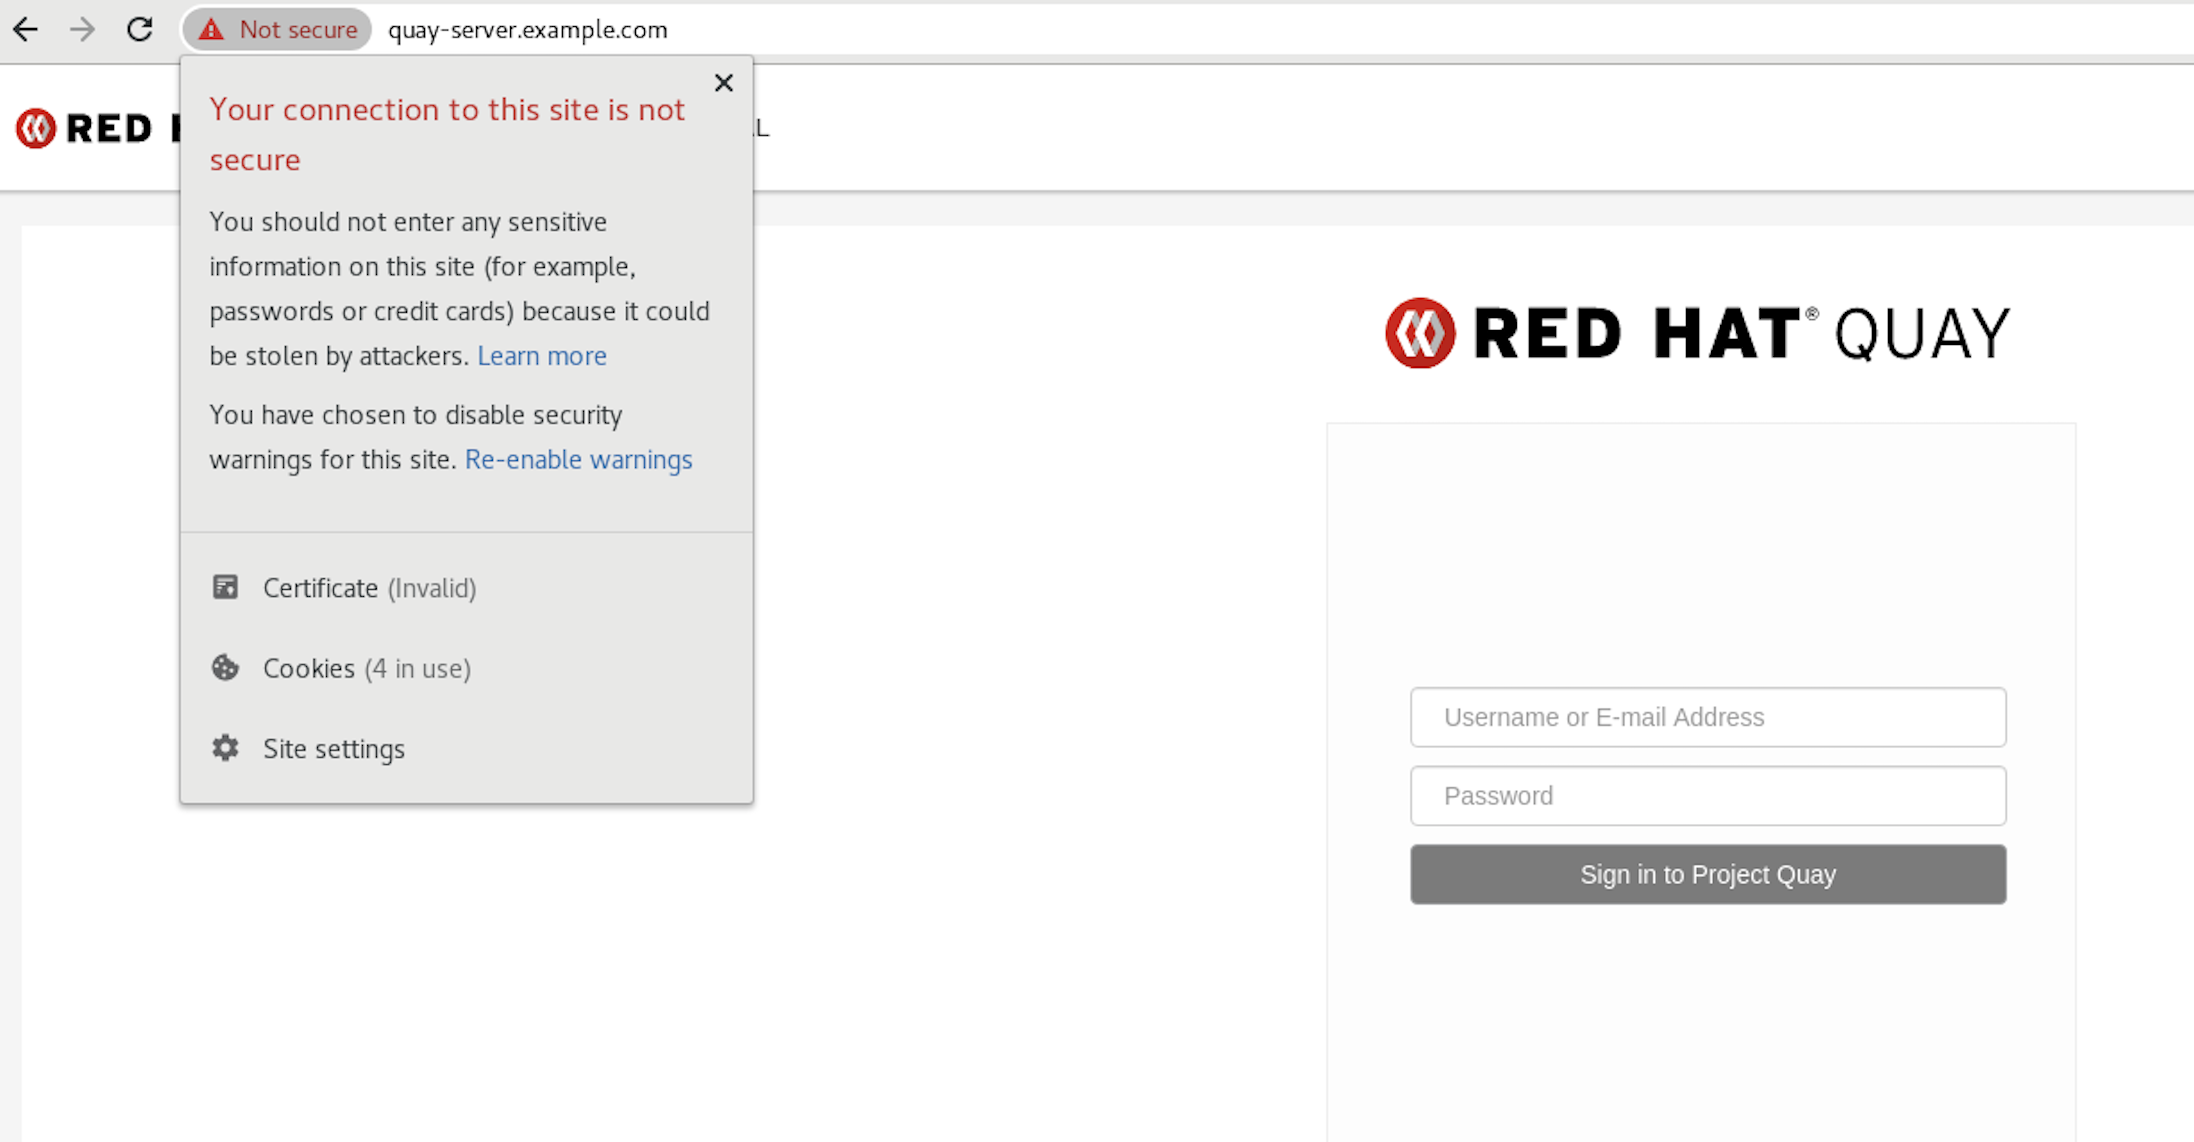
Configuring the system to trust the root Certificate Authority (CA) is covered in the subsequent section.
3.1.7. Configuring podman to trust the Certificate Authority
Podman uses two paths to locate the CA file, namely, /etc/containers/certs.d/ and /etc/docker/certs.d/.
Copy the root CA file to one of these locations, with the exact path determined by the server hostname, and naming the file
ca.crt:$ sudo cp rootCA.pem /etc/containers/certs.d/quay-server.example.com/ca.crt
Alternatively, if you are using Docker, you can copy the root CA file to the equivalent Docker directory:
$ sudo cp rootCA.pem /etc/docker/certs.d/quay-server.example.com/ca.crt
You should no longer need to use the --tls-verify=false option when logging in to the registry:
$ sudo podman login quay-server.example.com Username: quayadmin Password: Login Succeeded!
3.1.8. Configuring the system to trust the certificate authority
Copy the root CA file to the consolidated system-wide trust store:
$ sudo cp rootCA.pem /etc/pki/ca-trust/source/anchors/
Update the system-wide trust store configuration:
$ sudo update-ca-trust extract
You can use the
trust listcommand to ensure that the Quay server has been configured:$ trust list | grep quay label: quay-server.example.comNow, when you browse to the registry at
https://quay-server.example.com, the lock icon shows that the connection is secure: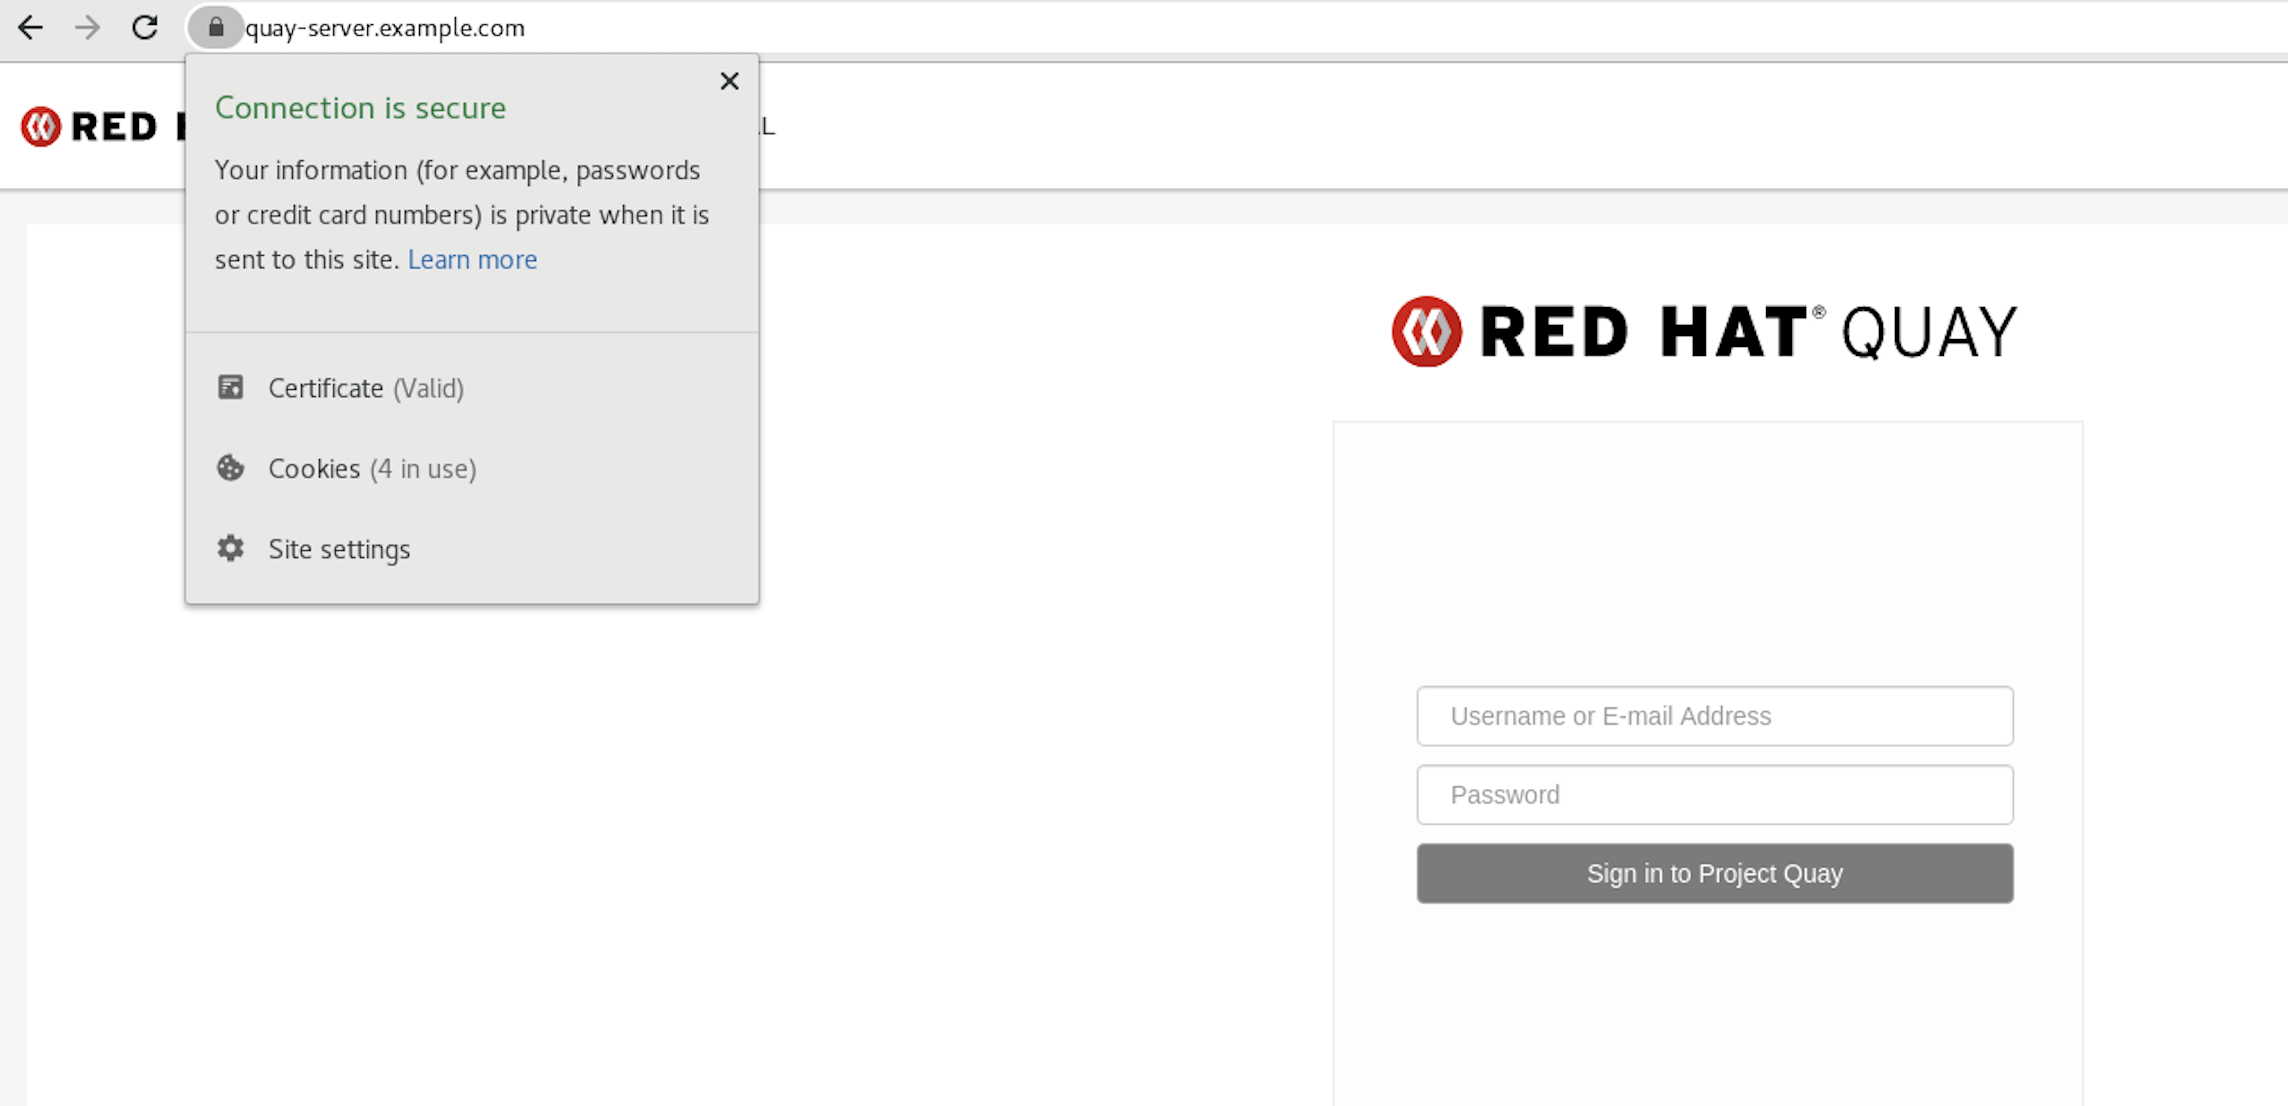
To remove the root CA from system-wide trust, delete the file and update the configuration:
$ sudo rm /etc/pki/ca-trust/source/anchors/rootCA.pem $ sudo update-ca-trust extract $ trust list | grep quay $
More information can be found in the RHEL 8 documentation in the chapter Using shared system certificates.
3.2. Red Hat Quay superuser
A superuser is a Quay user account that has extended privileges, including the ability to:
- Manage users
- Manage organizations
- Manage service keys
- View the change log
- Query the usage logs
- Create globally visible user messages
3.2.1. Adding a superuser to Quay using the UI
This section covers how to add a superuser using the Quay UI. To add a superuser using the command line interface, see the following section.
Start the
Quaycontainer in configuration mode, loading the existing configuration as a volume:$ sudo podman run --rm -it --name quay_config \ -p 8080:8080 \ -p 443:8443 \ -v $QUAY/config:/conf/stack:Z \ registry.redhat.io/quay/quay-rhel8:v3.5.7 config secret
-
Under the
Access Settingssection of the UI, enter the name of the user (in this instance,quayadmin) in theSuper Usersfield and clickAdd. Validate and download the
configurationfile and then terminate theQuaycontainer that is running in config mode. Extract theconfig.yamlfile to the configuration directory and restart theQuaycontainer in registry mode:$ sudo podman rm -f quay $ sudo podman run -d --rm -p 80:8080 -p 443:8443 \ --name=quay \ -v $QUAY/config:/conf/stack:Z \ -v $QUAY/storage:/datastorage:Z \ registry.redhat.io/quay/quay-rhel8:v3.5.7
3.2.2. Editing the config.yaml file to add a superuser
You can also add a superuser by editing the config.yaml file directly. The list of superuser accounts is stored as an array in the field SUPER_USERS.
Stop the container registry if it is running, and add the
SUPER_USERSarray to theconfig.yamlfile:$QUAY/config/config.yaml
SERVER_HOSTNAME: quay-server.example.com SETUP_COMPLETE: true SUPER_USERS: - quayadmin ...
3.2.3. Accessing the superuser admin panel
Restart the Quay registry:
$ sudo podman rm -f quay
$ sudo podman run -d --rm -p 80:8080 -p 443:8443 \
--name=quay \
-v $QUAY/config:/conf/stack:Z \
-v $QUAY/storage:/datastorage:Z \
registry.redhat.io/quay/quay-rhel8:v3.5.7
Access the Super User Admin Panel by clicking on the current user’s name or avatar in the top right-hand corner of the UI. If the user has been added as a superuser, an extra item is presented in the drop-down list called Super User Admin Panel.

3.2.3.1. Creating a globally visible user message
Using the Superuser Admin Panel, you can create Normal, Warning, or Error messages for your organization.
-
Click your user name in the top right-hand corner of the UI. Select
Super User Admin Panel. -
On the Red Hat Quay Management page, click
Globally visible user messageson the left hand pane. Click
Create Messageto show a drop-down menu containingNormal,Warning, andErrormessage types:
-
Enter a message by selecting
Click to set message, then clickCreate Message.
Messages can be deleted by clicking Options and then Delete Message.
3.3. Repository Mirroring
3.3.1. Repository mirroring
Red Hat Quay repository mirroring lets you mirror images from external container registries (or another local registry) into your Red Hat Quay cluster. Using repository mirroring, you can synchronize images to Red Hat Quay based on repository names and tags.
From your Red Hat Quay cluster with repository mirroring enabled, you can:
- Choose a repository from an external registry to mirror
- Add credentials to access the external registry
- Identify specific container image repository names and tags to sync
- Set intervals at which a repository is synced
- Check the current state of synchronization
To use the mirroring functionality, you need to:
- Enable Repository Mirroring in the Red Hat Quay configuration
- Run a repository mirroring worker
- Create mirrored repositories
All repository mirroring configuration can be performed using the configuration tool UI or via the Quay API
3.3.2. Mirroring configuration UI
Start the
Quaycontainer in configuration mode and select the Enable Repository Mirroring check box. If you want to require HTTPS communications and verify certificates during mirroring, select the HTTPS and cert verification check box.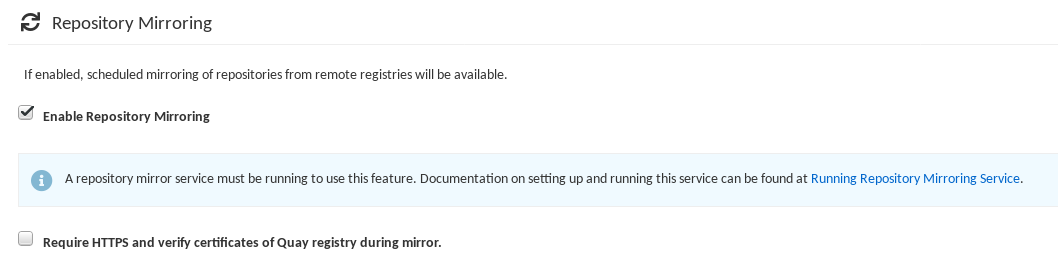
-
Validate and download the
configurationfile, and then restart Quay in registry mode using the updated config file.
3.3.3. Mirroring worker
To run the repository mirroring worker, start by running a
Quaypod with therepomirroroption:$ sudo podman run -d --name mirroring-worker \ -v $QUAY/config:/conf/stack:Z \ registry.redhat.io/quay/quay-rhel8:v3.5.7 repomirror
If you have configured TLS communications using a certificate
/root/ca.crt, then the following example shows how to start the mirroring worker:$ sudo podman run -d --name mirroring-worker \ -v $QUAY/config:/conf/stack:Z \ -v /root/ca.crt:/etc/pki/ca-trust/source/anchors/ca.crt \ registry.redhat.io/quay/quay-rhel8:v3.5.7 repomirror
3.3.4. Creating a mirrored repository
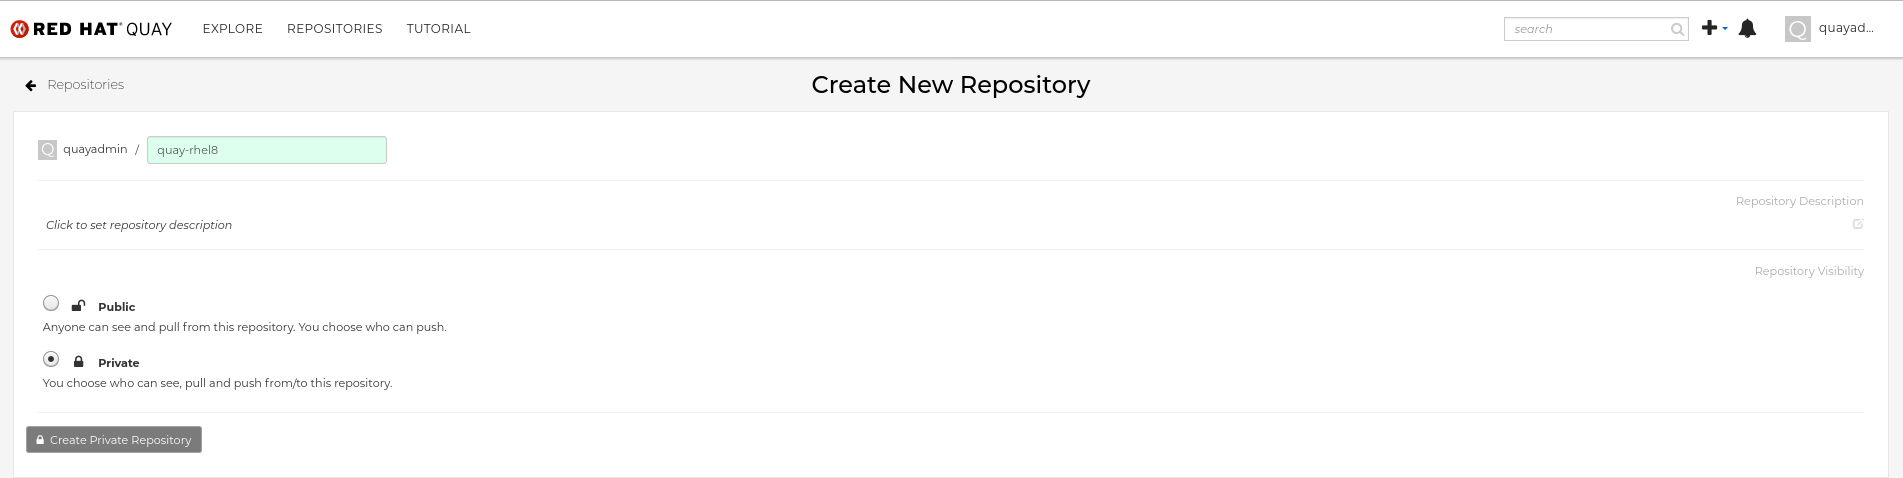
The steps shown in this section assume you already have enabled repository mirroring in the configuration for your Red Hat Quay cluster and that you have a deployed a mirroring worker.
When mirroring a repository from an external container registry, create a new private repository. Typically the same name is used as the target repository, for example, quay-rhel8:
3.3.4.1. Repository mirroring settings
In the Settings tab, set the Repository State to
Mirror:
In the Mirror tab, enter the details for connecting to the external registry, along with the tags, scheduling and access information:

Enter the details as required in the following fields:
-
Registry Location: The external repository you want to mirror, for example,
registry.redhat.io/quay/quay-rhel8 Tags: This field is required. You may enter a comma-separated list of individual tags or tag patterns. (See Tag Patterns section for details.)
NoteIn order for Quay to get the list of tags in the remote repository, one of the following requirements must be met:
- An image with the "latest" tag must exist in the remote repository OR
- At least one explicit tag, without pattern matching, must exist in the list of tags that you specify
- Start Date: The date on which mirroring begins. The current date and time is used by default.
- Sync Interval: Defaults to syncing every 24 hours. You can change that based on hours or days.
- Robot User: Create a new robot account or choose an existing robot account to do the mirroring.
- Username: The username for accessing the external registry holding the repository you are mirroring.
- Password: The password associated with the Username. Note that the password cannot include characters that require an escape character (\).
-
Registry Location: The external repository you want to mirror, for example,
3.3.4.2. Advanced settings
- In the Advanced Settings section, configure TLS and proxy, if required:
- Verify TLS: Check this box if you want to require HTTPS and to verify certificates, when communicating with the target remote registry.
- HTTP Proxy: Identify the HTTP proxy server needed to access the remote site, if one is required.
- HTTPS Proxy: Identify the HTTPS proxy server needed to access the remote site, if one is required.
- No Proxy: List of locations that do not require proxy
3.3.4.3. Synchronize now
To perform an immediate mirroring operation, press the Sync Now button on the repository’s Mirroring tab. The logs are available on the Usage Logs tab:
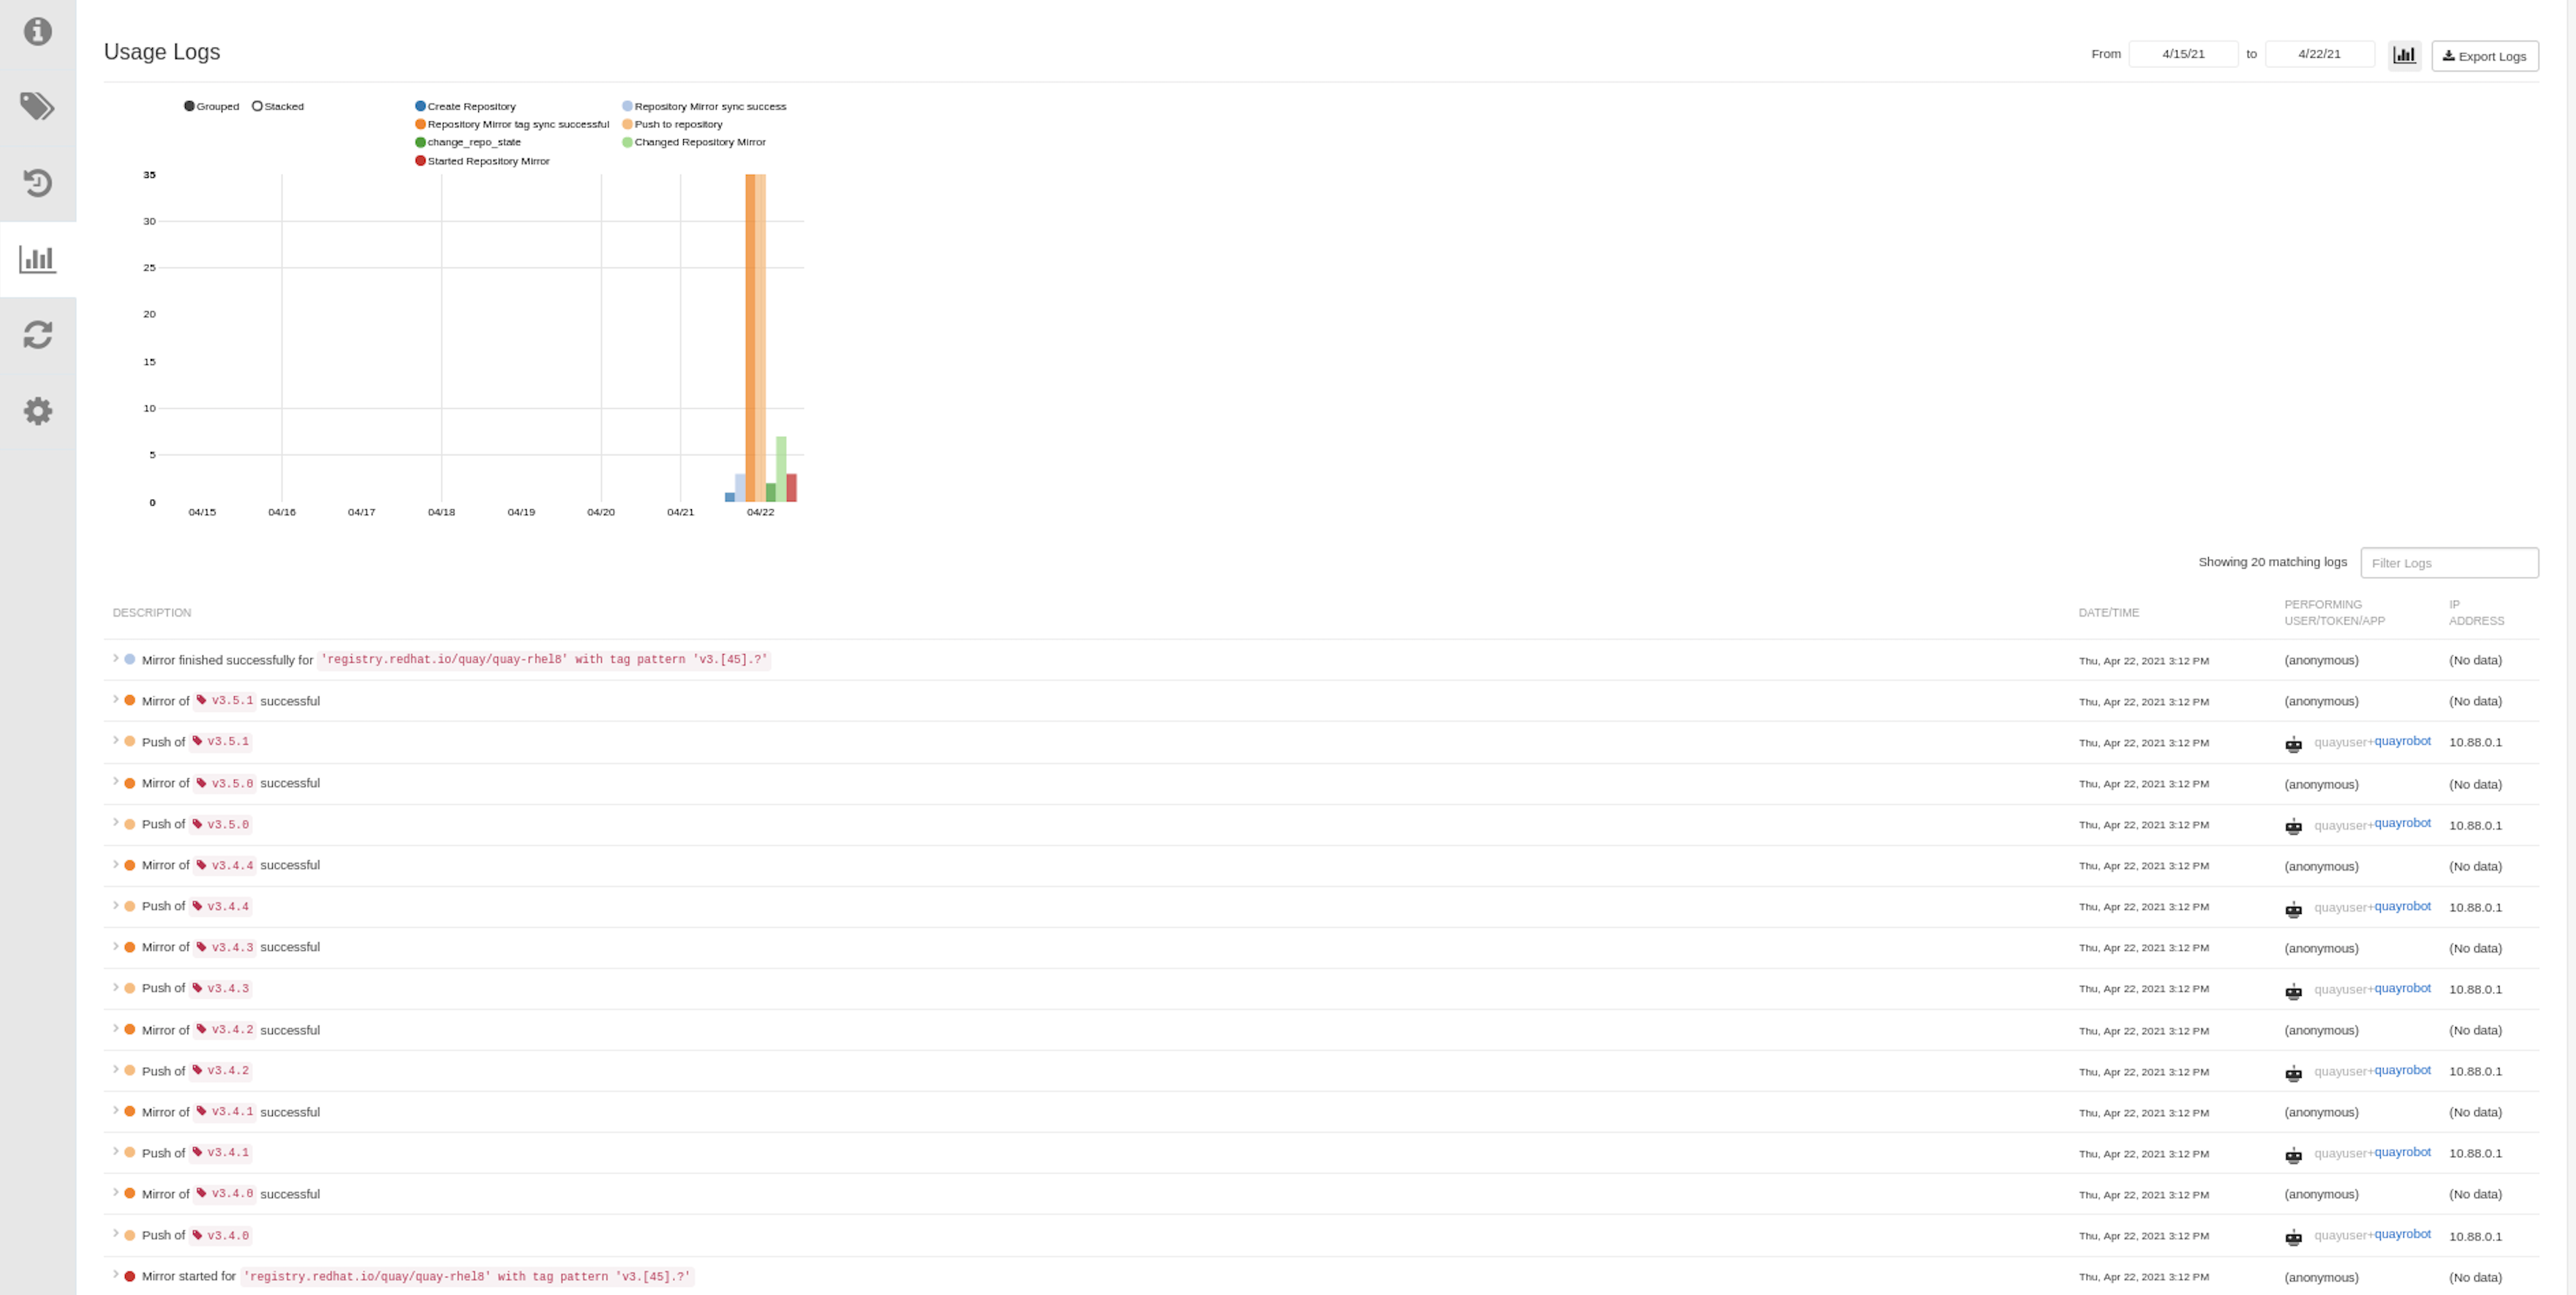
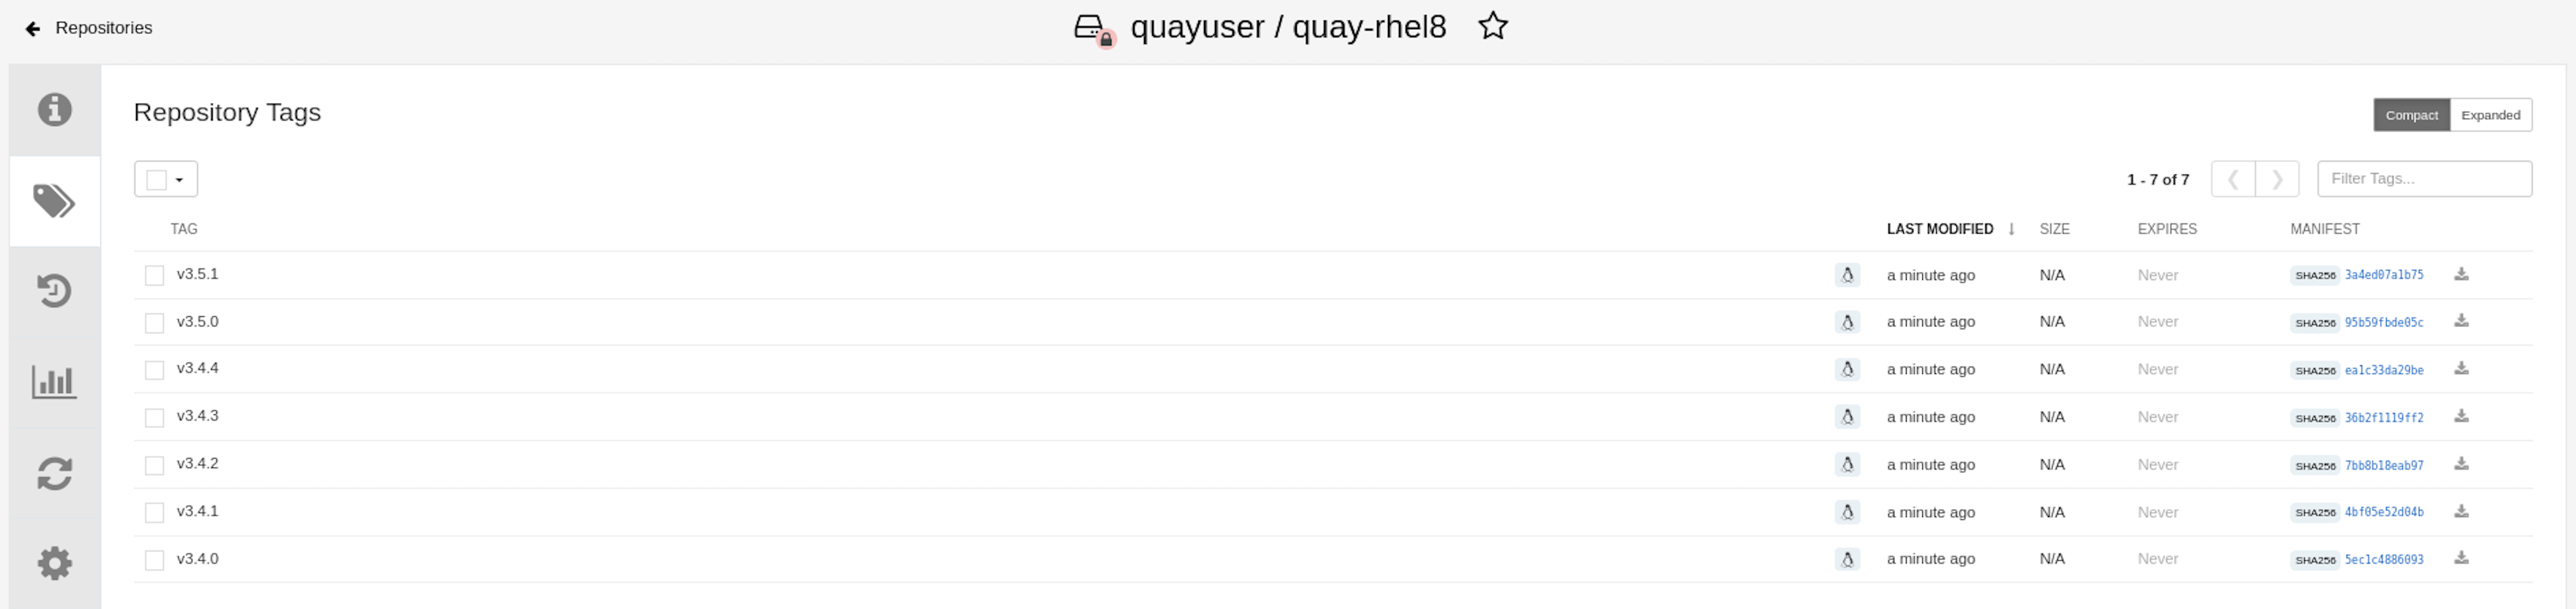
When the mirroring is complete, the images will appear in the Tags tab:
Below is an example of a completed Repository Mirroring screen:

3.3.5. Mirroring tag patterns
As noted above, at least one Tag must be explicitly entered (ie. not a tag pattern) or the tag "latest" must exist in the report repository. (The tag "latest" will not be synced unless specified in the tag list.). This is required for Quay to get the list of tags in the remote repository to compare to the specified list to mirror.
3.3.5.1. Pattern syntax
| Pattern | Description |
| * | Matches all characters |
| ? | Matches any single character |
| [seq] | Matches any character in seq |
| [!seq] | Matches any character not in seq |
3.3.5.2. Example tag patterns
| Example Pattern | Example Matches |
| v3* | v32, v3.1, v3.2, v3.2-4beta, v3.3 |
| v3.* | v3.1, v3.2, v3.2-4beta |
| v3.? | v3.1, v3.2, v3.3 |
| v3.[12] | v3.1, v3.2 |
| v3.[12]* | v3.1, v3.2, v3.2-4beta |
| v3.[!1]* | v3.2, v3.2-4beta, v3.3 |
3.4. Deploying Clair V4
Clair is an application for parsing image contents and reporting vulnerabilities affecting the contents. This is performed via static analysis and not at runtime. Clair’s analysis is broken into three distinct parts:
- Indexing: Indexing starts with submitting a Manifest to Clair. On receipt, Clair will fetch layers, scan their contents, and return an intermediate representation called an IndexReport. Manifests are Clair’s representation of a container image. Clair leverages the fact that OCI Manifests and Layers are content-addressed to reduce duplicated work. Once a Manifest is indexed, the IndexReport is persisted for later retrieval.
- Matching: Matching takes an IndexReport and correlates vulnerabilities affecting the manifest that the report represents. Clair is continually ingesting new security data and a request to the matcher will always provide you with the most up to date vulnerability analysis of an IndexReport.
- Notifications: Clair implements a notification service. When new vulnerabilities are discovered, the notifier service will determine if these vulnerabilities affect any indexed Manifests. The notifier will then take action according to its configuration.
3.4.1. Deploying a separate database for Clair
Clair requires a Postgres database. You can share a common database between Quay and Clair if Quay is also using Postgres, but in this example a separate, Clair-specific database is deployed.
In this proof-of-concept scenario, you will use a directory on the local file system to persist database data.
In the installation folder, denoted here by the variable $QUAY, create a directory for the Clair database data and set the permissions appropriately:
$ mkdir -p $QUAY/postgres-clairv4 $ setfacl -m u:26:-wx $QUAY/postgres-clairv4
Use podman to run the Postgres container, specifying the username, password, database name and port, together with the volume definition for database data. As the standard Postgres port,
5432, is already in use by the Quay deployment, expose a different port, in this instance5433:$ sudo podman run -d --rm --name postgresql-clairv4 \ -e POSTGRESQL_USER=clairuser \ -e POSTGRESQL_PASSWORD=clairpass \ -e POSTGRESQL_DATABASE=clair \ -e POSTGRESQL_ADMIN_PASSWORD=adminpass \ -p 5433:5432 \ -v $QUAY/postgres-clairv4:/var/lib/pgsql/data:Z \ registry.redhat.io/rhel8/postgresql-10:1
Ensure that the Postgres
uuid-osspmodule is installed, as it is required by Clair:$ sudo podman exec -it postgresql-clairv4 /bin/bash -c 'echo "CREATE EXTENSION IF NOT EXISTS \"uuid-ossp\"" | psql -d clair -U postgres'
3.4.2. Quay configuration for Clair
Stop the
Quaycontainer if it is running, and restart it in configuration mode, loading the existing configuration as a volume:$ sudo podman run --rm -it --name quay_config \ -p 80:8080 -p 443:8443 \ -v $QUAY/config:/conf/stack:Z \ registry.redhat.io/quay/quay-rhel8:v3.5.7 config secret
Log in to the configuration tool and enable scanning in the Security Scanner section of the UI. Set the HTTP endpoint for Clair using a port that is not already in use on the
quay-serversystem, for example8081. Create a Clair pre-shared key (PSK) using theGenerate PSKbutton, for example:-
Security Scanner Endpoint:
http://quay-server.example.com:8081 Security Scanner PSK:
MTU5YzA4Y2ZkNzJoMQ==The UI for setting the scanner data is shown in the following image:
Security Scanner UI

-
Security Scanner Endpoint:
Validate and download the
configurationfile and then stop theQuaycontainer that is running the configuration editor. Extract the configuration bundle as before into the$QUAY/configdirectory.$ cp ~/Downloads/quay-config.tar.gz $QUAY/config $ cd $QUAY/config $ tar xvf quay-config.tar.gz
The Quay configuration file is now updated to contain the following fields for the security scanner:
$QUAY/config/config.yaml
... FEATURE_SECURITY_NOTIFICATIONS: false FEATURE_SECURITY_SCANNER: true ... SECURITY_SCANNER_INDEXING_INTERVAL: 30 SECURITY_SCANNER_V4_ENDPOINT: http://quay-server.example.com:8081 SECURITY_SCANNER_V4_PSK: MTU5YzA4Y2ZkNzJoMQ== SERVER_HOSTNAME: quay-server.example.com ...
3.4.3. Clair configuration
Detailed information on Clair configuration is available at https://github.com/quay/clair/blob/main/Documentation/reference/config.md.
Create a config.yaml file in your
/etc/directory, for example,/etc/clairv4/config/config.yaml. Use the following example, which provides a minimal configuration for use in a proof of concept deployment:http_listen_addr: :8081 introspection_addr: :8089 log_level: debug indexer: connstring: host=quay-server.example.com port=5433 dbname=clair user=clairuser password=clairpass sslmode=disable scanlock_retry: 10 layer_scan_concurrency: 5 migrations: true matcher: connstring: host=quay-server.example.com port=5433 dbname=clair user=clairuser password=clairpass sslmode=disable max_conn_pool: 100 run: "" migrations: true indexer_addr: clair-indexer notifier: connstring: host=quay-server.example.com port=5433 dbname=clair user=clairuser password=clairpass sslmode=disable delivery_interval: 1m poll_interval: 5m migrations: true auth: psk: key: "MTU5YzA4Y2ZkNzJoMQ==" iss: ["quay"] # tracing and metrics trace: name: "jaeger" probability: 1 jaeger: agent_endpoint: "localhost:6831" service_name: "clair" metrics: name: "prometheus"-
http_listen_addris set to the port of the Clair HTTP endpoint that you specified in the Quay configuration tool, in this case:8081. -
The Clair pre-shared key (PSK) that you generated in the Quay configuration tool is used for authentication, with the issuer, specified in the
issfield, set toquay.
3.4.4. Running Clair
Use the
podman runcommand to run the Clair container, exposing the HTTP endpoint port that you specified in the configuration tool, in this case8081:$ sudo podman run -d --rm --name clairv4 \ -p 8081:8081 -p 8089:8089 \ -e CLAIR_CONF=/clair/config.yaml -e CLAIR_MODE=combo \ -v /etc/clairv4/config:/clair:Z \ registry.redhat.io/quay/clair-rhel8:v3.5.7
Next, restart the
Quaycontainer using the updated configuration file containing the scanner settings:$ sudo podman run -d --rm -p 80:8080 -p 443:8443 \ --name=quay \ -v $QUAY/config:/conf/stack:Z \ -v $QUAY/storage:/datastorage:Z \ registry.redhat.io/quay/quay-rhel8:v3.5.7
3.4.5. Using Clair security scanning
From the command line, log in to the registry:
$ sudo podman login --tls-verify=false quay-server.example.com
Username: quayadmin
Password:

Login Succeeded!
Pull, tag and push a sample image to the registry:
$ sudo podman pull ubuntu:20.04
$ sudo podman tag docker.io/library/ubuntu:20.04 quay-server.example.com/quayadmin/ubuntu:20.04
$ sudo podman push --tls-verify=false quay-server.example.com/quayadmin/ubuntu:20.04
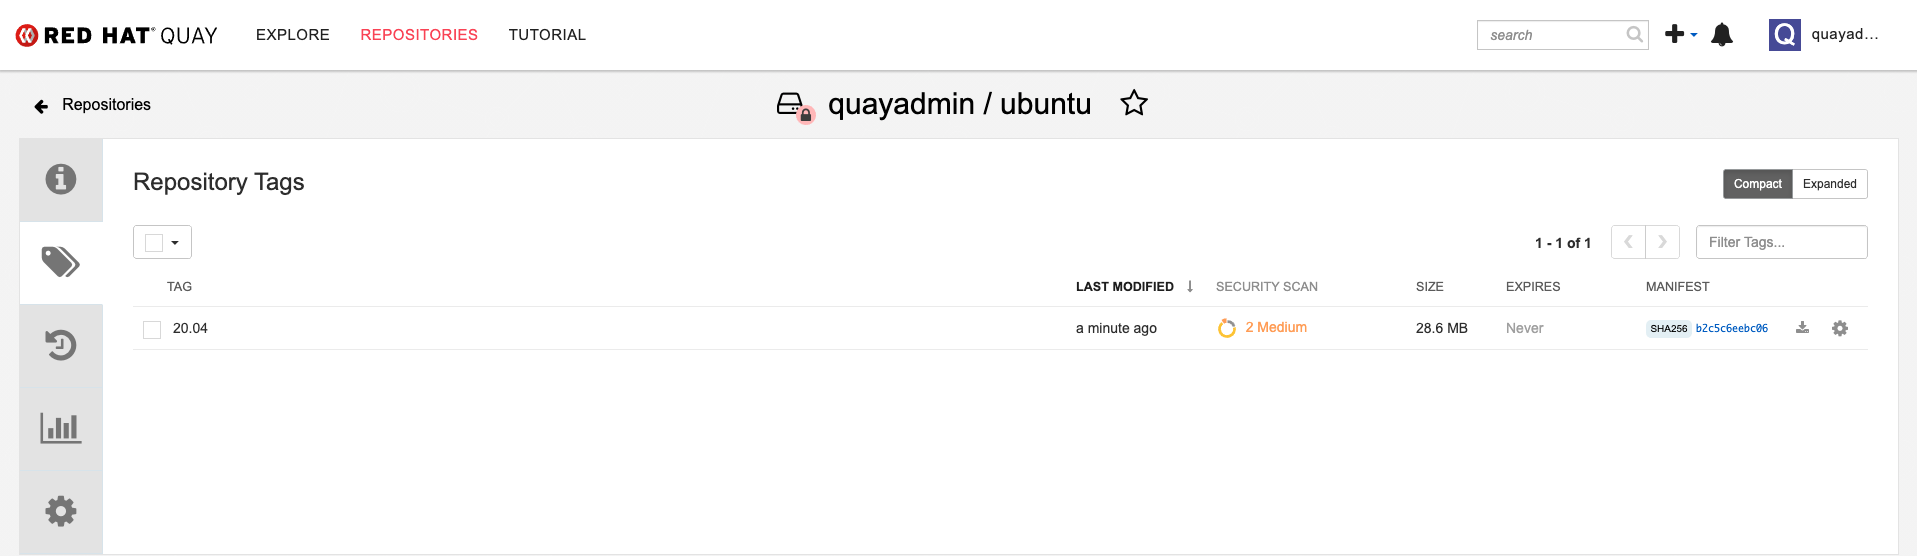
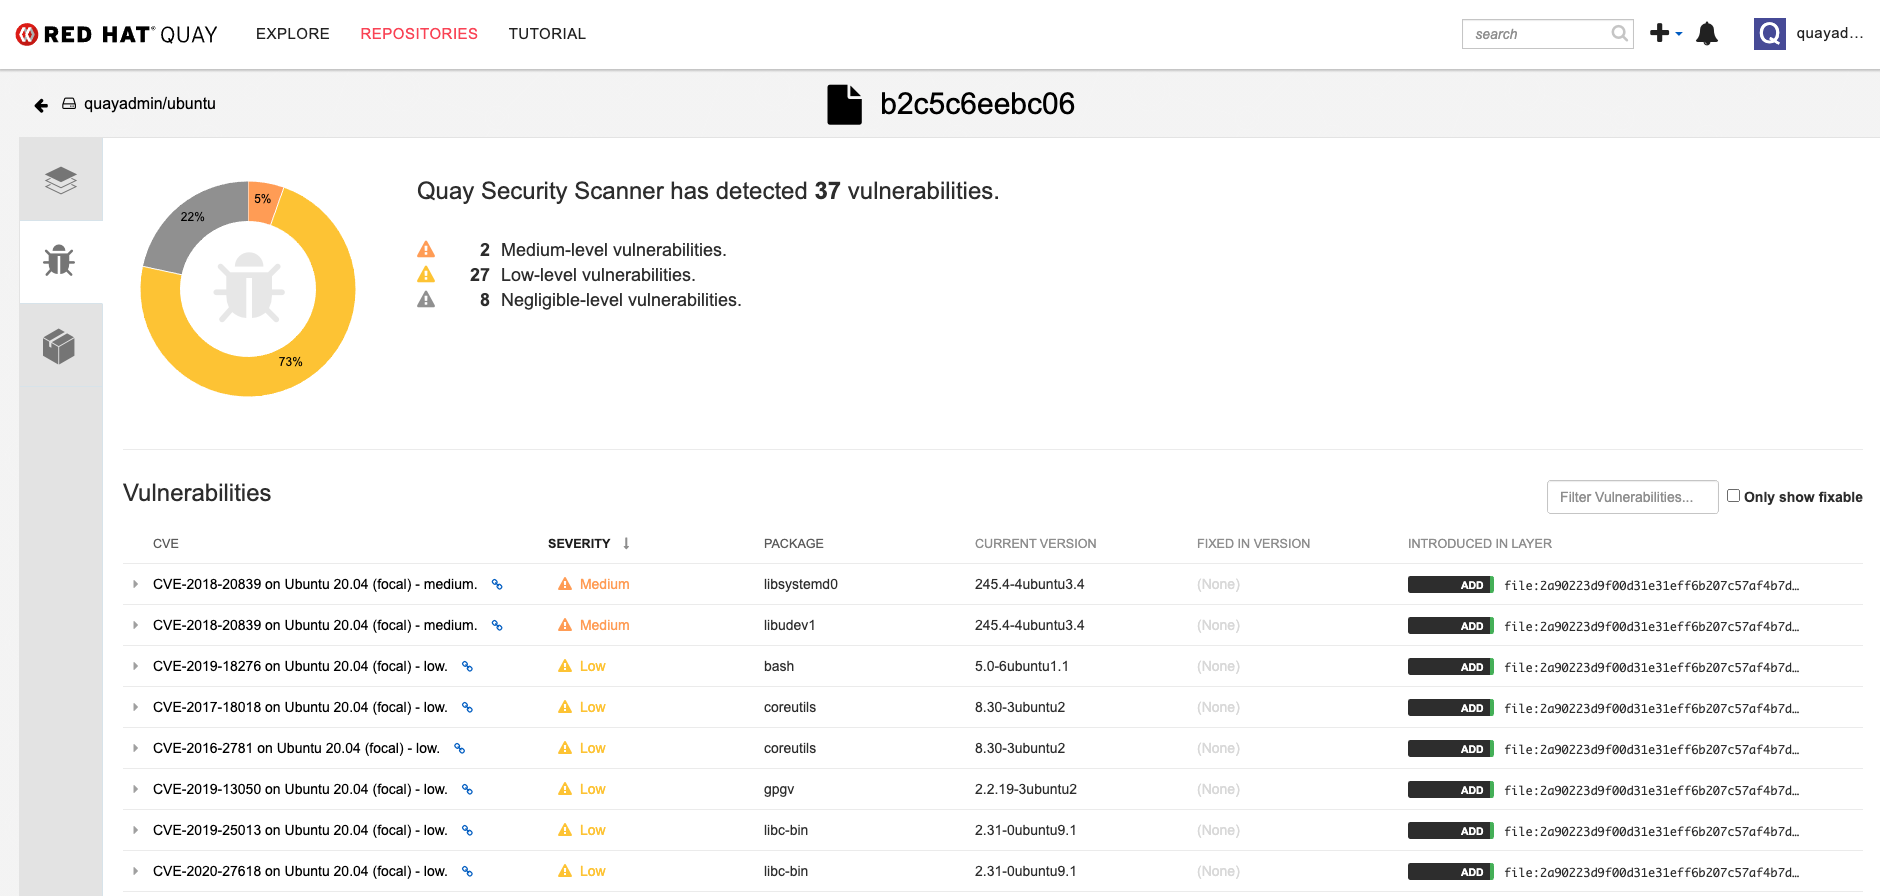
The results from the security scanning can be seen in the Quay UI, as shown in the following images:
Scanning summary
Scanning details
3.5. Restarting containers
Because the --restart option is not fully supported by podman, you can configure podman as a systemd service, as described in Porting containers to systemd using Podman
3.5.1. Using systemd unit files with Podman
By default, Podman generates a unit file for existing containers or pods. You can generate more portable systemd unit files using the podman generate systemd --new command. The --new flag instructs Podman to generate unit files that create, start and remove containers.
Create the systemd unit files from a running Red Hat Quay registry as follows:
$ sudo podman generate systemd --new --files --name redis
$ sudo podman generate systemd --new --files --name postgresql-quay
$ sudo podman generate systemd --new --files --name quay
$ sudo podman generate systemd --new --files --name postgresql-clairv4
$ sudo podman generate systemd --new --files --name clairv4
Copy the unit files to
/usr/lib/systemd/systemfor installing them as a root user:$ sudo cp -Z container-redis.service /usr/lib/systemd/system $ sudo cp -Z container-postgresql-quay.service /usr/lib/systemd/system $ sudo cp -Z container-quay.service /usr/lib/systemd/system $ sudo cp -Z container-postgresql-clairv4.service /usr/lib/systemd/system $ sudo cp -Z container-clairv4.service /usr/lib/systemd/system
Reload systemd manager configuration:
$ sudo systemctl daemon-reload
Enable the services and start them at boot time:
$ sudo systemctl enable --now container-redis.service
$ sudo systemctl enable --now container-postgresql-quay.service
$ sudo systemctl enable --now container-quay.service
$ sudo systemctl enable --now container-postgresql-clairv4.service
$ sudo systemctl enable --now container-clairv4.service
3.5.2. Starting, stopping and checking the status of services
Check the status of the Quay components:
$ sudo systemctl status container-redis.service
$ sudo systemctl status container-postgresql-quay.service
$ sudo systemctl status container-quay.service
$ sudo systemctl status container-postgresql-clairv4.service
$ sudo systemctl status container-clairv4.service
To stop the Quay component services:
$ sudo systemctl stop container-redis.service
$ sudo systemctl stop container-postgresql-quay.service
$ sudo systemctl stop container-quay.service
$ sudo systemctl stop container-postgresql-clairv4.service
$ sudo systemctl stop container-clairv4.service
To start the Quay component services:
$ sudo systemctl start container-redis.service
$ sudo systemctl start container-postgresql-quay.service
$ sudo systemctl start container-quay.service
$ sudo systemctl start container-postgresql-clairv4.service
$ sudo systemctl start container-clairv4.service
3.5.3. Testing restart after reboot
Once you have the services configured and enabled, reboot the system. When the system has re-started, use podman ps to check that all the containers for the Quay components have been restarted:
$ sudo podman ps -a
CONTAINER ID  IMAGE                                       COMMAND         CREATED         STATUS             PORTS                   NAMES
4e87c7889246  registry.redhat.io/rhel8/postgresql-10:1    run-postgresql  19 seconds ago  Up 18 seconds ago  0.0.0.0:5432->5432/tcp  postgresql-quay
b8fbac1920d4  registry.redhat.io/rhel8/redis-5:1          run-redis       19 seconds ago  Up 18 seconds ago  0.0.0.0:6379->6379/tcp  redis
d959d5bf7a24  registry.redhat.io/rhel8/postgresql-10:1    run-postgresql  18 seconds ago  Up 18 seconds ago  0.0.0.0:5433->5432/tcp  postgresql-clairv4
e75ff8651dbd  registry.redhat.io/quay/clair-rhel8:v3.4.0                  18 seconds ago  Up 17 seconds ago  0.0.0.0:8081->8080/tcp  clairv4
In this instance, the Quay container itself has failed to start up. This is due to the fact that, when security scanning is enabled in Quay, it tries to connect to Clair on startup. However, Clair has not finished initializing and cannot accept connections and, as a result, Quay terminates immediately. To overcome this issue, you need to configure the Quay service to have a dependency on the Clair service, as shown in the following section.
3.5.4. Configuring Quay’s dependency on Clair
In the systemd service file for Quay, set up a dependency on the Clair service in the [Unit] section by setting After=container-clairv4.service. To give the Clair container time to initialize, add a delay in the [Service] section, for example RestartSec=30. Here is an example of the modified Quay file, after configuring the dependency on Clair:
/usr/lib/systemd/system/container-quay.service
# container-quay.service
# autogenerated by Podman 2.0.5
# Tue Feb 16 17:02:26 GMT 2021

[Unit]
Description=Podman container-quay.service
Documentation=man:podman-generate-systemd(1)
Wants=network.target
After=container-clairv4.service

[Service]
Environment=PODMAN_SYSTEMD_UNIT=%n
Restart=on-failure
RestartSec=30
ExecStartPre=/bin/rm -f %t/container-quay.pid %t/container-quay.ctr-id
ExecStart=/usr/bin/podman run --conmon-pidfile %t/container-quay.pid --cidfile %t/container-quay.ctr-id --cgroups=no-conmon -d --rm -p 8080:8080 --name=quay -v /home/user1/quay/config:/conf/stack:Z -v /home/user1/quay/storage:/datastorage:Z registry.redhat.io/quay/quay-rhel8:v3.4.0
ExecStop=/usr/bin/podman stop --ignore --cidfile %t/container-quay.ctr-id -t 10
ExecStopPost=/usr/bin/podman rm --ignore -f --cidfile %t/container-quay.ctr-id
PIDFile=%t/container-quay.pid
KillMode=none
Type=forking

[Install]
WantedBy=multi-user.target default.target
Once you have updated the Quay service configuration, reboot the server and immediately run podman ps:
$ sudo podman ps -a
CONTAINER ID  IMAGE                                       COMMAND         CREATED         STATUS             PORTS                   NAMES
4e87c7889246  registry.redhat.io/rhel8/postgresql-10:1    run-postgresql  29 seconds ago  Up 28 seconds ago  0.0.0.0:5432->5432/tcp  postgresql-quay
b8fbac1920d4  registry.redhat.io/rhel8/redis-5:1          run-redis       29 seconds ago  Up 28 seconds ago  0.0.0.0:6379->6379/tcp  redis
d959d5bf7a24  registry.redhat.io/rhel8/postgresql-10:1    run-postgresql  28 seconds ago  Up 28 seconds ago  0.0.0.0:5433->5432/tcp  postgresql-clairv4
e75ff8651dbd  registry.redhat.io/quay/clair-rhel8:v3.4.0                  28 seconds ago  Up 27 seconds ago  0.0.0.0:8081->8080/tcp  clairv4
Initially, the Quay container will not be available, but once the RestartSec delay has expired, it should start up:
$ sudo podman ps -a
CONTAINER ID  IMAGE                                       COMMAND         CREATED         STATUS             PORTS                   NAMES
4e87c7889246  registry.redhat.io/rhel8/postgresql-10:1    run-postgresql  35 seconds ago  Up 34 seconds ago  0.0.0.0:5432->5432/tcp  postgresql-quay
ab9f0e6ad7c3  registry.redhat.io/quay/quay-rhel8:v3.4.0   registry        3 seconds ago   Up 2 seconds ago   0.0.0.0:8080->8080/tcp  quay
b8fbac1920d4  registry.redhat.io/rhel8/redis-5:1          run-redis       35 seconds ago  Up 34 seconds ago  0.0.0.0:6379->6379/tcp  redis
d959d5bf7a24  registry.redhat.io/rhel8/postgresql-10:1    run-postgresql  34 seconds ago  Up 34 seconds ago  0.0.0.0:5433->5432/tcp  postgresql-clairv4
e75ff8651dbd  registry.redhat.io/quay/clair-rhel8:v3.4.0                  34 seconds ago  Up 33 seconds ago  0.0.0.0:8081->8080/tcp  clairv4
The CREATED field for the Quay container shows the 30 second difference in creation time, as configured in the service definition.
Log in to the Red Hat Quay registry at quay-server.example.com and ensure that everything has restarted correctly.
3.6. Helm OCI Support and Red Hat Quay
Container registries such as Red Hat Quay were originally designed to support container images in the Docker image format. To promote the use of additional runtimes apart from Docker, the Open Container Initiative (OCI) was created to provide a standardization surrounding container runtimes and image formats. Most container registries support the OCI standardization as it is based on the Docker image manifest V2, Schema 2 format.
In addition to container images, a variety of artifacts have emerged that support not just individual applications, but the Kubernetes platform as a whole. These range from Open Policy Agent (OPA) policies for security and governance to Helm charts and Operators to aid in application deployment.
Red Hat Quay is a private container registry that not only stores container images, but supports an entire ecosystem of tooling to aid in the management of containers. With the release of Red Hat Quay 3.5, support for the use of OCI based artifacts, and specifically Helm Charts, has graduated from Technical Preview (TP) and now has General Availability (GA) status.
When Red Hat Quay 3.5 is deployed using the OpenShift Operator, support for Helm and OCI artifacts is now enabled by default. If you need to explicitly enable the feature, for example, if it has previously been disabled or if you have upgraded from a version where it is not enabled by default, see the section Explicitly enabling OCI and Helm support.
3.6.1. Helm and OCI prerequisites
Trusted certificates: Communication between the Helm client and Quay is facilitated over HTTPS and as of Helm 3.5, support is only available for registries communicating over HTTPS with trusted certificates. In addition, the operating system must trust the certificates exposed by the registry. Support in future Helm releases will allow for communicating with remote registries insecurely. With that in mind, ensure that your operating system has been configured to trust the certificates used by Quay, for example:
$ sudo cp rootCA.pem   /etc/pki/ca-trust/source/anchors/
$ sudo update-ca-trust extract
-
Experimental feature: Many of the commands for interacting with Helm and OCI registries make use of the
helm chartsubcommand. At the time of writing, OCI support in Helm is still marked as an “experimental” feature and must be enabled explicitly. This is accomplished by setting the environment variableHELM_EXPERIMENTAL_OCI=1. Install Helm client: Download your desired version from https://github.com/helm/helm/releases, for example, https://get.helm.sh/helm-v3.5.3-linux-amd64.tar.gz. Unpack it and move the helm binary to its desired destination:
$ tar -zxvf helm-v3.5.3-linux-amd64.tar.gz
$ mv linux-amd64/helm /usr/local/bin/helm
-
Create organization in Quay: Create a new organization for storing the Helm charts, using the Quay registry UI. For example, create an organization named
helm.
3.6.2. Using Helm charts with Quay
Helm, as a graduated project of the Cloud Native Computing Foundation (CNCF), has become the de facto package manager for Kubernetes as it simplifies how applications are packaged and deployed. Helm uses a packaging format called Charts which contain the Kubernetes resources representing an application. Charts can be made available for general distribution and consumption in repositories. A Helm repository is an HTTP server that serves an index.yaml metadata file and optionally a set of packaged charts. Beginning with Helm version 3, support was made available for distributing charts in OCI registries as an alternative to a traditional repository. To demonstrate how Quay can be used as a registry for Helm charts, an existing chart from a Helm repository will be used to showcase the interaction with OCI registries for chart developers and users.
In the following example, a sample etherpad chart is downloaded from from the Red Community of Practice (CoP) repository and pushed to a local Red Hat Quay repository using the following steps:
- Add the appropriate repository
- Update the repository with the latest metadata
-
Download and untar the chart to create a local directory called
etherpad
For example:
$ helm repo add redhat-cop https://redhat-cop.github.io/helm-charts
$ helm repo update
$ helm pull redhat-cop/etherpad --version=0.0.4 --untar
Tagging the chart requires use of the helm chart save command - this corresponds to using podman tag for tagging images.
$ helm chart save ./etherpad example-registry-quay-quay-enterprise.apps.user1.example.com/helm/etherpad:0.0.4

ref:     example-registry-quay-quay-enterprise.apps.user1.example.com/helm/etherpad:0.0.4
digest:  6850d9b21dd4b87cf20ad49f2e2c7def9655c52ea573e1ddb9d1464eeb6a46a6
size:    3.5 KiB
name:    etherpad
version: 0.0.4
0.0.4: saved
Use the helm chart list command to see the local instance of the chart:
helm chart list

REF                                                                               NAME     VERSION DIGEST SIZE   CREATED
example-registry-quay-quay-enterprise.apps.user1.example.com/helm/etherpad:0.0.4 etherpad 0.0.4   ce0233f 3.5 KiB 23 seconds
Before pushing the chart, log in to the repository using the helm registry login command:
$ helm registry login example-registry-quay-quay-enterprise.apps.user1.example.com
Username: quayadmin
Password:
Login succeeded
Push the chart to your local Quay repository using the helm chart push command:
$ helm chart push example-registry-quay-quay-enterprise.apps.user1.example.com/helm/etherpad:0.0.4

The push refers to repository [example-registry-quay-quay-enterprise.apps.user1.example.com/helm/etherpad]
ref:     example-registry-quay-quay-enterprise.apps.user1.example.com/helm/etherpad:0.0.4
digest:  ce0233fd014992b8e27cc648cdabbebd4dd6850aca8fb8e50f7eef6f2f49833d
size:    3.5 KiB
name:    etherpad
version: 0.0.4
0.0.4: pushed to remote (1 layer, 3.5 KiB total)
To test that the push worked, delete the local copy and then pull the chart from the repository:
$ helm chart rm example-registry-quay-quay-enterprise.apps.user1.example.com/helm/etherpad:0.0.4
$ rm -rf etherpad
$ helm chart pull example-registry-quay-quay-enterprise.apps.user1.example.com/helm/etherpad:0.0.4

0.0.4: Pulling from example-registry-quay-quay-enterprise.apps.user1.example.com/helm/etherpad
ref:     example-registry-quay-quay-enterprise.apps.user1.example.com/helm/etherpad:0.0.4
digest:  6850d9b21dd4b87cf20ad49f2e2c7def9655c52ea573e1ddb9d1464eeb6a46a6
size:    3.5 KiB
name:    etherpad
version: 0.0.4
Status: Downloaded newer chart for example-registry-quay-quay-enterprise.apps.user1.example.com/helm/etherpad:0.0.4
Use the helm chart export command to extract the chart files:
$ helm chart export example-registry-quay-quay-enterprise.apps.user1.example.com/helm/etherpad:0.0.4

ref:     example-registry-quay-quay-enterprise.apps.user1.example.com/helm/etherpad:0.0.4
digest:  ce0233fd014992b8e27cc648cdabbebd4dd6850aca8fb8e50f7eef6f2f49833d
size:    3.5 KiB
name:    etherpad
version: 0.0.4
Exported chart to etherpad/
3.6.3. OCI and Helm configuration
Support for Helm and OCI artifacts is now enabled by default in Red Hat Quay 3.5. If you need to explicitly enable the feature, for example, if it has previously been disabled or if you have upgraded from a version where it is not enabled by default, you need to add two properties in the Quay configuration to enable the use of OCI artifacts:
FEATURE_GENERAL_OCI_SUPPORT: true
FEATURE_HELM_OCI_SUPPORT: true
Table 3.1. OCI and Helm configuration
| Field | Type | Description |
|---|---|---|
| FEATURE_GENERAL_OCI_SUPPORT | Boolean |
Enable support for OCI artifacts |
| FEATURE_HELM_OCI_SUPPORT | Boolean |
Enable support for Helm artifacts |
3.7. FIPS readiness and compliance
FIPS (the Federal Information Processing Standard developed by the National Institute of Standards and Technology, NIST) is regarded as the gold standard for securing and encrypting sensitive data, particularly in heavily regulated areas such as banking, healthcare and the public sector. Red Hat Enterprise Linux and Red Hat OpenShift Container Platform support this standard by providing a FIPS mode in which the system would only allow usage of certain, FIPS-validated cryptographic modules, like openssl. This ensures FIPS compliance.
Red Hat Quay supports running on RHEL and OCP in FIPS mode in production since version 3.5. Furthermore, Red Hat Quay itself also commits to exclusively using cryptography libraries that are validated or are in the process of being validated by NIST. Red Hat Quay 3.5 has pending FIPS 140-2 validation based on the RHEL 8.3 cryptography libraries. As soon as that validation is finalized, Red Hat Quay will be officially FIPS compliant.
Chapter 4. Next steps
This document shows how to configure and deploy a proof-of-concept version of Red Hat Quay. For more information on deploying to a production environment, see the guide "Deploy Red Hat Quay - High Availability".
The "Use Red Hat Quay" guide shows you how to:
- Add users and repositories
- Use tags
- Automatically build Dockerfiles with build workers
- Set up build triggers
- Add notifications for repository events
The "Manage Red Hat Quay" guide shows you how to:
- Use SSL and TLS
- Enable security scanning with Clair
- Use repository mirroring
- Configure LDAP authentication
- Use georeplication of storage