
Chapter 3. Advanced Red Hat Quay deployment
3.1. Quay superuser
A superuser is a Quay user account that has extended privileges, including the ability to:
- Manage users
- Manage organizations
- Manage service keys
- View the change log
- Query the usage logs
- Create globally visible user messages
3.1.1. Adding a superuser to Quay using the UI
Stop the Quay registry if it is running, and restart the container in configuration mode, loading the existing configuration as a volume:
$ sudo podman run --rm -it --name quay_config \
  -p 8080:8080 \
  -v $QUAY/config:/conf/stack:Z \
  registry.redhat.io/quay/quay-rhel8:v3.4.7 config secret
In the Access Settings section of the UI, enter the name of the user (in this instance, quayadmin) in the Super Users field and press Add.
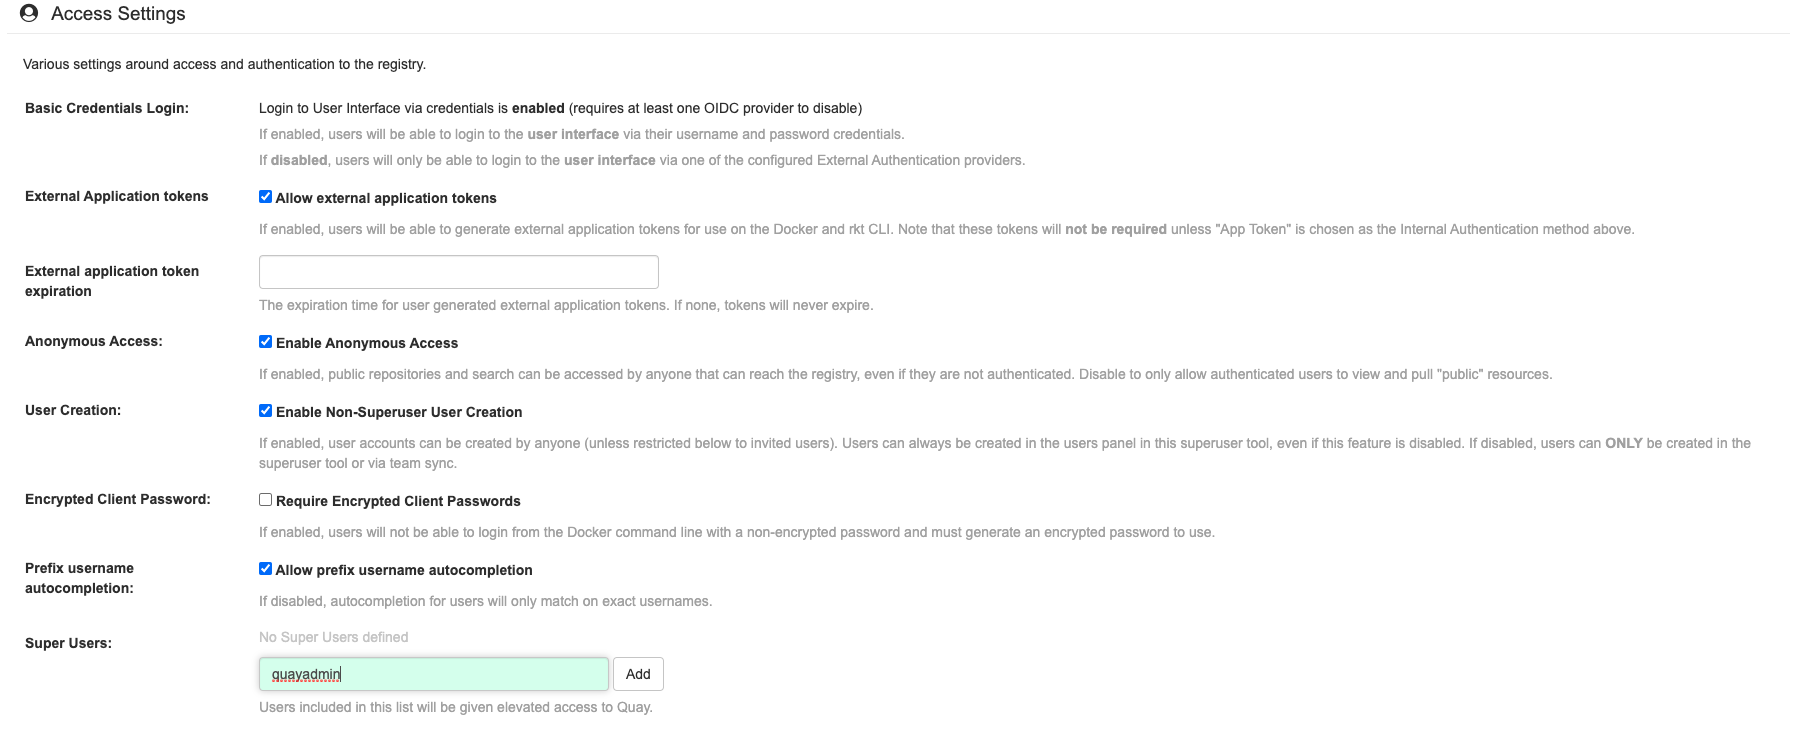
Validate and download the configuration bundle and then terminate the Quay container that is running in config mode. Extract the config.yaml file to the configuration directory and restart the Quay container in registry mode.
3.1.2. Editing the config.yaml file to add a superuser
You can also add a superuser by editing the config.yaml file directly. The list of superuser accounts is stored as an array in the field SUPER_USERS:
$QUAY/config/config.yaml
SERVER_HOSTNAME: quay-server:8080
SETUP_COMPLETE: true
SUPER_USERS:
  - quayadmin
...
3.1.3. Accessing the superuser admin panel
To access the Super User Admin Panel, click on the current user’s name or avatar in the top right-hand corner of the UI. If the user has been added as a superuser, an extra item is presented in the drop-down list called Super User Admin Panel.

3.2. Deploying Clair V4
Clair is an application for parsing image contents and reporting vulnerabilities affecting the contents. This is performed via static analysis and not at runtime. Clair’s analysis is broken into three distinct parts:
- Indexing: Indexing starts with submitting a Manifest to Clair. On receipt, Clair will fetch layers, scan their contents, and return an intermediate representation called an IndexReport. Manifests are Clair’s representation of a container image. Clair leverages the fact that OCI Manifests and Layers are content-addressed to reduce duplicated work. Once a Manifest is indexed, the IndexReport is persisted for later retrieval.
- Matching: Matching takes an IndexReport and correlates vulnerabilities affecting the manifest that the report represents. Clair is continually ingesting new security data and a request to the matcher will always provide you with the most up to date vulnerability analysis of an IndexReport.
- Notifications: Clair implements a notification service. When new vulnerabilities are discovered, the notifier service will determine if these vulnerabilities affect any indexed Manifests. The notifier will then take action according to its configuration.
3.2.1. Deploying a separate database for Clair
Clair requires a Postgres database. You can share a common database between Quay and Clair if Quay is also using Postgres, but in this example a separate, Clair-specific database is deployed.
In this proof-of-concept scenario, you will use a directory on the local file system to persist database data.
In the installation folder, denoted here by the variable $QUAY, create a directory for the Clair database data and set the permissions appropriately:
$ mkdir -p $QUAY/postgres-clairv4
$ setfacl -m u:26:-wx $QUAY/postgres-clairv4
Use podman to run the Postgres container, specifying the username, password, database name and port, together with the volume definition for database data. As the standard Postgres port,
5432, is already in use by the Quay deployment, expose a different port, in this instance5433:$ sudo podman run -d --rm --name postgresql-clairv4 \ -e POSTGRESQL_USER=clairuser \ -e POSTGRESQL_PASSWORD=clairpass \ -e POSTGRESQL_DATABASE=clair \ -e POSTGRESQL_ADMIN_PASSWORD=adminpass \ -p 5433:5432 \ -v $QUAY/postgres-clairv4:/var/lib/pgsql/data:Z \ registry.redhat.io/rhel8/postgresql-10:1
Ensure that the Postgres
uuid-osspmodule is installed, as it is required by Clair:$ sudo podman exec -it postgresql-clairv4 /bin/bash -c 'echo "CREATE EXTENSION IF NOT EXISTS \"uuid-ossp\"" | psql -d clair -U postgres'
3.2.2. Quay configuration for Clair
Stop the Quay container if it is running, and restart it in configuration mode, loading the existing configuration as a volume:
$ sudo podman run --rm -it --name quay_config \
  -p 8080:8080 \
  -v $QUAY/config:/conf/stack:Z \
  registry.redhat.io/quay/quay-rhel8:v3.4.7 config secret
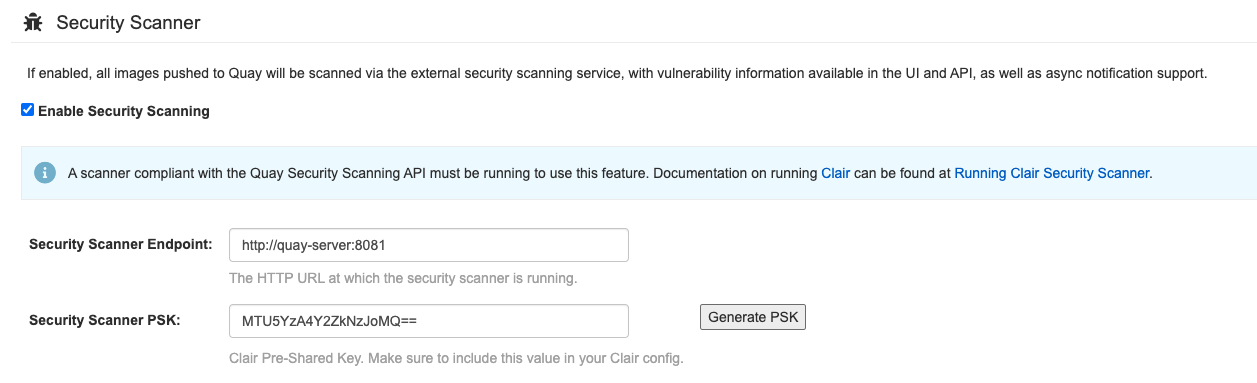
Log in to the configuration tool and enable scanning, in the Security Scanner section of the UI. Set the HTTP endpoint for Clair, using a port that is not already in use on the quay-server system, for example 8081. Create a Clair pre-shared key (PSK) using the Generate PSK button, for example:
-
Security Scanner Endpoint:
http://quay-server:8081 -
Security Scanner PSK:
MTU5YzA4Y2ZkNzJoMQ==
The UI for setting the scanner data is shown in the following image:
Security Scanner UI
Validate and download the configuration and then stop the Quay container that is running the configuration editor. Extract the configuration bundle as before into the $QUAY/config directory.
$ cp ~/Downloads/quay-config.tar.gz $QUAY/config
$ cd $QUAY/config
$ tar xvf quay-config.tar.gz
The Quay configuration file has been updated to contain the fields for the security scanner:
$QUAY/config/config.yaml
...
FEATURE_SECURITY_NOTIFICATIONS: false
FEATURE_SECURITY_SCANNER: true
...
SECURITY_SCANNER_INDEXING_INTERVAL: 30
SECURITY_SCANNER_V4_ENDPOINT: http://quay-server:8081
SECURITY_SCANNER_V4_PSK: MTU5YzA4Y2ZkNzJoMQ==
SERVER_HOSTNAME: quay-server:8080
...
3.2.3. Clair configuration
Detailed information on Clair configuration is available at https://github.com/quay/clair/blob/main/Documentation/reference/config.md. The following example provides a minimal configuration for use in a proof of concept deployment:
/etc/clairv4/config/config.yaml
http_listen_addr: :8081
introspection_addr: :8089
log_level: debug
indexer:
  connstring: host=quay-server port=5433 dbname=clair user=clairuser password=clairpass sslmode=disable
  scanlock_retry: 10
  layer_scan_concurrency: 5
  migrations: true
matcher:
  connstring: host=quay-server port=5433 dbname=clair user=clairuser password=clairpass sslmode=disable
  max_conn_pool: 100
  run: ""
  migrations: true
  indexer_addr: clair-indexer
notifier:
  connstring: host=quay-server port=5433 dbname=clair user=clairuser password=clairpass sslmode=disable
  delivery_interval: 1m
  poll_interval: 5m
  migrations: true
auth:
  psk:
    key: "MTU5YzA4Y2ZkNzJoMQ=="
    iss: ["quay"]
# tracing and metrics
trace:
  name: "jaeger"
  probability: 1
  jaeger:
    agent_endpoint: "localhost:6831"
    service_name: "clair"
metrics:
  name: "prometheus"
-
http_listen_addris set to the port of the Clair HTTP endpoint that you specified in the Quay configuration tool, in this case:8081. -
The Clair pre-shared key (PSK) that you generated in the Quay configuration tool is used for authentication, with the issuer, specified in the
issfield, set toquay.
3.2.4. Running Clair
Use the podman run command to run the Clair container, exposing the HTTP endpoint port that you specified in the configuration tool, in this case 8081:
sudo podman run -d --rm --name clairv4 \
  -p 8081:8081 -p 8089:8089 \
  -e CLAIR_CONF=/clair/config.yaml -e CLAIR_MODE=combo \
  -v /etc/clairv4/config:/clair:Z \
  registry.redhat.io/quay/clair-rhel8:v3.4.7
Now restart the Quay container, using the updated configuration file containing the scanner settings:
$ sudo podman run -d --rm -p 8080:8080  \
   --name=quay \
   -v $QUAY/config:/conf/stack:Z \
   -v $QUAY/storage:/datastorage:Z \
   registry.redhat.io/quay/quay-rhel8:v3.4.7
3.2.5. Using Clair security scanning
From the command line, log in to the registry:
$ sudo podman login --tls-verify=false quay-server:8080
Username: quayadmin
Password:
Login Succeeded!
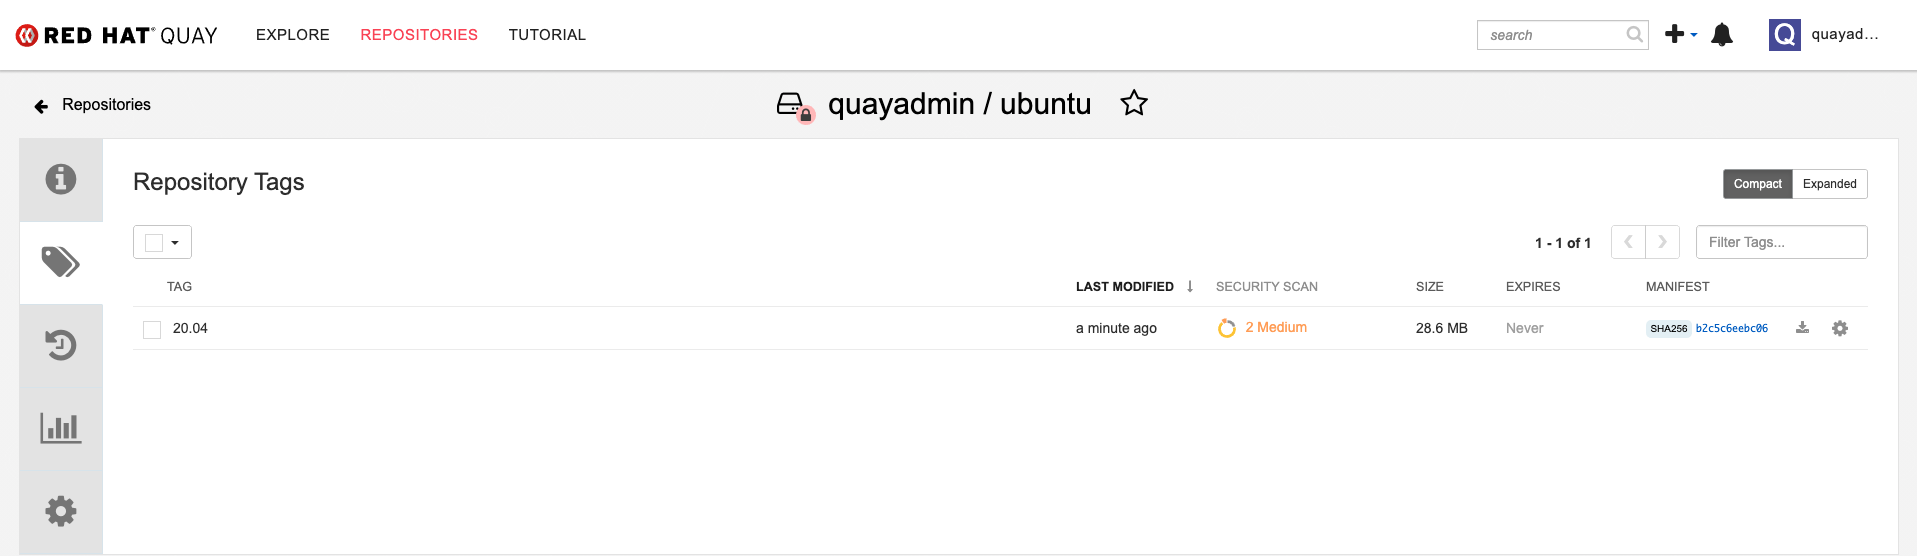
Pull, tag and push a sample image to the registry:
$ sudo podman pull ubuntu:20.04
$ sudo podman tag docker.io/library/ubuntu:20.04 quay-server:8080/quayadmin/ubuntu:20.04
$ sudo podman push --tls-verify=false quay-server:8080/quayadmin/ubuntu:20.04
The results from the security scanning can be seen in the Quay UI, as shown in the following images:
Scanning summary
Scanning details

3.3. Restarting containers
Because the --restart option is not fully supported by podman, you can configure podman as a systemd service, as described in Porting containers to systemd using Podman
3.3.1. Using systemd unit files with Podman
By default, Podman generates a unit file for existing containers or pods. You can generate more portable systemd unit files using the podman generate systemd --new command. The --new flag instructs Podman to generate unit files that create, start and remove containers.
Create the systemd unit files from a running Red Hat Quay registry as follows:
$ sudo podman generate systemd --new --files --name redis
$ sudo podman generate systemd --new --files --name postgresql-quay
$ sudo podman generate systemd --new --files --name quay
$ sudo podman generate systemd --new --files --name postgresql-clairv4
$ sudo podman generate systemd --new --files --name clairv4
Copy the unit files to
/usr/lib/systemd/systemfor installing them as a root user:$ sudo cp -Z container-redis.service /usr/lib/systemd/system $ sudo cp -Z container-postgresql-quay.service /usr/lib/systemd/system $ sudo cp -Z container-quay.service /usr/lib/systemd/system $ sudo cp -Z container-postgresql-clairv4.service /usr/lib/systemd/system $ sudo cp -Z container-clairv4.service /usr/lib/systemd/system
Reload systemd manager configuration:
$ sudo systemctl daemon-reload
Enable the services and start them at boot time:
$ sudo systemctl enable --now container-redis.service
$ sudo systemctl enable --now container-postgresql-quay.service
$ sudo systemctl enable --now container-quay.service
$ sudo systemctl enable --now container-postgresql-clairv4.service
$ sudo systemctl enable --now container-clairv4.service
3.3.2. Starting, stopping and checking the status of services
Check the status of the Quay components:
$ sudo systemctl status container-redis.service
$ sudo systemctl status container-postgresql-quay.service
$ sudo systemctl status container-quay.service
$ sudo systemctl status container-postgresql-clairv4.service
$ sudo systemctl status container-clairv4.service
To stop the Quay component services:
$ sudo systemctl stop container-redis.service
$ sudo systemctl stop container-postgresql-quay.service
$ sudo systemctl stop container-quay.service
$ sudo systemctl stop container-postgresql-clairv4.service
$ sudo systemctl stop container-clairv4.service
To start the Quay component services:
$ sudo systemctl start container-redis.service
$ sudo systemctl start container-postgresql-quay.service
$ sudo systemctl start container-quay.service
$ sudo systemctl start container-postgresql-clairv4.service
$ sudo systemctl start container-clairv4.service
3.3.3. Testing restart after reboot
Once you have the services configured and enabled, reboot the system. When the system has re-started, use podman ps to check that all the containers for the Quay components have been restarted:
$ sudo podman ps -a
CONTAINER ID  IMAGE                                       COMMAND         CREATED         STATUS             PORTS                   NAMES
4e87c7889246  registry.redhat.io/rhel8/postgresql-10:1    run-postgresql  19 seconds ago  Up 18 seconds ago  0.0.0.0:5432->5432/tcp  postgresql-quay
b8fbac1920d4  registry.redhat.io/rhel8/redis-5:1          run-redis       19 seconds ago  Up 18 seconds ago  0.0.0.0:6379->6379/tcp  redis
d959d5bf7a24  registry.redhat.io/rhel8/postgresql-10:1    run-postgresql  18 seconds ago  Up 18 seconds ago  0.0.0.0:5433->5432/tcp  postgresql-clairv4
e75ff8651dbd  registry.redhat.io/quay/clair-rhel8:v3.4.0                  18 seconds ago  Up 17 seconds ago  0.0.0.0:8081->8080/tcp  clairv4
In this instance, the Quay container itself has failed to start up. This is due to the fact that, when security scanning is enabled in Quay, it tries to connect to Clair on startup. However, Clair has not finished initializing and cannot accept connections and, as a result, Quay terminates immediately. To overcome this issue, you need to configure the Quay service to have a dependency on the Clair service, as shown in the following section.
3.3.4. Configuring Quay’s dependency on Clair
In the systemd service file for Quay, set up a dependency on the Clair service in the [Unit] section by setting After=container-clairv4.service. To give the Clair container time to initialize, add a delay in the [Service] section, for example RestartSec=30. Here is an example of the modified Quay file, after configuring the dependency on Clair:
/usr/lib/systemd/system/container-quay.service
# container-quay.service
# autogenerated by Podman 2.0.5
# Tue Feb 16 17:02:26 GMT 2021

[Unit]
Description=Podman container-quay.service
Documentation=man:podman-generate-systemd(1)
Wants=network.target
After=container-clairv4.service

[Service]
Environment=PODMAN_SYSTEMD_UNIT=%n
Restart=on-failure
RestartSec=30
ExecStartPre=/bin/rm -f %t/container-quay.pid %t/container-quay.ctr-id
ExecStart=/usr/bin/podman run --conmon-pidfile %t/container-quay.pid --cidfile %t/container-quay.ctr-id --cgroups=no-conmon -d --rm -p 8080:8080 --name=quay -v /home/user1/quay/config:/conf/stack:Z -v /home/user1/quay/storage:/datastorage:Z registry.redhat.io/quay/quay-rhel8:v3.4.0
ExecStop=/usr/bin/podman stop --ignore --cidfile %t/container-quay.ctr-id -t 10
ExecStopPost=/usr/bin/podman rm --ignore -f --cidfile %t/container-quay.ctr-id
PIDFile=%t/container-quay.pid
KillMode=none
Type=forking

[Install]
WantedBy=multi-user.target default.target
Once you have updated the Quay service configuration, reboot the server and immediately run podman ps:
$ sudo podman ps -a
CONTAINER ID  IMAGE                                       COMMAND         CREATED         STATUS             PORTS                   NAMES
4e87c7889246  registry.redhat.io/rhel8/postgresql-10:1    run-postgresql  29 seconds ago  Up 28 seconds ago  0.0.0.0:5432->5432/tcp  postgresql-quay
b8fbac1920d4  registry.redhat.io/rhel8/redis-5:1          run-redis       29 seconds ago  Up 28 seconds ago  0.0.0.0:6379->6379/tcp  redis
d959d5bf7a24  registry.redhat.io/rhel8/postgresql-10:1    run-postgresql  28 seconds ago  Up 28 seconds ago  0.0.0.0:5433->5432/tcp  postgresql-clairv4
e75ff8651dbd  registry.redhat.io/quay/clair-rhel8:v3.4.0                  28 seconds ago  Up 27 seconds ago  0.0.0.0:8081->8080/tcp  clairv4
Initially, the Quay container will not be available, but once the RestartSec delay has expired, it should start up:
$ sudo podman ps -a
CONTAINER ID  IMAGE                                       COMMAND         CREATED         STATUS             PORTS                   NAMES
4e87c7889246  registry.redhat.io/rhel8/postgresql-10:1    run-postgresql  35 seconds ago  Up 34 seconds ago  0.0.0.0:5432->5432/tcp  postgresql-quay
ab9f0e6ad7c3  registry.redhat.io/quay/quay-rhel8:v3.4.0   registry        3 seconds ago   Up 2 seconds ago   0.0.0.0:8080->8080/tcp  quay
b8fbac1920d4  registry.redhat.io/rhel8/redis-5:1          run-redis       35 seconds ago  Up 34 seconds ago  0.0.0.0:6379->6379/tcp  redis
d959d5bf7a24  registry.redhat.io/rhel8/postgresql-10:1    run-postgresql  34 seconds ago  Up 34 seconds ago  0.0.0.0:5433->5432/tcp  postgresql-clairv4
e75ff8651dbd  registry.redhat.io/quay/clair-rhel8:v3.4.0                  34 seconds ago  Up 33 seconds ago  0.0.0.0:8081->8080/tcp  clairv4
The CREATED field for the quay container shows the 30 second difference in creation time, as configured in the service definition.
Log in to the Red Hat Quay registry at quay-server:8080 to check that everything has restarted correctly.