
Use Red Hat Quay
Preface
{product-title} container image registries let you store container images in a central location. As a regular user of a {product-title} registry, you can create repositories to organize your images and selectively add read (pull) and write (push) access to the repositories you control. A user with administrative privileges can perform a broader set of tasks, such as the ability to add users and control default settings.
This guide assumes you have a {product-title} deployed and are ready to start setting it up and using it.
Chapter 1. Creating Red Hat Quay users and organizations
Before you begin creating repositories to hold your container images in Red Hat Quay, you should consider how you want to organize those repositories. Every repository in a Red Hat Quay instance must be associated with one of the following:
-
User: A user account lets you log in to your Red Hat Quay instance, either through the web UI or through a container client (such as
docker login). When you create a repo, its name is associated with your account, such as:myquay.example.com/<user>/<repo>. Once you create that repo, you can allow other Red Hat Quay user accounts or what are referred to asrobotaccounts to access the repo. -
Organization: Although you need superuser privilege to create user accounts, any user can create organizations to efficiently share repositories among groups of users. An organization is like a user account, in that you can define access to your repos for other user and robot accounts. However, you can also add access to sets of users referred to as
teams. A repository created under an organization would look similar to the following:myquay.example.com/<org>/<repo>
The following sections describe how to create user accounts and organizations to Red Hat Quay. Creating user accounts requires superuser privileges.
1.1. Creating user accounts
To create a new user for your Red Hat Quay instance:
- Log in to Red Hat Quay as the superuser (quay by default).
- Select your account name from the upper right corner of the home page and choose Super User Admin Panel.
- Select the Users icon from the left column.
- Select the Create User button.
- Enter the new user’s Username and Email address, then select the Create User button.
Back on the Users page, select the Options icon to the right of the new Username. A drop-down menu appears, as shown in the following figure:
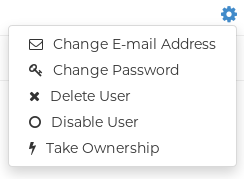
- Choose Change Password from the menu.
- Add the new password and verify it, then select the Change User Password button.
The new user can now use that username and password to log in via the web ui or through some container client.
1.2. Creating organization accounts
Any user can create their own organization to share repositories of container images. To create a new organization:
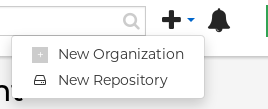
- While logged in as any user, select the plus sign (+) from the upper right corner of the home page and choose New Organization.
- Type the name of the organization. The name must be alphanumeric, all lower case, and between 2 and 255 characters long
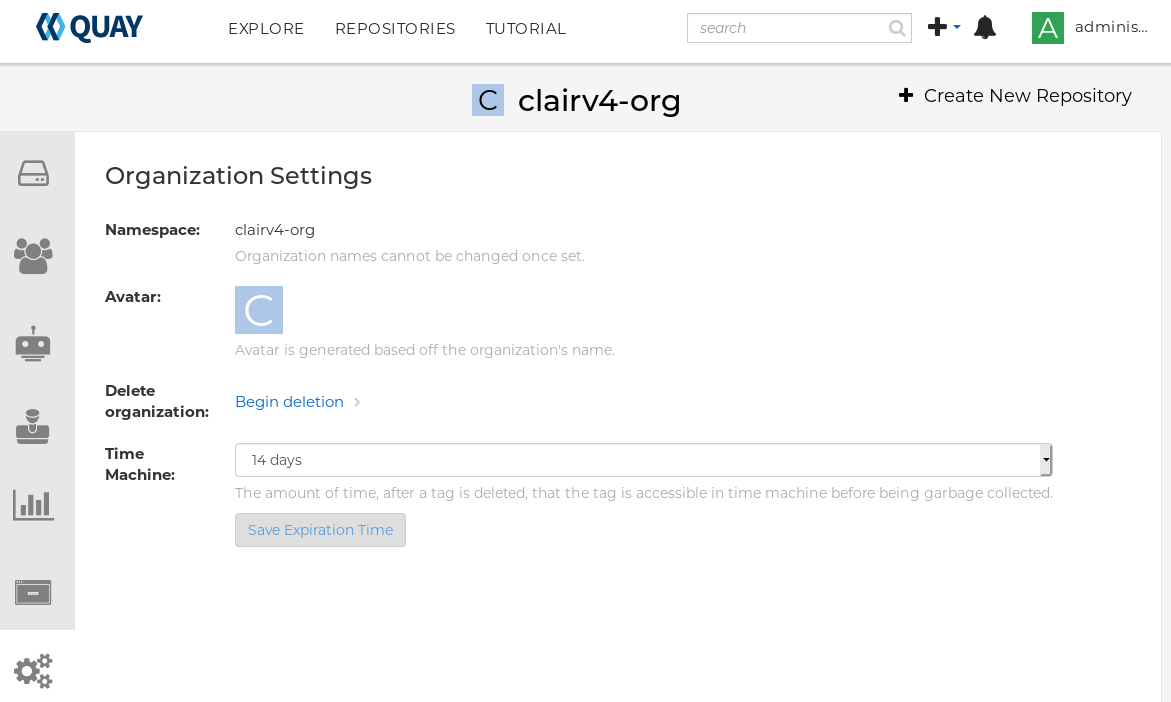
Select Create Organization. The new organization appears, ready for you to begin adding repositories, teams, robot accounts and other features from icons on the left column. The following figure shows an example of the new organization’s page with the settings tab selected.
Chapter 2. Creating a repository
A repository (also referred to as a namespace) provides a central location for storing a related set of container images. There are two ways to create a repository in Red Hat Quay: via a push (from docker or podman) and via the Red Hat Quay UI. These are essentially the same, whether you are using Quay.io or your own instance of Red Hat Quay.
2.1. Creating an image repository via the UI
To create a repository in the Red Hat Quay UI under a user account: . Log in to the user account through the web UI. . Click the + icon in the top right of the header on the home page (or other page related to the user) and choose New Repository, as shown in the following figure:
+
On the Create New Repository page that appears
- Add the new repository name to your user name
- Click Repository Description and type a description of the repository
- In Repository Visibility, select whether you want the repository to be public or private
- Click the Create Repository button.
The new repository is created, starting out empty. A docker pull command you could use to pull an image from this repository (minus the image name) appears on the screen.
To create a repository in the Red Hat Quay UI under an organization:
- Log in as a user that has Admin or Write permission to the organization.
- From the Repositories view, select the organization name from the right column under Users and Organizations. The page for the organization appears, similar to the page shown in Figure 2.x:
- Click +Create New Repository in the upper-right part of the page.
On the Create New Repository page that appears:
- Add the new repository name to the organization name
- Click Repository Description and type a description of the repository
- In Repository Visibility, select whether you want the repository to be public or private
- Click the Create Repository button.
The new repository is created, starting out empty. A docker pull command you could use to pull an image from this repository (minus the image name) appears on the screen.
2.2. Creating an image repository via docker or podman
Assuming you have the proper credentials, pushing an image to a repository that does not yet exist in your Red Hat Quay instance will create that repository as it pushes the image to that repository. Either the docker or podman commands will work for these examples.
Tag the image: With an image available from
dockerorpodmanon your local system, tag that image with the new repository name and image name. Here are examples for pushing images to Quay.io or your own Red Hat Quay setup (for example, reg.example.com). For the examples, replace namespace with your Red Hat Quay user name or organization and repo_name with the name of the repository you want to create:# docker tag myubi-minimal quay.io/namespace/repo_name # docker tag myubi-standard reg.example.com/namespace/repo_name
Push to the appropriate registry. For example:
# docker push quay.io/namespace/repo_name
# docker push reg.example.com/namespace/repo_name
To create an application repository, follow the same procedure you did for creating a container image repository.
Chapter 3. Managing access to repositories
As a Red Hat Quay user, you can create your own repositories and make them accessible to other users on your Red Hat Quay instance. As an alternative, you can create organizations to allow access to repositories based on teams. In both user and organization repositories, you can allow access to those repositories by creating credentials associated with robot accounts. Robot accounts make it easy for a variety of container clients (such as docker or podman) to access your repos, without requiring that the client have a Red Hat Quay user account.
3.1. Allowing access to user repositories
When you create a repository in a user namespace, you can add access to that repository to user accounts or through robot accounts.
3.1.1. Allowing user access to a user repository
To allow access to a repository associated with a user account, do the following:
- Log into your Red Hat Quay user account.
- Select a repository under your user namespace to which you want to share access.
- Select the Settings icon from the left column.
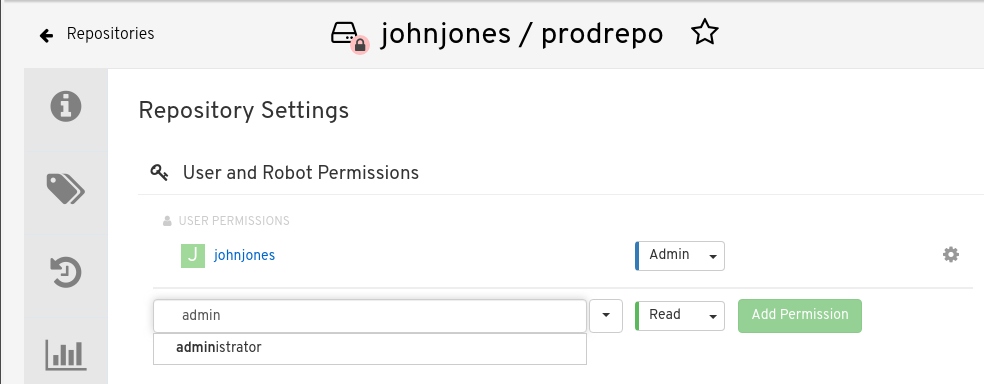
Type the name of the user to which you want to grant access to your repository. The user name should appear as you type, as shown in the following figure:
In the permissions box, select one of the following:
- Read - Allows the user to view the repository and pull from it.
- Write - Allows the user to view the repository, as well as pull images from or push images to the repository.
- Admin - Allows all administrative settings to the repository, as well as all Read and Write permissions.
- Select the Add Permission button. The user now has the assigned permission.
To remove the user permissions to the repository, select the Options icon to the right of the user entry, then select Delete Permission.
3.2. Allowing robot access to a user repository
Robot accounts are used to set up automated access to the repositories in your Red Hat Quay registry. They are similar to OpenShift service accounts. When you set up a robot account, you:
- Generate credentials that are associated with the robot account
- Identify repositories and images that the robot can push images to or pull images from
- Copy and paste generated credentials to use with different container clients (such as Docker, podman, Kubernetes, Mesos and others) to access each defined repository
Keep in mind that each robot account is limited to a single user namespace or organization. So, for example, the robot could provide access to all repositories accessible to a user jsmith, but not to any that are not in the user’s list of repositories.
The following procedure steps you through setting up a robot account to allow access to your repositories.
- Select Robot icon: From the Repositories view, select the Robot icon from the left column.
- Create Robot account: Select the Create Robot Account button.
- Set Robot name: Enter the name and description, then select the Create robot account button. The robot name becomes a combination of your user name, plus the robot name you set (for example, jsmith+myrobot)
Add permission to the robot account: From the Add permissions screen for the robot account, define the repositories you want the robot to access as follows:
- Put a check mark next to each repository the robot can access
For each repository, select one of the following, and click Add permissions:
- None - Robot has no permission to the repository
- Read - Robot can view and pull from the repository
- Write - Robot can read (pull) from and write (push) to the repository
- Admin - Full access to pull from and push to the repository, plus the ability to do administrative tasks associated with the repository
- Select the Add permissions button to apply the settings
- Get credentials to access repositories via the robot: Back on the Robot Accounts page, select the Robot account name to see credential information for that robot.
Get the token: Select Robot Token, as shown in the following figure, to see the token that was generated for the robot. If you want to reset the token, select Regenerate Token.
It is important to understand that regenerating a token makes any previous tokens for this robot invalid.

Get credentials: Once you are satisfied with the generated token, get the resulting credentials in the following ways:
- Kubernetes Secret: Select this to download credentials in the form of a Kubernetes pull secret yaml file.
- rkt Configuration: Select this to download credentials for the rkt container runtime in the form of a json file.
-
Docker Login: Select this to copy a full
docker logincommand line that includes the credentials. - Docker Configuration: Select this to download a file to use as a Docker config.json file, to permanently store the credentials on your client system.
- Mesos Credentials: Select this to download a tarball that provides the credentials that can be identified in the uris field of a Mesos configuration file.
3.3. Allowing access to organization repositories
Once you have created an organization, you can associate a set of repositories directly to that organization. To add access to the repositories in that organization, you can add Teams (sets of users with the same permissions) and individual users. Essentially, an organization has the same ability to create repositories and robot accounts as a user does, but an organization is intended to set up shared repositories through groups of users (in teams or individually).
Other things to know about organizations:
- You cannot have an organization in another organization. To subdivide an organization, you use teams.
- Organizations can’t contain users directly. You must first add a team, then add one or more users to each team.
- Teams can be set up in organizations as just members who use the repos and associated images or as administrators with special privileges for managing the organization
3.3.1. Adding a Team to an organization
When you create a team for your organization you can select the team name, choose which repositories to make available to the team, and decide the level of access to the team.
- From the Organization view, select the Teams and Membership icon from the left column. You will see that an owners Team exists with Admin privilege for the user who created the Organization.
- Select Create New Team. You are prompted for the new team name to be associated with the organization. Type the team name, which must start with a lowercase letter, with the rest of the team name as any combination of lowercase letters and numbers (no capitals or special characters allowed).
- Select the Create team button. The Add permissions window appears, displaying a list of repositories in the organization.
Check each repository you want the team to be able to access. Then select one of the following permissions for each:
- Read - Team members are able to view and pull images
- Write - Team members can view, pull, and push images
- Admin - Team members have full read/write privilege, plus the ability to do administrative tasks related to the repository
- Select Add permissions to save the repository permissions for the team.
3.3.2. Setting a Team role
After you have added a team, you can set the role of that team within the organization. From the Teams and Membership screen within the organization, select the TEAM ROLE drop-down menu, as shown in the following figure:
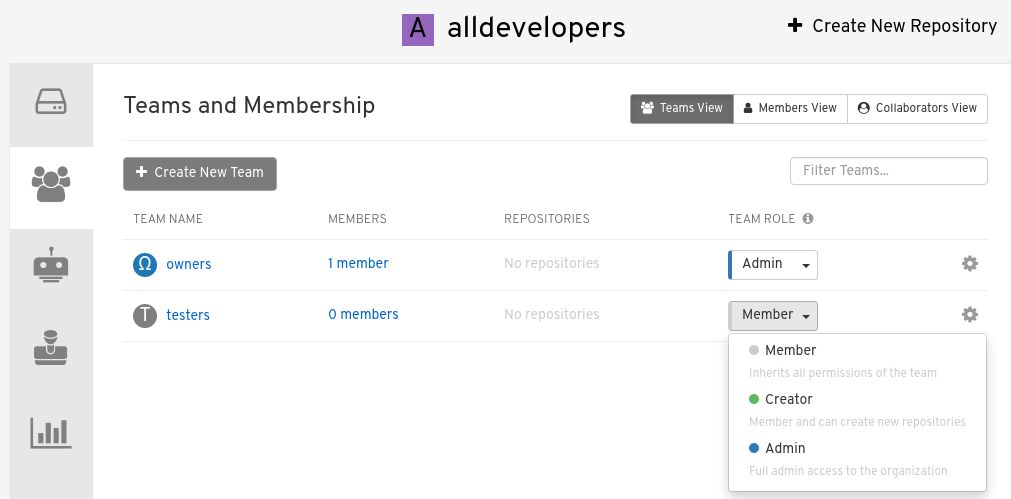
For the selected team, choose one of the following roles:
- Member - Inherits all permissions set for the team
- Creator - All member permissions, plus the ability to create new repositories
- Admin - Full administrative access to the organization, including the ability to create teams, add members, and set permissions.
3.3.3. Adding users to a Team
As someone with Admin privilege to an organization, you can add users and robots to a team. When you add a user, it sends an email to that user. The user remains pending until that user accepts the invitation.
To add users or robots to a team, start from the organization’s screen and do the following:
- Select the team you want to add users or robots to.
In the Team Members box, type one of the following:
- A username from an account on the Red Hat Quay registry
- The email address for a user account on the registry
- The name of a robot account. The name must be in the form of orgname+robotname
- In the case of the robot account, it is immediately added to the team. For a user account, an invitation to join is mailed to the user. Until the user accepts that invitation, the user remains in the INVITED TO JOIN state.
Next, the user accepts the email invitation to join the team. The next time the user logs in to the Red Hat Quay instance, the user moves from the INVITED TO JOIN list to the MEMBERS list for the organization.
Chapter 4. Working with tags
Tags provide a way to identify the version of an image, as well as offering a means of naming the same image in different ways. Besides an image’s version, an image tag can identify its uses (such as devel, testing, or prod) or the fact that it is the most recent version (latest).
From the Tags tab of an image repository, you can view, modify, add, move, delete, and see the history of tags. You also can fetch command-lines you can use to download (pull) a specific image (based on its name and tag) using different commands.
4.1. Viewing and modifying tags
The tags of a repository can be viewed and modified in the tags panel of the repository page, found by clicking on the Tags tab.
4.1.1. Adding a new tag to a tagged image
A new tag can be added to a tagged image by clicking on the gear icon next to the tag and choosing Add New Tag. Red Hat Quay will confirm the addition of the new tag to the image.
4.1.2. Moving a tag
Moving a tag to a different image is accomplished by performing the same operation as adding a new tag, but giving an existing tag name. Red Hat Quay will confirm that you want the tag moved, rather than added.
4.1.3. Deleting a tag
A specific tag and all its images can be deleted by clicking on the tag’s gear icon and choosing Delete Tag. This will delete the tag and any images unique to it. Images will not be deleted until no tag references them either directly or indirectly through a parent child relationship.
4.1.4. Viewing tag history and going back in time
4.1.4.1. Viewing tag history
To view the image history for a tag, click on the View Tags History menu item located under the Actions menu. The page shown will display each image to which the tag pointed in the past and when it pointed to that image.
4.1.4.2. Going back in time
To revert the tag to a previous image, find the history line where your desired image was overwritten, and click on the Restore link.
4.1.5. Fetching an image by tag or digest
From the Tags tab, you can view different ways of pulling images from the clients that are ready to use those images.
- Select a particular repository/image
- Select Tags in the left column
- Select the Fetch Tag icon for a particular image/tag combination
- When the Fetch Tag pop-up appears, select the Image format box to see a drop-down menu that shows different ways that are available to pull the image. The selections offer full command lines for pulling a specific container image to the local system:

You can select to pull a regular of an image by tag name or by digest name using the docker command. . Choose the type of pull you want, then select Copy Command. The full command-line is copied into your clipboard. These two commands show a docker pull by tag and by digest:
docker pull quay.io/cnegus/whatever:latest
docker pull quay.io/cnegus/whatever@sha256:e02231a6aa8ba7f5da3859a359f99d77e371cb47e643ce78e101958782581fb9
Paste the command into a command-line shell on a system that has the docker command and service available, and press Enter. At this point, the container image is ready to run on your local system.
On RHEL and Fedora systems, you can substitute podman for docker to pull and run the selected image.
4.2. Tag Expiration
Images can be set to expire from a Red Hat Quay repository at a chosen date and time using a feature called tag expiration. Here are a few things to know about about tag expiration:
- When a tag expires, the tag is deleted from the repository. If it is the last tag for a specific image, the image is set to be deleted.
- Expiration is set on a per-tag basis, not for a repository on the whole.
- When a tag expires or is deleted, it is not immediately removed from the registry. The value of Time Machine (in User settings) defines when the deleted tag is actually removed and garbage collected. By default, that value is 14 days. Up until that time, a tag can be repointed to an expired or deleted image.
- The Red Hat Quay superuser has no special privilege related to deleting expired images from user repositories. There is no central mechanism for the superuser to gather information and act on user repositories. It is up to the owners of each repository to manage expiration and ultimate deletion of their images.
Tag expiration can be set in different ways:
-
By setting the
quay.expires.after=LABEL in the Dockerfile when the image is created. This sets a time to expire from when the image is built. - By choosing the expiration date from the EXPIRES column for the repository tag and selecting a specific date and time to expire.
The following figure shows the Options entry for changing tag expiration and the EXPIRES field for when the tag expires. Hover over the EXPIRES field to see the expiration date and time that is currently set.

4.2.1. Setting tag expiration from a Dockerfile
Adding a label like quay.expires-after=20h via the Dockerfile LABEL command will cause a tag to automatically expire after the time indicated. The time values could be something like 1h, 2d, 3w for hours, days, and weeks, respectively, from the time the image is built.
4.2.2. Setting tag expiration from the repository
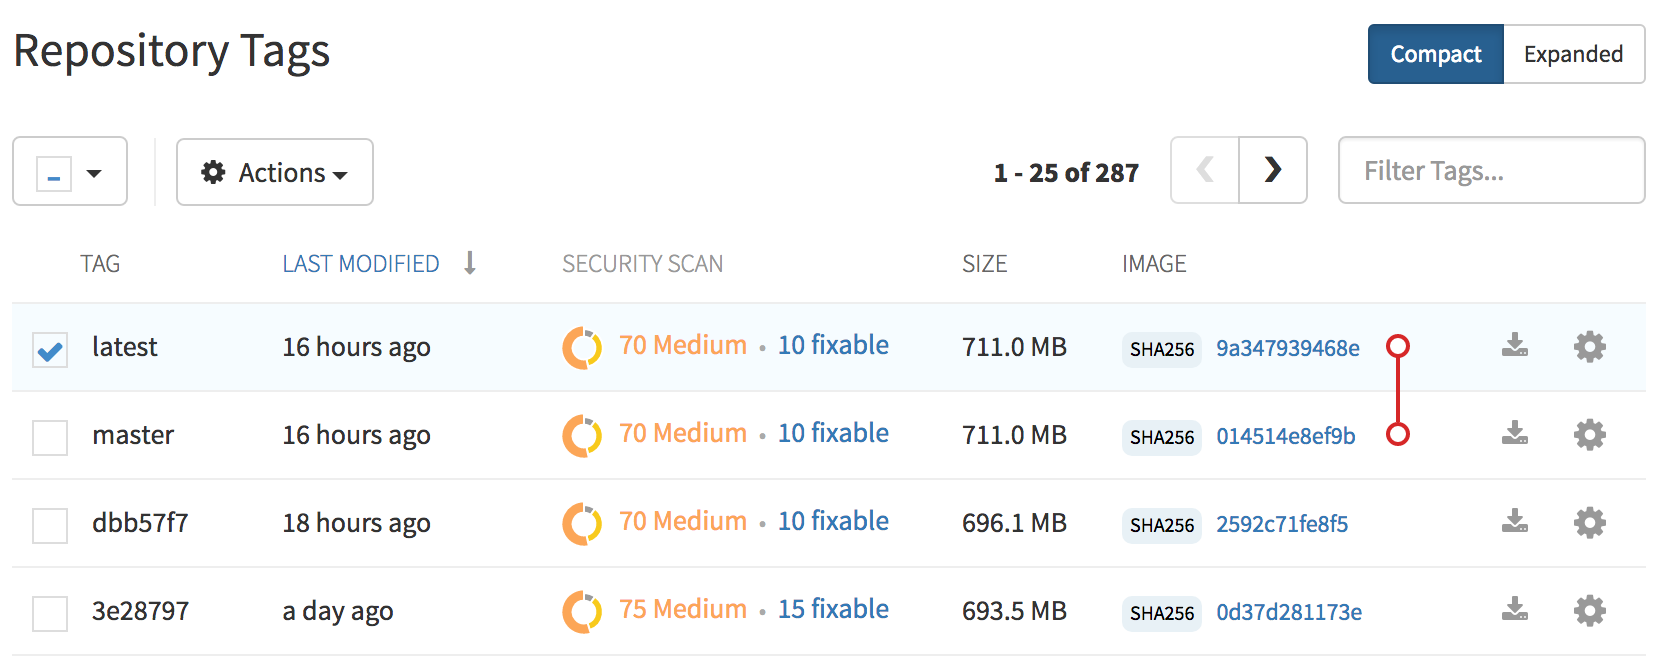
On the Repository Tag page there is a UI column titled EXPIRES that indicates when a tag will expire. Users can set this by clicking on the time that it will expire or by clicking the Settings button (gear icon) on the right and choosing Change Expiration.
Choose the date and time when prompted and select Change Expiration. The tag will be set to be deleted from the repository when the expiration time is reached.
4.3. Security scanning
By clicking the on the vulnerability or fixable count next to a tab you can jump into the security scanning information for that tag. There you can find which CVEs your image is susceptible to, and what remediation options you may have available.
Keep in mind that image scanning only lists vulnerabilities found by the Clair image scanner. What each user does about the vulnerabilities that are uncovered is completely up to that user. The Red Hat Quay superuser does not act on those vulnerabilities found.
Chapter 5. Viewing and exporting logs
Activity logs are gathered for all repositories and namespaces (users and organizations) in Red Hat Quay. There are multiple ways of accessing log files, including:
- Viewing logs through the web UI
- Exporting logs so they can be saved externally.
- Accessing log entries via the API
To access logs, you must have Admin privilege to the selected repository or namespace.
A maximum of 100 log results are available at a time via the API. To gather more results that that, you must use the log exporter feature described in this chapter.
5.1. Viewing logs
To view log entries for a repository or namespace from the web UI, do the following:
- Select a repository or namespace (organization or user) for which you have Admin privileges.
Select the Usage Logs icon from the left column. A Usage Logs screen appears, like the one shown in the following figure:
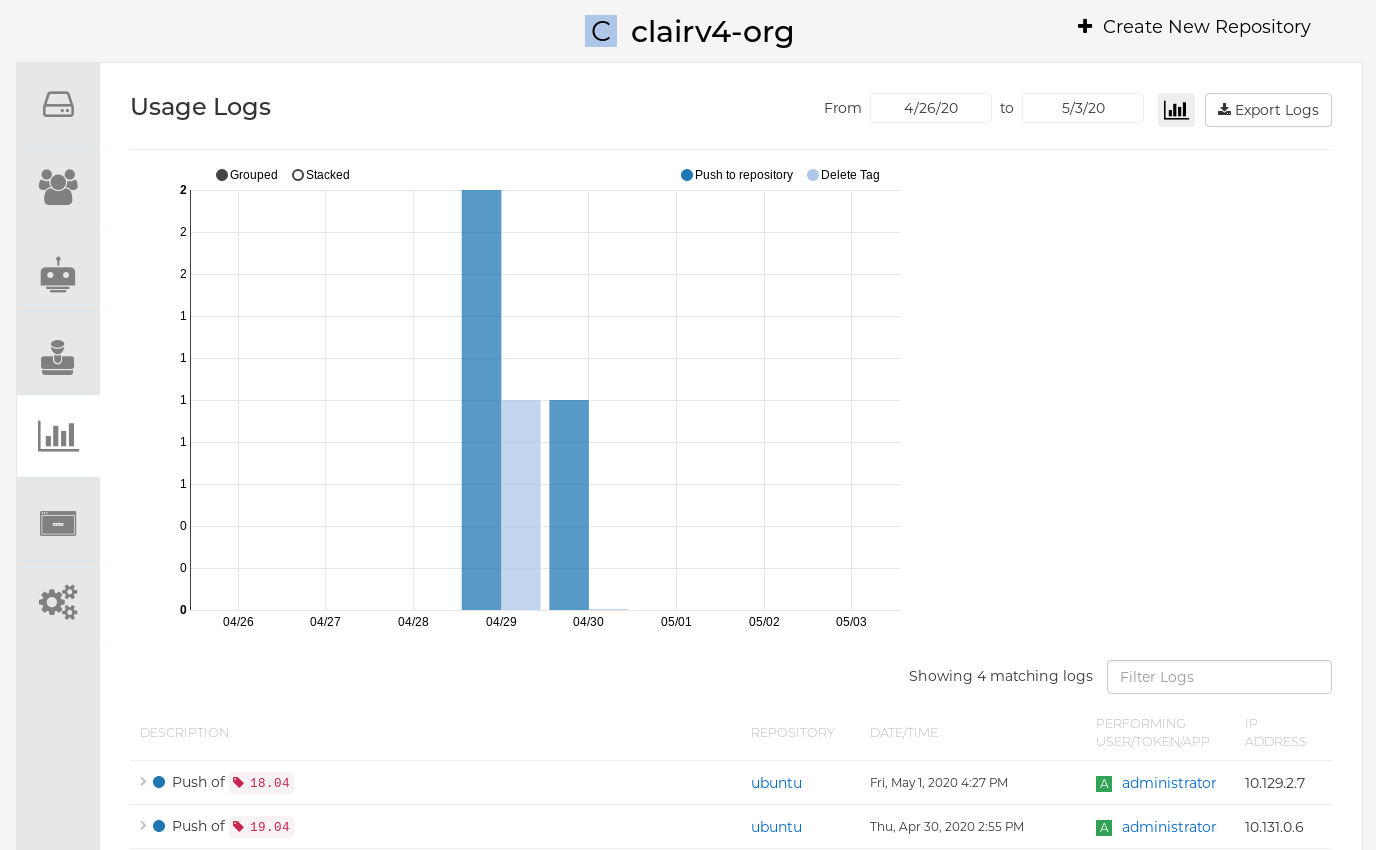
From the Usage Logs page, you can:
- Set the date range for viewing log entries by adding dates to the From and to boxes. By default, the most recent one week of log entries is displayed.
- Type a string into the Filter Logs box to display log entries that container the given string.
- Toggle the arrow to the left of any log entry to see more or less text associated with that log entry.
5.2. Exporting repository logs
To be able to grab a larger number of log files and save them outside of the Red Hat Quay database, you can use the Export Logs feature. Here are a few things you should know about using Export Logs:
- You can choose a range of dates for the logs you want to gather from a repository.
- You can request that the logs be sent to you via an email attachment or directed to a callback URL.
- You need Admin privilege to the repository or namespace to export logs
- A maximum of 30 days of log data can be exported at a time
- Export Logs only gathers log data that was previously produced. It does not stream logging data.
- Your Red Hat Quay instance must be configured for external storage for this feature (local storage will not work).
- Once the logs are gathered and available, you should immediately copy that data if you want to save it. By default, the data expires in an hour.
To use the Export Logs feature:
- Select a repository for which you have Admin privileges.
- Select the Usage Logs icon from the left column. A Usage Logs screen appears.
- Choose the From and to date range of the log entries you want to gather.
Select the Export Logs button. An Export Usage Logs pop-up appears, as shown

- Enter the email address or callback URL you want to receive the exported logs. For the callback URL, you could use a URL to a place such as webhook.site.
- Select Start Logs Export. This causes Red Hat Quay to begin gathering the selected log entries. Depending on the amount of logging data being gathered, this can take anywhere from one minute to an hour to complete.
When the log export is completed you will either:
- Receive an email, alerting you to the availability of your requested exported log entries.
- See a successful status of your log export request from the webhook URL. A link to the exported data will be available for you to select to download the logs.
Keep in mind that the URL points to a location in your Red Hat Quay external storage and is set to expire within an hour. So make sure you copy the exported logs before that expiration time if you intend to keep them.
Chapter 6. Automatically building Dockerfiles with build workers
Red Hat Quay supports building Dockerfiles using a set of worker nodes. Build triggers, such as GitHub webhooks can be configured to automatically build new versions of your repositories when new code is committed. This document will walk you through enabling the feature flag and setting up multiple build workers to enable this feature.
6.1. Enabling builds
- Open the Config Tool for your Red Hat Quay cluster.
Scroll down to the section entitled Dockerfile Build Support.

- Check the Enable Dockerfile Build box. You are prompted to Enable different types of build triggers.
Select the type of build triggers you want to enable: GitHub Build Triggers, BitBucket Build Triggers, or GitLab Build Triggers. Depending on which you enable, you are prompted to further configure those triggers:
- Enable GitHub Triggers: For the GitHub box, select GitHub Enterprise or GitHub.io. For GitHub Endpoint, provide the http:// or https:// address for the GitHub endpoint. For OAuth Client ID, enter the client ID for your OAuth client. For OAuth Client Secret, enter the secret needed to access the OAuth client.
- Enable BitBucket Triggers: To use BitBucket triggers to start registry builds, you need a registered BitBucket OAuth application. Then you must enter the OAuth consumer key and OAuth consumer secret here.
- Enable GitLab Triggers: For GitLab, select GitLab CE/EE or GitLab.com. For GitLab Endpoint, provide the http:// or https:// address for the GitLab endpoint. For Application id, provide the ID for the registered GitLab OAuth application. For Secret, enter the secret associated with the Application id. The callback URL for your Red Hat Quay cluster is provided.
- Click "Save Configuration Changes"
- Restart the container (you will be prompted)
6.2. Setting up build workers
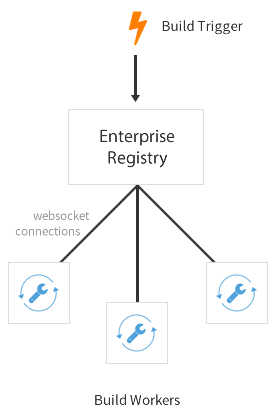
One or more build workers will communicate with Red Hat Quay to build new containers when triggered. The machines must have Docker installed and must not be used for any other work. The following procedure needs to be done every time a new worker needs to be added, but it can be automated fairly easily.
6.2.1. Pull the build worker image
Pull down the latest copy of the image. Make sure to pull the version tagged matching your Red Hat Quay version.
# docker pull quay.io/redhat/quay-builder:v3.3.4
6.2.2. Run the build worker image
Run this container on each build worker. Since the worker will be orchestrating docker builds, we need to mount in the docker socket. This orchestration will use a large amount of CPU and need to manipulate the docker images on disk — we recommend that dedicated machines be used for this task.
Use the environment variable SERVER to tell the worker the hostname at which Red Hat Quay is accessible:
| Security | Websocket Address |
|---|---|
| Using SSL | wss://your.quayenterprise.dnsname |
| Without SSL | ws://your.quayenterprise.dnsname |
Here’s what the full command looks like:
# docker run --restart on-failure \
  -e SERVER=ws://myquayenterprise \
  --privileged=true \
  -v /var/run/docker.sock:/var/run/docker.sock:Z \
  quay.io/redhat/quay-builder:v3.3.4
When the container starts, each build worker will auto-register and start building containers once a job is triggered and it is assigned to a worker.
If Red Hat Quay is setup to use a SSL certificate that is not globally trusted, for example a self-signed certificate, Red Hat Quay’s public SSL certificates must be mounted onto the quay-builder container’s SSL trust store. An example command to mount a certificate found at the host’s /path/to/ssl/rootCA.pem looks like:
# docker run --restart on-failure \
  -e SERVER=wss://myquayenterprise \
  --privileged=true \
  -v /path/to/ssl/rootCA.pem:/etc/pki/ca-trust/source/anchors/rootCA.pem \
  -v /var/run/docker.sock:/var/run/docker.sock:Z \
  quay.io/redhat/quay-builder:v3.3.4
6.3. Setting up GitHub builds (optional)
If your organization plans to have builds be conducted via pushes to GitHub (or GitHub Enterprise), continue with Creating an OAuth application in GitHub.
Chapter 7. Building Dockerfiles
Red Hat Quay supports the ability to build Dockerfiles on our build fleet and push the resulting image to the repository.
7.1. Viewing and managing builds
Repository Builds can be viewed and managed by clicking the Builds tab in the Repository View.
7.2. Manually starting a build
To manually start a repository build, click the + icon in the top right of the header on any repository page and choose New Dockerfile Build. An uploaded Dockerfile, .tar.gz, or an HTTP URL to either can be used for the build.
You will not be able to specify the Docker build context when manually starting a build.
7.3. Build Triggers
Repository builds can also be automatically triggered by events such as a push to an SCM (GitHub, BitBucket or GitLab) or via a call to a webhook.
7.3.1. Creating a new build trigger
To setup a build trigger, click the Create Build Trigger button on the Builds view page and follow the instructions of the dialog. You will need to grant Red Hat Quay access to your repositories in order to setup the trigger and your account requires admin access on the SCM repository.
7.3.2. Manually triggering a build trigger
To trigger a build trigger manually, click the icon next to the build trigger and choose Run Now.
7.3.3. Build Contexts
When building an image with Docker, a directory is specified to become the build context. This holds true for both manual builds and build triggers because the builds conducted by Red Hat Quay are no different from running docker build on your own machine.
Red Hat Quay build contexts are always the specified subdirectory from the build setup and fallback to the root of the build source if none is specified. When a build is triggered, Red Hat Quay build workers clone the git repository to the worker machine and enter the build context before conducting a build.
For builds based on tar archives, build workers extract the archive and enter the build context. For example:
example
├── .git
├── Dockerfile
├── file
└── subdir
    └── Dockerfile
Imagine the example above is the directory structure for a GitHub repository called "example". If no subdirectory is specified in the build trigger setup or while manually starting a build, the build will operate in the example directory.
If subdir is specified to be the subdirectory in the build trigger setup, only the Dockerfile within it is visible to the build. This means that you cannot use the ADD command in the Dockerfile to add file, because it is outside of the build context.
Unlike the Docker Hub, the Dockerfile is part of the build context on Red Hat Quay. Thus, it must not appear in the .dockerignore file.
Chapter 8. Setting up a Custom Git Trigger
A Custom Git Trigger is a generic way for any git server to act as a build trigger. It relies solely on SSH keys and webhook endpoints; everything else is left to the user to implement.
8.1. Creating a Trigger
Creating a Custom Git Trigger is similar to the creation of any other trigger with a few subtle differences:
- It is not possible for Red Hat Quay to automatically detect the proper robot account to use with the trigger. This must be done manually in the creation process.
- There are extra steps after the creation of the trigger that must be done in order to use the trigger. These steps are detailed below.
8.2. Post trigger-creation setup
Once a trigger has been created, there are 2 additional steps required before the trigger can be used:
- Provide read access to the SSH public key generated when creating the trigger.
- Setup a webhook that POSTs to the Red Hat Quay endpoint to trigger a build.
The key and the URL are both available at all times by selecting View Credentials from the gear located in the trigger listing.
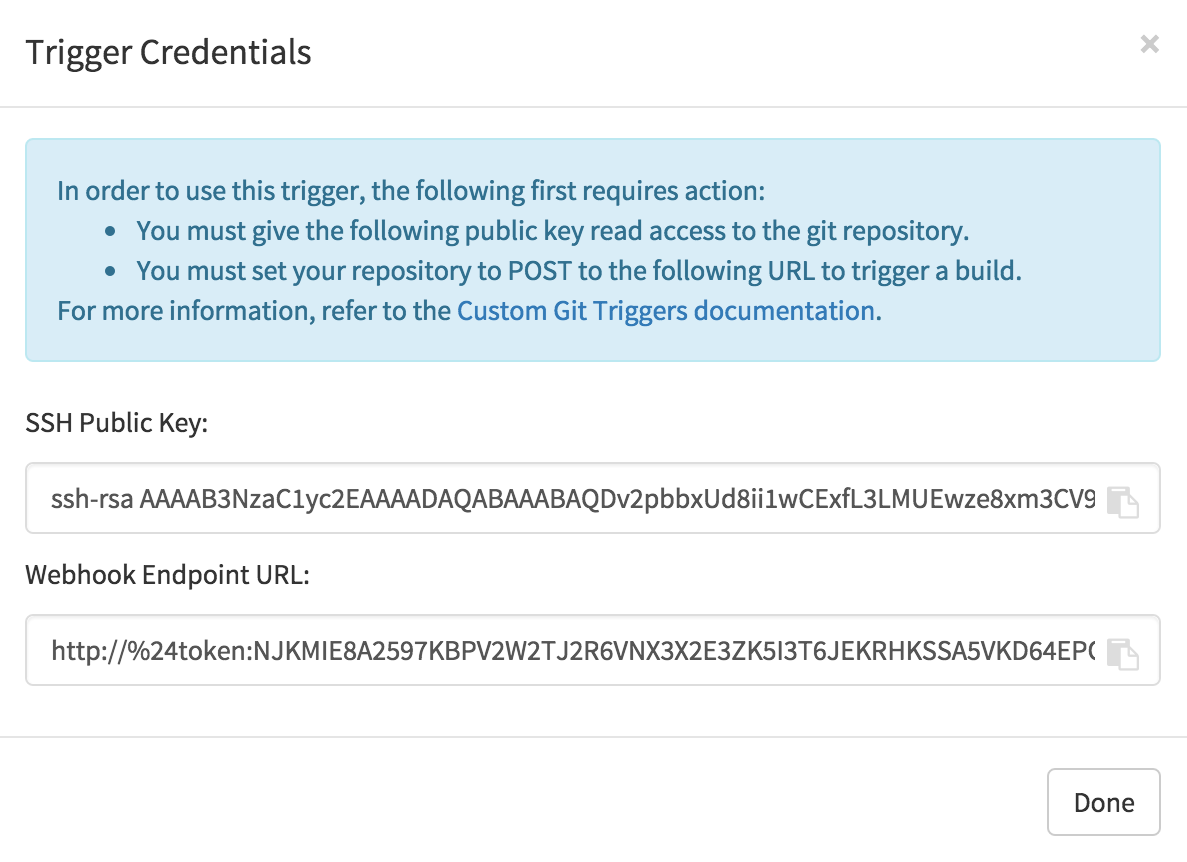
8.2.1. SSH public key access
Depending on the Git server setup, there are various ways to install the SSH public key that Red Hat Quay generates for a custom git trigger. For example, Git documentation describes a small server setup in which simply adding the key to $HOME/.ssh/authorize_keys would provide access for builders to clone the repository. For any git repository management software that isn’t officially supported, there is usually a location to input the key often labeled as Deploy Keys.
8.2.2. Webhook
In order to automatically trigger a build, one must POST a JSON payload to the webhook URL with the following format:
{
  "commit": "1c002dd",                                   // required
  "ref": "refs/heads/master",                            // required
  "default_branch": "master",                            // required
  "commit_info": {                                       // optional
    "url": "gitsoftware.com/repository/commits/1234567", // required
    "message": "initial commit",                         // required
    "date": "timestamp",                                 // required
    "author": {                                          // optional
      "username": "user",                                // required
      "avatar_url": "gravatar.com/user.png",             // required
      "url": "gitsoftware.com/users/user"                // required
    },
    "committer": {                                       // optional
      "username": "user",                                // required
      "avatar_url": "gravatar.com/user.png",             // required
      "url": "gitsoftware.com/users/user"                // required
    }
  }
}
This request requires a Content-Type header containing application/json in order to be valid.
Once again, this can be accomplished in various ways depending on the server setup, but for most cases can be done via a post-receive git hook.
Chapter 9. Skipping a source control-triggered build
To specify that a commit should be ignored by the Red Hat Quay build system, add the text [skip build] or [build skip] anywhere in the commit message.
Chapter 10. Set up GitHub build trigger tags
Red Hat Quay supports using GitHub or GitHub Enterprise as a trigger to building images. If you have not yet done so, go ahead and enable build support in Red Hat Quay.
10.1. Understanding tag naming for build triggers
Prior to Red Hat Quay 3.3, how images created from build triggers were named was limited. Images built by build triggers were named:
- With the branch or tag whose change invoked the trigger
-
With a
latesttag for images that used the default branch
As of Red Hat Quay 3.3 and later, you have more flexibility in how you set image tags. The first thing you can do is enter custom tags, to have any string of characters assigned as a tag for each built image. However, as an alternative, you could use the following tag templates to to tag images with information from each commit:
- ${commit_info.short_sha}: The commit’s short SHA
- ${commit_info.date}: The timestamp for the commit
- ${commit_info.author}: The author from the commit
- ${commit_info.committer}: The committer of the commit
- ${parsed_ref.branch}: The branch name
The following procedure describes how you set up tagging for build triggers.
10.2. Setting tag names for build triggers
Follow these steps to configure custom tags for build triggers:
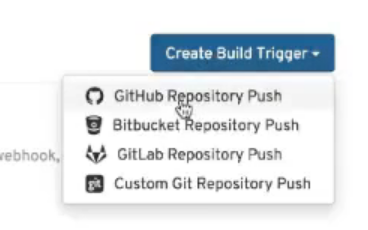
- From the repository view, select the Builds icon from the left navigation.
Select the Create Build Trigger menu, and select the type of repository push you want (GitHub, Bitbucket, GitLab, or Custom Git repository push). For this example, GitHub Repository Push is chosen, as illustrated in the following figure.
- When the Setup Build Trigger page appears, select the repository and namespace in which you want the trigger set up.
Under Configure Trigger, select either Trigger for all branches and tags or Trigger only on branches and tags matching a regular expression. Then select Continue. The Configure Tagging section appears, as shown in the following figure:
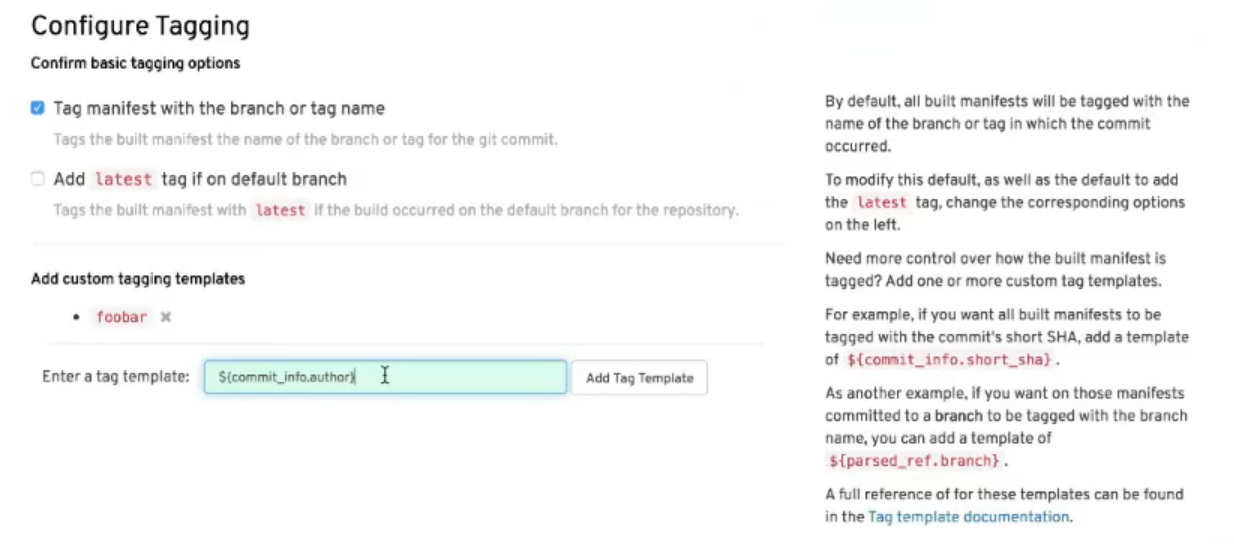
Scroll down to Configure Tagging and select from the following options:
- Tag manifest with the branch or tag name: Check this box to use the name of the branch or tag in which the commit occurred as the tag used on the image. This is enabled by default.
-
Add latest tag if on default branch: Check this box to use the
latesttag for the image if it is on the default branch for the repository. This is enabled by default. - Add custom tagging templates: Enter a custom tag or a template into the Enter a tag template box. There are multiple tag templates you can enter here, as described earlier in this section. They include ways of using short SHA, timestamps, author name, committer, and branch name from the commit as tags.
- Select Continue. You are prompted to select the directory build context for the Docker build. The build context directory identifies the location of the directory containing the Dockerfile, along with other files needed when the build is triggered. Enter "/" if the Dockerfile is in the root of the git repository.
- Select Continue. You are prompted to add an optional Robot Account. Do this if you want to pull a private base image during the build process. The robot account would need access to the build.
- Select Continue to complete the setup of the build trigger.
If you were to return to the Repository Builds page for the repository, the build triggers you set up will be listed under the Build Triggers heading.

Chapter 11. Creating an OAuth application in GitHub
You can authorize your registry to access a GitHub account and its repositories by registering it as a GitHub OAuth application.
11.1. Create new GitHub application
- Log into GitHub (Enterprise)
- Visit the Applications page under your organization’s settings.
-
Click Register New Application. The
Register a new OAuth applicationconfiguration screen is displayed: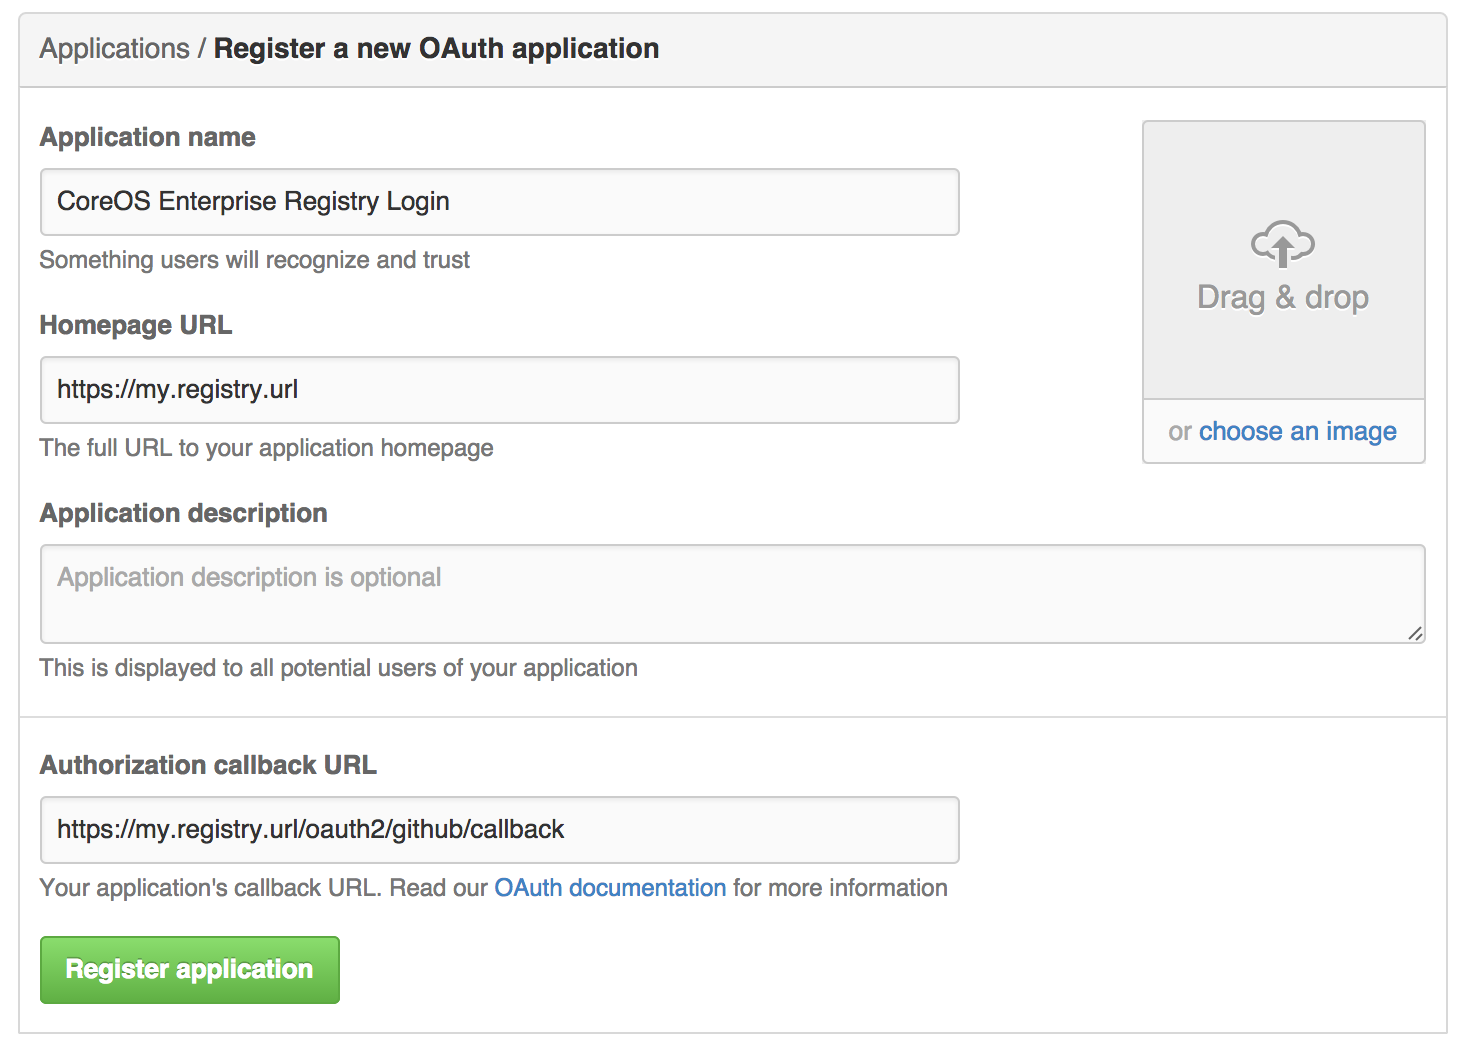
Set Homepage URL: Enter the Quay Enterprise URL as the
Homepage URLNoteIf using public GitHub, the Homepage URL entered must be accessible by your users. It can still be an internal URL.
- Set Authorization callback URL: Enter https://{$RED_HAT_QUAY_URL}/oauth2/github/callback as the Authorization callback URL.
- Save your settings by clicking the Register application button. The new new application’s summary is shown:
- Record the Client ID and Client Secret shown for the new application.
Chapter 12. Repository Notifications
Quay supports adding notifications to a repository for various events that occur in the repository’s lifecycle. To add notifications, click the Settings tab while viewing a repository and select Create Notification. From the When this event occurs field, select the items for which you want to receive notifications:

After selecting an event, further configure it by adding how you will be notified of that event.
Adding notifications requires repository admin permission.
The following are examples of repository events.
12.1. Repository Events
12.1.1. Repository Push
A successful push of one or more images was made to the repository:
{
  "name": "repository",
  "repository": "dgangaia/test",
  "namespace": "dgangaia",
  "docker_url": "quay.io/dgangaia/test",
  "homepage": "https://quay.io/repository/dgangaia/repository",
  "updated_tags": [
    "latest"
  ]
}
12.1.2. Dockerfile Build Queued
Here is a sample response for a Dockerfile build has been queued into the build system. The response can differ based on the use of optional attributes.
{
  "build_id": "296ec063-5f86-4706-a469-f0a400bf9df2",
  "trigger_kind": "github",                                                       //Optional
  "name": "test",
  "repository": "dgangaia/test",
  "namespace": "dgangaia",
  "docker_url": "quay.io/dgangaia/test",
  "trigger_id": "38b6e180-9521-4ff7-9844-acf371340b9e",                           //Optional
  "docker_tags": [
    "master",
    "latest"
  ],
  "repo": "test",
  "trigger_metadata": {
    "default_branch": "master",
    "commit": "b7f7d2b948aacbe844ee465122a85a9368b2b735",
    "ref": "refs/heads/master",
    "git_url": "git@github.com:dgangaia/test.git",
    "commit_info": {                                                             //Optional
      "url": "https://github.com/dgangaia/test/commit/b7f7d2b948aacbe844ee465122a85a9368b2b735",
      "date": "2019-03-06T12:48:24+11:00",
      "message": "adding 5",
      "author": {                                                                //Optional
        "username": "dgangaia",
        "url": "https://github.com/dgangaia",                                    //Optional
        "avatar_url": "https://avatars1.githubusercontent.com/u/43594254?v=4"    //Optional
      },
      "committer": {
        "username": "web-flow",
        "url": "https://github.com/web-flow",
        "avatar_url": "https://avatars3.githubusercontent.com/u/19864447?v=4"
      }
    }
  },
  "is_manual": false,
  "manual_user": null,
  "homepage": "https://quay.io/repository/dgangaia/test/build/296ec063-5f86-4706-a469-f0a400bf9df2"
}
12.1.3. Dockerfile Build Started
Here is an example of a Dockerfile build being started by the build system. The response can differ based on some attributes being optional.
{
  "build_id": "a8cc247a-a662-4fee-8dcb-7d7e822b71ba",
  "trigger_kind": "github",                                                     //Optional
  "name": "test",
  "repository": "dgangaia/test",
  "namespace": "dgangaia",
  "docker_url": "quay.io/dgangaia/test",
  "trigger_id": "38b6e180-9521-4ff7-9844-acf371340b9e",                         //Optional
  "docker_tags": [
    "master",
    "latest"
  ],
  "build_name": "50bc599",
  "trigger_metadata": {                                                         //Optional
    "commit": "50bc5996d4587fd4b2d8edc4af652d4cec293c42",
    "ref": "refs/heads/master",
    "default_branch": "master",
    "git_url": "git@github.com:dgangaia/test.git",
    "commit_info": {                                                            //Optional
      "url": "https://github.com/dgangaia/test/commit/50bc5996d4587fd4b2d8edc4af652d4cec293c42",
      "date": "2019-03-06T14:10:14+11:00",
      "message": "test build",
      "committer": {                                                            //Optional
        "username": "web-flow",
        "url": "https://github.com/web-flow",                                   //Optional
        "avatar_url": "https://avatars3.githubusercontent.com/u/19864447?v=4"   //Optional
      },
      "author": {                                                               //Optional
        "username": "dgangaia",
        "url": "https://github.com/dgangaia",                                   //Optional
        "avatar_url": "https://avatars1.githubusercontent.com/u/43594254?v=4"   //Optional
      }
    }
  },
  "homepage": "https://quay.io/repository/dgangaia/test/build/a8cc247a-a662-4fee-8dcb-7d7e822b71ba"
}
12.1.4. Dockerfile Build Successfully Completed
Here is a sample response of a Dockerfile build that has been successfully completed by the build system.
This event will occur simultaneously with a Repository Push event for the built image(s)
{
  "build_id": "296ec063-5f86-4706-a469-f0a400bf9df2",
  "trigger_kind": "github",                                                       //Optional
  "name": "test",
  "repository": "dgangaia/test",
  "namespace": "dgangaia",
  "docker_url": "quay.io/dgangaia/test",
  "trigger_id": "38b6e180-9521-4ff7-9844-acf371340b9e",                           //Optional
  "docker_tags": [
    "master",
    "latest"
  ],
  "build_name": "b7f7d2b",
  "image_id": "sha256:0339f178f26ae24930e9ad32751d6839015109eabdf1c25b3b0f2abf8934f6cb",
  "trigger_metadata": {
    "commit": "b7f7d2b948aacbe844ee465122a85a9368b2b735",
    "ref": "refs/heads/master",
    "default_branch": "master",
    "git_url": "git@github.com:dgangaia/test.git",
    "commit_info": {                                                              //Optional
      "url": "https://github.com/dgangaia/test/commit/b7f7d2b948aacbe844ee465122a85a9368b2b735",
      "date": "2019-03-06T12:48:24+11:00",
      "message": "adding 5",
      "committer": {                                                              //Optional
        "username": "web-flow",
        "url": "https://github.com/web-flow",                                     //Optional
        "avatar_url": "https://avatars3.githubusercontent.com/u/19864447?v=4"                                                        //Optional
      },
      "author": {                                                                 //Optional
        "username": "dgangaia",
        "url": "https://github.com/dgangaia",                                     //Optional
        "avatar_url": "https://avatars1.githubusercontent.com/u/43594254?v=4"     //Optional
      }
    }
  },
  "homepage": "https://quay.io/repository/dgangaia/test/build/296ec063-5f86-4706-a469-f0a400bf9df2",
  "manifest_digests": [
    "quay.io/dgangaia/test@sha256:2a7af5265344cc3704d5d47c4604b1efcbd227a7a6a6ff73d6e4e08a27fd7d99",
    "quay.io/dgangaia/test@sha256:569e7db1a867069835e8e97d50c96eccafde65f08ea3e0d5debaf16e2545d9d1"
  ]
}
12.1.5. Dockerfile Build Failed
A Dockerfile build has failed
{
  "build_id": "5346a21d-3434-4764-85be-5be1296f293c",
  "trigger_kind": "github",                                                       //Optional
  "name": "test",
  "repository": "dgangaia/test",
  "docker_url": "quay.io/dgangaia/test",
  "error_message": "Could not find or parse Dockerfile: unknown instruction: GIT",
  "namespace": "dgangaia",
  "trigger_id": "38b6e180-9521-4ff7-9844-acf371340b9e",                           //Optional
  "docker_tags": [
    "master",
    "latest"
  ],
  "build_name": "6ae9a86",
  "trigger_metadata": {                                                           //Optional
    "commit": "6ae9a86930fc73dd07b02e4c5bf63ee60be180ad",
    "ref": "refs/heads/master",
    "default_branch": "master",
    "git_url": "git@github.com:dgangaia/test.git",
    "commit_info": {                                                              //Optional
      "url": "https://github.com/dgangaia/test/commit/6ae9a86930fc73dd07b02e4c5bf63ee60be180ad",
      "date": "2019-03-06T14:18:16+11:00",
      "message": "failed build test",
      "committer": {                                                              //Optional
        "username": "web-flow",
        "url": "https://github.com/web-flow",                                     //Optional
        "avatar_url": "https://avatars3.githubusercontent.com/u/19864447?v=4"     //Optional
      },
      "author": {                                                                 //Optional
        "username": "dgangaia",
        "url": "https://github.com/dgangaia",                                     //Optional
        "avatar_url": "https://avatars1.githubusercontent.com/u/43594254?v=4"     //Optional
      }
    }
  },
  "homepage": "https://quay.io/repository/dgangaia/test/build/5346a21d-3434-4764-85be-5be1296f293c"
}
12.1.6. Dockerfile Build Cancelled
A Dockerfile build was cancelled
{
  "build_id": "cbd534c5-f1c0-4816-b4e3-55446b851e70",
  "trigger_kind": "github",
  "name": "test",
  "repository": "dgangaia/test",
  "namespace": "dgangaia",
  "docker_url": "quay.io/dgangaia/test",
  "trigger_id": "38b6e180-9521-4ff7-9844-acf371340b9e",
  "docker_tags": [
    "master",
    "latest"
  ],
  "build_name": "cbce83c",
  "trigger_metadata": {
    "commit": "cbce83c04bfb59734fc42a83aab738704ba7ec41",
    "ref": "refs/heads/master",
    "default_branch": "master",
    "git_url": "git@github.com:dgangaia/test.git",
    "commit_info": {
      "url": "https://github.com/dgangaia/test/commit/cbce83c04bfb59734fc42a83aab738704ba7ec41",
      "date": "2019-03-06T14:27:53+11:00",
      "message": "testing cancel build",
      "committer": {
        "username": "web-flow",
        "url": "https://github.com/web-flow",
        "avatar_url": "https://avatars3.githubusercontent.com/u/19864447?v=4"
      },
      "author": {
        "username": "dgangaia",
        "url": "https://github.com/dgangaia",
        "avatar_url": "https://avatars1.githubusercontent.com/u/43594254?v=4"
      }
    }
  },
  "homepage": "https://quay.io/repository/dgangaia/test/build/cbd534c5-f1c0-4816-b4e3-55446b851e70"
}
12.1.7. Vulnerability Detected
A vulnerability was detected in the repository
{
  "repository": "dgangaia/repository",
  "namespace": "dgangaia",
  "name": "repository",
  "docker_url": "quay.io/dgangaia/repository",
  "homepage": "https://quay.io/repository/dgangaia/repository",

  "tags": ["latest", "othertag"],

  "vulnerability": {
    "id": "CVE-1234-5678",
    "description": "This is a bad vulnerability",
    "link": "http://url/to/vuln/info",
    "priority": "Critical",
    "has_fix": true
  }
}
12.2. Notification Actions
12.2.1. Quay Notification
A notification will be added to the Quay.io notification area. The notification area can be found by clicking on the bell icon in the top right of any Quay.io page.
Quay.io notifications can be setup to be sent to a User, Team, or the organization as a whole.
12.2.2. E-mail
An e-mail will be sent to the specified address describing the event that occurred.
All e-mail addresses will have to be verified on a per-repository basis
12.2.3. Webhook POST
An HTTP POST call will be made to the specified URL with the event’s data (see above for each event’s data format).
When the URL is HTTPS, the call will have an SSL client certificate set from Quay.io. Verification of this certificate will prove the call originated from Quay.io. Responses with status codes in the 2xx range are considered successful. Responses with any other status codes will be considered failures and result in a retry of the webhook notification.
12.2.4. Flowdock Notification
Posts a message to Flowdock.
12.2.5. Hipchat Notification
Posts a message to HipChat.
12.2.6. Slack Notification
Posts a message to Slack.