
Chapter 5. Creating the mortgage-process data objects
Data objects are the building blocks for the rule assets that you create. Data objects are custom data types implemented as Java classes in specified packages of your project. These custom data types determine what data your assets and your decision services are based on.
The mortgage process project uses the following data objects:
-
Applicant -
Property -
ValidationErrorDO -
Application
5.1. Creating the Applicant data object
Follow these steps to create the Applicant data object, which contains information about the applicant. This is the basic information required to apply for the loan in this tutorial.
Procedure
- In Business Central, click on the MySpace default space.
- Click Menu → Design → Projects and click mortgage-process.
- Click Add Asset and select Data Object.
-
Enter
Applicantin the Data Object field of the Create new Data Object window. -
Select
com.myspace.mortgage_processfrom the Package pull-down menu and click Ok. -
Enter
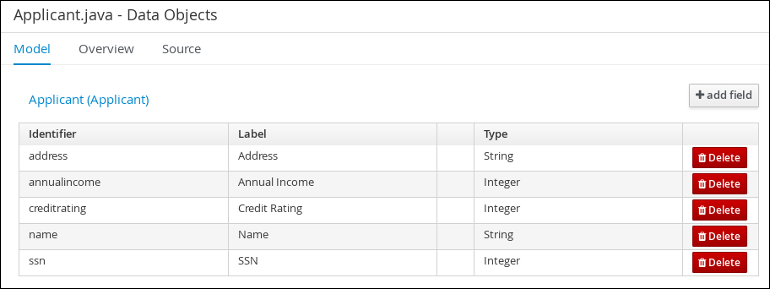
Applicantin the Label field of the 'Applicant'- general properties section. Click +add field and input the following Applicant data object values. Click Create and continue after each addition. For the last addition, click Create.
Figure 5.1. Applicant data object field values
- Click Save.
5.2. Creating the Property data object
Follow these steps to create the Property data object, which contains information about the property details, such as the property age and price.
Procedure
- In Business Central, click on the MySpace default space.
- Click Menu → Design → Projects and click mortgage-process.
- Click Add Asset and select Data Object.
-
Enter
Propertyin the Data Object field of the Create new Data Object window. -
Select
com.myspace.mortgage_processfrom the Package pull-down menu and click Ok. -
Enter
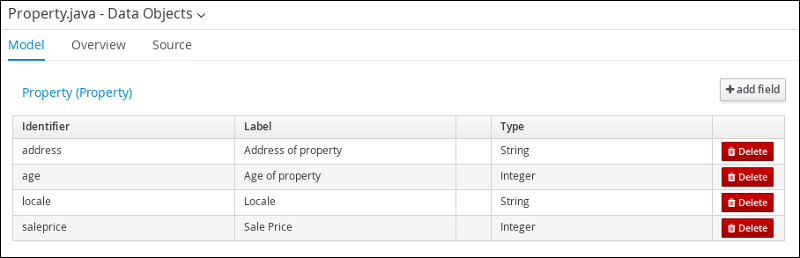
Propertyin the Label field of the 'Property'- general properties section. Click +add field and input the following Property data object values. Click Create and continue after each addition. For the last addition, click Create.
Figure 5.2. Property data object field values
- Click Save.
5.3. Creating the ValidationErrorDO data object
Follow these steps to create the ValidationErrorDO data object, which specifies the cause of an application error.
Procedure
- In Business Central, click on the MySpace default space.
- Click Menu → Design → Projects and click mortgage-process.
- Click Add Asset and select Data Object.
-
Enter
ValidationErrorDOin the Data Object field of the Create new Data Object window. -
Select
com.myspace.mortgage_processfrom the Package pull-down menu and click Ok. -
Enter
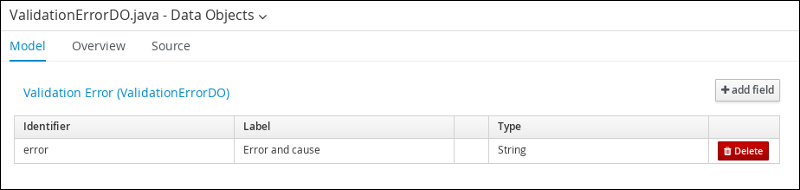
ValidationErrorDOin the Label field of the 'ValidationErrorDO'- general properties section. Click +add field and input the following ValidationErrorDO data object values. Click Create and continue after each addition. For the last addition, click Create.
Figure 5.3. ValidationErrorDO data object field values
- Click Save.
5.4. Creating the Application data object
Follow these steps to create the Application data object, which contains information about the mortgage details, such as the down payment and the mortgage amount.
Procedure
- In Business Central, click on the MySpace default space.
- Click Menu → Design → Projects and click mortgage-process.
- Click Add Asset and select Data Object.
-
Enter
Applicationin the Data Object field of the Create new Data Object window. -
Select
com.myspace.mortgage_processfrom the Package pull-down menu and click Ok. -
Enter
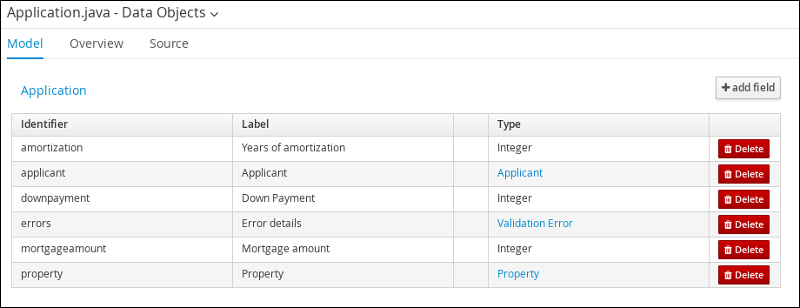
Applicationin the Label field of the 'Application'- general properties section. Click +add field and input the following Application data object values. Click Create and continue after each addition. For the last addition, click Create.
Figure 5.4. Application data object field values
- Click Save.