
Chapter 6. Milestones
Milestones are a special service task that can be configured in the case definition designer by adding the milestone node to the process designer palette. When creating a new case definition, a milestone configured as Adhoc autostart is included on the design palette by default. Newly created milestones are not set to Adhoc autostart by default.
Case management milestones generally occur at the end of a stage, but they can also be the result of achieving other milestones. A milestone always requires a condition to be defined in order to track progress. Milestones react to case file data when data is added to a case. A milestone represents a single point of achievement within the case instance. It can be used to flag certain events, which can be useful for Key Performance Indicator (KPI) tracking or identifying the tasks that are still to be completed.
Milestones can be in any of the following states during case execution:
-
Active- The condition has been defined on the milestone but it has not been met. -
Completed- The milestone condition has been met, the milestone has been achieved, and the case can proceed to the next task. -
Terminated- The milestone is no longer a part of the case process and is no longer required.
While a milestone is available or completed it can be triggered manually by a signal or automatically if Adhoc autostart is configured when a case instance starts. Milestones can be triggered as many times as required, however, it is directly achieved when the condition is met.
6.1. Creating the Hardware spec ready milestone
Create a HardwareSpecReady milestone that is reached when the required hardware specification document is completed.
Procedure
- In the process designer, expand Milestone in the Object Library and drag a new milestone on the canvas and place it on the right side of the Place order end event.
-
Click the new milestone and in the upper-right corner click the Properties
 icon.
icon.
-
Input
HardwareSpecReadyin the Name field. - Expand Implementation/Execution and select Adhoc Autostart.
Expand Data Assignments, click
in the Assignments field, and add the following:

Click the Source column drop-down, select Constant, and input
org.kie.api.runtime.process.CaseData(data.get("hwSpec") != null).- Click Save.
6.2. Creating the Manager decision milestone
This milestone is reached when the managerDecision variable has been given a response.
Procedure
- In the process designer, expand Milestone in the Object Library and drag a new milestone on to the canvas below the HardwareSpecReady milestone.
-
Click the new milestone and in the upper-right corner click the Properties
icon.
-
Input
ManagerDecisionin the Name field. - Expand Implementation/Execution and select Adhoc Autostart.
Expand Data Assignments and click
in the Assignments field and add the following:
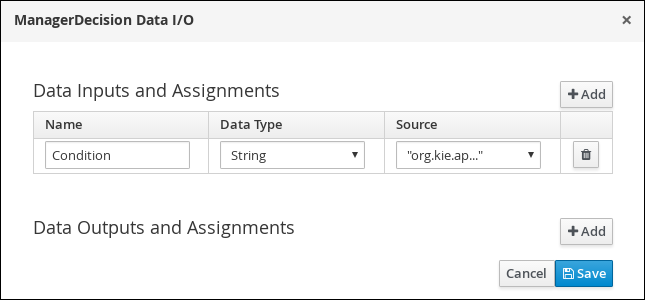
Click the Source column drop-down, select Constant, and input
org.kie.api.runtime.process.CaseData(data.get("managerDecision") != null).- Click Save.
6.3. Creating the Order placed milestone
This milestone is reached when the ordered variable, which is part of the Place order sub-process, has been given a response.
Procedure
- In the process designer, expand Milestone in the Object Library and drag a new milestone on the canvas below the Prepare hardware spec user task.
-
Click the new milestone and in the upper-right corner click the Properties
icon.
-
Input
Milestone1Orderplacedin the Name field. - Expand Implementation/Execution and select Adhoc Autostart.
Expand Data Assignments, click
in the Assignments field, and add the following:

Click the Source column drop-down, select Constant, and input
org.kie.api.runtime.process.CaseData(data.get("ordered") == true). This means that a case variable namedorderedexists with the valuetrue.- Click Save.
Click Milestone1OrderPlaced and create a new script task.

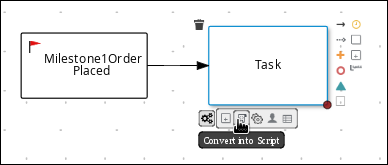
-
Click the new script task and in the upper-right corner click the Properties
icon.
-
Input
Notify requestorin the Name field. -
Expand Implementation/Execution and input
System.out.println("Notification::Order placed");. - Click the Notify requestor script task and create a signal end event.
-
Click the signal event and in the upper-right corner click the Properties.
icon.
- Expand Implementation/Execution, click the down arrow in the Signal field, and select New.
-
Input
Milestone2OrderShipped. - Click the down arrow in the Signal Scope field, select Process Instance.
Click Save.
Figure 6.1. OrderPlaced milestone

6.4. Creating the Order shipped milestone
The condition for this milestone is that a case file variable named shipped is true. Adhoc autostart is not enabled for this milestone. Instead, it is triggered by a signal event when the order is ready to be sent.
Procedure
- In the process designer, expand Milestone in the Object Library and drag a new milestone on the canvas below the Notify requestor script task.
-
Click the new milestone and in the upper-right corner click the Properties
icon.
-
Input
Milestone2OrderShippedin the Name field. - Expand Implementation/Execution and ensure that Adhoc Autostart is not selected.
Expand Data Assignments, click
in the Assignments field, and add the following:
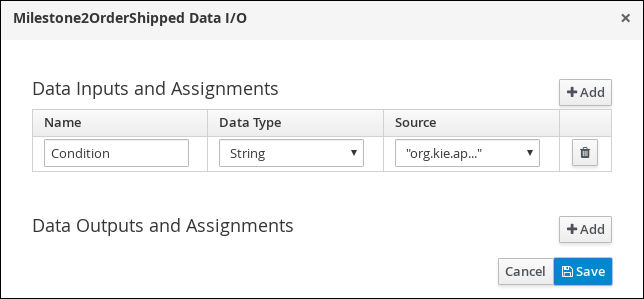
Click the Source column drop-down, select Constant, and input
org.kie.api.runtime.process.CaseData(data.get("shipped") == true). This means that a case variable namedshippedexists with the valuetrue.- Click Save.
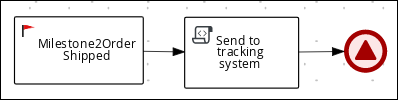
- Click Milestone2OrderPlaced and create a new script task.
-
Click the new script task and in the upper-right corner click the Properties
icon.
-
Input
Send to tracking systemin the Name field. -
Expand Implementation/Execution and input
System.out.println("Order added to tracking system");. - Click the Send to tracking system script task and create a signal end event.
-
Click the signal event and in the upper-right corner click the Properties.
icon.
- Expand Implementation/Execution, click the down arrow in the Signal field, and select New.
-
Input
Milestone3DeliveredToCustomer. - Click the down arrow in the Signal Scope field, select Process Instance.
Click Save.
Figure 6.2. OrderShipped milestone
6.5. Creating the Delivered to customer milestone
The condition for this milestone is that a case file variable named delivered is true. Adhoc autostart is not enabled for this milestone. Instead, it is triggered by a signal event after the order has successfully shipped to the customer.
Procedure
- In the process designer, expand Milestone in the Object Library and drag a new milestone on the canvas below the Send to tracking system script task.
-
Click the new milestone and in the upper-right corner click the Properties
icon.
-
Input
Milestone3DeliveredToCustomerin the Name field. - Expand Implementation/Execution and ensure that Adhoc Autostart is not selected.
Expand Data Assignments, click
in the Assignments field, and add the following:
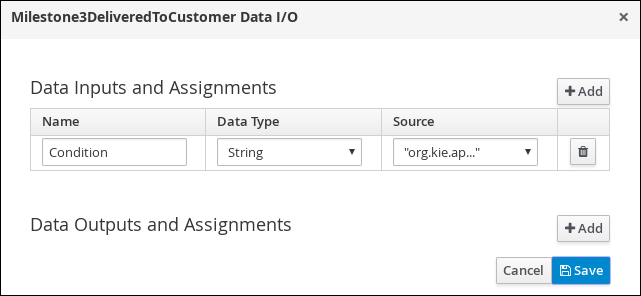
Click the Source column drop-down, select Constant, and input
org.kie.api.runtime.process.CaseData(data.get("delivered") == true). This means that a case variable nameddeliveredexists with the valuetrue.- Click Save.
Click Milestone3DeliveredToCustomer and create a new user task.
-
Click the new user task and in the upper-right corner click the Properties
icon.
-
Input
Customer satisfaction surveyin the Name field. -
Expand Implementation/Execution, click Add below the Actors menu, click Select → New, and input
owner. -
Input
CustomerSurveyin the Task Name field. Select the Skippable check box and enter the following text in the in the Description field:
Satisfaction survey for order #{CaseId}Click
in the Assignments field and add the following:
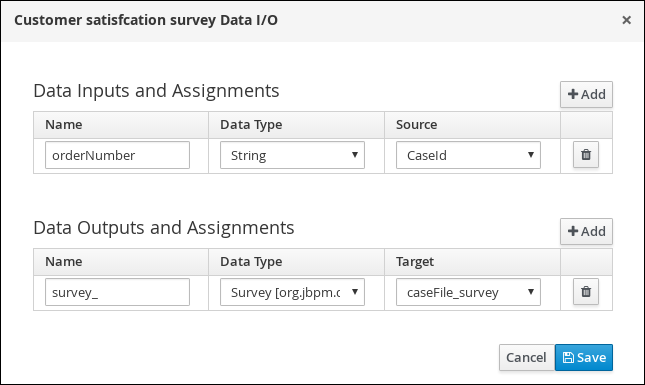
- Click Save.
-
Click the new user task and in the upper-right corner click the Properties
- Click the Customer satisfaction survey user task and create an end event.
Click Save to confirm your changes.
Figure 6.3. DeliveredToCustomer milestone

The IT Orders case can be closed after all milestone sequences are completed. However, due to the ad hoc nature of cases, the case could be reopened if, for example, the order was never received by the customer or the item is faulty. Tasks can be re-triggered or added to the case definition as required, even during run time.