
Getting started with case management
Abstract
Preface
As a business rules and processes developer, you can use case management assets in Business Central to create unpredictable and ad hoc case processes. Case workers or process administrators can also use Business Central for case management and execution. Red Hat Process Automation Manager provides example projects with example business assets in Business Central as a reference. This document describes how to create and test an example IT orders project based on the IT_Orders sample project included in Business Central.
Prerequisites
- Red Hat JBoss Enterprise Application Platform 7.2 is installed. For installation information, see Red Hat JBoss Enterprise Application Platform 7.2 Installation Guide.
- Red Hat Process Automation Manager is installed and configured with Process Server. For more information see Installing and configuring Red Hat Process Automation Manager on Red Hat JBoss EAP 7.2.
-
Red Hat Process Automation Manager is running and you can log in to Business Central with the
kie-server,user, andadminroles.
Chapter 1. Case management
Case management is an extension of Business Process Management (BPM) that enables you to manage adaptable business processes.
BPM is a management practice used to automate tasks that are repeatable and have a common pattern, with a focus on optimization by perfecting a process. Business processes are usually modeled with clearly defined paths leading to a business goal. This requires a lot of predictability, usually based on mass-production principles. However, many real-world applications cannot be described completely from start to finish (including all possible paths, deviations, and exceptions). Using a process-oriented approach in certain cases can lead to complex solutions that are hard to maintain.
Case management provides problem resolution for non-repeatable, unpredictable processes as opposed to the efficiency-oriented approach of BPM for routine, predictable tasks. It manages one-off situations when the process cannot be predicted in advance. A case definition usually consists of loosely coupled process fragments that can be connected directly or indirectly to lead to certain milestones and ultimately a business goal, while the process is managed dynamically in response to changes that occur during run time.
In Red Hat Process Automation Manager, case management includes the following core process engine features:
- Case file instance
- A per case runtime strategy
- Case comments
- Milestones
- Stages
- Ad hoc fragments
- Dynamic tasks and processes
- Case identifier (correlation key)
- Case lifecycle (close, reopen, cancel, destroy)
A case definition is always an ad hoc process definition and does not require an explicit start node. The case definition is the main entry point for the business use case.
A process definition is introduced as a supporting construct of the case and can be invoked either as defined in the case definition or dynamically to bring in additional processing when required. A case definition defines the following new objects:
- Activities (required)
- Case file (required)
- Milestones
- Roles
- Stages
1.1. Case files
A case instance is a single instance of a case definition and encapsulates the business context. All case instance data is stored in the case file, which is accessible to all process instances that might participate in the particular case instance. Each case instance and its case file are completely isolated from the other cases. Only case instance participants can access the case file.
A case file is used in case management as a repository of data for the entire case instance. It contains all roles, data objects, the data map, and any other data. The case can be closed and reopened at a later date with the same case file attached. A case instance can be closed at any time and does not require a specific resolution to be completed.
The case file can also include embedded documentation, references, PDF attachments, web links, and other options.
The Case ID prefix is an optional configurable prefix that enables you to easily distinguish different types of cases. The prefix is followed by a generated ID in the format ID-XXXXXXXXXX, where XXXXXXXXXX is a generated number that provides a unique ID for the case instance. If a prefix is not provided, the default prefix is CASE with the following identifiers:
CASE-0000000001
CASE-0000000002
CASE-0000000003
You can specify any prefix. For example, if you specify the prefix IT, the following identifiers are generated:
IT-0000000001
IT-0000000002
IT-0000000003
1.2. Comments
In case management, comments facilitate collaboration within the case instance, and allow case workers to easily communicate with each other to exchange information.
Comments are bound to the case instance. Case instances are part of the case file, so you can use comments to take action on the instances. Basic text-based comments can have a complete operations set, similar to CRUD (create, read, update, and delete).
1.3. Case roles
Case roles provide an additional layer of abstraction for user participation in case handling. Roles, users, and groups are used for different purposes in case management.
- Roles
- Roles drive the authorization for a case instance and are used for user activity assignments. A user or one or more groups can be assigned to the owner role. The owner is whoever the case belongs to. Roles are not restricted to a single set of people or groups as part of a case definition. Use roles to specify task assignments instead of assigning a specific user or group to a task assignment to ensure that the case remains dynamic.
- Groups
- A group is a collection of users who are able to carry out a particular task or have a set of specified responsibilities. You can assign any number of people to a group and assign any group to a role. You can add or change members of a group at any time. Do not hard code a group to a particular task.
- Users
- A user is an individual who can be given a particular task when you assign them a role or add them to a group.
The following example illustrates how the preceding case management concepts apply to a hotel reservation with:
-
Role =
Guest -
Group =
Receptionist,Maid -
User =
Marilyn
The Guest role assignment affects the specific work of the associated case and is unique to all case instances. The number of users or groups that can be assigned to a role is limited by the Case Cardinality, which is set during role creation in the process designer and case definition. For example, the hotel reservation case has only one guest while the IT_Orders sample project has two suppliers of IT hardware.
When roles are defined, ensure that roles are not hard-coded to a single set of people or groups as part of case definition and that they can differ for each case instance. This is why case role assignments are important.
Role assignments can be assigned or removed when a case starts or at any time when a case is active. Although roles are optional, use roles in case definitions to maintain an organized workflow.
Always use roles for task assignments instead of actual user or group names. This ensures that the case remains dynamic and actual user or group assignments can be made as late as required.
Roles are assigned to users or groups and authorized to perform tasks when a case instance is started.
Chapter 2. Reviewing the IT_Orders sample project
Before you create your own case management project, review the existing IT_Orders sample case management project in Business Central. This sample project contains predefined case management assets as a reference for your own case projects.
The business process application example includes features that are Technology Preview only. Technology Preview features are not supported with Red Hat production service level agreements (SLAs), might not be functionally complete, and are not recommended for production. These features provide early access to upcoming product features, enabling customers to test functionality and provide feedback during the development process. For more information about Red Hat Technology Preview support, see Technology Preview Features Support Scope.
Procedure
In Business Central, go to Menu → Design → Projects.
Red Hat Process Automation Manager provides a default space called MySpace, as shown in the following image. You can use the default space to create and test example projects.
Figure 2.1. Default space

- Click Try Samples.
- Select IT_Orders and click Ok.
The Assets view of the project opens. Select each example asset to explore how the project is designed to achieve the specified goal or workflow.
Review the orderhardware Business Processes asset to help you understand the business process flow.
The legacy process designer in Business Central is deprecated in Red Hat Process Automation Manager 7.6.0. It will be removed in a future Red Hat Process Automation Manager release. The legacy process designer will not receive any new enhancements or features. Existing users of the legacy process designer are advised to migrate projects to the new designer. For information about migrating projects to the new designer, see Managing projects in Business Central.
Chapter 3. Creating a new IT_Orders case project
Create a new IT_Orders project in Business Central to gain an understanding of all of the required assets and how they are used in the project.
Procedure
Log in to Business Central and go to Menu → Design → Projects.
Business Central provides a default space called MySpace, as shown in the following image. You can use the default space to create and test example projects.
Figure 3.1. Default spaces

Click Add Project → Case project.
Figure 3.2. Case project menu

-
Enter
IT_Orders_Newin the Name field. Click Add.
Figure 3.3. Add Project window

The Assets view of the project opens.
Chapter 4. Data objects
Data objects are the building blocks for the rule assets that you create. Data objects are custom data types implemented as Java objects in specified packages of your project. For example, you might create a Person object with data fields Name, Address, and DateOfBirth to specify personal details for loan application rules. These custom data types determine what data your assets and your decision services are based on.
4.1. Creating the ITOrderService data object
The ITOrderService data object specifies the data type that will be used to define the IT Orders variables.
Prerequisites
- The IT_Orders_New project is created.
Procedure
- Click Add Asset → Data Object.
In the Create new Data Object wizard, enter the following values:
-
Data Object:
ITOrderService -
Package:
com.myspace.it_orders_new
-
Data Object:
- Click Ok.
-
Click
 next to the Package pull-down menu to specify a new package for the data object.
-
Input
org.jbpm.demo.it_orders.servicesand click Add. - Click Save, and then click Yes, Move to confirm your changes.
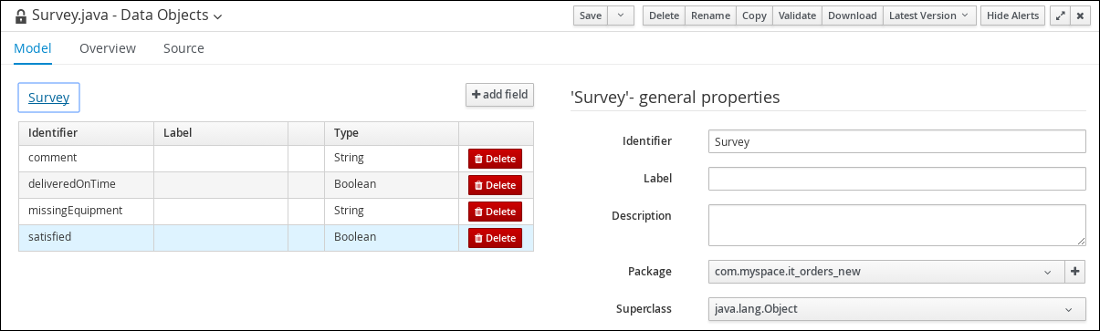
4.2. Creating the Survey data object
The Survey data object contains data fields, such as deliveredOnTime and missingEquipment. You will use the data and values when you design your case.
Prerequisites
- The IT_Orders_New project is created.
Procedure
- In Business Central, go to Menu → Design → Projects and click IT_Orders_New.
- Click Add Asset → Data Object.
In the Create new Data Object wizard, enter the following values:
-
Data Object:
Survey -
Package:
com.myspace.it_orders_new
-
Data Object:
- Click Ok.
Add the Survey data object constraints.
- Click add field.
Enter the following values:
-
Id:
comment - Label: Leave empty
-
Type:
String
-
Id:
Click Create and continue, and then enter the following values:
-
Id:
deliveredOnTime - Label: Leave empty
-
Type:
Boolean
-
Id:
Click Create and continue, and then enter the following values:
-
Id:
missingEquipment - Label: Leave empty
-
Type:
String
-
Id:
Click Create and continue, and then enter the following values:
-
Id:
satisfied - Label: Leave empty
-
Type:
Boolean
-
Id:
- Click Create.
Click Save to confirm your changes.
Figure 4.1. Survey data object details
Chapter 5. Designing the case definition
You design cases using the process designer in Business Central. Case design is the basis of case management and sets the specific goals and tasks for each case. The case flow can be modified dynamically during run time by adding dynamic tasks or processes. In this procedure, you will create this same case definition to familiarize yourself with the case definition design process.
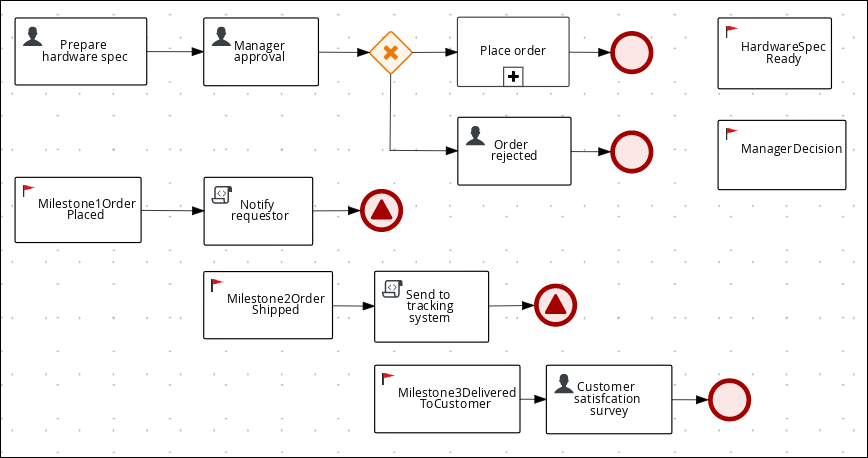
The IT_Orders sample project in Business Central includes the following orderhardware business process case definition.
Figure 5.1. orderhardware business process case definition
Prerequisites
- You have created a new case in Business Central. For more information, see Chapter 3, Creating a new IT_Orders case project.
- You have created the data objects. For more information, see Chapter 4, Data objects.
Procedure
- In Business Central, go to Menu → Design → Projects and click IT_Orders_New.
- Click Add Asset → Case Definition.
In the Create new Case definition window, add the following required information:
-
Case Definition: Input
orderhardware. This is usually the subject of the case or project that is being case managed. - Package: Select com.myspace.it_orders_new to specify the location that the case file is created in.
-
Case Definition: Input
- Click Ok to open the process designer.
Define values for the case file variables that are accessible to the subprocesses, subcases, and business rules used in the case.
-
In the upper-right corner, click the Diagram properties
 icon.
icon.
Scroll down and expand Case Management, click
 in the Case File Variables section, and enter the following:
Figure 5.2. orderhardware case file variables
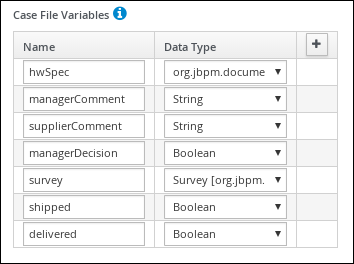
NoteThe following case file variables are custom data types:
- hwSpec: org.jbpm.document.Document (type in this value)
- survey: Survey [com.myspace.it_orders_new] (select this value)
-
In the upper-right corner, click the Diagram properties
- Click Save.
Define the roles involved in the case.
-
In the upper-right corner, click the Diagram properties
icon.
Scroll down and expand Case Management, click
in the Case Roles section, and enter the following:
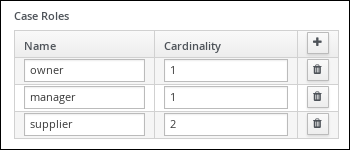
Figure 5.3. orderhardware case roles
-
owner: The employee who is making the hardware order request. The role cardinality is set to1, which means that only one person or group can be assigned to this role. -
manager: The employee’s manager; the person who will approve or deny the requested hardware. The role cardinality is set to1, which means that only one person or group can be assigned to this role. -
supplier: The available suppliers of IT hardware in the system. The role cardinality is set to2, which means that more than one supplier can be assigned to this role.
-
-
In the upper-right corner, click the Diagram properties
- Click Save.
5.1. Creating the Place order subprocess
Create the Place order subprocess, which is a separate business process that is carried out by the supplier. This is a reusable process that occurs during the course of case execution as described in Chapter 5, Designing the case definition.
Prerequisites
- You have created a new case in Business Central. For more information, see Chapter 3, Creating a new IT_Orders case project.
- You have created the data objects. For more information, see Chapter 4, Data objects.
Procedure
- In Business Central, go to Menu → Design → Projects → IT_Orders_New.
- From the project menu, click Add Asset → Business Process.
In the Create new Business Process wizard, enter the following values:
-
Business Process:
place-order -
Package: Select
com.myspace.it_orders_new
-
Business Process:
- Click Ok. The diagram editor opens.
-
Click an empty space in the canvas, and in the upper-right corner, click the Diagram properties
icon.
Scroll down and expand Process Data and click
in the Process Variables section and enter the following:
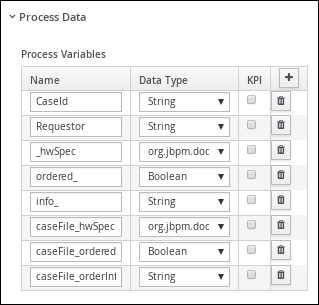
- Click Save.
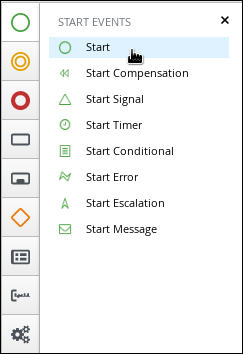
Drag a start event onto the canvas and create an outgoing connection from the start event to a task and convert the new task to a user task.


-
Click the user task and in the Diagram properties panel, input
Place orderin the Name field. -
Expand Implementation/Execution, click Add below the Groups menu, click Select → New, and input
supplier. Click
in the Assignments field and add the following:
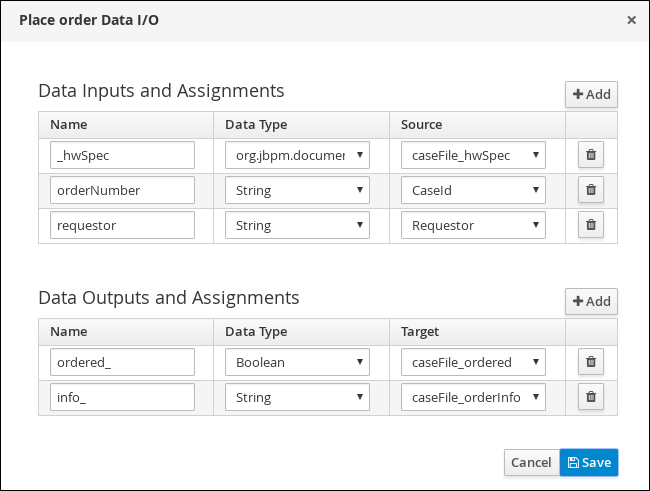
For the first input assignment, select Custom for the Data Type and input
org.jbpm.document.Document.- Click Save.
Select the Skippable check box and enter the following text in the Description field:
Approved order #{CaseId} to be placed
Create an outgoing connection from the Place order user task and connect it to an end event.
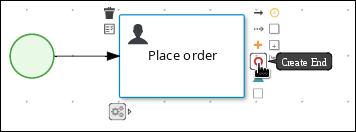

- Click Save to confirm your changes.
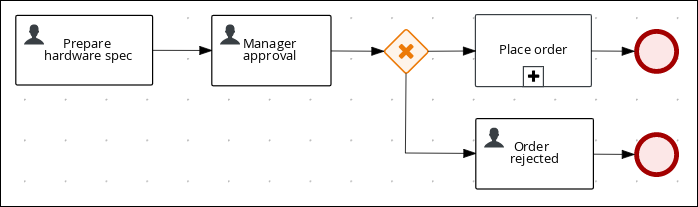
5.2. Creating the Manager approval business process
The manager approval process determines whether or not the order will be placed or rejected.
Procedure
- In Business Central, go to Menu → Design → Projects → IT_Orders_New → orderhardware Business Processes.
Create and configure the prepare hardware spec user task:
- Drag a start event onto the canvas and create an outgoing connection from the start event to a task and convert the new task to a user task.
-
Click the new user task and in the upper-right corner click the Properties
icon.
-
Input
Prepare hardware specin the Name field. -
Expand Implementation/Execution, click Add below the Groups menu, click Select → New, and input
supplier. -
Input
PrepareHardwareSpecin the Task Name field. Select the Skippable check box and enter the following text in the Description field:
Prepare hardware specification for #{initiator} (order number #{CaseId})Click
in the Assignments field and add the following:

- Click Save.
Create and configure the manager approval user task:
- Click the Prepare hardware spec user task and create a new user task.
-
Click the new user task and in the upper-right corner click the Properties
icon.
-
Click the user task and in the Properties panel input
Manager approvalin the Name field. -
Expand Implementation/Execution, click Add below the Actors menu, click Select → New, and input
manager. -
Input
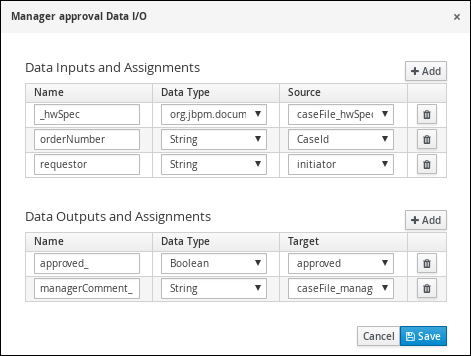
ManagerApprovalin the Task Name field. Click
in the Assignments field and add the following:
- Click Save.
Select the Skippable check box and enter the following text in the Description field:
Approval request for new hardware for #{initiator} (order number #{CaseId})Enter the following Java expression in the On Exit Action field:
kcontext.setVariable("caseFile_managerDecision", approved);- Click Save.
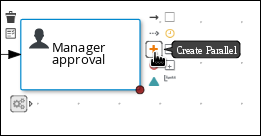
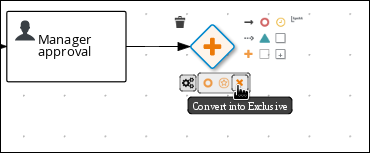
Click the Manager approval user task and create a Data-based Exclusive (XOR) gateway.
Create and configure the place order reusable subprocess:
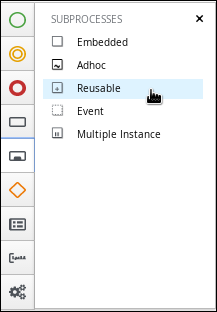
From the Object Library, expand Subprocesses, click Reusable, and drag the new element to the canvas on the right side of the Data-based Exclusive (XOR) gateway.
Connect the Data-based Exclusive (XOR) gateway to the subprocess.
-
Click the new sub task and in the upper-right corner click the Properties
icon.
-
Input
Place orderin the Name field. Expand Data Assignments and click
in the Assignments field and add the following:

-
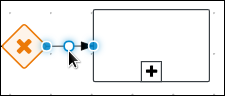
Click the connection from the Data-based Exclusive (XOR) gateway to the subprocess and click the Properties
icon.
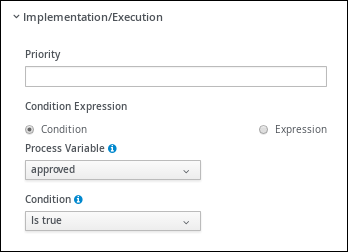
Expand Implementation/Execution, select Condition, and set the following condition expressions.
- Click the Place order user task and create an end event.
Create and configure the order rejected user task:
- Click the Data-based Exclusive (XOR) gateway and create a new user task.
Drag the new task to align it below the Place order task.

-
Click the new user task and in the upper-right corner click the Properties
icon.
-
Input
Order rejectedin the Name field. -
Expand Implementation/Execution and input
OrderRejectedin the Task Name field. -
Click Add below the Actors menu, click Select → New, and input
owner. Click
in the Assignments field and add the following:

- Click Save.
Select the Skippable check box and enter the following text in the Description field:
Order #{CaseId} has been rejected by manager- Click the Order rejected user task and create an end event.
- Click Save.
-
Click the connection from the Data-based Exclusive (XOR) gateway to the Order rejected user task and click the Properties
icon.
Expand Implementation/Execution, select Condition, and set the following condition expressions.

Click Save.
Figure 5.4. Manager approval business process
Chapter 6. Milestones
Milestones are a special service task that can be configured in the case definition designer by adding the milestone node to the process designer palette. When creating a new case definition, a milestone configured as Adhoc autostart is included on the design palette by default. Newly created milestones are not set to Adhoc autostart by default.
Case management milestones generally occur at the end of a stage, but they can also be the result of achieving other milestones. A milestone always requires a condition to be defined in order to track progress. Milestones react to case file data when data is added to a case. A milestone represents a single point of achievement within the case instance. It can be used to flag certain events, which can be useful for Key Performance Indicator (KPI) tracking or identifying the tasks that are still to be completed.
Milestones can be in any of the following states during case execution:
-
Active- The condition has been defined on the milestone but it has not been met. -
Completed- The milestone condition has been met, the milestone has been achieved, and the case can proceed to the next task. -
Terminated- The milestone is no longer a part of the case process and is no longer required.
While a milestone is available or completed it can be triggered manually by a signal or automatically if Adhoc autostart is configured when a case instance starts. Milestones can be triggered as many times as required, however, it is directly achieved when the condition is met.
6.1. Creating the Hardware spec ready milestone
Create a HardwareSpecReady milestone that is reached when the required hardware specification document is completed.
Procedure
- In the process designer, expand Milestone in the Object Library and drag a new milestone on the canvas and place it on the right side of the Place order end event.
-
Click the new milestone and in the upper-right corner click the Properties
icon.
-
Input
HardwareSpecReadyin the Name field. - Expand Implementation/Execution and select Adhoc Autostart.
Expand Data Assignments, click
in the Assignments field, and add the following:

Click the Source column drop-down, select Constant, and input
org.kie.api.runtime.process.CaseData(data.get("hwSpec") != null).- Click Save.
6.2. Creating the Manager decision milestone
This milestone is reached when the managerDecision variable has been given a response.
Procedure
- In the process designer, expand Milestone in the Object Library and drag a new milestone on to the canvas below the HardwareSpecReady milestone.
-
Click the new milestone and in the upper-right corner click the Properties
icon.
-
Input
ManagerDecisionin the Name field. - Expand Implementation/Execution and select Adhoc Autostart.
Expand Data Assignments and click
in the Assignments field and add the following:
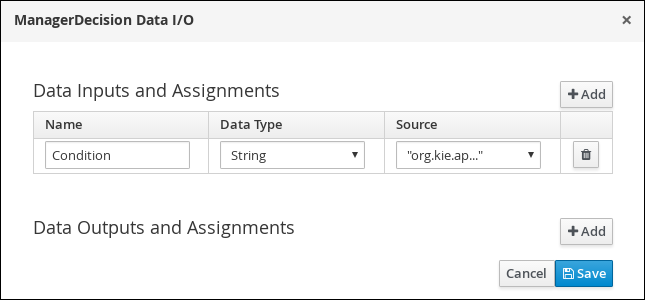
Click the Source column drop-down, select Constant, and input
org.kie.api.runtime.process.CaseData(data.get("managerDecision") != null).- Click Save.
6.3. Creating the Order placed milestone
This milestone is reached when the ordered variable, which is part of the Place order sub-process, has been given a response.
Procedure
- In the process designer, expand Milestone in the Object Library and drag a new milestone on the canvas below the Prepare hardware spec user task.
-
Click the new milestone and in the upper-right corner click the Properties
icon.
-
Input
Milestone1Orderplacedin the Name field. - Expand Implementation/Execution and select Adhoc Autostart.
Expand Data Assignments, click
in the Assignments field, and add the following:

Click the Source column drop-down, select Constant, and input
org.kie.api.runtime.process.CaseData(data.get("ordered") == true). This means that a case variable namedorderedexists with the valuetrue.- Click Save.
Click Milestone1OrderPlaced and create a new script task.

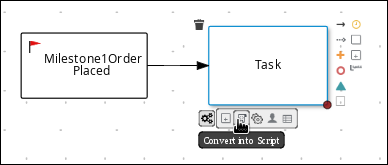
-
Click the new script task and in the upper-right corner click the Properties
icon.
-
Input
Notify requestorin the Name field. -
Expand Implementation/Execution and input
System.out.println("Notification::Order placed");. - Click the Notify requestor script task and create a signal end event.
-
Click the signal event and in the upper-right corner click the Properties.
icon.
- Expand Implementation/Execution, click the down arrow in the Signal field, and select New.
-
Input
Milestone2OrderShipped. - Click the down arrow in the Signal Scope field, select Process Instance.
Click Save.
Figure 6.1. OrderPlaced milestone

6.4. Creating the Order shipped milestone
The condition for this milestone is that a case file variable named shipped is true. Adhoc autostart is not enabled for this milestone. Instead, it is triggered by a signal event when the order is ready to be sent.
Procedure
- In the process designer, expand Milestone in the Object Library and drag a new milestone on the canvas below the Notify requestor script task.
-
Click the new milestone and in the upper-right corner click the Properties
icon.
-
Input
Milestone2OrderShippedin the Name field. - Expand Implementation/Execution and ensure that Adhoc Autostart is not selected.
Expand Data Assignments, click
in the Assignments field, and add the following:
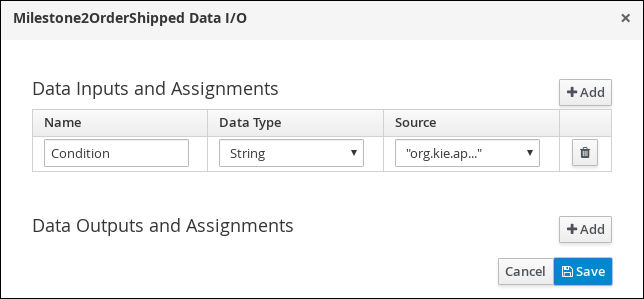
Click the Source column drop-down, select Constant, and input
org.kie.api.runtime.process.CaseData(data.get("shipped") == true). This means that a case variable namedshippedexists with the valuetrue.- Click Save.
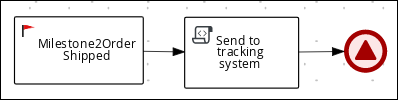
- Click Milestone2OrderPlaced and create a new script task.
-
Click the new script task and in the upper-right corner click the Properties
icon.
-
Input
Send to tracking systemin the Name field. -
Expand Implementation/Execution and input
System.out.println("Order added to tracking system");. - Click the Send to tracking system script task and create a signal end event.
-
Click the signal event and in the upper-right corner click the Properties.
icon.
- Expand Implementation/Execution, click the down arrow in the Signal field, and select New.
-
Input
Milestone3DeliveredToCustomer. - Click the down arrow in the Signal Scope field, select Process Instance.
Click Save.
Figure 6.2. OrderShipped milestone
6.5. Creating the Delivered to customer milestone
The condition for this milestone is that a case file variable named delivered is true. Adhoc autostart is not enabled for this milestone. Instead, it is triggered by a signal event after the order has successfully shipped to the customer.
Procedure
- In the process designer, expand Milestone in the Object Library and drag a new milestone on the canvas below the Send to tracking system script task.
-
Click the new milestone and in the upper-right corner click the Properties
icon.
-
Input
Milestone3DeliveredToCustomerin the Name field. - Expand Implementation/Execution and ensure that Adhoc Autostart is not selected.
Expand Data Assignments, click
in the Assignments field, and add the following:
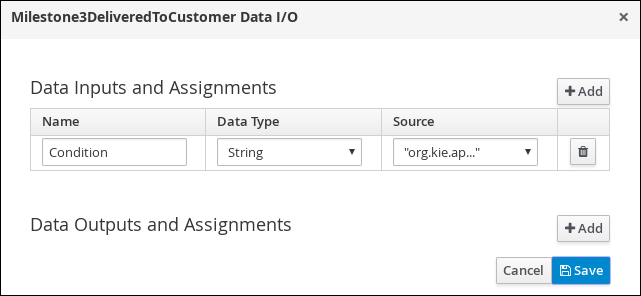
Click the Source column drop-down, select Constant, and input
org.kie.api.runtime.process.CaseData(data.get("delivered") == true). This means that a case variable nameddeliveredexists with the valuetrue.- Click Save.
Click Milestone3DeliveredToCustomer and create a new user task.
-
Click the new user task and in the upper-right corner click the Properties
icon.
-
Input
Customer satisfaction surveyin the Name field. -
Expand Implementation/Execution, click Add below the Actors menu, click Select → New, and input
owner. -
Input
CustomerSurveyin the Task Name field. Select the Skippable check box and enter the following text in the in the Description field:
Satisfaction survey for order #{CaseId}Click
in the Assignments field and add the following:
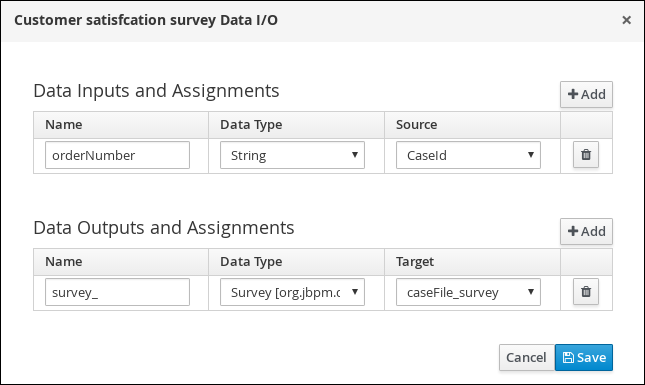
- Click Save.
-
Click the new user task and in the upper-right corner click the Properties
- Click the Customer satisfaction survey user task and create an end event.
Click Save to confirm your changes.
Figure 6.3. DeliveredToCustomer milestone

The IT Orders case can be closed after all milestone sequences are completed. However, due to the ad hoc nature of cases, the case could be reopened if, for example, the order was never received by the customer or the item is faulty. Tasks can be re-triggered or added to the case definition as required, even during run time.
Chapter 7. Deploying and testing the IT order case project
Prerequisites
- You have a running Process Server instance connected to Business Central. For more information see Installing and configuring Red Hat Process Automation Manager on Red Hat JBoss EAP 7.2.
- You have created a new case in Business Central. For more information, see Chapter 3, Creating a new IT_Orders case project.
- You have created the data objects. For more information, see Chapter 4, Data objects.
- You have created the Place order subprocess. For more information, see Section 5.1, “Creating the Place order subprocess”.
- You have designed the Order for IT hardware case. For more information, see Chapter 5, Designing the case definition.
Procedure
- In Business Central, go to Menu → Design → Projects and click IT_Orders_New.
- Click Deploy.
- Go to Menu → Manage → Process Definitions → Manage Process Instances → New Process Instance.
Go to Menu → Deploy and click Execution Servers and verify that a new container is deployed and started.

- Use the Case Management Showcase application to start a new case instance. For instructions about using the Showcase application, see Using the Showcase application for case management.
Chapter 8. Additional resources
Appendix A. Versioning information
Documentation last updated on Friday, May 22, 2020.