
Red Hat Training
A Red Hat training course is available for Red Hat Process Automation Manager
Chapter 4. Creating guided rule templates
You can use guided rule templates to define rule structures with placeholder values (template keys) that correspond to actual values defined in a data table. Guided rule templates are an efficient alternative to defining sets of many guided rules individually that use the same structure.
Procedure
- In Business Central, go to Menu → Design → Projects and click the project name.
- Click Add Asset → Guided Rule Template.
- Enter an informative Guided Rule Template name and select the appropriate Package. The package that you specify must be the same package where the required data objects have been assigned or will be assigned.
Click Ok to create the rule template.
The new guided rule template is now listed in the Guided Rule Templates panel of the Project Explorer.
- Click the Data Objects tab and confirm that all data objects required for your rules are listed. If not, click New item to import data objects from other packages, or create data objects within your package.
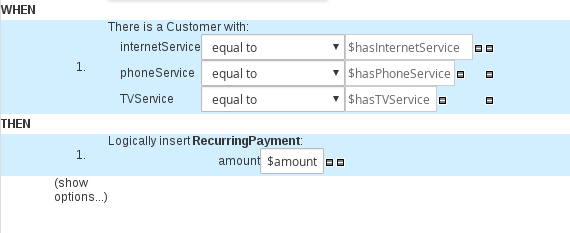
After all data objects are in place, return to the Model tab and use the buttons on the right side of the window to add and define the WHEN (condition) and THEN (action) sections of the rule template, based on the available data objects. For the field values that vary per rule, use template keys in the format
$keyin the rule designer or in the format@{key}in free form DRL (if used).Figure 4.1. Sample guided rule template
 Note on template keys
Template keys are fundamental in guided rule templates. Template keys are what enable field values in the templates to be interchanged with actual values that you define in the corresponding data table to generate different rules from the same template. You can use other value types, such as Literal or Formula, for values that are part of the rule structure of all rules based on that template. However, for any values that differ among the rules, use the Template key field type with a specified key. Without template keys in a guided rule template, the corresponding data table is not generated in the template designer and the template essentially functions as an individual guided rule.
The WHEN part of the rule template is the condition that must be met to execute an action. For example, if a telecommunications company charges customers based on the services they subscribe to (Internet, phone, and TV), then one of the WHEN conditions would be
internetService | equal to | $hasInternetService. The template key$hasInternetServiceis interchanged with an actual Boolean value (trueorfalse) defined in the data table for the template.The THEN part of the rule template is the action to be performed when the conditional part of the rule has been met. For example, if a customer subscribes to only Internet service, a THEN action for
RecurringPaymentwith a template key$amountwould set the actual monthly amount to the integer value defined for Internet service charges in the data table.- After you define all components of the rule, click Save in the guided rule templates designer to save your work.
4.1. Adding WHEN conditions in guided rule templates
The WHEN part of the rule contains the conditions that must be met to execute an action. For example, if a telecommunications company charges customers based on the services they subscribe to (Internet, phone, and TV), then one of the WHEN conditions would be internetService | equal to | $hasInternetService. The template key $hasInternetService is interchanged with an actual Boolean value (true or false) defined in the data table for the template.
Prerequisite
All data objects required for your rules have been created or imported and are listed in the Data Objects tab of the guided rule templates designer.
Procedure
In the guided rule templates designer, click the plus icon (
 ) on the right side of the
 WHENsection.The Add a condition to the rule window with the available condition elements opens.
Figure 4.2. Add a condition to the rule
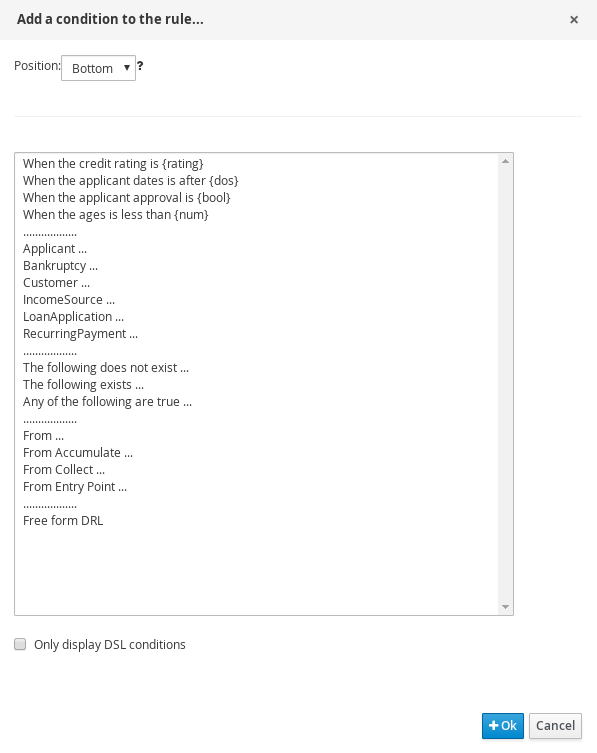
The list includes the data objects from the Data Objects tab of the guided rule templates designer, any DSL objects defined for the package, and the following standard options:
- The following does not exist: Use this to specify facts and constraints that must not exist.
- The following exists: Use this to specify facts and constraints that must exist. This option is triggered on only the first match, not subsequent matches.
- Any of the following are true: Use this to list any facts or constraints that must be true.
-
From: Use this to define a
Fromconditional element for the rule. -
From Accumulate: Use this to define an
Accumulateconditional element for the rule. -
From Collect: Use this to define a
Collectconditional element for the rule. -
From Entry Point: Use this to define an
Entry Pointfor the pattern. -
Free form DRL: Use this to insert a free-form DRL field where you can define condition elements freely, without the guided rules designer. For template keys in free form DRL, use the format
@{key}.
- Choose a condition element (for example, Customer) and click Ok.
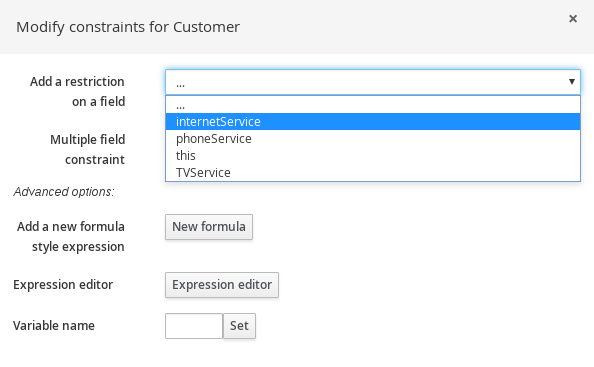
Click the condition element in the guided rule templates designer and use the Modify constraints for Customer window to add a restriction on a field, apply multiple field constraints, add a new formula style expression, apply an expression editor, or set a variable name.
Figure 4.3. Modify a condition
 Note
NoteA variable name enables you to identify a fact or field in other constructs within the guided rule. For example, you could set the variable of
Customertocand then referencecin a separateApplicantconstraint that specifies that theCustomeris theApplicant.c : Customer() Applicant( this == c )
After you select a constraint, the window closes automatically.
-
Choose an operator for the restriction (for example,
equal to) from the drop-down menu next to the added restriction. -
Click the edit icon (
 ) to define the field value.
-
Select Template key and add a template key in the format
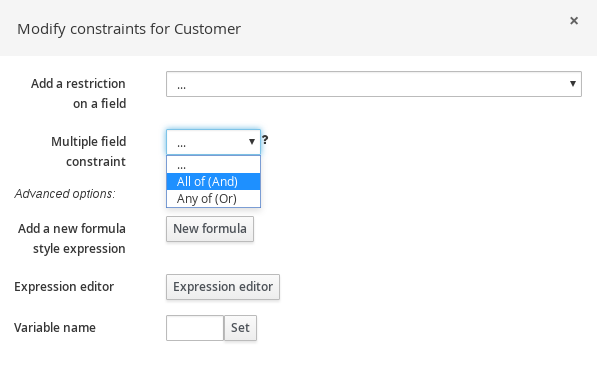
$keyif this value varies among the rules that are based on this template. This allows the field value to be interchanged with actual values that you define in the corresponding data table to generate different rules from the same template. For field values that do not vary among the rules and are part of the rule template, you can use any other value type. To apply multiple field constraints, click the condition and in the Modify constraints for Customer window, select All of(And) or Any of(Or) from the Multiple field constraint drop-down menu.
Figure 4.4. Add multiple field constraints
- Click the constraint in the guided rule templates designer and further define the field values.
- After you define all condition elements, click Save in the guided rule templates designer to save your work.
4.2. Adding THEN actions in guided rule templates
The THEN part of the rule template is the action to be performed when the conditional part of the rule has been met. For example, if a customer subscribes to only Internet service, a THEN action for RecurringPayment with a template key $amount would set the actual monthly amount to the integer value defined for Internet service charges in the data table.
Prerequisite
All data objects required for your rules have been created or imported and are listed in the Data Objects tab of the guided rule templates designer.
Procedure
In the guided rule templates designer, click the plus icon (
) on the right side of the THENsection.The Add a new action window with the available action elements opens.
Figure 4.5. Add a new action to the rule
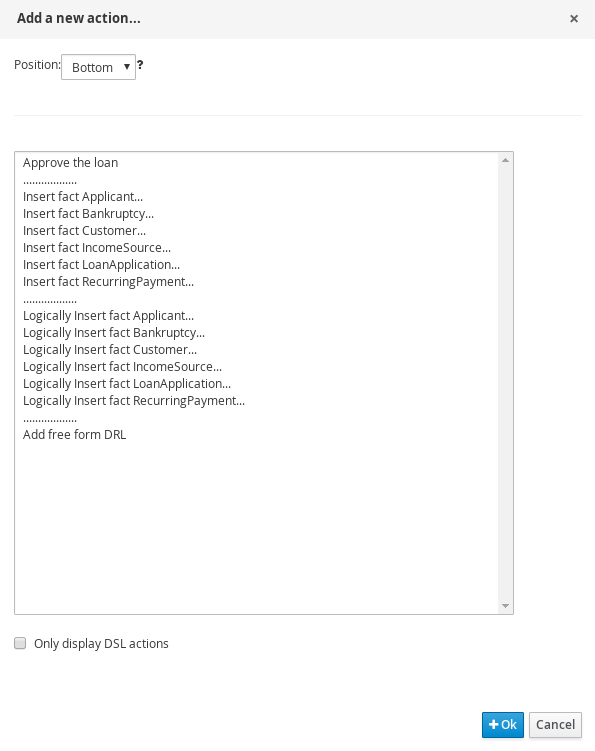
The list includes insertion and modification options based on the data objects in the Data Objects tab of the guided rule templates designer, and on any DSL objects defined for the package:
- Insert fact: Use this to insert a fact and define resulting fields and values for the fact.
- Logically Insert fact: Use this to insert a fact logically into the process engine and define resulting fields and values for the fact. The Red Hat Process Automation Manager process engine is responsible for logical decisions on insertions and retractions of facts. After regular or stated insertions, facts have to be retracted explicitly. After logical insertions, facts are automatically retracted when the conditions that originally asserted the facts are no longer true.
-
Add free form DRL: Use this to insert a free-form DRL field where you can define condition elements freely, without the guided rules designer. For template keys in free form DRL, use the format
@{key}.
- Choose an action element (for example, Logically Insert fact RecurringPayment) and click Ok.
Click the action element in the guided rule templates designer and use the Add a field window to select a field.
Figure 4.6. Add a field
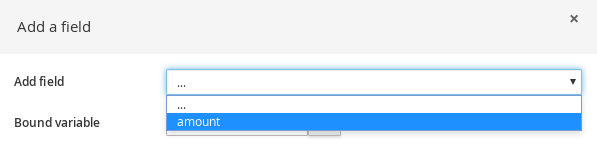
After you select a field, the window closes automatically.
-
Click the edit icon (
) to define the field value.
-
Select Template key and add a template key in the format
$keyif this value varies among the rules that are based on this template. This allows the field value to be interchanged with actual values that you define in the corresponding data table to generate different rules from the same template. For field values that do not vary among the rules and are part of the rule template, you can use any other value type. - After you define all action elements, click Save in the guided rule templates designer to save your work.
4.3. Adding other rule options
You can also use the rule designer to add metadata within a rule, define additional rule attributes (such as salience and no-loop), and freeze areas of the rule to restrict modifications to conditions or actions.
Procedure
- In the rule designer, click (show options…) under the THEN section.
-
Click the plus icon (
) on the right side of the window to add options.
Select an option to be added to the rule:
-
Metadata: Enter a metadata label and click the plus icon (
). Then enter any needed data in the field provided in the rule designer.
- Attribute: Select from the list of rule attributes. Then further define the value in the field or option displayed in the rule designer.
Freeze areas for editing: Select Conditions or Actions to restrict the area from being modified in the rule designer.
Figure 4.7. Rule options

-
Metadata: Enter a metadata label and click the plus icon (
- Click Save in the rule designer to save your work.
4.3.1. Rule attributes
Rule attributes are additional specifications that you can add to business rules to modify rule behavior. The following table lists the names and supported values of the attributes that you can assign to rules:
Table 4.1. Rule attributes
| Attribute | Value |
|---|---|
|
| An integer defining the priority of the rule. Rules with a higher salience value are given higher priority when ordered in the activation queue.
Example: |
|
| A Boolean value. When the option is selected, the rule is enabled. When the option is not selected, the rule is disabled.
Example: |
|
|
A string containing a date and time definition. The rule can be activated only if the current date and time is after a
Example: |
|
|
A string containing a date and time definition. The rule cannot be activated if the current date and time is after the
Example: |
|
| A Boolean value. When the option is selected, the rule cannot be reactivated (looped) if a consequence of the rule re-triggers a previously met condition. When the condition is not selected, the rule can be looped in these circumstances.
Example: |
|
| A string identifying an agenda group to which you want to assign the rule. Agenda groups allow you to partition the agenda to provide more execution control over groups of rules. Only rules in an agenda group that has acquired a focus are able to be activated.
Example: |
|
| A string identifying an activation (or XOR) group to which you want to assign the rule. In activation groups, only one rule can be activated. The first rule to fire will cancel all pending activations of all rules in the activation group.
Example: |
|
| A long integer value defining the duration of time in milliseconds after which the rule can be activated, if the rule conditions are still met.
Example: |
|
|
A string identifying either
Example: |
|
| A Quartz calendar definition for scheduling the rule.
Example: |
|
| A Boolean value, applicable only to rules within agenda groups. When the option is selected, the next time the rule is activated, a focus is automatically given to the agenda group to which the rule is assigned.
Example: |
|
|
A Boolean value, applicable only to rules within rule flow groups or agenda groups. When the option is selected, the next time the ruleflow group for the rule becomes active or the agenda group for the rule receives a focus, the rule cannot be activated again until the ruleflow group is no longer active or the agenda group loses the focus. This is a stronger version of the
Example: |
|
| A string identifying a rule flow group. In rule flow groups, rules can fire only when the group is activated by the associated rule flow.
Example: |
|
|
A string identifying either
Example: |