
Red Hat Training
A Red Hat training course is available for Red Hat Process Automation Manager
Chapter 3. Creating and editing DMN models in Business Central
You can use the DMN designer in Business Central to design DMN decision requirements diagrams (DRDs) and define decision logic for a complete and functional DMN decision model. Red Hat Process Automation Manager provides design and runtime support for DMN 1.2 models at conformance level 3, and includes enhancements and fixes to FEEL and DMN model components to optimize the experience of implementing DMN decision services with Red Hat Process Automation Manager. Red Hat Process Automation Manager also provides runtime-only support for DMN 1.1 models at conformance level 3, but any DMN 1.1 models that you import into Business Central, open in the DMN designer, and save are converted to DMN 1.2 models.
The DMN designer in Red Hat Process Automation Manager 7.2 is a Technology Preview feature and is disabled by default in Business Central. Technology Preview features are not supported with Red Hat production service level agreements (SLAs), might not be functionally complete, and are not recommended for production. These features provide early access to upcoming product features, enabling customers to test functionality and provide feedback during the development process.
To enable the DMN designer preview in Business Central, in the upper-right corner of the window, click Settings → Roles, select a role from the left panel, click Editors → DMN Designer → Read, and click Save to save the changes.
For more information about Red Hat Technology Preview support, see Technology Preview Features Support Scope.
Procedure
- In Business Central, go to Menu → Design → Projects and click the project name.
Create or import a DMN file in your Business Central project.
To create a DMN file, click Add Asset → DMN, enter an informative DMN model name, select the appropriate Package, and click Ok.
To import an existing DMN file, click Import, enter the DMN model name, select the appropriate Package, select the DMN file to upload, and click Ok.
The new DMN file is now listed in the DMN panel of the Project Explorer, and the DMN decision requirements diagram (DRD) canvas appears.
NoteIf you imported a DMN file that does not contain layout information, the imported decision requirements diagram (DRD) is formatted automatically in the DMN designer. Click Save in the DMN designer to save the DRD layout.
Begin adding components to your new or imported DMN decision requirements diagram (DRD) by clicking and dragging one of the DMN nodes from the left toolbar.

The following DRD components are available:
- Decision: Use this node for a DMN decision, where one or more input elements determine an output based on defined decision logic.
- Business knowledge model: Use this node for reusable functions with one or more decision elements. Decisions that have the same logic but depend on different sub-input data or sub-decisions use business knowledge models to determine which procedure to follow.
- Knowledge source: Use this node for external authorities, documents, committees, or policies that regulate a decision or business knowledge model. Knowledge sources are references to real-world factors rather than executable business rules.
- Input data: Use this node for information used in a decision node or a business knowledge model. Input data usually includes business-level concepts or objects relevant to the business, such as loan applicant data used in a lending strategy.
- Text annotation: Use this node for explanatory notes associated with an input data node, decision node, business knowledge model, or knowledge source.
NoteDecision service nodes are currently not supported in the Red Hat Process Automation Manager 7.2 DMN designer. This support will be provided in a future release.
- In the DMN designer canvas, double-click the new DRD node to enter an informative node name.
If the node is a decision or business knowledge model, select the node to display the node options and click the Edit icon to open the DMN boxed expression designer to define the decision logic for the node:
Figure 3.1. Opening a new decision node boxed expression
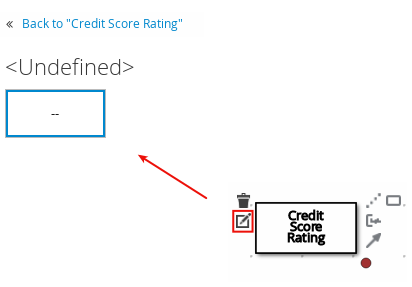
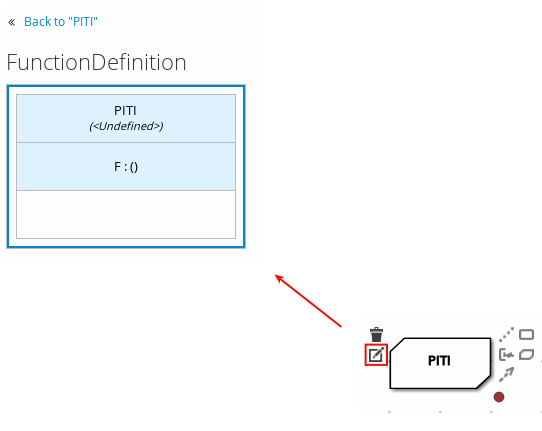
Figure 3.2. Opening a new business knowledge model boxed expression
By default, all business knowledge models are defined as boxed function expressions containing a literal FEEL expression, a nested context expression of an external JAVA or PMML function, or a nested boxed expression of any type.
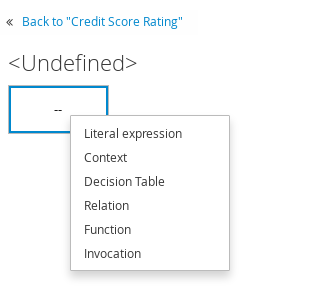
For decision nodes, you double-click the undefined table to select the type of boxed expression you want to use, such as a boxed literal expression, boxed context expression, decision table, or other DMN boxed expression.
For business knowledge models, you right-click the value cell and select the type of expression you want to use, or click Clear and double-click the cleared cell to select a boxed expression of another type.

In the selected boxed expression designer for either a decision node (any expression type) or business knowledge model (function expression), double-click the applicable table cells to define the table name, variable data types, variable names and values, function parameters and bindings, or FEEL expressions to include in the decision logic.
You can right-click cells for additional actions where applicable, such as inserting or removing table rows and columns or clearing table contents.
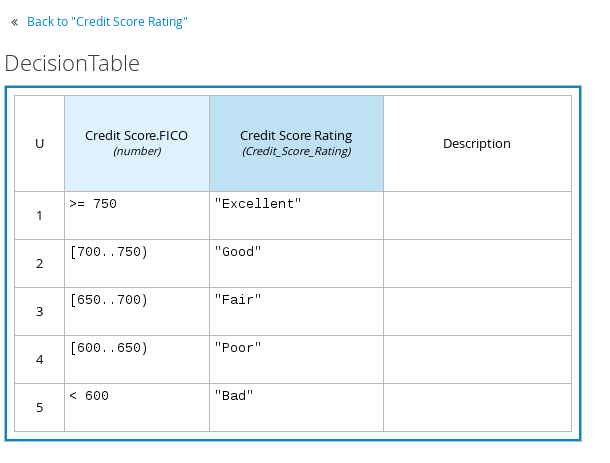
The following is an example decision table for a decision node that determines credit score ratings based on a defined range of a loan applicant’s credit score:
Figure 3.3. Decision node decision table for credit score rating
The following is an example boxed function expression for a business knowledge model that calculates mortgage payments based on principal, interest, taxes, and insurance (PITI) as a literal expression:
Figure 3.4. Business knowledge model function for PITI calculation

- After you define the decision logic for the selected node, click Back to "<NODE_NAME>" to return to the DRD view.
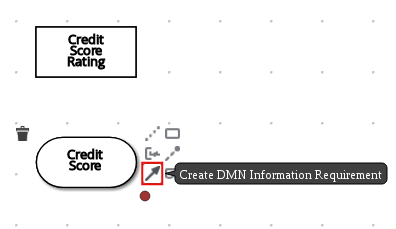
For the selected DRD node, use the available connection options to create and connect to the next node in the DRD, or click and drag a new node onto the DRD canvas from the left toolbar.
The node type determines which connection options are supported. For example, an Input data node can connect to a decision node, knowledge source, or text annotation using the applicable connection type, whereas a Knowledge source node can connect to any DRD element. A Decision node can connect only to another decision or a text annotation.
The following connection types are available, depending on the node type:
- Information requirement: Use this connection from an input data node or decision node to another decision node that requires the information.
- Knowledge requirement: Use this connection from a business knowledge model to a decision node or to another business knowledge model that invokes the decision logic.
- Authority requirement: Use this connection from an input data node or a decision node to a dependent knowledge source or from a knowledge source to a decision node, business knowledge model, or another knowledge source.
- Association: Use this connection from an input data node, decision node, business knowledge model, or knowledge source to a text annotation.
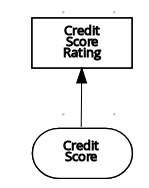
Figure 3.5. Connecting credit score input to credit score rating decision
- Continue adding and defining the remaining DRD components of your decision model. Periodically click Save in the DMN designer to save your work.
- After you add and define all components of the DRD, click Save to save and validate the completed DRD.
+
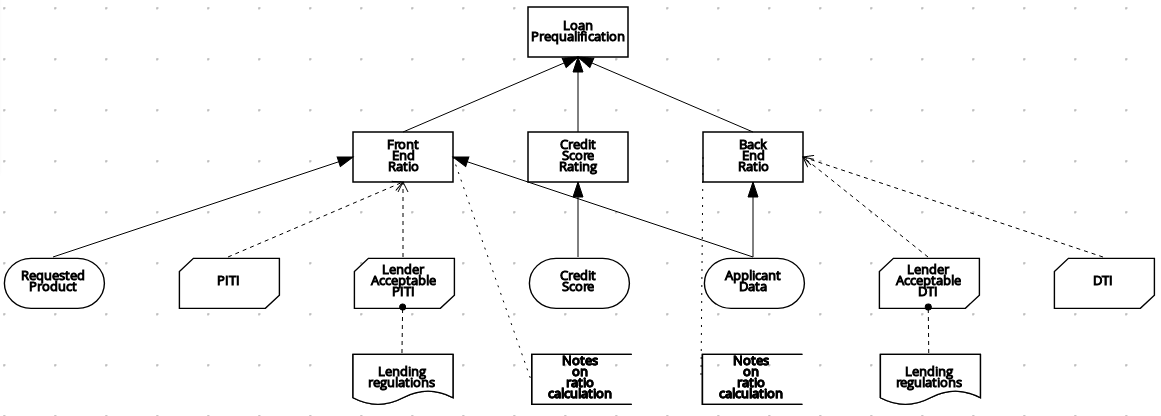
The following is an example DRD for a loan prequalification decision model:
Figure 3.6. Completed DRD for loan prequalification
3.1. Defining DMN decision logic in boxed expressions in Business Central
Boxed expressions in DMN are tables that you use to define the underlying logic of decision nodes and business knowledge models in a decision requirements diagram (DRD) or decision requirements graph (DRG). Some boxed expressions can contain other boxed expressions, but the top-level boxed expression corresponds to the decision logic of a single DRD artifact. While DRDs with one or more DRGs represent the flow of a DMN decision model, boxed expressions define the actual decision logic of individual nodes. DRDs and boxed expressions together form a complete and functional DMN decision model.
You can use the DMN designer in Business Central to define decision logic for your DRD components using built-in boxed expressions.
Prerequisites
- You have created or imported a DMN file in Business Central.
Procedure
- In Business Central, go to Menu → Design → Projects, click the project name, and select the DMN file you want to modify.
In the DMN designer canvas, select a decision node or business knowledge model that you want to define and click the Edit icon to open the DMN boxed expression designer:
Figure 3.7. Opening a new decision node boxed expression
Figure 3.8. Opening a new business knowledge model boxed expression
By default, all business knowledge models are defined as boxed function expressions containing a literal FEEL expression, a nested context expression of an external JAVA or PMML function, or a nested boxed expression of any type.
For decision nodes, you double-click the undefined table to select the type of boxed expression you want to use, such as a boxed literal expression, boxed context expression, decision table, or other DMN boxed expression.
For business knowledge models, you right-click the value cell and select the type of expression you want to use, or click Clear and double-click the cleared cell to select a boxed expression of another type.
For this example, use a decision node and select Decision table as the boxed expression type.
A decision table in DMN is a visual representation of one or more rules in a tabular format. Each rule consists of a single row in the table, and includes columns that define the conditions (input) and outcome (output) for that particular row.
-
Double-click the input column header to define the name and data type for the input condition. For example, name the input column Credit Score.FICO with a
numberdata type. This column specifies numeric credit score values or ranges of loan applicants. Double-click the output column header to define the name and data type for the output values. For example, name the output column Credit Score Rating and next to the Data Type option, click Manage to create a custom data type with score ratings as constraints.
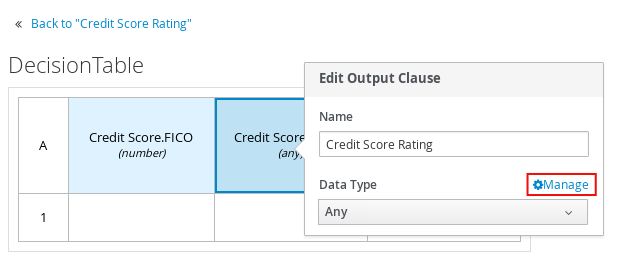
In the Manage Custom Data Types window, click Add and create a Credit_Score_Rating data type as a
stringwith the following constraints:"Excellent","Good","Fair","Poor","Bad".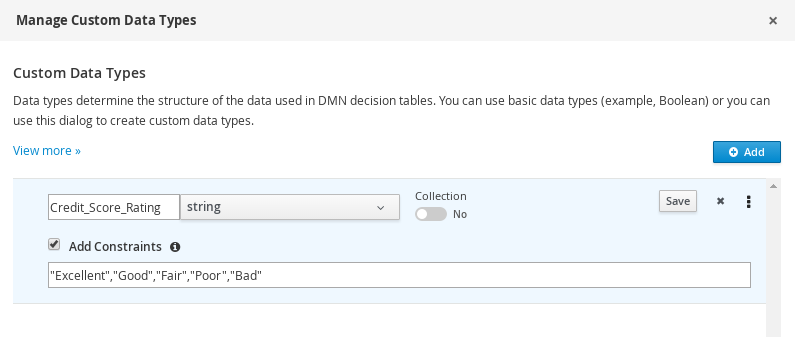
- Click Save to save the data type, and in the decision table, double-click the Credit Score Rating column header and set the data type to this new custom data type.
Use the Credit Score.FICO input column to define credit score values or ranges of values, and use the Credit Score Rating column to specify one of the corresponding ratings you defined in the Credit_Score_Rating data type.
Right-click any value cell to insert or delete rows (rules) or columns (clauses).
Figure 3.9. Decision node decision table for credit score rating
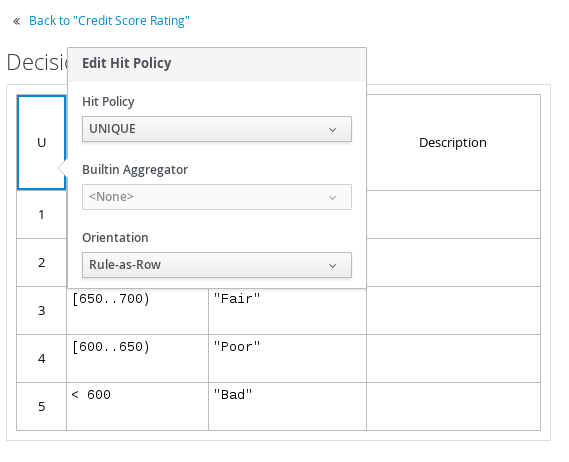
After you define all rules, click the top-left corner of the decision table to define the rule Hit Policy and Builtin Aggregator (for COLLECT hit policy only).
The hit policy determines how to reach an outcome when multiple rules in a decision table match the provided input values. The built-in aggregator determines how to aggregate rule values when you use the COLLECT hit policy.
 Note
NoteThe Orientation option is not supported in the Red Hat Process Automation Manager 7.2 DMN designer and will be removed from the Business Central user interface in a future release. This option determines whether rows, columns, or both rows and columns (CrossTable) represent rules in DMN decision tables.
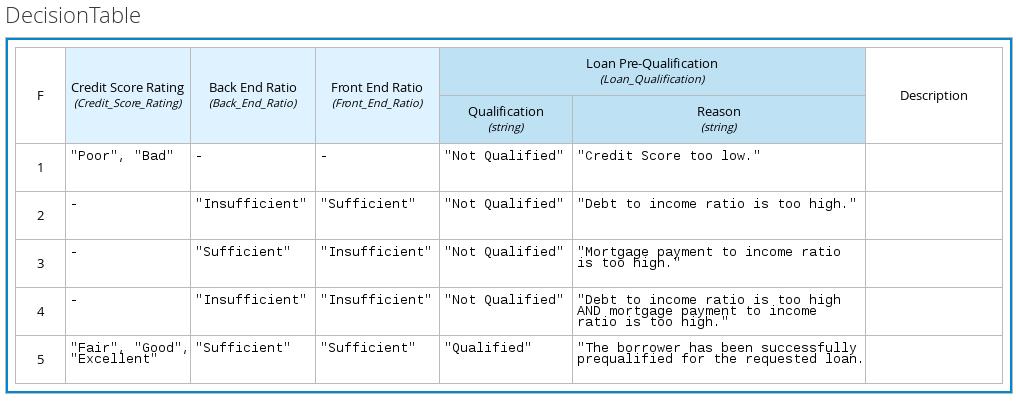
The following is a more complex decision table that determines applicant qualification for a loan as the concluding decision node in the same loan prequalification decision model:
Figure 3.10. Decision table for loan prequalification
For boxed expression types other than decision tables, you follow these guidelines similarly to navigate the boxed expression tables and define variables and parameters for decision logic, but according to the requirements of the boxed expression type. Some boxed expressions, such as boxed literal expressions, can be single-column tables, while other boxed expressions, such as function, context, and invocation expressions, can be multi-column tables with nested boxed expressions of other types.
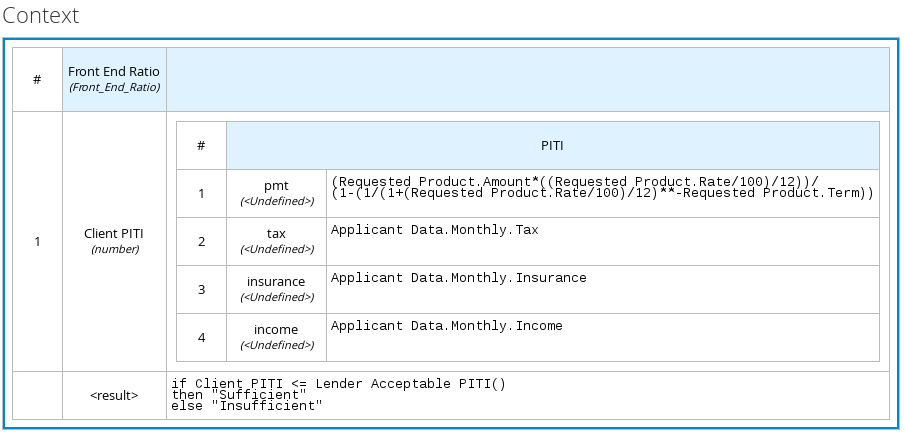
For example, the following boxed context expression defines the parameters that determine whether a loan applicant can meet minimum mortgage payments based on principal, interest, taxes, and insurance (PITI), represented as a front-end ratio calculation with a sub-context expression:
Figure 3.11. Boxed context expression for front-end client PITI ratio
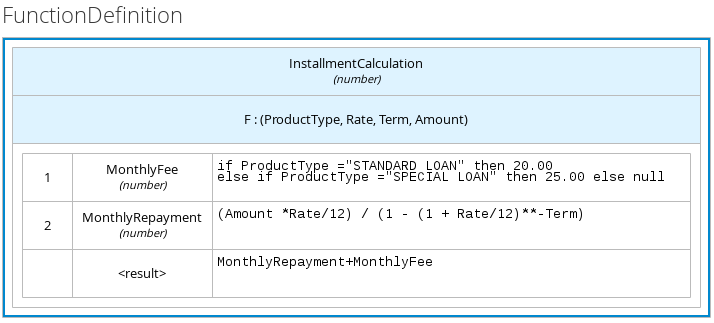
The following boxed function expression determines a monthly mortgage installment as a business knowledge model in a lending decision, with the function value defined as a nested context expression:
Figure 3.12. Boxed function expression for installment calculation in business knowledge model
For more information and examples of each boxed expression type, see Section 1.4, “DMN decision logic in boxed expressions”.
3.2. Creating custom data types for DMN boxed expressions in Business Central
In DMN boxed expressions in Business Central, data types determine the structure of the data that you use within an associated table, column, or field in the boxed expression. You can use default DMN data types (such as String, Number, Boolean) or you can create custom data types to specify additional fields and constraints that you want to implement for the boxed expression values.
Custom data types that you create for a boxed expression can be simple or structured:
-
Simple data types have only a name and a type assignment. Example:
Age (number). -
Structured data types contain multiple fields associated with a parent data type. Example: A single type
Personcontaining the fieldsName (string),Age (number),email (string).
Prerequisites
- You have created or imported a DMN file in Business Central.
Procedure
- In Business Central, go to Menu → Design → Projects, click the project name, and select the DMN file you want to modify.
- In the DMN designer canvas, select a decision node or business knowledge model for which you want to define the data types and click the Edit icon to open the DMN boxed expression designer.
If the boxed expression is for a decision node that is not yet defined, double-click the undefined table to select the type of boxed expression you want to use, such as a boxed literal expression, boxed context expression, decision table, or other DMN boxed expression.
Double-click the cell for the table header, column header, or parameter field (depending on the boxed expression type) for which you want to define the data type and click Manage to create a custom data type.
You can also manage custom data types by selecting the Diagram properties icon in the upper-right corner of the DMN designer:
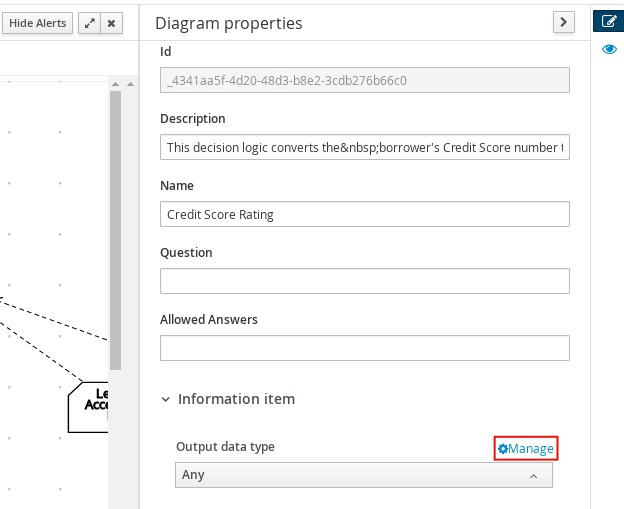
The data type that you define for a specified cell in a boxed expression determines the structure of the data that you use within that associated table, column, or field in the boxed expression.
In this example, an output column Credit Score Rating for a DMN decision table defines a set of custom credit score ratings based on an applicant’s credit score.
In the Manage Custom Data Types window, click Add and create a Credit_Score_Rating data type as a
stringwith the following constraints:"Excellent","Good","Fair","Poor","Bad".If the data type requires a list of items, enable the Collection setting.
Click Save to save the data type, and in the decision table, double-click the Credit Score Rating column header, set the data type to this new custom data type, and define the rule values for that column with the rating constraints that you specified.
Figure 3.13. Decision table for credit score rating
In the DMN decision model for this scenario, the Credit Score Rating decision flows into the following Loan Prequalification decision that also requires custom data types:
-
Continuing with this example, double-click any column header to return to the Manage Custom Data Types window, click Add, and create a Loan_Qualification data type as a
Structurewith no constraints. Next to the Loan_Qualification data type, select the settings icon (three vertical dots) and select Insert nested field to insert sub-fields within this parent data type.

You can use these sub-fields in association with the parent structured data type in boxed expressions, such as nested column headers in decision tables or nested table parameters in context or function expressions.
For this example, under the structured Loan_Qualification data type, add a Qualification field with constraints
"Qualified","Not Qualified"and a Reason field with no constraints. Add also a simple Back_End_Ratio and a Front_End_Ratio data type, both with constraints"Sufficient","Insufficient".Click Save for each data type that you create.

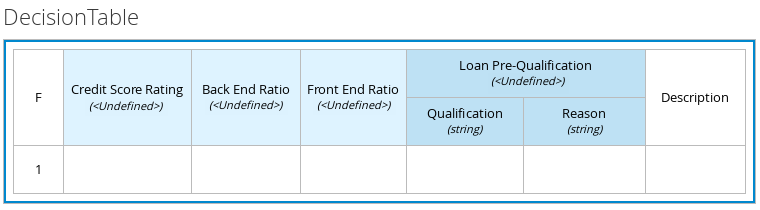
Return to the decision table and, for each column, double-click the column header cell, set the data type to the new corresponding custom data type, and define the rule values as needed for the column with the constraints that you specified, if applicable.
Figure 3.14. Decision table for loan prequalification
For boxed expression types other than decision tables, you follow these guidelines similarly to navigate the boxed expression tables and define custom data types as needed.
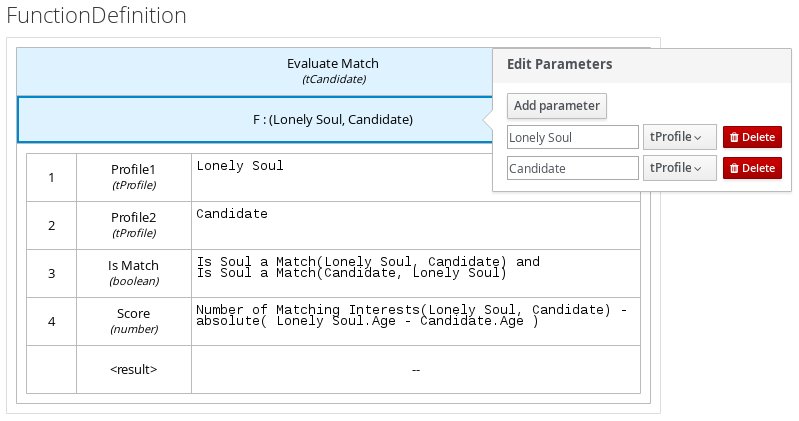
For example, the following boxed function expression uses custom tCandidate and tProfile structured data types to associate data for online dating compatibility:
Figure 3.15. Boxed function expression for online dating compatibility

Figure 3.16. Custom data type definitions for online dating compatibility
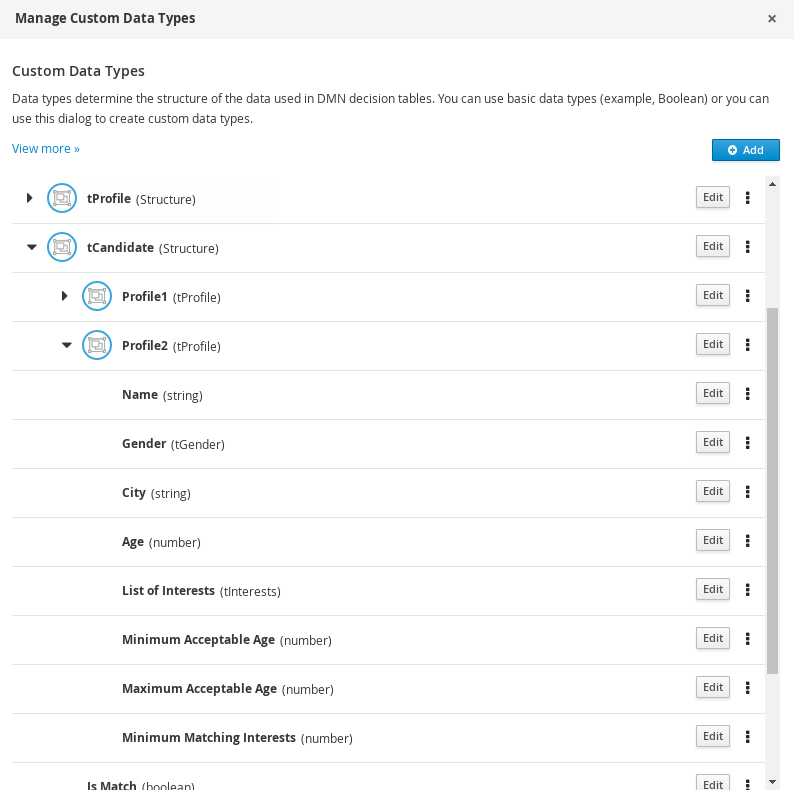
Figure 3.17. Parameter definitions with custom data types for online dating compatibility
3.3. DMN designer navigation and properties in Business Central
The DMN designer provides the following additional features to help you navigate through the components and properties of decision requirements diagrams (DRDs).
- DMN file and diagram views
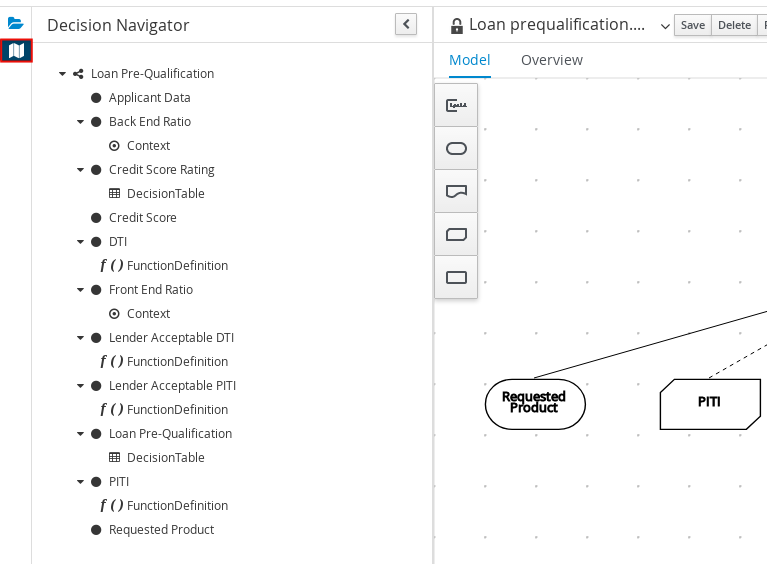
In the upper-left corner of the DMN designer, select the Project Explorer view to navigate between all DMN and other files or select the Decision Navigator view to navigate between the nodes and boxed expressions of a selected DRD:
Figure 3.18. Project Explorer view

Figure 3.19. Decision Navigator view
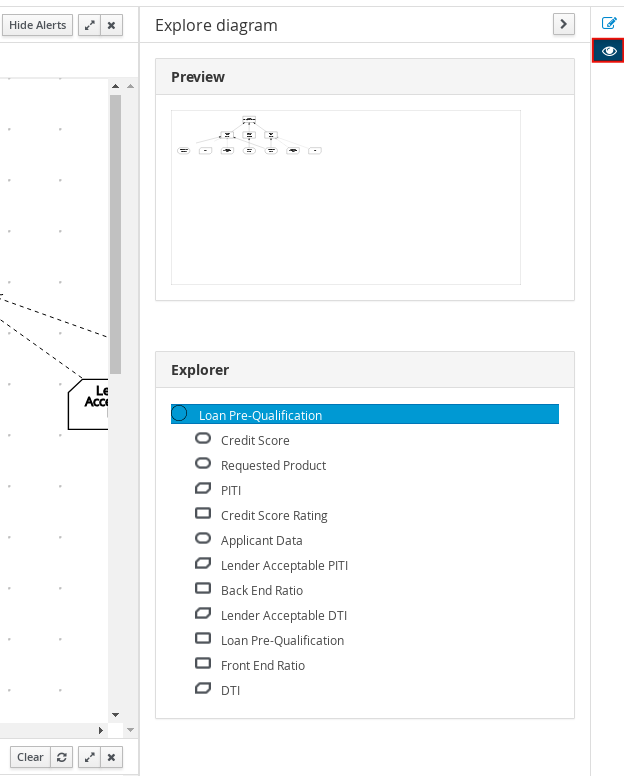
In the upper-right corner of the DMN designer, select the Explore diagram icon to view an elevated preview of the selected DRD and to navigate between the nodes of the selected DRD:
Figure 3.20. Explore diagram view
- DRD properties and design
In the upper-right corner of the DMN designer, select the Diagram properties icon to modify the identifying information, data types, and appearance of a selected DRD, DRD node, or boxed expression cell:
Figure 3.21. DRD node properties
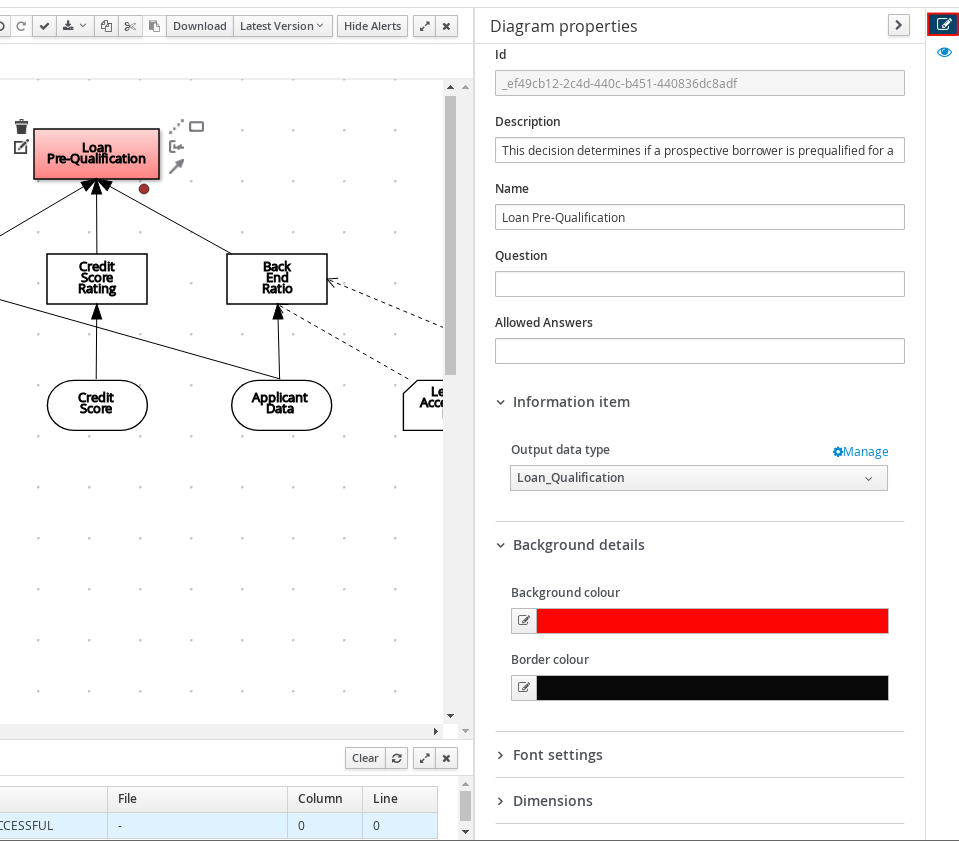
To view the properties of the entire DRD, click the DRD canvas background instead of a specific node.