
Red Hat Training
A Red Hat training course is available for Red Hat Process Automation Manager
Designing and building cases for case management
Abstract
Preface
As a developer, you can configure assets in Red Hat Process Automation Manager for case management using Business Central.
Case management differs from Business Process Management (BPM), in that it focuses on the actual data being handled throughout the case and less on the sequence of steps taken to complete a goal. Case data is the most important piece of information in case handling, while business context and decision-making is in the hands of the human case worker.
Red Hat Process Automation Manager includes the IT_Orders sample project in Business Central. This project is referred to throughout this document to explain case management concepts and provide examples. You can import the project in Business Central, deploy the project to the Process Server, and start IT_Orders cases using this project using the Showcase application.
Use this document to configure and design case management assets.
Prerequisites
- Red Hat JBoss Enterprise Application Platform 7.2 installed. See Red Hat JBoss EAP 7.2.0 Installation Guide.
- Red Hat Process Automation Manager installed. For more information about installation,see Planning a Red Hat Process Automation Manager installation.
-
Red Hat Process Automation Manager is running and you can log in to Business Central with the
userrole. For more information about users and permissions, see Planning a Red Hat Process Automation Manager installation. - The Showcase application is deployed. For information about how to install and log in to Showcase, see Using the Showcase application for case management.
Chapter 1. Case management
Case management is an extension of Business Process Management (BPM) that enables you to manage adaptable business processes.
BPM is a management practice for automating tasks that are repeatable and have a common pattern, with a focus on optimization by perfecting a process. Business processes are usually modeled with clearly defined paths leading to a business goal, often with a starting point that is structurally connected to build an end-to-end flow of work and data. This requires a lot of predictability, usually based on mass-production principles. However, many real-world applications cannot be described completely from start to finish (including all possible paths, deviations, and exceptions). Using a process-oriented approach in certain cases may lead to complex solutions that are hard to maintain.
Case management provides problem resolution for non-repeatable, unpredictable processes as opposed to the efficiency-oriented approach of BPM for routine, predictable tasks. It manages one-off situations when the process cannot be predicted in advance. Case definition usually consists of loosely coupled process fragments that can be connected directly or indirectly to lead to certain milestones and ultimately a business goal, while the process is managed dynamically in response to changes that occur during run time.
In Red Hat Process Automation Manager, case management includes the following core process engine features:
- Case file instance
-
A
Per caseruntime strategy - Case comments
- Milestones
- Stages
- Ad hoc fragments
- Dynamic tasks and processes
- Case identifier (correlation key)
- Case lifecycle (close, reopen, cancel, destroy)
A case definition is always an ad hoc process definition and does not require an explicit start node. The case definition is the main entry point for the business use case.
A process definition can still be introduced as a supporting construct of the case and can be invoked either as defined in the case definition or dynamically to bring in additional processing when required. A case definition defines the following new objects:
- Activities (required)
- Case file (required)
- Milestones
- Roles
- Stages
Chapter 2. Case Management Model and Notation (CMMN)
You can use Business Central to import, view, and modify the content of .cmmn files. When authoring a project, you can import your case management model and then select it from the asset list to view or modify it in a standard XML editor.
The following CMMN constructs are currently available:
- Tasks (human task, process task, decision task, case task)
- Discretionary tasks (same as above)
- Stages
- Milestones
- Case file items
- Sentries (entry and exit)
Required, repeat, and manual activation tasks are currently not supported. Sentries for individual tasks are limited to entry criteria while entry and exit criteria are supported for stages and milestones. Decision task maps by default to DMN decision. Event listeners are not supported.
Red Hat Process Automation Manager does not provide any modeling capabilities for CMMN and focuses purely on execution of the model.
Chapter 3. Creating a new IT Orders case project
A case project is a type of project in Business Central that is configured for case management. Business Central includes an example IT_Orders sample project with predefined case management assets as a reference. You can create your own IT Orders case project similar to this sample project as a tutorial.
Procedure
Log in to Business Central and go to Menu → Design → Projects.
Business Central provides a default space called MySpace, as shown in the following image. You can use the default space to create and test example projects.
Figure 3.1. Default spaces

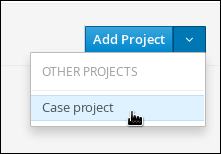
Click Add Project → Case project.
Figure 3.2. Case project menu
-
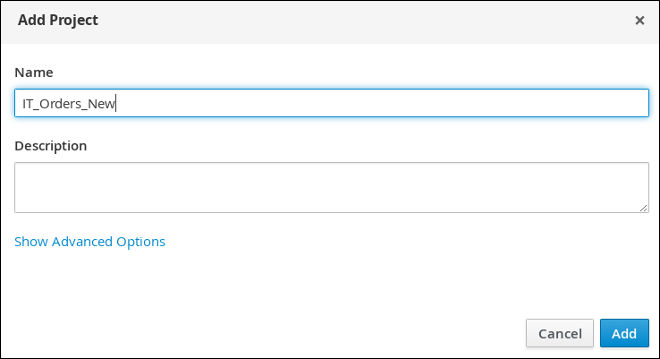
Enter
IT_Orders_Newin the Name field. Click Add.
Figure 3.3. Add Project window
The Assets view of the project opens.
Chapter 4. Designing a case
Cases are designed using the process designer in Business Central. The case design is the basis of case management and sets out the specific goals and tasks for each case. The case flow can be modified dynamically during run time by adding dynamic tasks or processes.
To demonstrate how to design a case, Red Hat Process Automation Manager includes the IT_Orders sample project in Business Central, which includes the following case definition:
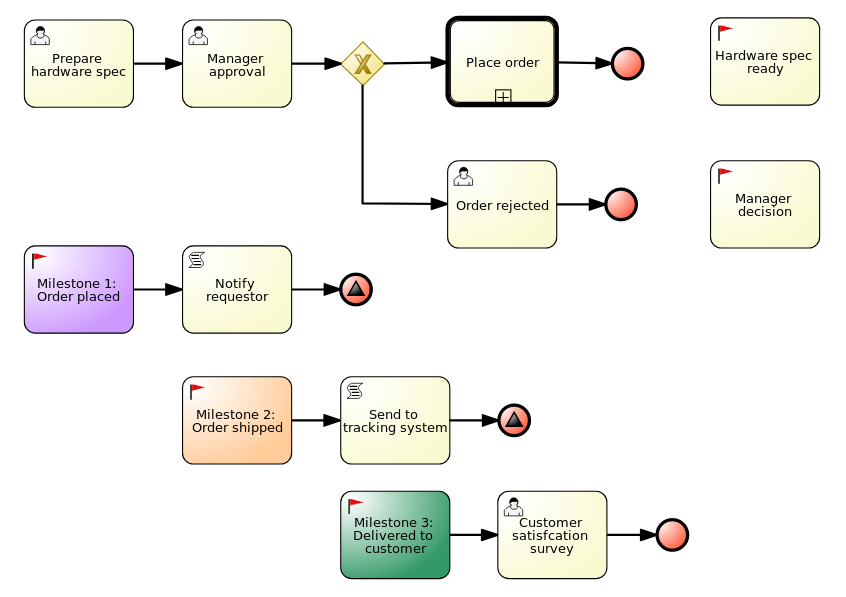
You can refer to and interact with this case definition by importing the sample project in Business Central.
Prerequisite
You have followed the procedure in Chapter 3, Creating a new IT Orders case project to create a new case in Business Central.
Procedure
- In the Assets window, click Add Asset in the upper-right corner of the project perspective and select Case definition (legacy).
Complete the required information in the Create new Case definition window:
-
name: The name of the case. This is usually the subject of the case or project that is being case managed. -
package: The location in which case file is to be created. Case ID prefix (optional): A configurable prefix that enables you to easily distinguish different types of cases. The prefix is followed by a generated ID in the formatID-XXXXXXXXXX, whereXXXXXXXXXXis a generated number that provides a unique ID for the case instance. If a prefix is not provided, the default prefix isCASEand generates instances with the following identifiers:CASE-0000000001CASE-0000000002CASE-0000000003If a prefix is set to something else, such as
ITfor example, the following identifiers are generated:IT-0000000001IT-0000000002IT-0000000003
-
Click Ok to open the process designer.
The designer uses a
WorkDefinitionfile that includes the work items required for case definition. These appear as usable objects in the process designer Object Library, accessible by clicking the in the upper-left corner of the designer.
Verify that the process designer includes the
MilestonesandCasesobjects by either checking the Object Library dock on the left side of the process designer, or by checking theWorkDefinitionfile under Work Item Definitions in the Project Explorer window on the left side of Business Central.Define process-level and case-level variables.
Click the
 arrow on the right side of the designer to open the Properties panel. Click the down arrow next to
 Variable Definitionsto open theEditor for Variable Definitions.Figure 4.1. IT_Orders variables
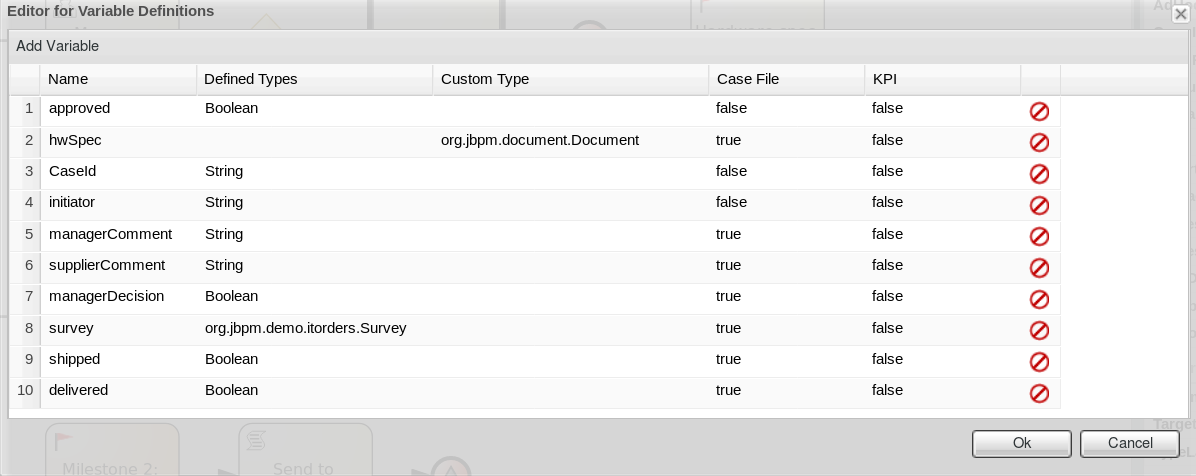
In the IT_Orders sample project, the
hwSpecvariable is an example of aCase File. A case file variable is stored in the case file itself and promotes reuse of the case file data rather than copying it across multiple process instances. For example, thehwSpecvariable is available to all processes within the case and is accessible directly from the case file even after the case instance is closed.To define the roles involved in the case, click
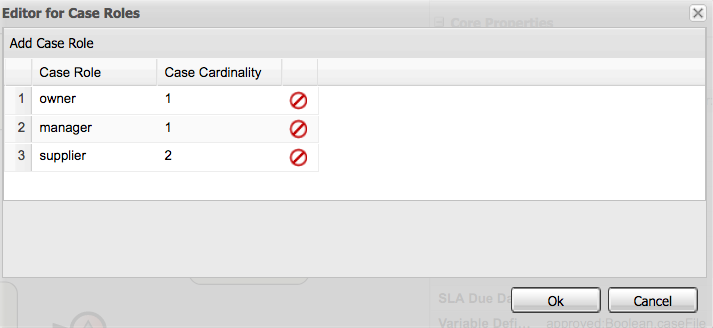
to open the Properties menu on the right side of the designer and open the Editor for Case Roles. Click Add Case Role to add case roles.
The IT_Orders sample case management project includes the following roles:
Figure 4.2. ITOrders Case Roles
-
owner: The employee who is making the hardware order request. There can be only one person assigned to this role. -
manager: The employee’s manager; the person who will approve or deny the requested hardware. The role cardinality is set to1, which means that only one person or group can be assigned to this role. -
supplier: The available suppliers of IT hardware in the system. There is usually more than one supplier.
-
Define the work item to be triggered when a new case starts.
Because case definition is an ad hoc process definition, it does not require an explicit start node. Nodes that have no incoming connections are marked as
Adhoc Autostartand are automatically triggered when a new case instance is started.By default, the process designer includes a
Milestoneobject configured asAdhoc autostartin the palette. Modify this object or replace it with another work item such as a user task or script task to be triggered when a new case is started.In the IT_Orders example, the
Prepare hardware specuser task and theMilestone 1: Order placedmilestones are configured asAdhoc autostart, and are automatically triggered when a new case instance is started.Define a subprocess.
In the IT_Orders example, the
place-orderprocess is a separate business process that is carried out by the supplier. This is a reusable process that occurs during the course of case execution.- From the project menu, click Add Asset → Business Process to create a new business process. Define the name and package for the new process and click Ok.
-
Define the process that is a subprocess within the case. For example, the IT_Orders
Place orderprocess is a simple user task that applies to the supplier group and receives the relevant order data and case variables directly from the case file.
-
Add a milestone to the case definition by selecting
Milestonefrom the Object Library and dragging it on to the process designer. Create an evaluation condition for the milestone based on a case file variable that determines when the milestone is completed. From the Properties menu on the right, open the Data Inputs and Assignments window and click Add to add a new condition.
In the IT_Orders case, the status of
Milestone 1: Order placeddepends on theorg.kie.api.runtime.process.CaseData(data.get("ordered") == true)condition. This means that a case variable namedorderedexists with the valuetrue, and it is configured on the milestone in the following way: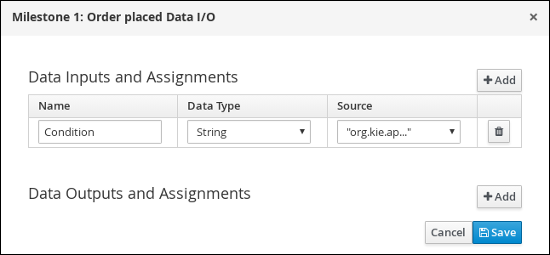
The IT_Orders case can be closed after all milestone sequences are completed. However, due to the ad hoc nature of cases, the case could be reopened if, for example, the order was never received by the customer or the item is faulty. Tasks can be re-triggered or added to the case definition as required, even during run time.
Chapter 5. Case files
A case instance is a single instance of a case definition and encapsulates the business context. All case instance data is stored in the case file, which is accessible to all process instances that might participate in the given case instance. Each case instance and its case file is completely isolated from the other cases. Only case instance participants can access the case file.
A case file is used in case management as a repository of data for the entire case instance. It contains all roles, the object, the data map, and any other data. The case can be closed and reopened at a later date with the same case file attached. A case instance can be closed at any time and does not require a specific resolution in order to be completed.
The case file can also include documentation in the form of embedded documentation, references, PDF attachments, web links, and other options.
Chapter 6. Creating sub cases in case management projects
Subcases give you the flexibility to compose advanced cases that consists of other cases. This means that you can split large and complex cases into multiple layers of abstraction and even multiple case projects. This is similar to splitting a process into multiple subprocesses.
A subcase is another case definition that is invoked from within another case instance or a regular process instance. It has all of the capabilities of a regular case instance:
- It has a dedicated case file.
- It is isolated from any other case instance.
- It has its own set of case roles.
- It has its own case prefix.
6.1. Configuring subcases
You can add subcases to your case definition using the process designer. A subcase is another case within your case project, similar to having a subprocess within your process. Subcases can also be added to a regular business process, which enables you to start a case from within a process instance.
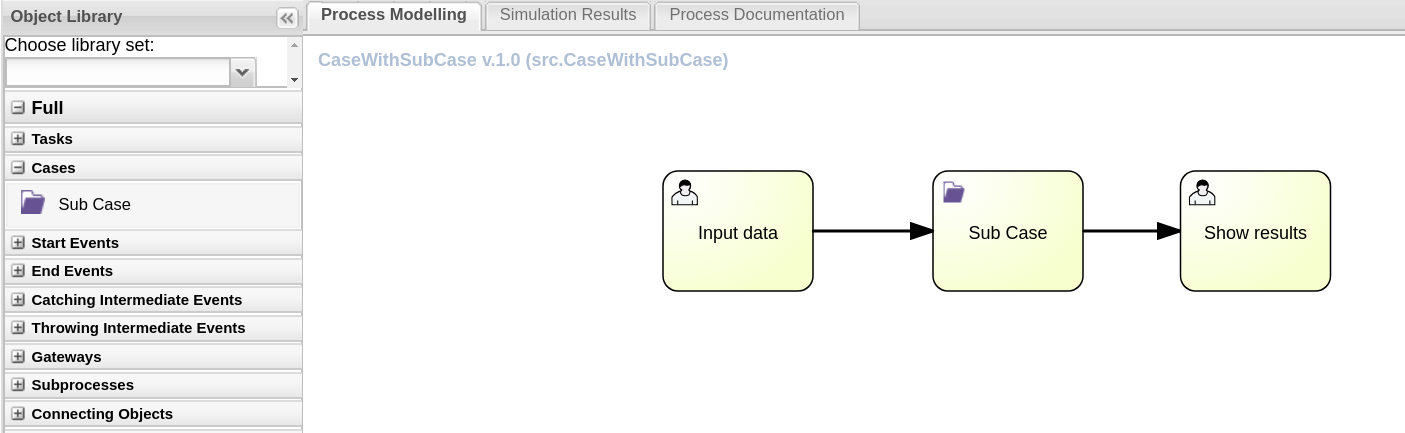
The Sub Case asset can be found in the case definition process designer Object Library under Cases:
Prerequisite
- A case management process has been created and configured in Business Central.
Procedure
-
With your case process open in the process designer, click
to open the Object Library on the left side of the design palette.
-
Click Cases to open the object menu and drag the
Sub Casedata object on to the design palette and add it to the case definition. Click
to open the Properties panel and click Assignments to open the data assignment editor. Alternatively, click
 on the
 Sub Casenode in the design palette. The Sub Case Data I/O window supports the following set of input parameters to properly configure and start the subcase: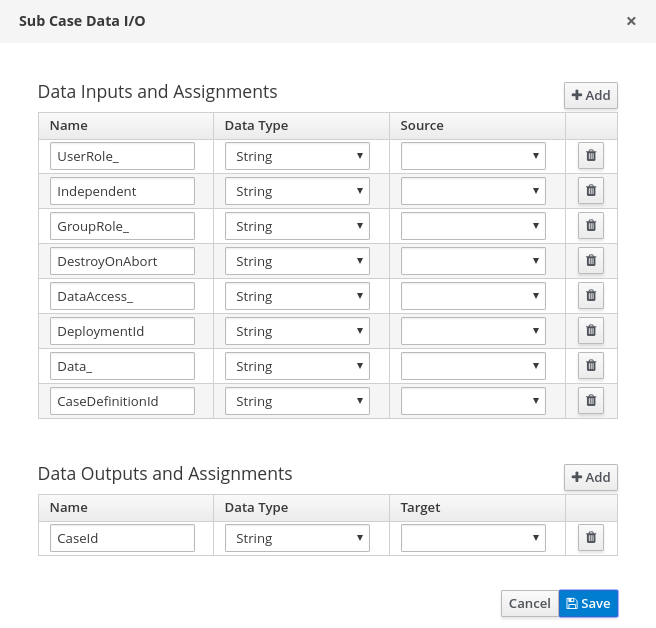
- Independent
-
Optional indicator that tells the process engine if the case instance is independent. If it is independent, the main case instance will not wait for its completion. This property is
falseby default. - GroupRole_XXX
-
Optional group to case role mapping. The role names belonging to this case instance can be referenced here, meaning that participants of the main case can be mapped to participants of the subcase. This means that whatever group was assigned to the main case will be automatically assigned to subcase, where
XXXis the role name and thevalueis the group role assignment. - DataAccess_XXX
-
Optional data access restrictions where
XXXis the name of data item and thevalueis the access restrictions. - DestroyOnAbort
-
Optional indicator that tells the process engine what to do when the subcase activity is aborted: cancel or destroy the subcase. This defaults to
true, which destroys the subcase and removes the case file. - UserRole_XXX
-
Optional user to case role mapping. You can reference the case instance role names here, meaning that an owner of the main case can be mapped to an owner of the subcase. Whoever was assigned to main case will be automatically assigned to the subcase, where
XXXis the role name andvalueis the user role assignment. - Data_XXX
-
Optional data mapping from this case instance or business process to a subcase, where
XXXis the name of the data in subcase being targeted. This can be given as many times as needed. - DeploymentId
- Optional deployment ID (or container ID in context of Process Server) that indicates where the targeted case definition is located.
- CaseDefinitionId
- The mandatory case definition ID to be started.
Regardless of the settings of the
Independentflag, there will always be output variable available named:- CaseId
- This is the case instance ID of the subcases after it is started.
Chapter 7. Ad hoc and dynamic tasks
You can use case management to carry out tasks in an ad hoc way, rather than following a strict end-to-end process. Tasks can also be added to a case dynamically during run time when required.
Ad hoc tasks are defined in the case modeling phase. Ad hoc tasks that are not configured as Adhoc autostart are optional and may or may not be worked on during a case. Therefore, they must be triggered by a signal event or by Java API to be available to be worked on during a case.
Dynamic tasks are defined during the case execution and are not present in the case definition model. Dynamic tasks address specific needs that arise during the case. They can be added to the case and worked on at any time using a case application, as demonstrated in the Red Hat Process Automation Manager Showcase application. Dynamic tasks can also be added by Java and Remote API calls.
Dynamic tasks can be user or service activities, while ad hoc tasks can be any type of task.
Dynamic processes are any reusable sub-process from a case project.
Ad hoc nodes with no incoming connections can be configured with the Adhoc autostart property, which is a property of the node itself. These tasks are triggered automatically when the case instance is started.
7.1. Adding ad hoc tasks
Ad hoc tasks are optional tasks that are configured in a case definition. Because they are ad hoc, they must be triggered in some way, usually by a signal event or Java API call.
Prerequisites
- A case project has been created in Business Central.
- The IT_Orders_New case project has been created in Business Central.
- A case definition has been created.
Procedure
- In Business Central, go to Menu → Design → Projects and IT_Orders_New.
- Click the IT_Orders_New case project Business Process (legacy) asset.
-
In the process designer, click
to open the Object Library on the left of the design palette.
From the list, select a task that you want to add to the case definition as an ad hoc task.
For example, you might want to add a user task to fill out a warranty claim if goods that are received are faulty. A warranty claim may or may not need to be completed during the course of the case, but it is available to be performed in an ad hoc way if required.
- Configure the ad hoc task properties in the Properties panel on the right.
-
Trigger the task during run time using a Java API call. For example, the
Order rejectedad hoc task is triggered by the following API call:CaseService.triggerAdHocFragment
Chapter 8. Starting dynamic tasks and processes
You can add dynamic tasks and processes to a case during run time. Dynamic actions are a way to address changing situations, where an unanticipated change during the case requires a new task or process to be incorporated into the case.
Use a case application to add a dynamic task during run time. For demonstration purposes, the Business Central distribution includes a Showcase application where you can start a new dynamic task or process for the IT Orders application.
Prerequisites
- The Process Server is deployed and connected to Business Central.
- The IT Orders project is deployed to Process Server.
-
The Showcase application
.warfile has been deployed alongside Business Central.
Procedure
With the IT_Orders_New project deployed and running in the Process Server, in a web browser, navigate to the Showcase login page
http://localhost:8080/rhpam-case-mgmt-showcase/.Alternatively, if you have configured Business Central to display the Apps launcher button, use it to open a new browser window with the Showcase login page.
- Log in to the Showcase application using your Business Central login credentials.
- Select an active case instance from the list to open it.
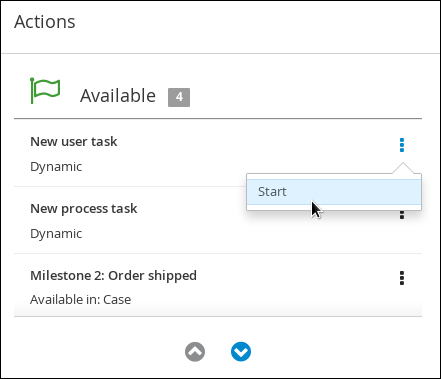
Under Overview → Actions → Available, click the
 button next to New user task or New process task to add a new task or process task.
Figure 8.1. Showcase dynamic actions
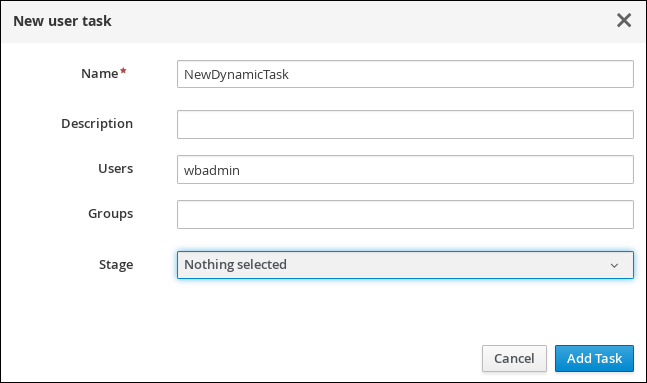
To create a dynamic user task, start a New user task and complete the required information:
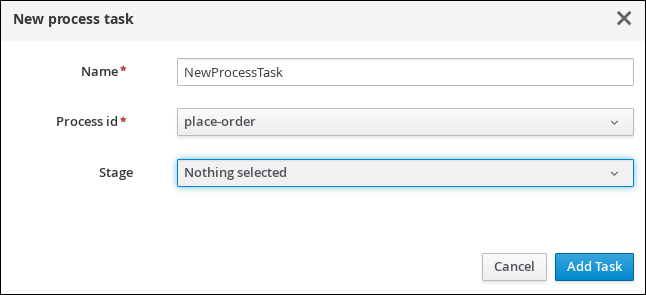
To create a dynamic process task, start a New process task and complete the required information:
To view a dynamic user task in Business Central, click Menu → Track → Task Inbox. The user task that was added dynamically using the Showcase application appears in the Task Inbox of users assigned to the task during task creation.
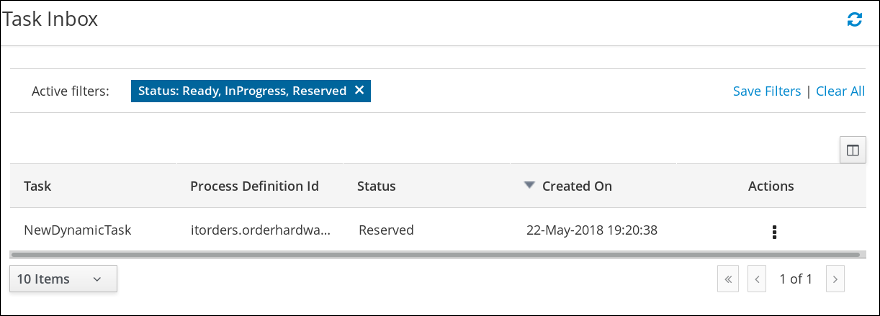
- Click the dynamic task in the Task Inbox to open the task. A number of action tabs are available from this page.
- Using the actions available under the task tabs, you can begin working on the task.
- In the Showcase application, click the refresh button in the upper-right corner. Case tasks and processes that are in progress appear under Overview → Actions → In progress.
- When you have completed working on the task, click the Complete button under the Work tab.
- In the Showcase application, click the refresh button in the upper-right corner. The completed task appears under Overview → Actions → Completed.
To view a dynamic process task in Business Central, click Menu → Manage → Process Instances.
- Click the dynamic process instance in the list of available process instances to view information about the process instance.
- In the Showcase application, click the refresh button in the upper-right corner. Case tasks and processes that are in progress appear under Overview → Actions → In progress.
Chapter 9. Adding dynamic tasks and processes to a case using the API
You can add dynamic tasks and processes to a case during run time to address unforeseen changes that can occur during the lifecycle of a case. Dynamic activities are not defined in the case definition and therefore they cannot be signaled the way that a defined ad hoc task or process can.
You can add the following dynamic activities to a case:
- User tasks
- Service tasks (any type that is implemented as a work item)
- Reusable subprocesses
Dynamic user and service tasks are added to a case instance and immediately executed. Depending on the nature of a dynamic task, it might start and wait for completion (user task) or directly complete after execution (service task). For dynamic subprocesses, the process engine requires a KJAR containing the process definition for that dynamic process to locate the process by its ID and execute it. This subprocess belongs to the case and has access to all of the data in the case file.
You can use the Swagger REST API application to create dynamic tasks and subprocesses.
Prerequisite
You are logged in to Business Central and a case instance has been started using the Showcase application. For more information about using Showcase, see Using the Showcase application for case management.
Procedure
In a web browser, open the following URL:
- Open the list of available endpoints under Case instances :: Case Management.
Locate the
POSTmethod endpoints for creating dynamic activities.POST /server/containers/{id}/cases/instances/{caseId}/tasksAdds dynamic task (user or service depending on the payload) to case instancePOST /server/containers/{id}/cases/instances/{caseId}/stages/{caseStageId}/tasksAdds dynamic task (user or service depending on the payload) to given stage within case instancePOST /server/containers/{id}/cases/instances/{caseId}/processes/{pId}Adds dynamic subprocess identified by process id to case instancePOST /server/containers/{id}/cases/instances/{caseId}/stages/{caseStageId}/processes/{pId}Adds dynamic subprocess identified by process id to stage within case instance
- Click the REST endpoint required to create the dynamic task or process to open the documentation.
- Click Try it out and provide the parameters and body required to create the dynamic activity.
- Click Execute to create the dynamic task or subprocess using the REST API.
9.1. Creating a dynamic user task using the REST API
You can create a dynamic user task during case run time using the REST API. To create a dynamic user task, the following information must be given:
- Task name
- Task description (optional, but recommended)
- Actors or groups (or both)
- Input data
Use the following procedure to create a dynamic user task for the IT_Orders sample project available in Business Central using the Swagger REST API tool. The same endpoint can be used for REST API without Swagger.
Prerequisite
You are logged in to Business Central and an IT Orders case instance has been started using the Showcase application. For more information about using Showcase, see Using the Showcase application for case management.
Procedure
In a web browser, open the following URL:
- Open the list of available endpoints under Case instances :: Case Management.
Click click the following
POSTmethod endpoint to open the details:/server/containers/{id}/cases/instances/{caseId}/tasksClick Try it out to complete the following parameters:
Table 9.1. Parameters
Name Description iditorderscaseIdIT-0000000001- body
{
 "name" : "RequestManagerApproval",
 "data" : {
   "reason" : "Fixed hardware spec",
   "caseFile_hwSpec" : "#{caseFile_hwSpec}"
  },
 "description" : "Ask for manager approval again",
 "actors" : "manager",
 "groups" : ""
}
- In the Swagger application, click Execute to create the dynamic task.
This procedure creates a new user task associated with case IT-000000001. The task is assigned to the person assigned to the manager case role. This task has two input variables:
-
reason -
caseFile_hwSpec: defined as an expression to allow run time capturing of process or case data.
Depending on the task, a form might be defined to provide a user-friendly UI for the task, which can be looked up by task name. In the IT Orders case, the RequestManagerApproval task includes the form RequestManagerApproval-taskform.form in its KJAR.
After it is created, the task appears in the assignee’s Task Inbox in Business Central.
9.2. Creating a dynamic service task using the REST API
Service tasks are generally less complex than user tasks, although they might need more data to execute properly. Service tasks require following information:
-
name: The name of the activity. -
nodeType: The type of node that will be used to find the work item handler. -
data: The map of the data to properly deal with execution.
You can create a dynamic service task during case run time with the same endpoint as a user task, but with a different body payload.
Use the following procedure use the Swagger REST API to create a dynamic service task for the IT_Orders sample project available in Business Central . The same endpoint can be used for REST API without Swagger.
Prerequisite
You are logged in to Business Central and an IT Orders case instance has been started using the Showcase application. For more information about using Showcase, see Using the Showcase application for case management.
Procedure
In a web browser, open the following URL:
- Open the list of available endpoints under Case instances :: Case Management.
Click click the following
POSTmethod endpoint to open the details:/server/containers/{id}/cases/instances/{caseId}/stages/{caseStageId}/tasksClick Try it out and complete the following parameters:
Table 9.2. Parameters
Name Description iditorderscaseIdIT-0000000001- body
{
 "name" : "InvokeService",
 "data" : {
   "Parameter" : "Fixed hardware spec",
   "Interface" : "org.jbpm.demo.itorders.services.ITOrderService",
   "Operation" : "printMessage",
   "ParameterType" : "java.lang.String"
  },
 "nodeType" : "Service Task"
}
- In the Swagger application, click Execute to create the dynamic task.
In this example, a Java-based service is executed. It consists of an interface with the public class org.jbpm.demo.itorders.services.ITOrderService, public printMessage method with a single String argument. Upon execution, the parameter value is passed to the method for execution.
Numbers and names and other types of data given to create service tasks depend on the implementation of a service task’s handler. In the provided example, the org.jbpm.process.workitem.bpmn2.ServiceTaskHandler handler is used.
For any custom service tasks, ensure the handler is registered in the deployment descriptor in the Work Item Handlers section, where the name is same as the nodeType used for creating a dynamic service task.
9.3. Creating a dynamic subprocess using the REST API
When creating a dynamic subprocess, only optional data is provided; there are no special parameters as there are when creating dynamic tasks.
Use the following procedure use the Swagger REST API to create a dynamic subprocess task for the IT_Orders sample project available in Business Central . The same endpoint can be used for REST API without Swagger.
Prerequisite
You are logged in to Business Central and an IT Orders case instance has been started using the Showcase application. For more information about using Showcase, see Using the Showcase application for case management.
Procedure
In a web browser, open the following URL:
- Open the list of available endpoints under Case instances :: Case Management.
Click click the following
POSTmethod endpoint to open the details:/server/containers/{id}/cases/instances/{caseId}/processes/{pId}Click Try it out and complete the following parameters:
Table 9.3. Parameters
Name Description iditorderscaseIdIT-0000000001pIditorders-data.place-orderThe
pIdis the process ID of the subprocess to be created.- body
{
 "placedOrder" : "Manually"
}
- In the Swagger application, click Execute to start the dynamic subprocess.
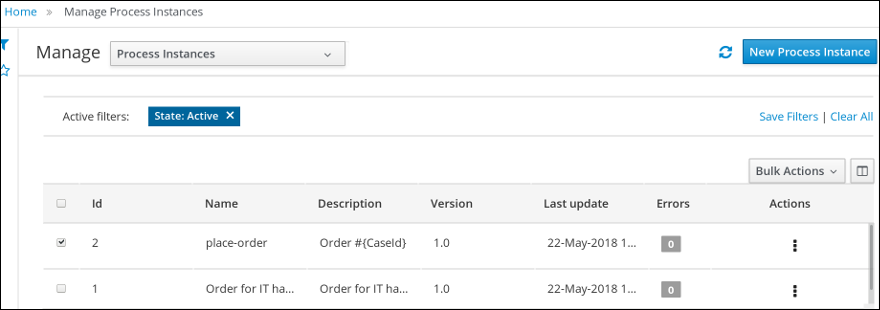
In this example, the place-order subprocess has been started in the IT Orders case with the case ID IT-0000000001. You can see this process in Business Central under Menu → Manage → Process Instances.
If the described example has executed correctly, the place-order process appears in the list of process instances. Open the details of the process and note that the correlation key for the process includes the IT Orders case instance ID, and the Process Variables list includes the variable placedOrder with the value Manually, as delivered in the REST API body.
Chapter 10. Case roles
Case roles provide an additional layer of abstraction for user participation in case handling. Roles, users, and groups are used for different purposes in case management.
- Role
- Roles drive the authorization for the case instance, and can be used for user activity assignments. A user or one or more groups can be assigned to the owner role. The owner is whoever the case belongs to. Roles are not restricted to a single set of people or groups as part of case definition. Use roles for task assignment instead of assigning a specific user or group in order to ensure the case remains dynamic.
- Group
- A group is a number of people who are able to carry out a particular task or have a set of specified responsibilities. You can assign any number of people to a group and assign any group to a role. You can add or change members of a group at any time, so you should never hard code a group to a particular task.
- User
- A user is an individual who can be given a particular task when you assign them a role or add them to a group.
The following illustrates how the preceding case management concepts apply to a hotel reservation.
-
Role =
Guest -
Group =
Receptionist,Maid -
User =
Marilyn
The role assignment (Guest) affects the specific work of the case and is unique to all case instances. The number of users or groups that can be assigned to a role is limited by the Case Cardinality, which is set during role creation in the process designer and case definition. For example, the hotel reservation case has only one guest while the IT_Orders sample project has two suppliers of IT hardware.
When the roles are defined, case management must ensure that these are not hard coded to single set of people or groups as part of case definition and that they can differ for each case instance. This is where case role assignments become important.
Role assignments can be assigned or removed when a case starts or at any time when a case is active. Although roles are optional, use roles in case definitions to maintain and organized workflow.
Always use roles for task assignments instead of actual user or group names. This ensures the case remains dynamic and actual user or group assignment can be made as late as possible.
Roles are assigned to users or groups and authorized to perform tasks when a case instance is started.
10.1. Creating case roles
You can create and define case roles in the case definition when designing the case in the process designer. Case roles are configured on the case definition level to keep them separate from the actors involved in handling the case instance. Roles can be assigned to user tasks or used as contact references throughout the case lifecycle, but they are not defined in the case as a specific user or group of users.
Case instances include the individuals that are actually handling the case work and it is recommended that roles are assigned when starting a new case instance. In order to keep cases flexible, case role assignment can be modified during case run time, although doing so will have no effect on tasks already created based on the previous role assignment. The actor assigned to a role is flexible but the role itself remains the same for each case.
Prerequisite
- You have created a case project in Business Central and added a case definition asset.
- The case definition asset is open in the process designer.
Procedure
-
To define the roles involved in the case, click
to open the Properties menu on the right side of the designer and open the Editor for Case Roles.
Click Add Case Role to add a case roles.
The case role requires a name for the role and a case cardinality. Case cardinality is the number of actors that can be assigned to the role in any case instance. For example, the IT_Orders sample case management project includes the following roles:
Figure 10.1. ITOrders Case Roles
In this example, there can only be one actor (a user or a group) assigned as the case
ownerand only one actor assigned to themanagerrole. Thesupplierrole can have two actors assigned. Depending on the case, there can be any number of actors assigned a particular role based on the configured case cardinality of the role.
10.2. Role authorization
Roles are authorized to perform certain case management tasks when starting a new case instance using the Showcase application or the REST API.
Use the following procedure to start a new IT Orders case using the REST API.
Prerequisite
- The IT_Orders sample project has been imported in Business Central and deployed to the Process Server.
Procedure
Create a
POSTREST API call with the following endpoint:-
itorders: The container alias that has been deployed to the Process Server. -
itorders.orderhardware: The name of the case definition.
-
Provide the following role configuration in the request body:
{
  "case-data" : {  },
  "case-user-assignments" : {
    "owner" : "cami",
    "manager" : "cami"
  },
  "case-group-assignments" : {
    "supplier" : "IT"
 }
}
This starts a new case with defined roles, as well as autostart activities, which are started and ready to be worked on. Two of the roles are user assignments (owner and manager) and the third is a group assignment (supplier).
After the case instance is successfully started, the case instance returns the case ID: IT-0000000001.
For information about how to start a new case instance using the Showcase application, see Using the Showcase application for case management.
10.3. Assigning a task to a role
Case management processes need to be as flexible as possible to accommodate changes that can happen dynamically during run time. This includes changing user assignments for new case instances or for active cases. For this reason, ensure that you do not hard-code roles to a single set of users or groups in the case definition. Instead, role assignments can be defined on the task nodes in the case definition, with users or groups assigned to the roles on case creation.
Use the following procedure to assign a case role to a task in the case definition.
Prerequisite
A case definition has been created with case roles configured at the case definition level. For more information about creating case roles, see Creating case roles.
Procedure
-
Click
to open the Object Library on the left side of the process designer.
- Open the Tasks list and drag the user or service task you want to add to your case definition on to the process design palette.
-
With the task node selected, click
to open the Properties panel on the right side of the designer.
Click the field next to the Actors property and type the name of the role to which the task will be assigned. You can use the Groups property in the same way to for group assignments.
For example, in the IT_Orders sample project, the
Manager approvaluser task is assigned to themanagerrole: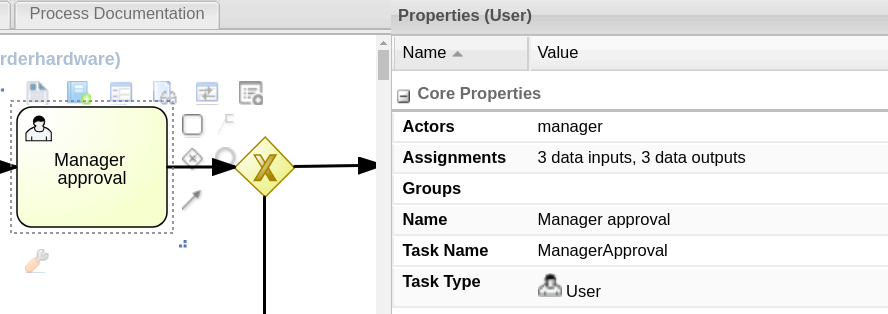
In this example, after the
Prepare hardware specuser task has been completed the user assigned to themanagerrole will receive theManager approvaltask in their Task Inbox in Business Central.
The user assigned to the role can be changed during the case run time, but the task itself continues to have the same role assignment. For example, the person originally assigned to the manager role might need to take time off (if they become ill, for example), or they might unexpectedly leave the company. To respond to this change in circumstances, you can edit the manager role assignment so that someone else can be assigned the tasks associated with that role.
For information about how to change role assignments during case run time, see Modifying case role assignments during run time using Showcase or Modifying case role assignments during run time using REST API.
10.4. Modifying case role assignments during run time using Showcase
You can change case instance role assignments during case run time using the Showcase application. Roles are defined in the case definition and assigned to tasks in the case lifecycle. Roles cannot change during run time because they are predefined, but you can change the actors assigned to the roles to change who is responsible for carrying out case tasks.
Prerequisite
There is an active case instance with users or groups already assigned to at least one case role.
Procedure
- In the Showcase application, click the case you want to work on in the Case list to open the case overview.
Locate the role assignment that you want to change in the Roles box in the lower-right corner of the page.
-
To remove a single user or group from the role assignment, click the
 next to the assignment. In the confirmation window, click Remove to remove the user or group from the role.
-
To remove all role assignments from a role, click the
next to the role and select the Remove all assignments option. In the confirmation window, click Remove to remove all user and group assignments from the role.
-
To change the role assignment from one user or group to another, click the
next to the role and select the Edit option.
In the Edit role assignment window, delete the name of the assignee that you want to remove from the role assignment. Type the name of the user you want to assign to the role into the User field or the group you want to assign in the Group field.
At least one user or group must be assigned when editing a role assignment.
- Click Assign to complete the role assignment.
10.5. Modifying case role assignments during run time using REST API
You can change case instance role assignments during case run time using the REST API or Swagger application. Roles are defined in the case definition and assigned to tasks in the case life cycle. Roles cannot change during run time because they are predefined, but you can change the actors assigned to the roles to change who is responsible for carrying out case tasks.
The following procedure includes examples based on the IT_Orders sample project. You can use the same REST API endpoints in the Swagger application or any other REST API client, or using Curl.
Prerequisite
An IT Orders case instance has been started with owner, manager, and supplier roles already assigned to actors.
Procedure
Retrieve the list of current role assignments using a
GETrequest on the following endpoint:http://localhost:8080/kie-server/services/rest/server/containers/{id}/cases/instances/{caseId}/rolesTable 10.1. Parameters
Name Description iditorderscaseIdIT-0000000001This returns the following response:
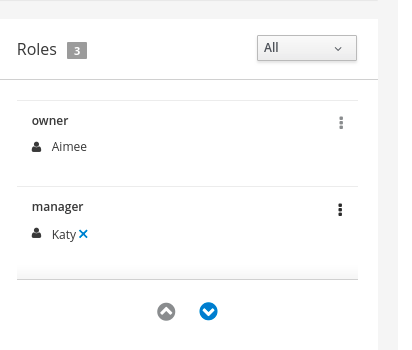
<?xml version="1.0" encoding="UTF-8" standalone="yes"?>
<case-role-assignment-list>
      <role-assignments>
            <name>owner</name>
            <users>Aimee</users>
      </role-assignments>
      <role-assignments>
            <name>manager</name>
            <users>Katy</users>
      </role-assignments>
      <role-assignments>
            <name>supplier</name>
            <groups>Lenovo</groups>
      </role-assignments>
</case-role-assignment-list>
To change the user assigned to the
managerrole, you must first remove the role assignment from the userKatyusingDELETE./server/containers/{id}/cases/instances/{caseId}/roles/{caseRoleName}Include the following information in the Swagger client request:
Table 10.2. Parameters
Name Description iditorderscaseIdIT-0000000001caseRoleNamemanageruserKatyClick Execute.
Execute the
GETrequest from the first step again to check that themanagerrole no longer has a user assigned:<?xml version="1.0" encoding="UTF-8" standalone="yes"?> <case-role-assignment-list> <role-assignments> <name>owner</name> <users>Aimee</users> </role-assignments> <role-assignments> <name>manager</name> </role-assignments> <role-assignments> <name>supplier</name> <groups>Lenovo</groups> </role-assignments> </case-role-assignment-list>Assign the user
Camito themanagerrole using aPUTrequest on the following endpoint:/server/containers/{id}/cases/instances/{caseId}/roles/{caseRoleName}Include the following information in the Swagger client request:
Table 10.3. Parameters
Name Description iditorderscaseIdIT-0000000001caseRoleNamemanageruserCamiClick Execute.
Execute the
GETrequest from the first step again to check that themanagerrole is now assigned toCami:<?xml version="1.0" encoding="UTF-8" standalone="yes"?> <case-role-assignment-list> <role-assignments> <name>owner</name> <users>Aimee</users> </role-assignments> <role-assignments> <name>manager</name> <users>Cami</users> </role-assignments> <role-assignments> <name>supplier</name> <groups>Lenovo</groups> </role-assignments> </case-role-assignment-list>
Chapter 11. Stages
Case management stages are a collection of tasks. A stage is an ad hoc subprocess that can be defined using the process designer and may include other case management nodes, such as a milestone. A milestone can also be configured as completed when a stage or a number of stages are completed. Therefore, a milestone may be activated or achieved by the completion of a stage, and a stage may include a milestone or a number of milestones.
For example, in a patient triage case, the first stage may consist of observing and noting any obvious physical symptoms or a description from the patient of what their symptoms are, followed by a second stage for tests, and a third for diagnosis and treatment.
There are three ways to complete a stage:
- By completion condition.
- By terminal end event.
-
By setting the
AdHocCompletionConditiontoautocomplete, which will automatically complete the stage when there are no active tasks left in the stage.
11.1. Defining a stage
A stage can be modeled in BPMN2 using the process designer. Stages are a way of grouping related tasks in a way that clearly defines activities that, if the stage is activated, must complete before the next stage of the case commences. For example, the IT_Orders case definition described in Chapter 4, Designing a case can also be defined using stages in the following way:
Figure 11.1. IT_Orders project stages example
Prerequisites
- You have followed the procedure in Chapter 3, Creating a new IT Orders case project to create a new case in Business Central.
- You have started a case definition and defined any other required case nodes described in Chapter 4, Designing a case. Stages must be triggered by another node within a case definition, so at least one other node must be configured in the designer before the stage can be started.
Procedure
-
From the process designer, click
on the left of the palette to open the Object Library. Open the Subprocesses object list, drag and drop an Ad-Hoc node onto the design canvas and provide a name for the stage node.
Define how the stage is activated:
- If the stage is being activated by an incoming node, connect the stage with a sequence flow line from the incoming node.
-
If the stage is instead being activated by a signal event, configure the
SignalRefon the signal node with the name of the stage that you configured in the first step. -
Alternatively, configure the
AdHocActivationConditionproperty to activate the stage when the condition has been met.
- Re-size the node as required to provide room to add the task nodes for the stage.
- Add the relevant tasks to the stage and configure them as required.
(Optional) Configure a completion condition for the stage. As an ad hoc subprocess, stages are configured as
autocompleteby default, which means that the stage will automatically complete and trigger the next activity in the case definition once all instances in the stage are no longer active.To change the completion condition, select the stage node and open the Properties panel on the right. Modify the
AdhocCompletionConditionproperty field in the with a free-form Drools expression for the completion condition you require. For more information about stage completion conditions, see Section 11.2, “Configuring stage activation and completion conditions”.- Once the stage has been configured, connect it to the next activity in the case definition using a sequence flow line.
11.2. Configuring stage activation and completion conditions
Stages can be triggered by a start node, intermediate node, or manually using an API call.
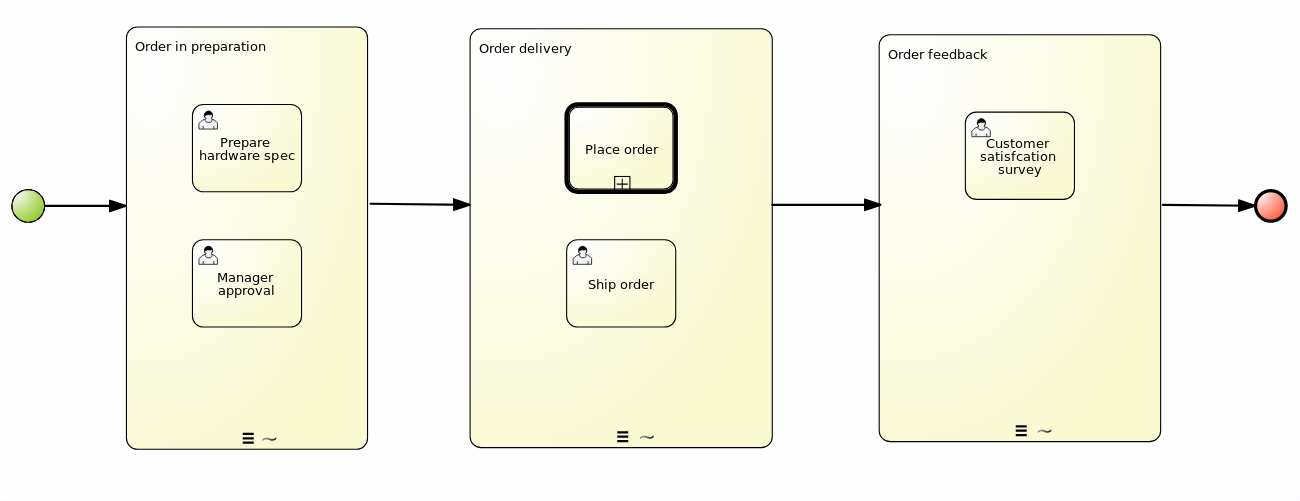
You can configure stages with both activation and completion conditions using free-form Drools rules, the same way that milestone completion conditions are configured. For example, in the IT_Orders sample project, the Milestone 2: Order shipped completion condition (org.kie.api.runtime.process.CaseData(data.get("shipped") == true)) can also be used as the completion condition for the Order delivery stage represented here:
Figure 11.2. IT_Orders project stages example
Activation conditions can also be configured using a free-form Drools rule to configure the AdHocActivationCondition property to activate a stage.
Prerequisite
- You have created a case definition in the Business Central process designer.
- You have added an ad hoc subprocess to the case definition that is to be used as a stage.
Procedure
-
With the stage selected on the case design canvas, click
to open the Properties panel on the right.
-
Open the
AdHocActivationConditionproperty editor to define an activation condition for the start node. For example, setautostart: trueto make the stage automatically activated when a new case instance is started. -
The
AdHocCompletionConditionis set toautocompleteby default. To change this, open the property editor to define a completion condition using a free-form Drools expression. For example, setorg.kie.api.runtime.process.CaseData(data.get("ordered") == true)to activate the second stage in the example shown previously.
For more examples and information about the conditions used in the IT_Orders sample project, see Getting started with case management.
11.3. Adding a dynamic task to a stage
Dynamic tasks can be added to a case stage during run time using a REST API request. This is similar to adding a dynamic task to a case instance, but you must also define the caseStageId of the stage to which the task is added.
The IT_Orders sample case project can be defined using stages instead of milestones.
Use the following procedure to add a dynamic task to a stage in the IT_Orders sample project available in Business Central using the Swagger REST API tool. The same endpoint can be used for REST API without Swagger.
Prerequisite
- The IT_Orders sample project BPMN2 case definition has been reconfigured to use stages instead of milestones, as demonstrated in the provided example. For information about configuring stages for case management, see Defining a stage.
Procedure
Start a new case using the Showcase application. For more information about using Showcase, see Using the Showcase application for case management.
Because this case is designed using stages, the case details page shows stage tracking:

The first stage starts automatically when the case instance is created.
As a
manageruser, approve the hardware specification in Business Central under Menu → Track → Task Inbox, then check the progress of the case.-
In Business Central, click Menu → Manage → Process Instances and open the active case instance
IT-0000000001. Click Diagram to see the case progress diagram:
-
In Business Central, click Menu → Manage → Process Instances and open the active case instance
In a web browser, open the following URL:
- Open the list of available endpoints under Case instances :: Case Management.
Click click the following
POSTmethod endpoint to open the details:/server/containers/{id}/cases/instances/{caseId}/stages/{caseStageId}/tasksClick Try it out to complete the following parameters:
Table 11.1. Parameters
Name Description iditorderscaseIdIT-0000000001caseStageIdOrder deliveryThe
caseStageIdis the name of the stage in the case definition where the dynamic task is to be created. This can be any dynamic or service task payload. See Creating a dynamic subprocess using the REST API or Creating a dynamic service task using the REST API for examples.
After the dynamic task has been added to the stage, it must be completed in order for the stage to complete and for the case process to move on to the next item in the case flow.
Chapter 12. Milestones
Milestones are a special service task that can be configured in the case definition designer by adding the milestone node to the process designer palette. When creating a new case definition, a milestone configured as Adhoc autostart is included on the design palette by default. Newly created milestones are not set to Adhoc autostart by default.
Case management milestones generally occur at the end of a stage, but they can also be the result of achieving other milestones. A milestone always requires a condition to be defined in order to track progress. Milestones react to case file data when data is added to a case. A milestone represents a single point of achievement within the case instance. It can be used to flag certain events, which can be useful for Key Performance Indicator (KPI) tracking or identifying the tasks that are still to be completed.
Milestones can be in any of the following states during case execution:
-
Active- The condition has been defined on the milestone but it has not been met. -
Completed- The milestone condition has been met, the milestone has been achieved, and the case can proceed to the next task. -
Terminated- The milestone is no longer a part of the case process and is no longer required.
While a milestone is available or completed it can be triggered manually by a signal or automatically if `Adhoc autostart`is configured when a case instance starts. Milestones can be triggered as many times as required, however, it is directly achieved when the condition is met.
12.1. Milestone configuration and triggering
Case milestones can be configured to start automatically when a case instance starts or they can triggered using a signal, which is configured manually during the case design.
Prerequisite
- A case project has been created in Business Central.
- A case definition has been created.
Procedure
-
In the process designer, click
to open the Object Library on the left of the design palette.
From the list, open Milestone and drag the
Milestoneobject onto the palette.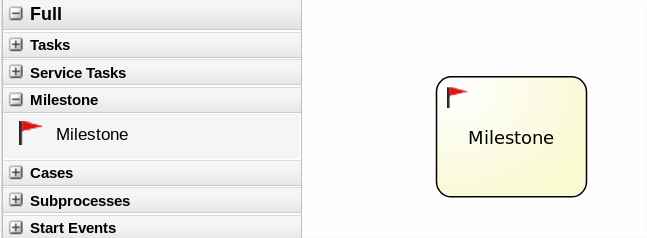
-
With the milestone node selected, click
to open the Properties panel on the right.
-
Open Assignments to add a completion condition. Milestones include a
conditionparameter by default. -
To define the completion condition to for the milestone, select
Constantfrom the list. The condition must be provided using the Drools syntax. Configure the
Adhoc autostartproperty.-
Set this property to
truefor milestones that are required to start automatically when a case instance starts. -
Set this property to
falsefor milestones that are to be triggered by a signal event.
-
Set this property to
(Optional) Configure a signal event to trigger a milestone once a case goal has been reached.
- With the signal event selected in the case design palette, open the Properties panel on the right.
-
Set the
Signal Scopeproperty toProcess Instance. Open the
SignalRefexpression editor and type the name of the milestone to be triggered.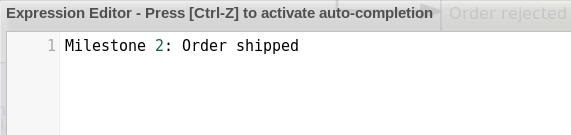
Click Ok to finish.
Chapter 13. Rules in case management
Cases are data-driven, rather than following a sequential flow. The steps required to resolve a case rely on data, which is provided by people involved in the case, or the system can be configured to trigger further actions based on the data available. In the latter case, you can use business rules to decide what further actions are required for the case to continue or reach a resolution.
Data can be inserted into the case file at any point during the case. The process engine constantly monitors case file data, meaning that rules react to data that is contained in the case file. Using rules to monitor and respond to changes in the case file data provides a level of automation that drives cases forward.
13.1. Using rules to drive cases
Refer to the the case management IT_Orders sample project in Business Central.
Suppose that the particular hardware specification provided by the supplier is incorrect or invalid. The supplier needs to provide a new, valid order so that the case can continue. Rather than wait for the manager to reject the invalid specification and create a new request for the supplier, you can create a business rule that will react immediately when the case data indicates that the provided specification is invalid. It can then create a new hardware specification request for the supplier.
The following procedure demonstrates how to create and use a business rule to execute the described scenario.
Prerequisites
- The IT_Orders sample project is open in Business Central, but it is not deployed to the Process Server.
The
ServiceRegistryis part of thejbpm-services-apimodule, and must be available on the class path.NoteIf building the project outside of Business Central, the following dependencies must be added to the project:
-
org.jbpm:jbpm-services-api -
org.jbpm:jbpm-case-mgmt-api
-
Procedure
Create the following business rule file called
validate-document.drl:package defaultPackage; import java.util.Map; import java.util.HashMap; import org.jbpm.casemgmt.api.CaseService; import org.jbpm.casemgmt.api.model.instance.CaseFileInstance; import org.jbpm.document.Document; import org.jbpm.services.api.service.ServiceRegistry; rule "Invalid document name - reupload" when $caseData : CaseFileInstance() Document(name == "invalid.pdf") from $caseData.getData("hwSpec") then System.out.println("Hardware specification is invalid"); $caseData.remove("hwSpec"); update($caseData); CaseService caseService = (CaseService) ServiceRegistry.get().service(ServiceRegistry.CASE_SERVICE); caseService.triggerAdHocFragment($caseData.getCaseId(), "Prepare hardware spec", null); endThis business rule detects when a file named
invalid.pdfis uploaded to the case file. It then removes theinvalid.pdfdocument and creates a new instance of thePrepare hardware specuser task.- Click Build, then click Deploy to deploy the IT_Orders project.
-
Create a file called
invalid.pdfand save it locally. - Create a file called `valid-spec.pdf`and save it locally.
- In Business Central, go to Menu → Projects → IT_Orders to open the IT_Orders project.
- Click Import Asset in the upper-right corner of the page.
Upload the
validate-document.drlfile to thedefaultpackage (src/main/resources).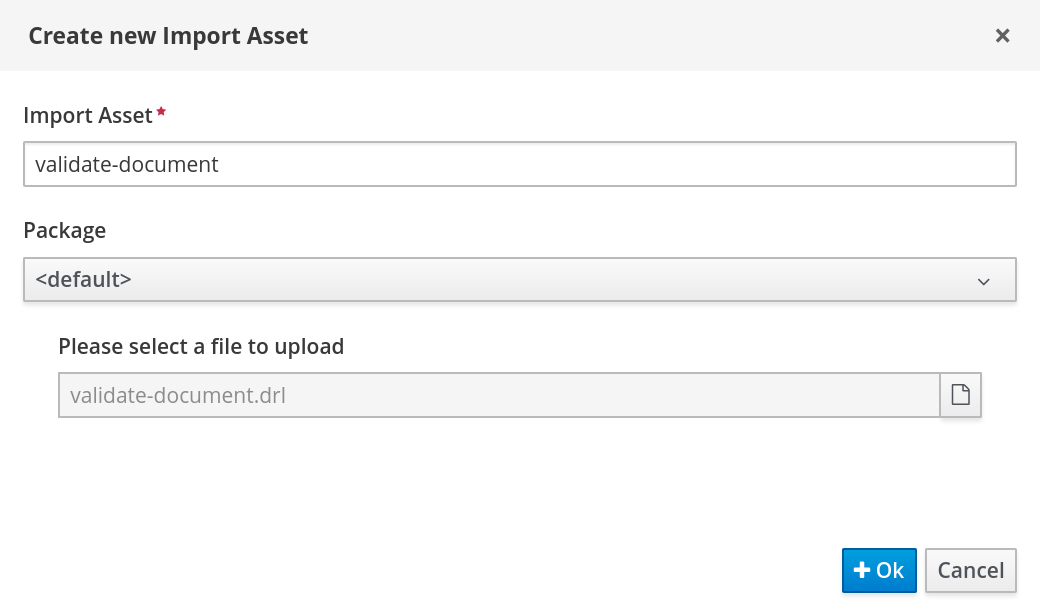
The
validate-document.drlrule is shown in the rule editor. Click Save or close to exit the rule editor.-
Open the Showcase application by either clicking the Apps launcher (if it is installed), or go to
http://localhost:8080/rhpam-case-mgmt-showcase/jbpm-cm.html. Start a new case for the IT_Orders project.
In this example, Aimee is the case
owner, Katy is themanager, and the supplier group issupplier.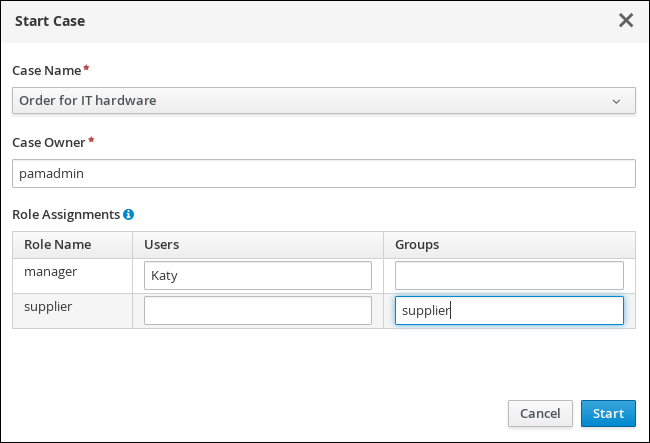
-
Log out of Business Central, and log back in as a user that belongs to the
suppliergroup. - Go to Menu → Track → Task Inbox.
-
Open the
Prepare hardware spectask and click Claim. This assigns the task to the logged in user. Click Start and click
 to locate the
 invalid.pdfhardware specification file. Click to upload the file.
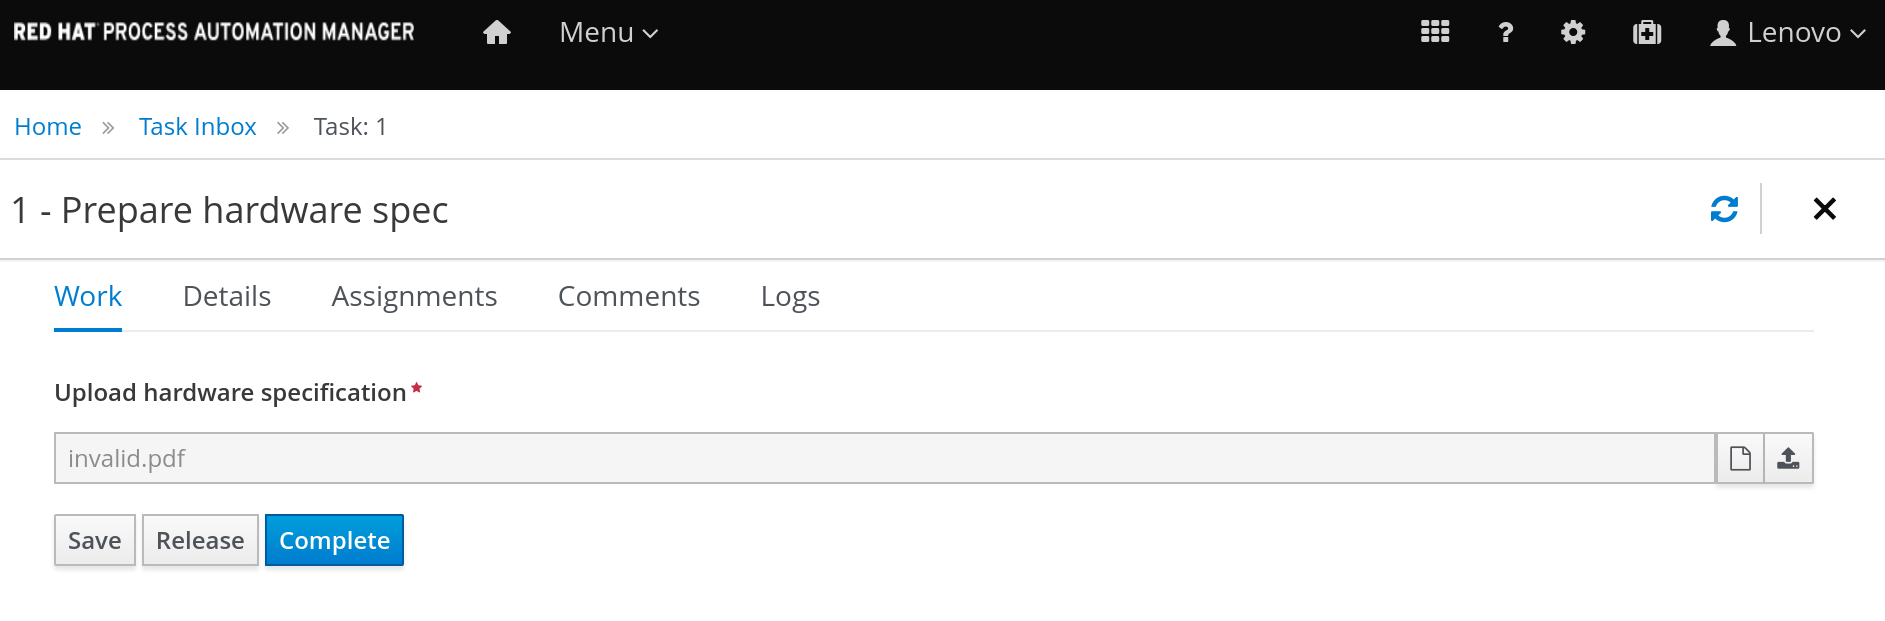
Click Complete.
The value in the Task Inbox for the
Prepare hardware specisReady.In Showcase, click Refresh in the upper-right corner. Notice that a
Prepare hardware taskmessage appears in the Completed column and another appears in the In Progress column.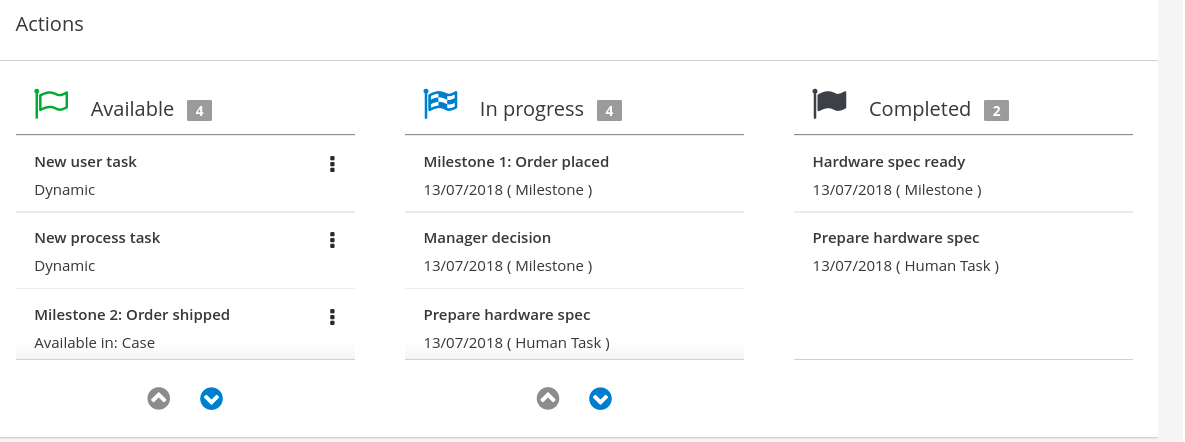
This is because the first
Prepare hardware spectask has been completed with the specification fileinvalid.pdf. As a result, the business rule causes the task and file to be discarded, and a new user task created.-
In the Business Central Task Inbox, repeat steps 12 and 13, but upload the
valid-spec.pdffile instead ofinvalid.pdf. -
Log out of Business Central and log back in again as
Katy. -
Go to Menu → Track → Task Inbox. There are two
Manager approvaltasks for Katy, one with theinvalid.pdfhardware specification file, the other with thevalid-spec.pdffile. Open, claim, and complete each task:
-
Check the
approvebox for the task that includes thevalid-spec.pdffile, then click Complete. -
Do not check the
approvebox on the task with theinvalid.pdffile, then click Complete.
-
Check the
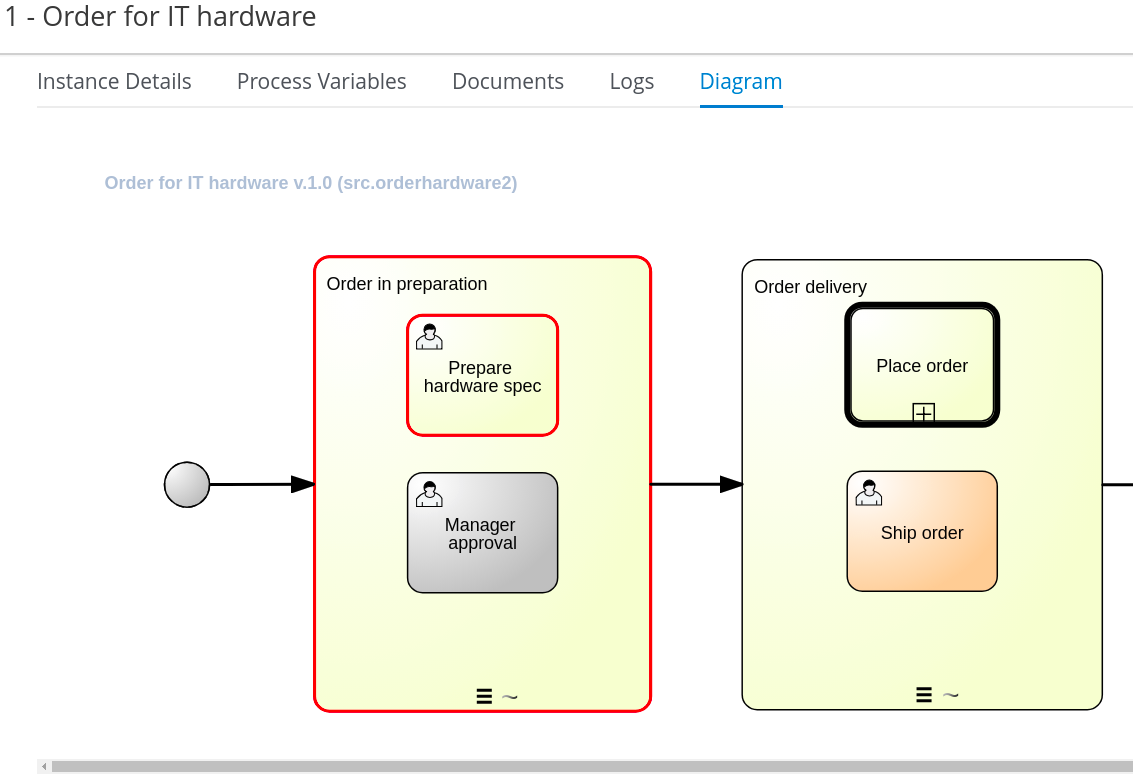
- Go to Menu → Manage → Process Instances and open the Order for IT hardware process instance.
Open the Diagram tab. The
Order rejectedandPlace orderprocesses are now marked as Completed.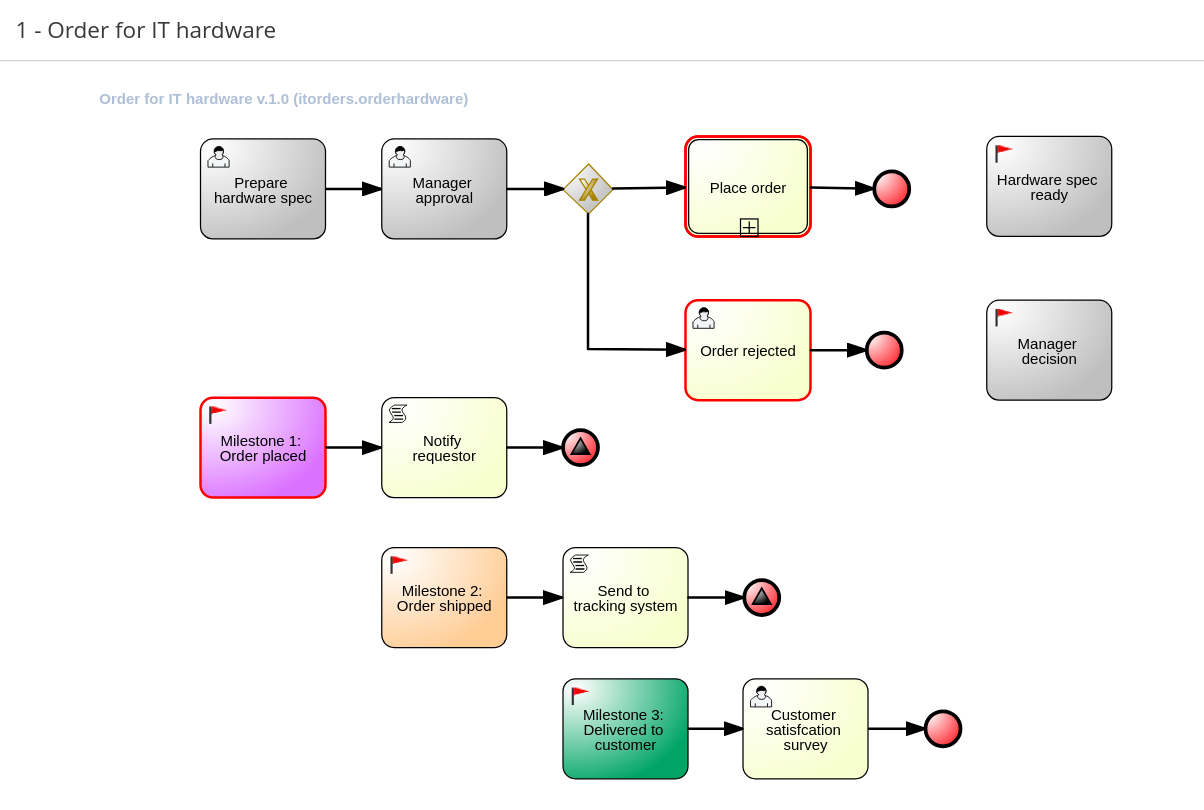
Similarly, the case details page in Showcase lists two
Manager approvaltasks in the Completed column.
Chapter 14. Case management security
Cases are configured at the case definition level with case roles. These are generic participants that are involved in case handling. These roles can be assigned to user tasks or used as contact references. Roles are not hard-coded to specific users or groups to keep the case definition independent of the actual actors involved in any given case instance. You can modify case role assignments at any time as long as case instance is active, though modifying a role assignment does not affect tasks already created based on the previous role assignment.
Case instance security is enabled by default. The case definition prevents case data from being accessed by users who do not belong to the case. Unless a user has a case role assignment (either assigned as user or a group member) then they are not able to access the case instance.
Case security is one of the reasons why it is recommended that you assign case roles when starting a case instance, as this will prevent tasks being assigned to users who should not have access to the case.
14.1. Configuring security for case management
You can turn off case instance authorization by setting the following system property to false:
org.jbpm.cases.auth.enabled
This system property is just one of the security components for case instances. In addition, you can configure case operations at the execution server level using the case-authorization.properties file, available at the root of the class path of the execution server application (kie-server.war/WEB-INF/classes).
Using a simple configuration file for all possible case definitions encourages you to think about case management as domain-specific. AuthorizationManager for case security is pluggable, which allows you to include custom code for specific security handling.
You can restrict the following case instance operations to case roles:
-
CANCEL_CASE -
DESTROY_CASE -
REOPEN_CASE -
ADD_TASK_TO_CASE -
ADD_PROCESS_TO_CASE -
ADD_DATA -
REMOVE_DATA -
MODIFY_ROLE_ASSIGNMENT -
MODIFY_COMMENT
Prerequisite
The Red Hat Process Automation Manager Process Server is not running.
Procedure
Open
JBOSS_HOME/standalone/deployments/kie-server.war/WEB-INF/classes/case-authorization.propertiesfile in your preferred editor.By default, the file contains the following operation restrictions:
CLOSE_CASE=owner,admin
CANCEL_CASE=owner,admin
DESTROY_CASE=owner,admin
REOPEN_CASE=owner,admin
You can add or remove role permissions for these operations.
-
To remove permission for a role to perform an operation, remove it from the list of authorized roles for that operation in the
case-authorization.propertiesfile. For example, removing theadminrole from theCLOSE_CASEoperation restricts permission to close a case to the case owner for all cases. To give a role permission to perform a case operation, add it to the list of authorized roles for that operation in the
case-authorization.propertiesfile. For example, to allow anyone with themanagerrole to perform aCLOSE_CASEoperation, add it to the list of roles, separated by a comma:CLOSE_CASE=owner,admin,manager
-
To remove permission for a role to perform an operation, remove it from the list of authorized roles for that operation in the
To add role restrictions to other case operations listed in the file, remove the
#from the line and list the role names in the following format:OPERATION=role1,role2,roleNOperations in the file that begin with
#have restrictions ignored and can be performed by anyone involved in the case.-
When you have finished assigning role permissions, save and close the
case-authorization.propertiesfile. Start the execution server.
The case authorization settings apply to all cases on the execution server.
Chapter 15. Closing cases
A case instance can be completed when there are no more activities to be performed and the business goal is achieved, or it can be closed prematurely. Usually the case owner closes the case when all work is completed and the case goals have been met. When you close a case, consider adding a comment about why the case instance is being closed. A closed case can be reopened later with the same case ID if required.
You can close case instances remotely using Process Server REST API requests or directly in the Showcase application.
15.1. Closing a case using the Process Server REST API
You can use a REST API request to close a case instance. Red Hat Process Automation Manager includes the Swagger client, which includes endpoints and documentation for REST API requests. Alternatively, you can use the same endpoints to make API calls using your preferred client or Curl.
Prerequisites
- A case instance has been started using Showcase.
-
You are able to authenticate API requests as a user with the
adminrole.
Procedure
Open the Swagger REST API client in a web browser:
localhost:8080/kie-server/docsUnder Case Instances :: Case Management, open the
POSTrequest with the following endpoint:/server/containers/{id}/cases/instances/{caseId}Click Try it out and fill in the required parameters:
Table 15.1. Parameters
Name Description iditorderscaseIdIT-0000000001-
Optionally, you can include a comment to be included in the case file. To leave a comment, type it into the
bodytext field as aString. - Click Execute to close the case.
- To confirm the case is closed, open the Showcase application and change the case list status to Closed.
15.2. Closing a case in the Showcase application
A case instance is complete when no more activities need to be performed and the business goal has been achieved. After a case is complete, you can close the case to indicate that the case is complete and that no further work is required. When you close a case, consider adding a specific comment about why you are closing the case. If needed, you can reopen the case later with the same case ID.
You can use the Showcase application to close a case instance at any time. From Showcase, you can easily view the details of the case or leave a comment before closing it.
Prerequisites
- You are logged in to the Showcase application and are the owner or administrator for a case instance that you want to close.
Procedure
- In the Showcase application, locate the case instance you want to close from the list of case instances.
- To close the case without viewing the details first, click Close.
To close the case from the case details page, click the case in the list to open it.
From the case overview page you can add comments to the case and verify that you are closing the correct case based on the case information.
- Click Close to close the case.
- Click Back to Case List in the upper-left corner of the page to return to the Showcase case list view.
- Click the drop-down list next to Status and select Canceled to view the list of closed and canceled cases.
Chapter 16. Canceling or destroying a case
Cases can be canceled if they are no longer required and do not require any case work to be performed. Cases that are canceled can be reopened later with the same case instance ID and case file data. In some cases, you might want to permanently destroy a case so that it cannot be reopened.
Cases can only be canceled or destroyed using an API request. Red Hat Process Automation Manager includes the Swagger client, which includes endpoints and documentation for REST API requests. Alternatively, you can use the same endpoints to make API calls using your preferred client or Curl.
Prerequisites
- A case instance has been started using Showcase.
-
You are able to authenticate API requests as a user with the
adminrole.
Procedure
Open the Swagger REST API client in a web browser:
localhost:8080/kie-server/docsUnder Case Instances :: Case Management, open the
DELETErequest with the following endpoint:/server/containers/{id}/cases/instances/{caseId}You can cancel a case using the
DELETErequest. Optionally, you can also destroy the case using thedestroyparameter.Click Try it out and fill in the required parameters:
Table 16.1. Parameters
Name Description iditorderscaseIdIT-0000000001destroytrue(Optional. Permanently destroys the case. This parameter is
falseby default.)- Click Execute to cancel (or destroy) the case.
- To confirm the case is canceled, open the Showcase application and change the case list status to Canceled. If the case has been destroyed, it will no longer appear in any case list.
Chapter 17. Additional resources
Appendix A. Versioning information
Documentation last updated on Friday, May 22, 2020.